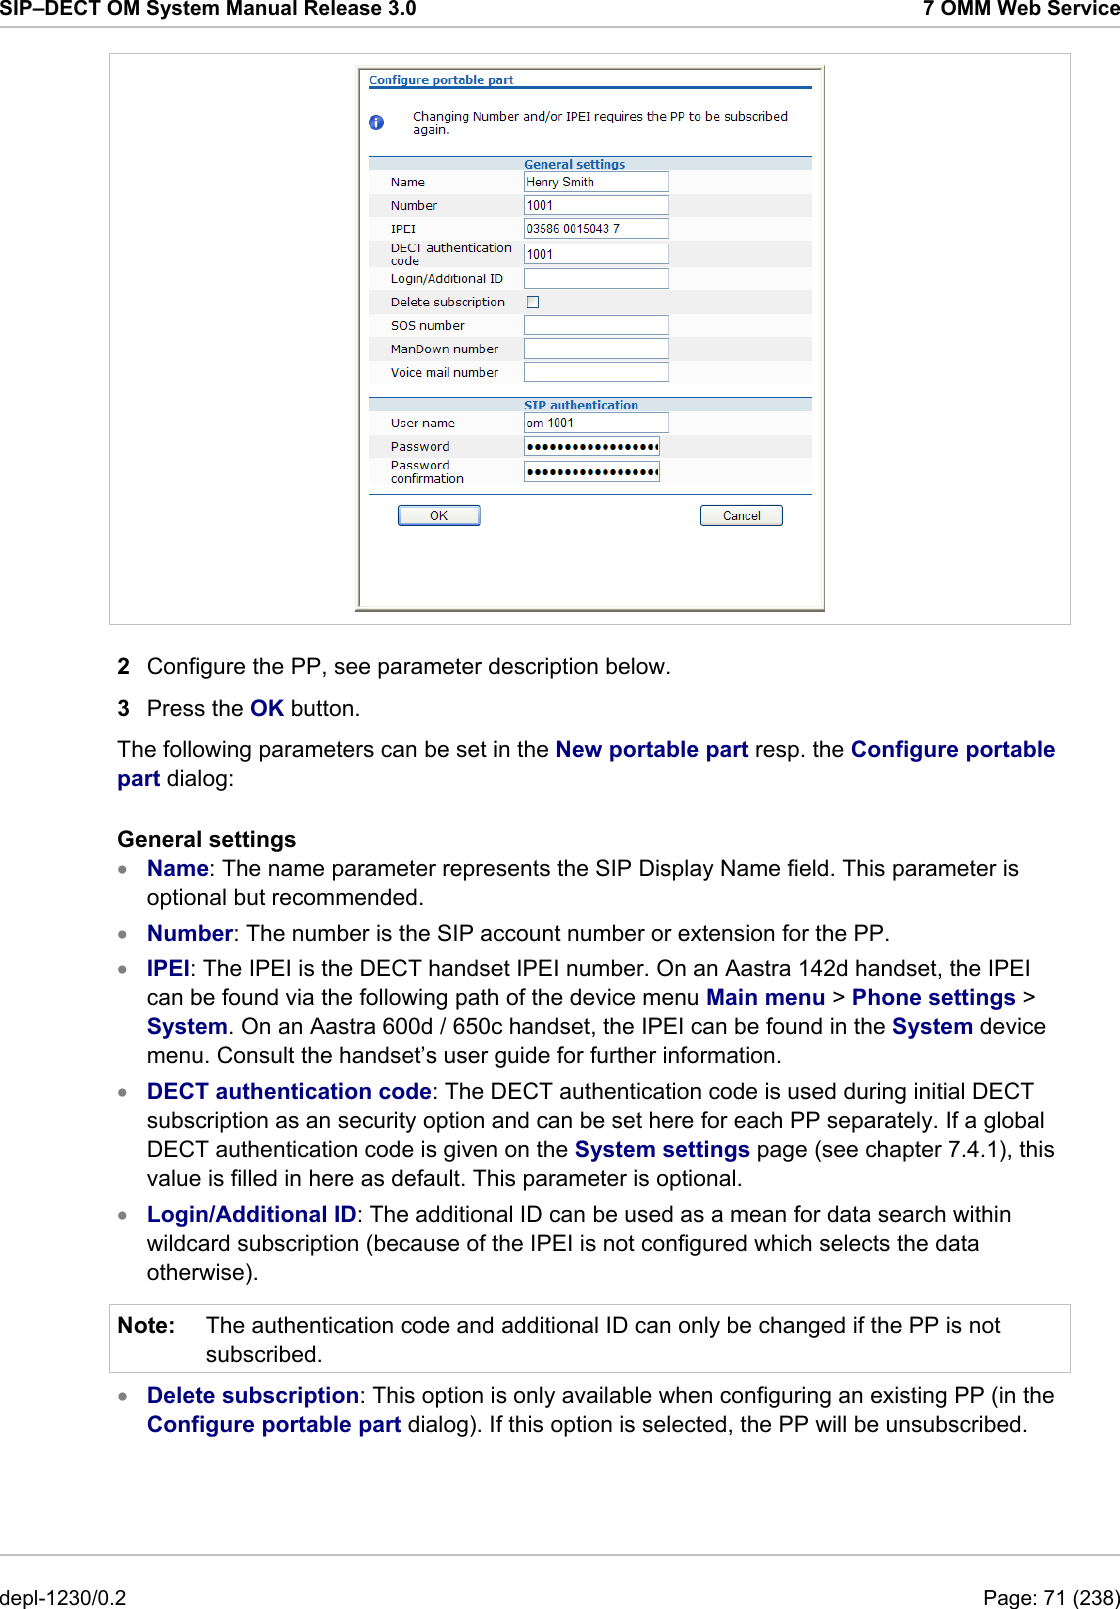
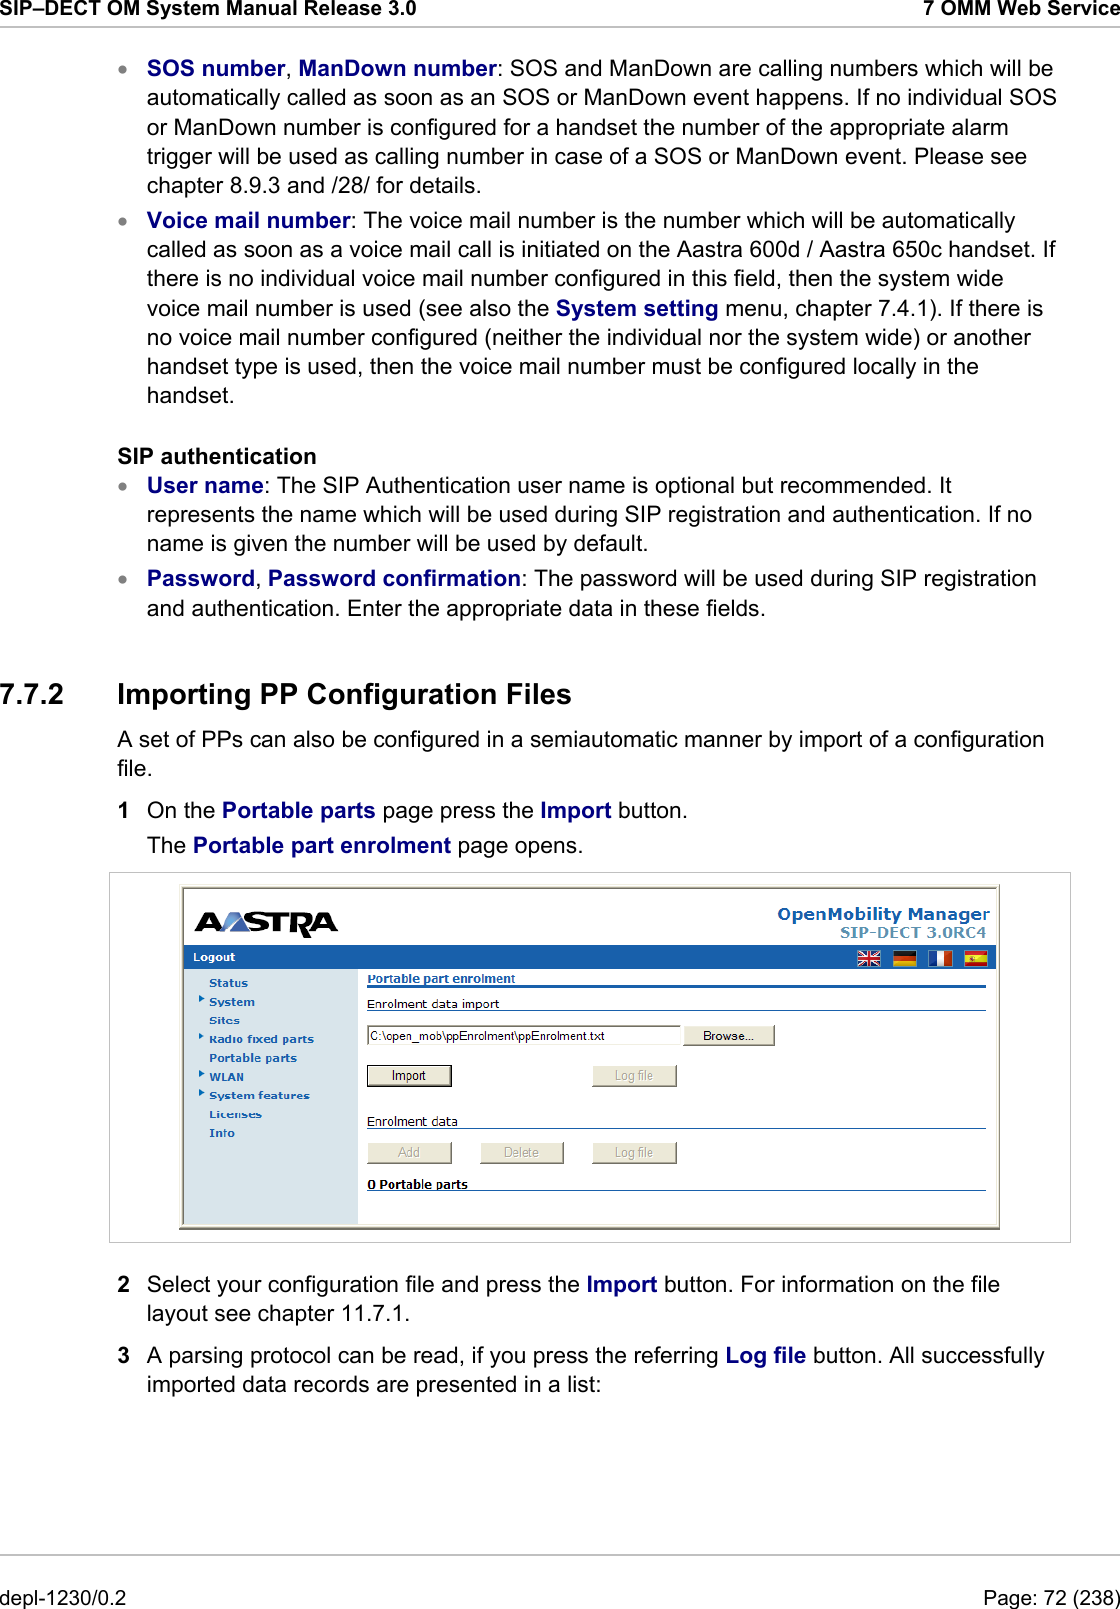
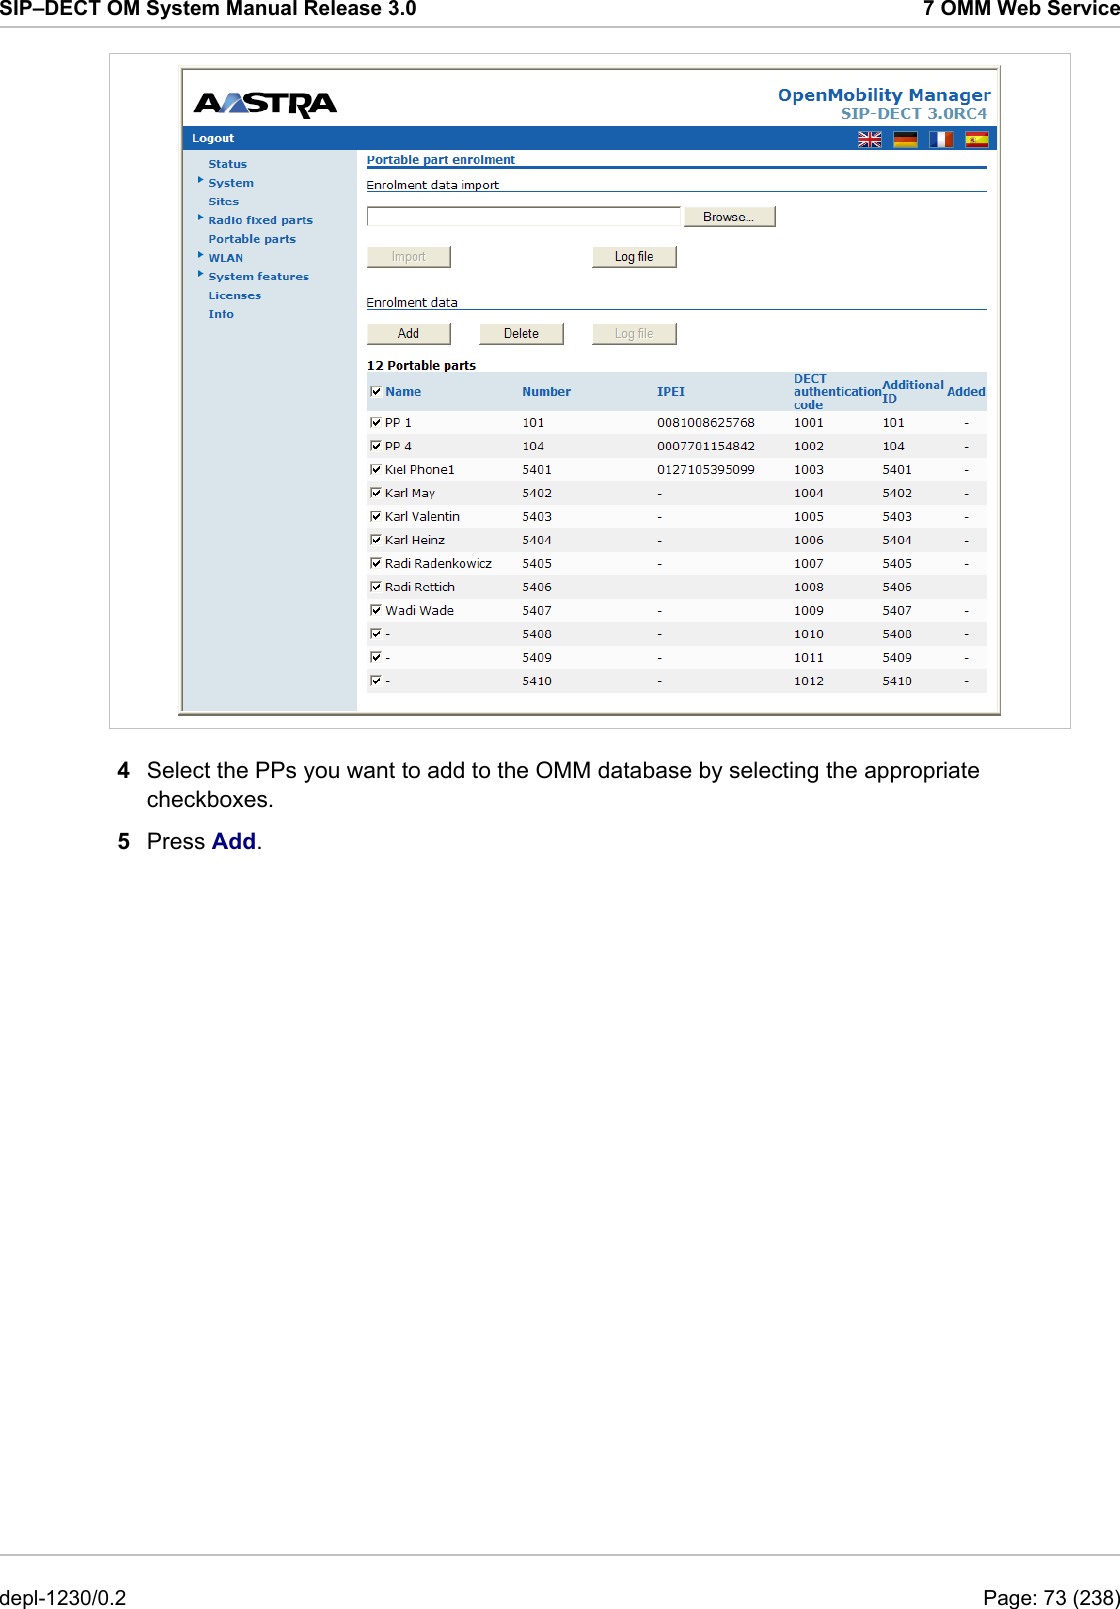
Mitel Deutschland 68635RFP36U-01 DECT base station User Manual SIP DECT OM System Manual
Mitel Deutschland GmbH DECT base station SIP DECT OM System Manual
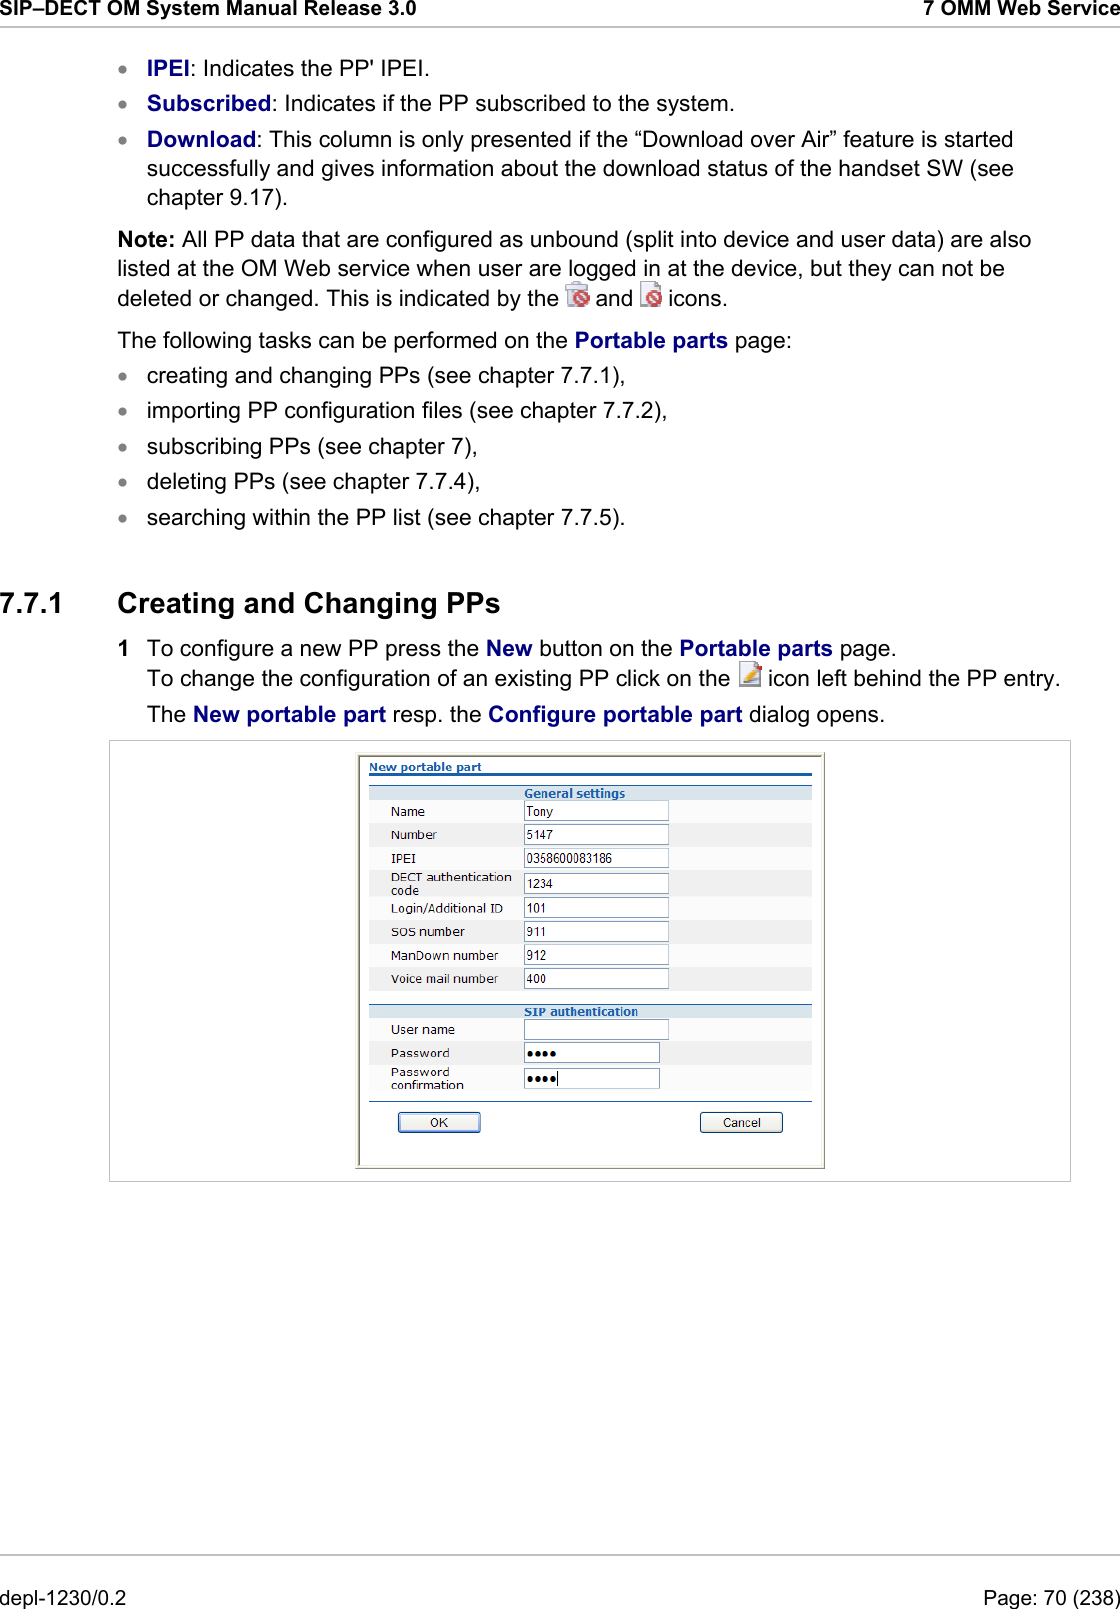
UserManual.wiki
>
Mitel Deutschland
>
68635RFP36U-01 User Manual
>
UserManual_part1
Contents
1.
UserManual_part1
2.
UserManual_part2
3.
UserManual.pdf
UserManual_part1
Navigation menu
Upload a User Manual
Namespaces
Wiki Guide
HTML
PDF
Info
Views
User Manual
Discussion / Help
Navigation

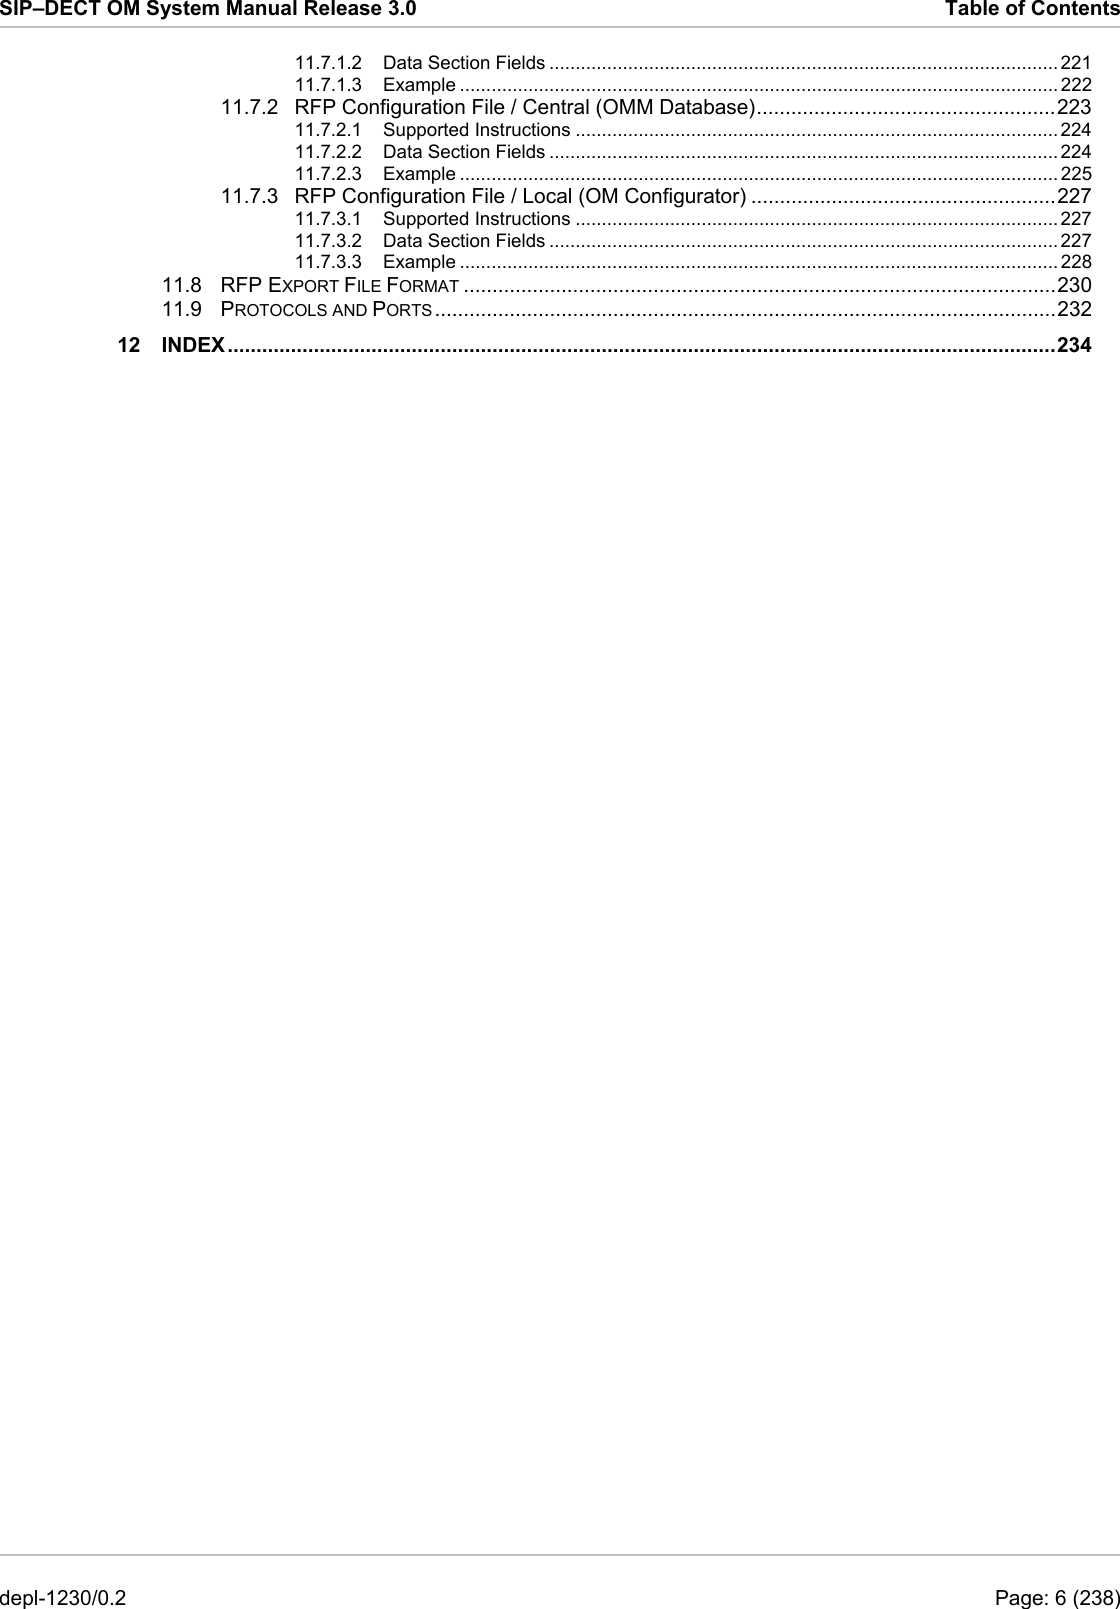

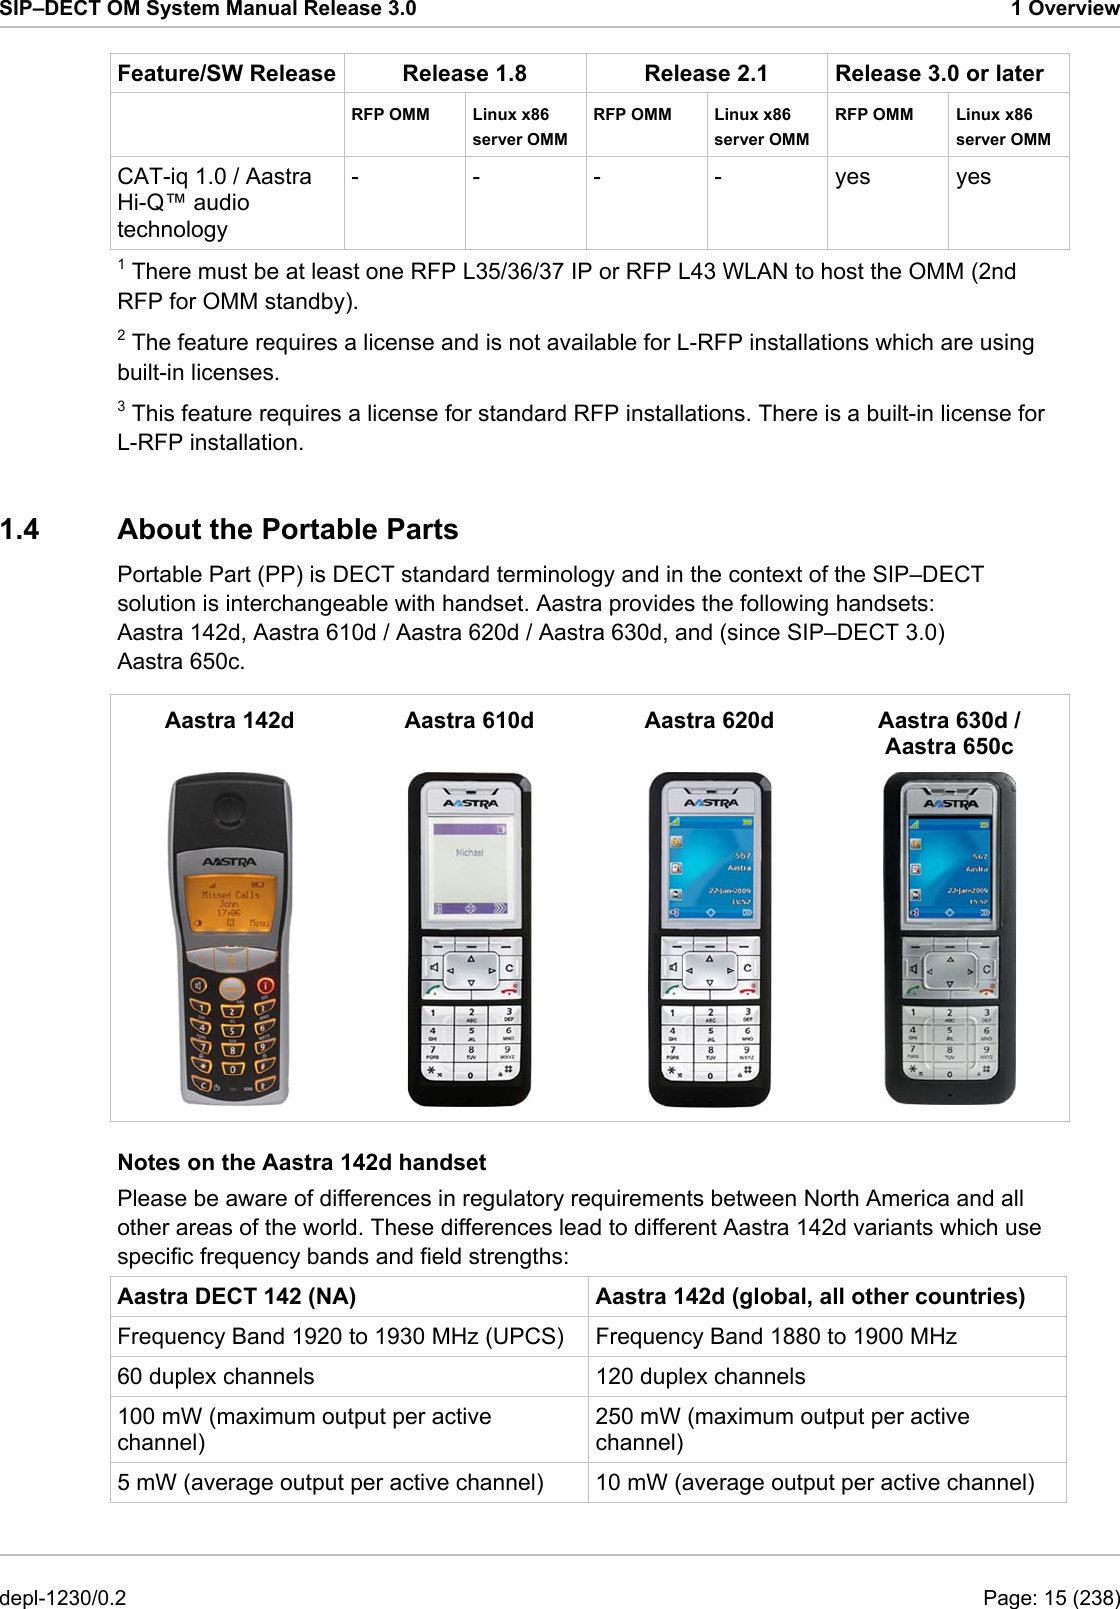
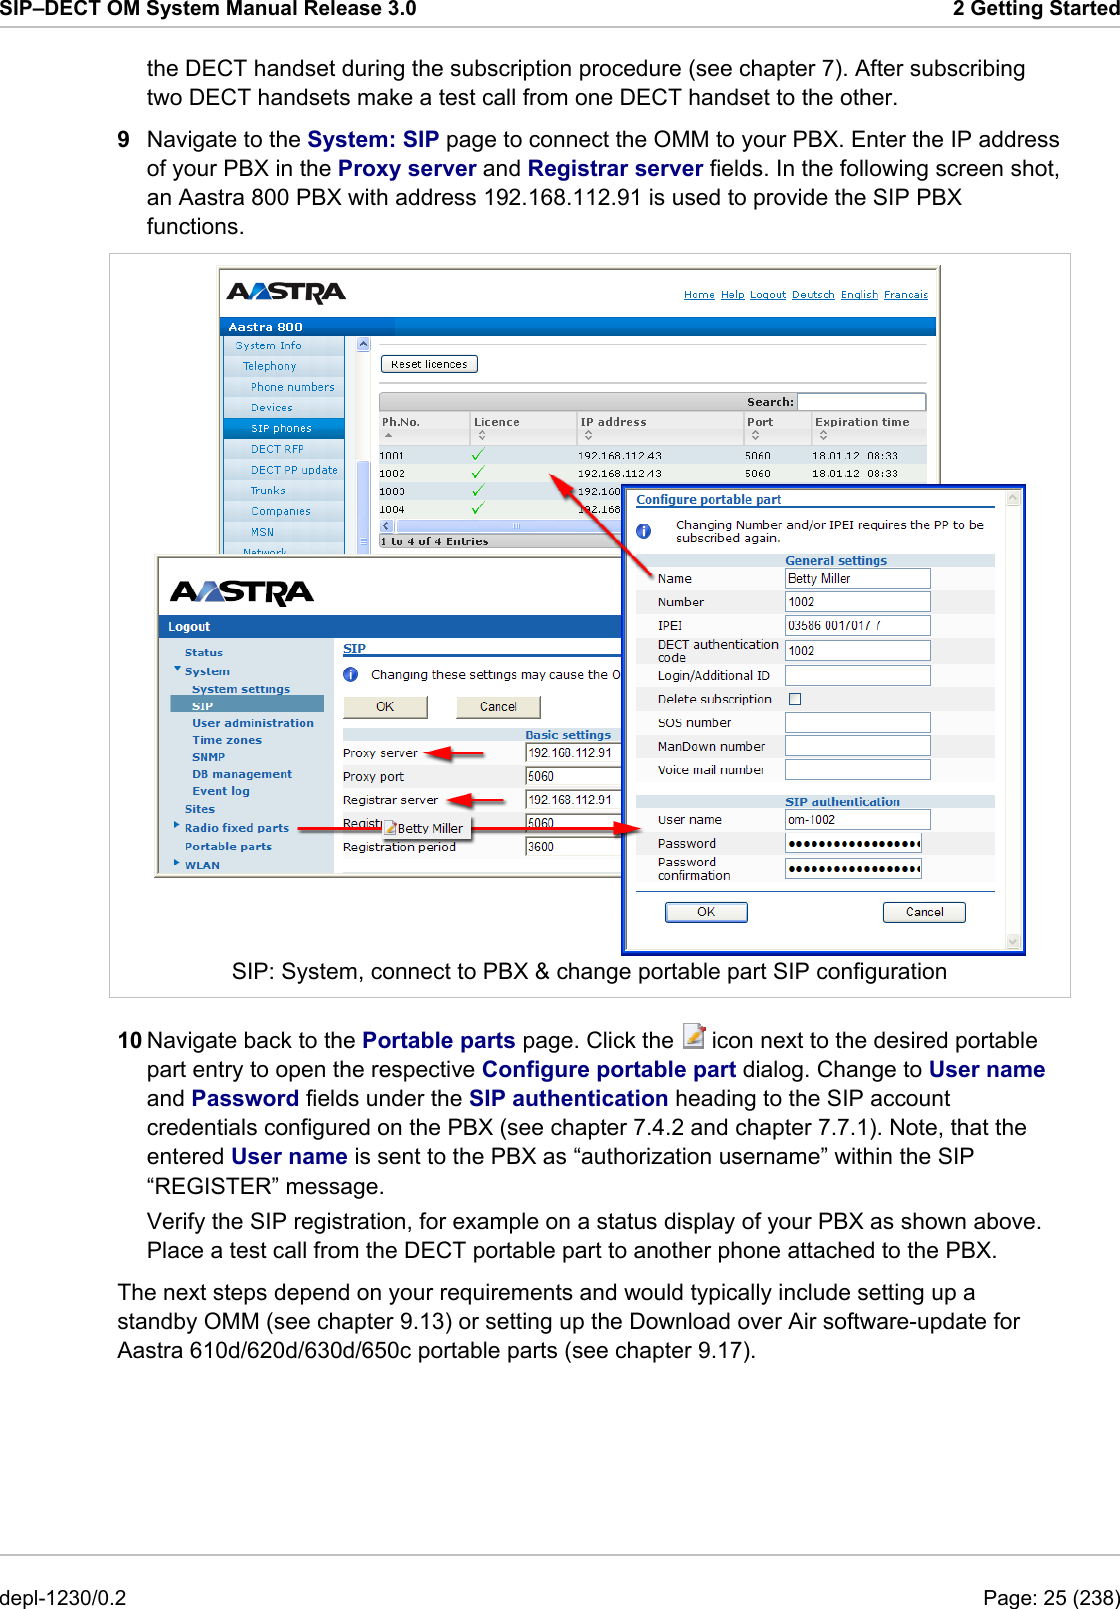
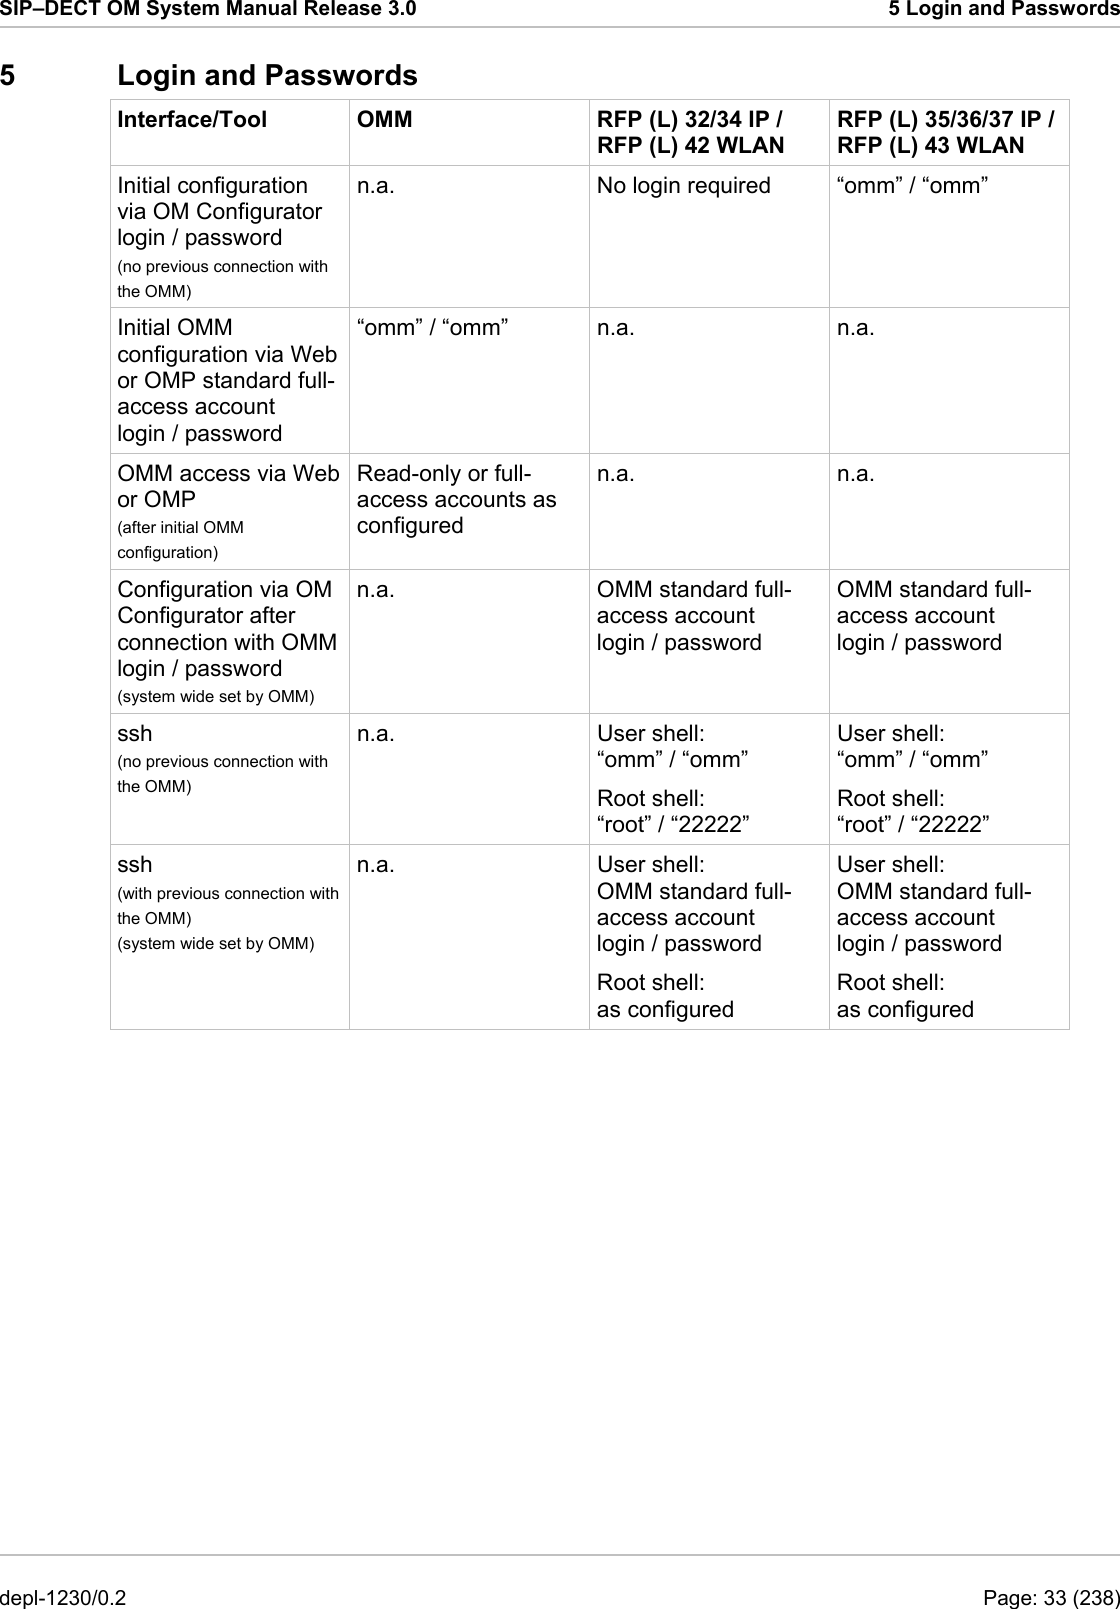
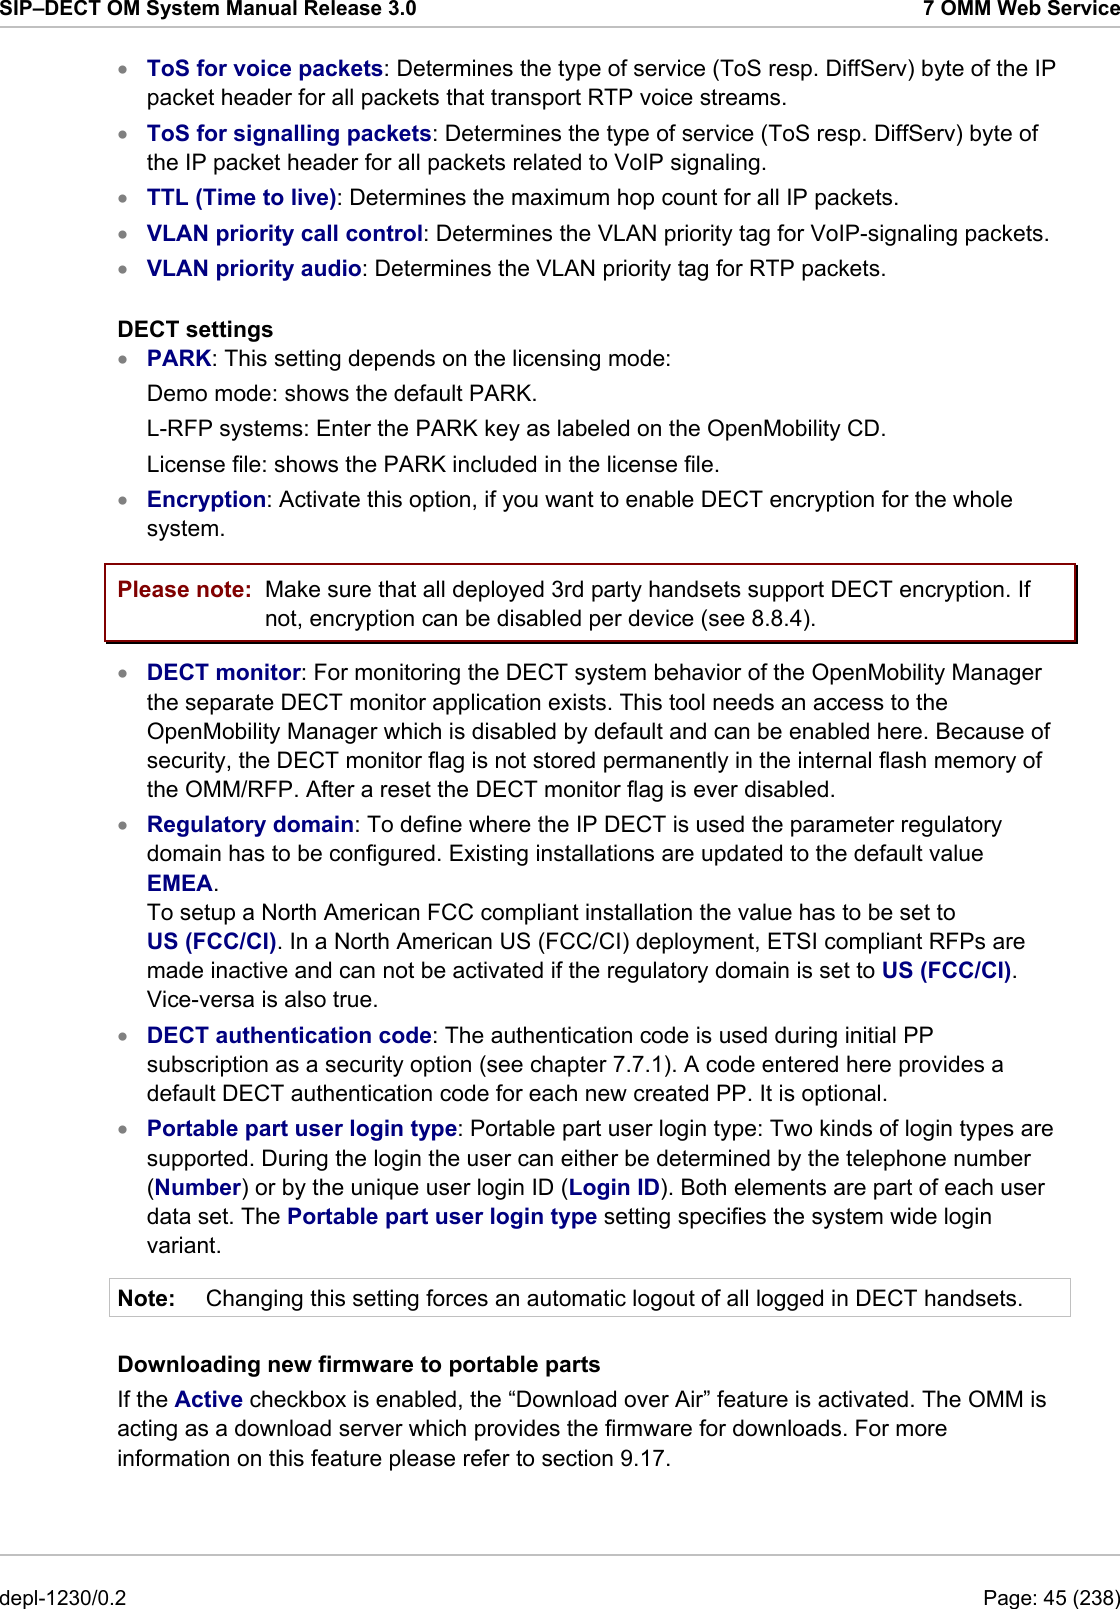
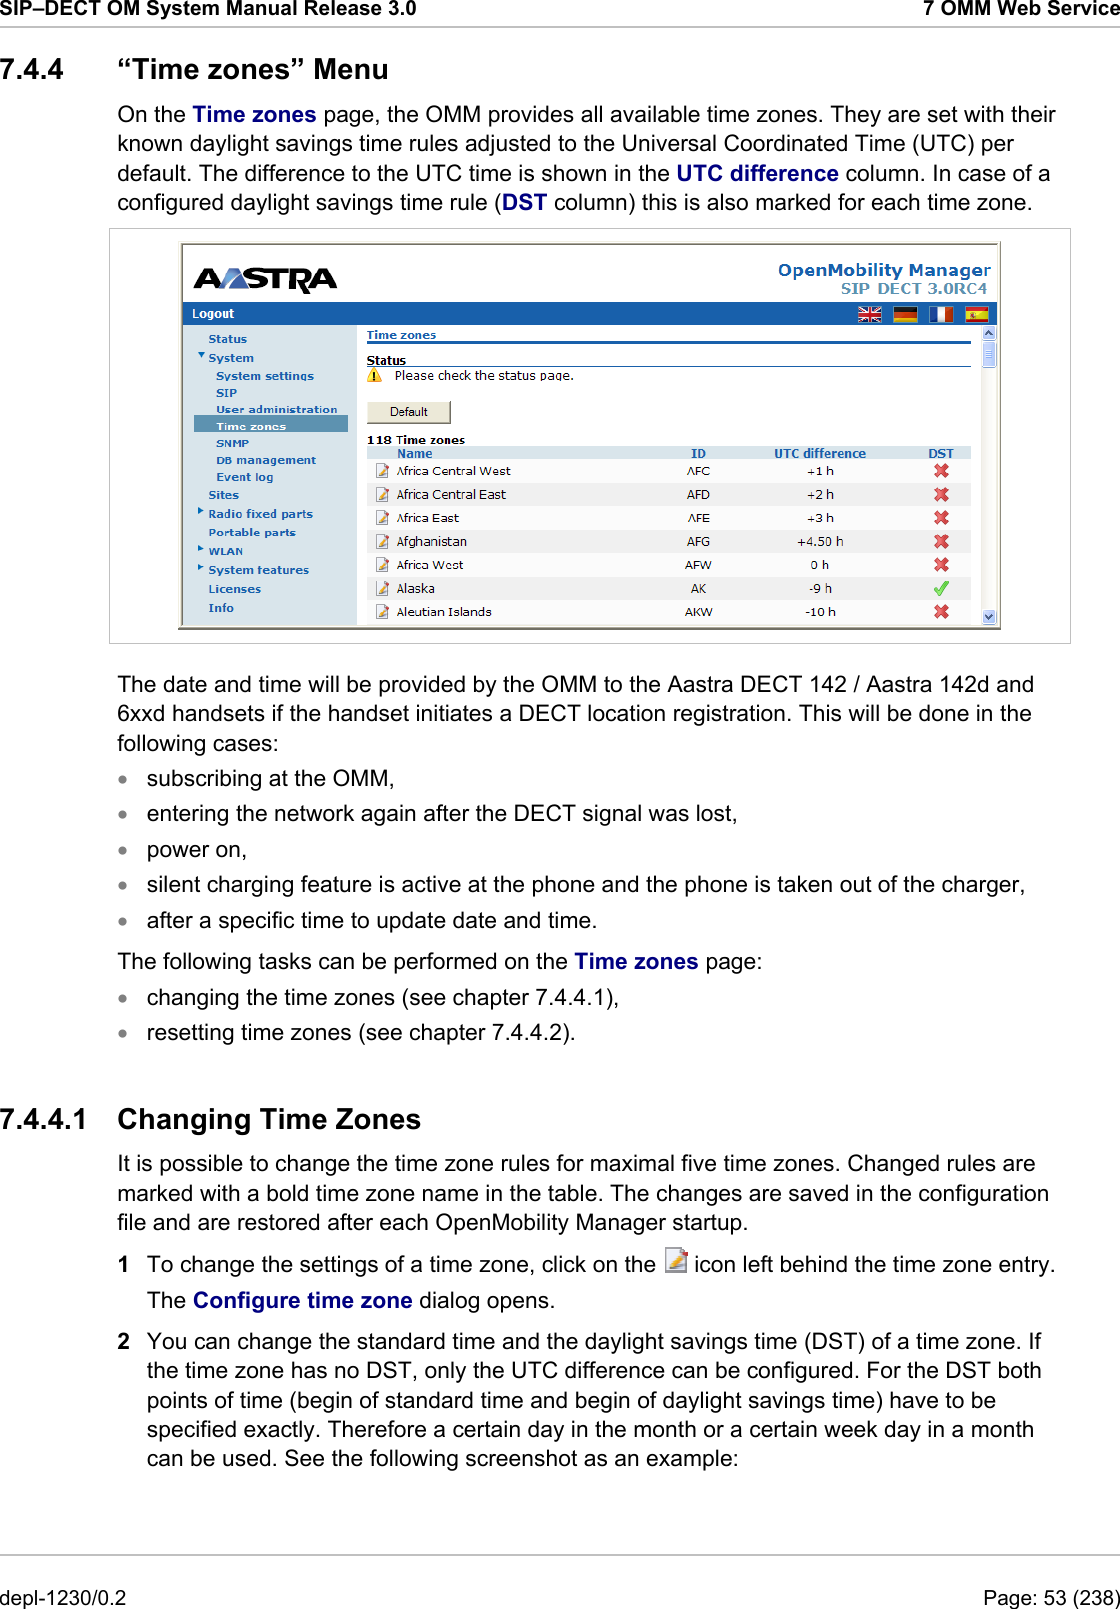
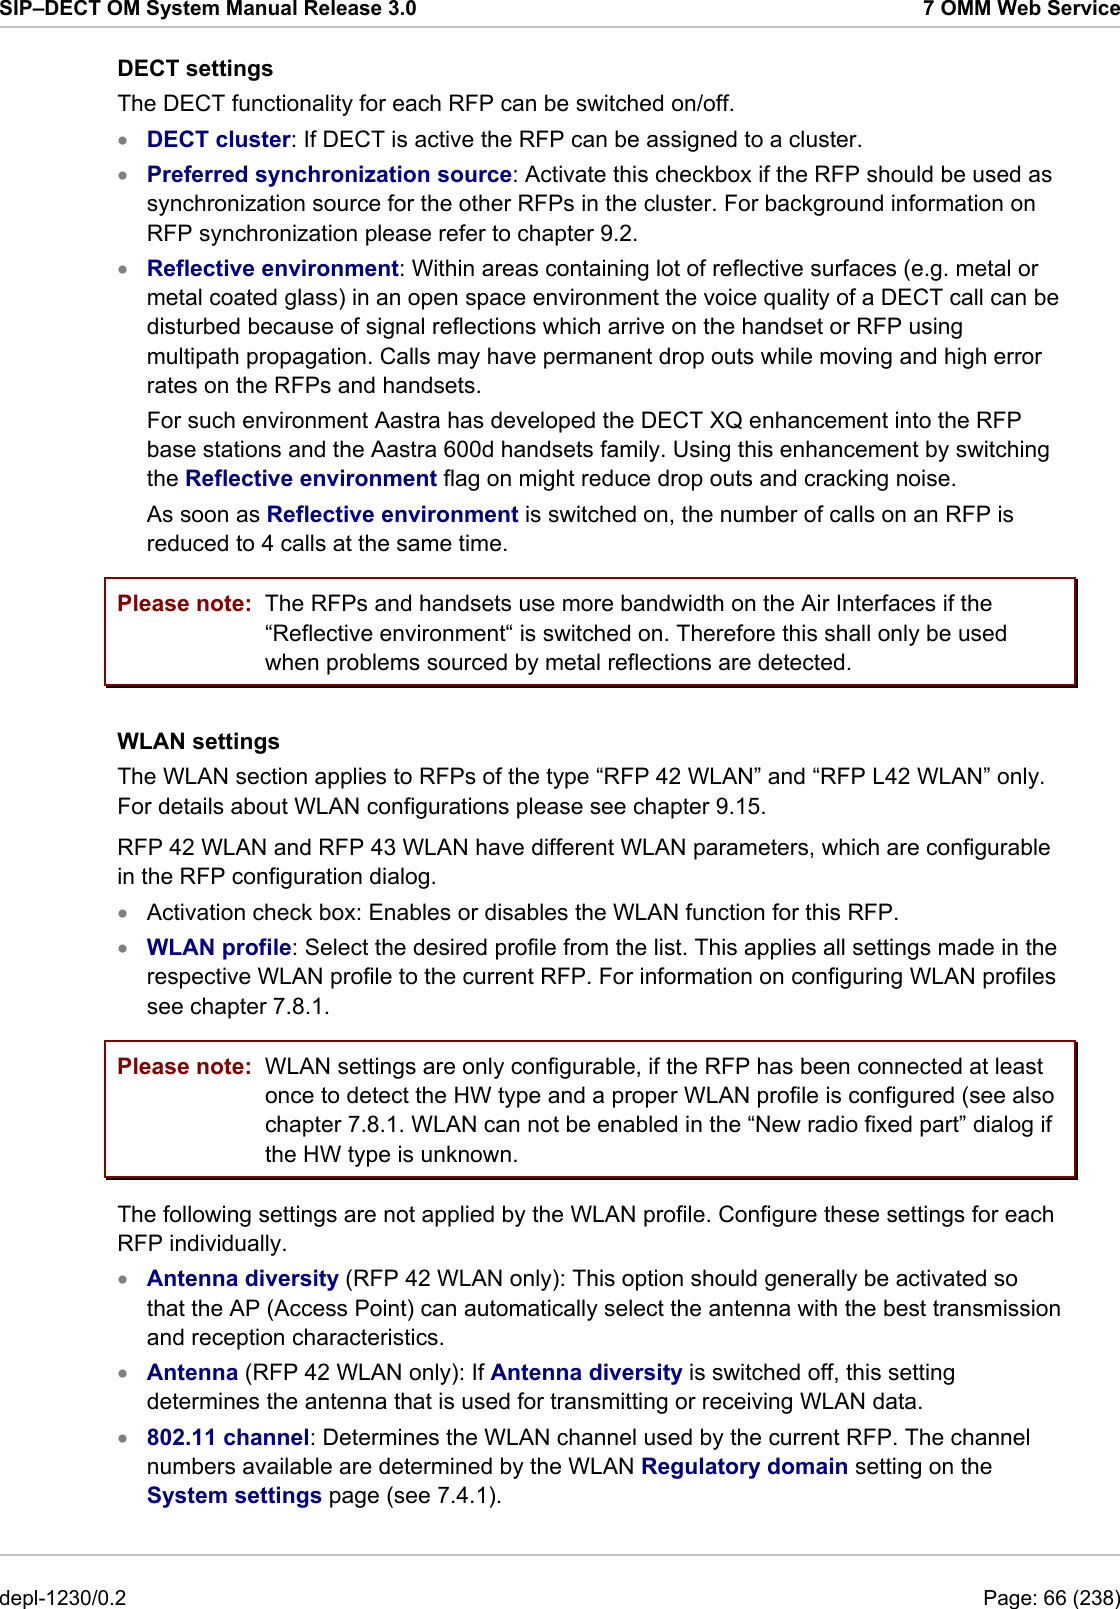
![SIP–DECT OM System Manual Release 3.0 2 Getting Started CentOS LiveCD, copy files, calling up a terminal 2 On the virtual machine’s desktop, double click the OMM-SIP CD-ROM. Use drag & drop to copy the “iprfp3g.dnld”, “iprfp2g.tftp”, and “aafon6xdd.dnld” files to the Linux desktop. 3 Start a terminal program. With Gnome desktop, select the Applications: Accessories: Terminal menu command. 4 In the terminal program, you need to enter the following commands to switch off the firewall and to start the SSH service: su –l Starts a super user (“root”) shell. ip -4 a Shows the current network configuration. The “eth0” adapter should show an IP address allocated by a DHCP server in your LAN. ip a add 192.168.1.1/24 dev eth0 ip l set dev eth0 up Optional: if the “eth0” adapter has no IP address, you can assign the address manually. /etc/init.d/sshd start Starts the SSH service. passwd centoslive Set a (simple) password for the “centoslive” user. iptables -F INPUT echo 0 > /selinux/enforce Flush (clear) the INPUT firewall. Disable SELINUX that prevents TFTP downloads. 5 Leave the virtual machine. With VirtualBox press and release the right [Ctrl] key. With VmWare Player press and release both the left [Ctrl] key and the left [Alt] key. You may iconize the virtual machines window now. 6 From your home desktop, start a remote terminal via SSH. Use your favorite SSH program (e.g. the PuTTY program for Windows) and connect to the IP address of the virtual machine. Log in as “centos” user with the password entered previously. Note, that it depl-1230/0.2 Page: 19 (238)](https://usermanual.wiki/Mitel-Deutschland/68635RFP36U-01.UserManual-part1/User-Guide-1704944-Page-19.png)
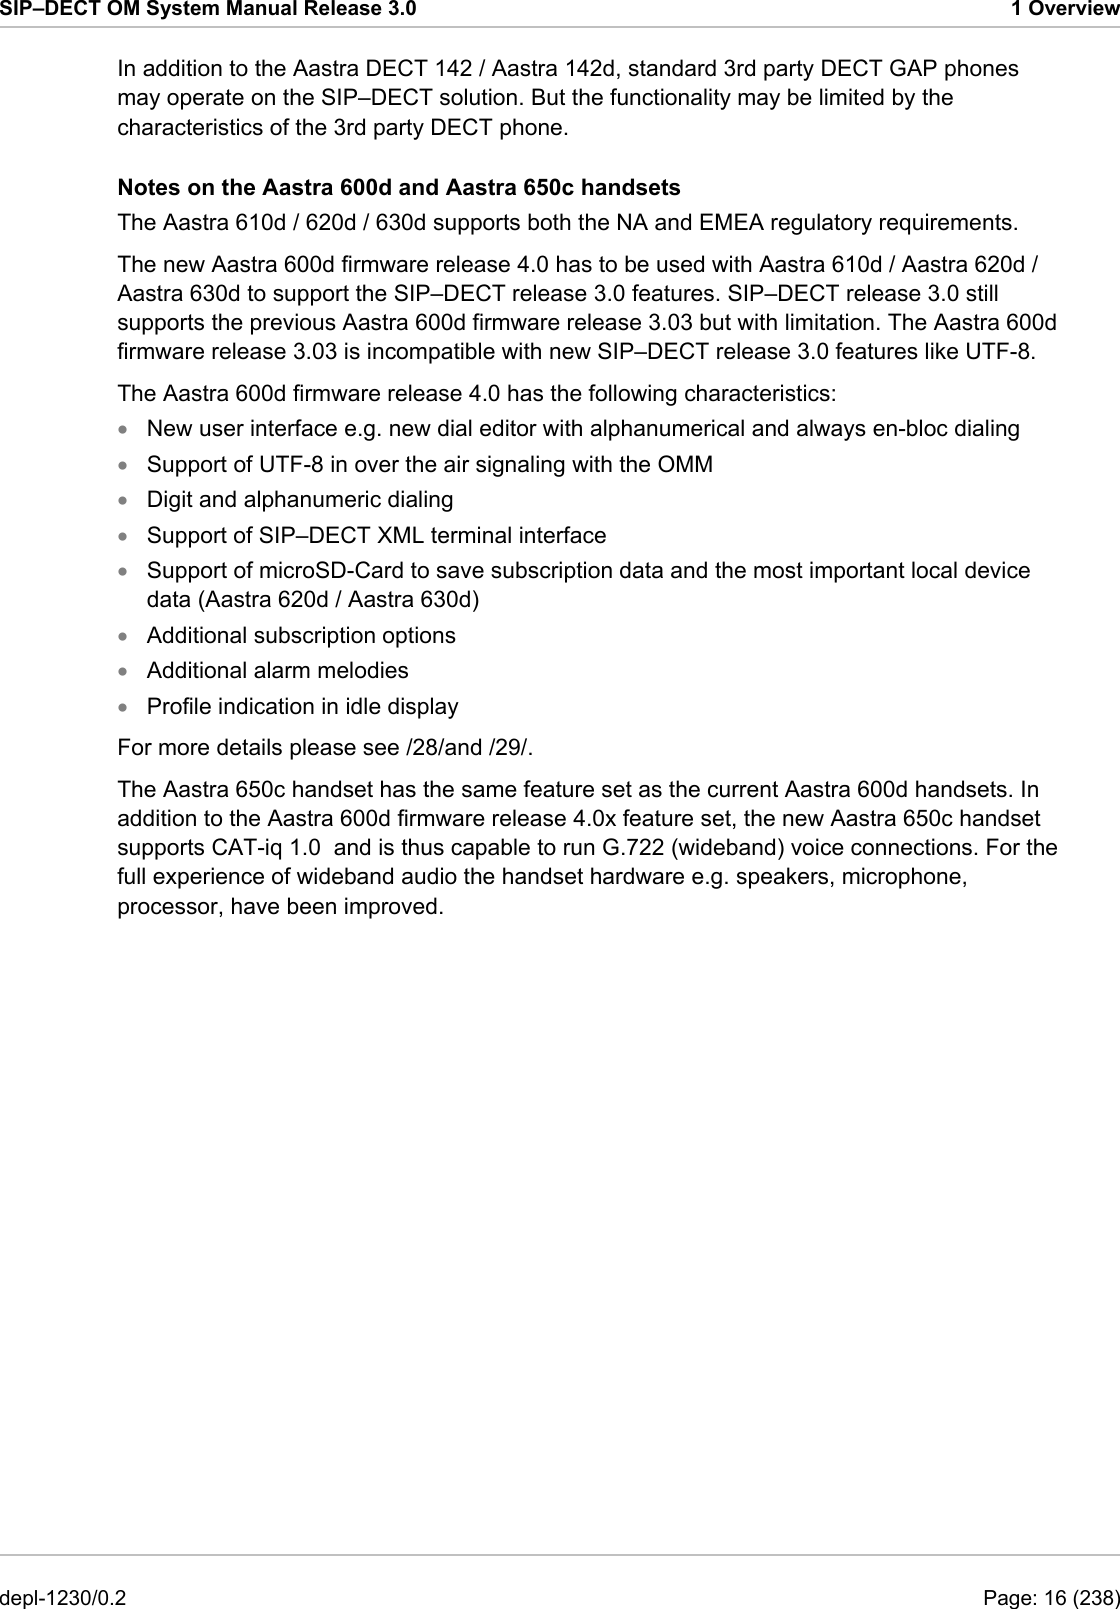
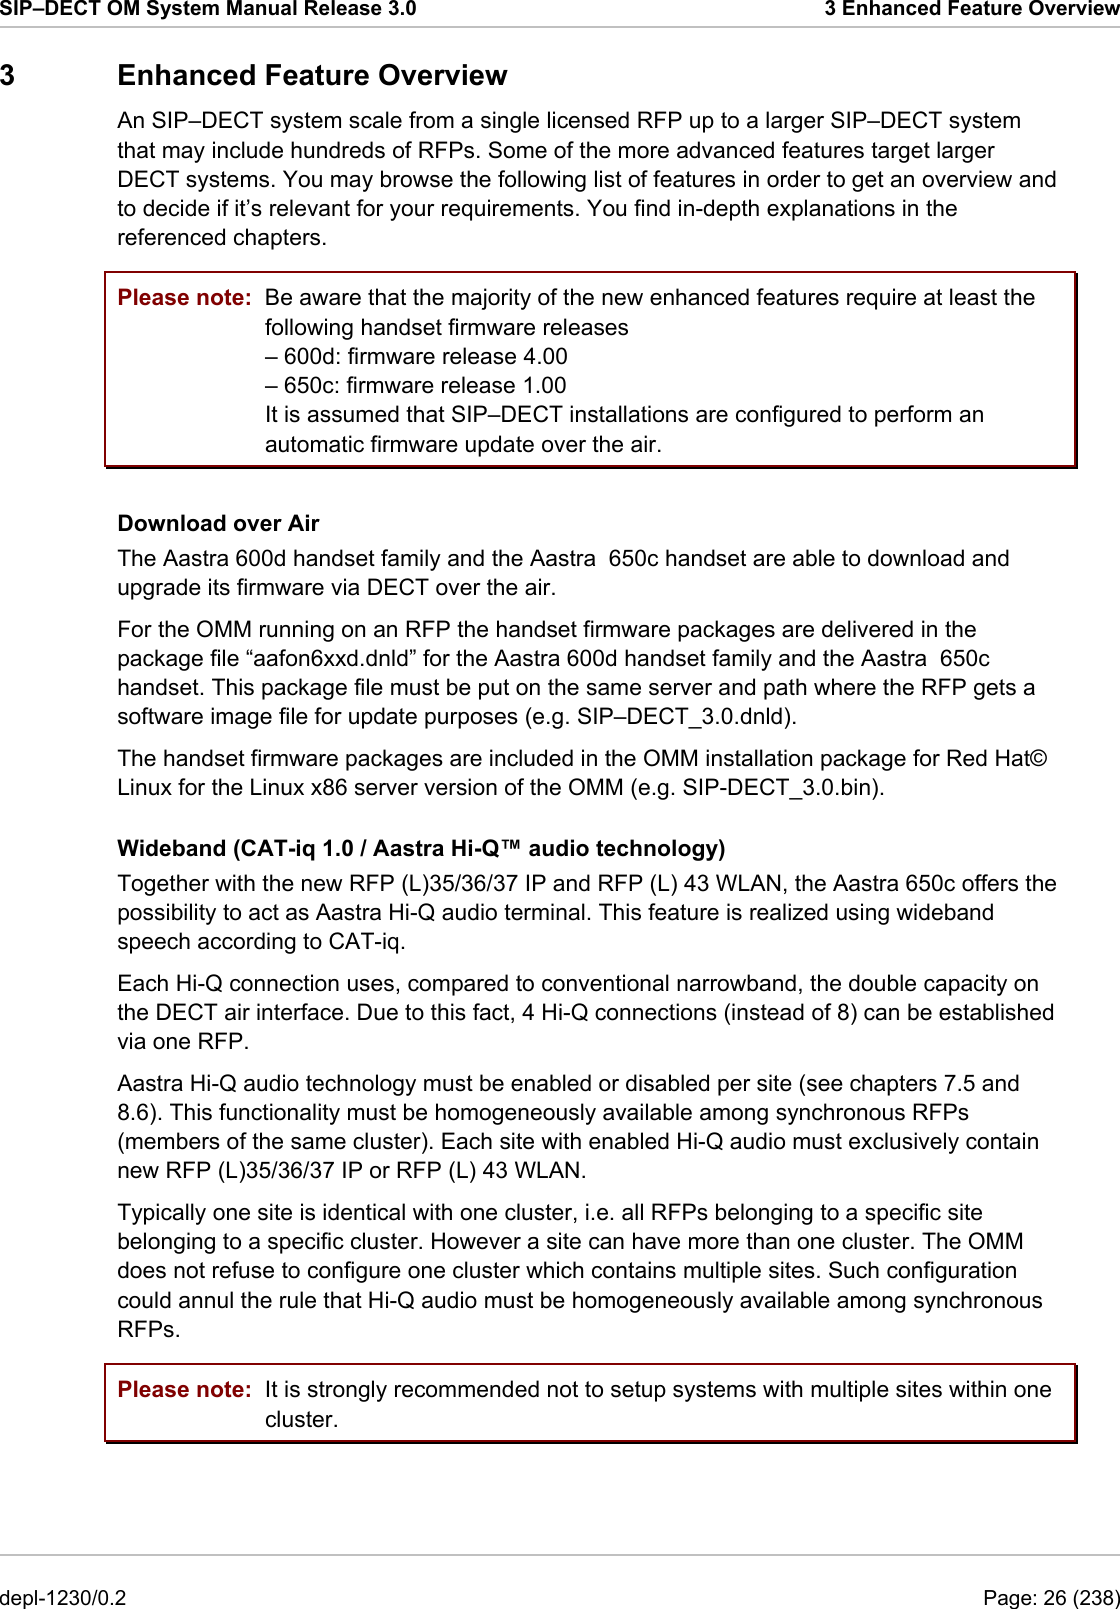
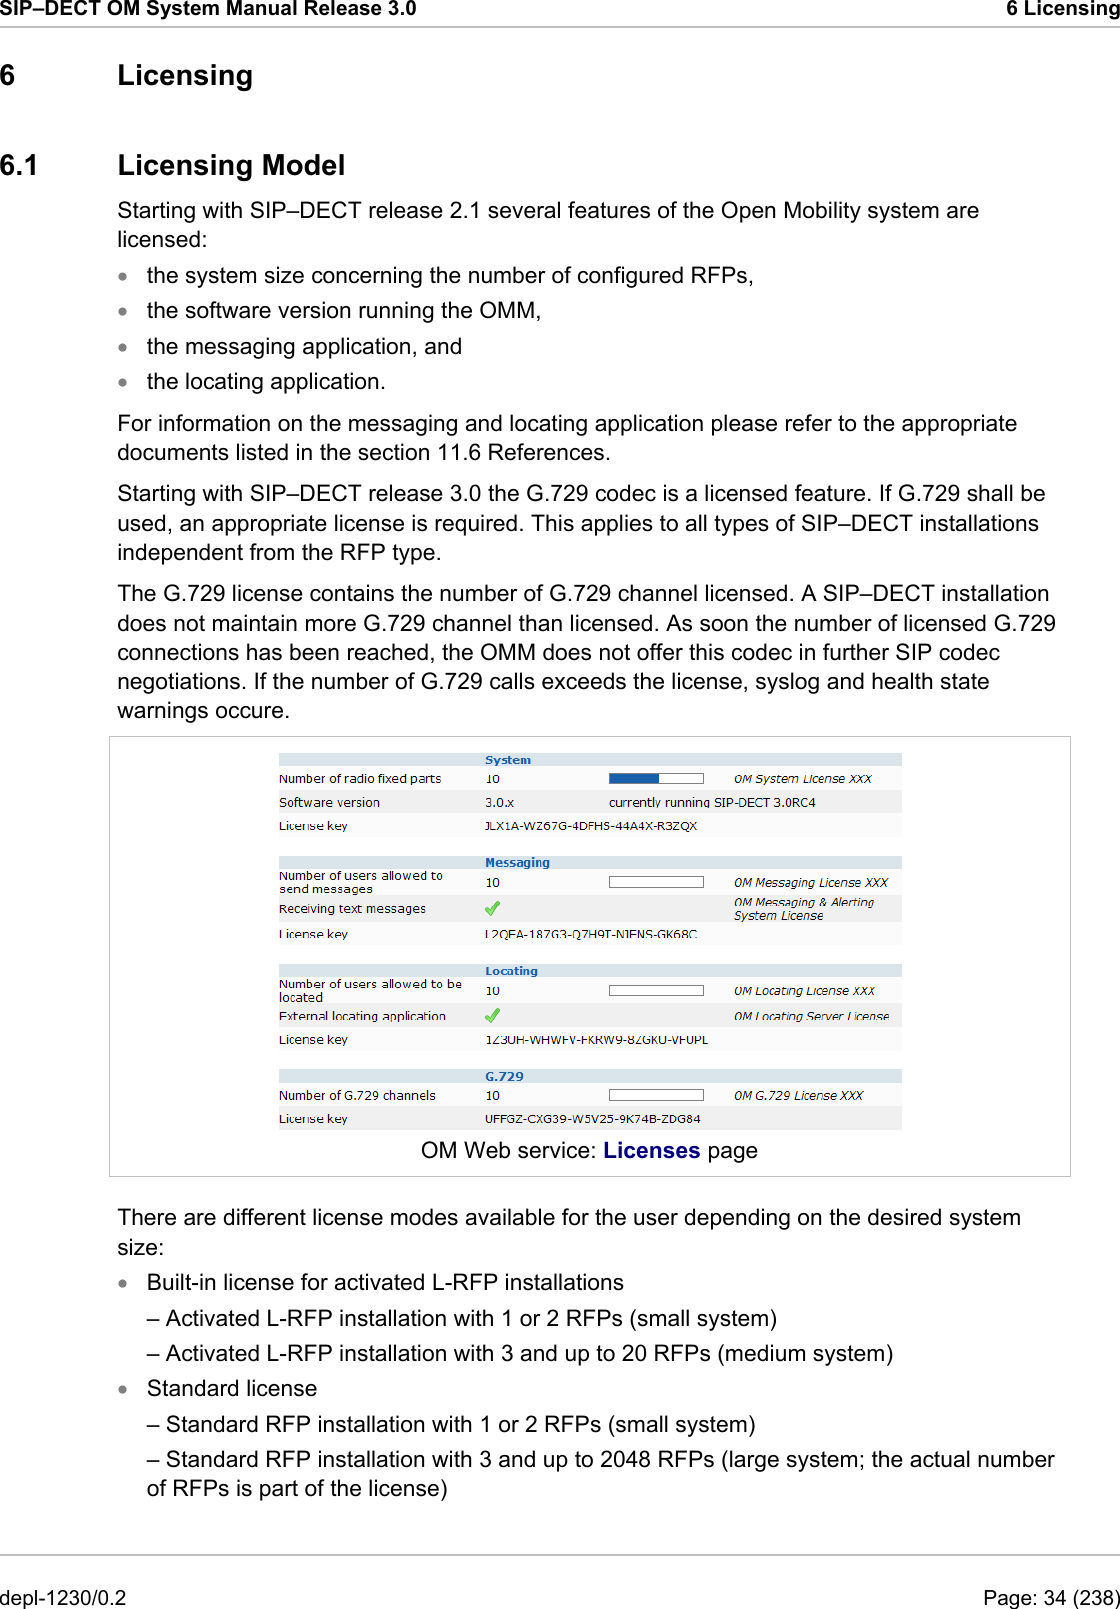
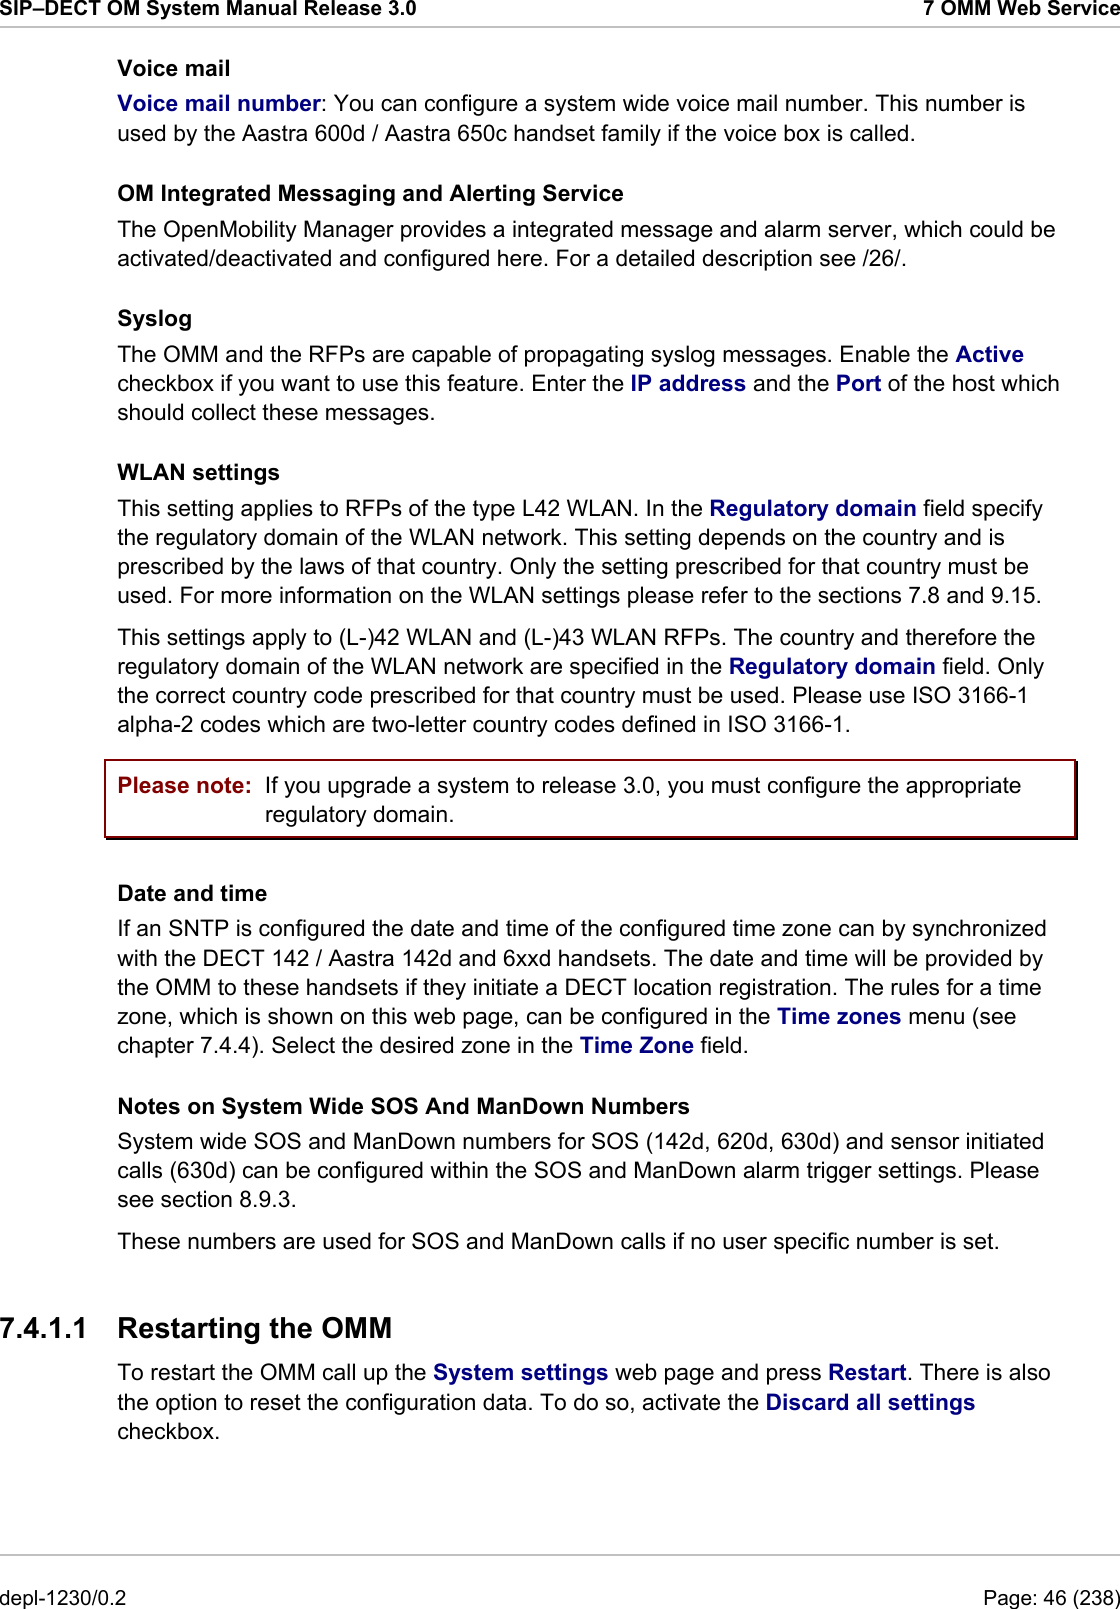
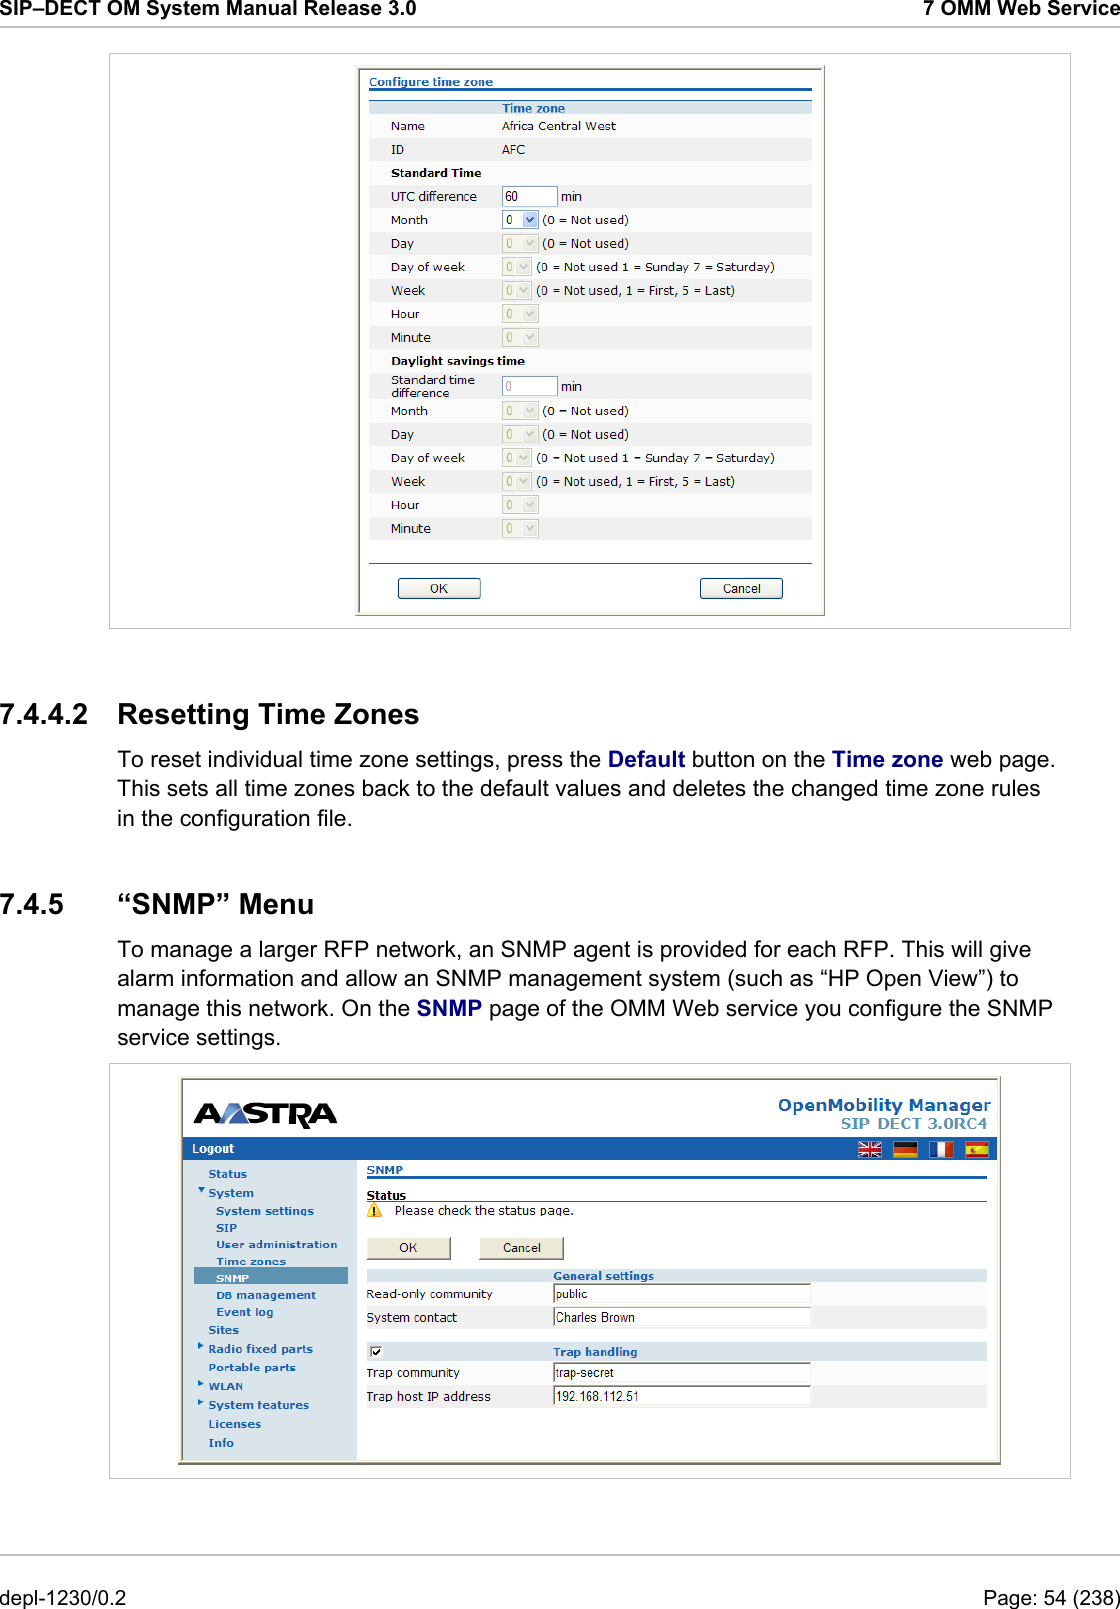
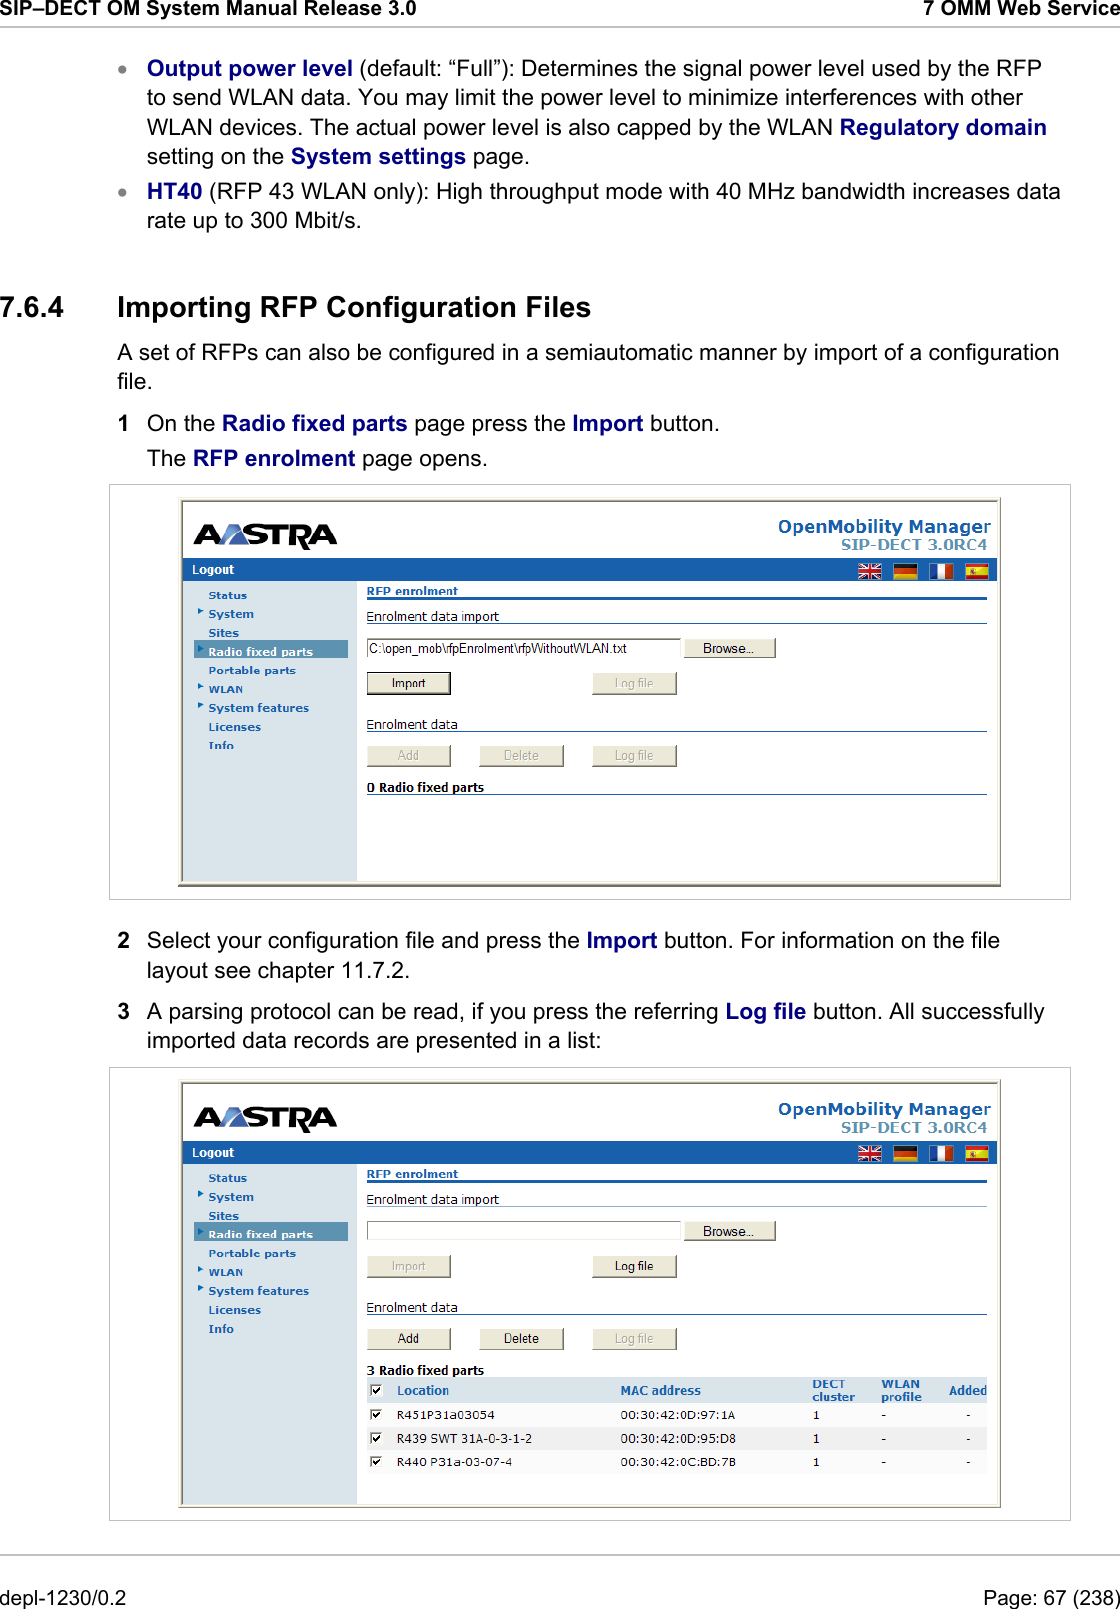
![SIP–DECT OM System Manual Release 3.0 2 Getting Started is now possible to use the clipboard to enter new commands and configuration file statements. 7 Enter the following commands to configure and start the DHCP/TFTP service: su -l Starts a super user (“root”) shell. yum install dhcp tftp-server Installs a DHCP and a TFTP server. yum install nano Installs the “nano” text editor. cd /var/lib/tftpboot Change the current directory. cp -v /home/centoslive/Desktop/* . Copy files here. (“iprfp3g.dnld”, “iprfp2g.tftp”, and “aafon6xdd.dnld” from the CD ROM). Mind the trailing dot in the command. nano /etc/dhcp/dhcpd.conf Start the “nano” text editor to change the “/etc/dhcp/dhcpd.conf” configuration file for the ISC DHCP daemon. Adapt and paste the example configuration from below. Press [Ctrl-X] to end the text editor and confirm saving the file with the [Y] and [Return] keys./etc/init.d/dhcpd restart Start the DHCP server. chkconfig tftp on /etc/init.d/xinetd restart Enable the TFTP server that is started from xinetd. Start the xinetd daemon after this. tail -f /var/log/messages View the system log for DHCP messages. 8 Connect the desired RFPs to your LAN. Establish their power supply, either by PoE or by plugging in the external power adapters. During the RFP start-up, the SSH console windows should display DHCP messages that indicate the RFP DHCP queries. DnsMasq Configuration File (/etc/ dhcp/dhcpd.conf) The following configuration example needs to be adapted to your network and RFPs. Change all lines with “192.168.112.” to match your LAN. Also change the MAC address (here: 00:30:42:0d:10:2e) to the value printed on the backside label of the RFP that is designated as OMM. ################################################ # dhcpd.conf sample configuration for SIP-DECT # ################################################ ddns-update-style interim; ignore client-updates; default-lease-time 86400; max-lease-time 86400; ### Define SIP-DECT options (incl. structure of option 43) ### option space SIPDECT; option SIPDECT.omm-ip code 10 = ip-address; option SIPDECT.omm-syslog code 14 = ip-address; option SIPDECT.omm-syslog-port code 15 = unsigned integer 16; option SIPDECT.country code 17 = unsigned integer 16; option SIPDECT.ntpsrvname code 18 = text; option SIPDECT.omm-ip2 code 19 = ip-address; depl-1230/0.2 Page: 20 (238)](https://usermanual.wiki/Mitel-Deutschland/68635RFP36U-01.UserManual-part1/User-Guide-1704944-Page-20.png)
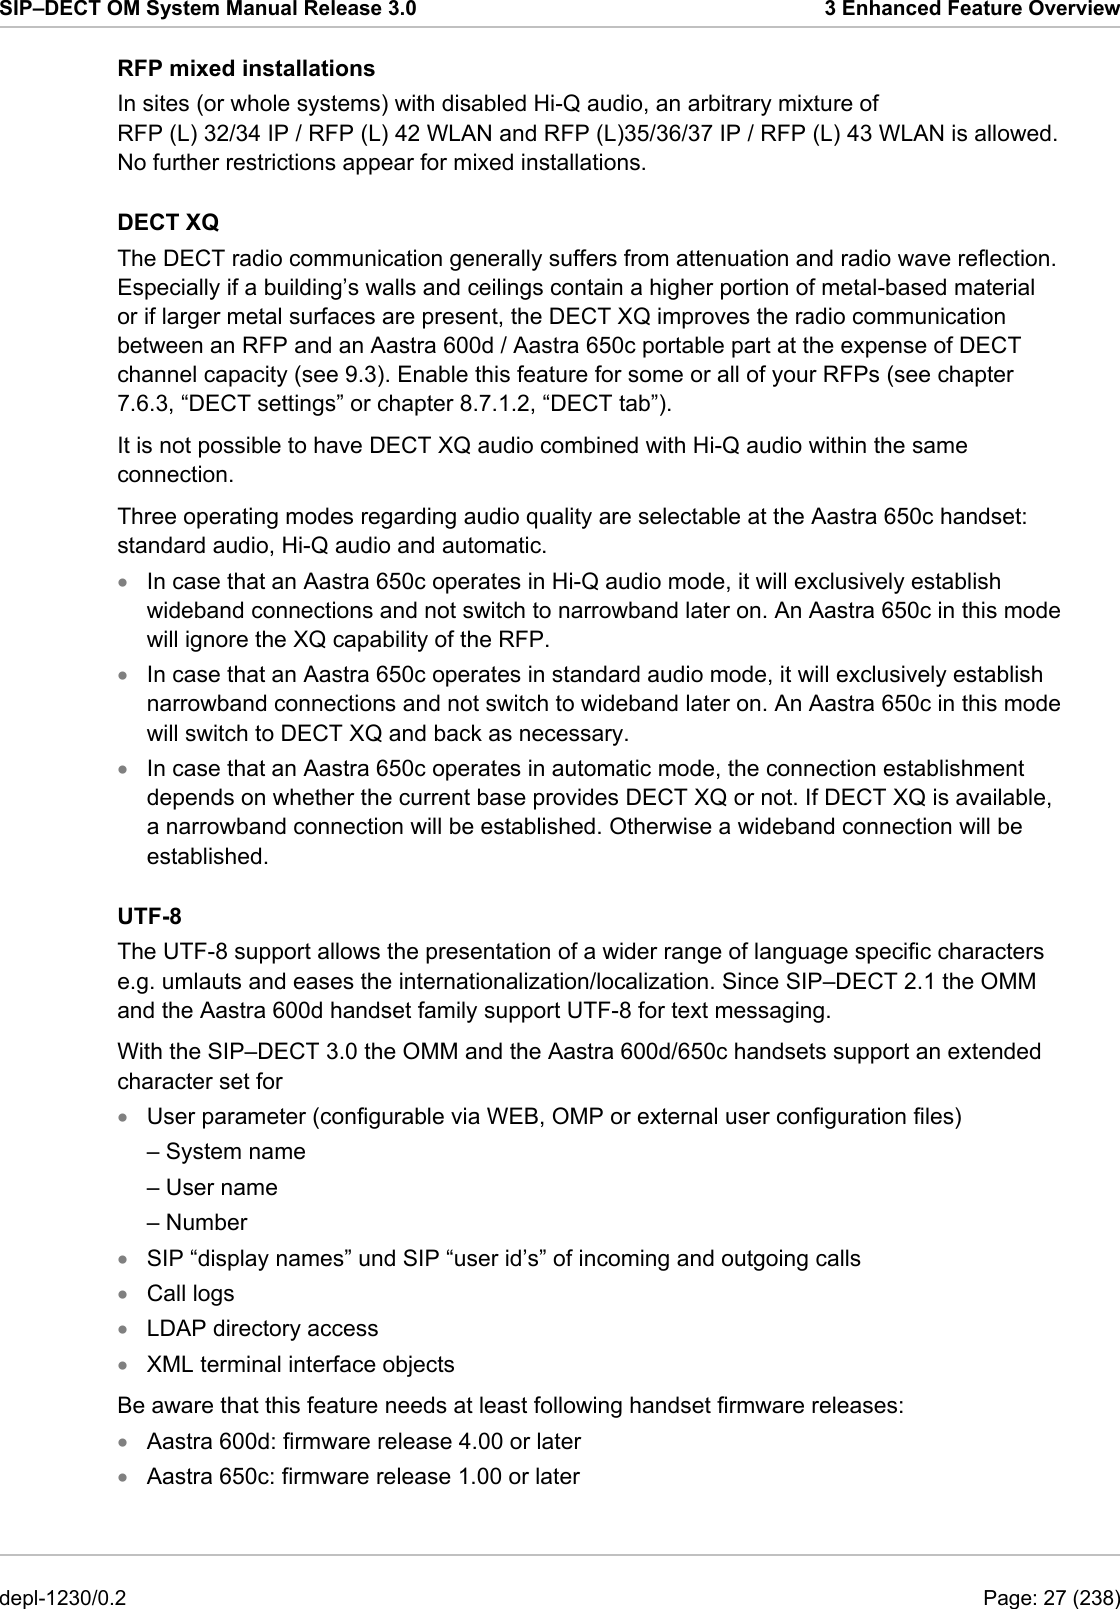
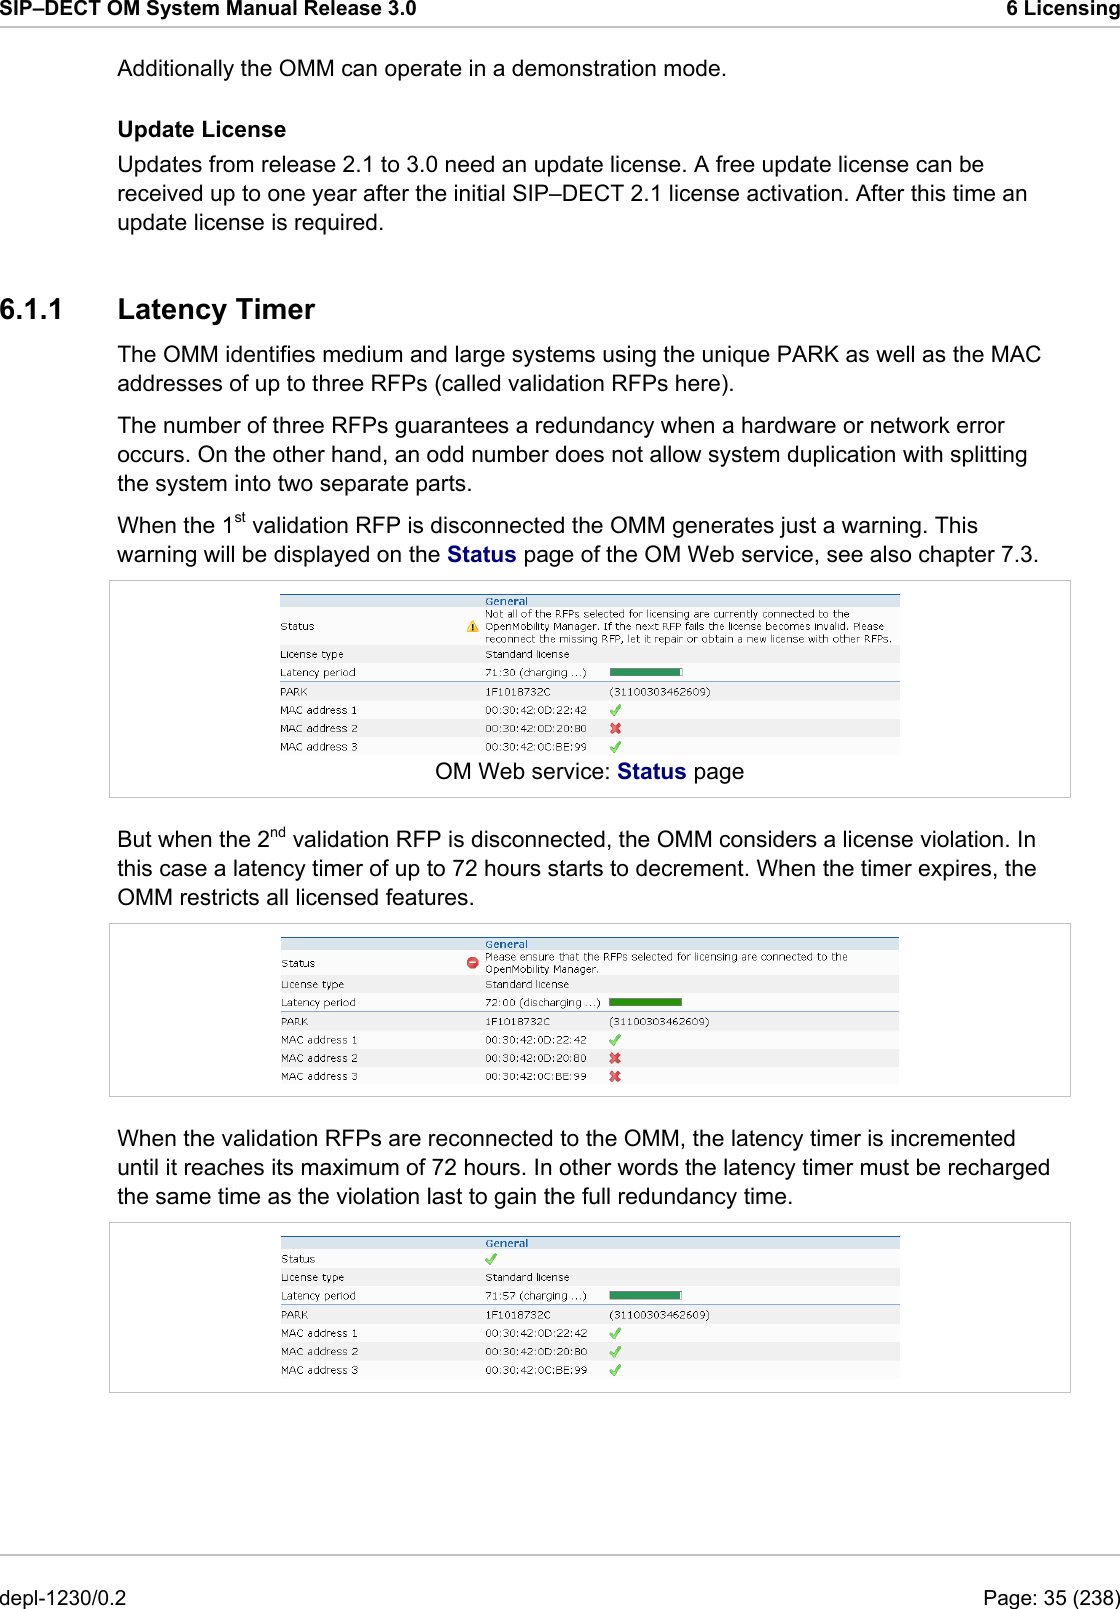
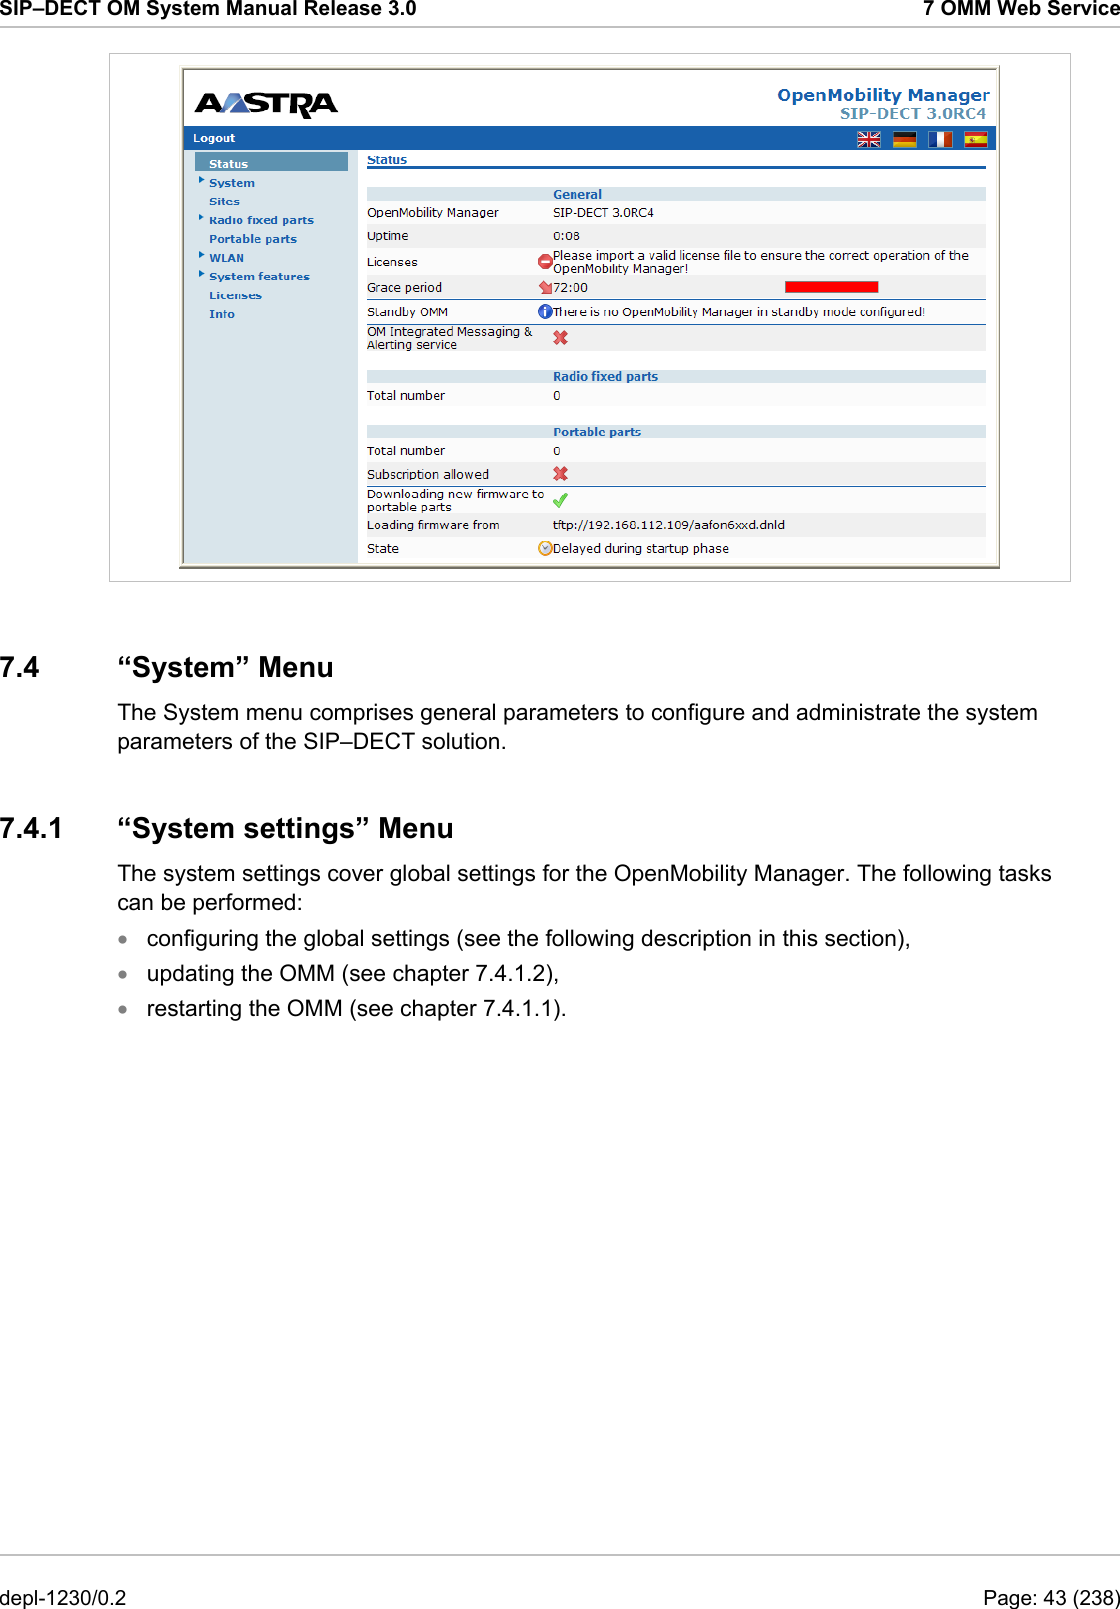
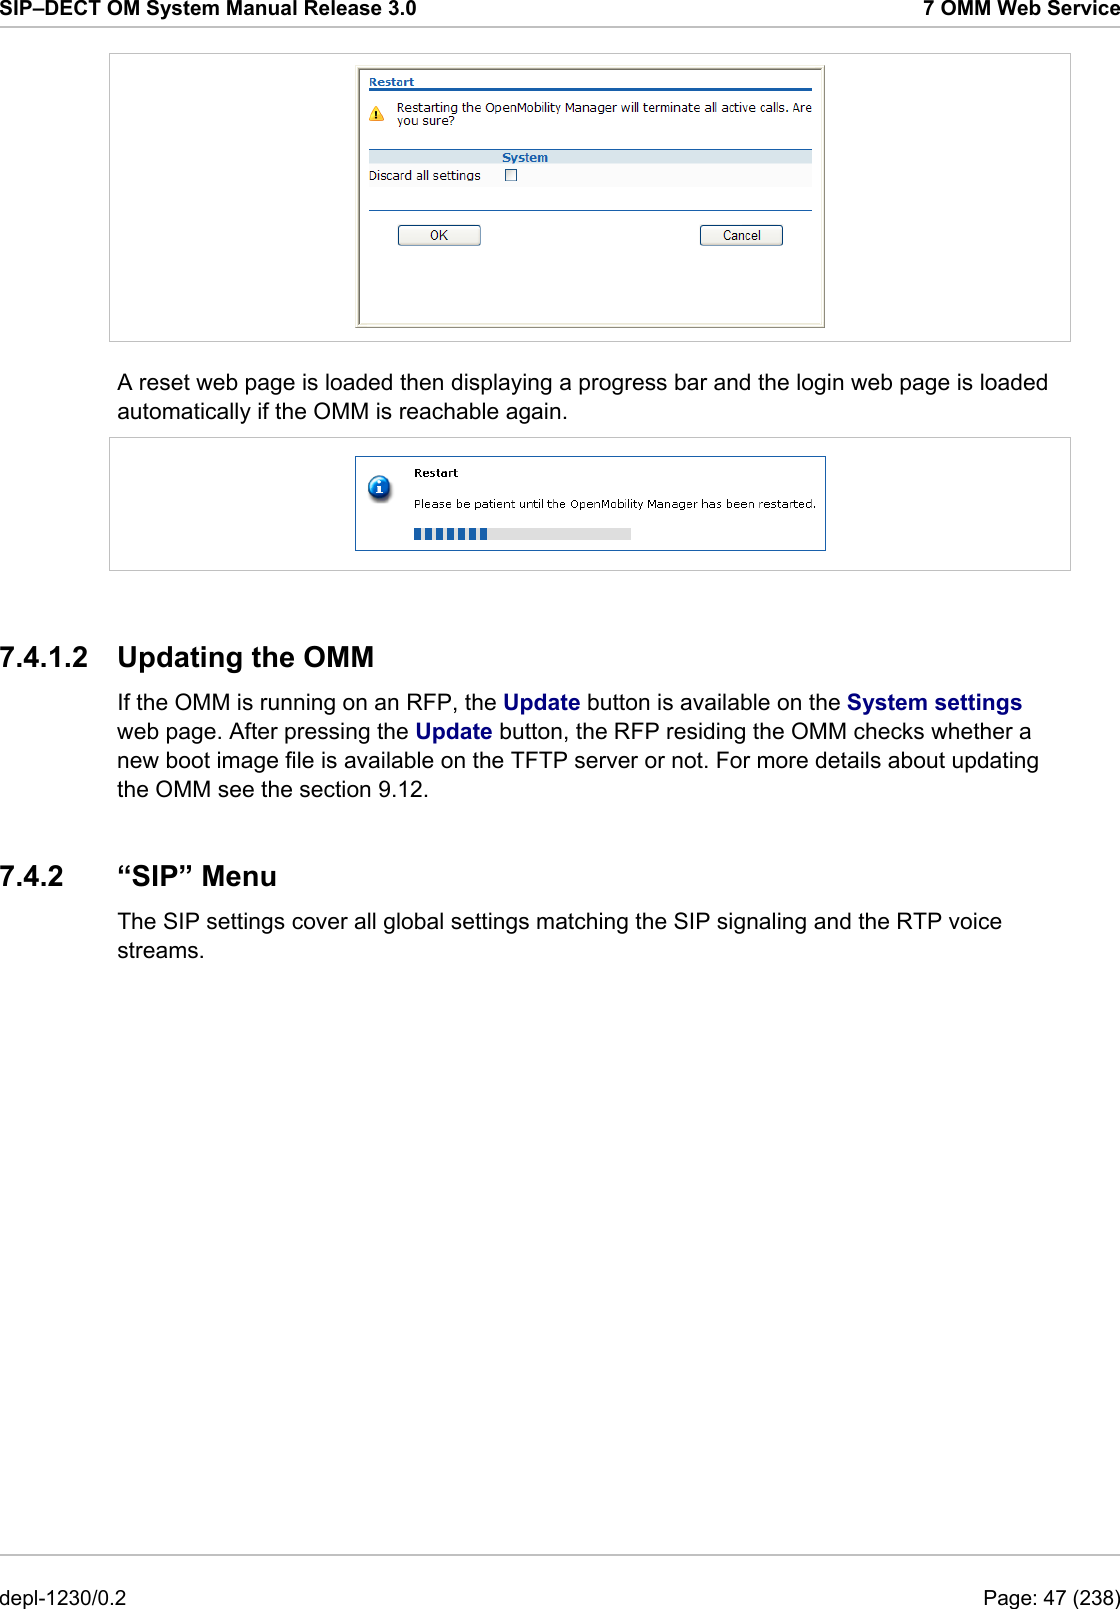
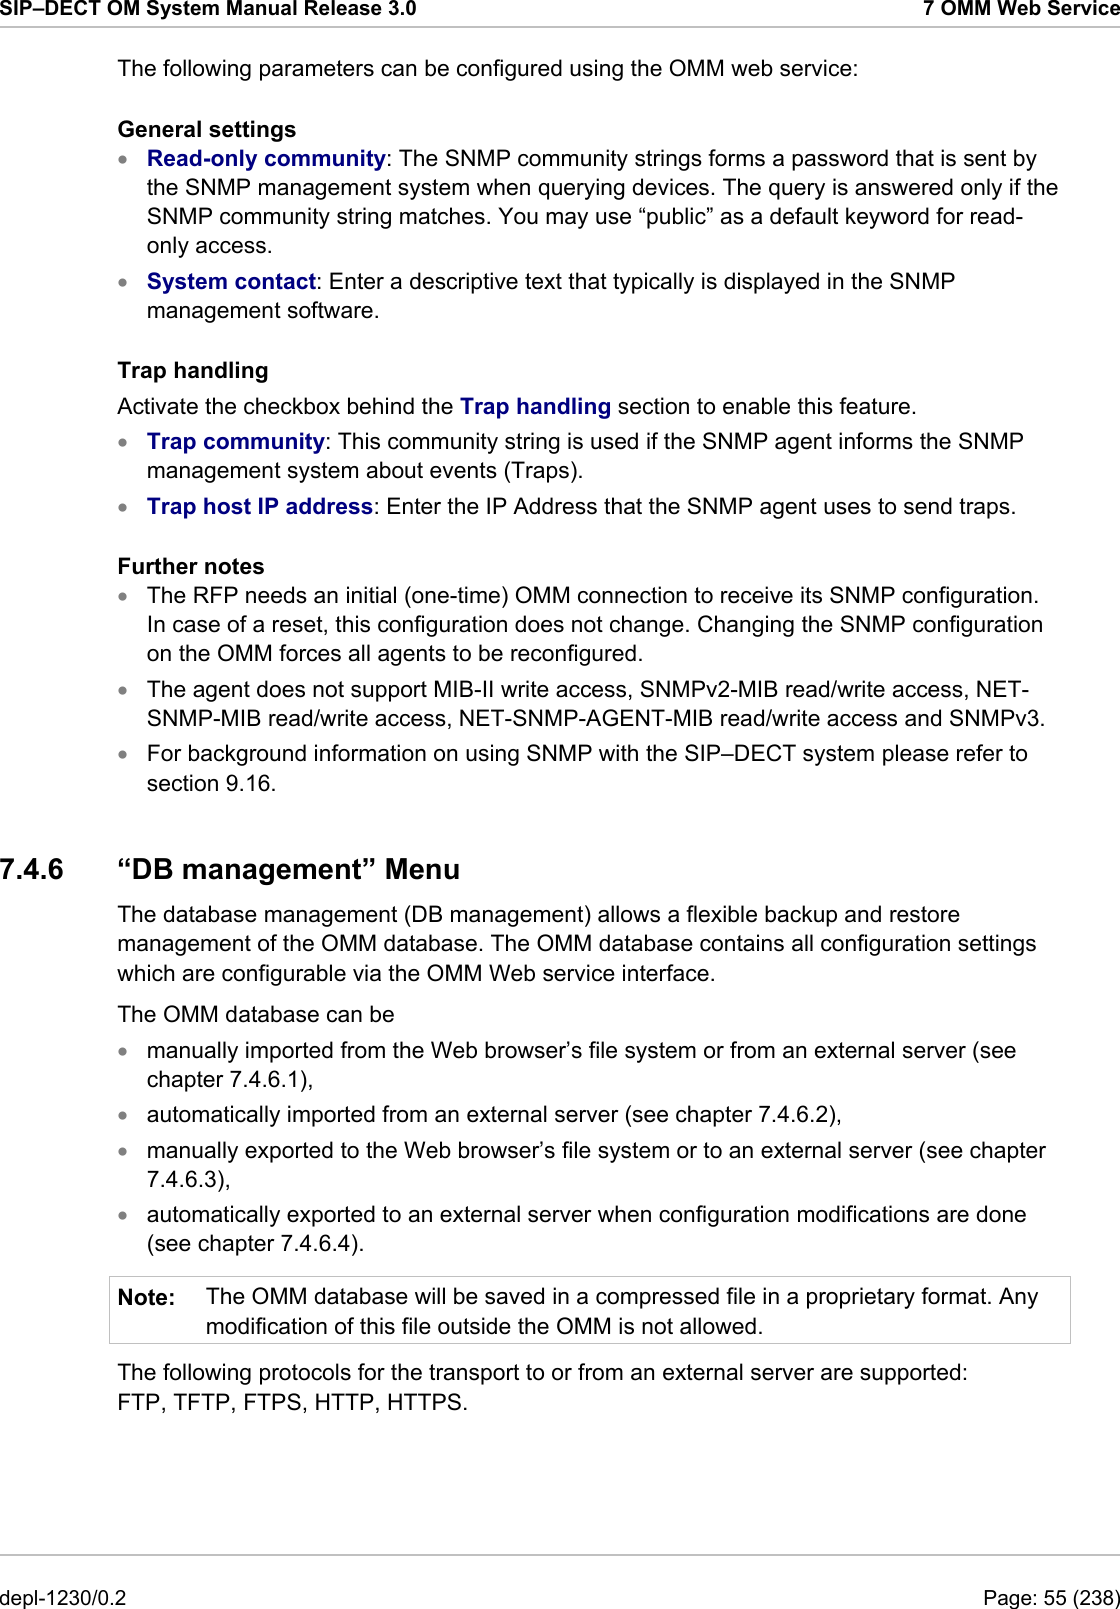
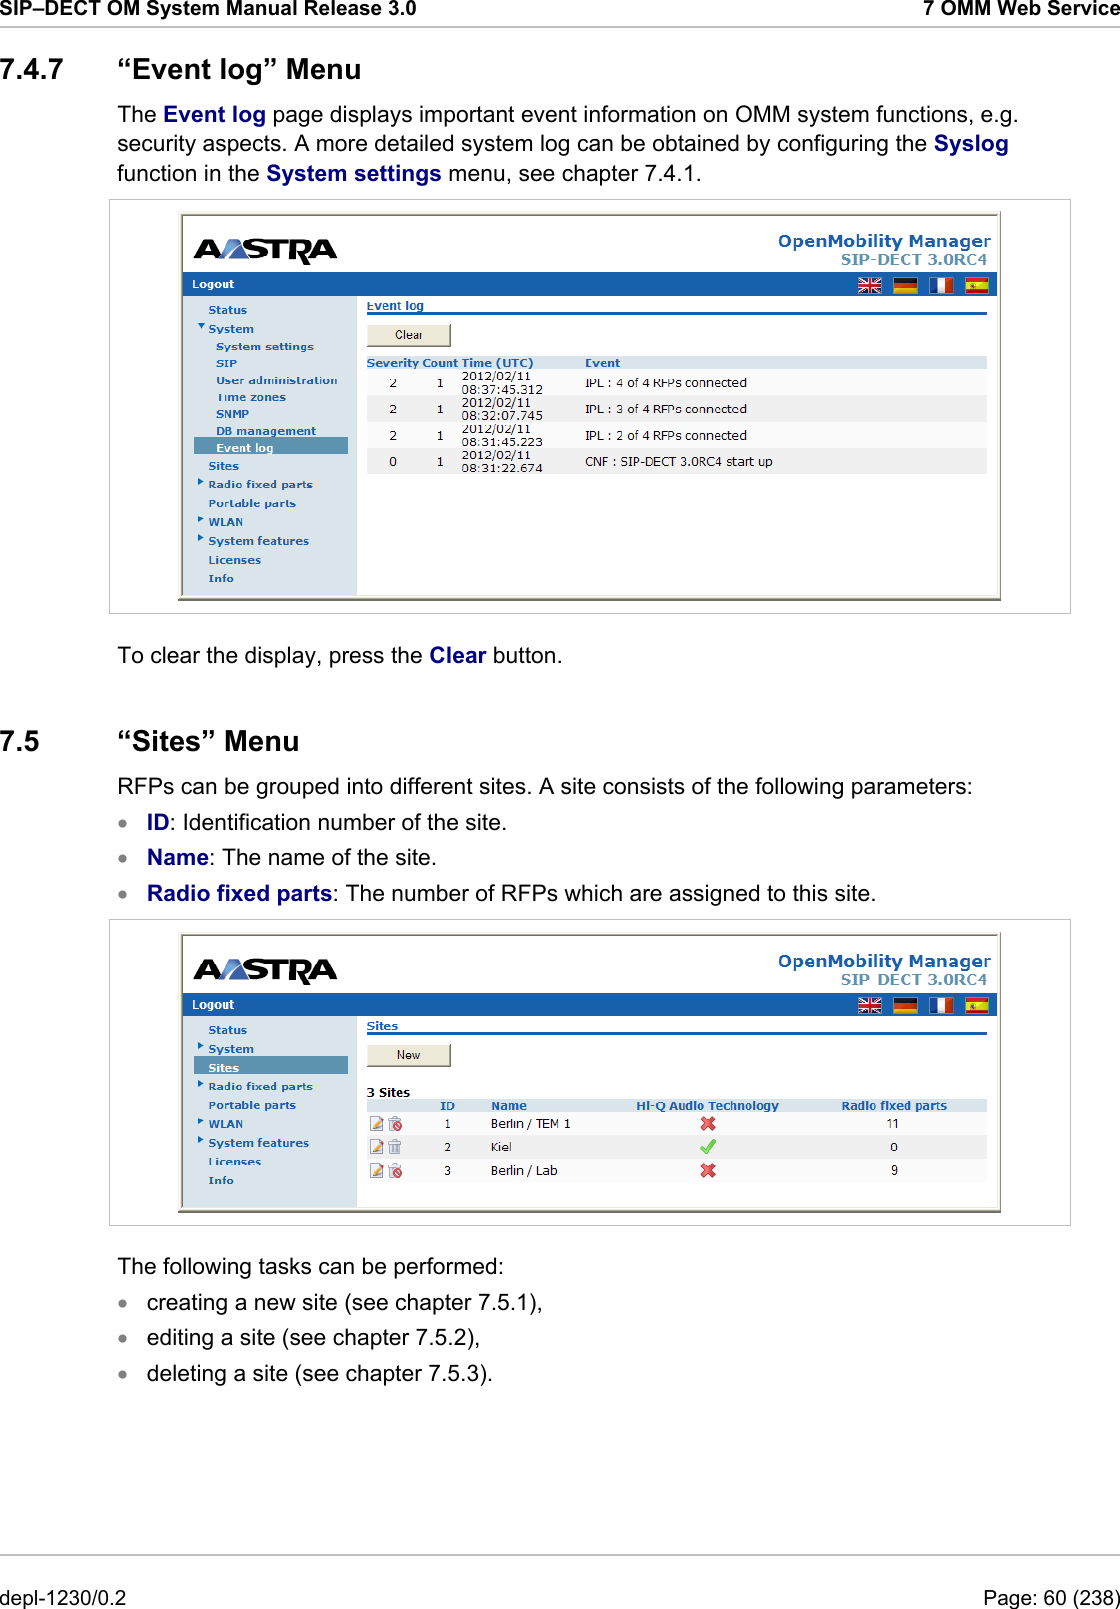
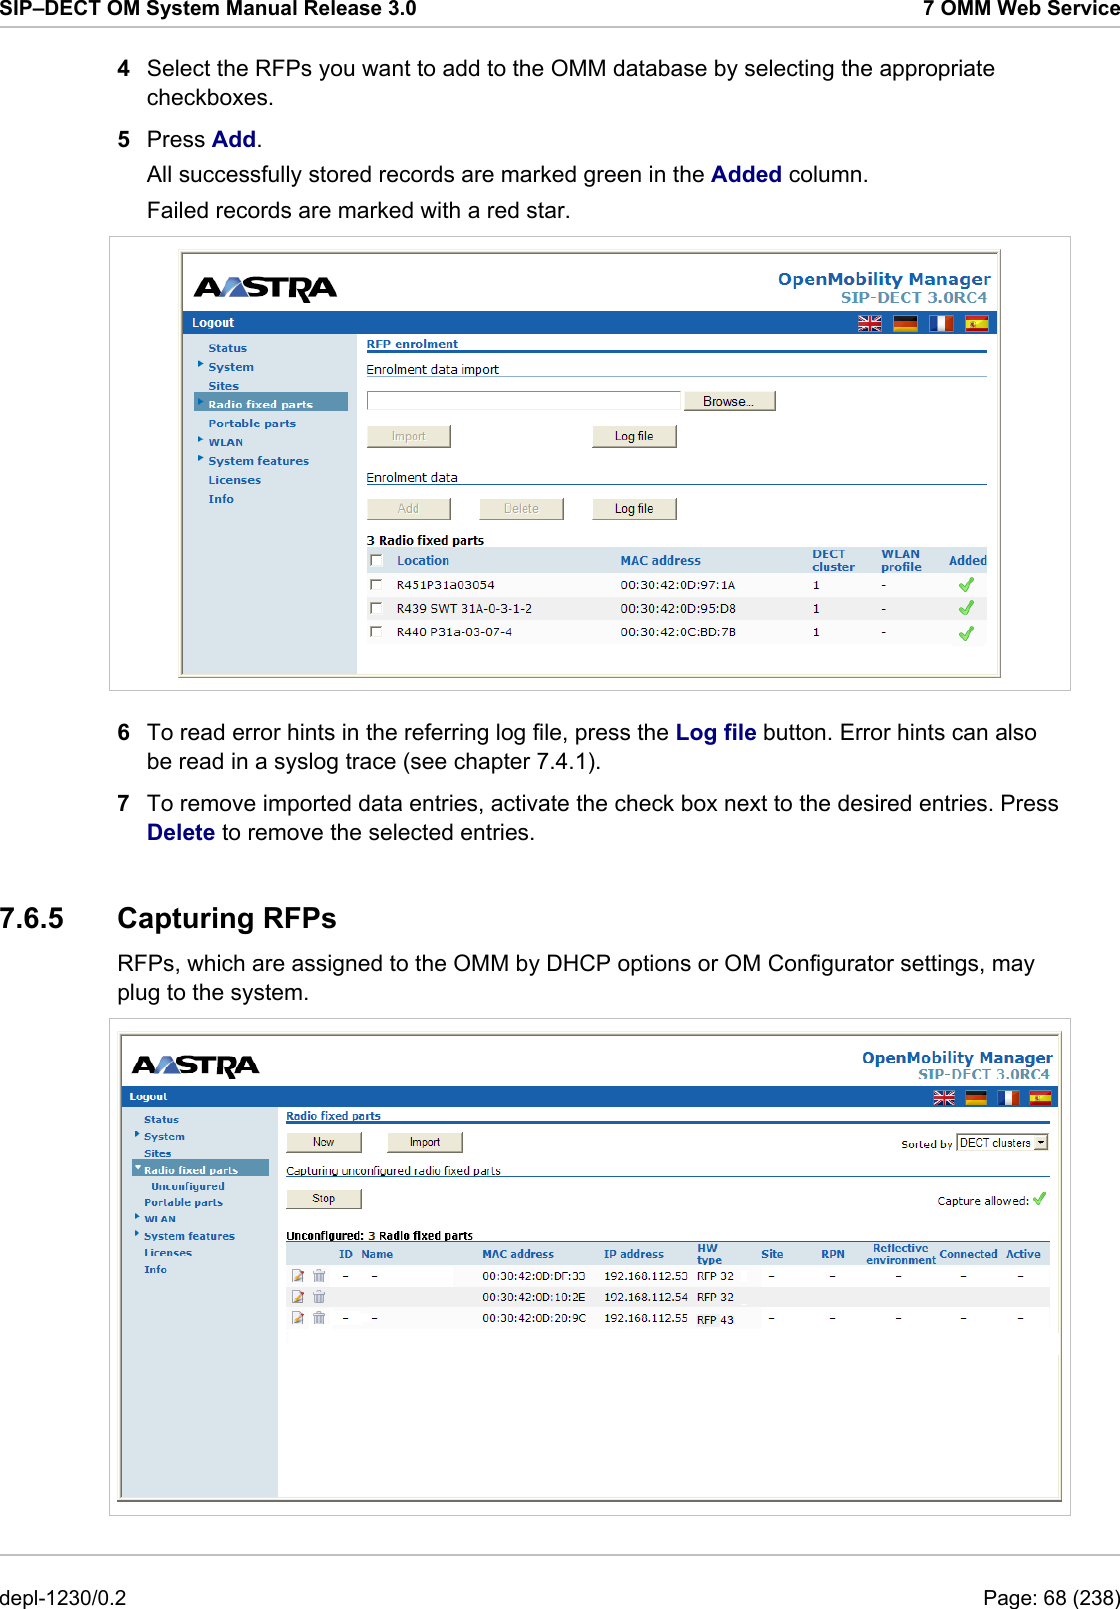
![SIP–DECT OM System Manual Release 3.0 7 OMM Web Service In the Automatic import section of the DB management page enter the following: 1 Startup only: Activate this option if the import should be started for an initial configuration. 2 Startup and periodically: If this option is activated, the OMM tries to import the configured database file during startup and at the configured time of day. 3 Time: Enter the time, the import should be started. Please note: An automatic database import at a configured time recommends the time synchronization with an NTP server. For NTP server configuration see chapter 9.5.4 and chapter 9.6. 1 URL: The database file for an automatic import has to be configured in an URL format like {ftp|ftps|http|https}://[[user:password@]server]/[directory/]file or tftp://server]/[directory/]file.To be available at OMM startup time and to allow an initial configuration via automatic import, this URL has to be specified via DHCP (option 24, see chapter 9.5.4) or OM Configurator (see chapter 9.6). If such a URL is given by DHCP or OM Configurator, the OMM tries to import a configured database file automatically during the OMM startup. The file URL configured via DHCP or OM Configurator is always displayed. 2 Click OK to confirm the settings for the automatic import. Before a database is accepted and replaced by automatic import process, the OMM performs the following checks: The integrity of the file must be OK. • • • • To avoid the import of the same file multiple times, the checksum of the new database file and the checksum of the last database import file (stored in the flash) must be different. For authorization/authentication reasons: The PARK of the new database file must be the same to the PARK of the current configuration. The admin/full access account (see also chapter 9.14.1) of the new database file must be the same to the one of the current configuration.Only if all of these checks are successful the database file is accepted. If the database file is not accepted or was not found, an error message is displayed on the Status page of the OMM Web service. depl-1230/0.2 Page: 57 (238)](https://usermanual.wiki/Mitel-Deutschland/68635RFP36U-01.UserManual-part1/User-Guide-1704944-Page-57.png)
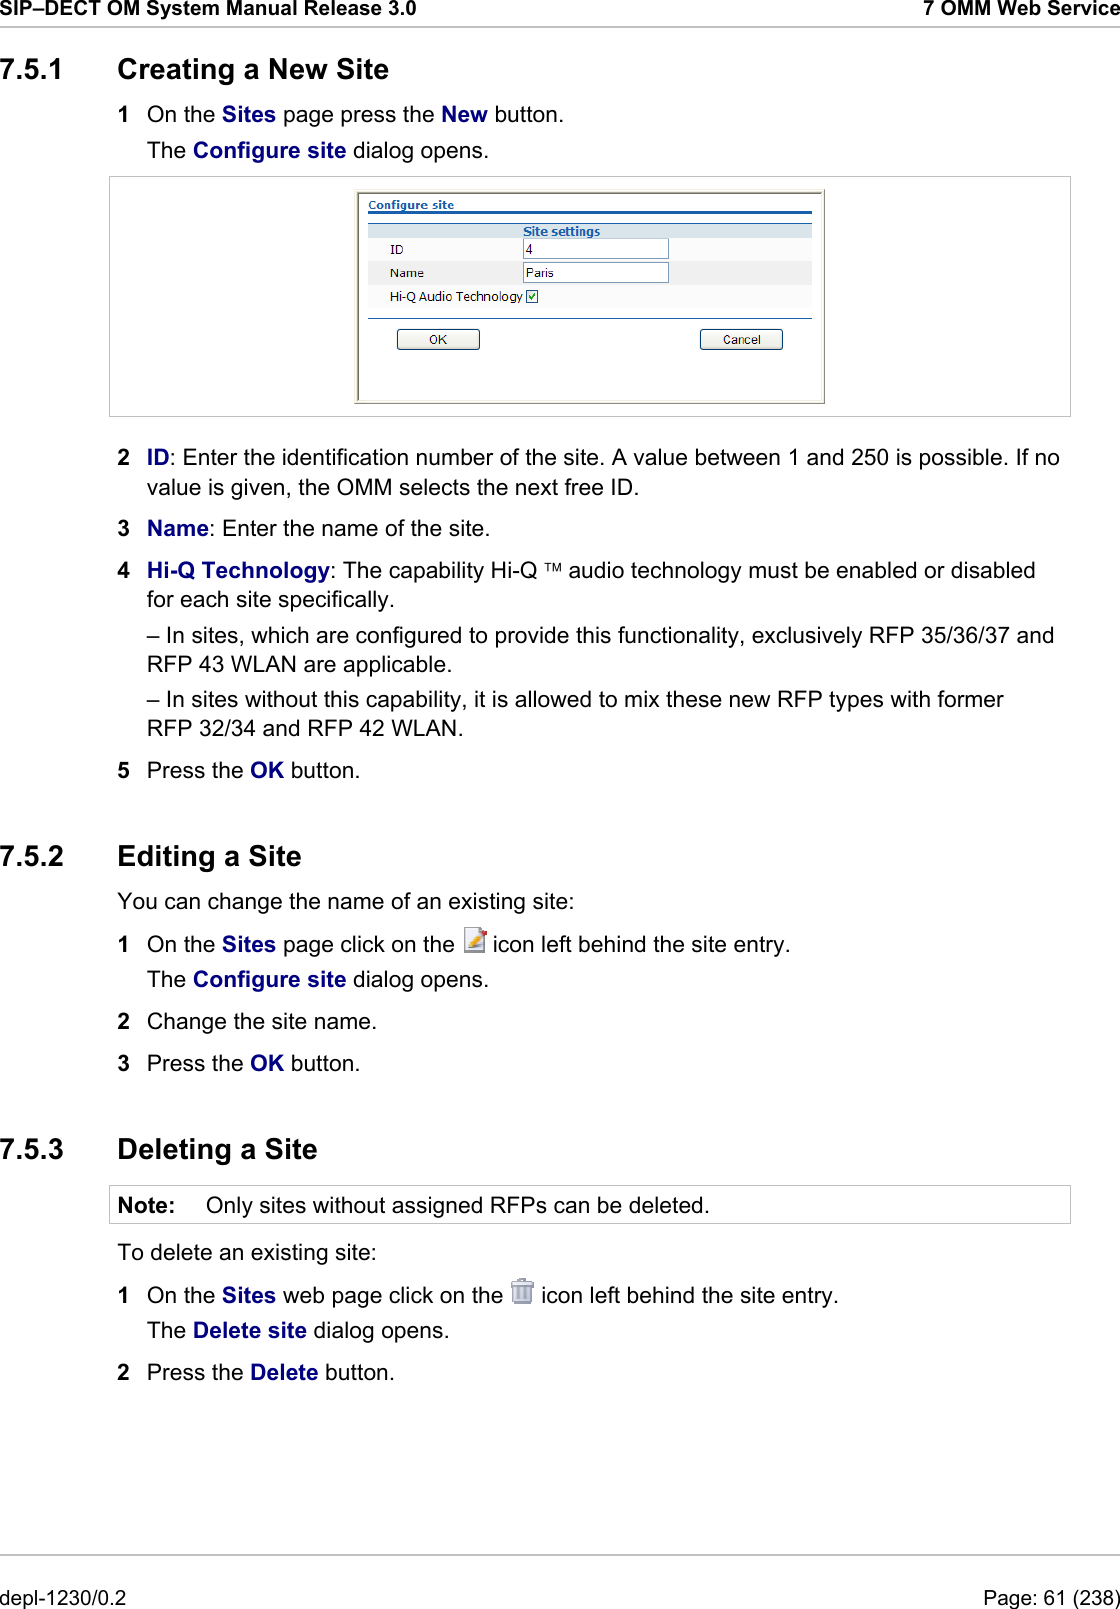
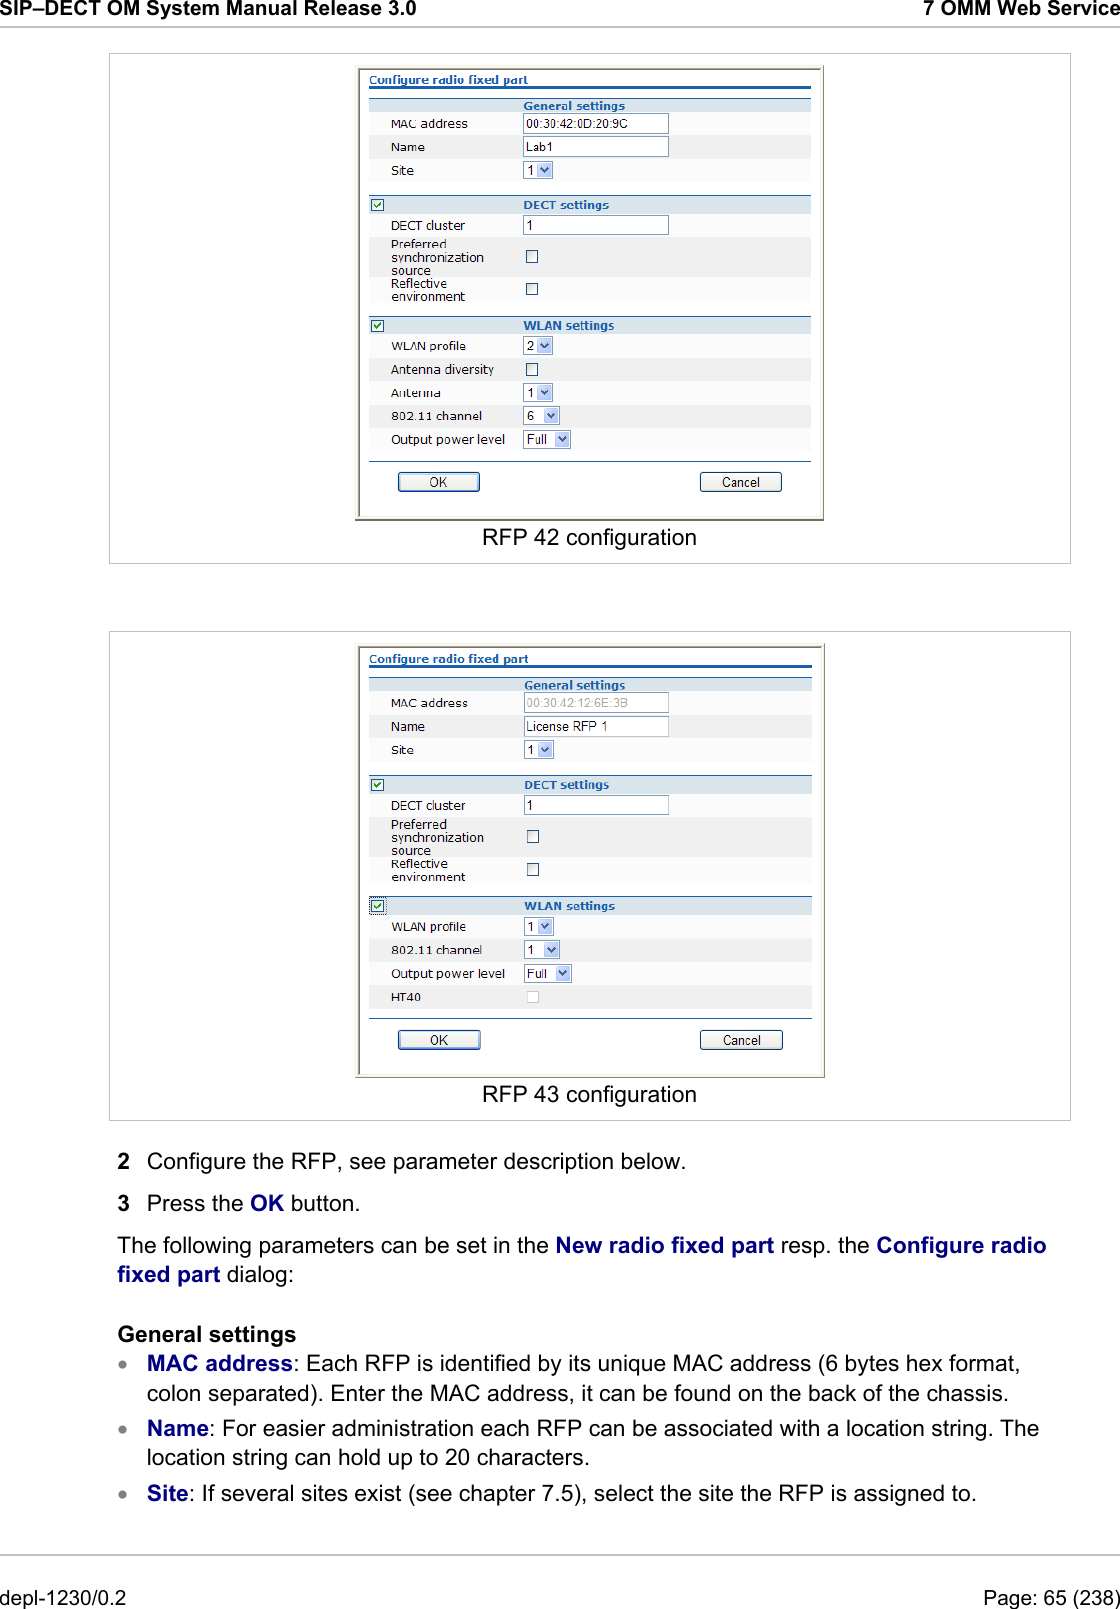
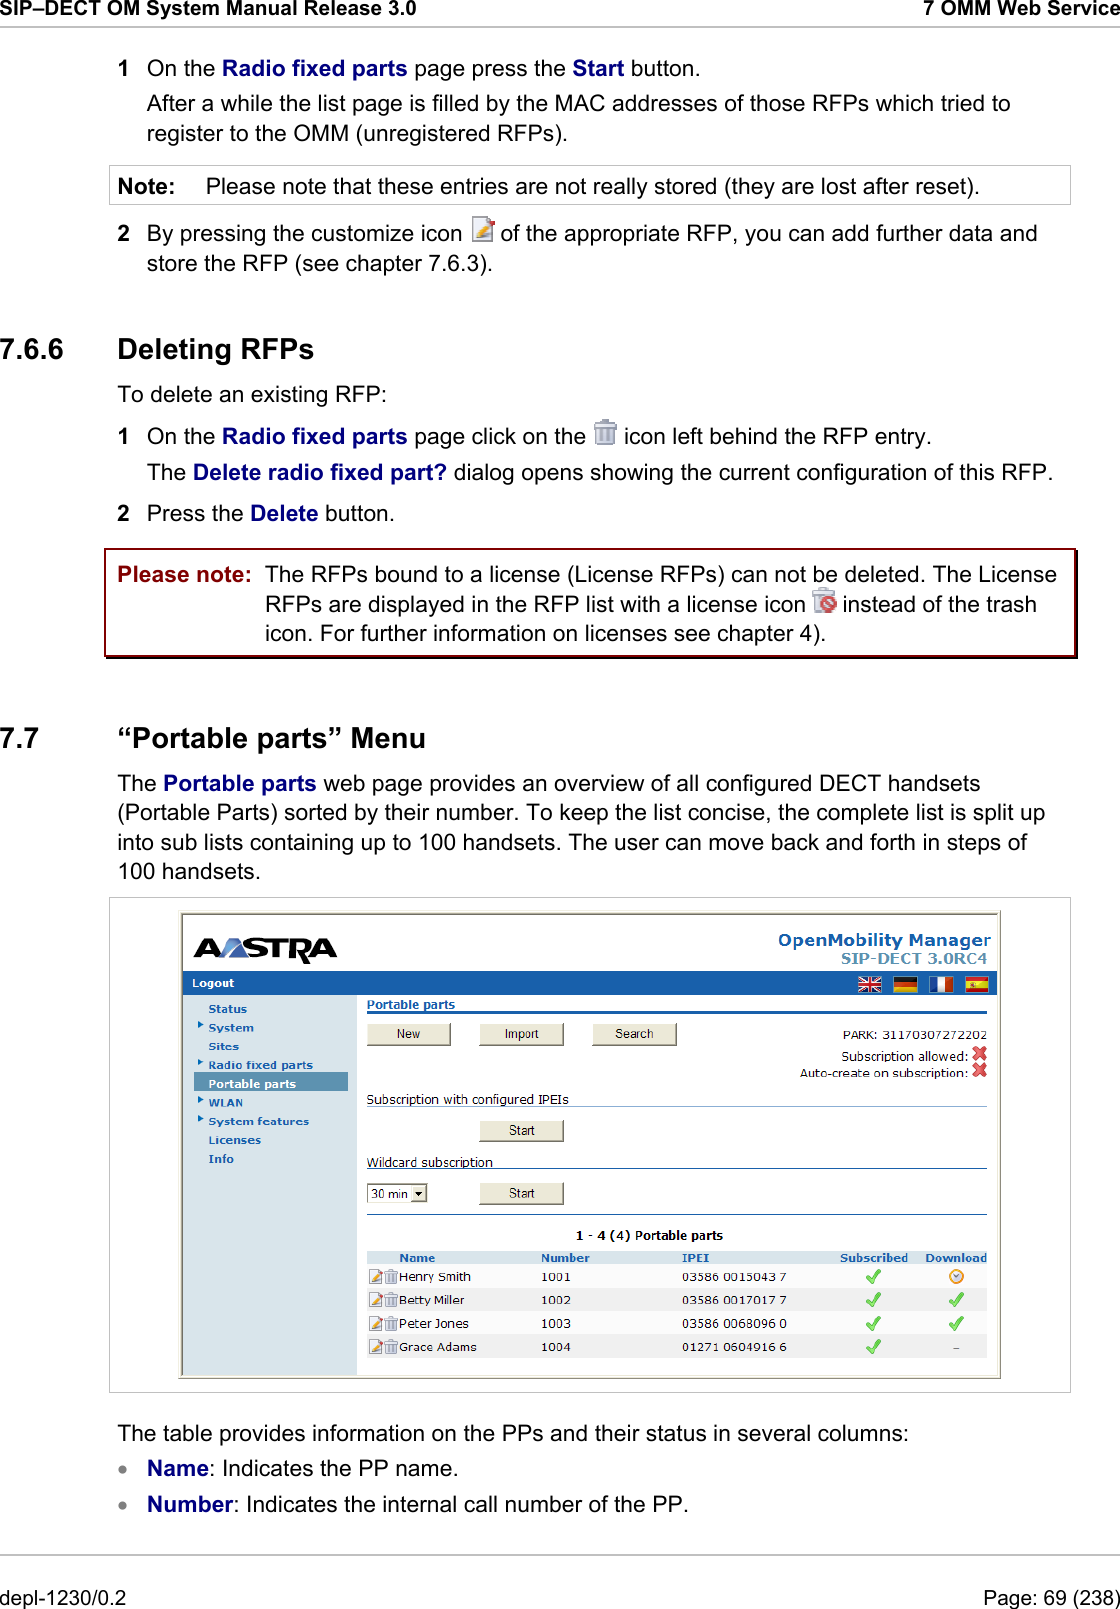
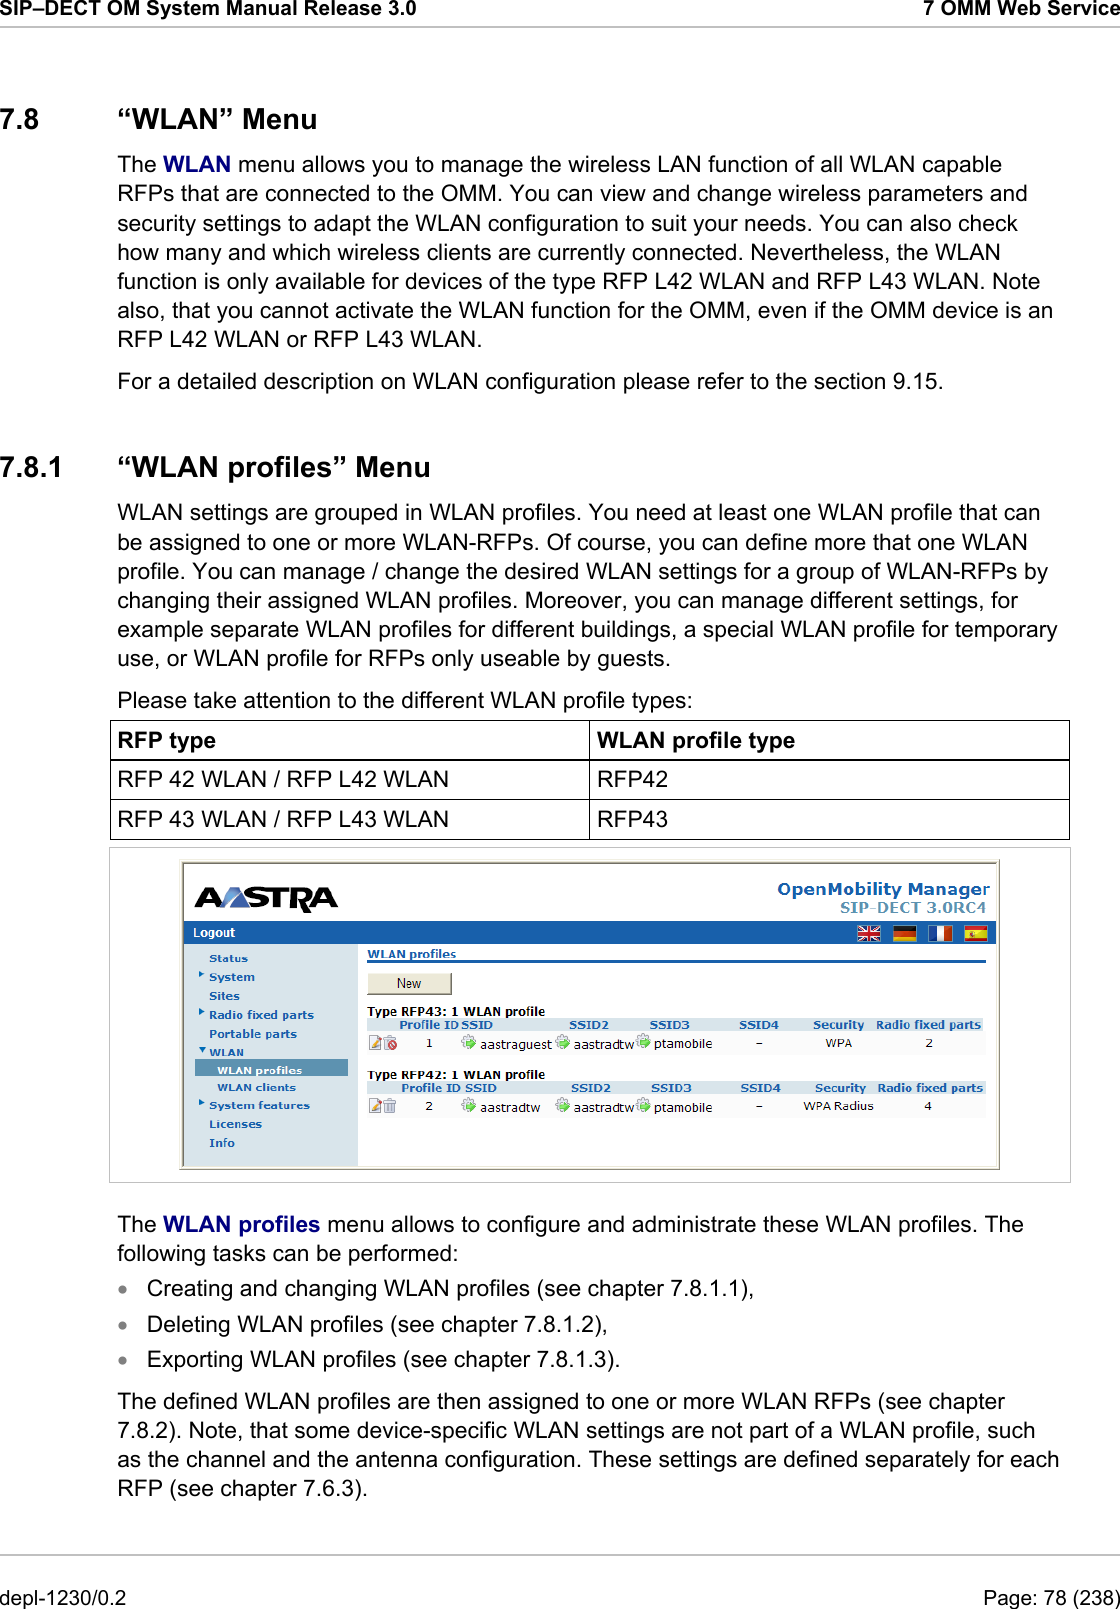
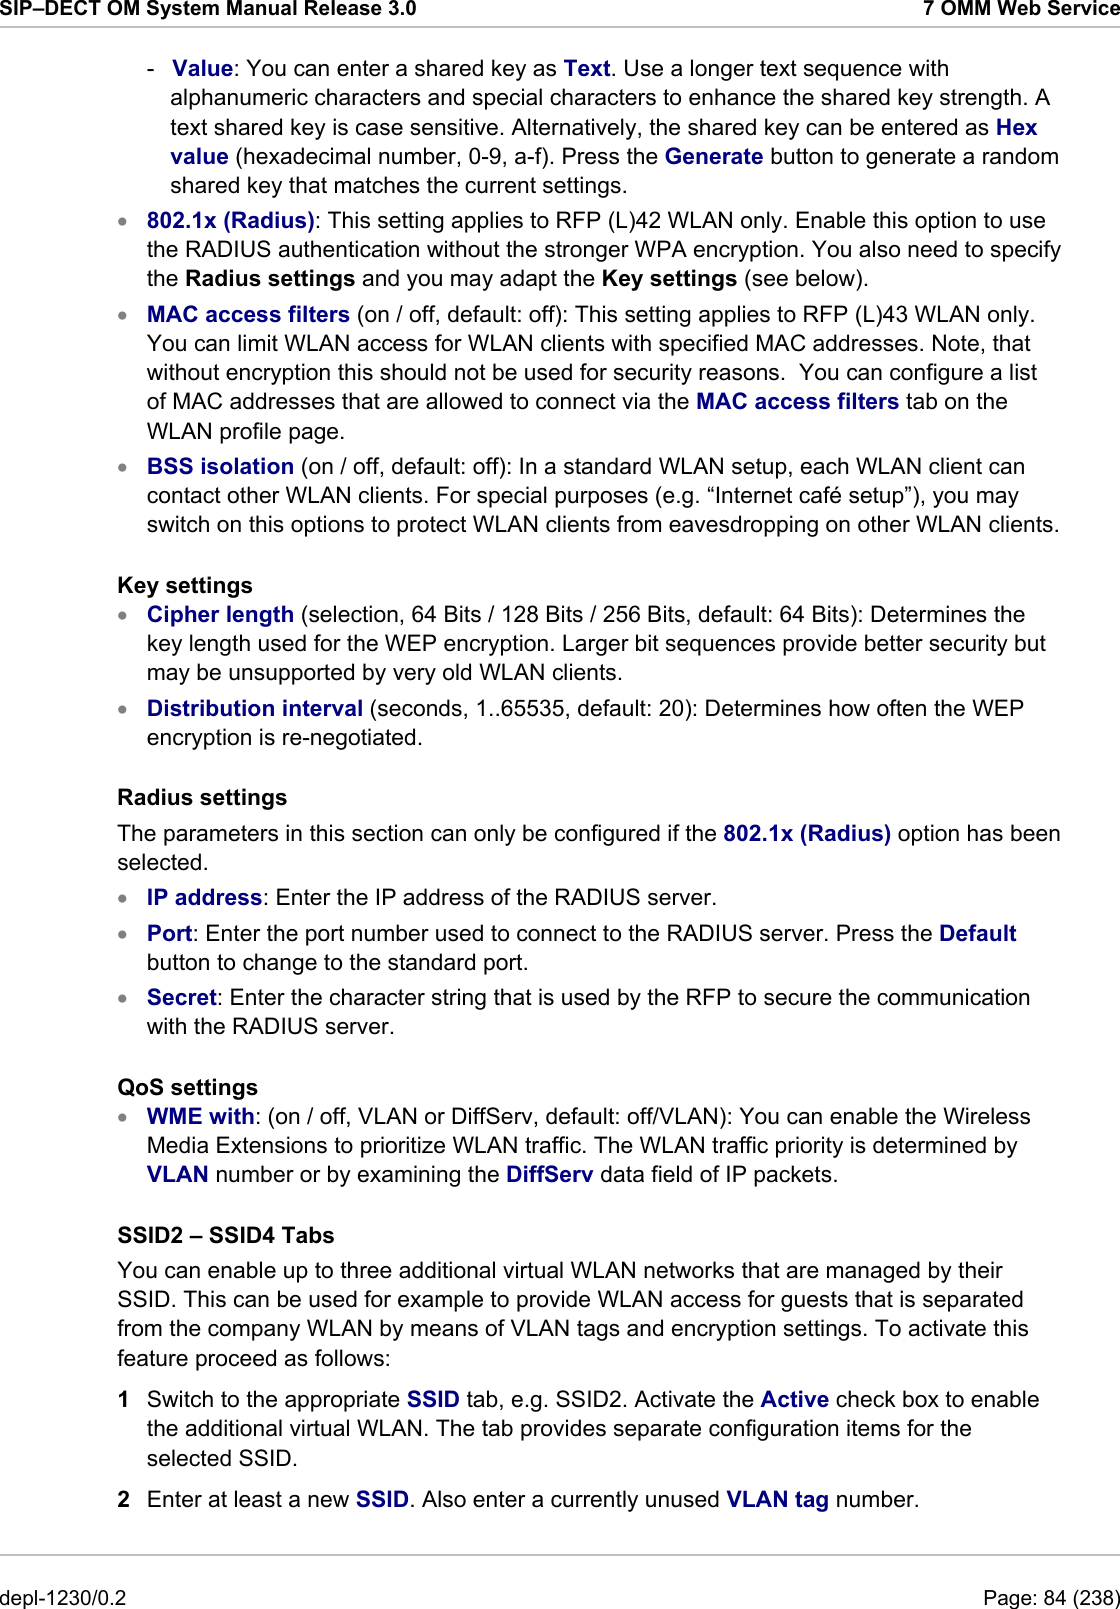
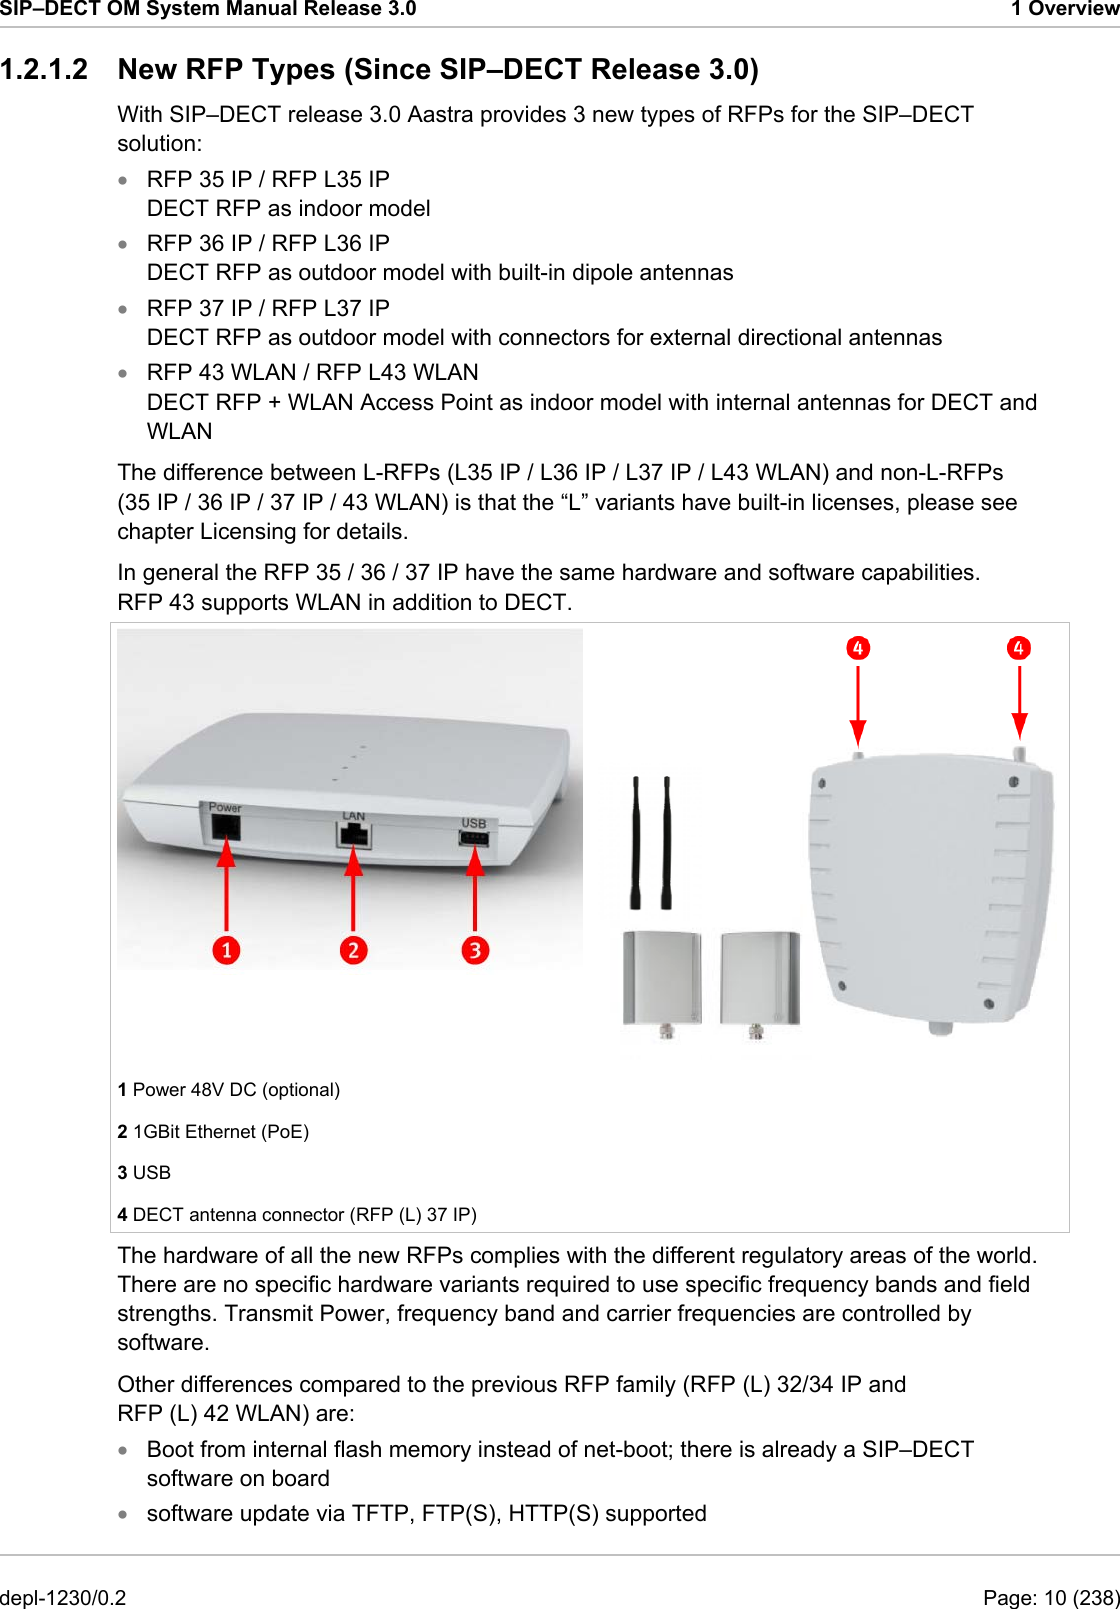
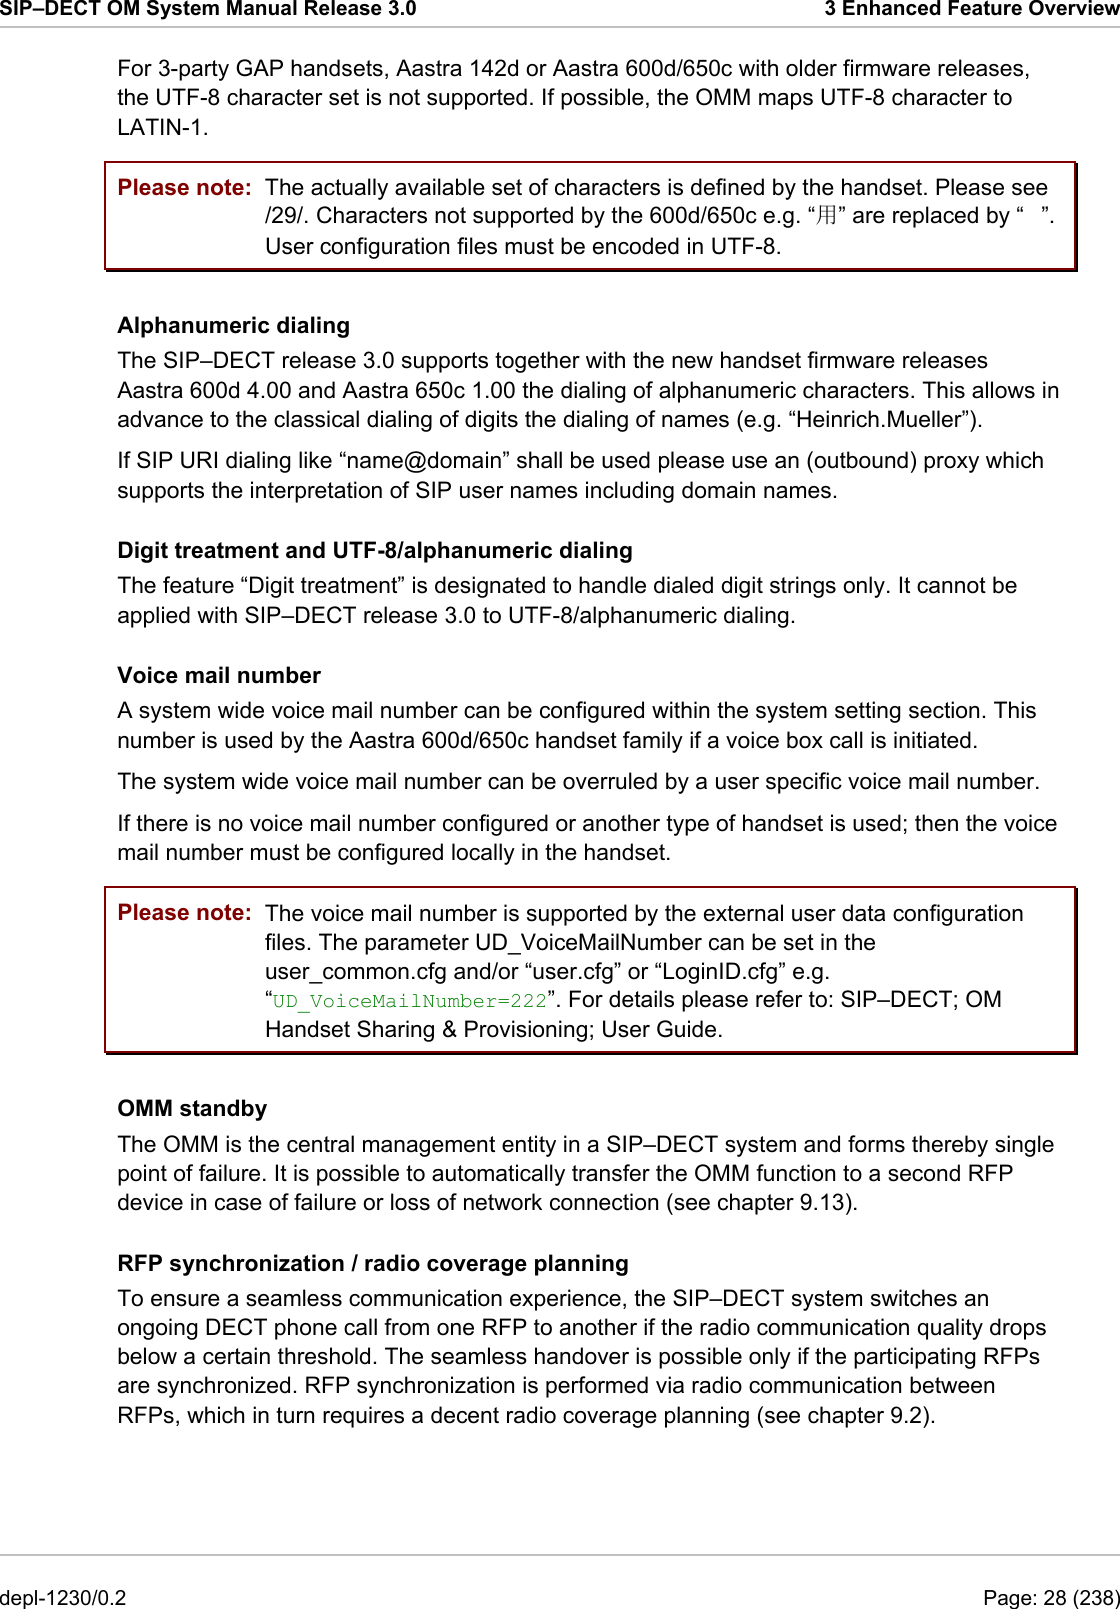
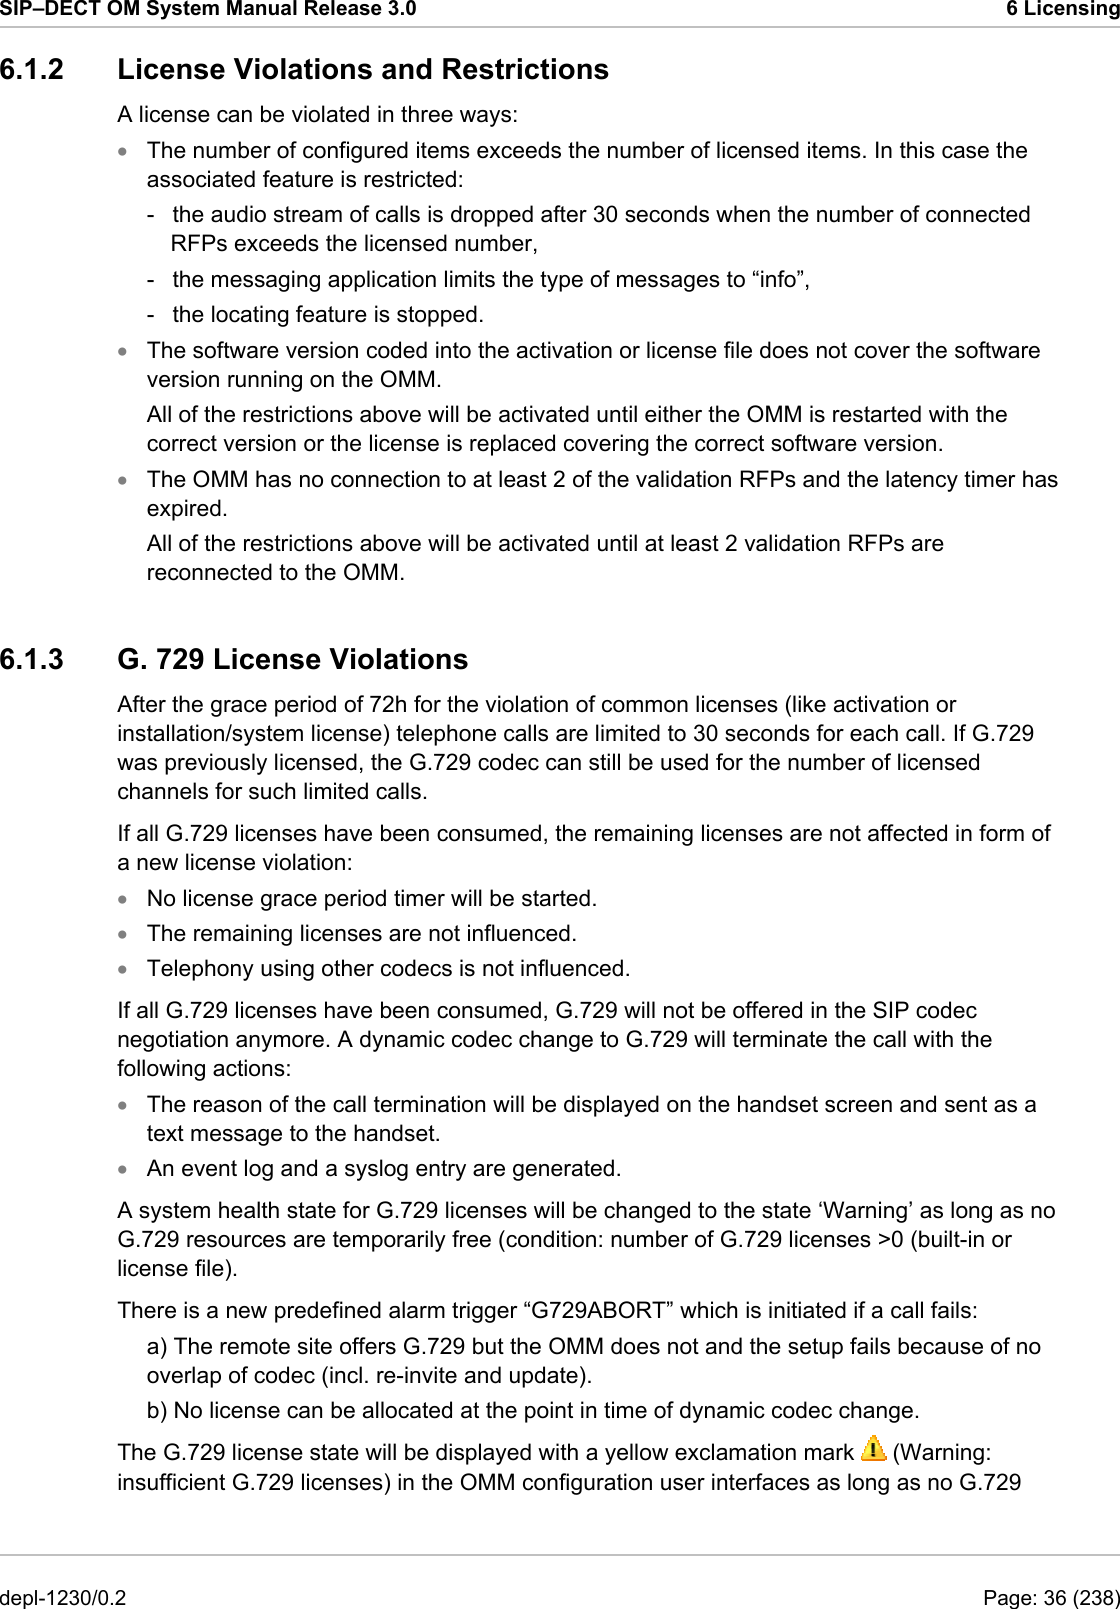
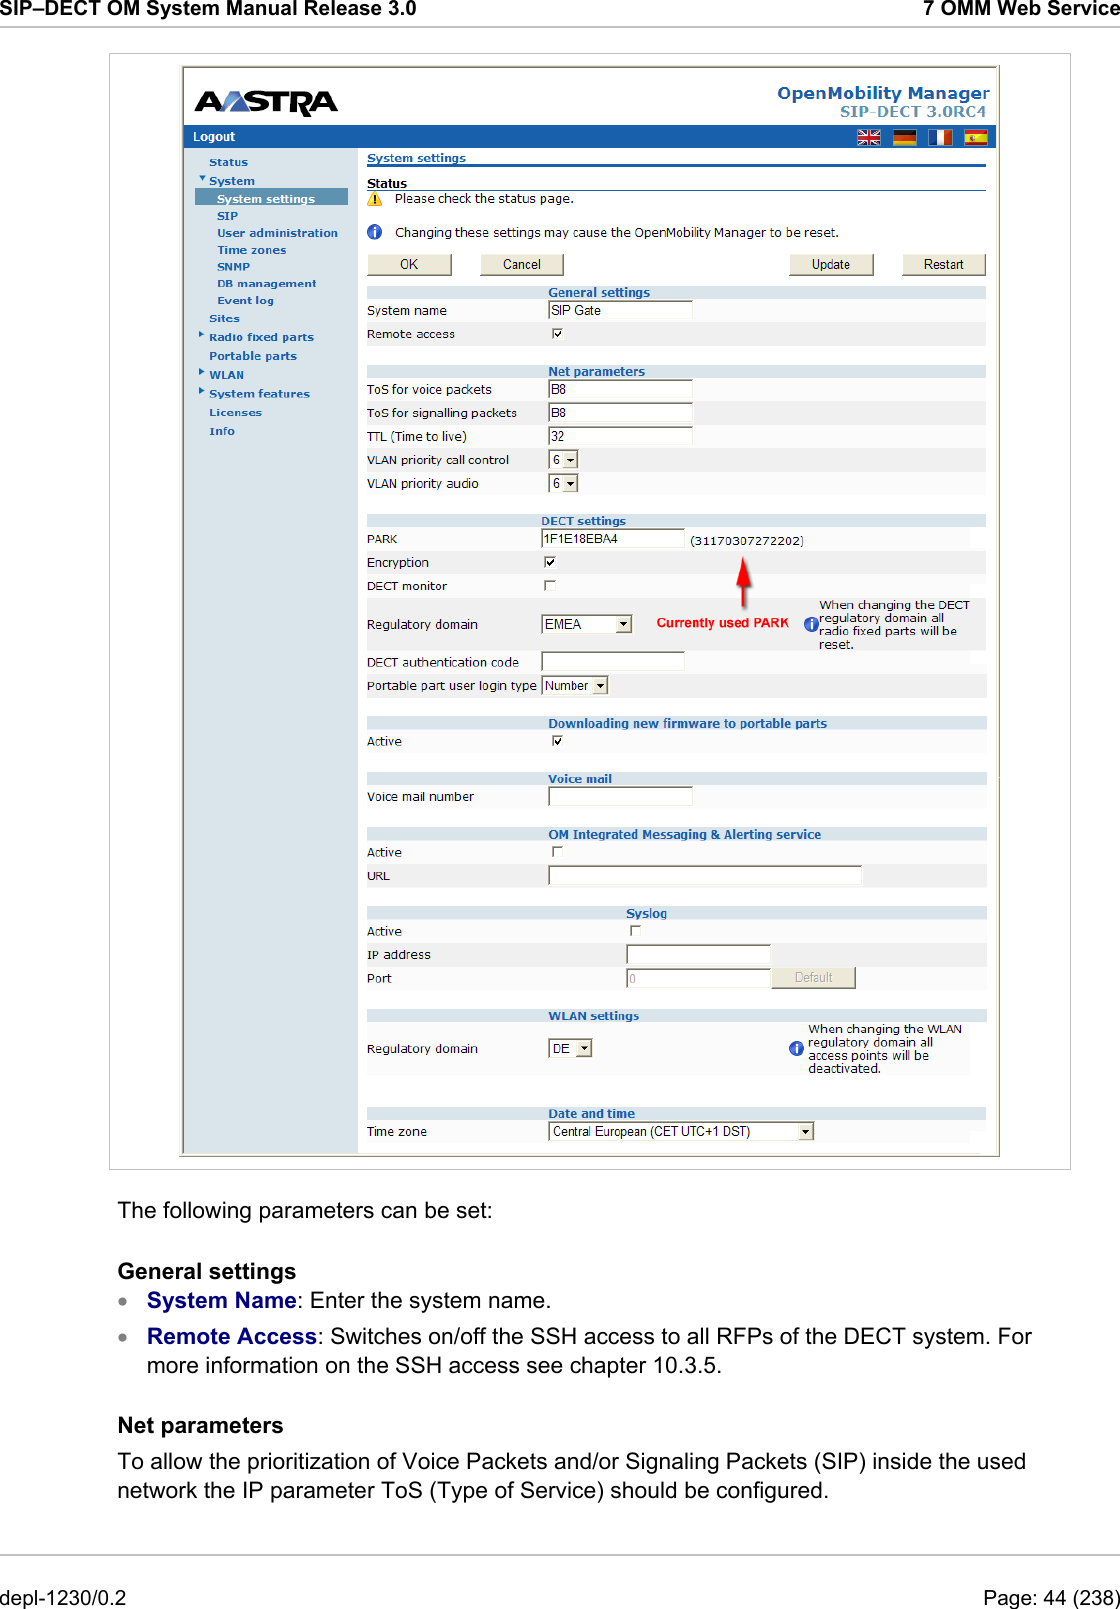
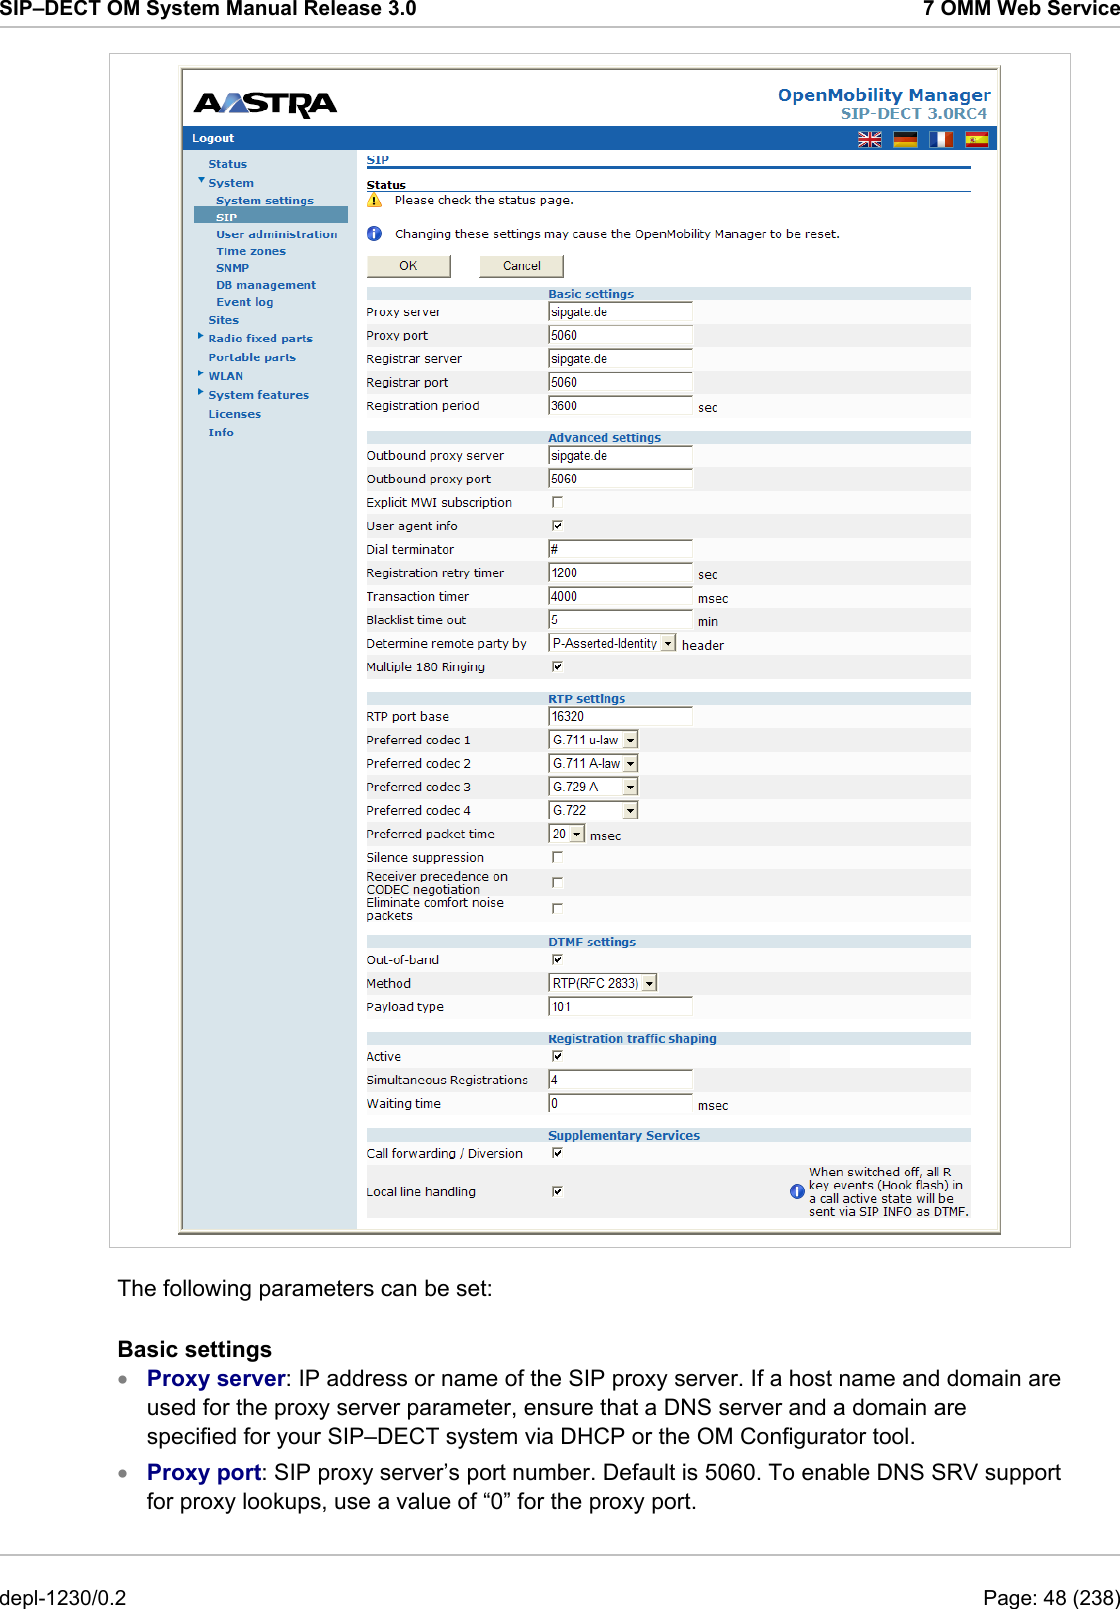
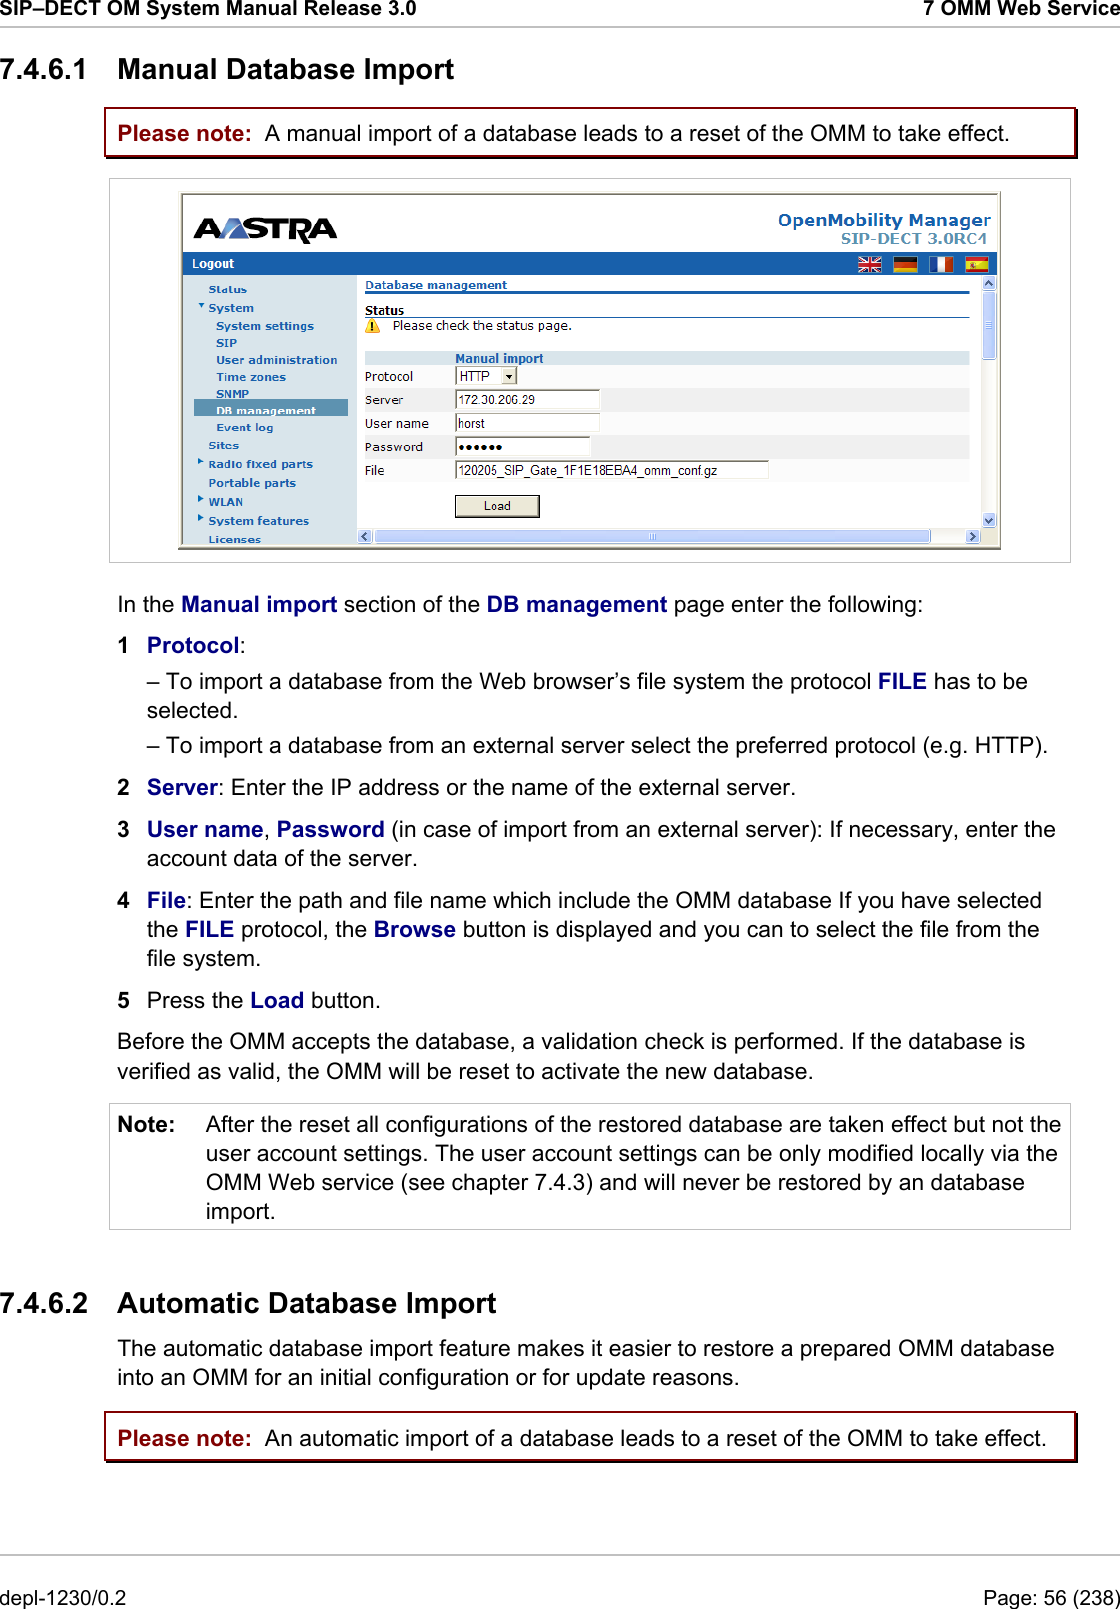
![SIP–DECT OM System Manual Release 3.0 7 OMM Web Service 7.8.1.1 Creating and Changing WLAN Profiles You need at least one active WLAN profile in order to operate the WLAN function for an RFP (L)42 WLAN or RFP (L)43 WLAN device. 1 Navigate to the WLAN profiles page. This page shows the number of existing WLAN profiles and a list of available WLAN profiles. 2 If you create a new WLAN profile, configure the RFP type first to get the correct input fields. Select the appropriate profile (RFP42 or RFP43) from the WLAN profile type selection list. 3 To add a new WLAN profile, press the New button. To change an existing WLAN profile, click on the icon available on the left of the WLAN profile entry. The New WLAN profile page resp. the WLAN profile [Number] page shows the WLAN profile configuration. depl-1230/0.2 Page: 79 (238)](https://usermanual.wiki/Mitel-Deutschland/68635RFP36U-01.UserManual-part1/User-Guide-1704944-Page-79.png)
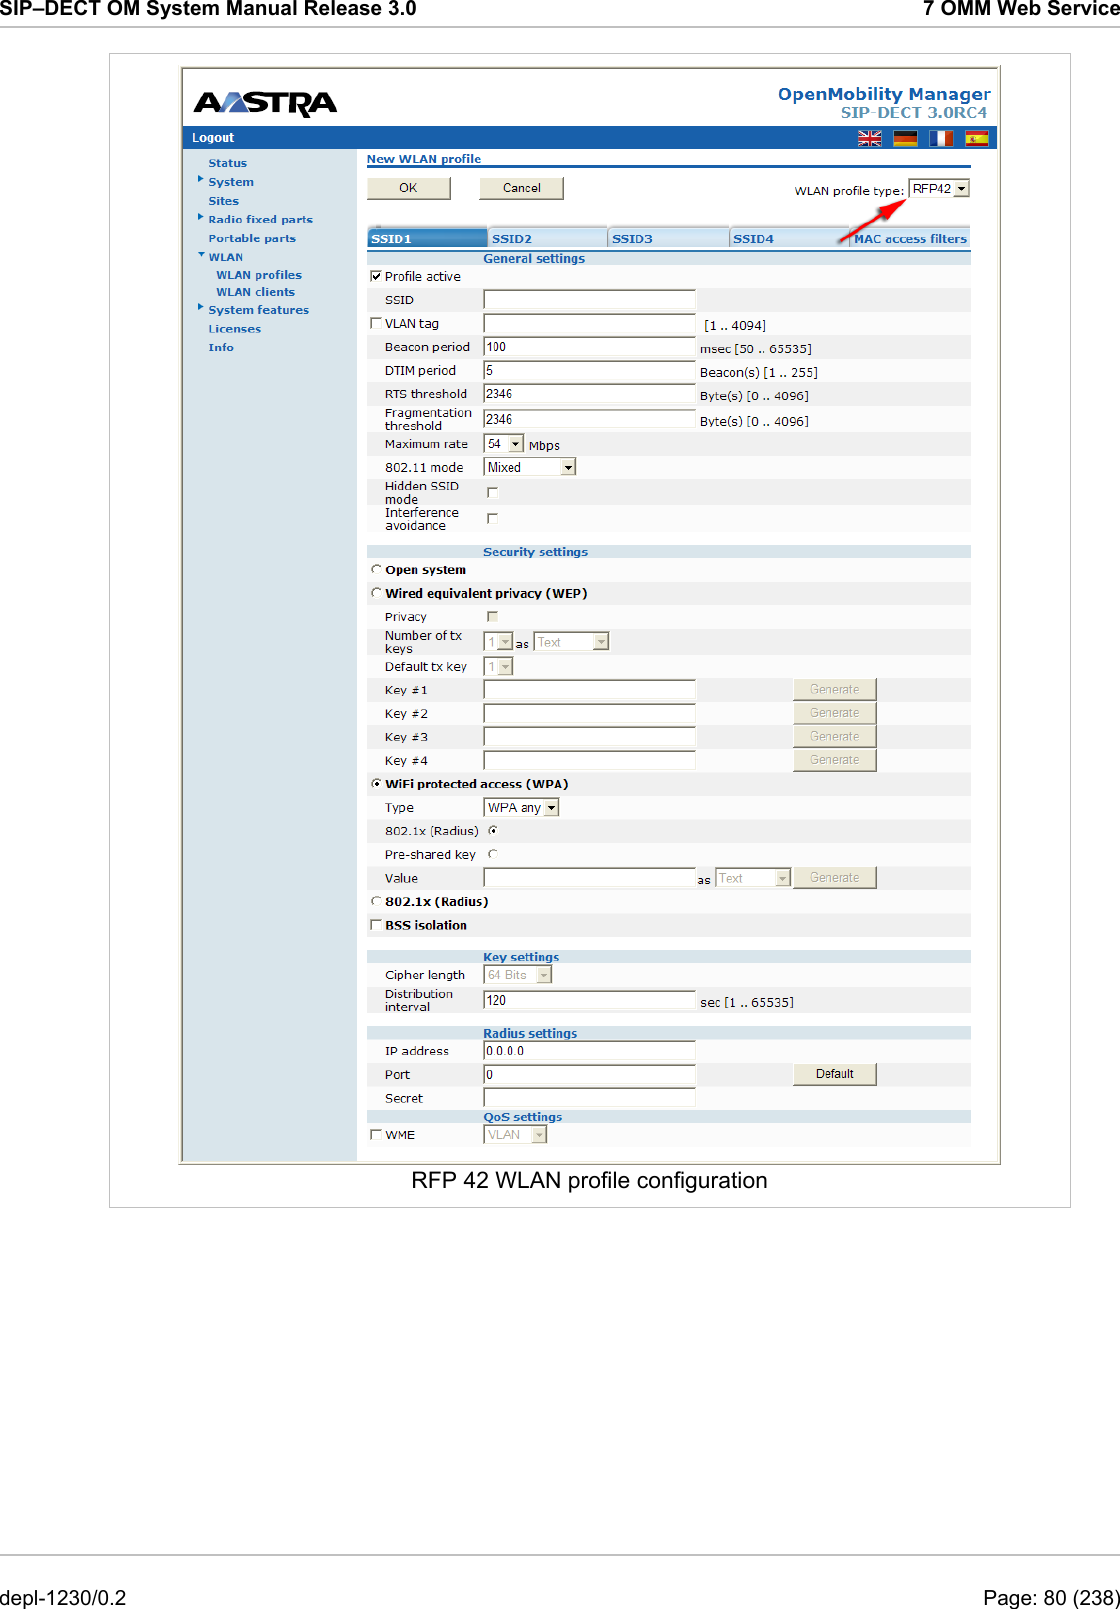
![SIP–DECT OM System Manual Release 3.0 7 OMM Web Service RFP 43 WLAN profile configuration 4 Change the desired settings of the WLAN profile. You need at last to define the ESSID setting. The different settings are explained in detail in the sections below. 5 Activate the Profile active setting, otherwise the WLAN profile is inactive which de-activates the WLAN function for RFPs that are assigned to this WLAN profile. 6 Press the OK button to apply the settings. If you created a new WLAN profile, you can proceed by assigning the WLAN profile to the desired RFPs (see chapter 7.6.3). If you changed an existing WLAN profile, the settings are applied to the assigned RFPs automatically. The following description details the different parameters that are available on the New WLAN profile page resp. on the WLAN profile [Number] page. depl-1230/0.2 Page: 81 (238)](https://usermanual.wiki/Mitel-Deutschland/68635RFP36U-01.UserManual-part1/User-Guide-1704944-Page-81.png)