Quanta Computer 9550015318 Mini-PCI Wireless LAN card in Notebook Computer User Manual Solo9550

Quanta Computer Inc Mini-PCI Wireless LAN card in Notebook Computer Solo9550
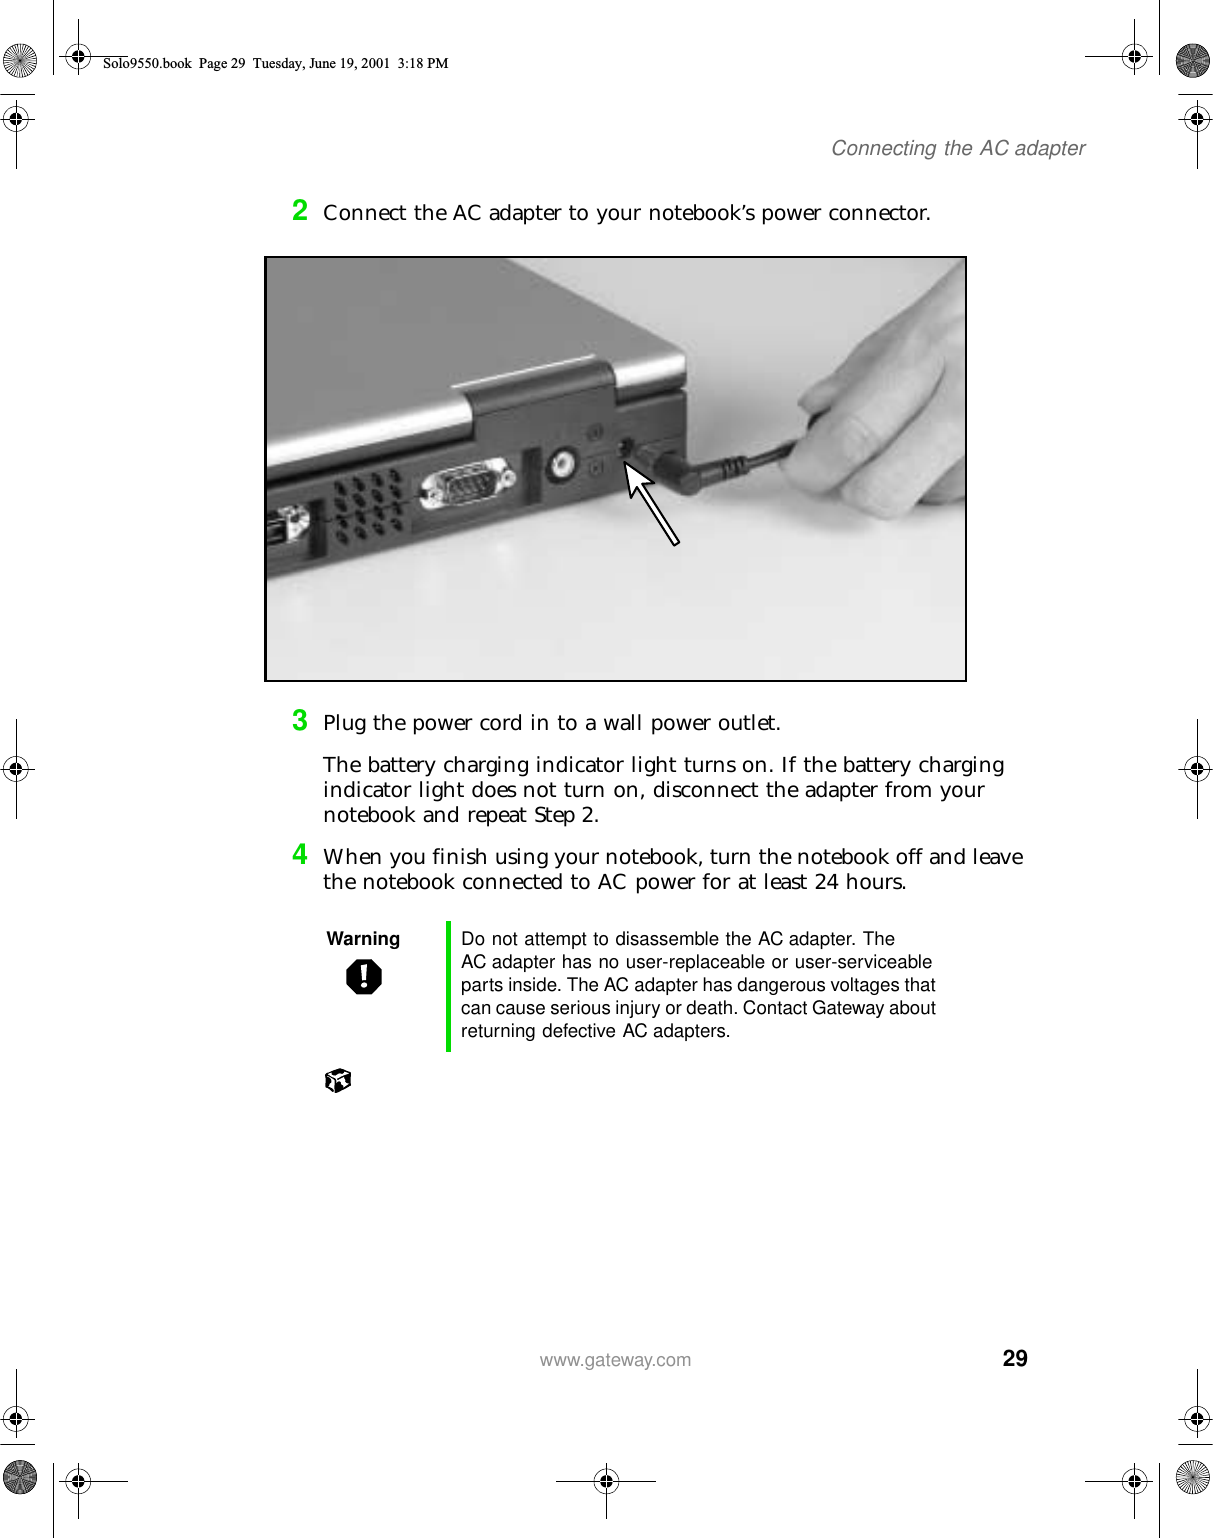
Manual Part 1

          iContents1 Checking Out Your Gateway Solo 9500 . . . . . . . . . . . . . . . . . . . . . . . . . . 1Front   . . . . . . . . . . . . . . . . . . . . . . . . . . . . . . . . . . . . . . . . . . . . . . . . . . . . . . . . . . . . . 2Left side  . . . . . . . . . . . . . . . . . . . . . . . . . . . . . . . . . . . . . . . . . . . . . . . . . . . . . . . . . . . 3Right side . . . . . . . . . . . . . . . . . . . . . . . . . . . . . . . . . . . . . . . . . . . . . . . . . . . . . . . . . . 4Back  . . . . . . . . . . . . . . . . . . . . . . . . . . . . . . . . . . . . . . . . . . . . . . . . . . . . . . . . . . . . . . 5Bottom  . . . . . . . . . . . . . . . . . . . . . . . . . . . . . . . . . . . . . . . . . . . . . . . . . . . . . . . . . . . . 7Identifying your model  . . . . . . . . . . . . . . . . . . . . . . . . . . . . . . . . . . . . . . . . . . . . . . . . 8Accessories  . . . . . . . . . . . . . . . . . . . . . . . . . . . . . . . . . . . . . . . . . . . . . . . . . . . . . . . . 92 Checking Out Your Gateway Solo 9550. . . . . . . . . . . . . . . . . . . . . . . . . 11Top . . . . . . . . . . . . . . . . . . . . . . . . . . . . . . . . . . . . . . . . . . . . . . . . . . . . . . . . . . . . . . 12Front   . . . . . . . . . . . . . . . . . . . . . . . . . . . . . . . . . . . . . . . . . . . . . . . . . . . . . . . . . . . . 14Left  . . . . . . . . . . . . . . . . . . . . . . . . . . . . . . . . . . . . . . . . . . . . . . . . . . . . . . . . . . . . . . 16Right   . . . . . . . . . . . . . . . . . . . . . . . . . . . . . . . . . . . . . . . . . . . . . . . . . . . . . . . . . . . . 17Back  . . . . . . . . . . . . . . . . . . . . . . . . . . . . . . . . . . . . . . . . . . . . . . . . . . . . . . . . . . . . . 19Bottom  . . . . . . . . . . . . . . . . . . . . . . . . . . . . . . . . . . . . . . . . . . . . . . . . . . . . . . . . . . . 21Identifying your model  . . . . . . . . . . . . . . . . . . . . . . . . . . . . . . . . . . . . . . . . . . . . . . . 23Accessories  . . . . . . . . . . . . . . . . . . . . . . . . . . . . . . . . . . . . . . . . . . . . . . . . . . . . . . . 243Getting Started. . . . . . . . . . . . . . . . . . . . . . . . . . . . . . . . . . . . . . . . . . . . . . . . . . 27Connecting the AC adapter  . . . . . . . . . . . . . . . . . . . . . . . . . . . . . . . . . . . . . . . . . . . 28Protecting from power source problems . . . . . . . . . . . . . . . . . . . . . . . . . . . . . . 30Starting your notebook   . . . . . . . . . . . . . . . . . . . . . . . . . . . . . . . . . . . . . . . . . . . . . . 31Waking up your notebook  . . . . . . . . . . . . . . . . . . . . . . . . . . . . . . . . . . . . . . . . . 32Turning off your notebook  . . . . . . . . . . . . . . . . . . . . . . . . . . . . . . . . . . . . . . . . . . . . 33Status indicators   . . . . . . . . . . . . . . . . . . . . . . . . . . . . . . . . . . . . . . . . . . . . . . . . . . . 34Using the keyboard  . . . . . . . . . . . . . . . . . . . . . . . . . . . . . . . . . . . . . . . . . . . . . . . . . 36Keys   . . . . . . . . . . . . . . . . . . . . . . . . . . . . . . . . . . . . . . . . . . . . . . . . . . . . . . . . . 37System key combinations  . . . . . . . . . . . . . . . . . . . . . . . . . . . . . . . . . . . . . . . . . 38Multi-function buttons   . . . . . . . . . . . . . . . . . . . . . . . . . . . . . . . . . . . . . . . . . . . . 40Using the EZ Pad touchpad   . . . . . . . . . . . . . . . . . . . . . . . . . . . . . . . . . . . . . . . . . . 42Using the touchpad  . . . . . . . . . . . . . . . . . . . . . . . . . . . . . . . . . . . . . . . . . . . . . . 43Connecting the modem  . . . . . . . . . . . . . . . . . . . . . . . . . . . . . . . . . . . . . . . . . . . . . . 45Connecting to an Ethernet network   . . . . . . . . . . . . . . . . . . . . . . . . . . . . . . . . . . . . 46Broadband Internet connections  . . . . . . . . . . . . . . . . . . . . . . . . . . . . . . . . . . . . 47Installing a printer, scanner, or other peripheral device  . . . . . . . . . . . . . . . . . . . . . 484Getting Help . . . . . . . . . . . . . . . . . . . . . . . . . . . . . . . . . . . . . . . . . . . . . . . . . . . . 49HelpSpot   . . . . . . . . . . . . . . . . . . . . . . . . . . . . . . . . . . . . . . . . . . . . . . . . . . . . . . . . . 50Solo9550.book Page i Tuesday, June 19, 2001 3:18 PM
ii          HelpSpot Videos . . . . . . . . . . . . . . . . . . . . . . . . . . . . . . . . . . . . . . . . . . . . . . . . .52Online help  . . . . . . . . . . . . . . . . . . . . . . . . . . . . . . . . . . . . . . . . . . . . . . . . . . . . . . . .53Gateway Web site   . . . . . . . . . . . . . . . . . . . . . . . . . . . . . . . . . . . . . . . . . . . . . . . . . .545 Windows Basics. . . . . . . . . . . . . . . . . . . . . . . . . . . . . . . . . . . . . . . . . . . . . . . . .57About the Windows environment  . . . . . . . . . . . . . . . . . . . . . . . . . . . . . . . . . . . . . . .58Desktop items . . . . . . . . . . . . . . . . . . . . . . . . . . . . . . . . . . . . . . . . . . . . . . . . . . .59Window items  . . . . . . . . . . . . . . . . . . . . . . . . . . . . . . . . . . . . . . . . . . . . . . . . . . .61Using the Start menu  . . . . . . . . . . . . . . . . . . . . . . . . . . . . . . . . . . . . . . . . . . . . . . . .63Working with files and folders   . . . . . . . . . . . . . . . . . . . . . . . . . . . . . . . . . . . . . . . . .64About drives  . . . . . . . . . . . . . . . . . . . . . . . . . . . . . . . . . . . . . . . . . . . . . . . . . . . .64About folders and files  . . . . . . . . . . . . . . . . . . . . . . . . . . . . . . . . . . . . . . . . . . . .66Copying and moving files and folders  . . . . . . . . . . . . . . . . . . . . . . . . . . . . . . . .67Deleting files and folders  . . . . . . . . . . . . . . . . . . . . . . . . . . . . . . . . . . . . . . . . . .68Browsing for files and folders   . . . . . . . . . . . . . . . . . . . . . . . . . . . . . . . . . . . . . .70Searching for files  . . . . . . . . . . . . . . . . . . . . . . . . . . . . . . . . . . . . . . . . . . . . . . . . . . .71Using the Windows Me or Windows 2000 Search utility  . . . . . . . . . . . . . . . . . .72Using the Windows 98 Find utility  . . . . . . . . . . . . . . . . . . . . . . . . . . . . . . . . . . .74Working with documents   . . . . . . . . . . . . . . . . . . . . . . . . . . . . . . . . . . . . . . . . . . . . .76Creating a new document   . . . . . . . . . . . . . . . . . . . . . . . . . . . . . . . . . . . . . . . . .77Saving a document   . . . . . . . . . . . . . . . . . . . . . . . . . . . . . . . . . . . . . . . . . . . . . .78Opening a document  . . . . . . . . . . . . . . . . . . . . . . . . . . . . . . . . . . . . . . . . . . . . .79Printing a document  . . . . . . . . . . . . . . . . . . . . . . . . . . . . . . . . . . . . . . . . . . . . . .80Shortcuts   . . . . . . . . . . . . . . . . . . . . . . . . . . . . . . . . . . . . . . . . . . . . . . . . . . . . . .81Transferring software and hardware from your old computer  . . . . . . . . . . . . . . . . .82Transferring files . . . . . . . . . . . . . . . . . . . . . . . . . . . . . . . . . . . . . . . . . . . . . . . . .82Transferring Internet settings  . . . . . . . . . . . . . . . . . . . . . . . . . . . . . . . . . . . . . . .84Reinstalling your old printer or scanner  . . . . . . . . . . . . . . . . . . . . . . . . . . . . . . .85Reinstalling your old programs   . . . . . . . . . . . . . . . . . . . . . . . . . . . . . . . . . . . . .866 Using the Internet . . . . . . . . . . . . . . . . . . . . . . . . . . . . . . . . . . . . . . . . . . . . . . .87Learning about the Internet   . . . . . . . . . . . . . . . . . . . . . . . . . . . . . . . . . . . . . . . . . . .88Setting up an Internet account  . . . . . . . . . . . . . . . . . . . . . . . . . . . . . . . . . . . . . . . . .89Accessing your Internet account  . . . . . . . . . . . . . . . . . . . . . . . . . . . . . . . . . . . .90Using the World Wide Web   . . . . . . . . . . . . . . . . . . . . . . . . . . . . . . . . . . . . . . . . . . .91Connecting to a Web site . . . . . . . . . . . . . . . . . . . . . . . . . . . . . . . . . . . . . . . . . .92Downloading files  . . . . . . . . . . . . . . . . . . . . . . . . . . . . . . . . . . . . . . . . . . . . . . . .93Using e-mail   . . . . . . . . . . . . . . . . . . . . . . . . . . . . . . . . . . . . . . . . . . . . . . . . . . . . . . .94Sending e-mail  . . . . . . . . . . . . . . . . . . . . . . . . . . . . . . . . . . . . . . . . . . . . . . . . . .94Checking your e-mail  . . . . . . . . . . . . . . . . . . . . . . . . . . . . . . . . . . . . . . . . . . . . .95Solo9550.book Page ii Tuesday, June 19, 2001 3:18 PM
          iii7 Using Multimedia . . . . . . . . . . . . . . . . . . . . . . . . . . . . . . . . . . . . . . . . . . . . . . . 97Using drives  . . . . . . . . . . . . . . . . . . . . . . . . . . . . . . . . . . . . . . . . . . . . . . . . . . . . . . . 98Using diskettes  . . . . . . . . . . . . . . . . . . . . . . . . . . . . . . . . . . . . . . . . . . . . . . . . . 98Using the CD/DVD drive  . . . . . . . . . . . . . . . . . . . . . . . . . . . . . . . . . . . . . . . . . . 99Using Audio DJ on the Solo 9550   . . . . . . . . . . . . . . . . . . . . . . . . . . . . . . . . . . . . 100Adjusting the volume  . . . . . . . . . . . . . . . . . . . . . . . . . . . . . . . . . . . . . . . . . . . . . . . 102Listening to CDs in Windows Me   . . . . . . . . . . . . . . . . . . . . . . . . . . . . . . . . . . . . . 104Listening to CDs in Windows 98  . . . . . . . . . . . . . . . . . . . . . . . . . . . . . . . . . . . . . . 105Recording and playing audio . . . . . . . . . . . . . . . . . . . . . . . . . . . . . . . . . . . . . . . . . 106Playing audio and video files with Windows Media Player   . . . . . . . . . . . . . . . . . 108Playing a DVD  . . . . . . . . . . . . . . . . . . . . . . . . . . . . . . . . . . . . . . . . . . . . . . . . . . . . 109Using MusicMatch  . . . . . . . . . . . . . . . . . . . . . . . . . . . . . . . . . . . . . . . . . . . . . . . . . 110Playing CDs   . . . . . . . . . . . . . . . . . . . . . . . . . . . . . . . . . . . . . . . . . . . . . . . . . . 110Creating music files   . . . . . . . . . . . . . . . . . . . . . . . . . . . . . . . . . . . . . . . . . . . . 111Editing track information  . . . . . . . . . . . . . . . . . . . . . . . . . . . . . . . . . . . . . . . . . 112Building a music library . . . . . . . . . . . . . . . . . . . . . . . . . . . . . . . . . . . . . . . . . . 113Changing the music library display settings  . . . . . . . . . . . . . . . . . . . . . . . . . . 114Listening to Internet radio  . . . . . . . . . . . . . . . . . . . . . . . . . . . . . . . . . . . . . . . . 115Using advanced features   . . . . . . . . . . . . . . . . . . . . . . . . . . . . . . . . . . . . . . . . 116Viewing the display on a television  . . . . . . . . . . . . . . . . . . . . . . . . . . . . . . . . . . . . 117Capturing video  . . . . . . . . . . . . . . . . . . . . . . . . . . . . . . . . . . . . . . . . . . . . . . . . . . . 1208 Sending and Receiving Faxes  . . . . . . . . . . . . . . . . . . . . . . . . . . . . . . . . . 121Setting up your cover page  . . . . . . . . . . . . . . . . . . . . . . . . . . . . . . . . . . . . . . . . . . 122Sending a fax   . . . . . . . . . . . . . . . . . . . . . . . . . . . . . . . . . . . . . . . . . . . . . . . . . . . . 125Faxing from programs  . . . . . . . . . . . . . . . . . . . . . . . . . . . . . . . . . . . . . . . . . . . . . . 127Receiving and viewing a fax  . . . . . . . . . . . . . . . . . . . . . . . . . . . . . . . . . . . . . . . . . 1289 Managing Power . . . . . . . . . . . . . . . . . . . . . . . . . . . . . . . . . . . . . . . . . . . . . . . 129Monitoring the battery charge  . . . . . . . . . . . . . . . . . . . . . . . . . . . . . . . . . . . . . . . . 130Recharging the battery   . . . . . . . . . . . . . . . . . . . . . . . . . . . . . . . . . . . . . . . . . . . . . 131Changing the main battery   . . . . . . . . . . . . . . . . . . . . . . . . . . . . . . . . . . . . . . . . . . 132Installing a second battery   . . . . . . . . . . . . . . . . . . . . . . . . . . . . . . . . . . . . . . . . . . 134Extending battery life  . . . . . . . . . . . . . . . . . . . . . . . . . . . . . . . . . . . . . . . . . . . . . . . 136Conserving battery power  . . . . . . . . . . . . . . . . . . . . . . . . . . . . . . . . . . . . . . . . 136Using alternate power sources  . . . . . . . . . . . . . . . . . . . . . . . . . . . . . . . . . . . . 136Changing power modes   . . . . . . . . . . . . . . . . . . . . . . . . . . . . . . . . . . . . . . . . . 137Changing automatic power settings in Windows Me, Windows 98, or Windows 2000 . . . . . . . . . . . . . . . . . . . . . . . . . . . . . . . . . . . . . . . . . . . . . . . . . 138Changing power settings in Windows NT . . . . . . . . . . . . . . . . . . . . . . . . . . . . 143Changing SpeedStep settings   . . . . . . . . . . . . . . . . . . . . . . . . . . . . . . . . . . . . 144Solo9550.book Page iii Tuesday, June 19, 2001 3:18 PM
iv          10 Travel Tips  . . . . . . . . . . . . . . . . . . . . . . . . . . . . . . . . . . . . . . . . . . . . . . . . . . . . .147Modem   . . . . . . . . . . . . . . . . . . . . . . . . . . . . . . . . . . . . . . . . . . . . . . . . . . . . . . . . . .148Radio frequency wireless connections  . . . . . . . . . . . . . . . . . . . . . . . . . . . . . . . . . .148Files . . . . . . . . . . . . . . . . . . . . . . . . . . . . . . . . . . . . . . . . . . . . . . . . . . . . . . . . . . . . .149Security  . . . . . . . . . . . . . . . . . . . . . . . . . . . . . . . . . . . . . . . . . . . . . . . . . . . . . . . . . .149Power   . . . . . . . . . . . . . . . . . . . . . . . . . . . . . . . . . . . . . . . . . . . . . . . . . . . . . . . . . . .15011 Customizing Your Notebook. . . . . . . . . . . . . . . . . . . . . . . . . . . . . . . . . . . .151Adjusting the screen and desktop settings   . . . . . . . . . . . . . . . . . . . . . . . . . . . . . .152Adjusting the color depth  . . . . . . . . . . . . . . . . . . . . . . . . . . . . . . . . . . . . . . . . .152Adjusting the screen area   . . . . . . . . . . . . . . . . . . . . . . . . . . . . . . . . . . . . . . . .154Applying a color scheme  . . . . . . . . . . . . . . . . . . . . . . . . . . . . . . . . . . . . . . . . .155Changing the desktop background   . . . . . . . . . . . . . . . . . . . . . . . . . . . . . . . . .157Selecting a screen saver  . . . . . . . . . . . . . . . . . . . . . . . . . . . . . . . . . . . . . . . . .159Changing the touchpad settings  . . . . . . . . . . . . . . . . . . . . . . . . . . . . . . . . . . . . . . .161Programming the multi-function buttons . . . . . . . . . . . . . . . . . . . . . . . . . . . . . . . . .16312 Upgrading Your Notebook. . . . . . . . . . . . . . . . . . . . . . . . . . . . . . . . . . . . . .165Adding PC Cards   . . . . . . . . . . . . . . . . . . . . . . . . . . . . . . . . . . . . . . . . . . . . . . . . . .166Changing bay modules  . . . . . . . . . . . . . . . . . . . . . . . . . . . . . . . . . . . . . . . . . . . . . .168Changing 5.25” bay modules  . . . . . . . . . . . . . . . . . . . . . . . . . . . . . . . . . . . . . .168Changing 3.5” bay modules  . . . . . . . . . . . . . . . . . . . . . . . . . . . . . . . . . . . . . . .170Preventing static electricity discharge   . . . . . . . . . . . . . . . . . . . . . . . . . . . . . . . . . .171Installing memory  . . . . . . . . . . . . . . . . . . . . . . . . . . . . . . . . . . . . . . . . . . . . . . . . . .172Replacing the main hard drive  . . . . . . . . . . . . . . . . . . . . . . . . . . . . . . . . . . . . . . . .17513 Using the Port Replicator and Docking Station. . . . . . . . . . . . . . . . .179Checking out the port replicator  . . . . . . . . . . . . . . . . . . . . . . . . . . . . . . . . . . . . . . .179Front  . . . . . . . . . . . . . . . . . . . . . . . . . . . . . . . . . . . . . . . . . . . . . . . . . . . . . . . . .180Left side   . . . . . . . . . . . . . . . . . . . . . . . . . . . . . . . . . . . . . . . . . . . . . . . . . . . . . .181Back  . . . . . . . . . . . . . . . . . . . . . . . . . . . . . . . . . . . . . . . . . . . . . . . . . . . . . . . . .182Right side  . . . . . . . . . . . . . . . . . . . . . . . . . . . . . . . . . . . . . . . . . . . . . . . . . . . . .184Connecting to the port replicator   . . . . . . . . . . . . . . . . . . . . . . . . . . . . . . . . . . . . . .185Checking out the docking station  . . . . . . . . . . . . . . . . . . . . . . . . . . . . . . . . . . . . . .187Front  . . . . . . . . . . . . . . . . . . . . . . . . . . . . . . . . . . . . . . . . . . . . . . . . . . . . . . . . .187Left side   . . . . . . . . . . . . . . . . . . . . . . . . . . . . . . . . . . . . . . . . . . . . . . . . . . . . . .188Back  . . . . . . . . . . . . . . . . . . . . . . . . . . . . . . . . . . . . . . . . . . . . . . . . . . . . . . . . .189Right side  . . . . . . . . . . . . . . . . . . . . . . . . . . . . . . . . . . . . . . . . . . . . . . . . . . . . .191Connecting to the docking station   . . . . . . . . . . . . . . . . . . . . . . . . . . . . . . . . . . . . .193Adjusting audio settings  . . . . . . . . . . . . . . . . . . . . . . . . . . . . . . . . . . . . . . . . . .194Installing a PCI card in the docking station  . . . . . . . . . . . . . . . . . . . . . . . . . . . . . .195Solo9550.book Page iv Tuesday, June 19, 2001 3:18 PM
          v14 Networking Your Computer . . . . . . . . . . . . . . . . . . . . . . . . . . . . . . . . . . . . 199Using a network . . . . . . . . . . . . . . . . . . . . . . . . . . . . . . . . . . . . . . . . . . . . . . . . . . . 200Sharing a single Internet connection   . . . . . . . . . . . . . . . . . . . . . . . . . . . . . . . 200Sharing drives  . . . . . . . . . . . . . . . . . . . . . . . . . . . . . . . . . . . . . . . . . . . . . . . . . 200Sharing peripherals  . . . . . . . . . . . . . . . . . . . . . . . . . . . . . . . . . . . . . . . . . . . . . 201Streaming audio and video files  . . . . . . . . . . . . . . . . . . . . . . . . . . . . . . . . . . . 201Playing multi-player games . . . . . . . . . . . . . . . . . . . . . . . . . . . . . . . . . . . . . . . 201Introducing the Gateway Connected Home   . . . . . . . . . . . . . . . . . . . . . . . . . . . . . 202Components of a Gateway Connected Home  . . . . . . . . . . . . . . . . . . . . . . . . 203Selecting a network connection   . . . . . . . . . . . . . . . . . . . . . . . . . . . . . . . . . . . . . . 204Wired connections . . . . . . . . . . . . . . . . . . . . . . . . . . . . . . . . . . . . . . . . . . . . . . 204Wireless Connections  . . . . . . . . . . . . . . . . . . . . . . . . . . . . . . . . . . . . . . . . . . . 205Assessing your connection needs   . . . . . . . . . . . . . . . . . . . . . . . . . . . . . . . . . 206Comparing data transfer speed   . . . . . . . . . . . . . . . . . . . . . . . . . . . . . . . . . . . 208Network shopping list   . . . . . . . . . . . . . . . . . . . . . . . . . . . . . . . . . . . . . . . . . . . . . . 210HPNA   . . . . . . . . . . . . . . . . . . . . . . . . . . . . . . . . . . . . . . . . . . . . . . . . . . . . . . . 210Ethernet . . . . . . . . . . . . . . . . . . . . . . . . . . . . . . . . . . . . . . . . . . . . . . . . . . . . . . 211Wireless Ethernet  . . . . . . . . . . . . . . . . . . . . . . . . . . . . . . . . . . . . . . . . . . . . . . 212Bluetooth  . . . . . . . . . . . . . . . . . . . . . . . . . . . . . . . . . . . . . . . . . . . . . . . . . . . . . 212For more information  . . . . . . . . . . . . . . . . . . . . . . . . . . . . . . . . . . . . . . . . . . . . . . . 21315 Maintaining Your Computer. . . . . . . . . . . . . . . . . . . . . . . . . . . . . . . . . . . . 215Caring for your computer   . . . . . . . . . . . . . . . . . . . . . . . . . . . . . . . . . . . . . . . . . . . 215Creating an emergency startup diskette  . . . . . . . . . . . . . . . . . . . . . . . . . . . . . . . . 217Protecting your computer from viruses  . . . . . . . . . . . . . . . . . . . . . . . . . . . . . . . . . 219Managing hard drive space . . . . . . . . . . . . . . . . . . . . . . . . . . . . . . . . . . . . . . . . . . 221Checking hard drive space  . . . . . . . . . . . . . . . . . . . . . . . . . . . . . . . . . . . . . . . 221Using Disk Cleanup   . . . . . . . . . . . . . . . . . . . . . . . . . . . . . . . . . . . . . . . . . . . . 222Scanning the hard drive for errors  . . . . . . . . . . . . . . . . . . . . . . . . . . . . . . . . . 223Defragmenting the hard drive  . . . . . . . . . . . . . . . . . . . . . . . . . . . . . . . . . . . . . 225Backing up files . . . . . . . . . . . . . . . . . . . . . . . . . . . . . . . . . . . . . . . . . . . . . . . . 227Using Maintenance Wizard  . . . . . . . . . . . . . . . . . . . . . . . . . . . . . . . . . . . . . . . 228Recalibrating the battery  . . . . . . . . . . . . . . . . . . . . . . . . . . . . . . . . . . . . . . . . . . . . 229Cleaning your computer   . . . . . . . . . . . . . . . . . . . . . . . . . . . . . . . . . . . . . . . . . . . . 230Cleaning the exterior . . . . . . . . . . . . . . . . . . . . . . . . . . . . . . . . . . . . . . . . . . . . 230Cleaning the keyboard   . . . . . . . . . . . . . . . . . . . . . . . . . . . . . . . . . . . . . . . . . . 231Cleaning the screen   . . . . . . . . . . . . . . . . . . . . . . . . . . . . . . . . . . . . . . . . . . . . 231Cleaning the mouse   . . . . . . . . . . . . . . . . . . . . . . . . . . . . . . . . . . . . . . . . . . . . 23116 Reinstalling Device Drivers . . . . . . . . . . . . . . . . . . . . . . . . . . . . . . . . . . . . 233Reinstalling device drivers in Windows 98, Windows Me, or Windows 2000 . . . . 234Updating device drivers in Windows 98, Windows Me, or Windows 2000 . . . . . . 236Solo9550.book Page v Tuesday, June 19, 2001 3:18 PM
vi          Reinstalling Windows NT 4.0 device drivers   . . . . . . . . . . . . . . . . . . . . . . . . . . . . .238Locating Windows NT 4.0 drivers   . . . . . . . . . . . . . . . . . . . . . . . . . . . . . . . . . .238Reinstalling Windows NT 4.0 video device drivers   . . . . . . . . . . . . . . . . . . . . .240Reinstalling Windows NT 4.0 audio device drivers  . . . . . . . . . . . . . . . . . . . . .243Reinstalling Windows NT 4.0 modem device drivers   . . . . . . . . . . . . . . . . . . .246Reinstalling Windows NT 4.0 network device drivers   . . . . . . . . . . . . . . . . . . .248Reinstalling the Windows NT Service Pack . . . . . . . . . . . . . . . . . . . . . . . . . . .25017 Restoring Software . . . . . . . . . . . . . . . . . . . . . . . . . . . . . . . . . . . . . . . . . . . . .251Reinstalling Windows 98, Windows Me, or Windows 2000  . . . . . . . . . . . . . . . . . .252Reinstalling Windows NT 4.0   . . . . . . . . . . . . . . . . . . . . . . . . . . . . . . . . . . . . . . . . .253Reinstalling programs  . . . . . . . . . . . . . . . . . . . . . . . . . . . . . . . . . . . . . . . . . . . . . . .25418 Troubleshooting . . . . . . . . . . . . . . . . . . . . . . . . . . . . . . . . . . . . . . . . . . . . . . . .257Safety guidelines   . . . . . . . . . . . . . . . . . . . . . . . . . . . . . . . . . . . . . . . . . . . . . . . . . .257First steps  . . . . . . . . . . . . . . . . . . . . . . . . . . . . . . . . . . . . . . . . . . . . . . . . . . . . . . . .258Software support tools   . . . . . . . . . . . . . . . . . . . . . . . . . . . . . . . . . . . . . . . . . . . . . .259Troubleshooting   . . . . . . . . . . . . . . . . . . . . . . . . . . . . . . . . . . . . . . . . . . . . . . . . . . .260CD/DVD drive  . . . . . . . . . . . . . . . . . . . . . . . . . . . . . . . . . . . . . . . . . . . . . . . . . .260Device installation   . . . . . . . . . . . . . . . . . . . . . . . . . . . . . . . . . . . . . . . . . . . . . .262Diskette drive  . . . . . . . . . . . . . . . . . . . . . . . . . . . . . . . . . . . . . . . . . . . . . . . . . .263File management  . . . . . . . . . . . . . . . . . . . . . . . . . . . . . . . . . . . . . . . . . . . . . . .264Hard drive  . . . . . . . . . . . . . . . . . . . . . . . . . . . . . . . . . . . . . . . . . . . . . . . . . . . . .264Internet  . . . . . . . . . . . . . . . . . . . . . . . . . . . . . . . . . . . . . . . . . . . . . . . . . . . . . . .265Keyboard   . . . . . . . . . . . . . . . . . . . . . . . . . . . . . . . . . . . . . . . . . . . . . . . . . . . . .266LCD panel   . . . . . . . . . . . . . . . . . . . . . . . . . . . . . . . . . . . . . . . . . . . . . . . . . . . .266Memory . . . . . . . . . . . . . . . . . . . . . . . . . . . . . . . . . . . . . . . . . . . . . . . . . . . . . . .267Modem  . . . . . . . . . . . . . . . . . . . . . . . . . . . . . . . . . . . . . . . . . . . . . . . . . . . . . . .267Mouse  . . . . . . . . . . . . . . . . . . . . . . . . . . . . . . . . . . . . . . . . . . . . . . . . . . . . . . . .272Networks . . . . . . . . . . . . . . . . . . . . . . . . . . . . . . . . . . . . . . . . . . . . . . . . . . . . . .272Passwords   . . . . . . . . . . . . . . . . . . . . . . . . . . . . . . . . . . . . . . . . . . . . . . . . . . . .273PC Cards   . . . . . . . . . . . . . . . . . . . . . . . . . . . . . . . . . . . . . . . . . . . . . . . . . . . . .273Power  . . . . . . . . . . . . . . . . . . . . . . . . . . . . . . . . . . . . . . . . . . . . . . . . . . . . . . . .273Printer  . . . . . . . . . . . . . . . . . . . . . . . . . . . . . . . . . . . . . . . . . . . . . . . . . . . . . . . .274ScanDisk   . . . . . . . . . . . . . . . . . . . . . . . . . . . . . . . . . . . . . . . . . . . . . . . . . . . . .275Sound  . . . . . . . . . . . . . . . . . . . . . . . . . . . . . . . . . . . . . . . . . . . . . . . . . . . . . . . .276Video   . . . . . . . . . . . . . . . . . . . . . . . . . . . . . . . . . . . . . . . . . . . . . . . . . . . . . . . .276Telephone support   . . . . . . . . . . . . . . . . . . . . . . . . . . . . . . . . . . . . . . . . . . . . . . . . .277Before calling Gateway Technical Support  . . . . . . . . . . . . . . . . . . . . . . . . . . .277Telephone numbers  . . . . . . . . . . . . . . . . . . . . . . . . . . . . . . . . . . . . . . . . . . . . .278Tutoring and training . . . . . . . . . . . . . . . . . . . . . . . . . . . . . . . . . . . . . . . . . . . . . . . .279Self-help  . . . . . . . . . . . . . . . . . . . . . . . . . . . . . . . . . . . . . . . . . . . . . . . . . . . . . .279Tutoring   . . . . . . . . . . . . . . . . . . . . . . . . . . . . . . . . . . . . . . . . . . . . . . . . . . . . . .279Solo9550.book Page vi Tuesday, June 19, 2001 3:18 PM
          viiTraining  . . . . . . . . . . . . . . . . . . . . . . . . . . . . . . . . . . . . . . . . . . . . . . . . . . . . . . 280A Safety, Regulatory, and Legal Information . . . . . . . . . . . . . . . . . . . . . 281Index . . . . . . . . . . . . . . . . . . . . . . . . . . . . . . . . . . . . . . . . . . . . . . . . . . . . . . . . . . . . . . 299Solo9550.book Page vii Tuesday, June 19, 2001 3:18 PM
viii          Solo9550.book Page viii Tuesday, June 19, 2001 3:18 PM
          11Checking Out Your Gateway Solo 9500If you purchased the Gateway Solo 9550, go to “Checking Out Your Gateway Solo 9550” on page 11.Tips & Tricks To access the contents of this manual while you are traveling, download an electronic copy from www.gateway.com/support/manlib/.Solo9550.book Page 1 Tuesday, June 19, 2001 3:18 PM
2          Checking Out Your Gateway Solo 9500FrontComponent Icon DescriptionSpeakers Provide audio output when headphones or speakers are not plugged in.Release latch Open the notebook cover by sliding the release latch to the right.Battery charge indicator Lights up when the computer is plugged in.■LED green –battery is fully charged.■LED orange –battery is charging.■LED off –notebook is running on battery power.Power indicator Lights up when the notebook is turned on and shows notebook power status:■LED on –power is ON.■LED blinking –power is in Standby or Suspend mode.■LED off –power is off.Speaker Release latch Battery indicator lightSpeakerPower indicator lightSolo9550.book Page 2 Tuesday, June 19, 2001 3:18 PM
Left side          3Left sideComponent Icon DescriptionPort options Depending on the options you ordered with your notebook, this area can contain:■A modem jack■An Ethernet jack■An IEEE 1394 (Firewire) portVentilation fan Helps cool internal components. Do not block.PC Card slots Insert one Type I, II, III or Zoom Video PC Card into this slot. For more information, see “Adding PC Cards” on page 166.3.5” modular bay Install a standard 3.5-inch diskette drive or an LS-120 drive. For more information, see “Using drives” on page 98 and “Changing 3.5” bay modules” on page 170.Portoptions Ventilation fan (do not block) PC Card slots 3.5” modular baySolo9550.book Page 3 Tuesday, June 19, 2001 3:18 PM
4          Checking Out Your Gateway Solo 9500Right sideComponent Icon DescriptionUSB ports Plug USB (Universal Serial Bus) devices (such as a USB printer, scanner, or camera) into these ports.S/PDIF digital audio jack Plug an optical Toslink digital audio cable into this jack.Line In jack Connect an external audio input source (such as a stereo) to this jack so that you can record sound on your computer or play sound through the notebook speakers.Microphone jack Plug a microphone into this jack. The built-in microphone is turned off when a microphone is plugged into this jack. For the location of your built-in microphone, see “Using the keyboard” on page 36.Headphone jack Plug amplified speakers or headphones into this jack.5.25” modular bay Install a CD or DVD drive, a second hard drive, or a second battery into this bay. For more information, see “Installing a second battery” on page 134 or “Changing 5.25” bay modules” on page 168.USB portsS/PDIF digital audio jackLine In jackMicrophone jackHeadphone jack5.25” modular baySolo9550.book Page 4 Tuesday, June 19, 2001 3:18 PM
Back          5BackComponent Icon DescriptionPS/2 port Plug a PS/2 device (such as a keyboard or mouse) into this port.Parallel port Plug a parallel device (such as a printer) into this port.Monitor port Plug an analog VGA monitor into this port.Docking port Connect the optional docking station or port replicator to this port.Warning! Power is passed through this port. This docking connection is UL certified for use only with Solo 9500 docking stations or port replicators.Ventilation fan Helps cool internal components. Do not block.Serial port Plug a serial device (such as a digital camera) into this port.TV out jack Plug a TV into this jack so that you can view your notebook display on a TV using NTSC/PAL composite video. For more information, see “Viewing the display on a television” on page 117.Power connectorTV out jackKensington lock slotSerial portPS/2 port Parallel port Monitor port Docking port Ventilation fan (do not block)Solo9550.book Page 5 Tuesday, June 19, 2001 3:18 PM
6          Checking Out Your Gateway Solo 9500Power connector Plug the AC adapter cable into this connector.Kensington lock slot Secure your computer to an object by connecting a Kensington cable lock to this slot.Component Icon DescriptionSolo9550.book Page 6 Tuesday, June 19, 2001 3:18 PM
Bottom          7BottomComponent Icon DescriptionReset hole Insert a straightened paper clip into this hole to manually restart the system.5.25” modular bay Install a CD or DVD drive, a second hard drive, or a second battery into this bay. For more information, see “Installing a second battery” on page 134 or “Changing 5.25” bay modules” on page 168.Memory bay Install memory modules into this bay. For more information, see “Installing memory” on page 172.Battery bay Insert the battery into this bay. For more information, see “Changing the main battery” on page 132.Ventilation fan Helps cool internal components. Do not block.3.5” modular bay Install a standard 3.5-inch diskette drive or an LS-120 drive. For more information, see “Using drives” on page 98 and “Changing 3.5” bay modules” on page 170.Memory bay5.25” modular bayBattery bayVentilation fanReset hole3.5” modular baySolo9550.book Page 7 Tuesday, June 19, 2001 3:18 PM
8          Checking Out Your Gateway Solo 9500Identifying your modelThe label on the bottom of your computer contains information that identifies your notebook model. Gateway Technical Support will need this information if you call for assistance.Important The label shown below is for informational purposes only. Label information varies by model.00.0X/000XXX X 0.0/XXGateway part numberGateway model numberGateway serial numberRevision code and display type/ processor sizeSolo9550.book Page 8 Tuesday, June 19, 2001 3:18 PM
Accessories          9Accessories Gateway offers accessories that can help you make the most of using your notebook.Batteries and automobile/airplane power adaptersIf you run your notebook on battery power for extended periods, you may want to buy an additional battery so that you can swap batteries when necessary.With an automobile/airplane power adapter, you can save battery power by plugging your notebook into an automobile cigarette lighter or an airplane in-flight power receptacle.Carrying casesGateway has large-capacity carrying cases if you need additional space for accessories or supplies.Docking stations or port replicatorsAlthough you can attach external devices directly to your notebook, a docking station or port replicator lets you make all of those connections at once. When you travel with your notebook, you merely disconnect from the docking station or port replicator instead of unplugging all the external devices.A docking station or port replicator also provides additional ports and other expansion features not included with your notebook.External devicesYou can attach external devices such as a keyboard, mouse, printer, or monitor to your notebook or docking station.MemoryLarge programs, such as multimedia games or graphics programs, use a lot of memory. If your programs are running more slowly than you think they should, try adding more memory.PrintersYou can attach many types of printers to your computer. The most common types are inkjet and laser printers, which print in color or black and white.Solo9550.book Page 9 Tuesday, June 19, 2001 3:18 PM
10          Checking Out Your Gateway Solo 9500Inkjet printers and cartridges are relatively inexpensive, but usually they are slower than laser printers. Using an inkjet color printer, you can print pictures, banners, and greeting cards, as well as documents.Laser printers and cartridges are more expensive, but usually they print much faster than inkjet printers. Laser printers are better than inkjet printers when you are printing large documents.Solo9550.book Page 10 Tuesday, June 19, 2001 3:18 PM
112www.gateway.comChecking Out Your Gateway Solo 9550If you purchased the Gateway Solo 9500, go to “Checking Out Your Gateway Solo 9500” on page 1.Tips & Tricks To access the contents of this manual while you are traveling, download an electronic copy from www.gateway.com/support/manlib/.Solo9550.book Page 11 Tuesday, June 19, 2001 3:18 PM
12Chapter 2: Checking Out Your Gateway Solo 9550www.gateway.comTopComponent Icon DescriptionBluetooth indicator (optional) Lights up when Bluetooth is turned on.Warning Radio frequency wireless communication can interfere with equipment on commercial aircraft. Current aviation regulations require wireless devices to be turned off while traveling in an airplane. Bluetooth and IEEE 802.11b (also known as wireless Ethernet or WiFi) communication devices are examples of devices that provide wireless communication. For instructions to turn Bluetooth on and off, see “Multi-function buttons” on page 40.Bluetooth IndicatorSolo9550.book Page 12 Tuesday, June 19, 2001 3:18 PM
13Topwww.gateway.comImportant If your system came equipped with an internal radio frequency wireless device, see “Safety, Regulatory, and Legal Information” on page 281 for general wireless regulatory and safety guidelines. To find out if your system has an internal wireless device, check the label (see “Identifying your model” on page 23).Solo9550.book Page 13 Tuesday, June 19, 2001 3:18 PM
14Chapter 2: Checking Out Your Gateway Solo 9550www.gateway.comFrontComponent Icon DescriptionCover release latch Open notebook cover by sliding the release latch to the right.Speakers Provide audio output when headphones or speakers are not plugged in.Audio DJ controls Control the built-in CD player. For more information, see “Using Audio DJ on the Solo 9550” on page 100.Battery charge indicator Lights up when the computer is plugged in.■LED green - battery is fully charged.■LED orange - battery is charging.■LED off - notebook is running on battery power.Power indicator Lights up when the notebook is turned on and shows notebook power status:■LED on - power is ON.■LED blinking - power is in Standby or Suspend mode■LED off - power is off.Battery chargeindicatorCover release latchSpeaker SpeakerAudio DJ controls Power indicatorHot-swap indicatorSolo9550.book Page 14 Tuesday, June 19, 2001 3:18 PM
15Frontwww.gateway.comHot-swap indicator Indicates when it is safe to remove the 5.25” bay module.■LED green - it is safe to remove the 5.25” bay module.■LED orange - it is not safe to remove the 5.25” bay module.For more information, see “Changing 5.25” bay modules” on page 168.Component Icon DescriptionSolo9550.book Page 15 Tuesday, June 19, 2001 3:18 PM
16Chapter 2: Checking Out Your Gateway Solo 9550www.gateway.comLeftComponent Icon DescriptionEthernet jack Plug a 10/100 Ethernet network cable into this jack. For more information, see “Connecting to an Ethernet network” on page 46 and “Networking Your Computer” on page 199.Fan Helps cool internal components. Do not block or insert objects into these slots.PC Card slot Insert one Type I, II, or III PC Card into this slot. For more information, see “Adding PC Cards” on page 166.3.5” modular bay Install a standard 3.5-inch diskette drive, an additional hard drive, or a second battery into this bay. For more information, see “Installing a second battery” on page 134 and “Changing 3.5” bay modules” on page 170.Ethernet jack Fan PC Card slot 3.5” modular baySolo9550.book Page 16 Tuesday, June 19, 2001 3:18 PM
17Rightwww.gateway.comRightComponent Icon DescriptionLine in jack Connect an external audio input source (such as a stereo) to this jack so that you can record sound on your computer or play sound through the notebook speakers.Microphone jack Plug a microphone into this jack. The built-in microphone is turned off when a microphone is plugged into this jack. For the location of your built-in microphone, see “Using the keyboard” on page 36.Headphone jack Plug amplified speakers or headphones into this jack.S/PDIF digital audio jack Plug an optical Toslink digital audio cable into this jack.USB ports Plug USB (Universal Serial Bus) devices (such as a USB Iomega™ Zip™ drive, printer, scanner, or camera) into these ports.IEEE 1394 port Plug an IEEE 1394 (Firewire) cable into this jack.Line in jackMicrophone jackHeadphone jackUSB portsS/PDIF digital audio jack IEEE 1394 port5.25” modular bayModem jackSolo9550.book Page 17 Tuesday, June 19, 2001 3:18 PM
18Chapter 2: Checking Out Your Gateway Solo 9550www.gateway.comModem jack Plug a telephone cord into this jack.5.25” modular bay Install a CD, DVD, or an additional hard drive into this bay. For more information, see “Changing 5.25” bay modules” on page 168.Component Icon DescriptionSolo9550.book Page 18 Tuesday, June 19, 2001 3:18 PM
19Backwww.gateway.comBackComponent Icon DescriptionPS/2 port Plug a PS/2 device (such as a keyboard or mouse) into this port.Parallel port Plug a parallel device (such as a printer) into this port.Fan Helps cool internal components. Do not block or insert objects into these slots.Docking port Connect the docking station or port replicator to this port.Warning! Power is passed through this port. This docking connection is UL certified for use only with Solo 9550 docking stations or port replicators.Monitor port Plug an analog VGA monitor into this port.Serial port Plug a serial device (such as a digital camera) into this port.TV out jack Plug a TV into this jack so that you can view your computer screen on a TV using NTSC/PAL composite video. For more information, see “Viewing the display on a television” on page 117.PS/2 portParallel port Fan Docking port Monitor port Serial portTV out jackPower connectorKensington lock slotSolo9550.book Page 19 Tuesday, June 19, 2001 3:18 PM
20Chapter 2: Checking Out Your Gateway Solo 9550www.gateway.comPower connector Plug the AC adapter cable into this connector.Kensington™ lock slot Secure your computer to an object by connecting a Kensington cable lock to this slot.Component Icon DescriptionSolo9550.book Page 20 Tuesday, June 19, 2001 3:18 PM
21Bottomwww.gateway.comBottomComponent Icon DescriptionReset hole Insert a straightened paper clip into this hole to manually restart the system.5.25” modular bay Install a CD, DVD, or an additional hard drive into this bay. For more information, see “Changing 5.25” bay modules” on page 168.Memory bay Install a memory module in this bay. For more information, see “Installing memory” on page 172.Battery bay Insert the main battery into this bay. For more information, see “Changing the main battery” on page 132.Reset hole5.25” modular bayMemory bayBattery bayFan3.5” modular baySolo9550.book Page 21 Tuesday, June 19, 2001 3:18 PM
22Chapter 2: Checking Out Your Gateway Solo 9550www.gateway.comFan Helps cool internal components. Do not block or insert objects into these slots.3.5” modular bay Install a standard 3.5-inch diskette drive, an additional hard drive, or a second battery into this bay. For more information, see “Installing a second battery” on page 134 and “Changing 3.5” bay modules” on page 170.Component Icon DescriptionSolo9550.book Page 22 Tuesday, June 19, 2001 3:18 PM
23Identifying your modelwww.gateway.comIdentifying your modelThe label on the bottom of your computer contains information that identifies your notebook model. Gateway Technical Support will need this information if you call for assistance.Important The label shown below is for informational purposes only. Label information varies by model.Gateway part numberGateway model numberGateway serial numberRevision code and display type/ processor sizeInternal wireless devicesSolo9550.book Page 23 Tuesday, June 19, 2001 3:18 PM
24Chapter 2: Checking Out Your Gateway Solo 9550www.gateway.comAccessories Gateway offers accessories that can help you make the most of using your notebook.Batteries and automobile/airplane power adaptersIf you run your notebook on battery power for extended periods, you may want to buy an additional battery so that you can swap batteries when necessary.With an automobile/airplane power adapter, you can save battery power by plugging your notebook into an automobile cigarette lighter or an airplane in-flight power receptacle.Carrying casesGateway has large-capacity carrying cases if you need additional space for accessories or supplies.Docking stations or port replicatorsAlthough you can attach external devices directly to your notebook, a docking station or port replicator lets you make all of those connections at once. When you travel with your notebook, you merely disconnect from the docking station or port replicator instead of unplugging all the external devices.A docking station or port replicator also provides additional ports and other expansion features not included with your notebook.External devicesYou can attach external devices such as a keyboard, mouse, printer, or monitor to your notebook or docking station.MemoryLarge programs, such as multimedia games or graphics programs, use a lot of memory. If your programs are running more slowly than you think they should, try adding more memory.PrintersYou can attach many types of printers to your computer. The most common types are inkjet and laser printers, which print in color or black and white.Solo9550.book Page 24 Tuesday, June 19, 2001 3:18 PM
25Accessorieswww.gateway.comInkjet printers and cartridges are relatively inexpensive, but usually they are slower than laser printers. Using an inkjet color printer, you can print pictures, banners, and greeting cards, as well as documents.Laser printers and cartridges are more expensive, but usually they print much faster than inkjet printers. Laser printers are better than inkjet printers when you are printing large documents.Solo9550.book Page 25 Tuesday, June 19, 2001 3:18 PM
26Chapter 2: Checking Out Your Gateway Solo 9550www.gateway.comSolo9550.book Page 26 Tuesday, June 19, 2001 3:18 PM
273www.gateway.comGetting StartedThis chapter provides basic information about your Gateway notebook. Read this chapter to find out:■How to connect the AC adapter■How to start and turn off your notebook■How to use the keyboard■How to use the EZ Pad™ touchpad■How to connect the modem■How to connect to an Ethernet network■How to install peripheral devicesSolo9550.book Page 27 Tuesday, June 19, 2001 3:18 PM
28Chapter 3: Getting Startedwww.gateway.comConnecting the AC adapterYou can run your notebook using an AC adapter or the notebook battery. The battery was shipped to you partially charged. You should use the AC adapter right away to fully charge the battery. Allow 24 hours for the battery to fully charge.To connect the AC adapter:1Connect the power cord to the AC adapter.Important If the battery is not fully charged before you use your notebook on battery power for the first time, the battery life may be much shorter than you expect. If the battery life seems short even after being charged for 24 hours, the battery may need to be recalibrated. For information on recalibrating the battery, see “Recalibrating the battery” on page 229.Warning Replace the power cord if it becomes damaged. The replacement cord must be of the same type and voltage rating as the original cord or the notebook may be damaged.Solo9550.book Page 28 Tuesday, June 19, 2001 3:18 PM
29Connecting the AC adapterwww.gateway.com2Connect the AC adapter to your notebook’s power connector.3Plug the power cord in to a wall power outlet.The battery charging indicator light turns on. If the battery charging indicator light does not turn on, disconnect the adapter from your notebook and repeat Step 2.4When you finish using your notebook, turn the notebook off and leave the notebook connected to AC power for at least 24 hours.Warning Do not attempt to disassemble the AC adapter. The AC adapter has no user-replaceable or user-serviceable parts inside. The AC adapter has dangerous voltages that can cause serious injury or death. Contact Gateway about returning defective AC adapters.Solo9550.book Page 29 Tuesday, June 19, 2001 3:18 PM
30Chapter 3: Getting Startedwww.gateway.comProtecting from power source problemsDuring a power surge, the voltage level of electricity coming into your computer can increase to far above normal levels and cause data loss or system damage. Protect your computer and peripherals by connecting them to a surge protector, which will absorb voltage surges and prevent them from reaching your computer.Warning High voltages can enter your computer through both the power cord and the modem connection. Protect your computer by using a surge protector. If you have a telephone modem, use a surge protector that has a modem jack. If you have a cable modem, use a surge protector that has an antenna/cable TV jack. During an electrical storm, unplug both the surge protector and the modem.Solo9550.book Page 30 Tuesday, June 19, 2001 3:18 PM
31Starting your notebookwww.gateway.comStarting your notebookTo start the notebook:1Open your notebook by sliding the latch on the front of your notebook to the right and lifting the LCD panel.2Press the power button located above the keyboard.Power buttonSolo9550.book Page 31 Tuesday, June 19, 2001 3:18 PM
32Chapter 3: Getting Startedwww.gateway.comThe power button is preset to On/Off mode. However, you can also set it to function in Standby/Resume mode. For instructions on changing the power button mode, see “Changing automatic power settings in Windows Me, Windows 98, or Windows 2000” on page 138.3If you are starting your computer for the first time, follow the on-screen instructions to set up your computer.Waking up your notebookWhen you have not used your notebook for several minutes, it will go into a power-saving mode called Standby. While in Standby, the power indicator light blinks.If your notebook has gone into Standby mode, “wake” it up by pressing the power button. For more information on changing power-saving settings, see “Changing automatic power settings in Windows Me, Windows 98, or Windows 2000” on page 138.Solo9550.book Page 32 Tuesday, June 19, 2001 3:18 PM
33Turning off your notebookwww.gateway.comTurning off your notebookTo turn off your notebook:1Click Start, then select Shut Down. The Shut Down Windows dialog box opens.2Select Shut down.3Click OK. Windows shuts down and turns off your notebook.Important If for some reason you cannot use the Shut down option in Windows to turn off your notebook, press and hold the power button for about five seconds.Solo9550.book Page 33 Tuesday, June 19, 2001 3:18 PM
34Chapter 3: Getting Startedwww.gateway.comStatus indicatorsThis light turns on... When...The notebook is accessing a hard drive.The notebook is accessing the 5.25” modular drive.Hard drive5.25” modular driveDiskette driveScroll lockPad lockCaps lockSolo9550.book Page 34 Tuesday, June 19, 2001 3:18 PM
35Status indicatorswww.gateway.comThe notebook is accessing the diskette drive.Caps Lock is turned on.Pad Lock is turned on.Scroll Lock is turned on.This light turns on... When...1Solo9550.book Page 35 Tuesday, June 19, 2001 3:18 PM
36Chapter 3: Getting Startedwww.gateway.comUsing the keyboardYour notebook features a full-size keyboard that has the full functionality of a desktop computer keyboard. Many of the keys have been assigned alternate functions, including shortcut keys for Windows, function keys for specific system operations, and the Pad Lock keys for the numeric keypad.You can attach an external keyboard to the notebook using a USB or PS/2 port. You do not need to shut down the notebook to connect a keyboard.FN key Windows key Numeric keypad Application keyArrow keysNavigation keysFunction/ system keysVolume control buttonsBuilt-in microphoneSolo9550.book Page 36 Tuesday, June 19, 2001 3:18 PM
37Using the keyboardwww.gateway.comKeysComponent Icon DescriptionVolume control buttons Press the volume buttons to change the volume, or press the mute button to turn off all sound.Function keys Press these keys labeled F1 to F12 to perform actions in programs. For example, pressing F1 may open help.Each program uses different function keys for different purposes. Refer to the program documentation to find out more about the function key actions. System keys Press these green or blue-colored keys in combination with the FNkey to perform specific actions.Navigation keys Press these keys to move the cursor to the beginning of a line, to the end of a line, up the page, down the page, to the beginning of a document, or to the end of a document.FN key Press the FNkey in combination with a green or blue-colored system key (such as STANDBY, PAUSE, or BLUETOOTH) to perform a specific action.Windows key Press to open the Windows Start menu. This key can also be used in combination with other keys to open utilities like F(Search utility), R(Run utility), and E(Explorer utility).Numeric keypad Use these keys to type numbers when the numeric keypad is turned on. Press FN+PAD LOCK to turn on the numeric keypad.Application key Press for quick access to shortcut menus and help assistants in Windows.Arrow keys Press these keys to move the cursor up, down, right, or left.Solo9550.book Page 37 Tuesday, June 19, 2001 3:18 PM
38Chapter 3: Getting Startedwww.gateway.comSystem key combinations When you press an FNkey and a system key at the same time, the notebook performs the action identified by the green or blue text on the key.Press and hold FN while pressing this system key... To...Display the power status box in the upper left corner of your screen. The box shows the battery charge level, the BIOS version, and whether the AC adapter is being used. Press the key combination again to close this box. (Available on the Solo 9500 only.)Toggle the notebook screen between the LCD, an external monitor, or both displays at the same time. A monitor must be plugged into the monitor port on the notebook or docking station.Enter Standby mode. Press the power button to leave Standby mode.Turn on Pad Lock so you can use the numeric keypad. Press this key combination again to turn off Pad Lock. The Pad Lock status indicator appears while this function is turned on.Pause the text scrolling in a DOS screen. The Scroll Lock status indicator appears when this function is turned on. Press the key combination again to continue scrolling. (This function is only available in some programs.)Pause execution of a DOS program. (This function is only available in some programs.)Stop the currently running DOS program. (This function is only available in some programs.)Increase the brightness of the display.Solo9550.book Page 38 Tuesday, June 19, 2001 3:18 PM
39Using the keyboardwww.gateway.comDecrease the brightness of the display.Turn Bluetooth on and off. (This function is only available on notebooks equipped with Bluetooth.)Press and hold FN while pressing this system key... To...Solo9550.book Page 39 Tuesday, June 19, 2001 3:18 PM
40Chapter 3: Getting Startedwww.gateway.comMulti-function buttonsButton Icon Press to...Bluetooth Turn Bluetooth on and off. This button must be pressed at the same time the FN button is pressed. (This function is only available on notebooks equipped with Bluetooth.)E-mail Open your e-mail program.Bluetooth/E-mail Internet Help User-defined shortcutSolo9550.book Page 40 Tuesday, June 19, 2001 3:18 PM
41Using the keyboardwww.gateway.comInternet Open your Web browser.Help Open online help.User-defined shortcut Open the program you assign to this key.Button Icon Press to...Solo9550.book Page 41 Tuesday, June 19, 2001 3:18 PM
42Chapter 3: Getting Startedwww.gateway.comUsing the EZ Pad touchpadThe EZ Pad™ consists of a touchpad, two buttons, and a rocker switch. (The rocker switch is available on the Solo 9550 only.)When you move your finger on the touchpad, the pointer (arrow) on the screen moves in the same direction.You can use the EZ-Pad left and right buttons below the touchpad to select objects. You can assign a function to the rocker switch between the touchpad buttons on the Solo 9550. This function can be to scroll up or down, maximize or minimize the active window, or open and close the Start menu. For more information about programming the rocker switch, see “Changing the touchpad settings” on page 161.Left touchpad buttonRight touchpad buttonRocker switchTouchpadSolo9550.book Page 42 Tuesday, June 19, 2001 3:18 PM
43Using the EZ Pad touchpadwww.gateway.comUsing the touchpadTo... Do this...Move the pointer on the screen. Move your finger around on the touchpad. If you run out of space on your touchpad and need to move the pointer farther, lift your finger, move it to the middle of the touchpad, then continue moving your finger.Select an object on the screen. Position the pointer over the object. Press the left button below the touchpad once. This action is called clicking.Start a program or open a file or folder.Position the pointer over the object. Press the left button below the touchpad twice in rapid succession. This action is called double-clicking.Access a shortcut menu or find more information about an object on the screen.Position the pointer over the object. Quickly press and release the right button once. This action is called right-clicking.Solo9550.book Page 43 Tuesday, June 19, 2001 3:18 PM
44Chapter 3: Getting Startedwww.gateway.comMove an object on the screen. Position the pointer over the object. Press the left button and hold it down, then use the touchpad to move (drag) the object to the appropriate part of the screen. Release the button to drop the object where you want it.To... Do this...Solo9550.book Page 44 Tuesday, June 19, 2001 3:18 PM
45Connecting the modemwww.gateway.comConnecting the modemIf your notebook has a modem jack, the notebook has a built-in 56K modem.To connect the modem:1Insert one end of the telephone cable into the modem jack  on the side of the notebook.2Insert the other end of the telephone cable into a telephone wall jack. The modem will not work with digital or PBX telephone lines.3Start your notebook, then start your communications software.Caution To reduce the risk of fire, use only No. 26 AWG or larger telecommunications line cord.Solo9550.book Page 45 Tuesday, June 19, 2001 3:18 PM
46Chapter 3: Getting Startedwww.gateway.comConnecting to an Ethernet networkIf your notebook has a network jack, you can connect it to a 10/100 Ethernet network.To connect to a network:1Insert one end of the network cable into the network jack  on the left side of the notebook.2Insert the other end of the network cable into a network wall jack. Ask your network administrator to help you select the correct network jack.Your notebook is now physically connected to the network. Your network administrator can help you log onto your network.Solo9550.book Page 46 Tuesday, June 19, 2001 3:18 PM
47Connecting to an Ethernet networkwww.gateway.comBroadband Internet connectionsYou can use your computer’s Ethernet jack for more than just networking. Many broadband Internet connections, such as cable modems and DSL modems, connect to your computer’s Ethernet jack. For more information, see “Using the Internet” on page 87 and “Networking Your Computer” on page 199.Solo9550.book Page 47 Tuesday, June 19, 2001 3:18 PM
48Chapter 3: Getting Startedwww.gateway.comInstalling a printer, scanner, or other peripheral deviceYour computer has one or more of the following ports: IEEE 1394 (Firewire), Universal Serial Bus (USB), serial, and parallel. These ports are used for connecting peripheral devices such as printers, scanners, and digital cameras to your computer. For more information about port locations, see “Checking Out Your Gateway Solo 9500” on page 1 and “Checking Out Your Gateway Solo 9550” on page 11.IEEE 1394 and USB ports support plug-and-play and hot swapping, which means that your computer will usually recognize such a device whenever you plug it into the appropriate port. When you use an IEEE 1394 or USB device for the first time, your computer will prompt you to install any software the device needs. After doing this, you can disconnect and reconnect the device at any time.Parallel and serial port devices are not plug-and-play. Refer to the device documentation for detailed information and installation instructions.Solo9550.book Page 48 Tuesday, June 19, 2001 3:18 PM

Navigation menu