Sierra Wireless MC5725 EVDO Mini-PCI Express Card CDMA Modem Module User Manual Universal Development Kit Quick Start Guide
Sierra Wireless Inc. EVDO Mini-PCI Express Card CDMA Modem Module Universal Development Kit Quick Start Guide
Contents
- 1. Quick Start Guide
- 2. Hardware Integration Guide
- 3. Users Manual
Quick Start Guide

Mini Card Universal Development Kit
Quick Start Guide
2130677
REV 1.1C

Mini Card Universal Development Kit Quick Start Guide
Preface
Limitation of liability
The information in this manual is subject to change without notice and does not
represent a commitment on the part of Sierra Wireless. SIERRA WIRELESS
AND ITS AFFILIATES SPECIFICALLY DISCLAIM LIABILITY FOR ANY
AND ALL DIRECT, INDIRECT, SPECIAL, GENERAL, INCIDENTAL,
CONSEQUENTIAL, PUNITIVE OR EXEMPLARY DAMAGES INCLUDING,
BUT NOT LIMITED TO, LOSS OF PROFITS OR REVENUE OR
ANTICIPATED PROFITS OR REVENUE ARISING OUT OF THE USE OR
INABILITY TO USE ANY SIERRA WIRELESS PRODUCT, EVEN IF
SIERRA WIRELESS AND/OR ITS AFFILIATES HAS BEEN ADVISED OF
THE POSSIBILITY OF SUCH DAMAGES OR THEY ARE FORESEEABLE
OR FOR CLAIMS BY ANY THIRD PARTY.
Notwithstanding the foregoing, in no event shall Sierra Wireless and/or its
affiliates aggregate liability arising under or in connection with the Sierra
Wireless product, regardless of the number of events, occurrences, or claims
giving rise to liability, be in excess of the price paid by the purchaser for the
Sierra Wireless product.
Patents
Portions of this product may be covered by some or all of the following US
patents:
5,515,0135,629,9605,845,2165,847,5535,878,234
5,890,0575,929,8156,169,8846,191,7416,199,168
6,339,4056,359,5916,400,3366,516,204 6,561,851
6,643,5016,653,9796,697,0306,785,8306,845,249
6,847,8306,876,6976,879,5856,886,0496,968,171
6,985,7577,023,878D442,170D459,303
and other patents pending.
This product includes
technology licensed from
Licensed by QUALCOMM Incorporated under one or more of the following United States
patents and/or their counterparts in other nations:
4,901,307 5,056,109 5,101,501 5,109,390 5,228,054
5,267,261 5,267,262 5,337,338 5,414,796 5,416,797
5,490,165 5,504,773 5,506,865 5,511,073 5,535,239
5,544,196 5,568,483 5,600,754 5,657,420 5,659,569
5,710,784 5,778,338
Copyright
©2006 Sierra Wireless. All rights reserved.
2 2130677
Preface
Trademarks
“Heart of the Wireless Machine” is a registered trademark of Sierra Wireless.
Sierra Wireless, the Sierra Wireless logo, the red wave design, the red-tipped
antenna, and Watcher are trademarks of Sierra Wireless.
Windows® is a registered trademark of Microsoft Corporation.
Qualcomm® is a registered trademark of Qualcomm Incorporated.
Other trademarks are the property of the respective owners.
Contact information
Technical
Support: You will have received (by e-mail) instructions on how to
access the OEM Customer Support web site. For more
details, please contact your account manager, or the Sierra
Wireless sales desk (see below).
Sales Desk: Phone: 1-604-232-1488
Hours: 8:00 AM to 5:00 PM Pacific Time
E-mail: sales@sierrawireless.com
Post: Sierra Wireless
13811 Wireless Way
Richmond, BC
Canada V6V 3A4
Fax: 1-604-231-1109
Web: www.sierrawireless.com
For up-to-date product descriptions, documentation, application notes, firmware
upgrades, troubleshooting tips, and press releases:
www.sierrawireless.com
To obtain the schematics for this device, contact your Sierra Wireless FAE and
refer to Item #2500083.
1.1C Apr-06 3

Mini Card Universal Development Kit Quick Start Guide
Table of contents
Introduction ...................................................................................................................5
Required Equipment .........................................................................................................5
Setup and installation................................................................................................... 6
Hardware setup.................................................................................................................6
Insert a USIM card (UMTS modules only).............................................................6
Insert the Mini Card ...............................................................................................7
Remove/replace the Mini Card..............................................................................8
Connect the antenna(s).........................................................................................8
Connect the power supply and USB cable..........................................................10
Configure the module......................................................................................................10
Install/update drivers.......................................................................................................12
Install drivers for CDMA modules (MC57xx) .......................................................12
Install drivers for UMTS modules (MC87xx)........................................................13
Install Watcher ................................................................................................................14
Install Watcher for CDMA modules (MC57xx).....................................................14
Install Watcher for UMTS modules (MC87xx) .....................................................15
4 2130677

Introduction
Introduction
This quick start guide explains how to set up the hardware and software
components of Sierra Wireless’ Universal Development Kit (UDK) for use with:
• CDMA modules – MC5720, MC5725
• UMTS modules – MC8755/8755V, MC8765/8765V, MC8775
Required Equipment
Table 1 details the items required to begin using the UDK in your development
environment. If any items are missing from the UDK, contact your Sierra
Wireless representative.
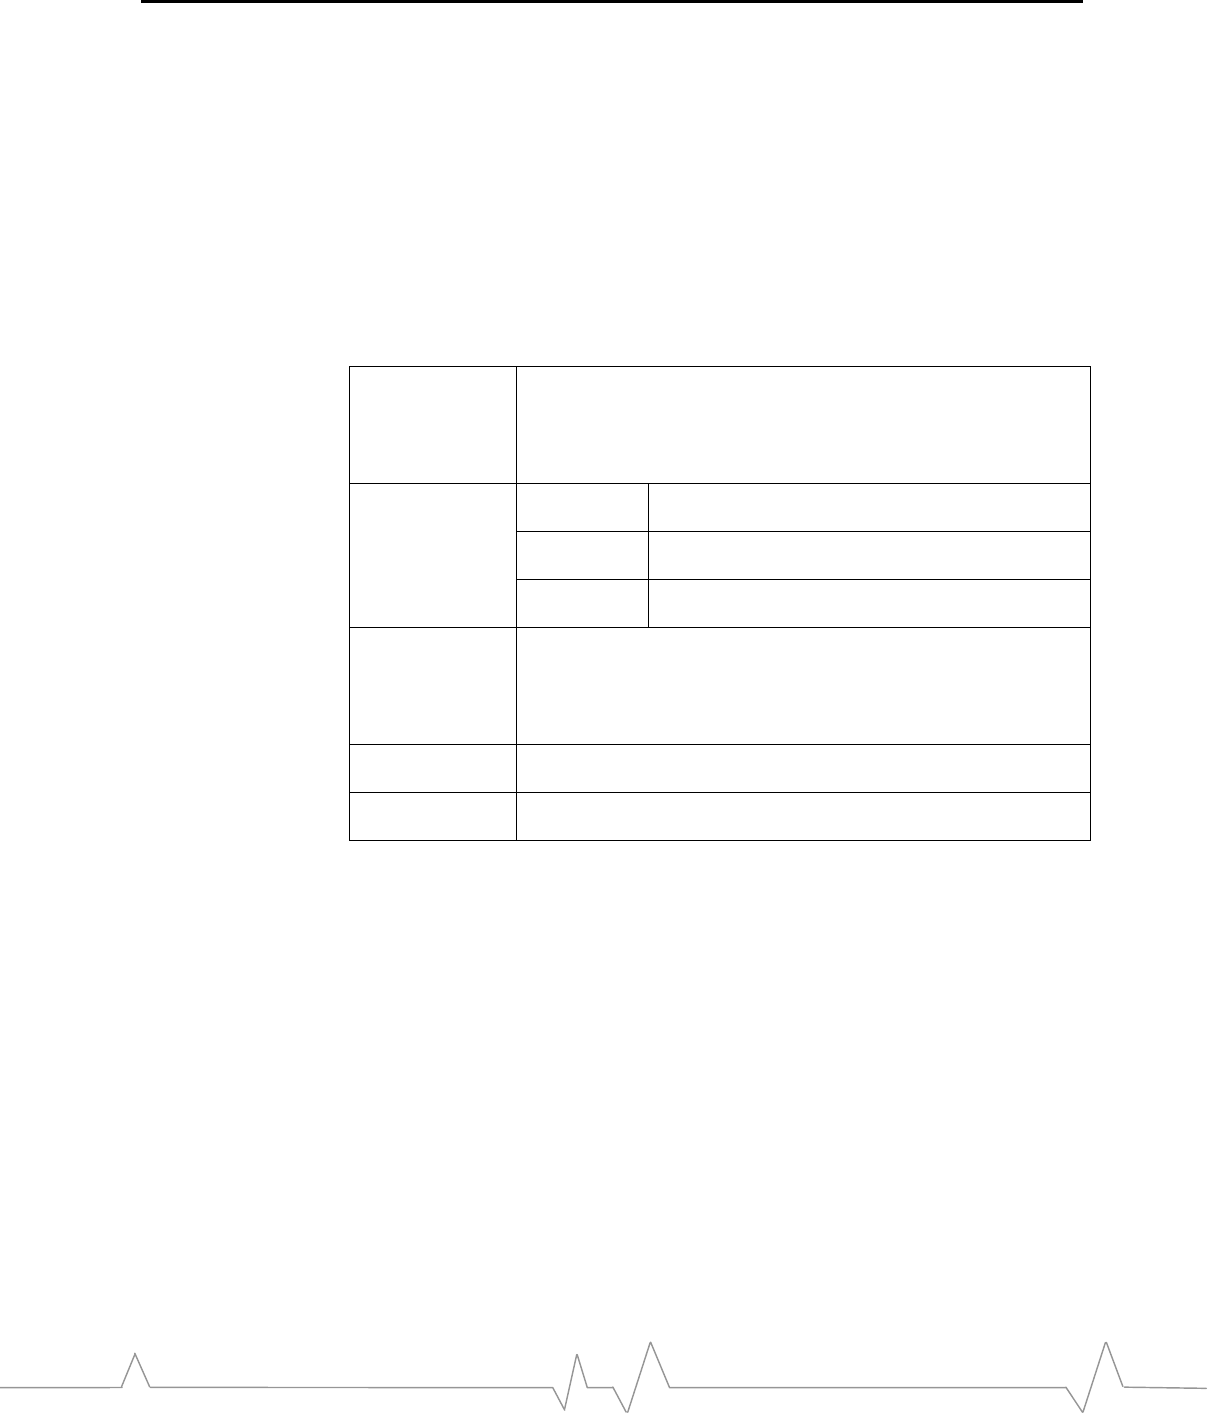
Table 1: Required equipment
Item Included
in UDK Details
Drivers &
system software No Ask your Sierra Wireless FAE for downloading
instructions.
Available for Windows XP Pro (SP2) and higher, and
Windows 2000 Pro (SP4) and higher.
Mini Card No The UDK supports the following Mini Cards (purchased
separately):
• MC5720/5725 (CDMA)
• MC8755/8755V
• MC8765/8765V
• MC8775
Antenna kit Yes The kit includes 2 each of:
• Antenna
• Antenna connector
• Sample/replacement Molex connector
• Connecting wire
Antenna
connector
removal tool
Yes
Daughterboard Yes The Mini Card is inserted into the daughterboard for
testing and development.
Power supply Yes Universal power supply, suitable for both 120 V and
240 V.
USB cable Yes Standard USB-A to USB-B cable
USIM card No (UMTS only)You need to supply a USIM with an active
UMTS account for use with UMTS Mini Cards.
1.1C Apr-06 5

Mini Card Universal Development Kit Quick Start Guide
Setup and installation
To begin using the UDK with your development system, you need to:
Set up the hardware
• Insert a USIM card (UMTS modules only) (page 6)
• Insert the Mini Card (page 7)
• Connect the antenna(s) (page 8)
• Connect the power supply and USB cable (page 10)
• Configure the module (page 10)
Set up the software
• Install/update drivers (page 12)
• Install Watcher (page 14)
Hardware setup
Insert a USIM card (UMTS modules only)
To use a UMTS module (MC87xx), you need to install a USIM card (with an
active UMTS account).
1. Place the daughterboard face-down – the USIM slot is at the opposite
end from the antenna connection.
2. Open the USIM casing – the casing latches in place, so you may have to
push the tab marked “LIFT” slightly to the side before lifting it.
6 2130677

Setup and installation
3. Insert the USIM card with its circuitry facing the daughterboard – line up
the notch in the card with the notch in the slot.
4. Close the USIM casing.
Insert the Mini Card
After inserting the USIM card, insert the Mini Card:
1. Place the daughterboard face-up – the Mini Card slot is beside the USB
connector.
2. Remove the two screws that are located on the metal strips near the
antenna end of the board.
3. Hold the Mini Card at the screw holes and slide it into the
daughterboard’s Mini Card slot at a 45-degree angle.
1.1C Apr-06 7

Mini Card Universal Development Kit Quick Start Guide
4. Push and hold the module down when it is firmly seated in the slot and
then fasten it using the screws removed in Step 2.
Remove/replace the Mini Card
When you want to remove or replace the Mini Card:
1. Place the daughterboard face-up.
2. Remove the connecting wire(s) from the Mini Card’s antennas – use the
connector tool, hooking it under the wire connector and pull straight up.
3. Unscrew the Mini Card from the daughterboard.
4. Hold the module at the screw holes and raise it to a 45-degree angle.
5. Pull the module out of the slot.
Connect the antenna(s)
After installing the Mini Card, connect the supplied antenna(s) to the
daughterboard (UMTS modules have a single antenna, CDMA modules have a
main antenna and a diversity antenna):
1. Place the daughterboard face-up.
8 2130677

Setup and installation
2. Screw the silver adapter onto the daughterboard’s main antenna
connector.
3. Connect the Mini Card’s main antenna to the daughterboard’s main
antenna connector using the gray wire provided – press down lightly on
the connector ends (the first few times you use these connectors, they
may be quite snug – press straight down on the end to get a secure
connection).
4. Connect the antenna to the adapter. (The first few times you attach the
antenna, it may be quite snug.)
5. If you are using a CDMA module, repeat Steps 2-4 for the diversity
antenna.
1.1C Apr-06 9

Mini Card Universal Development Kit Quick Start Guide
Connect the power supply and USB cable
To install the power supply and USB cable:
1. Place the daughterboard face-up.
2. Insert one end of the USB cable into the USB connector (beside the Mini
Card) – the other end connects to your development computer (DO NOT
connect it yet).
3. Insert the power supply into the daughterboard’s power supply connector
(beside the USB connector) – the other end connects to a standard power
outlet.
Configure the module
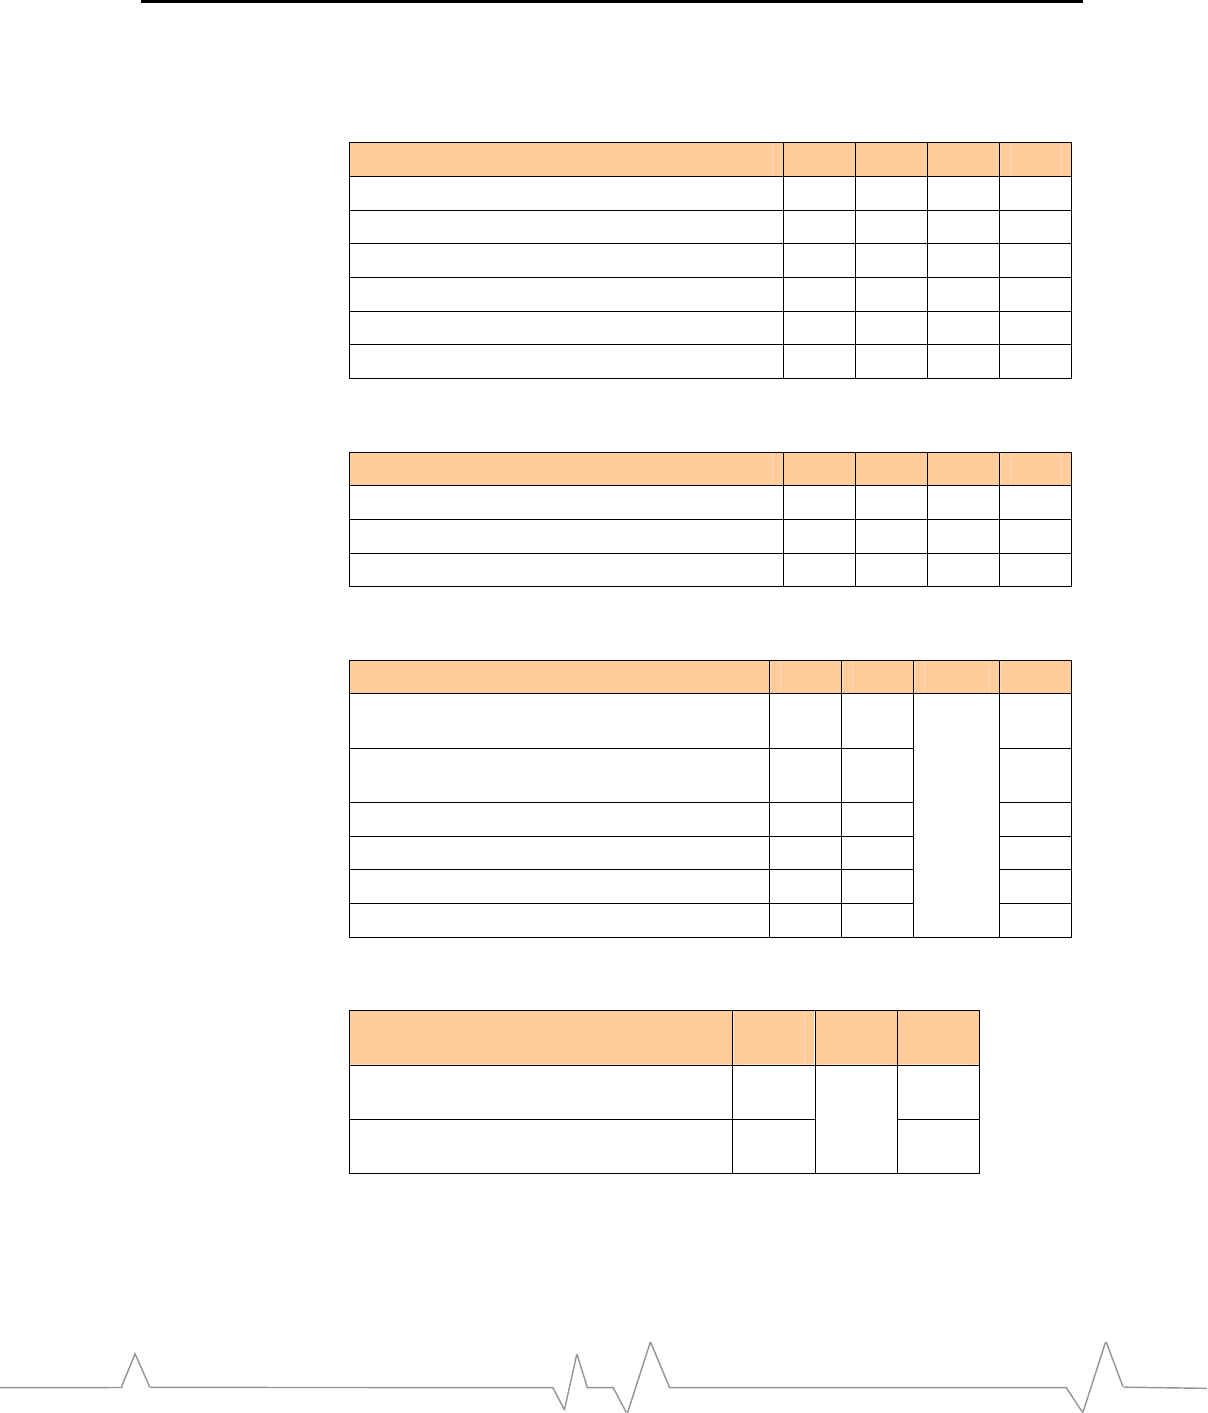
The daughterboard includes several switches and jumpers that you can use to
configure the module’s operation, as detailed in Tables 2 through 5.
10 2130677
Setup and installation
Table 2: SW200 Audio switch (installed on daughterboards used for voice-
enabled modules)
Function Dip1 Dip2 Dip3 Dip4
+20 dB mic path gain On Off
Unity gain mic path gain Off On
Disable mic connection Off Off
Differential mic input On Off
Single-ended mic input Off On
Disable mic connection Off Off
Table 3: SW5 - WAN LED switch
Function Dip1 Dip2 Dip3 Dip4
OPEN DRAIN LED control On Off On Off
CMOS LED control Off On Off On
Disable LED control Off Off Off Off
Table 4: SW201 - Enable switch
Function Dip1 Dip2 Dip3 Dip4
Fix VCC_3.3V LDO output to 3.30 V (powered
from barrel jack) On
Allow VCC_3.3V LDO output to adjust from 2 V
to 5 V via R102 potentiometer Off
Enable VCC_3.3V LDO On
Disable VCC_3.3V LDO Off
Disable Mini Card (asserts W_DISABLE_N) On
Enable Mini Card (deasserts W_DISABLE_N)
Always
off
Off
Table 5: CN201 - Power selection switch
Function Jump
1-2 Jump
3-4 Jump
5-6
Enable onboard LDO to supply VCC_3.3V
power from barrel jack Yes
Insert supercapacitor in circuit on VCC_3.3V
node (useful for GSM products)
n/a
Yes
R102 - VCC_3.3V Adjust
R102 can be used to scale the output of the VCC_3.3V on board regulator in the
range of 2.0 V-5.0 V when CN201 pins 1 and 2 are jumpered and SW201 (Dip-1)
is off.
1.1C Apr-06 11

Mini Card Universal Development Kit Quick Start Guide
Install/update drivers
Contact your Sierra Wireless FAE for instructions on downloading the most
recent driver/software installation package for your module. This package
contains drivers for Windows 2000 Professional and Windows XP Professional.
Install drivers for CDMA modules (MC57xx)
1. Download the installation package as instructed by your Sierra Wireless
FAE.
2. If you have installed earlier versions of the Sierra Wireless drivers, you
must remove them before continuing:
a. Open the Control Panel (Start > Settings > Control Panel or Start >
Control Panel depending on your operating system and view).
b. Double-click
Add or Remove Programs.
c. Select
Sierra Wireless USB MUX Driver package.
d. Click
Remove. You are prompted to confirm that the package is
to be deleted.
e. Click
Yes. The package is deleted and the installed programs list
is updated.
f. Close the window.
3. Run the installer file (double-click the icon in Windows Explorer, or use
Start > Run and then browse for the file). The Sierra Wireless USB MUX
Driver package Installation window appears.
4. Click
Next. The License Agreement appears.
5. Read the agreement, select I accept the terms in the license agreement, and
then click Next. The Customer Information section appears.
6. Enter appropriate information (name, organization, installation options)
and then click Next. The Setup Type window appears.
7. Select
Complete and then click Next. The Ready to Install the Program
window appears.
8. Click Install. A progress indicator appears, showing the progress of the
installation process, and then the Installation Completed window
appears.
9. Click
Finish.
10. Connect your computer to the daughterboard using the USB cable –
several Found New Hardware balloons appear above the tool tray as the
system detects the Mini Card devices. After the devices are detected, you
can see them in the Device Manager in the following categories:
Modems
• Sierra Wireless Modem Device
Network adapters
12 2130677

Setup and installation
• Sierra Wireless 1xEV-DO Network Adapter
• Sierra Wireless 1xEV-DO Network Adapter – Eacfilt Miniport
• Sierra Wireless 1xEV-DO Network Adapter – Packet Scheduler
Miniport
Ports (COM&LPT)
• Sierra Wireless COM Port Device
• Sierra Wireless COM Port Device
Universal Serial Bus controllers
• Sierra Wireless MC5720 Device
Install drivers for UMTS modules (MC87xx)
1. Download the installation package as instructed by your Sierra Wireless
FAE.
2. If you have installed earlier versions of the drivers, you must remove
them before loading the new ones:
a. Open the Control Panel (Start > Settings > Control Panel or Start >
Control Panel).
b. Double-click
System. The System Properties window appears.
c. Click the
Hardware tab.
d. Click
Device Manager.
e. Expand
Universal Serial Bus controllers to show the installed
devices.
f. Right-click the Sierra Wireless MC87xx Device entry and choose
Uninstall.
g. Click
OK to confirm that the device is to be uninstalled.
This removes all of the Sierra Wireless drivers listed in Step 4.
3. Locate and run DriverInstaller.exe – it is in the Software\DriverInstaller
folder. You can use Start > Run and then browse for the file, or double-
click the program icon in Windows Explorer.
Note: There is no feedback – the program takes only a few moments to
run.
4. Connect your computer to the daughterboard using the USB cable –
several Found New Hardware balloons appear above the tool tray as the
system detects the Mini Card devices. After the devices are detected, you
can see them in the Device Manager in the following categories:
Network adapters
• Sierra Wireless HSDPA Network Adapter
Ports (COM&LPT)
• Sierra Wireless AT Command Port (UMTS)
• Sierra Wireless CNS Port (UMTS)
1.1C Apr-06 13

Mini Card Universal Development Kit Quick Start Guide
• Sierra Wireless Data Port (UMTS)
• Sierra Wireless DM Port (UMTS)
Universal Serial Bus controllers
• Sierra Wireless MC87xx Device
Install Watcher
Contact your Sierra Wireless FAE for instructions on downloading the correct
version of Watcher for your module, or to order the software on CD.
Install Watcher for CDMA modules (MC57xx)
To install Watcher (for Windows 2000 Professional and Windows XP
Professional):
1. If you have installed an earlier version of Watcher, you must remove it
before continuing:
a. Open the Control Panel (Start > Control Panel or Start > Settings >
Control Panel).
b. Double-click
Add or Remove Programs.
c. Select
Sierra Wireless EVDO Watcher.
d. Click
Change/Remove.
2. Download the installation file indicated by your Sierra Wireless FAE –
this is a .zip file.
3. Install Watcher – unzip the file and then run launch.exe. The 3G Wireless
Module screen appears.
4. Click
Notebook Installation. The screen options change.
5. Click
Notebook Software Installation. The Watcher installation Welcome
window appears.
6. Click
Next. The License Agreement appears.
7. Read the agreement, select I accept the terms in the license agreement, and
then click Next. The Customer Information section appears.
8. Enter appropriate information (name, organization, installation options)
and then click Next. The destination folder selection section appears.
9. Use the default folder (or click Change to select a different folder), and
then click Next. The Setup Type section appears.
10. Select Complete and then click Next. The Ready to Install the Program
section appears.
14 2130677

Setup and installation
11. Click Install. A progress indicator appears, showing the progress of the
installation process.
a. If you are prompted to retain existing drivers, click Yes (you
have just installed the most recent drivers in the previous
procedure).
The Installation Completed section appears.
12. Click Finish.
13. On the 3G Wireless Module screen, click exit.
Install Watcher for UMTS modules (MC87xx)
To install Watcher (for Windows 2000 Professional and Windows XP
Professional):
1. If you have installed an earlier version of Watcher, you must remove it
before continuing:
a. Open the Control Panel (Start > Control Panel or Start > Settings >
Control Panel).
b. Double-click
Add or Remove Programs.
c. Select
Sierra Wireless 3G Watcher.
d. Click
Change/Remove.
2. Download the installation file indicated by your Sierra Wireless FAE –
this is an .msi file.
3. Install Watcher – run the .msi file. The Watcher installation Welcome
window appears.
4. Click
Next. The Select Region section appears.
5. Select the appropriate region and click Next. The License Agreement
appears.
6. Read the agreement, select I accept the terms in the license agreement, and
then click Next. The destination folder selection section appears.
7. Use the default folder (or click Change to select a different folder), and
then click Next. The Device type section appears.
8. Click
Sierra Wireless HSDPA Embedded MiniCard. The Setup Type section
appears.
9. Select
Complete and then click Next. The Ready to Install the Program
section appears.
10. Click Install. A progress indicator appears, showing the progress of the
installation process, and then the Installation Completed section appears.
11. Click Finish.
1.1C Apr-06 15