Contents
- 1. User manual 1 of 2
- 2. User manual 2 of 2
User manual 2 of 2
© 2008 4IPNET, INC.
93
4ipnet WHG301
User
’
s Manual
4.4.1 Network Address Translation
Set the configuration for DMZ, Public Accessible Server and Port and Redirect.
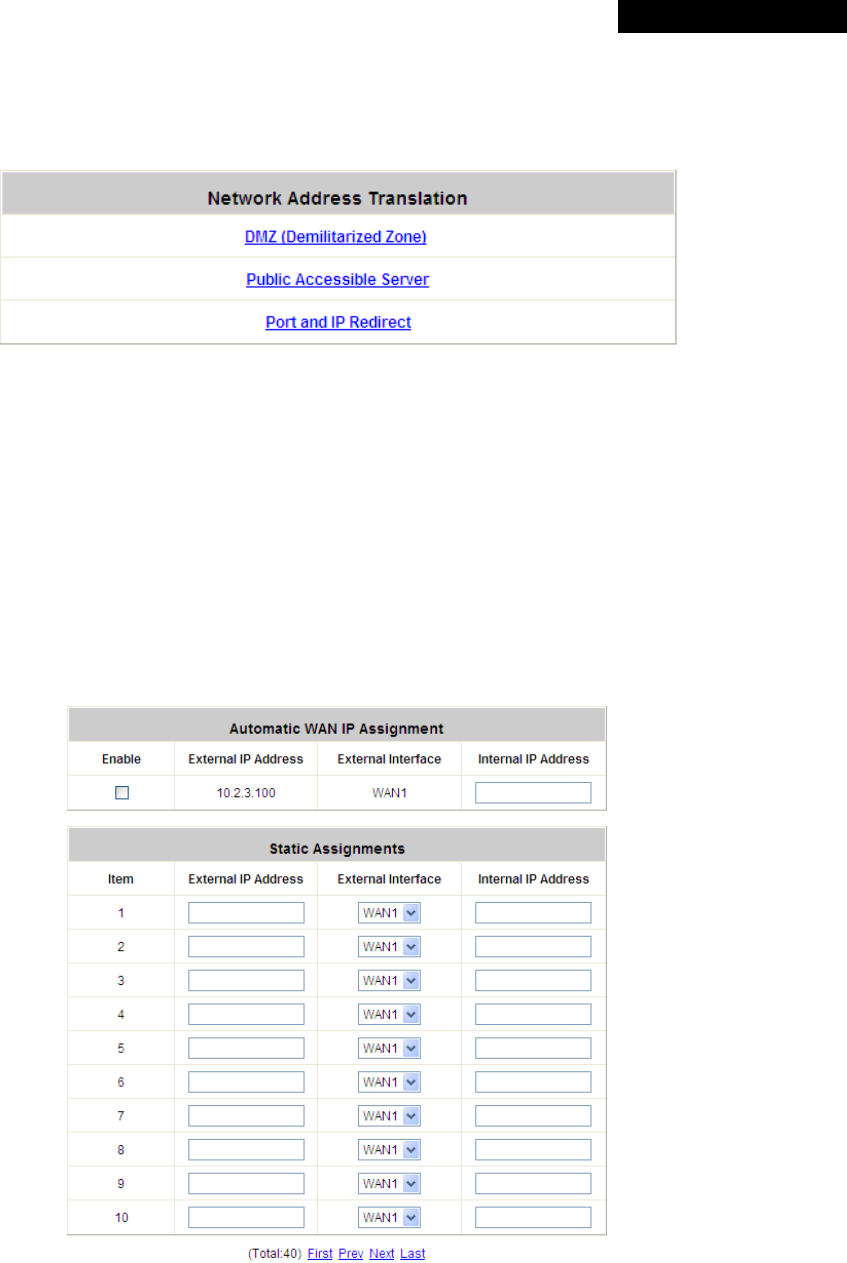
Ÿ DMZ
The system supports up to 40 sets of Internal IP address (LAN) to External IP address (WAN) mapping in the
Static Assignments. The External IP Address of the Automatic WAN IP Assignment is the IP address of External
Interface (WAN1) that will change dynamically if WAN1 Interface is Dynamic. When Automatic WAN IP
Assignments is enabled, the entered Internal IP Address of Automatic WAN IP Assignment will be bound with
WAN1 interface. Each Static Assignment could be bound with the chosen External Interface, WAN1 or WAN2.
There are 40 sets of static Internal IP Address and External IP Address available. Enter Internal and
External IP Addresses as a set. After the setup, accessing the WAN will be mapped to access the Internal IP
Address. These settings will become effective immediately after clicking the Apply button.
© 2008 4IPNET, INC.
94
4ipnet WHG301
User
’
s Manual
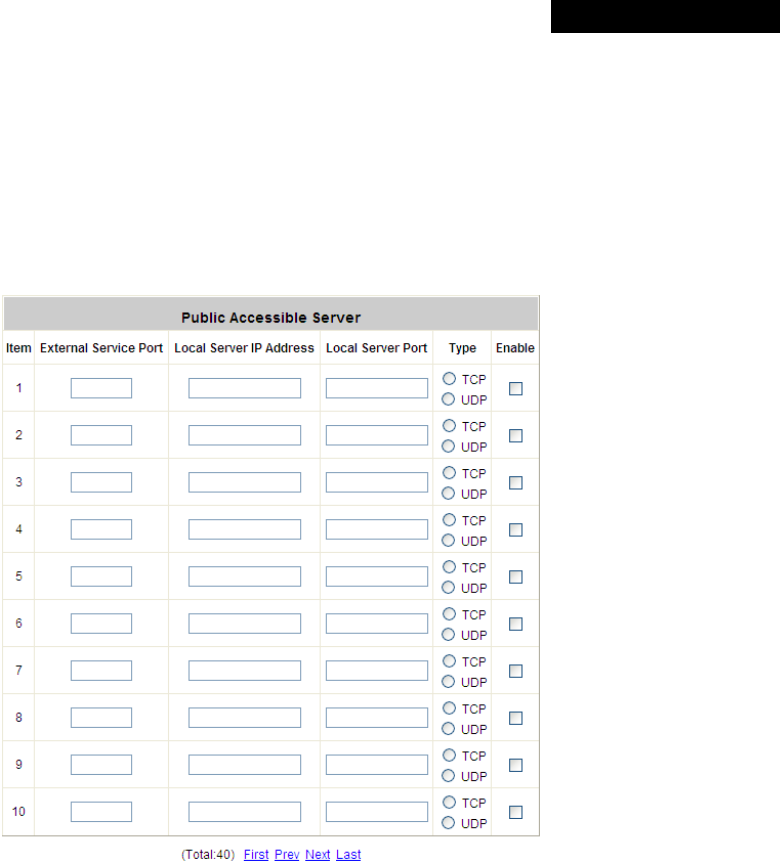
Ÿ Public Accessible Server
This function allows the administrator to set 40 virtual servers at most, so that client devices outside the
managed network can access these servers within the managed network. Different virtual servers can be
configured for different sets of physical services, such as TCP and UDP services in general. Enter the “External
Service Port”, “Local Server IP Address” and “Local Server Port”. Select “TCP” or “UDP” for the service’s
type. In the Enable column, check the desired server to enable. These settings will become effective
immediately after clicking the Apply button.
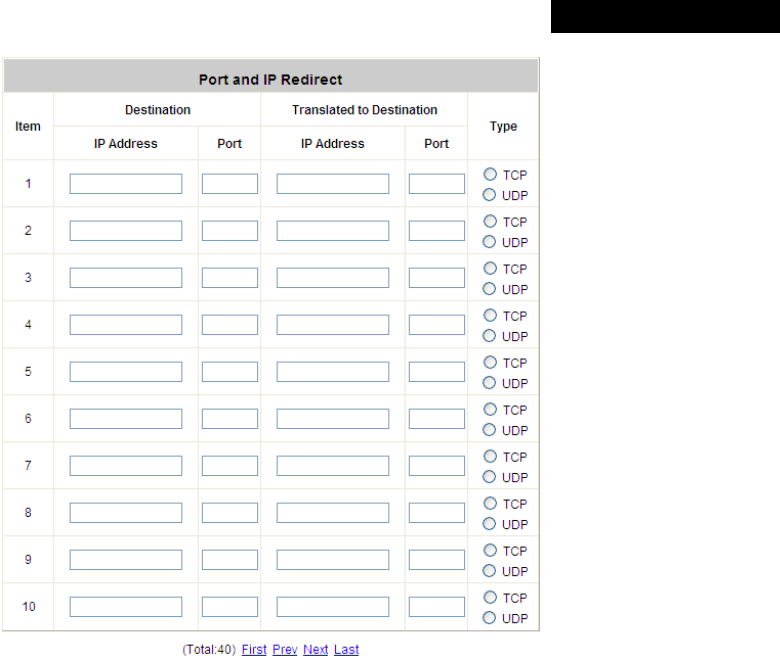
Ÿ Port and IP Redirect
This function allows the administrator to set 40 sets of the IP addresses at most for redirection purpose. When
the user attempts to connect to a destination IP address listed here, the connection packet will be converted and
redirected to the corresponding destination. Please enter the “IP Address” and “Port” of Destination, and the
“IP Address” and “Port” of Translated to Destination. Select “TCP” or “UDP” for the service’s type. These
settings will become effective immediately after clicking Apply.
© 2008 4IPNET, INC.
95
4ipnet WHG301
User
’
s Manual
© 2008 4IPNET, INC.
96
4ipnet WHG301
User
’
s Manual
4.4.2 Privilege List
Set the configuration for Privilege IP Address List and Privilege MAC Address List.
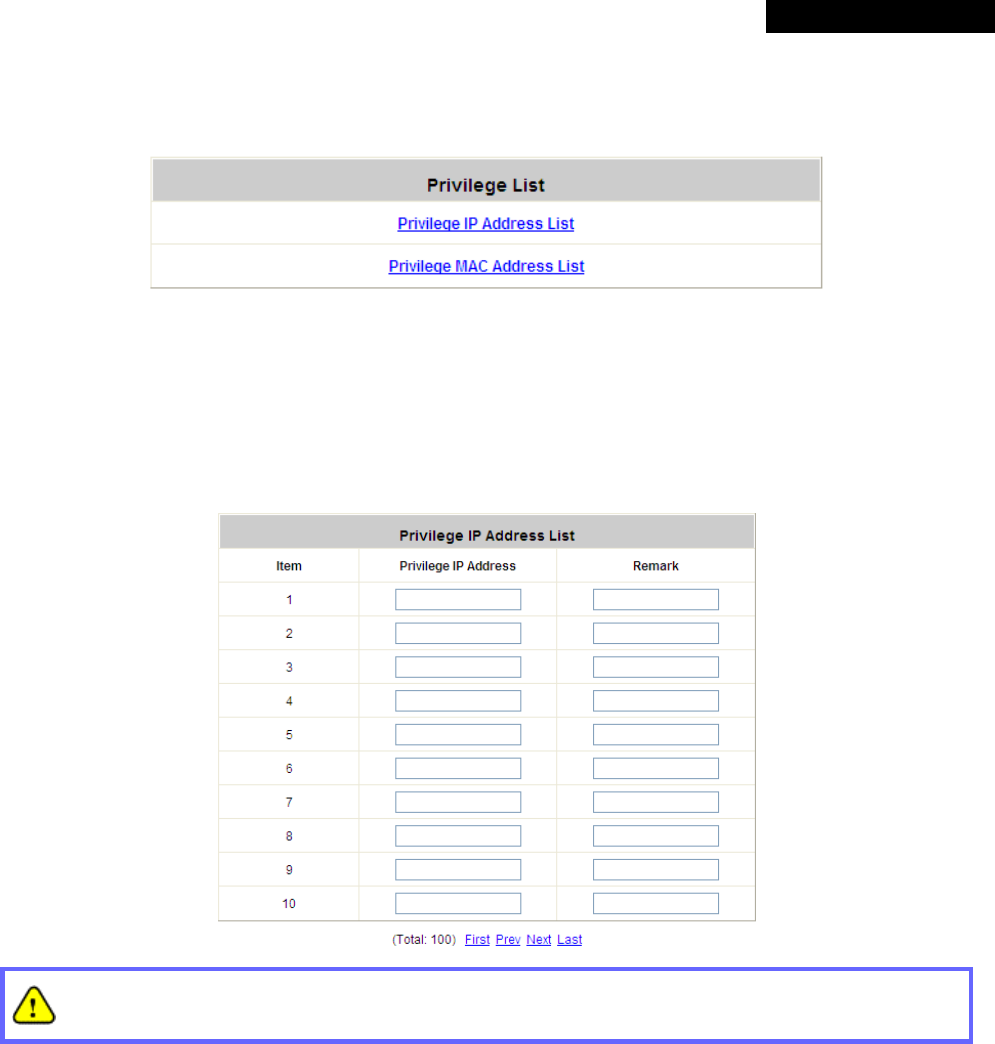
Ÿ Privilege IP Address List
If there are workstations inside the managed network that need to access the network without authentication,
enter the IP addresses of these workstations in the “Privilege IP Address List”. The “Remark” field is not
necessary but is useful to keep track. WHG301 allows 100 privilege IP addresses at most. These settings will
become effective immediately after clicking Apply.
Permitting specific IP addresses to have network access rights without going through standard
authentication process at the controlled port may cause security problems.
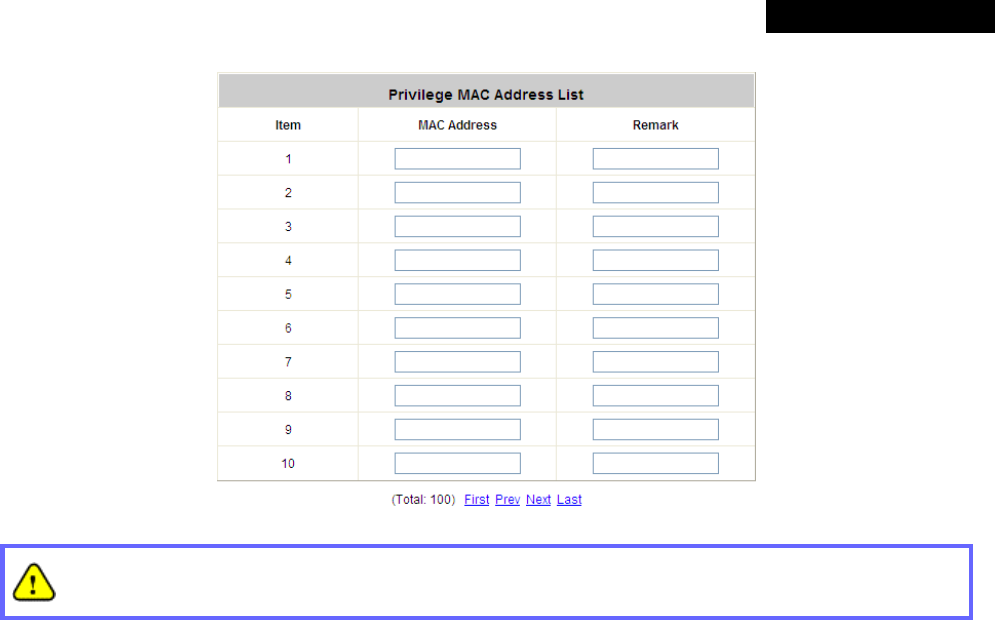
Ÿ Privilege MAC Address List
In addition to the IP address, the MAC address of the workstations that need to access the network without
authentication can also be set in the “Privilege MAC Address List”. WHG301 allows 100 privilege MAC
addresses at most. When manually creating the list, enter the MAC address (the format is xx:xx:xx:xx:xx:xx) as
well as the remark (not necessary). These settings will become effective immediately after clicking Apply.
© 2008 4IPNET, INC.
97
4ipnet WHG301
User
’
s Manual
Permitting specific MAC addresses to have network access rights without going through standard
authentication process at the controlled port may cause security problems
© 2008 4IPNET, INC.
98
4ipnet WHG301
User
’
s Manual
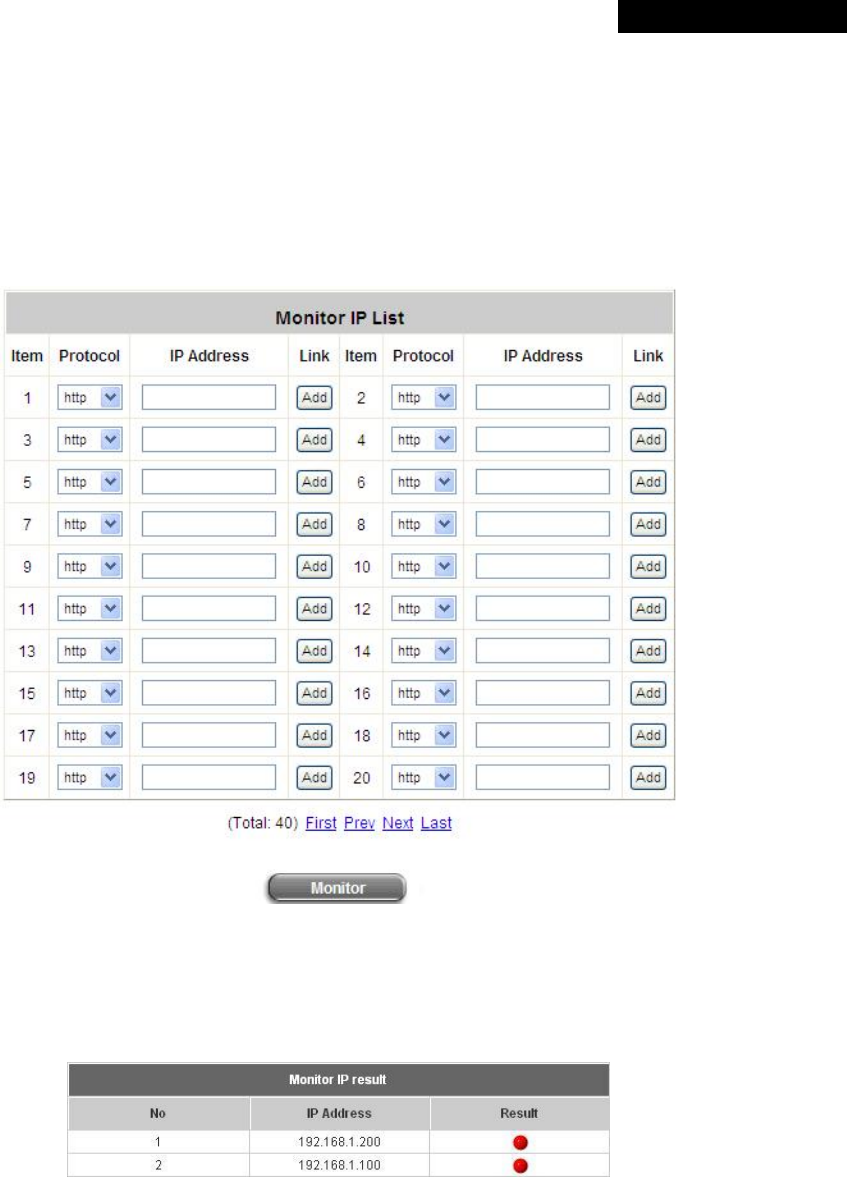
4.4.3 Monitor IP List
WHG301 will send out a packet periodically to monitor the connection status of the IP addresses on the list. If the
monitored IP address does not respond, the system will send an e-mail to notify the administrator that such
destination is not reachable. After entering the necessary information, click Apply to save the settings. Click
Monitor to check the current status of all the monitored IP. The system supports monitoring on 40 IP addresses
listed in the “Monitor IP List”.
On each monitored item with a WEB server running, administrators may add a link for the easy access by selecting
a protocol, http or https, and click the Add button. After clicking Add button, the IP address will become a hyperlink,
and administrators can easily access the host by clicking the hyperlink remotely. Click the Del button to remove the
setting.
© 2008 4IPNET, INC.
99
4ipnet WHG301
User
’
s Manual
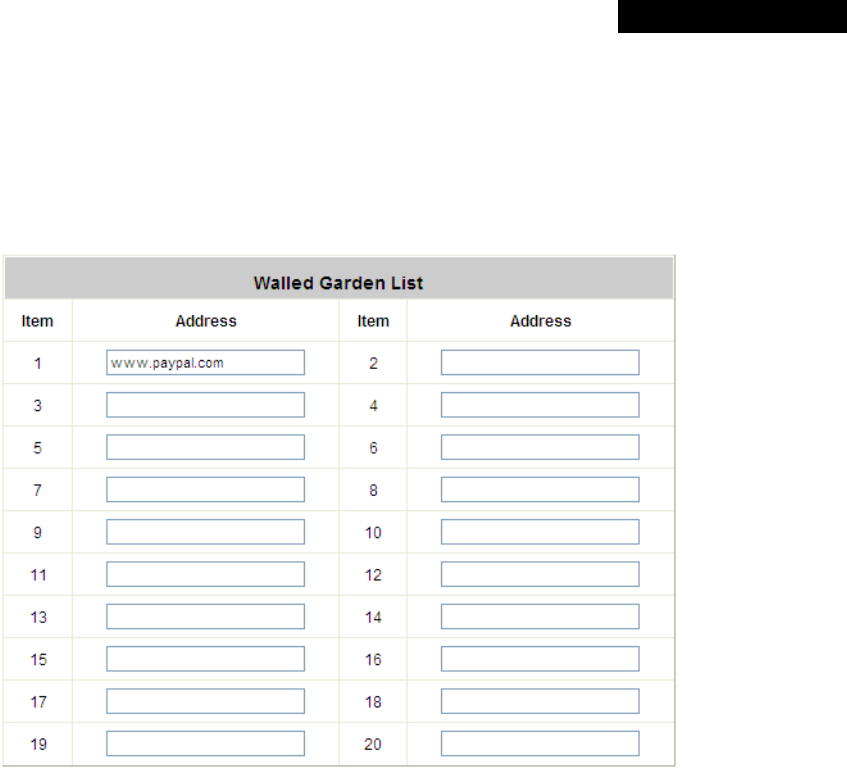
4.4.4 Walled Garden List
This function provides certain free services for users to access the websites listed here before login and
authentication. Up to 20 addresses or domain names of the websites can be defined in this list. Users without the
network access right can still have a chance to experience the actual network service free of charge. Enter the
website IP Address or Domain Name in the list and click Apply to save the settings.
© 2008 4IPNET, INC.
100
4ipnet WHG301
User
’
s Manual
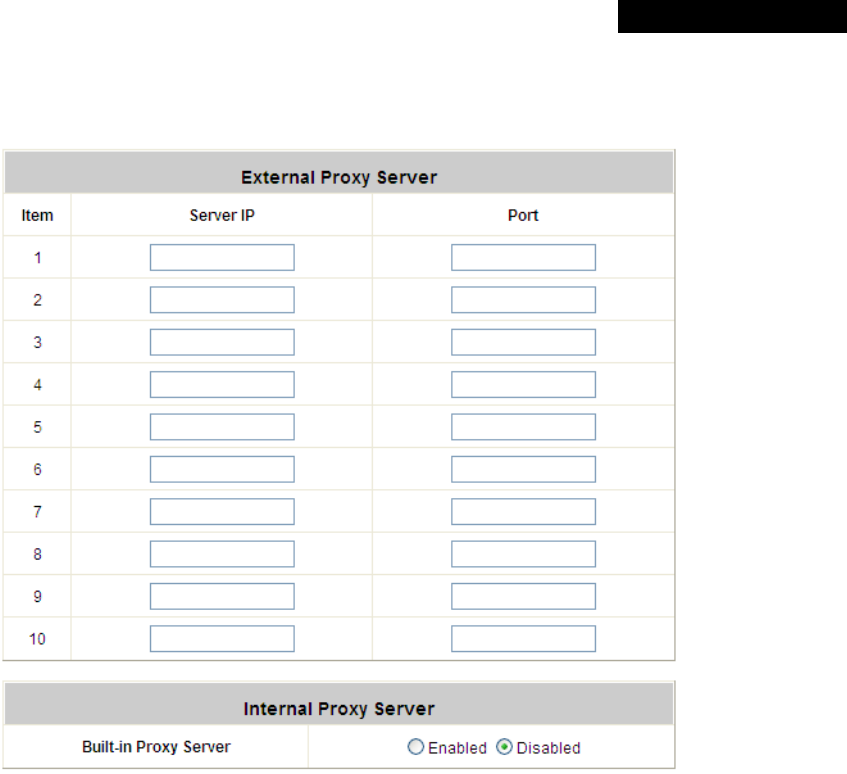
4.4.5 Proxy Server Properties
WHG301 supports Internal Proxy Server and External Proxy Server functions.
Ÿ External Proxy Server: Under the security management of WHG301, the system will match the External Proxy
Server list to the clients’ proxy settings. If there is not a match, the clients will not be able to reach the login page
and thus unable to access the network. If there is a match, the clients will be directed to the system for
authentication. After a successful authentication, the clients will be redirected back to the desired proxy servers
depending on different situations.
Ÿ Internal Proxy Server: WHG301 has a built-in proxy server. If this function is enabled, the clients will be forced
to treat WHG301 as the proxy server regardless of their original proxy settings.
For more details about how to set up the proxy servers, please refer to Appendix D. Proxy Setting.
© 2008 4IPNET, INC.
101
4ipnet WHG301
User
’
s Manual
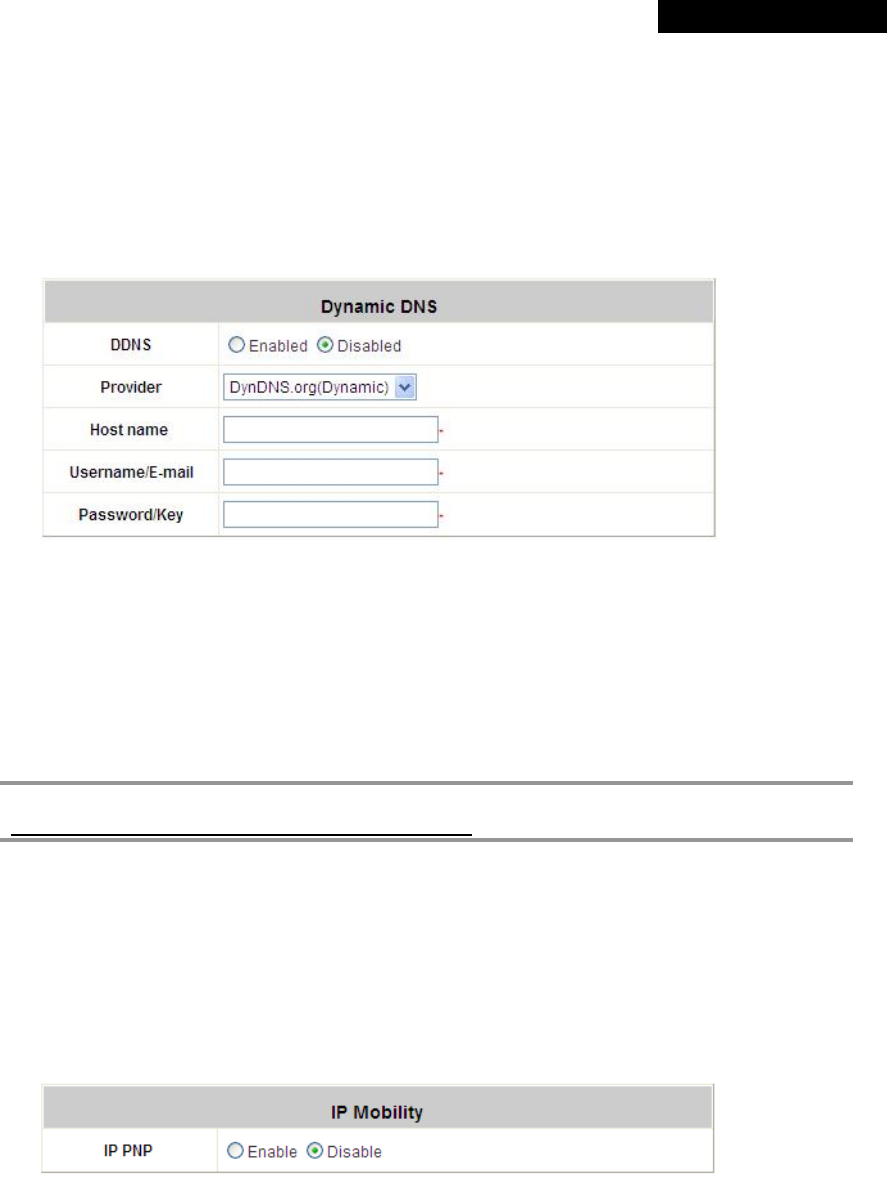
4.4.6 Dynamic DNS
Before activating this function, you must have your Dynamic DNS hostname registered with a Dynamic DNS
provider. WHG301 supports DNS function to alias the dynamic IP address for the WAN port to a static domain name,
allowing the administrator to easily access WHG301’s WAN. If the dynamic DHCP is activated at the WAN port, it
will update the IP address of the DNS server periodically. These settings will become effective immediately after
clicking Apply.
Ÿ DDNS: Enable or disable this function.
Ÿ Provider: Select the DNS provider.
Ÿ Host name: The IP address/domain name of the WAN port.
Ÿ Username/E-mail: The register ID (username or e-mail) for the DNS provider.
Ÿ Password/Key: The register password for the DNS provider.
8 Note:
To apply for free Dynamic DNS service, you may go to
http://www.dyndns.com/services/dns/dyndns/howto.html.
4.4.7 IP Mobility
WHG301 supports IP PNP function.
At the user end, a static IP address can be used to connect to the system. Regardless of what the IP address at the
user end is, authentication can still be performed through WHG301.
© 2008 4IPNET, INC.
102
4ipnet WHG301
User
’
s Manual
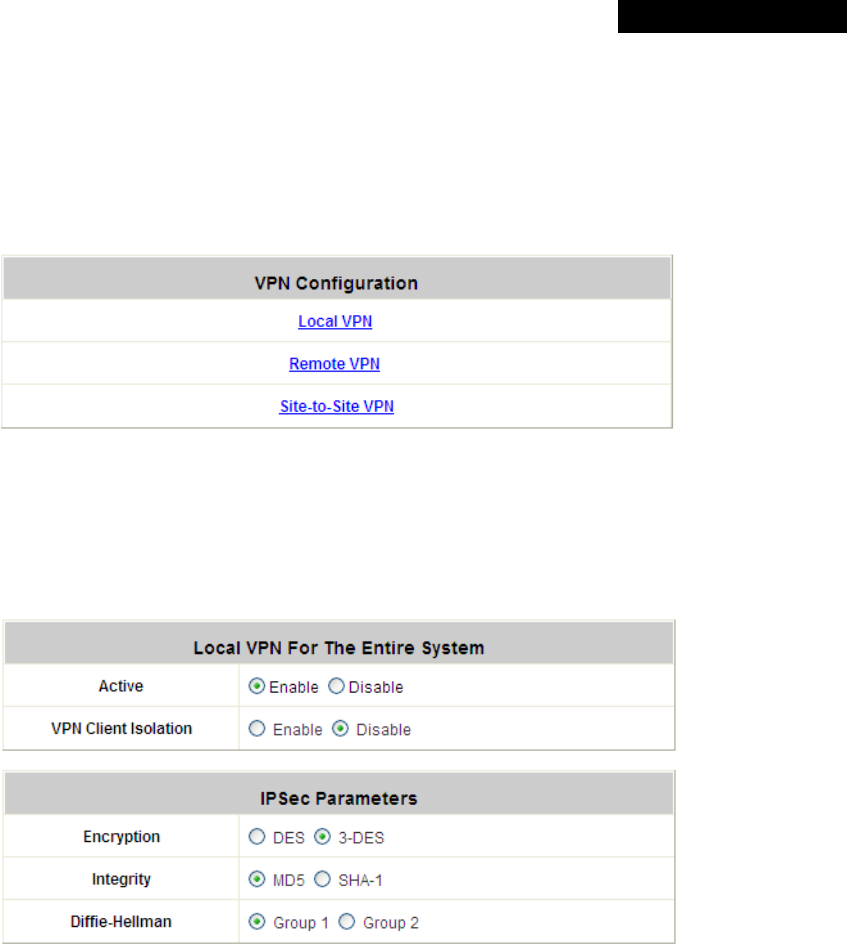
4.4.8 VPN Configuration
Virtual Private Network, or VPN, a type of technology designed to increase the security of information transferred
over the Internet. VPN can work with either wired or wireless networks, as well as with dial-up connections over
POTS. VPN creates a private encrypted tunnel from the end user's computer, through the local wireless network,
through the Internet, all the way to the corporate servers and database.
Local VPN: Local VPN allows to create the VPN tunnel between a user's device and WHG301, to encrypt the data
transmission. In addition, only when this function is enabled (Active) here do users of the entire system are able to
use Local VPN. Local VPN users can also be isolated from each other when VPN Client Isolation is enabled.
For more information about Local VPN, please see Appendix H. Local VPN.
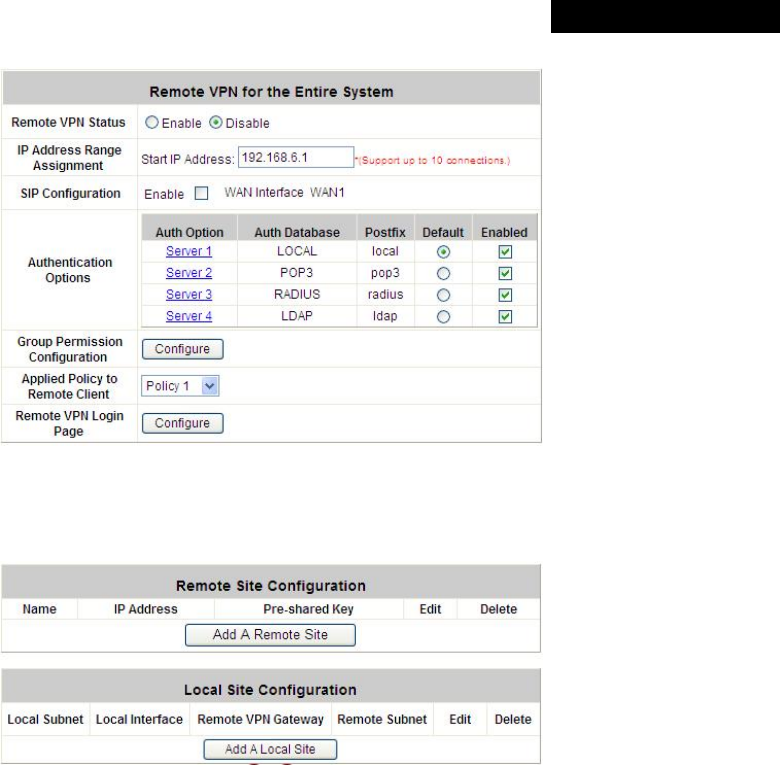
Remote VPN: When the setting is enabled, the system allows the VPN tunnel between a remote client and the
system to encrypt the data transmission via PPTP. The system’s VPN supports end-users’ device under Windows
2000, Windows XP SP1, SP2 and Windows Vista. Start IP field must be entered when enabled. The supported
Authentication Servers, Group Permission, Client Policy, and the Remote VPN login page also can be configured
here. The system supports up to 10 PPTP connections.
© 2008 4IPNET, INC.
103
4ipnet WHG301
User
’
s Manual
Site-to-site VPN: When the setting is enabled, the system enables the IPSec VPN tunnel between two remote
networks/sites to encrypt the data transmission. Click Add A Remote Site button to set configuration about remote
VPN capable devices such as VPN gateway. Click Add A Local Site button to set configuration about local site.
© 2008 4IPNET, INC.
104
4ipnet WHG301
User
’
s Manual
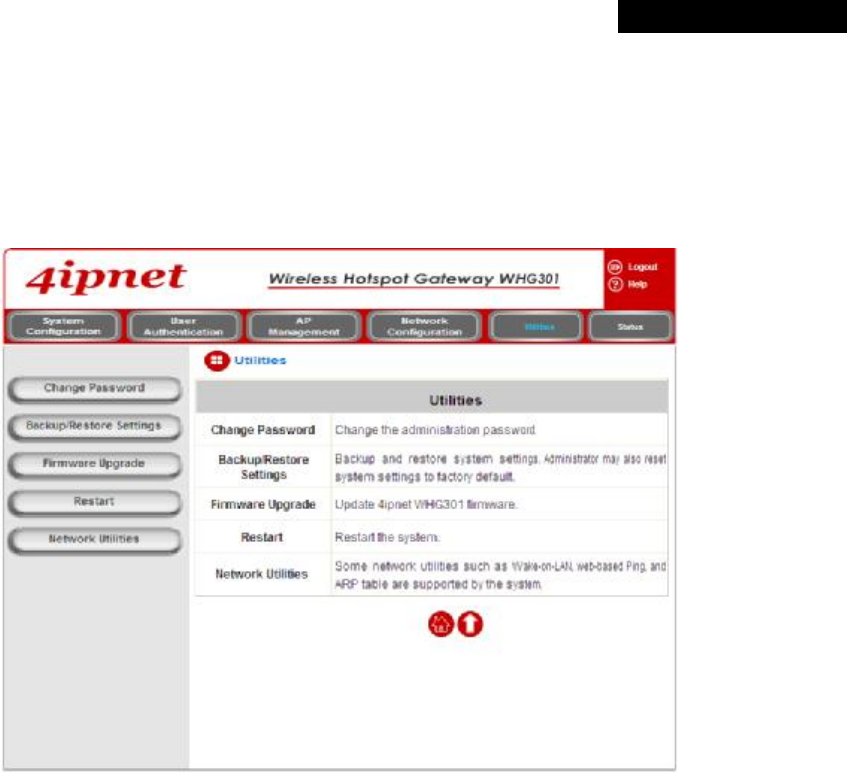
4.5 Utilities
This section provides four utilities to customize and maintain the system including Change Password,
Backup/Restore Settings, Firmware Upgrade, Restart and Network Utilities.
© 2008 4IPNET, INC.
105
4ipnet WHG301
User
’
s Manual
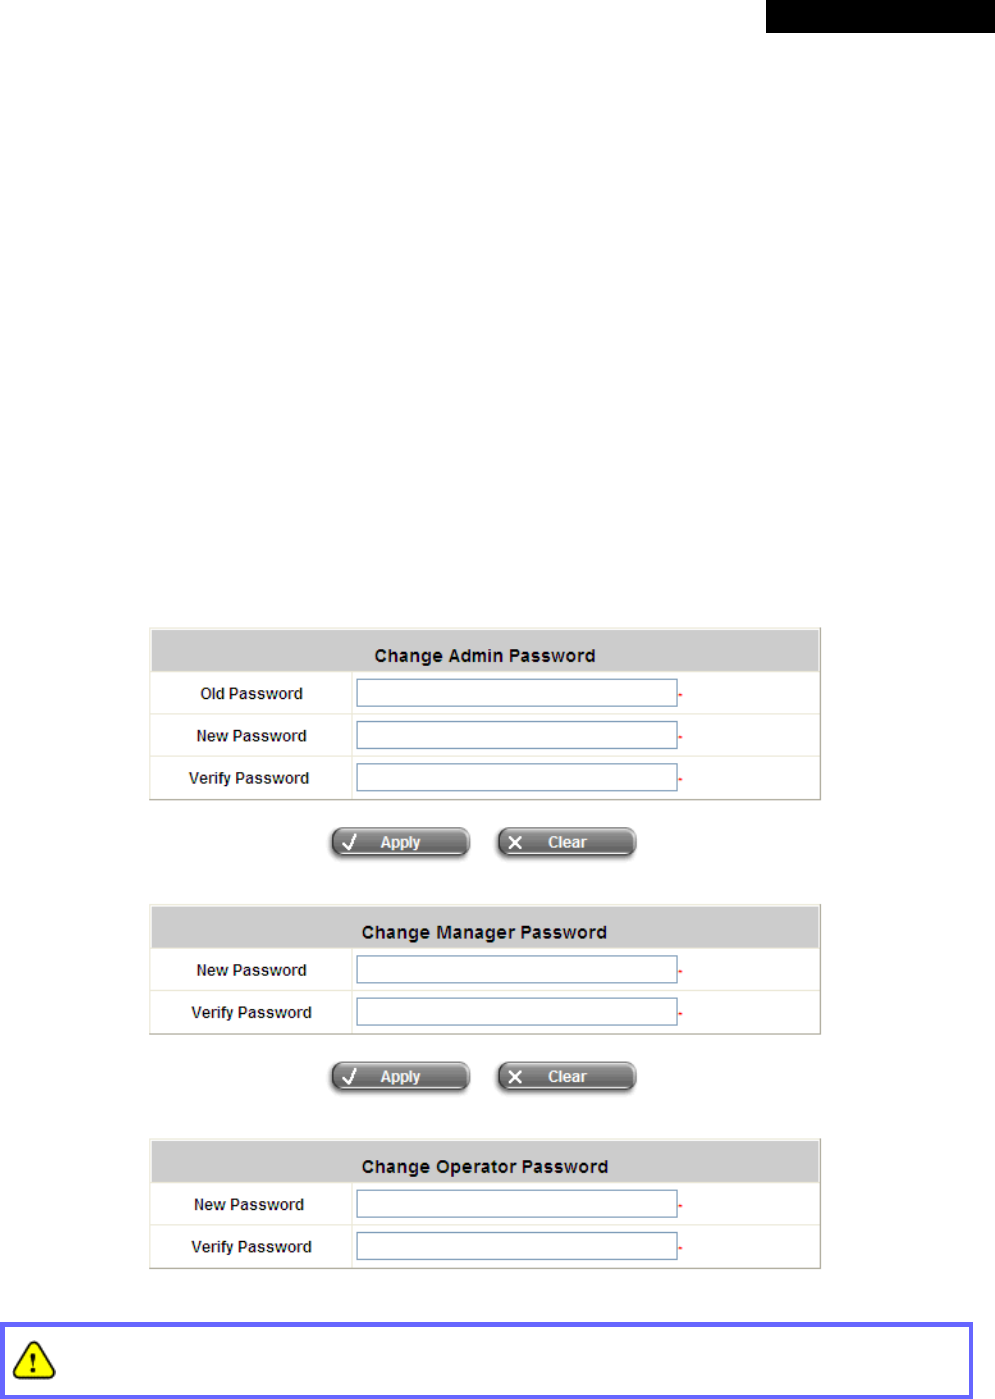
4.5.1 Change Password
There are three levels of authorities: admin, manager or operator. The default usernames and passwords are as
follows:
Admin: The administrator can access all configuration pages of WHG301.
User Name: admin
Password: admin
Manager: The manager can only access the configuration pages under User Authentication to manage the user
accounts, but without permission to change the settings of the profiles of Firewall, Specific Route and Schedule.
User Name: manager
Password: manager
Operator: The operator can only access the configuration page of Create On-demand User to create new
on-demand user accounts and print out the on-demand user account receipts.
User Name: operator
Password: operator
The administrator can change the passwords here. Please enter the current password and then enter the new
password twice to verify. Click Apply to activate this new password.
If the administrator’s password is lost, the administrator’s password still can be changed through the text
mode management interface at the serial console port.
© 2008 4IPNET, INC.
106
4ipnet WHG301
User
’
s Manual
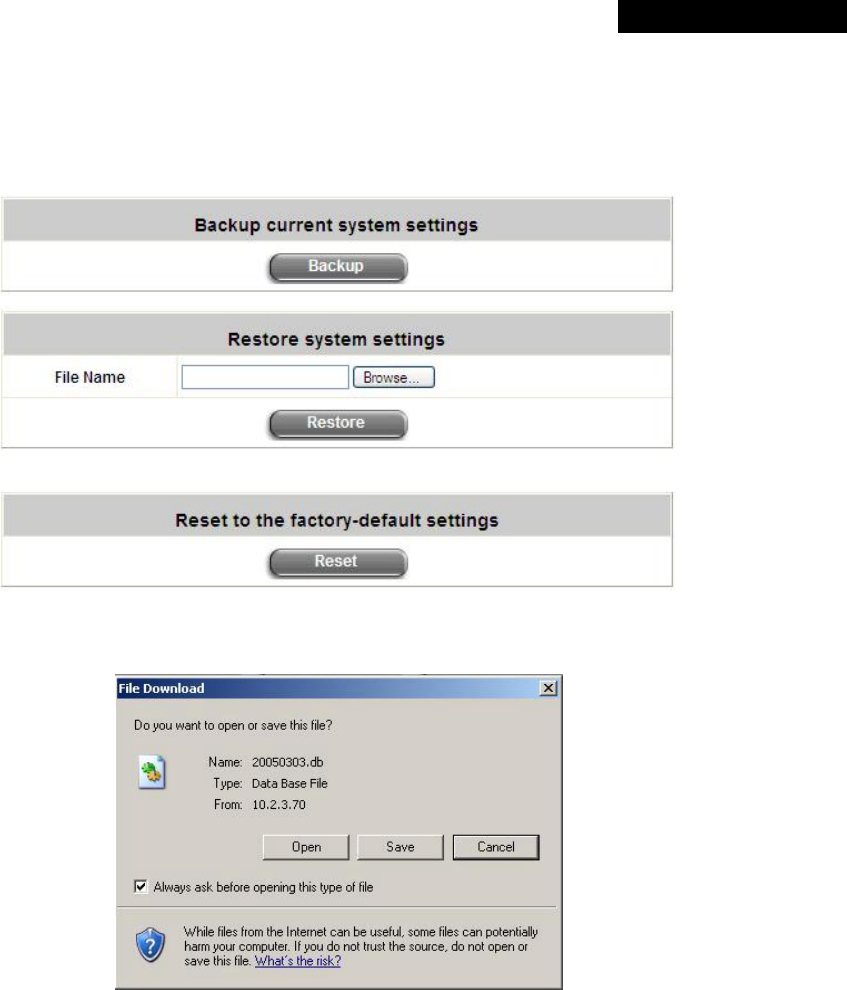
4.5.2 Backup/Restore Settings
This function is used to backup/restore the 4ipnet WHG301 settings. Also, WHG301 can be restored to the factory
default settings here.
Ÿ Backup current system settings: Click Backup to create a .db database backup file and save it on disk.
Ÿ Restore system settings: Click Browse to search for a .db database backup file created by WHG301 and click
Restore to restore to the same settings at the time when the backup file was saved.
Ÿ Reset to the factory-default settings: Click Reset to load the factory default settings of WHG301.
© 2008 4IPNET, INC.
107
4ipnet WHG301
User
’
s Manual
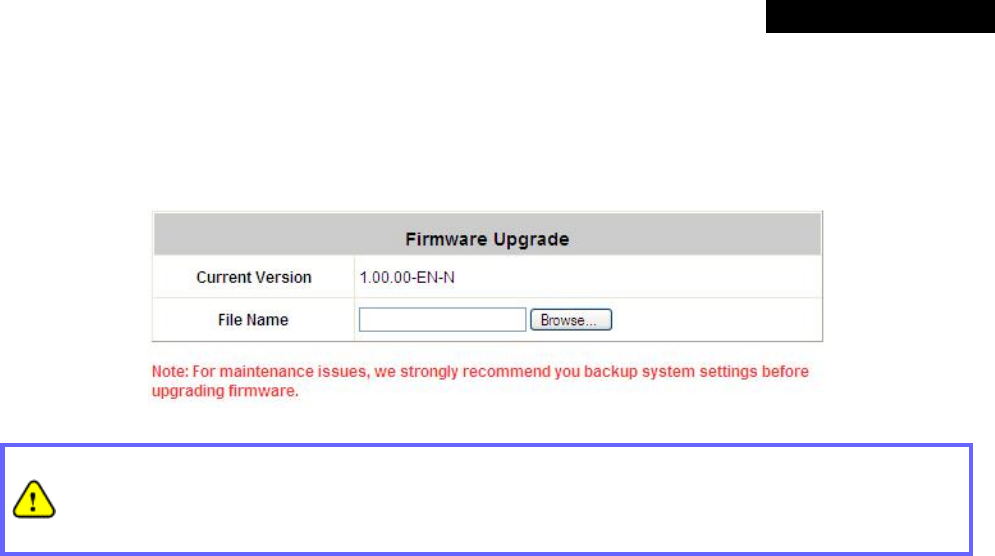
4.5.3 Firmware Upgrade
The administrator can download the latest firmware from website and upgrade the system here. Click Browse to
search for the firmware file and click Apply for the firmware upgrade. It might take a few minutes before the upgrade
process completes and the system needs to be restarted afterwards to activate the new firmware.
1. Firmware upgrade may cause the loss of some data. Please refer to the release notes for the limitation
before upgrading.
2. Please restart the system after upgrading the firmware. Do not power on/off the system during the
upgrade or restart process. It may damage the system and cause malfunction.
© 2008 4IPNET, INC.
108
4ipnet WHG301
User
’
s Manual
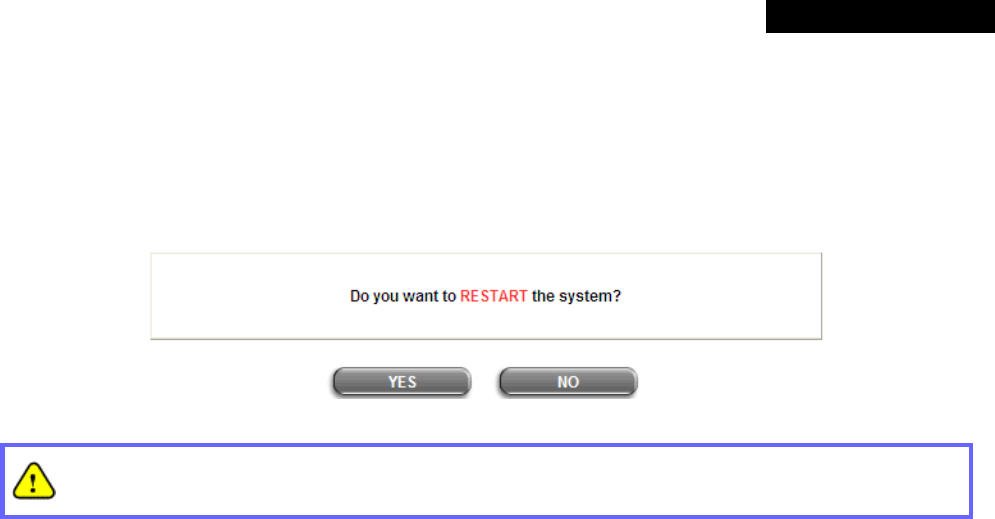
4.5.4 Restart
This function allows the administrator to safely restart 4ipnet WHG301, and the process might take approximately
three minutes. Click YES to restart WHG301; click NO to go back to the previous screen. If the power needs to be
turned off, it is highly recommended to restart WHG301 first and then turn off the power after completing the restart
process.
The connection of all online users of the system will be disconnected when system is in the process of
restarting.
© 2008 4IPNET, INC.
109
4ipnet WHG301
User
’
s Manual
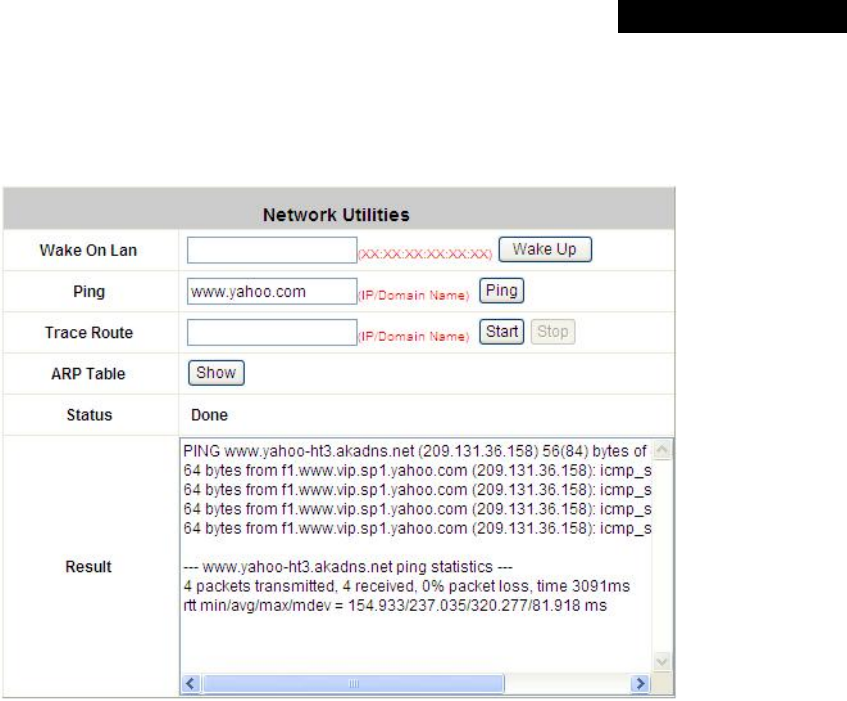
4.5.5 Network Utilities
This function allows the administrators to manage functions including Wake-on-LAN, Ping, Trace Route, and
showing ARP Table by entering IP or Domain Name.
Ø Wake on LAN: It allows the system to remotely boot up a power-down computer with Wake-On-LAN
feature enabled and is on the LAN side. Enter the MAC Address of the desired device and click Wake Up
button to execute this function.
Ø Ping: It allows administrator to detect a device using IP address or Host domain name to see if it is alive or
not.
Ø Trace Route: It allows administrator to find out the real path of packets from the gateway to a destination
using IP address or Host domain name.
Ø ARP Table: It allows administrator to view the IP-to-Physical address translation tables used by address
resolution protocol (ARP).
© 2008 4IPNET, INC.
110
4ipnet WHG301
User
’
s Manual
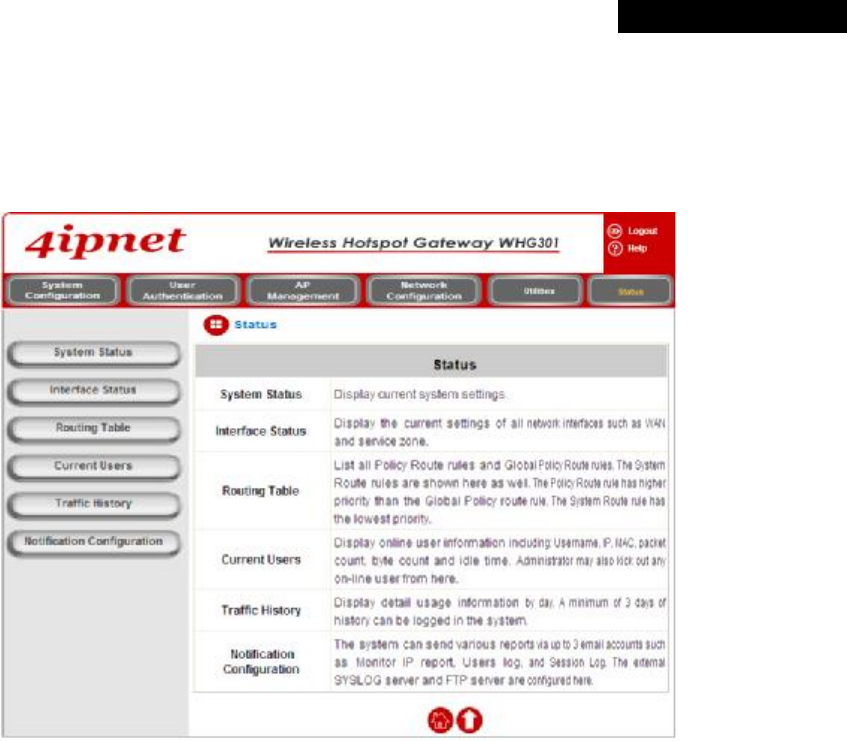
4.6 Status
This section includes System Status, Interface Status, Routing Table, Current Users, Traffic History, and
Notification Configuration to provide system status information and online user status.
© 2008 4IPNET, INC.
111
4ipnet WHG301
User
’
s Manual
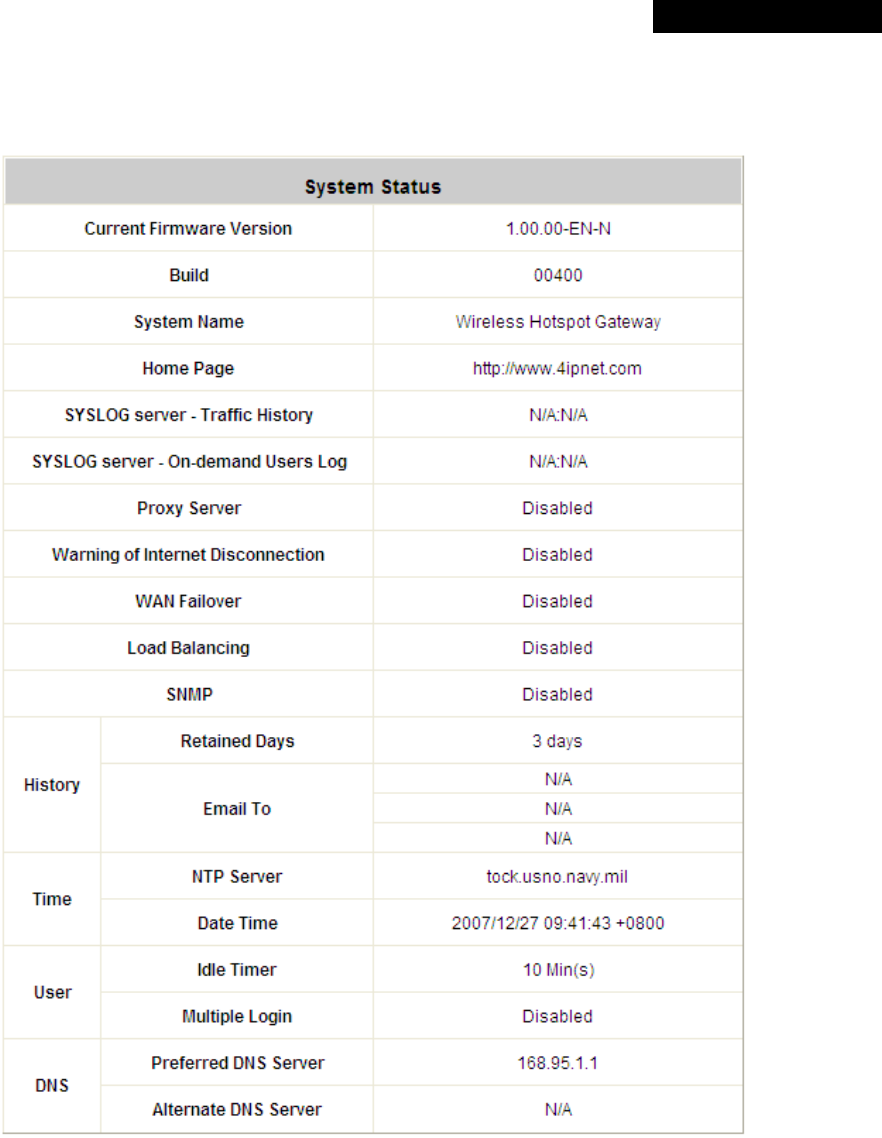
4.6.1 System Status
This section provides an overview of the system for the administrator.

© 2008 4IPNET, INC.
112
4ipnet WHG301
User
’
s Manual
The description of the above-mentioned table is as follows:
Item Description
Current Firmware Version The present firmware version of WHG301
Build The current build number.
System Name The system name. The default is WHG301
Home Page The page the users are directed to after initial login success.
Syslog server-Traffic History The IP address and port number of the external Syslog Server. N/A means
that it is not configured.
Syslog server-On demand User log The IP address and port number of the external Syslog Server. N/A means
that it is not configured.
Proxy Server Enabled/disabled stands for that the system is currently using the proxy
server or not.
Warning of Internet Disconnection
Enabled/Disabled stands for the connection at WAN is normal or abnormal
(Internet Connection Detection) and all online users are
allowed/disallowed to log in the network.
WAN Failover Enabled/Disabled stands for the function currently being used or not.
Load Balancing Enabled/Disabled stands for the function currently being used or not.
SNMP Enabled/disabled stands for the current status of the SNMP management
function.
Retained Days
The maximum number of days for the system to retain the users’ information.
History
Email To The email address to which the traffic history or user ’s traffic history
information will be sent.
NTP Server The network time server that the system is set to align.
Time
Date Time The system time is shown as the local time.
Idle Timer The minutes allowed for the users to be inactive
before their account expires
automatically.
User
Multiple Login
Enabled/disabled stands for the current setting to allow/disallow multiple
logins form the same account.
Preferred DNS
Server IP address of the preferred DNS Server.
DNS Alternate DNS
Server IP address of the alternate DNS Server.
© 2008 4IPNET, INC.
113
4ipnet WHG301
User
’
s Manual
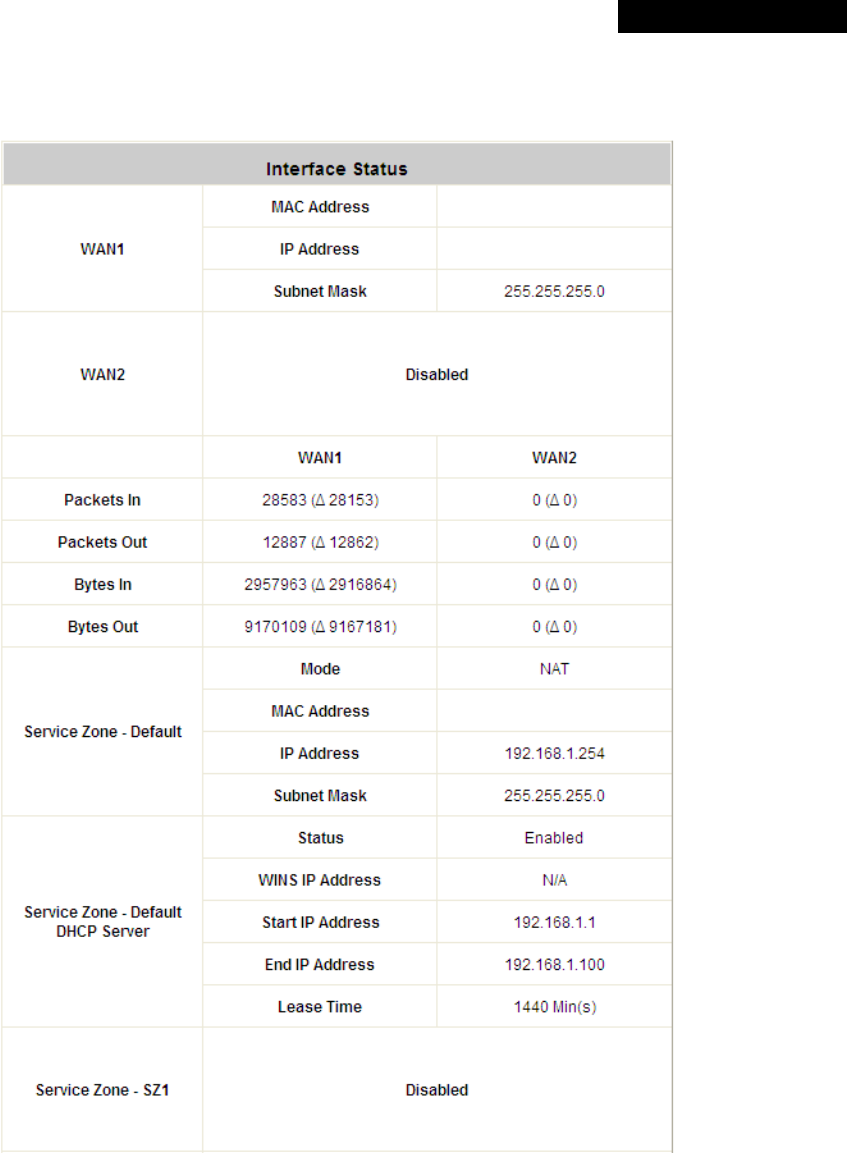
4.6.2 Interface Status
This section provides an overview of the interface for the administrator including WAN1, WAN2, SZ Default~8.

© 2008 4IPNET, INC.
114
4ipnet WHG301
User
’
s Manual
The description of the above-mentioned table is as follows:
Item Description
MAC Address The MAC address of the WAN1 port.
IP Address The IP address of the WAN1 port.
WAN1
Subnet Mask The Subnet Mask of the WAN1 port.
MAC Address The MAC address of the WAN2 port.
IP Address The IP address of the WAN2 port.
WAN2
Subnet Mask The Subnet Mask of the WAN2 port.
Packets In
The total accumulated packets in through this WAN port since the gateway
boots up. The delta shows the difference between the numbers from last time
this Interface Status page is visited.
Packets Out
The total accumulated packets out through this WAN port since the gateway
boots up. The delta shows the difference between the numbers from last time
this Interface Status page is visited.
Bytes In
The total accumulated bytes in through this WAN port since the gateway boots
up. The delta shows the difference between the numbers from last time this
Interface Status page is visited.
Bytes Out
The total accumulated packets out through this WAN port since the gateway
boots up. The delta shows the difference between the numbers from last time
this Interface Status page is visited.
Status Enable/disable stands for status of the DHCP server in Default Service Zone
WINS IP Address The WINS server IP on DHCP server. N/A means that it is not configured.
Start IP Address The start IP address of the DHCP IP range.
End IP address The end IP address of the DHCP IP range.
Service Zone -
Default DHCP
Server
Lease Time Minutes of the lease time of the IP address.
Mode The operation mode of the default SZ.
MAC Address The MAC address of the default SZ.
IP Address The IP address of the default SZ.
Service Zone –
Default
Subnet Mask The Subnet Mask of the default SZ.
© 2008 4IPNET, INC.
115
4ipnet WHG301
User
’
s Manual
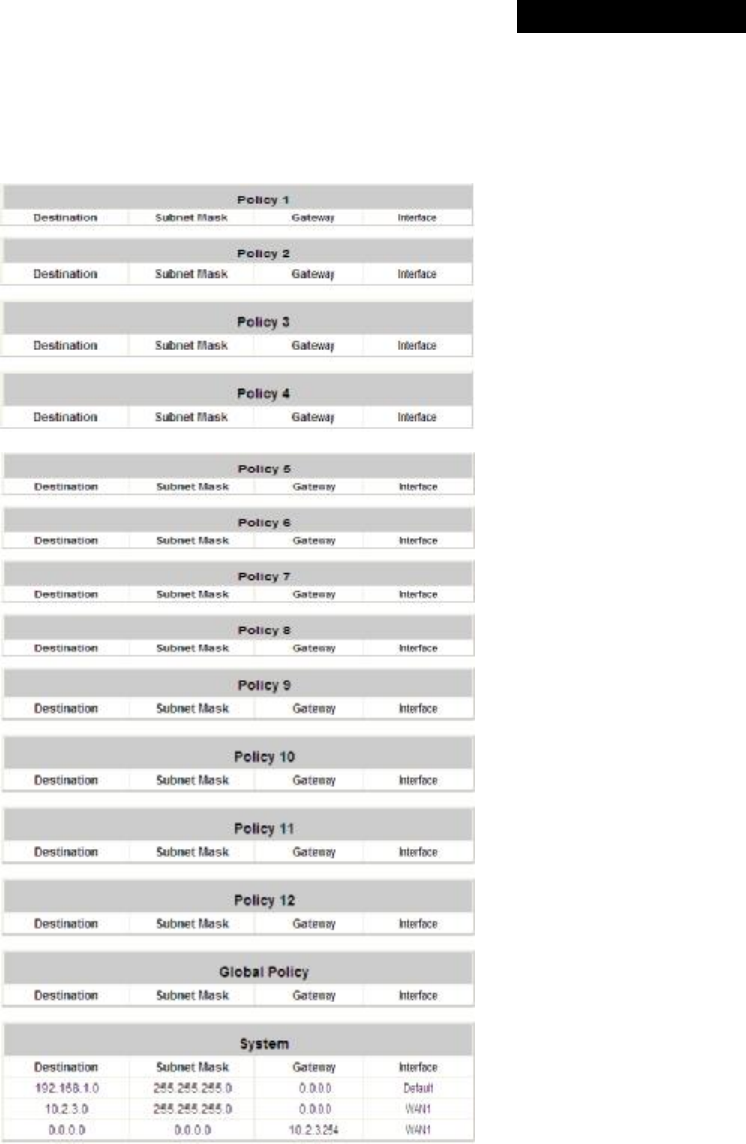
4.6.3 Routing Table
All the Policy Route rules and Global Policy Route rules will be listed here. Also it will show the System Route
rules specified by each interface.
Ÿ Policy 1~12: Shows the information of the individual Policy from 1 to 12.
Ÿ Global Policy: Shows the information of the Global Policy.
Ÿ System: Shows the information of the system administration.
Ø Destination: The destination IP address of the device.
Ø Subnet Mask: The Subnet Mask IP address of the port.
Ø Gateway: The Gateway IP address of the port.
Ø Interface: The choice of interface network, including WAN1, WAN2, Default, or the named Service
Zones to be applied for the traffic interface.
© 2008 4IPNET, INC.
116
4ipnet WHG301
User
’
s Manual
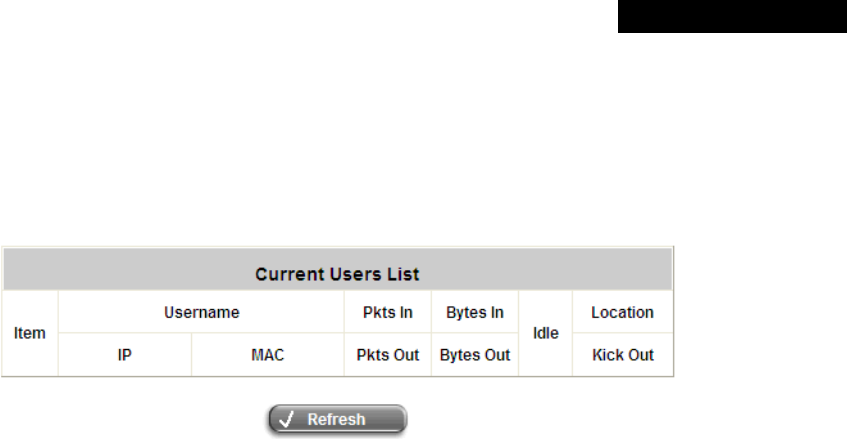
4.6.4 Current Users
In this function, each online user’s information including Username, IP, MAC, Pkts In, Bytes In, Pkts Out, Bytes
Out, Idle, Location and Kick Out will be shown. Administrators can force out a specific online user by clicking the
hyperlink of ”Logout” and check the user access AP status by clicking the hyperlink of the AP name for “Location.”
Click Refresh is to update the current users list.
© 2008 4IPNET, INC.
117
4ipnet WHG301
User
’
s Manual
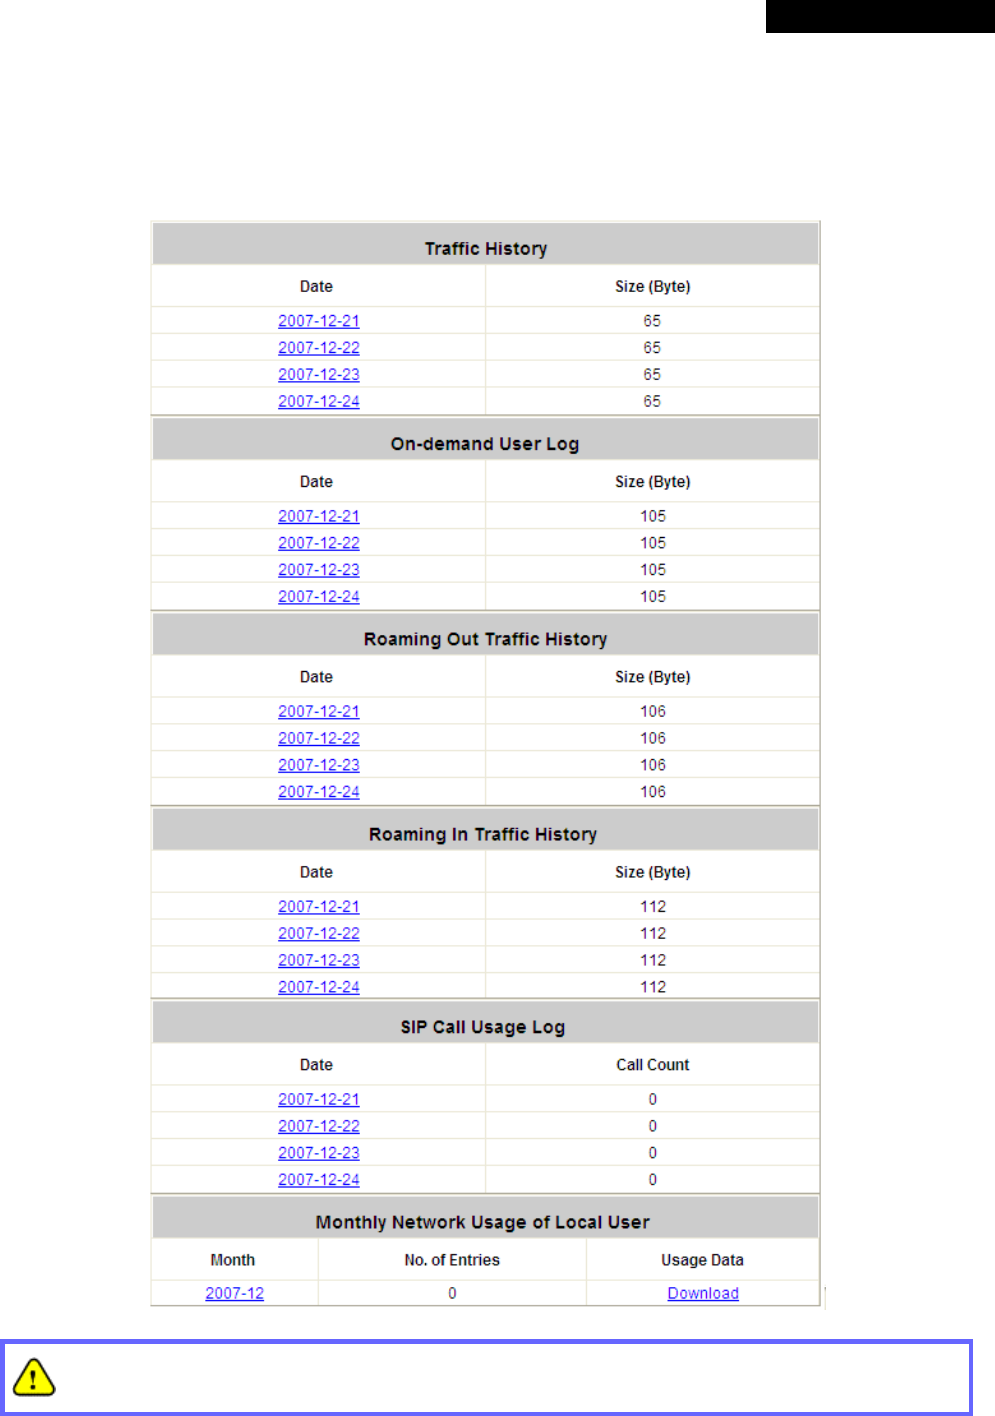
4.6.5 Traffic History
This function is used to check the traffic history of 4ipnet WHG301. The history of each day will be saved separately
in the DRAM for at least 3 days (72 full hours). The system also keeps a cumulated record of the traffic data
generated by each user in the latest 2 calendar months.
Since the history is saved in the DRAM, if you need to restart the system, and at the same time, keep the
history, please manually copy and save the traffic history information before restarting.
© 2008 4IPNET, INC.
118
4ipnet WHG301
User
’
s Manual
If the History Email has been entered under the Notify Configuration page, the system will automatically send out
the history information to that specified email address.
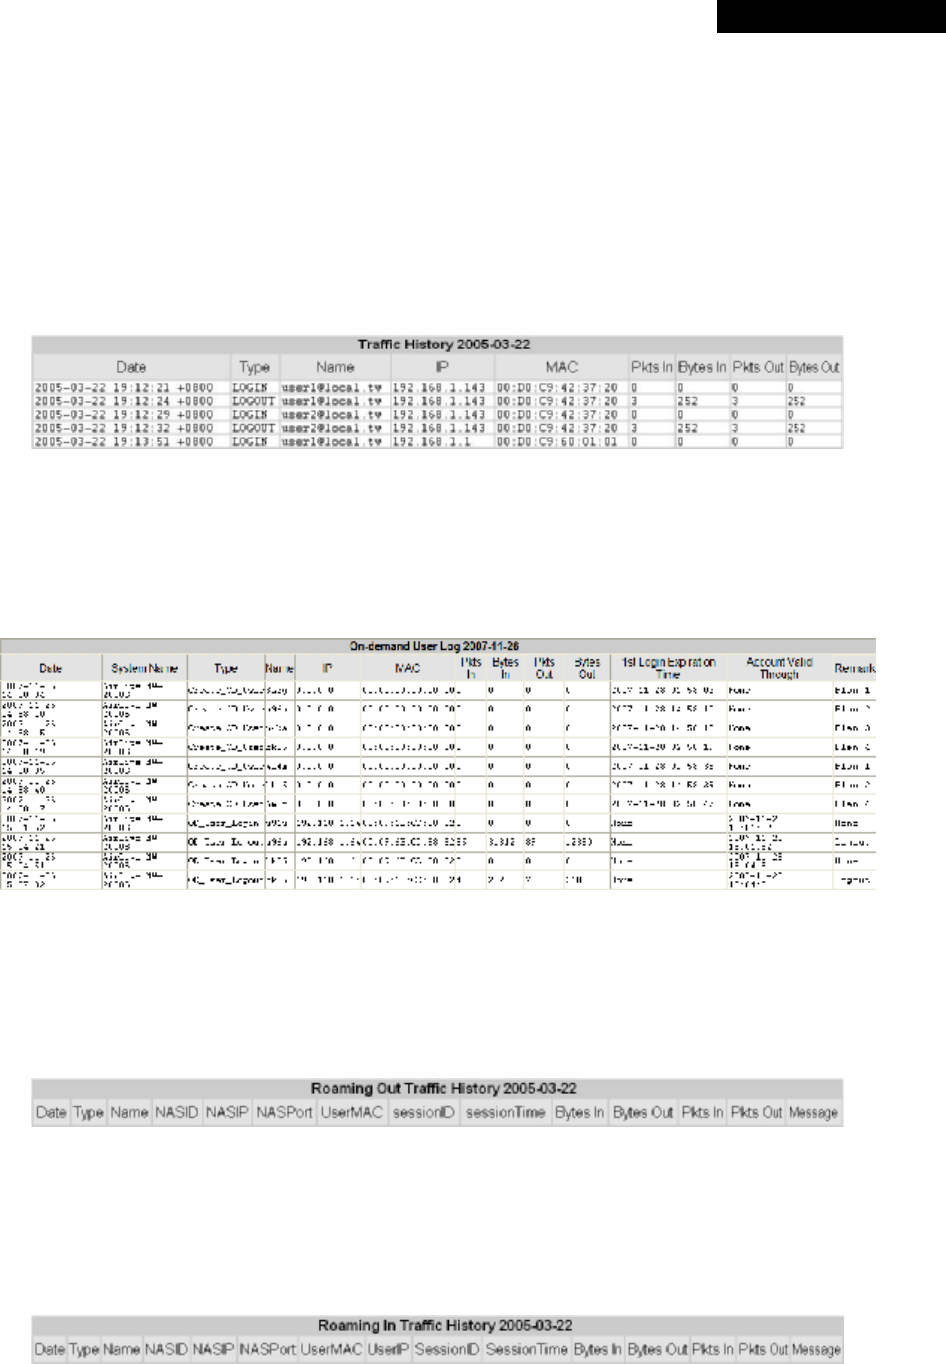
Ÿ Traffic History
All activities occur on the system within the nearest 72 hours are recorded; in date and time order. As shown in
the following figure, each line is a traffic history record consisting of 9 fields, Date, Type, Name, IP, MAC, Pkts
In, Bytes In, Pkts Out and Bytes Out of the user activities.
Ÿ On-demand User Log
As shown in the following figure, each line is a on-demand user log record consisting of 13 fields, Date, System
Name, Type, Name, IP, MAC, Pkts In, Bytes In, Pkts Out, Bytes Out, 1st Login Expiration Time, Account
Valid Through and Remark, of user activities.
Ÿ Roaming Out Traffic History
As shown in the following figure, each line is a roaming out traffic history record consisting of 14 fields,
Date,
Type, Name, NSID, NASIP, NASPort, UserMAC, SessionID, SessionTime, Bytes in, Bytes Out, Pkts In,
Pkts Out and Message, of user activities.
Ÿ Roaming In Traffic History
As shown in the following figure, each line is a roaming in traffic history record consisting of 15 fields, Date,
Type, Name, NSID, NASIP, NASPort, UserMAC, UserIP, SessionID, SessionTime, Bytes in, Bytes Out,
Pkts In, Pkts Out and Message, of user activities.

© 2008 4IPNET, INC.
119
4ipnet WHG301
User
’
s Manual
Ÿ SIP Call Usage Log
The log provides the login and logout activities of SIP clients (device and soft clients) such as Start Time, Caller,
Callee and Duration (seconds)
Ÿ Monthly Network Usage of Local User
The system keeps a cumulated record of the traffic data generated by each user in the latest 2 calendar months.
As shown in the following figure, each line in a monthly network usage of local user record consists of 6 fields,
System Name, Connection Time Usage, Packets In, Bytes In, Packets Out and Bytes Out of user activities.
o Username: Username of the local user account.
o Connection Time Usage: The total time used by the user.
o Pkts In/ Pkts Out: The total number of packets received and sent by the user.
o Bytes In/ Bytes Out: The total number of bytes received and sent by the user.
Ø Download Monthly Network Usage of Local User: Click on the Download button for outputting the
report manually to a local database.
A warning message will then appear. Click Save to download the record into .txt format.
© 2008 4IPNET, INC.
120
4ipnet WHG301
User
’
s Manual
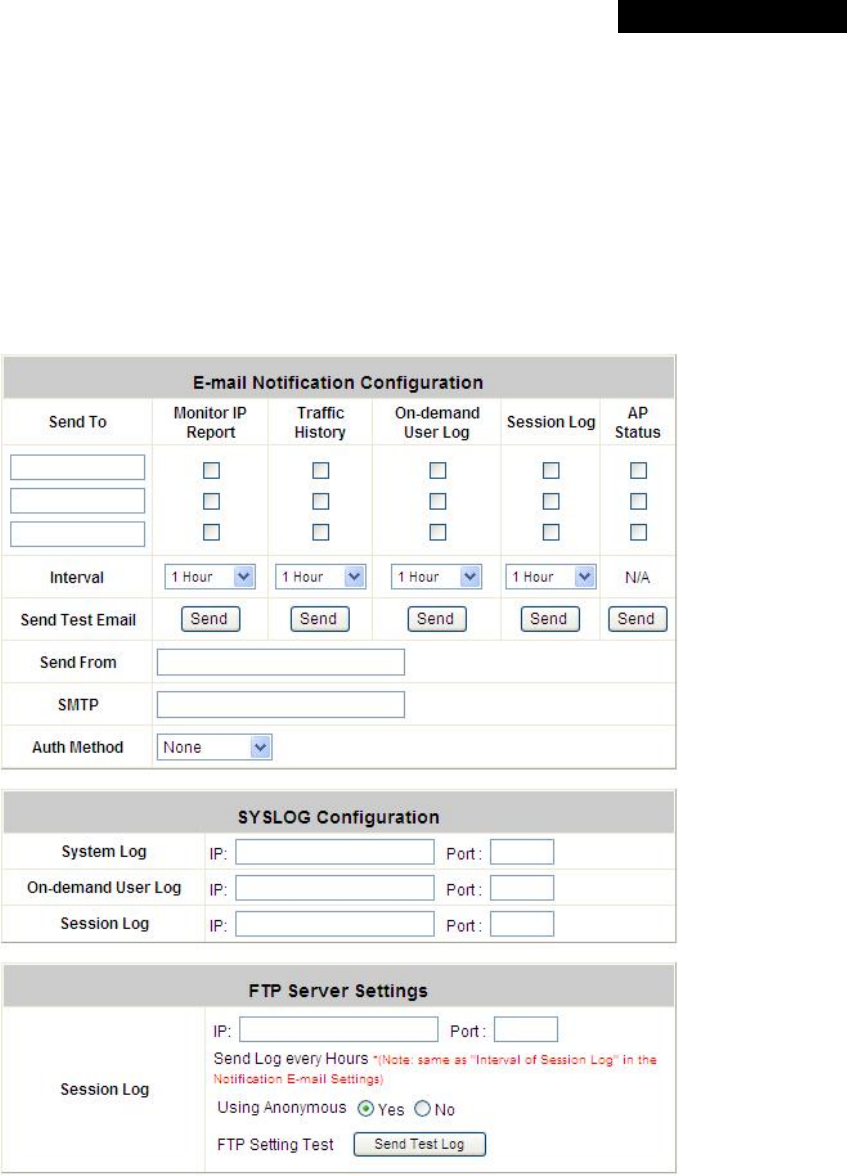
4.6.6 Notify Configuration
WHG301 can automatically send the notification of Monitor IP Report, Traffic History, On-demand User Log,
Session Log and AP status to up to 3 particular e-mail address. The notification of AP Status is triggered by the
event when a managed AP becomes unreachable while the other types of emails are sent periodically in given
intervals such as 1 hour. A trial email is provided by the system for validation. In addition, the system supports
recording Syslog of Traffic History, On-demand User Log and Session Log via external Syslog servers. In addition,
the Session Log can be sent to a specified FTP server. Enter the related information and select the desired items
and then apply the settings.
Ÿ E-mail Notification Configuration:
Ø Send To: Up to 3 e-mail address can be set up to receive the notification. These are the receiver’s e-mail
addresses. There are four kinds of notification to selection -- Monitor IP Report, Traffic History, On-demand
User Log and AP Status, and check which type of notification to be sent.
Ø Interval: The time interval to send the e-mail report.
Ø Send Test Email: To test the settings immediately.
Ø Send From: The e-mail address of the administrator in charge of the monitoring. This will show up as the

© 2008 4IPNET, INC.
121
4ipnet WHG301
User
’
s Manual
sender’s e-mail.
Ø
SMTP: The IP address of the sender’s SMTP server.
Ø
Auth Method: The system provides four authentication methods, Plain, Login, CRAM-MD5 and NTLMv1,
or “None” to use none of the above. Depending on which authentication method selected, enter the
Account Name, Password and Domain.
o NTLMv1 is not currently available for general use.
o Plain and CRAM-MD5 are standardized authentication mechanisms while Login and NTLMv1 are
Microsoft proprietary mechanisms. Only Plain and Login can use the UNIX login password.
Netscape uses Plain. Outlook and Outlook express use Login as default, although they can be set
to use NTLMv1.
o Pegasus uses CRAM-MD5 or Login but which method to be used can not be configured.
Ÿ Syslog Configuration: There are 3 types of Syslog supported: System Log, On-demand User Log, and
Session Log. Enter the IP address and Port number to specify which and from where the report should be sent
to.
8 Note:
When the number of a user’s session (TCP and UDP) reaches the session limit specified in the
policy, a record will be logged to this Syslog server.
Ÿ FTP Server Settings
Session Log: Log each connection created by users and tracking the source IP and destination IP. If Syslog is
enabled, Session Log will be sent to the Syslog server automatically during every defined interval in Session Log
email notification. Session Log allows uploading the log file to a FTP server periodically. The maximum log file size is
256K. The log file will be sent to the FTP server once the file size reaches its maximum size or periodical time
interval.
© 2008 4IPNET, INC.
122
4ipnet WHG301
User
’
s Manual
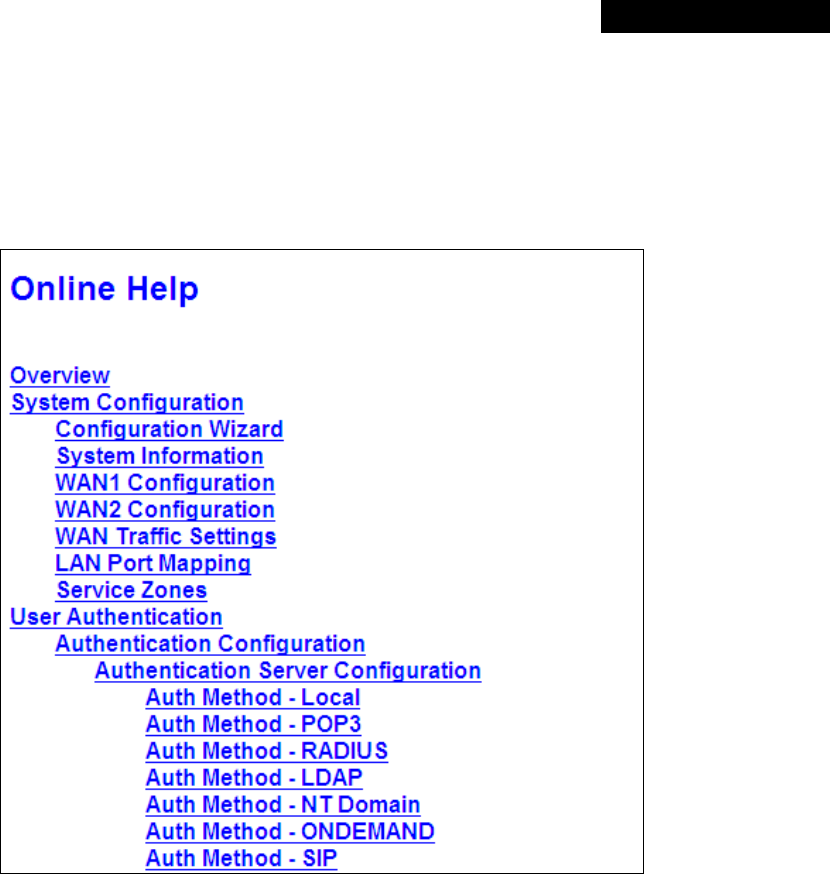
4.7 Help
On the screen, the Help button is on the upper right corner.
Click Help to the Online Help window and then click the hyperlink of the items to get the information.
© 2008 4IPNET, INC.
123
4ipnet WHG301
User
’
s Manual
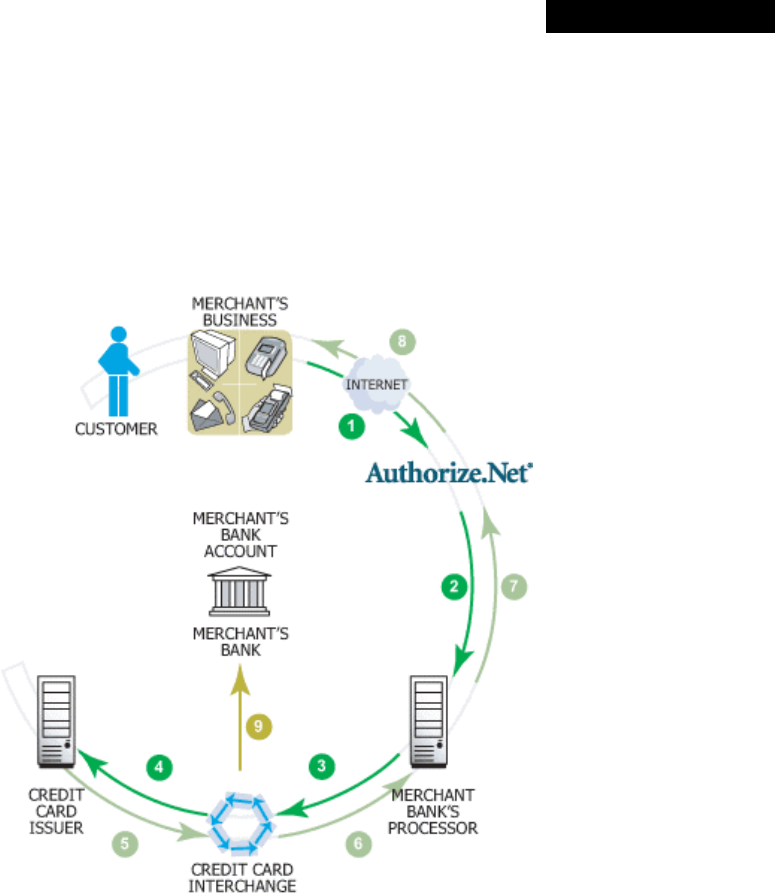
Appendix A. Accepting Payment via Authorize.Net
This section is to show independent Hotspot owners how to configure related settings in order to accept credit card
payments via Authorize.Net, making the Hotspot an e-commerce environment for clients to pay for and obtain
Internet access using their credit cards.
© 2008 4IPNET, INC.
124
4ipnet WHG301
User
’
s Manual
© 2008 4IPNET, INC.
125
4ipnet WHG301
User
’
s Manual
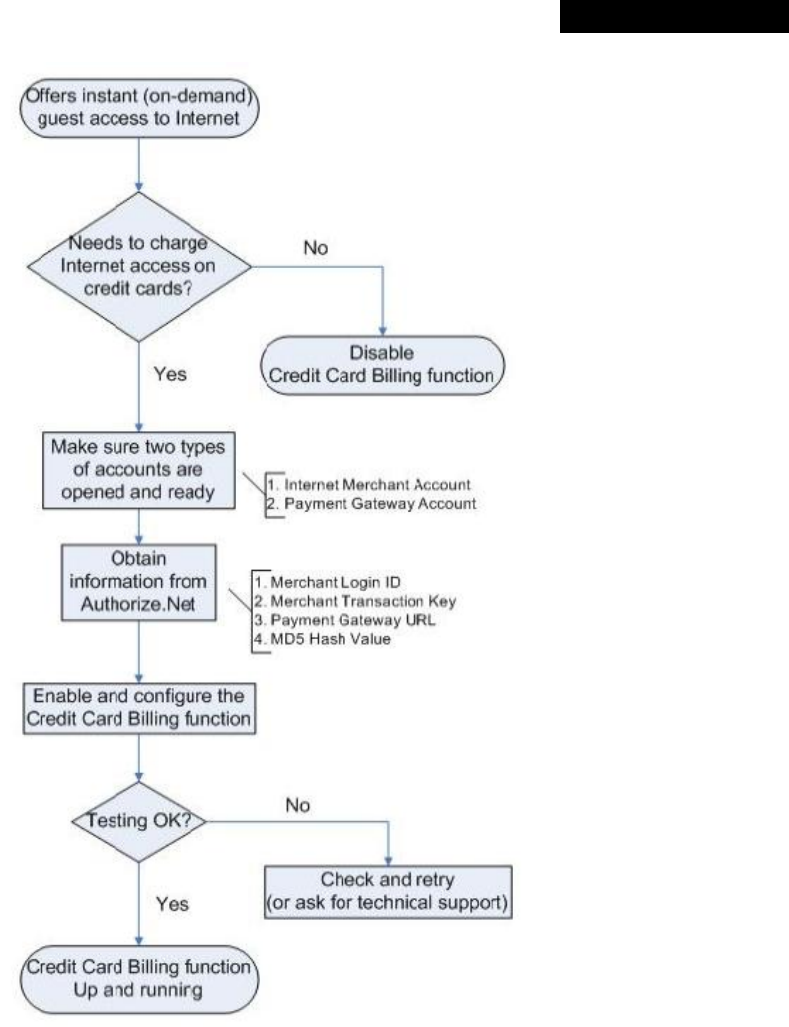
1. Setting Up
1.1 Open Accounts
To set up 4ipnet WHG301 to process credit card billing, the merchant owner will need two accounts (Internet
Merchant account and Authorize.Net account).
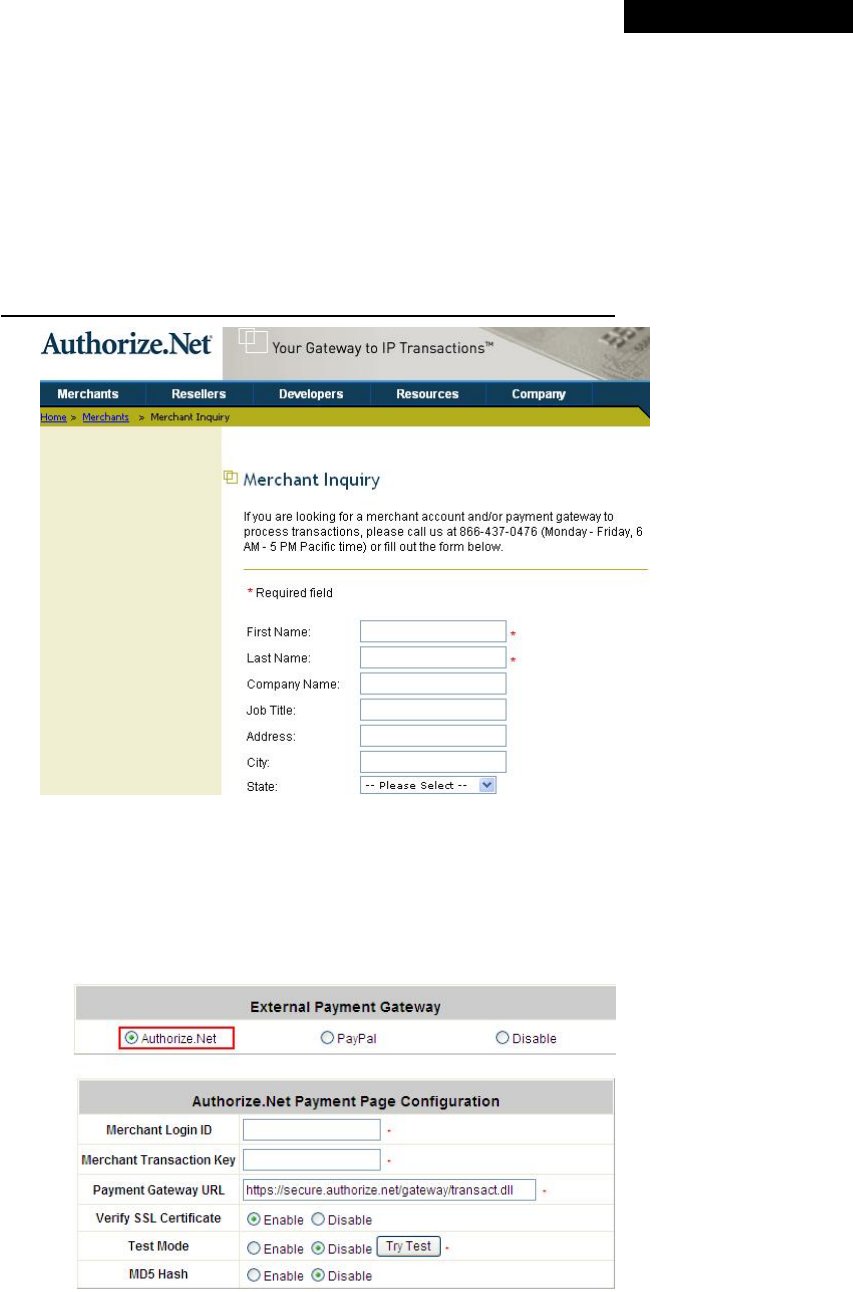
If you are looking for a merchant account or Internet payment gateway to process transactions, you can fill out the
Inquiry Form on http://www.authorize.net/solutions/merchantsolutions/merchantinquiryform/.
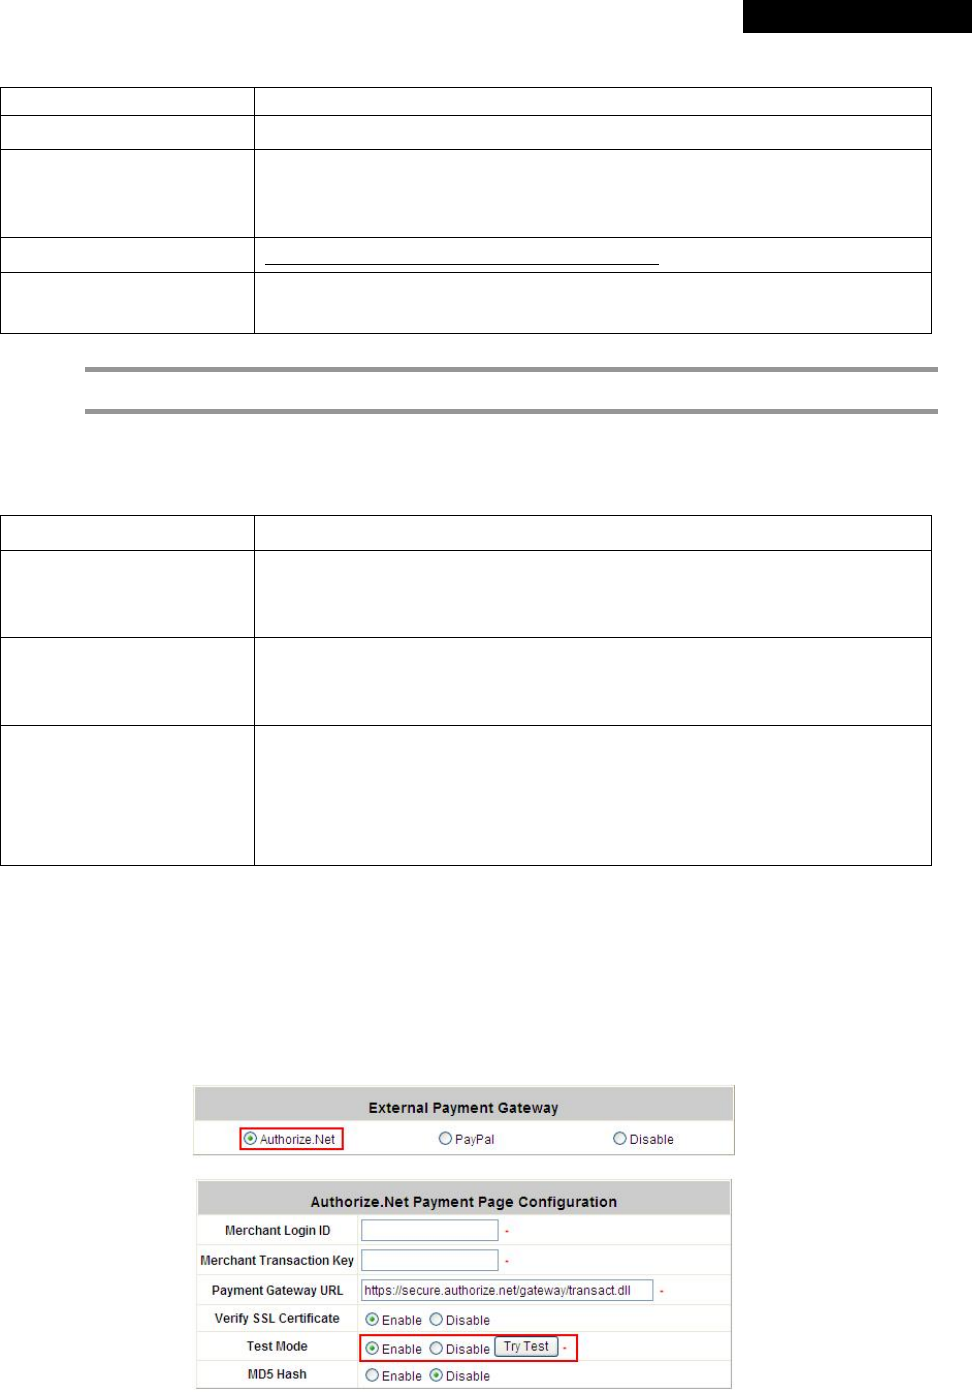
1.2 Configure 4ipnet WHG301 using an Authorize.Net account
Please log in 4ipnet WHG301. User Authentication >> Authentication Configuration >> Click the server name
On-demand User >> External Payment Gateway >> Click Configure >> External Payment Gateway >> Select
Authorize.Net
© 2008 4IPNET, INC.
126
4ipnet WHG301
User
’
s Manual
Some major fields are required:
Setting Description
Merchant Login ID This is the “Login ID” that comes with the Authorize.Net account.
Merchant Transaction Key
To get a new key, please log in Authorize.Net >> Click Settings and Profile >>
Go to the “Security” section >> Click Obtain Transaction Key >> Enter
“Secret Answer” >> Click Submit.
Payment Gateway URL https://secure.authorize.net/gateway/transact.dll (default gateway address)
MD5 Hash To enhance the transaction security, merchant owner can choose to enable this
function and enter a value in the text box: “MD5 Hash Value”.
8 Note:
For detailed description, please see 4.2.1.6 Authentication Method – On-demand User.
1.3 Configure the Authorize.Net Merchant Account to Match the Configuration of 4ipnet WHG301
Settings of the merchant account on Authorize.Net should be matched with the configuration of 4ipnet WHG301:
Setting Description
MD5 Hash
To configure “MD5 Hash Value”, please log in Authorize.Net >> Click Settings
and Profile >> Go to the “Security” section >> Click MD5 Hash >> Enter
“New Hash Value” & “Confirm Hash Value” >> Click Submit.
Required Card Code
If the “Card Code” is set up as a required field, please log in Authorize.Net >>
Click Settings and Profile >> Go to the “Security” section >> Click Card
Code Verification >> Check the Does NOT Match (N) box >> Click Submit.
Required Address Fields
After setting up the required address fields on the “Credit Card Payment Page
Billing Configuration” section of 4ipnet WHG301, the same requirements
must be set on Authorize.Net. To do so, please log in Authorize.Net >> Click
Settings and Profile >> Go to the “Security” section >> Click Address
Verification System (AVS) >> Check the boxes accordingly >> Click Submit.
1.4 Test The Credit Card Payment via Authorize.Net
To test the connection between 4ipnet WHG301 and Authorize.Net, please log in 4ipnet WHG301. User
Authentication >> Authentication Configuration >> Click the server On-demand User >> External Payment
Gateway >> Click Configure >> External Payment Gateway >> Select Authorize.Net >> Go to “Authorize.Net
Payment Page Configuration” section >> Enable the “Test Mode” >> Click Try Test and follow the instructions
© 2008 4IPNET, INC.
127
4ipnet WHG301
User
’
s Manual
2. Basic Maintenance
In order to maintain the operation, merchant owners will have to manage the accounts and transactions via
Authorize.Net as well as 4ipnet WHG301.
2.1 Void A Transaction and Remove the On-demand Account Generated on 4ipnet WHG301
Sometimes, a transaction (as well as the related user account on 4ipnet WHG301) may have to be canceled before
it has been settled with the bank.
a. To void an unsettled transaction, please log in Authorize.Net. Click Unsettled Transactions >> Locate the
specific transaction record on the “List of Unsettled Transactions” >> Click the Trans ID number >> Confirm
and click Void.
8 Note:
To find the on-demand account name, click Show Itemized Order Information on the “Order
Information” page >> Username can be found in the “Item Description”.
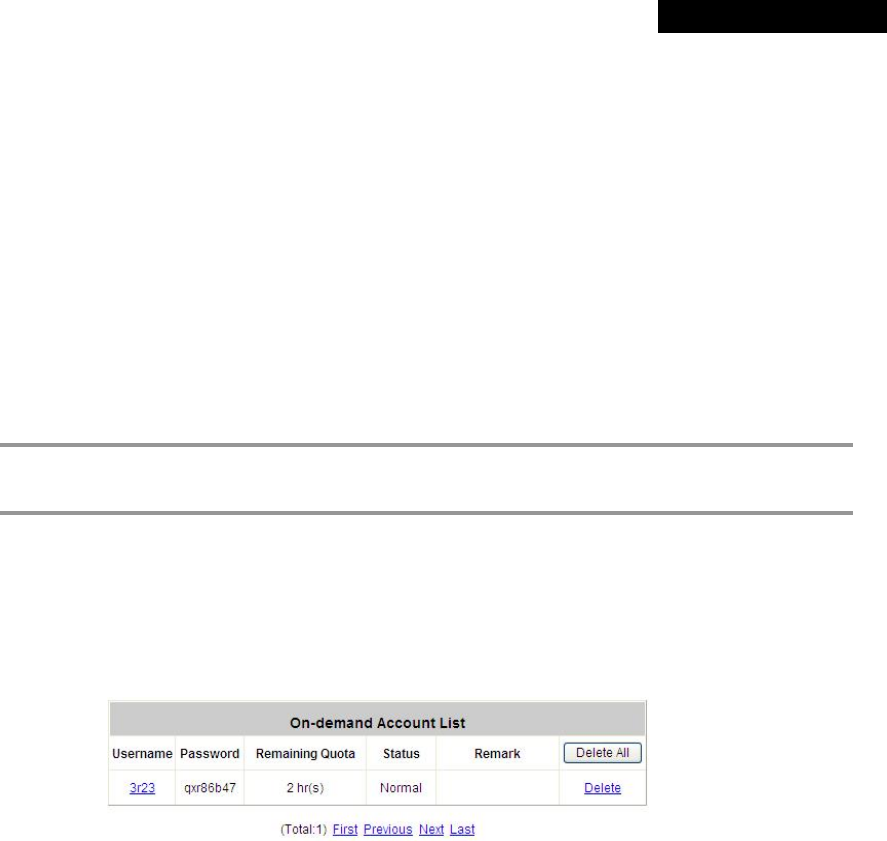
b. To remove the specific account from 4ipnet WHG301, please log in 4ipnet WHG301. User Authentication >>
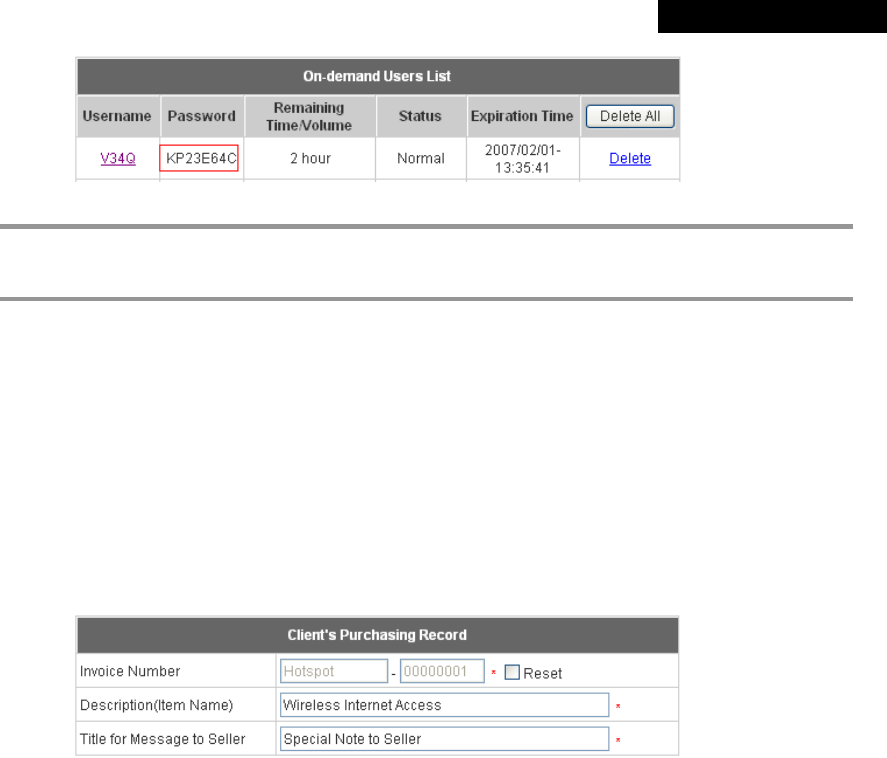
Authentication Configuration >> Click the server On-demand User >> On-demand Account List >> Click
View >> On-demand Account List >> Click Delete on the record with the account name. Click Delete All to
delete all users at once.
2.2 Refund A Settled Transaction and Remove the On-demand Account Generated on 4ipnet WHG301
a. To refund a credit card payment, please log in Authorize.Net. Click Virtual Terminal >> Select a Payment
Method >> Click Refund a Credit Card >> Payment/Authorization Information >> Type information in at least
three fields: Card Number, Expiration Date, and Amount >> Confirm and click Submit.
b. To remove the specific account from 4ipnet WHG301, please log in 4ipnet WHG301. User Authentication >>
Authentication Configuration >> Click the server On-demand User >> On-demand Account List >> Click
View >> On-demand Account List >> Click Delete on the record with the account name.
2.3 Find the Username and Password for A Specific Customer
Please log in Authorize.Net. Click Unsettled Transactions >> Try to locate the specific transaction record on the
“List of Unsettled Transactions” >> Click the Trans ID number >> Click Show Itemized Order Information in the
“Order Information” section >> Username and Password can be found in the “Item Description”.
2.4 Send An Email Receipt to A Customer
If a valid email address is provided, an email receipt with payment details for each successful transaction will be
automatically sent to the customer via Authorize.Net. To change the information on the receipt for customer, please
© 2008 4IPNET, INC.
128
4ipnet WHG301
User
’
s Manual
log in 4ipnet WHG301. User Authentication >> Authentication Configuration >> Click the server On-demand
User >> External Payment Gateway >> Click Configure >> External Payment Gateway >> Select
Authorize.NET >> Scroll down to Client's Purchasing Record section of the page >> Type in information in the
text boxes: “Description” and “E-mail Header” >> Confirm and click Apply.
2.5 Send an Email Receipt for Each Transaction to the Merchant Owner
A copy of email receipt with payment details for each successful transaction will also be automatically sent to the
merchant owner/administrator via Authorize.Net.
To configure the contact person who will receive a receipt for each transaction, please log in Authorize.Net. Click
Settings and Profile >> Go to the “General” section >> Click Manage Contacts >> Click Add New Contact to >>
Enter necessary contact information on this page >> Check the “Transaction Receipt” box >> Click Submit.
3. Reporting
During normal operation, the following steps will be necessary to generate transaction reports.
3.1 Transaction Statistics by Credit Card Type during the Period.
Please log in Authorize.Net. >> Click Reports >> Check “Statistics by Settlement Date” radio button
>> Select “Transaction Type”, “Start Date”, and “End Date” as the criteria >> Click Run Report.
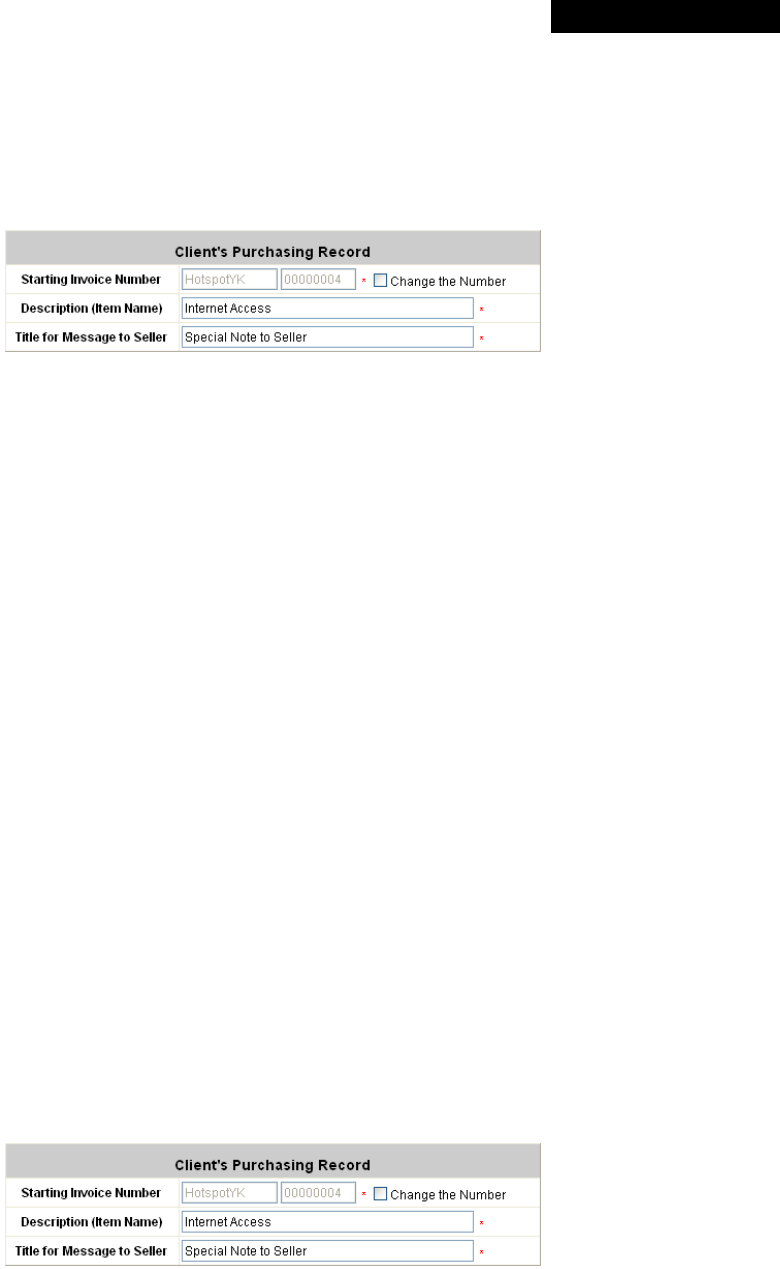
3.2 Transaction Statistics by Different Location
a. To deploy more than one 4ipnet WHG301, the way to distinguish transactions from different locations is to make
the invoice numbers different. To change the invoice setting, please log in 4ipnet WHG301. User
Authentication >> Authentication Configuration >> Click the server On-demand User >> External
Payment Gateway >> Click Configure >> External Payment Gateway >> Select Authorize.NET >> Scroll
down to “Client's Purchasing Record” section of the page >> Check the “Reset” box >> A location-specific ID
(for example, Hotspot-A) can be used as the first part of “Invoice Number” >> Confirm and click Apply.
© 2008 4IPNET, INC.
129
4ipnet WHG301
User
’
s Manual
b. Please log in Authorize.Net >> Click Search and Download >> Specify the transaction period (or ALL Settled,
Unsettled) in “Settlement Date” section >> Go to “Transaction” section >> Enter the first part of invoice
number plus an asterisk character (for example, Hotspot-A*) in the “Invoice #” text box >> Click Search >> If
transaction records can be found, the number of accounts sold is the number of search results >> Or, click
Download To File to download records and then use MS Excel to generate more detailed reports.
3.3 Search for The Transaction Details for A Specific Customer
Please log in Authorize.Net. Click Search and Download >> Enter the information for a specific customer as
criteria >> Click Search >> Click the Trans ID number to view the transaction details.
8 Note:
For more information about Authorize.Net, please see http://www.authorize.net.
4. Examples of Making Payment for End Users
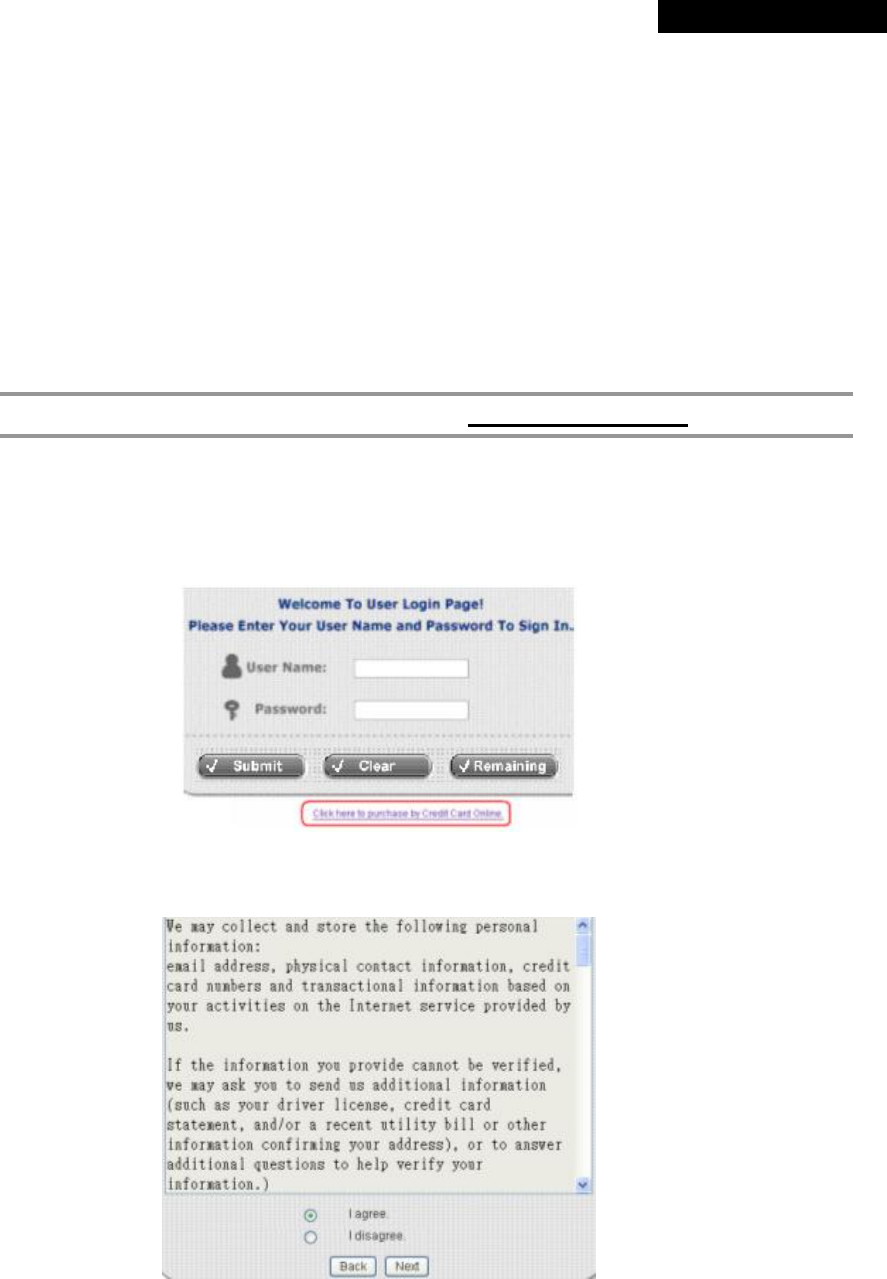
Step 1: Click the link below the login window to pay for the service by credit card via Authorize.Net.
Step 2: Choose I agree to accept the terms of use and click Next.
© 2008 4IPNET, INC.
130
4ipnet WHG301
User
’
s Manual
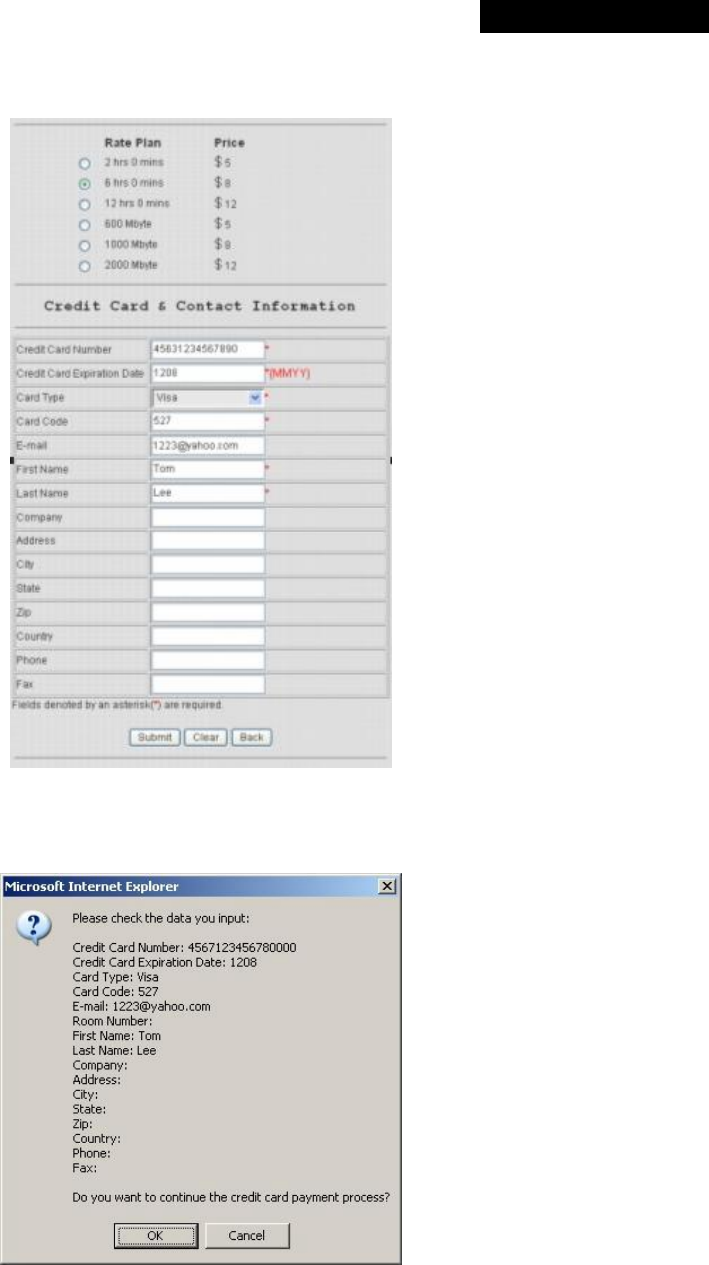
Step 3: Please fill out the form and Click Submit to send out this transaction. There will be a confirm dialog box.
Step 4: Please confirm the data and the click OK to go on the transaction or click Cancel to revise the data or cancel
this transaction. After clicking OK, there will be another dialog box showing up to confirm this transaction again.
© 2008 4IPNET, INC.
131
4ipnet WHG301
User
’
s Manual
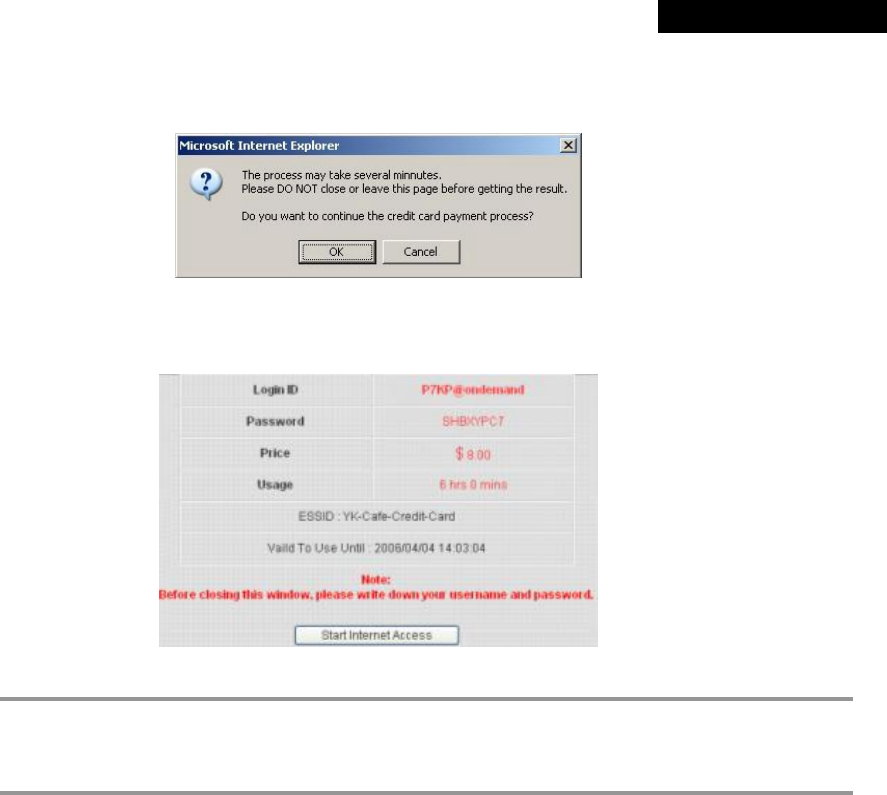
Step 5: Click OK to complete the process or click Cancel to revise the data or cancel this transaction.
Step 6: Click Start Internet Access to use the Internet access service.
8 Note:
The clients must fill in the correct credit card number and expiration date. Card code is the last 3
digits of the security code located on the back of your credit card. If clients choose to enter the e-mail
addresses, clients will receive confirmation letters for reference.
© 2008 4IPNET, INC.
132
4ipnet WHG301
User
’
s Manual
Appendix B. Accepting Payment via PayPal
This section is to show independent Hotspot owners how to configure related settings in order to accept payments
via PayPal, making the Hotspot an e-commerce environment for clients to pay for and obtain Internet access using
their PayPal accounts or credit cards.
© 2008 4IPNET, INC.
133
4ipnet WHG301
User
’
s Manual
1. Setting Up
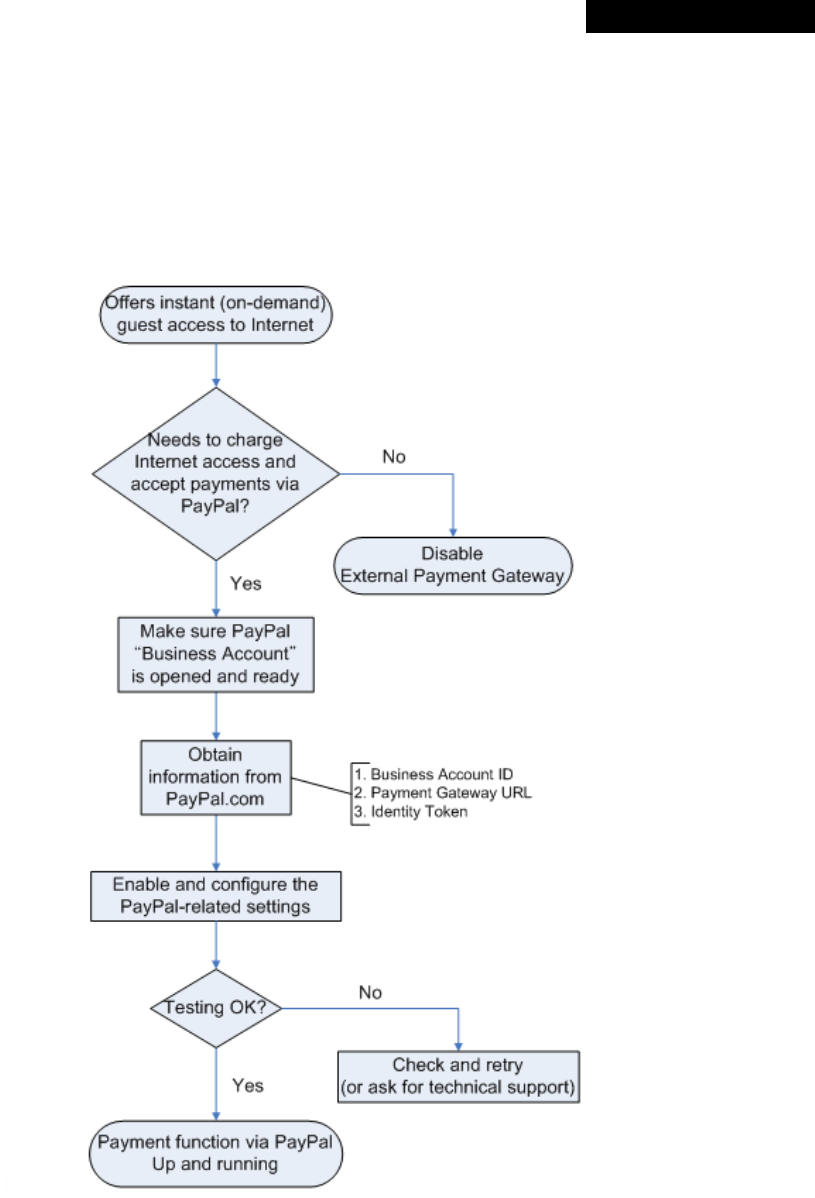
As follows are the basic steps to open and configure a “Business Account” on PayPal.
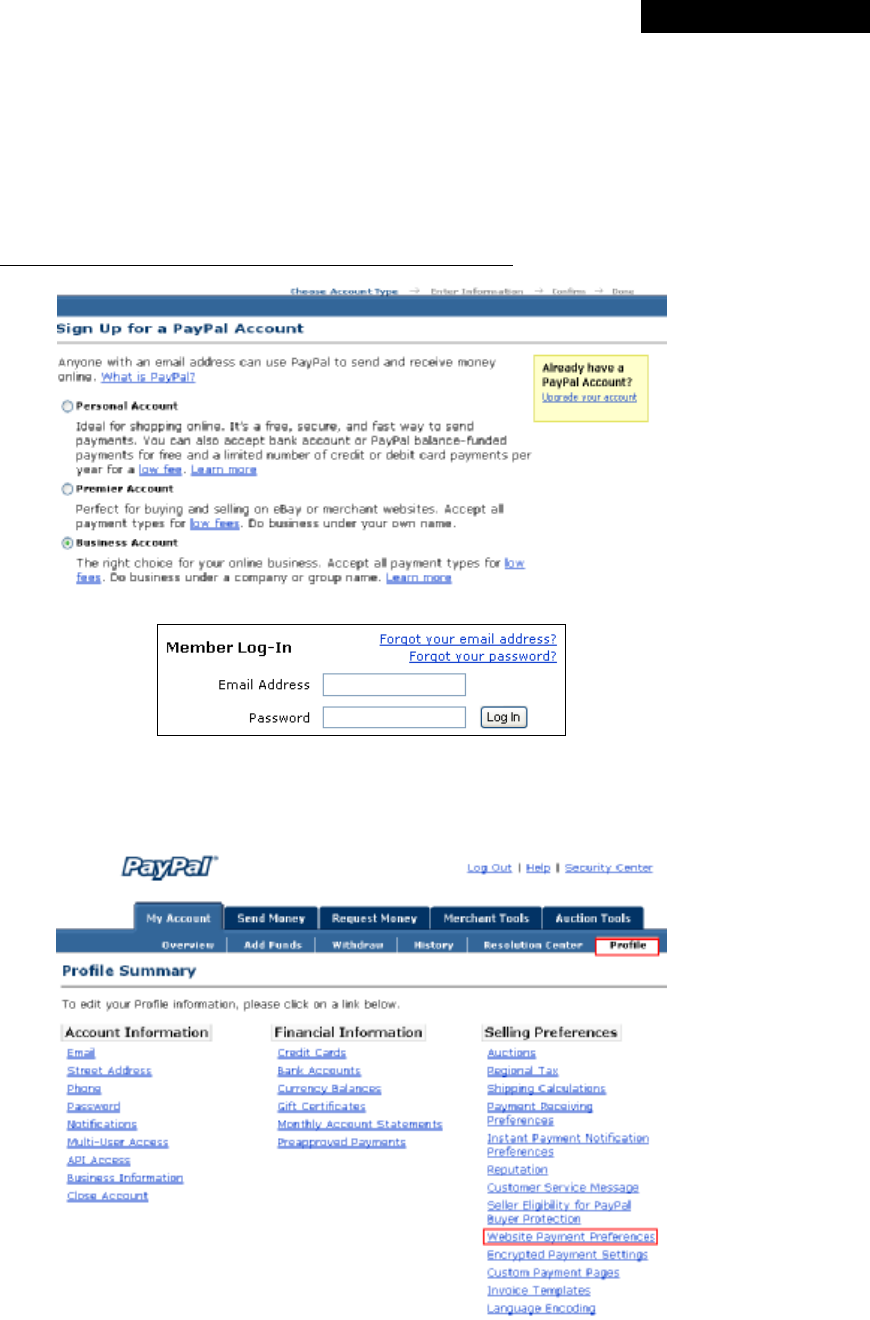
1.1 Open An Account
Step 1: Sign up for a PayPal Business Account and login.
Here is a link: https://www.paypal.com/cgi-bin/webscr?cmd=_registration-run
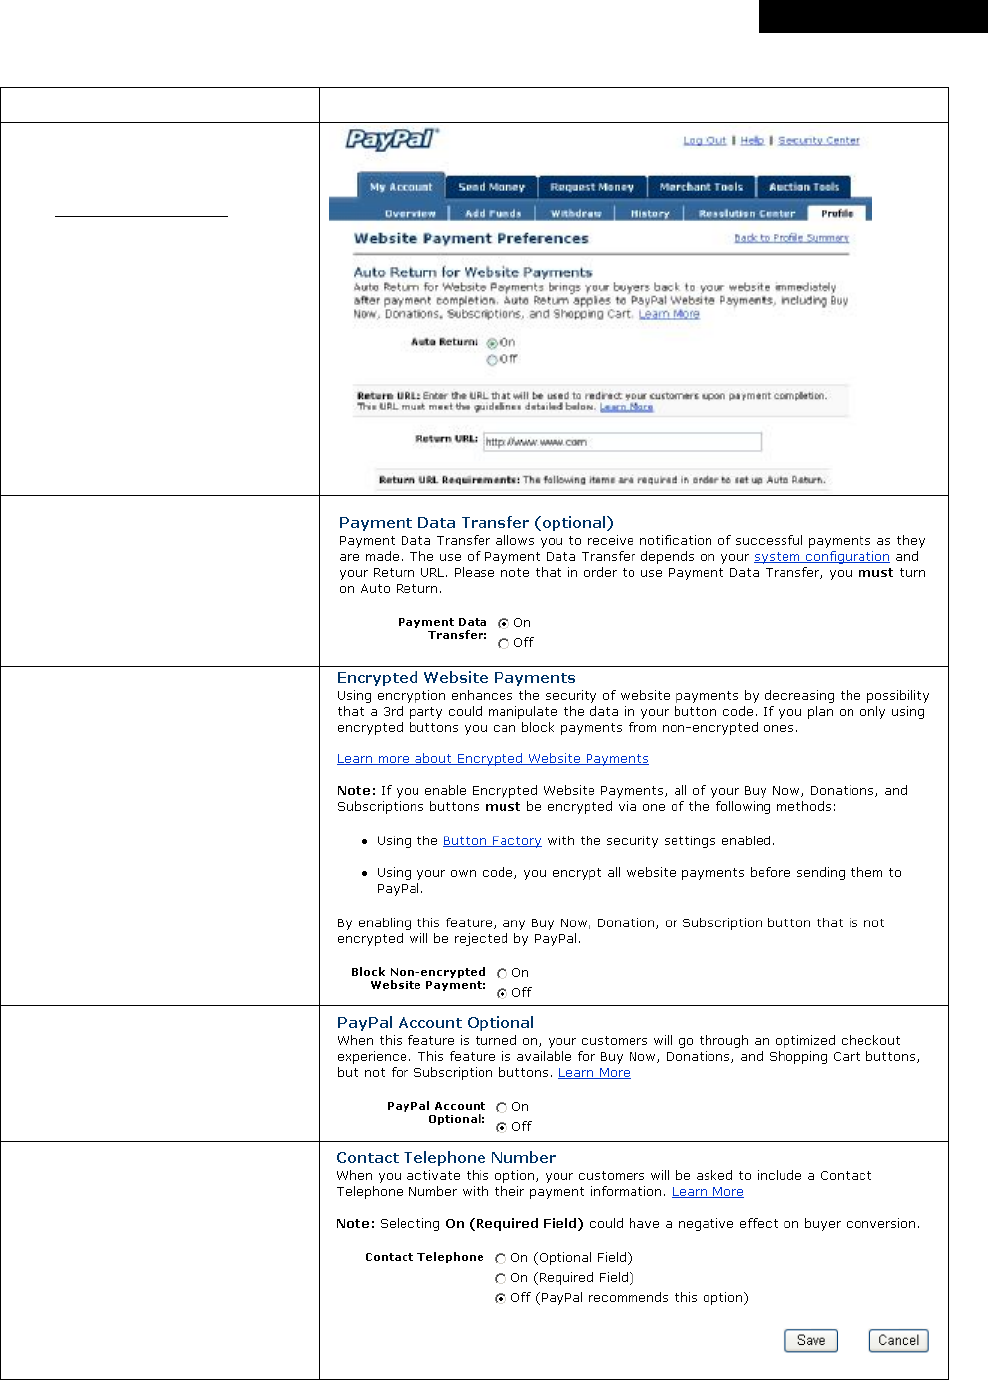
Step 2: Edit necessary settings in “Website Payment Preferences”
Click Profile >> Click Website Payment Preferences in the Selling Preferences section
Administrators should scroll down to edit each setting as shown in the table below. To activate all the changes,
please click Save at the end of the page.
© 2008 4IPNET, INC.
135
4ipnet WHG301
User
’
s Manual
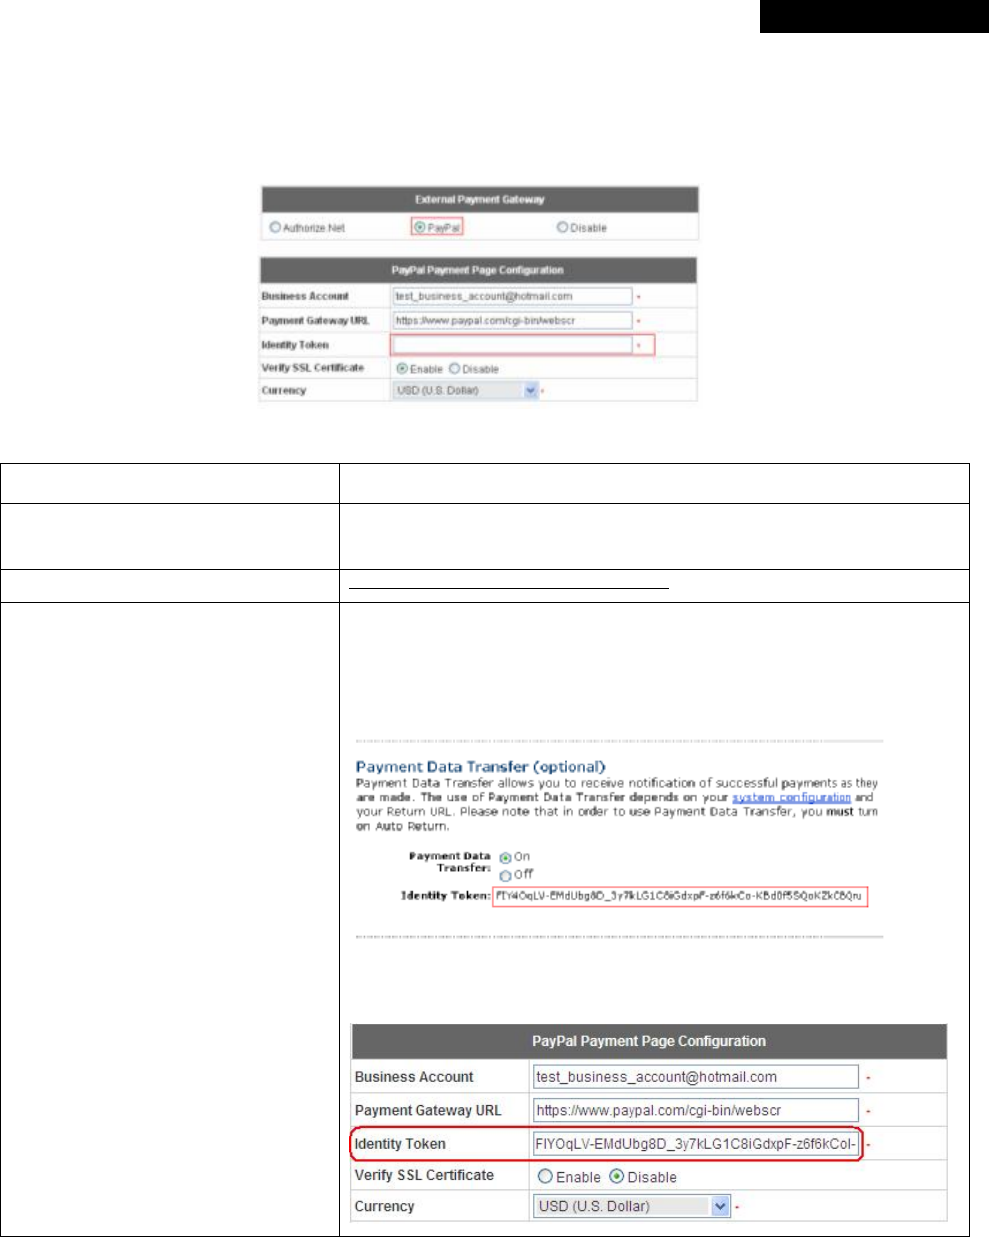
1.2 Configure 4ipnet WHG301 with a PayPal Business Account
Please log in 4ipnet WHG301:
User Authentication >> Authentication Configuration >> Click the server On-demand User >> External
Payment Gateway >> Click Configure >> External Payment Gateway >> Select PayPal
Three fields are required:
Setting Description
Business Account ID This is the “Login ID” (email address) that is associated with the PayPal
Business Account.
Payment Gateway URL https://www.paypal.com/cgi-bin/webscr (default URL for PayPal)
Identity Token
Please log in PayPal after saving the above settings >> Click Profile
>> Click Website Payment Preferences in the Selling Preferences
section >> Scroll down to the section, Payment Data Transfer
(optional).
Copy the Identity Token in the above page to the section “PayPal
Payment Page Configuration” of 4ipnet WHG301.
© 2008 4IPNET, INC.
136
4ipnet WHG301
User
’
s Manual
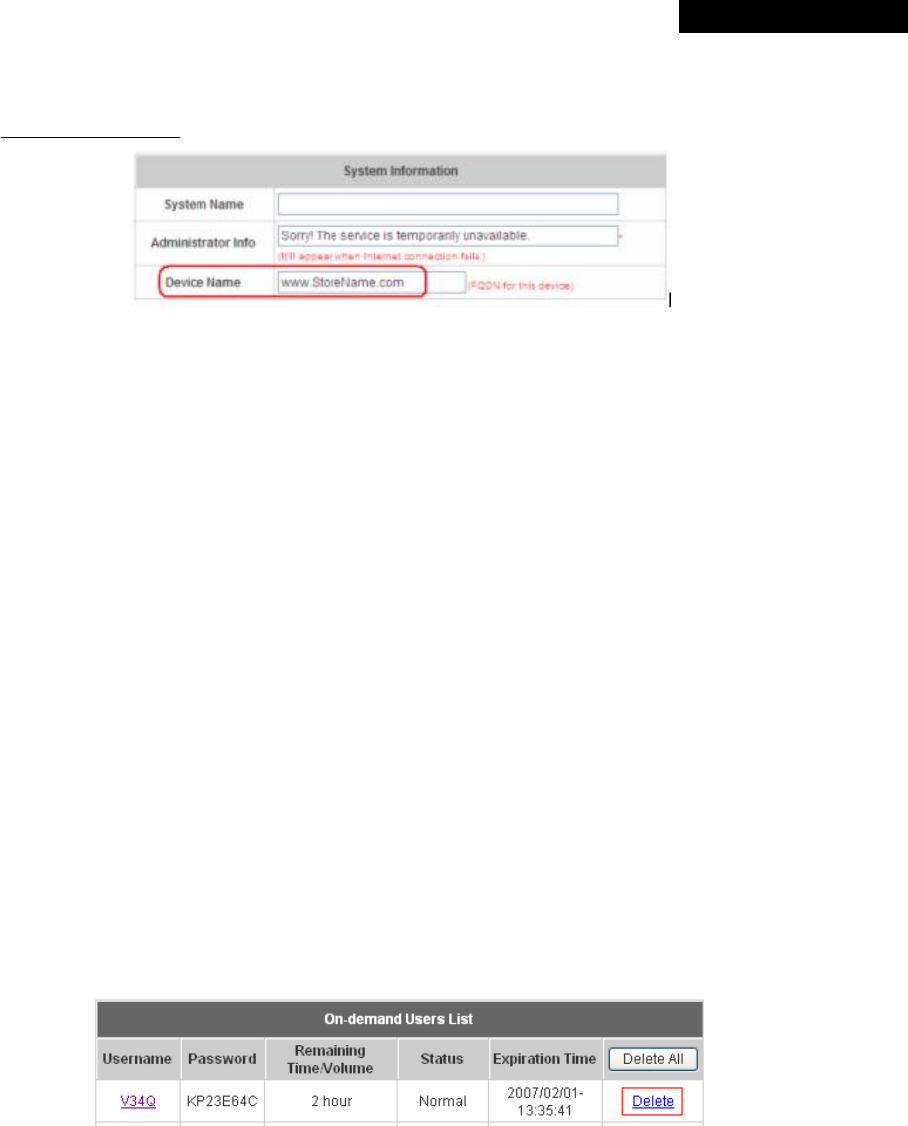
1.3 Requirements for Building a Secure PayPal-based E-Commerce Site
To deploy the PayPal function properly, it is required that the merchant register an Internet domain name (for
example, www.StoreName.com) for this subscriber gateway device.
In addition, it is necessary to sign up for a SSL certificate, licensed from a “Certificate Authority” (for example,
VeriSign), for this registered Internet domain name.
Thus, by meeting these two requirements, it will allow end customers or subscribers to pay for the Internet access in
a securer and convenient way.
2. Basic Maintenance
In order to maintain the operation, the merchant owner will have to manage the accounts and payment transactions
on PayPal website as well as 4ipnet WHG301.
2.1 Refund a completed payment and remove the on-demand account generated on 4ipnet WHG301
(1) To refund a payment, please log in PayPal >> Click History >> Locate the specific payment listing in the activity
history log >> Click Details of the payment listing >> Click Refund Payment at the end of the details page >> Type
in information: Gross Refund Amount and/or Optional Note to Buyer >> Click Submit >> Confirm the details and
click Process Refund
(2) To remove the specific account from 4ipnet WHG301, please log in 4ipnet WHG301:
User Authentication >> Authentication Configuration >> Click the server On-demand User >> On-demand
Account List >> Click View >> On-demand Account List >> Click Delete on the record with the account ID. Click
Delete All to delete all users at once.
2.2 Find the username and password for a specific customer
(1) To find the username, please log in PayPal >> Click History >> Locate the specific payment listing in the activity
history log >> Click Details of the payment listing >> Username can be found in the “Item Title” field
(2) To find the password associated with a specific username, please log in 4ipnet WHG301:
User Authentication >> Authentication Configuration >> Click the server On-demand User >> On-demand
Account List >> Click View >> On-demand Account List. Search for the specific username. Password can be
found in the same record
© 2008 4IPNET, INC.
137
4ipnet WHG301
User
’
s Manual
8 Note:
As stated by PayPal, you can issue a full or partial refund for any reason and for 60 days after the
original payment was sent. To find the on-demand account name for a specific payment, click Details
of the payment listing in the activity history log >> Username can be found in the “Item Title” field.
2.3 Send an email receipt to a customer
If a valid email address is provided, an email receipt with payment details for each successful transaction will be
automatically sent to the customer via PayPal. To change the information on the receipt for customer, please log in
4ipnet WHG301:
User Authentication >> Authentication Configuration >> Click the server On-demand User >> On-demand
User Server Configuration >> External Payment Gateway >> Click Configure >> External Payment Gateway
>> Select PayPal >> Go to “Client's Purchasing Record” section >> Type in information in the text boxes: Invoice
Number and Description (Item Name) >> Confirm and click Apply
2.4 Send an email receipt for each transaction to the merchant
A copy of email receipt with payment details (including available message note from buyer) for each successful
transaction will also be automatically sent to the merchant owner/administrator via PayPal.

© 2008 4IPNET, INC.
138
4ipnet WHG301
User
’
s Manual
3. Reporting
During normal operation, the following steps will be necessary to generate transaction reports.
3.1 Transaction activity during a period
(1) Please log in PayPal >> Click History >> Choose activity type from the Show field as the search criteria
>> Specify the dates (From and To fields) for the period >> Click Search
3.2 Search for the transaction details for a specific customer
Please log in PayPal >> Click History >> Click Advanced Search >> Enter the name for a specific customer as
criteria in the Search For field and Choose Last Name or First Name in the In field >> Specify the time
period >> Click Submit >> Click Details to view the transaction details
8 Note:
For more information about PayPal, please see http://www.paypal.com.
© 2008 4IPNET, INC.
139
4ipnet WHG301
User
’
s Manual
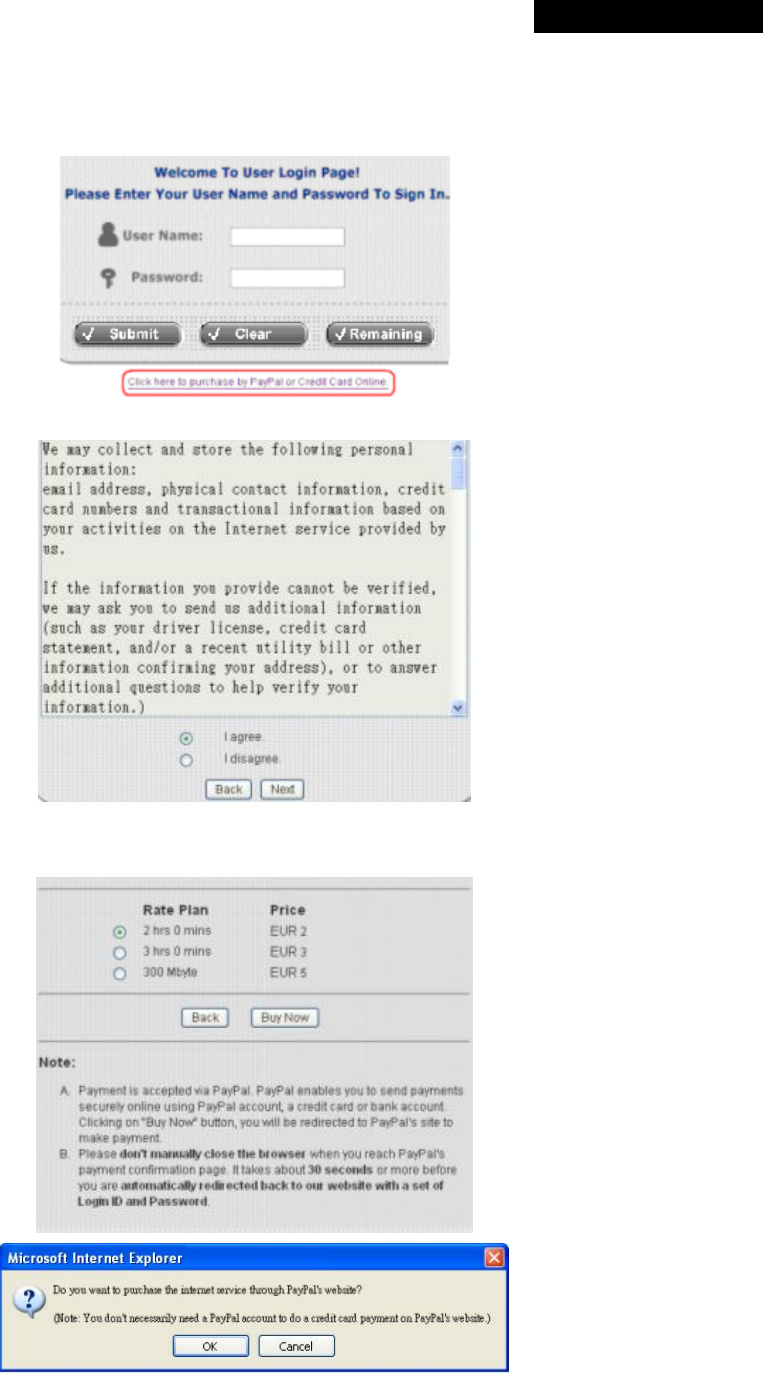
4. Examples of Making Payment for End Users
Step 1: Click the link below the login window to pay for the service via PayPal.
Step 2: Choose I agree to accept the terms of use and click Next.
Step 3: Please fill out the form and Click Submit to send out this transaction. There will be a confirm dialog box.
© 2008 4IPNET, INC.
140
4ipnet WHG301
User
’
s Manual
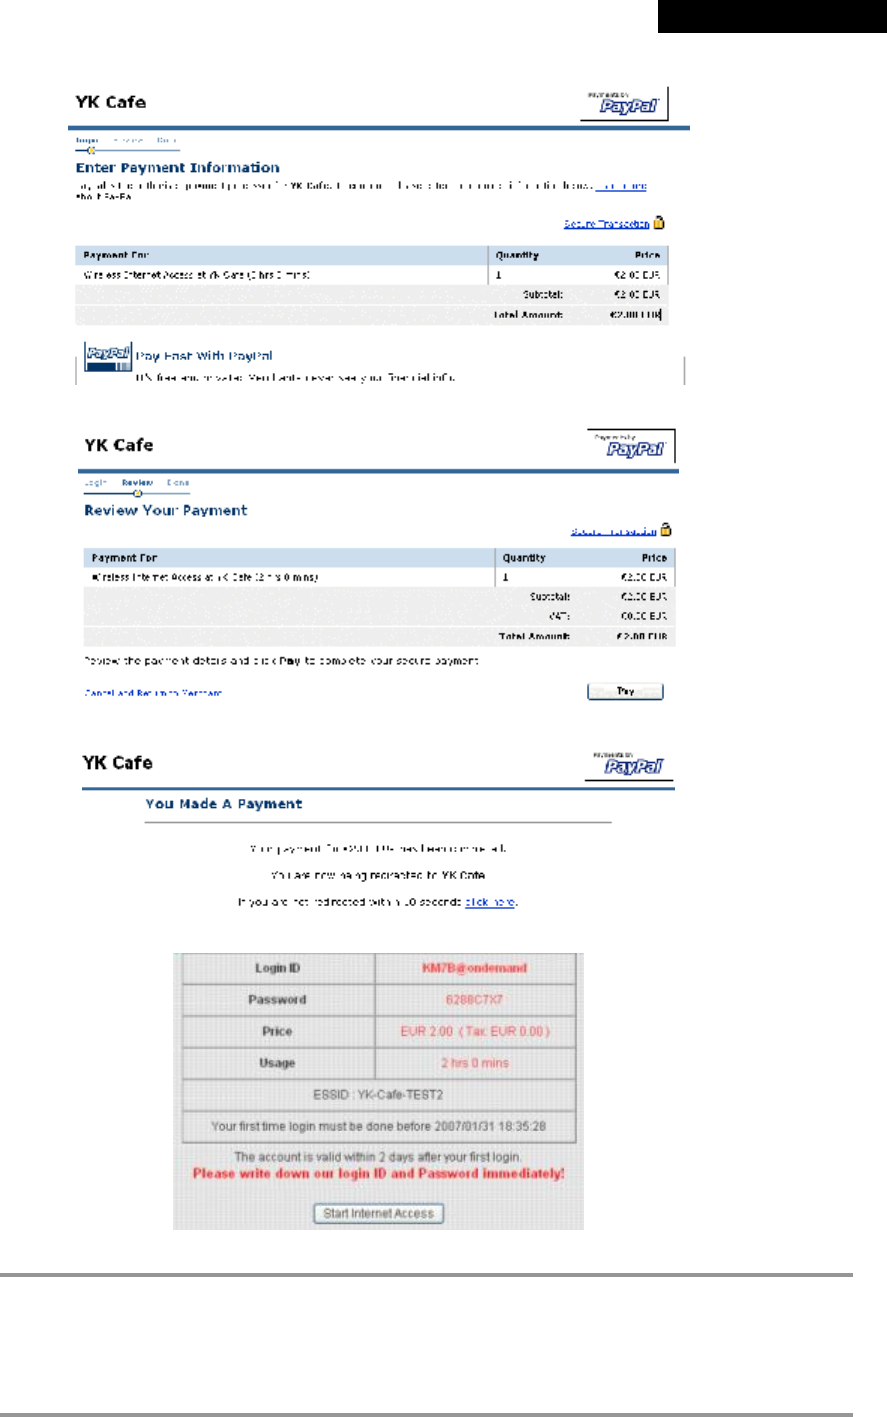
Step 4: You will be redirected to PayPal website to complete the payment process.
Step 5: Click Start Internet Access to use the Internet access service.
8 Note:
(a) Payment is accepted via PayPal. PayPal enables you to send payments securely online using
PayPal account, a credit card or bank account. Clicking on Buy Now button, you will be
redirected to PayPal’s site to make payment.
(b) Please do not manually close the browser when you reach PayPal’s payment confirmation
page. It takes about 30 seconds or more before you are automatically redirected back to our
website with a set of Login ID and Password.
© 2008 4IPNET, INC.
141
4ipnet WHG301
User
’
s Manual
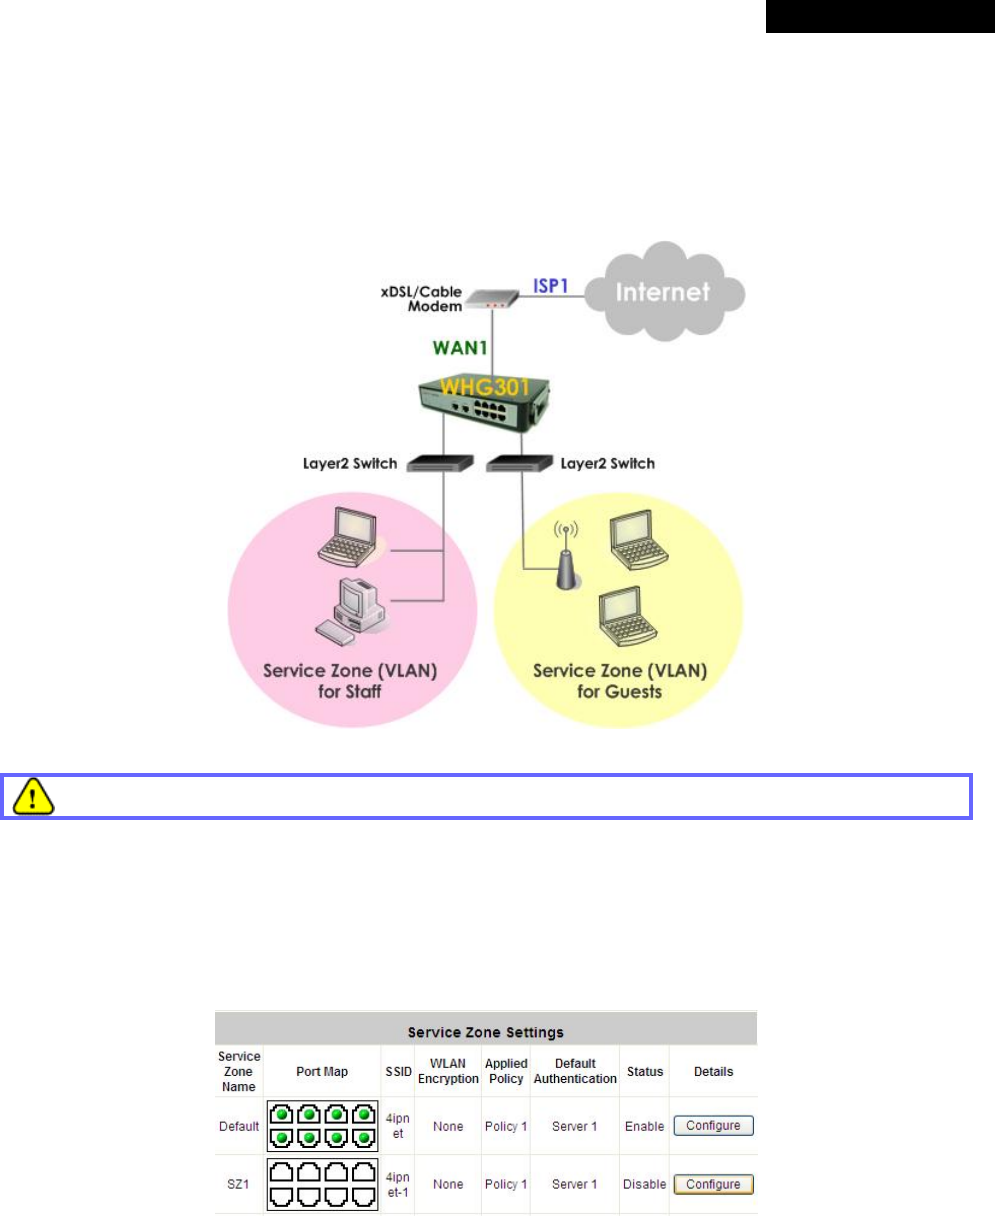
Appendix C. Service Zone Deployment Example
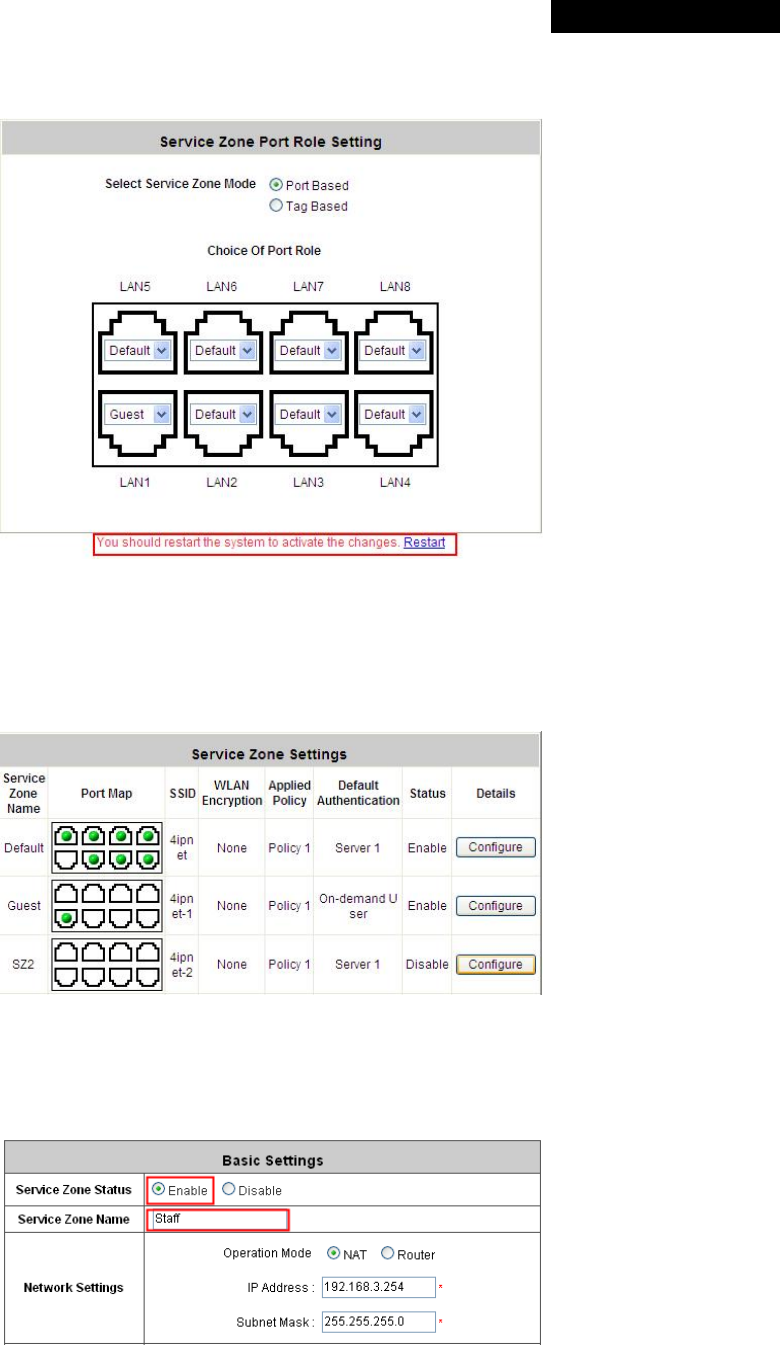
§ Port-Based Service Zone
In Port-Based mode, each LAN port can only serve traffic from one Service Zone. An example of network
application diagram is shown as below: one Service Zone for Staff and one for Guests.
The switches deployed under WHG301 in Port-Based mode must be Layer 2 switches only.
Ÿ Configuration Steps for Port-Based Service Zones:
Step 1: Configure Service Zone 1 for Guests
Assume that LAN1 is assigned to the Service Zone 1 (SZ1) for Guests. Click the System Configuration menu and
select the Service Zones tab. Click Configure of SZ1.
Step 2: Configure Basic Settings for SZ1
Check the Enable radio button of Service Zone Status to activate SZ1.
Enter a name for SZ1 (e.g. “Guests”) in the Service Zone Name field.

© 2008 4IPNET, INC.
142
4ipnet WHG301
User
’
s Manual
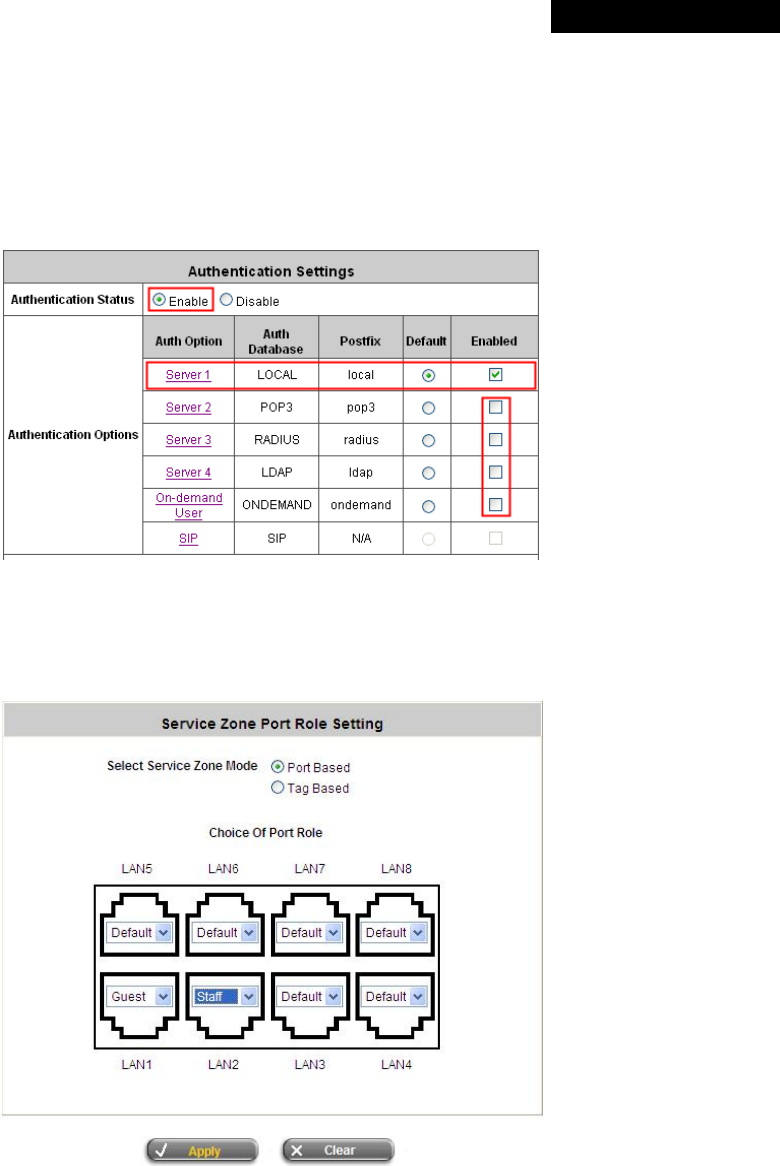
Step 3: Configure Authentication Settings for SZ1
Check the Enable radio button to enable Authentication Required for the Zone.
Check the Default button and Enabled box of Guest Users to set ONDEMAND authentication method as default.
Disable all other authentication options. Then, click Apply to activate the settings made so far. A warning message
“You should restart the system to activate the changes.” will appear at the bottom of the page. Do NOT restart
the system until you have completed all the configuration steps.
Step 4: Configure LAN Port Mapping for SZ1
Select the LAN Port Mapping tab from the System menu to enter the LAN Ports and Service Zone Mapping
page. Select Guests from the drop-down list box of LAN1. Click Apply to save the selection.
© 2008 4IPNET, INC.
143
4ipnet WHG301
User
’
s Manual
A warning message “You should restart the system to activate the changes.” will appear at the bottom of the
page. Do NOT restart the system until you have completed all the configuration steps.
LAN1 is now configured for Guests.
Step 5: Configure Service Zone 2 for Staff
Assume that LAN2 is assigned to the Service Zone 2 (SZ2) for Staff. Select the Service Zones tab and click
Configure of SZ2.
Step 6: Configure Basic Settings for SZ2
Check the Enable radio button of Service Zone Status to activate SZ2.
Enter a name for SZ2 (e.g. “Staff”) in the Service Zone Name field.
© 2008 4IPNET, INC.
144
4ipnet WHG301
User
’
s Manual
Step 7: Configure Authentication Settings for SZ2
Check the Enable radio button to enable Authentication Required for the Zone.
Check the Default button and Enabled box of Server 1 to set LOCAL authentication method as default. Disable all
other authentication options. Then, click Apply to activate the settings made so far. A warning message “You
should restart the system to activate the changes.” will appear at the bottom of the page. Do NOT restart the
system until you have completed all the configuration steps.
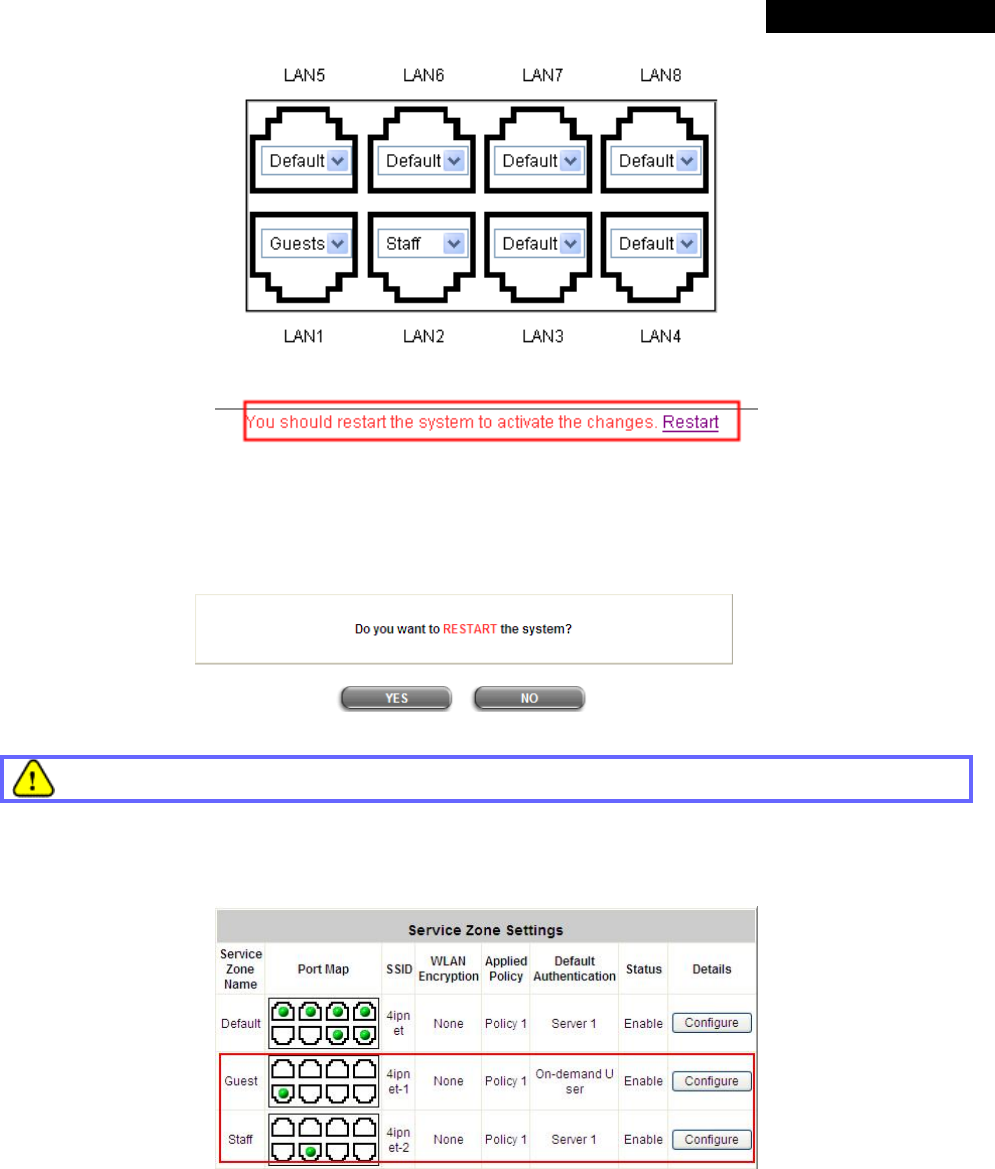
Step 8: Configure LAN Port Mapping for SZ2
Select the LAN Port Mapping tab from the System menu to enter the LAN Ports and Service Zone Mapping
page. Select Staff from the drop-down list box of LAN2. Click Apply to save the selection.
A warning message “You should restart the system to activate the changes.” will appear at the bottom of the
page. Click the hyperlink of Restart to restart the system and activate all configurations.
© 2008 4IPNET, INC.
145
4ipnet WHG301
User
’
s Manual
Step 9: Restart the System
A confirmation message of “Do you want to restart the system?” will appear. Click Yes to start the restarting
process. A confirmation dialog box will then pop out. Click OK to continue.
Please do not interrupt the system during the restarting process.
Once the settings of two Service Zones are completed, the configured result will be displayed in the Service Zone
Settings page: SZ1 and SZ2 are both enabled.
© 2008 4IPNET, INC.
146
4ipnet WHG301
User
’
s Manual
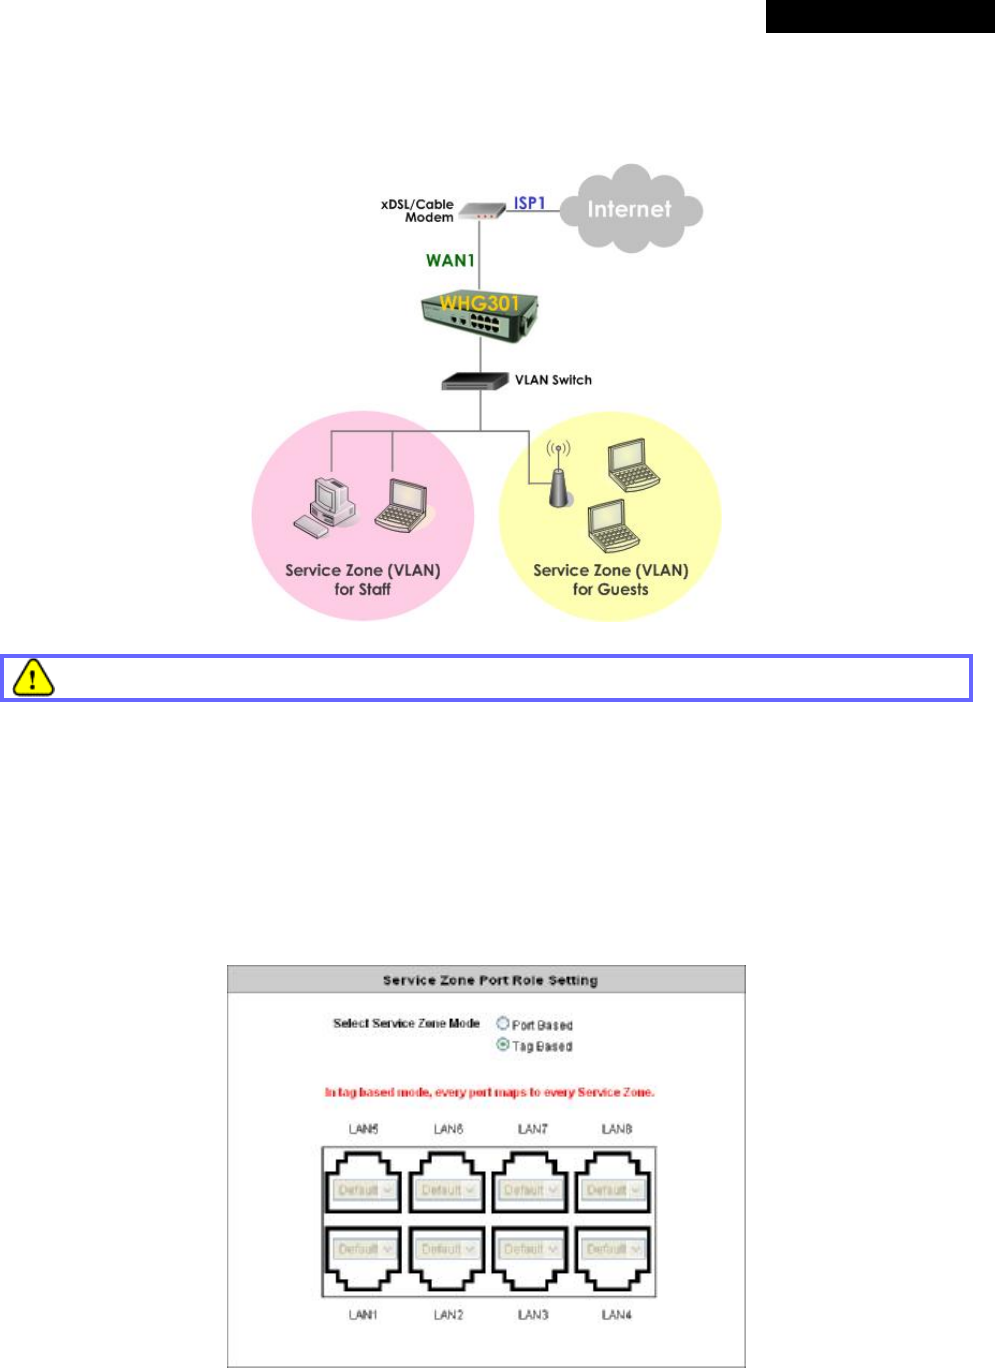
§ Tag-Based Service Zone
VLAN tags carried within message frames. An example of network application diagram is shown as below: one
Service Zone for Staff and another for Guests.
The switch deployed under WHG301 in Tag-Based mode must be a VLAN switch only.
Ÿ Configuration Steps for Tag-Based Service Zones:
The following example assumes the system is in factory default status and just powered up.
Step 1: Set Tag-Based mode
Click the System menu and select the LAN Port Mapping tab. Select Tag-Based mode and click Apply. A warning
message “You should restart the system to activate the changes.” will appear at the bottom of the page. Do
NOT restart the system until you have completed all the configuration steps.
© 2008 4IPNET, INC.
147
4ipnet WHG301
User
’
s Manual
Step 2: Configure Service Zone 1 for Staff
Select the Service Zones tab and click Configure of SZ1.
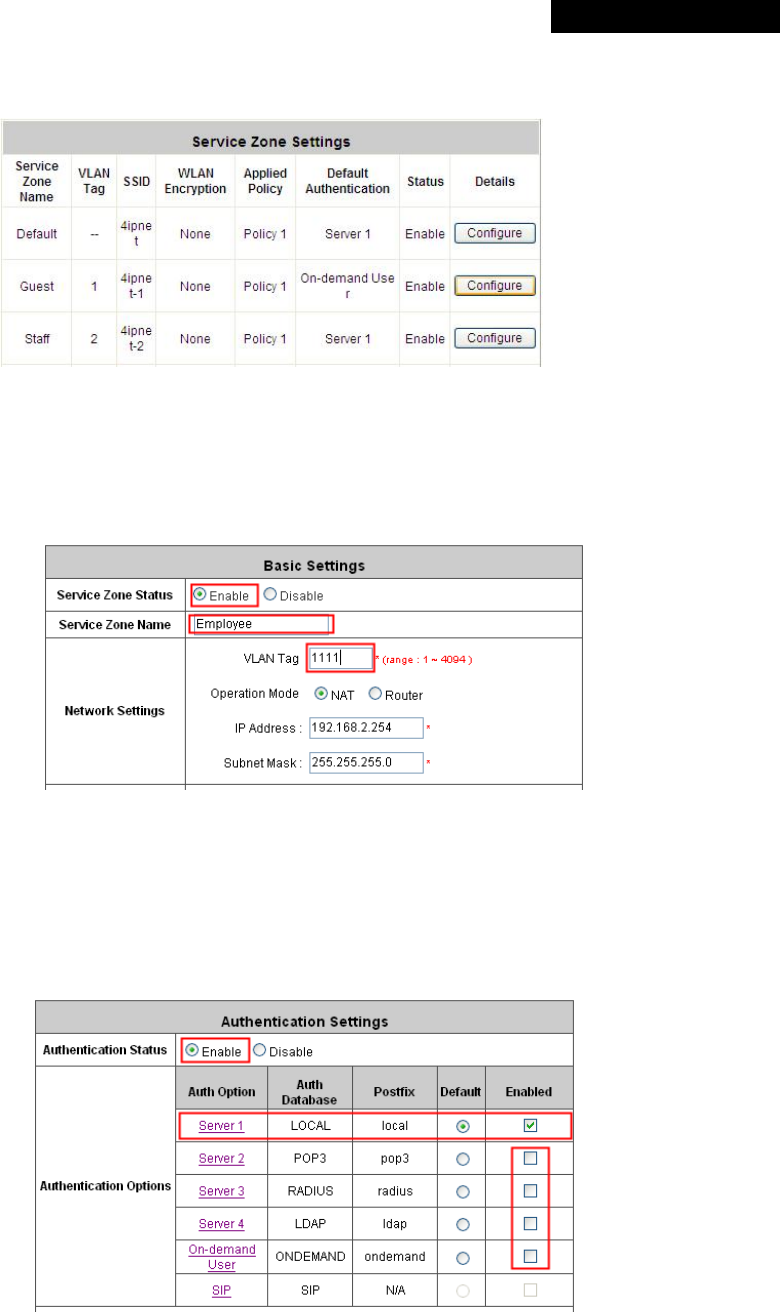
Step 3: Configure Basic Settings for SZ1
Check the Enable radio button of Service Zone Status to activate SZ1.
Enter a name for SZ1 (e.g. “Employee”) in the Service Zone Name field.
Enter a VLAN tag for SZ1 (e.g. “1111”) in the VLAN Tag field.
Step 4: Configure Authentication Settings for SZ1
Check the Enable radio button to enable Authentication Required for the Zone.
Check the Default button and Enabled box of Server 1 to set LOCAL authentication method as default. Disable all
other authentication options.
© 2008 4IPNET, INC.
148
4ipnet WHG301
User
’
s Manual
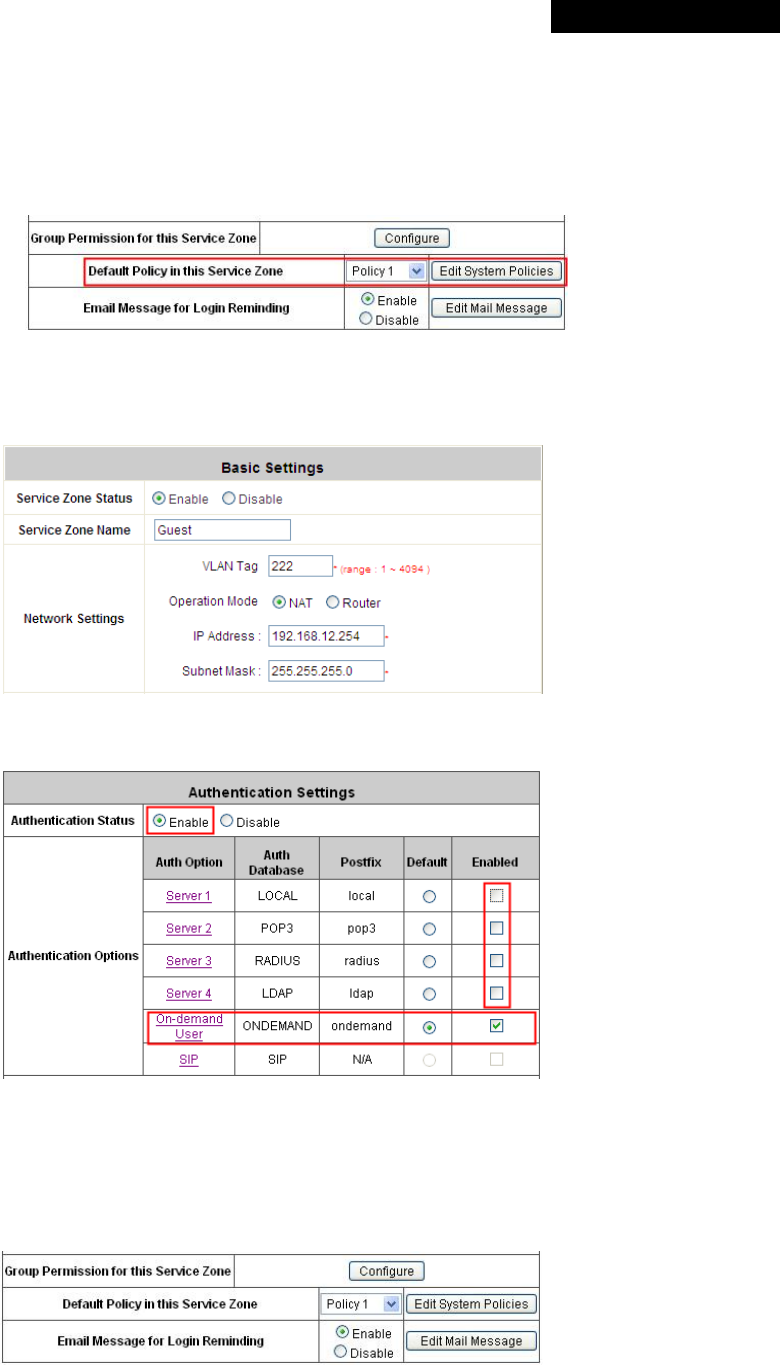
Step 5: Set Policy SZ1
Select Policy 1 from the drop-down list box.
Click Apply to activate the settings made so far. A warning message “You should restart the system to activate
the changes.” will appear at the bottom of the page. Do NOT restart the system until you have completed all the
configuration steps.
Step 6: Configure Service Zone 2 for Guests
Follow Step 2 to Step 5 to configure SZ2.
In the Authentication Settings section, check the Default button and Enable box of Guest Users to set
ONDEMAND authentication method as default. Disable all other authentication options.
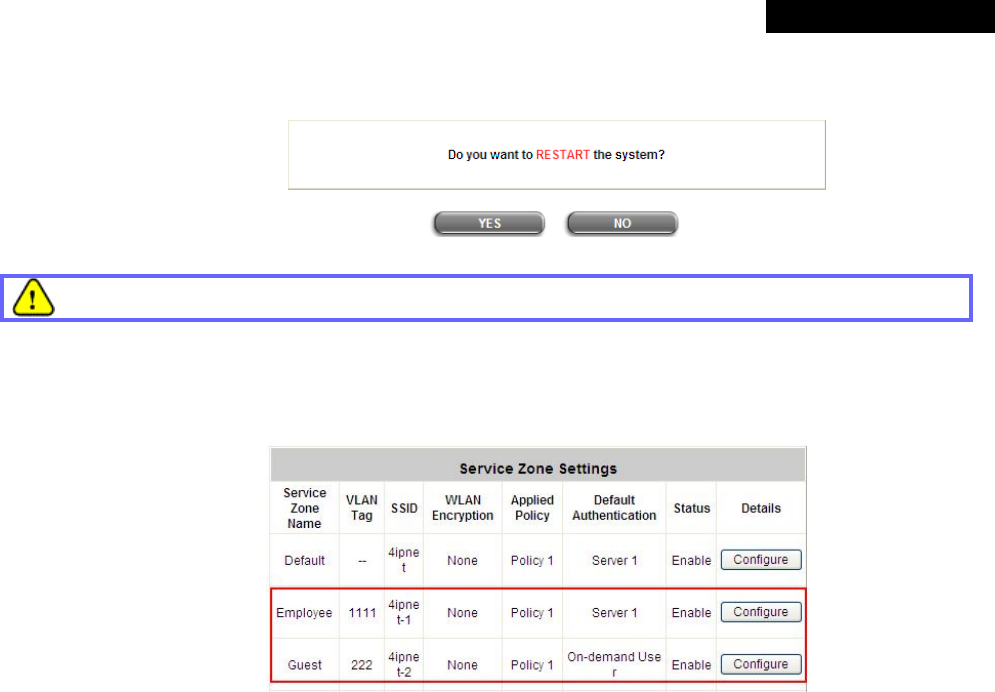
Step 7: Restart the System
Click Apply to activate the settings. A warning message “You should restart the system to activate the
changes.” will appear at the bottom of the page. Click the hyperlink of Restart to restart the system and activate all
changes you have made.
© 2008 4IPNET, INC.
149
4ipnet WHG301
User
’
s Manual
A confirmation message of “Do you want to restart the system?” will appear. Click Yes to start the restarting
process. A confirmation dialog box will then pop out. Click OK to continue.
Please do not interrupt the system during the restarting process
Once the settings of two Service Zones are completed, the configured result will be displayed in the Service Zone
Settings page: SZ1 and SZ2 are both enabled.
© 2008 4IPNET, INC.
150
4ipnet WHG301
User
’
s Manual
Appendix D. Proxy Setting
Basically, a proxy server can help clients access the network resources more quickly. This section presents basic
examples for configuring the proxy server settings of WHG301.
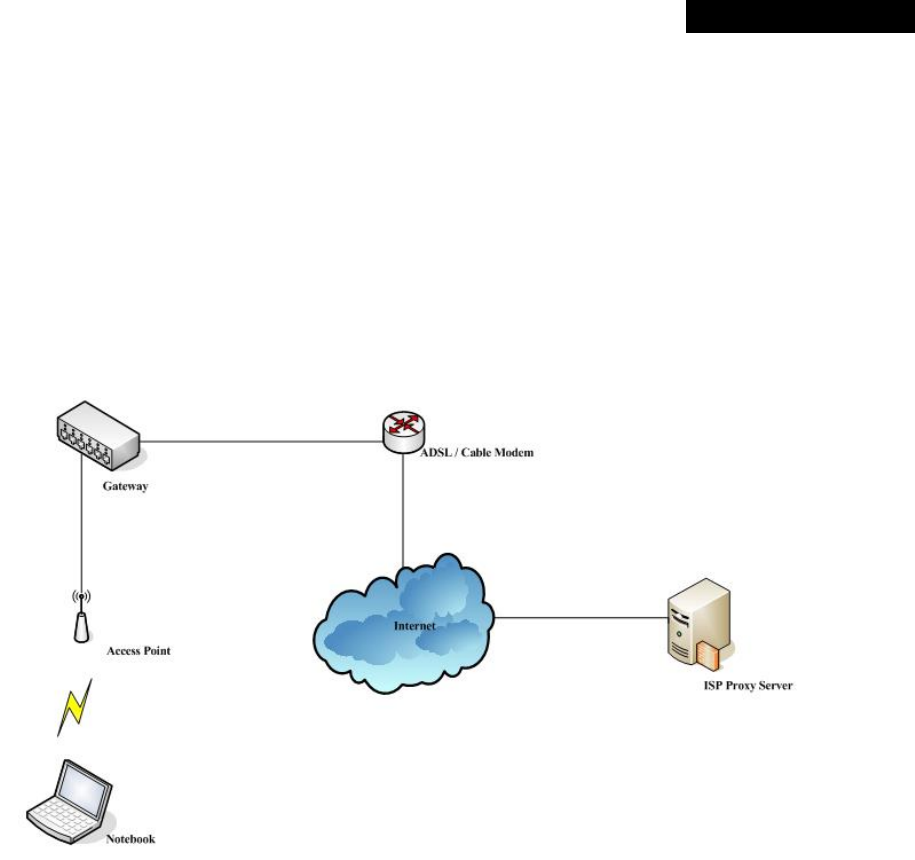
§ Using Internet Proxy Server
The first scenario is that a proxy server is placed outside the LAN environment or in the Internet. For example, the
following diagram shows that a proxy server of an ISP will be used.
© 2008 4IPNET, INC.
151
4ipnet WHG301
User
’
s Manual
Follow the following steps to complete the proxy configuration:
Step 1. Log into the system by using the admin account.
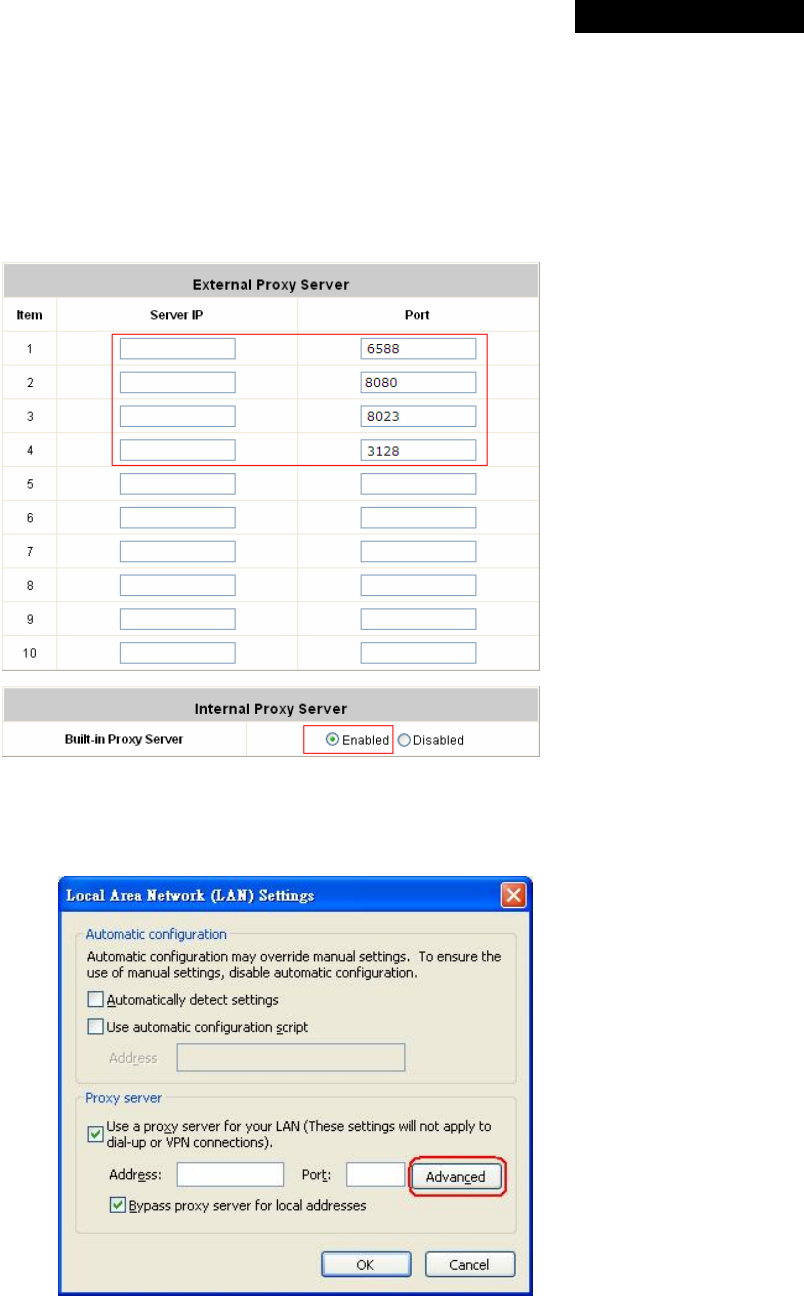
Step 2. Network >> Proxy Server >> External Proxy Servers page. Add the IP address (leaving it blank
means any IP address) and port number of the proxy servers into External Proxy Servers setting.
Enable the Built-in Proxy Server. Click Apply to save the settings.
Step 3. Make sure that the proxy server settings match with at least one of the proxy server setting of the
system – for example, in this case, 203.125.142.1:3128 matches with blank:3128.

© 2008 4IPNET, INC.
152
4ipnet WHG301
User
’
s Manual
1 It is required that the proxy server setting of the clients match with the proxy server setting of the
system. Otherwise, users will not be able to get the Login page for authentication via browsers and it
will show an error page in the browser.
2 What the Built-in Proxy Server is enabled, all the outgoing proxy traffic will be automatically redirected
to the built-in proxy server.
© 2008 4IPNET, INC.
153
4ipnet WHG301
User
’
s Manual
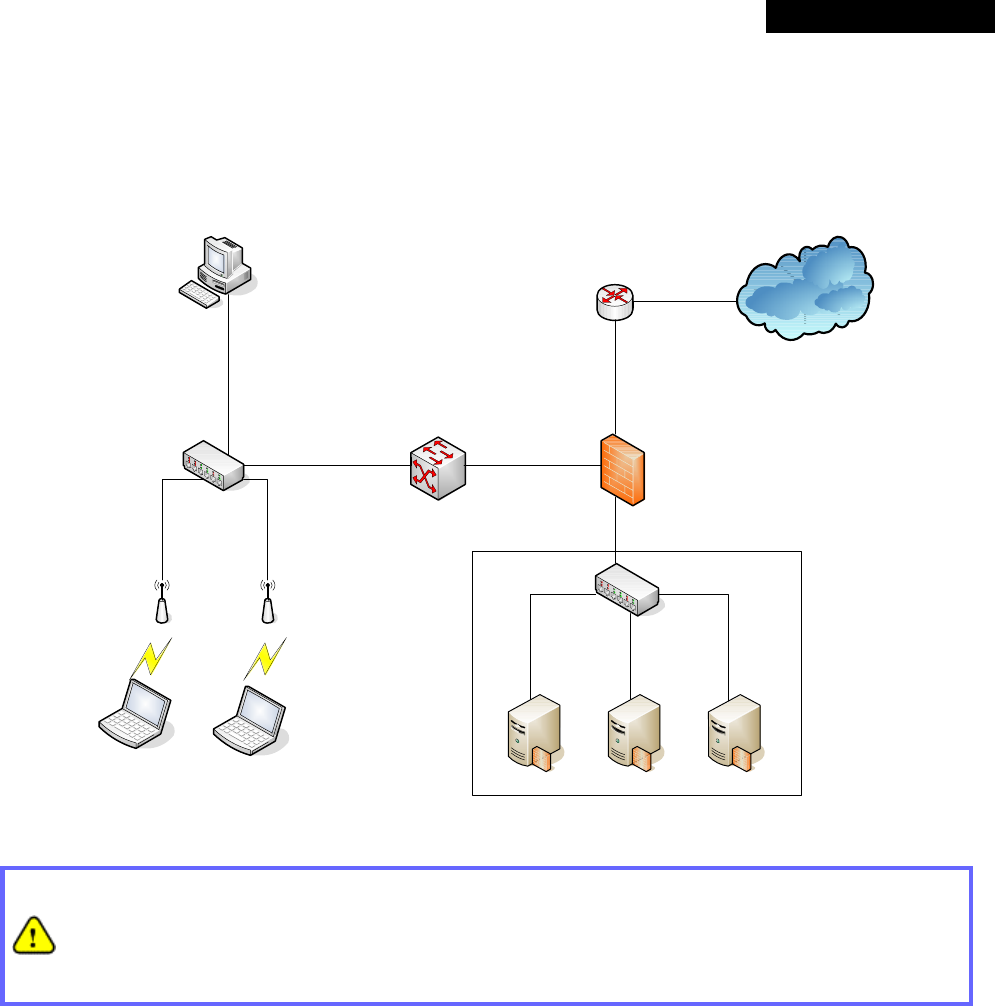
§ Using Extranet Proxy Server
The second scenario is that a proxy server is placed in the Extranet (such as DMZ), which all users from the Intranet
or the Internet are able to access. For example, the following diagram shows that a proxy server of an organization
in the DMZ will be used.
Internet
NotebookNotebook
Access PointAccess Point
Gateway
Desktop
Core SwitchFirewall
Router
L2 Switch
Proxy ServerWeb ServerMail Server
DMZ
A special scenario is that a proxy server is placed in a zone like Intranet – where users can reach each
other without going through the system. In this case, whenever any one of users in the Intranet has been
authenticated and connects to the network via the proxy server, other users using the same proxy setting in
their browsers will be able to access the network without any authentication. Therefore, to stop the risk, it is
strongly recommended to put all proxy servers outside the Intranet.
© 2008 4IPNET, INC.
154
4ipnet WHG301
User
’
s Manual
Follow the following steps to complete the proxy configuration:
Step 1. Log in the system by using the admin account.
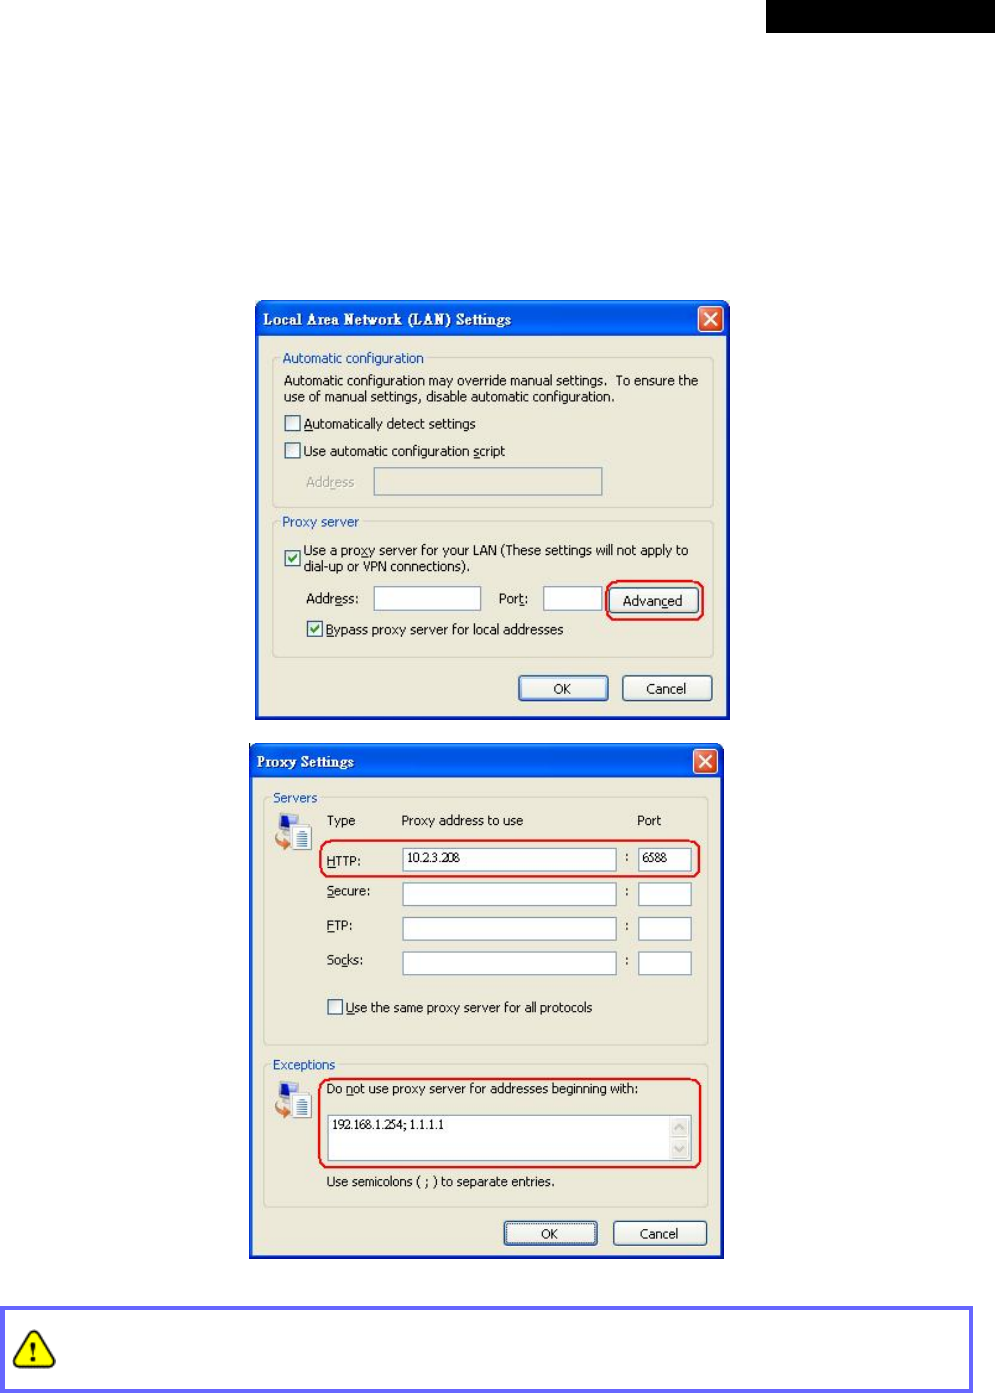
Step 2. Network >> Proxy Server >> External Proxy Servers page. Add the IP address and port number of the
proxy server into External Proxy Servers setting. Click Apply to save the settings.
Step 3. Make sure that clients use the same proxy server settings. Please also configure appropriate exceptions
if there is any traffic which is not needed to go through proxy server – for example, there is no need to
use proxy server for the Default Gateway (192.168.1.254).
It is required that the proxy server setting of the clients match with the proxy server setting of the system.
Otherwise, users will not be able to get the Login page for authentication via browsers and it will show an
error page in the browser.

© 2008 4IPNET, INC.
155
4ipnet WHG301
User
’
s Manual
Appendix E. Session Limit and Session Log
§ Session Limit
To prevent ill-behaved clients or malicious software from using up the system’s connection resources, the
administrator can restrict the number of concurrent sessions that a user can establish.
Ø The maximum number of concurrent sessions (TCP and UDP) for each user can be specified in the Global
policy, which applies to authenticated users, users on a non-authenticated port, privileged users, and
clients in DMZ zones.
Ø When the number of a user’s sessions reaches the session limit (a choice of Unlimited, 10, 25, 50, 100,
200, 350 and 500), the user will be implicitly suspended upon receipt of any new connection request. In
this case, a record will be logged to a Syslog server.
Ø Since this basic protection mechanism may not be able to protect the system from all malicious DoS
attacks, it is strongly recommended to build some immune capabilities (such as IDS or IPS solutions) in
network deployment to maintain network operation.
§ Session Log
The system can record connection details of each user accessing the Internet. In addition, the log data can be
sent out to a specified Syslog Server, Email Box or FTP Server based on pre-defined interval time.
Ø The description of the fields of a session log record is shown as below:
Field Description
Date and Time The date and time that the session is established
Session Type [New]: This is a newly established session.
[Blocked]: This session is blocked by a Firewall rule.
Username
The account name (with postfix) of the user. When it shows “N.A.”, it
indicates that the user or device does not need to log in with a
username, for example, the user or device is on a non-authenticated
port or on the privileged MAC/IP list. Change the account name
accordingly, if the name is not identifiable in the record.
8 Note: Only 31 characters are allowed for the combination of
Session Type plus Username.
Protocol The communication protocol of session: TCP or UDP
MAC The MAC address of the user’s computer or device
SIP The source IP address of the user’s computer or device
SPort The source port number of the user’s computer or device
DIP The destination IP address of the user’s computer or device
DPort The destination port number of the user’s computer or device

© 2008 4IPNET, INC.
156
4ipnet WHG301
User
’
s Manual
Ø An example of session log data is shown as below:
31 Aug 12:35:05 2007 [New]user1@local TCP MAC=00:09:6b:cd:83:8c SIP=10.1.1.37 SPort=1626 DIP=203.125.164.132 DPort=80
31 Aug 12:35:05 2007 [New]user1@local TCP MAC=00:09:6b:cd:83:8c SIP=10.1.1.37 SPort=1627 DIP=203.125.164.132 DPort=80
31 Aug 12:35:06 2007 [New]user1@local TCP MAC=00:09:6b:cd:83:8c SIP=10.1.1.37 SPort=1628 DIP=203.125.164.142 DPort=80
31 Aug 12:35:06 2007 [New]user1@local TCP MAC=00:09:6b:cd:83:8c SIP=10.1.1.37 SPort=1629 DIP=203.125.164.142 DPort=80
31 Aug 12:35:07 2007 [New]user1@local TCP MAC=00:09:6b:cd:83:8c SIP=10.1.1.37 SPort=1630 DIP=67.18.163.154 DPort=80
31 Aug 12:35:09 2007 [New]user1@local TCP MAC=00:09:6b:cd:83:8c SIP=10.1.1.37 SPort=1631 DIP=202.43.195.52 DPort=80
31 Aug 12:35:10 2007 [New]user1@local TCP MAC=00:09:6b:cd:83:8c SIP=10.1.1.37 SPort=1632 DIP=203.84.196.242 DPort=80
© 2008 4IPNET, INC.
157
4ipnet WHG301
User
’
s Manual
Appendix F. Network Configuration on PC & User Login
§ Network Configuration on PC
After 4ipnet WHG301 is installed, the following configurations must be set up on the PC: Internet Connection
Setup and TCP/IP Network Setup.
Ÿ Internet Connection Setup
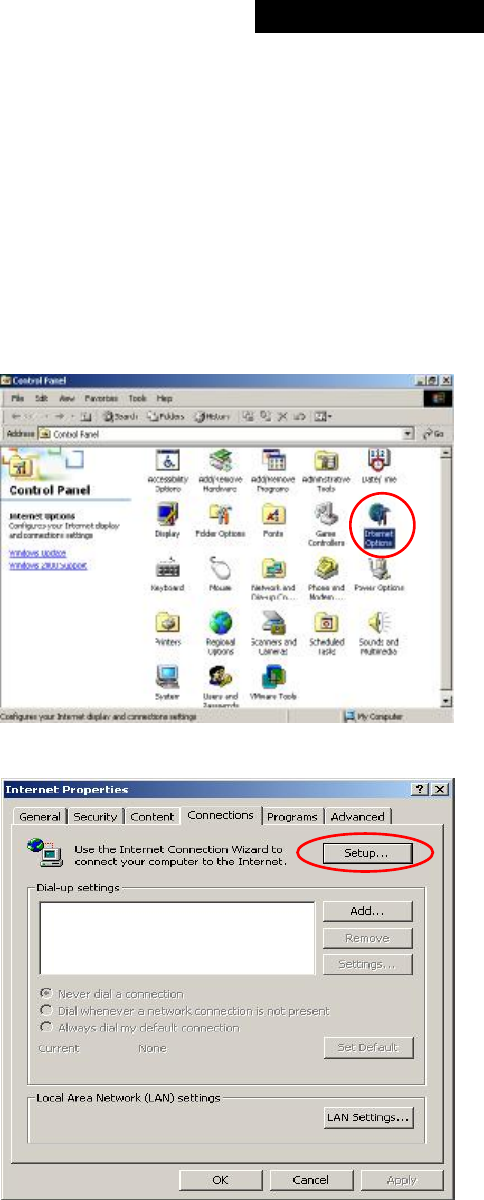
§ Windows 9x/2000
1) Choose Start >> Control Panel >> Internet
Options.
2) Choose the Connections tab, and then click
Setup.
© 2008 4IPNET, INC.
158
4ipnet WHG301
User
’
s Manual
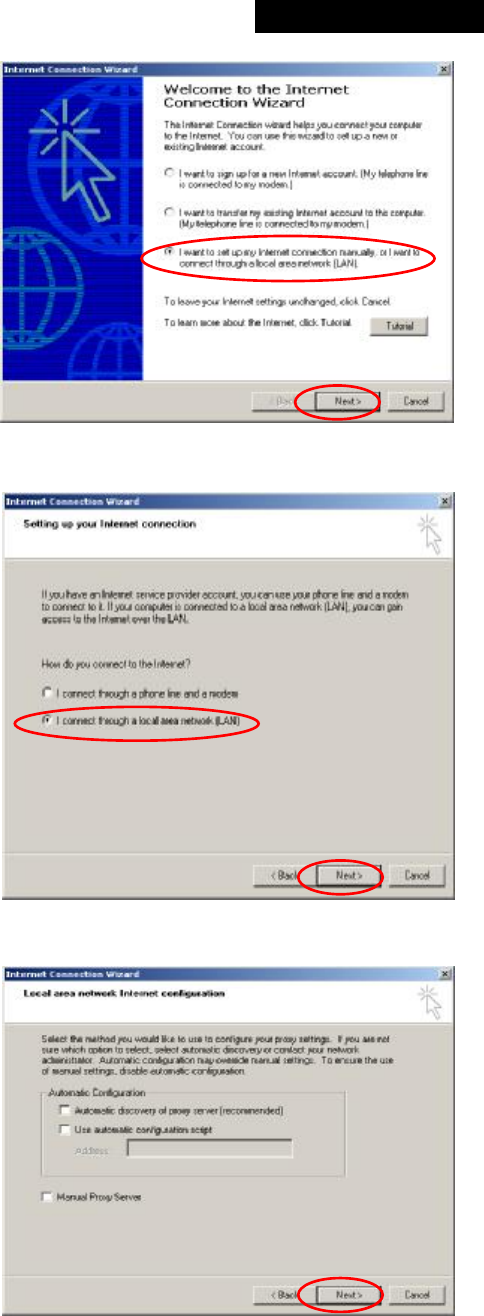
3) Choose “I want to set up my Internet
connection manually, or I want to connect
through a local Area network (LAN)”, and then
click Next.
4) Choose “I connect through a local area
network (LAN)” and then click Next.
5) DO NOT choose any option in the following LAN
window for Internet configuration, and just click
Next.
© 2008 4IPNET, INC.
159
4ipnet WHG301
User
’
s Manual
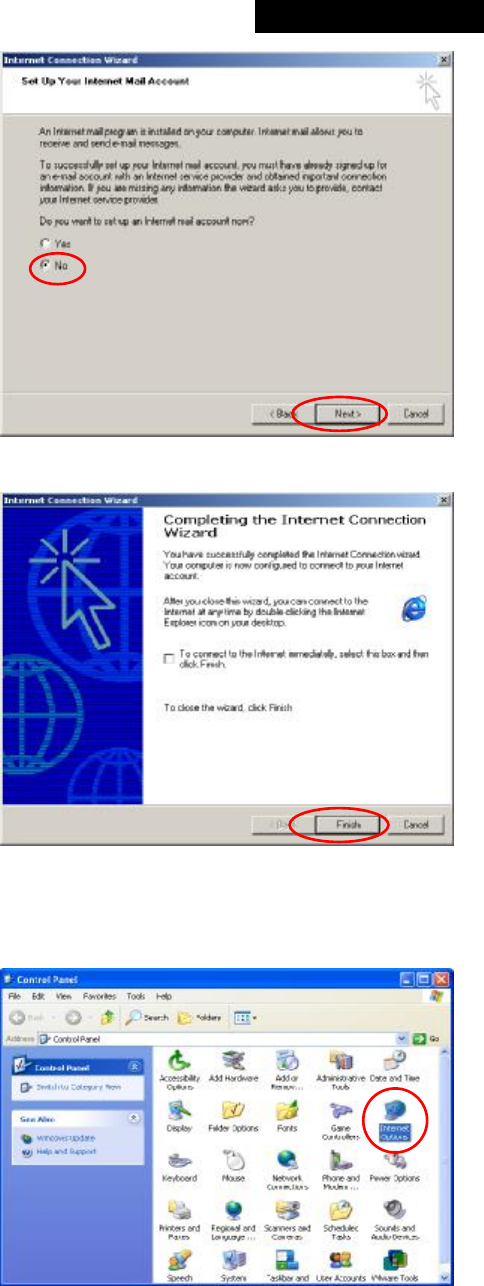
6) Choose “No” and then click Next.
7) Finally, click Finish to exit the Internet
Connection Wizard. Now, the set up is
completed.
§ Windows XP
1) Choose Start >> Control Panel >> Internet
Option.
© 2008 4IPNET, INC.
160
4ipnet WHG301
User
’
s Manual
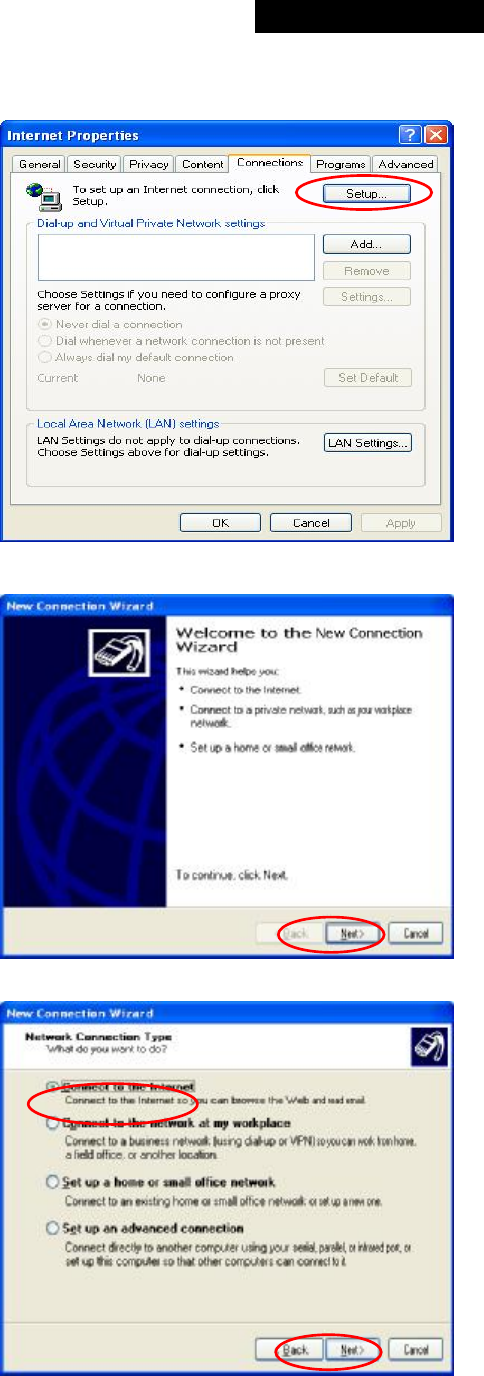
2) Choose the Connections tab, and then click
Setup.
3) When the Welcome to the New Connection
Wizard window appears, click Next.
4) Choose “Connect to the Internet” and then
click Next.
© 2008 4IPNET, INC.
161
4ipnet WHG301
User
’
s Manual
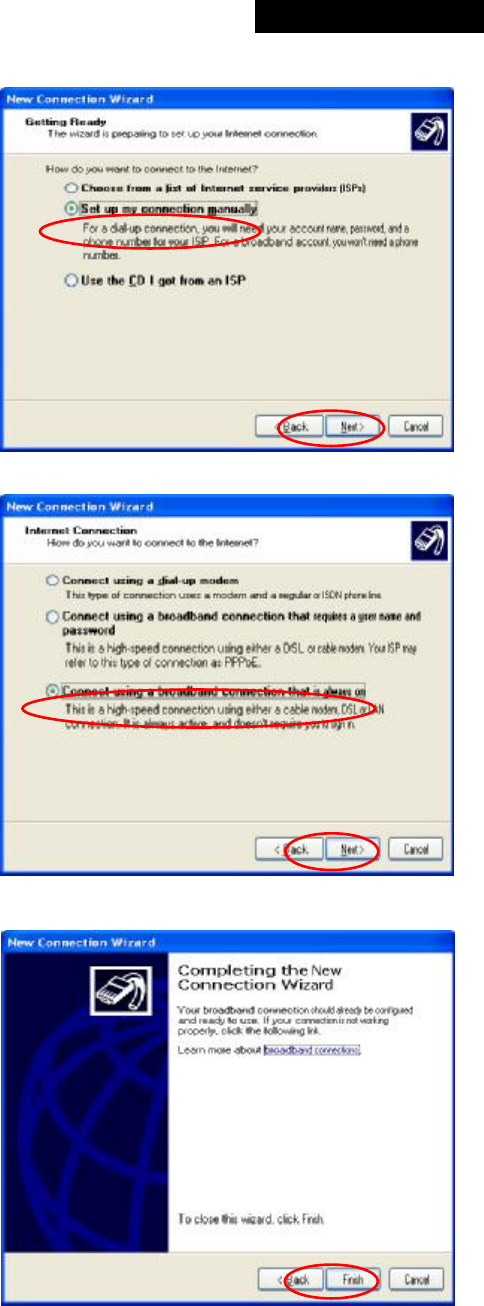
5) Choose “Set up my connection manually” and
then click Next.
6) Choose “Connect using a broadband
connection that is always on” and then click
Next.
7) Finally, click Finish to exit the Connection
Wizard. Now, the setup is completed.
© 2008 4IPNET, INC.
162
4ipnet WHG301
User
’
s Manual
Ÿ TCP/IP Network Setup
If the operating system of the PC in use is Windows 95/98/ME/2000/XP, keep the default settings without any
changes to directly start/restart the system. With the factory default settings, during the process of starting the
system, 4ipnet WHG301 with DHCP function will automatically assign an appropriate IP address and related
information for each PC. If the Windows operating system is not a server version, the default settings of the
TCP/IP will regard the PC as a DHCP client, and this function is called “Obtain an IP address automatically”.
If checking the TCP/IP setup or using the static IP in the LAN1/LAN2 or LAN3/LAN4 section is desired, please
follow these steps:
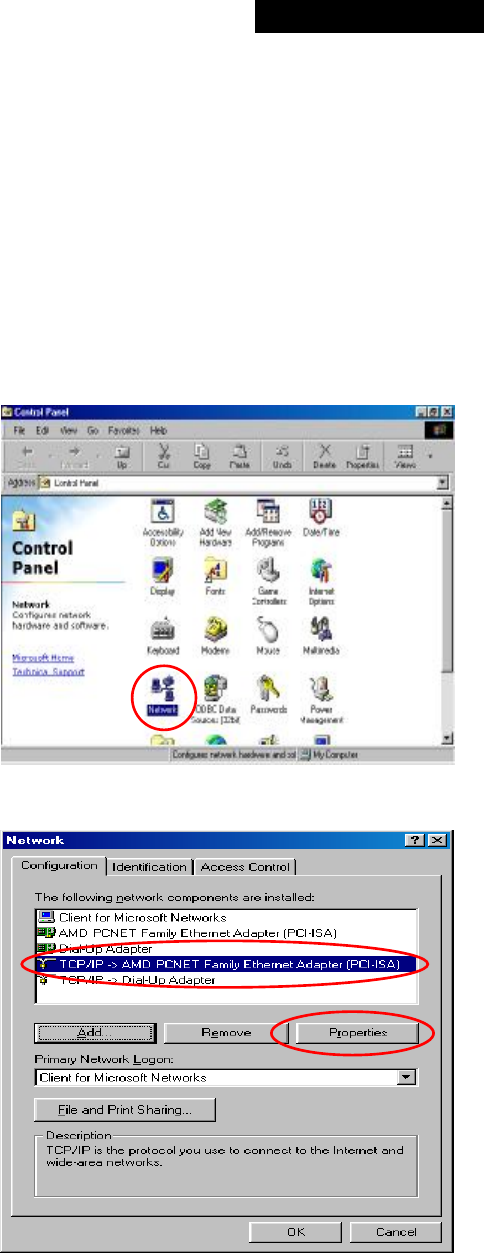
§ Check the TCP/IP Setup of Window 9x/ME
1) Choose Start >> Control Panel >> Network.
2) Click on the Configuration tab and select
“TCP/IP >> AMD PCNET Family Ethernet
Adapter (PCI-ISA)”, and then click Properties.
Now, you can choose to use DHCP or a specific
IP address.
© 2008 4IPNET, INC.
163
4ipnet WHG301
User
’
s Manual
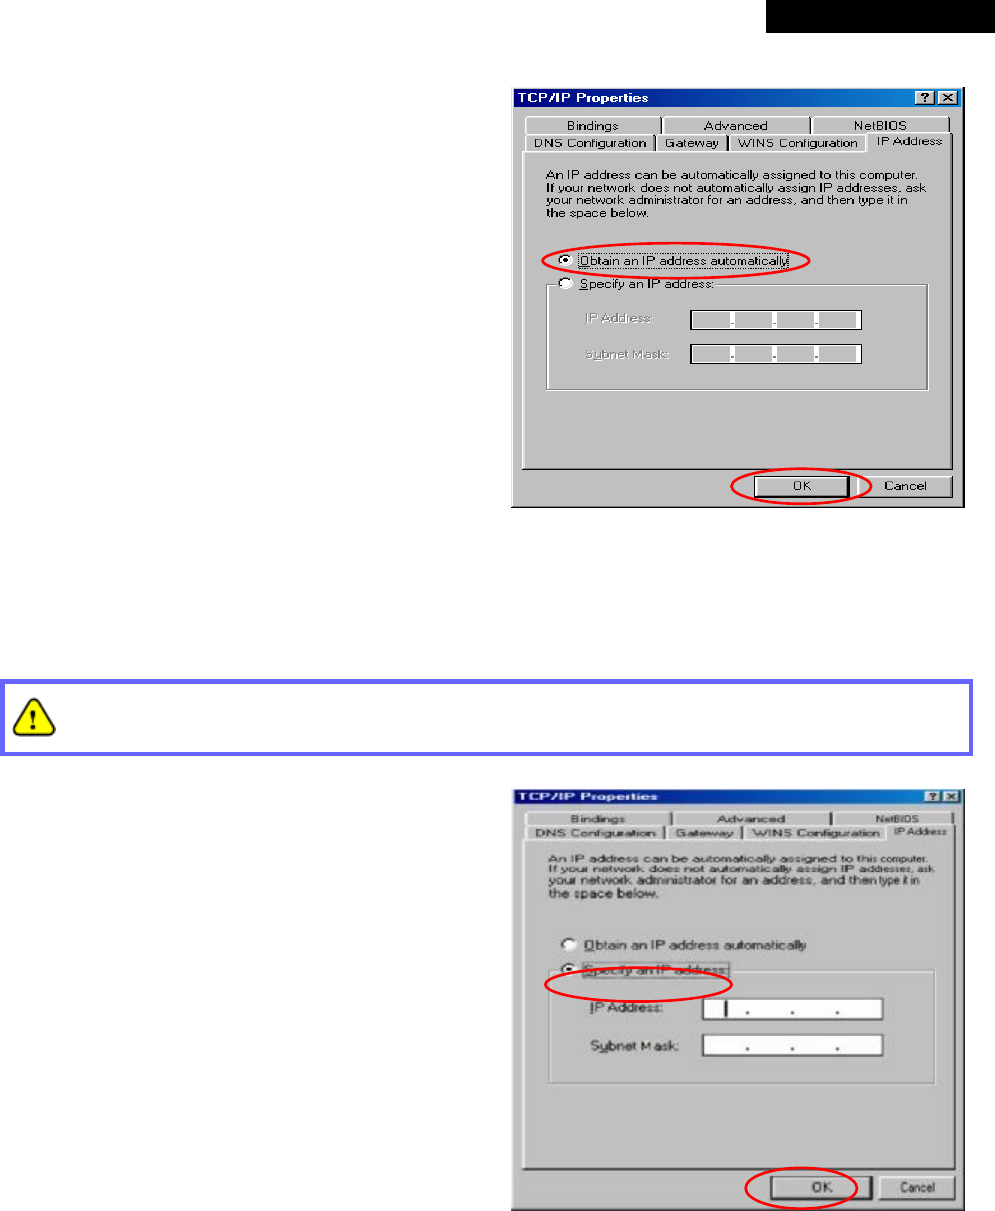
3) Using DHCP: If you want to use DHCP, click on
the IP Address tab and choose “Obtain an IP
address automatically”, and then click OK. This
is also the default setting of Windows. Then,
reboot the PC to make sure an IP address is
obtained from WHG301.
4) Using Specific IP Address: If you want to use a specific IP address, acquire the following information
from the network administrator: the IP Address, Subnet Mask and DNS Server address provided by your
ISP and the Gateway address of WHG301.
If your PC has been set up completely, please inform the network administrator before proceeding to the
following steps.
4.1) Click on the IP Address tab and choose
“Specify an IP address”. Enter the IP
Address, Subnet Mask and then click OK.
© 2008 4IPNET, INC.
164
4ipnet WHG301
User
’
s Manual
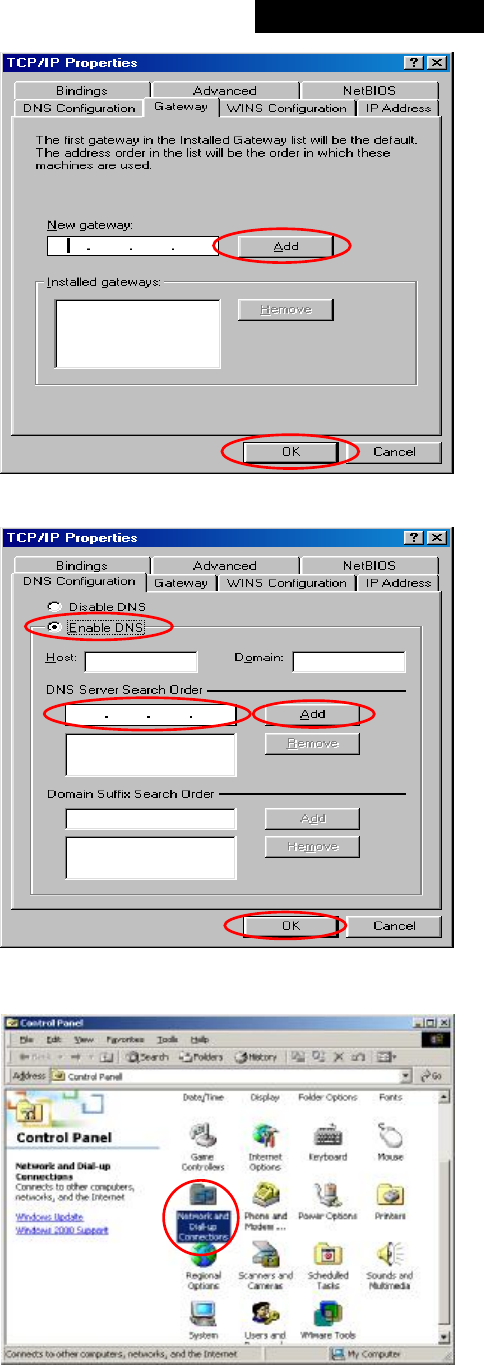
4.2) Click on the Gateway tab. Enter the gateway
address of WHG301 in the “New gateway”
field and click Add. Then, click OK.
4.3) Click on DNS Configuration tab. If the DNS
Server field is empty, select “Enable DNS”
and enter DNS Server address. Click Add, and
then click OK to complete the configuration.
§ Check the TCP/IP Setup of Window 2000
1) Select Start >> Control Panel >> Network and
Dial-up Connections.
© 2008 4IPNET, INC.
165
4ipnet WHG301
User
’
s Manual
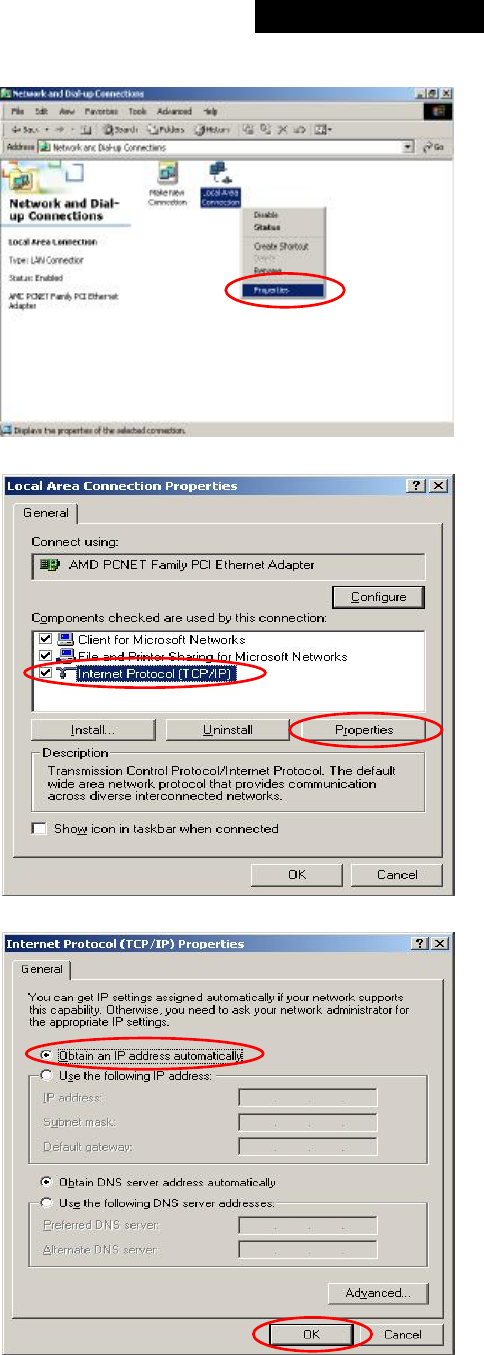
2) Right click on the Local Area Connection icon
and select “Properties”.
3) Select “Internet Protocol (TCP/IP)” and then
click Properties. Now, you can choose to use
DHCP or a specific IP address.
4) Using DHCP: If you want to use DHCP, choose
“Obtain an IP address automatically”, and then
click OK. This is also the default setting of
Windows. Then, reboot the PC to make sure an
IP address is obtained from WHG301.
© 2008 4IPNET, INC.
166
4ipnet WHG301
User
’
s Manual
5) Using Specific IP Address: If you want to use a specific IP address, acquire the following information
from the network administrator: the IP Address, Subnet Mask and DNS Server address provided by your
ISP and the Gateway address of WHG301.
If your PC has been set up completely, please inform the network administrator before proceeding to the
following steps.
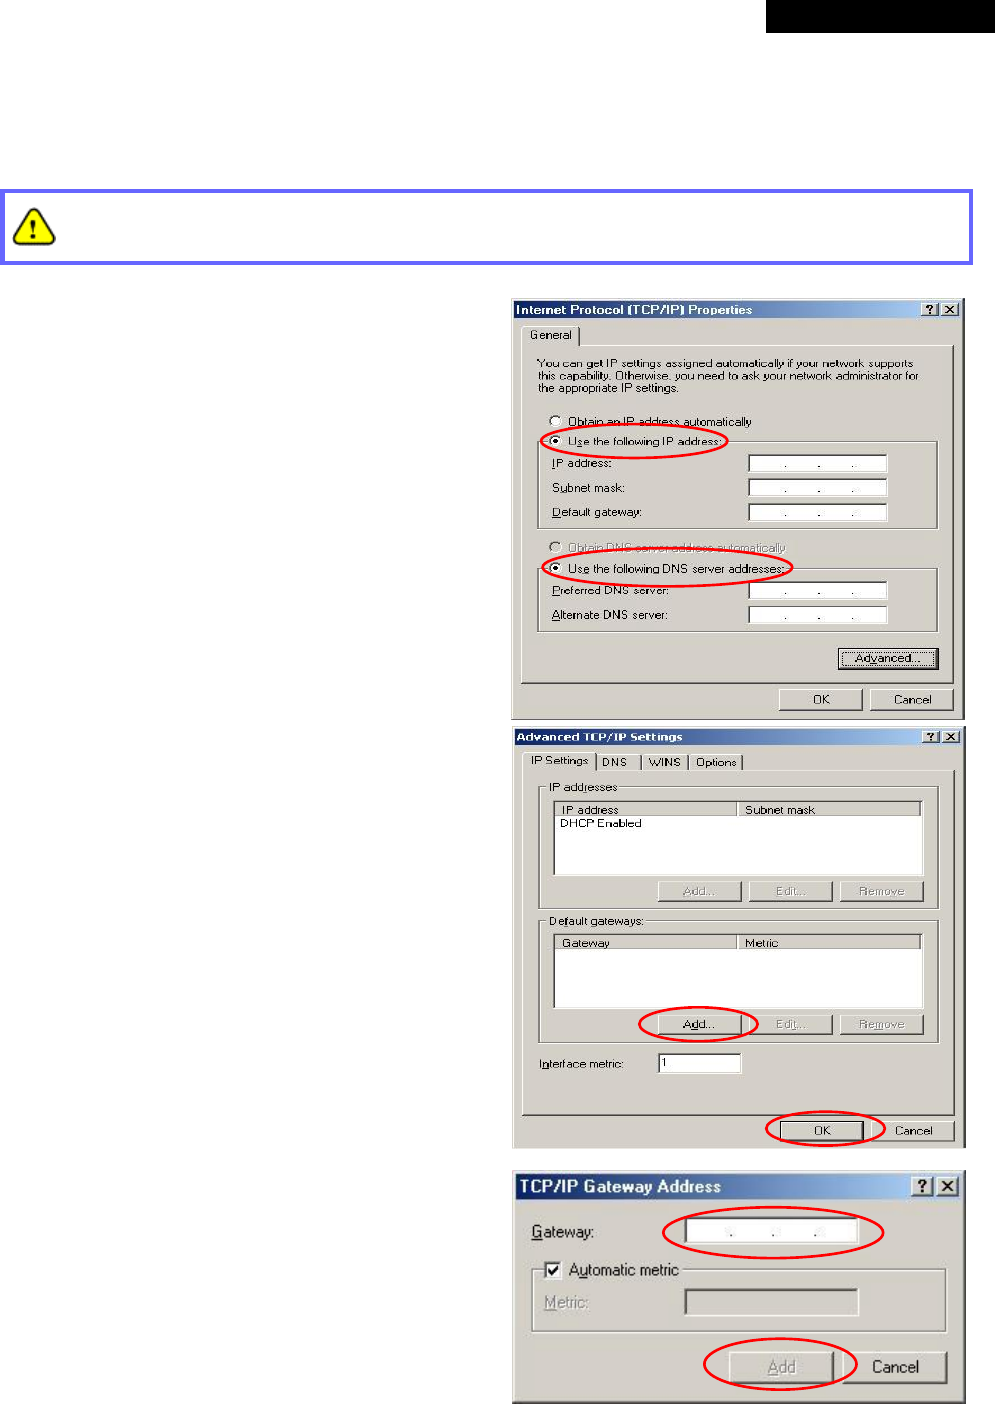
5.1) Choose “Use the following IP address” and
enter the IP address, Subnet mask. If the DNS
Server field is empty, select “Using the
following DNS server addresses” and enter
the DNS Server address. Then, click OK.
5.2) Click Advanced to enter the Advanced
TCP/IP Settings window.
5.3) Click on the IP Settings tab and click Add
below the “Default gateways” column and the
TCP/IP Gateway Address window will appear.
5.4) Enter the gateway address of WHG301 in the
“Gateway” field, and then click Add. After
back to the IP Settings tab, click OK to
complete the configuration.
© 2008 4IPNET, INC.
167
4ipnet WHG301
User
’
s Manual
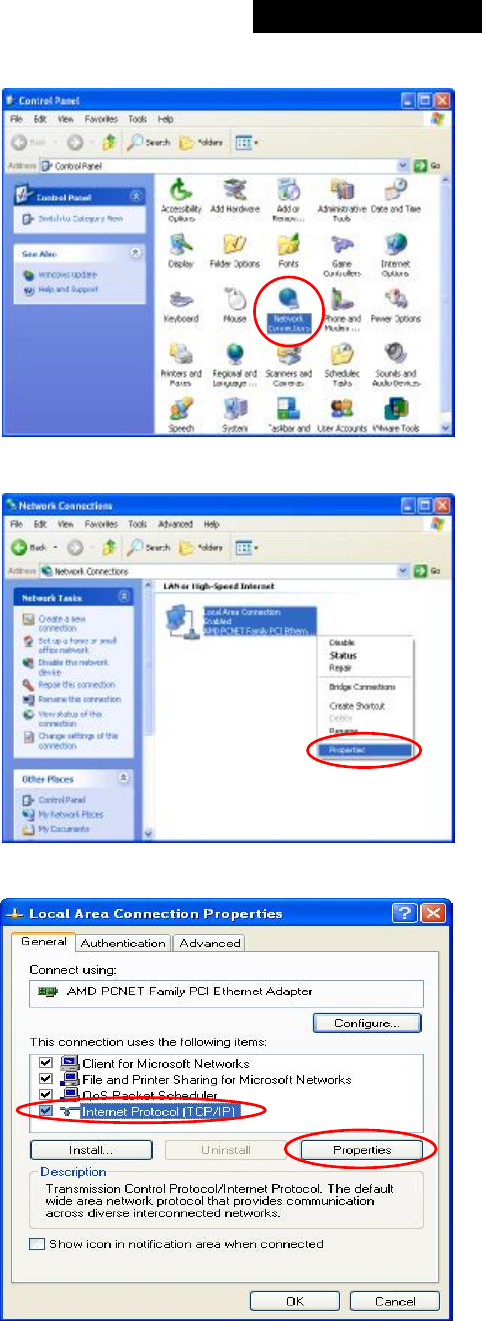
§ Check the TCP/IP Setup of Window XP
1) Select Start >> Control Panel >> Network
Connection.
2) Right click on the Local Area Connection icon
and select “Properties”.
3) Click on the General tab and choose “Internet
Protocol (TCP/IP)”, and then click Properties.
Now, you can choose to use DHCP or a specific
IP address.

© 2008 4IPNET, INC.
168
4ipnet WHG301
User
’
s Manual
4) Using DHCP: If you want to use DHCP, choose
“Obtain an IP address automatically” and click
OK. This is also the default setting of Windows.
Then, reboot the PC to make sure an IP address
is obtained from WHG301.
5) Using Specific IP Address: If you want to use a
specific IP address, acquire the following
information from the network administrator: the IP
Address, Subnet Mask and DNS Server address
provided by your ISP and the Gateway address of
WHG301.
If your PC has been set up completely, please inform the network administrator before proceeding to the
following steps.
5.1) Choose “Use the following IP address” and
enter the IP address, Subnet mask. If the DNS
Server field is empty, select “Using the
following DNS server addresses” and enter
the DNS Server address. Then, click OK.
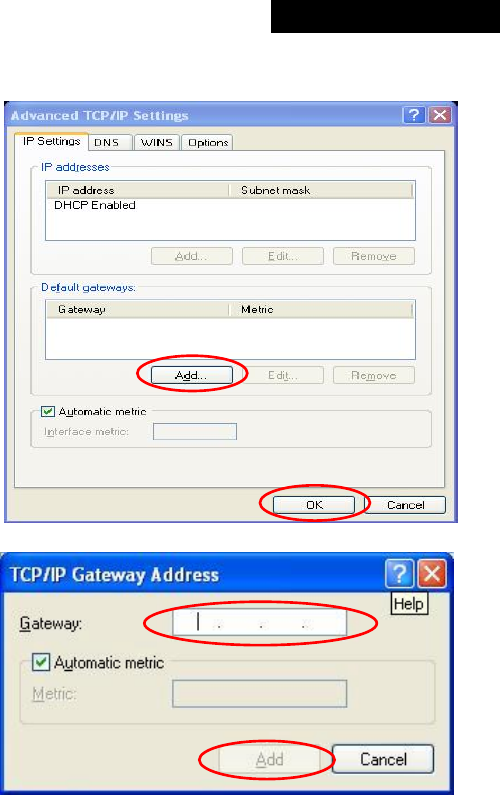
5.2) Click Advanced to enter the Advanced
TCP/IP Settings window.
© 2008 4IPNET, INC.
169
4ipnet WHG301
User
’
s Manual
5.3) Click on the IP Settings tab and click Add
below the “Default gateways” column and the
TCP/IP Gateway Address window will appear.
5.4) Enter the gateway address of WHG301 in the
“Gateway” field, and then click Add. After
back to the IP Settings tab, click OK to finish
the configuration.
© 2008 4IPNET, INC.
170
4ipnet WHG301
User
’
s Manual
§ An Example of User Login
Normally, users will be authenticated before they get network access through WHG301. This section presents the
basic authentication flow for end users. Please make sure that the WHG301 is configured properly and network
related settings are done.
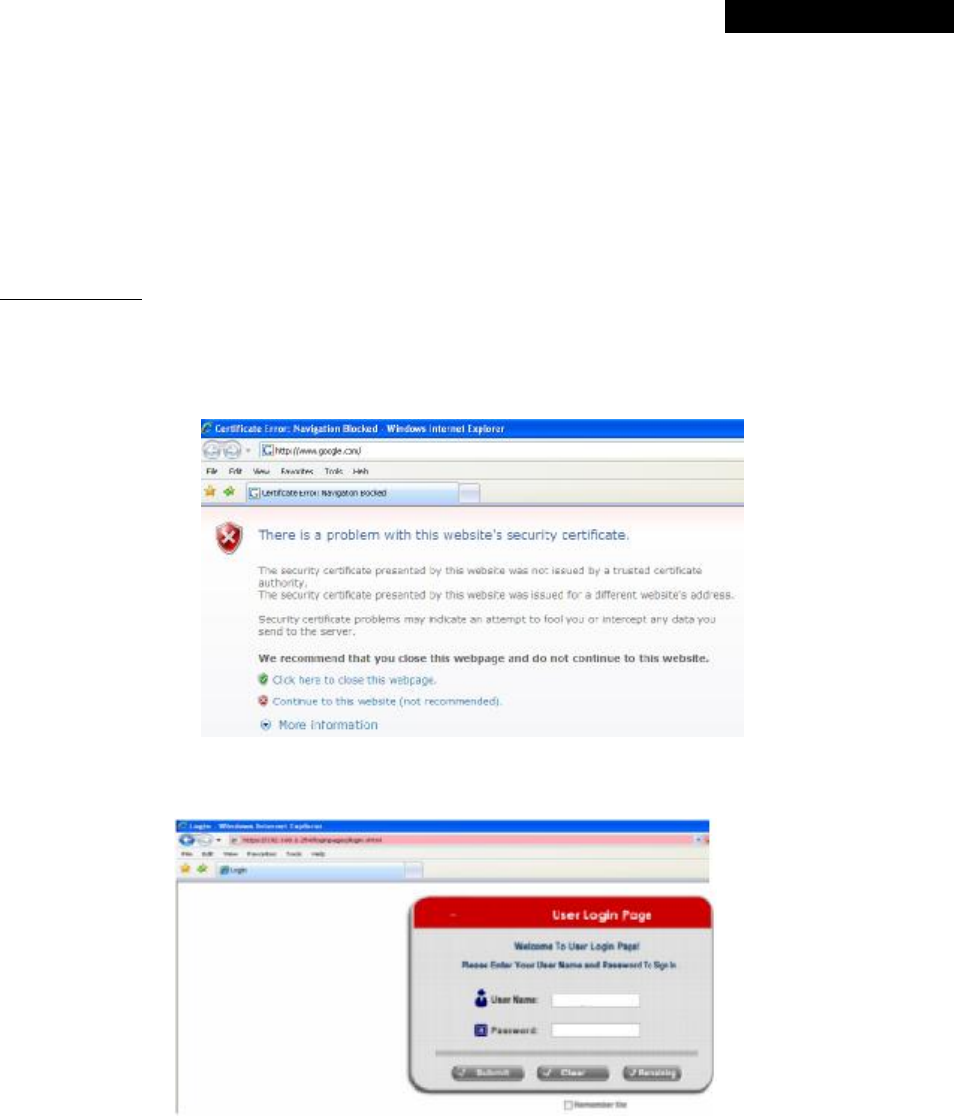
1. Open an Internet browser and try to connect to any website (in this example, we try to connect to
www.google.com).
a) For the first time, if the WHG301 is not using a trusted SSL certificate (for more information, please see
4.2.5 Additional Configuration), there will be a “Certificate Error”, because the browser treats WHG301
as an illegal website.
b) Please press “Continue to this website” to continue.
c) The default user login page will appear in the browser.
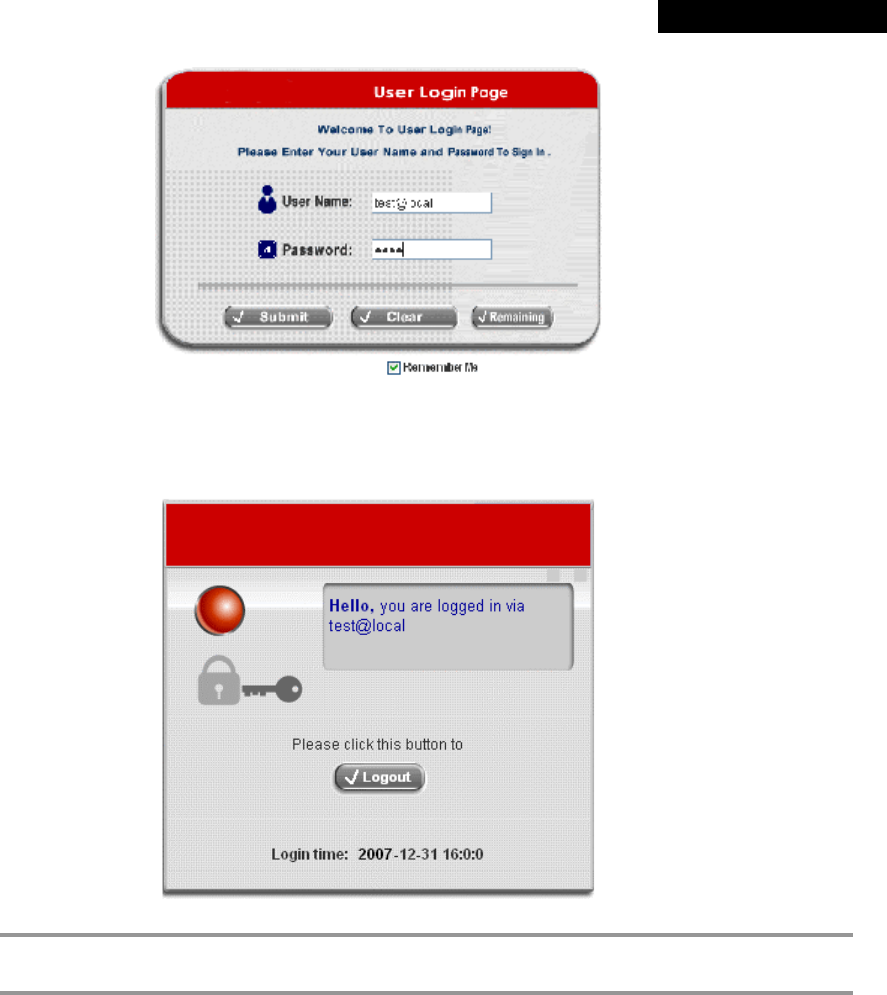
2. Enter the username and password (for example, we use a local user account: test@local here) and then click
Submit button. If the Remember Me check box is checked, the browser will remember this user’s name and
password so that he/she can just click Submit next time he/she wants to login.
Check the Remember Me box to store the username and password on the current computer in order to
automatically login to the system at next login. Then, click the Submit button.
The Remaining button on the User Login Page is for on-demand users only, where they can check their
Remaining Usage time.
© 2008 4IPNET, INC.
171
4ipnet WHG301
User
’
s Manual
3. Successful! The Login Successful page appearing means WHG301 has been installed and configured
successfully. Now, you are connected to the network and Internet!
8 Note:
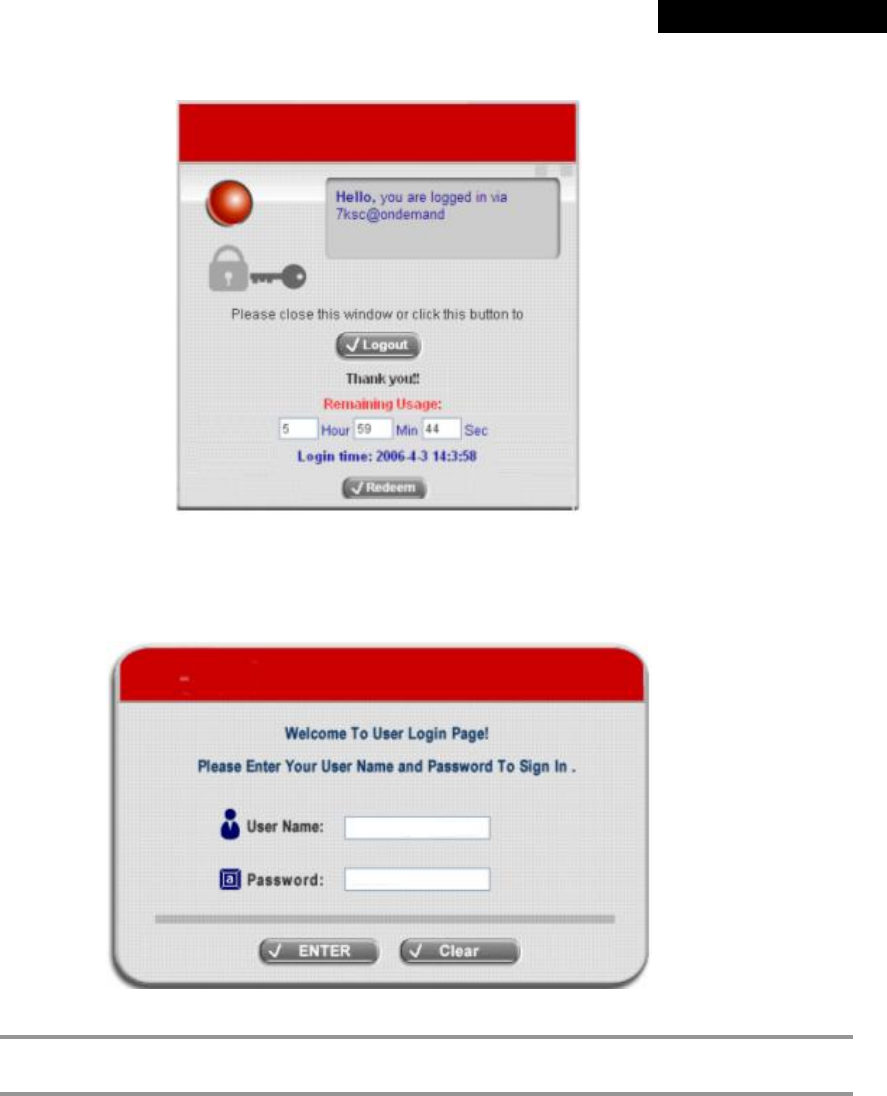
When On-demand accounts are used (for example, we use 7ksc@ondemand here), the system will
display more information, as shown below.
© 2008 4IPNET, INC.
172
4ipnet WHG301
User
’
s Manual
4. Remaining Usage: The remaining quota of this On-demand account that the user can surf the Internet.
5. Redeem: When the remaining quota is insufficient, the user can add up the quota by purchasing an additional
account. Please enter the new username and password in the Redeem Page and click ENTER button to merge
the two accounts so that there will be more quota for the original account.
8 Note:
The maximum session time/data transfer is 24305 days/9,999,999 Mbytes. If the redeem amount
exceeds this number, the system will automatically reject the redeem process.
© 2008 4IPNET, INC.
173
4ipnet WHG301
User
’
s Manual
Appendix G. Console Interface
Via this port to enter the console interface for the
administrator to handle the problems and situations
occurred during operation.
1. In order to connect to the console port of 4ipnet
WHG301, a console, modem cable and a terminal
simulation program, such as the Hyper Terminal
are needed.
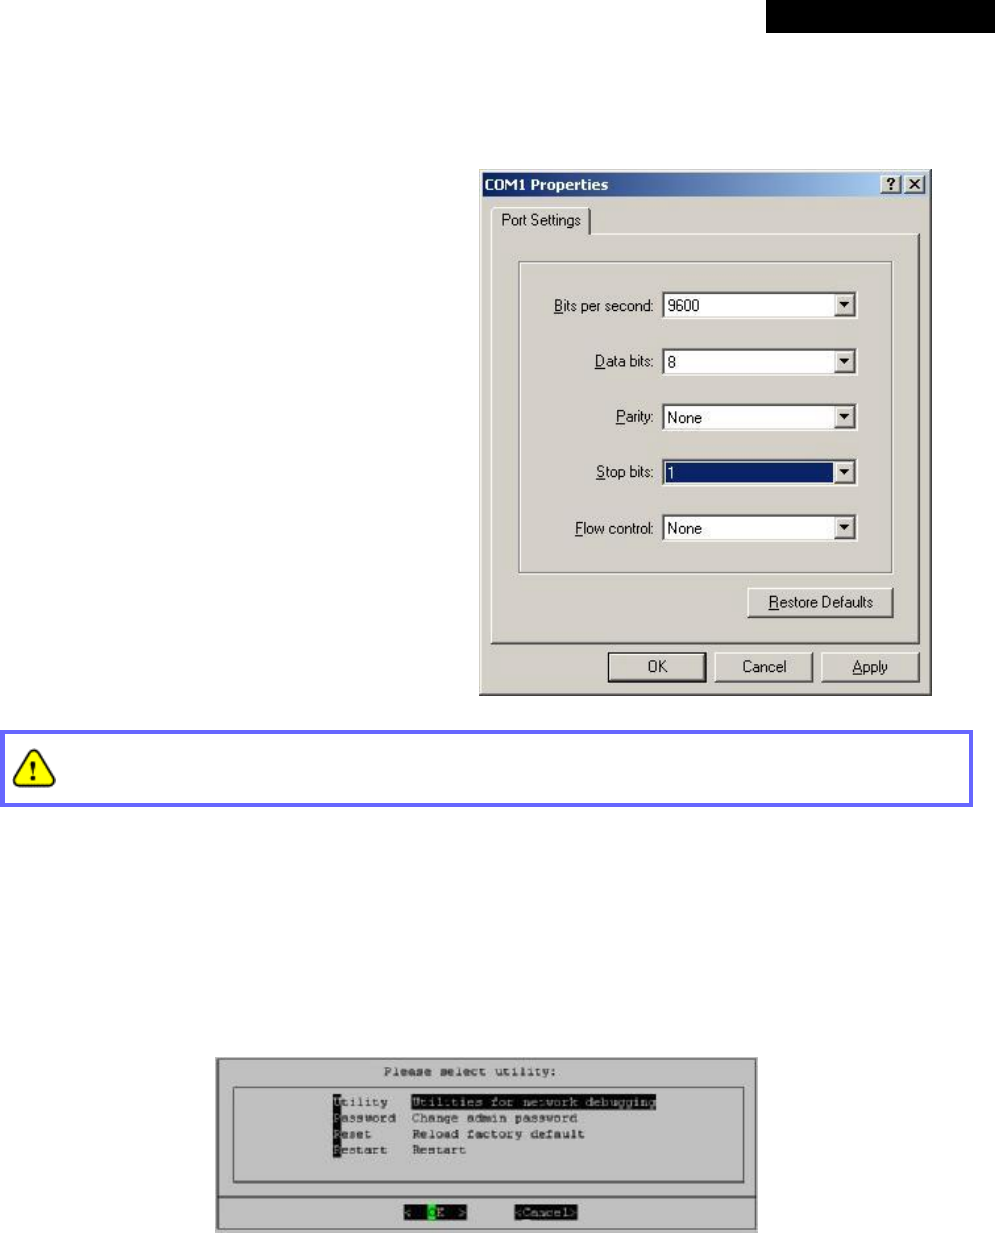
2. If a Hyper Terminal is used, please set the
parameters as 9600,8,n,1.
The main console is a menu-driven text interface with dialog boxes. Please use arrow keys on the
keyboard to browse the menu and press the Enter key to make selection or confirm what you enter.
3. Once the console port of 4ipnet WHG301 is connected properly, the console main screen will appear
automatically. If the screen does not appear in the terminal simulation program automatically, please try to press
the arrow keys, so that the terminal simulation program will send some messages to the system, where the
welcome screen or main menu should appear. If the welcome screen or main menu of the console still does not
pop up, please check the connection of the cables and the settings of the terminal simulation program.
© 2008 4IPNET, INC.
174
4ipnet WHG301
User
’
s Manual
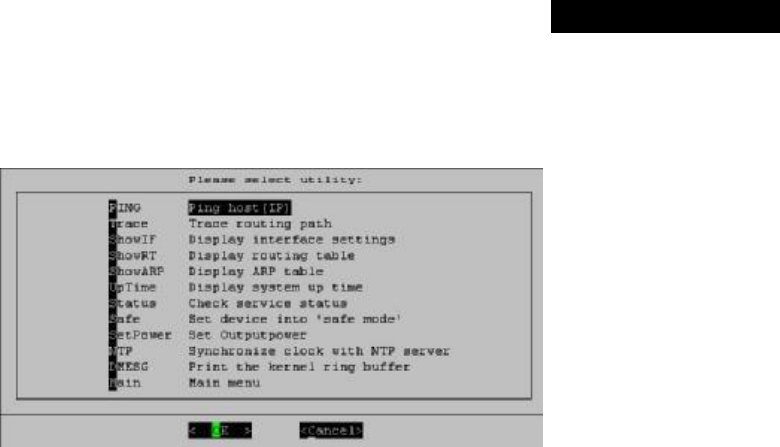
Ÿ Utilities for network debugging
The console interface provides several utilities to assist the Administrator to check the system conditions
and to debug any problems. The utilities are described as follows:
Ø Ping host (IP): By sending ICMP echo request to a specified host and wait for the response to test
the network status.
Ø Trace routing path: Trace and inquire the routing path to a specific target.
Ø Display interface settings: It displays the information of each network interface setting including the
MAC address, IP address, and netmask.
Ø Display the routing table: The internal routing table of the system is displayed, which may help to
confirm the Static Route settings.
Ø Display ARP table: The internal ARP table of the system is displayed.
Ø Display system up time: The system live time (time for system being turn on) is displayed.
Ø Check service status: Check and display the status of the system.
Ø Set device into “safe mode”: If the administrator is unable to use Web Management Interface via
browser for the system failed inexplicitly. The administrator can choose this utility and set it into safe
mode, which enables him to manage this device with browser again.
Ø Synchronize clock with NTP server: Immediately synchronize the clock through the NTP protocol
and the specified network time server. Since this interface does not support manual setup for its
internal clock, therefore we must reset the internal clock through the NTP.
Ø Print the kernel ring buffer: It is used to examine or control the kernel ring buffer. The program helps
users to print out their boot-up messages instead of copying the messages by hand.
Ø Main menu: Go back to the main menu.

© 2008 4IPNET, INC.
175
4ipnet WHG301
User
’
s Manual
Ÿ Change admin password
Besides supporting the use of console management interface through the connection of null modem, the
system also supports the SSH online connection for the setup. When using a null modem to connect to
the system console, we do not need to enter administrator’s password to enter the console management
interface. But connecting the system by SSH, we have to enter the username and password.
The username is “admin” and the default password is also “admin”, which is the same as for the web
management interface. Password can also be changed here. If administrators forget the password and
are unable to log in the management interface from the web or the remote end of the SSH, they can still
use the null modem to connect the console management interface and set the administrator’s password
again.
Although it does not require a username and password for the connection via the serial port, the same
management interface can be accessed via SSH. Therefore, we recommend you to immediately change
the 4ipnet WHG301 Admin username and password after logging in the system for the first time.
Ÿ Reload factory default
Choosing this option will reset the system configuration to the factory defaults.
Ÿ Restart 4ipnet WHG301
Choosing this option will restart 4ipnet WHG301.
© 2008 4IPNET, INC.
176
4ipnet WHG301
User
’
s Manual
Appendix H. Local VPN
The system is equipped with IPSec VPN feature. To utilize IPSec VPN supported by Microsoft Windows XP SP2
(with patch) and Windows 2000 operating systems, the system implements IPSec VPN tunneling technology
between client’s windows devices and the system itself regardless of wired or wireless network.
By pushing down ActiveX to the client’s Windows device from the system, no extra client software is required to be
installed except ActiveX, in which a so-called “clientless” IPSec VPN setting is then configured automatically. At the
end of this setup, a build-in IPSec VPN feature will be enabled and ready to serve once it is launched for setup. The
goal of this design is to eliminate the configuration difficulty from IPSec VPN users. At the client side, the IPSec VPN
implementation of the system is based on ActiveX and the built-in IPSec VPN client of Windows OS.
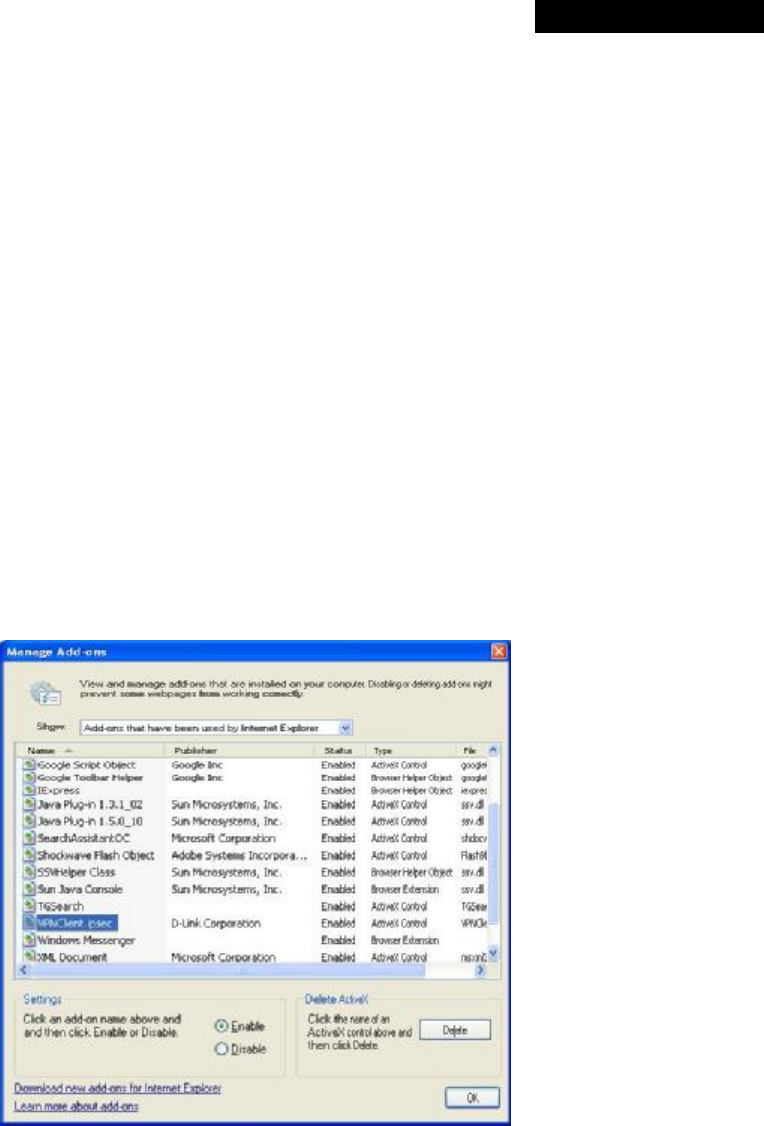
• ActiveX Component
The ActiveX is a software component running inside Internet Explorer. The ActiveX component can be checked
by the following windows.
Windows Internet Explorer: From the Tools menu, click on Internet Options. Select the Programs tab and
click Manage add-ons button to enter the Manage add-ons dialogue box, where you can see VPNClient.ipsec
is enabled.
© 2008 4IPNET, INC.
177
4ipnet WHG301
User
’
s Manual
During the first-time login to WHG301, Internet Explorer will ask clients to download an ActiveX component of
IPSec VPN. Once this ActiveX component is downloaded, it will run in parallel with the “Login Success Page”
after the page being brought up successfully. The ActiveX component helps set up individual IPSec VPN tunnels
between clients and WHG301 and check the validity of IPSec VPN tunnels between them. If the connection is
down, the ActiveX component will detect the broken link and decompose the IPSec tunnel. Once the IPSec VPN
tunnel was built, all sent packets will be encrypted. Without connecting to the original IPSec VPN tunnel, a client
has no alternative way to gain network connection beyond this. IPSec VPN feature supported by WHG301
directly solves possible data security leak problem between clients and the system via either wireless or wired
connections without extra hardware or client software installed.
• Limitations
The limitation on the client side due to ActiveX and Windows OS includes:
Ø Internet Connection Firewall of Windows XP or Windows XP SP1 is not compatible with IPSec protocol. It
shall be turned off to allow IPSec packets to pass through.
Ø Without patch, ICMP (Ping) and PORT command of FTP can not work in Windows XP SP2.
Ø The forced termination (through CTRL+ALT+DEL, Task Manager) of the Internet Explorer will stop the
running of ActiveX. It causes that IPSec tunnel cannot be cleared properly at client device. A reboot of
client device is needed to clear the IPSec tunnel.
Ø The crash of Windows Internet Explorer may cause the same result.
• Internet Connection Firewall
In Windows XP and Windows XP SP1, the Internet Connection Firewall is not compatible with IPSec. Internet
Connection Firewall will drop packets from tunneling of IPSec VPN. Please TURN OFF Internet Connection
Firewall feature or upgrade the Windows OS into Windows XP SP2.
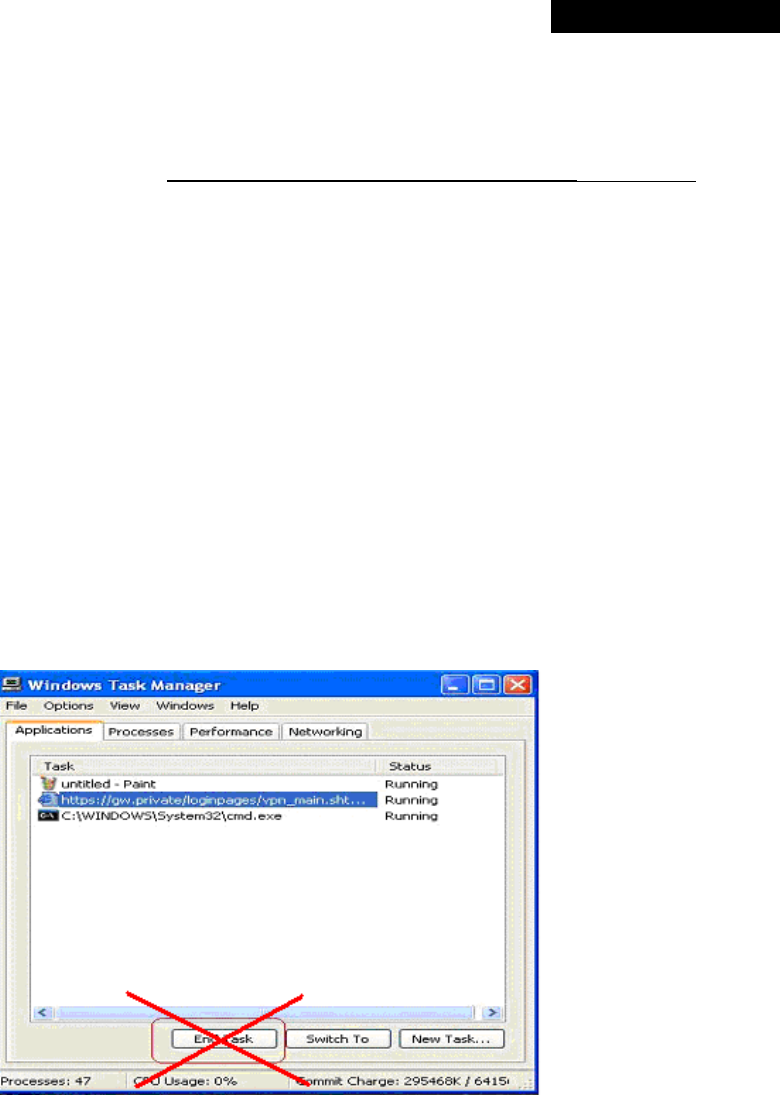
© 2008 4IPNET, INC.
178
4ipnet WHG301
User
’
s Manual
• ICMP and Active Mode FTP
In Windows XP SP2 without patching by KB889527, it will drop ICMP packets from IPSec tunnel. This problem
can be fixed by upgrading patch KB889527. Before enabling IPSec VPN function on client devices, please
access the patch from Microsoft’s web at http://support.microsoft.com/default.aspx?scid=kb;en-us;889527.
This patch also fixes the problem of supporting active mode FTP inside IPSec VPN tunnel of Windows XP SP2.
Please UPDATE clients’ Windows XP SP2 with this patch.
• The Termination of ActiveX
The ActiveX component for IPSec VPN is running in parallel with the web page of “Login Success”. To ensure
that the built-in IPSec VPN tunnel is always alive, unless clients decide to close the session and to disconnect
from WHG301, the following conditions or behaviors, which may cause the Internet Explorer to stop the
ActiveX, should be avoided.
(1) The crash of Internet Explorer on running ActiveX.
If it happens, please reboot the client computer. Once Windows service is resumed, go through the login
process again.
(2) Termination of the Internet Explorer Task from Windows Task Manager.
Do NOT terminate this VPN task of Internet Explorer.
(3) Execution of instructions given by the following Windows messages:
† Close the Windows Internet Explorer.
† Click Logout on Login Success page.
† Click Back or Refresh of the same Internet Explorer browser page.
† Enter a new URL in the same Internet Explorer browser page.
† Open a URL from the other application (e.g. email of Outlook) that occupies this existing Internet
Explorer.
Click Cancel if you do not intend to stop the IPSec VPN connection.

© 2008 4IPNET, INC.
179
4ipnet WHG301
User
’
s Manual
• Non-supported OS and Browser
Currently, Windows Internet Explorer is the only browser supported by the system. Windows XP and Windows
2000 are the only two supported OS along with this release.
• FAQ
(1) How to clean IPSec client?
ANS:
Open a command prompt window and type the commands as follows.
C:\> cd %windir%\system32
C:\> Clean_IPSEC.bat
Or
C:\> cd %windir%\system32
C:\> ipsec2k.exe stop
(2) How to remove ActiveX component in client’s computer?
ANS:
① Uninstall and delete ActiveX component
② Close all Internet Explorer windows
③ Open a command prompt window and type the commands as follows
C:\> cd %windir%\system32
C:\> regsvr32 /u VPNClient_1_5.ocx
C:\> del VPNClient_1_5.ocx
(3) What can I do if unable establish IPSec connection for Windows XP SP1?
ANS:
Disable Windows XP firewall
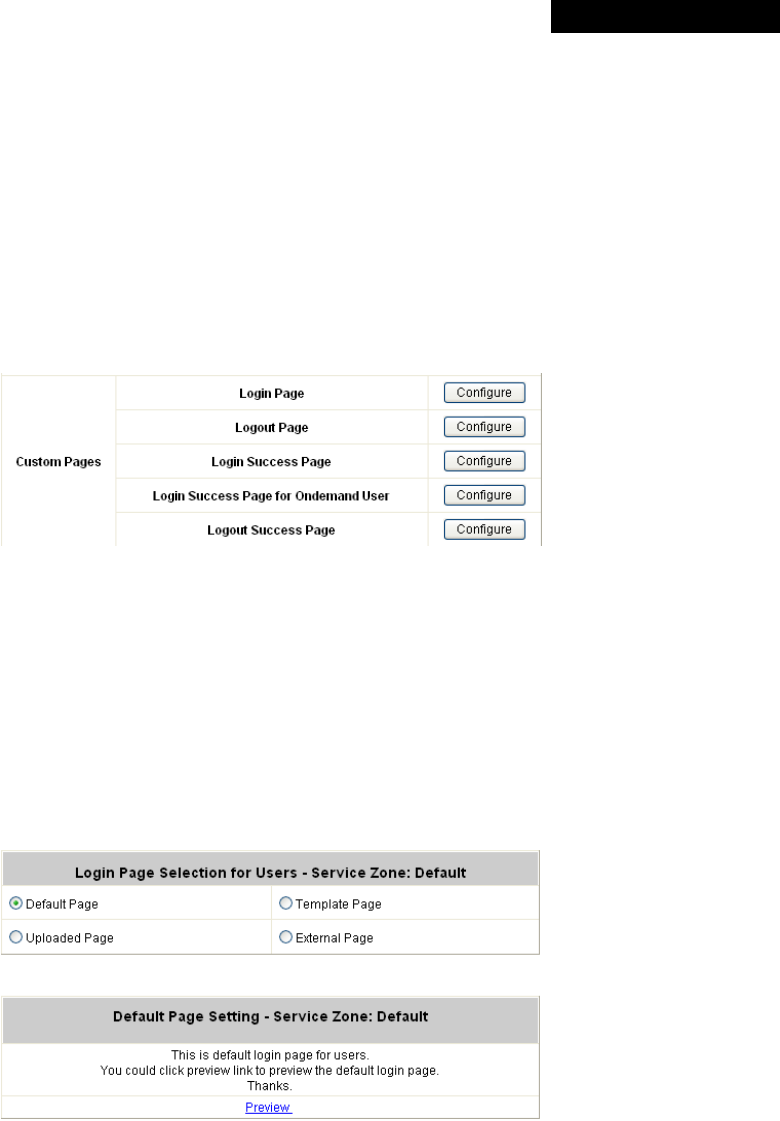
© 2008 4IPNET, INC.
180
4ipnet WHG301
User
’
s Manual
Appendix I. Customizable Pages
There are five users’ login and logout pages for each service zone that can be customized by administrators.
Go to System Configuration >> Service Zone >> Service Zone Settings Configure >> Custom Pages.
Click the button of Configure, the Login (Logout) page will appear, including Login page, Logout Page, Login
Success Page, Login Success Page for On-demand User and Logout Success Page.
Click the radio button of page selections to have further configuration.
1 Custom Pages >> Login Page
The administrator can use the default login page or get the customized login page by setting the template page,
uploading the page or downloading from a designated website. After finishing the setting, click
Preview to see
the login page.
Ÿ Custom Pages >> Login Page >> Default Page
Choose Default Page to use the default login page.
Ÿ Custom Pages >> Login Page >> Template Page
Choose Template Page to make a customized login page. Click Select to pick up a color and then fill in all of
the blanks. You can also upload a background image file for your template. Click
Preview to see the result
first.

© 2008 4IPNET, INC.
181
4ipnet WHG301
User
’
s Manual
Ÿ Custom Pages >> Login Page >> Uploaded Page
Choose Uploaded Page and upload a login page.
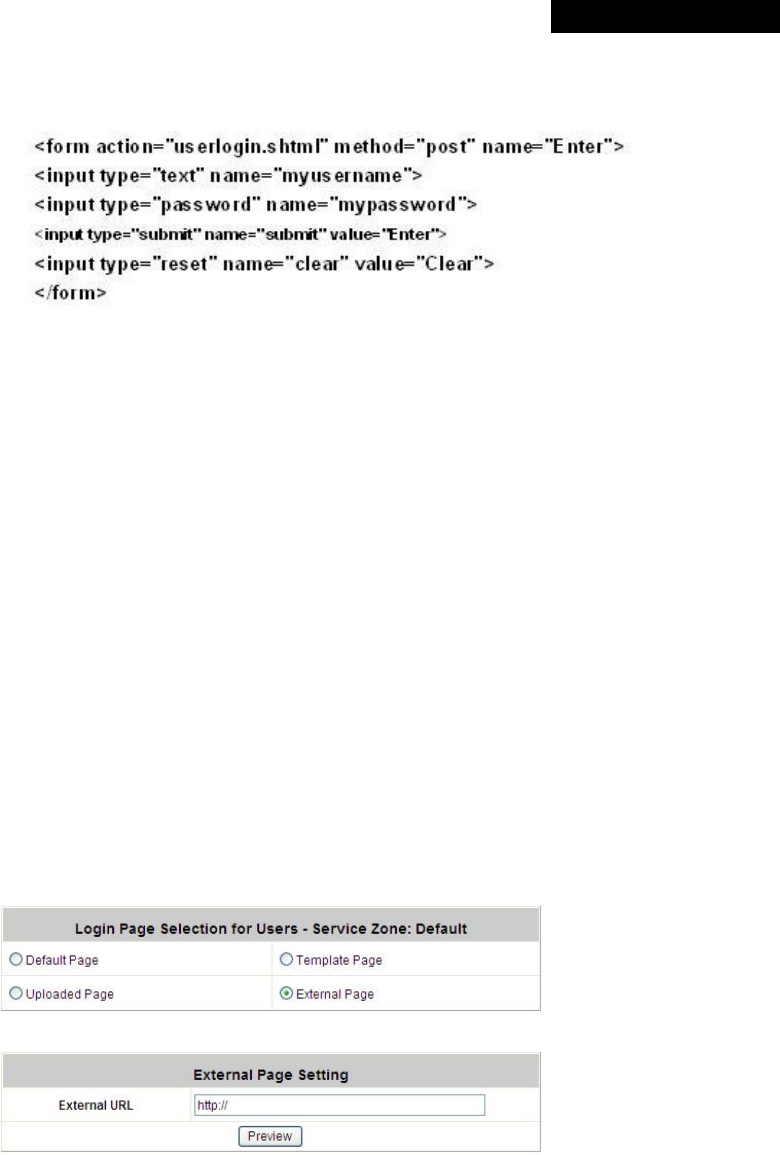
© 2008 4IPNET, INC.
182
4ipnet WHG301
User
’
s Manual
The user-defined login page must include the following HTML codes to provide the necessary fields for user
name and password.
And if the user-defined login page includes an image file, the image file path in the HTML code must be the
image file to be uploaded.
Remote VPN : <img src=images/xx.jpg”>
Default Service Zone: <img src=images0/xx.jpg”>
Service Zone 1 : <img src=images1/xx.jpg”>
Service Zone 2 : <img src=images2/xx.jpg”>
Service Zone 3 : <img src=images3/xx.jpg”>
Service Zone 4 : <img src=images4/xx.jpg”>
Click the Browse button to select the file to upload. Then click Submit to complete the upload process.
Next, enter or browse the filename of the images to upload in the Upload Images field on the Upload Images
Files page and then click Submit. The system will show the used space and the maximum size of the image
file of 512K. If the administrator wishes to restore the factory default of the login page, click the Use Default
Page button to restore it to default.
After the image file is uploaded, the file name will show on the “Existing Image Files” field. Check the file and
click Delete to delete the file.
After the upload process is completed and applied, the new login page can be previewed by clicking Preview
button at the button.
Ÿ Custom Pages >> Login Pages >> External Page
Choose the External Page selection and get the login page from a designated website. In the External Page
Setting, enter the URL of the external login page and then click Apply.
After applying the setting, the new login page can be previewed by clicking Preview button at the bottom of this
page.
The user-defined logout page must include the following HTML codes to provide the necessary fields for
username and password.
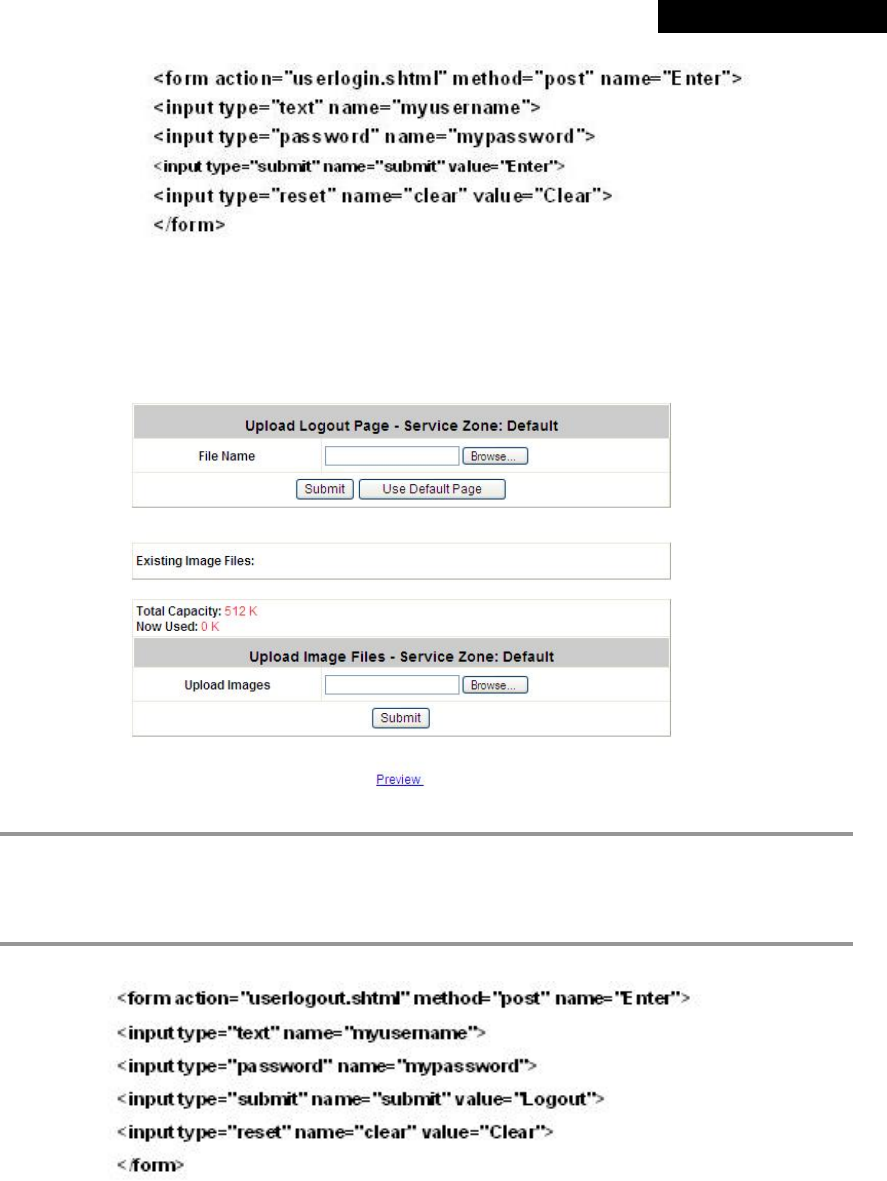
© 2008 4IPNET, INC.
183
4ipnet WHG301
User
’
s Manual
2 Custom Pages >> Logout Page
The administrator can apply their own logout page in the menu. As the process is similar to that of the Login
Page, please refer to the “Login Page >> Uploaded Page” instructions for more details.
8 Note:
The different part is the HTML code of the user-defined logout interface must include the following
HTML code that the user can enter the username and password. After the upload is completed, the
customized logout page can be previewed by clicking Preview at the bottom of this page. If restore to
factory default setting is needed for the logout interface, click the “Use Default Page” button.
3 Custom Pages >> Login Success Page
The users can apply their own Login Success page in the menu. As the process is similar to that of the Login
Page, please refer to the “Login Page” instructions for more details.
Ÿ Custom Pages >> Login Success Page >> Default Page
Choose Default Page to use the default login success page.
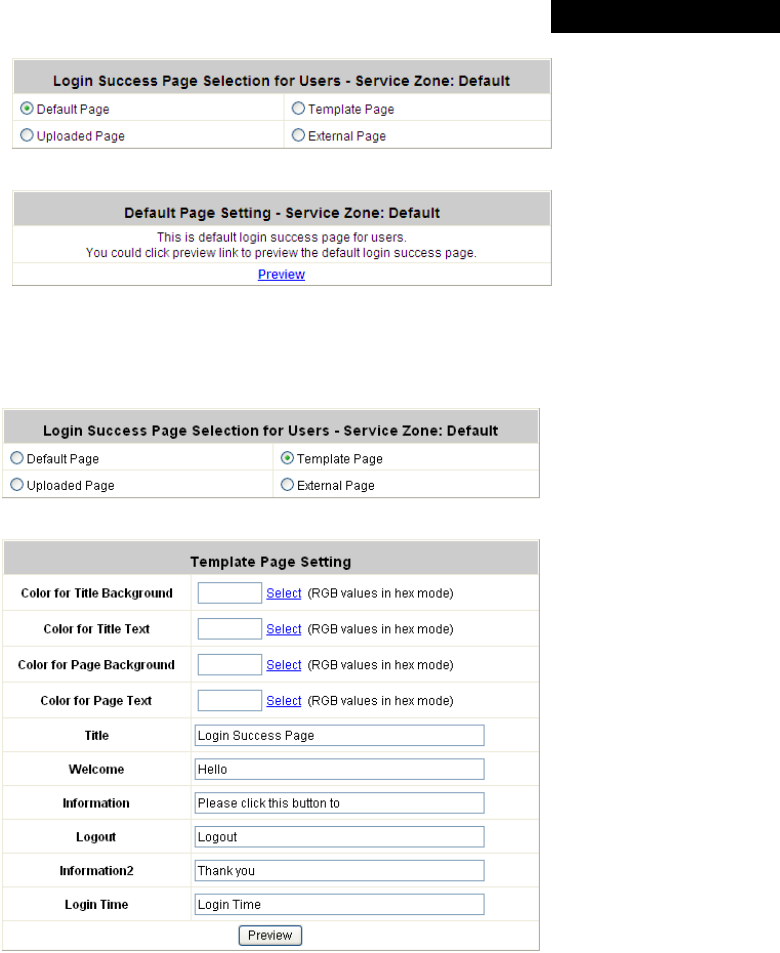
© 2008 4IPNET, INC.
184
4ipnet WHG301
User
’
s Manual
Ÿ Custom Pages >> Login Success Page >> Template Page
Choose Template Page to make a customized login success page. Click Select to pick up a color and then fill
in all of the blanks. Click Preview to see the result first.
Ÿ Custom Pages >> Login Success Page >> Uploaded Page
Choose Uploaded Page and get the login success page to upload. Click the Browse button to select the
file for the login success page upload. Then click Submit to complete the upload process.
After the upload process is completed and applied, the new login success page can be previewed by
clicking Preview button at the bottom.
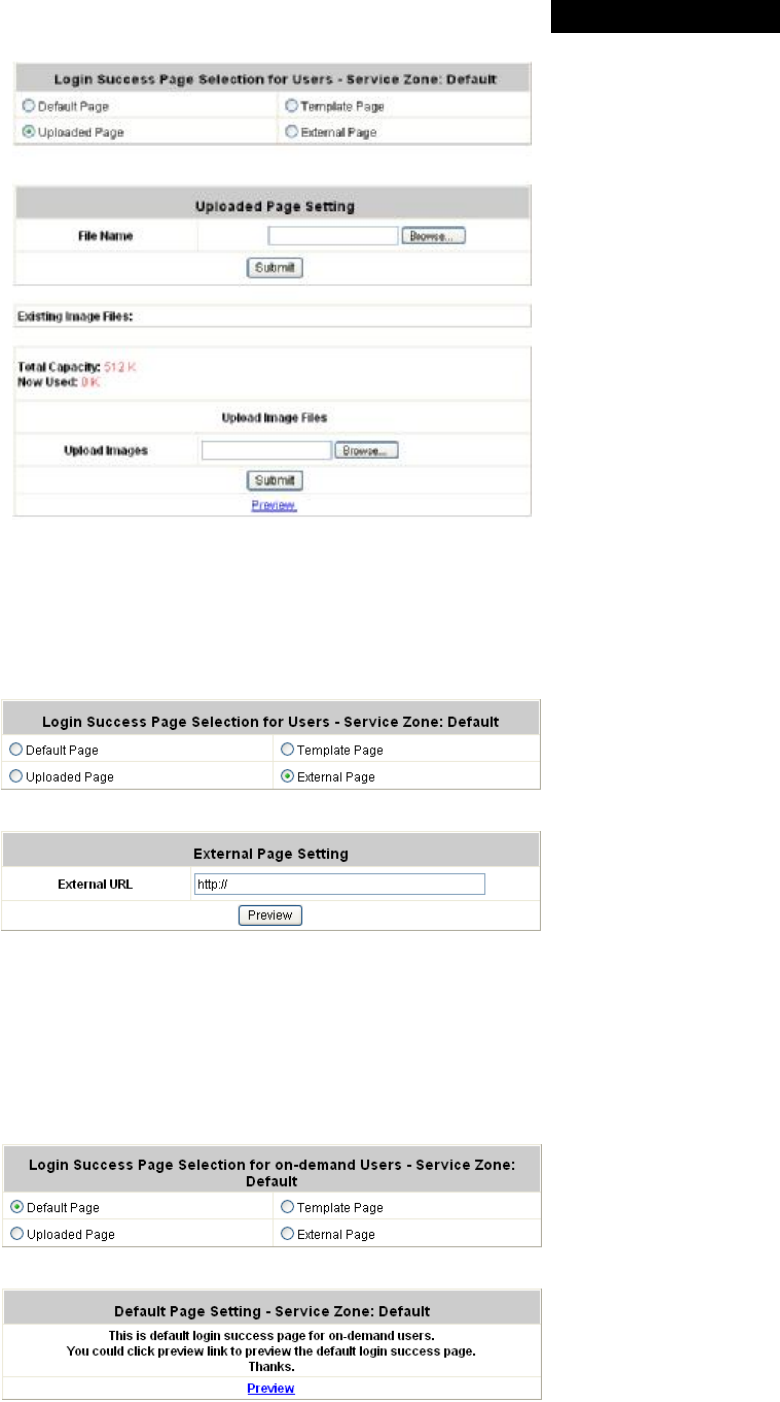
© 2008 4IPNET, INC.
185
4ipnet WHG301
User
’
s Manual
Ÿ Custom Pages >> Login Success Page >> External Page
Choose the External Page selection and get the login success page from a designated website. In the
External Page Setting, enter URL of the external login page and then click Apply. After applying the setting,
the new login success page can be previewed by clicking Preview button at the bottom of this page
4 Custom Pages >> Login Success Page for On-demand User
The users can apply their own Login Success page for on-demand Users in the menu. As the process is similar
to that of the Login Page, please refer to the “Login Page” instructions for more details.
Ÿ Custom Pages >> Login Success Page for On-demand Users >> Default Page
Choose Default Page to use the default login success page for on-demand account
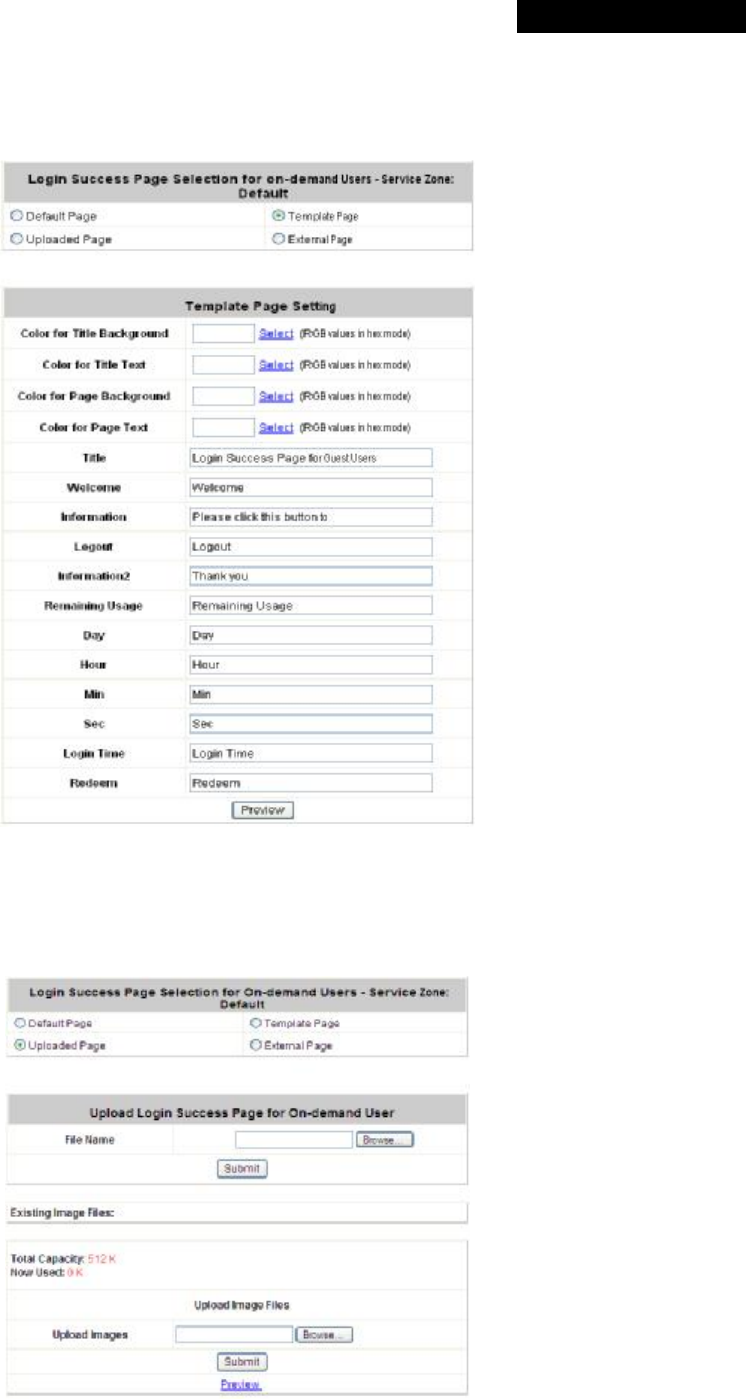
© 2008 4IPNET, INC.
186
4ipnet WHG301
User
’
s Manual
Ÿ Custom Pages>> Login Success Page for On-demand Users>> Template Page
Choose Template to make a customized login success for on-demand account. Click Select to pick up a
color and then fill in all of the blanks. Click Preview to see the result.
Ÿ Custom Pages>> Login Success Pages for On-demand Users>> Uploaded Page
Choose Uploaded Page and get the login success page for on-demand users by uploading. Click the
Browse button to select the file for the login success page for Instant upload. Then click Submit to
complete the upload process.
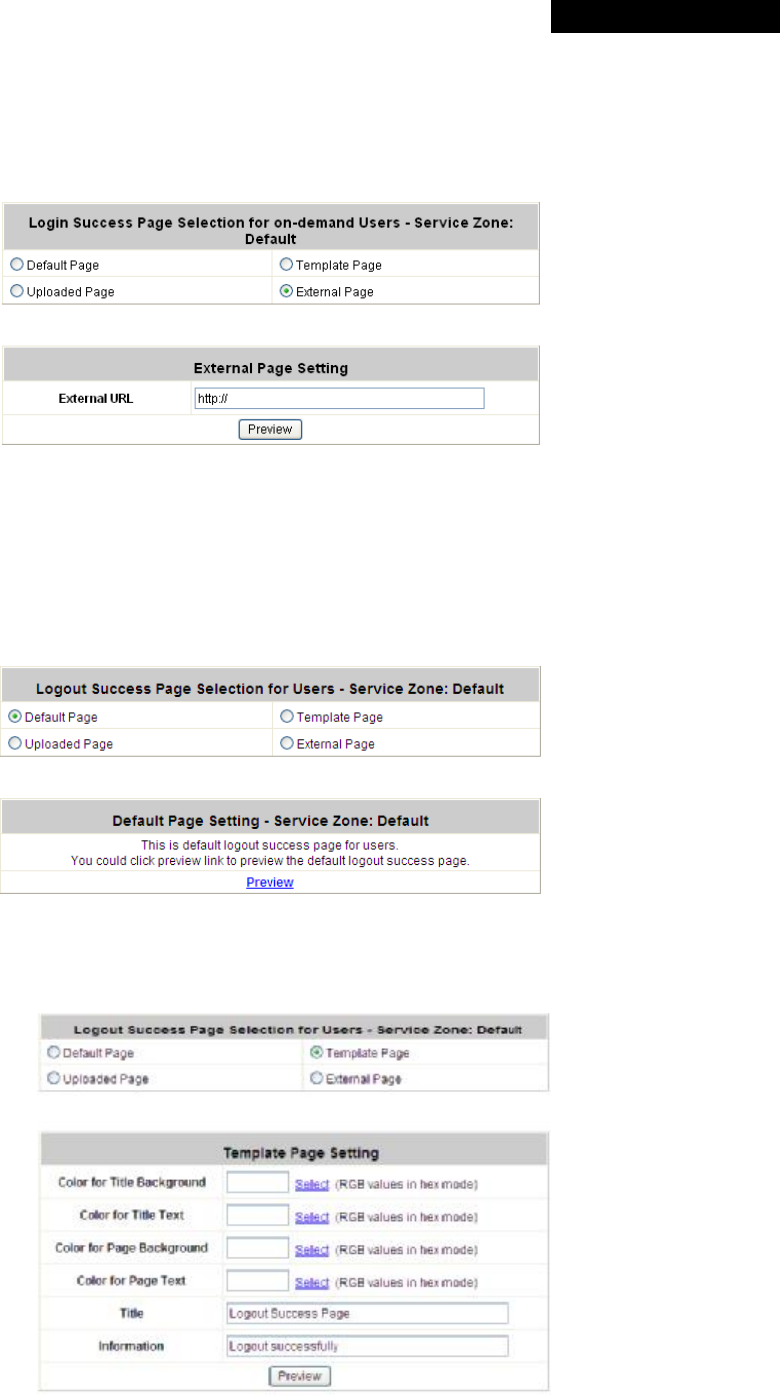
© 2008 4IPNET, INC.
187
4ipnet WHG301
User
’
s Manual
Ÿ Custom Pages >> Login Success Pages for On-demand Users >> External Page
Choose the External Page selection and get the login success page from a designated website. In the
External Page Setting, enter URL of the external login page and then click Apply. After applying the setting,
the new login success page can be previewed by clicking Preview button at the bottom of this page.
5 Custom Pages >> Logout Success Page
The administrator can apply their own Logout Success page for Users in the menu. As the process is similar to
that of the Login Page, please refer to the “Login Page” instructions for more details.
Ÿ Custom Pages >> Logout Success Page >> Default Page
Choose Default Page to use the default logout success page.
Ÿ Custom Pages >> Logout Success Page >>Template Page
Choose Template Page to make a customized logout success page. Click Select to pick up a color and then
fill in all of the blanks. Click Preview to see the result first.

© 2008 4IPNET, INC.
188
4ipnet WHG301
User
’
s Manual
Ÿ Custom Pages >> Logout Success Page >> Uploaded Page
Choose Uploaded Page and get the logout success page to upload. Click the Browse button to select the
file for the logout success page upload. Then click Submit to complete the upload process.
After the upload process is completed and applied, the new logout success page can be previewed by
clicking Preview button at the bottom.
Ÿ Custom Pages >>Logout Success Page >> External Page
Choose the External Page selection and get the logout success page from a designated website. Enter the
website address in the External Page Setting field and then click Apply. After applying the setting, the new
logout success page can be previewed by clicking Preview button at the bottom of this page.
P/N: 10020080124