ACA Digital HT1100 HT1100 Handy Terminal User Manual HT1100 UM EN
ACA Digital Corporation HT1100 Handy Terminal HT1100 UM EN
Contents
- 1. user manual part 1
- 2. user manual part 2
user manual part 2
Chapter 3 — Using the Hardware
26
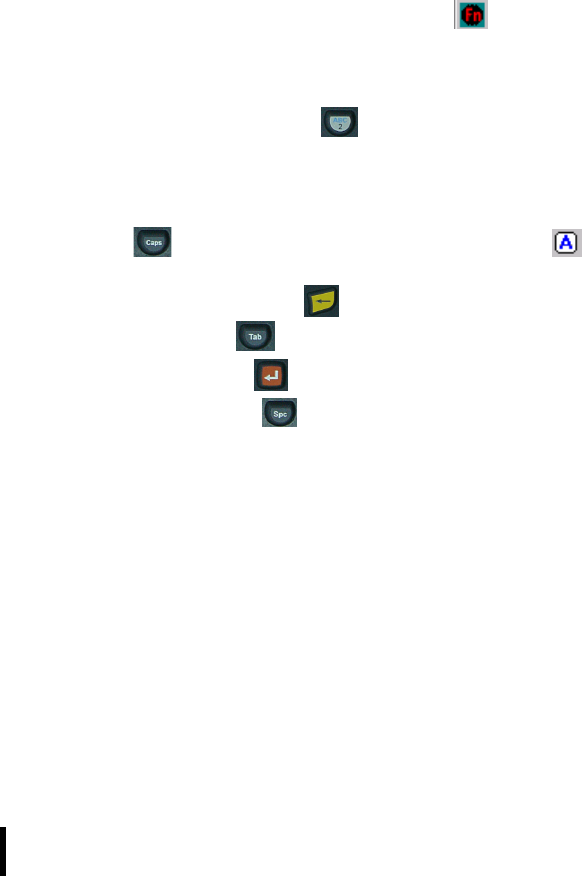
Entering Alphanumeric Characters
You can use the keypad to enter alphanumeric characters or use the
input panel in the operating system.
Entering Characters with the Keypad
Follow these instructions to enter text with the keypad.
• Press the Fn key to toggle keypad input between numeric and
alphanumeric input. When the Fn key icon appears in the
status tray, input is alphabetic. When the Fn key icon is absent,
input is numeric.
• To enter letters, press a key to cycle through the letters on the
key. For example, pressing will display a lower case ‘a’.
• Continue to press to scroll between a, b, and c. Note that if you
don’t press the key within two seconds, the cursor will move to
the next field.
• Press to enter uppercase letters. The Caps icon
appears in the system tray.
• Press the backspace key to delete characters.
• Press the tab key to enter a tab.
• Press the enter key to move to a new line.
• Press the space key to enter a space.
Chapter 3 — Using the Hardware
27
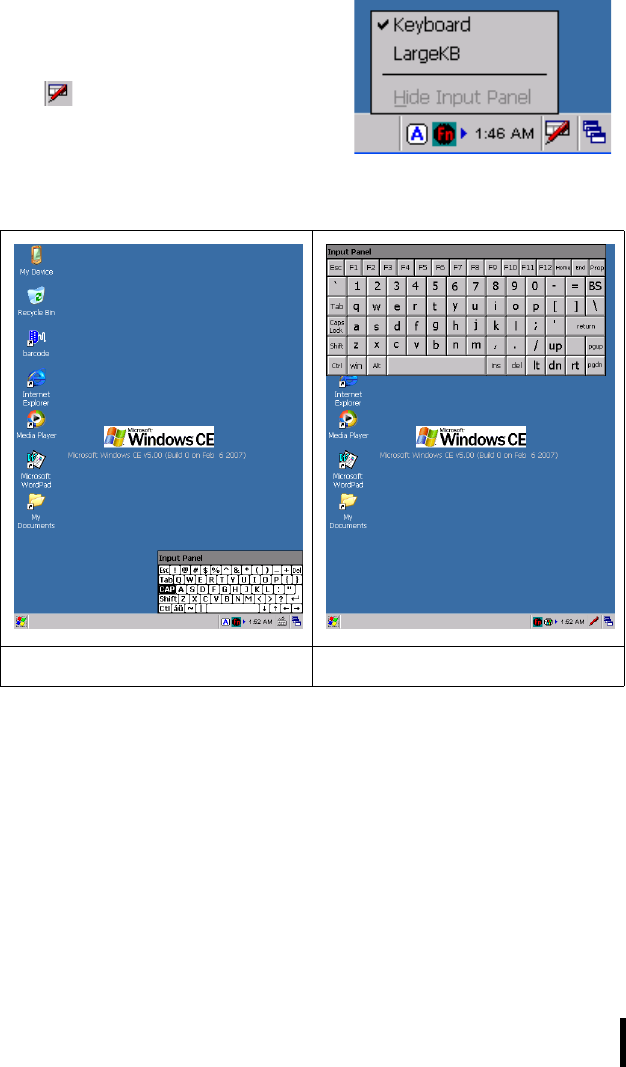
Entering Characters with the Keypad
The operating system has a
onscreen keyboard that enables you
to enter alphanumeric characters
with the stylus. Press the input panel
icon in the system tray to view
the input panel menu.
Tap Keyboard to view the default
onscreen keyboard or tap LargeKB
to view a large onscreen keyboard.
Tap Hide Input Panel to close the keyboard.
The keyboard emulates a standard computer keyboard. Tap the
onscreen keyboard to enter, edit, and delete text.
Default keyboard Large keyboard
Chapter 3 — Using the Hardware
28
Using the Stylus
CAUTION! Never use anything other than the HT1100 stylus
on the screen. Using another object as a stylus could cause
permanent damage. You can use your finger to interact with
the screen as well.
1. Remove the stylus from its holder.
2. Hold the stylus as you would a pencil.
3. To make a choice from a menu, lightly tap the tip of the stylus
on that choice.
4. To write data into a field on a form, use the stylus to print the
letters or numbers. Use very light pressure.

Chapter 3 — Using the Hardware
29
Adjusting the Double-Tap Rate
Set the stylus double-tap rate as follows.
1. Tap Start → Settings→ Control Panel.
2. Double-tap Stylus.
3. Tap the Double-Tap tab.
4. Double-tap on the checkerboard graphic to set your double tap
rate.
Chapter 3 — Using the Hardware
30
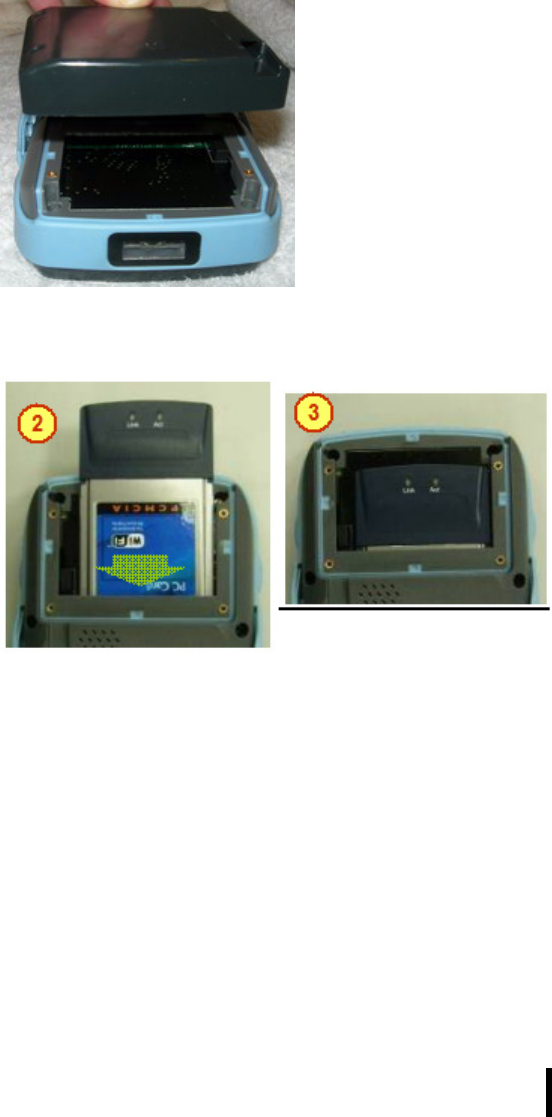
Inserting a PCMCIA Card
The HT1100 accommodates a Type II PCMCIA card.
You can enhance the functionality of the HT1100 by installing PCMCIA
cards such as the following:
•GPS PC card
• GPRS PC card
• 802.11b/g WLAN PC card
• Fingerprint PC card
NOTE:The list above are examples of the types of cards you
can install and is not exhaustive.
Follow these instructions to insert a PCMCIA card into the PCMCIA
slot.
1. Remove the screws securing the PCMCIA cover to the chas-
sis.
2. Remove the cover.
Chapter 3 — Using the Hardware
31
3. Slide the PCMCIA card into the slot as shown, until the con-
tacts are seated into the PCMCIA connector.
4. Replace the cover.
Chapter 3 — Using the Hardware
32
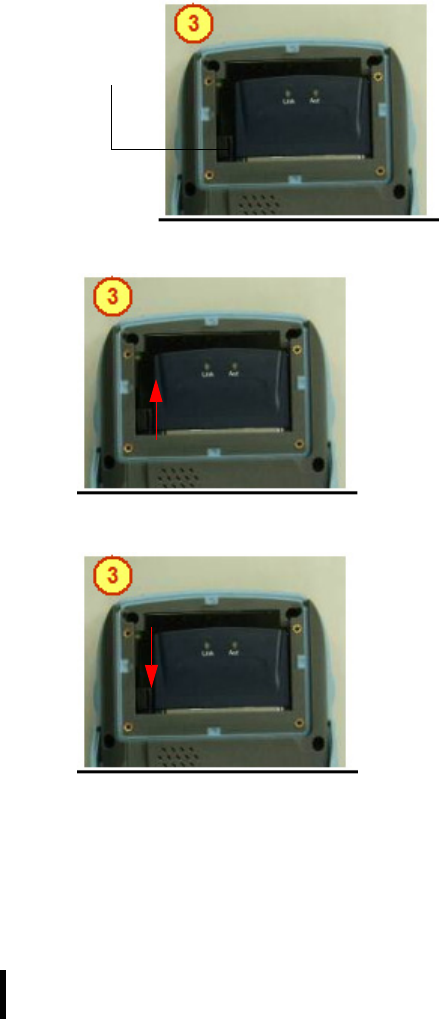
Removing a PCMCIA Card
To remove the PCMCIA card:
1. Press the black PCMCIA button next to the slot
The button pops out.
2. Press the button again to push the PCMCIA card out.
3. Remove the card.
PCMCIA
button
Chapter 3 — Using the Hardware
33
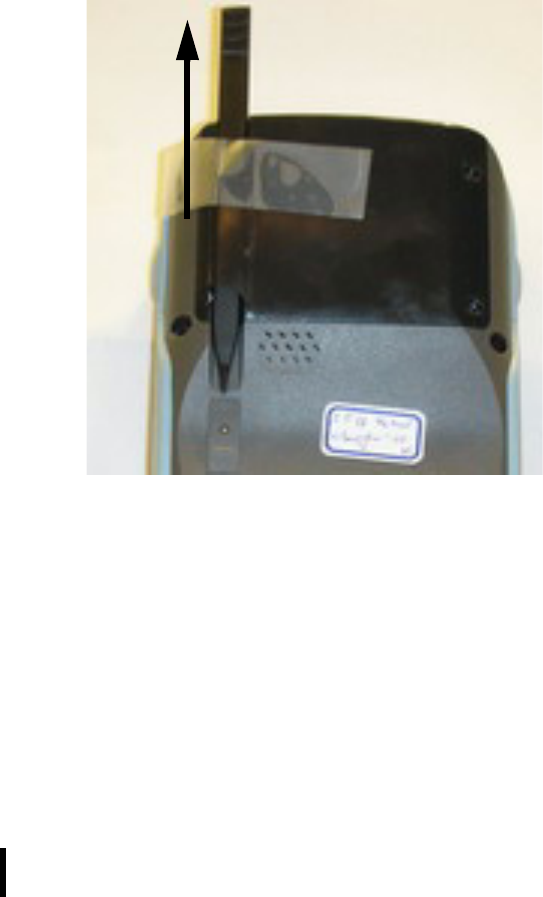
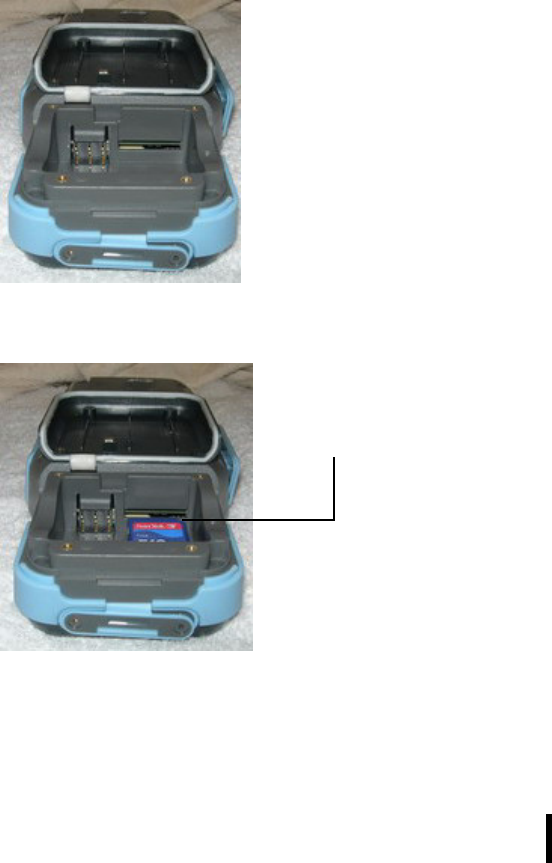
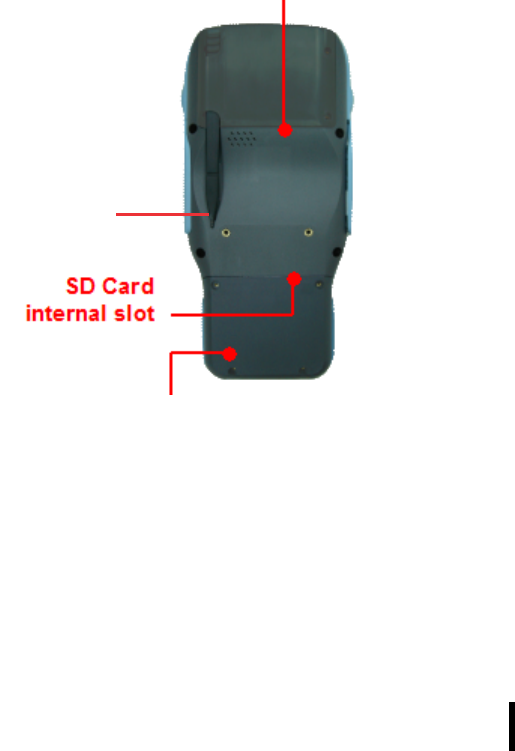
Inserting an SD Memory Card
Your HT1100 has an expansion slot compatible with a range of SD and
MMC storage cards, which are primarily used to back up or transfer
files and data. The slot also supports SDIO cards for added connectiv-
ity options.
Follow these instructions to insert a SD card into the SD slot.
1. Remove the battery compartment cover and battery. See See
Installing the Battery on page 12.
2. Insert the SD card with the notched corner as oriented as
shown in the following illustration
3. Push the card into the slot.
Notched corner
Chapter 3 — Using the Hardware
34
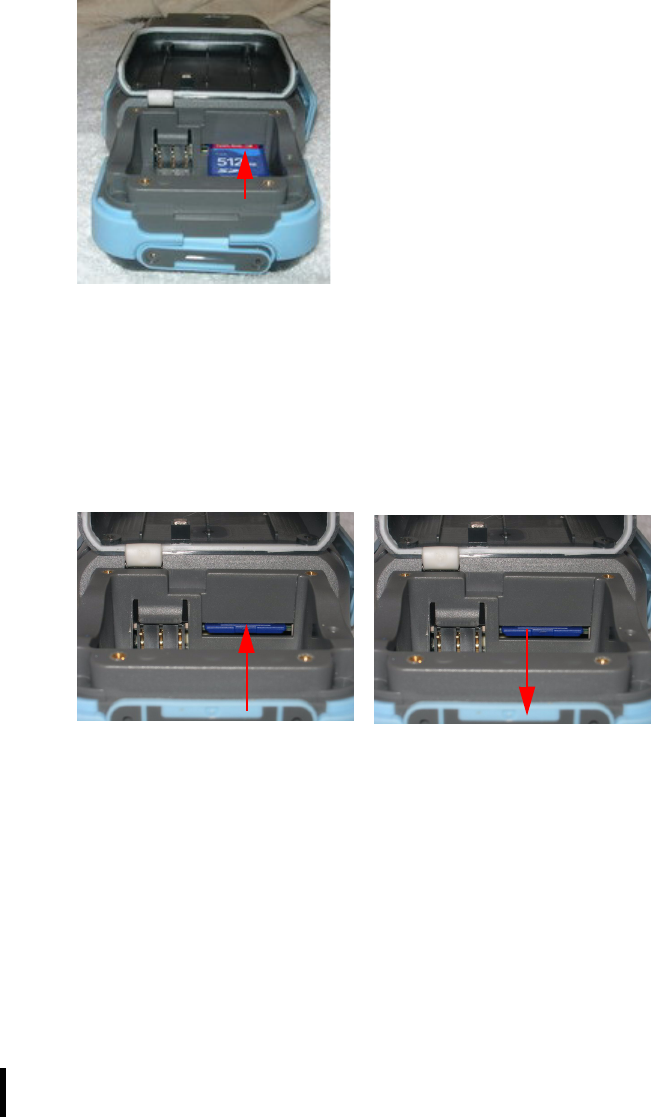
The card is secure when it is not protruding from the slot.
4. Replace the cover.
Removing a Storage Card
1. Remove the battery compartment cover and battery. See See
Installing the Battery on page 12.
2. Press the card in and release.
The card pops out.
3. Remove the card from the slot.

Chapter 3 — Using the Hardware
35
Connecting Devices to the HT1100
This section describes how to connect devices to the HT1100. You can
connect devices directly to the HT1100 or connect using the cradle.
Opening the Port Covers
The port covers protect the ports and connectors from rain, dust, and
adverse environmental conditions.
Remove the screws and open the port covers to access the ports.
Ensure that you close the covers tightly and replace the screws after
disconnecting cables and connectors.
Connecting USB
The HT1100 accommodates two USB Type A cables. You can connect
a USB mini Type B cable to the cradle. See Cradle on page 10.
Connecting a USB Type A
The illustration dis-
played here shows how
to connect a USB type A
cable to the HT1100.
The connector can only
go in one way. If it does
not go in smoothly,
check the orientation
and try again.
Chapter 3 — Using the Hardware
36
Connecting a USB Type B
The illustration dis-
played here shows how
to connect a mini USB
type B cable to the
HT1100. The connector
is keyed to only go in
one way. If it does not
go in smoothly, check
the orientation and try
again.
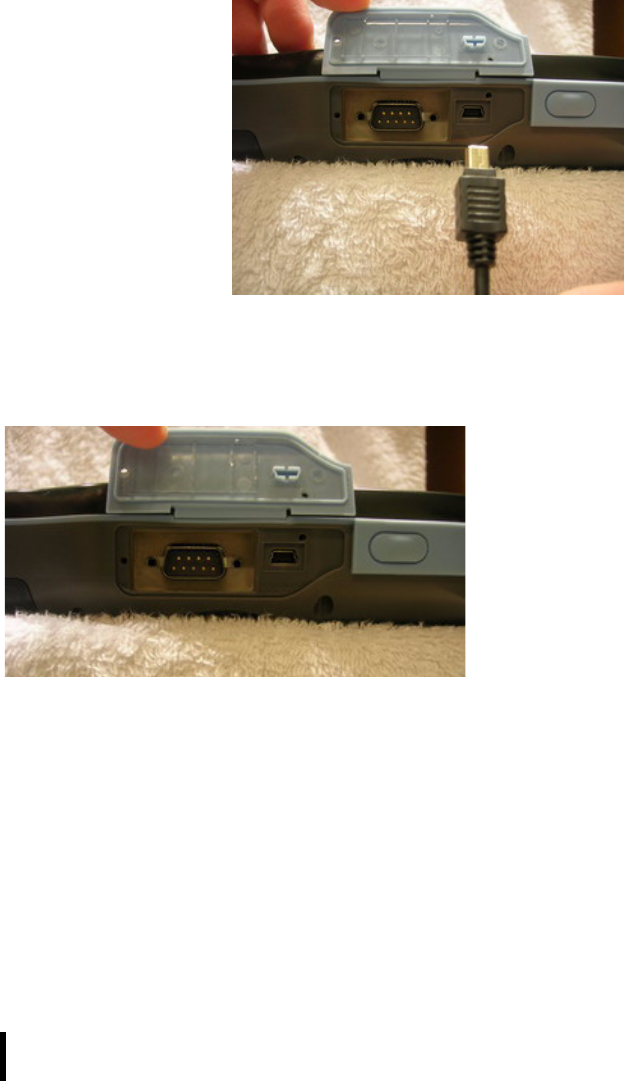
Connecting a Serial Cable
Connect a serial cable to the HT1100 to perform serial communica-
tions. Refer to the following illustration
Chapter 3 — Using the Hardware
37
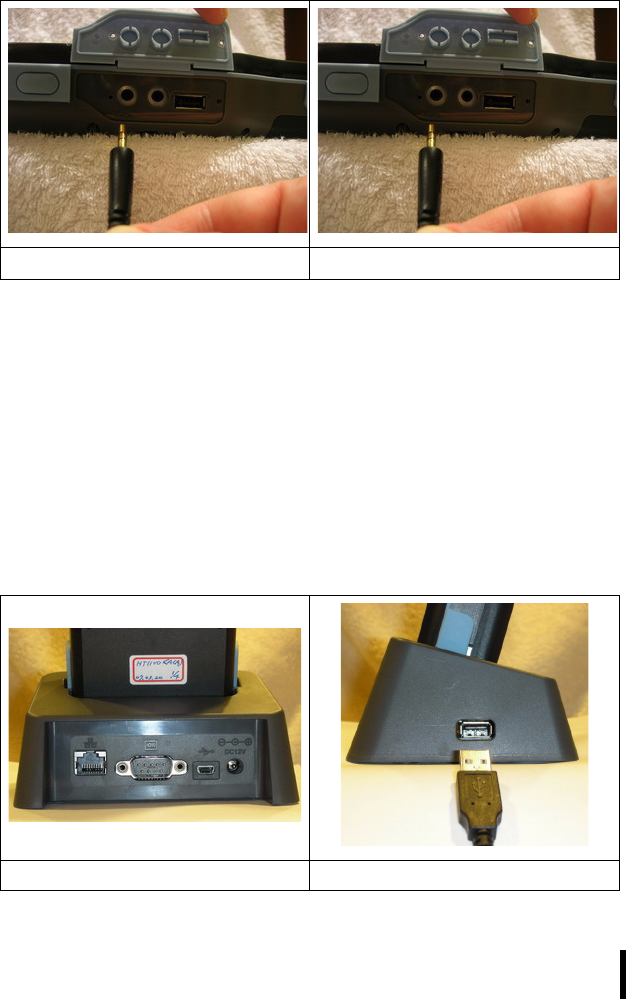
Connecting Headphones and a Microphone
The HT1100 has a built-in microphone and speaker. However, you can
connect a headset and microphone to the HT1100 for use in noisy
environments. Refer to the following illustrations.
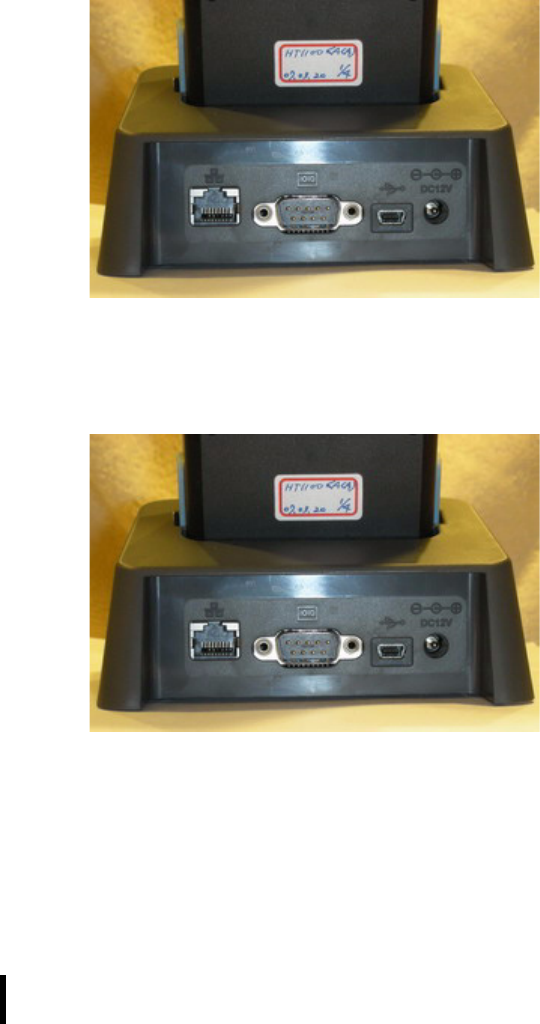
Connecting to the Cradle
The cradle enables you not only to recharge the HT1100’s batteries, it
also enables you to connect USB and serial devices, and connect to
the LAN.
Connecting USB
You can connect both USB Type A and Mini USB Type B connectors to
the cradle to transfer data with the HT1100. There is one Mini Type B
USB port at the rear of the cradle, and two Type A USB ports on the
sides. Refer to the following:
Connecting a microphone Connecting a headset.
Connecting a Mini Type B USB Connecting Type A USB
Chapter 3 — Using the Hardware
38
Connecting LAN
Connect a the cradle to the LAN using the RJ-45 port at the rear of the
cradle. Refer to the following illustration.
Connecting a Serial Cable
Connect a serial cable to the HT1100 cradle to perform serial commu-
nications. Refer to the following illustration
Chapter 3 — Using the Hardware
39
Using the Barcode Scanner
The HT1100 has an integrated scanner which reads all major bar code
labels with excellent performance.
NOTE:Reading software must be enabled in order to operate
the scanner. The HT1100 has a barcode reading program
available on the desktop.
Activating the Barcode Scanner
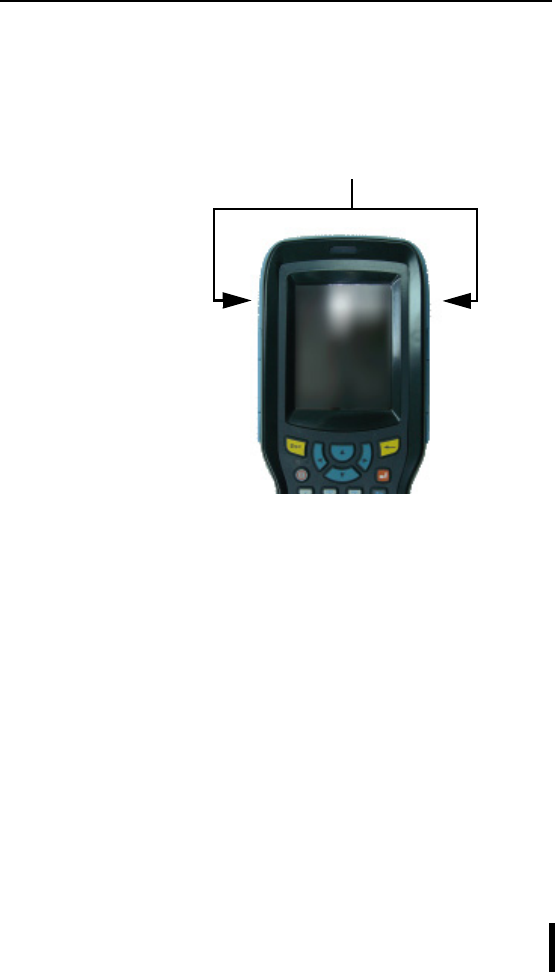
Activate the barcode
scanner by pressing
either one of the trig-
ger keys located on
the left and right side
of the unit.
The HT1100 has a
built-in barcode read-
ing program that
allows you to use the
device’s barcode scan
function.
Scan buttons
Chapter 3 — Using the Hardware
40
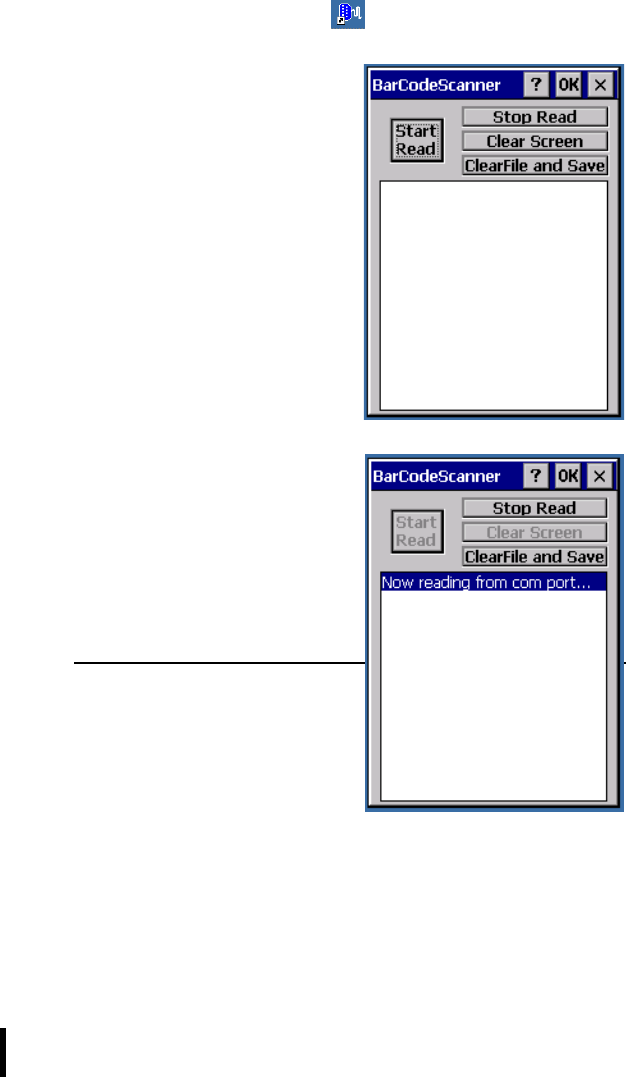
Launching the Barcode Reading Program
1. Double-tap the barcode icon on the desktop to launch the
barcode program.
The Barcode Scanner program
opens.
2. Tap Start Read and scan a
barcode by pressing either of
the scan code buttons on the
HT1100 and scanning over the
code.
The HT1100 vibrates slightly
and provides an audible signal
that the barcode is being
scanned.
The BarCode scanner program
displays a status message:
3. Tap Stop Read to discontinue
scanning. Tap Clear screen to
remove the status messages.
Tap ClearFile and Save to
save the reading to a text file.
NOTE:The barcode scanner
text file BarCodeResult is
saved to the SD card. You
must have an SD card inserted
to save the results.

Chapter 3 — Using the Hardware
41
Location and Reading Position
This section describes the use of the barcode scanner.
Tilt
Prevents reading of a bar code if all
the bars are not inside the reading
beam or if tilt is more than 25° tilt.
NOTE:Does not apply to stacked bar codes.
Skew
•Reduces bar width and is
much more critical for high-
density barcodes
•Reading may be possible
with a skew angle up to 65°
•Reduce skew to increase
reading efficiency skew
Pitch
• Reduces bar height
• Reading may be possible
with a pitch angle up to 75°
• Reduce pitch to increase
reading efficiency
• A small pitch angle (2-3°
minimum) is good as it pre-
vents direct reflection pitch

Chapter 3 — Using the Hardware
42
Reading distances
All distances are measured from the front of the scan engine. When
correctly mounted, an exit window will reduce reading distances by
about 4%.
Typical reading distances
The reading distances shown below are typical reading distances mea-
sured in an office environment (200 lux) with extended reading range
activated.
Symbology Density Minimum
Distance
Maximum
Distance
Code 39 0.1 mm / 4 mil 8.5 cm / 3.4" 22 cm / 8.7"
0.125 mm / 5 mil 8 cm / 3.1" 23.5 cm / 9.3"
0.25 mm / 10 mil 7 cm / 2.8" 35 cm / 13.8"
0.5 mm / 20 mil 6 cm / 2.4" 56 cm / 22.1"
1 mm / 40 mil 8 cm / 3.2" 90 cm / 35.4"
UPC/EAN 0.33 mm / 13 mil 5.5 cm / 2.2" 37.5 cm / 14.8"
PDF417 0.254 mm / 10 mil 13 cm / 5.2" 16 cm / 6.3"
0.381 mm / 15 mil 10.8 cm / 4.3" 18.2 cm / 7.2"

Chapter 3 — Using the Hardware
43
Minimum reading distances
Minimum reading distances are measured in the dark (0 lux) with
extended reading range disabled.
* Minimum distances depend on symbology length and scan angle.
Symbology Density Minimum
Distance
Maximum
Distance
Code 39 0.1 mm / 4 mil 11 cm / 4.3" 15.2 cm / 6"
0.125 mm / 5 mil 10 cm / 3.9" 18.8 cm / 7.4"
0.25 mm / 10 mil 6.8 cm / 2.7" 24 cm / 9.4"
0.5 mm / 20 mil * 31 cm / 12.2"
1 mm / 40 mil * 40 cm / 15.7"
UPC/EAN 0.33 mm / 13 mil 5.5 cm / 2.2" 26 cm / 10.2"
44
Chapter 4
Getting Connected
Connecting to a PC
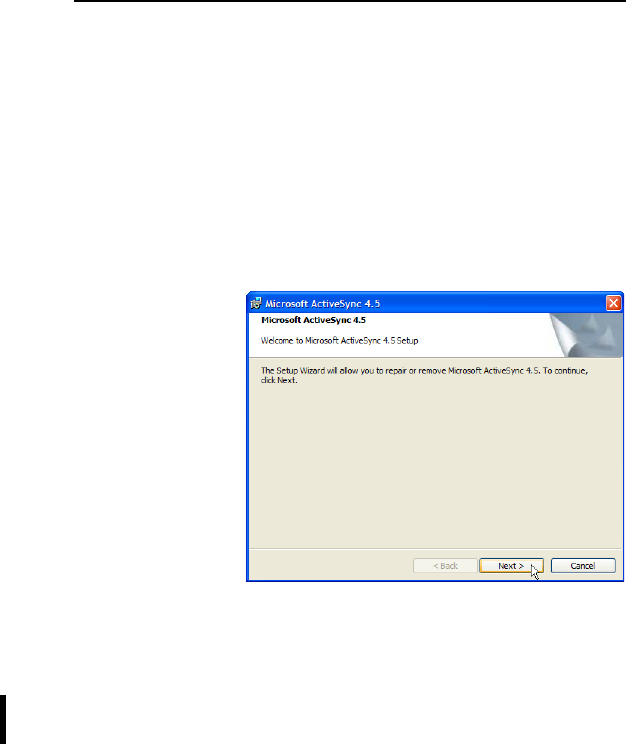
Installing Microsoft ActiveSync
In order to exchange data between your computer and HT1100,
Microsoft ActiveSync must be installed on your computer. Connect the
HT1100 to a PC using a USB mini type B cable.
NOTE:If you have a previous version of the Microsoft
ActiveSync installed in your computer, uninstall it first before
installing the latest version of Microsoft ActiveSync.
To install Microsoft ActiveSync on your computer:
1. Close any open programs, including those that run at startup,
and disable any virus-scanning software.
2. Download the ActiveSync software from the Microsoft Active-
Sync Download page at
http://www.microsoft.com/windowsmobile/downloads/
activesync42.mspx.
3. Browse to the
location of the
downloaded file,
and double-click
it.
The installation
wizard begins.
4. Click Next.
Chapter 4 — Getting Connected
45
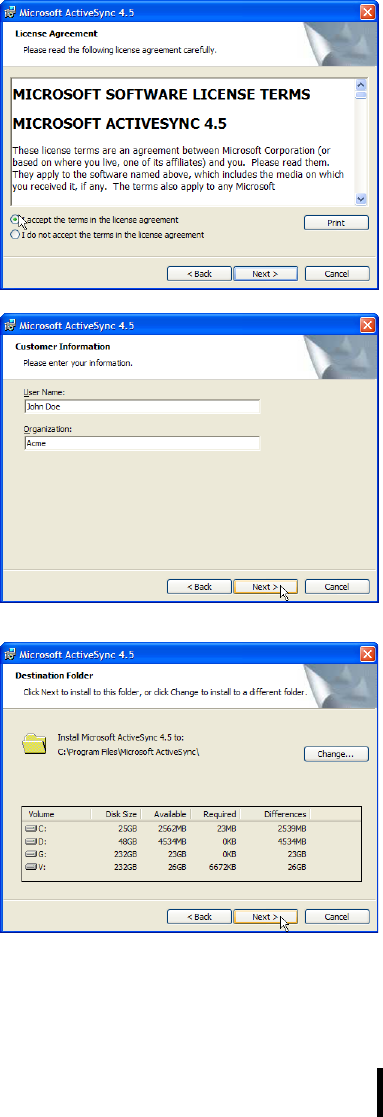
You are prompted
to read the End
User License
Agreement
(EULA).
5. Accept the
license agree-
ment terms and
click Next.
You are prompted
for user informa-
tion.
6. Type the user
name and organi-
zation and click
Next.
You are prompted
for the destina-
tion folder.
7. Select a drive to
install the pro-
gram to and click
Next.
Chapter 4 — Getting Connected
46
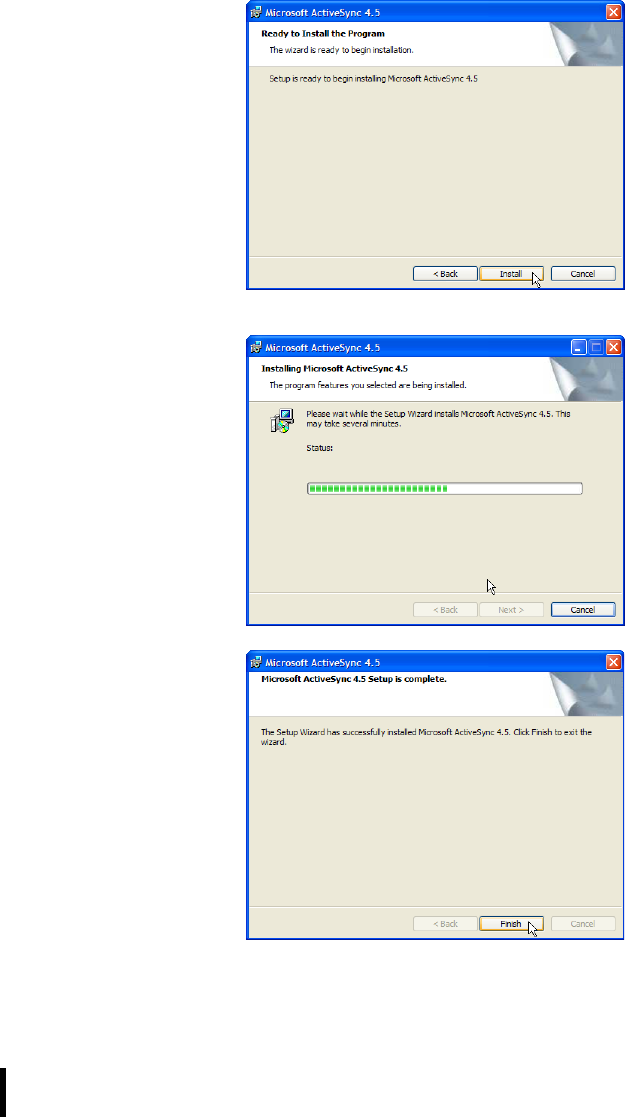
The installation
wizard has gath-
ered the informa-
tion it needs to
install Active-
Sync and
prompts you to
begin installation.
8. Click Install.
The program
begins installa-
tion
After the pro-
gram has finished
installing you see
the screen shown
here.
9. Click Finish.
You may be
prompted to
restart your com-
puter.
Chapter 4 — Getting Connected
47
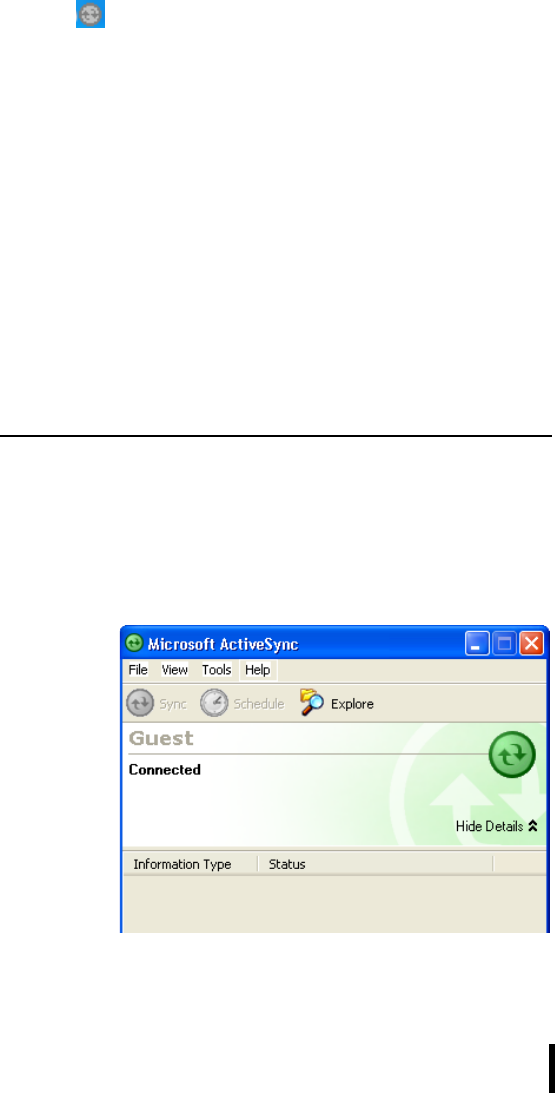
After you have installed ActiveSync and restarted your computer, the
ActiveSync icon appears in your computer’s system tray as shown
and ActiveSync Connection Wizard starts. For detailed information on
how to use ActiveSync on your computer, start ActiveSync then click
Help → Microsoft ActiveSync Help.
Connecting the Device to Your Computer
1. After ActiveSync has been installed, connect the USB Mini B
cable to the USB port on your HT1100. Refer to Connecting
the HT1100 to a PC on page 16.
2. Plug the other end of the USB cable into a USB port on your
computer.
3. Turn the device on.
4. ActiveSync starts automatically and configure the USB port to
work with the HT1100. The New Partnership setup wizard will
automatically start.
NOTE:If ActiveSync doesn’t start automatically, click Start →
Programs → Microsoft ActiveSync.
If a message appears indicating that it is unable to detect a
connection, click the Cancel button and manually configure
the communication settings.
5. Follow the onscreen instructions.
6. When the
configura-
tion pro-
cess is
complete,
the Active-
Sync win-
dow
appears.
7. Synchroniza-
tion will be
initialized
and will
take place
if you’ve chosen to synchronize periodically or upon connec-
tion.

Chapter 4 — Getting Connected
48
NOTE:Your computer can create a partnership with multiple
HT1100s. Also, a HT1100 can create a partnership with up to
two computers.
Synchronizing with Your Computer
Synchronization takes place according to the options you choose while
setting up ActiveSync on your computer. If you accept the default (On
Connect) synchronization option in the Microsoft ActiveSync Setup
Wizard, you’ll be able to simply connect your HT1100 to your desktop
computer and synchronization will take place.
NOTE:Refer to the ActiveSync online help for more informa-
tion about synchronization options.
Connection Options
You can set remote synchronization with your computer using the fol-
lowing connection options:
• USB connection
• Infrared connection
• Bluetooth connection
• WiFi connection
USB Connection
To synchronize with your computer using a USB connection:
1. Open ActiveSync.
2. Connect your device to your computer using the USB charging
cable.
3.
4.
5.
6.
Chapter 4 — Getting Connected
49
Infrared Connection
The infrared port allows you to synchronize information with an infrared
enabled computer. Align the infrared port of your device with the infra-
red port on the computer.
This method is ideal for quickly switching between multiple devices
since there are no cables or adapters to change.
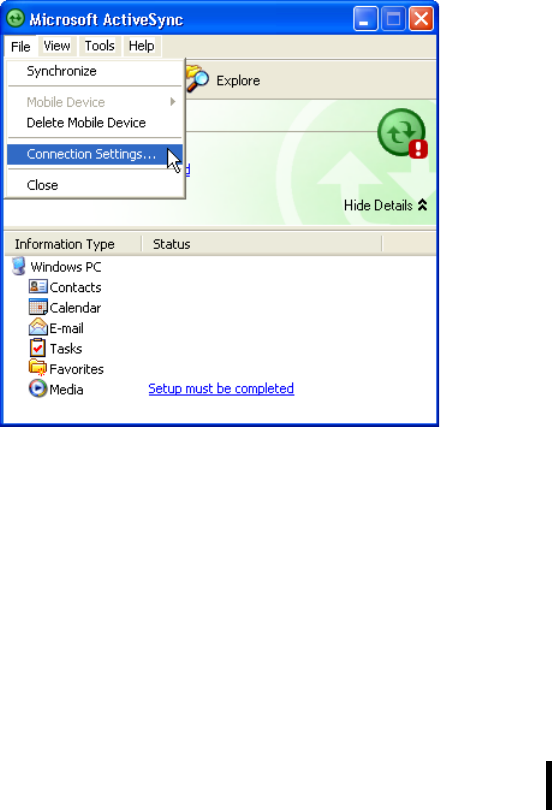
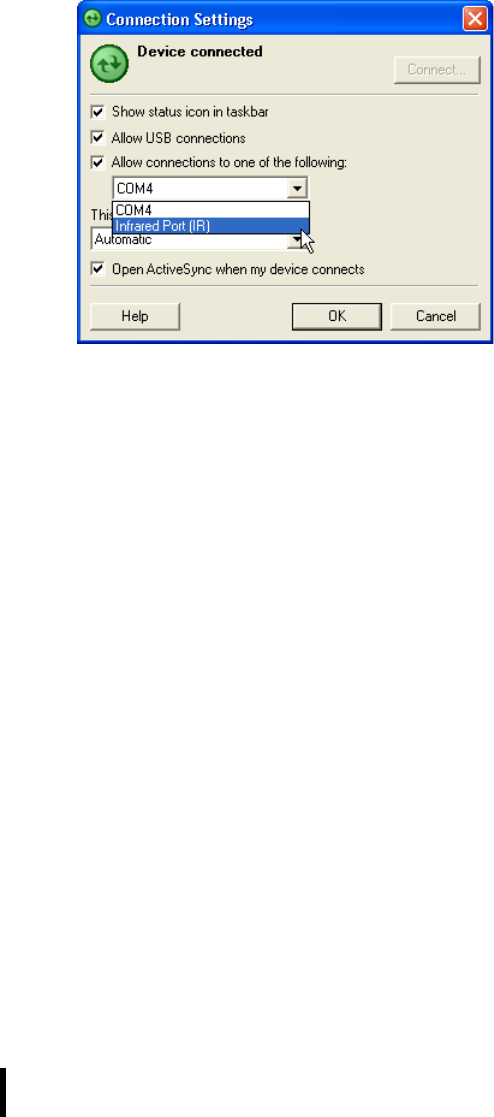
1. Perform the steps below on your computer:
a. Configure an infrared port on your computer following the
manufacturer’s instructions.
b. Once your computer’s IR port is ready, open ActiveSync.
c. Click File → Connection Settings.
d. Check Allow connections to one of the following and
select Infrared Port (IR) from the drop-down list.
Chapter 4 — Getting Connected
50
e. Click OK.
2. Perform the steps below on your device:
a. Align the IR port of your HT1100 with that on your computer
so that they are unobstructed and within close range.
b.
c.
d.
Bluetooth Connection
Your device is equipped with Bluetooth wireless technology that you
can use to synchronize information with a computer equipped with a
Bluetooth adapter or access point. Bluetooth wireless technology
allows you to communicate with the computer whenever it is within
range.
Follow these instructions to set up a Bluetooth connection.
1. Tap Start → Settings → Control Panel and double-tap Blue-
tooth.
2.
3.
4.
5.
6.
7.
8.

Chapter 4 — Getting Connected
51
WiFi Connection
With the device’s embedded WLAN module, you can send and receive
signals to a WiFi network then synchronize files.
NOTE:WiFi access requires a separate purchase of a service
contract with a wireless service provider. Contact a wireless
service provider for more information.
A wireless network can be added either when the network is detected
or by manually entering settings information. Before doing these steps,
determine if authentication information is needed.
1. Tap Start → Settings → Control Panel, then double-tap the
Network and Dial-up Connections.
2.
3.
4.
5.
6.
For more information on how to configure the wireless network set-
tings, tap Start → Help.

Chapter 4 — Getting Connected
52
Synchronizing Information
All files created on the device are stored in My Document/HT1100 My
Document folder (if the designated device name is HT1100). You can
view files by double-clicking the HT1100 My Documents icon on your
computer.
If you have enabled file synchronization, your HT1100 files are auto-
matically synchronized in the My Documents folder on your computer,
unless a different name was chosen for HT1100.
Synchronization Options
Synchronization options can be modified, including when you synchro-
nize and what gets synchronized. In the Mobile Device window, click
Tools → Sync Options.
For each type of information, the synchronization process can be has-
tened by limiting the amount of data to be synchronized. To do this,
select a service and click the Settings button. After enabling a service,
you must close and reopen the ActiveSync.

Chapter 4 — Getting Connected
53
Using ActiveSync to Exchange Files
You can use ActiveSync to exchange information from your device
your computer and vice versa. Changes you make to the information
on one location will not affect the information on the other one. If you
want to automatically update information on both your device and com-
puter, synchronize the information instead.
You can copy two types of information to your device: files and Pocket
Access Windows CE Store information.
The procedure below only applies to copying files. Refer to the Active-
Sync Help on your computer for instructions on how to copy Pocket
Access Windows CE Store information.
NOTE:Files created on your computer may need to be con-
verted by ActiveSync so that they can be viewed and edited on
your device, and vice versa.
To copy files:
1. Connect your device to your computer.
2. In ActiveSync on your computer, click Explore.
Windows Explorer opens the Mobile Device window for your
device.
3. Locate the file that you want to copy on your device or com-
puter.
4. Do either one of the following:
– To copy the file to your device, right-click the file and click
Copy. Place the cursor in the desired folder for your device,
right-click, then click Paste.
– To copy the file to your computer, right-click the file and click
Copy. Place the cursor in the desired folder for your com-
puter, right click, then click Paste.

54
Chapter 5
Scanner Setup
Symbologies
The following symbologies are supported by the HT1100.
Interface
The following interfaces are supported:
•Decoded mode: RS-232 TTL (max. baud rate 57600)
•Emulated and standard DBP: mode industry standard DBP
output
Mode Symbology
Decoded Codabar, Codablock A and F, Code 11,
Code 39, Code 93/93i, Code 128/ISBT 128/
UCC EAN 128, Industrial and Standard
2 of 5, Interleaved 2 of 5, Matrix, MSI,
PDF417/MicroPDF417/MacroPDF417
(unbuffered mode), Plessey, RSS, Telepen,
UPC/EAN/ISBN
Emulated DBP Codabar, Code 11, Code 39, Code 93/93i,
Code 128/UCC EAN 128, Standard 2 of 5,
Interleaved 2 of 5, Matrix, MSI,
PDF417/MacroPDF417 (unbuffered mode),
Plessey, RSS, Telepen, UPC/EAN
Standard DBP All symbologies supported by the host decoder
Chapter 5 — Scanner Setup
55
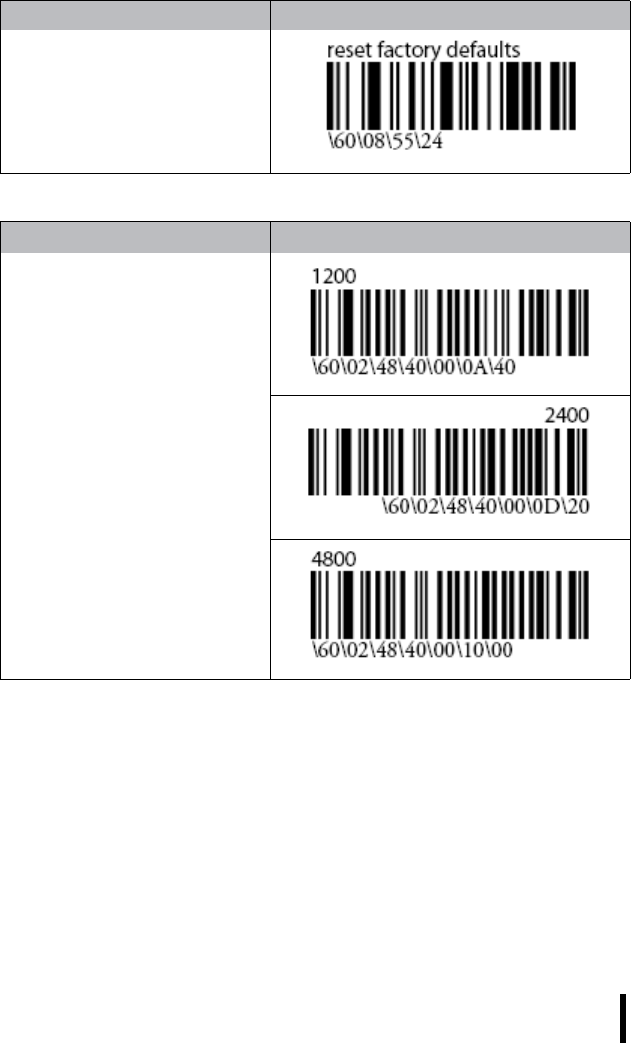
Basic Setup
Reset Factory Defaults Barcode
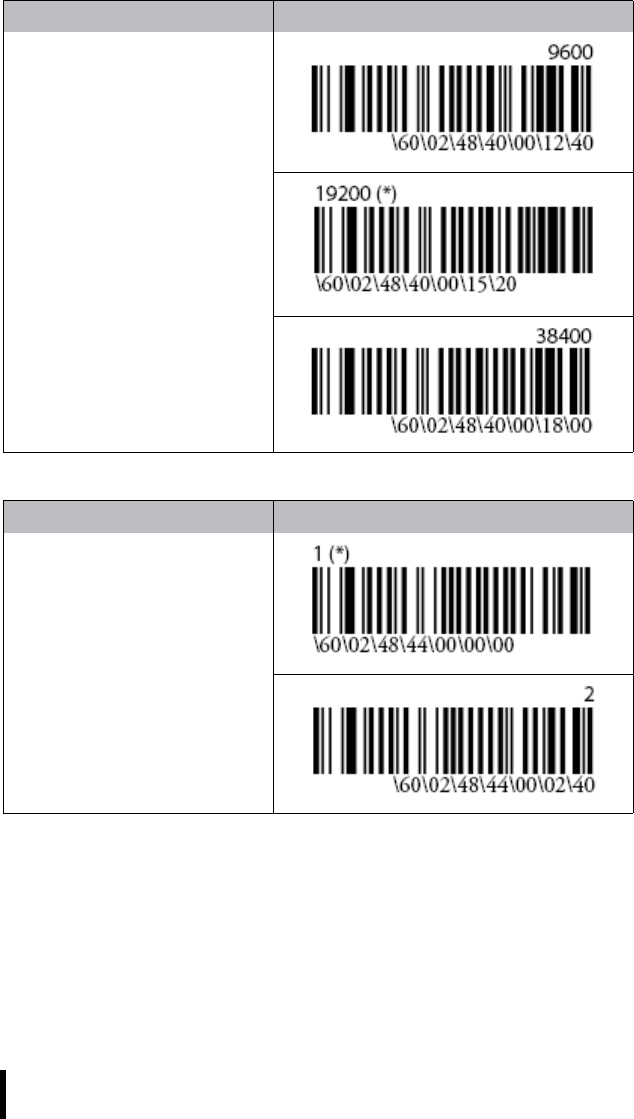
Select Baud Rate Barcode
Chapter 5 — Scanner Setup
56
Select Stop Bits Barcode
Select Baud Rate Barcode
Chapter 5 — Scanner Setup
57
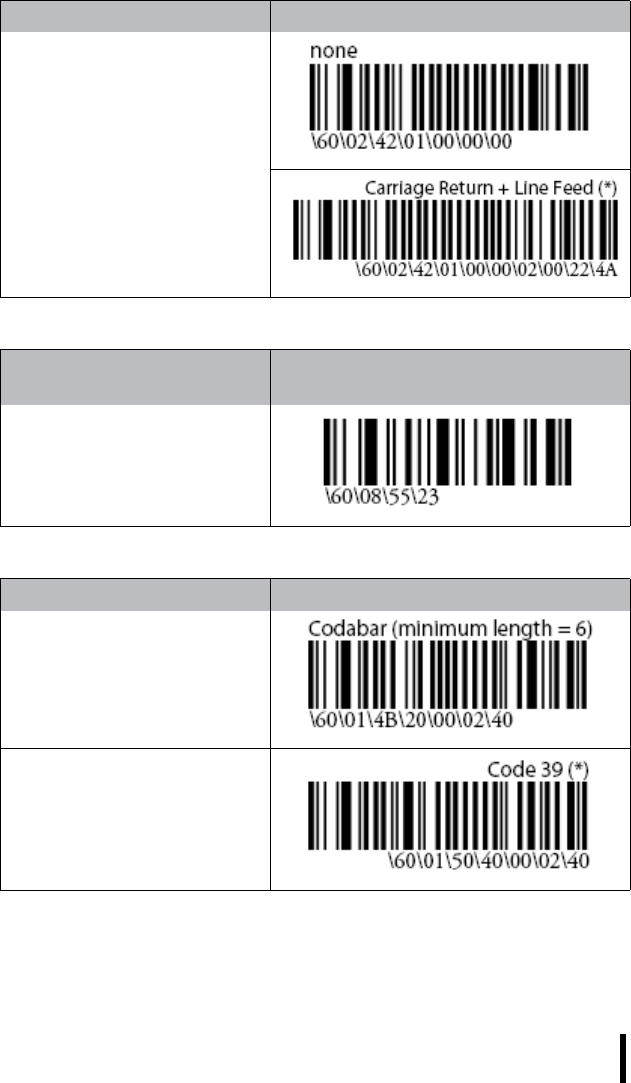
Select Postamble Barcode
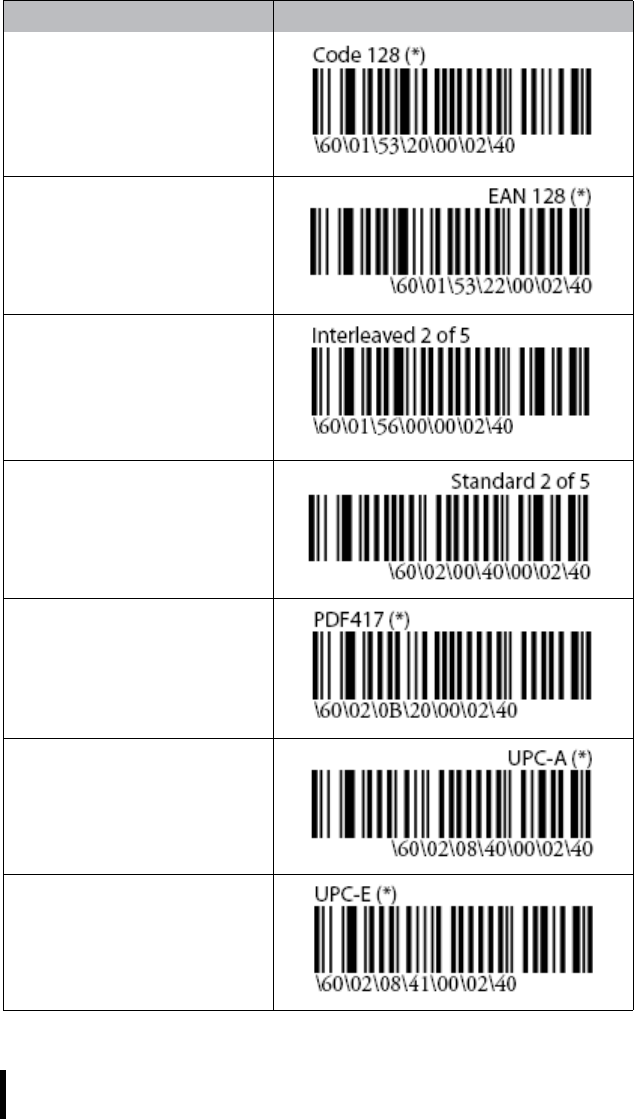
Disable all
Symbologies
Barcode
Select Symbologies Barcode
Chapter 5 — Scanner Setup
58
Select Symbologies Barcode

Chapter 5 — Scanner Setup
59
Select Symbologies Barcode
60
Chapter 6
Advance Settings
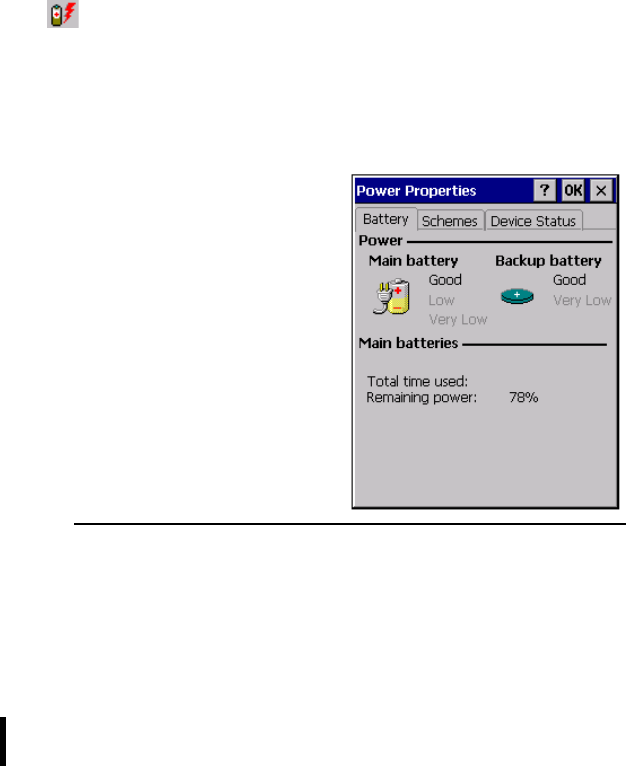
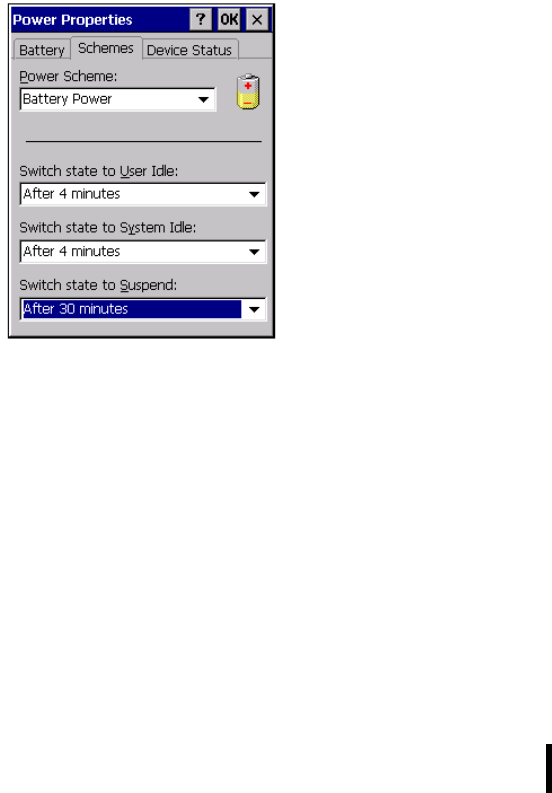
Checking the Battery Status
This section describes how to view the power level for both the main
and backup battery and how to set power saving options.
Checking the Battery Status
If the battery level becomes low in the course of normal use, a status
icon appears on the device screen indicating low or very low bat-
tery status. In both cases, perform an ActiveSync operation to back up
your data, then recharge your device as soon as possible.
If the battery level reaches low status, the device will enter suspend
mode. Recharge the battery as soon as possible.
To check the main and backup battery status:
1. Open Power Properties. Tap
Start → Settings → Control
Panel. Then double-tap
Power.
The Power screen appears.
2. The battery menu item dis-
plays the status of the main
and backup batteries.
NOTE:It is necessary to charge the battery when the battery
charge reaches below 10%. If the battery does not accept a
charge, contact Technical Support.
Chapter 6 — Advance Settings
61
Extending Battery Life
You can extend the HT1100 battery life by doing either of the following:
• Change the automatic power settings
• Minimize the use of the backlight
Changing the Automatic Power Settings
The HT1100 will enter idle mode when there is no task, or all tasks are
waiting for input.
To change the automatic power settings:
1. In the Power Properties screen tap the Schemes tab.
2. Tap the arrow next to the Power Scheme and select Battery
Power.
3. Tape the arrows next to the following three power saving sce-
narios and select the desired time out for each item.
– Switch state to User Idle: HT1100 enters power saving
mode when there is no user input after the selected timeout.
– Switch state to System Idle: HT1100 enters power saving
mode when there is no system activity after the selected
timeout.
– Switch state to Suspend: HT1100 enters suspend mode
when there is no user input or system activity after the
selected timeout.
Time out values range from Never, and 4/5/10/30 minutes.
Chapter 6 — Advance Settings
62
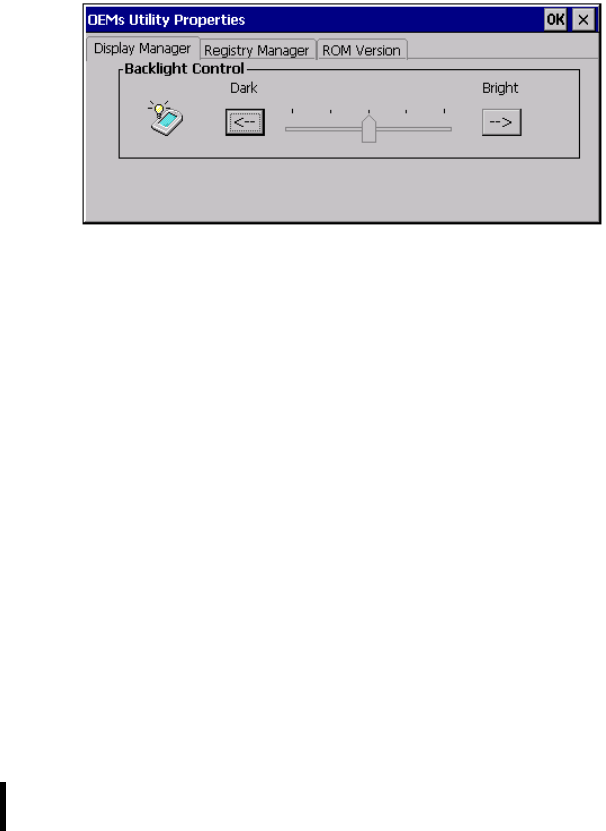
Adjusting Backlight Setting
The power consumption of the LCD backlight is high, turn off the back-
light function if it is not necessary.
If a backlight is required, set “automatically turn off the backlight” func-
tion.
To change backlight settings:
1. Tap Start → Settings → Control Panel.
2. Tap OEMs Utility.
3. Select Display Manager, and tap the arrow next to Dark or drag the
slider to the left to reduce the screen brightness.
Chapter 6 — Advance Settings
63
Performing a Reset
You may have to perform a reset if the device freezes (i.e., device no
longer responds to the buttons on the screen).
A reset allows your device to get a fresh start, similar to rebooting a
computer. This will restart your device and adjust memory allocation.
All records and entries are retained after a reset. Unsaved data in open
programs may in some cases be lost.
Performing a Warm Boot
1. Remove the stylus from its holder.
2. Lightly press the tip of the stylus to the reset button located on
the rear of the HT1100.
Reset button

64
Appendix
System Specifications
Item HT1100
Operating System Windows CE 5.0
Processor Intel PXA270 624MHz
Memory 128MB SDRAM on board
128MB Flash ROM(M-System) on board
Display 3.5-inch transflective TFT LCD, QVGA
resolution (240 X 320)
3.5-inch transflective TFT LCD, VGA
resolution (640 X 480) (option)
Touch Panel Resistive touch panel
Audio System AC-97, Internal microphone and one speaker
(stereo supported via earphone jack)
Application
Buttons
1 x power on/suspend button
Navigation Key+ Function Key + Numeric Key
(Total 28keys)
2 x Barcode scan button (Left & right lateral
side)
1 x software reset switch (back side)
Communication 802.11b/g WLAN module built-in with integral
a n t e n n a
Bluetooth class 2, v1.2 built-in with integral
a n t e n n a
Data Capture Optional imager 1D, and support 2D stack
(PDF417) decoding (Factory option), optional
RFID (CF interface) reader

Chapter 6 — System Specifications
65
External I/O
Interfaces
One USB type A connectors, USB1.1 Host
One USB mini type B connector, USB1.1
client
One RS-232 (full) port
One Stereo Headphone Jack
One Microphone Jack
One SD Slot
One PCMCIA Slot type II
One Cradle Connector (USB host x 1, USB
client x 1, RS232 x 1(full), DC)
Scan rate Decoded operation: up to 500 scans per
second (auto-adaptive)
Standard and emulated DBP: 200 scans per
second
Scanning angles Scan angle: 40°
Skew: 65°
Pitch: 75°
Tilt: 25° (N/A on stacked codes)
Barcode
characteristics
Min X dimension: down to 0.1 mm / 4 mil
Barcode width: up to 18 cm / 7 in on 0.3 / 12
mil resolution code
Print contrast: down to 25%
Reading distance: 0 to 49.2 cm / 19.4 in
Main Battery Rechargeable Li-ion smart battery, 7.4V,
1900mAh, 1P2S
Power Adapter Universal AC 100V ~ 240V, 50~60Hz input,
12V, 3.5A output.
Physical 210 x 100 x 43~36 mm, 575g
Environment Operating Temperature: -20 to +60°C
Storage Temperature -40 to +70°C
Charging Temperature 0 to +50°C
Operating Humidity 5% ~ 95% non-
condensing
Item HT1100

Chapter 6 — System Specifications
66
Rugged
Specification
IP67, 5 feet drop to concrete, MIL-STD-810F
Certification CE, FCC, cUL/UL, TUV, CB, CCC
Accessories One AC-Adapter & power cord
Stylus
Cradle (One LED,One DC-in jack, USB type B
x 1, two USB Type A connectors, one RS232/
422/485, one pad connector)
Sleeve with hand strap & shoulder strap
(Optional)
Battery charging station (Optional)
Gun Handle (Optional)
Single slot cradle (Optional)
Vehicle cradle (Optional)
Item HT1100