AEE Wireless Technology BT502 Wireless Camera User Manual S M502G190011 502UA OM OM final
Shenzhen AEE Wireless Technology Co., Ltd. Wireless Camera S M502G190011 502UA OM OM final
UserManual.wiki
>
AEE Wireless Technology
>
BT502 User Manual
Users Manual Rev 2
Navigation menu
Upload a User Manual
Namespaces
Wiki Guide
HTML
PDF
Info
Views
User Manual
Discussion / Help
Navigation

![3.1 Click on Install MPEG4 codec to install the MPEG4 codec. The following interface will pop up. Select a language per your request from the down-list box. Then click OK.3. Install MPEG4 codec3.2 Follow the installation wizard to install MPEG4 codec. Finally click Finish. Congratulations! Now you can use the application program to monitorwhat you want.13Connect the receiver to your computer with USB cable. Refer to [My Computer]/[Hardware]/[Device Manager]/ [Sound,video and game controllers] to check if the Trident Analog Video correctly installed. If youcannot find this device or there is a yellow "!" before the device, please unplug the receiver and re-plug it.](https://usermanual.wiki/AEE-Wireless-Technology/BT502/User-Guide-703550-Page-17.png)
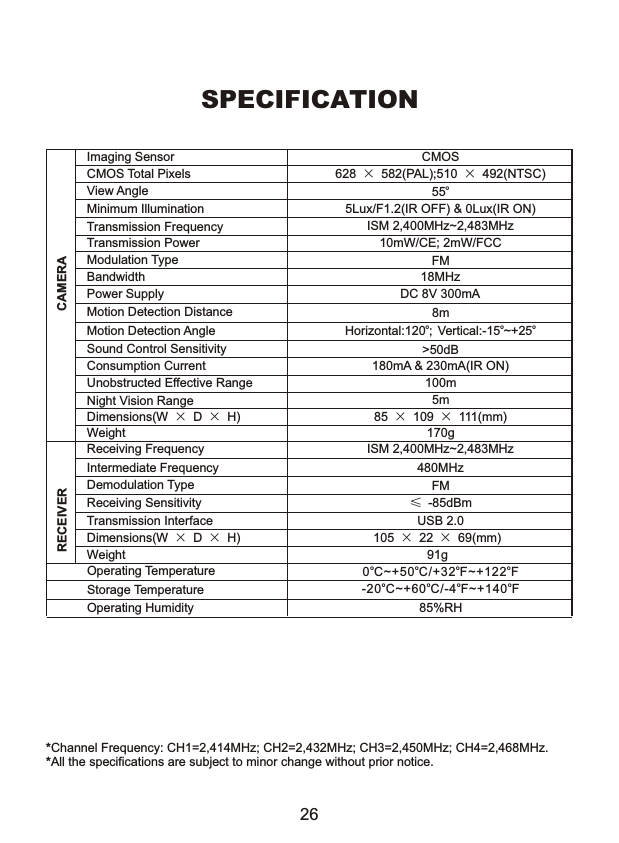
![Display Setup[Camera Alias]Aliases can be made to different cameras. For example, make babyroom as an alias to camera in channel 1. [Channel Loop]Set the interval of automatic loop. [On Screen Display]Three options can be selected to display on CameraViewer window:Date, Time, channel & name of the camera you are accessing.[Video Adjustment]Standard: Select PAL or NTSC to match your camera standard. The mismatch may cause faulty image display.Brightness: Slide the slide block to adjust the image brightnessSharpness: Slide the slide block to adjust the image sharpnessContrast: Slide the slide block to adjust the image contrastSaturation: Slide the slide block to adjust the image saturationNote: Clicking Default will reset the Video Adjustment parameter except Standard to default settings. 21](https://usermanual.wiki/AEE-Wireless-Technology/BT502/User-Guide-703550-Page-25.png)
![Alarm Setup[Alarm setup]1) Select the camera from which you want to receive alarm.2) Select the alarming type by checking Open move alarm or Open sound alarm you like. Note: Open move alarm will trigger the alarm while open sound alarm will trigger the alarm.[Operating of alarm]This is the countermeasure to alarm, warning you something unpleasant happening. When the camera alarms: Record: Enable the recording type when alarm is triggered. Under record mode, CameraViewer will record and store video files for future reference. Capture: Enable the capturing type when alarm is triggered. CameraViewer will take and store still pictures for future reference. Play alarm sound: Play alarming sound type when alarm is triggered.[Record strategy of alarm]You can set duration and frame rate of the recording files.Note: For NTSC the max. frame rate is 30fps, while for PAL it is 25fps.[Capture strategy of alarm]You can set the time when to capture a photo after the alarm is triggered. 22](https://usermanual.wiki/AEE-Wireless-Technology/BT502/User-Guide-703550-Page-26.png)
![Record setup[Record File Path]Click Change to select the location in which you want to save the record file.[Record File Setup]Compression: MPEG4File Format: AVIImage Size: Three image size per your request: 720*576, 352*576, 352*288(PAL); 720*480, 352*480, 352*240 (NTSC).Frame rate: 5,10,15,20,25fps (PAL); 5,10,15,20,25,30fps (NTSC)[Storage Strategy]Set the limited size for total storage and single file.[Take following operation when total file size limit reached]Set the processing method to the situation of reaching the limitation 23](https://usermanual.wiki/AEE-Wireless-Technology/BT502/User-Guide-703550-Page-27.png)
![Capture setup[Picture Path]Click Change to select the location in which you want to save the captures.[Picture Format]Compression: JPGImage Size: Three image size per your request: 720*576, 352*576, 352*288(PAL); 720*480, 352*480, 352*240 (NTSC). [Storage Strategy]Set the limited size for total storage of captured pictures.[Take following operation when total file size limit reached]Set the countermeasure to the situation of reaching the limitation 24](https://usermanual.wiki/AEE-Wireless-Technology/BT502/User-Guide-703550-Page-28.png)
![Plan task setupThe list of CHx, Timing, Operation displays your setup of plan task.[Task Strategy] Set the alarming frequency: daily alarm, weekly alarm, monthly alarm or alarm only once. [Timing] Scheduled record time[Operation] Set the duration for recorder video or set the duration and frequency of capturing still pictures.[Channel] Apply the above settings to the channel you select.251. Click New to start to set a schedule.2. Set the Task Strategy, Timing, Operation and Channel, then click Add to confirm your settings.3. You can select one task and click Delete button to delete it.Click OK to confirm all your settings about security, display, alarm, record,capture, plan task.](https://usermanual.wiki/AEE-Wireless-Technology/BT502/User-Guide-703550-Page-29.png)