AEE Wireless Technology BT502 Wireless Camera User Manual S M502G190011 502UA OM OM final
Shenzhen AEE Wireless Technology Co., Ltd. Wireless Camera S M502G190011 502UA OM OM final
Users Manual Rev 2
Please read this manual carefully and thoroughly before any attempt to
install and operate this product and retain it for your future reference.
User's Manual
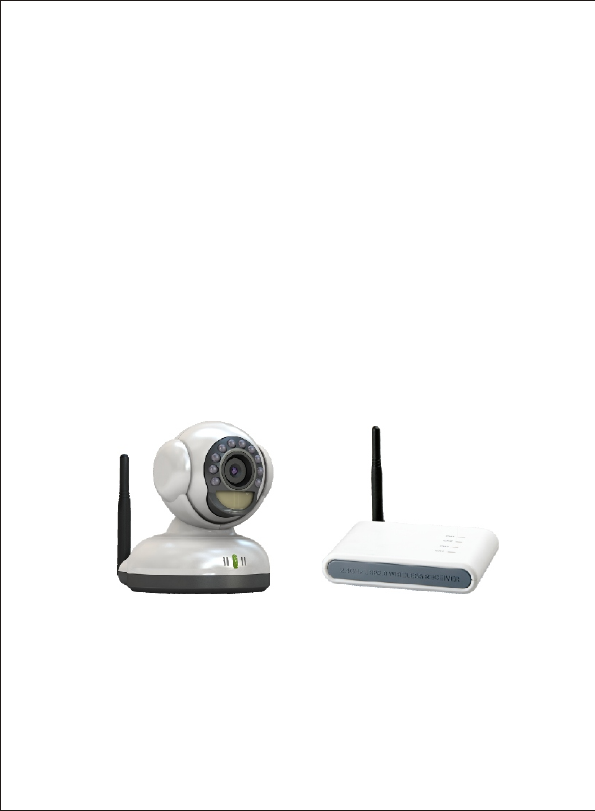
2.4GHz Color Wireless Camera Kit
MODEL: Bt502
The users manual or instruction manual for an intentional or unintentional
radiator shall caution the user that changes or modifications not expressly
approved by the party responsible for compliance could void the user's
authority to operate the equipment. In cases where the manual is provided
only in a form other than paper, such as on a computer disk or over the
Internet, the information required by this section may be included in the
manual in that alternative form, provided the user can reasonably be expected
to have the capability to access information in that form.

TABLE OF CONTENTS
INTRODUCTION 1~3
Notice
Restrictions
Maintenance
Approval Information (FCC/CE)
1
3
3
1~2
PRODUCT 4~7
Package Contents
Feature Locations
Adapter
PC System Requirement
Main Functions
4
5
6
6
7
PREPARATION
ACCESS YOUR CAMERA VIA PC
8~13
14~18
Camera Channel Setup
Fix the Camera 8
Access Your Camera
Operation Bar
8
14~15
16~18
Software Installation 9~13

SPECIFICATIONS
PARAMETERS SETUP WINDOW 19~25
TROUBLESHOOTING
26
27
Menu
Security Setup
Display Setup
Alarm Setup
Record setup
Capture setup
Plan task setup
19
20
21
22
23
24
25

INTRODUCTION
Thank you for your interest and support to our product and purchase this
wireless camera kit. This product
eel confident that you will be pleased with the quality and features of
this product.
The camera builds in one CMOS image sensor and one transmitting
module transmits the captured image wirelessly.
works at ISM-2.4GHz frequency band,
which could be legally used worldwide without permission.
We f
Notice
Notice: 2.4GHz wireless camera works at ISM band. It may cause
interference with other wireless equipment that operates on the same
band. Please turn off that equipment to eliminate the interference.
Product Assurance: 2.4GHz wireless camera will emit electromagnetic
wave, just like other wireless products. But the output power of this
products is less than other wireless products such as mobile phones.
The 2.4GHz wireless camera meets wireless frequency security standards
and recommended indexes while working. These standards and indexes
are certificated by academic organization and represent the cogitative
research of the scientific workers who continuously explore and annotate
the involved fields. So we believe that our products are safe for customers.
1
All our products meet the requirements of approval FCC or CE, and
obtained the FCC or CE certification. They are authorized to bear FCC
or CE mark.
Approval Information

FCC Information
This product complies with standards including Low Voltage Device
Directive 73/23/EEC; EMC Directive 89/336/EEC and R&TTE
Directive 1999/5/EC. It passed the subject tests by the authority
concerned and is authorized to bear CE mark.
CE
2
This equipment has been tested and found to comply with the limits for a
Class B digital device, pursuant to Part 15 of the FCC rules. These limits
are designed to provide reasonable protection against harmful
interference in a residential installation. This equipment generates, uses
and can radiate radio frequency energy and, if not installed and used in
accordance with the instructions, may cause harmful interference to
radio communications. However, there is no guarantee that interference
will not occur in a particular installation. If this equipment does cause
harmful interference to radio or television reception, which can be
determined by turning the equipment off and on, the user is encouraged
to try to correct the interference by one or more of the following
measures:
-Reorient or relocate the receiving antenna.
-Increase the separation between the equipment and the receiver.
-Connect the equipment into an outlet on a circuit different from that to
which the receiver is connected.
-Consult the dealer or an experienced radio/TV technician for help.
This device complies with Part 15 of the FCC Rules. Operation is subject
to the following two conditions:
(1) This device may not cause harmful interference, and
(2) this device must accept any interference received, including
interference that may cause undesired operation Changes and
modification not expressly approved by the manufacturer or registrant of
this equipment can void your authority to operate this equipment under
Federal Communications Commissions rules.

1. DO NOT use this product to violate one's privacy. Monitoring one's
activities without consent is illegal and this product is not designed
and manufactured for such purpose;
2. DO NOT put this product near any medical equipment. Radio
waves might potentially cause breakdown of electrical medical
equipment. So this product should be placed at least 1 feet away
from any heart pacemaker. Radio waves might potentially
influence heart pacemaker and lead to respiratory disturbance;
3. DO NOT use this product for any illegal activities. AEE Technology
shall not be responsible for any consequences of illegal acts
committed by the user.
Restrictions
1. Ensure the sufficient ventilation space is available;
2. Do not shake or strike the product;
3. Keep it dry and dustless and avoid exposing it to direct sunlight;
4. Do not place product near any magnetic objects;
5. Avoid putting the product in places where the constantly changed
temperature or humidity occurs;
6. Keep product away from heat sources such as electric heater;
7. Do not use the camera near aggressive chemicals;
8. Do not use this camera near water, for example, near a bath tub,
wash bowl, kitchen sink or laundry tub, in a wet basement or near
a swimming pool and the like;
9. Do not use the camera in the places which are enclosed by metal.
The surrounding metal like lifter, cabin, may shield the
electromagnetic wave, and result in failure of signal reception;
10. Please obey the local government's environment protection policy;
11. Please turn off the power when left unused;
12. Do not disassemble or repair the camera or receiver; doing so
might cause damages to the product.
Maintenance
3
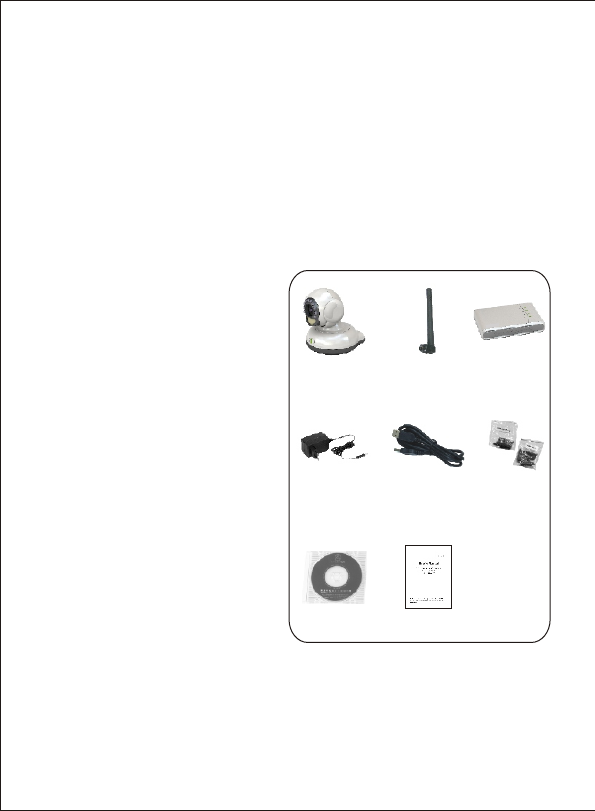
① 2.4GHz wireless camera ×1
② Antenna for camera ×2
③ 2.4GHz wireless receiver ×1
④ Adapter for camera ×1
⑤ USB cable ×1
⑥
Mounting hardware × 1
⑦ CD-ROM
⑧ User's Manual × 1
① ② ③
④ ⑤ ⑥
This package comes with the following items. Please check whether
they are all included in the packaging box, if one or some is missing,
contact the retailer for replacement.
Package Contents
PRODUCT
Note:
The pictures may vary from the actual objects.
⑦
4
⑧

Feature Locations
Lens
PIR Sensor
Power LED
IR Lights
Antenna
Antenna
Channel Indicator
USB socket
Blowhole
DC Power jack
Channel switch
Power switch
2. Receiver
1. Camera
5
CH 1
CH 2
CH 3
CH 4
MIC Hole
This product always conforms to the authenticated AC adapter. The
adapter should be marked one of the following:
Note: When using the power adapter, make sure the rating voltage on it is
compatible with that of the device to avoid potential damages resulting from
incorrect usage of power supply.
UL Mark
American power
supply authentication
SAA Mark
Australia power
supply authentication
GS Mark
German power
supply authentication
CCC Mark
China power
supply authentication
European Union power
supply authentication
CE Mark PSE Mark
Japan power
supply authentication
Adapter
6
PC System Requirement
The PC must meet the following technical specifications for the devices
to work properly.
1. CPU: 2.0 GHz or higher
2. RAM: 256MB or more
3. Color Monitor: Suggest at least 1024 * 768
4. OS(Operating System): Windows XP
5. Hardware disk: 30G or more
6. USB interface: Support USB 2.0 interface
7. Audio/Video card: Support DirectX 9.0 or later
8. DirectX 9.0
Note: The wireless camera kit comes with setup CD-ROM, suggest the CD-ROM
drive available to install the CameraViewer.
Night Vision
Instant Watch
Alarm Function
The built-in Infra-red lights in camera provide night vision for 24hours
surveillance. The Infra-red lights will be automatically activated in dark
places. The picture will turn to Black & White (monochrome) in Night
Vision status.
It refers to the alarm against PIR Motion and Sound. Both can trigger
the alarm. The monitoring image can be displayed on CameraViewer.
Built-in IR lights for
Night Vision
7
Main Functions
The 502UA does instant watch for what is happening. It is easy to install
and operate CameraViewer, an application program for surveillance. You
can record movie and capture still pictures with software CameraViewer
after easy configuration.
The camera can stand on table, it also can be mounted onto the wall.
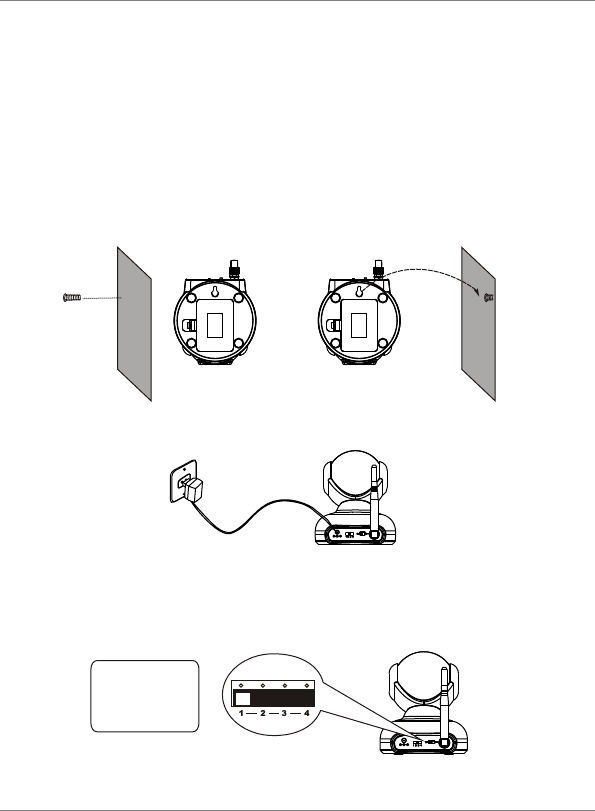
The steps of installation are as follows:
1. Drive one hole in the wall. Insert one mounting anchor firmly. Insert a
screw into the mounting anchor. Hang your camera on the screw.
Fix the Camera
8
PREPARATION
The channel switch is marked with 1-2-3-4. Any one of them can be
selected to meet the purpose of the multi-camera working and possible
interference avoidance.
Camera Channel Setup
CH1=2,414MHz
CH2=2,432MHz
CH3=2,450MHz
CH4=2,468MHz
2. Connect the camera to the adapter. Turn on the camera by sliding the
power switch to ON position. The power indicator lights up.
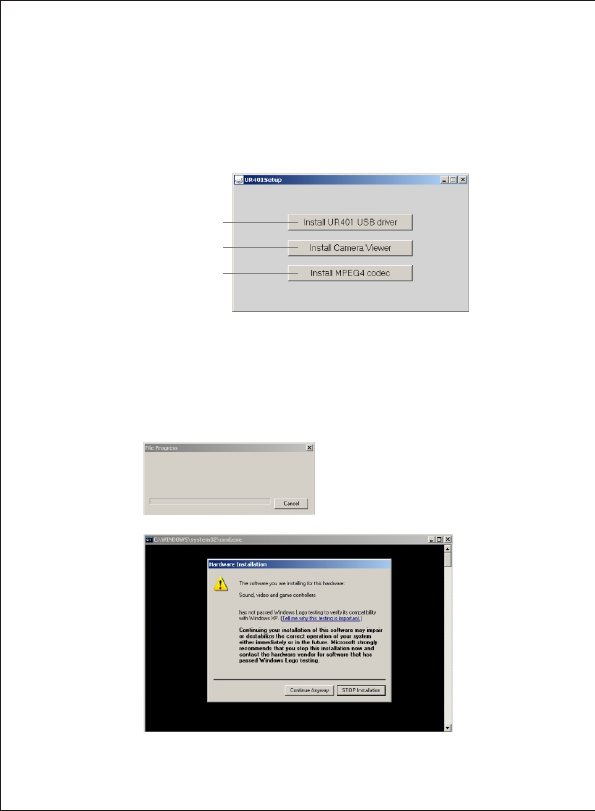
Software Installation
Insert the software CD into the CD-ROM drive of the PC. This will launch
the UR401 Setup installation wizard.
1.1 Click on Install UR401 USB driver to install the driver.
1. Install UR401 USB driver
1. Install UR401 USB driver
3. Install MPEG4 codec
2. Install Camera Viewer
1.2 Click Continue Anyway to install driver.
9
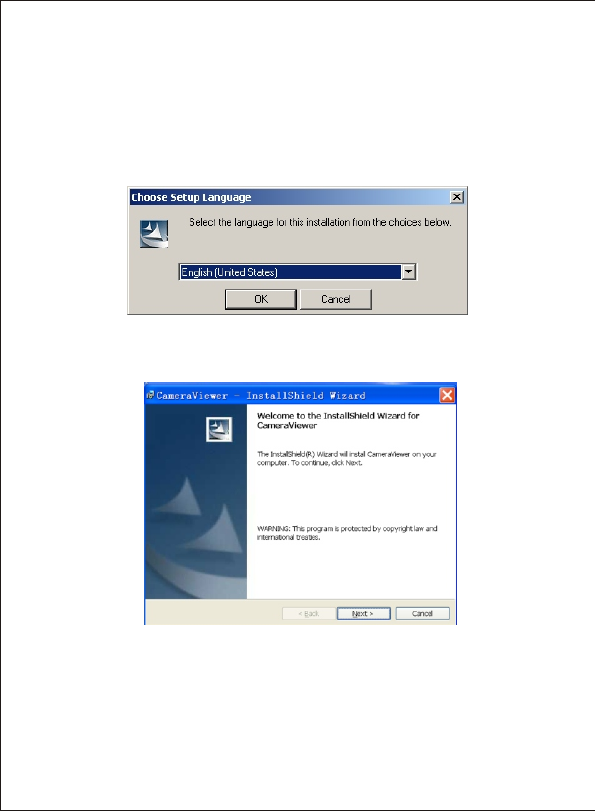
2. Install CameraViewer
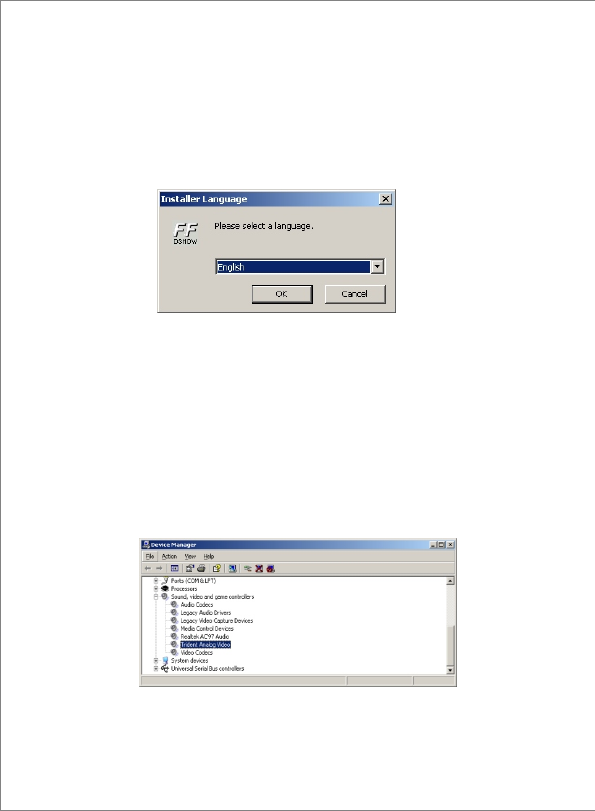
2.1 Select language per your request from the down-list box. And then
click OK.
2.2 Click Next to continue.
10
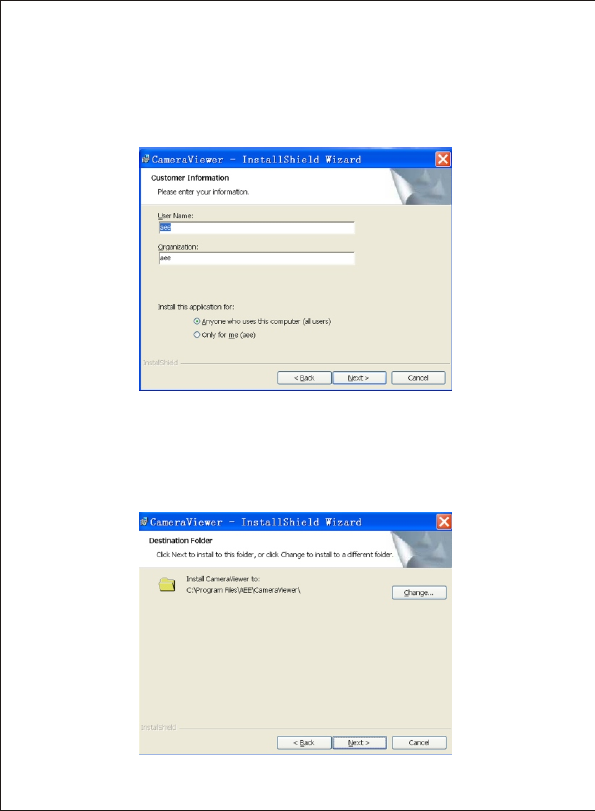
2.3 Fill in the boxes with your personal or public information. Click Next
to continue.
2.4 Click Next to continue.
You can click Change... to select a destination folder to install
CameraViewer software per your request, and then click Next to
continue.
11

2.5 Click on Install to install CameraViewer.
2.6 Click on Finish to finish the installation.
The icon CameraViewer will be created on the desktop.
12
3.1 Click on Install MPEG4 codec to install the MPEG4 codec. The
following interface will pop up. Select a language per your request
from the down-list box. Then click OK.
3. Install MPEG4 codec
3.2 Follow the installation wizard to install MPEG4 codec. Finally click
Finish.
Congratulations! Now you can use the application program to monitor
what you want.
13
Connect the receiver to your computer with USB cable. Refer to [My
Computer]/[Hardware]/[Device Manager]/ [Sound,video and game
controllers] to check if the Trident Analog Video correctly installed. If you
cannot find this device or there is a yellow "!" before the device, please
unplug the receiver and re-plug it.
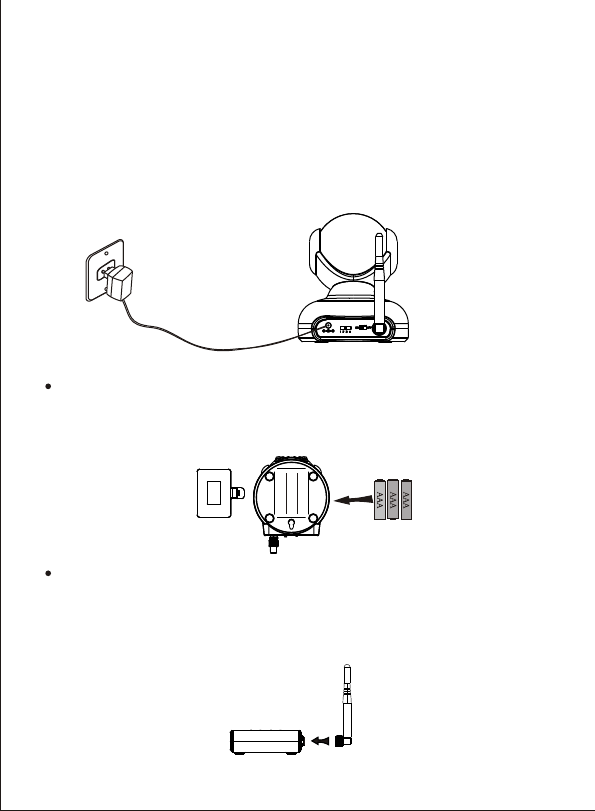
1. Connect the camera to the adapter (DC 8V 300mA). Turn on the camera
by sliding the power switch to ON position. The power indicator lights up.
Notes:
This camera can also work on dry battery , please load three AAA batteries to
the battery compartment at the bottom of camera with their polarities matched,
and then slide the power switch to ON position, the power indicator lights up.
ACCESS YOUR CAMERA VIA PC
The DC adapter will work instead of batteries after it is plugged. If the camera is
left unused for a long period of time, please unplug the adapter and remove the
batteries.
2. Connect the antenna to the receiver.
14
Access Your Camera
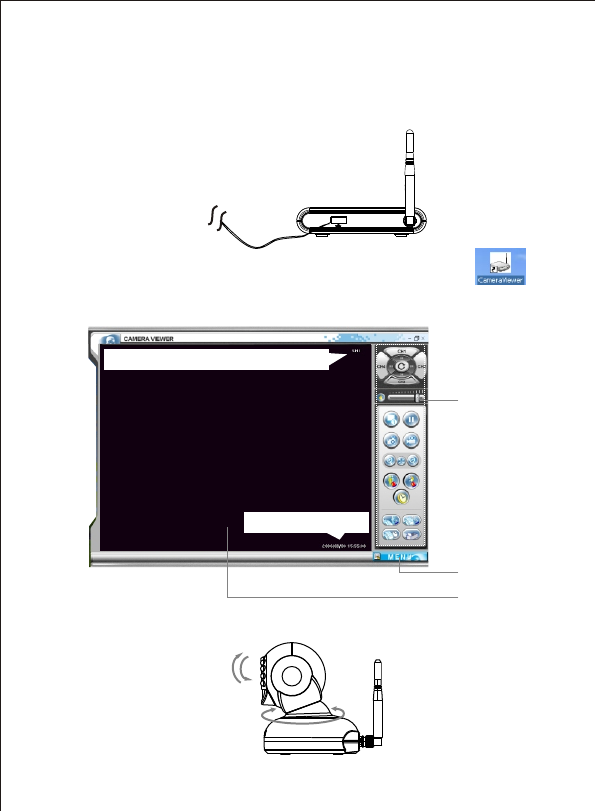
3. Connect the receiver and your PC with USB cable. One of the channel
LED lights up green. Now you can watch on your PC with the
CameraViewer .
4. After the connection, double-click on CameraViewer icon on
your desktop. The following interface will be shown.
Image Field
Setup MENU
Operation Bar
Present date and time
Channel of present monitoring camera
5. Rotate the camera to a suitable angle for surveillance.
15
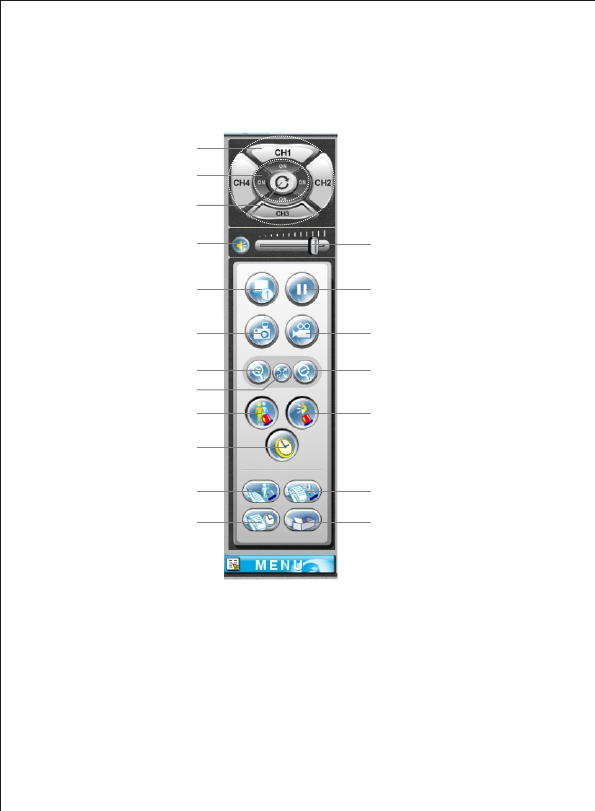
Channel buttons
Channel on/off
Channel loop on/off
Mute button
Split screen
Snapshot button
Zoom in
Full screen
IR detection on/off
Schedule mission on/off
IR detection configuration
Schedule mission
configuration
Volume slide block
Pause
Record
Zoom out
Sound detection on/off
Sound detection configuration
Record File Management
Operation Bar
16

Channel buttons: CH1,CH2,CH3,CH4
Click the right channel button to monitor image transmitted from the
corresponding channel camera.
Note: You can also press space key on your keyboard to select channel from
CH1~CH4 in turn.
Four channels to avoid interference: CH1=2,414MHz, CH2=2,432MHz,
CH3=2,450MHz, CH4=2,468MHz
Channel loop button
Click the channel loop button to start looping available channels. Click
channel loop button again to stop looping.
Channel on/off buttons
Click the channel on/off button to enable/disable the channel.
Mute button
Click the Mute button to turn off the sound.
When the sound is on, slide the volume slide block horizontally to adjust
the volume.
Split screen button
Click the split screen button to switch between single window and four
windows display.
The single window for one channel and four windows for four channels.
Snapshot button
Click the snapshot button to take a snapshot.
Refer to page 24 for more details.
Record button
Click the record button to start recording.
Refer to page 23 for more details.
Zoom in/Zoom out
Click zoom in button to magnify the image and zoom out to return to the
normal size.
Zoom in 2×, 3×, 4×
17

Full screen button
Click full screen button to display image in full screen. Double-click on the
image field to return display to the normal size.
Note: you can double-click on the image display area to switch between full screen
and normal view.
Alarm settings
PIR alarm
Motion detected by the camera will trigger the alarm. The effective
distance is 7~10m depending on different temperature. Click the IR
detection button to enable the PIR alarm trigger. Click again to disable
the alarm.
Refer to page 22 for more details.
Sound alarm
Sound above 50dB detected by the camera will trigger the alarm. 3m is
the effective distance for surveillance.
Click the Sound detection button to enable the sound alarm trigger.
Click again to disable the alarm.
Refer to page 22 for more details.
Schedule mission
Click the schedule mission button to enable schedule mission. The plan
task starts to execute assignment according your settings. Click again
to disable the schedule mission.
Refer to page 25 for more details.
You can set up configuration for the three alarm trigger by clicking the
following three buttons: IR detection configuration, Sound detection
configuration, Schedule mission configuration.
The recording files can be found by clicking Record File Management.
18
PARAMETERS SETUP WINDOW
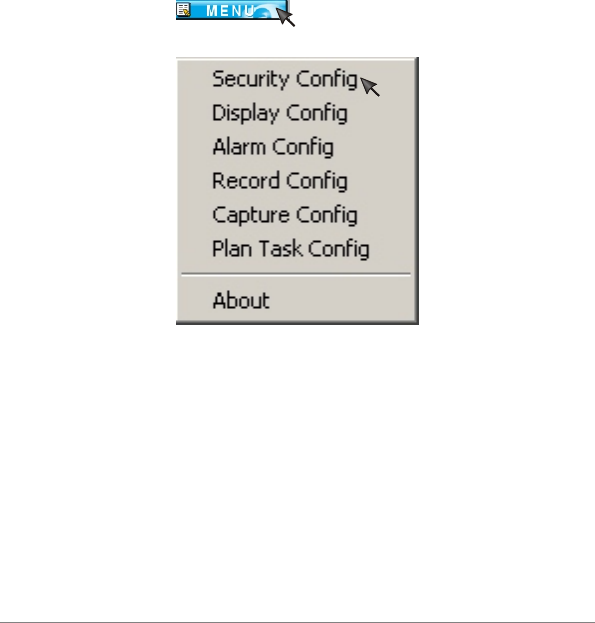
Click MENU button, the follow interface is shown. Click any item to
enter the parameters setup window.
19
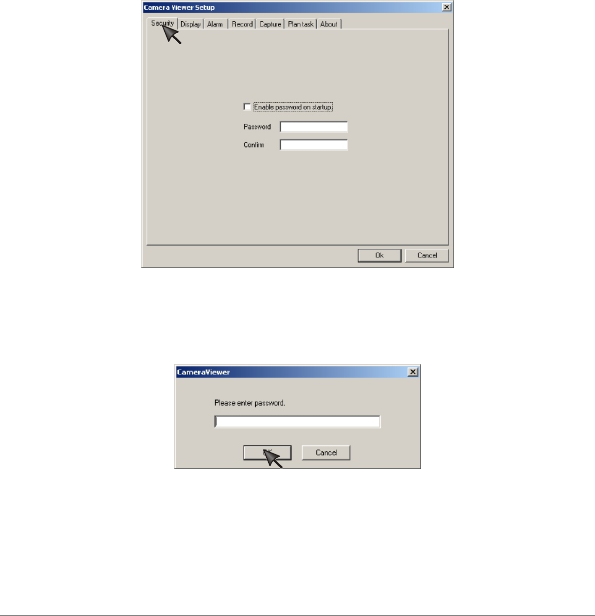
Security Setup
1. Check the "Enable password on startup", and then type a password
in the Password box. Re-type the password to confirm it.
2. Click OK to confirm your setting.
3. If you exit the CameraViewer window and re-enter, the following
interface will pop up. Type the password you set in step 1, you can
enter the CameraViewer window.
20

Display Setup
[Camera Alias]
Aliases can be made to different cameras. For example, make baby
room as an alias to camera in channel 1.
[Channel Loop]
Set the interval of automatic loop.
[On Screen Display]
Three options can be selected to display on CameraViewer window:
Date, Time, channel & name of the camera you are accessing.
[Video Adjustment]
Standard: Select PAL or NTSC to match your camera standard. The
mismatch may cause faulty image display.
Brightness: Slide the slide block to adjust the image brightness
Sharpness: Slide the slide block to adjust the image sharpness
Contrast: Slide the slide block to adjust the image contrast
Saturation: Slide the slide block to adjust the image saturation
Note: Clicking Default will reset the Video Adjustment parameter except
Standard to default settings.
21
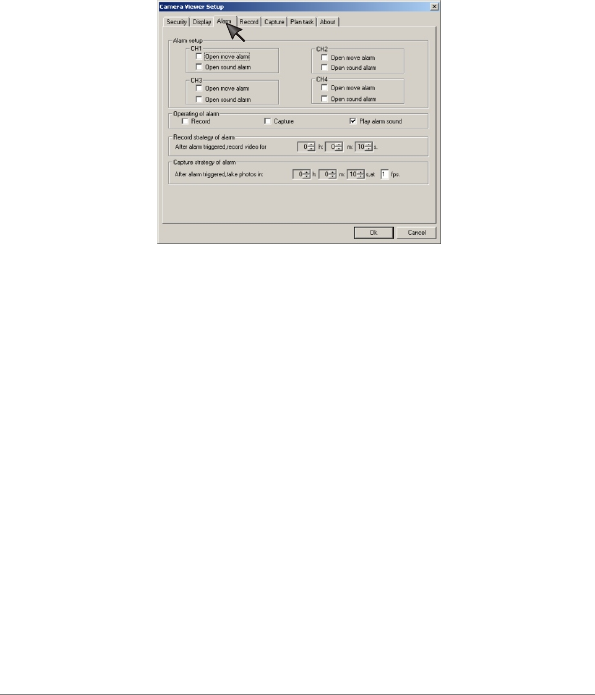
Alarm Setup
[Alarm setup]
1) Select the camera from which you want to receive alarm.
2) Select the alarming type by checking Open move alarm or Open
sound alarm you like.
Note: Open move alarm will trigger the alarm while open sound alarm will trigger
the alarm.
[Operating of alarm]
This is the countermeasure to alarm, warning you something unpleasant
happening. When the camera alarms:
Record: Enable the recording type when alarm is triggered. Under record mode,
CameraViewer will record and store video files for future reference.
Capture: Enable the capturing type when alarm is triggered. CameraViewer will
take and store still pictures for future reference.
Play alarm sound: Play alarming sound type when alarm is triggered.
[Record strategy of alarm]
You can set duration and frame rate of the recording files.
Note: For NTSC the max. frame rate is 30fps, while for PAL it is 25fps.
[Capture strategy of alarm]
You can set the time when to capture a photo after the alarm is triggered.
22
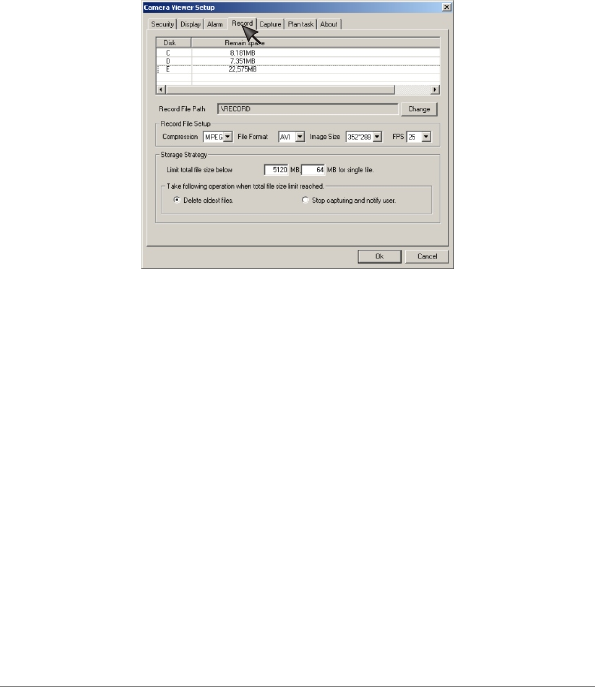
Record setup
[Record File Path]
Click Change to select the location in which you want to save the
record file.
[Record File Setup]
Compression: MPEG4
File Format: AVI
Image Size: Three image size per your request:
720*576, 352*576, 352*288(PAL); 720*480, 352*480,
352*240 (NTSC).
Frame rate: 5,10,15,20,25fps (PAL); 5,10,15,20,25,30fps (NTSC)
[Storage Strategy]
Set the limited size for total storage and single file.
[Take following operation when total file size limit reached]
Set the processing method to the situation of reaching the limitation
23
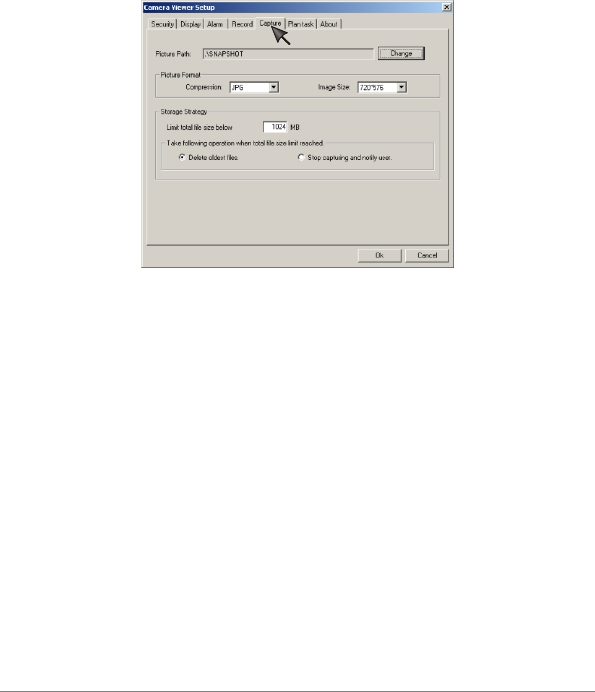
Capture setup
[Picture Path]
Click Change to select the location in which you want to save the
captures.
[Picture Format]
Compression: JPG
Image Size: Three image size per your request:
720*576, 352*576, 352*288(PAL); 720*480, 352*480,
352*240 (NTSC).
[Storage Strategy]
Set the limited size for total storage of captured pictures.
[Take following operation when total file size limit reached]
Set the countermeasure to the situation of reaching the limitation
24

Plan task setup
The list of CHx, Timing, Operation displays your setup of plan task.
[Task Strategy] Set the alarming frequency: daily alarm, weekly alarm,
monthly alarm or alarm only once.
[Timing] Scheduled record time
[Operation] Set the duration for recorder video or set the duration and
frequency of capturing still pictures.
[Channel] Apply the above settings to the channel you select.
25
1. Click New to start to set a schedule.
2. Set the Task Strategy, Timing, Operation and Channel, then click
Add to confirm your settings.
3. You can select one task and click Delete button to delete it.
Click OK to confirm all your settings about security, display, alarm, record,
capture, plan task.

SPECIFICATION
*Channel Frequency: CH1=2,414MHz; CH2=2,432MHz; CH3=2,450MHz; CH4=2,468MHz.
*All the specifications are subject to minor change without prior notice.
CAMERA
Imaging Sensor CMOS
CMOS Total Pixels 628 ×582(PAL);510 ×492(NTSC)
View Angle
Minimum Illumination 5Lux/F1.2(IR OFF) & 0Lux(IR ON)
Transmission Frequency ISM 2,400MHz~2,483MHz
Transmission Power 10mW/CE; 2mW/FCC
Modulation Type FM
Bandwidth 18MHz
Power Supply DC 8V 300mA
Motion Detection Distance 8m
Motion Detection Angle o o o
Horizontal:120 ; Vertical:-15 ~+25
Sound Control Sensitivity >50dB
Consumption Current 180mA & 230mA(IR ON)
Unobstructed Effective Range 100m
Night Vision Range 5m
Dimensions(W ×D×H) 85 ×109 ×111(mm)
Weight 170g
Receiving Frequency ISM 2,400MHz~2,483MHz
Intermediate Frequency 480MHz
Demodulation Type FM
Receiving Sensitivity
RECEIVER
≤-85dBm
o
55
Operating Temperature
Storage Temperature
Operating Humidity 85%RH
o o o o
-20 C~+60 C/-4 F~+140 F
o o o o
0 C~+50 C/+32 F~+122 F
Dimensions(W ×D×H) 105 ×22 ×69(mm)
Weight 91g
26
Transmission Interface USB 2.0

TROUBLESHOOTING
If the PC Camera is not working properly, these suggestions might help
you eliminate the problem. If is still does not help, take it to your local
retailer for assistance.
Forget the password to access the setting
interface.
No image displays at present channel.
Wireless communication does not work. Check if your receiver the same channel with
that of your camera.
The color of the picture is strange.
The unreadable characters are displayed.
The playing time of movie is much shorter
than recording time.
Your computer cannot afford that frame rate,
please set lower frame rate when you record.
1. Make sure the language of CameraViewer
software is the same as that of your PC
operating system.
2. Set the Encoding or the Character Set of
the selected language on the web browser.
Set the color setting of PC as 16 bits or more.
You need to remove the CameraViewer
software and and re-install it.
1. Make sure at least one channel is ON.
2. Signal is weak. Relocate the camera or
remove the obstacle around it.
3. It may be interfered by other microwave
product such as microwave oven. Turn off
the interfering source.
It shows black and white or the image
flashes.
The alarm does not work.
Your receiver is not set the same video system
as your camera. Refer to page 21 for more
details
Make sure the alarm function is set up(Refer to
page 22 for more details), and is activated by
clicking IR detection button/Sound detection.
Problem Cause and Remedy
S-M502G190011