ARRIS C41 Satellite Home Media Center Client Receiver with integrated RF4CE Wireless Remote User Manual
Pace Americas Satellite Home Media Center Client Receiver with integrated RF4CE Wireless Remote
ARRIS >
Contents
- 1. manual pt 1
- 2. manual pt 2
- 3. manual pt 3
- 4. manual pt 4
manual pt 4
8989
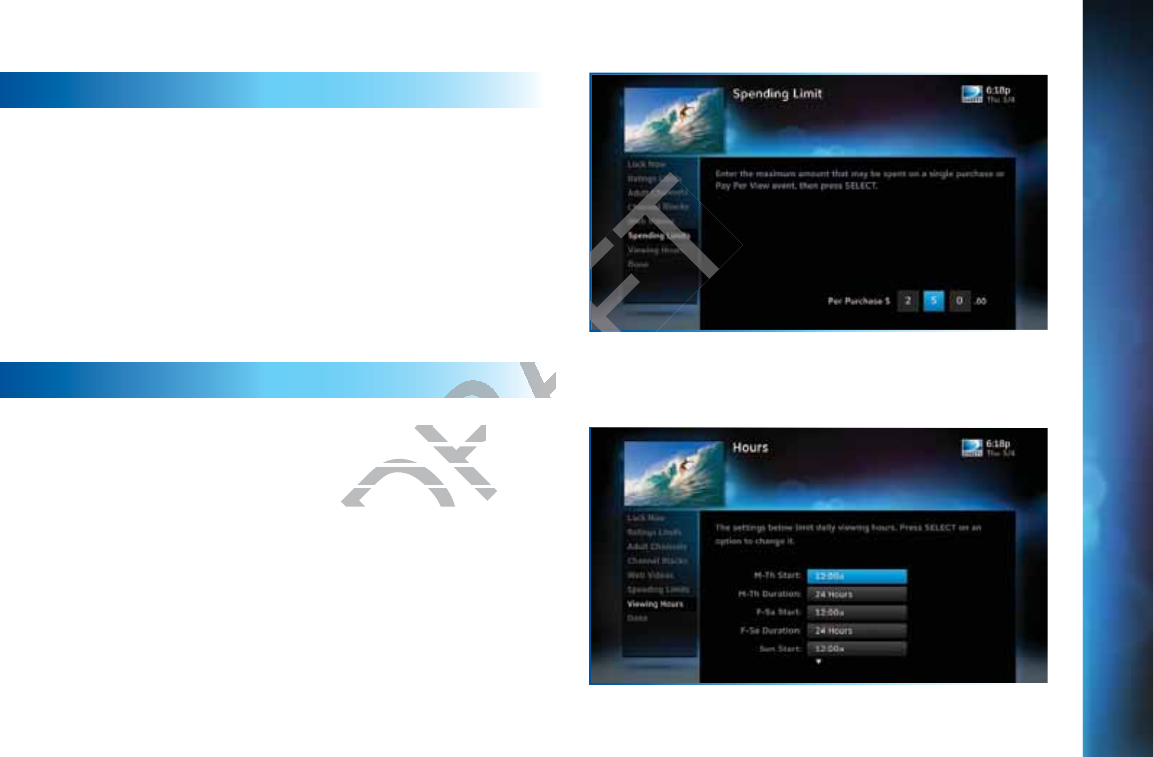
SPENDING LIMITS
Limit the amount that can be spent on each Pay Per View
purchase. Select “Spending Limits”. Then enter your preferred
spending dollar limit using the numbers on your remote.
VIEWING HOURS
Specify days and times when TV watching is allowed in your
household. Select “Viewing Hours”, then select the start times
and durations for viewing. You can set hours based on “school
c^\]ihº¸BdcYVn"I]jghYVn·VcY$dglZZ`ZcYc^\]ih¸;g^YVn"
Saturday, and Sunday.
P
P
A
R
R
ENT
A
A
A
L CO
N
N
TR
O
O
LS
CHAPTER 6 - SETTINGS & HELP
DRAFT
wed in your ed in your
ct the start times ct the start ti
s based on “schools based on “scho
Z`ZcYc^\]ih¸;g^YVn
Z`ZcYc^\]ih¸;g^YV

90
DIRECTV® HD DVR RECEIVER USER GUIDE
Create lists of your favorite channels. Use your list to see only
those specific channels listed in the guide as well as, when you’re
channel surfing in live TV. You can create up to two custom lists
on this receiver. You can also choose “Channels I Get” to see only
the channels that are in your DIRECTV programming package.
Press MENU on your remote, select “Settings and Help” then
“Favorite Channels”. If you haven’t created a Favorites list, the
“Setup Custom 1” and “Setup Custom 2” options will be displayed.
Select the one you want and follow the onscreen instructions to
create and name your list.
Selecting a Favorites list makes it active and hides the display of
all other channels in the guide. From the program guide, press
the YELLOW button on your remote, select “Favorites” and then
select the list you want to make active. The name of the currently
selected Favorites list is displayed in the bottom left of the
program guide screen to remind you which list you are currently
using. To return to displaying all channels, press the YELLOW
button while in the guide, select “Change favorites list”, then
select “All Channels”.
F
F
A
A
V
V
O
O
R
R
I
T
T
E
C
C
H
H
A
N
N
N
E
L
L
S
S
DRAFT
display of y o
uide, press uide, press
tes” and then tes” and then
me of the currently e of the currently
tom left of the left of the
h list you are currenth list you are cu
els, press the YELLOWels, press the YELLO
ge favorites list”, th
ge favorites list
9191
H
E
E
LP
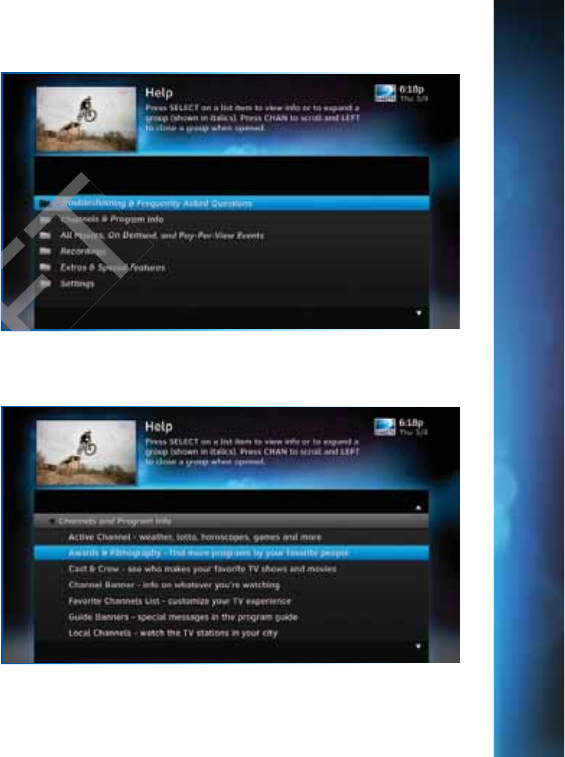
For helpful information about your receiver, as well as frequently
asked questions (FAQs), press MENU, select ”Settings & Help”,
then select “Help”. Select a category folder to see its contents,
then select a topic from the list for detailed information.
Tune to Channel 1 to access the interactive DIRECTV Customer
Information Channel. Watch videos on a variety of topics, such as
your remote control, receiver features, and troubleshooting. To
exit the Customer Information channel, press CHAN UP/DOWN,
press GUIDE, or enter a channel number to tune to.
You can also find answers to all your questions on DIRECTV’s
Answer Center at support.directv.com.
CHAPTER 6 - SETTINGS & HELP
DRAFT
AF

92
DIRECTV® HD DVR RECEIVER USER GUIDE
DRAFT

93
C
C
H
H
AP
T
T
E
R
R
7
7
-
G
G
ENI
E
E
™
™
H
H
D D
V
V
R
G
e
e
ni
i
e (A
d
d
v
W
h
ho
le
-H
H
H
om
e
e)
H
D
D
DV
R
R
R
......
.
.
..
..
.
..
..
....
..
.
..
.
..
..
..
.
...94
K
Ke
e
y Ge
n
ni
i
e
HD
D
D
VR
R
F
F
ea
tu
u
re
e
s
..
.
........
.
.
........
.
.
....
.
..
..
.
................
.
.
.... 94
K
Ke
e
y Ge
n
ni
i
e Cl
i
e
nt
F
F
e
ea
a
tu
re
e
s ....
.
..
........
..
......
.
.
....
..
.
..
.
..
......
.
.
..
.
.
.........94
S
Sh
are
P
Pr
r
ograms
B
B
e
et
t
we
e
n
R
oo
o
ms ..
..
......
.
.
....
..
.
..
.
..
......
.
.
..
.
.
.........95
C
Cl
i
ie
nt
-S
S
e
er
ve
r
r
Fe
a
t
u
ur
r
es
.
.
......
..
.
........
.
.
........
.
.
....
.
..
..
.
................
.
.
.... 95
C
Co
o
nnec
t
t
i
ng
C
lien
t
ts
s
.
.
......
..
.
.
....
.
..
........
..
......
.
.
....
..
.
..
.
..
......
.
.
..
.
.
.........96
S
p
p
ec
c
ial
F
Fe
e
at
ur
r
es
.
.
.
.
....
.
.
..
.
....
.
..
......
.
.
..
......
.
.
..
..
.
..
..
....
..
.
..
.
..
..
..
.
...98
P
Pi
c
ct
ure
i
n
P
ic
tu
re
.
.
.
.
......
..
.
.
....
.
..
........
..
......
.
.
....
..
.
..
.
..
......
.
.
..
.
.
.........98
B
a
a
ck
k
P
an
n
el
E
x
xa
m
p
le
e
..
.
.
..
.
....
.
..
......
.
.
..
......
.
.
..
..
.
..
..
....
..
.
..
.
..
..
..
.
...
CHAPTER 7 - GENIE™ HD DVR
DRAFT
9
9
9
8
.
.
...
9
9
9
99
94
DIRECTV® HD DVR RECEIVER USER GUIDE
G
G
ENIE
™
™
(
A
A
D
D
V
W
W
W
HO
L
L
E
-
-
H
O
O
ME
)
HD
D
D
V
V
R
R
Genie HD DVR is the most comprehensive and flexible DVR
experience from DIRECTV. It introduces a new industry
standard that provides HD DVR service in every room without
requiring additional HD DVR’s. The Genie (Adv Whole-Home)
HD DVR (models HR44, HR34 and above), together with Genie
clients (C31 and above) or RVU-capable TVs, can serve your
entire home and allow you and your family to watch what you
want, where you want, when you want!
Use this chapter to learn about all the great features of
DIRECTV Genie HD DVR and Clients. This chapter highlights
the additional features specific to these models.
KEY GENIE HD DVR FEATURES
Record up to five programs simultaneously.
Store up to 200 hours of HD programming and 800 hours
of SD total on the 1TB (terabyte) hard drive.
Actual recording capacity varies based on type of
programming being recorded.
Watch two shows at the same time with Picture In Picture.
NOTE: This feature is only available on the TV connected
directly to the Genie (Adv Whole-Home) HD DVR.
View live or recorded programming in up to four different
rooms at once (Genie clients required).
DASH
REC
Genie (Adv Whole-Home) HD DVR
Genie (Adv Whole-Home) Client
G
G
enie(Adv
DASH
REC
DRAFT
ing and 800 hours ng and 800 hours
d drive.d drive.
ased on type of
ased on type of
PicturePicture
AF
A
AF
DASHDASH
G

95
KEY GENIE CLIENT FEATURES
Watch and manage recorded programming from any room.
Pause and rewind live or recorded TV from any room.
Access On Demand content, TV Apps and other HD DVR features from any room
SHARE PROGRAMS BETWEEN ROOMS
Genie can be configured two ways to share content across your home:
1. As part of a Whole-Home DVR network - Genie enhances your current Whole-
Home setup. When connected to other HD receivers as the hub of your Whole-
Home DVR experience, Genie allows you to stream recordings to four active
rooms simultaneously (up to three Whole-Home clients).
2. In a client-server setup - with RVU-capable TVs or Genie clients in your home.
(RVU is a technology that allows you to connect certain TVs, devices, and
DIRECTV clients to your Genie HD DVR, without adding a full-featured
DIRECTV Receiver.)
G
G
ENI
E
E
™
™
(
A
A
DV
W
W
H
O
O
LE-H
O
O
O
ME)
H
H
D
D
D
VR
CHAPTER 7 - GENIE™ HD DVR
DRAFT
y roomy roo
our home: r home:
ances your current Wances your current W
ers as the hub of youers as the hub o
ream recordings to foream recordings to
Home clients).me clients).
pable TVs or pable TVs or
Genie clieGen
to connect certain TVto connect certain T
VR, without adding VR, without add

96
DIRECTV® HD DVR RECEIVER USER GUIDE
G
G
ENIE
™
™
(
A
A
D
D
V
W
W
W
HO
L
L
E
-
-
H
O
O
ME
)
HD
D
D
V
V
R
R
GENIE MEDIA CENTER
Use your GENIE MEDIA CENTER as a media server. An RVU-
capable TV, device, or Genie client lets you watch TV via your
DIRECTV Genie network.
Start watching a show in one room, press EXIT on your
remote, then resume watching in another.
Pause or rewind live programming in any connected room.
Schedule, watch or prioritize recordings from any room.
NOTE: Your Genie HD Receiver includes five (5) tuners. A tuner
is used whenever you watch or record a program. For example,
if two rooms are watching live TV, three tuners are available for
recording. Watching a recorded program does not
require a tuner.
See your RVU TV’s User Guide for more information on
connecting to the Genie (Adv Whole-Home) HD DVR. You will
need to activate the RVU TV by calling DIRECTV at
1.800.531.5000.
DRAF
A tuner ner
r example, r example,
e available for e available for
not not
e information on
e information o
me) HD DVR. Yome) HD DVR. Y
CTV at CTV at
AF

97
G
G
ENI
E
E
™
™
(
A
A
DV
W
W
H
O
O
LE-H
O
O
O
ME)
H
H
D
D
D
VR
CONNECTING CLIENTS
You may register up to eight clients per Genie HD DVR; these may be RVU TV, or Genie
Clients.
Before connecting and activating a client, your Genie HD DVR must be set up,
activated, and functioning.
To begin, connect, plug in and turn on the client. Once it detects the Genie HD DVR, it
will prompt you to enter a PIN. On your DIRECTV HD DVR, press MENU, then select
“Settings & Help”, then “Settings”. Select “Whole-Home” from the left menu, then
select “Add a Client”. Note the PIN shown on the “Add a Client” screen, and do not exit
the screen!
On the client, enter the PIN you received from the Genie HD DVR using the remote.
Select “Done” on the confirmation screen. The Create a Location screen displays. You
may add a new location, or replace a location. Select the appropriate option and follow
the onscreen instructions.
Once the location has been set up, you have a choice of copying settings from another
location or accepting the DIRECTV defaults.
The following settings are copied from a server or client to another client:
(The settings from any client can also be copied to the Genie HD DVR.)
Parental Control Settings
Favorite Channels
Display Settings
Clock
Language
Sound Effects
CHAPTER 7 - GENIE™ HD DVR
DRAFT
e HD DVR, it e HD DVR, it
U, then select U, the
eft menu, then eft menu, th
creen, and do not exitn, and do
D DVR using the remVR using the rem
Location screen dispLocation screen disp
the appropriate optiothe appropriate
choice of copying sethoice of copying set
server or client to a
server or client to a
pied to the Gepied to the G
98
DIRECTV® HD DVR RECEIVER USER GUIDE
S
S
P
E
E
CI
A
A
L
F
F
E
E
A
T
T
U
U
RES
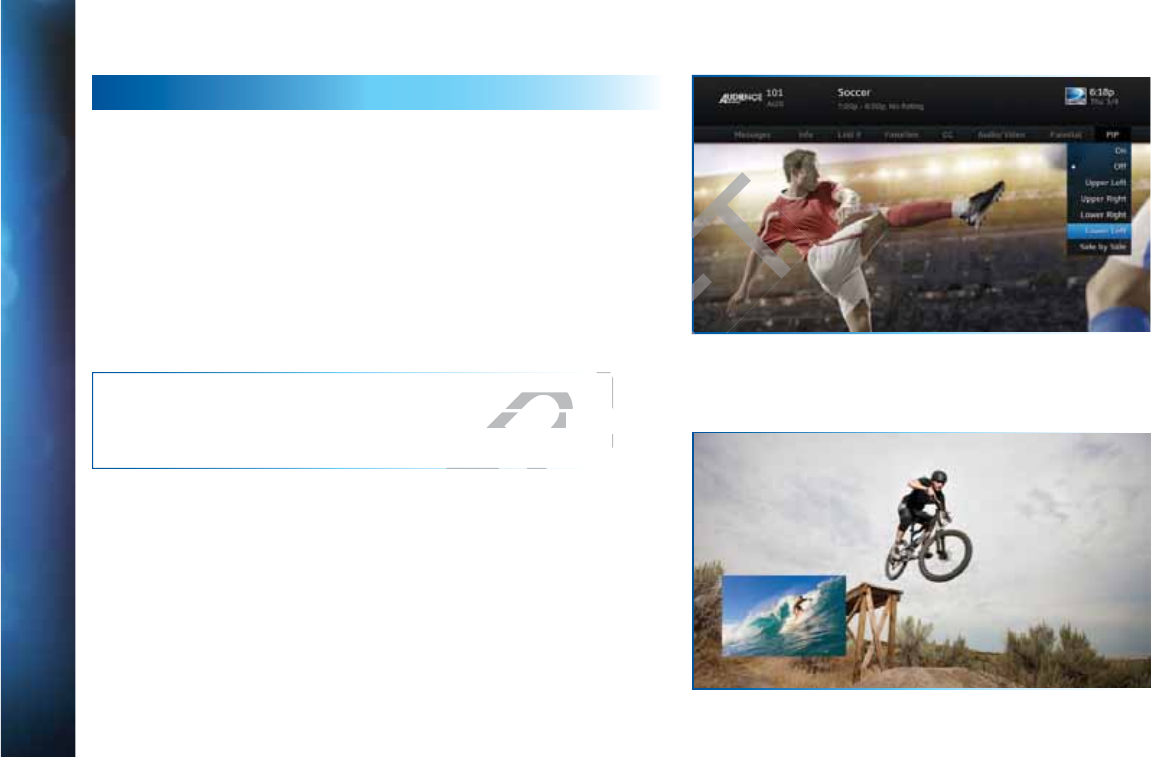
PICTURE IN PICTURE
Watch two programs, live or recorded, at the same time. While
watching one program, press the INFO button on your remote.
Select “PIP”. The program you’re currently watching moves
into a smaller window on your screen. The larger video is the
active program and can be controlled by your remote. To switch
between programs, press the DOWN ARROW.
To change the position of the smaller window, press INFO on
your remote. Select “PIP” and choose a position from the options
provided.
NOTE: Picture in Picture is only available on the TV connected
directly to the (models HR44, HR34 and above) Genie (Adv
Whole-Home) HD DVR.
DRA
V connected V connec
Genie (Adv Genie (Adv
DRAFT
ons
99
NETWORK
SWim ONLY
POWER INDIGITAL AUDIO
USBHDMI
A/V OUT
12 3 5 64
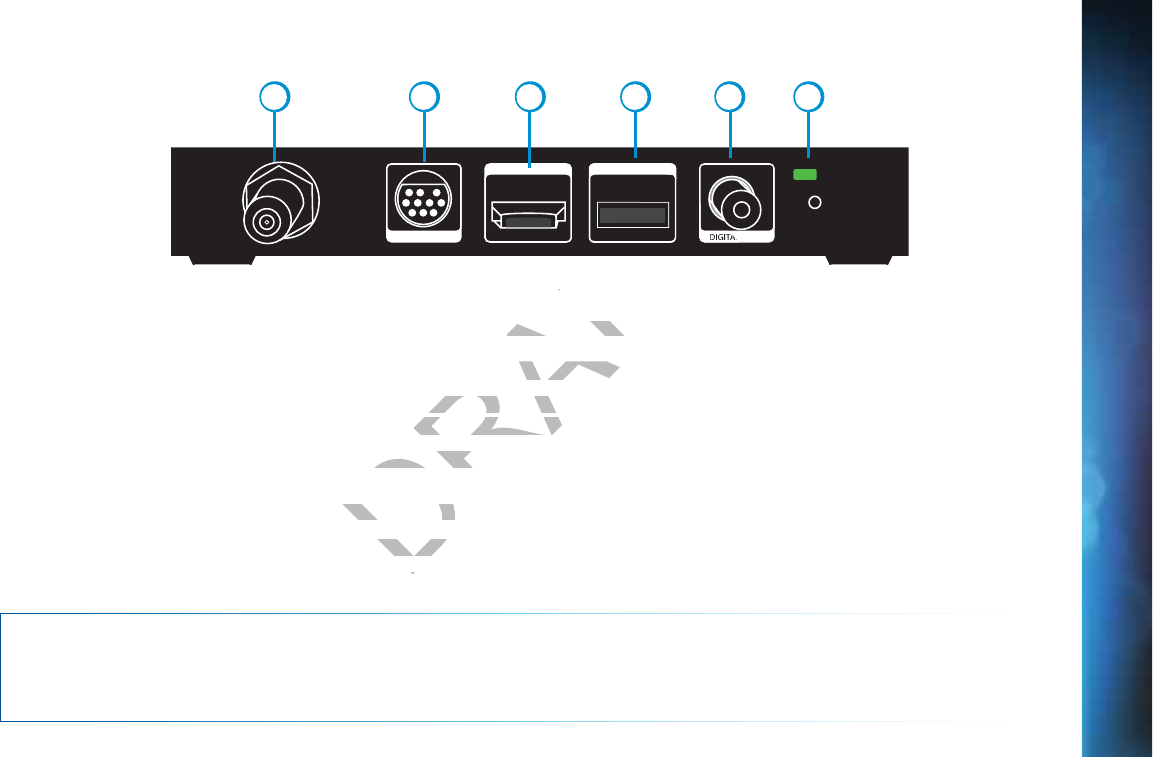
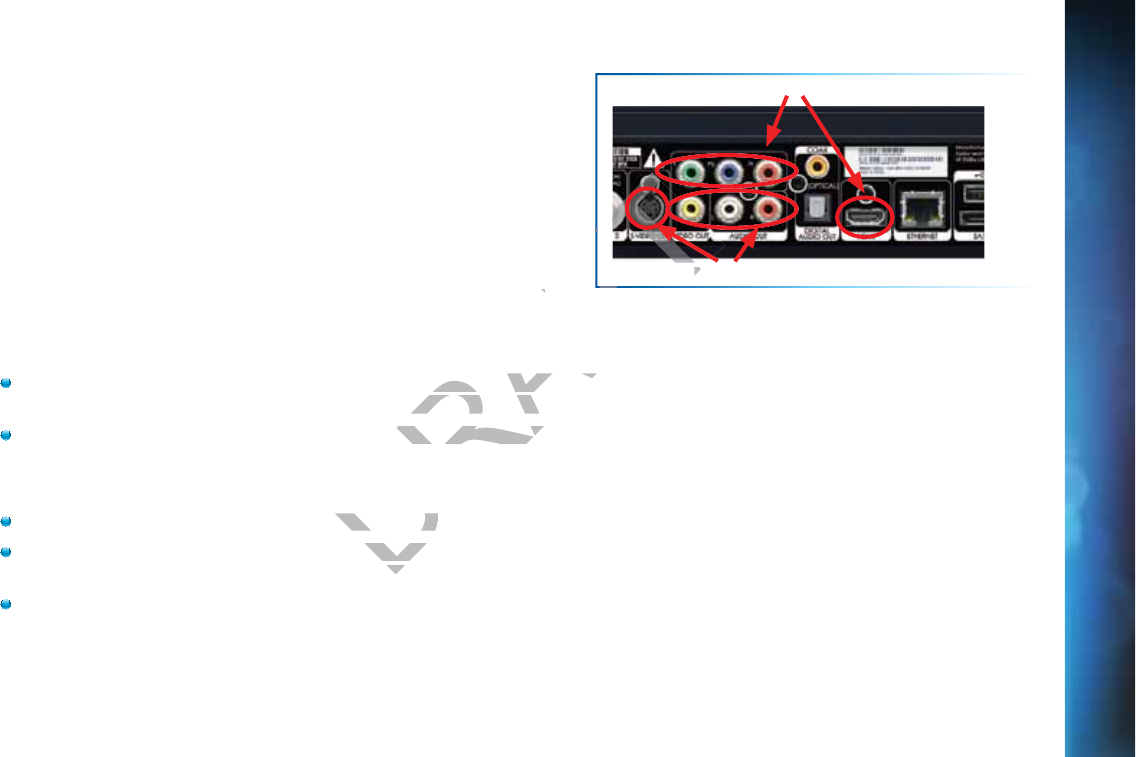
1. NETWORK SWM ONLY – Connect a cable from a Single Wire Multi-Switch (SWM) to this port. This is your SAT-IN connection.
2. A/V OUT – A combined 10-pin output that supports both audio and video. Your Genie Client comes with an A/V Out cable for
Component Video and RCA audio. An A/V Out cable for Composite Video and RCA audio can be purchased separately.
3. HDMI – Use this combination digital video and audio connector for the best picture quality. This is the recommended
connector for HD TV.
4. USB – For future use. USB 2.0 Host (FRONT/REAR EACH 5V = 500mA)
5. DIGITAL AUDIO OUT COAXIAL – Use this digital audio connection for sound.
6. POWER – Your receiver must be plugged in at all times to function properly.
WARNING: Use only the power supply (power cord) that came with your DIRECTV receiver. Failure to use the authorized power
supply (power cord) may cause electric shock, fire, bodily injury and/or property damage. If the power supply (power cord) becomes
damaged or needs to be replaced, please contact DIRECTV Customer Service to obtain an authorized replacement.
Your equipment may not look exactly like the model illustrated. This image has enlarged features for ease the purposes of illustration.
DIRECTV Genie™ (Adv Whole-Home) (HR44, HR34 and above)
B
B
ACK PA
N
N
N
EL E
X
X
AM
P
P
LE
CHAPTER 7 - GENIE™ HD DVR
DRAF
gle Wire Multi-Switcre Multi-Switc
rts both audio and virts both audio an
cable for Compositecable for Composit
o and audio connectoo and audio c
FRONT/REAR EACFRONT/REAR
digital audigital au
AFT
FT
FT
T
FT
FT
T
T
T
T
T
T
age has enlarged featureage has enlarged f
ove))

100
DIRECTV® HD DVR RECEIVER USER GUIDE
DRAFT

101
C
C
H
H
A
P
P
T
E
E
R
R
8
8
-
-
T
R
R
O
O
U
U
BL
E
E
SH
O
O
O
O
T
T
I
NG & F
A
A
QS
T
r
o
ou
u
bl
es
h
ho
ot
i
in
g
T
Ti
i
p
ps
..
.
..
.
.
............
..
....
..
.
..
..
.
.
..
.
......
.
.
..
..
..
.
..
102
R
Re
e
set
Yo
o
ur R
e
ec
ei
v
ve
e
r
r
....
..
..
.
..
....
..
......
.
.
........
.
..
.
....
.
.
..........
..
..
..
..
..
.
.. 102
R
Re
e
auth
o
o
r
ize
Y
Yo
ur
R
R
e
ec
ei
v
e
r
r
..
.
.
........
.
.
......
..
.
.
..
......
.
.
......
.
.
..
.
.
....
.
..
.102
S
Sy
st
em
S
So
ft
w
wa
re
U
U
p
pd
at
e
es
....
..
......
.
.
........
.
..
.
....
.
.
..........
..
..
..
..
..
.
.. 103
O
On
n
scre
e
e
n
Me
ss
ag
g
e
es
s
....
.
.
..
.
....
.
.
........
.
.
......
..
.
.
..
......
.
.
......
.
.
..
.
.
....
.
..
.103
R
Ru
u
n th
e
e
Syst
e
em
T
T
e
s
t
t
....
.
..
..
.
....
.
.
........
.
.
......
..
.
.
..
......
.
.
......
.
.
..
.
.
....
.
..
.104
F
r
e
eq
q
ue
nt
t
l
ly
A
s
sk
ed
Q
Q
ue
st
t
io
o
ns
s
......
..
....
..
.
..
..
.
.
..
.
......
.
.
..
..
..
.
..
105
CHAPTER 8 - TROUBLESHOOTING & FAQS
DRAFT

102
DIRECTV® HD DVR RECEIVER USER GUIDE
T
T
R
O
O
U
B
B
LE
S
S
H
H
O
O
O
T
IN
G
G
T
T
IP
S
S
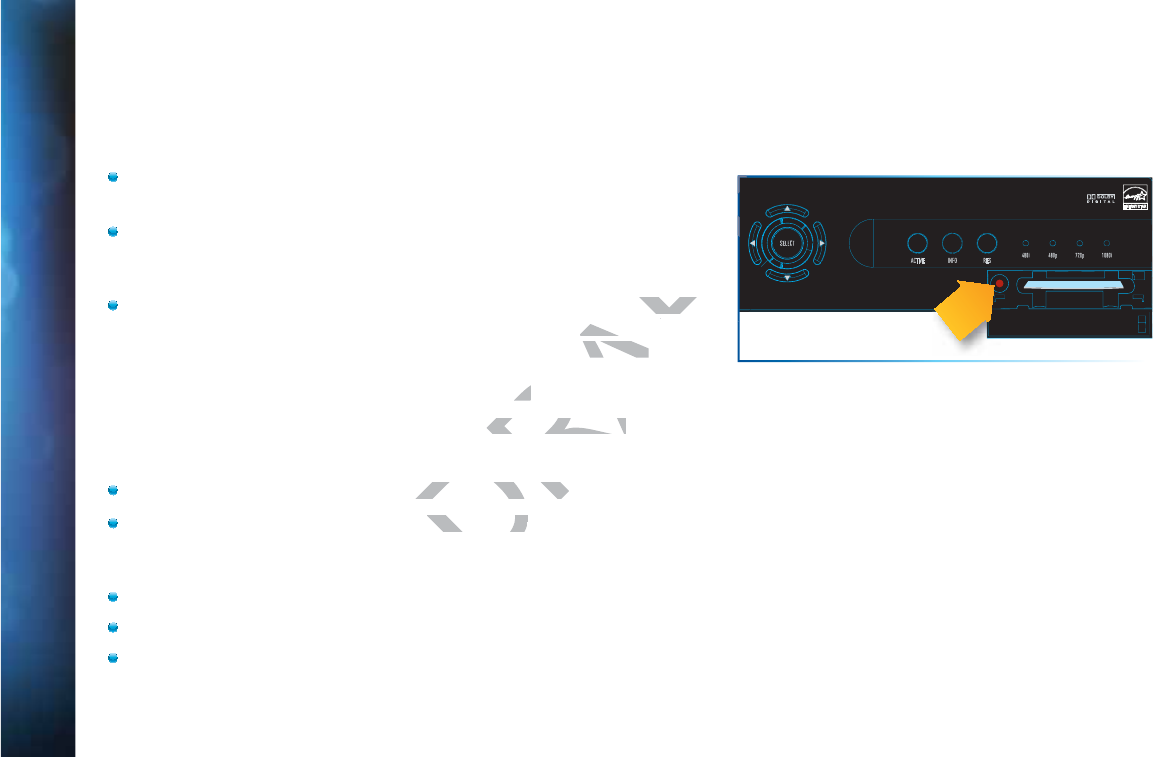
RESET YOUR RECEIVER
Many problems can be corrected by performing a simple reset
of the DIRECTV® HD DVR. If you experience frozen audio or
video, blank screen, or the receiver won’t respond to front panel
button or remote control, you can reset your receiver with the
following steps:
Press the red RESET button behind the access card panel
door on the front of the DIRECTV® HD DVR, then wait a few
minutes for program guide information to be acquired.
If you reset a Genie (Adv Whole-Home) client and the
problem persists, try resetting the Genie Server.
If the problems persist, try unplugging the power cord of the
DIRECTV Receiver for 15 seconds, then plug it in again.
REAUTHORIZE YOUR RECEIVER
If your receiver displayed the message “722 - Service Expired,”
try reauthorizing your receiver. On a computer, go to
directv.com/reauthorize and follow the onscreen instructions.
You will need to be logged into your account on directv.com to
complete this process.
Running the System Test (at the end of this section) can also
help you diagnose and solve many common problems. Note
that resetting your receiver twice in a row will clear all your
program guide data. It could take as much as 48 hours to
reacquire all of it.
SELECT
ACTIVE INFO RES 480i 480p 720p 1080i
RESET
Reset Button
(Your equipment may not look exactly like the model illustrated.)
RE
ES
DRAFT
cord of the cord of the
n again.n again.
“722 - Service Expire
“722 - Service Expir
mputer, go to mputer, go to
screen instrscreen instr
on direon dire
FT
FT
T
FT
FT
T
T
T
T
T
T
T
T
T

103
T
R
R
O
O
U
B
B
LES
H
H
H
OOTI
N
N
G
T
T
IPS
SYSTEM SOFTWARE UPDATES
DIRECTV periodically sends system software updates to your
receiver to improve performance and upgrade features and
functions. These updates will occur automatically. The receiver
will give you the option to download software “now” or “later.”
Software downloads take just a few minutes and should be
allowed to proceed when possible. When a download is in
progress, channels, interactive functions and applications will
temporarily become unavailable. After the download is complete,
the receiver may reset itself. Once the receiver download and/or
reset is complete, you can resume using as normal.
ONSCREEN MESSAGES
There may be times when you see an onscreen message similar
to the one on the right. The top line of the message gives a brief
description of what causes the onscreen message to display,
while the second line displays instructions to follow. Most
onscreen messages supply an error code in parentheses. Go
to directv.com/troubleshooting and select the onscreen error
message for solutions.
The message at the right shows an example of trying to view
a channel that you have not purchased or that is not in your
programming package. To resolve this error, call Customer
Service at 1.800.531.5000 and mention the error code number
when prompted.
CHAPTER 8 - TROUBLESHOOTING & FAQS
DRAFT
n message similar message similar
message gives a brief message gives a b
message to display,
message to display,
s to follow. Most s to follow. Mo
parenthesesparenthese
nscreenscree

104
DIRECTV® HD DVR RECEIVER USER GUIDE
RUN THE SYSTEM TEST
The System Test allows you to run a basic diagnostics check on your DVR.
First make sure that:
1. 6aaXdccZXi^dch¸_VX`h!XVWaZh!ZiX#¸VgZ^ceaVXZXdggZXian#HZZ6eeZcY^m'!¹Connections for TV and Equipment” for
more information.
2. There are batteries in the remote control and they are working correctly.
3. The access card is inserted in the DIRECTV® Receiver.
Follow these steps to run the diagnostics system test on your DVR:
1. Turn on your TV and the DVR.
2. Slide the mode switch to the DIRECTV position, then press MENU.
3. Select “Settings & Help”.
4. Select “Settings” then “Info & Test”.
5. If you have a High-Definition DVR, select “Run System Test”.
6. If your system does not pass the System Test, check any of these potential trouble areas: cabling, pointing the satellite dish,
phone connection and access card.
7. If you continue to have problems, call DIRECTV Customer Service at 1.800.531.5000.
8. You should run a system test several times before concluding that there is a problem. Occasional fluctuations in the phone
line or satellite signal can give temporary false readings.
T
T
R
O
O
U
B
B
LE
S
S
H
H
O
O
O
T
IN
G
G
T
T
IP
S
S
DRAFT
eeZcY^m'!¹eeZcY^
C
correctly.corr
your DVR:our DVR
n, then press MENU. n, then press ME
select “Run System Tselect “Run System
stem Test, checstem Test, che
ECT
ECT
105
F
F
REQUENT
L
L
Y
A
A
SKE
D
D
D
QU
E
E
STI
O
O
NS
Q
Q:
W
Wh
at t
o
o
d
do
a
bo
o
u
ut
t
em
po
ra
ry
l
os
s
s
of s
at
t
e
el
lite s
ig
g
na
l
l,
“fr
o
oz
en
”
p
pi
c
ct
ure, or
p
pi
ctur
e
e
br
e
ea
ki
n
ng
int
o
b
bl
ocks /
pi
x
xe
ls?
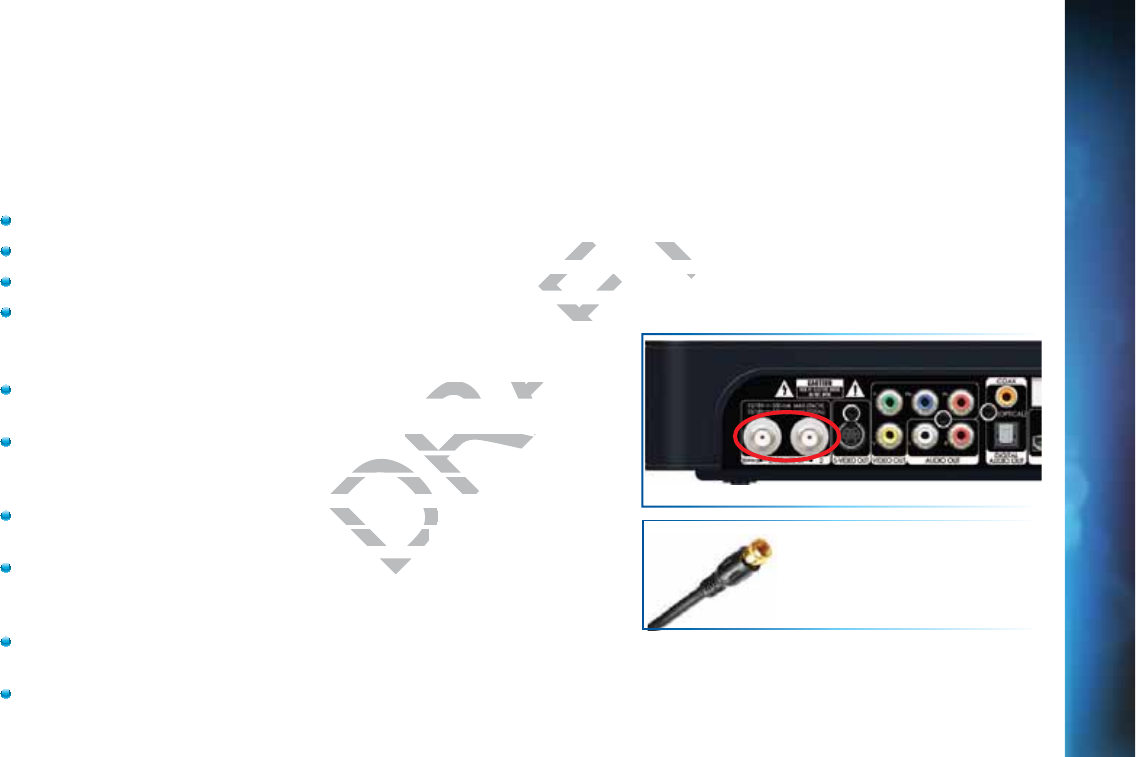
The image on your screen is frozen, blocky, or you see a message that says, “Searching for Satellite Signal (x 771).
Possible Causes:
Severe weather (rain, snow, hail etc.) may cause this issue.
There may be an obstruction to your dish (debris, snow, ice, etc.) or a building or tree that blocks your line of sight to the satellite.
There may be a problem with the cables running from your satellite dish to your DIRECTV® Receiver.
If the picture is frozen, blocky, or pixels, there may be a problem with the transmission from the source.
Solution:
Weather issues are usually temporary. Wait for the weather to clear and
your signal should return to normal.
If there are no weather problems in your area, reset your DIRECTV DVR
using the red RESET button behind the door on the front of the receiver or
by unplugging the receiver for 15 seconds and then plugging it back in.
Check all the connections on the back of your receiver, starting with the
SAT-IN connection, and make sure they’re secure.
If the problem is coming from the program source (for example, you see the
problem on one channel, but not on any others), wait for the broadcasting
channel to resolve the issue.
If there are obstructions blocking the dish’s clear view of the satellite, you
should contact a professional to remove them or a DIRECTV installer at 1.800.531.5000 to relocate your dish.
If your signal strength is lower than 70 (60 or lower on HD receivers) on most transponders in good weather, contact a
professional installer to realign your dish or call us at 1.800.531.5000.
Check Satellite (SAT-IN) Connections
Coaxial Satellite Cable
CHAPTER 8 - TROUBLESHOOTING & FAQS
DRAFT
building or tree that b
building or tree t
ellite dish to your DIRellite dish to your DIR
blem with the transmwith th
he weather to clear anhe weather to cl
rea,
reset your DIRECreset your DIREC
door on the front of thdoor on the fro
onds and then plugginonds and then plugg
k of your receiverk of your receiv
re secure.re secure.
sour
sour

106
DIRECTV® HD DVR RECEIVER USER GUIDE
F
F
R
E
QUEN
T
T
LY
A
A
SKE
D
D
Q
Q
U
U
ESTIONS
Q
Q:
W
W
hy is
m
m
y
scr
e
ee
n
n
b
bl
ue, black,
g
ra
y
y
or s
n
no
o
wy?
Your TV displays a blue, black, gray or snowy screen.
Possible Causes:
Your TV and/or your receiver are not powered on.
The DIRECTV® Receiver and most TVs and VCRs let you toggle between different video sources. Your TV may be on a different
input source than what you are trying to view.
Your TV may not support the selected HD resolution from your receiver.
Solution:
Check that the DIRECTV® Receiver and TV are both powered on.
If you don’t see the your DIRECTV picture, verify the input your TV is on by turning the TV on and off. Most TVs display the input
in the upper right- or left-hand corner. If the input is set to something other than your DIRECTV receiver, toggle through the
inputs with the “input” button on the DIRECTV remote (if programmed) or TV remote until you get your picture. (If the DIRECTV
remote is not working for the TV it may need to be programmed.)
If the TV remote is not available:
1. Find the Input or Source button on your TV and press it. It may be on the front panel, sides, bottom, or top edges of your TV.
2. Slowly set the TV to each input option, one at a time. Sometimes it takes a second or two for the input to switch, so don’t
proceed too quickly.
3. Set the TV to whichever input gives a picture.
If you see a snowy screen and are using a coax connection to connect to the TV, make sure your TV is on channel 3 or 4.
Press the TV/VCR button on the VCR remote or on the VCR’s front panel.
If problems persist, turn off all equipment connected to your TV, wait a few minutes, then turn the DIRECTV® Receiver back on.
Check your connections and cables.
DRAFT
n different n diffe
v
eceiver.eceiv
wered on. ered on
e input your TV is on bt your TV is on b
ut is set to somethingut is set to something
V remote (if programmV remote (if progr
d to be programmed to be programmed
your TV and press it. your TV and press it
n, one at a time. n, one at a tim
re.
re.
107
F
F
REQUENT
L
L
Y
A
A
SKE
D
D
D
QU
E
E
STI
O
O
NS
Check the HD output resolutions and deselect those not supported by your TV. For 1080p programs, some TVs do not
support the 24 frame-per-second rate DIRECTV provides. Press the RES button on your receiver’s front panel to change the
resolution to one your TV supports.
Q
Q:
W
W
hy d
o
oe
sn
’t
m
m
y
re
e
mote
w
w
or
k
k?
Possible Causes:
Weak batteries are almost always the problem.
Trying to operate equipment other than your DIRECTV Receiver?
Remote sensor on the receiver could be blocked.
Solution:
Check that nothing is between the remote control and the remote
sensor.
Make sure the remote control is in DIRECTV mode. Slide the MODE
switch on the remote to the DIRECTV position so the remote will control the DIRECTV® Receiver.
Check the batteries in the remote control. They may be weak, dead
or installed incorrectly. Try replacing batteries.
If you’re entering a channel number that is less than four digits long,
the receiver might wait two seconds before tuning to the channel.
Press ENTER after entering a channel number to tune immediately.
If you are trying to operate a device other than the DIRECTV DVR
that you have programmed the remote to control, make sure you
first slide the MODE switch to the mode that is programmed for that
device (AV1 or AV2). The indicator light for the component you’re
trying to control should light up when you press a valid key for that component. If it doesn’t, make sure the MODE switch is in
the correct position.
POWER
OPEN
GUIDE MENU REC
SELECT
PO
POW
OWE
OWER
WER
WER
R
Remote Sensor
Remote Battery Compartment
CHAPTER 8 - TROUBLESHOOTING & FAQS
DRAF
d the remote remote
mode. Slide the MODEmode. Slide the MOD
on so the remote wilso the remote wil
rol. They may be wearol. They may be
g
g
batteries. bat
at is less than fat is less tha
re tuning re tuning
ber t
ber t
FT
AFT
AFT
AFT
FT
FT
FT
FT
FT
FT
FT
FT
FT
FT
FT
FT
FT
FT
FT
FT
FT
FT
FT
FT
OPEN
F
F
F
F
T
AF

108
DIRECTV® HD DVR RECEIVER USER GUIDE
Make sure the device you are trying to control has been programmed to your DIRECTV Remote Control. See Chapter 6,
“Settings & Help:Settings:Remote Control” for instructions on how to program your remote to control other devices.
If the indicator lights on the remote control start flashing, the batteries in the remote control are running low and should be
replaced soon. You may also see an onscreen message that the batteries are low. Note that when you replace the batteries,
you should not have to reprogram your remote to control other devices unless the batteries have been completely dead for a
month or more.
Q
Q:
W
W
hy w
o
on
n
’t m
y
D
I
R
RE
CTV
®
®
R
ec
c
ei
v
e
r tu
rn
n
o
n?
Your receiver won’t turn on with either the remote or from the front panel.
Possible Causes:
Remote batteries have an insufficient charge.
Receiver or power strip is not plugged in to a power source, or power cord is not plugged in to receiver.
Wall outlet is not providing power.
Solution:
If your receiver won’t turn on, the problem may be with the receiver itself, or with the remote control. Please try the following:
To Check the Receiver:
Verify the detachable power cord is plugged into the back of the DIRECTV® Receiver and the wall outlet.
Check the outlet or power strip to make sure it is “live” by plugging in something else.
Try plugging receiver into a different wall outlet.
Make sure the outlet is not controlled by a wall switch.
Unplug receiver for five minutes, and then plug it in again.
F
F
R
E
QUEN
T
T
LY
A
A
SKE
D
D
Q
Q
U
U
ESTIONS
DRAFT
less
les
ont panel.nt panel.
wer source, or powerwer source, or power
em may be with the rem may be with th
ugged into tugged into
ure
ure

109
If your receiver is plugged into a power strip, check the power strip and reset by pressing its reset button. Make sure
receiver is plugged into a power strip outlet that has continuous power. Some power strips have energy saving ports that
only operate when a device is plug in and powered on.
To Check the Remote:
Press the power button on the front panel. If the receiver turns on, issue is with remote.
Make sure the remote control MODE switch is in the left-most position (DIRECTV Mode), and press PWR (power key) or
press POWER button on the front panel of the receiver.
Make sure remote batteries have sufficient charge. Green light should be solid green when the PWR button on remote is
pressed. If the light blinks several times slowly, replace the batteries. If there is no light, make sure batteries are inserted
with the positive and negative ends in the proper directions. Otherwise replace batteries.
Make sure nothing is blocking the IR sensor on the on the receiver. Remote must be pointed at receiver, unless it is capable
of RF and had been set up as RF.
I see
a
m
es
s
s
sa
ge
o
o
n
m
my
TV
s
c
re
e
en
t
h
ha
t sa
y
ys
s
, “Pleas
e
e
C
Ca
ll C
u
us
to
m
e
r
r
Servic
e
e
x
x7
21.”
W
W
ha
a
t’s
g
go
ing
o
on
n
?
Possible Causes
The channel you’re trying to watch may not be included in your programming package.
Your DIRECTV® Receiver may not have the programming information for this channel.
Solutions
If the channel is part of your programming package, try resetting your receiver by turning it off and unplugging it. Wait 15
seconds, then plug it back in and turn it on.
If the channel is not part of your programming package, you can change your package online or call 1.800.531.5000.
Finally, try reauthorizing your receiver. On a computer, go to directv.com/reauthorize and follow the onscreen instructions. You
will need to be logged into your account on directv.com to complete this process.
F
F
REQUENT
L
L
Y
A
A
SKE
D
D
D
QU
E
E
STI
O
O
NS
CHAPTER 8 - TROUBLESHOOTING & FAQS
DRAFT
with rwith
((
DIRECTV Mo
DIRECT
should be solid green
should be solid gree
atteries. If there is noteries. If th
. Otherwise replace wise
he receiver. Remote receiver. Remot
“Pleas
e
e
C
Ca
ll C
u
us
“Please Call
not be included in yonot be included
ve the programming
ve the programming
packapacka
110
DIRECTV® HD DVR RECEIVER USER GUIDE
Q:
W
W
hy
d
d
o
oe
s
my
y
P
Pr
o
og
ress
B
ar
f
re
e
ez
e wh
il
e acqu
ir
r
in
g
g
gu
id
d
e
da
a
ta
a
/
/
data
fr
r
o
m
sat
e
el
li
te
e
?
While the “Acquiring Guide Data” or “Acquiring Data From Satellite” message is on the screen, progress freezes during download.
Possible Causes:
This may be normal. After five minutes, the screen saver will display.
Press any key on the remote to see the progress bar again.
May happen if your satellite dish isn’t adjusted properly.
Solution:
If satellite data acquisition still does not move forward, press the RESET
button behind the access panel door on the front of the DIRECTV®
Receiver and wait for program guide information to be acquired.
Q
Q:
W
W
hy a
re
e
m
y vi
d
de
o
and
au
u
dio out of syn
c
c
?
The audio track does not match the lip movements on the screen.
Possible Causes:
Problem with how the program was produced or how it was sent to DIRECTV for broadcast.
Your surround sound system may be out of sync, or may be set up incorrectly.
Solution:
Change the channel on your DIRECTV® Receiver. This may re-sync the audio.
Rewind the program for about 5 seconds, then fast forward to live programming.
Try replacing or switching the cables between your surround sound system and your DIRECTV Receiver. Refer to your
surround sound system’s manual for assistance.
F
F
R
E
QUEN
T
T
LY
A
A
SKE
D
D
Q
Q
U
U
ESTIONS
SELECT
ACTIVE INFO RES 480i 480p 720p 1080i
RESET
R
Reset Button
DRAFT
ess the RESET he RES
DIRECTVDIRE
®®
be acquired.acquired.
c
?
c?
ents on the screen.nts on the screen.
s produced or how it s produced or how
e out of sync, ore out of sync,
F
FT
FT
FT
FT
T
T
T
T
T
T
T
T
T
FT
T

111
If the issue continues, reset your DIRECTV Receiver. Press the RESET button behind the access panel door on the front of the
DIRECTV Receiver. You can also press MENU, press SELECT “Settings & Help”, then “Settings”. Select the “Reset” item from
the left menu and follow the onscreen instructions.
Q:
W
hy i
s
there
no
o
a
a
udio
w
w
ith pi
ct
t
ure?
You can see a picture from your DIRECTV® Receiver, but there is no sound.
Possible Causes:
A setting (such as mute or volume) may have changed on the receiver or your TV.
The cables between your TV and the receiver may not be connected properly, or there may be a problem with an external
stereo or surround sound system.
Verify that your surround sound system is working, if applicable.
Your TV may not support the selected HD resolution from your receiver.
Solution:
Verify “MUTE” button not activated.
Raise or lower the volume. Did volume meter display on TV?
Test sound on TV by changing the input to another source, such as a DVD player, game box, or antenna.
If connected to stereo or surround sound system, verify components are on and set to the correct mode, and that audio
cables are secure and connected correctly.
If the issue continues, reset your DIRECTV® Receiver. Press the RESET button behind the access panel door on the front of
the DIRECTV® Receiver. You can also press MENU, select “Settings & Help”, then ““Settings”. Select the “Reset” item from
the left menu and follow the onscreen instructions.
Check the HD output resolutions and deselect those not supported by your TV. For 1080p programs, some TVs do not support
the 24 frame-per-second rate DIRECTV provides. Also, many TVs do not support 480i. You may have to press the RES button
on your receiver’s front panel to set the resolution to one your TV supports.
F
F
REQUENT
L
L
Y
A
A
SKE
D
D
D
QU
E
E
STI
O
O
NS
CHAPTER 8 - TROUBLESHOOTING & FAQS
iver or your TV.iver or your TV.
ected properly, or thected prope
pplicable.licable.
from your receiver.our receiver.
meter display on TVmeter display on
put to another sourc
put to another sourc
d system, ved system, v
yy

112
DIRECTV® HD DVR RECEIVER USER GUIDE
Q
Q:
W
Wh
at t
o
o
d
do
a
bo
o
u
t
partial pr
og
g
ra
m
mm
ing
lo
o
ss; ch
a
n
ne
e
ls m
i
is
si
n
g
f
ro
o
m Gu
id
d
e
e;
cha
nn
n
el
i
i
s in
t
he G
u
i
d
de
but I
ca
a
n’t tu
n
ne
e
to it
?
?
Your Program Guide is missing channels, or you are unable to use the guide to tune to a channel.
Possible Causes:
The channels might be excluded from the Favorites list currently in use.
Your satellite dish may be incorrectly configured.
Your receiver information may need to be refreshed.
Solution:
To change your Favorites List, press GUIDE on the remote, then press the YELLOW button and select “Change Favorites List”,
then “All Channels”.
Enter the channel number using the number pad on the remote control.
Check the dish type set in your receiver’s preferences: Press MENU, select “Settings & Help”, “Settings”, “Info & Test”, then
“More System Info”. Check the Satellite Dish Type shown on the System Setup screen to see if it is correct. If not, select
“Satellite” from the left menu, then select “Repeat Satellite Setup”. Follow the steps. From the Satellite Dish Type screen,
make sure the proper dish type is selected.
To refresh your receiver information, go to directv.com/reauthorize. You will need to be logged into your account on
directv.com to begin this process.
F
F
R
E
QUEN
T
T
LY
A
A
SKE
D
D
Q
Q
U
U
ESTIONS
DRAFT
e. e.
mote, then press the ote, then press th
ad on the ad on th
remote conmo
preferences: Press Mreferences: Press M
Dish Type shown onDish Type shown on
select “Repeat select “Repeat
SatellSa
selected.
sele
go to directvgo to direct

113
Q
Q:
W
W
hy d
o
oe
s
my
D
D
IR
R
E
EC
TV®
R
ec
e
ei
ve
e
r turn
o
o
ff while
p
la
a
yi
ng
?
Your receiver turns off unexpectedly.
Possible Causes:
Excessive heat may have caused the receiver to go into a standby state.
Electronic protection circuit may have been activated due to a power surge.
You may have blown a circuit breaker or be experiencing a power outage.
Parental viewing limits may have been activated on your DIRECTV® Receiver.
Solution:
Ensure that your receiver has plenty of ventilation and that nothing is on top of the receiver.
Wait 30 seconds for internal circuits to reset, then turn receiver back on.
Consider using a line conditioner or surge protector.
Consult an electrician if the problem is frequent or severe, especially if other household appliances or electronics are affected.
If parental limits are active, turn your DIRECTV® Receiver back on and enter your parental lock code at the prompt.
Q
Q:
W
W
hy d
o
oe
s
my
D
D
IR
R
E
EC
TV
D
D
VR
t
ur
n
n
on o
r
r
c
ch
ange
c
ha
a
nnels
un
n
ex
x
p
e
cted
ly
?
Your receiver changes to a different channel without a remote control command.
Possible Causes:
A scheduled recording may be about to begin, so the receiver is changing channels to record the show as requested.
Your TV’s timer may have been activated.
F
F
REQUENT
L
L
Y
A
A
SKE
D
D
D
QU
E
E
STI
O
O
NS
CHAPTER 8 - TROUBLESHOOTING & FAQS
DRAFT
rge. rge.
tage.tage
VV
®®
Receiver. Recei
hat nothing is on top at nothing is on to
urn receiver back oneiver back on
ctor.ctor.
uent or severe, especnt or severe, espec
IRECTVIRECTV
®
Receiver ba Recei
on o
r
r
c
ch
an on or
c
h
a
houthout

114
DIRECTV® HD DVR RECEIVER USER GUIDE
Solution:
Check your To Do List to see if there are other scheduled recordings. Press MENU, select “Recordings”, then “Manage
Recordings”, then “To Do list”.
Check your TV owner’s manual to turn off the TV’s timer.
Q
Q:
W
W
hy is
m
m
y
scr
e
ee
n
n
b
bl
ank?
There is no discernible video or image or the screen. Screen could be black, blue, grey or seem like TV is not on.
Possible Causes:
Your TV and/or your receiver are not powered on.
Your receiver may be hooked up to the TV incorrectly.
You may be on the wrong video source for your DIRECTV® Receiver.
You may be tuned to a channel that is not currently broadcasting, or that you don’t subscribe to.
Solution:
Check that DIRECTV DVR and TV are both powered on.
Read Appendix 2, “Connections to TV and Equipment” for instructions about connecting your receiver.
Press the INPUT button on the TV remote control to change video source.
Try another channel and see if you have live video.
Press the POWER button on the front panel of the DIRECTV® Receiver.
Press the red RESET button behind the door on the front panel of the receiver.
The program may have been blocked by Parental Locks.
F
F
R
E
QUEN
T
T
LY
A
A
SKE
D
D
Q
Q
U
U
ESTIONS
DRAFT
lack, blue, grey or
lack, blue, g
ECTV
®®
Receiver. Receiver.
ntly broadcasting, orntly broadcastin
both powered on.both powered o
TV and Equipment” f
TV and Equipment”
mote control tmote contro
live vidlive vid

115
Q
Q:
W
W
hy is
C
Ca
a
ller I
D
D
n
no
o
t wo
rk
k
in
g?
?
Caller ID information isn’t showing on your TV screen when phone calls come in.
Possible Causes:
You don’t subscribe to Caller ID service through your local phone company.
The Caller ID feature in your DIRECTV® Receiver is turned off. See “Caller ID” in Chapter 5.
You are using a wireless phone jack, which usually will not transmit Caller ID information.
Solution:
Contact your local phone company to subscribe to Caller ID service.
Turn on Caller ID notification. Press MENU, select “Caller ID” and then select “Turn On Notices”. (In some locations, you
must press MENU, select “Extras”, then “Caller ID”, then “Turn On Notices”.
Verify that your wireless phone jack transmits Caller ID information. If not, connect a standard phone cable to your receiver
or replace your wireless phone jack.
Q
Q:
W
W
hy d
id
d
n
n’
t a
p
r
o
g
r
ra
m I
tr
r
ied to r
e
ec
ord
s
s
h
ow up in
t
t
he
M
My
Pl
l
ay
y
li
s
st
scr
ee
e
n?
?
You wanted to record a program to watch later, but it is not listed in your Playlist.
Possible Causes:
Someone else may have prevented the recording or erased the program after it recorded.
The recording may have been cancelled due to a conflict with another program with higher priority in the Prioritizer.
The program may have been blocked by Parental Locks.
You may have deleted a Series recording. If you delete a Series by pressing RECORD on an episode in the Guide, you cancel
the entire series, not just the highlighted episode.
F
F
REQUENT
L
L
Y
A
A
SKE
D
D
D
QU
E
E
STI
O
O
NS
CHAPTER 8 - TROUBLESHOOTING & FAQS
DRAFT
er ID” in Chaer ID”
Caller ID informati
Caller ID infor
D service.D service.
ller ID” and then seleID” and then sel
then “Turn On NoticTurn On Notic
aller ID information. aller ID informa
r
e
ec
ord
s
s
h
ow up record sh
o
up
ater, but it is noater, but it is

116
DIRECTV® HD DVR RECEIVER USER GUIDE
Solution:
To see if the program was recorded then deleted, press MENU, select “Recordings”, then “Manage Recordings”, then in the
left menu, select “History”.
If the recording was cancelled due to a scheduling conflict, you will need to record the program again and if necessary you
will need to adjust the programming priority. See the “Manage Recordings: Series Manager” section in Chapter 4 for details.
Check the Parental Locks on your receiver and TV. Adjust the content ratings, if necessary.
Q
Q:
I
w
wa
nt
ed
d
t
o re
c
co
r
rd
a
pro
g
gr
am
, but I got
a
an
record.
W
Wh
at
d
d
o
I
d
do
?
Your DIRECTV DVR can record up to two programs at once, or it can record one program while you watch another live program.
Possible Causes:
You tried to record three programs at the same time or tried to watch a live program while recording two others at the same time.
There was an overlap in the programs you tried to record.
Solution:
If you tried to record three programs at once, or watch a live TV program with two others recording, you will need to decide
which recording to cancel.
If the overlap is a couple of minutes (for example, some networks occasionally start programs at 8:59 instead of 9:00 p.m.),
adjust your recording start and end time Recording Options. See the “Changing a Record Option” section in Chapter 4.
Someone else manually deleted the program.
The hard drive on your DVR is full. The program may not have recorded.
F
F
R
E
QUEN
T
T
LY
A
A
SKE
D
D
Q
Q
U
U
ESTIONS
DRAFT
gs: gs:
SerS
t ratings, if nec
t ratings
or it can record one por it can record
time or tried to watchtime or tried to
tried to record.ried to record.
ms at once, or watch
ms at once, or watch
examplexampl
ec
ec

117
Q
Q:
I
r
e
co
rd
ed
d
a p
r
ro
g
gr
a
am
a
nd
d
t
he
e
r
ec
c
ordi
ng
g
g
ot cut
o
ff
f
just be
fo
o
re
e
t
t
he end
s
o
o
I mi
ss
s
ed
t
he
l
ast bi
t
t
o
of
the
pr
r
ogra
m
m.
W
hy
?
?
Your recording stopped before the program or event ended.
Possible Causes:
The program you were trying to record may have started or ended early.
If you were trying to record a sporting event, the event may have run over its allotted time.
You may have had a recording conflict with a higher priority program.
Someone may have manually ended the recording.
Solution:
Try setting the end time of the recording in the Record Options so the recording ends one or two minutes later (or more, if
necessary). You may be able to record the same program again later in the week. Check the Program Guide for additional
showings.
For sporting events, you may want to extend the recording stop time 15 minutes or more to protect against overtime games.
If you had a priority conflict, try adjusting your start and end times. You may need to choose a different time slot to record a
program if the conflict continues.
Q
Q:
W
W
hy w
a
as
a
p
ro
o
gr
r
a
m
I r
ec
c
or
de
e
d
d
i
spla
ye
e
d
d
in the
My
y
Pl
ay
y
list
s
s
c
r
e
ee
n, but
d
eleted
b
ef
f
ore
I
I
coul
d
w
wa
tch it?
Your recording(s) were deleted before you had a chance to view them.
Possible Causes:
Someone else manually deleted the program.
The hard drive on your DVR is full. The program may not have recorded.
The receiver may have deleted older recordings to make room for newer ones.
F
F
REQUENT
L
L
Y
A
A
SKE
D
D
D
QU
E
E
STI
O
O
NS
CHAPTER 8 - TROUBLESHOOTING & FAQS
DRAFT
over its allotted tim
over its allot
ram.ram.
rd Options so the recons so the re
program again later iprogram again l
nd the recording stope recording stop
ng your start and endng your start and
spla
ye
e
d
d
in splaye
d
in
a chana chan

118
DIRECTV® HD DVR RECEIVER USER GUIDE
You exceeded the allotted purchase or viewing time on a Pay Per View movie or event.
Bad weather may have caused a loss in signal. Your receiver will automatically delete these incomplete programs.
Solution:
Delete some of the content on your DVR to make room for new recordings.
Change your recording options to keep programs until you delete them manually. See “Recording a Single Show” or
“Recording a Series” in Chapter 4 for details.
You can also change a recording you’ve already made to “Keep Until I Delete”. See “Managing My Playlist” in Chapter 4.
To avoid this in the future, you can change settings for recordings that you’ve set to occur in the future, but haven’t recorded
yet. Press MENU, select “Recordings”, then “Manage Recordings”, then “To Do List”, choose the show you want to change and
select it, select RECORD, press SELECT on “Keep…”, press SELECT on the “Keep Until” box to change it to “I Delete”, use the
ARROW button to move over to Update and press SELECT.
If you recorded a DIRECTV CINEMA movie or Pay Per View event, but did not watch it, the time which you are allowed to
purchase or watch it may have expired. To avoid this in the future, check your Pay Per View recordings in the My Playlist
screen for expiration dates.
Q
Q:
I
’v
v
e set
up
p
a s
e
r
ie
e
s reco
rd
d
ing.
W
h
y
do I
g
ge
t a bu
n
nc
h
h
of r
e
er
un
s
s
a
an
d mult
ip
p
le
e
cop
ie
e
s
o
f
t
he
e
same
p
pr
ogram?
Your DVR is getting full of duplicate recordings of the same program, or old episodes of the chosen show.
Possible Causes:
Your series is set to record both First Run and Repeat episodes.
The programmer may not provide enough details in the program description for your receiver to determine whether the
program is a repeat.
Solution:
When you set up a series, make sure you select only the “First Run” option. This is the default for one-touch recording unless
you have changed your default recording settings.
F
F
R
E
QUEN
T
T
LY
A
A
SKE
D
D
Q
Q
U
U
ESTIONS
DRAFT
..
m manually. m man
Until I Delete”. See “M
Until I Delete”. See
rdings that you’ve setings that y
cordings”, then “gs”, th
To D
press SELECT on the ress SELECT on
ELECT.CT.
ay Per View event, buay Per View even
oid this in the future,oid this in the futu
W
h
y
do I
g
ge
t a buWhy do I
g
e
t a
cordings of the samcordings of the
an
an
119
Q
Q:
W
Wh
y ca
n
I not
s
se
e
DIRE
C
T
V
m
me
n
u
s an
d
d
s
sc
reens on
m
y
TV
V
?
O
O
R
R
W
Wh
y
do
o
I
s
ee
a
m
m
e
es
sage
t
t
hat sa
y
s
, “Thi
s
s
TV or
it
t
s
c
a
bl
es
s
ar
e
not
H
D
. To
s
e
ee
e
scree
n
n
gr
a
ap
hi
c
cs
, pr
e
es
s
s the
RE
E
S
k
ke
y
on
n
the
f
f
ro
o
nt of
th
h
e receiver u
n
nt
il
t
t
his
me
e
s
ss
age
no
o
l
o
on
ge
r
r
ap
p
pear
s
s”
.
.
When the receiver resolution is set to 720p, 1080i, or 1080p, DIRECTV
screens and menus (“user interface”) will not appear on Standard
Definition (SD) outputs. A message is displayed to notify you that the
resolution setting needs to be changed.
Possible Causes:
You have connected your receiver to your TV using both a High Definition output (HDMI) and Standard Definition (SD) outputs
(S-Video, Component (Red/Yellow/White), or Coaxial) on the same receiver.
You are using SD outputs (S-Video, Component (Red/Yellow/White), or Coaxial) and have the receiver set to HD resolutions
such as, 720p, 1080i or 1080p.
Solutions:
Change the receiver resolution to 480i or 480p by pressing the RES button on the front receiver panel until 480i or 480p is selected.
Uncheck all resolutions except 480i or 480p on the TV Resolutions menu. Press MENU, select “Settings”, “HDTV” and then
“TV Resolutions”. Follow the onscreen instructions.
Turn “Native” Off. Press MENU, select “Settings”, “HDTV”, “Video”, then “Native”, and follow the onscreen instructions.
F
F
REQUENT
L
L
Y
A
A
SKE
D
D
D
QU
E
E
STI
O
O
NS
SD Video Outputs
HD Video Outputs
CHAPTER 8 - TROUBLESHOOTING & FAQS
DRAFT
the e
both a High Definitioboth a High Definitio
axial) on the same reaxial) on the sam
ent (Red/Yellow/Whitnt (Red/Yellow/Whit
r 480p by pressir 480p by pres
0p on the0p on the
uct
uct
T
S
S
T
FT
T

120
DIRECTV® HD DVR RECEIVER USER GUIDE
DRAFT

121
C
C
H
H
A
P
P
T
E
E
R
R
9
9
: W
A
A
R
R
R
AN
T
T
Y
A
A
N
N
D
D
O
O
T
H
H
ER I
N
N
FO
L
i
m
mi
ted
9
90
0
-D
ay
y
Wa
a
r
rr
r
an
ty
y
....
.
.
......
.
.
.
......
..
.
....
.
.
..
.
......
.
.
..
.
..
..
..
.
.122
W
Wh
h
o is
c
c
o
ov
er
e
d
? ....
..
..
........
.
..
....
.
..
........
.
..
......
..
.
.
.
....
..
.
.
........
..
......
..
.
...122
W
Wh
h
at is
C
Co
ve
re
e
d? ..
..
..
........
.
..
....
.
..
........
.
..
......
..
.
.
.
....
..
.
.
........
..
......
..
.
...122
W
Wh
h
at is
E
Ex
cl
ud
d
ed?
.
.
.
.
......
.
.
..
.
....
..
.
........
.
.
.
........
.
..
....
.
.
..
..
......
.
.
..
.
.
....
.
..
..123
M
Ma
a
ke S
u
ur
r
e Yo
u
u
Ke
e
ep
p
.
.
. ......
.
..
....
.
..
........
.
..
......
..
.
.
.
....
..
.
.
........
..
......
..
.
...124
B
Be
fore
R
R
eque
s
st
in
g
R
Re
e
pa
ir
r
S
S
er
v
vi
ce...
.
..
......
..
.
.
....
..
.
.
........
..
...........124
T
To
G
et
W
W
a
ar
ra
n
nt
y
Se
e
r
rv
v
ice.
..
.
.
..
....
.
..
........
.
..
......
..
.
.
.
....
..
.
.
........
..
......
..
.
...125
T
To
G
et
O
O
u
ut
-o
f-
-
Wa
r
r
a
an
n
ty S
e
er
r
vi
ce
e
... ....
.
..
......
..
.
.
.
....
..
.
.
........
..
......
..
.
...125
D
I
R
RE
E
CTV
P
PR
OT
T
EC
T
TI
I
O
ON
P
P
LA
A
N ......
.
.
.
......
..
.
....
.
.
..
.
......
.
.
..
.
..
..
..
.
.
FC
C
C
C Cu
st
o
om
er
r
Inf
o
or
r
m
ma
ti
on
n
..........
.
..
......
.
..
.
....
..
.
..
......
..
..
.
....
.
..
T
E
RM
M
S
A
AN
N
D
C
O
ND
D
I
T
T
IO
N
S
F
O
R
U
SE
E
E
OF
S
S
SO
F
FT
W
WA
R
E
(
“
“T
T
E
ER
MS
S
”
”)
..
.
.
....
..
.
.
.
.
.
....
..
.
......
.
.
......
.
.
.
......
..
.
....
.
.
..
.
......
.
.
..
.
..
..
..
.
.
CHAPTER 9 - WARRANTY AND OTHER INFORMATION
DRAFT
2
5
..
.
.
12
1
2
2
66
.
..
.
....
.
..
12
1
2
2
88
WA
R
E
WARE
..
.
......
.
.
..
.
..
..
..
.
..................
129
1
2
2
9

122
DIRECTV® HD DVR RECEIVER USER GUIDE
L
L
I
M
M
ITE
D
D
9
0
0
-D
A
A
Y
Y
W
A
A
R
R
A
A
NTY
DIRECTV warrants your DIRECTV HD DVR (Model Number: HR20, HR21, HR22, HR23, HR24) or Advanced Whole-Home HD DVR
(Model Numbers: HR34, HR44 and above) and any included accessories against defects in material or workmanship for a period of
ninety (90) days after the date of acquisition.
WHO IS COVERED?
You must have proof of acquisition to receive warranty service. A receipt or other document showing that you acquired the product
is considered proof of acquisition. THIS LIMITED WARRANTY EXTENDS ONLY TO THE ORIGINAL CONSUMER ACQUIRER OR ANY
PERSON RECEIVING THE DIRECTV HD DVR AS A GIFT FROM THE ORIGINAL CONSUMER ACQUIRER AND TO NO OTHER ACQUIRER
OR TRANSFEREE. THIS WARRANTY DOES NOT EXTEND TO COMMERCIAL USERS. THIS PRODUCT IS NOT AUTHORIZED FOR USE
OUTSIDE THE UNITED STATES AND ANY SUCH USE VOIDS THIS WARRANTY.
WHAT IS COVERED?
Warranty coverage begins the day you acquire the product. For ninety (90) days from the acquisition date, at the option of DIRECTV,
the DIRECTV HD DVR will be repaired or replaced with a new, repaired, refurbished or comparable product (whichever is deemed
necessary) if it becomes defective or inoperative. This exchange is done without charge to you for parts and labor. You will be
responsible for the cost of shipping to and from the location designated by DIRECTV. If DIRECTV cannot reasonably repair or replace
the Receiver then DIRECTV may, at its sole discretion, refund the price you paid for the product or the current retail price of the
product.
All products, including replacement products, are covered only for the original warranty period. When the warranty on the original
product expires, the warranty on the replacement product also expires. After ninety (90) days from the date of acquisition, you pay
for the replacement of all parts, and for all labor charges.
SOME STATES DO NOT ALLOW LIMITATIONS ON HOW LONG AN IMPLIED WARRANTY LASTS, SO THE ABOVE LIMITATION MAY NOT
APPLY TO YOU.
DRAFT
eipt or other docume
eipt or other docum
ENDS ONLY TO THE OENDS ONLY TO THE O
HE ORIGINAL CONSUORIGINA
COMMERCIAL USERSCOMMERCIAL
S THIS WARRANTY.THIS WARRANTY
quire the product. Foquire the product
or replaced with a ne
or replaced with a ne
operative. This exoperative. This
from the lofrom the lo
scretiscreti

123
L
L
IMITE
D
D
9
0
0
-DA
Y
Y
Y
WA
R
R
RA
N
N
TY
WHAT IS EXCLUDED?
Your warranty does NOT cover:
Labor charges for installation or setup of the product.
Installation, performance of, or repair of: audio/video cabling, telephone line, or accessory attachments used with the product.
Product replacement because of misuse, accident, lightning damage, unauthorized repair, or other cause not within the control
of DIRECTV. Incidental or consequential damages resulting from the product. SOME STATES DO NOT ALLOW THE EXCLUSION
OF INCIDENTAL OR CONSEQUENTIAL DAMAGES, SO THE ABOVE EXCLUSION MAY NOT APPLY TO YOU. Any modifications or
other changes to the product, including but not limited to software or hardware modification in any way other than as expressly
authorized by DIRECTV will void this limited warranty. Except in the case of hardware or software provided by DIRECTV, installing
software modifications, “hacks” or utilizing service access or “back doors” will void this limited warranty.
Reception transmission problems caused by signal conditions, telephone line, or cable or antenna systems outside the unit. A
product that has been modified or adapted to enable it to operate in any country other than the country for which it was designed,
manufactured, approved and/or authorized, or repair of products damaged by these modifications. A product used for commercial
or institutional purposes.
DIRECTV makes no warranty that the access connection will be a local (not long distance) phone call.
The continued provisioning of any of the programming and other services delivered through the Receiver including but not limited
to television programming, show information, program guide data, and scheduling information.
MAKE SURE YOU KEEP...
Please keep your receipt or other document showing proof of acquisition. Attach it to this User Guide (see page 10) and keep both
nearby. Also keep the original box and packing material in case you need to return your product.
BEFORE REQUESTING REPAIR SERVICE...
Please check the troubleshooting section of this guide. This may save you a call to DIRECTV Customer Care.
CHAPTER 9 - WARRANTY AND OTHER INFORMATION
DRAFT
accesacce
orized repaorized
ct. SOME STATES
ct. SOME S
USION MAY NOT APP
USION MAY NOT
r hardware modificati
r hardware modificat
e case of hardware orcase of har
ack doors” will void tors” w
ns, telephone line, or telephone line, o
operate in any countte in any count
of products damaged of products dam
nnection will be a locection will be a loc
ramming and other sramming and
ion, ion,
program guide dprogram guide
i
i

124
DIRECTV® HD DVR RECEIVER USER GUIDE
TO GET WARRANTY SERVICE...
Warranty service will be provided by DIRECTV. If you believe you need service for your Receiver, contact DIRECTV at 1-800-DIRECTV.
A representative will go through a diagnostic checklist with you. If it is determined that the product needs to be returned for service
or exchanged, you will receive a return authorization number. The representative will give you complete shipping details.
TO GET OUT-OF-WARRANTY SERVICE...
To obtain out-of-warranty service contact DIRECTV at 1-800-DIRECTV for information on the possibility of and any costs for repair or
replacement of out-of-warranty products.
ALL WARRANTIES IMPLIED BY LAW, INCLUDING ANY IMPLIED WARRANTIES OF MERCHANTABILITY AND FITNESS FOR A
PARTICULAR PURPOSE ARE EXPRESSLY LIMITED TO THE DURATION OF THIS EXPRESS LIMITED WARRANTY.
WITH THE EXCEPTION OF ANY WARRANTIES IMPLIED BY THE LAW OF ANY STATE OF THE U.S.A., THIS EXPRESS LIMITED
WARRANTY IS EXCLUSIVE AND IN LIEU OF ALL OTHER WARRANTIES, GUARANTEES, AGREEMENTS AND SIMILAR OBLIGATIONS
OF DIRECTV. REPAIR OR REPLACEMENT AS PROVIDED IN THIS LIMITED WARRANTY IS THE EXCLUSIVE REMEDY UNDER THIS
LIMITED WARRANTY. IN NO EVENT WILL DIRECTV BE LIABLE FOR ANY AMOUNT GREATER THAN THE RETAIL PRICE OF THE
DIRECTV® Receiver. DIRECTV SHALL NOT BE LIABLE FOR ANY INCIDENTAL OR CONSEQUENTIAL DAMAGES FOR BREACH OF ANY
EXPRESS OR IMPLIED WARRANTY ON THE DIRECTV® Receiver.
SOME STATES DO NOT ALLOW LIMITATIONS ON WARRANTIES, SO THE ABOVE LIMITATIONS MAY NOT APPLY TO YOU. THIS
WARRANTY GIVES YOU SPECIFIC LEGAL RIGHTS. YOU MAY HAVE OTHER RIGHTS WHICH VARY FROM STATE TO STATE.
DIRECTV
2230 E. Imperial Hwy
El Segundo, CA 90245
1-800-DIRECTV
L
L
I
M
M
ITE
D
D
9
0
0
-D
A
A
Y
Y
W
A
A
R
R
A
A
NTY
ive wilive w
IRECTV for informatioTV for in
MPLIED WARRANTIEED WARRANTIE
O THE DURATION OF THE DURATION OF
PLIED BY THE LAW OPLIED BY THE LAW
L OTHER WARRANTIOTHER WARRANT
S PROVIDED IN THIS VIDED IN THIS
DIRECTV BE LIABLEDIRECTV BE LIA
NOT BE LIABLE FOR A
NOT BE LIABLE FOR
THE DIRECTVTHE DIRECTV
®®
R
S ON WAS ON WA
HTS.
HTS.

125
Safeguard your DIRECTV® System with the ultimate in professional technical service. For a low monthly fee, the DIRECTV
PROTECTION PLAN covers the components of your entire DIRECTV® System, giving you affordable peace of mind and
comprehensive support to ensure that you and your family enjoy nonstop DIRECTV® entertainment.
"
#
$
Your DIRECTV Limited Warranty provides certain remedies for this receiver during the stated coverage term. The DIRECTV
PROTECTION PLAN provides comprehensive coverage for your DIRECTV® System, including:
All this — for one low monthly fee — covers every DIRECTV component and receiver on your account.
Si
g
gn
up
t
to
o
day
fo
o
r
th
h
e DI
RE
E
CT
V
V
PR
R
OT
EC
C
T
TI
ON P
LA
A
N
by
c
c
alli
n
ng
1
-8
8
00-D
IR
R
E
EC
TV
The DIRECTV PROTECTION PLAN is offered by AIG Warranty Guard and underwritten by New Hampshire Insurance Company
on behalf of DIRECTV where authorized by law. Certain limitations may apply. Pricing, terms and conditions of the DIRECTV
PROTECTION PLAN are subject to change. Full terms and conditions will be mailed to you prior to service billing and are available
at directv.com/protection.
D
D
IRE
C
C
T
T
V
P
P
ROT
E
E
E
CTION P
L
L
AN
Professional In-home service calls when needed Dedicated Technical Support 24-hour a day
Power surge related repairs including those caused by
lightning Unlimited dish antenna alignments
Cables, switches and associated wiring throughout
your home
Replacement of defective receiver equipment
(if problem can not be resolved over the phone)
Defective remote control replacements All parts and labor for repair
CHAPTER 9 - WARRANTY AND OTHER INFORMATION
D
hly fee — chly fee — c
DRAFT
DRAF
AF
RA
RA
RA
RA
DR
R
R
FT
T
ing the sing th
stem, includin
stem, in
icated Technical Sup
Unlimited dish
hout
Rep
(if pr
ts

126
DIRECTV® HD DVR RECEIVER USER GUIDE
This device complies with Part 15 of the FCC Rules. Operation is subject to the following two conditions: (1) this device may not cause
harmful interference, and (2) this device must accept any interference received, including interference that may cause undesired operation.
Responsible Party:
DIRECTV
2230 E. Imperial Hwy
El Segundo, CA 90245
1-800-DIRECTV
IgVYZCVbZ/9>G:8IK
IneZd[:fj^ebZci/9>G:8IKHViZaa^iZGZXZ^kZg
Model Number: HR34, HR42, HR44, C31, C41, C41W and above
Federal Communications Commission (FCC): This equipment complies with both Part 15 and Part 68 of the FCC rules.
This equipment has been tested and found to comply with the limits of a Class B digital device, pursuant to part 15 of the FCC Rules.
These limits are designed to provide reasonable protection against harmful interference in a residential installation.
This equipment generates, uses, and can radiate radio frequency energy and, if not installed and used in accordance with the
instructions, may cause harmful interference to radio communications. However there is no guarantee that interference will not
occur in a particular installation. If this equipment does cause harmful interference to radio or television reception, which can be
determined by removing and applying power to the equipment, the user is encouraged to try to correct the interference by one or
more of the following measures:
GZdg^ZcidggZadXViZi]ZgZXZ^k^c\satellite dish antenna.
>cXgZVhZi]ZhZeVgVi^dcWZilZZci]ZZfj^ebZciVcYi]Z9>G:8IKGZXZ^kZg#
8dccZXii]ZZfj^ebZci^cidVcdjiaZidcVX^gXj^iY^[[ZgZci[gdbi]Viidl]^X]i]Z9>G:8IKGZXZ^kZg^hXdccZXiZY#
8dchjaii]ZYZVaZgdgVcZmeZg^ZcXZYgVY^d$IKiZX]c^X^Vc[dg]Zae#
F
F
C
C
C
U
U
S
T
O
O
M
E
E
R
R
INF
O
O
R
R
M
M
ATI
O
O
N
DRAFT
equipment complies wequipment comp
omply with the limits mply with the limits
able protection againable protection again
n radiate radio frequen radiate radio freq
erence to radio com
erence to radio com
quipment doesquipment do
r to the er to the e
Model Number: HR34, HR42, HR44, C31, C41, C41W and
AF
and aboveabove

127
86JI>DC/8]Vc\ZhdgbdY^ÃXVi^dchcdiZmegZhhanVeegdkZYWni]ZbVcj[VXijgZggZhedch^WaZ[dgXdbea^VcXZXdjaYkd^Yi]Z
user’s authority to operate the equipment.
The user may find the following booklet, prepared by the Federal communications Commission, helpful: “How to Identify and
Resolve Radio and TV Interference Problems”. This booklet is available from the U.S. Government Printing Office, Washington,
DC. To meet FCC requirements, only peripherals (computer input/output devices, terminals, printers, etc.) certified to comply with
Class B limits may be attached to this device. Operation with non-certified peripherals is likely to result in interference to radio and
TV reception. To meet FCC requirements, shielded cables are required to connect the device to a personal computer, peripheral, or
other Class B certified device.
This equipment complies with Part 68 of the FCC Rules and the requirements adopted by ACTA. On the back of this equipment is a
label that contains a product identifier in the format US:AAAEQ##TXXXX.
If requested, this information must be provided to your telephone company. This equipment uses the following USOC Jack: RJ11C.
A plug and jack used to connect this equipment to the premises’ wiring and telephone network must comply with the applicable
FCC Part 68 rules and requirements adopted by ACTA. A compliant telephone cord and modular plug is provided with this product.
It is designed to be connected to a compatible modular jack that is also compliant.
See installation instructions for details.
The REN (Ringer Equivalence Number) is used to determine the number of devices that may connect to a telephone line. Excessive
RENs on a telephone line may result in the devices not ringing in response to an incoming call. In most but not all areas, the sum
of the RENs should not exceed five (5.0).
To be certain of the number of devices that may be connected to a line, as determined by the total RENs, contact your local
telephone company. The REN for this product is part of the product identifier that has the format US: AAAEQ##TXXXX. The digits
represented by ## are the REN without the decimal point (e.g., 03 is a REN of 0.3).
If this DIRECTV® Receiver causes harm to the telephone network, the telephone company will notify you in advance that temporary
discontinuance of service may be required. But if advance notice isn’t practical, the telephone company will notify the customer as
soon as possible. Also, you will be advised of your right to file a complaint with the FCC if you believe it is necessary.
The telephone company may make changes in its facilities, equipment, operations or procedures that could affect the proper
functioning of your equipment. If they do, you will be notified in advance in order for you to make necessary modifications to
F
F
C
C
C
C
C
U
U
S
T
T
O
M
M
ER I
N
N
N
FOR
M
M
AT
I
I
ON
CHAPTER 9 - WARRANTY AND OTHER INFORMATION
DRAFT
ter
ter
ipherals iipher
nnect the devic
nnect the
rements adopted by A
rements adopted by
TXXXX. XXX.
one company. This equone company. T
ises’ wiring and telepes’ wiring and tele
compliant telephone ant telephone
r jack that is also comr jack that is als
d to determine the nuto determine the nu
devices not ringing indevices not ringi
may be connecmay be conn
is part of is part of
mal
mal

128
DIRECTV® HD DVR RECEIVER USER GUIDE
maintain uninterrupted service. Connection to party line service is subject to state tariffs. Contact the state public utility commission,
public service commission or corporation commission for information.
If trouble is experienced with this unit, for repair or warranty information, please contact DIRECTV Customer Care at the address
and phone number listed below. If the equipment is causing harm to the network, the telephone company may request that you
disconnect the equipment until the problem is resolved.
DIRECTV
2230 E. Imperial Hwy
El Segundo, CA 90245
1-800-DIRECTV
If your home has specially wired alarm equipment connected to the telephone line, ensure the installation of this DIRECTV Satellite
Receiver does not disable your alarm equipment. If you have questions about what will disable alarm equipment, consult your alarm
company, telephone company or a qualified installer.
DO NOT DISASSEMBLE THIS EQUIPMENT. It does not contain any user-serviceable components.
We recommend the installation of an AC surge arrester in the AC outlet to which this equipment is connected. Telephone companies
report that electrical surges, typically lightning transients, are very destructive to customer terminal equipment connected to AC
power sources.
FCC RF Radiation Exposure Statement
MPE/SAR/RF Exposure Information. This equipment complies with FCC RF radiation exposure limits set forth for an uncontrolled
environment.
This equipment was verified for RF exposure and found to comply with Council Recommendation 1999/519/EC and FCC OET-65 RF
exposure requirements.
WARNING: While this equipment is in operation, a separation distance of at least 20 centimeters (equal to 8 inches) must be
maintained between the antenna inside the equipment and the bodies of all persons exposed to the antenna in order to meet
the FCC RF exposure guidelines. Making changes to the antenna or the equipment is not permitted. Doing so may result in the
equipment exceeding the FCC RF exposure guidelines. This equipment must not be co-located or operated in conjunction with any
other antenna or radio transmitter.
F
F
C
C
C
U
U
S
T
O
O
M
E
E
R
R
INF
O
O
R
R
M
M
ATI
O
O
N
DRAFT
o the telephone line, e telepho
e questions about whae questions abo
ot contain any user-sot contain any u
arrester in the AC outarrester in the AC o
ng transients, are veryransients, are very
FCC RF Radiation Exposure Statement
D
t
t
t complies with FCC RF radiation exposure limits set forth for an uncontrolled
MPE/SAR/RF Exposure Information. This equ
D
equipment cequipment c
environment.
This equipment was verified for RF exposure and found to comply with Council Recommendation 1999/519/EC and FCC OET-65 RF
D
d
d
qp
ex
p
osure re
q
uirements.
WARNIN
G:
While this e
q
ui
p
ment is in o
p
eration, a se
p
aration distance of at least 20 centimeters (e
q
ual to 8 inches) must be
qp p p q
maintained between the antenna inside the e
q
ui
p
ment and the bodies of all
p
ersons ex
p
osed to the antenna in order to meet
qp p p
the FCC RF ex
p
osure
g
uidelines. Makin
g
chan
g
es to the antenna or the e
q
ui
p
ment is not
p
ermitted. Doin
g
so may result in the
pg gg qp p g
equipment exceeding the FCC RF exposure guidelines. This equipment must not be co-located or operated in conjunction with any
qp g
o
th
e
r
a
nt
e
nn
a
o
r r
ad
i
o
tr
a
n
s
mitt
e
r.

129
THE DIRECTV® RECEIVER INCORPORATES SOFTWARE WHICH IS OWNED BY DIRECTV OR ITS THIRD PARTY LICENSORS (the
“Software”). BEFORE USING THE RECEIVER PLEASE READ THESE TERMS. IF YOU DO NOT AGREE TO THESE TERMS, YOU MAY
NOT USE THE RECEIVER AND SHOULD IMMEDIATELY RETURN THE RECEIVER TO DIRECTV OR YOUR SUPPLIER. THESE TERMS
ALSO APPLY TO ANY MODIFICATIONS, UPDATES OR SUPPLEMENTS TO THE SOFTWARE PROVIDED
TO YOU.
A. License Grant and Conditions
DIRECTV grants you a non-exclusive, non-transferable, limited license to use the Software solely in executable code form and
solely as integrated with, incorporated into, and in conjunction with the Receiver. You must ensure that the copyright, trademark
and other protective notices contained in the Software are maintained and not altered or removed. The Software is protected
by copyright and other laws and international copyright and other treaties. All title and intellectual property rights in and to the
Software and all modifications, updates, enhancements and derivative works of the Software are owned exclusively by DIRECTV
or its licensors and you agree to execute any document reasonably requested by DIRECTV to evidence such ownership rights.
Certain third party software used in connection with the Receiver may be made directly available to you by the providers thereof.
The source code to certain software subject to the GNU GPL and other open source licenses that is used in connection with the
Receiver is made available to you by DIRECTV following the written request to DIRECTV. Use of such Software is also subject to
the terms of any applicable agreement between you and each such provider. DIRECTV reserves the right to modify, supplement,
update and otherwise alter the Software via software download or other modification procedures, and these terms will apply to
such Software as modified, supplemented, updated, and otherwise altered.
B. License Restrictions
You may not copy, modify or transfer the Software, or any copy thereof, in whole or in part. You may not reverse engineer,
disassemble, decompile or translate the Software, or otherwise attempt to derive the source code of the Software, except to the
extent allowed under any applicable law. Any attempt to transfer any of the rights, duties or obligations of this license agreement
is void. You may not rent, lease, load, resell for profit or distribute the Software, or any part thereof. You may not export, transfer
or re-export the Software in violation of any applicable law. The Software may include some components that are covered by
“free software” licenses, open source licenses and other similar license use rights, which require such components to be used,
modified and/or distributed only under the terms of such licenses. Any such components are subject only to the terms of such
licenses, and not these Terms.
T
E
E
R
M
M
S
A
A
N
D
D
C
C
O
N
N
D
D
I
T
T
ION
S
S
F
O
R
U
U
S
S
E O
F
F
S
S
O
F
F
TW
A
A
RE (“
T
T
ER
M
M
S”)
CHAPTER 9 - WARRANTY AND OTHER INFORMATION
DRAFT
use the Software s
use the Softw
Receiver. You must e
Receiver. You mu
d and not altered or r
d and not altered or r
treaties. All title andaties. All
rivative works of the rivative works
onably requested by Dnably requested b
Receiver may be madeer may be made
U GPL and other openU GPL and other open
ing the written requeing the written re
you and each such proou and each such pr
ftware e
download or odownload or o
updated, and otherwisupdated, and oth
tware, or anytware, or an
are, or are, or

130
DIRECTV® HD DVR RECEIVER USER GUIDE
C. Ownership of Software and Reservation of Rights
The Software is licensed, not sold, to you for use only under the terms of this license agreement, DIRECTV is NOT transferring title
or any ownership rights in the Software to you and DIRECTV and its suppliers reserve all rights not expressly granted to you. Except
as stated above, this license agreement does not grant to you any intellectual property rights in the Software.
D. Termination
These Terms are effective until terminated. You may terminate these Terms by returning the Receiver to DIRECTV or your supplier.
These Terms will terminate automatically without notice if you fail to comply with these Terms or any other agreement between you
and DIRECTV. Upon termination you must return the Receiver to DIRECTV or your supplier.
E. Disclaimer
THE SOFTWARE IS (TO THE EXTENT PERMITTED BY LAW) SUPPLIED “AS IS”. NEITHER DIRECTV NOR ANY OF ITS LICENSORS
EXPRESSLY MAKES OR PASSES ON TO YOU ANY WARRANTY OR REPRESENTATION ON BEHALF OF DIRECTV OR ITS LICENSORS
WITH RESPECT TO THE SOFTWARE, INCLUDING BUT NOT LIMITED TO ANY WARRANTIES, EXPRESS OR IMPLIED, INCLUDING
(BUT NOT LIMITED TO) ANY IMPLIED WARRANTIES OF MERCHANTABILITY, SATISFACTORY QUALITY, FITNESS FOR A PARTICULAR
PURPOSE, TITLE OR NON-INFRINGEMENT OF THIRD PARTY RIGHTS.
IN NO EVENT WILL DIRECTV OR ITS LICENSORS BE LIABLE TO YOU WITH RESPECT TO THE SOFTWARE FOR ANY DIRECT,
INDIRECT, CONSEQUENTIAL, SPECIAL, PUNITIVE OR INCIDENTAL DAMAGE (INCLUDING LOSS OF PROFITS, LOST SAVINGS, LOSS
OF DATA OR THE COST OF PROCUREMENT OF SUBSTITUTE GOODS, TECHNOLOGY OR SERVICES) ARISING OUT OF THE USE
OR THE INABILITY TO USE THE SOFTWARE, EVEN IF DIRECTV OR ITS LICENSORS HAVE BEEN ADVISED OF THE POSSIBILITY OF
SUCH DAMAGES, OR FOR ANY CLAIM BY A THIRD PARTY. Some states or jurisdictions do not allow the exclusion or limitation of
incidental, consequential or special damages, so the above limitations may not apply to you.
%'#$
DIRECTV’S LICENSORS AND SUPPLIERS SHALL BE THIRD PARTY BENEFICIARIES OF THESE LICENSE TERMS, AS APPLICABLE.
YOUR USE OF THE RECEIVER CONSTITUTES YOUR ACKNOWLEDGEMENT THAT YOU HAVE READ THESE TERMS AND AGREE TO BE
BOUND HEREBY.
T
T
E
R
R
MS A
N
N
D
D
C
O
O
NDI
T
T
I
O
O
N
S
S
FO
R
R
US
E
E
O
O
F
F
S
S
OF
T
W
W
AR
E
E
(“TE
R
R
R
MS”)
DRAFT
ms by returning
ms by ret
omply with these Te
omply with the
RECTV or your suppli
RECTV or your supp
SUPPLIED “AS IS”. NESUPPLIED “AS IS
NTY OR REPRESENTY OR REPRESEN
NOT LIMITED TO ANNOT LIMITED TO AN
S OF MERCHANTABILS OF MERCHAN
THIRD PARTY RIGHTSTHIRD PARTY RIGH
SORS BE LIABLE TO YBE LIABLE TO Y
PUNITIVE OR INCIDENPUNITIVE OR IN
MENT OF SUBSTITUTEMENT OF SUBSTITUT
WARE, EVEN IF DIRWARE, EVEN IF
A THIRD PARA THIRD PA
s, so ths, so th

131
G. Additional Information
Certain additional terms and information for the Software and certain third party software (including the text of licenses applicable
to any free, open source and other similar software that may be included in the Software) may be found in the DIRECTV website
located at www.directv.com, and the GNU website located at www.gnu.org.
H. GNU GPL and Open Source Software
Certain components of the Software may be subject to the GNU General Public Licence, Version 2, June 1991 (“GPL”), “free
software” licenses and other open source software licenses. The foregoing components of the Software are not and may not
be subject to the License Restrictions in Section B above. In compliance with the GPL, DIRECTV, its suppliers, or its third party
licensors, upon written request, will make the source code of the software, libraries and associated utilities it uses, together with
its modifications (if any), available to the public in source code form. You are free to use, modify and distribute the software and
any modifications as long as you comply with the terms of the GPL referred to above and other open source software licenses.
The license terms applicable to the GPL may be found in the DIRECTV website located at www.directv.com, and the GNU website
located at www.gnu.org, specifically at (http://www.gnu.org/licenses/old-licenses/gpl-2.0.html). To request a copy of the applicable
source code please write to DIRECTV at:
Attention: Vice President, STB Engineering
DIRECTV
2230 E. Imperial Highway
El Segundo, CA 90245
GNU GENERAL PUBLIC LICENSE
Version 2, June 1991
Copyright © 1989, 1991 Free Software Foundation, Inc.,
51 Franklin Street, Fifth Floor, Boston, MA 02110-1301 USA
Everyone is permitted to copy and distribute verbatim copies
of this license document, but changing it is not allowed.
T
E
E
R
M
M
S
A
A
N
D
D
C
C
O
N
N
D
D
I
T
T
ION
S
S
F
O
R
U
U
S
S
E O
F
F
S
S
O
F
F
TW
A
A
RE (“
T
T
ER
M
M
S”)
CHAPTER 9 - WARRANTY AND OTHER INFORMATION
DRAFT
blic Licence, Ve
blic Licen
ng components of th
ng components
ce with the GPL, DIRE
ce with the GPL, DIR
oftware, libraries andftware, libraries and
rm. You are free to usou are f
GPL referred to abovGPL referred to
e DIRECTV website loIRECTV website
org/licenses/old-licenrg/licenses/old-licen

132
DIRECTV® HD DVR RECEIVER USER GUIDE
Preamble
The licenses for most software are designed to take away your freedom to share and change it. By contrast, the GNU General Public
License is intended to guarantee your freedom to share and change free software--to make sure the software is free for all its users.
This General Public License applies to most of the Free Software Foundation’s software and to any other program whose authors
commit to using it. (Some other Free Software Foundation software is covered by the GNU Lesser General Public License instead.)
You can apply it to your programs, too.
When we speak of free software, we are referring to freedom, not price. Our General Public Licenses are designed to make sure
that you have the freedom to distribute copies of free software (and charge for this service if you wish), that you receive source code
or can get it if you want it, that you can change the software or use pieces of it in new free programs; and that you know you can do
these things.
To protect your rights, we need to make restrictions that forbid anyone to deny you these rights or to ask you to surrender the rights.
These restrictions translate to certain responsibilities for you if you distribute copies of the software, or if you modify it.
For example, if you distribute copies of such a program, whether gratis or for a fee, you must give the recipients all the rights that
you have. You must make sure that they, too, receive or can get the source code. And you must show them these terms so they
know their rights.
We protect your rights with two steps: (1) copyright the software, and (2) offer you this license which gives you legal permission to
copy, distribute and/or modify the software.
Also, for each author’s protection and ours, we want to make certain that everyone understands that there is no warranty for this
free software. If the software is modified by someone else and passed on, we want its recipients to know that what they have is not
the original, so that any problems introduced by others will not reflect on the original authors’ reputations.
Finally, any free program is threatened constantly by software patents. We wish to avoid the danger that redistributors of a free
program will individually obtain patent licenses, in effect making the program proprietary. To prevent this, we have made it clear that
any patent must be licensed for everyone’s free use or not licensed at all.
The precise terms and conditions for copying, distribution and modification follow.
T
T
E
R
R
MS A
N
N
D
D
C
O
O
NDI
T
T
I
O
O
N
S
S
FO
R
R
US
E
E
O
O
F
F
S
S
OF
T
W
W
AR
E
E
(“TE
R
R
R
MS”)
DRAFT
by t
by
Our General Pub
Our Gener
harge for this service
harge for this ser
pieces of it in new fre
pieces of it in new fr
bid anyone to deny yobid anyone to d
or you if you distributeu if you distribute
am, whether gratis oam, whether gratis o
eive or can get the soeive or can get the
opyright the softwareopyright the s
are.are.
ours, we want to mours, we want t
by someone by someone
d by othd by oth

133
GNU GENERAL PUBLIC LICENSE
TERMS AND CONDITIONS FOR COPYING, DISTRIBUTION AND MODIFICATION
0. This License applies to any program or other work which contains a notice placed by the copyright holder saying it may
be distributed under the terms of this General Public License. The “Program”, below, refers to any such program or work,
and a “work based on the Program” means either the Program or any derivative work under copyright law: that is to say, a
work containing the Program or a portion of it, either verbatim or with modifications and/or translated into another language.
(Hereinafter, translation is included without limitation in the term “modification”.) Each licensee is addressed as “you”.
Activities other than copying, distribution and modification are not covered by this License; they are outside its scope. The act of
running the Program is not restricted, and the output from the Program is covered only if its contents constitute a work based on
the Program (independent of having been made by running the Program). Whether that is true depends on what the Program does.
1. You may copy and distribute verbatim copies of the Program’s source code as you receive it, in any medium, provided that you
conspicuously and appropriately publish on each copy an appropriate copyright notice and disclaimer of warranty; keep intact all
the notices that refer to this License and to the absence of any warranty; and give any other recipients of the Program a copy of this
License along with the Program.
You may charge a fee for the physical act of transferring a copy, and you may at your option offer warranty protection in exchange
for a fee.
2. You may modify your copy or copies of the Program or any portion of it, thus forming a work based on the Program, and copy and
distribute such modifications or work under the terms of Section 1 above, provided that you also meet all of these conditions:
a) You must cause the modified files to carry prominent notices stating that you changed the files and the date of any change.
b) You must cause any work that you distribute or publish, that in whole or in part contains or is derived from the Program or any
part thereof, to be licensed as a whole at no charge to all third parties under the terms of this License.
c) If the modified program normally reads commands interactively when run, you must cause it, when started running for such
interactive use in the most ordinary way, to print or display an announcement including an appropriate copyright notice and a
notice that there is no warranty (or else, saying that you provide a warranty) and that users may redistribute the program under
these conditions, and telling the user how to view a copy of this License. (Exception: if the Program itself is interactive but does not
normally print such an announcement, your work based on the Program is not required to print an announcement.)
T
E
E
R
M
M
S
A
A
N
D
D
C
C
O
N
N
D
D
I
T
T
ION
S
S
F
O
R
U
U
S
S
E O
F
F
S
S
O
F
F
TW
A
A
RE (“
T
T
ER
M
M
S”)
CHAPTER 9 - WARRANTY AND OTHER INFORMATION
work wor
cations and/cation
ation”.) Each lice
ation”.) Ea
red by this License; th
red by this Licens
am is covered only if
am is covered only if
ogram). Whether thatram). Whet
s source code as you s source code
propriate copyright noopriate copyright
f any warranty; and gwarranty; and g
ring a copy, and you mring a copy, and y
Program or any portiorogram or any portio
r the terms of Sectionr the terms of Se
arry prominent notic
arry prominent notic
ute or publisute or publis
arge toarge to

134
DIRECTV® HD DVR RECEIVER USER GUIDE
These requirements apply to the modified work as a whole. If identifiable sections of that work are not derived from the Program,
and can be reasonably considered independent and separate works in themselves, then this License, and its terms, do not apply to
those sections when you distribute them as separate works. But when you distribute the same sections as part of a whole which
is a work based on the Program, the distribution of the whole must be on the terms of this License, whose permissions for other
licensees extend to the entire whole, and thus to each and every part regardless of who wrote it.
Thus, it is not the intent of this section to claim rights or contest your rights to work written entirely by you; rather, the intent is to
exercise the right to control the distribution of derivative or collective works based on the Program.
In addition, mere aggregation of another work not based on the Program with the Program (or with a work based on the Program)
on a volume of a storage or distribution medium does not bring the other work under the scope of this License.
3. You may copy and distribute the Program (or a work based on it, under Section 2) in object code or executable form under the
terms of Sections 1 and 2 above provided that you also do one of the following:
a) Accompany it with the complete corresponding machine-readable source code, which must be distributed under the terms of
Sections 1 and 2 above on a medium customarily used for software interchange; or,
b) Accompany it with a written offer, valid for at least three years, to give any third party, for a charge no more than your cost of
physically performing source distribution, a complete machine-readable copy of the corresponding source code, to be distributed
under the terms of Sections 1 and 2 above on a medium customarily used for software interchange; or,
c) Accompany it with the information you received as to the offer to distribute corresponding source code. (This alternative is
allowed only for noncommercial distribution and only if you received the program in object code or executable form with such an
offer, in accord with Subsection b above.)
The source code for a work means the preferred form of the work for making modifications to it. For an executable work, complete
source code means all the source code for all modules it contains, plus any associated interface definition files, plus the scripts
used to control compilation and installation of the executable. However, as a special exception, the source code distributed need not
include anything that is normally distributed (in either source or binary form) with the major components (compiler, kernel, and so
on) of the operating system on which the executable runs, unless that component itself accompanies the executable.
If distribution of executable or object code is made by offering access to copy from a designated place, then offering equivalent
access to copy the source code from the same place counts as distribution of the source code, even though third parties are not
compelled to copy the source along with the object code.
T
T
E
R
R
MS A
N
N
D
D
C
O
O
NDI
T
T
I
O
O
N
S
S
FO
R
R
US
E
E
O
O
F
F
S
S
OF
T
W
W
AR
E
E
(“TE
R
R
R
MS”)
to work wto wo
ks based on th
ks based
ram with the Program
ram with the Pro
e other work under th
e other work under th
n it, under Section 2) under Se
ne of the following:ne of the follow
ne-readable source creadable source c
d for
software interchtware interch
ast three years, to givast three years, t
mplete machine-readmplete machine-rea
n a medium customaa medium customa
u received as to the ofu received as to the
bution and only if you
bution and only if you
))
rred forrred for
mo
mo

135
4. You may not copy, modify, sublicense, or distribute the Program except as expressly provided under this License. Any attempt
otherwise to copy, modify, sublicense or distribute the Program is void, and will automatically terminate your rights under this License.
However, parties who have received copies, or rights, from you under this License will not have their licenses terminated so long
as such parties remain in full compliance.
5. You are not required to accept this License, since you have not signed it. However, nothing else grants you permission to modify
or distribute the Program or its derivative works. These actions are prohibited by law if you do not accept this License. Therefore,
by modifying or distributing the Program (or any work based on the Program), you indicate your acceptance of this License to do
so, and all its terms and conditions for copying, distributing or modifying the Program or works based on it.
6. Each time you redistribute the Program (or any work based on the Program), the recipient automatically receives a license from
the original licensor to copy, distribute or modify the Program subject to these terms and conditions. You may not impose any
further restrictions on the recipients’ exercise of the rights granted herein. You are not responsible for enforcing compliance by
third parties to this License.
7. If, as a consequence of a court judgment or allegation of patent infringement or for any other reason (not limited to patent
issues), conditions are imposed on you (whether by court order, agreement or otherwise) that contradict the conditions of this
License, they do not excuse you from the conditions of this License. If you cannot distribute so as to satisfy simultaneously your
obligations under this License and any other pertinent obligations, then as a consequence you may not distribute the Program at
all. For example, if a patent license would not permit royalty-free redistribution of the Program by all those who receive copies
directly or indirectly through you, then the only way you could satisfy both it and this License would be to refrain entirely from
distribution of the Program.
If any portion of this section is held invalid or unenforceable under any particular circumstance, the balance of the section is
intended to apply and the section as a whole is intended to apply in other circumstances.
It is not the purpose of this section to induce you to infringe any patents or other property right claims or to contest validity of
any such claims; this section has the sole purpose of protecting the integrity of the free software distribution system, which
is implemented by public license practices. Many people have made generous contributions to the wide range of software
distributed through that system in reliance on consistent application of that system; it is up to the author/donor to decide if he or
she is willing to distribute software through any other system and a licensee cannot impose that choice.
T
E
E
R
M
M
S
A
A
N
D
D
C
C
O
N
N
D
D
I
T
T
ION
S
S
F
O
R
U
U
S
S
E O
F
F
S
S
O
F
F
TW
A
A
RE (“
T
T
ER
M
M
S”)
CHAPTER 9 - WARRANTY AND OTHER INFORMATION
DRAFT
ever, never
d by law if yd by l
m), you indicate y
m), you ind
g the Program or wor
g the Program o
e Program), the recipe Program), the recip
bject to these terms at to these
nted herein. You are nted herein. Yo
n of patent infringemen of patent infringem
ourt order, agreemenourt order, agre
s of this License. If ys of this License. If
rtinent obligations, thent obligations, th
ot permit royalty-free ot permit roya
only way you could saonly way you could
r unenforcear unenforce
intendintend

136
DIRECTV® HD DVR RECEIVER USER GUIDE
This section is intended to make thoroughly clear what is believed to be a consequence of the rest of this License.
8. If the distribution and/or use of the Program is restricted in certain countries either by patents or by copyrighted interfaces,
the original copyright holder who places the Program under this License may add an explicit geographical distribution limitation
excluding those countries, so that distribution is permitted only in or among countries not thus excluded. In such case, this License
incorporates the limitation as if written in the body of this License.
9. The Free Software Foundation may publish revised and/or new versions of the General Public License from time to time. Such
new versions will be similar in spirit to the present version, but may differ in detail to address new problems or concerns. Each
version is given a distinguishing version number. If the Program specifies a version number of this License which applies to it and
“any later version”, you have the option of following the terms and conditions either of that version or of any later version published
by the Free Software Foundation. If the Program does not specify a version number of this License, you may choose any version ever
published by the Free Software Foundation.
10. If you wish to incorporate parts of the Program into other free programs whose distribution conditions are different, write to
the author to ask for permission. For software which is copyrighted by the Free Software Foundation, write to the Free Software
Foundation; we sometimes make exceptions for this. Our decision will be guided by the two goals of preserving the free status of all
derivatives of our free software and of promoting the sharing and reuse of software generally.
NO WARRANTY
11. BECAUSE THE PROGRAM IS LICENSED FREE OF CHARGE, THERE IS NO WARRANTY FOR THE PROGRAM, TO THE EXTENT
PERMITTED BY APPLICABLE LAW. EXCEPT WHEN OTHERWISE STATED IN WRITING THE COPYRIGHT HOLDERS AND/OR OTHER
PARTIES PROVIDE THE PROGRAM “AS IS” WITHOUT WARRANTY OF ANY KIND, EITHER EXPRESSED OR IMPLIED, INCLUDING, BUT
NOT LIMITED TO, THE IMPLIED WARRANTIES OF MERCHANTABILITY AND FITNESS FOR A PARTICULAR PURPOSE. THE ENTIRE
RISK AS TO THE QUALITY AND PERFORMANCE OF THE PROGRAM IS WITH YOU. SHOULD THE PROGRAM PROVE DEFECTIVE, YOU
ASSUME THE COST OF ALL NECESSARY SERVICING, REPAIR OR CORRECTION.
12. IN NO EVENT UNLESS REQUIRED BY APPLICABLE LAW OR AGREED TO IN WRITING WILL ANY COPYRIGHT HOLDER, OR
ANY OTHER PARTY WHO MAY MODIFY AND/OR REDISTRIBUTE THE PROGRAM AS PERMITTED ABOVE, BE LIABLE TO YOU FOR
DAMAGES, INCLUDING ANY GENERAL, SPECIAL, INCIDENTAL OR CONSEQUENTIAL DAMAGES ARISING OUT OF THE USE OR
INABILITY TO USE THE PROGRAM (INCLUDING BUT NOT LIMITED TO LOSS OF DATA OR DATA BEING RENDERED INACCURATE OR
LOSSES SUSTAINED BY YOU OR THIRD PARTIES OR A FAILURE OF THE PROGRAM TO OPERATE WITH ANY OTHER PROGRAMS),
T
T
E
R
R
MS A
N
N
D
D
C
O
O
NDI
T
T
I
O
O
N
S
S
FO
R
R
US
E
E
O
O
F
F
S
S
OF
T
W
W
AR
E
E
(“TE
R
R
R
MS”)
DRAFT
of the Generof the
er in detail to addr
er in detail t
ifies a version numbe
ifies a version nu
conditions either of th
conditions either of t
fy a version number oa version n
her free programs whr free programs w
s copyrighted by the Frighted by the
s. Our decision will bes. Our decision
the sharing and reusthe sharing and re
SED FREE OF CHARGSED FREE OF CHAR
CEPT WHEN OTHECEPT WHEN OT
” WITHOUT W” WITHOUT W
ES OF MES OF M
EO
EO

137
EVEN IF SUCH HOLDER OR OTHER PARTY HAS BEEN ADVISED OF THE POSSIBILITY OF SUCH DAMAGES.
END OF TERMS AND CONDITIONS
How to Apply These Terms to Your New Programs
If you develop a new program, and you want it to be of the greatest possible use to the public, the best way to achieve this is to
make it free software which everyone can redistribute and change under these terms.
To do so, attach the following notices to the program. It is safest to attach them to the start of each source file to most effectively
convey the exclusion of warranty; and each file should have at least the “copyright” line and a pointer to where the full notice is found.
<one line to give the program’s name and a brief idea of what it does.>
Copyright (C) <year> <name of author>
This program is free software; you can redistribute it and/or modify it under the terms of the GNU General Public License as
published by the Free Software Foundation; either version 2 of the License, or (at your option) any later version.
This program is distributed in the hope that it will be useful, but WITHOUT ANY WARRANTY; without even the implied warranty of
MERCHANTABILITY or FITNESS FOR A PARTICULAR PURPOSE. See the GNU General Public License for more details. You should
have received a copy of the GNU General Public License along with this program; if not, write to the Free Software Foundation, Inc.,
51 Franklin Street, Fifth Floor, Boston, MA 02110-1301 USA.
Also add information on how to contact you by electronic and paper mail. If the program is interactive, make it output a short notice
like this when it starts in an interactive mode:
Gnomovision version 69, Copyright (C) year name of author
Gnomovision comes with ABSOLUTELY NO WARRANTY; for details type `show w’. This is free software, and you are welcome to
redistribute it under certain conditions; type `show c’ for details.
The hypothetical commands `show w’ and `show c’ should show the appropriate parts of the General Public License. Of course,
the commands you use may be called something other than `show w’ and `show c’; they could even be mouse-clicks or menu
items--whatever suits your program.
You should also get your employer (if you work as a programmer) or your school, if any, to sign a “copyright disclaimer” for the
program, if necessary. Here is a sample; alter the names:
T
E
E
R
M
M
S
A
A
N
D
D
C
C
O
N
N
D
D
I
T
T
ION
S
S
F
O
R
U
U
S
S
E O
F
F
S
S
O
F
F
TW
A
A
RE (“
T
T
ER
M
M
S”)
CHAPTER 9 - WARRANTY AND OTHER INFORMATION
o th
o th
terms.term
h them to the sta
them to
copyright” line and a
copyright” line a
s.>.>
modify it under the terodify it under th
2 of the License, or (af the License, or (
eful, but WITHOUT ANful, but WITHOUT AN
PURPOSE. See the GPURPOSE. See
cense along with this cense along with th
0-1301 USA.301 USA.
by electronic and papby electronic an
ode:ode:
r name of authorr name of auth
WARRANTY;WARRANTY
how chow c

138
DIRECTV® HD DVR RECEIVER USER GUIDE
Yoyodyne, Inc., hereby disclaims all copyright interest in the program `Gnomovision’ (which makes passes at compilers) written by
James Hacker.
<signature of Ty Coon>, 1 April 1989
Ty Coon, President of Vice
This General Public License does not permit incorporating your program into proprietary programs. If your program is a subroutine
library, you may consider it more useful to permit linking proprietary applications with the library. If this is what you want to do, use
the GNU Lesser General Public License instead of this License.
T
T
E
R
R
MS A
N
N
D
D
C
O
O
NDI
T
T
I
O
O
N
S
S
FO
R
R
US
E
E
O
O
F
F
S
S
OF
T
W
W
AR
E
E
(“TE
R
R
R
MS”)
propriprop
ations with ation

139
A
A
P
P
PEN
D
D
I
I
C
E
E
S
S
A
Ap
p
pe
e
nd
ix
x
1
:
Se
e
tu
p
p
a
n
d
A
Ac
c
ti
va
a
tion
......
.
.
....
.
..
.
.
......
.
..
......
.
..
140
G
Gu
u
ided
S
S
et
up
....
..
..........
.
.
......
..
.
........
.
.
........
.
.
....
.
..
..
.
................
.
.
.. 140
A
Ac
tiva
te
e
Y
our DI
RE
E
C
CT
T
V®
S
S
e
er
vi
c
ce
....
.
.
........
.
.
....
.
..
..
.
................
.
.
.. 140
A
Ap
p
pe
e
nd
ix
x
2
:
C
o
nn
e
e
c
tion
s
to
T
T
V &
E
Eq
ui
p
p
m
e
en
t ....
.
..
......
.
..
141
Y
Yo
u
ur
P
h
o
o
ne
C
on
ne
e
c
ct
t
ion
.
.
......
..
.
........
.
.
........
.
.
....
.
..
..
.
................
.
.
.. 141
Y
Yo
u
ur
Int
e
er
net Co
n
n
e
c
ti
on
n
.
.
....
.
..
........
..
......
.
.
....
..
.
..
.
..
......
.
.
..
.
.
.......141
C
Co
o
nnec
t
t
i
ons
f
fo
r
A
Au
u
x
i
liar
y
y
E
Eq
u
i
pm
en
n
n
t ....
.
.
....
..
.
..
.
..
......
.
.
..
.
.
.......142
H
HD
D
TV
C
Co
o
nn
e
c
ti
on
n
s
s
......
.
.
......
..
.
........
.
.
........
.
.
....
.
..
..
.
................
.
.
.. 145
S
SD
D
TV
C
Co
o
nn
ec
c
ti
on
s
s
.
.
......
..
.
.
....
.
..
........
..
......
.
.
....
..
.
..
.
..
......
.
.
..
.
.
.......14
A
Au
dio
C
o
o
nn
ec
c
tion
s
.
.
......
..
.
.
....
.
..
........
..
......
.
.
....
..
.
..
.
..
......
.
.
..
.
.
.......
C
Co
o
nnec
t
t
i
ons
t
to
O
t
th
h
e
er
E
q
u
i
p
m
e
nt ..
.
.
........
.
.
....
.
..
..
.
................
.
.
..
A
Ap
p
pe
e
nd
ix
x
3
:
R
e
ce
i
iv
v
e
er
F
r
ro
n
nt
a
a
nd
B
B
ac
k
P
P
Pa
ne
e
l
s
A
Ap
p
pe
e
nd
ix
x
4
:
H
o
w
t
to
o
N
et
w
wo
o
rk
k
You
r
r
r
HD
D
D
D
VR
R
P
Pr
o
of
es
s
i
o
on
al
ly
y
I
ns
ta
a
l
ll
ed
D
I
RE
CT
V
C
C
i
ne
ma
a
a
C
o
on
n
ne
ct
io
o
n Kit 156
S
Se
lf-I
ns
s
t
ta
ll
ed
d
D
IR
E
EC
C
TV
C
C
in
n
em
m
a Co
n
n
nn
ecti
o
on
K
K
it
t
- W
ir
r
eles
s
s
.157
W
Wi
red
.
.
.
..
......
.
..
....
..
..........
.
.
......
..
.
........
.
.
........
.
.
....
.
..
..
.
................
.
.
.. 157
W
Wi
rele
ss
s
s
......
.
..
....
..
..........
.
.
......
..
.
........
.
.
........
.
.
....
.
..
..
.
................
.
.
.. 159
A
Ap
p
pe
e
nd
ix
x
5
:
A
b
ou
t
t
H
Hi
gh
-
-D
D
efi
niti
on
n
n
....
.
.
....
.
..
.
.
......
.
..
......
.
..
162
S
Sc
reen
F
F
or
ma
a
t &
R
Re
e
so
lu
u
ti
o
on
.
..
........
..
......
.
.
....
..
.
..
.
..
......
.
.
..
.
.
.......162
S
Su
ppor
t
te
e
d
Re
e
so
lu
u
t
i
o
on
s
.
.
......
..
.
........
.
.
........
.
.
....
.
..
..
.
................
.
.
.. 164
W
Wi
de-S
c
c
r
een VS.
S
St
t
a
an
da
r
rd
F
or
r
ma
ts
s
......
.
.
....
..
.
..
.
..
......
.
.
..
.
.
.......165
APPENDICES
DRAFT
4
4
4
5
.
14
1
14
4
77
......
14
4
4
99
......
.
.
...........
1
50
0
..
..
.
..
.
..
..
..
.
..............
1
51
R
R
..
....
..
.
..
.
..
..
..
.
.......
15
1
5
5
55
C
o
on
n
ne
ct
io
o
n Kit C
o
on
nection Kit
..
15
6
cti
o
on
K
K
it
t
- W
ir
r
eles
s
s
c
t
ti
on it - Wireless
.
.
....
.
..
..
.
...................................
.
.
..
..
.
.......................
.
.

140
DIRECTV® HD DVR RECEIVER USER GUIDE
A
A
PPENDI
X
X
1
1
: S
E
E
T
T
UP
A
A
N
N
D
ACTIVATIO
N
N
GUIDED SETUP
If your receiver was not professionally installed, or you have had to reset your receiver for any reason, you will need to follow the
guided setup screens before starting DIRECTV service.
1. Make sure the MODE switch at the top of the remote control is set to DIRECTV, which is the far-left position.
2. Press PWR. The DIRECTV® Receiver will turn on. (Make sure your TV is also turned on!)
3. The first screen will allow you to select a language. Using the arrow keys on the remote control, move to the language you
prefer and press SELECT.
4. Follow the onscreen instructions.
After these setup procedures are complete, you’ll see a message onscreen that says, “Acquiring Satellite Info”, as the receiver
gathers information from the satellite for the onscreen program guide. Next, you’ll be given the opportunity to program your
remote to control other equipment such as your TV and/or DVD player. Just follow the screen instructions and you’ll be ready to
watch in no time!
ACTIVATE YOUR DIRECTV® SERVICE
Once all the setup processes are complete, all that’s left to do is activate your DIRECTV® service. Be sure to:
1. Have on hand your service address, social security number and a valid major credit card.
2. Note your receiver ID and access card numbers. The receiver ID is on a sticker behind the access card door on the front of the
receiver, while the card number is on the access card itself. Use the Product Information page to note this information.
3. When you’re ready, just call 1.800.531.5000 to pick the programming package that’s right for you and subscribe to
DIRECTV service.
ECTV, wECTV
is also turned on
s also tur
ow keys on the ow keys on the
remot
rem
essage onscreen thatssage onscreen t
program guide. Nextram guide. Next
nd/or DVD player. Jusnd/or DVD player. Jus
SERVICE
e, all that’s lee, all that’s
l secul secu

141
A
A
PP
E
E
N
N
D
D
IX 2:
CO
N
N
N
N
E
E
C
C
TIO
N
S
S
T
O
O
TV
&
&
&
EQUIPM
E
E
NT
YOUR PHONE CONNECTION
Connecting your receiver to a land-based telephone line saves you money because it allows you to purchase Pay Per View movies
and special events without calling DIRECTV® to order. It is required for sports package subscriptions and is also used to enhance
the interactive features available on our interactive channels. The receiver uses a toll-free number once a month for a few minutes
duration and is designed not to interfere with your regular phone service. You will need an RJ11-type modulator jack (the most
common type of phone jack). If you disconnect the phone line, the receiver will not allow you to purchase PPV programs and some
features of our interactive channels will be limited. If your receiver is connected to the Internet, either directly or via a DIRECTV
Home Network connection, you do not need to be connected to a phone line. See “Your Internet Connection” below.
Do not connect your receiver to a digital PBX phone system — doing so may permanently damage your equipment and void your
warranty.
YOUR INTERNET CONNECTION
Connecting your DIRECTV Receiver to the Internet and your home network gives you access to features like TV Apps, Music &
Photos, and more.
The instructions for connecting to a network are different depending upon whether you have Whole-Home DVR Service. Please see
Appendix 4.
NOTE: For the most current options and instructions to connect
your receiver to the Internet, please visit directv.com/getconnected.
APPENDICES
D
DRAFT
a tolla to
will need an will n
will not allow you
will not allo
nnected to the Intern
nnected to the In
one line. See “Your Int
one line. See “Your Int
oing so may permanso may
rnet and your home nnd your home n
work are different dep
work are different dep

142
DIRECTV® HD DVR RECEIVER USER GUIDE
CONNECTIONS FOR AUXILIARY EQUIPMENT
If you upgrade your TV, get a new DIRECTV® Receiver, or add new equipment such as a surround sound system, DVD player or
burner, or VCR, you have various options for connecting your equipment. All of the video and audio outputs on your receiver offer good
quality. Pick a video and audio output from the following lists based on the connectors your receiver and TV support; they are listed in
order, with the highest quality options at the top of each list. Not all connectors are available on all receivers and TV models.
NOTE:
Not all cables come with your digital satellite receiver; you may need to purchase additional cables depending on your setup.
HDMI cables are available from DIRECTV at a nominal charge. Contact DIRECTV customer service for more information.
Never connect an IN to an IN or an OUT to an OUT. All A/V jacks and inputs are color-coded. Always match the color of the plug to
the same color of the jack.
To obtain the best picture quality, make sure the receiver is connected directly to the TV.
Due to restrictions imposed by copyright holders, certain programming may include content protection measures that may
restrict viewing or recording with certain consumer electronics equipment attached to the receiver. Please contact the
manufacturer of such equipment for additional information.
WARNING: Use only the power supply (power cord) that came with your DIRECTV receiver. Failure to use the authorized power
supply (power cord) may cause electric shock, fire, bodily injury and/or property damage. If the power supply (power cord) becomes
damaged or needs to be replaced, please contact DIRECTV Customer Service to obtain an authorized replacement.
WARNING: Do not connect your receiver (or any other equipment, such as a TV or VCR) to the AC power supply until you have
properly connected all the other cables.
A
A
PPENDI
X
X
2
2
:
C
C
O
O
NN
E
E
C
T
T
I
O
O
NS
T
T
O T
V
V
&
&
E
Q
Q
UIP
M
M
E
E
NT
DRAFT
he
he
nnectonnec
ctors are avactors a
may need to purchasey need to p
arge. Contact DIRECTontact
A/V jacks and inputs a/V jacks and inpu
receiver is connectedreceiver is connected
ers, certain programmers, certain prog
nsumer electronics ensumer electronics
tional information.al information.
power cord) that campower cord) that ca
c shock, fire, bodily
c shock, fire, bodily
e contact DIREe contact DIR
ny o
ny o
143
The table below shows the benefits and disadvantages of each type of available video connector:
HDMI Component S-Video RCA
High Def (HD)
HD 1080p
3D
Built-in Audio
Standard Def
HD
D
Vid
eo
o
C
on
n
e
c
t
io
o
ns
HDMI [High-Definition Multimedia Interface] provides the best digital video and digital audio in one connector. HDMI is the
only recommended cable, and is required for the highest quality 1080p signal and 3D TV.
Component Video Output (YPbPr) provides high-quality HD video, but does not provide audio. You will need to connect audio
separately using the digital audio or RCA audio connectors. Newer receivers have an “A/V Out” connector that provides
Component Video and RCA audio output in a single, custom cable. Component cables do not provide 1080p or 3D TV.
SD
V
id
eo
o
C
on
ne
e
ct
t
io
o
ns
These cables are provided for convenience only, and do not present an HD picture. They are useful if you have to connect your
DIRECTV® HD DVR to an older CRT TV, a VCR, or other non-HD device.
S-Video provides good video, but does not provide audio. You will need to connect audio separately using the digital audio or
RCA audio connectors. (Not all receivers have S-Video outputs.)
RCA output (composite video) provides good video and usually comes bundled with three cables for one video and two
audio channels.
A
A
PP
E
E
N
N
D
D
IX 2:
CO
N
N
N
N
E
E
C
C
TIO
N
S
S
T
O
O
TV
&
&
&
EQUIPM
E
E
NT
APPENDICES
DRAFT
FT
T
T
T
T
T
T
FT
FT
FT
FT
FT
FT
FT
FT
FT
FT
FT
FT
s the best digital videe best digital vide
ghest quality 1080p sghest quality 1080p s
h-quality HD video, bh-quality HD vide
dio connectors. Neweo connectors. New
n a single, custom caa single, custom ca
only, and do nonly, and do
or otheror other

144
DIRECTV® HD DVR RECEIVER USER GUIDE
Au
d
di
o
Co
o
n
nn
ecti
o
on
s
HDMI [High-Definition Multimedia Interface] provides the best digital video and audio in one connector.
Digital Audio Optical provides excellent quality digital audio and is often used on newer surround sound and DVD equipment.
Digital Audio Coax provides high quality digital audio and is also found on newer surround sound and DVD equipment.
RCA outputs provide good audio quality and are found on older auxiliary equipment.
There are so many makes and models of TVs and auxiliary equipment, it is impossible to fully describe all of the possible
connections between them and your receiver. Refer to the manuals for that equipment to see the connection options specific to each
make and model. The following images show examples of how your receiver may be connected using the supported video and audio
connections for the TV, the surround sound, and the DVD player/burner or VCR. Several models of DIRECTV Receivers are shown,
giving you a variety of connection options to your TV and other equipment.
A
A
PPENDI
X
X
2
2
:
C
C
O
O
NN
E
E
C
T
T
I
O
O
NS
T
T
O T
V
V
&
&
E
Q
Q
UIP
M
M
E
E
NT
DRAFT
new
new
ry equipmery eq
t is impossible to fu
t is impossib
or that equipment to s
or that equipment
ur receiver may be cor receiver may be co
r/burner or rner or
VCR. SeveV
er equipment.er equipment.
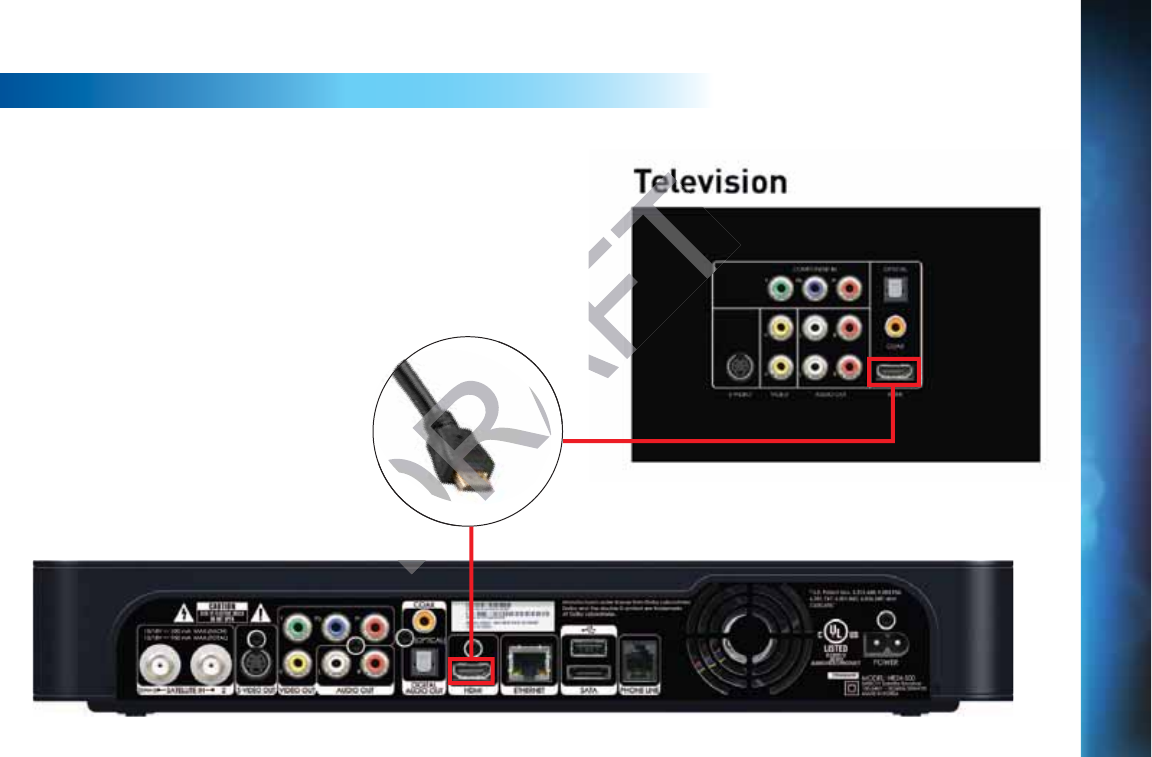
145
Example: TV with HDMI Connector - RECOMMENDED
Here is an example using a TV that has an HDMI connector as the
best video/audio input.
Note: Only an HDMI connection provides a 1080p picture and 3D TV.
HD TV CONNECTIONS
HDMI Cable
A
A
PP
E
E
N
N
D
D
IX 2:
CO
N
N
N
N
E
E
C
C
TIO
N
S
S
T
O
O
TV
&
&
&
EQUIPM
E
E
NT
APPENDICES
DRAF
DRAF
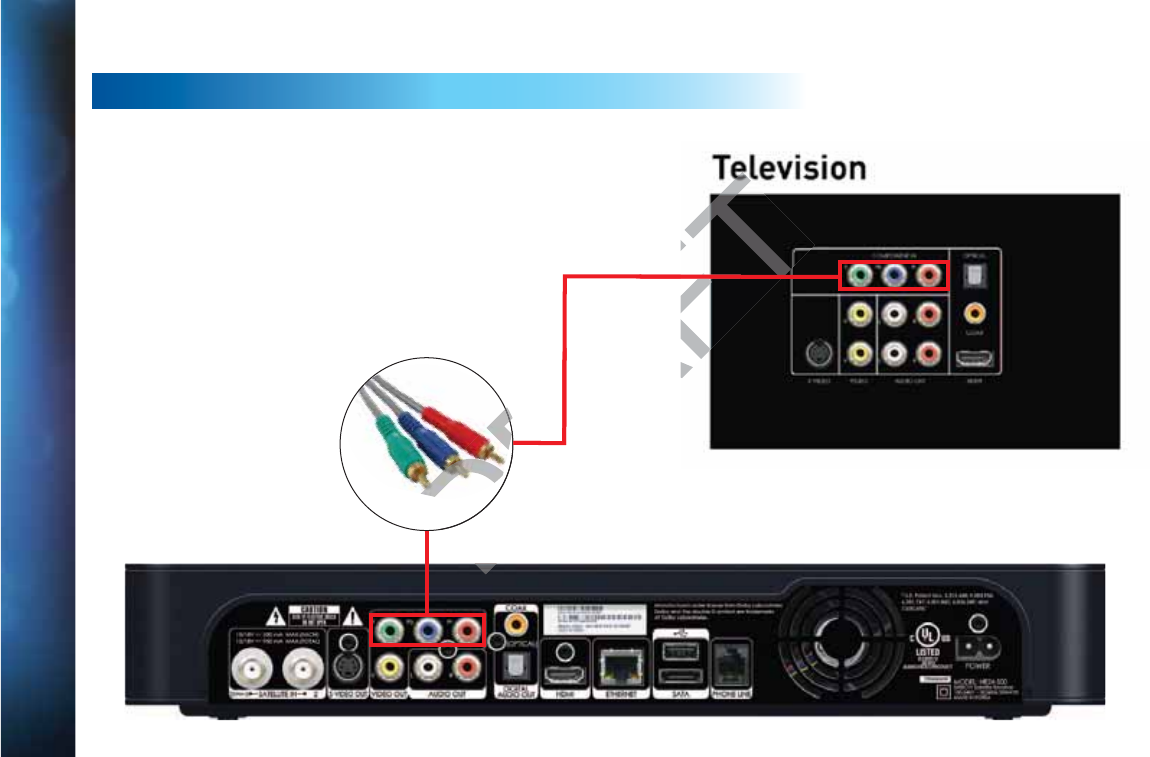
146
DIRECTV® HD DVR RECEIVER USER GUIDE
Example: TV with Component Video Connectors
Here is an example using a TV that has component video connectors
as the best video input.
Note: A Component Video connection will not provide a 1080p
picture nor 3D TV.
Component Video requires a separate audio connection.
HD TV CONNECTIONS
Component
Video
A
A
PPENDI
X
X
2
2
:
C
C
O
O
NN
E
E
C
T
T
I
O
O
NS
T
T
O T
V
V
&
&
E
Q
Q
UIP
M
M
E
E
NT
DRAF
DR
F
DRAFT
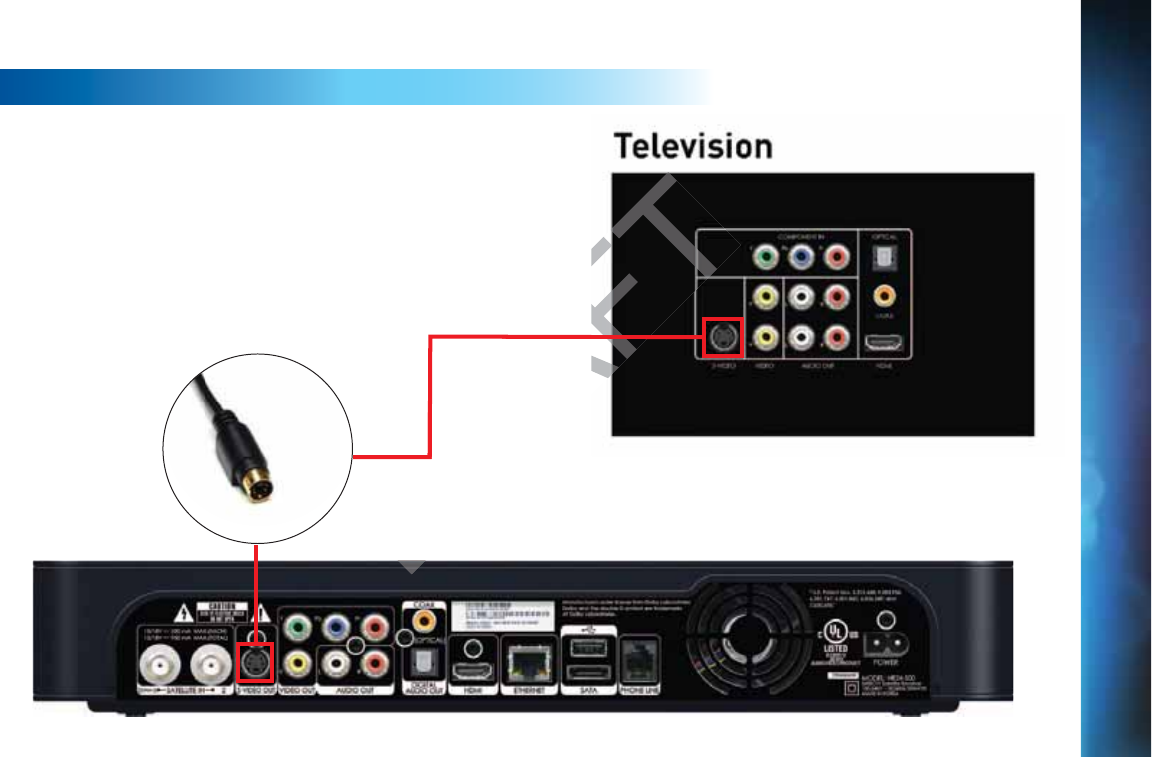
147
(This connection does not provide an HD picture.)
Example: TV with RCA Connectors
Here is an example of a TV that has an S-Video connector
as the best video input (Not all receivers have an S-Video
connector.)
S-Video requires a separate audio connection.
SD TV CONNECTIONS
S-Video
Cable
A
A
PP
E
E
N
N
D
D
IX 2:
CO
N
N
N
N
E
E
C
C
TIO
N
S
S
T
O
O
TV
&
&
&
EQUIPM
E
E
NT
APPENDICES
DRAF
DRAF
DRAF
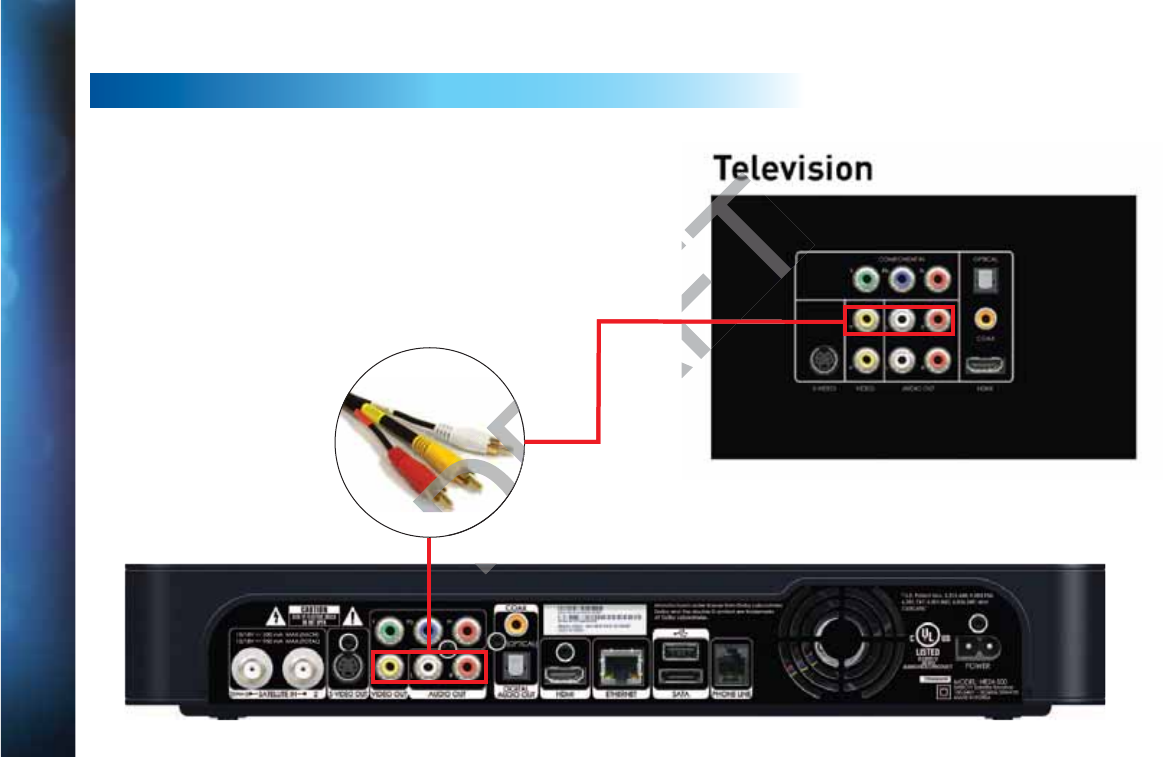
148
DIRECTV® HD DVR RECEIVER USER GUIDE
(This connection does not provide an HD picture.)
Example: TV with RCA Connectors
Here is an example of a TV that has RCA connectors as the best
video input.
RCA cables are often bundled as a three-way cable with one
video and two audio connections. You can also purchase a
single-connection RCA video cable, and a separate cable for
audio.
SD TV CONNECTIONS
RCA Video
and Audio
A
A
PPENDI
X
X
2
2
:
C
C
O
O
NN
E
E
C
T
T
I
O
O
NS
T
T
O T
V
V
&
&
E
Q
Q
UIP
M
M
E
E
NT
DRAF
DR
DRAF
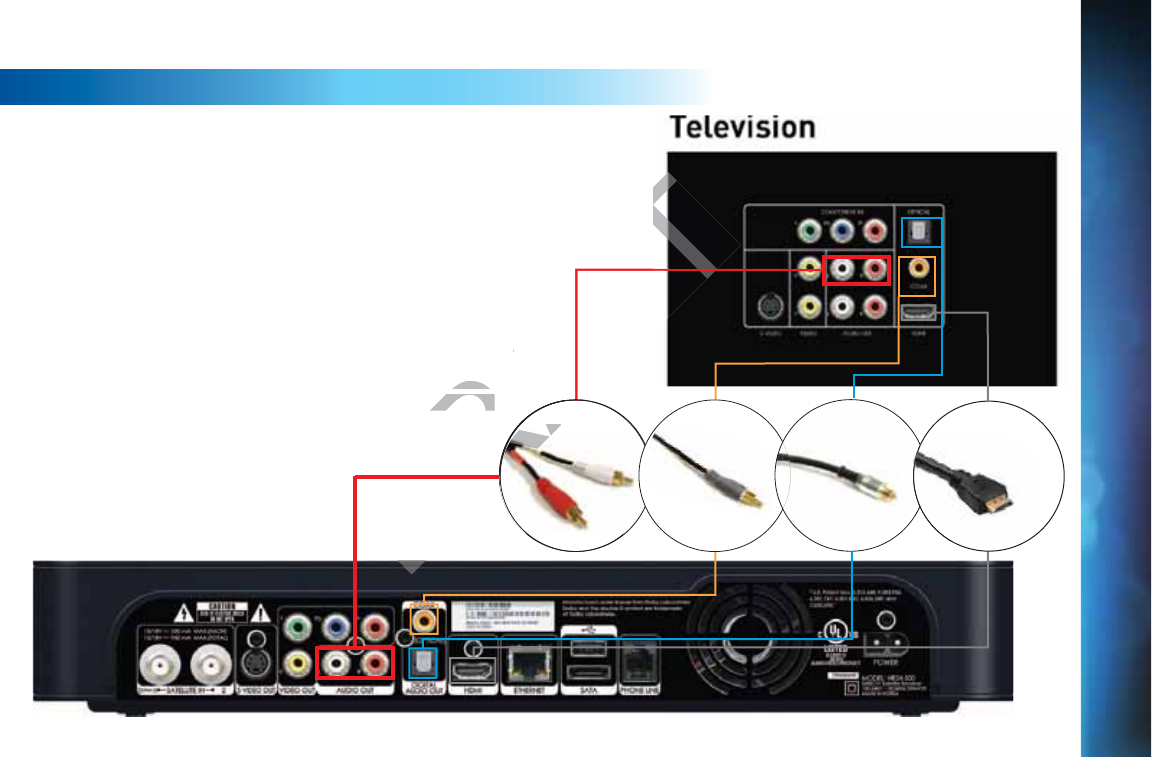
149
Of all the video connections, only HDMI provides an audio signal
with the video. The other connections all require a separate
audio cable. Of these, your best quality signal will be from the
Digital Audio Out/Optical connector, followed by the Digital
Coax connector, followed by the RCA Audio Out connector.
The connector you end up using may be determined by the
equipment you are connecting to. (For example, your home
theater system may support only the Digital Audio Out/Optical
connector.)
The red and white RCA audio out connectors are so common, it
is possible you may have one of these cables already. However,
these cables provide an analog signal, so you will be missing
out on the benefits of digital quality sound.
AUDIO CONNECTIONS
RCA Audio Digital Coax Digital Optical HDMI Cable
A
A
PP
E
E
N
N
D
D
IX 2:
CO
N
N
N
N
E
E
C
C
TIO
N
S
S
T
O
O
TV
&
&
&
EQUIPM
E
E
NT
APPENDICES
DRAFT
RA
D
DR
AFT
RA
RA
A
on, it t
owever, owev
missing missing
RCARCA
RCARCA

150
DIRECTV® HD DVR RECEIVER USER GUIDE
CONNECTIONS TO OTHER EQUIPMENT
In addition to your TV, you may wish to connect other
equipment, such as a DVD burner, VCR, or even a second TV
to your DIRECTV® Receiver. For the best-quality picture, it is
recommended you do not use a pass-through connection from
your TV or other equipment as an input to a DVD burner or
VCR. Instead, use an available connection from your DIRECTV
Receiver. For example, if you use the HDMI connection on
your DIRECTV Receiver to connect to your TV, you can use the
Component Video, Composite Video RCA, or S-Video Out to
connect to your DVD burner, VCR, or second TV.
A
A
PPENDI
X
X
2
2
:
C
C
O
O
NN
E
E
C
T
T
I
O
O
NS
T
T
O T
V
V
&
&
E
Q
Q
UIP
M
M
E
E
NT
DRAFT
RA
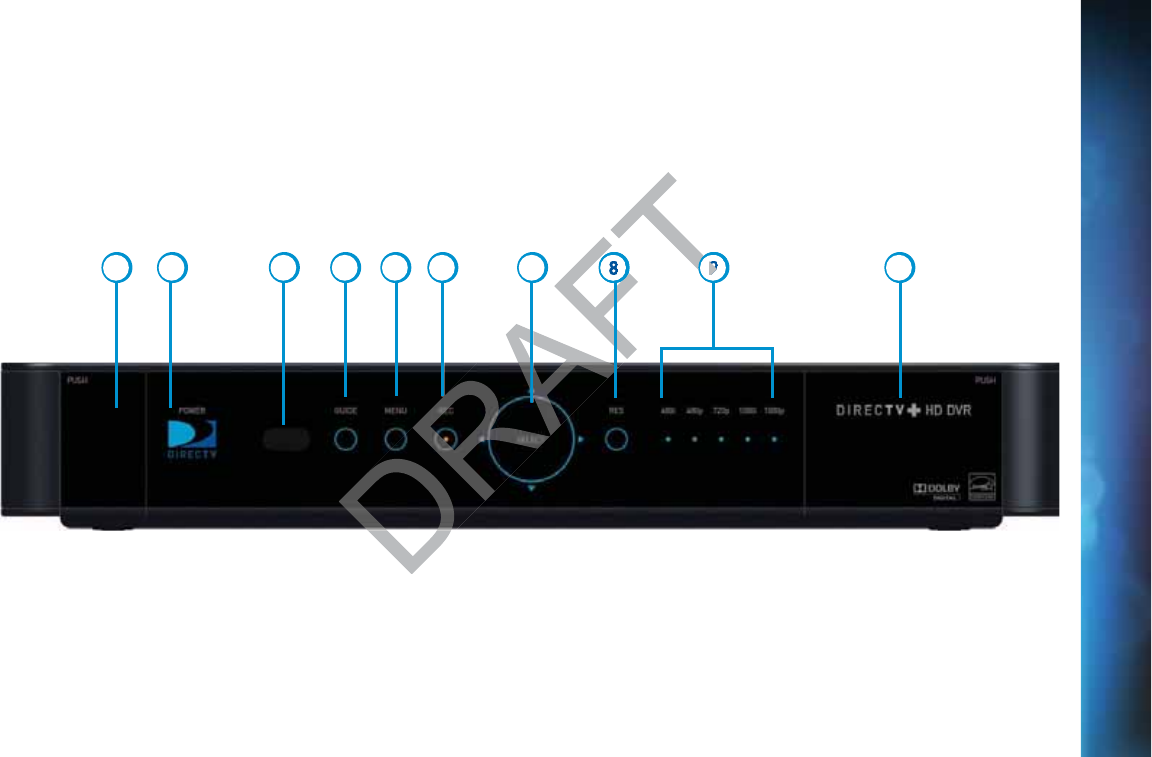
151
Fr
o
on
t Pa
ne
e
l Ex
a
m
p
pl
e
The buttons on the front panel perform the same functions as similarly named buttons on the remote control. You can use the front
panel buttons at any time, but they are especially useful if you misplace your remote control or the batteries die.
Your equipment may not look exactly like the model illustrated.
12 3 5 6 7 8 9 104
A
A
P
P
PE
N
N
D
D
I
X
X
3:
R
R
EC
E
E
I
V
V
E
E
R
R
FR
O
O
N
N
T
A
A
ND
B
B
B
ACK
P
P
AN
E
E
LS
APPENDICES
RA
AFT
R
FT
FT
T
T
9

152
DIRECTV® HD DVR RECEIVER USER GUIDE
1. DOOR PANEL, USB PORT – For future use. USB 2.0 Host (FRONT/REAR EACH 5V = 500mA)
2. POWER – Turns your DIRECTV® Receiver on or off. Your DIRECTV Receiver still records and receives messages when powered
off. The power light flashes when you press a key on the remote to let you know it has received the command.
3. REMOTE SENSOR – The infrared sensor picks up commands from the remote control. You cannot have any opaque object
between the remote and this sensor or else the command will not get through. If you have an optional RF remote, this sensor
is not used. With an optional RF remote, you can place your receiver inside a cabinet or any non-metal enclosure and it will
receive the remote control commands up to 200 feet away.
4. GUIDE – Displays the onscreen program guide.
5. MENU – Brings up the Main Menu to access settings and services.
6. RECORD – This button lights orange when a recording is in progress.
7. SELECT – Selects the item highlighted.
8. RES (RESOLUTION) – The RES key switches the output resolution of the DIRECTV Receiver. Each time you press the key, it
cycles to the next available resolution: 480i, 480p, 720p, 1080i and 1080p (supported on some models). Note: The RESOLUTION
button on the front panel only changes the resolution. It does not change the screen format (crop, stretch, letterbox, pillarbox).
The FORMAT button on the remote control cycles through all of the screen formats and resolutions. See Appendix 5 for
details.
9. RESOLUTION INDICATORS – Lights indicate the current resolution setting. 480i is the old analog TV setting. 480p is Enhanced
Definition TV, which is less than HD. 720p is the first level of HDTV. 1080p is the highest level of HDTV provided by the receiver.
To get the best out of HD, you should be using 720p or higher resolution for your HDTV.
10. DOOR / PANEL, ACCESS CARD – The access card slot, RESET button, and receiver ID and model number are located behind
the door panel.
A
A
PPENDI
X
X
3
3
:
R
R
E
E
CEI
V
V
E
R
R
F
F
RO
N
N
T A
N
N
D
B
B
A
A
CK PA
N
N
EL
S
DRAFT
ot
ot
rough. roug
nside a cabin
nside a
ervices.ces.
is in progress.s in progress.
he output resolution ohe output resolu
, 480p, 720p, 1080i an 480p, 720p, 1080i
he resolution. It does esolution. It does
ntrol cycles through ntrol cycles th
indicate the cur indicate the c
20p is the fi20p is the fi
sing sing
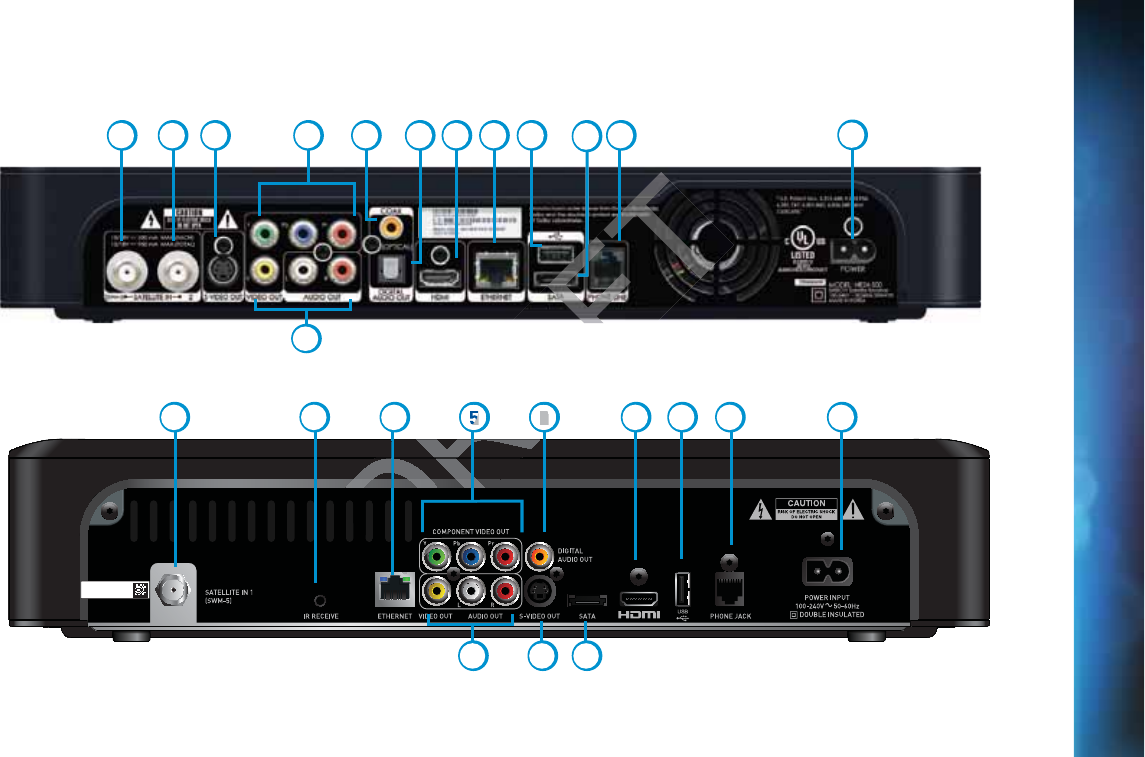
153
Ba
c
ck
P
an
n
e
el
Exa
m
mp
p
le
e
s
Your equipment may not look exactly like the model illustrated.
Warranty VOID
if Broken
or Removed
GENIE™ HD DVR
DIRECTV HD DVR
1
3
5 6 89 10
11
12 1314
4
12 3 6 7 8 9 10 11 12 13
5
4
A
A
P
P
PE
N
N
D
D
I
X
X
3:
R
R
EC
E
E
I
V
V
E
E
R
R
FR
O
O
N
N
T
A
A
ND
B
B
B
ACK
P
P
AN
E
E
LS
APPENDICES
DR
D
D
D
D
D
D
D
D
DR
DR
D
D
D
D
D
D
R
R
DR
RAF
R
DR
DR
D
D
D
A
D
RA
DR
RA
RA
5
A
RA
RA
6
R
F
FT

154
DIRECTV® HD DVR RECEIVER USER GUIDE
1. SATELLITE IN 1 – Connect one line from your satellite dish here. A Single Wire Multi-Switch (SWM) connection, if applicable, is
made to this satellite in port.
2. SATELLITE IN 2 – Connect the second line from your satellite dish here.
3. S-VIDEO OUT – A Standard-Definition video output.
4. RCA-Audio/Video Jacks – Standard-Definition output. You can use the entire row of RCA connectors (yellow, white and red) to
feed a VCR or DVD player/burner.
5. COMPONENT VIDEO OUT – Use this block to connect up component video cables (green, blue, red); use the white and red RCA
connectors below it for analog audio out. These connectors provide an HD picture, but do not support 1080p or 3D.
6. DIGITAL AUDIO OUT COAXIAL – Use this digital audio connection for sound.
7. DIGITAL AUDIO OUT OPTICAL – Use this digital audio connection for sound.
8. HDMI – Use this combination digital video and audio connector for the best picture quality. This is the recommended
connector for HD TV.
9. ETHERNET – Please refer to Appendix 4 for information on networking options on your HD DVR before connecting anything to
the Ethernet port.
10. USB – For future use. USB 2.0 Host (FRONT/REAR EACH 5V = 500mA)
11. SATA – Use this connector to add an external hard drive to your receiver.
12. PHONE JACK – Connect your phone line here to enable Pay Per View purchasing and Caller ID (if your phone service package
includes it).
13. POWER – Your receiver must be plugged in at all times to function properly.
14. IR RECEIVE – Connect an IR (infrared) extender or repeater here when your receiver is in a cabinet or otherwise not “visible” to
your remote control.
A
A
PPENDI
X
X
3
3
:
R
R
E
E
CEI
V
V
E
R
R
F
F
RO
N
N
T A
N
N
D
B
B
A
A
CK PA
N
N
EL
S
DRAFT
entire rowentir
nent video nent
cables (gre
ables
provide an HD picturprovide an HD pictur
nnection for sound.on for s
o connection for sounonnection for sou
dio connector for thedio connector for the
or information on netinformation on net
(FRONT/REAR EAC(FRONT/REAR EA
n external hard dn external har
here to here to

155
To use your DIRECTV HD DVR on your home network, you will need:
A compatible DIRECTV Receiver, such as the DIRECTV HD DVR (models HR44, HR34, HR20 or later) or DIRECTV Plus® DVR
(model R22)
A broadband Internet connection, with a minimum connection speed of 750 kbps or higher (DSL or cable).
A network router with an available Ethernet port, and/or wireless capability.
The instructions for connecting to a network vary depending on whether or not you have Genie or Whole-Home DVR Service.
Please see the appropriate sections that follow.
NOTE: For the most current options and instructions to connect your receiver to the Internet, please visit
directv.com/getconnected.
If
y
y
ou h
a
v
e
e
Wh
o
ol
e
e-
H
Ho
me
o
o
r
Ge
e
ni
e
e
HD D
V
V
VR
servi
c
ce
:
Professionally Installed DIRECTV CINEMA Connection Kit: Schedule a professional installation appointment at
directv.com/getconnected.
Wireless Self-Installed DIRECTV Cinema Connection Kit: If you already connect to the Internet via WiFi, you can order this
wireless kit at directv.com and connect yourself.
If
y
y
ou d
o
o
n
no
t
ha
a
ve
e
W
W
hole
-
-H
om
m
e
D
DV
R or
G
G
enie D
V
VR
s
er
v
i
ce:
Wired: The fastest, most reliable connection. Your house must be wired for Ethernet, or you must run cables from a
network router to your DIRECTV HD DVR.
Wireless: This can be easiest method if you already connect to the Internet via Wi-Fi. However, wireless connections may
be slower and somewhat less reliable than wired. You can order the Wireless DIRECTV CINEMA Connection Kit from
directv.com, or at 1.800.531.5000.
AP
P
P
E
E
NDIX
4
4
: H
O
O
W
W
W
T
T
O N
E
T
T
W
O
O
RK
Y
Y
Y
OUR
H
H
D
D
D
VR
APPENDICES
DRAFT
not you have Ge
not you ha
your receiver to the Ir receive
ervi
c
ce
::
nection Kit: Schedulnection Kit: Sche
Connection Kit: If yoConnection
ct yourself.ct yourself.
D
DV
R or
G
G
enieDVR or en
ion. Youion. You

156
DIRECTV® HD DVR RECEIVER USER GUIDE
If you have Whole-Home DVR Service:
PROFESSIONALLY INSTALLED DIRECTV CINEMA CONNECTION KIT
Because Whole-Home DVR service uses a network to share programs between your DIRECTV
receivers, only a professionally installed DIRECTV CINEMA Connection Kit or the DIRECTV
CINEMA Connection Kit - Wireless can be used to connect to the Internet.
Never connect an Ethernet cable to an HR24 or H24 receiver with Whole-Home DVR
service; this will disable the Whole-Home network and disable playlist sharing.
If you have DECA Connected Home Adapters connected to your HD DVR (Models HR20-
23, R22), you must use either a professionally installed DIRECTV CINEMA Connection
Kit, or the DIRECTV CINEMA Connection Kit - Wireless, to connect to the Internet.
Your professionally installed DIRECTV CINEMA Connection Kit will include a Broadband DECA
similar to one shown of the models here.
The DIRECTV CINEMA Connection Kit connects to a coaxial cable and an Ethernet cable
connected to your home router to provide home network and Internet connectivity to all of the
Whole-Home capable receivers in your household.
If you have Whole-Home DVR Service and are having difficulty accessing the DIRECTV
CINEMA service or DIRECTV™ Media Share features, check to ensure the Broadband DECA is
powered and the coaxial cable and Ethernet cable are firmly connected.
Power Supply
DECA
Power Supply
DECA-2
A
A
PPENDI
X
X
4
4
:
H
H
O
O
W
T
T
O N
E
E
TW
O
O
RK
Y
Y
O
O
U
U
R
R
HD
D
D
V
V
R
DRAFT
n you
n yo
the DIREthe
h h
Whole-Home DVR
Whole-Home D
e playlist sharing.e playlist sharing.
your HD DVR (Modelr HD DVR
DIRECTV CINEMA CoDIRECTV CINE
ss, to connect to the to connect to th
nection Kit will includnection Kit will
ts to a coaxial cable o a coaxial cable
home network and Inhome network
household. household.
nd are having diffind are having d
e features, ce features,
cable acable a

157
SELF-INSTALLED DIRECTV CINEMA CONNECTION KIT - WIRELESS
You can also order the DIRECTV CINEMA Connection Kit - Wireless from directv.com, or by calling 1.800.531.5000. Please follow the
installation instructions in the kit’s user guide.
If you do not have Whole-Home DVR service:
WIRED
St
e
ep
1 -
C
C
o
on
ne
ct
t
y
y
o
u
r DI
RE
E
CT
V
V
HD
D
DVR
t
t
o your
r
r
ou
t
te
r
Connect one end of your Ethernet cable to the Ethernet port on the back
of your router.
Connect the other end of the Ethernet cable to the Ethernet port on the
back of your DIRECTV HD DVR.
Ethernet cable
connects to an
unused port on the
router
Ethernet cable plugs
into receiver
D
D
i
r
re
e
c
ct
t
C
C
o
o
on
n
n
n
n
e
c
c
ct
io
o
n
Router DVR Receiver
Ethernet Cable
AP
P
P
E
E
NDIX
4
4
: H
O
O
W
W
W
T
T
O N
E
T
T
W
O
O
RK
Y
Y
Y
OUR
H
H
D
D
D
VR
APPENDICES
DRAFT
r
r
ou
t
te
rrouter
ort on the back the back
o theo the
Ethernet port oEtherne
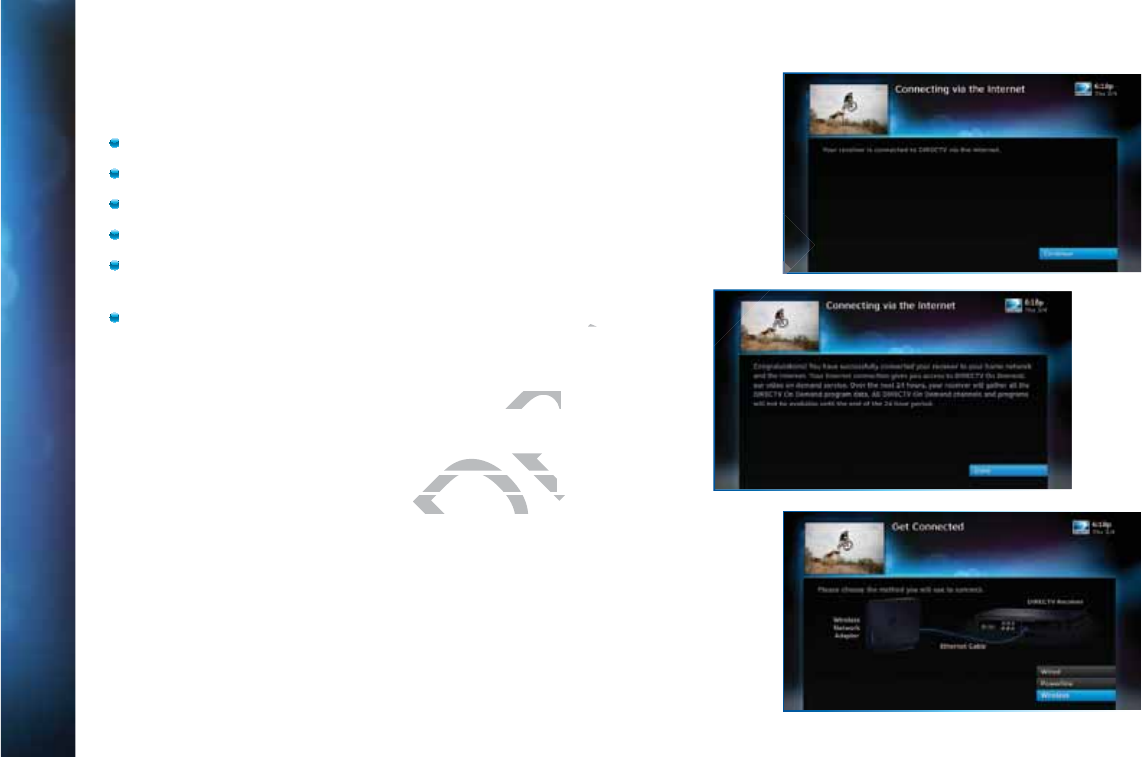
158
DIRECTV® HD DVR RECEIVER USER GUIDE
S
St
ep
p
p
2
-
V
V
er
i
f
y
th
h
at
y
y
ou
a
a
r
re
c
c
o
n
n
n
ne
ct
e
ed
To verify you are connected:
Press MENU on your DIRECTV Remote
Select Settings & Help
Select Settings
Select Network Setup
Choose Connect Now (or Test Connection if you have
connected previously)
Select Continue after successfully connecting to DIRECTV via
the Internet (See figure A).
Select Done to complete the setup process (See figure B).
If your DIRECTV HD DVR does not immediately recognize the
network connection, you will get the option to choose the
connection method. Choose Wired (See Figure C). Follow the
onscreen instructions.
Figure A
Figure B
Figure C
A
A
PPENDI
X
X
4
4
:
H
H
O
O
W
T
T
O N
E
E
TW
O
O
RK
Y
Y
O
O
U
U
R
R
HD
D
D
V
V
R
DRAFT
TV via
gure B).gure B).
ately recognize the ately recognize
ion to choose the ion to choose the
e Figure C). Follow t
e Figure C). Follow t
Figure B

159
WIRELESS
Create a wireless connection between your wireless router and your DIRECTV HD
DVR, so your receiver can access the Internet.
Along with the Network Requirements at the beginning of Appendix 4,
you will need:
A wireless adapter that uses an Ethernet port to connect to a media device,
preferably the DIRECTV CINEMA Connection Kit - Wireless, as mentioned
above [USB devices are not supported by the DIRECTV HD DVR].
A wireless router (in place of a regular router). You must have initialized your
wireless device for your home network before beginning to network your
DIRECTV HD DVR.
St
e
ep
1:
Co
o
n
nn
ect
yo
o
u
ur
DIR
E
C
TV
H
D DVR
t
to
o
the
wi
r
re
less
a
d
da
pt
er
r
Connect one end of the Ethernet cable to the Ethernet port on the back of the
wireless adapter. Connect the other end of the Ethernet cable to the Ethernet port
on the back of your DIRECTV HD DVR. If using the DIRECTV Cinema Connection
@^i·L^gZaZhh![daadlXdccZXi^dc^chigjXi^dch[djcY^ci]ZjhZg¼hbVcjVai]Vi
came with the device (or go to directv.com/getconnected) to determine
proper connection.
Plug your wireless adapter into an electrical outlet.
Ethernet cable plugs
into DVR Receiver
Ethernet cable
connects to the
Ethernet port of the
wireless adapter.
Ethernet Cable
Wireless Transceiver DVR Receiver
AP
P
P
E
E
NDIX
4
4
: H
O
O
W
W
W
T
T
O N
E
T
T
W
O
O
RK
Y
Y
Y
OUR
H
H
D
D
D
VR
APPENDICES
DRAFT
a device, a dev
entioned entioned
R].
ave initialized your ave initialized
g to o
network your network your
R
t
to
o
the to
he
he he
Ethernet port on Ethernet port on
of the Ethernet cab
of the Ethernet cab
ng the DIRECTng the DIREC
djcY^cdjcY^c
nne
nne
Wire
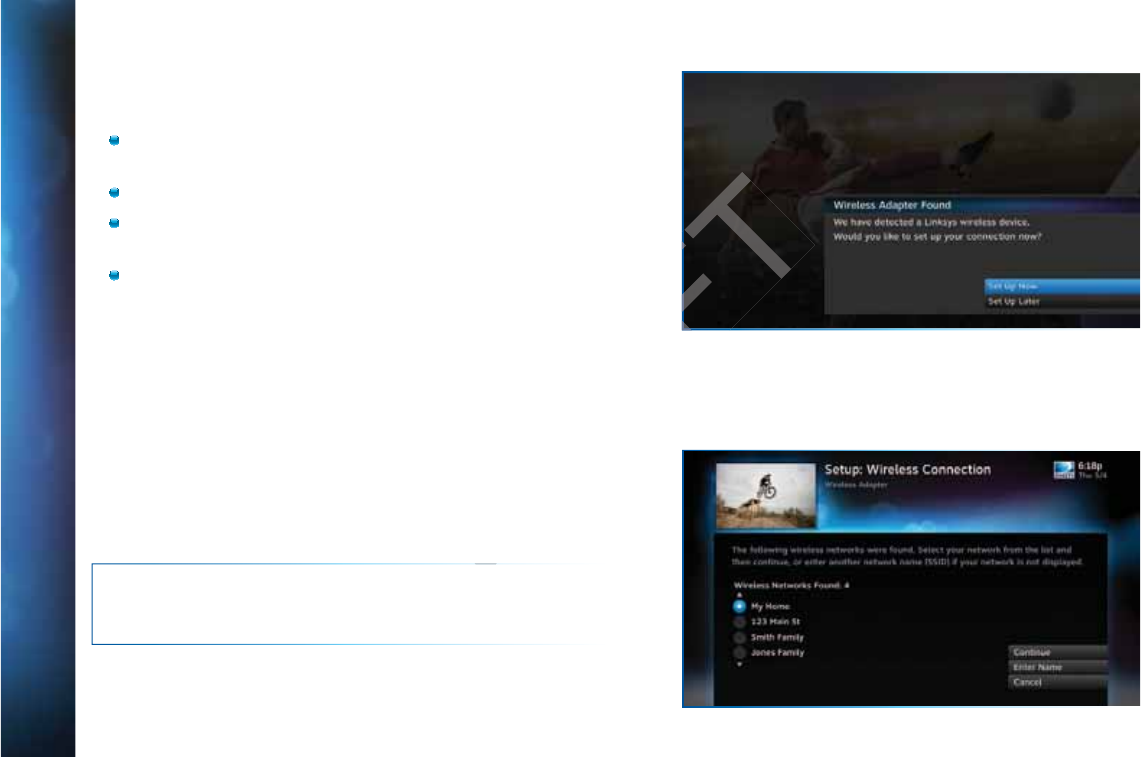
160
DIRECTV® HD DVR RECEIVER USER GUIDE
S
St
ep
p
p
2
-
-
E
E
ns
u
ur
e
e
t
h
e
w
w
wi
re
l
e
s
ss
a
a
d
da
a
p
pt
er
i
s
re
e
co
o
g
n
iz
e
e
ed
b
by
y
y
ou
r
r
h
ho
m
e
n
n
e
et
wo
o
o
rk.
Once your router detects the wireless adapter it will prompt
you to configure the two devices.
Select Set Up Now.
Highlight your wireless network and press SELECT to display
a blue dot next to your network. Then select Continue.
Follow the onscreen instructions to complete the set-up
process of the wireless adapter.
NOTE: If you are having difficulty connecting to the Internet or
need more information, visit www.directv.com/getconnected.
A
A
PPENDI
X
X
4
4
:
H
H
O
O
W
T
T
O N
E
E
TW
O
O
RK
Y
Y
O
O
U
U
R
R
HD
D
D
V
V
R
A
A
PPENDI
X
X
4
4
:
H
H
O
O
W
T
T
O N
E
E
TW
O
O
RK
Y
Y
O
O
U
U
R
R
HD
D
D
V
V
R
DRAFT
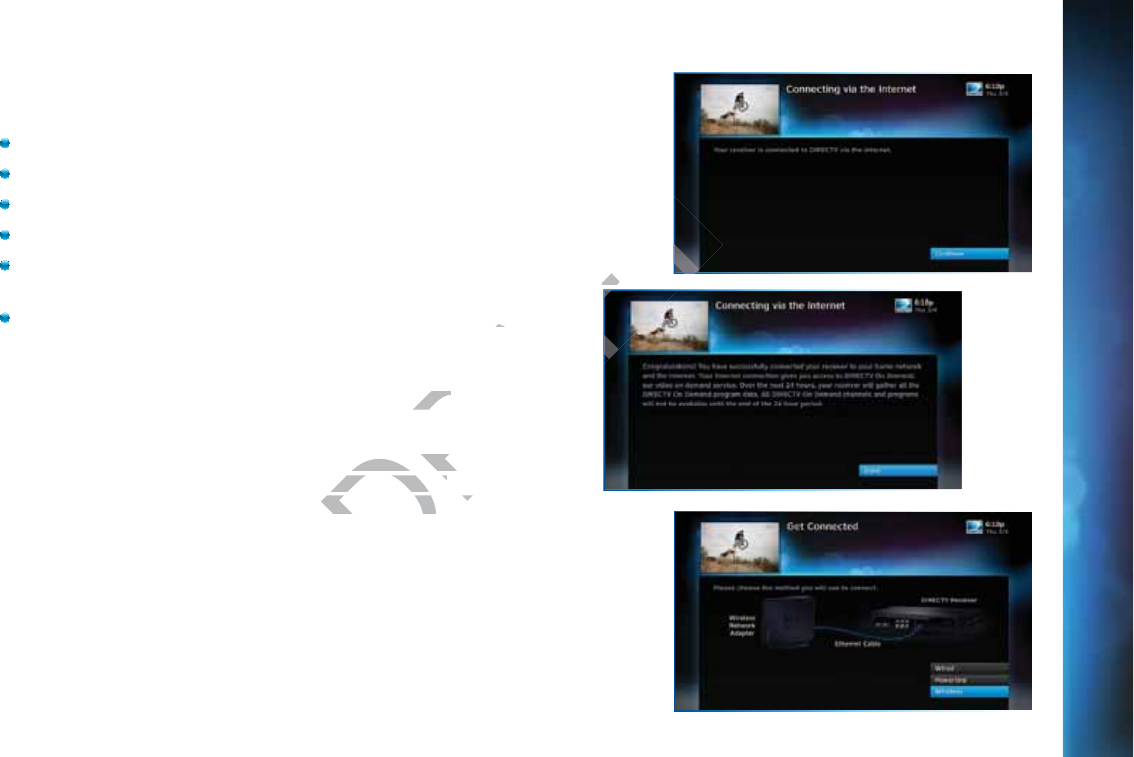
161
S
St
ep
p
p
3
-
V
V
er
i
f
y
th
h
at
y
y
ou
a
a
r
re
c
c
o
on
n
n
ne
ct
e
ed
To verify you are connected:
Press MENU on your DIRECTV Remote
Select Settings & Help
Select Settings
Select Network Setup
Choose Connect Now (or Test Connection if you have
connected previously)
Select Continue after successfully connecting to DIRECTV via
the Internet (See figure A).
Select Done to complete the setup process (See figure B).
If your DIRECTV HD DVR does not immediately recognize the
network connection, you will get the option to choose the
connection method. Choose Wireless (See Figure C). Follow the
onscreen instructions.
Figure A
Figure B
Figure C
AP
P
P
E
E
NDIX
4
4
: H
O
O
W
W
W
T
T
O N
E
T
T
W
O
O
RK
Y
Y
Y
OUR
H
H
D
D
D
VRAP
P
P
E
E
NDIX
4
4
: H
O
O
W
W
W
T
T
O N
E
T
T
W
O
O
RK
Y
Y
Y
OUR
H
H
D
D
D
VR
APPENDICES
DRAFT
via
re B).re B).
ely recognize the ly recognize t
n to choose the n to choose the
ee Figure C). Follow
ee Figure C). Follow
Figure BFig

162
DIRECTV® HD DVR RECEIVER USER GUIDE
SCREEN FORMAT & RESOLUTION
In addition to resolution and interlacing, a television picture is also defined by its VheZXigVi^d¸gZ[Zgg^c\idi]Zh]VeZd[i]ZhXgZZc
as defined by the ratio of the screen’s width to its height.
;dgVcVad\IK!i]ZVheZXigVi^d^h)jc^ihl^YZWn(jc^ih]^\])/(#I]^h^hi]Z[Vb^a^Vgh]VeZd[XdckZci^dcVaIKh¸ha^\]ianl^YZg
i]Vci]ZnVgZiVaa#H9IKVcY:9IKe^XijgZhXVcWZZ^i]Zg)/(dg&+/.#;dg=9IKWgdVYXVhih!i]ZVheZXigVi^d^h&+/.¸cZVganil^XZ
as wide as it is tall. This is approximately the shape of movies shown in theaters, which makes HD an ideal format for viewing
movies on TV. You will be able to see much of what is captured on film, but lost on an SDTV display.
>cdgYZgiddei^b^oZi]ZY^heaVnd[egd\gVbhdcndjgiZaZk^h^dc¸[dgZmVbeaZ!^[ndjVgZlViX]^c\V)/(X]VccZadcV&+/.IKdg
k^XZkZghV¸ndjbVndXXVh^dcVaancZZYidX]Vc\Zi]ZgZhdaji^dcVcY$dghXgZZc[dgbVi#I]ZgZVgZild`Znhi]ViXVcWZjhZYid
make changes: the FORMAT key on the remote control and the RES (Resolution) key on the front panel of the DIRECTV HD DVR.
To change your Screen Format, TV Ratio, or TV Resolution settings, press MENU, select “Settings & Help”, then “Settings”, and
then “HDTV”.
FO
O
RM
AT
T
K
K
ey
o
n
R
Re
e
mote
C
on
tr
ol
Press the FORMAT key on your remote to cycle the resolutions settings supported by your TV, as well as the screen formats in
conjunction with each individual resolution. Available screen formats such as crop, stretch or letter/pillar box, are based on the TV
Ratio setting. With each press, an onscreen message will let you know what the current resolution/format setting is.
For example, if you indicated that your TV supports only 1080i, 480i and 480p and it is a 16:9 television, and Native is turned off*,
the cycle of settings for the FORMAT key are as follows:
1st press: 480i/Stretch 5th press: 480p/Letter box 9th press: 1080i/Crop
2nd press: 480i/Letter box 6th press: 480p/Crop 10th press: repeat cycle
3rd press: 480i/Crop 7th press: 1080i/Stretch
4th press: 480p/Stretch 8th press: 1080i/Letter box
A
A
PPENDI
X
X
5
5
:
A
A
B
B
OU
T
T
H
H
I
G
G
H-D
E
E
FINI
T
T
I
O
O
N
N
DRAFT
Z[Vb^a^VZ[Vb
=9IKWgdVYXVh
=9IKWgd
theaters, which ma
theaters, wh
m, but lost on an SDT
m, but lost on an S
¸[dgZmVbeaZ!^[ndjVdgZmVbeaZ
^dcVcY$dghXgZZc[dgY$dghX
the RES (Resolution)the RES (Resolu
on settings, press MEettings, press ME
ycle the resolutions sycle the resolutions s
on. Available screen fon. Available scre
creen message will l
creen message will l
V supports onlyV supports on
e as folloe as follo

163
NOTE: * In Native mode, the receiver automatically adjusts the resolution to match individual TV programs as they are tuned.
If Native is turned on, the FORMAT key cycles through Stretch, Letter and Crop for the current TV program’s native resolution. The
FORMAT key allows you to easily cycle all resolution and format settings with a single key until the picture displays the way you
like it.
If pressing this key causes a loss of video and audio, continue to press it until the picture returns. (Wait a second between presses
to allow the Receiver to change the resolution.) This can happen if your settings include a resolution that your TV doesn’t support.
To correct this, you’ll need to change your resolution setting: Press MENU, select “Settings & Help”, “Settings”, “HDTV” and then
select “TV Resolutions”. Mark or unmark the TV Resolutions to display the resolutions supported by your television.
Re
s
so
luti
o
on
n
(RE
S
S)
K
ey
on
R
Re
ce
e
iv
er
r
Fron
t
t
Pa
nel
This key is used to cycle through all available resolutions on your DIRECTV HD DVR. It does not cycle through format settings.
If video and audio are not appearing, it may be because the current resolution setting is not supported by your television. By
pressing this key, you can check all available resolutions to see if that solves the problem. The lights next to the RES key on the
front panel will light below the resolution to which the receiver is set; they will change with each key press.
A
P
P
PE
N
N
D
D
I
X 5: AB
O
O
U
T
T
HIG
H
H
H
-DEFINIT
I
I
ON
APPENDICES
DRAFT
ngle
ngl
ntil the picture ret
ntil the pict
settings include a res
settings include
MENU, select “Setting
MENU, select “Setting
splay the resolutions say the reso
ons on your DIRECTV ons on your DIR
ause the current resoause the current re
solutions to see if thatutions to see if that
which the receiver is swhich the rece
164
DIRECTV® HD DVR RECEIVER USER GUIDE
SUPPORTED RESOLUTIONS
The following table shows the resolutions that can be output from each type of connection:
Output Connection Available Resolutions
HDMI 1080i, 1080p, 720p, 480i, 480p
Component Video (YPbPr) 1080i, 720p, 480i, 480p
S-Video 480i
Video (RCA Type/Yellow) 480i
NOTE: 720p, 1080i and 1080p are HD formats: 480i and 480p are not. S-Video and RCA outputs display all resolutions as 480i.
A
A
PPENDI
X
X
5
5
:
A
A
B
B
OU
T
T
H
H
I
G
G
H-D
E
E
FINI
T
T
I
O
O
N
N
DRAFT
T
T
T
T
FT
AF
RA
RA
tion
0p, 480i, 480p0p, 480i, 480p
720p, 480i, 480p0p, 480i, 4
480i480
480i4
D formats: 480i and 48D formats: 480i and
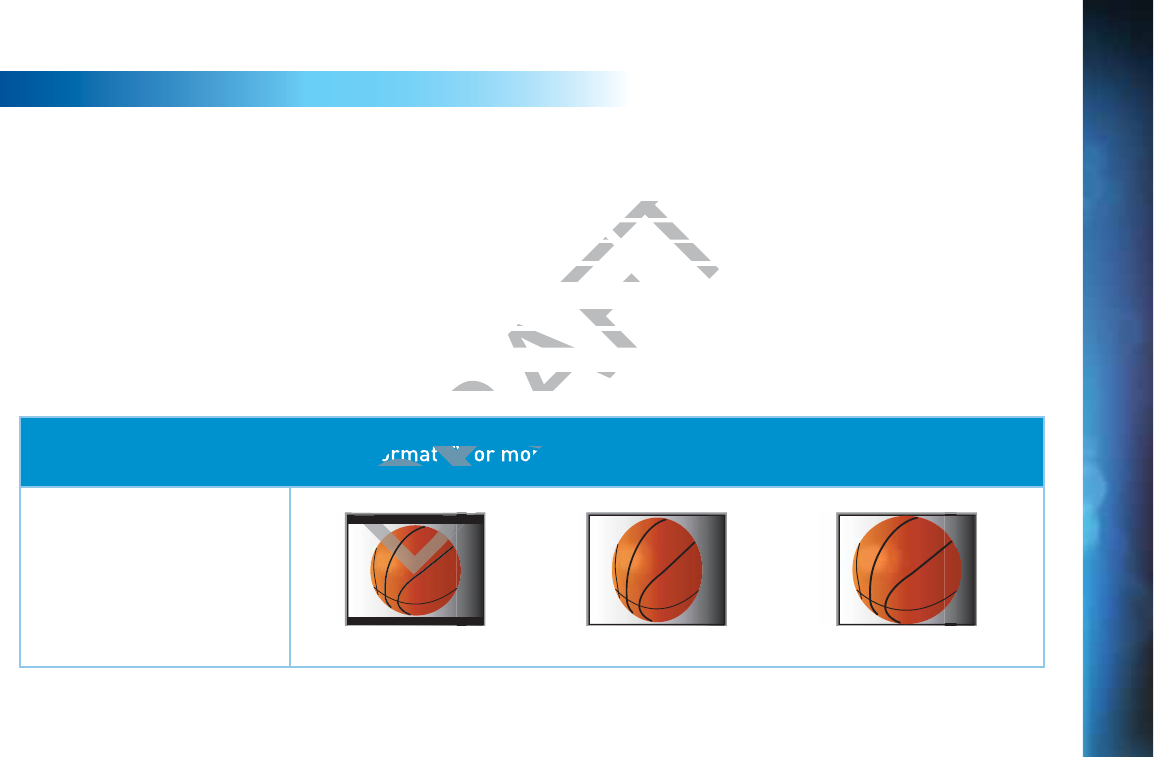
165
WIDE-SCREEN VS. STANDARD FORMATS
4
:3
3
TVs
S
S
h
ho
wi
ng
g
1
6:
:
9 pr
og
g
ram
For a standard 4:3 TV showing a wide screen program, the program is too wide to fit on the screen. To alleviate this, choose:
Letterbox: With this format, the 16:9 image is shrunk until the entire width of the program fits on your TV. Since the aspect ratio
of the program is maintained, the image is no longer tall enough to fill your screen, so gray or black bars are seen at the top and
bottom of the screen To change the bar color, press MENU, select “Settings & Help”, “Settings”, “HDTV” and then “Video”. Select the
desired bar color. See your TV’s owner’s manual for information on the best color for your set.
Stretch: In the Stretch setting, instead of adding bars to the top and bottom, the 16:9 program image is stretched vertically until it’s
tall enough to fill the screen. Your entire screen will be full, but the program images are stretched to compensate.
Crop: This format crops (cuts off) the left and right portions of the 16:9 frame so it fits the 4:3 screen.
If your display is a 4:3 format TV or monitor, your format options include these:
For 16:9 program signals:
Letterbox Stretch Crop
A
P
P
PE
N
N
D
D
I
X 5: AB
O
O
U
T
T
HIG
H
H
H
-DEFINIT
I
I
ON
APPENDICES
RAFT
f the prograf the p
r screen, so gray
r screen, so
ings & ings
Help”, “Settin
p”, “Se
he best color for your
he best color for your
p and bottom, the 16:9p and bottom,
but the program imagt the program im
tions of the 16:9 framtions of the 16:9 fram
DRA
DR
RA
DR
format TV or mon
D
D
D
D
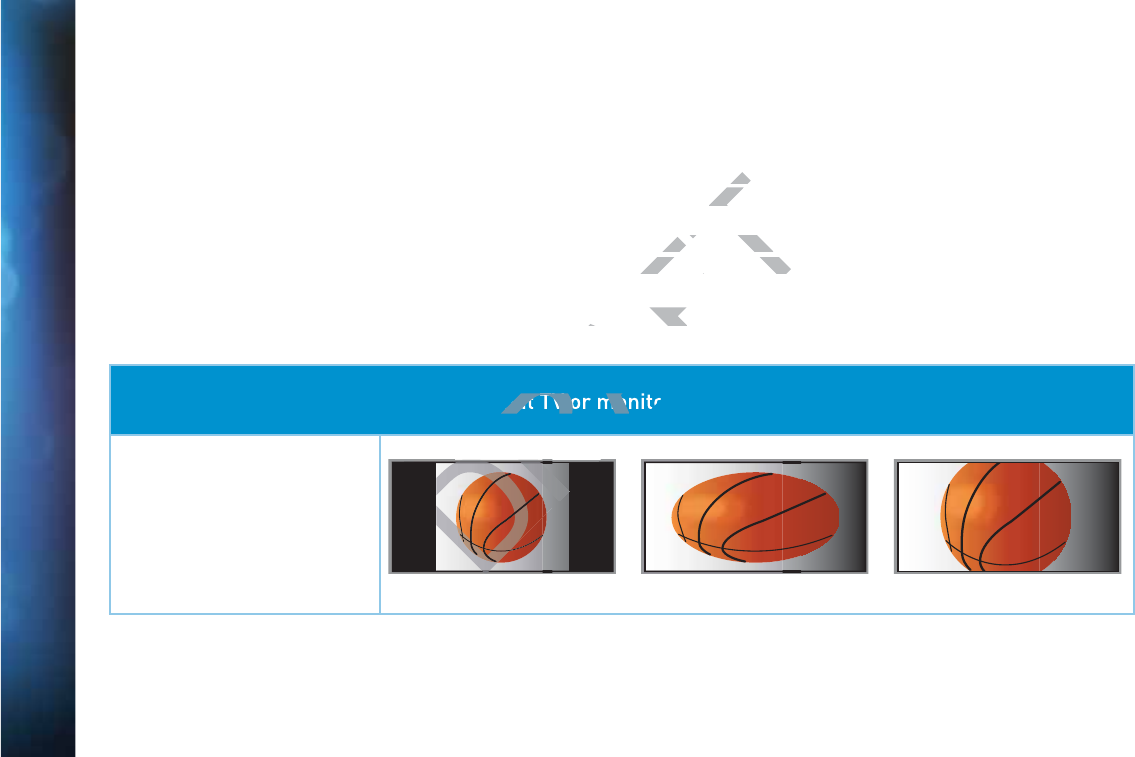
166
DIRECTV® HD DVR RECEIVER USER GUIDE
16
:9
9
TVs
S
howi
n
ng
4
:3
pro
g
gr
ams
For a wide screen 16:9 TV showing a standard 4:3 TV program, the program is too tall to fit the screen. Your choices here include:
Pillar Box: Here the 4:3 image is shrunk until the entire height of the program fits on your TV. Since the aspect ratio is maintained,
the image is no longer wide enough to fill the screen, so gray or black bars are seen at the left and right edges. To change the bar
color, press MENU, select “Settings & Help”, “Settings”, “HDTV” and then “Video”. Select the desired bar color option. See your TV’s
owner’s manual for information on the best color for your set.
Stretch: In this setting, instead of adding bars to the sides, the 4:3 program image is stretched horizontally until it’s wide enough to
fill the screen. Your entire screen will be full, but the images are a little stretched to compensate.
Crop: This format crops (cuts off) the top and bottom of a 4:3 frame, keeping the 4:3 ratio intact.
If your display is a 16:9 format TV or monitor, your format options include these:
For 4:3 program signals:
Pillar Box Stretch Crop
A
A
PPENDI
X
X
5
5
:
A
A
B
B
OU
T
T
H
H
I
G
G
H-D
E
E
FINI
T
T
I
O
O
N
N
RAFT
see
se
Video”. SeVideo
gram image is stret
gram image is
ttle stretched to com
ttle stretched to com
frame, keeping the 4frame, keepi
RA
DR
RA
RA
mat TV or mon
DR
R
DR
D
D
DR
D
R

167
APPENDICES
DRAFT

168
DIRECTV® HD DVR RECEIVER USER GUIDE
A
A
Access Card - 7, 8
,
,
76, 83, 102, 104, 140,
152
Advance - 12, 70, 176
Adv Whole-Home HD DVR - 15
,
24
,
71,
83
,
96
,
98, 122
Album - 58
All Movies - 20
,
25
,
30, 31, 32, 33, 34, 35,
49
Artist - 58
Aspect Ratio - 78, 162, 165, 166
Audio Connections - 15, 55, 98, 144, 149
audio options - 76
Audio options - 80
Audio Sync - 15, 55
,
98
autorecord - 48
Autorecord - 28, 174
Auxiliary Equipment - 12
,
142, 144
B
Back Panel - 98, 99, 153
Batteries - 7, 10, 104
,
107, 108, 109, 151
C
Cables - 7
,
55, 66, 98
,
99
,
104, 105
,
106,
110, 111, 115, 119, 123, 125
,
127
,
142
,
,
143, 148, 149, 154, 155, 156
,
157
,
159
Caller ID - 15, 26, 56, 60, 98
,
115
,
,
154
Call Log - 60
Cast & Crew - 16, 73
Channel Banner - 21, 22
,
,
23
,
,
24, 77
Clock - 76
,
79, 97
Closed Captioning - 21
,
,
22, 79
Component Video Out - 154
Component Video Output - 143
Connections - 40, 74, 104, 105 106 114
139, 141, 142, 144
,
145, 146 147 148
149, 150, 155
Customer Care - 123 128
D
3D - 18, 143 145 146 154
3D Channels - 15 18
Date & Time - 19 53
Defaults - 39 50 51, 83
,
84
,
97
Deleting - 43 48
Destination Buttons - 11
Digital Audio - 99, 144, 149, 154
DIRECTV Active Channel - 26, 56, 57, 98,
176
DIRECTV Cinema - 118, 155
,
156, 157
,
,
159, 175
DIRECTV® DoublePlay™ - 63
DIRECTV Everywhere™ - 53, 74
DIRECTV Mode - 107, 109
DIRECTV Protection Plan - 98, 125
DIRECTV™ Mobile Apps - 73
,
74
DIRECTV® Whole-Home DVR Service -
66
,
67
,
68, 69, 70, 83
Disk Space Bar - 46
Display - 17
,
76, 97
Dolby Digital - 15, 80, 98
Download - 18
,
,
31
,
34, 48, 103, 110, 129
DVD burner - 150
DVD Control Buttons - 34
DVD Schedule Mobile App - 34
DVR control buttons - 12, 13, 43
,
70
E
Episodes - 16, 32, 42, 44
,
47
,
51, 118,
174, 175
Erase - 34
,
84
Error Message - 103, 116
Ethernet - 66, 154
,
,
155
,
,
156
,
,
157
,
,
159
Exit - 11, 43
,
61, 96, 176
Extras - 15, 25
,
,
26
,
,
53, 55, 56, 57
,
,
58, 59,
60
,
61
,
62, 115
F
FAQs - 91, 101
,
105
,
106, 107, 108, 109,
110, 111, 112, 113
,
114, 115
,
116
,
117
,
,
118, 119
Favorite Channels - 15
,
17, 20, 21, 22
,
26
,
73
,
75, 90, 97
FCC Customer Information - 5
,
121, 126,
IN
D
D
EX
DRAFT
4343
10505
,
10606
,,
1141
,
146146
,
147
,
1488
,
,
1233
,
128128
,
14314
,
,
1455
, ,
146146
,
15454
hannels - hannels
15
,
1818
ate & Time - ate & Time
19
,
5353
Defaults - faults -
3939
,
5050
, ,
5151
Deleting - Deleting -
43
,
48
Destination Buestination B
Digital Audial Audi
DIRECTVECT
176176
DIR
DIR

169
127, 128
Filtering the Guide - 19
Folders - 46
Front Panel - 7
,
8, 102, 106, 107, 108
,
109, 111, 114, 151, 152
,
162
,
163
,
174
G
GameSearch - 64
Genie Clients - 37
,
71
,
94, 95, 97
,
,
99
Genie HD DVR - 71
,
72
,
94, 95, 97, 155
Genie Recommends - 27, 36, 37
GSN Game Lounge - 26
,
,
56
,
57
Guide - 11
,
16, 18, 19
,
42
,
77
,
,
91, 112
,
152, 176
channel types - 16, 17, 18
customize - 17
,
,
23
customizing - 20
filtering - 19
guided setup - 140
jump to a date & time - 19
options - 19
H
HDMI - 99
,
119
,
,
143, 145
,
,
149, 150
,
,
154,
164
Help - 10, 17, 20, 25, 26
,
67, 68
,
75, 76,
85, 86
,
90, 91, 97, 104
,
,
108, 111
,
,
112, 158,
161, 162, 163, 165, 166
History - 25
,
48, 50, 116
Home Page - 32
I
Icons - 16, 48, 174
,
,
175
Info - 11, 15
,
16, 21
,
24
,
29, 31, 41 42 44
62, 69
,
77, 85, 86, 98, 121, 176
Interactive Channels - 15, 18
Internet Connection - 74 141
Internet radio - 61
In Theaters - 30, 34 35
J
Just Added - 30
K
Keep - 33 41 44, 46
Keyword Search - 28, 48
L
Language - 16
,
,
23
,
,
77, 80, 87, 97
Last 4 - 22
Live Buffer - 14
Live TV - 11, 12, 14, 43, 63, 64, 76, 90
,
96,
116, 176
Local Channels - 17
Lock - 84, 86
M
M
Mail - 21
Manual Recordings - 39
,
50
Mark & Delete - 45
Media Share - 58, 156
Menu - 10
,
11, 25, 26, 176
Messages - 21
,
26
,
55, 56, 101, 103
Mini Guide - 15, 20
Mobile Apps - 39, 52, 53, 55
,
,
73, 74
Model Number - 122, 126
Mode Switch - 10, 12, 81
,
,
104, 107
,
,
109,
140, 176
Movies - 16, 19
,
20, 25, 27, 30, 31, 32
,
33,
34, 35
,
45, 49, 73, 74, 87
,
,
141, 162
Movies Ratings - 87
Music & Photos - 26, 55
,
56
,
58, 141
Mute - 111, 176
My Playlist - 46, 115, 117, 118
N
Navigation Buttons - 11
Network - 7
,
,
46, 58
,
66
,
76, 95, 96, 127,
128, 141, 155, 156
,
158
,
159
,
160
,
161
New Movie Releases - 30
News Mix Channels - 18
IN
D
D
EX
APPENDICES
DRAFT
11
, ,
4242
,
44
,
6
1818
44
, ,
14114
4
,
35
ded - ded -
3030
K
Keep - Keep -
333
,
4141
, ,
44
4
Keyword Searchord Searc
LL
ng
ng

170
DIRECTV® HD DVR RECEIVER USER GUIDE
O
O
On Demand - 20, 25, 27
,
30, 31
,
32
,
33,
34
,
35
,
49, 95
Onscreen Messages - 101, 103
Ordering Programs - 35
Other Ratings - 87
P
Pandora - 55, 56, 61
Parental Controls - 21, 23, 26, 70, 84
,
,
85,
86
,
87
,
88, 89, 174
adult channels - 88
channel blocks - 88
hours (viewing) - 89
locking - 86
passcode - 85, 86, 175
rating limits - 87
spending - 89
unlocking - 86
web videos - 88
Password - 84
,
85
Pay Per View - 20, 27
,
30
,
31
,
,
32, 33, 34,
35
,
49
,
50, 89, 118
,
141, 154
Phone Connection - 104
,
141
Playlist - 11
,
,
25, 32
,
33
,
34, 35, 39, 43
,
44,
45
,
47
,
48, 67, 68, 70, 83
,
,
115, 117, 118,
176
change order - 45
filter - 46
managing - 46
mark and delete - 45
open/close all - 46
options - 45
sort - 45
Power - 3, 7, 10
,
,
99, 108, 109
,
114 126
,
152, 154, 176
Power Outage - 113
Power Saving - 83
Power Surge - 113
,
125
Press and Hold Buttons - 176
Previous Channels - 22
Product Information - 8 140
Program Guide - 11 16 17 18, 19, 20
,
22,
28
,
30
,
35 40 42 51 52 77, 88, 90, 102,
110, 112 117 123 140, 152, 176
Program Info - 12 16, 21
Progress Bar - 13, 14, 110
Purchases - 48
,
,
50
Queue - 32
,
,
33, 35, 48, 49
,
175
QuickTune - 55
,
,
64
R
RCA Connectors - 147
,
148, 154
Rear Panel - 6, 153, 154
Recent Searches - 28
Recordings - 25, 32
,
33
,
35, 43, 44
,
48
,
,
49, 50
,
51, 70, 88, 114
,
,
116, 118
a series - 42
a single show - 40
changing a record option - 42
defaults - 50
from “All Movies” or “On Demand” - 31
from Live TV - 42
from the guide - 42
history - 50
managing - 50
,
,
51
manually - 50
purchases - 50
remote - 52
,
53
stopping an in-progress - 42
watching and deleting - 43
Remote Control - 7
,
,
9, 10, 11, 12, 64, 65,
70, 73
,
74, 75, 76, 81, 82
,
,
91
,
102
,
104
,
,
107, 108, 109, 112, 113
,
114
,
125
,
140
,
,
151, 152, 154, 162, 175
advanced setups - 82
buttons - 10, 11, 12
,
,
13
,
,
176
IR/RF setup - 81
modes - 10
problems - 107
program remote - 81
receiver mode - 82
Remote Recording - 52
,
53
Repair - 123, 124
Reset - 79
,
83, 84, 102, 103, 105, 109
,
IN
D
D
EX
DRAFT
44
,
,
,
,
1261
2525
uttons - ons
176176
nels - n
22
rmation - mation -
8
,
14040
Guide - e -
11
,
1616
, ,
1717
, ,
188
3535
, ,
404
,
422
,
5151
,
,
525
,
777
,,
112112
,
11717
,
1233
,
1401
,
1
Program Info - rogram Info -
1212
, ,
1616
Progress Bar - gress Bar -
1313
Purchases - Purchases
48
Q
QueueQueue
Qui
Qui

171
111, 113, 140
Resolution - 23, 76, 77, 78, 79, 106, 107,
111, 119, 152, 162
,
163
Resolution Indicator - 152
Restart - 83
RF Remote - 81
S
Satellite - 3
,
7, 40, 75
,
82, 104, 105
,
110,
112, 126, 128, 140
,
142, 154
Satellite Data Acquisition - 110
Satellite Signal Strength - 82
Scheduler - 174
ScoreGuide™ - 65
Search & Browse - 25, 28, 29, 30, 36
Search Features - 28
,
29
Self-Installed DIRECTV Cinema
Connection Kit - Wireless - 157
Serial Number - 8
Series - 31, 36
,
,
41
,
,
42, 44, 46, 47
,
,
48, 49,
51
,
53
Series Manager - 39, 48, 49, 51, 116
Settings - 26, 50, 67, 68
,
76, 77
,
80
,
81,
82
,
83
,
84
Setup - 76
Shortcut Buttons - 11
Shortcut Hints - 11
,
16
Showroom - 26, 61
Smart Search - 25, 27, 28, 29
Software - 18, 76, 101, 103, 123, 129,
130, 131, 132, 134, 135
,
136
,
137
Song - 58
Sort - 18
,
,
19, 45
Sort Programs by Category - 18, 19, 45
Sound Effects - 80, 97
Special Features - 93
,
,
98
Spending Limits - 89
Sports Mix Channels - 18
Suggested Searches - 28
Surround Sound - 3, 10 80 81 110 111,
142, 144
S-Video - 119, 143 147 150 164
System Info - 76 112
System Messages - 21 26 56, 101, 103
System Software Updates - 103
System Test - 76 102
,
104
Temporarily Unlock - 86
Terms & Conditions for Use of Software
- 129 130, 131
,
,
132
,
,
133
,
134, 135, 136,
137, 138
Tickmark - 12
To Do List - 39
,
,
42
,
,
48, 70, 114, 118
Troubleshooting - 76, 91
,
101, 102
,
103,
104
TV Apps - 26, 65, 95, 141
TV Problems - 106, 109, 110
,
111, 114
TV Ratings - 87
TV Ratio - 76, 78, 162
TV Shows - 25, 27, 30
,
,
36, 37
U
Unlock - 86
Unsubscribed Channels - 17
V
VCR - 81
,
,
106, 142
,
,
144
,
,
150
,
154, 176
Video - 76, 77, 88, 91, 102, 106, 110, 114,
154, 163, 164, 165
W
W
W
Warranty - 8, 121, 122, 123, 124, 125
Watching and Deleting Your Recorded
Shows - 39, 43
Web Videos - 75, 88
What’s On Now? - 30
Whole-Home DVR service - 66
,
67
,
,
68,
69, 156, 157
Wired Connection - 155
,
157, 158
Wireless Connection - 159, 160, 161
Y
YouTube Search - 27, 29
IN
D
D
EX
INDEX
DRAFT
4
4
2828
,
100
,
8080
, ,
8181
,
1101
,
111
14343
, ,
147147
,
,
,
150
,
164164
o -
76
,
11211
Messages - Messages -
2121
,
26
,
566
m Software Updates -m Software Upda
stem Test - em Test -
7676
, ,
102102
, ,
101
TT
Temporarily Urarily U
Terms & CoTerms & C
129129
, ,
1313
77
11

172
DIRECTV® HD DVR RECEIVER USER GUIDE
V1.4HR2X3X9NOV2012
ACTIVATION OF PROGRAMMING SUBJECT TO CREDIT APPROVAL. CREDIT CARD REQUIRED (except in MA
and PA). Programming subject to change. DIRECTV services not available outside the U.S. DIRECTV programming is
available separately and independently of DIRECTV System hardware. A valid programming subscription is required to
operate DIRECTV System hardware. Activate your DIRECTV programming today at 1.800.531.5000. ©2012 DIRECTV.
DIRECTV and the Cyclone Design logo, DIRECTV Active, DIRECTV INTERACTIVE, DIRECTV PLUS, HomePlug and
the DIRECTV Plus DVR and DIRECTV HD DVR logos are trademarks of DIRECTV. All other trademarks and service marks
are the property of their respective owners.
This item incorporates copy protection technology that is protected by U.S. patents and other intellectual property rights of
Rovi Corporation. Reverse engineering and disassembly are prohibited.
Due to restrictions imposed by copyright holders, certain programming may include content protection measures that may
Please contact the manufacturer of such equipment for additional information.
THIS PRODUCT IS LICENSED UNDER THE AVC PATENT PORTFOLIO LICENSE FOR THE PERSONAL AND NON-
COMMERCIAL USE OF A CONSUMER TO (i) ENCODE VIDEO IN COMPLIANCE WITH THE AVC STANDARD
!"#$%&!#'%!"#!"!"#*+*/6"&#!"!7:#&6;<"'"&=="!&
>"'6#&?&!&#&#<<"'?**:&!#'/6#7*&"!@'#<!"#>'#!"'
?"&6"!*#>'#!"!"#&#?"&6"6='&*"!#'6+??7"<>?"!@#'&:#*+"';6"
!!*#&?&@#'<*#&<:7"#7*&"!@'#<<>"=?K??6""+**>Y///<>"=?#<
DRAFT
utsid
valid
mming today
CTV INTERACTIV
demarks of DIRECTV.
protected by U.S.
re prohibited.
rs, certain program
ment for additiona
UNDER THE AVC PA
SUMER TO (i) E
#!"
?
&#

173
DRAFT

174
DIRECTV® HD DVR RECEIVER USER GUIDE
Arrow Icons
Indicate that a show’s start or end time is earlier or later than is visible in the Guide program cell.
LEFT and RIGHT arrows on the remote offer special functionality.
Objects are scrollable above or below the visible window.
UP and DOWN arrows on the receiver front panel offer special functionality.
Other Icons
Indicates a program is set to record.
Indicates record has been set for all episodes of an ongoing program.
Indicates showing that was set by the user conflicts with another showing.
Indicates showing that was set by the user was canceled by the scheduler due to an unexpected conflict.
Shows Autorecord has been set for matching programs in a Search.
Indicates a recorded or live-stored video is fast forwarding at normal speed.
Indicated a recorded or live-stored video is rewinding at normal speed.
Indicates current video is paused.
This key plays current video when paused; it displays the control bar when already playing.
Indicates one or more new messages are in the Inbox.
Shows that Parental Control limits are currently “locked”.
Shows that limits are temporarily unlocked.
Shows that there are no current limits imposed.
Indicates a rating level or channel that is blocked via Parental Controls.
I
C
O
O
N
R
R
EF
E
E
R
R
E
N
N
C
C
E
D
D
D
D
DR
DR
DR
DR
DRA
RA
RA
RA
RA
RA
AF
AF
AFT
AFT
FT
FT
FT
T
FT
T
T
nel o
episodes of an ongo
the user con
set by the user
set for matching
ed or live-stored
corded or live-stored
urrent video is paused
key plays current vide
ates one or mor
t Parenta
175
Other Icons
“All Day Ticket” indicates that the program is rented for 24 hours starting when you first view the program.
Indicates program shown in letterbox format.
Denotes an error condition has occurred.
Appears when at least one rating or channel is allowed.
Appears when at least one rating or channel is blocked.
Used to create/enter passcodes in parental controls.
On screen color hint indicating a special function activated by pressing the related color button on
the remote control.
Indicates the scheduled PPV is set to purchase.
Program is currently downloading.
Indicates the program is/will be broadcast in High-Definition format.
Indicates program is ready to watch.
Indicates a Program is in the Queue.
All episodes of an ongoing programs are in the Queue.
Indicates a program is about to expire
Indicates that the programs comes from DIRECTV CINEMA.
Indicates a recorded program is not available for viewing.
D
D
D
D
DR
DR
DR
DR
DRA
RA
RAF
RA
AFT
T
FT
FT
T
llowe
is blocke
ntal c
g a special funct
eduled PPV is set to
urrently downloading.
s the program is/wil
s program is r
Program i
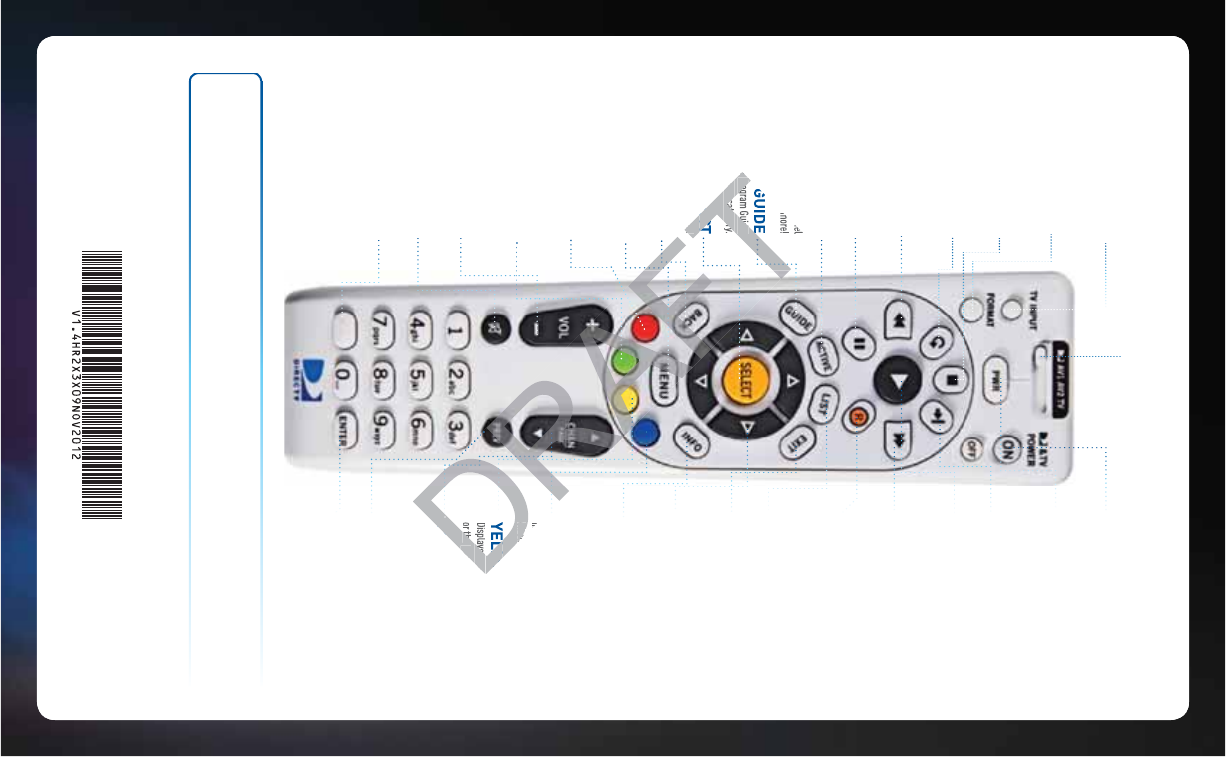
MODE SWITCH
Changes remote to control other
equipment, for example a DVD Player.
DIRECTV & TV POWER ON
Turns your DIRECTV® Receiver and TV, together,
on or off.
POWER
Turns on /off whichever equipment the MODE
switch is set to.
ADVANCE*
Jumps ahead 30 seconds. Hold down to jump
forward to the end.
PLAY*
Play current video; press and hold
for slow motion.
FFWD*
Press up to four times to fast forward
at increasing speeds.
RECORD*
Press once to record a live TV program or
the program highlighted in the Program Guide.
Press twice to record a series.
LIST
Displays the Playlist.
EXIT
Exits any menu and returns to last channel
viewed.
ARROWS
Moves the highlight (up, down, left, right)
within a menu.
INFO
Displays information about the program
you are watching or that is highlighted in
the Program Guide.
BLUE
In live TV, displays the Mini guide; Function varies
on other screens - look for onscreen hints.
YELLOW
Displays various options while viewing the Guide
or the Playlist.
CHAN/PAGE
In live TV, changes channel up or down;
in a menu, such as the guide, scrolls page
up and down.
PREV
Tunes to previous channel viewed.
ENTER
Activates channel number entries quickly.
Keys in orange text can be programmed to function with your VCR, DVD player or other stand alone equipment.
* These descriptions apply to DIRECTV HD DVRs. Other equipment may behave differently.
TV INPUT
Changes the “source” - the piece of equipment
whose signal is displayed on your TV.
FORMAT
Cycles through screen formats (crop, stretch,
pillar box, letter box) and resolutions.
STOP*
Stops Recorded Video
REPLAY*
Jumps back 6 seconds. Hold down to jump
back to the beginning.
REWIND*
Press up to four times to rewind
at increasing speed.
PAUSE*
Pauses current video.
ACTIVE
Displays the DIRECTV Active Channel
-local weather and more!
GUIDE
Press once to see the Program Guide.
Press twice to see programs by category.
SELECT
Selects any highlighted item.
BACK
Takes you back one menu screen.
MENU
Display a menu of settings
and services.
RED
In Guide, jumps 12 hours back; other
functions vary - look for hint onscreen.
GREEN
In Guide, jumps 12 hours forward; Function varies
on other screens - look for onscreens hints.
VOLUME
Raises or lowers volume.
MUTE
Toggles sound volume on/off.
NUMBERS & DASH
Tune to a channel directly;
also input numbers when needed
in onscreen menus.
on oth
LLOW
ays variou
the
Play
CH
E
e
Program Guide.
ms by category
LECT
em.