Contents
- 1. USER MANUAL HCC 100
- 2. USER MANUAL HCR 800 805
USER MANUAL HCR 800 805
RD-MU-02161-13 1/1 07/07/03
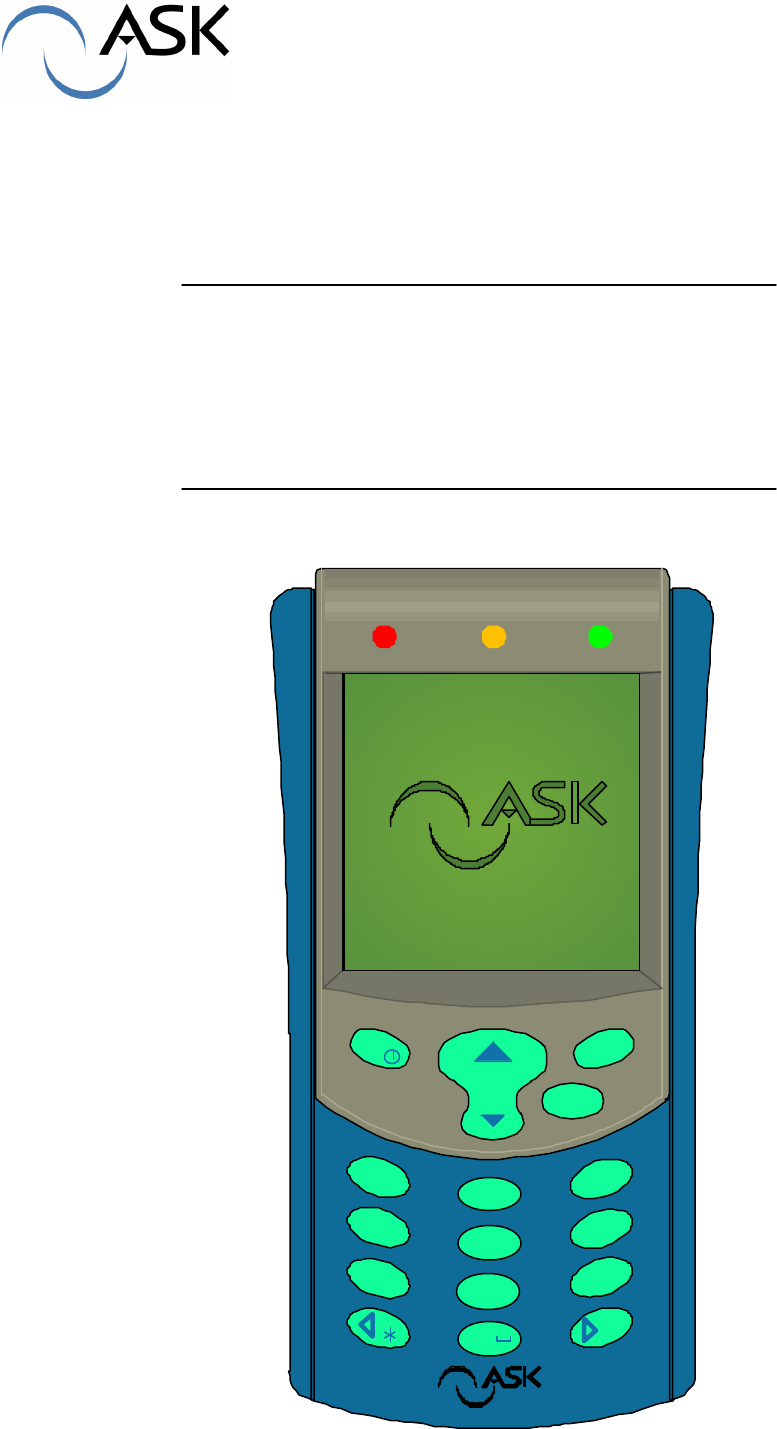
HAND-HELD READER
HCR 800/805
USER MANUAL
Menu OK
Annul
123
456
789
0
abc
def
ghijkl
mno
pqrstuv
wxyz
#

RD-MU-02161-13 2/19 07/07/03
FCC Compliance Statements
This equipment has been tested and found to comply with the radiated limits for a Class
B digital device, pursuant to Part 15 of the FCC Rules. These limits are designed to
provide a reasonable protection against harmful interferences in a residential
installation. This equipment generates, uses and can radiate radio frequency energy
and, if not installed and used in accordance with the instructions, may cause harmful
interference to radio communications. However, there is no guarantee that interference
will not occur in a particular installation. If this equipment does cause harmful
interference to radio or television reception, which can be determined by turning the
equipment off and on, the user is encouraged to try the correct interference by one or
more of the following measures:
- Reorient or relocate the receiving antenna.
- Increase the separation between the equipment and receiver.
- Connect the equipment into an outlet on a circuit different from that to which
the receiver is connected.
- Consult the dealer or an experienced radio/TV technician for help.
This device complies with Part 15 of the FCC rules. Operation is subject to the following
two conditions. (1) This device may not cause harmful interferences. And (2) this device
must accept any interference received, including interference that may cause undesired
operation.
The ASK HCR800/HCR805 readers were submitted and a grand of authorization
received from the FCC as device under the intentional radiator requirements of Part 15,
Subpart C.
Caution: Any changes or modification not approved by ASK could void user’s authority
to operate the equipment.
CE Compliance statement
The ASK HCR readers are in conformity with European requirements, this product has
been assessed to the following standard:
EN 300330
EN 301 489-3
EN 60950-1 / IEC 60950-1

RD-MU-02161-13 3/19 07/07/03
Table of contents
1 – FIRST USE 4
1.1 Unpacking 4
1.2 HCR 800 overview 4
1.3 Strap installation 5
1.4 Strap adjustment 6
1.5 Belt base using 6
2 – BATTERY RECHARGING 6
3 – SAM MODULES SETUP 7
4 – APPLICATIVE SOFTWARE LOADING 8
5 – USE 8
5.1 ON/OFF 8
5.1 Contactless card 8
5.2 Contact card 8
6 –TECHNICAL FEATURES 9
7 – TROUBLESHOOTING – AUTOTEST 10
RD-MU-02161-13 4/19 07/07/03
1 – First use
1.1 Unpacking
Check in packaging box if following items are present:
-1 hand-held reader
-1 belt base
-1 holding strap
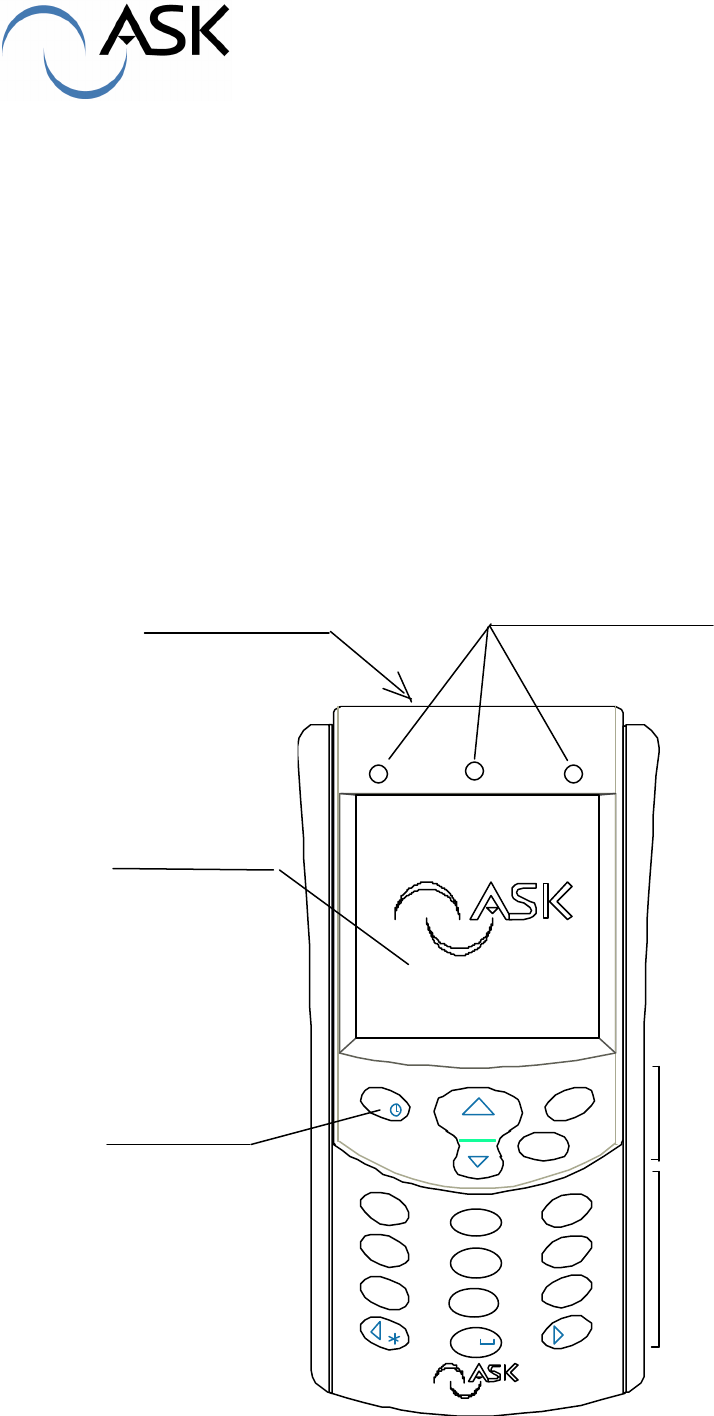
1.2 HCR 800 /805 overview
Menu OK
Annul
123
456
789
0
abc
def
ghijkl
mno
pqrstuv
wxyz
#
Graphic display
160 pl x 160 pl
Antenna location
ON/OFF
key
(press 3s.)
Control leds
Browser
keys
Alphanumeric
Keys
RD-MU-02161-13 5/19 07/07/03
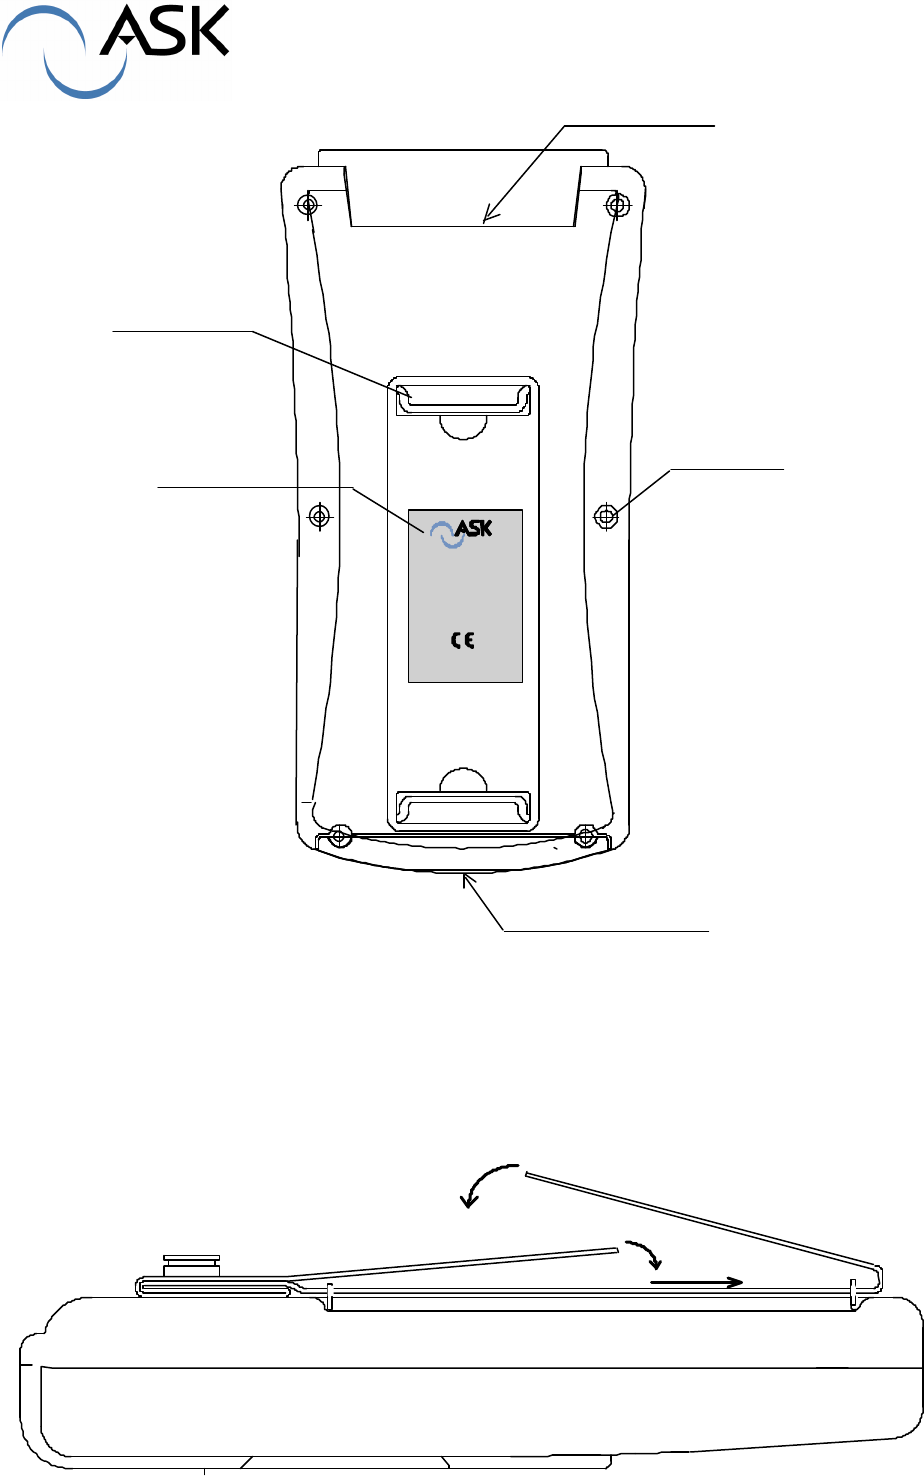
Contact card slot
Connector for battery charging
x 6 screws for
bottom case closure
Holder strap
HCR 800
made in France
Type : DE-075-01
Serial 024401
ID label
1.3 Strap installation
Insert the strap into the holder upper strap ring, then into the lower ring, after, bend back the two
sides of the strap as shown in the following figure.
RD-MU-02161-13 6/19 07/07/03
1.4 Strap adjustment
The strap should be adjusted to the user’s hand. For that, it is necessary to move the two straps
part (Velcro covered) in order to have the required space.
1.5 Using belt base
Belt base should be locked on belt vertically from top to bottom. The HCR goes to belt base via
the riveted button on the strap. Reader is inserted from bottom to top. For extracting, apply a
pressure with one hand to the two lateral buttons of the base, with the other hand lift the hand-
held reader up.
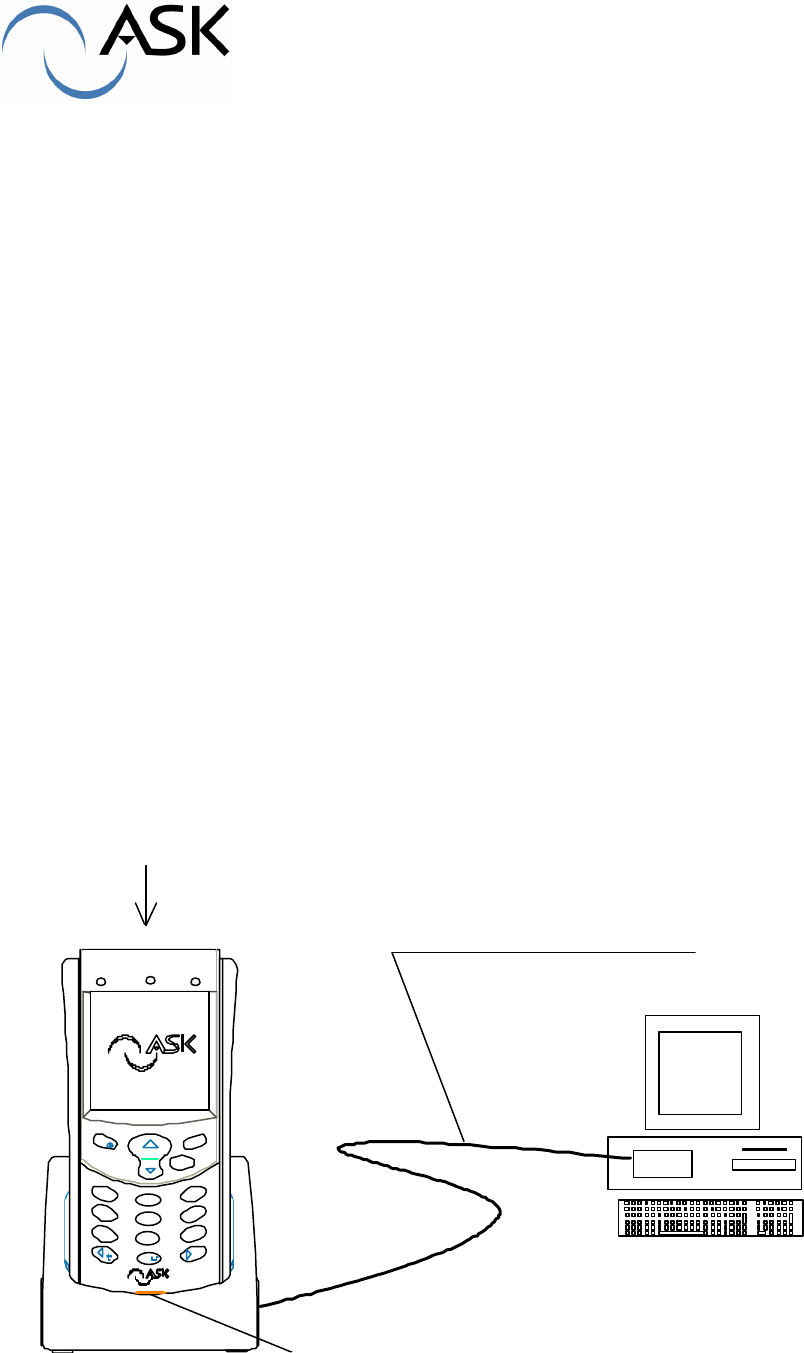
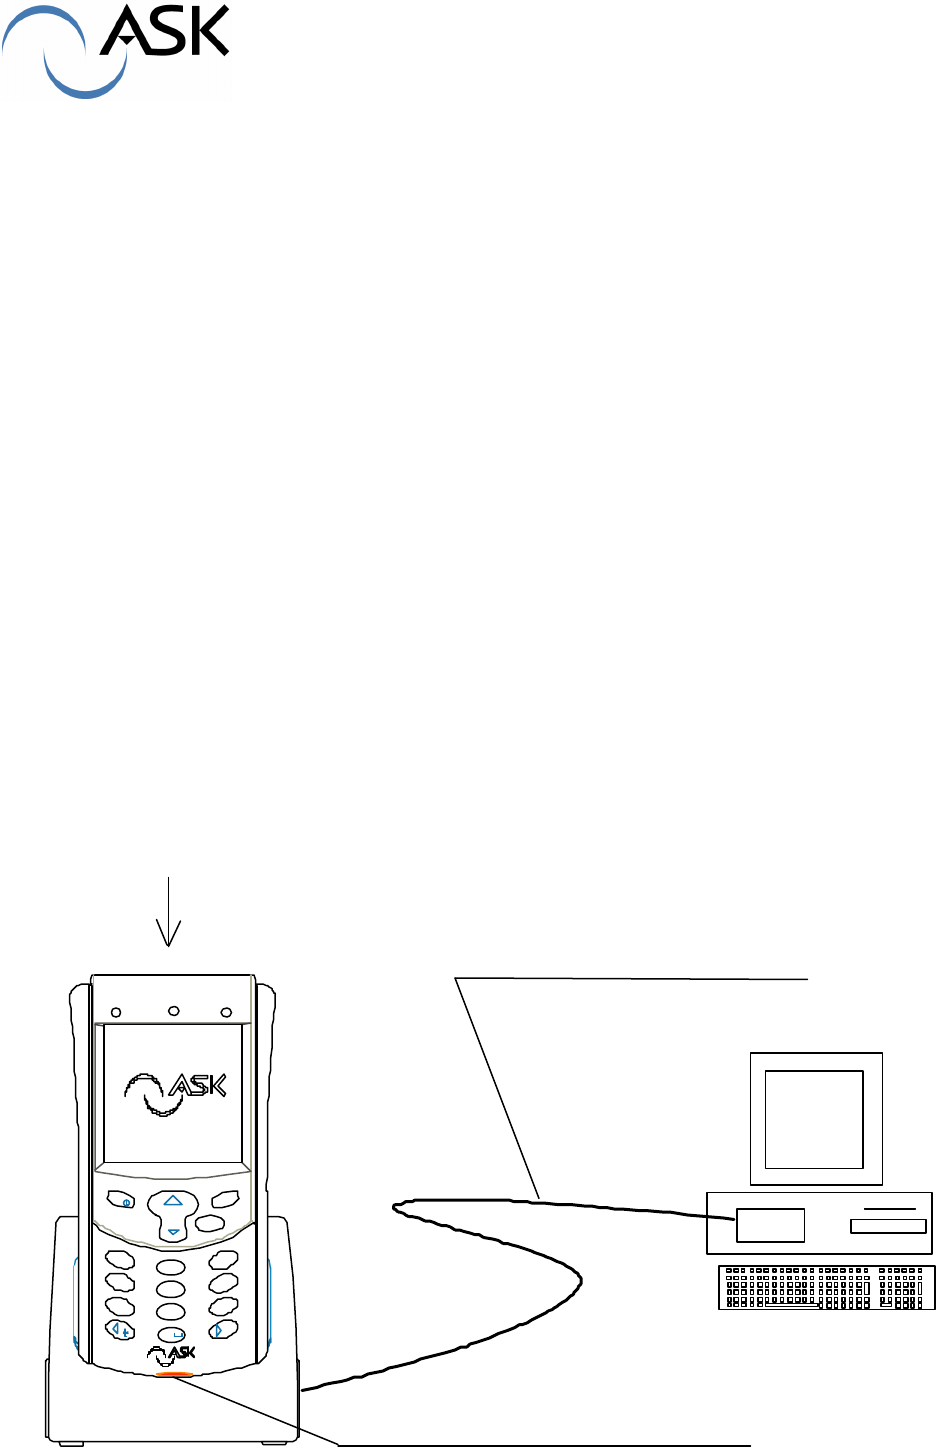
2 – Battery recharging
Before first use, the HCR should be inserted in its base station for five hours minimum for
battery charging completion.
The next recharge will depend on the battery discharge. Internal battery uses li-ion technology,
that means it doesn’t have memory effect. The internal battery can be charged at any time,
without capacity waste.
The docking station should be connected to a computer via an USB port. No other connection is
required. The docking station’s light should bright, three colors are possible :
- Orange : docking station power is ON
Me nu OK
Annul
1
2
3
456
789
0
abc
def
ghijkl
mno
pqrstuv
wxyz
#
Reader setup
USB cable to PC
Charging red light indicator

RD-MU-02161-13 7/19 07/07/03
- Red : hand-held reader is charging. It shouldn’t be carried out
- Green : charging is over, reader can be carried out
Blinking on colors means the hand-held reader is exchanging data with the computer.
Do not remove the reader from the docking station when led is blinking.
Do not shut off the PC power supply when reader is set on dockingstation
Note : When reader is set on docking station, its power up is automatically launched and will
remain so until recharging completion.
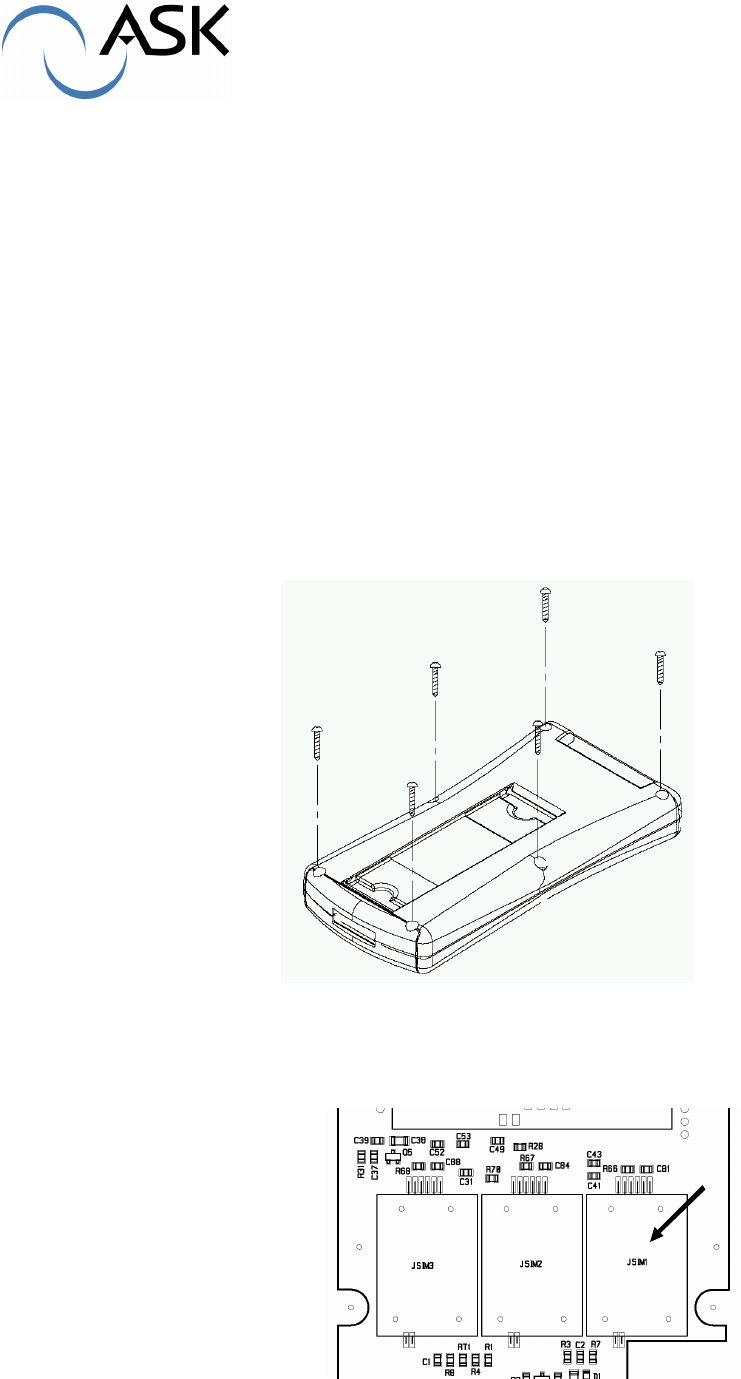
3 – SAM modules setup
For opening, flip over the hand-held reader. Screw off the six screws around the bottom part of
the plastic case, then lift this part up.
For this operation, the screwdriver type must be : Pozidriv N°1.
SAM slots can be reached directly. Tree location are offered, the first one is JSIM 1(see figure
below).
First, SAM module must be gently inserted in the open door socket, then door should be locked.
After operation, set again the bottom of the plastic case with the six screws.
RD-MU-02161-13 8/19 07/07/03
4 – Applicative software loading
Applicative software is loaded by PC computer while hand-held reader is set on docking station.
Environment software installation CD (ART TOOLKIT) provides all the tools required for
developing load applicative software.
This CD ROM is delivered separately, please contact your local reseller for more information.
5 - Use
5.1 ON/OFF
Hand-held reader is turned ON by pressing the menu key for 3 seconds. After that applicative
software (user specific) is ready to run.
The reader is turned OFF by pressing the menu key for 3 secondes.
5.1 Contactless card
All cards are detected in any position when they are presented close to the target printed at the
top of the reader.
5.2 Contact card
Smart card should be inserted chip side face up on top in the reader’s slot.
Menu OK
Annul
123
456
789
0
abc
def
ghijkl
mno
pqrstuv
wxyz
#
0,6A/m
1A/m
1,5 A/m
2 A/m
Contact: 4,4 A/m
13 mm
18 mm
25 mm 35 mm

RD-MU-02161-13 9/19 07/07/03
6 –Technical features
HCR 800 readers are compliant with the following directives on standard :
CEN 50166-1 or C18-600 (11/95)
CEN 50166-2, C18-610 (11/95
ISO 14443 standards ( A and B) for contactless interface
ISO 7816 standard for contact interface
The HCR support all ASK cards (GTML/GTML2/CD97/CT2000…) , C.tickets® and C.label®
ETS 301-489-1/3 and ETS 300-330. (CE marking)
MIFARE® standard supported: HCR805 model only
Electrical autonomy
Autonomy depends on the application
Autonomy depends on the application software and the way the HCR is used.
The HCR 800 readers have been designed to allow 1000 card controls over a period of 8 hours
(average time for one control is 5 s).
Temperature rating:
Operating temperature range: +23°F to +131°F (-5°C to +55°C)
Battery recharge temperature range: +32°F to +113°F ( 0°C to + 45°C)
Storage temperature range : -4°F to +140°F (-20°C to +60°C)
Case characteristics :
Half case parts are made with ABS-PC shockproof. The face side is made with poly carbonate
material. The protection display glass is made of PMMA
- Length : 7.17 in (182 mm)
- width : 3.3 in (84 mm) handling area, 3.62 in (92 mm) reading area
- thickness : 1.06 in (27 mm) to 1.3 in ( 33 mm )
- weight : 320g with battery (without strap)
Battery characteristics :
- Lithium Ion technology
- Nominal voltage 3.7V
- Nominal capacity 1800mAh
- Recharge time 5 h.
MIFARE® is a registered trademark of Philips Electronics N.V.
C.tickets® and C.label® are registered trademarks of ASK S.A.

RD-MU-02161-13 10/19 07/07/03
7 - Troubleshooting – Autotest
The ART TOOLKIT software incorporates functional tests.
Main features can be checked :
- Keyboard
- Screen
- LED
- Buzzer
- Contact card transactions
- Contactless card transactions
These products are covered with one year warranty (Li-ion battery also included)
RD-MU-02161-13 11/19 07/07/03
TERMINAL DE CONTRÔLE
HCR 800/805
MANUEL UTILISATEUR
Menu OK
Annul
123
456
789
0
abc
def
ghijkl
mno
pqrstuv
wxyz
#

RD-MU-02161-13 12/19 07/07/03
Table des matières
1 – MISE EN ROUTE 13
1.1 Déballage 13
1.2 Description du terminal de contrôle 13
1.3 Mise en place de la sangle 14
1.4 Réglage de la sangle 15
1.5 Utilisation du clip de ceinture 15
2 – RECHARGEMENT DU TERMINAL 15
3 – MISE EN PLACE DES MODULES SAM 16
4 – CHARGEMENT DU LOGICIEL APPLICATIF 17
5 – UTILISATION 17
6 – FICHE TECHNIQUE 18
7 – DEPANNAGE – AUTOTEST 19
RD-MU-02161-13 13/19 07/07/03
1 – Mise en route
1.1 Déballage
Vérifier dans l’emballage la présence des composants suivants :
- 1 terminal de contrôle
- 1 clip de ceinture
- 1 sangle de maintien
1.2 Description du terminal de contrôle
Menu OK
Annul
123
456
789
0
abc
def
ghijkl
mno
pqrstuv
wxyz
#
Ecran graphique
160 pt x 160 p
t
Positionnement de
l'antenne
Touche
marche/Arrêt
(Appui 3s.)
Voyants de contrôle
Touches de
navigation
Touches
Alpha numériques
RD-MU-02161-13 14/19 07/07/03
Entrée carte à contact
Connecteur de rechargement
Vis de fixations (x 6) de la
coque inférieure
Attaches métalliques
de sangle
HCR 800
made in France
Type : DE-075-01
Serial
024401
Etiquette Produit
1.3 Mise en place de la sangle
Introduire la sangle par l’attache supérieure de l’appareil, puis l’attache inférieure et replier les
deux côtés dans l’ordre de la figure ci-dessous.
RD-MU-02161-13 15/19 07/07/03
1.4 Réglage de la sangle
La sangle doit être ajustée en fonction de la main de l’utilisateur. Pour cela il faut déplacer les
deux parties recouvertes de Velcro R pour créer l’espace désiré.
1.5 Utilisation du clip de ceinture
Le clip doit être introduit verticalement et de haut en bas sur la ceinture. Le terminal s’introduit
dans le clip par l’intermédiaire du bouton riveté sur la sangle. L’introduction s’effectue de bas en
haut. Pour retirer le terminal, pincer d’une main les deux boutons latéraux du clip et , de l’autre
main, retirer le terminal de bas en haut
2 - Rechargement du Terminal
Avant la première utilisation le terminal doit être placé sur son socle pour une durée minimum de
cinq heures afin d’effectuer la charge complète de la batterie. Les recharges suivantes
dépendront du niveau de décharge de la batterie. Celle-ci étant de technologie Li-ion , elle ne
possède pas d’effet mémoire et peut être rechargée à tout moment sans dégradation de sa
capacité.
Menu OK
Annul
1
2
3
456
789
0
abc
def
ghijkl
mno
pqrstuv
wxyz
#
Mise en place du terminal
Liaison au PC par cable USB
Voyant indicateur de charge
RD-MU-02161-13 16/19 07/07/03
Le socle doit être raccordé à la prise USB d’un ordinateur . Aucune autre connexion n’est
nécessaire. Le voyant du socle doit être allumé et possède trois couleurs :
- Orange : le socle est alimenté
- Rouge : le terminal est en phase de chargement, il ne doit pas être retiré
- Vert : le terminal est chargé, il peut être retiré
Des clignotements sur les couleurs indiquent que le terminal est en train de communiquer avec le
PC. Attendre la couleur verte fixe pour retirer le terminal du socle .
Le PC ne doit jamais être éteint pendant le rechargement du terminal.
Nota : Lorsque le terminal est placé sur son socle, sa mise en marche est déclenchée
automatiquement et elle est maintenue durant toute la durée du rechargement.
3 – Mise en place des modules SAM
Après avoir retourné le terminal, retirer les 6 vis de fixation de la coque inférieure en utilisant un
tournevis cruciforme Pozidriv N°1 et retirer verticalement la coque inférieure.
Les modules SAM sont alors directement accessibles pour la mise en place des cartes µSim , en
plaçant la première carte dans la position JSIM 1.
Prendre soin de bien verrouiller les modules après mise en place des cartes.
Replacer la coque inférieure et remettre en place les 6 vis de fixation.

RD-MU-02161-13 17/19 07/07/03
4 - Chargement du logiciel applicatif
Le logiciel applicatif se charge par l’intermédiaire du socle relié à un PC. Le CD d’installation de
l’environnement logiciel ART TOOLKIT permet d’effectuer toutes les opérations de
développement et de chargement des applicatifs. Le CD est livré séparément. Contactez votre
revendeur.
5 - Utilisation
5.1 Arrêt /marche
Le terminal est mis en marche en maintenant la touche menu appuyée 3 secondes.
L’arrêt du terminal s’effectue en appuyant la même touche menu pendant 3 secondes.
Le terminal en mode veille est activé par pression sur la touche haute de navigation.
5.2 Carte sans contact
Les cartes sont détectées dans toutes les position en contact avec la cible située à l’avant de la
coque.
5.3 Carte à contact
La carte s’introduit module vers le haut dans la fente sur le dessus du terminal.
Menu OK
Annul
123
456
789
0
abc
def
ghijkl
mno
pqrstuv
wxyz
#
0,6A/m
1A/m
1,5 A/m
2 A/m
Contact: 4,4 A/m
13 mm
18 mm
25 mm 35 mm

RD-MU-02161-13 18/19 07/07/03
6- Fiche technique
Le terminal est conforme aux normes suivantes :
CEN 50166-1 ou C18-600 (11/95)
CEN 50166-2 , C18-610 (11/95
ISO 14443 standard (A et B) pour interfaces sans contact
ISO 7816 Standard pour interfaces à contact
Le terminal HCR est compatible avec toutes les cartes et tickets ASK
(GTML/GTML2/CD97/CT2000/C.ticket…)
ETS 300-683 et ETS 300-330. (marquage CE)
FCC Radiation émises
MIFARE® standard supporté : modèle HCR805 seulement.
Autonomie d’utilisation :
L’autonomie dépend de l’applicatif et du mode d’utilisation du HCR.
Le terminal est prévu pour effectuer 1000 contrôles de cartes sur une période de travail de 8
heures avec une durée moyenne de contrôle de 5 s.
Conditions d’utilisation :
Température d’utilisation : -5°C à +55°C
Température de rechargement : 0°C à + 45°C
Température de stockage : -20°C à +60°C
Caractéristiques générales :
Les coques sont en ABS-PC antichoc. La façade semi-transparente en poly carbonate. La vitre de
protection de l’écran est en PMMA
- Longueur : 182 mm
- Largeur : 84 mm (zone de préhension), 92 mm (zone de lecture)
- Epaisseur : 27 mm à 33 mm
- Poids : 320g avec batterie et sans la sangle et clip de ceinture
Caractéristiques batterie :
- Technologie Lithium Ion
- Tension nominale 3.7V
- Capacité nominale 1800mAh
- Temps de recharge 5 h.
MIFARE® is a registered trademark of Philips Electronics N.V

RD-MU-02161-13 19/19 07/07/03
7 - Dépannage – Autotest
Le logiciel ART TOOLKIT possède une fonction de test des fonctionnalités du terminal qui
permet de vérifier les fonctionnalités clavier, écran, led, buzzer, lecture à contact et sans contact.
Les produits sont garantis un an, y compris la batterie Li-ions