ASUSTeK Computer F94965AGN NOTEBOOK P.C User Manual AD5EA4E5A4E2A5552E706466
ASUSTeK Computer Inc NOTEBOOK P.C AD5EA4E5A4E2A5552E706466
Contents
- 1. USERS MANUAL 1
- 2. USERS MANUAL 2
- 3. USERS MANUAL 3
- 4. USERS MANUAL 4
USERS MANUAL 3
49
Using the Notebook PC 4
3UHVV>)1)@RUGRXEOHFOLFN
the Wireless Console icon on
the taskbar). Four icons will
appear as shown here. Click on
the 1st setting to activate both
Wireless & Bluetooth, or you
may select the 2nd option for
Wireless activation only.
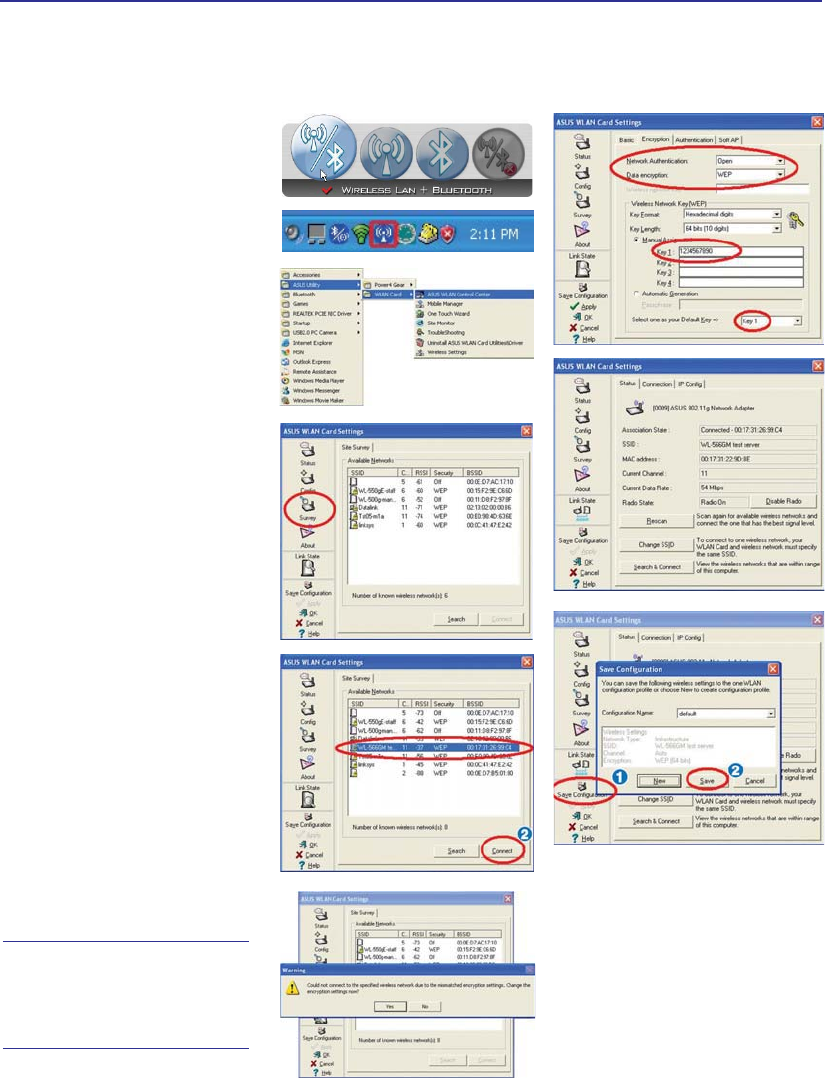
1. Click Start | Programs
| ASUS Utility | WLAN
Card | ASUS WLAN Con-
trol Center.
2. On the left hand side menu,
click Survey to start scan-
ning for available networks
in your area.
3. The list will show all avail-
able networks within your
area. Select the network you
want and click Connect.
4. If the selected Network has
security settings, you may
be required to enter a pass-
word.
5. Click the Encryption tab
to configure the Network
Authentication mode and
Password.
6. The Status tab will show
connection status and de-
tails.
Note: Click “Save Con-
ÀJXUDWLRQµ DQG ´6DYHµ
to remember settings
for this network.
ASUS Wireless LAN (on selected models)
Connecting to a network
50
4 Using the Notebook PC
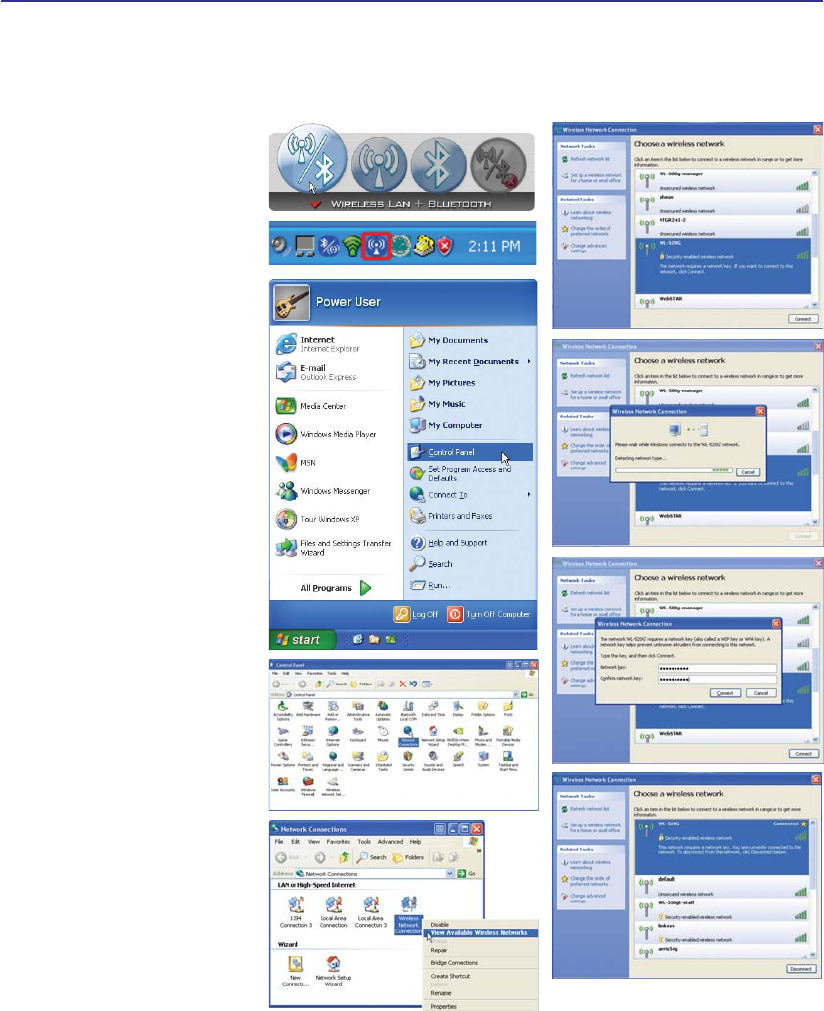
3UHVV >)1 )@ RU GRXEOH FOLFN
the Wireless Console icon on the
taskbar). Four icons will appear
as shown here. Click on the 1st
setting to activate both Wireless
& Bluetooth, or you may select
the 2nd option for Wireless acti-
vation only.
1. Click on Start and select
Control Panel
2. Click on the icon Network
Connections (If this icon
cannot be seen, click “Switch
to Classic View” on the left
side menu.
3. Right click on the icon Wire-
less Network Connection
and select View Available
Wireless Networks.
4. Select Refresh network list
from the left side menu and
a list of available network
within your area and its sig-
nal strength will show. Select
your network and click on
Connect.
'HWHFWLQJ DQG FRQQHFWLQJ
will start to initiate as shown
here.
6. When connecting, you may
have to enter a password.
7. After connection has been
established, “Connected”
will be shown on the right
side above the signal strength
indicator.
Windows Wireless Network Connection
Connecting to a network
51
Using the Notebook PC 4
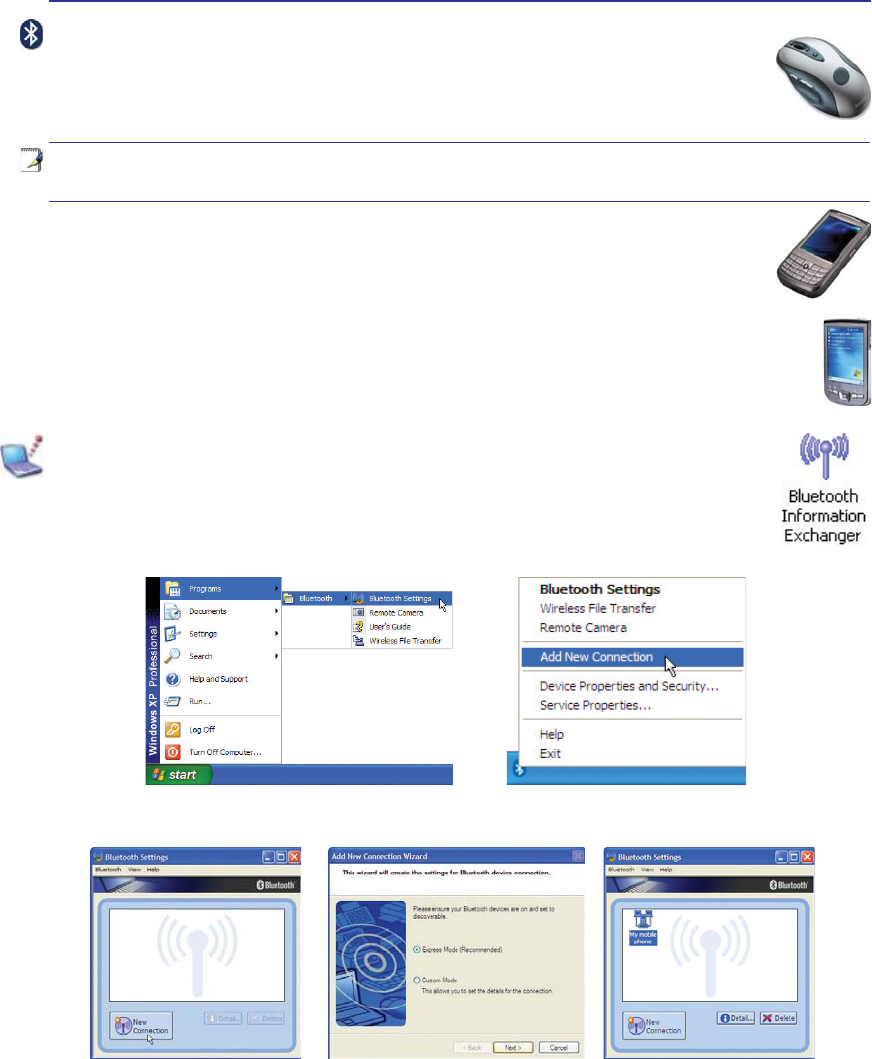
Add New Connection from the
Bluetooth taskbar icon
Bluetooth Settings from Windows Start |
Programs | Bluetooth
Click New Connection from
Bluetooth Settings. Follow the wizard to add Bluetooth
devices. After complete, you should see
your device in the window.
Pairing with Bluetooth-enabled devices
<RXÀUVWQHHGWRSDLU\RXU1RWHERRN3&ZLWKD%OXHWRRWKHQDEOHGGHYLFHEHIRUH\RXFDQ
connect to it. Make sure the Bluetooth-enabled device is turned ON and ready to accept a
pair. Launch Bluetooth Settings from Windows Start | Programs | Bluetooth or select
Add New Connection from the Bluetooth taskbar icon if available.
Bluetooth Wireless Connection (on selected models)
Notebook PCs with Bluetooth technology eliminates the need for cables for connecting
Bluetooth-enabled devices. Examples of Bluetooth-enabled devices may be Notebook PCs,
'HVNWRS3&VPRELOHSKRQHVDQG3'$V
Note: If your Notebook PC did not come with built-in Bluetooth, you need to connect
a USB or ExpressCard Bluetooth module in order to use Bluetooth.
Bluetooth-enabled mobile phones
<RXFDQZLUHOHVVFRQQHFWWR\RXUPRELOHSKRQH'HSHQGLQJRQ\RXUPRELOHSKRQH·VFDSD-
ELOLWLHV\RXFDQWUDQVIHUSKRQHERRNGDWDSKRWRVVRXQGÀOHVHWFRUXVHLWDVDPRGHPWR
connect to the Internet. You may also use it for SMS messaging.
Bluetooth-enabled computers or PDAs
<RXFDQZLUHOHVVFRQQHFWWRDQRWKHUFRPSXWHURU3'$DQGH[FKDQJHÀOHVVKDUHSHULSKHUDOVRU
share Internet or network connections. You may also make use of Bluetooth-enabled wireless
keyboard or mouse.

52
4 Using the Notebook PC
Power Management Modes
The Notebook PC has a number of automatic or adjustable power saving features that you can use to
maximize battery life and lower Total Cost of Ownership (TCO). You can control some of these features
through the Power menu in the BIOS Setup. ACPI power management settings are made through the
operating system. The power management features are designed to save as much electricity as possible
by putting components into a low power consumption mode as often as possible but also allow full
operation on demand. These low power modes are referred to as “Stand by” (or Suspend-to-RAM) and
´+LEHUQDWLRQµPRGHRU6XVSHQGWR'LVN67'7KH6WDQGE\PRGHLVDVLPSOHIXQFWLRQSURYLGHGE\WKH
operating system. When the Notebook PC is in either one of the power saving modes, the status will be
VKRZQE\WKHIROORZLQJ´6WDQGE\µ3RZHU/('%OLQNVDQG´+LEHUQDWLRQµ3RZHU/('2))
Full Power Mode & Maximum Performance
The Notebook PC operates in Full Power mode when the power management function is disabled by
FRQÀJXULQJ:LQGRZVSRZHUPDQDJHPHQWDQG6SHHG6WHS:KHQWKH1RWHERRN3&LVRSHUDWLQJLQ)XOO
3RZHU0RGHWKH3RZHU/('UHPDLQV21,I\RXDUHFRQVFLRXVRIERWKV\VWHPSHUIRUPDQFHDQGSRZHU
consumption, select “Maximum Performance” instead of disabling all power management features.
ACPI
$GYDQFHG&RQÀJXUDWLRQDQG3RZHU0DQDJHPHQW$&3,ZDVGHYHORSHGE\,QWHO0LFURVRIWDQG7RVKLED
especially for Windows and later to control power management and Plug and Play features. ACPI is the
new standard in power management for Notebook PCs.
NOTE: APM was used in older operating systems like Windows NT4 and Windows 98.
Because newer operating systems like Windows XP, Windows 2000, and Windows ME
utilize ACPI, APM is no longer fully supported on this Notebook PC.
Suspend Mode
,Q´6WDQGE\µ675DQG´+LEHUQDWLRQµ67'WKH&38FORFNLVVWRSSHGDQGPRVWRIWKH1RWHERRN3&
devices are put in their lowest active state. The suspend mode is the lowest power state of the Notebook
3&7KH1RWHERRN3&HQWHUVVXVSHQGPRGHZKHQWKHV\VWHPUHPDLQVLGOHIRUDVSHFLÀHGDPRXQWRIWLPH
RUPDQXDOO\XVLQJWKH>)Q@>)@NH\V7KH3RZHU/('EOLQNVZKHQWKH1RWHERRN3&LVLQ675PRGH
,Q67'PRGHWKH1RWHERRN3&ZLOODSSHDUWREHSRZHUHG2))5HFRYHUIURP675E\SUHVVLQJDQ\
NH\ERDUGEXWWRQH[FHSW)Q5HFRYHUIURP67'E\XVLQJWKHSRZHUVZLWFKMXVWOLNHSRZHULQJ21WKH
Notebook PC).
Power Savings
,QDGGLWLRQWRUHGXFLQJWKH&38FORFNWKLVPRGHSXWVGHYLFHVLQFOXGLQJWKH/&'EDFNOLJKWLQWKHLUORZHU
active state. The Notebook PC enters “Stand by” mode (low priority) when the system remains idle for a
VSHFLÀHGDPRXQWRIWLPH7KHWLPHRXWFDQEHVHWWKURXJK:LQGRZVSRZHUPDQDJHPHQWKLJKHUSULRULW\
To resume system operation, press any key.

53
Using the Notebook PC 4
Thermal Power Control
There are three power control methods for controlling the Notebook PC’s thermal state. These power
FRQWUROFDQQRWEHFRQÀJXUHGE\WKHXVHUDQGVKRXOGEHNQRZQLQFDVHWKH1RWHERRN3&VKRXOGHQWHU
these states. The following temperatures represent the chassis temperature (not CPU).
• The fan turns ON for active cooling when the temperature reaches the safe upper limit.
• The CPU decreases speed for passive cooling when the temperature exceeds the safe upper limit.
• The system shut down for critical cooling when temperature exceeds the maximum safe upper
limit.
Power State Summary
STATE ENTRY EVENT EXIT EVENT
“Stand by” • “Stand by” through Windows Start button
• Timer as set though “Power Management” in
Windows Control Panel (higher priority)
• Any device
• Battery low
STR (“Stand by”)
(Suspend-to-RAM) • Hotkey (see “Colored Hotkeys” under “Special
Keyboard Functions” in the previous section) • Signal from modem port
• Power button or any key
STD (“Hibernate”)
(Suspend-to-Disk) • Hotkey (see “Colored Hotkeys” under “Special
Keyboard Functions” in the previous section) • Power button
Soft OFF 3RZHUEXWWRQFDQEHGHÀQHGDV675RU67'
• “Shut down” through Windows Start button • Power button
54
4 Using the Notebook PC
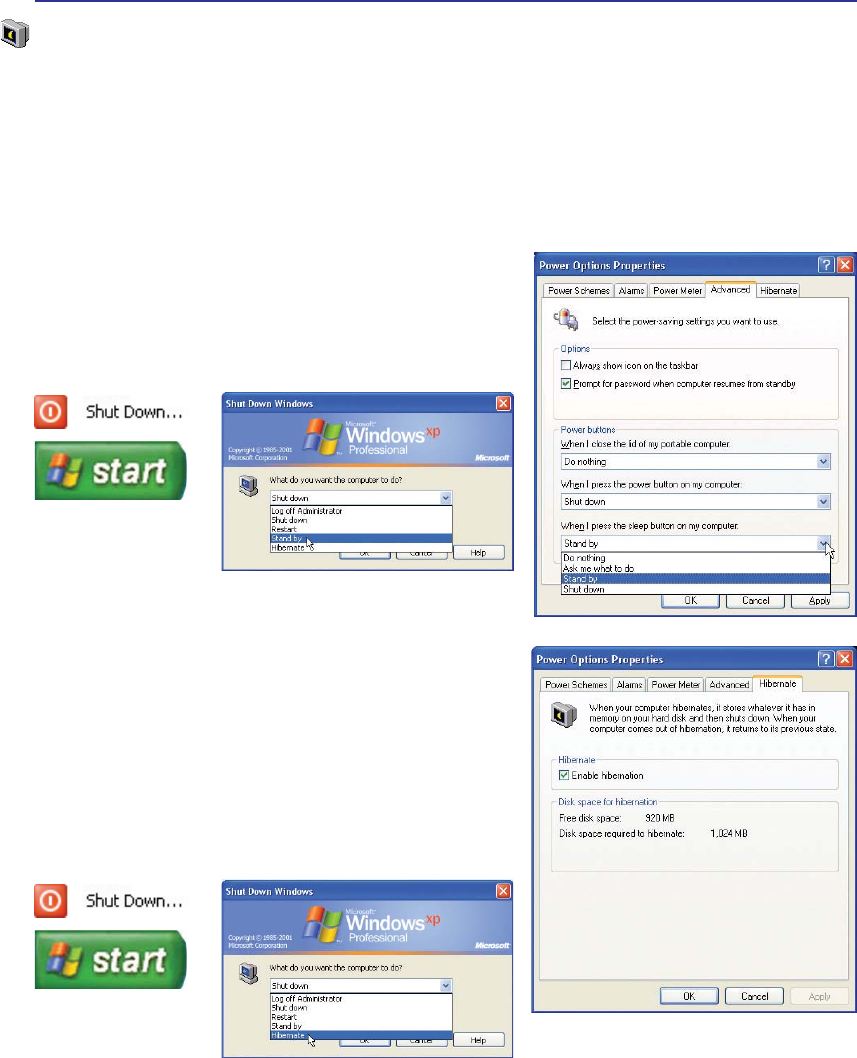
“Stand by” is the same as Suspend-to-RAM (STR). This
function stores your current data and status in RAM while
many components are turned OFF. Because RAM is volatile,
it requires power to keep (refresh) the data. To operate: select
“Start” | “Shut down”, and “Stand by”.
“Hibernate” LV WKH VDPH DV 6XVSHQGWR'LVN 67' DQG
stores your current data and status on the hard disk drive. By
doing this, RAM does not have to be periodically refreshed
and power consumption is greatly reduced but not completely
eliminated because certain wake-up components like LAN
needs to remain powered. “Hibernate” saves more power
compared to “Stand by”. To operate: Enable hibernation
in “Power Options” and select “Start” | “Shut down”, and
“Hibernate”.
Stand by and Hibernate
Power management settings can be found in the Windows control panel. The following shows the power
RSWLRQVSURSHUWLHVLQ:LQGRZV<RXFDQGHÀQH´6WDQG%\µRU´6KXWGRZQµIRUFORVLQJWKHGLVSOD\SDQHO
pressing the power button, or activating sleep mode. “Stand by” and “Hibernate” saves power when
your Notebook PC is not in use by turning OFF certain components. When you resume your work, your
last status (such as a document scrolled down half way or email typed half way) will reappear as if you
never left. “Shut down” will close all applications and ask if you want to save your work if any are not
saved.
55
Using the Notebook PC 4
OFF ON
ASUS WIDE SCREEN NOTEBOOK
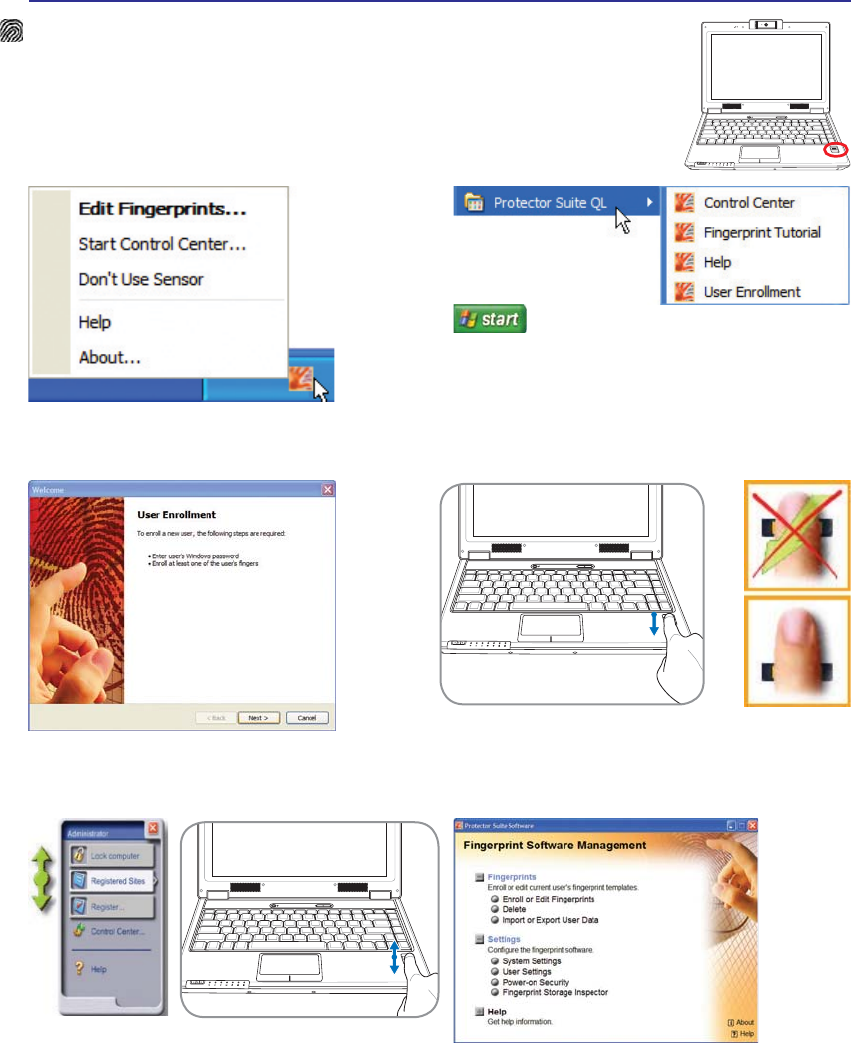
Fingerprint Scanner (on selected models)
7KHÀQJHUSULQWVFDQQHUFDQEHXVHGIRULQVWDQWDQGVHFXUHXVHUDXWKHQWLFDWLRQ
1.3
MEGA
PIXELS
OFF ON
ASUS WIDE SCREEN NOTEBOOK
/HIWRUULJKWFOLFNWKHÀQJHUSULQWWDVNEDULFRQ
WRRSHQWKHPHQXWRHGLWÀQJHUSULQWVRUPDNH
control settings.
,I\RXKDYHQRWFRQÀJXUHGDXVHU\RXZLOOEH
directed to the “User Enrollment”. Follow the
LQVWUXFWLRQVWRVHWXSWKHÀQJHUSULQWVFDQQHU
6FDQQLQJ\RXUÀQJHUSULQWUHTXLUHVWKDW\RXUÀQJHUEHVWUDLJKW
DQGÁDWDVVKRZQKHUH
After you setup a user, you can open the
Control Center to edit Fingerprints or make
software settings.
You can launch the Control Center from Windows “Start” if
the taskbar icon is not running.
After software setup, you can use the
ÀQJHUSULQWVFDQQHUDVDVFUROOZKHHOOLNHWKDW
on a mouse.
OFF ON
ASUS WIDE SCREEN NOTEBOOK
56
4 Using the Notebook PC
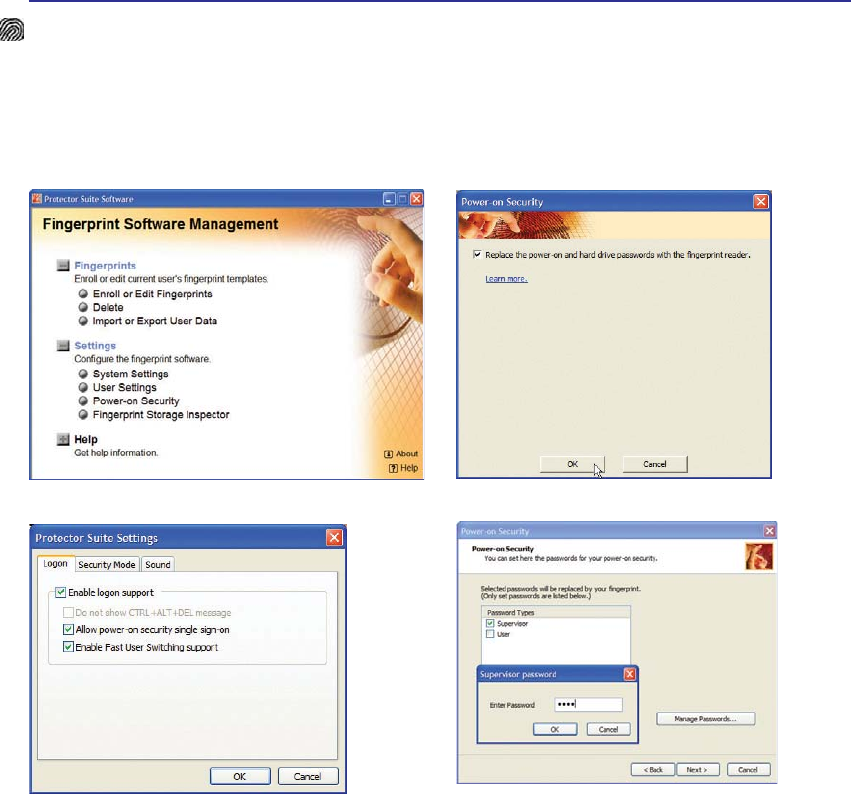
Fingerprint Login
7KHÀQJHUSULQWVFDQQHUFDQEHXVHGWRUHSODFHWKHV\VWHPERRWXSDQGRU:LQGRZVORJLQSDVVZRUGFKHFN
To use this feature:
1. You must set a Supervisor Password on the “Security” page in BIOS SETUP UTILITY.
2. Password CheckRQWKH´6HFXULW\µSDJHLQ%,266(78387,/,7<PXVWEHVHWWR>)LQJHUSULQW@
3. Choose Power-on Security in the “Control Center”. 4. Select “Replace the power-on and hard...”.
5. Select “Allow power-on security single
VLJQRQµ in System Settings from the “Control
Center”. This page allows you to select
ÀQJHUSULQWORJRQRSWLRQV
'XULQJV\VWHPERRW\RXZLOOVHH´6ZLSHÀQJHUWRDXWKRUL]HDFFHVVµ,I\RXGRQRWVXFFHVVIXOO\
GRVRLQWKHDOORZHGWLPHLWZLOOUHYHUWWR´(QWHU3DVVZRUGBµ3UHVVLQJWKH>(6&@NH\ZLOOVKRZ
´%LRPHWULFRSHUDWLRQFDQFHOOHGµDQGDOORZ\RXWRHQWHUDSDVVZRUGLQVWHDGRIXVLQJDÀQJHUSULQW,Q
HLWKHUFDVH\RXZLOOVHH$&&(66*5$17('ZKHQDXWKRUL]HG
,I\RXXVHGDÀQJHUSULQWRQV\VWHPERRW\RXZLOODOVRDXWRPDWLFDOO\ORJLQWR:LQGRZVZLWK\RXU
account. You will see “Succeeded” on the login screen. If you used a password on system boot, you
ZLOOEHUHTXLUHGWRXVH\RXUÀQJHUSULQWRUW\SHLQDSDVVZRUGWRORJLQWR:LQGRZV
6. Set the password type for power-on security
DVVRFLDWHGZLWK\RXUÀQJHUSULQWLQ´(QUROORU(GLW
Fingerprints” from the “Control Center”. You will
be asked for the relevant BIOS password based
on your selection.
57
Using the Notebook PC 4
Trusted Platform Module (TPM) (on selected models)
The TPM, or Trusted Platform Module, is a security hardware device on the system board that will hold
computer-generated keys for encryption. It is a hardware-based solution that an help avoid attacks by
hackers looking to capture passwords and encryption keys to sensitive data. The TPM provides the abil-
ity to the PC or notebook to run applications more secure and to make transactions and communication
more trustworthy.
The security features provided by the TPM are internally supported by the following cryptographic capa-
bilities of each TPM: hashing, random number generation, asymmetric key generation, and asymmetric
encryption/decryption. Each individual TPM on each individual computer system has a unique signature
initialized during the silicon manufacturing process that further enhances its trust/security effectiveness.
Each individual TPM must have an Owner before it is useful as a security device.
TPM Applications
TPM is useful for any customer that is interested in providing an addition layer of security to the com-
puter system. The TPM, when bundled with an optional security software package, can provide overall
V\VWHP VHFXULW\ ÀOH SURWHFWLRQ FDSDELOLWLHV DQG SURWHFW DJDLQVW HPDLOSULYDF\ FRQFHUQV 730 KHOSV
provide security that can be stronger than that contained in the system BIOS, operating system, or any
non-TPM application.
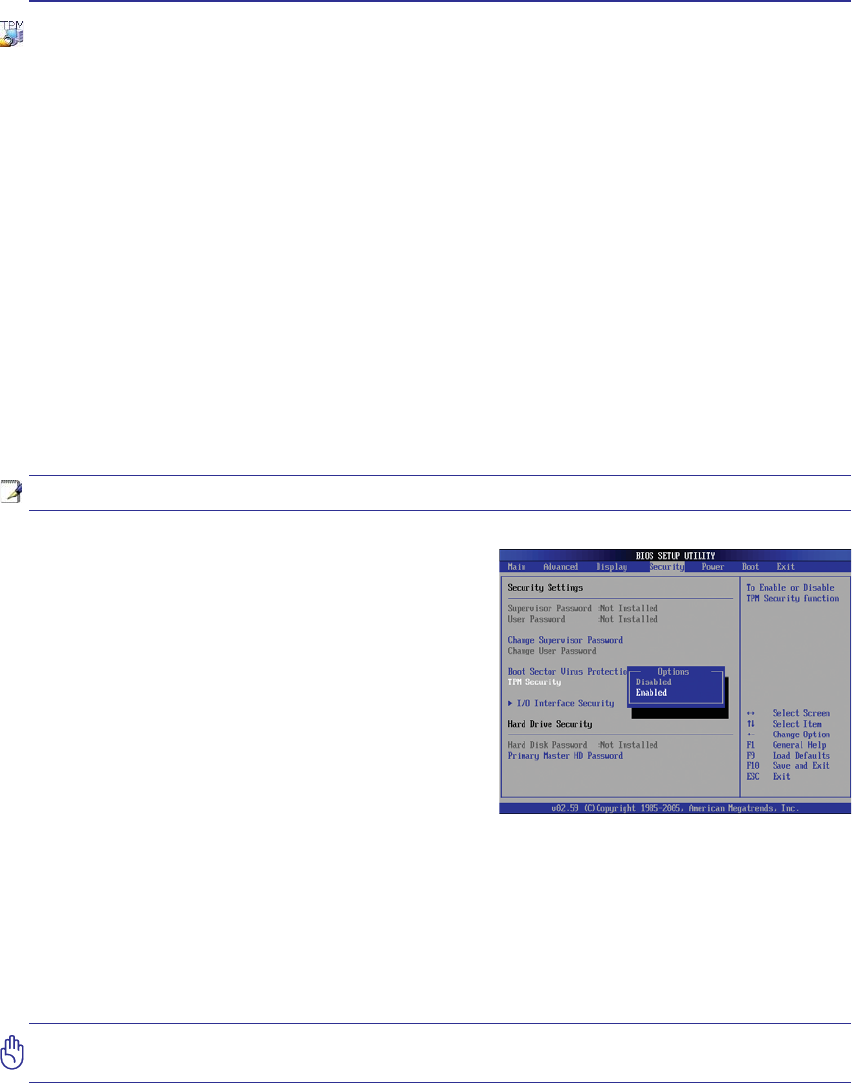
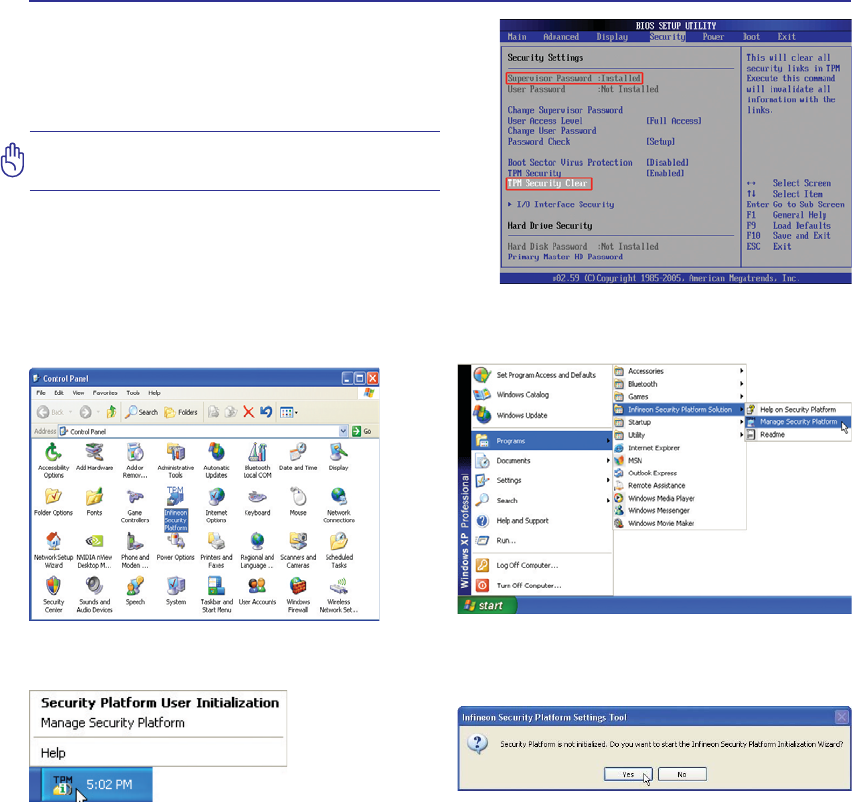
Enabling TPM Security
Enter BIOS SetupSUHVV>)@RQV\VWHPVWDUWXS
On Security page, set TPM Security to [Enabled]
,PSRUWDQW8VH\RXU730DSSOLFDWLRQҋV´5HVWRUHµRU´0LJUDWLRQµIXQFWLRQWREDFNXS
your TPM security data.
Note: The TPM is disabled by default. Use BIOS setup to enable it.
58
4 Using the Notebook PC
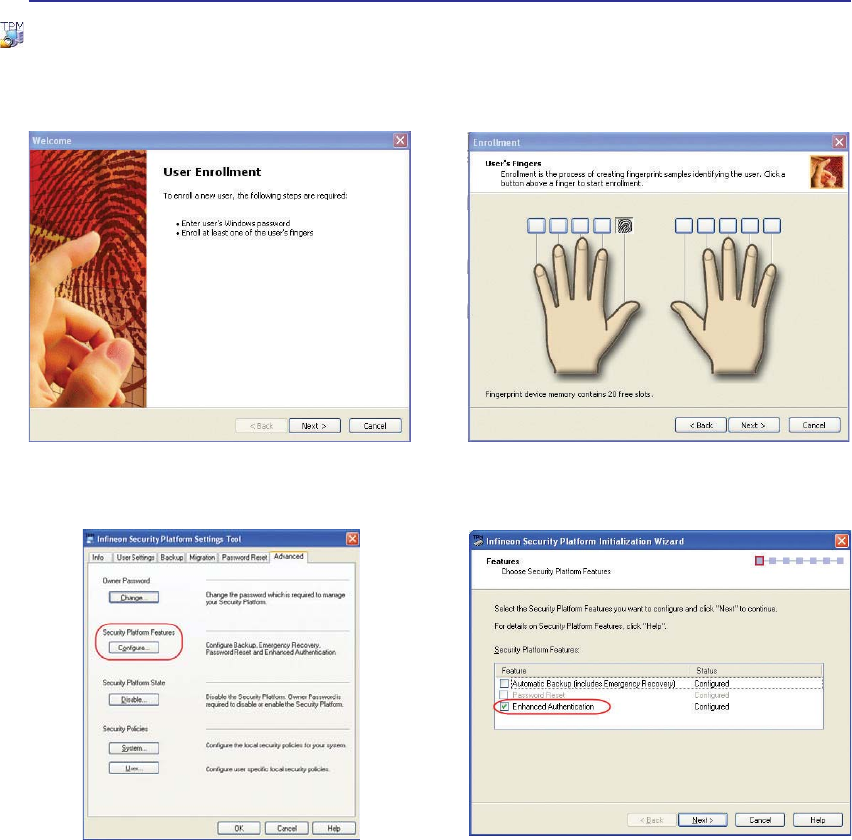
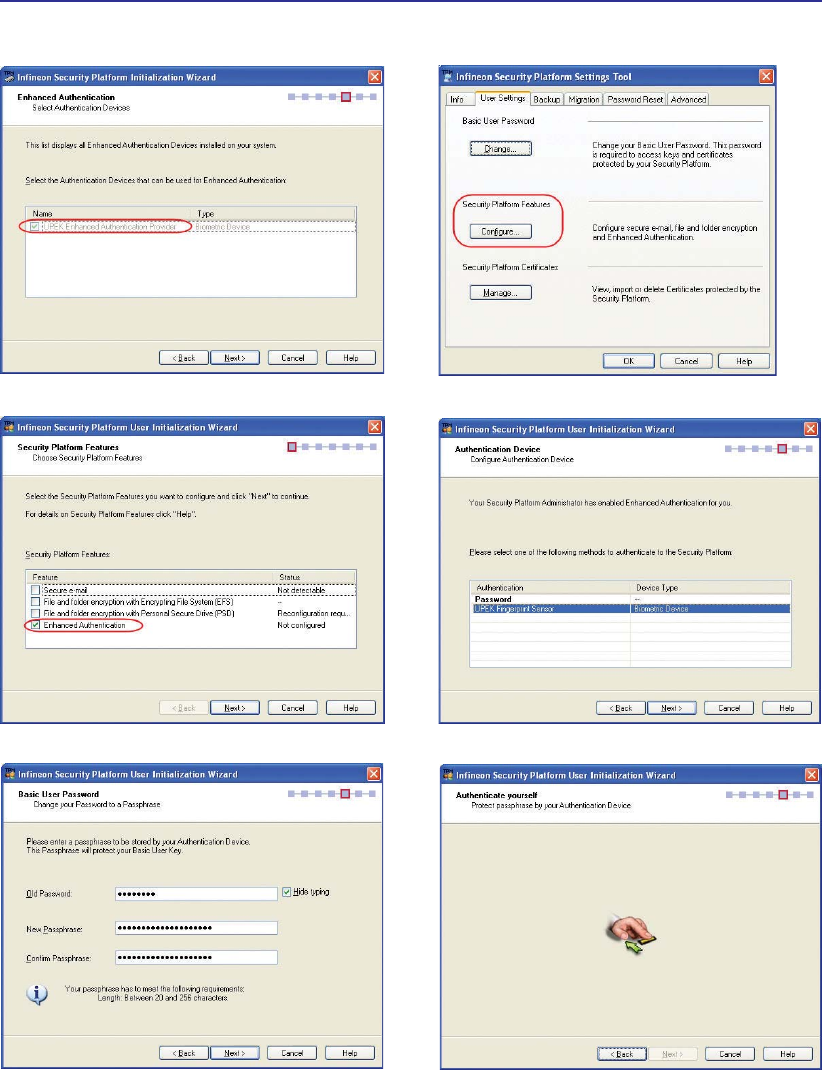
,QLWLDOL]H,QÀQHRQ7306HFXULW\3ODWIRUP (QUROOÀQJHUSULQWXVLQJ364/
6HWWLQJ,QÀQHRQ6HFXULW\3ODWIRUP&OLFN&RQ-
ÀJXUHRQWKH´$GYDQFHGµSDJH
4. Check Enhanced Authentication and click
Next.
TPM Setup for Fingerprint Scanner
7KHVHLQVWUXFWLRQVZLOOVKRZ\RXKRZWRXVHWKHÀQJHUSULQWVFDQQHUWRDXWKHQWLFDWHWKH,QÀQHRQ730
59
Using the Notebook PC 4
5. Choose UPEK Enhanced Authentication Provider. &OLFN&RQÀJXUHLQ8VHU6HWWLQJVSDJH
7. Check the Enhanced Authentication and Next. 8. Select the UPEK Fingerprint Sensor and Next.
9. Enter the old password and a new passphrase. 6ZLSHÀQJHUWRDXWKHQWLFDWH
TPM Setup for Fingerprint Scanner (Cont.)

60
4 Using the Notebook PC
11. Settings are complete. Authentication when
accessing TPM in Infineon Security Platform
will change from asking TPM basic password to
Biometric device (Fingerprint Reader) or new
passphrase.
12. This is the original screen before setting en-
hanced authentication.
13. This is the screen after setting enhanced au-
thentication.
14. This is the screen after setting enhanced authen-
WLFDWLRQLIÀQJHUSULQWQRWVXFFHVVIXOLQWKHDOORZHG
time (previous screen).
TPM Setup for Fingerprint Scanner (Cont.)
61
Using the Notebook PC 4
You can launch the Security Platform
application from Windows “Control Panel”.
You can launch the Security Platform
application from Windows “Start” menu.
When the Security Platform is running, this
icon will show in the Windows taskbar. You
can choose to initialize or manage here.
When you launch the Security Platform
DSSOLFDWLRQIRUWKHÀUVWWLPHDQVZHUYes and
IROORZWKHLQVWUXFWLRQVWRFRQÀJXUHLW
Clearing TPM Secured Data
When Supervisor Password is installed, TPM Se-
curity Clear will appear. Use this item to clear all
data secured by TPM.
Important: Use should routinely backup
your TPM secured data.
Running Security Platform in Windows

62
4 Using the Notebook PC

Appendix
Optional Accessories & Connections
Operating System and Software
System BIOS Settings
Common Problems and Solutions
Windows Software Recovery
NTFS Converter
Glossary
Declarations and Safety Statements
Notebook PC Information
NOTE: Photos and icons in this manual are used for artistic purposes only and do not
show what is actually used in the product itself.
A Appendix
Optional Accessories
These items, if desired, come as optional items to complement your Notebook PC.
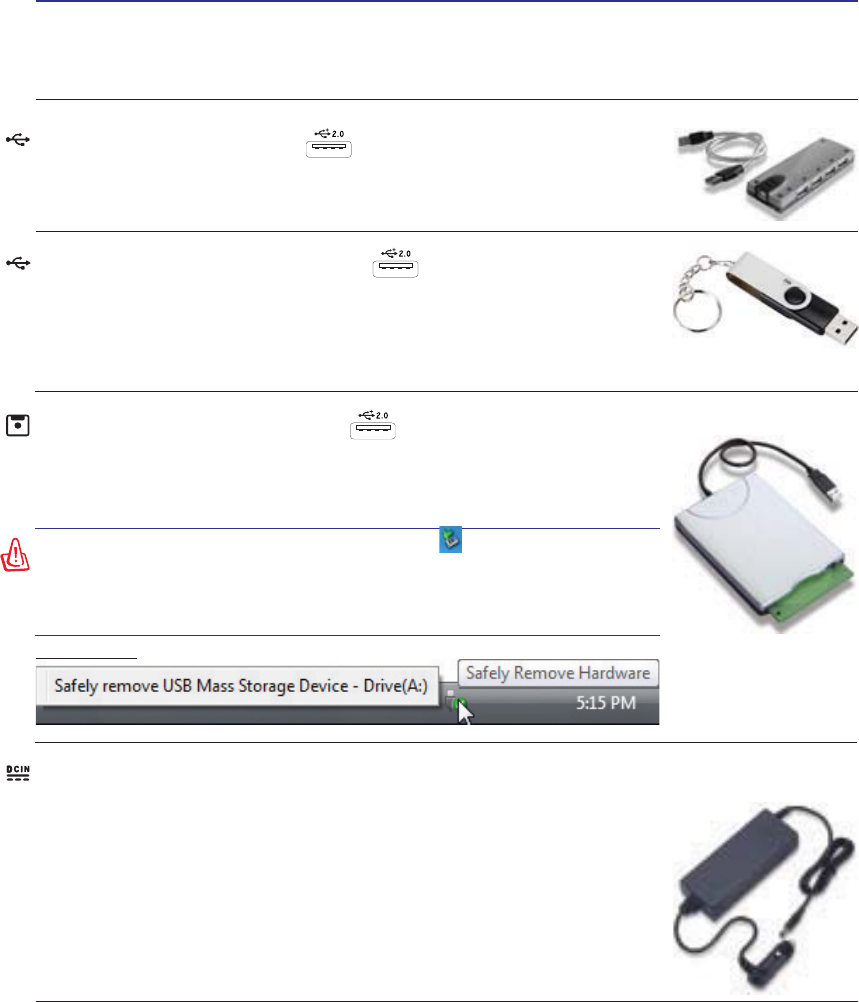
USB Flash Memory Disk
$86%ÁDVKPHPRU\GLVNLVDQRSWLRQDOLWHPWKDWFDQUHSODFHWKH0%ÁRSS\
disk and provide storage up to several hundred megabytes, higher transfer speeds,
and greater durability. When used in current operating systems, no drivers are
necessary.
USB Hub (Optional)
Attaching an optional USB hub will increase your USB ports and allow you to
quickly connect or disconnect many USB peripherals through a single cable.
Vehicle Power Adapter
The vehicle power adapter provides a source of power for using the Notebook
PC and/or charging the Notebook PC’s battery pack while in transit when no AC
power is available. This product is an essential tool for today’s mobile profes-
sional. Your purchase will enhance the power, performance, and versatility of
your portable computer while traveling on the road or on the sea. The Vehicle
Power Adapter can be used in vehicles or boats using a standard cigarette lighter
VRFNHW7KH9HKLFOH3RZHU$GDSWHUDFFHSWVLQSXWUDQJHVIURP9'&9ROWV
'LUHFW&XUUHQWWR9'&DQGSURYLGHV9'&XSWR::DWWV
USB Floppy Disk Drive
$QRSWLRQDO86%LQWHUIDFHÁRSS\GLVNGULYHFDQDFFHSWDVWDQGDUG0%RU
.%LQFKÁRSS\GLVNHWWH
WARNING! To prevent system failures, use (Windows XP Safely
Remove Hardware) on the taskbar before disconnecting the USB
ÁRSS\GLVNGULYH(MHFWWKHÁRSS\GLVNEHIRUHWUDQVSRUWLQJWKH
Notebook PC to prevent damage from shock.
Windows Vista
Appendix A
Optional Connections
These items, if desired, may be purchased from third-parties.
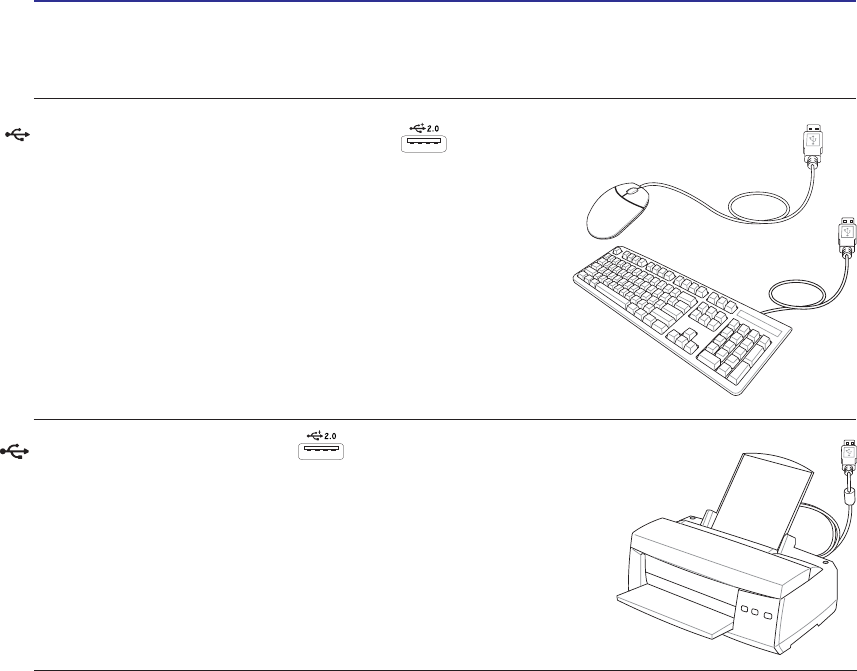
USB Keyboard and Mouse
Attaching an external USB keyboard will allow data entry to be
more comfortable. Attaching an external USB mouse will allow
Windows navigation to be more comfortable. Both the external
USB keyboard and mouse will work simultaneously with the
Notebook PC’s built-in keyboard and touchpad.
Printer Connection
One or more USB printers can be simultaneously used on any USB port
or USB hub.
A Appendix
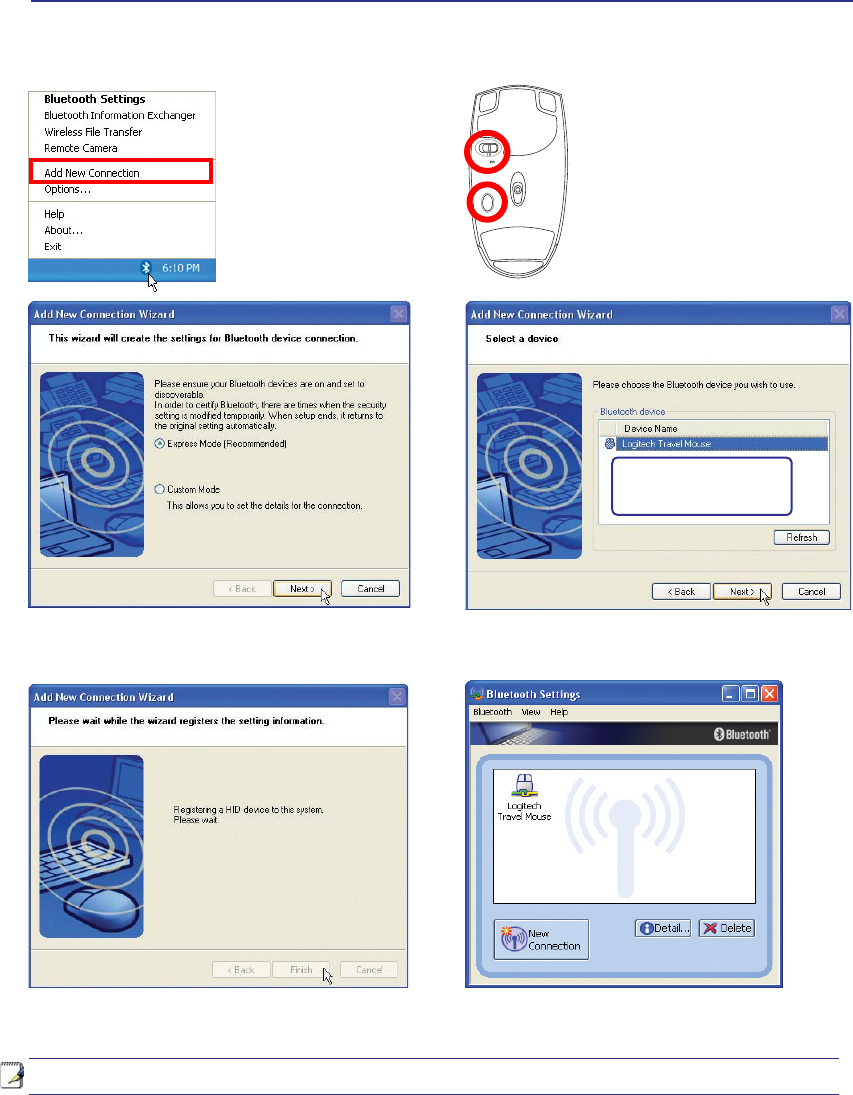
1. A Bluetooth icon
should be located on
your Windows taskbar.
Right click the taskbar
Bluetooth icon and
choose Add New
Connection.
5. Select “Express Mode” and click Next.
3. Turn ON the switch on the
bottom of the mouse.
2. Install two “AA” batteries.
6. A list of available Bluetooth devices will appear.
Select “Logitech Travel Mouse” and click Next.
7. The software will register the Bluetooth mouse.
Click Finish when complete.
8. A mouse icon with a pair of green and
yellow hands will show in this window.
R
E
S
E
T
OFF ON
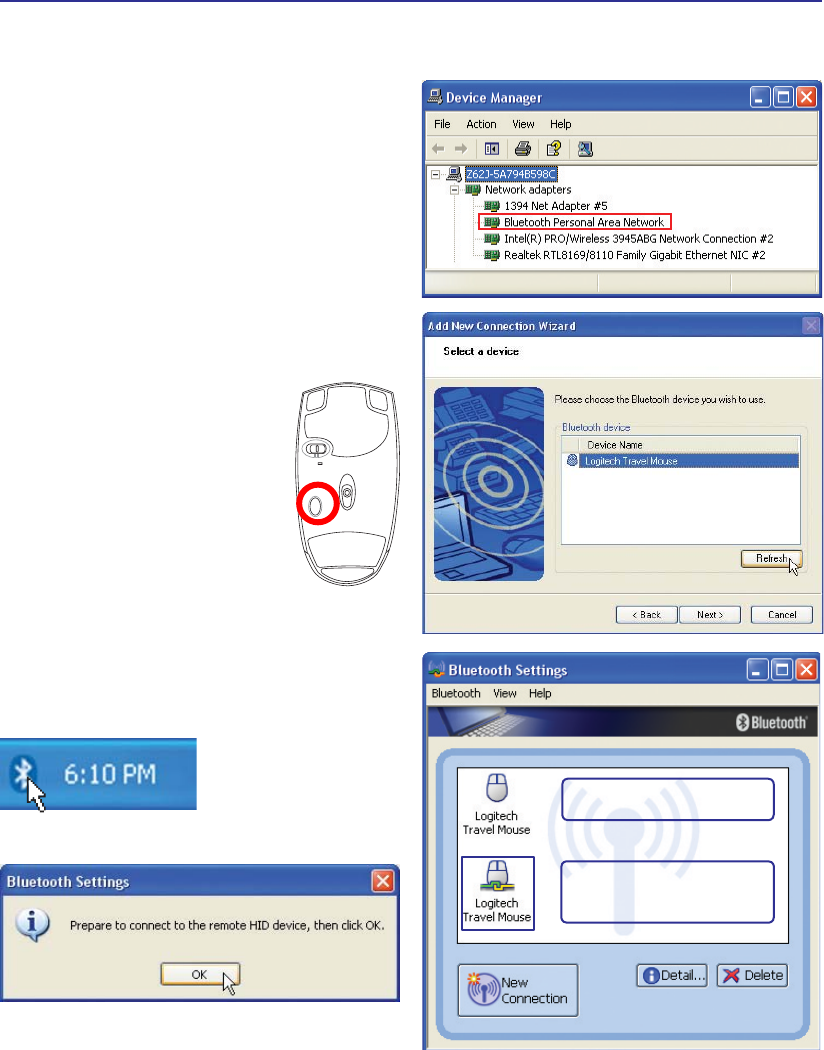
If you do not see the Bluetooth
mouse here. Push the “RESET”
button on the bottom of the
mouse and click Refresh here.
1RWH´5(6(7µPD\EHQHFHVVDU\DIWHUFKDQJLQJEDWWHULHV5HSHDWVWHSVLIQHFHVVDU\
Bluetooth Mouse (optional)
Windows XP
4. Push the “RESET” button on
the bottom of the mouse.
Appendix A
Troubleshooting (Windows XP)
In “Device Manager”, check if “Bluetooth Personal
Area Network” is available as shown here.
4XHVWLRQ,FDQQRWVHHP\%OXHWRRWKPRXVHLQ
the list. What do I do?
Double-click on the
Bluetooth Icon.
Double-click on the
registered Bluetooth mouse.
After connection, the icon
will show a pair of green and
yellow hands.
Click Refresh in the software and
“RESET” on the mouse. Repeat if
necessary.
4XHVWLRQ , DOUHDG\ UHJLVWHUHG WKH %OXHWRRWK
mouse before. Why is it not working now? How
do I connect to it?
4XHVWLRQ +RZ GR , FKHFN LI P\ %OXHWRRWK LV
ready?
$SURPSWZLOODSSHDUIRUFRQÀUPDWLRQ&OLFNOK.
R
E
S
E
T
OFF ON

A Appendix
Support Software
This Notebook PC comes with a support disc that provides BIOS, drivers and applications
to enable hardware features, extend functionality, help manage your Notebook PC, or
add functionality not provided by the native operating system. If updates or replace-
ment of the support disc is necessary, contact your dealer for web sites to download
individual software drivers and utilities.
The support disc contains all drivers, utilities and software for all popular operating systems
including those that have been pre-installed. The support disc does not include the operating system
LWVHOI7KHVXSSRUWGLVFLVQHFHVVDU\HYHQLI\RXU1RWHERRN3&FDPHSUHFRQÀJXUHGLQRUGHUWRSURYLGH
additional software not included as part of the factory pre-install.
A recovery disc is optional and includes an image of the original operating system installed on the hard
drive at the factory. The recovery disc provides a comprehensive recovery solution that quickly restores
the Notebook PC’s operating system to its original working state provided that your hard disk drive is
in good working order. Contact your retailer if you require such a solution.
Note: Some of the Notebook PC’s components and features may not work until the
device drivers and utilities are installed.
Operating System and Software
This Notebook PC may offer (depending on territory) its customers the choice of a pre-installed operat-
ing system such as Microsoft Windows “XP” or “Vista”. The choices and languages will depend on
the territory. The levels of hardware and software support may vary depending on the installed operating
system. The stability and compatibility of other operating systems cannot be guaranteed.