ASUSTeK Computer HD05UGPZ5 BLUETOOTH MODULE User Manual 2 OF 4
ASUSTeK Computer Inc BLUETOOTH MODULE 2 OF 4
UserManual.wiki
>
ASUSTeK Computer
>
HD05UGPZ5 User Manual
>
USER MANUAL 2 OF 4
Contents
1.
USER MANUAL 1 OF 4
2.
USER MANUAL 2 OF 4
3.
USER MANUAL 3 OF 4
4.
USER MANUAL 4 OF 4
USER MANUAL 2 OF 4
Navigation menu
Upload a User Manual
Namespaces
Wiki Guide
HTML
PDF
Info
Views
User Manual
Discussion / Help
Navigation
![Introduction 第 77 頁,共 224 頁file://C:\Documents and Settings\anitachou\Local Settings\Temp\~hh114B.htm 2004/11/30 This section describes how to send a fax using a mobile telephone as a modem. →Setting up the mobile telephone→Installing a modem→Setting fax information→Sending a fax→Receiving a faxzPlease ensure that any drivers used to connect the PC to the mobile telephone have been installed.zA Bluetooth passkey (PIN code) is required for you to connect to the mobile telephone. Please make a note of your Bluetooth passkey before you start the set -up process.zA fax application is required for you to be able to send and receive faxes. The description below is based on a example using Microsoft Fax, which is installed with Windows XP as standard.If you are going to use a commercially available fax application , then please refer to the manual that came with the application for information on how to send and receive faxes. Set up and register the mobile telephone as a fax service.1. Turn on the mobile telephone, and set it to be connectable via Bluetooth{Please refer to the instruction manual for information on how to operate the telephone. 2. Right-click on the Bluetooth icon in the task tray, and then click on [Add New Connection]ImportantSetting up the mobile telephoneProcedureNoteUsing a mobile telephone for fax transmissions [FAX]](https://usermanual.wiki/ASUSTeK-Computer/HD05UGPZ5.USER-MANUAL-2-OF-4/User-Guide-546596-Page-1.png)
![Introduction 第 78 頁,共 224 頁file://C:\Documents and Settings\anitachou\Local Settings\Temp\~hh114B.htm 2004/11/30 {Alternatively, click [Start]→[All Programs]→[Bluetooth]→[Bluetooth Settings], and then click on [New Connection] from the active [Bluetooth Settings] window. The [Add New Connection Wizard (Welcome to the Add New Connection Wizard)] window will appear.3. Select [Custom Mode], and then click on the [Next] button The [Add New Connection Wizard (Searching for Bluetooth devices)] window will appear.Note](https://usermanual.wiki/ASUSTeK-Computer/HD05UGPZ5.USER-MANUAL-2-OF-4/User-Guide-546596-Page-2.png)
![Introduction 第 79 頁,共 224 頁file://C:\Documents and Settings\anitachou\Local Settings\Temp\~hh114B.htm 2004/11/30Once the program has finished searching for the devices, the [Add New Connection Wizard (Select Device)] window will appear.4. Select the device name of the mobile telephone from [Device List], and then click on the [Next] button The [Add New Connection Wizard (Searching for Services)] window will appear. 5. If you are connecting to the mobile telephone for the first time, enter the passkey for the device from the [Bluetooth Passkey (PIN Code)] window, and then click on the [OK] button.](https://usermanual.wiki/ASUSTeK-Computer/HD05UGPZ5.USER-MANUAL-2-OF-4/User-Guide-546596-Page-3.png)
![Introduction 第 80 頁,共 224 頁file://C:\Documents and Settings\anitachou\Local Settings\Temp\~hh114B.htm 2004/11/30Once the program has finished searching for the services, the [Add New Connection Wizard (Select Service)] window will appear.6. Select "Fax" under [Select Service], and then click on the [Next] buttonThe [Add New Connection Wizard (Connecting to Remote Device)] screen will appear.The COM port and modem registration process will then be automatically performed.](https://usermanual.wiki/ASUSTeK-Computer/HD05UGPZ5.USER-MANUAL-2-OF-4/User-Guide-546596-Page-4.png)
![Introduction 第 81 頁,共 224 頁file://C:\Documents and Settings\anitachou\Local Settings\Temp\~hh114B.htm 2004/11/30 Once the COM port and modem (standard 33600 bps type) registration is complete,the [Add New Connection Wizard (Setting Connection Name)] screen will appear.7. Configure the type and name of the icon to appear after registration, and click on the [Next] button. Please click only on the [Next] button once you are satisfied with the configuration.The [Add New Connection Wizard (Completing the Add New Connection Wizard)] screen will appear. 8. Click on the [Finish] button The settings will be registered, and the icon will appear on the [Bluetooth Settings] screen. Configure send/receive settings and register fax information. 1. Select [Start]→[Control Panel], and then double-click on the [Printers and Other Hardware] icon {If the control panel is displayed in "Classic view", and you use Windows 2000, please start from Step (2). 2. Double-click on the [Printers and Faxes] iconThe [Printers & Faxes] window will appear.Setting fax informationProcedureNote](https://usermanual.wiki/ASUSTeK-Computer/HD05UGPZ5.USER-MANUAL-2-OF-4/User-Guide-546596-Page-5.png)
![Introduction 第 82 頁,共 224 頁file://C:\Documents and Settings\anitachou\Local Settings\Temp\~hh114B.htm 2004/11/303. Click on "Set up faxing" in the [Printers and Faxes] windowA window showing installed programs will appear, and a Fax icon will have been created in the [Printers and Faxes] screen.4. Click on "Send a fax" under "Printer Tasks" on the left side of the window](https://usermanual.wiki/ASUSTeK-Computer/HD05UGPZ5.USER-MANUAL-2-OF-4/User-Guide-546596-Page-6.png)
![Introduction 第 83 頁,共 224 頁file://C:\Documents and Settings\anitachou\Local Settings\Temp\~hh114B.htm 2004/11/30If you have not yet configured a fax device, the [Fax Configuration Wizard] window will appear. In the window you can enter settings pertaining to the sender (yourself). {If the fax configuration information has already been registered, the [Send Fax Wizard] window, which can be viewed under " Sending a fax" below, will appear instead of the [Fax Configuration Wizard] window. 5. Enter the sender information, and click on the [Next] button {The sender information that you configure here will be automatically appended as header information when you send a fax. The [Fax Configuration Wizard (Select Device for Sending or Receiving Faxes)] window will appear. 6. Select a device to be used for fax transmissions, enable the device for sending or receiving, and then click on the [Next] buttonNoteNote](https://usermanual.wiki/ASUSTeK-Computer/HD05UGPZ5.USER-MANUAL-2-OF-4/User-Guide-546596-Page-7.png)
![Introduction 第 84 頁,共 224 頁file://C:\Documents and Settings\anitachou\Local Settings\Temp\~hh114B.htm 2004/11/30{If [Enable Receive] is selected, the device will be on standby for receiving faxes even if it is not sending or receiving anything, and therefore will be in continuous connection to the wireless modem (when COM Auto Connect is on).Please decide whether to select this option based on to the desired objective and/or frequency of transmission. The [Fax Configuration Wizard (Transmitting Subscriber Identification (TSID))] window will appear. 7. Click on the [Next] buttonIt is important that you do not change the transmitter subscriber identification.The [Fax Configuration Wizard (Completing the Fax Configuration Wizard)] window will appear. 8. Click on the [Finish] buttonNote](https://usermanual.wiki/ASUSTeK-Computer/HD05UGPZ5.USER-MANUAL-2-OF-4/User-Guide-546596-Page-8.png)
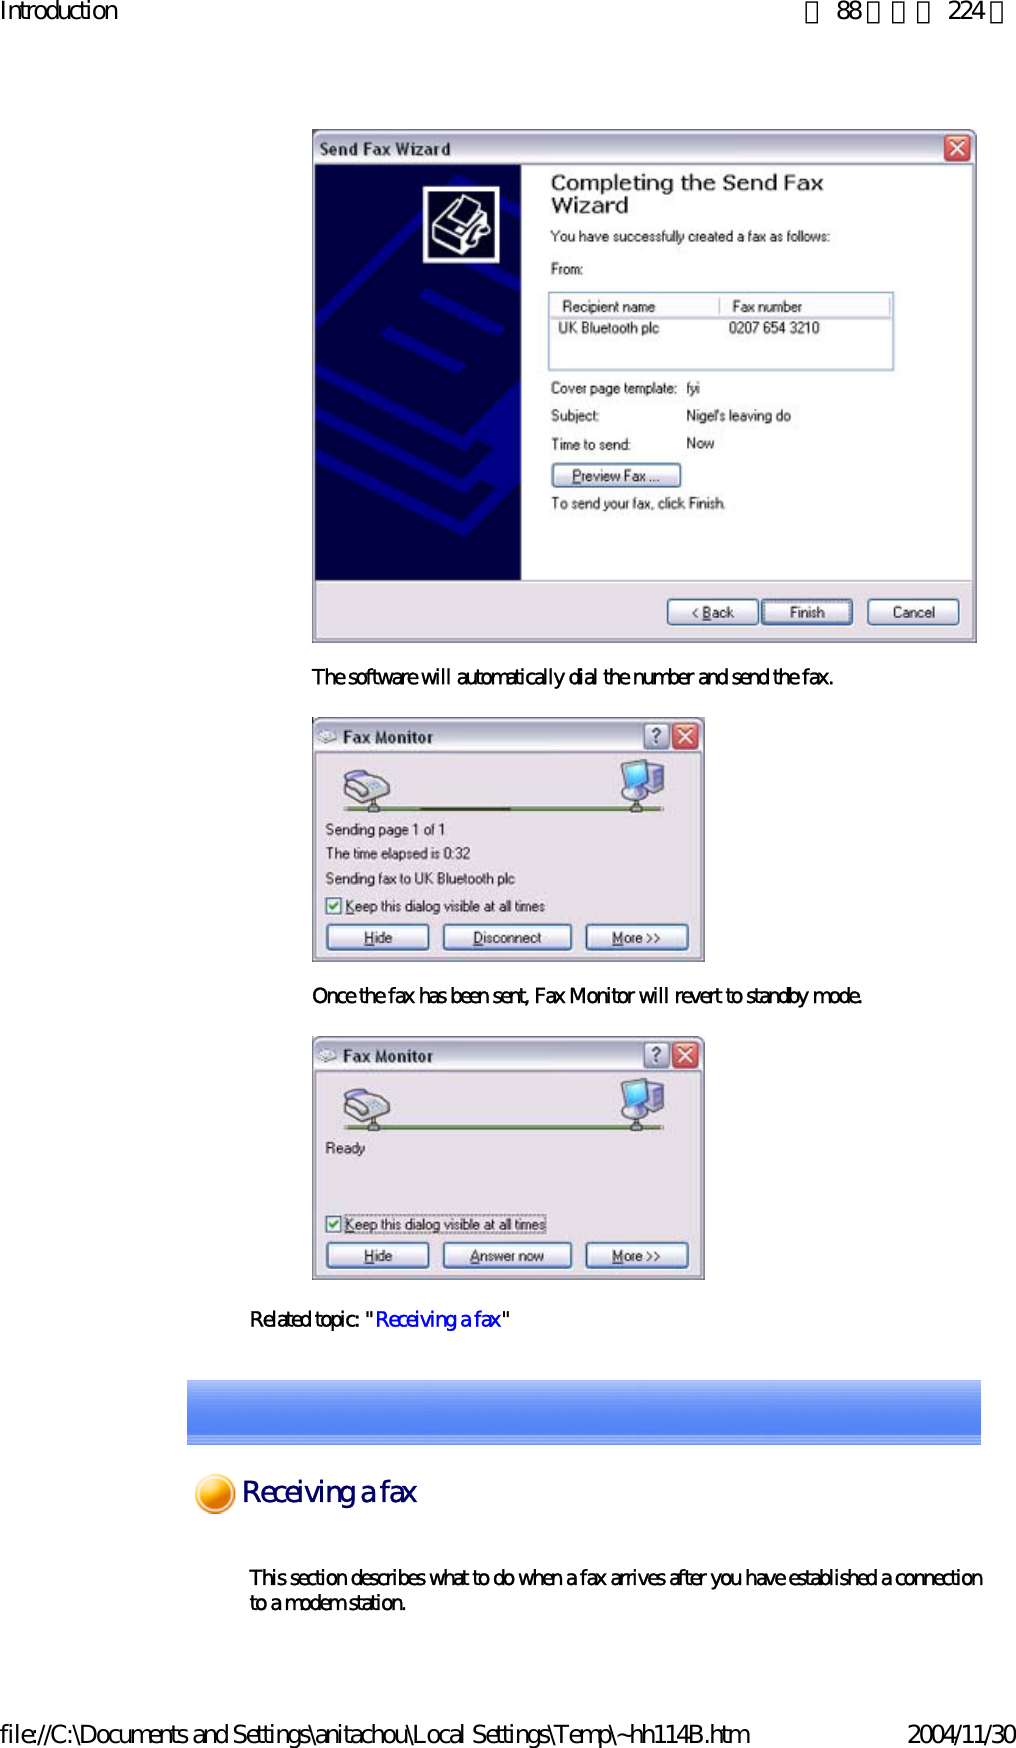
![Introduction 第 85 頁,共 224 頁file://C:\Documents and Settings\anitachou\Local Settings\Temp\~hh114B.htm 2004/11/30The fax information will be have been registered, and the [Fax Console] window will appear.This will complete the fax set-up process. Related topics: "Sending a fax" and "Receiving a fax" This section describes how to send a fax from the Fax Console. zThe Fax service must be enabled for sending in order for you to send a fax.Please refer to "Using a mobile telephone" under "Troubleshooting" for how to change the send and receive settings once the service has been configured."" 1. Double-click on the [Fax] icon in the Control PanelThe [Fax Console] window will appear. ImportantProcedureSending a fax](https://usermanual.wiki/ASUSTeK-Computer/HD05UGPZ5.USER-MANUAL-2-OF-4/User-Guide-546596-Page-9.png)
![Introduction 第 86 頁,共 224 頁file://C:\Documents and Settings\anitachou\Local Settings\Temp\~hh114B.htm 2004/11/302. In the [Fax Console] window, click [File] →[Send fax]The [Send Fax Wizard (Starting the Send Fax Wizard)] window will appear. 3. Click on the [Next] buttonThe [Send Fax Wizard (Recipient Information)] window will appear.4. Enter the name and fax number of the destination party, and then click on the [Next] button](https://usermanual.wiki/ASUSTeK-Computer/HD05UGPZ5.USER-MANUAL-2-OF-4/User-Guide-546596-Page-10.png)
![Introduction 第 87 頁,共 224 頁file://C:\Documents and Settings\anitachou\Local Settings\Temp\~hh114B.htm 2004/11/30The [Send Fax Wizard (Preparing the Cover Page)] window will appear. 5. Specify the cover page template, subject line, and note (body text), and then click on the [Next] buttonThe [Send Fax Wizard (Schedule)] window will appear.6. If you wish to send the fax immediately, select "Now", and then click on the [Next] buttonThe [Send Fax Wizard (Completing the Send Fax Wizard)] window will appear. 7. Confirm the destination information and transmission details, and then click on the [Finish] button](https://usermanual.wiki/ASUSTeK-Computer/HD05UGPZ5.USER-MANUAL-2-OF-4/User-Guide-546596-Page-11.png)
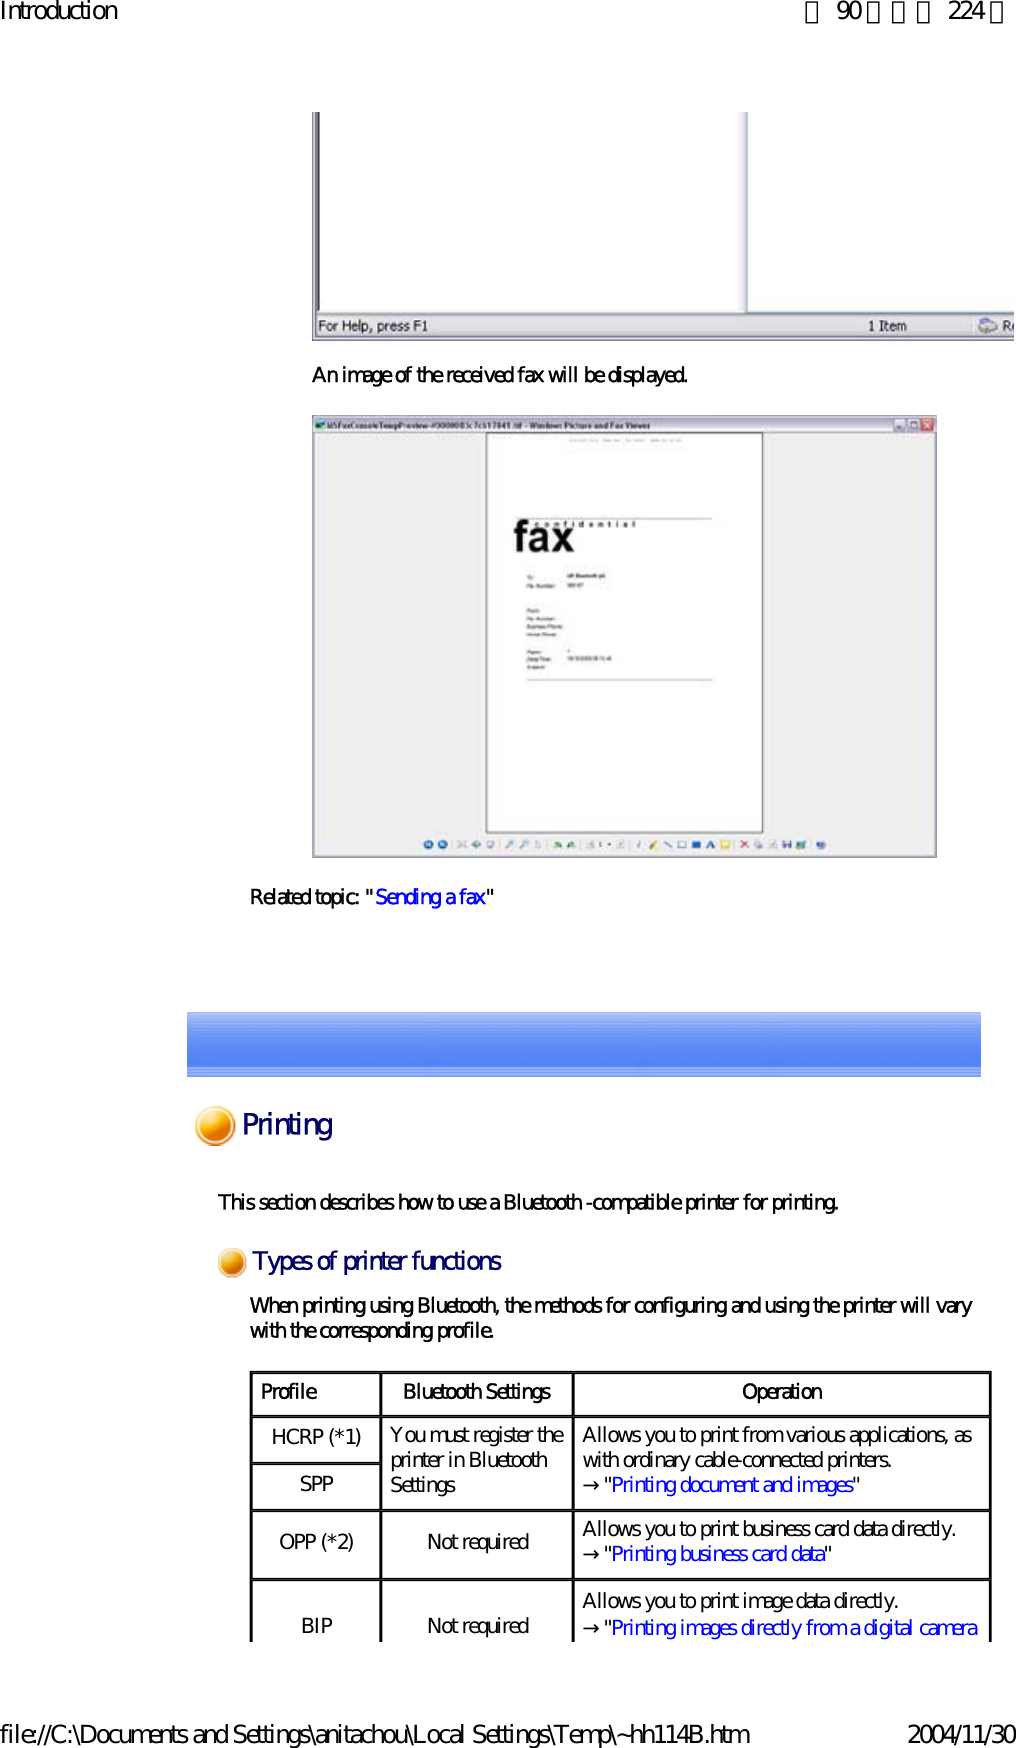
![Introduction 第 89 頁,共 224 頁file://C:\Documents and Settings\anitachou\Local Settings\Temp\~hh114B.htm 2004/11/30zThe Fax service must be enabled for receiving in order for you to receive a fax. Please refer to "Using a mobile telephone" under "Troubleshooting" for information on how to change the send and receive settings once the fax service has been configured.zPlease ensure you have connected to a modem station before you receive a fax (the device will be connected to the modem if "Enable Receive" has been selected or COM Auto Connect has been activated). 1. When a fax arrives, the Fax Monitor will start automatically as the fax is received Once the fax has been received, the Fax Monitor will revert to standby mode. {If you have enabled manual fax reception, the message below will appear when a fax arrives.Click on the message with your mouse to receive the fax.2. Double-click on the [Fax] icon in the Control PanelThe [Fax Console] window will appear.3. In the [Fax Console] window, double-click on the fax that has arrivedImportantProcedureNote](https://usermanual.wiki/ASUSTeK-Computer/HD05UGPZ5.USER-MANUAL-2-OF-4/User-Guide-546596-Page-13.png)
![Introduction 第 91 頁,共 224 頁file://C:\Documents and Settings\anitachou\Local Settings\Temp\~hh114B.htm 2004/11/30 z(*1) The majority of Bluetooth-compatible printers support HCRP.If you have selected Express Mode, HCRP will be chosen as the default profile. If the printer does not support HCRP, then SPP will be the next choice. z(*2) The printing of business cards using OPP complies exclusively with the business card (vCARD) standard. or other device"NoteThis section describes how to print using a Bluetooth -compatible printer. →Setting up the printer→Printing zPlease ensure that any printer-specific drivers have been installed on the PC before you have established a Bluetooth connection. zA Bluetooth passkey (PIN code) is required for you to connect to the printer. Please make a note of your Bluetooth passkey before you start the set -up process. 1. Turn on the printer2. Right-click on the Bluetooth icon in the task tray, and then click on [Add New Connection]ImportantSetting up the printerProcedurePrinting documents and images [HCRP] [SPP]](https://usermanual.wiki/ASUSTeK-Computer/HD05UGPZ5.USER-MANUAL-2-OF-4/User-Guide-546596-Page-15.png)
![Introduction 第 92 頁,共 224 頁file://C:\Documents and Settings\anitachou\Local Settings\Temp\~hh114B.htm 2004/11/30 {Alternatively, click [Start]→[All Programs]→[Bluetooth]→[Bluetooth Settings], and then click on [New Connection] from the active [Bluetooth Settings] window. The [Add New Connection Wizard (Welcome to the Add New Connection Wizard)] window will appear.3. Confirm that [Express Mode] has been selected, and then click on the [Next] buttonThe [Add New Connection Wizard (Searching for Bluetooth devices)] window will appear.Note](https://usermanual.wiki/ASUSTeK-Computer/HD05UGPZ5.USER-MANUAL-2-OF-4/User-Guide-546596-Page-16.png)
![Introduction 第 93 頁,共 224 頁file://C:\Documents and Settings\anitachou\Local Settings\Temp\~hh114B.htm 2004/11/30Once the program has finished searching for the devices, the [Add New Connection Wizard (Device Selection)] window will appear.4. Select the device name of the printer from [Device List], and then click on the [Next] buttonThe [Add New Connection Wizard (Searching for Services)] window will appear. 5. If you are connecting to the printer for the first time, enter the passkey for the device from the [Bluetooth Passkey (PIN Code)] window, and then click on the [OK] button.](https://usermanual.wiki/ASUSTeK-Computer/HD05UGPZ5.USER-MANUAL-2-OF-4/User-Guide-546596-Page-17.png)
![Introduction 第 94 頁,共 224 頁file://C:\Documents and Settings\anitachou\Local Settings\Temp\~hh114B.htm 2004/11/30Once the services have been detected successfully, connection to the device and creation of the HCRP port will be performed automatically. If you have not yet installed a printer, a message prompting you to install a printer will appear.6. Click on the [OK] buttonThe [Add Printer Wizard (Starting the Add Printer Wizard)] window will appear.7. Click on the [Next] buttonThe [Add Printer Wizard (Local Printer or Network Printer)] window will appear.8. Select "Local printer attached to this computer", remove the check next to "Automatically detect and install my Plug and Play printer", and then click on the [Next] button](https://usermanual.wiki/ASUSTeK-Computer/HD05UGPZ5.USER-MANUAL-2-OF-4/User-Guide-546596-Page-18.png)
![Introduction 第 95 頁,共 224 頁file://C:\Documents and Settings\anitachou\Local Settings\Temp\~hh114B.htm 2004/11/30 The [Add Printer Wizard (Select Printer Port)] window will appear.9. Select the desired port, and then click on the [Next] buttonThe [Add Printer Wizard (Install Printer Software)] window will appear.10. Select the [Manufacturer] and [Printer] as pertains to the printer to be installed, or click on the [Use Device] button, and then click on the [Next] button](https://usermanual.wiki/ASUSTeK-Computer/HD05UGPZ5.USER-MANUAL-2-OF-4/User-Guide-546596-Page-19.png)
![Introduction 第 96 頁,共 224 頁file://C:\Documents and Settings\anitachou\Local Settings\Temp\~hh114B.htm 2004/11/30 Please install the printer according to the instructions in the windows that follow.Once installation is complete, a message of confirmation will appear in the [Add New Connection Wizard (Printer Settings)] window.11. Click on [Next]The [Add New Connection Wizard (Connection Name Settings)] window will appear.12. Enter the type and name of the icon displayed after registration, and then click on the [Next] buttonPlease click on the [Next] button if you are satisfied with the settings.](https://usermanual.wiki/ASUSTeK-Computer/HD05UGPZ5.USER-MANUAL-2-OF-4/User-Guide-546596-Page-20.png)
![Introduction 第 97 頁,共 224 頁file://C:\Documents and Settings\anitachou\Local Settings\Temp\~hh114B.htm 2004/11/30{You can change the connection icon and icon name.→"Changing the connection icon name"→"Changing the connection icon" Try to print from the message pad. 1. Click [File]→[Print]The [Print] screen will appear.2. Select wireless printer from under [Select Printer], and then click on the [Print] buttonPrinting will commence. zIf you have connected to a printer using HCRP or SPP profiles, all future Bluetooth connections to that printer will be established automatically once you have printed a document from your PC. NotePrintingNoteIf you have a printer that supports BIP (Basic Imaging Profile), you can send images direPrinting images directly from a digital camera or other device [BIP]](https://usermanual.wiki/ASUSTeK-Computer/HD05UGPZ5.USER-MANUAL-2-OF-4/User-Guide-546596-Page-21.png)
![Introduction 第 99 頁,共 224 頁file://C:\Documents and Settings\anitachou\Local Settings\Temp\~hh114B.htm 2004/11/30The [Bluetooth Information Exchanger] window will appear.3. Double-click on the [Image Transfer] iconA list of devices will appear in the [Image Transfer] window.{If your desired printer does not appear in the list, please confirm that the prhas been turned on, and then click on [Bluetooth] →[Search Devices]A device search will be performed. 4. Drag and drop the file to be sent on top of the icon of the destination printerNote](https://usermanual.wiki/ASUSTeK-Computer/HD05UGPZ5.USER-MANUAL-2-OF-4/User-Guide-546596-Page-23.png)
![Introduction 第 100 頁,共 224 頁file://C:\Documents and Settings\anitachou\Local Settings\Temp\~hh114B.htm 2004/11/30The file will be sent to the printer. If the file has been sent to the printer successfully, the message below will appeathe image will be printed out. Please click on the [OK] button.The message below will appear if the file transmission was unsuccessful. Please on the [OK] button to close the message, and repeat the printing procedure. {If the printer does not support the BIP profile, the message below will appe ■Printing image files to a printer (by right -clicking the mouse)1. Turn on the printer2. Right-click on the file to be sent, and then click on the destination printer under [Bluetooth]Note](https://usermanual.wiki/ASUSTeK-Computer/HD05UGPZ5.USER-MANUAL-2-OF-4/User-Guide-546596-Page-24.png)
![Introduction 第 101 頁,共 224 頁file://C:\Documents and Settings\anitachou\Local Settings\Temp\~hh114B.htm 2004/11/30{If your desired device does not appear in the list, please confirm that the dehas been turned on, and then click on [to Bluetooth] →[Search Other DeviOnce the device has been detected, the message below will appear. Please sthe destination device, and click on the [Send] button.A window indicating that the file is being sent to the printer will appear.If the file has been sent to the printer successfully, the message below will appeathe image will be printed out. Please click on the [OK] button.The message below will appear if the file transmission was unsuccessful. Please on the [OK] button to close the message, and repeat the printing procedure.Note](https://usermanual.wiki/ASUSTeK-Computer/HD05UGPZ5.USER-MANUAL-2-OF-4/User-Guide-546596-Page-25.png)
![Introduction 第 102 頁,共 224 頁file://C:\Documents and Settings\anitachou\Local Settings\Temp\~hh114B.htm 2004/11/30 {If the printer does not support the BIP profile, the message below will appe NoteIf you have a printer that supports OPP (Object Push Profile), you can directly send busincard data that conforms to the "vCard" standard to a printer and print it out. →Printing business card data (using icons)→Printing business card data (by right-clicking the mouse)■Printing business card data (using icons)1. Turn on the printer2. Click on the Bluetooth Information Exchanger icon on the Desktop ProcedurePrinting business card data [OPP]](https://usermanual.wiki/ASUSTeK-Computer/HD05UGPZ5.USER-MANUAL-2-OF-4/User-Guide-546596-Page-26.png)
![Introduction 第 103 頁,共 224 頁file://C:\Documents and Settings\anitachou\Local Settings\Temp\~hh114B.htm 2004/11/30{Alternatively, open Explorer and click on the Bluetooth Information Exchafolder for the same result.The [Bluetooth Information Exchanger] window will appear.3. Double-click on the [Object Push] iconA list of devices will appear in the [Object Push] window.Here, the image will be sent to the target printer. Note](https://usermanual.wiki/ASUSTeK-Computer/HD05UGPZ5.USER-MANUAL-2-OF-4/User-Guide-546596-Page-27.png)
![Introduction 第 104 頁,共 224 頁file://C:\Documents and Settings\anitachou\Local Settings\Temp\~hh114B.htm 2004/11/30{If your desired printer does not appear in the list, please confirm that the prhas been turned on, and then click on [Bluetooth] →[Search Devices]A device search will be performed. 4. Drag and drop the business card data to be sent on top of the icon of the destinatiprinterThe business card will be sent to the printer. If the business card has been sent to the printer successfully, the message below wappear, and the image will be printed out. Please click on the [OK] button.The message below will appear if the business card transmission was unsuccessfuPlease click on the [OK] button to close the message, and repeat the printing procedure.Note](https://usermanual.wiki/ASUSTeK-Computer/HD05UGPZ5.USER-MANUAL-2-OF-4/User-Guide-546596-Page-28.png)
![Introduction 第 105 頁,共 224 頁file://C:\Documents and Settings\anitachou\Local Settings\Temp\~hh114B.htm 2004/11/30■Printing business card data (by right-clicking the mouse)1. Turn on the printer2. Right-click on the business card data to be sent, and then click on the destinationprinter under [to Bluetooth]{If your desired device does not appear in the list, please confirm that the dehas been turned on, and then click on [to Bluetooth] →[Search Other DeviOnce the device has been detected, the message below will appear. Please sthe destination device, and click on the [Send] button.Note](https://usermanual.wiki/ASUSTeK-Computer/HD05UGPZ5.USER-MANUAL-2-OF-4/User-Guide-546596-Page-29.png)
![Introduction 第 106 頁,共 224 頁file://C:\Documents and Settings\anitachou\Local Settings\Temp\~hh114B.htm 2004/11/30The business card will be sent to the printer. If the business card has been sent to the printer successfully, the message below wappear, and the image will be printed out. Please click on the [OK] button.The message below will appear if the business card transmission was unsuccessfuPlease click on the [OK] button to close the message, and repeat the printing procedure.This section describes how to use the stereo headphones to listen to your favourite music or oaudio files stored on your PC.→Configuring the stereo headphones→Connecting to the stereo headphones→Listening to music or other audio files→Playing music using remote control→Copyright protection function Configuring the stereo headphonesProcedureListening to music using the stereo headphones 【GAVDP】 【A2DP】 【AVRCP】](https://usermanual.wiki/ASUSTeK-Computer/HD05UGPZ5.USER-MANUAL-2-OF-4/User-Guide-546596-Page-30.png)
![Introduction 第 107 頁,共 224 頁file://C:\Documents and Settings\anitachou\Local Settings\Temp\~hh114B.htm 2004/11/301. Right-click on the Bluetooth icon in the task tray, and click on [Add New Connection]. {Alternatively, click [Start]→[All Programs]→[Bluetooth]→[Bluetooth Settings], and then click on [New Connection] from the [Bluetooth Settingsscreen that has opened. The [Add New Connection Wizard (Welcome to the Add New Connection Wizarwill appear.2. Switch ON the stereo headphones and activate "Discoverable" modePlease refer to the user guide for the stereo headphones for further information onhow to operate them.3. Confirm that [Express Mode] has been selected, and then click on the [Next] buttThe [Add New Connection Wizard (Searching for Bluetooth Devices)] screen wiappear.Note](https://usermanual.wiki/ASUSTeK-Computer/HD05UGPZ5.USER-MANUAL-2-OF-4/User-Guide-546596-Page-31.png)
![Introduction 第 108 頁,共 224 頁file://C:\Documents and Settings\anitachou\Local Settings\Temp\~hh114B.htm 2004/11/30Once the search for the devices has ended, the [Add New Connection Wizard (SeDevice)] screen will appear.4. Select the device name of the stereo headphones from the list, and click on the [NbuttonThe [Add New Connection Wizard (Searching for Services)] screen will appear.5. Configure the type and name of the icon to appear once registration is complete, click on the [Next] buttonPlease click the [Next] button once you are satisfied with the configuration.](https://usermanual.wiki/ASUSTeK-Computer/HD05UGPZ5.USER-MANUAL-2-OF-4/User-Guide-546596-Page-32.png)
![Introduction 第 109 頁,共 224 頁file://C:\Documents and Settings\anitachou\Local Settings\Temp\~hh114B.htm 2004/11/30The [Add New Connection Wizard (Configure Connection Name)] screen will appear.6. Click on the [Finish] buttonThe settings will be registered, and the icon will appear on the [Bluetooth Settingscreen.You can connect to the stereo headphones from the icon registered in [Bluetooth SettingsPlease refer to the user guide for information on how to make a connection from the stereheadphones.zPlease close the following audio applications before any connection is made betweyour stereo headphones and PC.{Music/video playback applications{e-Conferencing applications{Voice-recognition applicationsPlease finish connecting the stereo headphones before launching any of these applications.1. Playing music or other audio files on your PC{Please confirm the points below if you are unable to hear anything despite having properly connected the stereo headphones.Click [Start]→[All Programs]→[Accessories]→[Entertainment]→[VolumControl].Remove the tick next to [Mute] if it has been ticked. If the volume is at its lowest setting, please adjust it to an appropriate level.{Music playback may be interrupted if other Bluetooth devices are currentlyconnected to your PC. When you are listening to music, it is recommendedthe stereo headphones be the only connected device.{Music playback may be interrupted if you are some distance away from theor if there are any obstructions between you and the PC.{If you are unable to hear any sound out of your stereo headphones while mor audio is currently playing in a related application, please stop the files beConnecting to the stereo headphonesImportantListening to music or other audio filesImportant](https://usermanual.wiki/ASUSTeK-Computer/HD05UGPZ5.USER-MANUAL-2-OF-4/User-Guide-546596-Page-33.png)
![Introduction 第 110 頁,共 224 頁file://C:\Documents and Settings\anitachou\Local Settings\Temp\~hh114B.htm 2004/11/30played, open [Sounds and Audio Devices] from the Control Panel, and chanthe default device to "Toshiba Bluetooth Wave."If you are still unable to hear any sound from the stereo headphones even ahaving set "Toshiba Bluetooth Wave" as the default device, please re -launapplication. 2. Finishing listening to music and disconnecting1. Right-click on the icon for the currently connected mode from [BluetoothSettings] on your PC, and click on "Disconnect."A message confirming the disconnection may appear.2. Click on the "Yes" button after having followed the instructions in the message.The icon will indicate that the device has been disconnected. {Please close the following audio applications before you disconnect the sterheadphones from your PC:Music/video playback applicationse-Conferencing applicationsVoice-recognition applicationsPlease completely disconnect the stereo headphones before launching any othese applications.Please refer to the user guide for information on terminating a connection fthe stereo headphones. Music applications and video playback applications installed on your PC (e.g.,"Windows Media Player 9" and "InterVideo WinDVD") may be operated with the remote control button/switch on your stereo headphones.The remote control used with the stereo headphones must be compliant with th Bl t th AVRCP fil Pl f t th h d h id fImportantPlaying music using remote control](https://usermanual.wiki/ASUSTeK-Computer/HD05UGPZ5.USER-MANUAL-2-OF-4/User-Guide-546596-Page-34.png)
![Introduction 第 111 頁,共 224 頁file://C:\Documents and Settings\anitachou\Local Settings\Temp\~hh114B.htm 2004/11/30the Bluetooth AVRCP profile. Please refer to the headphones user guide for further information.You can configure the application to be operated using the switch/button according to the following procedure.1. Double-click on the Bluetooth icon in the taskbarLaunches "Bluetooth Settings."2. Click on [Bluetooth]→[Select AV Player] from the menu barThe [Select AV Player] screen will appear.3. Select the application, and click on the [OK] button The functions and switch/button that can be operated may differ depending on the application used for music/video playback as well as the version.The procedure below can be performed in order to change the position where the receive command is displayed or to not have the command displayed.1. Double-click on the Bluetooth icon in the taskbarLaunches "Bluetooth Settings."2. Click on [Bluetooth]→[Select AV Player] from the menu bar.The [Select AV Player] screen will appear.3. Select the appropriate item from the pull -down menu of positions where the receive command is to be displayed, and then click on the [OK] button. If the receive command appears but does not function properly, sometimes the problem may be rectified by changing the setting to "Do not display."The commands supported by this application are shown below. Please refer to the headphone user guide for commands that are supported by the stereo headphones. Problems with operation may be encountered with certain versions of "Windows Media Player 9" and "InterVideo WinDVD."[Windows Media Player 9]zPlayzStop zPausezNextzPreviouszFast forwardzRewind[InterVideo WinDVD]zPlayzStopzPausezNext chapterzPrevious chapterzFast ForwardzFast BackwardProcedureProcedure](https://usermanual.wiki/ASUSTeK-Computer/HD05UGPZ5.USER-MANUAL-2-OF-4/User-Guide-546596-Page-35.png)
![Introduction 第 112 頁,共 224 頁file://C:\Documents and Settings\anitachou\Local Settings\Temp\~hh114B.htm 2004/11/30zUpzDownzLeftzRightzSelectzRoot menuzAngleA copyright protection function is supported according to the SCMS -T format as defined in the Bluetooth specifications. Follow the configuration procedure below to establish connections only with devices that support this function.1. Double-click on the Bluetooth icon in the task tray.Launches "Bluetooth Settings."2. Select [Bluetooth] from the menu, and click on [Copyright Protection SettingThe copyright protection dialog will appear.3. Tick the box next to "Only connect to devices that are copyright -protected uthe SCMS-T format," and click on the OK button. Copyright protection functionProcedureThis section describes how to connect a Bluetooth -compatible keyboard to a PC. 1. Right-click on the Bluetooth icon in the task tray, and then click on [Add New Connection]Setting up the wireless keyboardProcedureUsing a wireless keyboard [HID]](https://usermanual.wiki/ASUSTeK-Computer/HD05UGPZ5.USER-MANUAL-2-OF-4/User-Guide-546596-Page-36.png)
![Introduction 第 113 頁,共 224 頁file://C:\Documents and Settings\anitachou\Local Settings\Temp\~hh114B.htm 2004/11/30 {Alternatively, click [Start]→[All Programs]→[Bluetooth]→[Bluetooth Seand then click on [New Connection] from the active [Bluetooth Settings] window. The [Add New Connection Wizard (Welcome to the Add New Connection Wizarwindow will appear.2. Confirm that [Express Mode] has been selected, and then click on the [Next] buttThe [Add New Connection Wizard (Searching for Bluetooth devices)] window wappear.Once the program has finished searching for the devices, the [Add New ConnectiWizard (Device Selection)] window will appearNote](https://usermanual.wiki/ASUSTeK-Computer/HD05UGPZ5.USER-MANUAL-2-OF-4/User-Guide-546596-Page-37.png)
![Introduction 第 114 頁,共 224 頁file://C:\Documents and Settings\anitachou\Local Settings\Temp\~hh114B.htm 2004/11/30Wizard (Device Selection)] window will appear.3. Select the device name of the keyboard from [Device List], and then click on the[Next] buttonThe [Add New Connection Wizard (Searching for Services)] window will appear 4. Use the wireless keyboard to enter the numbers that appear in [Bluetooth PasskeCode)], and then hit the [Enter] key](https://usermanual.wiki/ASUSTeK-Computer/HD05UGPZ5.USER-MANUAL-2-OF-4/User-Guide-546596-Page-38.png)
![Introduction 第 115 頁,共 224 頁file://C:\Documents and Settings\anitachou\Local Settings\Temp\~hh114B.htm 2004/11/30Once the program has detected the services successfully, connection to the deviceregistration of settings information will be performed automatically.The [Add New Connection Wizard (Connection Name Settings)] window will ap5. Enter the type and name of the icon displayed after registration, and then click on[Next] buttonPlease click on the [Next] button if you are satisfied with the settings. {You can change the connection icon and icon name.→"Changing a connection icon name"→"Changing a connection icon" Note](https://usermanual.wiki/ASUSTeK-Computer/HD05UGPZ5.USER-MANUAL-2-OF-4/User-Guide-546596-Page-39.png)
![Introduction 第 116 頁,共 224 頁file://C:\Documents and Settings\anitachou\Local Settings\Temp\~hh114B.htm 2004/11/30The [Add New Connection Wizard (Completing the Add New Connection Wizarwindow will appear.6. Click on the [Finish] buttonThe settings information will be registered, and an icon will appear in the [BluetoSettings] window. zPressing any key on the wireless keyboard will automatically connect it to the PC thereafter.Please connect manually if automatic connection is unsuccessful. NoteThis section describes how to connect a Bluetooth -compatible mouse to a PC. 1. Turn on the wireless mouse, and set it to be connectable via BluetoothPlease refer to the instruction manual for details on how to operate the mouse.2. Right-click on the Bluetooth icon in the task tray, and then click on [Add New Connection]Setting up the wireless mouseProcedureUsing a wireless mouse [HID]](https://usermanual.wiki/ASUSTeK-Computer/HD05UGPZ5.USER-MANUAL-2-OF-4/User-Guide-546596-Page-40.png)
![Introduction 第 117 頁,共 224 頁file://C:\Documents and Settings\anitachou\Local Settings\Temp\~hh114B.htm 2004/11/30 {Alternatively, click [Start]→[All Programs]→[Bluetooth]→[Bluetooth Seand then click on [New Connection] from the active [Bluetooth Settings] window. The [Add New Connection Wizard (Welcome to the Add New Connection Wizarwindow will appear.3. Confirm that [Express Mode] has been selected, and then click on the [Next] buttThe [Add New Connection Wizard (Searching for Bluetooth devices)] window wappear.Note](https://usermanual.wiki/ASUSTeK-Computer/HD05UGPZ5.USER-MANUAL-2-OF-4/User-Guide-546596-Page-41.png)
![Introduction 第 118 頁,共 224 頁file://C:\Documents and Settings\anitachou\Local Settings\Temp\~hh114B.htm 2004/11/30Once the program has finished searching for the devices, the [Add New ConnectiWizard (Device Selection)] window will appear.4. Select the device name of the mouse from [Device List], and then click on the [NbuttonThe [Add New Connection Wizard (Searching for Services)] window will appearA message confirming a device connection will appear.5. Click on the [OK] button](https://usermanual.wiki/ASUSTeK-Computer/HD05UGPZ5.USER-MANUAL-2-OF-4/User-Guide-546596-Page-42.png)
![Introduction 第 119 頁,共 224 頁file://C:\Documents and Settings\anitachou\Local Settings\Temp\~hh114B.htm 2004/11/30The [Add New Connection Wizard (Connection Name Settings)] window will ap6. Enter the type and name of the icon displayed after registration, and then click on[Next] buttonPlease click on the [Next] button if you are satisfied with the settings.{Please use this window to change the connection name and icon. - Changing the connection icon name- Changing the connection icon The [Add New Connection Wizard (Completing the Add New Connection Wizarwindow will appear.7. Click on the [Finish] buttonThe settings information will be have been registered, and an icon will appear in [Bluetooth Settings] window. {Clicking on one of the mouse buttons or otherwise operating it will automatically connect it to the PC thereafter. Please connect manually if automatic connection is unsuccessful. NoteNote](https://usermanual.wiki/ASUSTeK-Computer/HD05UGPZ5.USER-MANUAL-2-OF-4/User-Guide-546596-Page-43.png)
![Introduction 第 120 頁,共 224 頁file://C:\Documents and Settings\anitachou\Local Settings\Temp\~hh114B.htm 2004/11/30You can send and receive files other than business card data with a Bluetooth -enabled PPDA.Use "File transfer" in the Bluetooth Information Exchanger to exchange files. zThe same operations will be valid as long as the PC and PDA support the FTP profz"File transfer" cannot be used to send or receive business card data. Please instead "Object Push" to perform these activities. →Sending files to a PC or PDA (using icons)→Sending files to a PC or PDA (by right-clicking the mouse)→Receiving files from a PC or PDA ■Sending files to a PC or PDA (using icons) 1. Turn on the PC or PDA2. Double-click on the Bluetooth Information Exchanger icon on the Desktop {Alternatively, opening Explorer and clicking on the Bluetooth Information Exchanger folder will produce the same result.NoteProcedureNoteExchanging files with a PC or PDA [FTP]](https://usermanual.wiki/ASUSTeK-Computer/HD05UGPZ5.USER-MANUAL-2-OF-4/User-Guide-546596-Page-44.png)
![Introduction 第 121 頁,共 224 頁file://C:\Documents and Settings\anitachou\Local Settings\Temp\~hh114B.htm 2004/11/30The [Bluetooth Information Exchanger] window will appear.3. Double-click on the [File transfer] iconA list of devices will appear in the [File transfer] window.{If the desired device does not appear in the list, please confirm that the devhas been turned on, and then select [Bluetooth] →[Search Devices].A device search will be performed. {You can also use "Image transfer" when sending individual image files. 4. Use the mouse to drag and drop the file you wish to send over the destination icoIn this case, the file will be sent to a PC named "PC -1".Note](https://usermanual.wiki/ASUSTeK-Computer/HD05UGPZ5.USER-MANUAL-2-OF-4/User-Guide-546596-Page-45.png)
![Introduction 第 122 頁,共 224 頁file://C:\Documents and Settings\anitachou\Local Settings\Temp\~hh114B.htm 2004/11/30{When using "File transfer", you can send individual files as well as entire folders.5. Confirm that the file is being sentThe file will be sent to the PC.{When sending files using "File transfer", a message requesting permission treceive the files may appear on the destination (receiving) device. The contthe message will vary with the Bluetooth software installed on the destinatidevice, so please be sure to follow the instructions provided.If you are using the Bluetooth Utility, a message similar to the one below wappear. If the file has been sent successfully, the message below will appear.Please click on the [OK] button.The message below will appear if the file transmission was unsuccessful.Please click on the [OK] button to close the message, and repeat the procedure.NoteNoteNote](https://usermanual.wiki/ASUSTeK-Computer/HD05UGPZ5.USER-MANUAL-2-OF-4/User-Guide-546596-Page-46.png)
![Introduction 第 123 頁,共 224 頁file://C:\Documents and Settings\anitachou\Local Settings\Temp\~hh114B.htm 2004/11/30{Files that have been sent will be saved in a file transfer shared folder on thedestination device.{Additionally, with "File transfer", you can open the shared folder on the destination device using Explorer, specify a subfolder, and then send the filthere.{You can use Properties in the Bluetooth Information Exchanger to change location of the "Shared folder" on the hard drive. ■Sending files to a PC or PDA (by right-clicking the mouse)1. Turn on the PC or PDAConfirm that a Bluetooth connection has been enabled before proceeding.2. Right-click on the file you wish to send, and then select its destination from [to Bluetooth]](https://usermanual.wiki/ASUSTeK-Computer/HD05UGPZ5.USER-MANUAL-2-OF-4/User-Guide-546596-Page-47.png)
![Introduction 第 124 頁,共 224 頁file://C:\Documents and Settings\anitachou\Local Settings\Temp\~hh114B.htm 2004/11/30{If the desired device does not appear in the list, please confirm that the devhas been turned on, and then select [to Bluetooth] →[Search other devices]Once the devices have been detected, the message below will appear. Pleasselect the destination device, and then click on the [Send] button.3. Confirm that the file is being sentThe file will be sent to the PC.{When sending files using "File transfer", a message requesting permission treceive the files may appear on the destination (receiving) device. The contthe message will vary with the Bluetooth software installed on the destinatidevice, so please be sure to follow the instructions provided.If you are using the Bluetooth Utility, a message similar to the one below wappear.NoteNote](https://usermanual.wiki/ASUSTeK-Computer/HD05UGPZ5.USER-MANUAL-2-OF-4/User-Guide-546596-Page-48.png)
![Introduction 第 125 頁,共 224 頁file://C:\Documents and Settings\anitachou\Local Settings\Temp\~hh114B.htm 2004/11/30 If the file has been sent successfully, the message below will appear.Please click on the [OK] button.The message below will appear if the file transmission was unsuccessful.Please click on the [OK] button to close the message, and then repeat the procedu{Files that have been sent will be saved in a file transfer shared folder on thedestination device.■Receiving files from a PC or PDAYour PC is able to receive files that have been saved in the shared folder on the destinatiPC or PDA. Received files will be saved in the shared folder under "File transfer".1. Turn on the PC or PDAConfirm that a Bluetooth connection has been enabled before proceeding.2. Double-click on the Bluetooth Information Exchanger icon on the Desktop {Alternatively, opening Explorer and clicking on the Bluetooth Information Exchanger folder will produce the same result.NoteNote](https://usermanual.wiki/ASUSTeK-Computer/HD05UGPZ5.USER-MANUAL-2-OF-4/User-Guide-546596-Page-49.png)
![Introduction 第 126 頁,共 224 頁file://C:\Documents and Settings\anitachou\Local Settings\Temp\~hh114B.htm 2004/11/30The [Bluetooth Information Exchanger] window will appear.3. Double-click on the [File transfer] iconA list of devices will appear in the [File transfer] window.In this case, the file will be received from the PDA named "My Mobile".4. Double-click on the [PDA-1] iconThe file saved in the shared folder in "My Mobile" will appear.5. Right-click on the file you wish to receive, and then select "Receive file".](https://usermanual.wiki/ASUSTeK-Computer/HD05UGPZ5.USER-MANUAL-2-OF-4/User-Guide-546596-Page-50.png)
![Introduction 第 127 頁,共 224 頁file://C:\Documents and Settings\anitachou\Local Settings\Temp\~hh114B.htm 2004/11/30The file will be received from a PDA.{With "File transfer", you can send individual files as well as entire folders.Please right-click on the folder you wish to receive, and select "Receive foSubsequent operations should be performed in the same manner as when receiving individual files. If the file has been received successfully, the message below will appear.Please click on the [OK] button.The message below will appear if the file transmission was unsuccessful. Please on the [OK] button to close the message, and repeat the procedure.{The received file will be saved in the "Shared folder" under "File transfer" Bluetooth Information ExchangerNoteNote](https://usermanual.wiki/ASUSTeK-Computer/HD05UGPZ5.USER-MANUAL-2-OF-4/User-Guide-546596-Page-51.png)
![Introduction 第 128 頁,共 224 頁file://C:\Documents and Settings\anitachou\Local Settings\Temp\~hh114B.htm 2004/11/30You can use Properties under the Bluetooth Information Exchanger to specthe location of the "Shared folder" on the hard drive. You can send image data to a Bluetooth -compatible mobile telephone.Large images will be automatically reduced to fit on the telephone display screen.Images are sent using "Image transfer" under Bluetooth Information Exchanger.zThe mobile telephone must support the BIP profile.zThe following image file formats can be sent and received using "Image transfer": {Bitmap (*.bmp){JPEG (*.jpg, *.jpeg) {PNG (*.png)→Sending images to a mobile telephone (using icons)→Sending images to a mobile telephone (by right -clicking the mouse) ■Sending images to a mobile telephone (using icons)1. Turn on the PC or PDAConfirm that a Bluetooth connection has been enabled before proceeding.2. Double-click on the Bluetooth Information Exchanger icon on the DesktopNoteProcedureSending images to a mobile telephone [BIP]](https://usermanual.wiki/ASUSTeK-Computer/HD05UGPZ5.USER-MANUAL-2-OF-4/User-Guide-546596-Page-52.png)
![Introduction 第 129 頁,共 224 頁file://C:\Documents and Settings\anitachou\Local Settings\Temp\~hh114B.htm 2004/11/30 {Alternatively, opening Explorer and clicking on the Bluetooth Information Exchanger folder will produce the same result.The [Bluetooth Information Exchanger] window will appear.3. Double-click on the [Image transfer] iconA list of devices will appear in the [Image transfer] window.{If the desired device does not appear in the list, please confirm that the devhas been turned on and then select [Bluetooth]→[Search Devices]NoteNote](https://usermanual.wiki/ASUSTeK-Computer/HD05UGPZ5.USER-MANUAL-2-OF-4/User-Guide-546596-Page-53.png)
![Introduction 第 130 頁,共 224 頁file://C:\Documents and Settings\anitachou\Local Settings\Temp\~hh114B.htm 2004/11/30has been turned on, and then select [Bluetooth]→[Search Devices].A device search will be performed. 4. Drag and drop the file you wish to send over the destination iconIn this case, the image will be sent to a mobile telephone named "BT -Phone-1".The image will be sent.If the image has been sent successfully, the message below will appear.Please click on the [OK] button.The message below will appear if the image transmission was unsuccessful.Please click on the [OK] button to close the message, and repeat the procedure. ■Sending images to a mobile telephone (by right -clicking the mouse)1. Turn on the mobile telephoneConfirm that a Bluetooth connection has been enabled before proceeding.2. Right-click on the file you wish to send, and then click on its destination from [toBluetooth]](https://usermanual.wiki/ASUSTeK-Computer/HD05UGPZ5.USER-MANUAL-2-OF-4/User-Guide-546596-Page-54.png)
![Introduction 第 131 頁,共 224 頁file://C:\Documents and Settings\anitachou\Local Settings\Temp\~hh114B.htm 2004/11/30{If the desired device does not appear in the list, please confirm that the devhas been turned on, and then select [to Bluetooth] →[Search other devices]Once the devices have been detected, the message below will appear. Pleasselect the destination device, and then click on the [Send] button.The image will be sent.If the image has been sent successfully, the message below will appear.Please click on the [OK] button.Note](https://usermanual.wiki/ASUSTeK-Computer/HD05UGPZ5.USER-MANUAL-2-OF-4/User-Guide-546596-Page-55.png)
![Introduction 第 132 頁,共 224 頁file://C:\Documents and Settings\anitachou\Local Settings\Temp\~hh114B.htm 2004/11/30The message below will appear if the image transmission was unsuccessful.Please click on the [OK] button to close the message, and repeat the procedure. You can send image data to a Bluetooth -enabled PC or PDA.Images are sent using "Image transfer" under Bluetooth Information Exchanger.zThe following image file formats can be sent and received using "Image transfer": {Bitmap (*.bmp){JPEG (*.jpg, *.jpeg){PNG (*.png)→Sending images to a PC or PDA (using icons)→Sending images to a PC or PDA (by right-clicking the mouse)■Sending images to a PC or PDA (using icons)1. Turn on the PC or PDAConfirm that a Bluetooth connection has been enabled before proceeding.2Double-click on the Bluetooth Information Exchanger icon on the DesktopNoteProcedureSending images to a PC or PDA [BIP]](https://usermanual.wiki/ASUSTeK-Computer/HD05UGPZ5.USER-MANUAL-2-OF-4/User-Guide-546596-Page-56.png)
![Introduction 第 133 頁,共 224 頁file://C:\Documents and Settings\anitachou\Local Settings\Temp\~hh114B.htm 2004/11/302.Doubleclick on the Bluetooth Information Exchanger icon on the Desktop {Alternatively, opening Explorer and clicking on the Bluetooth Information Exchanger folder will produce the same result.The [Bluetooth Information Exchanger] window will appear.3. Double-click on the [Image transfer] iconA list of devices will appear in the [Image transfer] window.NoteNote](https://usermanual.wiki/ASUSTeK-Computer/HD05UGPZ5.USER-MANUAL-2-OF-4/User-Guide-546596-Page-57.png)
![Introduction 第 134 頁,共 224 頁file://C:\Documents and Settings\anitachou\Local Settings\Temp\~hh114B.htm 2004/11/30{If the desired device does not appear in the list, please confirm that the devhas been turned on, and then select [Bluetooth] →[Search Devices].A device search will be performed. 4. Drag and drop the file you wish to send over the destination iconIn this case, the image will be sent to a PC named "PC -1".The image will be sent.If the image has been sent successfully, the message below will appear.Please click on the [OK] button.The message below will appear if the image transmission was unsuccessful.Please click on the [OK] button to close the message, and repeat the procedure.{Images that have been sent will be saved in an image transfer folder on thedestination device.{Images received using "Image transfer" in the Bluetooth Information Exchawill be saved in the "Image Box" in "Image transfer". Note](https://usermanual.wiki/ASUSTeK-Computer/HD05UGPZ5.USER-MANUAL-2-OF-4/User-Guide-546596-Page-58.png)
![Introduction 第 135 頁,共 224 頁file://C:\Documents and Settings\anitachou\Local Settings\Temp\~hh114B.htm 2004/11/30{You can use Properties under the Bluetooth Information Exchanger to chanthe location of the "Image Box" folder on the hard drive. ■Sending images to a PC or PDA (by right-clicking the mouse)1. Turn on the PC or PDAConfirm that a Bluetooth connection has been enabled before proceeding2. Right-click on the file you wish to send, and then click on its destination from [toBluetooth]{If the desired device does not appear in the list, please confirm that the devhas been turned on, and then select [to Bluetooth] →[Search other devices]Once the devices have been detected, the message below will appear. Pleasselect the destination device, and then click on the [Send] button.Note](https://usermanual.wiki/ASUSTeK-Computer/HD05UGPZ5.USER-MANUAL-2-OF-4/User-Guide-546596-Page-59.png)
![Introduction 第 136 頁,共 224 頁file://C:\Documents and Settings\anitachou\Local Settings\Temp\~hh114B.htm 2004/11/30The image will be sent.If the image has been sent successfully, the message below will appear.Please click on the [OK] button.The message below will appear if the image transmission was unsuccessful.Please click on the [OK] button to close the message, and repeat the procedure.{When you send images by right-clicking the mouse, the image data that hasent will be saved in the image transfer shared folder on the destination devThis is also the case when you send images using icons. NoteExchanging business card data with a PC or PDA [OPP]](https://usermanual.wiki/ASUSTeK-Computer/HD05UGPZ5.USER-MANUAL-2-OF-4/User-Guide-546596-Page-60.png)
![Introduction 第 138 頁,共 224 頁file://C:\Documents and Settings\anitachou\Local Settings\Temp\~hh114B.htm 2004/11/30The [Bluetooth Information Exchanger] window will appear.3. Double-click on the [Object Push] iconA list of devices will appear in the [Object Push] window.{If the desired device does not appear in the list, please confirm that the devhas been turned on, and then select [Bluetooth] →[Search Devices].A device search will be performed. 4. Use the mouse to drag and drop the business card you wish to send over the destination iconIn this case, the business card will be sent to a PC named "PC -1".Note](https://usermanual.wiki/ASUSTeK-Computer/HD05UGPZ5.USER-MANUAL-2-OF-4/User-Guide-546596-Page-62.png)
![Introduction 第 139 頁,共 224 頁file://C:\Documents and Settings\anitachou\Local Settings\Temp\~hh114B.htm 2004/11/30The business card will be sent. {When you try to send a business card, a message requesting permission to receive the card may appear on the device belonging to the other party (i.e.the receiving end). The content of the message will vary with the Bluetoothsoftware installed on the destination device, so please be sure to follow the instructions provided. If you are using the Bluetooth Utility, a message simthe one below will appear. If the business card has been sent successfully, the message below will appear.Please click on the [OK] button.The message below will appear if the business card transmission was unsuccessfuPlease click on the [OK] button to close the message, and repeat the procedure.{Data that have been sent will be saved in a folder for exchanged business con the destination device.NoteMemo](https://usermanual.wiki/ASUSTeK-Computer/HD05UGPZ5.USER-MANUAL-2-OF-4/User-Guide-546596-Page-63.png)
![Introduction 第 140 頁,共 224 頁file://C:\Documents and Settings\anitachou\Local Settings\Temp\~hh114B.htm 2004/11/30{You can configure an associated application (Microsoft Outlook etc) to starautomatically when you have received a business card, allowing you to viecard details.You can use Properties under Bluetooth Information Exchanger to configurwhether or not you would like such an application to start automatically.■Selecting a business card and sending it to a PC or PDA (by right -clicking the mouse1. Turn on the PC or PDAConfirm that a Bluetooth connection has been enabled before proceeding.2. Right-click on the business card you wish to send, and then click on its destinatiofrom [to Bluetooth]{If the desired device does not appear in the list, please confirm that the devNote](https://usermanual.wiki/ASUSTeK-Computer/HD05UGPZ5.USER-MANUAL-2-OF-4/User-Guide-546596-Page-64.png)
![Introduction 第 141 頁,共 224 頁file://C:\Documents and Settings\anitachou\Local Settings\Temp\~hh114B.htm 2004/11/30pp , phas been turned on, and then select [to Bluetooth] →[Search other devices]Once the devices have been detected, the message below will appear. Pleasselect the destination device, and then click on the [Send] button.The business card will be sent. {When you try to send a business card, a message requesting permission to receive the files may appear on the device belonging to the other party (i.e.the receiving end). The content of the message will vary with the Bluetoothsoftware installed on the destination device, so please be sure to follow the instructions provided. If you are using the Bluetooth Utility, a message similar to the one below wappear. If the business card has been sent successfully, the message below will appear.Please click on the [OK] button.Note](https://usermanual.wiki/ASUSTeK-Computer/HD05UGPZ5.USER-MANUAL-2-OF-4/User-Guide-546596-Page-65.png)
![Introduction 第 142 頁,共 224 頁file://C:\Documents and Settings\anitachou\Local Settings\Temp\~hh114B.htm 2004/11/30The message below will appear if the business card transmission was unsuccessfuPlease click on the [OK] button to close the message, and repeat the procedure.{Data that have been sent will be saved in a folder for exchanged business con the destination device.■Sending your personal business cardYou can prepare a business card bearing your name and other details such as your compaand telephone numbers, and then send it to another party.zPlease use Properties under Bluetooth Information Exchanger beforehand to configwhich data to use for your own business card. zYou can only have one business card registered as your own that is able to be sent.1. Turn on the PC or PDAConfirm that a Bluetooth connection has been enabled before proceeding2. Double-click on the Bluetooth Information Exchanger icon on the Desktop {Alternatively, opening Explorer and clicking on the Bluetooth Information Exchanger folder will produce the same result.NoteNoteNote](https://usermanual.wiki/ASUSTeK-Computer/HD05UGPZ5.USER-MANUAL-2-OF-4/User-Guide-546596-Page-66.png)
![Introduction 第 143 頁,共 224 頁file://C:\Documents and Settings\anitachou\Local Settings\Temp\~hh114B.htm 2004/11/30The [Bluetooth Information Exchanger] window will appear.3. Double-click on the [Object Push] iconA list of devices will appear in the [Object Push] window.{If the desired device does not appear in the list, please confirm that the devhas been turned on, and then select [Bluetooth] →[Search Devices].A device search will be performed. 4. Right-click on the destination icon, and then click on [Send business card To]In this case, your personal business card will be sent to a PC named "PC -1".The business card will be sent. Note](https://usermanual.wiki/ASUSTeK-Computer/HD05UGPZ5.USER-MANUAL-2-OF-4/User-Guide-546596-Page-67.png)
![Introduction 第 144 頁,共 224 頁file://C:\Documents and Settings\anitachou\Local Settings\Temp\~hh114B.htm 2004/11/30{When you try to send a business card, a message requesting permission to receive the files may appear on the device belonging to the other party (i.e.the receiving end). The content of the message will vary with the Bluetoothsoftware installed on the destination device, so please be sure to follow the instructions provided. If you are using the Bluetooth Utility, a message simthe one below will appear.{Business cards that have been sent will be saved in the Inbox of the destinaparty. If your business card has been sent successfully, the message below will appear.Please click on the [OK] button.The message below will appear if the business card transmission was unsuccessfuPlease click on the [OK] button to close the message, and repeat the procedure.{Data that has been sent will be saved in a folder for exchanged business carthe destination device. ■Acquiring a business card from another partyYou can use your PC to acquire a business card from a party containing their details.1. Turn on the PC or PDAConfirm that a Bluetooth connection has been enabled before proceeding2. Double-click on the Bluetooth Information Exchanger icon on the DesktopNoteNote](https://usermanual.wiki/ASUSTeK-Computer/HD05UGPZ5.USER-MANUAL-2-OF-4/User-Guide-546596-Page-68.png)
![Introduction 第 145 頁,共 224 頁file://C:\Documents and Settings\anitachou\Local Settings\Temp\~hh114B.htm 2004/11/30 {Alternatively, opening Explorer and clicking on the Bluetooth Information Exchanger folder will produce the same result.The [Bluetooth Information Exchanger] window will appear.3. Double-click on the [Object Push] iconA list of devices will appear in the [Object Push] window.fhd i dd i d i hli l fi h hdNoteNote](https://usermanual.wiki/ASUSTeK-Computer/HD05UGPZ5.USER-MANUAL-2-OF-4/User-Guide-546596-Page-69.png)
![Introduction 第 146 頁,共 224 頁file://C:\Documents and Settings\anitachou\Local Settings\Temp\~hh114B.htm 2004/11/30{If the desired device does not appear in the list, please confirm that the devhas been turned on, and then select [Bluetooth] →[Search Devices].A device search will be performed. 4. Right-click on the icon of the party whose card you wish to acquire, and then clic[Receive business card]In this case, the business card of the other party will be acquired from a PC name"PC-1".The business card will be received.{When you try to acquire a business card, a message requesting permission send the files may appear on the device belonging to the other party (i.e., osending end). The content of the message will vary with the Bluetooth softwinstalled on the destination device, so please be sure to follow the instructioprovided.If you are using the Bluetooth Utility, a message similar to the one below wappear.If the business card has been received successfully, the message below will appeaPlease click on the [OK] button.The message below will appear if the business card was unsuccessfully received.Please click on the [OK] button to close the message, and repeat the procedure.Note](https://usermanual.wiki/ASUSTeK-Computer/HD05UGPZ5.USER-MANUAL-2-OF-4/User-Guide-546596-Page-70.png)
![Introduction 第 147 頁,共 224 頁file://C:\Documents and Settings\anitachou\Local Settings\Temp\~hh114B.htm 2004/11/30{Business card data that have been received will be saved in the Inbox unde"Object Push".You can use Properties under the Bluetooth Information Exchanger to set tlocation of the Inbox on the hard drive. ■Exchanging business cardsSimultaneously exchange your business card with one belonging to another party.1. Turn on the PC or PDAConfirm that a Bluetooth connection has been enabled before proceeding.2. Double-click on the Bluetooth Information Exchanger icon on the Desktop {Alternatively, opening Explorer and clicking on the Bluetooth Information Exchanger folder will produce the same result.The [Bluetooth Information Exchanger] window will appear.NoteNote](https://usermanual.wiki/ASUSTeK-Computer/HD05UGPZ5.USER-MANUAL-2-OF-4/User-Guide-546596-Page-71.png)
![Introduction 第 148 頁,共 224 頁file://C:\Documents and Settings\anitachou\Local Settings\Temp\~hh114B.htm 2004/11/303. Double-click on the [Object Push] iconA list of devices will appear in the [Object Push] window.{If the desired device does not appear in the list, please confirm that the devhas been turned on, and then select [Bluetooth] →[Search Devices].A device search will be performed. 4. Right-click on the icon of the party with whom you wish to exchange business caand then click on [Object Push]In this case, the business cards will be exchanged with a PC named "PC -1".The business card from the party who executed the "Exchange business cards" command will be sent first.{When you try to send a business card, a message requesting permission to receive the files may appear on the device belonging to the other party (i.e.the receiving end). The content of the message will vary with the Bluetoothsoftware installed on the destination device, so please be sure to follow the NoteNote](https://usermanual.wiki/ASUSTeK-Computer/HD05UGPZ5.USER-MANUAL-2-OF-4/User-Guide-546596-Page-72.png)
![Introduction 第 149 頁,共 224 頁file://C:\Documents and Settings\anitachou\Local Settings\Temp\~hh114B.htm 2004/11/30instructions provided.If you are using the Bluetooth Utility, a message similar to the one below wappear. A message of confirmation will appear if the card has been successfully sent.{Business cards that have been sent will be saved in the Inbox of the destinaparty. Once your business card has finished being sent, the program will start receiving business card belonging to the other party.{When a business card is to be received, a message such as the one below mappear on the device belonging to the other party.Please click on the [Yes] button if you give permission for the business carbe sent. A message of confirmation will appear if the card has been successfully received{Business cards that have been received will be saved in the "Inbox" under "Object Push".You can use Properties under the Bluetooth Information Exchanger to set tlocation of the Inbox on the hard drive. NoteNoteNoteBy connecting a Bluetooth-compatible digital camera to your PC via Bluetooth, you will be to operate the camera shutter from the PC and transmit the captured images to it as wellUsing a Bluetooth-compatible camera [BIP]](https://usermanual.wiki/ASUSTeK-Computer/HD05UGPZ5.USER-MANUAL-2-OF-4/User-Guide-546596-Page-73.png)
![Introduction 第 150 頁,共 224 頁file://C:\Documents and Settings\anitachou\Local Settings\Temp\~hh114B.htm 2004/11/30to operate the camera shutter from the PC and transmit the captured images to it as well.→Connecting the camera→Taking pictures→Viewing images saved on your PCUse the "Remote Camera" tool in the Bluetooth Utility to connect the camera to your PC1. Click on [Start ]→[All Programs]→[Bluetooth]→[Remote Camera] {In Windows 2000, click on [Start]→[Programs]→[Bluetooth]→[Remote Camera]. The [Remote Camera] window will appear.2. Turn on the camera, and set it to be connectable via Bluetooth{Different cameras are operated in different ways, depending on the manufaand model used. Please refer to the instruction manual for further details onto operate your camera. 3. Click on the [Camera Search...] buttonConnecting the cameraProcedureNoteNote](https://usermanual.wiki/ASUSTeK-Computer/HD05UGPZ5.USER-MANUAL-2-OF-4/User-Guide-546596-Page-74.png)
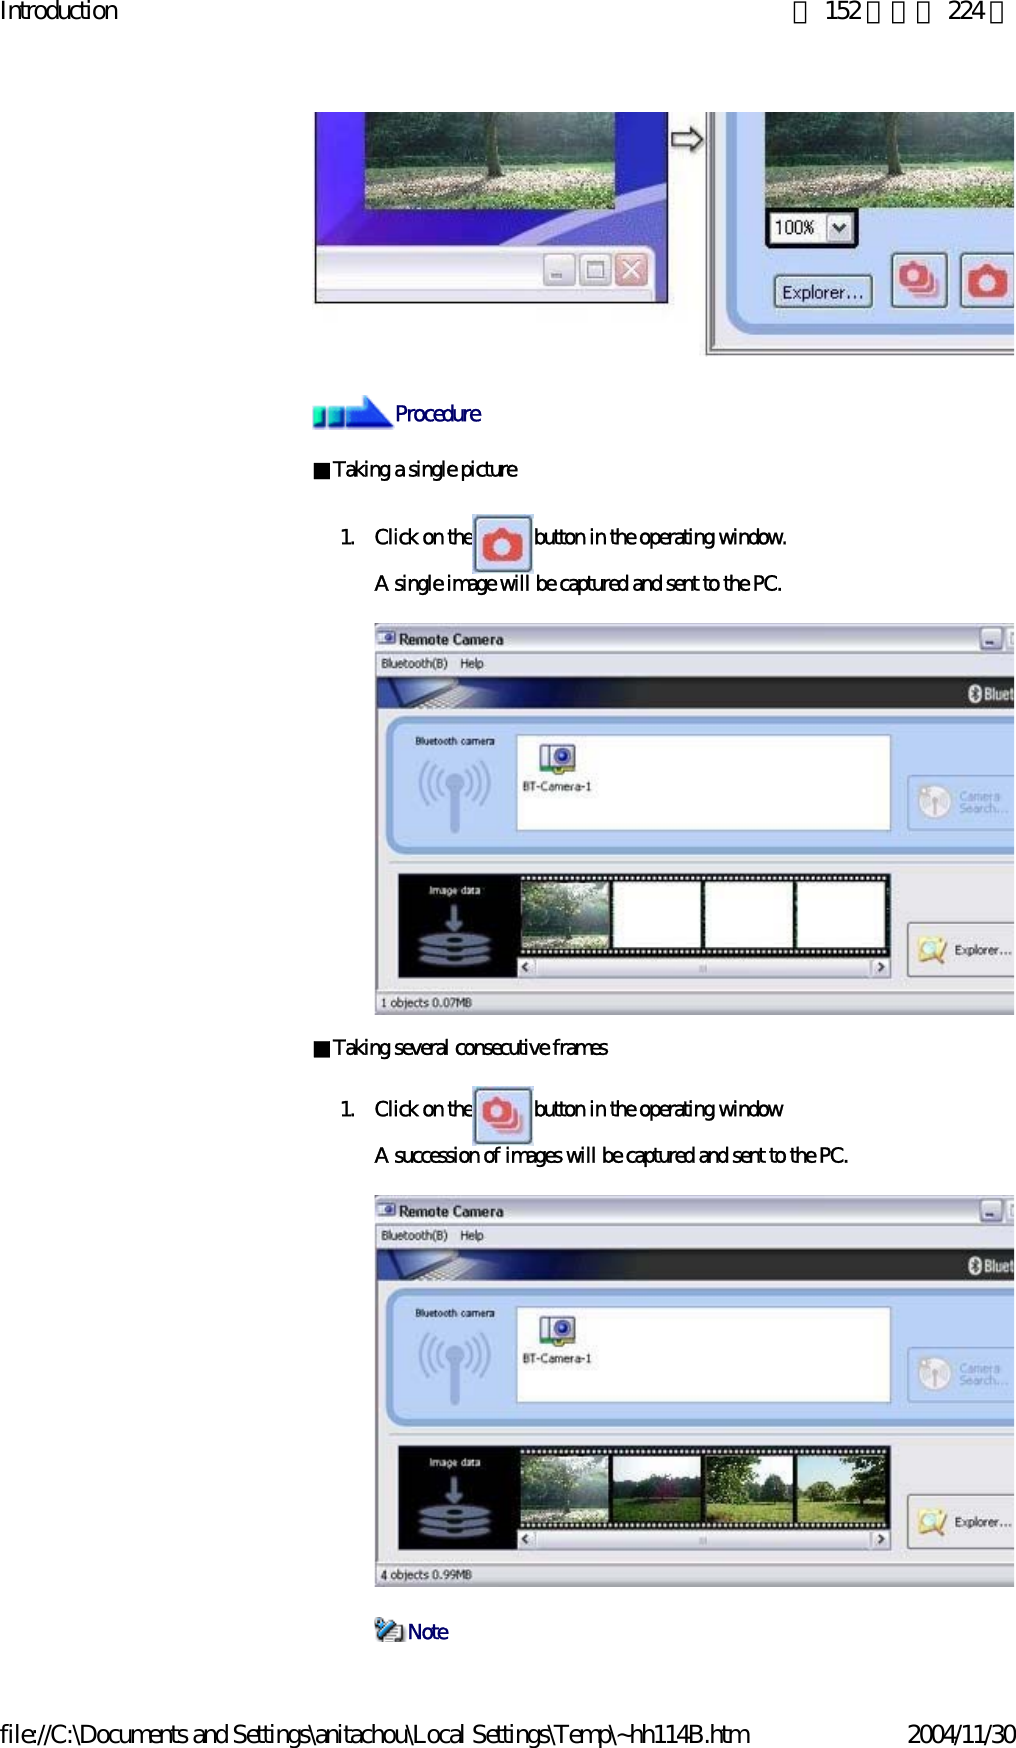
![Introduction 第 151 頁,共 224 頁file://C:\Documents and Settings\anitachou\Local Settings\Temp\~hh114B.htm 2004/11/30The camera will be detected and its icon displayed.4. Right-click on the camera icon, and select [Connect]The camera will be connected, and images from the camera will appear on -screeBy placing the mouse cursor over the on-screen image, the camera's operating window wappear. You can operate the camera from this window.Taking pictures](https://usermanual.wiki/ASUSTeK-Computer/HD05UGPZ5.USER-MANUAL-2-OF-4/User-Guide-546596-Page-75.png)
![Introduction 第 153 頁,共 224 頁file://C:\Documents and Settings\anitachou\Local Settings\Temp\~hh114B.htm 2004/11/30{The remote camera shutter cannot be operated while the camera is connectethe PC. {The number of consecutive pictures taken can be set to anywhere between 16{Images are not only sent to the PC, but are stored in the camera's on -boardmemory as well.Please be aware of the remaining memory capacity when you are taking a lnumber of pictures.{Large file sizes are common for high-resolution images, and may take somto be transferred to the PC.A "Remote Camera" folder will be created in the "Bluetooth" folder under "My Documenduring initial set-up. A folder bearing the same name as the camera will be created in it, images will be saved in this folder.Click the [Explorer] button in the [Remote Camera] window to display the folder where images have been saved.1. In the [Remote Camera] window, click on [Bluetooth]→[Propertie[Consecutive Image Settings]The [Change number of consecutive images] dialog box will appe2. Click on the [<][>] buttons to select the number of consecutive imto be captured ImportantViewing images saves on your PC](https://usermanual.wiki/ASUSTeK-Computer/HD05UGPZ5.USER-MANUAL-2-OF-4/User-Guide-546596-Page-77.png)