ASUSTeK Computer USBN10 ASUS EZ N NETWORK ADAPTER User Manual 4
ASUSTeK Computer Inc ASUS EZ N NETWORK ADAPTER Users Manual 4
Contents
- 1. Users Manual 4
- 2. Users Manual 1
- 3. Users Manual 2
- 4. Users Manual 3
Users Manual 4
ASUS USB-N10 Chapter 4: Using the ASUS WLAN Control Center
36
To set up the wireless connection properties, right-click the wireless icon on the
taskbar and select Open Network Connection. Then right-click the network
connection icon and select Property to open the Wireless Network Connection
Status page.
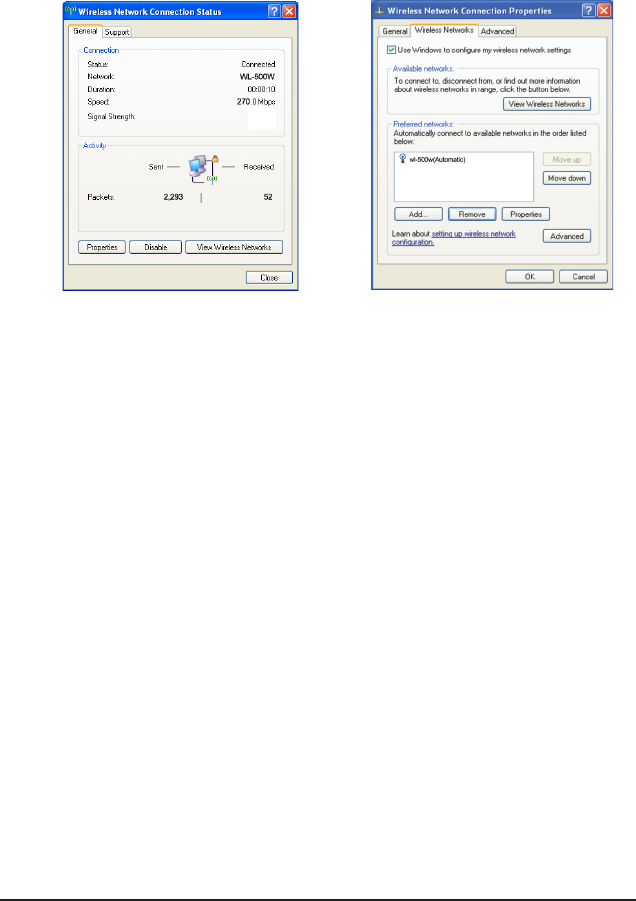
1. The General page shows status,
duration, speed, and signal strength.
The green bars represent signal
strength, with 5 bars indicating
excellent signal and 1 bar meaning
poor signal.
2. Select “Wireless Networks” tab to
show Preferred networks. Use
the Add button to add the “SSID”
of available networks and set the
connection preference order with
the Move up and Move down
buttons. The radio tower with a
signal icon identifies the currently
connected access point. Click
Properties to set the authentication
of the wireless connection.
ASUS USB-N10 Chapter 4: Using the ASUS WLAN Control Center 37
Windows® Vista Wireless optionsVista Wireless options
If you want to congure your WLAN Adapter via Windows® Wireless Client service,
follow the instruction below to make the settings.
2. A window prompts out asking
you for the key if you have set up
encryption on your wireless router,
input the keys and click Connect.
The connection is complete.
1. Right-click the network icon on
the task bar at the right bottom
corner of the desktop. Then select
Connect to a network to view
available networks. Select the AP
and click Connect.
To set up the wireless connection properties:
1. Right-click the network icon on the taskbar and select Network and sharing
Center.
2. Select Manage network connections from the prompt window.
3 Double click the wireless network connection icon to open the Wireless Network
Connection Status page.
4 Click Properties to open the Property page from the Wireless Network
Connection Status page.
a. T h e G e n e r a l p a g e s h o w s
status,SSID, duration, speed, and
signal strength. The green bars
represent signal strength, with 5
bars indicating excellent signal and
1 bar meaning poor signal.
b. Click Properties from the Property
page to set the authentication of the
wireless connection,. .
ASUS USB-N10 Chapter 4: Using the ASUS WLAN Control Center
38
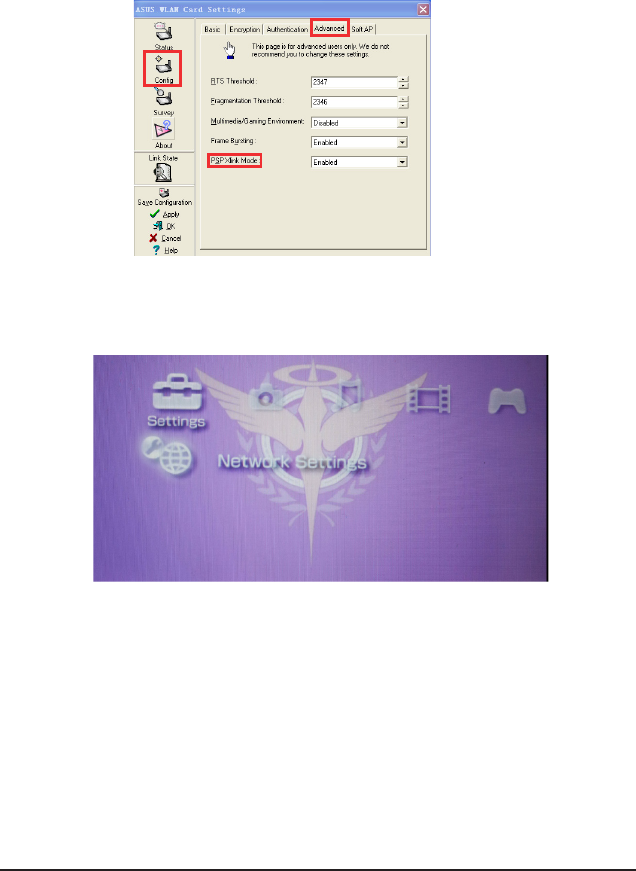
Setting up the XLink Mode
Windows XP
1.Click ASUS WLAN Control Center > Cong > Advanced to enable the PSP
Xlink Mode.
2. Turn on your PSP to set up the conguration.
3. Select Network Settings.
ASUS USB-N10 Chapter 4: Using the ASUS WLAN Control Center 39
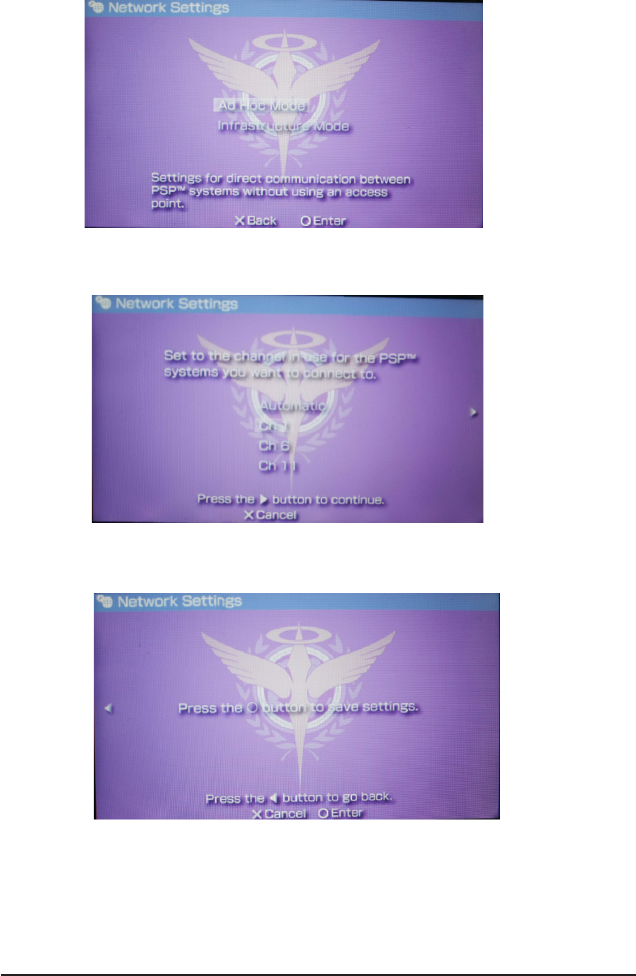
4. Select AD Hoc Mode.
5. Select the PSP channel you like to connect.
6. When done, select O to save settings.
ASUS USB-N10 Chapter 4: Using the ASUS WLAN Control Center
40
7. Select the game that is available for system-link you want to play then start the
game connection. The PSP can provide you the SSID named PSP_**** to
connect.
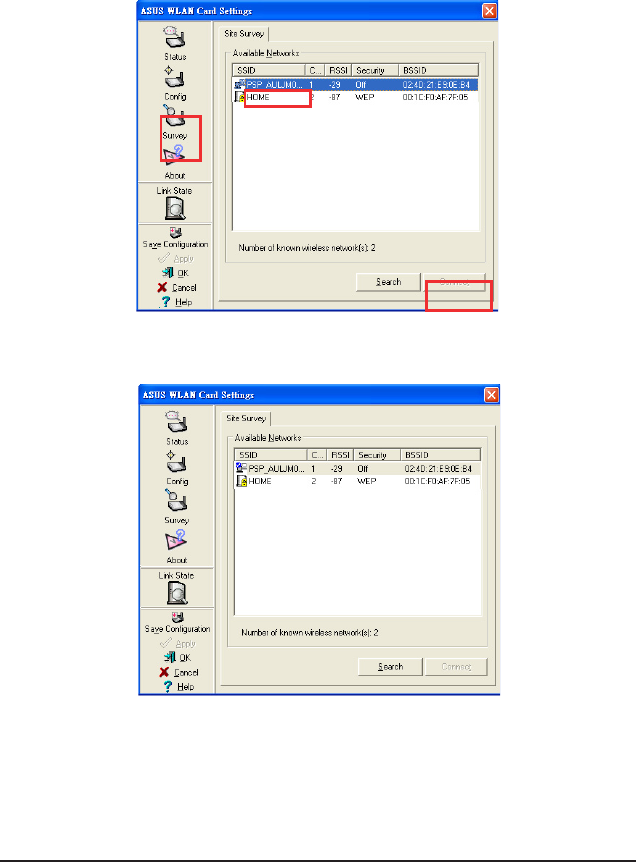
Click ASUS WLAN control center > survey to search the available
connection.
Select PSP_**** to connect.
8. When done, click Connect.
ASUS USB-N10 Chapter 4: Using the ASUS WLAN Control Center 41
MAC OS
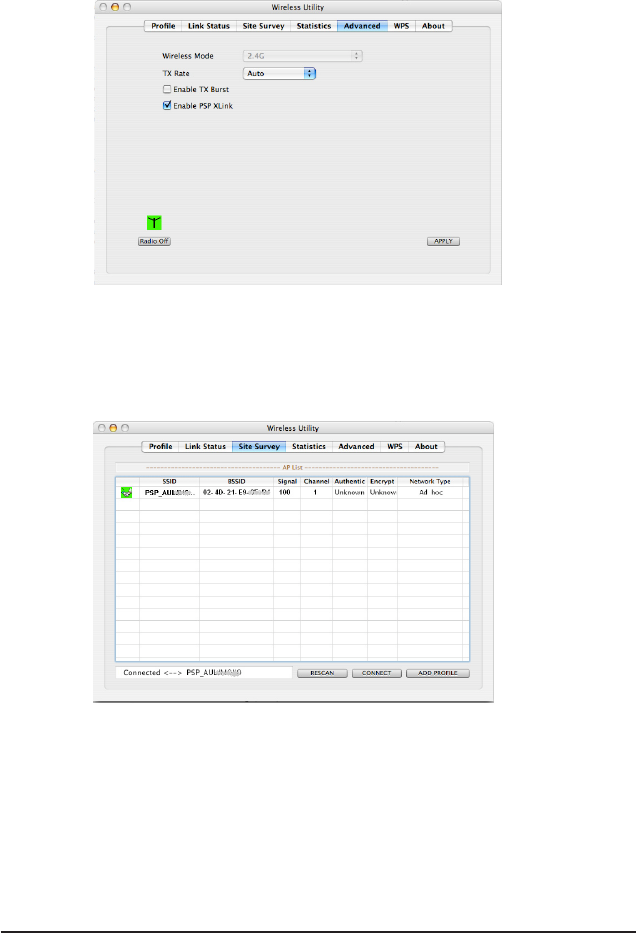
1. Select USBWirelessUtility > Advanced to enable PSP Xlink.
2. Click USBWirelessUtility > Site survey to search the available connection.
Select PSP_**** to connect.
3. When done, click connect

ASUS USB-N10 42
Troubleshooting
The following troubleshooting guides provide answers to some of the more
common problems, which you may encounter while installing or using WLAN
Adapter products. If you encounter difculties that are not mentioned in this section,
please contact the Wireless LAN Technical Support.
Verify if the WLAN Adapter is installed correctly.
When the WLAN Adapter setup is complete, you can verify if the driver has been
setup properly. Right click My Computer, select Properties, and click the Device
Manager tab. Then double-click the Network adapters icon; you should see
“802.11g Network Adapter” with an icon of an expansion adapter. There should
not be a “!” or “?” (problem) or “x” (disabled) symbol over this icon.
There is a yellow exclamation mark or a yellow question mark in Device Manager
in front of my WLAN Adapter.
To resolve the problem, you should update/reinstall the WLAN Adapter driver. In
“Device Manager”, right click 802.11g Network Adapter, select Properties, and
select Driver tab. Click on Update Driver button, then follow the “Update Device
Driver Wizard” to complete the driver installation.
Cannot connect to any access points
Follow the procedure below to congure your WLAN Adapter.
a. Verify that the “Network Type” is in “Infrastructure” mode.
b. Verify that the “SSID” of your WLAN Adapter is set to the same “SSID” of an
access point.
c. Verify that the “Encryption” type is the same as that of an access point. If you
enabled “WEP” encryption, you must also set the same WEP Keys on both
sides.
Cannot connect to a Station (WLAN Adapter)
Follow the procedure below to congure your WLAN Adapter.
a. Verify that the “Network Type” is in “Ad Hoc” mode.
Chapter 5
Troubleshooting

ASUS USB-N10 Chapter 5: Troubleshooting 43
b. Verify that the “SSID” of your WLAN Adapter is set to the same “SSID” of the other
station (or another WLAN Adapter).
c. Verify that the “channel” of the WLAN Adapter is “Auto” or set to the same
“channel” of the other station (or another WLAN Adapter).
d. Verify that the “Encryption” type is the same as the other station (or another
WLAN Adapter). If “WEP” encryption is enabled, you must set the same
“WEP” Keys on both stations.
Bad link quality or bad signal strength
There are two possible reasons. First is radio interference, keep the environment
around the WLAN Adapter away from microwave ovens and large metal objects.
Then try to reorient the WLAN Adapter antenna. Second is the distance, decrease
the distance between your WLAN Adapter and the access point or station (or
another WLAN Adapter).
The TCP/IP protocol did not bind to the WLAN PC Adapter.
This will occur when the computer already has six TCP/IP bindings in Windows
98 or ten bindings in Windows Me. These limits are imposed by the Microsoft
operating system.
Solution: If your computer already has the maximum number of TCP/IP bindings,
remove one of the network adapters from the Network configuration before
installing the WLAN Adapter driver.


46 ASUS USB-N10 Chapter 6: Appendices
Contact Information
ASUSTeK COMPUTER INC. (Asia Pacic)
Address 15 Li-Te Road, Peitou, Taipei, Taiwan 11259
Website www.asus.com.tw
Technical Support
Telephone +886228943447
Support Fax +886228907698
Software download support.asus.com*
ASUS COMPUTER INTERNATIONAL (America)
Address 800 Corporate Way, Fremont, CA 94539, USA
Telephone +15029550883
Fax +15029338713
Website usa.asus.com
Software download support.asus.com*
ASUS COMPUTER GmbH (Germany and Austria)
Address Harkort Str. 25, D40880 Ratingen, Germany
Fax +492102959911
Online contact www.asus.com.de/sales
Technical Support
Component Telephone +49-1805-010923
System/Notebook
/Eee/LCD Telephone +49-1805-010920
Support Fax +492102959911
Online support www.asus.com.de/support
Website www.asus.com.de/news
* Available on this site is an online Technical Inquiry Form that you can ll out to contact
technical support.

ASUS USB-N10 Chapter 6: Appendices 47
Manufacturer: ASUSTeK Computer Inc.
Tel: +886-2-2894-3447
Address: No. 15, LI-TE RD., PEITOU, TAIPEI 112,
TAIWAN
Authorised representative
in Europe:
ASUS Computer GmbH
Address: HARKORT STR. 21-23, 40880
RATINGEN, GERMANY
Authorised distributors
in Turkey:
BOGAZICI BIL GISAYAR SAN. VE TIC. A.S.
Tel: +90 212 3311000
Address: AYAZAGA MAH. KEMERBURGAZ CAD.
NO.10 AYAZAGA/ISTANBUL
INDEX BILGISAYAR SISTEMLERI MUHENDISLIK
SAN. VE TIC. A.S.
Tel: +90 212 3312121
Address: AYAZAGA MAH: CENDERE YOLU
NO:9 AYAZAGA/ISTANBUL
EEE Yönetmeliğine Uygundur
Canada
Industry Canada regulatory information
Operation is subject to the following two conditions: (1) this device may not cause
interference, and (2) this device must accept any interference, including interference
that may cause undesired operation of the device.
The user is cautioned that this device should be used only as specified within this
manual to meet RF exposure requirements. Use of this device in a manner
inconsistent with this manual could lead to excessive RF exposure conditions.
SAR Value: 0.717 W/kg
警語
經型式認證合格之低功率射頻電機, 非經許可,公司, 商號或使用者均不得擅自變更頻率,加
大功率或變更原設計之特性及功能
低功率射頻電機之使用不得影響飛航影響安全及干擾合法通信, 經發現有干擾現象時,應立
即停用,並改善至無干擾時方得繼續使用
前項合法通信,指一電信法規定作業之無線電通信低功率射頻電機需忍受合法通信或工業,科
學及醫療用電波輻射性電機設備之干擾