ASUSTeK Computer WL500GPV2 ASUS WIRELESS ROUTER User Manual WL 500gP V2 UserMan
ASUSTeK Computer Inc ASUS WIRELESS ROUTER WL 500gP V2 UserMan
Contents
- 1. users manual 1
- 2. users manual 2
- 3. users manual 3
- 4. users manual 4
users manual 1
User Manual
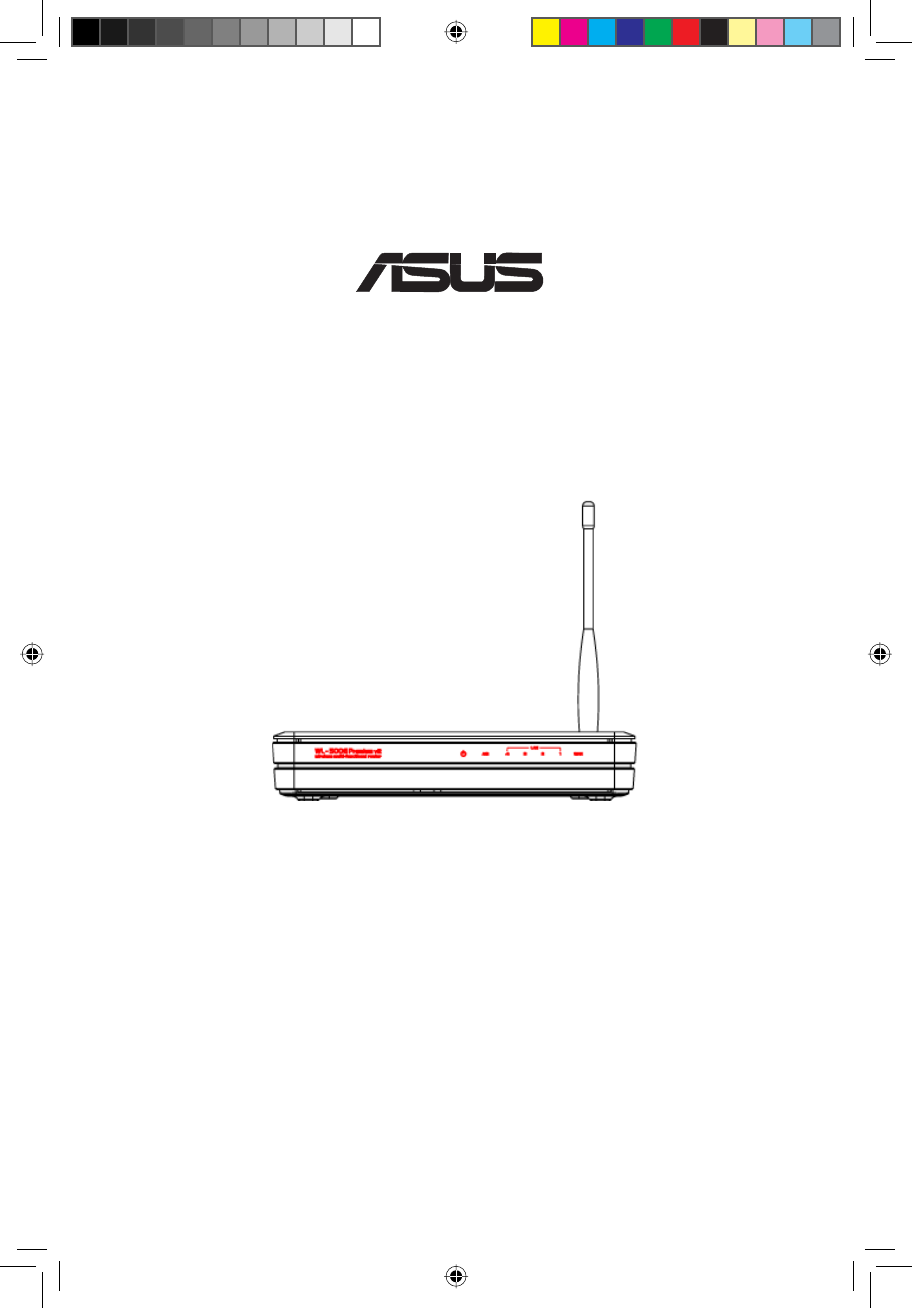
WL-500gP V2 Wireless Router
E3209/ April 2007
®
WL500gP_Manual.indd 1 2007.4.19 5:05:28 PM

Manufacturer Contact Information
$6867H.&20387(5,1&$VLD3DFLÀF
Company address: 15 Li-Te Road, Beitou, Taipei 11259
General (tel): +886-2-2894-3447 Web site address: www.asus.com.tw
General (fax): +886-2-2894-7798 General email: info@asus.com.tw
$686&20387(5,17(51$7,21$/$PHULFD
Company address: 44370 Nobel Drive, Fremont, CA 94538, USA
General (fax): +1-510-608-4555 Web site address: usa.asus.com
Technical support
General support: +1-502-995-0883 Support (fax): +1-502-933-8713
Online support: http://vip.asus.com/eservice/techserv.aspx
$686&20387(5*PE+*HUPDQ\$XVWULD
Company address: Harkort Str. 25, D-40880 Ratingen, Germany
General (tel): +49-2102-95990 Web site address: www.asuscom.de
General (fax): +49-2102-959911 Online contact: www.asuscom.de/sales
Technical support
Components: +49-2102-95990 Online support: www.asuscom.de/support
Notebook: +49-2102-959910 Support (fax): +49-2102-959911
WL500gP_Manual.indd 2 2007.4.19 5:05:28 PM

WL-500gP V2 Wireless Router User Manual
1
Table of contents
1. Package contents.................................................................................3
2. Connecting ADSL modem and wireless router .................................3
1) Cable connection ...............................................................................3
2) Status indicators ................................................................................4
3) Wall mount option ..............................................................................4
3. Getting started......................................................................................5
1) Wired connection ............................................................................... 5
2) Wireless Connection..........................................................................5
3) Setting IP address for wired or wireless client ...................................5
&RQÀJXULQJWKHZLUHOHVVURXWHU ..........................................................6
5) Quick setup .......................................................................................7
4. Wireless router features .................................................................... 12
1) Choosing an appropriate operation mode .......................................12
2) Setting up wireless encryption ........................................................13
3) Setting up virtual server in your LAN ............................................... 14
4) Setting up virtual DMZ in your LAN .................................................15
5) Setting up DDNS .............................................................................15
6) Setting up Bandwidth Management.................................................21
5. Application features ...........................................................................23
1) Sharing USB storage .......................................................................23
2) Setting up FTP site ..........................................................................25
3) Web camera ....................................................................................26
4) Sharing USB printer.........................................................................28
5) Playing stream media on Xbox360 ..................................................31
6. Setting up using ASUS utility ................................................................ 34
1) Utility Installation for WL-500gP V2 ................................................. 34
2) EZSetup...........................................................................................35
WL500gP_Manual.indd 1 2007.4.19 5:05:29 PM

WL-500gP V2 Wireless Router User Manual
2
7. Troubleshooting .................................................................................37
8. Appendix .............................................................................................39
WL500gP_Manual.indd 2 2007.4.19 5:05:29 PM
WL-500gP V2 Wireless Router User Manual
3
2. Connecting ADSL modem and wireless router
1. Package contents
• WL-500gP V2 wireless router x 1
• Power adapter x 1
• Utility CD x 1
• RJ45 cable x 1
• Quick Start Guide x 1
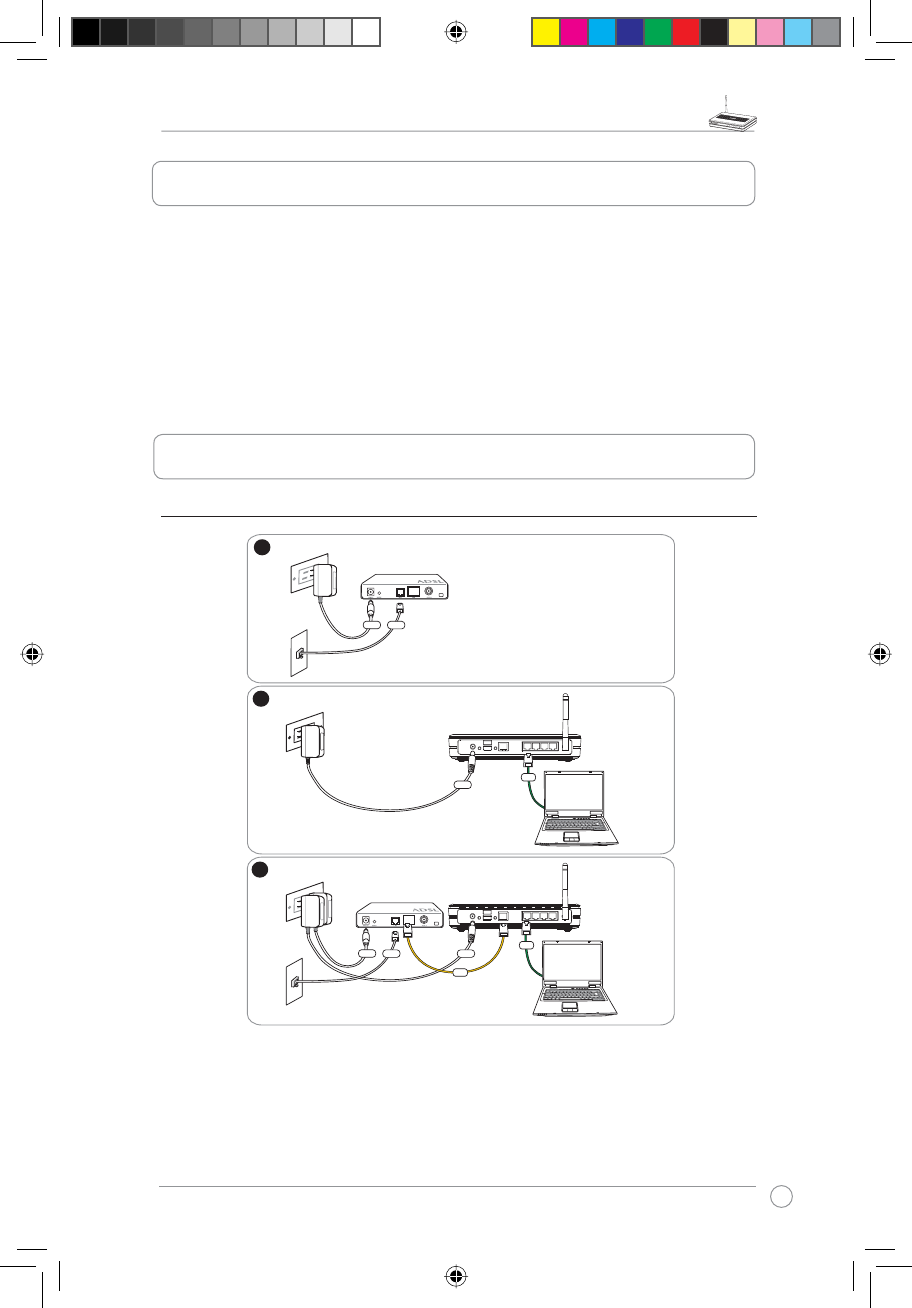
&DEOHFRQQHFWLRQ
1
Modem
Wall telephone outlet
Wall power outlet
Phone
Power
2
Wall power outlet
ASUS Wireless Router
LAN
3
Modem
Wall telephone outlet
Wall power outlet
LAN
Power
Phone
Power
ASUS Wireless Router
WAN
Power
WL500gP_Manual.indd 3 2007.4.19 5:05:32 PM
WL-500gP V2 Wireless Router User Manual
4
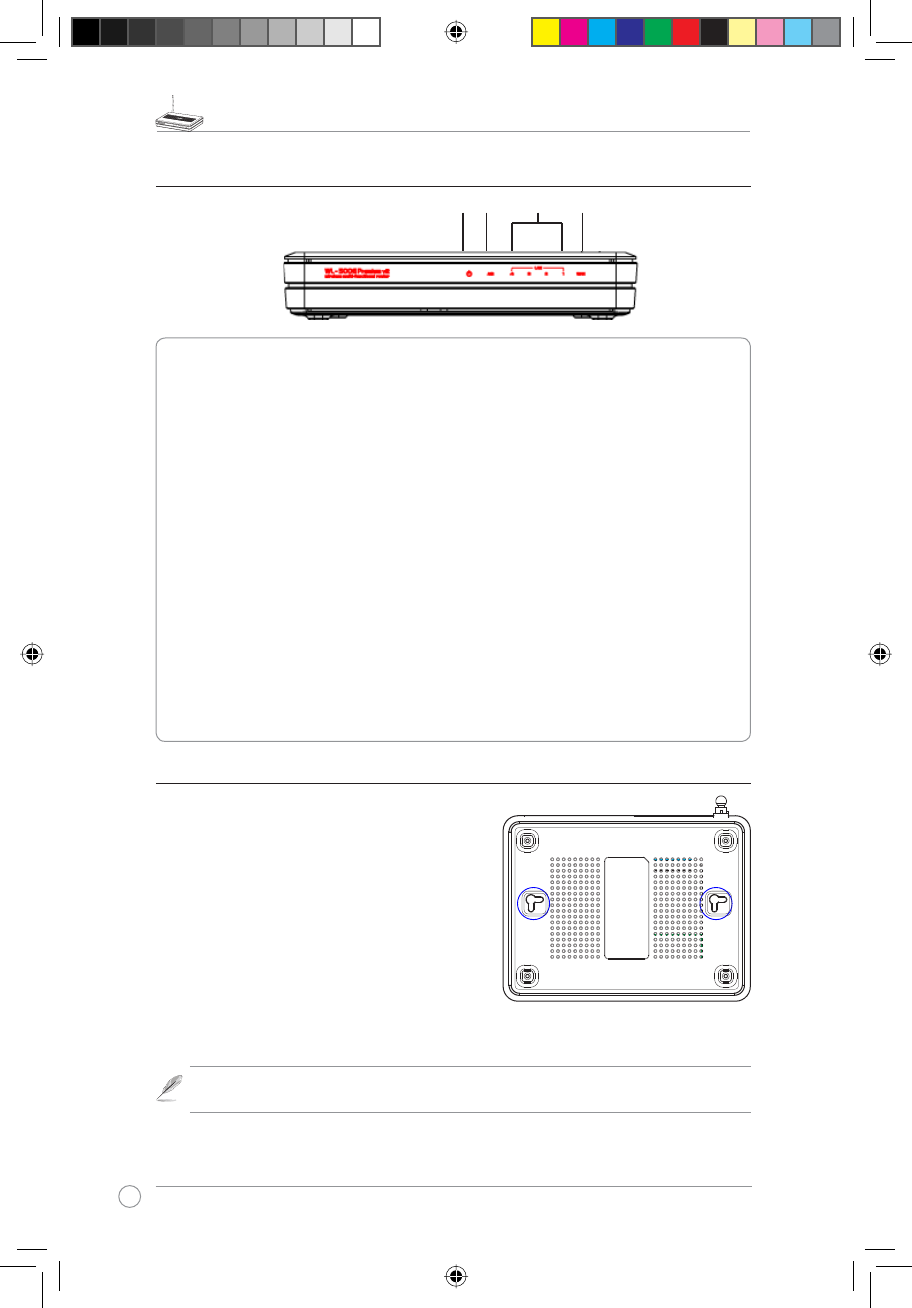
6WDWXVLQGLFDWRUV
3:53RZHU
Off No power
On System ready
Flashing-slow Firmware upgrade failed
Flashing-quick EZsetup processing
$,5:LUHOHVV1HWZRUN
Off No power
On Wireless system ready
Flashing Transmitting or receiving data (wireless)
:$1:LGH$UHD1HWZRUN
Off No power or no physical connection
On Has physical connection to an Ethernet network
Flashing Transmitting or receiving data (through Ethernet cable)
/$1/RFDO$UHD1HWZRUN
Off No power or no physical connection
On Has physical connection to an Ethernet network
Flashing Transmitting or receiving data (through Ethernet cable)
:DOOPRXQWRSWLRQ
Out of the box, ASUS WL-500gP V2 Wireless
5RXWHULVGHVLJQHGWRVLWRQDUDLVHGÁDWVXUIDFHOLNH
D ÀOH FDELQHW RU ERRN VKHOI 7KH XQLW PD\ DOVR EH
converted for mounting to a wall or ceiling.
Follow these steps to mount the ASUS Wireless
Router to a wall:
1. Look on the underside for the two mounting
hooks.
0DUNWZRXSSHUKROHVLQDÁDWVXUIDFH
3. Tighten two screws until only 1/4'' is showing.
4. Latch the hooks of the ASUS Wireless Router onto the screws.
Note: Re-adjust the screws if you cannot latch the ASUS Wireless Router onto the
screws or if it is too loose.
PWR
AIR WANLAN
WL500gP_Manual.indd 4 2007.4.19 5:05:34 PM
WL-500gP V2 Wireless Router User Manual
5
The ASUS WL-500gP V2 Wireless Router can meet various working scenarios with proper
FRQÀJXUDWLRQ 7KH GHIDXOW VHWWLQJV RI WKH ZLUHOHVV URXWHU PD\ QHHG FKDQJH VR DV WR PHHW \RXU
individual needs. Therefore, before using the ASUS Wireless Router, check the basic settings to
make sure they all work in your environment.
$686SURYLGHVDXWLOLW\QDPHG(=6HWXSIRUIDVWZLUHOHVVFRQÀJXUDWLRQ,I\RXZRXOGOLNHWRXVH
(=6HWXSIRU\RXUZLUHOHVVQHWZRUNFRQÀJXUDWLRQUHIHUWRFKDSWHUIRUGHWDLOV
Note: :LUHG FRQQHFWLRQ IRU LQLWLDO FRQÀJXUDWLRQ LV UHFRPPHQGHG WR DYRLG SRVVLEOH
setup problems due to wireless uncertainty.
:LUHG FRQQHFWLRQired connection
The ASUS WL-500gP V2 Wireless Router is supplied with an Ethernet cable in the package.
Since the ASUS Wireless Router has integrated auto-crossover function, therefore, you can use
either straight-through or crossover cable for wired connection. Plug one end of the cable to the
LAN port on the rear panel of the router and the other end to the Ethernet port on your PC.
:LUHOHVV&RQQHFWLRQ
For establishing wireless connection, you need an IEEE 802.11b/g compatible WLAN card. ReferRefer
to your wireless adapter user manual for wireless connection procedures. By default, the
SSID of ASUS Wireless Router is “default” (in lower case), encryption is disabled and open
system authentication is used.
6HWWLQJ,3DGGUHVVIRUZLUHGRUZLUHOHVVFOLHQW
To access WL-500gP V2 Wireless Router, you must have correct TCP/IP settings on your wired or
wireless clients. Set the IP addresses of the clients within the same subnet of WL-500gP V2.
Getting IP address Automatically
The ASUS Wireless Router integrates DHCP server functions, therefore, you can make your
PC get IP address automatically from the ASUS Wirelesss Router.
Note: Before rebooting your PC, switch ON the
wireless router and make sure the router is in ready
state.
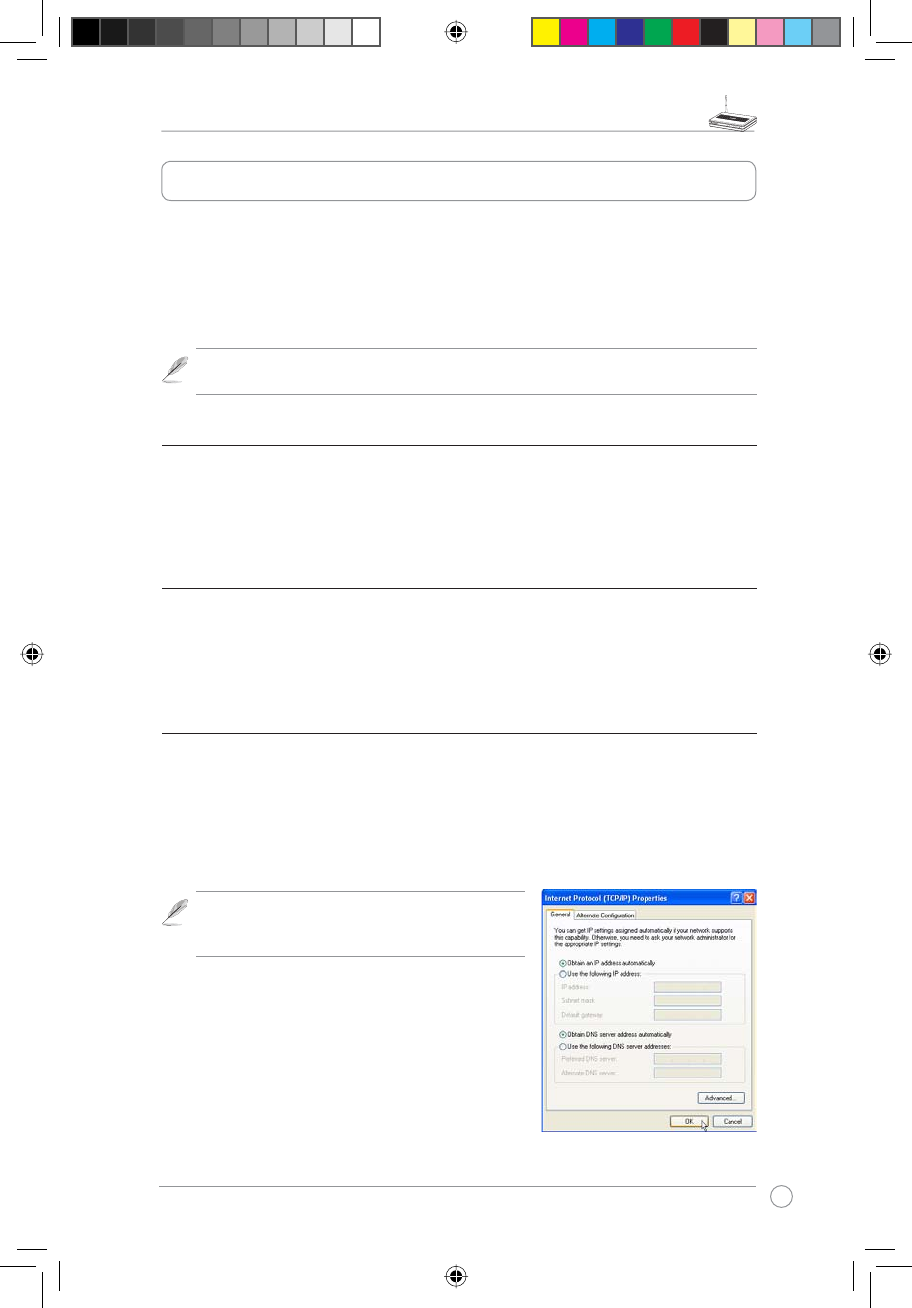
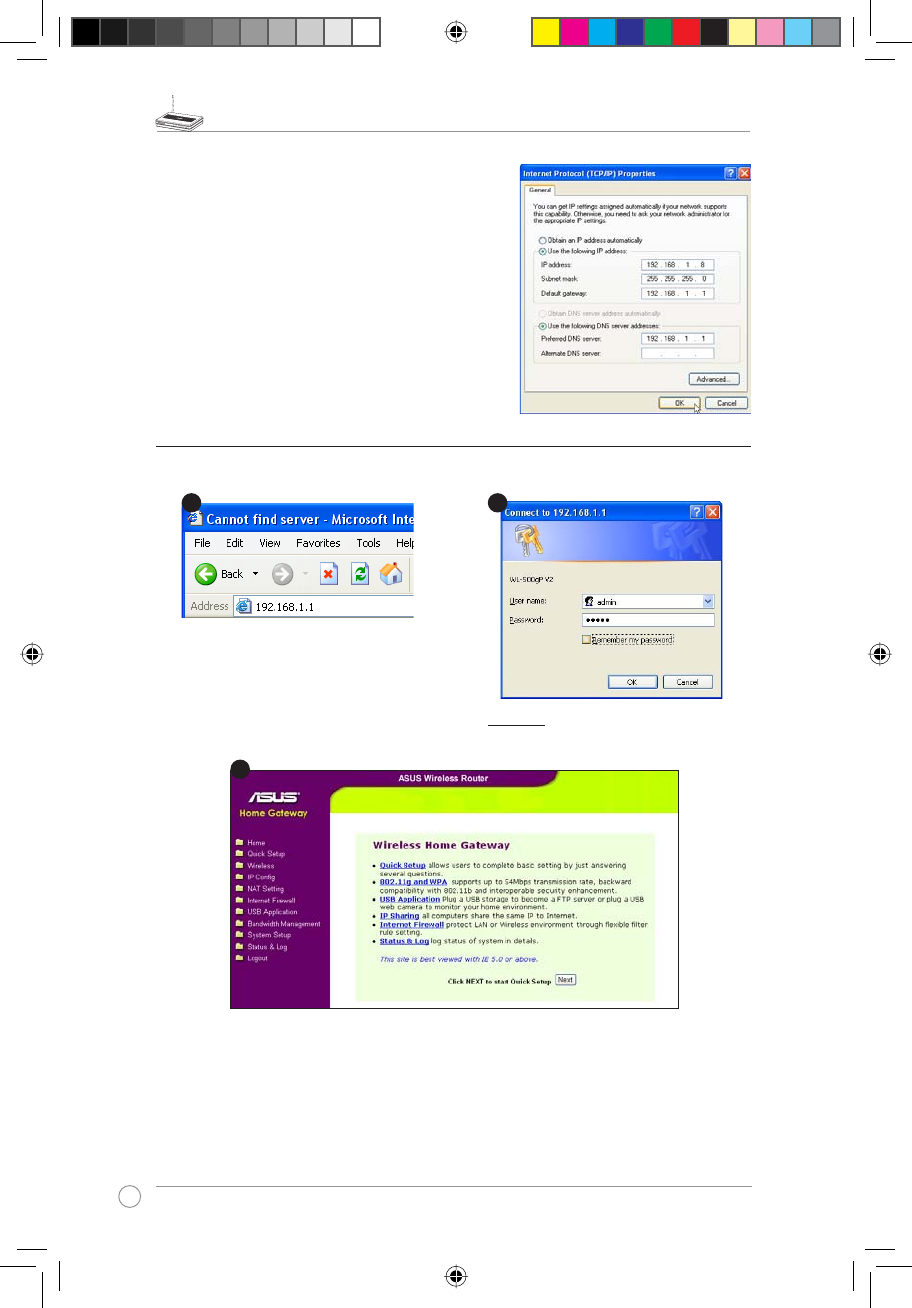
Setting up IP address Manually
To set IP address manually, you need to know the default
settings of the ASUS Wireless Router:
• IP address 192.168.1.1
• Subnet Mask 255.255.255.0
3. Getting started
WL500gP_Manual.indd 5 2007.4.19 5:05:35 PM
WL-500gP V2 Wireless Router User Manual
6
To set up the connection with a manually assigned
IP address, the address of your PC and the wireless
router must be within the same subnet:
• IP address: 192.168.1.xxx (xxx can be any
number between 2 and 254. Make sure the IP
address is not used by other device)
• Subnet Mask: 255.255.255.0 (same as WL-500gP
V2)
• Gateway: 192.168.1.1 (IP address of WL-500gP V2)
• DNS: 192.168.1.1 (WL-500gP V2), or assign a
known DNS server in your network.
&RQÀJXULQJWKHZLUHOHVVURXWHU
)ROORZWKHVWHSVEHORZWRHQWHUWKH:HEFRQÀJXUDWLRQLQWHUIDFHRI:/J39
Defaults
User name: admin Password: admin
Enter the following address in your
web browser: http://192.168.1.1
After logging in, you can see the ASUS Wireless Router home page.
7KHKRPHSDJHGLVSOD\VTXLFNOLQNVWRFRQÀJXUHWKHPDLQIHDWXUHVRIWKHZLUHOHVVURXWHU
2
1
3
WL500gP_Manual.indd 6 2007.4.19 5:05:38 PM
WL-500gP V2 Wireless Router User Manual
7
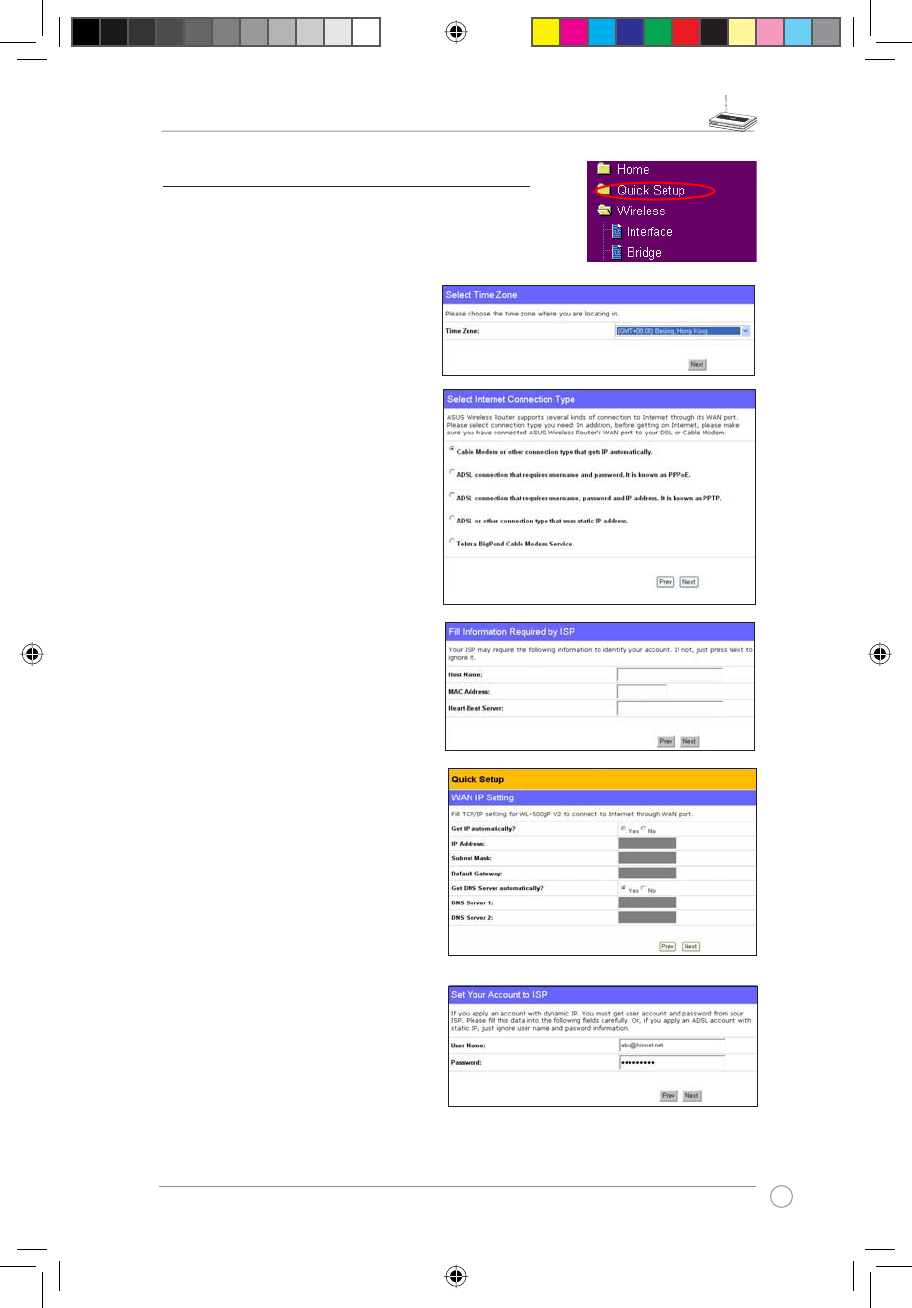
1. Select your time zone and click
Next.
4XLFNVHWXS
To start quick setup, click Next to enter the “Quick Setup”
page. Follow the instructions to setup the ASUS Wireless
Router.
2. ASUS wireless router supports
five types of ISP services: cable,
PPPoE, PPTP, static WAN IP,
and Telstra BigPond. Select your
connection type and click Next to
continue.
Cable or dynamic IP user
If you are using services provided by
cable ISP, select Cable Modem or other
connection that gets IP automatically.
If your ISP provides you hostname, MAC
address, and heartbeat server address,
fill these information into the boxes on
the setting page; if not, click Next to skip
this step.
PPPoE user
If you use PPPoE service, select ADSL
connection that requires username
and password. It is known as PPPoE.
You need to input the username and
password provided by your ISP. Click
Next to continue.
WL500gP_Manual.indd 7 2007.4.19 5:05:40 PM
WL-500gP V2 Wireless Router User Manual
8
PPTP user
If you are using PPTP services, select ADSL
connection that requires username,
password and IP address. Fill in the
username, password and IP address
provided by your ISP into the fields. Click
Next to continue.
Static IP user
If you are using ADSL or other connection
type that uses static IP address, select ADSL
or other connection type that uses static
IP address. Input the IP address, subnet
mask, and default gateway provided by your
ISP. You can specify DNS servers, or get
DNS information automatically.
herk036@adsl-comfort
3. After the connection type setting is
complete, you are to set up your wireless
interface. Specify to your wireless router
an SSID (Service Set Identifier), which
LVDXQLTXHLGHQWLÀHUDWWDFKHGWRSDFNHWV
VHQWRYHU:/$17KLVLGHQWLÀHUHPXODWHV
a password when a device attempts to
communicate with your wireless router
via WLAN.
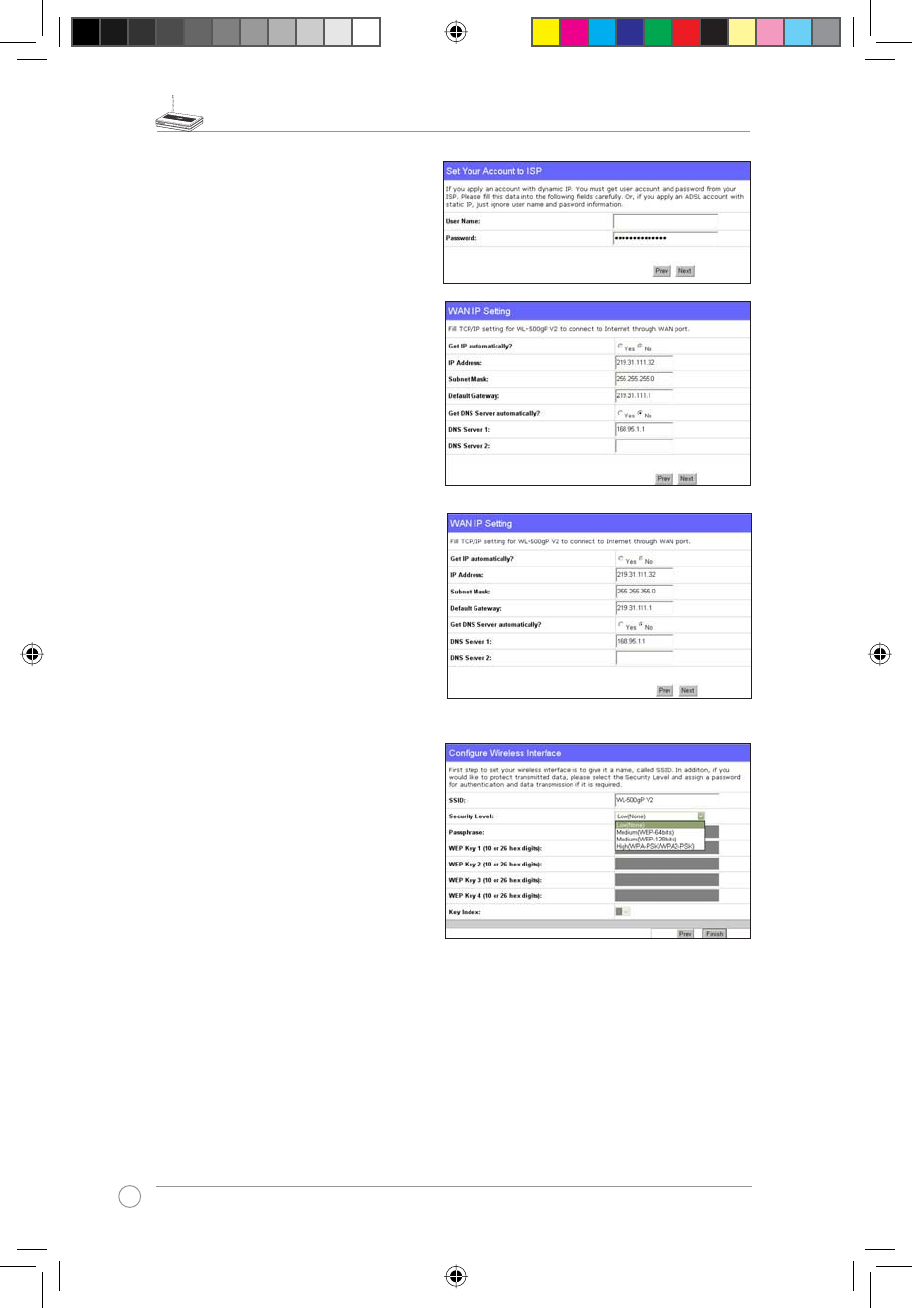
If you want to protect transmitted data, select a Security Level to enable encryption methods.
Medium: Only users with the same WEP key settings can connect to your wireless router
and transmit data using 64bits or 128bits WEP key encryption.
High: Only users with the same WPA pre-shared key settings can connect to your wireless
router and transmit data using TKIP encryption.
WL500gP_Manual.indd 8 2007.4.19 5:05:41 PM
WL-500gP V2 Wireless Router User Manual
9
4. Input four sets of WEP keys in the WEP
Key fields (10 hexadecimal digits for
WEP 64bits, 26 hexadecimal digits
for WEP 128bits). You can also let the
system generate the keys by inputting
a Passphrase. Record the PassphraseRecord the Passphrase
and the WEP keys in your notebook,
then click Finish.
For example, if we select WEP 64bitsFor example, if we select WEP 64bits
encryption mode and input 11111 as
the Passphrase, the WEP Keys are
generated automatically.
5. Click Save&Restart to restart the
wireless router and activate the new
settings.
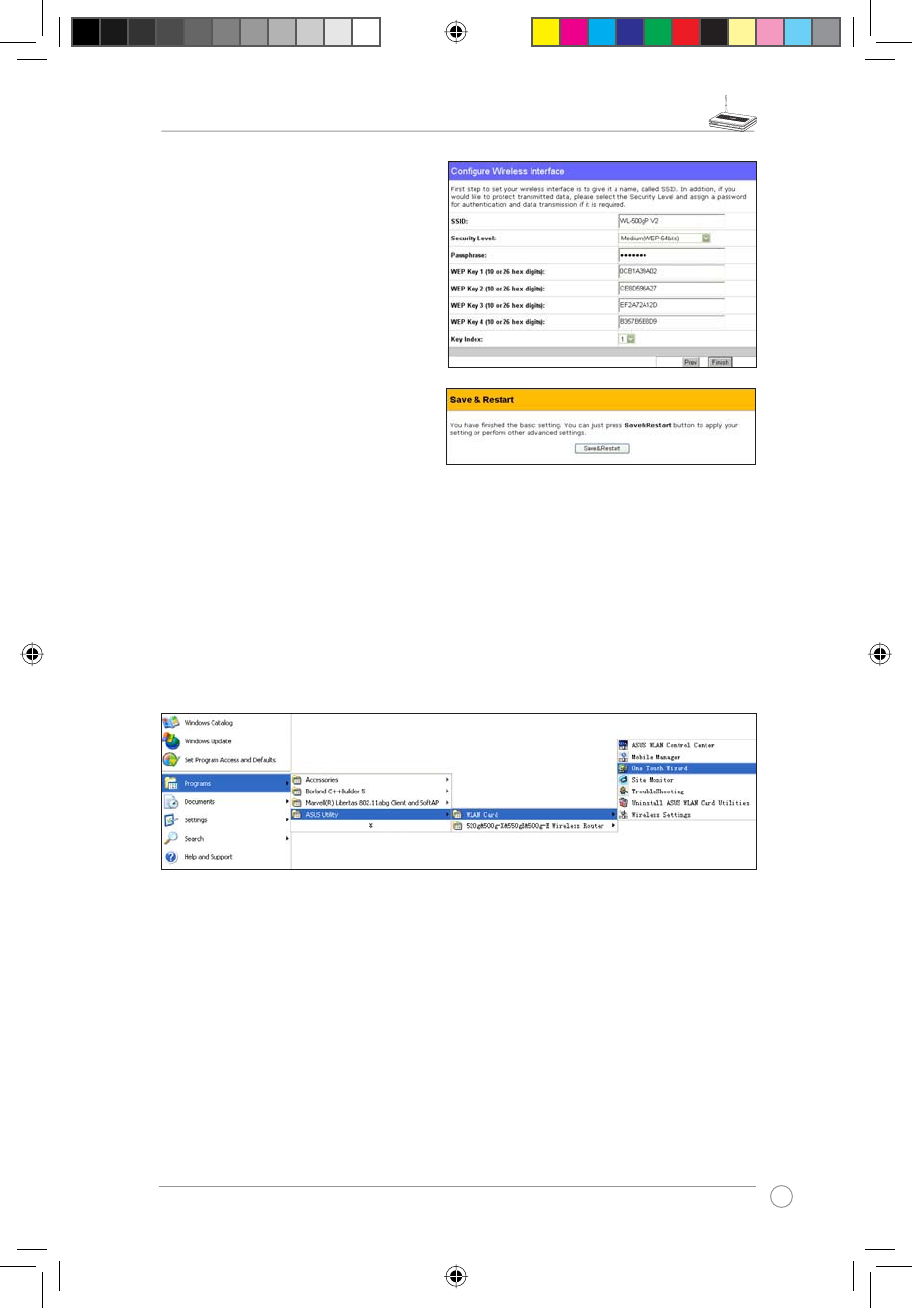
6. Connect to the wireless router via wireless.
To connect the wireless router from a wireless client, you can use Windows® Wireless
=HUR&RQÀJXUDWLRQVHUYLFHWRVHWXSWKHFRQQHFWLRQ,I\RXXVH$686 :LUHOHVV&DUGRQ
your computer, you can use the One Touch Wizard utility supplied in WLAN Card support
CD for wireless connection.
&RQÀJXULQJ$686:/$1&DUGZLWK2QH7RXFK:L]DUG
If you have installed ASUS wireless card together with its utilities and drives on your PC, click Start
!3URJUDPHV !$6868WLOLW\!:/$1 &DUG!2QH 7RXFK :L]DUG to launch the One Touch
Wizard utility.
WL500gP_Manual.indd 9 2007.4.19 5:05:42 PM

WL-500gP V2 Wireless Router User Manual
10
3) Set the authentication and encryption of
your WLAN card the same with those at
WL-500gP V2. In the previous steps the
Key Length is 64 bits,Passphrase is
11111 Click Next to continue.
1) Select Connect to an existing wireless
/$16WDWLRQ radio button and click
Next to continue.
2) One Touch Wizard searches and displays
the available APs in the Available
Networks list. Select WL-500gP V2 and
press Next to continue.
4) It takes several seconds for the wireless
card to associate with WL-500gP V2.
Press Next to setup TCP/IP for your
WLAN Card.
5) Setup the IP address of the WLAN Card
according to your network condition.
After the setup is complete, click Finish
to exit the One Touch Wizard.
WL500gP_Manual.indd 10 2007.4.19 5:05:43 PM
WL-500gP V2 Wireless Router User Manual
11
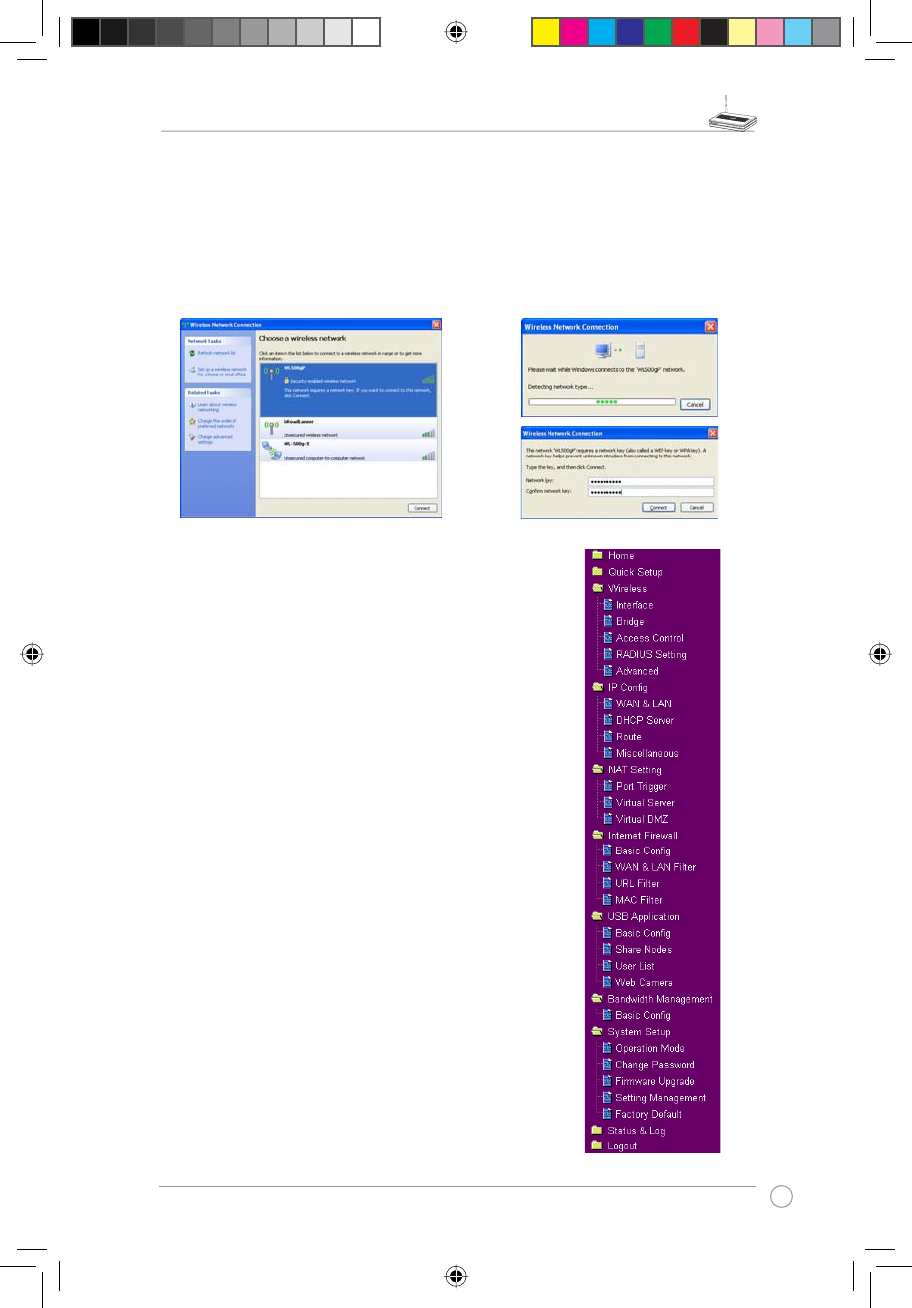
&RQÀJXULQJDGYDQFHGIHDWXUHV
To view and adjust other settings of the wireless router,
enter the Web configuration page of WL-500gP V2.
Click on items on the menu to open a submenu and
follow the instructions to setup the router. Tips show up
when you move your cursor over each item.
&RQÀJXULQJ:/$1FDUGZLWK:LQGRZV:=&VHUYLFH
If you use non-ASUS wireless card, you can set up the wireless connection with Windows®
:LUHOHVV=HUR&RQÀJXUDWLRQ:=&VHUYLFH
2) Input the 10-digit keys you have set on
the wireless router and click Connect.
The connection is complete within
several seconds.
1) Double-click the wireless network icon on
the task bar to view available networks.
Select your wireless router and click
Connect.
WL500gP_Manual.indd 11 2007.4.19 5:05:44 PM