ASUSTeK Computer WL500GPV2 ASUS WIRELESS ROUTER User Manual WL 500gP V2 UserMan
ASUSTeK Computer Inc ASUS WIRELESS ROUTER WL 500gP V2 UserMan
Contents
- 1. users manual 1
- 2. users manual 2
- 3. users manual 3
- 4. users manual 4
users manual 3
WL-500gP V2 Wireless Router User Manual
23
ASUS WL-500gP V2 Wireless Router provides two USB2.0 ports for connecting
USB storage, USB camera, and USB printer, therefore, you can monitor the
working environment, share data and printer with both wired and wireless users in
your network. Furthermore, WL-500gP V2 provides a download utility - Download
0DVWHUWRIDFLOLDWHDQGVKDUHWKHGRZQORDGÀOHV
Warning: Before unplugging the USB storage disk from WL-500gP V2, you must
eject the disk in 6WDWXV/RJ!([WHUQDO86%'LVN page to prevent data corruption.
Note: Before applying change and rebooting WL-500gP V2, make sure all USB
applications are disabled, it would take more than 20 seconds for WL-500gP V2 to
reboot.
6KDULQJ86%VWRUDJH
To use this feature, you need to plug a USB hard disk to the USB2.0 port on the rear
panel of WL-500gP V2. Make sure the hard disk is formated and partitioned properly.
Note:)$7KDVD*%ÀOHVL]HOLPLWDWLRQDQGGRQRWVXSSRUWÀOHVDERYHWKDWVL]H,I
\RXZDQWWRXVHÀOHVRIDERYH*%\RXPXVWIRUPDWWKHGLVNWR(;7ÀOHV\VWHP
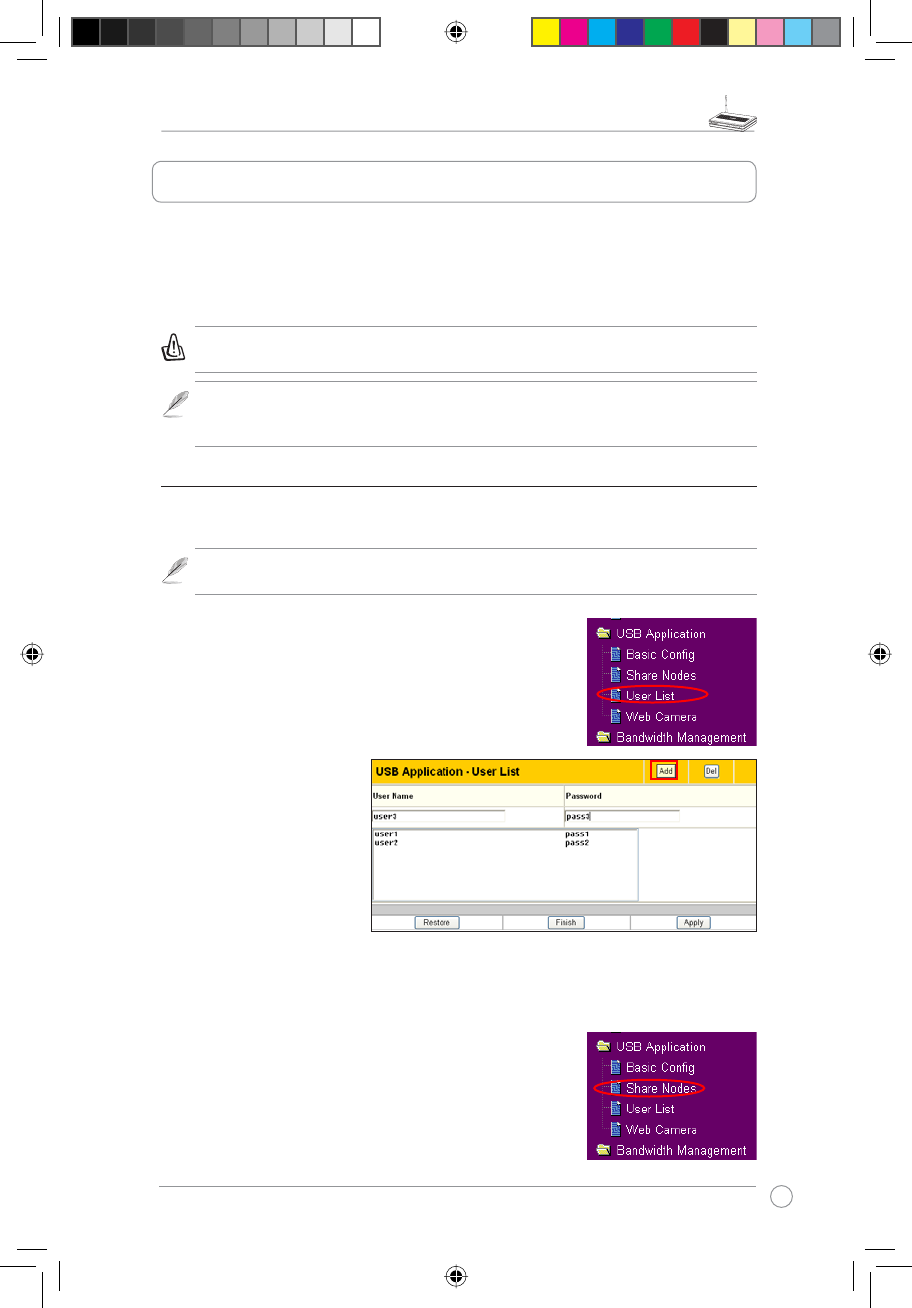
Creating user account
To share the data in the USB storage, you need to create
XVHUDFFRXQWVÀUVW
2. I nput User Name and
Password for the accounts.
Click Add to add the
account to the list.
3. To delete an account,
select the account from
the list and click Del.
4. Click Apply to apply the
changes and restart the
wireless router.
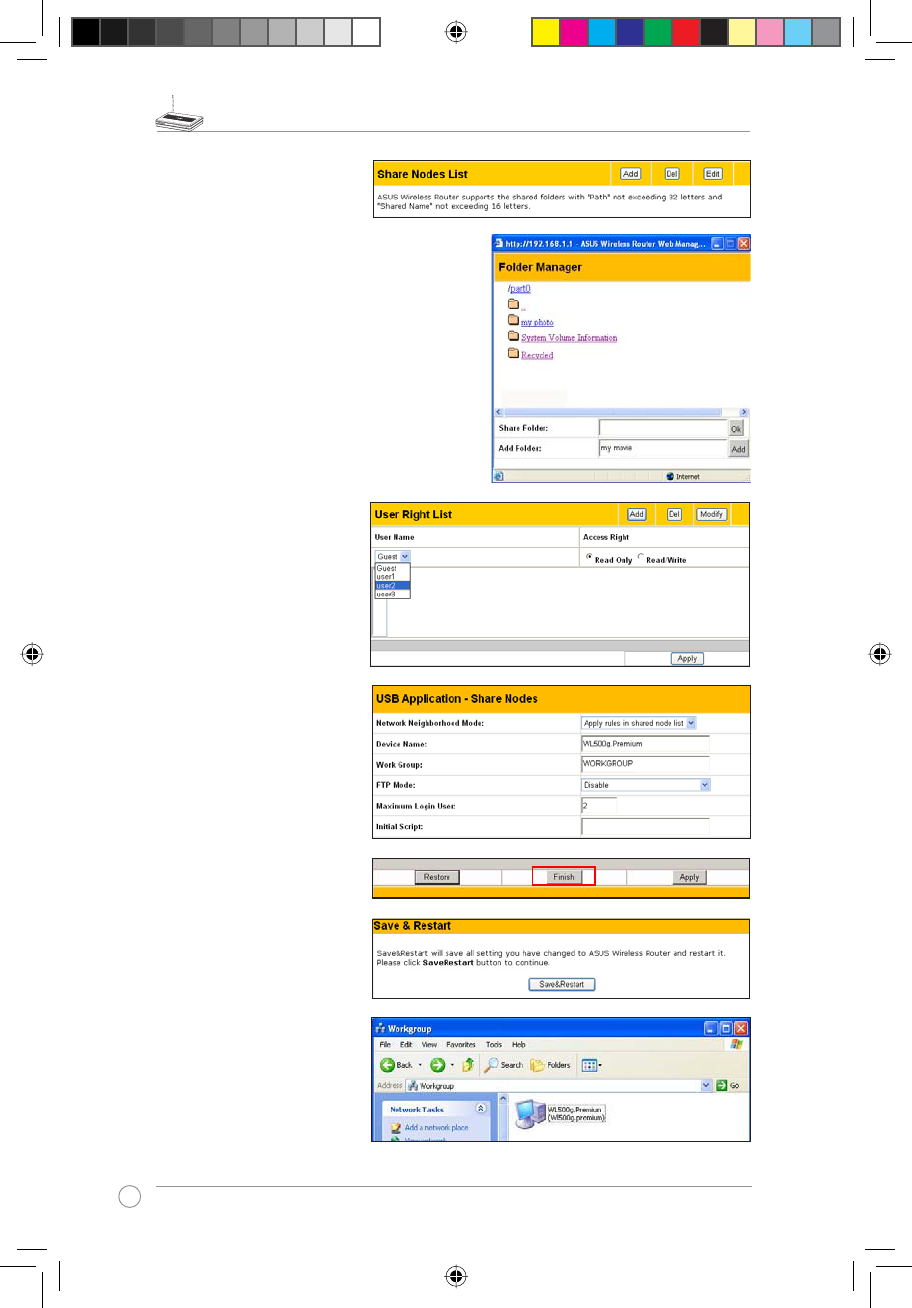
Creating share folder and access right
You can create a new share folder or share an existing
folder in your hard disk.
1. Click 86%$SSOLFDWLRQ!8VHU/LVW in the left side
PHQXWRRSHQWKHFRQÀJXUDWLRQSDJH
1. Click 86%$SSOLFDWLRQ!6KDUH1RGHV in the left
VLGHPHQXWRRSHQWKHFRQÀJXUDWLRQSDJH
5. Application features
WL500gP_Manual.indd 23 2007.4.19 5:06:02 PM
WL-500gP V2 Wireless Router User Manual
24
2. Click Add to add a share
folder.
3. Select the folder you want to share
from Folder Manager and click Ok.
To create a share folder, input the
folder name in Add Folder field
and press Add.
'HÀQH WKH DFFHVV ULJKW IRU
the share folder by appoint
User Name and Access
Right. Click Add to add
the access right rule. When
finished, click Apply to
VDYHWKHFRQÀJXUDWLRQ
6. Click Finish.
5. Set Network Neighbourhood
Mode to Apply rules in
shared node list, Work
Group to WORKGROUP to
enable all computers within
WORKGROUP to access
WL-500gP V2 USB storage.
7. Click Save & Restart to
restart the wireless router
and activate the settings.
8. Open My Network Place
from a computer connected
to WL-500gP V2. Click view
work group computers,
you can see WL-500gP V2
in the Workgroup category.
$OOÀOHVRQWKH86%VWRUDJH
are ready for sharing.
WL500gP_Manual.indd 24 2007.4.19 5:06:04 PM
WL-500gP V2 Wireless Router User Manual
25
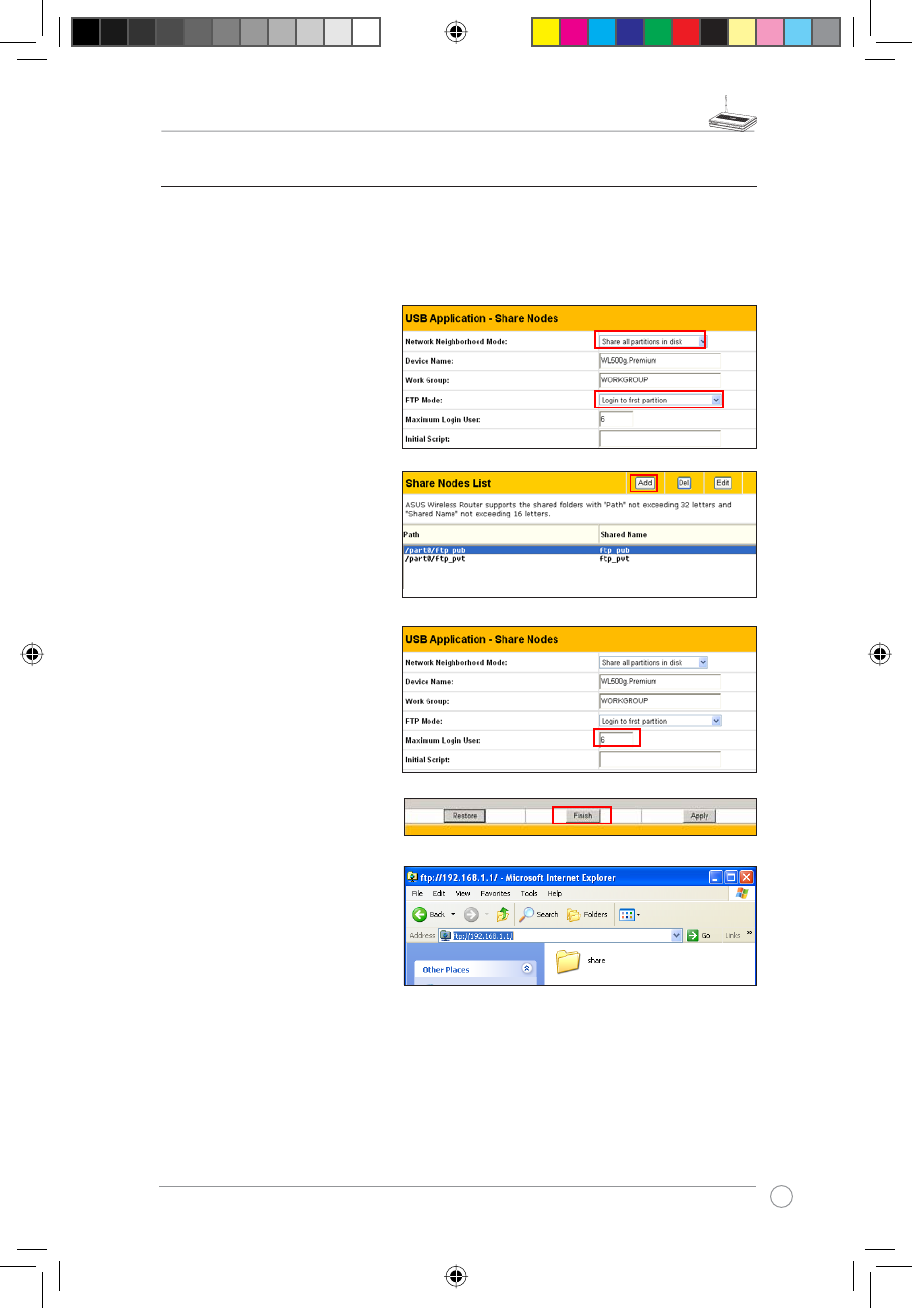
6HWWLQJXS)73VLWH
WL-500gP V2 can also serve as an FTP site. You can make your FTP site accessible
by all users, or set up access policy to restrict anonymous login. To use this feature,
you need to plug a USB storage disk to the USB2.0 port on the rear panel of WL-
500gP V2. Make sure the hard disk is formated and partitioned properly.
1. To allow anonymous login: Set
Network Neighbourhood Mode
to Share all paritions in disk,
FTP Mode to Login to first
partition. The anonymous login
directory is the root directory of
ÀUVWSDUWLWLRQ
To allow accout login only: Set
Network Neighbourhood Mode
to Apply rules in shared node
list, FTP Mode to Login to
first mached shared node.
Click Add in the Share Node List
to specify the access directory
and access right of FTP account.
2. The Maximum Login User
field specifies the maximum
logged in users at a same time.
The default value is 6.
3. Click Finish to activate the
settings and reboot. This process
may take several minutes.
4. Type ftp://192.168.1.1 into
the address box of your Web
browser and press Enter to
login the FTP site.
WL500gP_Manual.indd 25 2007.4.19 5:06:05 PM
WL-500gP V2 Wireless Router User Manual
26
:HEFDPHUD
The ASUS Wireless Router implements several applications for a
USB Web camera, enabling you to capture images and send them
over the Internet. For this function, you need to plug a USB camera
onto WL-500gP V2 and enable ActiveX for your Web browser.
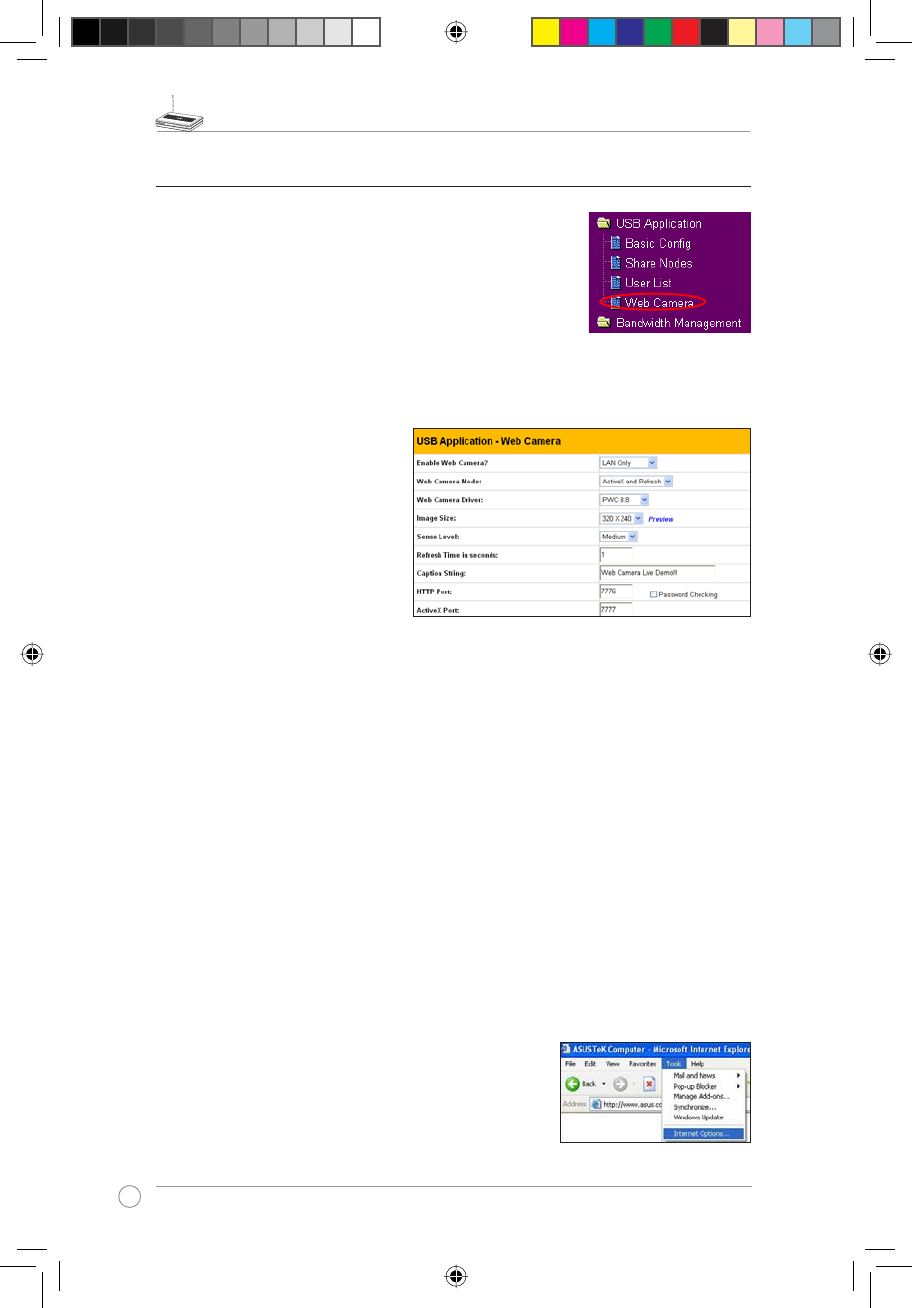
Web camera
1. Click Web Camera page in USB Application folder.
2. Enable Web Camera - Selecting LAN Only enables Web Camera for LAN users.
Selecting LAN and WAN enableds Web Camera for both LAN users and WAN users
WKURXJKÀUHZDOO
Web Camera Mode - Select the
appropriate camera mode from
the drop down list. ActiveX Only
enables user to execute ActiveX
clients on an Windows® IE
platform and get the best image
quality. ActiveX and Refresh
enables user to get a basic image
on both IE and other browsers.
Refresh Only provides to all users
still images which are refreshed in
DVSHFLÀHGLQWHUYDO
Web Camera Driver - When you plug a supported Web Camera into the USB2.0 port in
the wireless router, the appropriate driver is selected automatically. Refer to the USB Web
Camera support list on ASUS Website (www.asus.com) for supported Web Camera models.
,PDJH6L]H - Select the image size from the drop down list. 320 x 240 provides a larger
image while 160 x 120 provides faster transmission. Click Preview to see the effect.
Sense Level7KLVÀHOGLQGLFDWHVWKHVHQVLWLYLW\DWZKLFKLPDJHPRYHPHQWLVGHWHFWHG
Refresh Time in Seconds7KLVÀHOGLQGLFDWHVWKHWLPHLQWHUYDOLQVHFRQGVLQZKLFKWKH
system reloads images. The range of values is 1~65535.
HTTP Port7KLVÀHOGLQGLFDWHVWKHSRUWWKDW+773VHUYHUOLVWHQVRQWRFRPPXQLFDWH)RU
example, by default, you can connect to your web camera by using http://192.168.1.1:7776
ZLWKRXWSDVVZRUGFKHFNLQJ7KHSDVVZRUGFKHFNLQJÀHOGLVXQFKHFNHG
ActiveX Port 7KLV ÀHOG LQGLFDWHV WKH SRUW WKDW VHUYHU OLVWHQV RQ WR FRPPXQLFDWH ZLWK
ActiveX clients.
Enabling ActiveX for your IE
If you use Internet Explorer®, you need to enable ActiveX or
the Web Camera cannot function properly. For clients using
Netscape or other browsers, ignore this part.
1. Open Internet Explorer 5.0 or above on your computer,
click Tools -> Internet Options.
WL500gP_Manual.indd 26 2007.4.19 5:06:06 PM

WL-500gP V2 Wireless Router User Manual
27
2. Select Security tab and click Custom
Level button.
3. Enable the activeX controls and plug-ins.
By default, these items are disabled.
4. By default, these three items are enabled.
Enable them if changed.
5. Click Yes to change the security settings.
Enable Web Camera to WAN users
With proper setting to DDNS, you can monitor your working environment from anywhere on
Internet, even if dynamic WAN IP address is used. If any motion is detected by the camera,
WL-500gP V2 captures the images and send them to your appointed E-mail box. Refer to
page 15-17 for DDNS setup procedures.
Enable Security Mode? -Select
Yes to enable security function on
the data and time you set below.
Date to Enable Security Mode -
This field defines the date that
Security Mode is enabled.
Time to Enable Security Mode -
7KLVÀHOGGHÀQHVWKHWLPHLQWHUYDO
that Security Mode is enabled.
Send to - Input the E-mail address you wish WL-500gP V2 send the image to.
Email Server7KLVÀHOGLQGLFDWHVWKH(PDLOVHUYHU\RXXVHIRUH[FKDQJLQJ(PDLO,I\RXOHDYH
WKLVÀHOGEODQN:/J39XVHVWKHPDLOVHUYHURI\RXU(PDLODGGUHVVLQSend toÀHOG
Subject7KLVÀHOGLVIRUWKHVXEMHFWRI(PDLO
Attach Image File?7KLVÀHOGDOORZV\RXWRDWWDFKWKHFDSWXUHGLPDJHLQWKH(PDLO
WL500gP_Manual.indd 27 2007.4.19 5:06:08 PM
WL-500gP V2 Wireless Router User Manual
28
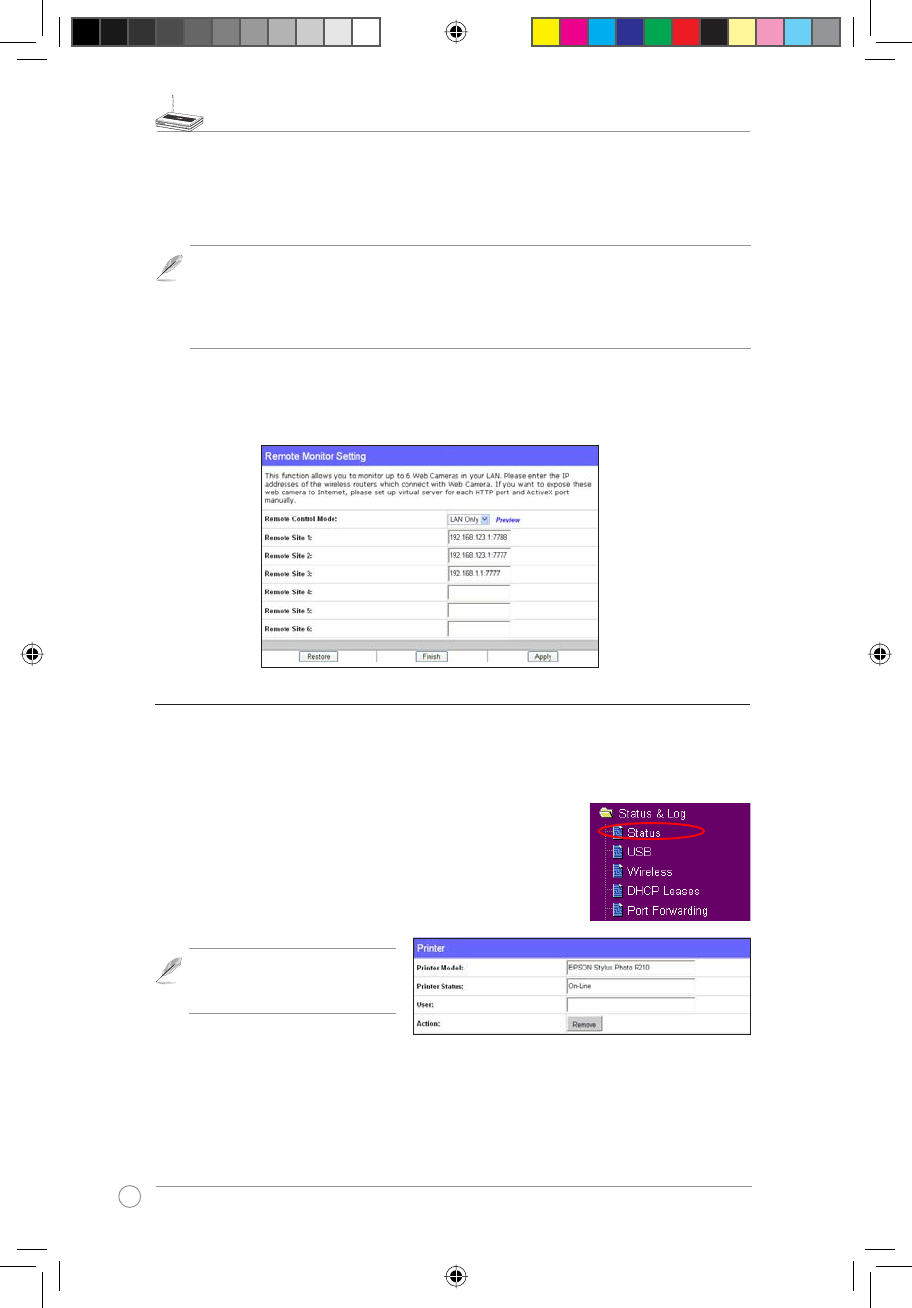
Remote Site 1-67KLVÀHOGVWDQGVIRUWKH,3DGGUHVVDQGSRUWQXPEHURI5HPRWH6LWH
7KHYDOXHRIWKLVÀHOGLV>,3$GGUHVV@>&RQQHFWLRQ3RUW@
Preview - Click Preview to see the view of all the Web Camera sites you set in Remote
Site.
6KDULQJ86%SULQWHU
You can connect a comptible USB printer to the USB2.0 port of WL-500gP V2 to
share the printer with your LAN users. Follow the procedures below to setup your
computers to utilize the printer server function of WL-500gP V2.
,QVWDOOLQJ86%SULQWHU
Plug your USB printer to the USB2.0 port on WL-500gP V2 rear
panel. To verify whether your printer is properly installed and to
WL-500gP V2 Wireless router, click Status & Log -> Status. If
Printer Model is correct and Printer Status is On-Line, you can
share this printer within your LAN.
Note: Visit ASUS Website for
comaptible printer vendor and
models.
Remote monitors
This function allows you to monitor up to 6 Web Cameras in your LAN. You can enter
the IP addresses of other ASUS Wireless Routers which have Web Camera attached.
Note: When enabling "LAN and WAN" remote control in the Wireless Router, packets
from Internet with destination ports 8081 to 8086 will be forwarded to WL-500gP V2
LQ5HPRWH&RQWUROÀHOGV7RPDNHVXUHSDFNHWVIURP:/J39DUHURXWHGEDFN
to Internet, you need to set a static route entry for WL-500gP V2. The IP address and
gateway address are same as the address of WL-500gP V2.
Setting up printer client under Windows XP
Follow the steps below to install network printer on your clients.
WL500gP_Manual.indd 28 2007.4.19 5:06:09 PM
WL-500gP V2 Wireless Router User Manual
29
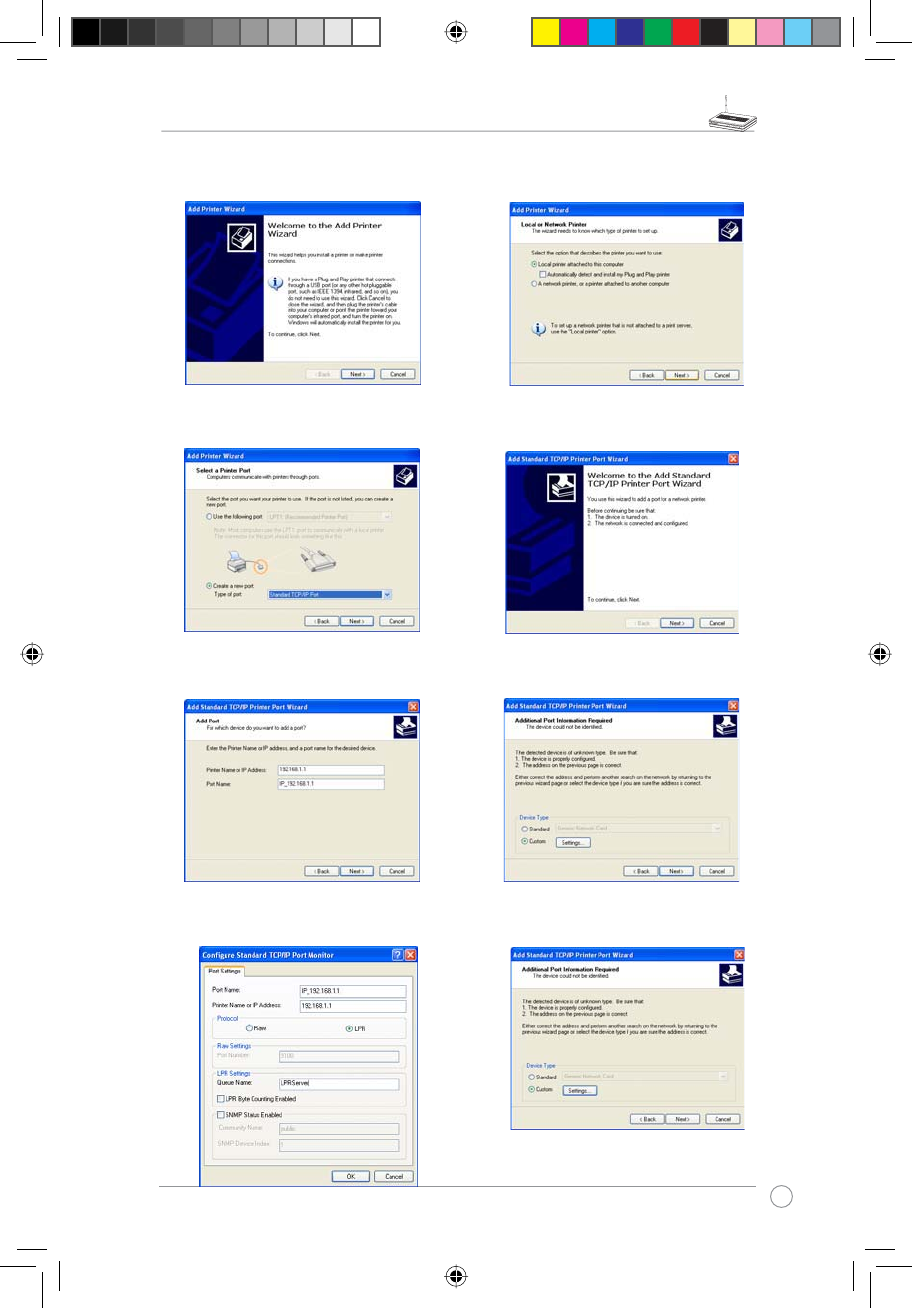
1. Run Add Printer Wizard from Start ->
Printers and Faxes -> Add a printer.
2. Select Local printer attached to this
computer and click Next.
5. Input the IP address of WL-500gP V2
in the Printer Name of IP Address
ÀHOGDQGFOLFNNext.
6. Select Custom and click Settings...
3. Select Create a new port and set Type
of port to Standard TCP/IP Port, then
click Next.
4. Click Next to setup TCP/IP port for
accessing the network printer.
7. S e t Protocol to LPR and type
LPRServer in 4XHXH1DPHÀHOG&OLFN
Next to continue.
8. Press Next to finish standard TCP/IP
port setting.
WL500gP_Manual.indd 29 2007.4.19 5:06:11 PM
WL-500gP V2 Wireless Router User Manual
30
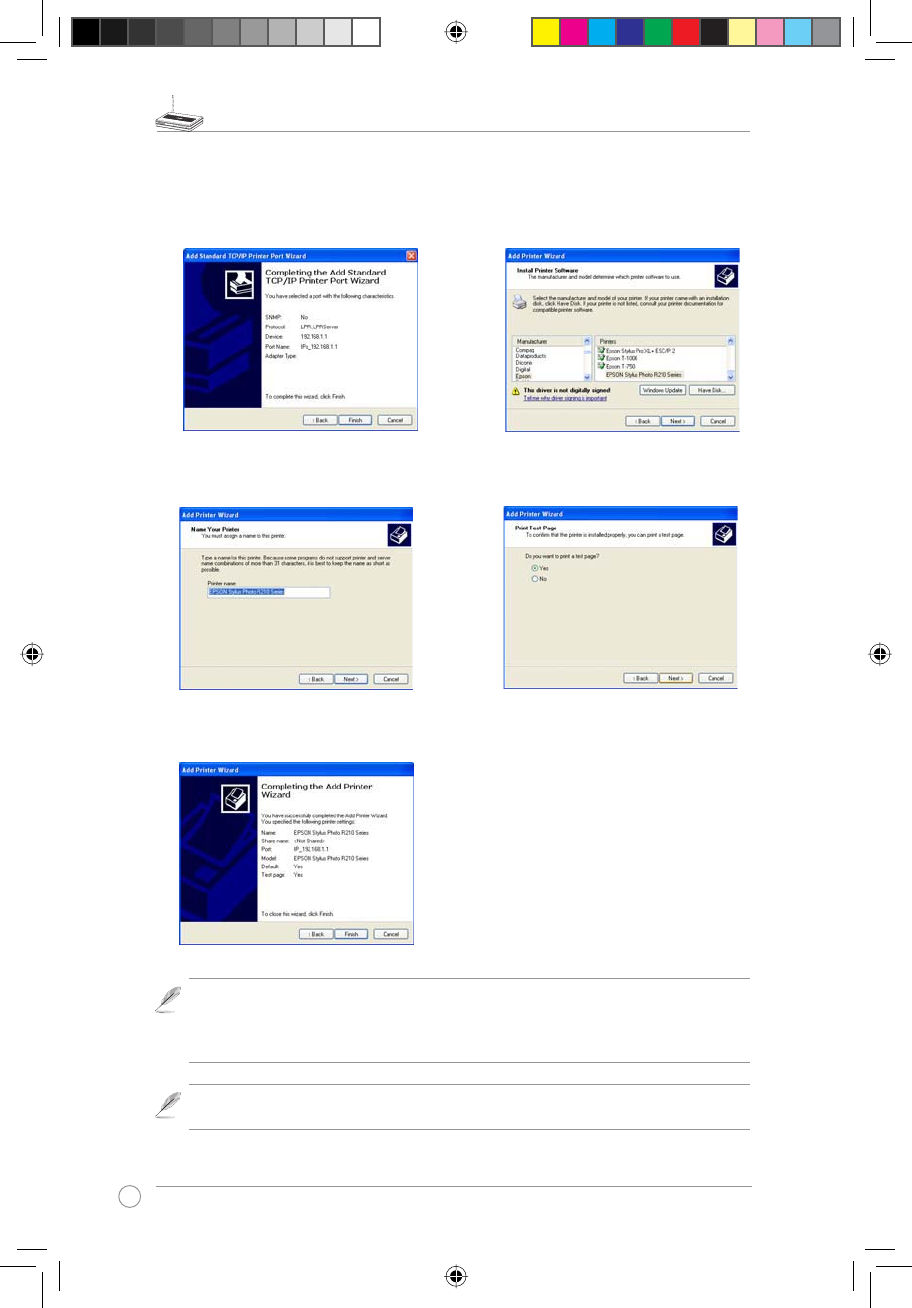
9. Press Finish to complete the settings
and return to Add Printer Wizard.
10. Install printer driver from the vendor-
model list. If your printer is not in the
list, click Have Disk to manually assign
the location of driver.
11. Click Next to accpt the default name
for the printer.
12.Select Yes to print a test page. Click
Next to print.
13.The installation is complete. Click
Finish to quit the Add Printer Wizard.
Note: If you use Windows® 98 or ME which does not support Standard TCP/IP port,
you need to use Romote Port which is supported by WL-500gP V2.
Note: If you have already installed the printer locally on your computer, right click the
printer icon and select Property -> Port tab to add a standard TCP/IP port. Click Add
Port then select Standard TCP/IP Port and click New Port button. Refer to step 5-8
for setting procedures.
WL500gP_Manual.indd 30 2007.4.19 5:06:13 PM
WL-500gP V2 Wireless Router User Manual
31
3OD\LQJVWUHDPPHGLDRQ;ER[
If you have a set of Xbox360, you can connect it to WL-500gP V2 and play the
PHGLD ÀOHV VWRUHG LQ WKH KDUG GLVN RQ \RXU WHOHYLVLRQ 7R XVH WKLV IXQFWLRQ PDNH
sure you have installed a wireless card on your Xbox360 and enabled Media
Server function on your WL-500gP V2.
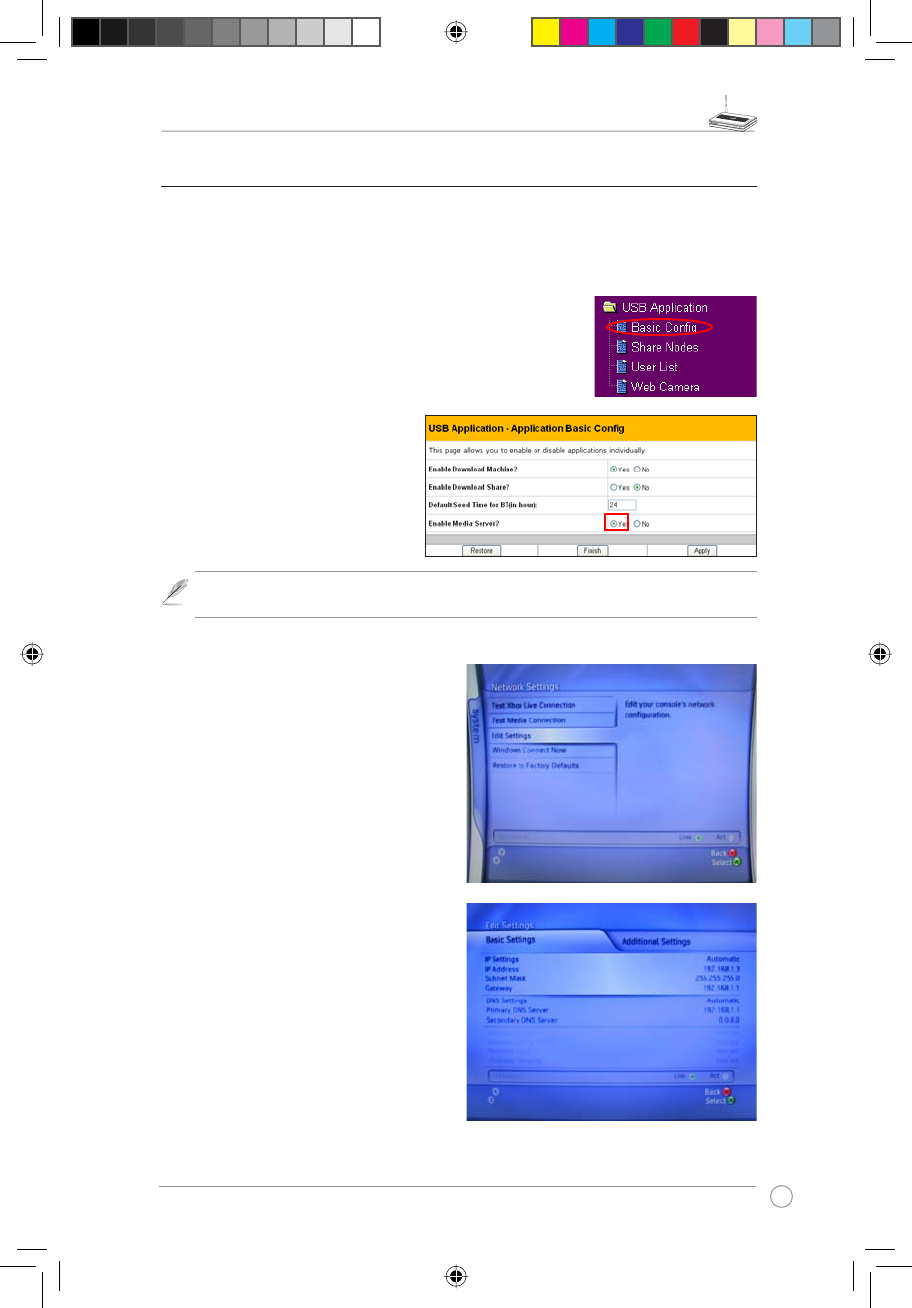
Enable Media Sever on WL-500gP V2
1. Click %DVLF&RQÀJ page in USB Application folder.
2. Select Enable Media Sever and
press Apply. WL-500gP V2 is
ready to share the media files
stored in the USB hard disk.
Note: Before connection, access the USB hard disk from My Network Place and copy
your music to /Music directory and photos to /Photo directory.
3OD\LQJPHGLDÀOHVRQ;ER[
1. Open Xbox360 and enter System ->
Edit Settings configuration page to
setup wireless network connection.
2. Set IP Settings to Automatic and
make sure Xbox360 gets a valid IP
address.
WL500gP_Manual.indd 31 2007.4.19 5:06:14 PM
WL-500gP V2 Wireless Router User Manual
32
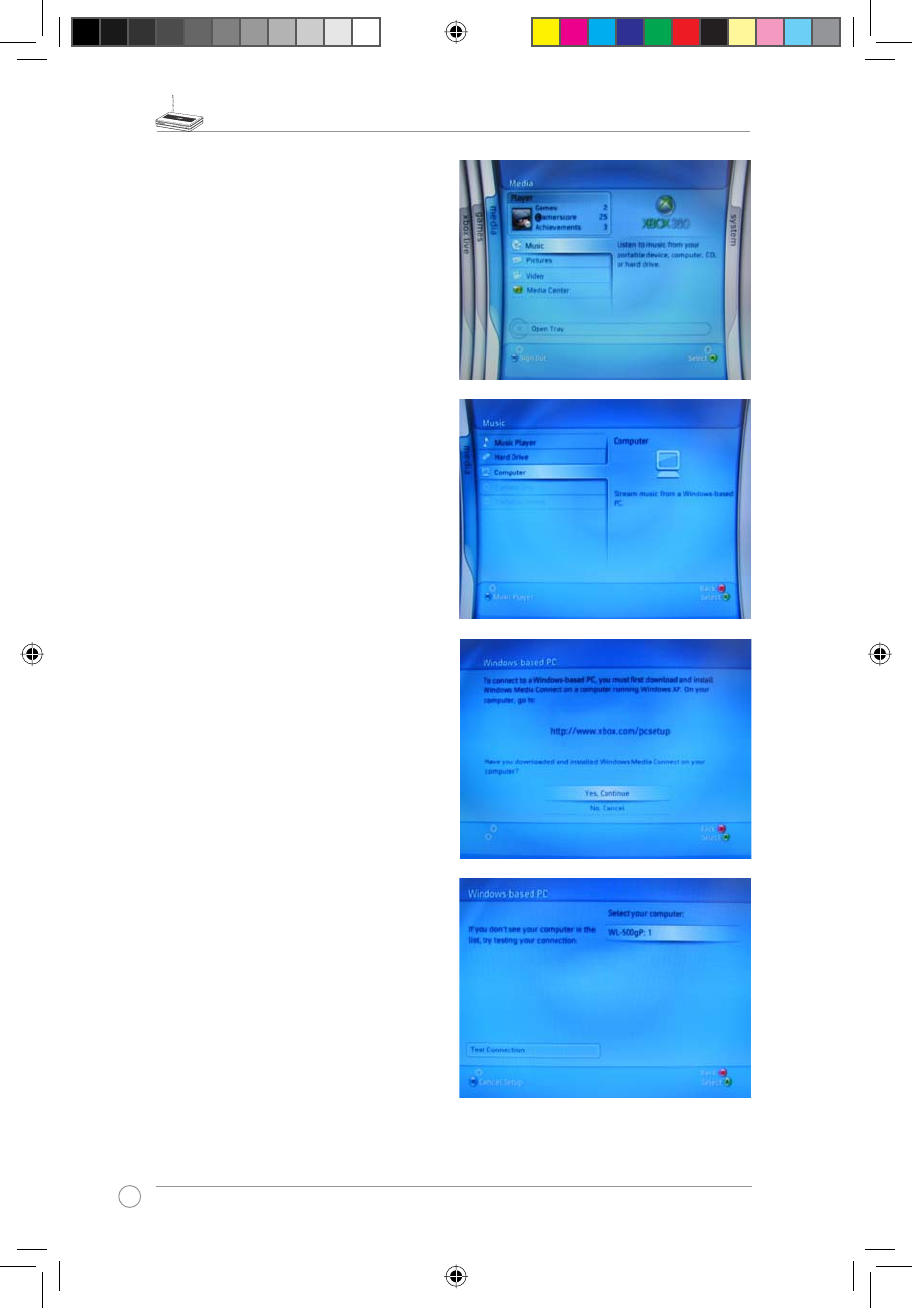
5. Select Yes, continue when prmopted
to install Window Media Connect on
your PC.
6. Xbox360 automatically searches
and find the WL-500gP V2. Select
WL-500gP V2 to establish wireless
connection.
3. To play music from the USB hard disk,
select Media page -> Music.
4. Select Computer.
WL500gP_Manual.indd 32 2007.4.19 5:06:16 PM
WL-500gP V2 Wireless Router User Manual
33
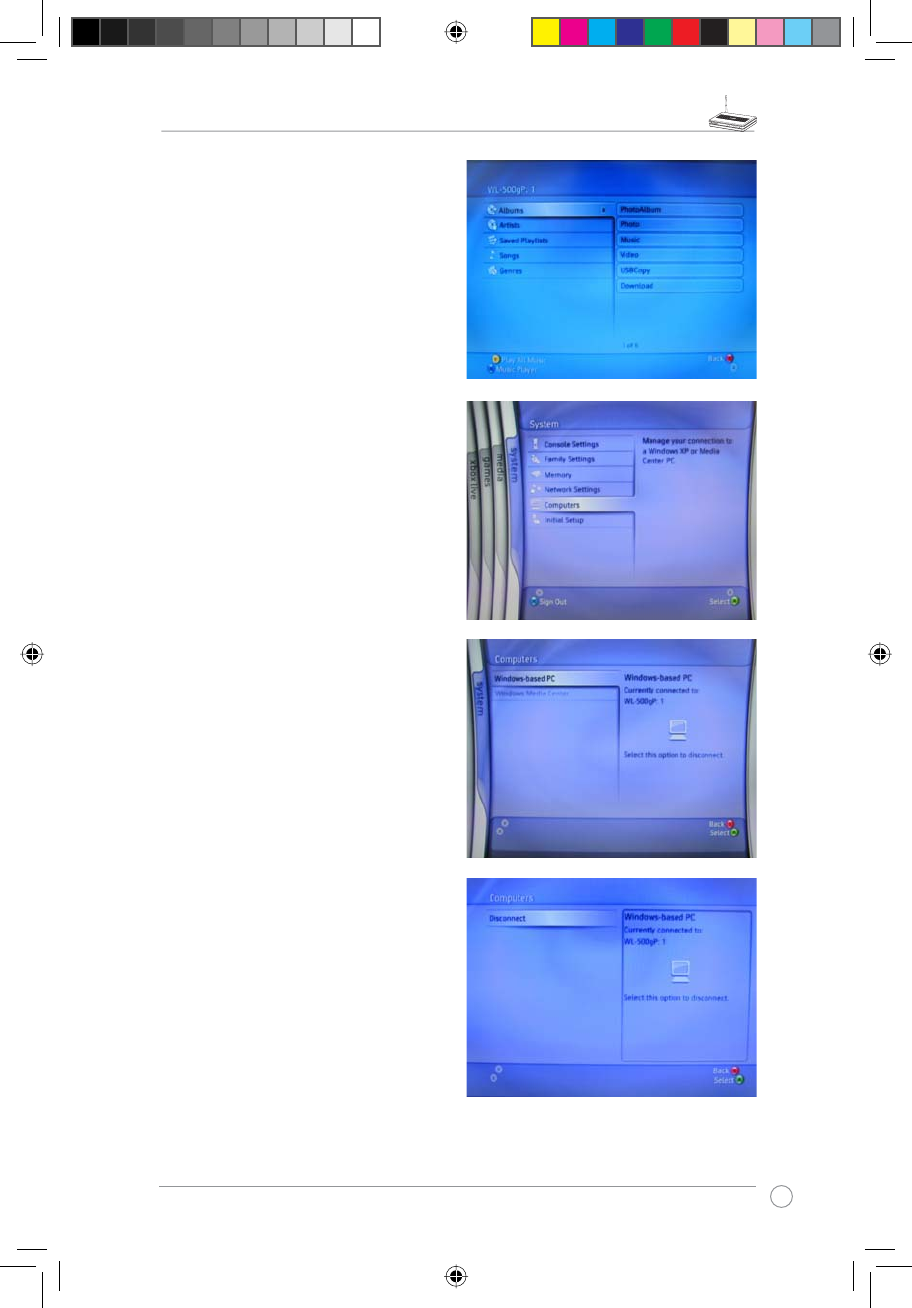
7. Select Music folder in the hard disk and
browse through the music list. Select
the music you want to play.
8. To disconnect from WL-500gP V2, enter
System page and select Computers.
9. Select Windows-based PC.The screen
displays the currently connected PC.
10. Select Disconnect.
WL500gP_Manual.indd 33 2007.4.19 5:06:17 PM