ASUSTeK Computer WL500GPV2 ASUS WIRELESS ROUTER User Manual WL 500gP V2 UserMan
ASUSTeK Computer Inc ASUS WIRELESS ROUTER WL 500gP V2 UserMan
UserManual.wiki
>
ASUSTeK Computer
>
WL500GPV2 User Manual
>
users manual 3
Contents
1.
users manual 1
2.
users manual 2
3.
users manual 3
4.
users manual 4
users manual 3
Navigation menu
Upload a User Manual
Namespaces
Wiki Guide
HTML
PDF
Info
Views
User Manual
Discussion / Help
Navigation
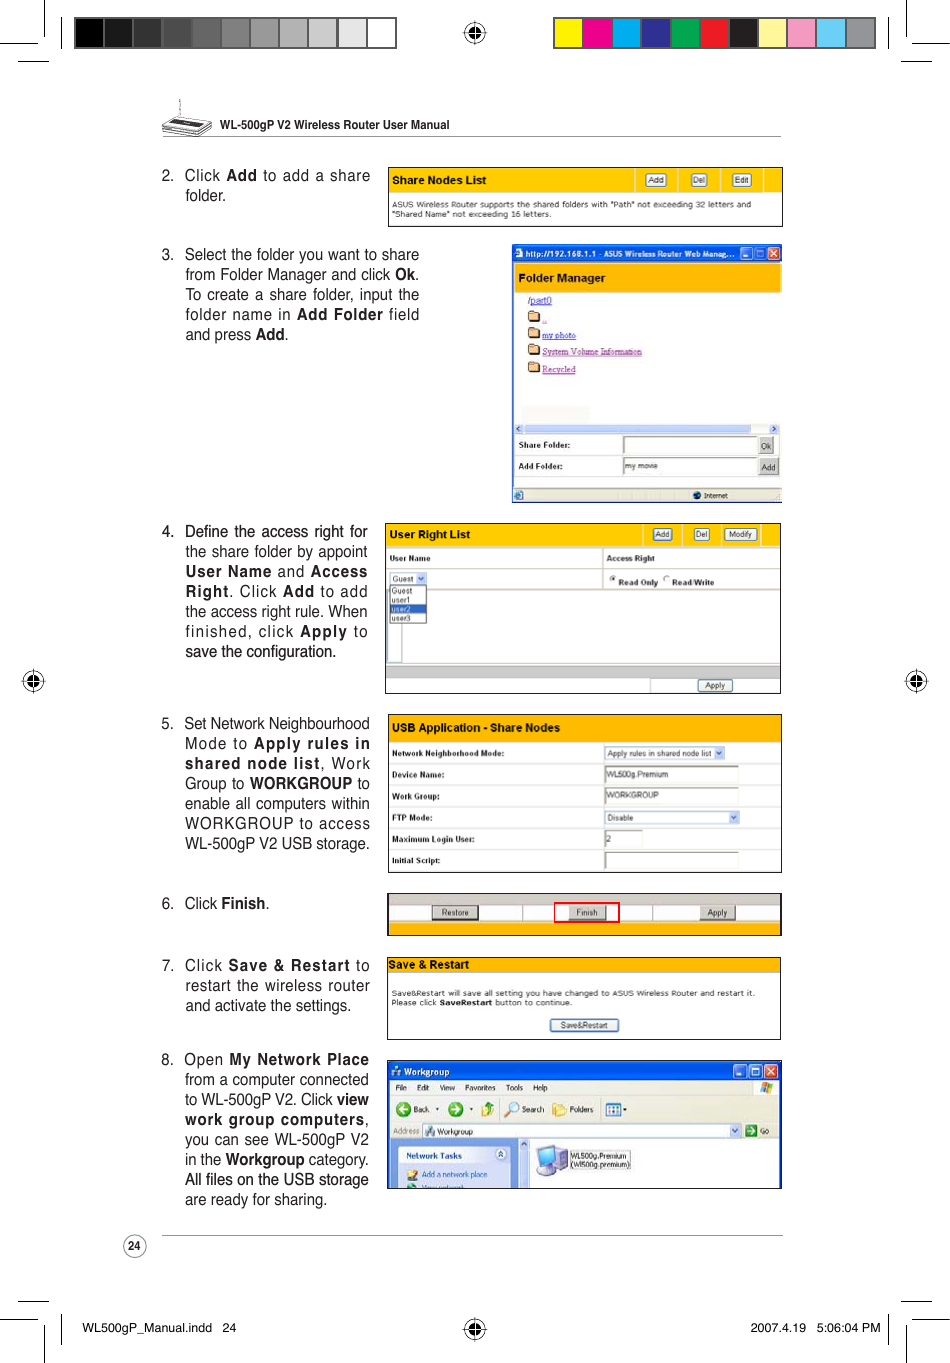
![WL-500gP V2 Wireless Router User Manual23ASUS WL-500gP V2 Wireless Router provides two USB2.0 ports for connecting USB storage, USB camera, and USB printer, therefore, you can monitor the working environment, share data and printer with both wired and wireless users in your network. Furthermore, WL-500gP V2 provides a download utility - Download 0DVWHUWRIDFLOLDWHDQGVKDUHWKHGRZQORDGÀOHVWarning: Before unplugging the USB storage disk from WL-500gP V2, you must eject the disk in 6WDWXV/RJ!([WHUQDO86%'LVN page to prevent data corruption.Note: Before applying change and rebooting WL-500gP V2, make sure all USB applications are disabled, it would take more than 20 seconds for WL-500gP V2 to reboot.6KDULQJ86%VWRUDJHTo use this feature, you need to plug a USB hard disk to the USB2.0 port on the rear panel of WL-500gP V2. Make sure the hard disk is formated and partitioned properly.Note:)$7KDVD*%ÀOHVL]HOLPLWDWLRQDQGGRQRWVXSSRUWÀOHVDERYHWKDWVL]H,I\RXZDQWWRXVHÀOHVRIDERYH*%\RXPXVWIRUPDWWKHGLVNWR(;7ÀOHV\VWHPCreating user accountTo share the data in the USB storage, you need to create XVHUDFFRXQWVÀUVW2. I nput User Name and Password for the accounts. Click Add to add the account to the list. 3. To delete an account, select the account from the list and click Del.4. Click Apply to apply the changes and restart the wireless router.Creating share folder and access rightYou can create a new share folder or share an existing folder in your hard disk. 1. Click 86%$SSOLFDWLRQ!8VHU/LVW in the left side PHQXWRRSHQWKHFRQÀJXUDWLRQSDJH1. Click 86%$SSOLFDWLRQ!6KDUH1RGHV in the left VLGHPHQXWRRSHQWKHFRQÀJXUDWLRQSDJH5. Application featuresWL500gP_Manual.indd 23 2007.4.19 5:06:02 PM](https://usermanual.wiki/ASUSTeK-Computer/WL500GPV2.users-manual-3/User-Guide-791555-Page-1.png)

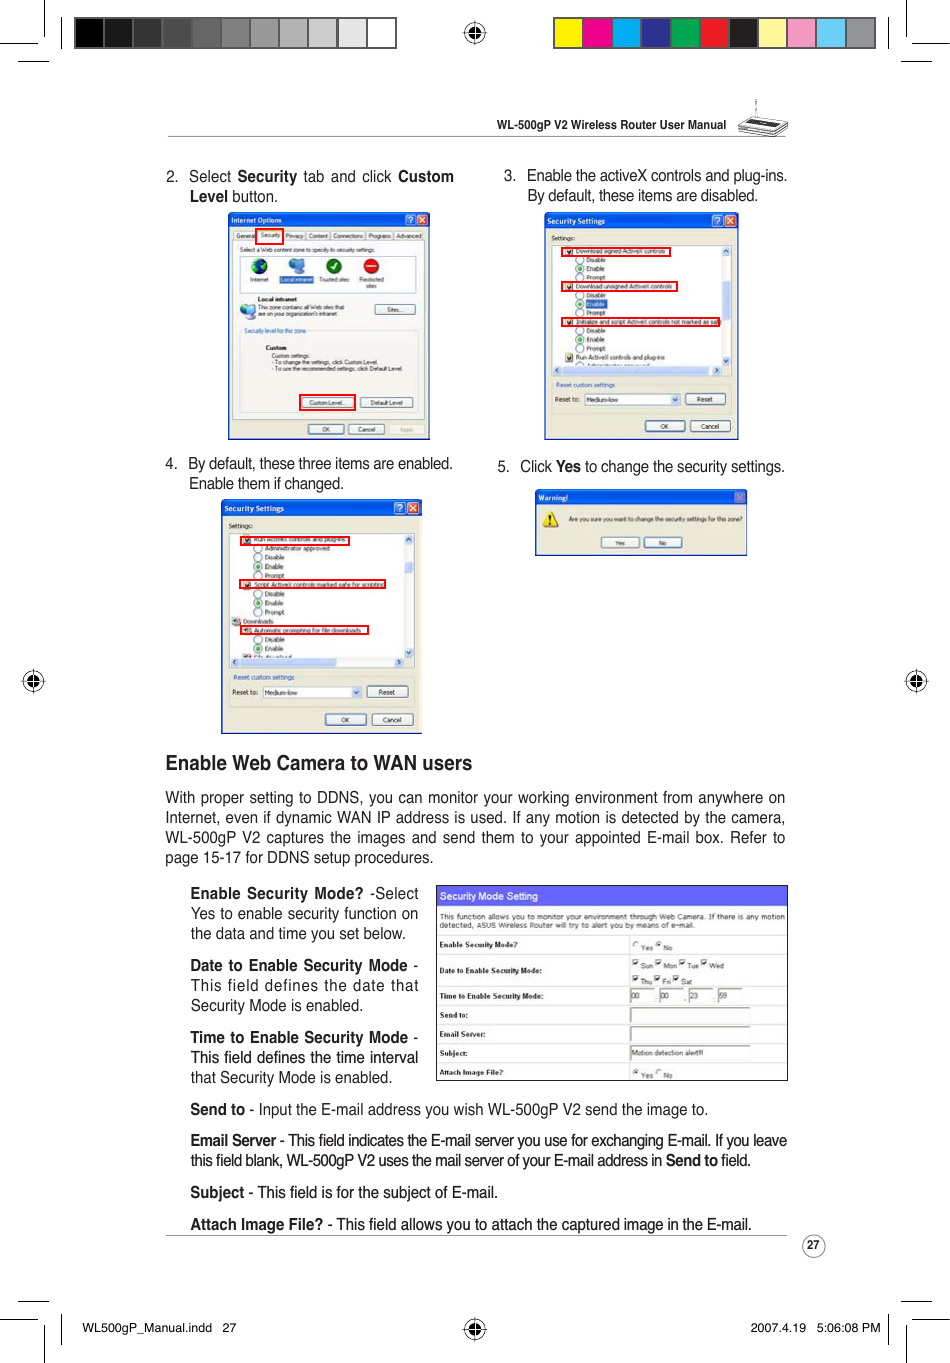
![WL-500gP V2 Wireless Router User Manual26:HEFDPHUDThe ASUS Wireless Router implements several applications for a USB Web camera, enabling you to capture images and send them over the Internet. For this function, you need to plug a USB camera onto WL-500gP V2 and enable ActiveX for your Web browser.Web camera1. Click Web Camera page in USB Application folder.2. Enable Web Camera - Selecting LAN Only enables Web Camera for LAN users. Selecting LAN and WAN enableds Web Camera for both LAN users and WAN users WKURXJKÀUHZDOOWeb Camera Mode - Select the appropriate camera mode from the drop down list. ActiveX Only enables user to execute ActiveX clients on an Windows® IE platform and get the best image quality. ActiveX and Refresh enables user to get a basic image on both IE and other browsers. Refresh Only provides to all users still images which are refreshed in DVSHFLÀHGLQWHUYDOWeb Camera Driver - When you plug a supported Web Camera into the USB2.0 port in the wireless router, the appropriate driver is selected automatically. Refer to the USB Web Camera support list on ASUS Website (www.asus.com) for supported Web Camera models.,PDJH6L]H - Select the image size from the drop down list. 320 x 240 provides a larger image while 160 x 120 provides faster transmission. Click Preview to see the effect.Sense Level7KLVÀHOGLQGLFDWHVWKHVHQVLWLYLW\DWZKLFKLPDJHPRYHPHQWLVGHWHFWHGRefresh Time in Seconds7KLVÀHOGLQGLFDWHVWKHWLPHLQWHUYDOLQVHFRQGVLQZKLFKWKHsystem reloads images. The range of values is 1~65535.HTTP Port7KLVÀHOGLQGLFDWHVWKHSRUWWKDW+773VHUYHUOLVWHQVRQWRFRPPXQLFDWH)RUexample, by default, you can connect to your web camera by using http://192.168.1.1:7776 ZLWKRXWSDVVZRUGFKHFNLQJ7KHSDVVZRUGFKHFNLQJÀHOGLVXQFKHFNHGActiveX Port 7KLV ÀHOG LQGLFDWHV WKH SRUW WKDW VHUYHU OLVWHQV RQ WR FRPPXQLFDWH ZLWKActiveX clients.Enabling ActiveX for your IEIf you use Internet Explorer®, you need to enable ActiveX or the Web Camera cannot function properly. For clients using Netscape or other browsers, ignore this part.1. Open Internet Explorer 5.0 or above on your computer, click Tools -> Internet Options.WL500gP_Manual.indd 26 2007.4.19 5:06:06 PM](https://usermanual.wiki/ASUSTeK-Computer/WL500GPV2.users-manual-3/User-Guide-791555-Page-4.png)