ASUSTeK Computer WL600G ALL-IN1 WIRELESS ADSL2/2+ HOME GATEWAY User Manual A5468060352
ASUSTeK Computer Inc ALL-IN1 WIRELESS ADSL2/2+ HOME GATEWAY A5468060352
USERS MANUAL
User Manual
E2458 / June 2006
All-in-1 Wireless ADSL2/2+ Home Gateway
WL-600g
®
Manufacturer Contact Information
$6867H.&20387(5,1&$VLD3DFLÀF
Company address: 15 Li-Te Road, Beitou, Taipei 11259
General (tel): +886-2-2894-3447 Web site address: www.asus.com.tw
General (fax): +886-2-2894-7798 General email: info@asus.com.tw
$686&20387(5,17(51$7,21$/$PHULFD
Company address: 44370 Nobel Drive, Fremont, CA 94538, USA
General (fax): +1-510-608-4555 Web site address: usa.asus.com
Technical support
General support: +1-502-995-0883 Support (fax): +1-502-933-8713
Online support: http://vip.asus.com/eservice/techserv.aspx
$686&20387(5*PE+*HUPDQ\$XVWULD
Company address: Harkort Str. 25, D-40880 Ratingen, Germany
General (tel): +49-2102-95990 Web site address: www.asus.com.de
General (fax): +49-2102-959911 Online contact: www.asus.com.de/sales
Technical support
Components: +49-2102-95990 Online support: www.asus.com.de/support
Notebook: +49-2102-959910 Support (fax): +49-2102-959911

WL-600g All-in-1 Wireless ADSL2/2+ Home Gateway User Manual
1
Table of contents
Package contents...........................................................................3
Setup Process Overview ...............................................................4
Hardware overview.........................................................................5
Front panel....................................................................................... 5
Rear panel ....................................................................................... 6
Product features............................................................................... 6
Hardware connections ..................................................................... 7
Connecting to the Internet.............................................................8
Before you start................................................................................ 8
Preparing your WAN ........................................................................ 8
Preparing your LAN ......................................................................... 8
/RJLQWRWKH:HEFRQÀJXUDWLRQLQWHUIDFH ......................................... 9
Quick setup .................................................................................... 10
Manual Setup................................................................................. 12
EZSetup ......................................................................................... 16
Connecting WL-600g with ASUS WLAN Card............................... 20
Wireless settings..........................................................................22
Setting up SSID ............................................................................. 22
Setting up wireless security ........................................................... 22
0$&ÀOWHU ....................................................................................... 27
Wireless bridge .............................................................................. 27
Wireless advanced settings ........................................................... 31
Network security...........................................................................32
Setting up access right to WL-600g ............................................... 32
Setting up port triggering................................................................ 33

WL-600g All-in-1 Wireless ADSL2/2+ Home Gateway User Manual
2
Setting up virtual server ................................................................. 34
Setting up DMZ host ...................................................................... 35
Allowing SIP request through NAT................................................. 35
)LUHZDOO2XWJRLQJ,3ÀOWHU............................................................. 35
)LUHZDOO,QFRPLQJ,3ÀOWHU.............................................................. 36
Access time restriction ................................................................... 37
Advanced settings........................................................................38
WAN............................................................................................... 38
LAN ............................................................................................... 38
Setting up DNS server ................................................................... 39
Setting up dynamic DNS ............................................................... 39
Setting up default gateway............................................................. 42
Setting up static route .................................................................... 42
Setting up routing protocol - RIP.................................................... 43
USB applications..........................................................................44
FTP server function........................................................................ 44
Sharing USB printer ....................................................................... 46
Game Blaster ................................................................................49
Gaming Blaster on WL-600g ......................................................... 49
Setting up priorities for IP phone & other A/V apps........................ 49
Management..................................................................................50
&RQÀJXUDWLRQEDFNXS ..................................................................... 50
5HVWRUHVHWWLQJVIURPDEDFNXSÀOH................................................ 50
Reset to factory default .................................................................. 51
Setting up time server .................................................................... 51
Firmware update ............................................................................ 51

WL-600g All-in-1 Wireless ADSL2/2+ Home Gateway User Manual
3
• WL-600g Wireless ADSL2/2+ Home Gateway
• AC power adapter (type varies by region)
• Category 5 (Cat. 5) Ethernet cable
• Telephone cable
• Splitter (type varies by region)
• Support CD (with electronic user manual included)
• Quick Start Guide
Package contents
WL-600g All-in-1 Wireless ADSL2/2+ Home Gateway User Manual
4
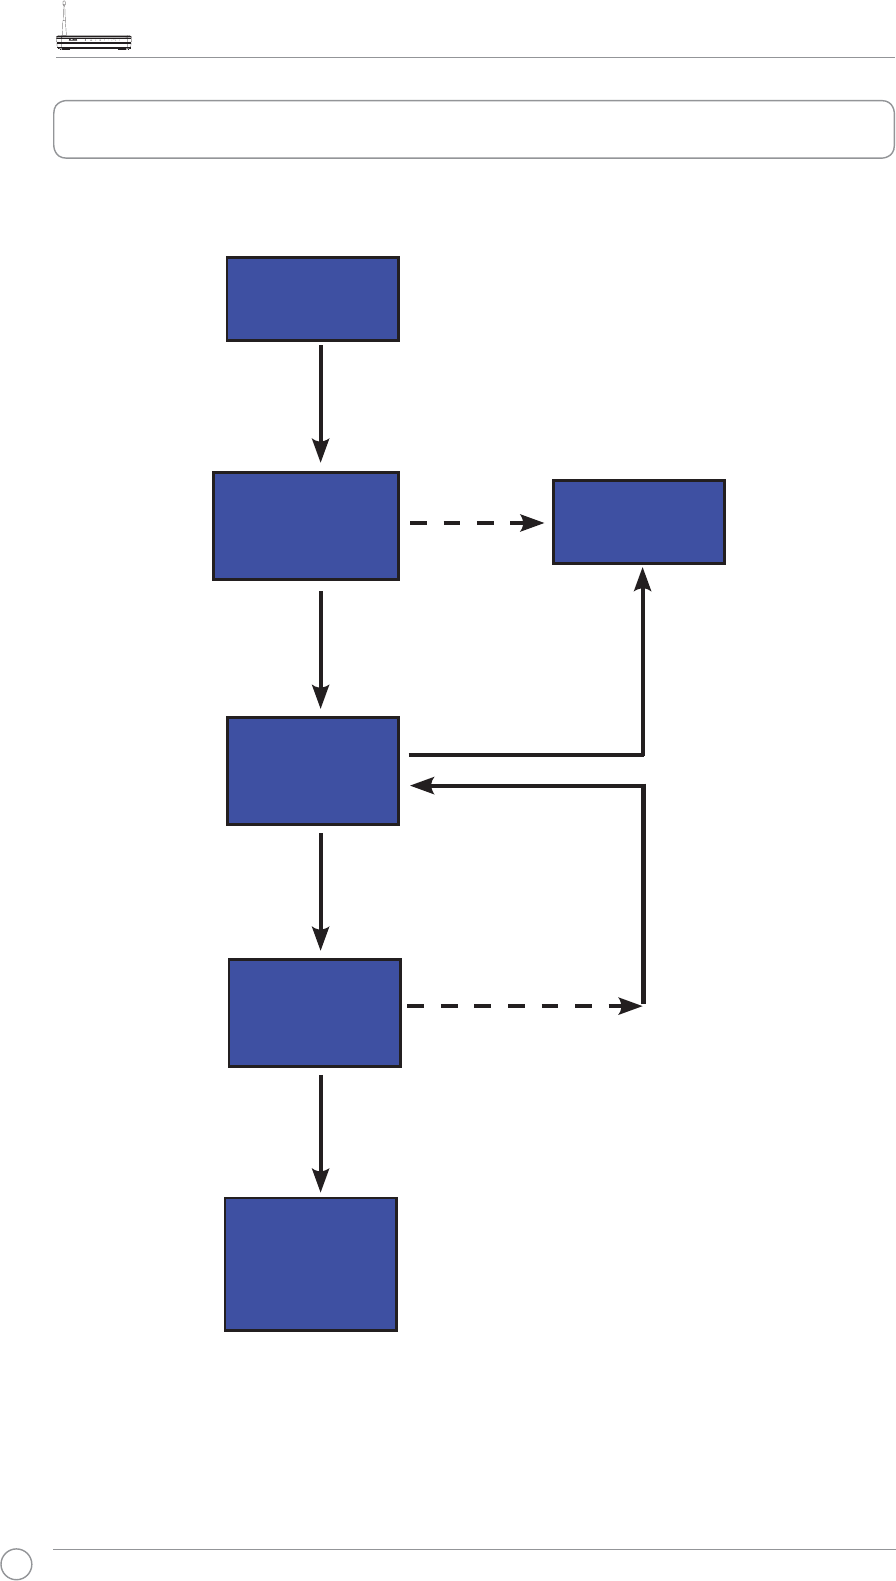
Setup Process Overview
Hardware
setup
Quick Setup -
ADSL connection
auto-detection
Manual
setup
Quick Setup-
Wireless setup
Quick Setup-
Summary page
Quick Setup
ÀQLVKHG
WL-600g is
ready to use.
Check OK. Login to 192.168.1.1 to
FRQÀJXUH\RXU:/J
Connection not
detected OR
connection type
shown is not
correct.
Connection detected and
connection type is correct.
$'6/VHWXSÀQLVKHG
Change wireless
settings.
Check not OK.
Check OK
Refer to the hardware diagram
on page 7.
Change ADSL settings.
WL-600g All-in-1 Wireless ADSL2/2+ Home Gateway User Manual
5
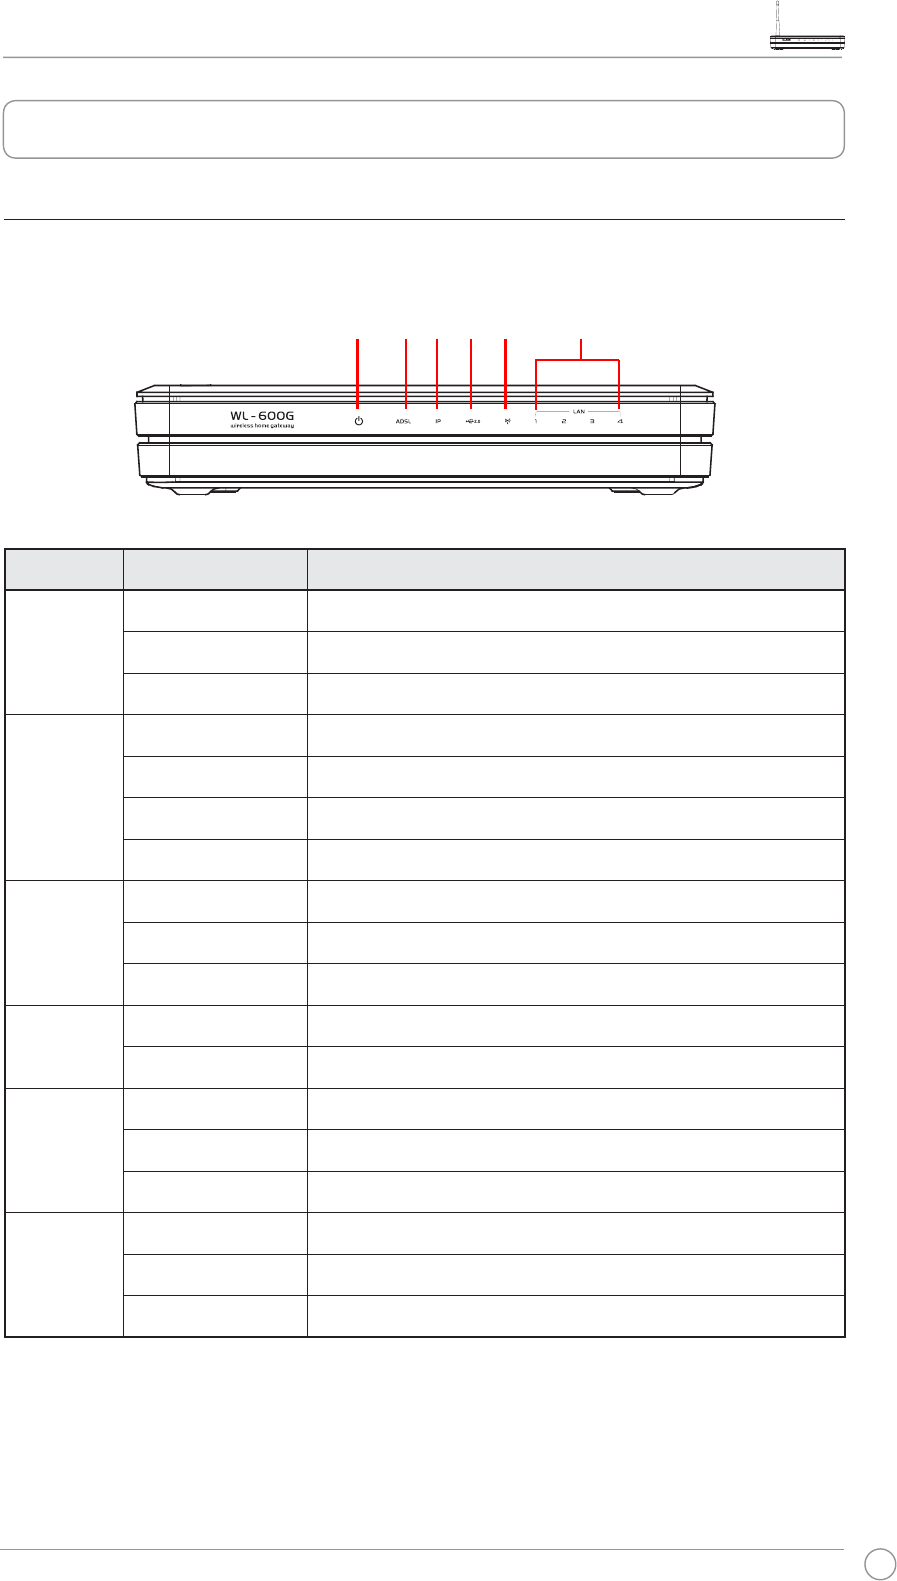
Hardware overview
Front panel
The WL-600g Wireless ADSL2/2+ Home Gateway front panel contains LED indicators
which shows the status of WL-600g.
Label Activity Description
PWR
(Power)
ON Power ON
OFF No power
Blink Restoring to factory default
ADSL ON (Green) ADSL link up
Blink (Green) ADSL training
ON (Red) ADSL link down
OFF ADSL is down
IP ON (Green) ADSL is up and the link is PPP
ON (Red) ADSL is up, but the link is not PPP
OFF ADSL is down
USB 2.0 ON USB device detected
OFF No USB device detected
AIR ON Wireless LAN ready
Blink Transmiting or receiving data through wireless
OFF No power or wireless LAN not ready
LAN 1-4 ON Physically connected to an Ethernet device
Blink Transmitting or receiving data through Ethernet cable
OFF No power or no physical connection
PWR ADSL IP USB AIR LAN
WL-600g All-in-1 Wireless ADSL2/2+ Home Gateway User Manual
6
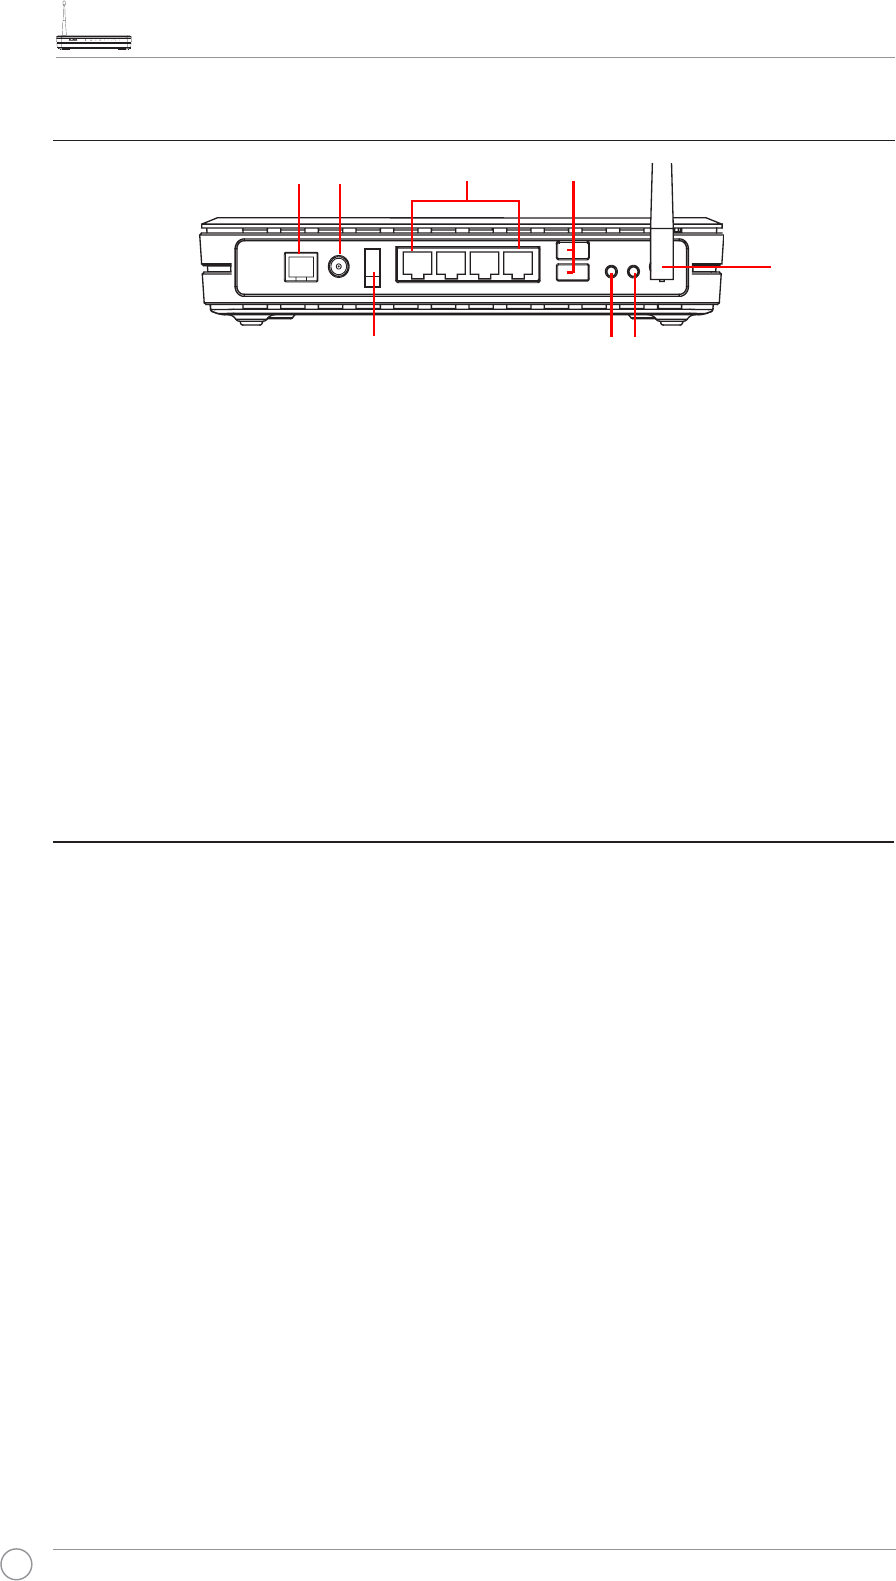
Rear panel
Viewed from left to right, the rear panel of WL-600g contains the following elements:
• ADSL port
• Power connector
• Power switch
• Four Local Area Network (LAN) ports
• USB 2.0 ports
• EZSetup button
• Reset button
• SMA antenna connector
Product features
The WL-600g Wireless ADSL 2/ 2+ Home Gateway provides the following features:
• Built-in ADSL modem
• Built-in firewall
• IEEE802.11g standard-based wireless network, backward compatible with
802.11b devices
• Easy-to-use Web-based configuration interface: Quick Setup for ADSL connection,
wireless, and security configuration
• Extensive routing protocol support: RIP v1, v2
• Content-based filter
• EZSetup™ utility for ADSL connection, wireless network and security quick setup
PWRADSL
EZSetup
USB 2.0
Reset
LAN
Antenna
Power switch
WL-600g All-in-1 Wireless ADSL2/2+ Home Gateway User Manual
7
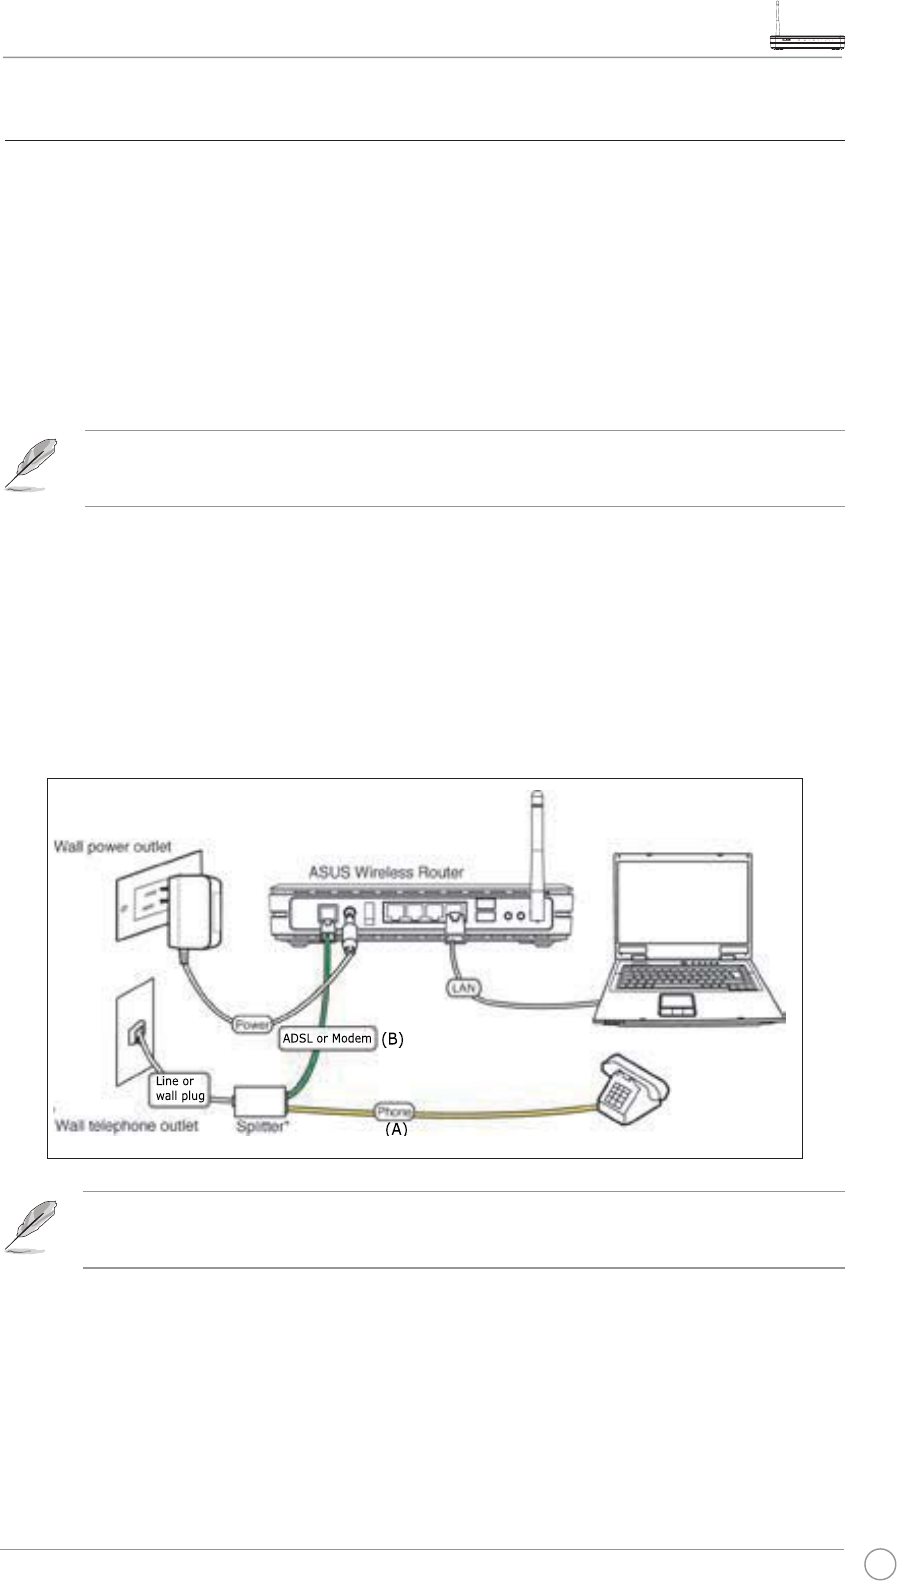
Hardware connections
ADSL connection
Use the ADSL splitter supplied in the package to split ADSL signal and telephone
service. First connect the splitter to the wall telephone outlet either by just plugging your
splitter onto the outlet or by inserting the line connector into the outlet. Then connect
your ASUS WL-600g to the ADSL or mode port of the splitter with the telephone cable
supplied in the package. Use another telephone cable to connect your telephone to the
phone port of the ADSL splitter.
The format of the connector on the supplied splitter (line or plug) may differ
by region.
Wireless connection
To access Internet via wireless connection, you need to install an IEEE802.11b/g
wireless adapter on your computer, such as ASUS WL-167g, WL-100gE, WL-100gD,
WL-169gE, and WL-106gM.
Ethernet connection
Use Category 5 (CAT5) Ethernet cable to build up your wired LAN connections. The
ASUS WL-600g Wireless ADSL2/ 2+ Home Gateway is a Fast Ethernet device that
provides 100Mbps network connection. To ensure the connection quality, use CAT5
Ethernet cable to connect your network devices, such as desktop computers and
network printers.
Splitter *: The name or the location of the ports on the supplied splitter may
vary by region.

WL-600g All-in-1 Wireless ADSL2/2+ Home Gateway User Manual
8
Before you start
Before you start, you need to:
• make sure the cable connections are correct and WL-600g is powered ON;
• acquire an active Internet service, such as an ADSL account.
:HUHFRPPHQGXVLQJZLUHGFRQQHFWLRQIRULQLWLDOFRQÀJXUDWLRQZKLFKPD\
help avoid possible setup problems due to wireless uncertainty. Use a CAT5
cable to connect an Ethernet-enabled computer to a LAN port of WL-600g.
Preparing your WAN
Depending on your ISP's requirements, you may need to acquire some of the
information listed below to set up Internet connection on WL-600g.
• Vitual Path Identifier (VPI)
• Virtual Channel Identifier (VCI)
• Host name
• Domain name
• ISP login user name and password
• ISP Domain Name System (DNS) server address
• Static IP address (For static IP users)
Preparing your LAN
To use the WL-600g Wireless ADSL2/2+ Home Gateway on your network, you need to install
a network interface card (NIC) or an IEEE802.11b/g wireless network card to your computer.
/$1FRQÀJXUDWLRQUHTXLUHPHQW
)RULQLWLDOFRQÀJXUDWLRQZHUHFRPPHQG\RXWRFRQQHFWDFRPSXWHUWRRQHRIWKH/$1
SRUW RI :/J DQG FRQÀJXUH WKH 7&3,3 VHWWLQJV RI \RXU FRPSXWHU 7KH GHIDXOW ,3
settings of WL-600g are:
IP address: 192.168.1.1
Subnet mask: 255.255.255.0
DHCP server: enabled
To access WL-600g, you must set your computer in the same subnet with the ADSL
router. You can make the computer accept a dynamic IP address assigned by the
DHCP server of WL-600g, or manually set up IP address for your computer.
Connecting to the Internet
WL-600g All-in-1 Wireless ADSL2/2+ Home Gateway User Manual
9
Getting dynamic IP address
Open Control Panel -> Local Area Network Connection, double-click Local
Connection icon, then double-click ,QWHUQHW 3URWRFRO 7&3,3 Select Obtain an IP
address automatically and Obtain DNS server address automatically, then click OK.
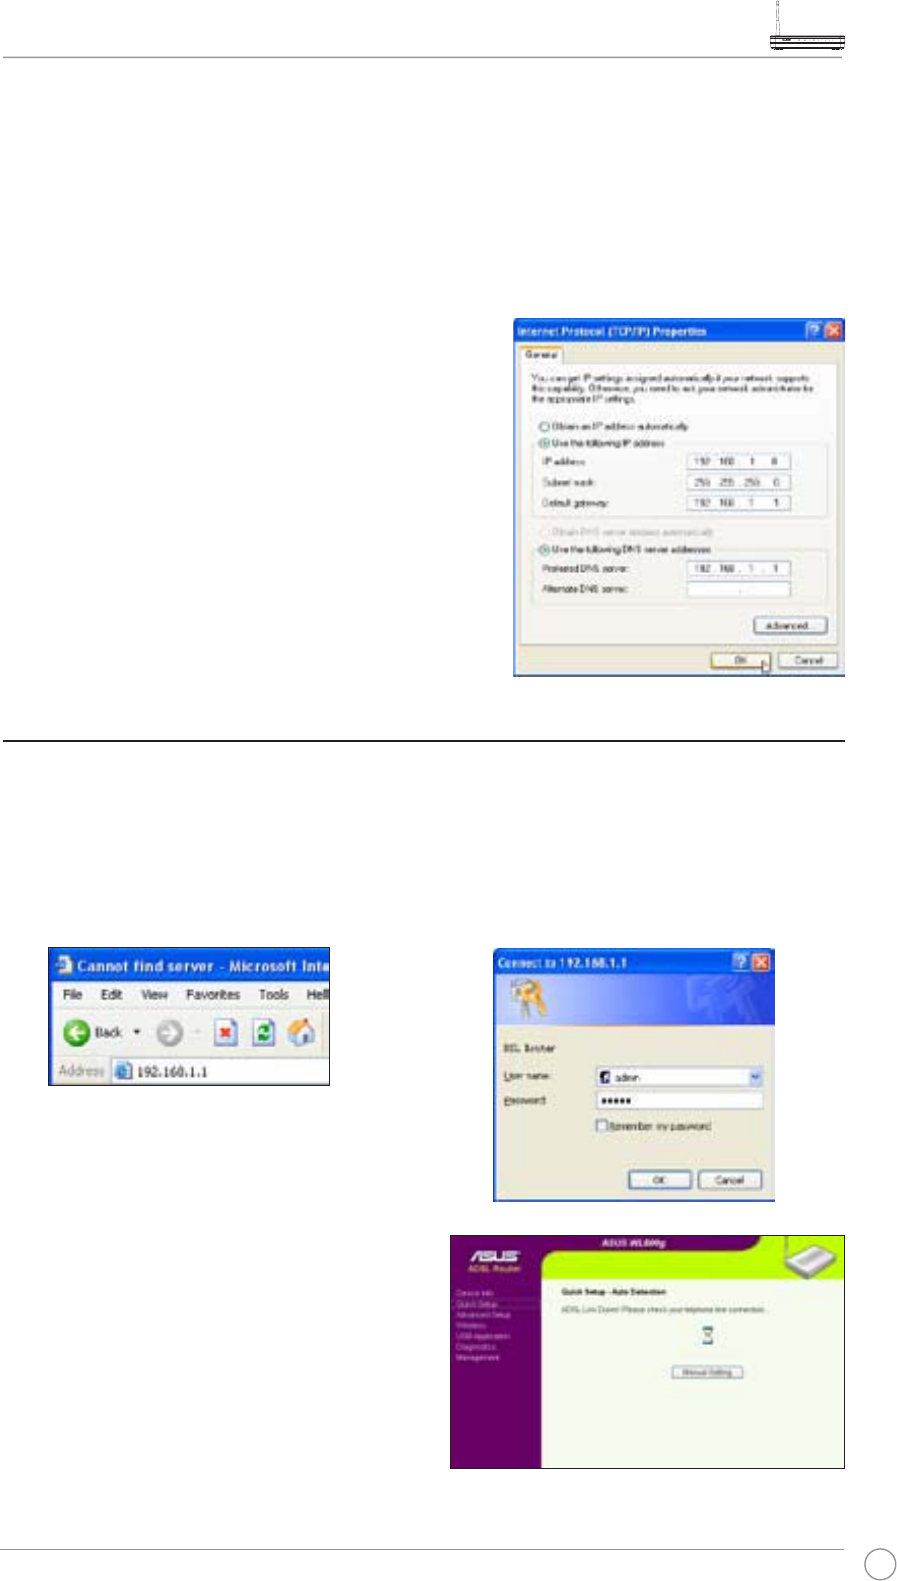
Assigning IP address manually
Open Control Panel -> Local Area Network
Connection, double-click Local Connection
icon, then double-click Internet Protocol (TCP/
,3. Follow the descriptions below to setup the
TCP/IP on your computer.
• IP address: 192.168.1.xxx (xxx can be any
number between 2 and 254, make sure the
IP address is not used by other device)
• Subnet Mask: 255.255.255.0
• Gateway: 192.168.1.1
• DNS: 192.168.1.1
/RJLQWRWKH:HEFRQÀJXUDWLRQLQWHUIDFH
7RFKDQJHWKH$'6/DQGZLUHOHVVVHWWLQJV\RXQHHGWRORJLQWRWKH:HEFRQÀJXUDWLRQ
interface.
2. A login window appears. The default
username is admin, password is
admin (in lower case).
1. Type 192.168.1.1 (default IP address
of WL-600g) into the address box of
the Web browser and press Enter.
3. When logged in, you can see the home
page of WL-600g Web configuration
interface. To setup the router, refer to
Quick Setup in the next section. To
setup the advanced functions, refer
to the following chapters for detailed
information.
WL-600g All-in-1 Wireless ADSL2/2+ Home Gateway User Manual
10
Quick setup
/RJLQWRWKH:/JFRQÀJXUDWLRQSDJH
1. Input 192.168.1.1 into the address box of your Web browser and press Enter.
2. A login window appears for user name and password. The default username is
admin, password is admin (in lower case).
$IWHUORJJLQJLQ\RXFDQVHHWKH:/JFRQÀJXUDWLRQSDJH
ADSL setup
:LWK4XLFNVHWXS\RXQHHGWRVHWXSWKH$'6/OLQNÀUVWWKHQWKHZLUHOHVVVHWXS
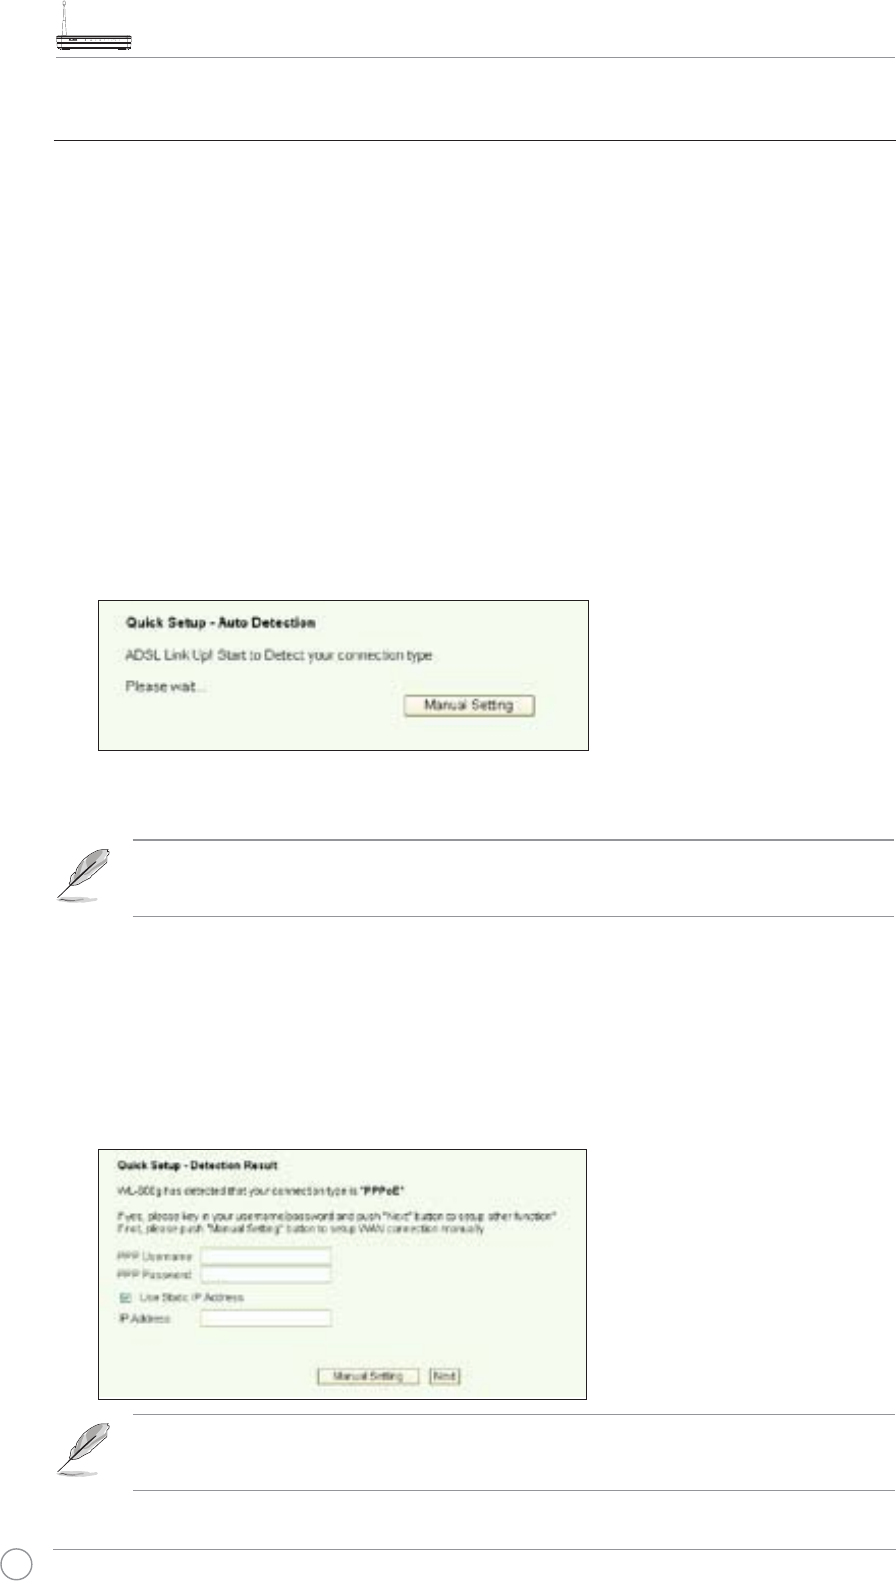
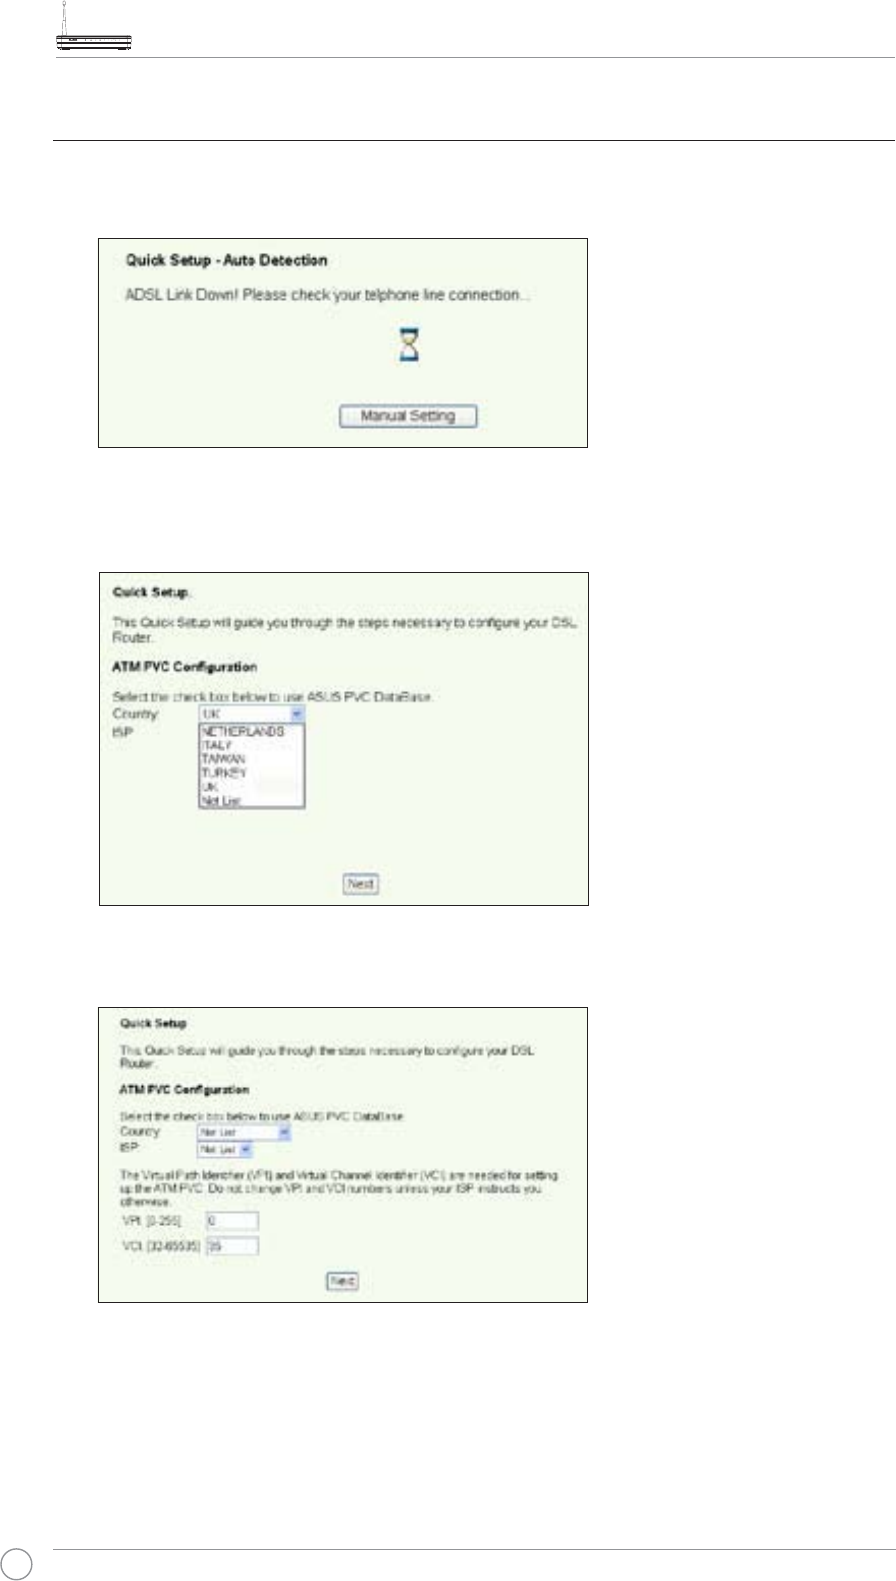
1. By default, the Quick Setup page pops up. The Quick Setup Wizard automatically
detects your ADSL connection type.
2. If ADSL connection is detected, the next page shows your ISP connection type
(PPPoE, PPPoA or MER).
If your ADSL connection is not detected, click Manual Setting to manually
set up WL-600g. Refer to Page 11-13 for manual setting instructions.
-- If it shows your connection type is PPPoE or PPPoA
For dynamic IP users, input your user name and password then click Next.
For static IP users, check Use Static IP Address, input your IP address, then
click Next.
Click Next to save the ADSL information to WL-600g.
If your actual connection is not PPPoE or PPPoA, click Manual Setting to
manually set up WL-600g. Refer to Page 11-13 for manual setting instructions.
WL-600g All-in-1 Wireless ADSL2/2+ Home Gateway User Manual
11
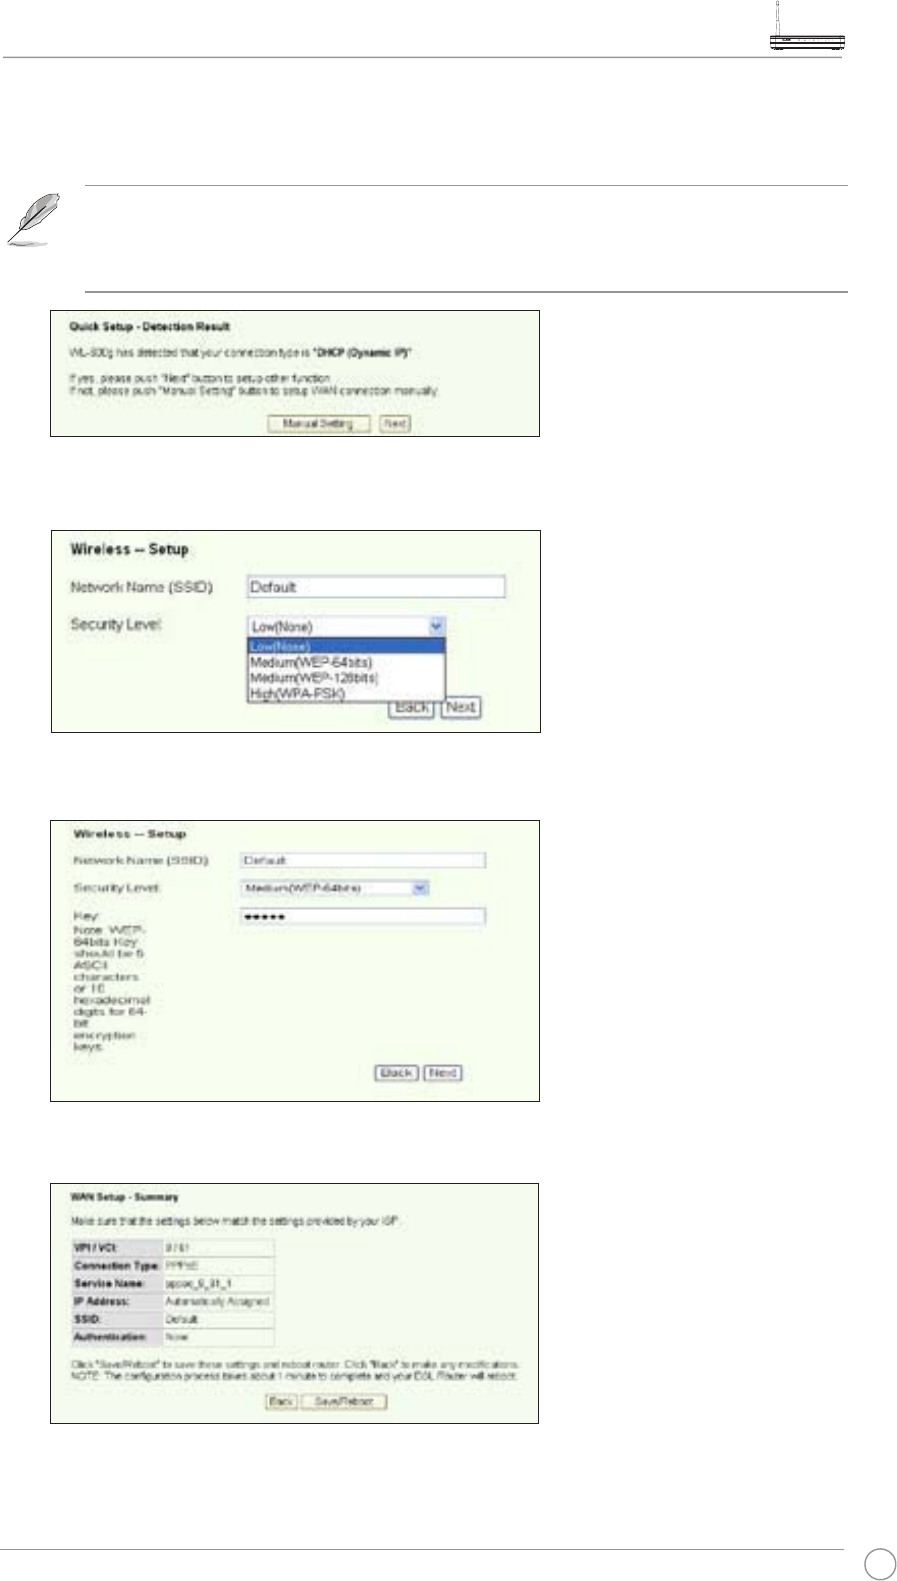
,ILWVKRZV\RXUFRQQHFWLRQW\SHLV0(5'+&3
Click Next if your connection type is MER (DHCP).
If your actual connection is not MER(DHCP), click Manual Setting
to manually set up WL-600g. Refer to Page 11-13 for manual setting
instructions.
Wireless setup
1. Choose a Security Level. For detailed security information, refer to Page 21-22.
2. Input a key in the KeyÀHOG7KHQXPEHURIGLJLWIRUWKHNH\GHSHQGVRQWKHVHFXULW\
level you choose.
3. The summary page then shows up. If the information displayed is correct, click
Save/RebootWRÀQLVKWKHVHWXS2WKHUZLVHFOLFNBack to modify the settings.
4. Setup complete! Wait for about 60 seconds to reboot. The Web page will refresh to
show device information after reboot.
WL-600g All-in-1 Wireless ADSL2/2+ Home Gateway User Manual
12
Manual Setup
,I\RXHQFRXQWHUDQ\GLIÀFXOW\FRQÀJXULQJ\RXU$'6/FRQQHFWLRQZLWK4XLFN6HWXSFOLFN
Manual Setting to manually set up your WL-600g.
ADSL Setup
1. Select your Country and ISP and click Next.
2. If your country and ISP are not on the list, select Not list, key in your VPI and VCI
values and click Next. You may ask your ISP for VPI/VCI values.
WL-600g All-in-1 Wireless ADSL2/2+ Home Gateway User Manual
13
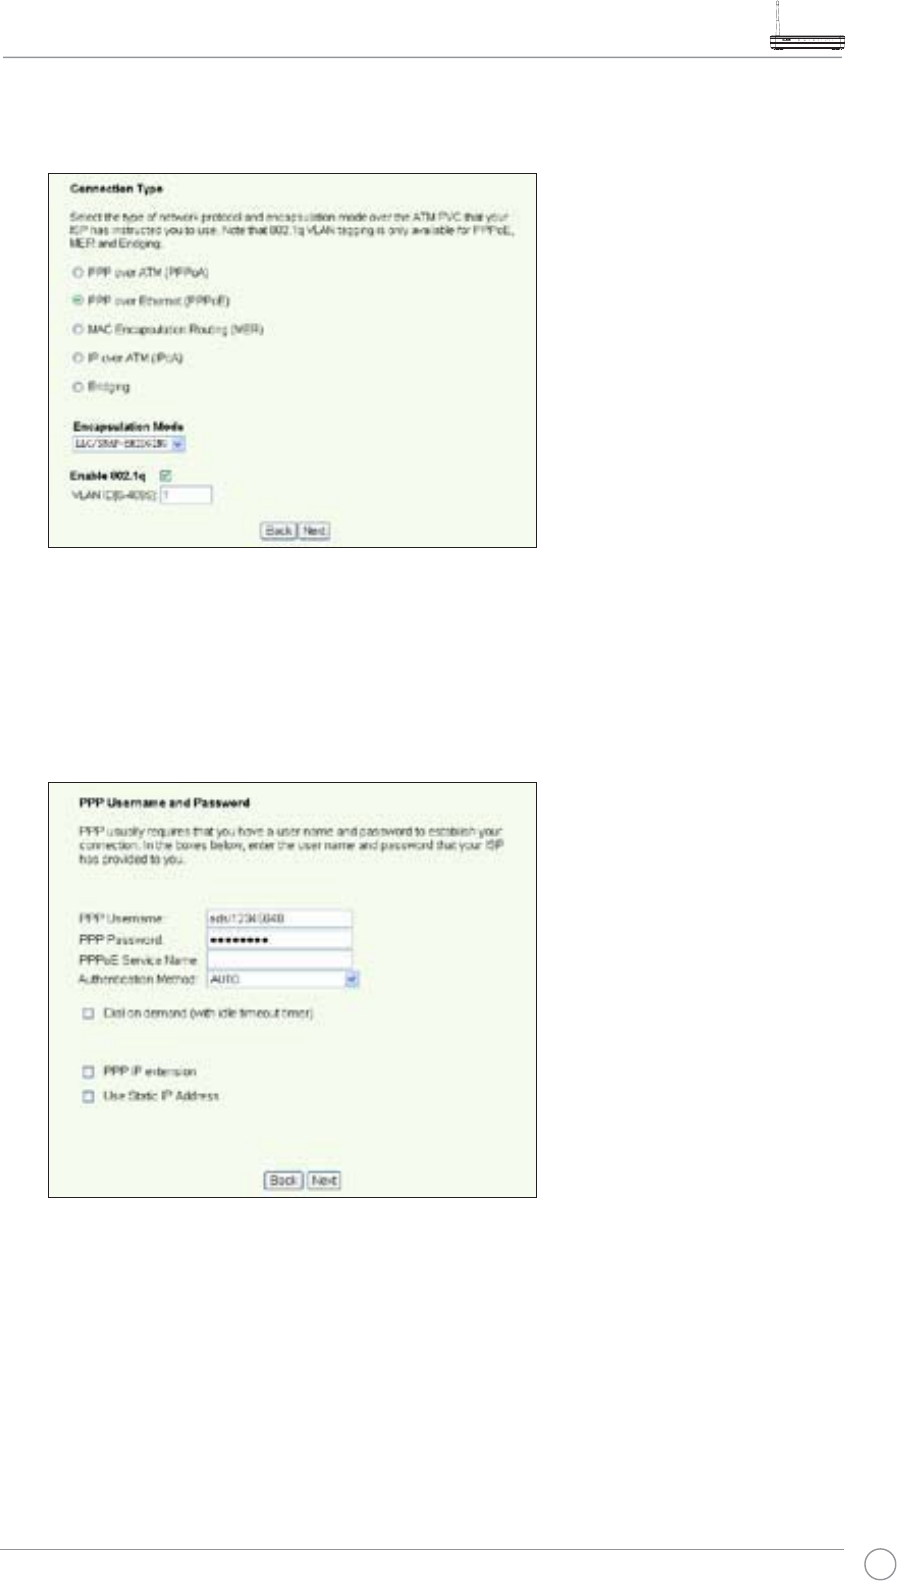
3. Select your connection type and click Next. You can get the connection type from
your ISP.
-- If your connection type is PPPoA or PPPoE
For dynamic IP users, input your PPP user name, password, and service name
then click Next.
For static IP users, check Use Static IP Address then key in your IP address,
then click Next.
WL-600g All-in-1 Wireless ADSL2/2+ Home Gateway User Manual
14
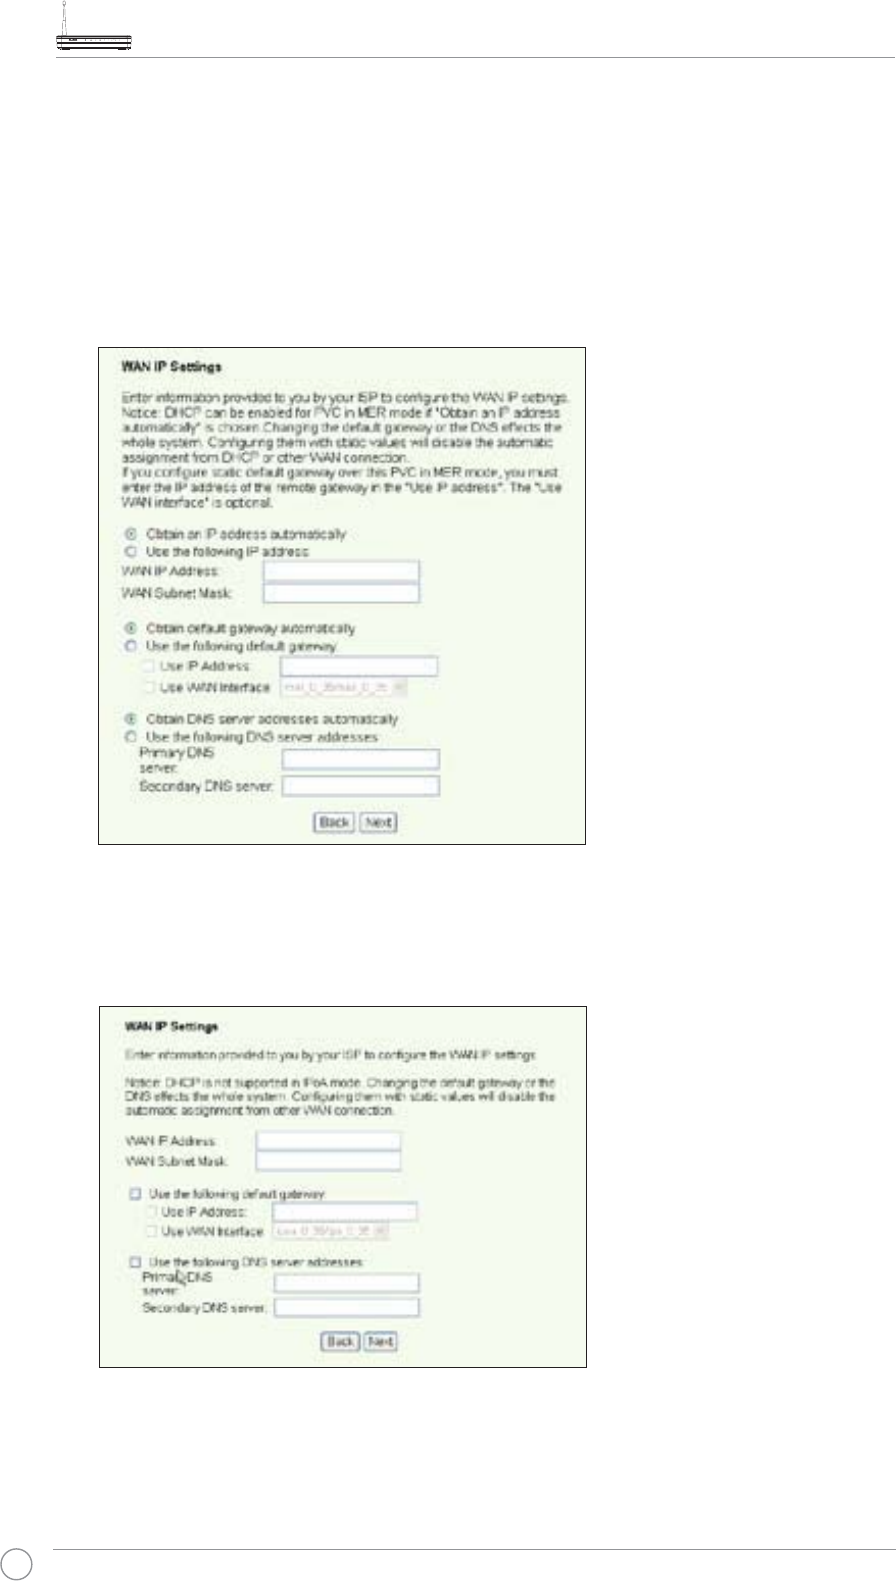
-- If your connection type is MER
For dynamic IP users, check Obtain an IP address automatically, Obtain
default gateway automatically, and Obtain DNS server address automatically,
then click Next.
For static IP users, check Use the following IP Address,Use the following
default gateway, and Use the following DNS server address, then input the
DGGUHVVHVLQFRUUHVSRQGHQWÀHOGV
-- If your connection type is IPoA
Static IP user only. Input the WAN IP address assigned by your ISP, then click
Next.
WL-600g All-in-1 Wireless ADSL2/2+ Home Gateway User Manual
15
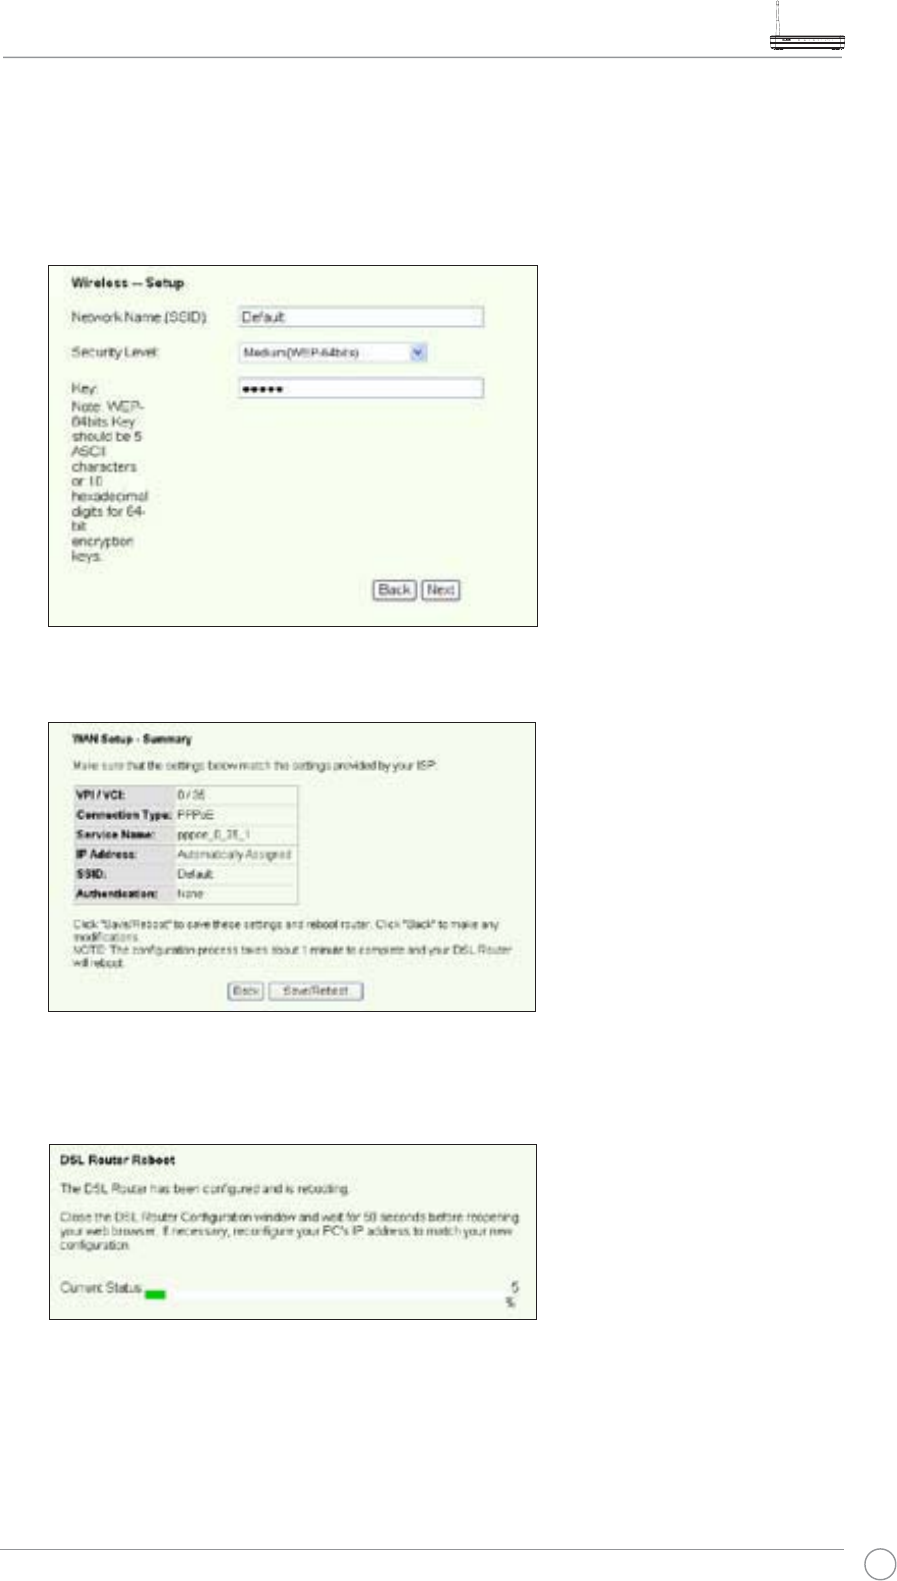
Wireless Setup
1. Designate an SSID (network name) for WL-600g. Choose the security level then
input a key. The number of digit of your key depends on the security level you
FKRRVH5HIHUWRWKHQRWHRQWKHZHESDJH:KHQÀQLVKHGFOLFNNext.
7KLVSDJHSURYLGHVD VXPPDU\RI:/J:$1DQGZLUHOVVFRQÀJXUDWLRQ&OLFN
Save/Reboot WRVDYHDQGDFWLYDWH\RXUFRQÀJXUDWLRQ
3. Setup complete! WL-600g reboots in about 50 seconds. The green bar shows the
current rebooting status. After reboot, the web page will automatically refresh to
display the settings.
WL-600g All-in-1 Wireless ADSL2/2+ Home Gateway User Manual
16
EZSetup
ASUS WL-600g Wireless ADSL2/2+ Home Gateway provides an easy-to-use setup
utility -- EZSetup. With this utility, you can wirelessly setup your Internet connection,
wireless LAN with just several clicks.
Installing ASUS utility
7R XVH$686 (=6HWXS IRU :/J FRQÀJXUDWLRQ \RX PXVW LQVWDOO WKH$686 XWLOLWLHV
from the support CD included in your package. Insert the CD into your optical drive and
autorun the installation program. If autorun is disabled on your computer, double-click
SETUP.EXE in the root directory of the CD.
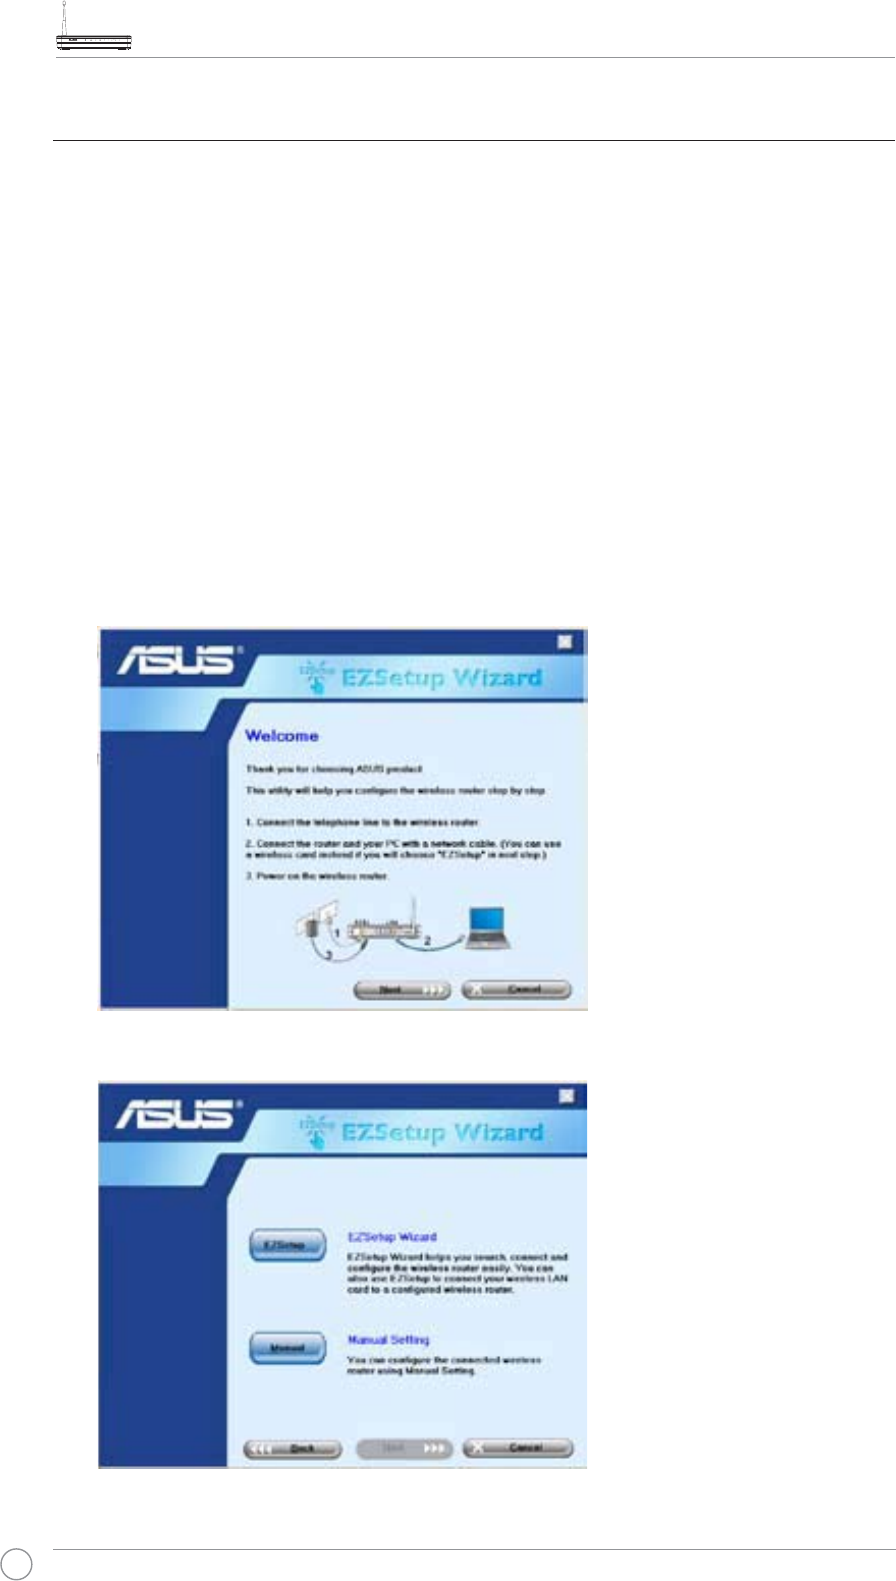
Setup WL-600g using EZSetup
1. Before using this utility, make sure that your hardware connections are all set. Click
Start -> Program -> ASUS Utility -> WL-600g Wireless Router -> EZSetup
Wizard to start EZSetup. Click Next.
2. Click EZSetup.
WL-600g All-in-1 Wireless ADSL2/2+ Home Gateway User Manual
17
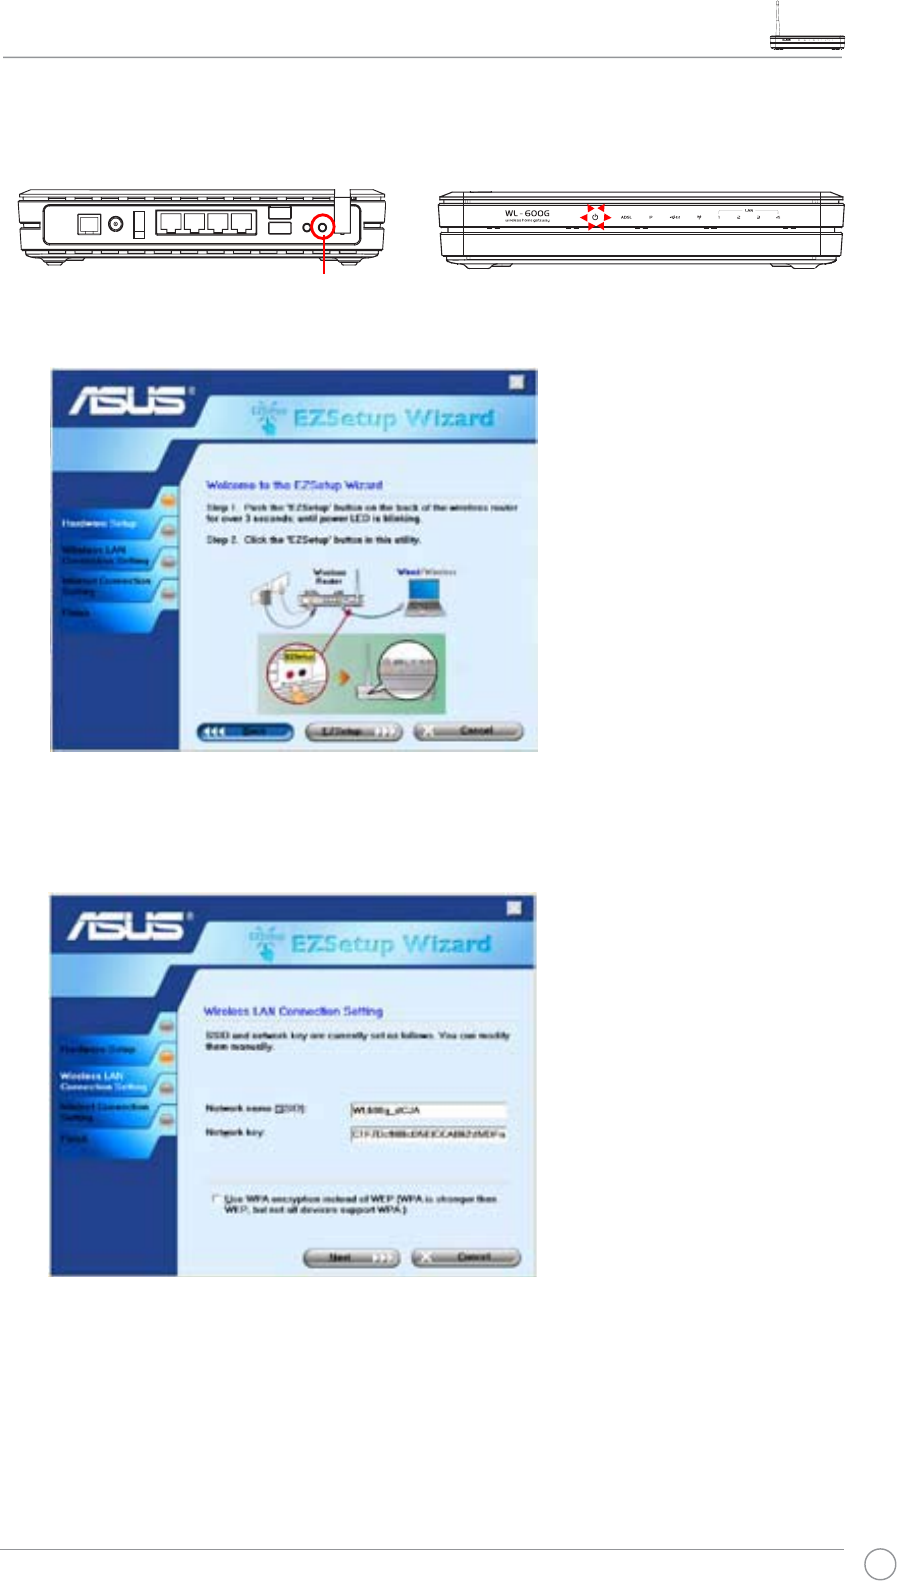
EZSetup
3. Push the red EZSetup button on the rear panel of WL-600g for over 3 seconds until
the PWR LED is blinking.
5. The system generates the SSID and Network key automatically. The network key
is a 128-bit WEP key by default. You can accept the settings, or assign SSID and
keys to your own need. Click Next to save the wireless settings.
4. Click EZSetup button.
WL-600g All-in-1 Wireless ADSL2/2+ Home Gateway User Manual
18
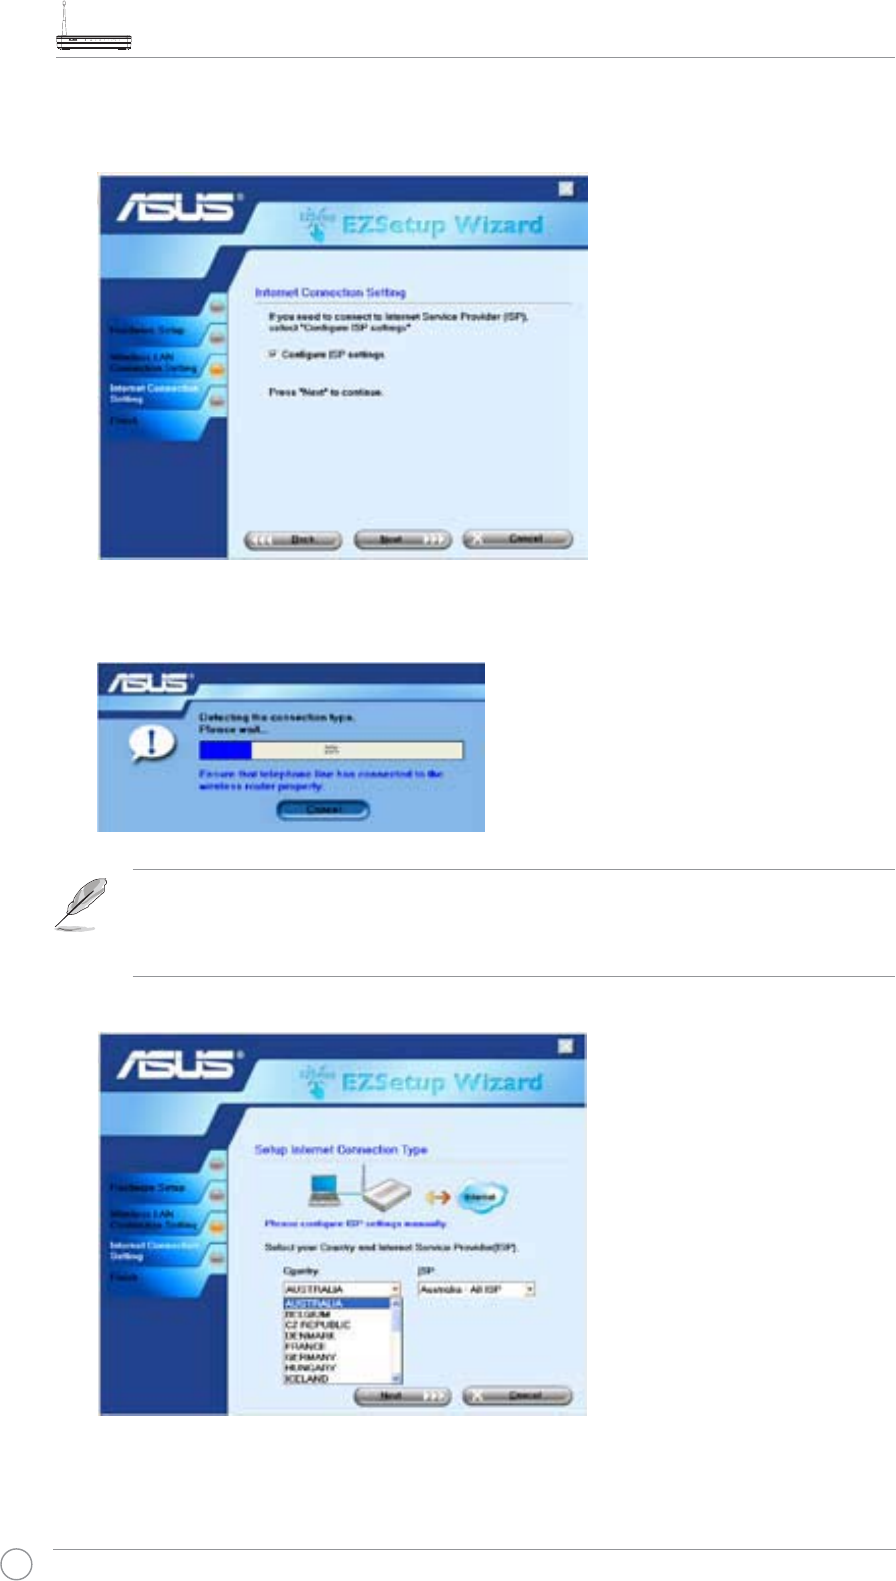
6. Next, EZSetup will guide you to complete the Internet connection settings. Check
&RQÀJXUH,63VHWWLQJV then click Next to continue.
7. The system detects your Internet connection type. The progress may take several
seconds.
If your ADSL connection is successfully detected by WL-600g, skip to Step
8. If your ADSL connection can not be detected, you need follow Step 8 and
manually set up your ADSL connection.
8. Select your country and ISP then click Next.
WL-600g All-in-1 Wireless ADSL2/2+ Home Gateway User Manual
19
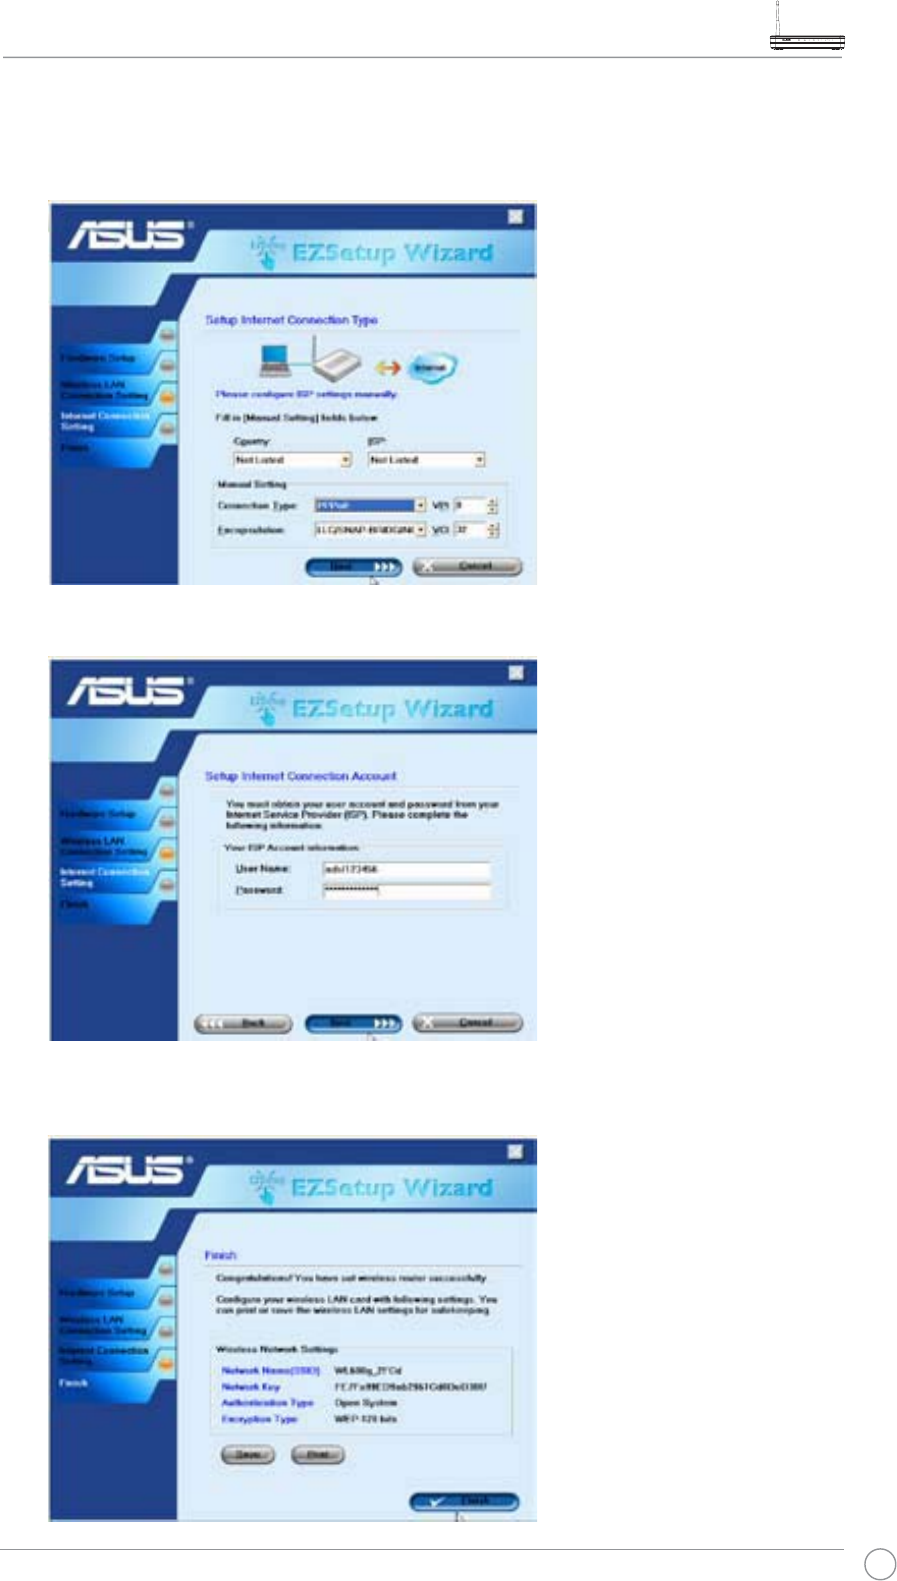
If your country or ISP are not on the list, select Not listed for both country and
,63ÀHOGV7KHQVHOHFWConnection typeDQGÀOOLQ93,DQG9&,<RXFDQJHW
VPI/VCI values from your ISP.
9. Input your ISP account username and password then click Next.
10. Setup complete! This page shows the wireless network setting parameters. You can
either save it or print it out for future reference. Click Finish to quit EZSetup.
WL-600g All-in-1 Wireless ADSL2/2+ Home Gateway User Manual
20
Connecting WL-600g with ASUS WLAN Card
&RQÀJXULQJ$686:/$1&DUGZLWK2QH7RXFK:L]DUG
We recommend you use ASUS WLAN card (WL-100gD, WL-100gE, Wl-107g, WL-
167g, WL-169gE) for better wireless connection. If you have installed ASUS wireless
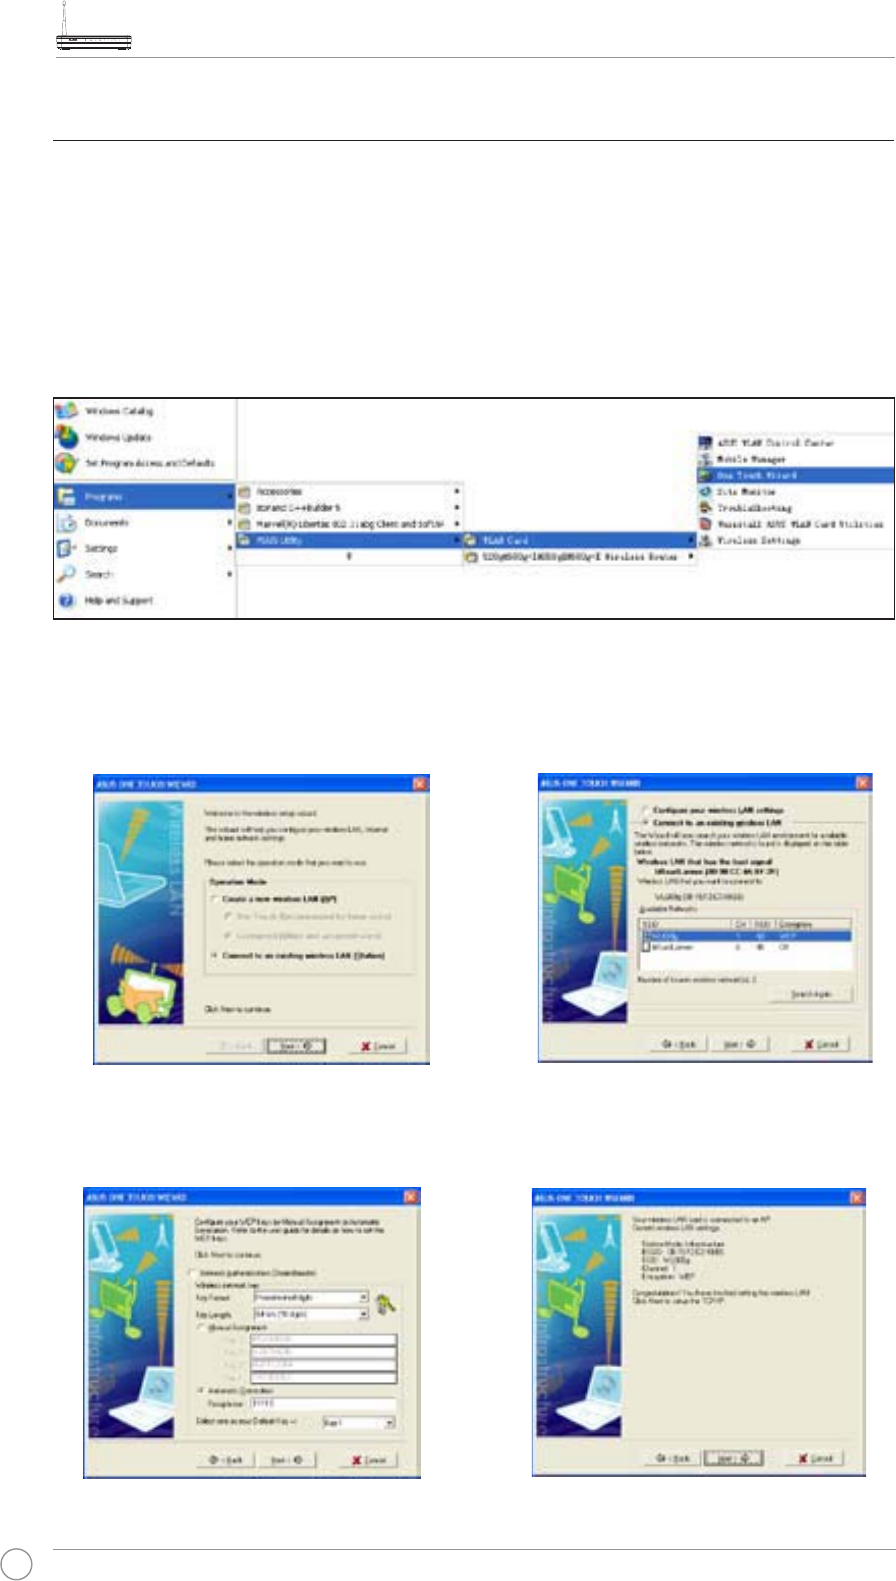
card together with its utilities and drives on your PC, click Start -> All Programs ->
ASUS Utility-> WLAN Card -> One Touch Wizard to launch the One Touch Wizard
utility.
3. Set the authentication and encryption of
your WLAN card the same with those at
WL-600g. Click Next to continue.
1. Select Connect to an existing wireless
/$16WDWLRQ radio button and click
Next to continue.
2. One Touch Wizard searches and displays
the available APs in the Available
Networks list. Select WL-600g and press
Next to continue.
4. It takes several seconds for the wireless
card to associate with WL-600g. Press
Next to setup TCP/IP.
WL-600g All-in-1 Wireless ADSL2/2+ Home Gateway User Manual
21
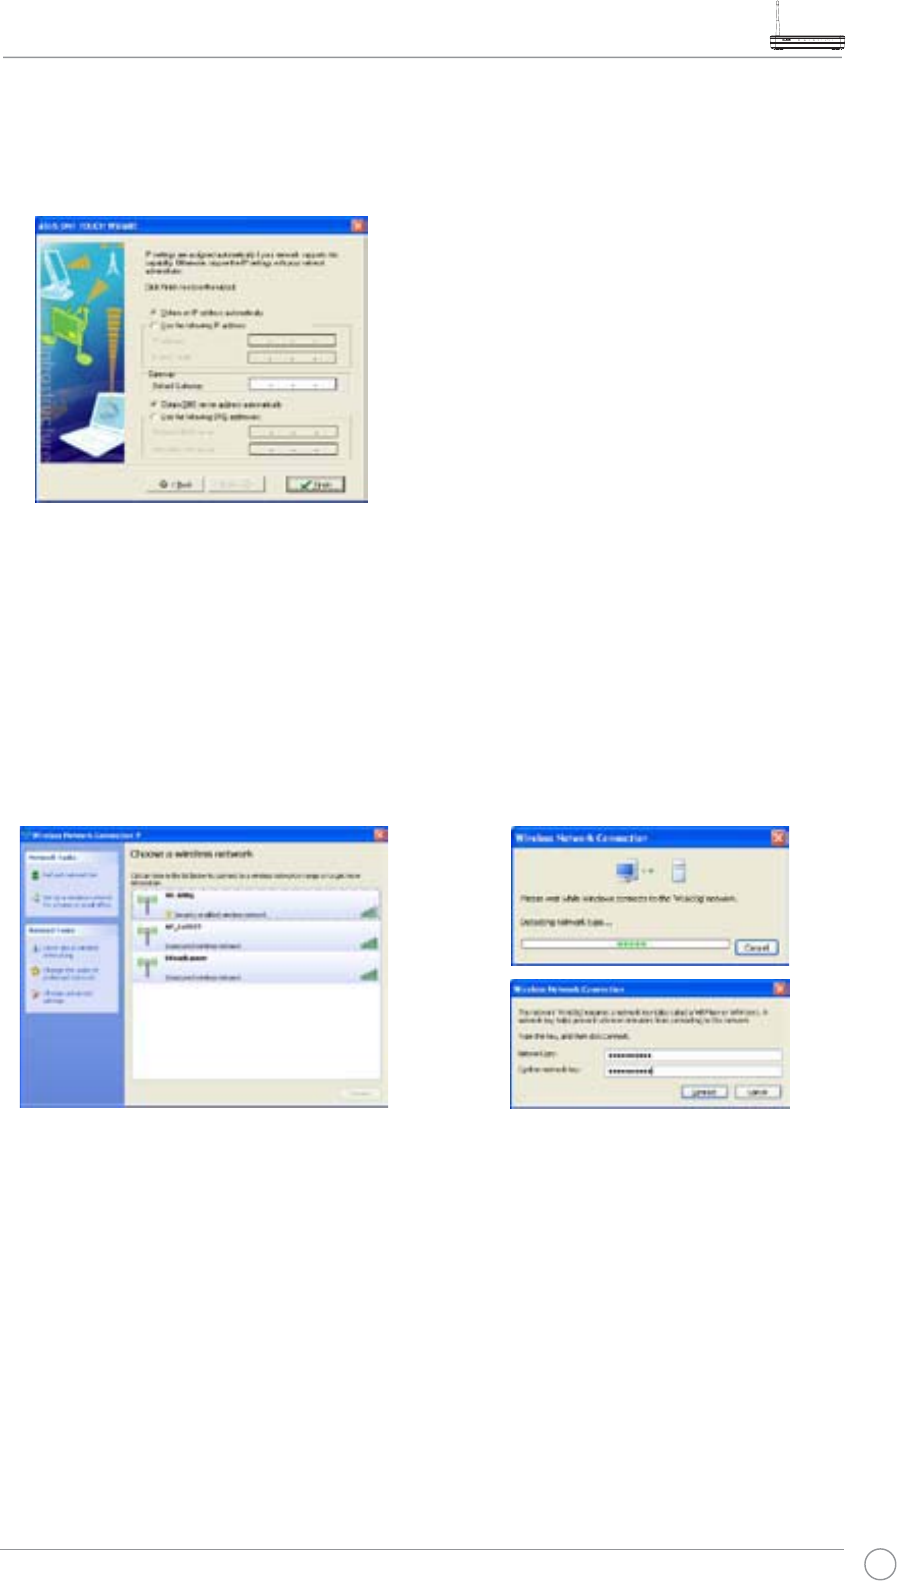
2. Input the key you have set on the
WL-600g and click Connect. The
connection is completed within
several seconds.
1. Double-click the wireless network
icon on the task bar to view available
networks. Select your wireless router
and click Connect.
5. Setup the IP address of the WLAN Card
according to your network condition.
After the setup is completed, click
Finish to exit the One Touch Wizard.
&RQÀJXULQJ:/$1FDUGZLWK:LQGRZV
®
WZC service
You can also use Windows
®
:LUHOHVV=HUR&RQÀJXUDWLRQVHUYLFHWRVHWXSWKHZLUHOHVV
connection with WL-600g.
WL-600g All-in-1 Wireless ADSL2/2+ Home Gateway User Manual
22
Wireless settings
7KLVFKDSWHUGHVFULEHVKRZWRFRQÀJXUHWKHZLUHOHVVIHDWXUHVRI\RXU$686:/J
ADSL Wireless Router.
Setting up SSID
66,'VWDQGVIRU6HUYLFH6HW,GHQWLÀHUDOVRNQRZQDVWKHQDPHRIDZLUHOHVVQHWZRUN
To connect a wireless router, or to form a wireless bridge system, all wireless routers or
APs or clients must have the same SSID.To setup SSID:
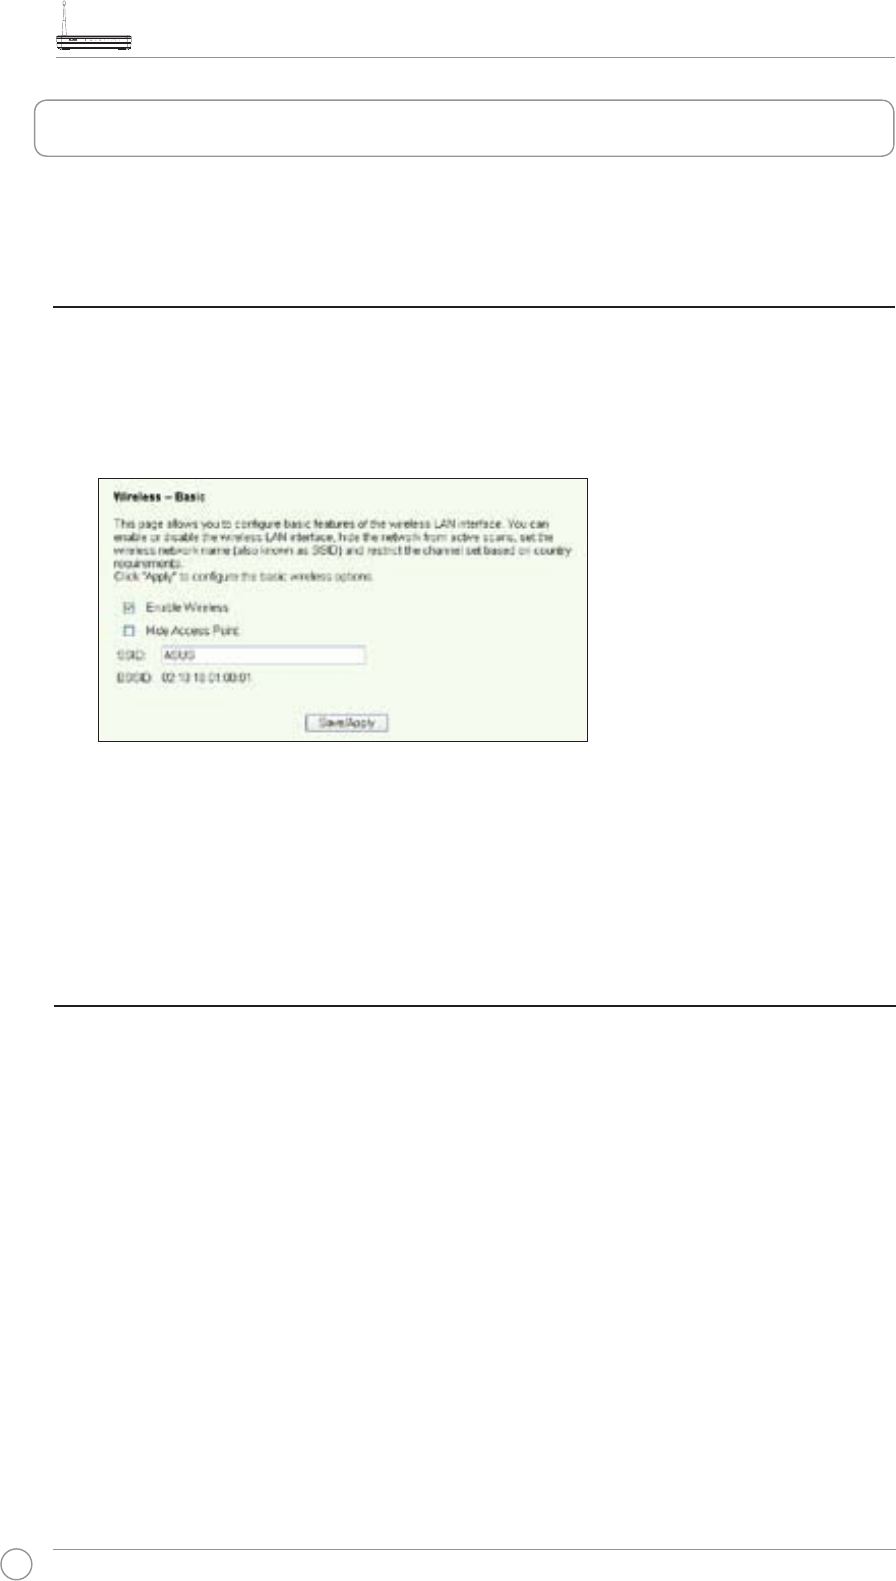
1. Click Wireless -> BasicLQWKHOHIWVLGHPHQXWRRSHQWKHFRQÀJXUDWLRQSDJH
2. Select Enable Wireless checkbox.
3. You can hide WL-600g from wireless scanning by selecting Hide Access Point, but
wireless clients still can connect to WL-600g by specifying correct SSID.
'HÀQHWKH66,'IRU:/J7KHGHIDXOW66,'LVDefault.
5. Press Save/Apply to save and activate the settings.
Setting up wireless security
To protect your wireless network, you need to setup a security mechanism at both
WL-600g and the wireless clients.
Network authentication
Network authentication uses certain types of mechanism to identify authenticated
wireless clients. WL-600g supports the following authentication methods:
Open: This option disables authentication protection for your wireless network.
Under the Open mode, any IEEE802.11b/g wireless client can connect to
your wireless network.
Shared: Shared means using the same WEP keys for authentication and encryption.
802.1X: 802.1X uses RADIUS (Remote Access Dial-Up User Service) server
to authenticate wireless clients with a username and password. It can
authenticate user with different levels of access right.
WL-600g All-in-1 Wireless ADSL2/2+ Home Gateway User Manual
23
WPA: WPA stands for WiFi-Protected Access. WPA provides two security
modes for Home/SOHO user and enterprise network. The former
solution adopts Pre-Shared Key for authentication, and the latter uses the
existing 802.1X RADIUS server in the enterprise network to process the
authentication requests.
WPA - PSK: WPA-PSK (Pre-Shared Key) is the solution for home and SOHO
users who have no 802.11X authentication server within the LAN. To
setup WPA-PSK, you need to input a passphrase and let the system
generate the key. Combination of letters, numbers and non-alphanumeric
characters is recommended for ensuring security.
Encryption
Encryption is used to convert plain text data into unreadable codes with certain type of
algorithm before capsulation for wireless transmission. WL-600g supports the following
encryption methods:
WEP: WEP stands for Wired Equivalent Privacy. It uses 64 or 128-bit static
keys. You can let the system generate the WEP keys by inputting a
Passphrase.
TKIP: Temporal Key Integrity Protocol (TKIP) dynamically generates unique
keys to encypt every data packet in a wireless session.
AES: Advanced Encryption Standard (AES) is a dependable encryption
adopted in WPA2 or IEEE802.11i standard. It offers stronger protection
and greatly increases the complexity of wireless encryption.
TKIP + AES: For a network where WPA clients (using TKIP encryption) and WPA2
clients (using AES encryption) co-exist. Select this option to enable both.
How to setup wireless security
Open
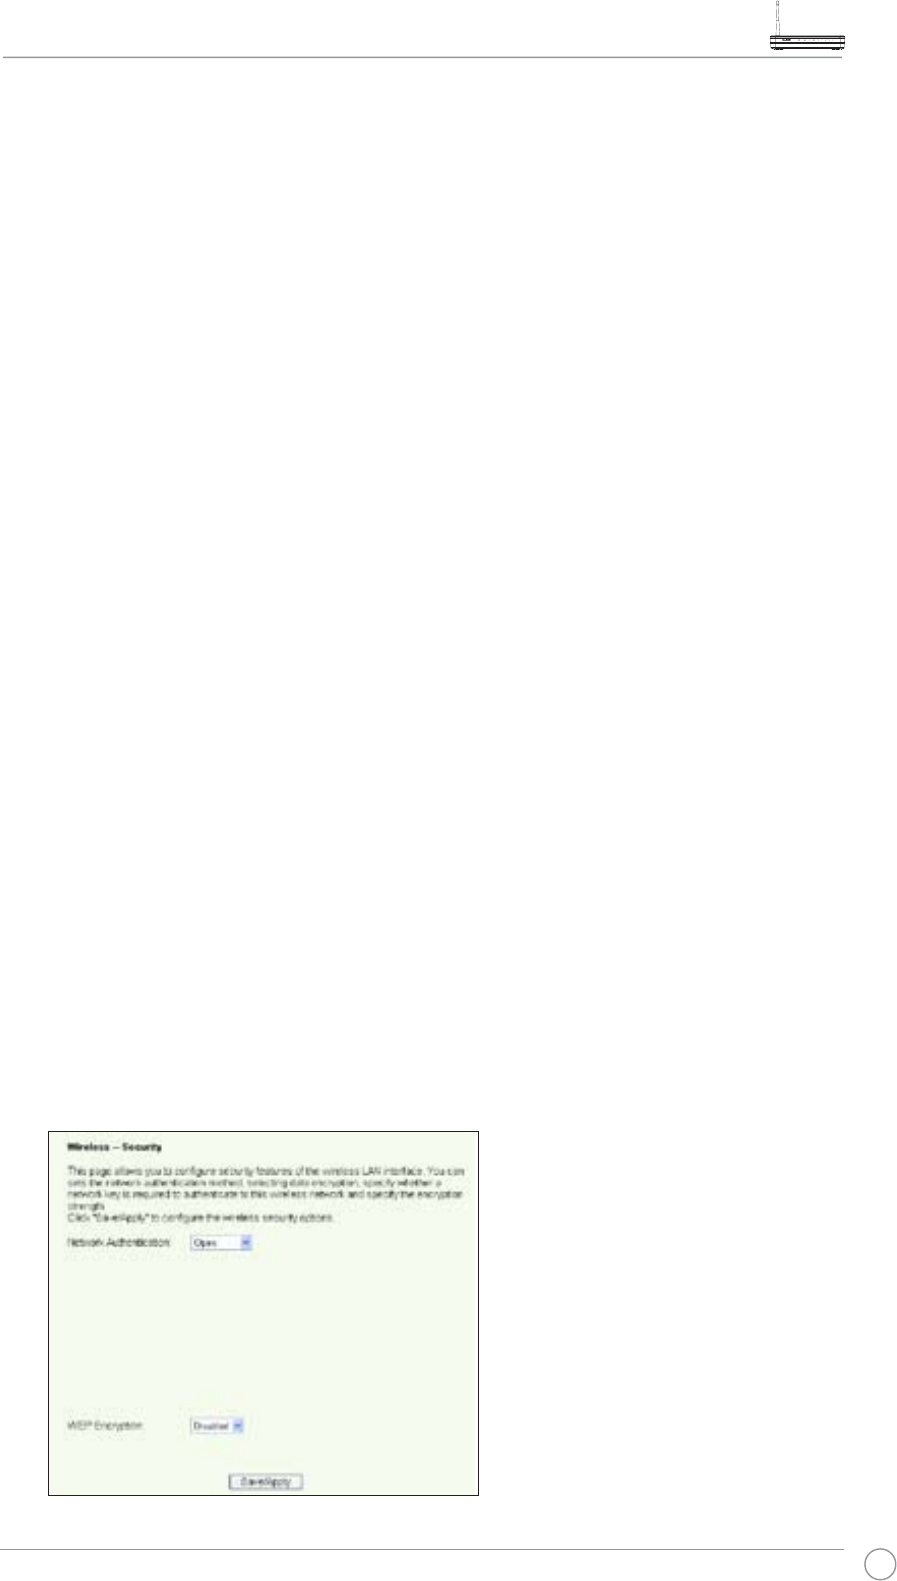
1. Click Wireless -> SecurityLQWKHOHIWVLGHPHQXWRRSHQWKHFRQÀJXUDWLRQSDJH
2. Select Open in the Network AuthenticationÀHOGWRGLVDEOHDXWKHQWLFDWLRQPHFKDQLVP
WL-600g All-in-1 Wireless ADSL2/2+ Home Gateway User Manual
24
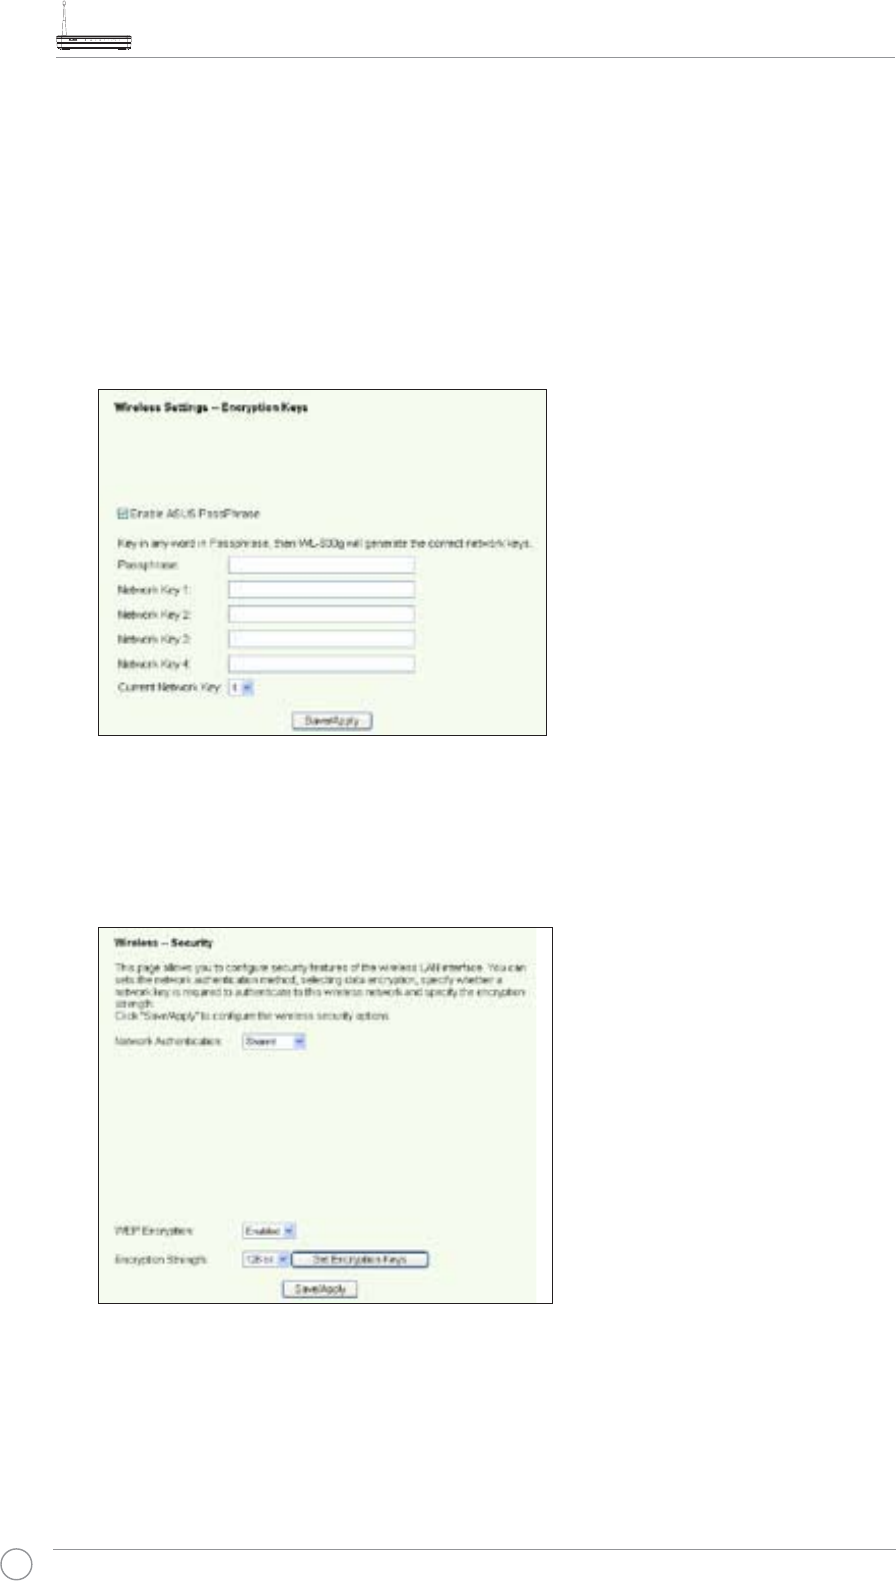
3. Select Enable in the WEP EncryptionÀHOGWRXVH:(3NH\VIRUGDWDHQFU\SWLRQV
Select 64-bit or 128-bit Encryption Strength for key length then click Set
Encryption Keys button to setup the keys. If you do not want to encrypt data,
select Disable in WEP Encryption and skip to Step 5.
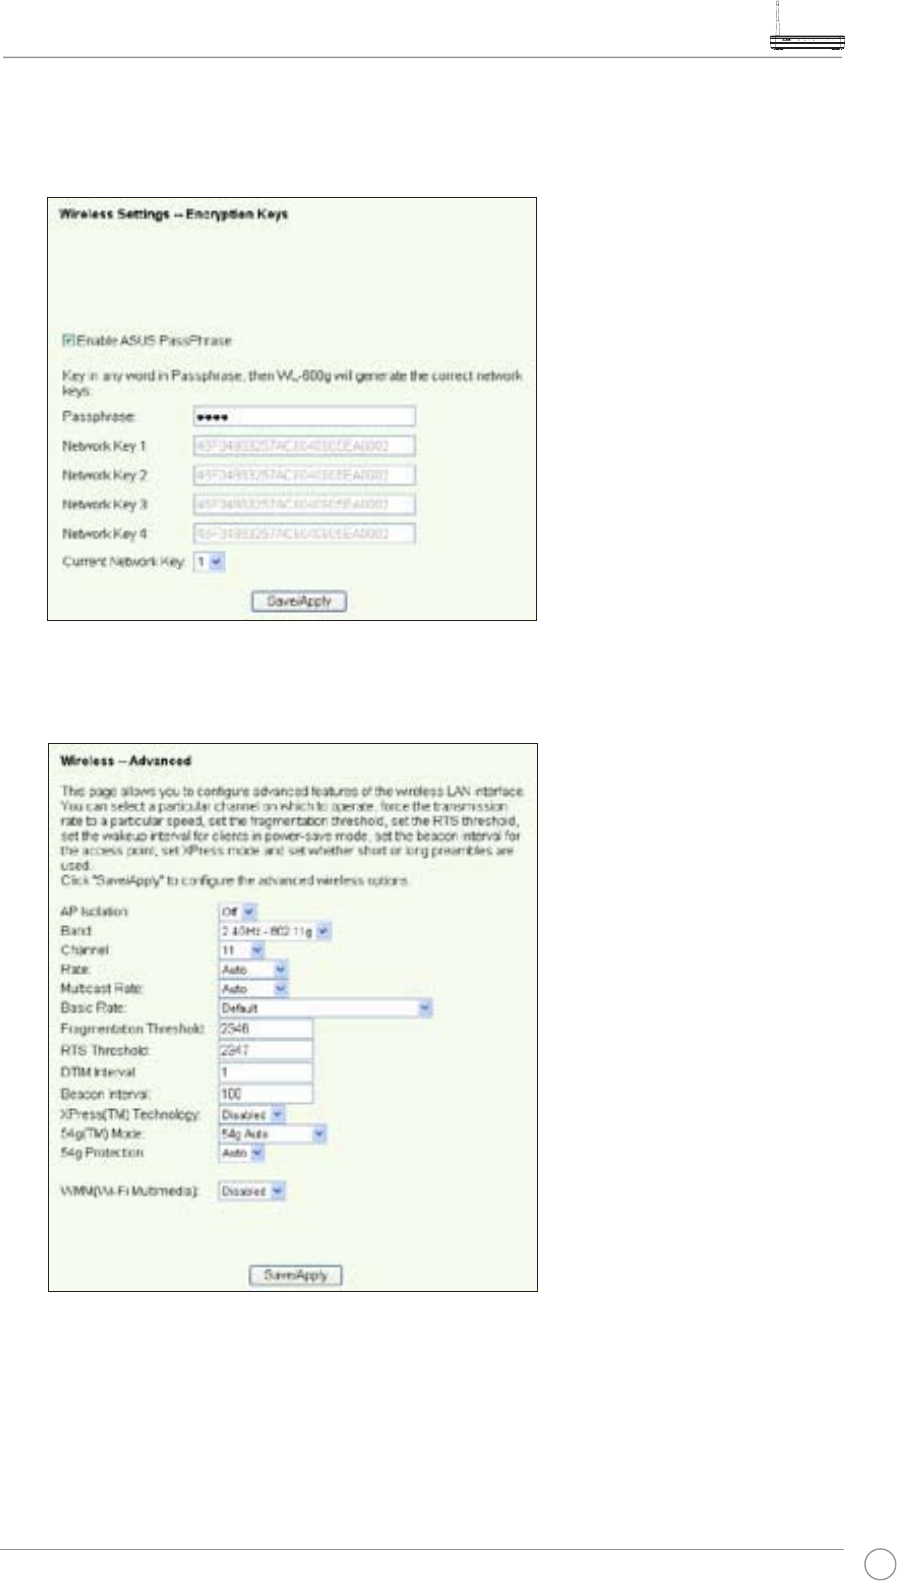
4. After you click the Set Encryption Keys button, you are directed to another page to
setup the keys. You can select Enable ASUS Passphrase and input a passphrase
LQWKHÀUVWER[EHORZWKHV\VWHPDXWRPDWLFDOO\JHQHUDWHVIRXUQHWZRUNNH\VIRU\RX
You can also disable ASUS Passphrase and input four keys manually. Record the
passphrase (if any) and keys in your note.
5. Press Save/Apply to save and activate the settings.
Shared
1. Click Wireless -> SecurityLQWKHOHIWVLGHPHQXWRRSHQWKHFRQÀJXUDWLRQSDJH
2. Select Shared in the Network AuthenticationÀHOGWRXVH:(3DXWKHQWLFDWLRQ
3. The WEP Encryption is fixed to Enabled because Shared mode use the same
WEP keys for both encryption and authentication.
4. Select 64-bit or 128-bit Encryption Strength for key length then click Set
Encryption Keys button to setup the keys. Refer to Open mode Step 4 for key
FRQÀJXUDWLRQ
5. Press Save/Apply to save and activate the settings.
WL-600g All-in-1 Wireless ADSL2/2+ Home Gateway User Manual
25
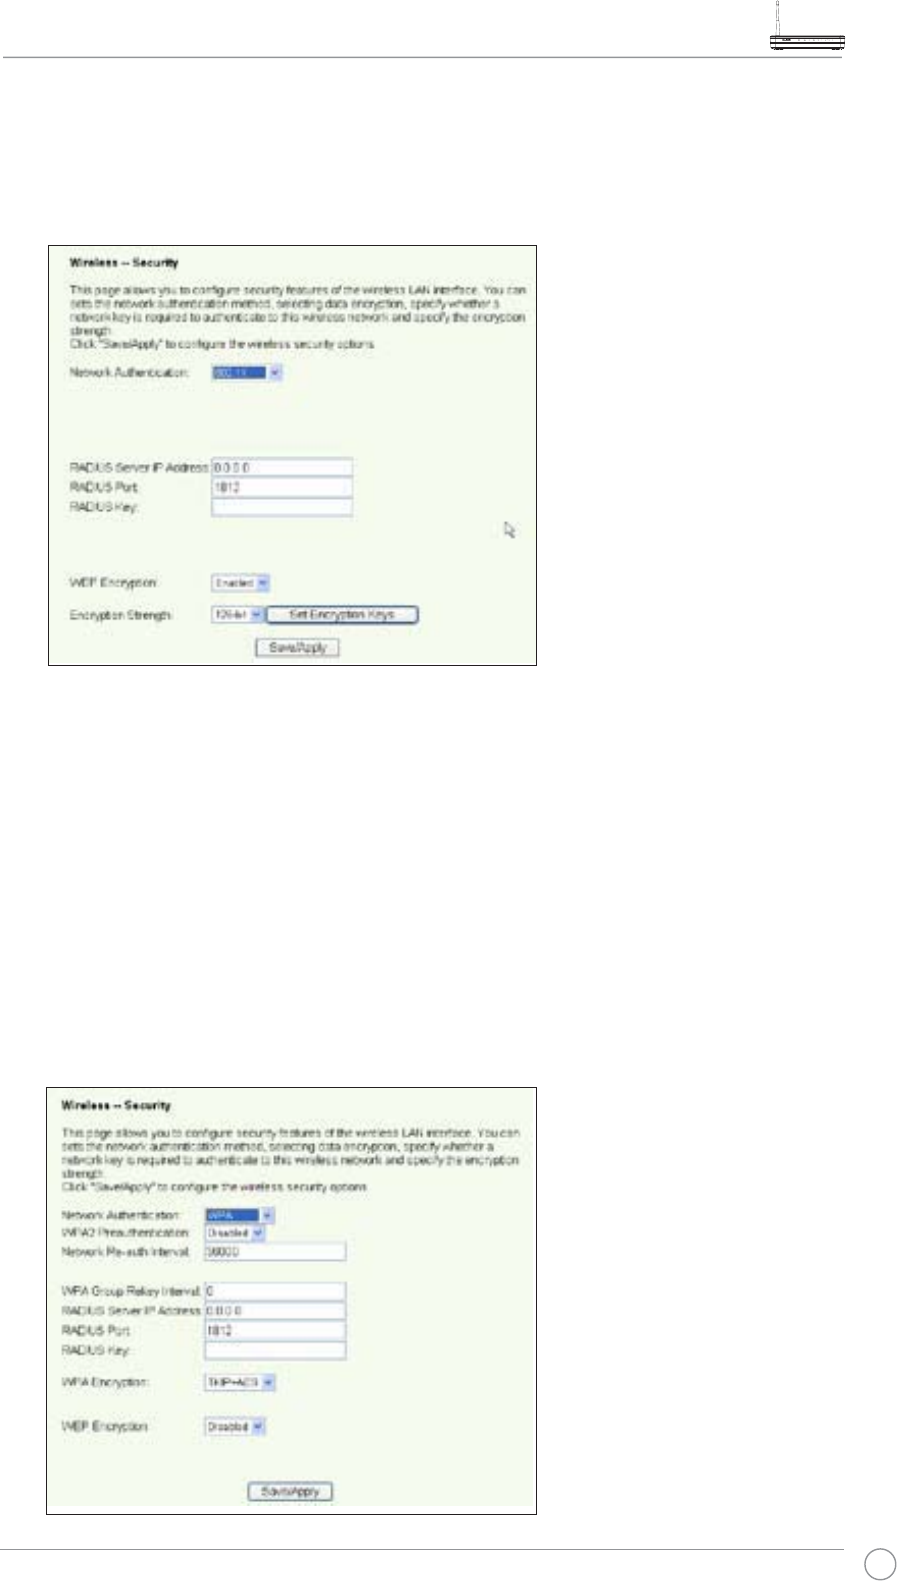
802.1X
1. Click Wireless -> SecurityLQWKHOHIWVLGHPHQXWRRSHQWKHFRQÀJXUDWLRQSDJH
2. Select 802.1X in the Network AuthenticationÀHOGWRHQDEOHDXWKHQWLFDWLRQXVLQJ
RADIUS server in your network.
3. Input the RADIUS Server IP address, RADIUS port (the default value is 1812), and
RADIUS Key.
4. You can choose to enable or disable data encryption. If you want to encrypt data,
select Enable in the :(3 (QFU\SWLRQ ÀHOG, select 64-bit or 128-bit Encryption
Strength for key length. Click Set Encryption Keys button to setup the keys.
5. Refer to OpenPRGH6WHSIRUNH\FRQÀJXUDWLRQ
6. Press Save/Apply to save and activate the settings.
WPA
1. Click Wireless -> SecurityLQWKHOHIWVLGHPHQXWRRSHQWKHFRQÀJXUDWLRQSDJH
2. Select WPA in the Network Authentication field to enable RADIUS server
authentication and advanced encryption methods.
WL-600g All-in-1 Wireless ADSL2/2+ Home Gateway User Manual
26
3. Set the WPA2 Preauthentication to Enabled if you want to use this function.
4. The Network Re-auth Interval is 36000 seconds by default, you can setup this
value according to your network environment.
5. Set up RADIUS server inforamtion by inputting WPA Group Rekey Interval,
RADIUS server IP address, RADIUS port and RADIUS Key.
6. Set up WPA encryption methods. If there are only WPA2 clients within your network,
select AES, if WPA clients only, select TKIP; if both exist, select TKIP+AES.
7. You can also enable WEP client to access your wireless network. To enable WEP
clients, set WEP Encryption to Enabled. Select 64-bit or 128-bit Encryption
Strength for key length then click Set Encryption Keys button to setup the keys.
Refer to OpenPRGH6WHSIRUNH\FRQÀJXUDWLRQ
8. Press Save/Apply to save and activate the settings.
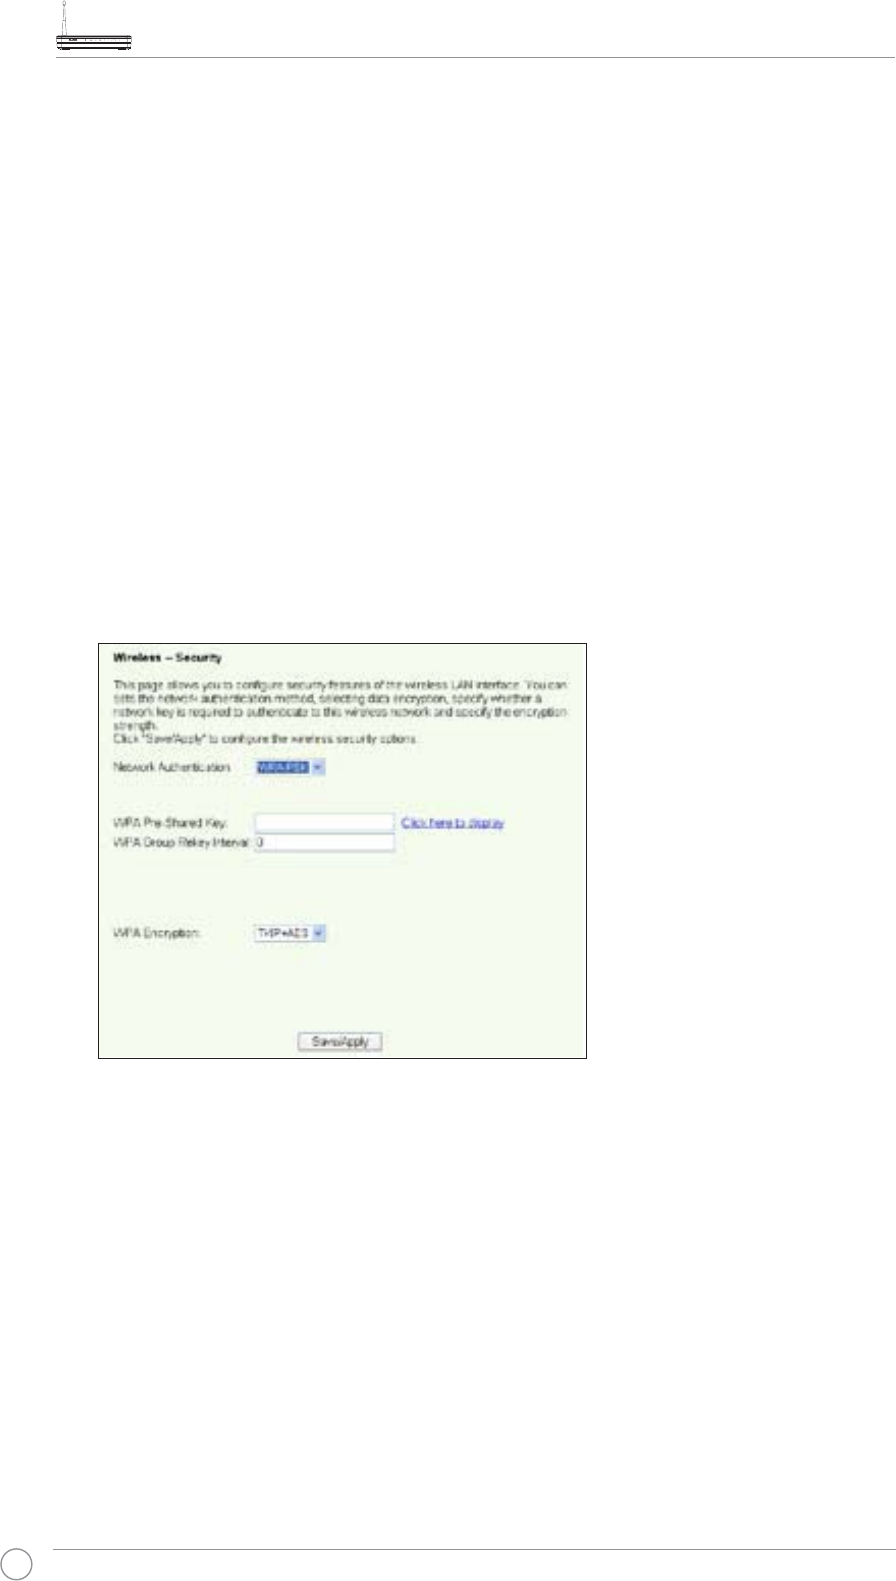
WPA-PSK
1. Click Wireless -> SecurityLQWKHOHIWVLGHPHQXWRRSHQWKHFRQÀJXUDWLRQSDJH
2. Select WPA-PSK in the Network AuthenticationÀHOG
3. Input the WPA Pre-Shared Key. The key is masked by the system. To check the
key, press Save/Apply and wait until the page refreshes. Then click Click here to
display link, you can see the key displayed in a separate window.
4. Setup the WPA Group Rekey Interval.
5. Set up WPA encryption methods. If there are only WPA2 clients within your network,
select AES, if WPA clients only, select TKIP; if both exist, select TKIP+AES.
6. You can also enable WEP client to access your wireless network. To enable WEP
clients, set WEP Encryption to Enabled. Select 64-bit or 128-bit Encryption
Strength for key length then click Set Encryption Keys button to setup the keys.
Refer to OpenPRGH6WHSIRUNH\FRQÀJXUDWLRQ
7. Press Save/Apply to save and activate the settings.
WL-600g All-in-1 Wireless ADSL2/2+ Home Gateway User Manual
27
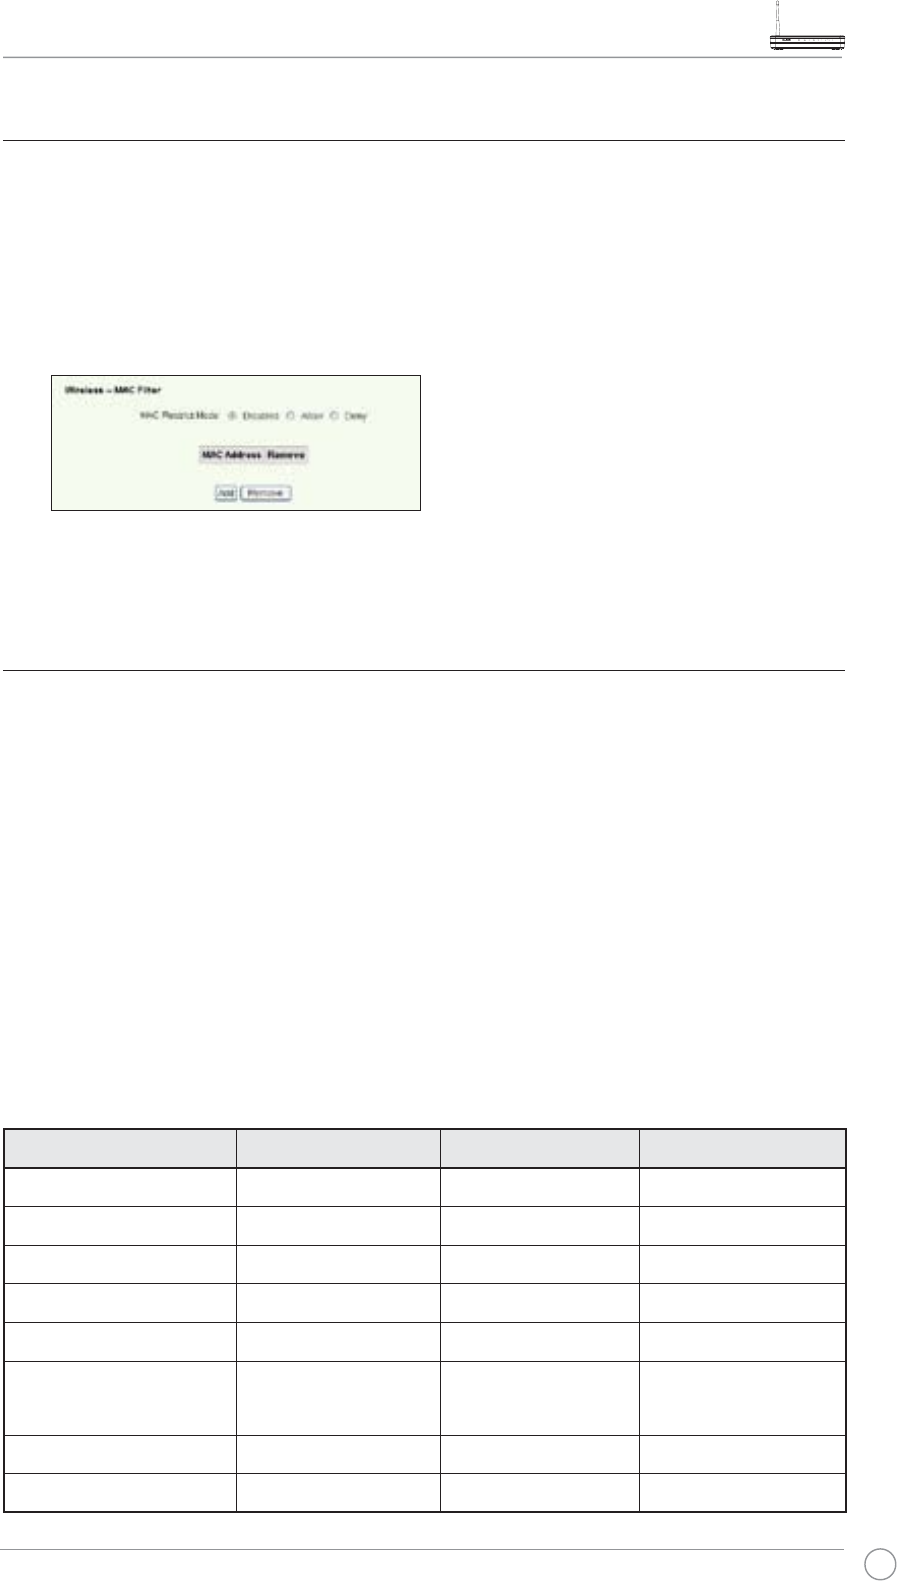
0$&ÀOWHU
<RXFDQVHWXS0$&ÀOWHUVWRDOORZRUGHQ\ZLUHOHVVFOLHQWVZLWKNQRZQ0$&DGGUHVVHV
7RVHWXS0$&ÀOWHU
1. Click Wireless -> MAC FilterLQWKHOHIWVLGHPHQXWRRSHQWKHFRQÀJXUDWLRQSDJH
6HOHFWWKHUHVWULFWLRQ PRGHIRUWKHÀOWHU VHOHFWAllow to allow the client and deny
the rest; select DenyWRGHQ\WKHFOLHQWDQGDOORZWKHUHVW%\GHIDXOWWKHÀOWHULVVHW
to Disable which allows all clients. Click AddWRFUHDWHDÀOWHU
2. Type the MAC address of the wireless client you want to allow or block.
3. Press Save/Apply to save and activate the settings.
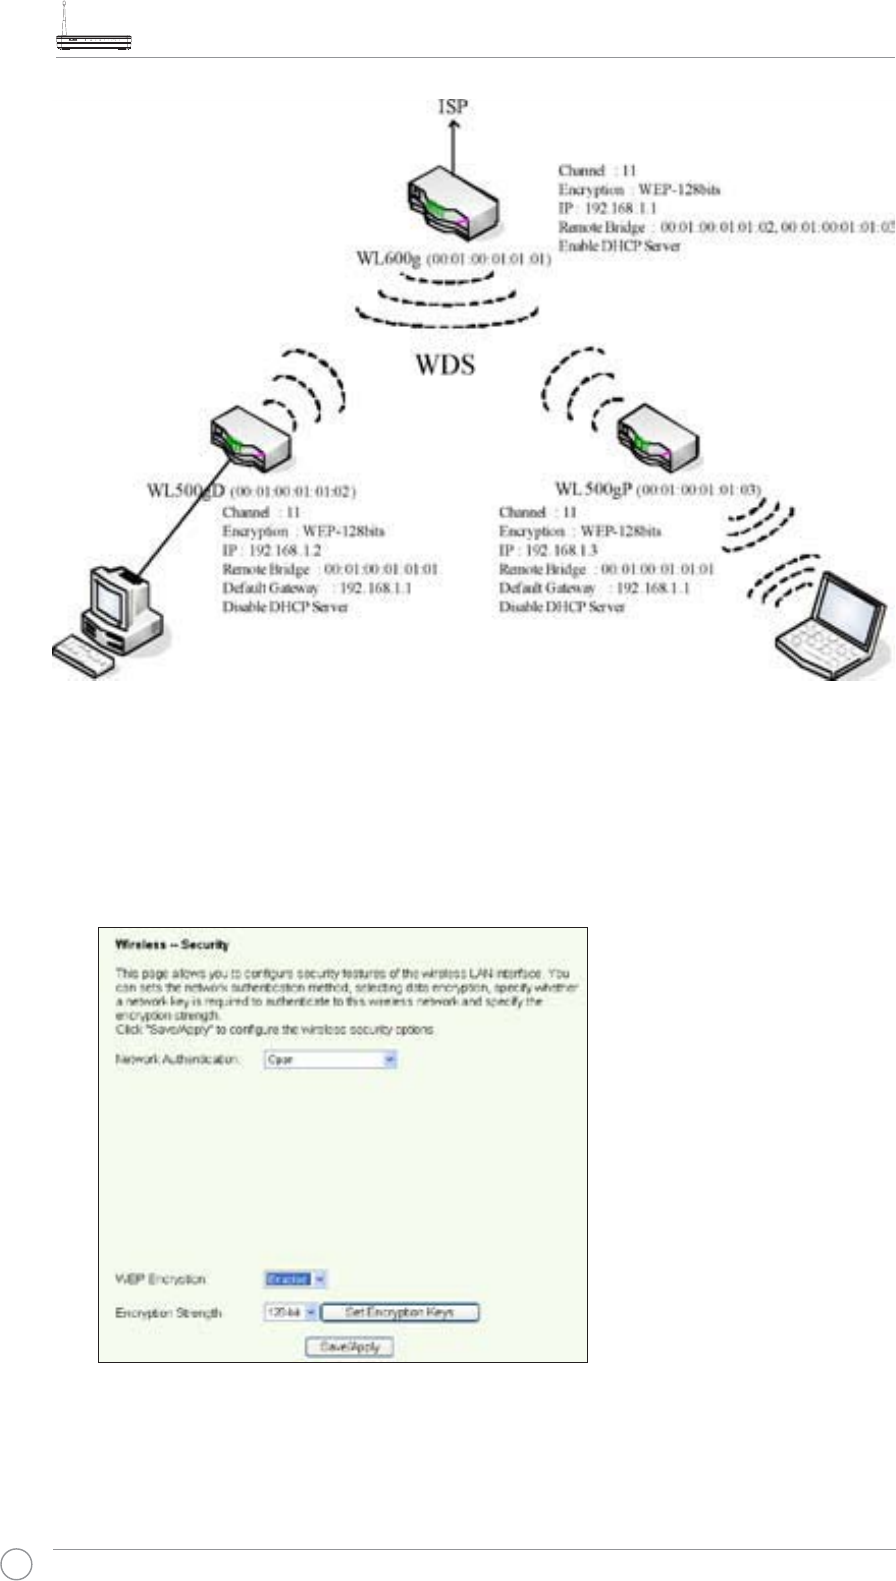
Wireless bridge
You can connect WL-600g to other wireless bridges so as to expand your wireless LAN.
This function is also referred to as Wireless Distribution System (WDS).
To set up WDS, the wireless routers must meet the following requirements:
1. Using the same encryption.
2. Working on the same channel.
3. The IP addresses of all wireless bridges are within the same subnet.
4. WDS enabled.
5. For bridging wireless routers, the MAC Addresses of the uplink wireless router must
be saved to the Remote Bridge List. For uplink wireless router, MAC addresses of
all bridging router must be saved.
Example: WL-600g (wireless bridge with Internet access), WL-500gP (wireless bridge),
and WL-500gD (wireless bridge). Refer to the illustration on the next page.
WL-600g WL-500gD WL-500gP
SSID ASUS ASUS ASUS
DHCP server Enabled Disabled Disabled
LAN IP address 192.168.1.1 192.168.1.2 192.168.1.3
Authentication Open Open Open
Encryption WEP-128bit WEP-128bit WEP-128bit
Remote bridge 00:01:00:01:01:02
00:01:00:01:01:03
00:01:00:01:01:01 00:01:00:01:01:01
MAC address 00:01:00:01:01:01 00:01:00:01:01:02 00:01:00:01:01:03
Channel 11 11 11
WL-600g All-in-1 Wireless ADSL2/2+ Home Gateway User Manual
28
:'6VHWXS:/J
1. Setting up encryption
If you want to use encryption function, select a Network Authentication mode; if not,
select Disabled. Click Wireless -> SecurityWRRSHQWKHFRQÀJXUDWLRQSDJH
In this example, set authentication to Open and encryption to Enabled, select 128bit for
Encryption Strength, then click Set Encryption Keys.
WL-600g All-in-1 Wireless ADSL2/2+ Home Gateway User Manual
29
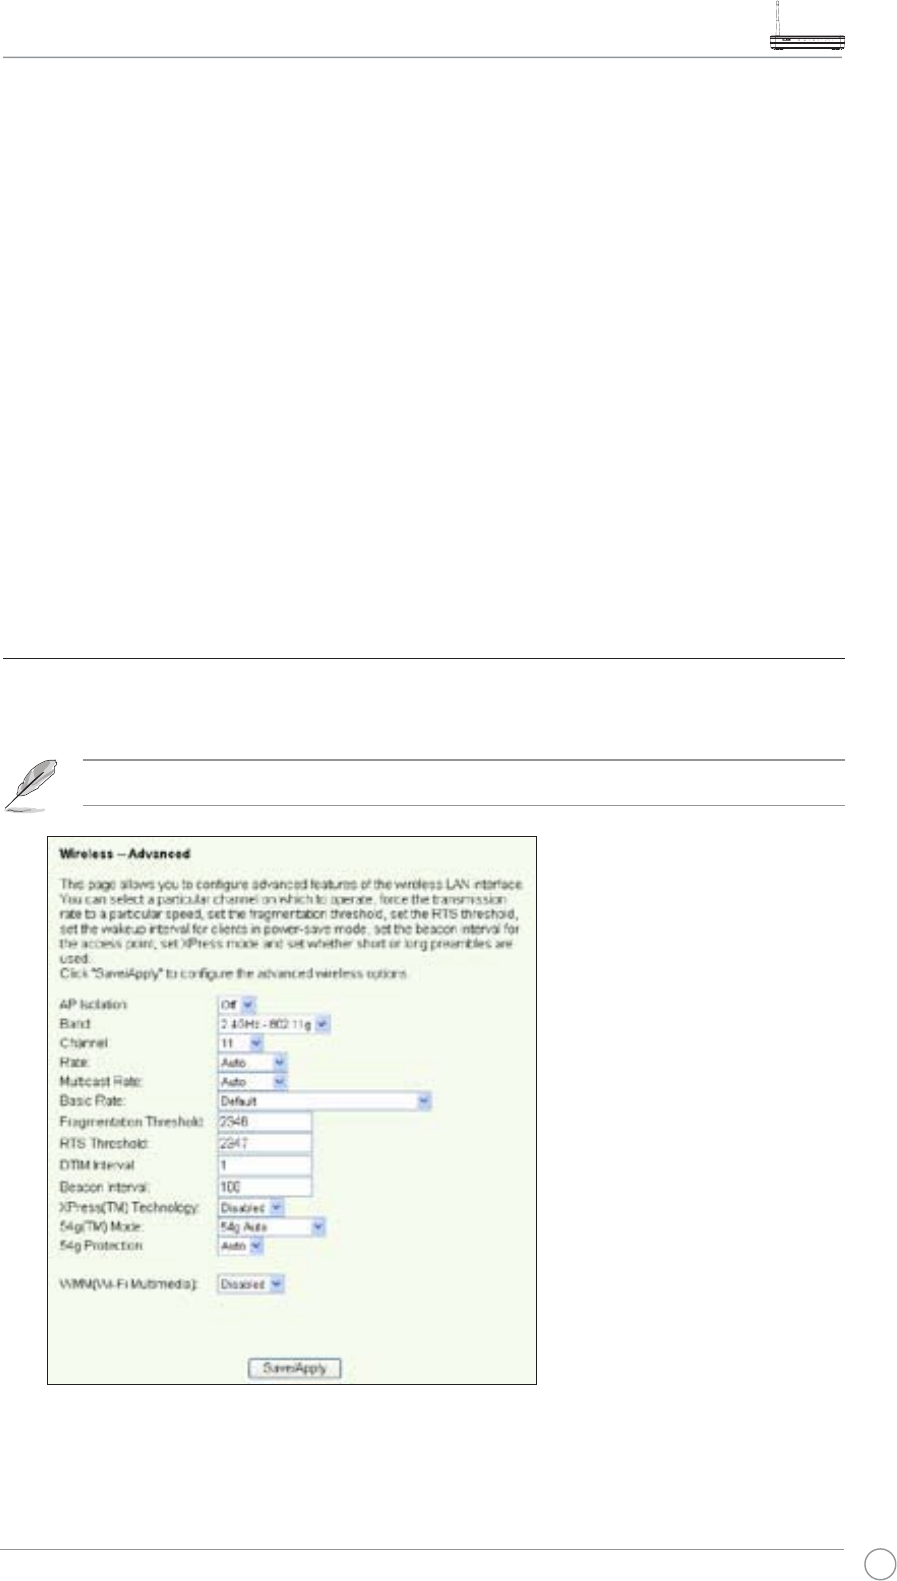
2. Setting up channel
Click Wireless -> Advanced. Set Channel to 11 and click Save/Apply.
You can check Enable ASUS PassPhrase and input a string in PassphraseÀHOGWROHW
the system generate the Network Keys. You can also disable Passphrase and input four
NH\VPDQXDOO\:KHQÀQLVKHGFOLFN Save/Apply.
WL-600g All-in-1 Wireless ADSL2/2+ Home Gateway User Manual
30
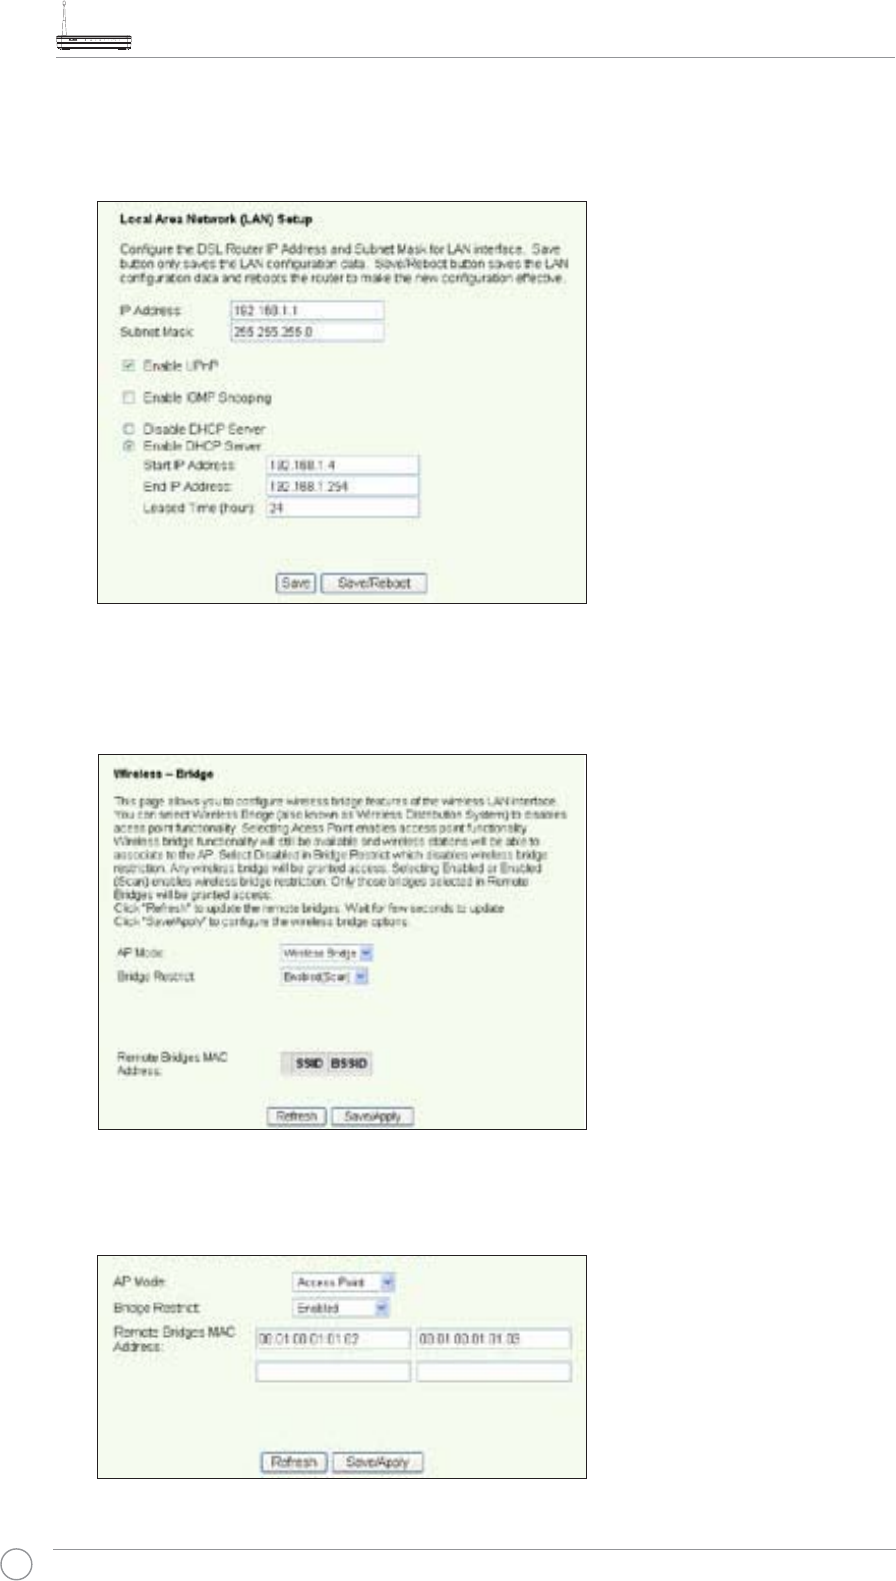
3. Setting IP address
Click Advanced Setup -> LAN. Set WL-600g IP address to 192.168.1.1, select Enable
DHCP Server and set Start IP address to 192.168.1.4. Click Save/ Reboot.
4. Setting WDS
Click Wireless -> Wireless Bridge. Select Wireless Bridge. You can select Enabled
6FDQ to find WL-500gD and WL-500gP. If the stations are on the list, check the
checkbox and click Save/Apply.
,I\RXFDQQRWÀQG:/J'E\VFDQQLQJVHWBridge Restrict to Enable and input the
0$&DGGUHVVRI:/J'DQG:/J3PDQXDOO\:KHQÀQLVKHGFOLFNSave/Apply.
WL-600g WDS setup is complete!
WL-600g All-in-1 Wireless ADSL2/2+ Home Gateway User Manual
31
Wireless advanced settings
Click Wireless -> AdvancedWRFRQÀJXUHDGYDQFHGIHDWXUHVRIWKHZLUHOHVVURXWHUVXFK
as communication channel, data rate and WMM.
If you do not know the meaning of these items, use the default setting.
:'6VHWXS:/J'DQG:/J3
Set up WL-500gD and WL-500gP according to the table on Page 26.
1. Wireless Setting
Set WL-500gD, WL-500gP wireless channel, authentication, encryption and keys
the same as WL-600g.
2. Set IP address to 192.168.1.2 (WL-500gD), 192.168.1.3 (WL-500gP)
3. Disable DHCP Server and set default gateway to 192.168.1.1,
4. WDS Setting
• Open Wireless -> Bridge, set AP Mode to Hybrid.
• Set Channel to 11.
• Add the MAC address of WL-600g to Remote Bridge List.
5. Save the settings and reboot.
WL-600g All-in-1 Wireless ADSL2/2+ Home Gateway User Manual
32
Network security
This chapter shows how to set up security defence for your local area network.
Setting up access right to WL-600g
To protect your wired and wireless LAN, we recommend setting up access protection
VRDVWRSUHYHQW:/JIURPEHLQJYLHZHGRUPRGLÀHGE\XQDXWKHQWLFDWHGXVHUV
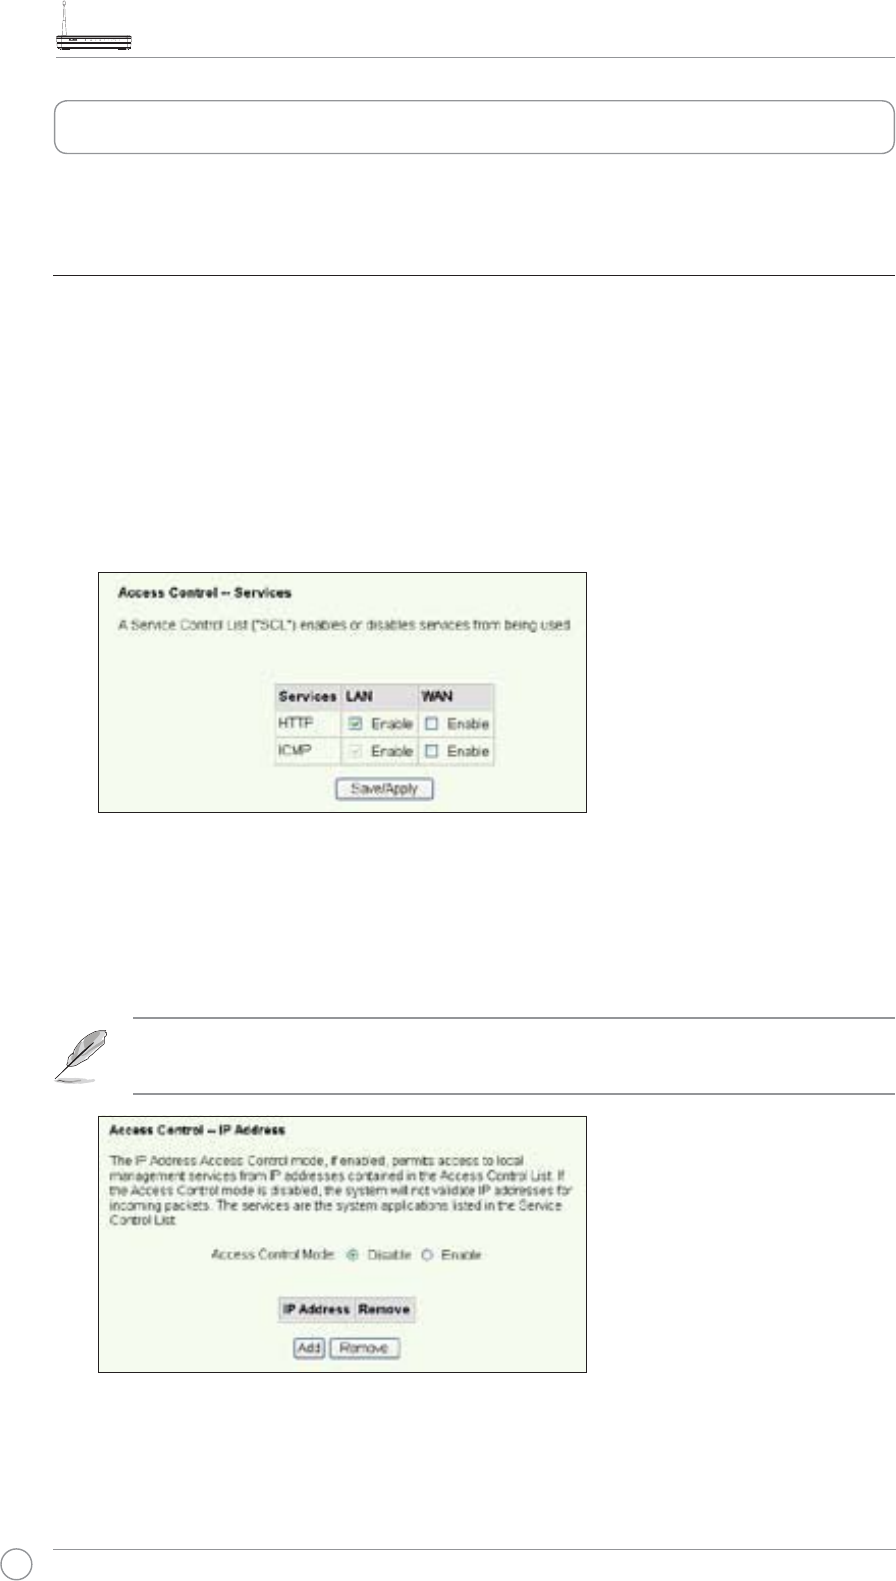
Service restriction
WL-600g provides a Service Control List (SCL) that can enable or disable services
ZKLFKDUH XVHGWR DFFHVVWKH URXWHUFRQÀJXUDWLRQ LQWHUIDFH<RX FDQFKRRVH DOORZLQJ
+773 ,&03IURP:$1 RUDOORZLQJ +773IURP /$1$IWHUFRQÀJXUDWLRQ LVFRPSOHWH
click Save/Apply to activate the settings.
IP address restriction
To protect the router from being accessed by unauthenticated user in your LAN, you can
restrict the access right to the hosts with certain IP addresses. Click Management ->
Access Control -> IP Addresses to setup the IP address for the authenticated network
supervisors.
Before setting up the IP address restriction, make sure addresses of
authenticated hosts are static.
WL-600g All-in-1 Wireless ADSL2/2+ Home Gateway User Manual
33
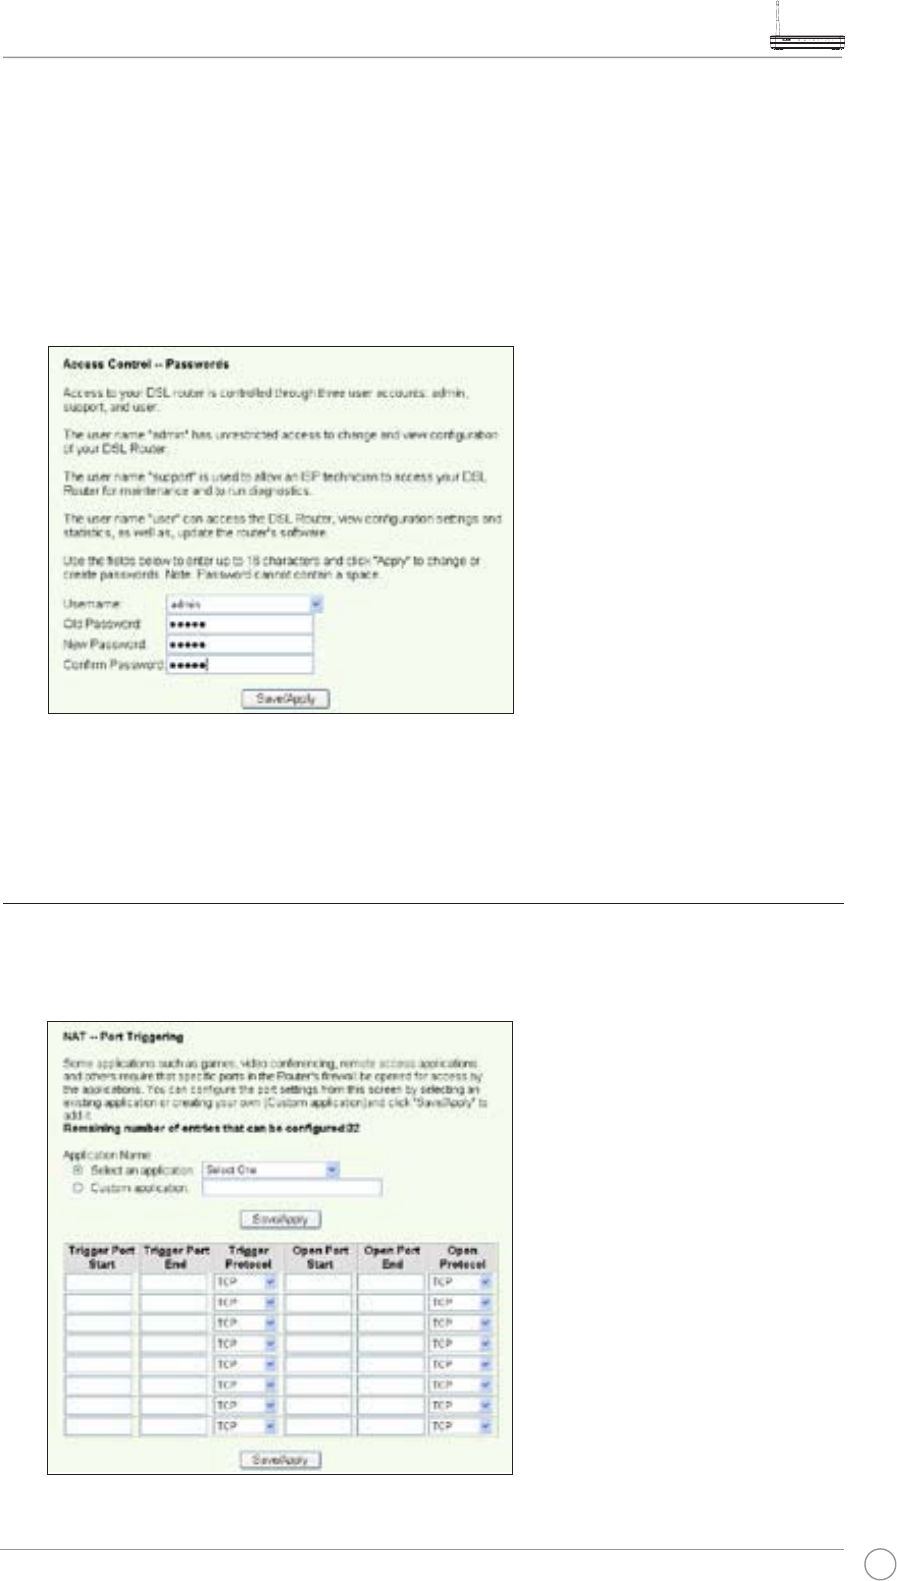
Password protection
WL-600g ADSL also provides three levels of access right: admin, support, and user.
Account "admin" has full access to change and view configuration of the router,
"support" is for ISP technician to view and keep maintenance to the router, "user" can
view the router settings and statistics, as well as to update the software.
1. Click Management -> Access Control -> Passwords in the left side menu to
setup passwords for these accounts.
6HOHFWWKHDFFRXQWXVHUQDPHDQGÀOOLQROGSDVVZRUGDQGQHZSDVVZRUGWZLFH
Each passwords contains up to 16 characters or digits.
3. Press Save/Apply to save and activate the settings.
Setting up port triggering
Some applications such as games, video conferencing, and remote access require
VSHFLÀHGSRUWV LQ WKHÀUHZDOO WREH RSHQHGIRU UHPRWHDFFHVV<RX FDQFRQÀJXUH WKH
port settings by selecting an existing application or creating your custom applications.
WL-600g All-in-1 Wireless ADSL2/2+ Home Gateway User Manual
34
1. Click Advanced Setup -> NAT -> Port Triggering in the left side menu to open the
FRQÀJXUDWLRQSDJH&OLFNAdd to create a new rule.
6HOHFWWKHVHUYLFH\RXZDQWWRFRQÀJXUHDQGOHWWKHV\VWHPDXWRPDWLFDOO\ÀOOLQWKH
external and internal port number and protocol type. You can also select Custom
Server radio button to designate a certain known server.
3. Fill in trigger port (range) and protocol, open port (range) and protocol for the
service if you select Custom Server radio button.
4. Press Save/Apply to save and activate the settings.
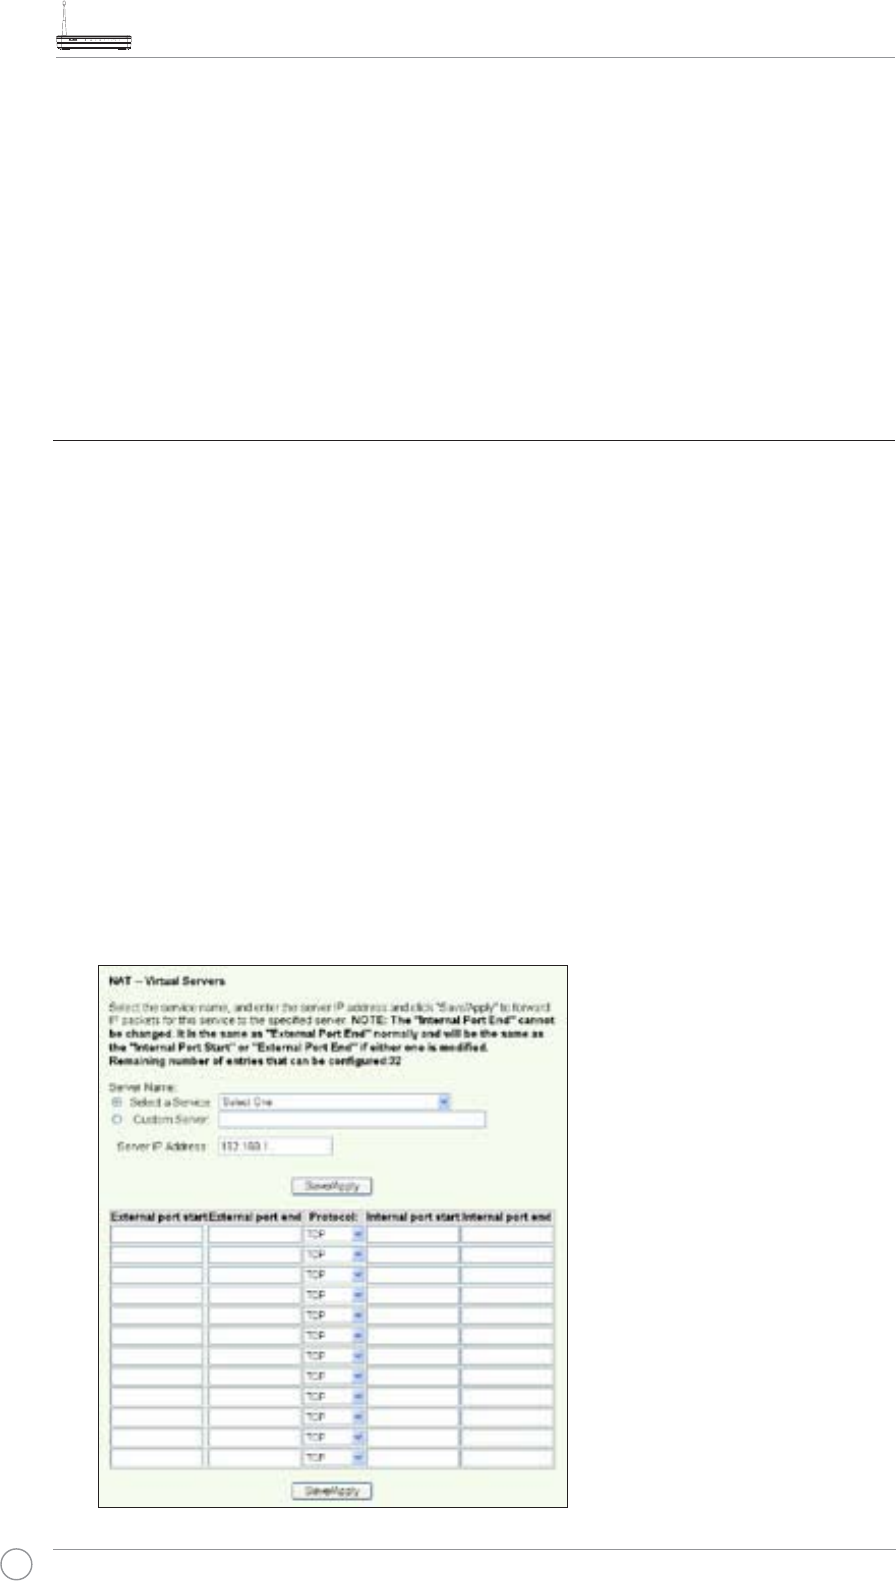
Setting up virtual server
9LUWXDOVHUYHUDOORZVGLUHFWLQJ:$1LQFRPLQJWUDIÀFWRKRVWVRUVHUYHUVXVLQJSULYDWH,3
addresses within a LAN. With virtual server, the router checks the port number of the
packets sent to the WAN interface, translates the port numbers into private IP address,
and redirects the packets to the corresponding internal hosts and servers. WL-600g
supports up to 32 virtual server entries. To set up virtual server:
1. Click Advanced Setup -> NAT -> Virtual Server in the left side menu to open the
FRQÀJXUDWLRQSDJH&OLFNAdd to create a new rule.
6HOHFWWKHVHUYLFH\RXZDQWWRFRQÀJXUHDQGOHWWKHV\VWHPDXWRPDWLFDOO\ÀOOLQWKH
external and internal port number and protocol type. You can also select Custom
Server radio button to designate a certain known server.
3. Fill in external port (range), internal port (range), and protocol for the service if you
select Custom Server radio button.
4. Fill the Server IP Address box with the network address of the host or server within
your LAN.
5. Press Save/Apply to save and activate the settings.
WL-600g All-in-1 Wireless ADSL2/2+ Home Gateway User Manual
35
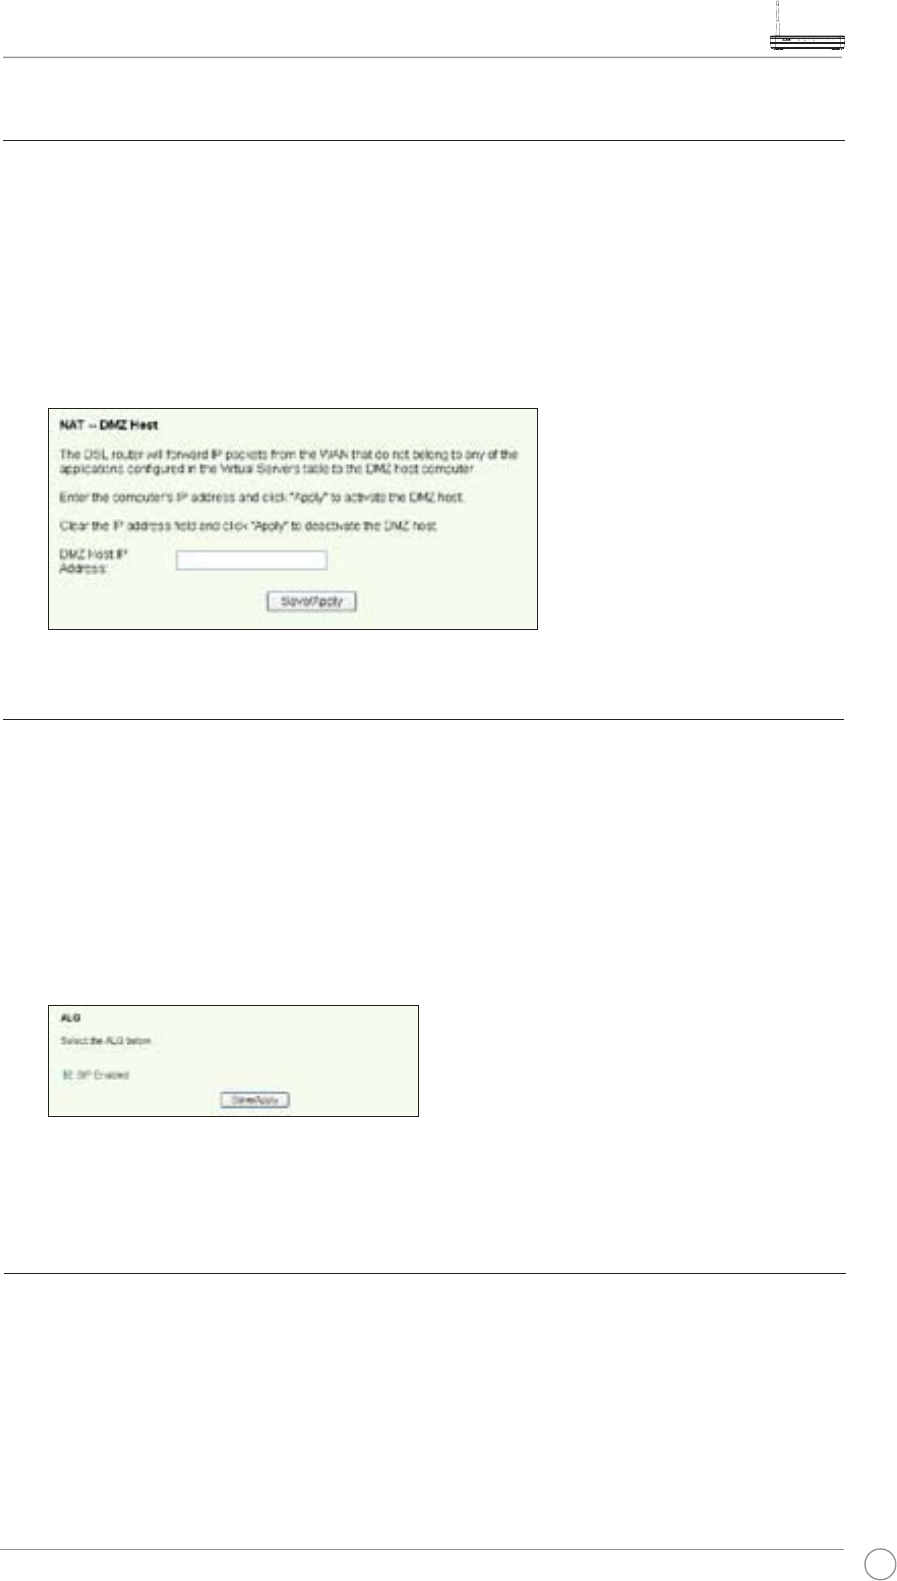
Setting up DMZ host
The function of DMZ is similar to that of virtual server. The difference between virtual
server and DMZ is that DMZ opens all ports to WAN while virtual server opens ports
DFFRUGLQJWRWKHGHPDQGRIWKHHQDEOHGVHUYLFHV7RFRQÀJXUH'0=KRVW
1. Click Advanced Setup -> NAT -> DMZ Host in the left side menu to open the
FRQÀJXUDWLRQSDJH
2. Enter the IP address of the host to be setup as DMZ host.
3. Press Save/Apply to activate the settings.
$OORZLQJ6,3UHTXHVWWKURXJK1$7
NAT checks IP header only and translate the information into private IP address.
However, for applications that demand many dynamic ports for session control such as
Session Initiation Protocol (SIP), traditional NAT cannot translate the address because
lack of preset service ports. To enable such services while at the same time do not
sacrifice network security, WL-600g introduces Application Layer Gateway (ALG) to
DOORZ6,3UHTXHVWJRLQJWKURXJKÀUHZDUHDQG1$7IURP:$17RFRQÀJXUH$/*
1. Click Advanced Setup -> NAT -> ALG in the left side menu to open the
FRQÀJXUDWLRQSDJH
2. Select SIP Enabled checkbox to allow SIP request, or uncheck to disable.
3. Press Save/Apply to save and activate the settings.
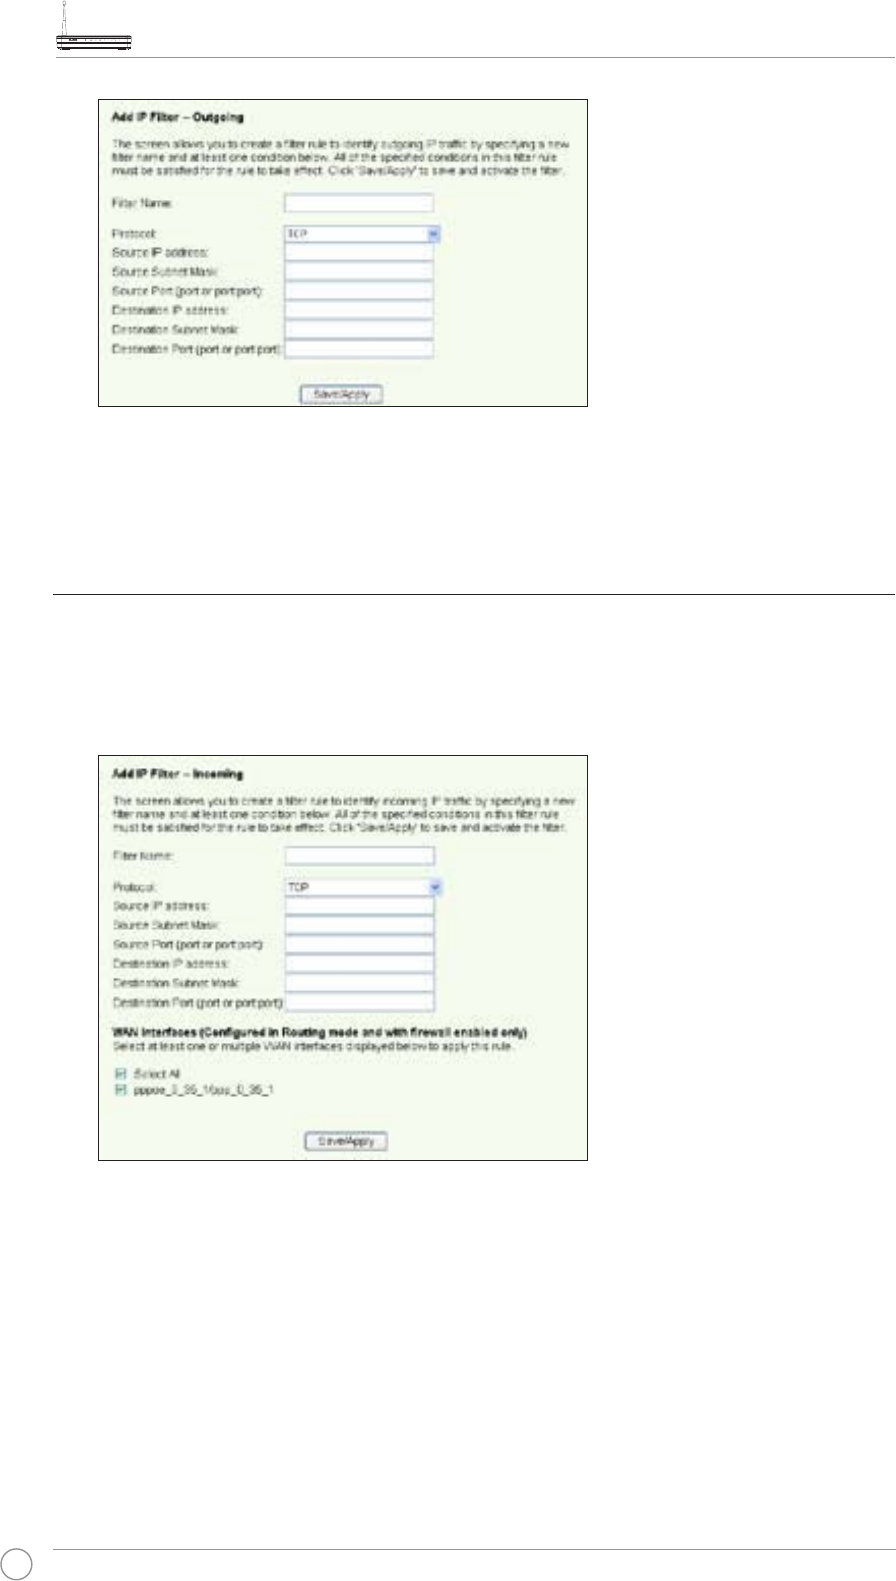
)LUHZDOO2XWJRLQJ,3ÀOWHU
%\GHIDXOWDOORXWERXQG,3WUDIÀFLVDOORZHG<RXFDQEORFNFHUWDLQW\SHVRI,3WUDIÀFE\
VHWWLQJXSÀOWHUUXOHVDW:/J
1. Click Advanced Setup -> Security -> IP Filtering -> Outgoing in the left side
PHQXWRRSHQWKHFRQÀJXUDWLRQSDJH&OLFNAdd to create a new rule.
WL-600g All-in-1 Wireless ADSL2/2+ Home Gateway User Manual
36
'HÀQHDFilter NameIRUWKHÀOWHUUXOH6SHFLI\SURWRFROVRXUFH,3DGGUHVVVXEQHW
mask and port (range) and destination IP address, subnet mask and port (range).
3. Press Save/Apply to save and activate the settings.
)LUHZDOO,QFRPLQJ,3ÀOWHU
%\GHIDXOWDOOLQFRPLQJ,3WUDIÀFLVEORFNHG<RXFDQDOORZFHUWDLQW\SHVRI,3WUDIÀFE\
VHWWLQJXSÀOWHUUXOHVDW:/J
1. Click Advanced Setup -> Security -> IP Filtering -> Incoming in the left side
PHQXWRRSHQWKHFRQÀJXUDWLRQSDJH&OLFNAdd to create a new rule.
'HÀQHDFilter NameIRUWKHÀOWHUUXOH6SHFLI\SURWRFROVRXUFH,3DGGUHVVVXEQHW
mask and port (range) and destination IP address, submask and port (range).
6HOHFWWKH:$1LQWHUIDFHWKURXJKZKLFKWKHSDFNHWVHQWHUWKHÀUHZDOO
4. Press Save/Apply to save and activate the settings.
WL-600g All-in-1 Wireless ADSL2/2+ Home Gateway User Manual
37
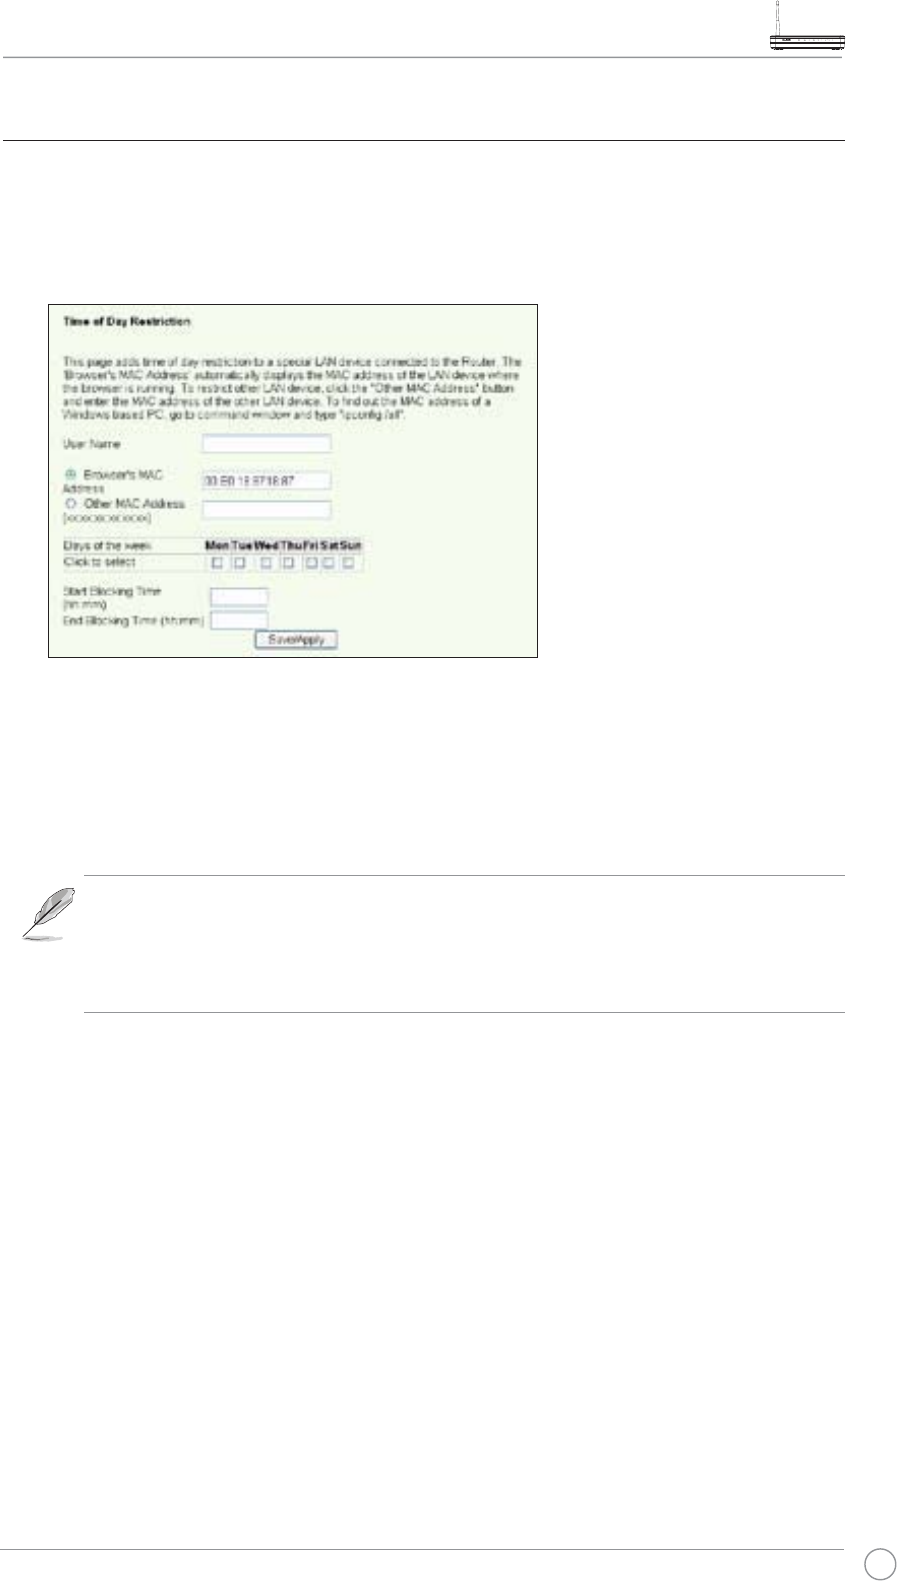
Access time restriction
This function enables to put time restriction on Internet access by setting up blocking
WLPHWDEOH7RFRQÀJXUHWKHDFFHVVWLPHUHVWULFWLRQ
1. Click Advanced Setup -> Security -> Parental Control in the left side menu to
RSHQWKHFRQÀJXUDWLRQSDJH&OLFNAdd to create a new rule.
2. Fill in the username to whom you want to apply the restriction.
)LOOLQWKH0$&DGGUHVVRIWKHUHVWULFWHGKRVW,I\RXDUHDFFHVVLQJWKLVFRQÀJXUDWLRQ
at the computer of restricted host, select Browser's MAC Address radio button. The
V\VWHPDXWRPDWLFDOO\GHWHFWVWKH0$&DGGUHVVRIWKHFRQÀJXUDWLRQFRQVROH,I\RX
ZDQWWRFRQÀJXUHKRVWVRWKHUWKDQWKHFRQVROHFRPSXWHUHQWHUWKH0$&DGGUHVV
manually.
To get the MAC address of a host, click Start menu on the desktop of the
host, select Run, type cmd into the box and press OK, then type command
LSFRQÀJDOODQGSUHVVHQWHU<RXFDQÀQGWKH0$&DGGUHVVGLVSOD\HGDV
Physical Address.
4. Select the days of a week to which the rule shall apply.
5. Fill time into the Start Blocking Time and End Blocking Time box to set up block
time.
6. Press Save/Apply to save and activate the settings.
WL-600g All-in-1 Wireless ADSL2/2+ Home Gateway User Manual
38
7KLVFKDSWHUVKRZVKRZWRFRQÀJXUHRWKHUDGYDQFHGURXWHUIHDWXUHVRI:/J
WAN
Click Advanced Setup -> WAN in the left side menu to enter the WAN setup page. This
page allows you to edit the WAN settings.
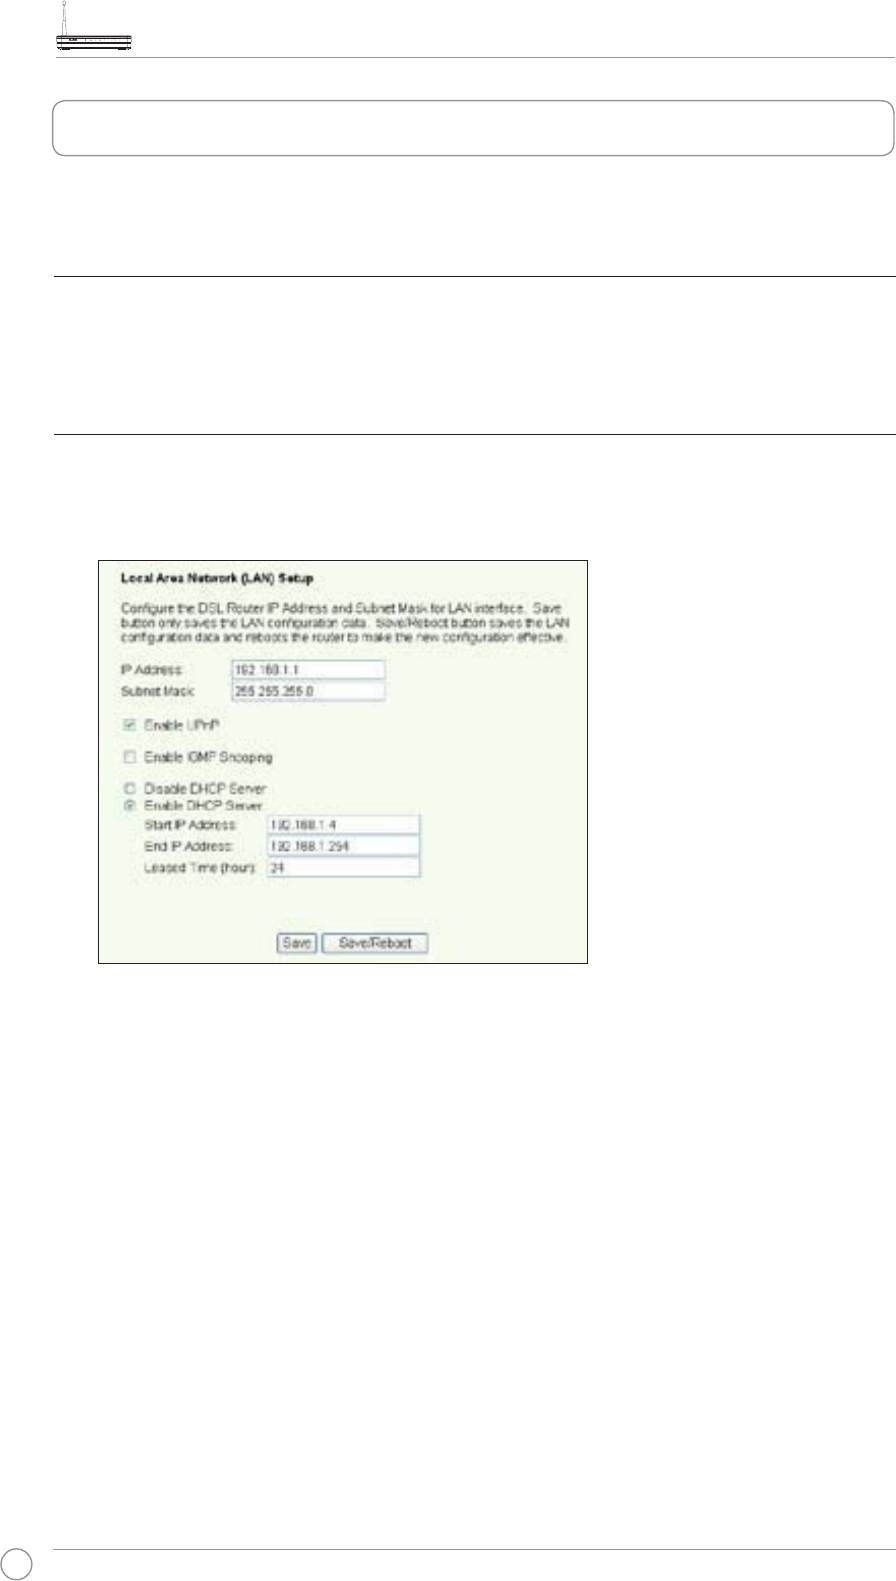
LAN
1. Click Advanced Setup -> LAN in the left side menu to enter the Local Area Network
/$16HWXSpage. This page allows to change the IP address and subnet mask of
the router, enables or disables UPnP, IGMP snooping and DHCP server.
The default settings are:
• IP Address: 192.168.1.1
• Subnet mask: 255.255.255.0
• Enable UPnP: Yes
• Enable IGMP Snooping: No
• Enable DHCP Server: Yes
Start IP Address: 192.168.1.2
End IP Address: 192.168.1.254
Lease Time (hour): 24
'+&3VHUYHULVHQDEOHGE\GHIDXOW<RXFDQGHÀQHZKLFKDGGUHVVHVWREHDVVLJQHGWR
the LAN computers by DHCP server.
2. Press Save to save the configurations and go on setting up other features. If all
settings are complete, press Save/ Reboot to apply the settings and reboot WL-600g.
Advanced settings
WL-600g All-in-1 Wireless ADSL2/2+ Home Gateway User Manual
39
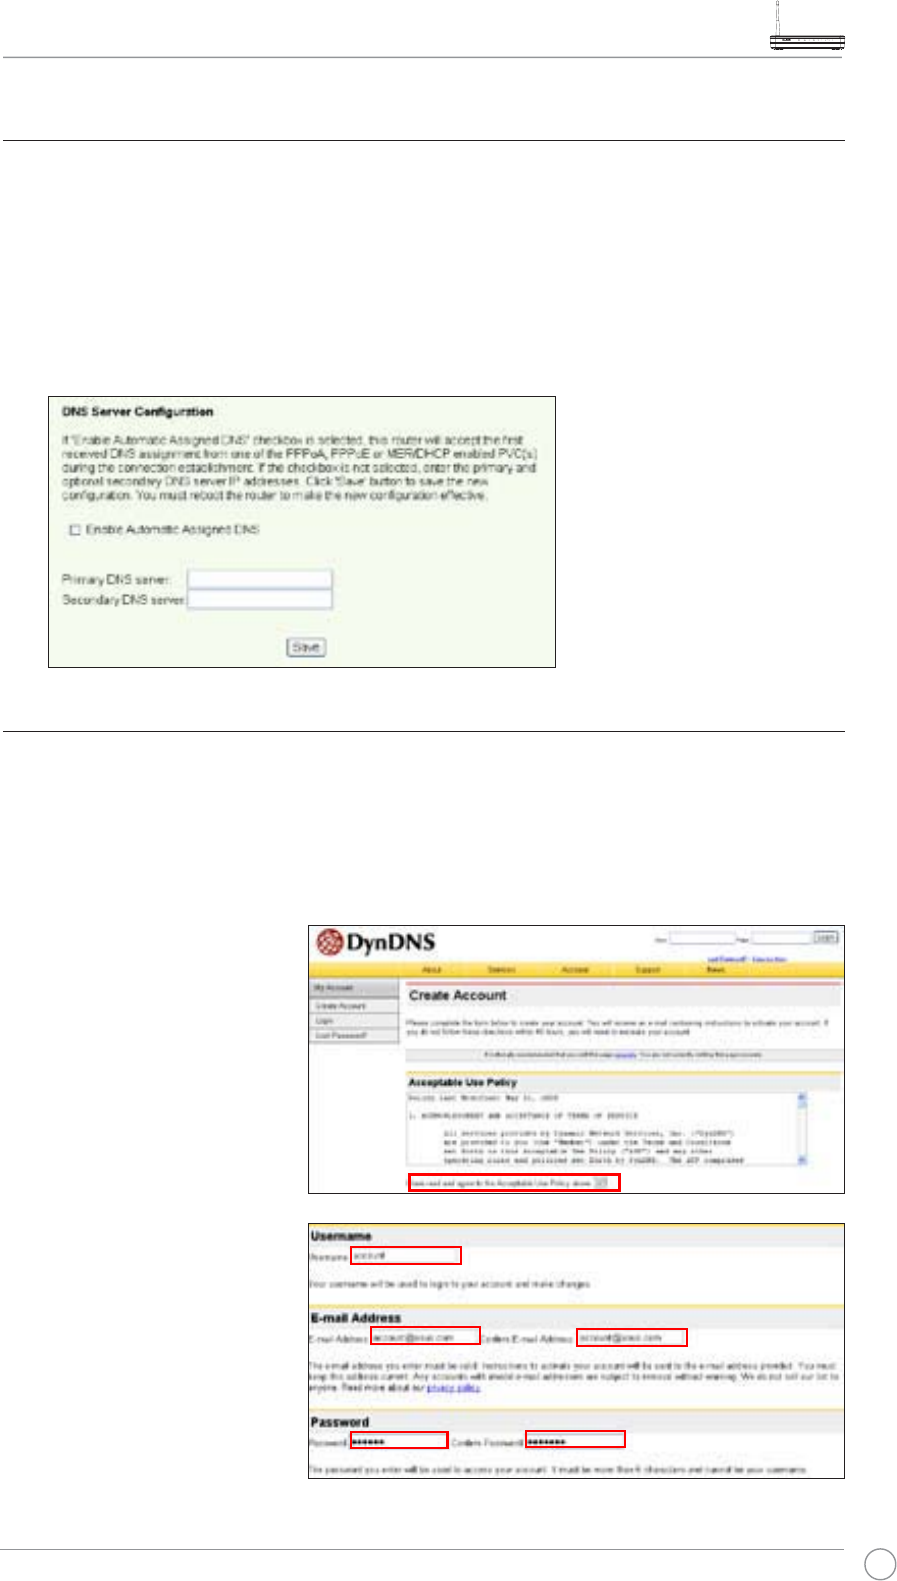
Setting up DNS server
Domain Name System (DNS) server is used to translate IP addresses into easy-to-
remember domain names, such as www.asus.com, and vice versa.
Click Advanced Setup -> DNS -> DNS ServerWRRSHQWKH'16VHUYHUFRQÀJXUDWLRQ
page. By default, the DNS server is set to automatically accept the DNS server assigned
E\,63,I\RXU,63VSHFLÀHVFHUWDLQ'16VHUYHUDGGUHVVHVXQFKHFNEnable Automatic
Assigned DNS checkbox and type the DNS addresses into the Primary DNS server
box and Secondary DNS server box (if any). Click Save to save the settings.
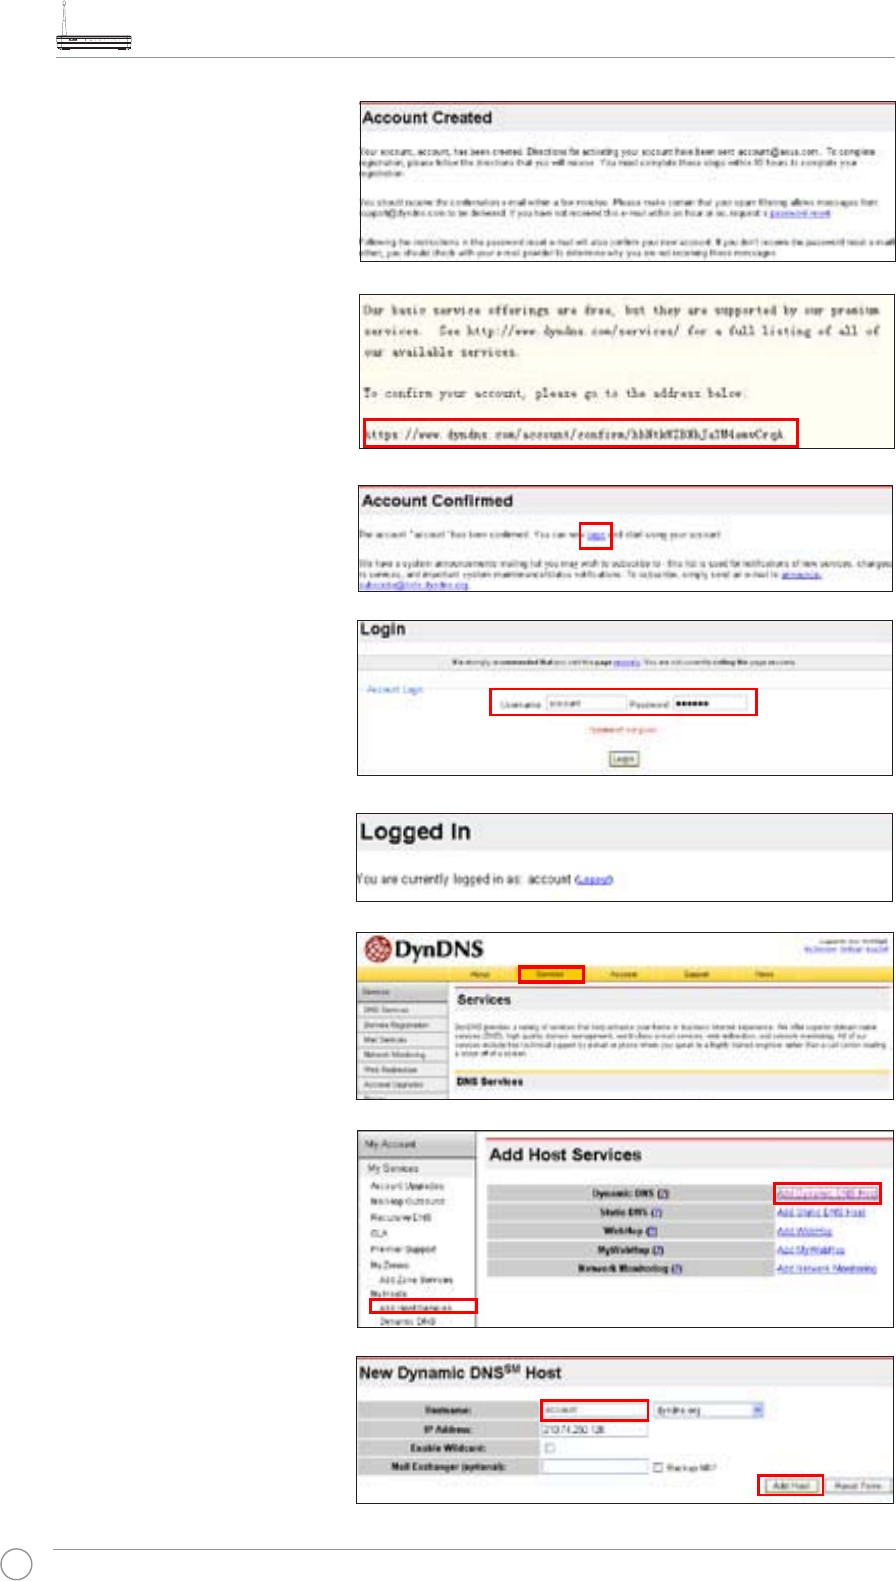
Setting up dynamic DNS
Hosts using dynamic IP addresses can associate with a domain name via Dynamic
DNS (DDNS). To use DDNS function, you need to first register at a dynamic DNS
service provider, such as DDNS, to get a valid account.
''16DFRXQWUHTXHVWSURFHGXUHV
1. Type www.DynDNS.
org to the address box
of your Web browser
and press Enter.
Read the policy and
select "I have read...".
2. Enter your user
name, e-mail address,
password, then click
Create Account.
WL-600g All-in-1 Wireless ADSL2/2+ Home Gateway User Manual
40
3. A message prompts out
asking you to check your
mailbox for the activation
letter. Open your mailbox
and read the mail.
<RXFDQÀQGWKHOHWWHULQ
your E-mail box. Click
the hyperlink.
5. The link directs you to a
login page. Click login.
6. Enter the username
and password then click
Login.
7. After logging in, you
can see this welcome
message.
8. Select Services tab.
9. Click Add Dynamic
DNS Host .
10. Enter the host name
then click Add Host.
WL-600g All-in-1 Wireless ADSL2/2+ Home Gateway User Manual
41
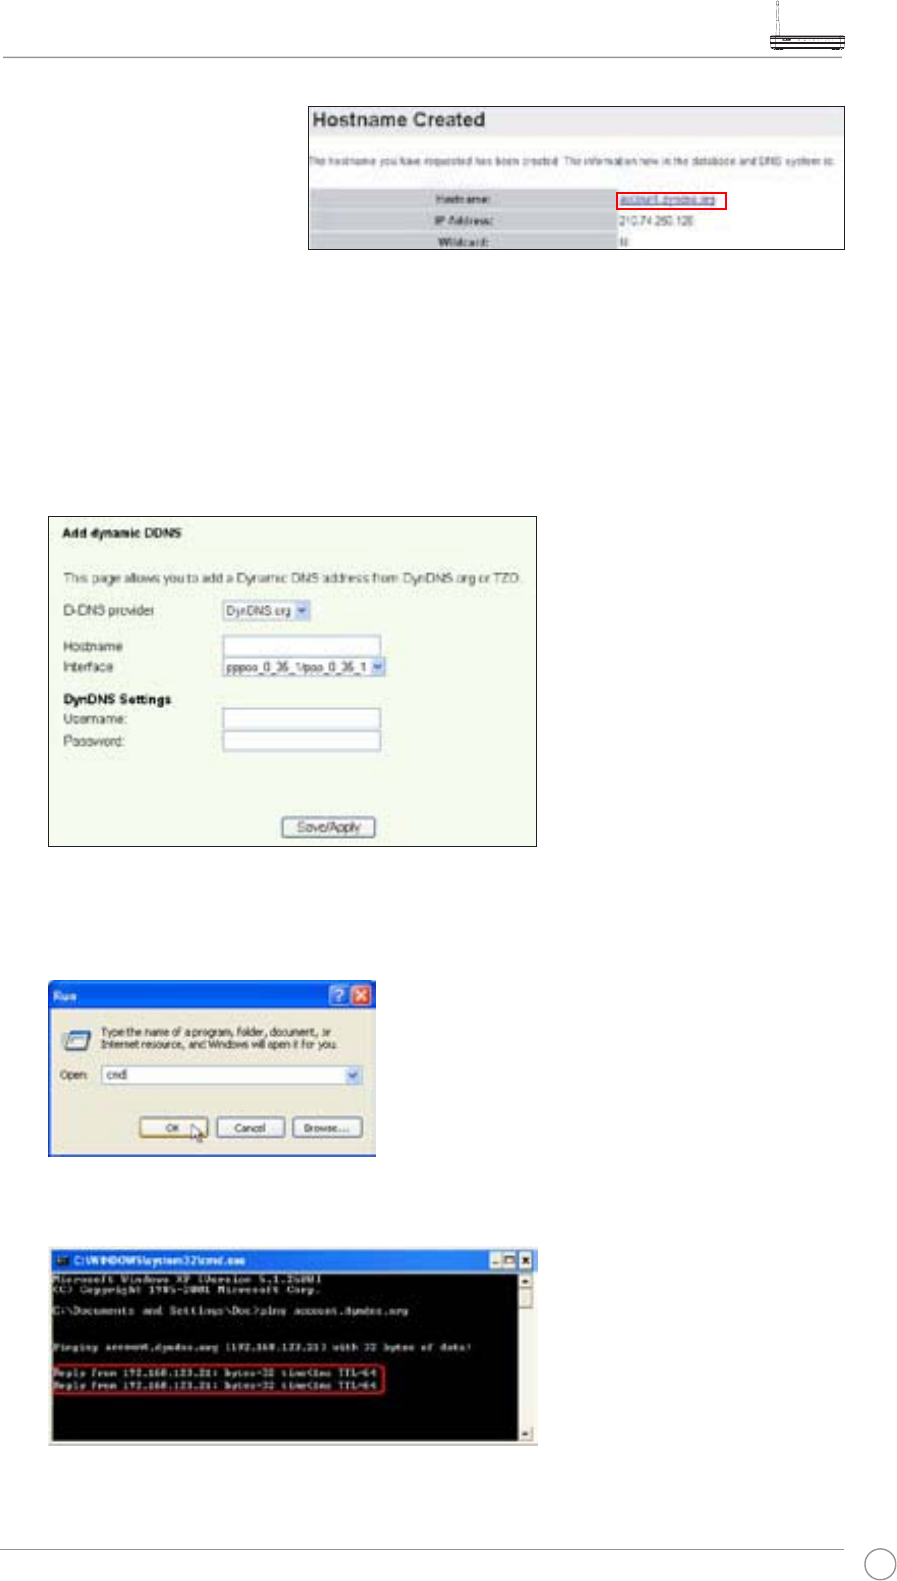
11. You can see this
message when your
hostname is successfully
created.
3. Press Save/Apply to save and activate the settings.
4. To verify whether DDNS is working, click Start menu and select Run....Type cmd
and click OK to open the CLI console.
5. Type ping account.dyndns.org (your DDNS domain name). If you can see the
reply like what is shown in the picture, DDNS is working correctly.
WL-600g DDNS settings
1. Click Advanced Setup -> DNS -> Dynamic DNSWRHQWHUWKHFRQÀJXUDWLRQSDJH
3UHVV$GGWRFRQÀJXUH'\QDPLF'16
2. Choose your DDNS provider and fill in the hostname. The supported DDNS
provider are DynDNS.org and TZO. DynDNS.org settings require username and
password of your DDNS account. TZO requires registered Email address and Key.
WL-600g All-in-1 Wireless ADSL2/2+ Home Gateway User Manual
42
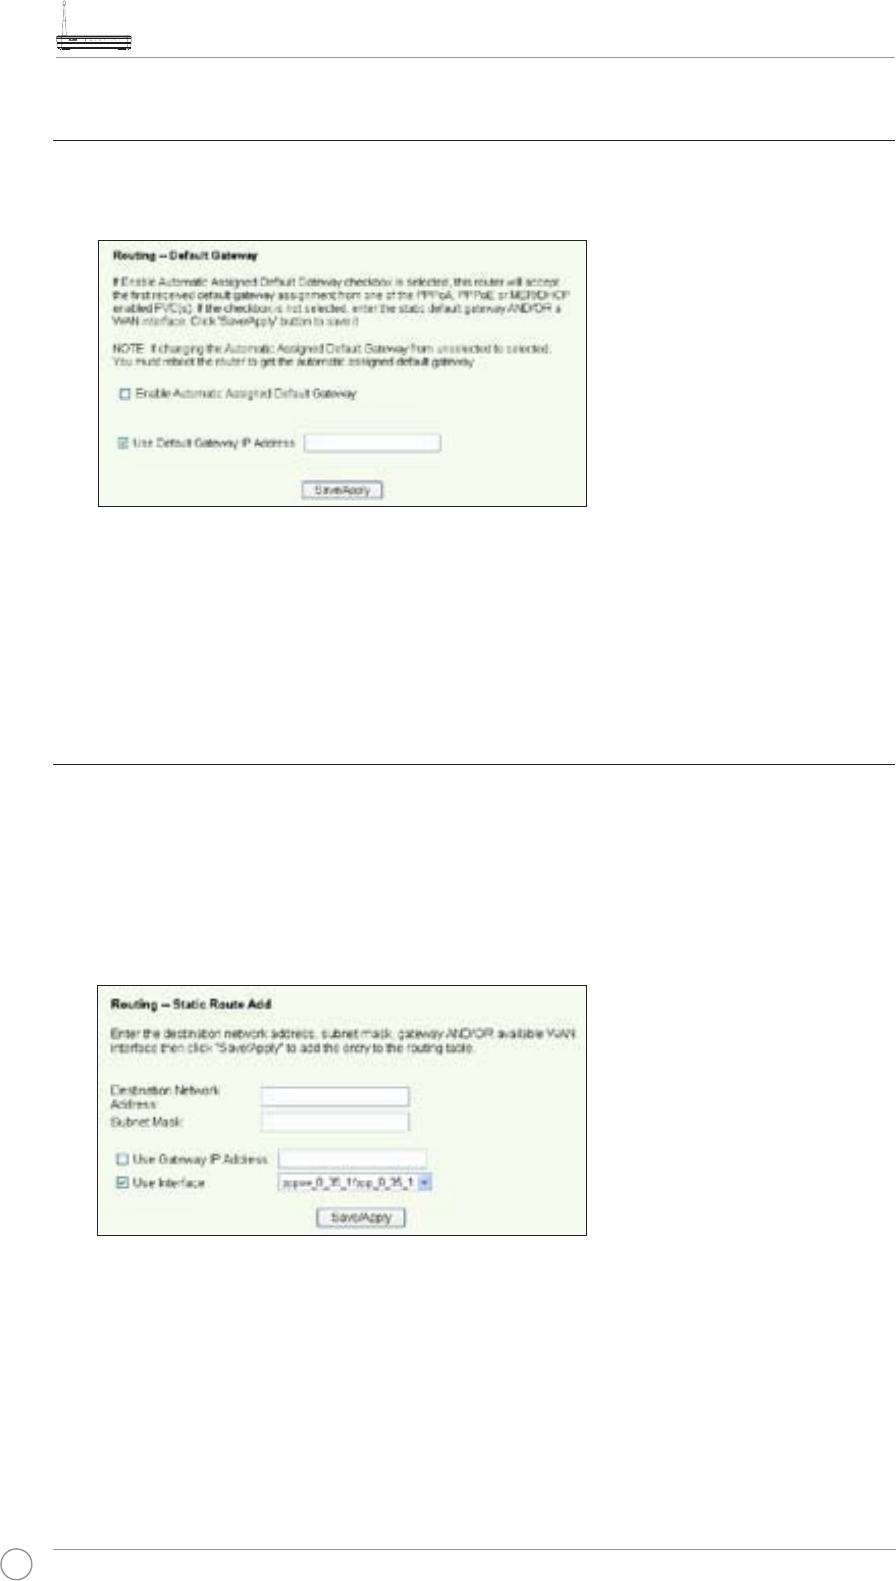
Setting up default gateway
This section allows to manually setup default gateway of Internet connection.
1. Click Advanced Setup -> Routing -> Default GatewayWRRSHQWKHFRQÀJXUDWLRQSDJH
2. By default, automatic assigned default gateway is enabled, that is, the router
accepts the first received gateway assignment from ISP. If your ISP specifies a
gateway, uncheck Enable Automatic Assigned Default Gateway and enter the
gateway address.
3. Press Save/Apply to save and activate the settings.
Setting up static route
For simple networks that have only one router, you do not need to set up static route.
For more complicated network such as an enterprise network where several routers and
GLIIHUHQWVXEQHWVH[LVW\RXQHHGWRFRQÀJXUHVWDWLFURXWHVVRDVWRGLUHFWWKHQHWZRUN
WUDIÀFFRUUHFWO\
1. Click Advanced Setup -> Routing -> Static Route WRRSHQWKHFRQÀJXUDWLRQSDJH
and view the current static route settings. Press Add to create a new static route.
7KHFRQÀJXUDEOHVHWWLQJVLQFOXGH
• Destination Network: input the IP address of destination;
• Subnet Mask: input the subnet mask of destination;
• Use Gateway IP Address: input the gateway network address (optional);
• User Interface: select the interface of your router to which the static route applies.
3. Press Save/Apply to save and activate the settings.
WL-600g All-in-1 Wireless ADSL2/2+ Home Gateway User Manual
43
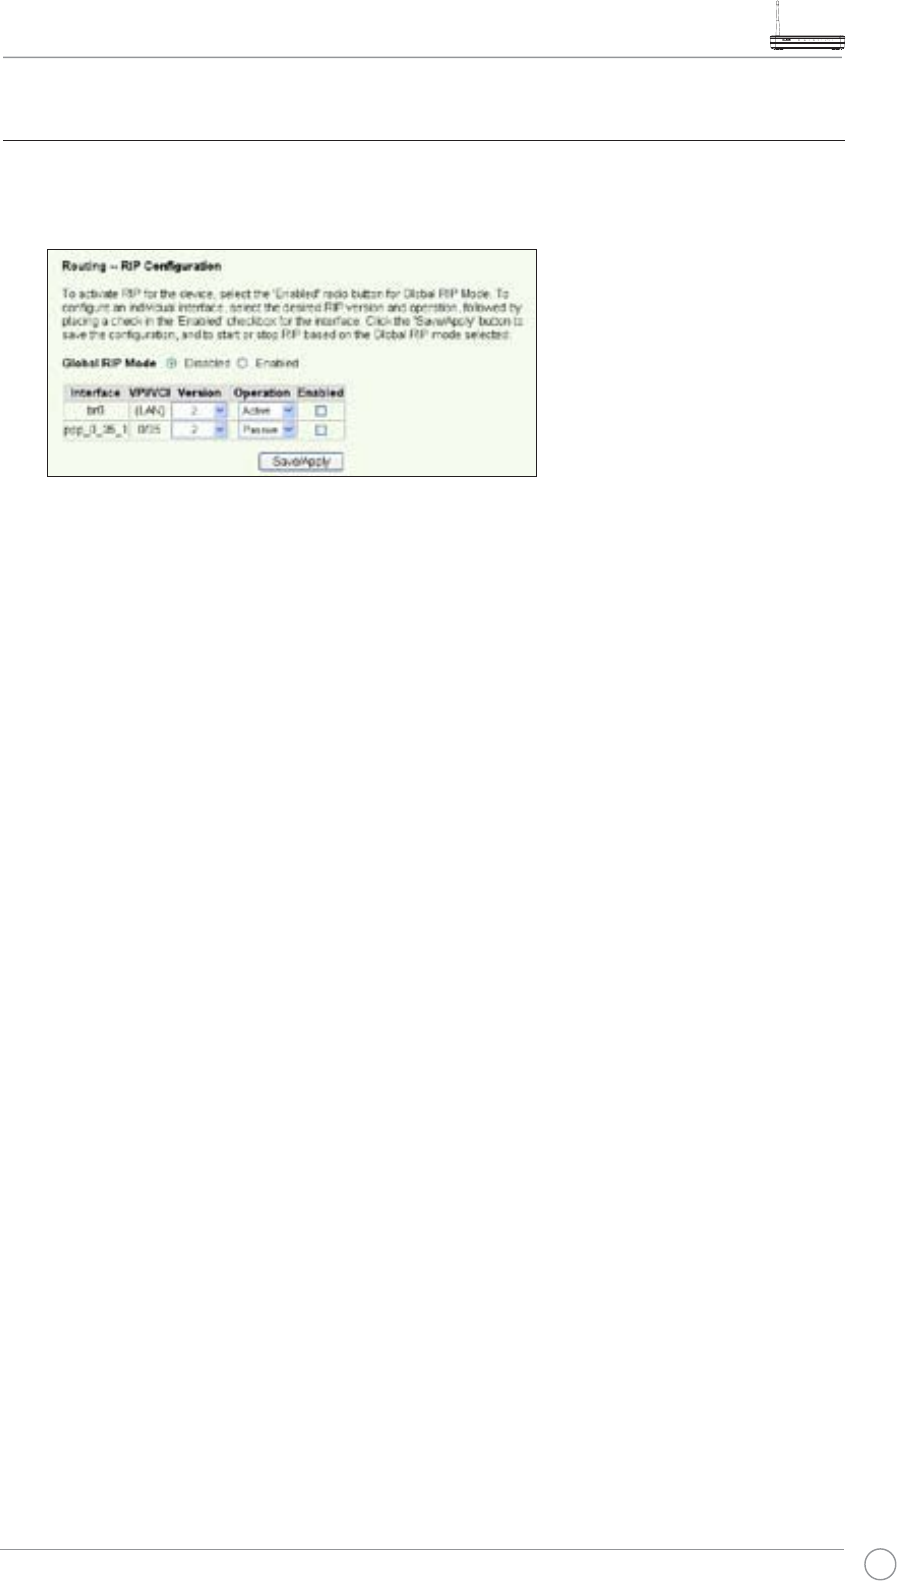
Setting up routing protocol - RIP
RIP stands for Rounting Information Protocol. WL-600g supports RIPv1 and RIPv2.
1. Click Advanced Setup -> Routing -> RIPWRRSHQWKHFRQÀJXUDWLRQSDJH
2. To activate RIP, select Enabled radio button for global RIP mode.
7R FRQÀJXUH DQ LQGLYLGXDO LQWHUIDFH VHOHFW WKH GHVLUHG 5,3 YHUVLRQ DQG RSHUDWLRQ
and check the Enabled checkbox for the interface.
4. Press Save/Apply to save and activate the settings.
WL-600g All-in-1 Wireless ADSL2/2+ Home Gateway User Manual
44
WL-600g offers two USB2.0 ports for setting up FTP server and sharing USB printer.
FTP server function
Before setup, you need to prepare a USB disk for FTP storage.
If the format of your external hard disk is NTFS, the FTP server can only be
UHDGDEOH 8SORDGLQJ ÀOHV RQ WKH )73 VHUYHU LV QRW DOORZHG %HVLGHV RQO\
Anonymous User can login. Super User can not login under NTFS FTP
server.
Setting up FTP server
To setup FTP server:
1. Plug your USB storage into the USB2.0 port on the WL-600g rear panel. Then click
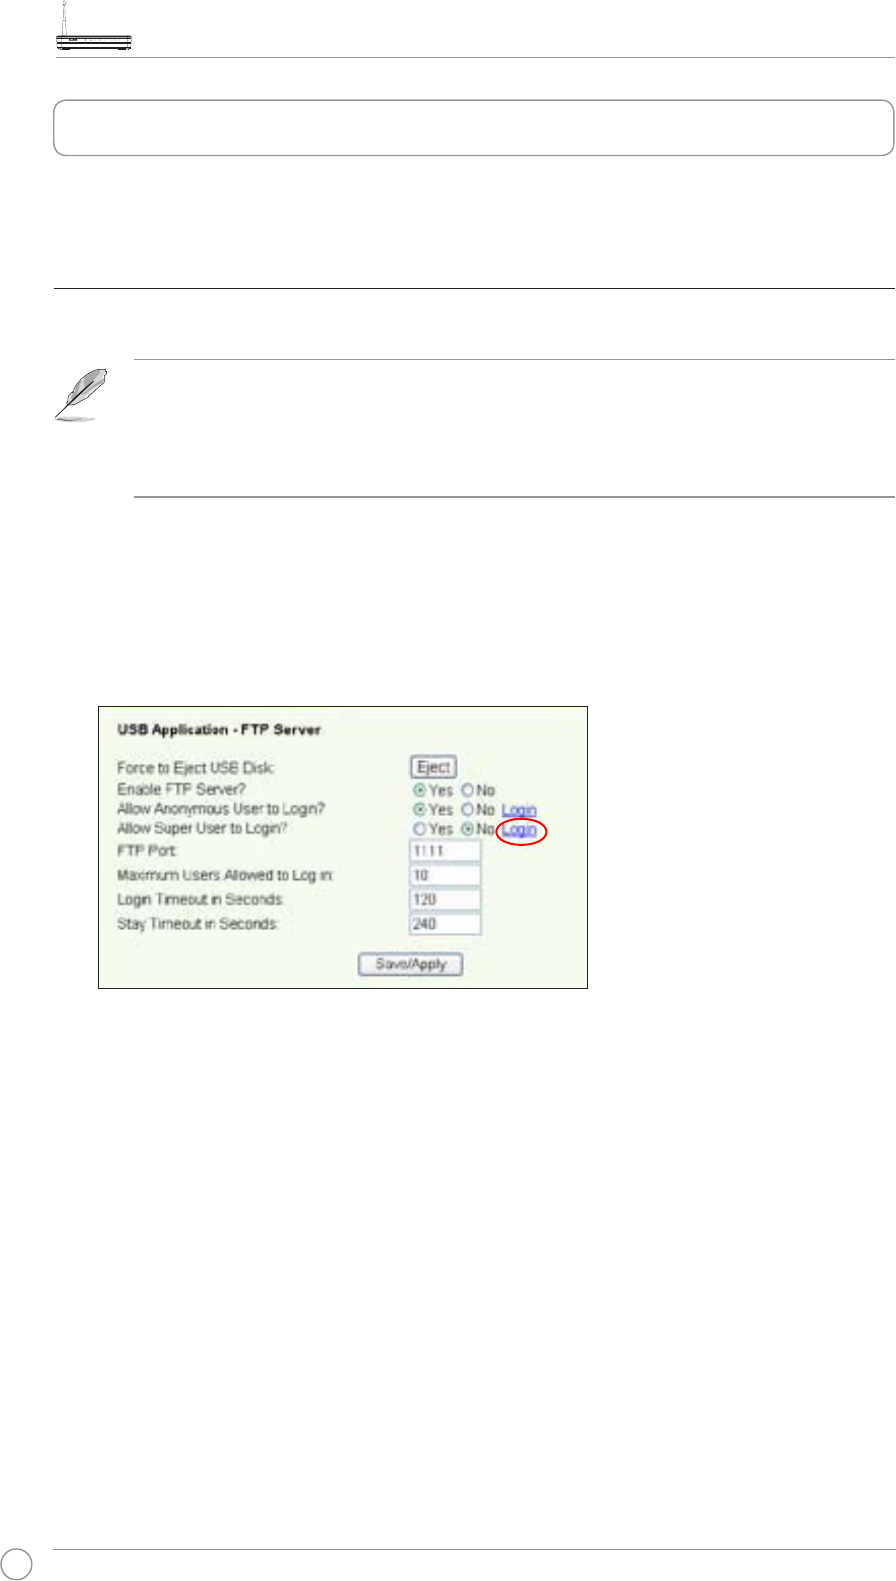
USB Application -> FTP ServerLQWKHOHIWVLGHPHQXWRRSHQWKHFRQÀJXUDWLRQSDJH
USB applications
2. Set Enable FTP Server to Yes.
3. Allow Anonymous User to Login: If you want to allow anonymous user to access
your FTP site, select Yes; if you want to protect your data from unauthenticated
user, select No.
4. Allow Super User to Login: Select Yes to allow super user to access the FTP
server.
5. FTP Port: Set up the port number of the FTP server. For example, if the port number
is set to 1111, you can access the FTP server by typing ftp://192.168.1.1:1111 into the
address box of your Web browser (192.168.1.1 is the default IP address of WL-600g).
6. Maximum User Allowed to Login: set up the maximum login user according to
your working environment.
7. Login Timeout in Seconds: When login times out, the login trail is terminated.
8. Stay Timeout in Seconds: Timeout value for inactive connection.
9. Press Save/Apply to save and activate the settings.
WL-600g All-in-1 Wireless ADSL2/2+ Home Gateway User Manual
45
If you use web access for Super User Login (as the red circle marks),
please set Maximum Users Allowed to Log in to more than 1 or the mes-
sage "server is busy" will pop up.
Setting up FTP account
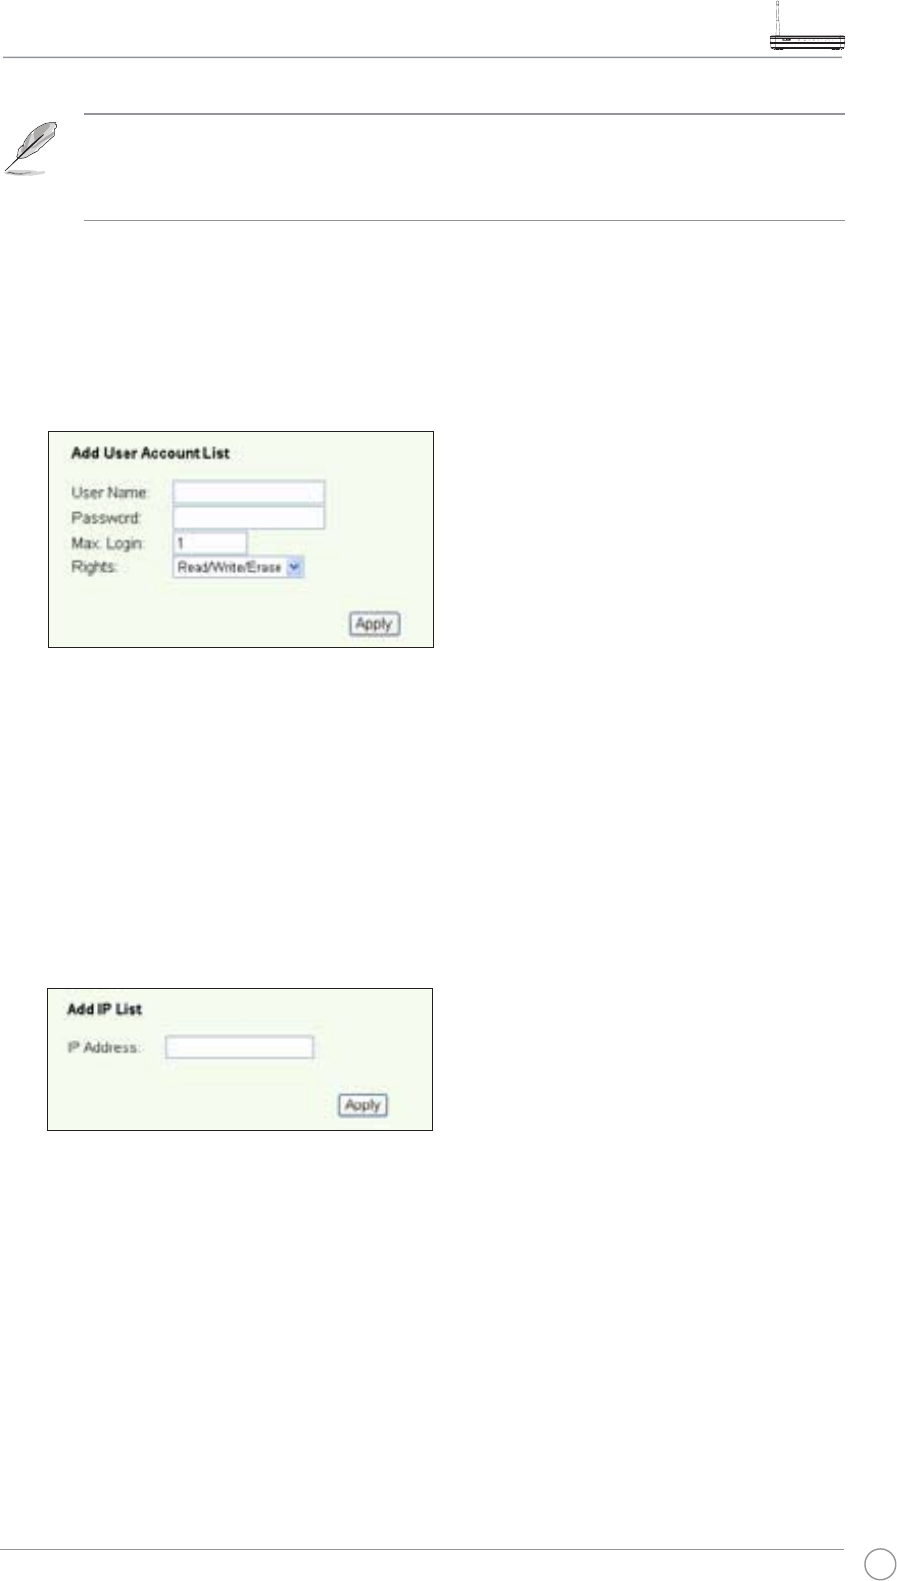
You can set up 12 accounts for your FTP site.
1. Click USB Application -> FTP Server -> User List in the left side menu to open the
FRQÀJXUDWLRQSDJH&OLFNAdd to create new FTP account.
'HÀQHWKH Username, Password for the new account. Setup the Max. Login to
UHVWULFWWKHDFFHVVUHTXHVW'HÀQHWKHDFFHVVULJKWWRWKHDFFRXQW
3. Click Apply to save the new account.
4. Click Save to save and activate the settings.
Setting up FTP security
You can deny access request from certain IP address by setting up Banned IP List.
1. Click USB Application -> FTP Server -> Banned IP List in the left side menu to
RSHQWKHFRQÀJXUDWLRQSDJH&OLFNAdd to create a new rule.
2. Input the IP address of the banned host and click Apply to save the banned IP.
Make sure the banned IP is static.
3. Click Save to save and activate the settings.
Your FTP site is ready. Type IWSSRUWQXPEHU into the address box of
your Web browser and press Enter. When prompted for login, input the username and
password you have set up for FTP account and login.
WL-600g All-in-1 Wireless ADSL2/2+ Home Gateway User Manual
46
Sharing USB printer
You can plug your USB printer to the USB2.0 port of WL-600g to share it within your
LAN. After you plug a printer to the USB port, you can see the status of printer by
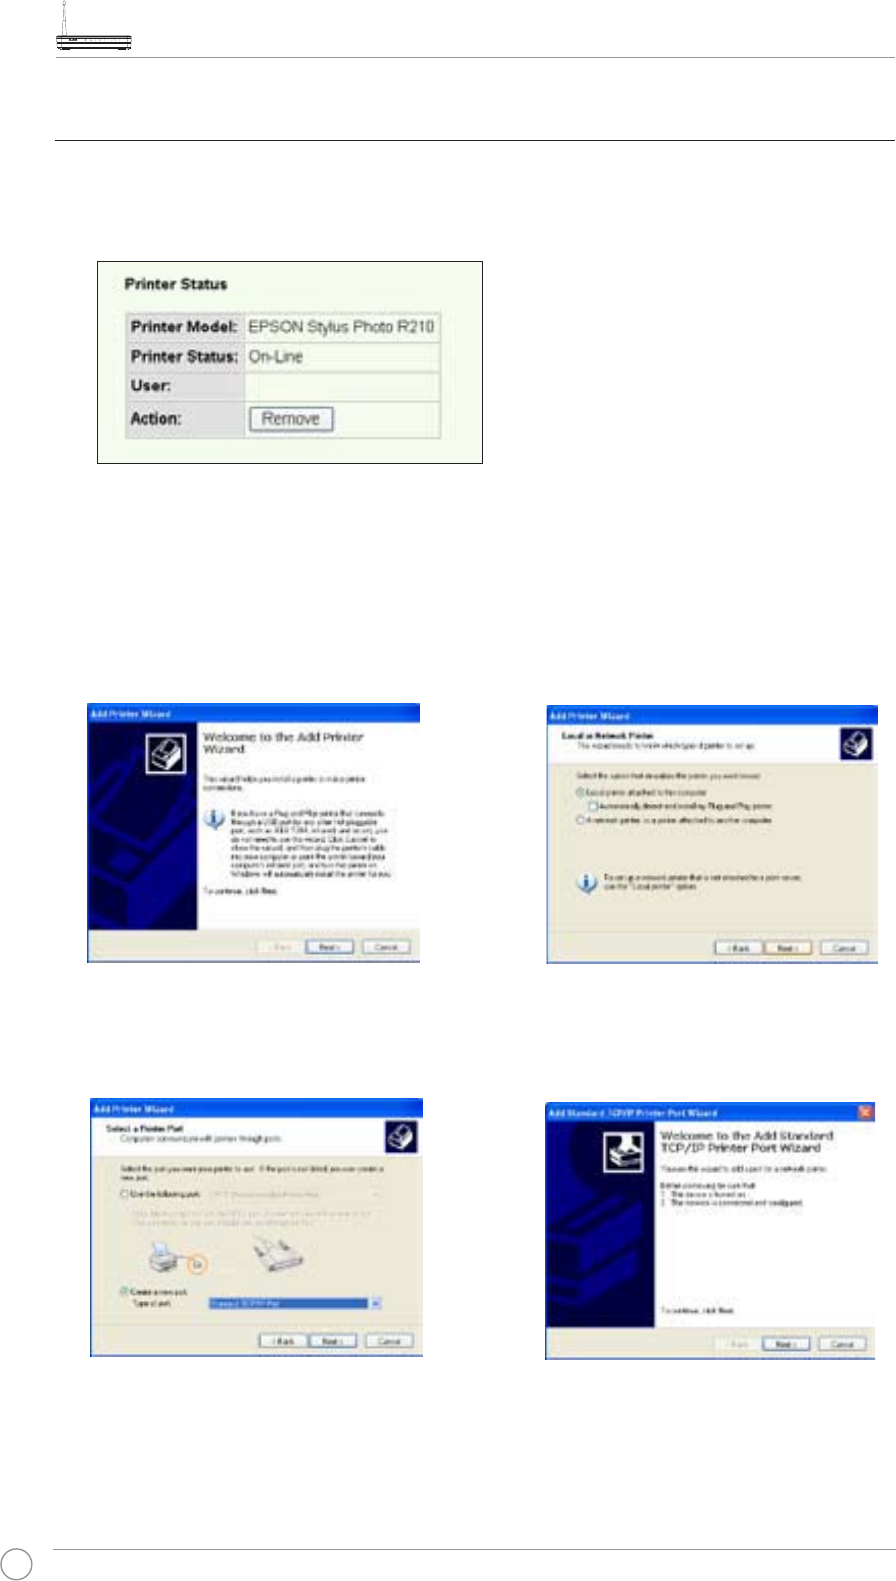
clicking USB Application -> Printer Status.
1. Run Add Printer Wizard from Start
-> Printers and Faxes -> Add a
printer.
2. Select Local printer attached to
this computer and click Next.
3. Select Create a new port and set
Type of port to Standard TCP/IP
Port, then click Next.
4. Click Next to setup TCP/IP port for
accessing the network printer.
Setting up printer client under Windows XP
Follow the steps below to install network printer on your clients.

WL-600g All-in-1 Wireless ADSL2/2+ Home Gateway User Manual
47
5. Input the IP address of WL-600g in
the Printer Name of IP Address
ÀHOGDQGFOLFNNext.
6. Select Custom and click Settings.
7. Set Protocol to LPR and type
LPRServer in Queue Name field.
Click Next to continue.
8. Press NextWRÀQLVKVWDQGDUG7&3
IP port setting.
9. Press Finish to complete the
settings and return to Add Printer
Wizard.
10. Install printer driver from the vendor-
model list. If your printer is not in
the list, click Have Disk to manually
assign the location of driver.
WL-600g All-in-1 Wireless ADSL2/2+ Home Gateway User Manual
48
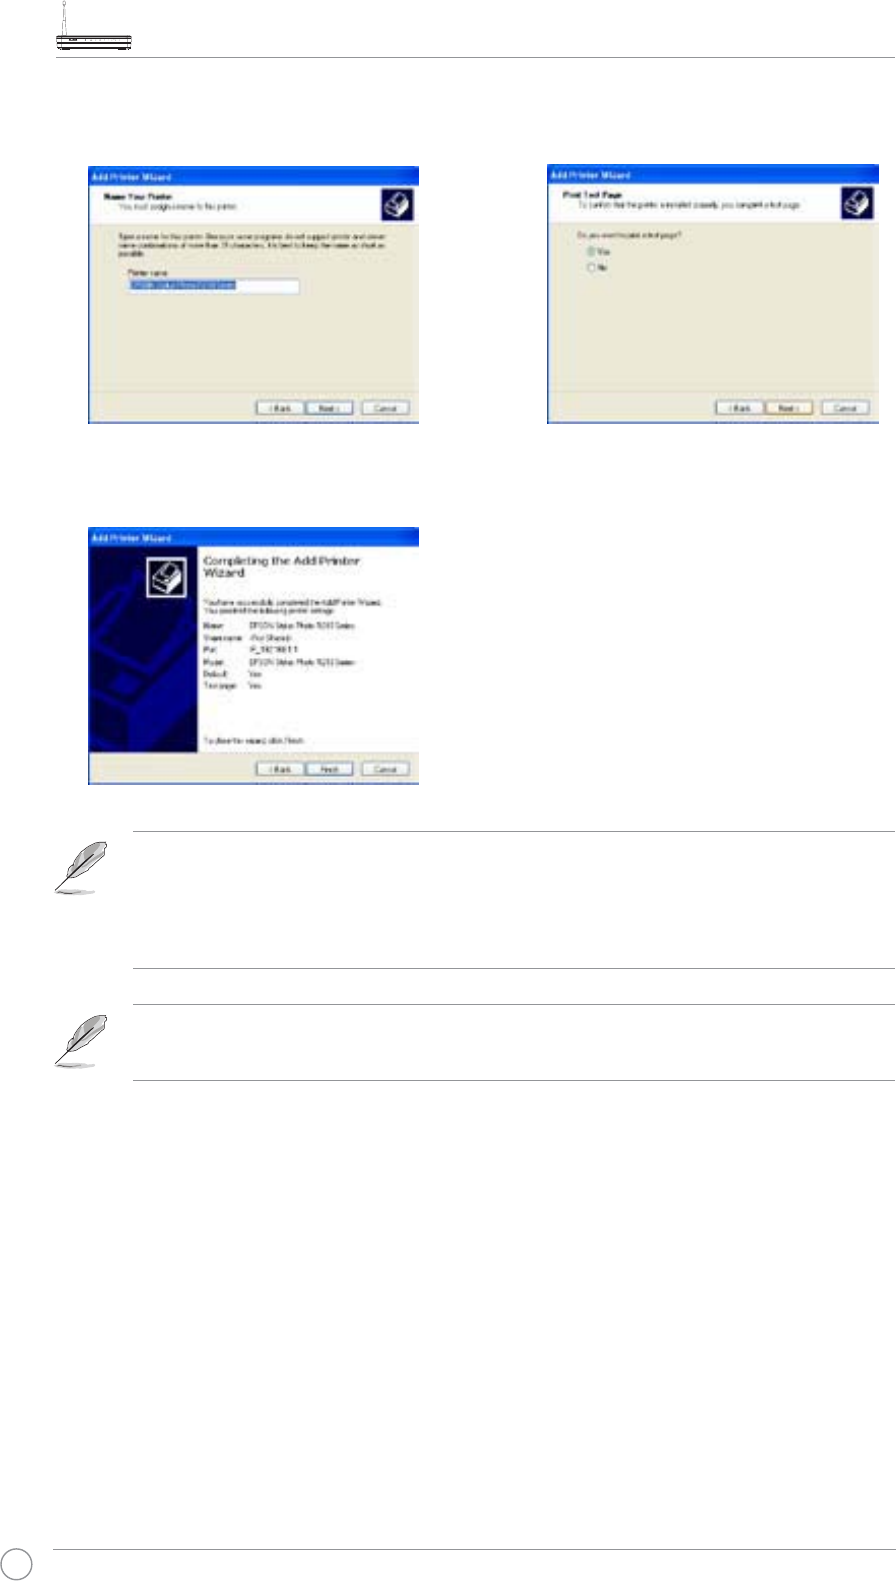
11. Click Next to accept the default name
for the printer.
12. Select Yes to print a test page. Click
Next to print.
13. The installation is complete. Click
Finish to quit the Add Printer Wizard.
If you use Windows
®
98 or ME which does not support Standard TCP/IP
port, you need to use Remote Port which is supported by WL-600g.
If you have already installed the printer locally on your computer, right click
the printer icon and select Property -> Port tab to add a standard TCP/IP
port. Click Add Port then select Standard TCP/IP Port and click New Port
button. Refer to Step 5-8 for setting procedures.
WL-600g All-in-1 Wireless ADSL2/2+ Home Gateway User Manual
49
$686:/J·V´*DPLQJ%ODVWHUµLVGHVLJQHGWRHQKDQFH\RXURQOLQHJDPLQJ
experience. This technology provides the uninterrupted and latency-free gaming
experience that online gamers expect. It intelligently optimizes network resources and
automatically prioritizes network traffic to better execute time-sensitive applications
including IP phone and multimedia applications.
“Gaming Blaster” on WL-600g
By default:/JLVVHWRQ´*DPLQJ%ODVWHUµPRGHDQG\RXFDQWKHQH[SHULHQFHWKH
enhanced gaming power. Just click on the Gaming Blaster icon and you can enable
or disable this function on WL-600g. From the bar chart at the bottom of the web
page, you can see that the gaming application, by default, takes most of the WL-600g's
network resource.
8VHU6SHFLÀHG6HUYLFH
Setting up online gaming priority by indicating ports and IP addresses.
<RXFDQDOVRUHVHUYHDYDLODEOHQHWZRUNWUDIÀFIRU\RXURQOLQHJDPHE\LQGLFDWLQJSRUWV
where the online gaming applications go.
1. Assign any name for the Service Name. For example, "My game".
2. Put in the IP address and its corresponding port where the application is.
3. Rank the priority (1, 2, 3, ...) of the service (application) according to your preference.
4. If you want to remove the service from the list, just check the Remove box.
IP phone and other A/V applications on WL-600g
If you would like to have better voice over IP and other A/V application quality, just click
RQ WKH ´9R,39LGHR PRGHµ LFRQ <RX FDQ WKHQ HQMR\ XQLQWHUUXSWHG 9R,3 TXDOLW\ DQG
smooth multimedia downloading. From the bar chart at the bottom of the web page, you
can see that the VoIP/Video application now takes most of WL-600g's network resource.
8VHU6SHFLÀHG6HUYLFH
Setting up VoIP / Video application priority by indicating ports and IP addresses.
<RXFDQDOVRUHVHUYHDYDLODEOHQHWZRUNWUDIÀFIRU\RXU,3SKRQHDQG$9GRZQORDGLQJ
applications by indicating ports where the applications go.
1. Assign any name for the Service Name. For example, "My IP phone".
2. Put in the IP address and its corresponding port where the application is.
Gaming Blaster
WL-600g All-in-1 Wireless ADSL2/2+ Home Gateway User Manual
50
For more information, refer to the Asus website at http://www.asus.com
3. Rank the priority (1, 2, 3, ...) of the service (application) according to your preference.
4. If you want to remove the service from the list, just check the Remove box.
Management
This chapter describes how to maintain your WL-600g wireless ADSL router.
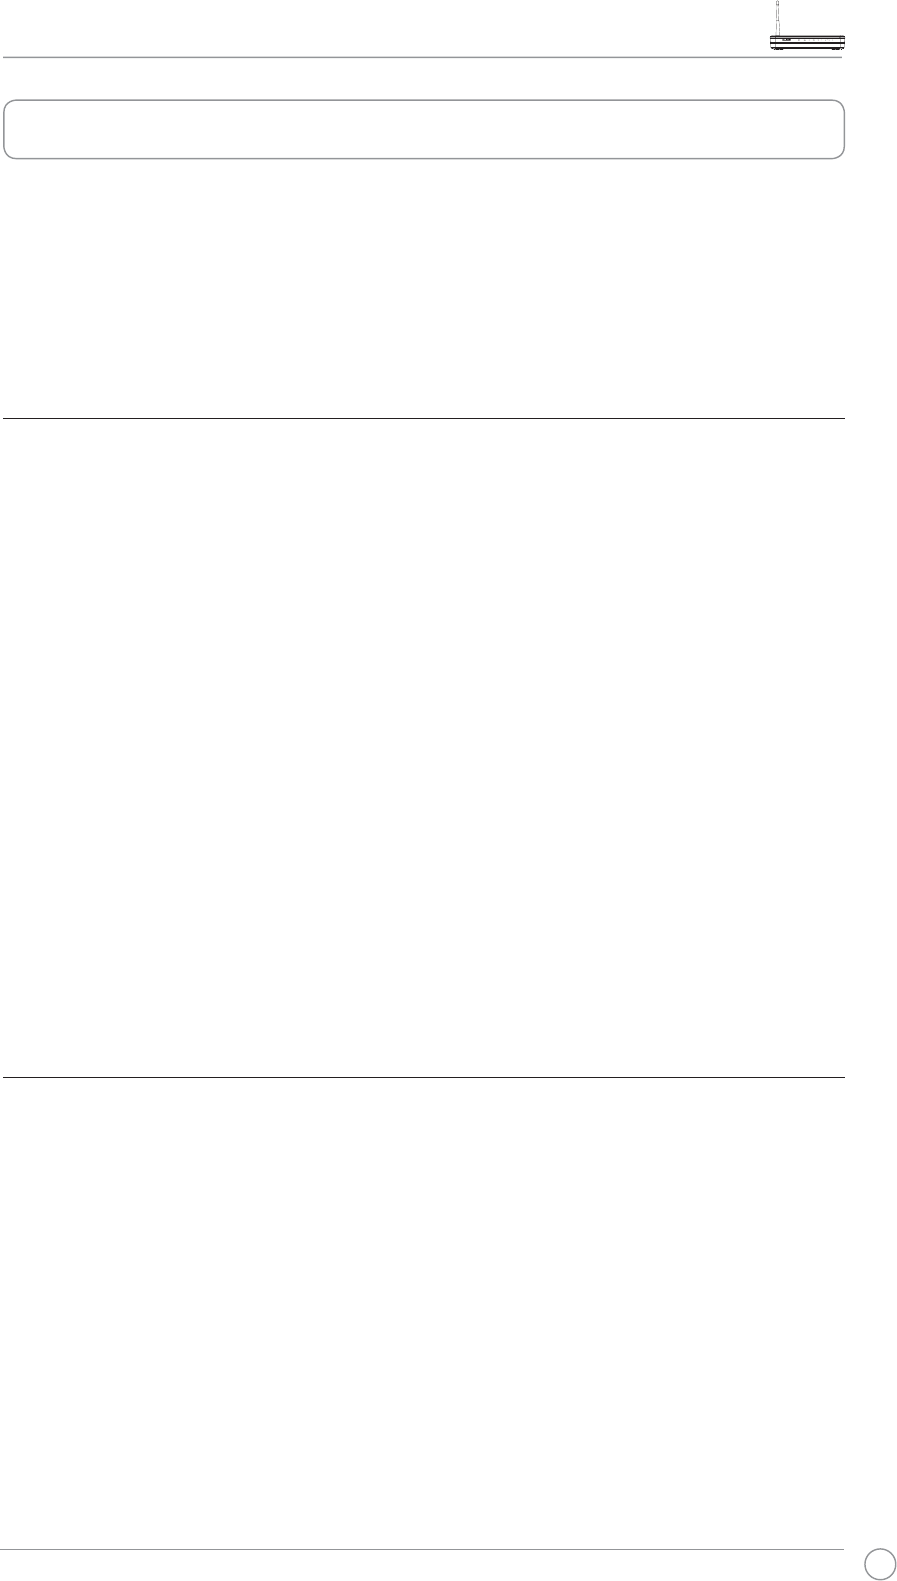
&RQÀJXUDWLRQEDFNXS
<RXFDQEDFNXSWKHFRQÀJXUDWLRQWRDÀOHDQGVWRUHLWRQ\RXUFRPSXWHU&OLFN
Management -> SettingsWRRSHQWKHFRQÀJXUDWLRQSDJHDQGFOLFNWKHBackup
Settings button. Click SaveDQGGHÀQHWKHGHVWLQDWLRQIROGHU7KHGHIDXOWQDPHIRU
EDFNXSÀOHLVbackupsettings.conf.
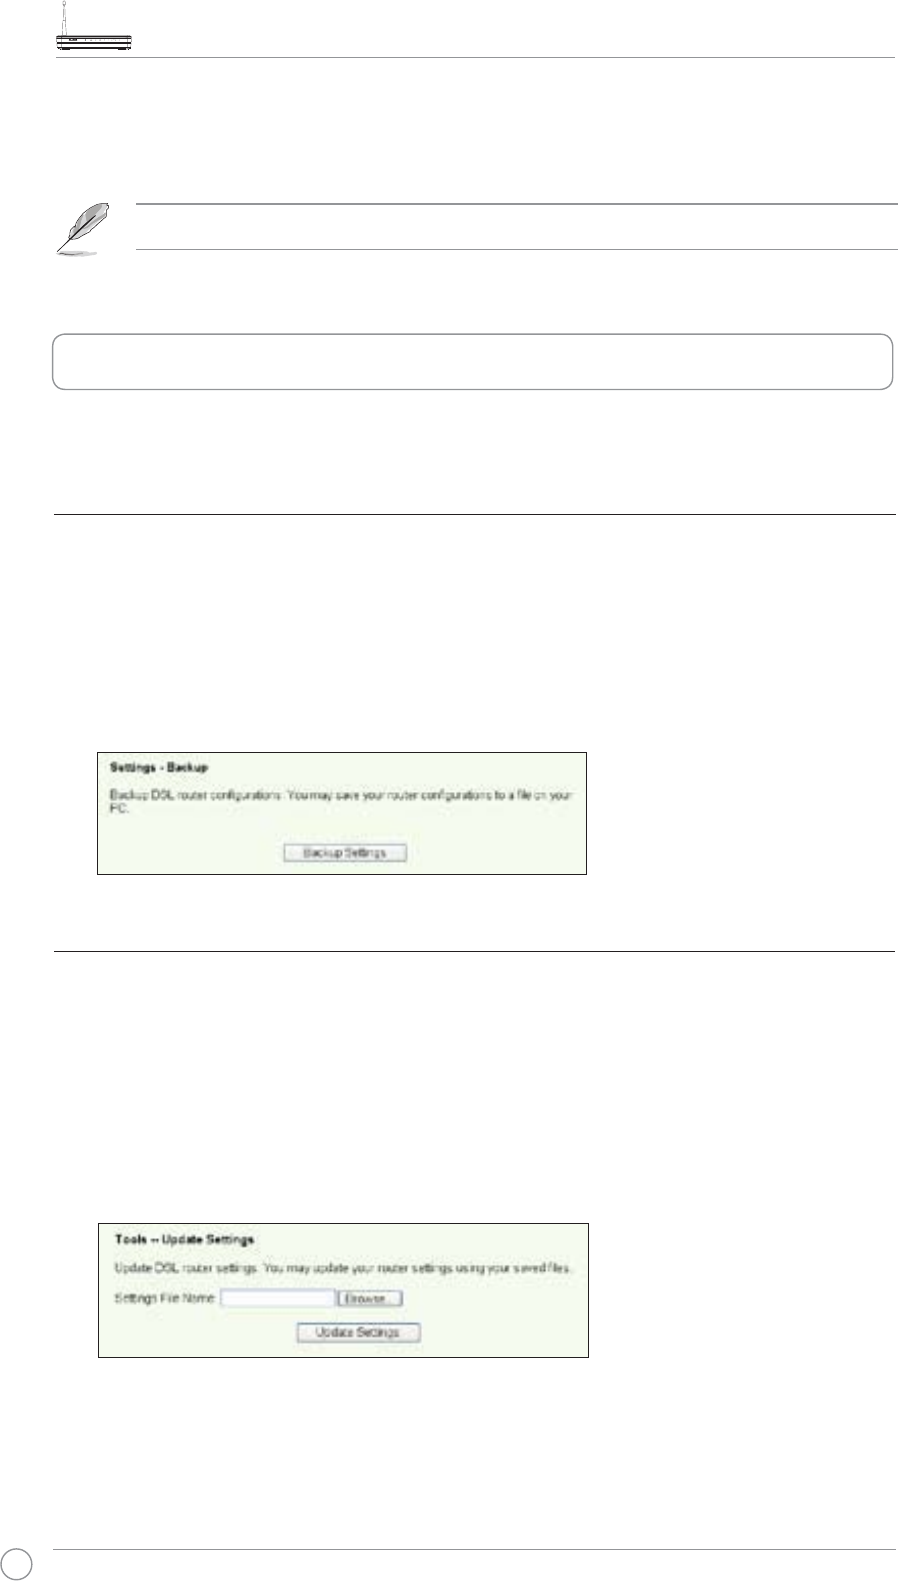
5HVWRUHVHWWLQJVIURPDEDFNXSÀOH
<RXFDQUHVWRUHWKHVHWWLQJVIURPDEDFNXSÀOHZKHQ\RXKDYHUHVHWWKHZLUHOHVVURXWHU
to factory default. Click Management -> Settings -> UpdateWRRSHQWKHFRQÀJXUDWLRQ
page. Click Browse WRORFDWHWKHEDFNXSÀOHRQ\RXUFRPSXWHUWKHQFOLFNUpdate
Settings button to proceed. When the restoring process is completed, the wireless
router reboots. The whole process takes about 80 seconds.
WL-600g All-in-1 Wireless ADSL2/2+ Home Gateway User Manual
51
Reset to factory default
To clear all settings and return to the factory default settings, you can press the Reset
button on the rear panel of the wireless router for 10 seconds; or click Management
-> Settings -> Restore Default WRRSHQWKHFRQÀJXUDWLRQSDJHDQGFOLFNWKHRestore
Default Settings button.
Setting up time server
<RXFDQFRQÀJXUHWKHWLPHVHWWLQJVRWKDW:/JFDQDOZD\VV\QFKURQL]HZLWKDWLPH
server from Internet. Click Management -> Time settings and check Automatically
synchronize with International servers. Select a time server from the drop-down list
DQGVHW\RXUWLPH]RQH:KHQÀQLVKHGFOLFNSave/Apply.
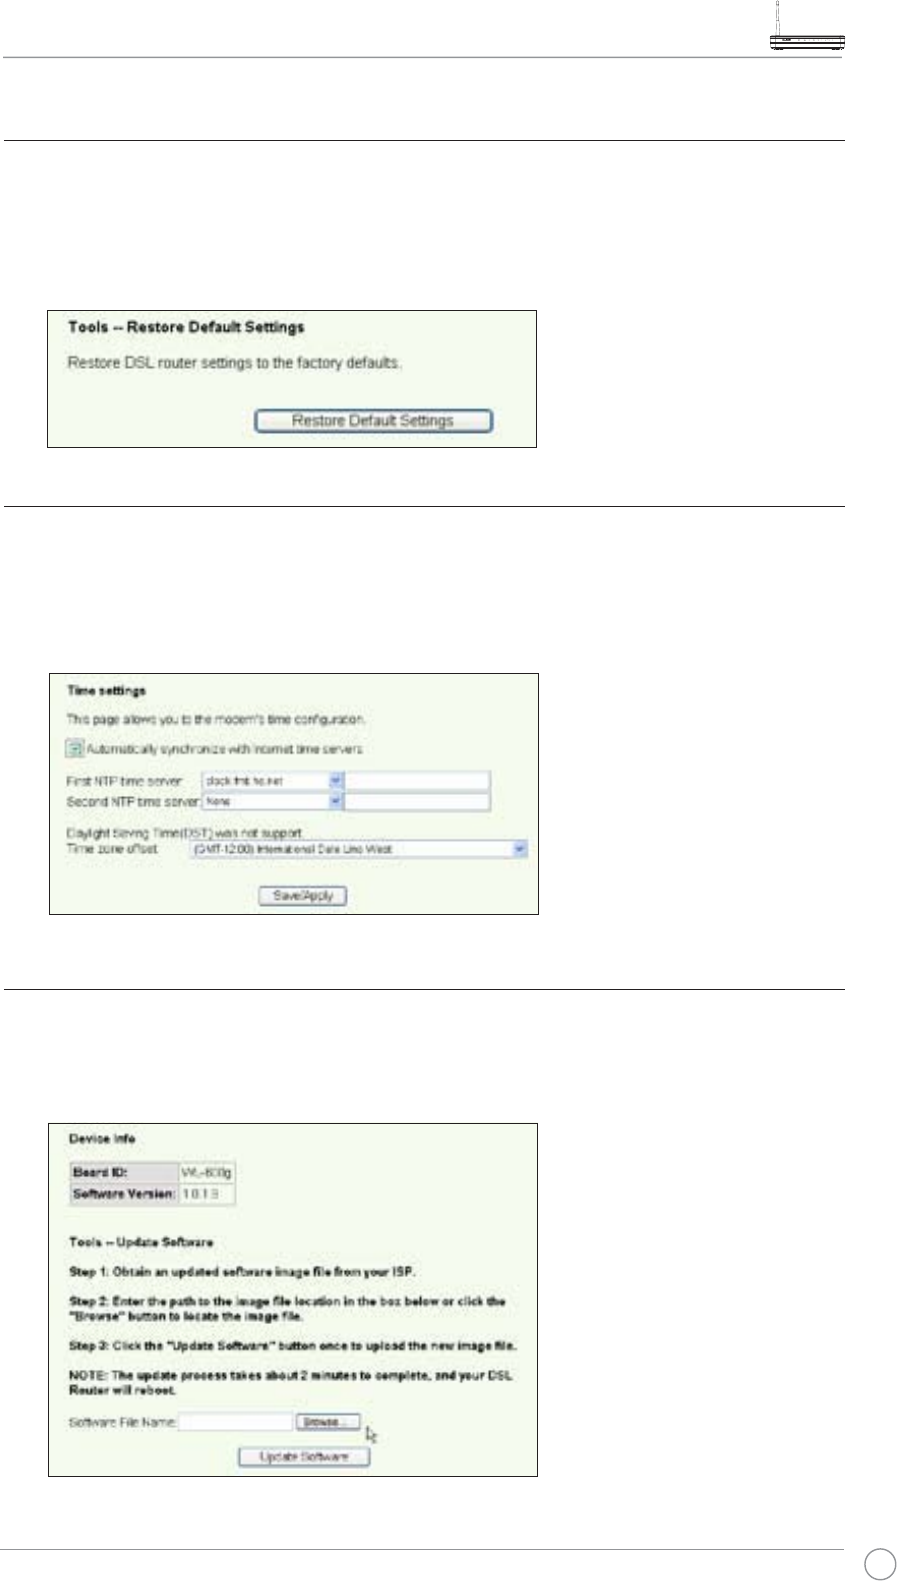
Firmware update
7RXSGDWH ÀUPZDUHFOLFN0anagement -> Update Software. Click Browse to locate
WKH ÀUPZDUH ÀOH WKHQ FOLFN Update Software EXWWRQ WR VWDUW XSORDGLQJ WKH ÀUPZDUH
The update process takes about two minutes.

APPENDIX
52
FCC Warning Statement
This device complies with Part 15 of the FCC Rules. Operation is subject to the following
two conditions:
(1) this device may not cause harmful interference, and
(2) this device must accept any interference received, including interference that may
cause undesired operation.
This equipment has been tested and found to comply with the limits for a class B digital device,
pursuant to part 15 of the FCC Rules. These limits are designed to provide reasonable protection
against harmful interference in a residential installation.
This equipment generates, uses and can radiate radio frequency energy and, if not installed and
used in accordance with the instructions, may cause harmful interference to radio communications.
However, there is no guarantee that interference will not occur in a particular installation. If this
equipment does cause harmful interference to radio or television reception, which can be
determined by turning the equipment off and on, the user is encouraged to try to correct the
interference by one or more of the following measures:
-Reorient or relocate the receiving antenna.
-Increase the separation between the equipment and receiver.
-Connect the equipment into an outlet on a circuit different from that to which the receiver is
connected.
-Consult the dealer or an experienced radio/TV technician for help.
Any changes or modifications not expressly approved by the party responsible for
compliance could void the user’s authority to operate the equipment.
Prohibition of Co-location
This device and its antenna(s) must not be co-located or operating in conjunction with any other
antenna or transmitter
Safety Information
To maintain compliance with FCC’s RF exposure guidelines, this equipment should be installed and
operated with minimum distance 20cm between the radiator and your body. Use on the supplied
antenna. Use on the supplied antenna. Unauthorized antenna, modification, or attachments
could damage the transmitter and may violate FCC regulations.

APPENDIX
53
Declaration of Conformity for R&TTE directive 1999/5/EC
Essential requirements – Article 3
Protection requirements for health and safety – Article 3.1a
Testing for electric safety according to EN 60950-1 has been conducted. These are considered
relevant and sufficient.
Protection requirements for electromagnetic compatibility – Article 3.1b
Testing for electromagnetic compatibility according to EN 301 489-1 and EN 301 489-17 has been
conducted. These are considered relevant and sufficient.
Effective use of the radio spectrum – Article 3.2
Testing for radio test suites according to EN 300 328 has been conducted. These are considered
relevant and sufficient.
CE Mark Warning
This is a Class B product, in a domestic environment, this product may cause radio interference, in
which case the user may be required to take adequate measures.