User Manual

AT388 User guide
AT388 Product User guide
Moon-Cheol Song
2017-09-04
ATID CO., LTD
UHF Reader
AT388 User guide Page 2
AT388 User guide
AT388 Product User guide
Company
Atid Co., Ltd.
Doc
Name
User guide
Writer
Moon-Cheol
Song
Date
2017-09-04
Ver.
v0.1
Revision History
Version
Revised Date
Revised
Reason
Revised Contents
Writer
V0.1
2017-09-04
Draft
Issue Draft
MoonCheol Song

AT388 User guide Page 3
AT388 User guide
AT388 Product User guide
Company
Atid Co., Ltd.
Doc
Name
User guide
Writer
Moon-Cheol
Song
Date
2017-09-04
Ver.
v0.1
Contents
Contents .......................................................................................................................................................................................... 3
1 Before Beginning, .............................................................................................................................................................. 5
2 Product Overview .............................................................................................................................................................. 5
3 Strength of Product .......................................................................................................................................................... 6
4 H/W Specification .............................................................................................................................................................. 7
5 Product Composition ....................................................................................................................................................... 9
5.1 Product Composition ....................................................................................................................................... 9
5.2 Composition of Each Product`s Part ...................................................................................................... 10
5.3 Function of Each Button .............................................................................................................................. 14
5.4 Configuration and operation of the Lamp ......................................................................................... 15
5.5 Screen Composition....................................................................................................................................... 16
5.5.1 State Display Section ..................................................................................................................................... 16
5.5.2 Message Output Section ............................................................................................................................. 17
6 Basic Function of Device ............................................................................................................................................. 17
6.1 Basic Function of Device ............................................................................................................................. 17
6.1.1 Scan Mode ......................................................................................................................................................... 17
6.1.2 Scan configuration Menu ............................................................................................................................ 17
6.1.3 System Configuration .................................................................................................................................... 18
6.2 Power ON and OFF ........................................................................................................................................ 18
6.2.1 Power ON ........................................................................................................................................................... 18
6.2.2 Power OFF .......................................................................................................................................................... 19
6.3 Barcode Data Reading(Barcode Scan) ................................................................................................... 19
6.4 RFID Tag Data Reading(RFID Scan) ........................................................................................................ 20
6.5 Scan Configuration ......................................................................................................................................... 20
6.6 System Configuration .................................................................................................................................... 21
7 Settings & Changes....................................................................................................................................................... 22
7.1 Scan Configuration ......................................................................................................................................... 22
7.1.1 “1. View data” ................................................................................................................................................... 22
7.1.2 “2. Upload data” .............................................................................................................................................. 22
7.1.3 “3. Erase data” .................................................................................................................................................. 22

AT388 User guide Page 4
AT388 User guide
AT388 Product User guide
Company
Atid Co., Ltd.
Doc
Name
User guide
Writer
Moon-Cheol
Song
Date
2017-09-04
Ver.
v0.1
7.1.4 “4. Data space” ................................................................................................................................................. 22
7.1.5 “5. Comm & Mode” ....................................................................................................................................... 23
7.1.6 “6. Poweroff Time” .......................................................................................................................................... 23
7.1.7 “7.Network Setup”........................................................................................................................................... 24
7.1.7.1 “1. Show Info” ................................................................................................................................................. 24
7.1.7.2 “2. Host Pairing” ............................................................................................................................................. 24
7.1.7.3 “3. DHCP Mode” ............................................................................................................................................ 25
7.1.7.4 “4. Paired Mode” ............................................................................................................................................ 25
7.1.7.5 “5. Manual Setup” ......................................................................................................................................... 26
7.2 System Configuration .................................................................................................................................... 26
7.2.1 “1. Symbol Setup” ........................................................................................................................................... 26
7.2.2 “2. OP Mode” .................................................................................................................................................... 26
7.2.3 “3. Comm & Mode” ....................................................................................................................................... 28
7.2.4 “4. Data Format” .............................................................................................................................................. 29
7.2.5 “5. System Setup” ............................................................................................................................................ 31
7.2.6 “6. Factory Reset” ............................................................................................................................................ 33
7.2.7 “7. Exit” ................................................................................................................................................................. 33
8 Bluetooth Connection setting ............................................................................................................................... 34
9.1 Windows 7 Environment ............................................................................................................................. 34
9.2 Windows 8 or Windows 10 Environment ............................................................................................ 39
9 Firmware Update ....................................................................................................................................................... 42
10.1 Preparation for Firmware ............................................................................................................................. 42
10.2 Firmware Update Start ................................................................................................................................. 42
10 Warranty and Technical Supports ........................................................................................................................... 46

AT388 User guide Page 5
AT388 User guide
AT388 Product User guide
Company
Atid Co., Ltd.
Doc
Name
User guide
Writer
Moon-Cheol
Song
Date
2017-09-04
Ver.
v0.1
1 Before Beginning,
The objective of user guide is to pass the basic contents related with AT388`s maintenance and
smooth uses.
User guide inclusive of text, images, logos, product name may not be distributed, modified,
displayed, reproduced (in whole or in part) without the prior written permission of ATID CO.LTD
Furthermore, the described contents in this document are subject to change without notice for
improving or maintaining the product and we inform the user that some material can be different
with the described contents due to the firmware changes of product.
Ownership of text, images, logos, product name in user guide is included in writer and some parts
of text, images, logos, product name in the user guide were borrowed for user`s understanding at
random. if there is a legal restriction such as a copyright law, it will be re-distributed after adjustment
2 Product Overview
AT388 is both subminiature barcode and RFID reader which can grasp with just one hand. As the
device that meets the basic function for industrial product such as IP65 in water & dust test and
1.2 m drop specification, it can take an active as data collector in the various kinds of part in
medicine, stock and product management and logistics shipping/tracking, access control. 1D
Barcode, UHF/HF RFID Tag information can be collected by just one AT388 and collected data can
transfer to the HOST PC or Smart Phone by using Bluetooth or Wireless LAN through Remote
process / real time process / batch process mode. This device is designed to handle the data by
the equipment which has the Windows, Android as an operating system.

AT388 User guide Page 6
AT388 User guide
AT388 Product User guide Company Atid Co., Ltd.
Doc
Name User guide Writer Moon-Cheol
Song Date 2017-09-04 Ver. v0.1
3 Strength of Product
AT388 is the smallest product among the existing RFID Barcode Scanner-Reader product
Its device as durable industrial PDA meets IP65 standard for the dust & water
proof and 1.2m drop to concrete.
Apply Honeywell N3680 Barcode module, fast and accurate support for
Barcode data collection.
UHF RFID Tag can be read and written quickly since Impinj R2000 module is
installed in the product
In case of that HF RFID module is installed, Various HF RFID tag can be read
and written.
Mode of Remote Process and Batch Process and Real Time Process can work
for device
It device can be connected with PC and charged up itself through USB Cable.
It can be charged up without exclusive adapter through normal smartphone
charger
Read data through LCD Display can be directly checked.
Battery changes is easily available and its device can change the battery in
case of battery shortage while using it.
Exclusive charging package for only battery charging will be offered
(Option: To be Offered in the near future)

AT388 User guide Page 7
AT388 User guide
AT388 Product User guide Company Atid Co., Ltd.
Doc
Name User guide Writer Moon-Cheol
Song Date 2017-09-04 Ver. v0.1
4 H/W Specification
Performance Characteristics
Processor ARM7 Core
Support Operating System Windows(WLAN/BT), Android(BT)
Memory 1Mbit (512Kbyte able to use)
Display 1.3inch LCD & LED Indicator
Weight 270g(without Battery 210g)
Operation Temperature -20~40℃
Storage Temperature -30~70℃
Humidity 95% non-condensing
Drop specification 1.2M Drop to concrete
Dust & Water Proof IP65
Physical Characteristics
Audio Buzzer
Standard I/O Port Bluetooth 4.0
Notification LED, Buzzer, LCD, vibrator
Dimensions(L x W x H) 164 x 50 x 35(54)mm
Battery Supply
Main Battery 3,200mAH Li-Ion Rechargeable Battery
Power Adapter Battery Charger(Option) & DC5V, 2000mA
Network Characteristics
Wireless LAN 802.11 b/g/n Wireless LAN, Key Emulator
Bluetooth Bluetooth 4.1 HID/SPP
Barcode Data Processing Device
Barcode Engine 1D Laser Scanner

AT388 User guide Page 8
AT388 User guide
AT388 Product User guide Company Atid Co., Ltd.
Doc
Name User guide Writer Moon-Cheol
Song Date 2017-09-04 Ver. v0.1
UHF 900MHz RFID Reader/Writer (Option)
Chips set Impinj R2000
Frequency refer to the test report (Support Global Frequency)
Reading Range 0M~3M(According to Tag & Environment)
Writing Range 0M~1.5M(According to Tag & Environment)
Max. RF output
Protocol EPC Gen2, ISO/IEC 18000-6C
Special Function Anti-Collision
AT388 User guide Page 9
AT388 User guide
AT388 Product User guide Company Atid Co., Ltd.
Doc
Name User guide Writer Moon-Cheol
Song Date 2017-09-04 Ver. v0.1
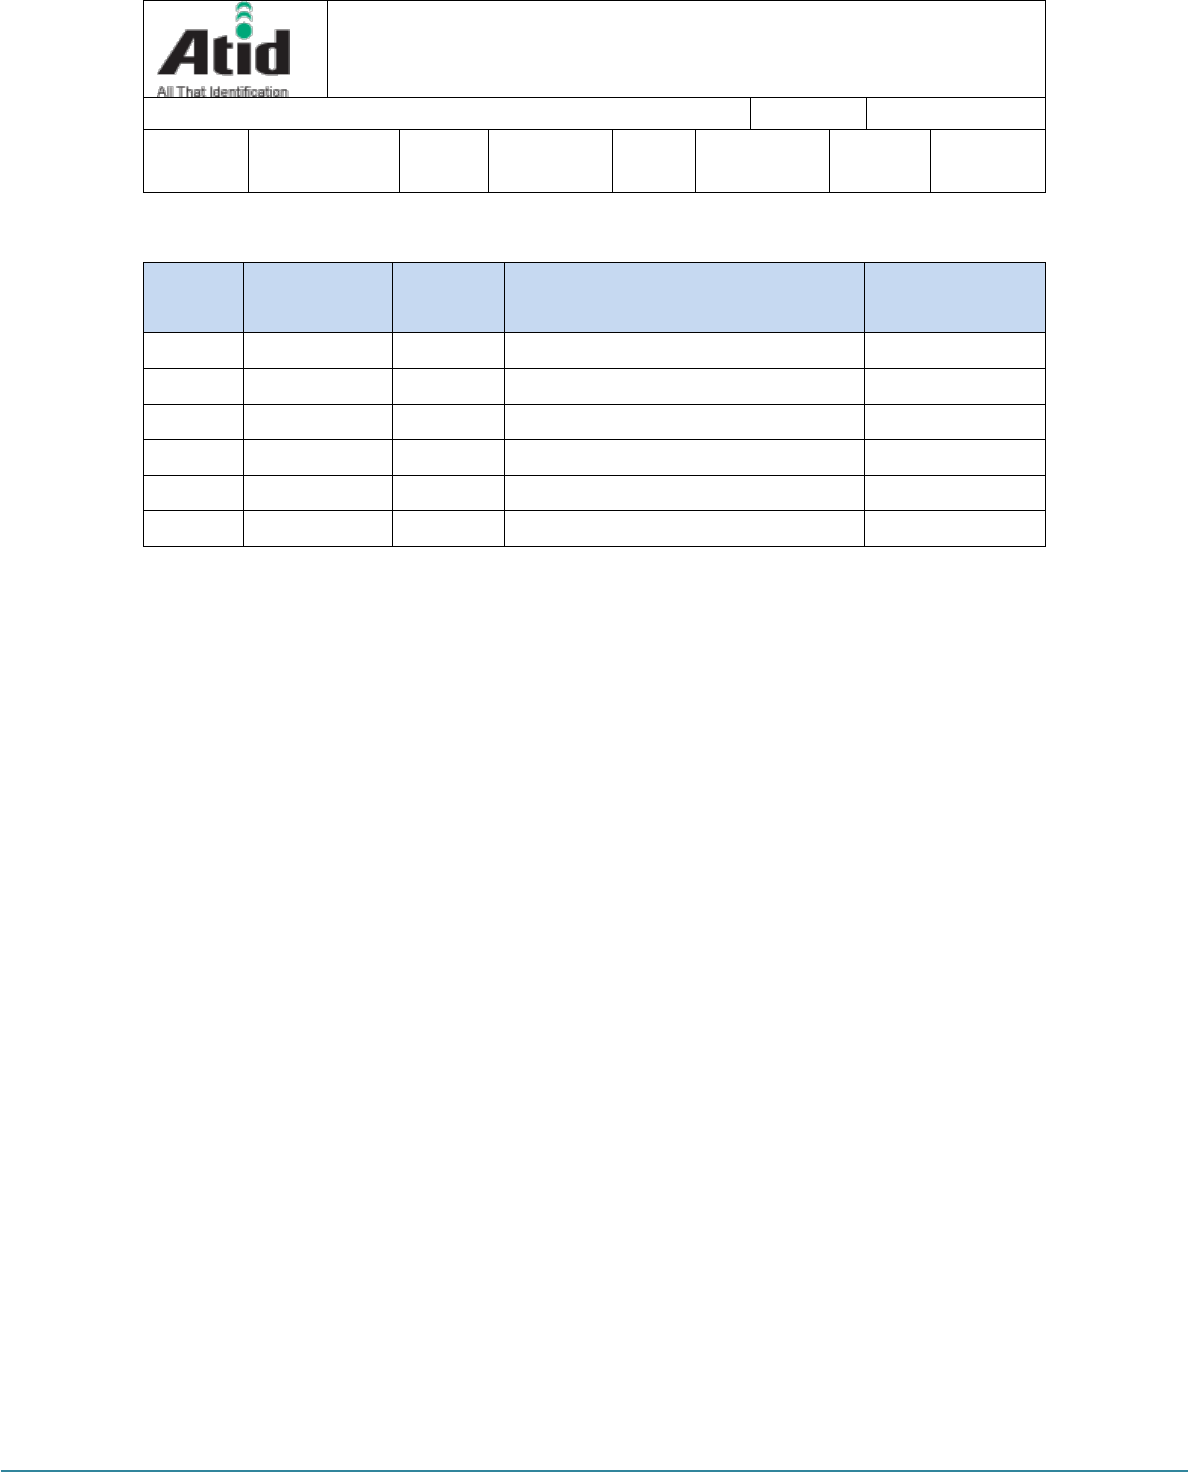
5 Product Composition
5.1 Product Composition
The basic package for AT388 is shown as below
< Device Body > <Battery>
< User Guide >
AT388 User guide Page 10
AT388 User guide
AT388 Product User guide Company Atid Co., Ltd.
Doc
Name User guide Writer Moon-Cheol
Song Date 2017-09-04 Ver. v0.1
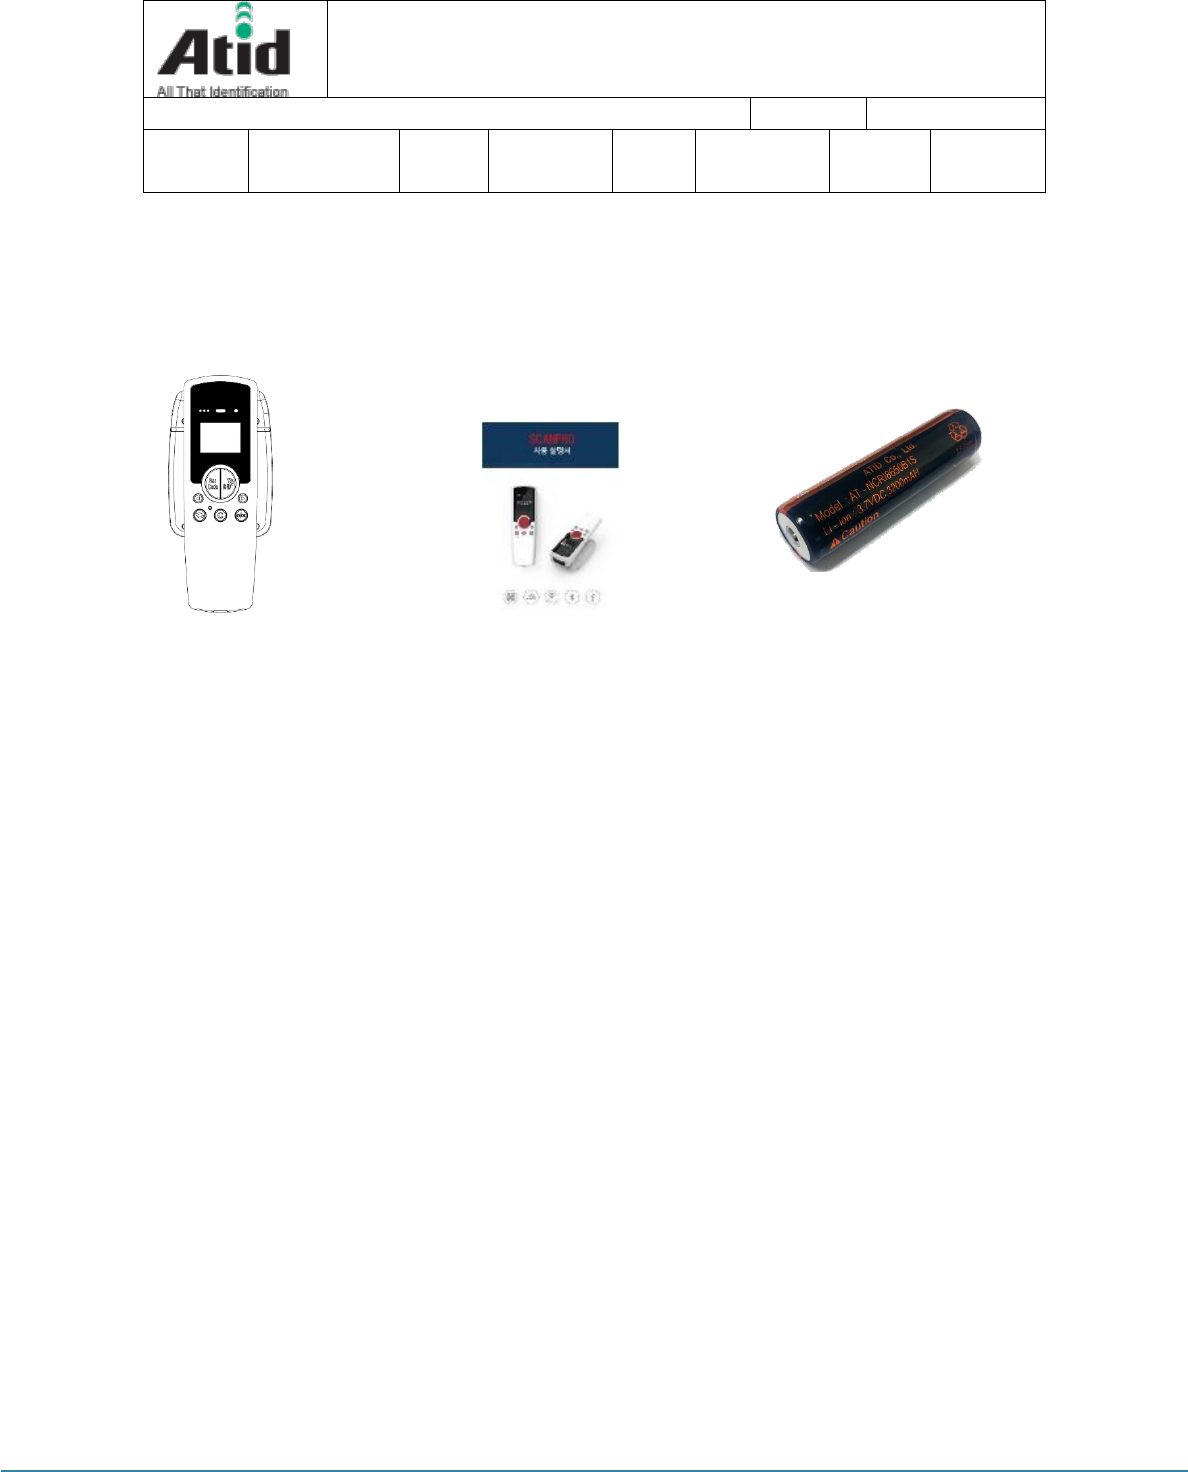
5.2 Composition of Each Product`s Part
i. Front Side
SCAN Lamp: blue lamp will be lit in case of reading the barcode and RFID Tag
information
Communication State Display Lamp: Show the connection state of Bluetooth,
Wireless LAN
Power Lamp: Show the state-of-charge (Charging : Red, Full Charge : Green)
LCD Display: Show the collected data and current state of device
Arrow Button(Left/Right): Movement of Operation Menu or Setting Menu
Scan Button: Use its button in case of selecting the barcode and RFID Tag
RFID ANT
Scan Button
(Barcode/RFID)
Arrow Button (Right)
Communication port
Change Button
Power/Selection
Button
Arrow Button (Left)
LCD Display
Communication
Status Lamp
SCAN Lamp
Power Lamp
LAMP 충전 램
Reset Button
<Front Side>
Cancel Button

AT388 User guide Page 11
AT388 User guide
AT388 Product User guide Company Atid Co., Ltd.
Doc
Name User guide Writer Moon-Cheol
Song Date 2017-09-04 Ver. v0.1
reading operation
Reset Button: Restart the device by force.
Communication port change Button: Change and selection the Bluetooth,
WLAN Communication port
Cancel Button: Exit the Barcode or RFID Scan operation or Movement of
previous Menu
Power/Selection Button: Power On/Off or Selection of Menu operation
AT388 User guide Page 12
AT388 User guide
AT388 Product User guide Company Atid Co., Ltd.
Doc
Name User guide Writer Moon-Cheol
Song Date 2017-09-04 Ver. v0.1
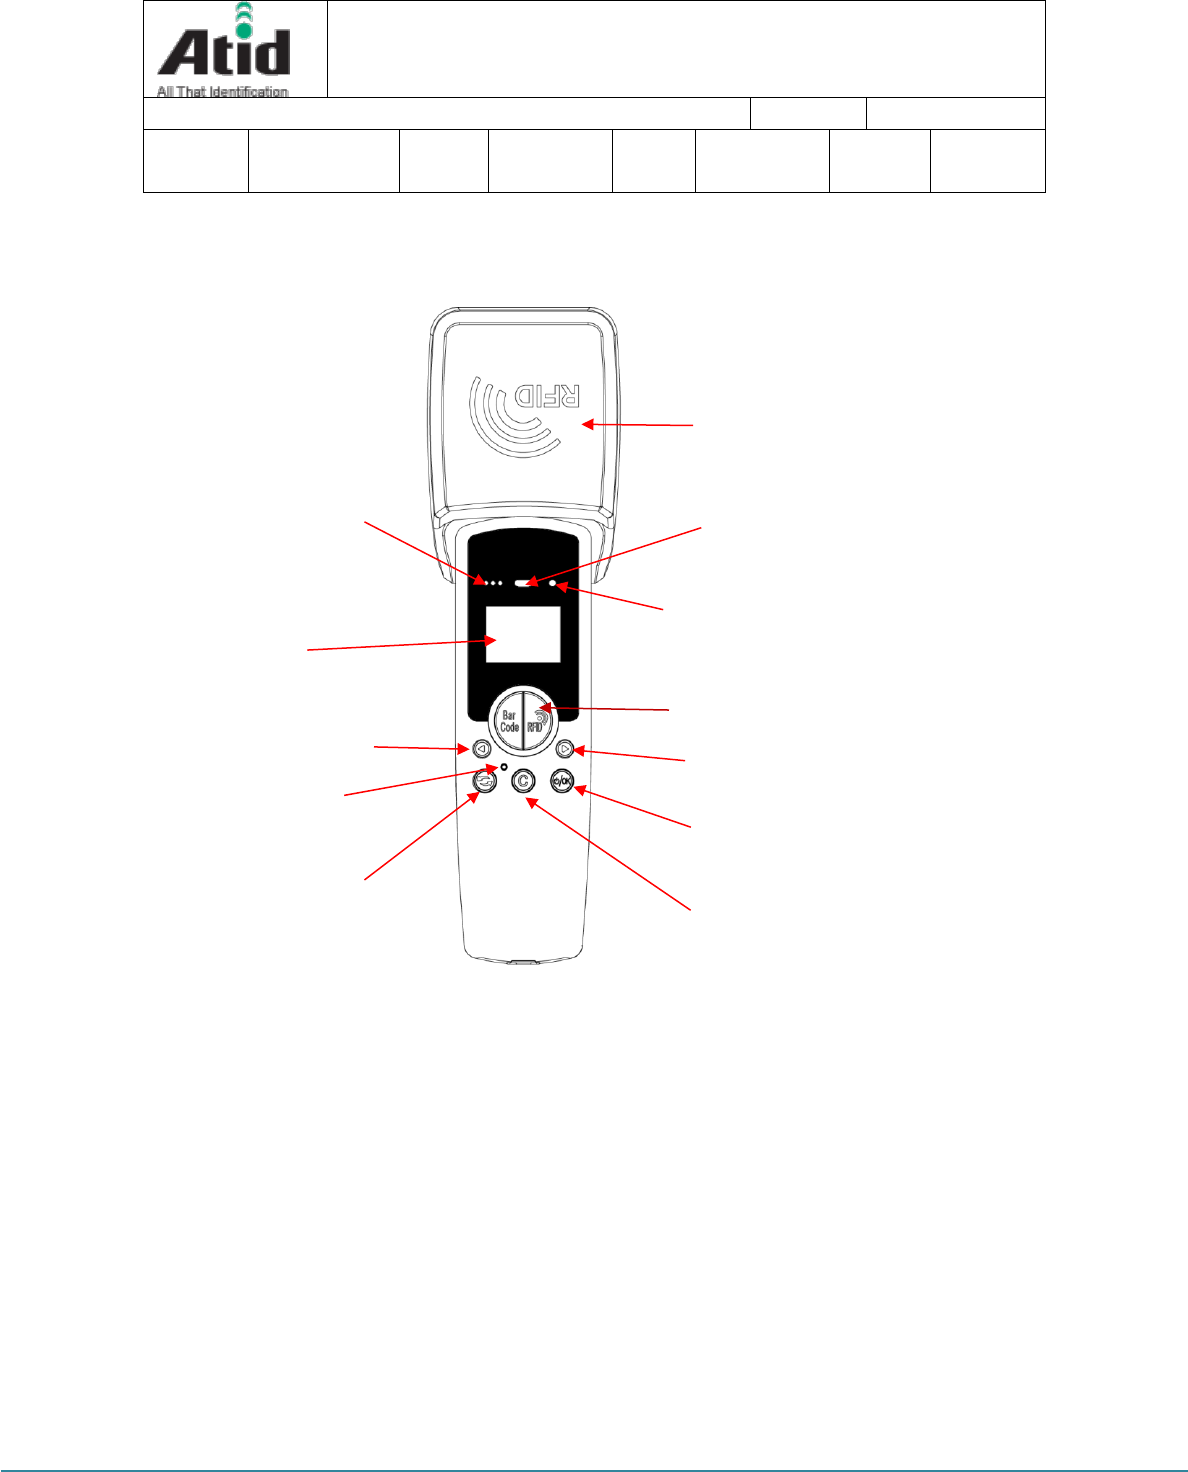
i. Right and Left Side of Device
RFID Antenna: HF or UHF RFID Antenna are built in the device and, the radio
is emitted through RFID Antenna when reading the Tag
Battery Cover: Battery can be changed after getting rid of cover
Strap Hole: Fix the Neck strap or Hand strap enclosed with the product
RFID Antenna
Battery Cover
Strap Hole
< Left Side > < Right Side >
Barcode
Module
USB Connector
S
trap Hole
< T
op Side
> < Bottom Side >
RFID Antenna
AT388 User guide Page 13
AT388 User guide
AT388 Product User guide Company Atid Co., Ltd.
Doc
Name User guide Writer Moon-Cheol
Song Date 2017-09-04 Ver. v0.1
ii. Top and Bottom Side of Device
RFID Antenna: HF or UHF RFID Antenna are built in the device and, the radio
is emitted through RFID Antenna when reading the Tag
Barcode Module: Barcode scanner is built in the device and 1D barcode
module will be selectively applied. Please note that it should be careful to use
since it is one of the most important part to read the barcode
USB Connector & Waterproof Cover: If the Waterproof Cover opens up, Micro
USB connector is located in it. User can charge the device through
Cable Please do lock the cover in case of keeping or using the device.
Strap Hole: The portability of device can be improved by connecting the Hand
Strap or Neck strap with strap hole
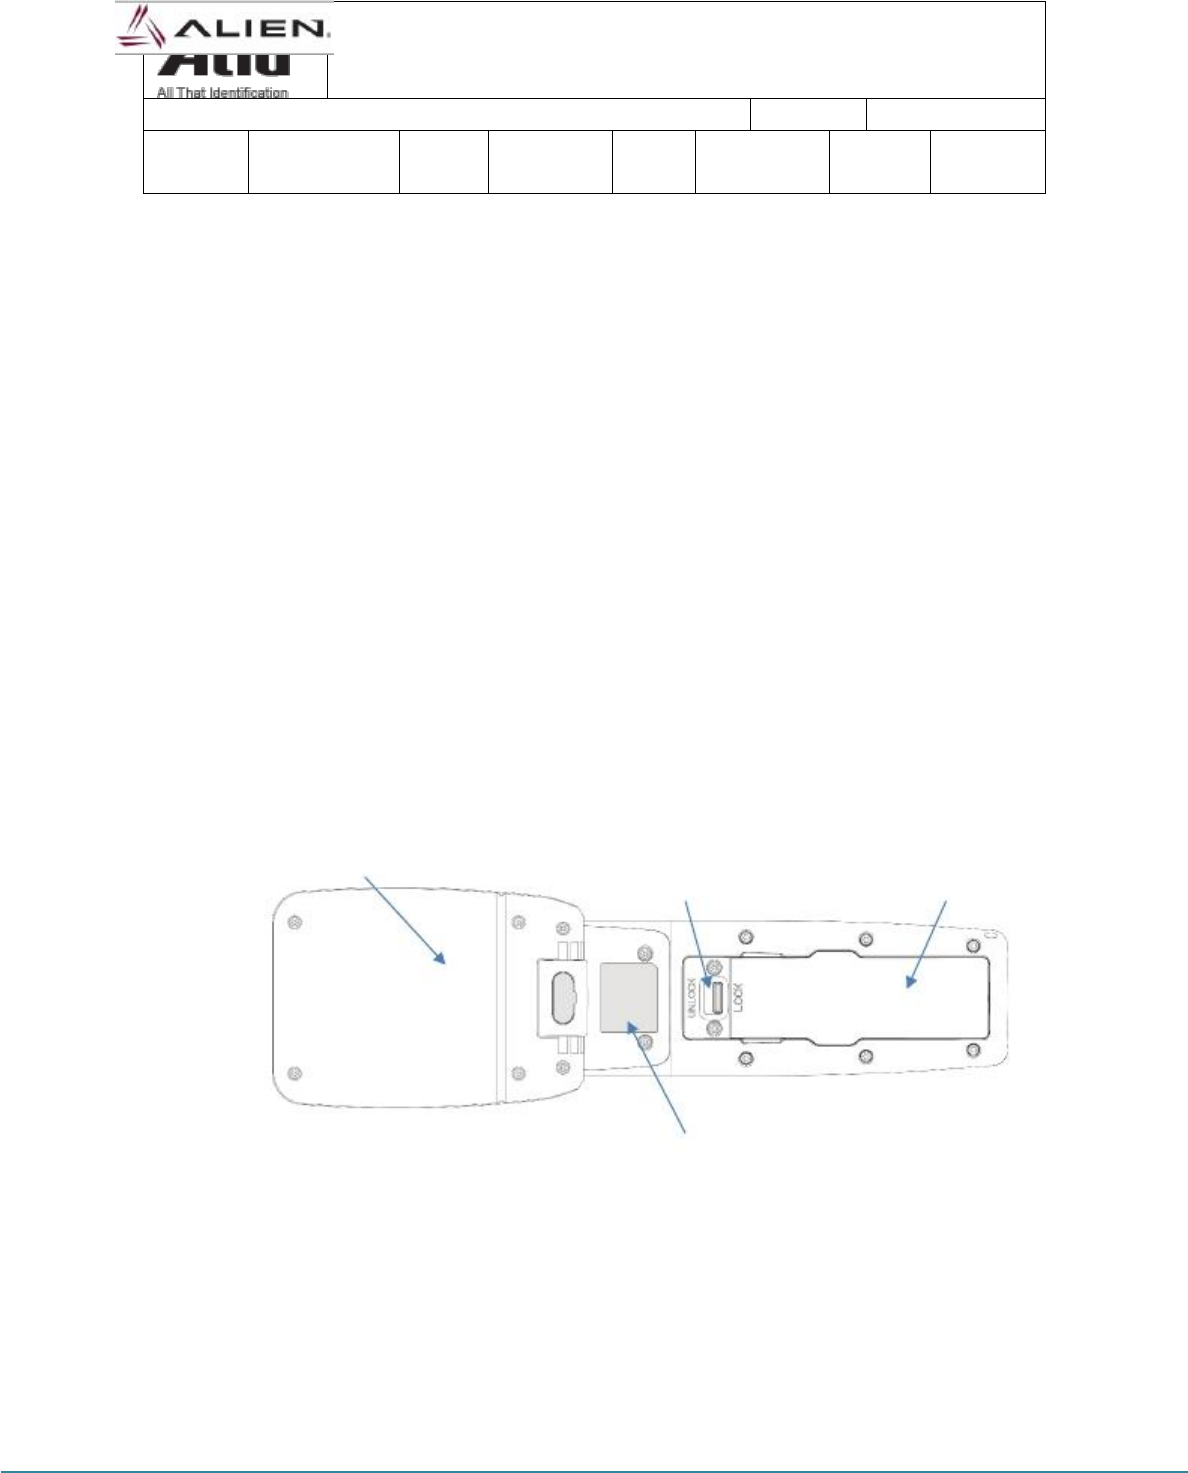
iii. Back Side of Device
RFID ANT Battery
Lock Battery Cover
Product
Label
Battery cover: Remove the cover and attach the battery.
Battery Lock: Move the battery lock to the UNLOCK position and the battery
< Back Side >
AT388 User guide Page 14
AT388 User guide
AT388 Product User guide Company Atid Co., Ltd.
Doc
Name User guide Writer Moon-Cheol
Song Date 2017-09-04 Ver. v0.1
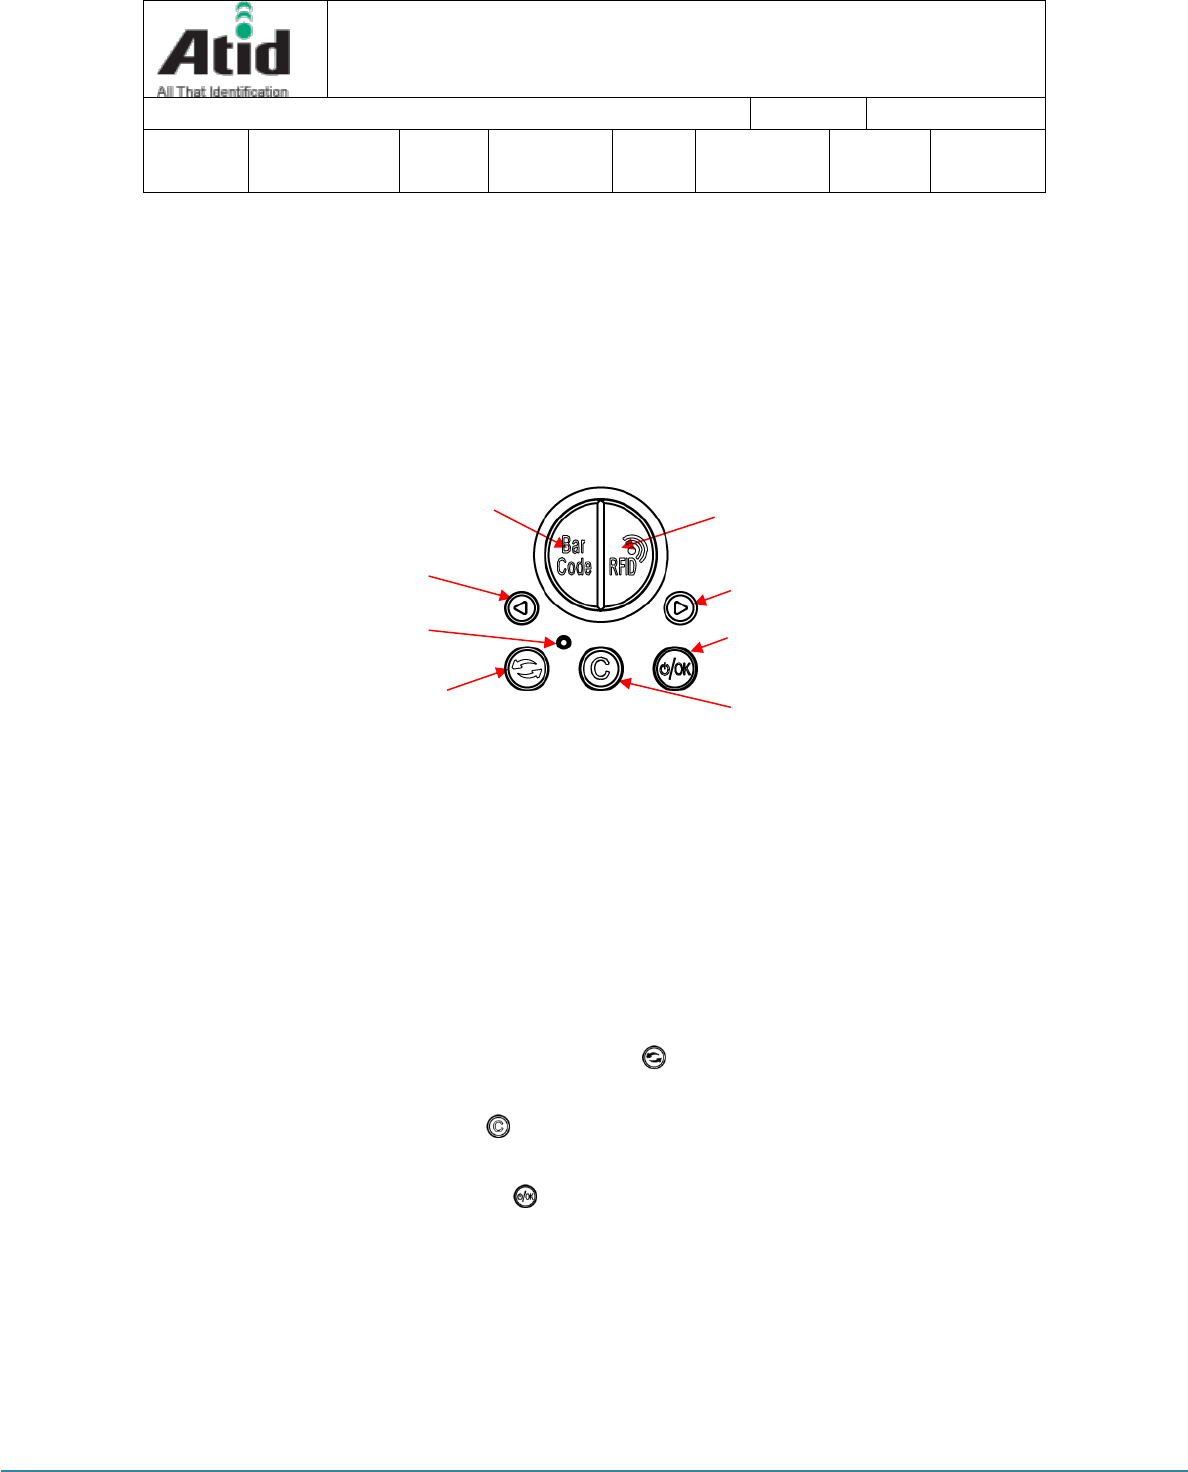
RFID Scan Button
Reset Button
< Operating Button >
Barcode Scan Button
◀ Button ▶ Button
C
ommunication
Change Button
OK/Power
Button
Cancel Button
cover will open.
Product Label: This product is labeled with the input voltage and other device
information and the serial number of the product.
5.3 Function of Each Button
Barcode scan button: Scans the barcode data.
RFID Scan Button: Scan RFID data.
◀ Button: Scroll the screen upward or select the previous item. If user press
and hold, the setting menu is displayed.
▶ Button: Scroll the screen downward or select the next item.
Reset Button: Restart the device.
Communication change Button( ): Switch the communication function of
Bluetooth, WLAN whenever you press it.
Cancel Button( ): In the Settings menu, cancel the current selection and
return to the previous step.
OK/Power Button( ): Select a specific item or press and hold for more than
two second to turn the power on and off.
AT388 User guide Page 15
AT388 User guide
AT388 Product User guide Company Atid Co., Ltd.
Doc
Name User guide Writer Moon-Cheol
Song Date 2017-09-04 Ver. v0.1
LCD Display
Communication
Status Lamp
SCAN Lamp
Charging
Lamp
< Display screen and Lamp >
5.4 Configuration and operation of the Lamp
Communication Status Lamp: Displays the communication method currently
in use. Each time the communication switch button is pressed, the three
modes of Bluetooth ( ) and WiFi ( ) are switched, and the lamp of each
position lights up.
Fast blinking: Indicates that it is waiting for connection with host device.
Slow blinking: Indicates that the host device is connected to the current
communication mode.
SCAN Lamp: According to the setting, the blue lamp lights up when
recognizing the barcode or RFID information, and when the data is recognized,
the blue lamp also lights up to indicate that normal data has been read.
Charging lamp: The red lamp lights up when the unit starts charging.
AT388 User guide Page 16
AT388 User guide
AT388 Product User guide Company Atid Co., Ltd.
Doc
Name User guide Writer Moon-Cheol
Song Date 2017-09-04 Ver. v0.1
Conversely, when the battery is low and needs to be recharged, it blinks. When
charging is completed, the blue lamp lights up.
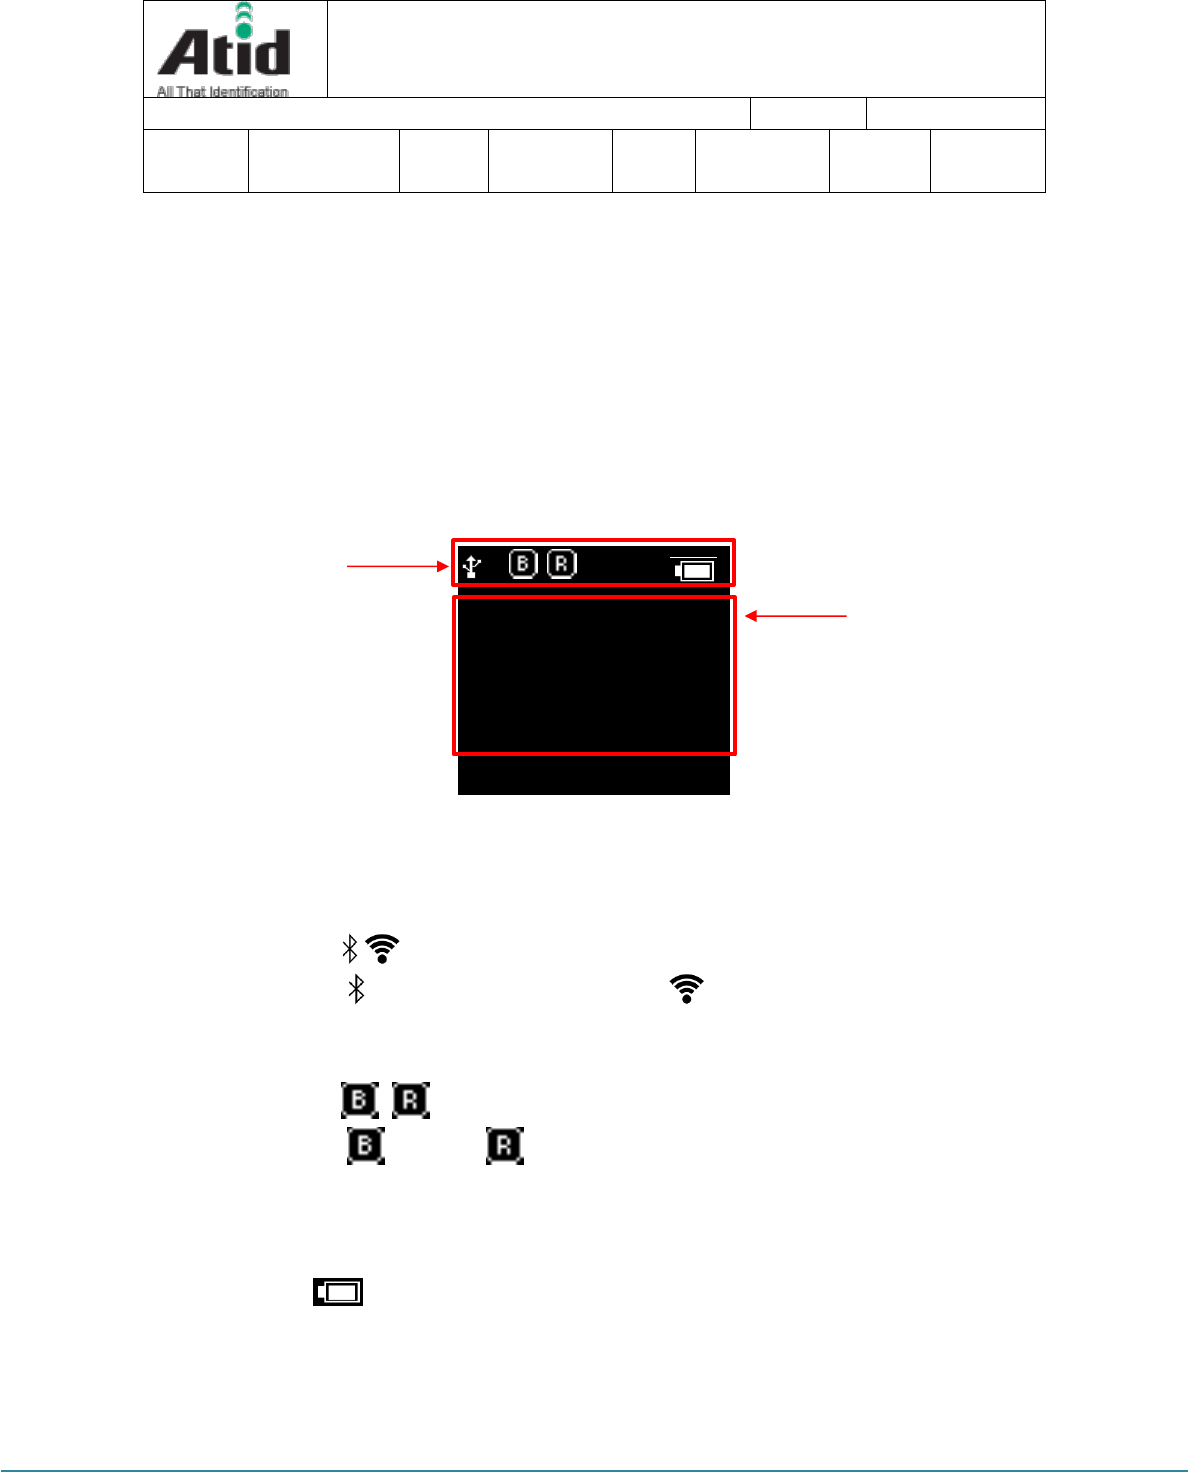
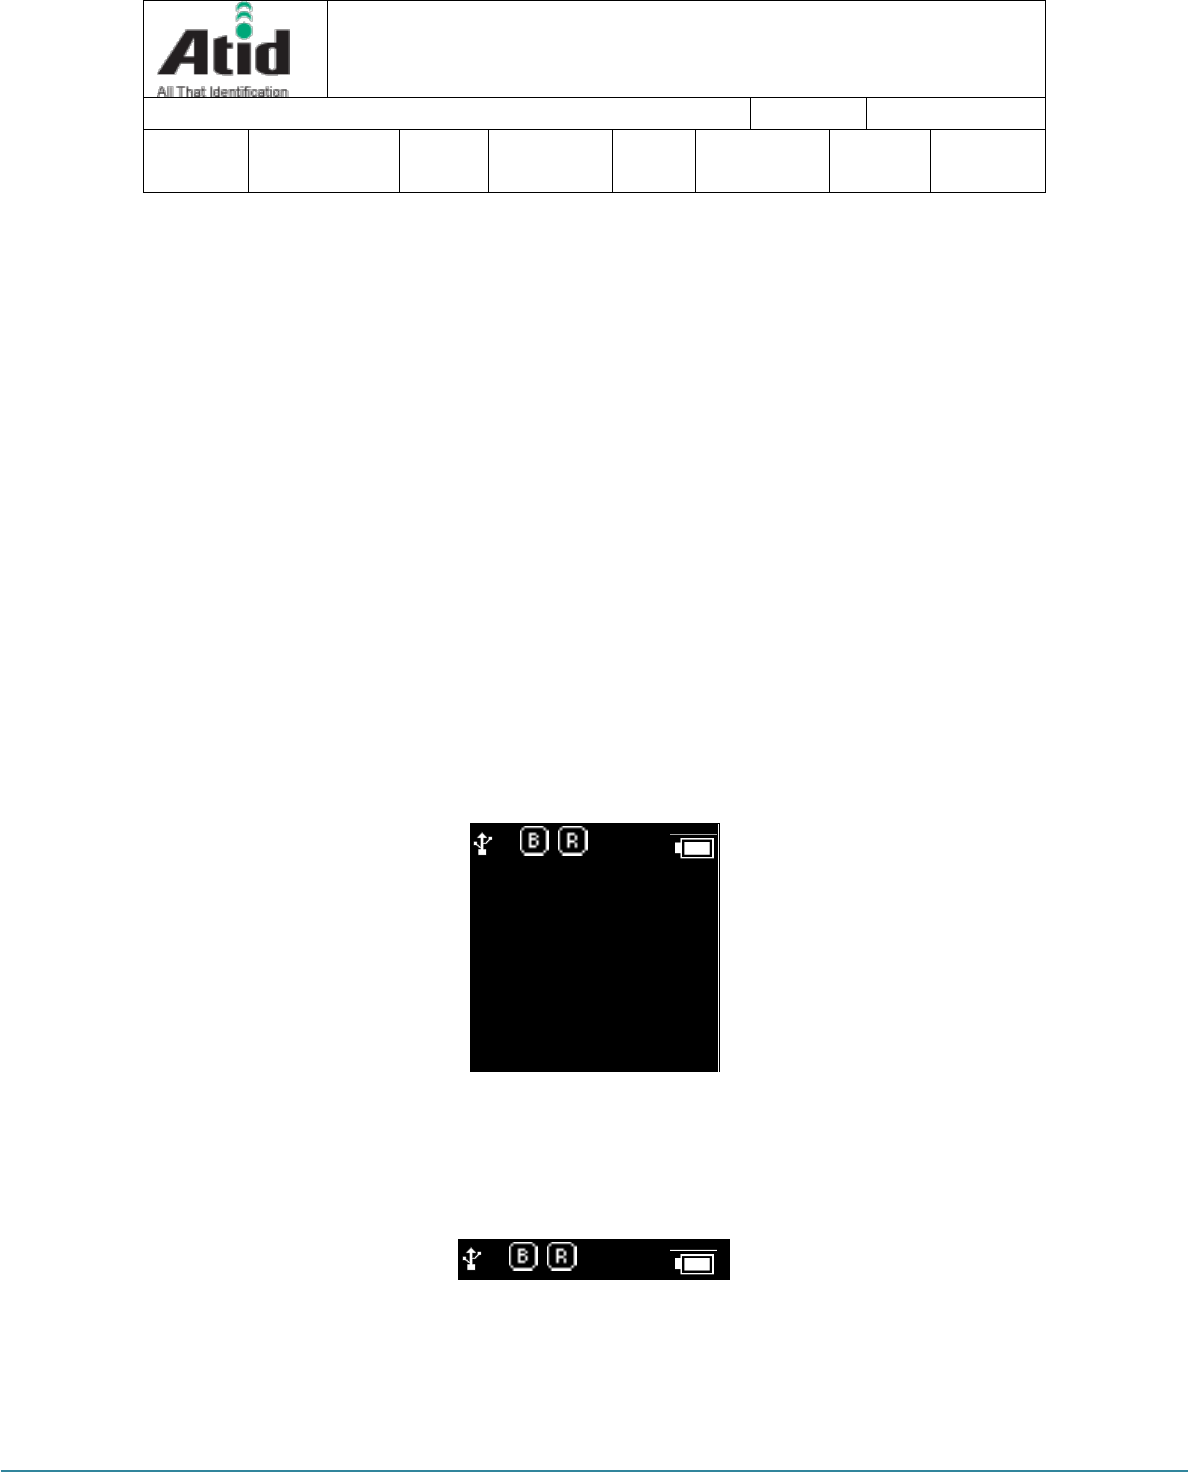
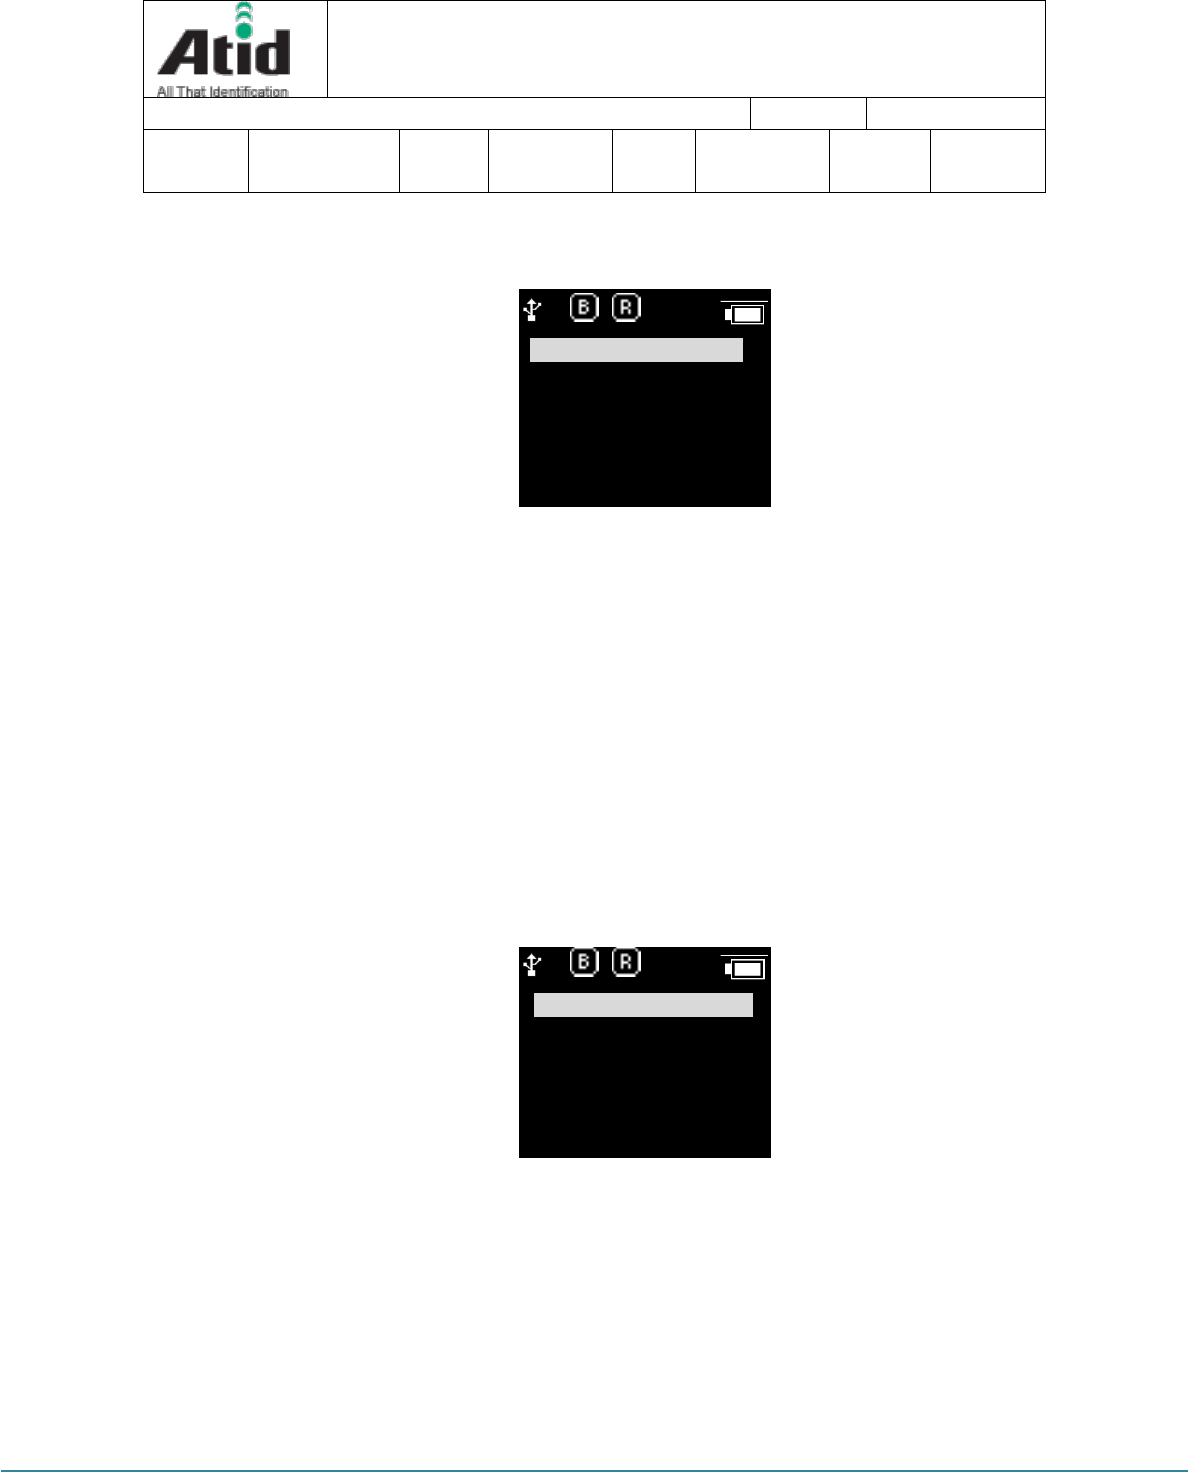
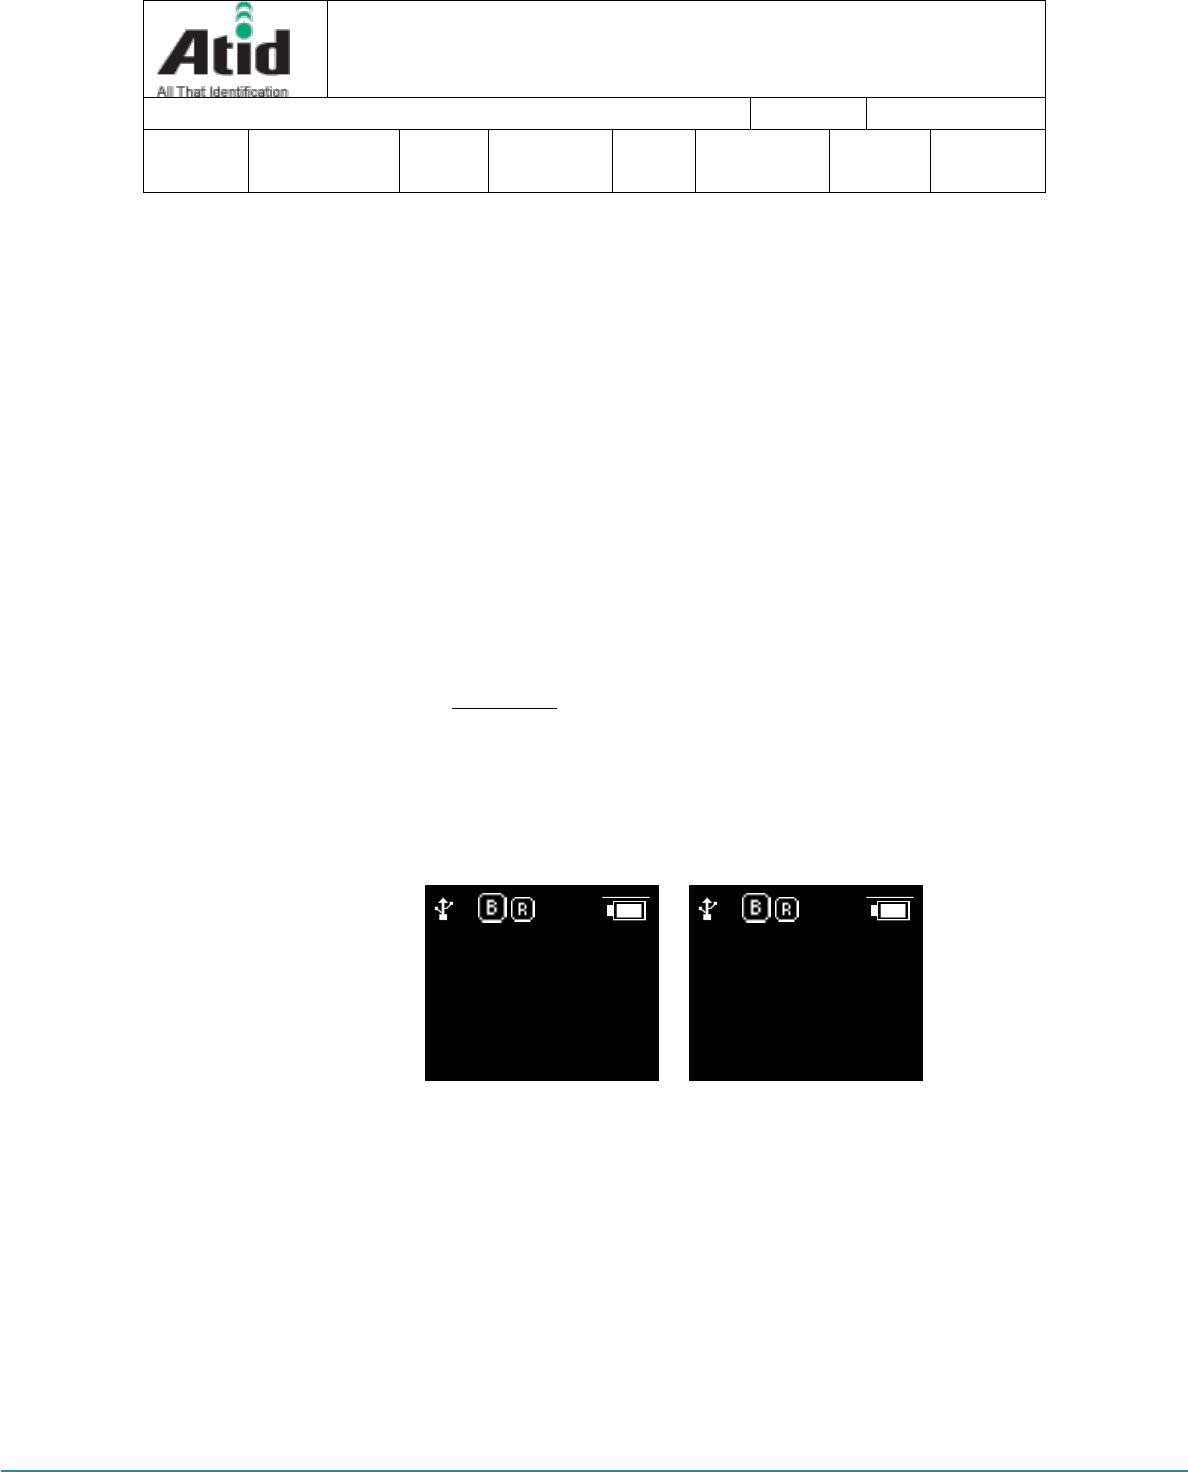
5.5 Screen Composition
AT388 shows the various kinds of item through compact LCD such as the current state
of device and read data
The screen is separated as state display section and message display section
? 1:00P
1. View Mode
2. Upload Data
3. Erase Data
4. Data Space
5. Comm & Mode
5.5.1 State Display Section
Its section shows the present time, battery remains and operating set-up state.
, Indication of connection mode: Show the Bluetooth connection mode
( ), Wireless Lan connection mode( ).
?, H, S, T : Show the connection state with the Host.
Disconnection State(?), HID Mode(H), Serial Mode(S), WLAN (T)
, : Show the Scanner Mode and show the activated state of Barcode
( )and RFID ( )through the ICON.
( Bright Condition: ON, Dark Condition: OFF)
10:00P: Show the set time. (There is a possibility to be different with the
present time) It can be reset up at the system configuration menu.
Battery State: Show the battery remains as a four level
Status Display
Section
Message Output
Section
AT388 User guide Page 17
AT388 User guide
AT388 Product User guide
Company
Atid Co., Ltd.
Doc
Name
User guide
Writer
Moon-Cheol
Song
Date
2017-09-04
Ver.
v0.1
5.5.2 Message Output Section
Its section shows the read barcode and RFID Tag information.
6 Basic Function of Device
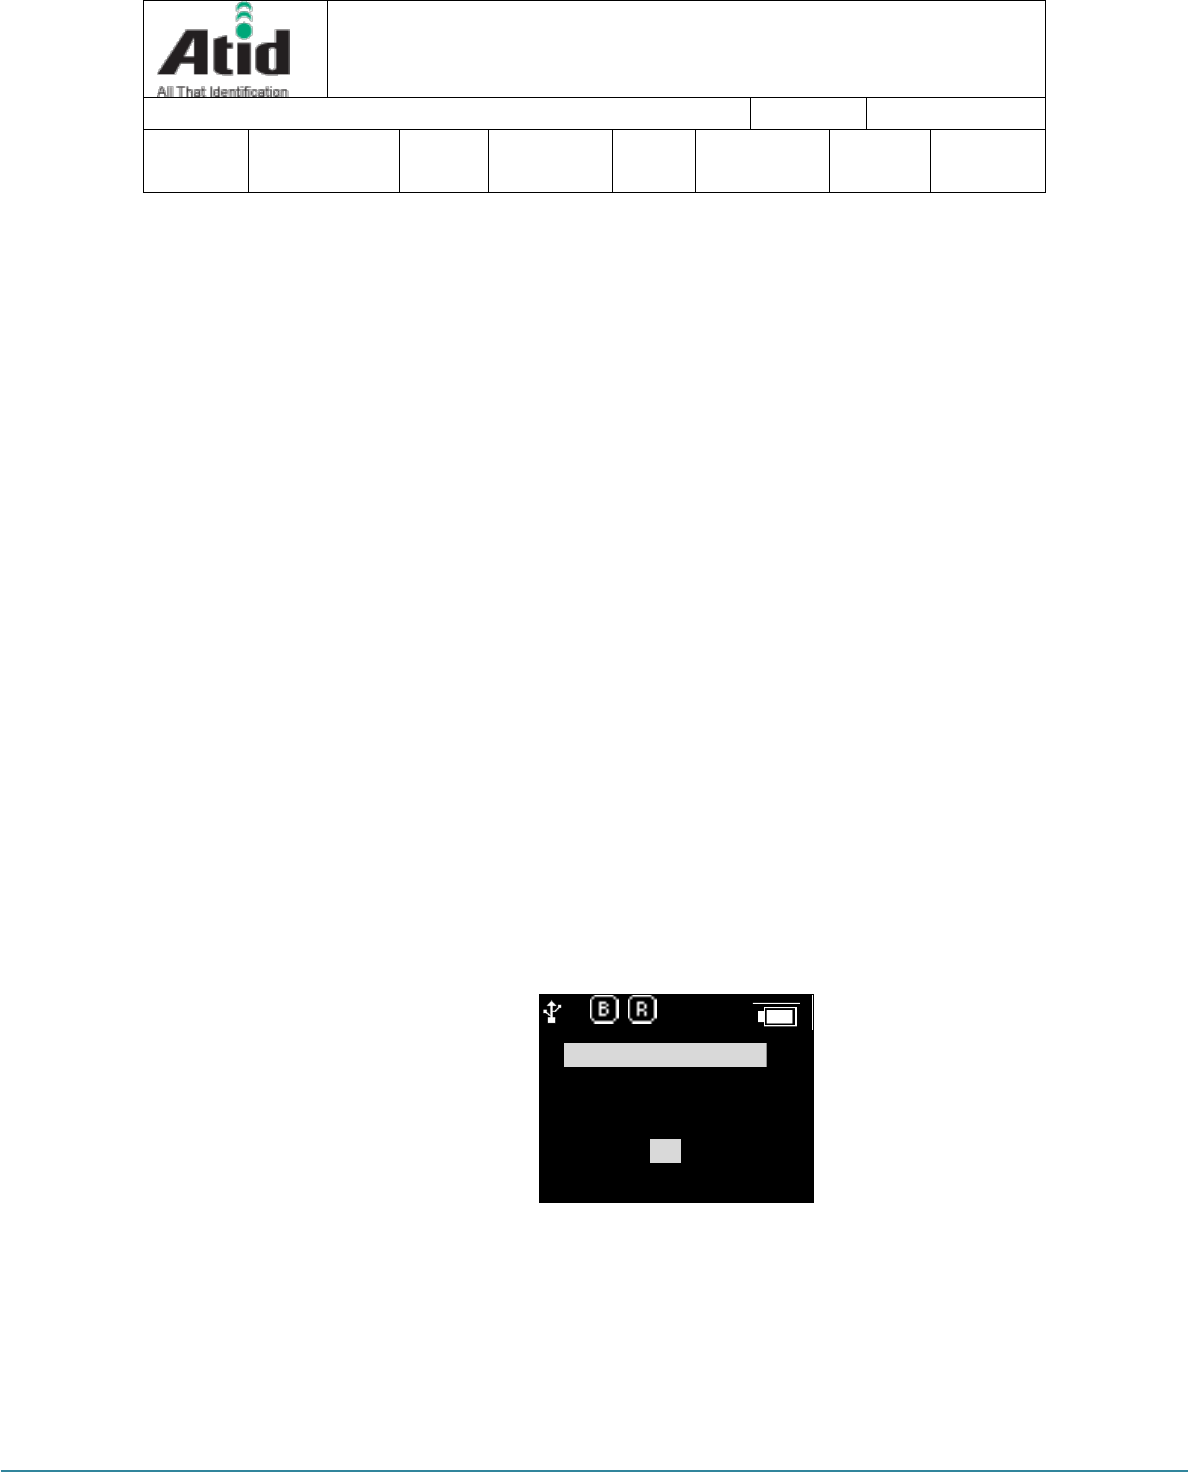
AT388 supports the reading function for basic barcode and RFID without host after turning on
the device. Please acquire the basic function in accordance with the below step.
6.1 Basic Function of Device
AT388 is basically worked as three kinds of different mode
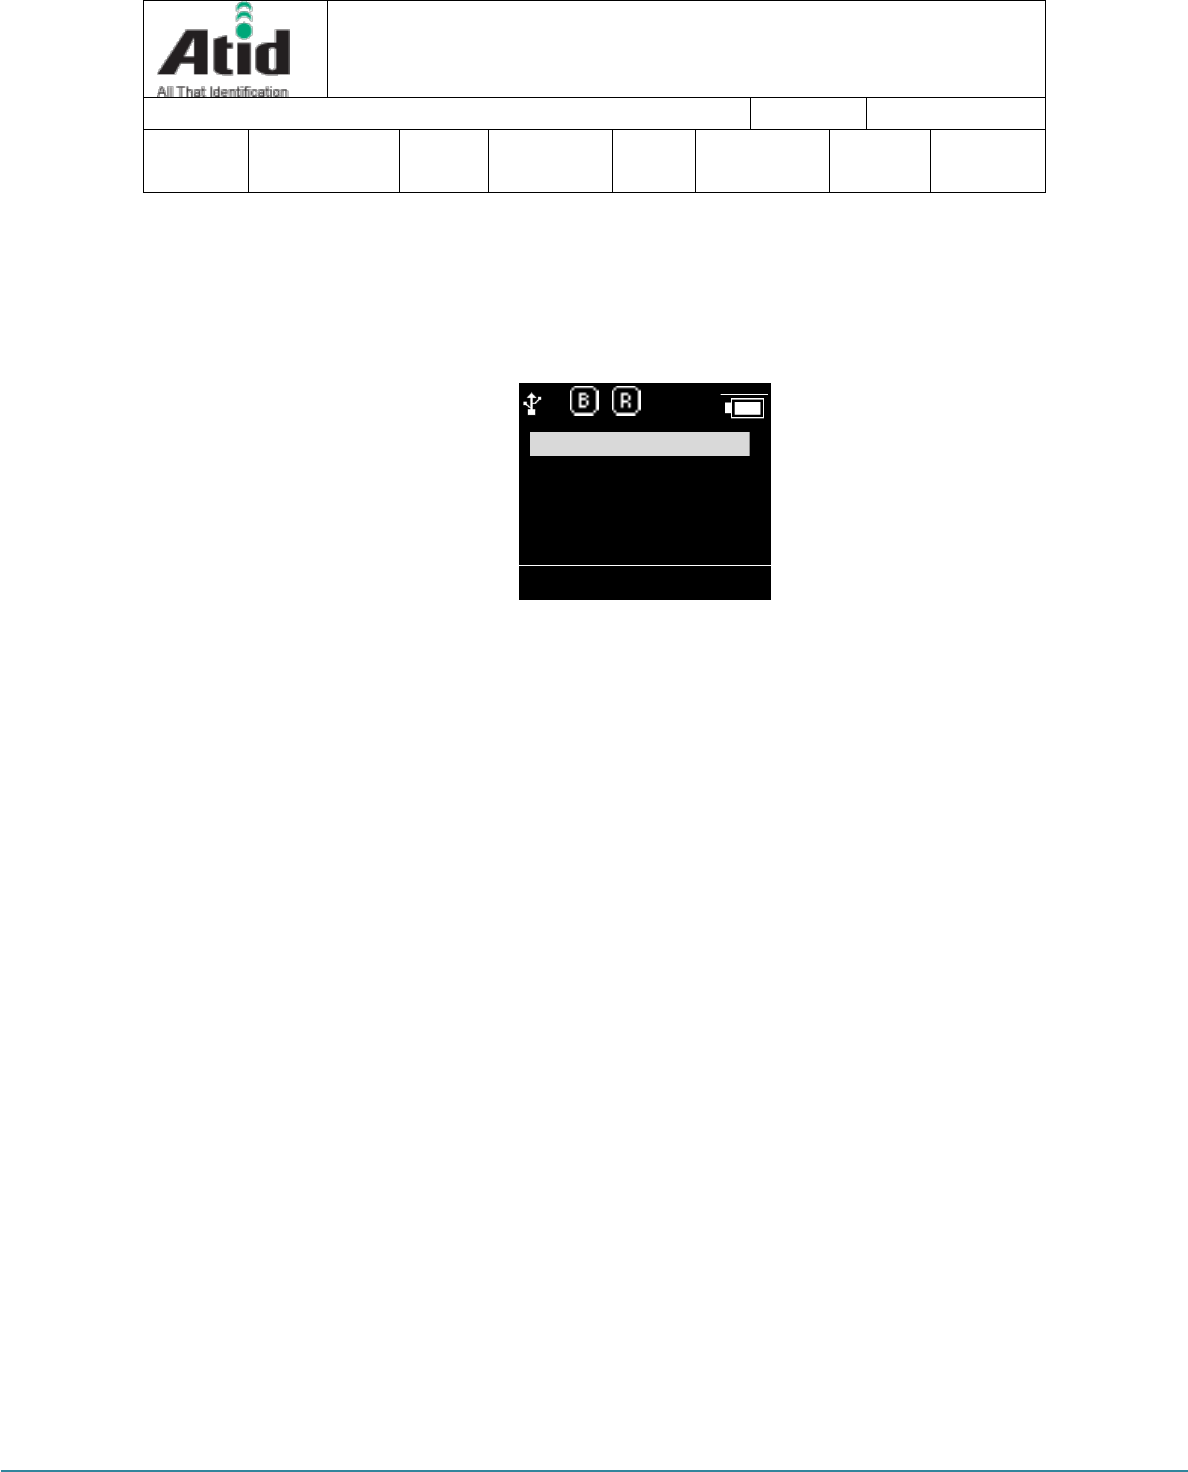
6.1.1 Scan Mode
This is the screen shown at the first when turning on the device and It acts a role in
collecting the barcode and RFID data
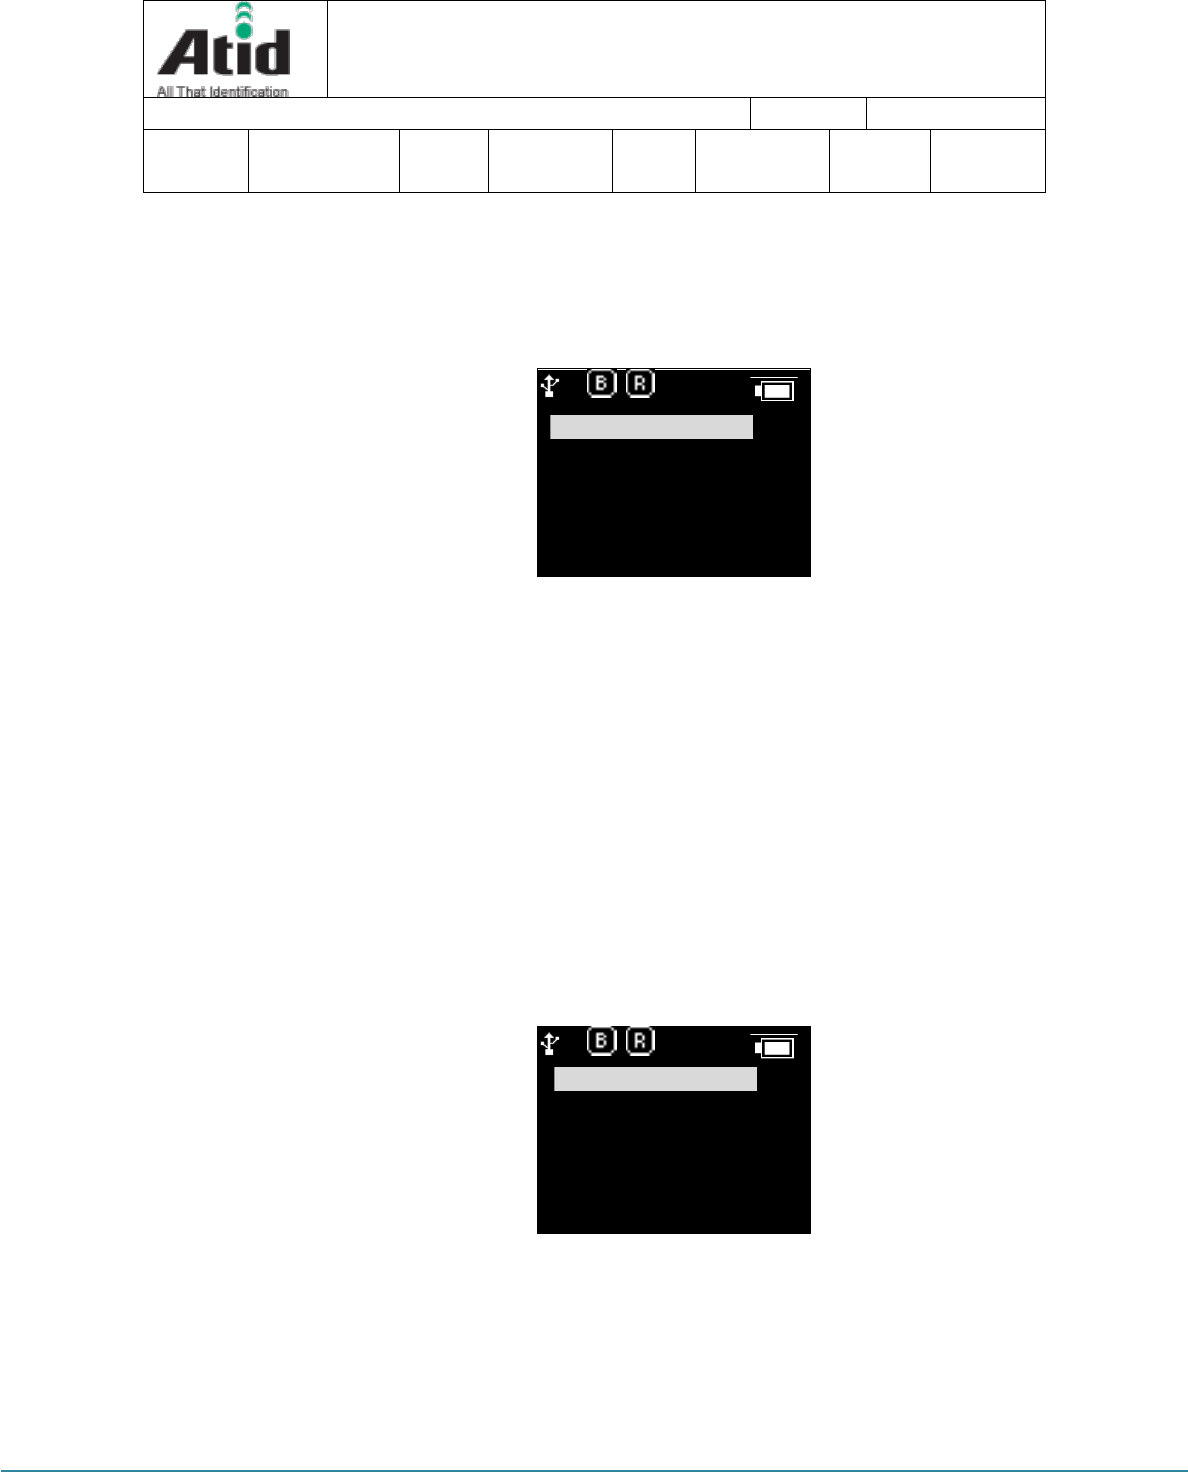
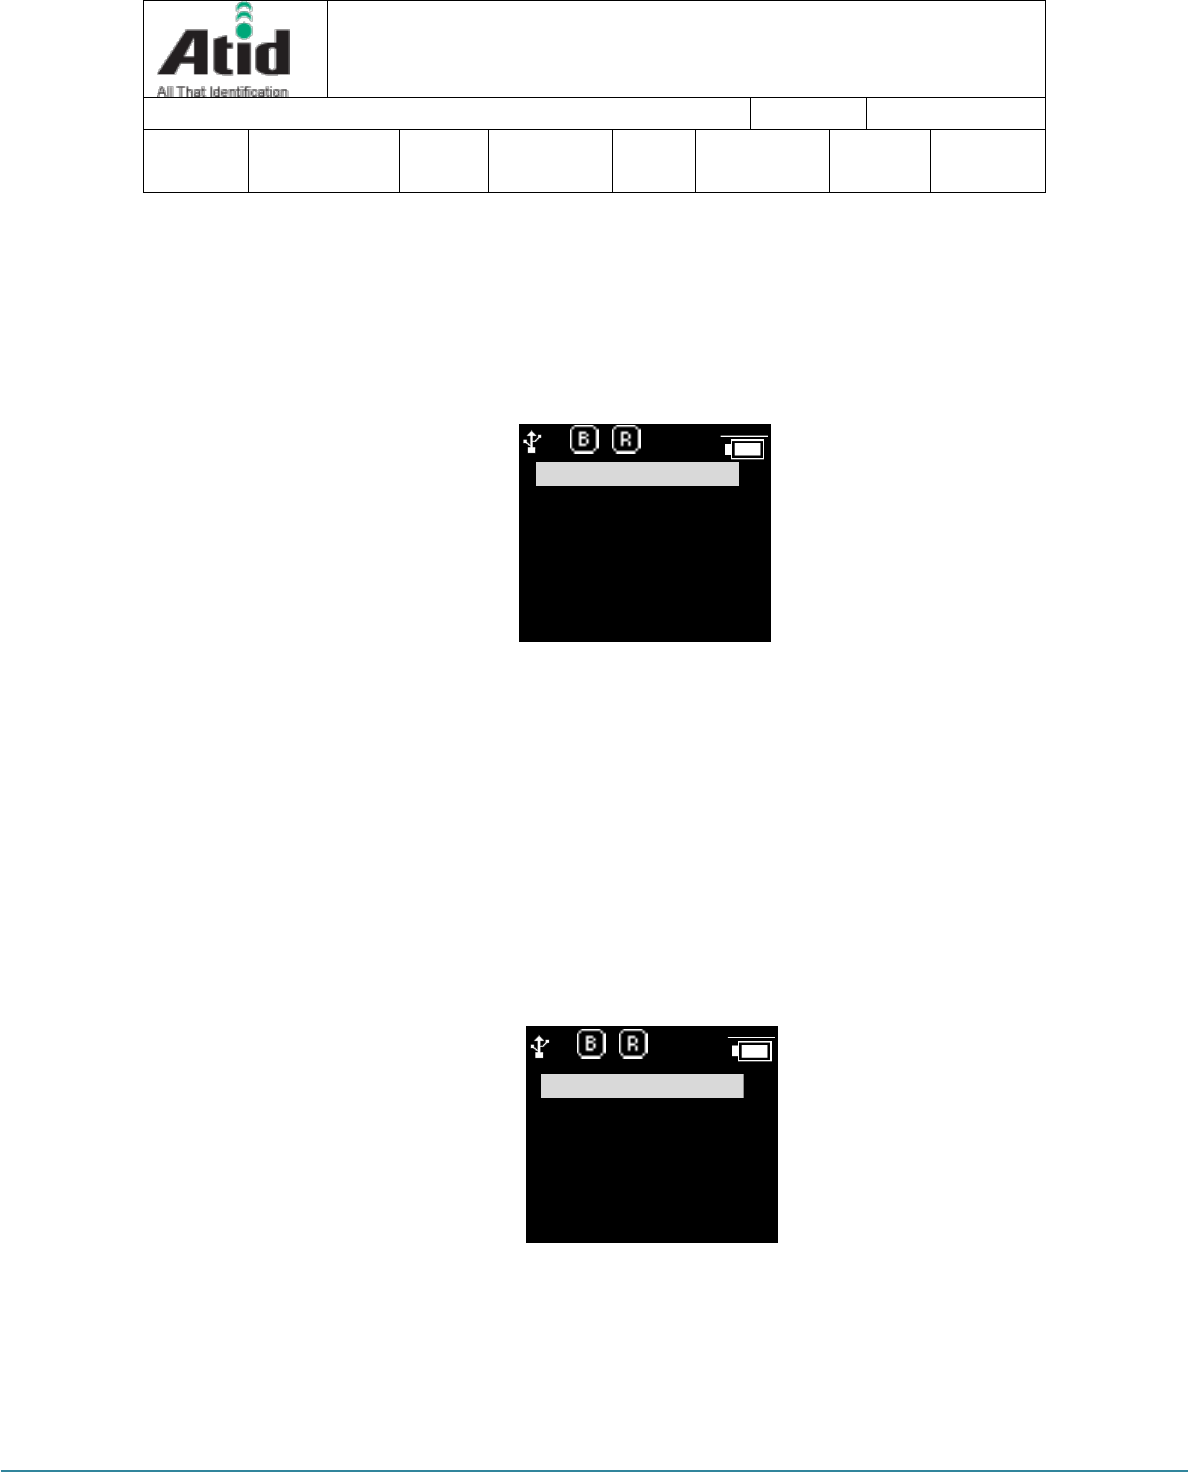
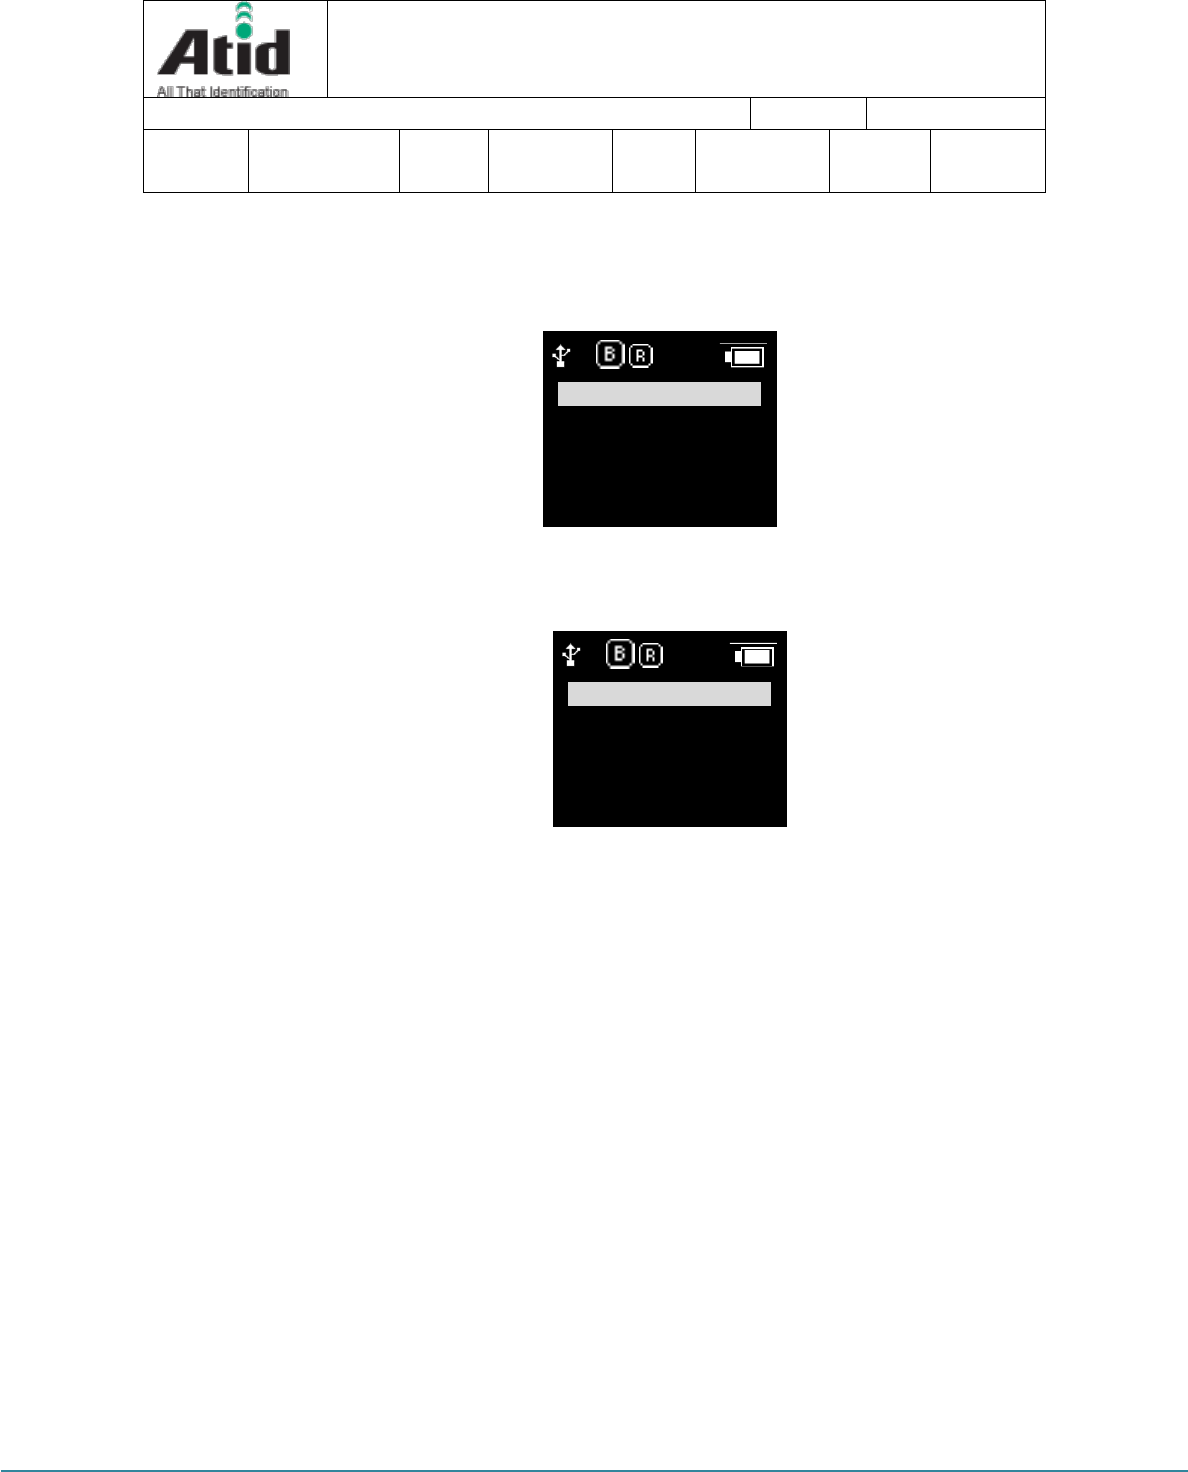
6.1.2 Scan configuration Menu
User can adjust the basic setting of device through this menu such as confirmation of
read data, memory management, communication mode and setting the time to turn
off the device
?
1:00P
?
10:00P
Scan Ready
AT388 User guide Page 18
AT388 User guide
AT388 Product User guide
Company
Atid Co., Ltd.
Doc
Name
User guide
Writer
Moon-Cheol
Song
Date
2017-09-04
Ver.
v0.1
1. View Mode
2. Upload Data
3. Erase Data
4. Data Space
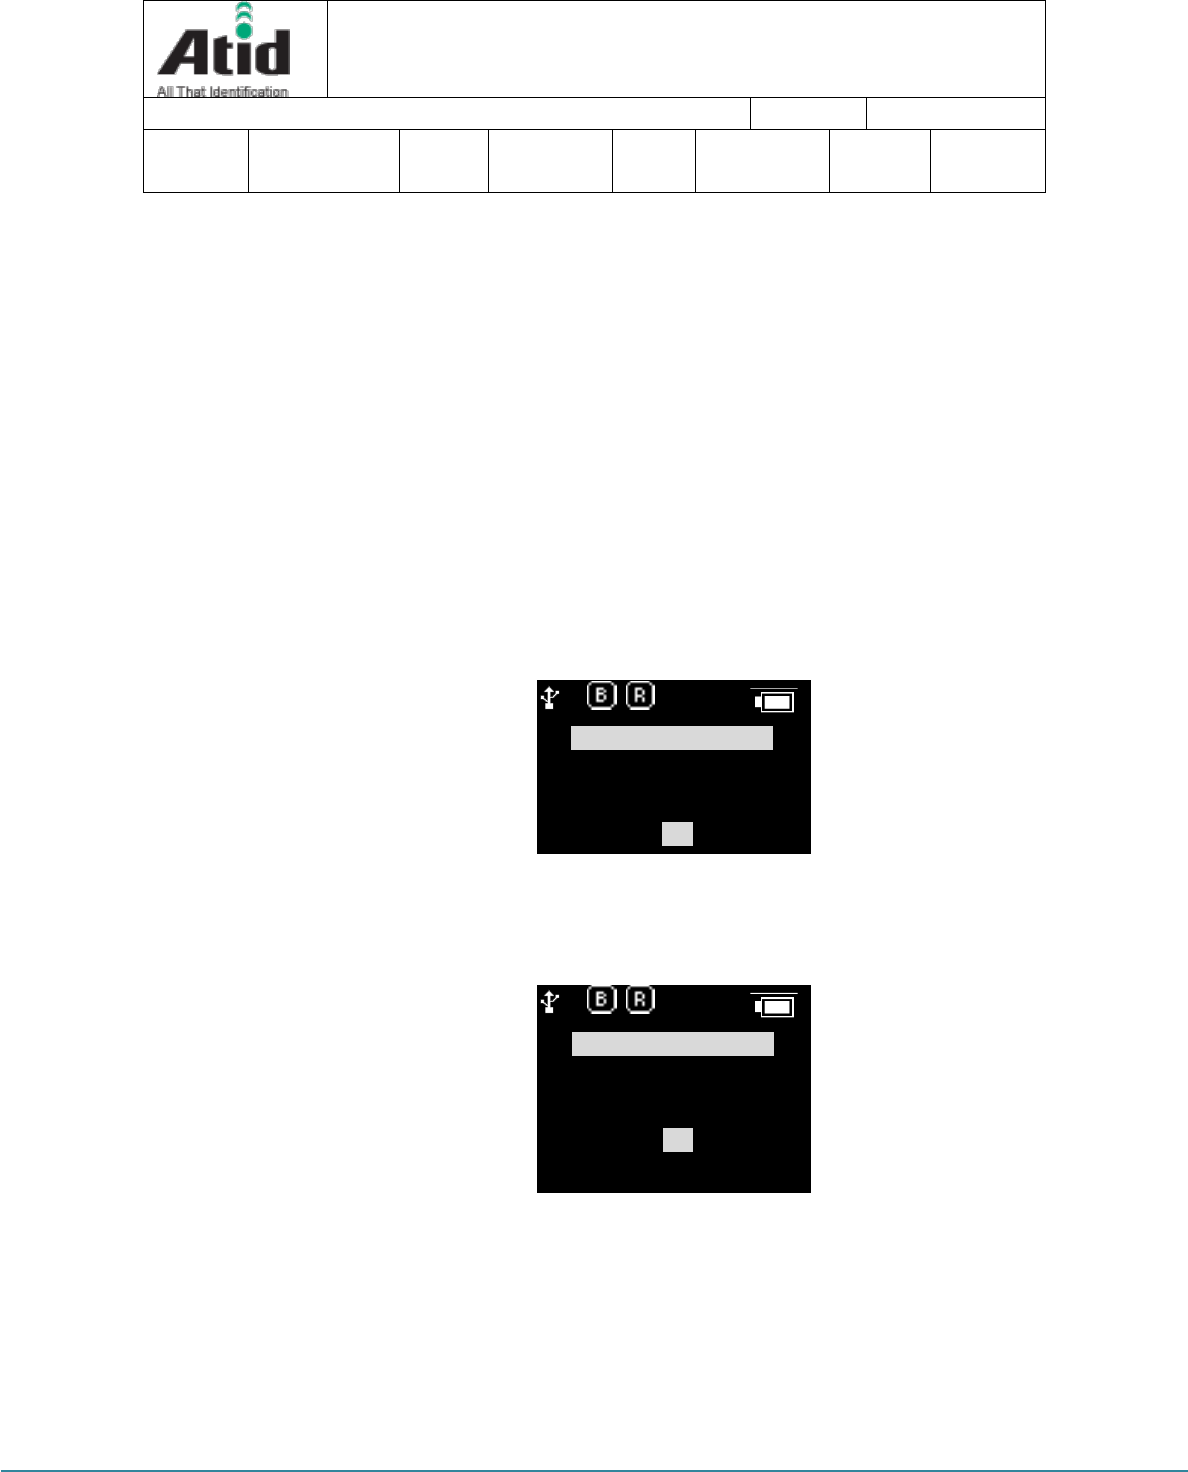
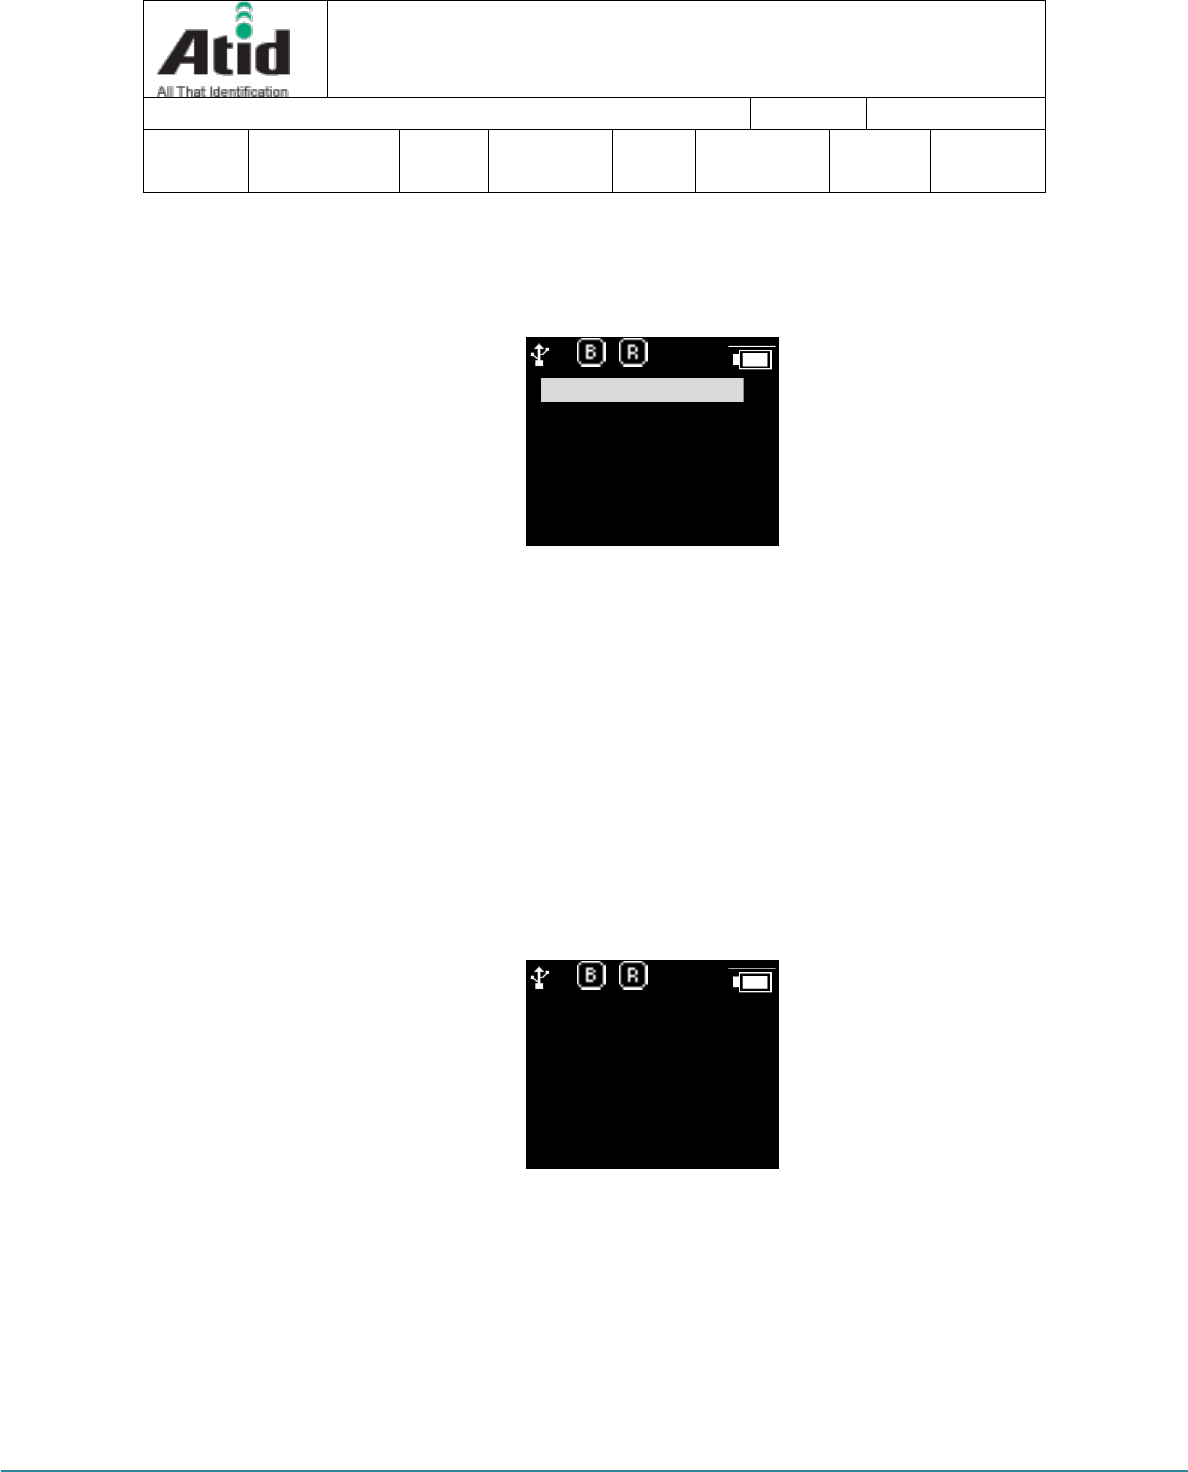
6.1.3 System Configuration
User can adjust the relation settings with whole function of device, barcode symbol
settings, Barcode/RFID operation and communication
?
1:00P
1. Symbol Setup
2. OP Mode
3. Comm & Mode
4. Data Format
5. System Setup
6.2 Power ON and OFF
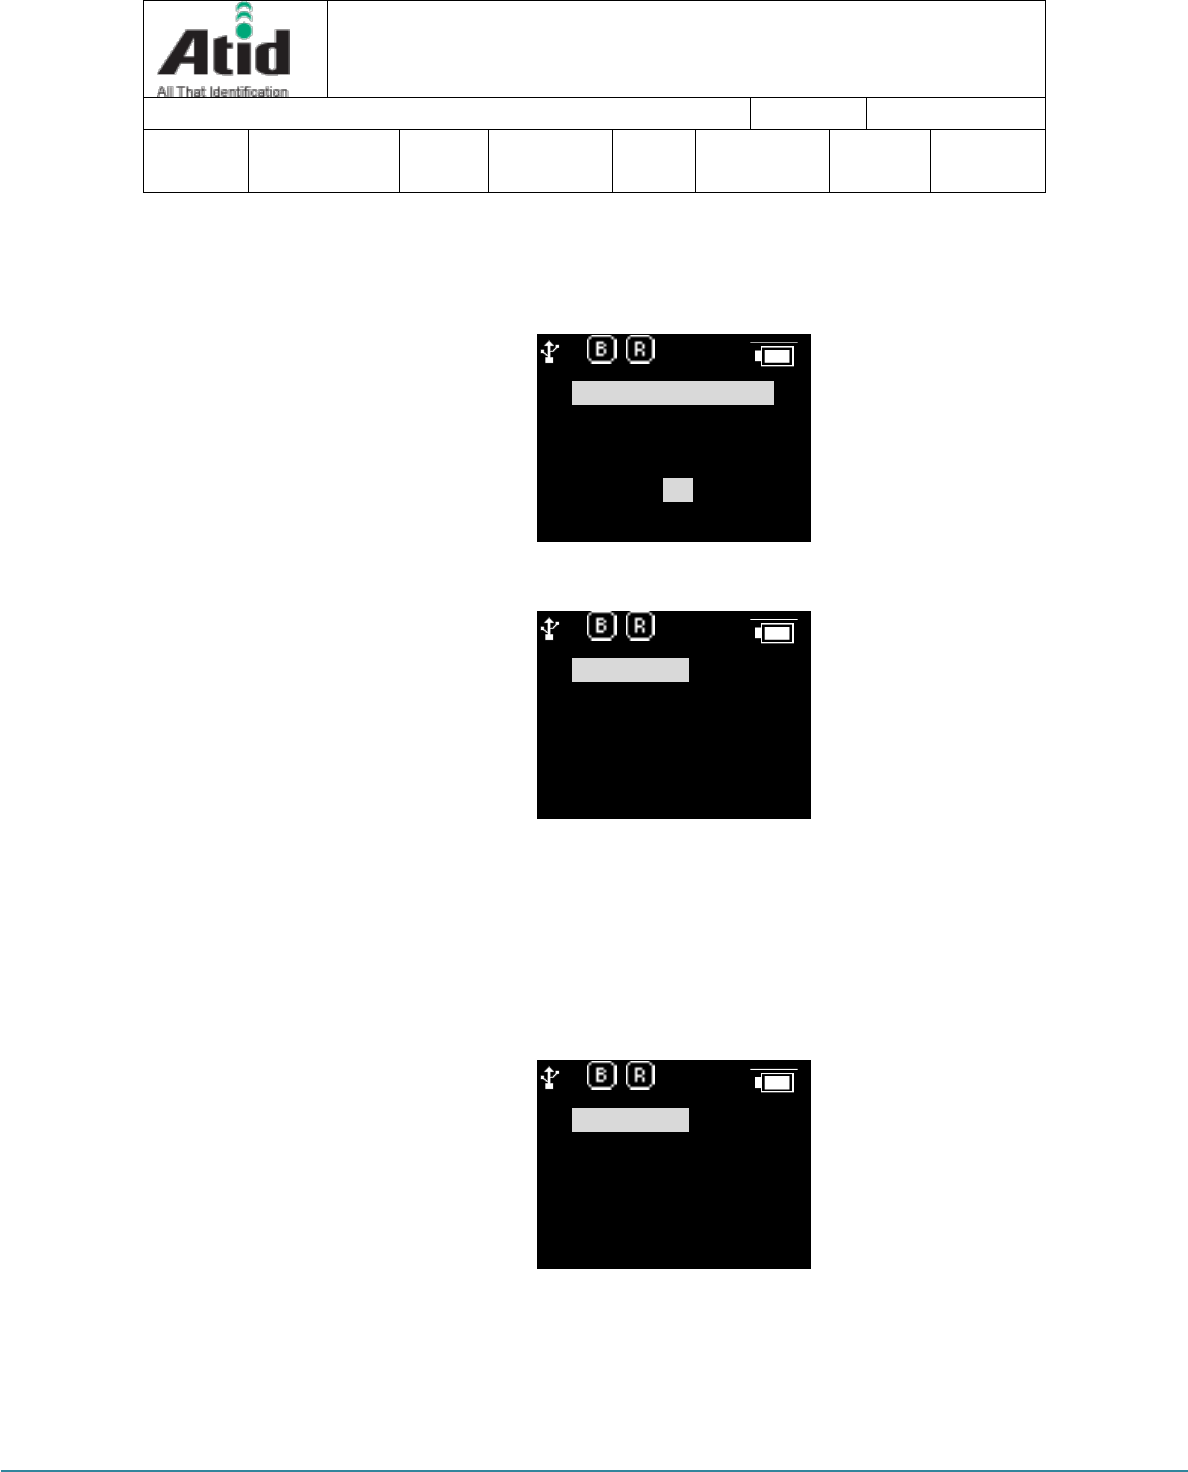
6.2.1 Power ON
① Press the Power/Section button for 2 seconds.
② After “Booting…” message is come out at the screen, please move the hand from
scan in case of that “Wait…” message is come out.
③ If the “Scan Ready” message is come out as below, device can read the Barcode
or RFID Tag data.
?
1:00P
AT388 User guide Page 19
AT388 User guide
AT388 Product User guide
Company
Atid Co., Ltd.
Doc
Name
User guide
Writer
Moon-Cheol
Song
Date
2017-09-04
Ver.
v0.1
Scan Ready
6.2.2 Power OFF
① Press the Power/Selection button for 2 seconds in the Scan Ready
② Select the “Yes” through either ◀button or ▶button and then, turn off
the power by pressing the Power/Selection button
③ If “No” is selected, user can return back to the scan mode
?
1:00P
6.3 Barcode Data Reading(Barcode Scan)
① Press the Barcode scan button in the Scan Ready
② User can read the barcode after “Scan Ready” message.
?
1:00P
Power off
continue?
Yes No
AT388 User guide Page 20
AT388 User guide
AT388 Product User guide
Company
Atid Co., Ltd.
Doc
Name
User guide
Writer
Moon-Cheol
Song
Date
2017-09-04
Ver.
v0.1
< Scan Ready > < After Barcode reading >
6.4 RFID Tag Data Reading(RFID Scan)
① Press the RFID scan button in the Scan Ready
② User can read the RFID tag after “Scan Ready” message.
<
Scan Ready > < Af te r R F ID R e a d i n g >
6.5 Scan Configuration
Contents for reading history & operation of Barcode/RFID Tag, Auto Power Off might be
changed by the scan configuration
Entry for Scan Menu
Please refer to the chapter 5. Settings & Changes in regard to detailed information on scan
menu.
① Turn on the device
Scan Ready
?
1:00P
183972
?
1:00P
Scan Ready
?
1:00P
3000000000000000000000018

AT388 User guide Page 21
AT388 User guide
AT388 Product User guide
Company
Atid Co., Ltd.
Doc
Name
User guide
Writer
Moon-Cheol
Song
Date
2017-09-04
Ver.
v0.1
② The scan menu will be shown up after pressing the ◀button for a second
③ Select the preferred item by using either ◀button or ▶button and then, press the Scan
button to check the detailed information on selected item
④ Press the “Cancel Button” for returning back to Scan mode
6.6 System Configuration
It has to be controlled in the system configuration menu for changing the operating
direction of device, settings for communication function, settings of barcode symbol and
scan mode
6.6.1 Entry for System Configuration
① Turn on the device
② Show the system configuration menu if user press the ◀button and
Power button for several seconds.
③ Select the menu by using either ◀button or ▶button and then, enter
the configuration menu through scan button
④ User can check the detailed information on selected item through the
OK button after selecting the preferred item with either ◀button or ▶
button in the system configuration menu.
⑤ For restarting it to scan mode after completing the whole settings and
storing the contents, user has to select the “Save & Exit” after selecting
the “8. Exit”. If user selects the “No Save & Exit”, it will be restarted to
scan mode without storage of adjusted contents.
AT388 User guide Page 22
AT388 User guide
AT388 Product User guide
Company
Atid Co., Ltd.
Doc
Name
User guide
Writer
Moon-Cheol
Song
Date
2017-09-04
Ver.
v0.1
7 Settings & Changes
7.1 Scan Configuration
Please refer to the chapter “7. Settings & Changes in regard to detailed information on
system configuration menu
7.1.1 “1. View data”
View Data shows the stored data located in the internal memory, in case of Batch
Process Mode. Check the next or previous item through either ◀button or ▶
button
7.1.2 “2. Upload data”
Stored data in the internal memory are transferred to Host`s Bluetooth or WLAN
Data of memory will be remained after transferring.
7.1.3 “3. Erase data”
Stored data in the internal memory can be wholly deleted
If user wants to erase the data, please select “Yes”
7.1.4 “4. Data space”
Show the amount of used internal memory
?
10:00P
Data Space
900K bytes(100%)
Left
0 records
OK
AT388 User guide Page 23
AT388 User guide
AT388 Product User guide
Company
Atid Co., Ltd.
Doc
Name
User guide
Writer
Moon-Cheol
Song
Date
2017-09-04
Ver.
v0.1
7.1.5 “5. Comm & Mode”
Comm & Mode is set up the communication measures and data transferring way
between device and host.
“*” is marked at the present settings.
① Realtime-BTH: Transfer the read data to device connected with
Bluetooth in real time.
② Batch-BTH: Transfer the read data to equipment connected with
Bluetooth in a lump (Batch Process mode)
③ Remote-BTH: Link with application program. (BTH_SPP only)
7.1.6 “6. Poweroff Time”
The time to automatically turn off the device can be selected as 1 minute, 2 minutes,
5 minutes, 10 minutes, 30 minutes, 60 minutes, 120 minutes, None. The device will
be automatically turned off itself after designated time. “*” is marked at the present
Settings.
?
10:00P
?
10:00P
*Realtime–BTH
Realtime–USB
Realtime–WLAN
Batch–BTH
Batch–USB
None
* 1 minute
2 minutes
5 minutes
10 minutes
OK
AT388 User guide Page 24
AT388 User guide
AT388 Product User guide
Company
Atid Co., Ltd.
Doc
Name
User guide
Writer
Moon-Cheol
Song
Date
2017-09-04
Ver.
v0.1
7.1.7 “7.Network Setup”
The menus are organized as follows.
7.1.7.1 “1. Show Info”
Information (SSID, Password) and MAC Address related to WiFi connection set up
in this product are displayed. For detailed WiFi connection information setting,
please use the special setting tool provided separately.
7.1.7.2 “2. Host Pairing”
When the connection mode is used as Bluetooth or WLAN, it provides a function
for pairing with the parent device.
① “1. PIN Code”: Check pin code necessary for pairing.
② “2. WLAN Pairing”: Wa i t i n g f o r p a i r i n g w it h h o s t d e v i c e ( H O S T ) v i a
W i F i, a n d wa it s fo r c o nn e c t i on a t t h e h o st d e vi c e .
③ “3. BTH Pairing”: Wait ing for pairing with host device (HOST)
via Blueto ot h, and w aits for connection at the ho st device.
?
10:00P
?
10:00P
PIN code
1234
OK
Wlan Pairing
192.168.0.3
wait for pairing
….
OK
AT388 User guide Page 25
AT388 User guide
AT388 Product User guide
Company
Atid Co., Ltd.
Doc
Name
User guide
Writer
Moon-Cheol
Song
Date
2017-09-04
Ver.
v0.1
The device identificat ion name requ ired for pa iring is
disp layed together.
7.1.7.3 “3. DHCP Mode”
On: Enable DHCP mode to automatically obtain IP.
Off: Disable DHCP Mode and set IP on the device separately.
7.1.7.4 “4. Paired Mode”
?
10:00P
?
10:00P
?
10:00P
BTH Pairing
AT388-67FE
wait for pairing
….
OK
On
Off
On
Off

AT388 User guide Page 26
AT388 User guide
AT388 Product User guide
Company
Atid Co., Ltd.
Doc
Name
User guide
Writer
Moon-Cheol
Song
Date
2017-09-04
Ver.
v0.1
On: Do not pair with any device oth er than the last device
that was current ly paired.
Off: Allow any device to pair.
7.1.7.5 “5. Manual Setup”
Switch to the mode to receive wireless LAN connection information and IP
information from the PC's dedicated setting program.
Please refer to the separately distributed manual for setting program
for PC.
7.2 System Configuration
7.2.1 “1. Symbol Setup”
User can choose to read the barcode symbol or not. The item that can be set will be
changed in accordance with the type and supportive function of module. The “*” is
marked at the Enable item.
7.2.2 “2. OP Mode”
Set up the operating mode of RFID and Barcode Reader and basic function of RFID
Module
?
10:00P
Manual Setup
Wait for
Connection…
OK
AT388 User guide Page 27
AT388 User guide
AT388 Product User guide
Company
Atid Co., Ltd.
Doc
Name
User guide
Writer
Moon-Cheol
Song
Date
2017-09-04
Ver.
v0.1
“1. READER”: Set up the barcode and RFID operating mode
“BARCODE“: Set up the exclusive barcode mode and, read the only barcode
when user pushes the scan button
“UHF RFID”: Set up the exclusive RFID mode, read the only UHF RFID Tag
when user pushes the scan button.
“BARCORDE–RFID”: Set up either barcode mode or RFID mode at the scan
ready.
“BARCORDE+RFID”: Set up the both barcode mode and RFID mode
“2. Report Mode”:
Set up the tag Reading Mode of RFID among Multi Tag / Single Tag / Multi
Repeat
“MULTI”: Set up Multi Tag Reading mode to read all the nearby tags.
“SINGLE”: Set up Single Tag mode to read only one Tag data.
“Multi Repeat”: Set up Multi Repeat mode to read all the tags nearby but
does not read same tags twice.
?
1:00P
?
1:00P
BARCODE
* UHF RFID
BARCODE–RFID
BARCODE+RFID
* MULTI
SINGLE
Multi Repeat
AT388 User guide Page 28
AT388 User guide
AT388 Product User guide
Company
Atid Co., Ltd.
Doc
Name
User guide
Writer
Moon-Cheol
Song
Date
2017-09-04
Ver.
v0.1
7.2.3 “3. Comm & Mode”
AT388 can connect with host through Bluetooth and WLAN. Bluetooth supports the different
kinds of protocol
1. BTH Protocol: Select the communication protocol to be used when
connecting with Bluetooth
BTH HID: It will connect through Human Interface Device and the data
to be transferred will be inputted in accordance with the contents typed
through Keyboard at the place where the cursor is located. User has to
require more attention for using this mode since between the data where
the cursor is located and actual reading data can be differently shown up
with the keyboard language settings of host.
BTH SPP: It will connect through serial port profile and the data to be
transferred will be transferred to serial port (COM port) of host. The host
has to make the separate program for utilizing the transferred data.
?
1:00P
1. BTH Protocol
2. USB Protocol
3. Com Mode
AT388 User guide Page 29
AT388 User guide
AT388 Product User guide
Company
Atid Co., Ltd.
Doc
Name
User guide
Writer
Moon-Cheol
Song
Date
2017-09-04
Ver.
v0.1
3. Com Mode
Set up the data transferring mode and communication protocol between
AT388 and host. “*” is marked in selected item.
Realtime-BTH: The read data will be transferred to the equipment that
connects with its device through Bluetooth in real time
Batch-BTH: The read data will be transferred to the equipment that
connects with its device through Bluetooth (Batch Process mode)
Remote-BTH: Link with application program. (BTH_SPP only)
7.2.4 “4. Data Format”
The contents of this menu are explained on the basis of a situation that device
can read the barcode. The operation can be different when reading the RFID
Tag
“1. Barcode Record”: After reading the barcode, user can decide to use the barcode
?
1:00P
?
1:00P
*Realtime–BTH
Realtime–USB
Realtime–WLAN
Batch–BTH
Batch–USB
Batch–WLAN
Remote–BTH
Int
1. Barcode Record
2. Time format
3. Quantity
4. Numbering
5. Terminator
6. UHF Report
AT388 User guide Page 30
AT388 User guide
AT388 Product User guide
Company
Atid Co., Ltd.
Doc
Name
User guide
Writer
Moon-Cheol
Song
Date
2017-09-04
Ver.
v0.1
type ID or time to be appended when storing or transferring the data
“*” is marked in selected item.
Barcode Only: The only reads barcode data will be stored or transferred
ID+Barcode: ID of barcode and read barcode data will be stored or
transferred
Time+Barcode: Time data and read barcode will be stored or transferred
Time+ID+BarcodeMode: Time data, ID of barcode and read barcode data
will be stored or transferred.
“2. Time format”: In case of that the time will be stored or transferred with the
read barcode, user can set up the time format
“*” is marked in selected item
Year: Choose to use the year data or not at the time data (YYYY)
Month & Date: Choose to use Month & Date or not at the time
data(MMDD)
?
1:00P
?
1:00P
* Barcode Only
ID+Barcode
Time+Barcode
Time+ID+Barcode
Year
*Month & Date
*Hour & Minute
AT388 User guide Page 31
AT388 User guide
AT388 Product User guide
Company
Atid Co., Ltd.
Doc
Name
User guide
Writer
Moon-Cheol
Song
Date
2017-09-04
Ver.
v0.1
Hour & Minute: Choose to use Hour & Minute or not at the time
data(HHMM)
“3. Quantity”: Choose to input tag quantity. Quantity settings can be operated in
the only barcode mode and its settings might be possible after reading the
barcode tag. User can get AT388 to input quantity from 1 to 9999 and it cannot
read another tag before inputting applicable tag quantity. “*” is marked in default
settings
“4. Numbering”: Store or transfer the data index when reading the barcode and
RFID tag. If the memory is vacated, it will be started from 1
“5. Terminator”: Select which letter will be attached at the end of data among LF,
CR, CR&LF, Tab, Space, Semicolon when transferring the data via host
“6. UHF Report” (UHF Only): Select whether only EPC data is sent or both the EPC
data and PC data is sent when transferring the UHF RFID Tag Data
7.2.5 “5. System Setup”
Set up to use the time, sound, vibrator, LCD and etc are needed or not
“1. Clock Setting”: Set up the current time. Designated time can be used with RFID
tag information and barcode.
★ Please do set up the time in regularly since time error can be occurred
“2. Poweroff Time”: Select the time to automatically turn off the power when not
in use. User can select the time among 1 minute, 2 minutes, 5 minutes, 10 minutes,
10:00P
?
1. Clock Setting
2. Poweroff Time
3. Disp.off Time
4. HID Language
5. Notification
10:00P
?
6. BT HIDMode
7. F/W Version
AT388 User guide Page 32
AT388 User guide
AT388 Product User guide
Company
Atid Co., Ltd.
Doc
Name
User guide
Writer
Moon-Cheol
Song
Date
2017-09-04
Ver.
v0.1
30 minutes, 60 minutes, 120 minutes and None. The device will be automatically
turned off the its power after the designated time from LCD power off. “*” is
marked in default settings
“3. Disp,off Time”: Set up the time to turn off the LCD for saving battery and LCD
will be automatically turned off in accordance with the designated time
“4. HID Language”: Set up the language type in case of HID mode. User can
select the preferred one among the UNIVER-SAL, FRENCH, UK, US
“5. Notification”: Set up the operation when pressing the button or placing the
Alert situation
1. Button notify
Set up whether beep, vibrate, light is being operated when pressing the button.
2. Alert notify
Set up whether beep, vibrate, light is being operated when placing the Alert
situation such as connection success/failure with remote or booting up. The
time to operate can be different in accordance with situation
3. Button mode
Select the holding time of Button notify among None, Short, Long. In case of
10:00P
?
None
* 1 minute
2 minutes
5 minutes
10 minutes
10:00P
?
None
* 1 minute
3 minutes
5 minutes

AT388 User guide Page 33
AT388 User guide
AT388 Product User guide
Company
Atid Co., Ltd.
Doc
Name
User guide
Writer
Moon-Cheol
Song
Date
2017-09-04
Ver.
v0.1
None settings, there is no reaction, but in case of Short settings, it will operate
for 0.3 seconds. In case of Long settings, it will operate until user detaches
the button
“6. BT HID Mode”: Set up the Bluetooth HID data speed to High or Low speed.
High Speed
Set up the Bluetooth HID data speed to High speed.
Low Speed
Set up the Bluetooth HID data speed to Low speed.
“7. F/W Version”: Show the installed firmware version. User cannot change the
firmware for changing the basic function and improvement of device. Please make
an inquiry on the firmware to manufacturer or distributor.
7.2.6 “6. Factory Reset”
Return all settings to default
7.2.7 “7. Exit”
Terminate the system configuration and saving operation.

AT388 User guide Page 34
AT388 User guide
AT388 Product User guide
Company
Atid Co., Ltd.
Doc
Name
User guide
Writer
Moon-Cheol
Song
Date
2017-09-04
Ver.
v0.1
8 Bluetooth Connection setting
To transmit / receive data using this product with Bluetooth, you need a PC with built-in
Bluetooth function or a dedicated Bluetooth dongle.
※ Please check with your PC vendor or product installer for details on Bluetooth
function.
※ This chapter assumes that the Bluetooth driver is installed normally.
※ Please contact the distributor or the manufacturer who purchased the product for
any problems during use or installation.
※ If the Bluetooth driver does not install properly, or if you use a special driver that
is supported separately by Windows 7 and 8 or 10 OS, this manual and the
contents may not match.
8.1 Windows 7 Environment
① Turn on the AT388 and set it to 7. Network Setup -> 2. Host Paring ->
3. BTH Pairing.
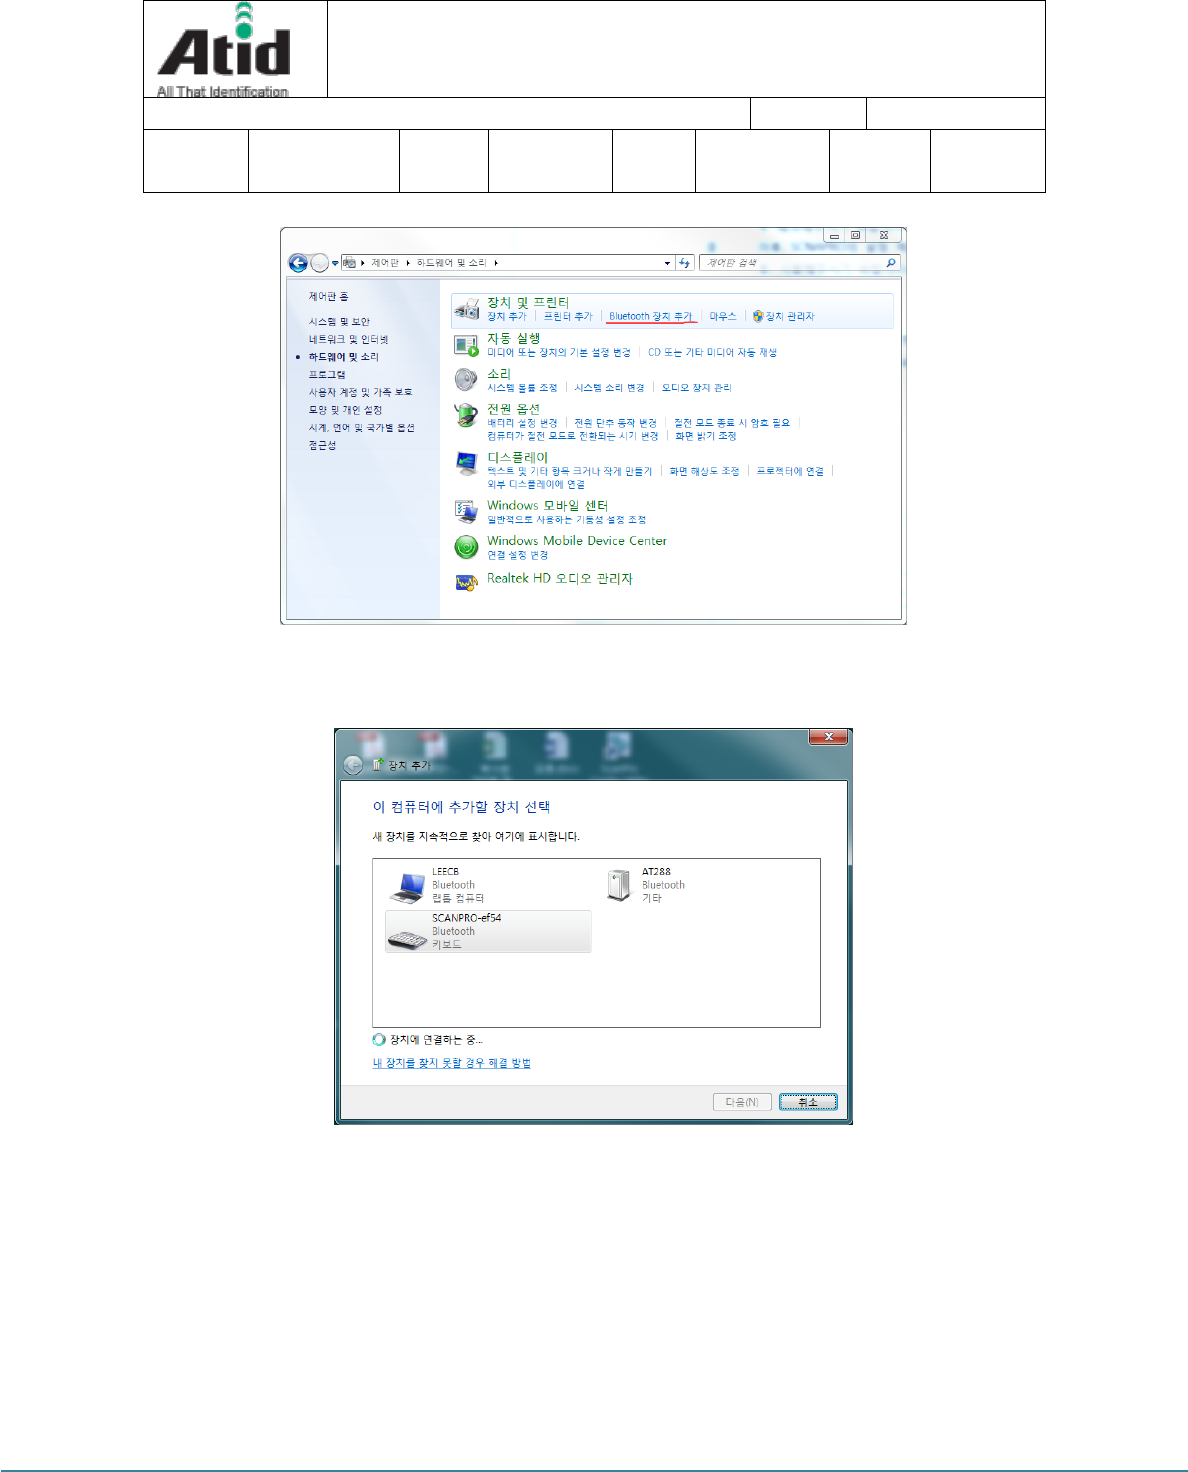
② In Windows, select Start -> Control Panel -> Hardware and Sound ->
Devices and Printers -> "Add Bluetooth Device".
AT388 User guide Page 35
AT388 User guide
AT388 Product User guide
Company
Atid Co., Ltd.
Doc
Name
User guide
Writer
Moon-Cheol
Song
Date
2017-09-04
Ver.
v0.1
③ The Bluetooth device will be detected automatically, select the AT388
you want to connect to, then press N (Next) to proceed with device
addition.
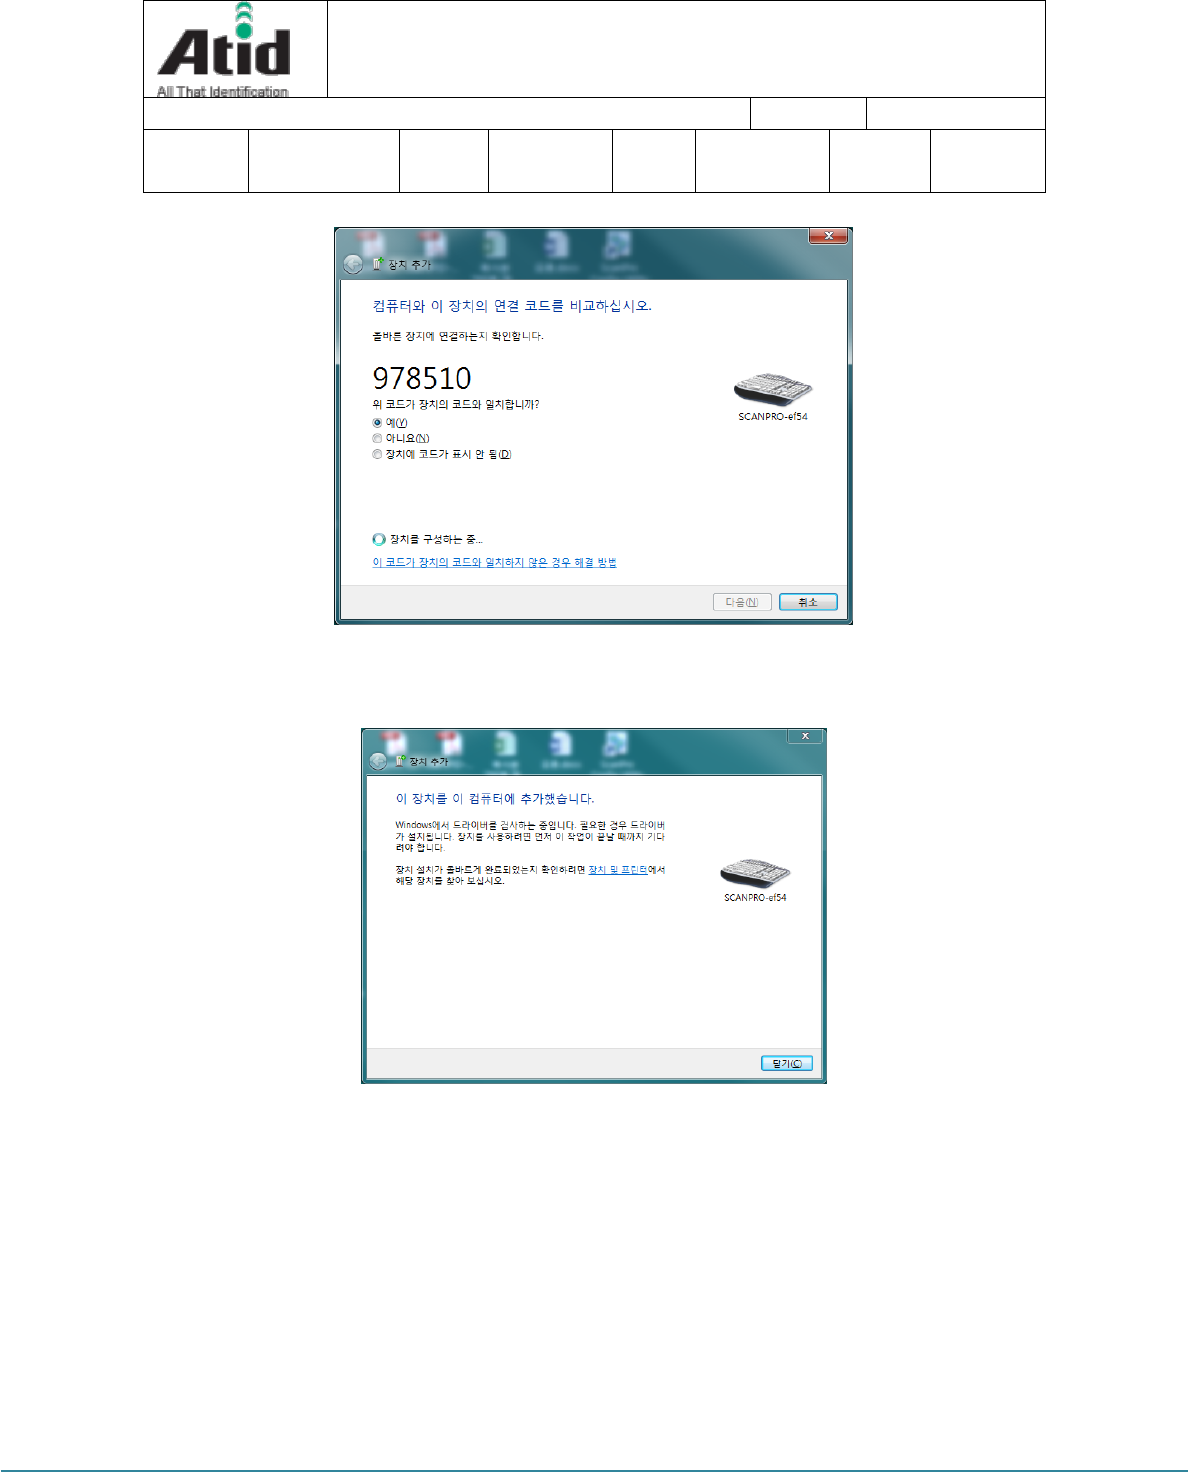
④ When the confirmation window for the connection code is displayed,
press N to continue. The connection code does not need to be changed
specially.
AT388 User guide Page 36
AT388 User guide
AT388 Product User guide
Company
Atid Co., Ltd.
Doc
Name
User guide
Writer
Moon-Cheol
Song
Date
2017-09-04
Ver.
v0.1
⑤ After a while, Windows7 will automatically detect the driver and proceed
with the installation, and the screen will display the message
Completion of device addition.
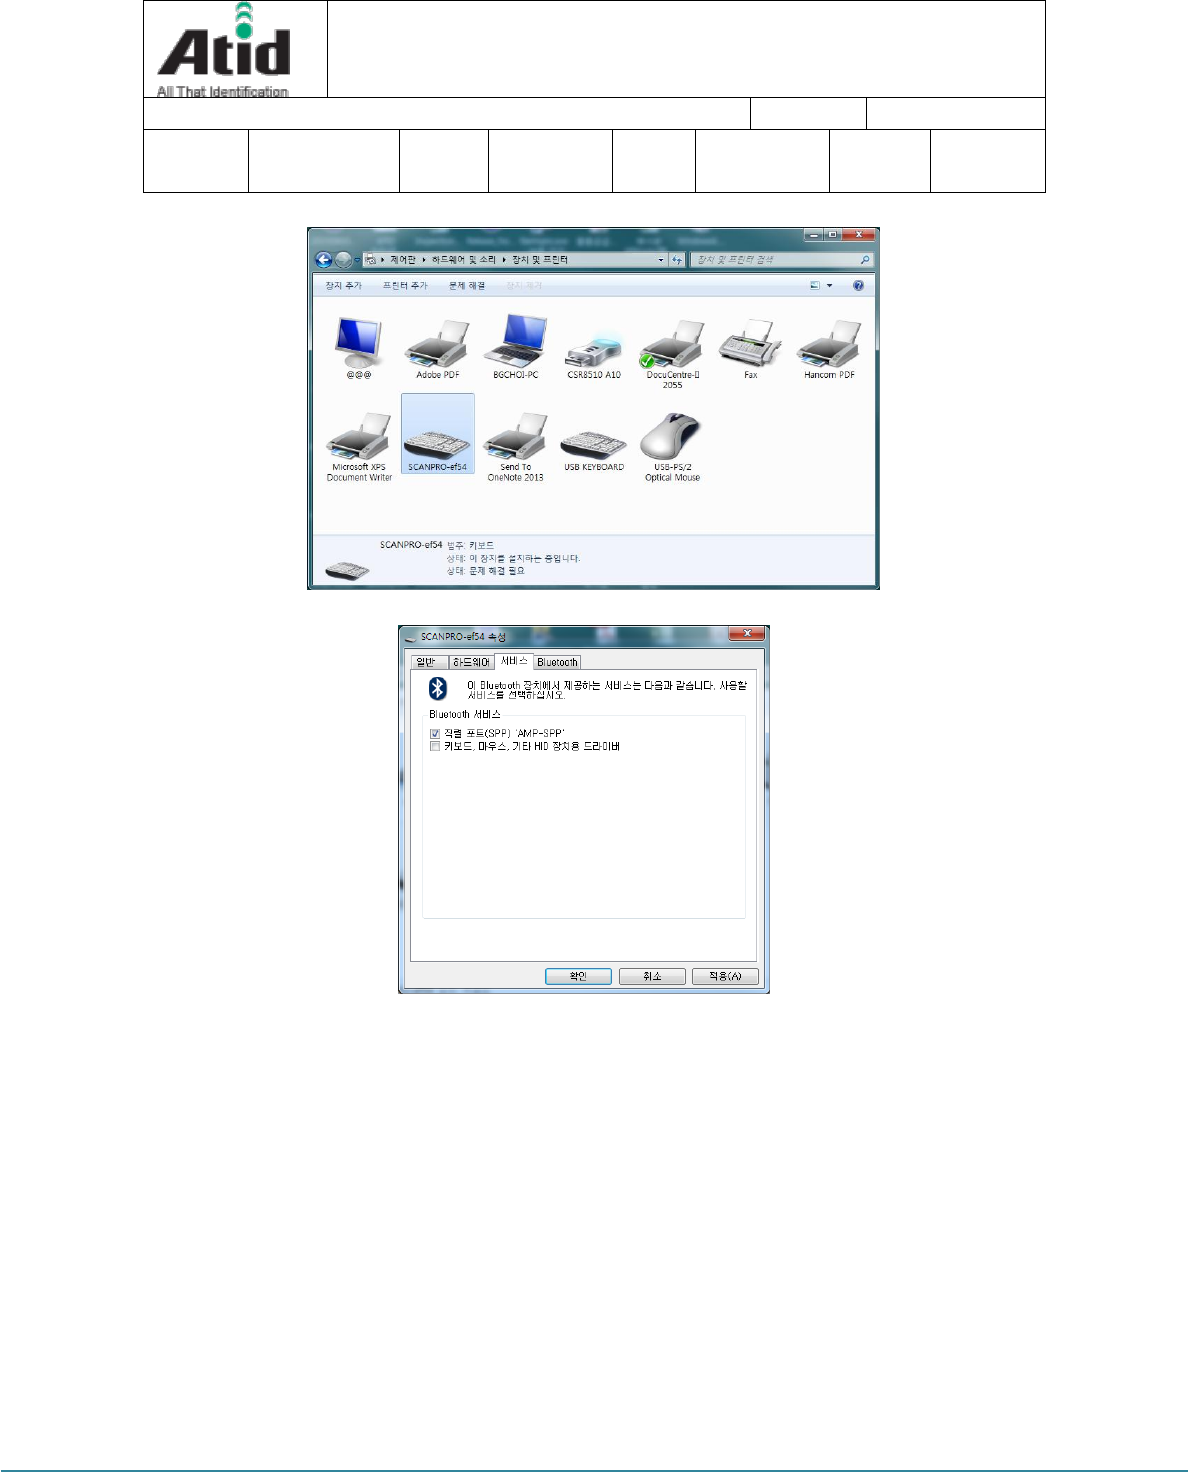
⑥ Double-click on the newly added AT388 in Control Panel -> Devices
and Printers to display its properties, then go to the "Services" tab.
AT388 User guide Page 37
AT388 User guide
AT388 Product User guide
Company
Atid Co., Ltd.
Doc
Name
User guide
Writer
Moon-Cheol
Song
Date
2017-09-04
Ver.
v0.1
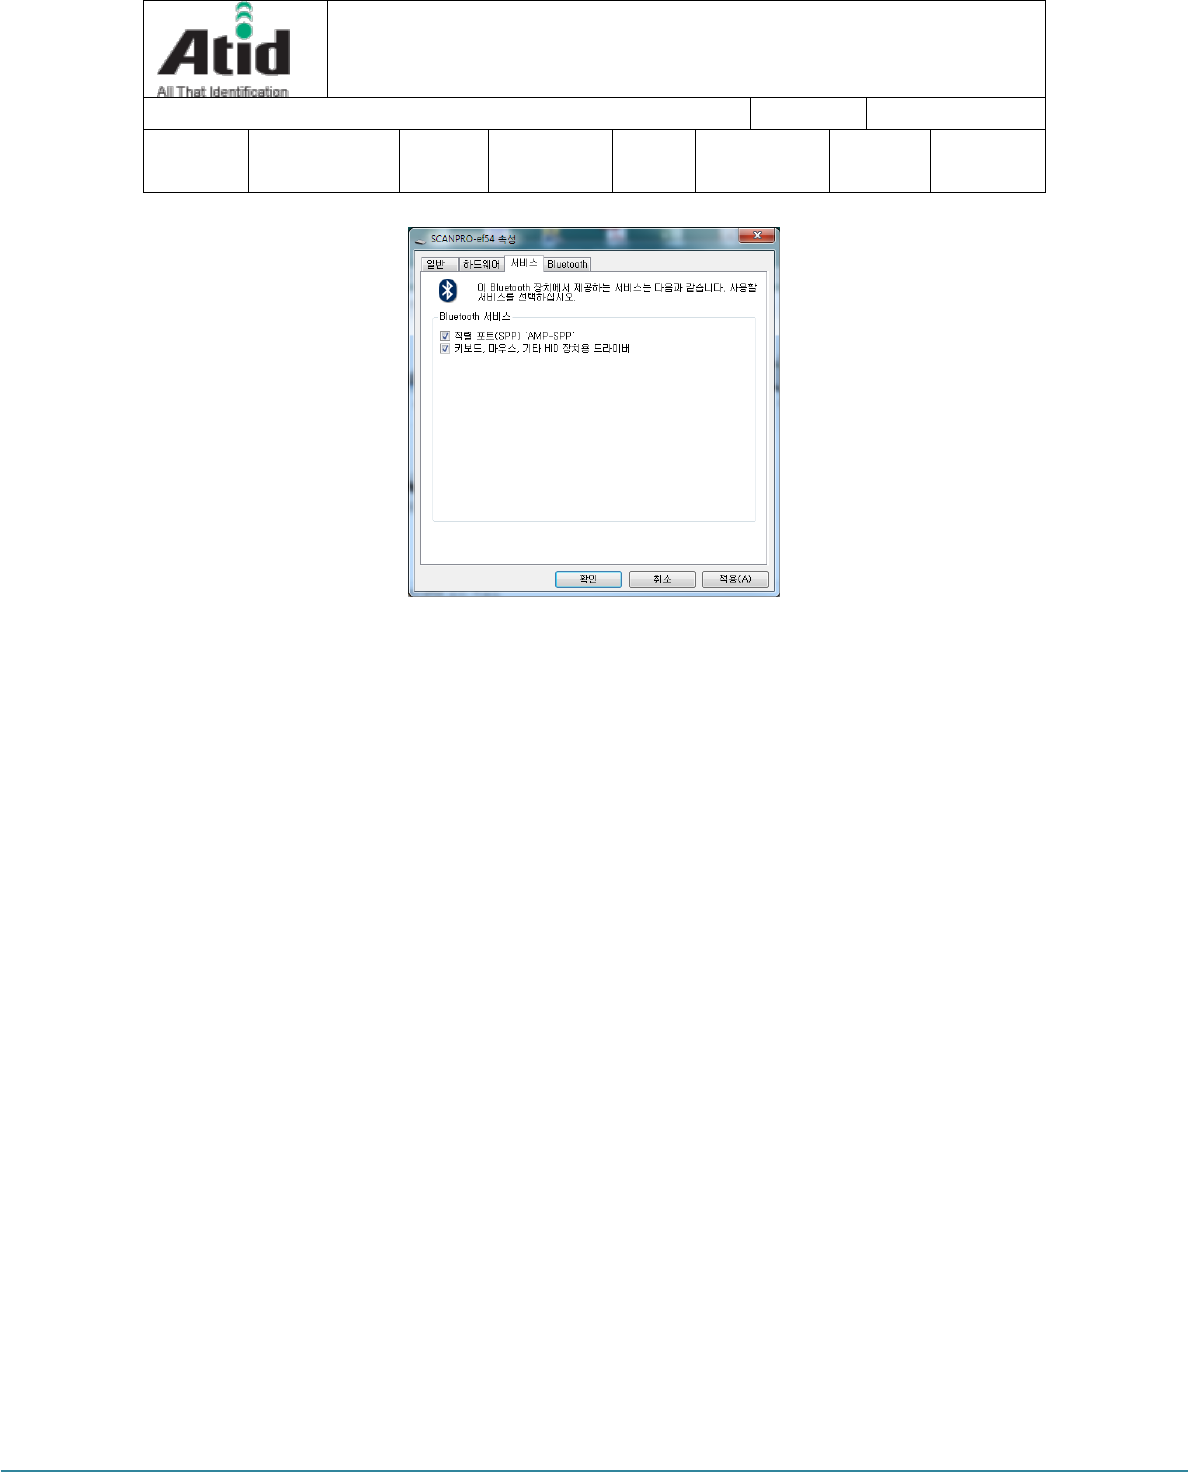
⑦ After checking all the two services that appear in the Bluetooth service,
click the OK button to finish adding the service and adding the
Bluetooth device.
AT388 User guide Page 38
AT388 User guide
AT388 Product User guide
Company
Atid Co., Ltd.
Doc
Name
User guide
Writer
Moon-Cheol
Song
Date
2017-09-04
Ver.
v0.1
⑧ After that, exit the setting menu of AT388 and set it to the desired
operation mode.
AT388 User guide Page 39
AT388 User guide
AT388 Product User guide
Company
Atid Co., Ltd.
Doc
Name
User guide
Writer
Moon-Cheol
Song
Date
2017-09-04
Ver.
v0.1
8.2 Windows 8 or Windows 10 Environment
Windows 8 and Windows 10 are similar to the basic user interface, so the contents are
based on Windows 8.
① Turn on the AT388 and set it to 7. Network Setup -> 2. Host Paring ->
3. BTH Pairing.
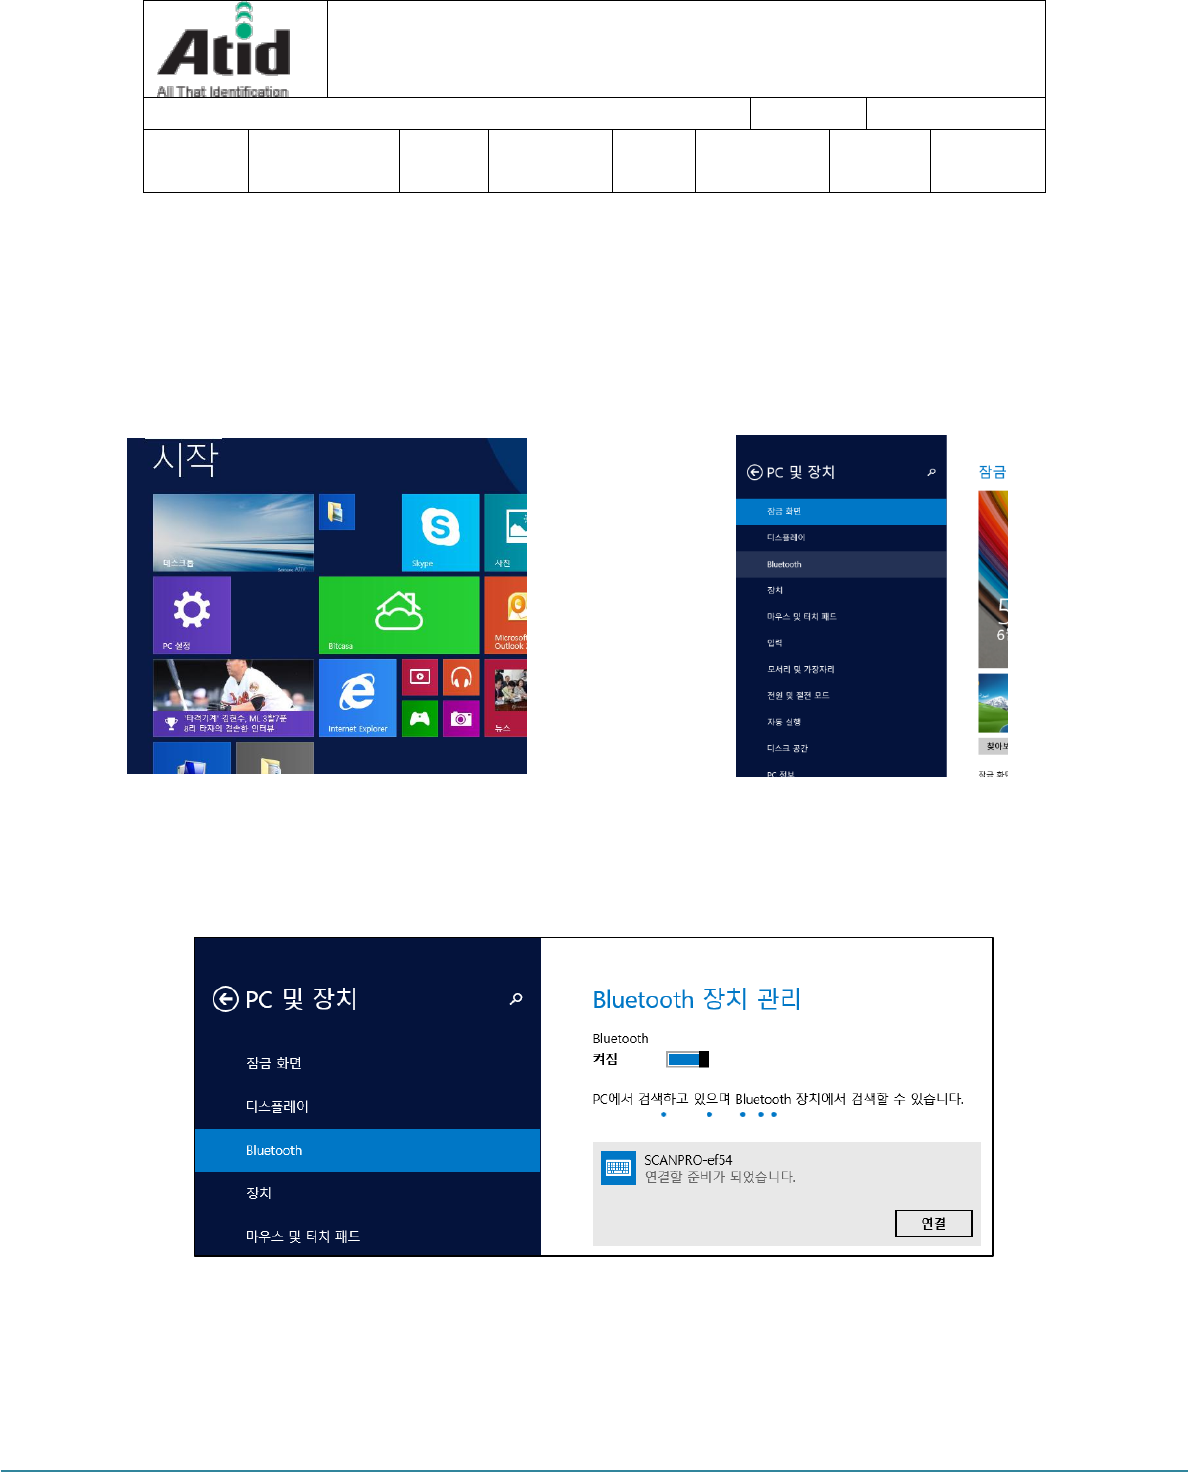
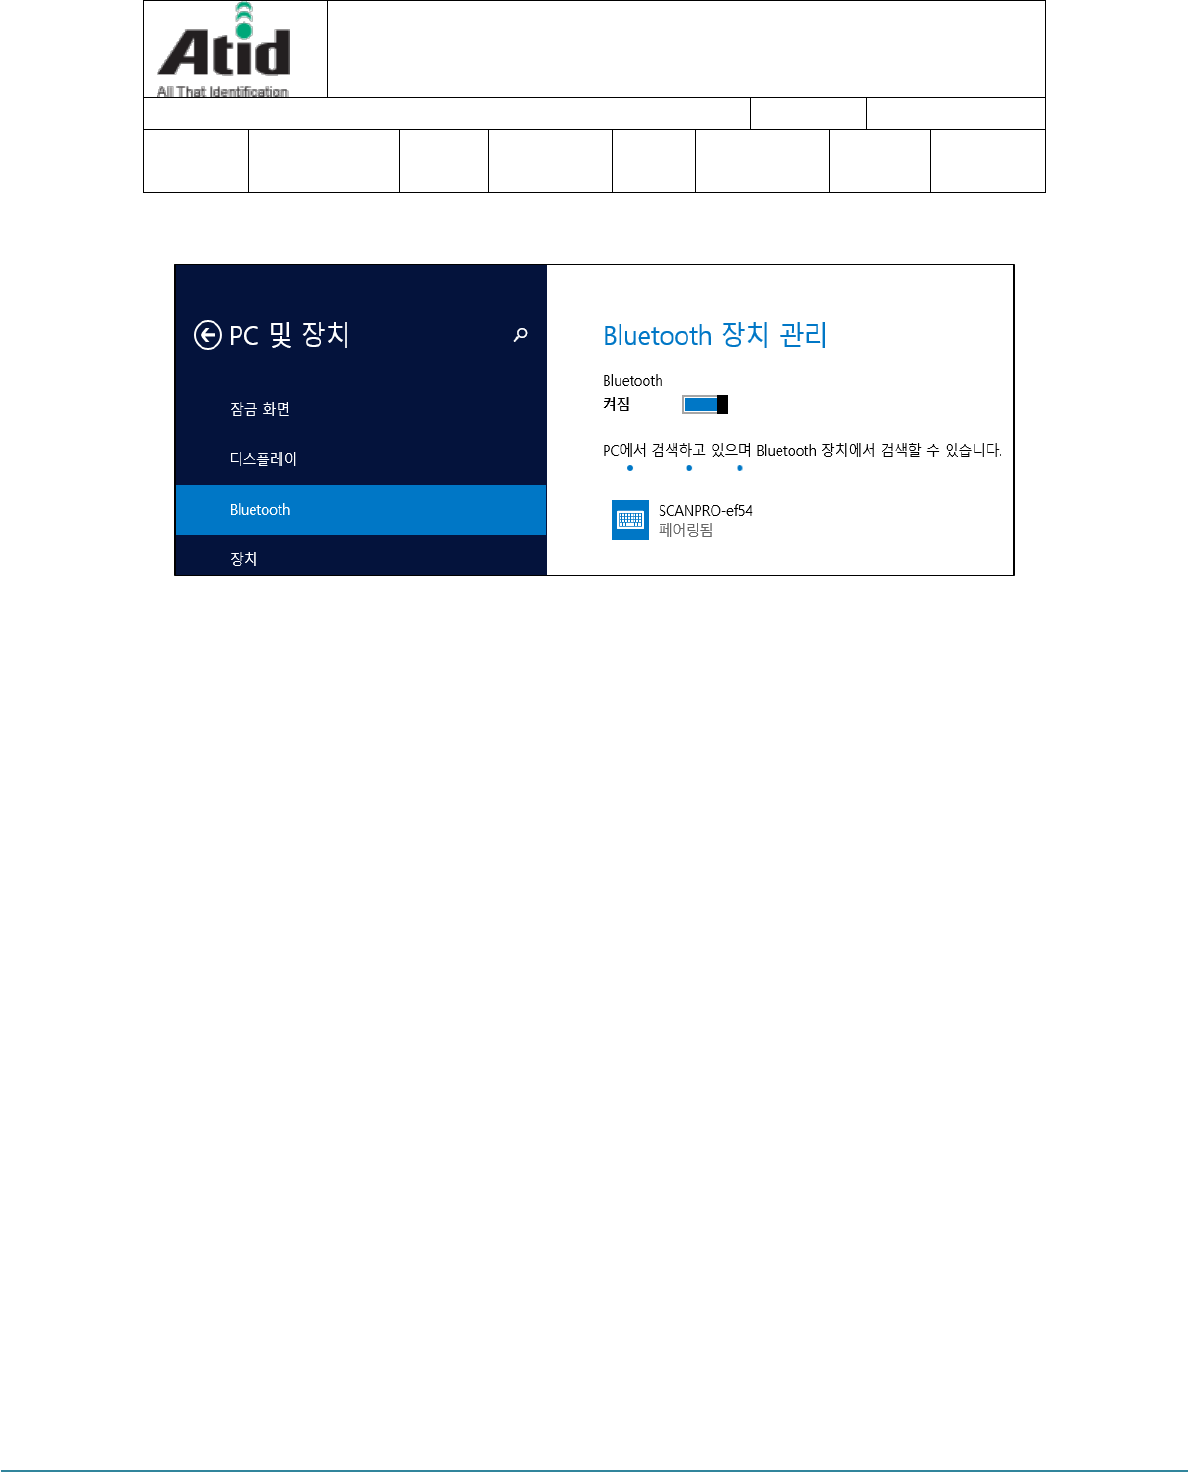
② In Windows, select Start -> PC Settings -> PC and Devices -> Bluetooth.
->
< Select settings at Start>
< Select Bluetooth on your PC and device>
③ If Bluetooth is off, if you change Bluetooth to on, the AT388 is
automatically detected and displayed.
※ The AT388 name may take a while to appear.
④ After confirming that the displayed contents of the AT388 matches the
AT388 User guide Page 40
AT388 User guide
AT388 Product User guide
Company
Atid Co., Ltd.
Doc
Name
User guide
Writer
Moon-Cheol
Song
Date
2017-09-04
Ver.
v0.1
AT388's LCD screen, click the "Connect" button on the corresponding
device.
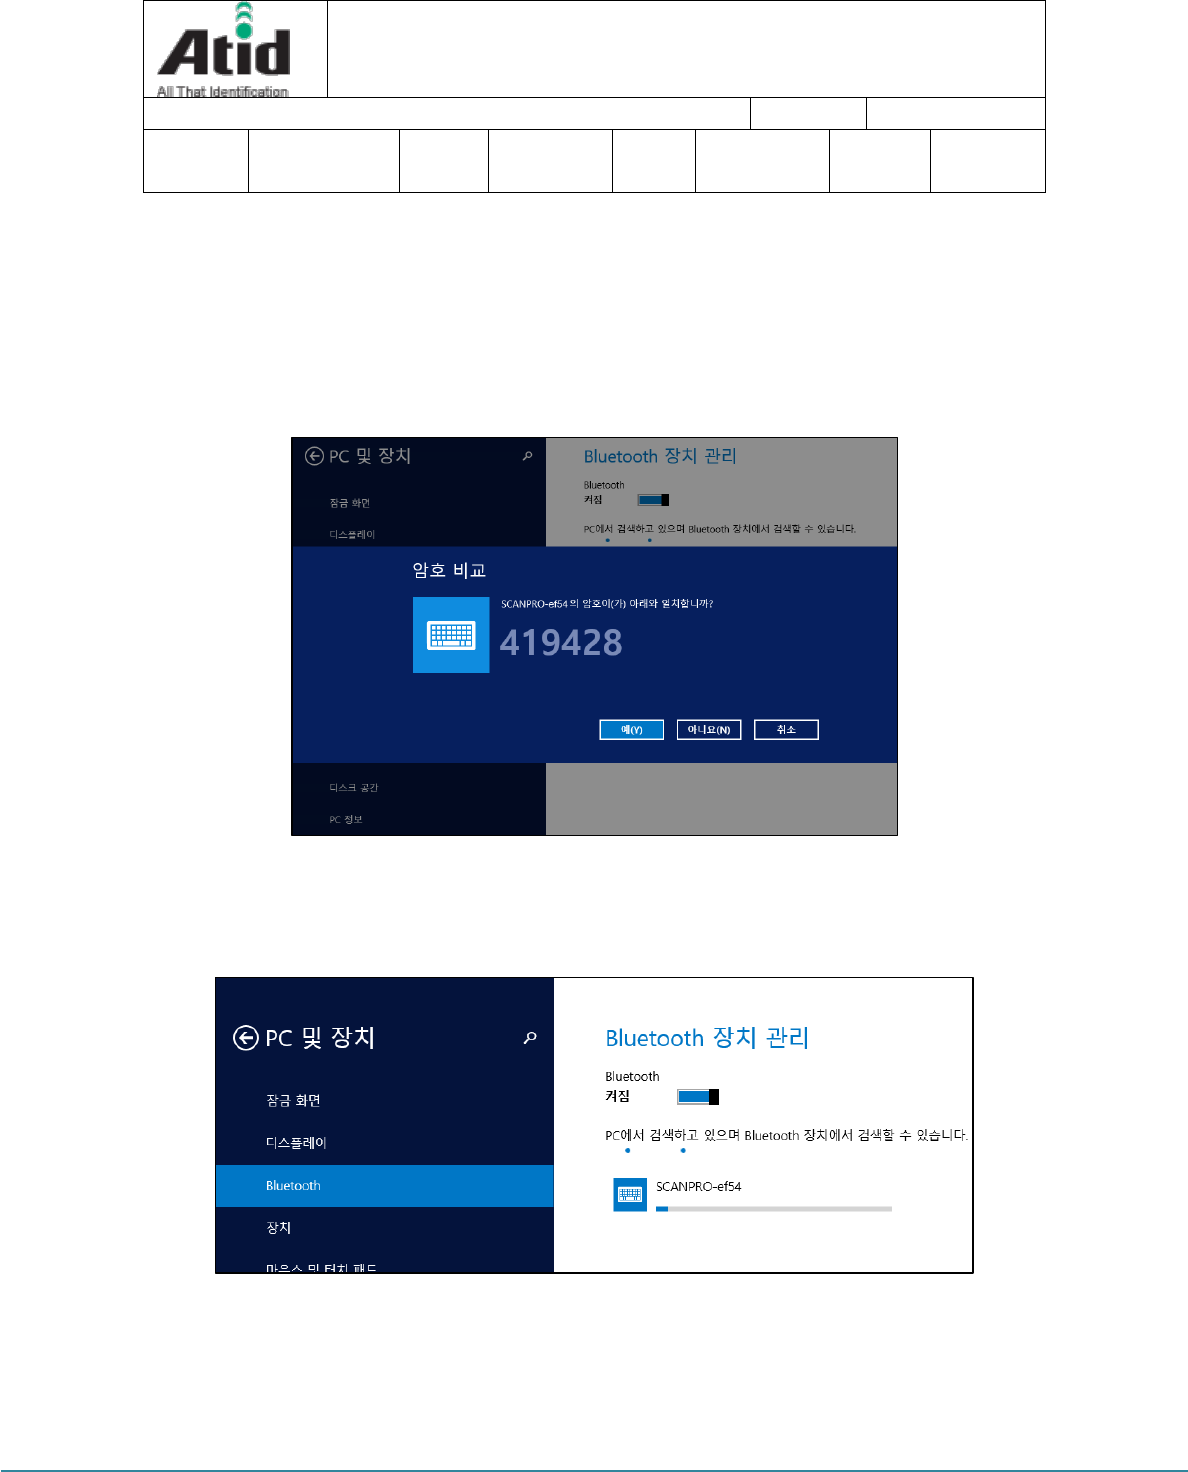
⑤ When the device connection is established for the first time, the
password (PIN code) with AT388 will be set automatically, and if
confirmation screen is displayed, click "Yes".
※ The password is set automatically, so there is no need to change it.
⑥ The driver will be installed automatically when "Connect" is done.
※ It may take a few minutes to install the driver.
⑦ After the driver installation is complete, the message "Paired" is
AT388 User guide Page 41
AT388 User guide
AT388 Product User guide
Company
Atid Co., Ltd.
Doc
Name
User guide
Writer
Moon-Cheol
Song
Date
2017-09-04
Ver.
v0.1
displayed when the device is successfully added.
⑧ After that, exit the setting menu of AT388 and set it to the desired
operation mode, then use it.
AT388 User guide Page 42
AT388 User guide
AT388 Product User guide
Company
Atid Co., Ltd.
Doc
Name
User guide
Writer
Moon-Cheol
Song
Date
2017-09-04
Ver.
v0.1
9 Firmware Update
Firmware for AT388 can be updated for improvement of its device. If user does not have a
proper knowledge on software and hardware, please ask distributor or manufacturer to handle
the issue since the recovery of device cannot be possible, in case of that the problem comes
up in doing update.
9.1 Preparation for Firmware
Computer with over Windows 7 OS
1 piece of USB 2.0 Port
AT388 product
Micro USB Cable (with Device sold)
Firmware File( .bin)
Firmware Updater Application
(SetupUpdater.msi, it will be supplied from manufacturer or distributor)
9.2 Firmware Update Start
① Install the SetupUpdater.msi into the PC (With Double-click)
② Save the Firmware File to specific folder
③ Execute the Firmware Update Program(fwupdate.exe)
AT388 User guide Page 43
AT388 User guide
AT388 Product User guide
Company
Atid Co., Ltd.
Doc
Name
User guide
Writer
Moon-Cheol
Song
Date
2017-09-04
Ver.
v0.1
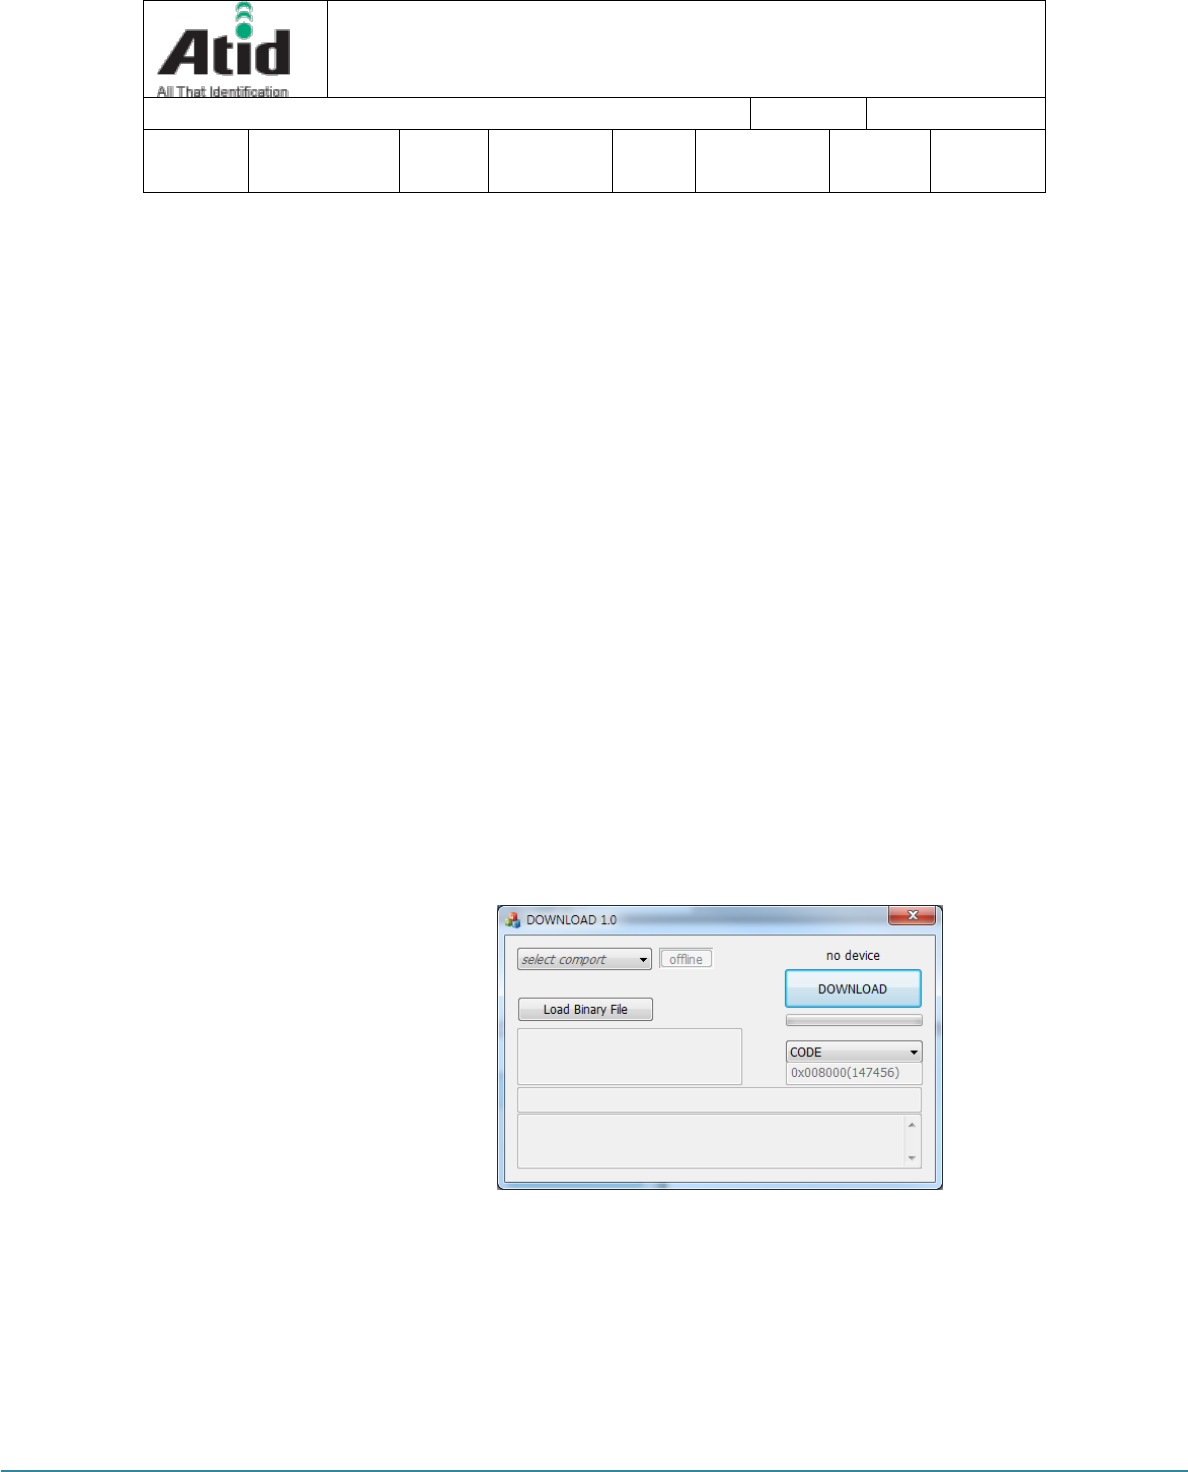
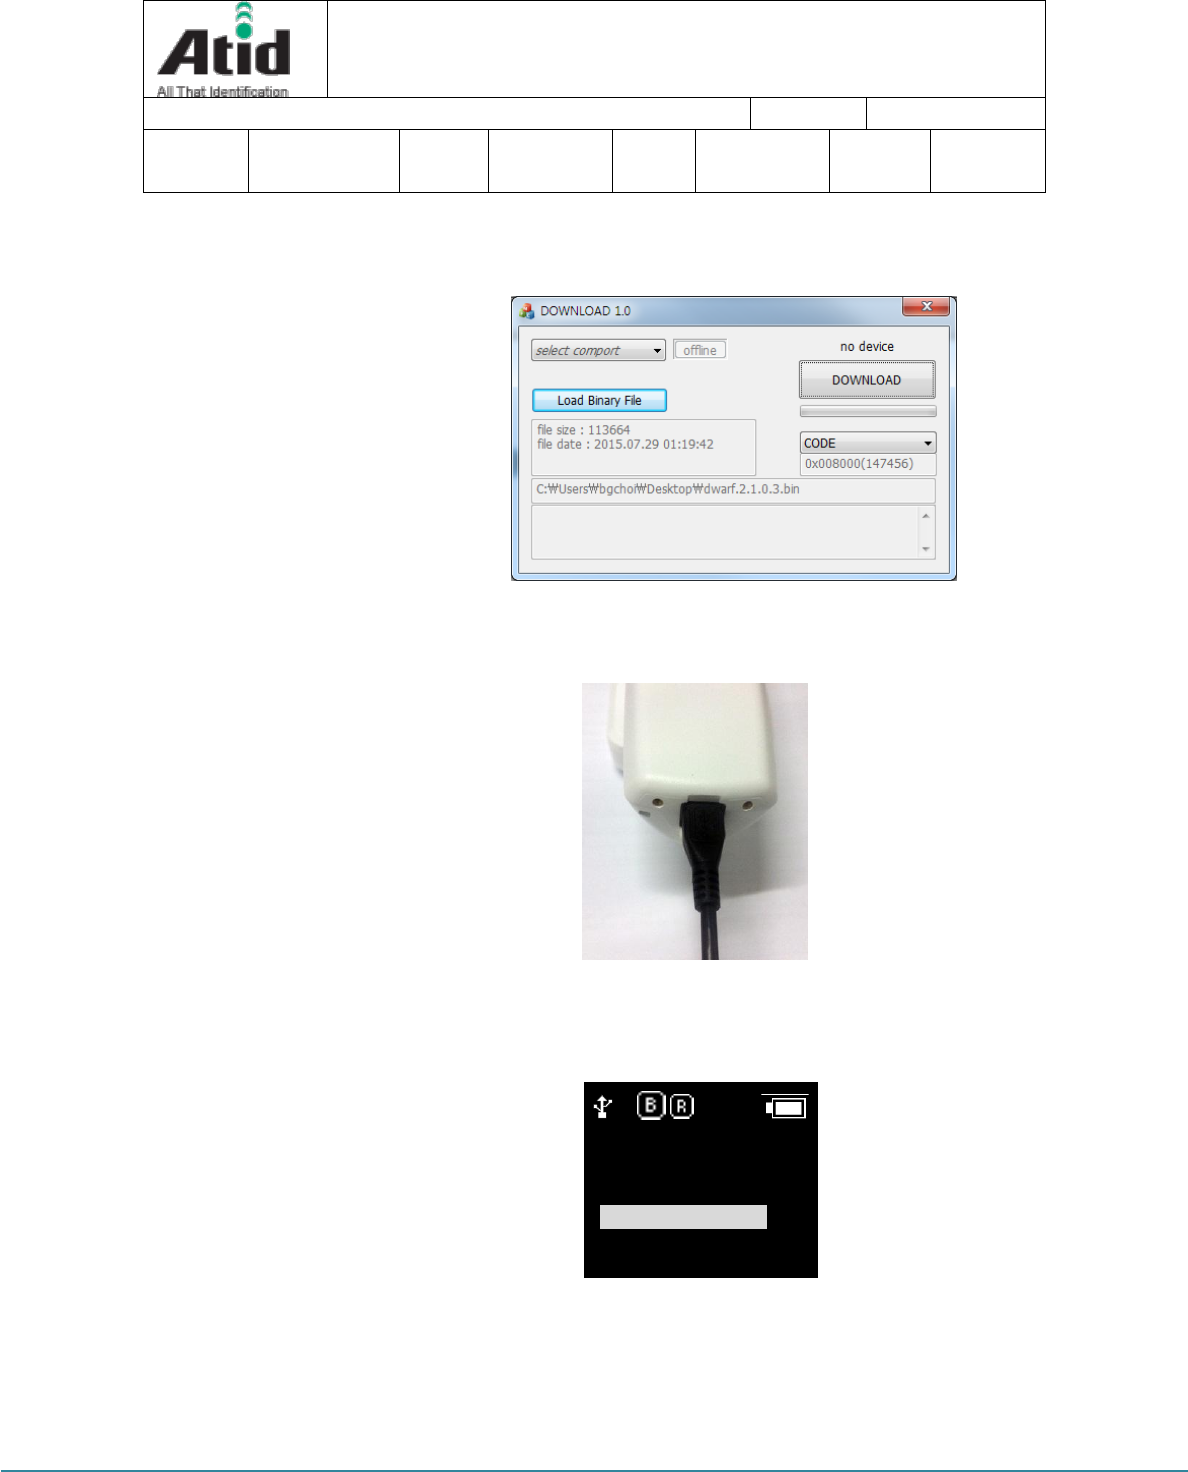
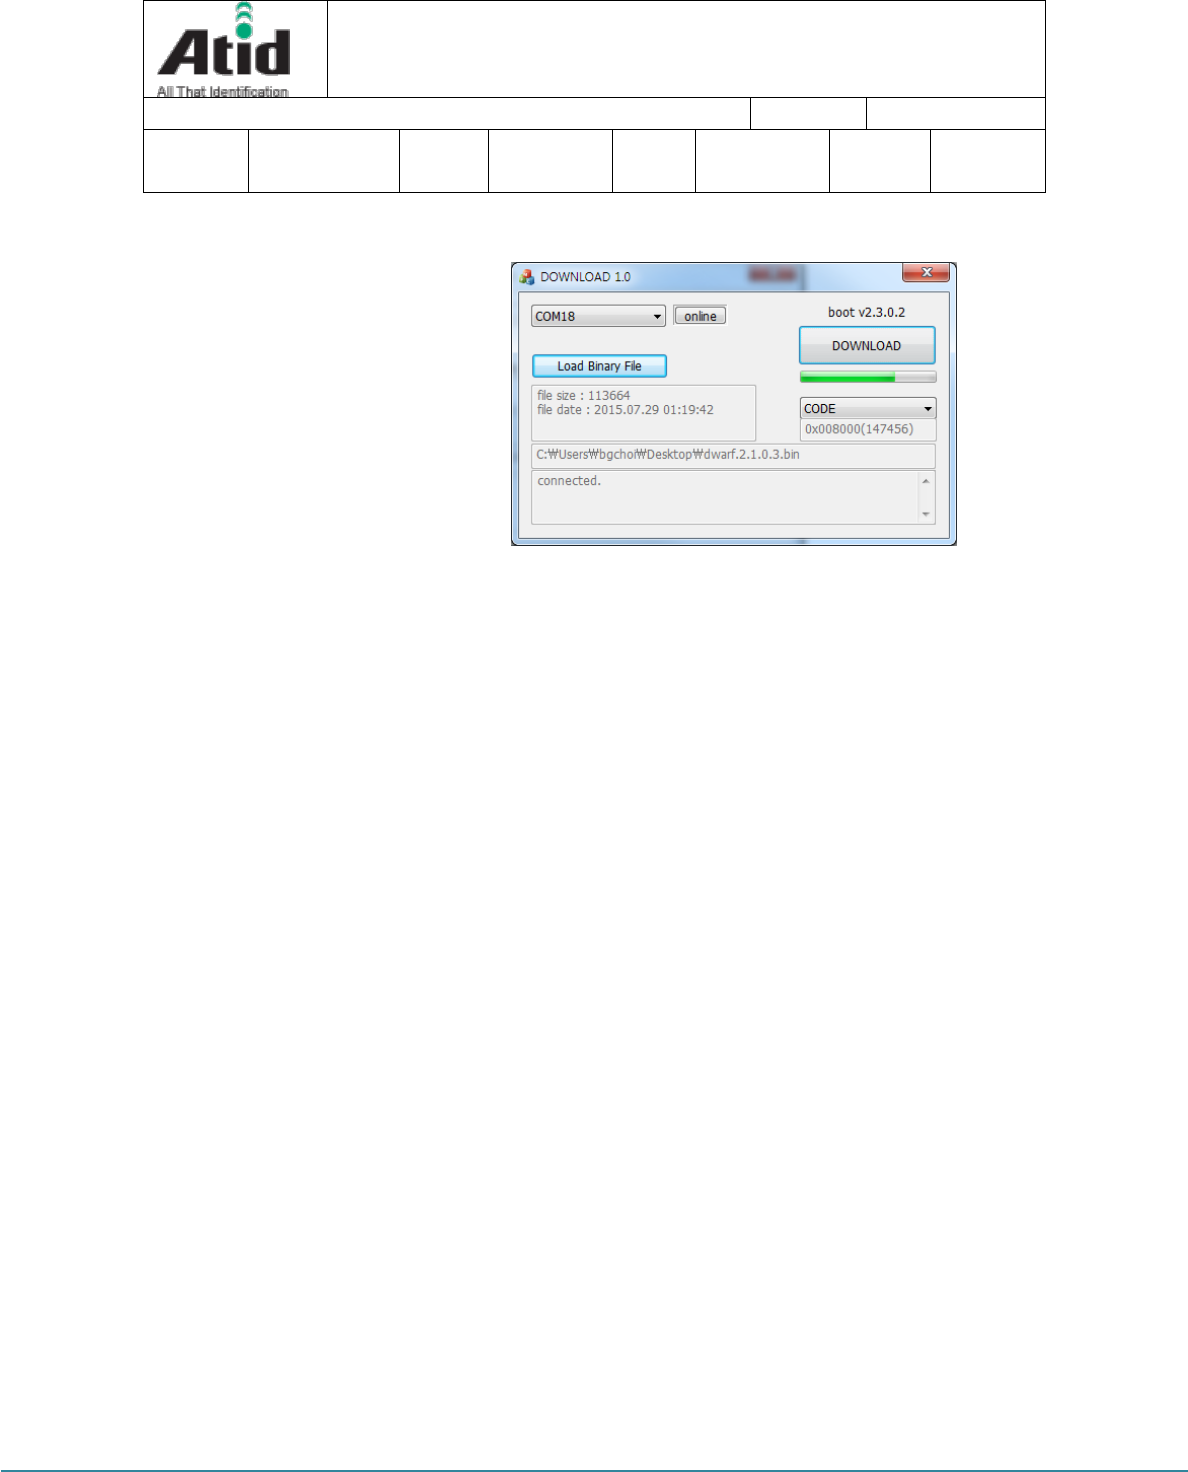
④ Click the “Load Binary File” button and then, select the stored Firmware
File in the specific folder
⑤ Connect AT388 with PC through USB cable
⑥ Enter the the Firmware Download Mode in AT388`s configuration menu.
10:00P
?
5. System Setup
6 Factory Reset
7. Exit
8. Download FW
AT388 User guide Page 44
AT388 User guide
AT388 Product User guide
Company
Atid Co., Ltd.
Doc
Name
User guide
Writer
Moon-Cheol
Song
Date
2017-09-04
Ver.
v0.1
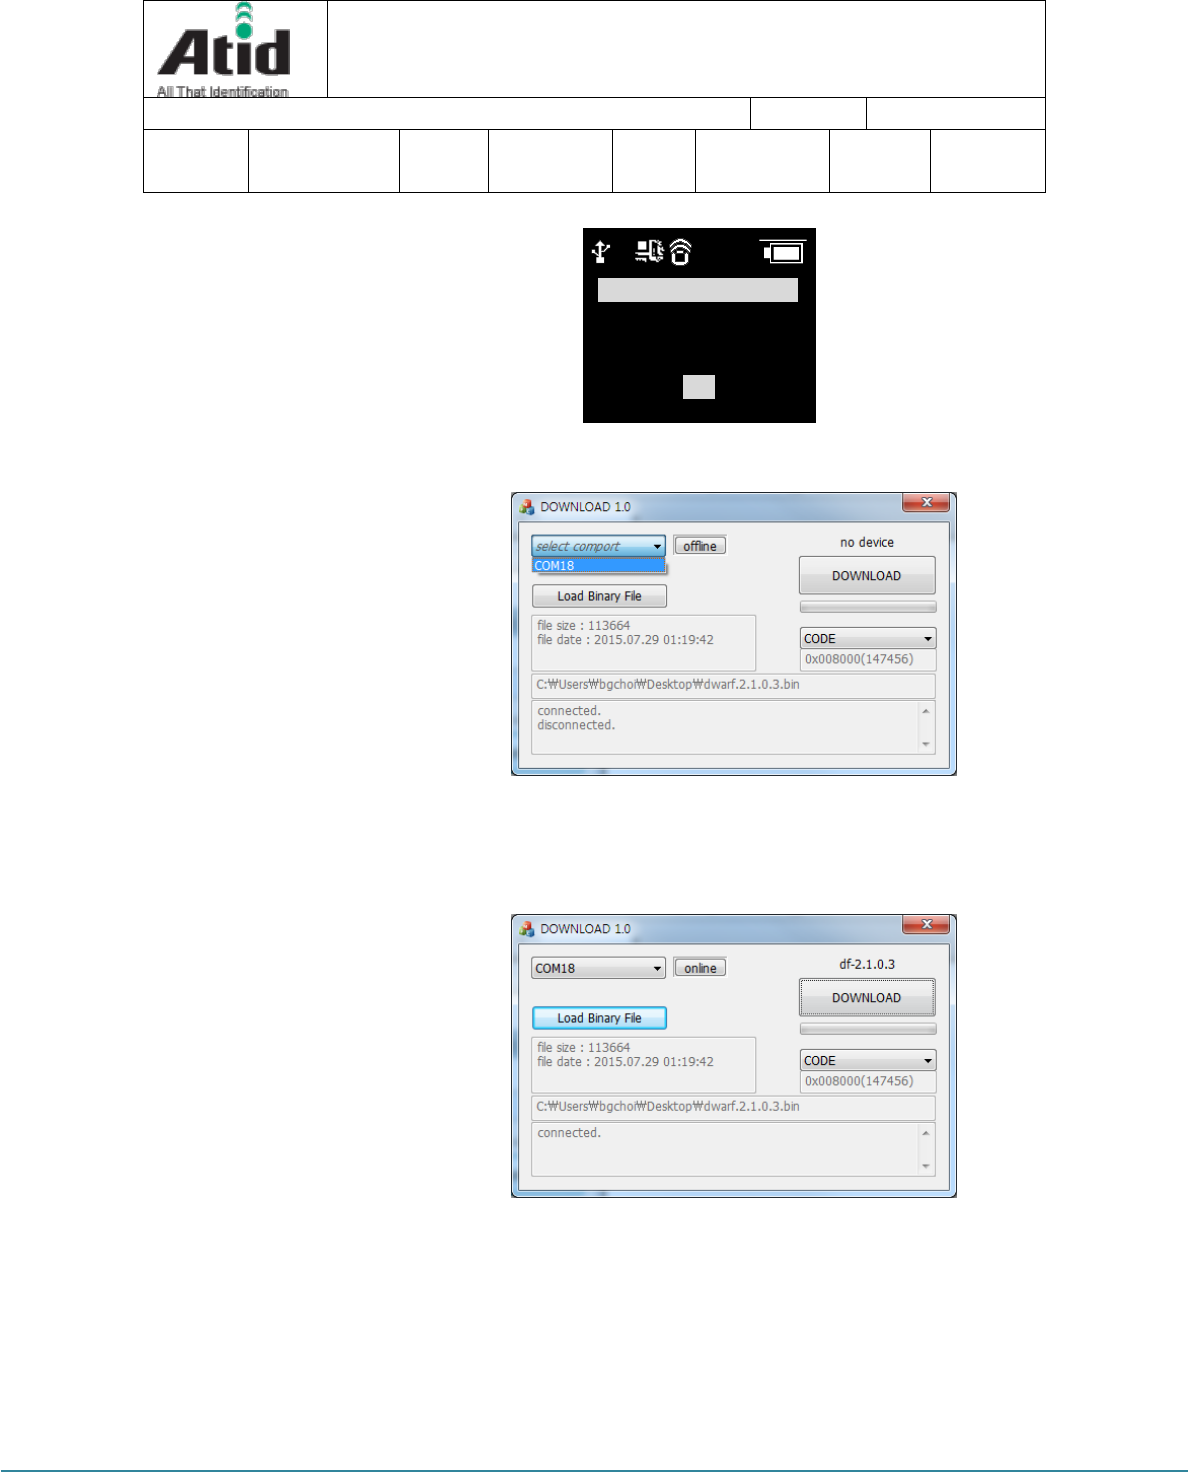
⑦ Click “select comport” in the Updater and select the assigned COM port
⑧ “Online” will be appeared when clicking “off line” and Firmware version
will be displayed as well.
10:00P
?
Download ap
wait for
Connection . . .
OK
AT388 User guide Page 45
AT388 User guide
AT388 Product User guide
Company
Atid Co., Ltd.
Doc
Name
User guide
Writer
Moon-Cheol
Song
Date
2017-09-04
Ver.
v0.1
⑨ Start the download for Firmware by clicking the download button
⑩ After completion of download, new firmware will be automatically
restarted

AT388 User guide Page 46
AT388 User guide
AT388 Product User guide
Company
Atid Co., Ltd.
Doc
Name
User guide
Writer
Moon-Cheol
Song
Date
2017-09-04
Ver.
v0.1
10 Warranty and Technical Supports
All of ATID products have one-year warranty from date of manufacture
However, there is a principle in ATID that the customer will be charged for the repairs, in case
of the damage caused by customer even if it is under warranty period
We recommend requesting the warranty and technical support for AT388 through distributor.
ATID Co., Ltd.
#1211 Byuksan/Gyungin Digitial Valley II, #481-10 Gasan-Dong Gumchon-Gu, Seoul, Korea
TEL: +82-2-544-1436
FAX: +82-2-2113-0040
Homepage: http://www.atid1.com
E-mail: atid@atid1.com , webmaster@atid1.com
English: +82-70-8677-8589
Chinese: +82-70-8677-8669
Japanese: +82-70-8677-8594
Korean: +82-70-8677-8594

Caution:
Use the Product in the environment with the temperature
Between -20℃ and 40℃; Otherwise, it may damage your product. It can be Operating under
2000m。
For the following equipment:
Product Name: UHF Reader
Model: AT388 Brand Name: ATID
ATID CO., LTD E-mail: djlee@atid1.com
hereby declares that this [Name: UHF Reader, Model: AT388] is in compliance with the essential
requirements and other relevant provisions of Directive 2014/53/EU.
The product shall only be connected to a USB interface of version USB2.0 or higher, and that the
connection to a power USB is allowed.
Adapter shall be installed near the equipment and shall be easily accessible.
Only can use deceive with Output: 5.0V 2A which comply with CE for charging
The RF distance between body and Mobile Phone is 0mm
This product is intended for sale and application in a business environment.
RED Article 10
2
Manufacturers shall ensure that radio equipment shall be so constructed that it can be
operated in at least one Member State without infringing applicable requirements on
the use of radio spectrum.
-This product can be used across EU member states
10
In cases of restrictions on putting into service or of requirements for authorisation of
use, information available on the packaging shall allow the identification of the
Member States or the geographical area within a Member State where restrictions on
putting into service or requirements for authorisation of use exist. Such information
shall be completed in the instructions accompanying the radio equipment. The
Commission may adopt implementing acts specifying how to present that information.
Those implementing acts shall be adopted in accordance with the advisory procedure
referred to in Article 45(2).
-The product is class 1 product, No restrictions

Technical Characteristics of EUT
Bluetooth Version:
Bluetooth V4.1 (Only EDR)
Frequency Range:
2402-2480MHz
RF Output Power:
9.42dBm (EIRP)
Type of Modulation:
GFSK, Pi/4 DQPSK, 8DPSK
Data Rate:
1Mbps, 2Mbps, 3Mbps
Quantity of Channels:
79
Channel Separation:
1MHz
Type of Antenna:
Integral Antenna
Antenna Gain:
0dBi
Wi-Fi
Support Standards:
802.11b, 802.11g, 802.11n-HT20
Frequency Range:
2412-2472MHz for 802.11b/g/n(HT20)
Max.RF Output Power:
9.81dBm (EIRP)
Type of Modulation:
CCK, OFDM, QPSK, BPSK, 16QAM, 64QAM
Data Rate:
1-11Mbps, 6-54Mbps, up to 150Mbps
Quantity of Channels
13 for 802.11b/g/n(HT20)
Channel Separation:
5MHz
Type of Antenna:
Integral Antenna
Antenna Gain:
2.2dBi
RFID
Frequency Range:
865.7-867.5MHz
RF Output Power:
26.47dBm (ERP)
Modulation:
ASK
Quantity of Channels:
4
Channel Separation:
600kHz
Antenna Type:
Integral Antenna
Antenna Gain:
1dBi
FCC RF Exposure Information and Statement
The SAR limit of USA (FCC) is 1.6 W/kg averaged over one gram of tissue. This device has also
been tested against this SAR limit. SAR information on this and other pad can be viewed on‐line
at http://www.fcc.gov/oet/ea/fccid/. Please use the device FCC ID number for search. This device
was tested simulation typical 0mm wear on hand.
FCC Warning
This device complies with Part 15 of the FCC Rules. Operation is subject to the following two
conditions:
(1) This device may not cause harmful interference, and (2) this device must accept any
interference received, including interference that may cause undesired operation.
NOTE 1: Any changes or modifications to this unit not expressly approved by the party
responsible for compliance could void the user's authority to operate the equipment.