ATID AT870N Industrial PDA User Manual AT870N WinMB User Guide v 1 2 Eng
ATID Co., Ltd Industrial PDA AT870N WinMB User Guide v 1 2 Eng
UserManual.wiki
>
ATID
>
AT870N User Manual
>
Users Manual-2
Contents
1.
Users Manual-1
2.
Users Manual-2
3.
Users Manual-3
4.
Users Manual_Part 1
5.
Users Manual_Part 2
6.
Users Manual_Part 3
Users Manual-2
Navigation menu
Upload a User Manual
Namespaces
Wiki Guide
HTML
PDF
Info
Views
User Manual
Discussion / Help
Navigation
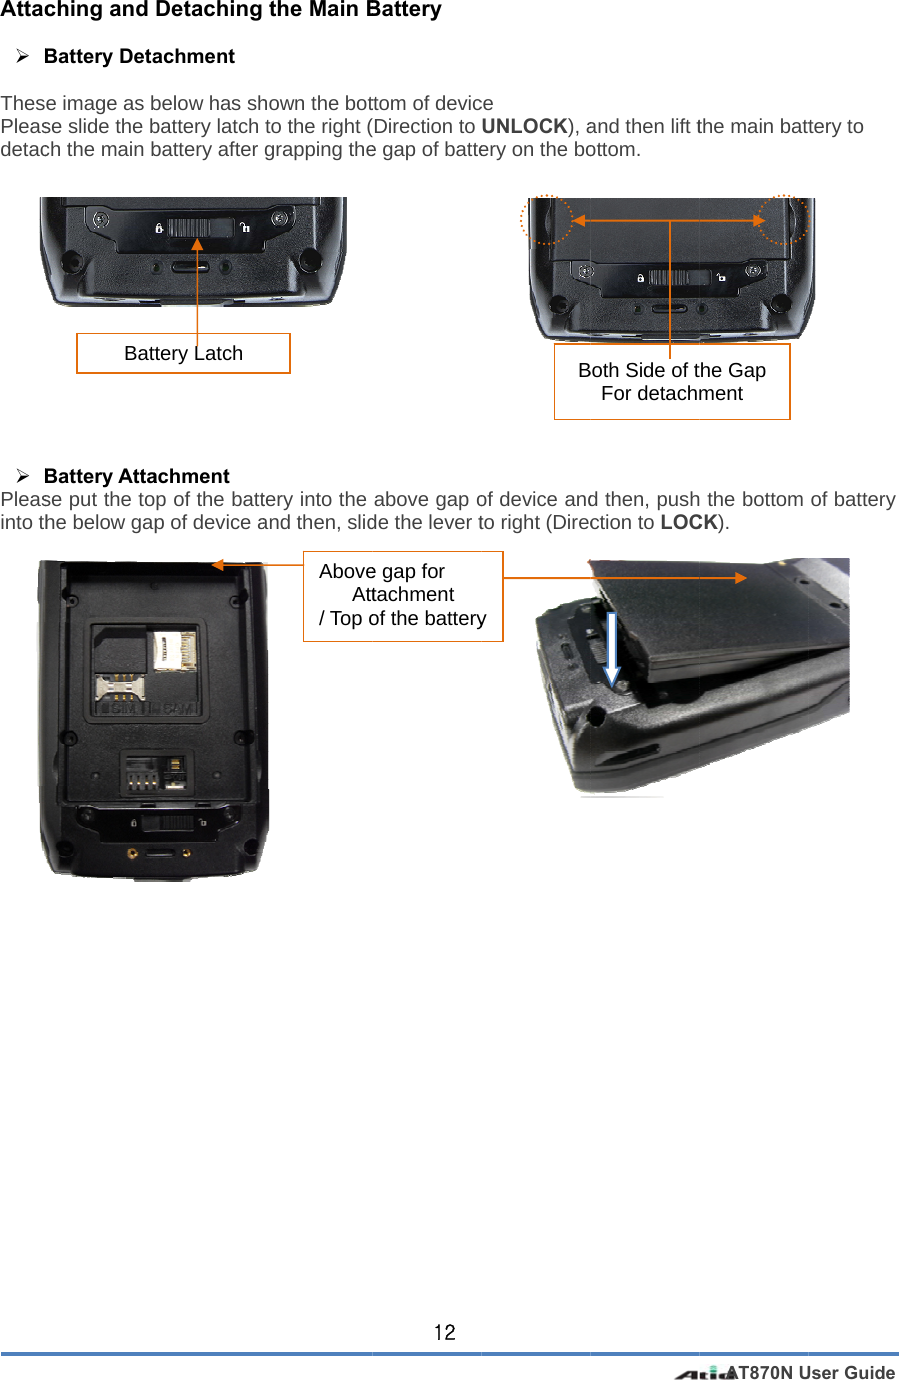
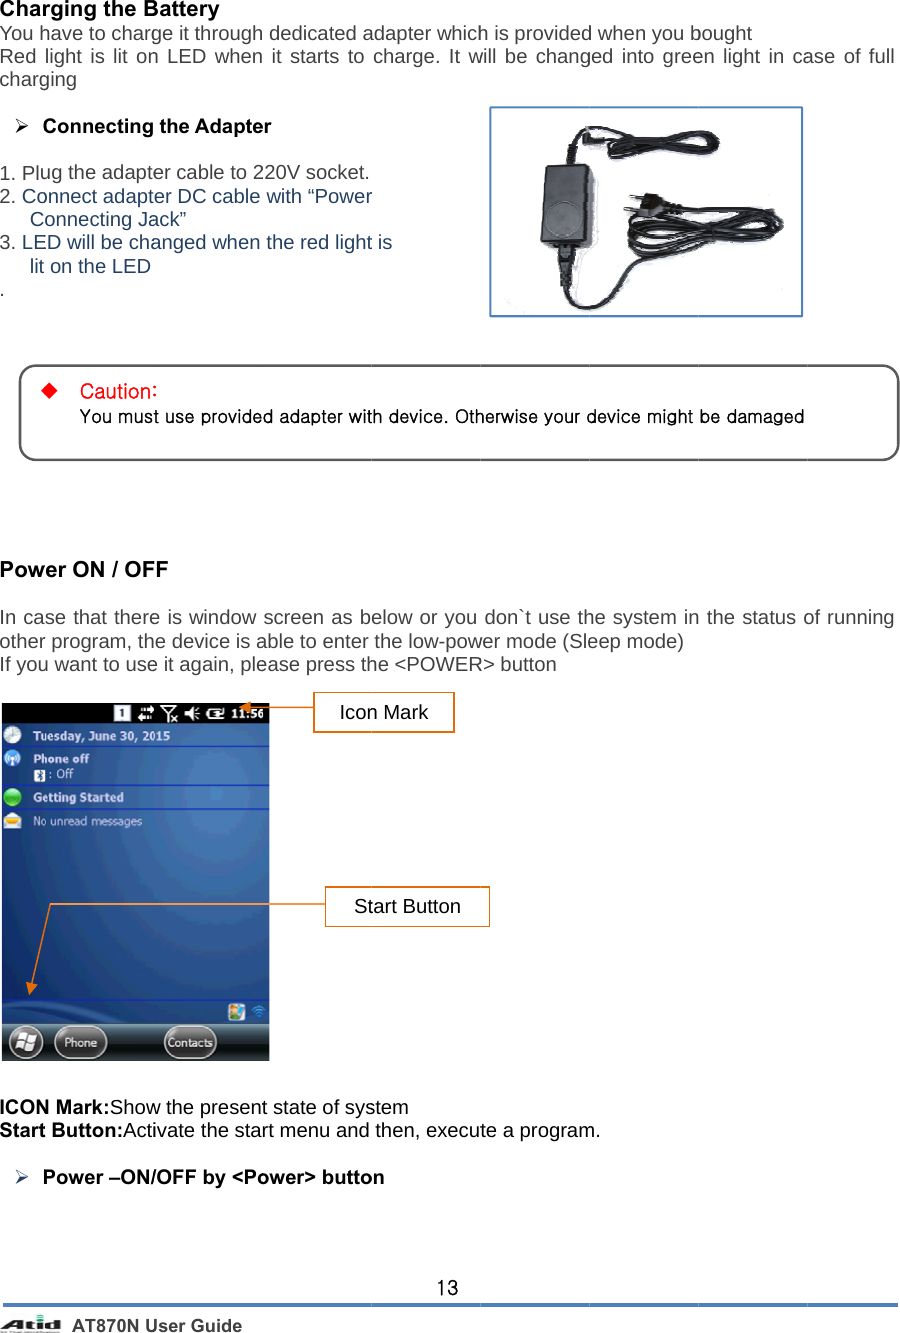
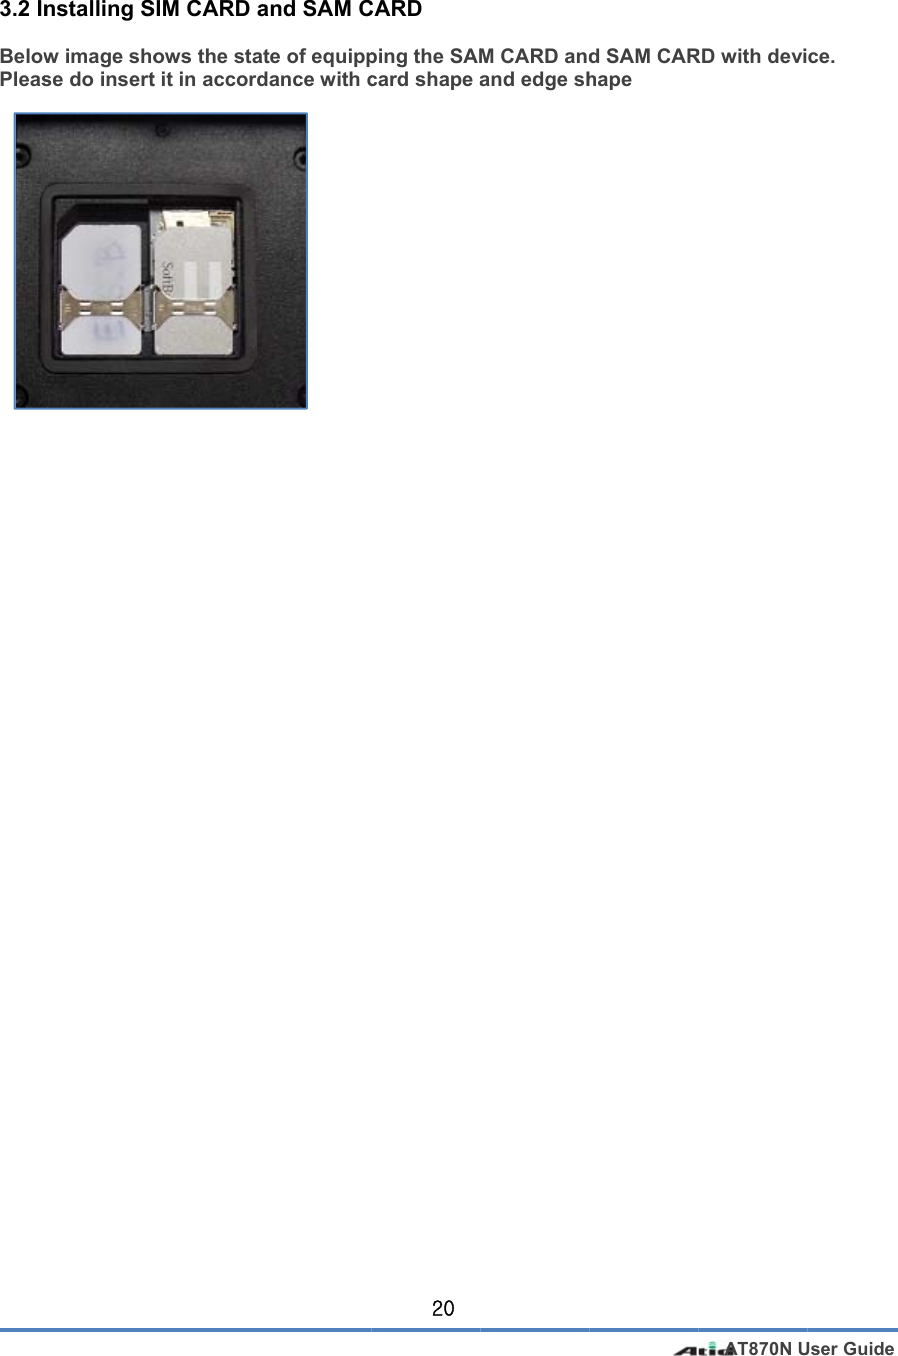
![ NIf therprograstate, AThefor tbelowith [STAR NOTE: re was a tiny bams will be rethe RAM dataAutomatic e device will the designatow. If user shout user andRT BUTTON] battery gauge covered in casa will disappeaPower-OFbe automatited time. Usesets proper td battery can-> [SETTINGremained desse of power-oar, and the sysF cally entereder can changtime-out, then be prolongeGS] -> [POWEPower ButtonIcIn14spite of power-on. If both mainstem will be red to low-powge the desige device caned. R] ->[ADVANn PowPowcon for POWndication User candouble c System mode by-off, the data on battery and e-starting if thewer mode (Slgnated time an be protecteNCED] wer-OFF:1. When t<Powescreen mode ( wer-ON: 1. When tbutton jon and2. SystemconnecWER n enter the aclicking the iccan be turney pushing theof RAM will bebackup battere power is chaleep mode) iat the controed from the the system iser> button forwill be turne(sleep mode)the system isjust a mome start the sysm will automacted with USBabove screencon of <Poweed on in casee <POWER>AT870N Ue saved, and try are in the diarged again. if user does ol panel and situation of s in booting sr 2~3 seconded off and ent). s in off statusent, then screstem. atically be turB cable for An in case of er indication>e of low-powe> button User Guide hese ischarge not use it power as power-on status, pressds, then the ter the low-ps, press <Poeen will be turned on if it isActiveSync > er s ower wer> urned s](https://usermanual.wiki/ATID/AT870N.Users-Manual-2/User-Guide-3262861-Page-3.png)
![AT870N User Guide 15 Turn Off the Device in Case of Discharging the Battery If the system cannot be used by electric discharge, it will be automatically entered into low-power mode (sleep mode). In this case, user have to charge the main battery or connect the adaptor with the adaptor connecting jack of main body, then press the <Power> button to turn on the system since it won`t be turned on despite of pressing the <POWER> button. Checking Battery Gauge NOTE: Using time for battery will be influenced by way of use, surrounding environment. In general, you can use the device from 6 hours to 12 hours after 2200 mA battery is fully charged. Checking the Gauge Remained [START] -> [SETTINGS] -> [POWER] -> [BATTERY] Caution for Low Battery If the system is unavailable for low-battery, caution screen for lack of battery will be came out. In this situation, please turn off the device by pushing <POWER> button and then charge as soon as possible.](https://usermanual.wiki/ATID/AT870N.Users-Manual-2/User-Guide-3262861-Page-4.png)
![Bac Back ChaYou 2. SPleasrespo 2.1 S In neTherethe pdevicmem [ProcPleassyste [Resu S O S Acw k-up Batte-up battery isnging theneed to pur CAUTIOPlease System Rse do restart onse SOFT RESEeed of Soft re is a Hang-urogram. Whece. Please noory. But it docess of Softse press theem will be result of Soft RSystem will bOS will be reScreen will bAdjusted regcopied file anwill be remai CAURAdistheery s used for pre Battery rchase a neON! discard thReset the system wET reset, up, which meen user encoote that warmoesn`t influent Reset] e Reset buttostarted after Reset] be restarted.estarted. be reshown agistry informand installed pined UTION: AM data willscharge. Acte system wilrotecting the ew battery ife expired bwhen the apeans that theounters Hangm reset can mnce on instalon which is lturning off th after 10 secoation, program l be disapptivated RAMll restart in c16RAM data inf existing babattery at tplication doee system receg-up, please make the proled program located on the screen jusonds peared if boM data will bcase of inpuRESBUTTPOWEBUTTn case of discattery got dathe designaesn`t work preives no resdo reset theogram terminand data etche device wst a moment oth main ane disappearutting the poET TON ER TON charging theamaged or ated locatioroperly or sysponse in case system for rnate and cleac. with stylus peautomaticallnd back-up red at the ruower insteadAT870N Ue main batteryreached to on stem receivese of runningrecovering thar the using en for a momly. battery counning progd of recoverUser Guide y its life es no g he ment. The mpletely gram and ring.](https://usermanual.wiki/ATID/AT870N.Users-Manual-2/User-Guide-3262861-Page-5.png)
![2.2 In neHardvalueresetuses Plea [ProcPleasthose [Resu S O S T 2.3 Pleas 1. Wh2. Wh3. Wh4. Wh Press [Boot [1230 AT870N UHARD RESeed of Hard d reset whiche, copied file , but please the hard resase use hardcess of Hardse press thee buttons. ult of Hard RSystem will bOS will be reScreen will bThere are seInitializing se use [Boot hen user wanhen user wanhen user wanhen user wans <Fun> buttt Menu] is ca[Boot Menu]1. SD Ima2. Clean O3. Factory0. Exit User Guide SET reset h is called coand installednote that timst d reset if it is d Reset] Power buttoReset] be restarted.estarted. be reshown etting screen the SystemMenu] whennts to recovents to initializnts to initializnts to make ston and pressame out at th] ge UpdateOn Exit (Ny Reset old reset can d program came/date will impossible ton and reset of time / datm n user encouer the adjusteze the storagze the storagsystem a coms <RESET> e screen aftee No) 17be used for an be remaibe initializedo recover thet button withte and user hunters below ed registry inge space insige space insimeback as thbutton simuler 2 ~ 3 secoFunRePowinitializing thned originalld. Thereforee system desh stylus pen have to resetsituation nformation bade the “My Cde the “Flashe state of bltaneously onds as belon Button eset Buttonwer ButtonEnter the lefthe <Power>System will bbutton even the sleep mohe hardware cy even thouge, please do spite of soft rsimultaneout the setting oack again. Computer” h Disk” beginning w ft screen eve> icon be turned onthough devicode by automcompletely. gh user usesreset the timreset usly and thenog time and en if user doun if user pushce has beenmatic power o Registry s the hard me if user n, unhand date. uble clicks h the Power entered intooff o](https://usermanual.wiki/ATID/AT870N.Users-Manual-2/User-Guide-3262861-Page-6.png)
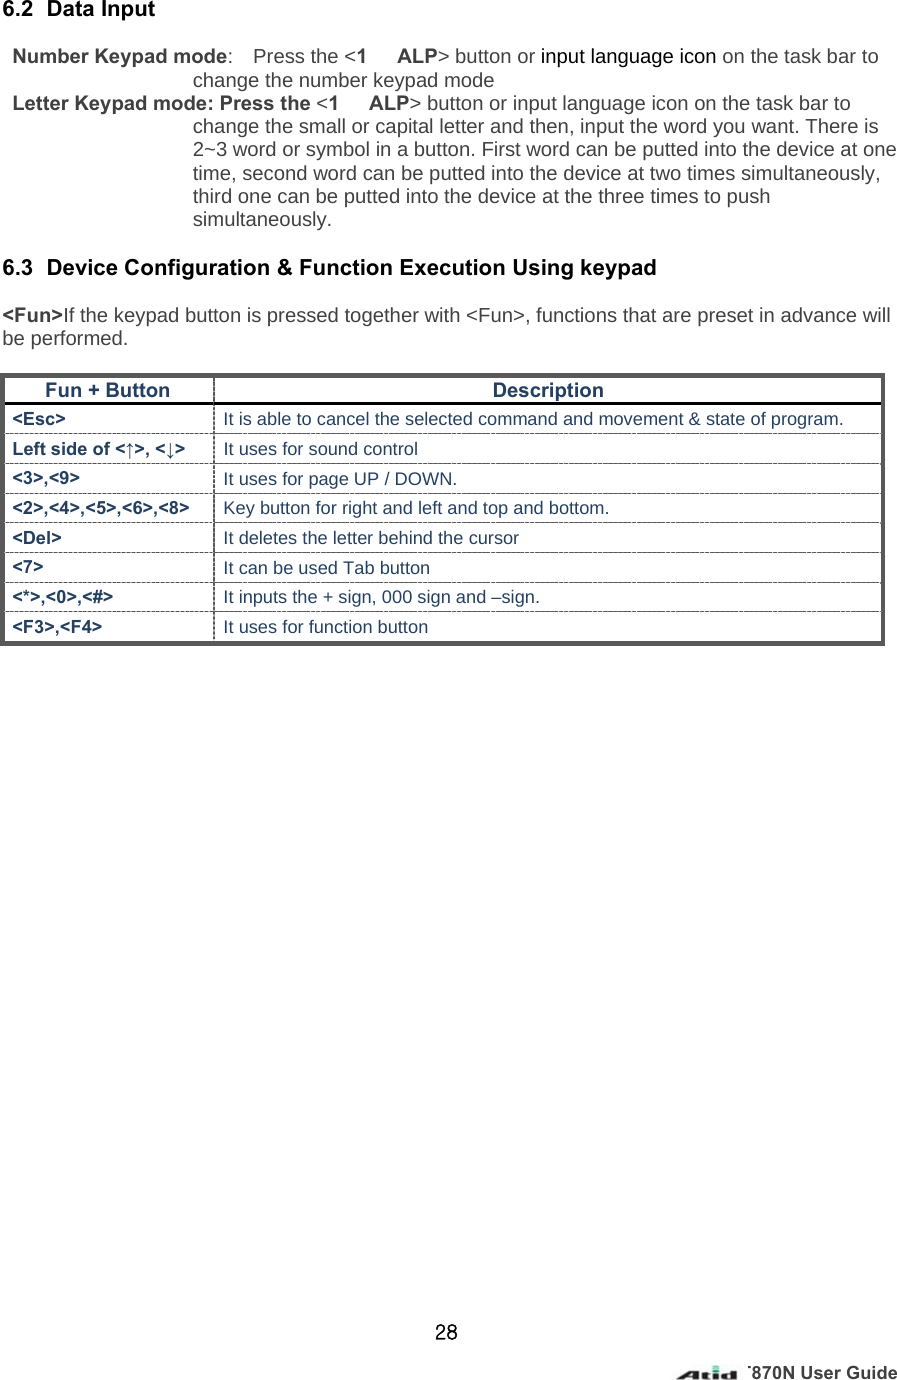
![3. UBelowThere 3.1 In DCAslo Use of Miw image showe are 1EA SInstalling M[[Boot MSD ImageUpdate theClean OnFunction fFactory RFunction fbeginning Exit Boot Meno unlock tARD by slidot cover righicro SD, ws the back IM Card SlotMicro SD CAMenu] Initial e Update e image (bo Exit for recoveryReset for recoverynu Terminatthe Micro ding the cht side SIM, SAside of devict, 3EA SAM CARD Screen oot, OS) by y of My deviy of My deviion MicrSAMSIM SDard18M CARDce when sepCard Slot anSD Cardice, registryice, registryro SD CARD sloM CARD slot CARD slot D parating the md 1EA Microy as a state y, Flash Foldotmain battery o SD Card Sloof beginninder as a staLift the AT870N Ufrom device ot. ng ate of e slot cover User Guide up](https://usermanual.wiki/ATID/AT870N.Users-Manual-2/User-Guide-3262861-Page-7.png)
![SD MMicro [STA Puslup AT870N UMMC CARD fo SD memorART] -> [File ut the SD mot and thenp User Guide folder will bry card as bExplorer] memory on , shut the cobe shown if ubelow image theover19user impleme ments the file explorer aDo lock thsliding itthen, turnafter equip. after insertinhe slot covto left sidn on the pping the ba ng the ver byde anddeviceattery](https://usermanual.wiki/ATID/AT870N.Users-Manual-2/User-Guide-3262861-Page-8.png)
![AT870N User Guide 214. Individual Environment Setting 4.1 Phone Password Setting User can set a limitation on use of phone by setting with password for USIM card for prevention from stranger`s use [PINSetting Method] [START] -> [SETTINGS] -> [PERSONEL] -> [PHONE] -> [SECURITY] Please select the “Require PIN when phone is used” when using password and then, input the 4-digit password at the password input screen and then, press <Enter> Button 4.2 User Information User can set up the his/her information (Name, Corporation, Address, E-mail) & Memo [User Information Setting Method] [START] -> [SETTINGS] -> [PERSONNEL] -> [IDENTIFICATION] Use of Password Password Change Caution: PIN Code is set with ‘0000” to protect USIM card information It can be changed by user`s preference PUK Code is USIM unlock code, in case that user continuously enters incorrect PIN in 3 times (8 Digit) This code is marked on envelop or body in case of purchasing USIM CARD Please note the USIM card would be impossible to use when user continuously enters incorrect password in 10 times](https://usermanual.wiki/ATID/AT870N.Users-Manual-2/User-Guide-3262861-Page-10.png)
![AT870N User Guide 22 4.3 LOCK User can set up the device as lock status for protecting data from device Device is converted with lock status for a predetermined time and user has to input the password for unlocking the device. [Lock Setting Method] [START] -> [SETTINGS] -> [LOCK] LOCK SETTING SCREEN LOCK SCREEN PASSWORD INPUT SCREEN](https://usermanual.wiki/ATID/AT870N.Users-Manual-2/User-Guide-3262861-Page-11.png)
![AT870N User Guide 235. System Configuration 5.1 Memory User can verify the volume of memory [Memory Checking Method] [START] -> [SETTINGS] -> [SYSTEM] -> [MEMORY] Main Memory: User can verify the remained and used volume Storage Card: User can verify the volume of SD card and Flash section 5.2 Task Manger User can verify the volume of running program list and memory [Task Manager Method] [START] -> [SETTINGS] -> [SYSTEM] -> [TASK MANAGER] User can make device stop by selecting the running program at the list 5.3 Program Removal Program list will be marked on the screen without basic program [Program Removal Method] [START] -> [SETTING] -> [SYSTEM] -> [PROGRAM REMOVAL] User can remove the program by selecting the program at the list](https://usermanual.wiki/ATID/AT870N.Users-Manual-2/User-Guide-3262861-Page-12.png)
![AT870N User Guide 245.4 GPS User can set up the GPS port inside of device [GPS Setting Method] [START] -> [SETTINGS] -> [SYSTEM] -> [GPS] No need to do other set-up since there is basic GPS port which is already used 5.5 Brightness Setting At the beginning, brightness is set up with around 70 % [Brightness Setting Method] [START] -> [SETTINGS] -> [SYSTEM] -> [CONTRAST] Brightness: User can control the screen brightness 5.6 Brightness On/Off Setting It can be adjusted by user`s preference since it has influenced on battery consumption Time out for screen off can be set up with user`s preference [START] -> [SETTINGS] -> [SYSTEM] -> [BACKLIGHT] Battery Power: Turn Off/On backlight if device uses battery power External Power: Turn Off/On backlight if device uses external power](https://usermanual.wiki/ATID/AT870N.Users-Manual-2/User-Guide-3262861-Page-13.png)
![AT870N User Guide 255.7 Screen Adjustment Please readjust the coordinate correction value in case that user uses the device at the beginning or for long period if the screen point cannot be selected by stylus pen. [Start] -> [Settings] -> [System] -> [Screen] -> [Align Screen] 5.8 Volume Settings User can set up the volume Volume Setting Icon User can adjust the volume using left side button (Hardware)](https://usermanual.wiki/ATID/AT870N.Users-Manual-2/User-Guide-3262861-Page-14.png)
![AT870N User Guide 265.9 Sound & Notification Setting User can set upthe vibration, sounds and notification ON/OFF [Alarm & Sound Setting Method] [Start] –> [Settings] -> [Sound & Notification] Vibration: Vibration Amplitude settings Sounds: Sound event settings Notification: Ringtone settings 5.10 Clock & Alarms Setting User can set up the time, date and alarms [Clock & Alarm Setting Method] [Start] -> [Settings] -> [Clock & Alarms] Time: Date and Time settings. Alarms: Alarm settings.](https://usermanual.wiki/ATID/AT870N.Users-Manual-2/User-Guide-3262861-Page-15.png)
![AT870N User Guide 275.11 Wireless Manager User can turn on/off the Bluetooth, WiFi, phone function [Wireless Manager Setting Method] [Start] -> [Settings] ->[Connection] ->[Wireless Manger] All: WiFi , Bluetooth , phone function can be turned on/off simultaneously Separate Selection: WiFi, Bluetooth, phone function can be turned on/off separately 6. Use of Keypad Using the keypad, characters, numbers, alphabets etc. can be easily typed in the handheld device.Also, using the <Fun> together, keypad can be used in different ways. 6.1 Use of Keypad Please press the <1 ALP> button as below step if user wants to change the input language It will be converted in the order of [Number] -> [Small Letter] –> [Capital Letter] If user clicks icon on the task bar, input mode will be converted It can be differently expressed by option](https://usermanual.wiki/ATID/AT870N.Users-Manual-2/User-Guide-3262861-Page-16.png)

![8.2 C P[S <W ActivAT870N UConnectioC settings Start] -> [ProWindows XPveSync progUser Guide n settings ogram]-> [MP< Win7 / Vgram screenfor PC Microsoft Acista > . 31tiveSync] Click oon the Conneection settinngs.](https://usermanual.wiki/ATID/AT870N.Users-Manual-2/User-Guide-3262861-Page-20.png)
![1. U AT 1.1 BRead AT870N UUsing 1D T870N can beBarcode Red barcodes oUser Guide or 2D Be equipped weading r set decodinarcode Swith 1D & 2Dng option usiRun App- [Start B Main Wi- Start S- Stop S- Symbo- Length- Menu:- Exit: E 35ScannerD barcode scaing the Barcoplication Button] -> Ruindow Scan: Start bScan: Stop bol: Type namh: Length ofApplicationExit applicatianner. ode scannerun [DEMO_Bbarcode scabarcode scame of the reaf the read ban Menu pop-ion. . BarcodeScananning. nning. ad barcodearcode -up. n]](https://usermanual.wiki/ATID/AT870N.Users-Manual-2/User-Guide-3262861-Page-24.png)
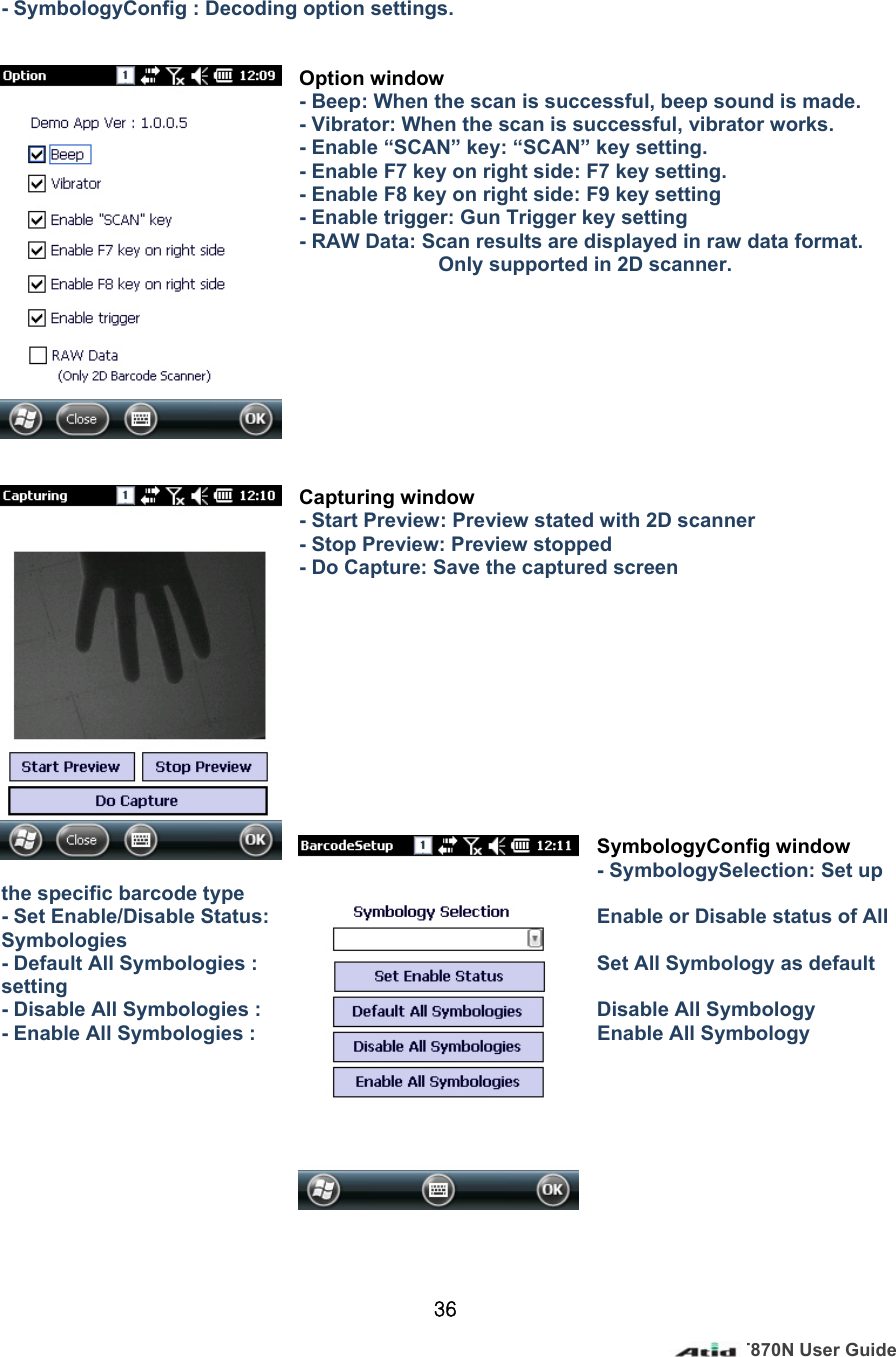
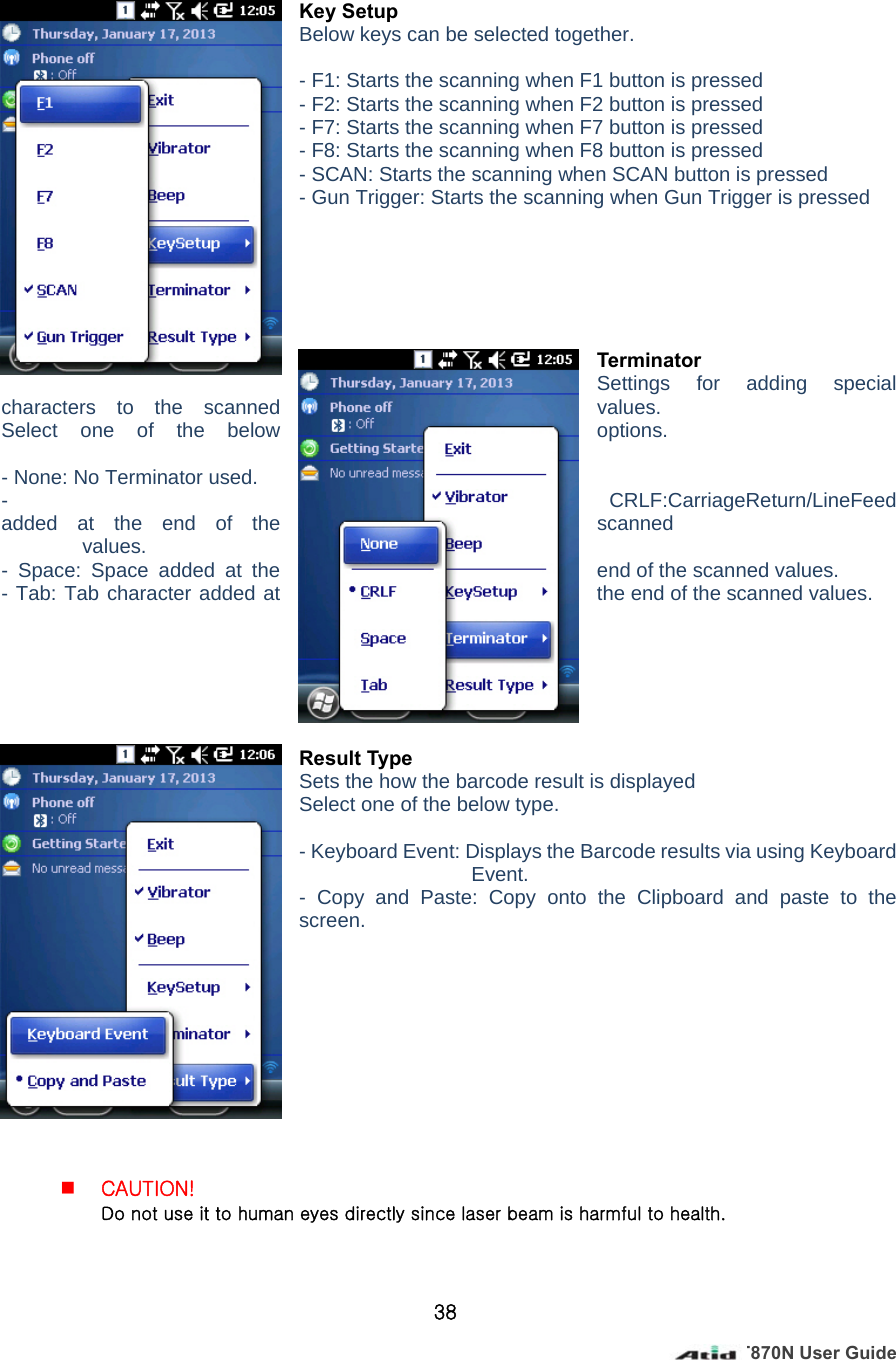
![AT870N User Guide 37 1.2 Setting Barcode Emulator Can input the read barcode values (Notes, Internet Explorer…) where the cursors are located. Sets the barcode value input method, scan button, scan sound etc. using Barcode Emulator program. When opening the Barcode Emulator, if other Barcode programs are being run, please close the program first to run the Barcode Emulator. Opening Application - [Start Button] -> [File Explorer] -> [My Device] -> [Program Files] -> [ATID_DemoApps] -> BarcodeEmulatorWM.exe Running Application. - When running the application, barcode scan icon is created at the bottom-right corner of the screen. And Barcode scan is enabled. - By clicking on the Barcode Icon, Main Menu pops up and the settings can be changed. . Emulator Main Menu - Exit: Exit Application - Vibrator: When the scan is successful, vibrator works - Beep: When the scan is successful, beep sound is made - Key Setup: Sets Barcode scan keys - Terminator: Selects the special character to be added to the barcode values - Result Type: Selects the output type of the Barcode value](https://usermanual.wiki/ATID/AT870N.Users-Manual-2/User-Guide-3262861-Page-26.png)
![AT870N User Guide 39 1.3 Barcode Scanning 1. Remove the protect film in front of the scanner. 2. Run BarcodeDemo. 3. Point the scan beam to center of the barcode. • Adjust the distance in accordance with the barcode size. • The beam will automatically be stopped if the pointer deviates from the barcode for 5 seconds. [Correct way to read the barcode] 1. Please bring it close to barcode in case of smaller barcode. This device can read the barcode in range of 40~300mm. If you have failure to read the barcode, please do check the angle and range. 2. Laser beam will be shown up as a clear red line when using it at the barcode [Wrong way to read the barcode] 1. Laser bean have to be crossed in the barcode 2. If laser beam partly will be shown up on the barcode, it doesn`t work well. 1D 2D 1D 2D](https://usermanual.wiki/ATID/AT870N.Users-Manual-2/User-Guide-3262861-Page-28.png)
![AT870N User Guide 402. WiFi 2.1WiFi On /Off WiFi is turned off before its dispatch. Turn on the WiFi to use the WiFi. [Settings] [Start] -> [Setting] -> [System] -> [WiFi Power] Off: Turn off WiFi. On: Turn on WiFi. 2.2WiFi function On /Off WiFi function can be set On/Off. First, WiFi power needs to be on. [Settings] [Start] -> [Setting] -> [System] -> [WiFi Power] Wi-Fi Off, turns off WiFi function Wi-Fi On, turns on WiFi function](https://usermanual.wiki/ATID/AT870N.Users-Manual-2/User-Guide-3262861-Page-29.png)
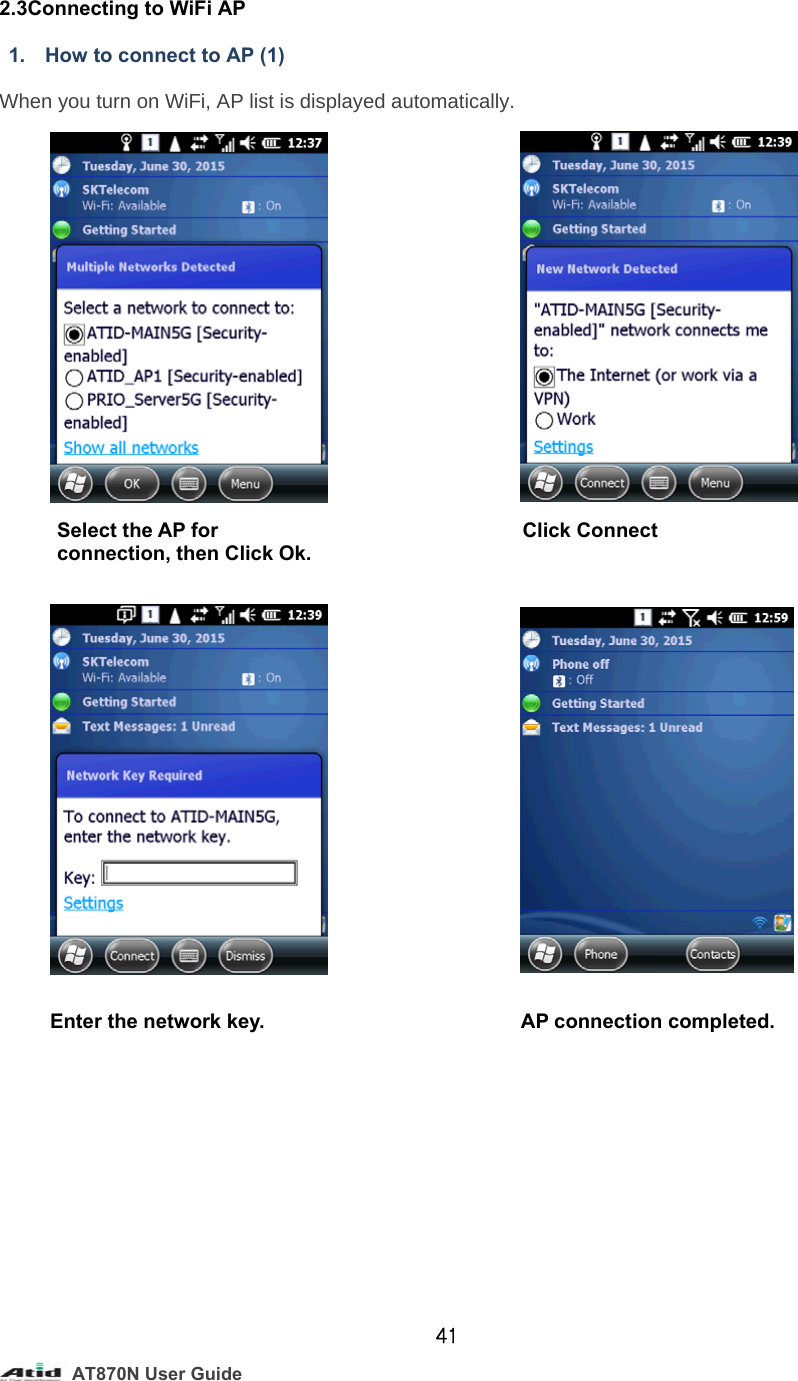
![AT870N User Guide 422. How to connect to AP (2) Connecting to AP via Wireless Network Configuration. [Start] -> [Setting] -> [Connection] -> [Network card] Click Next. Click Finish Connecting to AP. Select the network from theAP list.](https://usermanual.wiki/ATID/AT870N.Users-Manual-2/User-Guide-3262861-Page-31.png)
![AT870N User Guide 433. Bluetooth AT870N of Windows Mobile is designed to be able to use Bluetooth Stack Service. The following part of the guide describes about Paring and Disconnection of Bluetooth. In addition, Mobile Printer SPR-R203 of Bixolon is used for test demonstration. ** Pairing is possible with total of 6 devices, but COM port allocation of COM2 and COM7 is maximum limit. 3.1Bluetooth On/Off 1. Bluetooth Power On/Off [How to Turn on/Off] [Start] -> [Setting] -> [Bluetooth] -> [Mode] Turning on Bluetooth : Click on the checkbox to turn on Bluetooth. Checked: Bluetooth On Not Checked: Bluetooth Off Allowing other devices to search for the handheld. : Click on the checkbox to make the handheld visible to other devices. Checked: Allow other devices to search for AT870N Bluetooth. Not Checked: Does not allow other devices to search for AT870N Bluetooth. ClickClick](https://usermanual.wiki/ATID/AT870N.Users-Manual-2/User-Guide-3262861-Page-32.png)
![AT870N User Guide 443.2 Bluetooth Paring Bluetooth power must be on before the pairing. [How to Pair] [Start] -> [Setting] -> [Bluetooth] -> [Devices] Click on Add to search for the possible Bluetooth pairing devices. Select the Pairing device from the list and click Next. * In some cases, the devices might require to enter the PIN code before pairing.](https://usermanual.wiki/ATID/AT870N.Users-Manual-2/User-Guide-3262861-Page-33.png)