ATID AT870N Industrial PDA User Manual AT870N WinMB User Guide v 1 2 Eng
ATID Co., Ltd Industrial PDA AT870N WinMB User Guide v 1 2 Eng
ATID >
Contents
Users Manual-2
Atta
c
B
Thes
Plea
s
deta
c
B
Plea
s
into t
h
c
hing and
B
atter
y
Det
a
e image as
b
s
e slide the
b
c
h the main
b
B
atter
y
Att
a
s
e put the to
h
e below ga
p
Bat
t
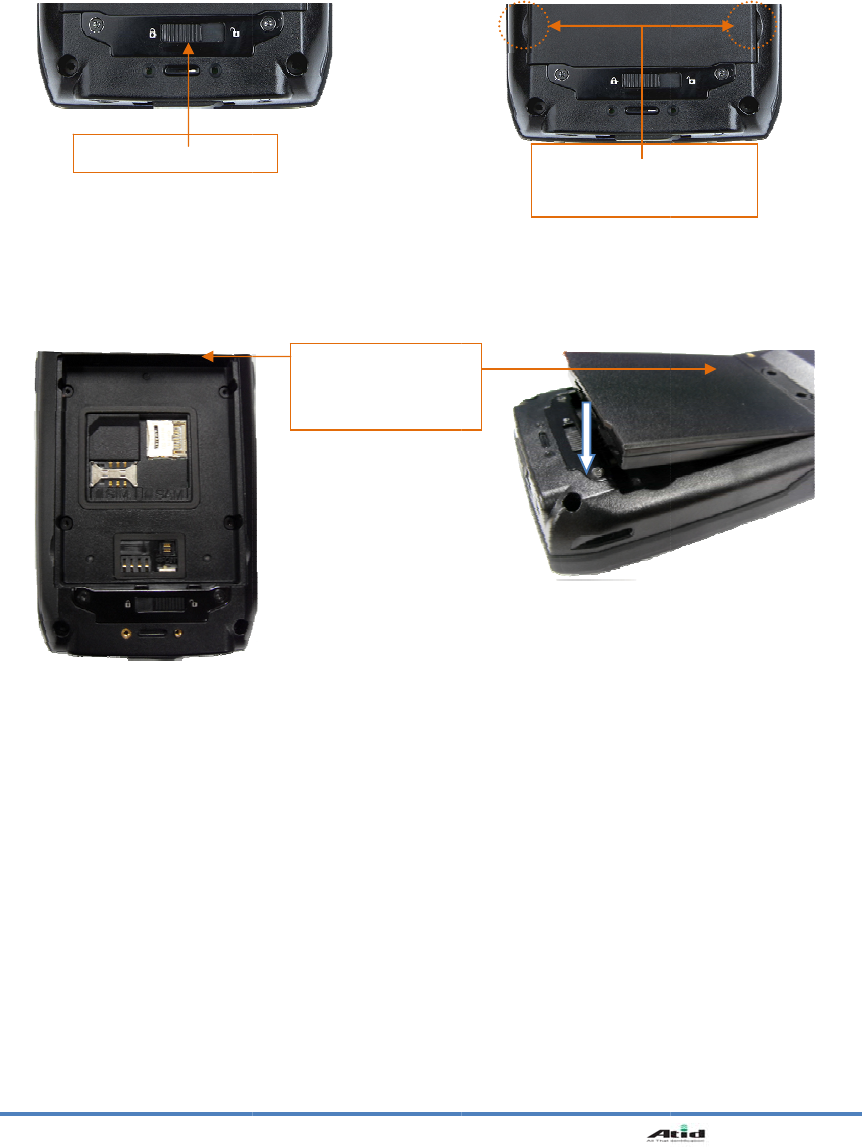
Detaching
a
chment
b
elow has s
h
b
attery latch
b
attery after
a
chment
p of the bat
t
p
of device
a
t
ery Latch
the Main
B
h
own the bo
t
to the right (
grapping th
e
t
ery into the
a
nd then, sli
d
A
bov
e
A
t
t
/ Top
o
12
B
attery
t
tom of devi
c
Direction to
e
gap of batt
e
above gap
o
d
e the lever
t
e
gap for
t
achment
o
f the batter
y
c
e
UNLOCK
),
a
e
ry on the b
o
o
f device an
d
t
o right (Dire
c
B
y
a
nd then lift
t
o
ttom.
d
then, push
c
tion to
LO
C
B
oth Side of t
For detach
AT870N
U
t
he main bat
t
the bottom
C
K
).
t
he Gap
ment
U
ser Guide
t
ery to
of battery
Cha
r
You
h
Red
char
g
C
1. Pl
u
2. C
o
C
3. L
E
lit
.
Po
w
In ca
othe
r
If yo
u
ICO
N
Star
t
P
AT870N
U
r
ging the
B
h
ave to char
g
light is lit o
n
g
ing
C
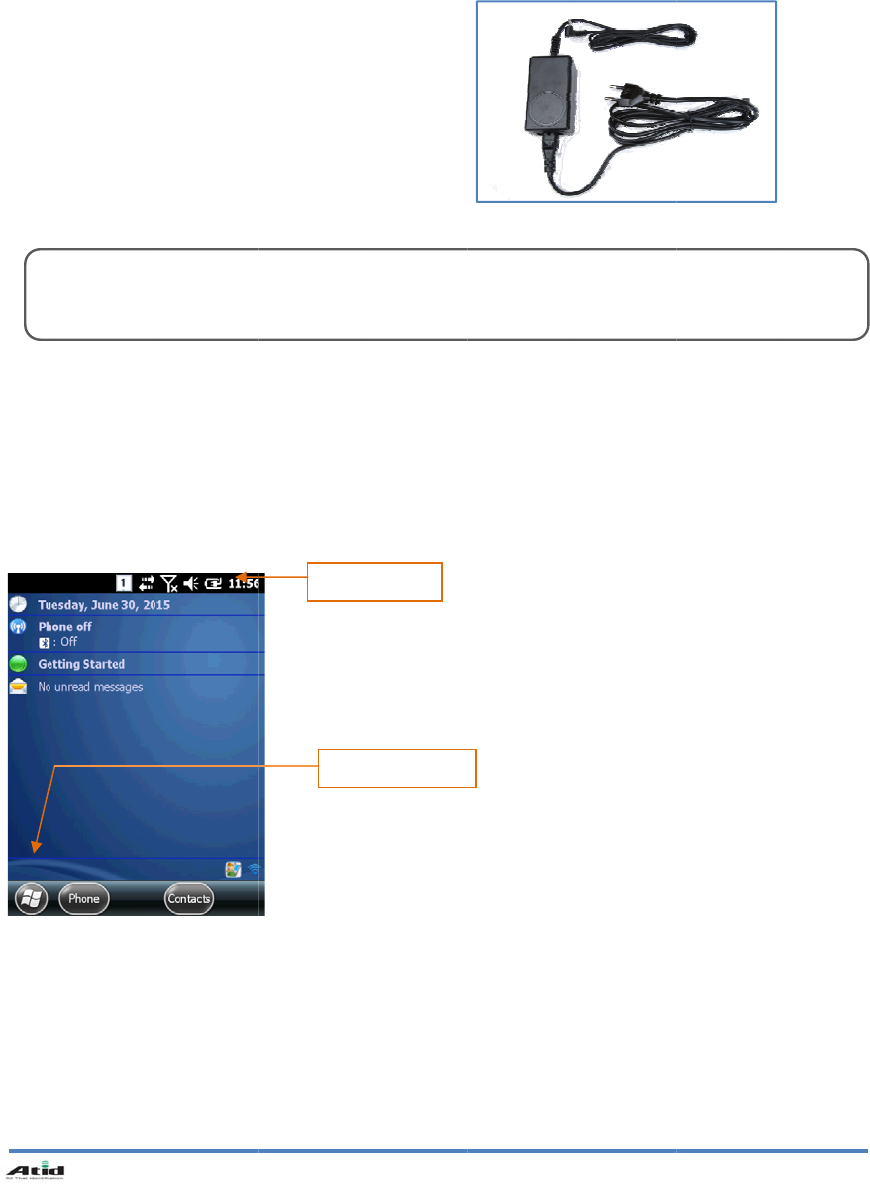
onnectin
g
u
g the adapt
e
o
nnect adapt
onnecting J
a
E
D will be ch
a
on the LED
w
er ON / O
F
se that ther
e
r
program, th
u
want to us
e
N
Mark:
Sho
w
t
Button:
A
ct
i
P
ower –ON
/
Caution
:
You mus
t
U
ser Guide
B
attery
g
e it through
n
LED when
the
A
dapt
e
e
r cable to
2
er DC cable
a
ck”
a
nged when
F
F
e
is window
e device is
a
e
it again, pl
e
w
the presen
t
i
vate the sta
/
OFF b
y
<P
o
:
t use provide
dedicated
a
it starts to
er
2
20V socket.
with “Powe
r
the red ligh
t
screen as b
a
ble to enter
e
ase press t
h
t
state of sy
s
rt menu and
o
wer> butt
o
S
t
Ico
n
d adapter wi
t
13
a
dapter whic
h
charge. It
w
r
t
is
elow or you
the low-po
w
h
e <POWE
R
s
tem
then, execu
t
o
n
t
art Button
n
Mark
t
h device. Ot
h
h
is provide
d
w
ill be chan
g
don`t use t
h
w
er mode (Sl
e
R
> button
t
e a progra
m
h
erwise your
d
d
when you
b
g
ed into gre
e
h
e system in
e
ep mode)
m
.
d
evice might
b
ought
e
n light in c
a
the status
o
be damaged
a
se of full
o
f running
N
If the
r
progr
a
state,
A
Th
e
for
t
bel
o
wit
h
[STA
R
N
OTE:
r
e was a tiny
b
a
ms will be re
the RAM dat
a
A
utomatic
e
device will
t
he designa
t
o
w. If user
s
h
out user an
d
R
T BUTTON]
b
attery gauge
covered in ca
s
a
will disappe
a
Powe
r
-OF
be automati
t
ed time. Us
e
s
ets proper
t
d
battery ca
n
-> [SETTIN
G
remained de
s
s
e of power-
o
a
r, and the sy
s
F
cally entere
d
e
r can chan
g
t
ime-out, th
e
n
be prolong
e
G
S] -> [POWE
Power Butto
n
I
c
I
n
14
s
pite of power
-
o
n. If both mai
n
s
tem will be r
e
d
to lo
w
-po
w
g
e the desi
g
e
device ca
n
e
d.
R] ->[
A
DVA
N
n
Po
w
Po
w
c
on for PO
W
n
dication
User ca
n
double
c
System
mode b
y
-
off, the data
o
n
battery and
e
-starting if th
e
w
er mode (S
l
g
nated time
a
n
be protect
e
N
CED]
w
e
r
-OFF:
1.
When
t
<Pow
e
screen
mode
(
w
e
r
-ON:
1. When
t
button
j
on and
2. Syste
m
conne
c
W
ER
n
enter the
a
c
licking the i
c
can be turn
e
y
pushing th
e
o
f RAM will b
e
backup batte
r
e
power is ch
a
l
eep mode)
i
a
t the contr
o
e
d from the
t
he system i
s
e
r> button fo
r
will be turn
e
(
sleep mode
)
t
he system i
s
j
ust a mom
e
start the sy
s
m
will autom
a
c
ted with US
B
a
bove scree
n
c
on of <Pow
e
e
d on in cas
e
e
<POWER
>
AT870N
U
e
saved, and t
r
y are in the d
i
a
rged again.
i
f user does
o
l panel and
situation of
s
in booting
s
r
2~3 secon
d
e
d off and en
t
)
.
s
in off statu
s
e
nt, then scr
e
s
tem.
a
tically be tu
r
B
cable for
A
n
in case of
e
r indication
>
e
of lo
w
-pow
e
>
button
U
ser Guide
hese
i
scharge
not use it
power as
power-on
s
tatus, pres
s
d
s, then the
t
er the low-p
s
, press <Po
e
en will be t
u
r
ned on if it i
s
A
ctiveSync
>
e
r
s
ower
wer>
u
rned
s
AT870N User Guide
15
Turn Off the Device in Case of Discharging the Battery
If the system cannot be used by electric discharge, it will be automatically entered into low-power
mode (sleep mode). In this case, user have to charge the main battery or connect the adaptor with
the adaptor connecting jack of main body, then press the <Power> button to turn on the system
since it won`t be turned on despite of pressing the <POWER> button.
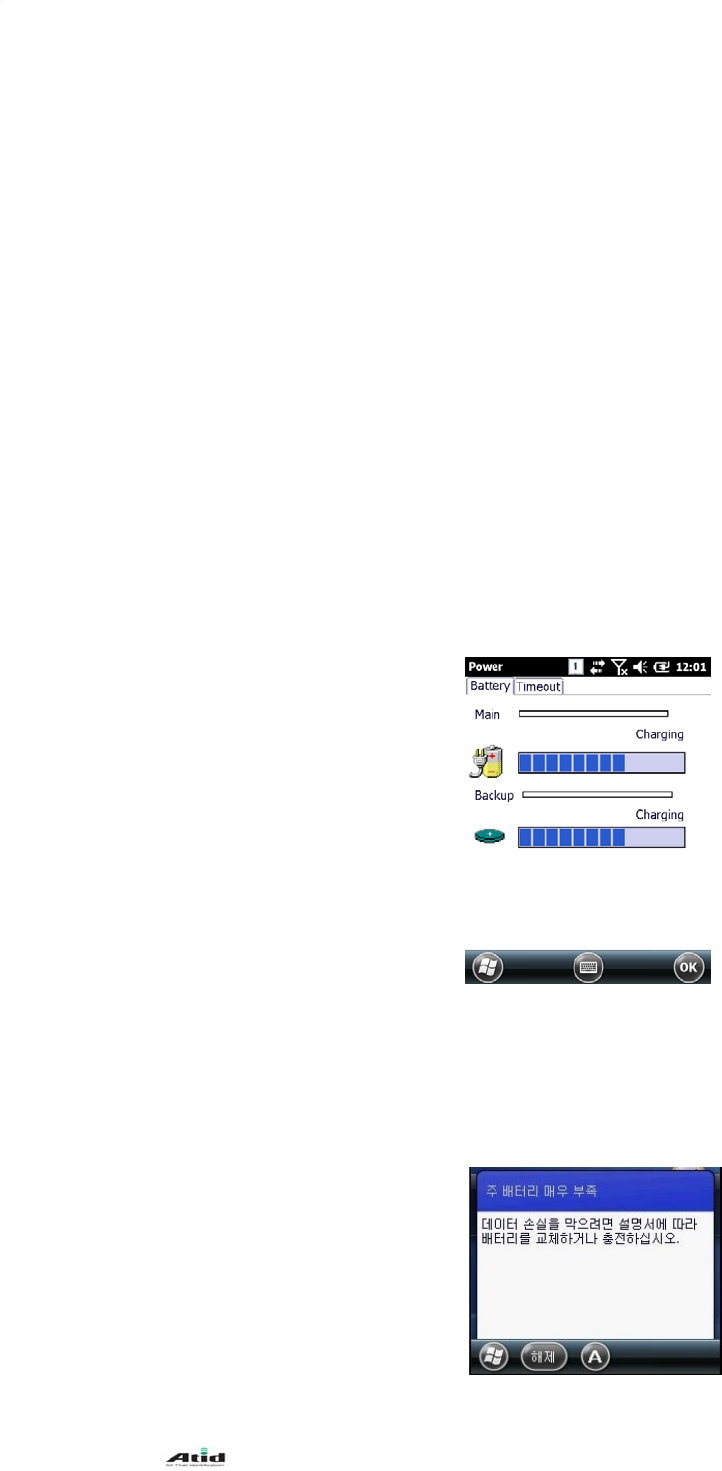
Checking Battery Gauge
NOTE:
Using time for battery will be influenced by way of use, surrounding environment. In general, you can
use the device from 6 hours to 12 hours after 2200 mA battery is fully charged.
Checking the Gauge Remained
[START] -> [SETTINGS] -> [POWER] -> [BATTERY]
Caution for Low Battery
If the system is unavailable for low-battery, caution screen for lack of battery will be came
out. In this situation, please turn off the device by pushing <POWER> button and then
charge as soon as possible.
Bac
Back
Cha
You
2.
S
Plea
s
resp
o
2.1
S
In n
e
Ther
e
the p
devi
c
mem
[Pro
c
Plea
s
syst
e
[Res
u
S
O
S
A
c
w
k-up Batt
e
-up battery i
s
nging the
need to pu
r
CAUTI
O
Please
S
ystem
R
s
e do restart
o
nse
S
OFT RES
E
e
ed of Soft
r
e
is a Hang-
u
rogram. Wh
e
c
e. Please n
o
ory. But it d
o
c
ess of Sof
t
s
e press th
e
e
m will be re
s
u
lt of Soft
R
S
ystem will
b
O
S will be r
e
S
creen will
b
A
djusted re
g
c
opied file a
n
w
ill be rema
i
CA
U
R
A
di
s
th
e
e
ry
s
used for p
r
e
Battery
r
chase a n
e
O
N!
discard th
R
eset
the system
w
E
T
r
eset,
u
p, which m
e
e
n user enc
o
o
te that war
m
o
esn`t influe
n
t
Reset]
e
Reset butt
o
s
tarted after
R
eset]
b
e restarted.
e
started.
b
e reshown
a
g
istry inform
a
n
d installed
p
i
ned
U
TION:
A
M data wil
l
s
char
g
e. Ac
t
e
s
y
stem wi
l
r
otecting the
e
w battery i
f
e expired
b
w
hen the ap
e
ans that th
e
o
unters Han
g
m
reset can
m
n
ce on instal
o
n which is
l
turning off t
h
a
fter 10 sec
o
a
tion,
p
rogram
l
be disap
p
t
ivated RA
M
l
l restart in
c
16
RAM data i
n
f
existing b
a
b
attery at
t
plication do
e
e
system rec
e
g
-up, please
m
ake the pr
o
led program
l
ocated on t
h
e screen ju
s
o
nds
p
eared if b
o
M
data will b
c
ase of inp
u
RES
BUT
T
POW
E
BUT
T
n
case of dis
c
a
ttery got d
a
t
he design
a
e
sn`t work p
r
e
ives no res
do reset th
e
o
gram termi
n
and data et
c
he device
w
s
t a moment
o
th main a
n
e disappea
r
u
ttin
g
the p
o
ET
T
ON
E
R
T
ON
c
harging th
e
a
maged or
a
ted locati
o
r
operly or sy
s
ponse in ca
s
e
system for
r
n
ate and cle
a
c
.
w
ith stylus p
e
automatical
l
n
d back-up
r
ed at the r
u
o
wer instea
d
AT870N
U
e
main batter
y
reached to
o
n
s
tem receiv
e
s
e of runnin
g
r
ecovering t
h
a
r the using
e
n for a mo
m
l
y.
batter
y
co
u
nnin
g
pro
g
d
of recove
r
U
ser Guide
y
its life
e
s no
g
h
e
m
ent. The
mpletel
y
g
ram and
r
in
g
.
2.2
In n
e
Har
d
valu
e
reset
uses
Ple
a
[Pro
c
Plea
s
thos
e
[Res
u
S
O
S
T
2.3
Plea
s
1. W
h
2. W
h
3. W
h
4. W
h
Pres
s
[Boo
t
[
1
2
3
0
AT870N
U
HARD RE
S
e
ed of Hard
d
reset whic
h
e
, copied file
, but please
the hard re
s
a
se use har
d
c
ess of Har
d
s
e press the
e
buttons.
u
lt of Hard
R
S
ystem will
b
O
S will be r
e
S
creen will
b
T
here are s
e
Initializing
s
e use [Boot
h
en user wa
n
h
en user wa
n
h
en user wa
n
h
en user wa
n
s
<Fun> but
t
t
Menu] is c
a
[
Boot Menu
]
1
. SD Ima
2
. Clean
O
3
. Factor
y
0
. Exit
U
ser Guide
S
ET
reset
h
is called c
o
and installe
d
note that ti
m
s
t
d
reset if it is
d
Reset]
Power butt
o
R
eset]
b
e restarted.
e
started.
b
e reshown
e
tting screen
the Syste
m
Menu] whe
n
n
ts to recov
e
n
ts to initiali
z
n
ts to initiali
z
n
ts to make
s
t
on and pres
s
a
me out at th
]
g
e Updat
e
O
n Exit
(N
y
Reset
o
ld reset can
d
program c
a
m
e/date will
impossible t
o
n and rese
t
of time / da
t
m
n
user enco
u
e
r the adjust
e
z
e the stora
g
z
e the stora
g
s
ystem a co
m
s
<RESET>
e screen aft
e
e
N
o
)
17
be used for
a
n be remai
be initialize
d
o recover th
e
t
button wit
h
t
e and user
h
u
nters below
e
d registry i
n
g
e space insi
g
e space insi
m
eback as t
h
button simu
l
e
r 2 ~ 3 sec
o
Fu
n
R
e
Po
w
initializing t
h
ned originall
d
. Therefor
e
e
system de
s
h
stylus pen
h
ave to rese
t
situation
n
formation b
a
de the “My
C
de the “Flas
h
e state of
b
l
taneously
o
nds as belo
n
Button
e
set Button
w
er Button
Enter the le
f
the <Power
>
System will
b
button even
the sleep m
o
h
e hardware
c
y even thou
g
e
, please do
s
pite of soft
r
simultaneo
u
t
the setting
o
a
ck again.
C
omputer”
h Disk”
b
eginning
w
f
t screen ev
e
>
icon
b
e turned o
n
though devi
c
o
de by auto
m
completely.
g
h user use
s
reset the ti
m
r
eset
u
sly and the
n
o
g time and
e
n if user do
u
n
if user pus
h
c
e has been
m
atic power
o
Registry
s
the hard
m
e if user
n
, unhand
date.
u
ble clicks
h
the Power
entered int
o
o
ff
o
3.
U
Belo
w
Ther
e
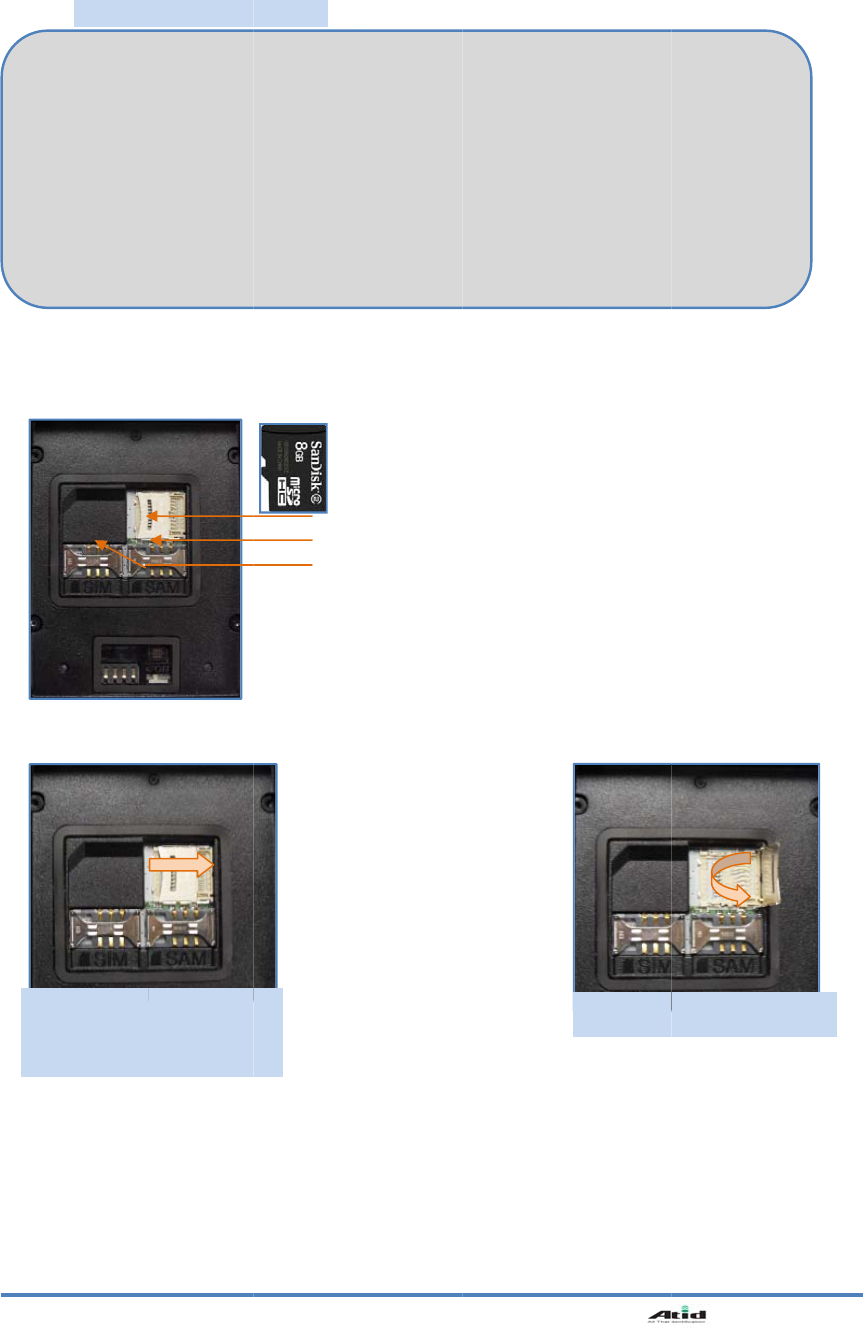
3.1 I
n
D
C
A
sl
o
U
se of M
i
w
image sho
w
e
are 1EA S
I
n
stalling
M
[[Boot
M
SD Imag
e
Update th
e
Clean On
Function
f
Factory
R
Function
f
beginning
Exit
Boot Me
n
o unlock
t
A
RD b
y
sli
d
o
t cover ri
gh
i
cro SD,
ws the back
I
M Card Slo
t
M
icro SD C
A
M
enu] Initial
e
Update
e
image (b
o
Exit
f
or recover
y
R
eset
f
or recover
y
n
u Terminat
t
he Micro
d
in
g
the c
h
t side
SIM, SA
side of devi
c
t
, 3EA SAM
C
A
RD
Screen
o
ot, OS) by
y
of My dev
i
y
of My dev
i
ion
Mic
r
SA
M
SIM
SD
ard
18
M CAR
D
c
e when se
p
C
ard Slot an
SD Card
i
ce, registr
y
i
ce, registr
y
r
o SD CARD sl
o
M
CARD slot
CARD slot
D
p
arating the
m
d 1EA Micr
o
y
as a state
y
, Flash Fol
d
o
t
m
ain battery
o
SD Card Sl
o
of beginni
n
d
er as a st
a
Lift th
e
AT870N
U
from device
o
t.
n
g
a
te of
e
slot cover
U
ser Guide
up
SD
M
Micr
o
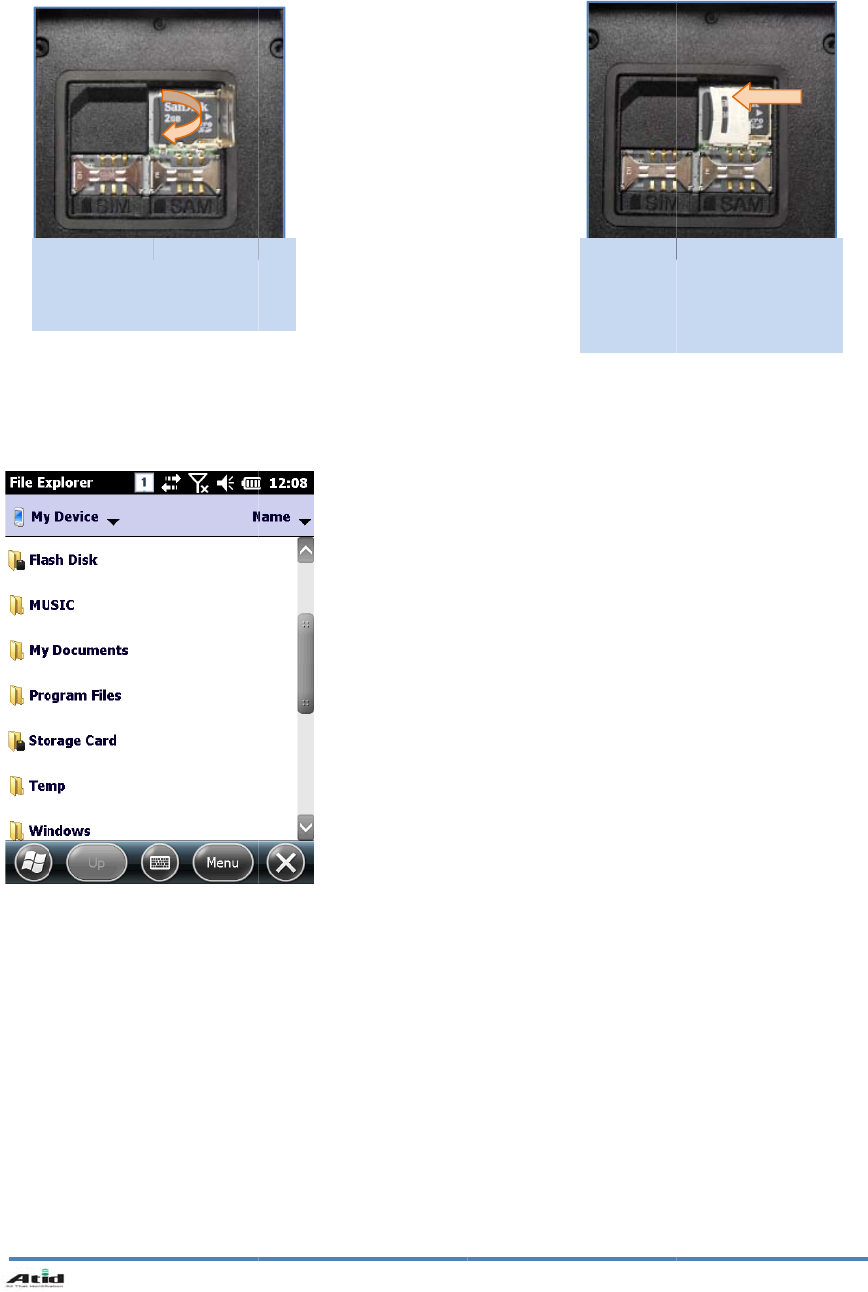
[ST
A
P
u
sl
u
p
AT870N
U
M
MC CARD
f
o
SD memo
r
A
RT] -> [File
u
t the SD
m
ot and then
p
U
ser Guide
f
older will
b
ry
card as
b
Explore
r
]
m
emor
y
on
, shut the c
o
b
e shown if
u
b
elow ima
ge
the
o
ve
r
19
u
ser imple
m
e
m
ents the file explorer
a
Do lock t
h
sliding it
then, tur
n
after equi
p
.
a
fter inserti
n
h
e slot co
v
to left si
d
n
on the
p
pin
g
the b
a
ng
the
v
er b
y
d
e and
device
a
tter
y

3.2 I
n
Belo
w
Plea
s
n
stalling
S
w
ima
g
e sh
o
s
e do inser
t
S
IM CARD
a
o
ws the sta
t
it in accor
d
a
nd SAM
C
te of equip
p
d
ance with
c
20
C
ARD
p
in
g
the SA
M
c
ard shape
a
M
CARD an
d
a
nd ed
g
e s
h
d
SAM CA
R
h
ape
AT870N
U
R
D with devi
U
ser Guide
ce.

AT870N User Guide
21
4. Individual Environment Setting
4.1 Phone Password Setting
User can set a limitation on use of phone by setting with password for USIM card for prevention from
stranger`s use
[PINSetting Method]
[START] -> [SETTINGS] -> [PERSONEL] -> [PHONE] -> [SECURITY]
Please select the “Require PIN when phone is used” when using
password and then, input the 4-digit password at the password input
screen and then, press <Enter> Button
4.2 User Information
User can set up the his/her information (Name, Corporation, Address,
E-mail) & Memo
[User Information Setting Method]
[START] -> [SETTINGS] -> [PERSONNEL] -> [IDENTIFICATION]
Use of Password
Password Change
Caution:
PIN Code is set with ‘0000” to protect USIM card information
It can be changed by user`s preference
PUK Code is USIM unlock code, in case that user continuously enters incorrect PIN in 3 times (8
Digit)
This code is marked on envelop or body in case of purchasing USIM CARD Please note the USIM
card would be impossible to use when user continuously enters incorrect password in 10 times
AT870N User Guide
22
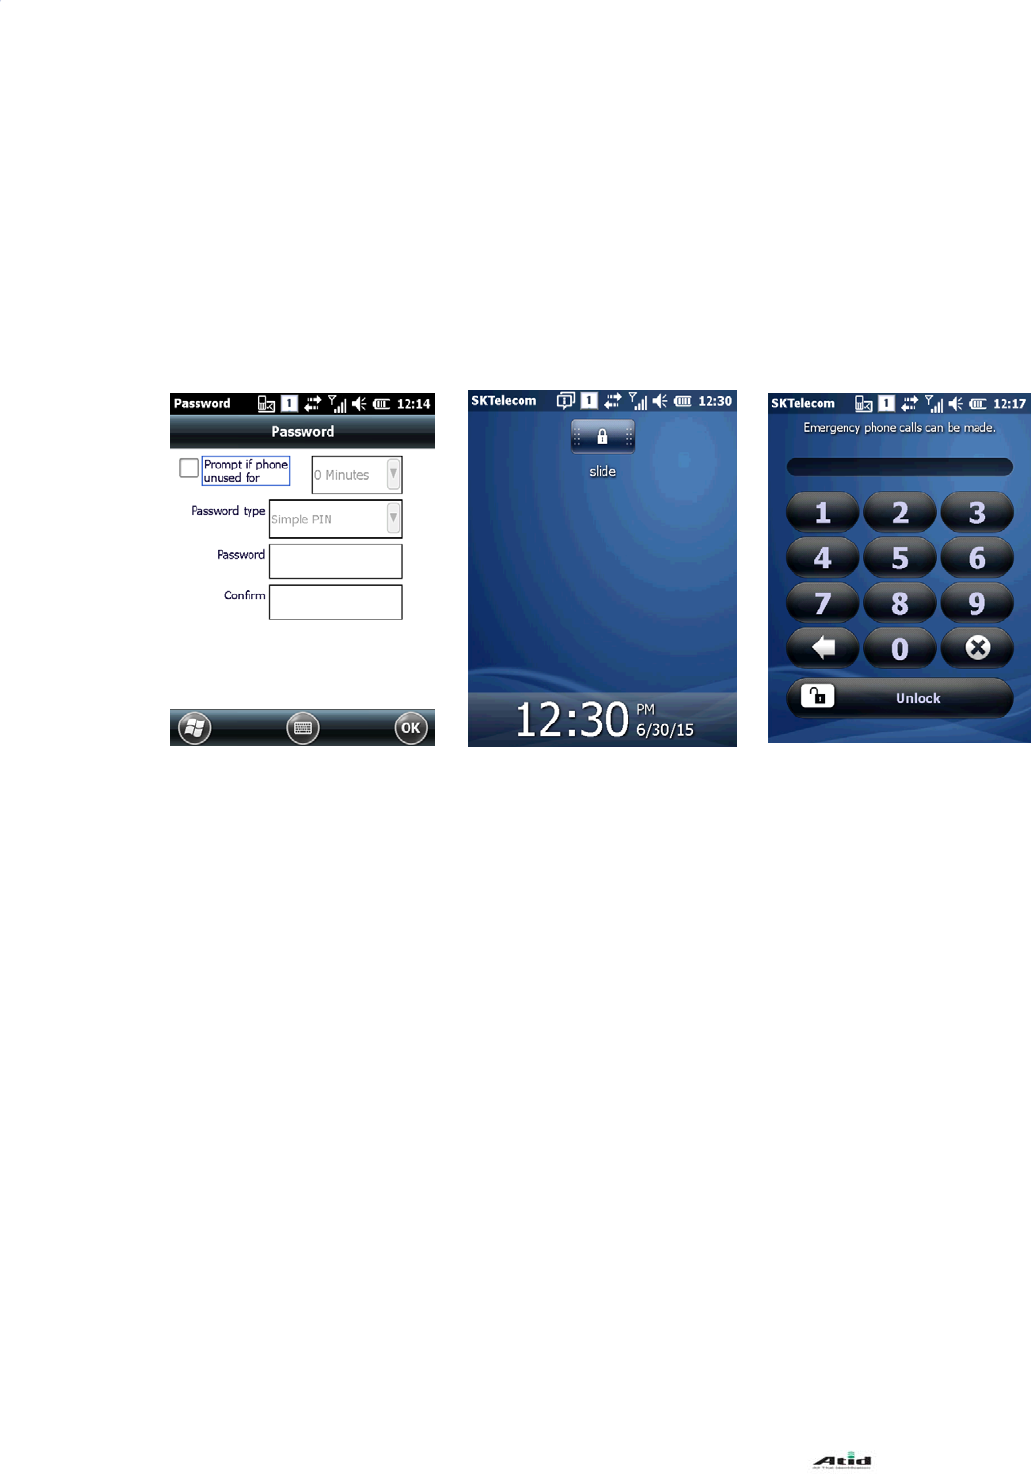
4.3 LOCK
User can set up the device as lock status for protecting data from device
Device is converted with lock status for a predetermined time and user has to input the password for
unlocking the device.
[Lock Setting Method]
[START] -> [SETTINGS] -> [LOCK]
LOCK SETTING SCREEN LOCK SCREEN PASSWORD INPUT
SCREEN
AT870N User Guide
23
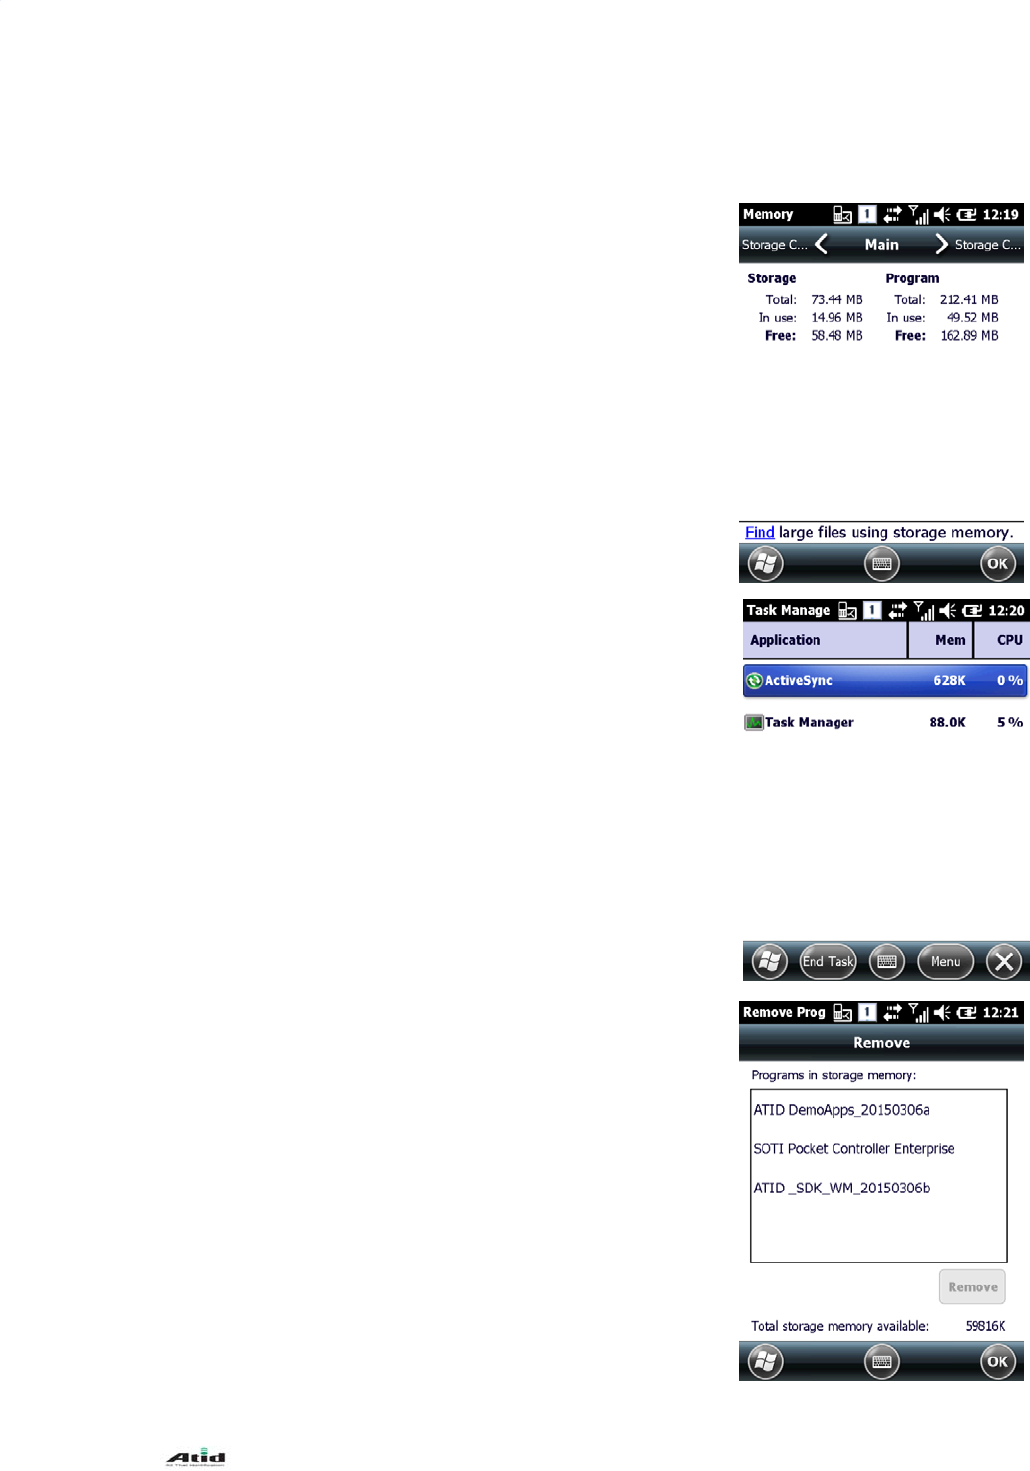
5. System Configuration
5.1 Memory
User can verify the volume of memory
[Memory Checking Method]
[START] -> [SETTINGS] -> [SYSTEM] -> [MEMORY]
Main Memory: User can verify the remained and used volume
Storage Card: User can verify the volume of SD card and Flash
section
5.2 Task Manger
User can verify the volume of running program list and memory
[Task Manager Method]
[START] -> [SETTINGS] -> [SYSTEM] -> [TASK MANAGER]
User can make device stop by selecting the running
program at the list
5.3 Program Removal
Program list will be marked on the screen without basic program
[Program Removal Method]
[START] -> [SETTING] -> [SYSTEM] -> [PROGRAM
REMOVAL]
User can remove the program by selecting the program at the
list
AT870N User Guide
24
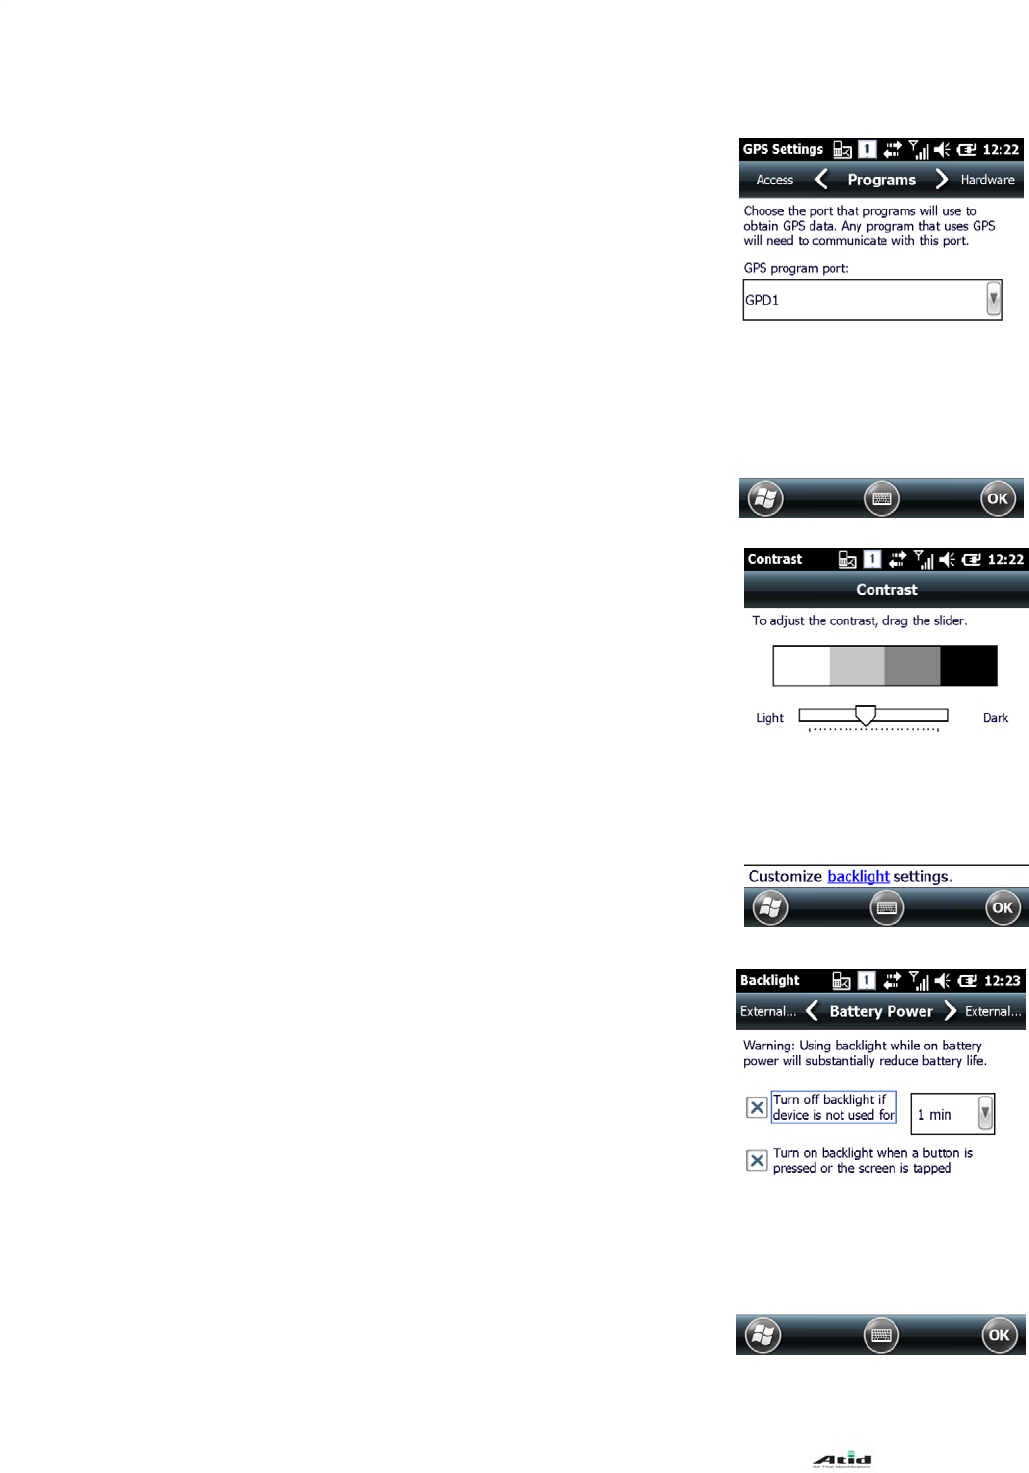
5.4 GPS
User can set up the GPS port inside of device
[GPS Setting Method]
[START] -> [SETTINGS] -> [SYSTEM] -> [GPS]
No need to do other set-up since there is basic GPS port
which is already used
5.5 Brightness Setting
At the beginning, brightness is set up with around 70 %
[Brightness Setting Method]
[START] -> [SETTINGS] -> [SYSTEM] -> [CONTRAST]
Brightness: User can control the screen brightness
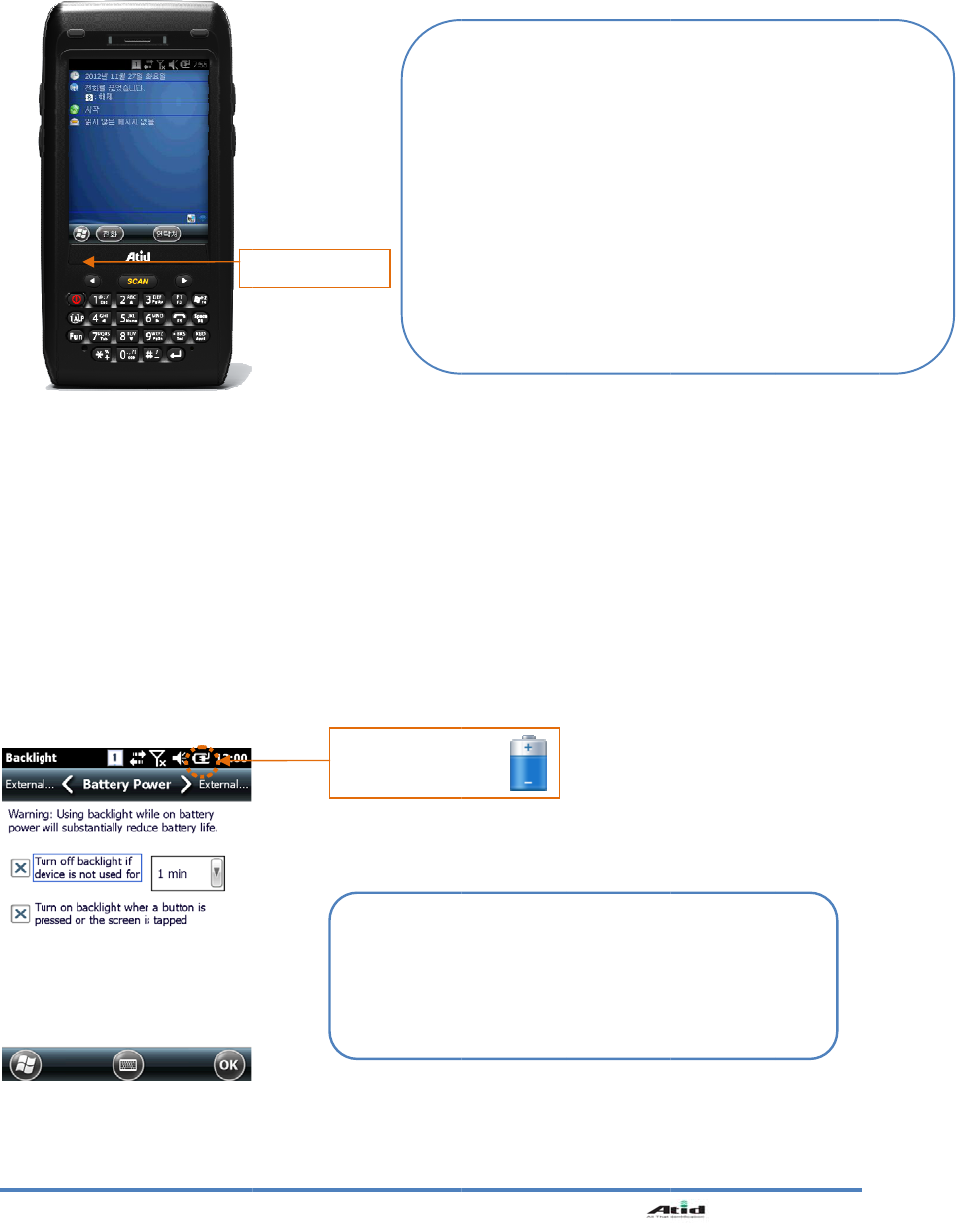
5.6 Brightness On/Off Setting
It can be adjusted by user`s preference since it has influenced
on battery consumption
Time out for screen off can be set up with user`s preference
[START] -> [SETTINGS] -> [SYSTEM] -> [BACKLIGHT]
Battery Power: Turn Off/On backlight if device uses battery power
External Power: Turn Off/On backlight if device uses external power
AT870N User Guide
25
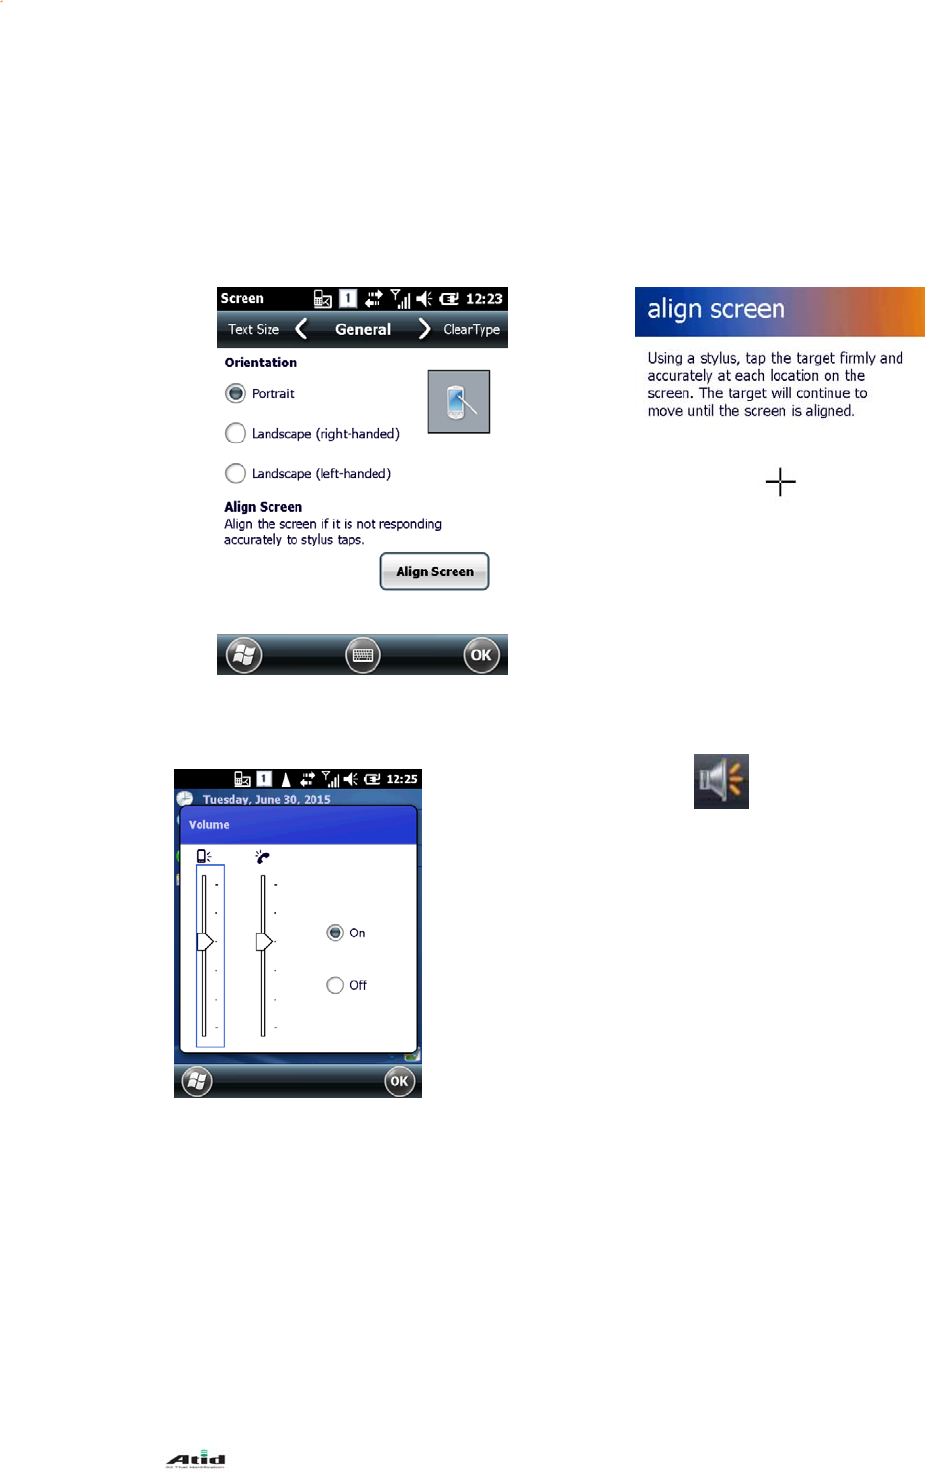
5.7 Screen Adjustment
Please readjust the coordinate correction value in case that user uses the device at the beginning or
for long period if the screen point cannot be selected by stylus pen.
[Start] -> [Settings] -> [System] -> [Screen] -> [Align Screen]
5.8 Volume Settings
User can set up the volume
Volume Setting Icon
User can adjust the volume using left side button
(Hardware)
AT870N User Guide
26
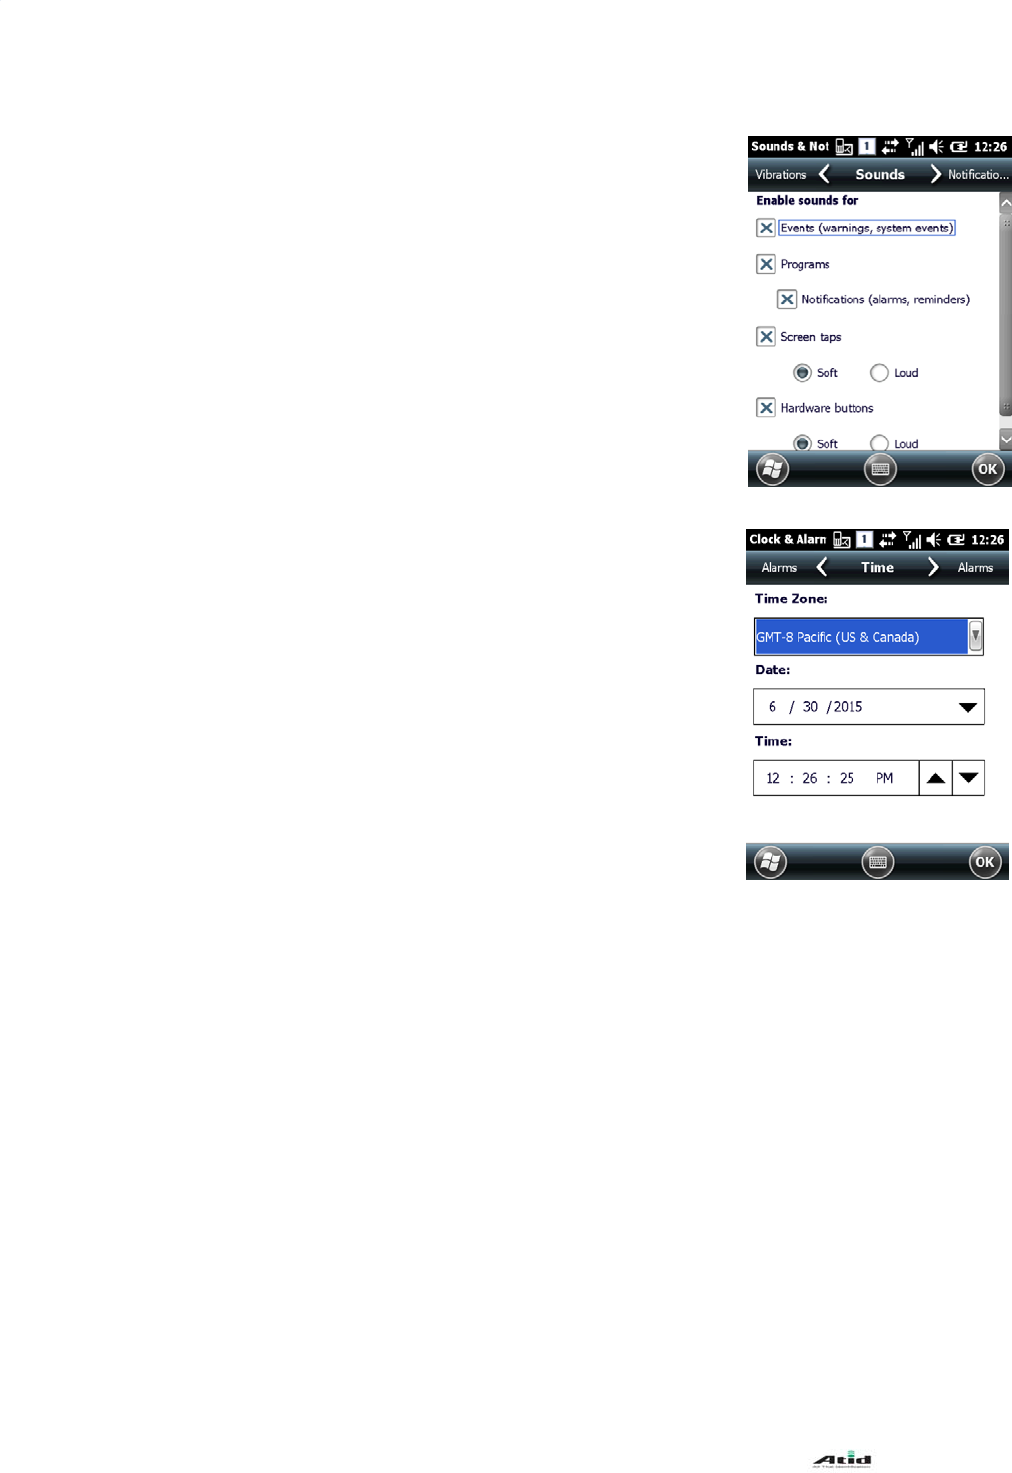
5.9 Sound & Notification Setting
User can set upthe vibration, sounds and notification ON/OFF
[Alarm & Sound Setting Method]
[Start] –> [Settings] -> [Sound & Notification]
Vibration: Vibration Amplitude settings
Sounds: Sound event settings
Notification: Ringtone settings
5.10 Clock & Alarms Setting
User can set up the time, date and alarms
[Clock & Alarm Setting Method]
[Start] -> [Settings] -> [Clock & Alarms]
Time: Date and Time settings.
Alarms: Alarm settings.
AT870N User Guide
27
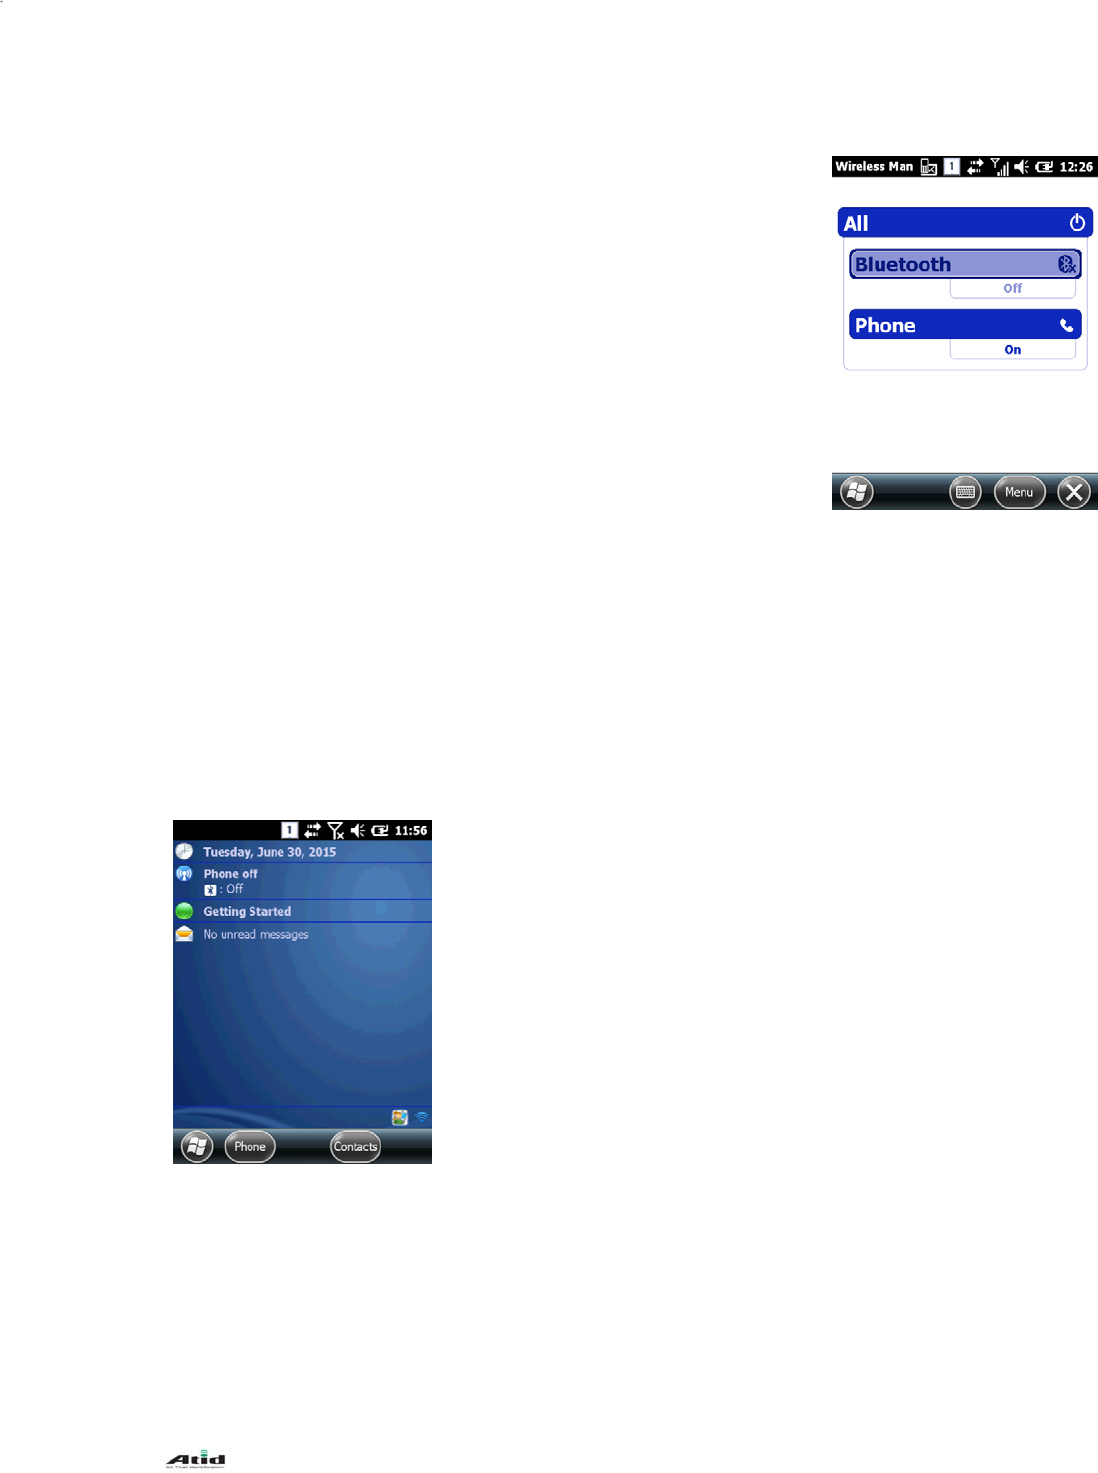
5.11 Wireless Manager
User can turn on/off the Bluetooth, WiFi, phone function
[Wireless Manager Setting Method]
[Start] -> [Settings] ->[Connection] ->[Wireless Manger]
All: WiFi , Bluetooth , phone function can be turned on/off simultaneously
Separate Selection: WiFi, Bluetooth, phone function can be turned on/off
separately
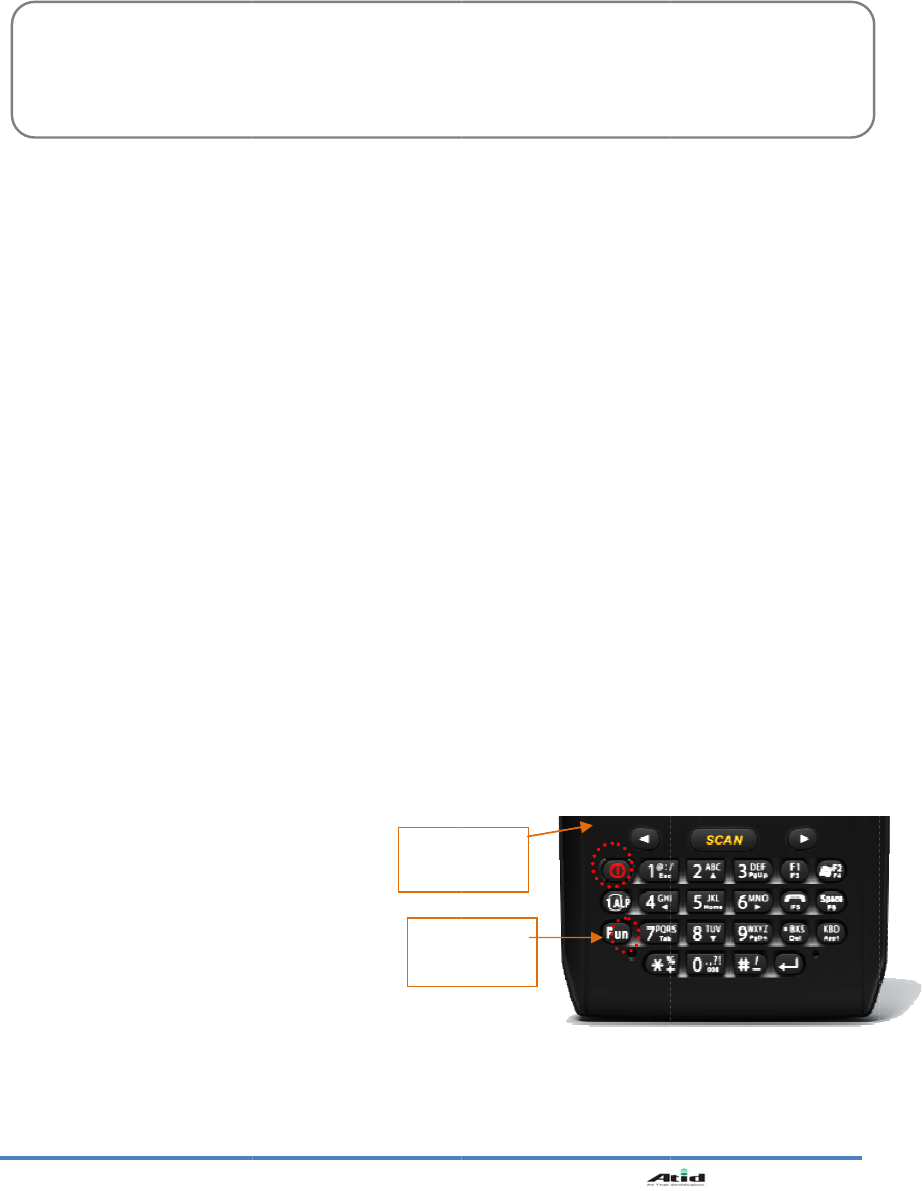
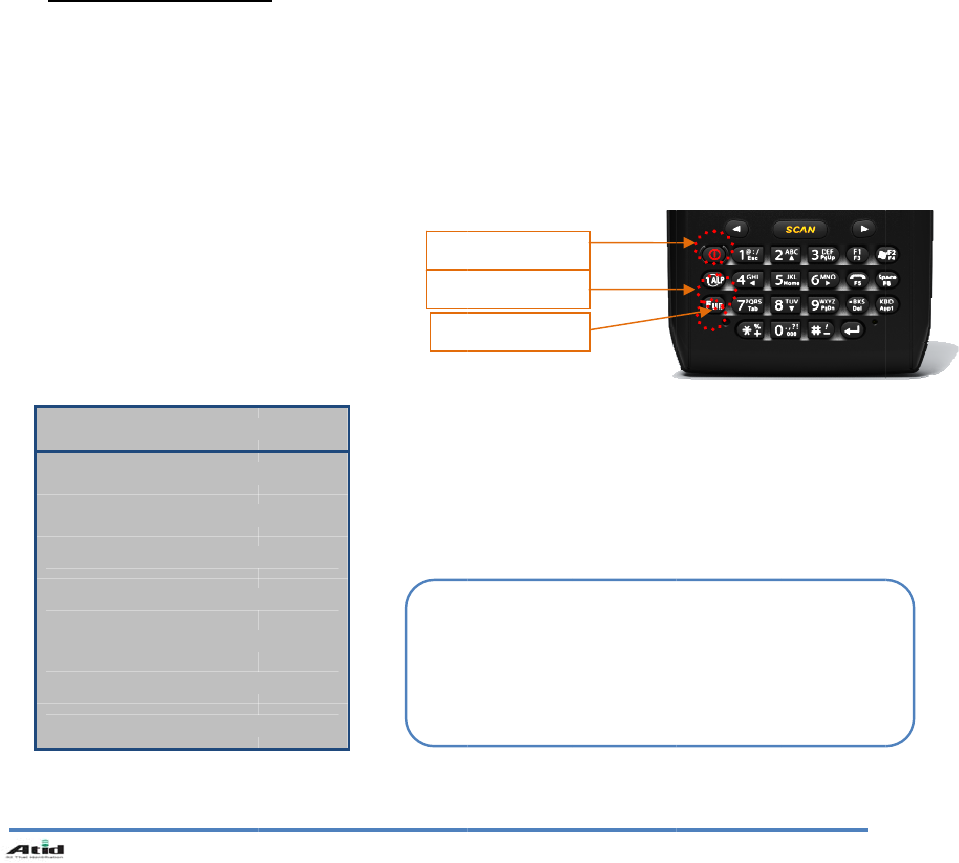
6. Use of Keypad
Using the keypad, characters, numbers, alphabets etc. can be easily typed in the handheld
device.Also, using the <Fun> together, keypad can be used in different ways.
6.1 Use of Keypad
Please press the <1 ALP> button as below step if user wants to change the input language
It will be converted in the order of [Number] -> [Small Letter] –> [Capital Letter]
If user clicks icon on the task bar, input
mode will be converted
It can be differently expressed by option

AT870N User Guide
28
6.2 Data Input
Number Keypad mode: Press the <1 ALP> button or input language icon on the task bar to
change the number keypad mode
Letter Keypad mode: Press the <1 ALP> button or input language icon on the task bar to
change the small or capital letter and then, input the word you want. There is
2~3 word or symbol in a button. First word can be putted into the device at one
time, second word can be putted into the device at two times simultaneously,
third one can be putted into the device at the three times to push
simultaneously.
6.3 Device Configuration & Function Execution Using keypad
<Fun>If the keypad button is pressed together with <Fun>, functions that are preset in advance will
be performed.
Fun + Button Description
<Esc> It is able to cancel the selected command and movement & state of program.
Left side of <↑>, <↓> It uses for sound control
<3>,<9> It uses for page UP / DOWN.
<2>,<4>,<5>,<6>,<8> Key button for right and left and top and bottom.
<Del> It deletes the letter behind the cursor
<7> It can be used Tab button
<*>,<0>,<#> It inputs the + sign, 000 sign and –sign.
<F3>,<F4> It uses for function button
AT870N User Guide
29
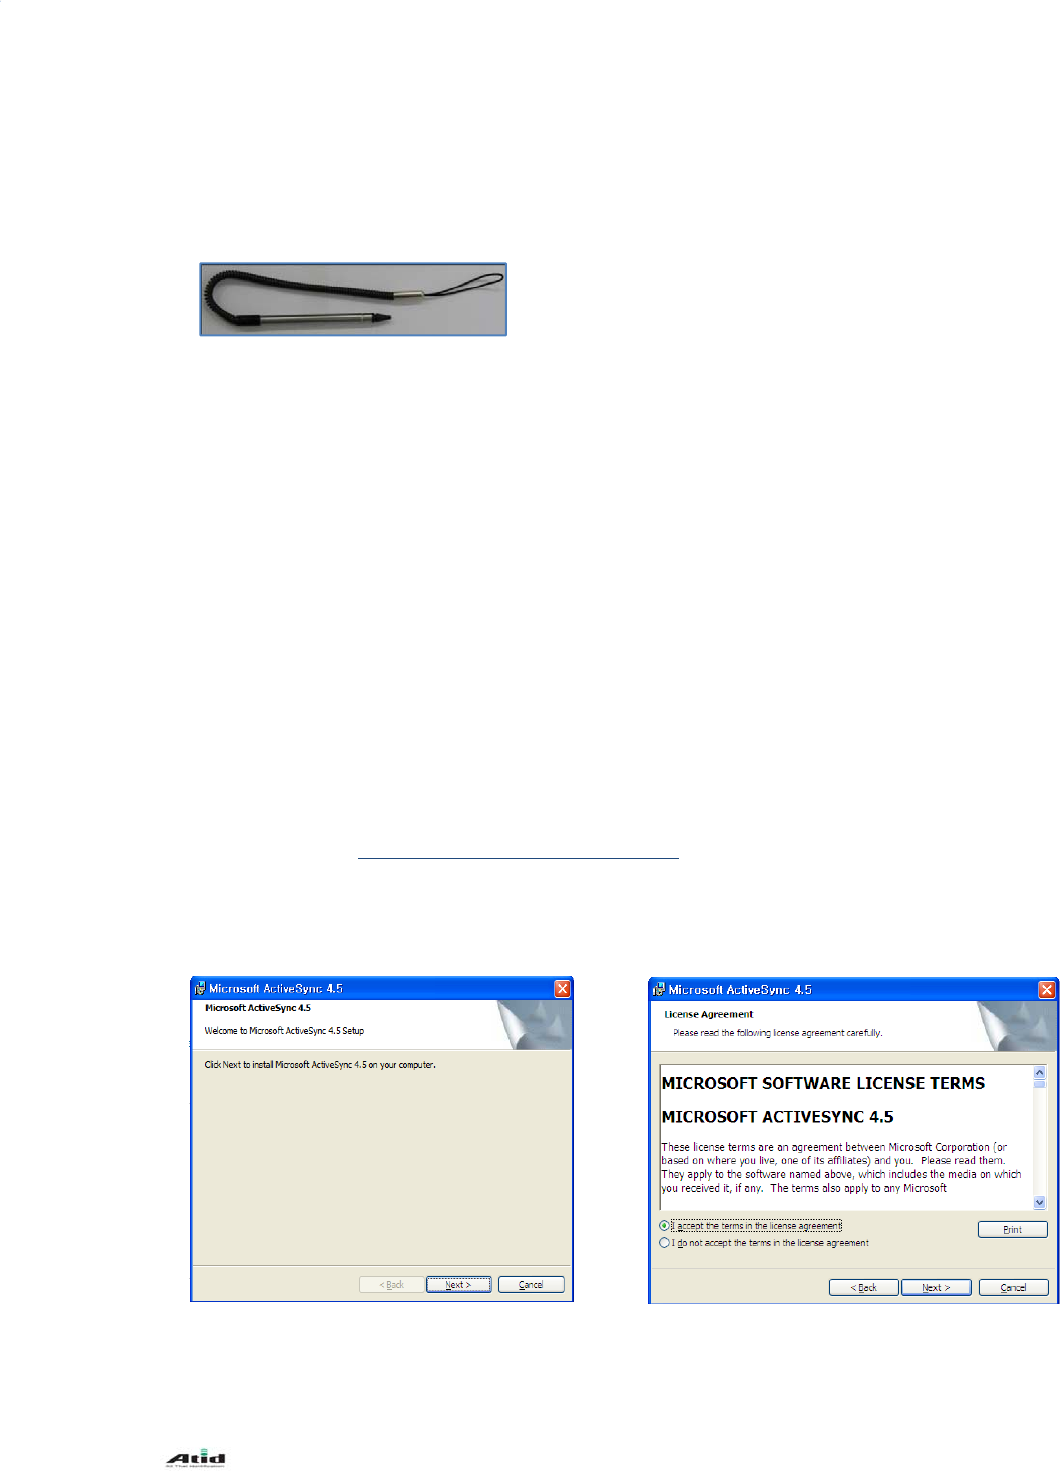
7. Use of Stylus
User is able to use stylus pen that has same function with computer mouse and it can be used in
connection with hand strap hole located on back bottom side of PDA.
8. ActiveSync
Using the ActiveSync, the handheld device can connect to PC for data transfer, copy, installation,
and move etc. via synchronizing the device with PC.
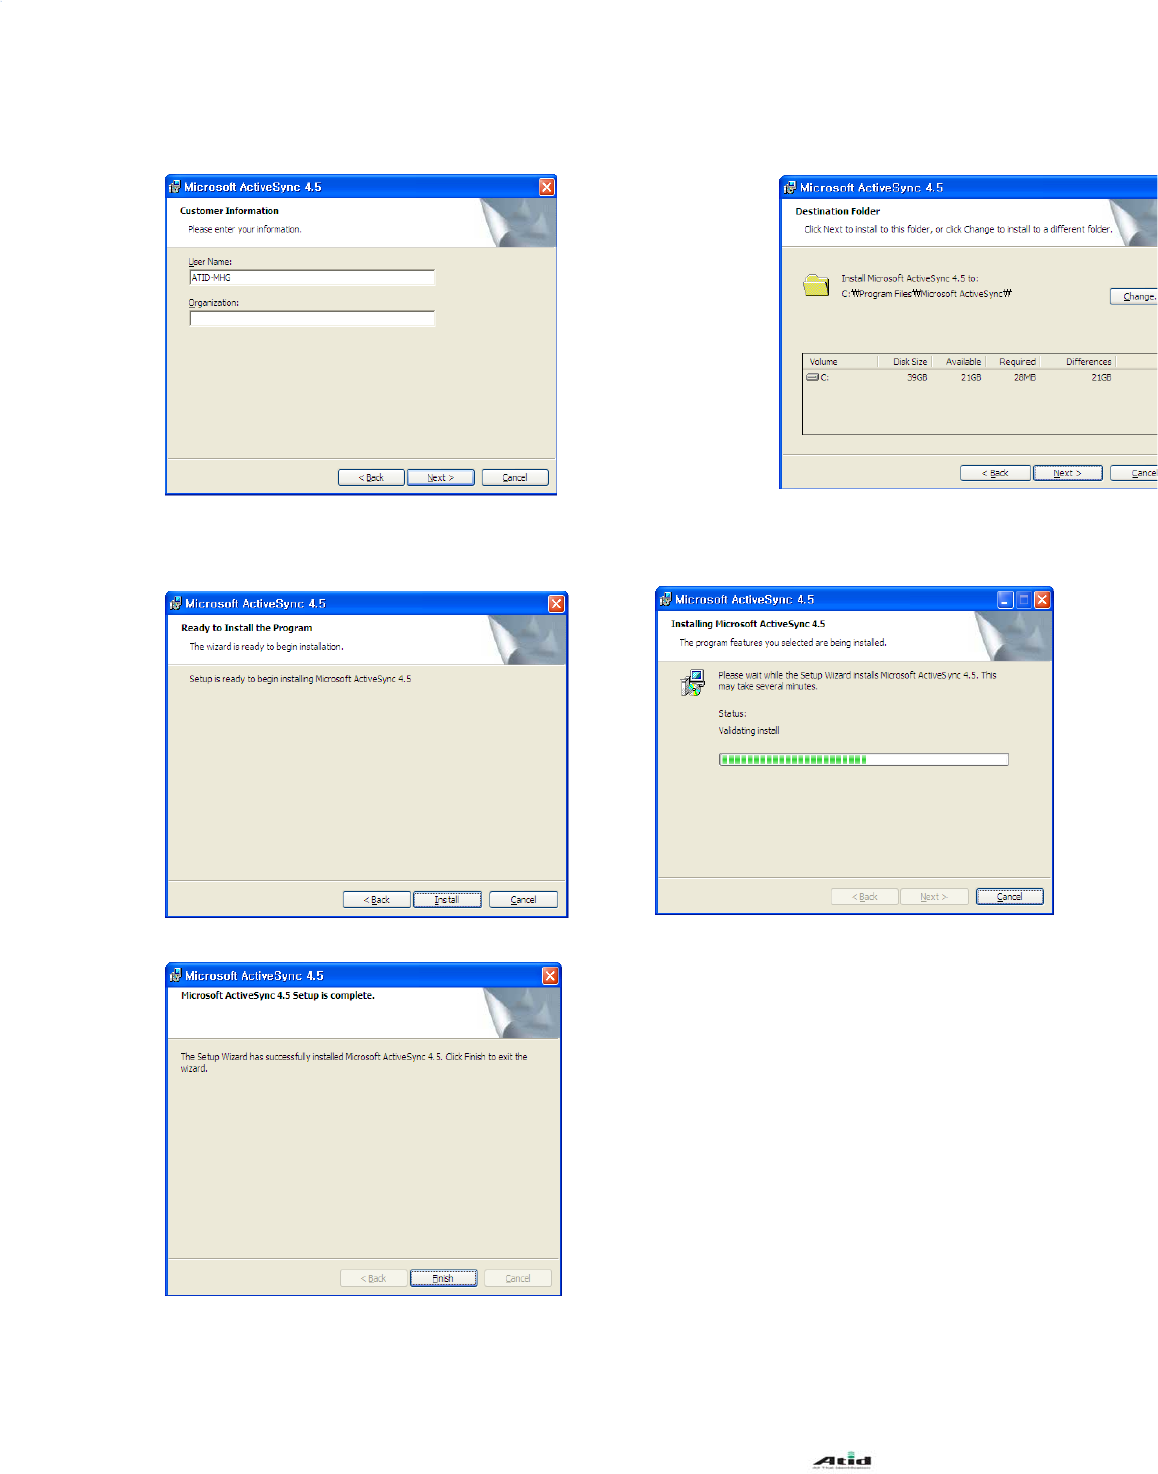
8.1 Microsoft ActiveSync Installation
Microsoft Windows CE. Download the latest version and install it on PC.
ActiveSync: Windows XP
Windows Mobile Device Center 6.1 ( 64bit ) : Windows XP or later version
Download link:http://www.microsoft.com/downloads/.
Caution:
To synchronize via ActiveSync,Microsoft ActiveSync 3.7 or later version must be used.
CAUTION:
There is a danger of getting damaged if you use any other sharp objects except for
provided stylus pen since it is very sensitive one
Use of Stylus
Setting Direction of Screen Display
Selection of letter on the soft keypad
Applied program on the main screen
or task bar
Selection of button, field and tap at
the applied program and dialog box
Click on the Next. Click on Agree and then Next to continue.
AT870N User Guide
30
Enter the user name and compan
y
and click
Next.
Choose the installation director
y
and click
Next.
Click on the Install button to continue.
ActiveSync is being installed.
Click Finish to complete the installation.
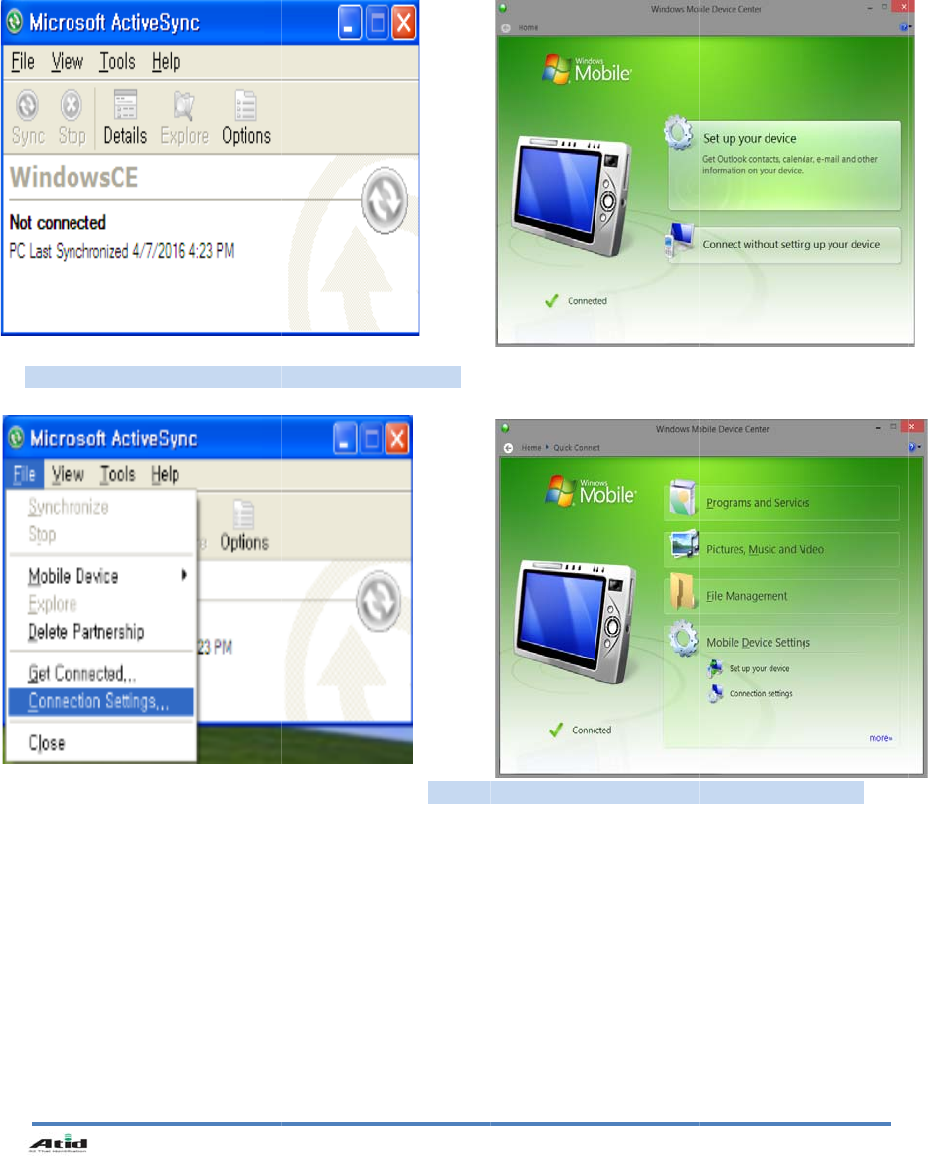
8.2
C
P
[
S
<
W
Acti
v
AT870N
U
C
onnectio
C settin
g
s
S
tart] -> [Pr
o
W
indows X
P
v
eS
y
nc pro
g
U
ser Guide
n settings
og
ram]-> [
M
P
< Win7 / V
g
ram screen
for PC
M
icrosoft Ac
ista >
.
31
tiveS
y
nc]
Click
o
o
n the Conn
e
e
ction setti
n
ng
s.
AT870N User Guide
32
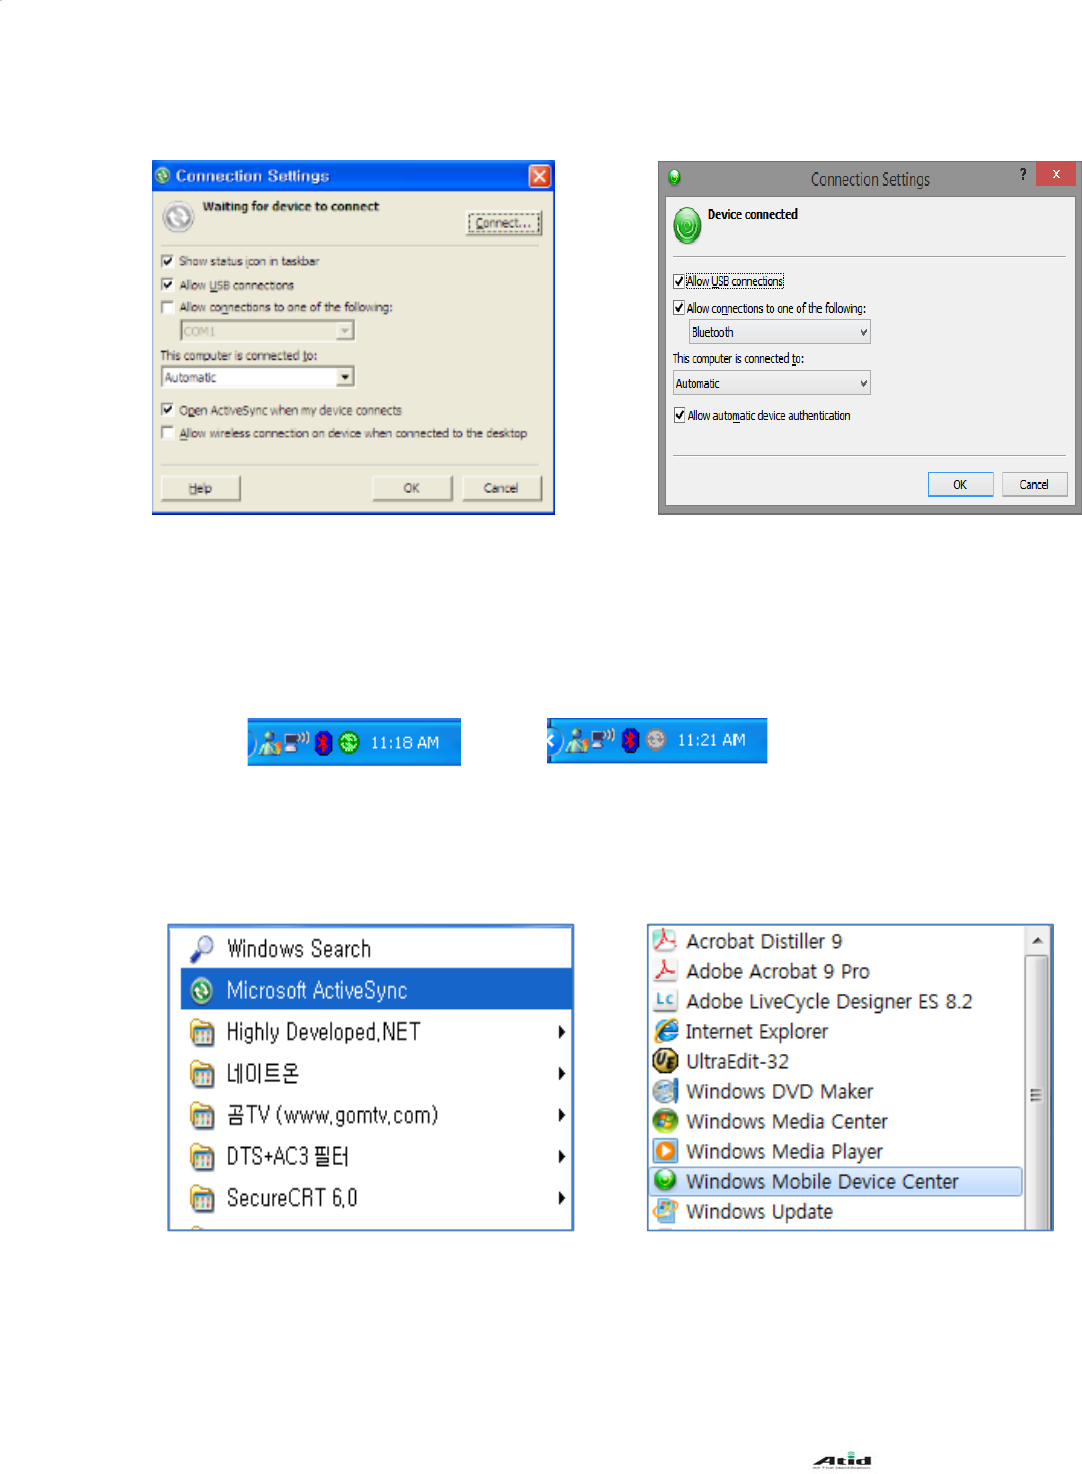
8.3 Data Transfer
Connect to PC via USB.
< Windows Xp>< Win7 / Vista >
After checkin
g
on Allow USB S
y
nc cable connection, click OK to continue.
Can check on the ActivSync connection status in task bar.
Connected state Disconnected state
Go to Start – Program – Microsoft
ActiveSync. Go to Start – Program – Windows Mobile
Device Center.
AT870N User Guide
33
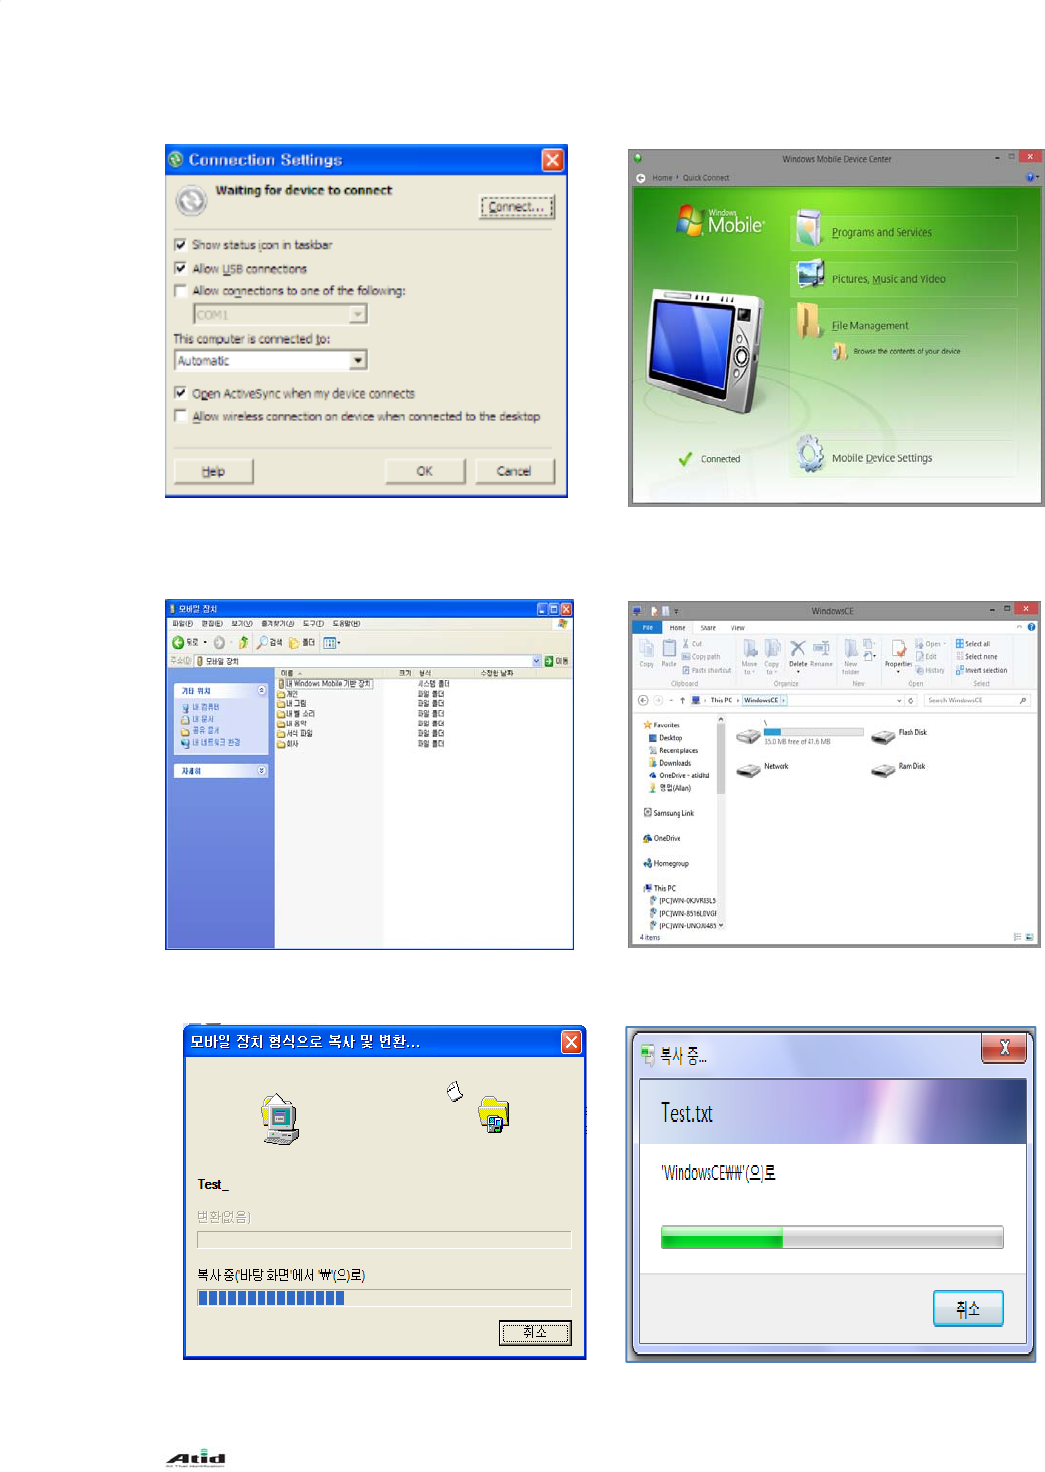
When ActiveS
y
nc is connected, click on
the explorer menu.
When ActiveSync is connected, click on
the device search icon.
File/Directory screen.

AT870N User Guide
34
Chapter 4. Optional Module
This chapter shows various option module which can be equipped in AT870N. Please refer to the
explanation of optional module.
Option Module for AT870N
AT870N provides below option types with user in accordance with use of purpose. Please
do check this option types before buying AT870N since its option is specification for
AT870N.
Option types for AT870N
1) Barcode Reader
-. 1D Laser Barcode Scanner
-. 2D Imager Barcode Scanner
2) Wireless LAN – 801.11 a/ b/g
3) Bluetooth
4) UHF 900 M – Gen 2 Full Function
ISO18000 6C (Only Tag UID Reader)
5) RF 13.56 – Mifare, ISO15693
6) GPS Module
7) Phone
8) Camera
Data transfer screen.
1.
U
AT
1.1
B
Rea
d
AT870N
U
U
sing 1D
T
870N can b
e
B
arcode R
e
d
barcodes o
U
ser Guide
or 2D B
e
equipped
w
e
ading
r set decodi
n
arcode
S
w
ith 1D & 2
D
n
g option us
i
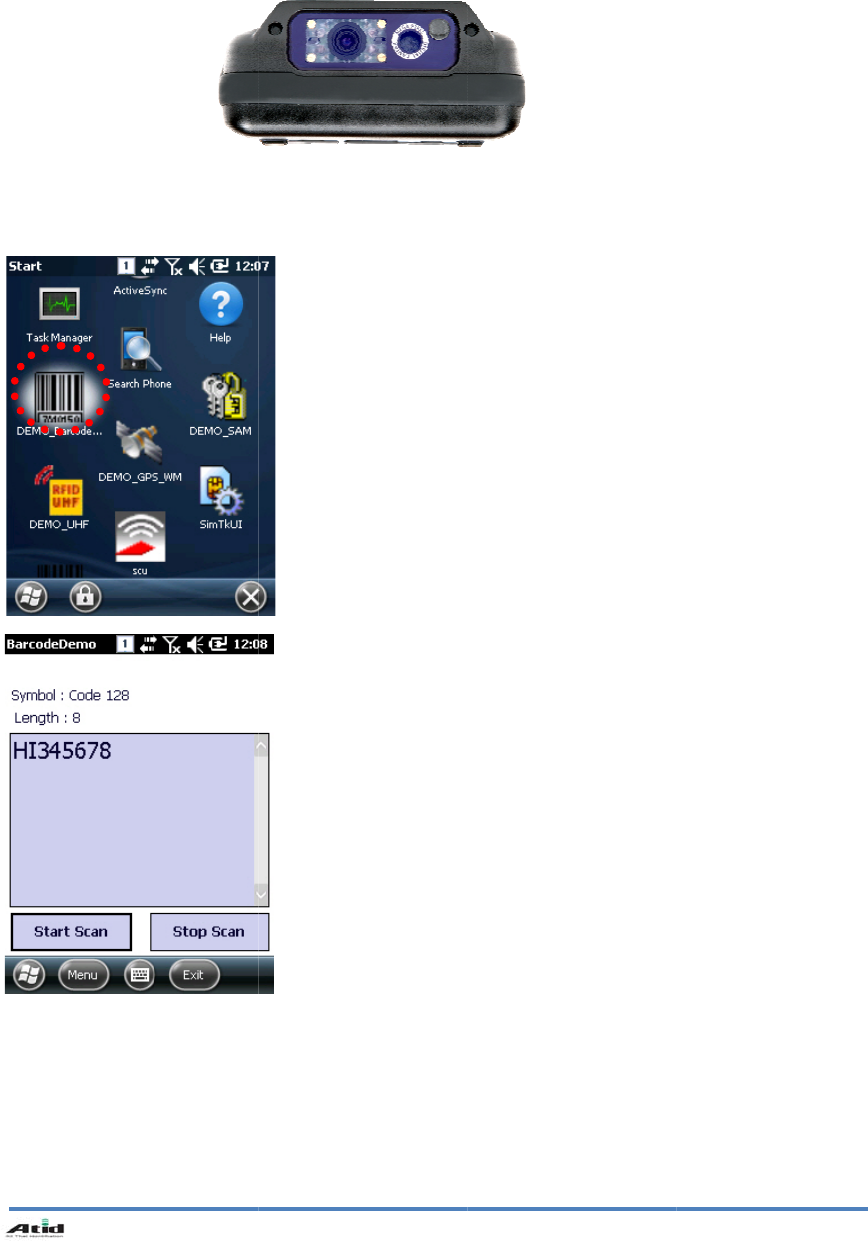
Run Ap
p
- [Start
B
Main W
i
- Start
S
- Stop
S
- S
y
mb
o
- Len
g
t
h
- Menu:
- Exit:
E
35
S
canner
D
barcode sc
a
i
ng the Barc
o
p
lication
B
utton] -> R
u
i
ndow
S
can: Start
b
S
can: Stop
b
o
l: T
y
pe na
m
h
: Len
g
th o
f
A
pplicatio
n
E
xit applicat
i
a
nner.
o
de scanner
u
n [DEMO_
B
b
arcode sc
a
b
arcode sca
m
e of the re
a
f
the read b
a
n
Menu pop
-
i
on.
.
B
arcodeSca
n
a
nnin
g
.
nnin
g
.
a
d barcode
a
rcode
-
up.
n
]
AT870N User Guide
36
- SymbologyConfig : Decoding option settings.
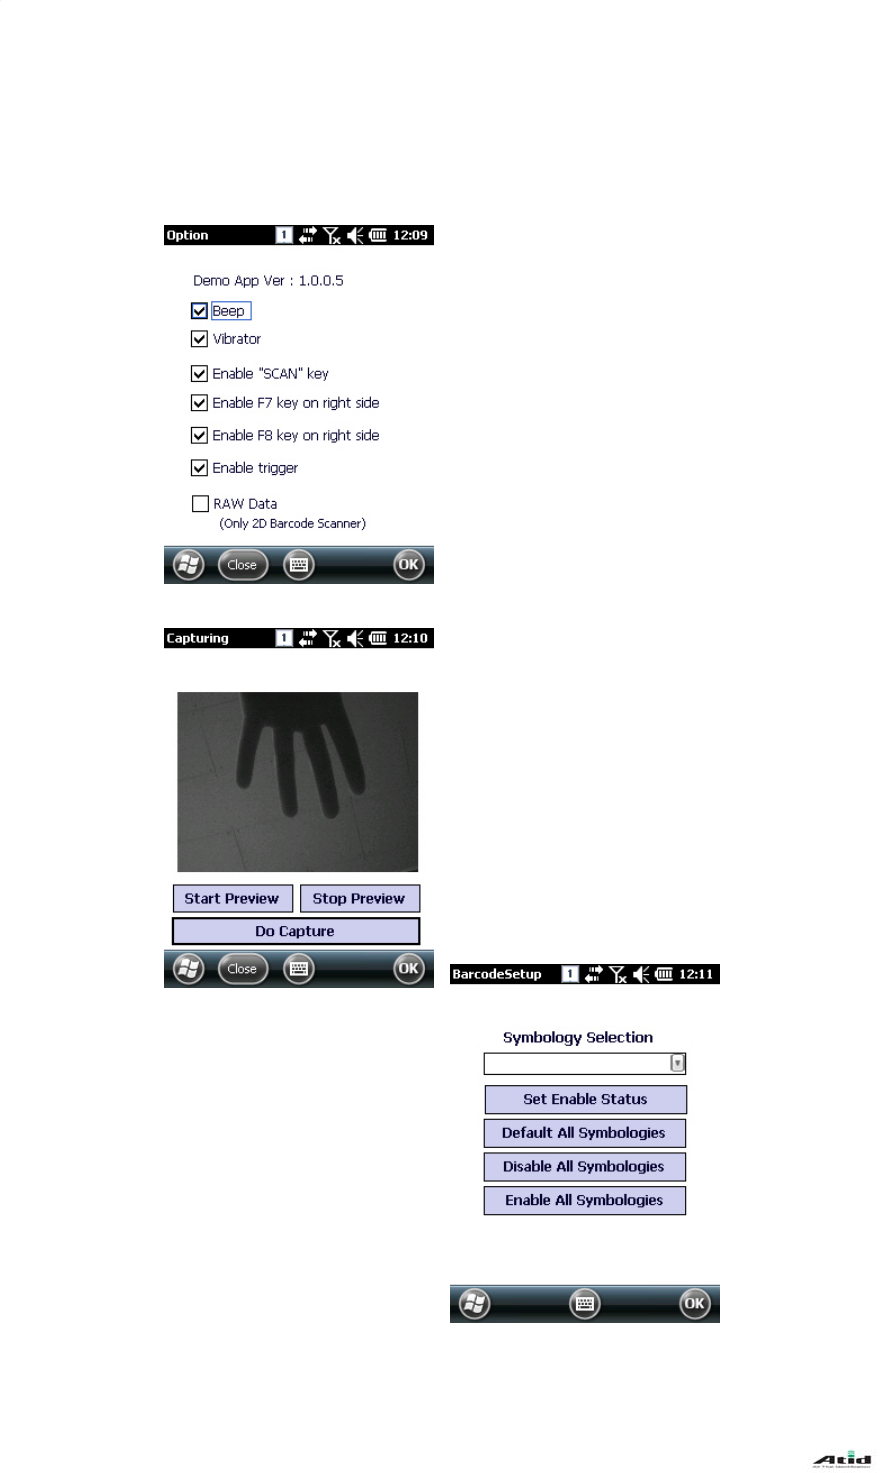
Option window
- Beep: When the scan is successful, beep sound is made.
- Vibrator: When the scan is successful, vibrator works.
- Enable “SCAN” key: “SCAN” key setting.
- Enable F7 key on right side: F7 key setting.
- Enable F8 key on right side: F9 key setting
- Enable trigger: Gun Trigger key setting
- RAW Data: Scan results are displayed in raw data format.
Only supported in 2D scanner.
Capturing window
- Start Preview: Preview stated with 2D scanner
- Stop Preview: Preview stopped
- Do Capture: Save the captured screen
SymbologyConfig window
- SymbologySelection: Set up
the specific barcode type
- Set Enable/Disable Status: Enable or Disable status of All
Symbologies
- Default All Symbologies : Set All Symbology as default
setting
- Disable All Symbologies : Disable All Symbology
- Enable All Symbologies : Enable All Symbology

AT870N User Guide
37
1.2 Setting Barcode Emulator
Can input the read barcode values (Notes, Internet Explorer…) where the cursors are located.
Sets the barcode value input method, scan button, scan sound etc. using Barcode Emulator
program.
When opening the Barcode Emulator, if other Barcode programs are being run, please close the
program first to run the Barcode Emulator.
Opening Application
- [Start Button] -> [File Explorer] -> [My Device] -> [Program Files]
-> [ATID_DemoApps] -> BarcodeEmulatorWM.exe
Running Application.
- When running the application, barcode scan icon is created
at the bottom-right corner of the screen. And Barcode scan is
enabled.
- By clicking on the Barcode Icon, Main Menu pops up and the
settings can be changed.
.
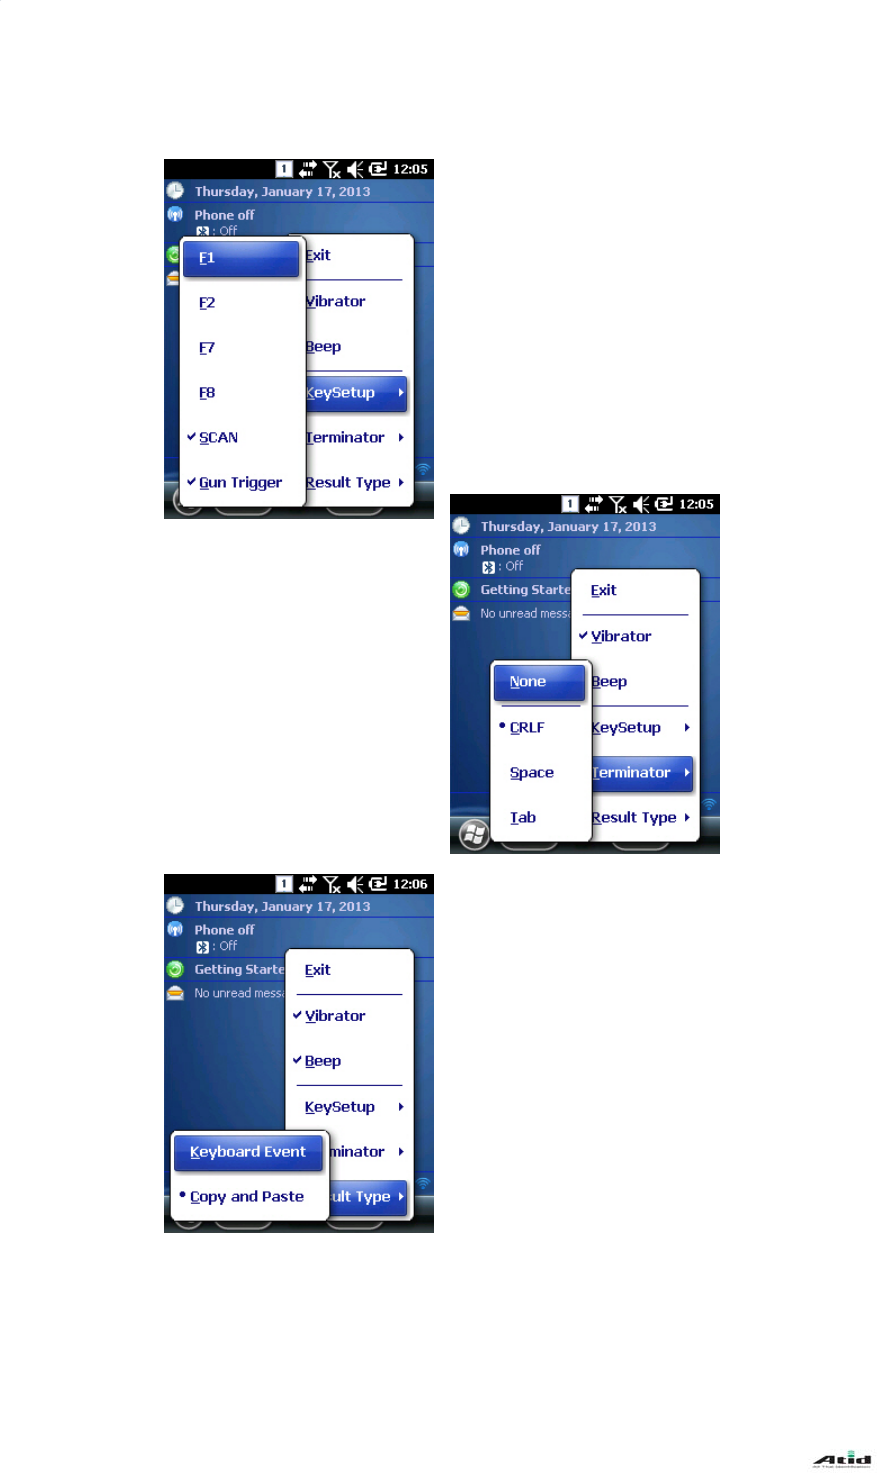
Emulator Main Menu
- Exit: Exit Application
- Vibrator: When the scan is successful, vibrator works
- Beep: When the scan is successful, beep sound is made
- Key Setup: Sets Barcode scan keys
- Terminator: Selects the special character to be added to the
barcode values
- Result Type: Selects the output type of the Barcode value
AT870N User Guide
38
Key Setup
Below keys can be selected together.
- F1: Starts the scanning when F1 button is pressed
- F2: Starts the scanning when F2 button is pressed
- F7: Starts the scanning when F7 button is pressed
- F8: Starts the scanning when F8 button is pressed
- SCAN: Starts the scanning when SCAN button is pressed
- Gun Trigger: Starts the scanning when Gun Trigger is pressed
Terminator
Settings for adding special
characters to the scanned values.
Select one of the below options.
- None: No Terminator used.
- CRLF:CarriageReturn/LineFeed
added at the end of the scanned
values.
- Space: Space added at the end of the scanned values.
- Tab: Tab character added at the end of the scanned values.
Result Type
Sets the how the barcode result is displayed
Select one of the below type.
- Keyboard Event: Displays the Barcode results via using Keyboard
Event.
- Copy and Paste: Copy onto the Clipboard and paste to the
screen.
CAUTION!
Do not use it to human eyes directly since laser beam is harmful to health.
AT870N User Guide
39
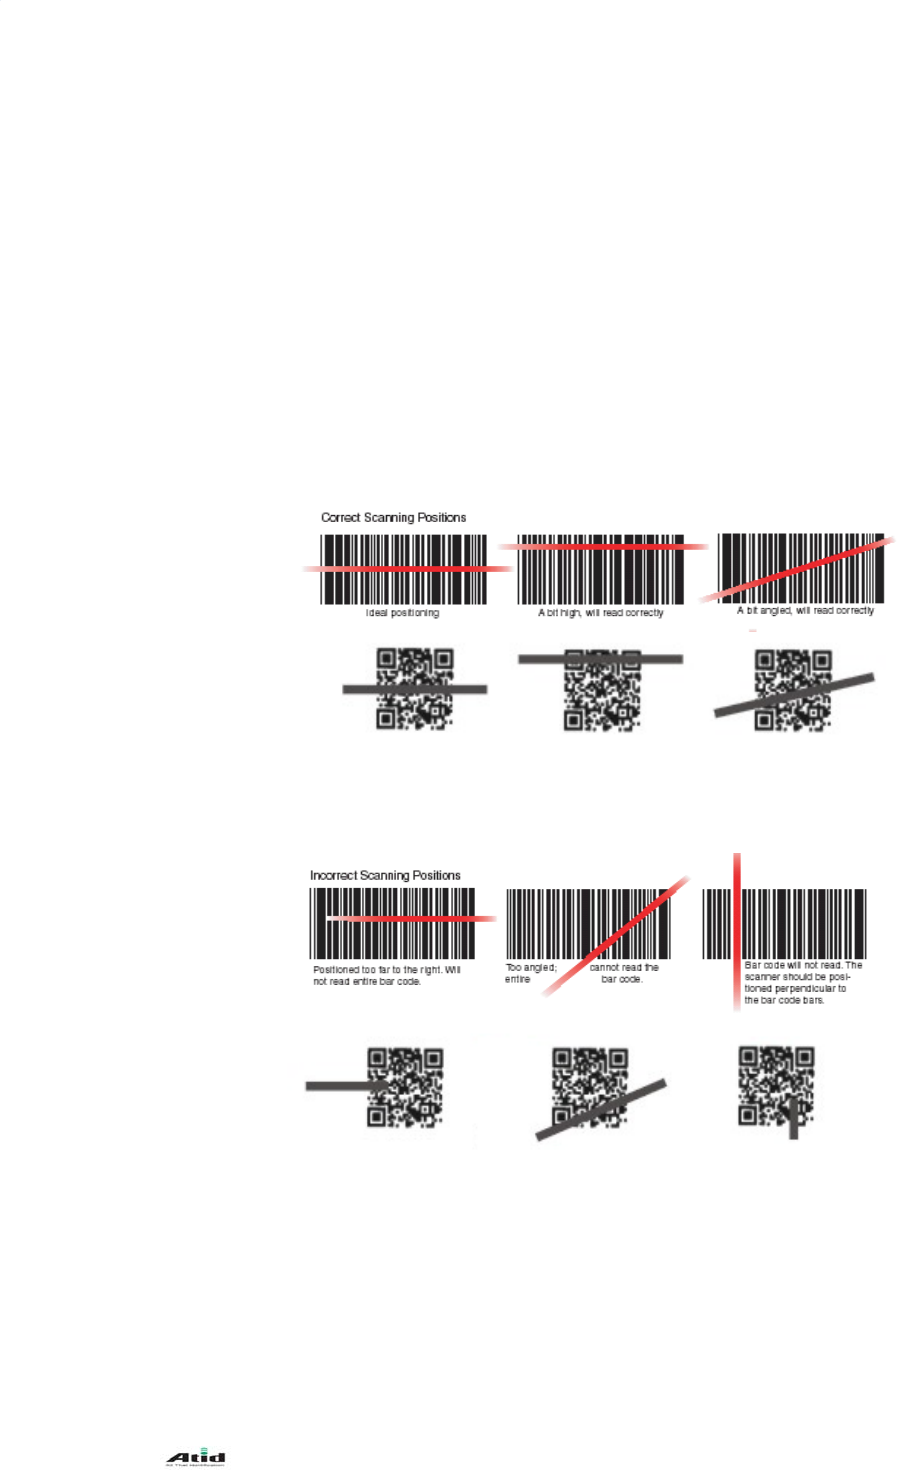
1.3 Barcode Scanning
1. Remove the protect film in front of the scanner.
2. Run BarcodeDemo.
3. Point the scan beam to center of the barcode.
• Adjust the distance in accordance with the barcode size.
• The beam will automatically be stopped if the pointer deviates from the barcode for 5
seconds.
[Correct way to read the barcode]
1. Please bring it close to barcode in case of smaller barcode. This device can read the barcode in
range of 40~300mm. If you have failure to read the barcode, please do check the angle and
range.
2. Laser beam will be shown up as a clear red line when using it at the barcode
[Wrong way to read the barcode]
1. Laser bean have to be crossed in the barcode
2. If laser beam partly will be shown up on the barcode, it doesn`t work well.
1D
2D
1D
2D
AT870N User Guide
40
2. WiFi
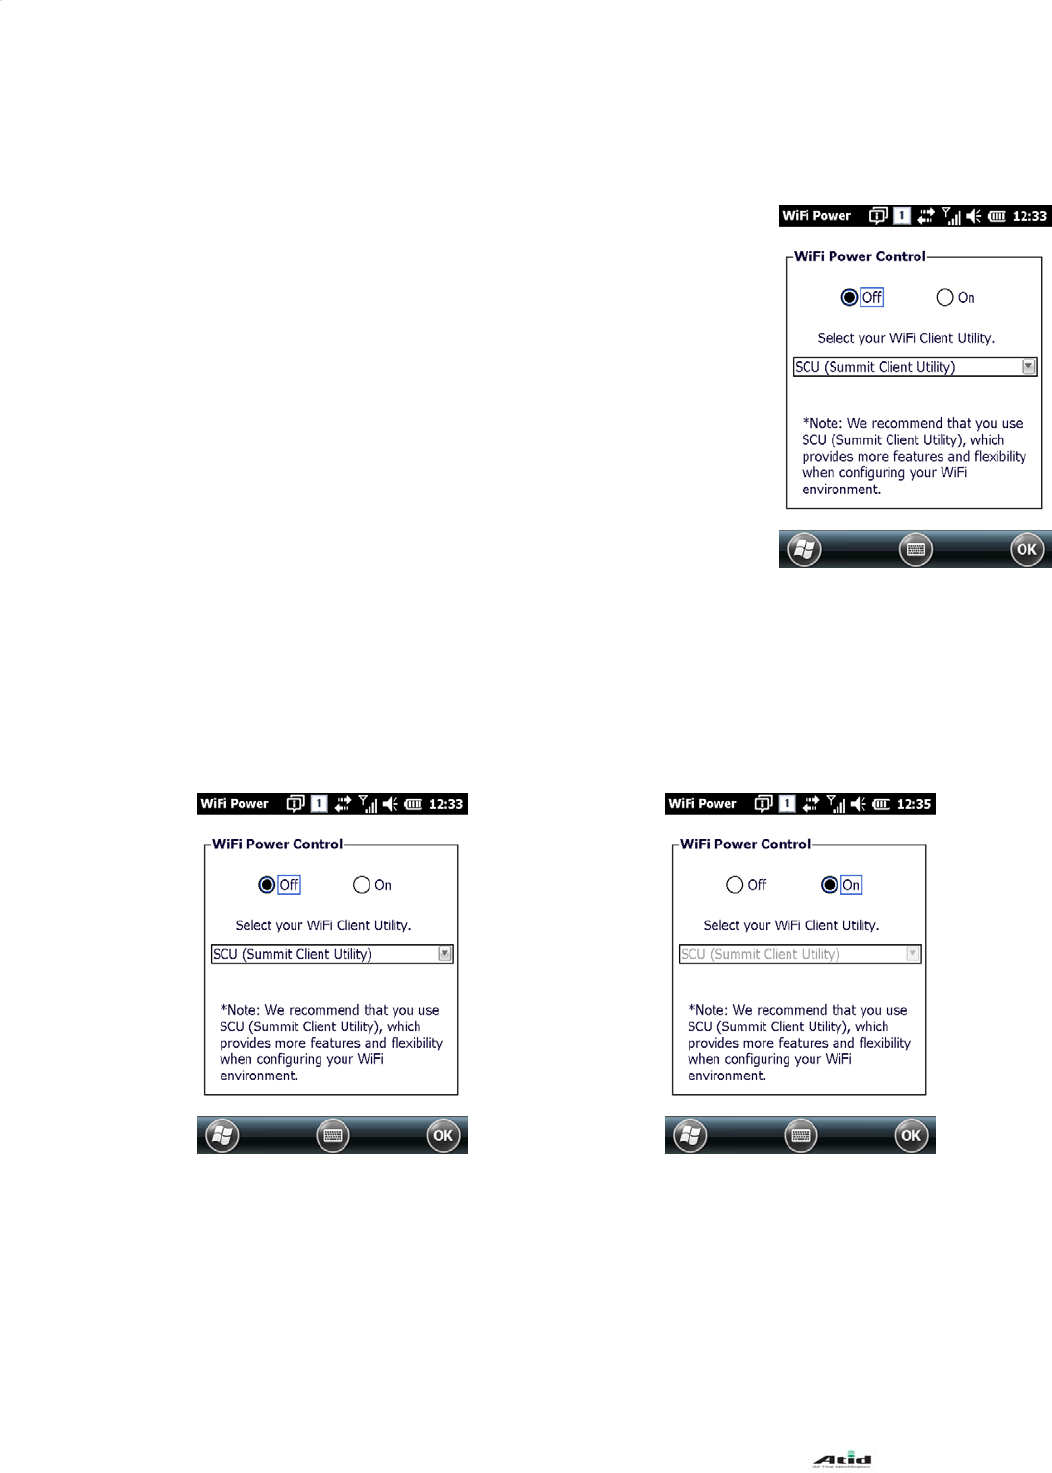
2.1WiFi On /Off
WiFi is turned off before its dispatch. Turn on the WiFi to use the
WiFi.
[Settings]
[Start] -> [Setting] -> [System] -> [WiFi Power]
Off: Turn off WiFi.
On: Turn on WiFi.
2.2WiFi function On /Off
WiFi function can be set On/Off.
First, WiFi power needs to be on.
[Settings]
[Start] -> [Setting] -> [System] -> [WiFi Power]
Wi-Fi Off, turns off WiFi function Wi-Fi On, turns on WiFi function
AT870N User Guide
41
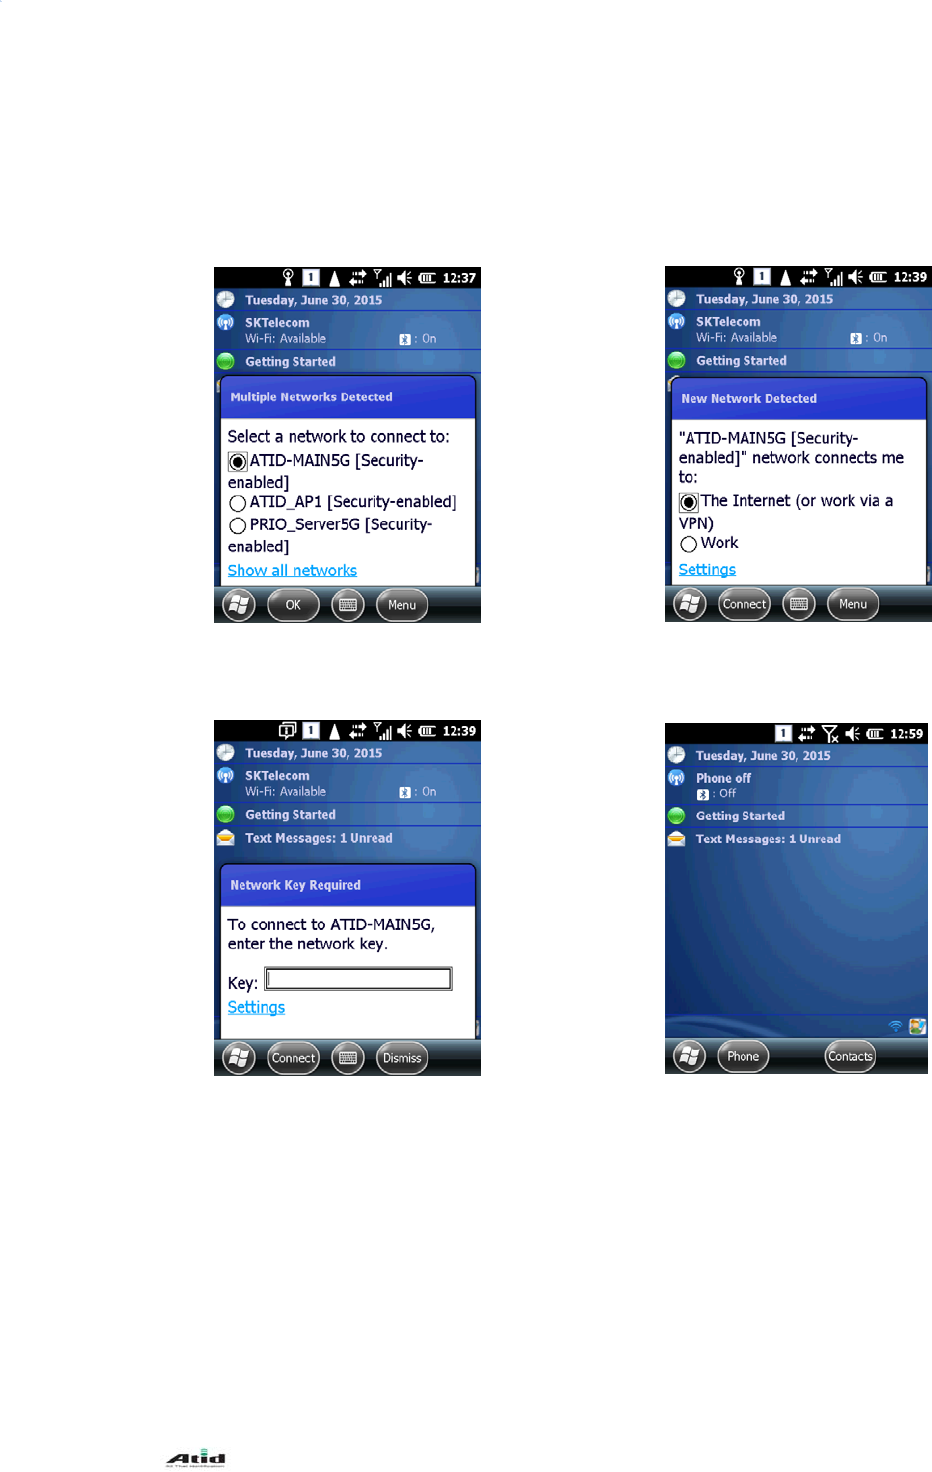
2.3Connecting to WiFi AP
1. How to connect to AP (1)
When you turn on WiFi, AP list is displayed automatically.
Select the AP for
connection, then Click Ok.
Click Connect
Enter the network key. AP connection completed.
AT870N User Guide
42
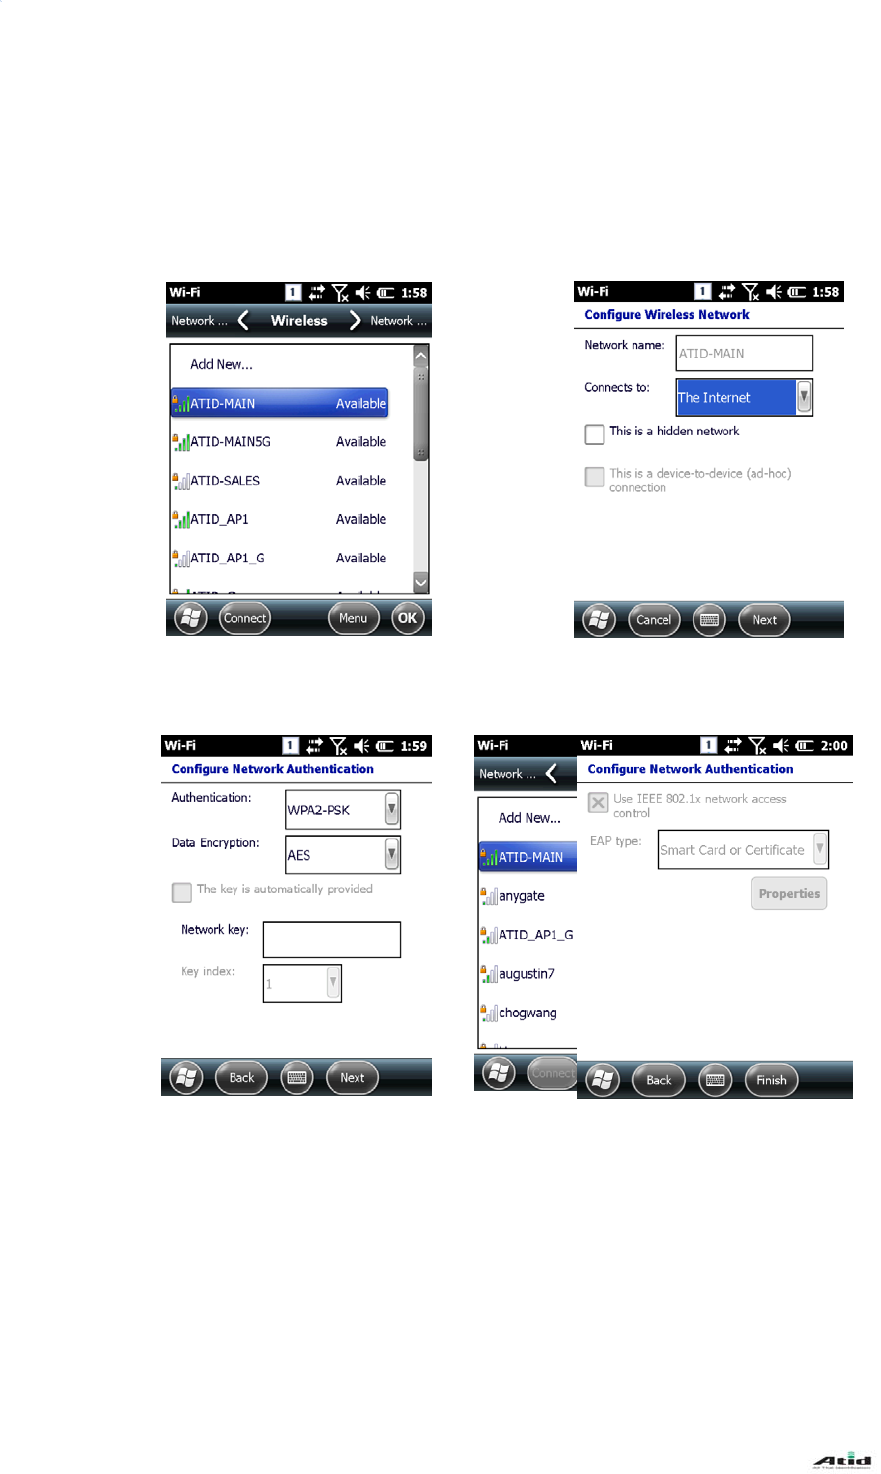
2. How to connect to AP (2)
Connecting to AP via Wireless Network Configuration.
[Start] -> [Setting] -> [Connection] -> [Network card]
Click Next.
Click Finish Connecting to AP.
Select the network from the
AP list.
AT870N User Guide
43
3. Bluetooth
AT870N of Windows Mobile is designed to be able to use Bluetooth Stack Service.
The following part of the guide describes about Paring and Disconnection of Bluetooth. In addition,
Mobile Printer SPR-R203 of Bixolon is used for test demonstration.
** Pairing is possible with total of 6 devices, but COM port allocation of COM2 and COM7 is
maximum limit.
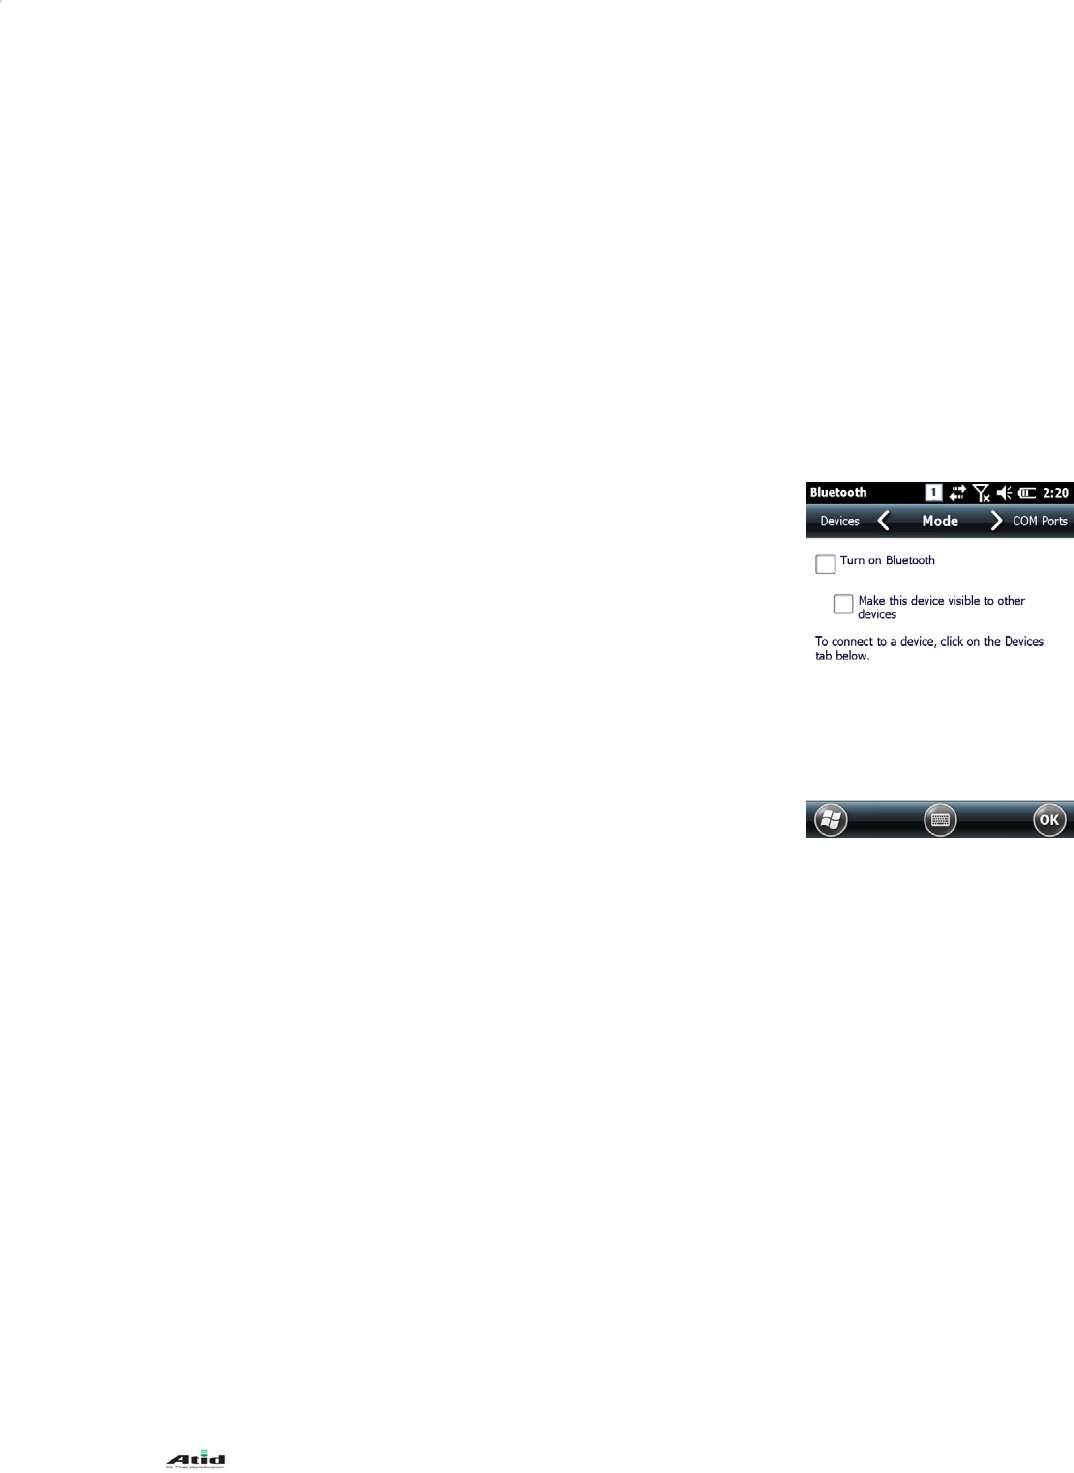
3.1Bluetooth On/Off
1. Bluetooth Power On/Off
[How to Turn on/Off]
[Start] -> [Setting] -> [Bluetooth] -> [Mode]
Turning on Bluetooth
: Click on the checkbox to turn on Bluetooth.
Checked: Bluetooth On
Not Checked: Bluetooth Off
Allowing other devices to search for the handheld.
: Click on the checkbox to make the handheld visible to other devices.
Checked: Allow other devices to search for AT870N
Bluetooth.
Not Checked: Does not allow other devices to search for
AT870N Bluetooth.
Click
Click

AT870N User Guide
44
3.2 Bluetooth Paring
Bluetooth power must be on before the pairing.
[How to Pair]
[Start] -> [Setting] -> [Bluetooth] -> [Devices]
Click on Add to search for the
possible Bluetooth pairing devices.
Select the Pairing device from the list and click
Next.
* In some cases, the devices mi
g
ht require to enter
the PIN code before pairing.