ATID AT870N Industrial PDA User Manual AT870N WinMB User Guide v 1 2 Eng
ATID Co., Ltd Industrial PDA AT870N WinMB User Guide v 1 2 Eng
ATID >
Contents
Users Manual_Part 3
AT870N User Guide
45
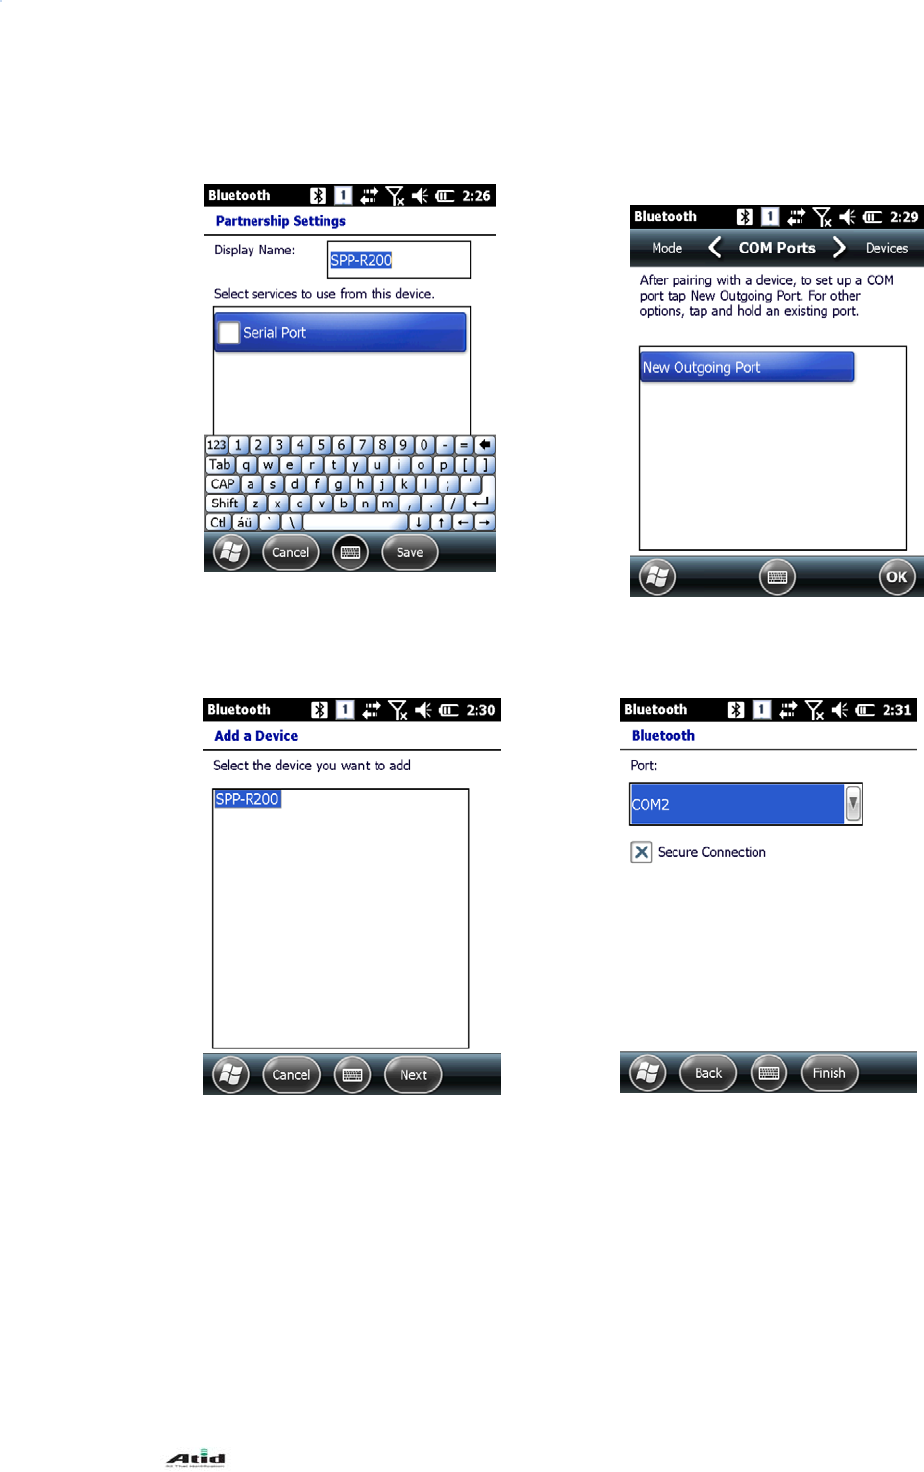
After entering PIN code, click Next.
*Default PIN code for SPP-R200 printer
is “0000”.
Select SPP-R200 from the list.
Select Serial Port
Select New Outgoing Port from COM
Ports tab.
Select SPP-R200. Select COM 2 and click Finish.
A
fter the pairin
g
, Data transfer/reception is
possible via COM2
AT870N User Guide
46
* If the device information is not displayed correctly, please try Add New Devices again.
* PIN code used in pairing can be mutually set on devices.
* After the normal pairing, S/W, SDK etc. provided from Bluetooth manufacturer can be
used for further Bluetooth services.
3.3 Bixolon SPP-R200 Printer Demo
SPP-R2000 of Bixolon’s leading mobile printer is used for Bluetooth Print
demonstration. Application listed on the homepage was used for the test.
**The SDK and programs from 2011/08/05 was used for the demonstration test and it
may be different from the ones that are presently listed on Bixolon homage.
1. Go to Bixolon website (www.bixolon.com) for “SPP-R200 Windows SDK”, and unzip
the file onto the hard drive.
2. Turn on Bluetooth Power.
3. Run “Bluetooth Device Properties” from Control Panel.
4. Turn on SPP-R200.
5. Set SPP-R200 printer into Bluetooth mode (Refer to SPP-R200 User Guide for the
details.)
6. Click Scan Device to search for the devices nearby that can be paired.
7. Try pairing with SPP-R200 when searched on the list. PIN code is “0000” if the setting
is in default.
8. If the pairing is successful, message that device is connected via COM2 port is
shown on the screen (If the pairing has been performed previously, the message may
not be shown.)
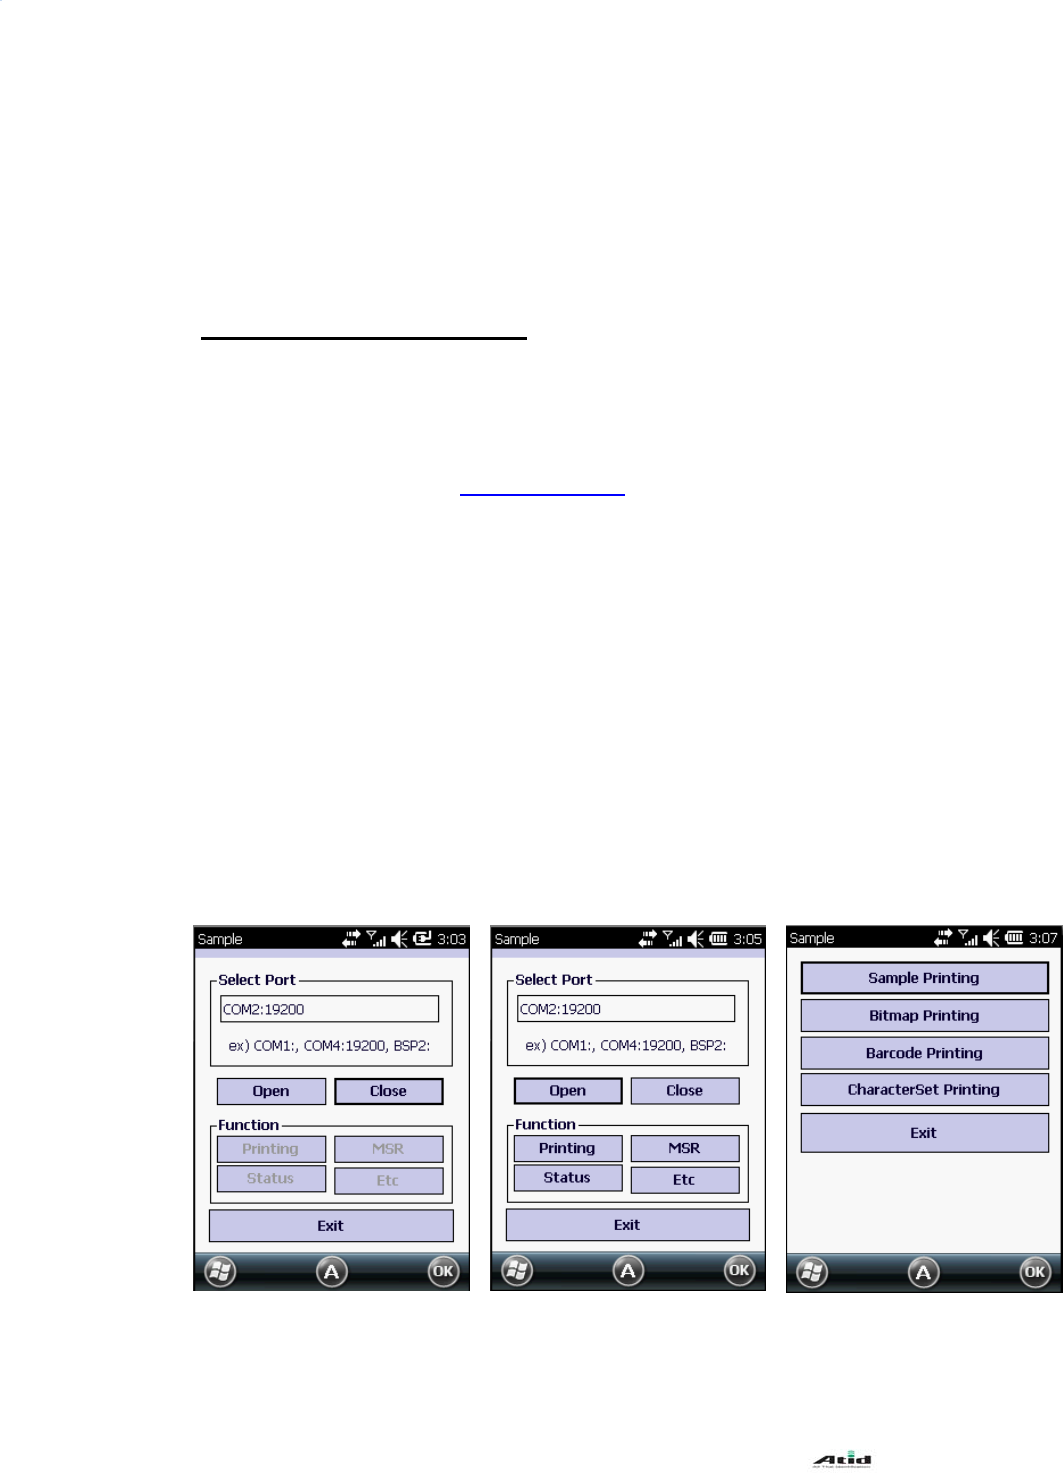
9. In the downloaded SDK from Bixolon website, copy DLL files and execute files from
bin\wm6\ folder to Flash Disk folder of AT870N.
10. Run Sample.exe from Flash Disk folder of AT870N.
11. Since SPR-R200 is allocated in COM2, change COM8 to COM2 and click Open.
12. Click on the Printing button and Sample Printing to check if the printing is performed.
COM8 -> COM2 Select Open and then select
Printing Select Sample Printing
4.
4.1
T
1.
2.
3.
4.2
M
AT870N
U
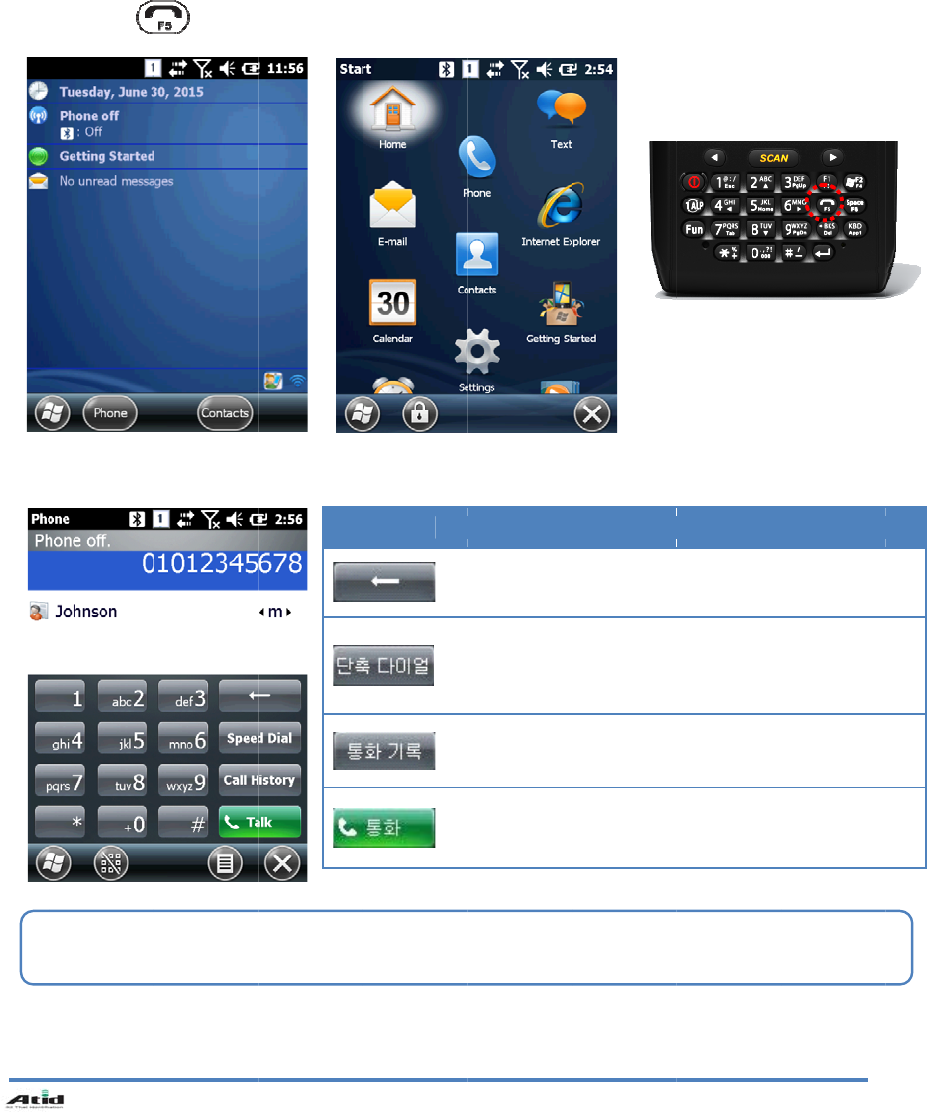
Phone
T
urn on th
e
[Home] ->
[Start]->[
P
Press
M
aking a p
h
The s
p
e
e
U
ser Guide
e
phone
[Phone]
P
hone]
from t
h
h
one call
e
d dial num
h
e keypad.
ber is
p
res
s
47
Icon
D
S
b
s
a
C
Ta
s
ed for a fe
w
D
elete the nu
S
peed dial c
a
y pressing
o
a
ve up to 9
8
C
all History.
Ta
lk enables
t
w
seconds f
Des
c
mbers.
a
n be used t
o
o
n accordin
g
8
numbers.)
t
he calling.
or the s
p
ee
c
ription
o
call the pr
e
g
number. (
S
d dial calls.
e
-stored nu
m
S
peed dial
c
m
ber
c
an
AT870N User Guide
48
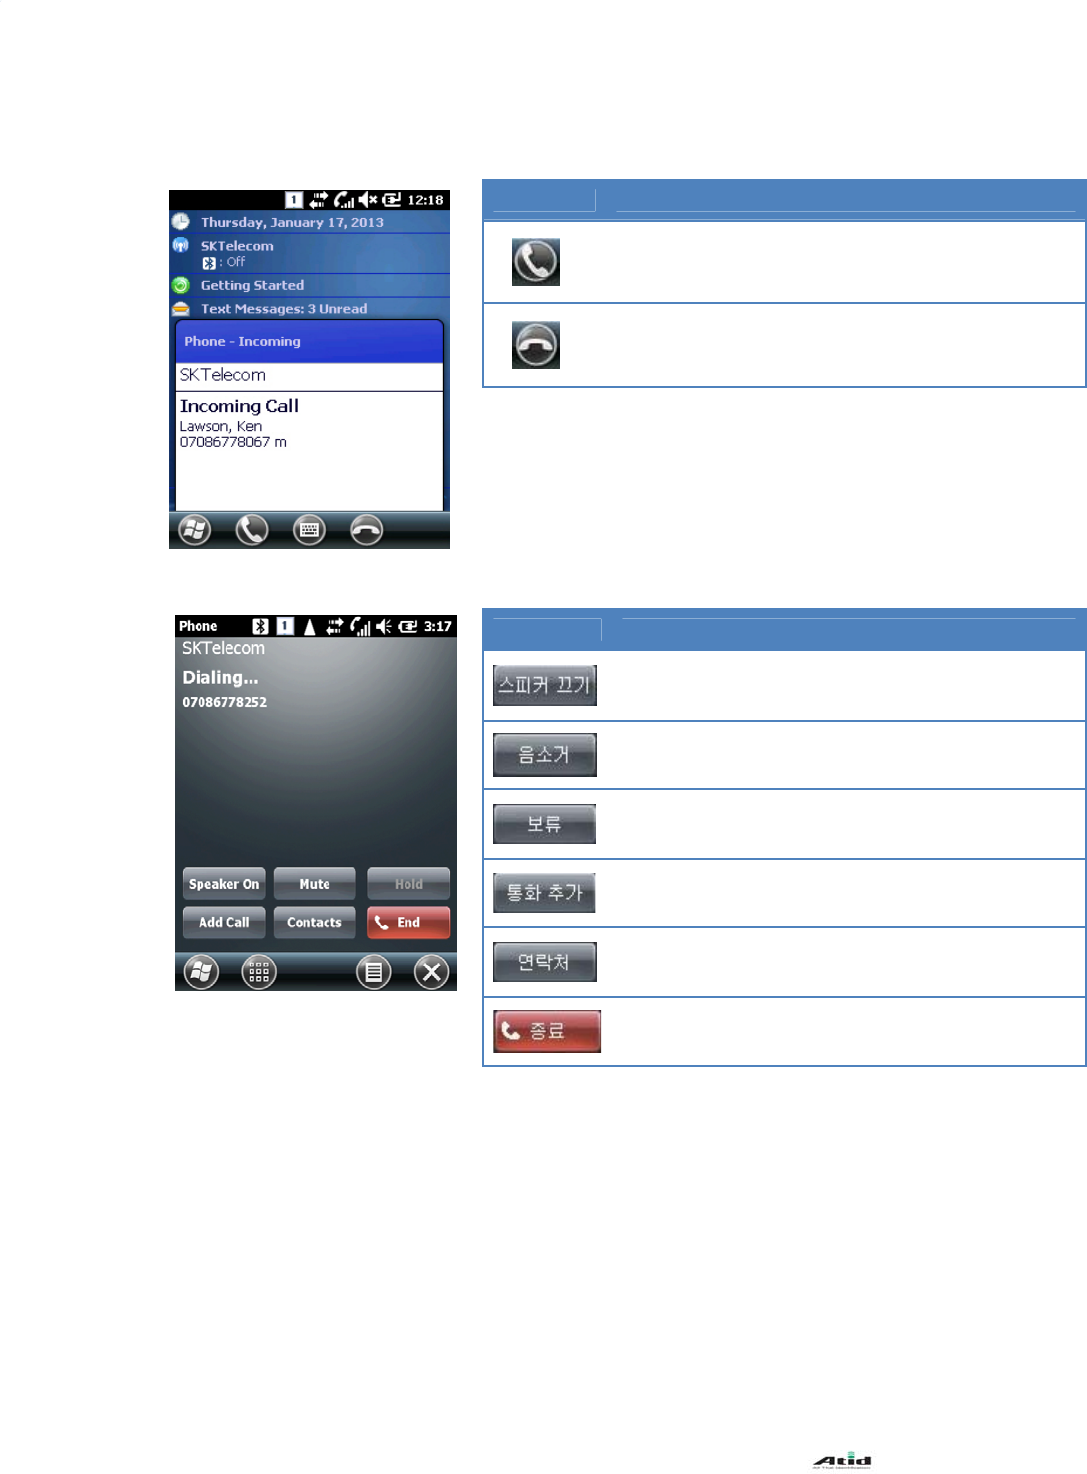
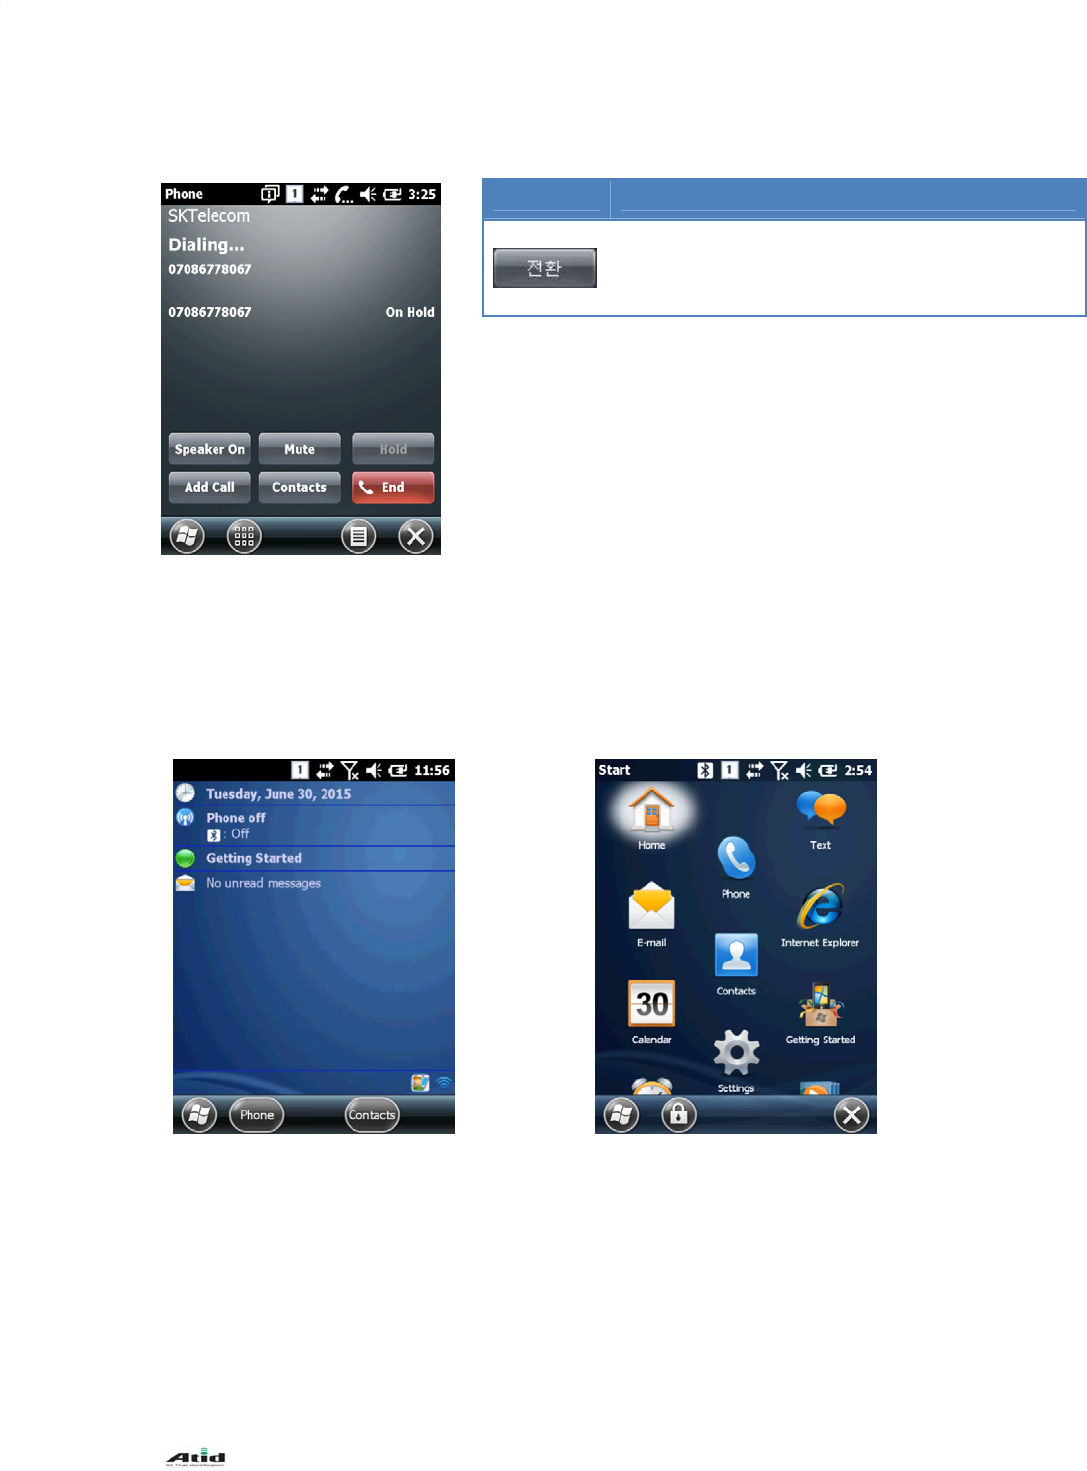
4.3 Receiving calls
4.4Hanging up calls
Icon Description
Receives the incoming calls.
Rejects the incoming calls.
Icon Description
Use Speaker phone.
Use Mute.
Put the current phone call on hold state.
After putting the call on hold, add another call.
Contact can be used for search/add/delete of
contacts.
End calls.
Receiving call messages may be displayed differently.
AT870N User Guide
49
4.5Switching calls
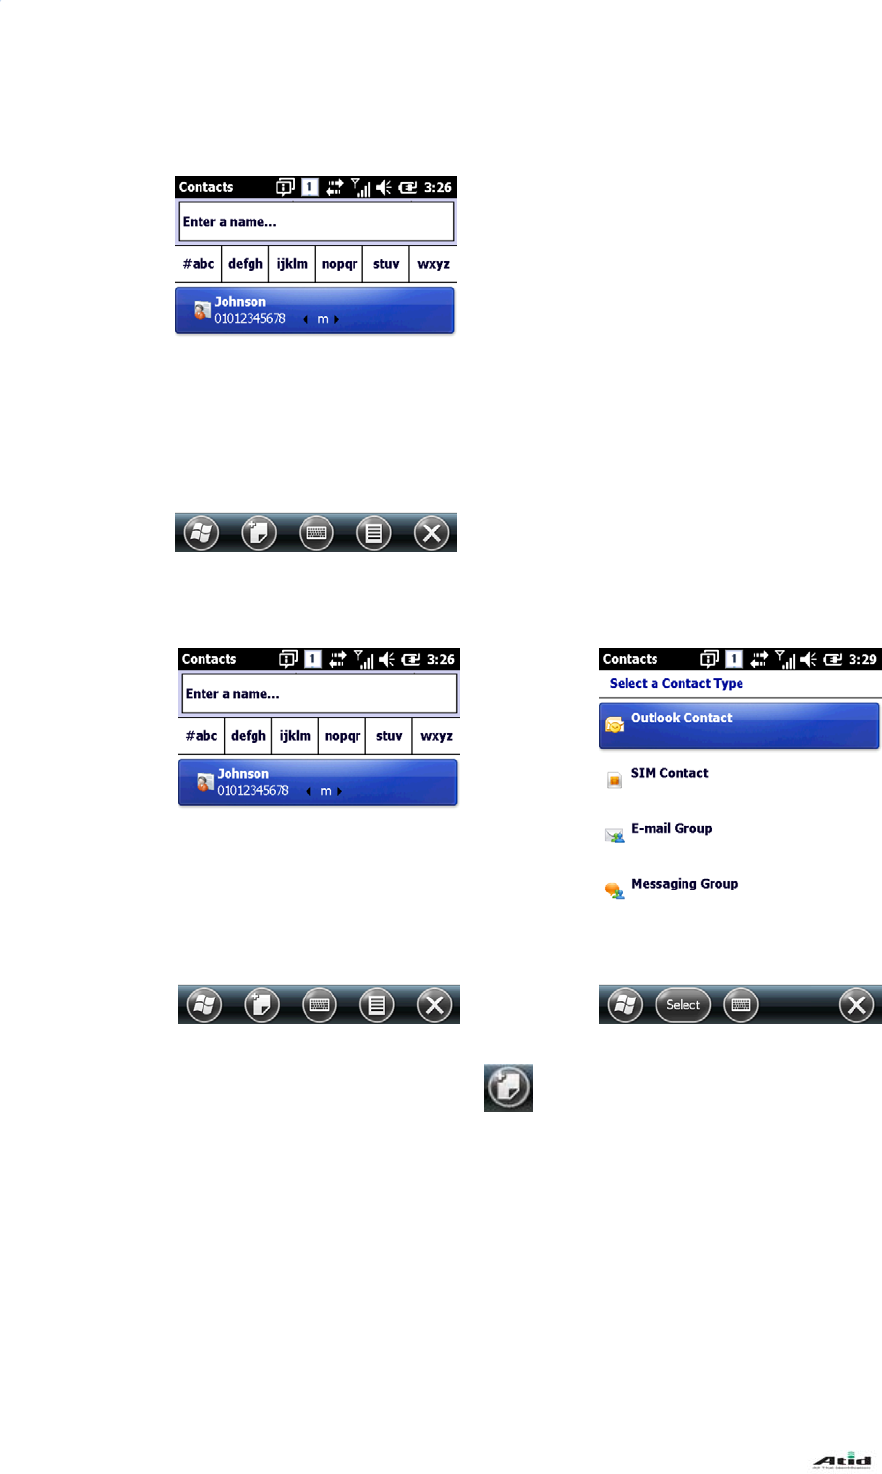
5. Contacts
5.1Contacts
1. [Home] -> [Contacts]
2. [Start]->[Contacts]
Icon Description
Put the current call on hold and the call that was on
hold back to call state.
AT870N User Guide
50
Click on the button to add
new contacts.
5.2 Search for Contacts
5.3 Adding New Contacts
Enter a name for searching.
Select a contact type.
AT870N User Guide
51
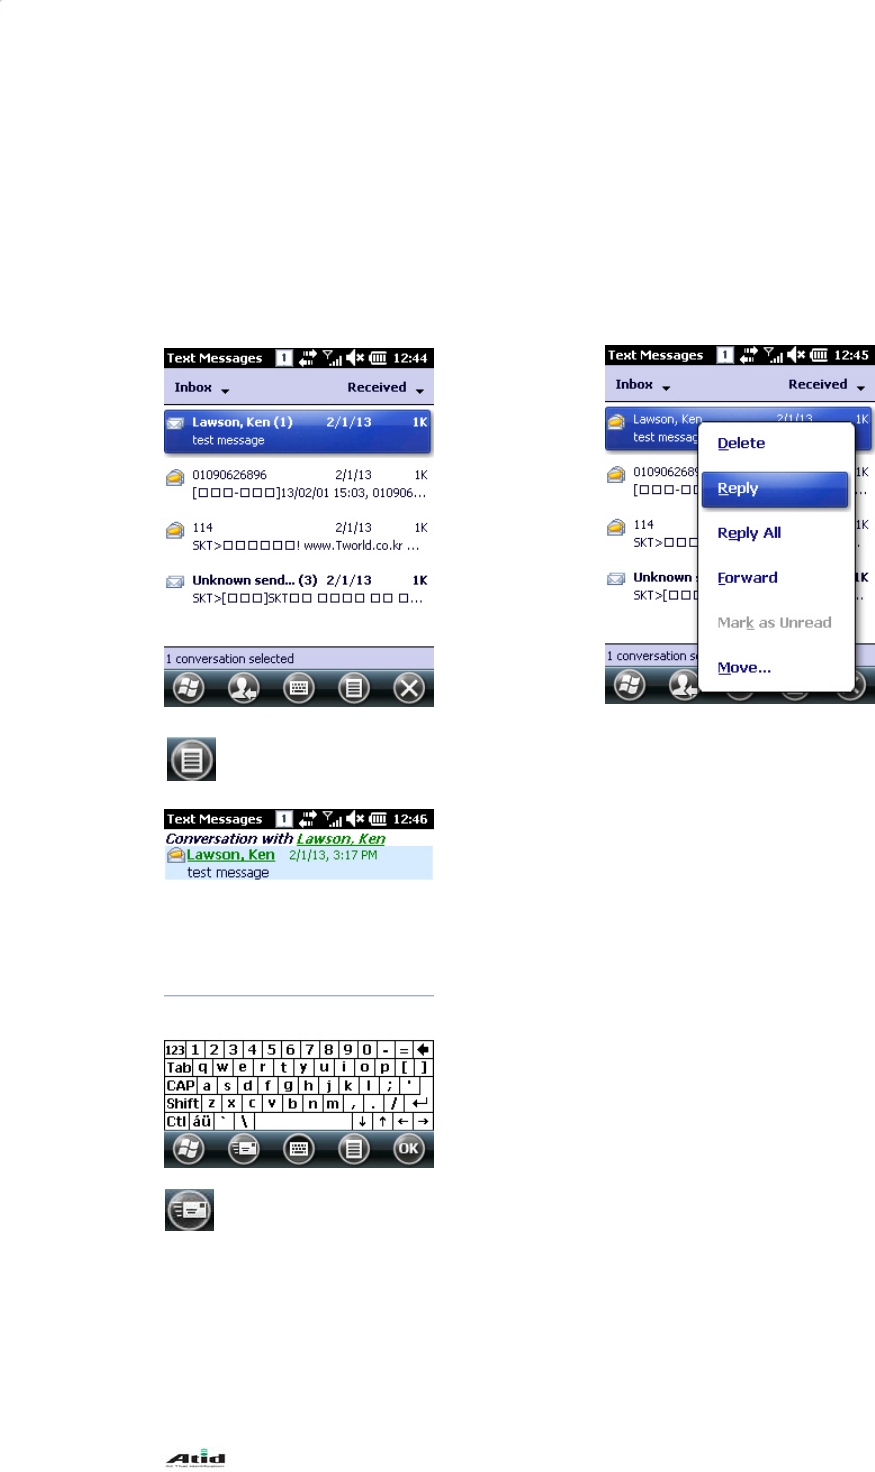
6. Text Message
6.4 Replying to the Text Message
Click on the Reply.
Click on the message from the
Inbox
Enter the messages and click on the
button to send.
AT870N User Guide
52
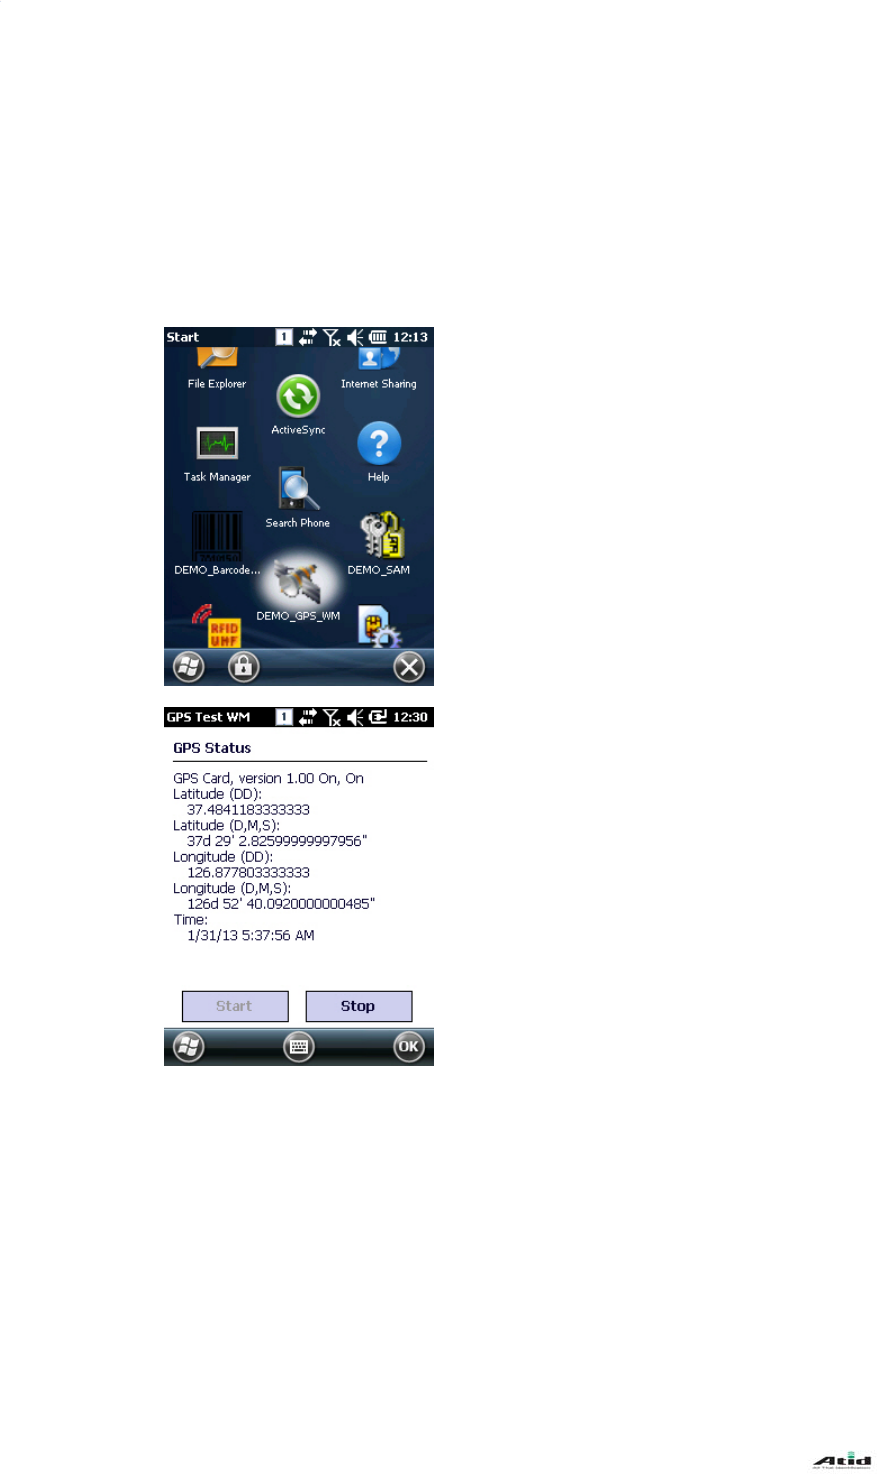
7. GPS Module
GPS Module can be selected as an option in AT870N, and GPS Module is built-in at the top of the
handheld.
GPS program port: GPD1
GPS hardware port: COM6, 9600
7.1GPS Demo Program
Run application
- [Start Button] -> [DEMO_GPS_WM]
Main Window
- Start: Start receiving GPS Data
- Stop: Stop receiving GPS Data
8. Camera
The handheld can be equipped with 3.0-megapixel camera with functions of adjusting brightness
and resolution, capture, video etc.
Checking on GPS Data Reception:
1. The reception has to be checked in an open area.
2. The reception time for GPS Data can be different depending on the
environments. (About 3~10 minutes)
After the receiving the GPS data at first, it may take less time for
reconnection/rece
p
tion of GPS data next time.
AT870N User Guide
53
8.1 Camera
Run application
- [Start Button] -> [Pictures & Videos] -> [Camera]
Main Window
- Thumb…: Close the main window and go to Pictures & Videos screen.
- Menu: Menu popup
- To save screen, press “Enter” from the keypad.
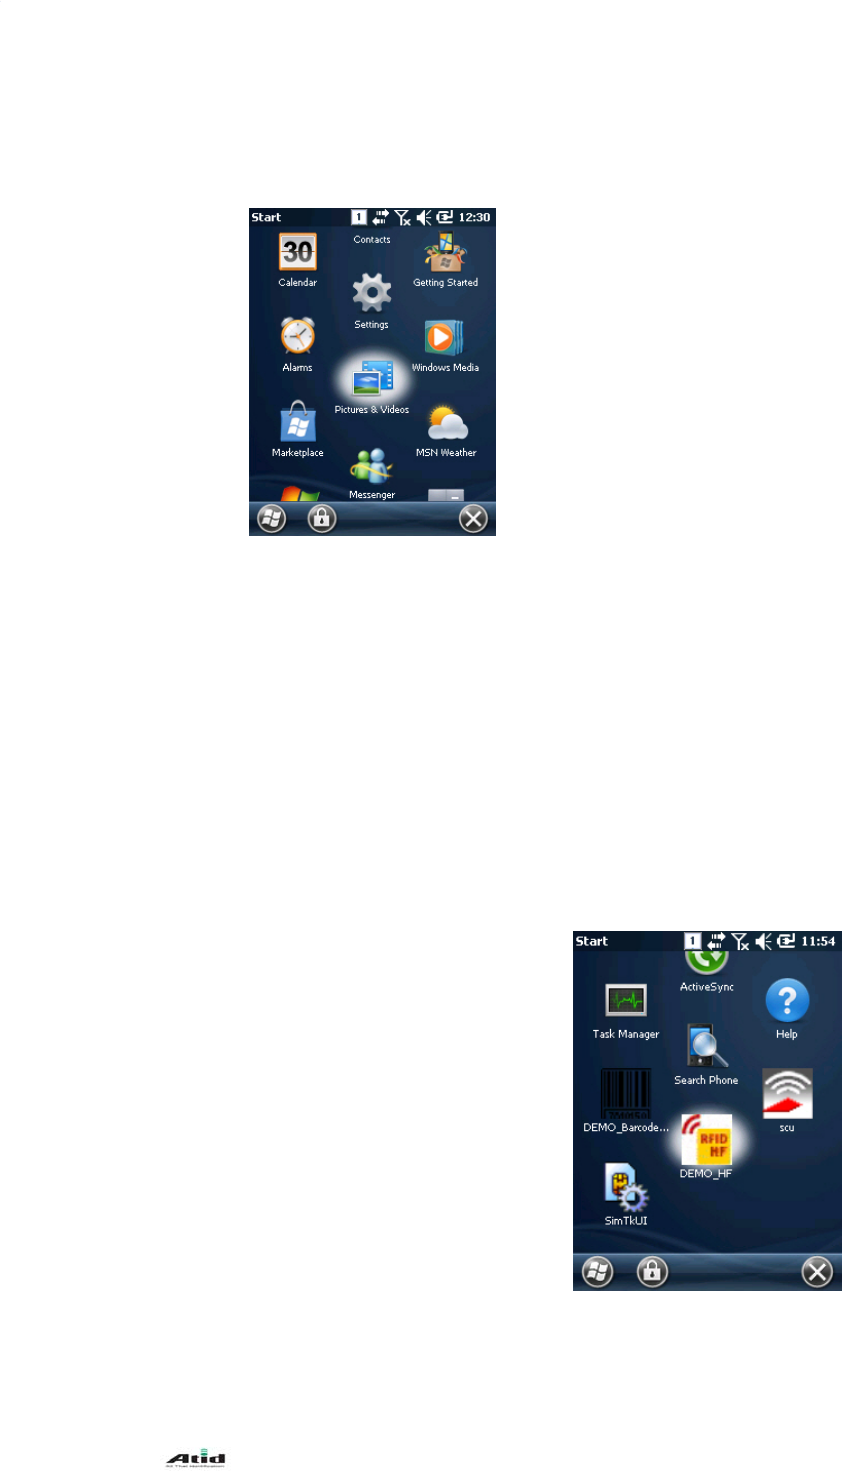
9. HF13.56MHz
The handheld can be equipped with HF13.56Mhz module internally. According to ISO standards, it
can read tags from 3~8.5cm distance (For Mifare, the distance is 1~3.5cm).
9.1RF13.56 Demo Program
Run application
- [Start Button] -> [DEMO_HF]
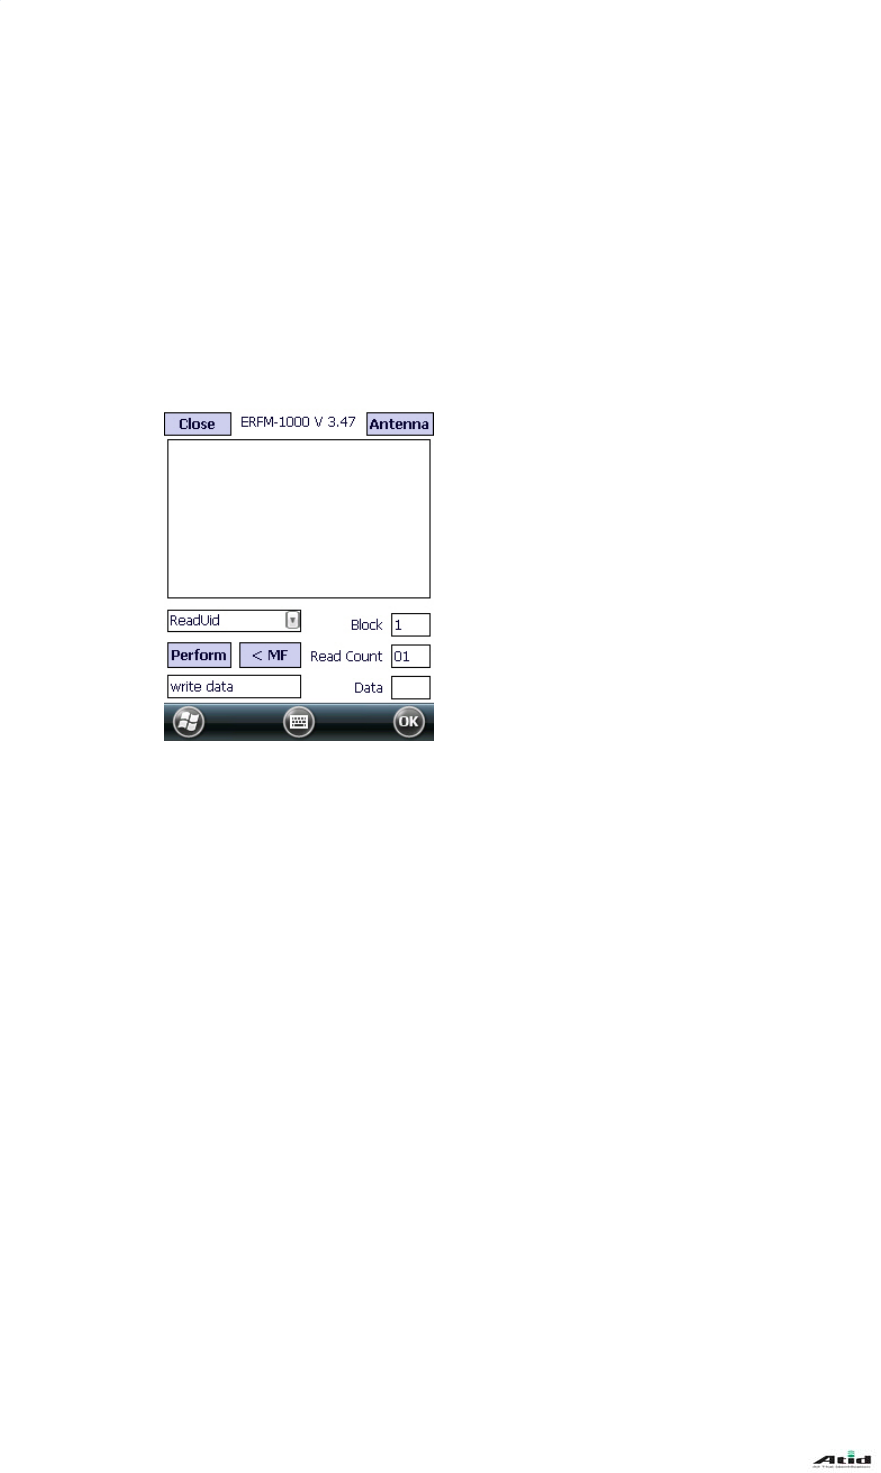
Mifare Window
AT870N User Guide
54
- Open: Open HF device
- Antenna: Stops the antenna signal.
- Perform: Run the selected command from combo box.
- ISO>: Change to ISO-15693 command screen.
- Block: Number of Block be accessed.
- Key Type: Key type of Block to be accessed.
- Key Set: Key set of Block to be accessed.
ISO-15693 Window
- <MF: Change to Mifare command screen
- Block: Start number of Block to be accessed.
- Read Count: Number of Block to be accessed
AT870N User Guide
55
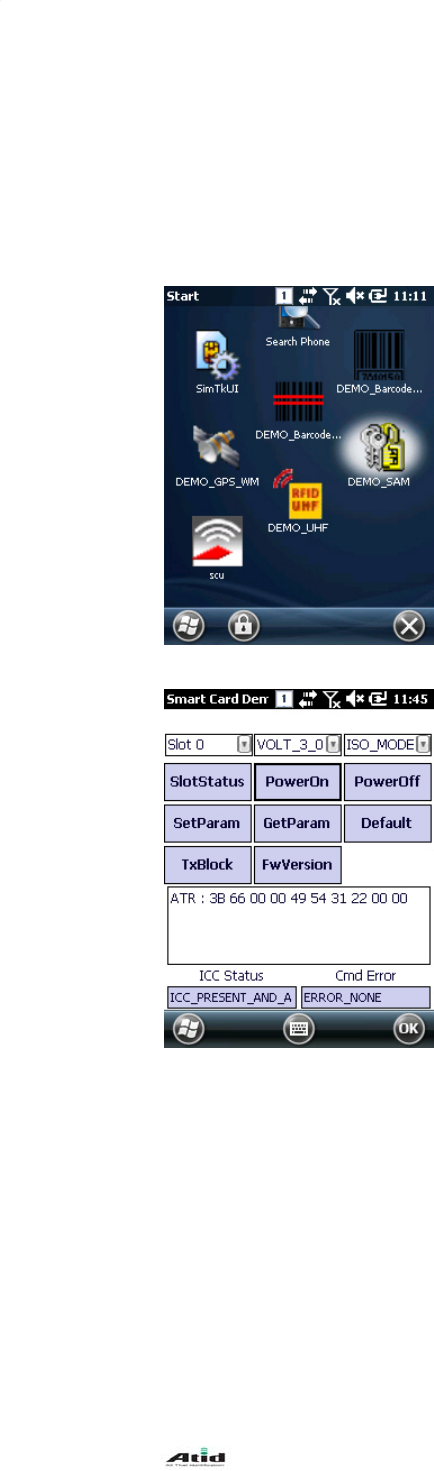
10. Smart Card Device
The handheld can communicate with IC Card via ISO-7816.
10.1Smartcard Program
Run application
- [Start Button] -> [DEMO_SAM]
Main Window
- Slot Status: Check the status of the slot.
- PowerOn: Authorize the power of smart card device.
- PowerOff:Unauthorize the power of smart card device.
- SetParam: Set protocol type, clock rate, bit rate etc. of the card
device.
- GetParam: Read protocol type, clock rate, bit rate etc. of the card
device.
- Default: Set to default settings.
- TxBlock: Transfer APDU Command to the card device.
- FwVersion: Read the firmware version of the card device.
11.
The
RFI
D
cou
n
11.1
UHF 90
0
handheld c
D
tags. The
n
tries.
UHF 900
M
UHF
Reader
0
Mhz
an be equi
p
frequency
M
hz Progra
m
p
ped with
U
range is 8
5
m
Run ap
p
- [Start
B
Main W
i
- Start:
S
- Clear:
C
- Menu:
56
U
HF 900Mh
5
0 ~ 960M
h
p
lication
B
utton] -> [D
E
i
ndow
S
tart the Inv
e
C
lear all the
Main menu
z. It can re
a
h
z which c
a
E
MO_UHF]
e
ntory.
tag informa
t
a
d or write
E
a
n be adjus
t
t
ion shown o
AT870N
U
E
PC GEN
2
t
ed accordi
n the scree
n
U
ser Guide
2
protocol
n
g to the
n
.
AT870N User Guide
57
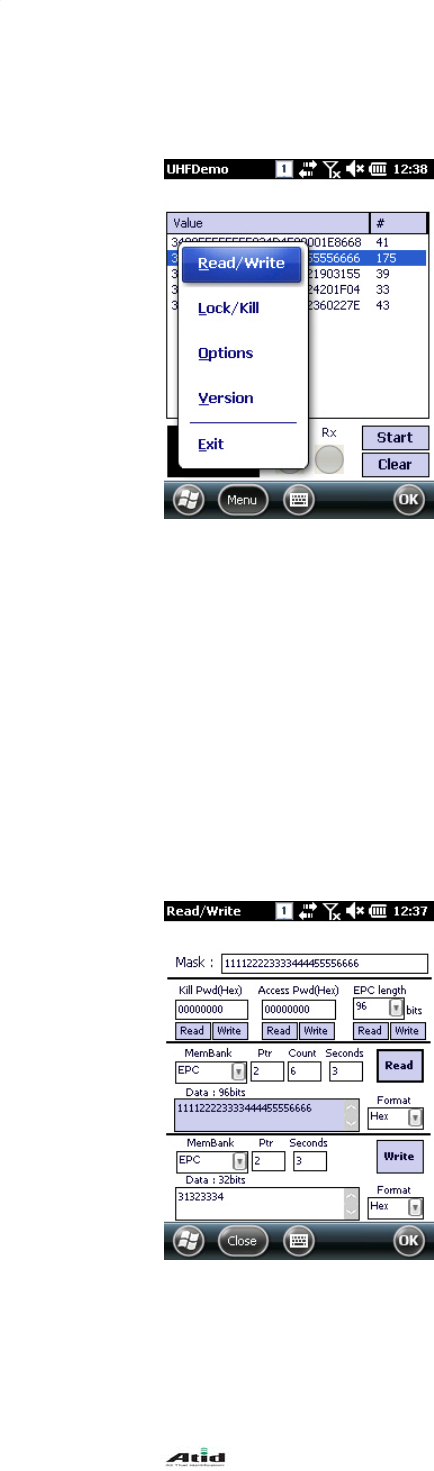
Application option menu
- Read/Write: Perform Read/Write.
- Lock/Kill: Perform Lock/Kill.
- Option: Application option
- Version: Version information
Read/Write Window
- Mask: Selected value from main window is displayed here. It is
used as masking pattern when performing Read/Write.
Even if there are many tags nearby, only tags that are set
as masking pattern can be read or written.
- Kill Pwd, Access Pwd: Read/Write tag’s Kill password, access
password.
- EPC length: Read/Write tag’s EPC length.
Even if 128 bit sized tags are used, if the EPC
length is set to 96 bit, then the Inventory is only
performed on 96 bit.
Please refer to EPC Class1 Gen2 specification details.
- Read/Write: Read/Write on selected Memory Bank.
- MemBank: Target memory bank of Read/Write.
- Ptr: Start of Memory bank’s offset
- Seconds: Time taken in seconds for Read/Write.
- Format: format the data to be Read/Write.
Lock/Kill Window
- Mask: Selected value from main window is displayed here. It is
used as masking pattern when performing Lock/Kill.
Even if there are many tags nearby, only tags that are set
as masking pattern can be lock/kill.
- Kill Pwd, Access Pwd: Read/Write tag’s Kill password, access
password.
- EPC length: Read/Write tag’s EPC length.
Even if 128 bit sized tags are used, if the EPC length is set to 96 bit,
then the Inventory is only performed on 96 bit.
Please refer to EPC Class1 Gen2 specification details.
- Do Lock: Perform on Lock as it is set in the checkboxes.
- Kill: Kill tags. Once the Kill tag is performed it cannot be restored
to its original state.
AT870N User Guide
58
Options Window
- Session: Change Session that is used in Tag operation
- Target: Change Target that is used in Tag operation
- Q: Change Q that is used in Tag operation
- LBT Ch State/Time: Change LBT option that is used in Europe, Japan frequencies (Not
available)
- Power: Change Tx Power level of the reader.
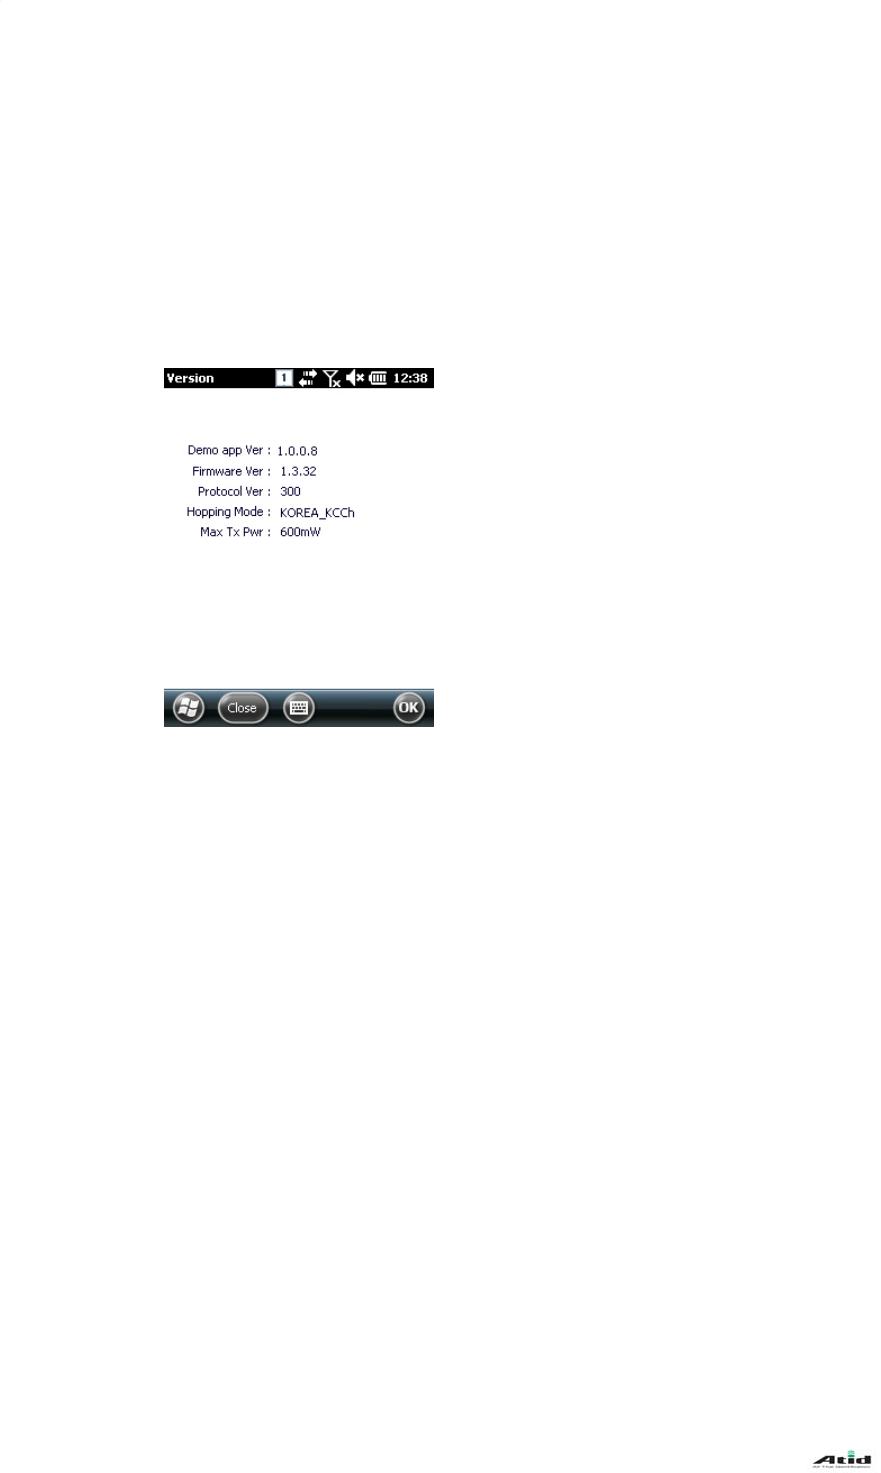
Version Window
- Demo app Ver: Demo application version
- Firmware Ver: UHF module firmware version
- Protocol Ver: UHF module library version
- Hopping Mode: UHF module’s country version
- Max TxPwr: UHF module’s max output

AT870N User Guide
59
Chapter 5. Appendix
Product Specifications
Physical Characteristics
Dimension(L*W*H) 76 X 148 X 24.8(30.5) mm
Weight 320g (PDA only, without Battery)
Operating Temp. -20℃ ~ 60℃
Storage Temp. -30℃ ~ 70℃
Humidity 95% Non-condensing
Drop 1.5m Drop to concrete
Performance Characteristics
Processor Marvell PXA320 806MHz
Operating System Windows CE 5.0
Memory 512MB RAM / 512MB ROM
Display
3.5" QVGA with Backlight
TFT LCD, 240*320 Pixel, 262,144color
Stylus Touch Screen Interface
Audio Phone Receiver, Speaker, Ear Jack, Microphone
Standard I/O Port USB 1.1 Client / USB Host & Serial (RS-232) via gender cable or cradle
Expansion Slot 1 Micro SD slot (SDHC support)
1 SIM slot
Keypad 29 key
Notification Vibrator and LED, Speaker
Power System
Battery Lithium ion 3.7V Above 2,960mAH(Rechargeable)
Up to 4,400mAH(Optional)
Back-up Battery Lithium Polymer 3.7V, 80mAH(Rechargeable)
Power Adapter Input AC110~240V / Output DC 5V 3A
Network characteristic
Radio MODEM 3G (GSM / GPRS / HSDPA / HSPA+)
WLAN IEEE 802.11 b/g/a compliant
Antenna Internal LAN & WAN
Data Capture Device
Scanner 1D Laser, 2D Imager Barcode Scanner
Camera 3.0 Megapixel Auto Focus with Flash
UHF 900MHz tag reader
Frequency 860MHz- 960Mhz(Adjustable)
Reading Range 0m ~ 7m (differs from each tag)

AT870N User Guide
60
Writing Range 0m ~ 3m (According to Tag & Environment)
Antenna Gain 2 dbi (Standard)
Speed 62.5 kbps
RF Output 1W EIRP
Protocol EPC Gen2 ISO 18000 6C
ISO 18000 6B(Optional)
Special Function Anti-collision
AT870N User Guide
61