Abbott Diabetes Care AV2-C Insulin Pump/Glucose Meter Transmitter User Manual 1 of 2
Abbott Diabetes Care Insulin Pump/Glucose Meter Transmitter 1 of 2
UserManual.wiki
>
Abbott Diabetes Care
>
AV2-C User Manual
>
User manual 1 of 2
Contents
1.
Regulatory statement
2.
User manual 1 of 2
3.
User manual 2 of 2
User manual 1 of 2
Navigation menu
Upload a User Manual
Namespaces
Wiki Guide
HTML
PDF
Info
Views
User Manual
Discussion / Help
Navigation

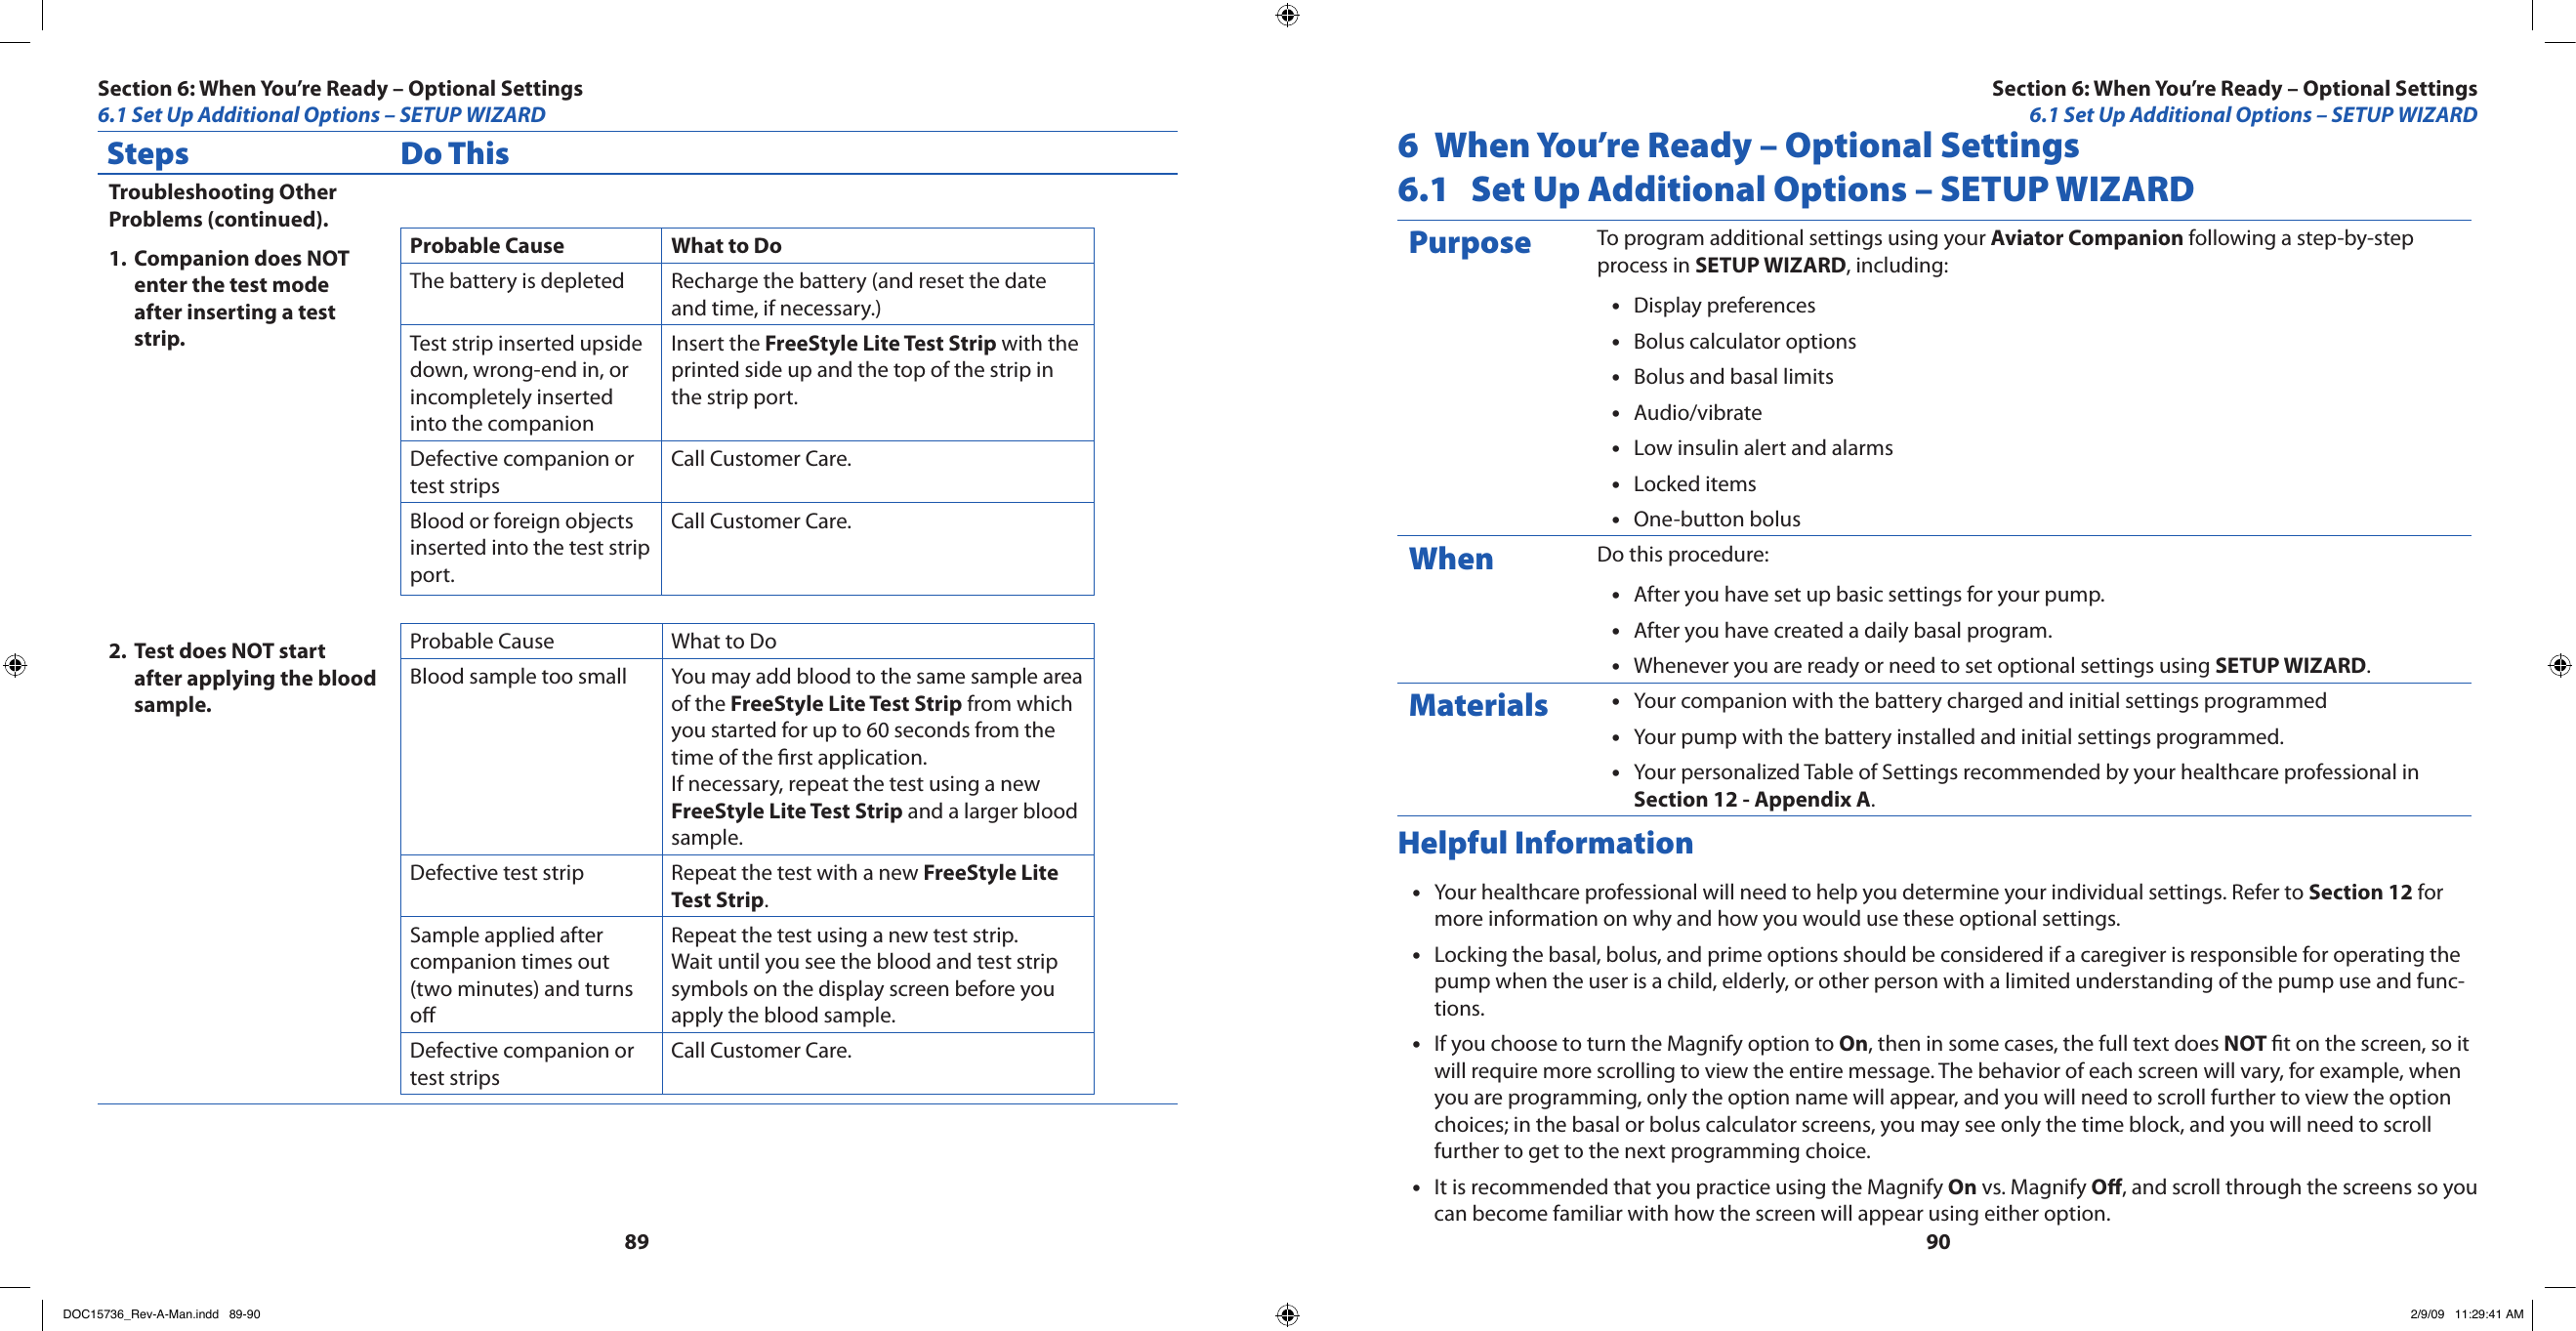
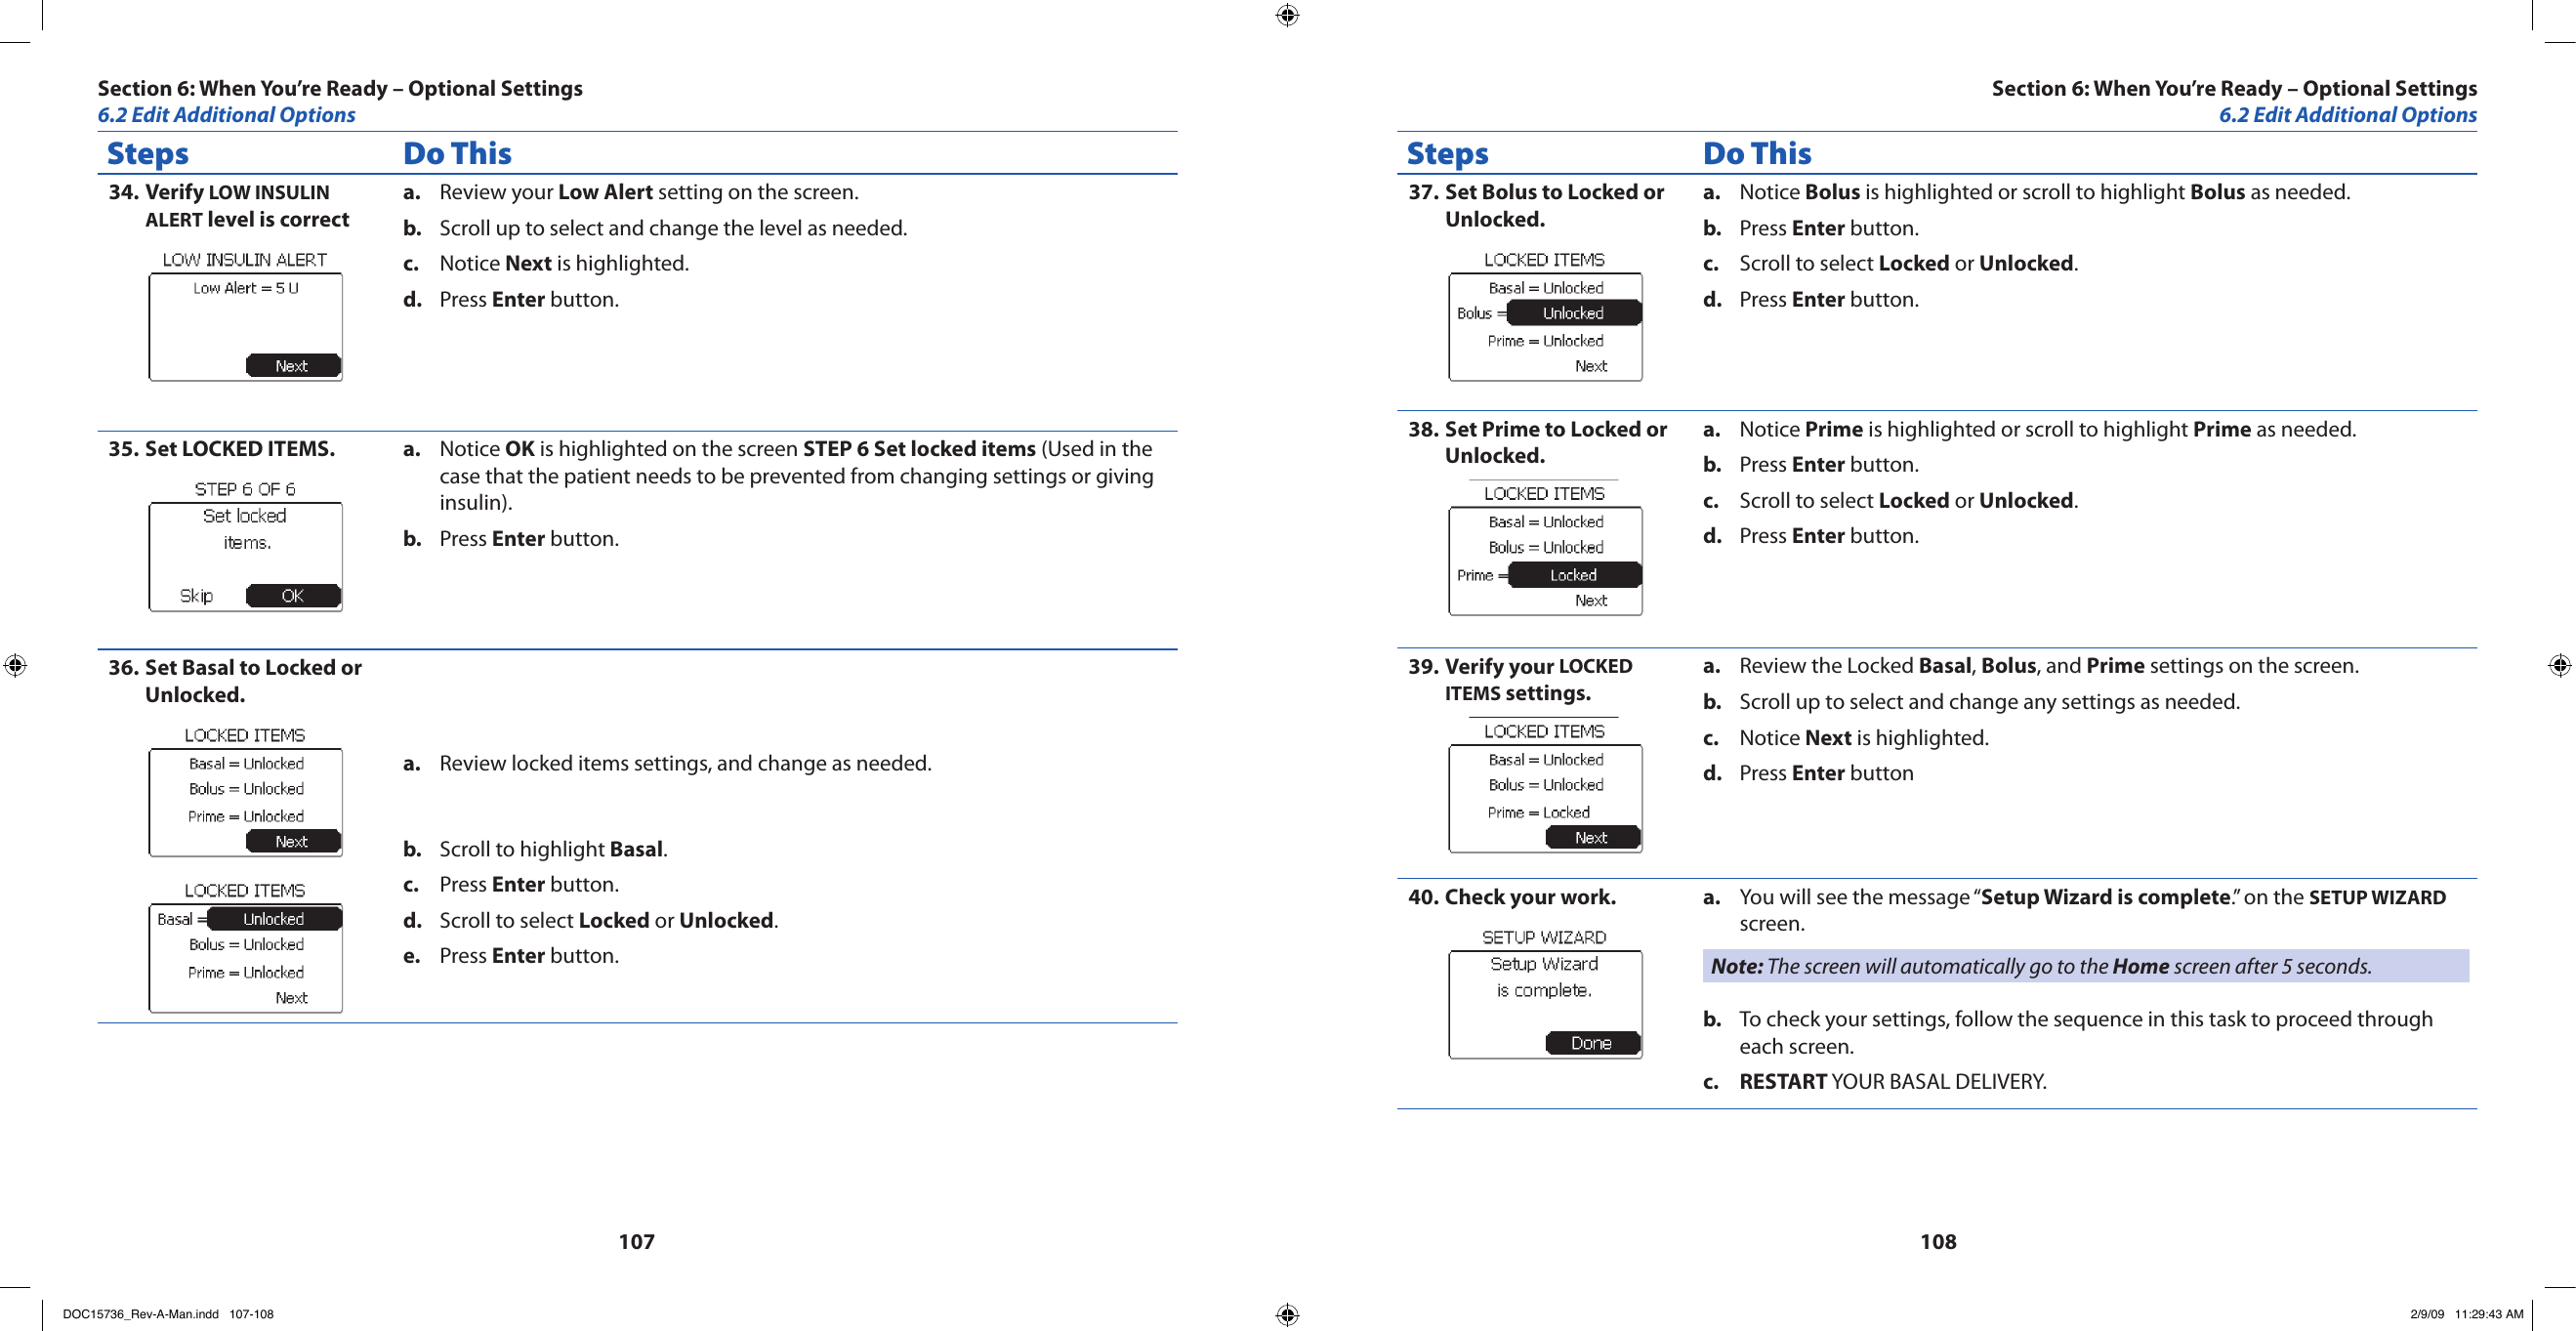
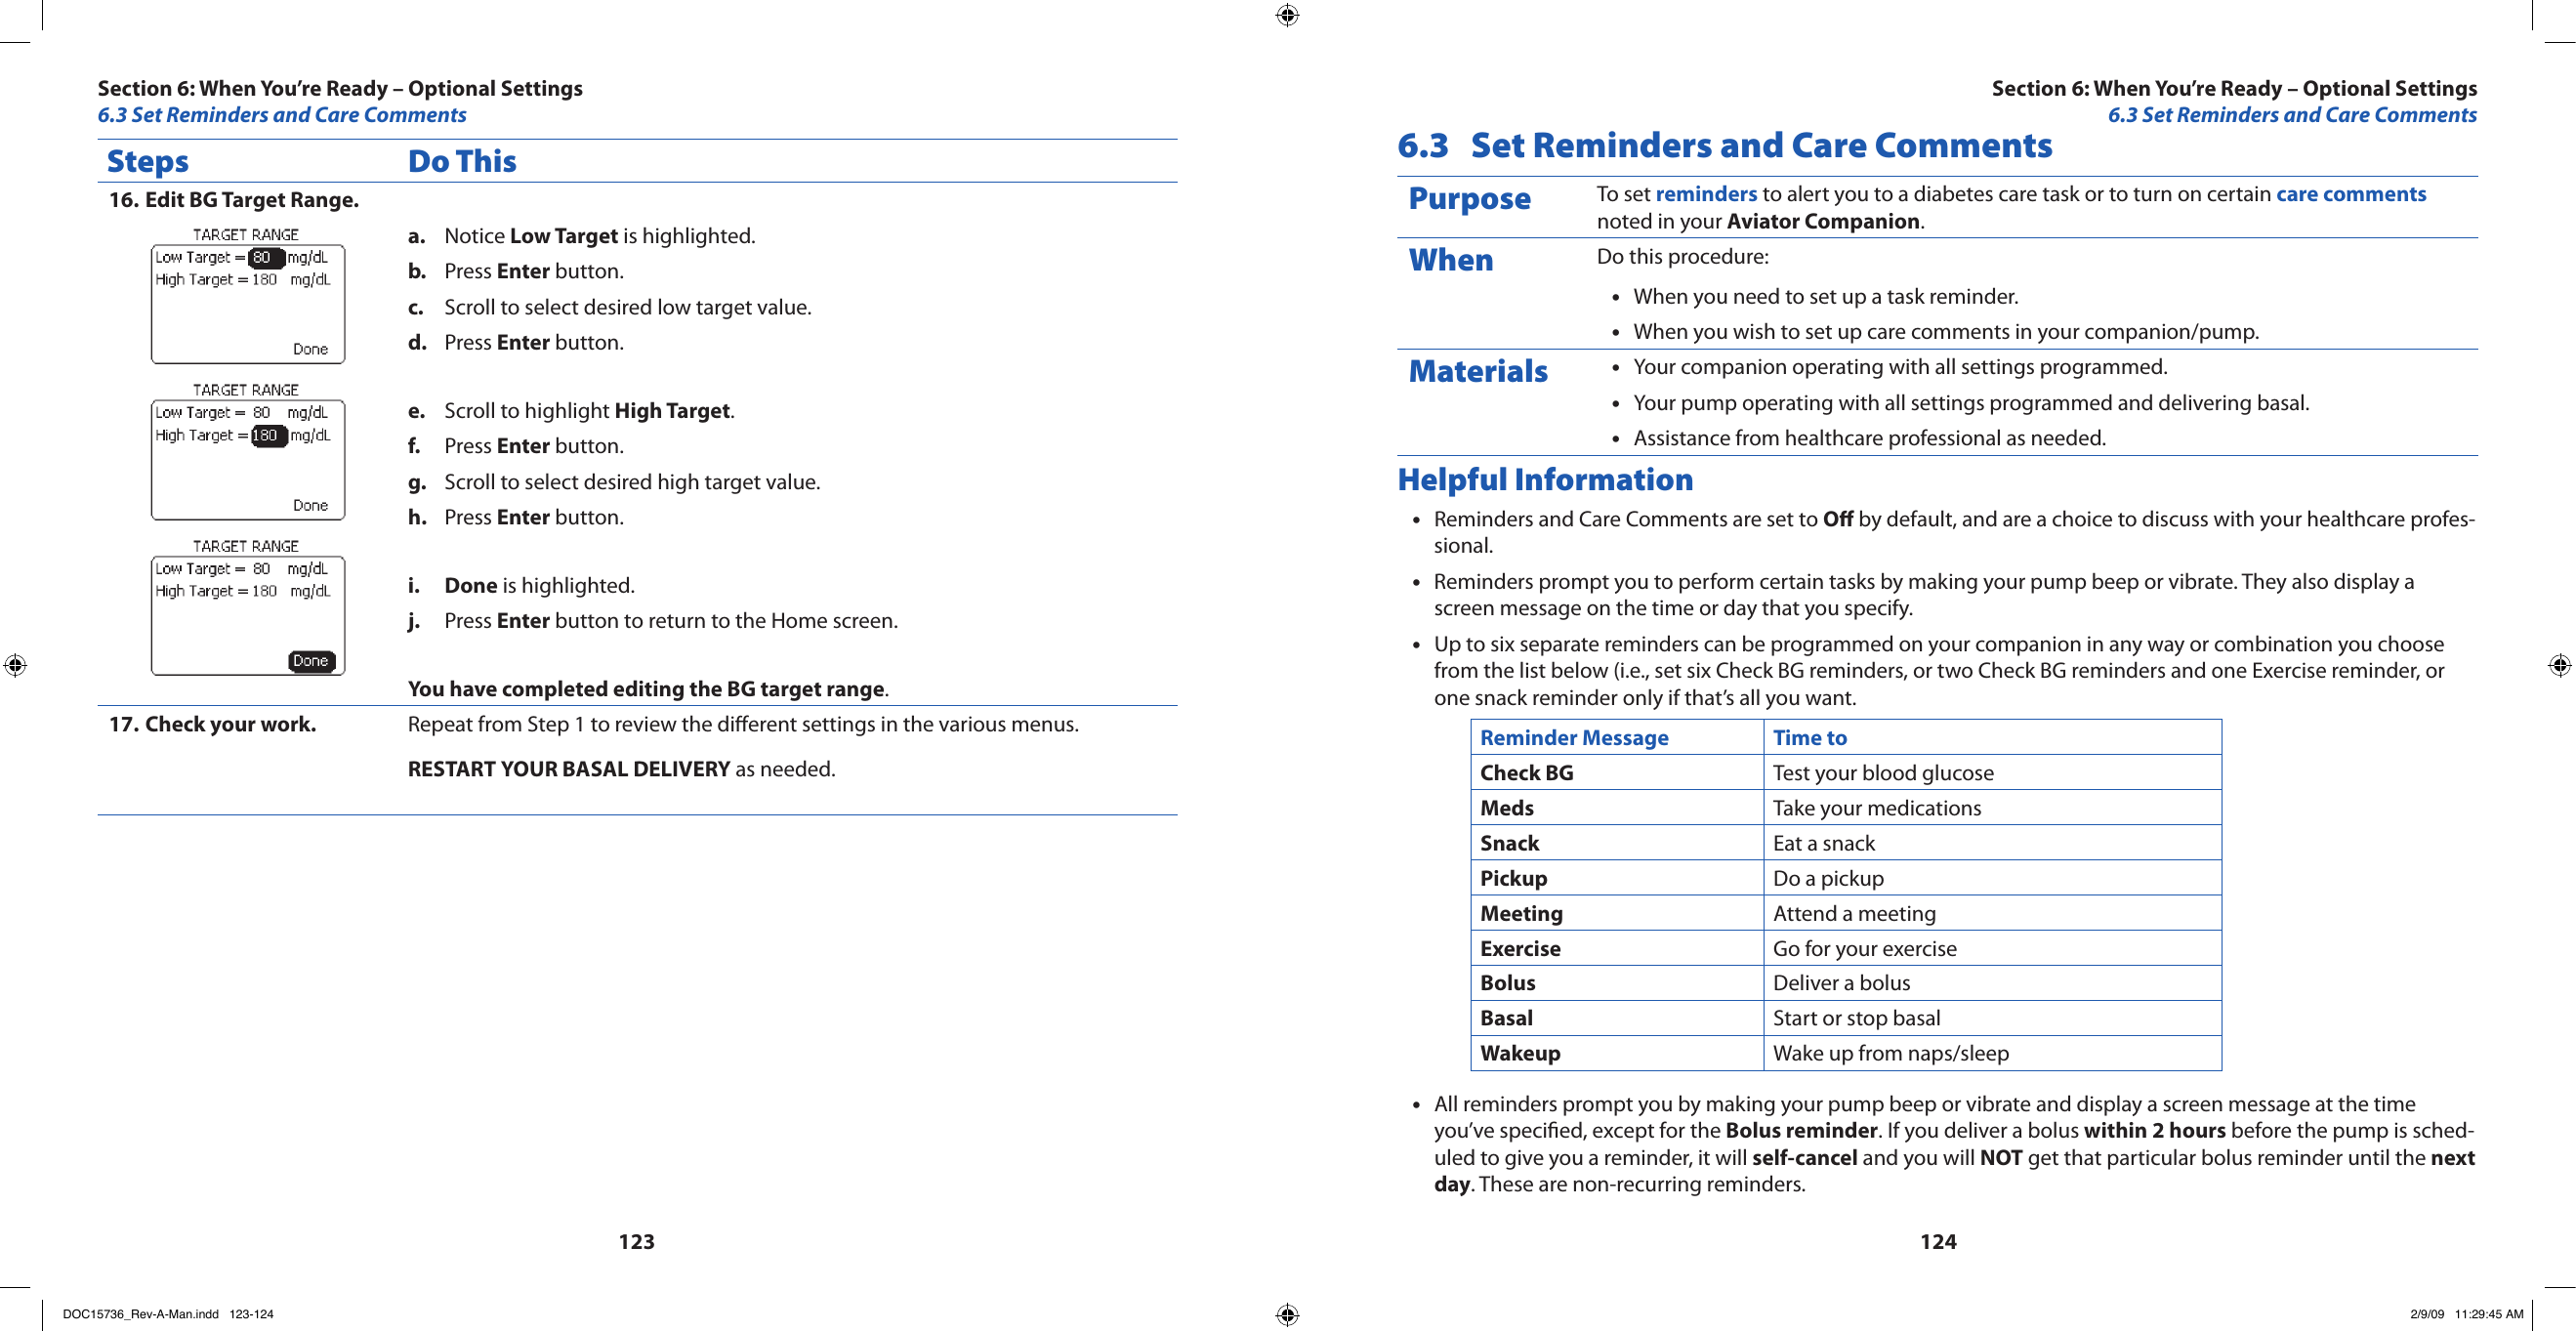
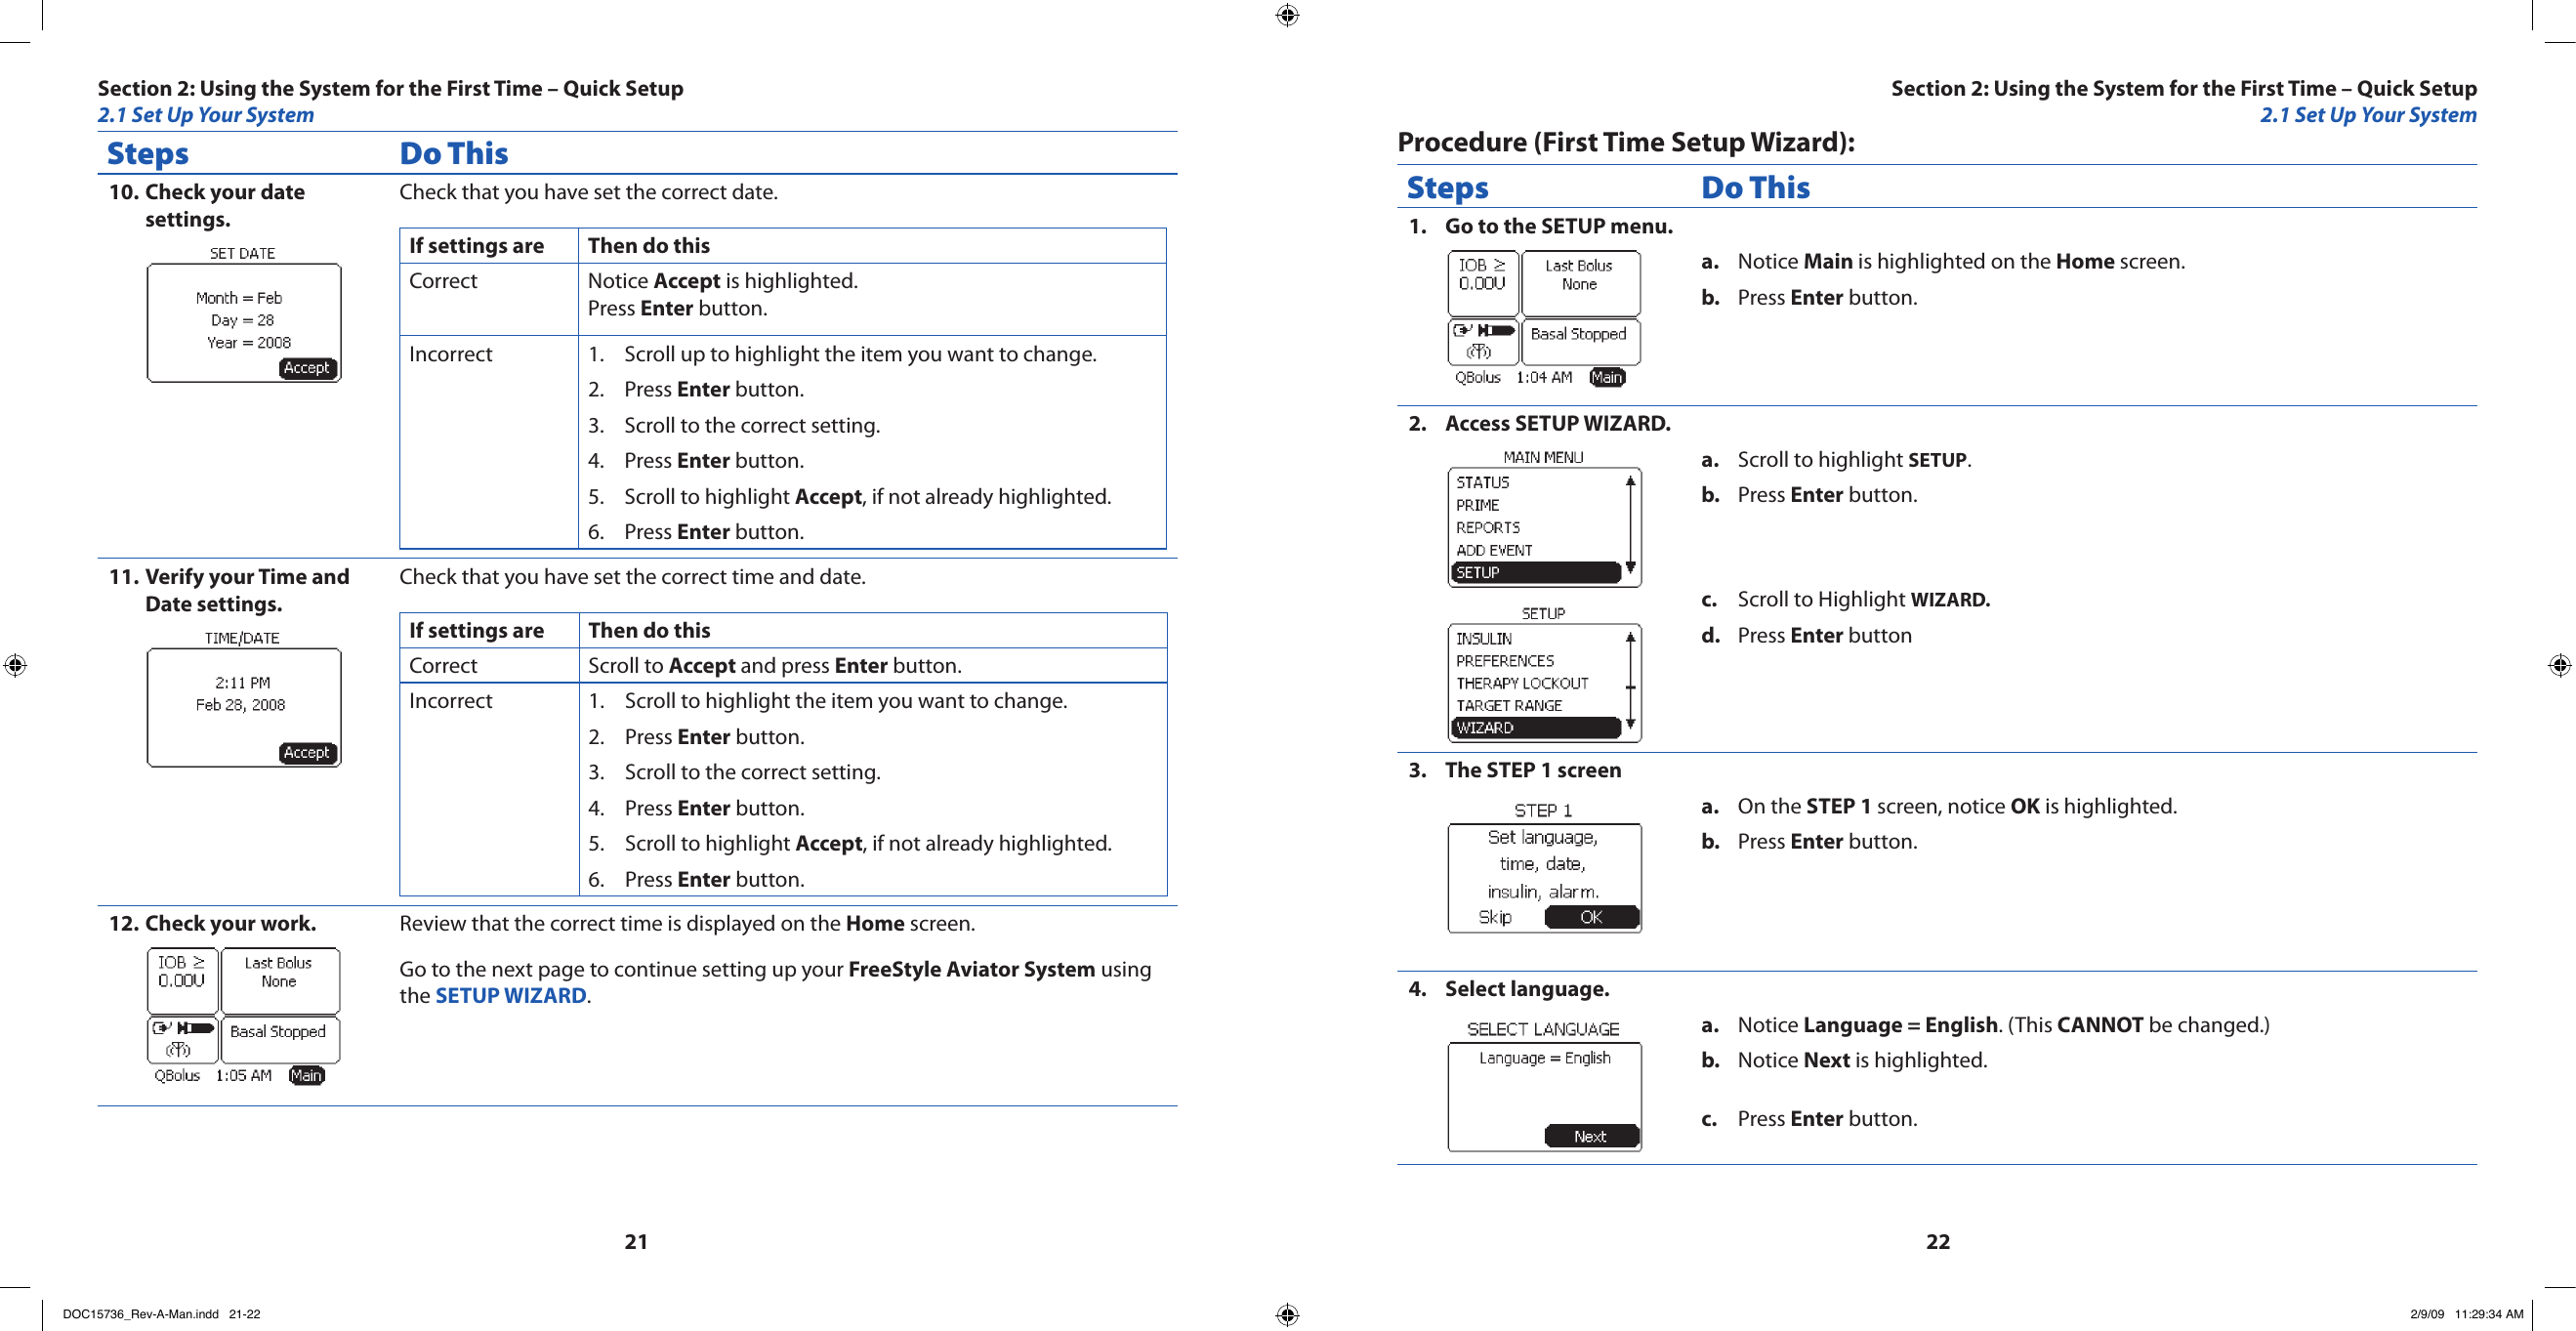
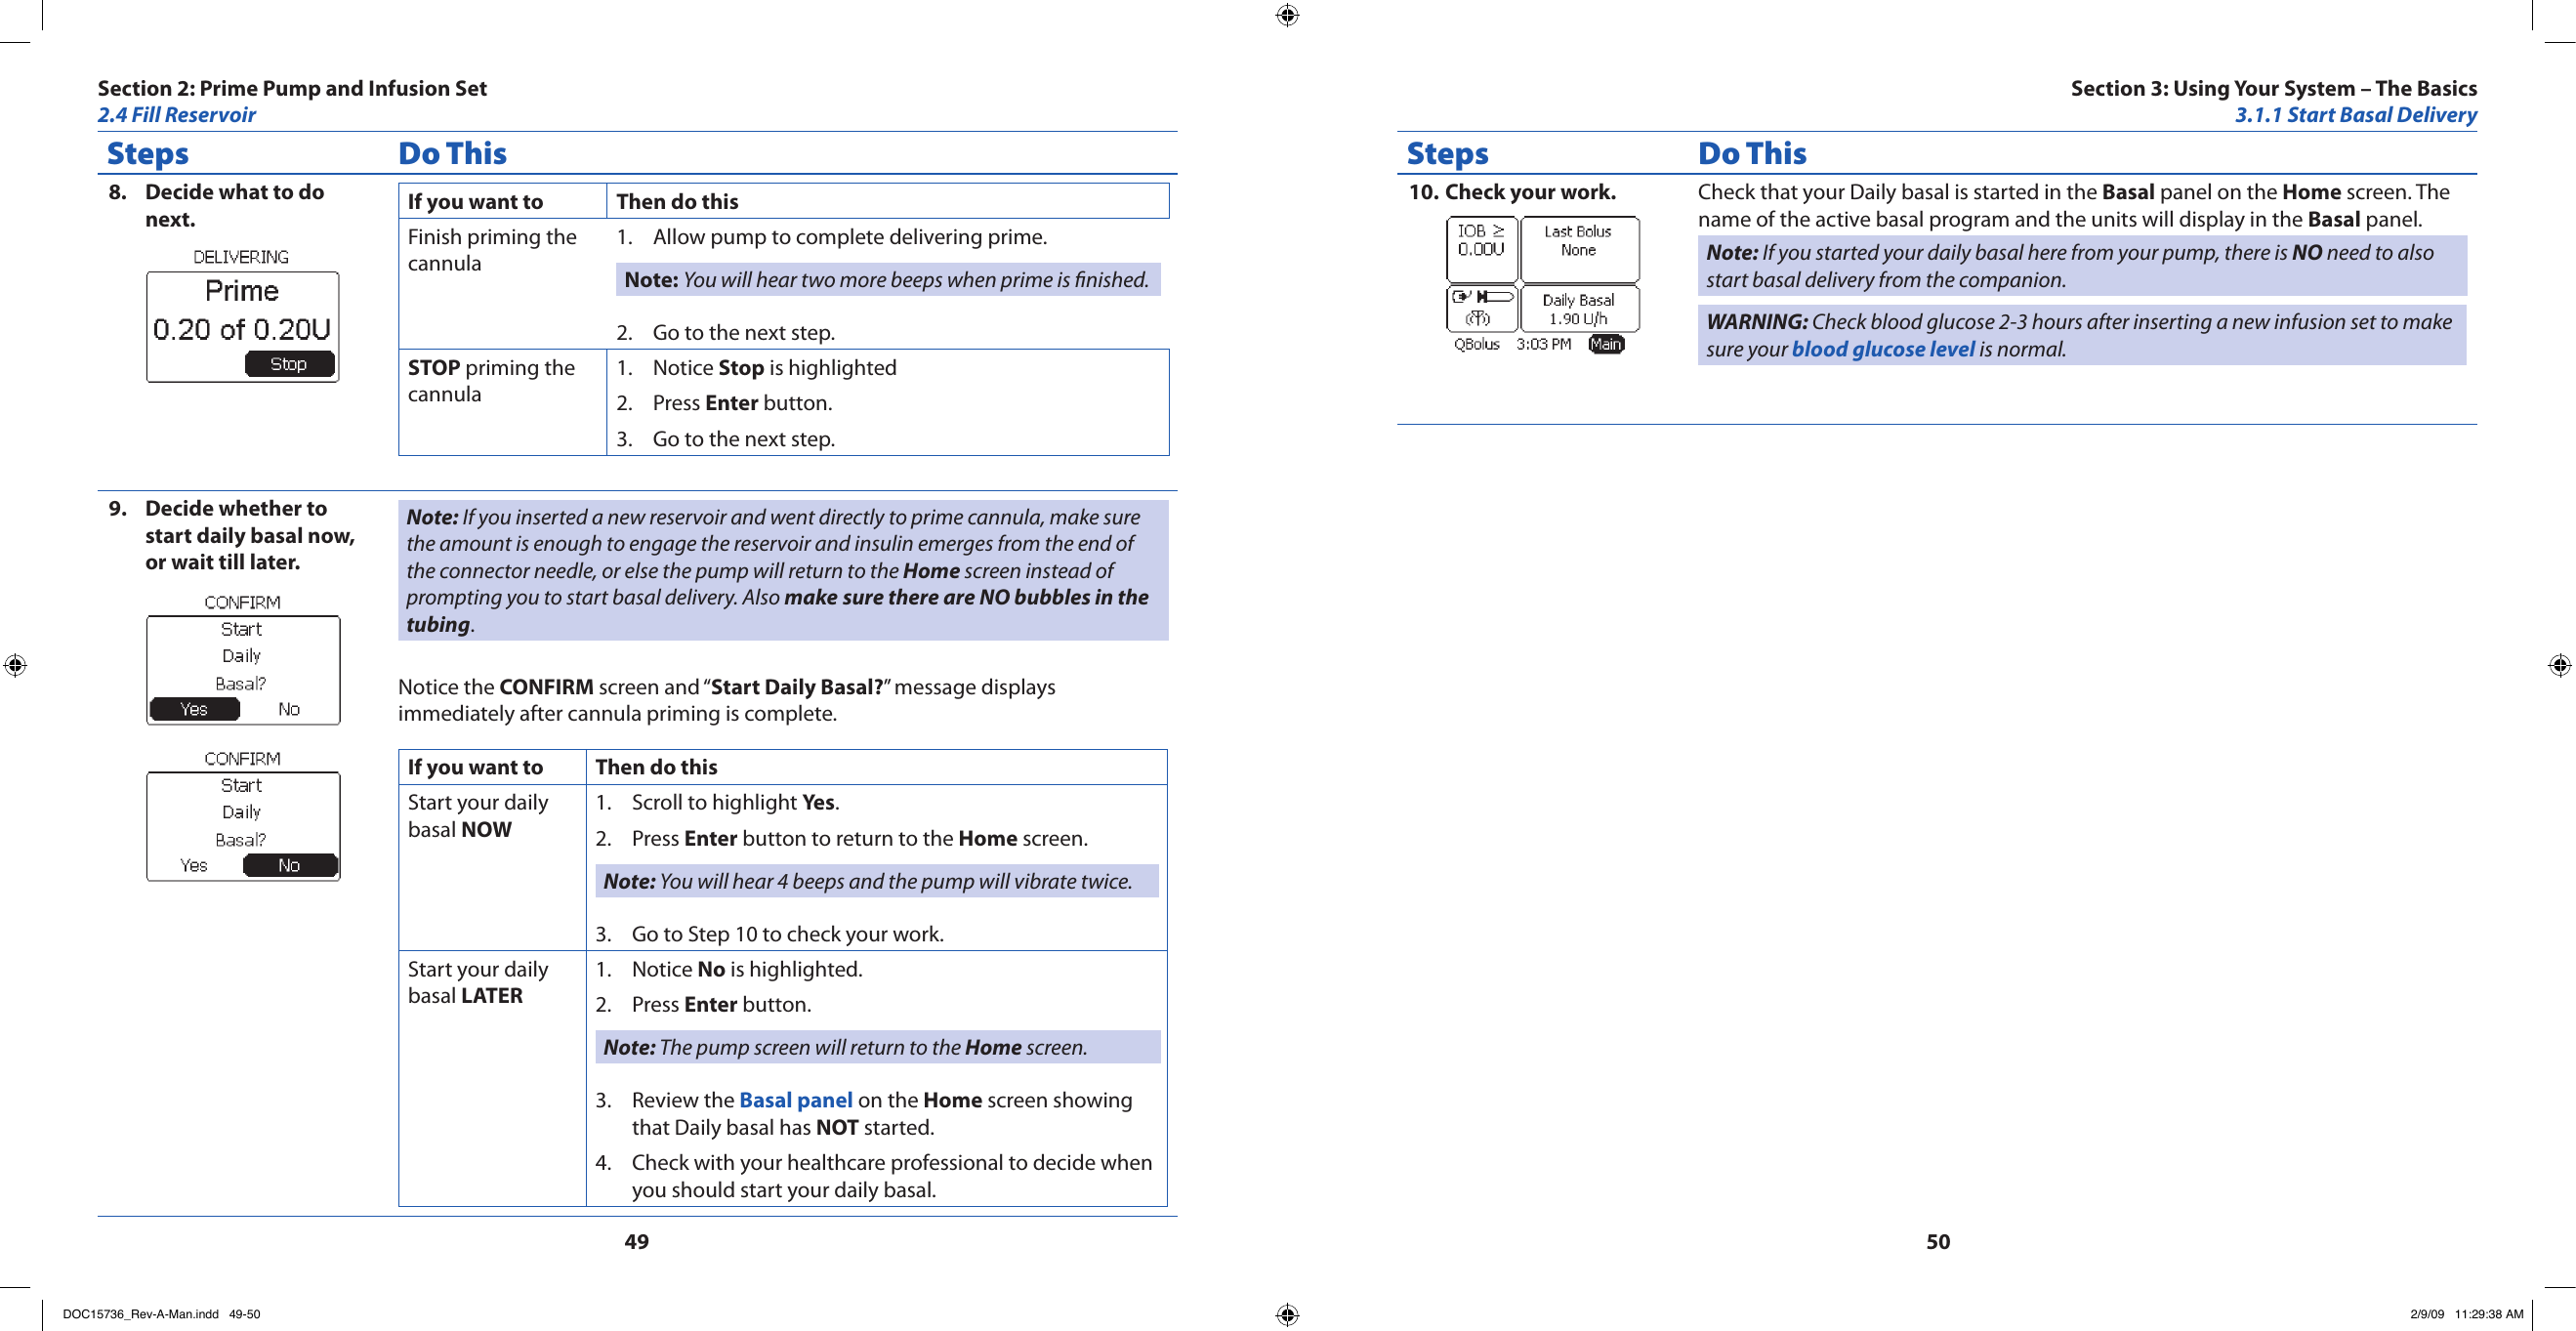
![VIIIIXAppropriate and accurate bolus amounts are necessary to avoid delivery errors that may result in adverse medi-•cal events or serious injury. Delivering a meal bolus but then NOT eating a meal may result in low blood glu-cose values. Eating a meal and NOT delivering a meal bolus to cover the meal may result in high blood glucose values.BatteriesMake sure the fresh battery is at room temperature to avoid false alarms.•Use • ONLY Duracell MN2400 or Energizer E92 AAA alkaline primary battery (non-rechargeable) in your pump.Do • NOT use lithium, nickel cadmium (NiCad), nickel metal hydride (NiHM), carbon zinc (heavy duty), or recharge-able batteries in your pump. Using other types of batteries may shorten the life of the battery, cause inappropri-ate low battery alert warnings, or fail to give low battery alert warnings.The • Aviator Companion contains lithium internal batteries. At the end of their useful life dispose of • FreeStyle Aviator System components and accessories according to local environment and other rules and regulations that may apply.AlarmsIf you receive an occlusion alarm, you • MUST disconnect from the pump using the quick disconnect feature of the Infusion Set before investigating the cause of the occlusion. Bolus delivery may occur when the cause of the occlusion is removed.Continued use of a pump with malfunctioning sounds may result in the user being unaware of an alarm or alert •condition or that delivery has stopped, resulting in possible adverse medical events or serious injury.When your insulin supply is low, there will be a Low Insulin Alert or No Insulin alarm. Also, the insulin icon in the •Levels panel on the Home screen will show the level of insulin in the reservoir.2. CautionsGeneralRemove your pump before prolonged exposure to water, and follow your healthcare professional’s recommen-•dations on insulin dosing when you are disconnected from the pump.You should avoid exposing your pump to temperatures above 104º F (40º C), common in hot tubs, whirlpools, •and saunas.If your pump is exposed to extreme temperature ranges (see • Section 10), there is a possibility the insulin in your pump will be damaged or destroyed. The insulin in the reservoir and tubing needs to be replaced (see Section 2.4), and the infusion set changed.If the • Aviator Pump is carried at a vertically higher position than the infusion site, a very small amount of ad-ditional insulin infusion or interruption delivery may take place. To minimize this condition and maintain pump delivery accuracy, the pump should be carried no higher than 12 inches (30 cm) above the insertion site. For those using basal rates of less than 1.0 units per hour, this may be especially important. When using very low basal rates of less than 1.0 units per hour, position the pump vertically below the level of the infusion site to eliminate this condition. This behavior is common to most traditional insulin pumps.If Aviator Pump is exposed to large changes in vertical height, a small amount of additional insulin infusion or •interruption of delivery may take place. To minimize this condition and maintain pump delivery accuracy, avoid sudden large changes in height between the pump and infusion site, when using basal rates less than 1.0 unit per hour. This behavior is common to most traditional insulin pumps.If the pump malfunctions or a problem is detected, the pump will alarm. If you • CANNOT resolve the alarm and the issue continues, contact Customer Care.If • Aviator Pump is exposed to large temperature changes, a small amount of additional insulin infusion or inter-ruption of delivery may take place due to thermal expansion or contraction of the insulin volume. This behavior is common to most traditional insulin pumps. To minimize this condition and maintain pump delivery accuracy, avoid large temperature changes The resulting insulin delivery or interruption in delivery more greatly aects people who use basal rates less than 1.0 units per hour.If • Aviator Pump is exposed to a high G force, such as might occur on an amusement park ride, it might cause a small volume of insulin to be either unintentionally delivered to your body, or unintentionally be siphoned from your body.Be careful • NOT to use too much force to place the battery cap on the pump. Excess force can lead to bending or breaking of the metal prongs. The • Aviator Pump is intended for your own personal use only. Do NOT share your pump with others.Make sure the hub connections are properly tightened. If any are loose, insulin may accidentally leak out of the •system, reducing insulin delivery, and your blood glucose levels could rise rapidly to dangerous levels.Hyperbaric chambers will aect pump operation and may damage the pump.•Avoid high humidity (greater than 90 percent) and high or low (10,000 feet [3048 meters] or more above sea •Symbols and Important Safety Information Symbols and Important Safety InformationDOC15736_Rev-A-Man.indd 8-9 2/9/09 11:29:31 AM](https://usermanual.wiki/Abbott-Diabetes-Care/AV2-C.User-manual-1-of-2/User-Guide-1071817-Page-8.png)

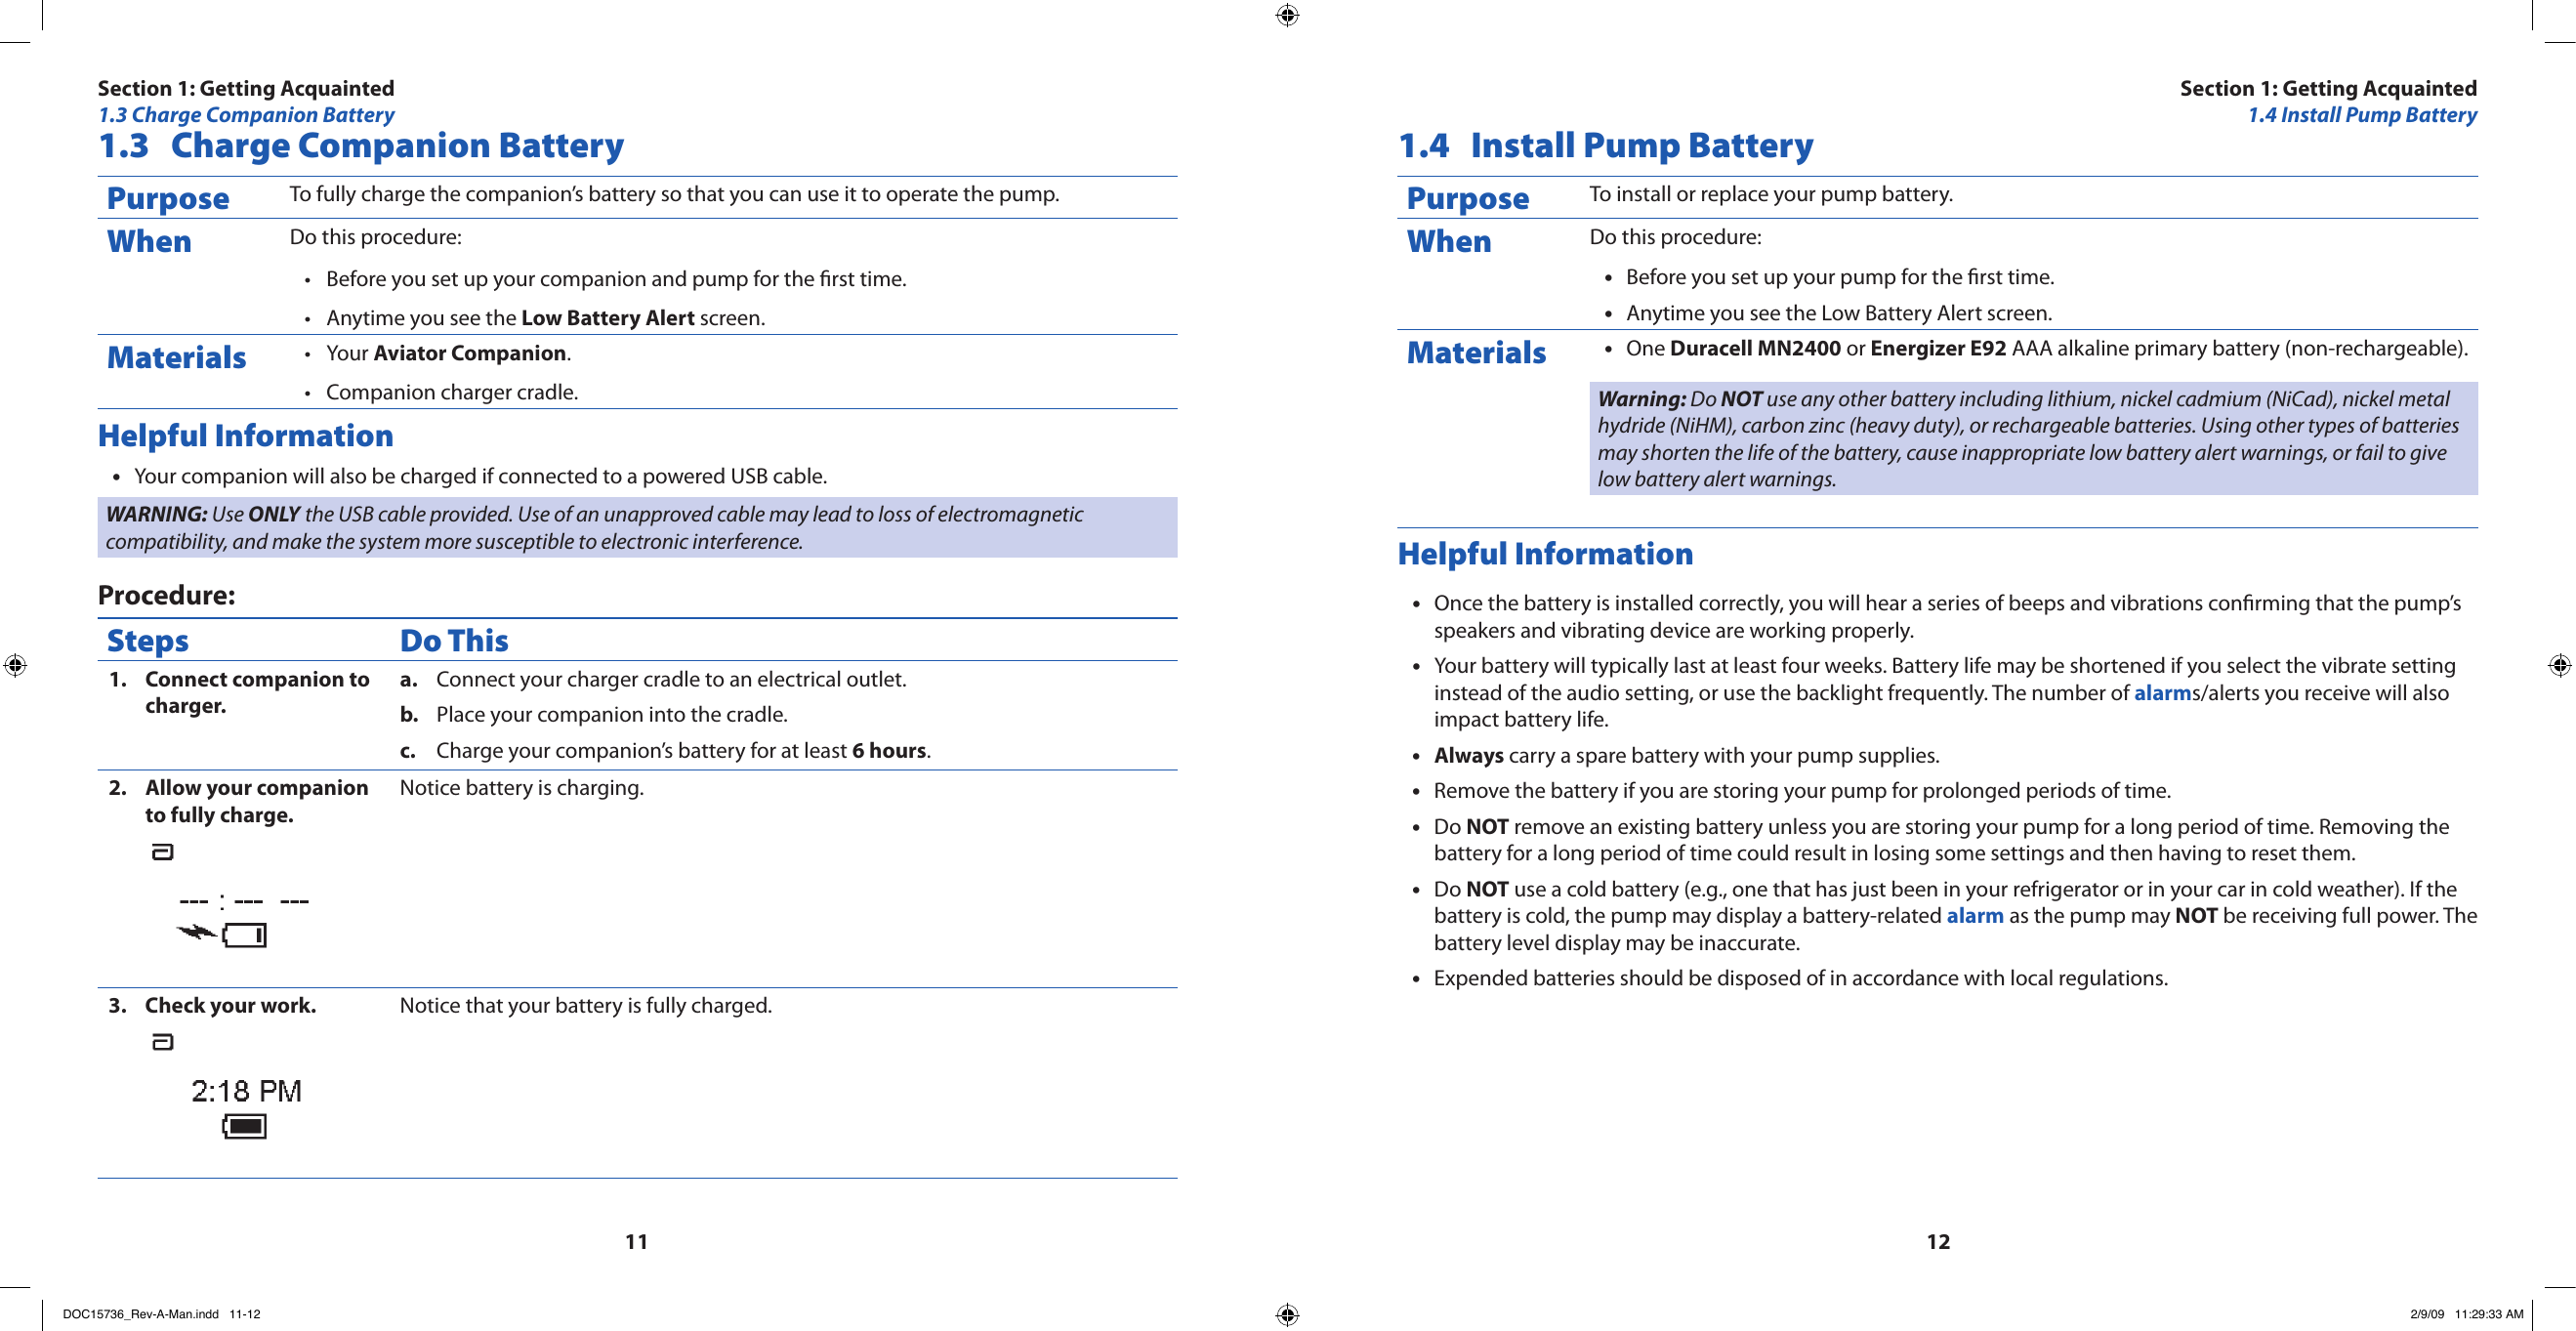

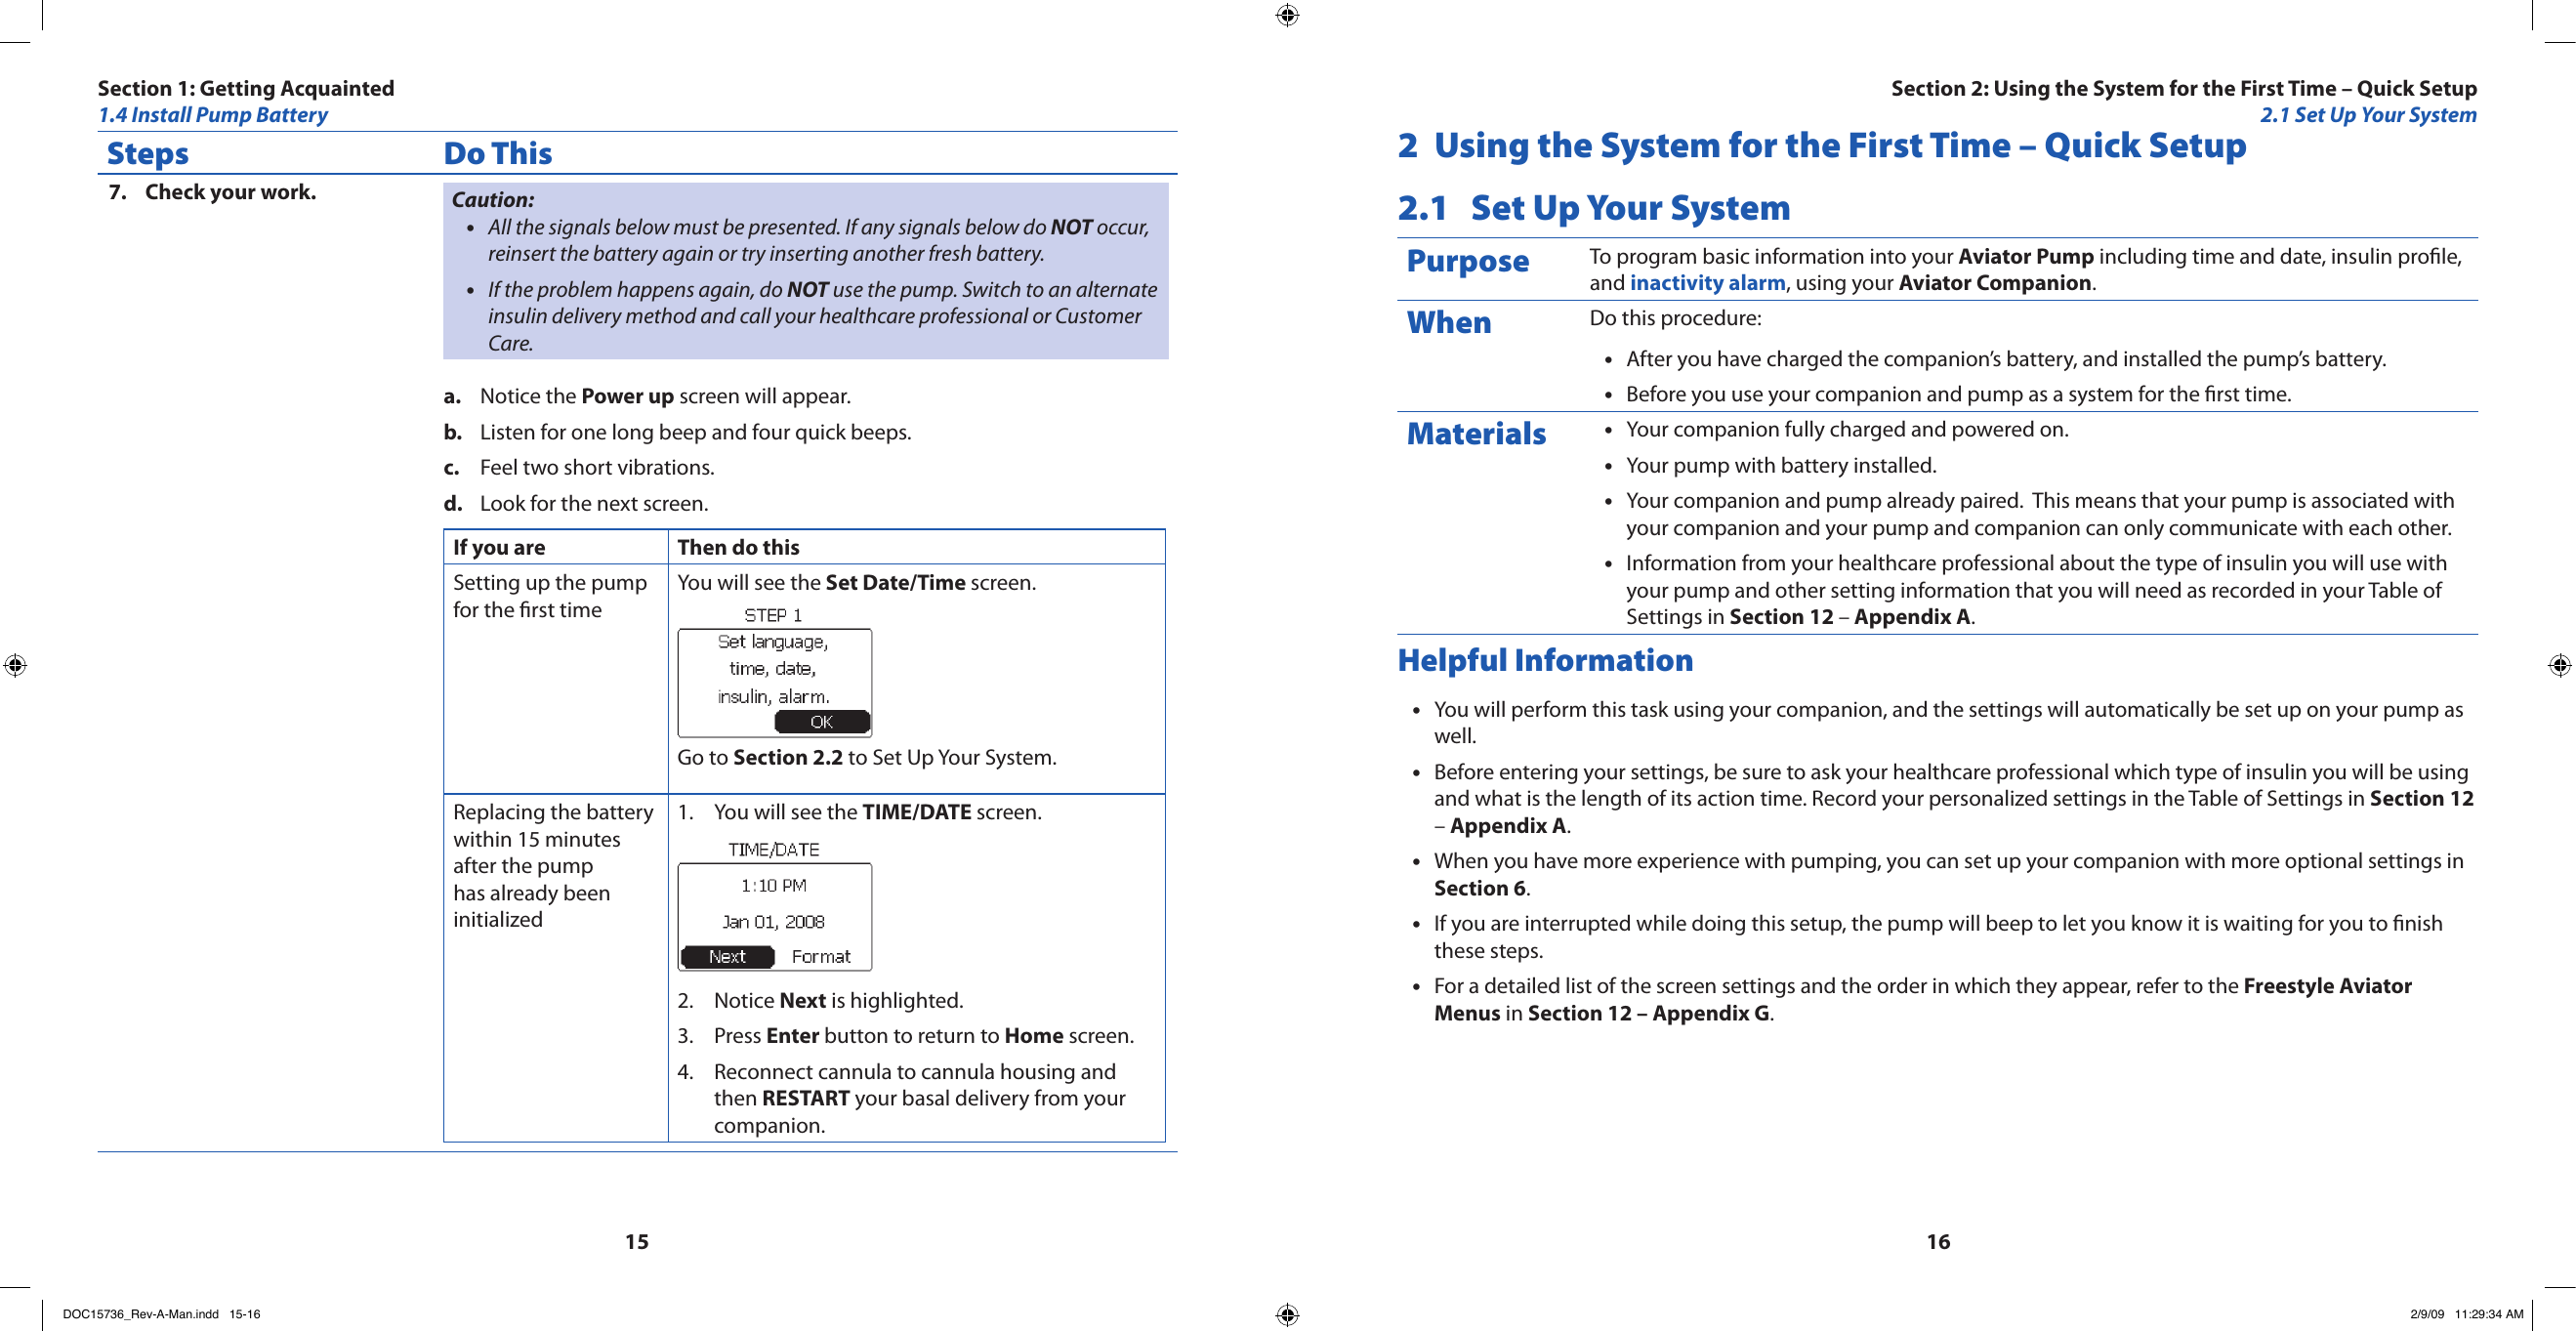
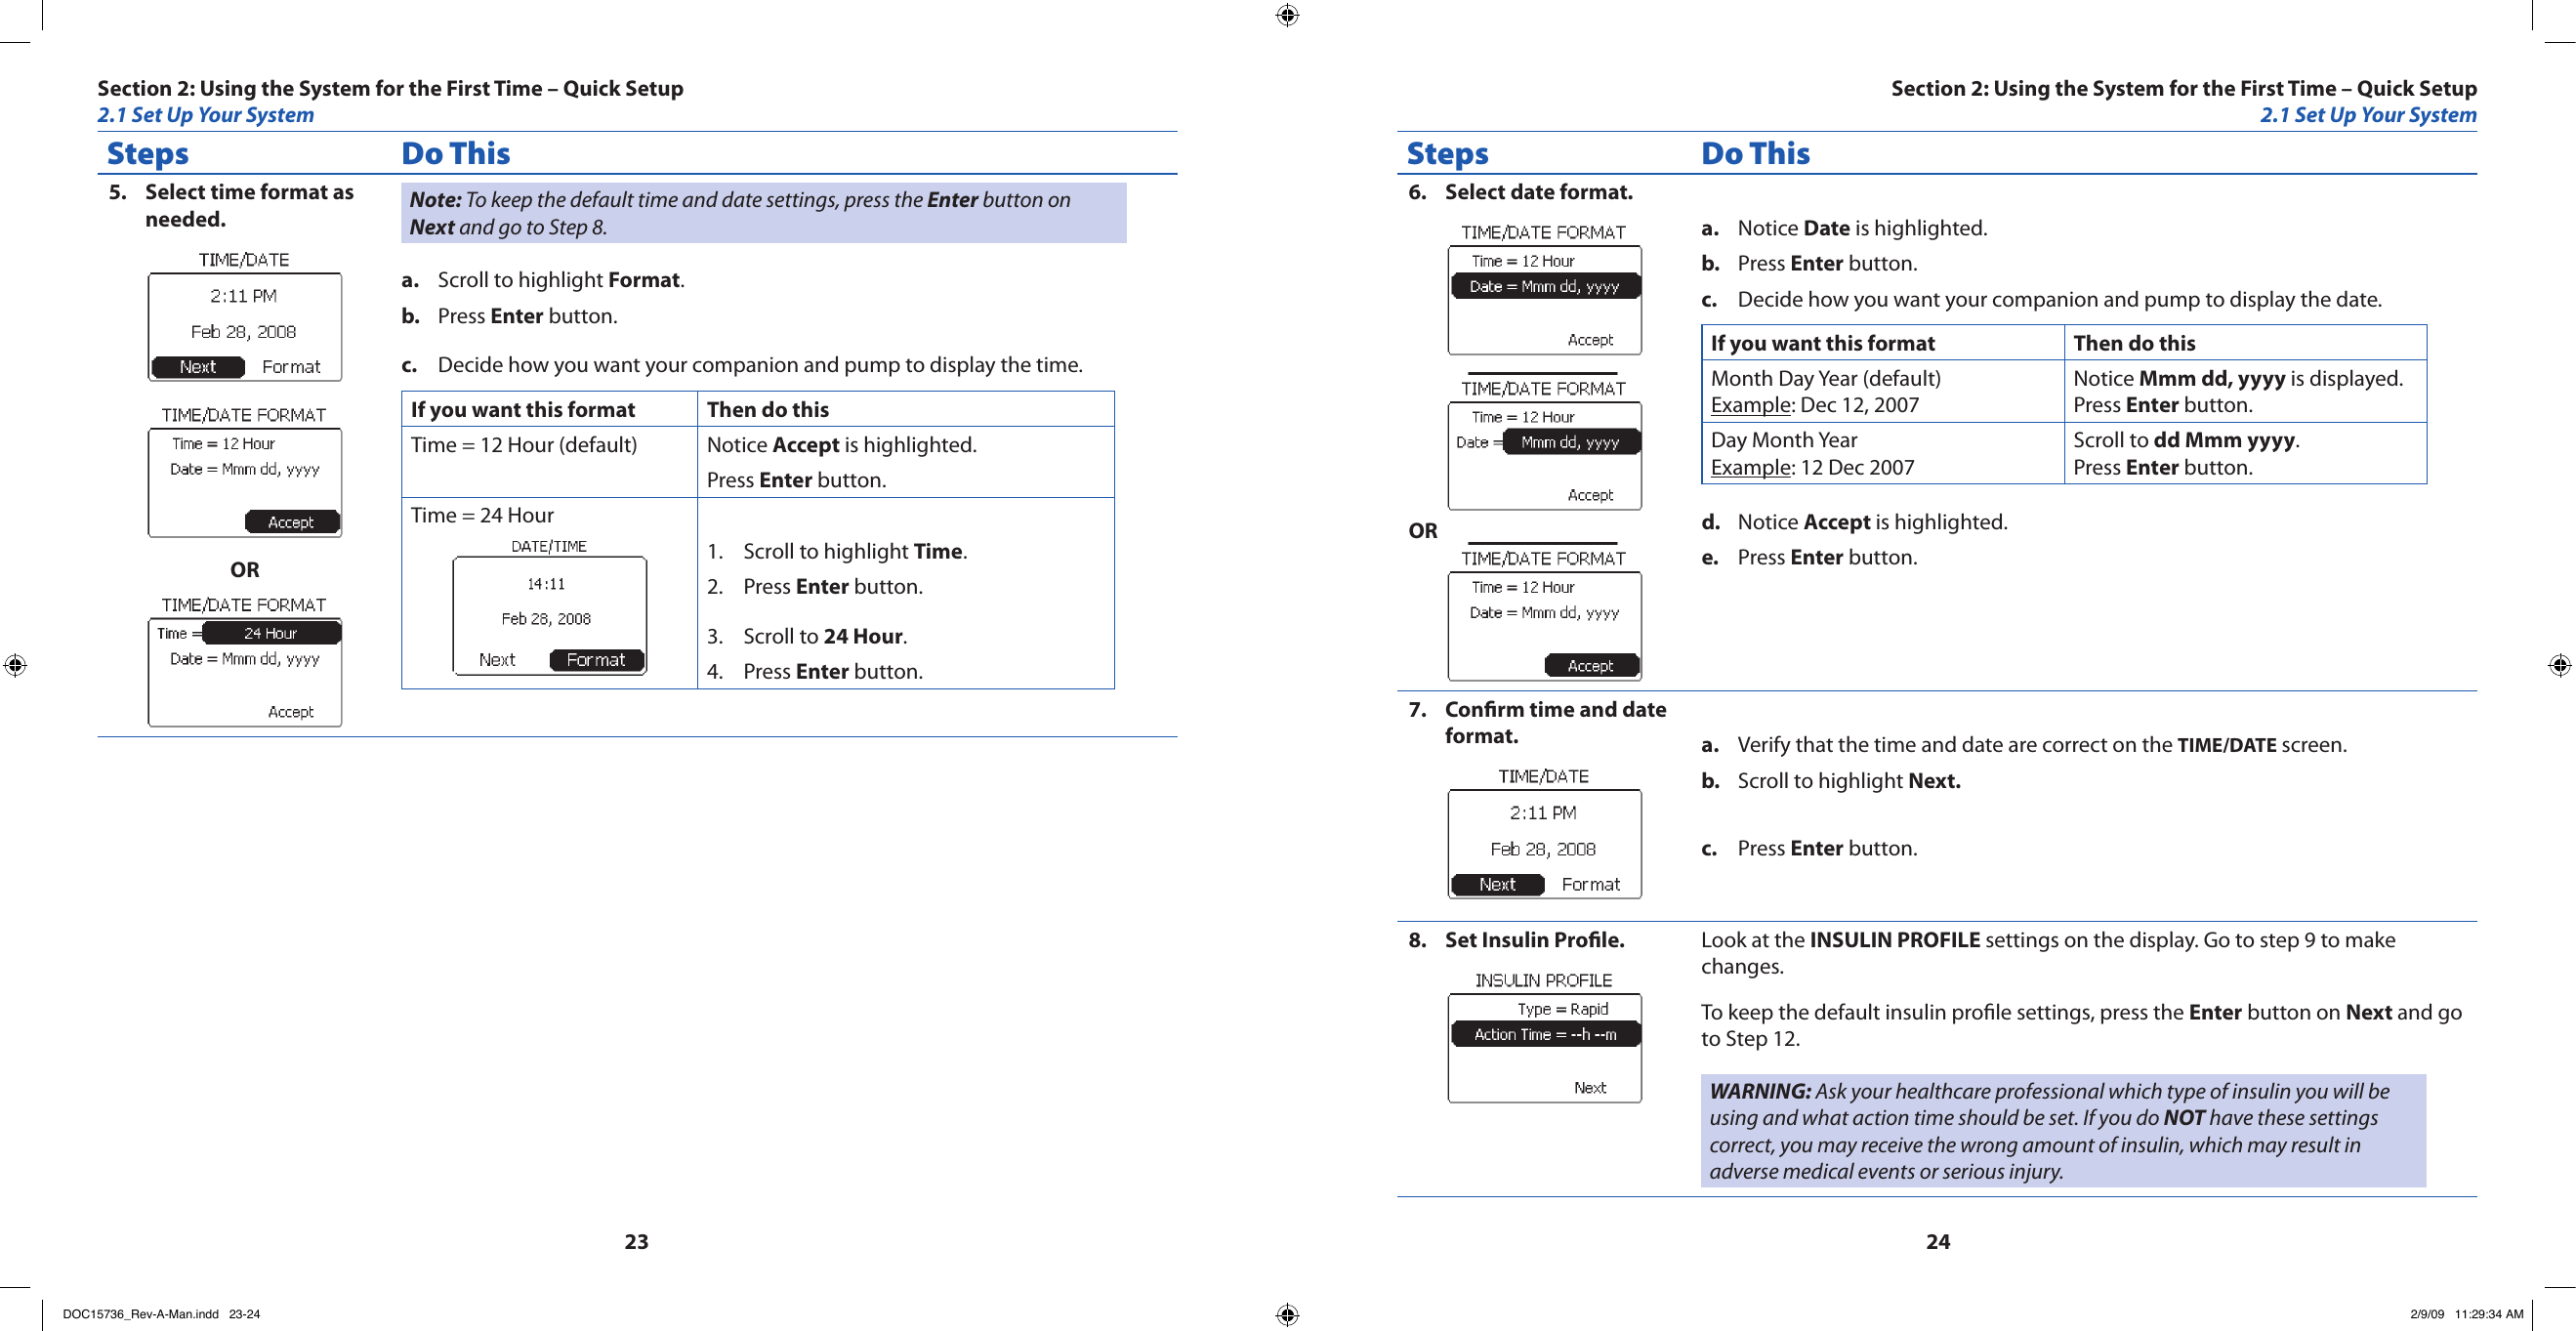

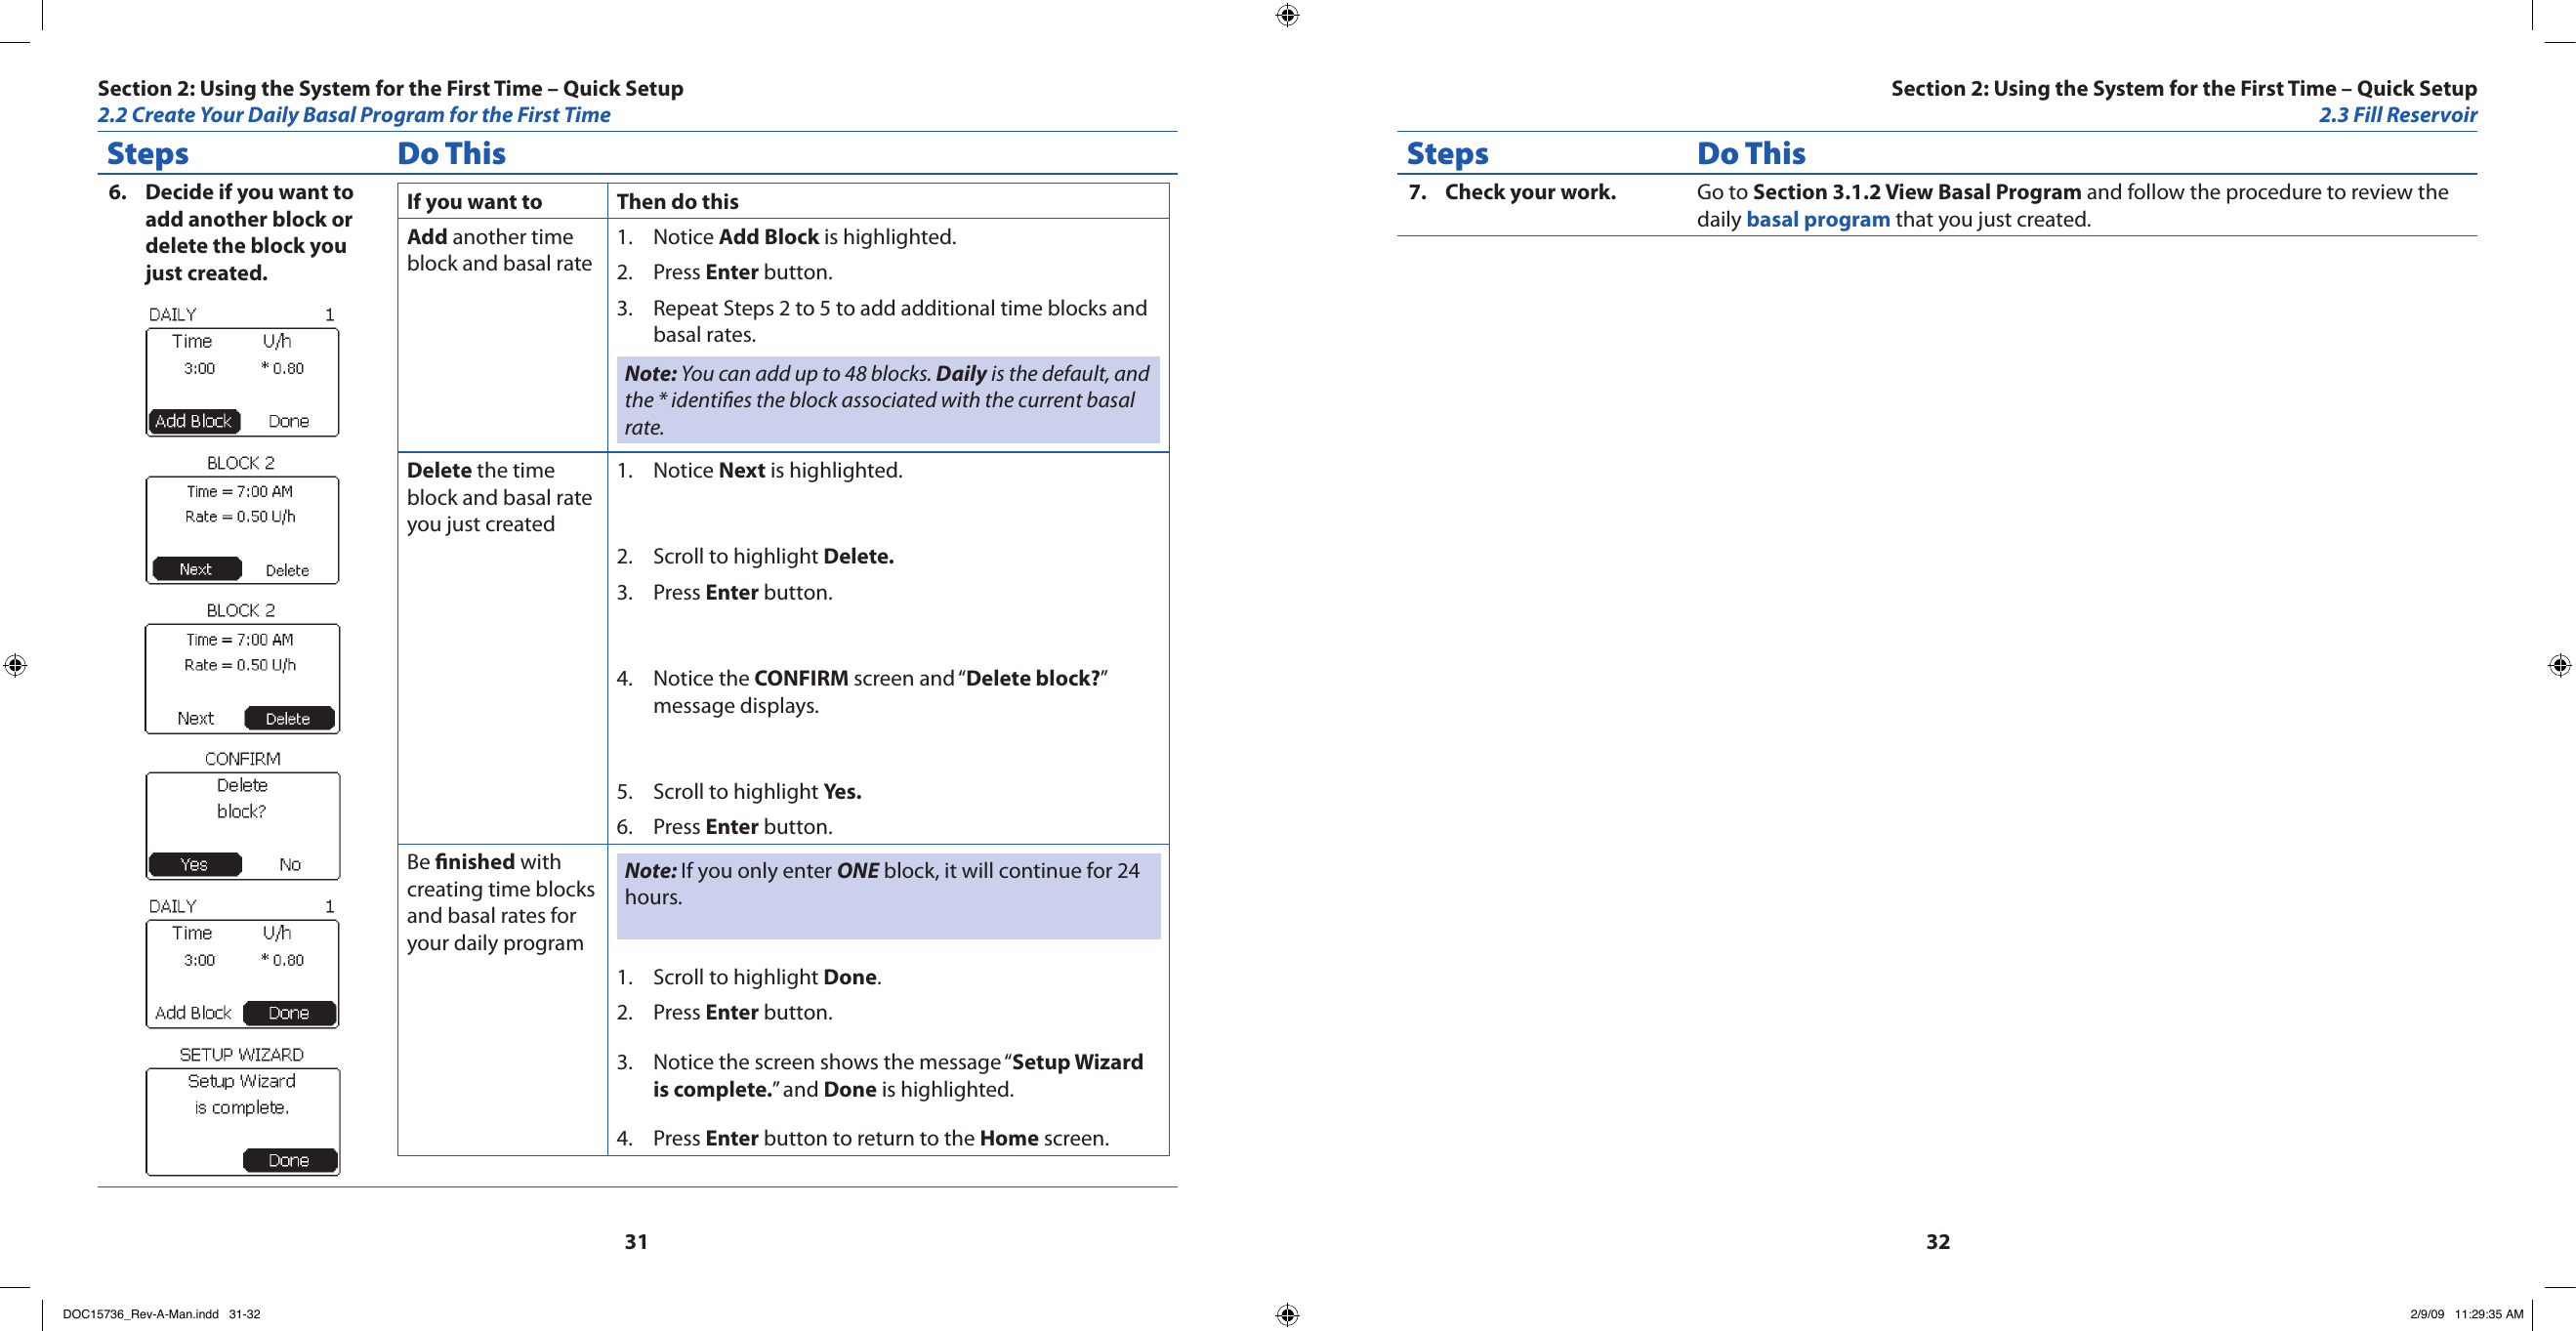
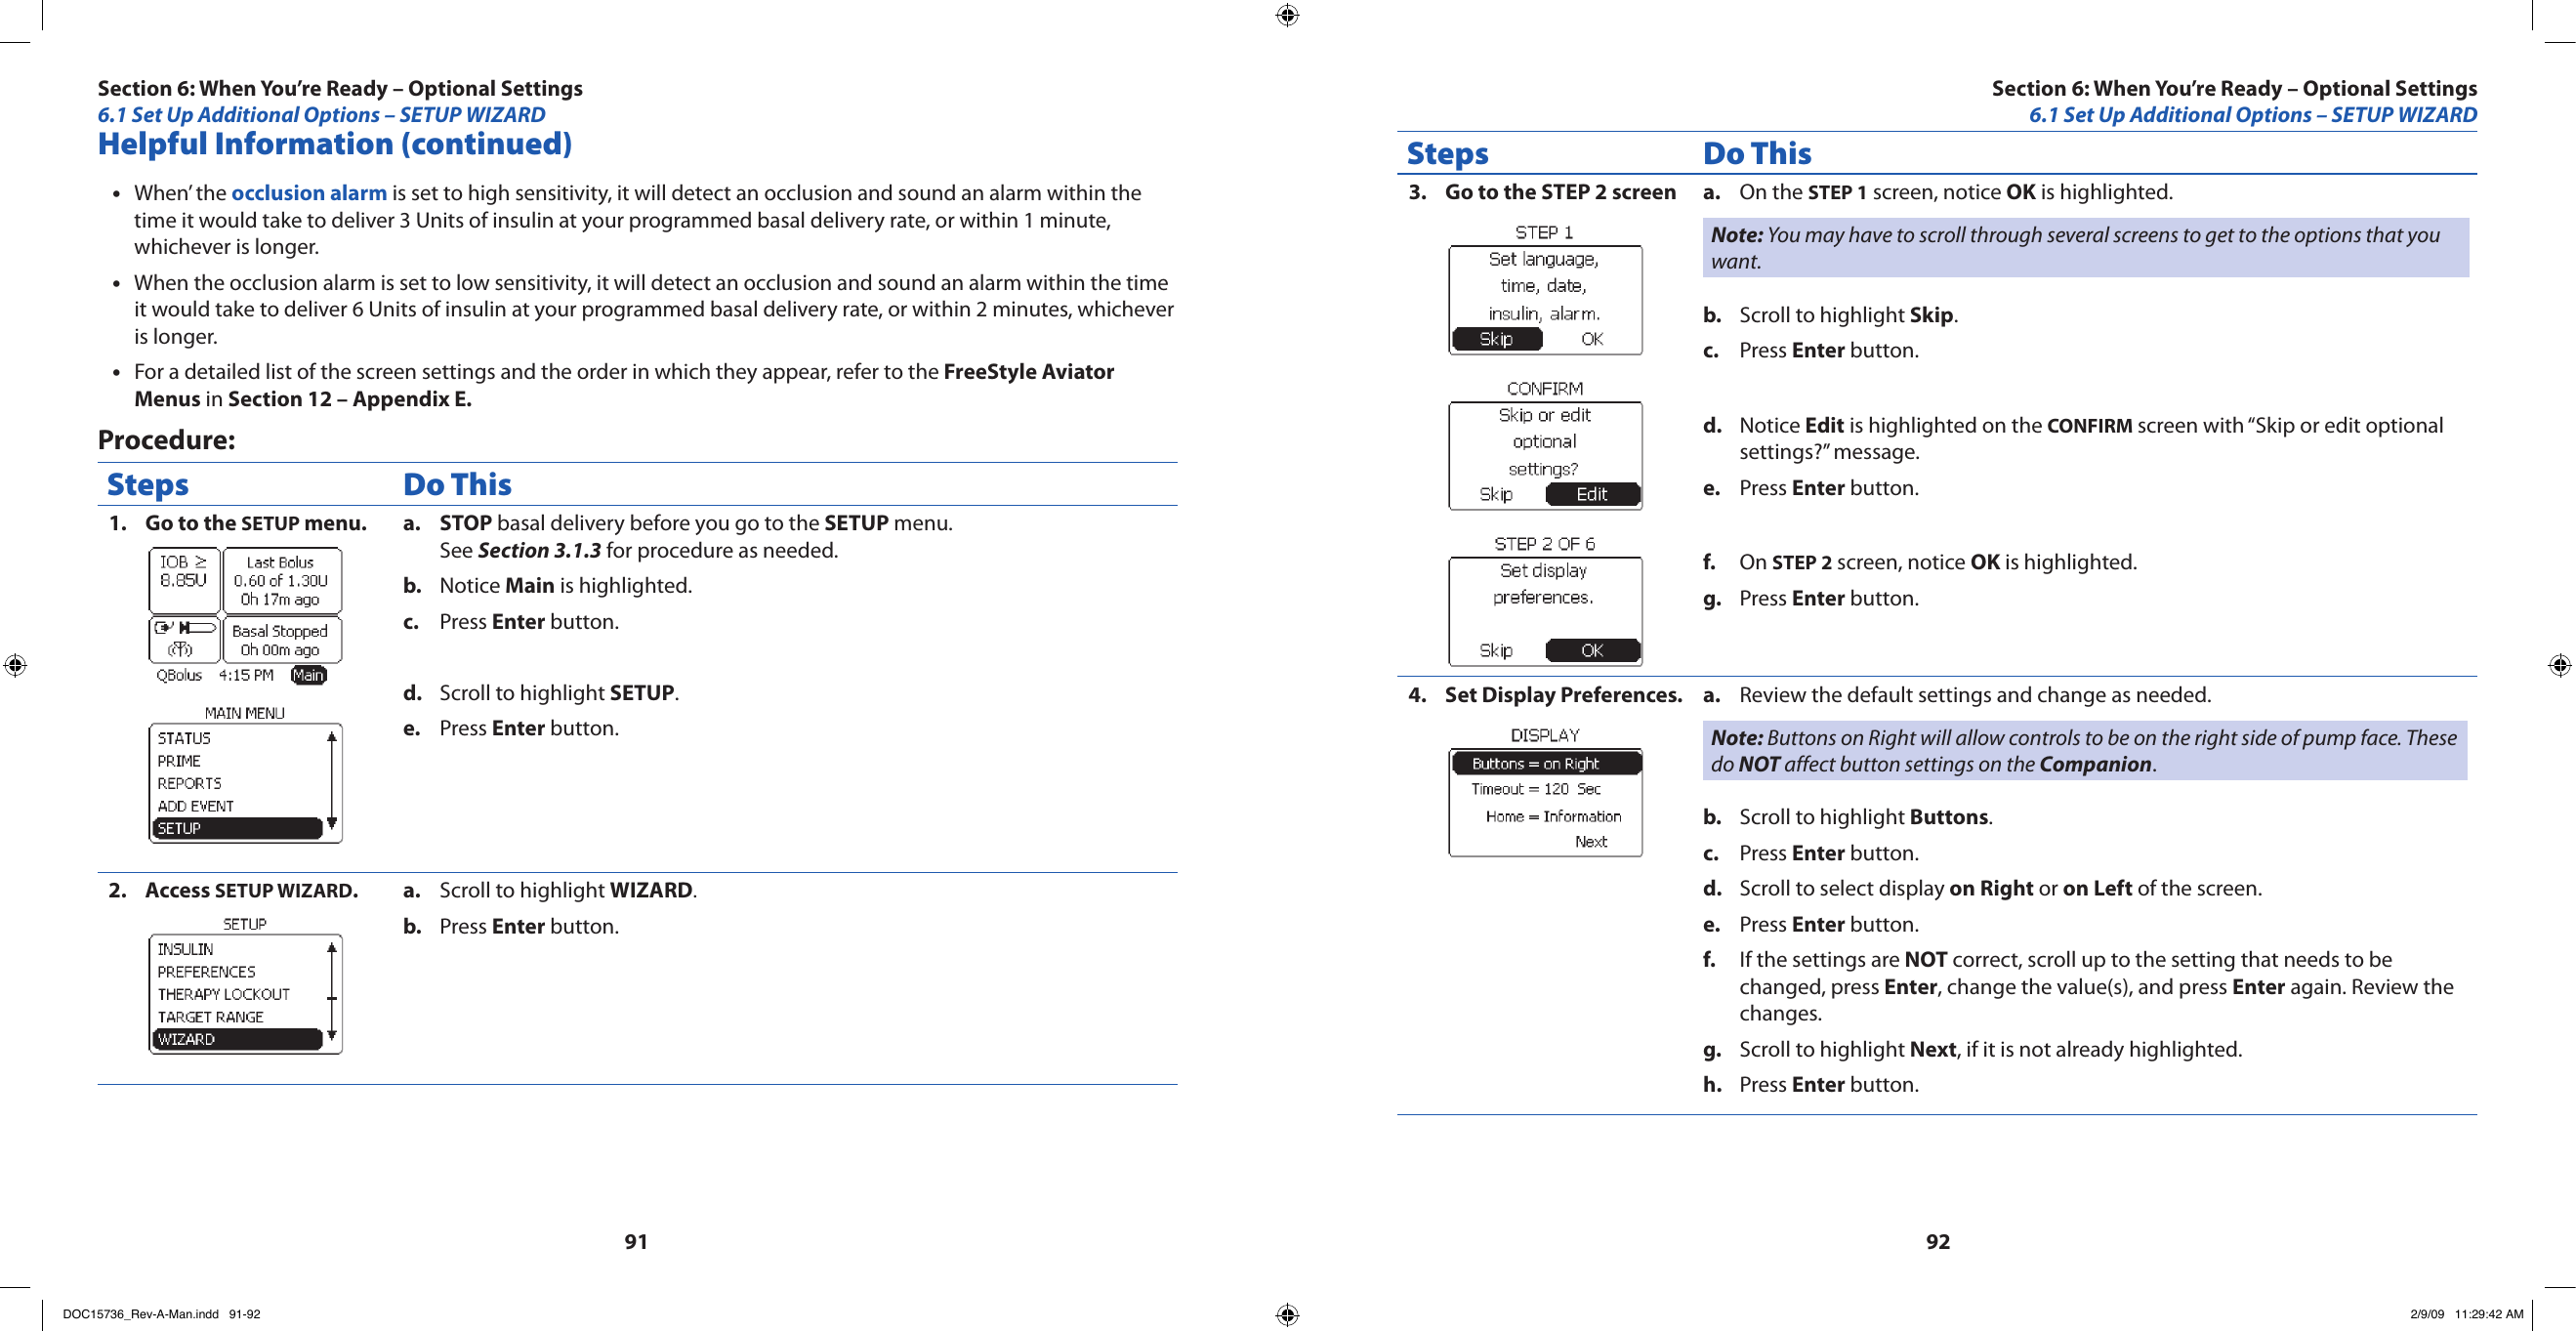
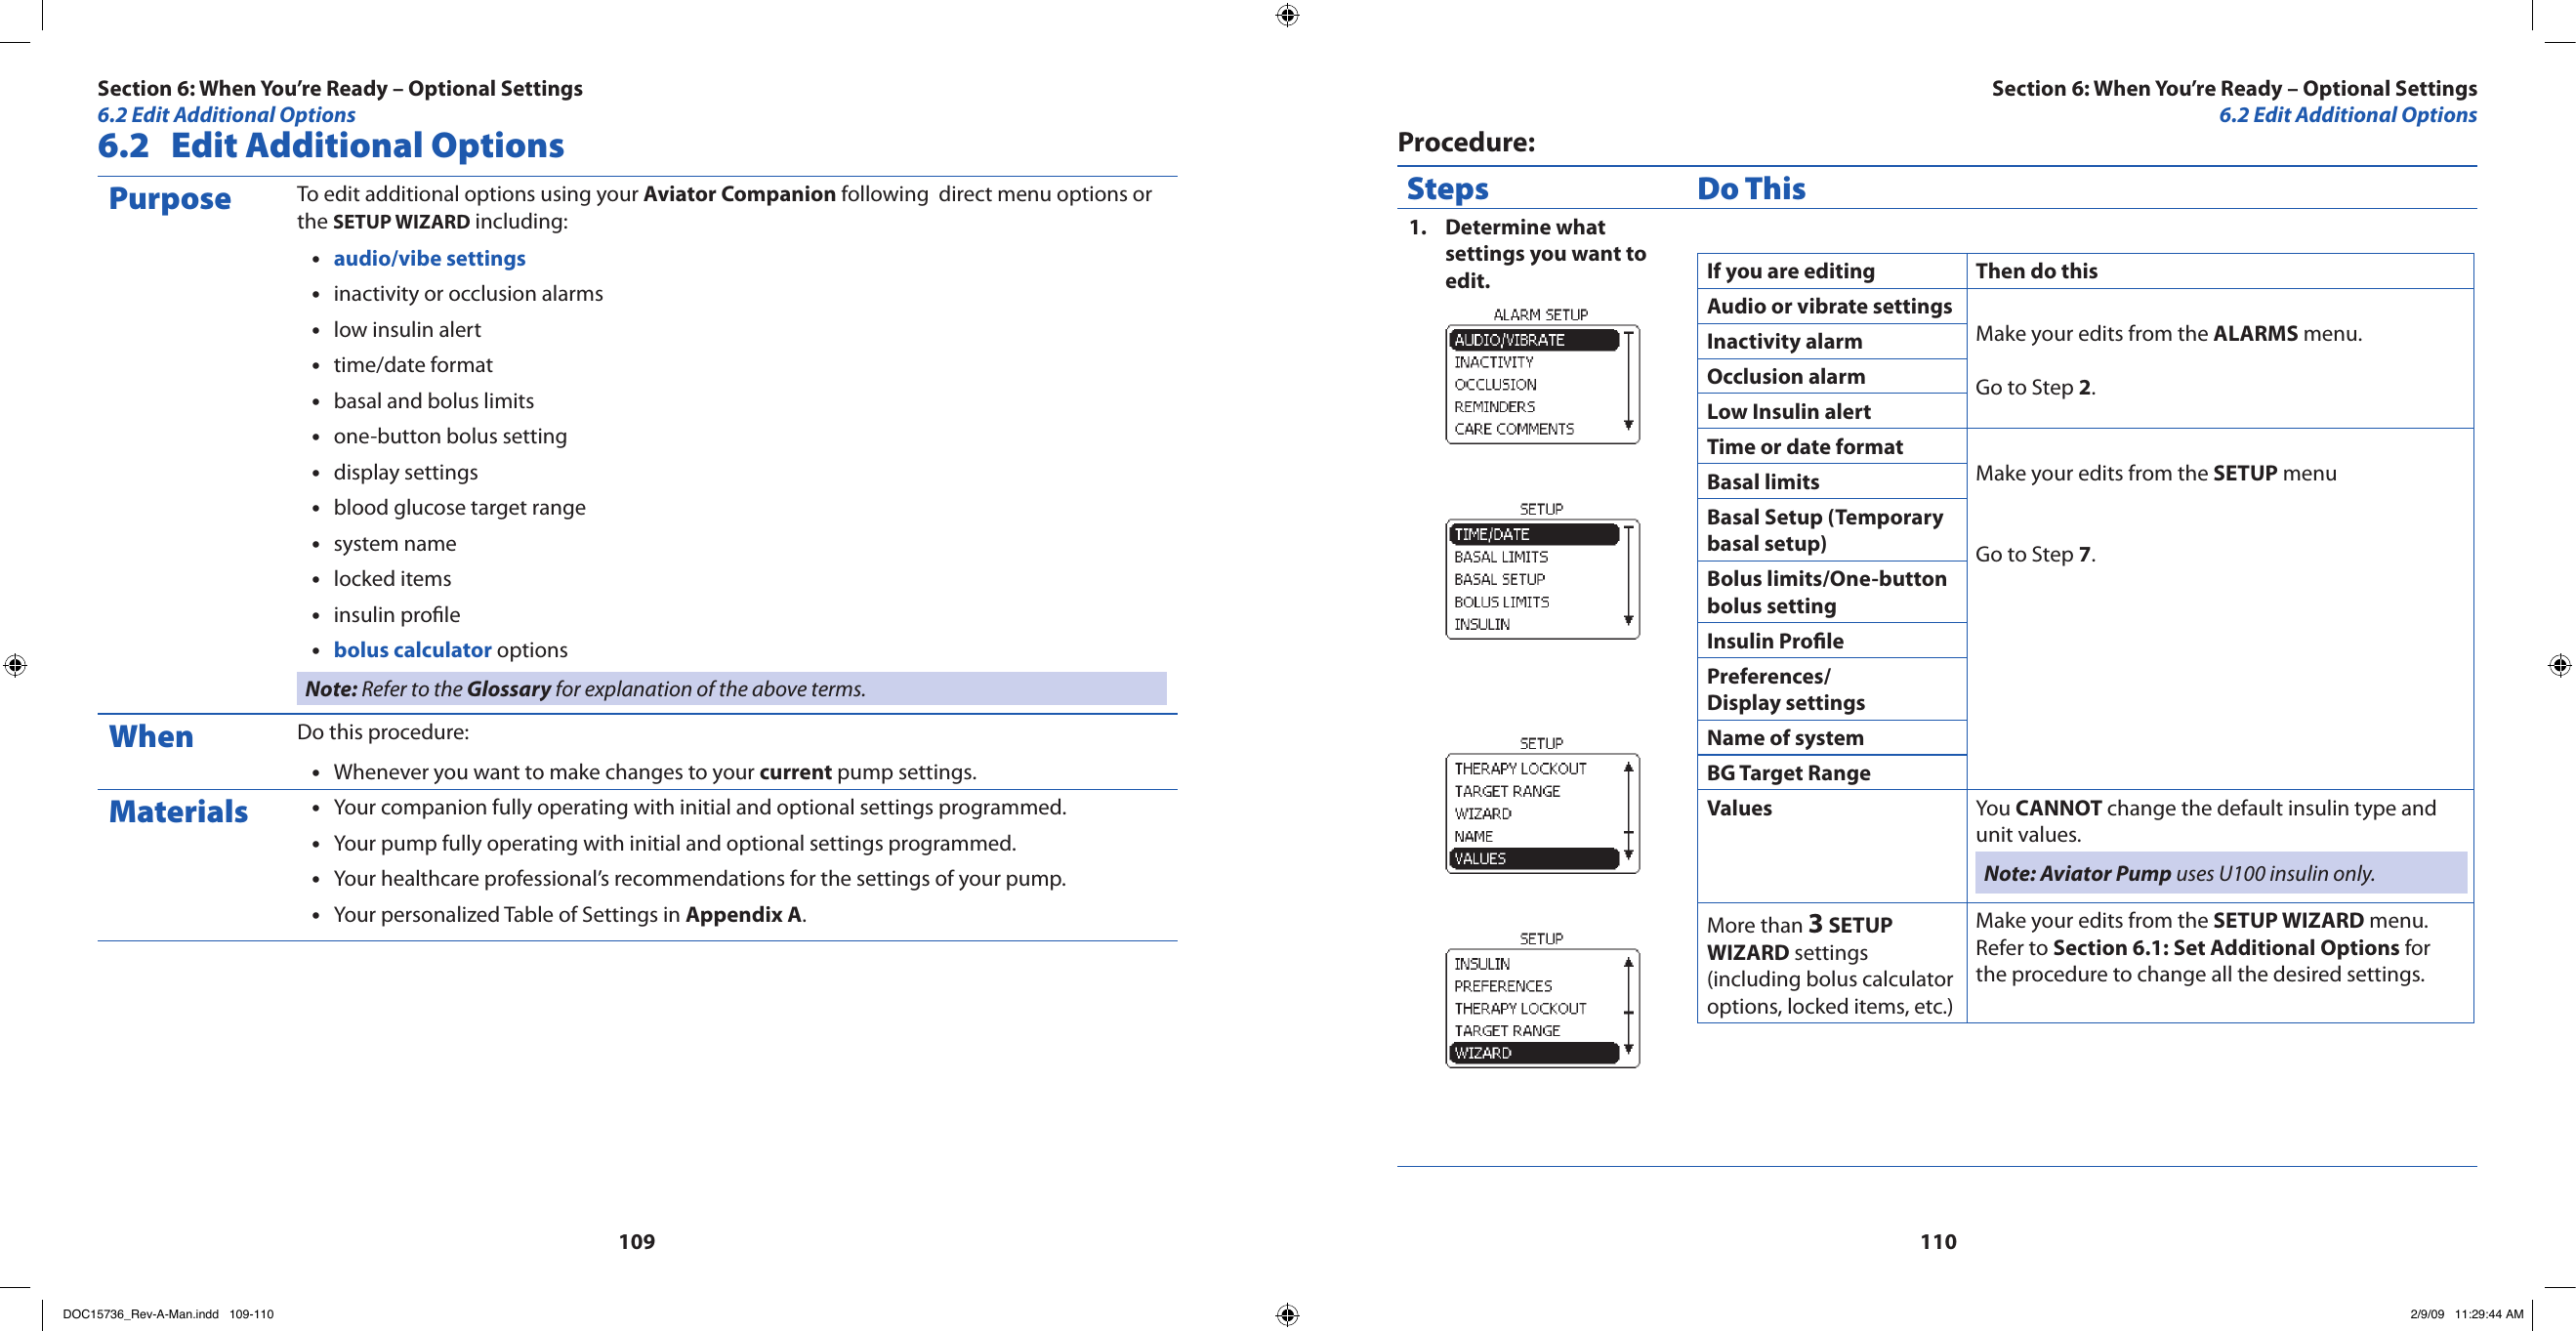
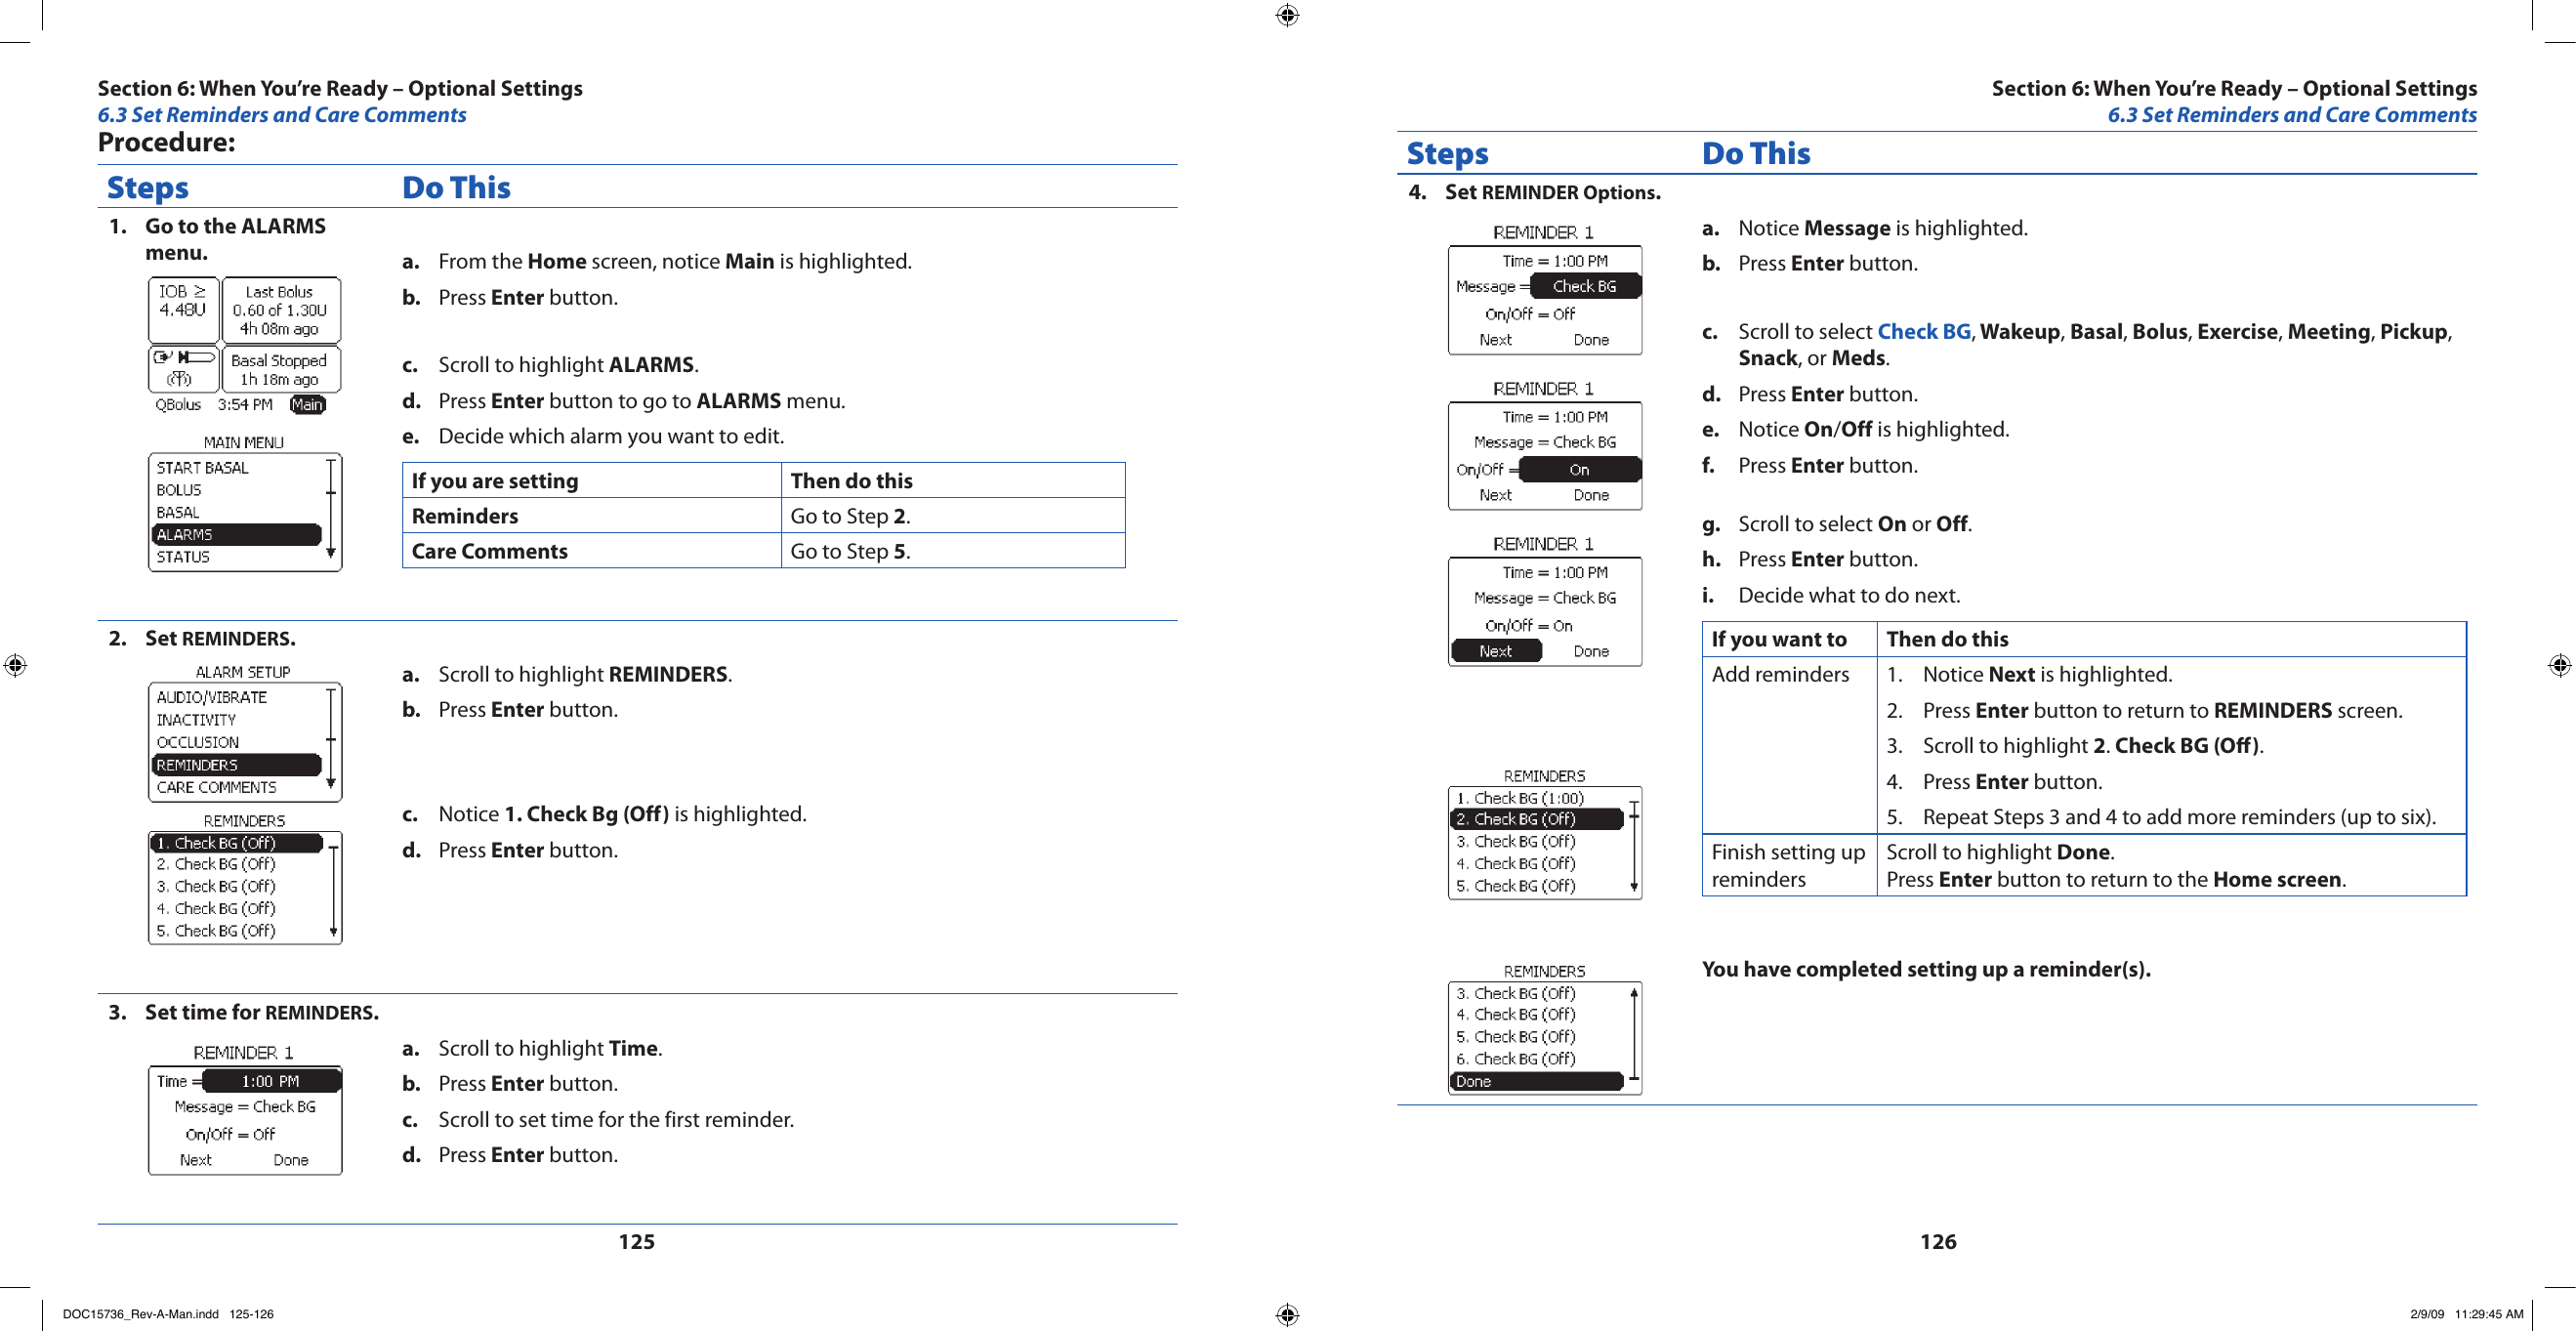
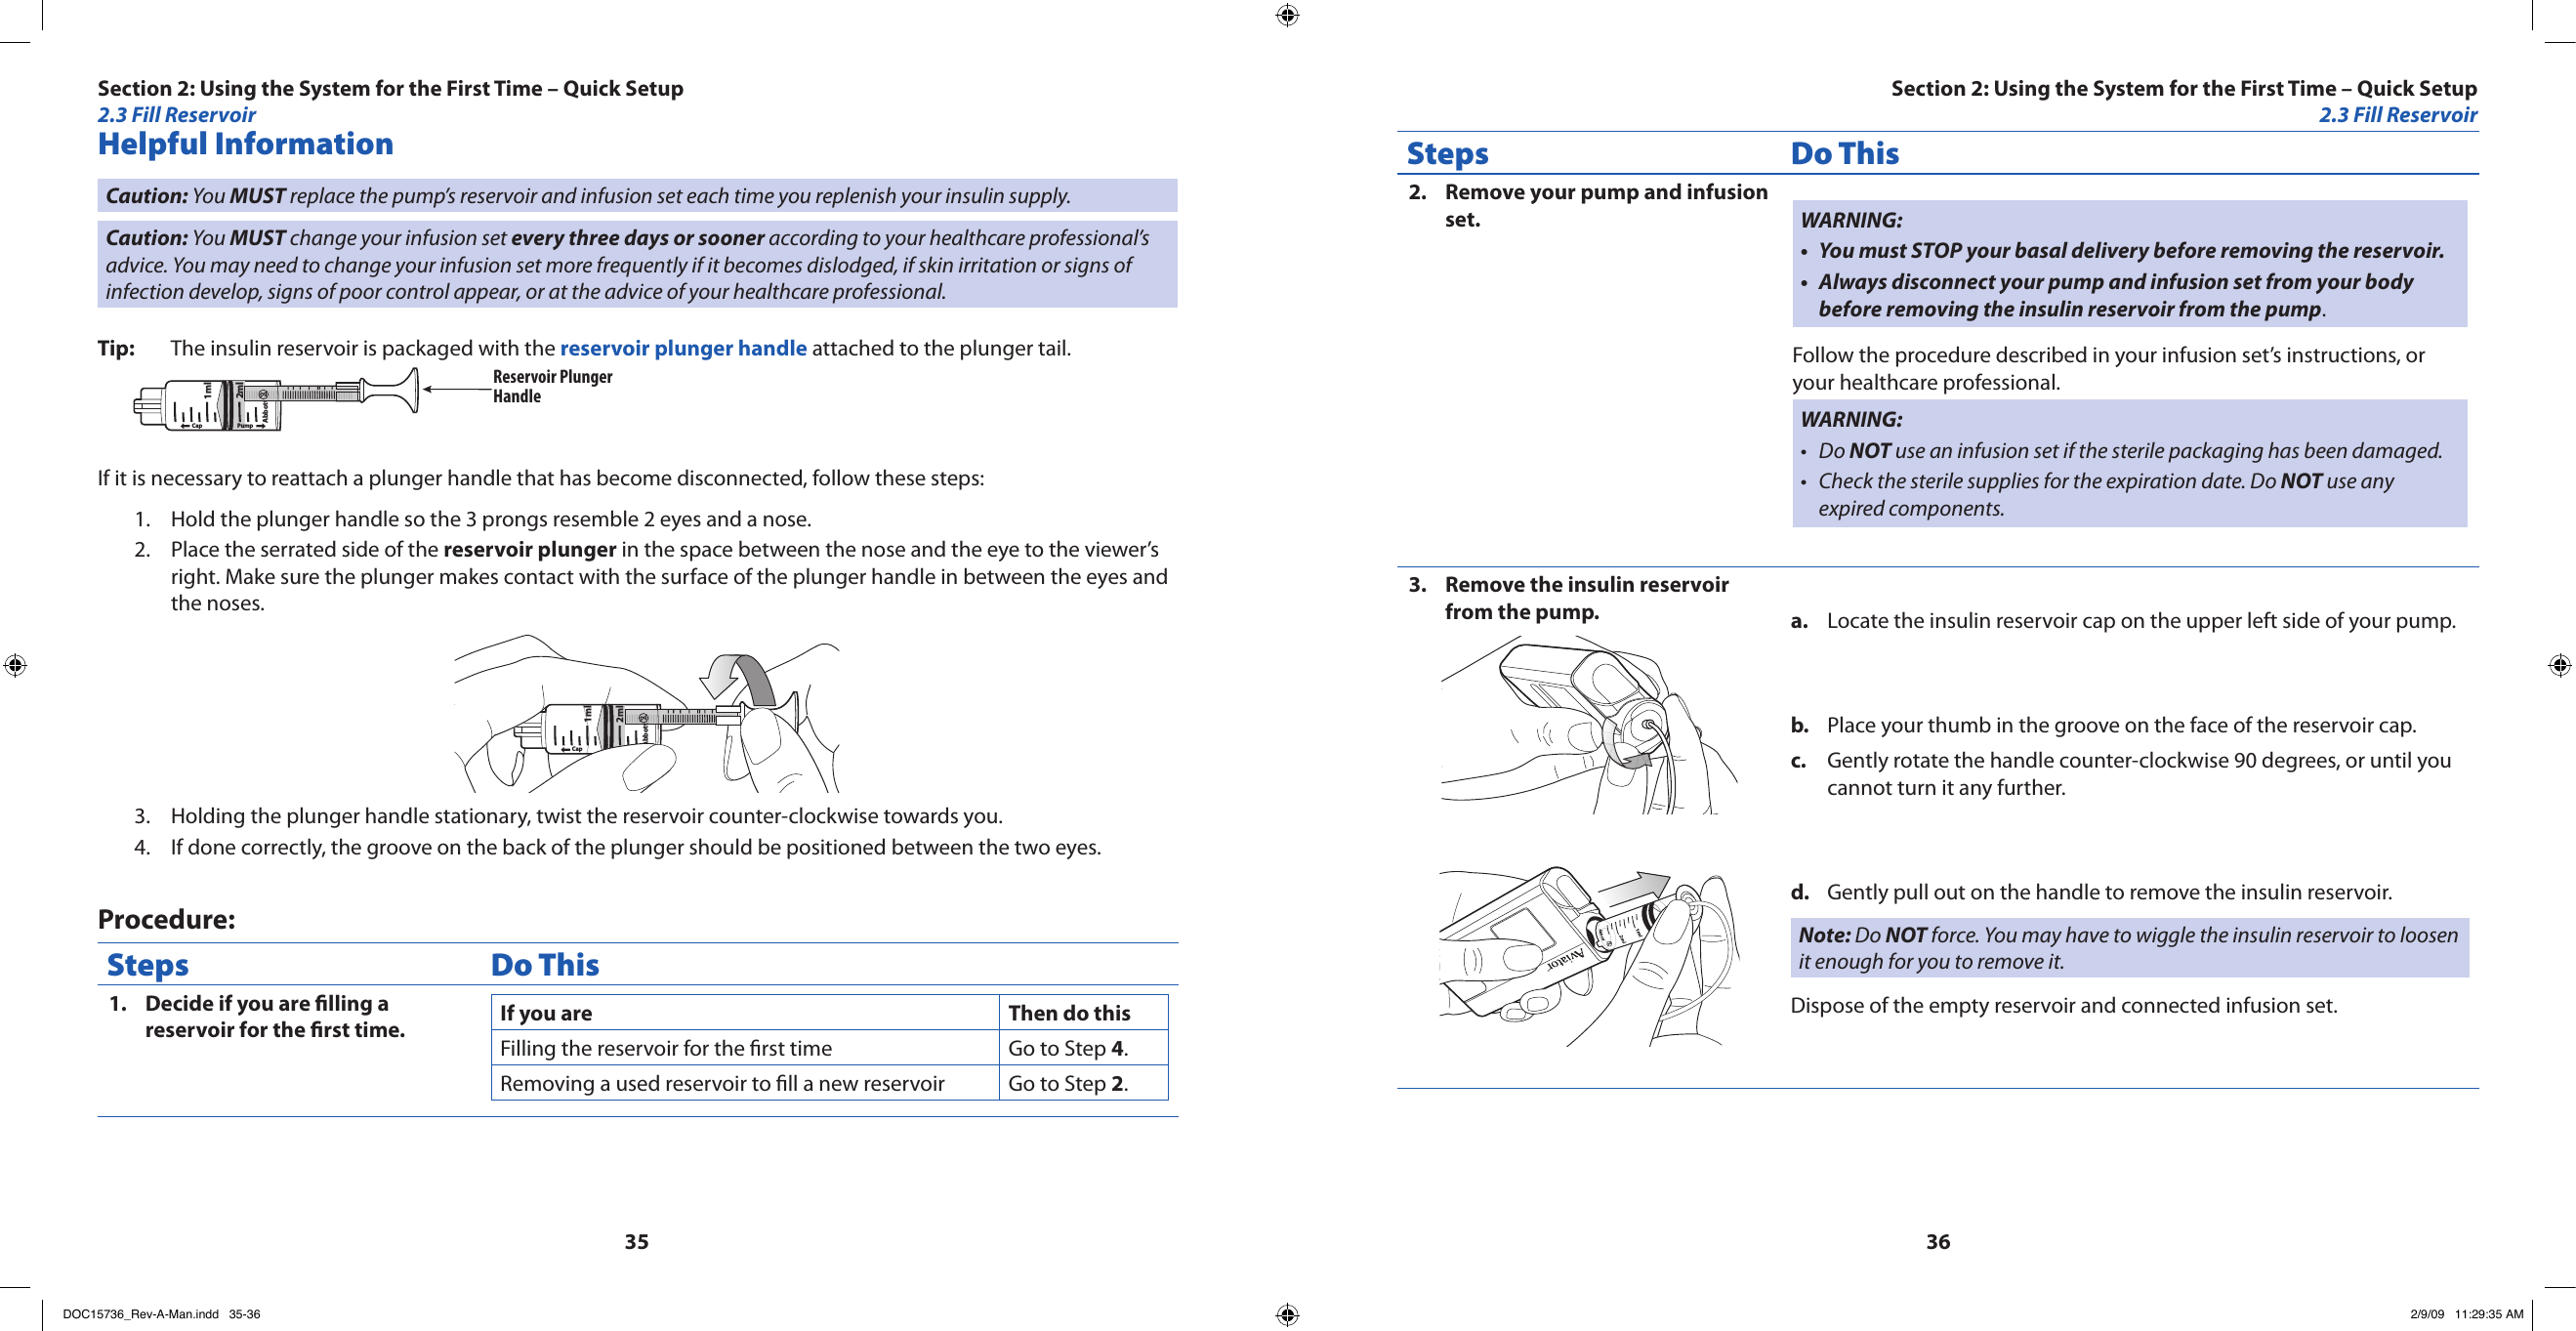
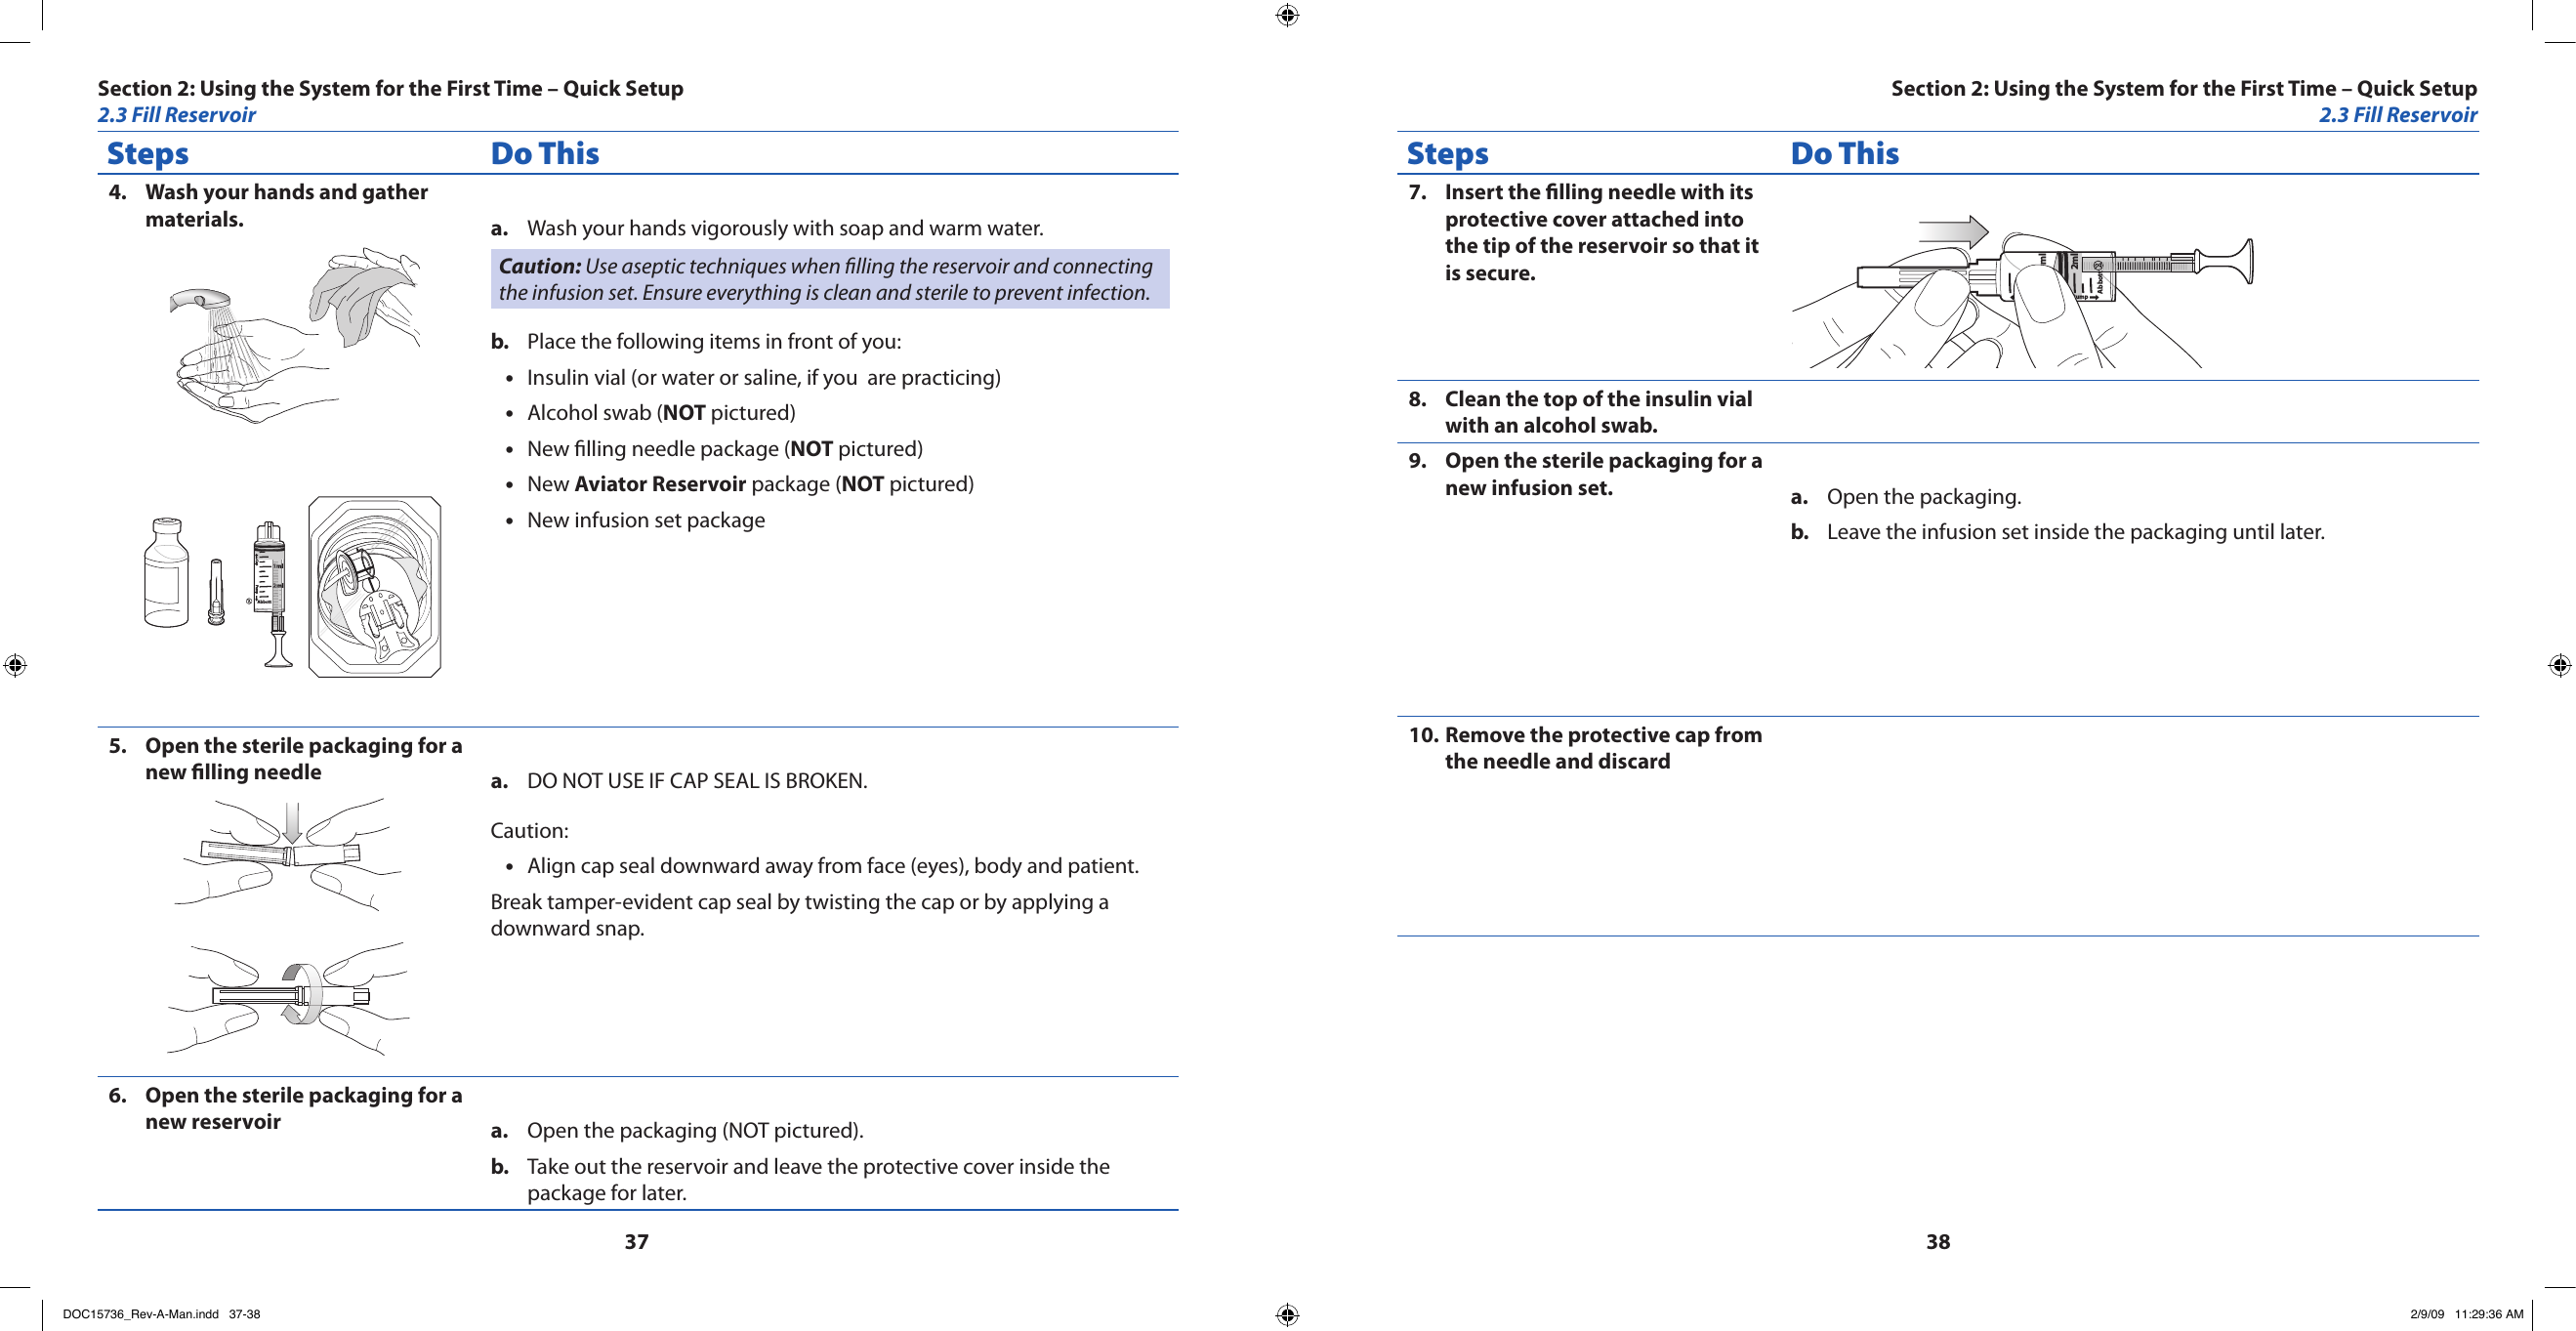
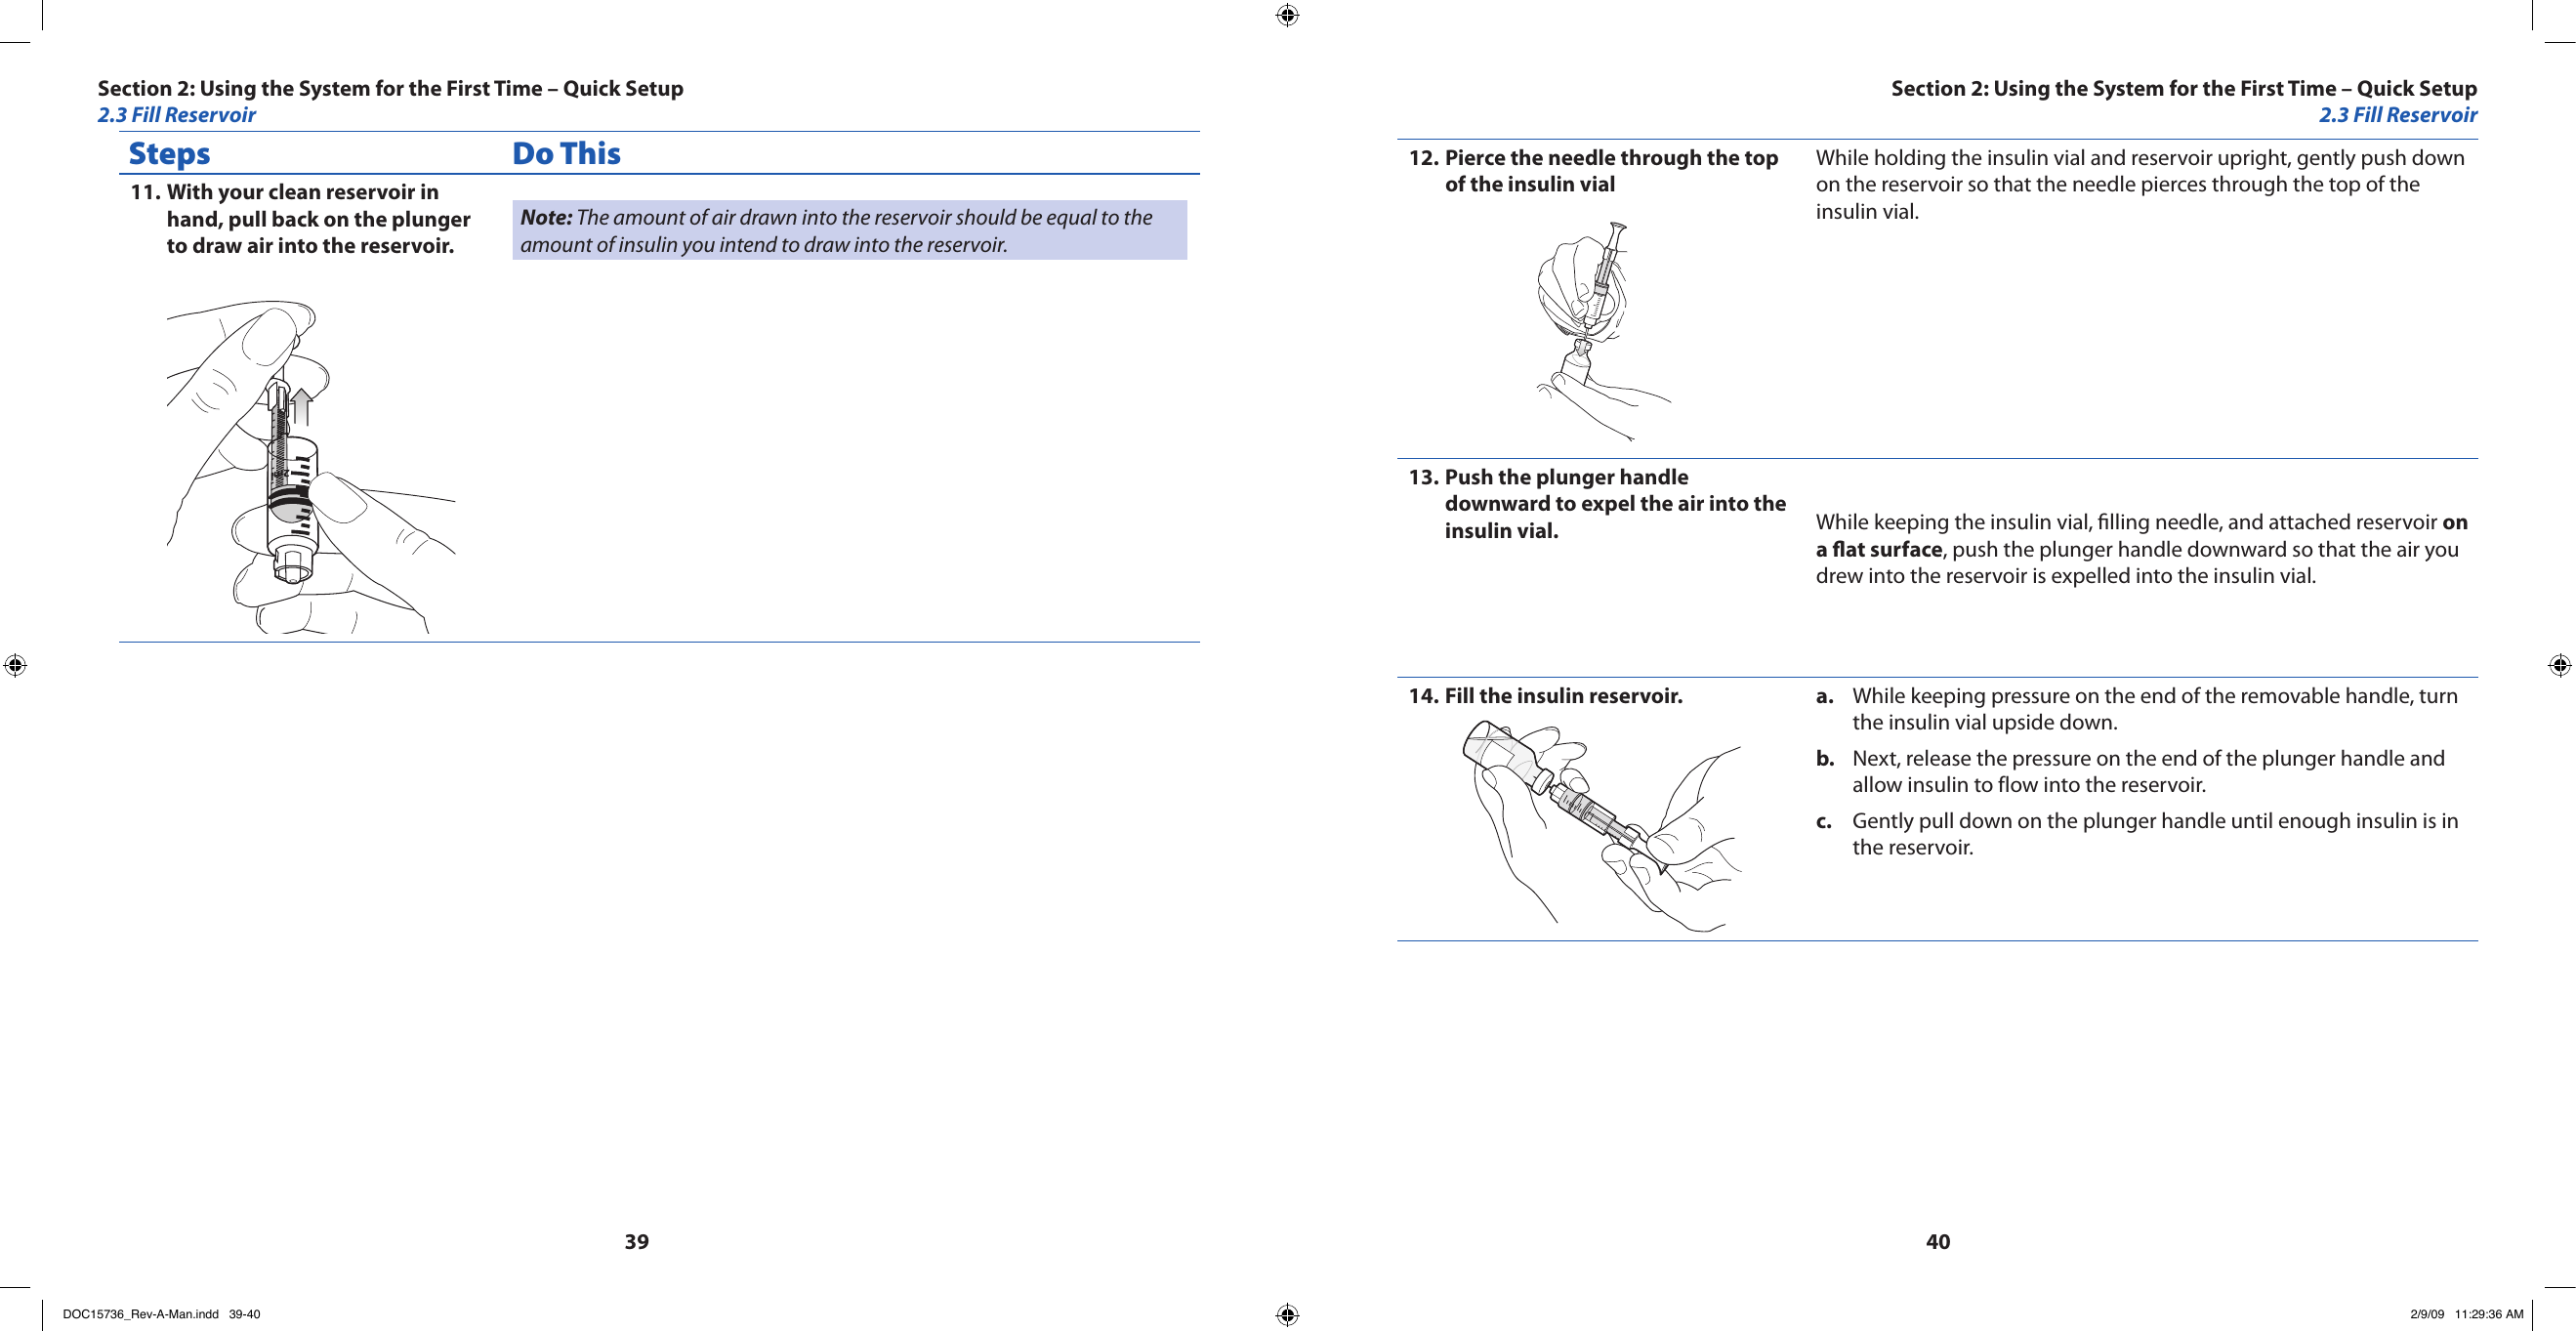
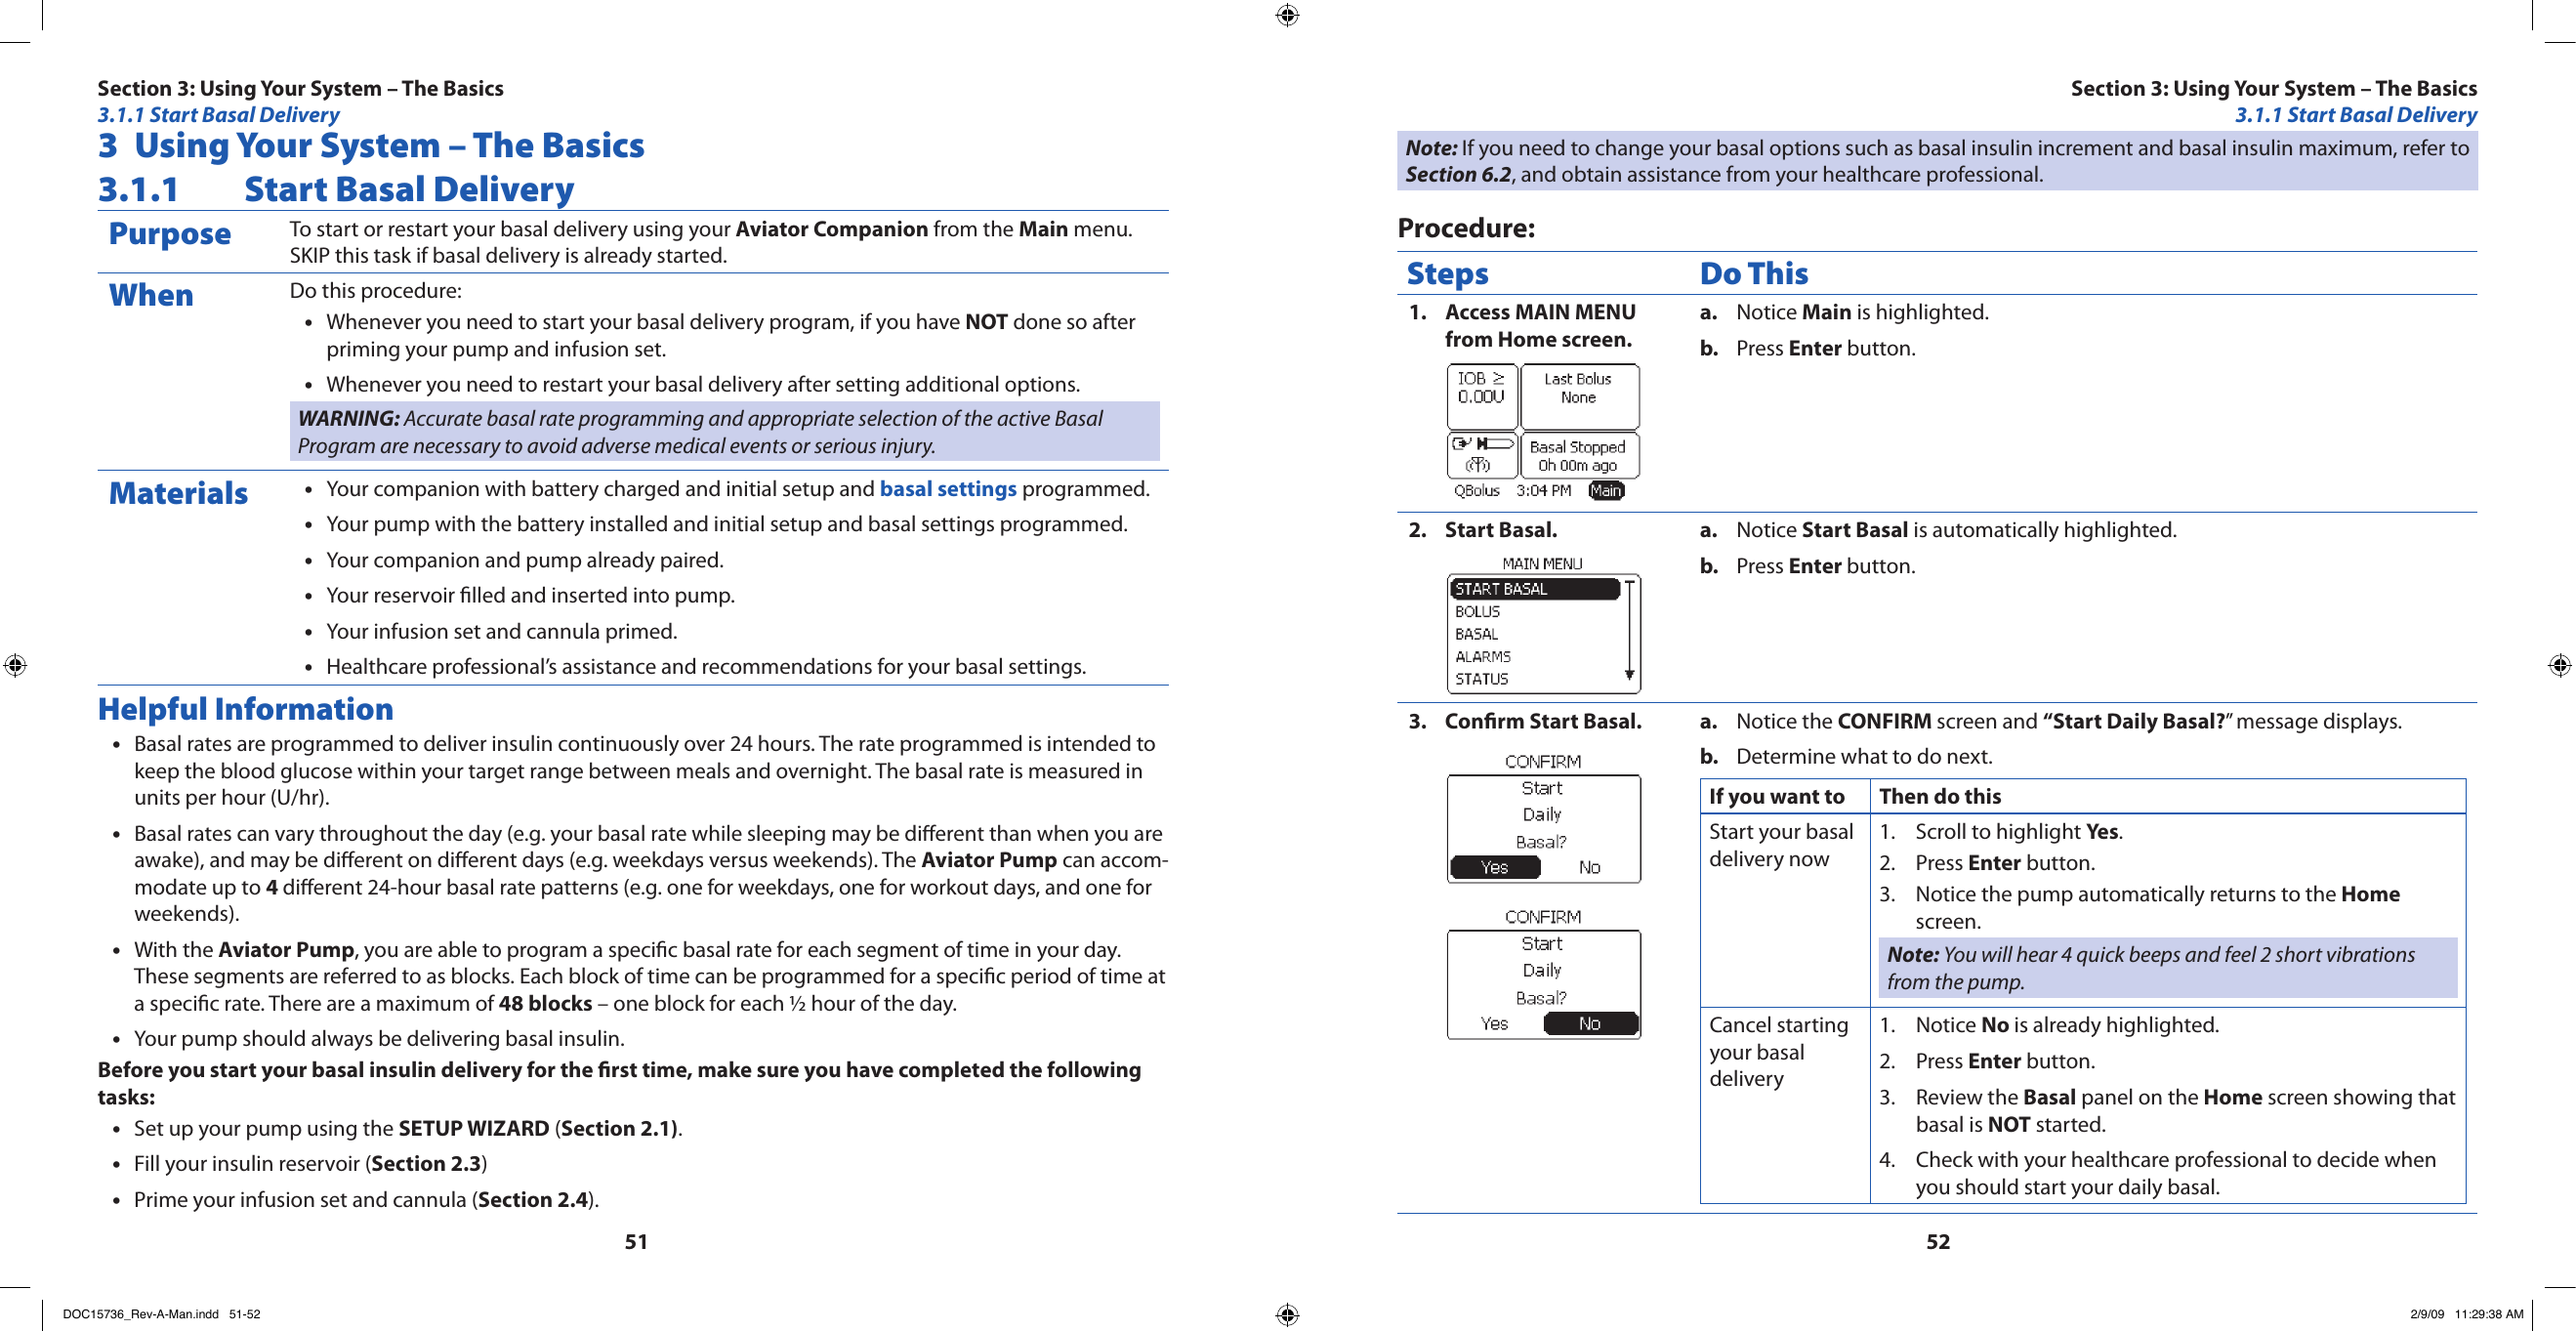
![33342.3 Fill ReservoirPurpose To ll the pump’s reservoir with insulin for delivery.WhenDo this procedure when you:Need to ll your • insulin reservoir.Caution: When your insulin supply is low, there will be a Low Insulin Alert or Insulin Empty alarm. Also, the insulin icon in the Levels panel on the Home screen will show the level of insulin in the reservoir.Want to practice lling the insulin reservoir.•WARNING: While the pump and infusion set are disconnected from your body, you can practice lling your insulin reservoir with saline until you are comfortable with the procedure. You must dispose of the used infusion set and reservoir after practicing. Do NOT rell the reservoir.WARNING: Insulin that has been degraded by environmental conditions [extreme heat over 104ºF (40º C), extreme cold below 30ºF (-1º C), has clots, etc.] may cause adverse medical events or serious injury. Discard any insulin that has been exposed to extreme temperatures.WARNING: ALWAYS disconnect your pump and infusion set from your body before removing the insulin reservoir from the pump. There is a possibility of occurrence of adverse medical events or serious injury if the reservoir is NOT installed in the pump and the reservoir is accidentally pressed or hit.Materials Gather these materials before you begin:Package containing the reservoir with the removable plunger handle attached to •the reservoir plunger and a reservoir protective cap (female luer cap).WARNING: Your pump’s reservoir is for single use only. Use only the Aviator-compatible reservoir intended for your pump. Do NOT substitute with any other reservoir. Do NOT reuse the plastic reservoir. It is intended to work best when replaced after one use.Insulin (or water or saline, if you are practicing).WARNING: Do NOT allow any insulin or uid to get into the reservoir compartment.WARNING: Before lling the reservoir, make sure your insulin is at room temperature to limit the amount of bubbles. If you have questions about the correct temperature, consult your insulin manufacturer’s product insert or your healthcare professional.WARNING: Use only rapid-acting or short-acting U-100 insulin with the Aviator Pump. Use of another type of insulin may result in adverse medical events or serious injury.The following insulins have been tested by Abbott Diabetes Care, Inc. and found to be safe for use in the Aviator Pump: Humalog ®, Apidra®, Novolog®, and regular insulin. Before using a dierent insulin with this pump, check the insulin label to make sure the insulin can be used with the pump.Package for the • lling needle.Use in conjunction with one of the following: Tyco Healthcare Kendall Monoject™ 22 GA (0.7mm) x 1” (25.4mm) - Part Number 8881 250222Tyco Healthcare Kendall Monoject™ 23 GA (0.6mm) x 1/2” (12.7mm) - Part Number 8881 250263 - (Available in USA only)Package for the • infusion set containing the infusion set with an attached reser-voir cap.Soap and water•Alcohol swab•Section 2: Using the System for the First Time – Quick Setup2.3 Fill ReservoirSection 2: Using the System for the First Time – Quick Setup2.3 Fill ReservoirDOC15736_Rev-A-Man.indd 33-34 2/9/09 11:29:35 AM](https://usermanual.wiki/Abbott-Diabetes-Care/AV2-C.User-manual-1-of-2/User-Guide-1071817-Page-27.png)
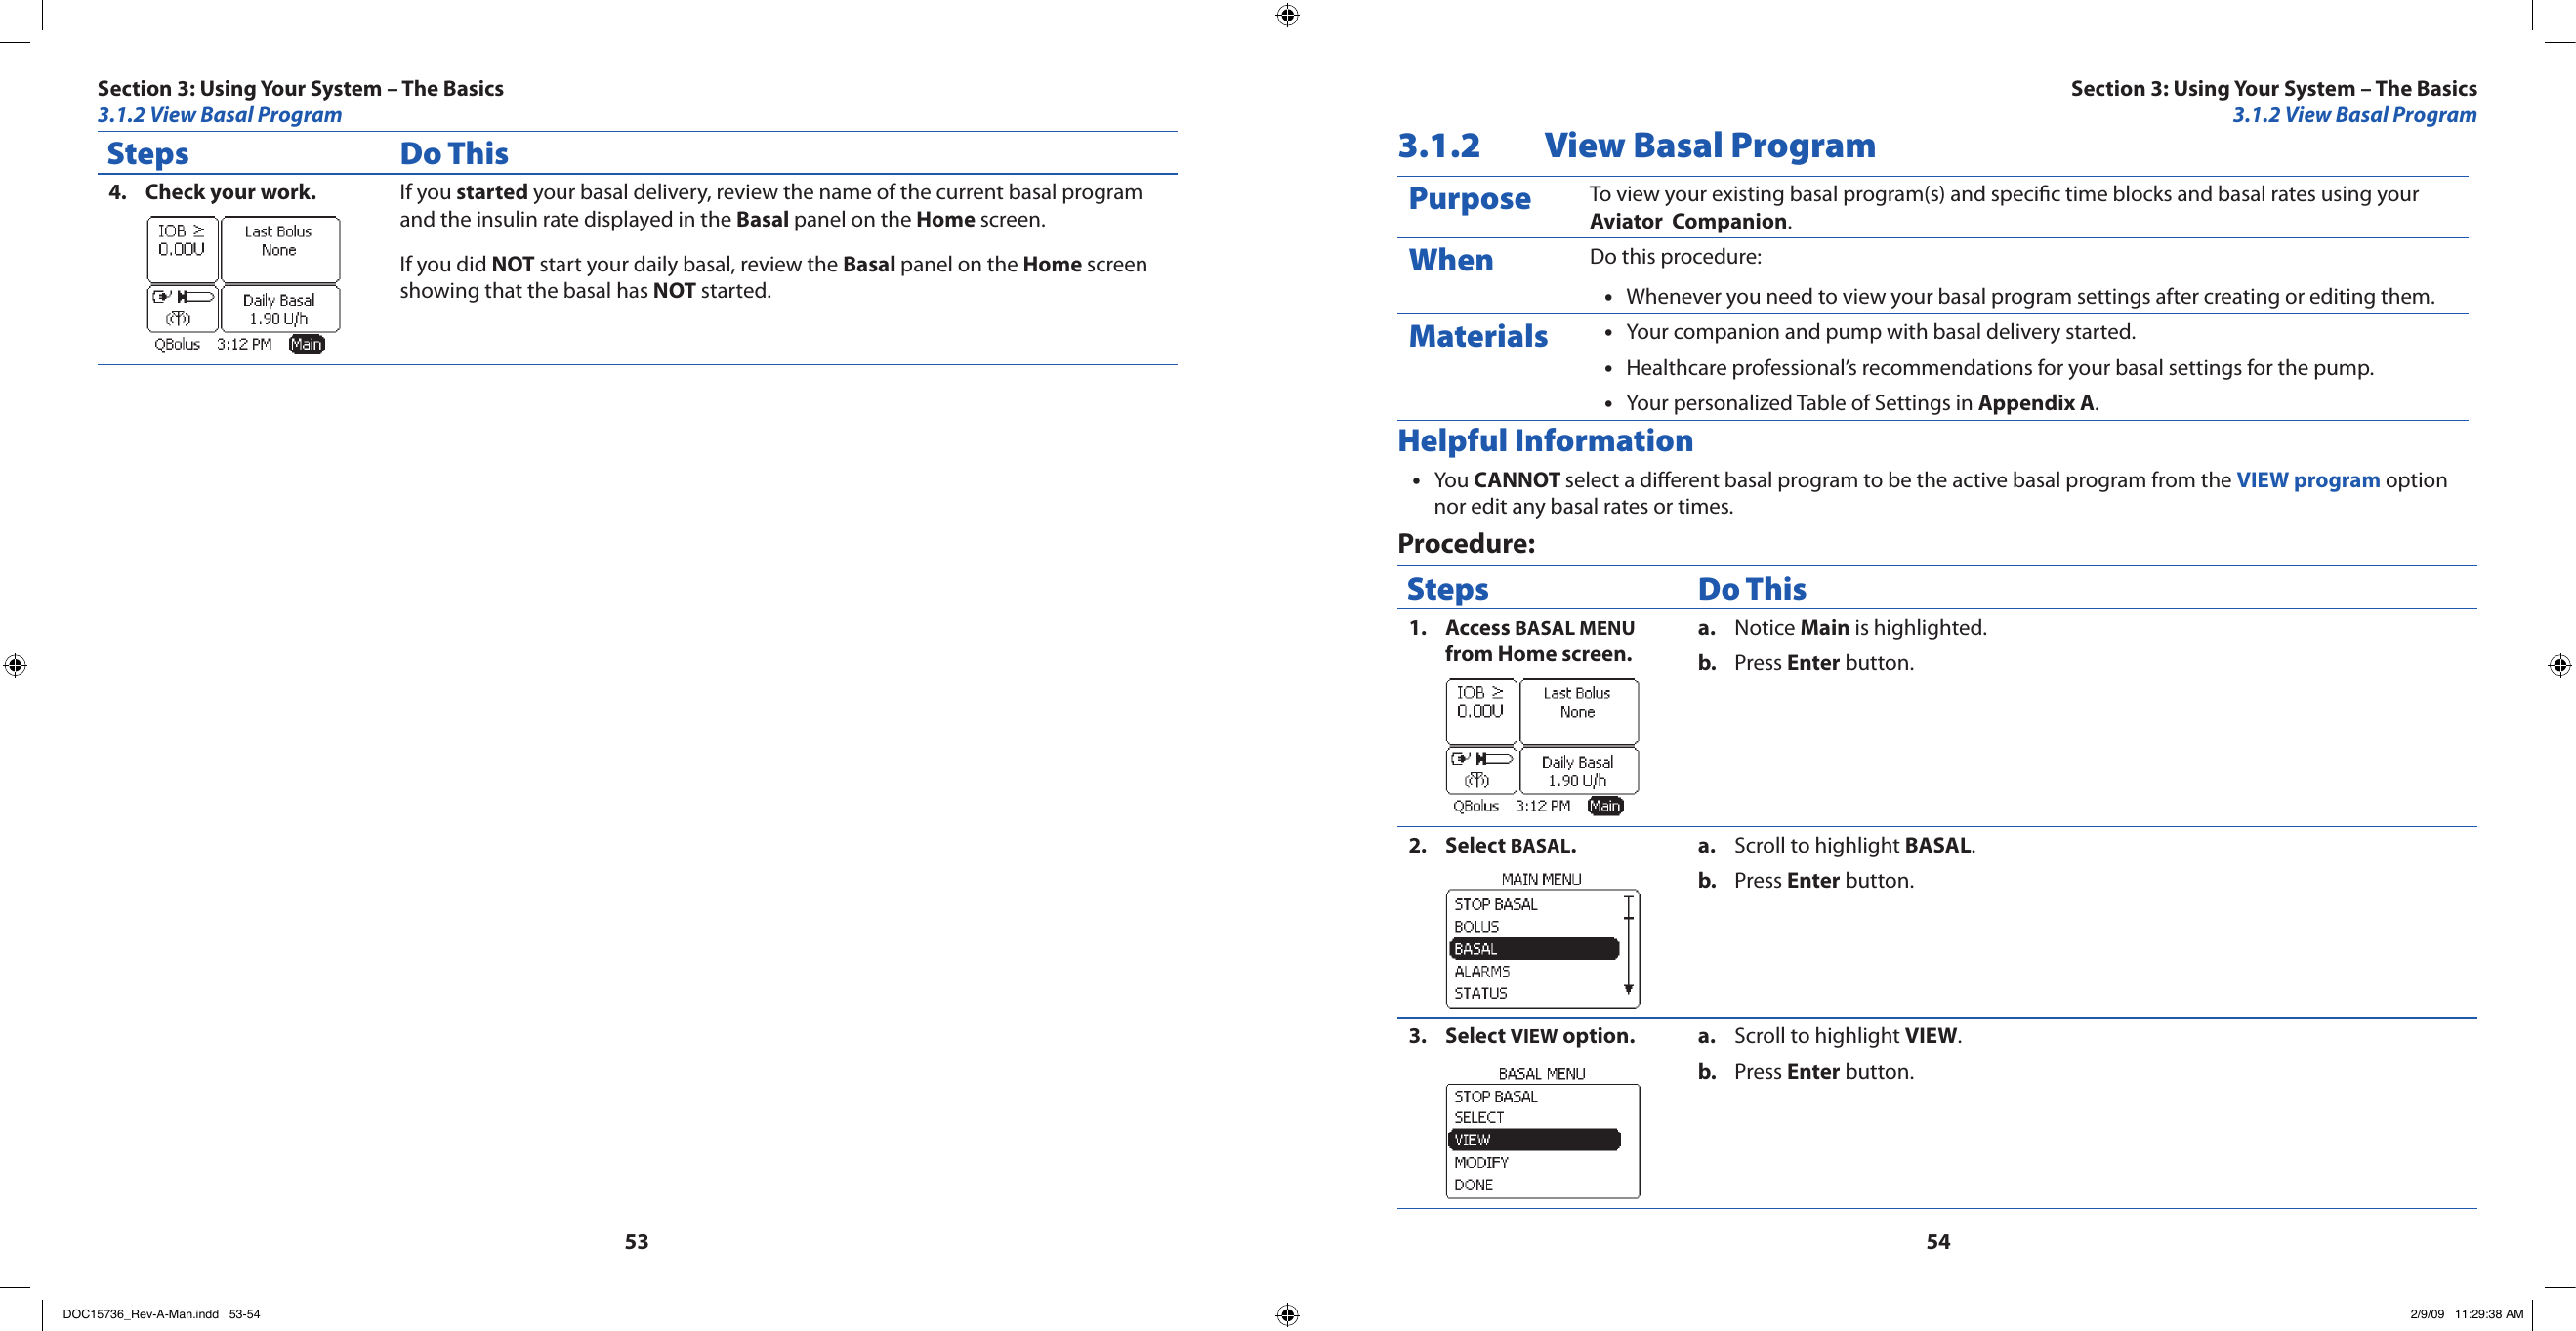

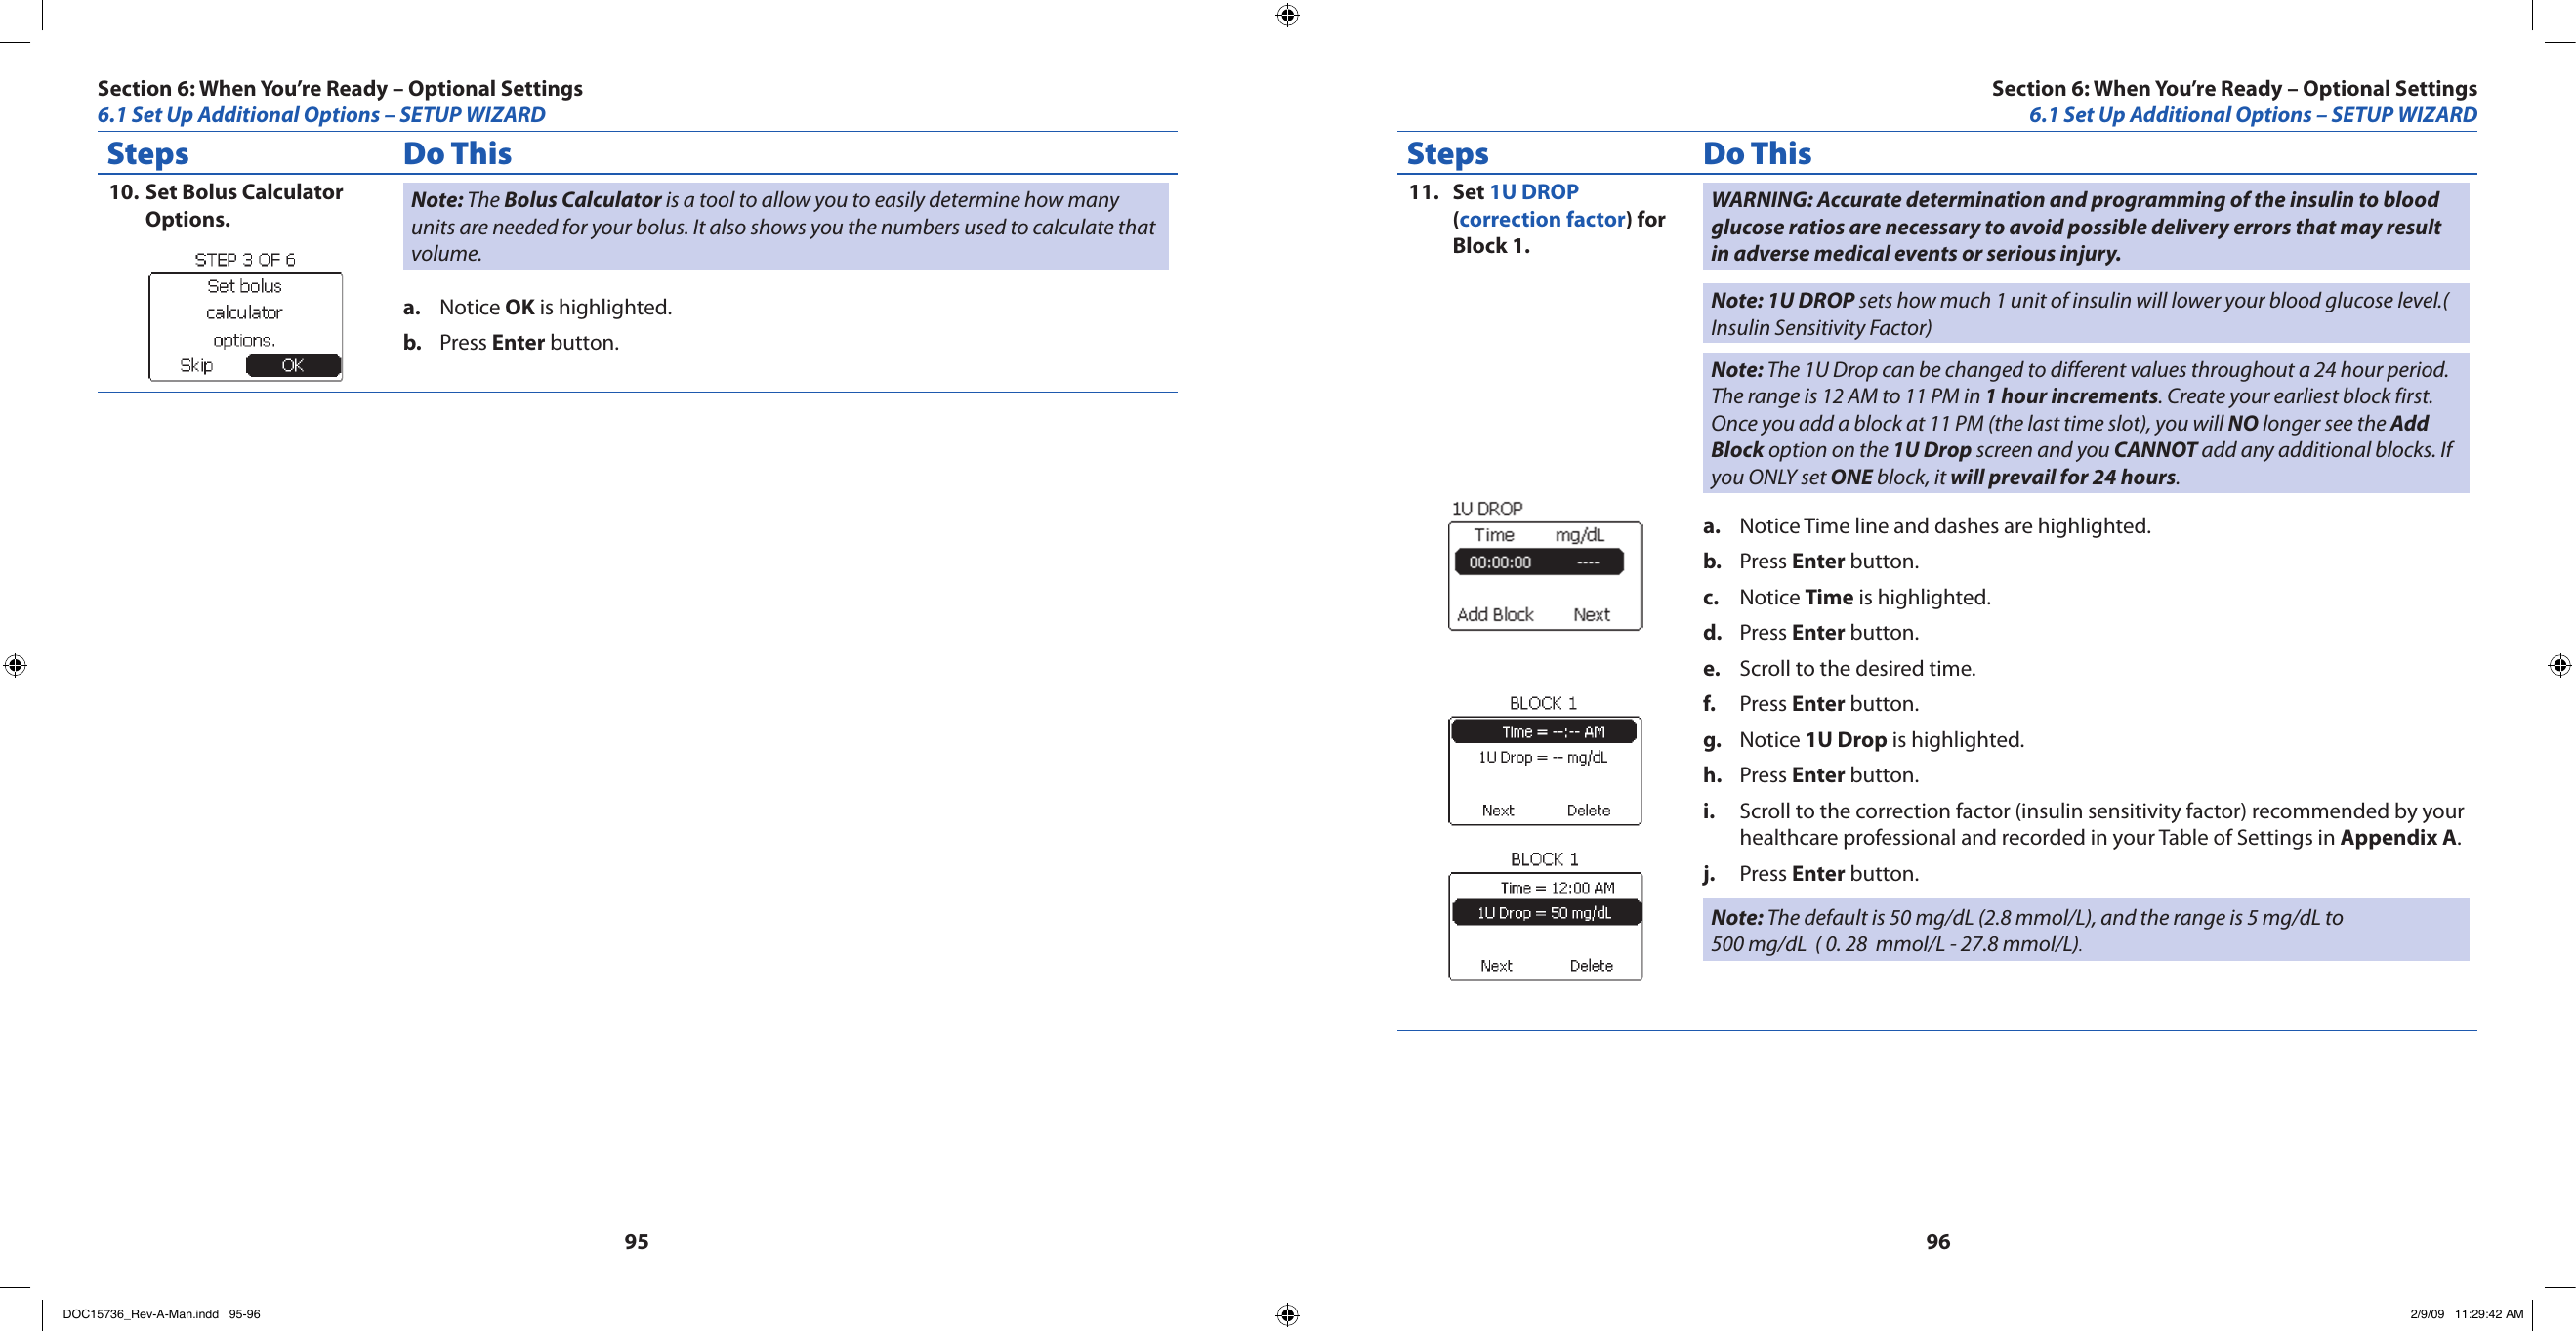
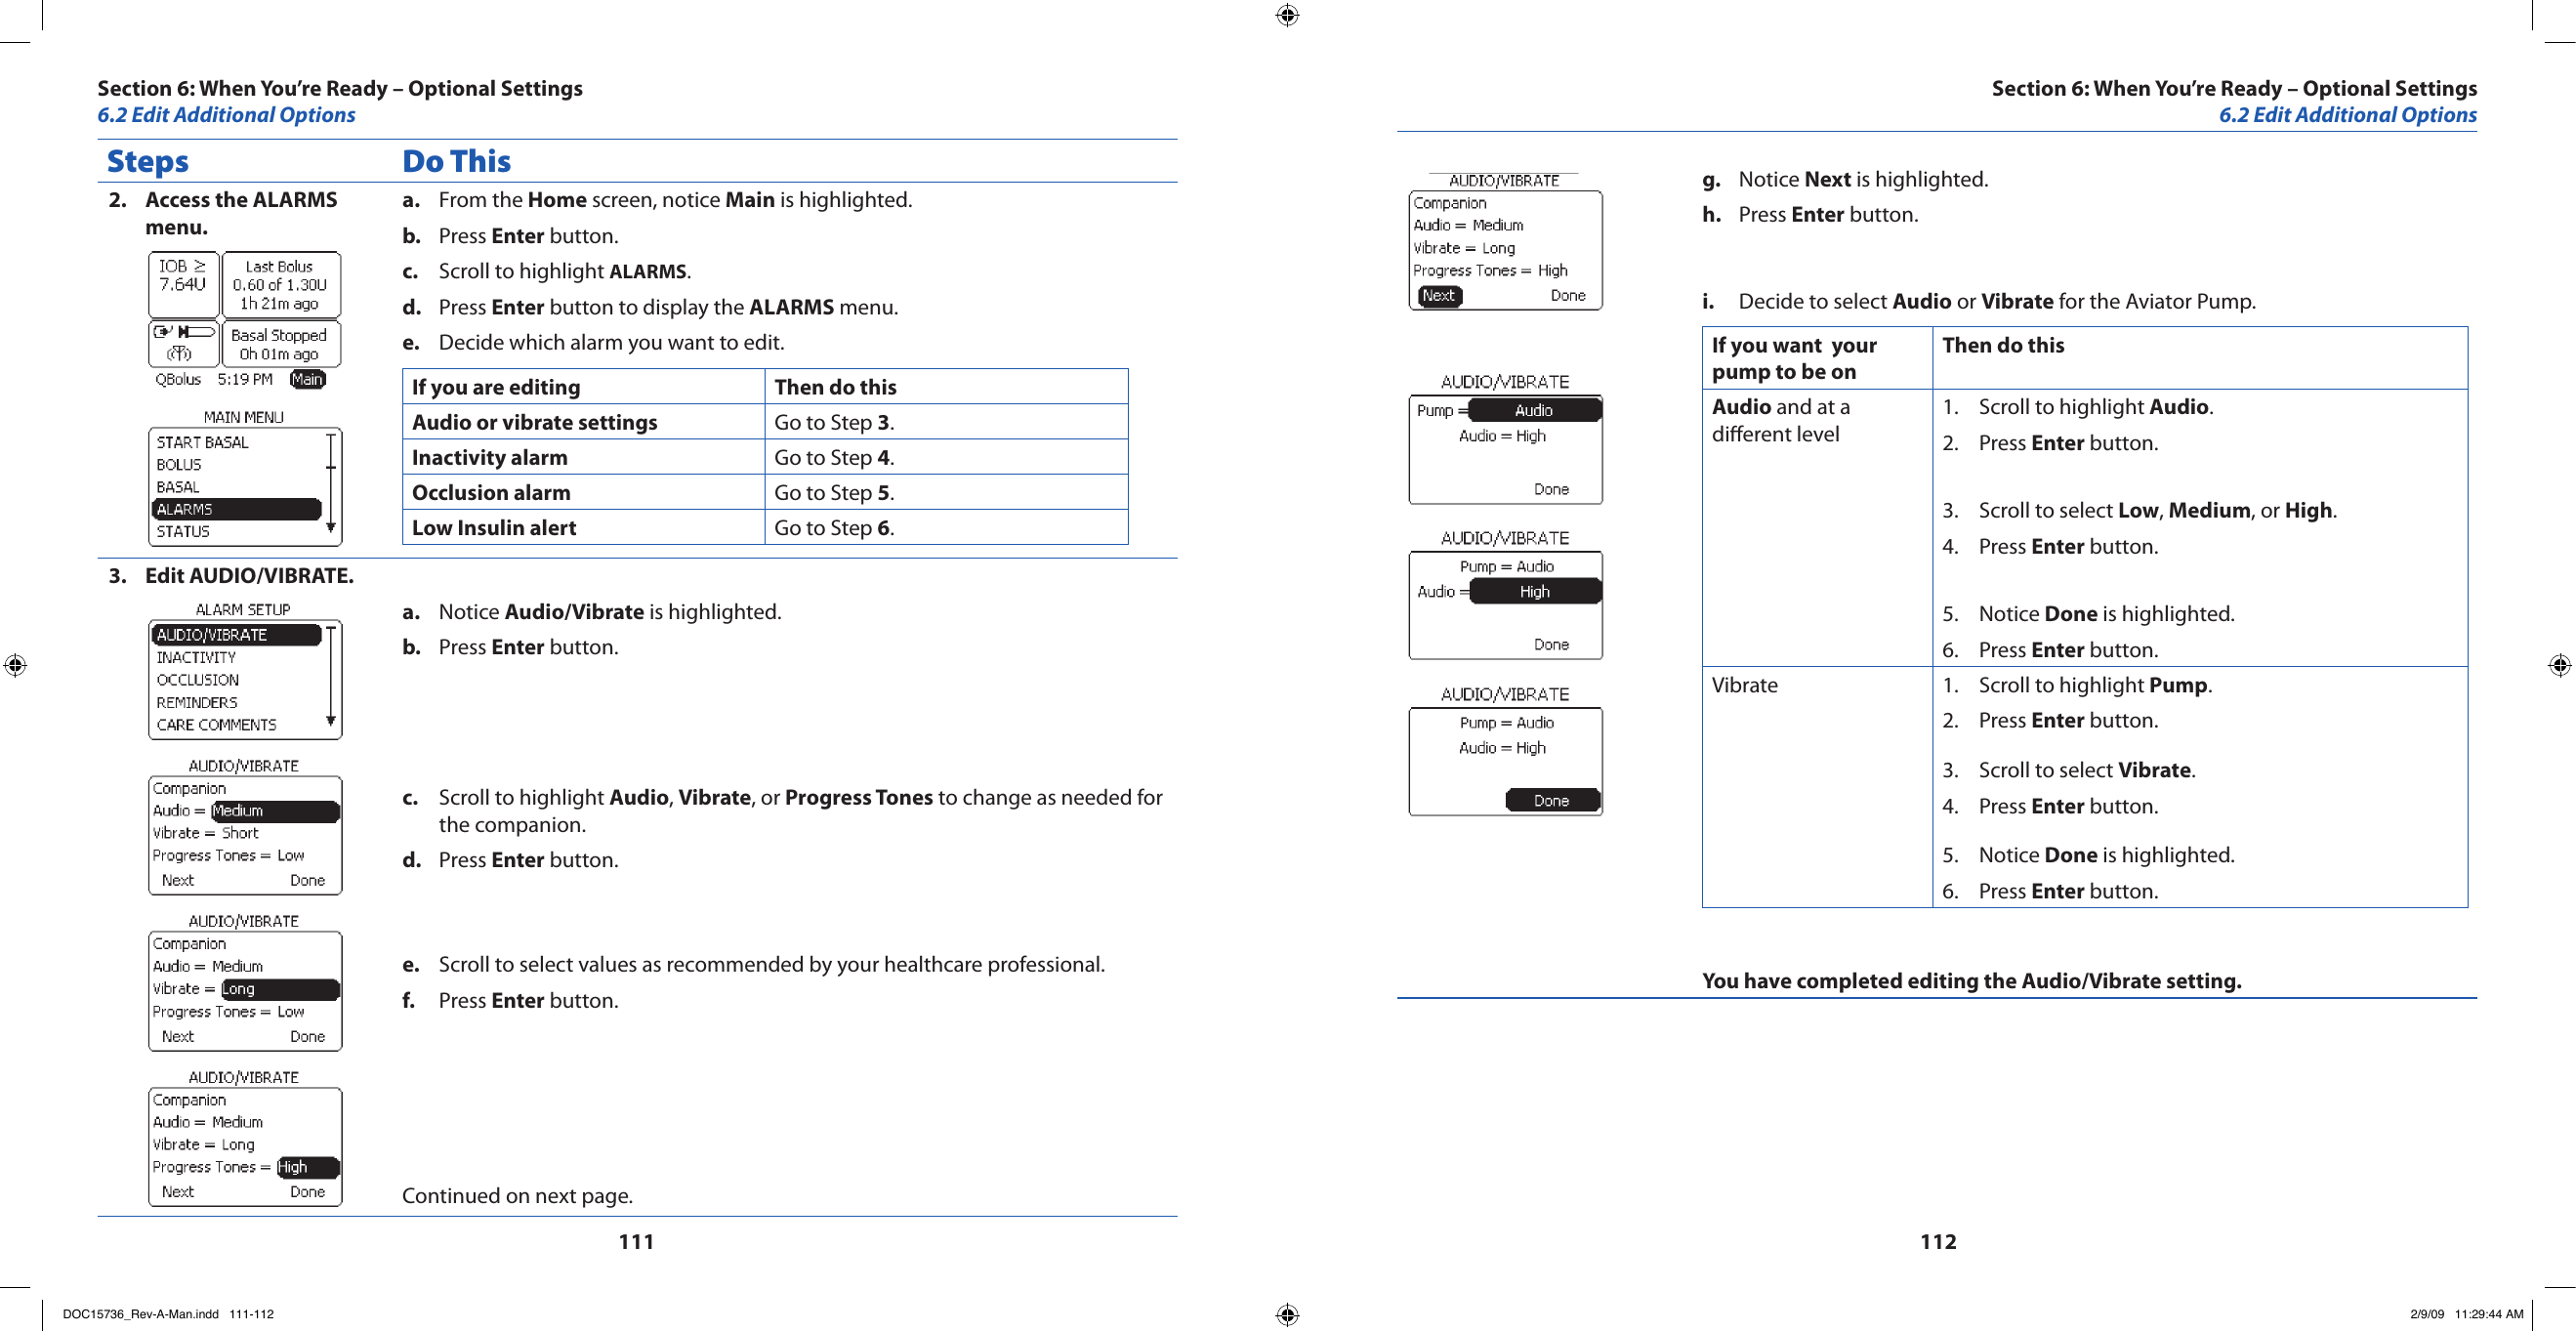
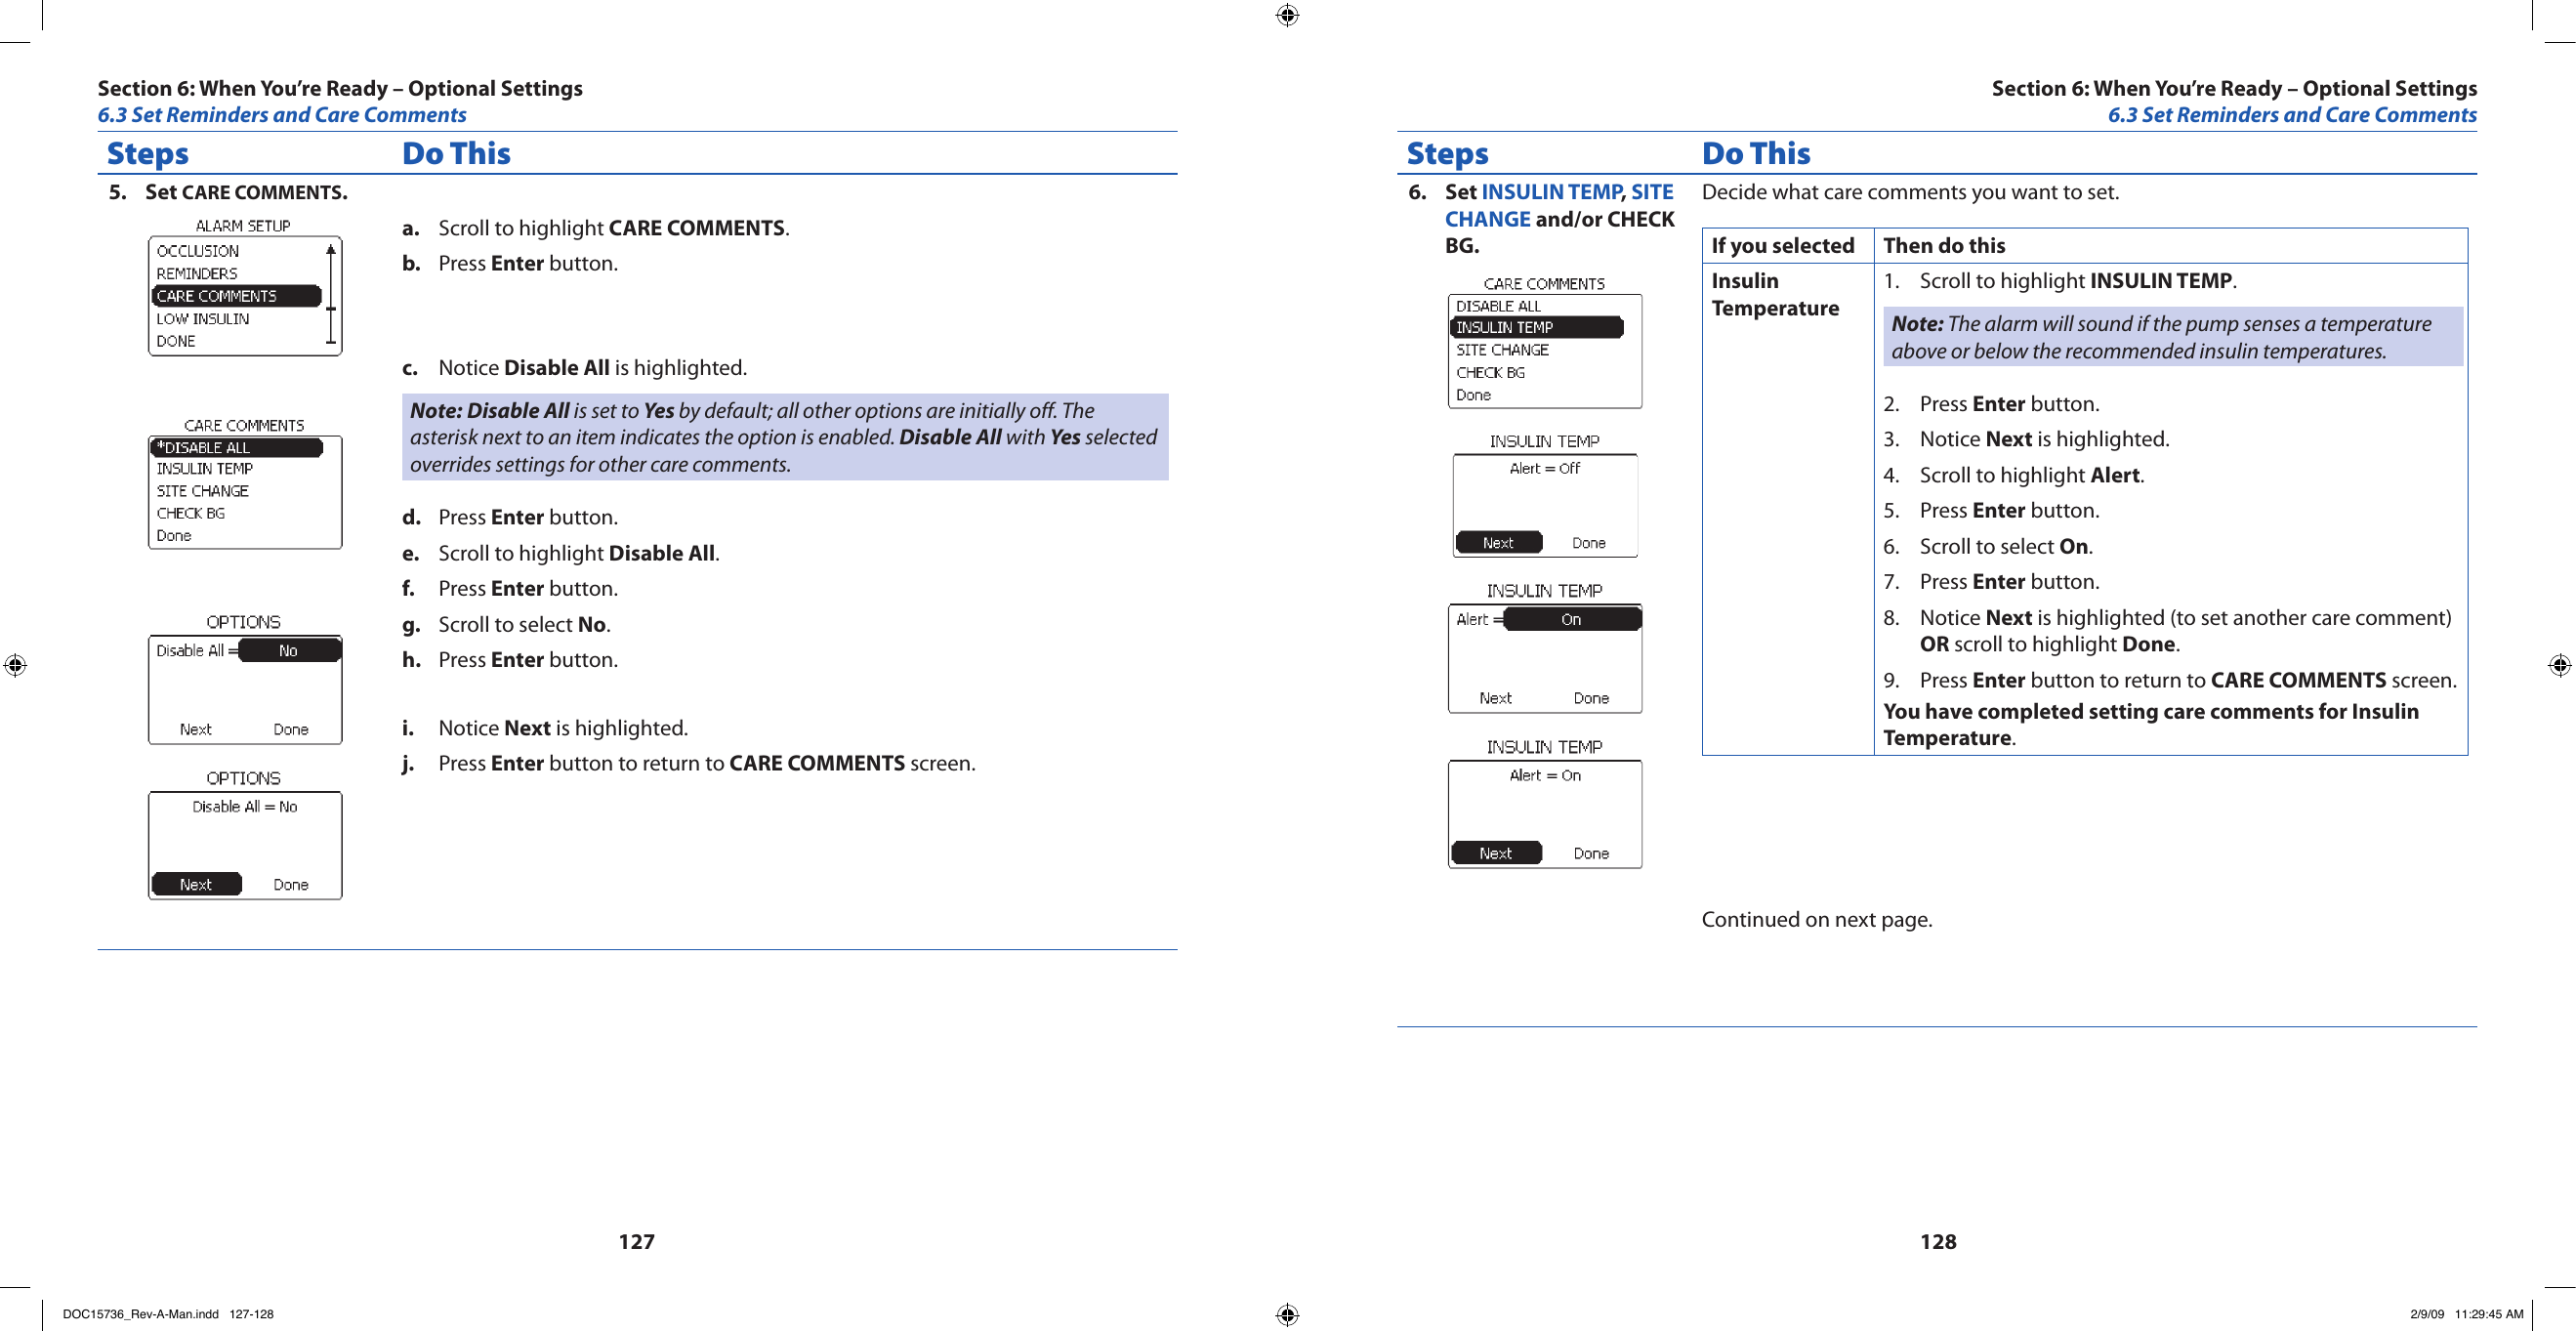
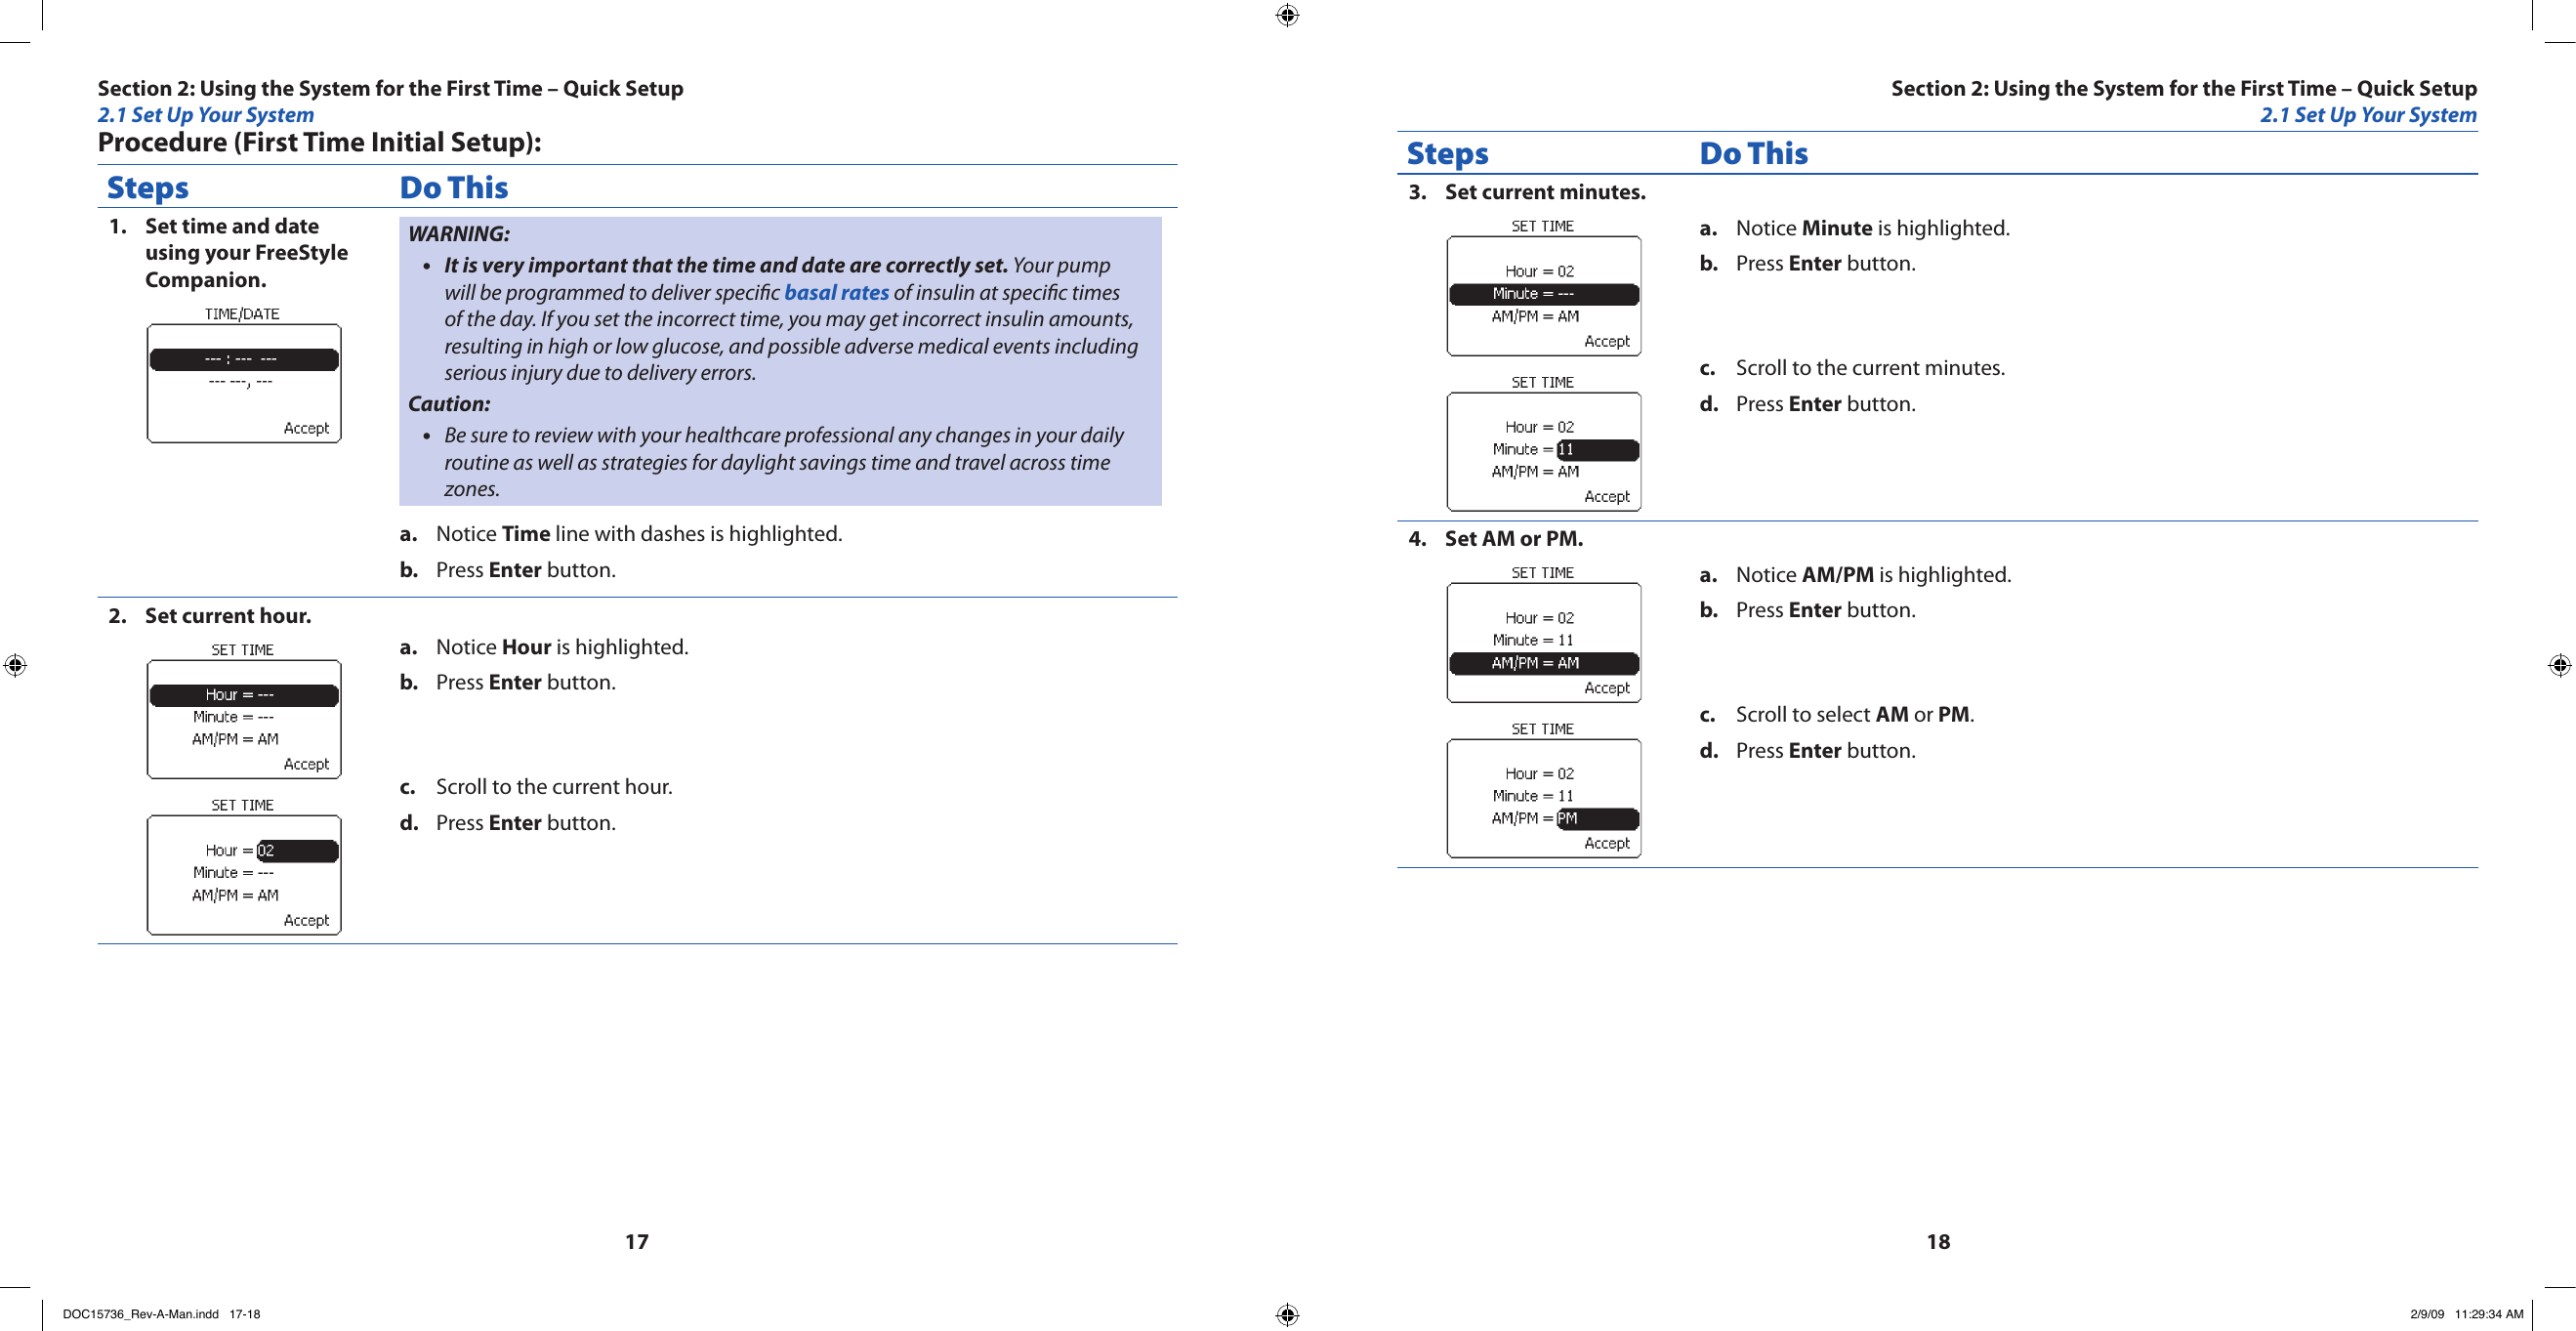
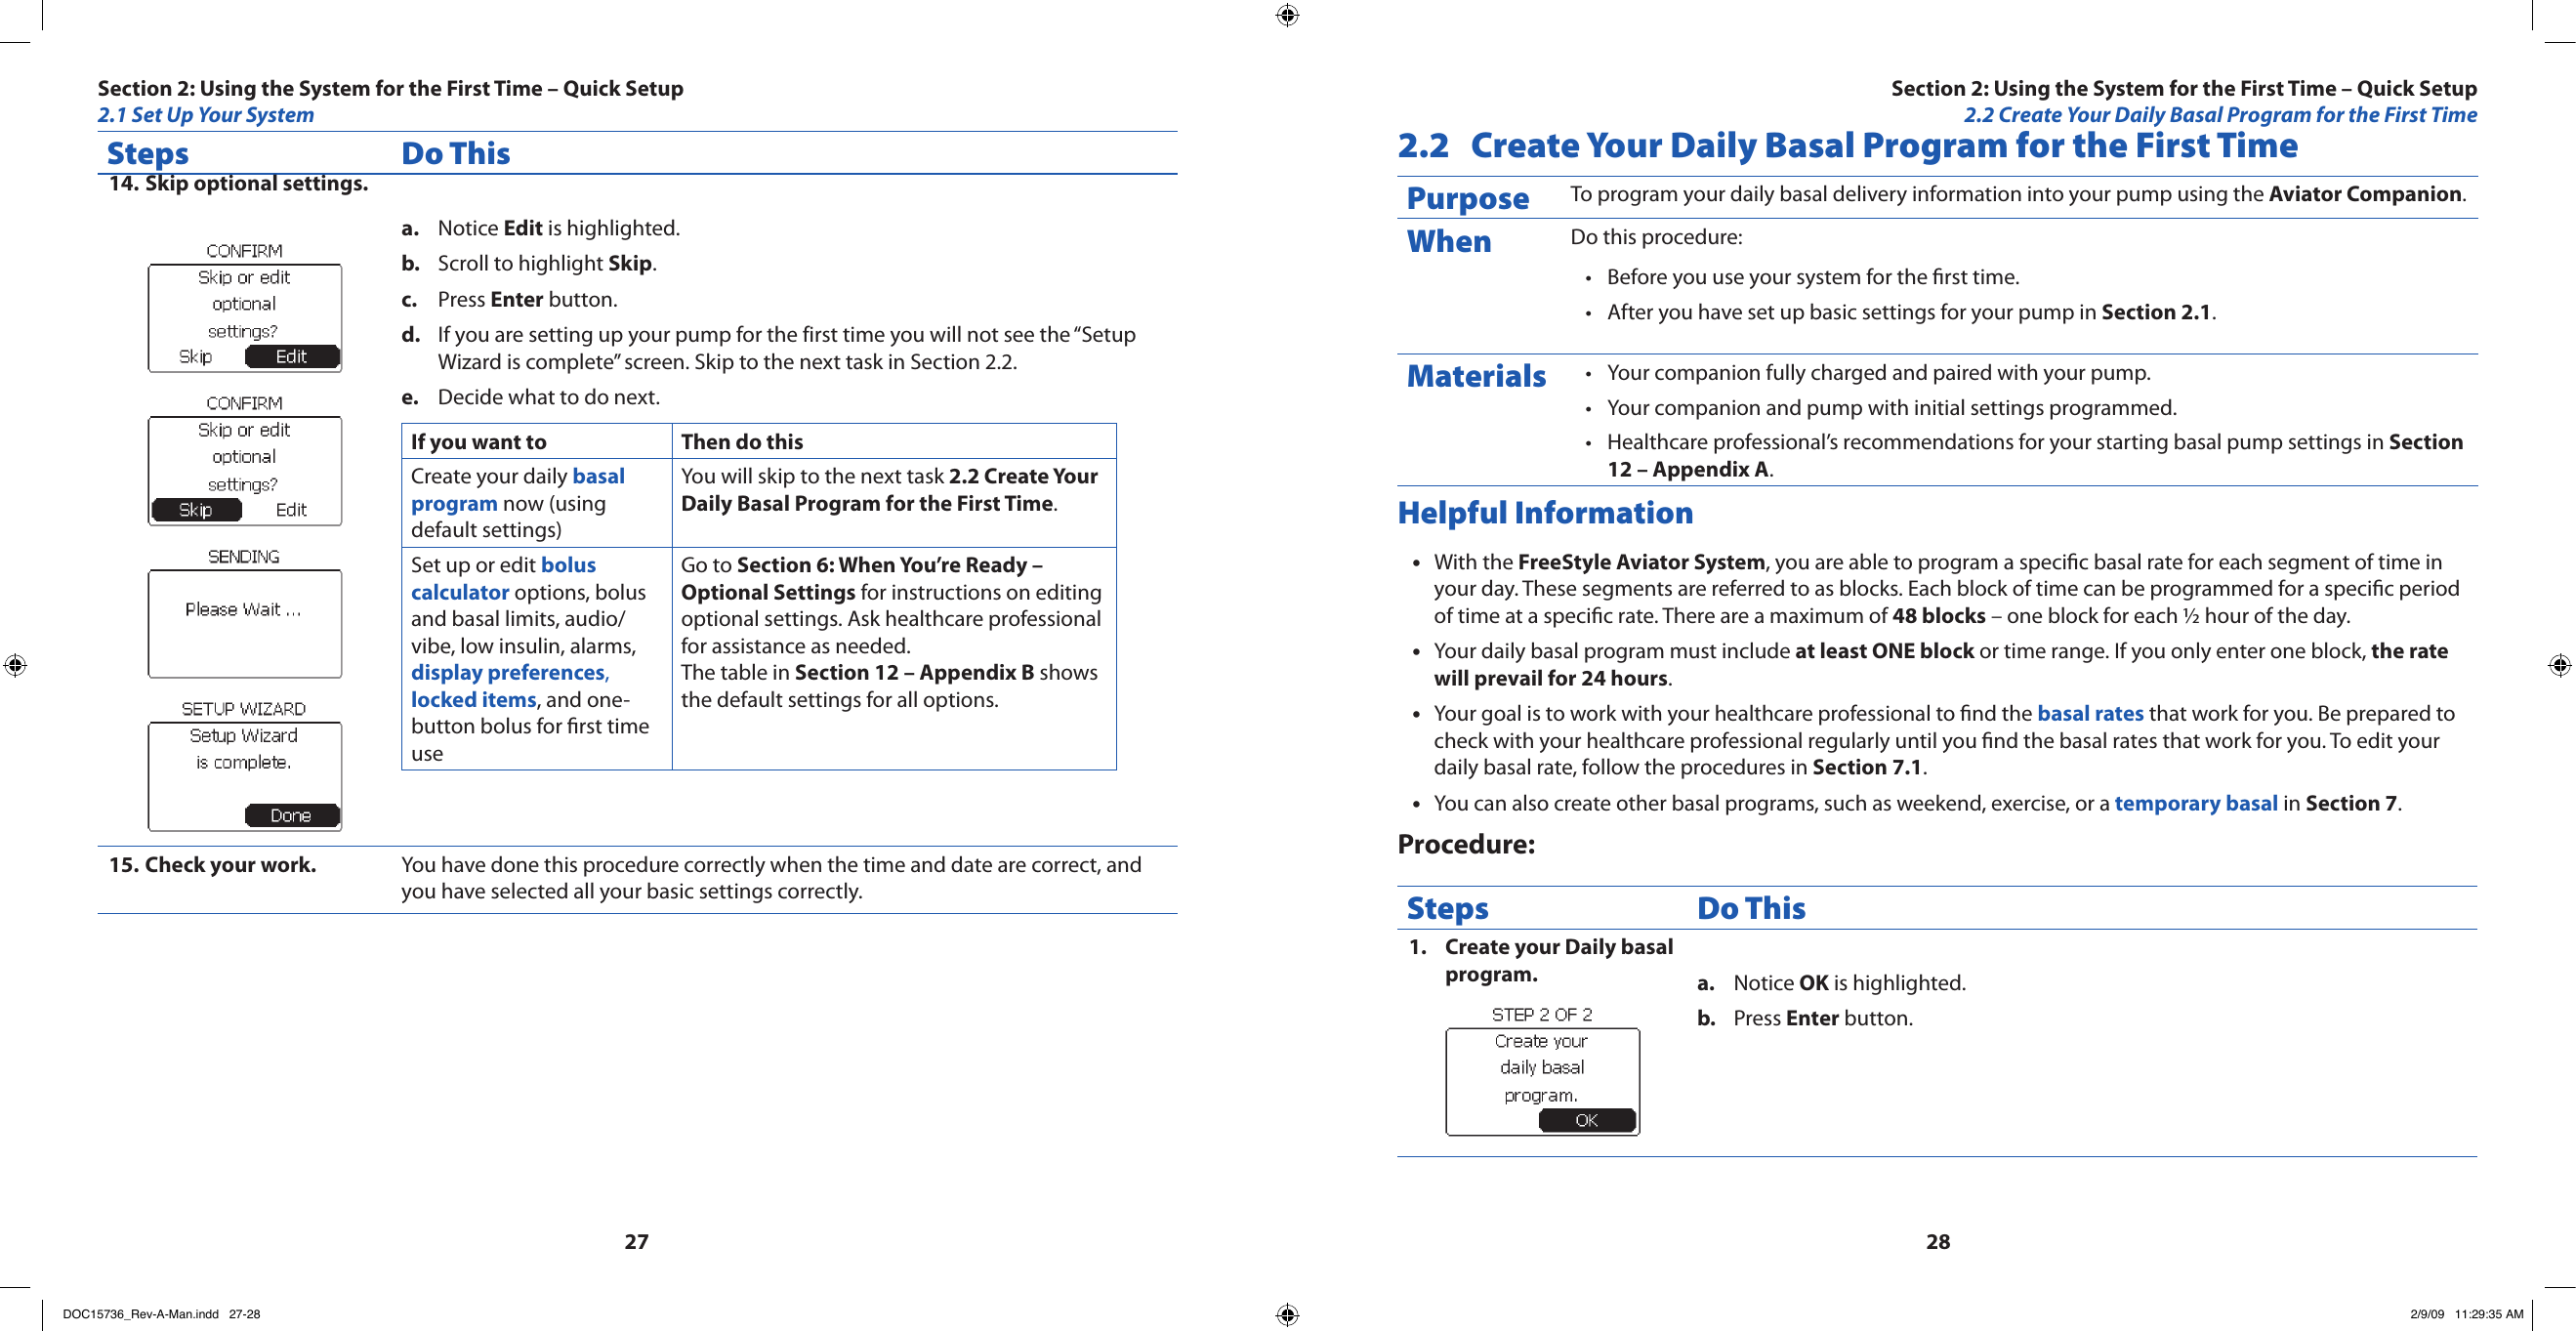
![8788Steps Do ThisTroubleshooting Error 12. Messages.Error 1 (Er 1) Possible Causes:Sample is too small.•Problem with the • FreeStyle Lite Test Strip.Problem with the companion.•Very low blood glucose (less then 20 mg/dL [1.1 mmol/L]).•What You Should Do:If you have symptoms such as weakness, sweating, nervousness, headache or 1. confusion, follow your healthcare professional’s recommendation for treating hypoglycemia.Conduct a control solution test using a new 2. FreeStyle Lite Test Strip. If the results of the control solution test are within the appropriate range printed on the side of your test strip vial, retest using blood and a new FreeStyle Lite Test Strip.If the retest using control solution does NOT work or the error persists, call 3. Customer Care.Error 2 (Er 2) Possible Causes:Problem with the • FreeStyle Lite Test Strip.Problem with the companion.•Very high blood glucose (above 500 mg/dL [27.8 mmol/L]).•HIGH control solution applied when temperature is too cold. (This applies only •to control solution that is labeled as HIGH).What You Should Do:If you have symptoms such as thirst, fatigue, excess urination or blurry 1. vision, follow your healthcare professional’s recommendation for treating hyperglycemia.Conduct a control solution test using a new 2. FreeStyle Lite Test Strip. If the results of the control solution test are within the appropriate range printed on your test strip vial, retest using blood and a new FreeStyle Lite Test Strip.If the retest using control solution does 3. NOT work or the error persists, call Customer Care.Steps Do ThisTroubleshooting Error Messages (continued).(Error 4 screenshot)Error 3 (Er 3) Possible Causes:Incorrect test procedure. For example, putting blood on the test strip before •inserting the test strip into the strip port or applying blood before the blood drop and test strip symbols display.Problem with the • FreeStyle Lite Test Strip.Problem with the companion.•What You Should Do:Be sure you see the blood drop and test strip symbols on the display screen 1. before you apply blood or control solution.Conduct a control solution test using a new FreeStyle Lite Test Strip. If the 2. results of the control solution test are within the appropriate range printed on your test strip vial, retest using blood and a new FreeStyle Lite Test Strip.If the retest using control solution does NOT work or the error persists, call 3. Customer Care.Error 4 (Er 4) Possible Causes:Problem with the • FreeStyle Lite Test Strip.Problem with the companion.•What You Should Do:Conduct a control solution test using a new 1. FreeStyle Lite Test Strip. If the results of the control solution test are within the appropriate range printed on the side of your test strip vial, retest using blood and a new FreeStyle Lite Test Strip.If the retest using control solution does 2. NOT work or the error persists, call Customer Care.Section 5: Testing Your Blood Glucose5.2 Check Your Blood GlucoseSection 5: Testing Your Blood Glucose5.2 Check Your Blood GlucoseFPODOC15736_Rev-A-Man.indd 87-88 2/9/09 11:29:41 AM](https://usermanual.wiki/Abbott-Diabetes-Care/AV2-C.User-manual-1-of-2/User-Guide-1071817-Page-54.png)