Abbott Diabetes Care AV2-C Insulin Pump/Glucose Meter Transmitter User Manual 2 of 2
Abbott Diabetes Care Insulin Pump/Glucose Meter Transmitter 2 of 2
UserManual.wiki
>
Abbott Diabetes Care
>
AV2-C User Manual
>
User manual 2 of 2
Contents
1.
Regulatory statement
2.
User manual 1 of 2
3.
User manual 2 of 2
User manual 2 of 2
Navigation menu
Upload a User Manual
Namespaces
Wiki Guide
HTML
PDF
Info
Views
User Manual
Discussion / Help
Navigation

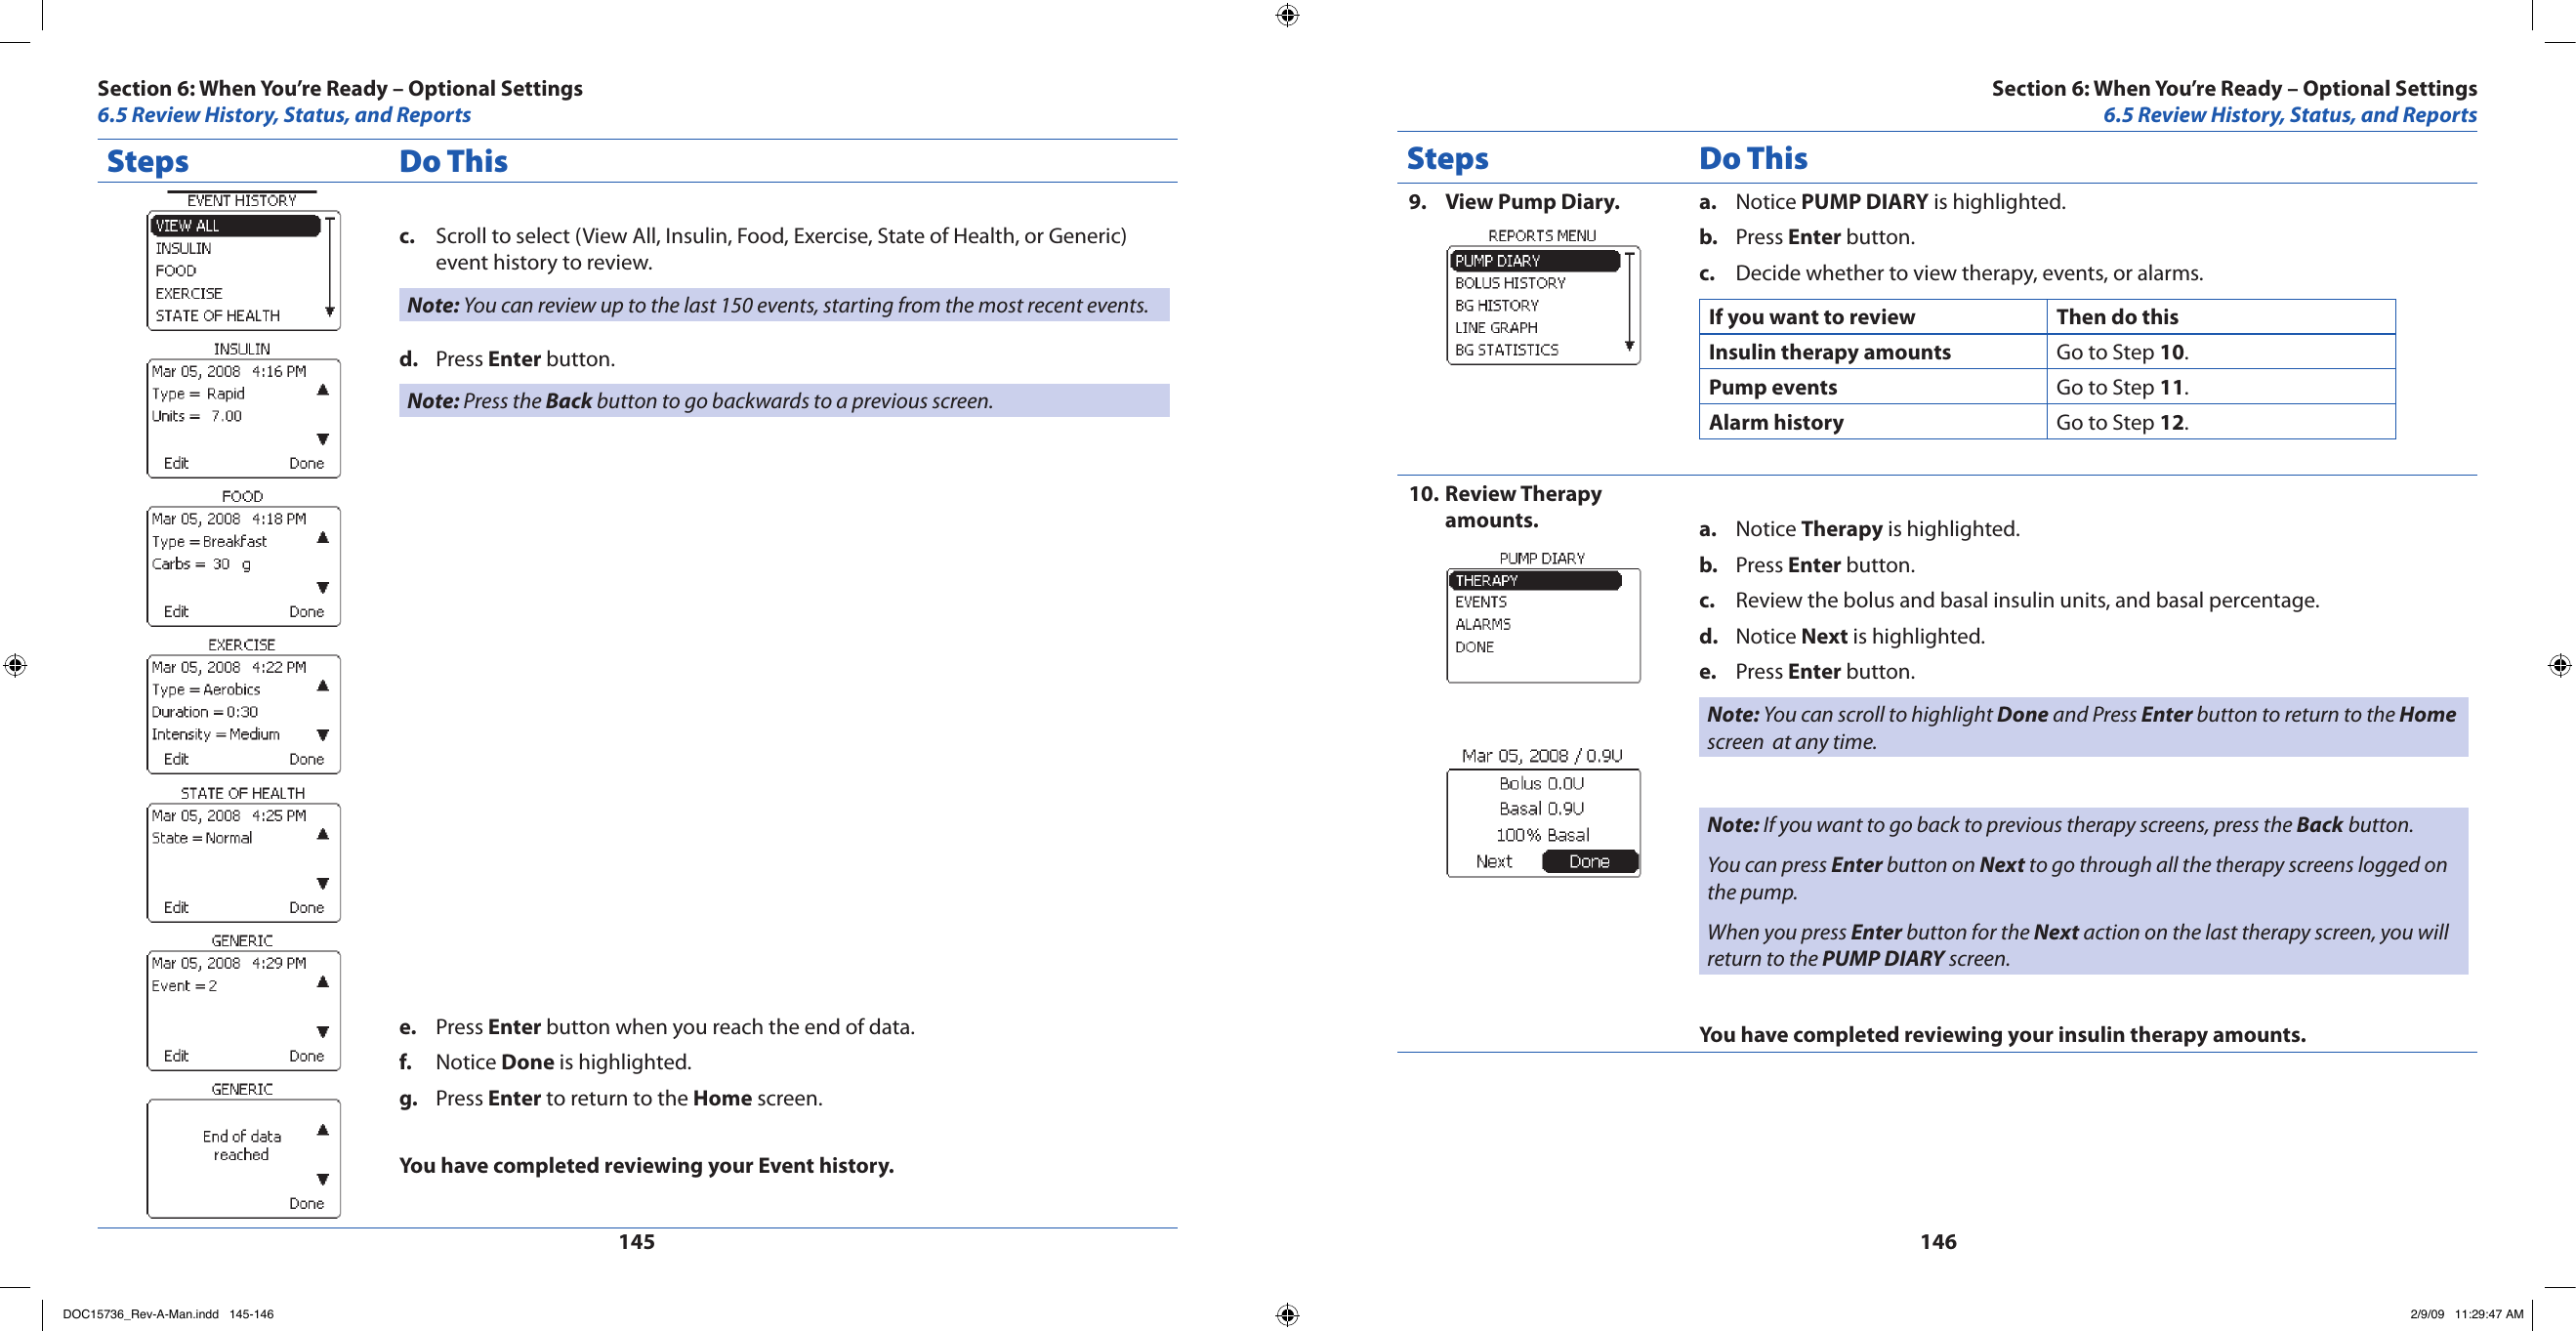
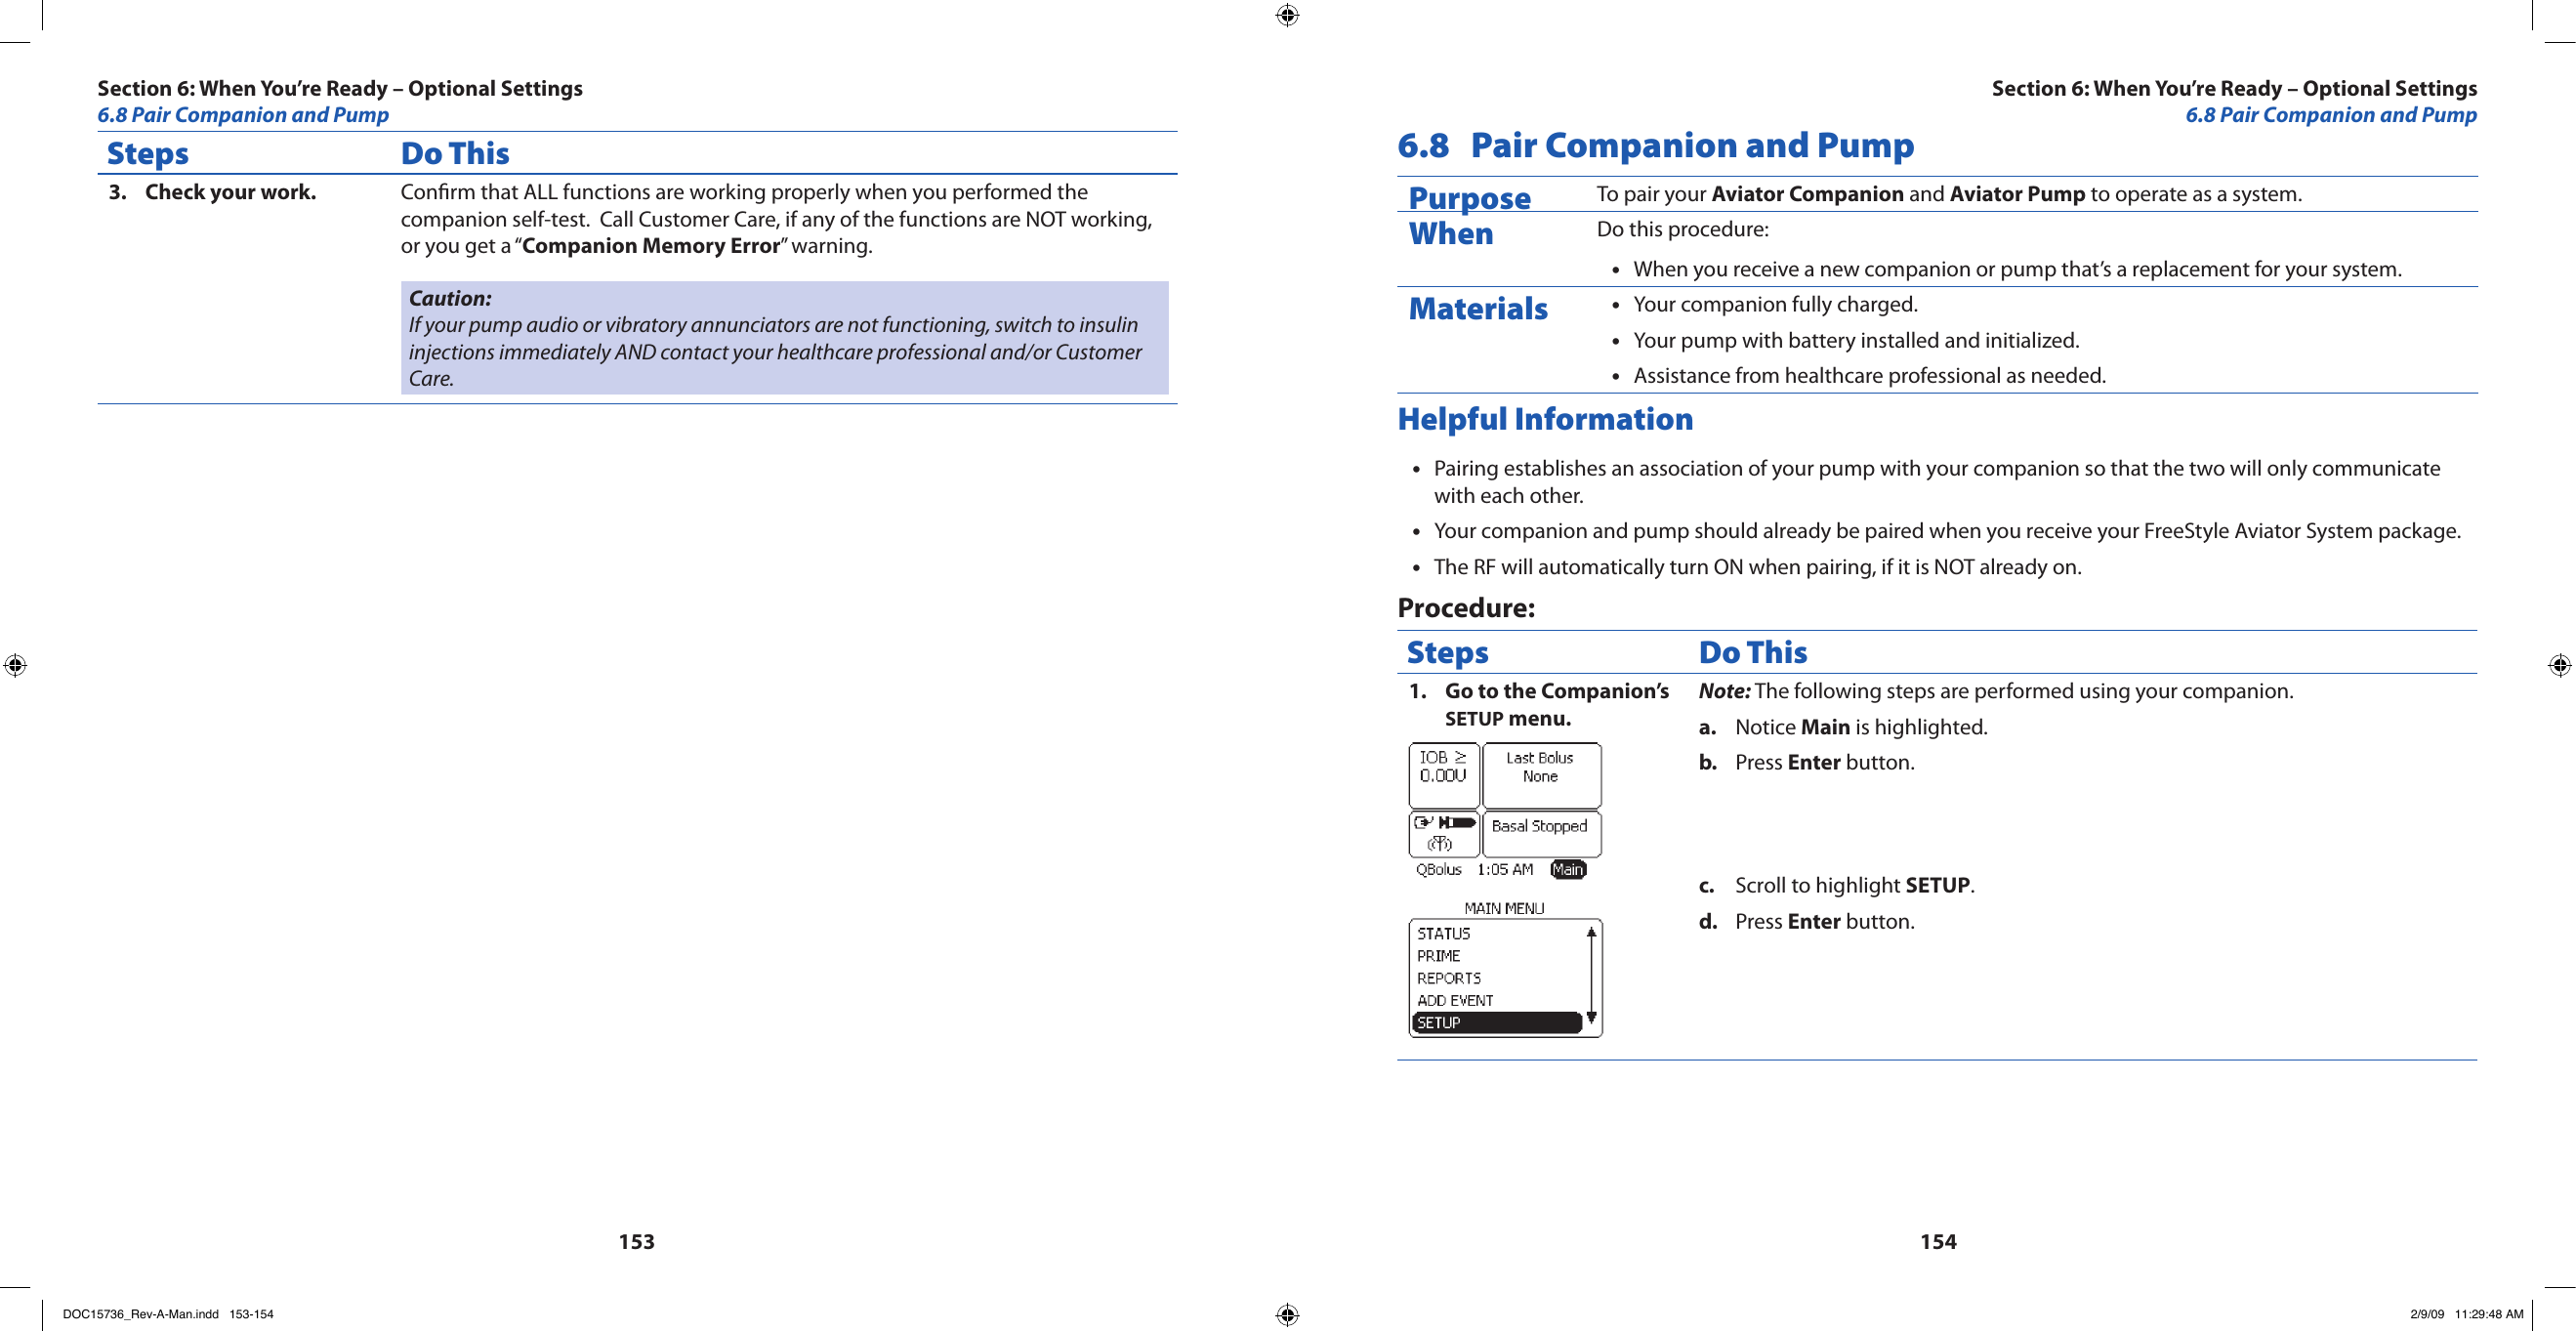

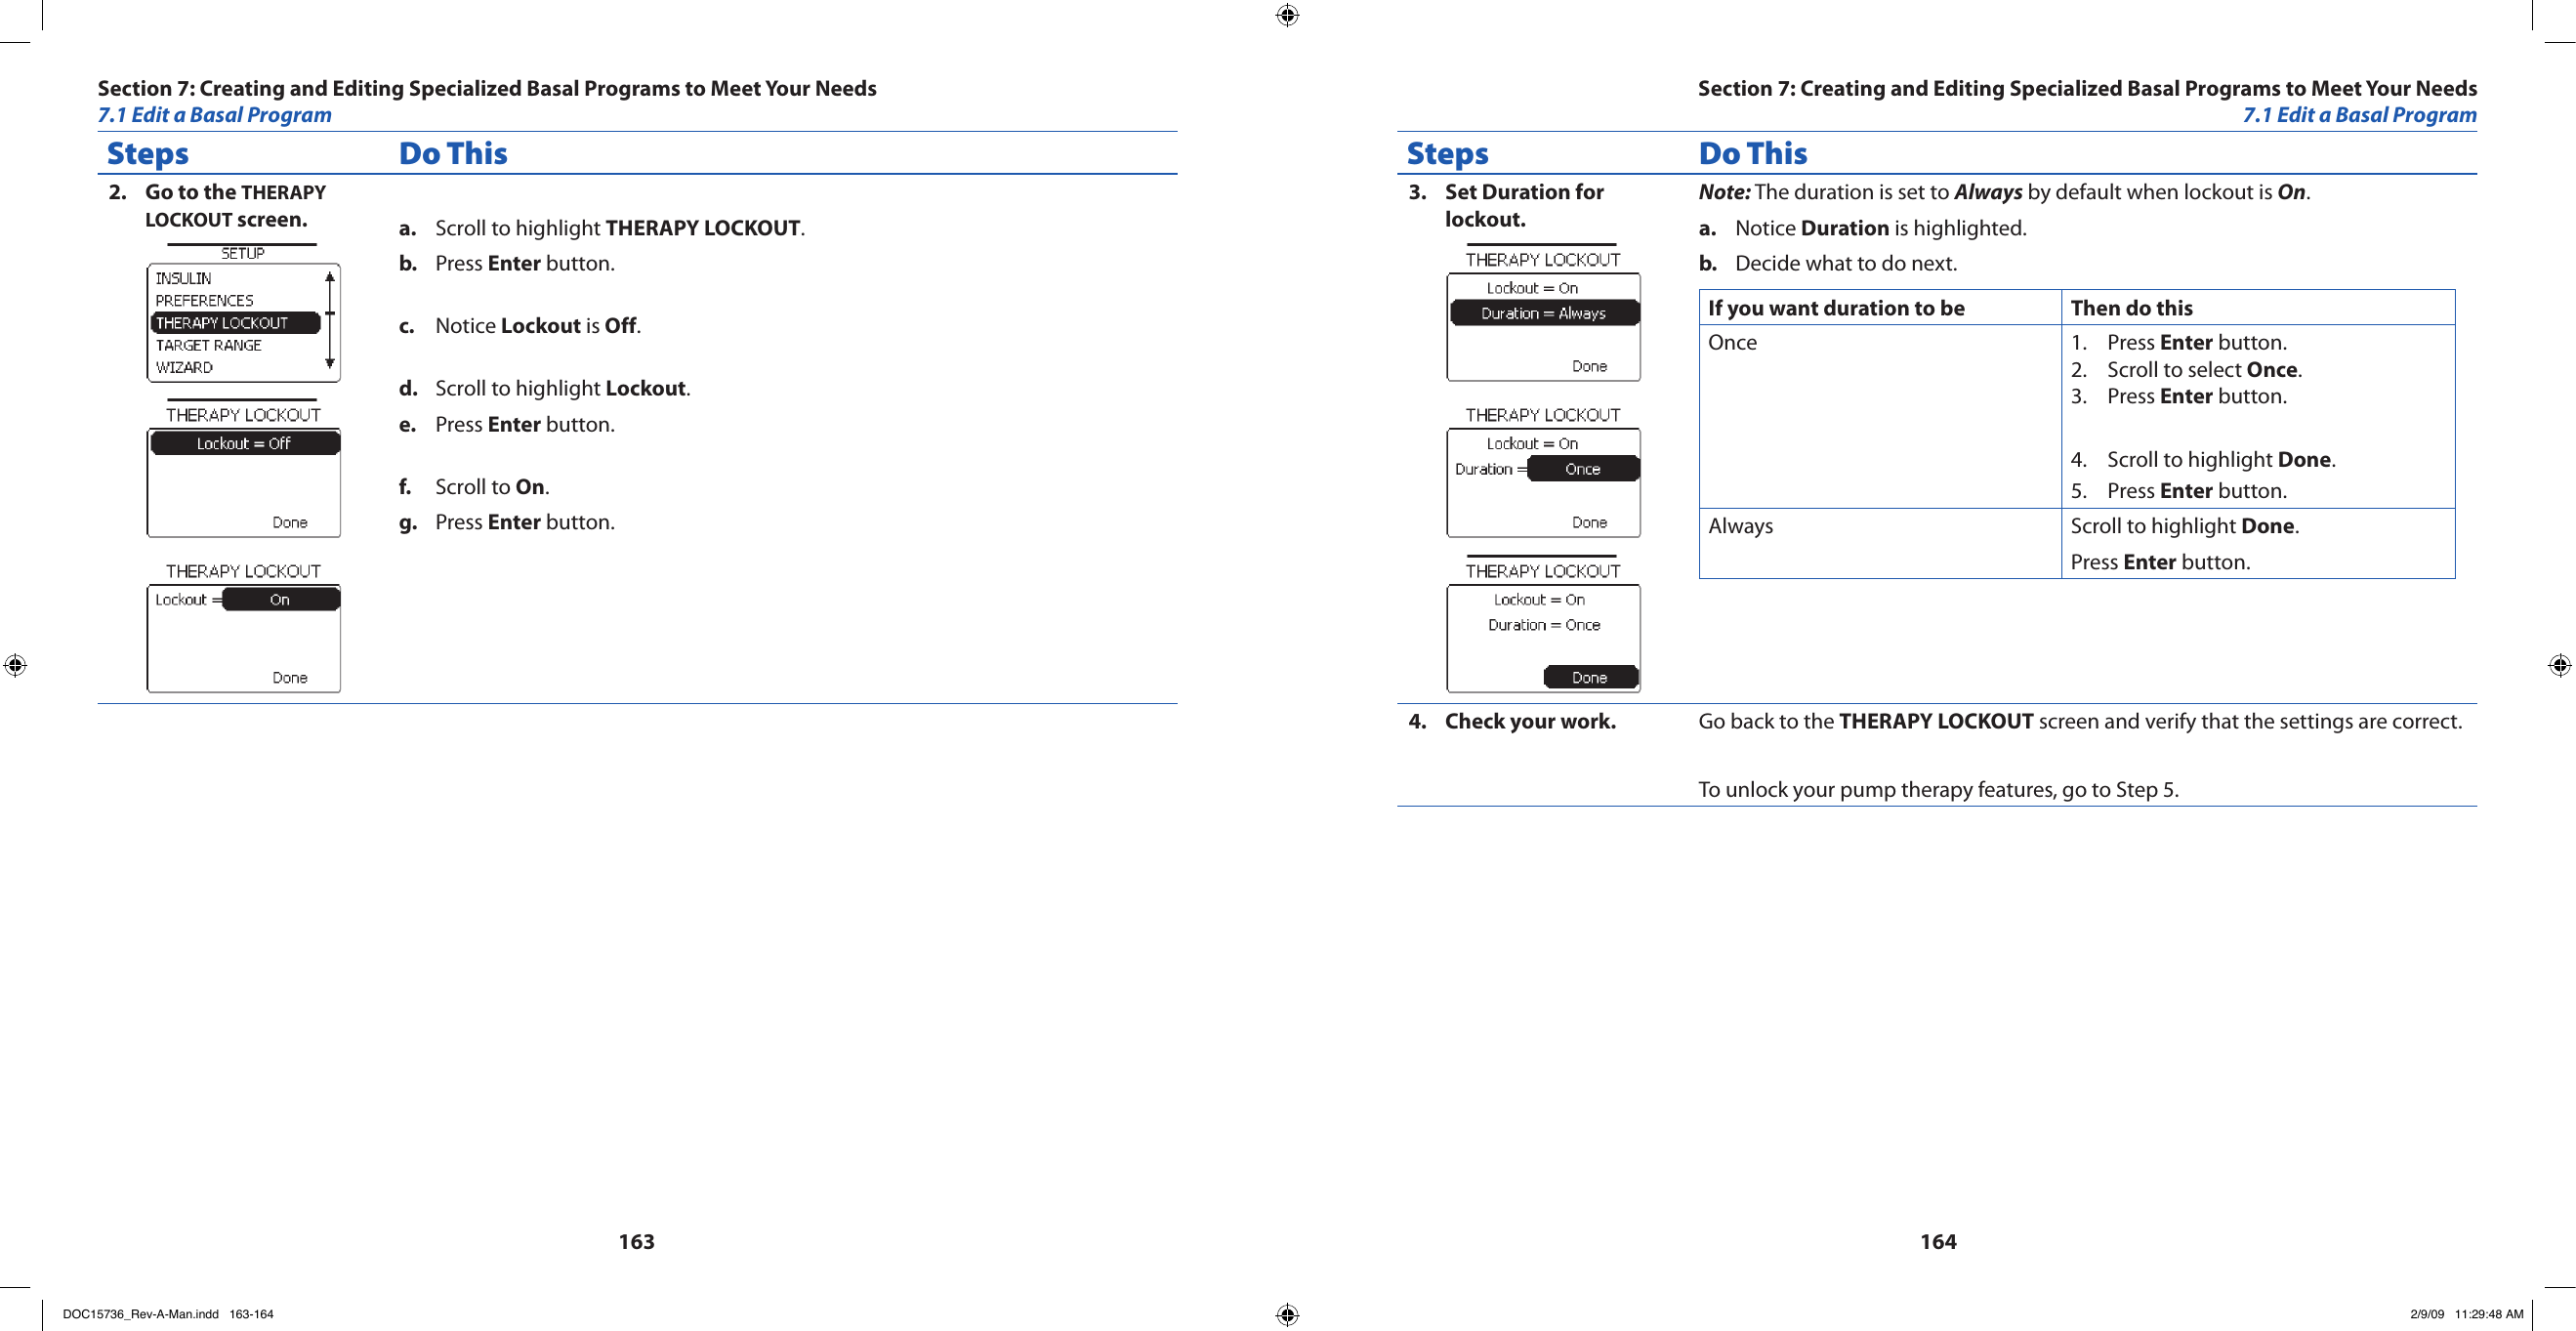
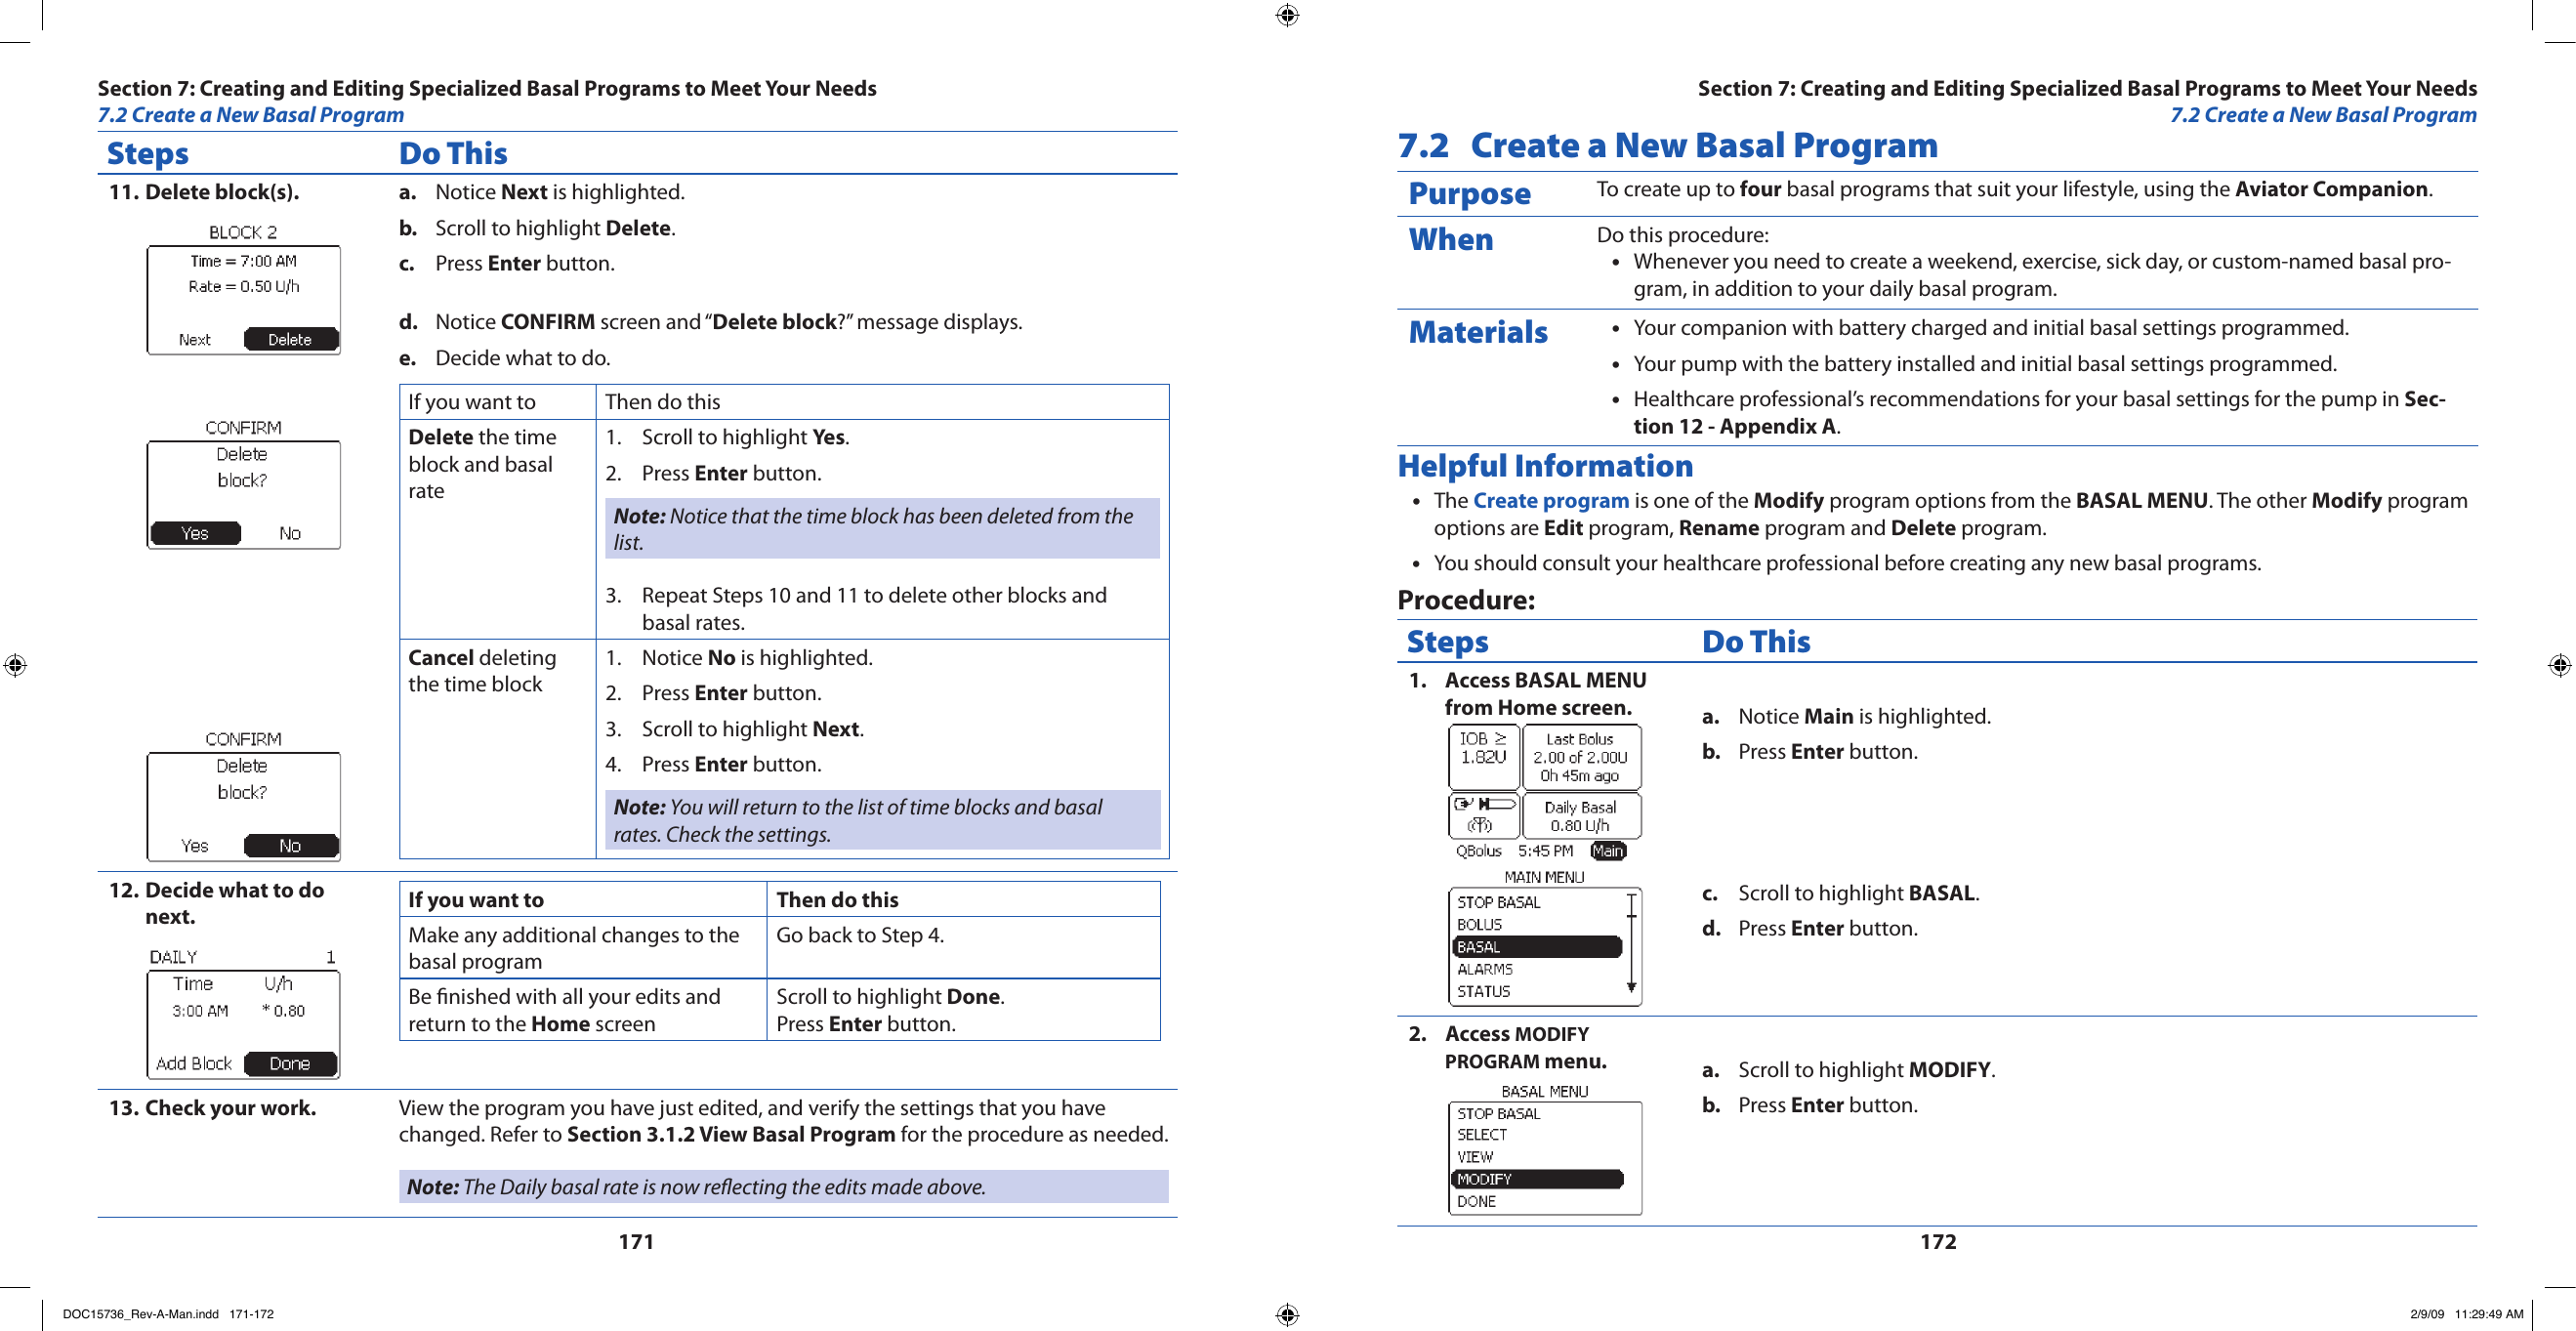

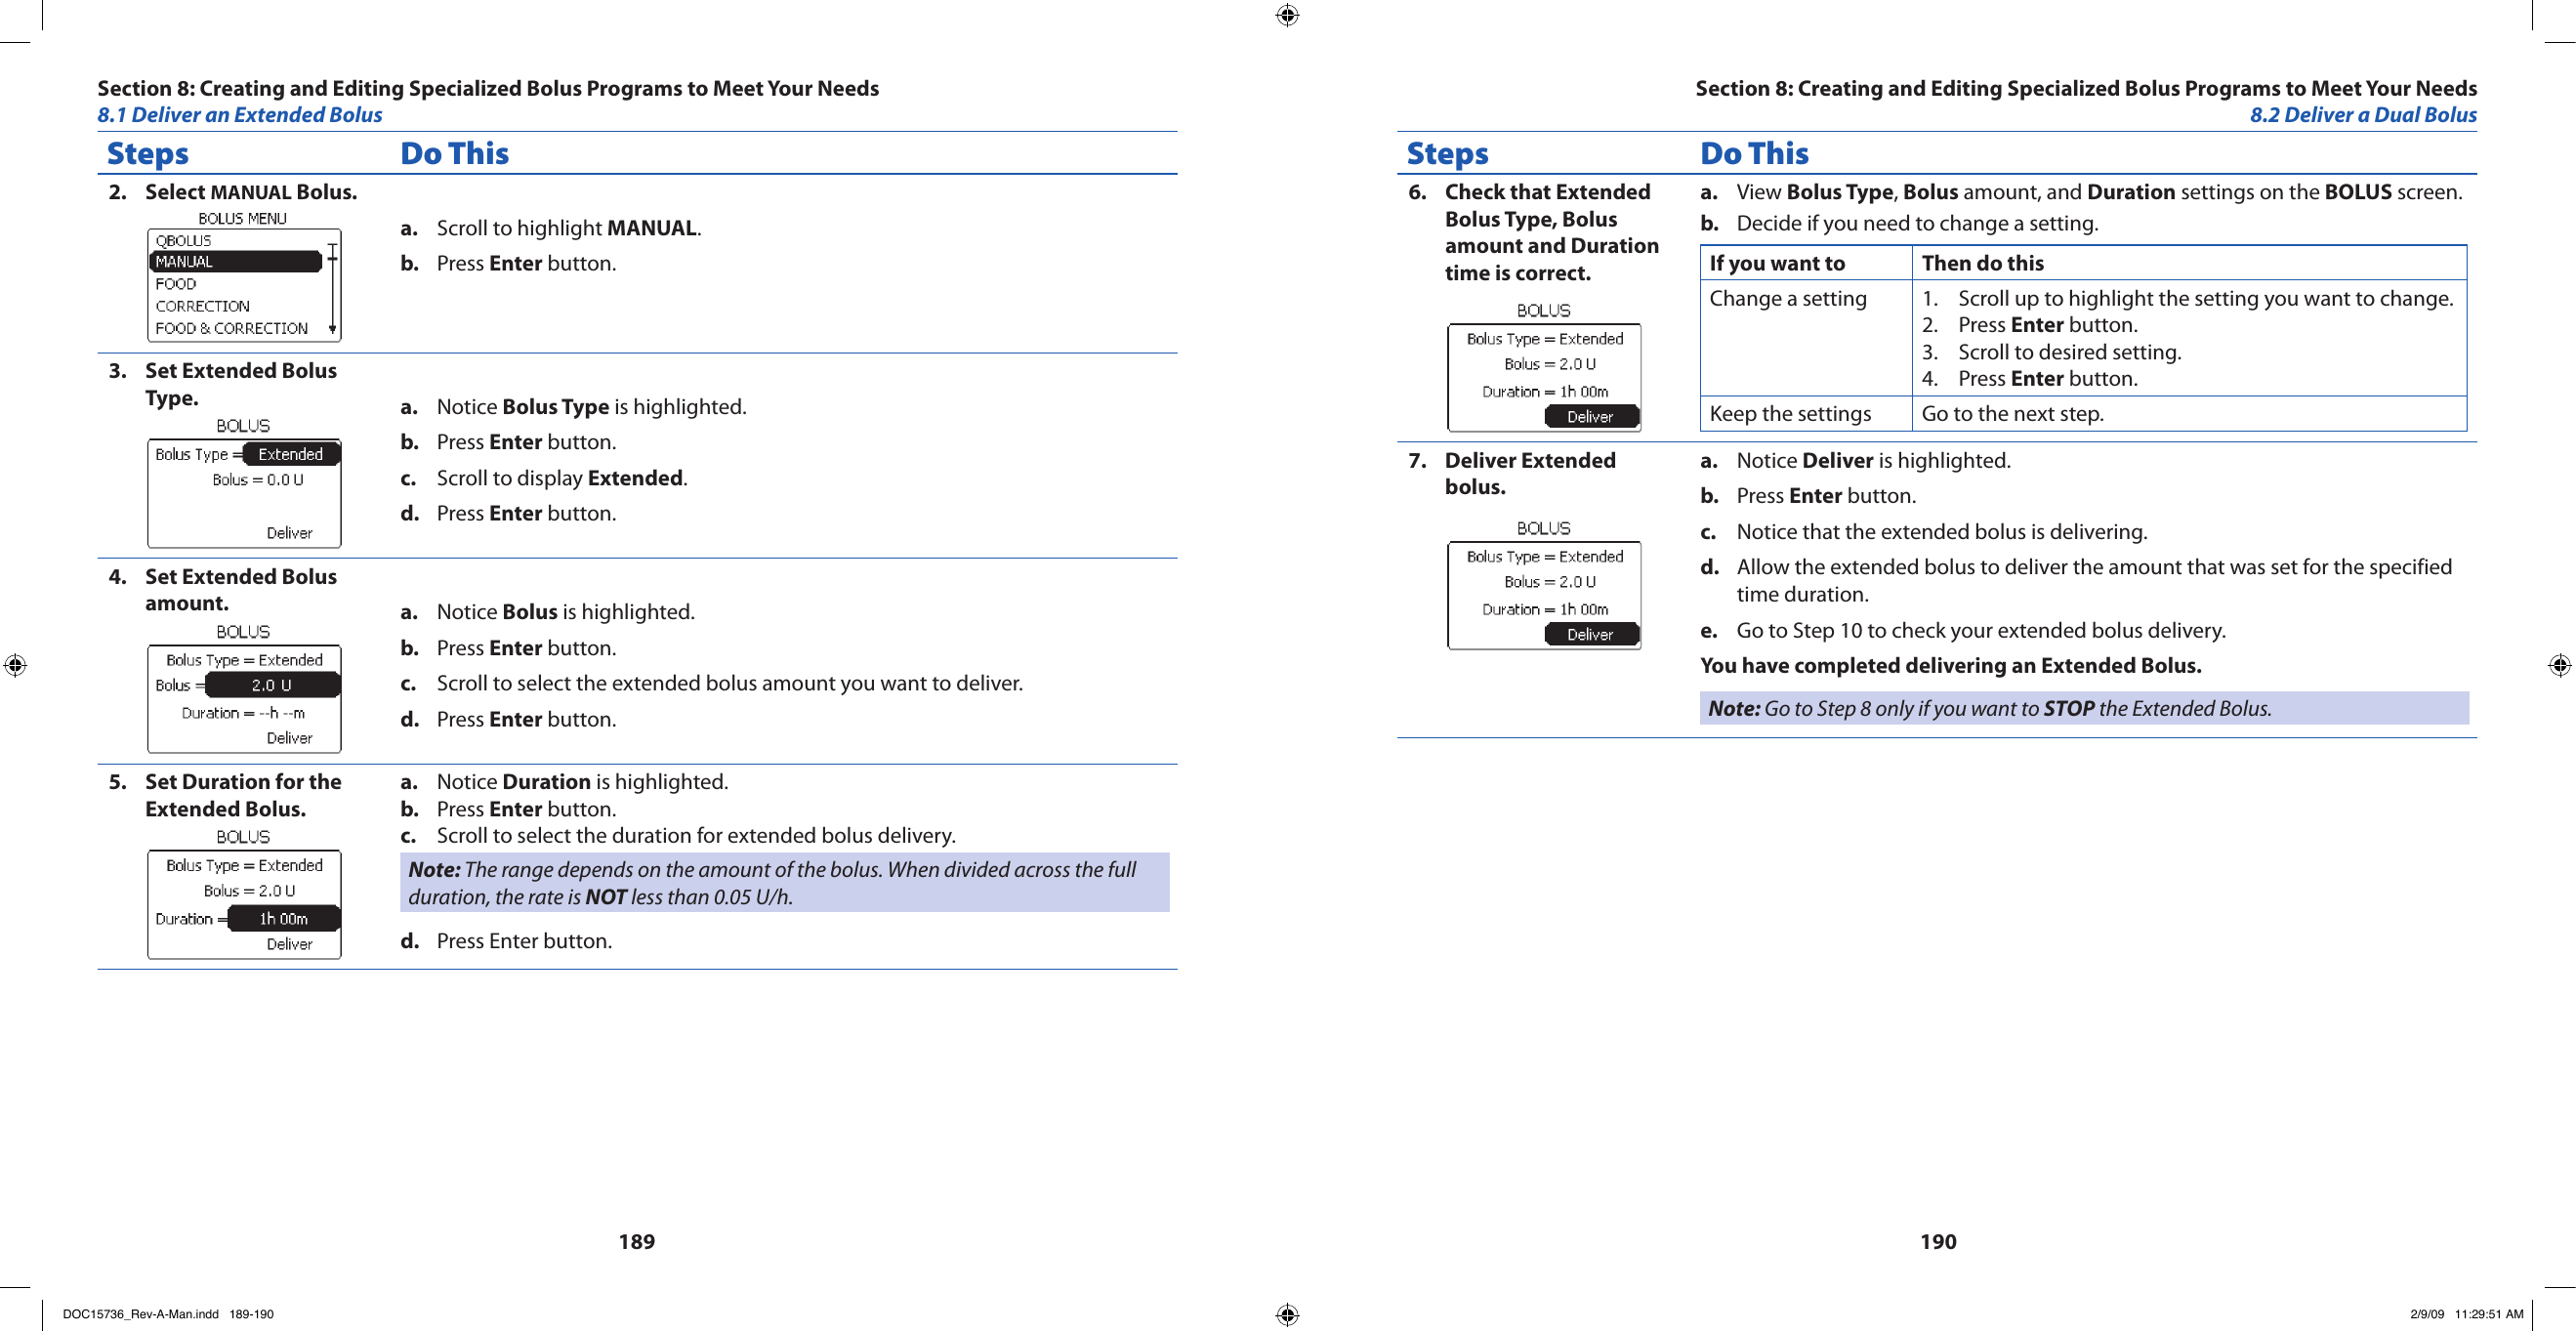


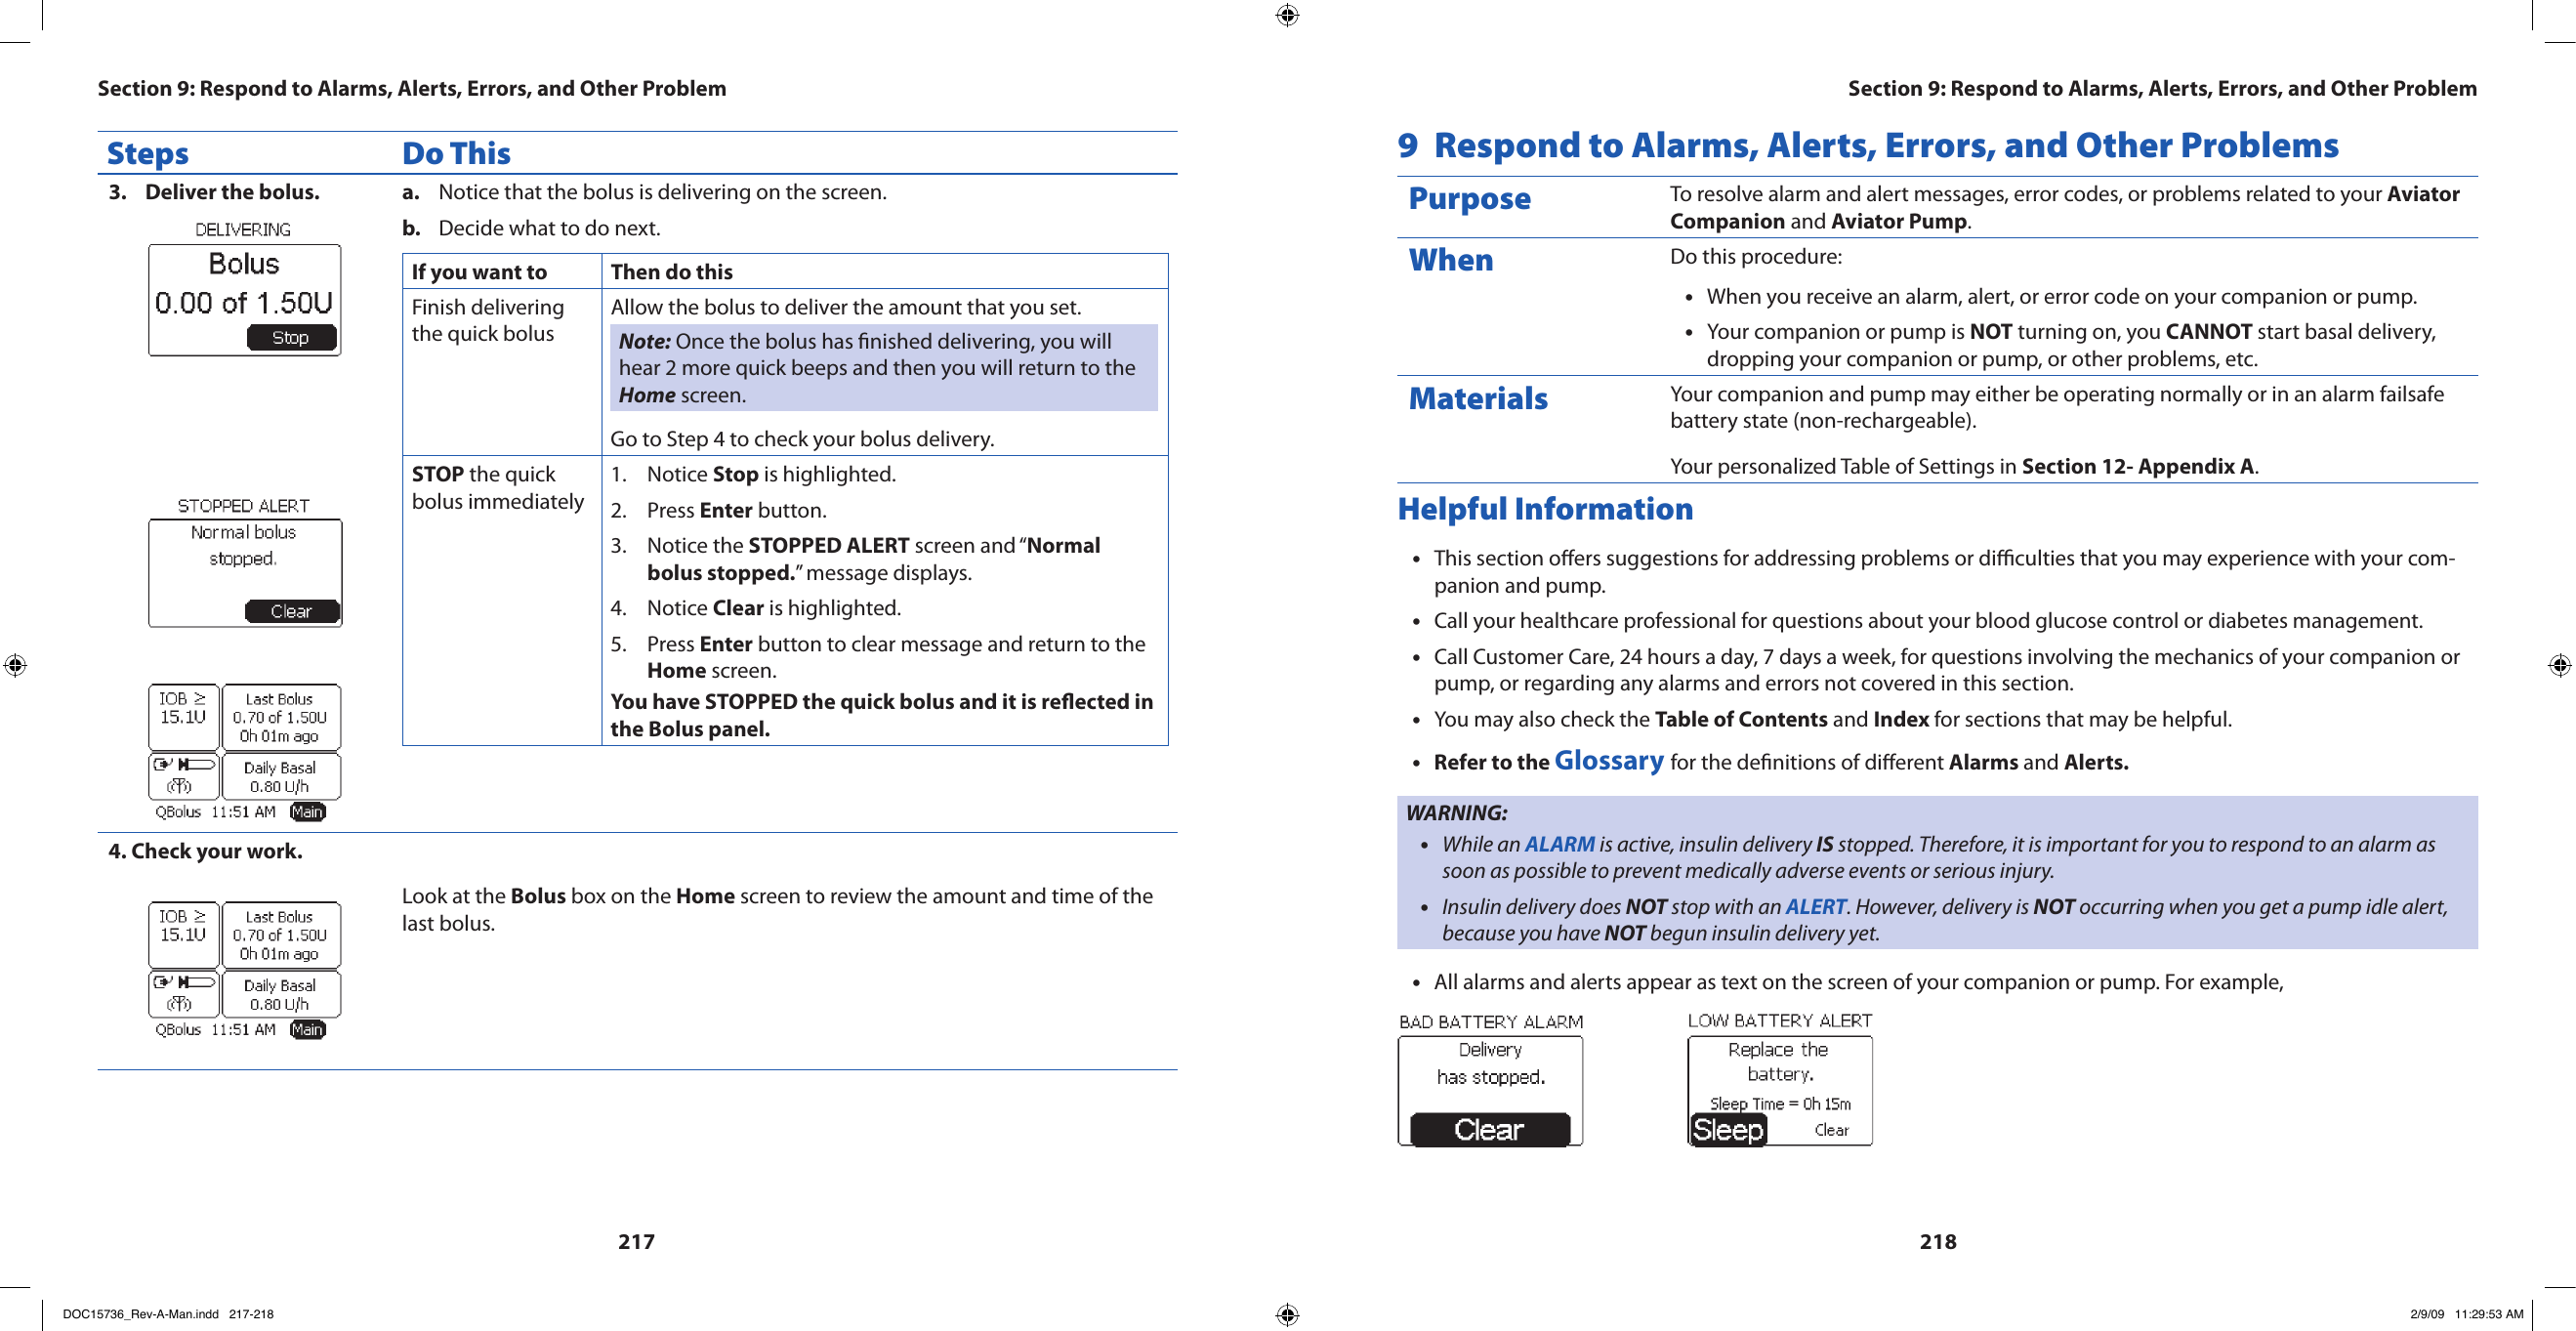
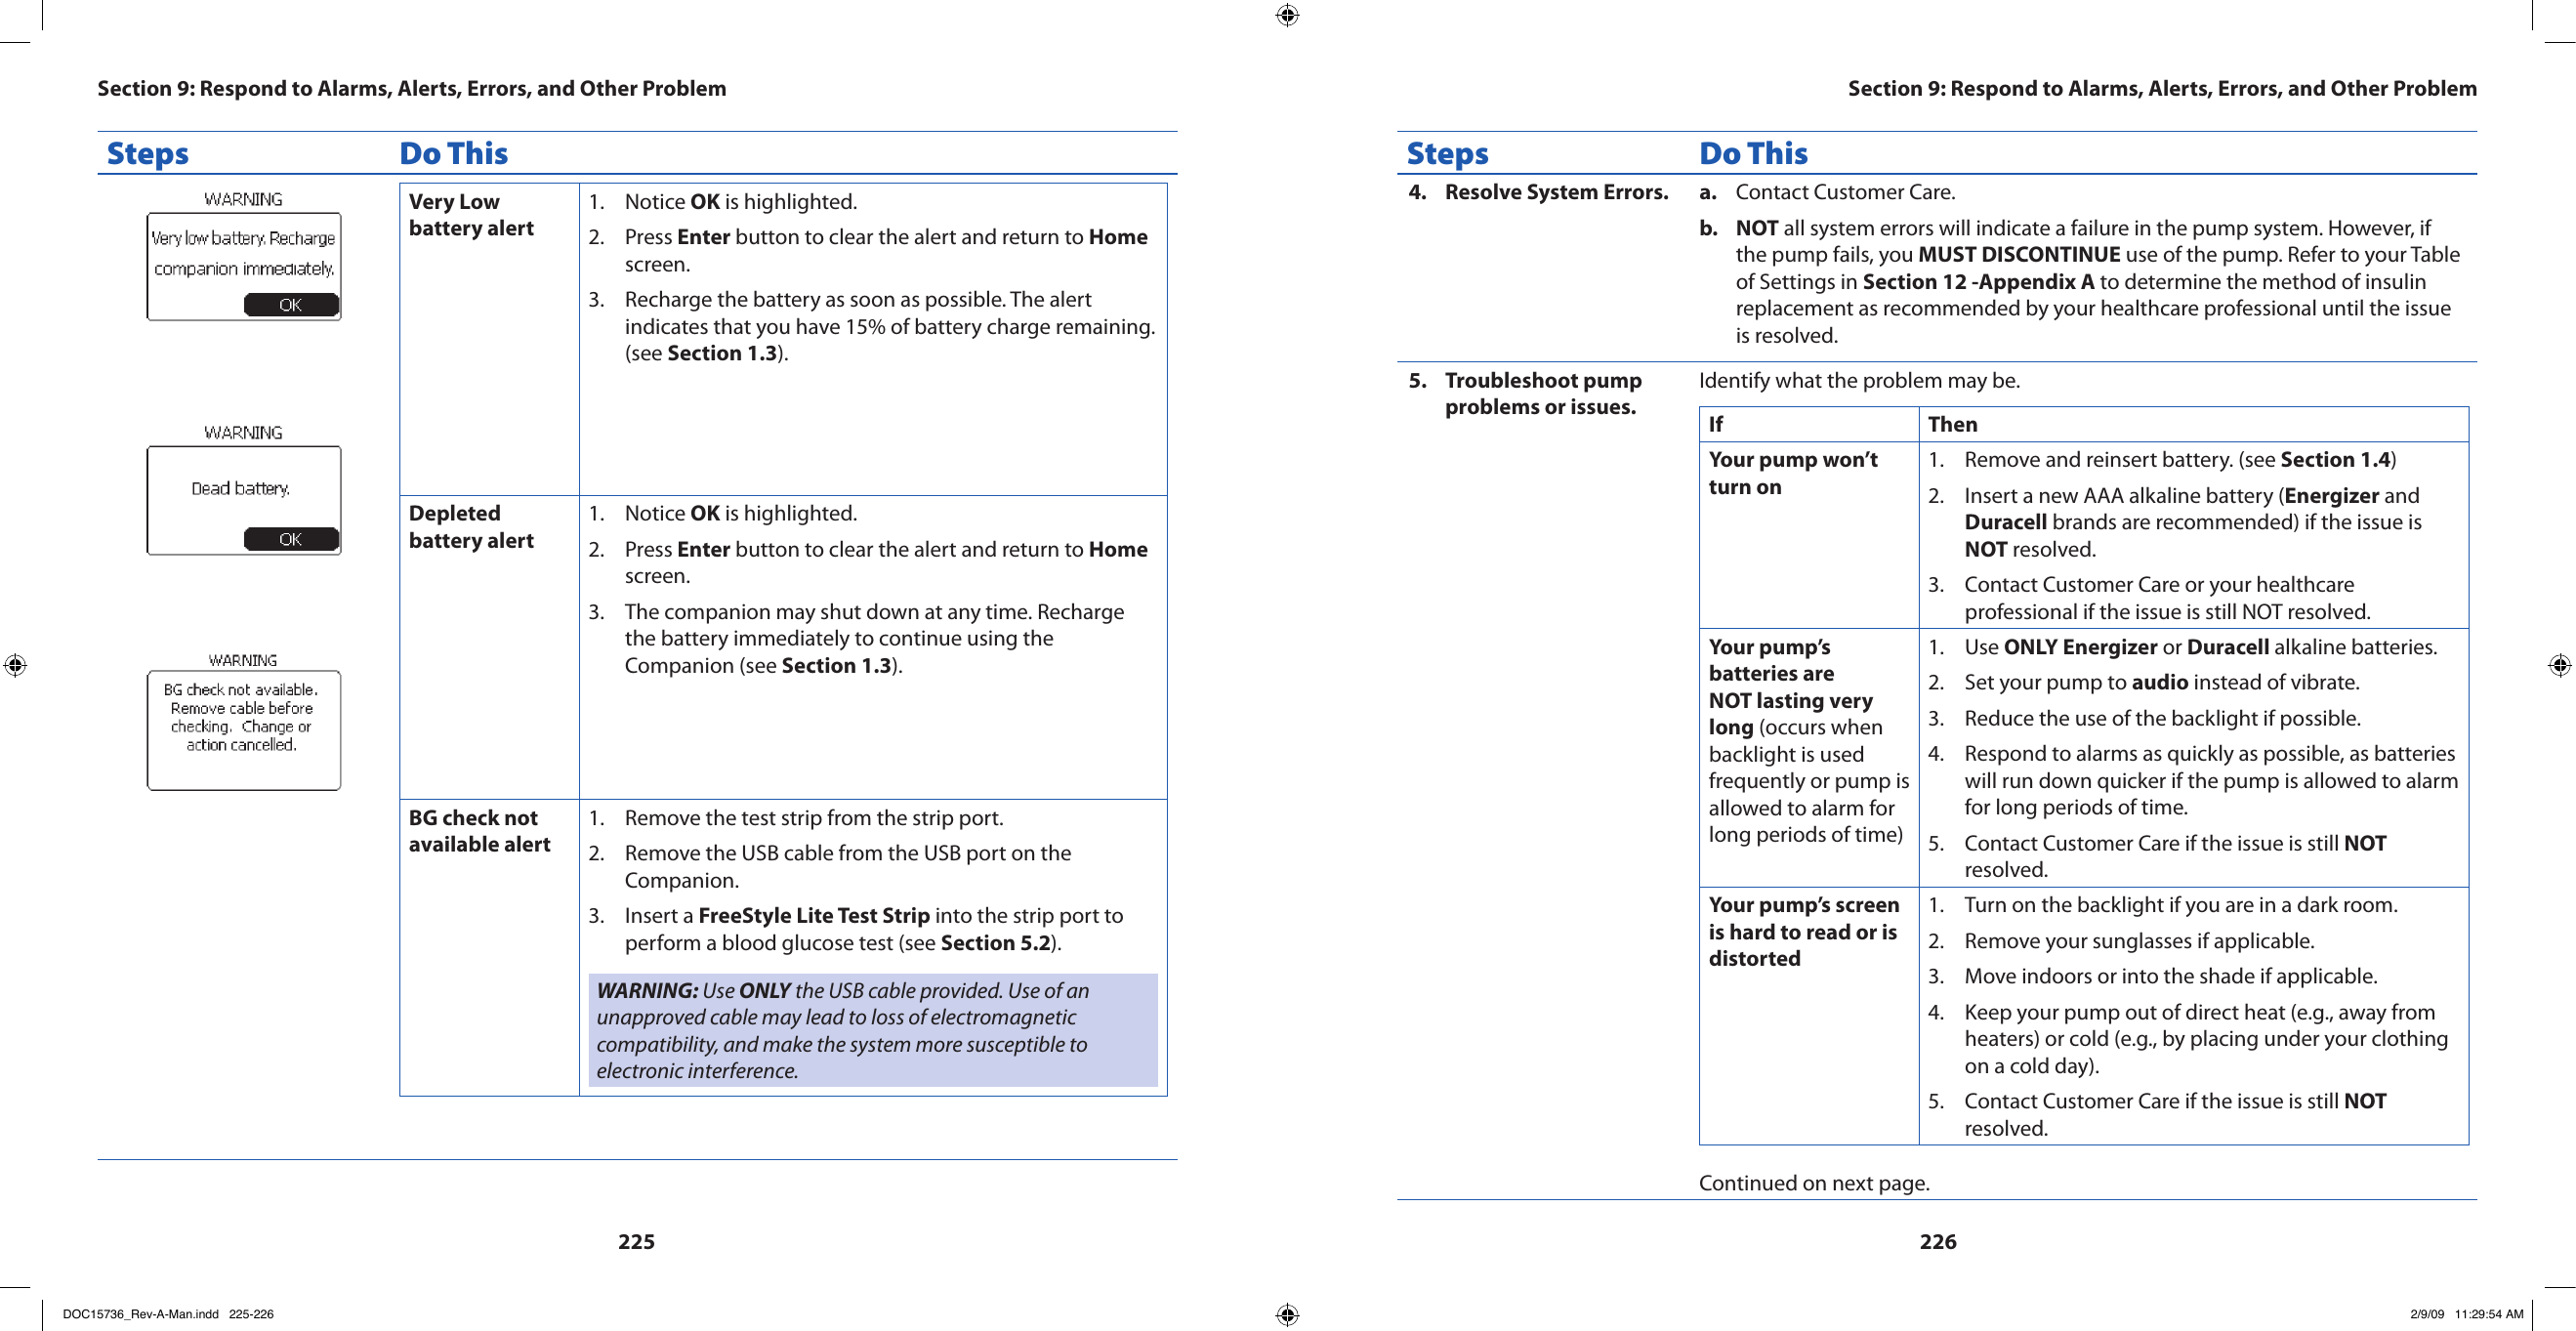
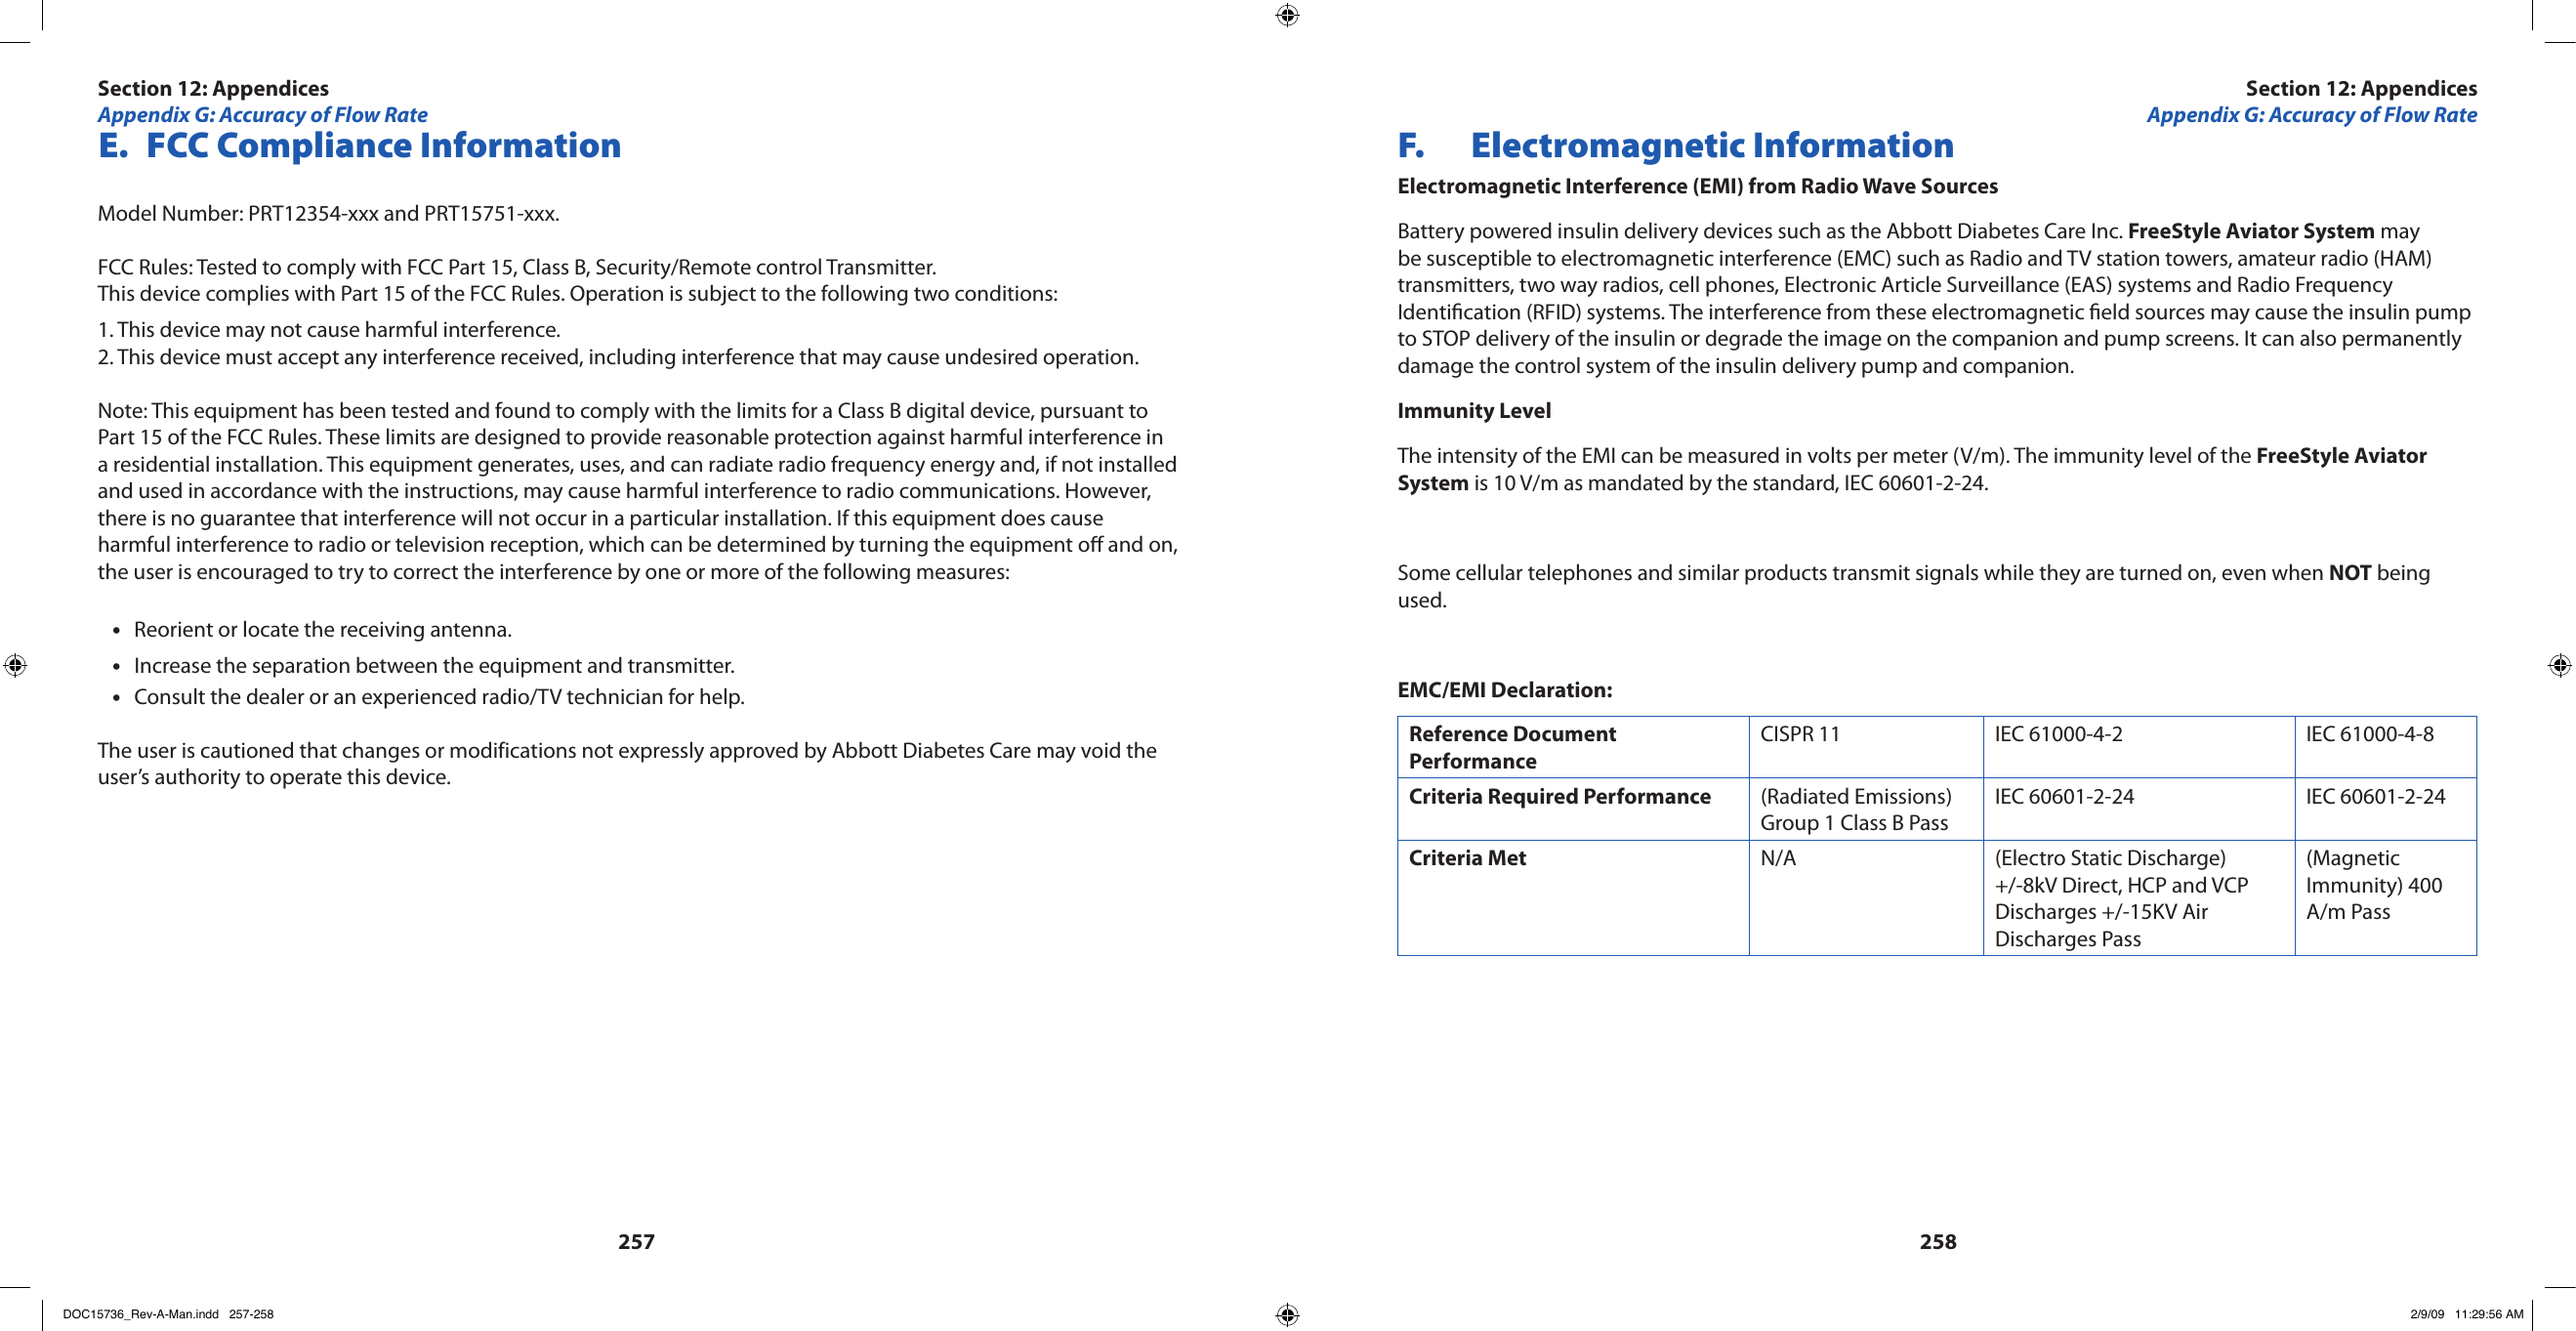
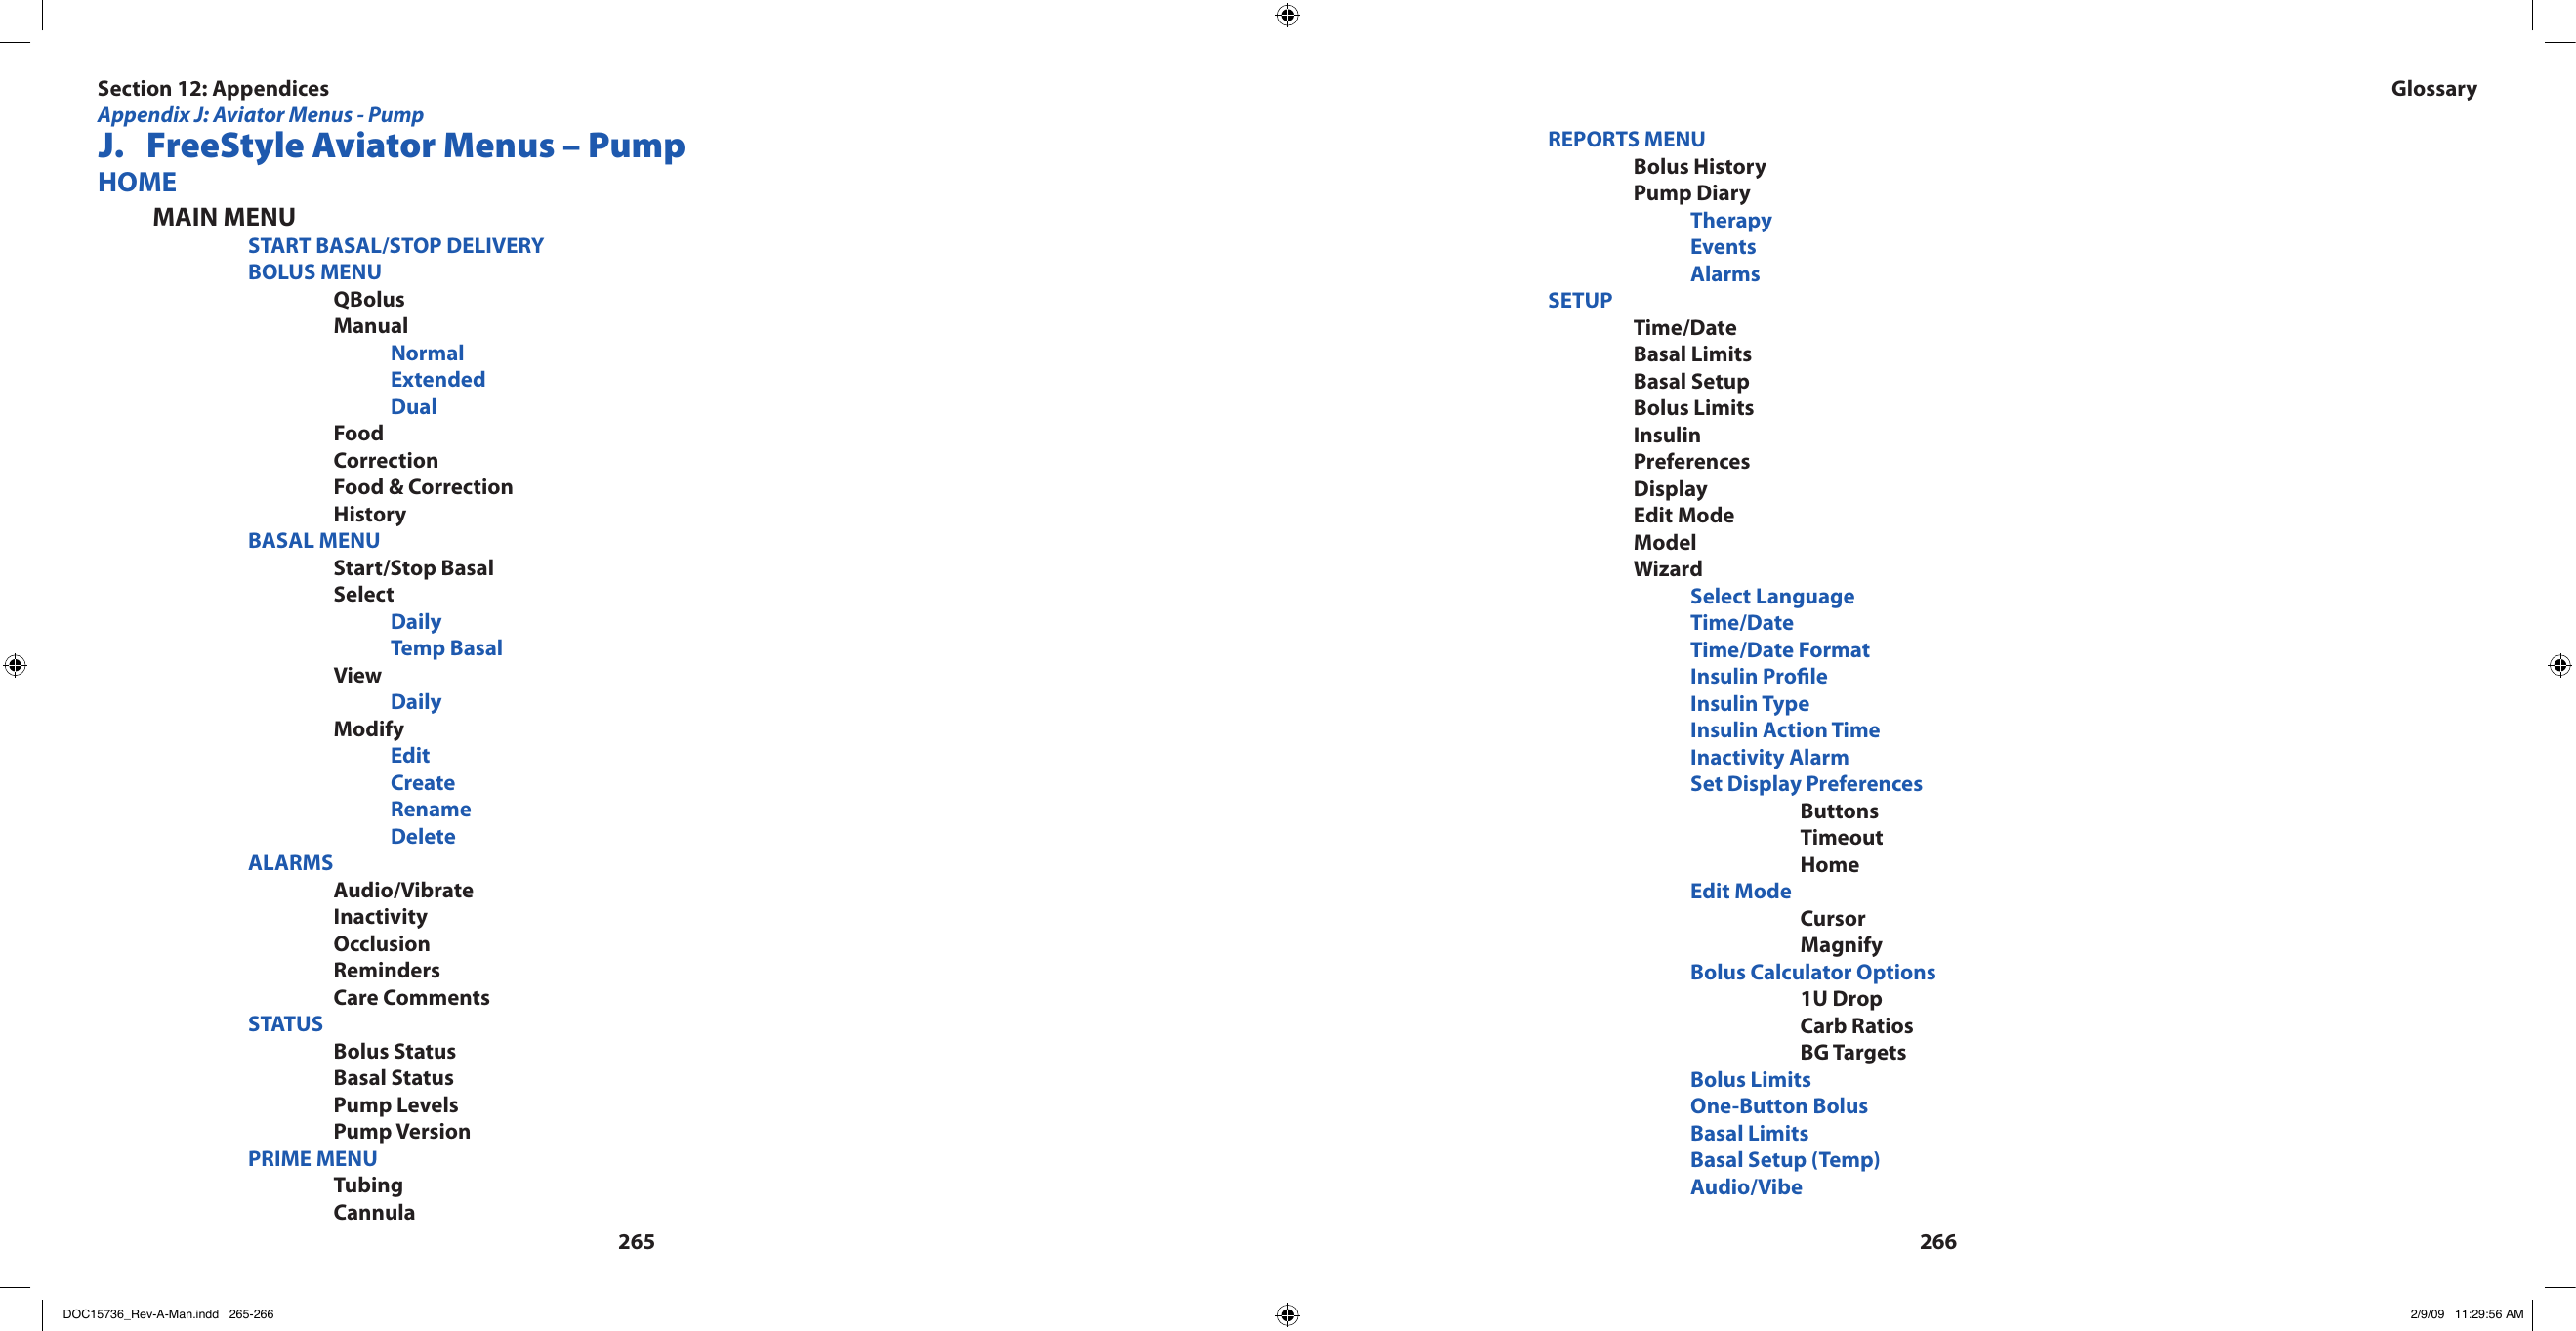
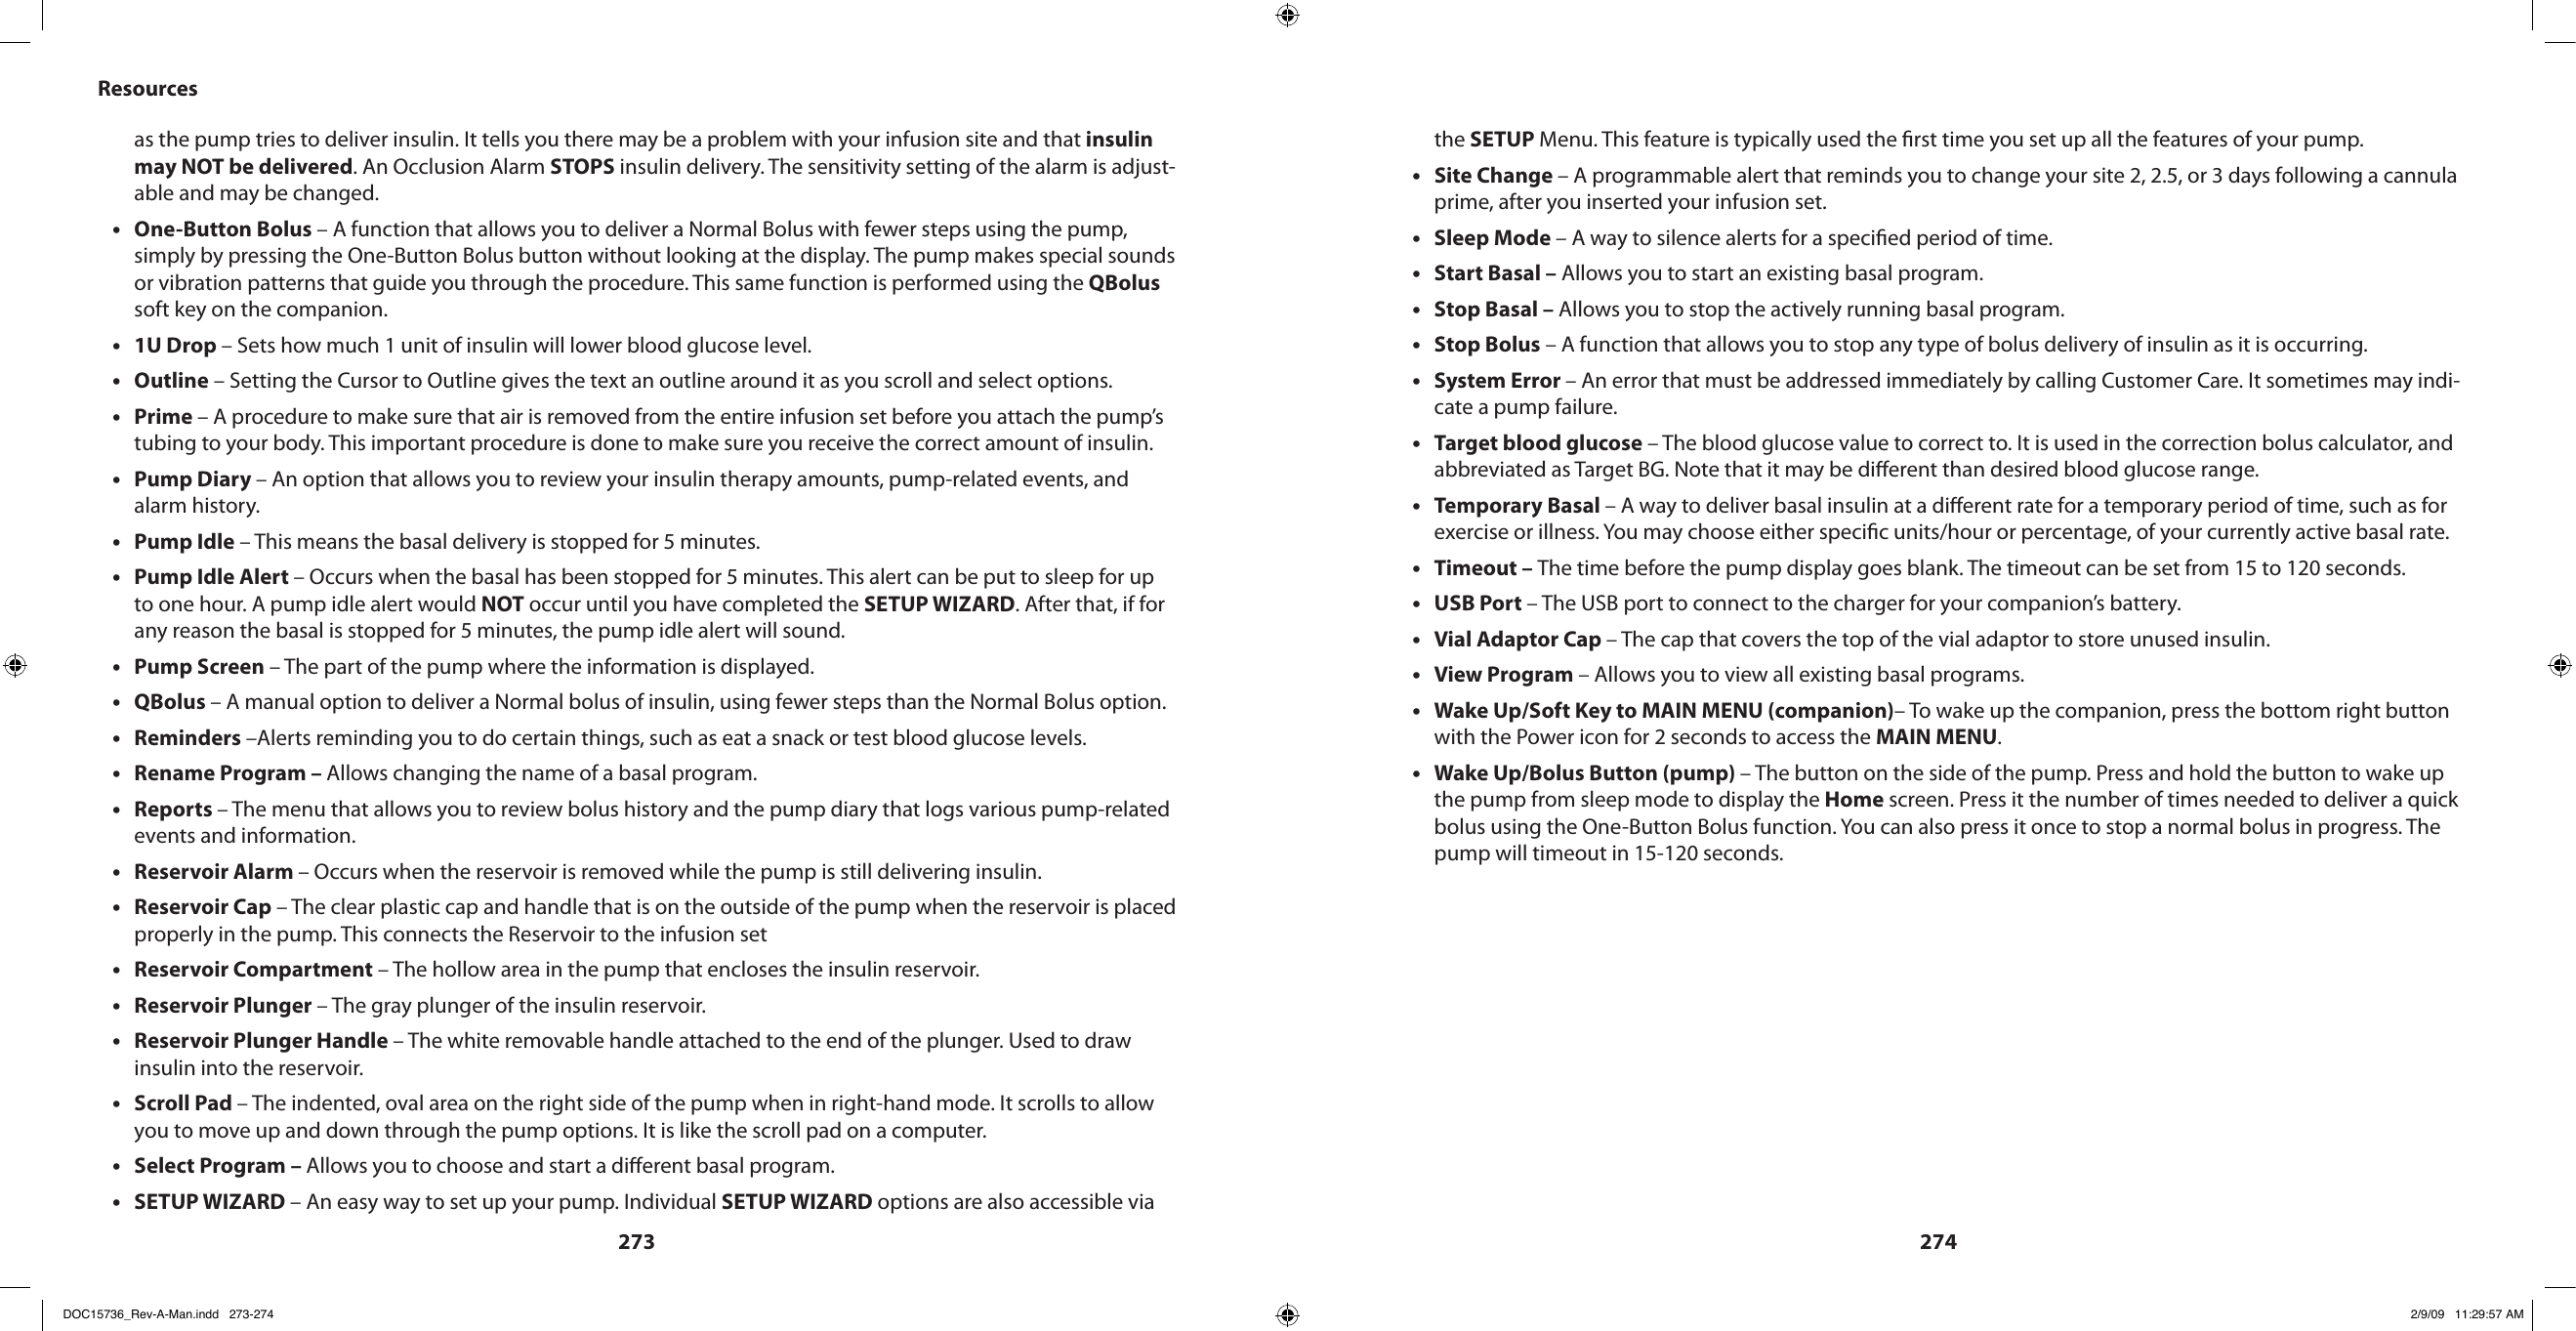
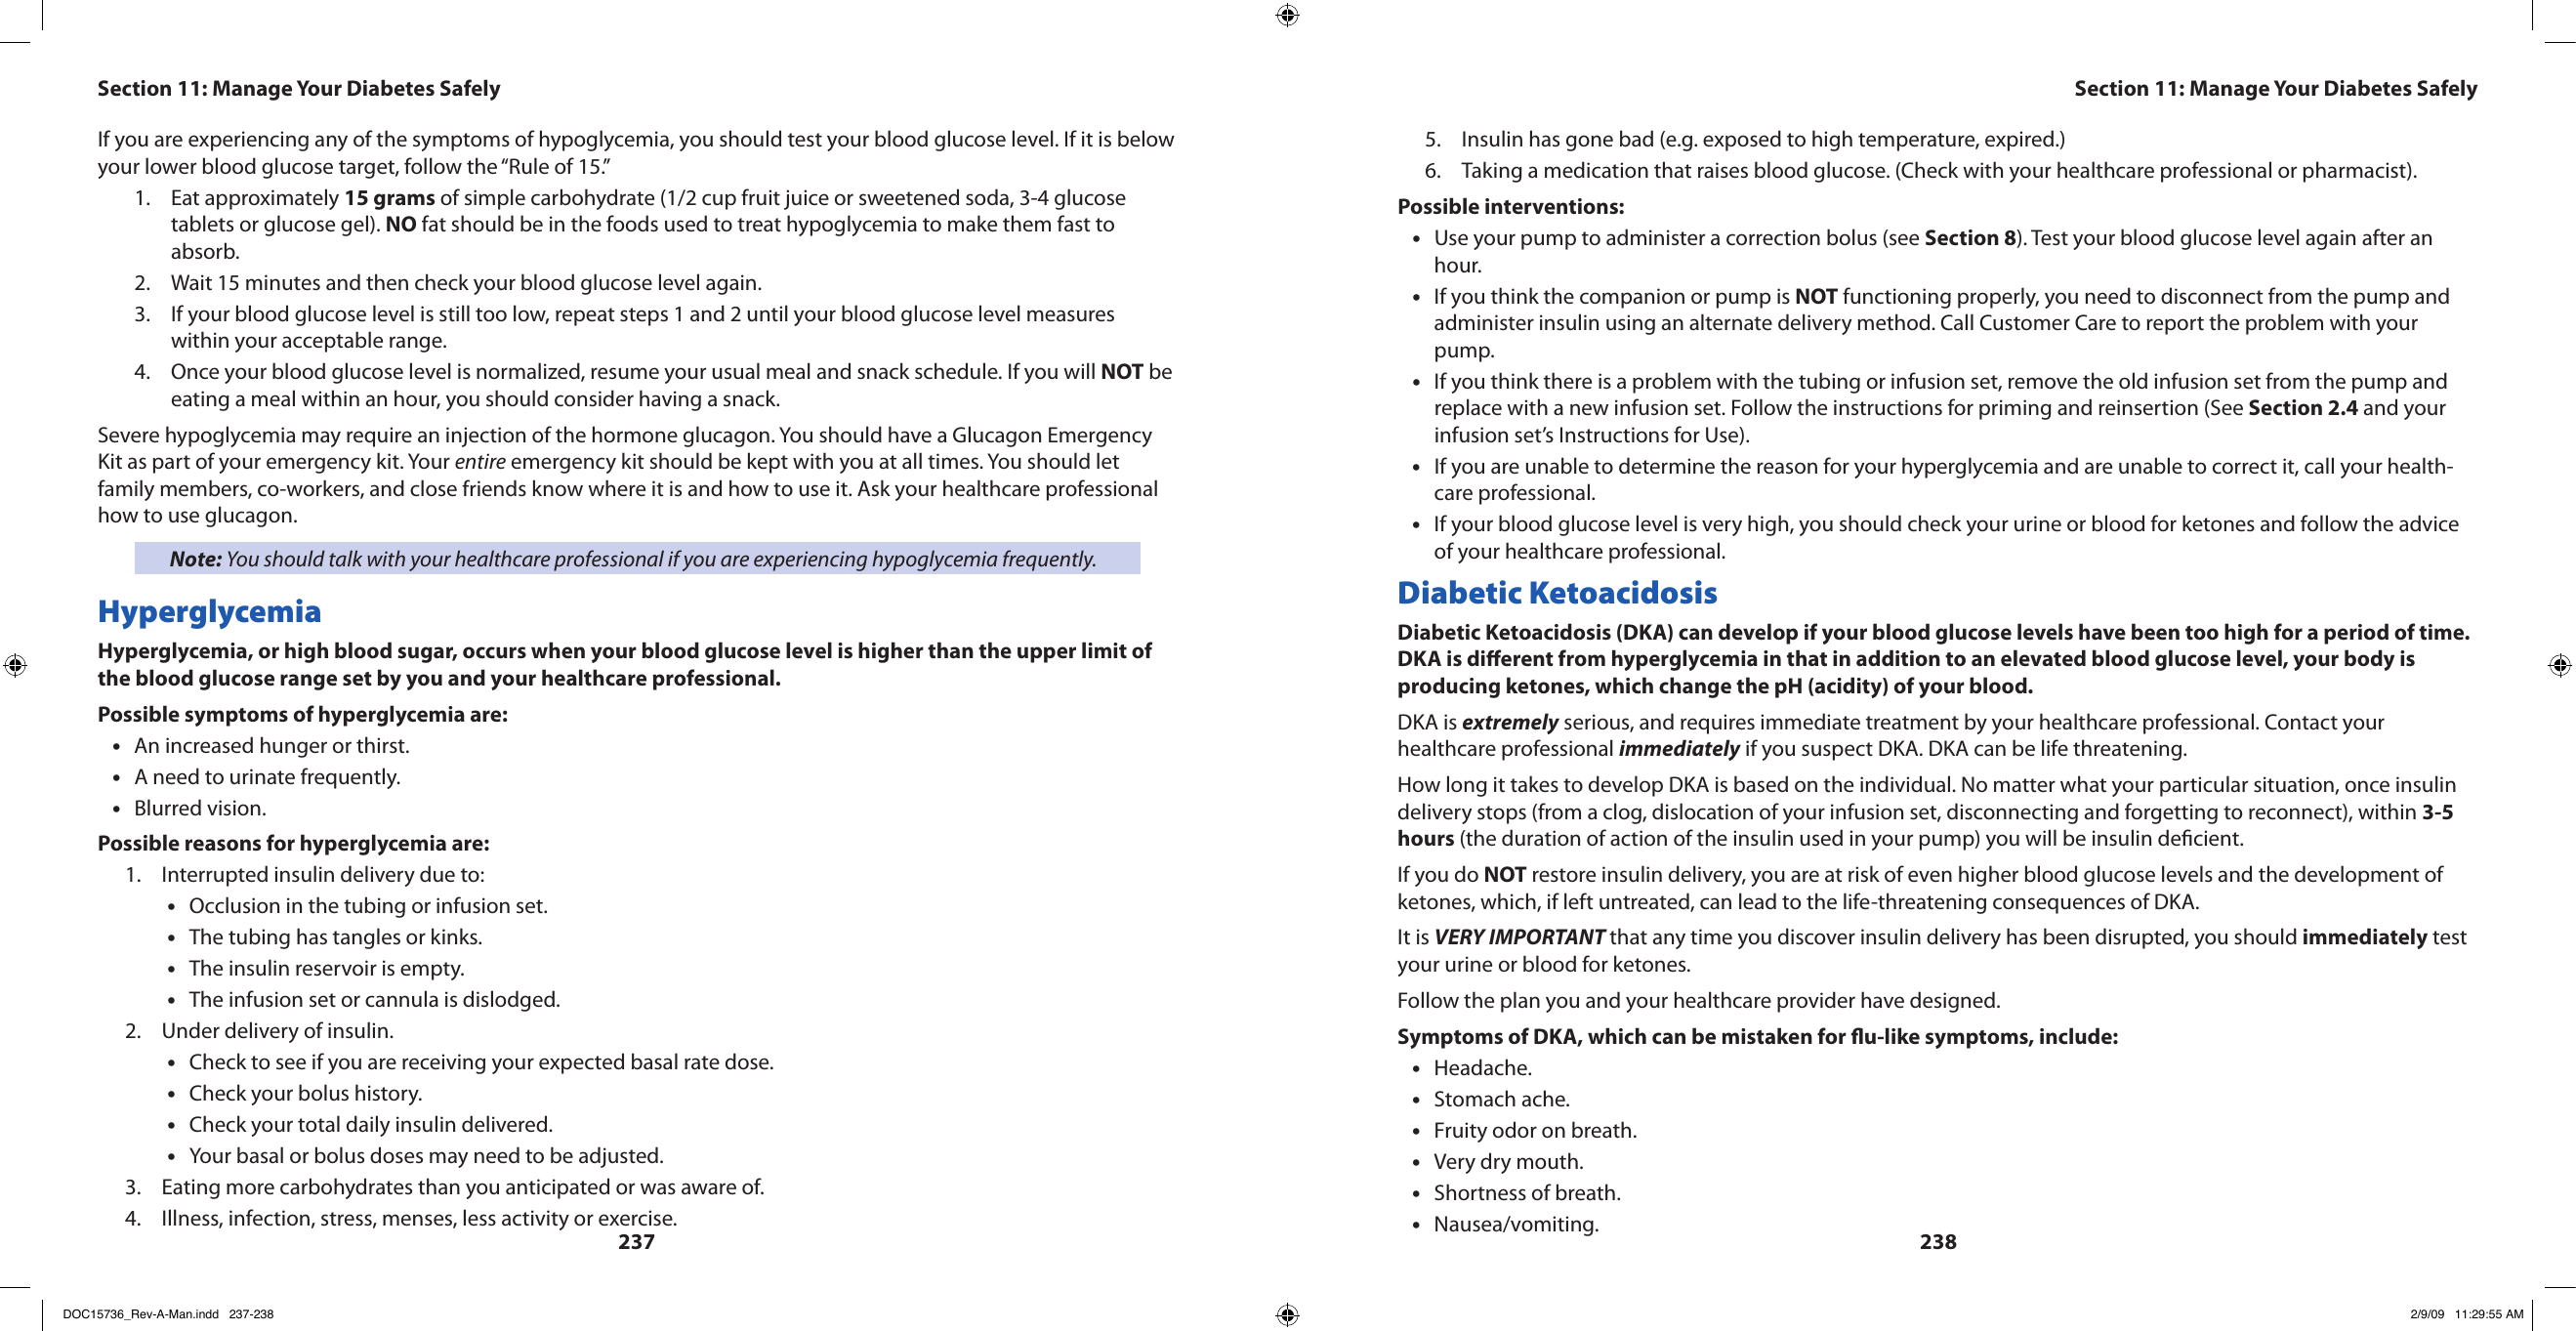
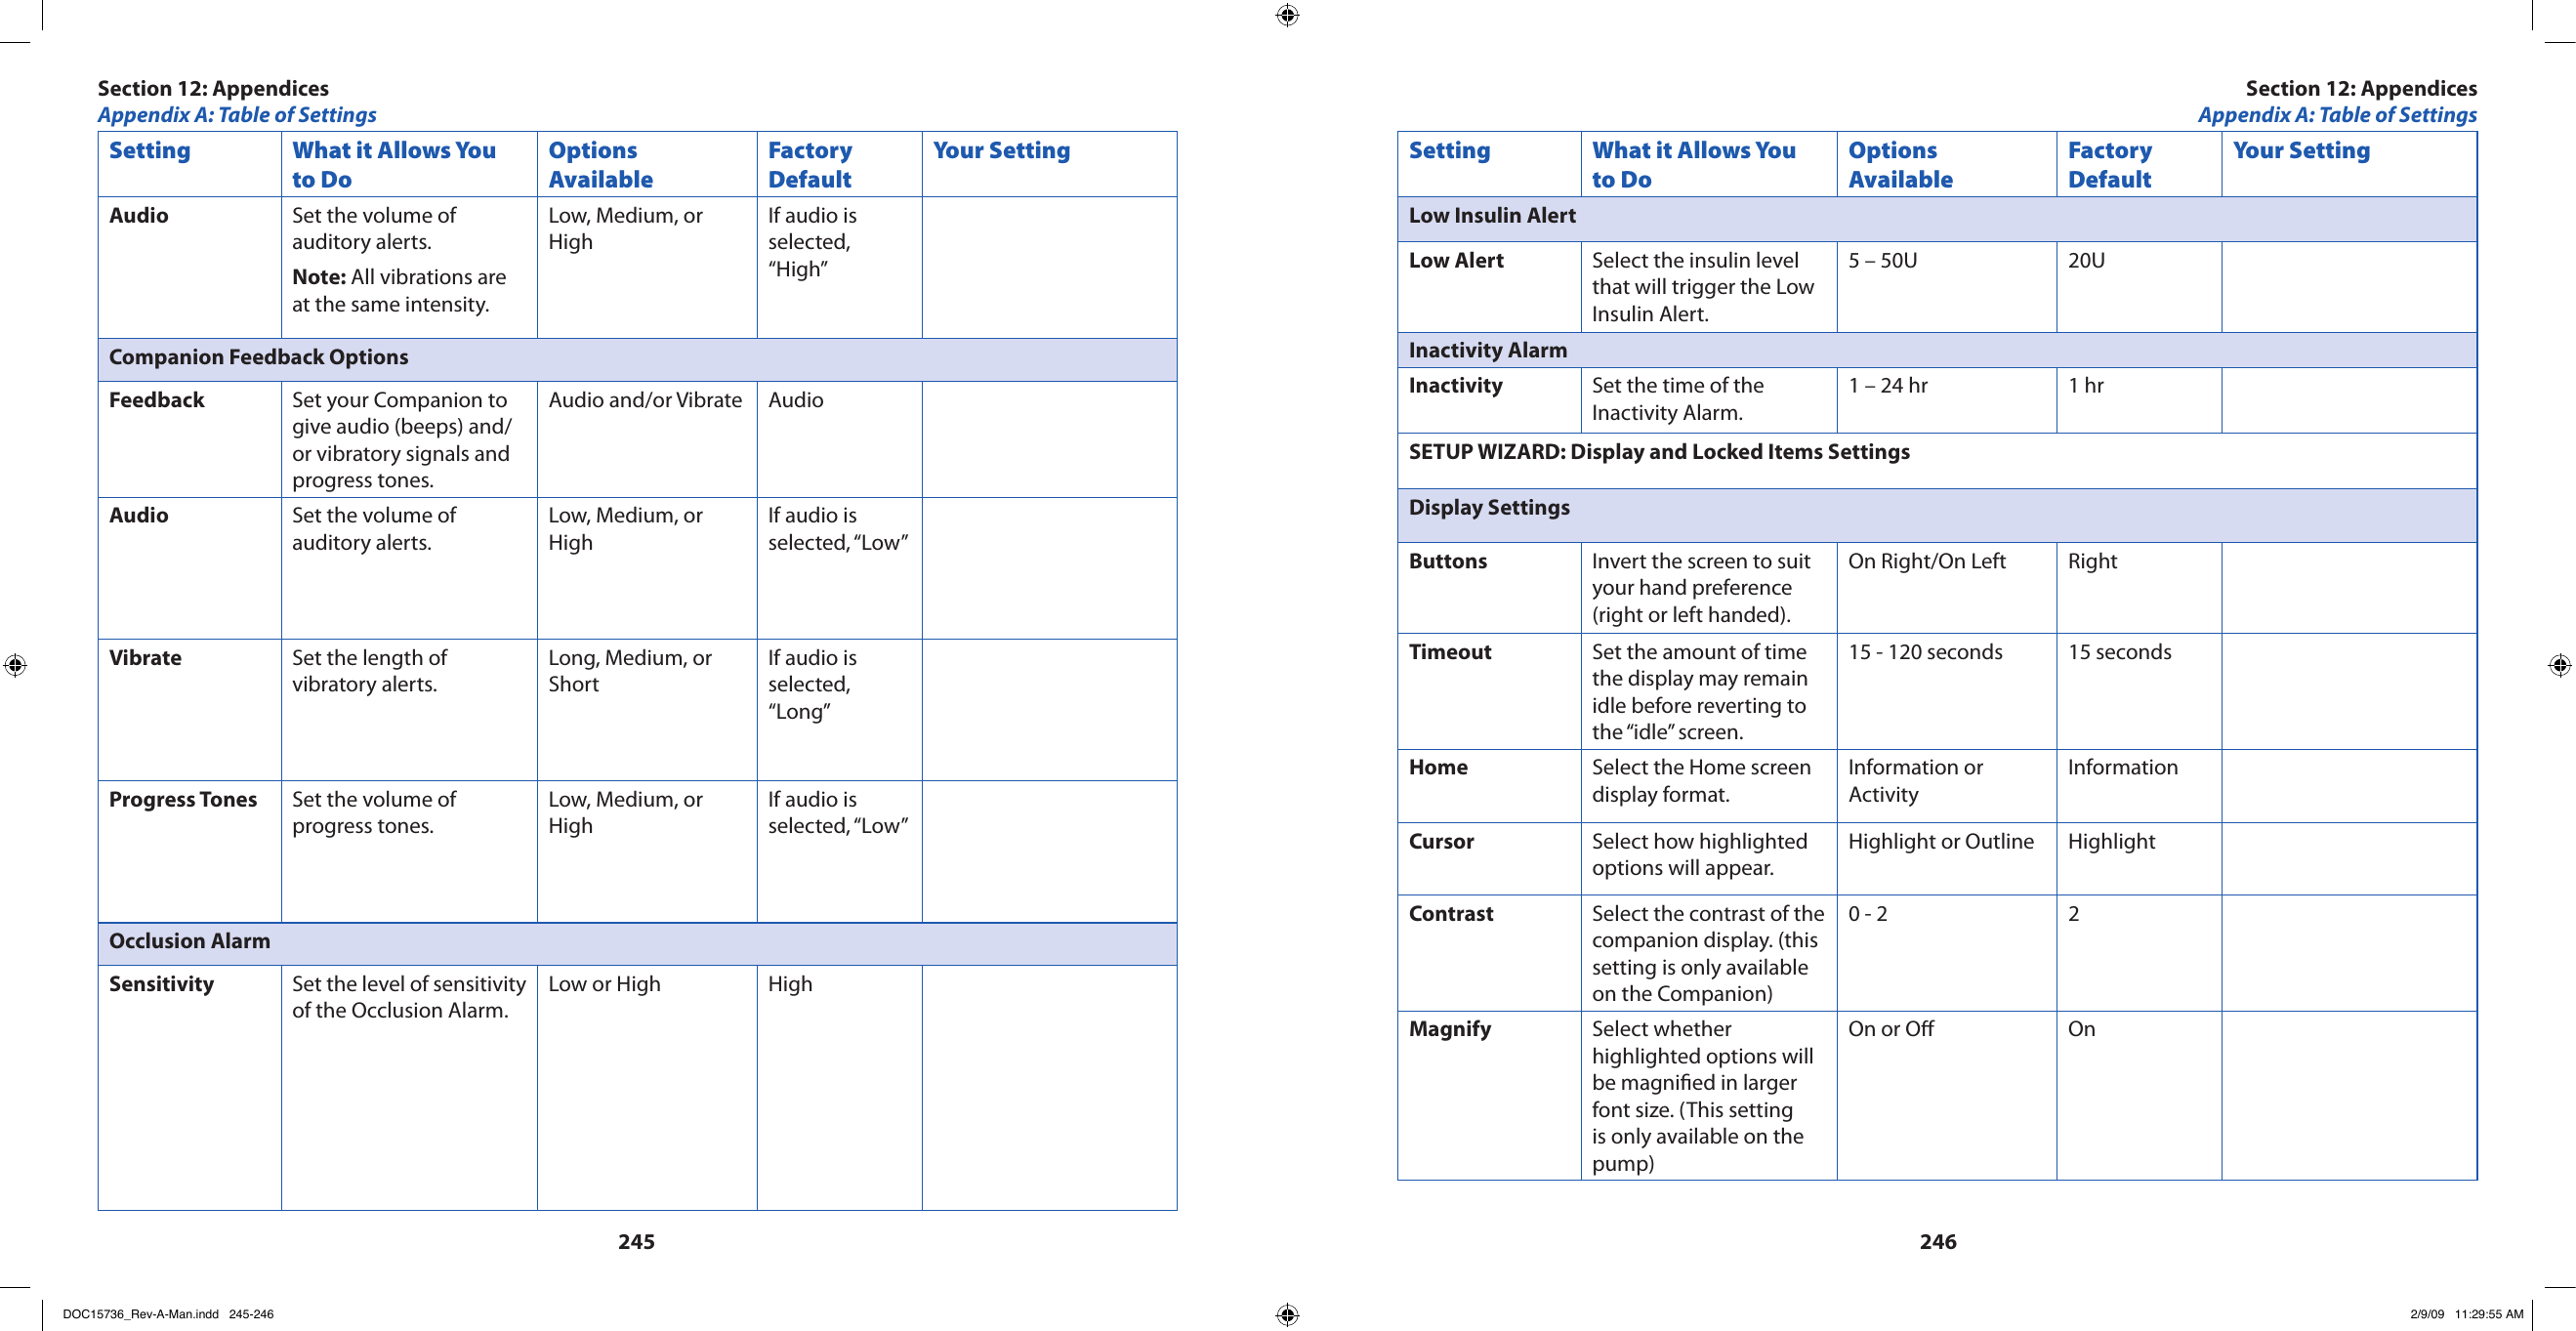
![23123210.3. Store Your Aviator Companion and Aviator PumpHelpful InformationStop all delivery prior to removing the pump battery.•Remove the battery before storing your pump.•Store your pump with the battery cap and dust cap in place to protect the inside of your pump.•Store your Aviator Companion and pump in a clean, dry place where there are • NOT extreme temperatures, high humidity, or extreme atmospheric pressures.10.4. Handle a Damaged or Wet Companion or PumpCaution: If your companion or pump is cracked or a button is torn, discontinue use and switch to an alternate insulin therapy method immediately. Follow your healthcare professional’s recommendations for alternate insulin delivery method in Section 12-Appendix A and/or call Customer Care. ONLY the personnel at Abbott Diabetes Care should take care of a damaged pump.Helpful InformationBe careful • NOT to drop your companion or pump, or hit it against hard surfaces.Check for missing segments and that the screens display correctly and audio / vibration occurs after installing a •pump battery. Also verify the audio / vibration test when starting basal delivery.Do • NOT submerge the companion in water. If it is accidentally dropped in water, towel dry the outside of the companion. Do NOT use a hair dryer to dry your companion.If your pump is accidentally submerged in water and the battery cap and infusion set hub are in place, you can •towel dry the outside of the pump. Inspect the reservoir compartment and battery compartment and dry any water you nd with a Q-tip. Do NOT use a hair dryer to dry your pump. If your pump was submerged in salt wa-ter, thoroughly clean with a damp cloth before drying.If your pump is accidentally submerged in water and the battery cap or the infusion set is • NOT properly in-stalled, submersion will likely damage internal pump components. Call Customer Care.If your companion is accidentally submerged in water, you can towel dry the outside of the companion. Do • NOT recharge or reuse the Companion. Contact Customer Care.You should remove your pump before every prolonged exposure to water, including bathing, showering, and •swimming.Because of the • Aviator Pump’s unique hub connection, use ONLY Aviator-compatible sets with the pump.If your pump is damaged, it will need to be serviced or replaced. Call Customer Care for information about ser-•vicing or replacing your pump.10.5. Conditions for Transport, Storage, and UseHelpful InformationDo • NOT to subject your companion or pump to extreme conditions, which may cause malfunctions and pos-sible adverse events or serious injury.Try to AVOID:Exposing your companion or pump to temperatures above 104ºF (40ºC), as might happen in a sauna or on a •very hot day.Allowing your companion or pump to absorb radiant heat (e.g., sunlight) that would increase its temperatures to •above 104 ºF (40ºC). This can also damage your insulin in the tubing exposed to the radiant heat.Using a dark colored pump case, which would increase the intensity of radiant heat.•Lowering the temperature of your companion or pump below 41ºF (1ºC).•Storing your pump below or above the recommended temperature when you are not using the pump. Note that •storage temperature should be between -4°F to 104°F (-20°C to 43°C).Exposing your companion or pump to very high humidity (over 100 percent) for prolonged periods of time. Your •system may NOT operate properly.Low atmospheric pressures (Elevation 10,000 feet [3048 meters] and above. Commercial airliners are OK because •of the pressurized cabins.) Your system may NOT operate properly.The • Aviator Companion contains lithium batteries. At the end of their useful life, dispose system components and accessories according to local environment and other rules and regulations that may apply.Avoid getting dirt, dust, blood, control solution, water or any other liquid in the • Aviator Companion’s test strip and data port. When traveling by air, pack your extra lithium batteries in checked baggage.•Caution: If your pump is exposed to these extreme ranges, there is a possibility the insulin in your pump will be damaged or destroyed. The insulin in the insulin reservoir may need to be replaced (see Section 2.3), and the infusion set changed. Please check with your healthcare professional.Section 11: Manage Your Diabetes SafelySection 11: Manage Your Diabetes SafelyDOC15736_Rev-A-Man.indd 231-232 2/9/09 11:29:54 AM](https://usermanual.wiki/Abbott-Diabetes-Care/AV2-C.User-manual-2-of-2/User-Guide-1071818-Page-51.png)

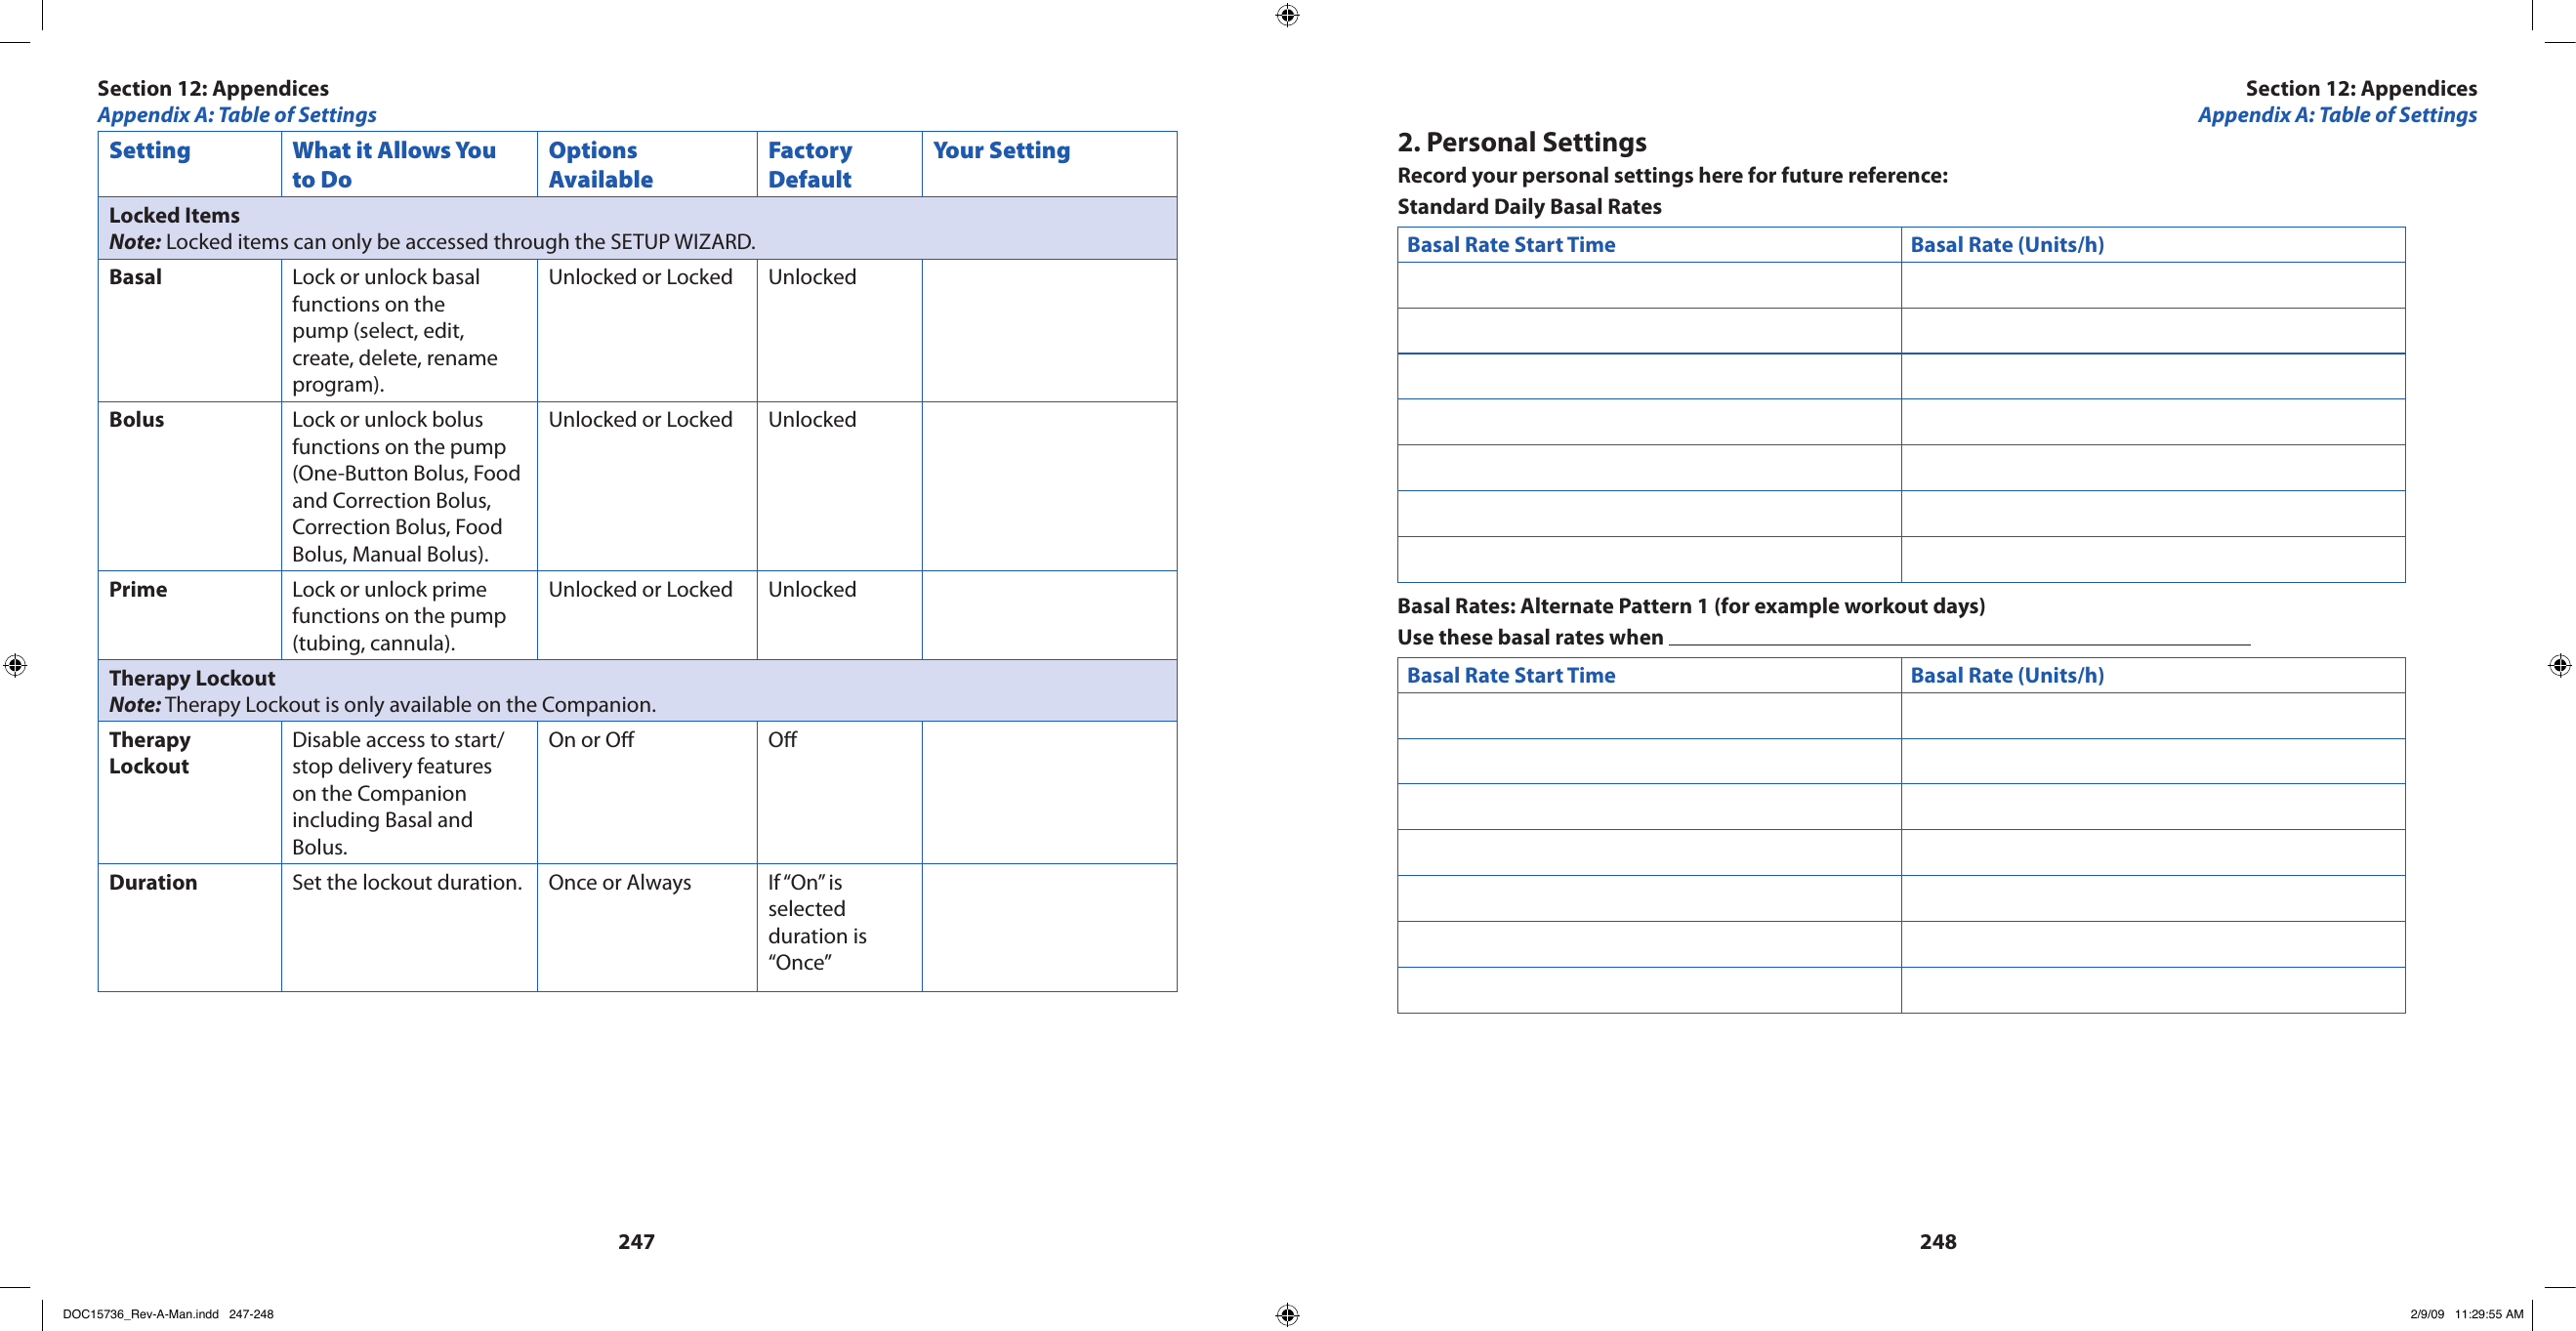
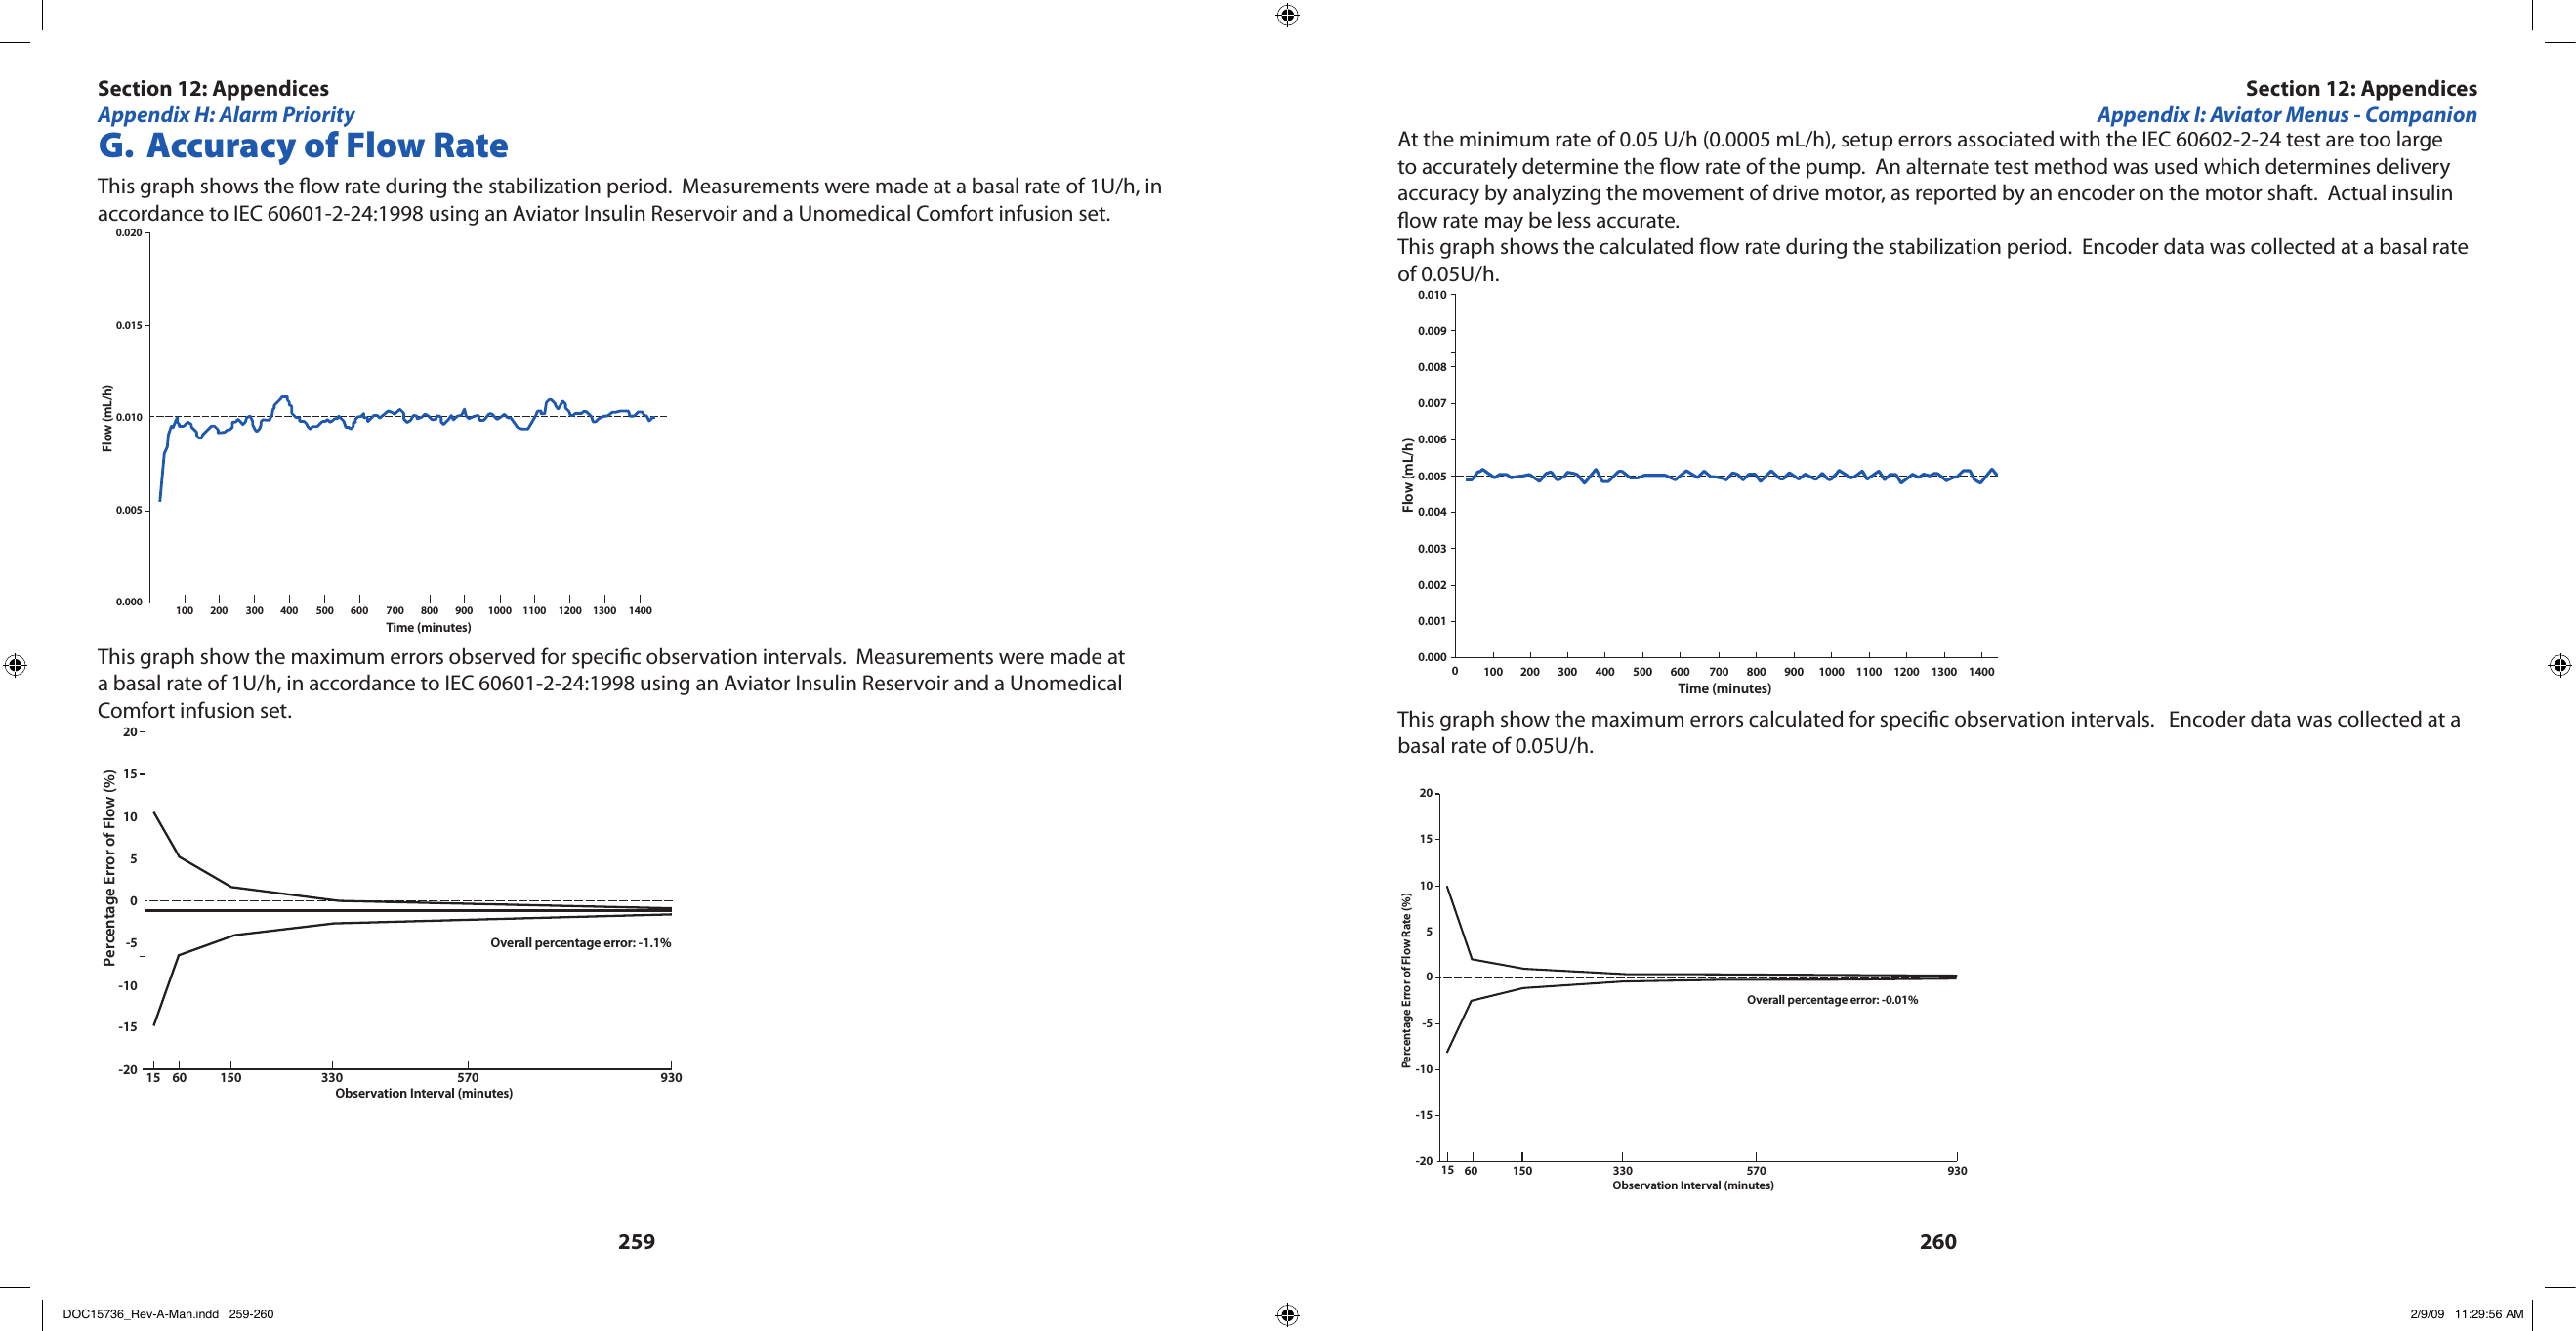
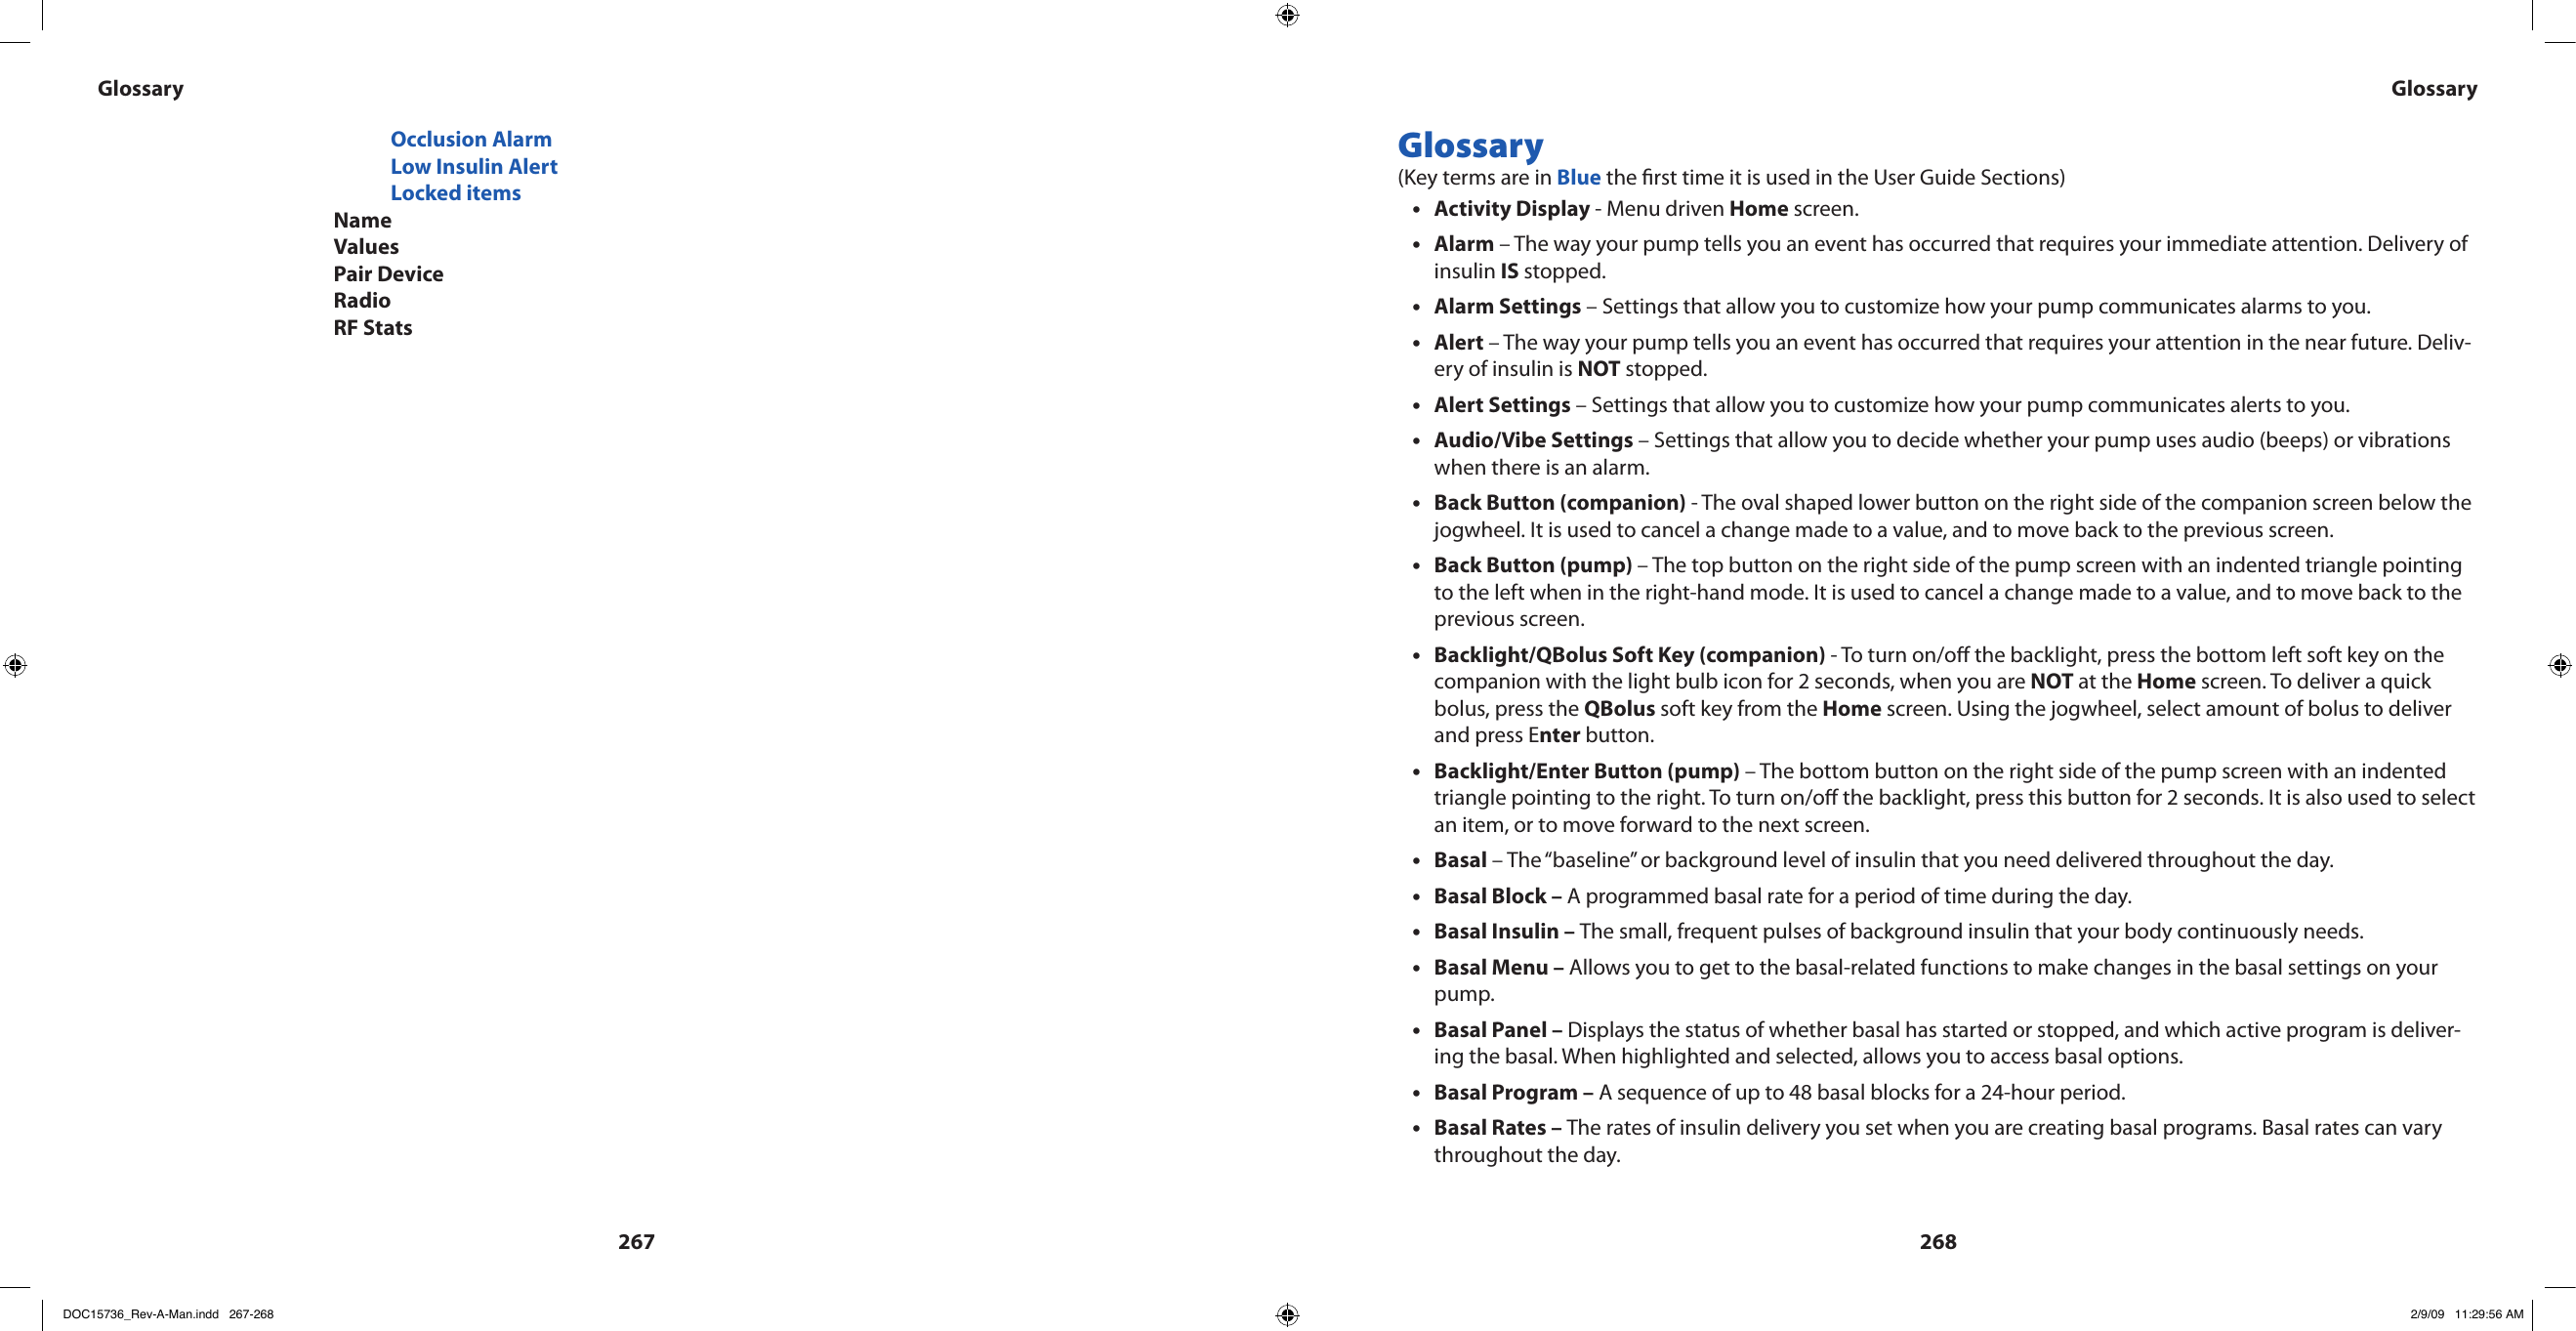
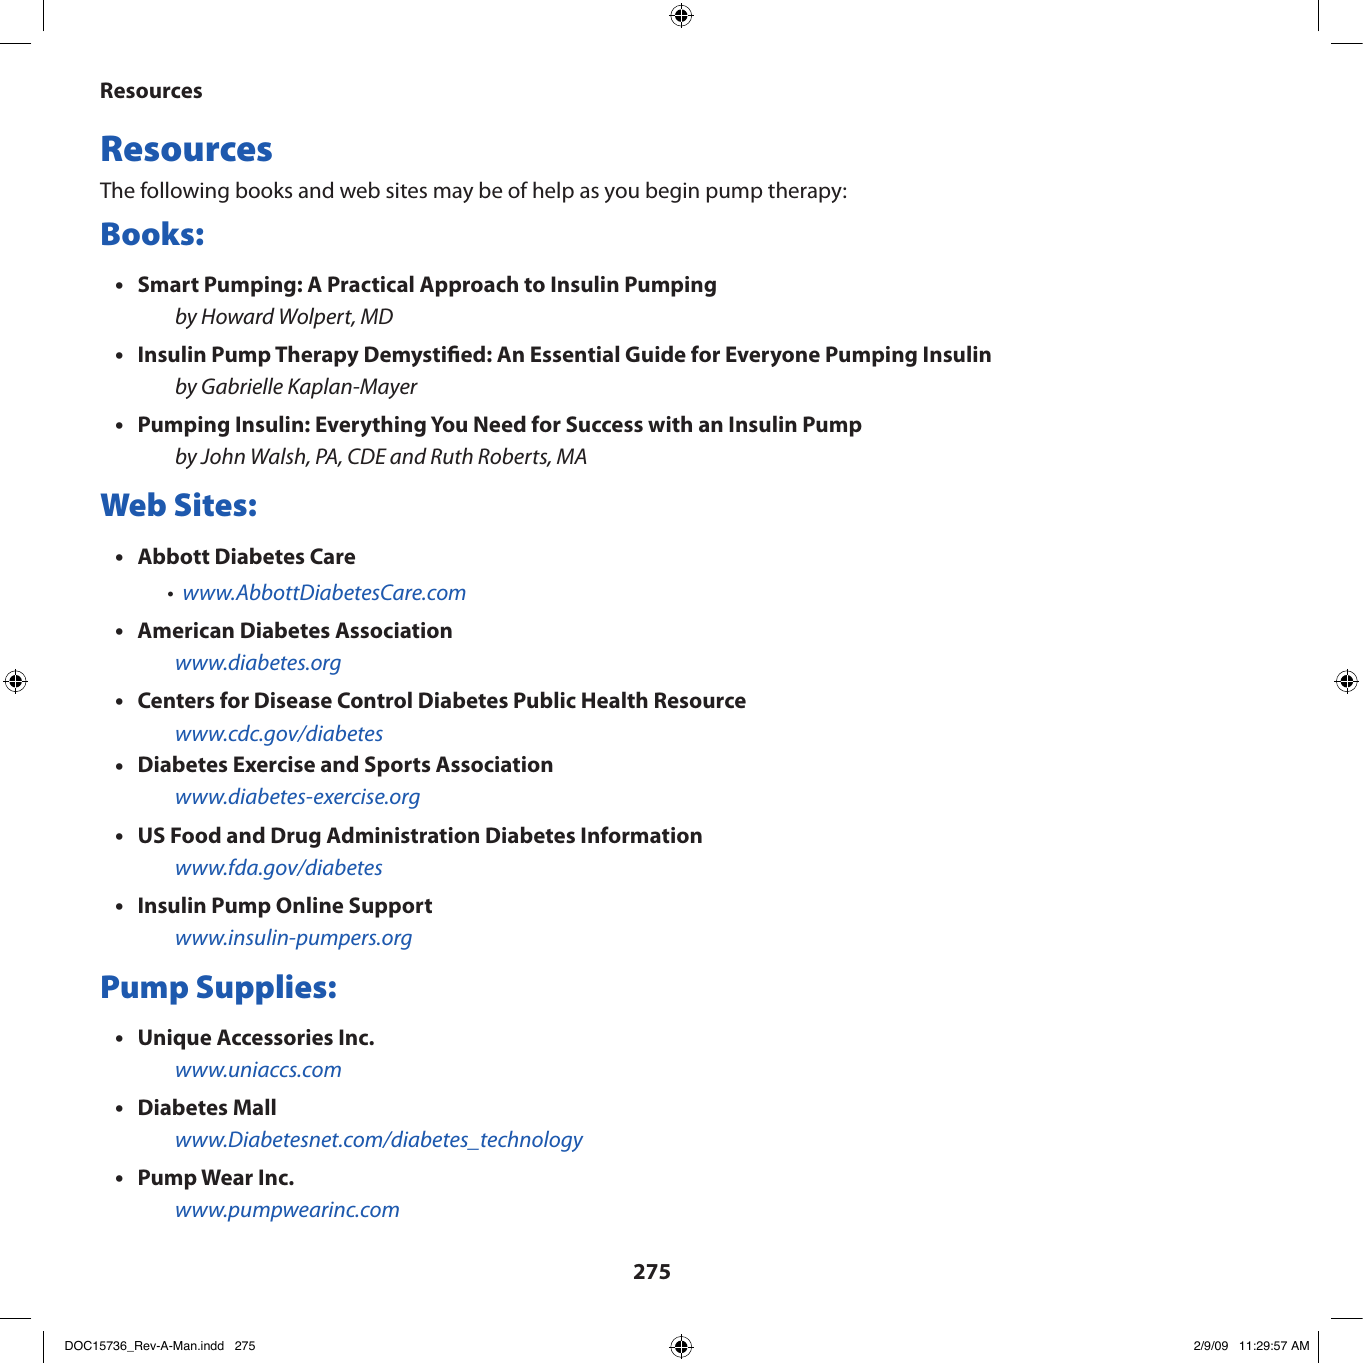
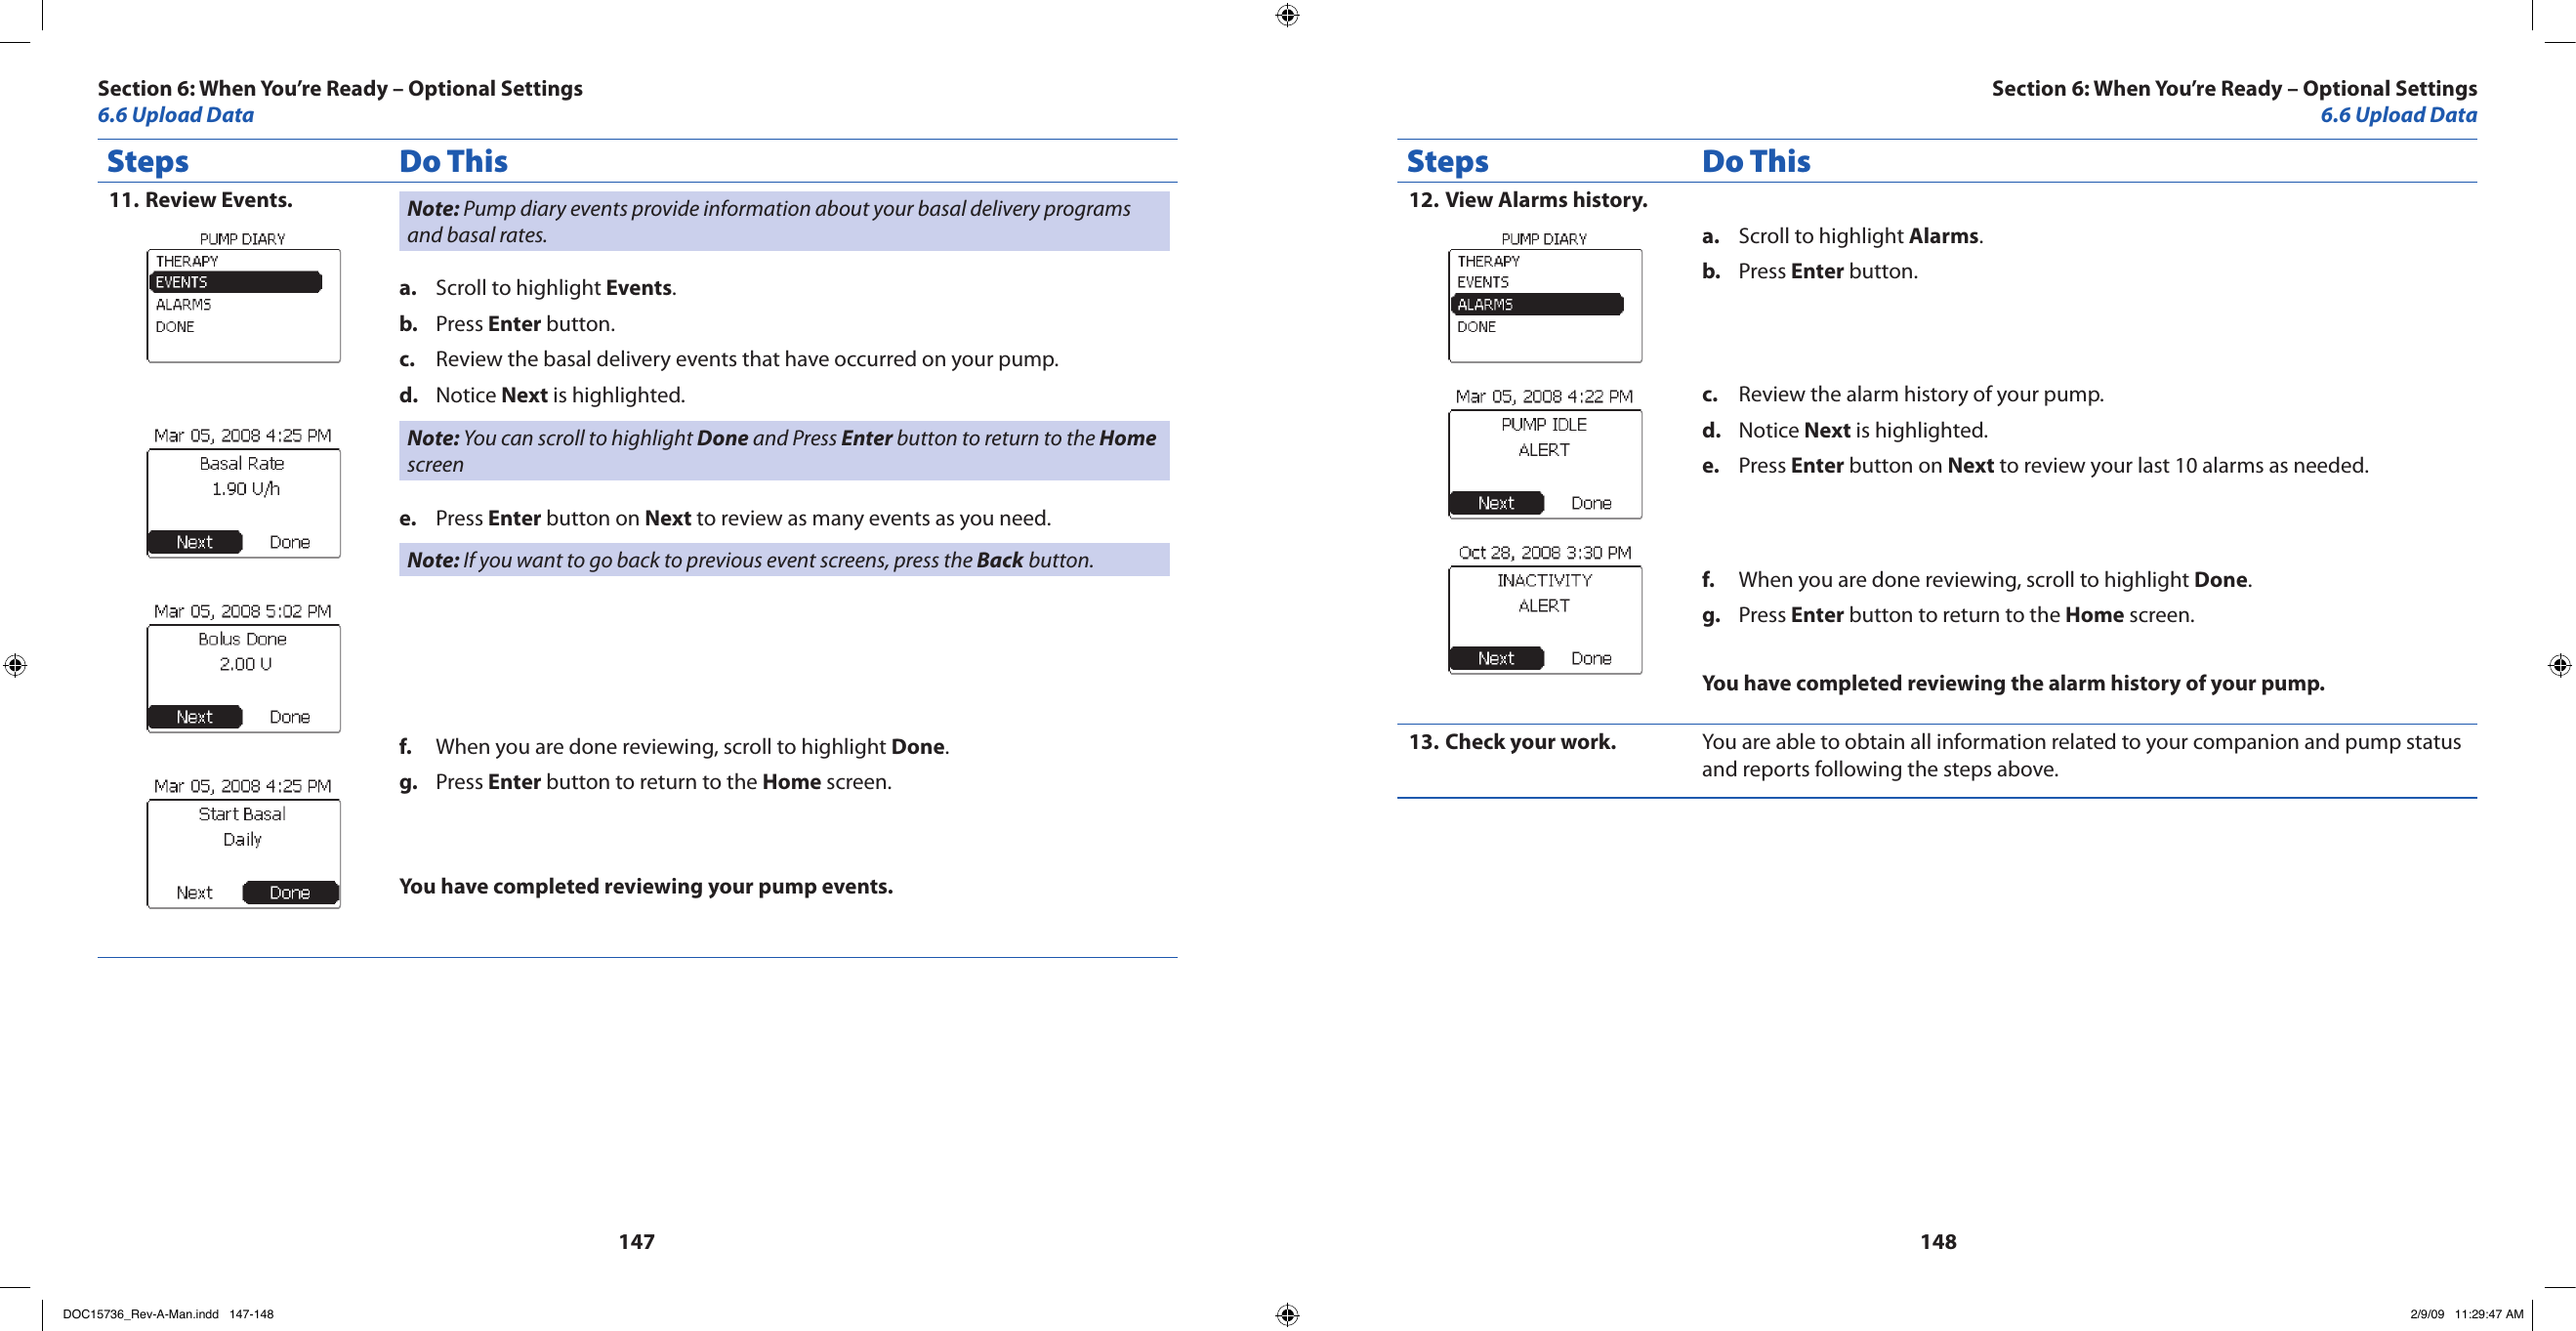
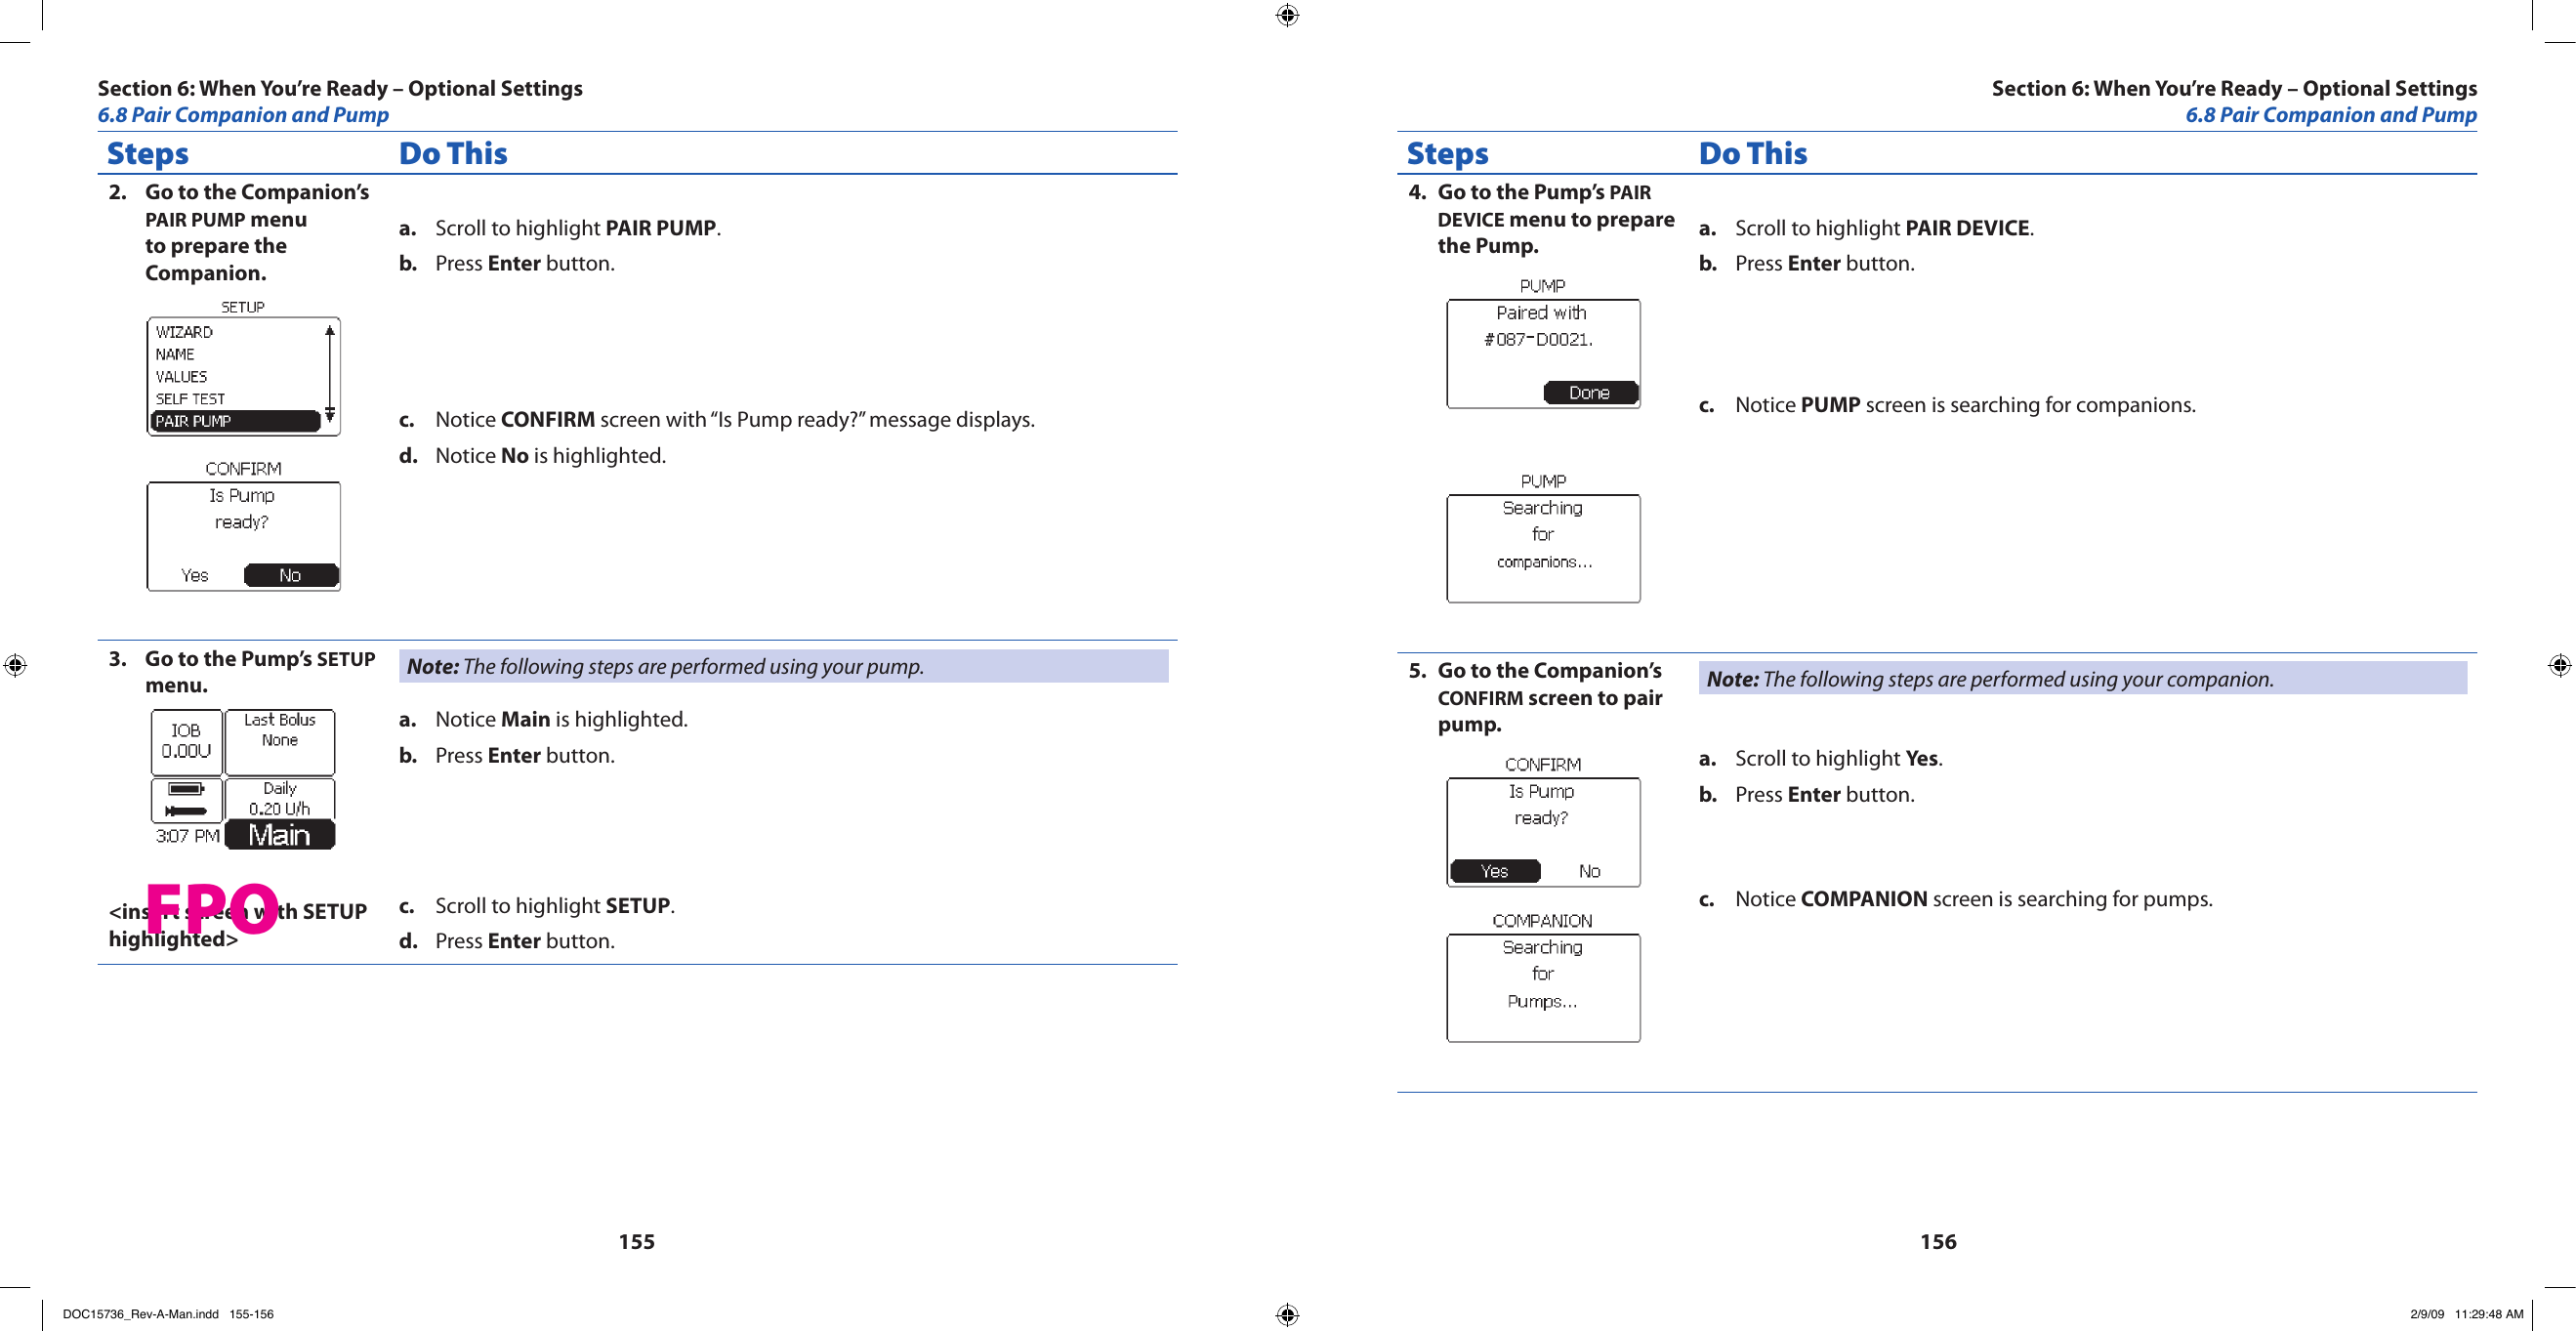
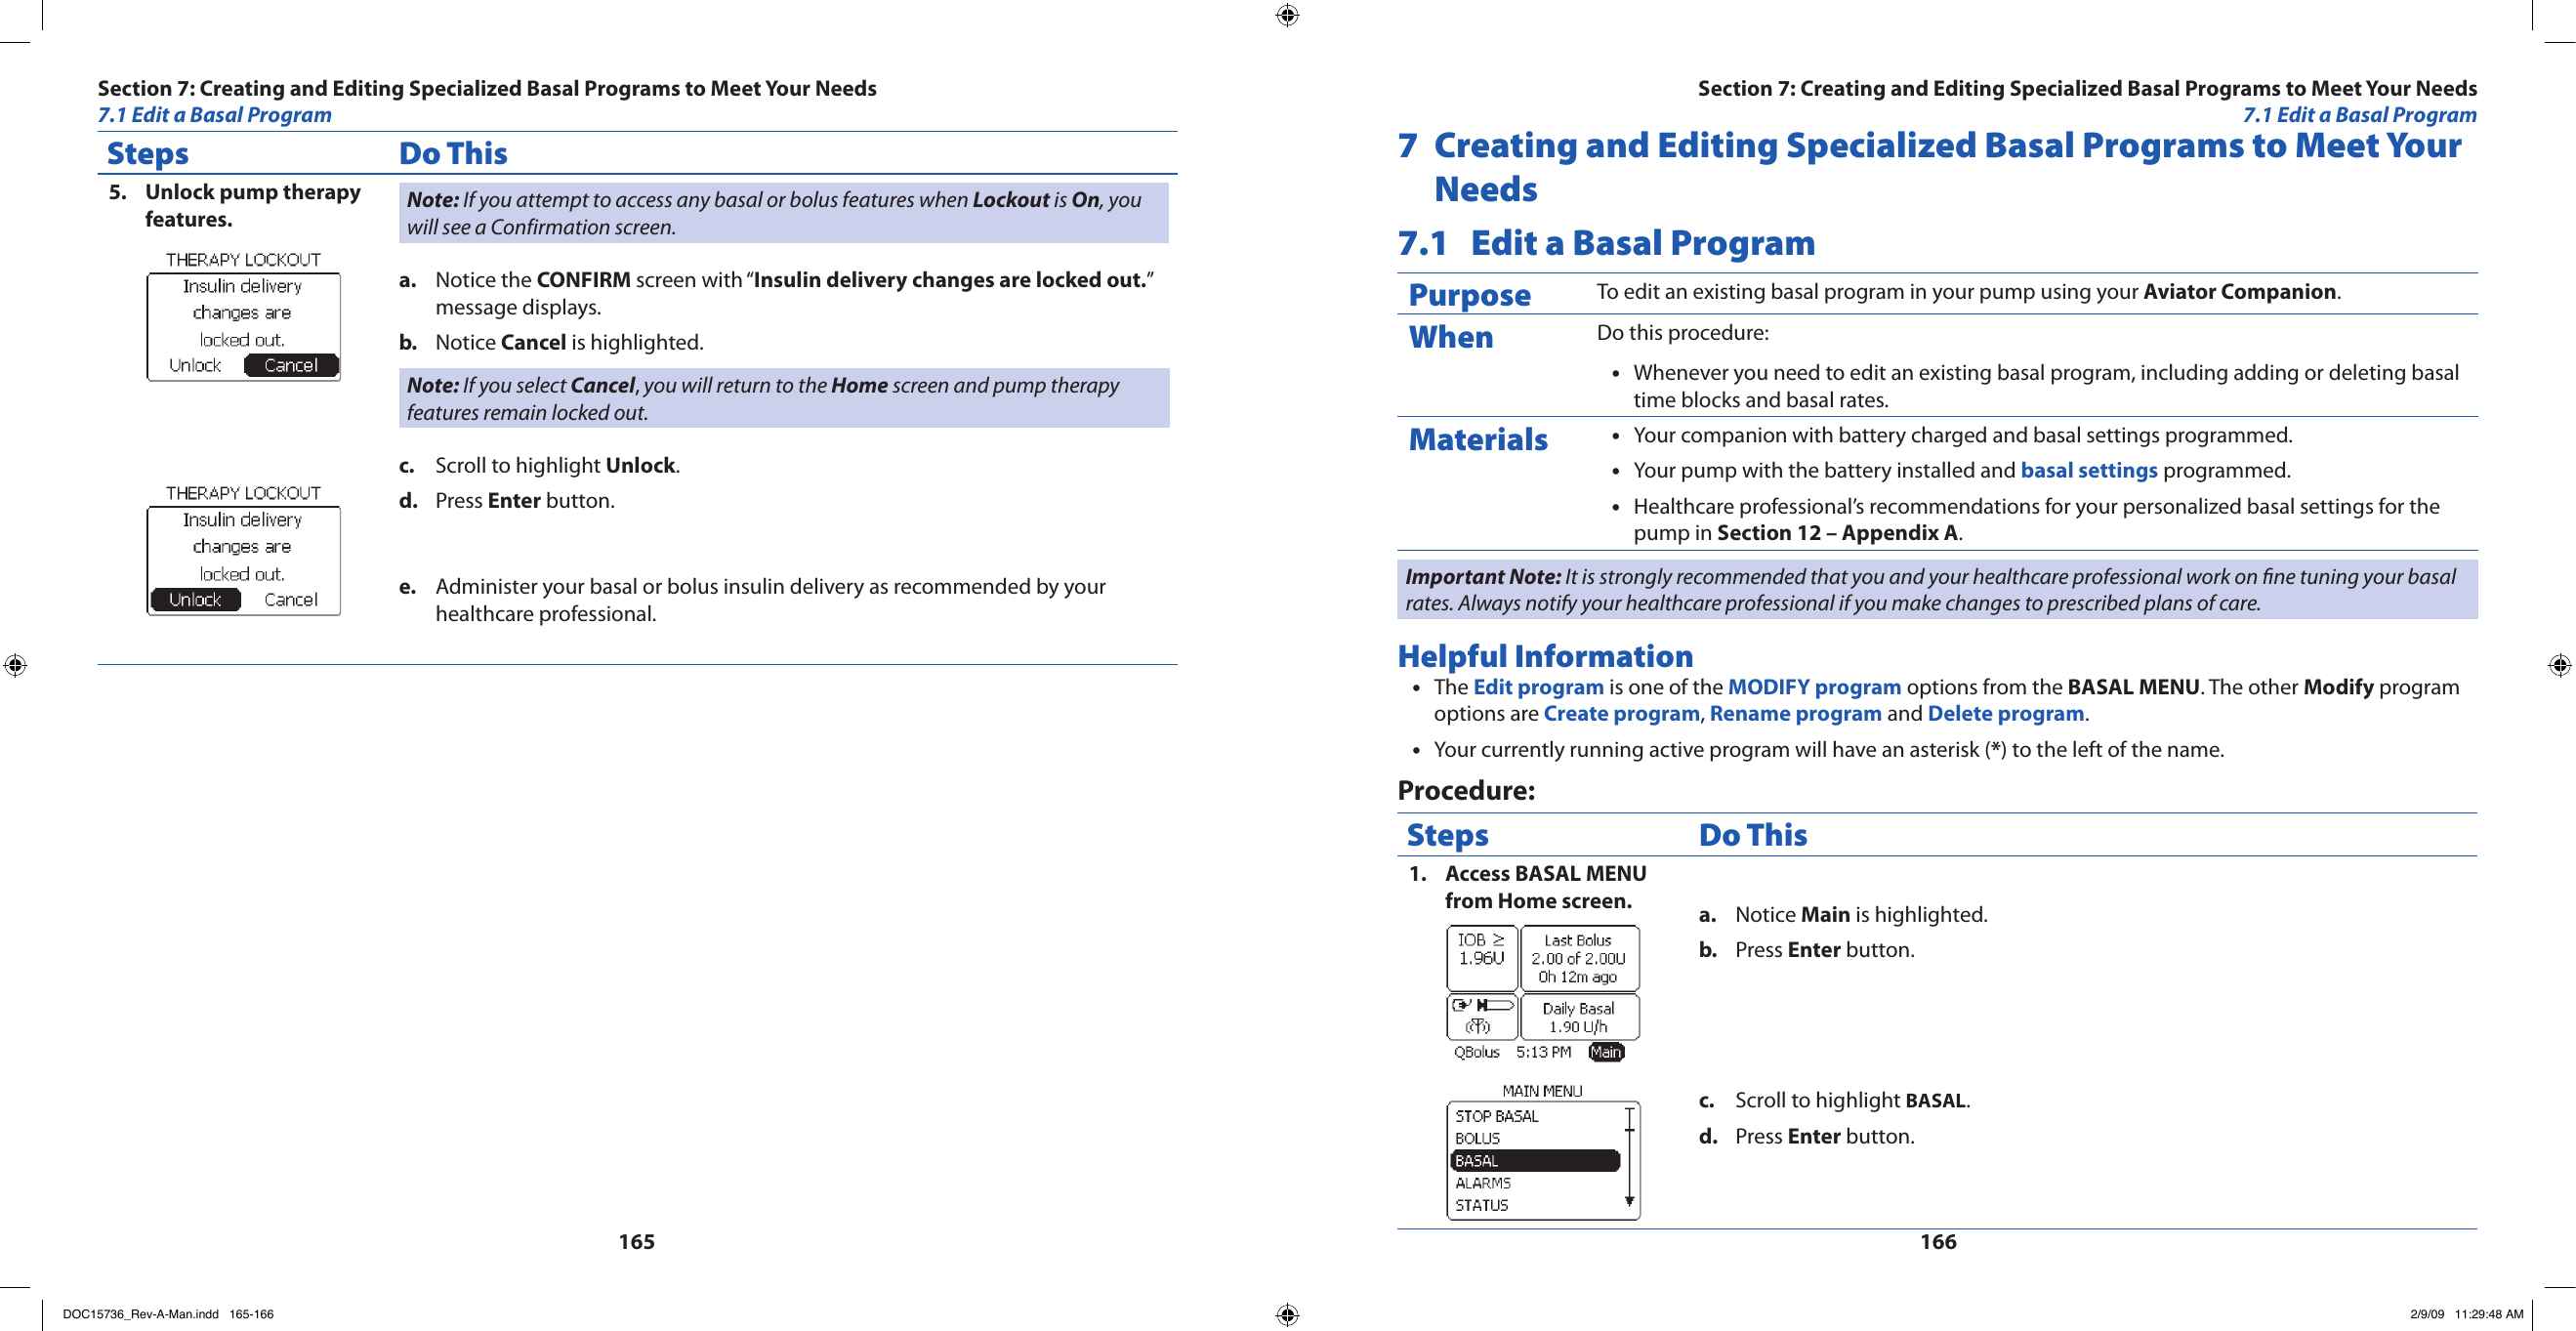
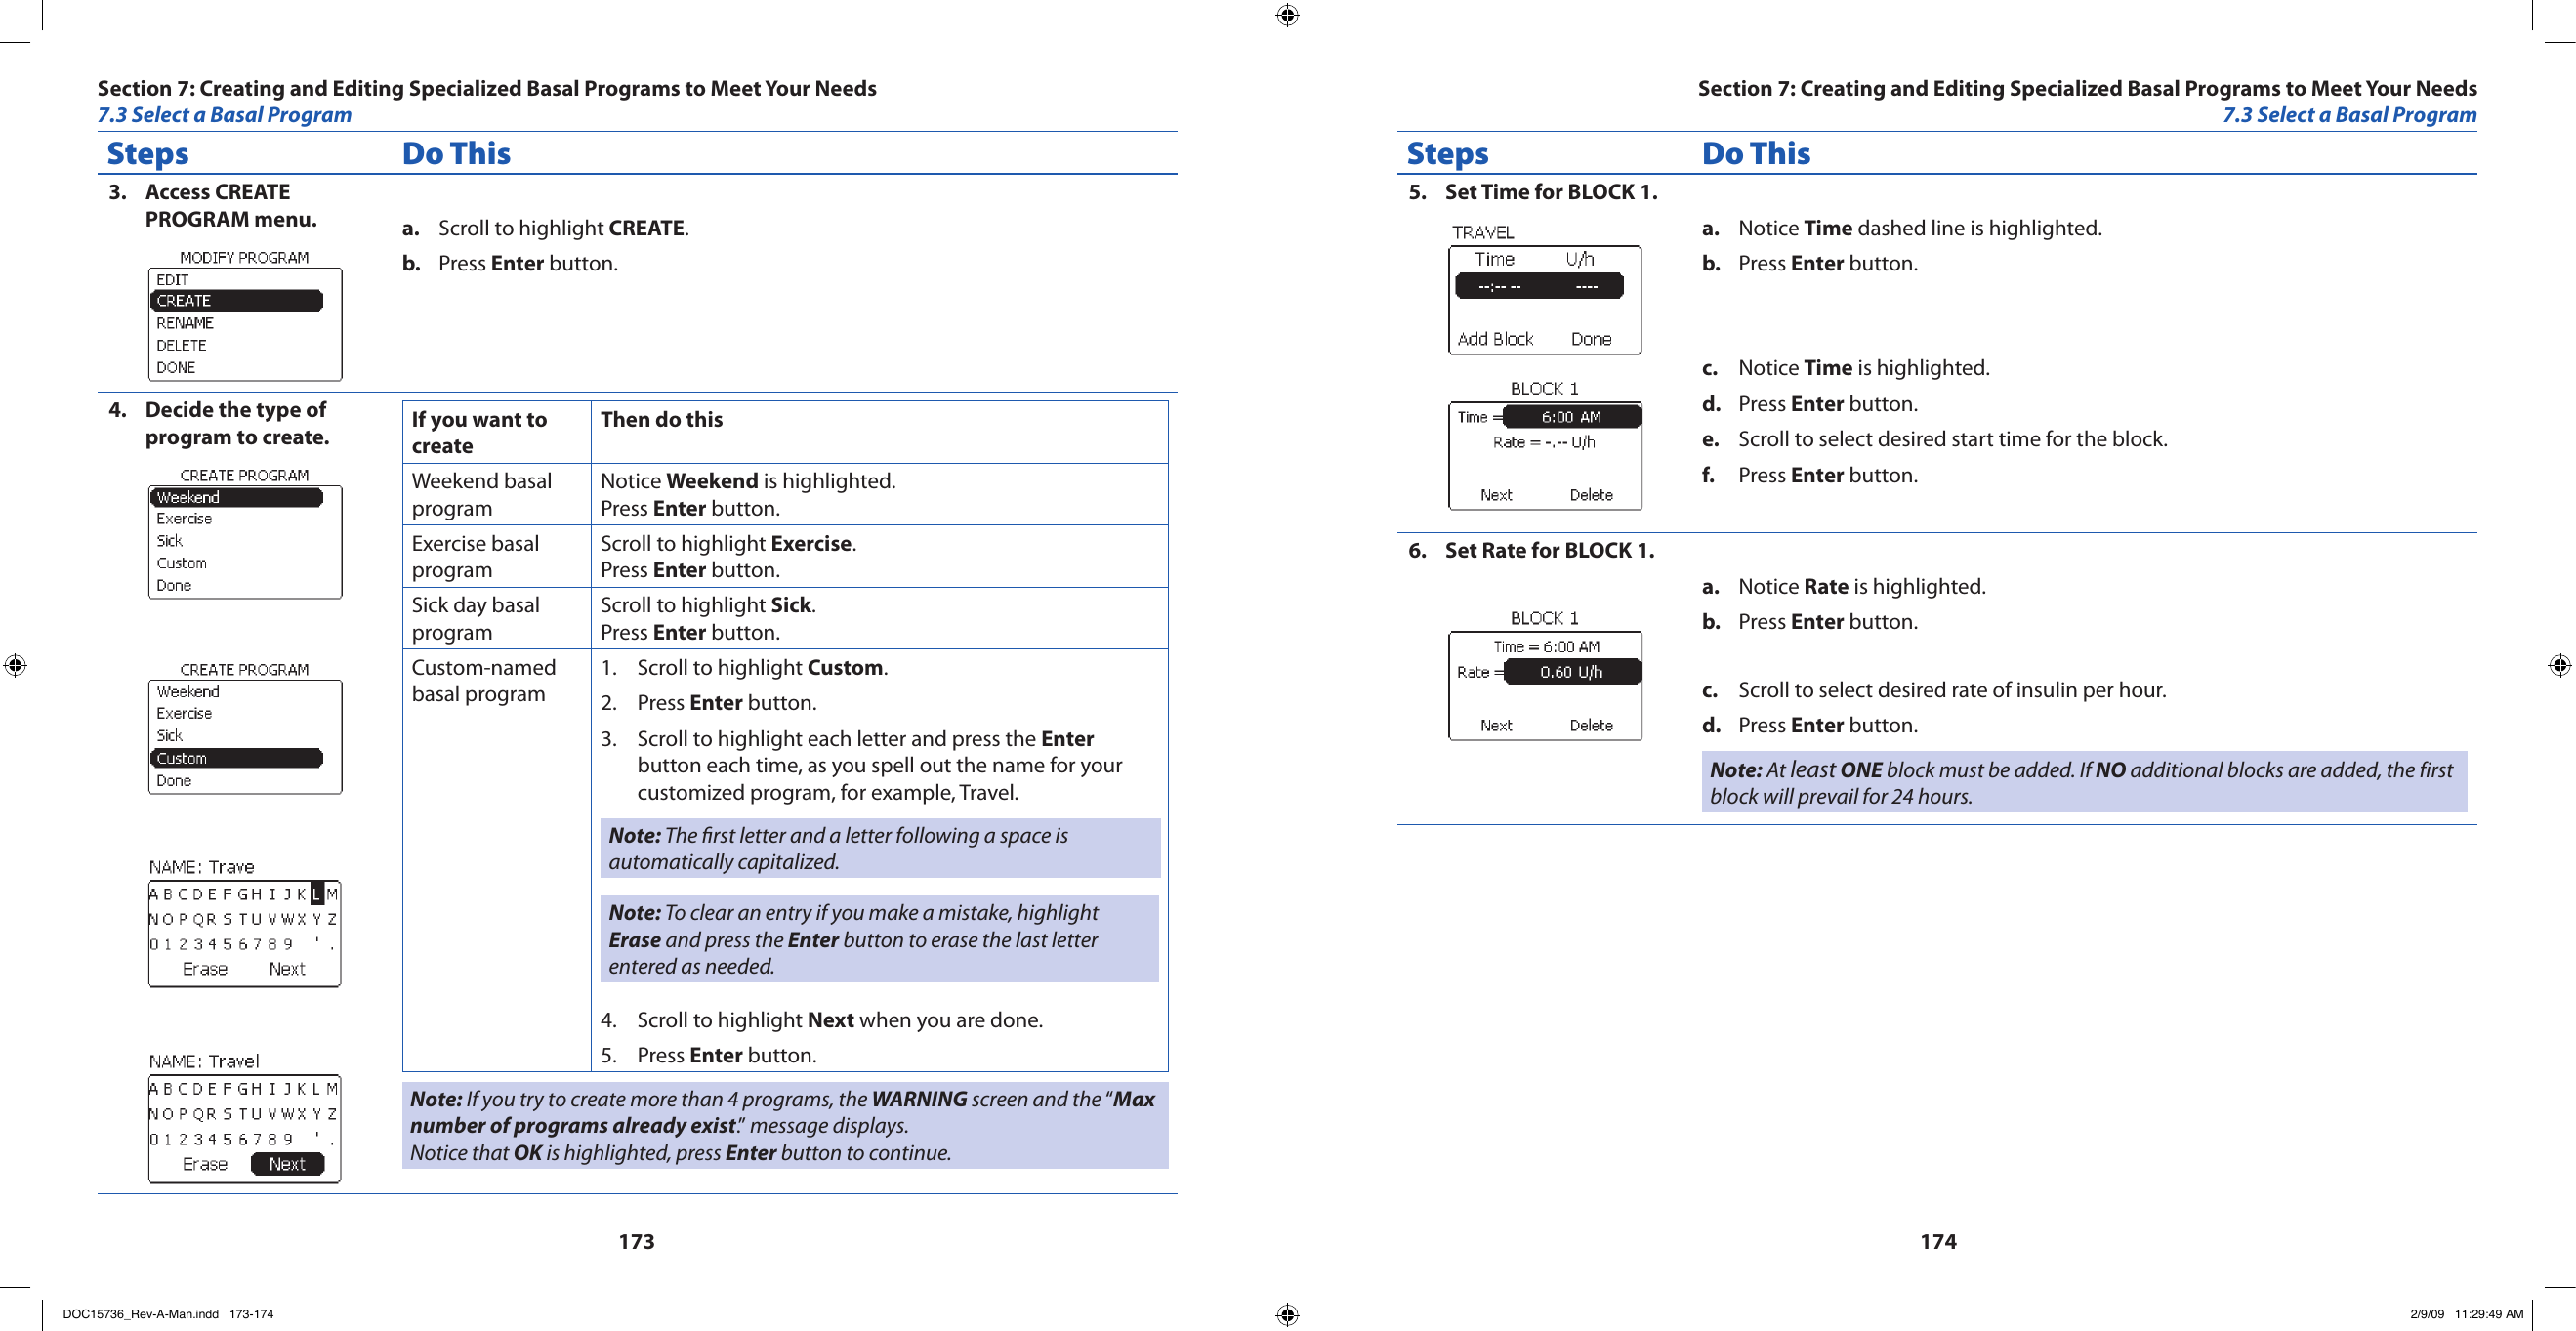
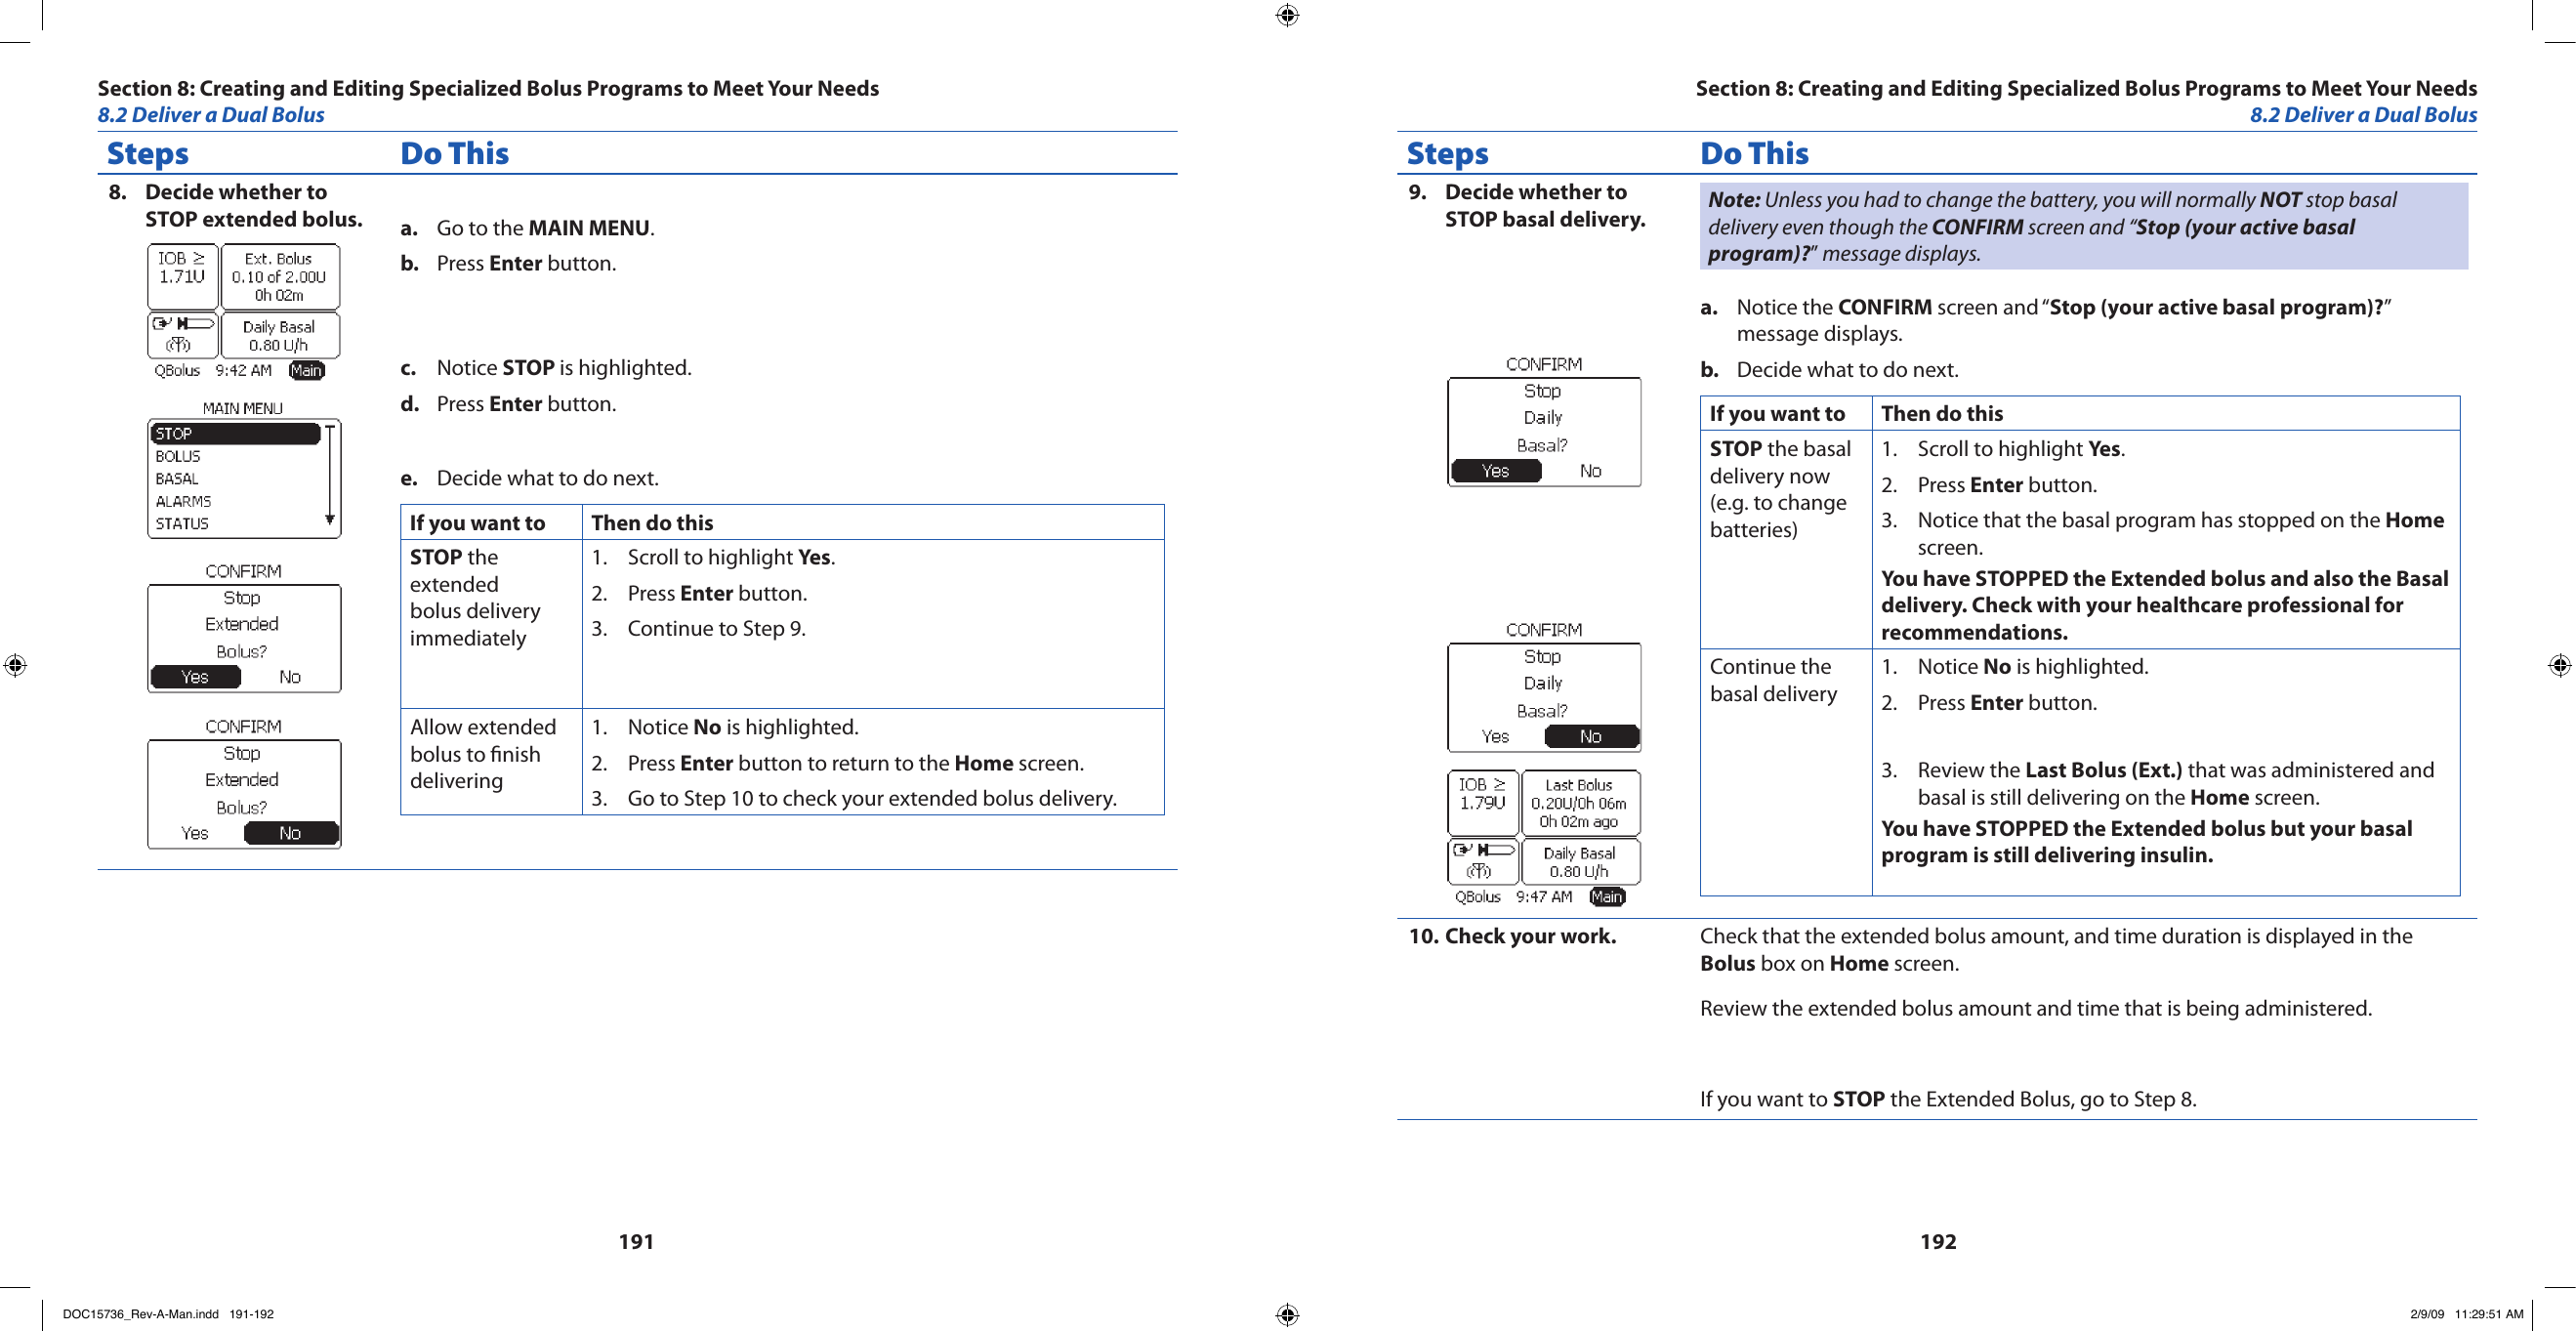
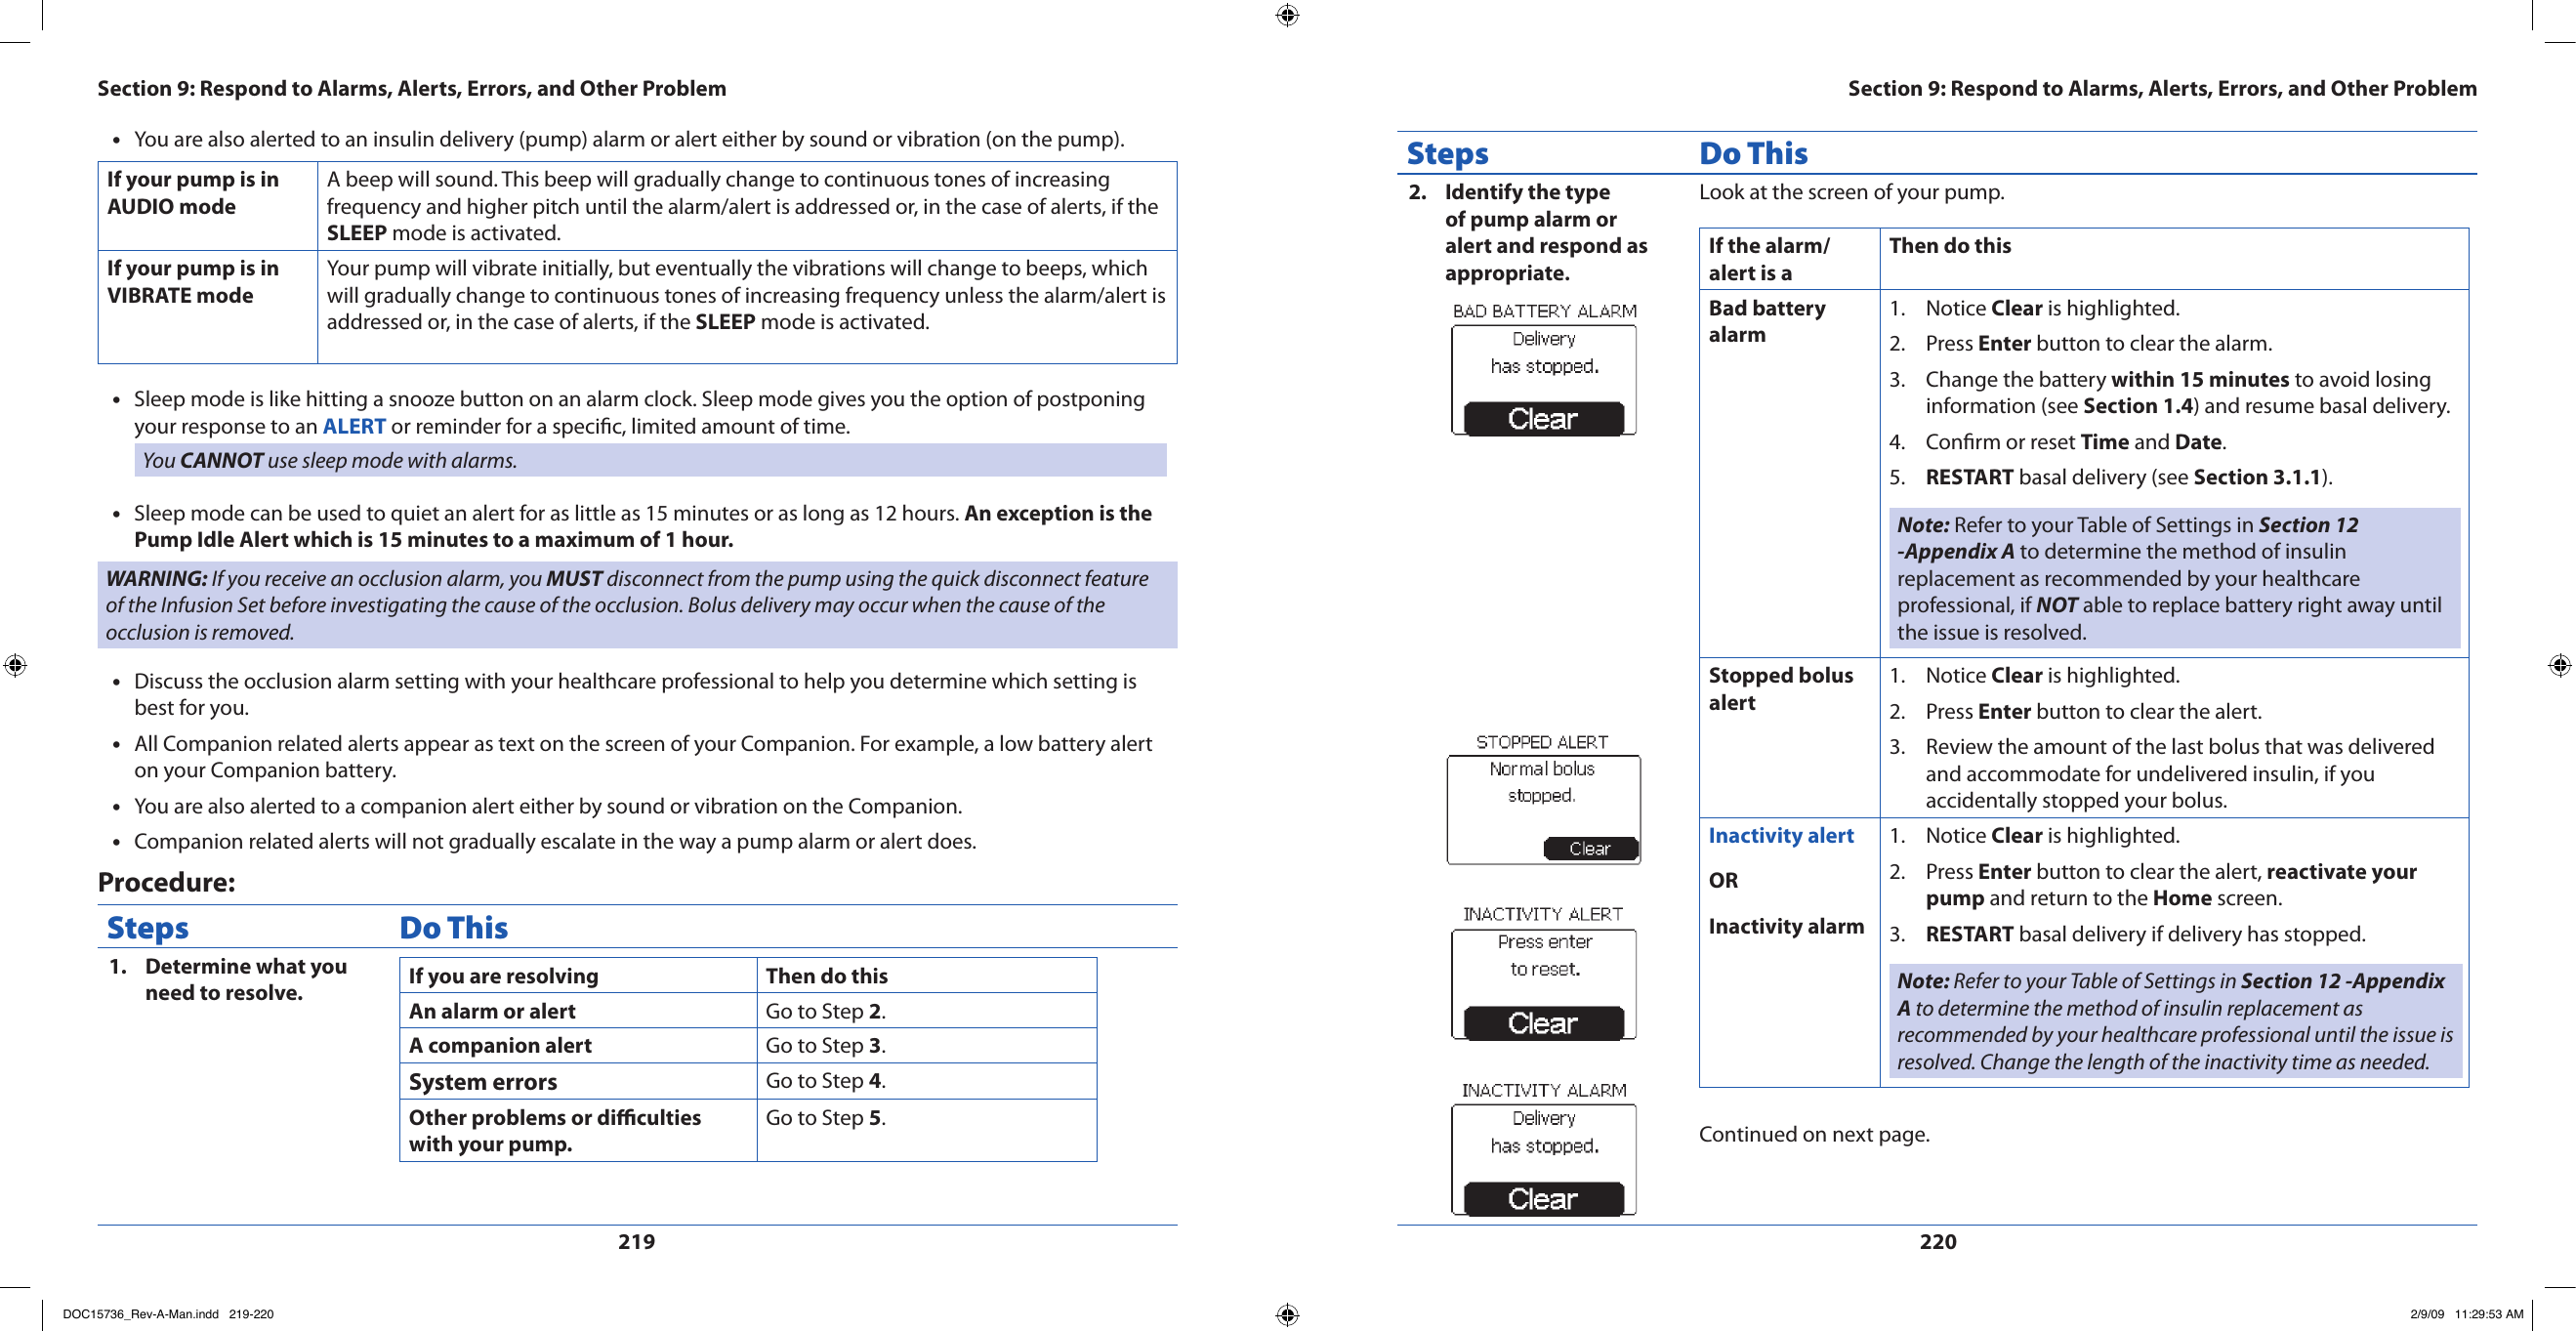
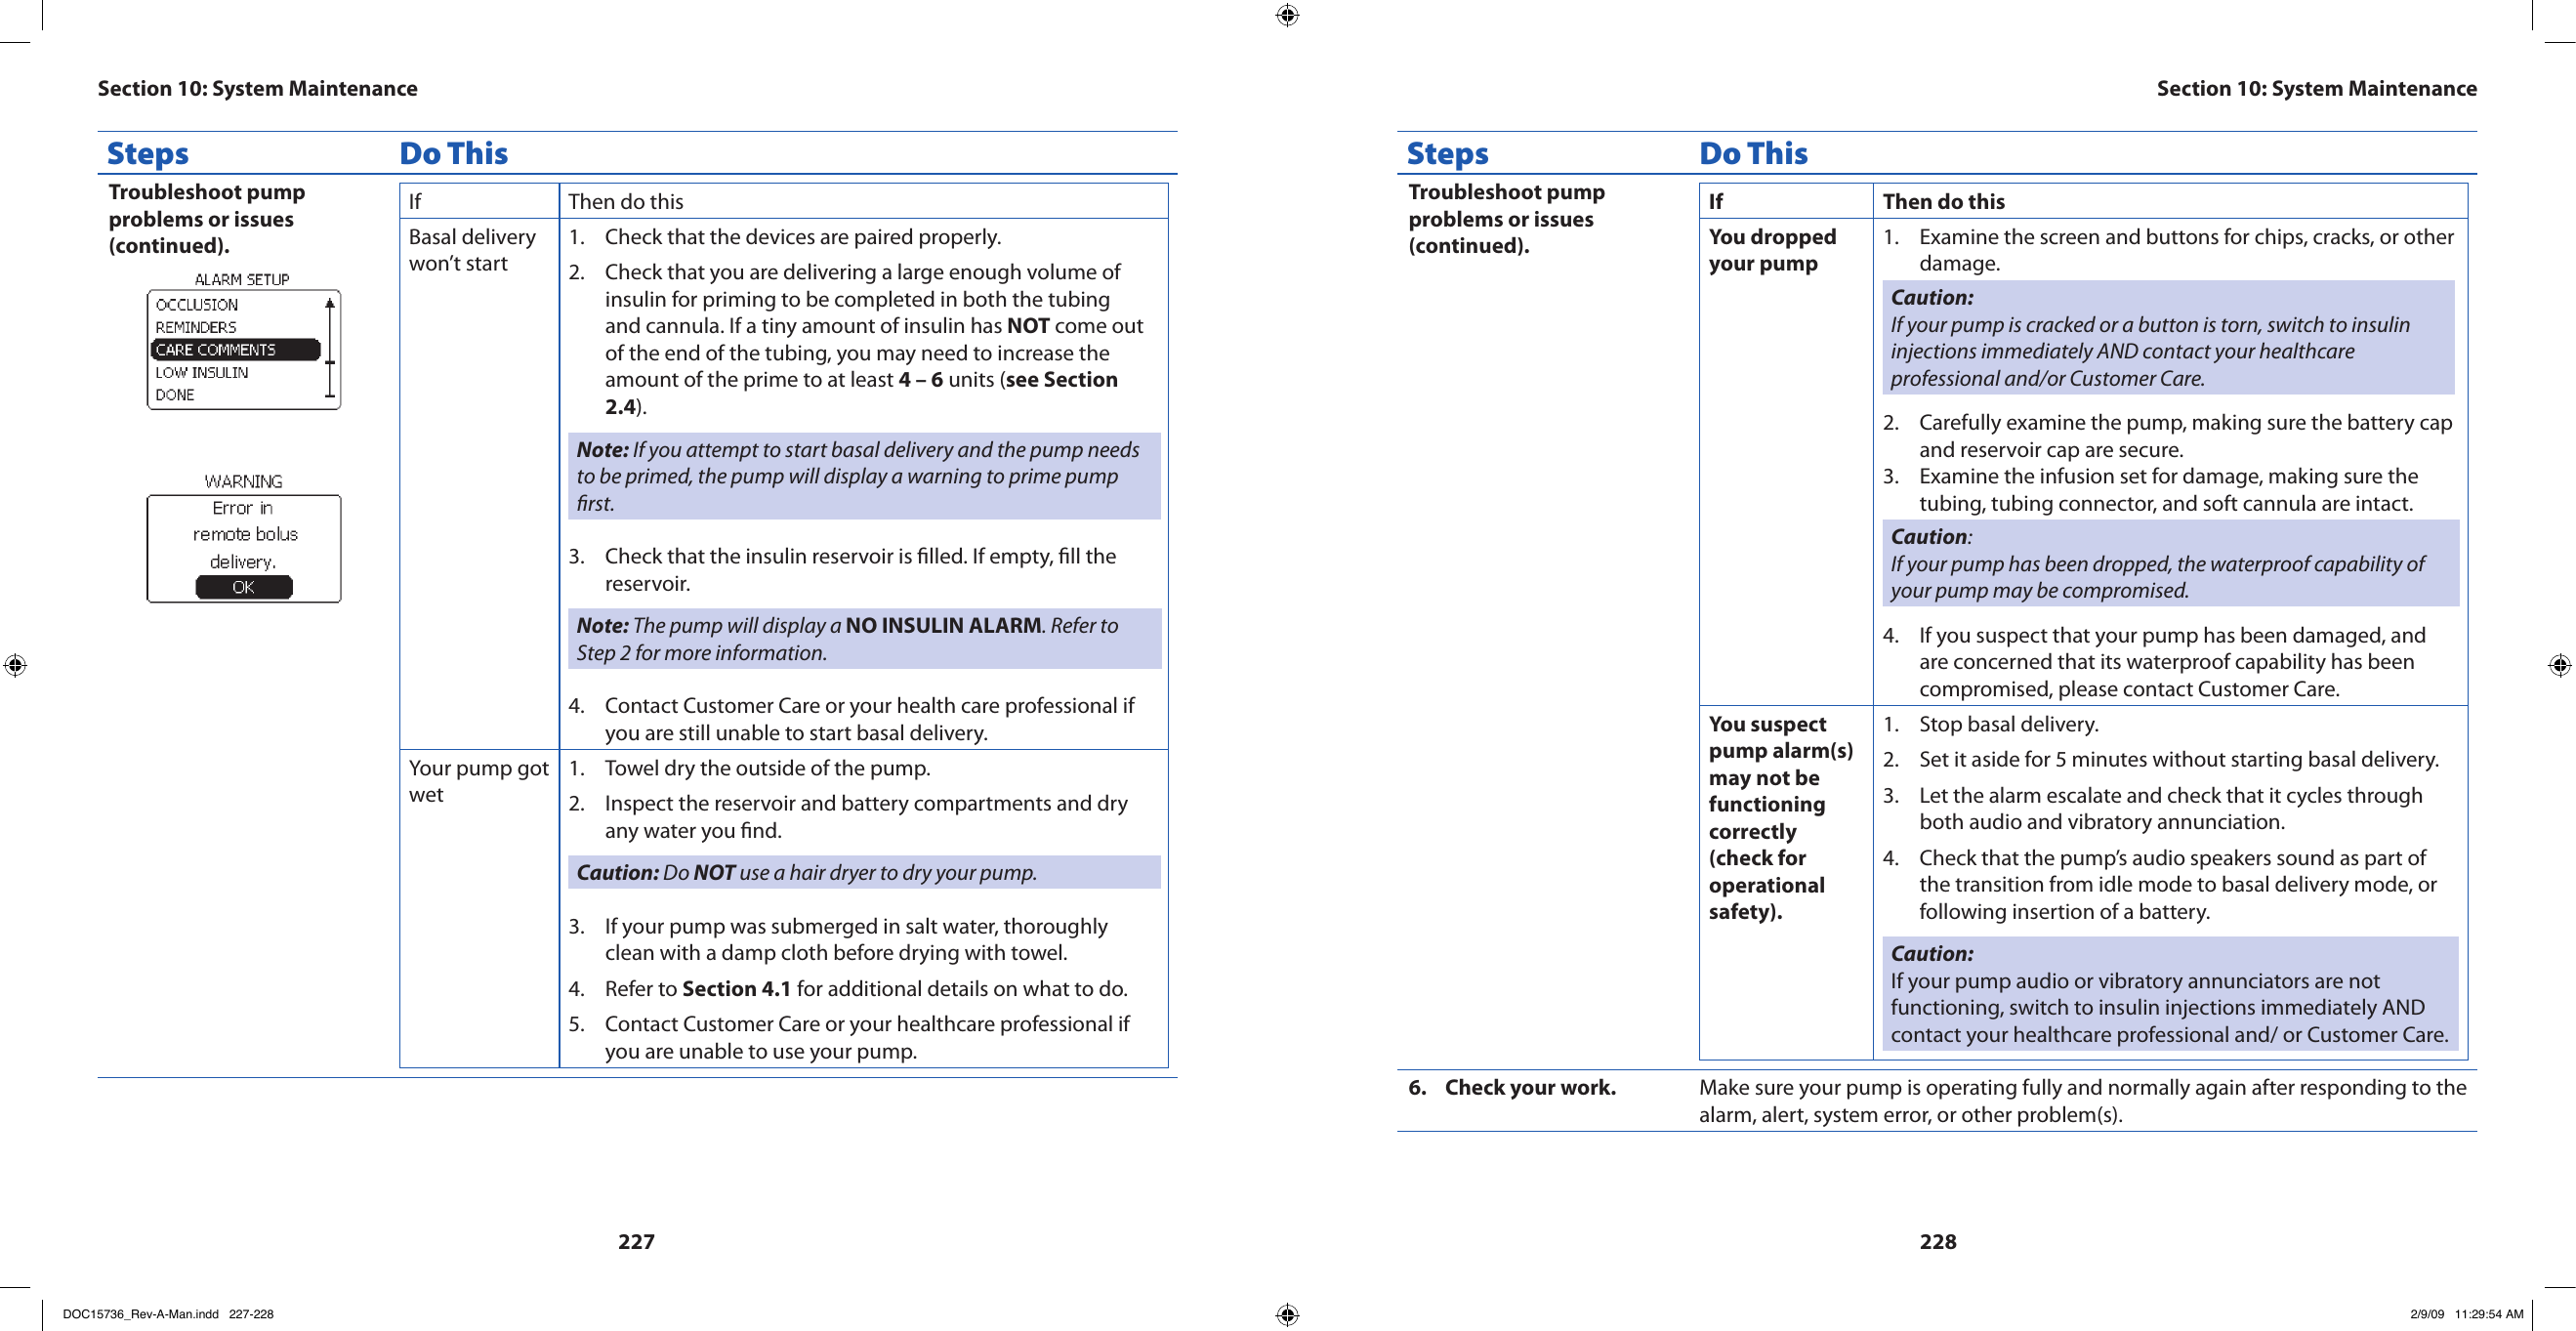
![253254Other Preferences That are Not Part of the WizardMenu Item ScreenDefault Cong Valid Values IncrementREMINDERS Reminders 1 – 6 On/OO “On,” “O” N/AREMINDERS Reminders 1 – 6 MessageTest “Test”, “Wakeup”, “Basal”, “Bolus”, “Exercise”, “Meeting”, “Pickup”, “Snack”, “Meds”N/AREMINDERS Disable All Care Comments On “On”, “O” N/AREMINDERS On/O Insulin Temp Care CommentsO “O”, “On” N/AREMINDERS On/O Site Change Care CommentsO “O”, “On” N/AREMINDERS Frequency Site Change Care Comments2.0 days 2.0, 2.5, 3.0 N/AREMINDERS On/O Check BG Care CommentO “O”, “On” N/A C. Device Specications – CompanionAssay Method (FreeStyle Lite Blood Glucose meter):Coulometric electrochemical sensorAutomatic shuto: User settable up to two minutes after last user actionCalibration (FreeStyle Lite Blood Glucose meter): Plasma equivalentHematocrit (FreeStyle Lite Blood Glucose meter): 15% to 65%Measurement Units: Either mg/dL or mmol/LResult Range (FreeStyle Lite Blood Glucose meter):20 to 500 mg/dL (1.1 to 27.8 mmol/L)Sample (FreeStyle Lite Blood Glucose meter): Whole blood, capillarySample size (FreeStyle Lite Blood Glucose meter):0.3 microlitre (300 nanolitres)Test time (FreeStyle Lite Blood Glucose meter): Average of 5 secondsDimensions: 3.89 X 2.44 x 0.63” (99 X 62 X 16 mm )Display Type: Dot graphic•Display Viewable Dimensions: 1.77 x 1.28” (45 X 32.5 mm)Display Backlight: YesAudio/Vibe Alert: YesWeight: 2.6 oz (75 grams)Companion Battery: Lithium polymer, 3.7V 690mAhBattery Life: 3 daysThe expected life of the battery is dependant upon the following usage:- 5 boluses per day with total daily bolus delivery of 24 Units (U100) - Basal delivery of 1U/h (U100) 24 hr/day, 7 days/week - Prime of 20 Units (U100) occurs 3 times per week. - 5 blood glucose readings per day - Enter and log 8 events per day - Data transfer to CoPilot three times per monthMemory: 90 days worth of events. All events can be seen if downloaded to a PC.Water Resistance: NoneOperational Conditions (Temperature, Humidity and Pressure):41°F – 104°F (5°C to 40°C) with 10% to 90% relative humidity 14.7 psia - 10.2 psia (equivalent to an altitude of sea level to 10,000 feet [3048 meters] under standard atmospheric conditions)Storage Range Shipping container for 1 year at -4 – 113°F, average temperature at 72.5°F (-20°C to 45°C, average temperature at 22.5°C) with 10% to 90% relative humidity, non-condensing.Data Storage Time: The Companion has the ability to store a minimum of 90 days of events in non-volatile memory for the expected life of the companion.Section 12: AppendicesAppendix D: Device Specications – PumpSection 12: AppendicesAppendix D: Device Specications – PumpDOC15736_Rev-A-Man.indd 253-254 2/9/09 11:29:56 AM](https://usermanual.wiki/Abbott-Diabetes-Care/AV2-C.User-manual-2-of-2/User-Guide-1071818-Page-62.png)
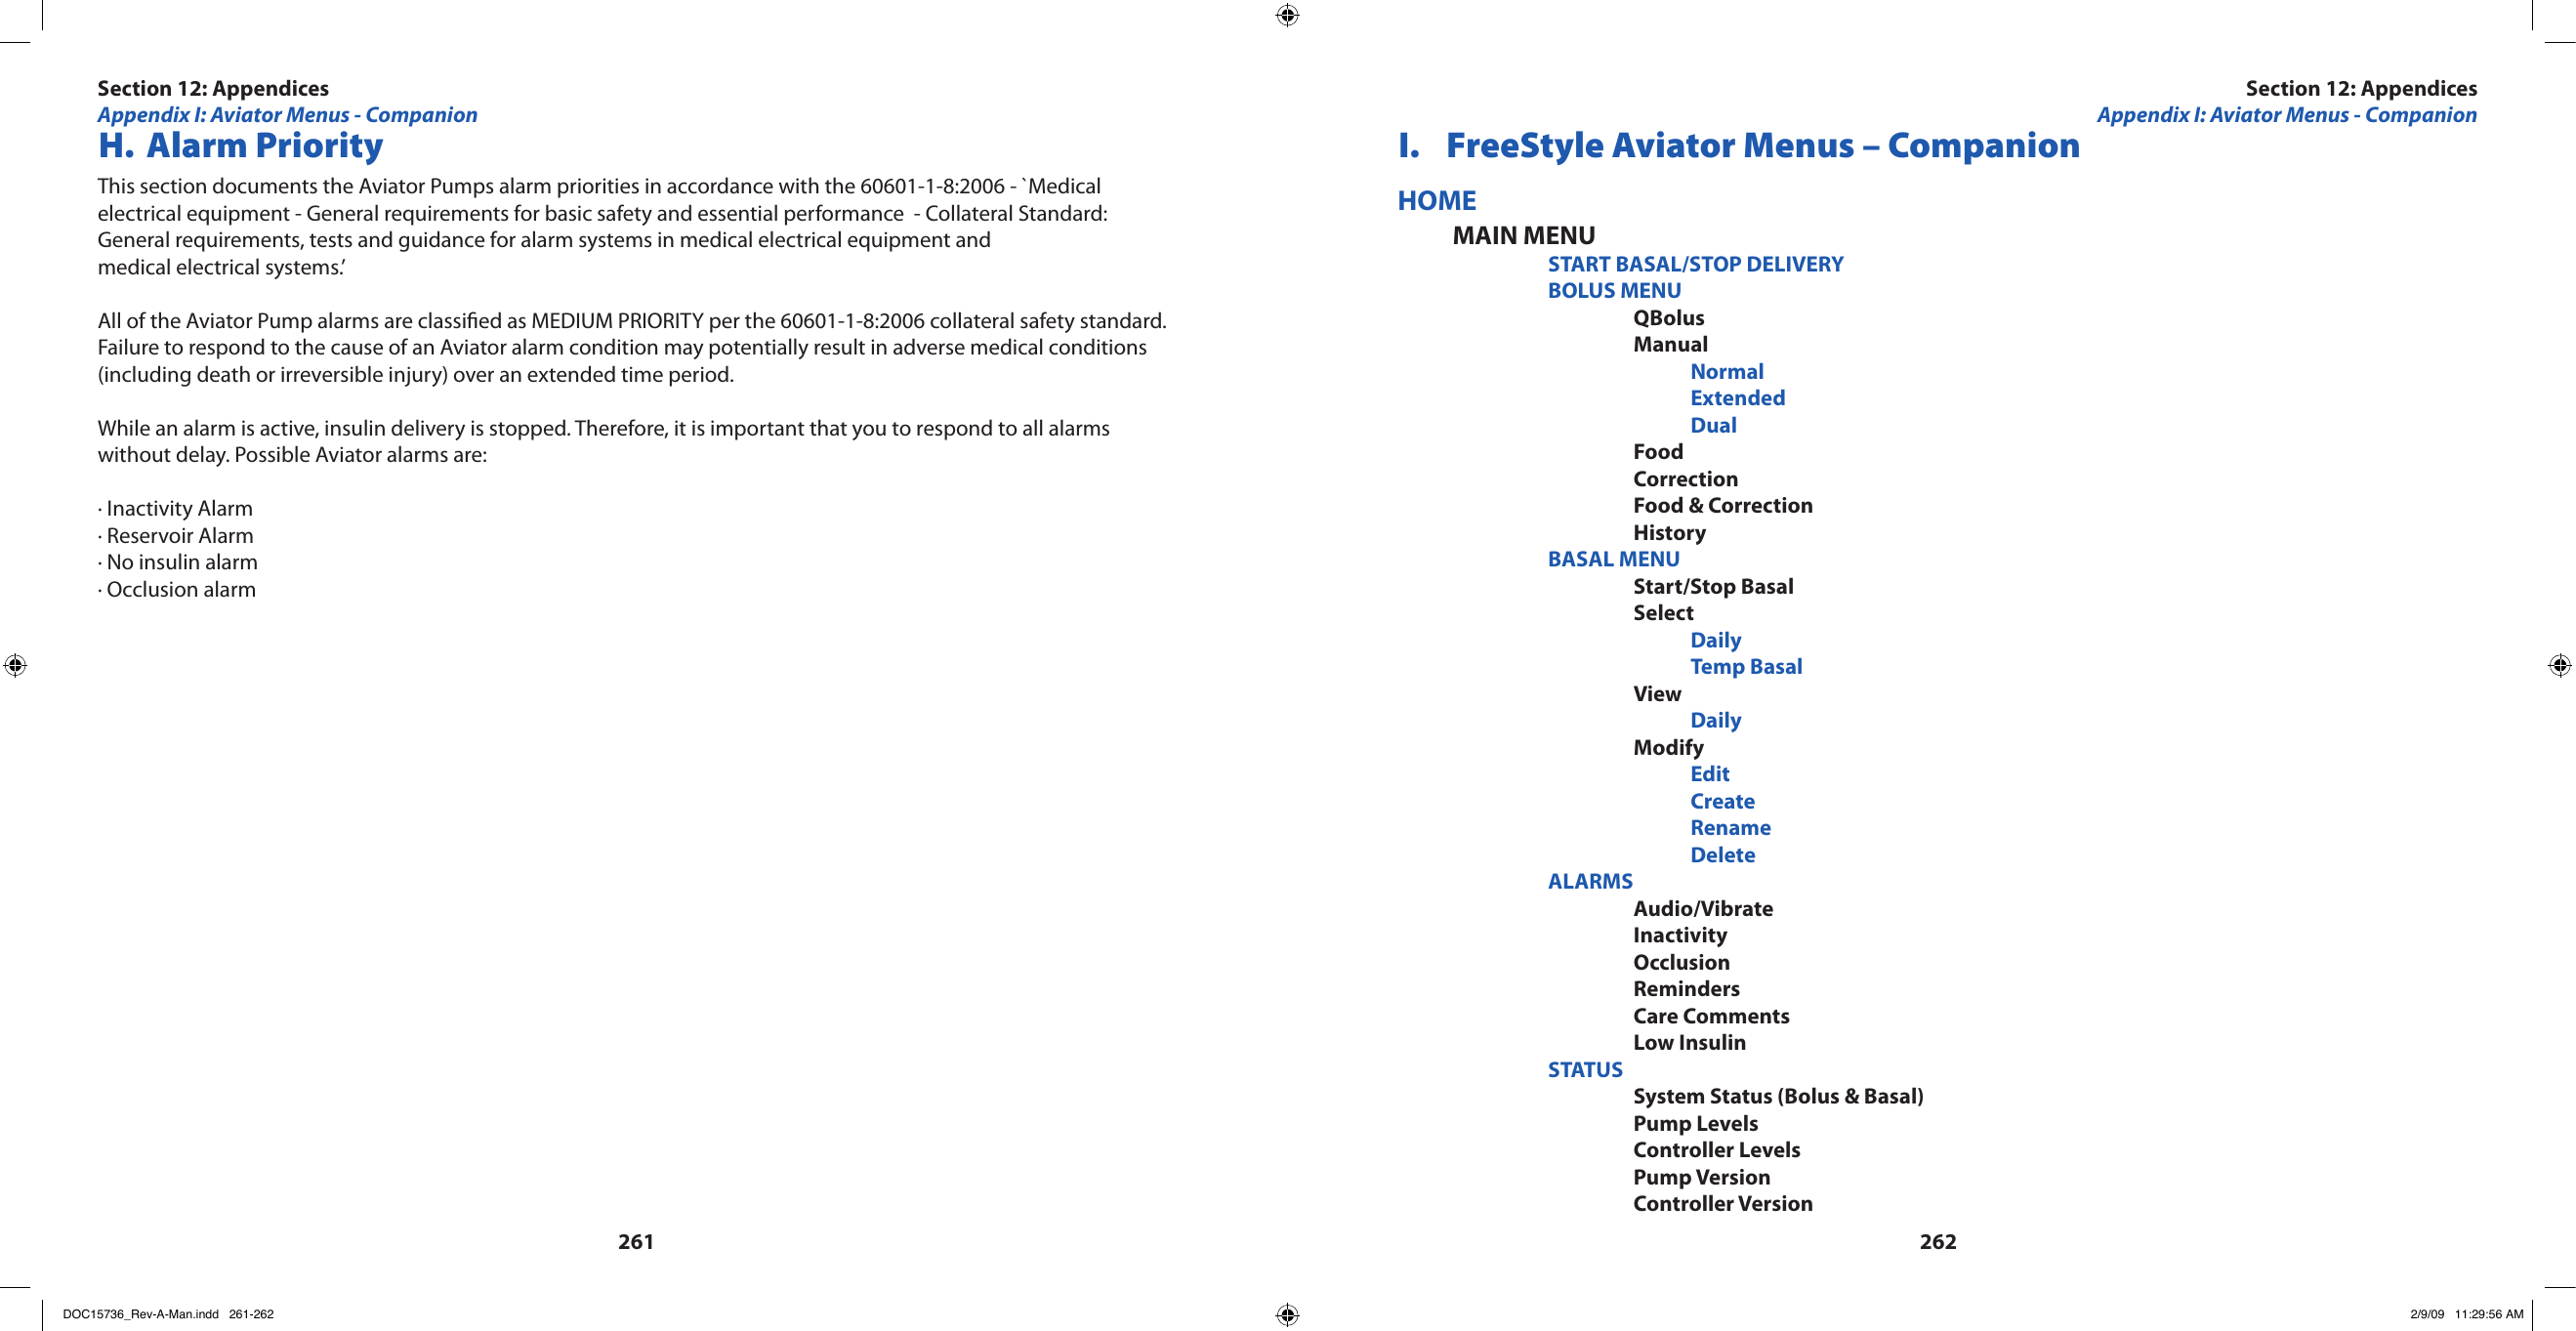
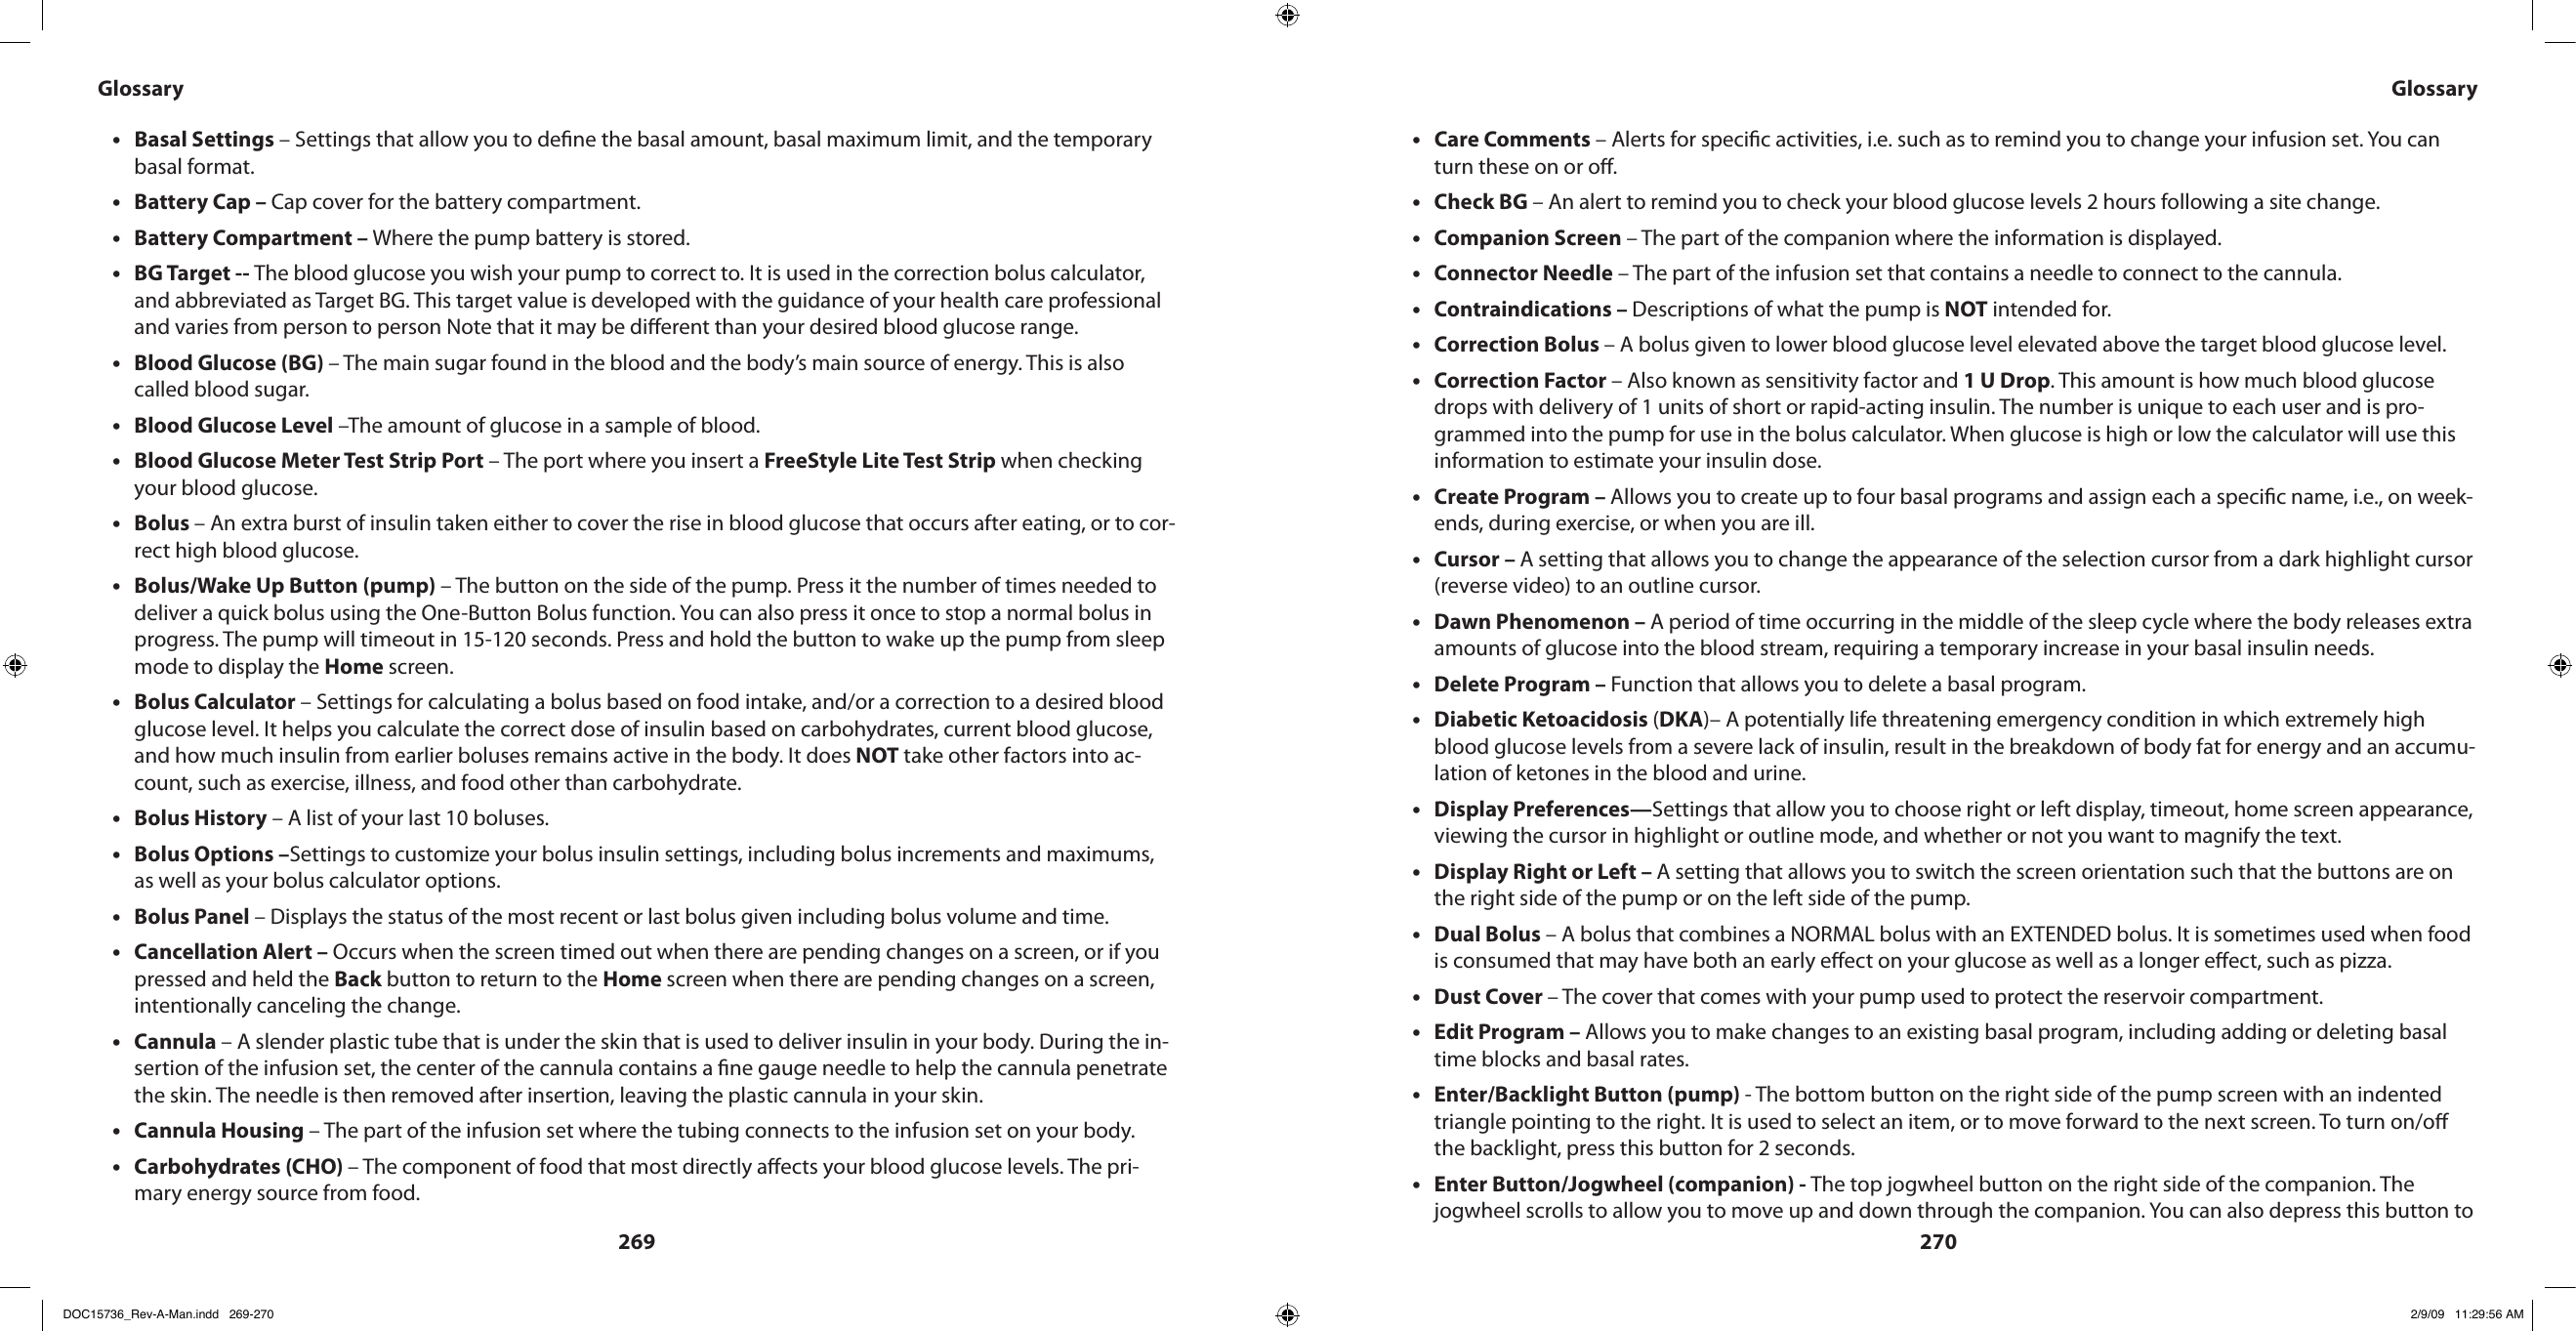
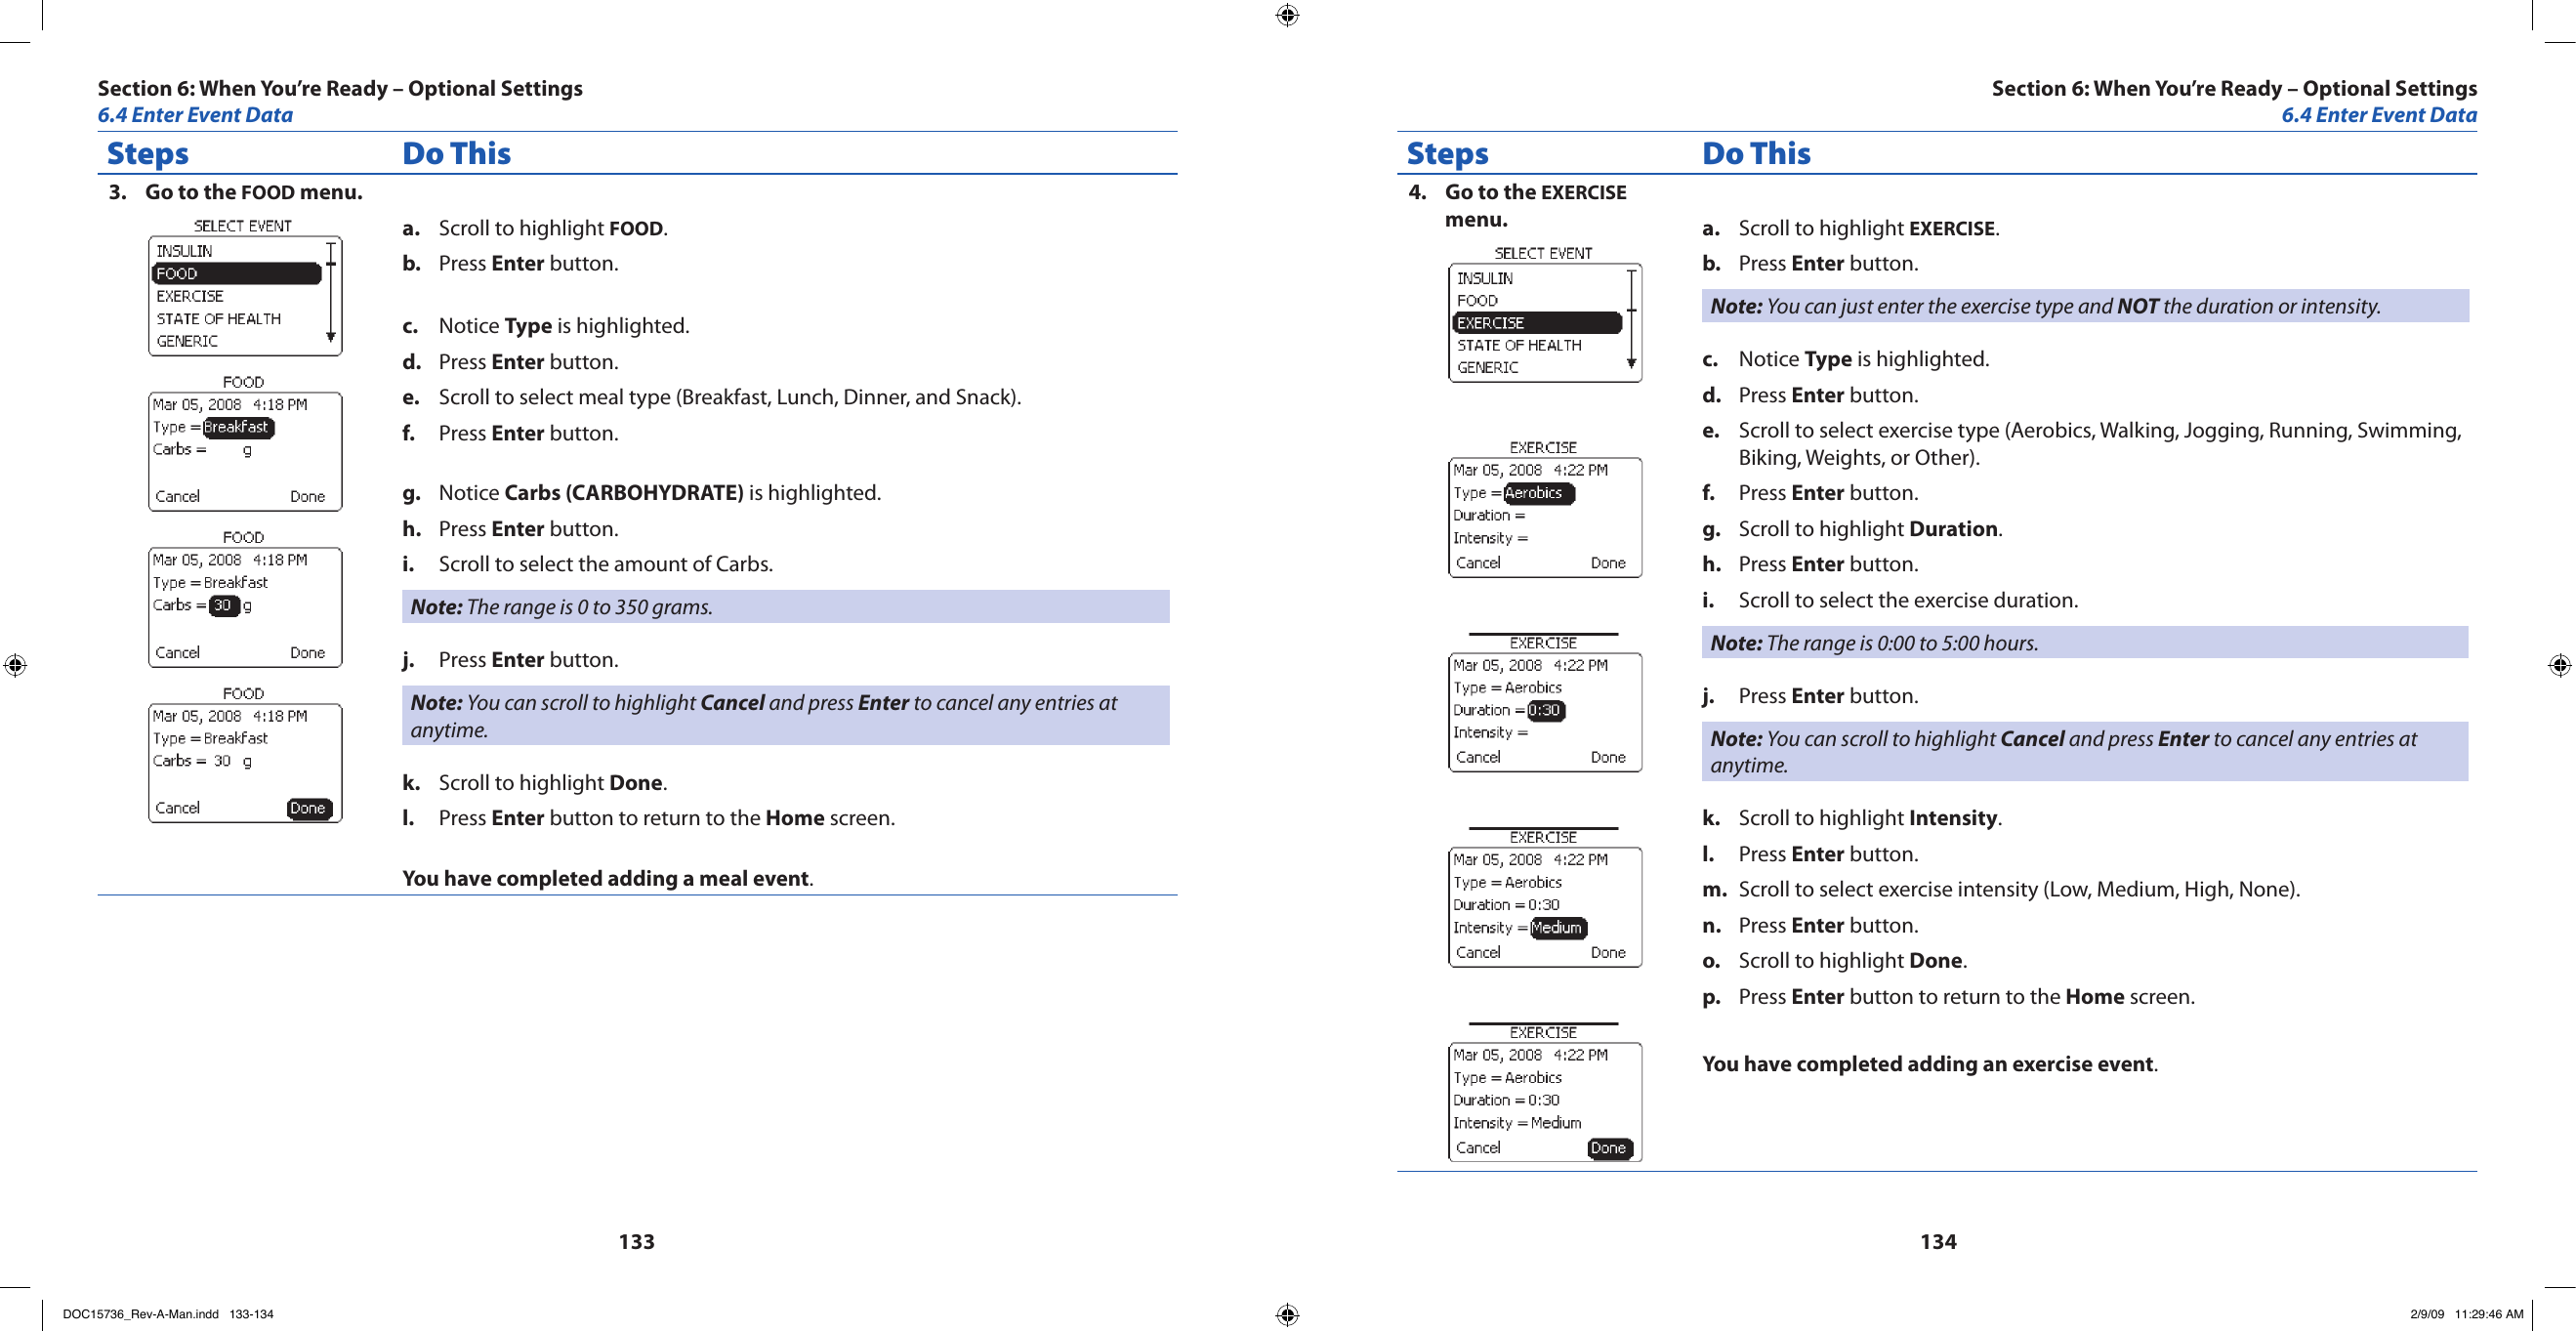
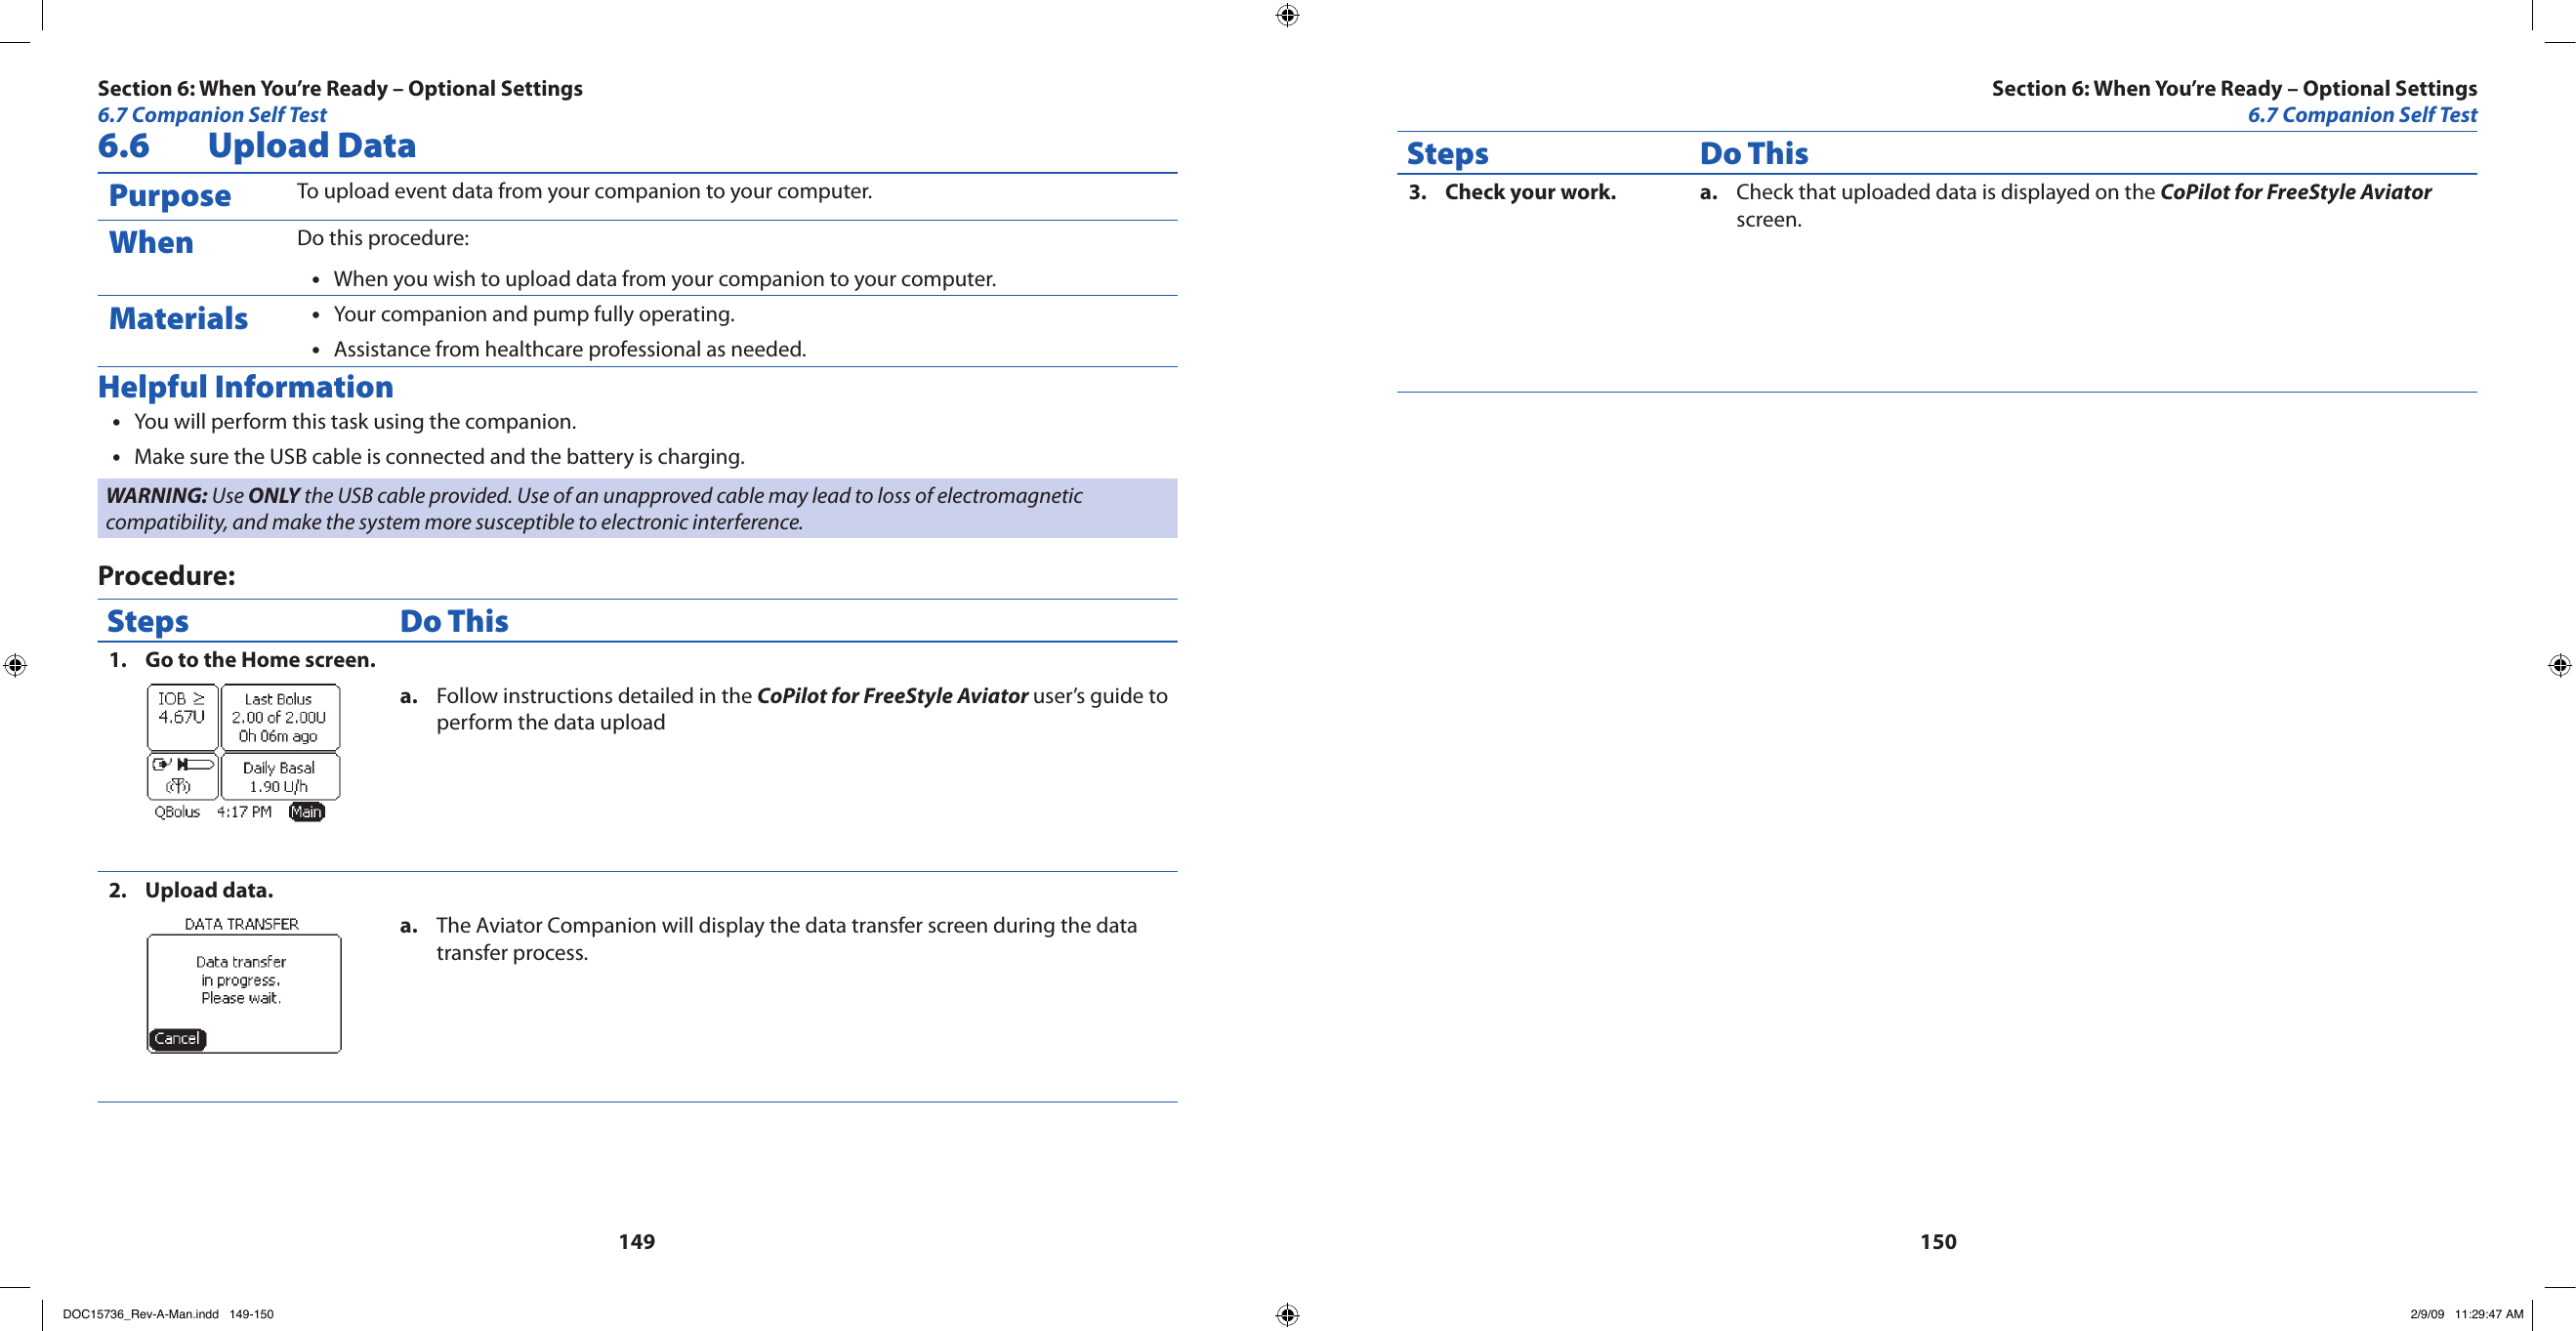
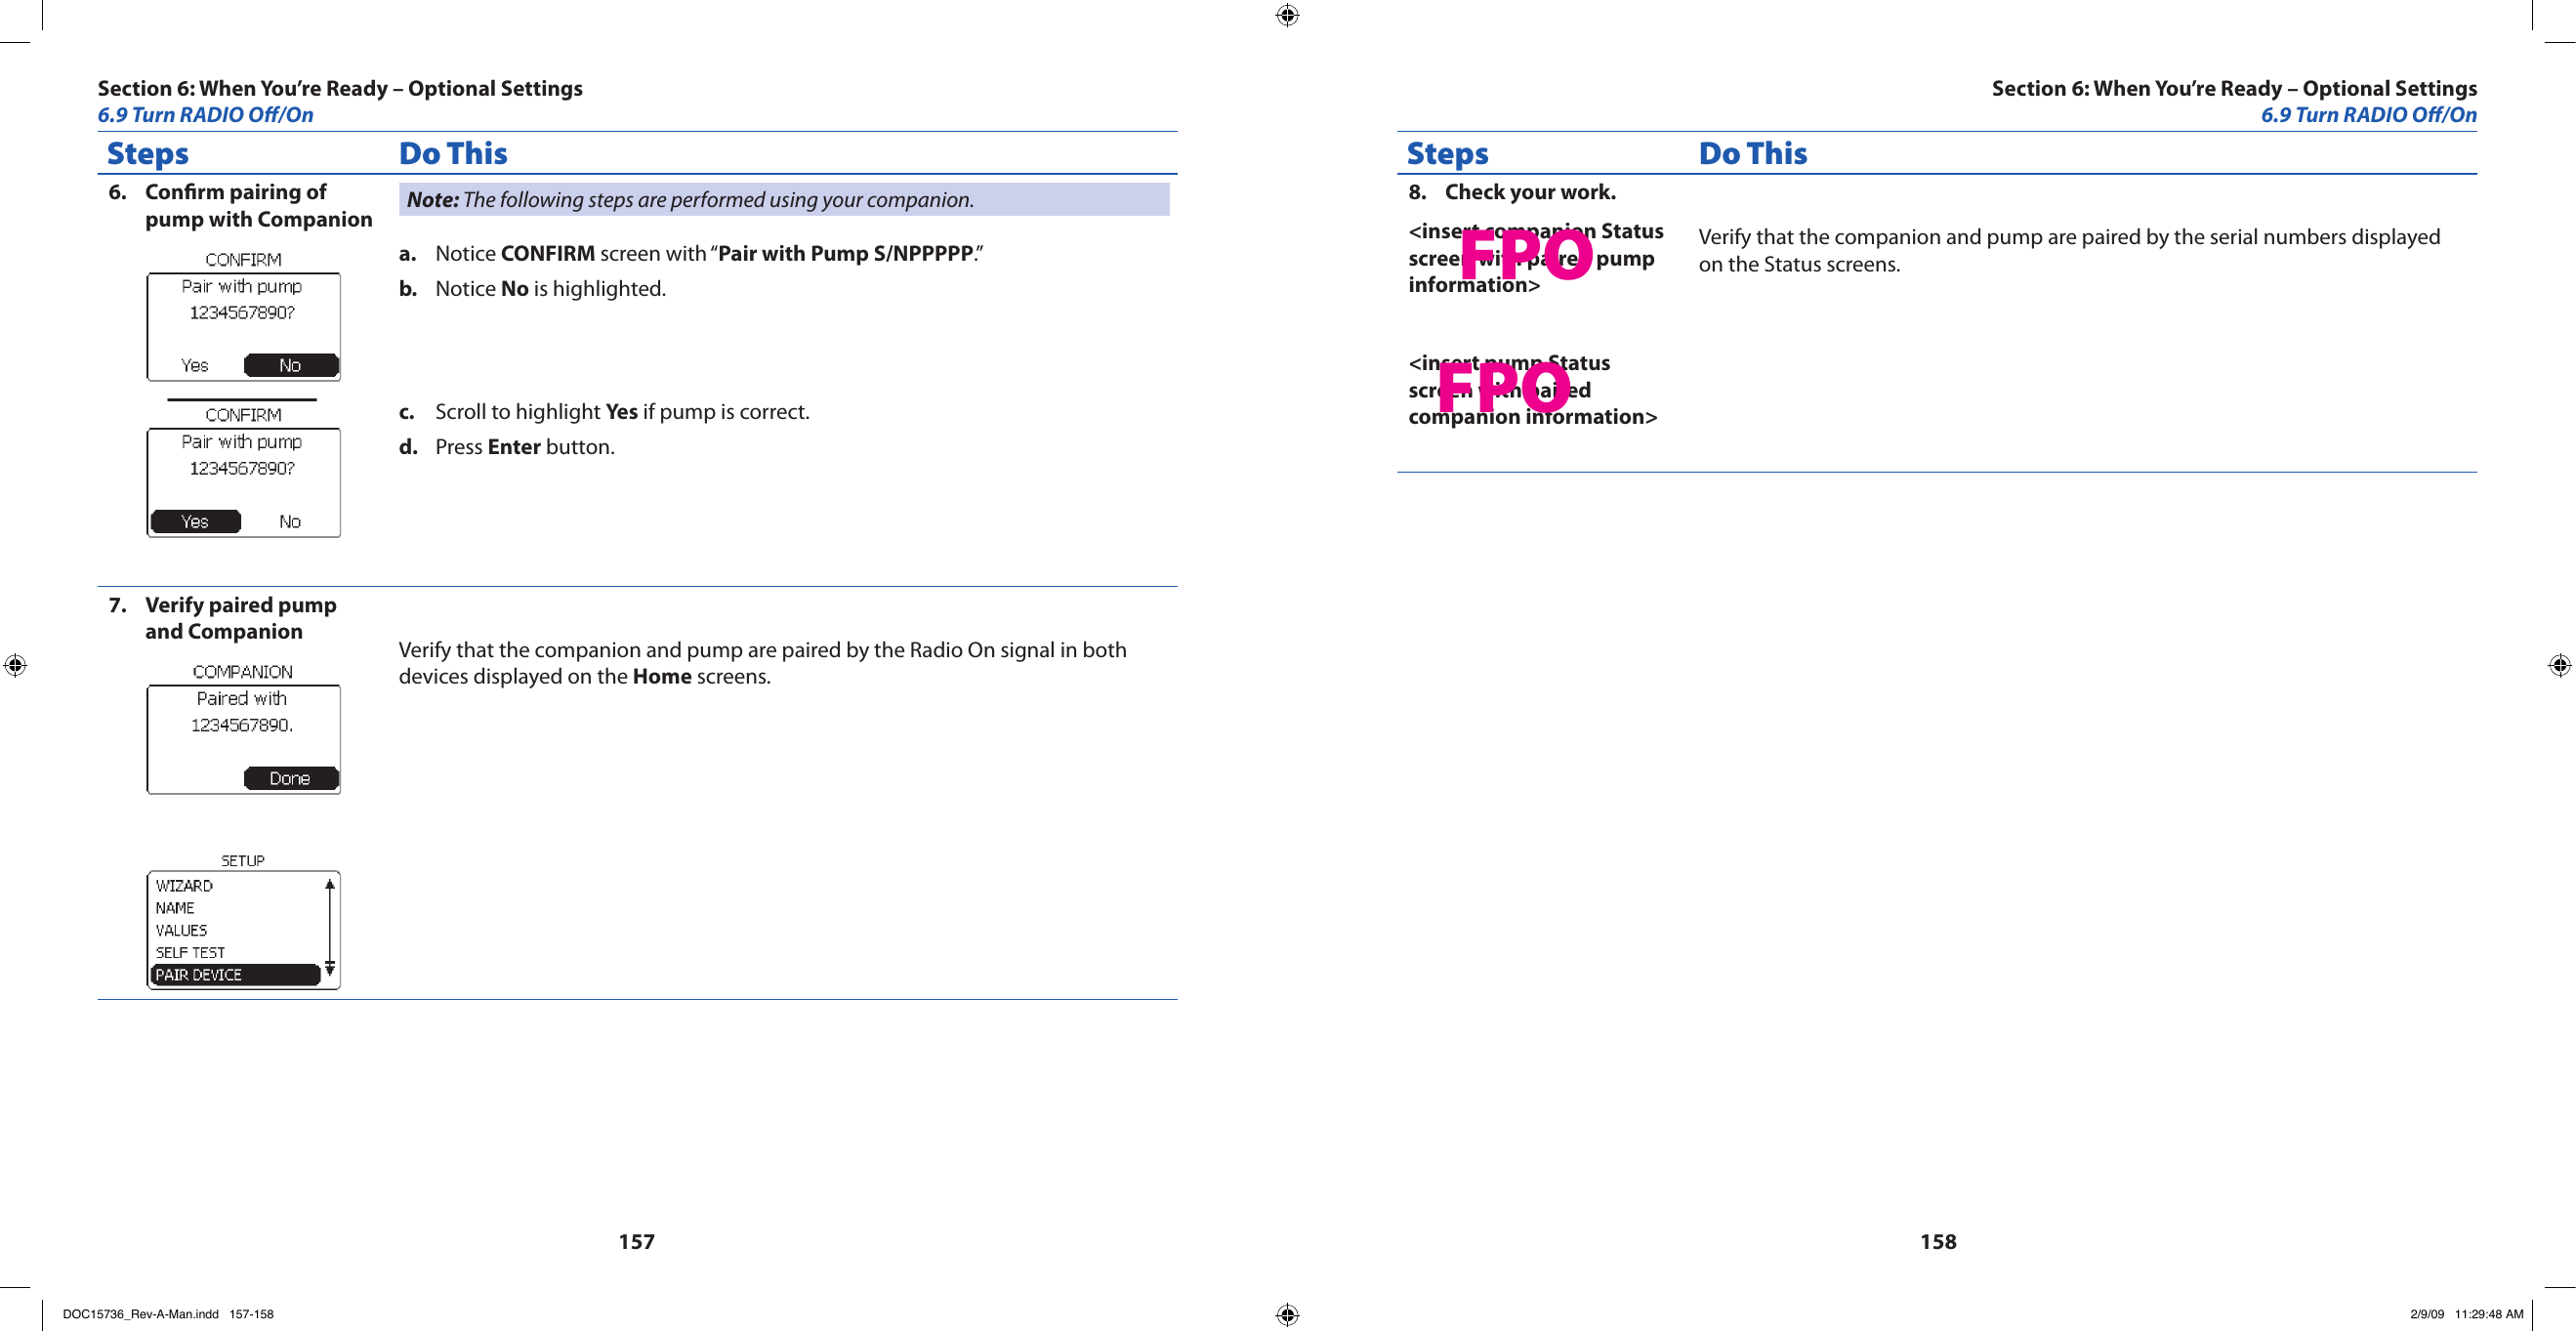
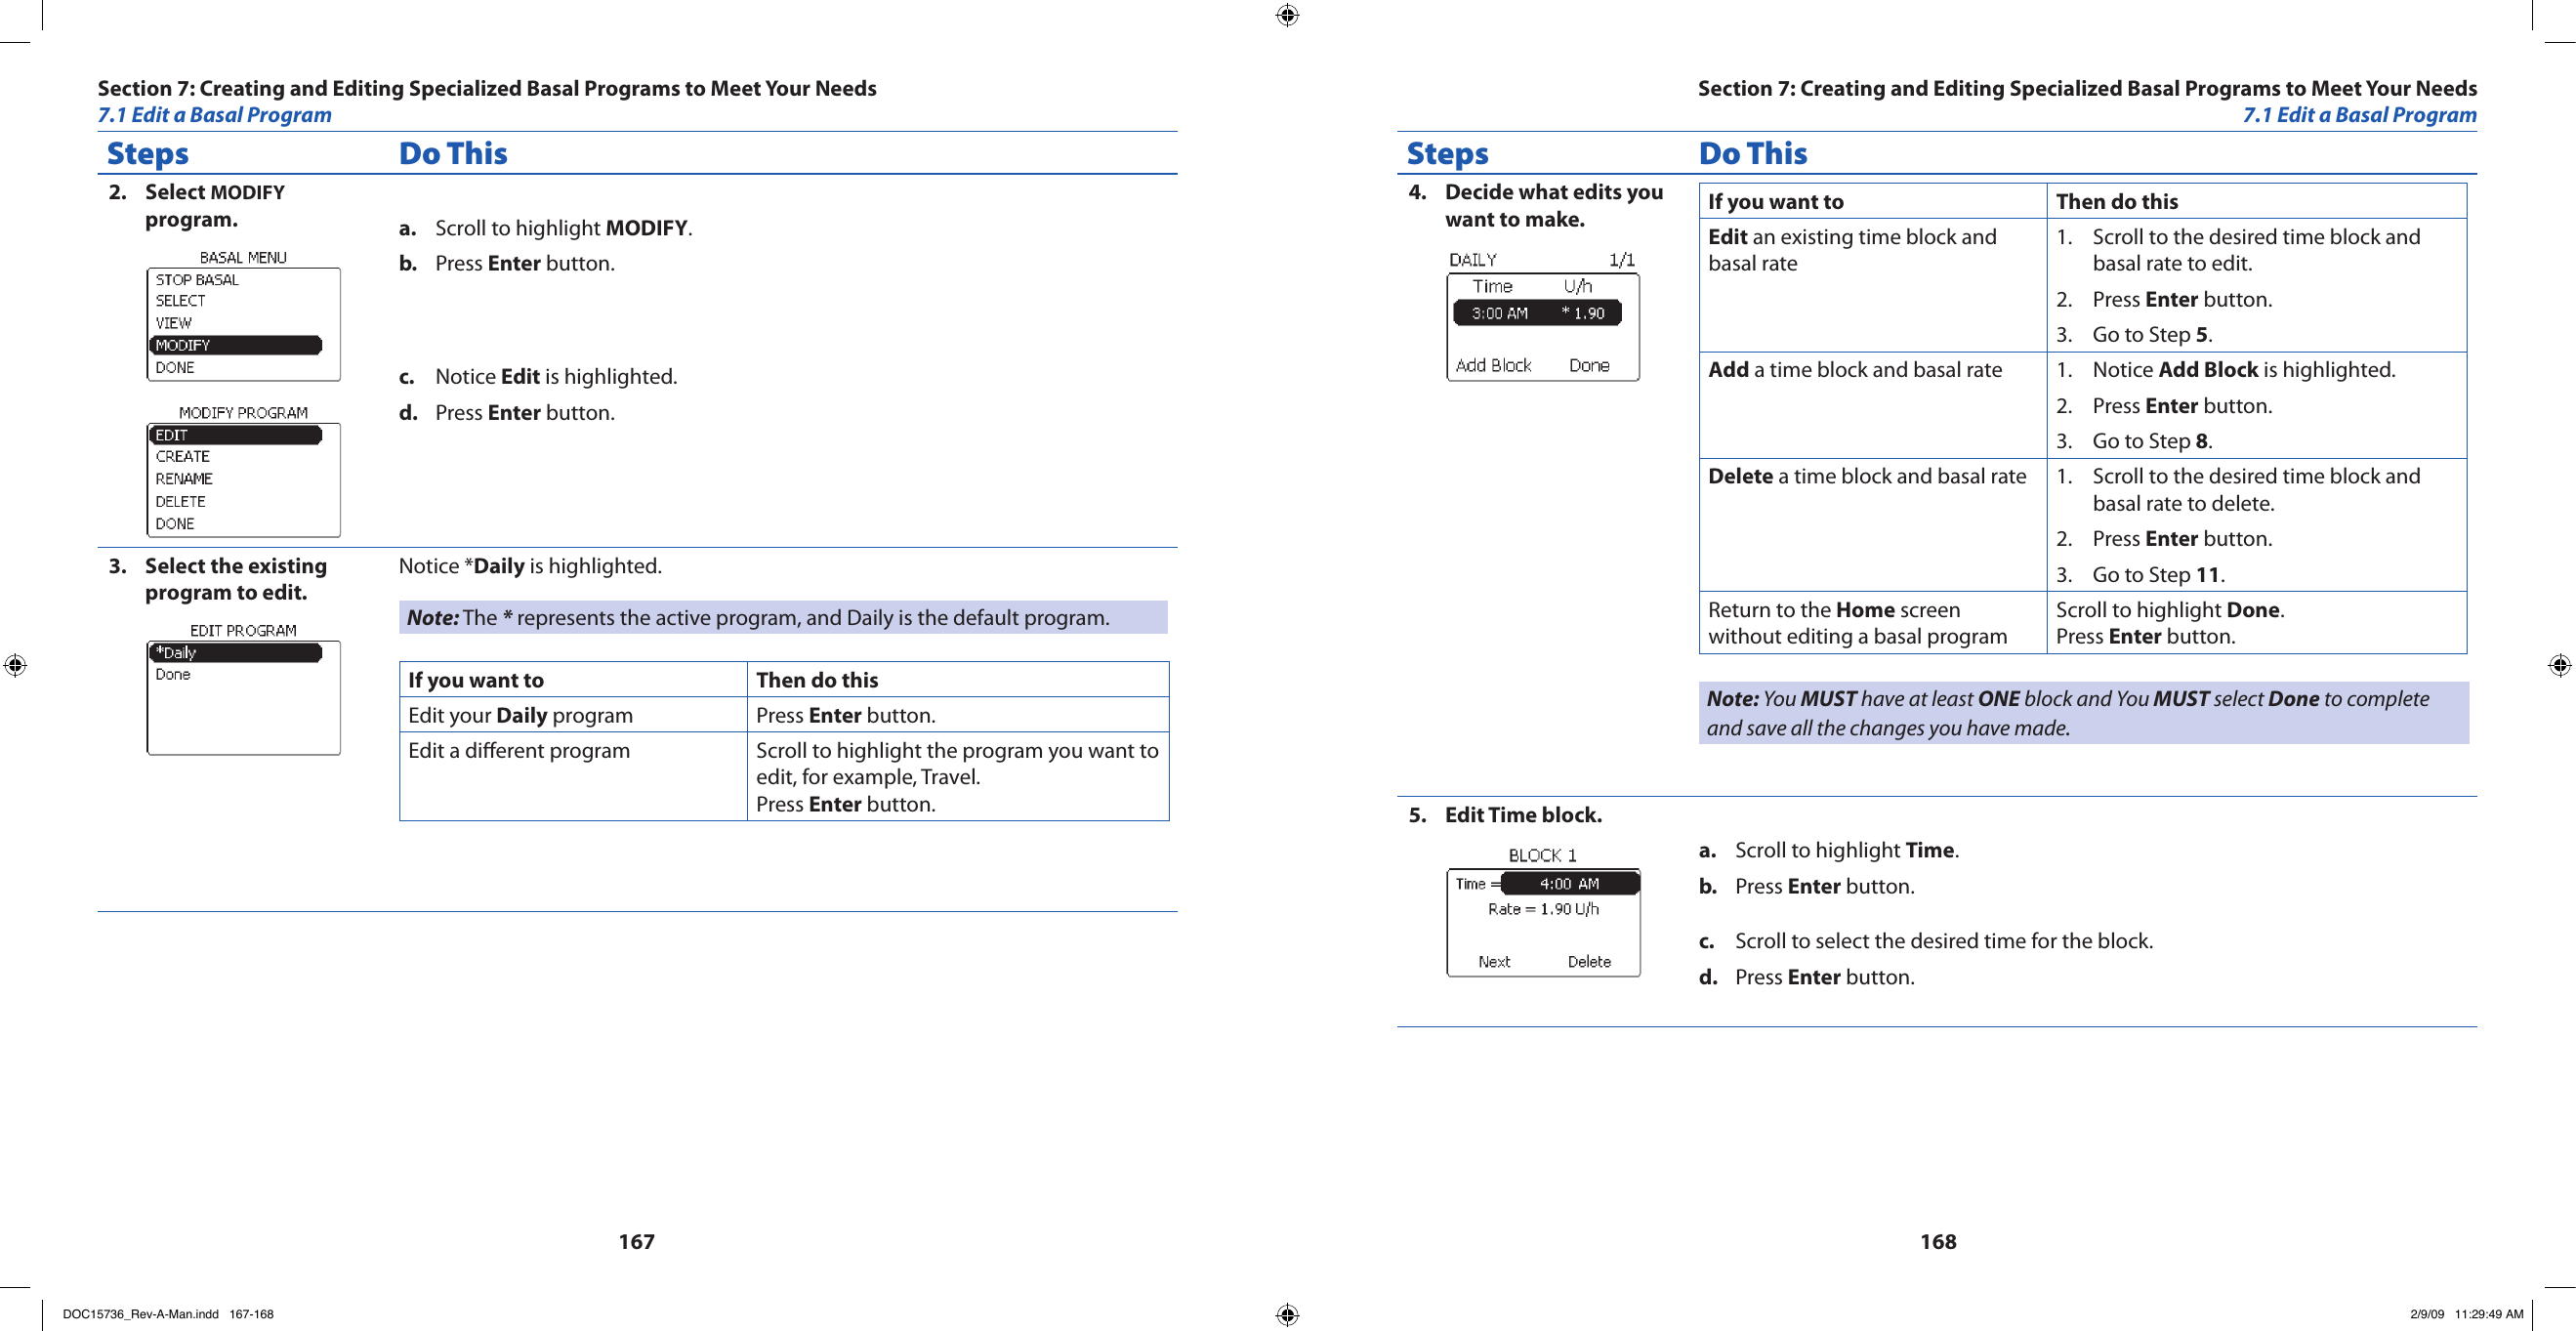
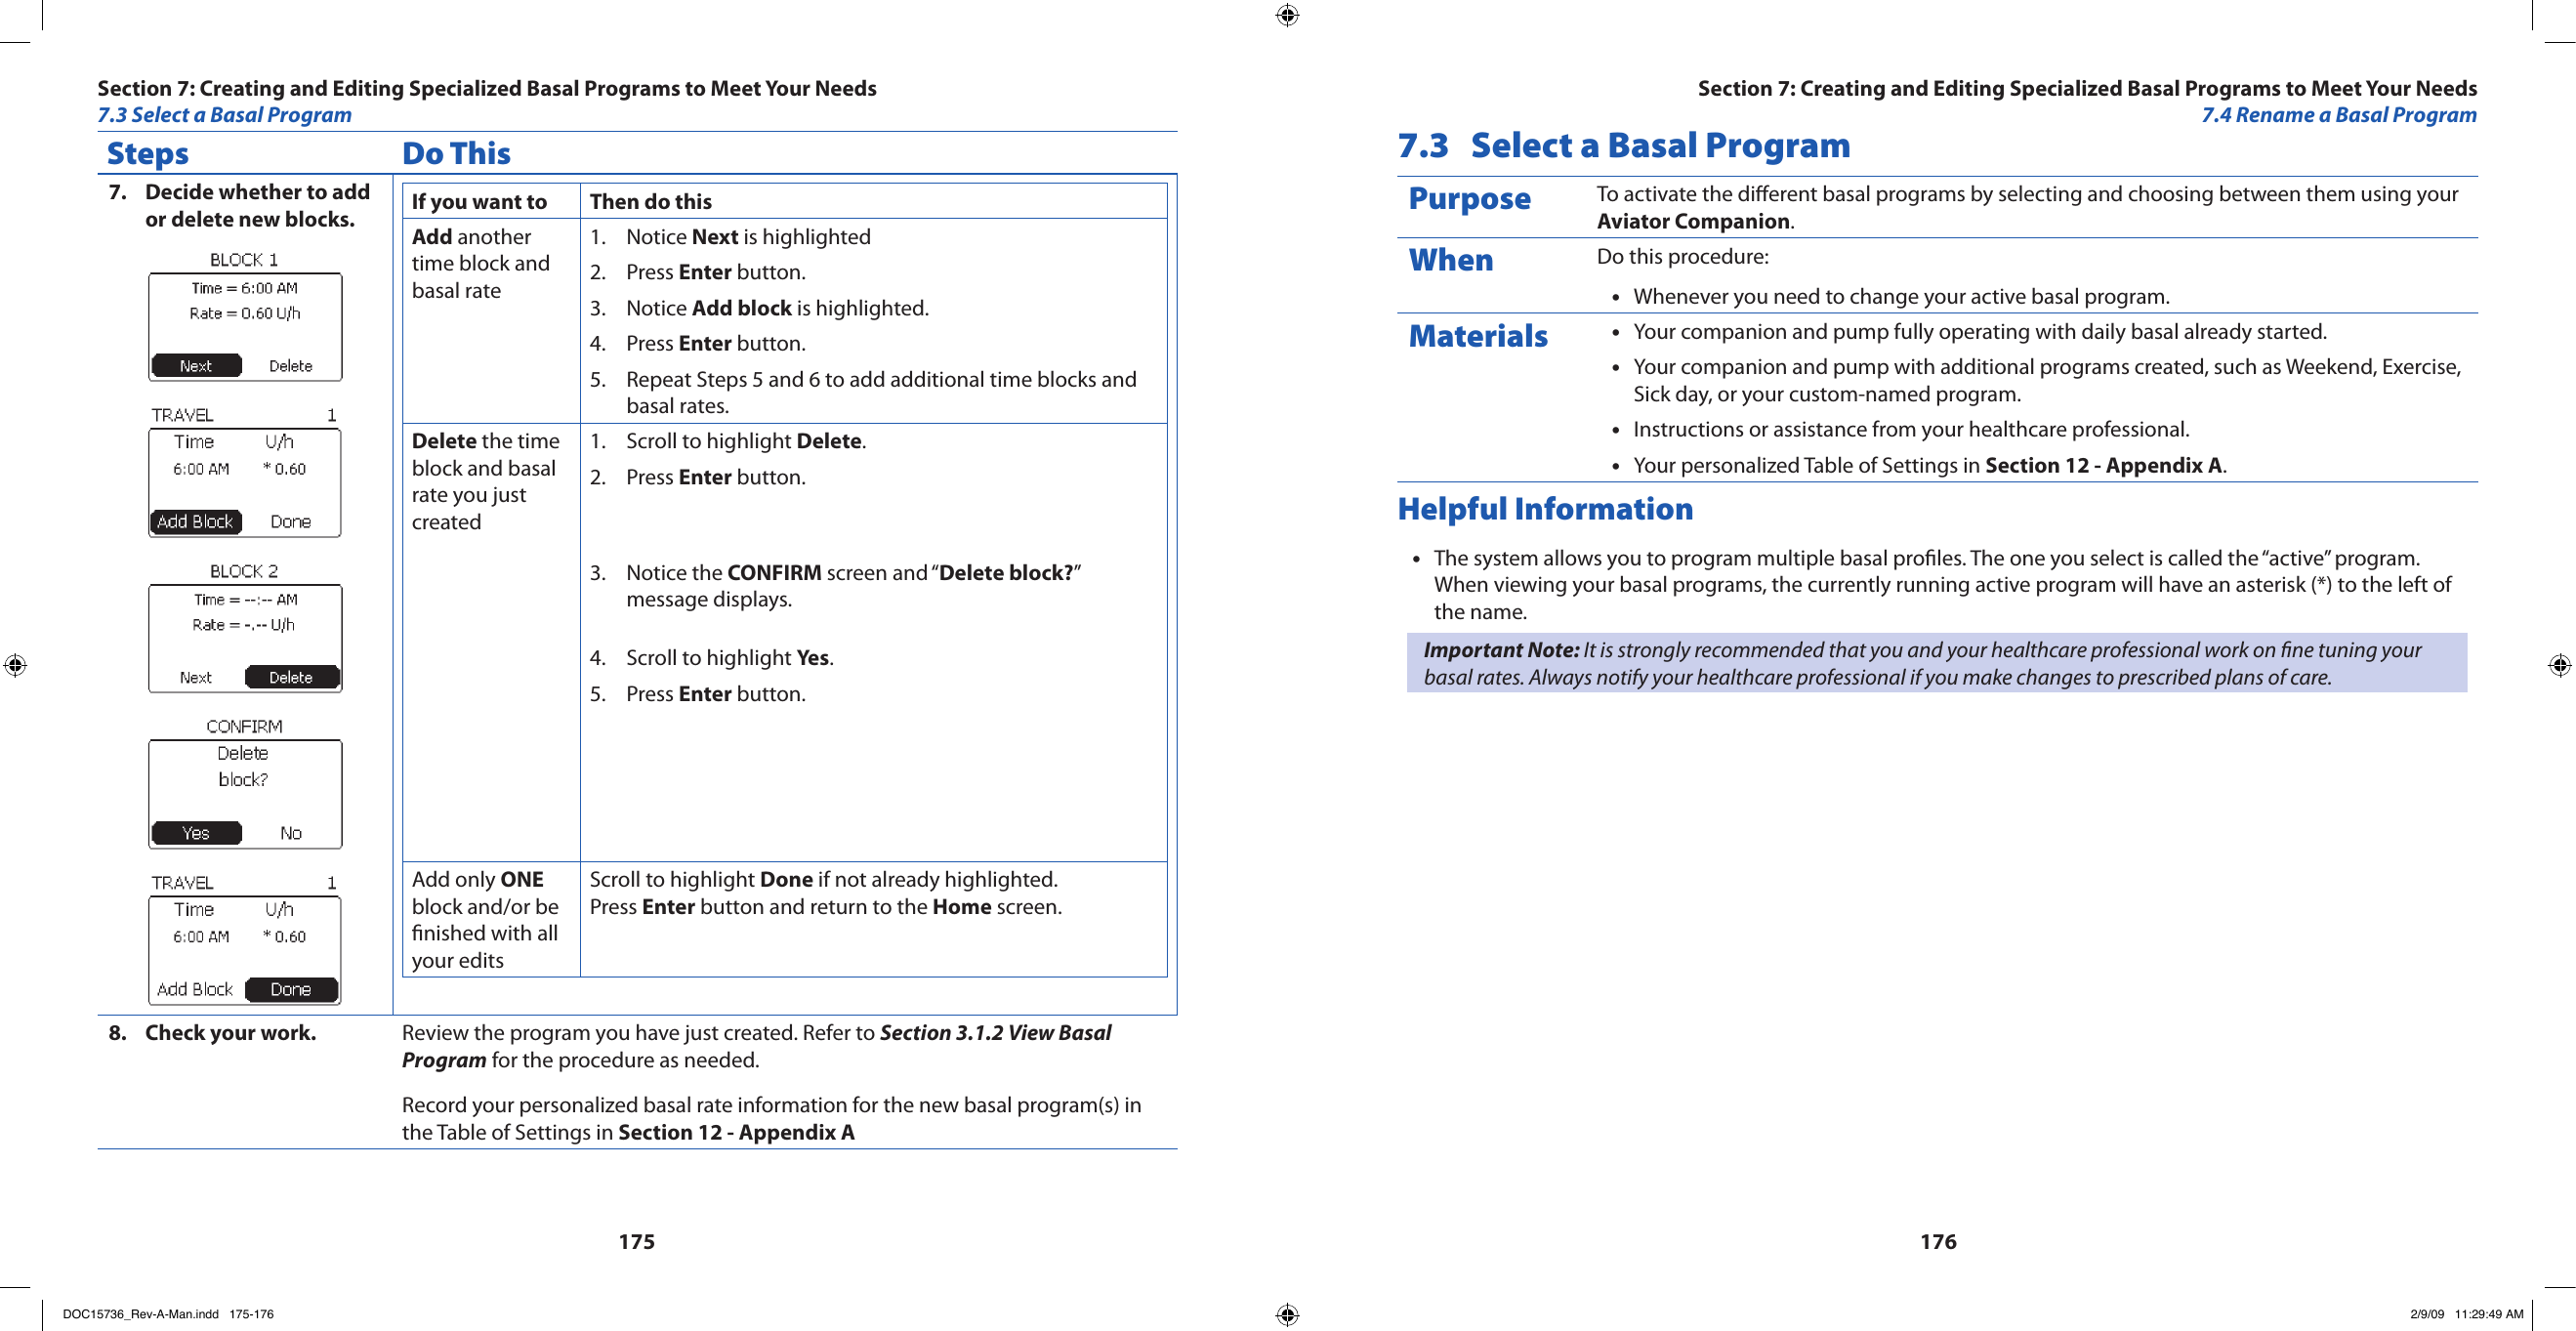
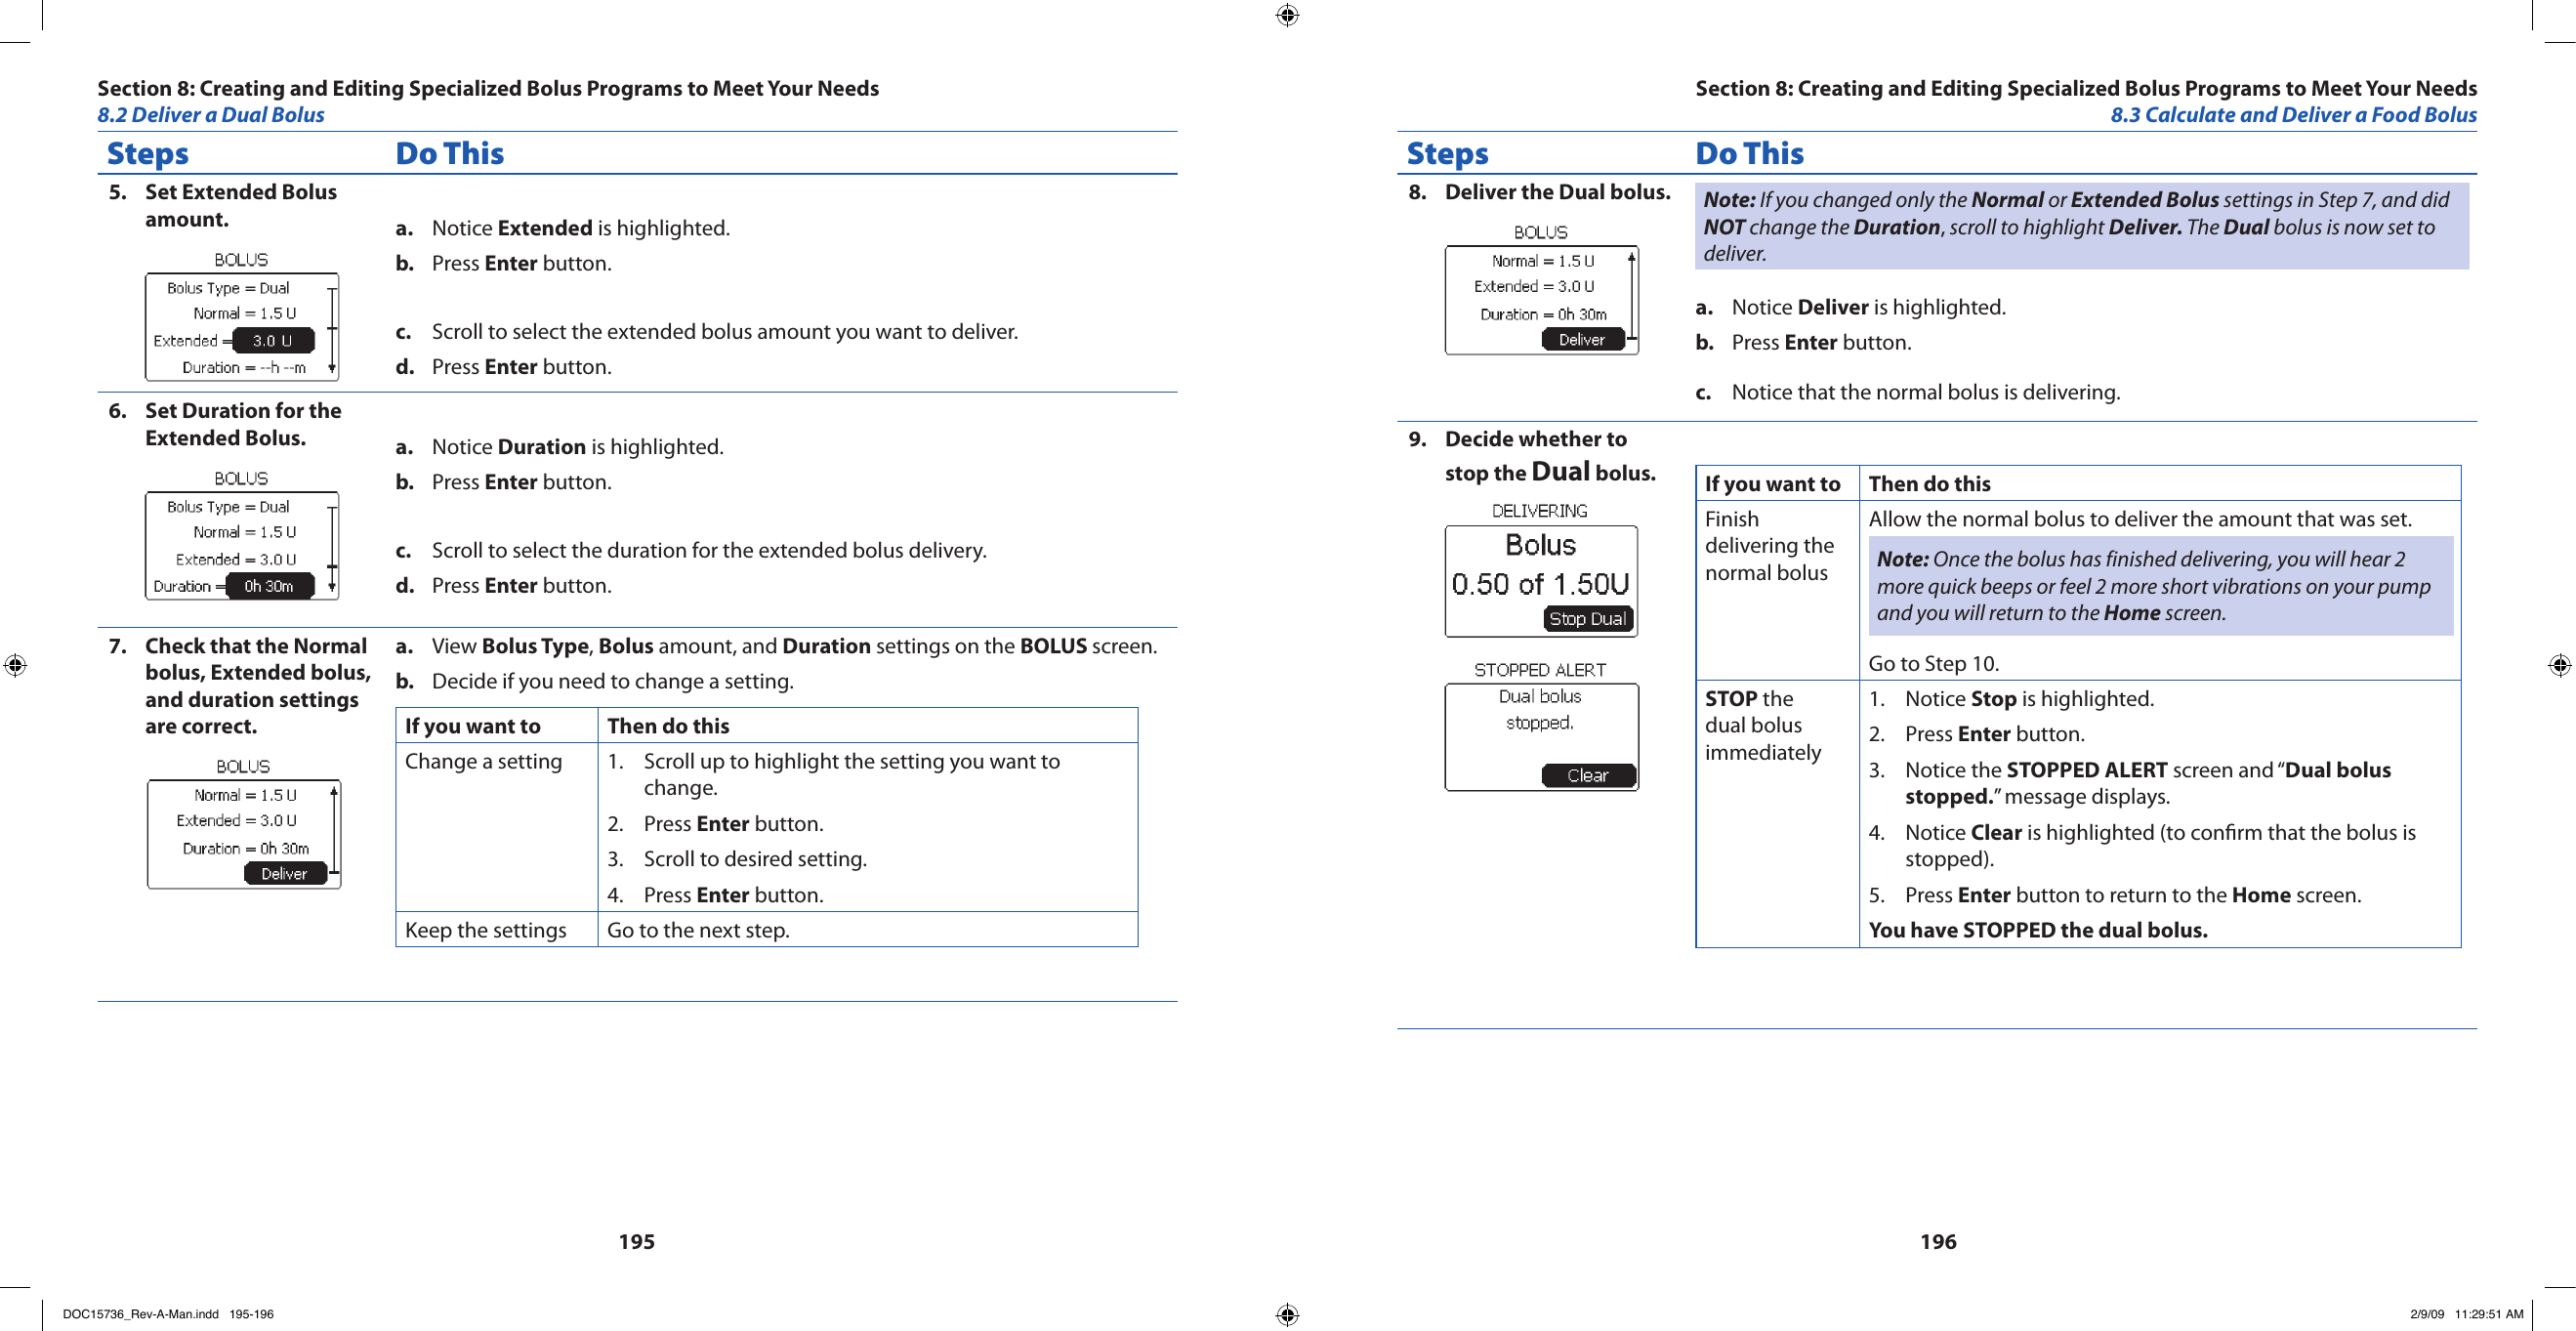
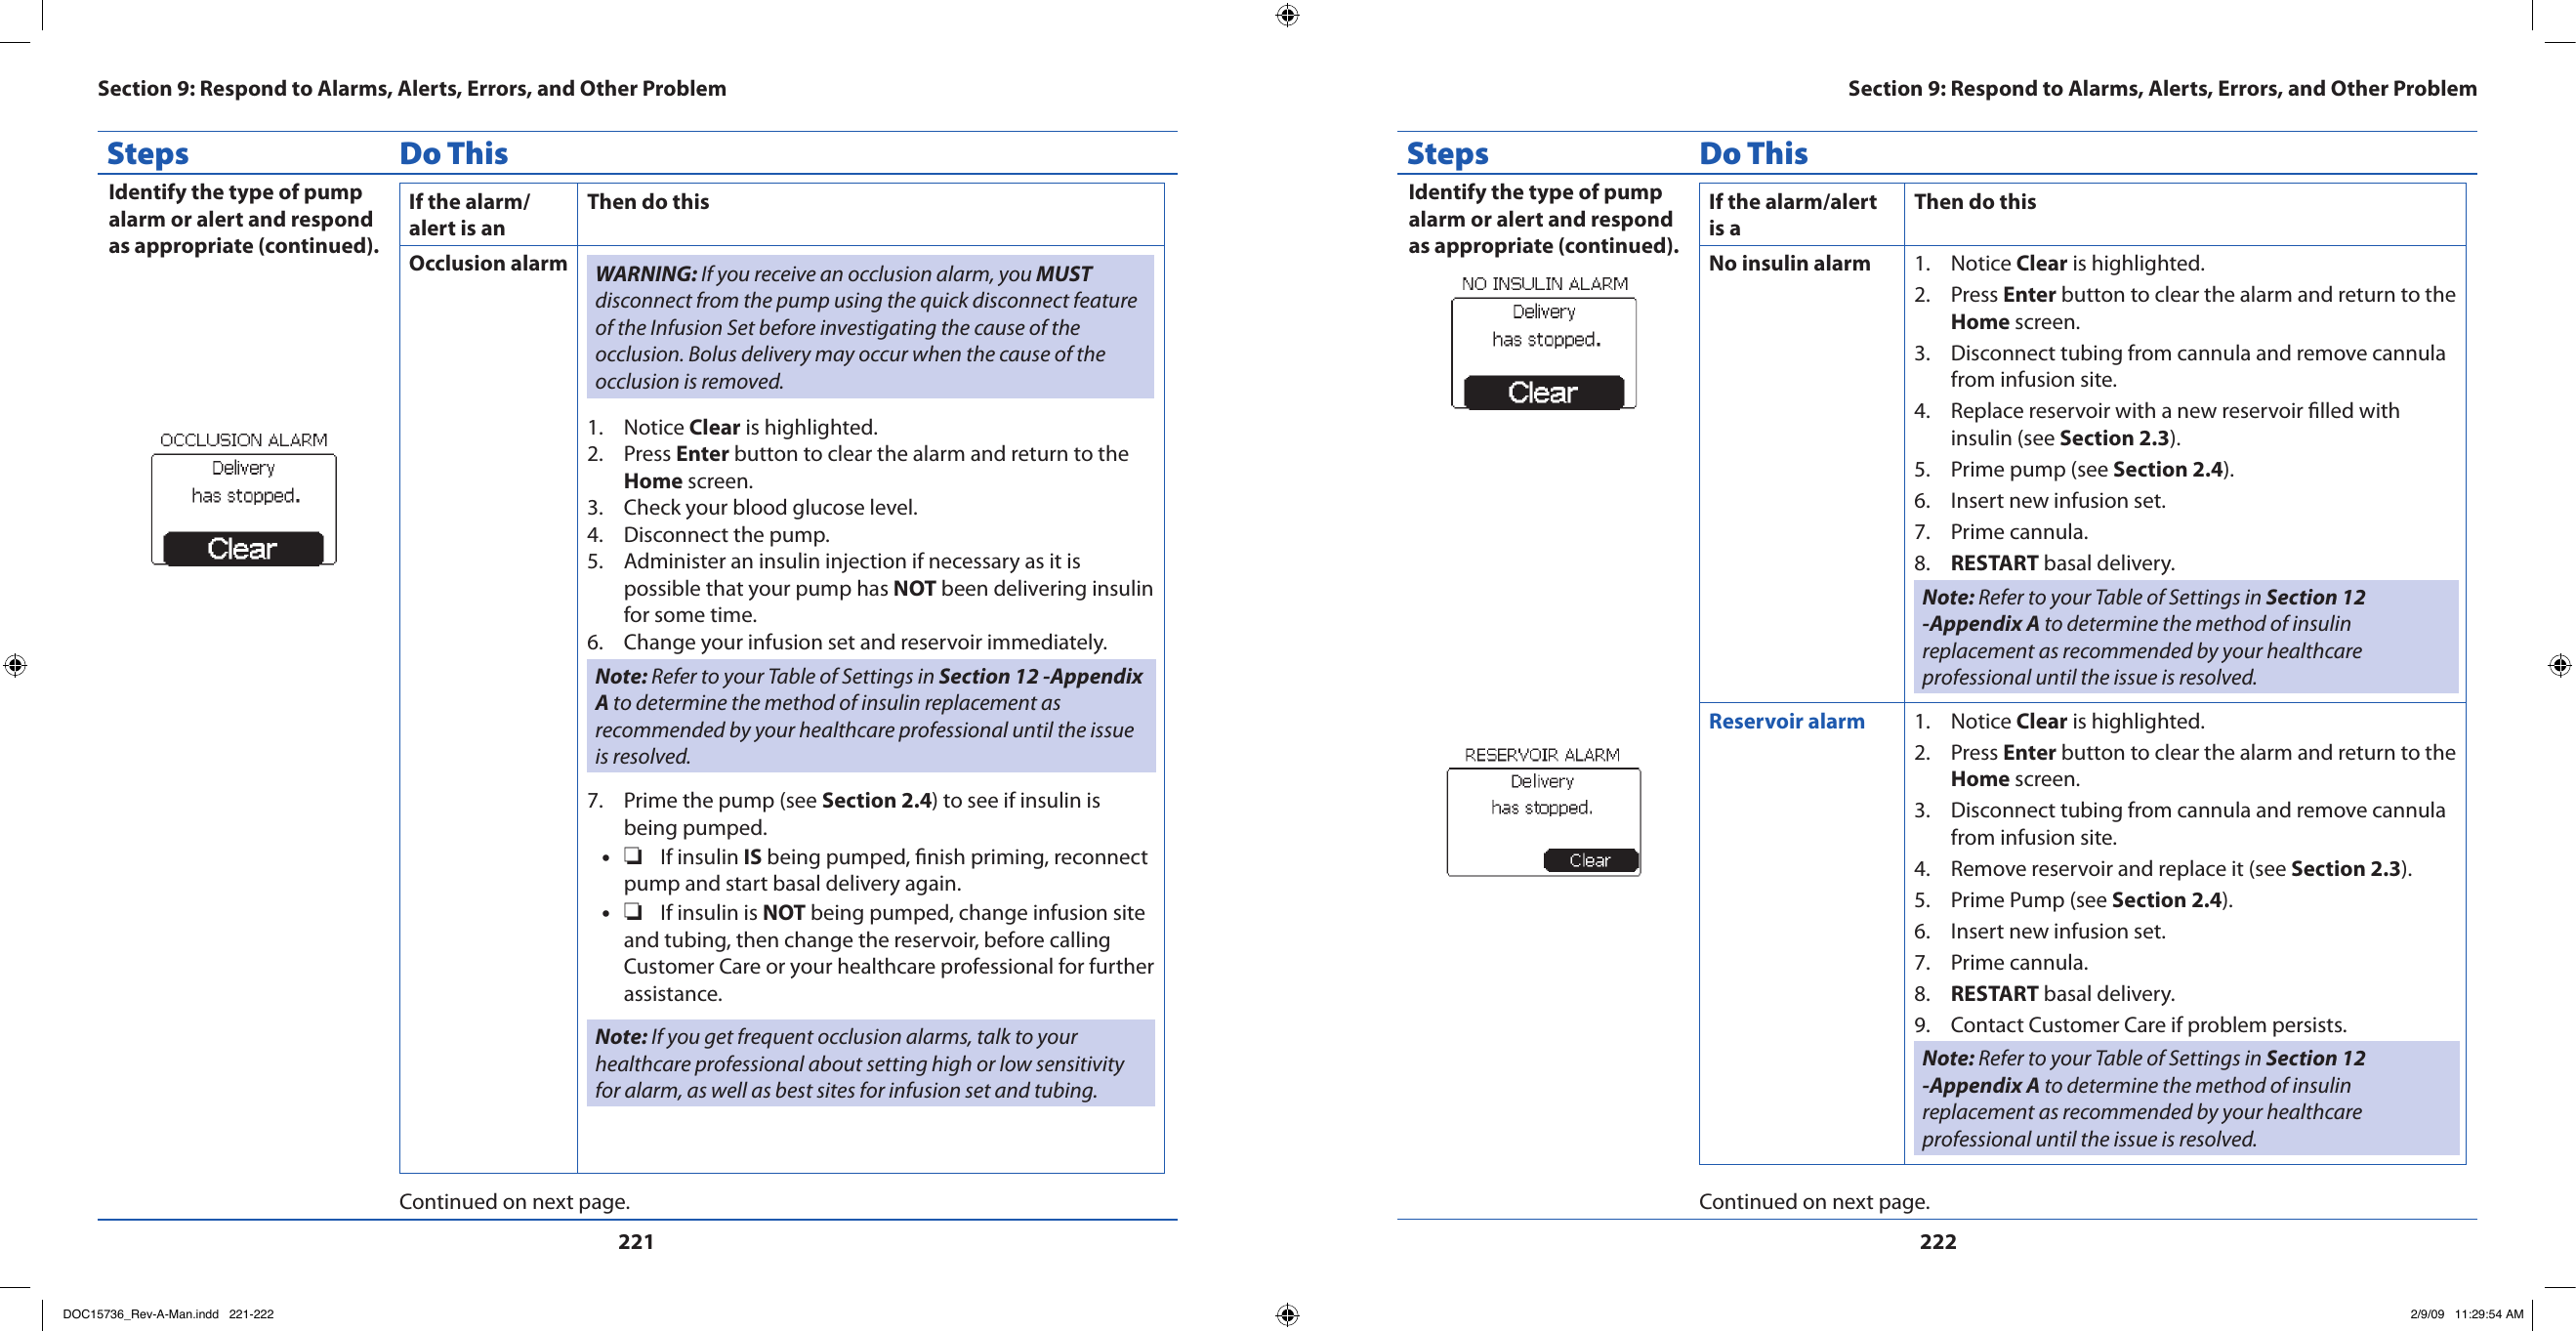
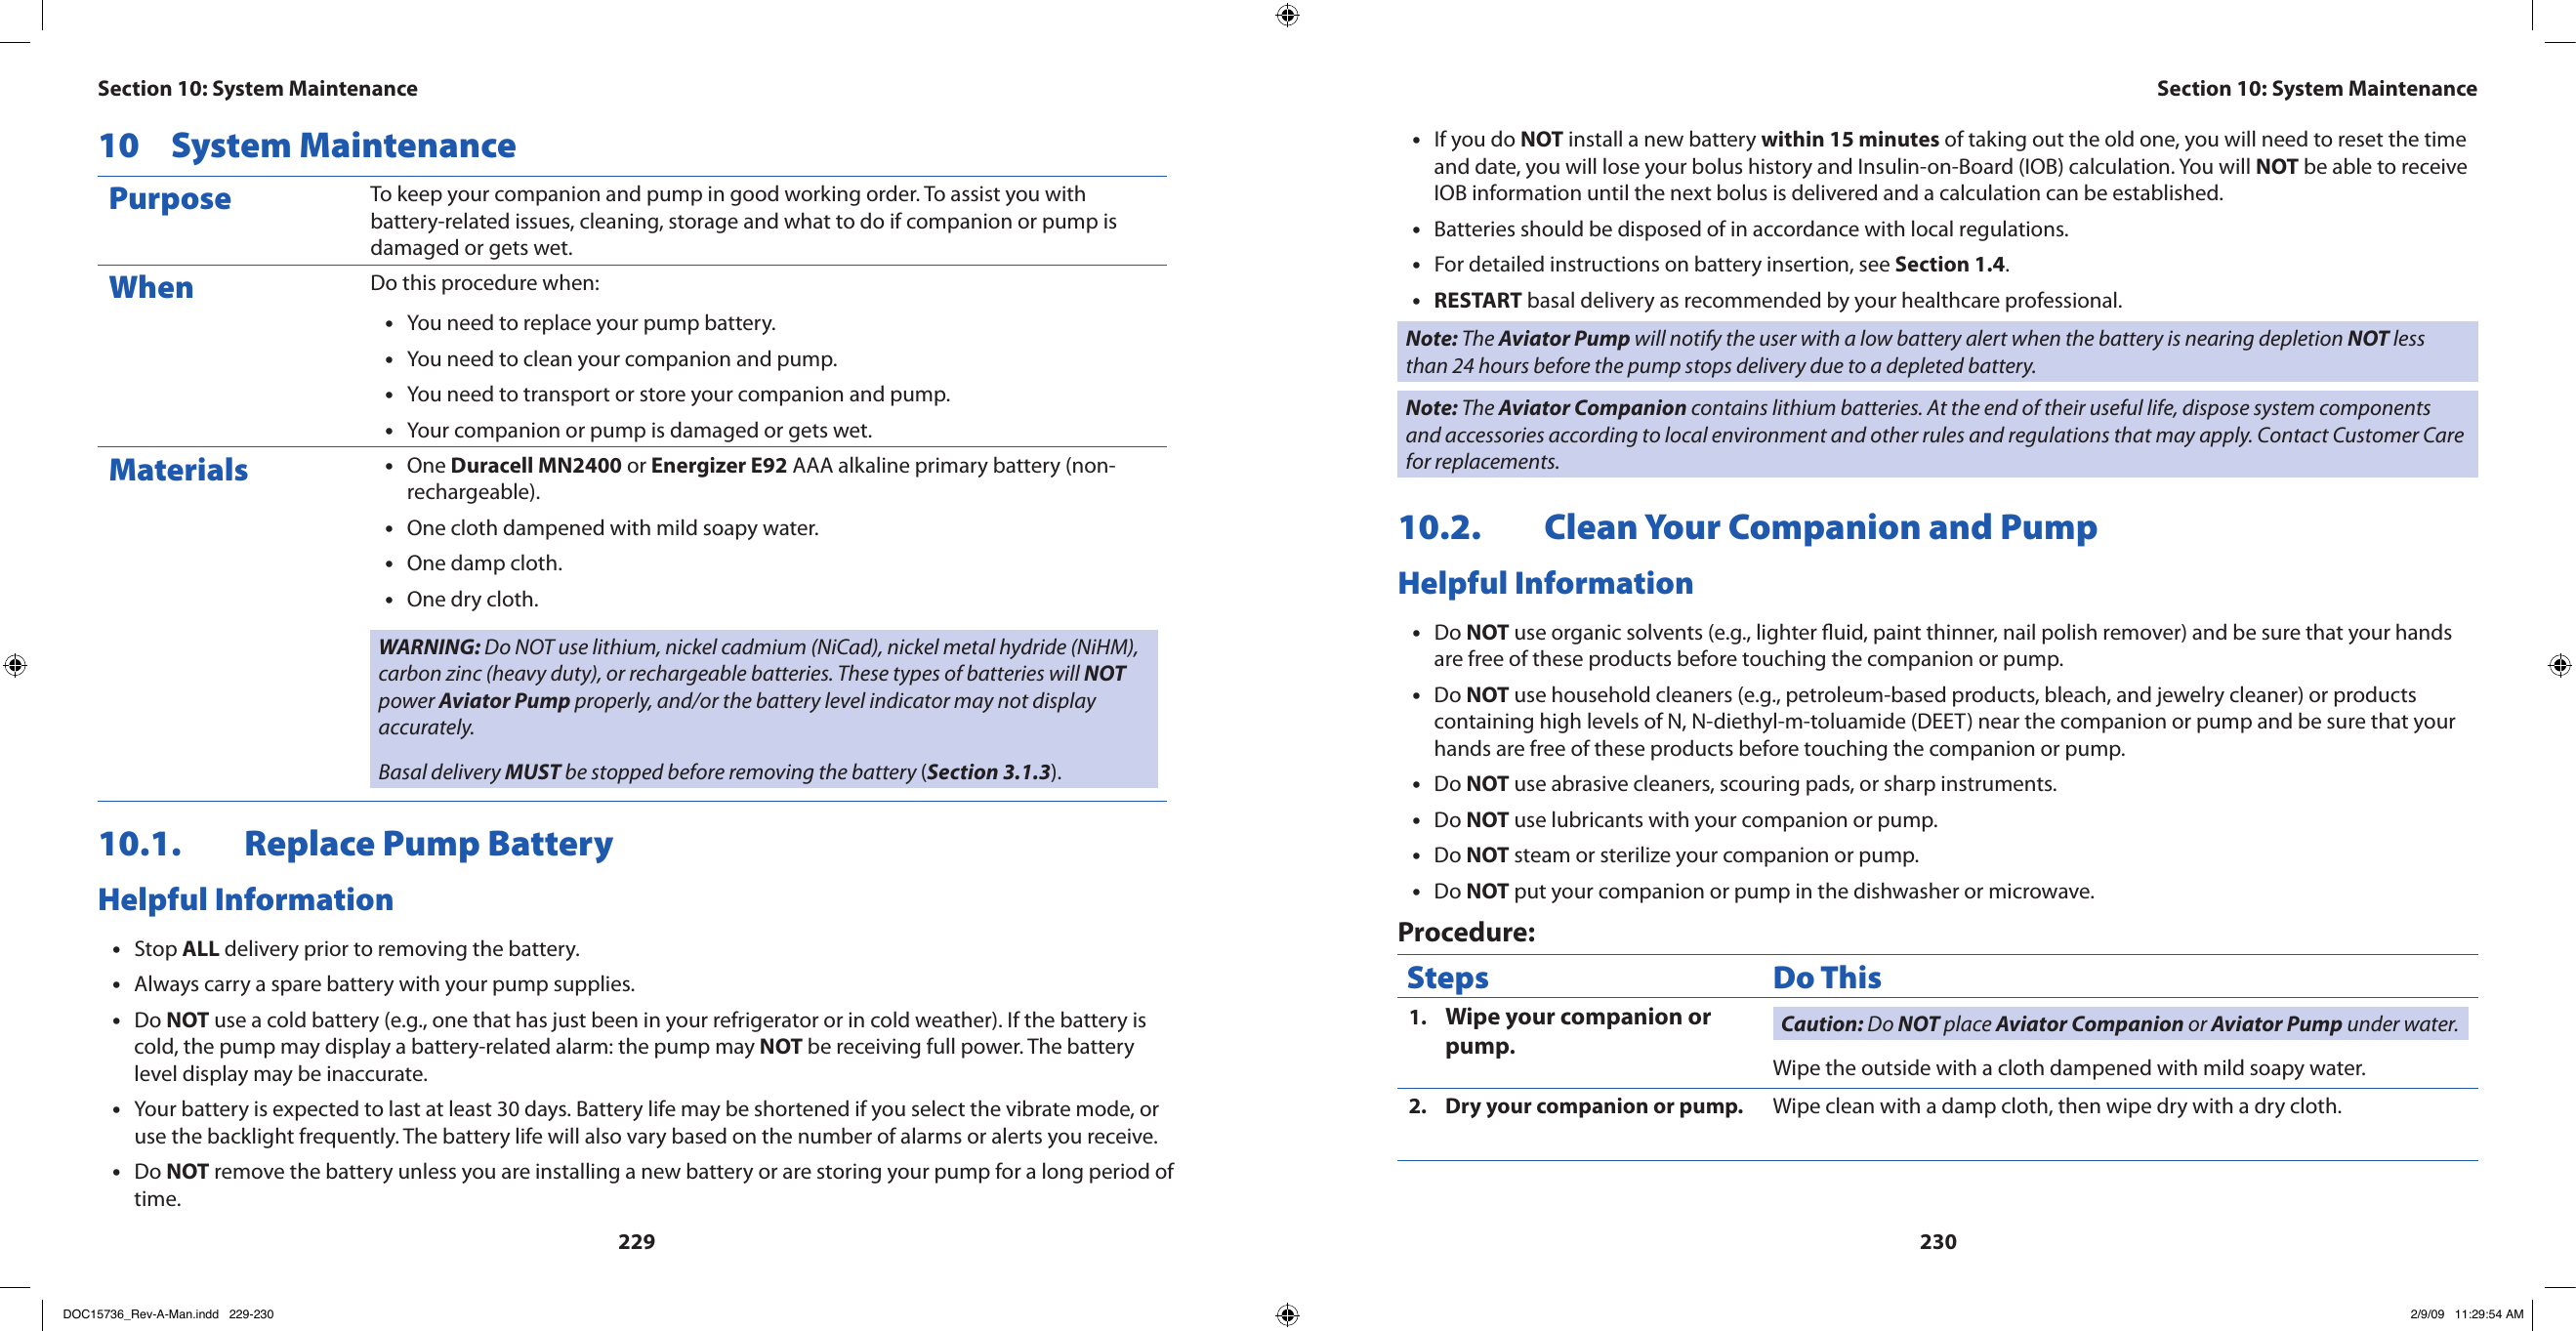
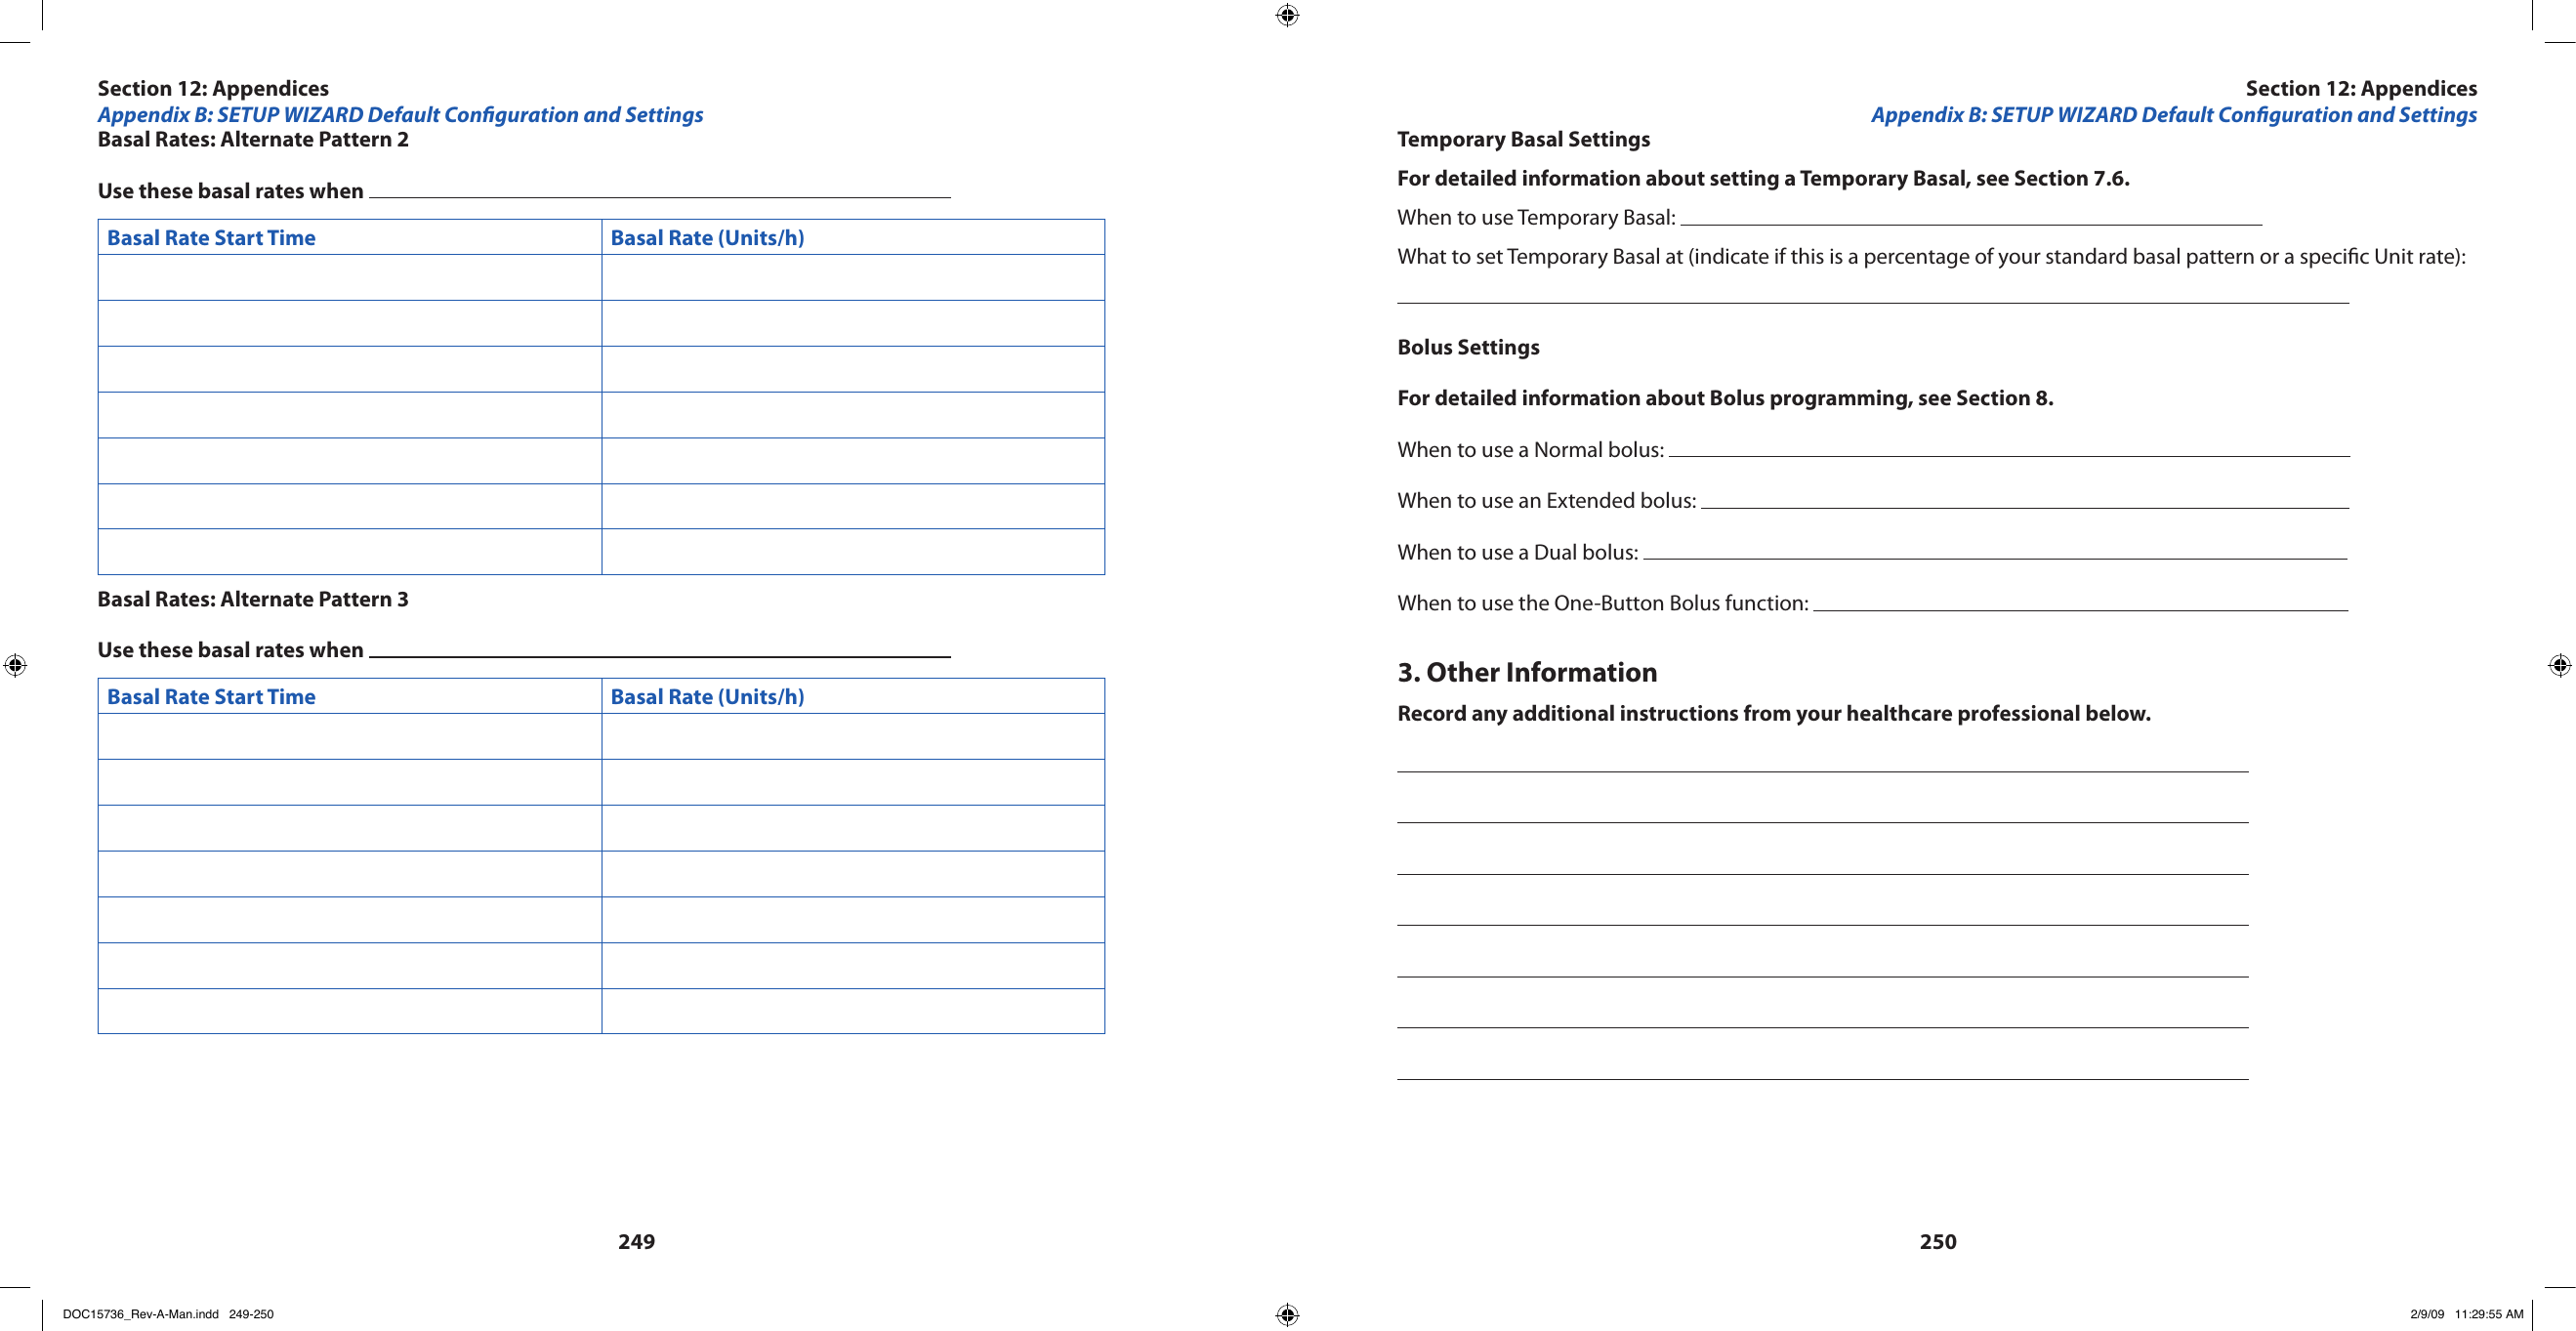
![255256 D. Device Specications – PumpDimensions: 3.3 X 1.8 X 0.75” (84 X 46 X 19 mm)Display Type: Dot graphic•Display Viewable Dimensions: 0.97” X 0.76” (24.7 X 19.4 mm )Display Backlight: YesAudio/Vibe Alert: YesWeight: Without battery and reservoir/hub, weight is approximately 2.7 oz (76.5 g). Add battery and empty reservoir, weight is approximately 3.3 oz (93.6 g).Reservoir: Single use plastic reservoirReservoir Connection: Proprietary secure connectorBasal Increment: 0.05 unitsTotal Basal Rates: 48/dayBasal Prole Conguration: Numerical displayBasal Proles: 4Basal Interval: 30 minutesBasal Frequency: Every 3 minutesBasal Rate Range: 0.05 to 30U/hTemporary Basal: +/- 10% increment between 0-200% for 0.05 to 30U/h* OR +/- 0.05 unit increment, single rate for 0.05 to 30U/h.You may set a temporary basal for up to 72 hours.*• The minimum allowable percentage is equal to the minimum basal rate (0.05) divided by the lowest basal rate over the specied duration of the temporary basal that is greater than 0. (e.g. if the lowest basal rate greater than 0.0U over the duration is 0.20U, the minimum percentage is 25% — 0.05/0.2 = 0.25)The maximum allowable percentage is equal to the maximum basal limit (Setup: Basal Limits: Maximum) divided by the highest basal rate over the specied duration of the temporary basal, truncated to the nearest 10%. (e.g. if the highest basal rate over the duration is 1.35 U/h, and the maximum basal limit is 2.00 U/h, the maximum percentage is 140% — 2.00/1.35 = 1.48)Bolus Dose Range: 0.05 to 50UBolus Increments: 0.05U, 0.1, 0.5 or 1.0 using One-Button Bolus (audio/vibrate)Normal Bolus Delivery Rate: At least 0.1U per secondPrime Deliver Rate: At least 0.1U per secondExtended Bolus: Yes1 U Bolus Duration: 10 seconds typicalInactivity Alarm: Always on, 1 – 24 hours.Maximum Time to Assert Occlusion Alarm: Occlusion Alarm set to High Sensitivity1 U/hr Approximately 3 hrs Approximately 6 hrs 0.05U/hr Approximately 60 hrs Approximately 120 hrsOcclusion Alarm Threshold/Pressure (Maximum Infusion Pressure) 25 psig (pounds per square inch gauge)Bolus Volume upon Release of an Occlusion Approximately 2.0 unitsPump Battery: One AAA battery (Energizer E92 or Duracell MN2400 recommended). Other models from these companies have not been tested.Battery Life: 30 days (in typical use cases)The expected life of the battery is dependent upon the following usage:Basal: 1 U/h (U100) 24 hr/day, 7 days/week Bolus: 5 boluses per day with a total daily bolus delivery of 24 Units (U100) Prime: 20 Units (U100) occurs three times a weekMemory: 90 days worth of events; display shows last 30, remainder can be seen if downloaded to a PCWater Resistance: Water resistant to IPX8Moisture Protection: IPX8 (Water resistant to 8 feet [2.4 meters] for 30 minutes and 12 feet [3.6 meters] for 3 minutes)IEC Classication: Internally powered equipment, Type BF applied part (protection against electric shock)Reservoir Volume: 250U or 2.5 mLOperational Conditions (Temperature and Humidity):41°F – 104°F (5°C to 40°C) with 10% to 90% relative humidityStorage Range: Shipping container for 1 year at -4°F – 113°F, average temperature at 72.5°F (-20°C to 45°C, average temperature at 22.5°C) with 10% to 90% relative humidity.Accuracy: Bolus Accuracy : +0.1U / -0.2U (or +0.001ml/-0.002ml); for doses from 0.05U to 2U inclusive+5% / -10%; for doses greater than 2U up to and including 6U+5% / -5% for doses greater than 6UBasal Accuracy: +/-5%Data Storage: The Pump has the ability to store a minimum of 2700 patient events in non-volatile memory for the expected life of the pump.Section 12: AppendicesAppendix E: FCC Compliance InformationSection 12: AppendicesAppendix F: Electromagnetic InformationDOC15736_Rev-A-Man.indd 255-256 2/9/09 11:29:56 AM](https://usermanual.wiki/Abbott-Diabetes-Care/AV2-C.User-manual-2-of-2/User-Guide-1071818-Page-63.png)