Abbott Diabetes Care AV2-C Insulin Pump/Glucose Meter Transmitter User Manual 2 of 2
Abbott Diabetes Care Insulin Pump/Glucose Meter Transmitter 2 of 2
Contents
- 1. Regulatory statement
- 2. User manual 1 of 2
- 3. User manual 2 of 2
User manual 2 of 2
131
132
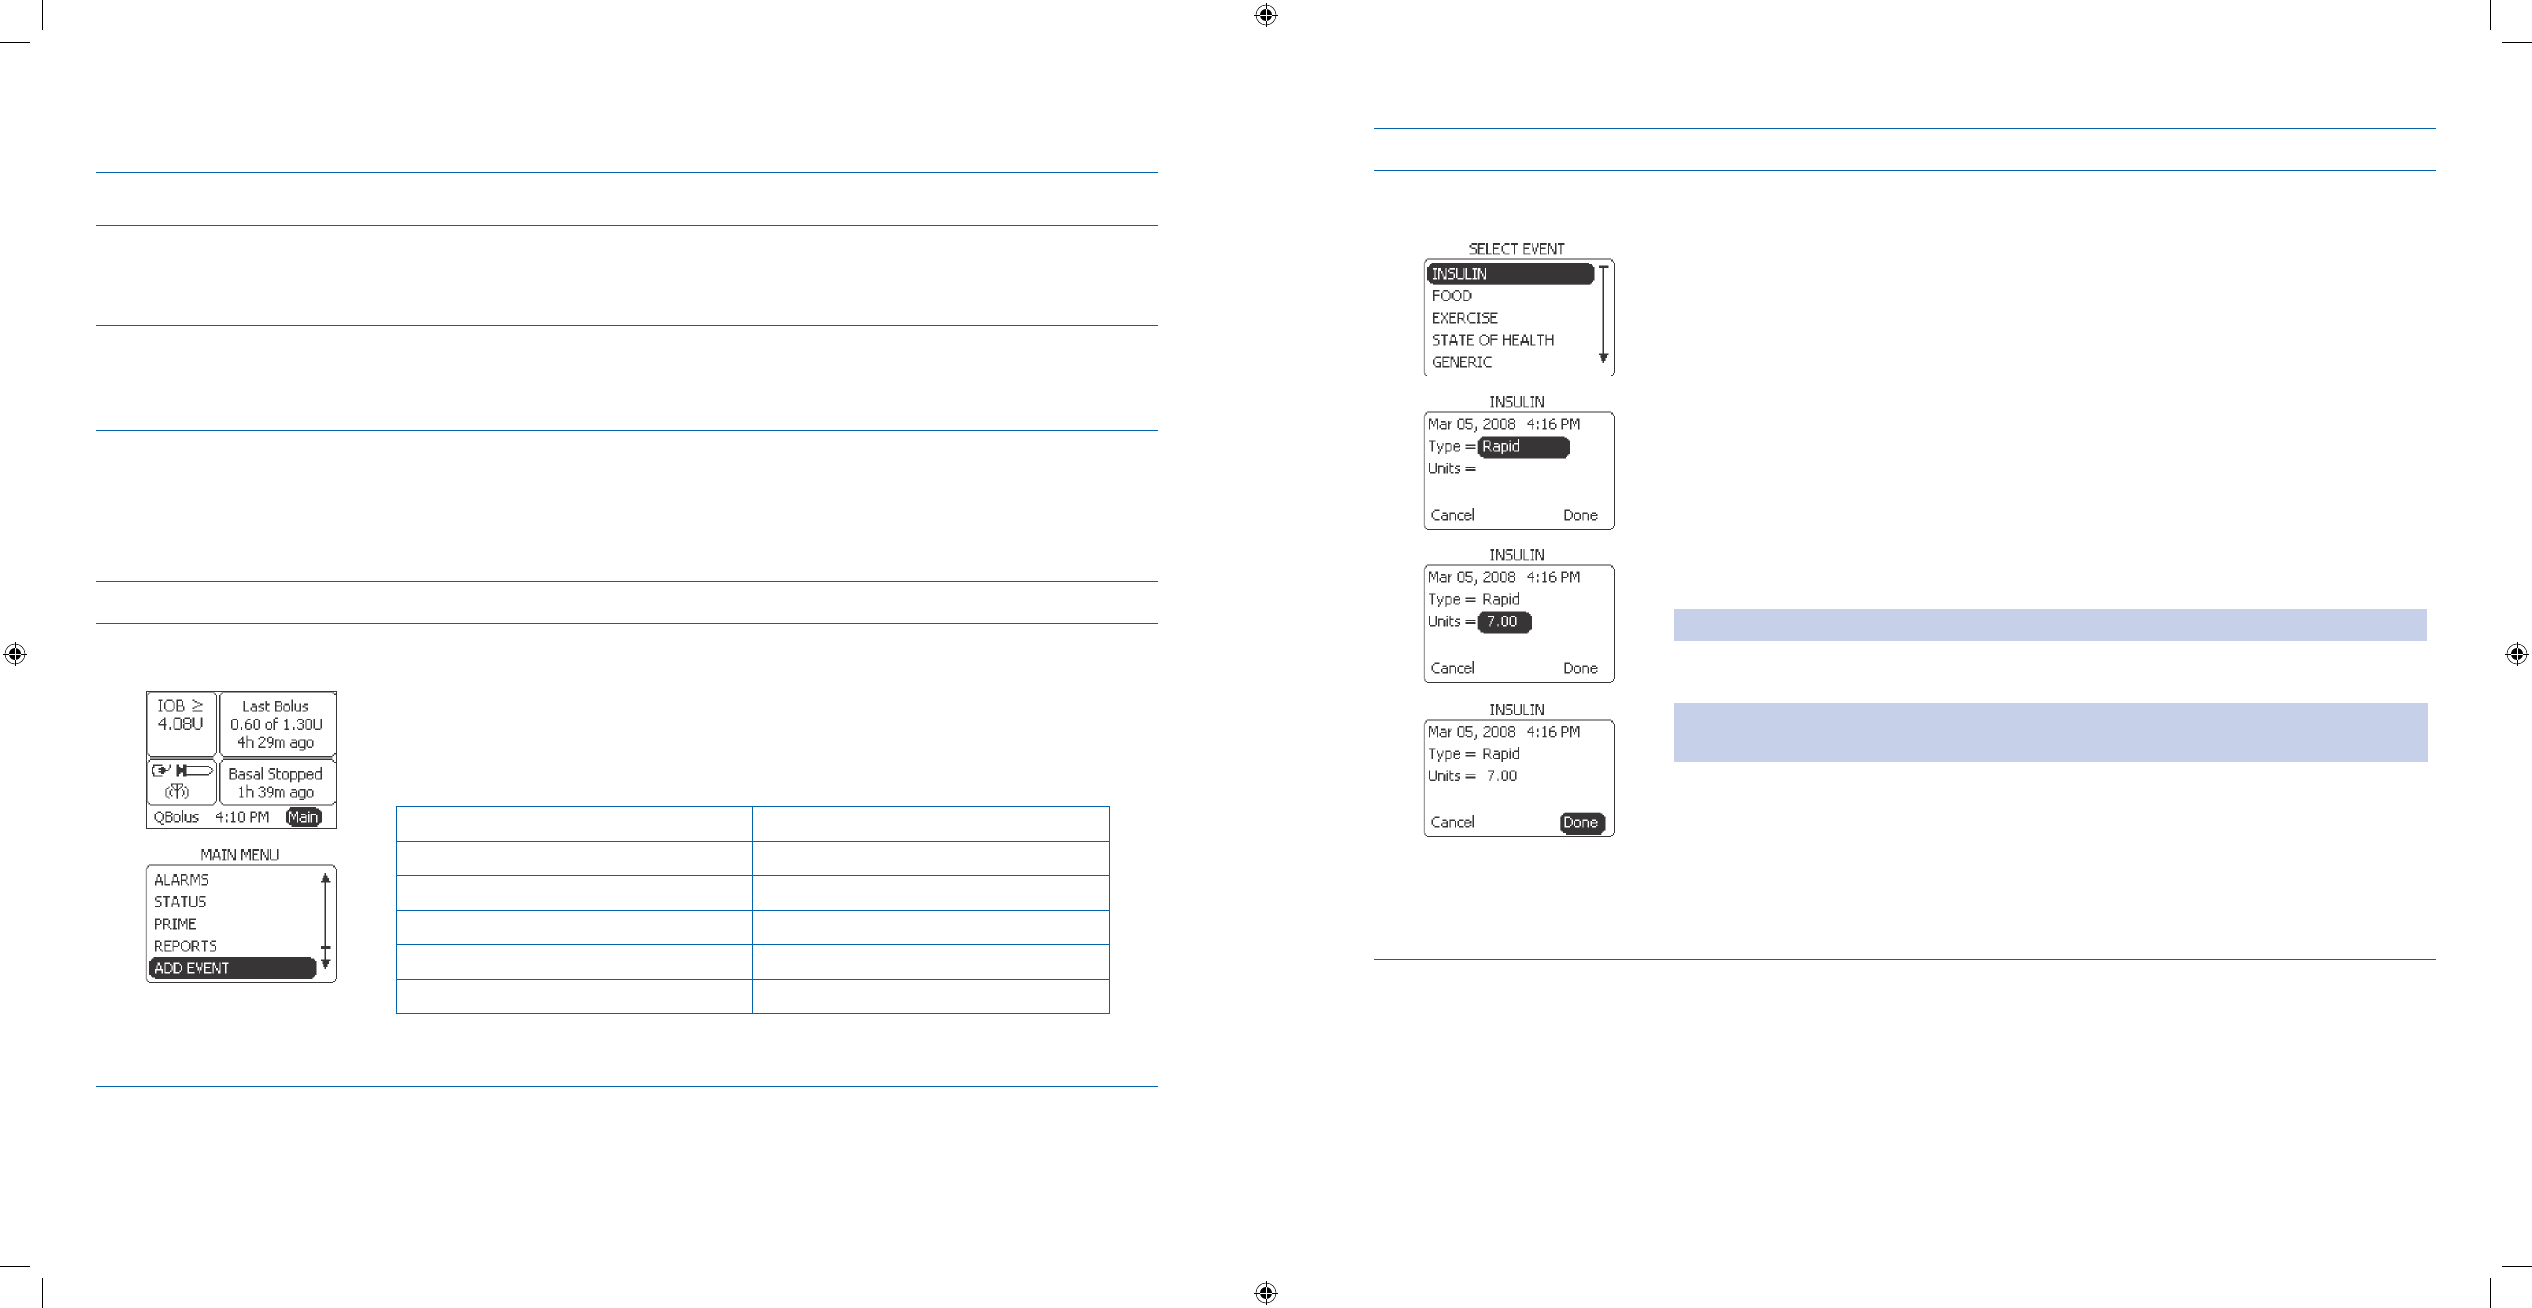
6.4 Enter Event Data
Purpose To enter event data into your Aviator Companion for a record of event history.
When Do this procedure:
When you wish to enter insulin, meals, exercise, state of health, or generic event data into
•
your companion.
Materials Your companion operating with all settings programmed.•
Your pump operating with all settings programmed.•
Assistance from healthcare professional as needed.•
Helpful Information
You can ONLY perform this task using your companion. You • CANNOT enter event data using your pump.
Procedure:
Steps Do This
Access the 1. SELECT
EVENT menu.
From the Home screen, notice a. Main is highlighted.
Press b. Enter button.
Scroll to highlight c. ADD EVENT.
Press d. Enter button to go to SELECT EVENT menu.
Decide what event you want to add.e.
If you are adding an event for Then do this
Insulin Go to Step 2.
Food Go to Step 3.
Exercise Go to Step 4.
State of Health Go to Step 5.
Generic Go to Step 6.
Steps Do This
Go to the 2. INSULIN
menu. Notice a. INSULIN is highlighted.
Press b. Enter button.
Notice c. Type is highlighted.
Press d. Enter button.
Scroll to select insulin type (Rapid, Intermediate, Pre-Mix, Long Acting, Short-e.
Acting, Inhaled)
Press f. Enter button.
Scroll to highlight g. Units.
Press h. Enter button.
Scroll to select the units of insulin.i.
Note: The range is 0.00 to 99.50.
Press j. Enter button.
Note: You can scroll to highlight Cancel and press Enter to cancel any entries at
anytime.
Scroll to highlight k. Done.
Press l. Enter button to return to the Home screen.
You have completed adding an insulin event.
Section 6: When You’re Ready – Optional Settings
6.4 Enter Event Data
Section 6: When You’re Ready – Optional Settings
6.4 Enter Event Data
DOC15736_Rev-A-Man.indd 131-132 2/9/09 11:29:46 AM
133
134
Steps Do This
Go to the 3. FOOD menu.
Scroll to highlight a. FOOD.
Press b. Enter button.
Notice c. Type is highlighted.
Press d. Enter button.
Scroll to select meal type (Breakfast, Lunch, Dinner, and Snack).e.
Press f. Enter button.
Notice g. Carbs (CARBOHYDRATE) is highlighted.
Press h. Enter button.
Scroll to select the amount of Carbs.i.
Note: The range is 0 to 350 grams.
Press j. Enter button.
Note: You can scroll to highlight Cancel and press Enter to cancel any entries at
anytime.
Scroll to highlight k. Done.
Press l. Enter button to return to the Home screen.
You have completed adding a meal event.
Steps Do This
Go to the 4. EXERCISE
menu. Scroll to highlight a. EXERCISE.
Press b. Enter button.
Note: You can just enter the exercise type and NOT the duration or intensity.
Notice c. Type is highlighted.
Press d. Enter button.
Scroll to select exercise type (Aerobics, Walking, Jogging, Running, Swimming, e.
Biking, Weights, or Other).
Press f. Enter button.
Scroll to highlight g. Duration.
Press h. Enter button.
Scroll to select the exercise duration.i.
Note: The range is 0:00 to 5:00 hours.
Press j. Enter button.
Note: You can scroll to highlight Cancel and press Enter to cancel any entries at
anytime.
Scroll to highlight k. Intensity.
Press l. Enter button.
Scroll to select exercise intensity (Low, Medium, High, None).m.
Press n. Enter button.
Scroll to highlight o. Done.
Press p. Enter button to return to the Home screen.
You have completed adding an exercise event.
Section 6: When You’re Ready – Optional Settings
6.4 Enter Event Data
Section 6: When You’re Ready – Optional Settings
6.4 Enter Event Data
DOC15736_Rev-A-Man.indd 133-134 2/9/09 11:29:46 AM
135
136
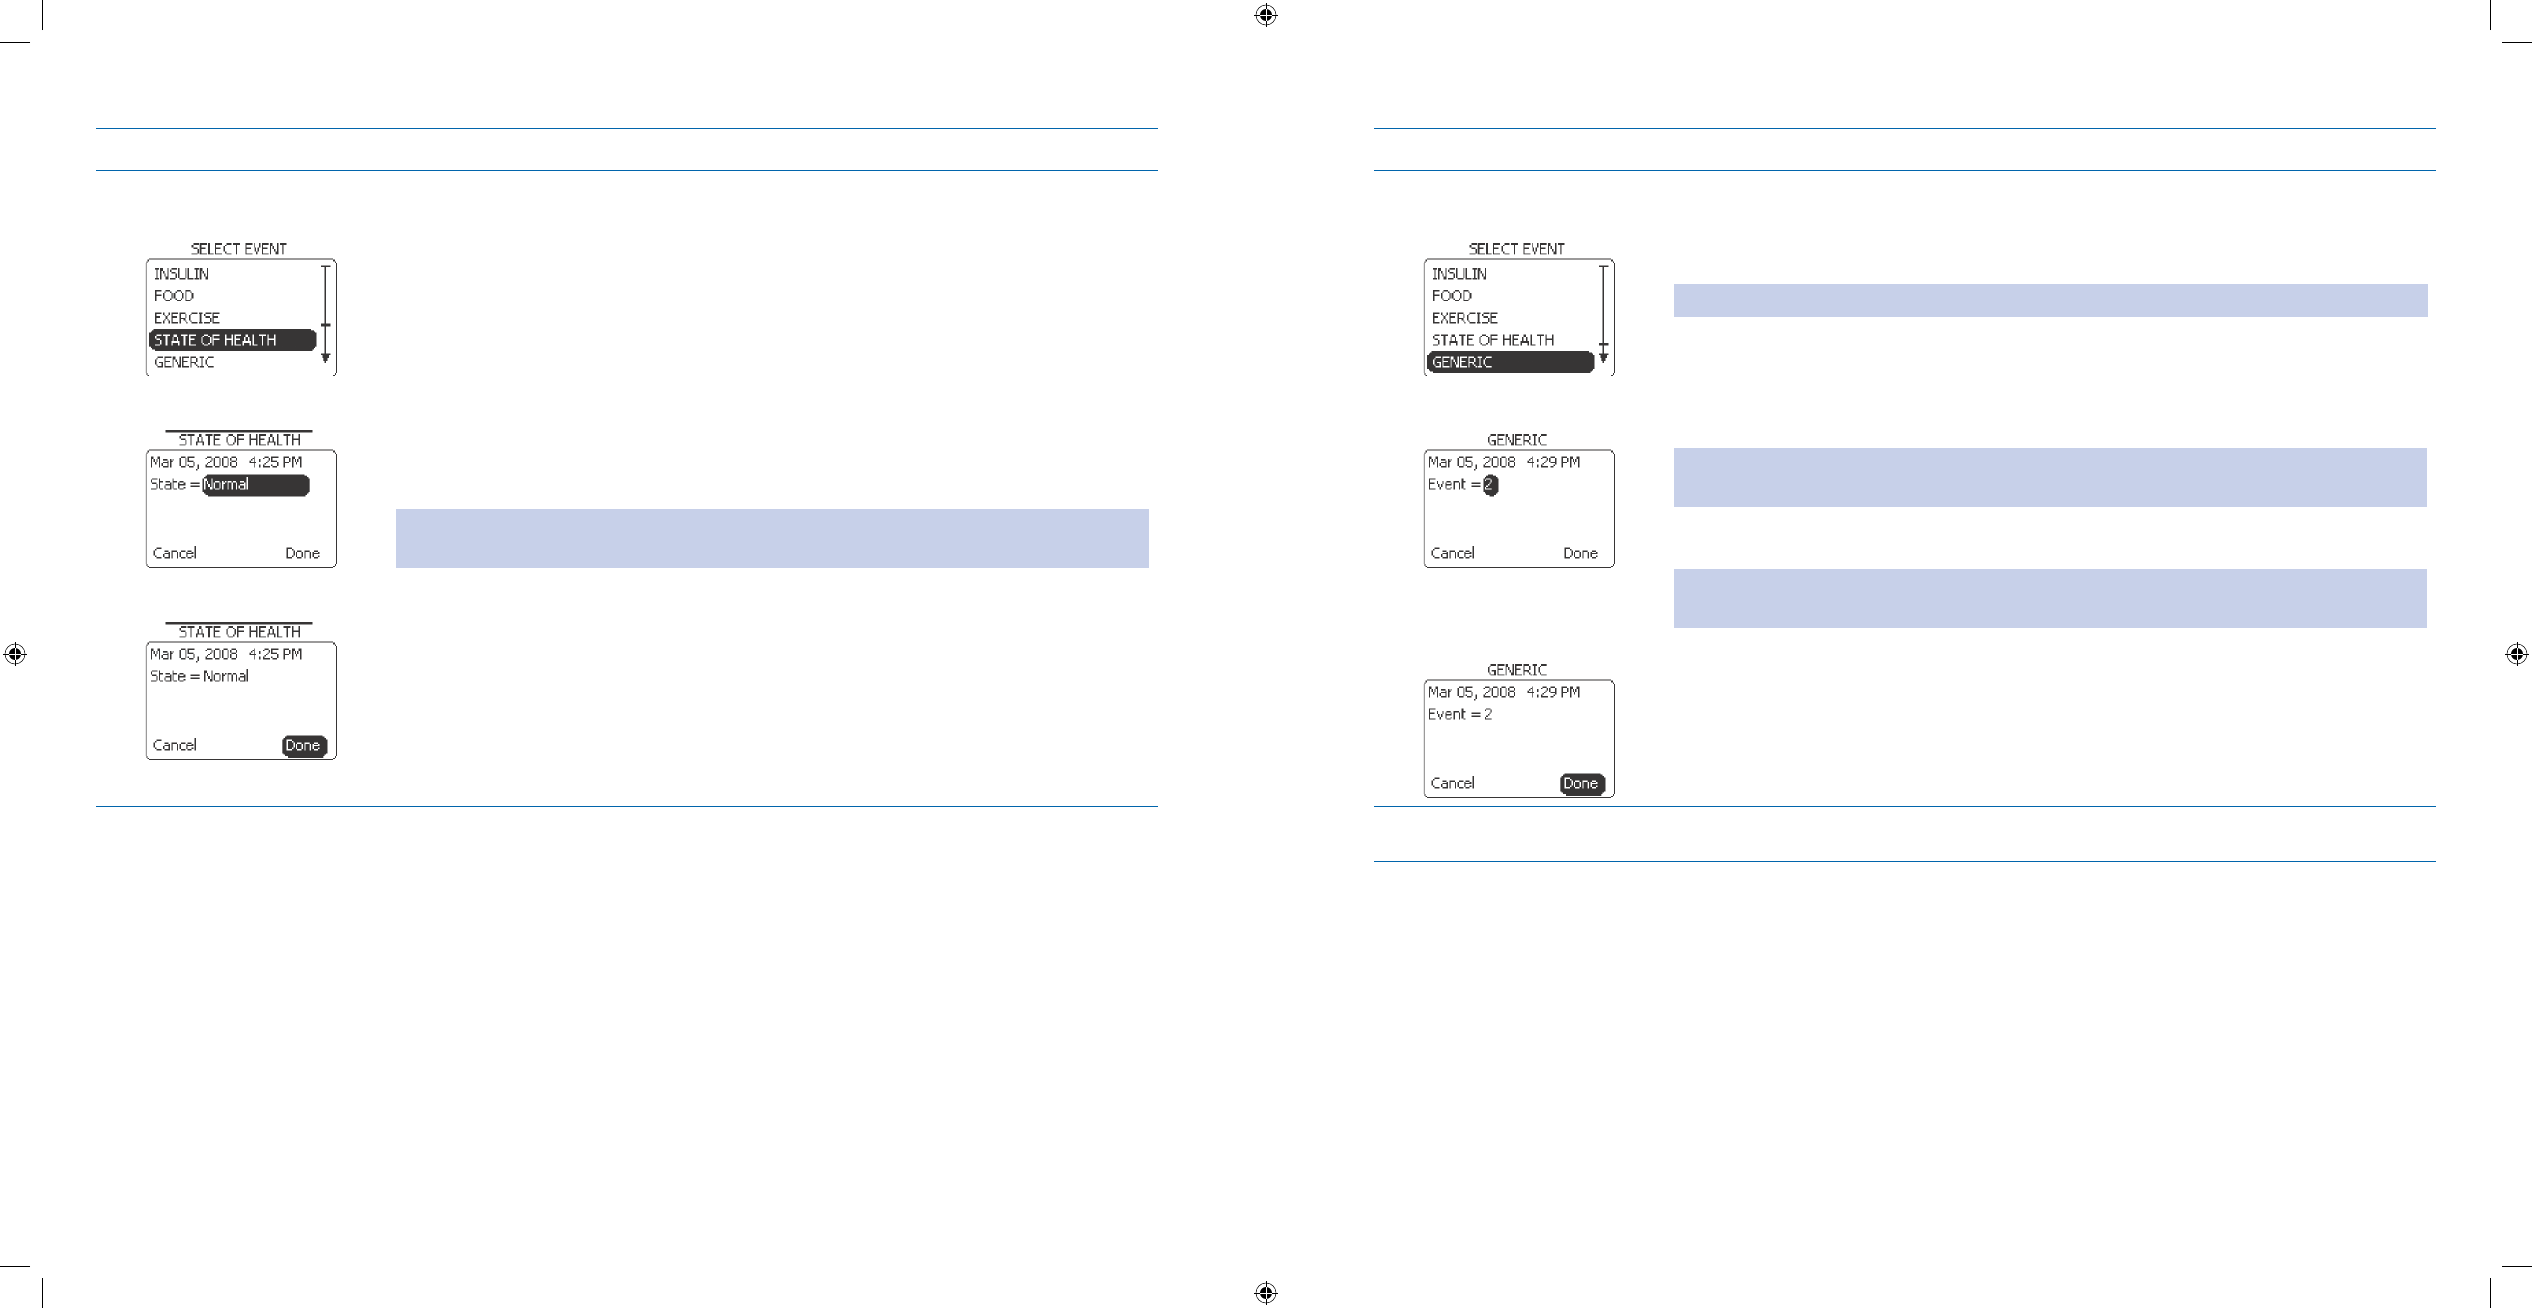
Steps Do This
Go to the 5. STATE OF
HEALTH menu. Scroll to highlight a. STATE OF HEALTH.
Press b. Enter button.
Notice c. State is highlighted.
Press d. Enter button.
Scroll to select state of health (Normal, Cold, Sore Throat, Infection, Tired, e.
Stress, Fever, Flu, Allergy, Period, Dizzy, Alcohol, Low Symptoms, or High
Symptoms).
Press f. Enter button.
Note: You can scroll to highlight Cancel and press Enter to cancel any entries at
anytime.
Scroll to highlight g. Done.
Press h. Enter button to return to the Home screen.
You have completed adding a state of health event.
Steps Do This
Go to the 6. GENERIC
menu. Scroll to highlight a. GENERIC.
Press b. Enter button.
Note: You can enter up to eight generic events.
Notice c. Event is highlighted.
Press d. Enter button.
Scroll to select event number.e.
Note: The range is 1 to 8. You need to define what the generic events 1 to 8 means
and record in your Table of Settings in Section 12-Appendix A.
Press f. Enter button.
Note: You can scroll to highlight Cancel and press Enter to cancel any entries at
anytime.
Scroll to highlight g. Done.
Press h. Enter button to return to the Home screen.
You have completed adding a generic event.
Check your work.7. Go back to each event menu to see if you have the correct information added.
Section 6: When You’re Ready – Optional Settings
6.5 Review History, Status, and Reports
Section 6: When You’re Ready – Optional Settings
6.5 Review History, Status, and Reports
DOC15736_Rev-A-Man.indd 135-136 2/9/09 11:29:46 AM

137
138
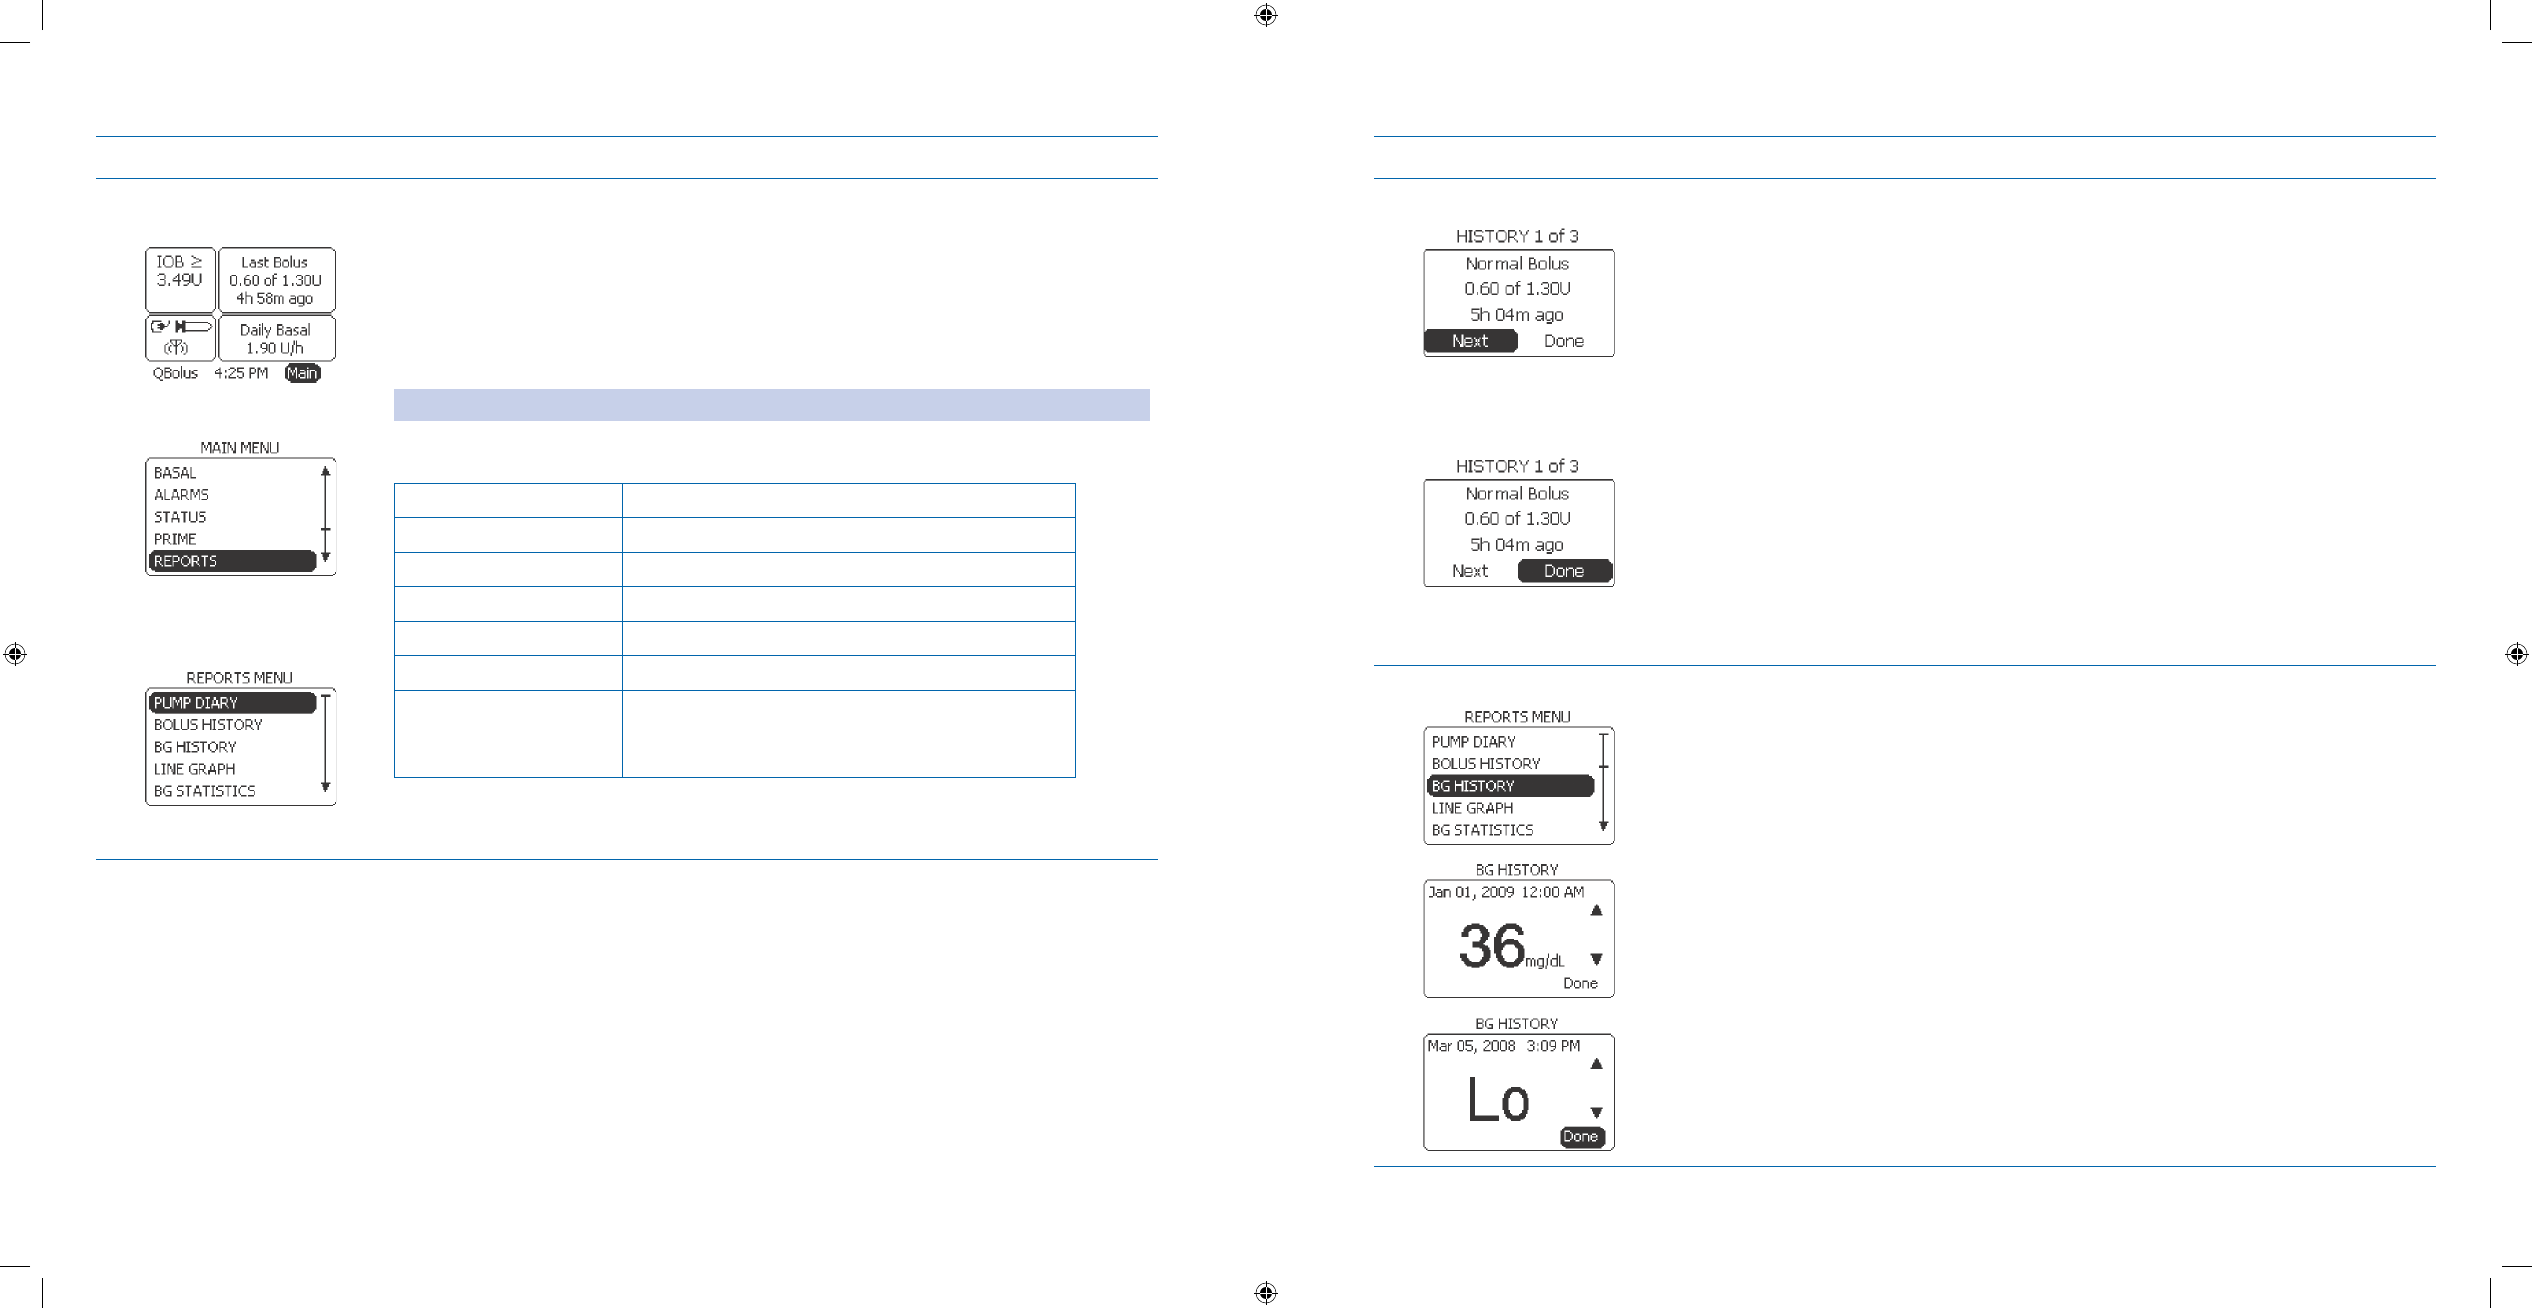
6.5 Review History, Status, and Reports
Purpose To review important system and diabetes care information using your Aviator Companion.
When Do this procedure when you need detailed information about:
Bolus status (up to 30 days)
•
Basal status (up to 30 days)•
System status•
Pump levels•
Companion levels•
Pump version•
Companion version•
Bolus History•
BG History•
Line Graph•
BG Statistics•
Event History (up to 150 most recent events)•
Pump Diary• (Therapy, Events, Alarms)
Materials Your companion and pump fully operating.•
Assistance from healthcare professional as needed.•
Helpful Information
If you need to call Customer Care, you may be asked to provide information from your companion or pump •
screens.
If you have unexplained high or low blood glucose, review your recent bolus history to see if you missed deliv-
•
ering a bolus or if you delivered an incorrect dose (see Section 11), as well as review your basal rates and daily
totals to assist you or your healthcare professional to resolve the cause of the observation.
•
Procedure:
Steps Do This
Decide if you need to 1.
review system status or
reports.
If you are reviewing Then do this
Last Bolus Status
Basal Status
System Status (Battery/Insulin levels)
Pump Levels
Companion Levels
Pump Version
Companion Version
Go to Step 2 - STATUS menu.
Bolus History
BG History
Line Graph
BG Statistics
Event History
Pump Diary (Therapy, Events, Alarms)
Go to Step 3 - REPORTS menu.
Section 6: When You’re Ready – Optional Settings
6.5 Review History, Status, and Reports
Section 6: When You’re Ready – Optional Settings
6.5 Review History, Status, and Reports
DOC15736_Rev-A-Man.indd 137-138 2/9/09 11:29:46 AM
139
140
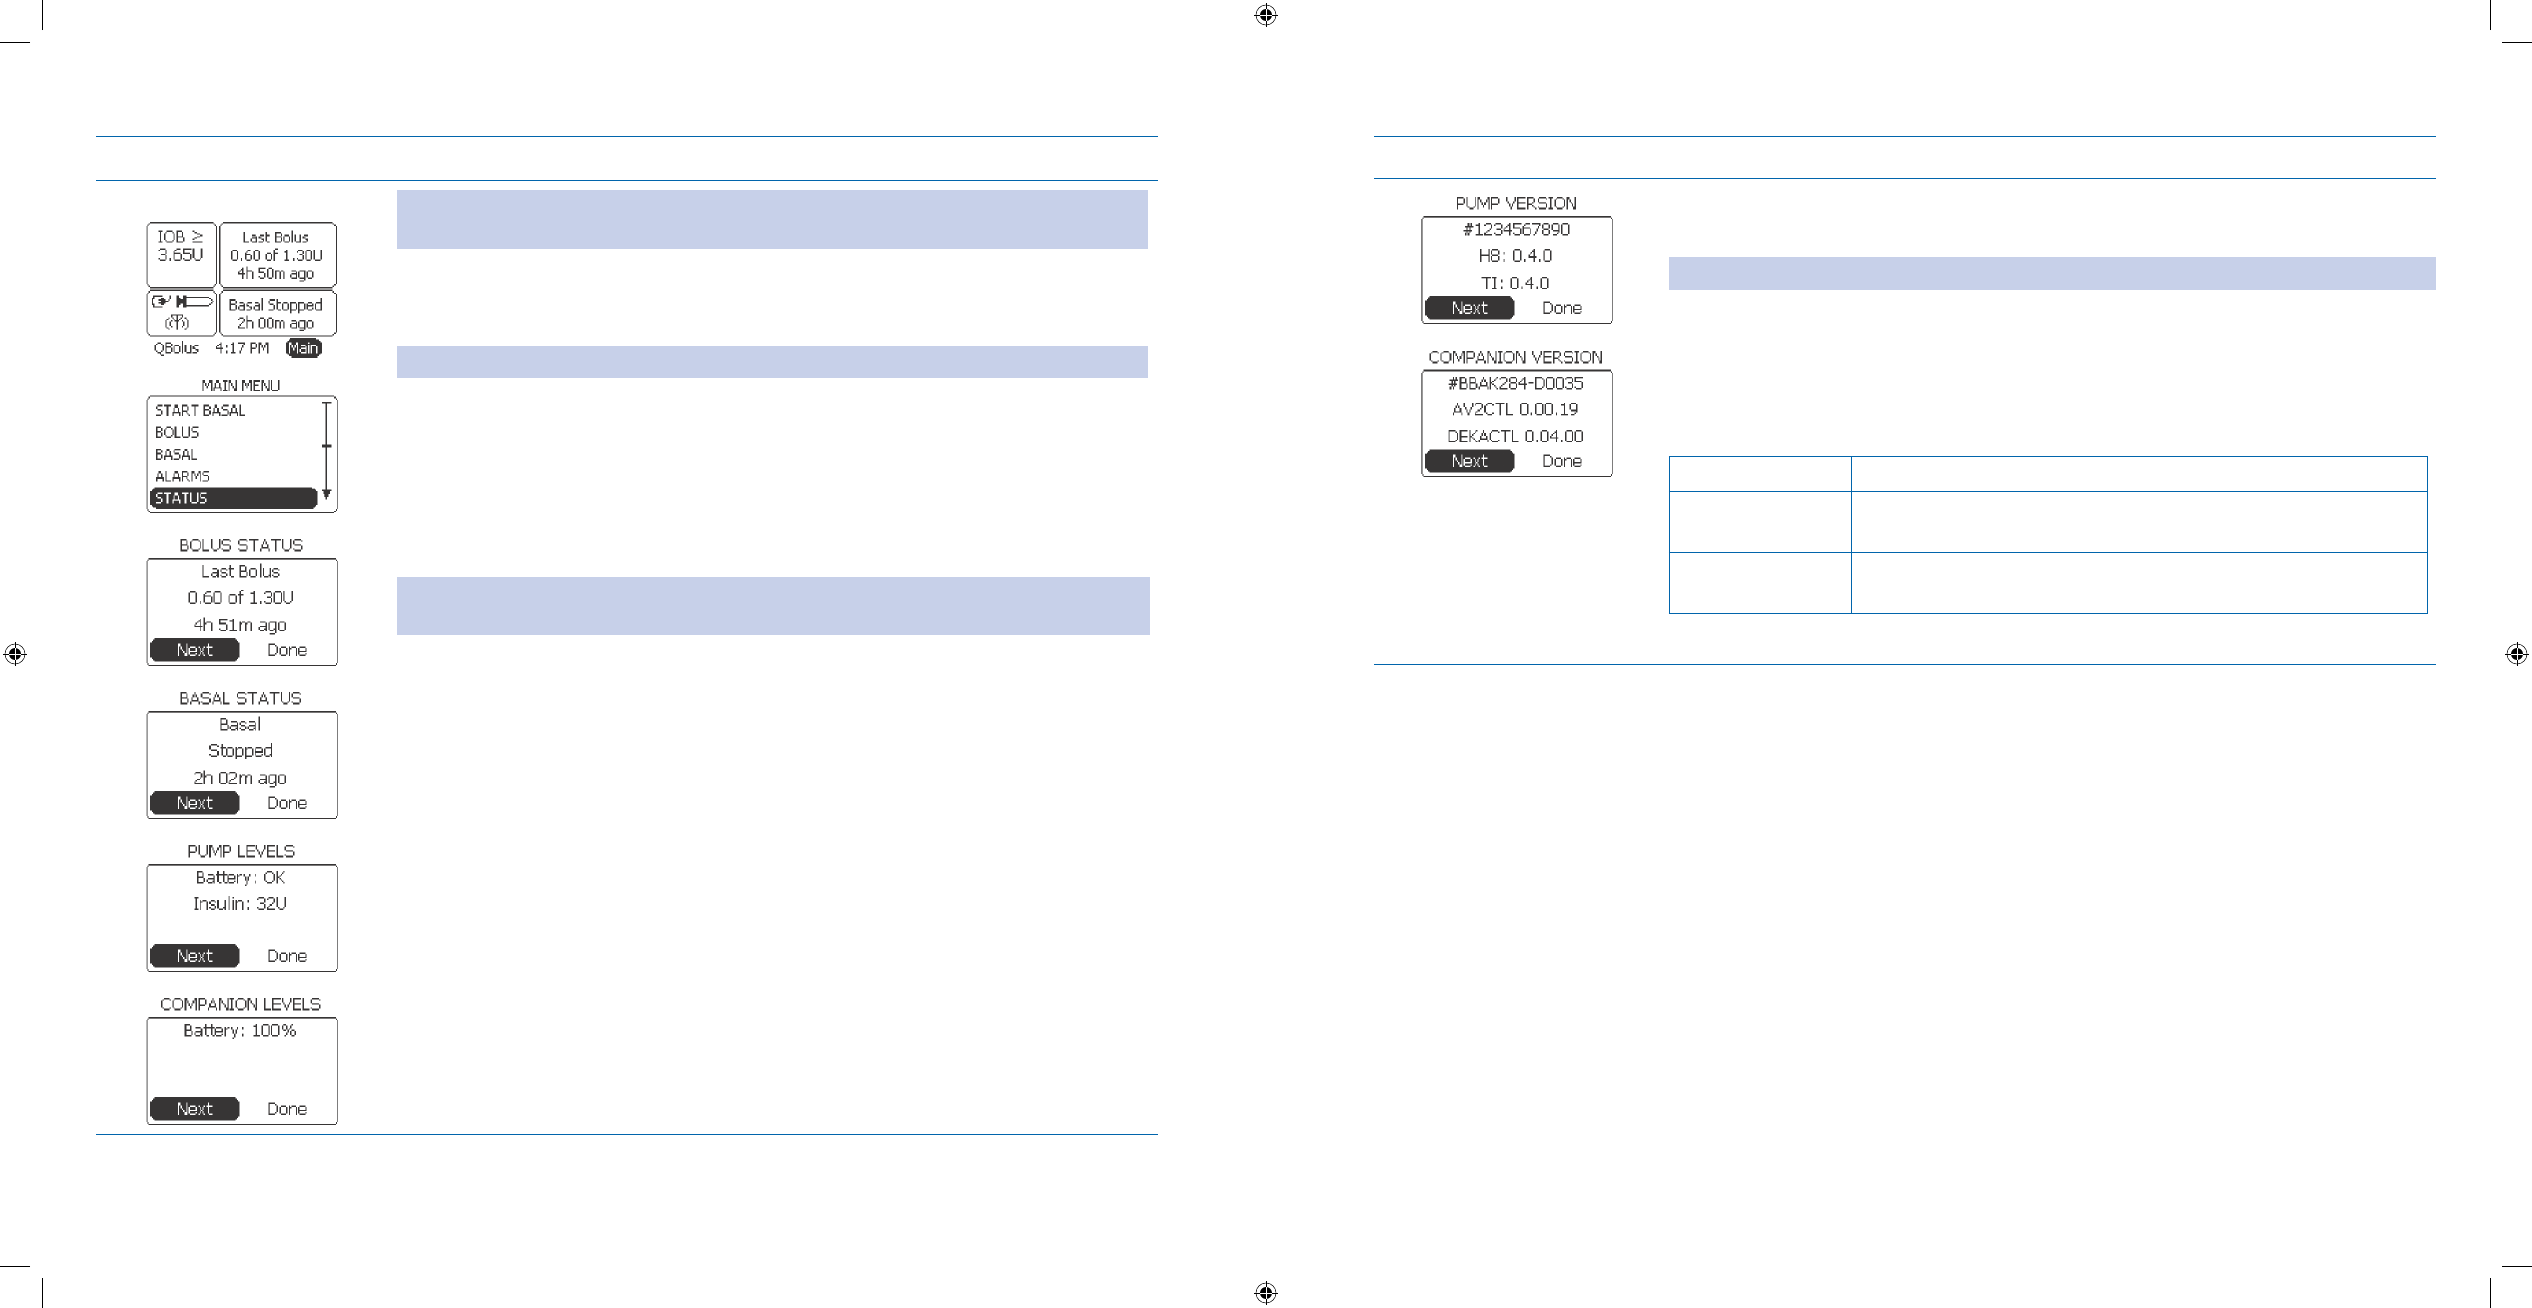
Steps Do This
Go to the 2. STATUS menu. Note: The following screens will appear when the system is paired, Radio is ON, and
pump communication is available.
From the a. Home screen, Notice Main is highlighted.
Press b. Enter button.
Note: You can also access System Status screens from the System Status panel.
Scroll to highlight c. STATUS.
Press d. Enter button.
Review the bolus status.e.
Notice f. Next is highlighted.
Note: You can scroll to highlight Done and Press Enter button to return to the MAIN
MENU screen at any time.
Press g. Enter button.
Review the basal status.h.
Notice i. Next is highlighted.
Press j. Enter button.
Review the pump’s battery and insulin levels.k.
Notice l. Next is highlighted.
Press m. Enter button.
Review the companion’s battery level.n.
Notice o. Next is highlighted.
Press p. Enter button.
Continued on next page.
Steps Do This
Review the pump’s version.q.
Note: The version numbers displayed on your system may be different.
Notice r. Next is highlighted.
Press s. Enter button.
Review the companion’s version.t.
Decide whether to return to u. MAIN MENU or Home screen.
If Then do this
MAIN MENU Notice Next is highlighted.
Press Enter button.
Home screen Scroll to highlight Done.
Press Enter button..
You have completed reviewing status information about your pump.
Section 6: When You’re Ready – Optional Settings
6.5 Review History, Status, and Reports
Section 6: When You’re Ready – Optional Settings
6.5 Review History, Status, and Reports
DOC15736_Rev-A-Man.indd 139-140 2/9/09 11:29:46 AM
141
142
Steps Do This
Go to the 3. REPORTS
menu. From the a. Home screen, Notice Main is highlighted.
Press b. Enter button.
Scroll to highlight c. REPORTS.
Press d. Enter button.
Note: The pump screen will only display Bolus History, Pump Diary, and Send Diary.
Decide what to review.e.
If you are reviewing Then do this
Bolus History Go to step 4.
BG History Go to Step 5.
Line Graph Go to Step 6.
BG Statistics Go to Step 7.
Event History Go to Step 8.
Pump diary including
therapy, events, and
alarms
Go to Step 9.
Steps Do This
View Bolus History.4. Scroll to highlight a. BOLUS HISTORY.
Press b. Enter button.
Review your bolus history starting from the most recent bolus.c.
Notice d. Next is highlighted.
Press e. Enter button to review another bolus.
Press f. Enter button on Next to review as many bolus records as needed.
Highlight g. Done when you have reviewed enough bolus history records.
Press h. Enter button to return to the Home screen.
You have completed reviewing your Bolus history.
View BG History.5.
Scroll to highlight a. BG HISTORY.
Press b. Enter button.
Scroll to review your blood glucose readings.c.
Press d. Enter button when you are done reviewing.
Notice e. Done is highlighted.
Press f. Enter button to return to the Home screen.
You have completed reviewing your BG history.
Section 6: When You’re Ready – Optional Settings
6.5 Review History, Status, and Reports
Section 6: When You’re Ready – Optional Settings
6.5 Review History, Status, and Reports
DOC15736_Rev-A-Man.indd 141-142 2/9/09 11:29:47 AM
143
144
Steps Do This
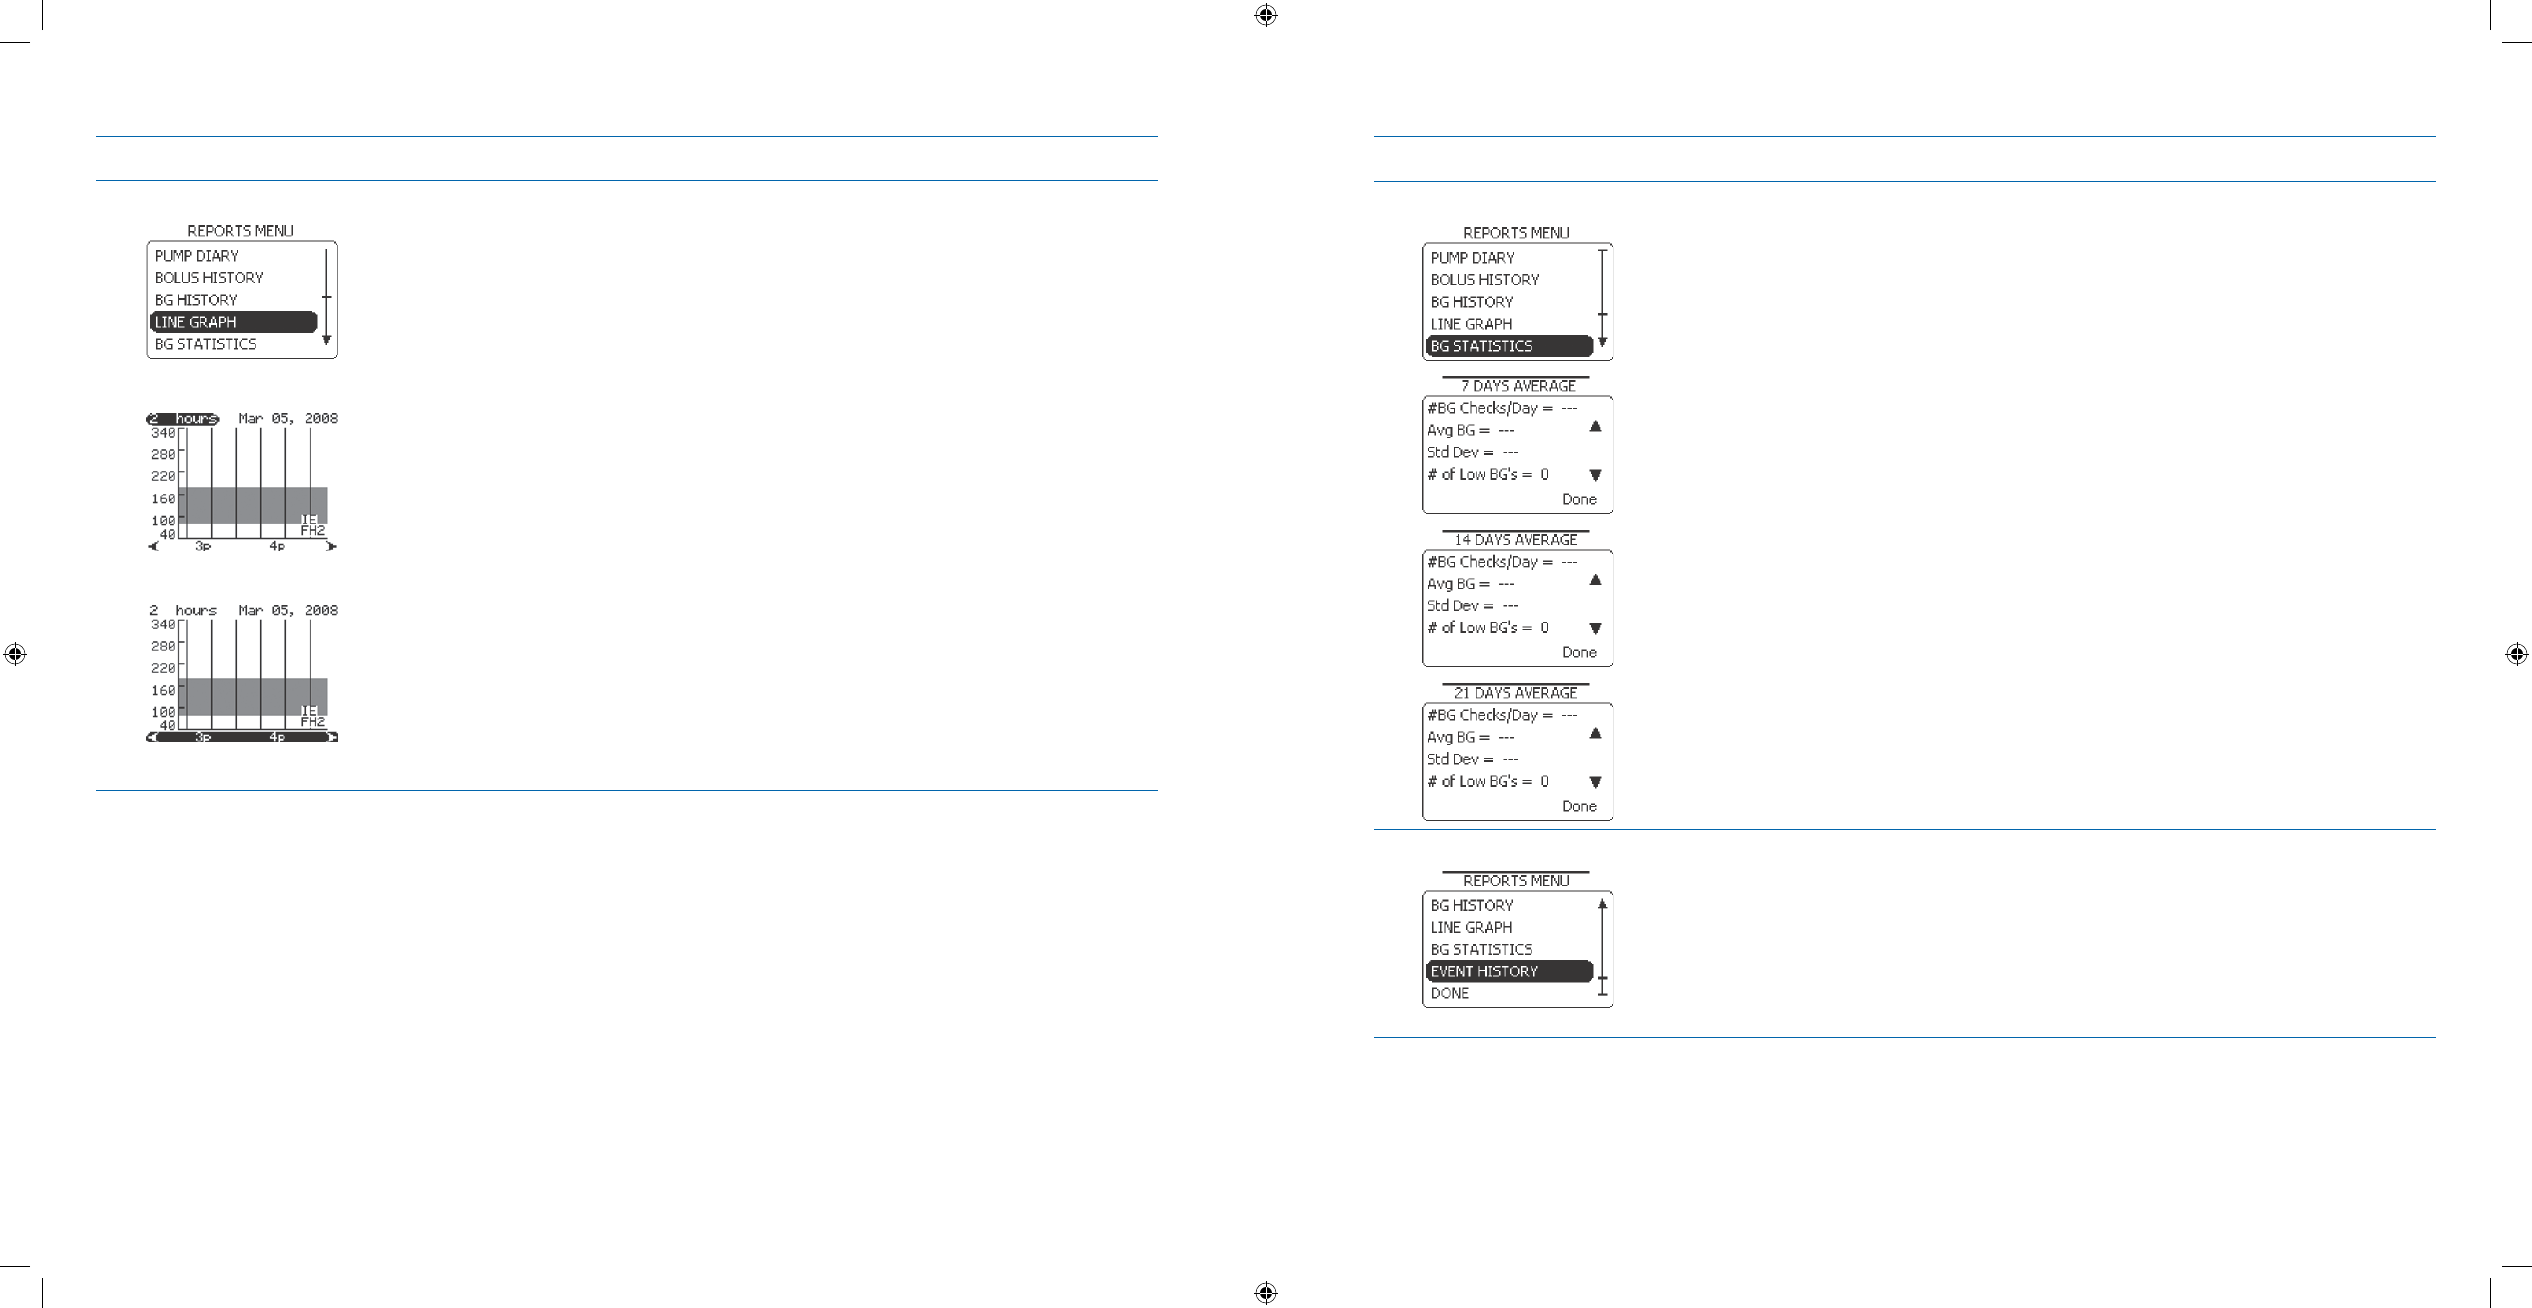
View BG Line Graph.6.
Scroll to highlight a. LINE GRAPH.
Press b. Enter button.
Review your blood glucose line graph.c.
Press d. Enter button.
Scroll to select the time period to display on the line graph. (If a 4 hour time e.
range is selected, then the bottom scroll displays data in 4 hour time periods
from 12am to 11pm), and press Enter button.
Notice the time period highlighted at the bottom of the line graph. Press f.
Enter button again to use the scroll to select a specific time period to view, for
example, 5pm to 6pm.
Press g. Back button to return to the REPORTS menu.
You have completed reviewing your BG line graph.
Steps Do This
View BG Statistics.7.
Scroll to highlight a. BG STATISTICS.
Press b. Enter button.
Scroll to review your blood glucose information for 7, 14, or 21 days as needed.c.
Press d. Enter button when you are done reviewing.
Notice e. Done is highlighted.
Press f. Enter button to return to the Home screen.
You have completed reviewing your BG statistics.
View Event History.8.
Scroll to highlight a. EVENT HISTORY.
Press b. Enter button.
Section 6: When You’re Ready – Optional Settings
6.5 Review History, Status, and Reports
Section 6: When You’re Ready – Optional Settings
6.5 Review History, Status, and Reports
DOC15736_Rev-A-Man.indd 143-144 2/9/09 11:29:47 AM

145
146
Steps Do This
Scroll to select (View All, Insulin, Food, Exercise, State of Health, or Generic) c.
event history to review.
Note: You can review up to the last 150 events, starting from the most recent events.
Press d. Enter button.
Note: Press the Back button to go backwards to a previous screen.
Press e. Enter button when you reach the end of data.
Notice f. Done is highlighted.
Press g. Enter to return to the Home screen.
You have completed reviewing your Event history.
Steps Do This
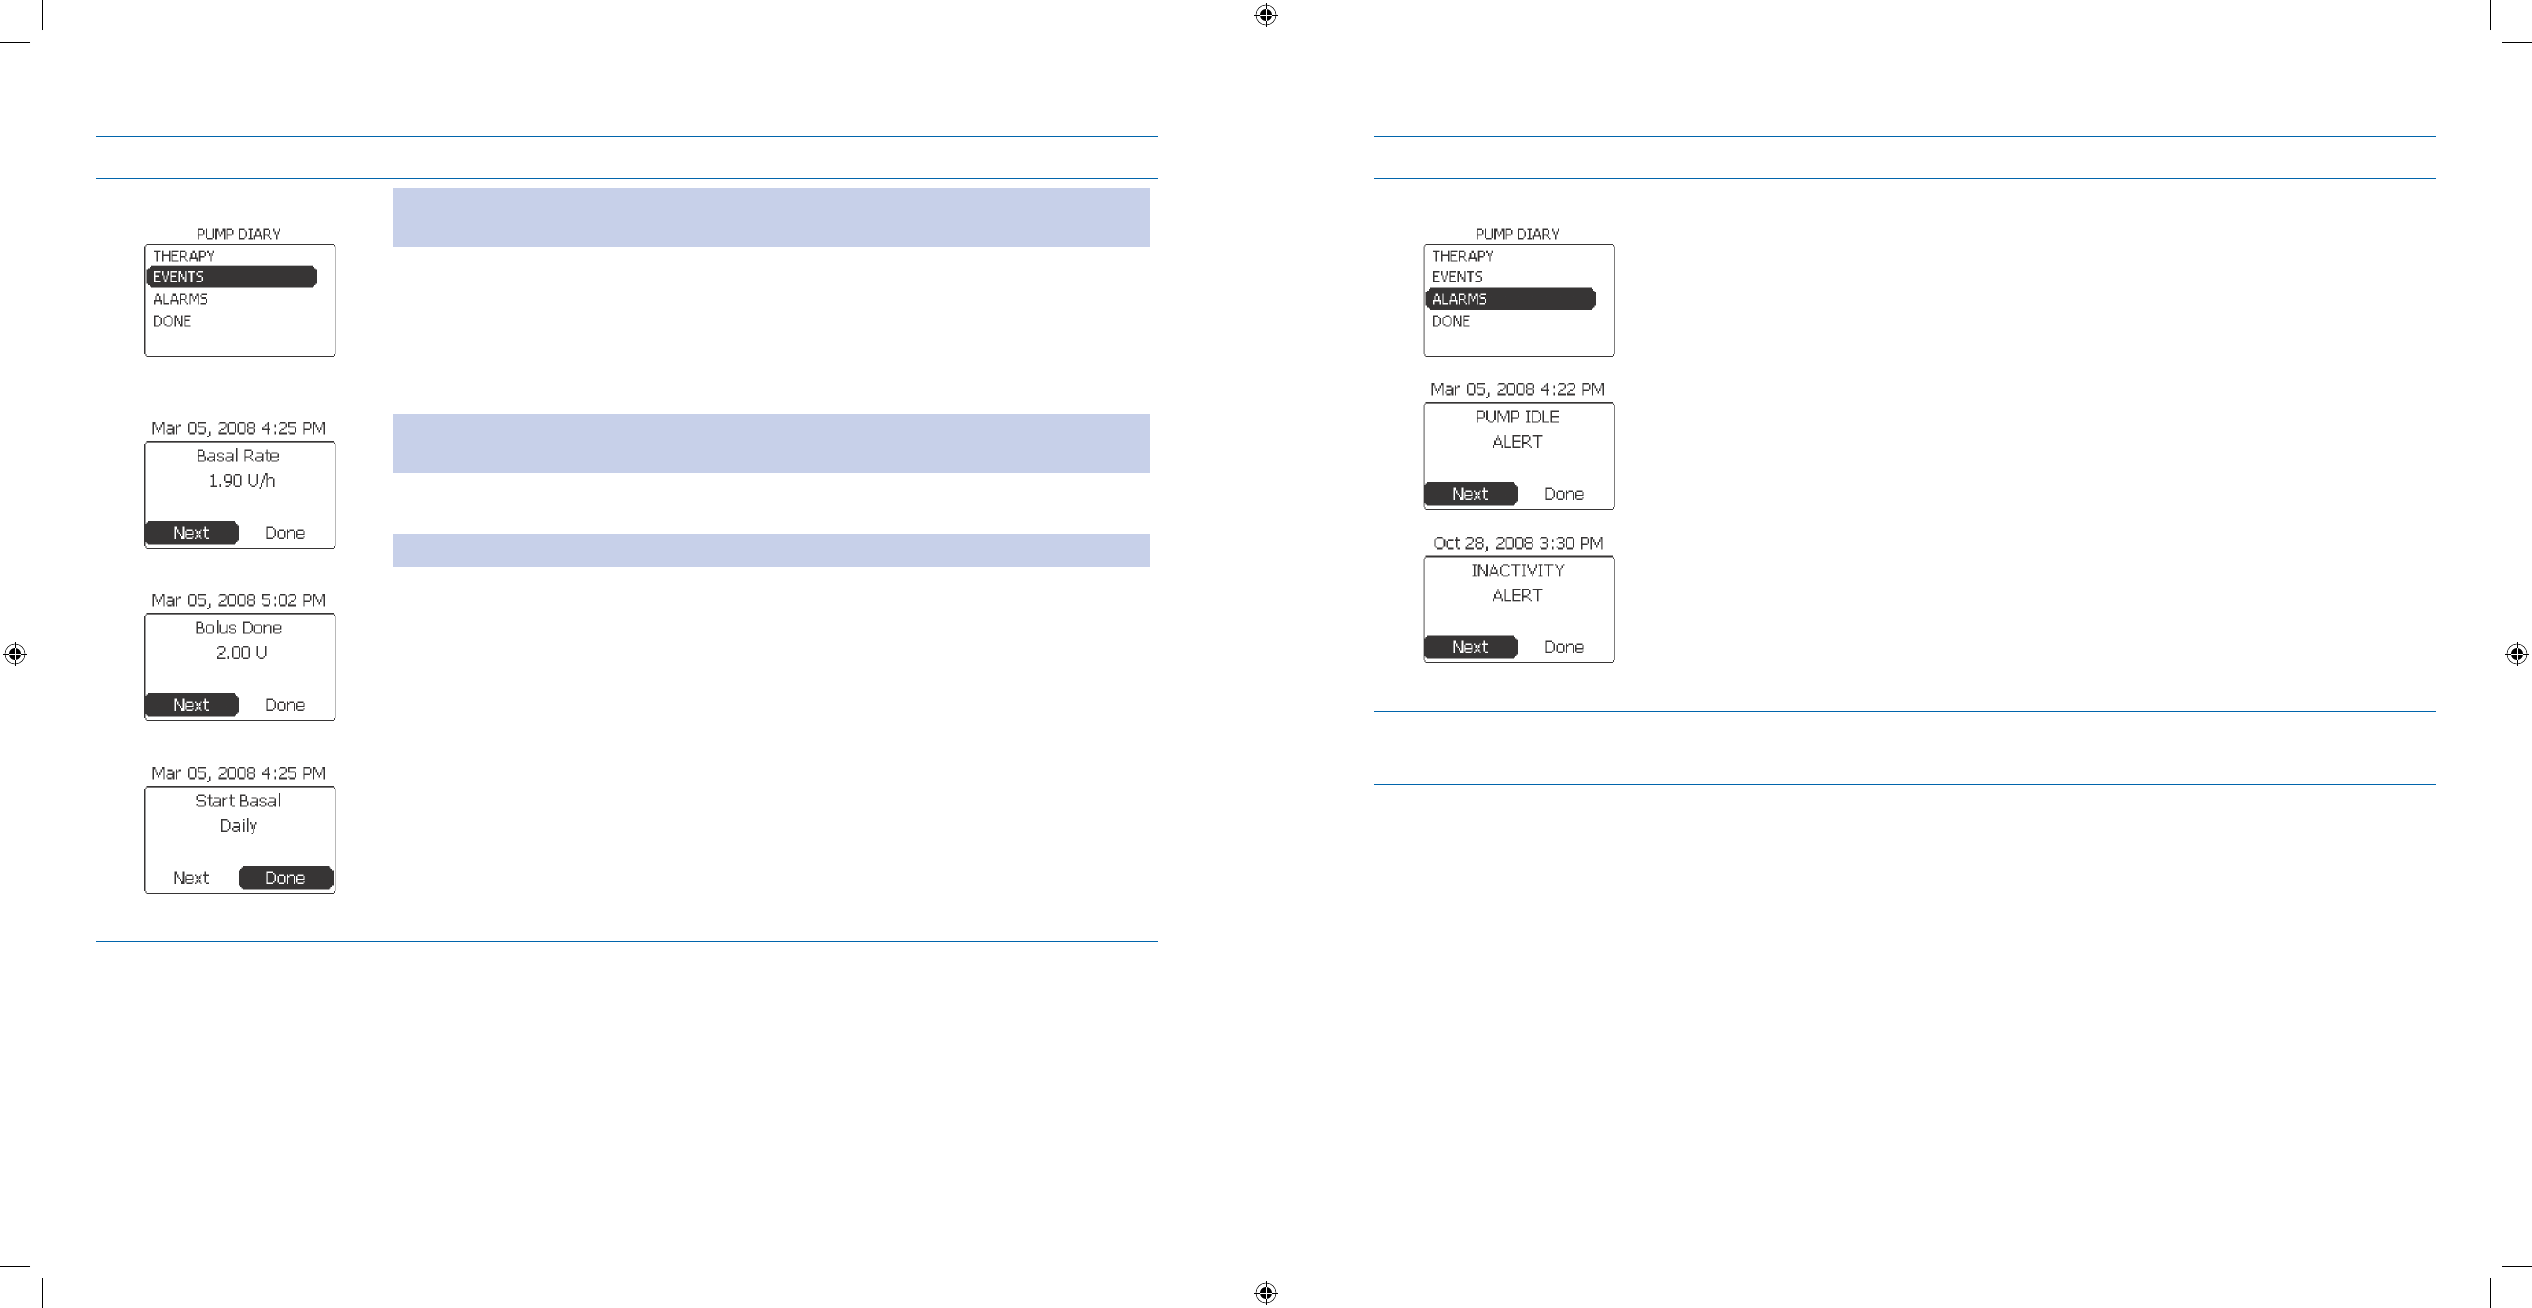
View Pump Diary.9. Notice a. PUMP DIARY is highlighted.
Press b. Enter button.
Decide whether to view therapy, events, or alarms.c.
If you want to review Then do this
Insulin therapy amounts Go to Step 10.
Pump events Go to Step 11.
Alarm history Go to Step 12.
Review Therapy 10.
amounts. Notice a. Therapy is highlighted.
Press b. Enter button.
Review the bolus and basal insulin units, and basal percentage.c.
Notice d. Next is highlighted.
Press e. Enter button.
Note: You can scroll to highlight Done and Press Enter button to return to the Home
screen at any time.
Note: If you want to go back to previous therapy screens, press the Back button.
You can press Enter button on Next to go through all the therapy screens logged on
the pump.
When you press Enter button for the Next action on the last therapy screen, you will
return to the PUMP DIARY screen.
You have completed reviewing your insulin therapy amounts.
Section 6: When You’re Ready – Optional Settings
6.5 Review History, Status, and Reports
Section 6: When You’re Ready – Optional Settings
6.5 Review History, Status, and Reports
DOC15736_Rev-A-Man.indd 145-146 2/9/09 11:29:47 AM
147
148
Steps Do This
Review Events.11. Note: Pump diary events provide information about your basal delivery programs
and basal rates.
Scroll to highlight a. Events.
Press b. Enter button.
Review the basal delivery events that have occurred on your pump.c.
Notice d. Next is highlighted.
Note: You can scroll to highlight Done and Press Enter button to return to the Home
screen
Press e. Enter button on Next to review as many events as you need.
Note: If you want to go back to previous event screens, press the Back button.
When you are done reviewing, scroll to highlight f. Done.
Press g. Enter button to return to the Home screen.
You have completed reviewing your pump events.
Steps Do This
View Alarms history.12.
Scroll to highlight a. Alarms.
Press b. Enter button.
Review the alarm history of your pump.c.
Notice d. Next is highlighted.
Press e. Enter button on Next to review your last 10 alarms as needed.
When you are done reviewing, scroll to highlight f. Done.
Press g. Enter button to return to the Home screen.
You have completed reviewing the alarm history of your pump.
Check your work.13. You are able to obtain all information related to your companion and pump status
and reports following the steps above.
Section 6: When You’re Ready – Optional Settings
6.6 Upload Data
Section 6: When You’re Ready – Optional Settings
6.6 Upload Data
DOC15736_Rev-A-Man.indd 147-148 2/9/09 11:29:47 AM

149
150
6.6 Upload Data
Purpose To upload event data from your companion to your computer.
When Do this procedure:
When you wish to upload data from your companion to your computer.
•
Materials Your companion and pump fully operating.•
Assistance from healthcare professional as needed.•
Helpful Information
You will perform this task using the companion. •
Make sure the USB cable is connected and the battery is charging.•
WARNING: Use ONLY the USB cable provided. Use of an unapproved cable may lead to loss of electromagnetic
compatibility, and make the system more susceptible to electronic interference.
Procedure:
Steps Do This
Go to the Home screen.1.
Follow instructions detailed in the a. CoPilot for FreeStyle Aviator user’s guide to
perform the data upload
Upload data.2.
The Aviator Companion will display the data transfer screen during the data a.
transfer process.
Steps Do This
Check your work.3. Check that uploaded data is displayed on the a. CoPilot for FreeStyle Aviator
screen.
Section 6: When You’re Ready – Optional Settings
6.7 Companion Self Test
Section 6: When You’re Ready – Optional Settings
6.7 Companion Self Test
DOC15736_Rev-A-Man.indd 149-150 2/9/09 11:29:47 AM
151
152
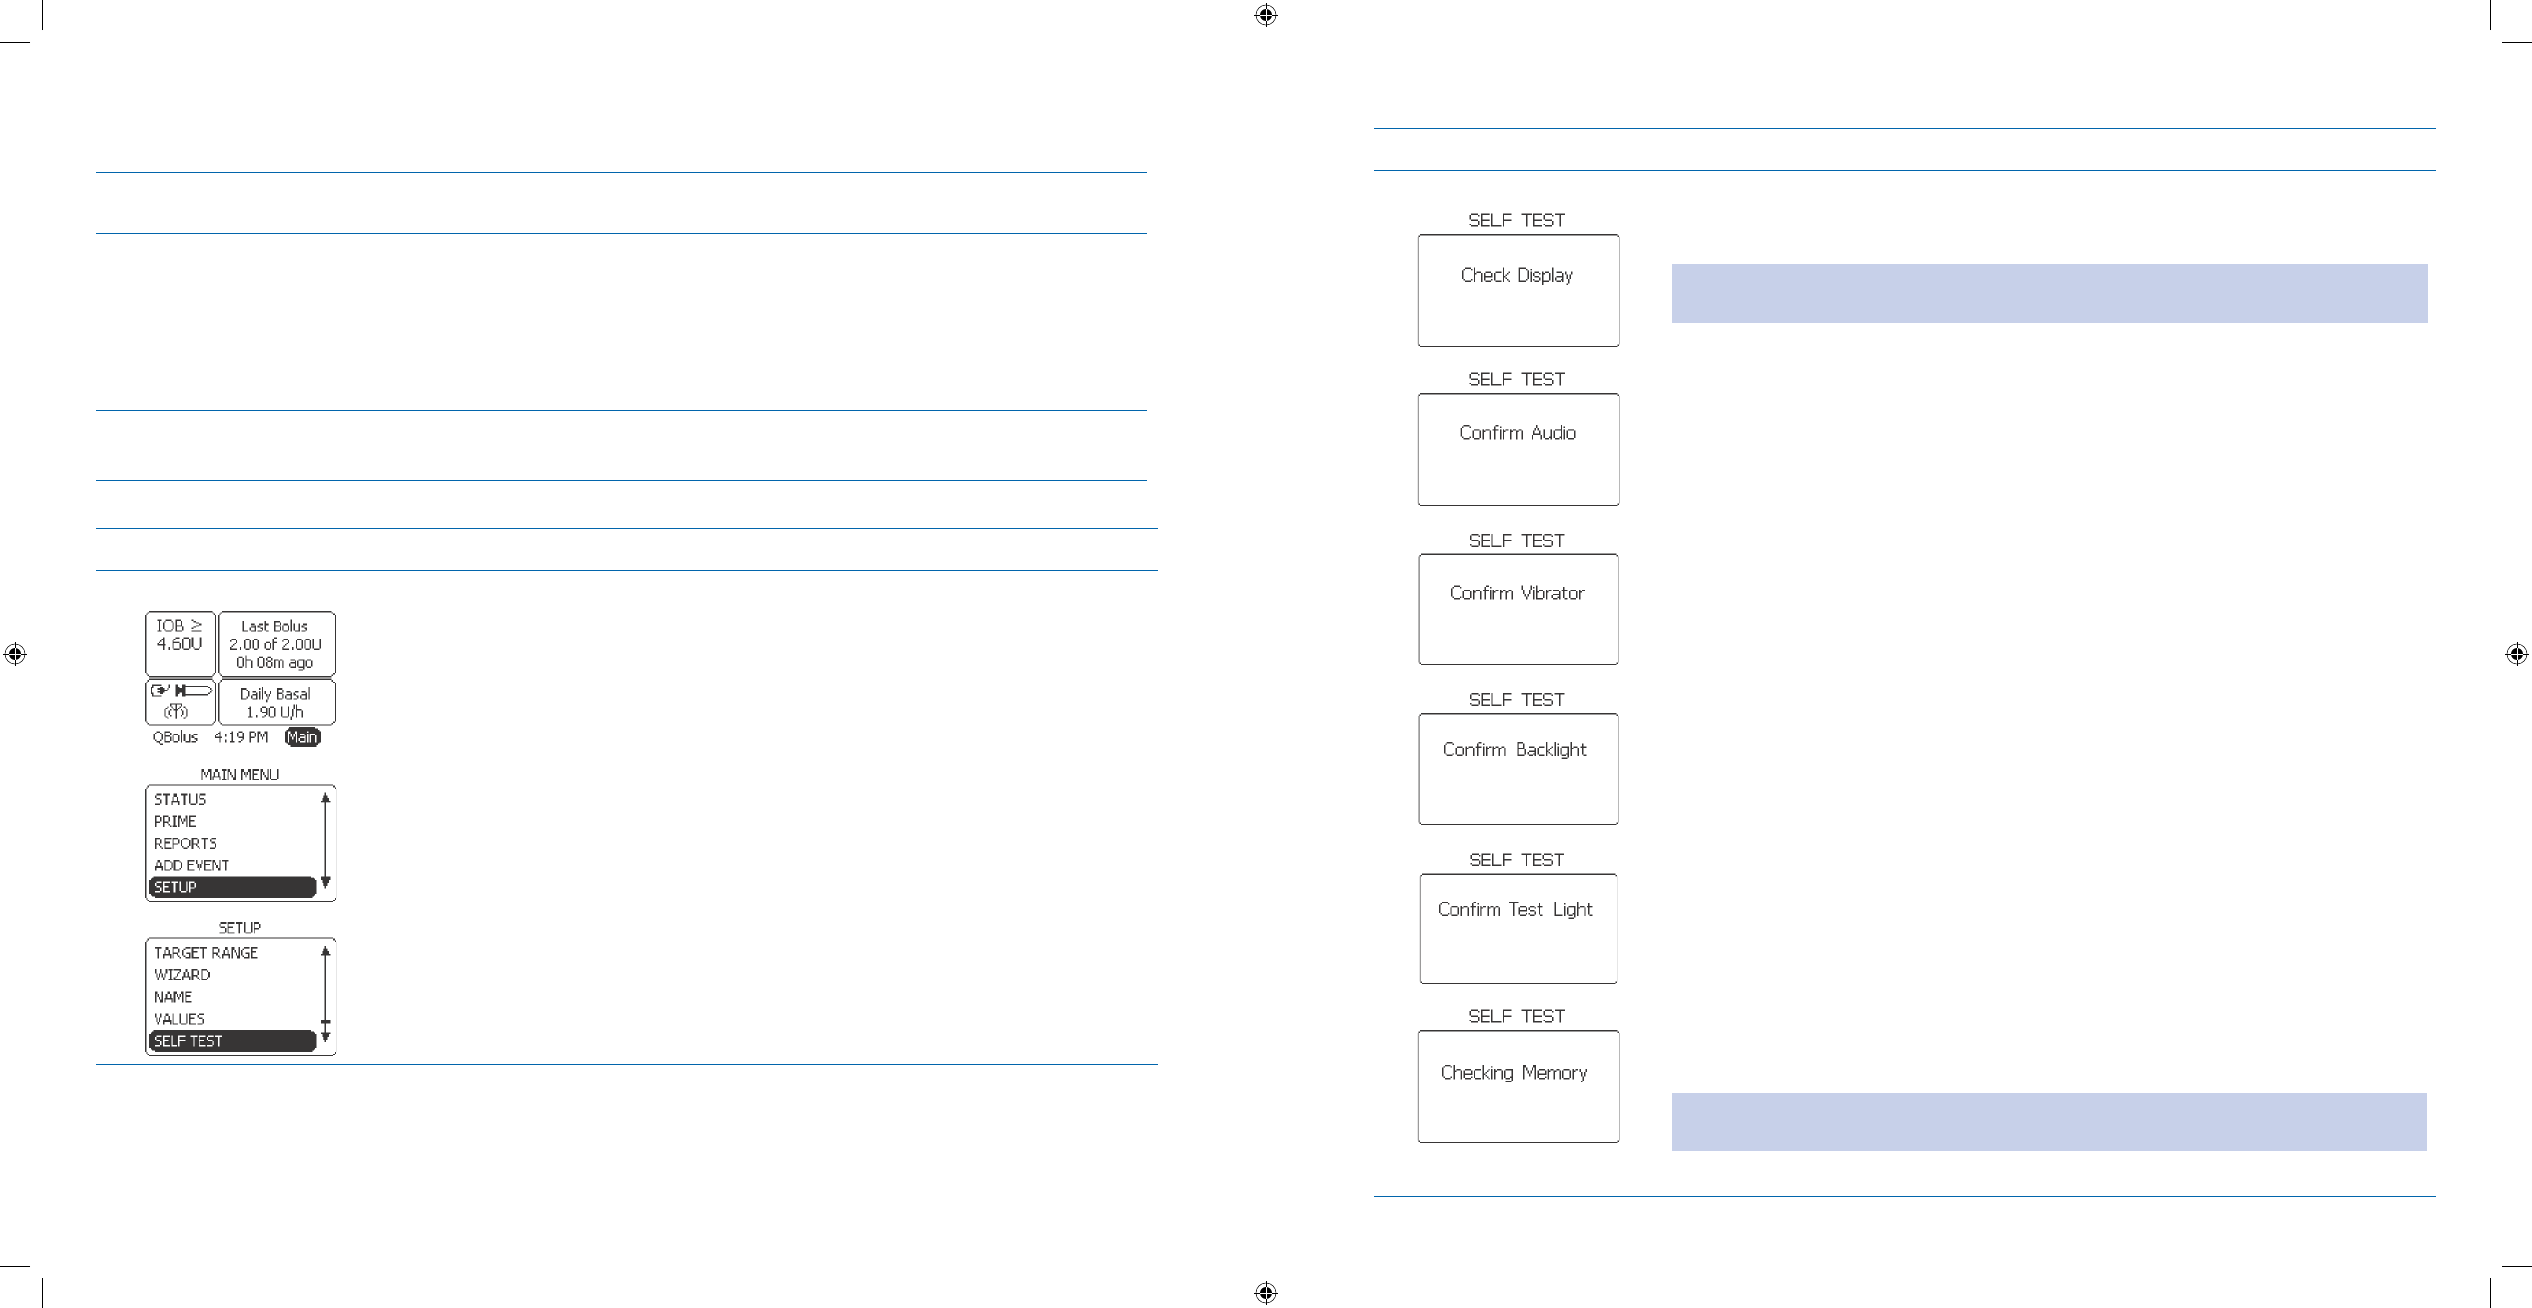
6.7 Companion Self Test
Purpose To perform a self test for the Aviator Companion to ensure that the display, audio,
vibrator, backlight, test light, and memory functions are working.
When Do this procedure:
Before you set up and use your companion and pump for the rst time.
•
When you wish to self test the companion because you are • NOT sure if all the
functions are working properly.
Anytime you see the
• Low Battery Alert screen.
Materials Your companion operating with all settings programmed.•
Assistance from healthcare professional as needed.•
Procedure:
Steps Do This
Go to the SETUP menu.1.
From the a. Home screen, notice Main is highlighted.
Press b. Enter button.
Scroll to highlight c. SETUP.
Press d. Enter button.
Scroll to highlight e. SELF TEST.
Press f. Enter button.
Steps Do This
Observe Self Test.2. Check the display (the display will highlight).a.
Note: The display automatically advances through the sequence of screens at a rate
of 0.5 seconds per screen.
Confirm audio sounds (you will hear beeps).b.
Confirm vibrator (you will feel short vibes).c.
Confirm backlight (the backlight turns on).d.
Confirm test light (the test light turns on).e.
Check memory.f.
Note: You will automatically return to the SETUP menu, and Home screen if no
other actions are taken.
Section 6: When You’re Ready – Optional Settings
6.8 Pair Companion and Pump
Section 6: When You’re Ready – Optional Settings
6.7 Companion Self Test
DOC15736_Rev-A-Man.indd 151-152 2/9/09 11:29:48 AM

153
154
Steps Do This
Check your work.3. Conrm that ALL functions are working properly when you performed the
companion self-test. Call Customer Care, if any of the functions are NOT working,
or you get a “Companion Memory Error” warning.
Caution:
If your pump audio or vibratory annunciators are not functioning, switch to insulin
injections immediately AND contact your healthcare professional and/or Customer
Care.
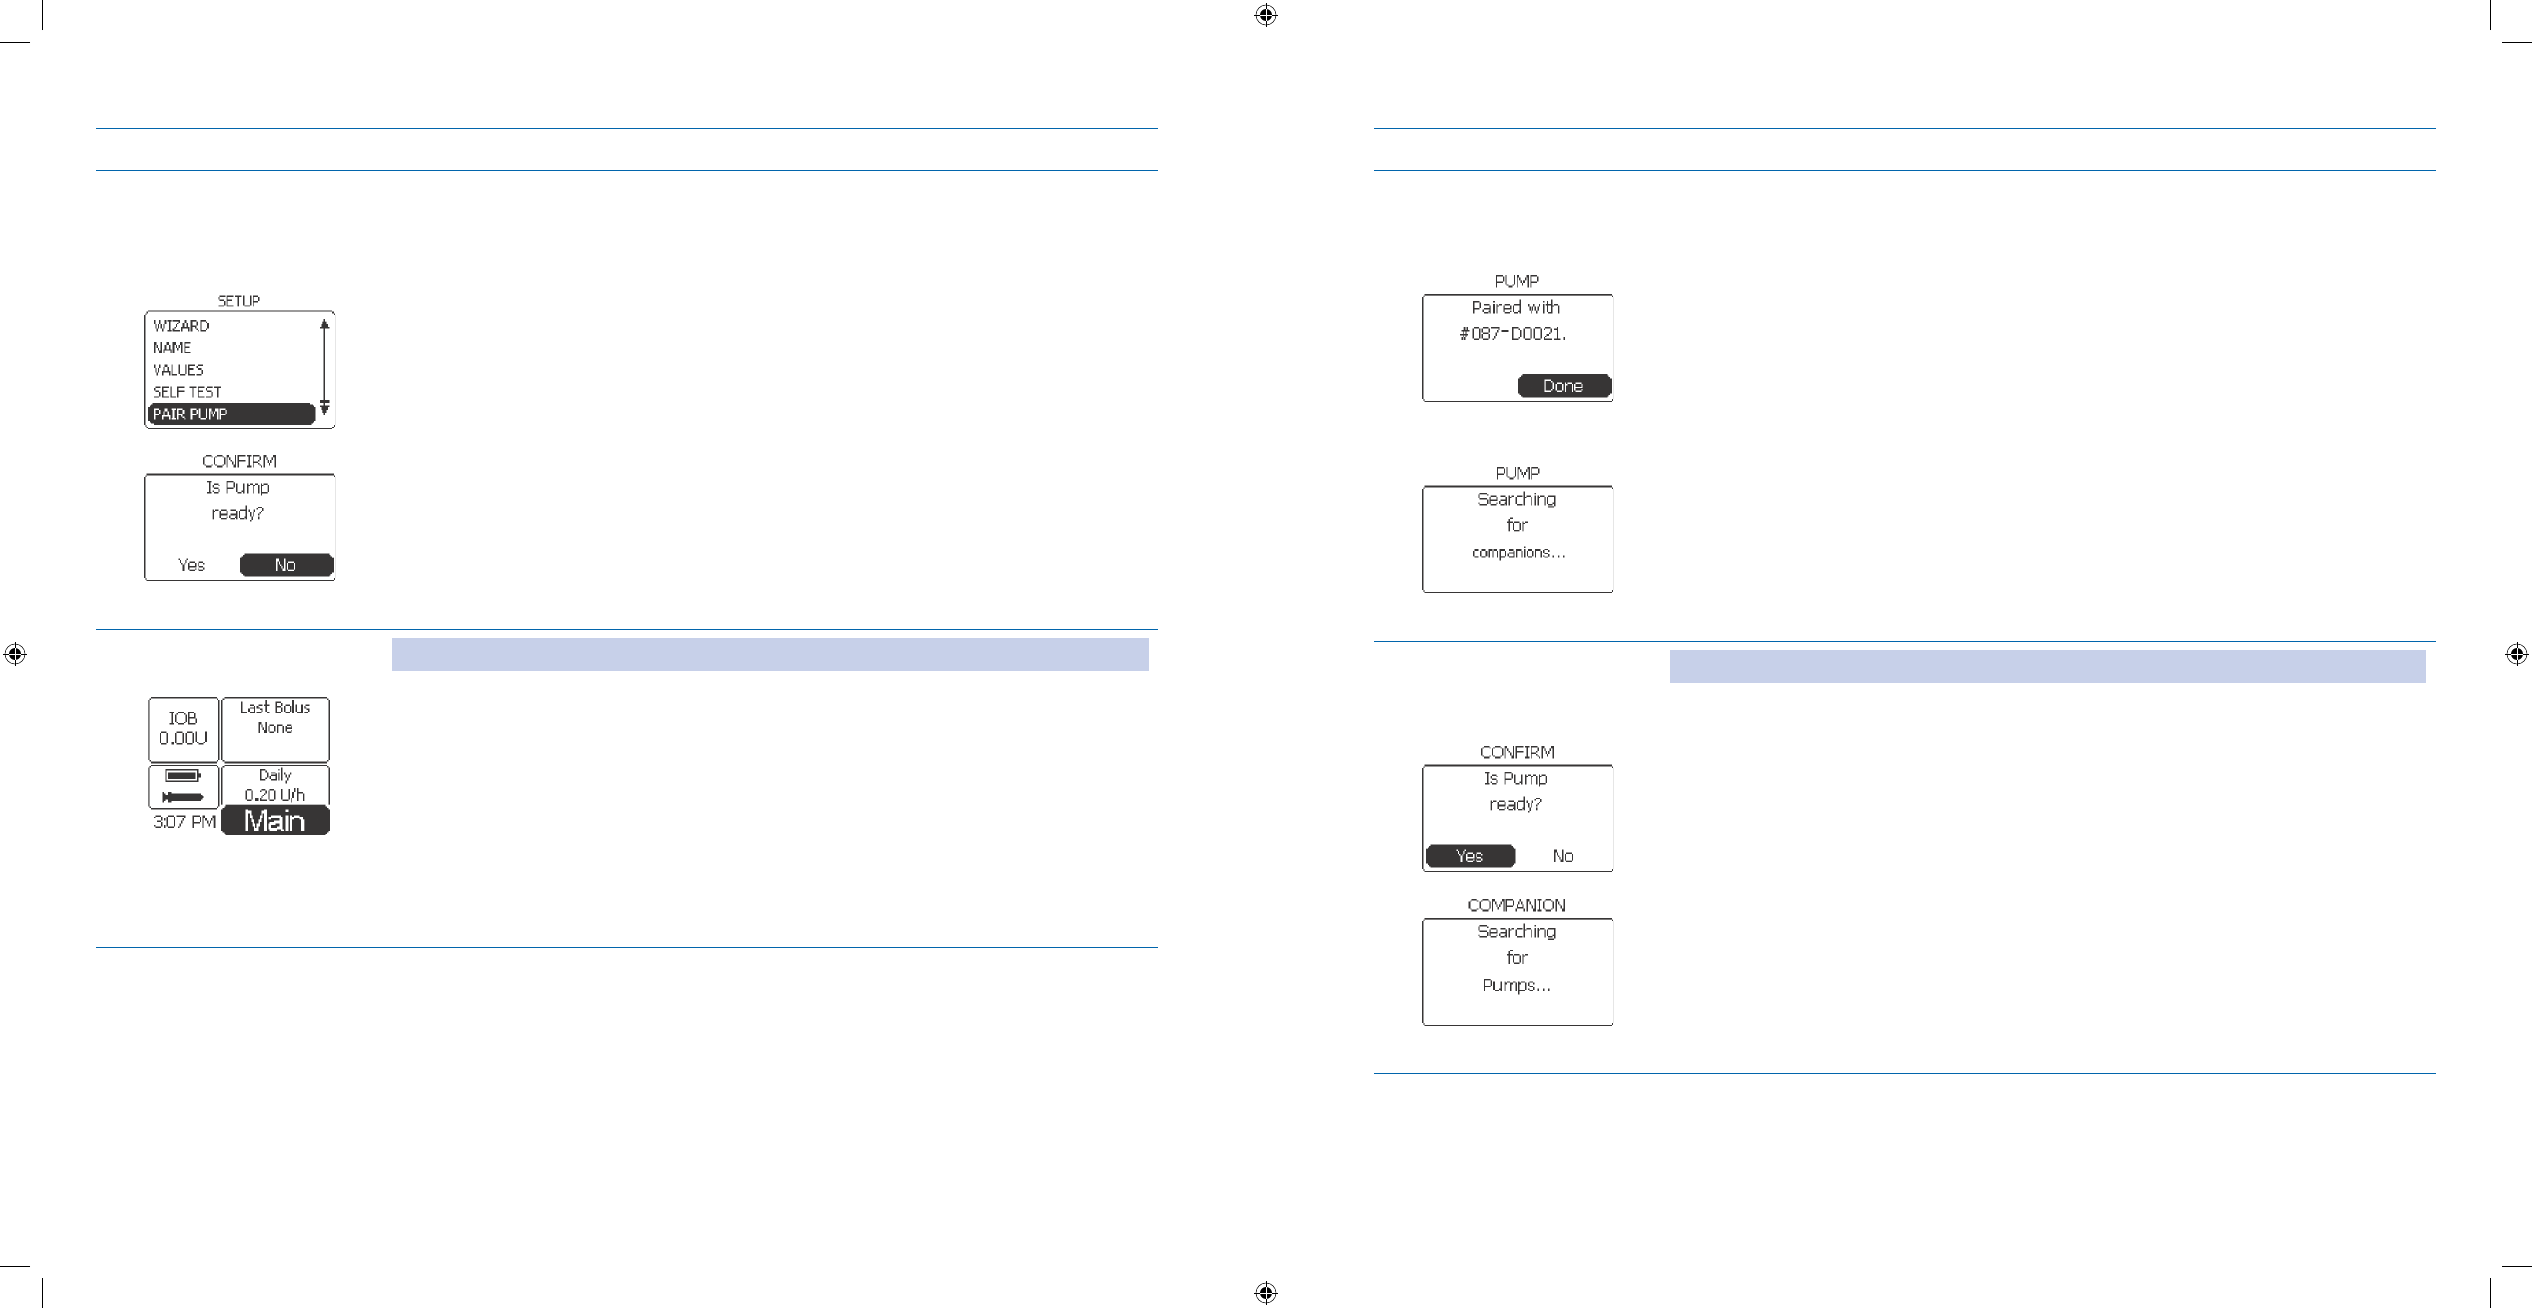
6.8 Pair Companion and Pump
Purpose To pair your Aviator Companion and Aviator Pump to operate as a system.
When Do this procedure:
When you receive a new companion or pump that’s a replacement for your system.
•
Materials Your companion fully charged.•
Your pump with battery installed and initialized.•
Assistance from healthcare professional as needed.•
Helpful Information
Pairing establishes an association of your pump with your companion so that the two will only communicate •
with each other.
Your companion and pump should already be paired when you receive your FreeStyle Aviator System package.
•
The RF will automatically turn ON when pairing, if it is NOT already on.•
Procedure:
Steps Do This
Go to the Companion’s 1.
SETUP menu.
Note: The following steps are performed using your companion.
Notice a. Main is highlighted.
Press b. Enter button.
Scroll to highlight c. SETUP.
Press d. Enter button.
Section 6: When You’re Ready – Optional Settings
6.8 Pair Companion and Pump
Section 6: When You’re Ready – Optional Settings
6.8 Pair Companion and Pump
DOC15736_Rev-A-Man.indd 153-154 2/9/09 11:29:48 AM
155
156
Steps Do This
Go to the Companion’s 2.
PAIR PUMP menu
to prepare the
Companion.
Scroll to highlight a. PAIR PUMP.
Press b. Enter button.
Notice c. CONFIRM screen with “Is Pump ready?” message displays.
Notice d. No is highlighted.
Go to the Pump’s 3. SETUP
menu.
<insert screen with SETUP
highlighted>
Note: The following steps are performed using your pump.
Notice a. Main is highlighted.
Press b. Enter button.
Scroll to highlight c. SETUP.
Press d. Enter button.
Steps Do This
Go to the Pump’s 4. PAIR
DEVICE menu to prepare
the Pump. Scroll to highlight a. PAIR DEVICE.
Press b. Enter button.
Notice c. PUMP screen is searching for companions.
Go to the Companion’s 5.
CONFIRM screen to pair
pump.
Note: The following steps are performed using your companion.
Scroll to highlight a. Yes.
Press b. Enter button.
Notice c. COMPANION screen is searching for pumps.
Section 6: When You’re Ready – Optional Settings
6.8 Pair Companion and Pump
Section 6: When You’re Ready – Optional Settings
6.8 Pair Companion and Pump
FPO
DOC15736_Rev-A-Man.indd 155-156 2/9/09 11:29:48 AM

157
158
Steps Do This
Conrm pairing of 6.
pump with Companion Note: The following steps are performed using your companion.
Notice a. CONFIRM screen with “Pair with Pump S/NPPPPP.”
Notice b. No is highlighted.
Scroll to highlight c. Yes if pump is correct.
Press d. Enter button.
Verify paired pump 7.
and Companion Verify that the companion and pump are paired by the Radio On signal in both
devices displayed on the Home screens.
Steps Do This
Check your work.8.
<insert companion Status
screen with paired pump
information>
<insert pump Status
screen with paired
companion information>
Verify that the companion and pump are paired by the serial numbers displayed
on the Status screens.
Section 6: When You’re Ready – Optional Settings
6.9 Turn RADIO O/On
Section 6: When You’re Ready – Optional Settings
6.9 Turn RADIO O/On
FPO
FPO
DOC15736_Rev-A-Man.indd 157-158 2/9/09 11:29:48 AM
159
160
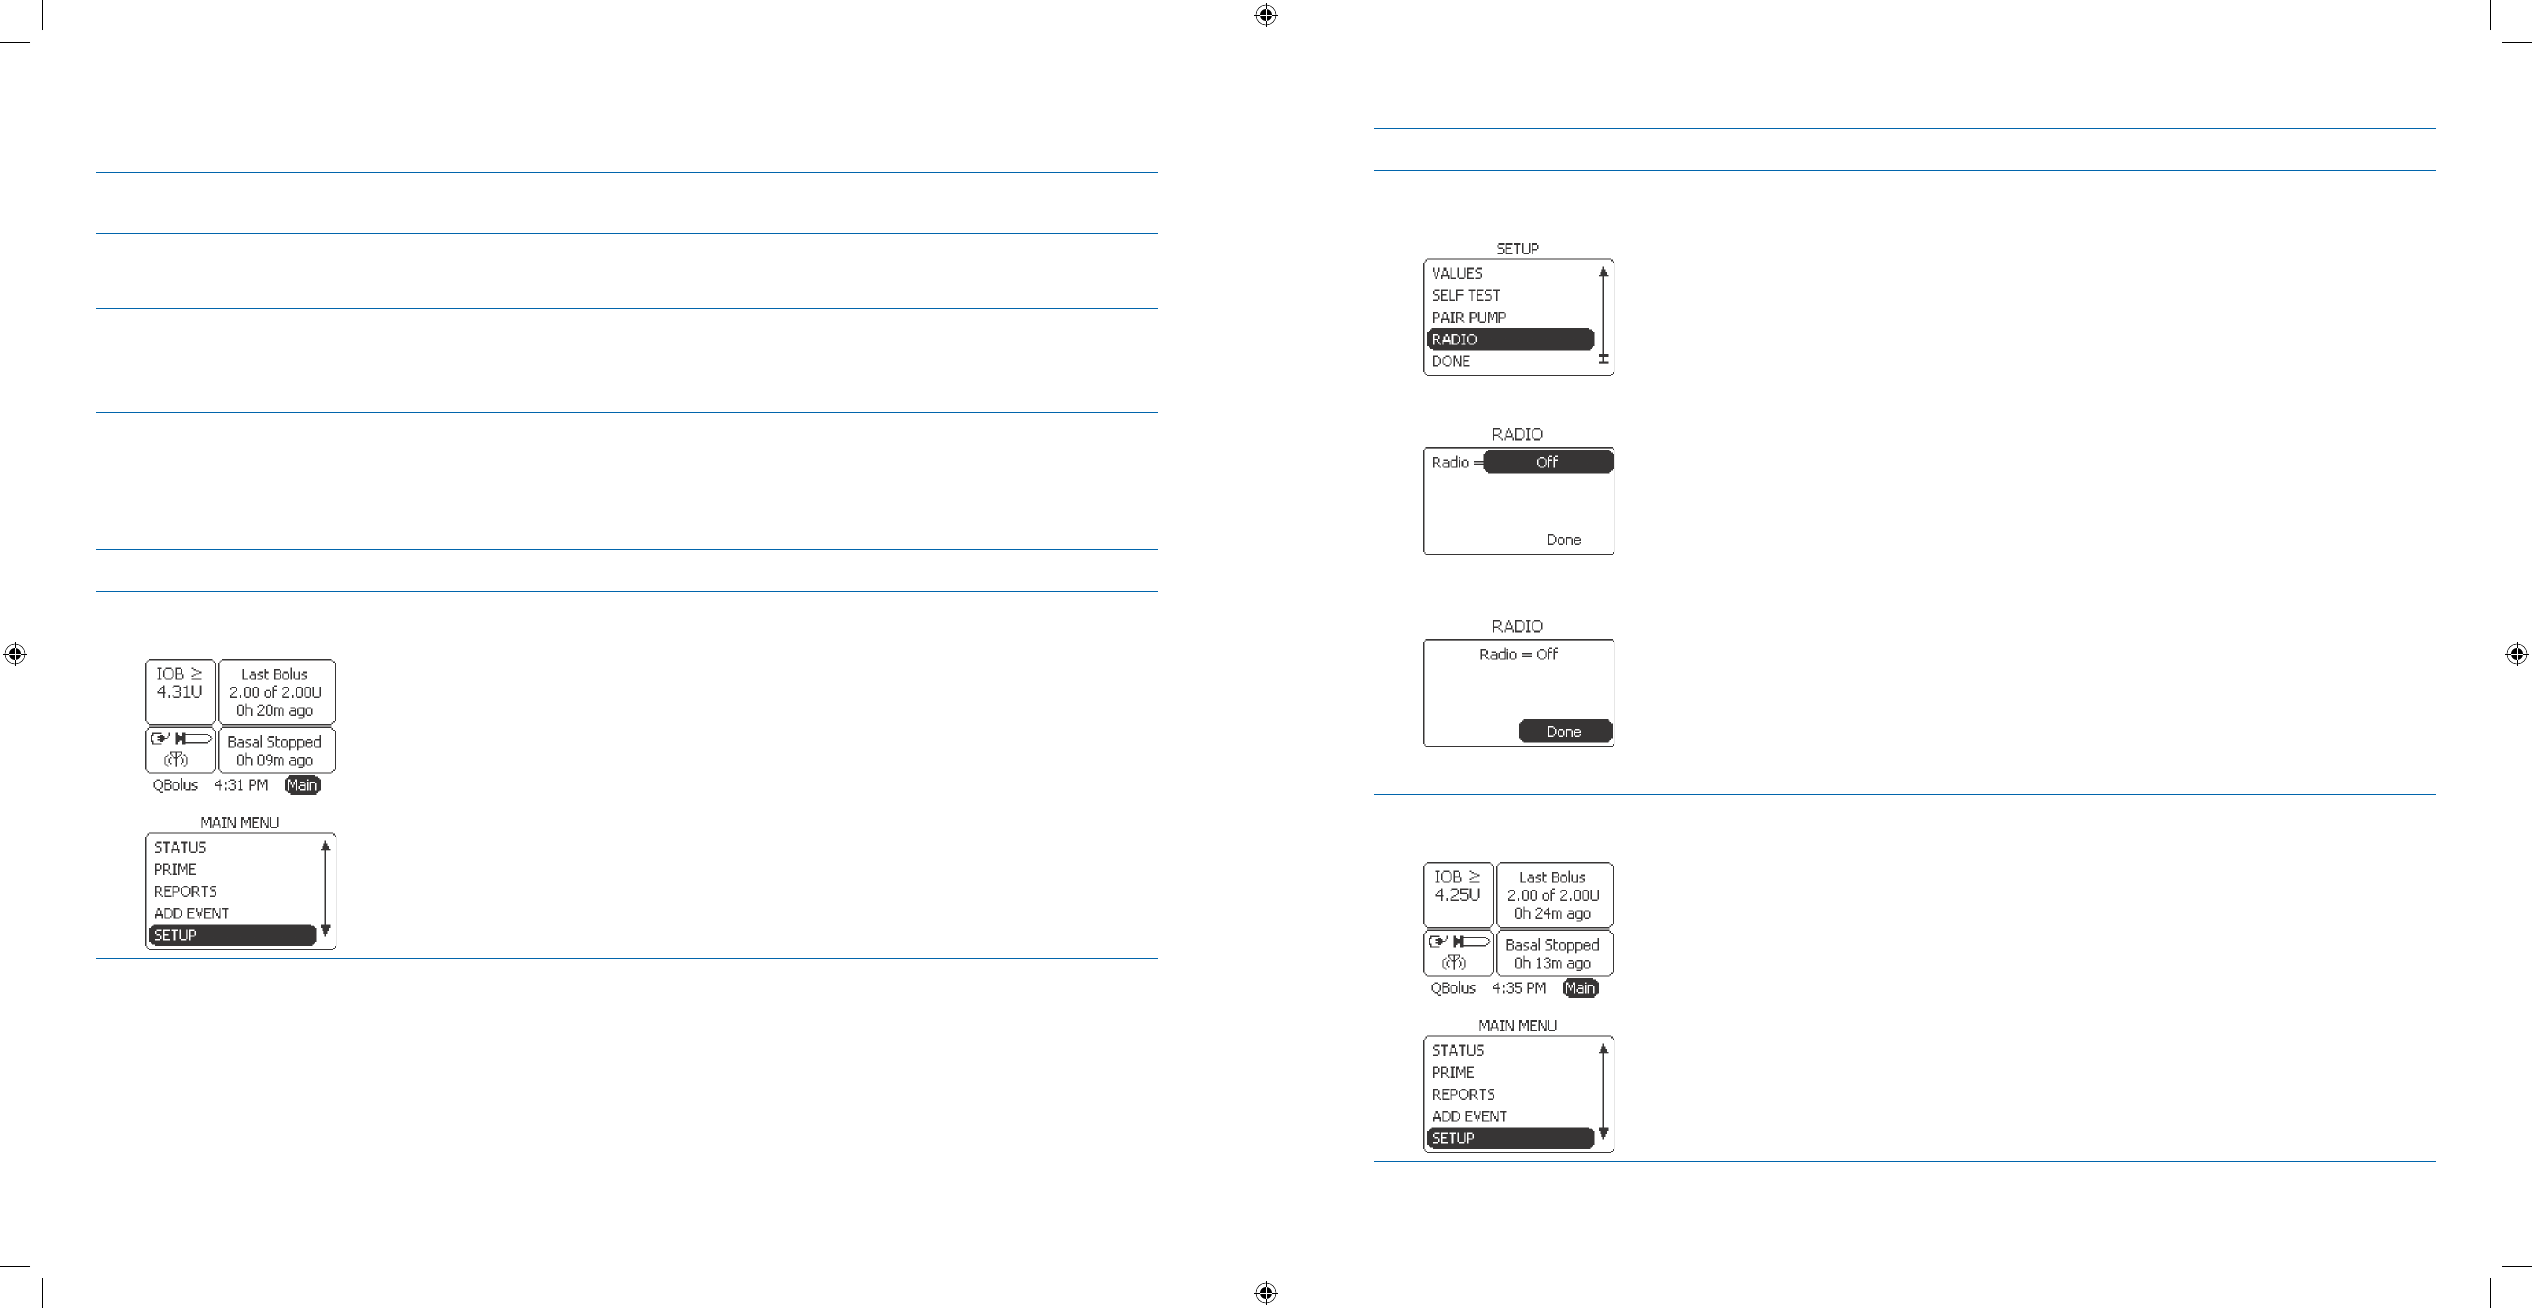
6.9 Turn RADIO O/On
Purpose To turn o the radio frequency signal between your Aviator Companion and Aviator Pump
before you get on an airplane.
When Do this procedure:
Before you take o in an airplane or as directed by any other ocial.
•
Materials Your companion and pump fully operating.•
Your companion and pump already paired.•
Assistance from healthcare professional as needed.•
Helpful Information
If your companion and pump are • NOT paired, radio setting will be O.
Procedure:
Steps Do This
Go to the 1. SETUP menu
on the Companion. From the a. Home screen, notice Main is highlighted.
Press b. Enter button.
Scroll to highlight c. SETUP.
Press d. Enter button.
Steps Do This
Go to the 2. RADIO menu
on your Companion.Scroll to highlight a. RADIO.
Press b. Enter button.
Notice c. Done is highlighted.
Scroll to highlight d. Radio.
Press e. Enter button.
Scroll to f. Off.
Press g. Enter button.
Notice h. Done is highlighted.
Press i. Enter button.
Go to the SETUP menu 3.
on the pump. From the a. Home screen, notice Main is highlighted.
Press b. Enter button.
Scroll to highlight c. SETUP.
Press d. Enter button.
Section 6: When You’re Ready – Optional Settings
6.9 Turn RADIO O/On
Section 6: When You’re Ready – Optional Settings
6.10 Therapy Lockout
DOC15736_Rev-A-Man.indd 159-160 2/9/09 11:29:48 AM
161
162
Steps Do This
Go to the 4. RADIO menu
on your Pump.
Scroll to highlight a. RADIO.
Press b. Enter button.
Notice c. Done is highlighted.
Scroll to highlight d. Radio.
Press e. Enter button.
Scroll to f. Off.
Press g. Enter button.
Notice h. Done is highlighted.
Press Enter button.
Check your work.5. Look at the system status panel on the Home screen to verify that the radio signal
is o.
To turn the radio signal back on, repeat all the steps above and scroll to select
Radio to On.
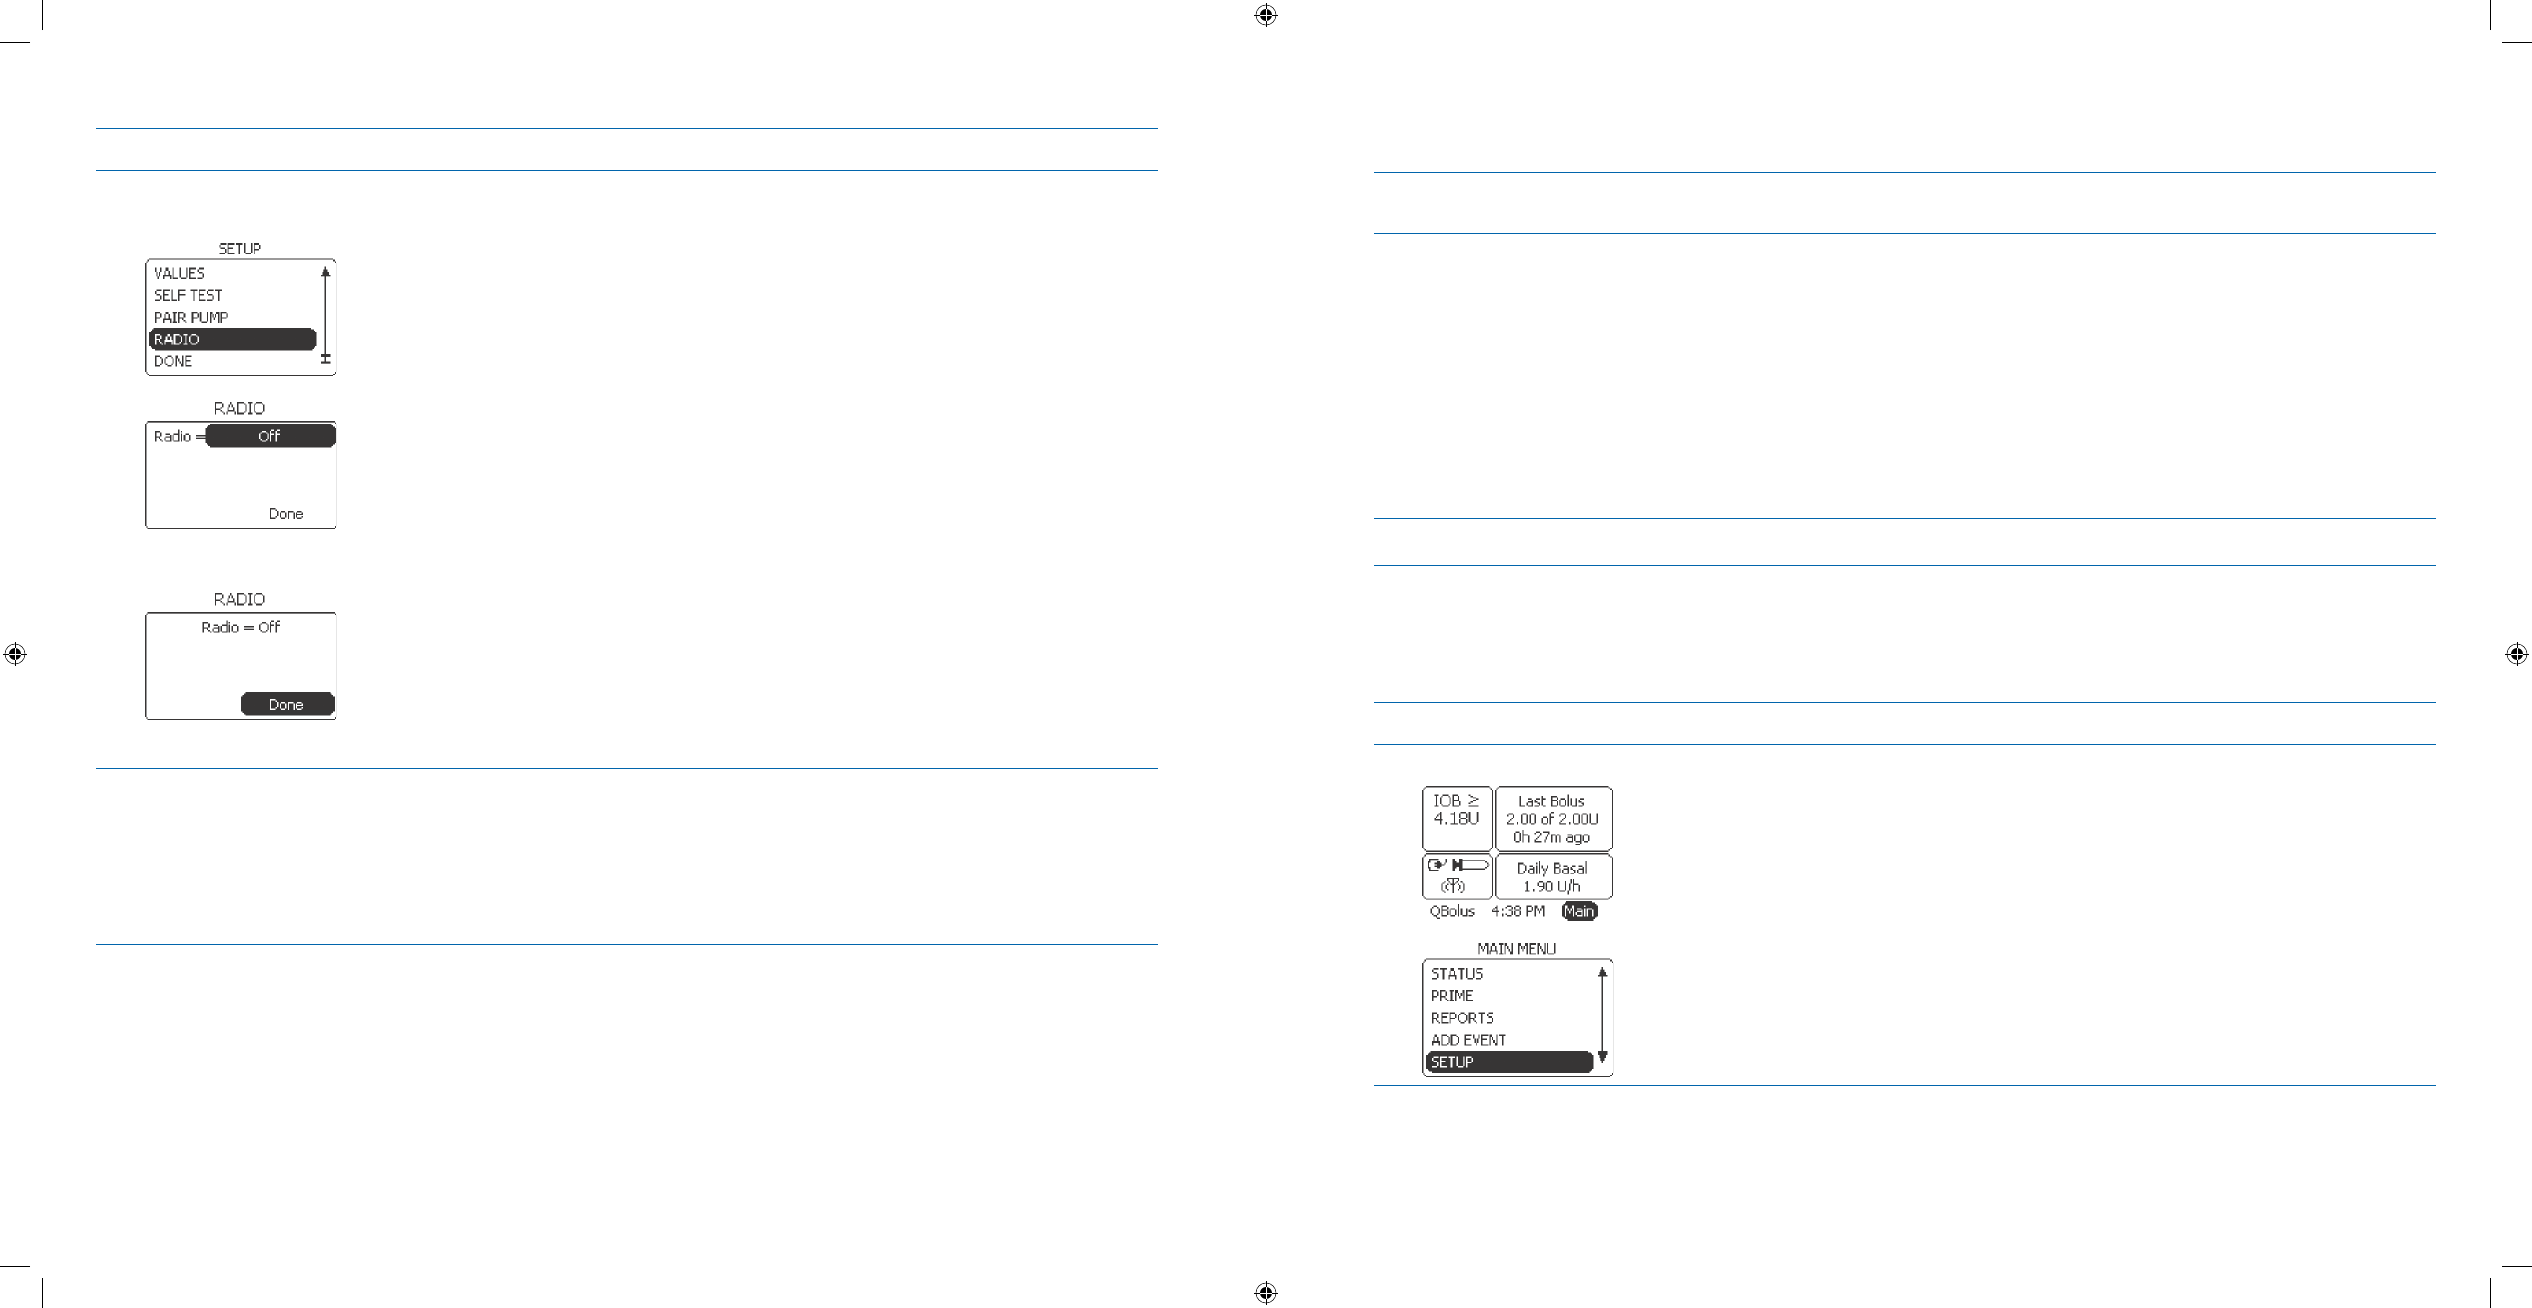
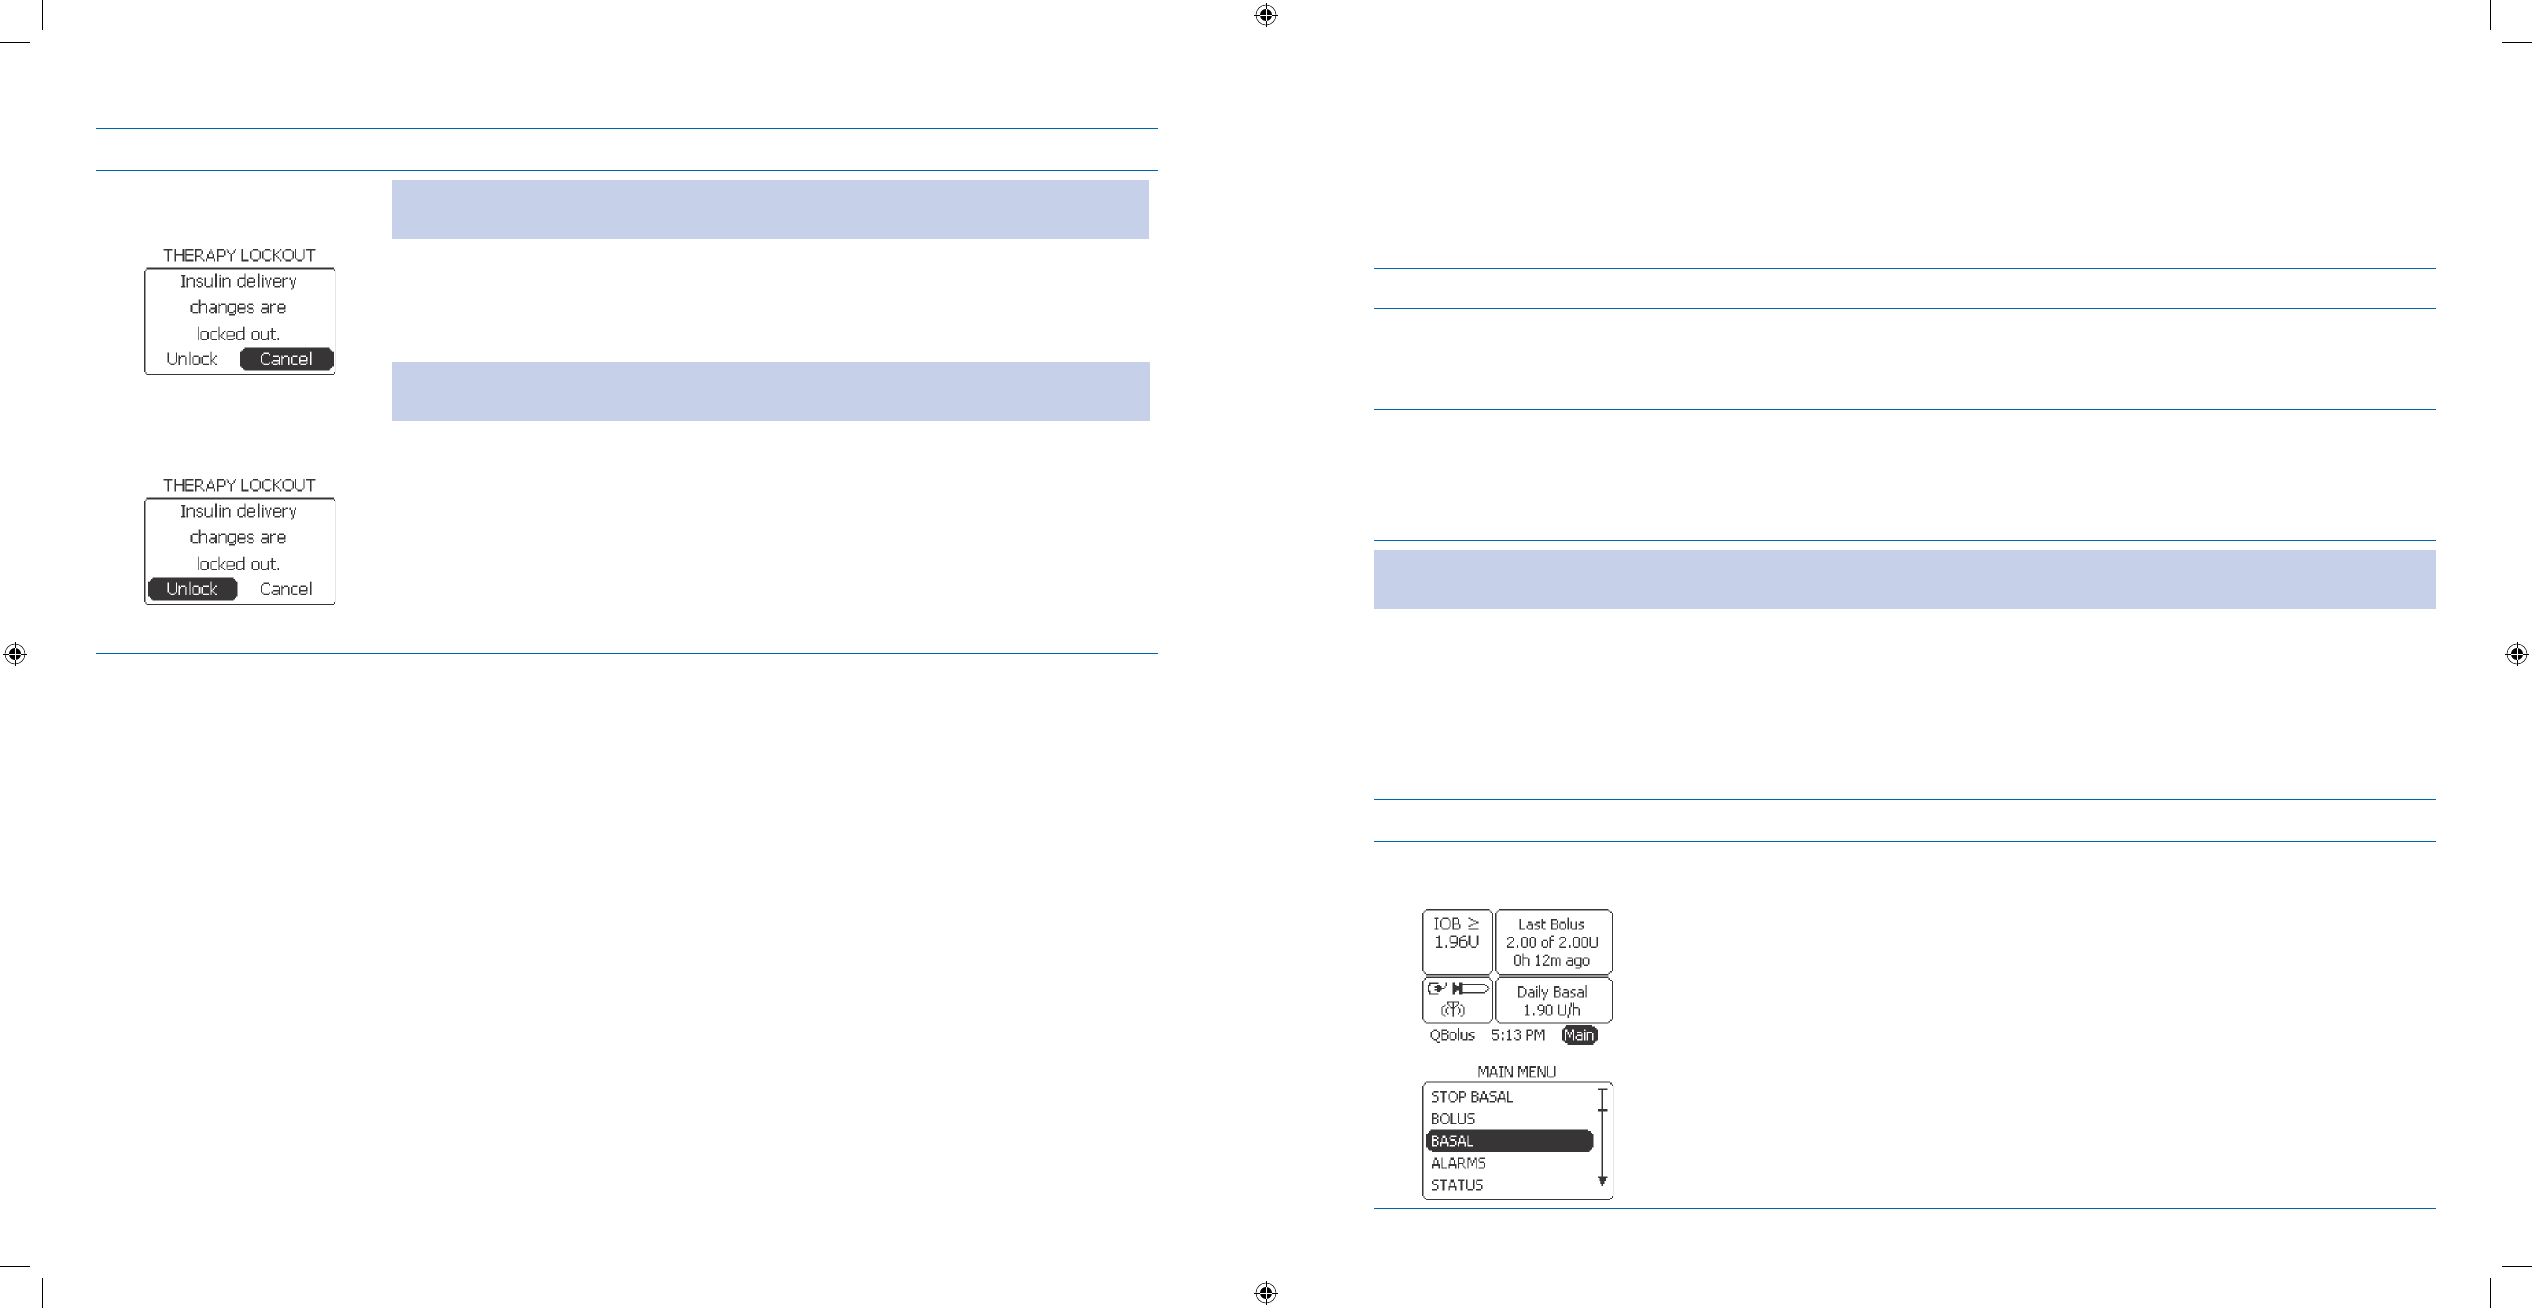
6.10 Therapy Lockout
Purpose To lock and unlock the Aviator Pump’s basal and bolus features from your Aviator
Companion.
When Do this procedure when you wish to prevent access to the following pump options:
Selecting either the basal or bolus panels on the
• Home screen.
Using the
• QBolus soft key on the Home screen.
Selecting any of the following on the
• MAIN MENU screen.
START/STOP
➢
BOLUS ➢
BASAL ➢
PRIME ➢
Materials Your companion fully operating.•
Helpful Information
The • Lockout setting is O by default.
Procedure:
Steps Do This
Go to the 1. SETUP menu.
From the a. Home screen, notice Main is highlighted.
Press b. Enter button.
Scroll to highlight c. SETUP.
Press d. Enter button.
Section 6: When You’re Ready – Optional Settings
6.10 Therapy Lockout
Section 6: When You’re Ready – Optional Settings
6.10 Therapy Lockout
DOC15736_Rev-A-Man.indd 161-162 2/9/09 11:29:48 AM
163
164
Steps Do This
Go to the 2. THERAPY
LOCKOUT screen. Scroll to highlight a. THERAPY LOCKOUT.
Press b. Enter button.
Notice c. Lockout is Off.
Scroll to highlight d. Lockout.
Press e. Enter button.
Scroll to f. On.
Press g. Enter button.
Steps Do This
Set Duration for 3.
lockout.
Note: The duration is set to Always by default when lockout is On.
Notice a. Duration is highlighted.
Decide what to do next.b.
If you want duration to be Then do this
Once Press 1. Enter button.
Scroll to select 2. Once.
Press 3. Enter button.
Scroll to highlight 4. Done.
Press 5. Enter button.
Always Scroll to highlight Done.
Press Enter button.
Check your work.4. Go back to the THERAPY LOCKOUT screen and verify that the settings are correct.
To unlock your pump therapy features, go to Step 5.
Section 7: Creating and Editing Specialized Basal Programs to Meet Your Needs
7.1 Edit a Basal Program
Section 7: Creating and Editing Specialized Basal Programs to Meet Your Needs
7.1 Edit a Basal Program
DOC15736_Rev-A-Man.indd 163-164 2/9/09 11:29:48 AM
165
166
Steps Do This
Unlock pump therapy 5.
features. Note: If you attempt to access any basal or bolus features when Lockout is On, you
will see a Confirmation screen.
Notice the a. CONFIRM screen with “Insulin delivery changes are locked out.”
message displays.
Notice b. Cancel is highlighted.
Note: If you select Cancel, you will return to the Home screen and pump therapy
features remain locked out.
Scroll to highlight c. Unlock.
Press d. Enter button.
Administer your basal or bolus insulin delivery as recommended by your e.
healthcare professional.
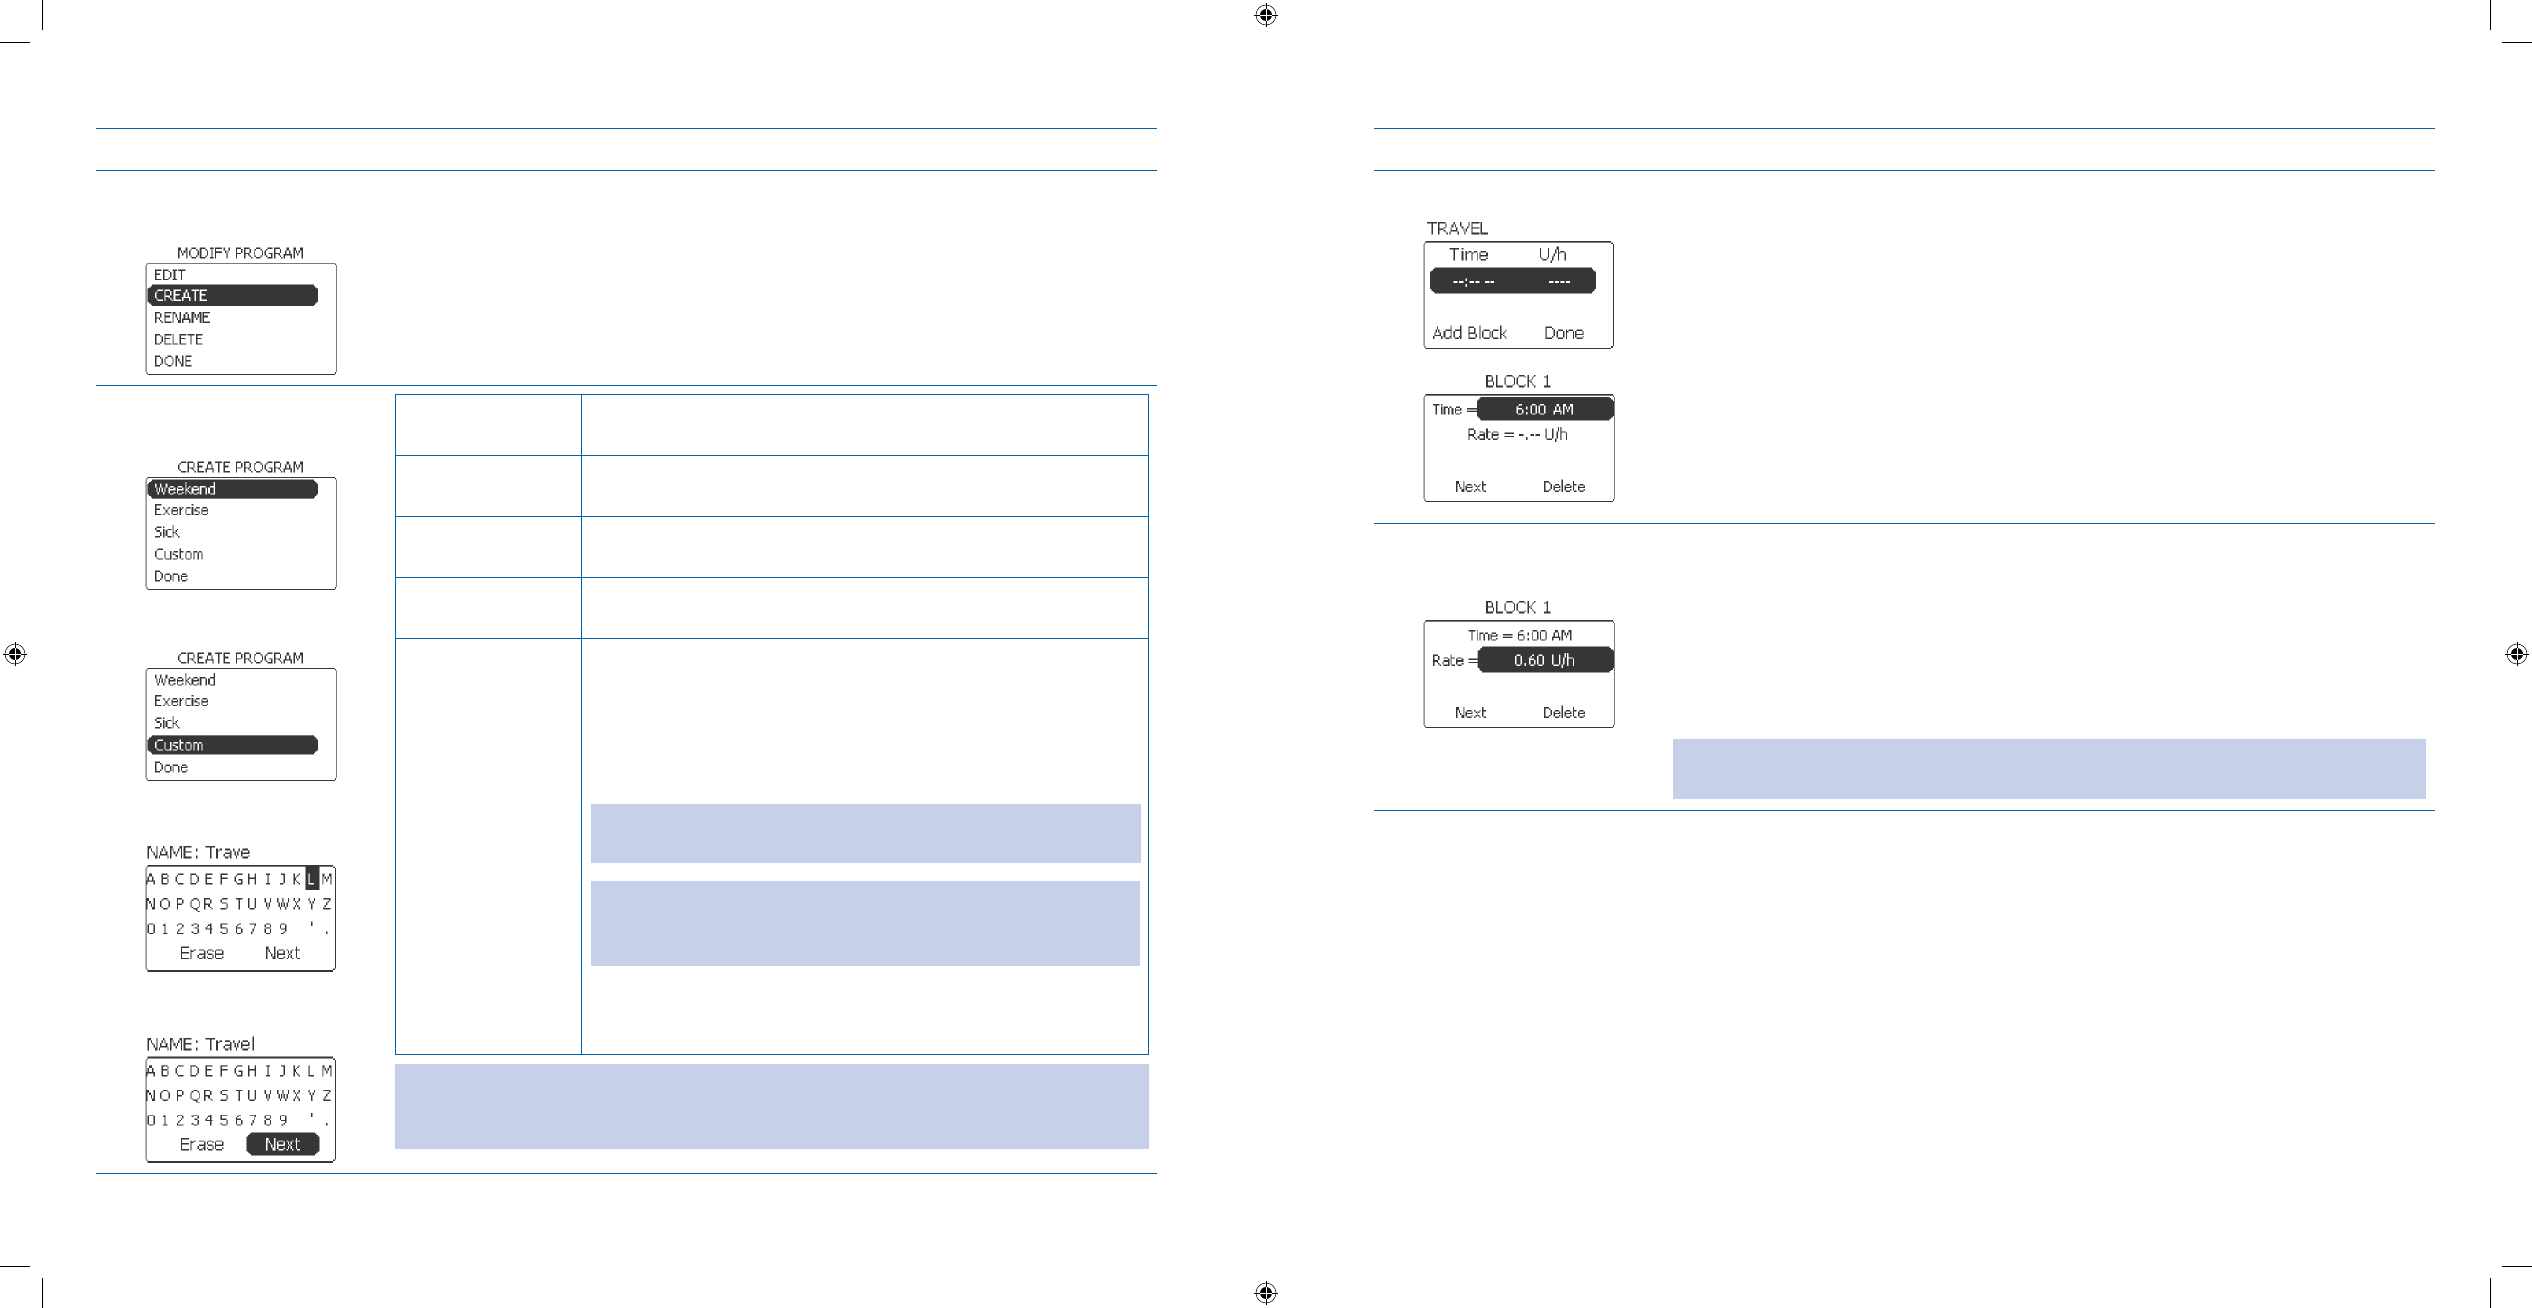
7 Creating and Editing Specialized Basal Programs to Meet Your
Needs
7.1 Edit a Basal Program
Purpose To edit an existing basal program in your pump using your Aviator Companion.
When Do this procedure:
Whenever you need to edit an existing basal program, including adding or deleting basal
•
time blocks and basal rates.
Materials Your companion with battery charged and basal settings programmed.•
Your pump with the battery installed and • basal settings programmed.
Healthcare professional’s recommendations for your personalized basal settings for the
•
pump in Section 12 – Appendix A.
Important Note: It is strongly recommended that you and your healthcare professional work on ne tuning your basal
rates. Always notify your healthcare professional if you make changes to prescribed plans of care.
Helpful Information
The • Edit program is one of the MODIFY program options from the BASAL MENU. The other Modify program
options are Create program, Rename program and Delete program.
Your currently running active program will have an asterisk (
• *) to the left of the name.
Procedure:
Steps Do This
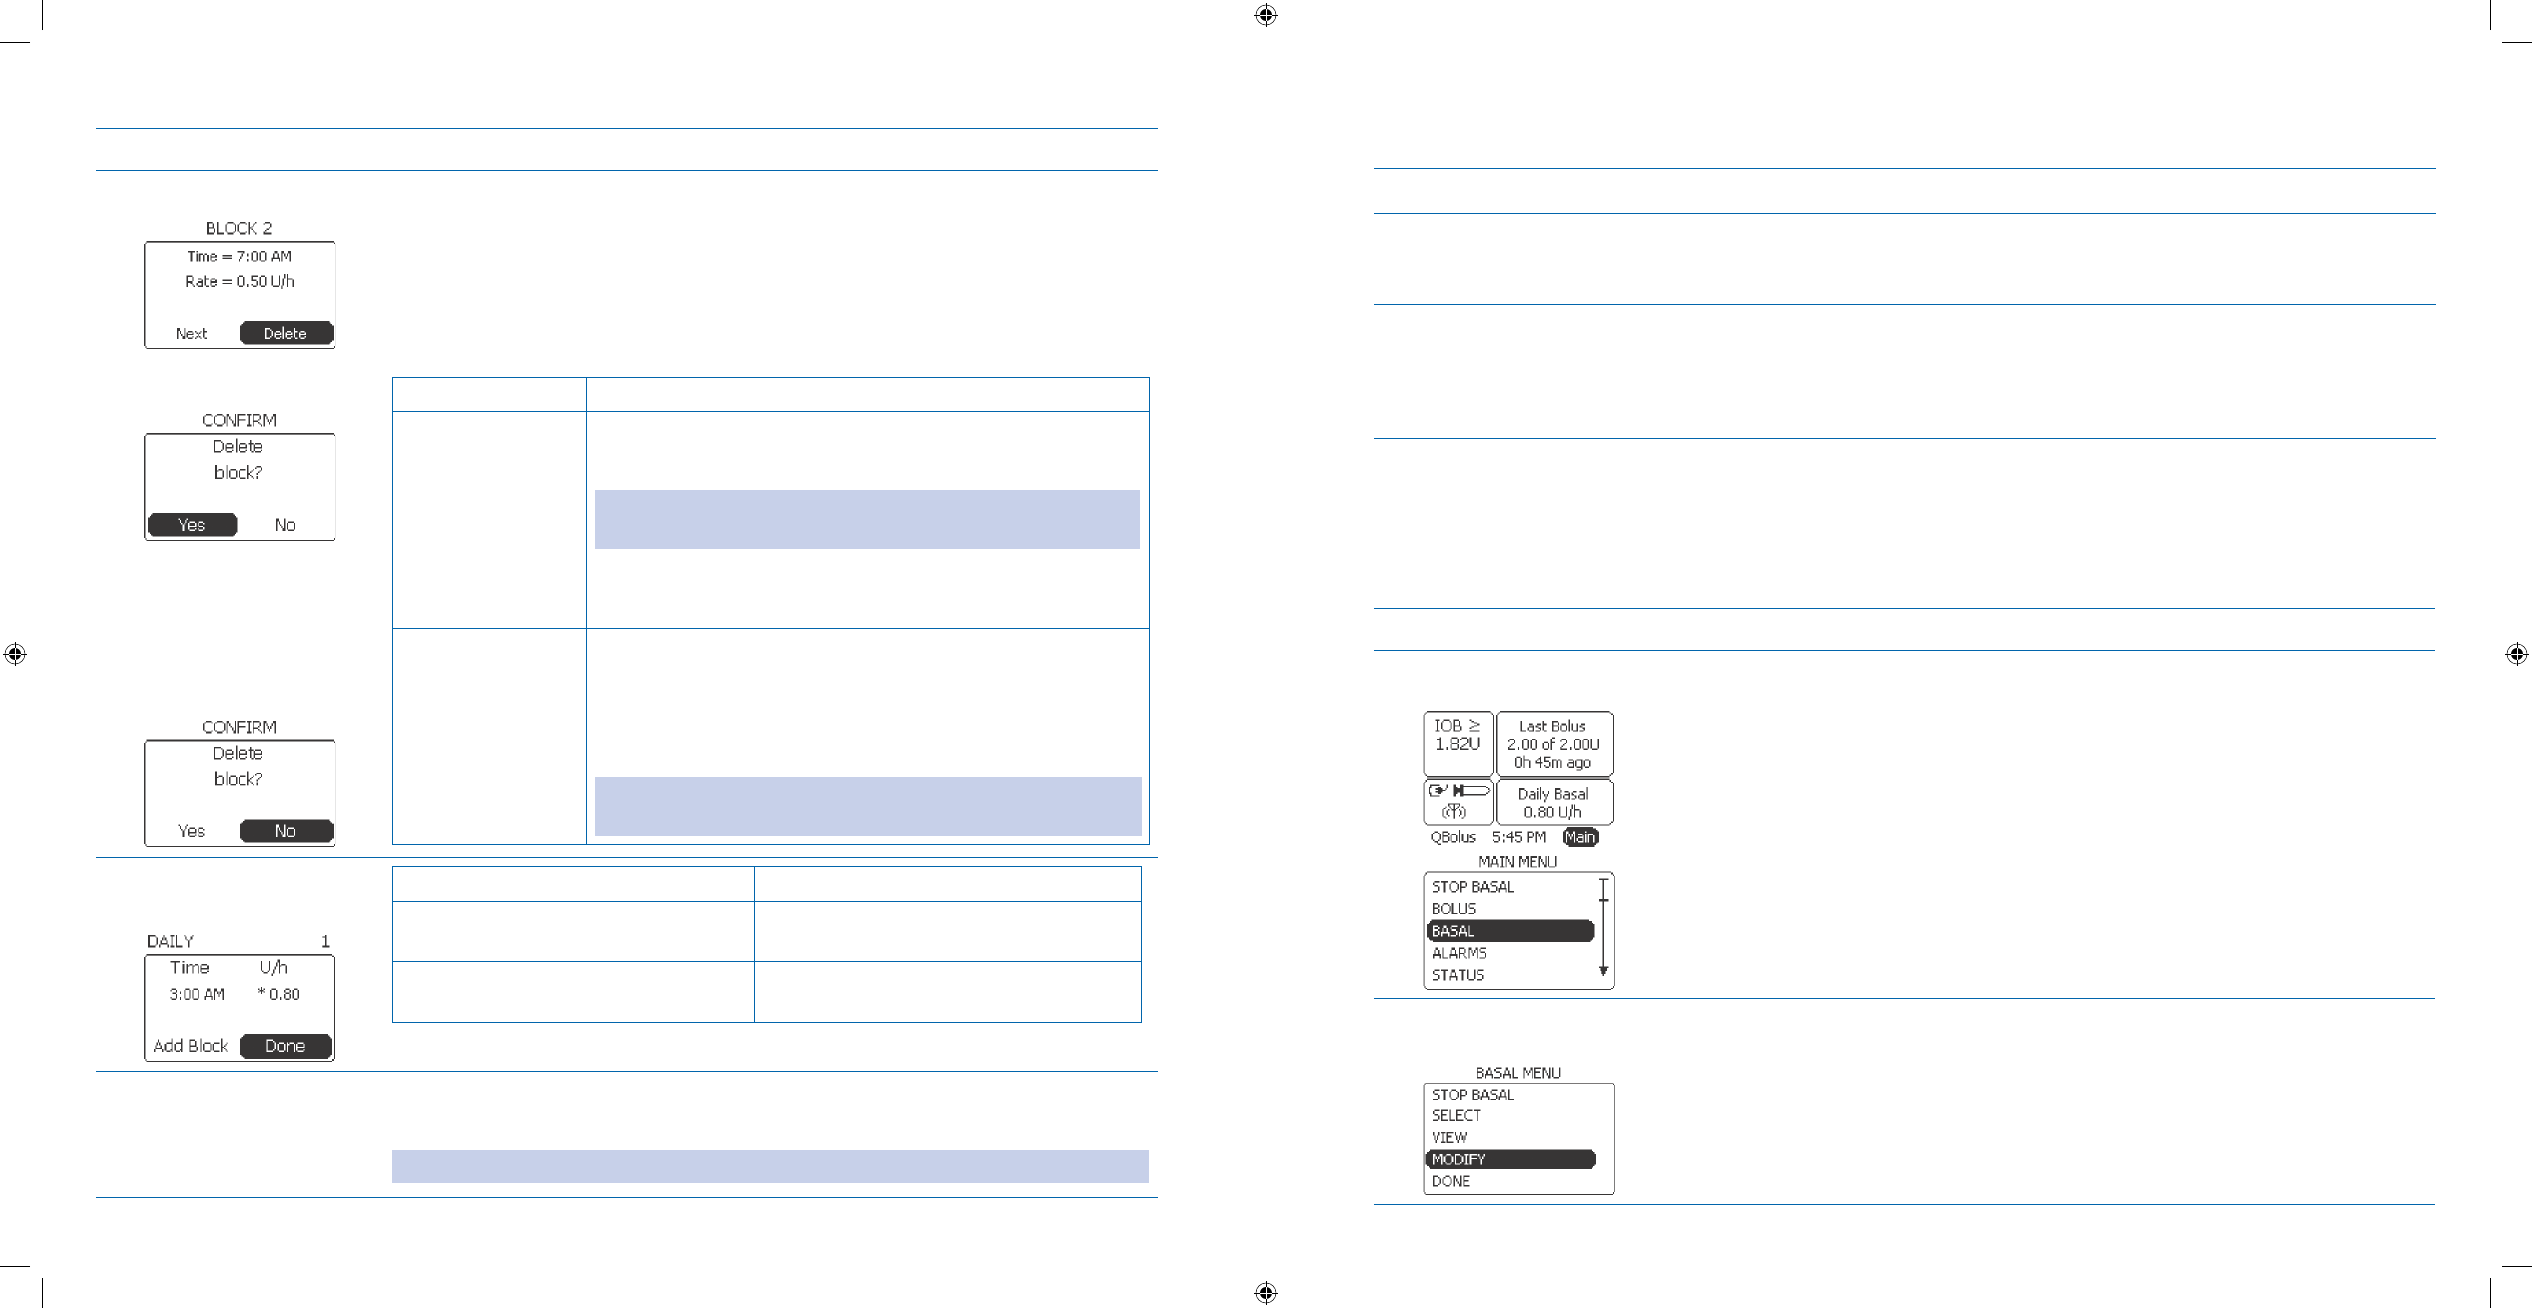
Access BASAL MENU 1.
from Home screen. Notice a. Main is highlighted.
Press b. Enter button.
Scroll to highlight c. BASAL.
Press d. Enter button.
Section 7: Creating and Editing Specialized Basal Programs to Meet Your Needs
7.1 Edit a Basal Program
Section 7: Creating and Editing Specialized Basal Programs to Meet Your Needs
7.1 Edit a Basal Program
DOC15736_Rev-A-Man.indd 165-166 2/9/09 11:29:48 AM
167
168
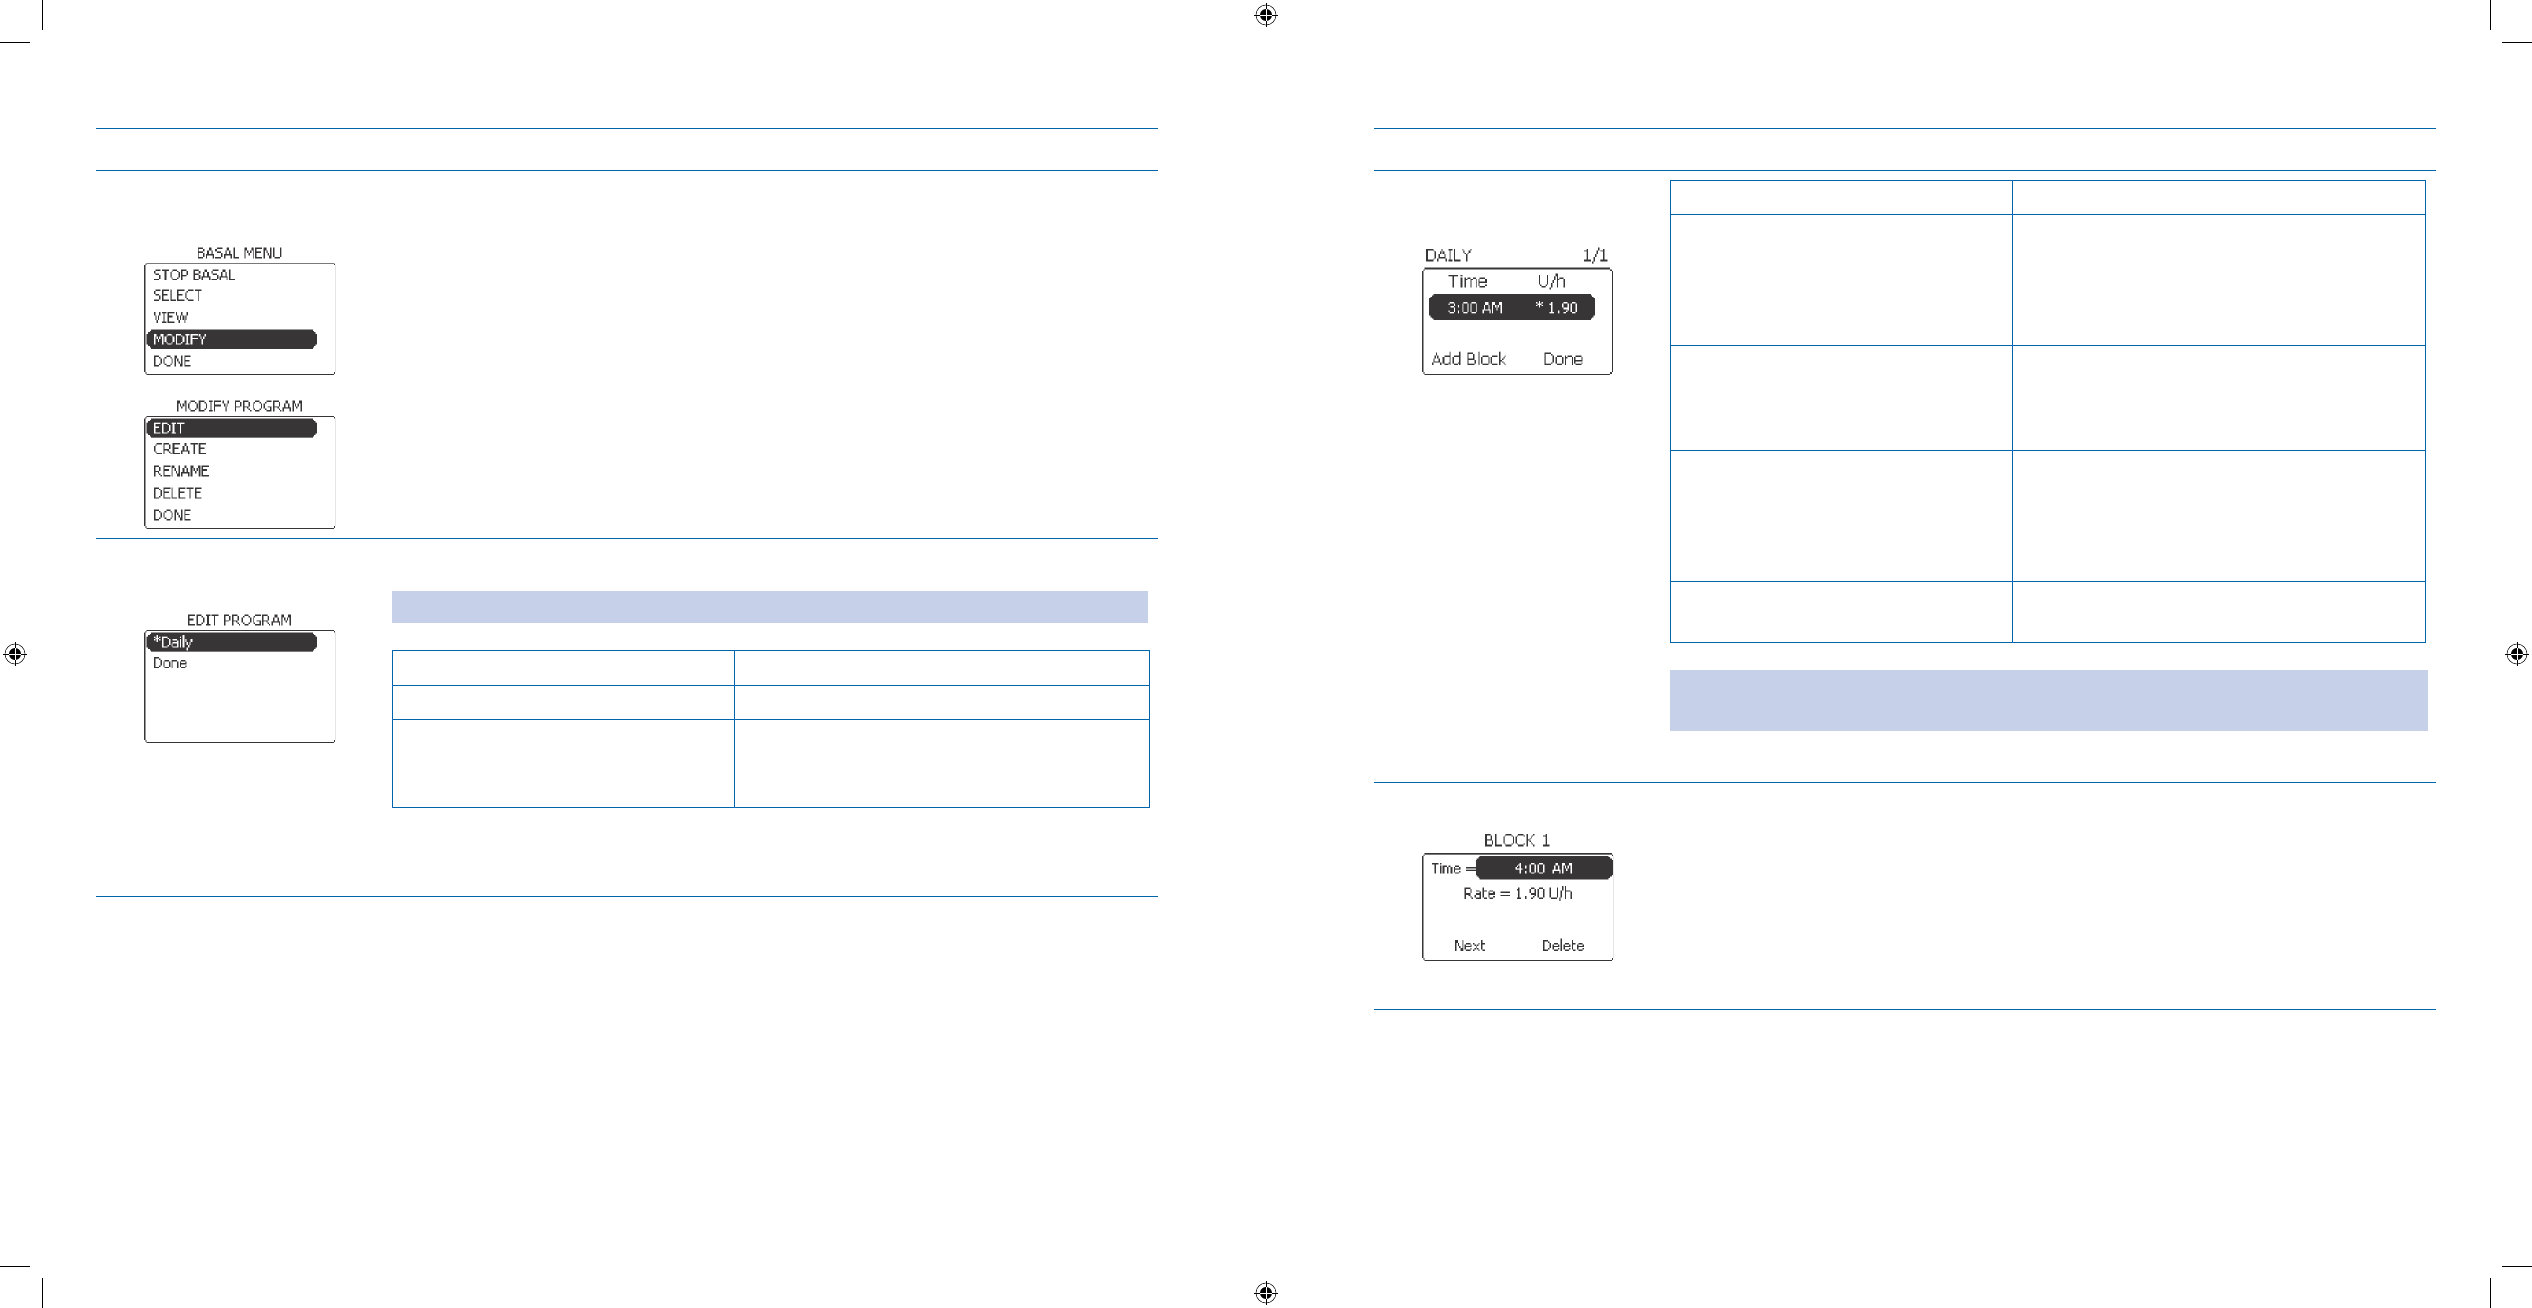
Steps Do This
Select 2. MODIFY
program. Scroll to highlight a. MODIFY.
Press b. Enter button.
Notice c. Edit is highlighted.
Press d. Enter button.
Select the existing 3.
program to edit.
Notice *Daily is highlighted.
Note: The * represents the active program, and Daily is the default program.
If you want to Then do this
Edit your Daily program Press Enter button.
Edit a dierent program Scroll to highlight the program you want to
edit, for example, Travel.
Press Enter button.
Steps Do This
Decide what edits you 4.
want to make. If you want to Then do this
Edit an existing time block and
basal rate
Scroll to the desired time block and 1.
basal rate to edit.
Press 2. Enter button.
Go to Step 3. 5.
Add a time block and basal rate Notice 1. Add Block is highlighted.
Press 2. Enter button.
Go to Step 3. 8.
Delete a time block and basal rate Scroll to the desired time block and 1.
basal rate to delete.
Press 2. Enter button.
Go to Step 3. 11.
Return to the Home screen
without editing a basal program
Scroll to highlight Done.
Press Enter button.
Note: You MUST have at least ONE block and You MUST select Done to complete
and save all the changes you have made.
Edit Time block.5.
Scroll to highlight a. Time.
Press b. Enter button.
Scroll to select the desired time for the block.c.
Press d. Enter button.
Section 7: Creating and Editing Specialized Basal Programs to Meet Your Needs
7.1 Edit a Basal Program
Section 7: Creating and Editing Specialized Basal Programs to Meet Your Needs
7.1 Edit a Basal Program
DOC15736_Rev-A-Man.indd 167-168 2/9/09 11:29:49 AM
169
170
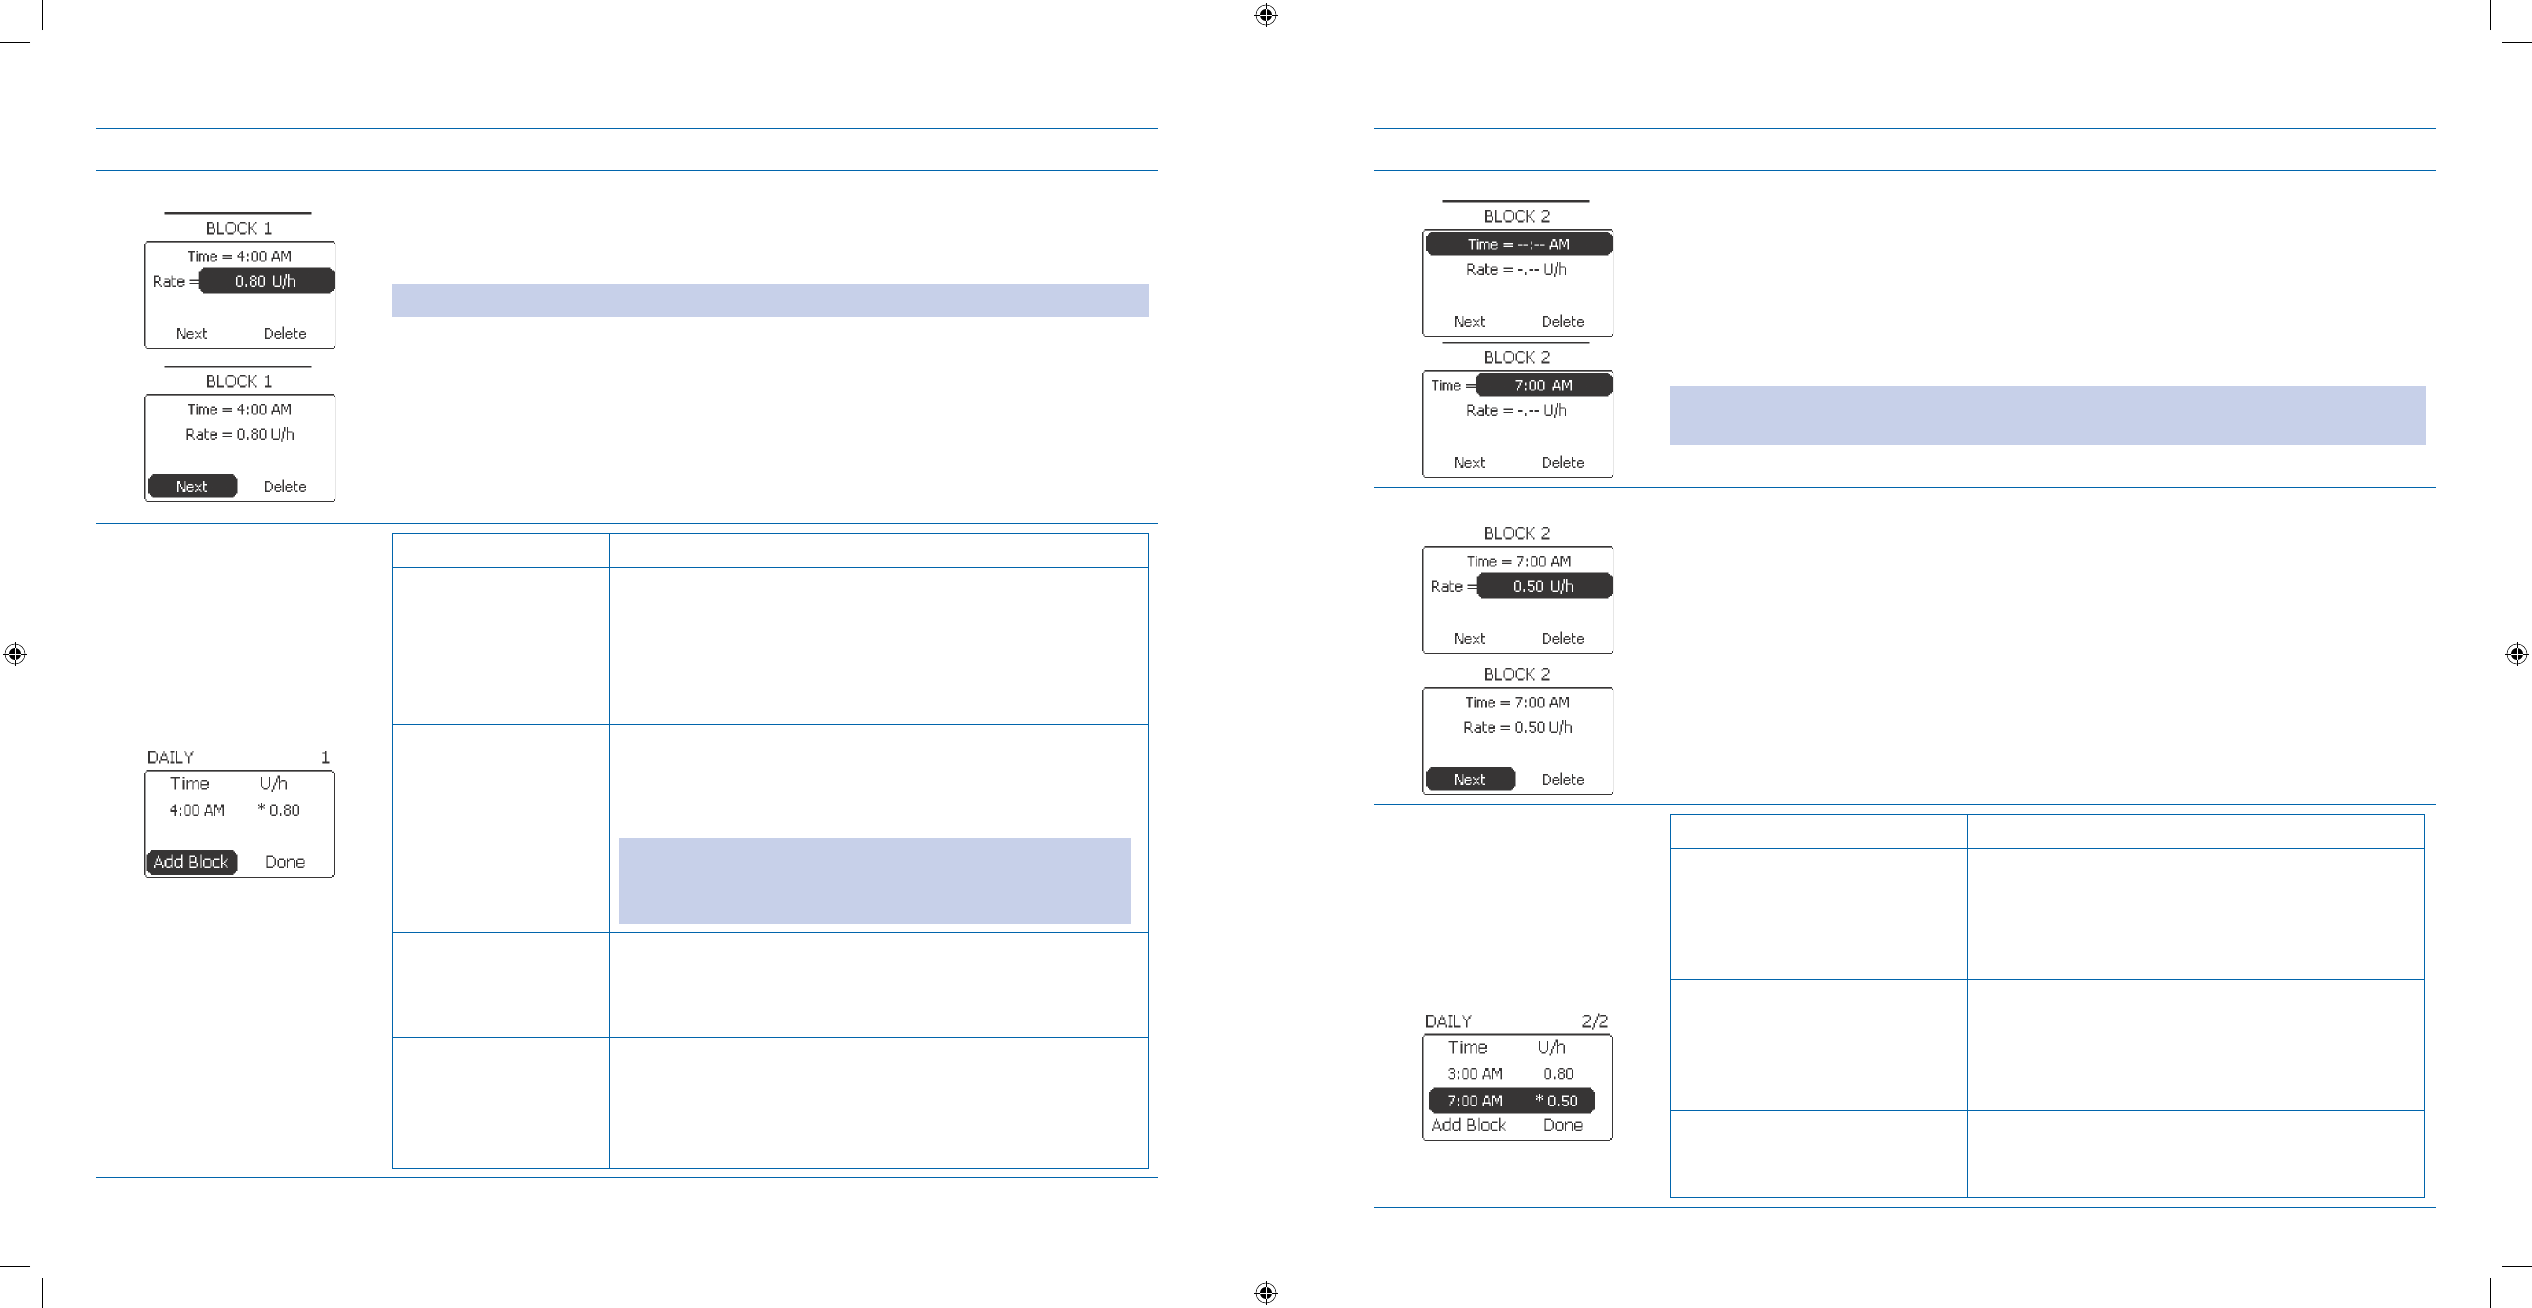
Steps Do This
Edit Basal Rate.6.
Notice a. Rate is highlighted.
Press b. Enter button.
Note: If you are keeping the same basal rate, leave the basal rate as shown.
Scroll to select desired basal rate.c.
Press d. Enter button.
Notice e. Next is highlighted.
Press f. Enter button.
Decide what to do 7.
next. If you want to Then do this
Edit another time
block and basal rate
Scroll to another time block and basal rate that you 1.
want to edit.
Press 2. Enter button.
Repeat Steps 5 and 6 to edit additional time blocks 3.
and basal rates.
Add a time block and
basal rate
Notice 1. Add Block is highlighted.
Press 2. Enter button.
Go to Step 3. 8.
Note: If the last time block begins at 11:30 pm, the
Add block option is removed from the screen and you
CANNOT add another block.
Delete a time block
and basal rate
Scroll to desired time block and basal rate to delete.1.
Press 2. Enter button.
Go to Step 3. 11.
Be nished with all
your edits and return
to the Home screen
Scroll to highlight 1. Done.
Press 2. Enter button.
Go to Step 3. 13 to conrm you have completed this
task.
Steps Do This
Set Time for new block.8.
Notice a. Time is highlighted.
Press b. Enter button.
Scroll to select desired time for the block.c.
Press d. Enter button.
Note: The starting time for the new block will be ½ hour after the block you just
created.
Set Rate for new block.9.
Notice a. Rate is highlighted.
Press b. Enter button.
Scroll to select desired basal rate for the block.c.
Press d. Enter button.
Notice e. Next is highlighted.
Press f. Enter button.
Decide what to do 10.
next. If you want to Then do this
Add another time block and
basal rate
Scroll to highlight 1. Add Block.
Press 2. Enter button.
Repeat Steps 8 and 9 to add additional time 3.
blocks and basal rates.
Delete a time block and basal
rate
Scroll to desired time block and basal rate 1.
to delete.
Press 2. Enter button.
Go to Step 11.3.
Be nished with all your edits
and return to the Home
screen
Scroll to highlight Done.
Press Enter button.
Section 7: Creating and Editing Specialized Basal Programs to Meet Your Needs
7.2 Create a New Basal Program
Section 7: Creating and Editing Specialized Basal Programs to Meet Your Needs
7.2 Create a New Basal Program
DOC15736_Rev-A-Man.indd 169-170 2/9/09 11:29:49 AM
171
172
Steps Do This
Delete block(s).11. Notice a. Next is highlighted.
Scroll to highlight b. Delete.
Press c. Enter button.
Notice d. CONFIRM screen and “Delete block?” message displays.
Decide what to do.e.
If you want to Then do this
Delete the time
block and basal
rate
Scroll to highlight 1. Yes.
Press 2. Enter button.
Note: Notice that the time block has been deleted from the
list.
Repeat Steps 10 and 11 to delete other blocks and 3.
basal rates.
Cancel deleting
the time block
Notice 1. No is highlighted.
Press 2. Enter button.
Scroll to highlight 3. Next.
Press 4. Enter button.
Note: You will return to the list of time blocks and basal
rates. Check the settings.
Decide what to do 12.
next. If you want to Then do this
Make any additional changes to the
basal program
Go back to Step 4.
Be nished with all your edits and
return to the Home screen
Scroll to highlight Done.
Press Enter button.
Check your work.13. View the program you have just edited, and verify the settings that you have
changed. Refer to Section 3.1.2 View Basal Program for the procedure as needed.
Note: The Daily basal rate is now reecting the edits made above.
7.2 Create a New Basal Program
Purpose To create up to four basal programs that suit your lifestyle, using the Aviator Companion.
When Do this procedure:
Whenever you need to create a weekend, exercise, sick day, or custom-named basal pro-•
gram, in addition to your daily basal program.
Materials Your companion with battery charged and initial basal settings programmed.•
Your pump with the battery installed and initial basal settings programmed.•
Healthcare professional’s recommendations for your basal settings for the pump in • Sec-
tion 12 - Appendix A.
Helpful Information
The • Create program is one of the Modify program options from the BASAL MENU. The other Modify program
options are Edit program, Rename program and Delete program.
You should consult your healthcare professional before creating any new basal programs.
•
Procedure:
Steps Do This
Access BASAL MENU 1.
from Home screen. Notice a. Main is highlighted.
Press b. Enter button.
Scroll to highlight c. BASAL.
Press d. Enter button.
Access 2. MODIFY
PROGRAM menu. Scroll to highlight a. MODIFY.
Press b. Enter button.
Section 7: Creating and Editing Specialized Basal Programs to Meet Your Needs
7.2 Create a New Basal Program
Section 7: Creating and Editing Specialized Basal Programs to Meet Your Needs
7.2 Create a New Basal Program
DOC15736_Rev-A-Man.indd 171-172 2/9/09 11:29:49 AM
173
174
Steps Do This
Access CREATE 3.
PROGRAM menu. Scroll to highlight a. CREATE.
Press b. Enter button.
Decide the type of 4.
program to create. If you want to
create
Then do this
Weekend basal
program
Notice Weekend is highlighted.
Press Enter button.
Exercise basal
program
Scroll to highlight Exercise.
Press Enter button.
Sick day basal
program
Scroll to highlight Sick.
Press Enter button.
Custom-named
basal program
Scroll to highlight 1. Custom.
Press 2. Enter button.
Scroll to highlight each letter and press the 3. Enter
button each time, as you spell out the name for your
customized program, for example, Travel.
Note: The rst letter and a letter following a space is
automatically capitalized.
Note: To clear an entry if you make a mistake, highlight
Erase and press the Enter button to erase the last letter
entered as needed.
Scroll to highlight 4. Next when you are done.
Press 5. Enter button.
Note: If you try to create more than 4 programs, the WARNING screen and the “Max
number of programs already exist.” message displays.
Notice that OK is highlighted, press Enter button to continue.
Steps Do This
Set Time for BLOCK 1.5.
Notice a. Time dashed line is highlighted.
Press b. Enter button.
Notice c. Time is highlighted.
Press d. Enter button.
Scroll to select desired start time for the block.e.
Press f. Enter button.
Set Rate for BLOCK 1.6.
Notice a. Rate is highlighted.
Press b. Enter button.
Scroll to select desired rate of insulin per hour.c.
Press d. Enter button.
Note: At least ONE block must be added. If NO additional blocks are added, the first
block will prevail for 24 hours.
Section 7: Creating and Editing Specialized Basal Programs to Meet Your Needs
7.3 Select a Basal Program
Section 7: Creating and Editing Specialized Basal Programs to Meet Your Needs
7.3 Select a Basal Program
DOC15736_Rev-A-Man.indd 173-174 2/9/09 11:29:49 AM

175
176
Steps Do This
Decide whether to add 7.
or delete new blocks. If you want to Then do this
Add another
time block and
basal rate
Notice 1. Next is highlighted
Press 2. Enter button.
Notice 3. Add block is highlighted.
Press 4. Enter button.
Repeat Steps 5 and 6 to add additional time blocks and 5.
basal rates.
Delete the time
block and basal
rate you just
created
Scroll to highlight 1. Delete.
Press 2. Enter button.
Notice the 3. CONFIRM screen and “Delete block?”
message displays.
Scroll to highlight 4. Yes.
Press 5. Enter button.
Add only ONE
block and/or be
nished with all
your edits
Scroll to highlight Done if not already highlighted.
Press Enter button and return to the Home screen.
Check your work.8. Review the program you have just created. Refer to Section 3.1.2 View Basal
Program for the procedure as needed.
Record your personalized basal rate information for the new basal program(s) in
the Table of Settings in Section 12 - Appendix A
7.3 Select a Basal Program
Purpose To activate the dierent basal programs by selecting and choosing between them using your
Aviator Companion.
When Do this procedure:
Whenever you need to change your active basal program.
•
Materials Your companion and pump fully operating with daily basal already started.•
Your companion and pump with additional programs created, such as Weekend, Exercise, •
Sick day, or your custom-named program.
Instructions or assistance from your healthcare professional.
•
Your personalized Table of Settings in • Section 12 - Appendix A.
Helpful Information
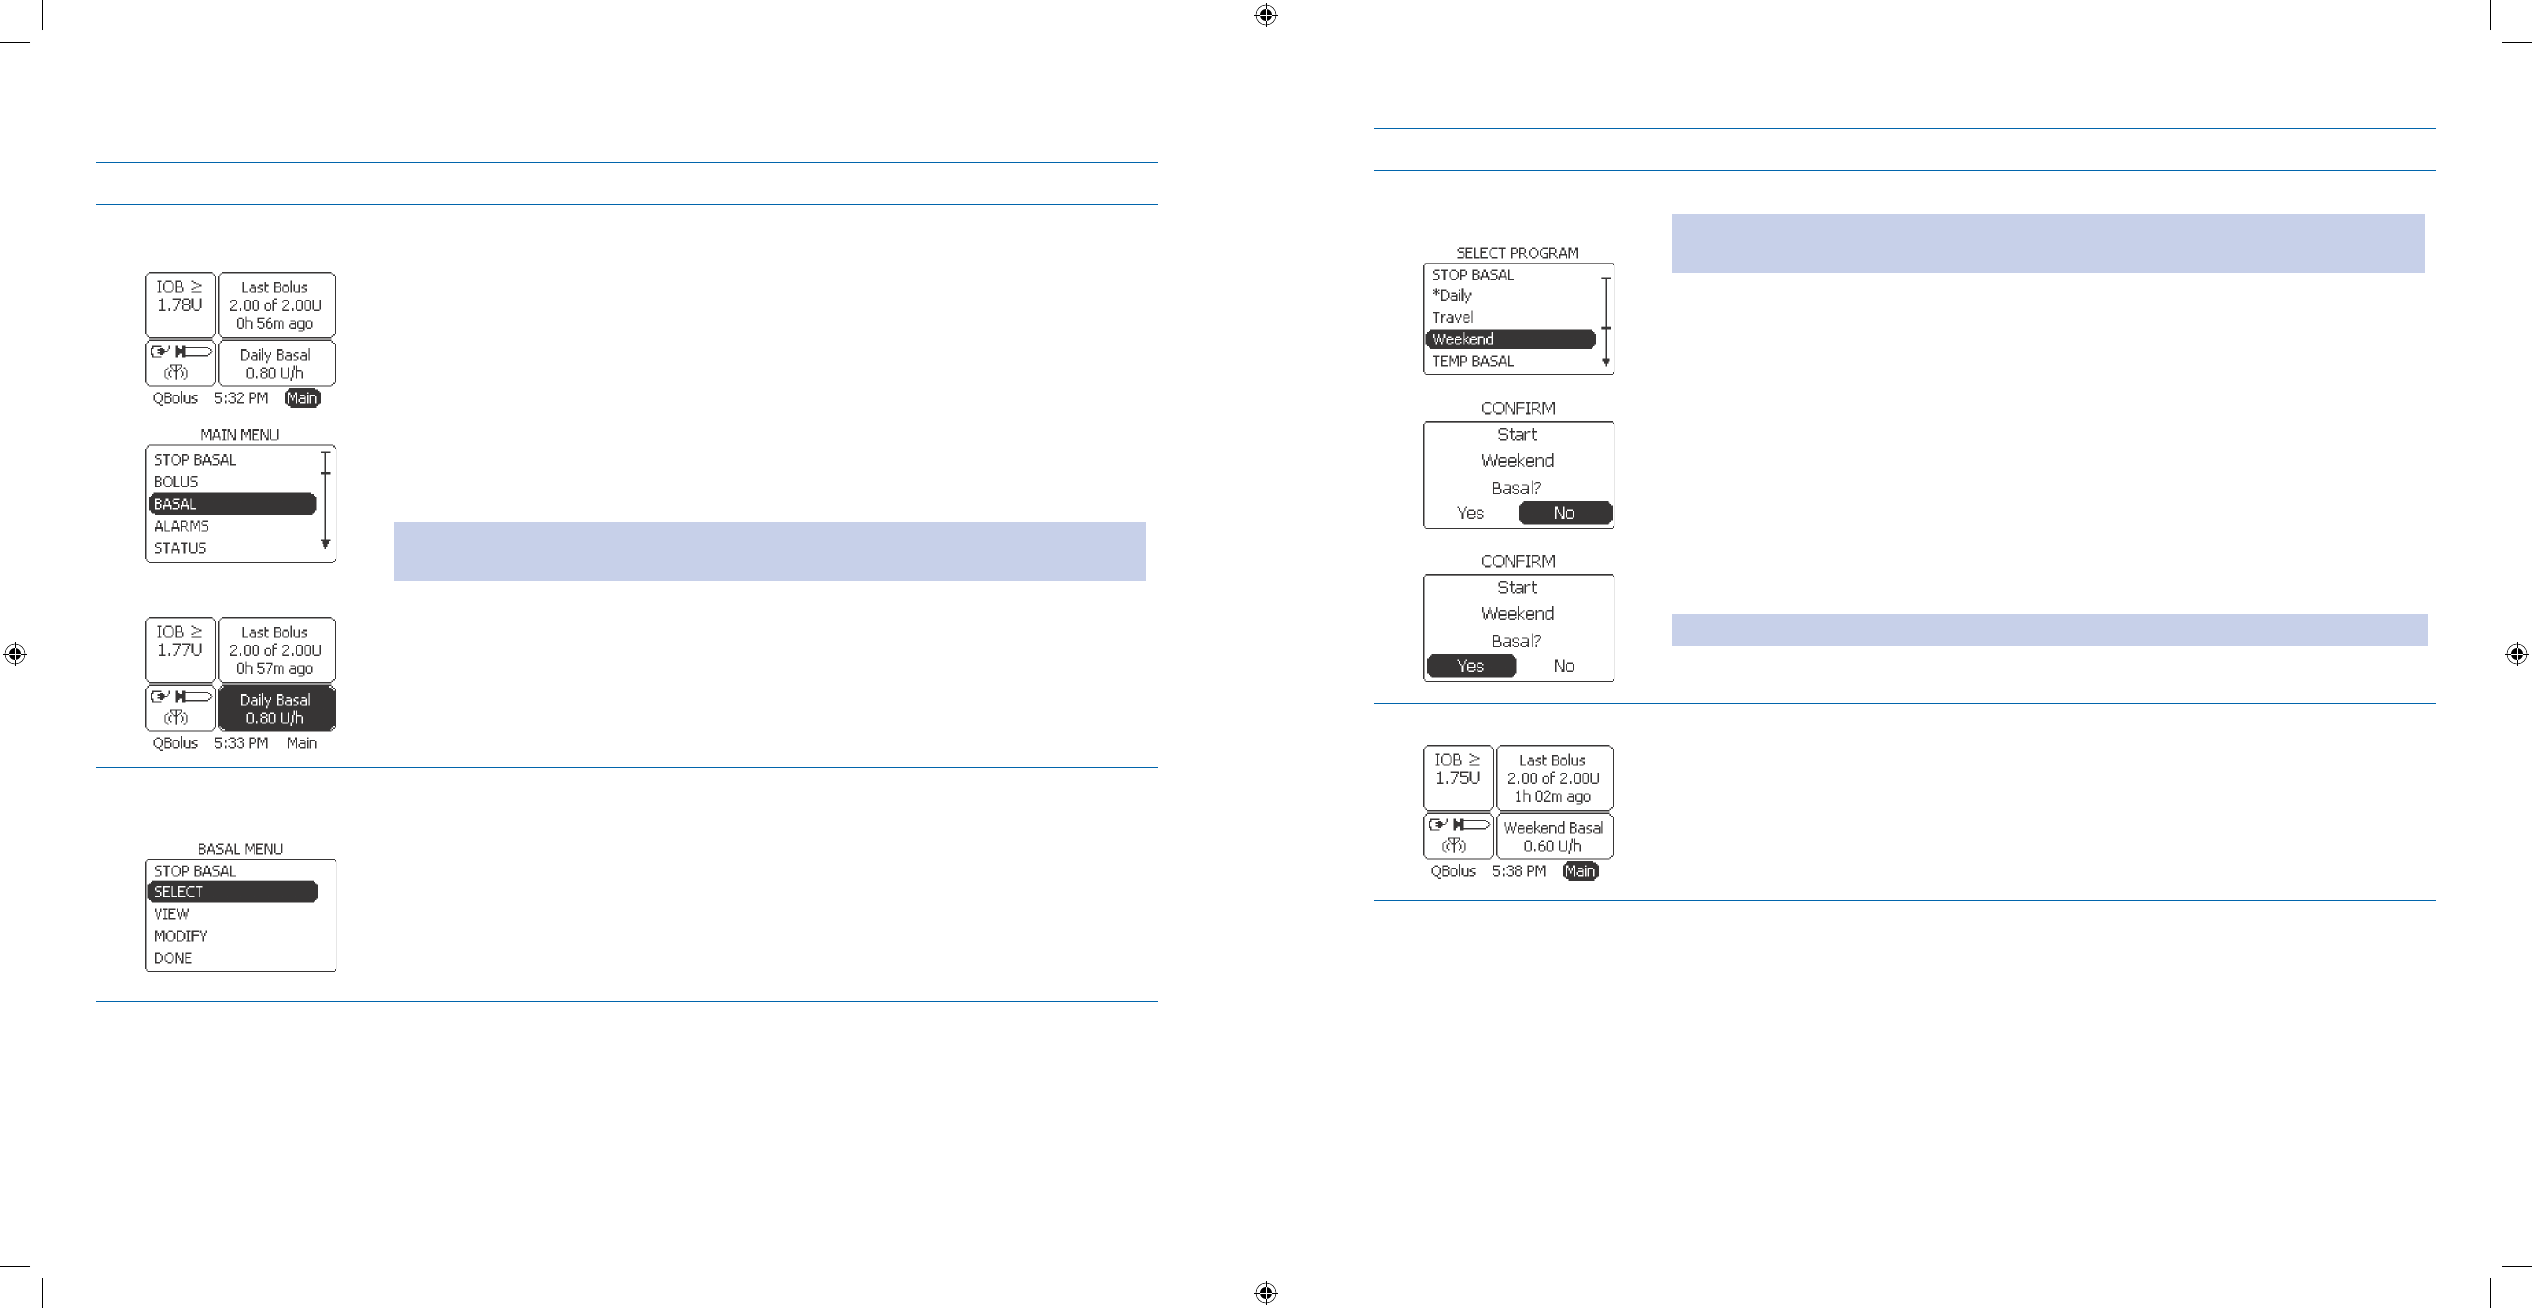
The system allows you to program multiple basal proles. The one you select is called the “active” program. •
When viewing your basal programs, the currently running active program will have an asterisk (*) to the left of
the name.
Important Note: It is strongly recommended that you and your healthcare professional work on ne tuning your
basal rates. Always notify your healthcare professional if you make changes to prescribed plans of care.
Section 7: Creating and Editing Specialized Basal Programs to Meet Your Needs
7.4 Rename a Basal Program
Section 7: Creating and Editing Specialized Basal Programs to Meet Your Needs
7.3 Select a Basal Program
DOC15736_Rev-A-Man.indd 175-176 2/9/09 11:29:49 AM
177
178
Procedure:
Steps Do This
Access BASAL MENU 1.
from Home screen.
OR
Maina. is highlighted.
Press b. Enter button.
Scroll to highlight c. BASAL.
Press d. Enter button.
OR
Note: This is a short cut to get to the SELECT PROGRAM screen when basal is
delivering.
Scroll to select the a. Basal panel on the Home screen.
Press b. Enter button.
Go to Step 3c.
Access 2. SELECT PROGRAM
menu. Scroll to highlight a. SELECT.
Press b. Enter button.
Steps Do This
Select the program that 3.
you want to be active. Note: In this example, the Daily program is the currently active program running,
because it has an * beside “Daily.”
Scroll to highlight the desired program, for example, Weekend.a.
Press b. Enter button.
Notice the c. CONFIRM screen and “Start (your selected) program?” message
displays.
Scroll to highlight d. Yes.
Press e. Enter button.
Note: You will hear four short confirmation beeps from your pump.
Check your work.4.
Verify that the Home screen displays the active basal program you have just
selected.
Section 7: Creating and Editing Specialized Basal Programs to Meet Your Needs
7.4 Rename a Basal Program
Section 7: Creating and Editing Specialized Basal Programs to Meet Your Needs
7.4 Rename a Basal Program
DOC15736_Rev-A-Man.indd 177-178 2/9/09 11:29:50 AM
179
180
7.4 Rename a Basal Program
Purpose To rename an existing basal program of your pump using your Aviator Companion.
When Do this procedure:
When you CHOOSE to rename a previously created existing basal program.
•
Materials Your companion with battery charged and basal settings programmed.•
Your pump with the battery installed and basal settings programmed.•
Your pump with basal programs that have already been created and named.•
Your personalized Table of Settings in • Section 12 - Appendix A.
Helpful Information
The• Rename program is one of the Modify program options in the Basal menu. The other Modify program op-
tions are Edit program, Create program and Delete program.
Procedure:
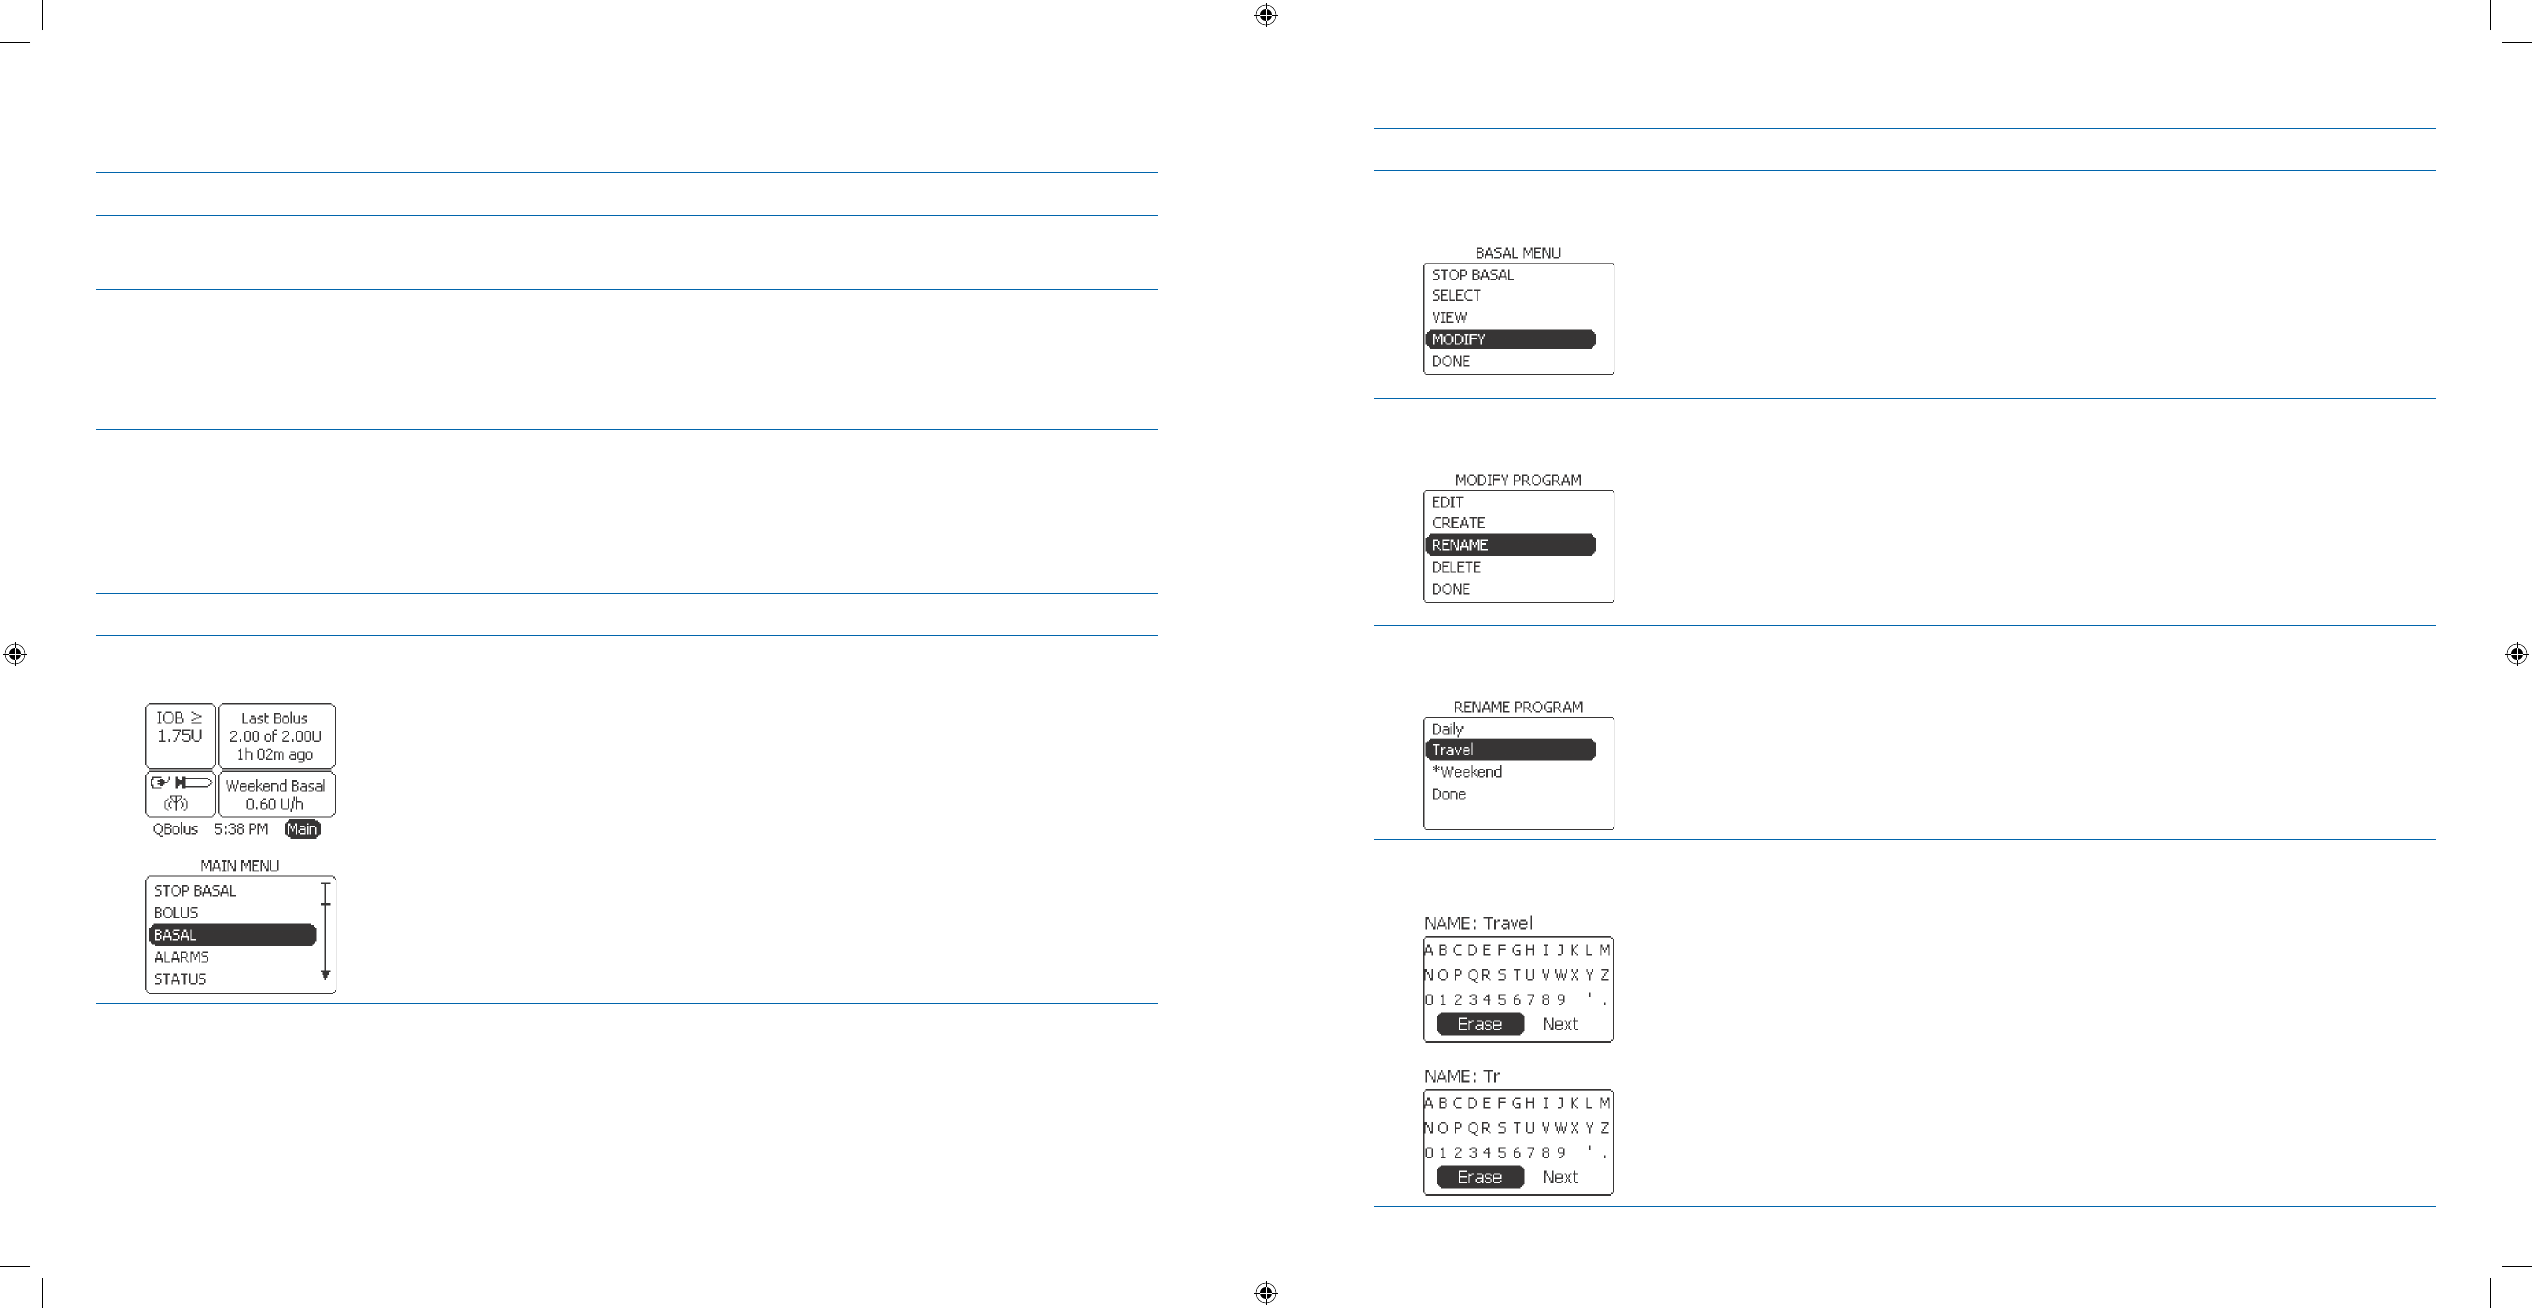
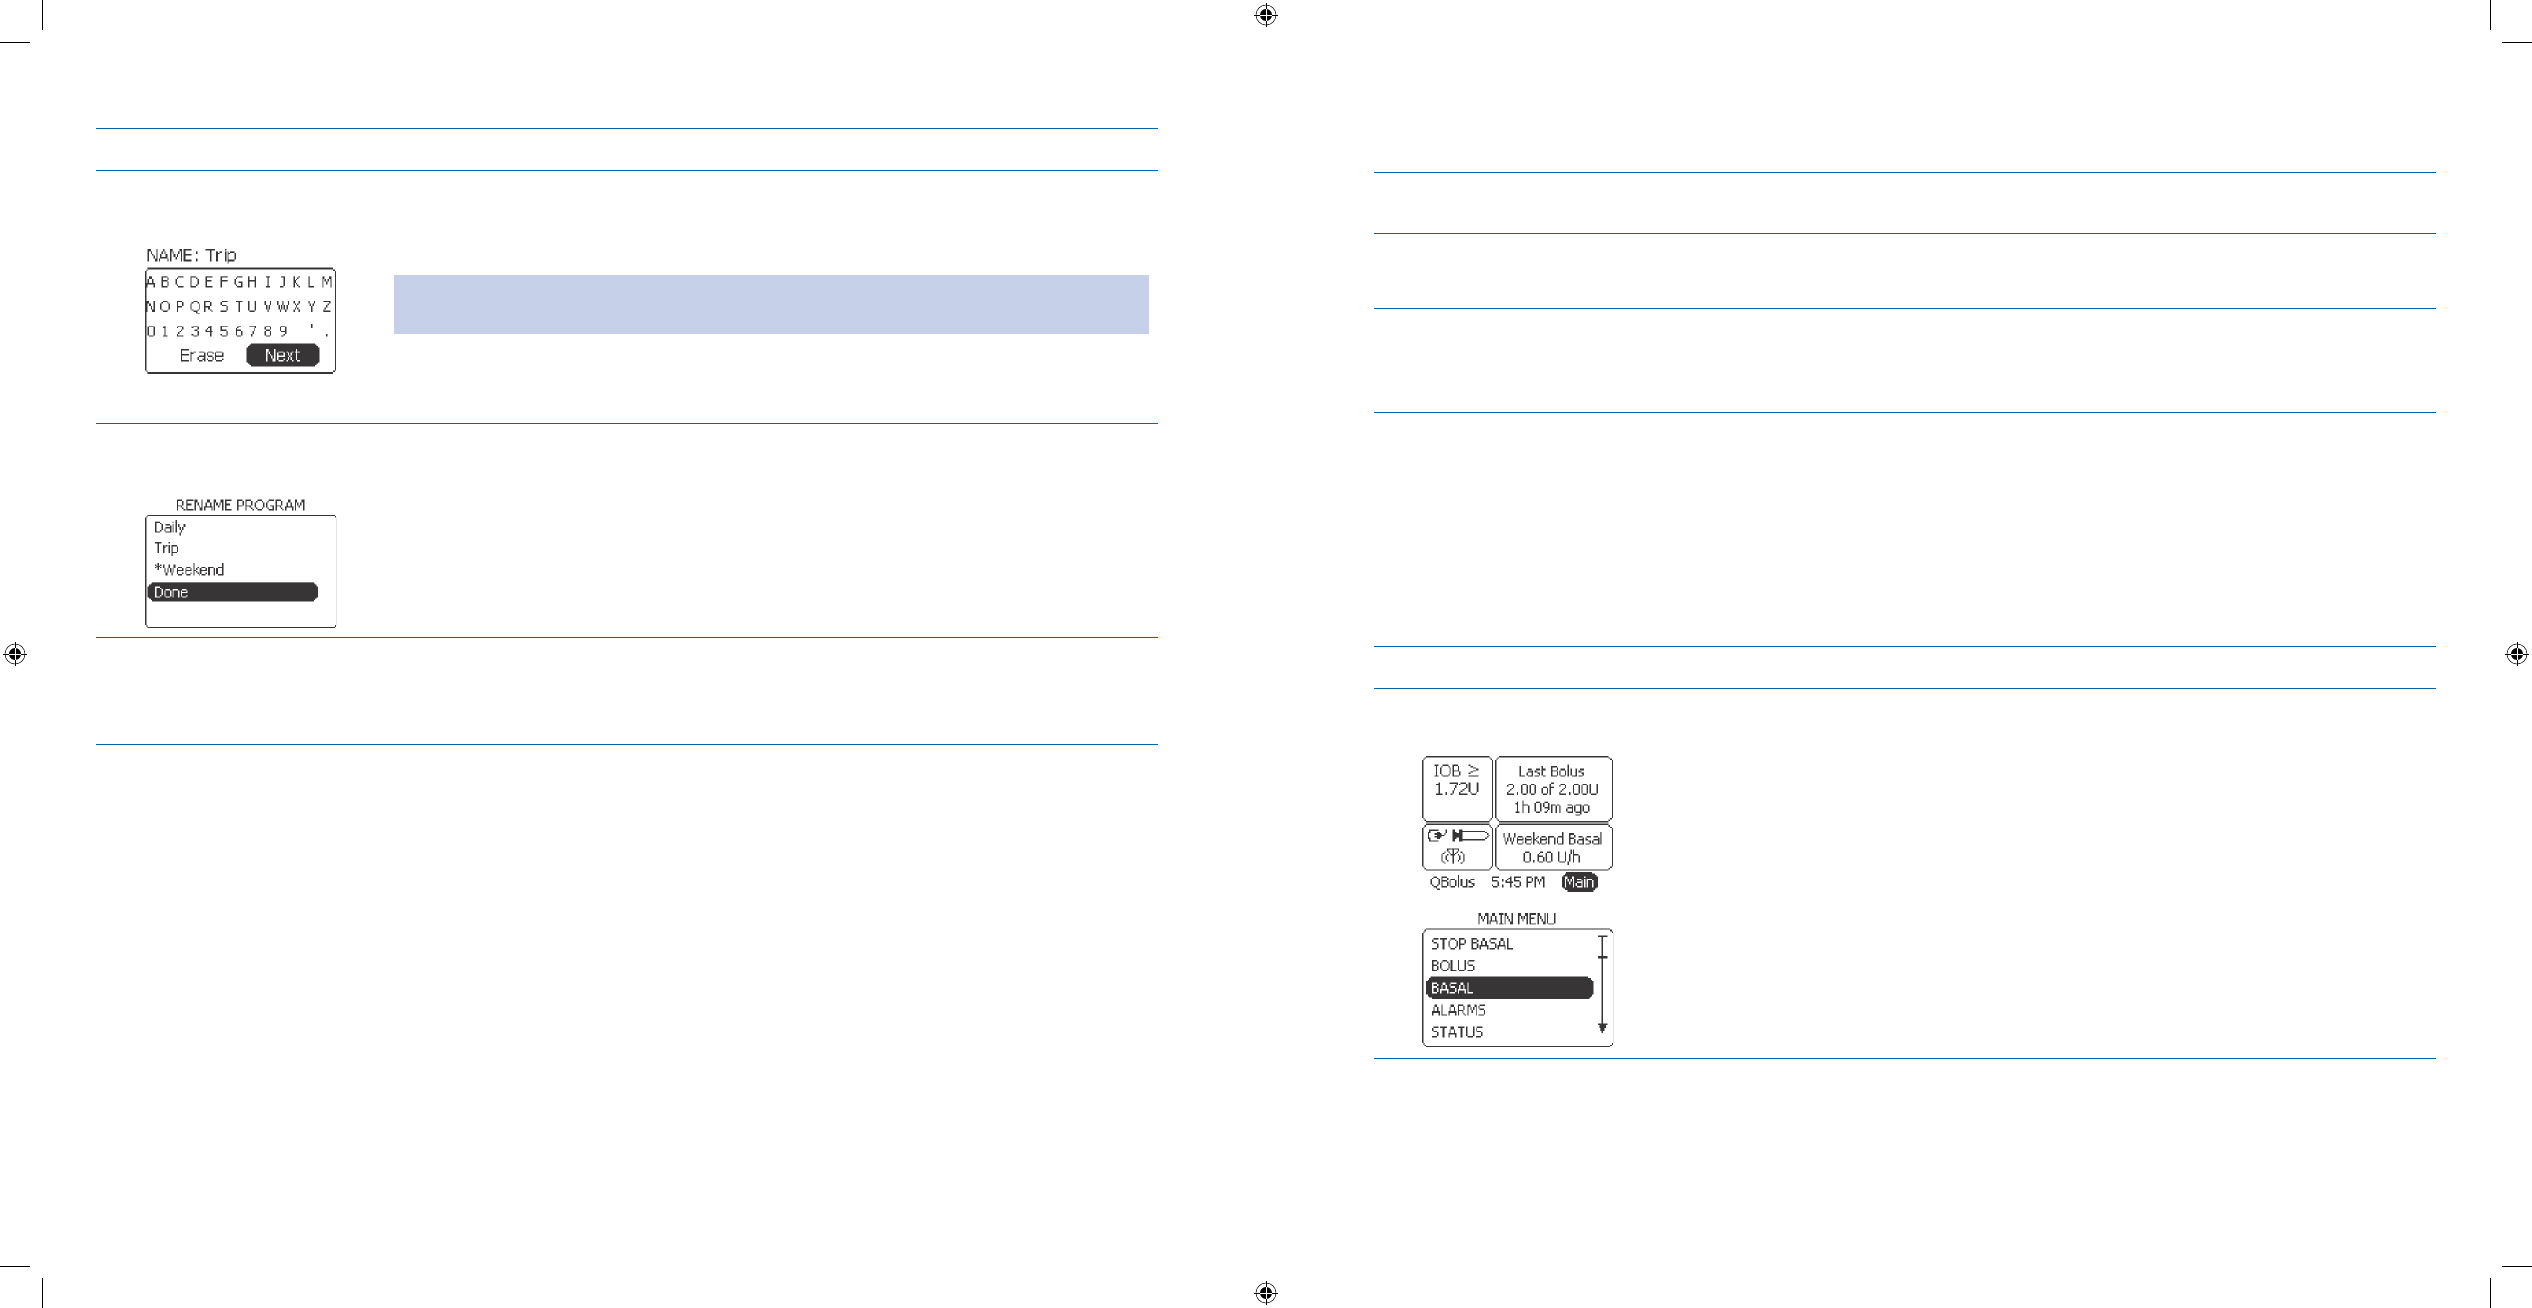
Steps Do This
Access 1. BASAL Menu
from Home screen. Notice a. Main is highlighted.
Press b. Enter button.
Scroll to highlight c. BASAL.
Press d. Enter button.
Steps Do This
Access MODIFY 2.
PROGRAM menu. Scroll to highlight a. MODIFY.
Press b. Enter button.
Access 3. RENAME
PROGRAM screen. Scroll to highlight a. RENAME.
Press b. Enter button.
Select program to 4.
rename. Scroll to highlight the program you want to rename.a.
Press b. Enter button.
Delete existing 5.
program name. Scroll to highlight a. Erase.
Keep pressing the b. Enter button to erase each letter of the old program name.
Section 7: Creating and Editing Specialized Basal Programs to Meet Your Needs
7.5 Delete a Basal Program
Section 7: Creating and Editing Specialized Basal Programs to Meet Your Needs
7.5 Delete a Basal Program
DOC15736_Rev-A-Man.indd 179-180 2/9/09 11:29:50 AM
181
182
Steps Do This
Create new program 6.
name. Scroll to highlight each letter and press the a. Enter button each time to spell
out the new program name.
Note: To clear an entry if you make a mistake, highlight Erase and press the Enter
button to erase the last letter entered as needed.
Scroll to highlight b. Next.
Press c. Enter button.
Complete the name 7.
change. Scroll to highlight a. Done.
Press b. Enter button to return to the Home screen.
Check your work.8. Review the program you have just renamed. Go to Section 3.1.2 View Basal
Program for the procedure.
Record the names and what they mean in your Table of Settings in Appendix A.
7.5 Delete a Basal Program
Purpose To remove (delete) a basal program already programmed into your pump using your Aviator
Companion.
When Do this procedure:
Whenever you need to delete an existing basal program.
•
Materials Your companion with battery charged and basal settings programmed.•
Your pump with the battery installed and basal settings programmed.•
Instruction or assistance from your healthcare professional.•
Helpful Information
The • Delete program is one of the Modify program options. The other Modify program options are Edit pro-
gram, Create program, and Rename program.
You
• CANNOT delete a basal program that is active.
Consult your healthcare professional before deleting any of your basal programs.
•
Procedure:
Steps Do This
Access 1. BASAL menu
from Home screen. Notice a. Main is highlighted.
Press b. Enter button.
Scroll to highlight c. BASAL.
Press d. Enter button.
Section 7: Creating and Editing Specialized Basal Programs to Meet Your Needs
7.6 Set a Temporary Basal Program
Section 7: Creating and Editing Specialized Basal Programs to Meet Your Needs
7.5 Delete a Basal Program
DOC15736_Rev-A-Man.indd 181-182 2/9/09 11:29:50 AM
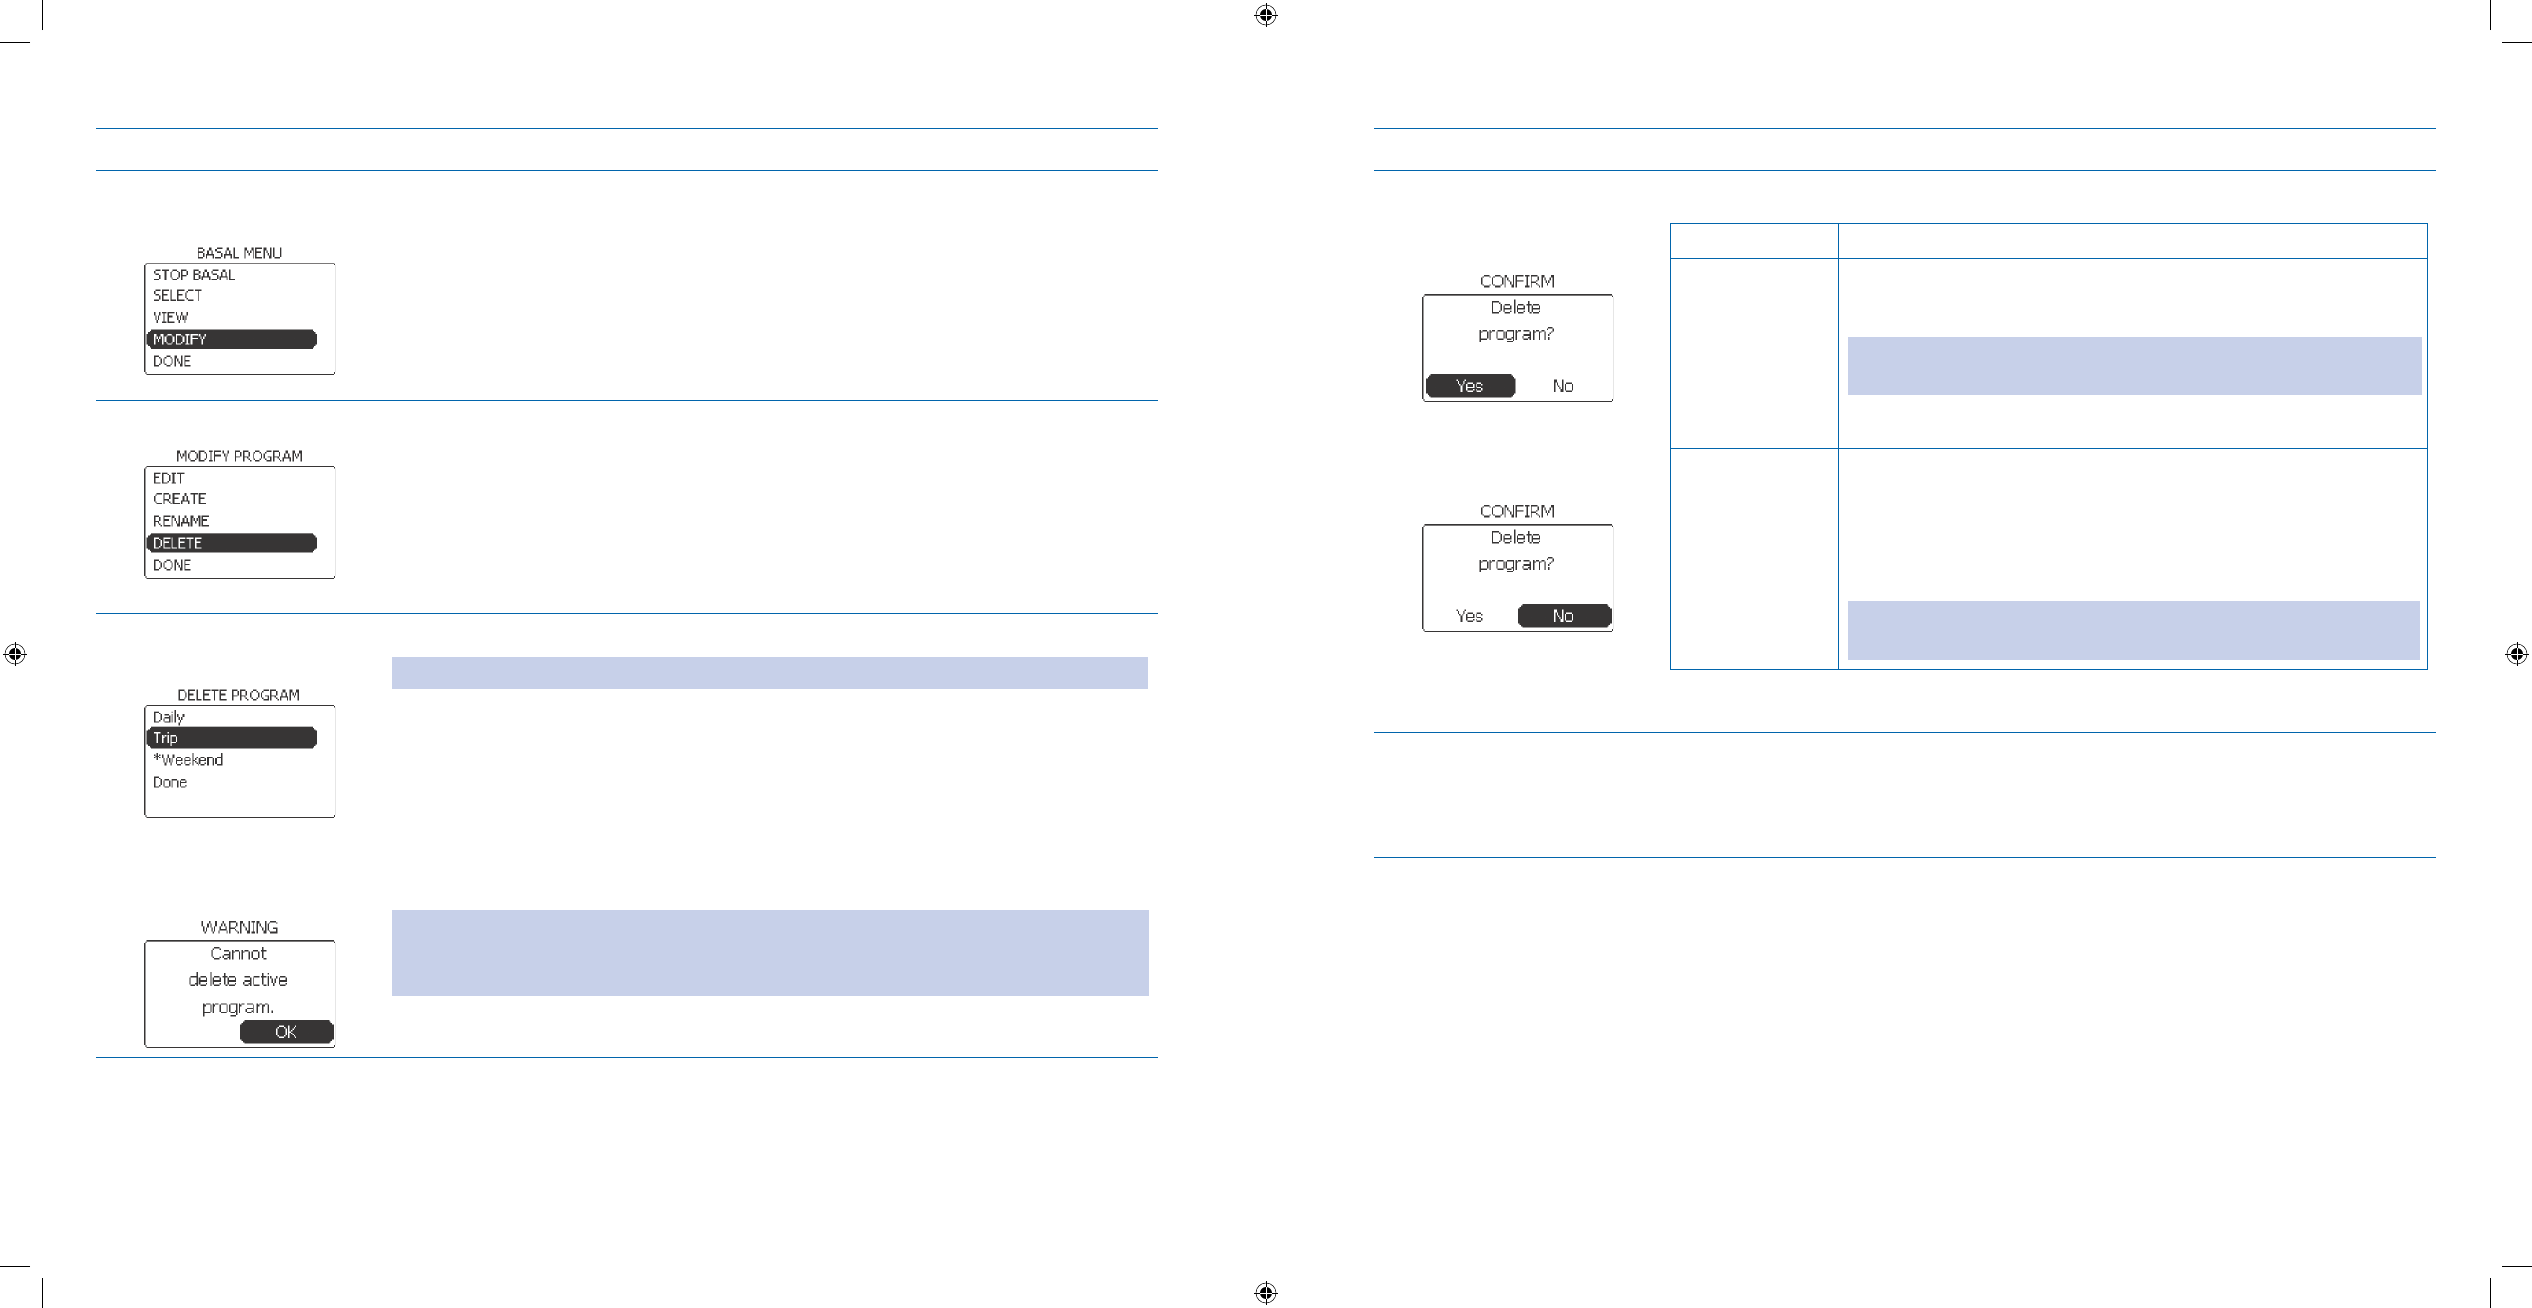
183
184
Steps Do This
Access 2. MODIFY
PROGRAM menu. Scroll to highlight a. MODIFY.
Press b. Enter button.
Select 3. DELETE program.
Scroll to highlight a. Delete.
Press b. Enter button.
Select program to 4.
delete.
Scroll to highlight the program you wish to delete. For example, Trip.a.
Note: You CANNOT delete an active program, indicated with an asterisk *.
Press b. Enter button.
Note: If you get this warning screen with OK highlighted, press Enter to clear the
warning and return to the Home screen. Start over at Step 1 to delete a program that
is NOT active.
Steps Do This
Decide what to do 5.
next.
Notice the CONFIRM screen with “Delete program?” message displays.
If you want to Then do this
Delete the
program
Scroll to highlight 1. Yes.
Press 2. Enter button.
Note: The program is deleted from the pump’s memory and you
will return to the Home screen.
Go to Step 6 to check your work.3.
Cancel deleting
the program
Notice 1. No is highlighted.
Press 2. Enter button.
Scroll to Highlight 3. Done.
Press 4. Enter button.
Note: You will return to the Home screen. Your deletion is
cancelled and the program is still an option
Check your work.6. Verify that you have deleted the program.
The program you deleted should NOT be listed when you review basal programs.
Refer to Section 3.1.2 View Basal Program for the procedure as needed.
Section 7: Creating and Editing Specialized Basal Programs to Meet Your Needs
7.6 Set a Temporary Basal Program
Section 7: Creating and Editing Specialized Basal Programs to Meet Your Needs
7.6 Set a Temporary Basal Program
DOC15736_Rev-A-Man.indd 183-184 2/9/09 11:29:50 AM

185
186
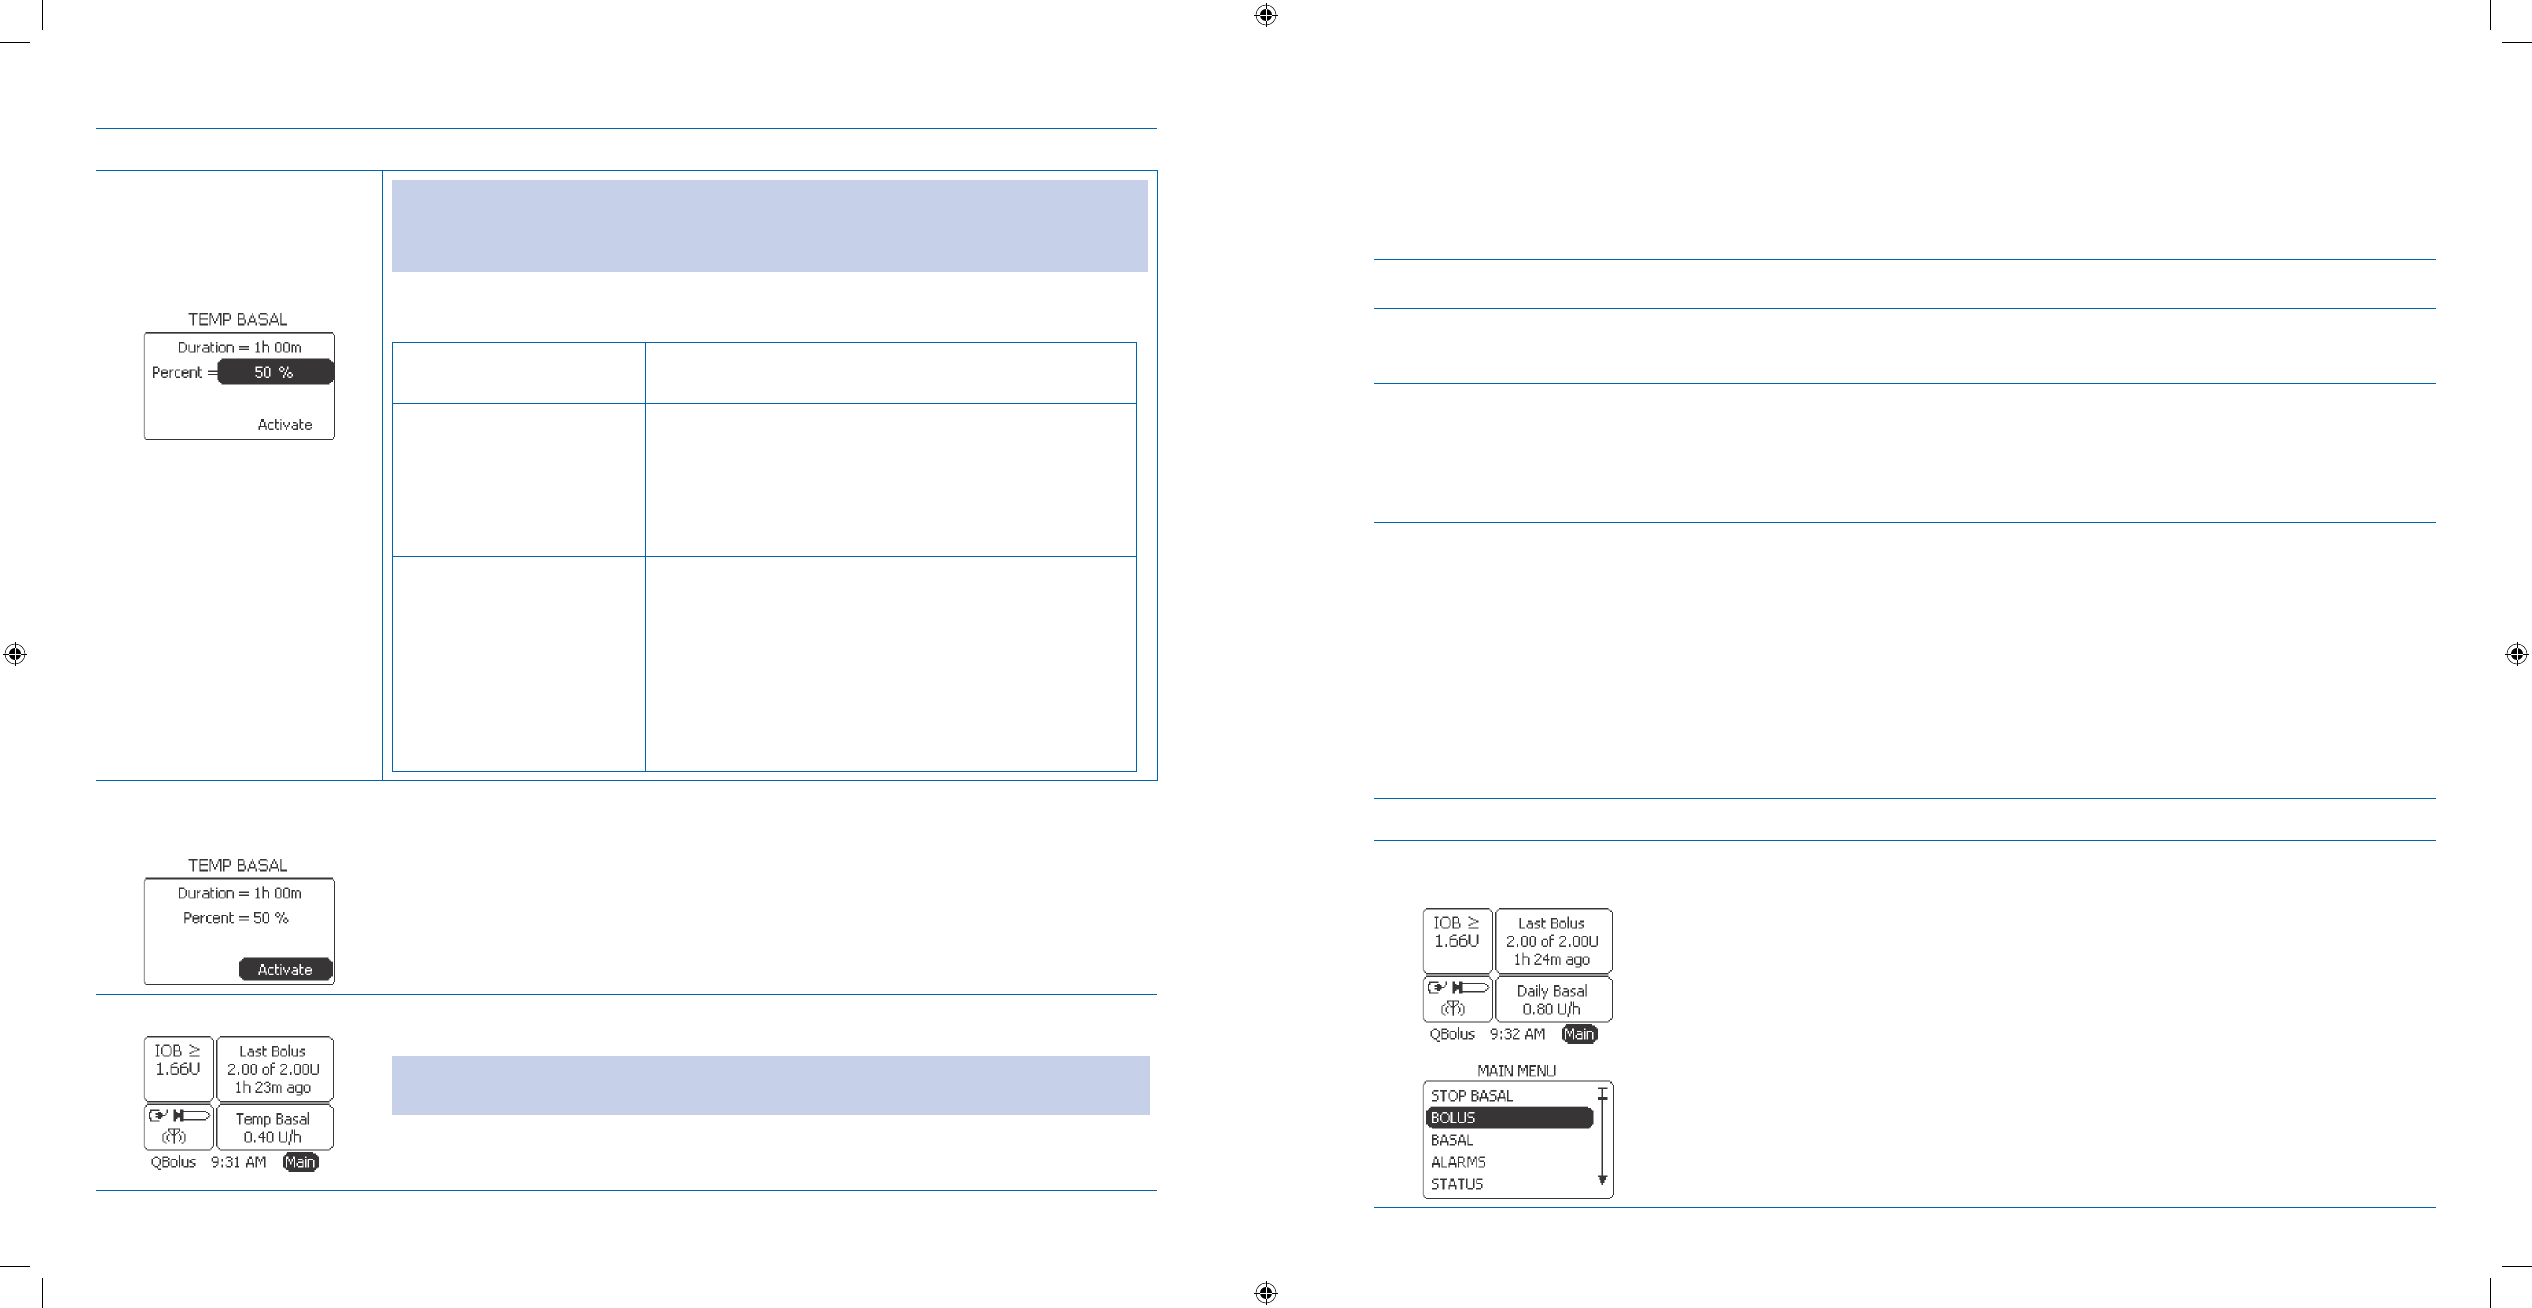
7.6 Set a Temporary Basal Program
Purpose To program a temporary basal rate and the length of time you want the temporary basal rate
to last, using your Aviator Companion.
When Do this procedure:
When you want to make a one time, temporary change to the currently delivered basal
•
rate, for example, when you exercise or when you are sick.
Materials Your companion and pump fully operating and delivering basal insulin.•
Healthcare professional’s instructions for your temporary basal pump settings.•
Your personalized Table of Settings in • Section 12 - Appendix A.
Helpful Information
A temporary basal rate is in eect from 30 minutes to 72 hours in increments of 30 minutes. This temporary rate is
limited by the set up of your pump’s maximum basal rate setting (Refer to Section 6).
If you have NOT modied your maximum basal delivery rate, you will be allowed to increase your basal rate to a
value up to 30 units per hour (default). If you set up a dierent maximum basal delivery rate, you can only set the
temporary rate to that number of units/hour maximum limit.
Example A:
You set your basal rate increment to 0.1 units/hour.1.
You modied your maximum basal rate to 5.0 units/hour.2.
Your regular daily basal rate is set at 0.5 units/hour.3.
Setting a temporary basal rate of 10% for a duration of 3 hours would result in a temporary basal rate of 0.05
units/hour.
If the desired temporary basal delivery rate is higher than the maximum basal rate of your pump settings, your
pump will NOT deliver the requested temporary rate.
Example B:
You set your basal rate increment to 3.0 units/hour.1.
You modied your maximum basal rate to 5.0 units/hour, telling the pump that you never want to have a 2.
basal rate to exceed 5.0 units/hour.
If you set a 200% temporary basal, this will result in a basal rate of 6.0 units/hour. This is more than the basal
maximum, so it would NOT be allowed by the pump. Your pump will beep and display a “Warning: invalid %
Maximum rate exceeded” screen. You will have to increase the basal maximum and reset a temporary basal rate
within the range for it to take eect.
You may choose either specic units/hour OR a percentage of your current active basal rate.
•
The active basal program will resume when the temporary basal delivery is either manually stopped or reaches •
completion of duration.
Refer to • Section 11 for more information on how to set temporary basal to manage exercise or illness.
Procedure:
Steps Do This
Access 1. BASAL MENU
from Home screen. Notice a. Main is highlighted.
Press b. Enter button.
Scroll to highlight c. BASAL.
Press d. Enter button.
Choose SELECT 2.
program. Scroll to highlight a. SELECT.
Press b. Enter button.
Select 3. TEMP BASAL.
Scroll to highlight a. TEMP BASAL.
Press b. Enter button.
Set Duration.4. Notice a. Duration is highlighted.
Press b. Enter button.
Scroll to select the amount of time you want your temporary basal to be in c.
effect.
Note: The range is 30 minutes to 72 hours.
Press d. Enter button.
Section 8: Creating and Editing Specialized Bolus Programs to Meet Your Needs
8.1 Deliver an Extended Bolus
Section 8: Creating and Editing Specialized Bolus Programs to Meet Your Needs
8.1 Deliver an Extended Bolus
DOC15736_Rev-A-Man.indd 185-186 2/9/09 11:29:50 AM
187
188
Steps Do This
Decide to set Percent 5.
or Rate. Caution: When setting a temporary basal percent, make sure that you are setting the
percentage of your basal that will be delivered, and NOT the percentage reduction in
your basal rate.
Example: If your active basal rate is 0.35 U/h, then selecting 75% will set the
temporary basal at 0.26 U/h, which is 75% of the current basal.
If you want to set the
temporary basal
Then do this
At a percentage of the
current rate
Notice 1. Percent is highlighted.
Press 2. Enter button.
Scroll to select the desired percentage of the 3.
active basal rate.
Press 4. Enter button.
As a set rate Notice 1. Percent is highlighted.
Press 2. Enter button.
Scroll to highlight 3. Rate.
Press 4. Enter button.
Scroll to select the desired units per hour for 5.
the temporary basal delivery.
Press 6. Enter button.
Conrm and activate 6.
Temp Basal. Verify the duration and percentage/rate is correct.a.
Scroll up to make any changes as needed.b.
Notice c. Activate is highlighted.
Press d. Enter button.
Check your work.7. Notice that the Temp Basal is activated and displayed in the Basal panel on the
Home screen.
Note: When the duration for the temporary basal is over, it will automatically revert
back to your Daily basal program.
Record your personalized temporary basal values in the Table of Settings in
Section 12 - Appendix A.
8 Creating and Editing Specialized Bolus Programs to Meet Your
Needs
8.1 Deliver an Extended Bolus
Purpose To administer an extended bolus from your pump using your Aviator Companion.
When Do this procedure:
Whenever you need to deliver an extended bolus over a period of time.
•
Materials Your companion set up with basal delivery started.•
Your pump set up with basal delivery started.•
Bolus recommendations from your healthcare professional.•
Your personalized Table of Settings in Section 12 - Appendix A.•
Helpful Information
You will perform this task using the companion. To administer an extended bolus using your pump, refer to • Sec-
tion 12.
Bolus insulin is the insulin you program whenever you need insulin other than your basal needs. For example •
you would bolus for a meal or bolus to correct for blood glucose levels that are higher than your target glucose
range. You can record your personalized bolus recommendations in the Table of Settings in Section 12 - Appen-
dix A.
You should have set up your bolus options using the • SETUP WIZARD in Section 6.1.
Procedure:
Steps Do This
Access Bolus Menu 1.
from Home screen. Notice a. Main is highlighted.
Press b. Enter button.
Scroll to highlight c. BOLUS.
Press d. Enter button.
Section 8: Creating and Editing Specialized Bolus Programs to Meet Your Needs
8.1 Deliver an Extended Bolus
Section 8: Creating and Editing Specialized Bolus Programs to Meet Your Needs
8.1 Deliver an Extended Bolus
DOC15736_Rev-A-Man.indd 187-188 2/9/09 11:29:50 AM
189
190
Steps Do This
Select 2. MANUAL Bolus.
Scroll to highlight a. MANUAL.
Press b. Enter button.
Set Extended Bolus 3.
Type. Notice a. Bolus Type is highlighted.
Press b. Enter button.
Scroll to display c. Extended.
Press d. Enter button.
Set Extended Bolus 4.
amount. Notice a. Bolus is highlighted.
Press b. Enter button.
Scroll to select the extended bolus amount you want to deliver.c.
Press d. Enter button.
Set Duration for the 5.
Extended Bolus.
Notice a. Duration is highlighted.
Press b. Enter button.
Scroll to select the duration for extended bolus delivery.c.
Note: The range depends on the amount of the bolus. When divided across the full
duration, the rate is NOT less than 0.05 U/h.
Press Enter button.d.
Steps Do This
Check that Extended 6.
Bolus Type, Bolus
amount and Duration
time is correct.
View a. Bolus Type, Bolus amount, and Duration settings on the BOLUS screen.
Decide if you need to change a setting.b.
If you want to Then do this
Change a setting Scroll up to highlight the setting you want to change.1.
Press 2. Enter button.
Scroll to desired setting.3.
Press 4. Enter button.
Keep the settings Go to the next step.
Deliver Extended 7.
bolus.
Notice a. Deliver is highlighted.
Press b. Enter button.
Notice that the extended bolus is delivering.c.
Allow the extended bolus to deliver the amount that was set for the specified d.
time duration.
Go to Step 10 to check your extended bolus delivery.e.
You have completed delivering an Extended Bolus.
Note: Go to Step 8 only if you want to STOP the Extended Bolus.
Section 8: Creating and Editing Specialized Bolus Programs to Meet Your Needs
8.1 Deliver an Extended Bolus
Section 8: Creating and Editing Specialized Bolus Programs to Meet Your Needs
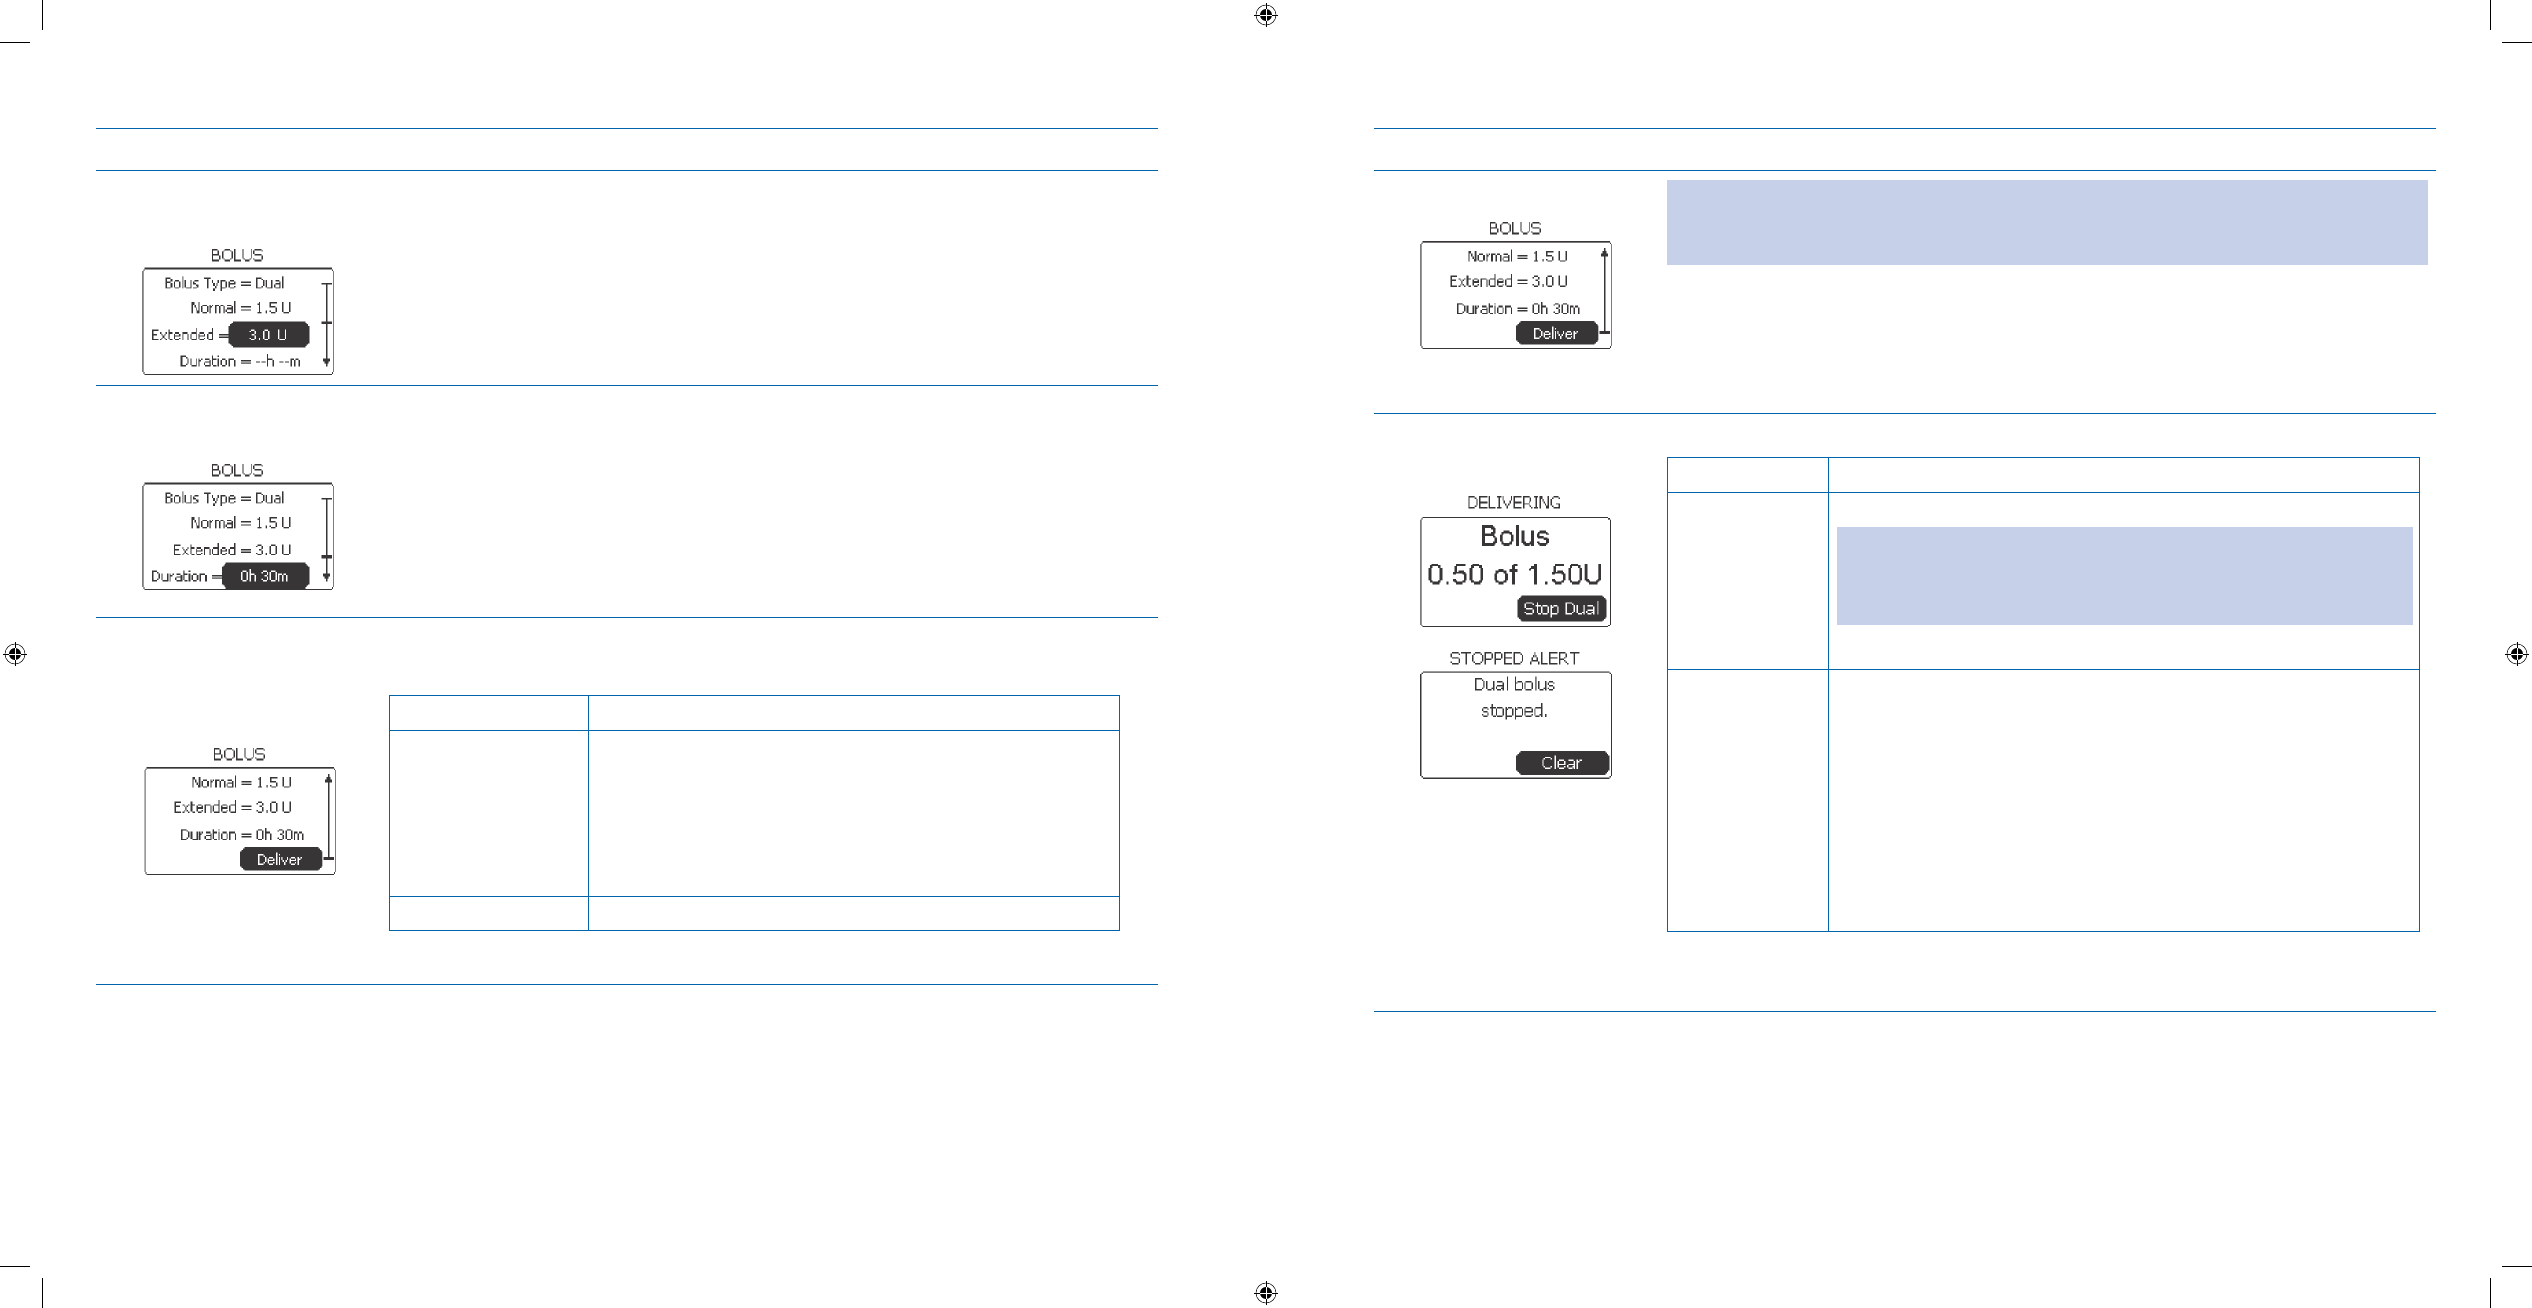
8.2 Deliver a Dual Bolus
DOC15736_Rev-A-Man.indd 189-190 2/9/09 11:29:51 AM
191
192
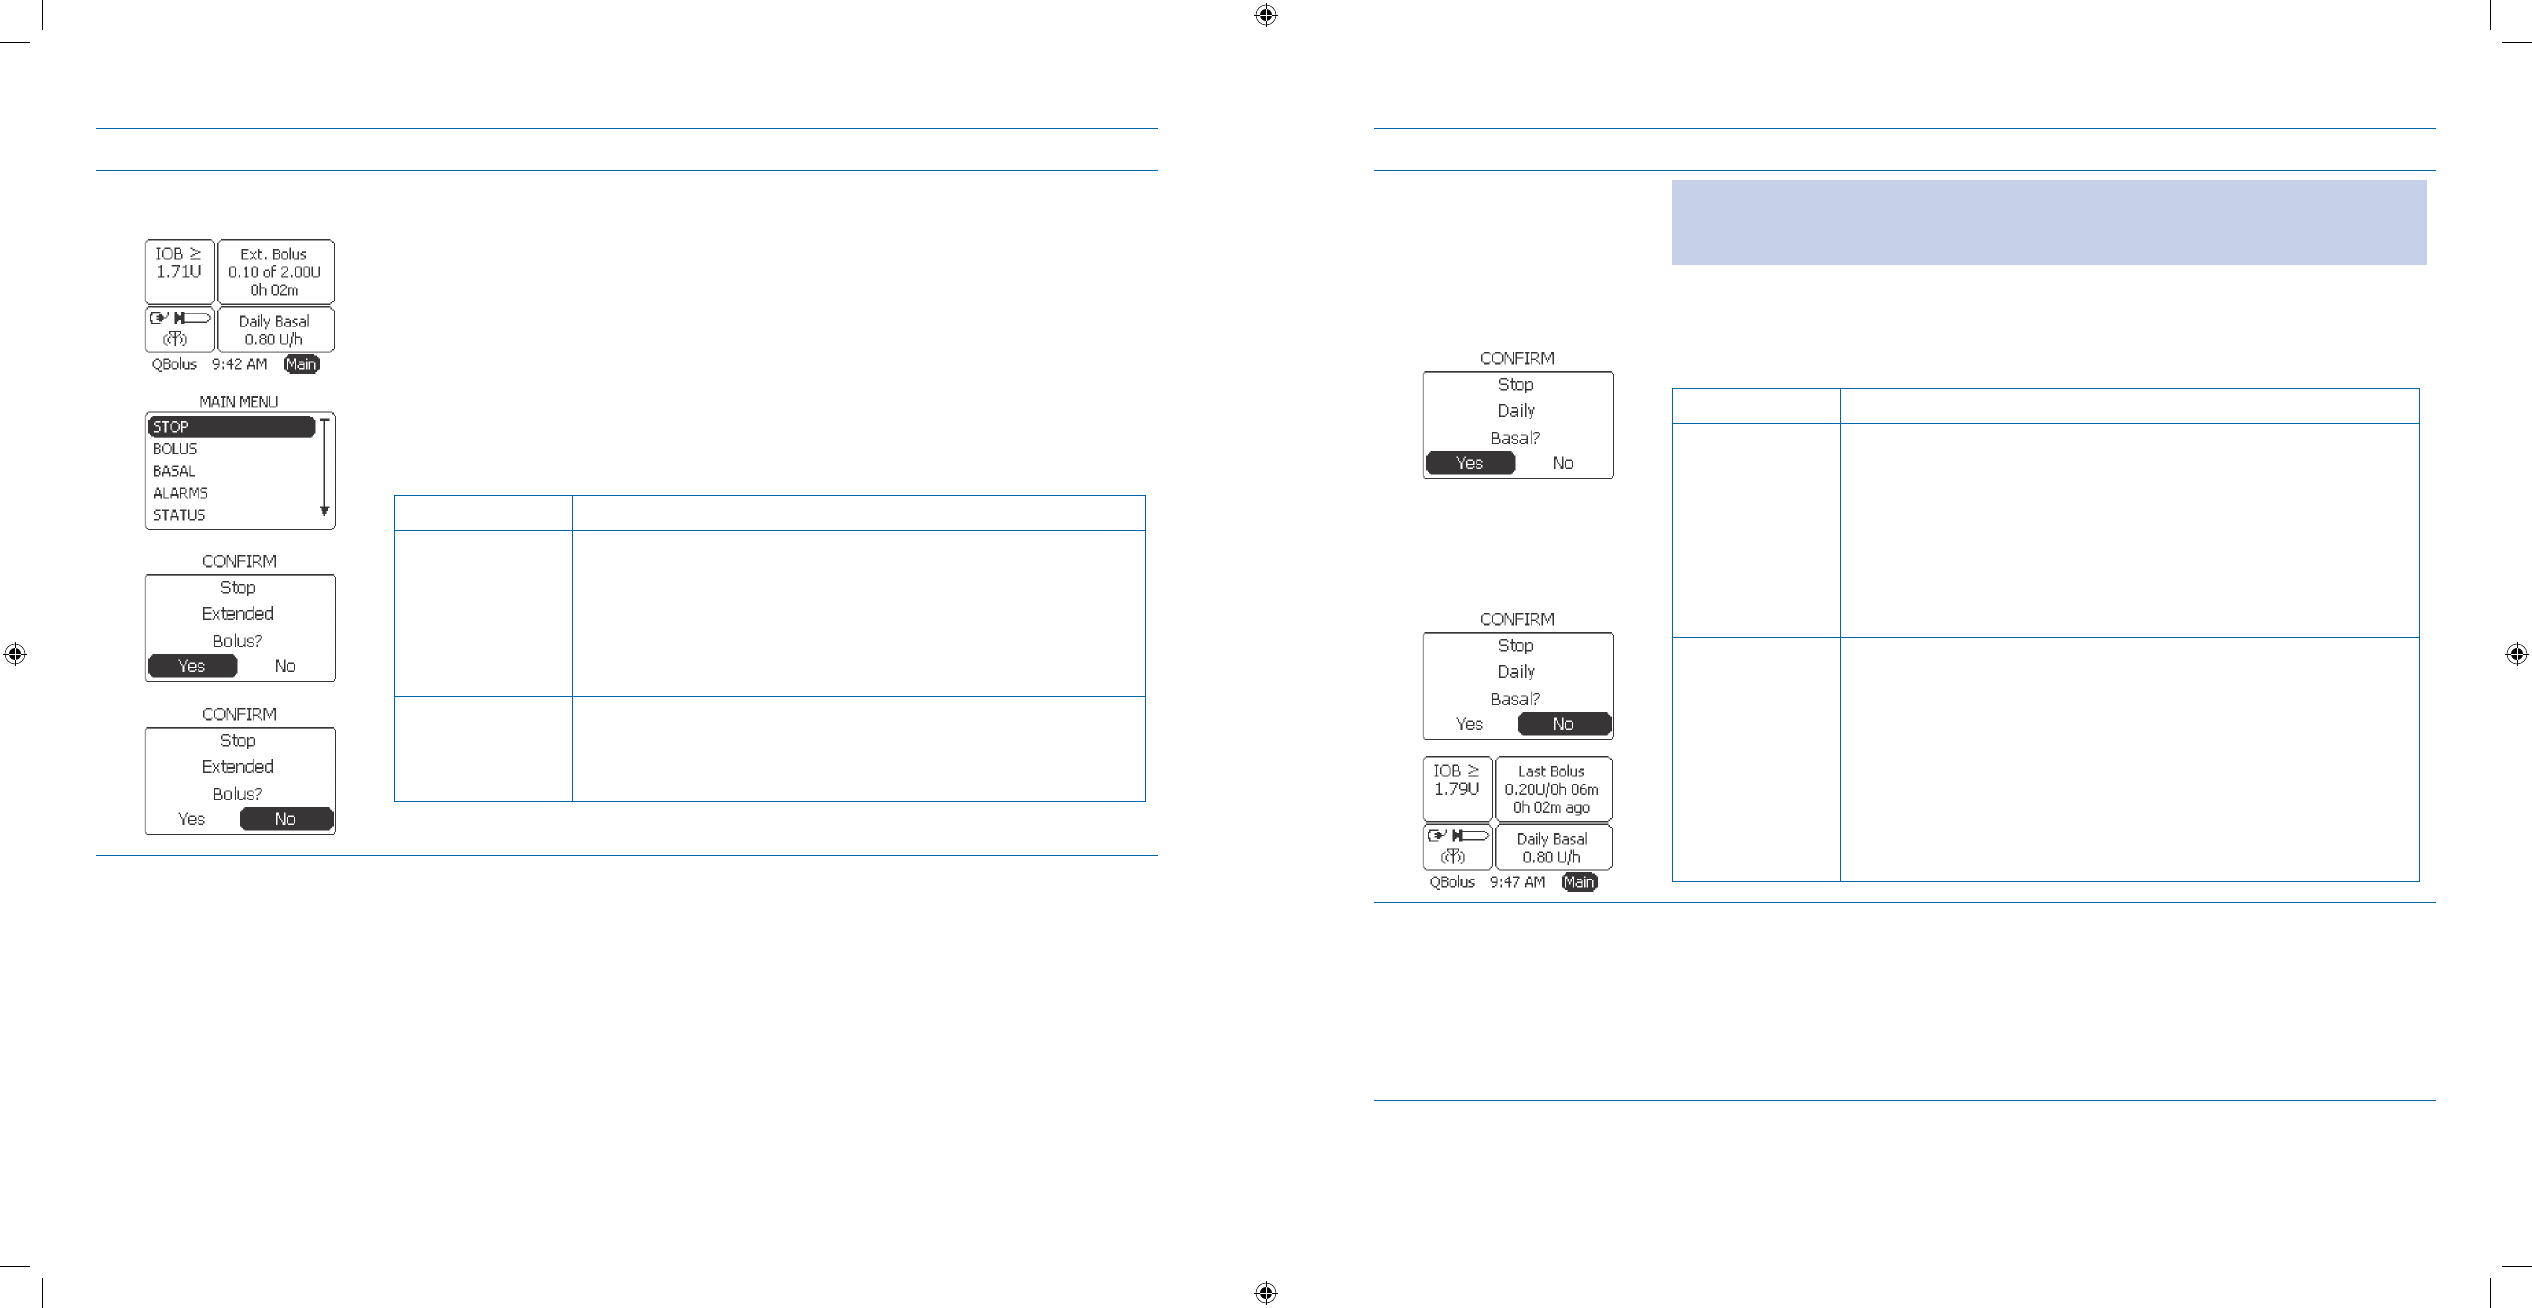
Steps Do This
Decide whether to 8.
STOP extended bolus. Go to the a. MAIN MENU.
Press b. Enter button.
Notice c. STOP is highlighted.
Press d. Enter button.
Decide what to do next.e.
If you want to Then do this
STOP the
extended
bolus delivery
immediately
Scroll to highlight 1. Yes.
Press 2. Enter button.
Continue to Step 9.3.
Allow extended
bolus to nish
delivering
Notice 1. No is highlighted.
Press 2. Enter button to return to the Home screen.
Go to Step 10 to check your extended bolus delivery.3.
Steps Do This
Decide whether to 9.
STOP basal delivery. Note: Unless you had to change the battery, you will normally NOT stop basal
delivery even though the CONFIRM screen and “Stop (your active basal
program)?” message displays.
Notice the a. CONFIRM screen and “Stop (your active basal program)?”
message displays.
Decide what to do next.b.
If you want to Then do this
STOP the basal
delivery now
(e.g. to change
batteries)
Scroll to highlight 1. Yes.
Press 2. Enter button.
Notice that the basal program has stopped on the 3. Home
screen.
You have STOPPED the Extended bolus and also the Basal
delivery. Check with your healthcare professional for
recommendations.
Continue the
basal delivery
Notice 1. No is highlighted.
Press 2. Enter button.
Review the 3. Last Bolus (Ext.) that was administered and
basal is still delivering on the Home screen.
You have STOPPED the Extended bolus but your basal
program is still delivering insulin.
Check your work.10. Check that the extended bolus amount, and time duration is displayed in the
Bolus box on Home screen.
Review the extended bolus amount and time that is being administered.
If you want to STOP the Extended Bolus, go to Step 8.
Section 8: Creating and Editing Specialized Bolus Programs to Meet Your Needs
8.2 Deliver a Dual Bolus
Section 8: Creating and Editing Specialized Bolus Programs to Meet Your Needs
8.2 Deliver a Dual Bolus
DOC15736_Rev-A-Man.indd 191-192 2/9/09 11:29:51 AM

193
194
8.2 Deliver a Dual Bolus
Purpose To administer a dual bolus using your Aviator Companion so that you can deliver
a bolus immediately and also trickle out insulin as the food you eat is converted into
glucose over time. The pump has the option to deliver two waves of insulin over a
period of time. This option is helpful if there are foods in your meal plan that have a
long duration and require longer periods of digestion. These foods will aect your
glucose both immediately and over a number of hours later.
When Do this procedure:
Whenever you need to deliver a dual bolus, which includes a normal bolus and
•
an extended bolus.
Materials Your companion set up with basal delivery started.•
Your pump set up with basal delivery started.•
Bolus recommendations from your healthcare professional.•
Refer to your personalized Table of Settings in • Section 12 - Appendix A as
needed.
Helpful Information
You should have already set up your bolus options via the • SETUP WIZARD. You should record your personalized
list of your bolus options in the Table of Settings in Appendix A. These options can be changed via the SETUP
WIZARD.
Discuss with your healthcare professional what types of foods would require a dual bolus. For example, you may
•
want to consider a dual bolus for eating: pizza (due to the carbohydrate content of the dough plus the high fat
content of the cheese, sausage, pepperoni, etc.); appetizers at a party (such as nibbling chips or other carbohy-
drate foods for an extended period of time); Mexican food (the carbohydrates from chips, beans and rice plus
the protein and fat from the meat and cheese).
Procedure:
Steps Do This
Access 1. BOLUS MENU
from Home screen. Notice a. Main is highlighted.
Press b. Enter button.
Scroll to highlight c. BOLUS.
Press d. Enter button.
Select 2. MANUAL bolus.
Scroll to highlight a. MANUAL.
Press b. Enter button.
Set Dual Bolus Type.3.
Notice a. Bolus Type is highlighted.
Press b. Enter button.
Scroll to display c. Dual.
Press d. Enter button.
Set Normal Bolus 4.
amount. Notice a. Normal is highlighted.
Press b. Enter button.
Scroll to select the normal bolus amount you want to deliver.c.
Press d. Enter button.
Section 8: Creating and Editing Specialized Bolus Programs to Meet Your Needs
8.2 Deliver a Dual Bolus
Section 8: Creating and Editing Specialized Bolus Programs to Meet Your Needs
8.2 Deliver a Dual Bolus
DOC15736_Rev-A-Man.indd 193-194 2/9/09 11:29:51 AM
195
196
Steps Do This
Set Extended Bolus 5.
amount. Notice a. Extended is highlighted.
Press b. Enter button.
Scroll to select the extended bolus amount you want to deliver.c.
Press d. Enter button.
Set Duration for the 6.
Extended Bolus. Notice a. Duration is highlighted.
Press b. Enter button.
Scroll to select the duration for the extended bolus delivery.c.
Press d. Enter button.
Check that the Normal 7.
bolus, Extended bolus,
and duration settings
are correct.
View a. Bolus Type, Bolus amount, and Duration settings on the BOLUS screen.
Decide if you need to change a setting.b.
If you want to Then do this
Change a setting Scroll up to highlight the setting you want to 1.
change.
Press 2. Enter button.
Scroll to desired setting.3.
Press 4. Enter button.
Keep the settings Go to the next step.
Steps Do This
Deliver the Dual bolus.8. Note: If you changed only the Normal or Extended Bolus settings in Step 7, and did
NOT change the Duration, scroll to highlight Deliver. The Dual bolus is now set to
deliver.
Notice a. Deliver is highlighted.
Press b. Enter button.
Notice that the normal bolus is delivering.c.
Decide whether to 9.
stop the Dual bolus. If you want to Then do this
Finish
delivering the
normal bolus
Allow the normal bolus to deliver the amount that was set.
Note: Once the bolus has finished delivering, you will hear 2
more quick beeps or feel 2 more short vibrations on your pump
and you will return to the Home screen.
Go to Step 10.
STOP the
dual bolus
immediately
Notice 1. Stop is highlighted.
Press 2. Enter button.
Notice the 3. STOPPED ALERT screen and “Dual bolus
stopped.” message displays.
Notice 4. Clear is highlighted (to conrm that the bolus is
stopped).
Press 5. Enter button to return to the Home screen.
You have STOPPED the dual bolus.
Section 8: Creating and Editing Specialized Bolus Programs to Meet Your Needs
8.2 Deliver a Dual Bolus
Section 8: Creating and Editing Specialized Bolus Programs to Meet Your Needs
8.3 Calculate and Deliver a Food Bolus
DOC15736_Rev-A-Man.indd 195-196 2/9/09 11:29:51 AM
197
198
Steps Do This
Decide whether to 10.
nish delivering the
Extended Bolus.
If you want to Then do this
Finish delivering
the extended
bolus
Allow the extended bolus to deliver the amount that was set
for the specied time duration.
Note: Once the Normal bolus is completely delivered, you
will automatically return to the Home screen where you will
see the extended bolus, bolus amount, and time duration
displayed in the Bolus panel. You will also see the IOB value,
which reects the Normal bolus that was delivered. Another
possible reason to stop basal here is when you realize there is
too much IOB and need some time to recover.
Go to Step 13 to check your extended bolus delivery.
STOP the
extended bolus
Go to the 1. MAIN MENU.
Notice 2. STOP is highlighted.
Press 3. Enter button.
Continue to Step 11.4.
Decide whether to 11.
STOP the extended
bolus.
Notice the a. CONFIRM screen and “Stop Extended Bolus?” message displays.
Decide what to do next.b.
If you want to Then do this
STOP the
extended
bolus delivery
immediately
Scroll to highlight 1. Yes.
Press 2. Enter button.
Continue to Step 12.3.
Allow extended
bolus to nish
delivering
Notice 1. No is highlighted.
Press 2. Enter button to return to the Home screen.
Go to Step 13 to check your extended bolus delivery.3.
Steps Do This
Decide whether to 12.
STOP basal delivery. Note: Unless you wanted to change the battery you will normally NOT stop
basal delivery even though the CONFIRM screen and “Stop (your active basal
program)?” message displays. Another possible reason to stop basal here is when
you realize there is too much IOB and need some time to recover
Notice the a. CONFIRM screen and “Stop (your active basal program)?” message
displays.
Decide what to do next.b.
If you want to Then do this
STOP the basal
delivery now
(e.g. to change
batteries)
Scroll to highlight 1. Yes.
Press 2. Enter button.
Notice that the basal program has STOPPED on the 3.
Home screen.
You have STOPPED the Extended bolus and also
STOPPED the Basal delivery.
Continue the
basal delivery
Notice 1. No is highlighted.
Press 2. Enter button.
Note: You will automatically return to the Home screen.
Review the 3. Last Bolus that was administered.
You have STOPPED the Extended bolus but your basal
program is still delivering insulin.
Check your work.13. Check that the extended bolus amount, and time duration is displayed in the Bolus
panel on Home screen.
Review the extended bolus amount and the time that it is being administered.
Review the IOB value, which reflects the normal bolus that was delivered.
Section 8: Creating and Editing Specialized Bolus Programs to Meet Your Needs
8.3 Calculate and Deliver a Food Bolus
Section 8: Creating and Editing Specialized Bolus Programs to Meet Your Needs
8.3 Calculate and Deliver a Food Bolus
DOC15736_Rev-A-Man.indd 197-198 2/9/09 11:29:51 AM
199
200
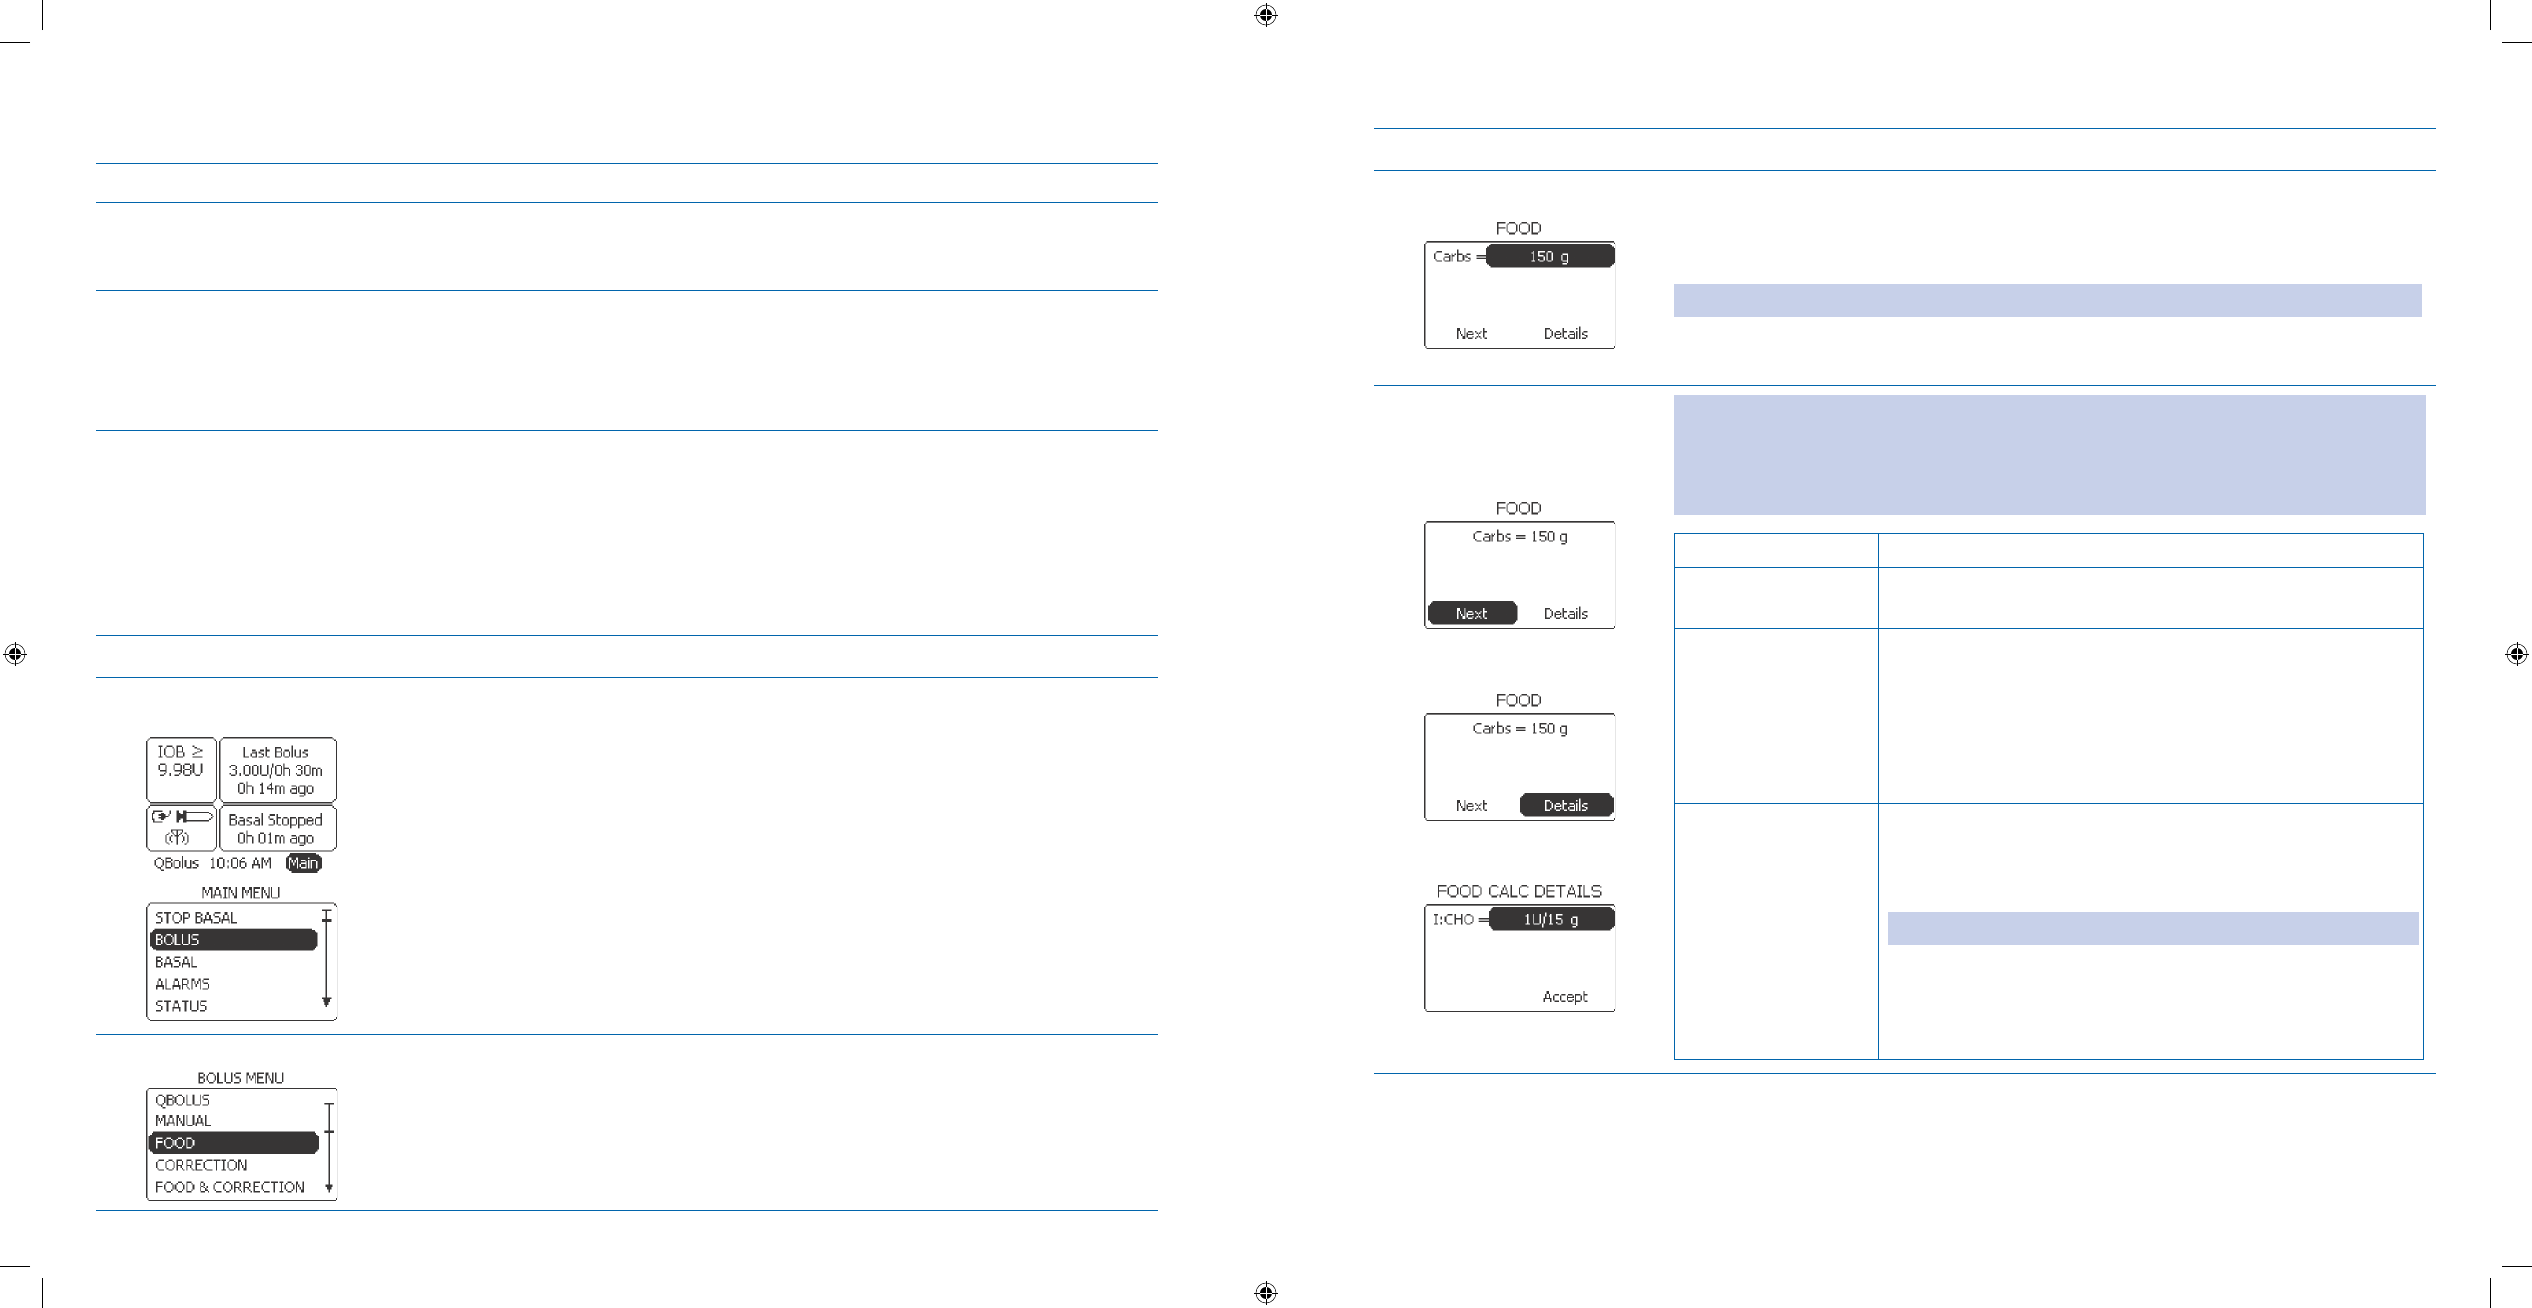
8.3 Calculate and Deliver a Food Bolus
Purpose To calculate and deliver a food bolus using your Aviator Companion.
When Do this procedure:
Whenever you want to calculate carbohydrates and administer a bolus to cover a meal or •
snack.
Materials Your companion set up with basal delivery started.•
Your pump set up with basal delivery started.•
Bolus recommendations from your healthcare professional and assistance from Diabetes •
Educator as needed.
Your personalized Table of Settings in • Section 12 - Appendix A.
Helpful Information
To be able to use this option, you must rst have an understanding of carbohydrate counting, and have refer-•
ences for the carbohydrate content of foods. Consult your Diabetes Educator and/or Registered Dietitian before
using this feature.
You can set up bolus calculator options and bolus limits in Section 6.1 before performing this task. It would be •
easier to program a food bolus and use the bolus calculator if you have established settings.
Procedure:
Steps Do This
Access 1. BOLUS MENU
from Home screen. Notice a. Main is highlighted.
Press b. Enter button.
Scroll to highlight c. BOLUS.
Press d. Enter button.
Select 2. FOOD bolus.
Scroll to highlight a. FOOD.
Press Enter button.b.
Steps Do This
Set Carbs.3. Notice a. Carbs is highlighted.
Press b. Enter button.
Scroll to select the number of grams of carbohydrates you are planning to eat.c.
Note: The range is 0-200 g.
Press d. Enter button.
Decide what to do next.4. Note: The I:CHO ratio is established when setting up your pump using the
SETUP WIZARD in Section 6.1.
Unless instructed otherwise by your healthcare professional, do NOT change
this value.
If you want to Then do this
Continue to select
bolus type
Notice Next is highlighted.
Press Enter button.
View Food
Calculation Details
Scroll to highlight 1. Details.
Press 2. Enter button.
Review the insulin-to-carbohydrate ratio.3.
Notice 4. Accept is highlighted.
Press 5. Enter button.
Change I:CHO ratio Scroll to highlight1. I:CHO.
Press 2. Enter button.
Scroll to change 3. I:CHO as needed.
Note: The range is 1U/1g to1U/150g.
Press 4. Enter button.
Notice 5. Accept is highlighted.
Press 6. Enter button.
Section 8: Creating and Editing Specialized Bolus Programs to Meet Your Needs
8.3 Calculate and Deliver a Food Bolus
Section 8: Creating and Editing Specialized Bolus Programs to Meet Your Needs
8.4 Calculate and Deliver a Correction Bolus
DOC15736_Rev-A-Man.indd 199-200 2/9/09 11:29:51 AM
201
202
Steps Do This
Set Bolus Type.5. Notice a. Bolus Type is highlighted. Normal is the default.
Press b. Enter button.
Note: The recommended calculated bolus amount is displayed. Pay careful
consideration before changing the recommended amount, depending on situations
such as exercise, stress, sickness, etc. that may influence more or less insulin delivery
at this time.
Scroll to select the bolus type you want to deliver.c.
Note: Remember to also set the duration for Extended or Dual bolus types if you
are delivering either type of bolus. Refer to Section 8.1 or 8.2 as needed.
Press d. Enter button.
Review Bolus amount.6. Decide what to do next.
If you want to Then do this
Accept the
calculated bolus
amount and
continue to bolus
Notice 1. Bolus is highlighted.
Scroll to highlight 2. Deliver.
Change the bolus
amount
Notice 1. Bolus is highlighted.
Press 2. Enter button.
Scroll to select the bolus amount to deliver.3.
Press 4. Enter button.
Conrm that bolus 7.
type, bolus amount
(and duration) are
correct.
Check your Bolus Type and Bolus settings on the BOLUS screen.
Note: The value displayed is from the bolus calculator.
Scroll up to select and make edits as needed.
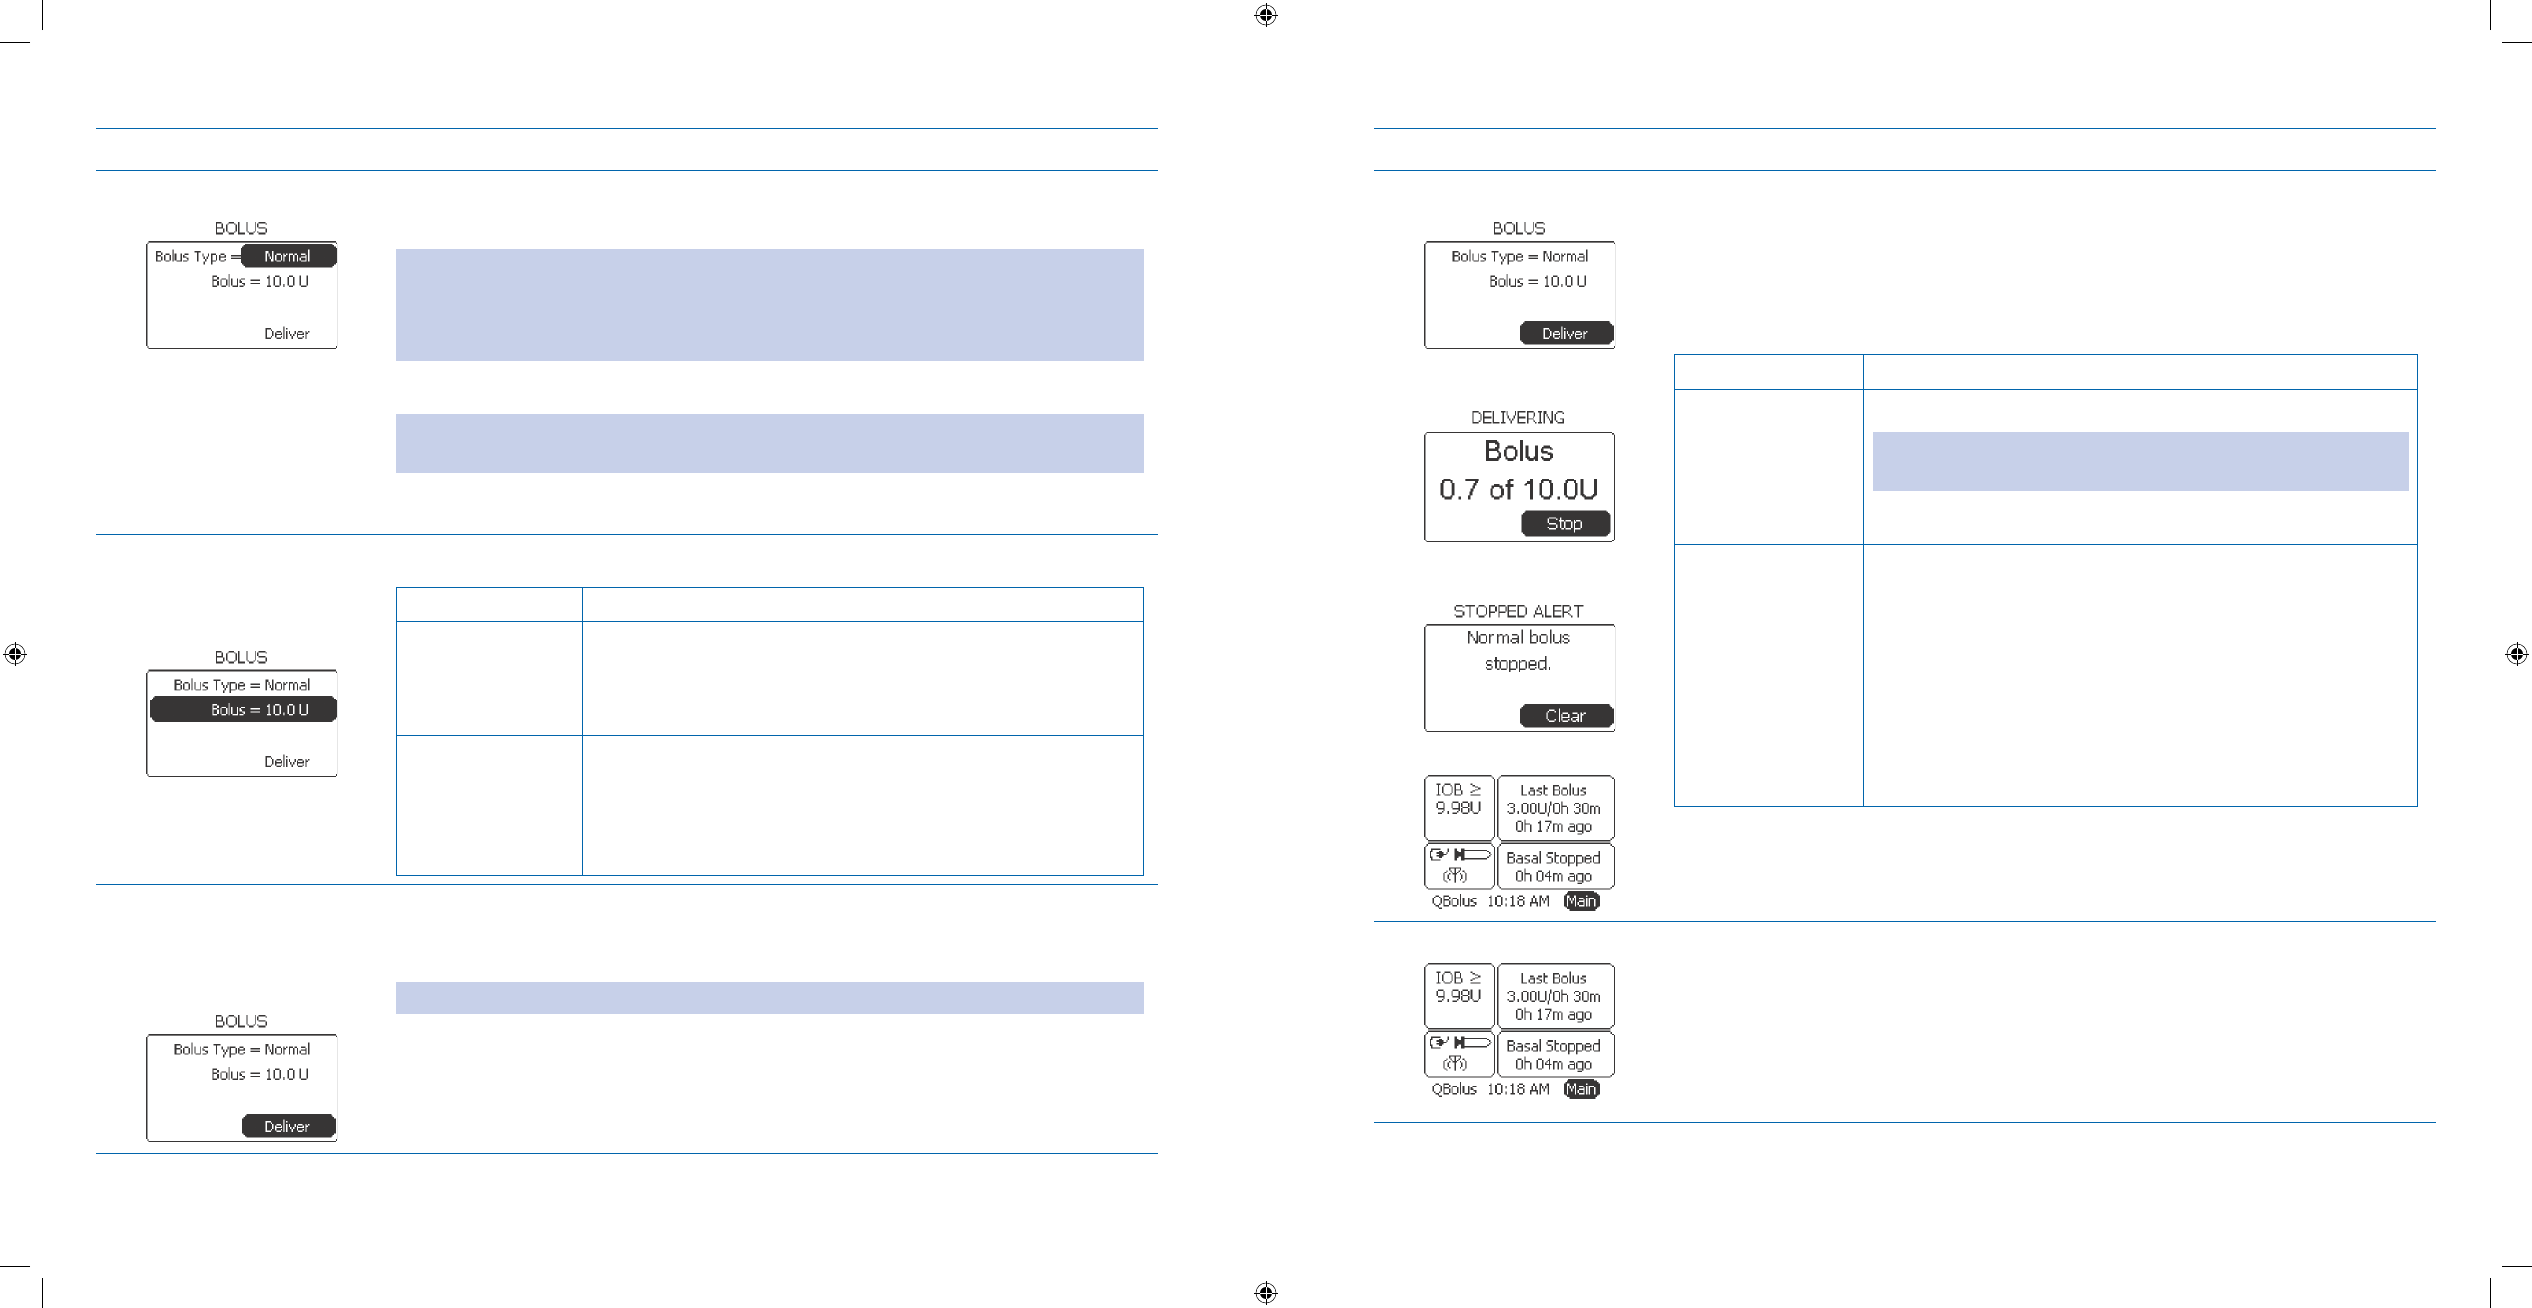
Steps Do This
Deliver Food bolus.8. Notice a. Deliver is highlighted.
Press b. Enter button.
Note: You will hear 2 quick beeps from your pump.
Notice that the bolus is delivering.c.
Decide what to do next.d.
If you want to Then do this
Finish delivering
food bolus
Allow the food bolus to deliver the amount that was set.
Note: Once the bolus has finished delivering, you will hear 2
more quick beeps and then return to the Home screen.
Go to Step 9 to check your bolus delivery.
STOP the food
bolus delivery
immediately
Notice 1. Stop is highlighted.
Press 2. Enter button.
Notice the 3. STOPPED ALERT screen and “Normal
bolus stopped.” message displays.
Notice 4. Clear is highlighted.
Press 5. Enter button to return to the Home screen.
You have STOPPED the food bolus and it is reflected in
the Bolus panel.
Check your work.9.
Review the Last Bolus amount and time displayed in the Bolus panel on the
Home screen.
Section 8: Creating and Editing Specialized Bolus Programs to Meet Your Needs
8.4 Calculate and Deliver a Correction Bolus
Section 8: Creating and Editing Specialized Bolus Programs to Meet Your Needs
8.4 Calculate and Deliver a Correction Bolus
DOC15736_Rev-A-Man.indd 201-202 2/9/09 11:29:52 AM
203
204
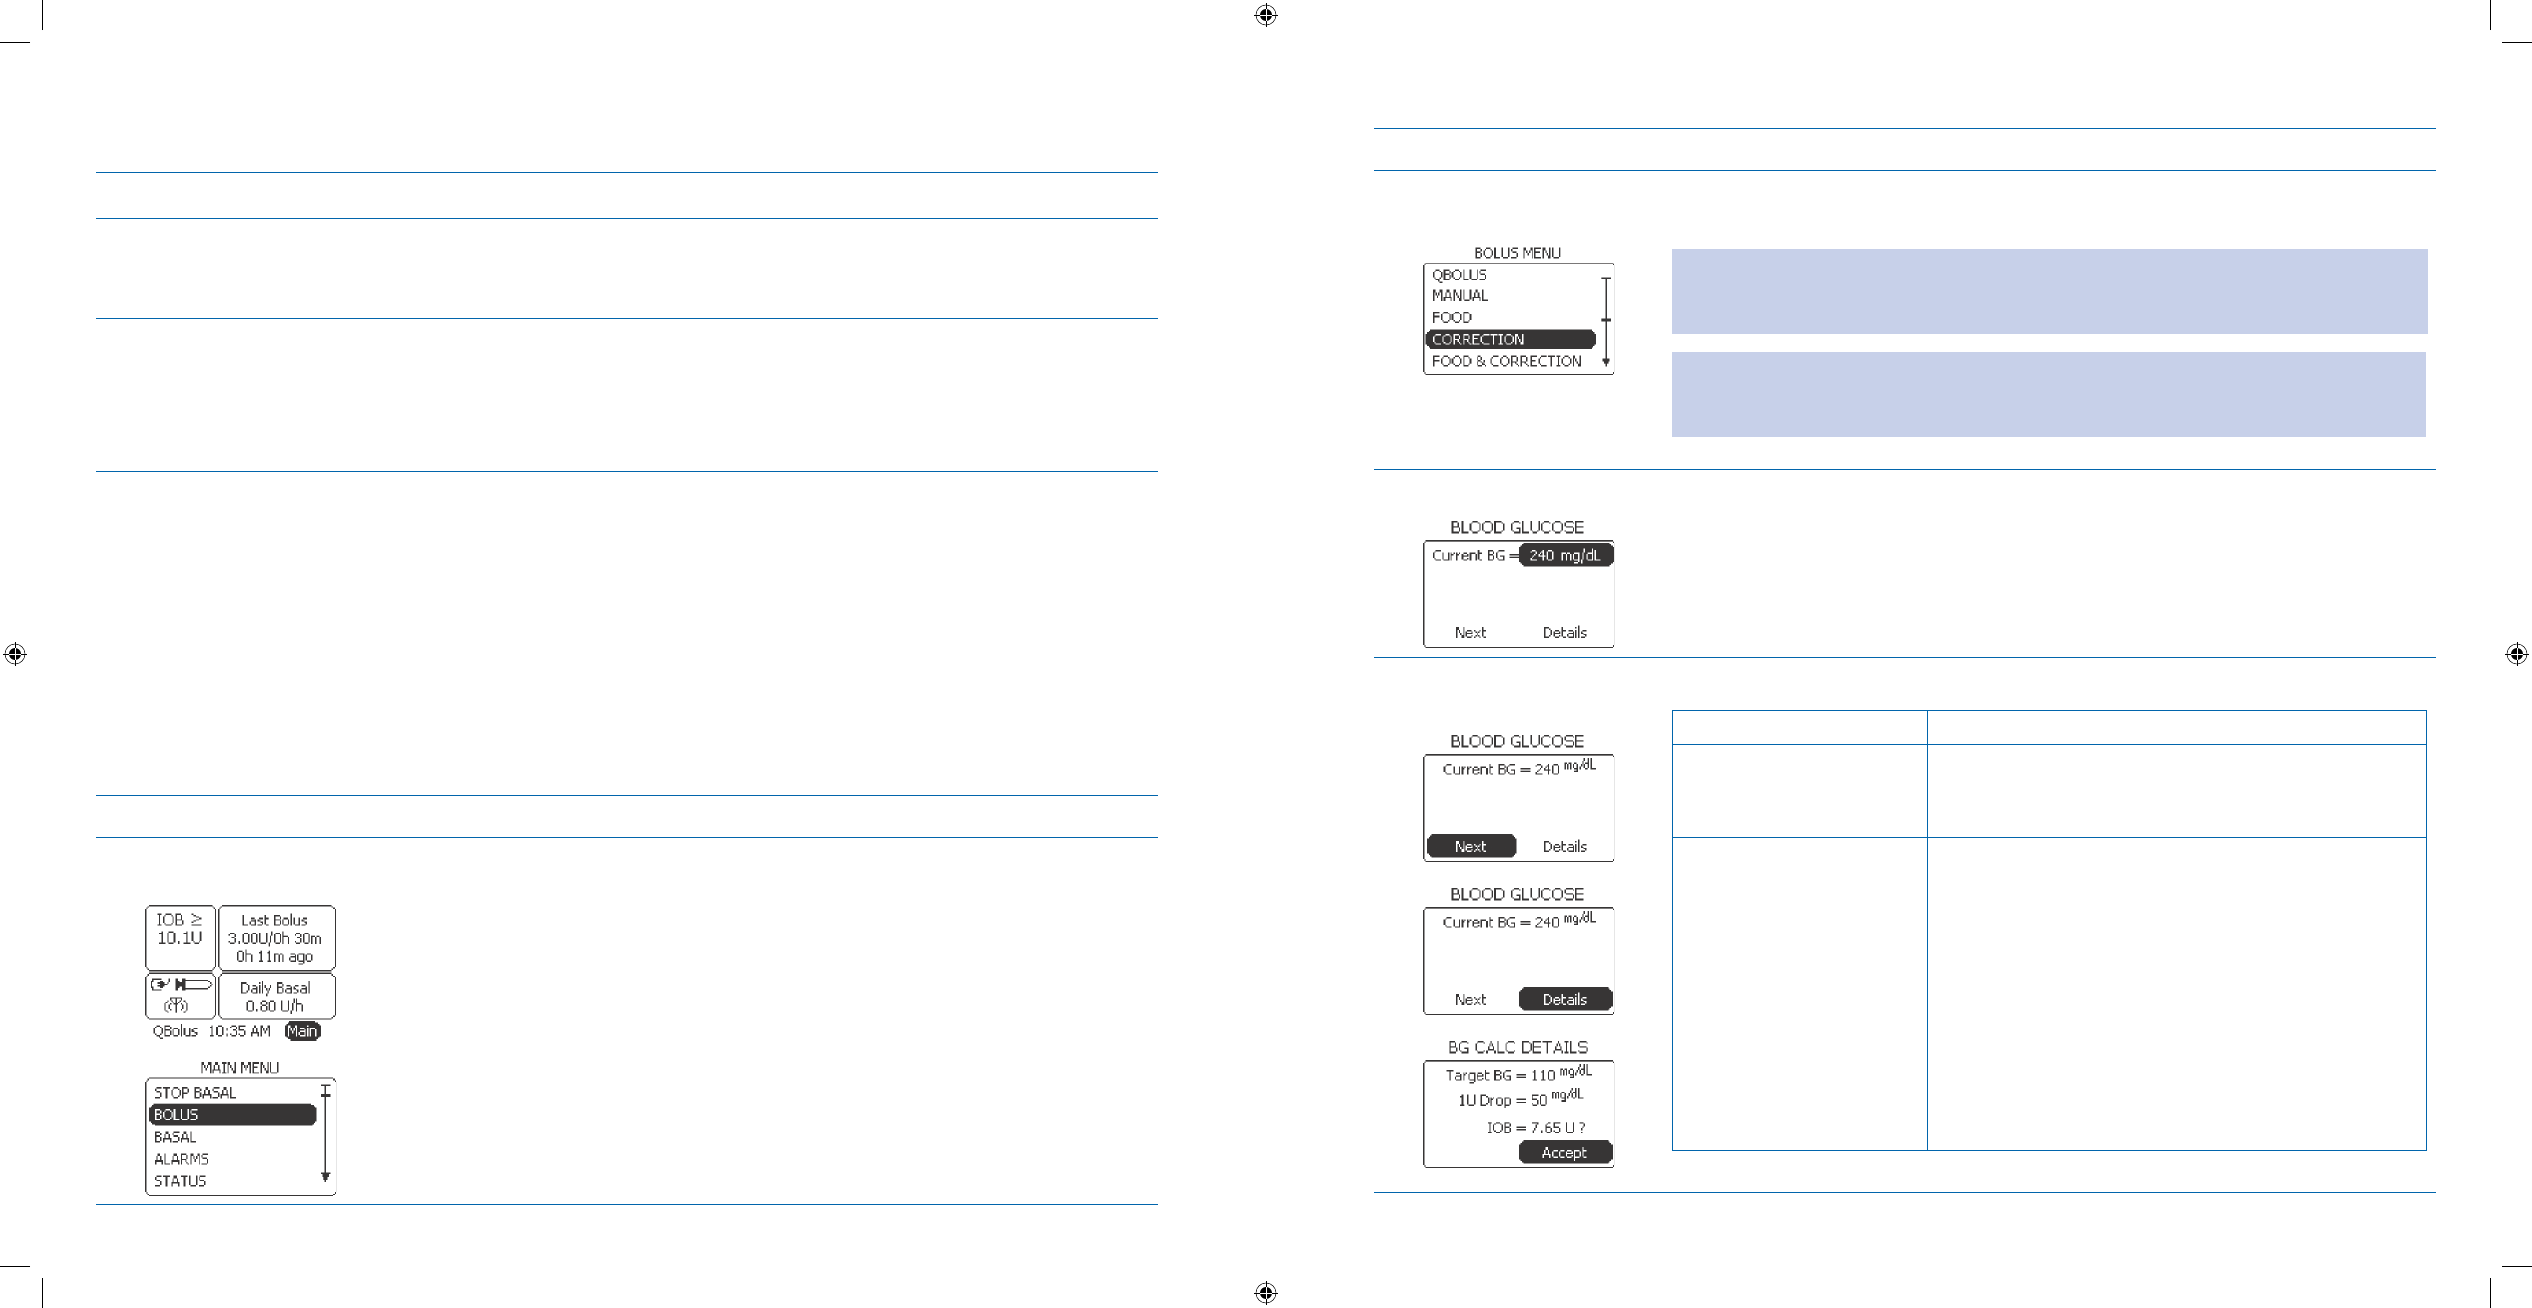
8.4 Calculate and Deliver a Correction Bolus
Purpose To calculate and deliver a correction bolus using your Aviator Companion.
When Do this procedure:
Whenever you want to calculate and administer a correction bolus because your blood
•
glucose levels are higher than your target glucose.
Materials Your companion set up with basal delivery started.•
Your pump and pump set up with basal delivery started.•
Bolus recommendations from your healthcare professional and assistance from your Dia-•
betes Educator as needed.
Your personalized Table of Settings in
• Section 12 - Appendix A
Helpful Information
Establish setting for programming a correction bolus and use of the bolus calculator with the instructions listed •
in Section 6.1 before performing this task.
Using this feature requires that you have a working understanding and knowledge of your insulin sensitivity, or
•
correction factor, and know your BG targets obtained from your healthcare team. Refer to
Section 12 –Appendix A for calculation sheet.
While the pump will provide a suggested dose based on the settings you have established, there may be other
•
factors that may aect the dosage decision (such as anticipated increased physical activity), so be sure to discuss
this feature with your healthcare team.
Procedure:
Steps Do This
Access 1. BOLUS MENU
from Home screen. Notice a. Main is highlighted.
Press b. Enter button.
Scroll to highlight c. BOLUS.
Press d. Enter button.
Steps Do This
Select 2. CORRECTION
bolus.
Scroll to highlight a. CORRECTION.
Press b. Enter button.
Note: You may get a WARNING screen and message “Less than 2 hours since last
bolus.” with OK highlighted. Consider the possible safety issues if another bolus is
delivered at this time, prior to pressing the Enter button.
Note: If there is NO bolus history, and the pump has NOT been powered on for the
duration of the action time, you may get a CONFIRMATION screen and message
“Last bolus time unknown. Continue?” displayed. Press Enter to continue.
Set Current BG.3.
Scroll to highlight a. Current Bg.
Press b. Enter button.
Scroll to select your current blood glucose level.c.
Press d. Enter button.
Determine what to do 4.
next.
If you want to Then do this
Continue to select bolus
type
Notice Next is highlighted.
Press Enter button.
View BG Calculation
Details
Scroll to highlight 1. Details.
Press 2. Enter button.
Review the 3. Target BG, 1U Drop and, IOB.
Notice 4. Accept is highlighted.
Press 5. Enter button.
Scroll to highlight 6. Next.
Press 7. Enter button.
Section 8: Creating and Editing Specialized Bolus Programs to Meet Your Needs
8.5 Calculate and Deliver a Food & Correction Bolus
Section 8: Creating and Editing Specialized Bolus Programs to Meet Your Needs
8.4 Calculate and Deliver a Correction Bolus
DOC15736_Rev-A-Man.indd 203-204 2/9/09 11:29:52 AM
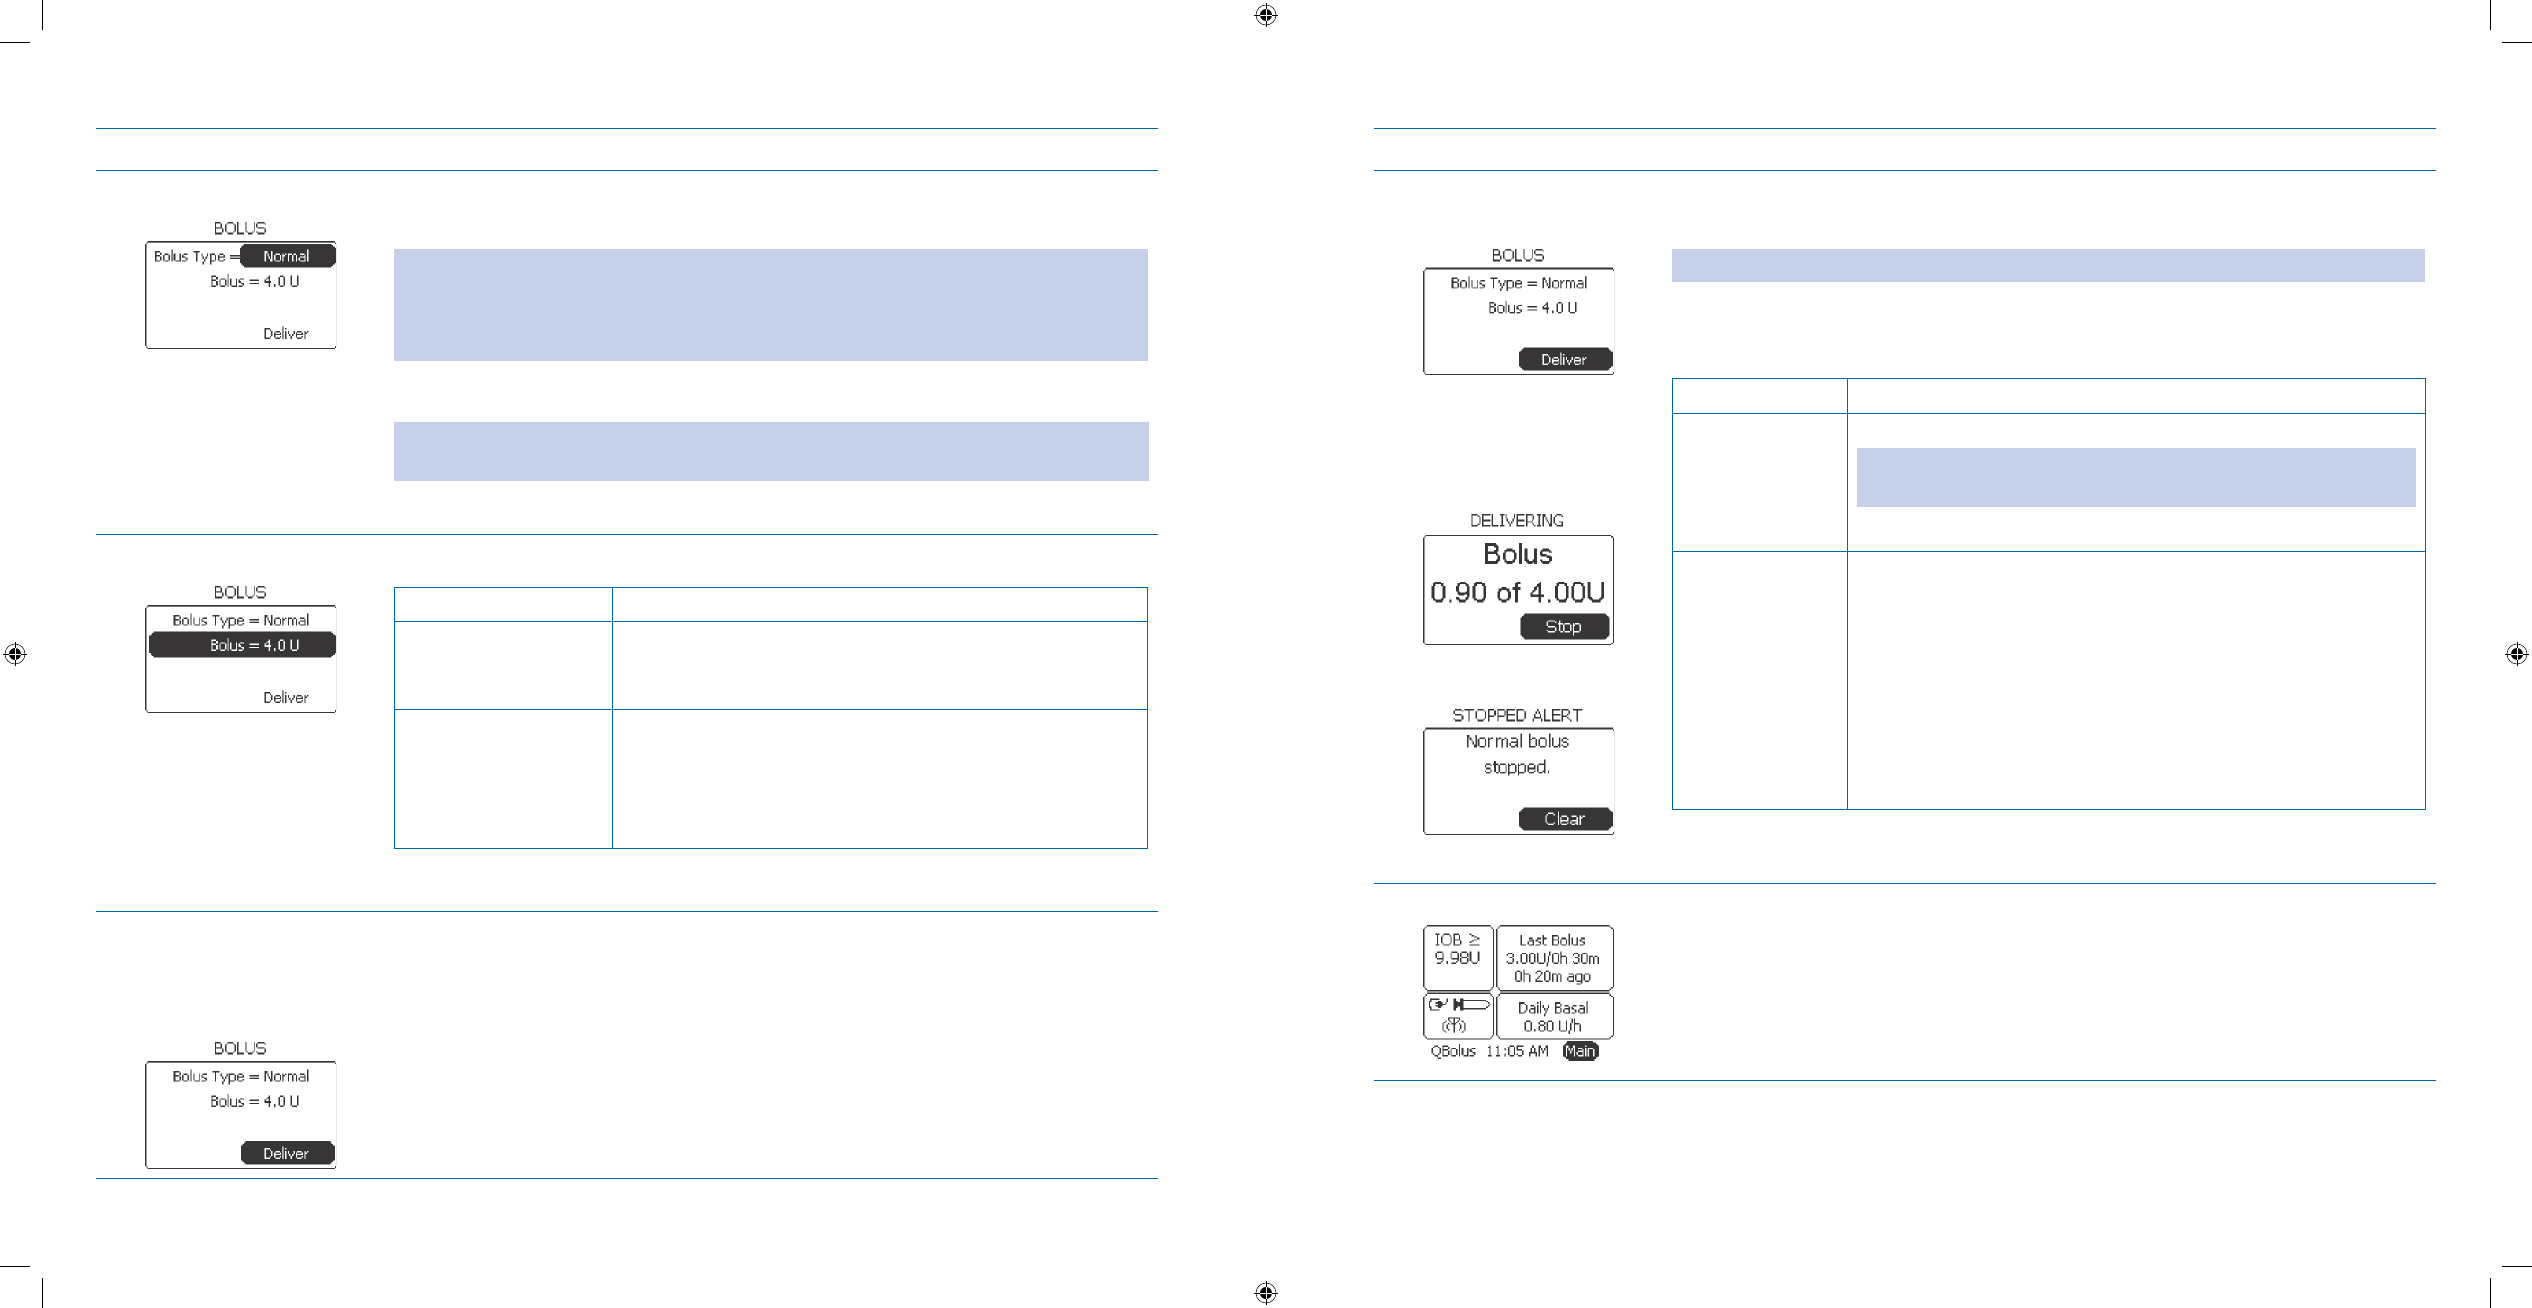
205
206
Steps Do This
Set Bolus Type.5. Notice a. Bolus Type is highlighted.
Press b. Enter button.
Note: The recommended calculated bolus amount is displayed. Pay careful
consideration before changing the recommended amount, depending on situations
such as exercise, stress, sickness, etc. that may influence more or less insulin delivery
at this time.
Scroll to select the bolus type you want to deliver.c.
Note: Remember to also set the duration for Extended or Dual bolus types if you are
delivering either type of bolus. Refer to Section 8.1 or 8.2 as needed.
Press d. Enter button.
Review Bolus amount.6. Decide what to do next.
If you want to Then do this
Accept the calculated
bolus amount and
continue to bolus
Notice 1. Bolus is highlighted.
Scroll to highlight 2. Deliver.
Change the bolus
amount
Notice 1. Bolus is highlighted.
Press 2. Enter button.
Scroll to select the bolus amount to deliver.3.
Press 4. Enter button.
Conrm that bolus 7.
type, bolus amount
(and duration) is
correct.
Check your Bolus Type and Bolus amount settings on the BOLUS screen.
Scroll up to select and make edits as needed.
Steps Do This
Deliver Correction 8.
bolus.
Notice a. Deliver is highlighted.
Press b. Enter button.
Note: You will hear 2 quick beeps from your pump.
Notice that the bolus is delivering on the screen.c.
Decide what to do next.d.
If you want to Then do this
Finish delivering
correction bolus
Allow the correction bolus to deliver the calculated amount
Note: Once the bolus has nished delivering, you will hear 2
more quick beeps and return to the Home screen.
Go to Step 9 to check your bolus delivery.
STOP the
correction
bolus delivery
immediately
Notice 1. Stop is highlighted.
Press 2. Enter button.
Notice the 3. STOPPED ALERT screen and “Normal bolus
stopped.” message displays.
Notice 4. Clear is highlighted.
Press 5. Enter button to return to the Home screen.
You have STOPPED the correction bolus and it is reected
in the Bolus panel.
Check your work.9.
Review the Last Bolus amount and time displayed in the Bolus panel on the
Home screen.
Section 8: Creating and Editing Specialized Bolus Programs to Meet Your Needs
8.5 Calculate and Deliver a Food & Correction Bolus
Section 8: Creating and Editing Specialized Bolus Programs to Meet Your Needs
8.5 Calculate and Deliver a Food & Correction Bolus
DOC15736_Rev-A-Man.indd 205-206 2/9/09 11:29:52 AM
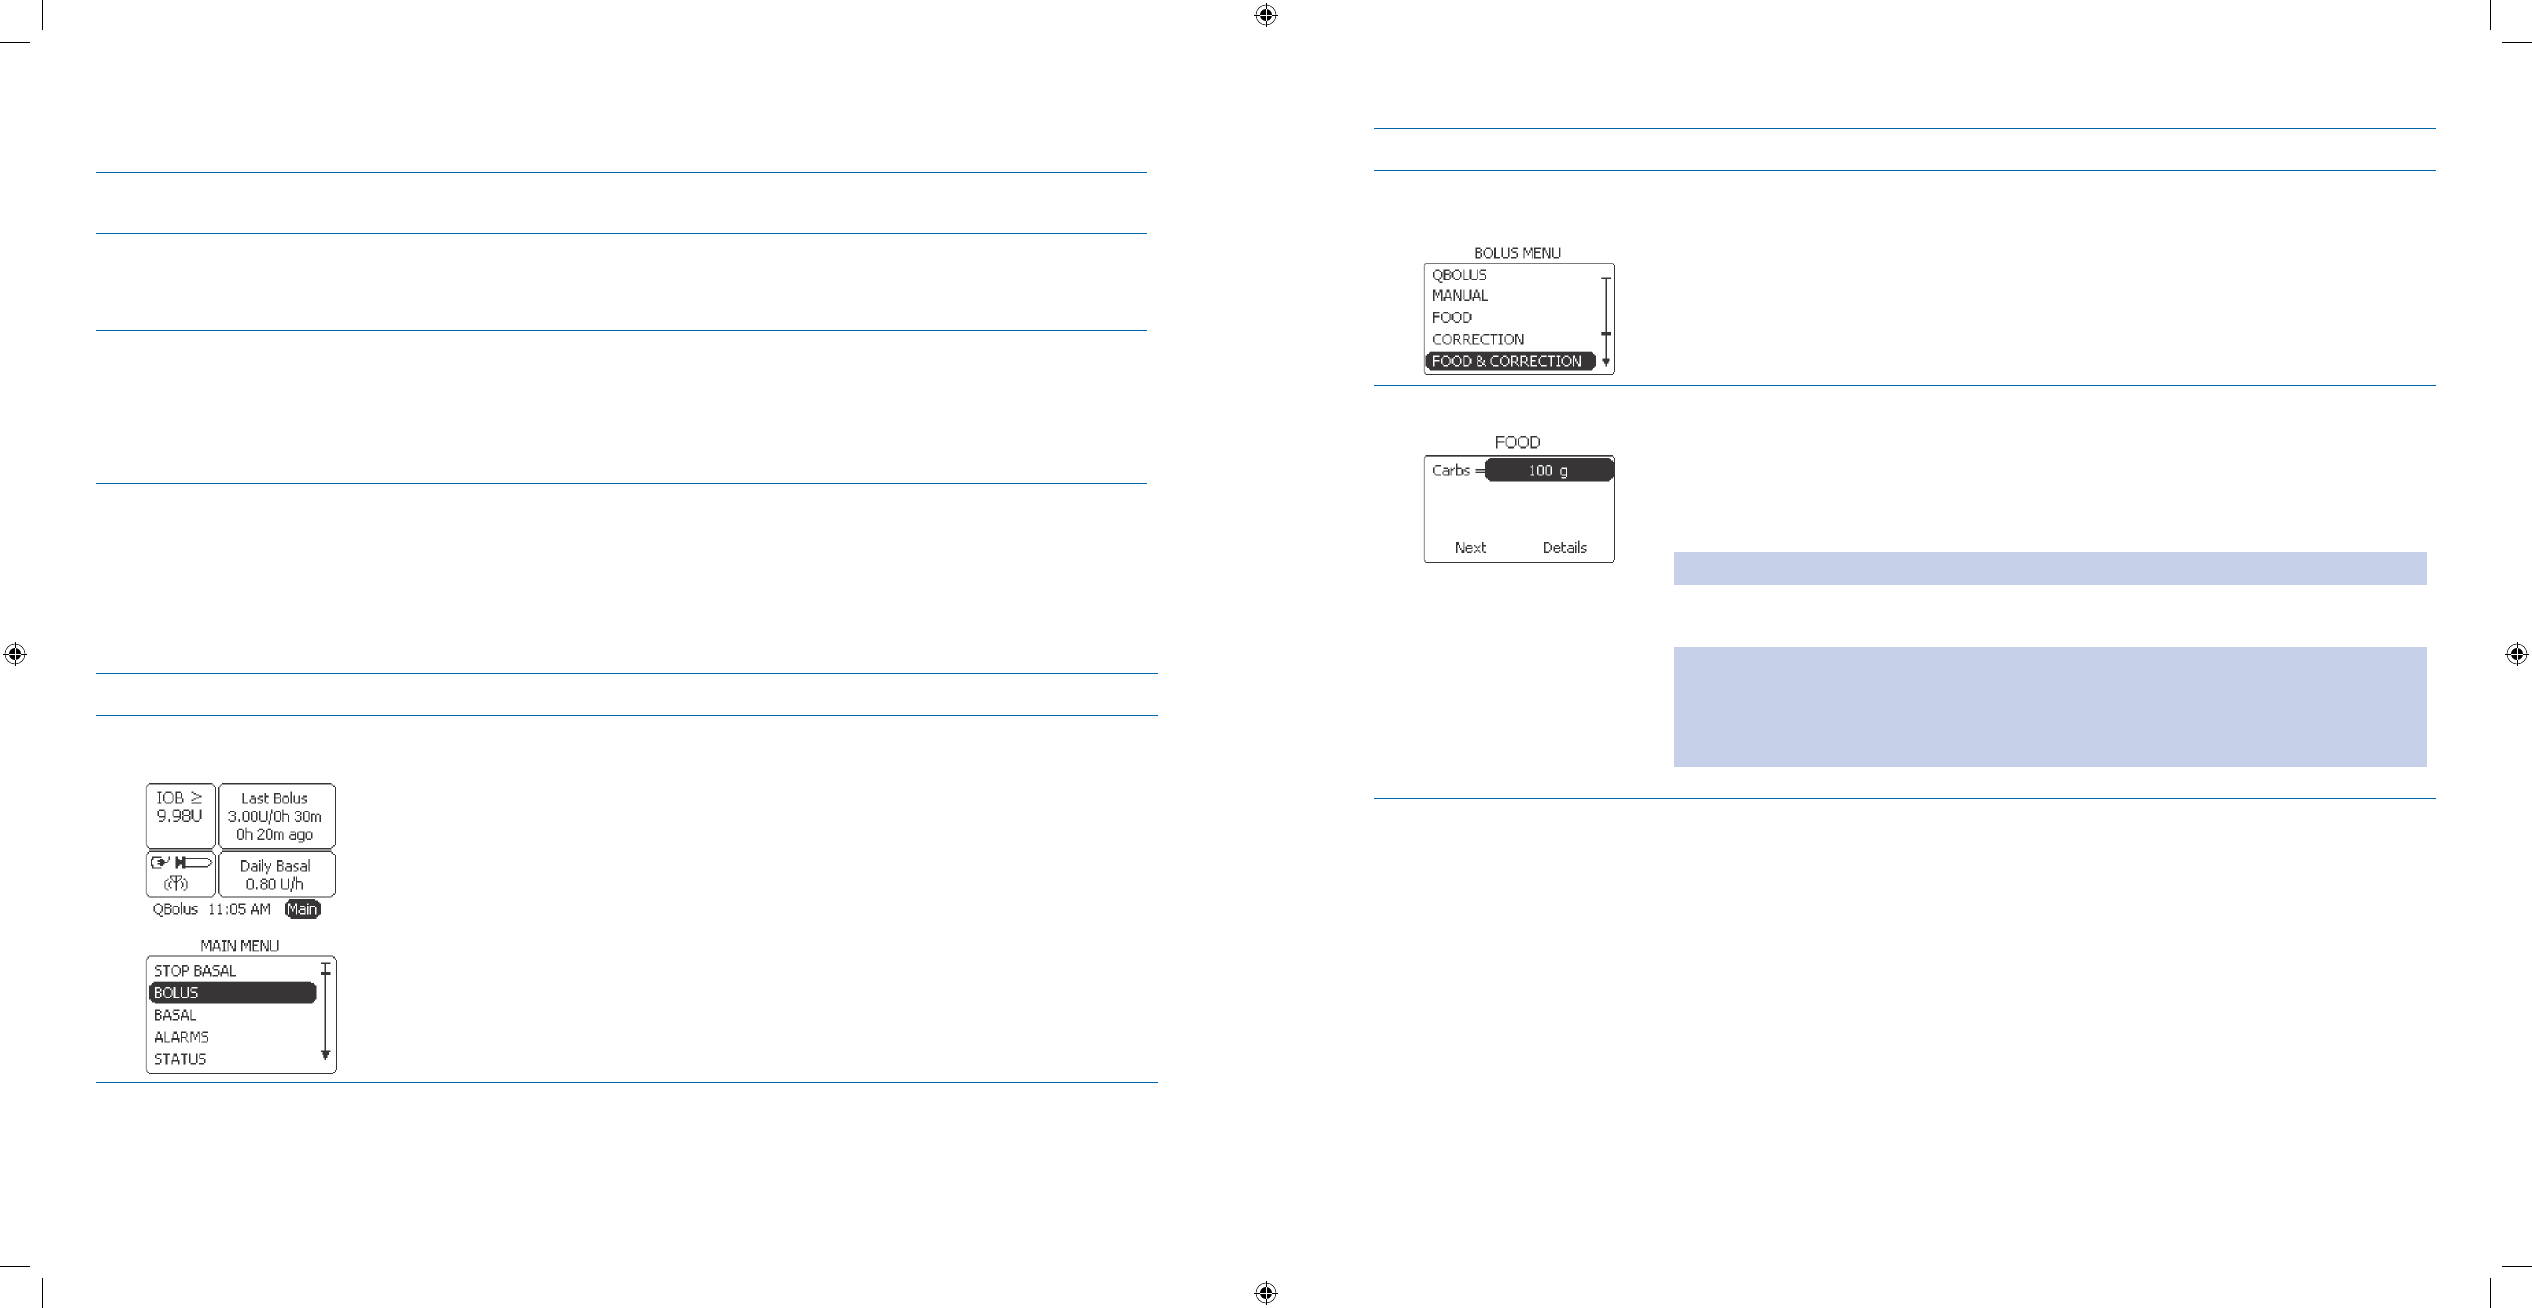
207
208
8.5 Calculate and Deliver a Food & Correction Bolus
Purpose To calculate and deliver a bolus when you are about to eat and your blood glucose
levels are above or below your pre-meal target goals.
When Do this procedure:
Whenever you want to administer a bolus because you are about to eat a meal,
•
and your blood glucose is above or below your target range.
Materials Your companion with basal delivery started.•
Your pump set up with basal delivery started.•
Bolus recommendations from your healthcare professional and assistance from •
your Diabetes Educator as needed.
Your personalized Table of Settings in
• Section 12 - Appendix A.
Helpful Information
To administer a • food and correction bolus, you must rst have an understanding and knowledge of your insu-
lin sensitivity, or correction factor and your I:CHO ratio, which you will have obtained from your healthcare team
(see Section 6.1 for additional settings).
Procedure:
Steps Do This
Access 1. BOLUS MENU
from Home screen. Notice a. Main is highlighted.
Press b. Enter button.
Scroll to highlight c. BOLUS.
Press d. Enter button.
Steps Do This
Select 2. FOOD &
CORRECTION Bolus. Scroll to highlight a. FOOD & CORRECT.
Press b. Enter button.
Set Carbs.3.
Notice a. Carbs is highlighted.
Press b. Enter button.
Scroll to select the number of grams of carbohydrates you are planning to eat.c.
Note: The range is 1-200 grams.
Press d. Enter button.
Note: The I:CHO ratio is established when setting up your pump using the SETUP
WIZARD in Section 6.1.
Unless instructed otherwise by your healthcare professional, do NOT change
this value.
Section 8: Creating and Editing Specialized Bolus Programs to Meet Your Needs
8.5 Calculate and Deliver a Food & Correction Bolus
Section 8: Creating and Editing Specialized Bolus Programs to Meet Your Needs
8.5 Calculate and Deliver a Food & Correction Bolus
DOC15736_Rev-A-Man.indd 207-208 2/9/09 11:29:52 AM
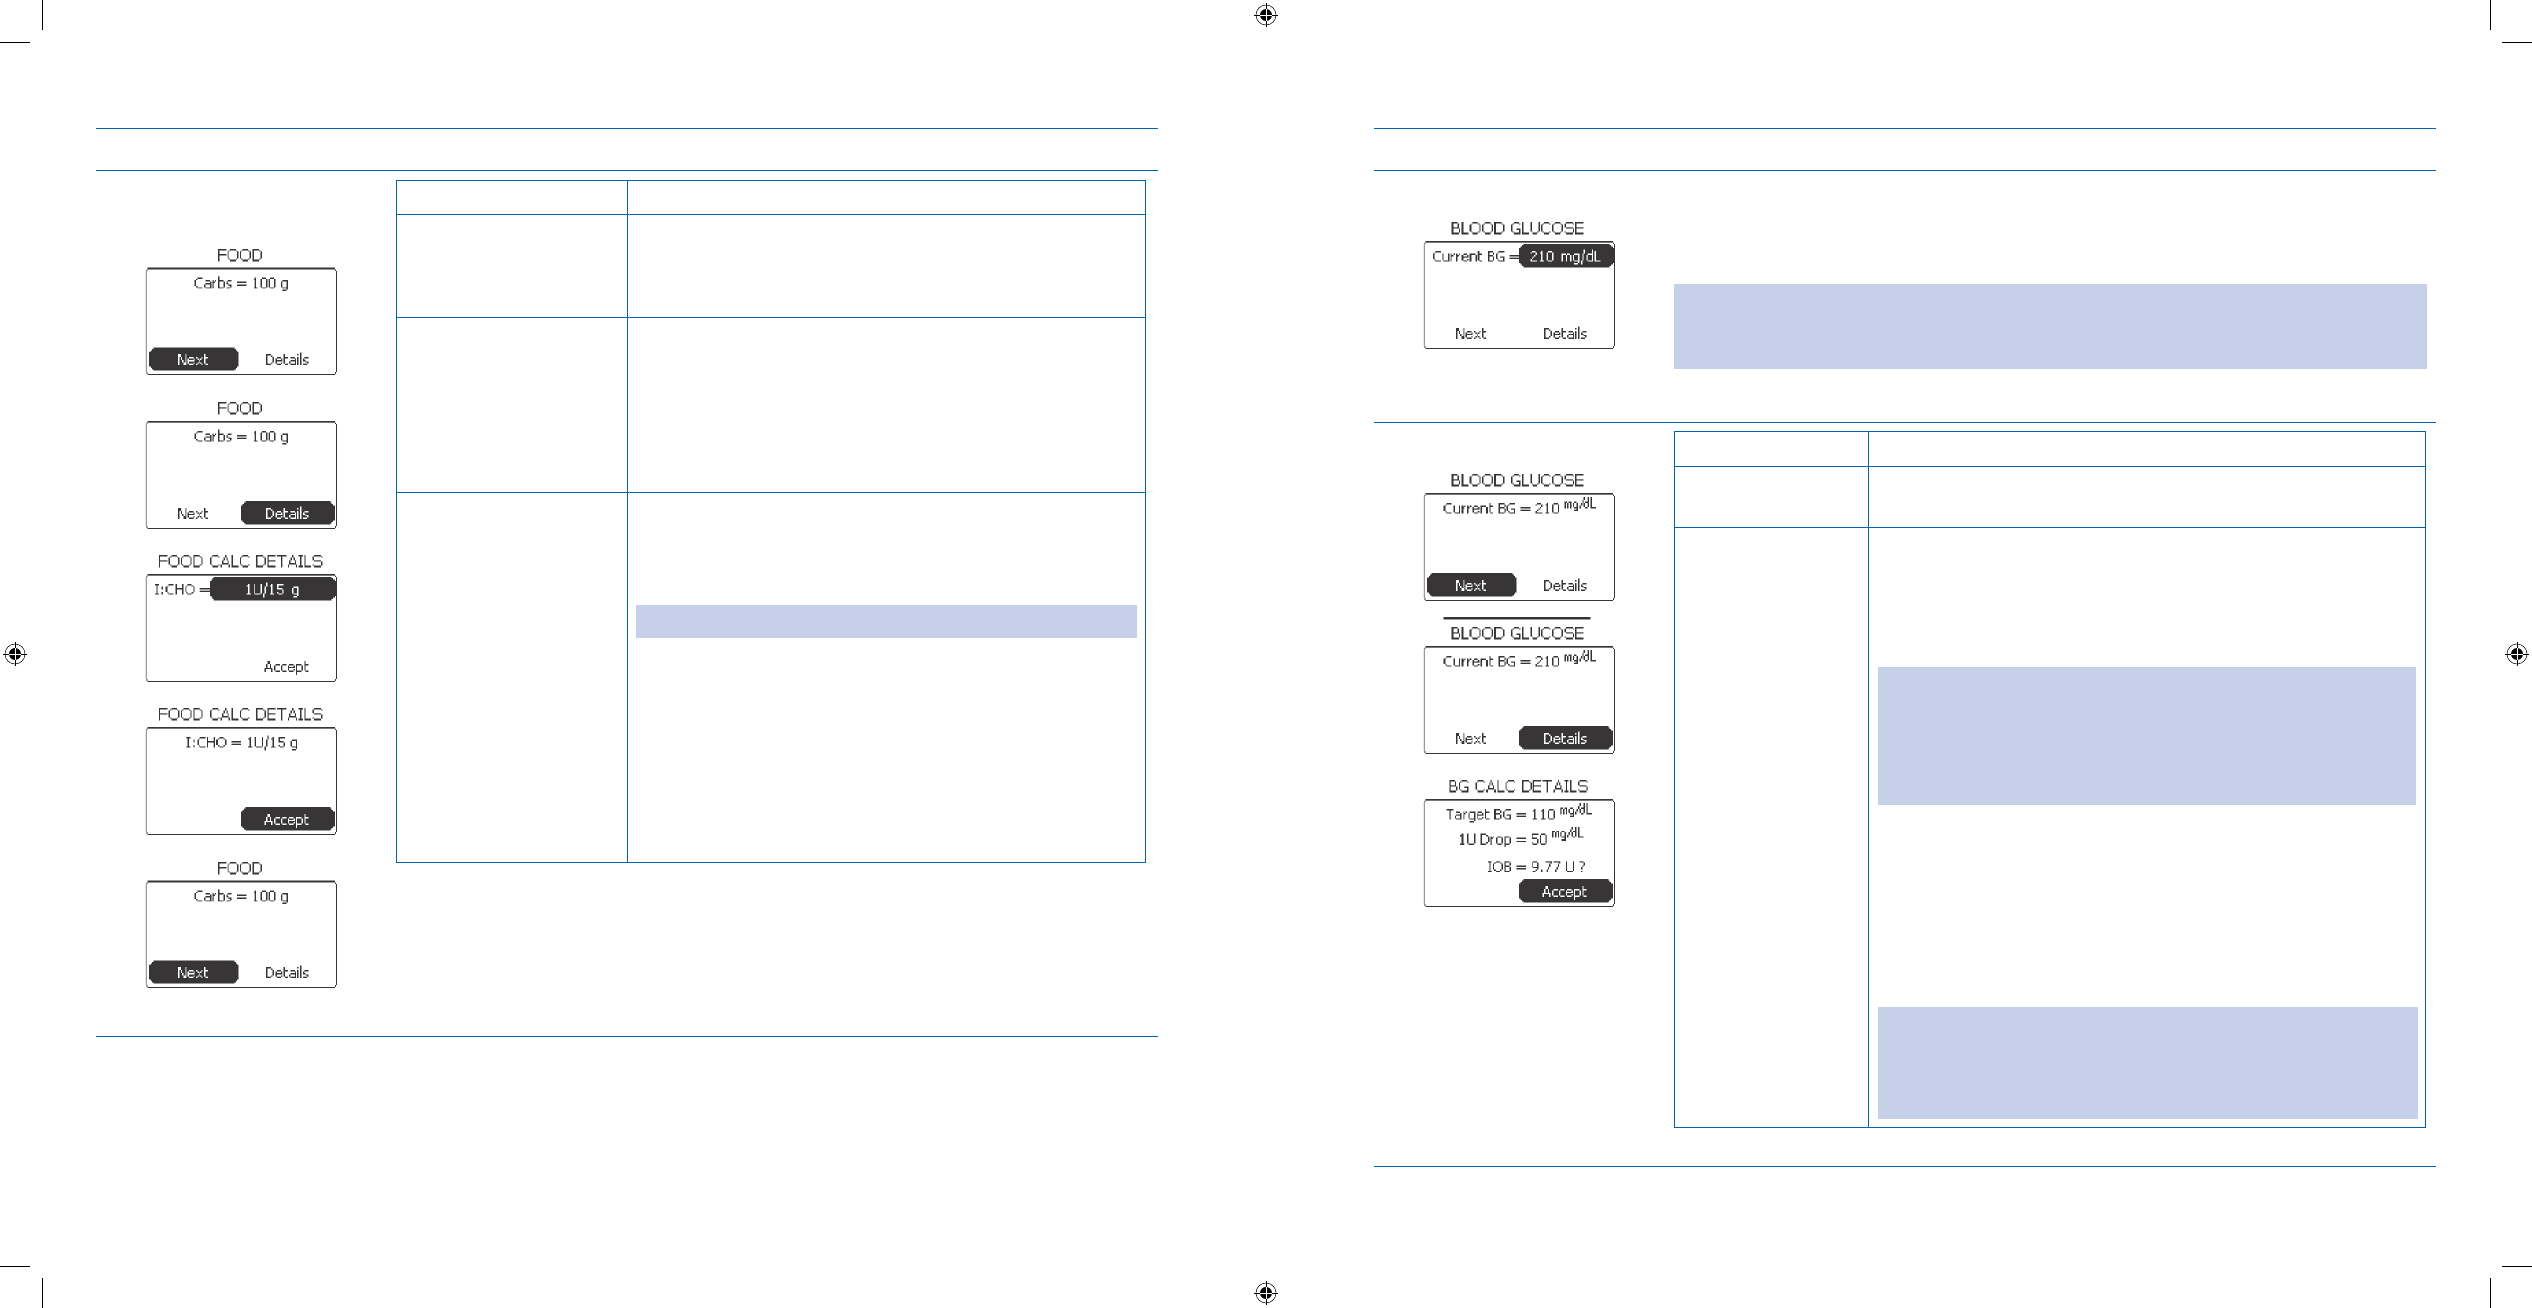
209
210
Steps Do This
Decide what to do 4.
about I:CHO ratio. If you want to Then do this
Continue to select
bolus type
Notice Next is highlighted.
Press Enter button.
View Food Calculation
Details
Scroll to highlight 1. Details.
Press 2. Enter button.
Review the insulin-to-carbohydrate ratio.3.
Notice 4. Accept is highlighted.
Press 5. Enter button.
Change I:CHO ratio Scroll to highlight 1. I:CHO.
Press 2. Enter button.
Scroll to change 3. I:CHO as needed.
Note: The range is 1U/1g to1U/150g.
Press 4. Enter button.
Notice 5. Accept is highlighted.
Press 6. Enter button.
Notice 7. Next is highlighted.
Press 8. Enter button.
Steps Do This
Set CURRENT BG.5. Noticea. Current Bg is highlighted.
Press b. Enter button.
Scroll to select your current blood glucose level.c.
Note: The default value is whatever your current Target BG is. When Target BG is NOT
defined in WIZARD, both Current BG and Target BG defaults to
110 mg/dL (6.1 mmol/L).
Press d. Enter button.
Decide what to do next.6. If you want to Then do this
Continue to select
bolus type
Notice Next is highlighted.
Press Enter button.
View BG
Calculation Details
Scroll to highlight 1. Details.
Press 2. Enter button.
Review the 3. IOB on the BG CALC DETAILS screen, and
make changes as needed.
Note: You CANNOT change the IOB on this screen. When
IOB is questionable, a question mark appears next to it on
the BG CALC DETAILS screen. For example, IOB may be
questionable when you initially turn on the pump within
the rst insulin action time, based on initial setup.
Notice 4. Accept is highlighted.
Press 5. Enter button.
Notice 6. Details is highlighted.
Scroll to highlight 7. Next.
Press 8. Enter button.
Note: The recommended calculated bolus amount is
displayed. You should change this only if you purposely
want to give a dierent amount than what is recommended
by the pump.
Section 8: Creating and Editing Specialized Bolus Programs to Meet Your Needs
8.5 Calculate and Deliver a Food & Correction Bolus
Section 8: Creating and Editing Specialized Bolus Programs to Meet Your Needs
8.6 Deliver a Quick Bolus from QBolus Menu
DOC15736_Rev-A-Man.indd 209-210 2/9/09 11:29:52 AM

211
212
Steps Do This
Set Bolus Type.7. Notice a. Bolus Type is highlighted on the BOLUS screen.
Press b. Enter button.
Note: The recommended calculated bolus amount is displayed. You should
change this only if you purposely want to give a different amount than what is
recommended by the pump.
Scroll to select the bolus type you want to deliver.c.
Note: Remember to also set the duration for Extended and Dual bolus types if you
are delivering either type of bolus.
Press d. Enter button.
Set Bolus.8. Decide what to do next.
If you want to Then do this
Accept the
calculated bolus
amount and
continue to bolus
Notice 1. Bolus is highlighted.
Scroll to highlight 2. Deliver.
Change the bolus
amount
Notice 1. Bolus is highlighted.
Press 2. Enter button.
Scroll to adjust the amount that was 3.
calculated.
Press 4. Enter button.
Check that bolus type 9.
and bolus amount is
correct.
Check your Bolus Type and Bolus amount settings on the screen.
Scroll up to select and make edits as needed.
Steps Do This
Deliver 10. Food &
Correction bolus.Notice a. Deliver is highlighted.
Press b. Enter button.
Note: You will hear 2 quick beeps from your pump.
Notice that the bolus is delivering on the screen.c.
Decide what to do next.d.
If you want to Then do this
Finish delivering
food and
correction bolus
Allow the food and correction bolus to deliver the amount
that was set.
Note: Once the bolus has nished delivering, you will hear
2 more quick beeps and then you will return to the Home
screen.
Go to Step 11 to check your bolus delivery.
STOP the food
and correction
bolus delivery
immediately
Notice 1. Stop is highlighted.
Press 2. Enter button.
Notice the 3. STOPPED ALERT screen and “Normal bolus
stopped.” message displays.
Notice 4. Clear is highlighted.
Press 5. Enter button to clear message and return to the
Home screen.
You have STOPPED the food and correction bolus, and it
is reected on the Bolus panel.
Check your work.11.
Review the Last Bolus amount and time displayed in the Bolus panel on the
Home screen.
Section 8: Creating and Editing Specialized Bolus Programs to Meet Your Needs
8.6 Deliver a Quick Bolus from QBolus Menu
Section 8: Creating and Editing Specialized Bolus Programs to Meet Your Needs
8.7 Deliver a Quick Bolus from QBolus Soft Key
DOC15736_Rev-A-Man.indd 211-212 2/9/09 11:29:53 AM
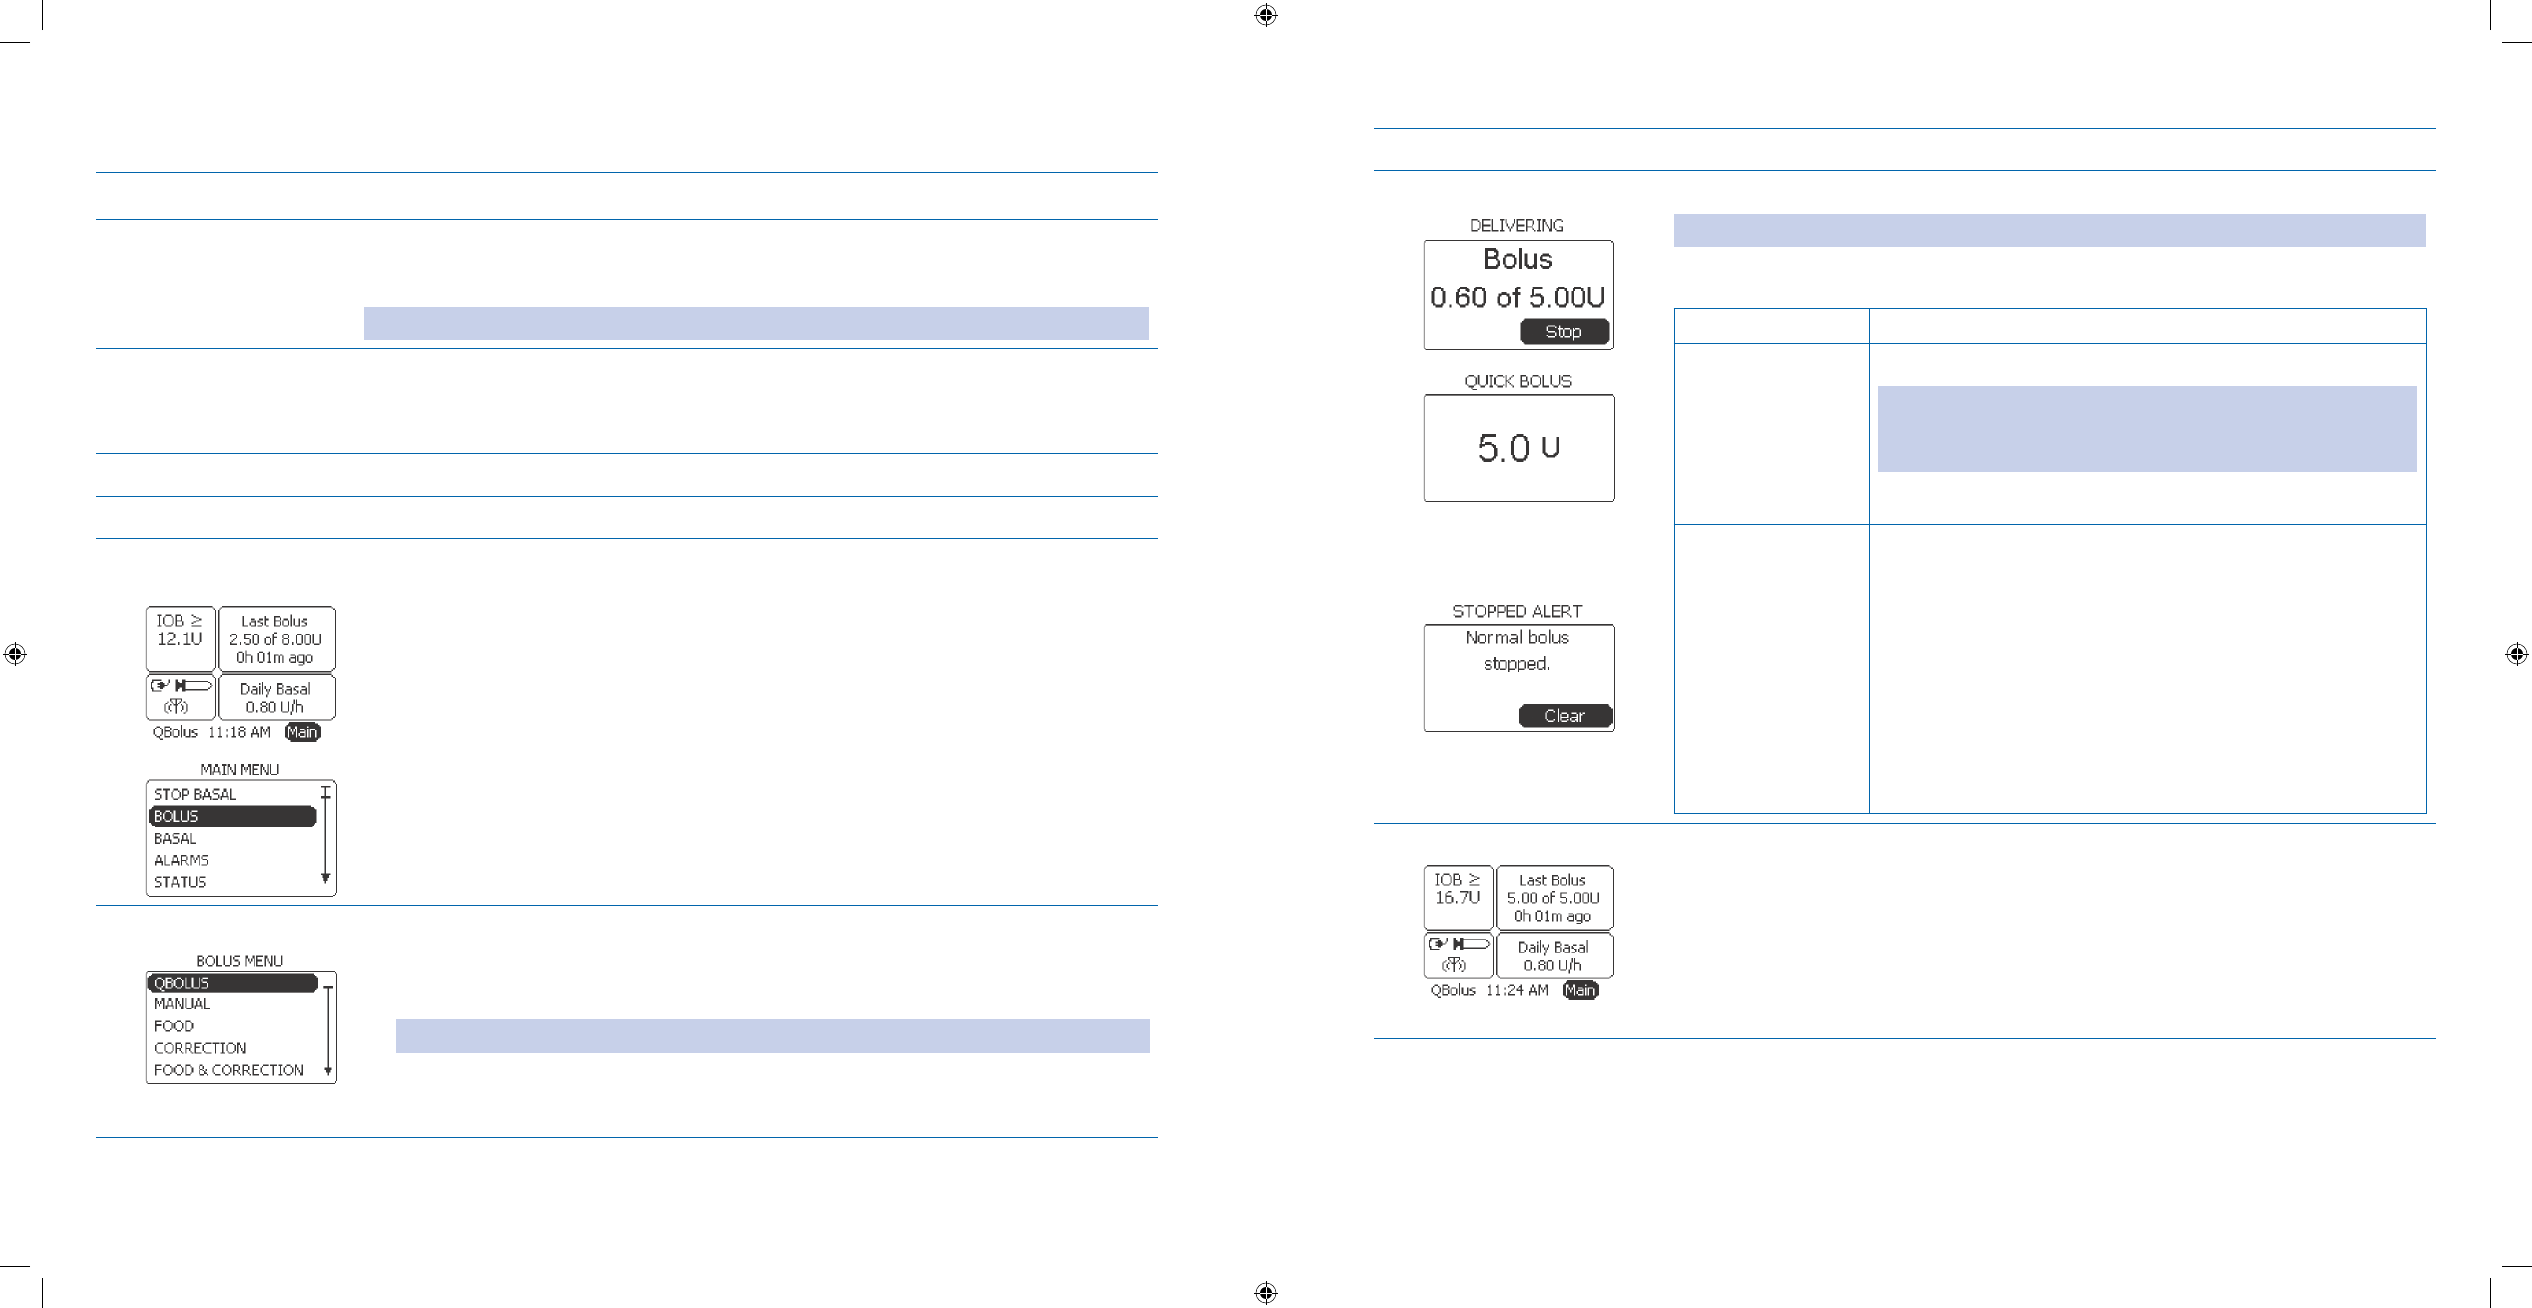
213
214
8.6 Deliver a Quick Bolus from QBolus Menu
Purpose To administer a normal bolus using the QBOLUS menu of your Aviator Companion.
When Do this procedure:
Whenever you need to deliver a normal bolus from the
• Qbolus menu.
Note: The increments are either 0.5 or 1.0 Units.
Materials Your companion set up with basal delivery started.•
Your pump set up with basal delivery started.•
Bolus recommendations from your healthcare professional.•
Procedure:
Steps Do This
Access 1. BOLUS MENU
from Home screen. Notice a. Main is highlighted.
Press b. Enter button.
Scroll to highlight c. BOLUS.
Press d. Enter button.
Set 2. QBOLUS.Notice a. QBOLUS is highlighted.
Press b. Enter button.
Scroll to select the desired quick bolus amount to administer.c.
Note: The increments are either 0.5 or 1.0 Units.
Press d. Enter button.
Steps Do This
Deliver Quick bolus.3. Notice that the bolus is delivering on the screen.a.
Note: You will hear 2 quick beeps from your pump.
Decide what to do next.b.
If you want to Then do this
Finish delivering
the quick bolus
Allow the quick bolus to deliver the amount that you set.
Note: Once the bolus has nished delivering, you will hear 2
more quick beeps from your pump and return to the Home
screen.
Go to Step 4 to check your bolus delivery.
STOP the quick
bolus delivery
immediately
Notice 1. Stop is highlighted.
Press 2. Enter button.
Notice the 3. STOPPED ALERT screen and “Normal
bolus stopped.” message displays.
Notice 4. Clear is highlighted.
Press 5. Enter button to clear message and return to the
Home screen.
You have STOPPED the quick bolus and it is reected
on the Bolus panel.
Check your work.4.
Review the Last Bolus amount and time displayed in the Bolus panel on the
Home screen.
Section 8: Creating and Editing Specialized Bolus Programs to Meet Your Needs
8.7 Deliver a Quick Bolus from QBolus Soft Key
Section 8: Creating and Editing Specialized Bolus Programs to Meet Your Needs
8.7 Deliver a Quick Bolus from QBolus Soft Key
DOC15736_Rev-A-Man.indd 213-214 2/9/09 11:29:53 AM
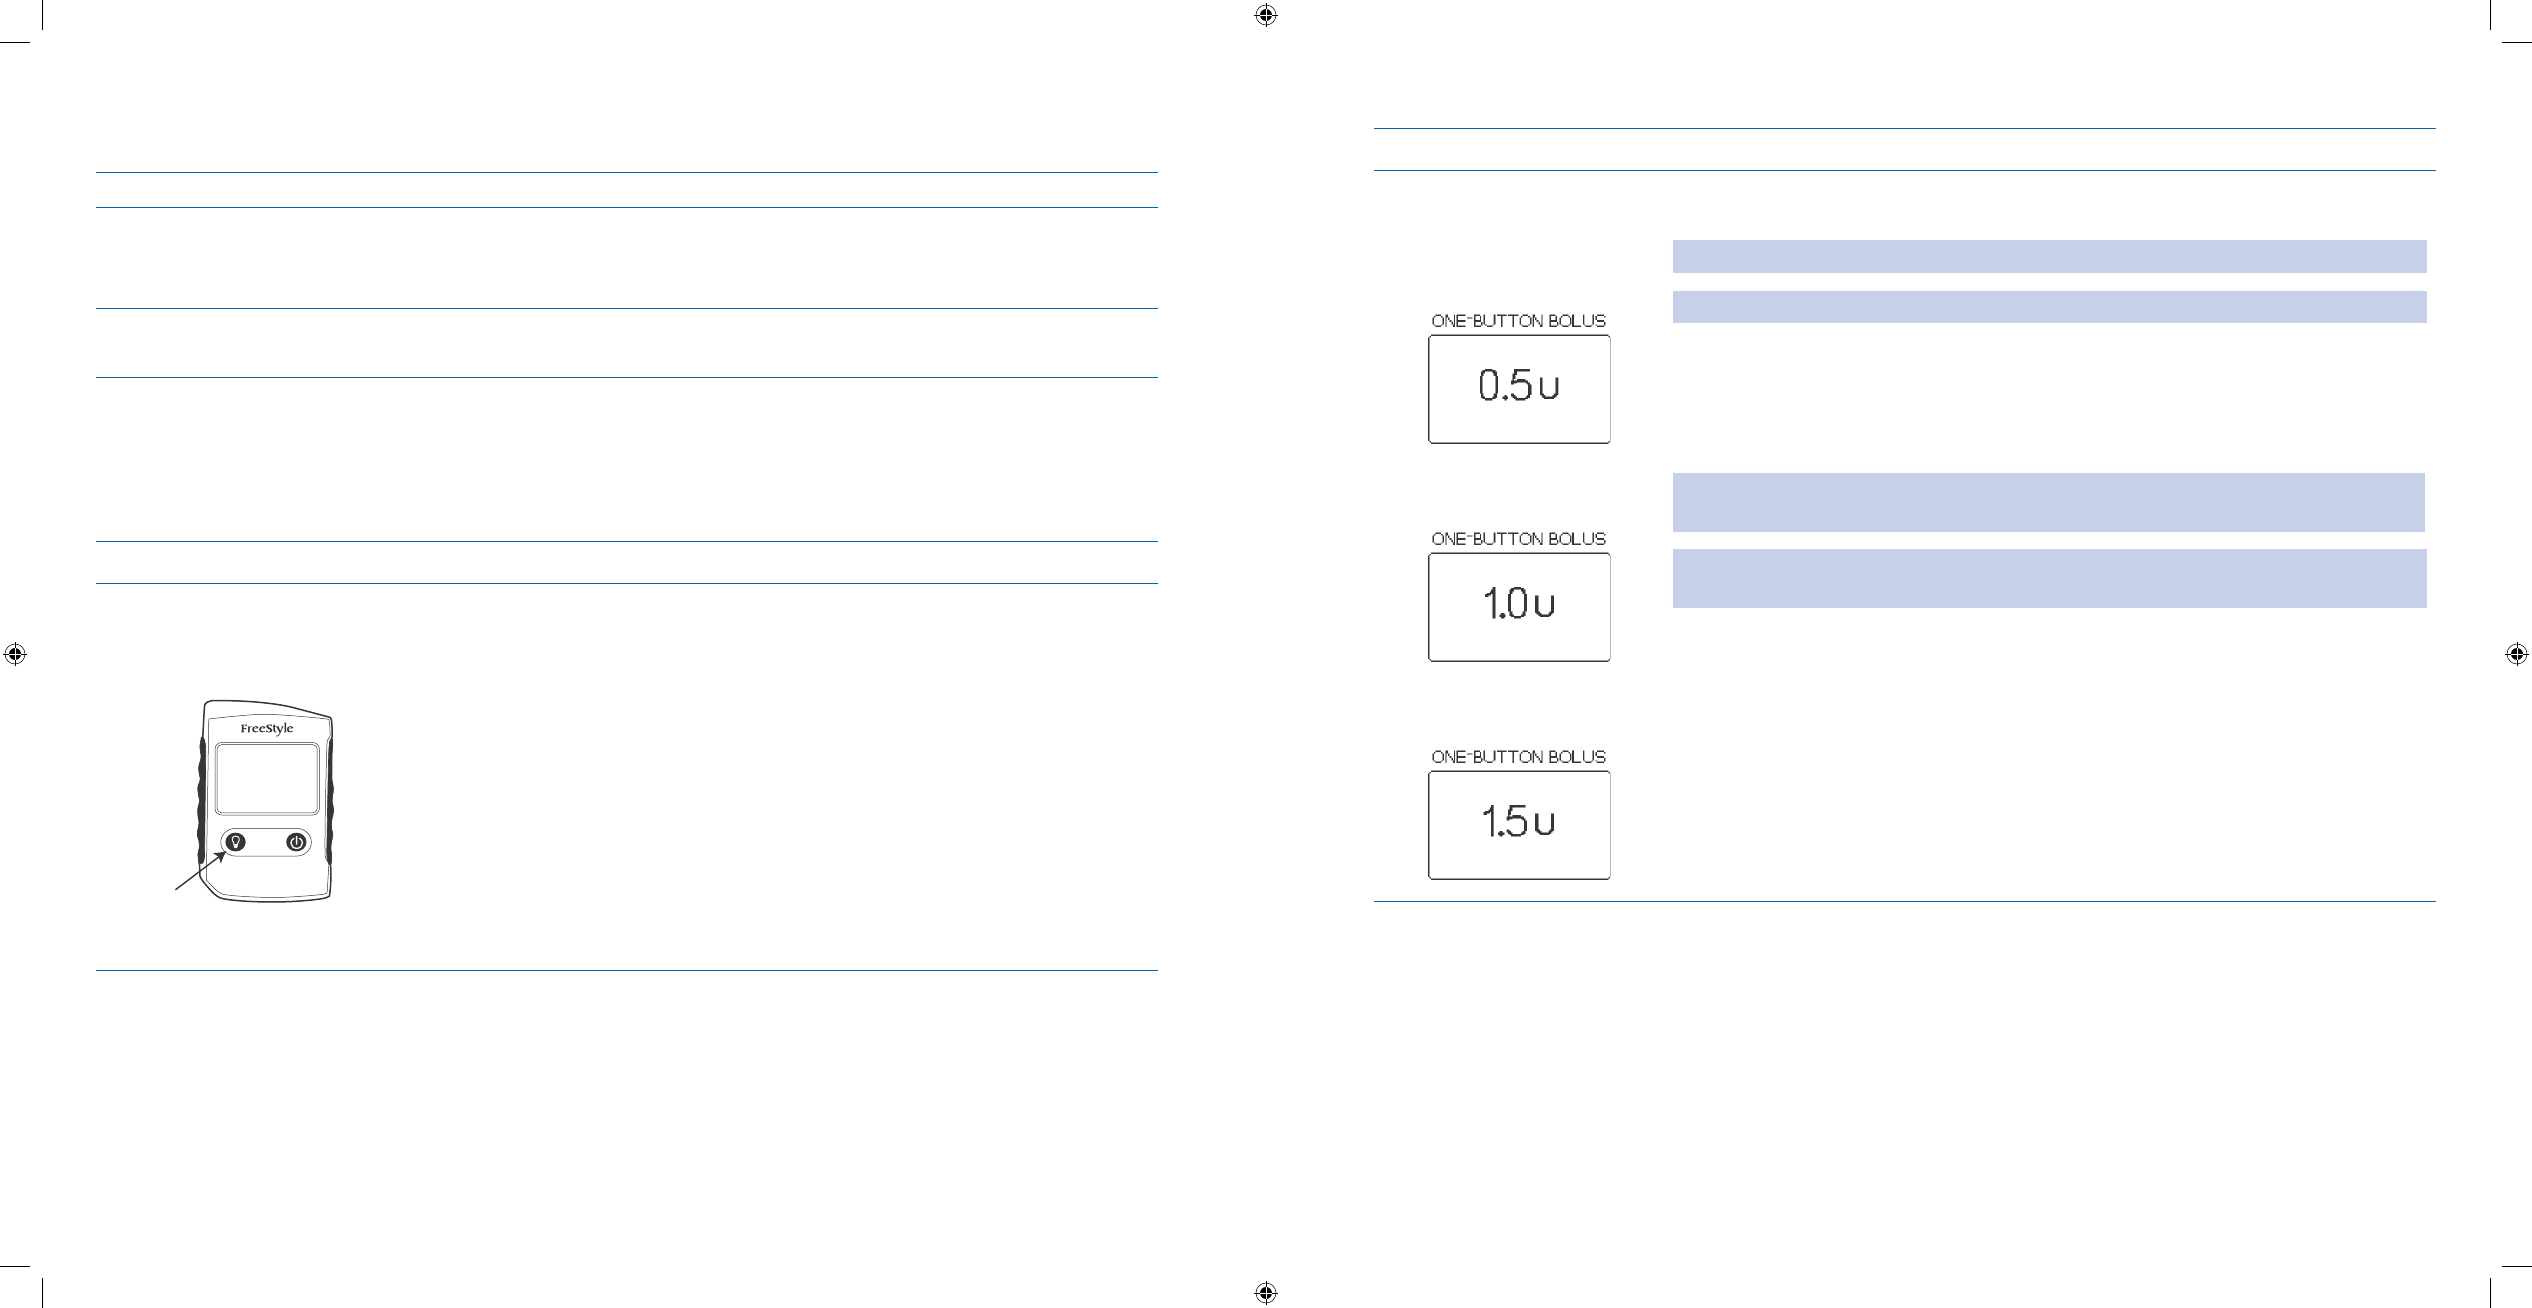
215
216
8.7 Deliver a Quick Bolus from QBolus Soft Key
Purpose To administer a normal bolus using the QBolus soft key from your companion’s Home screen.
When Do this procedure:
Whenever you need to administer a normal bolus quickly, conveniently, and discreetly,
•
using the fewest steps possible.
Materials Your companion and pump set up with basal delivery started.•
Bolus recommendations from your healthcare professional.•
Helpful Information
A • Normal bolus may be delivered using the QBolus soft key from your companion’s Home screen. You should
have already set up the bolus increments using the procedure in Section 6.1.
Procedure:
Steps Do This
Locate the QBolus 1.
soft key on your
companion.
QBolus
Soft Key
Locate the QBolus soft key (also called the Backlight soft key) on the bottom left
of your companion.
Steps Do This
Initiate the number 2.
of bolus increments to
deliver.
1 button push displays:
2 button pushes displays:
3 button pushes displays:
Press the a. QBolus soft key the same number of times as the number of
increments to deliver, companion sounds a beep with each press.
Note: You may have to press the soft key once to wake companion up.
Note: The increments for the one-button bolus are either 0.5 or 1.0 Units.
Notice that after a few seconds, the companion will b. beep the same number
of times that you pressed the QBolus soft key to verify your instructions.
After the beeps, press the c. QBolus soft key ONE MORE TIME within 2 seconds
to CONFIRM the correct number of increments for bolus delivery.
Note: You MUST press the Bolus button after the complete feedback beeps within 2
seconds, or the bolus is cancelled.
Note: The bolus will also be cancelled if you press the Bolus button before the
feedback completes.
Section 9: Respond to Alarms, Alerts, Errors, and Other Problem Section 9: Respond to Alarms, Alerts, Errors, and Other Problem
FPO
Screen shot
DOC15736_Rev-A-Man.indd 215-216 2/9/09 11:29:53 AM
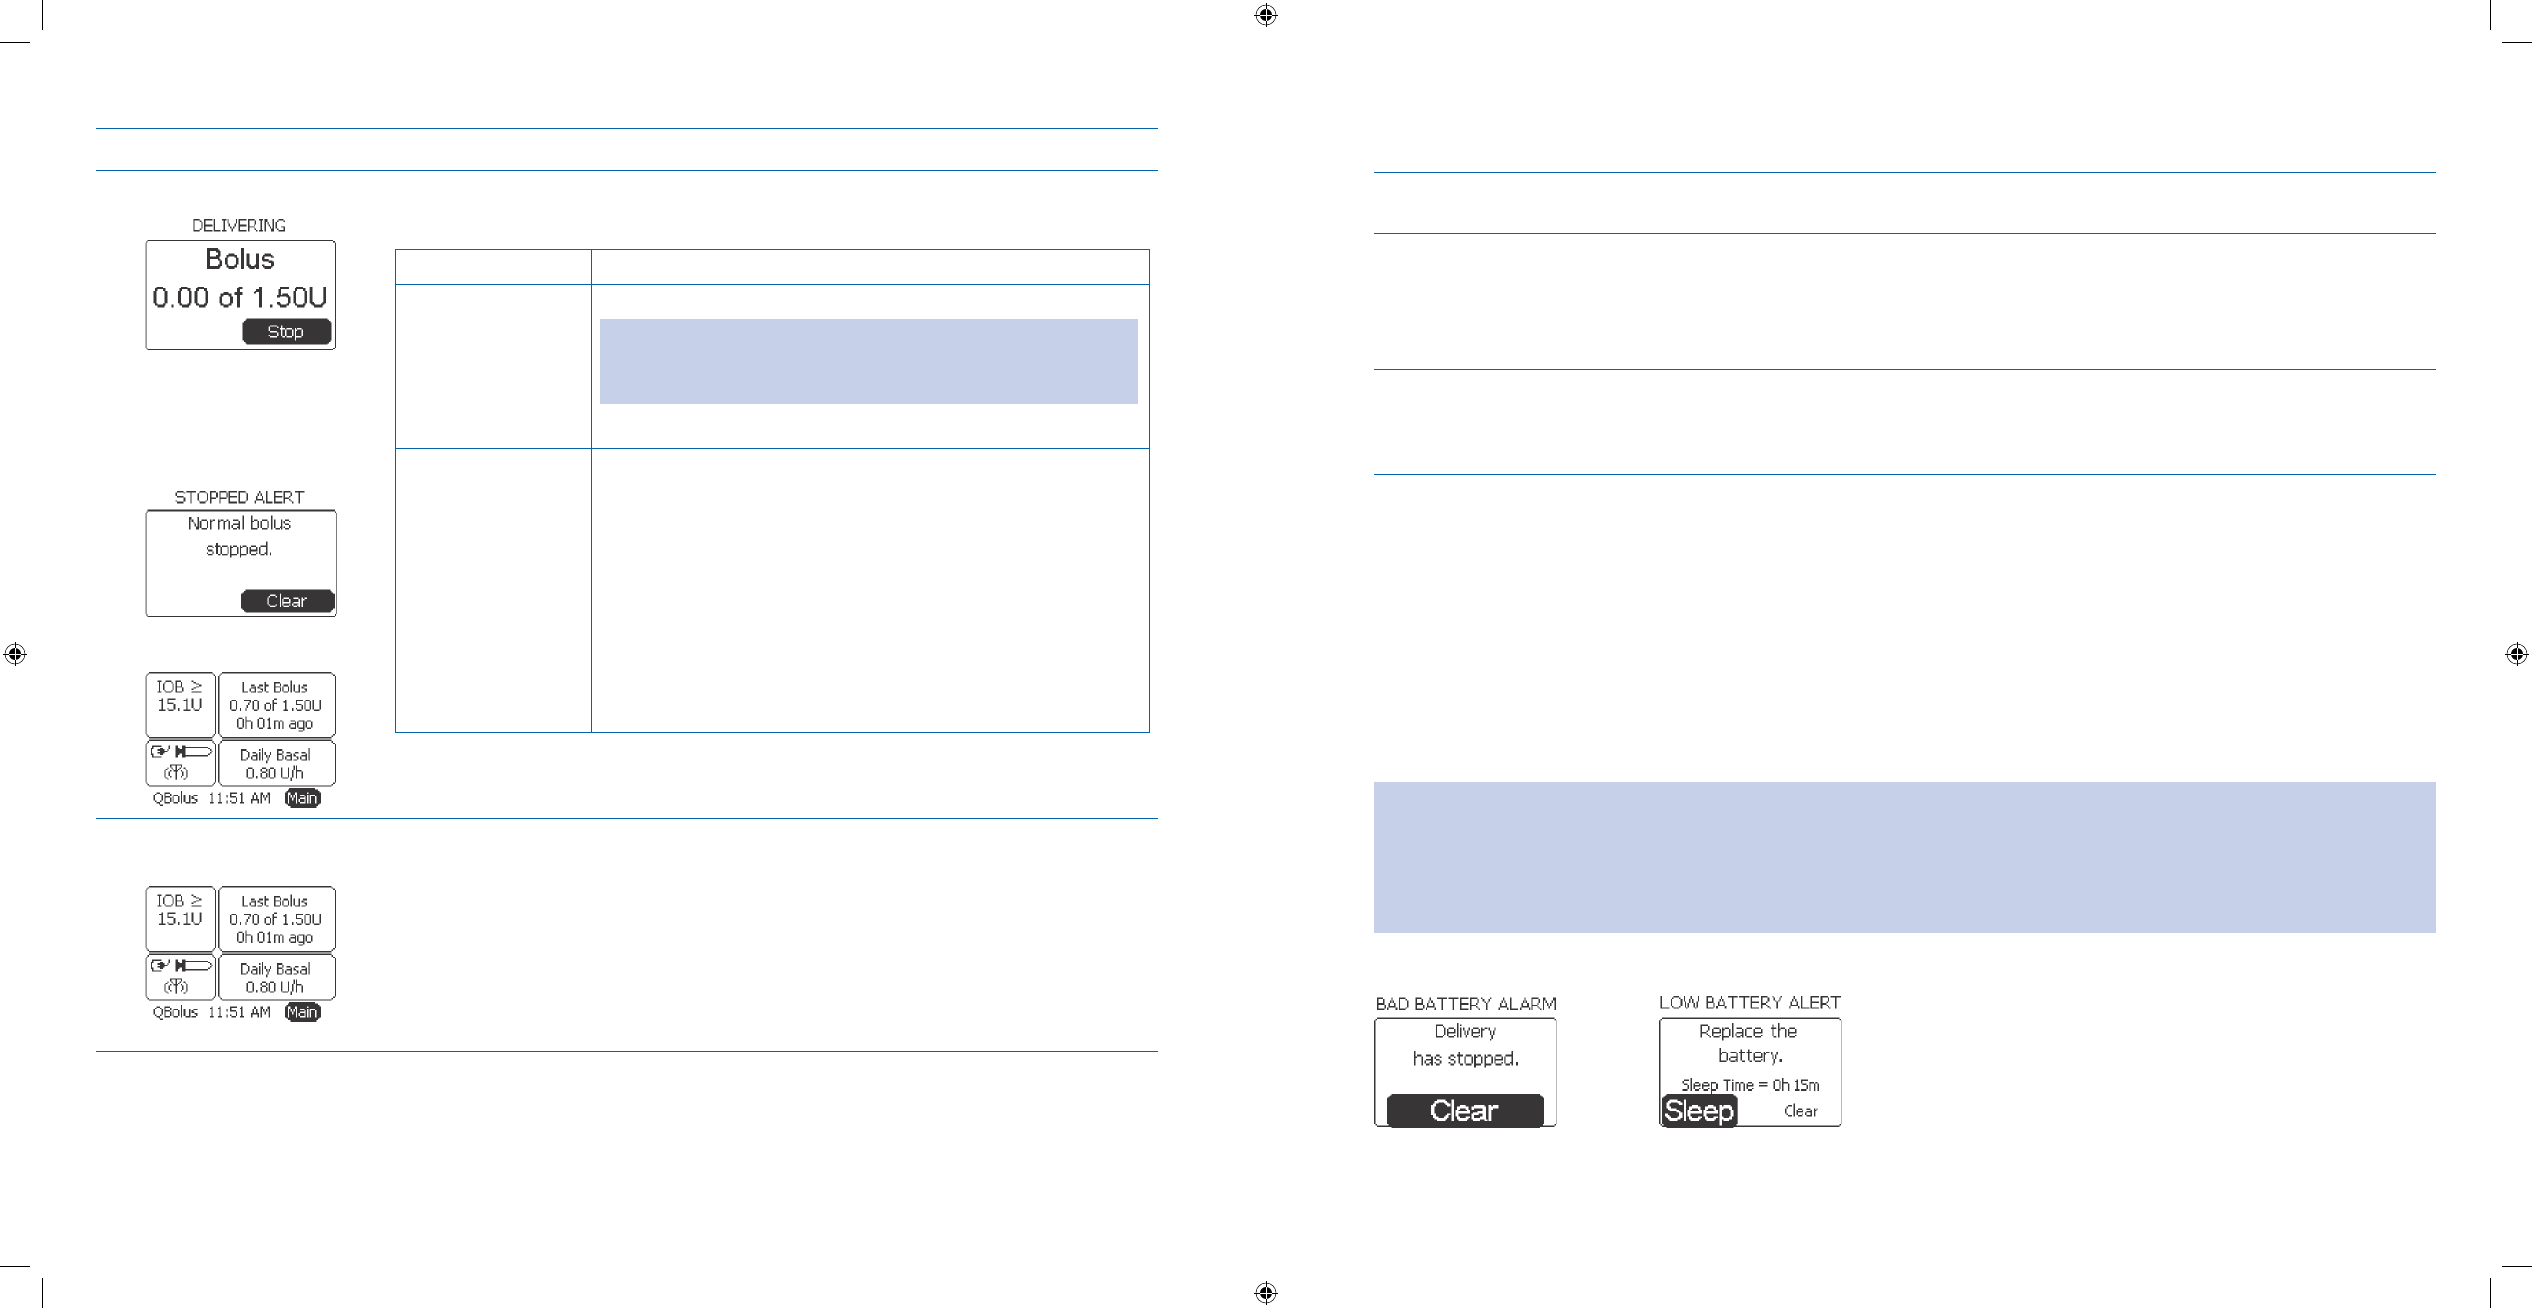
217
218
Steps Do This
Deliver the bolus.3. Notice that the bolus is delivering on the screen.a.
Decide what to do next.b.
If you want to Then do this
Finish delivering
the quick bolus
Allow the bolus to deliver the amount that you set.
Note: Once the bolus has nished delivering, you will
hear 2 more quick beeps and then you will return to the
Home screen.
Go to Step 4 to check your bolus delivery.
STOP the quick
bolus immediately
Notice 1. Stop is highlighted.
Press 2. Enter button.
Notice the 3. STOPPED ALERT screen and “Normal
bolus stopped.” message displays.
Notice 4. Clear is highlighted.
Press 5. Enter button to clear message and return to the
Home screen.
You have STOPPED the quick bolus and it is reected in
the Bolus panel.
4. Check your work.
Look at the Bolus box on the Home screen to review the amount and time of the
last bolus.
9 Respond to Alarms, Alerts, Errors, and Other Problems
Purpose To resolve alarm and alert messages, error codes, or problems related to your Aviator
Companion and Aviator Pump.
When Do this procedure:
When you receive an alarm, alert, or error code on your companion or pump.
•
Your companion or pump is • NOT turning on, you CANNOT start basal delivery,
dropping your companion or pump, or other problems, etc.
Materials Your companion and pump may either be operating normally or in an alarm failsafe
battery state (non-rechargeable).
Your personalized Table of Settings in Section 12- Appendix A.
Helpful Information
This section oers suggestions for addressing problems or diculties that you may experience with your com-•
panion and pump.
Call your healthcare professional for questions about your blood glucose control or diabetes management.
•
Call Customer Care, 24 hours a day, 7 days a week, for questions involving the mechanics of your companion or •
pump, or regarding any alarms and errors not covered in this section.
You may also check the
• Table of Contents and Index for sections that may be helpful.
Refer to the • Glossary for the denitions of dierent Alarms and Alerts.
WARNING:
While an
• ALARM is active, insulin delivery IS stopped. Therefore, it is important for you to respond to an alarm as
soon as possible to prevent medically adverse events or serious injury.
Insulin delivery does
• NOT stop with an ALERT. However, delivery is NOT occurring when you get a pump idle alert,
because you have NOT begun insulin delivery yet.
All alarms and alerts appear as text on the screen of your companion or pump. For example,
•
Section 9: Respond to Alarms, Alerts, Errors, and Other ProblemSection 9: Respond to Alarms, Alerts, Errors, and Other Problem
DOC15736_Rev-A-Man.indd 217-218 2/9/09 11:29:53 AM

219
220
You are also alerted to an insulin delivery (pump) alarm or alert either by sound or vibration (on the pump).•
If your pump is in
AUDIO mode
A beep will sound. This beep will gradually change to continuous tones of increasing
frequency and higher pitch until the alarm/alert is addressed or, in the case of alerts, if the
SLEEP mode is activated.
If your pump is in
VIBRATE mode
Your pump will vibrate initially, but eventually the vibrations will change to beeps, which
will gradually change to continuous tones of increasing frequency unless the alarm/alert is
addressed or, in the case of alerts, if the SLEEP mode is activated.
Sleep mode is like hitting a snooze button on an alarm clock. Sleep mode gives you the option of postponing
•
your response to an ALERT or reminder for a specic, limited amount of time.
You CANNOT use sleep mode with alarms.
Sleep mode can be used to quiet an alert for as little as 15 minutes or as long as 12 hours.
• An exception is the
Pump Idle Alert which is 15 minutes to a maximum of 1 hour.
WARNING: If you receive an occlusion alarm, you MUST disconnect from the pump using the quick disconnect feature
of the Infusion Set before investigating the cause of the occlusion. Bolus delivery may occur when the cause of the
occlusion is removed.
Discuss the occlusion alarm setting with your healthcare professional to help you determine which setting is
•
best for you.
All Companion related alerts appear as text on the screen of your Companion. For example, a low battery alert
•
on your Companion battery.
You are also alerted to a companion alert either by sound or vibration on the Companion.
•
Companion related alerts will not gradually escalate in the way a pump alarm or alert does.•
Procedure:
Steps Do This
Determine what you 1.
need to resolve. If you are resolving Then do this
An alarm or alert Go to Step 2.
A companion alert Go to Step 3.
System errors Go to Step 4.
Other problems or diculties
with your pump.
Go to Step 5.
Steps Do This
Identify the type 2.
of pump alarm or
alert and respond as
appropriate.
Look at the screen of your pump.
If the alarm/
alert is a
Then do this
Bad battery
alarm
Notice 1. Clear is highlighted.
Press 2. Enter button to clear the alarm.
Change the battery 3. within 15 minutes to avoid losing
information (see Section 1.4) and resume basal delivery.
Conrm or reset 4. Time and Date.
RESTART5. basal delivery (see Section 3.1.1).
Note: Refer to your Table of Settings in Section 12
-Appendix A to determine the method of insulin
replacement as recommended by your healthcare
professional, if NOT able to replace battery right away until
the issue is resolved.
Stopped bolus
alert
Notice 1. Clear is highlighted.
Press 2. Enter button to clear the alert.
Review the amount of the last bolus that was delivered 3.
and accommodate for undelivered insulin, if you
accidentally stopped your bolus.
Inactivity alert
OR
Inactivity alarm
Notice 1. Clear is highlighted.
Press 2. Enter button to clear the alert, reactivate your
pump and return to the Home screen.
RESTART3. basal delivery if delivery has stopped.
Note: Refer to your Table of Settings in Section 12 -Appendix
A to determine the method of insulin replacement as
recommended by your healthcare professional until the issue is
resolved. Change the length of the inactivity time as needed.
Continued on next page.
Section 9: Respond to Alarms, Alerts, Errors, and Other ProblemSection 9: Respond to Alarms, Alerts, Errors, and Other Problem
DOC15736_Rev-A-Man.indd 219-220 2/9/09 11:29:53 AM
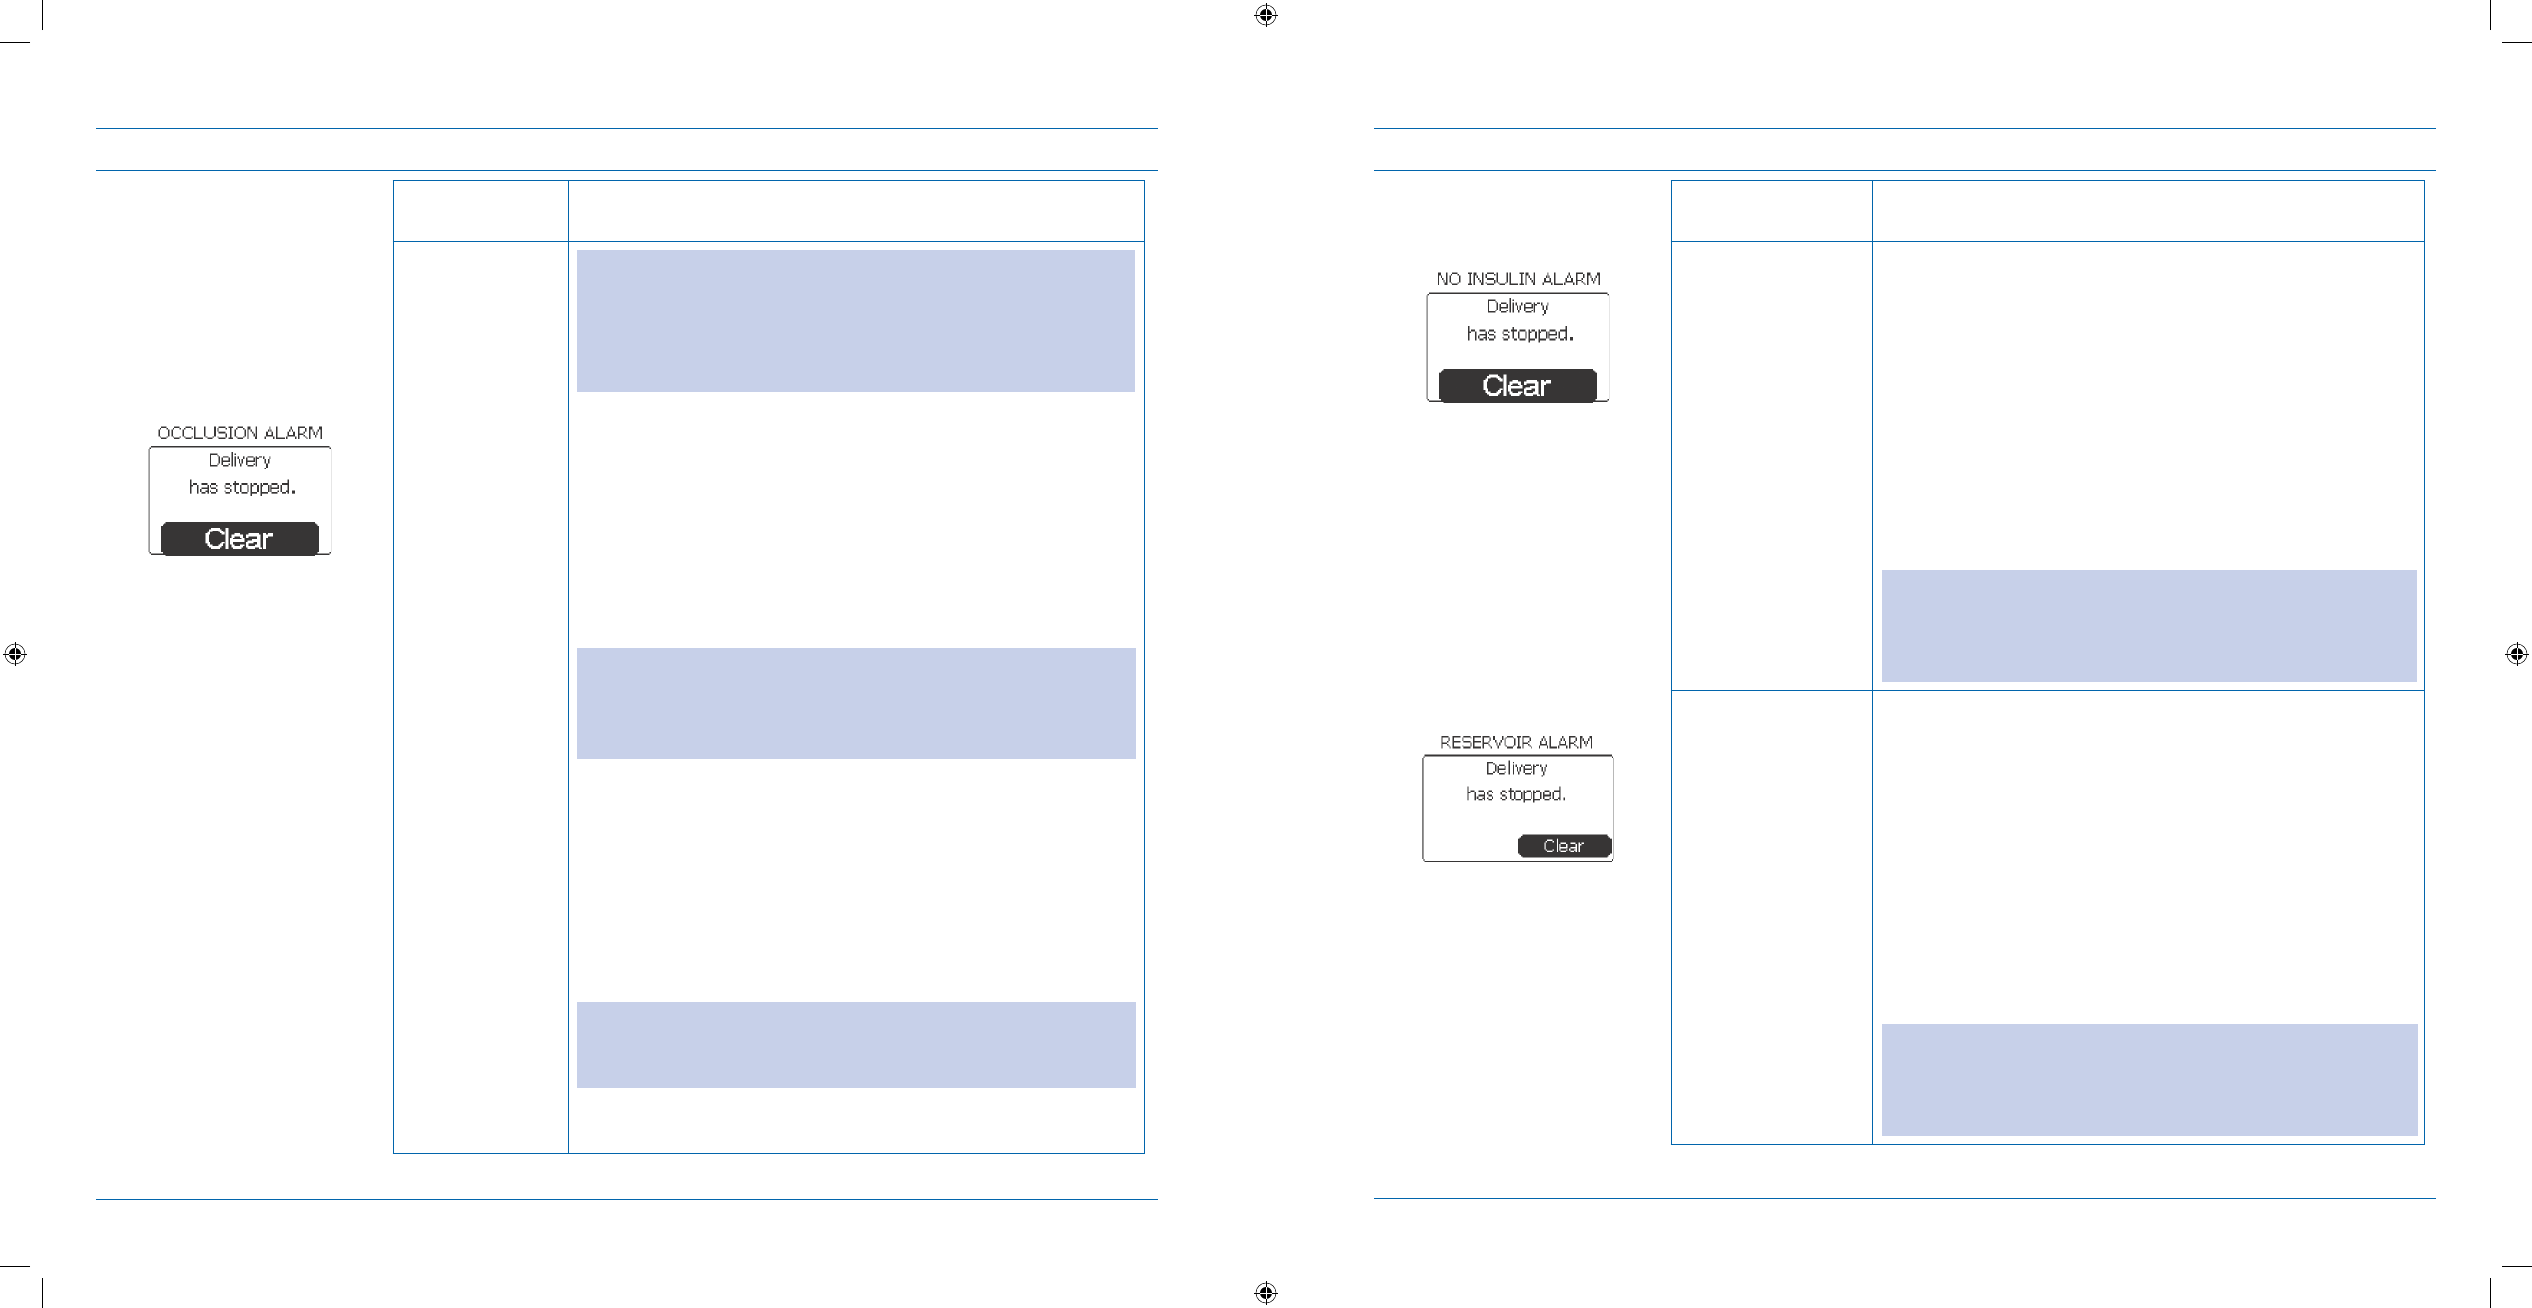
221
222
Steps Do This
Identify the type of pump
alarm or alert and respond
as appropriate (continued).
If the alarm/
alert is an
Then do this
Occlusion alarm WARNING: If you receive an occlusion alarm, you MUST
disconnect from the pump using the quick disconnect feature
of the Infusion Set before investigating the cause of the
occlusion. Bolus delivery may occur when the cause of the
occlusion is removed.
Notice 1. Clear is highlighted.
Press 2. Enter button to clear the alarm and return to the
Home screen.
Check your blood glucose level.3.
Disconnect the pump.4.
Administer an insulin injection if necessary as it is 5.
possible that your pump has NOT been delivering insulin
for some time.
Change your infusion set and reservoir immediately.6.
Note: Refer to your Table of Settings in Section 12 -Appendix
A to determine the method of insulin replacement as
recommended by your healthcare professional until the issue
is resolved.
Prime the pump (see 7. Section 2.4) to see if insulin is
being pumped.
❏• If insulin IS being pumped, nish priming, reconnect
pump and start basal delivery again.
❏• If insulin is NOT being pumped, change infusion site
and tubing, then change the reservoir, before calling
Customer Care or your healthcare professional for further
assistance.
Note: If you get frequent occlusion alarms, talk to your
healthcare professional about setting high or low sensitivity
for alarm, as well as best sites for infusion set and tubing.
Continued on next page.
Steps Do This
Identify the type of pump
alarm or alert and respond
as appropriate (continued).
If the alarm/alert
is a
Then do this
No insulin alarm Notice 1. Clear is highlighted.
Press 2. Enter button to clear the alarm and return to the
Home screen.
Disconnect tubing from cannula and remove cannula 3.
from infusion site.
Replace reservoir with a new reservoir lled with 4.
insulin (see Section 2.3).
Prime pump (see 5. Section 2.4).
Insert new infusion set.6.
Prime cannula.7.
RESTART8. basal delivery.
Note: Refer to your Table of Settings in Section 12
-Appendix A to determine the method of insulin
replacement as recommended by your healthcare
professional until the issue is resolved.
Reservoir alarm Notice 1. Clear is highlighted.
Press 2. Enter button to clear the alarm and return to the
Home screen.
Disconnect tubing from cannula and remove cannula 3.
from infusion site.
Remove reservoir and replace it (see 4. Section 2.3).
Prime Pump (see 5. Section 2.4).
Insert new infusion set.6.
Prime cannula.7.
RESTART8. basal delivery.
Contact Customer Care if problem persists.9.
Note: Refer to your Table of Settings in Section 12
-Appendix A to determine the method of insulin
replacement as recommended by your healthcare
professional until the issue is resolved.
Continued on next page.
Section 9: Respond to Alarms, Alerts, Errors, and Other ProblemSection 9: Respond to Alarms, Alerts, Errors, and Other Problem
DOC15736_Rev-A-Man.indd 221-222 2/9/09 11:29:54 AM
223
224
Steps Do This
Identify the type of pump
alarm or alert and respond
as appropriate (continued).
<Insert screen shots>
<insert screenshots>
If the alarm/alert
is a
Then do this
Low battery alert Note: The Aviator Pump will notify the user when the
battery is nearing depletion NOT less than 24 hours before
the pump stops delivery due to a depleted battery.
Notice 1. Sleep is highlighted.
Scroll to highlight 2. Clear.
Press 3. Enter button to clear the alert and return to
Home screen.
Replace the battery as soon as possible (see 4. Section
1.4).
Cancellation alert Notice 1. Clear is highlighted.
Press 2. Enter button to clear the alert.
Reenter your changes/edits ONLY if necessary so that 3.
they are saved.
Note: Change the idle screen time to a longer period if this
occurs frequently.
Low insulin alert Notice 1. Sleep is highlighted.
Scroll to highlight 2. Clear.
Press 3. Enter button to clear the alert and return to
Home screen.
Replace and rell the reservoir as soon as possible 4.
(see Section 2.3).
Continued on next page.
Steps Do This
Identify the type of pump
alarm or alert and respond
as appropriate (continued).
If the alarm/alert
is a
Then do this
Pump idle alert/
pump NOT
started
Notice 1. Sleep is highlighted.
Decide what to do next.2.
If you want to Then
Clear the alert Scroll to highlight Clear and press
Enter button to return to Home screen.
Put pump back
to sleep again
Press Enter button to put pump back to
sleep again.
Put pump back
to sleep for a
longer time
Scroll to highlight Sleep Time.
Press Enter button.
Scroll to change the sleep time.
Press Enter button.
Note: Change the length of Sleep Time as needed.
START3. basal delivery (see Section 3.1.1) per healthcare
professional recommendations.
Identify the type of 3.
Companion alert
and respond as
appropriate.
If the alarm/alert
is a
Then do this
Low battery
alert
Notice 1. OK is highlighted.
Press 2. Enter button to clear the alert and return to
Home screen.
Recharge the battery as soon as possible. The alert 3.
indicates that you have 30% of battery charge
remaining. (see Section 1.3).
Section 9: Respond to Alarms, Alerts, Errors, and Other ProblemSection 9: Respond to Alarms, Alerts, Errors, and Other Problem
FPO
FPO
DOC15736_Rev-A-Man.indd 223-224 2/9/09 11:29:54 AM

225
226
Steps Do This
Very Low
battery alert
Notice 1. OK is highlighted.
Press 2. Enter button to clear the alert and return to Home
screen.
Recharge the battery as soon as possible. The alert 3.
indicates that you have 15% of battery charge remaining.
(see Section 1.3).
Depleted
battery alert
Notice 1. OK is highlighted.
Press 2. Enter button to clear the alert and return to Home
screen.
The companion may shut down at any time. Recharge 3.
the battery immediately to continue using the
Companion (see Section 1.3).
BG check not
available alert
Remove the test strip from the strip port. 1.
Remove the USB cable from the USB port on the 2.
Companion.
Insert a 3. FreeStyle Lite Test Strip into the strip port to
perform a blood glucose test (see Section 5.2).
WARNING: Use ONLY the USB cable provided. Use of an
unapproved cable may lead to loss of electromagnetic
compatibility, and make the system more susceptible to
electronic interference.
Steps Do This
Resolve System Errors.4. Contact Customer Care.a.
NOTb. all system errors will indicate a failure in the pump system. However, if
the pump fails, you MUST DISCONTINUE use of the pump. Refer to your Table
of Settings in Section 12 -Appendix A to determine the method of insulin
replacement as recommended by your healthcare professional until the issue
is resolved.
Troubleshoot pump 5.
problems or issues.
Identify what the problem may be.
If Then
Your pump won’t
turn on
Remove and reinsert battery. (see 1. Section 1.4)
Insert a new AAA alkaline battery (2. Energizer and
Duracell brands are recommended) if the issue is
NOT resolved.
Contact Customer Care or your healthcare 3.
professional if the issue is still NOT resolved.
Your pump’s
batteries are
NOT lasting very
long (occurs when
backlight is used
frequently or pump is
allowed to alarm for
long periods of time)
Use 1. ONLY Energizer or Duracell alkaline batteries.
Set your pump to 2. audio instead of vibrate.
Reduce the use of the backlight if possible.3.
Respond to alarms as quickly as possible, as batteries 4.
will run down quicker if the pump is allowed to alarm
for long periods of time.
Contact Customer Care if the issue is still 5. NOT
resolved.
Your pump’s screen
is hard to read or is
distorted
Turn on the backlight if you are in a dark room.1.
Remove your sunglasses if applicable.2.
Move indoors or into the shade if applicable.3.
Keep your pump out of direct heat (e.g., away from 4.
heaters) or cold (e.g., by placing under your clothing
on a cold day).
Contact Customer Care if the issue is still 5. NOT
resolved.
Continued on next page.
Section 9: Respond to Alarms, Alerts, Errors, and Other ProblemSection 9: Respond to Alarms, Alerts, Errors, and Other Problem
DOC15736_Rev-A-Man.indd 225-226 2/9/09 11:29:54 AM

227
228
Steps Do This
Troubleshoot pump
problems or issues
(continued).
If Then do this
Basal delivery
won’t start
Check that the devices are paired properly.1.
Check that you are delivering a large enough volume of 2.
insulin for priming to be completed in both the tubing
and cannula. If a tiny amount of insulin has NOT come out
of the end of the tubing, you may need to increase the
amount of the prime to at least 4 – 6 units (see Section
2.4).
Note: If you attempt to start basal delivery and the pump needs
to be primed, the pump will display a warning to prime pump
rst.
Check that the insulin reservoir is lled. If empty, ll the 3.
reservoir.
Note: The pump will display a NO INSULIN ALARM. Refer to
Step 2 for more information.
Contact Customer Care or your health care professional if 4.
you are still unable to start basal delivery.
Your pump got
wet
Towel dry the outside of the pump.1.
Inspect the reservoir and battery compartments and dry 2.
any water you nd.
Caution: Do NOT use a hair dryer to dry your pump.
If your pump was submerged in salt water, thoroughly 3.
clean with a damp cloth before drying with towel.
Refer to 4. Section 4.1 for additional details on what to do.
Contact Customer Care or your healthcare professional if 5.
you are unable to use your pump.
Steps Do This
Troubleshoot pump
problems or issues
(continued).
If Then do this
You dropped
your pump
Examine the screen and buttons for chips, cracks, or other 1.
damage.
Caution:
If your pump is cracked or a button is torn, switch to insulin
injections immediately AND contact your healthcare
professional and/or Customer Care.
Carefully examine the pump, making sure the battery cap 2.
and reservoir cap are secure.
Examine the infusion set for damage, making sure the 3.
tubing, tubing connector, and soft cannula are intact.
Caution:
If your pump has been dropped, the waterproof capability of
your pump may be compromised.
If you suspect that your pump has been damaged, and 4.
are concerned that its waterproof capability has been
compromised, please contact Customer Care.
You suspect
pump alarm(s)
may not be
functioning
correctly
(check for
operational
safety).
Stop basal delivery.1.
Set it aside for 5 minutes without starting basal delivery.2.
Let the alarm escalate and check that it cycles through 3.
both audio and vibratory annunciation.
Check that the pump’s audio speakers sound as part of 4.
the transition from idle mode to basal delivery mode, or
following insertion of a battery.
Caution:
If your pump audio or vibratory annunciators are not
functioning, switch to insulin injections immediately AND
contact your healthcare professional and/ or Customer Care.
Check your work.6. Make sure your pump is operating fully and normally again after responding to the
alarm, alert, system error, or other problem(s).
Section 10: System MaintenanceSection 10: System Maintenance
DOC15736_Rev-A-Man.indd 227-228 2/9/09 11:29:54 AM

229
230
10 System Maintenance
Purpose To keep your companion and pump in good working order. To assist you with
battery-related issues, cleaning, storage and what to do if companion or pump is
damaged or gets wet.
When Do this procedure when:
You need to replace your pump battery.
•
You need to clean your companion and pump.•
You need to transport or store your companion and pump.•
Your companion or pump is damaged or gets wet.•
Materials One • Duracell MN2400 or Energizer E92 AAA alkaline primary battery (non-
rechargeable).
One cloth dampened with mild soapy water.
•
One damp cloth.•
One dry cloth.•
WARNING: Do NOT use lithium, nickel cadmium (NiCad), nickel metal hydride (NiHM),
carbon zinc (heavy duty), or rechargeable batteries. These types of batteries will NOT
power Aviator Pump properly, and/or the battery level indicator may not display
accurately.
Basal delivery MUST be stopped before removing the battery (Section 3.1.3).
10.1. Replace Pump Battery
Helpful Information
Stop • ALL delivery prior to removing the battery.
Always carry a spare battery with your pump supplies.
•
Do • NOT use a cold battery (e.g., one that has just been in your refrigerator or in cold weather). If the battery is
cold, the pump may display a battery-related alarm: the pump may NOT be receiving full power. The battery
level display may be inaccurate.
Your battery is expected to last at least 30 days. Battery life may be shortened if you select the vibrate mode, or
•
use the backlight frequently. The battery life will also vary based on the number of alarms or alerts you receive.
Do
• NOT remove the battery unless you are installing a new battery or are storing your pump for a long period of
time.
If you do
• NOT install a new battery within 15 minutes of taking out the old one, you will need to reset the time
and date, you will lose your bolus history and Insulin-on-Board (IOB) calculation. You will NOT be able to receive
IOB information until the next bolus is delivered and a calculation can be established.
Batteries should be disposed of in accordance with local regulations.
•
For detailed instructions on battery insertion, see • Section 1.4.
RESTART
• basal delivery as recommended by your healthcare professional.
Note: The Aviator Pump will notify the user with a low battery alert when the battery is nearing depletion NOT less
than 24 hours before the pump stops delivery due to a depleted battery.
Note: The Aviator Companion contains lithium batteries. At the end of their useful life, dispose system components
and accessories according to local environment and other rules and regulations that may apply. Contact Customer Care
for replacements.
10.2. Clean Your Companion and Pump
Helpful Information
Do • NOT use organic solvents (e.g., lighter uid, paint thinner, nail polish remover) and be sure that your hands
are free of these products before touching the companion or pump.
Do
• NOT use household cleaners (e.g., petroleum-based products, bleach, and jewelry cleaner) or products
containing high levels of N, N-diethyl-m-toluamide (DEET) near the companion or pump and be sure that your
hands are free of these products before touching the companion or pump.
Do
• NOT use abrasive cleaners, scouring pads, or sharp instruments.
Do
• NOT use lubricants with your companion or pump.
Do
• NOT steam or sterilize your companion or pump.
Do
• NOT put your companion or pump in the dishwasher or microwave.
Procedure:
Steps Do This
Wipe your companion or 1.
pump.
Caution: Do NOT place Aviator Companion or Aviator Pump under water.
Wipe the outside with a cloth dampened with mild soapy water.
Dry your companion or pump.2. Wipe clean with a damp cloth, then wipe dry with a dry cloth.
Section 10: System MaintenanceSection 10: System Maintenance
DOC15736_Rev-A-Man.indd 229-230 2/9/09 11:29:54 AM

231
232
10.3. Store Your Aviator Companion and Aviator Pump
Helpful Information
Stop all delivery prior to removing the pump battery.•
Remove the battery before storing your pump.•
Store your pump with the battery cap and dust cap in place to protect the inside of your pump.•
Store your Aviator Companion and pump in a clean, dry place where there are • NOT extreme temperatures, high
humidity, or extreme atmospheric pressures.
10.4. Handle a Damaged or Wet Companion or Pump
Caution: If your companion or pump is cracked or a button is torn, discontinue use and switch to an alternate
insulin therapy method immediately. Follow your healthcare professional’s recommendations for alternate insulin
delivery method in Section 12-Appendix A and/or call Customer Care. ONLY the personnel at Abbott Diabetes
Care should take care of a damaged pump.
Helpful Information
Be careful • NOT to drop your companion or pump, or hit it against hard surfaces.
Check for missing segments and that the screens display correctly and audio / vibration occurs after installing a
•
pump battery. Also verify the audio / vibration test when starting basal delivery.
Do
• NOT submerge the companion in water. If it is accidentally dropped in water, towel dry the outside of the
companion. Do NOT use a hair dryer to dry your companion.
If your pump is accidentally submerged in water and the battery cap and infusion set hub are in place, you can
•
towel dry the outside of the pump. Inspect the reservoir compartment and battery compartment and dry any
water you nd with a Q-tip. Do NOT use a hair dryer to dry your pump. If your pump was submerged in salt wa-
ter, thoroughly clean with a damp cloth before drying.
If your pump is accidentally submerged in water and the battery cap or the infusion set is
• NOT properly in-
stalled, submersion will likely damage internal pump components. Call Customer Care.
If your companion is accidentally submerged in water, you can towel dry the outside of the companion. Do
• NOT
recharge or reuse the Companion. Contact Customer Care.
You should remove your pump before every prolonged exposure to water, including bathing, showering, and
•
swimming.
Because of the
• Aviator Pump’s unique hub connection, use ONLY Aviator-compatible sets with the pump.
If your pump is damaged, it will need to be serviced or replaced. Call Customer Care for information about ser-
•
vicing or replacing your pump.
10.5. Conditions for Transport, Storage, and Use
Helpful Information
Do • NOT to subject your companion or pump to extreme conditions, which may cause malfunctions and pos-
sible adverse events or serious injury.
Try to AVOID:
Exposing your companion or pump to temperatures above 104ºF (40ºC), as might happen in a sauna or on a
•
very hot day.
Allowing your companion or pump to absorb radiant heat (e.g., sunlight) that would increase its temperatures to
•
above 104 ºF (40ºC). This can also damage your insulin in the tubing exposed to the radiant heat.
Using a dark colored pump case, which would increase the intensity of radiant heat.
•
Lowering the temperature of your companion or pump below 41ºF (1ºC).•
Storing your pump below or above the recommended temperature when you are not using the pump. Note that •
storage temperature should be between -4°F to 104°F (-20°C to 43°C).
Exposing your companion or pump to very high humidity (over 100 percent) for prolonged periods of time. Your
•
system may NOT operate properly.
Low atmospheric pressures (Elevation 10,000 feet [3048 meters] and above. Commercial airliners are OK because
•
of the pressurized cabins.) Your system may NOT operate properly.
The
• Aviator Companion contains lithium batteries. At the end of their useful life, dispose system components
and accessories according to local environment and other rules and regulations that may apply.
Avoid getting dirt, dust, blood, control solution, water or any other liquid in the
• Aviator Companion’s test strip
and data port.
When traveling by air, pack your extra lithium batteries in checked baggage.
•
Caution: If your pump is exposed to these extreme ranges, there is a possibility the insulin in your pump will
be damaged or destroyed. The insulin in the insulin reservoir may need to be replaced (see Section 2.3), and
the infusion set changed. Please check with your healthcare professional.
Section 11: Manage Your Diabetes SafelySection 11: Manage Your Diabetes Safely
DOC15736_Rev-A-Man.indd 231-232 2/9/09 11:29:54 AM

233
234
11 Manage Your Diabetes Safely
This section provides detailed information related to the safe use of your companion and pump. It describes
what the companion and pump are used for and what it must NEVER be used for. Review this section
carefully. If you have any questions or concerns after reviewing this section, contact Customer Care or your
healthcare professional for assistance.
Indication
The FreeStyle Aviator Insulin Delivery and Blood Glucose Monitoring System is intended for continuous
delivery of insulin at set and variable rates and as an aid in the management of diabetes mellitus in persons
requiring insulin. The FreeStyle Aviator System is also intended for the quantitative measurement of glucose in
fresh whole capillary blood (in vitro). The system is available by prescription only.
Contraindications
The Aviator System is NOT intended for:
People who are unwilling to consistently test their blood glucose levels at least 4 times a day.
•
People who are unwilling to self-insert an infusion set every 2-3 days.•
People who don’t want to work closely with their healthcare professional.•
People whose vision is impaired to the point where they • CANNOT read the companion or pump’s screen.
People whose hearing is impaired to the point where they
• CANNOT hear the companion or pump’s alarms.
Blood Glucose Testing
Your blood glucose levels should stay within the range determined by you and your healthcare professional.
It is extremely important that you check your blood glucose levels regularly and often while using your
insulin pump. In addition to this ongoing testing, your blood glucose level must also be tested:
Whenever you stop your pump’s operation for any length of time, as the insulin level in your blood will be de-
•
pleted quickly and blood glucose levels will rise rapidly when the pump is stopped.
Within 1-3 hours of replacing the insulin reservoir and/or inserting/attaching a new infusion set.
•
More frequently during times of illness, injury or stress.•
When you rst start pump therapy and are adjusting your basal rates.•
When changing insulin dosages.•
Refer to Section 5 for more information about testing your blood glucose using your integrated Aviator
Companion Blood Glucose Meter.
Two Consecutive High Blood Glucose Readings despite the
Administration of a Correction Bolus
If you get two consecutive unexplainable high blood glucose readings while on pump therapy, do the
following:
If your healthcare professional plan calls for a correction bolus, follow the recommendations for 1.
administering the correction bolus.
Check for ketones, if your healthcare professional instructed you to do so.2.
Evaluate your pump and infusion set for loose connections or insulin leakage.3.
Check your pump programming to conrm you are receiving your expected basal rate dose.4.
Check bolus history to ensure you have received your last several boluses.5.
Check your daily total insulin amount to make sure that you are on track with the amount of insulin you 6.
have been using.
Inspect your tubing for air bubbles. Check to see if it is connected to your site correctly and that your site 7.
has NOT accidentally become dislodged.
Evaluate other causes of unexpected high blood sugars:8.
Are you sick?
•
Have you had a change in your physical condition (pain, menses, surgery, illness)?•
Has your insulin been exposed to higher temperatures in the day or hours leading up to these higher •
levels?
Have you recently started taking a medication that could be causing your blood sugar to be high?
•
Have you encountered additional personal or physical stress in the hours leading up to this episode?•
If there is 9. NO clear reason for the high blood sugars, then it is recommended that you disconnect your
infusion set from your body, throw away the set, tubing, and reservoir of insulin. Fill a new reservoir with
fresh insulin, prime your system, and reinsert a new set into a dierent area of your body. Continue to
measure your blood glucose levels every 1 to 3 hours after the new insertion to insure your blood glucose
levels return to your normal levels.
If in doubt with any step, contact your healthcare professional for guidance.10.
Section 11: Manage Your Diabetes SafelySection 11: Manage Your Diabetes Safely
DOC15736_Rev-A-Man.indd 233-234 2/9/09 11:29:54 AM

235
236
FreeStyle Aviator Safety Features
A number of advanced safety features are incorporated into the Aviator Pump. Some of the more important
features are listed in the table below.
Safety Feature What It Does To Set the Safety Feature or for
More Information
Maximum Bolus Limits the size of your bolus, so you don’t
accidentally give yourself too much insulin in a
single bolus (protects from over-infusion).
See Section 6
Maximum Basal
Rate
Limits your basal insulin delivery, so you don’t
accidentally set a basal rate that is too high
(protects from over-infusion).
See Section 6
Bolus Calculator Allows you to easily calculate an insulin bolus.
Clearly shows you the data used to determine
units to deliver (protects from over- or under-
infusion). Also allows you to adjust a bolus.
See Section 6
Speaker Backups The Aviator Pump has a set of backup speakers
to make sure the audio tones are heard.
N/A
Essentials for Safe and Eective Use
In order to use your FreeStyle Aviator System safely and eectively, you will need:
Support from and close contact with your healthcare professional trained in the use of insulin pumps.•
A commitment to follow-up appointments for continuing care.•
An understanding of the basic principles of diabetes care.•
An understanding of basal and bolus insulin use.•
Dedication to frequent blood glucose testing: 4 or more times per day and appropriate actions based on testing •
results.
A backup plan of insulin administration, in case of interruption of pump usage.•
Potential Risks Connected with Pump Therapy
Complications can arise as a result of pump therapy if you are NOT attentive to routine glucose testing and
evaluation. These risks include:
Frequent or severe hypoglycemia.•
Diabetic Ketoacidosis (DKA)• .
Infections where you insert your cannula for insulin delivery.•
The best way to avoid any risk while using the pump is to be prepared with a written plan from your healthcare
professional to deal with each risk. Each risk has specic ways your healthcare professional can instruct you to lessen
the risk. Frequent glucose monitoring and taking action with the results will also protect you from undetected high
or low blood glucose.
Infections
Ways to avoid the potential for infection:
Always clean the intended insertion site with soap and warm water or a solution suggested by your healthcare
•
professional.
Do
• NOT blow on your site to help it dry after you clean it. You may transfer germs from your mouth and/or lungs
onto your skin. These germs then enter your skin when you insert the cannula.
Be diligent in changing your infusion set
• at least every 3 days. Do NOT use your infusion set for long periods of
time. This will increase your chance for infection and may potentially eliminate the site from future use.
Other points about your infusion site:
Select infusion sites away from scarred or infected areas, and rotate infusion site locations regularly.
•
When you remove your infusion set, there may be some clear drainage or a small “bump” under the surface of •
the skin where the cannula is inserted. The bump should heal and go away over a few days. If it becomes worse,
check with your healthcare professional for any infection.
Your infusion site should never have any type of cloudy, smelly, or colored drainage.
•
There may be slight redness around the site from your adhesive tape but there should • NOT be a ring of red-
dened skin around the infusion site.
Your site should
• NOT be tender or hurt. If you notice any drainage, redness, hot to the touch, tenderness or
lumps at the infusion site, you need to contact your healthcare professional immediately. They will help you ad-
dress the problem quickly so you avoid additional problems of infection moving to another area of tissue. Most
commonly, a mild antibiotic is prescribed to help cure the infection.
When inserting a new infusion set, avoid inserting within 2 inches of a site that had been infected. Failure to do
•
so could result in further infection, DKA and/or high blood glucose due to absorption issues. If you have ques-
tions, contact your healthcare professional.
Hypoglycemia
Hypoglycemia, or low blood sugar, occurs when your blood glucose level falls below the lower limit of your
established safe blood glucose range. Symptoms of hypoglycemia include:
Feeling light-headed, dizzy, confused, sleepy, weak, nervous, and/or hungry.
•
Shakiness.•
Excessive perspiration.•
Common causes of hypoglycemia include:
Too much insulin.
•
Skipping a meal (or eating a meal that is smaller than you anticipated).•
Heavy exercise or a higher-than-normal activity level.•
Excessive consumption of alcohol.•
Section 11: Manage Your Diabetes SafelySection 11: Manage Your Diabetes Safely
DOC15736_Rev-A-Man.indd 235-236 2/9/09 11:29:54 AM

237
238
If you are experiencing any of the symptoms of hypoglycemia, you should test your blood glucose level. If it is below
your lower blood glucose target, follow the “Rule of 15.”
Eat approximately 1. 15 grams of simple carbohydrate (1/2 cup fruit juice or sweetened soda, 3-4 glucose
tablets or glucose gel). NO fat should be in the foods used to treat hypoglycemia to make them fast to
absorb.
Wait 15 minutes and then check your blood glucose level again.2.
If your blood glucose level is still too low, repeat steps 1 and 2 until your blood glucose level measures 3.
within your acceptable range.
Once your blood glucose level is normalized, resume your usual meal and snack schedule. If you will 4. NOT be
eating a meal within an hour, you should consider having a snack.
Severe hypoglycemia may require an injection of the hormone glucagon. You should have a Glucagon Emergency
Kit as part of your emergency kit. Your entire emergency kit should be kept with you at all times. You should let
family members, co-workers, and close friends know where it is and how to use it. Ask your healthcare professional
how to use glucagon.
Note: You should talk with your healthcare professional if you are experiencing hypoglycemia frequently.
Hyperglycemia
Hyperglycemia, or high blood sugar, occurs when your blood glucose level is higher than the upper limit of
the blood glucose range set by you and your healthcare professional.
Possible symptoms of hyperglycemia are:
An increased hunger or thirst.
•
A need to urinate frequently.•
Blurred vision.•
Possible reasons for hyperglycemia are:
Interrupted insulin delivery due to:1.
Occlusion in the tubing or infusion set.
•
The tubing has tangles or kinks.•
The insulin reservoir is empty.•
The infusion set or cannula is dislodged.•
Under delivery of insulin.2.
Check to see if you are receiving your expected basal rate dose.
•
Check your bolus history.•
Check your total daily insulin delivered.•
Your basal or bolus doses may need to be adjusted.•
Eating more carbohydrates than you anticipated or was aware of.3.
Illness, infection, stress, menses, less activity or exercise.4.
Insulin has gone bad (e.g. exposed to high temperature, expired.)5.
Taking a medication that raises blood glucose. (Check with your healthcare professional or pharmacist).6.
Possible interventions:
Use your pump to administer a correction bolus (see
• Section 8). Test your blood glucose level again after an
hour.
If you think the companion or pump is
• NOT functioning properly, you need to disconnect from the pump and
administer insulin using an alternate delivery method. Call Customer Care to report the problem with your
pump.
If you think there is a problem with the tubing or infusion set, remove the old infusion set from the pump and
•
replace with a new infusion set. Follow the instructions for priming and reinsertion (See Section 2.4 and your
infusion set’s Instructions for Use).
If you are unable to determine the reason for your hyperglycemia and are unable to correct it, call your health-
•
care professional.
If your blood glucose level is very high, you should check your urine or blood for ketones and follow the advice
•
of your healthcare professional.
Diabetic Ketoacidosis
Diabetic Ketoacidosis (DKA) can develop if your blood glucose levels have been too high for a period of time.
DKA is dierent from hyperglycemia in that in addition to an elevated blood glucose level, your body is
producing ketones, which change the pH (acidity) of your blood.
DKA is extremely serious, and requires immediate treatment by your healthcare professional. Contact your
healthcare professional immediately if you suspect DKA. DKA can be life threatening.
How long it takes to develop DKA is based on the individual. No matter what your particular situation, once insulin
delivery stops (from a clog, dislocation of your infusion set, disconnecting and forgetting to reconnect), within 3-5
hours (the duration of action of the insulin used in your pump) you will be insulin decient.
If you do NOT restore insulin delivery, you are at risk of even higher blood glucose levels and the development of
ketones, which, if left untreated, can lead to the life-threatening consequences of DKA.
It is VERY IMPORTANT that any time you discover insulin delivery has been disrupted, you should immediately test
your urine or blood for ketones.
Follow the plan you and your healthcare provider have designed.
Symptoms of DKA, which can be mistaken for u-like symptoms, include:
Headache.
•
Stomach ache.•
Fruity odor on breath.•
Very dry mouth.•
Shortness of breath.•
Nausea/vomiting.•
Section 11: Manage Your Diabetes SafelySection 11: Manage Your Diabetes Safely
DOC15736_Rev-A-Man.indd 237-238 2/9/09 11:29:55 AM

239
240
Possible causes of DKA include:
Improper use of insulin.
•
Infection or illness.•
Stress.•
Your risk of DKA is lessened if you follow these guidelines:
Work with your healthcare professional to make sure your pump is programmed properly, that you know how to
•
use your pump, and that your selected bolus and basal insulin doses are appropriate.
Always have insulin and reservoirs available.
•
Keep your emergency kit with backup insulin supplies with you at all times.•
Monitor your blood glucose level closely when you are ill or during periods of high activity or stress.•
Talk with your healthcare professional if you have any questions about DKA or what you can do to prevent it.
How Illness Aects Blood Glucose Levels
Infection or illness is usually accompanied by higher than normal blood glucose levels (hyperglycemia). Your
insulin needs will most likely increase when you are ill. Follow these guidelines:
Insulin must be taken when you are ill; contact your healthcare professional for specic advice, but do
• NOT stop
taking basal insulin, even if you feel too sick to eat.
Check your blood glucose level every 2-4 hours.
•
Check your blood or urine for ketones;•
Your insulin pump can be programmed with a basal insulin pattern that can be used when you are ill (see Section
7); you may want to talk with your healthcare professional about this option.
Sick Day Management
When you are sick, your body’s stress level increases. The body produces hormones to help ght o the sickness.
However, there are side eects: blood glucose levels increase and insulin’s ability to lower blood glucose levels
decrease. In this situation, blood glucose levels are much more dicult to keep in your target range, which could
lead to DKA.
You need to plan ahead, work with your healthcare professional, and prepare a sick day plan in advance. The
plan should include:
When to call your healthcare team.
•
How often to test blood glucose.•
When and how often to test for ketones.•
What medicines to take.•
A plan for eating.•
Contact numbers for your healthcare team.•
How Exercise Aects Blood Glucose Levels
Exercise can help lower blood glucose levels. The more active you are, the more dramatic this lowering will be. When
starting or stopping an exercise program (or increasing or decreasing your level of activity), you may have to adjust
your basal rates. Your food intake may also need to be adjusted.
Your insulin pump can be programmed with a basal insulin pattern or a temporary basal rate that can be used on
days you are exercising (see Section 7.6). You may want to talk with your healthcare professional about this option
or any other questions you may have about how exercise aects your blood glucose levels and insulin needs. In
addition, there are other resources that may be helpful to understand the impact of exercise on your diabetes. See
the Resources section of this User Guide for additional resources on exercise and diabetes.
Your Daily Kit
You must have a backup plan in case something goes wrong with your pump or you have a medical •
emergency. Keep a daily kit with you at all times. Let family members, co-workers, and close friends know
where it is and how to use it. Your kit should include:
Blood glucose monitoring supplies.
•
Ketone monitoring supplies.•
Glucose tablets/gel or liquid or other sources of carbohydrate to treat a low glucose.•
A Glucagon Emergency Kit (Glucagon Emergency Kits have an expiration date; check frequently to make sure •
your kit has NOT expired).
An extra insulin infusion set.
•
An extra unopened pump reservoir.•
An extra AAA alkaline battery.•
Dressings and adhesives.•
Spare battery cap.•
Insulin syringe and short or rapid-acting insulin vial or insulin pen. Remember, insulin is sensitive to temperature •
extremes. Replace your spare insulin monthly.
Discontinuing Pump Use
If you and your healthcare professional determine that stopping pump therapy makes sense, you must be prepared
to switch to an alternate insulin therapy method.
Medical Procedures
You may need to suspend pump use for/during certain medical procedures. Keep these points in mind:
Do
• NOT expose your companion or pump to MRI, X-ray, CAT scan, or ultrasound equipment. ALWAYS discon-
nect your companion and pump and store it away from the machines. Do NOT bring the companion and/or
pump into the procedure room at any time.
Talk with your healthcare professional about whether or
• NOT you should use your pump during outpatient pro-
cedures, hospitalizations, surgeries, or ER visits.
Section 12: Appendices
Appendix A: Table of Settings
Section 11: Manage Your Diabetes Safely
DOC15736_Rev-A-Man.indd 239-240 2/9/09 11:29:55 AM

241
242
Frequently Asked Questions
Q. How do I obtain supplies for my pump?
A. Supplies for the Aviator Pump can be obtained by calling Customer Care.
Q. When a question or problem arises, should I call Customer Care or my healthcare provider?
A. In general, if you have a question about the programming or operation of your pump, you should call Customer Care.
If you have a question about your personal insulin therapy, treatment plan, or diabetes management, you should contact
your healthcare professional.
Q. Should I insure my pump?
A. Contact your insurance provider to see if they oer coverage.
Q. Is it okay to take a break from pump therapy?
A. Consult your healthcare professional before changing or stopping pump therapy. If you take a break from pump
therapy, you must switch back to injecting insulin. Be sure to administer insulin for meals and to cover basal insulin
requirements.
Q. Is a pump support group worthwhile?
A. Many people nd a pump support group helpful. It can be a place to go where you can discuss pump therapy with – and
be supported by – your peers. If you are interested in a pump support group, ask your healthcare professional.
12 Appendices
A. Table of Settings
Everyone has dierent insulin requirements and pump preferences. Before you begin using your pump, you will
need to work with your healthcare professional to determine the correct pump settings to meet your individual
needs.
It is important to keep your personal settings charts updated. Remember to record any changes recommended by
your healthcare professional.
The table below provides the options available as well as the factory default setting.
1. Pump Settings
Record your pump settings here for future reference:
SETUP WIZARD: Language, Time/Date, and Insulin Settings
Setting What it Allows You
to Do
Options
Available
Factory
Default
Your Setting
Language Set the language your
pump will use for its text
instructions.
English English English
Time/Date Format
Time Select the time format. 12-hour (e.g., 1 PM
will appear as 1:00
PM) or 24-hour (e.g.,
1 PM will appear as
13:00).
12 hour
Date Select the date format. Month/day/year or
day/month/year
Mmm dd, yyyy
Current Time Set the time. N/A -- N/A
Current Date Set the date. N/A -- N/A
Insulin
Concentration The insulin
concentration on your
pump is xed at U100.
U100 U100
Section 12: Appendices
Appendix A: Table of Settings
Section 12: Appendices
Appendix A: Table of Settings
DOC15736_Rev-A-Man.indd 241-242 2/9/09 11:29:55 AM

243
244
Setting What it Allows You
to Do
Options
Available
Factory
Default
Your Setting
Type Select the type of insulin
you will be using in your
pump.
Rapid or short Rapid
Action Time Set the action time of
the insulin you will be
using in your pump.
2 to 8 hours 5 hours 00
minutes
SETUP WIZARD: Bolus and Basal Settings
Bolus Limits
Increment Set the increments (in
Units) of insulin that may
be programmed for a
bolus.
0.05U, 0.1U, 0.5U, or
1.0U
0.1U
Maximum Set the maximum
programmable amount
of insulin for a single
bolus.
0.1 - 50.0 when
increment =>0.1 units
0.05 – 9.95 when
increment = 0.05 units
10.0U
One-Button Bolus
On/O Turn the one-button
bolus function on or o.
On/O O
Increment Set the One-Button
bolus increment (how
much each button press
increases the bolus
amount).
0.5U or 1.0U If One-Button
is “o”, there
is no option. If
set to “on”, 0.5U
Bolus Calculator
Carb Ratios Select the amount of
bolus insulin needed
to handle each gram of
carbohydrate you plan to
eat, for up to 24 dierent
time blocks.
1-150 (1U/1g-
1U/150g)
--
Setting What it Allows You
to Do
Options
Available
Factory
Default
Your Setting
1 U Drop Set how much 1U of
insulin will lower your
blood glucose level, for
up to 24 dierent time
blocks.
5 - 500 mg/dL
(0.28 – 27.8 mmol/L)
--
Blood Glucose Range
Blood Glucose
Targets
Set the values for your
blood glucose targets for
up to 24 dierent time
blocks.
50-300 mg/dL
(2.8 – 16.7 mmol/L)
110 mg/dL
(6.1 mmol/L)
Basal Settings
Increment Select the increment for
changes in basal insulin
delivery rates
0.05 U/h, 0.10 U/h,
0.50 U/h, or 1.00 U/h
0.05 U/h
Maximum Select the maximum
amount of insulin to be
used for hourly basal
insulin delivery rates.
0.05 U/h to 30.00 U/h 2.00 U/h
Temporary Set the format used to
program a temporary
basal rate in either
absolute Units or as
a percentage of the
programmed basal rate.
Units or Percent Percent
SETUP WIZARD: Feedback and Alerts/Alarms
Pump Feedback Options
Feedback Set your pump to give
either audio (beeps) or
vibratory signals.
Audio or Vibrate Audio
Section 12: Appendices
Appendix A: Table of Settings
Section 12: Appendices
Appendix A: Table of Settings
DOC15736_Rev-A-Man.indd 243-244 2/9/09 11:29:55 AM

245
246
Setting What it Allows You
to Do
Options
Available
Factory
Default
Your Setting
Audio Set the volume of
auditory alerts.
Note: All vibrations are
at the same intensity.
Low, Medium, or
High
If audio is
selected,
“High”
Companion Feedback Options
Feedback Set your Companion to
give audio (beeps) and/
or vibratory signals and
progress tones.
Audio and/or Vibrate Audio
Audio Set the volume of
auditory alerts.
Low, Medium, or
High
If audio is
selected, “Low”
Vibrate Set the length of
vibratory alerts.
Long, Medium, or
Short
If audio is
selected,
“Long”
Progress Tones Set the volume of
progress tones.
Low, Medium, or
High
If audio is
selected, “Low”
Occlusion Alarm
Sensitivity Set the level of sensitivity
of the Occlusion Alarm.
Low or High High
Setting What it Allows You
to Do
Options
Available
Factory
Default
Your Setting
Low Insulin Alert
Low Alert Select the insulin level
that will trigger the Low
Insulin Alert.
5 – 50U 20U
Inactivity Alarm
Inactivity Set the time of the
Inactivity Alarm.
1 – 24 hr 1 hr
SETUP WIZARD: Display and Locked Items Settings
Display Settings
Buttons Invert the screen to suit
your hand preference
(right or left handed).
On Right/On Left Right
Timeout Set the amount of time
the display may remain
idle before reverting to
the “idle” screen.
15 - 120 seconds 15 seconds
Home Select the Home screen
display format.
Information or
Activity
Information
Cursor Select how highlighted
options will appear.
Highlight or Outline Highlight
Contrast Select the contrast of the
companion display. (this
setting is only available
on the Companion)
0 - 2 2
Magnify Select whether
highlighted options will
be magnied in larger
font size. (This setting
is only available on the
pump)
On or O On
Section 12: Appendices
Appendix A: Table of Settings
Section 12: Appendices
Appendix A: Table of Settings
DOC15736_Rev-A-Man.indd 245-246 2/9/09 11:29:55 AM

247
248
Setting What it Allows You
to Do
Options
Available
Factory
Default
Your Setting
Locked Items
Note: Locked items can only be accessed through the SETUP WIZARD.
Basal Lock or unlock basal
functions on the
pump (select, edit,
create, delete, rename
program).
Unlocked or Locked Unlocked
Bolus Lock or unlock bolus
functions on the pump
(One-Button Bolus, Food
and Correction Bolus,
Correction Bolus, Food
Bolus, Manual Bolus).
Unlocked or Locked Unlocked
Prime Lock or unlock prime
functions on the pump
(tubing, cannula).
Unlocked or Locked Unlocked
Therapy Lockout
Note: Therapy Lockout is only available on the Companion.
Therapy
Lockout
Disable access to start/
stop delivery features
on the Companion
including Basal and
Bolus.
On or O O
Duration Set the lockout duration. Once or Always If “On” is
selected
duration is
“Once”
2. Personal Settings
Record your personal settings here for future reference:
Standard Daily Basal Rates
Basal Rate Start Time Basal Rate (Units/h)
Basal Rates: Alternate Pattern 1 (for example workout days)
Use these basal rates when
Basal Rate Start Time Basal Rate (Units/h)
Section 12: Appendices
Appendix A: Table of Settings
Section 12: Appendices
Appendix A: Table of Settings
DOC15736_Rev-A-Man.indd 247-248 2/9/09 11:29:55 AM

249
250
Basal Rates: Alternate Pattern 2
Use these basal rates when
Basal Rate Start Time Basal Rate (Units/h)
Basal Rates: Alternate Pattern 3
Use these basal rates when
Basal Rate Start Time Basal Rate (Units/h)
Temporary Basal Settings
For detailed information about setting a Temporary Basal, see Section 7.6.
When to use Temporary Basal:
What to set Temporary Basal at (indicate if this is a percentage of your standard basal pattern or a specic Unit rate):
Bolus Settings
For detailed information about Bolus programming, see Section 8.
When to use a Normal bolus:
When to use an Extended bolus:
When to use a Dual bolus:
When to use the One-Button Bolus function:
3. Other Information
Record any additional instructions from your healthcare professional below.
Section 12: Appendices
Appendix B: SETUP WIZARD Default Conguration and Settings
Section 12: Appendices
Appendix B: SETUP WIZARD Default Conguration and Settings
DOC15736_Rev-A-Man.indd 249-250 2/9/09 11:29:55 AM

251
252
B. SETUP WIZARD Default Conguration and Settings
Wizard
Step Item Screen
Default
Cong Valid Values Increment
1 Language SELECT LANGUAGE English VALUE CANNOT BE CHANGED N/A
1 Time TIME/DATE FORMAT 12 Hour “12 Hour,” “24 Hour” N/A
1 Date TIME/DATE FORMAT Mmm dd,
yyyy “Mmm dd, yyyy”, “dd Mmm yyyy” N/A
1 Hour SET TIME -- 01 – 12 (12hr); 00 – 23 (24hr) 1
1 Minute SET TIME -- 00 – 59 1
1 AM/ PM SET TIME AM “AM”, “ PM” N/A
1 Month SET DATE -- “Jan”, “Feb”, “Mar”, “Apr”, “May”, “Jun”, “Jul”, “Aug”,
“Sep”, “Oct”, “Nov”, “Dec” N/A
1 Day SET DATE -- 01 – 31 1
1 Year SET DATE -- 2007 – 2049 1
1 Type INSULIN PROFILE Rapid “Rapid”, “Short” N/A
1 Action Time INSULIN PROFILE 5h 00m 2h 00m – 8h 00m 15 (min)
1 Time INACTIVITY ALARM -- h 1 – 24 (always On) 1
2 Buttons DISPLAY on Right “on Right”, “on Left” N/A
2 Timeout DISPLAY 15 Sec 15 – 120 15
2 Home DISPLAY Information “Information”, “Activity” N/A
2 Cursor EDIT MODE Highlight “Highlight”, “Outline” N/A
2 Magnify EDIT MODE On “On”, “O” N/A
3Time, 1U
Drop 1U DROP --
24 blocks of time allowed
5 – 500 mg/dL (0.28 – 27.8 mmol/L)
Programming starting value: 50 in one unit
increments
1 hour
1
3 Time, I:CHO CARB RATIOS --
24 blocks of time allowed
1 – 150 (1U/1g – 1U/150g)
Programming starting value: 1U/15g
Carbs – 1 – 200 grams
1 hour
1
1
3Time,
mg/dL BG TARGETS --
24 blocks of time allowed
50 – 300 mg/dL (2.8 – 16.7 mmol/L)
Default value is 110 mg/dL (6.1 mmol/L)
1 hour
2
4 Increment BOLUS LIMITS 0.1 U “0.5 U”, “1.0 U” N/A
4 Maximum BOLUS LIMITS 10.0 U 0.1 –50.0 when increment => 0.1 units
0.05 – 9.95 when increment = 0.05 = Increment
Wizard
Step Item Screen
Default
Cong Valid Values Increment
4 On/O ONE-BUTTON BOLUS On “O”, “On” N/A
4 Increment ONE-BUTTON BOLUS
Enabled 0.5 U 0.5 or 1.0 (0.5 or 1.0) 0.5
4 Increment BASAL LIMITS 0.05 U/h “0.05 U/h”, “0.10 U/h”, “0.50 U/h”, “1.00 U/h” N/A
4 Maximum BASAL LIMITS 2.00 U/h 0.05 – 30.00 .05
4 Temp BASAL SETUP Percent “Units”, “Percent” N/A
5 Pump AUDIO/VIBE Audio “Audio”, “Vibrate” N/A
5 Audio AUDIO/VIBE High “Medium”, “High”, “Low” N/A
5 Sensitivity OCCLUSION ALARM High “High”, “Low” N/A
5 Low Alert LOW INSULIN ALERT 20 U 5 – 50 5
6 Basal LOCKED ITEMS Unlocked “Unlocked”, “Locked” N/A
6 Bolus LOCKED ITEMS Unlocked “Unlocked”, “Locked” N/A
6 Prime LOCKED ITEMS Unlocked “Unlocked”, “Locked” N/A
7 Time Add Block 1 12:00 a.m. 12:00 a.m. – 11:30 p.m. 30 (min)
7Rate Add Block 1 -- 0.00 – Max Limit
(user programmable)
user
programmable
7 Time Add Block n+1 -- Time of Block n +:30 – 11:30 p.m.
(or 23:30 for 24 hour) 30 (min)
7Rate Add Block n+1 -- 0.00 – Max Limit
(user programmable)
user
programmable
Section 12: Appendices
Appendix B: SETUP WIZARD Default Conguration and Settings
Section 12: Appendices
Appendix C: Device Specications – Companion
DOC15736_Rev-A-Man.indd 251-252 2/9/09 11:29:55 AM

253
254
Other Preferences That are Not Part of the Wizard
Menu Item Screen
Default
Cong Valid Values Increment
REMINDERS Reminders
1 – 6 On/O
O “On,” “O” N/A
REMINDERS Reminders
1 – 6 Message
Test “Test”, “Wakeup”, “Basal”, “Bolus”, “Exercise”,
“Meeting”, “Pickup”, “Snack”, “Meds”
N/A
REMINDERS Disable All Care Comments On “On”, “O” N/A
REMINDERS On/O Insulin Temp Care
Comments
O “O”, “On” N/A
REMINDERS On/O Site Change Care
Comments
O “O”, “On” N/A
REMINDERS Frequency Site Change Care
Comments
2.0 days 2.0, 2.5, 3.0 N/A
REMINDERS On/O Check BG Care
Comment
O “O”, “On” N/A
C. Device Specications – Companion
Assay Method (FreeStyle Lite Blood Glucose
meter):
Coulometric electrochemical sensor
Automatic shuto: User settable up to two minutes after last user action
Calibration (FreeStyle Lite Blood Glucose meter): Plasma equivalent
Hematocrit (FreeStyle Lite Blood Glucose meter): 15% to 65%
Measurement Units: Either mg/dL or mmol/L
Result Range (FreeStyle Lite Blood Glucose
meter):
20 to 500 mg/dL (1.1 to 27.8 mmol/L)
Sample (FreeStyle Lite Blood Glucose meter): Whole blood, capillary
Sample size (FreeStyle Lite Blood Glucose
meter):
0.3 microlitre (300 nanolitres)
Test time (FreeStyle Lite Blood Glucose meter): Average of 5 seconds
Dimensions: 3.89 X 2.44 x 0.63” (99 X 62 X 16 mm )
Display Type: Dot graphic•
Display Viewable Dimensions: 1.77 x 1.28” (45 X 32.5 mm)
Display Backlight: Yes
Audio/Vibe Alert: Yes
Weight: 2.6 oz (75 grams)
Companion Battery: Lithium polymer, 3.7V 690mAh
Battery Life: 3 days
The expected life of the battery is dependant upon the following usage:
- 5 boluses per day with total daily bolus delivery of 24 Units (U100)
- Basal delivery of 1U/h (U100) 24 hr/day, 7 days/week
- Prime of 20 Units (U100) occurs 3 times per week.
- 5 blood glucose readings per day
- Enter and log 8 events per day
- Data transfer to CoPilot three times per month
Memory: 90 days worth of events. All events can be seen if downloaded to a PC.
Water Resistance: None
Operational Conditions (Temperature, Humidity
and Pressure):
41°F – 104°F (5°C to 40°C) with 10% to 90% relative
humidity 14.7 psia - 10.2 psia (equivalent to an altitude of sea level to
10,000 feet [3048 meters] under standard atmospheric conditions)
Storage Range Shipping container for 1 year at -4 – 113°F, average temperature at 72.5°F
(-20°C to 45°C, average temperature at 22.5°C) with 10% to 90% relative
humidity, non-condensing.
Data Storage Time: The Companion has the ability to store a minimum of 90 days of
events in non-volatile memory for the expected life of the companion.
Section 12: Appendices
Appendix D: Device Specications – Pump
Section 12: Appendices
Appendix D: Device Specications – Pump
DOC15736_Rev-A-Man.indd 253-254 2/9/09 11:29:56 AM

255
256
D. Device Specications – Pump
Dimensions: 3.3 X 1.8 X 0.75” (84 X 46 X 19 mm)
Display Type: Dot graphic•
Display Viewable Dimensions: 0.97” X 0.76” (24.7 X 19.4 mm )
Display Backlight: Yes
Audio/Vibe Alert: Yes
Weight: Without battery and reservoir/hub, weight is approximately 2.7 oz (76.5 g). Add battery and
empty reservoir, weight is approximately 3.3 oz (93.6 g).
Reservoir: Single use plastic reservoir
Reservoir Connection: Proprietary secure connector
Basal Increment: 0.05 units
Total Basal Rates: 48/day
Basal Prole Conguration: Numerical display
Basal Proles: 4
Basal Interval: 30 minutes
Basal Frequency: Every 3 minutes
Basal Rate Range: 0.05 to 30U/h
Temporary Basal: +/- 10% increment between 0-200% for 0.05 to 30U/h* OR +/- 0.05 unit increment, single
rate for 0.05 to 30U/h.
You may set a temporary basal for up to 72 hours.
*• The minimum allowable percentage is equal to the minimum basal rate (0.05)
divided by the lowest basal rate over the specied duration of the temporary basal that is
greater than 0. (e.g. if the lowest basal rate greater than 0.0U over the duration is 0.20U, the
minimum percentage is 25% — 0.05/0.2 = 0.25)
The maximum allowable percentage is equal to the maximum basal limit (Setup: Basal
Limits: Maximum) divided by the highest basal rate over the specied duration of the
temporary basal, truncated to the nearest 10%. (e.g. if the highest basal rate over the
duration is 1.35 U/h, and the maximum basal limit is 2.00 U/h, the maximum percentage is
140% — 2.00/1.35 = 1.48)
Bolus Dose Range: 0.05 to 50U
Bolus Increments: 0.05U, 0.1, 0.5 or 1.0 using One-Button Bolus (audio/vibrate)
Normal Bolus Delivery Rate: At least 0.1U per second
Prime Deliver Rate: At least 0.1U per second
Extended Bolus: Yes
1 U Bolus Duration: 10 seconds typical
Inactivity Alarm: Always on, 1 – 24 hours.
Maximum Time to Assert Occlusion
Alarm: Occlusion Alarm set to High
Sensitivity
1 U/hr Approximately 3 hrs Approximately 6 hrs
0.05U/hr Approximately 60 hrs Approximately 120 hrs
Occlusion Alarm Threshold/Pressure
(Maximum Infusion Pressure) 25 psig (pounds per square inch gauge)
Bolus Volume upon Release of an
Occlusion Approximately 2.0 units
Pump Battery: One AAA battery (Energizer E92 or Duracell MN2400 recommended). Other models from
these companies have not been tested.
Battery Life: 30 days (in typical use cases)
The expected life of the battery is dependent upon the following usage:
Basal: 1 U/h (U100) 24 hr/day, 7 days/week
Bolus: 5 boluses per day with a total daily bolus delivery of 24 Units (U100)
Prime: 20 Units (U100) occurs three times a week
Memory: 90 days worth of events; display shows last 30, remainder can be seen if downloaded to a PC
Water Resistance: Water resistant to IPX8
Moisture Protection: IPX8 (Water resistant to 8 feet [2.4 meters] for 30 minutes and 12 feet [3.6 meters] for 3
minutes)
IEC Classication: Internally powered equipment, Type BF applied part (protection against electric shock)
Reservoir Volume: 250U or 2.5 mL
Operational Conditions (Temperature
and Humidity):
41°F – 104°F (5°C to 40°C) with 10% to 90% relative humidity
Storage Range: Shipping container for 1 year at -4°F – 113°F, average temperature at 72.5°F (-20°C to 45°C,
average temperature at 22.5°C) with 10% to 90% relative humidity.
Accuracy: Bolus Accuracy : +0.1U / -0.2U (or +0.001ml/-0.002ml); for doses from 0.05U to 2U inclusive
+5% / -10%; for doses greater than 2U up to and including 6U
+5% / -5% for doses greater than 6U
Basal Accuracy: +/-5%
Data Storage: The Pump has the ability to store a minimum of 2700 patient events in non-volatile memory
for the expected life of the pump.
Section 12: Appendices
Appendix E: FCC Compliance Information
Section 12: Appendices
Appendix F: Electromagnetic Information
DOC15736_Rev-A-Man.indd 255-256 2/9/09 11:29:56 AM

257
258
E. FCC Compliance Information
Model Number: PRT12354-xxx and PRT15751-xxx.
FCC Rules: Tested to comply with FCC Part 15, Class B, Security/Remote control Transmitter.
This device complies with Part 15 of the FCC Rules. Operation is subject to the following two conditions:
1. This device may not cause harmful interference.
2. This device must accept any interference received, including interference that may cause undesired operation.
Note: This equipment has been tested and found to comply with the limits for a Class B digital device, pursuant to
Part 15 of the FCC Rules. These limits are designed to provide reasonable protection against harmful interference in
a residential installation. This equipment generates, uses, and can radiate radio frequency energy and, if not installed
and used in accordance with the instructions, may cause harmful interference to radio communications. However,
there is no guarantee that interference will not occur in a particular installation. If this equipment does cause
harmful interference to radio or television reception, which can be determined by turning the equipment o and on,
the user is encouraged to try to correct the interference by one or more of the following measures:
Reorient or locate the receiving antenna.
•
Increase the separation between the equipment and transmitter.•
Consult the dealer or an experienced radio/TV technician for help.•
The user is cautioned that changes or modifications not expressly approved by Abbott Diabetes Care may void the
user’s authority to operate this device.
F. Electromagnetic Information
Electromagnetic Interference (EMI) from Radio Wave Sources
Battery powered insulin delivery devices such as the Abbott Diabetes Care Inc. FreeStyle Aviator System may
be susceptible to electromagnetic interference (EMC) such as Radio and TV station towers, amateur radio (HAM)
transmitters, two way radios, cell phones, Electronic Article Surveillance (EAS) systems and Radio Frequency
Identication (RFID) systems. The interference from these electromagnetic eld sources may cause the insulin pump
to STOP delivery of the insulin or degrade the image on the companion and pump screens. It can also permanently
damage the control system of the insulin delivery pump and companion.
Immunity Level
The intensity of the EMI can be measured in volts per meter (V/m). The immunity level of the FreeStyle Aviator
System is 10 V/m as mandated by the standard, IEC 60601-2-24.
Some cellular telephones and similar products transmit signals while they are turned on, even when NOT being
used.
EMC/EMI Declaration:
Reference Document
Performance
CISPR 11 IEC 61000-4-2 IEC 61000-4-8
Criteria Required Performance (Radiated Emissions)
Group 1 Class B Pass
IEC 60601-2-24 IEC 60601-2-24
Criteria Met N/A (Electro Static Discharge)
+/-8kV Direct, HCP and VCP
Discharges +/-15KV Air
Discharges Pass
(Magnetic
Immunity) 400
A/m Pass
Section 12: Appendices
Appendix G: Accuracy of Flow Rate
Section 12: Appendices
Appendix G: Accuracy of Flow Rate
DOC15736_Rev-A-Man.indd 257-258 2/9/09 11:29:56 AM
259
260
G. Accuracy of Flow Rate
This graph shows the ow rate during the stabilization period. Measurements were made at a basal rate of 1U/h, in
accordance to IEC 60601-2-24:1998 using an Aviator Insulin Reservoir and a Unomedical Comfort infusion set.
0.020
0.015
0.010
0.005
0.000 100 200 300 400 500 600 700 800 900 1000 1100 1200 1300 1400
Time (minutes)
Flow (mL/h)
This graph show the maximum errors observed for specic observation intervals. Measurements were made at
a basal rate of 1U/h, in accordance to IEC 60601-2-24:1998 using an Aviator Insulin Reservoir and a Unomedical
Comfort infusion set.
20
15
10
5
-5
-10
-15
-20
0
15 60 150
Observation Interval (minutes)
330 570 930
Percentage Error of Flow (%)
Overall percentage error: -1.1%
At the minimum rate of 0.05 U/h (0.0005 mL/h), setup errors associated with the IEC 60602-2-24 test are too large
to accurately determine the ow rate of the pump. An alternate test method was used which determines delivery
accuracy by analyzing the movement of drive motor, as reported by an encoder on the motor shaft. Actual insulin
ow rate may be less accurate.
This graph shows the calculated ow rate during the stabilization period. Encoder data was collected at a basal rate
of 0.05U/h.
0.010
0.009
0.006
0.007
0.008
0.003
0.004
0.005
0.002
0.000
0
0.001
100 200 300 400 500 600 700 800 900 1000 1100 1200 1300 1400
Time (minutes)
Flow (mL/h)
This graph show the maximum errors calculated for specic observation intervals. Encoder data was collected at a
basal rate of 0.05U/h.
20
15
10
5
-5
-10
-15
-20
0
15 60 150
Observation Interval (minutes)
330 570 930
Percentage Error of Flow Rate (%)
Overall percentage error: -0.01%
Section 12: Appendices
Appendix H: Alarm Priority
Section 12: Appendices
Appendix I: Aviator Menus - Companion
DOC15736_Rev-A-Man.indd 259-260 2/9/09 11:29:56 AM

261
262
H. Alarm Priority
This section documents the Aviator Pumps alarm priorities in accordance with the 60601-1-8:2006 - `Medical
electrical equipment - General requirements for basic safety and essential performance - Collateral Standard:
General requirements, tests and guidance for alarm systems in medical electrical equipment and
medical electrical systems.’
All of the Aviator Pump alarms are classied as MEDIUM PRIORITY per the 60601-1-8:2006 collateral safety standard.
Failure to respond to the cause of an Aviator alarm condition may potentially result in adverse medical conditions
(including death or irreversible injury) over an extended time period.
While an alarm is active, insulin delivery is stopped. Therefore, it is important that you to respond to all alarms
without delay. Possible Aviator alarms are:
· Inactivity Alarm
· Reservoir Alarm
· No insulin alarm
· Occlusion alarm
I. FreeStyle Aviator Menus – Companion
HOME
MAIN MENU
START BASAL/STOP DELIVERY
BOLUS MENU
QBolus
Manual
Normal
Extended
Dual
Food
Correction
Food & Correction
History
BASAL MENU
Start/Stop Basal
Select
Daily
Temp Basal
View
Daily
Modify
Edit
Create
Rename
Delete
ALARMS
Audio/Vibrate
Inactivity
Occlusion
Reminders
Care Comments
Low Insulin
STATUS
System Status (Bolus & Basal)
Pump Levels
Controller Levels
Pump Version
Controller Version
Section 12: Appendices
Appendix I: Aviator Menus - Companion
Section 12: Appendices
Appendix I: Aviator Menus - Companion
DOC15736_Rev-A-Man.indd 261-262 2/9/09 11:29:56 AM

263
264
PRIME MENU
Tubing
Cannula
REPORTS MENU
Pump Diary
Therapy
Events
Alarms
BG History
Line Graph
BG Statistics
7 Day Average
14 Day Average
21 Day Average
ADD EVENT
Insulin
Food
Exercise
State of Health
Generic
SETUP
Time/Date
Basal Limits
Basal Setup
Bolus Limits
Insulin
Preferences
Buttons
Timeout
Home
Cursor
Magnify
Contrast
Therapy Lockout
Target Range
Wizard
Select Language
Time/Date
Time/Date Format
Insulin Prole
Insulin Type
Insulin Action Time
Inactivity Alarm
Set Display Preferences
Timeout
Home
Edit Mode
Cursor Type
Magnify
Bolus Calculator Options
1U Drop
Carb Ratios
BG Targets
Bolus Limits
One-Button Bolus
Basal Limits
Basal Setup (Temp)
Audio/Vibe
Occlusion Alarm
Low Insulin Alert
Locked items
Name
Values
Self Test
Pair Pump
Radio
Section 12: Appendices
Appendix J: Aviator Menus - Pump
Section 12: Appendices
Appendix J: Aviator Menus - Pump
DOC15736_Rev-A-Man.indd 263-264 2/9/09 11:29:56 AM

265
266
J. FreeStyle Aviator Menus – Pump
HOME
MAIN MENU
START BASAL/STOP DELIVERY
BOLUS MENU
QBolus
Manual
Normal
Extended
Dual
Food
Correction
Food & Correction
History
BASAL MENU
Start/Stop Basal
Select
Daily
Temp Basal
View
Daily
Modify
Edit
Create
Rename
Delete
ALARMS
Audio/Vibrate
Inactivity
Occlusion
Reminders
Care Comments
STATUS
Bolus Status
Basal Status
Pump Levels
Pump Version
PRIME MENU
Tubing
Cannula
REPORTS MENU
Bolus History
Pump Diary
Therapy
Events
Alarms
SETUP
Time/Date
Basal Limits
Basal Setup
Bolus Limits
Insulin
Preferences
Display
Edit Mode
Model
Wizard
Select Language
Time/Date
Time/Date Format
Insulin Prole
Insulin Type
Insulin Action Time
Inactivity Alarm
Set Display Preferences
Buttons
Timeout
Home
Edit Mode
Cursor
Magnify
Bolus Calculator Options
1U Drop
Carb Ratios
BG Targets
Bolus Limits
One-Button Bolus
Basal Limits
Basal Setup (Temp)
Audio/Vibe
Section 12: Appendices
Appendix J: Aviator Menus - Pump
Glossary
DOC15736_Rev-A-Man.indd 265-266 2/9/09 11:29:56 AM

267
268
Occlusion Alarm
Low Insulin Alert
Locked items
Name
Values
Pair Device
Radio
RF Stats
Glossary
(Key terms are in Blue the rst time it is used in the User Guide Sections)
Activity Display
• - Menu driven Home screen.
Alarm
• – The way your pump tells you an event has occurred that requires your immediate attention. Delivery of
insulin IS stopped.
Alarm Settings
• – Settings that allow you to customize how your pump communicates alarms to you.
Alert
• – The way your pump tells you an event has occurred that requires your attention in the near future. Deliv-
ery of insulin is NOT stopped.
Alert Settings
• – Settings that allow you to customize how your pump communicates alerts to you.
Audio/Vibe Settings
• – Settings that allow you to decide whether your pump uses audio (beeps) or vibrations
when there is an alarm.
Back Button (companion)
• - The oval shaped lower button on the right side of the companion screen below the
jogwheel. It is used to cancel a change made to a value, and to move back to the previous screen.
Back Button (pump)
• – The top button on the right side of the pump screen with an indented triangle pointing
to the left when in the right-hand mode. It is used to cancel a change made to a value, and to move back to the
previous screen.
Backlight/QBolus Soft Key (companion)
• - To turn on/o the backlight, press the bottom left soft key on the
companion with the light bulb icon for 2 seconds, when you are NOT at the Home screen. To deliver a quick
bolus, press the QBolus soft key from the Home screen. Using the jogwheel, select amount of bolus to deliver
and press Enter button.
Backlight/Enter Button (pump)
• – The bottom button on the right side of the pump screen with an indented
triangle pointing to the right. To turn on/o the backlight, press this button for 2 seconds. It is also used to select
an item, or to move forward to the next screen.
Basal
• – The “baseline” or background level of insulin that you need delivered throughout the day.
Basal Block –
• A programmed basal rate for a period of time during the day.
Basal Insulin –
• The small, frequent pulses of background insulin that your body continuously needs.
Basal Menu –
• Allows you to get to the basal-related functions to make changes in the basal settings on your
pump.
Basal Panel –
• Displays the status of whether basal has started or stopped, and which active program is deliver-
ing the basal. When highlighted and selected, allows you to access basal options.
Basal Program –
• A sequence of up to 48 basal blocks for a 24-hour period.
Basal Rates –
• The rates of insulin delivery you set when you are creating basal programs. Basal rates can vary
throughout the day.
Glossary Glossary
DOC15736_Rev-A-Man.indd 267-268 2/9/09 11:29:56 AM

269
270
Basal Settings• – Settings that allow you to dene the basal amount, basal maximum limit, and the temporary
basal format.
Battery Cap –
• Cap cover for the battery compartment.
Battery Compartment –
• Where the pump battery is stored.
BG Target --
• The blood glucose you wish your pump to correct to. It is used in the correction bolus calculator,
and abbreviated as Target BG. This target value is developed with the guidance of your health care professional
and varies from person to person Note that it may be dierent than your desired blood glucose range.
Blood Glucose (BG)
• – The main sugar found in the blood and the body’s main source of energy. This is also
called blood sugar.
Blood Glucose Level
• –The amount of glucose in a sample of blood.
Blood Glucose Meter Test Strip Port
• – The port where you insert a FreeStyle Lite Test Strip when checking
your blood glucose.
Bolus
• – An extra burst of insulin taken either to cover the rise in blood glucose that occurs after eating, or to cor-
rect high blood glucose.
Bolus/Wake Up Button
• (pump) – The button on the side of the pump. Press it the number of times needed to
deliver a quick bolus using the One-Button Bolus function. You can also press it once to stop a normal bolus in
progress. The pump will timeout in 15-120 seconds. Press and hold the button to wake up the pump from sleep
mode to display the Home screen.
Bolus Calculator
• – Settings for calculating a bolus based on food intake, and/or a correction to a desired blood
glucose level. It helps you calculate the correct dose of insulin based on carbohydrates, current blood glucose,
and how much insulin from earlier boluses remains active in the body. It does NOT take other factors into ac-
count, such as exercise, illness, and food other than carbohydrate.
Bolus History
• – A list of your last 10 boluses.
Bolus Options –
• Settings to customize your bolus insulin settings, including bolus increments and maximums,
as well as your bolus calculator options.
Bolus Panel
• – Displays the status of the most recent or last bolus given including bolus volume and time.
Cancellation Alert –
• Occurs when the screen timed out when there are pending changes on a screen, or if you
pressed and held the Back button to return to the Home screen when there are pending changes on a screen,
intentionally canceling the change.
Cannula
• – A slender plastic tube that is under the skin that is used to deliver insulin in your body. During the in-
sertion of the infusion set, the center of the cannula contains a ne gauge needle to help the cannula penetrate
the skin. The needle is then removed after insertion, leaving the plastic cannula in your skin.
Cannula Housing
• – The part of the infusion set where the tubing connects to the infusion set on your body.
Carbohydrates (CHO)
• – The component of food that most directly aects your blood glucose levels. The pri-
mary energy source from food.
Care Comments
• – Alerts for specic activities, i.e. such as to remind you to change your infusion set. You can
turn these on or o.
Check BG
• – An alert to remind you to check your blood glucose levels 2 hours following a site change.
Companion Screen
• – The part of the companion where the information is displayed.
Connector
• Needle – The part of the infusion set that contains a needle to connect to the cannula.
Contraindications –
• Descriptions of what the pump is NOT intended for.
Correction Bolus
• – A bolus given to lower blood glucose level elevated above the target blood glucose level.
Correction Factor
• – Also known as sensitivity factor and 1 U Drop. This amount is how much blood glucose
drops with delivery of 1 units of short or rapid-acting insulin. The number is unique to each user and is pro-
grammed into the pump for use in the bolus calculator. When glucose is high or low the calculator will use this
information to estimate your insulin dose.
Create Program –
• Allows you to create up to four basal programs and assign each a specic name, i.e., on week-
ends, during exercise, or when you are ill.
Cursor –
• A setting that allows you to change the appearance of the selection cursor from a dark highlight cursor
(reverse video) to an outline cursor.
Dawn Phenomenon –
• A period of time occurring in the middle of the sleep cycle where the body releases extra
amounts of glucose into the blood stream, requiring a temporary increase in your basal insulin needs.
Delete Program –
• Function that allows you to delete a basal program.
Diabetic Ketoacidosis
• (DKA)– A potentially life threatening emergency condition in which extremely high
blood glucose levels from a severe lack of insulin, result in the breakdown of body fat for energy and an accumu-
lation of ketones in the blood and urine.
Display Preferences—
• Settings that allow you to choose right or left display, timeout, home screen appearance,
viewing the cursor in highlight or outline mode, and whether or not you want to magnify the text.
Display Right or Left –
• A setting that allows you to switch the screen orientation such that the buttons are on
the right side of the pump or on the left side of the pump.
Dual Bolus
• – A bolus that combines a NORMAL bolus with an EXTENDED bolus. It is sometimes used when food
is consumed that may have both an early eect on your glucose as well as a longer eect, such as pizza.
Dust Cover
• – The cover that comes with your pump used to protect the reservoir compartment.
Edit Program –
• Allows you to make changes to an existing basal program, including adding or deleting basal
time blocks and basal rates.
Enter/Backlight Button (pump)
• - The bottom button on the right side of the pump screen with an indented
triangle pointing to the right. It is used to select an item, or to move forward to the next screen. To turn on/o
the backlight, press this button for 2 seconds.
Enter Button/Jogwheel (companion) -
• The top jogwheel button on the right side of the companion. The
jogwheel scrolls to allow you to move up and down through the companion. You can also depress this button to
Glossary Glossary
DOC15736_Rev-A-Man.indd 269-270 2/9/09 11:29:56 AM

271
272
select an item and to move forward to the next screen. You can also stop a normal bolus in progress.
Extended Bolus
• – A bolus delivered over a determined period of time that is sometimes used to better match a
food that is absorbed slowly.
Food Bolus
• – A bolus calculator option that allows administration of a bolus to account for food about to be
eaten.
Food and Correction Bolus
• – A Bolus Calculator option that allows administration of a bolus to correct blood
glucose levels that are higher than the desired blood glucose level and takes into account food about to be
eaten.
Highlight –
• Setting the Cursor to highlight gives the text a highlighted display as you scroll and select options.
Home Screen:
•
The • Information-based home screen provides details about current basal and bolus status, including the
time and amount of your last bolus and whether basal delivery is running or stopped. When basal delivery is
running, the name of the active basal prole and delivery rate is displayed.
The
• Activity-based home screen provides direct access to the pump options. Information about the basal
and last bolus status is accessible through the STATUS option.
Home Screen Appearance -
• The Information-based home screen provides details about current basal and bo-
lus status, including the time and amount of your last bolus, and whether basal delivery is running or stopped.
When basal delivery is running, the name of the active basal prole and delivery rate is displayed.
Hyperglycemia
• – Blood glucose levels that are higher than target level.
Hypoglycemia
• – Blood glucose levels that are lower than target level.
I:CHO
• (or Carb Ratio) – Insulin-to-carbohydrate ratio that denes how many grams of carbohydrates 1 unit of
insulin covers. CHO is an abbreviation for carbohydrate. This number is programmed into the pump for use by
the bolus calculator. When you program in your number of carbohydrates you are about to eat, the bolus calcu-
lator helps you decide how much insulin may be needed for that food. It does NOT take into account food other
than carbohydrates.
Inactivity Alarm –
• A safety alarm that sound when you have NOT touched any buttons within the time period
selected. If you do NOT respond to an inactivity alert within 15 minutes, the INACTIVITY ALARM will sound and
basal insulin delivery is stopped.
Inactivity Alert –
• When the inactivity time has elapsed without any interaction on the pump, the pump rst
displays the INACTIVITY ALERT screen to keep delivery going.
Indication
• – A description of what the pump should be used for.
Information Display
• – Home screen conguration that provides important status information concerning basal
and bolus delivery. Also oers short cuts to get to lower level menus.
Infusion Set
• – The combination of the reservoir cap, tubing, and cannula that delivers insulin from the pump’s
reservoir into the body. It is used one time only, and is discarded after each use.
Glossary Glossary
Infusion Set Tubing
• – Part of the infusion set that carries insulin from the pump to the cannula.
Insulin
• – A hormone that helps the body use glucose for energy. When the body cannot make enough insulin, it
is taken in by injection or through use of a pump.
Insulin On Board (IOB)
• – The amount of insulin units that remain active in your body. The IOB is calculated us-
ing the insulin action time setting chosen in your insulin prole (see Section 2.1), along with looking at ear-
lier boluses delivered. In addition, if a correction dose has recently been given, (for information on correction
boluses, refer to Section 8.4.) the IOB feature may help you prevent giving too much insulin to correct your high
glucose.
Insulin Reservoir
• – The reservoir holds the insulin that the pump will deliver to your body. The reservoir holds
250 units of insulin. Your healthcare professional will tell you how much insulin to use to ll the reservoir. The
reservoir is a single-use only item.
Insulin Reservoir Vial Adapter
• – Attaches to the top of the insulin vial and is used in place of a lling needle to
transfer liquid into the insulin reservoir.
Insulin Temp
• – An alert that lets you know if the temperature of the pump is too hot or too cold.
Introducer Needle
• – The needle that guides the insertion of the cannula in your body. The needle is removed
and only the cannula is left in your body.
IOB Panel –
• Provides an indication of the amount of insulin that is still active in your body from past boluses.
Jogwheel/Enter Button (companion) -
• The top jogwheel button on the right side of the companion. It scrolls
to allow you to move up and down through the companion. You can also use this button to select an item and
to move forward to the next screen. You can also stop a normal bolus in progress.
Levels Panel
• – Displays the battery and insulin reservoir levels by icons.
Locked Item Setting
• – Setting that allows change of whether Bolus and Basal Menu options are locked (inac-
cessible) or unlocked (accessible). This is a safety feature to prevent unwanted changes in insulin, by a child for
example.
Low Insulin Alert
• – An alert, based on programmed settings telling when insulin is getting low.
Low Power
• Sleep State – This means the display is blank when the display timed out or when the user deliber-
ately puts the pump to sleep by pressing and holding the back button on the Home screen.
Magnify
• – Turning the Magnify option to On makes the text larger and easier to view on the screen.
Main Menu
• – Lists the options to start/stop basal, go to bolus menu, basal menu, Alarm Setup, bolus status,
prime menu, reports menu, and setup menu.
Manual Bolus
• – A bolus that is delivered without using the bolus calculator.
Modify Program
• – Allows edit, create, rename, or delete basal programs.
Normal Bolus
• – A one time quick dose of insulin that is programmed when you eat or need a dose of insulin to
be delivered immediately.
Occlusion Alarm
• – Alarm that alerts you to an obstruction of uid. The alarm occurs when pressure is detected
DOC15736_Rev-A-Man.indd 271-272 2/9/09 11:29:56 AM

273
274
Resources
as the pump tries to deliver insulin. It tells you there may be a problem with your infusion site and that insulin
may NOT be delivered. An Occlusion Alarm STOPS insulin delivery. The sensitivity setting of the alarm is adjust-
able and may be changed.
One-Button Bolus
• – A function that allows you to deliver a Normal Bolus with fewer steps using the pump,
simply by pressing the One-Button Bolus button without looking at the display. The pump makes special sounds
or vibration patterns that guide you through the procedure. This same function is performed using the QBolus
soft key on the companion.
1U Drop
• – Sets how much 1 unit of insulin will lower blood glucose level.
Outline
• – Setting the Cursor to Outline gives the text an outline around it as you scroll and select options.
Prime
• – A procedure to make sure that air is removed from the entire infusion set before you attach the pump’s
tubing to your body. This important procedure is done to make sure you receive the correct amount of insulin.
Pump Diary
• – An option that allows you to review your insulin therapy amounts, pump-related events, and
alarm history.
Pump Idle
• – This means the basal delivery is stopped for 5 minutes.
Pump Idle Alert
• – Occurs when the basal has been stopped for 5 minutes. This alert can be put to sleep for up
to one hour. A pump idle alert would NOT occur until you have completed the SETUP WIZARD. After that, if for
any reason the basal is stopped for 5 minutes, the pump idle alert will sound.
Pump Screen
• – The part of the pump where the information is displayed.
QBolus
• – A manual option to deliver a Normal bolus of insulin, using fewer steps than the Normal Bolus option.
Reminders
• –Alerts reminding you to do certain things, such as eat a snack or test blood glucose levels.
Rename Program –
• Allows changing the name of a basal program.
Reports
• – The menu that allows you to review bolus history and the pump diary that logs various pump-related
events and information.
Reservoir Alarm
• – Occurs when the reservoir is removed while the pump is still delivering insulin.
Reservoir Cap
• – The clear plastic cap and handle that is on the outside of the pump when the reservoir is placed
properly in the pump. This connects the Reservoir to the infusion set
Reservoir Compartment
• – The hollow area in the pump that encloses the insulin reservoir.
Reservoir Plunger
• – The gray plunger of the insulin reservoir.
Reservoir Plunger Handle
• – The white removable handle attached to the end of the plunger. Used to draw
insulin into the reservoir.
Scroll Pad
• – The indented, oval area on the right side of the pump when in right-hand mode. It scrolls to allow
you to move up and down through the pump options. It is like the scroll pad on a computer.
Select Program –
• Allows you to choose and start a dierent basal program.
SETUP WIZARD
• – An easy way to set up your pump. Individual SETUP WIZARD options are also accessible via
the SETUP Menu. This feature is typically used the rst time you set up all the features of your pump.
Site Change
• – A programmable alert that reminds you to change your site 2, 2.5, or 3 days following a cannula
prime, after you inserted your infusion set.
Sleep Mode
• – A way to silence alerts for a specied period of time.
Start Basal –
• Allows you to start an existing basal program.
Stop Basal –
• Allows you to stop the actively running basal program.
Stop Bolus
• – A function that allows you to stop any type of bolus delivery of insulin as it is occurring.
System Error
• – An error that must be addressed immediately by calling Customer Care. It sometimes may indi-
cate a pump failure.
Target blood glucose
• – The blood glucose value to correct to. It is used in the correction bolus calculator, and
abbreviated as Target BG. Note that it may be dierent than desired blood glucose range.
Temporary Basal
• – A way to deliver basal insulin at a dierent rate for a temporary period of time, such as for
exercise or illness. You may choose either specic units/hour or percentage, of your currently active basal rate.
Timeout –
• The time before the pump display goes blank. The timeout can be set from 15 to 120 seconds.
USB Port
• – The USB port to connect to the charger for your companion’s battery.
Vial Adaptor Cap
• – The cap that covers the top of the vial adaptor to store unused insulin.
View Program
• – Allows you to view all existing basal programs.
Wake Up/Soft Key to MAIN MENU (companion)
• – To wake up the companion, press the bottom right button
with the Power icon for 2 seconds to access the MAIN MENU.
Wake Up/Bolus Button (pump)
• – The button on the side of the pump. Press and hold the button to wake up
the pump from sleep mode to display the Home screen. Press it the number of times needed to deliver a quick
bolus using the One-Button Bolus function. You can also press it once to stop a normal bolus in progress. The
pump will timeout in 15-120 seconds.
DOC15736_Rev-A-Man.indd 273-274 2/9/09 11:29:57 AM

275
Resources
Resources
The following books and web sites may be of help as you begin pump therapy:
Books:
Smart Pumping: A Practical Approach to Insulin Pumping•
by Howard Wolpert, MD
Insulin Pump Therapy Demystied: An Essential Guide for Everyone Pumping Insulin
•
by Gabrielle Kaplan-Mayer
Pumping Insulin: Everything You Need for Success with an Insulin Pump
•
by John Walsh, PA, CDE and Ruth Roberts, MA
Web Sites:
Abbott Diabetes Care•
www.AbbottDiabetesCare.com•
American Diabetes Association
•
www.diabetes.org
Centers for Disease Control Diabetes Public Health Resource
•
www.cdc.gov/diabetes
Diabetes Exercise and Sports Association
•
www.diabetes-exercise.org
US Food and Drug Administration Diabetes Information
•
www.fda.gov/diabetes
Insulin Pump Online Support
•
www.insulin-pumpers.org
Pump Supplies:
Unique Accessories Inc.•
www.uniaccs.com
Diabetes Mall
•
www.Diabetesnet.com/diabetes_technology
Pump Wear Inc.
•
www.pumpwearinc.com
DOC15736_Rev-A-Man.indd 275 2/9/09 11:29:57 AM

DOC15736_Rev-A-Cvr.indd 3 2/9/09 11:32:16 AM

Caution: Federal Law restricts this device to sale by or on the order of a physician.
(Patent information to be placed here.)
©2008 Abbott DOC15736 Rev. A 12/08
Distributed by:
(Place distribution addresses here.)
Humalog®, Apidra®, Novolog®, and Kendall Monoject™
are not trademarks of the Abbott Group of Companies.
DOC15736_Rev-A-Cvr.indd 4 2/9/09 11:32:19 AM