Acer orporated SHM900DF Smart Handheld User Manual Acer M900DF UM EN 2010
Acer Incorporated Smart Handheld Acer M900DF UM EN 2010
Contents
- 1. Manual Part 1
- 2. Manual Part 2
Manual Part 1

1
Acer M900DF
User Guide

Acer M900DF Smartphone User Guide2
© 2010. All Rights Reserved
Acer M900DF Smartphone User Guide
First issue: 01/2010
Acer M900DF Smartphone
Model number: __________________________________
Serial number: ___________________________________
Date of purchase: ________________________________
Place of purchase: ________________________________

3
Table of Contents
Get to know your Acer M900DF Smartphone
Features and functions . . . . . . . . . . . . . . . . . . . . . . . . 7
Other sources of help . . . . . . . . . . . . . . . . . . . . . . . . . 8
Product registration . . . . . . . . . . . . . . . . . . . . . . . . . . . 9
Chapter 1: Set Up
Unpack your smartphone . . . . . . . . . . . . . . . . . . . . . 11
Get to know your smartphone . . . . . . . . . . . . . . . . . 12
Install the SIM card . . . . . . . . . . . . . . . . . . . . . . . . . . 15
Remove the SIM card and battery . . . . . . . . . . . . . . 16
Charge the battery . . . . . . . . . . . . . . . . . . . . . . . . . . 17
Turn on for the first time . . . . . . . . . . . . . . . . . . . . . 18
The Home screen . . . . . . . . . . . . . . . . . . . . . . . . . . . . 20
Connect to your PC and synchronize data . . . . . . . . 23
Chapter 2: Making Calls
Before making a call . . . . . . . . . . . . . . . . . . . . . . . . . 25
The onscreen number pad . . . . . . . . . . . . . . . . . . . . 26
Make a voice/video call . . . . . . . . . . . . . . . . . . . . . . . 26
The voice call screen . . . . . . . . . . . . . . . . . . . . . . . . . 28
Onscreen call options . . . . . . . . . . . . . . . . . . . . . . . . 31
Chapter 3: Input Devices
The stylus . . . . . . . . . . . . . . . . . . . . . . . . . . . . . . . . . . 35
The fingerprint reader . . . . . . . . . . . . . . . . . . . . . . . . 35
The application buttons . . . . . . . . . . . . . . . . . . . . . . 36
The onscreen keyboard . . . . . . . . . . . . . . . . . . . . . . . 37
The QWERTY keyboard . . . . . . . . . . . . . . . . . . . . . . . 38
Chapter 4: Messaging
The messaging screen . . . . . . . . . . . . . . . . . . . . . . . . 43
Text (SMS) messages . . . . . . . . . . . . . . . . . . . . . . . . . 44

Acer M900DF Smartphone User Guide4
MMS messages . . . . . . . . . . . . . . . . . . . . . . . . . . . . . . 45
Email . . . . . . . . . . . . . . . . . . . . . . . . . . . . . . . . . . . . . . 48
Chapter 5: Home Screen Overview
The Home screen . . . . . . . . . . . . . . . . . . . . . . . . . . . . 49
Customize basic settings . . . . . . . . . . . . . . . . . . . . . . 52
Chapter 6: Using the Camera
Camera icons and indicators . . . . . . . . . . . . . . . . . . . 55
Take a photo . . . . . . . . . . . . . . . . . . . . . . . . . . . . . . . 57
Shoot a video . . . . . . . . . . . . . . . . . . . . . . . . . . . . . . . 57
Photo and video options . . . . . . . . . . . . . . . . . . . . . . 58
Chapter 7: The Fingerprint Reader
Security settings . . . . . . . . . . . . . . . . . . . . . . . . . . . . . 61
Navigate with the fingerprint reader . . . . . . . . . . . . 62
Chapter 8: Advanced Operation
Put your Acer M900DF Smartphone in flight mode 65
Comm. Manager . . . . . . . . . . . . . . . . . . . . . . . . . . . . 66
Adjust connection settings . . . . . . . . . . . . . . . . . . . . 66
Phone settings . . . . . . . . . . . . . . . . . . . . . . . . . . . . . . 71
Manage contacts . . . . . . . . . . . . . . . . . . . . . . . . . . . . 73
Namecard Manager . . . . . . . . . . . . . . . . . . . . . . . . . . 76
SIM Manager . . . . . . . . . . . . . . . . . . . . . . . . . . . . . . . 77
Connect to a PC and install software . . . . . . . . . . . . 79
Other functions . . . . . . . . . . . . . . . . . . . . . . . . . . . . . 80
Multimedia playback . . . . . . . . . . . . . . . . . . . . . . . . . 81
Satellite Data Update . . . . . . . . . . . . . . . . . . . . . . . . 84
Reset your Acer M900DF Smartphone . . . . . . . . . . . 89
Chapter 9: Accessories and Tips
Use the stereo headset . . . . . . . . . . . . . . . . . . . . . . . 93
Use a Bluetooth headset . . . . . . . . . . . . . . . . . . . . . . 93
Use your Acer M900DF Smartphone as a modem . . 94
Insert a micro SD card . . . . . . . . . . . . . . . . . . . . . . . . 98
Appendix

5
FAQ, troubleshooting and error messages . . . . . . . 99
Specifications . . . . . . . . . . . . . . . . . . . . . . . . . . . . . . 102
Warnings and precautions . . . . . . . . . . . . . . . . . . . 104
Emergency calls . . . . . . . . . . . . . . . . . . . . . . . . . . . . 110
Disposal and recycling information . . . . . . . . . . . . 110
Taking care of your Acer M900DF Smartphone . . . 111
Safety regulations . . . . . . . . . . . . . . . . . . . . . . . . . . 113


7Features and functions
Get to know your Acer
M900DF Smartphone
Features and functions
Your new Acer M900DF Smartphone is a multi-functional tool
packed with intuitive features and powerful applications that
make organizing your information and synchronizing it with
your personal activities an easy, efficient task. Your Acer
M900DF Smartphone lets you:
• Synchronize email with your server while on the move.
• Make voice calls and video calls when connected to a
3G/EDGE/GPRS/HSUPA/HSDPA network.
• Connect wirelessly to your local network to access the
internet and other network features.
• Use the customizable Home screen to access a wide
range of software to perform common tasks on the
Windows Mobile 6.1 Professional platform.
• Synchronize the information on your computer with
the information on your Acer M900DF Smartphone.
• Exchange information between devices that have
Bluetooth/WLAN capabilities.
Acer M900DF Smartphone User Guide8
Other sources of help
To help you use your Acer M900DF Smartphone, we have
designed a set of guides:
Accessing the help menus
Your Acer M900DF Smartphone features detailed help menus
to aid you in making connections and using the embedded
applications.
1. Tap Start > Help to access the Help menus.
2. Tap Contents to view all help topics or Search to find help
on specific topics.
For information on: Refer to:
Programs on your Acer
M900DF Smartphone and
additional programs that can
be installed on your Acer
M900DF Smartphone
This User Guide. Bundled in the Acer
M900DF Smartphone Getting Started
CD, it provides online reference for
using your Acer M900DF Smartphone.
The Acer M900DF Smartphone help file.
Select Help from the Start menu.
Connecting to and synchro-
nizing with your computer
The Acer M900DF Smartphone Quick
Start Guide.
ActiveSync Help on your computer. To
view Help, click Help and then Microsoft
ActiveSync Help.
Last-minute updates and
detailed technical
information
The Read Me files. Located in the Micro-
soft ActiveSync folder on your computer
and on the Acer M900DF Smartphone
Getting Started CD.
Up-to-date information
regarding your Acer M900DF
Smartphone
http://www.acer.com/
Service enquiries http://www.acer.com/support/

9Product registration
Product registration
When using your product for the first time, it is recommended
that you immediately register it. This will give you access to
some useful benefits, such as:
• Faster service from our trained representatives
• Membership in the Acer community: receive promo-
tions and participate in customer surveys
• The latest news from Acer
Hurry and register, as other advantages await you!
How to Register
To register your Acer product, visit our website at http://regis-
tration.acer.com. Choose your country and follow the simple
instructions.
After we receive your product registration, you will be sent a
confirmation email with important data that you should keep
in a safe place.


11Unpack your smartphone
Chapter 1: Set Up
Unpack your smartphone
Your Acer M900DF Smartphone comes packed in a cardboard
box. Carefully unpack the box and remove the contents. If any
of the following items are missing or damaged, contact your
dealer immediately:
• Acer M900DF Smartphone
• Battery
• AC adapter
Acer M900DF Smartphone User Guide12
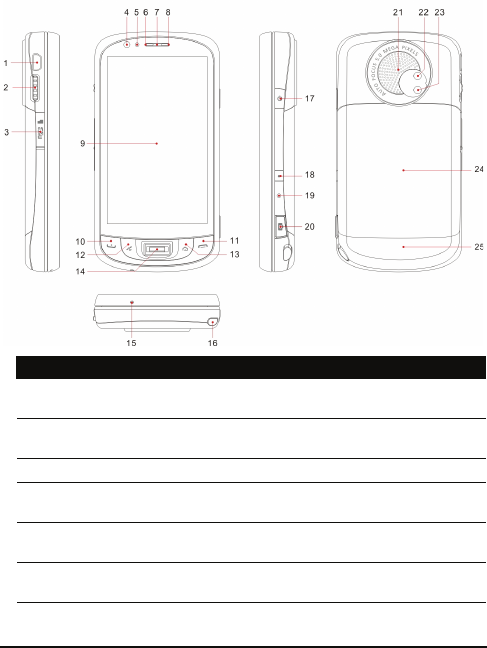
Get to know your smartphone
Views
No. Item Description
1 Mini USB connector
Connect to a USB cable/headphones/char-
ger.
2 3-way rocker wheel Scroll through items on the display. Press
inwards to activate the selected item.
3 Micro SD card slot Expand your device’s memory capacity.
4 Video conference
camera
Camera for video calls.
5 Light sensor Senses ambient light to adjust screen
brightness for comfortable viewing.
6 Bluetooth/WLAN/GPS
indicator
Indicates Bluetooth, WLAN and GPS status.

13Get to know your smartphone
7 Phone speaker Emits audio from your smartphone; suit-
able for holding to your ear.
8 Charge indicator Indicates battery charge status.
9 Touchscreen 800 x 480 pixel screen to display data,
phone content and enter information.
10 Talk/send button Activate phone/dial/view recently dialed
numbers/answer a call.
11 End button
Press to end a call/disconnect GPRS; press
and hold to turn the phone function on/off.
12 GPS button Activate the GPS viewer.
13 Back button Return to the Home screen.
14 Fingerprint reader Secure your phone using Biometrics; navi-
gate through items on the screen.
15 Microphone Internal microphone.
16 Stylus Use to enter information or select items
on the touch screen.
17 Power button Press to turn the screen on/off or enter
sleep mode; press and hold to turn the
Smartphone off.
18 Record button Press to launch the recording toolbar.
19 Reset pinhole Insert the stylus into this hole to reset the
device.
20 Camera button Activate the camera or take a picture.
Press down halfway to auto-focus.
21 Speaker Emits audio from your smartphone; suit-
able for handsfree use.
22 Main camera A 5-megapixel camera for taking high-res-
olution images.
23 Flash Used to illuminate an object when taking
photos in low-light conditions.
24 Battery cover Covers the battery/SIM card bay.
25 Lower locking panel Moves up and down to lock the battery
cover in place.
No. Item Description
Acer M900DF Smartphone User Guide14
LED indicators
Bluetooth/WLAN/GPS indicator:
Charge indicator:
LED
Color
State Description
White Flashing GPS active
Amber Flashing WLAN connected
Blue Flashing Bluetooth on
LED
Color
State Description
Red Flashing Battery is low and needs recharging/alarm
notification (missed call, new message, etc.)
Steady Battery is charging
Green Flashing Phone is active
Steady Battery fully charged
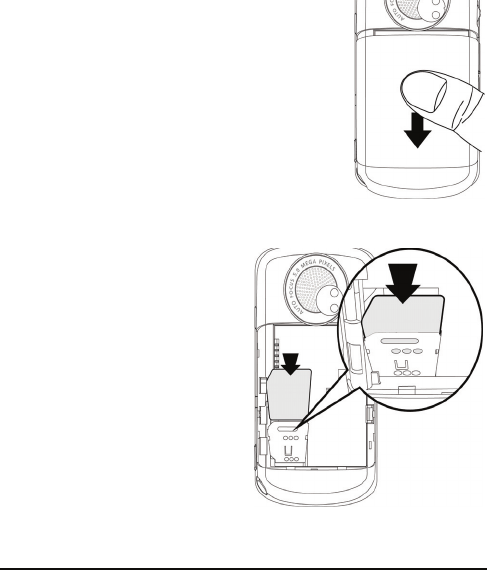
15Install the SIM card
Install the SIM card
To take full advantage of your Acer M900DF Smartphone’s
telephony capabilities, you must install a SIM card. The SIM
card holder is located beneath the battery.
Open the battery compartment
Gently, but firmly slide the battery cover
down to release it. Remove the battery
cover.
Insert the SIM and replace the battery
Insert the SIM card into the
SIM holder as shown.
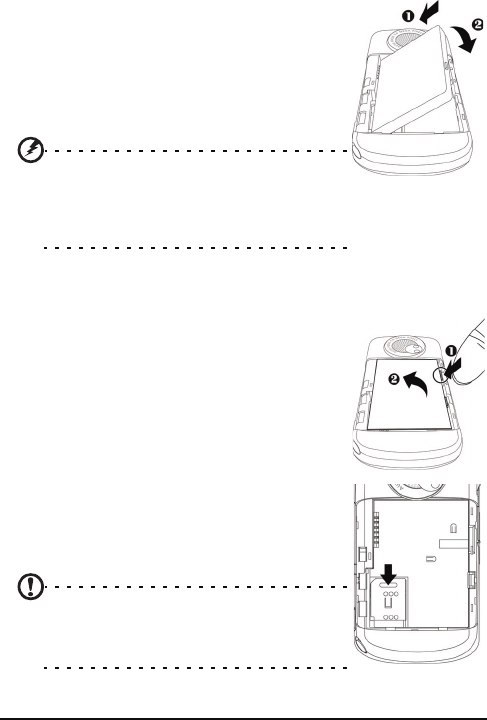
Acer M900DF Smartphone User Guide16
Place the battery into the battery compart-
ment, lining up the battery connectors
with those on the side the compartment.
Slide the battery cover back and press the
lower locking panel upwards until it clicks
into place.
CAUTION:
RISK OF EXPLOSION IF BATTERY IS REPLACED
BY AN INCORRECT TYPE.
DISPOSE OF USED BATTERIES ACCORDING TO
THE INSTRUCTIONS.
Remove the SIM card and battery
Open the battery compartment as shown
in “Open the battery compartment“ on
page 15. Using the small tab on the upper
right side of the battery, carefully lift it out
of its compartment.
Use the tip of the stylus to carefully unlock
the SIM card holder by pushing it down.
Lift up the holder and remove the SIM
card.
Note: Place your Acer M900DF Smartphone
on a flat but soft surface when performing
this step, to avoid scratching or damaging
the screen.
17Charge the battery
Replace the battery and battery cover as shown in “Insert the
SIM and replace the battery“ on page 15.
SIM card lock
Your Acer M900DF Smartphone may come with a SIM card
lock, i.e., you will only be able to use the SIM card provided by
your network operator.
To find out how to cancel a SIM lock, contact your network
provider.
Charge the battery
For initial use, you need to charge your Acer M900DF Smart-
phone for eight hours. After that you can charge it each day to
recharge the battery to full capacity.
Connect the AC adapter cord to the mini USB connector on
your Acer M900DF Smartphone.
Plug the AC adapter into any AC current outlet and charge the
device for at least eight hours for the first charge.
Tip: We recommend you get into the habit of leaving your Acer
M900DF Smartphone charging overnight, when not in use. This way
you will not have to worry about recharging during the daytime,
when it may be inconvenient.
Power LED status during charging
Charging: LED indicator steady red.
Charging complete: LED indicator steady green.
If the battery level becomes low in the course of normal use, a
status icon appears on the Acer M900DF Smartphone screen
indicating low battery status and an alarm sounds. The charge
indicator will flash red.
Acer M900DF Smartphone User Guide18
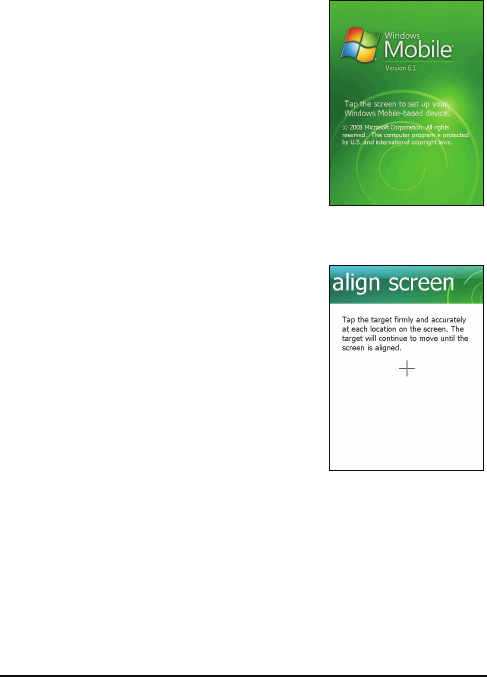
Turn on for the first time
To turn on your Acer M900DF Smart-
phone for the first time, press and hold
the power button until the system
bootup screen appears.
You will be required to enter the Mas-
ter Password (default is four zeroes:
0000) to complete the setup process.
Use the embedded numeric keypad or
onscreen number pad to enter the Mas-
ter Password.
Tap the screen to set up your Acer
M900DF Smartphone.
Follow the onscreen instructions to
align the screen, practice using the
stylus, set the date and time, and con-
figure a password to protect your Acer
M900DF Smartphone.
Install add-on applications
After you’ve finished the initial setup, you will be asked if you
want to install the following add-on applications:
•Acer Album: Displays photos and images in thumbnail
and full-screen views.
• Acer Namecard Manager
: Detects and stores text from
photos of business cards for easy contact management.

19Turn on for the first time
•Acer Backup Utility: Creates backup copies of your cal-
endar, contacts, tasks, personal profile, network set-
tings, My Documents and messages.
• Acer Voice Commander: Uses voice commands to look
up contacts, make phone calls, retrieve calendar infor-
mation and control media playback.
• Acer Satellite Data Update: Accelerates GPS position-
ing by ensuring constantly updated satellite reference
data.
• Acer Easy Keyboard: Provides an easy-to-use onscreen
keyboard with larger keys.
• Acer SIM Manager: Manages contact data stored on
the SIM card.
•Acer Streaming Player: Plays back streamed video con-
tent from the Internet.
Tap Next to continue. The installation of the chosen and other
applications and tools will continue.
Set up fingerprint security
Once you’ve finished installing the add-on
applications, you will be asked to set up the
fingerprint security features of your Acer
M900DF Smartphone. You will need to
swipe your selected finger four times to
enroll it with the application.
Once you have set up fingerprint security,
you can swipe your finger to access the
phone or the other functions described in
“Security settings“ on page 61.
Note: You can opt to skip this step by tapping OK in the top right-
hand corner of the screen, however, it is recommended that you set
up the security features now.
Acer M900DF Smartphone User Guide20
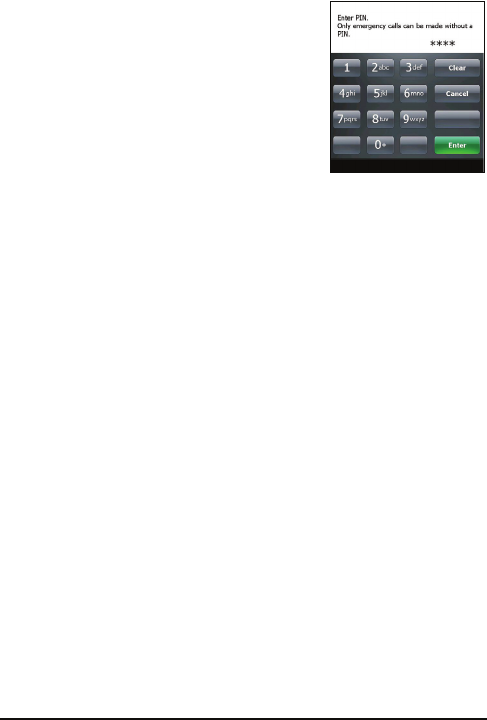
Enter your PIN code
When you install a SIM card for the first
time, you will have to enter a PIN code
using embedded numeric keypad or the
onscreen number pad.
If the PIN code you enter is incorrect, a
warning message appears.
Activating a new SIM card
If you are using your SIM card for the first time, it may require
activation. Contact your network operator for details on how
to do this.
The Home screen
After rebooting, your Acer M900DF Smartphone will display
the Home screen. You will be asked if you want to view the
Icon Matrix or Acer 3D view as the default.
The Acer 3D view gives you icon-based access to many of the
applications and features of your Acer M900DF Smartphone.
You can scroll from side to side by dragging your finger or sty-
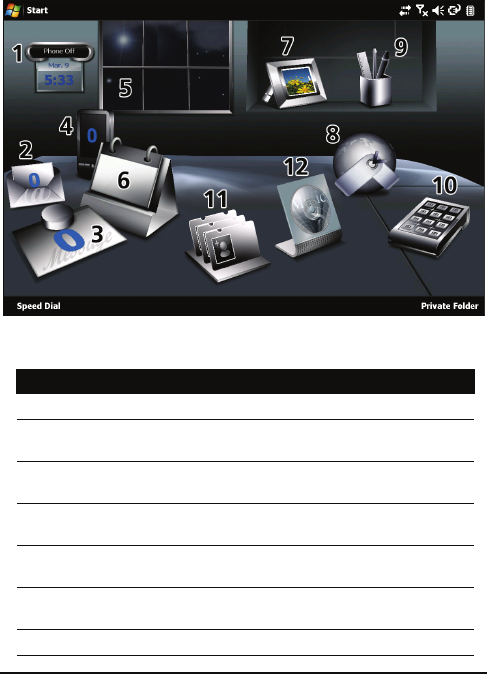
21The Home screen
lus to the left or right (only part of the screen will be visible at
any time).
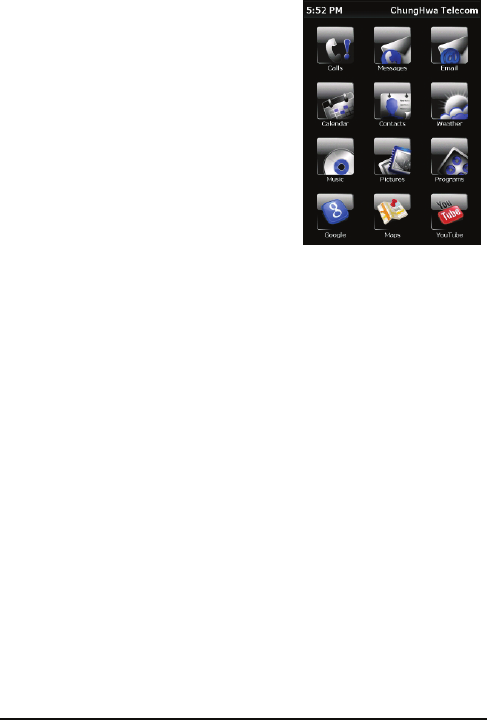
Tap an icon to launch the following features:
No. Feature Description
1 Clock View your set locations on the globe.
2 Email Launch the email application; also indicates any
unread mails.
3 Messages Launch the messaging application; also indicates
any unread messages.
4 Calls Open the list of recently dialed numbers, missed
calls.
5 Weather View local weather forecasts for your set loca-
tions.
6 Calendar Open your calendar to view upcoming appoint-
ments.
7 Pictures View content in
My pictures
as a slideshow.
Acer M900DF Smartphone User Guide22
You can add or remove icons by tap-
ping and holding anywhere on the
Acer 3D view. This will reveal a tab
that you can tap and drag up to
show additional functions. Tap and
drag icons between the desktop and
the tab to add or remove them. You
can also move the icons on the desk-
top while the tab is visible.
8 Bookmarks Open your
Favorites
folder.
9 Settings Open the toolkit to customize your Acer M900DF
Smartphone.
10 Programs Open the
Quick Menu
; you can set shortcuts here
for quick access to frequently used applications
and programs.
11 Contacts Add Contacts from your SIM and phone contact
lists to this handy “favorites” list.
12 Music Search for and play music files stored on your
phone.
No. Feature Description
23Connect to your PC and synchronize data
Alternatively, if you prefer a more
traditional appearance, you can
swipe your finger up or down the
screen to use the Icon Matrix.
Connect to your PC and
synchronize data
You can synchronize the data on your Acer M900DF Smart-
phone with the data on your PC using the supplied USB sync
cable and the Windows Vista Sync Center.
Refer to “Connect to a PC and install software“ on page 79 for
more details on connecting and synchronizing.

25Before making a call
Chapter 2: Making Calls
This chapter shows you how to make voice and video calls, and
the various options available to you during your call.
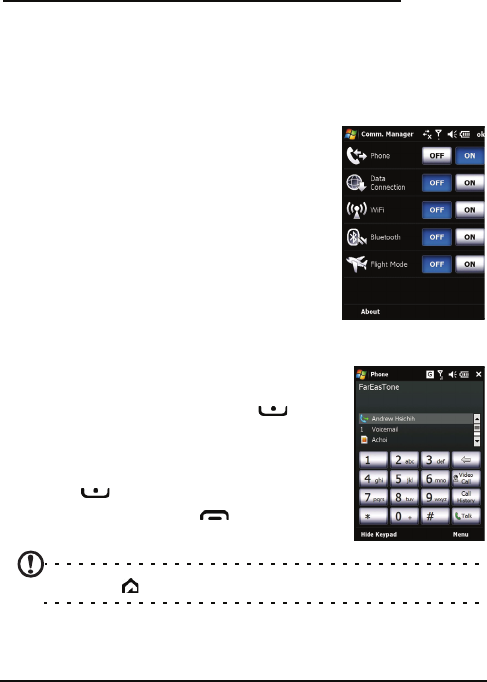
Before making a call
The phone function needs to be turned
on before you can make voice and video
calls; you can turn the phone on from the
Comm. Manager (refer to “Comm. Man-
ager” on page 66), or by pressing and
holding the End key.
1. To access the Comm. Manager, tap any
of the icons at the top of the screen or
Start > Settings > Connections tab >
Comm. Manager.
2. Tap the phone connection icon so it displays On.
Make a call
1. From the Home screen, press to
open the onscreen number pad to enter
the telephone number, or use the
embedded numeric keypad.
2. Press to make the call.
3. To end the call, press or tap End on
the call screen.
Note: Press to return to the Home screen from the call screen.
Acer M900DF Smartphone User Guide26
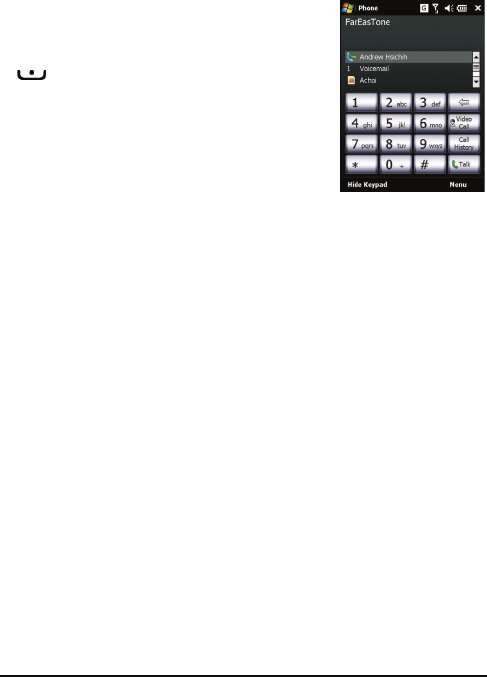
The onscreen number pad
The onscreen number pad allows you to
dial numbers with the stylus.
To access the onscreen number pad press
, the Talk/send button, or tap Start >
Phone.
Make a voice/video call
To make a call from your Acer M900DF
Smartphone you can dial the number
using the onscreen number pad or the
embedded numeric keypad. Please refer to “The embedded
numeric keypad“ on page 39.
Dial from the onscreen number pad
1. Enter the number you want to call by tapping the onscreen
number pad with the stylus.
2. Tap Talk (for voice calls) or Video Call (for video calls) to dial
the number.
Make a call to one of your contacts
1. Your contacts will be displayed above the onscreen number
pad.
2. Tap the contact you want to call. The contact’s details are
shown.
3. Tap the number you want to call.
27Make a voice/video call
Dial from the Speed Dial
Any contacts in your contact list will auto-
matically be added to your Speed Dial. Tap
Speed Dial beneath the Home screen and tap
the contact you wish to call. You can opt to
arrange numbers alphabetically or by the fre-
quency with which you call the numbers.
Swipe your finger up or down the screen to
scroll through the list of contacts or tap a let-
ter in the bar at the bottom of the page.
Dial a number from Call History
Your Call History is also displayed above the onscreen number
pad, and displays all received, dialed, and missed calls.
Tap a number to view the call details. To redial any number in
the call history, select the number and press or tap Call.
Missed calls will be displayed in the telephone icon on the
Home Page as well as at the top of the screen using the
icon.
Dial from other applications
You can dial numbers quickly and easily even when using
other applications.
1. Press Start > Phone.
2. Make your call.
3. When you have finished your call, tap X in the top right cor-
ner of the screen, to return to the application you were
using before you made the call.
Acer M900DF Smartphone User Guide28
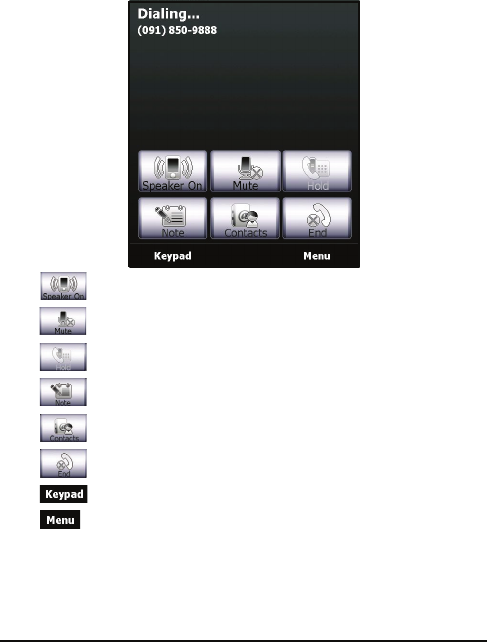
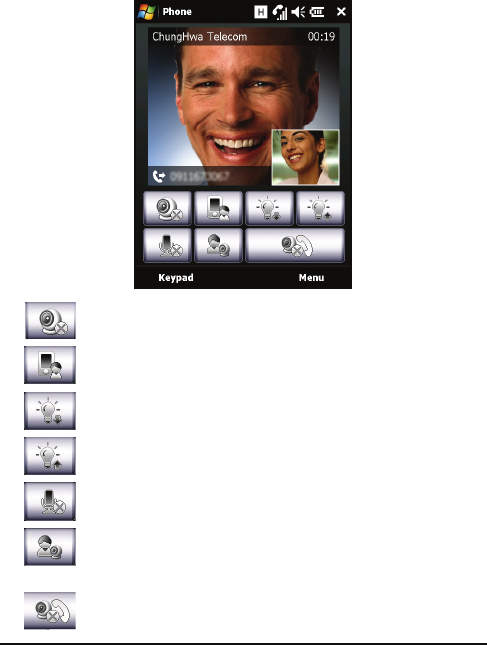
The voice call screen
Once you have dialed your number the voice call screen
appears, where several options are available.
Turn on the speakerphone.
Mute the call.
Put the current call on hold.
Add a note.
Tap to enter the contacts list.
End the call.
Display the keypad.
Open the menu.
29The voice call screen
The voice call/video call menu
Tap Menu on the voice call or video call screen to access the
menu. The menu options available are:
Note: Certain options are only available during a call. These menu
items are greyed out when not in a call.
Action Description
Hold Put the call on hold.
Mute/Unmute Mute/unmute the call.
Turn Speaker-
phone On/Off
Turn the speakerphone on/off.
Turn Hands-free
On/Off
Turn the handsfree feature on/off.
Conference Begin a conference call.
Paste Paste a copied number from the clipboard
into the number field on the voice call
screen.
Save to Contacts Save the entered number to contacts.
Create Note Create a note.
Call History Enter the call history screen.
Speed Dial Enter the speed dial directory.
Options Enter the phone settings screen.
Acer M900DF Smartphone User Guide30
The video call screen
There are also several options available on the video call
screen.
Turn the camera on or off.
Switch from the front camera to the back camera.
Decrease screen brightness.
Increase screen brightness.
Mute the call.
Change the image layout, make your or your con-
tact’s video the main picture, or view both videos
side-by-side.
End the call.
31Onscreen call options
Turn the camera on and off
You can turn the camera on and off at any time during a video
call.
To turn the camera on and off, tap the icon on the
video call screen.
Onscreen call options
Answer a call
Press or tap Answer to answer a call.
For incoming video calls, position your Acer M900DF Smart-
phone so your picture is shown clearly on the screen.
Reject a call
Press or tap Ignore to reject a call.
End a call
To end a call, press or tap End.
Put a call on hold
To put a call on hold, tap Hold on the voice call screen. Tap
again to resume the call.
Swap between calls
When you receive a second call while already on a call, a notifi-
cation message will appear.
1. Press to answer the incoming call and the first call will
be put on hold.
2. Tap Swap on the voice call screen to switch between calls.
Acer M900DF Smartphone User Guide32
Conference calls
If you have one or more calls on hold and another online, you
can combine all calls to create a conference call.
1. Tap Menu > Conference. All calls are combined.
2. To speak to selected participants privately during your con-
ference call, tap Menu > Private.
3. Select the participant you wish to talk to in private.
4. To resume the conference call, tap Menu > Conference.
Press or tap End and all participants will be disconnected.
Dial an international number
When dialing international numbers, there is no need to enter
the international direct dialing prefix (‘00’ etc.) before the
country code. Simply tap and hold +0 on the onscreen number
pad until + appears onscreen, or press + on the embedded
numeric keypad (<Fn> + <G>).
Warning: International call rates can vary greatly depending on the
country you are calling and your network provider. We suggest you
check all call rates with your network provider, to avoid excessive
phone bills. If you are using your Acer M900DF Smartphone
abroad, roaming charges will apply. Consult your network provider
for roaming rates specific to the country you are visiting before you
leave.
Use the speakerphone
The speakerphone function allows you to make calls without
having to hold the Acer M900DF Smartphone. This handsfree
function is especially useful when driving.
To activate the speakerphone, tap Speaker On on the voice call
screen. Tap Speaker Off to disable the speakerphone.
33Onscreen call options
Add notes
You can write or type notes during a call to record important
information and view it at a later date.
1. Tap Note on the voice call screen.
2. Use the onscreen keyboard to enter letters and characters
or the stylus to write handwritten notes.
3. Tap OK when you have finished to save the note.
To view the notes at a later date, tap Start > Programs > Notes.
Tap the note you want to open and view.
Mute a call
To mute a call, tap Mute on the voice call screen or on
the video call screen to switch off the microphone. Tap
Unmute or to switch the microphone back on.
Save a dialed number to contacts
You can save a number you have dialed to your contacts for
future use.
1. Select the number from the Call History list, and tap Save.
2. Enter the contact’s information and tap OK to save.
Redial a missed call
When you have a missed call, the icon appears at the top of
the Home screen, while the phone icon will display the number
of missed calls.
1. Tap View to display the missed call details.
2. Select the call from the list and press or tap Call.

Acer M900DF Smartphone User Guide34
Speed dial
Tap Speed Dial at the bottom of the Home Screen to view all
your contacts as tiles indicating the contact name and number.
You can sort the tiles alphabetically or by the frequency with
which you have dialed the numbers. Tap a tile to immediately
dial that contact.
Call History
View recent calls by accessing Call History: open the onscreen
number pad by pressing ; then tapping Call History.
Call History Menu options
There are various options available in the Call History Menu.
•Tap Filter to organize the call history view. For exam-
ple, tap Filter > Missed and only missed calls will be
displayed.
•Tap Delete All Calls to delete all calls from the call his-
tory list.

35The stylus
Chapter 3: Input
Devices
This section will take you through the various input methods
available to you on your Acer M900DF Smartphone.
The stylus
The stylus is used to select items and enter information.
On your Acer M900DF Smartphone, the stylus replaces the
mouse. Carefully remove the stylus from its holder to use.
Tap: Touch the screen once with the stylus to open items and
select options.
Drag: Hold the stylus on the screen and drag across the screen
to select text and images. Drag on a scroll bar to scroll up and
down the screen.
Tap and hold: Tap and hold the stylus on an item to see a list
of actions available for that item. On the pop-up menu that
appears, tap the action you want to perform.
The stylus is also used for handwritten input. Refer to “The
onscreen keyboard” on page 37 for more details.
The fingerprint reader
The fingerprint reader can be used to navigate up, down, left
and right through screens and menu by sliding your finger up,
down, left to right on the reader. Tap the fingerprint reader to
select menu entries and execute shortcut icons.
Acer M900DF Smartphone User Guide36
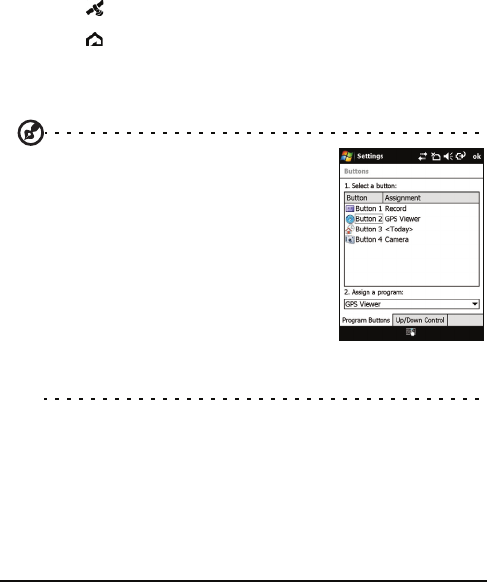
The application buttons
The buttons are set to access the following applications by
default:
Button 1 - Voice Commander or Record; press and hold to
launch the Notes function
Button 2 - GPS Viewer
Button 3 - Home screen
Button 4 - Camera
We recommend that you use these defaults whenever possible.
Tip: The four application buttons listed
above can be configured to launch
applications that you use the most.
To configure which applications to launch
with each button, tap Start > Settings >
Buttons.
Select the button you wish to configure
from the list, then select the program to
assign to the button from the drop-down
list below.
Tap OK to confirm and save.
As the buttons have icons printed on
them, Acer strongly recommends retaining the default settings.
This avoids confusion when using your Acer M900DF Smartphone.
37The onscreen keyboard
The onscreen keyboard
You can activate an onscreen keyboard in
certain applications when entering data.
Tap the keyboard icon at the bottom of
the screen to display the keyboard. Tap
again to hide the keyboard.
Tap the arrow next to the keyboard
symbol to select different input options.
Note: The handwriting function can take some practice getting
used to. Tap the ? symbol, visible when one of the handwriting
options (*) is active, to view writing demonstrations and access the
Help menus.
Tap Options from the keyboard menu to adjust options and
settings for each input mode.
Mode Description
Block Recognizer* Write using letters, numbers, symbols and punc-
tuation marks to be converted to text.
Keyboard (Default) Displays a standard keyboard. Tap to enter
letters, numbers and use function keys.
Letter Recognizer* Write uppercase letters, lowercase letters,
numbers and punctuation marks to be converted
into text.
Symbols Displays all symbols and special characters.
Transcriber* Use the stylus to write in cursive, mixed or print
handwriting to be converted into text.
Acer M900DF Smartphone User Guide38
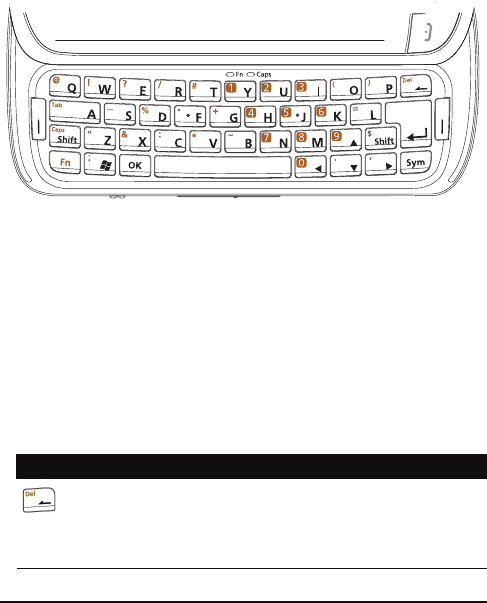
The QWERTY keyboard
Your Acer M900DF Smartphone features a 39/41-key QWERTY
keyboard which offers all functions of a regular keyboard in a
compact and ergonomic design.
Your Acer M900DF Smartphone has a key layout similar to
your desktop or notebook computer for greater ease of use.
Your Acer M900DF Smartphone keyboard also has an embed-
ded numeric keypad (highlighted in orange) for entering num-
ber data or dialing phone numbers.
Furthermore, keys that are not part of the embedded numeric
keypad can be used to enter symbols (marked in orange),
symbols are entered by pressing <Fn>, and then pressing the
key with the desired symbol printed on it. Certain keys have
specific functions, as indicated in the table below.
Key Name Description
Backspace Press to delete a character to the left of the cur-
sor or a highlighted block of characters.
Press <Fn> and then this key to delete the charac-
ter to the right of the cursor.
39The QWERTY keyboard
The embedded numeric keypad
The keyboard of your Acer M900DF Smartphone features an
embedded numeric keypad. The numbers are printed on the
keys in an orange background. To use the keypad, press the
<
Fn
> key twice to illuminate the blue
Fn
LED and then press the
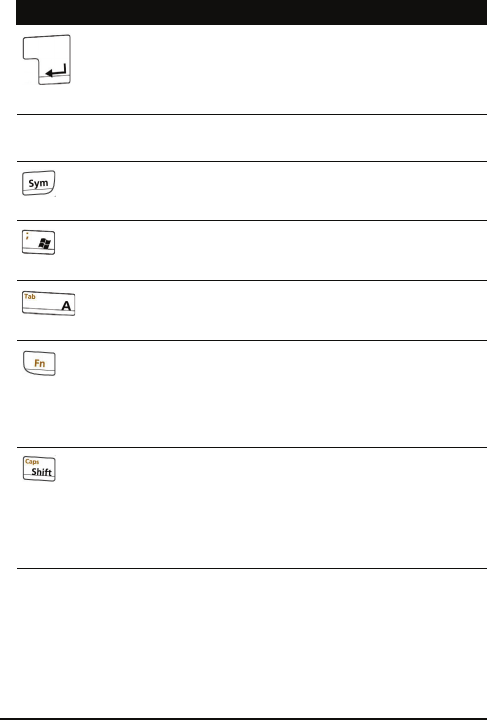
Enter Press to move to the next line when entering text
or numbers or to enter commands.
Press to begin a voice call after entering the
phone number.
Space bar Press to enter a space.
Symbol Type a character, then press this key to add a sym-
bol, such as an accent, to the character.
Windows Press to bring up the Windows Start menu, press
twice to return to the Today screen.
Tab Press to insert a tab, or to jump to the next field
or item (if supported by the application).
Function Press to activate the numeric keypad and other
special key characters (marked in orange).
Press twice to enter persistent numeric/symbol
mode (the blue
Fn
LED at the top of the keyboard
will light up). Press twice to return to text mode.
Shift/Caps
lock
Press once and the next character to be entered
will be uppercase.
Press twice to enter persistent numeric/symbol
mode (the blue
Caps
LED at the top of the key-
board will light up). Press twice to return to text
mode.
Key Name Description

Acer M900DF Smartphone User Guide40
corresponding keys to enter numbers. To enter a single number
in a line of text, press the <
Fn
> key once and press the key with
the number you want to enter (the LED will not light up).
The symbol key
The symbol key allows you to add symbols, such as accents, to
the characters you enter. Enter the character and then press
the Sym key to progress through the available alternatives.
Configure input settings
You can change the default input method when using the
onscreen keyboard.
1. Tap Start > Settings > Personal tab > Input > Input Method
tab.
2. Select the input method you prefer from the list.
3. When certain modes are selected further options are avail-
able. In these cases, tap Options to view further settings.
4. Tap OK to confirm and save.
Enable word completion
Your Acer M900DF Smartphone makes writing emails, mes-
sages and documents more efficient with the help of the word
completion feature. This feature suggests words as you type.
1. Tap Start > Settings > Personal tab > Input >Word
Completion tab.
2. Select the options you want to activate.
3. Tap OK to confirm and save.

41The QWERTY keyboard
Other input options
You can also configure voice recording options, zoom levels
and grammar rules on the Input Settings screen.
1. Tap Start > Settings > Personal tab > Input > Options tab.
2. Select and configure the settings as appropriate.
3. Tap OK to confirm and save.
Note: Refer to the Help menus for more information on adjusting
input settings.

43The messaging screen
Chapter 4: Messaging
This chapter shows you how to set up and use the SMS, MMS
and email functions of your Acer M900DF Smartphone.
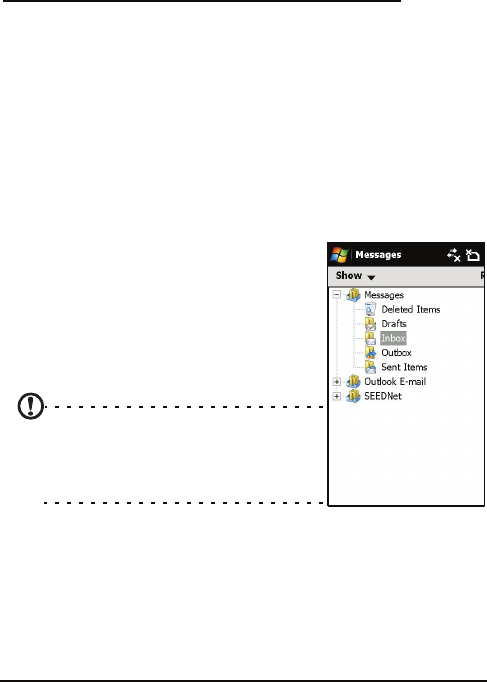
The messaging screen
All SMS, MMS and email messages are accessed via the messag-
ing screen.
To access the messaging screen, tap Start > Messaging > Mes-
sages. Then tap the drop-down menu in the top left corner of
the messaging screen to view the folder list.
All email accounts, SMS and MMS fold-
ers are displayed here. Tap on the plus
sign next to each folder to view the sub
folder list. Each folder features the fol-
lowing subfolders:
• Deleted Items: Displays all messages
you have selected to delete.
Note: To completely erase messages, you
will need to delete them from the
Deleted Items folders as well. Tap Menu
> Tools > Empty Deleted Items to accom-
plish this.
• Drafts: Displays all draft messages.
• Inbox: Displays all received messages.
• Outbox: Displays messages in the process of being
sent.
• Sent Items: Displays all sent messages.
Acer M900DF Smartphone User Guide44
Tap a subfolder to open it. Tap Inbox to return to the main
messaging screen. Tap Menu for a list of options appropriate
to the selected folder.
Manage your folders
You can select synchronization, download and other settings
for certain folders. To manage your folders, tap Menu > Tools
> Manage Folders, tap and hold on the folder name to open a
menu of action items. Tap Folder Options to open and modify
the settings for that folder.
Text (SMS) messages
You can use your Acer M900DF Smartphone to send text mes-
sages to other mobile phones. Each text message can contain
up to 160 characters.
Create and send text messages
1. Tap Start > Messaging > Messages. Then tap the drop-down
menu in the top left corner of the messaging screen.
2. Tap the Messages folder and the Inbox appears.
3. Tap New. The message window appears.
4. Select a recipient and enter your message then tap Send.
Tip: You can request delivery notification to ensure that your mes-
sage has reached its recipient. To do this, tap Menu > Tools >
Options > Accounts tab from the Text Messages folder. Tap Text
Messages and check the Request delivery notifications checkbox.
Reply to text messages
When a new text message arrives a message icon appears at
the top of the Home screen and a notification message is
displayed.

45MMS messages
1. Tap Start > Messaging > Messages. Then tap the drop-down
menu in the top left corner of the messaging screen.
2. Tap the Text Messages folder and the Inbox appears.
3. Tap a message to open it.
4. Tap Reply to reply to the message and the message window
appears.
5. Enter your message and tap Send.
Sort text messages
You can sort your text messages by message type, sender,
received messages and message subject.
Tap the Sort by drop-down menu in the top-right of the mes-
saging screen, and select an option from the list.
MMS messages
MMS messages are similar to text messages but also allow you
to attach multimedia files such as pictures, audio or video clips.
Each MMS message can be up to 300 kB in size.
Set up MMS messaging
Before you can send MMS messages, you have to set up a con-
nection and profile. Ask your network provider for the infor-
mation required to complete the setup procedure.
1. Tap Start > Settings > Connections tab > Connections.
2. Tap Add a new modem connection under the My ISP
section.
3. The Make New Connection screen appears.
4. Enter a name for the connection.
5. Select Cellular Line (GPRS) from the Select a modem list and
tap Next.
6. Enter the access point name provided by your network
provider.
Acer M900DF Smartphone User Guide46
7. Enter your user name, password and domain.
8. Tap Finish to save and complete setup.
Set up MMS profiles
You can select and configure several MMS messaging profiles
for different networks and environments.
1. Tap Start > Messaging > Messages, then tap the drop-down
menu in the top left corner of the messaging screen.
2. Tap the Messages folder and the Inbox appears.
3. Tap Menu > MMS Settings > MMS Settings tab.
4. Tap a profile from the list. Tap Edit to view the selected
profile settings.
5. Tap each field to adjust its setting. These fields should be
automatically configured by your network provider. If so,
we recommend you leave them as they are.
6. Tap Done once you have finished editing the profile.
7. Tap Select to select the profile from the list and tap OK.
Note: For further information on options available to you when
editing or creating MMS profiles, refer to the Help menus.
Create MMS messages
1. Tap Start > Messaging > Messages. Then tap the drop-down
menu in the top left corner of the messaging screen.
2. Tap the Messages folder and the Inbox appears.
3. Tap New and the message window appears.
4. Enter the recipient (along with other recipients in the Cc
and Bcc fields if necessary) and subject of the MMS.
5. To attach a picture or video clip, tap Insert Picture/Video...
and select the file you want to attach.
47MMS messages
6. To attach an audio file, tap Insert Audio... and select the file
you want to attach. The audio file will be displayed in the
message.
7. To insert text, tap Insert Text and enter your message.
All attachments and text will now be displayed in the mes-
sage window.
8. Tap Send.
Reply to MMS messages
When a new MMS message arrives, a message icon appears at
the top of the Home screen and a notification message is
displayed.
1. Tap Start > Messaging > Messages, then tap the drop-down
menu in the top left corner of the messaging screen.
2. Tap the Messages folder and the Inbox appears.
3. Tap a message to open it.
4. Tap Menu > Reply to reply to the message. The message
window will appear.
5. Follow the steps described in “Create MMS messages” on
page 46 to compose your reply.
6. Tap Send.
Sort MMS messages
You can sort your MMS messages by message type, sender,
received messages and message subject.
Tap the Sort by drop-down menu in the top-right of the mes-
saging screen, and select an option from the list.
Note: For further information on options available to you when
creating, replying to and sorting SMS and MMS messages, refer to
the Help menus.
Acer M900DF Smartphone User Guide48
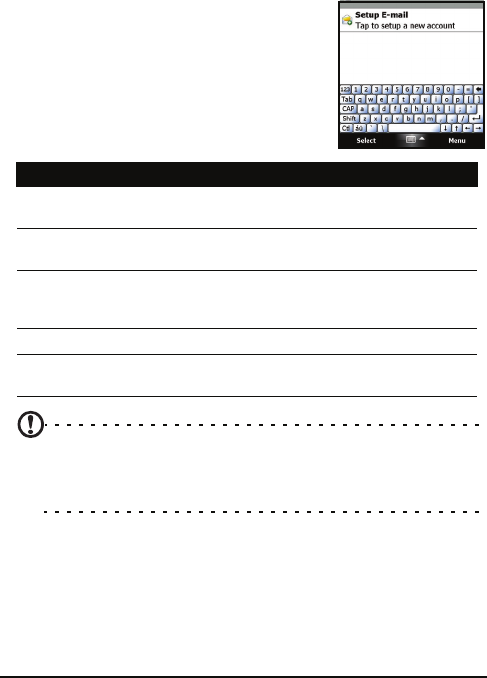
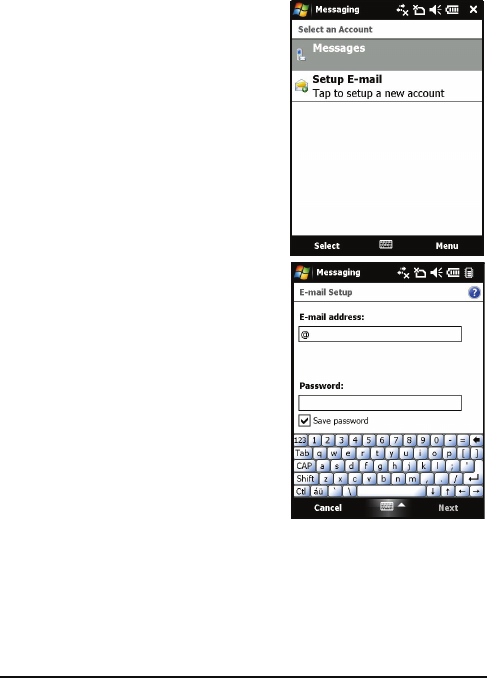
Email
Your Acer M900DF Smartphone
uses Outlook Mobile to manage
email accounts. Tap Start > Mes-
saging to open the messaging win-
dow. Tap Setup E-mail to set up
your email account.
Enter your email address and pass-
word to set up the account. Select
if you want to save your password
or not.
When you’ve finished entering the
information, tap Next. Your Acer
M900DF Smartphone has pre-set
definitions for a variety of popular
ISPs and will recommend settings
if your email address is recognized.
Otherwise your Acer M900DF
Smartphone will try to connect to
the Internet to find the settings.
49The Home screen
Chapter 5: Home
Screen Overview
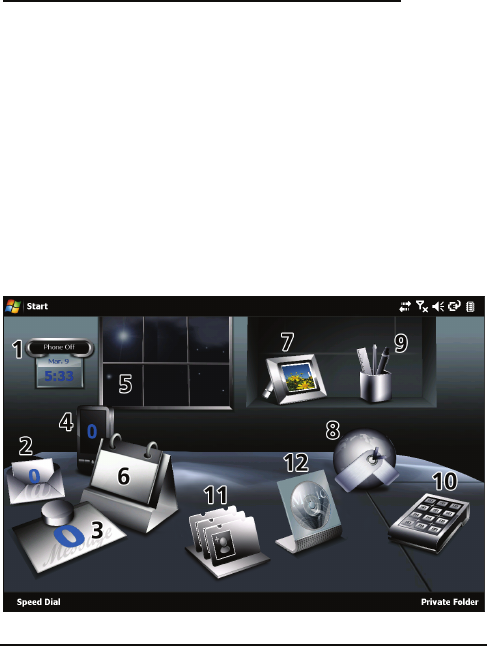
The Home screen
When you switch on your Acer M900DF Smartphone, the
Home screen appears following boot up.
The Home screen is the main point from which you can
navigate your Acer M900DF Smartphone. The screen features
connection status information, displays the date and time, and
features a set of shortcut icons that help you to access the most
frequently used applications quickly and easily.
In the Acer 3D view, scroll from side to side by dragging your
finger or stylus to the left or right (only part of the screen will
be visible at any time) to reveal more icons.
Acer M900DF Smartphone User Guide50
Tap an icon to launch the following features:
You can add or remove icons by tapping
and holding anywhere on the Acer 3D
view. This will reveal a tab that you can
tap and drag up to show additional func-
tions. Tap and drag icons between the
desktop and the tab to add or remove
them. You can also move the icons on the
desktop while the tab is visible.
No. Feature Description
1 Clock View your set locations on the globe.
2 Email Launch the email application; also indicates any
unread mails.
3 Messages Launch the messaging application; also indicates
any unread messages.
4 Calls Open the list of recently dialed numbers, missed
calls.
5 Weather View local weather forecasts for your set loca-
tions.
6 Calendar Open your calendar to view upcoming appoint-
ments.
7 Pictures View content in
My pictures
as a slideshow.
8 Bookmarks Open your
Favorites
folder.
9 Settings Open the toolkit to customize your Acer M900DF
Smartphone.
10 Programs Open the
Quick Menu
; you can set shortcuts here
for quick access to frequently used applications
and programs.
11 Contacts Add Contacts from your SIM and phone contact
lists to this handy “favorites” list.
12 Music Search for and play music files stored on your
phone.

51The Home screen
Status icons
Icon Description Icon Description
New email, SMS or
MMS
Missed call or calls
WLAN access available Telephone call
connected
WLAN connected Call is being forwarded
Connected to PC via
USB
Call is on hold
Signal strength System sounds on
No signal Vibrate only, no system
sounds
Antenna off (tele-
phone is off)
All system sounds off
No phone service Battery charge
indicator
Incoming telephone call Low battery warning
GPRS available Battery is charging
3G network available 3G connected
GPRS connected Bluetooth headset
connected
EDGE available Synchronizing over
EDGE
EDGE connected HSDPA/HSUPA network
available
Acer M900DF Smartphone User Guide52
Return to the Home screen
You can return to the Home screen from any application by
tapping Start > Today or pressing the button.
Customize basic settings
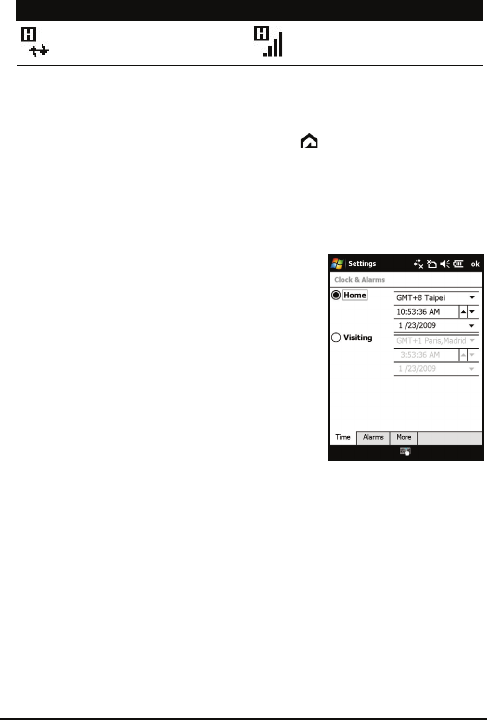
Set the date and time
To set the date and time, tap Start >
Settings > System tab > Clock & Alarms
> Time tab.
Tap Home and select your time zone
from the drop-down menu. Set the time
by tapping the up and down arrows.
Select the date from the drop-down cal-
endar.
When you have finished, tap OK. A con-
firmation message will appear. Tap Yes
to save your settings.
Personalize your Acer M900DF
Smartphone
You can enter your personal information to easily identify
your Acer M900DF Smartphone. This is especially useful if it
should ever be lost or stolen. To enter owner information, tap
Start > Settings > Owner Information.
Synchronizing over
HSDPA/HSUPA
HSDPA/HSUPA
connected
Icon Description Icon Description
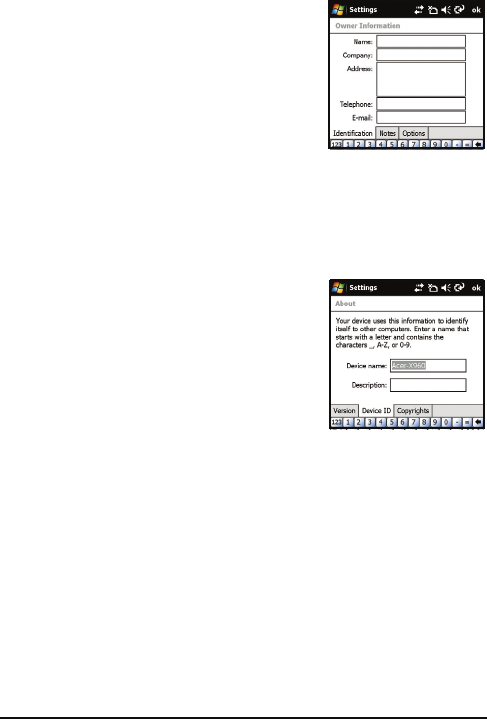
53Customize basic settings
Enter your name along with any other
information you want to store.
Tap the Notes tab to add any
additional notes.
Tap the Options tab to configure how
this information is displayed.
Tap OK to confirm and save.
Name your Acer M900DF Smartphone
Your Acer M900DF Smartphone uses a name to identify itself
when connected to other computers. To specify a name, tap
Start > Settings > System tab > About > Device ID.
Enter a name for your device. Add a
description if necessary.
Tap OK to confirm and save.

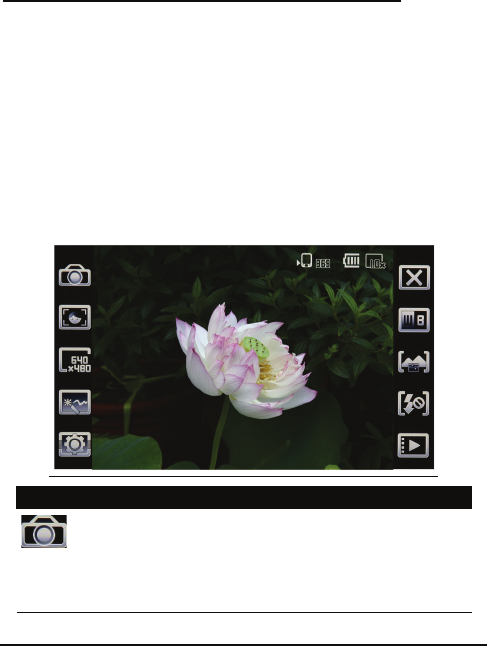
55Camera icons and indicators
Chapter 6: Using the
Camera
Your Acer M900DF Smartphone features two cameras, a 300K
pixel VGA camera mounted on the front of the unit, and a 5-
megapixel digital camera mounted on the rear. This section
will take you through all the steps to get you up and taking
photos and videos with your Acer M900DF Smartphone.
To activate the camera, press the camera button or go to Start
> Programs > Multimedia > Camera.
Camera icons and indicators
Icon Description
Adjust the camera mode.
• Photo - Take a photograph.
• Video - Shoot a video.
• Continuous 3/5/9 - Take three, five or nine
photos in a burst (select the number of photos
by tapping the icon repeatedly).
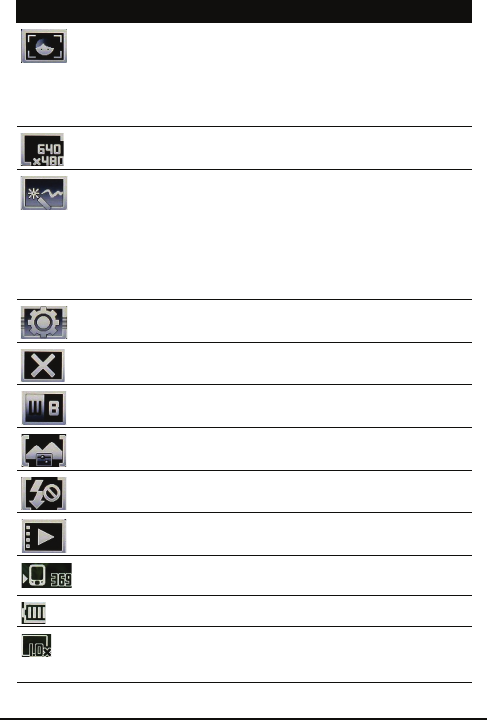
Acer M900DF Smartphone User Guide56
Adjust the camera focus mode.
• Central Focus - Focus on the item in the center
of the frame.
• Face Detection - Detect and focus on faces.
• Multi-zone - Focus using multiple reference
points.
Adjust the image resolution.
Apply an effect to photos taken:
• Normal - No effect is applied.
• Greyscale - Takes black and white photos.
• Negative - Uses negative colors when taking
the photo.
• Sepia - The photo is given a Sepia appearance.
• Mirror - The object is mirrored.
Enter the advanced settings page.
Exit and return to the previous screen.
Set the white-balance mode.
Set the best settings for the type of subject you’re
photographing.
Turn the flash on or off, or set it to Auto; turn the
spotlight on or off.
Open the album to view thumbnails of stored pictures
and videos.
Displays the storage being used and approximately
how many photos you can still take.
Displays the battery charge status.
Displays the current magnification. Slide your finger
from side-to-side across the fingerprint reader to adjust
magnification.
Icon Description
57Take a photo
Take a photo
1. Frame your subject and steady your Acer M900DF Smart-
phone.
2. Adjust any settings you require, such as brightness and
scene mode. To zoom in or out slide your finger from side-
to-side across the fingerprint reader.
3. Press the camera button down halfway until the image
comes into focus. Push down fully to take the photo.
Shoot a video
1. Frame your subject and steady your Acer M900DF
Smartphone.
2. Press the camera button down fully to begin recording.
3. Press the camera button down fully to stop recording.
Supported formats
The following file formats are supported:
Save photos and videos to a micro SD
card
Tap Start > File Explorer > My Documents > My Pictures (or My
Videos). Tap and hold on the file you want to save to your
micro SD card, select Copy or Cut from the pop-up menu.
Navigate to your micro SD card in File Explorer, tap and hold in
the folder you want to save the image/video to, and select
Paste from the pop-up menu.
Type Formats
Image JPEG and BMP
Video 3GP
Acer M900DF Smartphone User Guide58
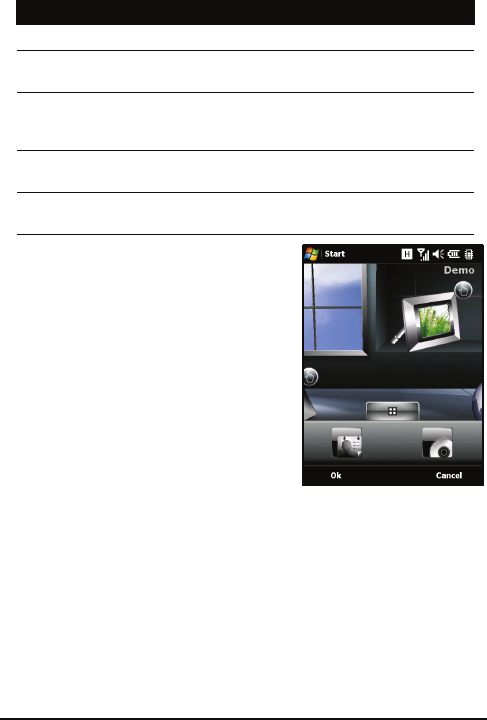
Photo and video options
After you have taken your photo or video, it is automatically
saved.
Note: The default locations for saving photos and videos are My
Documents/My Pictures and My Documents/My Videos respectively.
This can be changed from the Settings page.
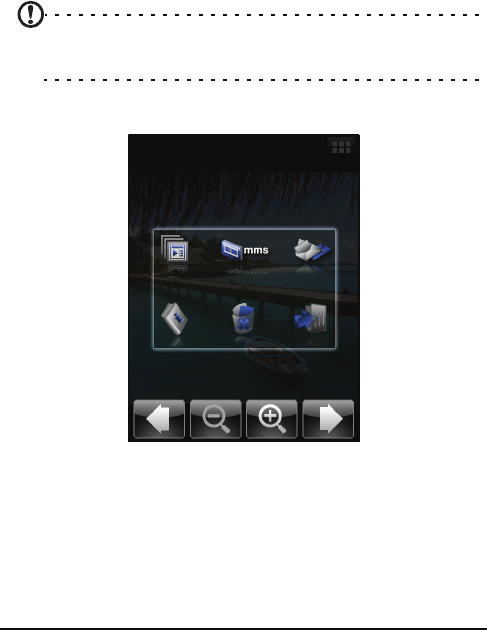
Tap the Album icon and select a photo to view. Tap the photo
to display the option icons.
From this interface, you can start a slideshow with all the pic-
tures in the folder, send the current picture to a contact as an
MMS or email message, view the picture’s information, delete
the picture or return to the thumbnail view.
You can also zoom into the picture or zoom out and navigate
to the previous or following file.

59Photo and video options
Edit photos
You can crop or rotate your saved photos.
1. Tap Start > Programs > Pictures & Videos.
2. All your photos and videos are displayed as thumbnails.
Select a photo to edit.
3. Tap Menu to view the list of editing options.
