Advance Security R44 Car Alarm Receiver User Manual
Advance Security Inc Car Alarm Receiver
Users Manual

APRIL/18/2004
1
MKE - 400
14 PIN PLUG:
7. Black / White Wire: (-) 200mA Channel 3 Output
8. Yellow Wire: To Ignition Switched +12V
9. Red Wire: To Vehicle’s +12V Constant Power
2. White / Black Wire: (+) 10A Porch Light Relay Output
12. Green Wire: (+) 200mA Vehicle’s Door Lock Output
13. Blue / White Wire: (+) 200mA Cargo’s Door Unlock Output
11. Green / White Wire: (+) 200mA Vehicle’s Door Unlock Output
3. Brown Wire: (+) 10A Dome Light Relay Output
5. Violet Wire: (+) 200mA Channel 5 Output
6. Orange Wire: (-) 200mA Channel 4 Output
14. Blue Wire: (+) 200mA Cargo’s Door Lock Output
4. White Wire: (+) 10A Parking Light Relay Output
10. Red / White Wire: To RV’s +12V Constant Power
1. Black Wire: Ground to Vehicle Frame.
APRIL/18/2004
2
PROGRAMMING
A. 3- BUTTON TRANSMITTER PROGRAMMING:
Note: This mode will only retain the last 4 remote transmitters programmed. If the transmitter memory is
exceeded, the security system will start deleting transmitters from memory in chronological order.
1. Turn the Ignition 'switch to ‘ON’ position. Within 15 seconds.
2. Push the Program switch 3 times, the on board LED will flashing and the beeper will emit a long chirp to
indicate the system in the Transmitter programming mode.
3. Press and hold any button of the transmitter until the on board LED turns On for 2 seconds and the
beeper responds with a confirming chirp, indicating the signal has been stored into memory.
4. If you have additional transmitters (up to 4) that need to be programmed, repeat step 3 for each
transmitter.
Exit: Turn Ignition to 'OFF' position, or leave it for 15 seconds. The on board LED turns Off and the beeper
will emit 3 long chirps to confirm exit.
B. 4- BUTTON TRANSMITTERS PROGRAMMING:
Note: This mode will only retain the last 4 remote transmitters programmed. If the transmitter memory is
exceeded, the security system will start deleting transmitters from memory in chronological order.
1. Turn the Ignition 'switch to ‘ON’ position. Within 15 seconds.
2. Push the Program switch 5 times, the on board LED will flashing and the beeper will emit a long chirp to
indicate the system in the Transmitter programming mode.
3. Press and hold any button of the transmitter until the on board LED turns On for 2 seconds and the
beeper responds with a confirming chirp, indicating the signal has been stored into memory.
4. If you have additional transmitters (up to 4) that need to be programmed, repeat step 3 for each
transmitter.
Exit: Turn Ignition to 'OFF' position, or leave it for 15 seconds. The on board LED turns Off and the beeper
will emit 3 long chirps to confirm exit.
C. FEATURES PROGRAMMING:
1. Turn the Ignition 'switch to ‘OFF’ position. Within 15 seconds.
2. Push the Program switch 7 times, the on board LED wills Turns On constantly and the beeper will emit a
long chirp to indicate the system in the Feature programming mode.
3. Press and release the transmitter button ‘A’ corresponding to the feature ‘A’ you want to change.
- The beeps from beeper and the on board LED pause will indicate previously setting.
4. Depress the transmitter button ‘A’ again to change the feature again. Simple keep re-depressing the
transmitter button ‘A’ again until the module advances to your desired setting.
5. Depress the transmitter button ‘B’ corresponding to the feature ‘B’ you wants to program.
Press Transmitter Button or
keypad One Beep / LED one pause
Factory Default Setting
Two Beeps / LED Two pauses
Press Button on the
transmitter or
Press and hold the “1/2” Key on
the keypad for 3 seconds
Channel 3 Output = Momentary
output Channel 3 Output = Latched
output
Press Button on the
transmitter or
Press and hold the “3/4” Key on
the keypad for 3 seconds
Channel 4 Output = Momentary
output Channel 4 Output = Latched
output
Press Button on the 3
button transmitter or
Press Button on the 4
button transmitter or
Press and hold the “5/6” Key on
the keypad for 3 seconds
Channel 5 Output = Momentary
output
Channel 5 Output = Latched
output
Exit: Turn Ignition to 'ON' position or Press the “LOCK” button 1 seconds on the key pad or leave it for 15
seconds. The beeper will emit 3 long chirps and the on board led will turns Off to confirm exit.
APRIL/18/2004
3
D. ALL CODES BACK TO DEFAULT:
1 Enter the “MAGNADYNE Master Code” (7352000) on the keypad; the beeper will emit a long chirp to
confirm the correct code was entered.
2 Press the “LOCK” key on the keypad and holding in for 5 seconds until five beeps is hearing then
release the “LOCK” key
3 The system will re-program all codes back to default. (Default dealer code is 12345 and user code is
54321)
E. RE-PROGRAM THE DEALER CODE: Default Dealer Code is 12345
1. Enter the “Dealer Code” on the keypad; the beeper will emit a long chirp to confirm the correct code was
entered.
2. Press the “LOCK” key on the keypad and holding in for 2 seconds until five beeps is hearing then release
the “LOCK” key.
3. Enter the new 4 – 6 digit dealer codes on the keypad. (The dealer code can be 4, 5 or 6 digits.)
4. Finish by press the “LOCK” key on the keypad one long beep with 2 short beeps to confirm the new
dealer code has been stored into memory and the all user code was back to default setting (Default user
code is 54321).
Exit: If 15 seconds of inactivity expire during of above steps, the unit will revert back to the last successfully
stored code. 3 long beep to confirm exit.
F. PROGRAM THE USER CODE: Default Dealer Code is 54321
Note: This mode will only retain the last 4 “user code” programmed. If the “user code” memory is exceeded,
the system will start deleting “user code” from memory in chronological order.
1. Enter the “Dealer Code” on the keypad; the beeper will emit a long chirp to confirm the correct code was
entered.
2. Enter the new 4 – 6 digit user codes on the keypad. (The user code can be 4, 5 or 6 digits.)
3. Finish by press the “LOCK” key on the keypad one long beep with 2 short beeps to confirm the new
dealer code has been stored into memory.
4. If you have additional user code (up to 4) that needs to be programmed, repeat step 2 and 3 for each new
user code.
Exit: Press and hold the “LOCK” key for 1 seconds or If 15 seconds of inactivity expire during of above
steps, the unit will revert back to the last successfully stored code. 3 long beep to confirm exit.
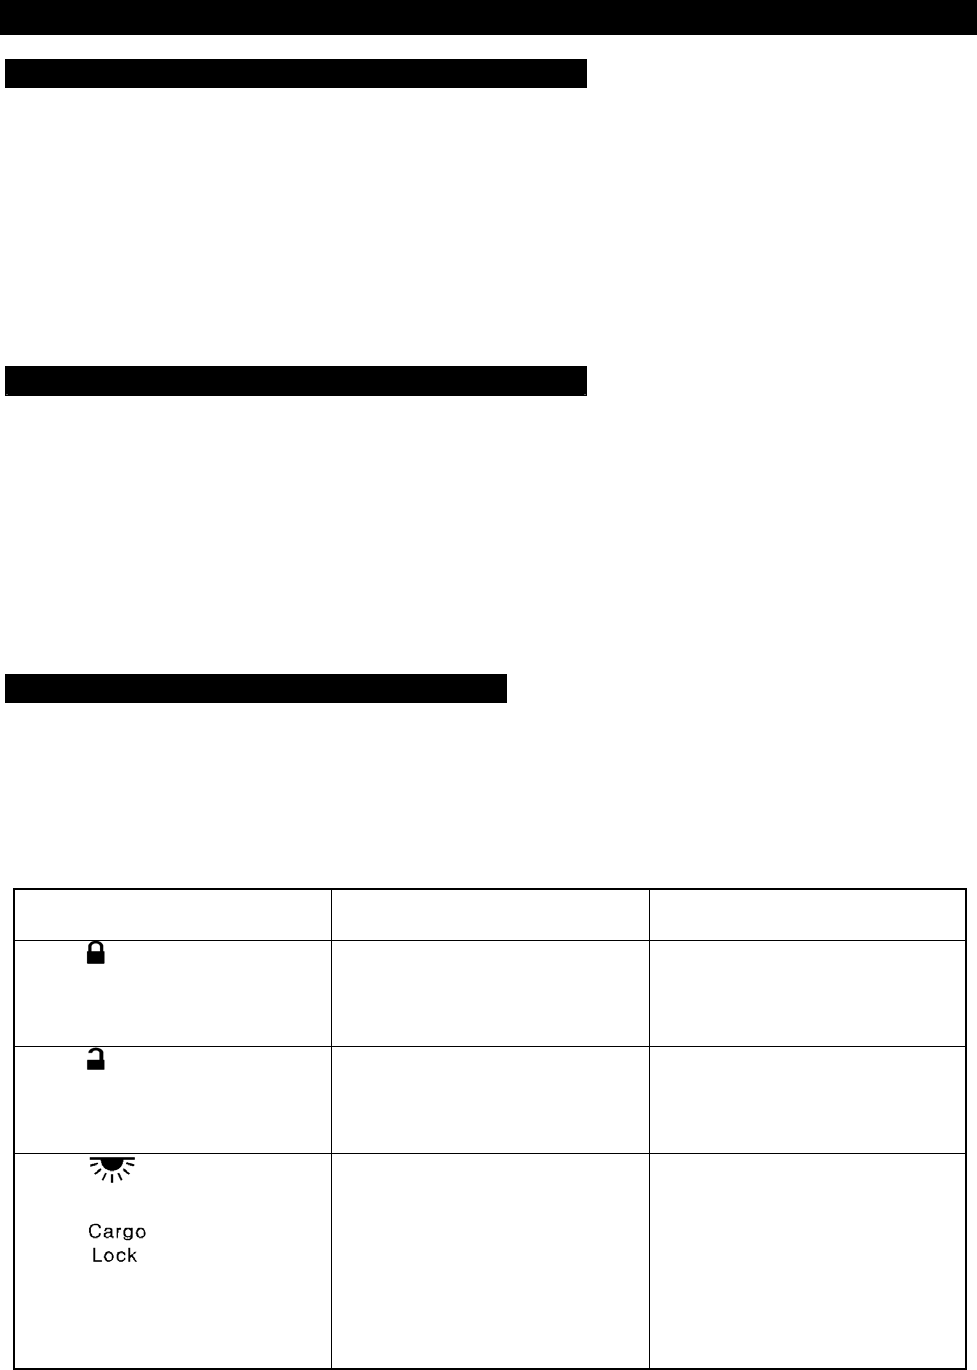
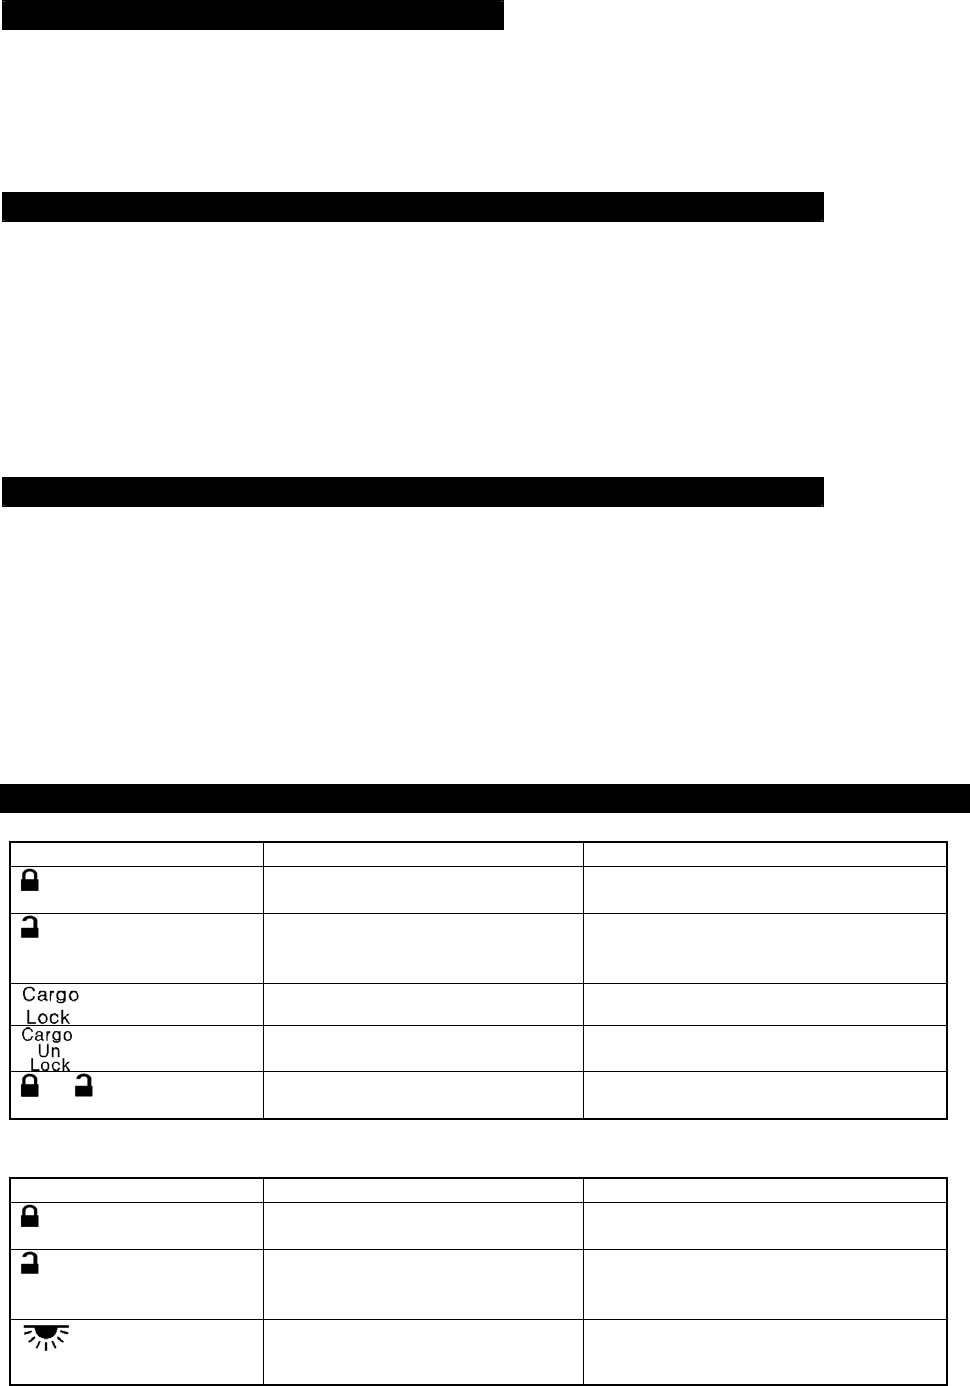
OPERATION:
A. 4-BUTTON TRANSMITTER OPERATION:
Transmitter Button System Function Remark
Lock The Vehicle’s Doors and
Cargo Door Parking light one flash.
Unlock The Vehicle’s Doors 1. Parking light two flashes.
2. Dome light turns on for 30 seconds
3. Porch light turns on for 30 seconds
Lock The Cargo Door
Unlock The Cargo Door
+ Turns On the Porch Light for 30
seconds or Turns it Off Upon Vehicle’s Door Unlock
B. 3-BUTTON TRANSMITTER OPERATION:
Transmitter Button System Function Remark
Lock The Vehicle’s Doors and
Cargo Door Parking light one flash.
Unlock The Vehicle’s Doors 1. Parking light two flashes.
2. Dome light turns on for 30 seconds
3. Porch light turns on for 30 seconds
Turns On the Porch Light for 30
seconds or Turns it Off
Upon Vehicle’s Door Unlock

APRIL/18/2004
4
C. KEYPAD OPERATION:
KEYPAD System Function Remark
Press “LOCK” key. Lock The Vehicle’s Doors and
Cargo Door Parking light one flash.
Key in the “User Code“. Unlock The Vehicle’s Doors 1. Parking light two flashes.
2. Dome light turns on for 30 seconds
3. Porch light turns on for 30 seconds
Press and hold “1/2“ key
for 3 seconds Lock or Unlock The Cargo Door Upon Vehicle’s Door Unlock
Press and hold “3/4“ key
for 3 seconds Turns On the Porch Light for 30
seconds or Turns it Off Upon Vehicle’s Door Unlock
Key in the “User Code“
first then press “5/6“ key
within 5 seconds
Activate the Channel 3 output
Key in the “User Code“
first then press “7/8“ key
within 5 seconds
Activate the Channel 4 output
Key in the “User Code“
first then press “9/0“ key
within 5 seconds
Activate the Channel 5 output
Note: Turn On the ignition switch or “lock” the vehicle’s door will turn off the dome light.
This device complies with part 15 of the FCC rules. Operation is subject to the following two conditions.
1) This device may not cause harmful interference, and
2) This device must accept any interference received, including interference that may cause undesired
operation.
Per FCC 15.21, you are cautioned that changes or modifications not expressly approved by the part
responsible for compliance could void the user’s authority to operate the equipment.