Alien Technology ATRM900F01 RFID Reader User Manual ALH 900x Users Guide
Alien Technology, LLC RFID Reader ALH 900x Users Guide
Contents
- 1. Users Manual
- 2. Quickstart
- 3. Users Guide
Users Guide
ALIEN TECHNOLOGY®
ALH-9000
ALH-9001
USER’S GUIDE
02/06/12
ALH-9000
ALH-9001
ALH-9000 EMA
ALH-9001 EMA

Legal Notices
Copyright ©2012 Alien Technology Corporation. All rights reserved.
Alien Technology Corporation has intellectual property rights relating to technology embodied in the products described in this
document, including without limitation certain patents or patent pending applications in the U.S. or other countries.
This document and the products to which it pertains are distributed under licenses restricting their use, copying, distribution and
decompilation. No part of this product documentation may be reproduced in any form or by any means without the prior written consent
of Alien Technology Corporation and its licensors, if any. Third party software is copyrighted and licensed from Licensors. Alien, Alien
Technology, the Alien logo, Nanoblock, FSA, Gen2Ready, Squiggle, the Squiggle logo, Nanoscanner and other graphics, logos, and
service names used in this document are trademarks of Alien Technology Corporation in the U.S. and other countries. All other
trademarks are the property of their respective owners. U.S. Government approval required when exporting the product described in
this documentation.
Federal Acquisitions: Commercial Software -- Government Users Subject to Standard License Terms and Conditions. U.S.
Government: If this Software is being acquired by or on behalf of the U.S. Government or by a U.S. Government prime contractor or
subcontractor (at any tier), then the Government's rights in the Software and accompanying documentation shall be only as set forth in
this license; this is in accordance with 48 C.F.R. 227.7201 through 227.7202-4 (for Department of Defense (DoD) acquisitions) and
with 48 C.F.R. 2.101 and 12.212 (for non-DoD acquisitions).
DOCUMENTATION IS PROVIDED “AS IS” AND ALL EXPRESS OR IMPLIED CONDITIONS, REPRESENTATIONS AND
WARANTEES, INCLUDING ANY IMPLIED WARRANTY OF MERCHANTABILITY, FITNESS FOR A PARTICULAR PURPOSE OR
NON-INFRINGMENT ARE HEREBY DISCLAIMED, EXCEPT TO THE EXTENT THAT SUCH DISCLAIMERS ARE HELD TO BE
LEGALLY INVALID.
FCC Compliance
This equipment has been tested and found to comply with the limits for Class A digital device, pursuant to Part 15 of the FCC Rules.
These limits are designed to provide reasonable protection against harmful interference when the equipment is operated in a
commercial environment. This equipment generates, uses, and can radiate radio frequency energy and, if not installed and used in
accordance with instruction manual, may cause harmful interference with radio communications. Operation of this equipment in a
residential area is likely to cause harmful interference in which case the user will be required to correct the interference at his own
expense.
Any change or modification to this product voids the user’s authority to operate per FCC Part 15 Subpart A. Section 15.21 regulations.
Industry Canada Compliance
Operation is subject to the following two conditions: (1) this device may not cause interference and (2) this device must accept any
interference, including interference that may cause undesired operation of the device.
This device has been designed to operate with an antenna having a maximum gain of 6dBi. Antenna having a higher gain is strictly
prohibited per regulations of Industry Canada. The required antenna impedance is 50 ohms.
To reduce potential radio interference to other users, the antenna type and its gain should be so chosen that the equivalent
isotropically radiated power (EIRP) is not more than that required for successful communication.
Caution
Reader antennas should be positioned so that personnel in the area for prolonged periods may safely remain at least 23 cm (9 in) in an
uncontrolled environment from the antenna’s surface. See FCC OET Bulletin 56 “Hazards of radio frequency and electromagnetic
fields” and Bulletin 65 “Human exposure to radio frequency electromagnetic fields.”
European Radio Compliance
This Equipment has been tested and found compliant with the following Mandatory Specifications:
EN 302 208
Electromagnetic Compatibility and Radio spectrum Matters (ERM)
Radio Frequency Identification Equipment operating in the band
865 MHz to 868 MHz with Power levels of 2w ERP.
Part 1: Technical requirements and methods of measurements.
Part 2: Harmonized EN under article 3.2 of R&TTE Directive.
EN 301 489
Electromagnetic compatibility and Radio spectrum Matters (ERM)
Electromagnetic Compatibility (EMC) standards for Radio
equipment and services:
Part 1: Common technical requirements
Part 3: Specific conditions for short-Range Devices (SRD)
operating on frequencies between 9 kHz and 40 GHz.
EN60950
Safety of information technology equipment.
This radio must be used with the external mains to DC power
adaptor, supplied with the product.
1177

TABLE OF CONTENTS
ALH-900X USER’S GUIDE
DOC. CONTROL #8102114-000 REV B i
Alien Technology®
User’s Guide
ALH-9000, ALH-9001
02/06/12
Table of Contents
CHAPTER 1 INTRODUCTION...........................................................................................................1
About this Manual ..................................................................................................................................1
Who should read this manual?.......................................................................................................................1
How to use the battery correctly.....................................................................................................................1
Caution when using........................................................................................................................................1
Components and Features ....................................................................................................................1
Package components.....................................................................................................................................2
Handheld Components...................................................................................................................................3
Description of Each Component.....................................................................................................................4
CHAPTER 2 BASIC FUNCTIONS......................................................................................................5
Power and Battery .................................................................................................................................5
Switch On Backup Battery..............................................................................................................................5
Detaching the Main Battery............................................................................................................................5
Attaching the Main Battery .............................................................................................................................6
Charging.........................................................................................................................................................6
Power On and Off...........................................................................................................................................7
Checking the Battery Gauge ..........................................................................................................................8
Backup Battery...............................................................................................................................................9
Disposal of Battery .........................................................................................................................................9
System Reset.........................................................................................................................................9
Soft (Warm) Reset..........................................................................................................................................9
Hard (Cold) Reset ........................................................................................................................................10
Using a MicroSD Card .........................................................................................................................10
Installing a MicroSD Card.............................................................................................................................10
System Settings...................................................................................................................................12
Setting Brightness ........................................................................................................................................12
Screen Calibration........................................................................................................................................13
Setting Volume and Sounds .........................................................................................................................13
Setting the Date and Time............................................................................................................................14
Using the Keypad.................................................................................................................................15
Inputting Data...............................................................................................................................................15
Using the <Fun> Button ...............................................................................................................................16
Using the Soft Input Panel ...................................................................................................................16
Using the Stylus ...................................................................................................................................17
Using ActiveSync .................................................................................................................................17
Installing Microsoft ActiveSync Program ......................................................................................................17
Connecting PC to PDA.................................................................................................................................18
Transmitting Data.........................................................................................................................................19
Firmware Upgrade ...............................................................................................................................21
Boot Menu............................................................................................................................................23
CHAPTER 3 RFID TAG READER ..................................................................................................24
Starting the ALH-900x RFID Demo Software.......................................................................................24
Inventory Utility ....................................................................................................................................25
Geiger Tag Utility..................................................................................................................................26
Tag Access Utility.................................................................................................................................27
Basic Access Tab .........................................................................................................................................27
Advanced Access Tab ..................................................................................................................................29

TABLE OF CONTENTS
ALH-900X USER’S GUIDE
DOC. CONTROL #8102114-000 REV B
ii
Tag Mask..............................................................................................................................................31
Tag Mask – Scan..........................................................................................................................................32
Tag Mask – Specify ......................................................................................................................................32
Tag Mask – Presets......................................................................................................................................34
Reader Settings ...................................................................................................................................35
CHAPTER 4 BARCODE SCANNER (1D & 2D)................................................................................36
BarcodeDemo......................................................................................................................................36
Using the BarcodeEmulator.................................................................................................................37
Setting Barcode Symbology ................................................................................................................39
Barcode Scanning Beam Position .......................................................................................................41
Correct Scanning Beam Position .................................................................................................................41
Incorrect Scanning Beam Position ...............................................................................................................41
CHAPTER 5 WIRELESS LAN .......................................................................................................42
Powering Up the WLAN Radio ............................................................................................................42
Configuring the WLAN Connection......................................................................................................42
Checking WLAN Information ...............................................................................................................43
CHAPTER 6 BLUETOOTH.............................................................................................................44
Turning on Bluetooth............................................................................................................................44
Connecting Bluetooth Printers (SPP) ..................................................................................................44
CHAPTER 7 USING GPS .............................................................................................................47
Executing GPS Demo Program...........................................................................................................47
CHAPTER 8 USING THE CAMERA.................................................................................................48
Using the Camera................................................................................................................................48
CHAPTER 9 USING A SIM CARD ..................................................................................................50
Installing SIM Card.......................................................................................................................................50
Configure the Remote Access Server (RAS)................................................................................................50
Making the 3G Network Connection.............................................................................................................52
APPENDIX ....................................................................................................................................53
Configuration........................................................................................................................................53

CHAPTER 1 INTRODUCTION
ALH-900X USER’S GUIDE
DOC. CONTROL #8102114-000 REV A 1
Chapter 1
Introduction
About this Manual
This manual provides you with safety information, technical support information, and sources for
additional product information.
Who should read this manual?
This manual is written for the person who is responsible for installing, configuring, and maintaining
the ALH-900x handheld. This manual provides you with information about the features of the
ALH-900x, and how to install, configure, operate, and maintain it. Before you work with the
ALH-900x, you should be familiar with your network and general networking terms, such as IP
address.
Before you handle and operate your ALH-900x, please read through and become familiar with the
contents of this manual.
How to use the battery correctly
• Do not touch the terminals of the battery with any metal objects.
• If you do not use the battery for a long time after charging, keep it at room temperature.
• Depending on the age of the battery and the operating time while using it, the charge
capacity can be reduced.
• You must charge the device with only the provided adaptor.
Caution when using
• Careless use or repair attempts may damage the unit or stored data. Alien is not
responsible for this damage, so important data should be kept separately.
• If you have a problem, do not try to repair or disassemble the product yourself; please
contact Alien customer service.
• Do not use where devices sensitive to electromagnetic radiation are operating, such as a
hospital, airplane, etc., or risk of interference may occur.
• The unit may malfunction at very high or low temperatures, or in a very humid
environment.
• Please do not use sharp objects to touch the screen, or damage may result. Use only soft
objects, like your finger or the included stylus, on the touchscreen.
Components and Features
The ALH-900x mobile computer is a small, ergonomically designed PDA, built on the Microsoft
window CE Operating System. The PDA is equipped with an, RFID tag reader, MicroSD card
reader, wireless modem, 1D or 2D barcode scanner, and optional GPS and camera modules.
INTRODUCTION CHAPTER 1
ALH-900X USER’S GUIDE
DOC. CONTROL #8102114-000 REV A
2
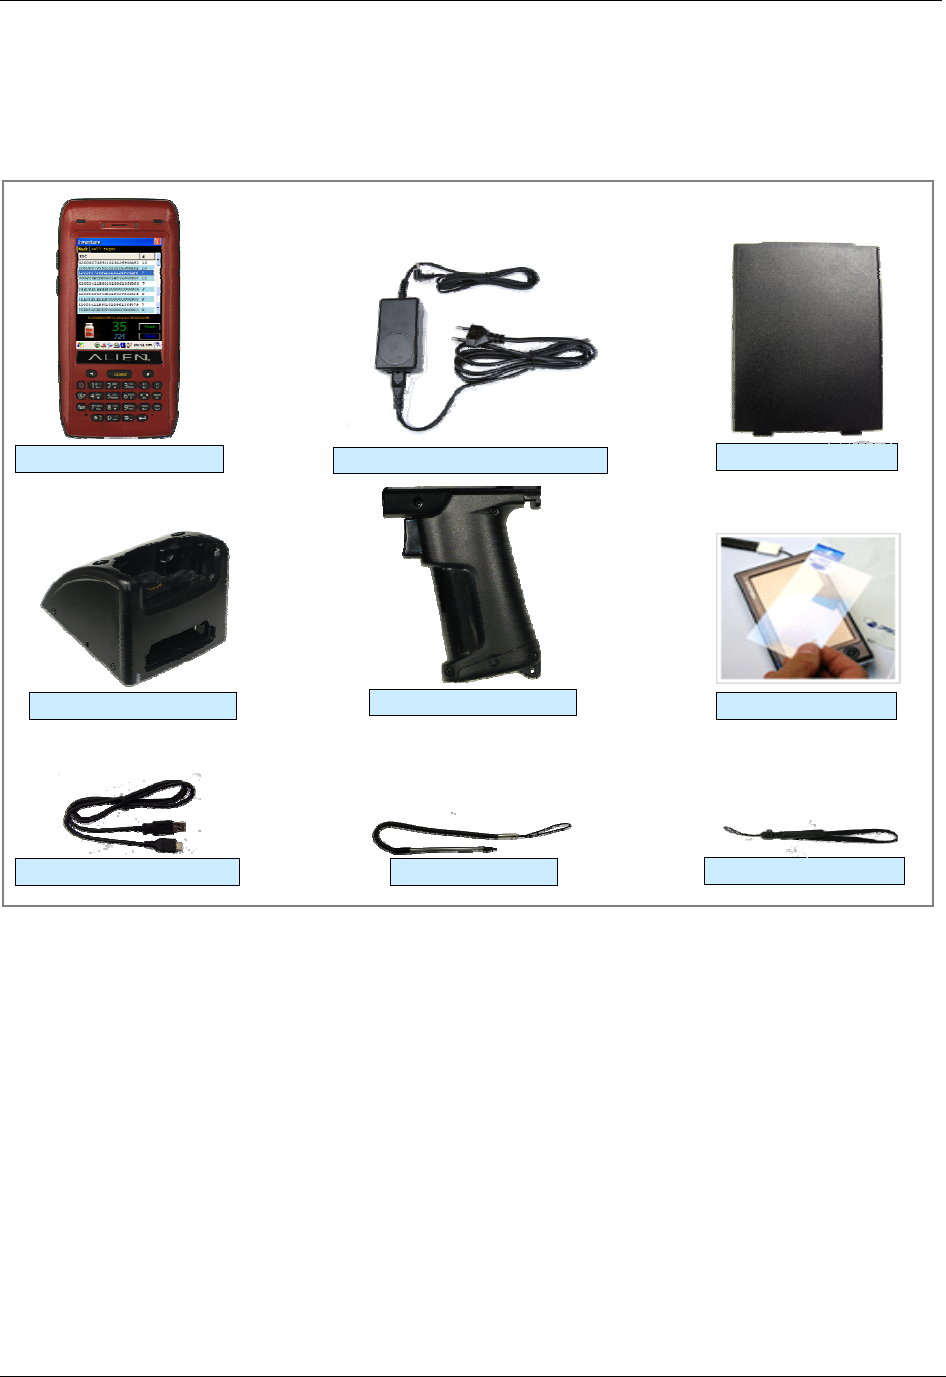
Package components
After opening the product packaging box, check the items listed as below. If there are missing or
defective items, please contact the Alien customer support, or your place of purchase.
Protective Film
Adaptor and AC Cable
USB Sync Cable Stylus
Main Battery
Hand Strap
Cradle
ALH-900x Body
Pistol Grip
CHAPTER 1 INTRODUCTION
ALH-900X USER’S GUIDE
DOC. CONTROL #8102114-000 REV A 3
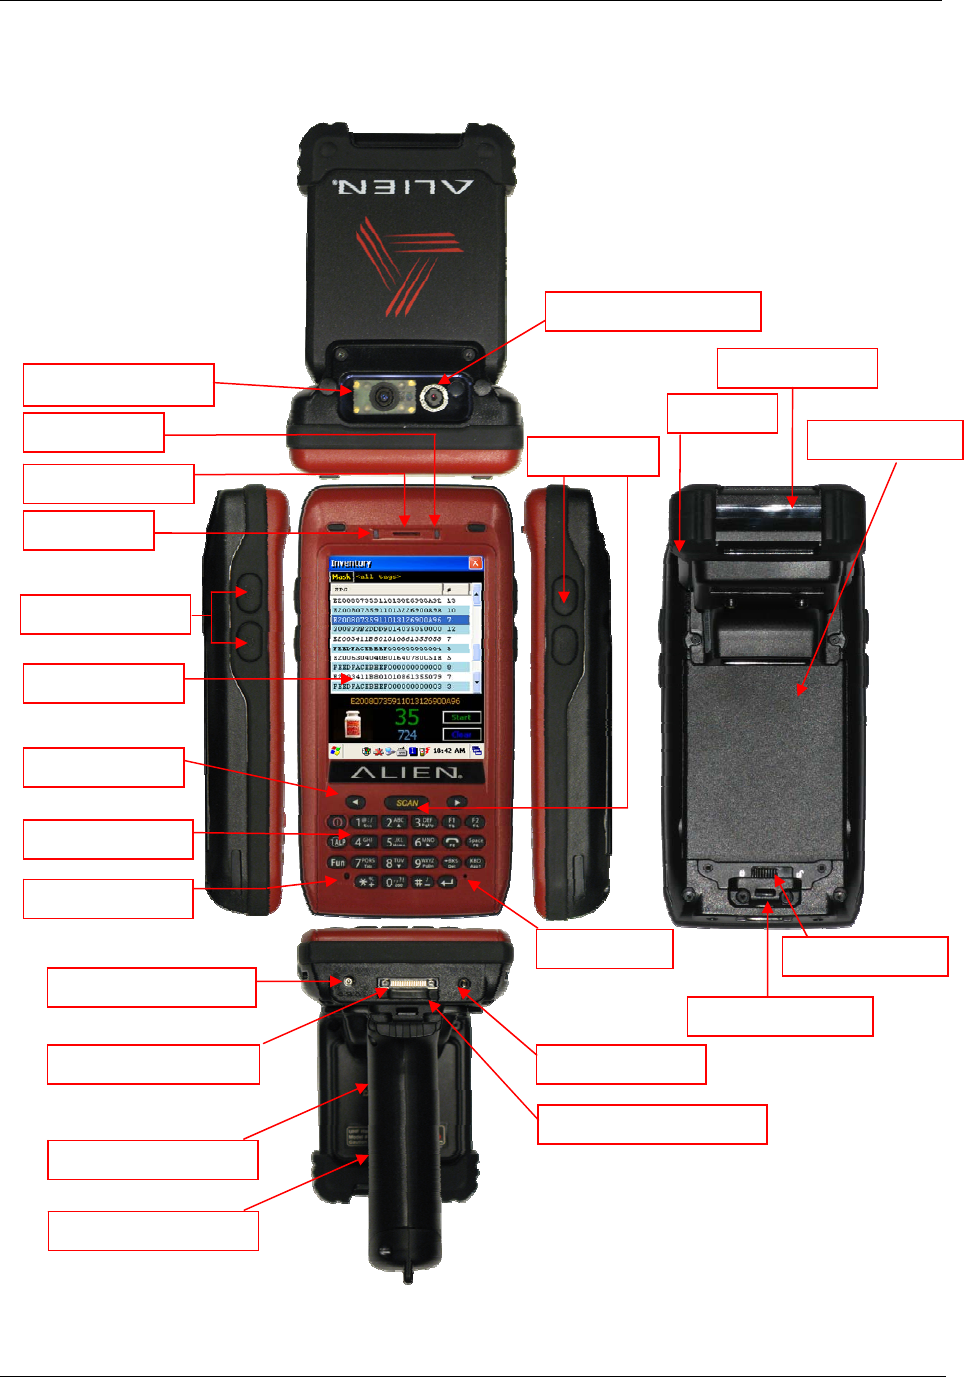
Handheld Components
Barcode Scanner
Camera (ALH-9001)
RFID Reader
Handstrap Hole
Speaker
Main Battery
Battery Latch
F7/F8 F9
Volume
Microphone
DC Power Jack
Earphone Jack Cradle Connector
USB Sync Connector
WLAN LED
Phone Speaker
Power
Touch Screen
Keypad
L/R Arrow Key
Reset Button
Pistol Grip
Trigger Button (F19)

INTRODUCTION CHAPTER 1
ALH-900X USER’S GUIDE
DOC. CONTROL #8102114-000 REV A
4
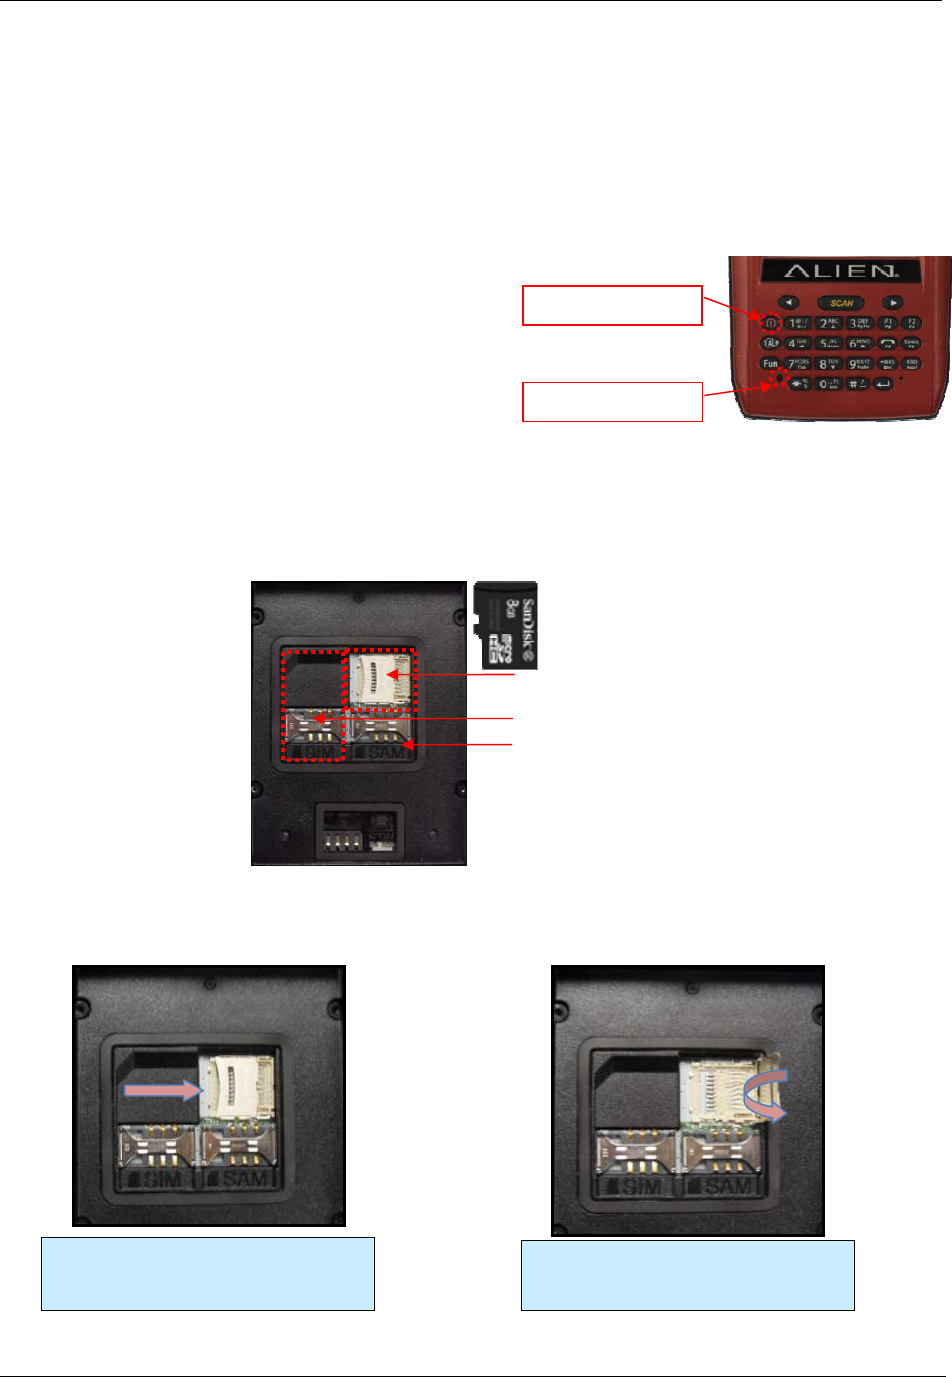
Description of Each Component
Part Descriptions
UHF Reader The 900MHz UHF RFID tag reader module.
1D/2D Barcode Scanner The laser beam is emitted through this window. Do not look directly at the
laser!
Reset Button Enables you to perform a Soft Reset. Press along with the <Power> button
to perform a Hard Reset.
Microphone Records audio from the surrounding environment.
WLAN LED Indicates WLAN power on-off status.
Battery Latch Allows you to detach the main battery.
Main Battery Provides primary power to the unit.
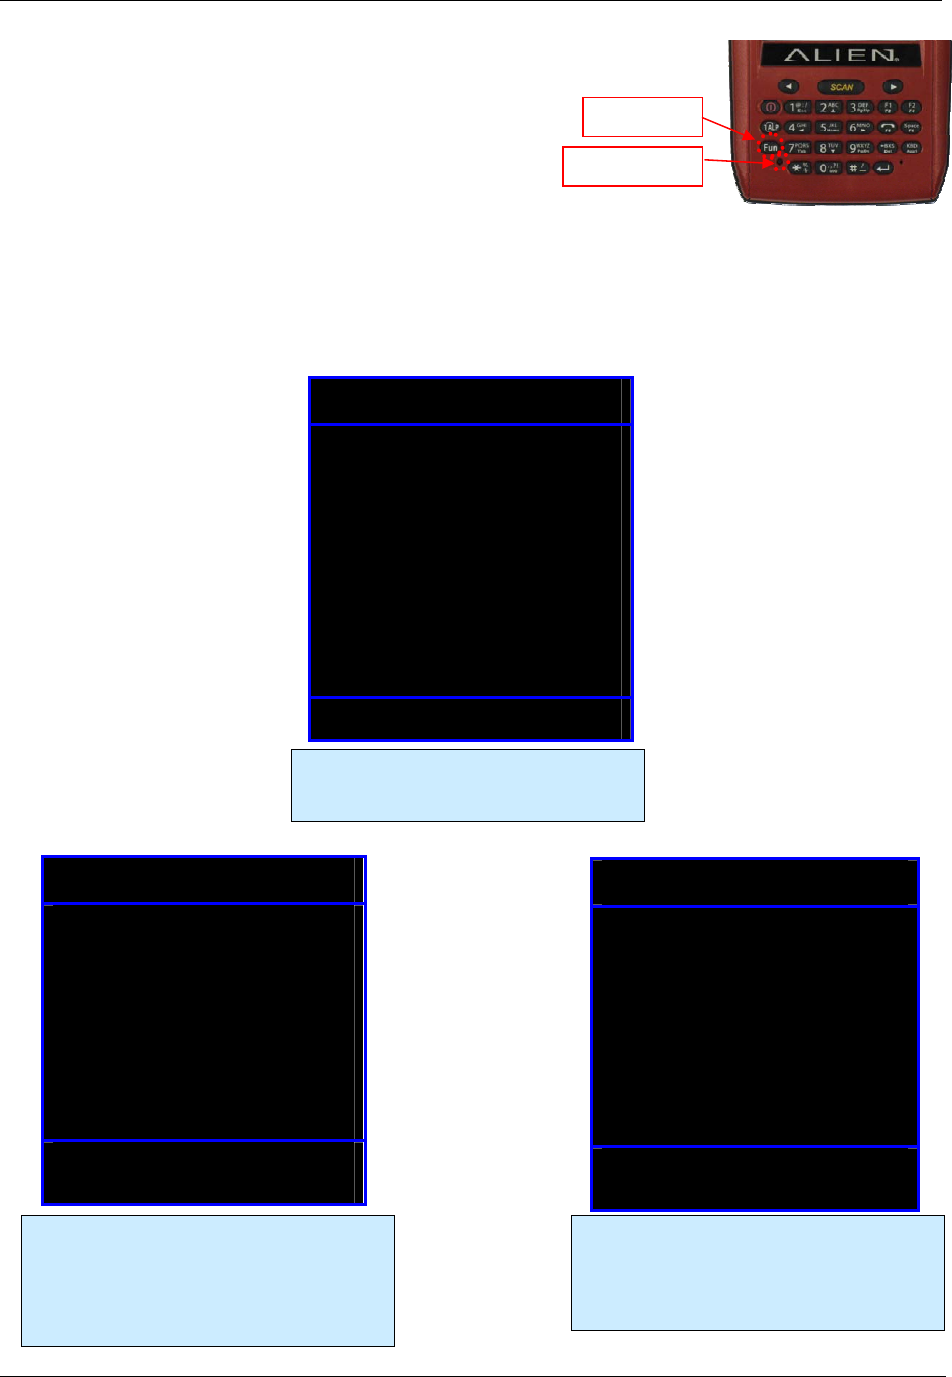
Volume Buttons Adjusts the volume, when you also press the <Fun> button.
Function Buttons (F7, F8) Allows you to perform common actions.
Function Button (F9) Allows you to perform common actions, like scan for an RFID tag.
Speaker Built-in speaker emits various sound effects.
USB Sync Connector Allows you to connect and send data to a PC via a USB sync cable.
Earphone Jack Allows you to connect earphones.
L/R Arrow Key Moves the cursor left and right. When also pressing the <Fun> button,
moves the cursor up and down.
Power LED Illuminates red when the battery is charging and green when it is fully
charged.
Cradle Connector Interfaces with the cradle, when docked.
Camera (ALR-9001) Allows you to capture and store photographic images.
Cradle Connector Enables you to sync with a PC, while charging the batteries.
Keypad Allows you to input key presses (numbers, letters, and symbols).
Touchscreen Displays running programs, and allows you to control them directly, using
the stylus and touchscreen.
Hand Strap Hole Enables you to attach the hand strap and/or stylus in a convenient location,
while using the device for a long period of time.
CHAPTER 2 BASIC FUNCTIONS
ALH-900X USER’S GUIDE
DOC. CONTROL #8102114-000 REV A 5
Chapter 2
Basic Functions
Power and Battery
The ALH-900x battery system is composed of main battery, an optional pistol grip battery, and a
backup battery. The main battery supplies the power to the system and RAM which retains saved
data. A backup battery saves the data in RAM in the situation where the main battery is
discharged completely.
Main Battery: 3,000 mAh, 3.7v Lithium–Polymer
Pistol-Grip Battery (optional): 4,400 mAh, 3.7v Lithium-Ion
Backup Battery: 100 mAh, 3.7v Lithium–Polymer
Switch on the backup battery when first setting up the ALH-900x, and then install the main battery
and charge it completely.
Switch On Backup Battery
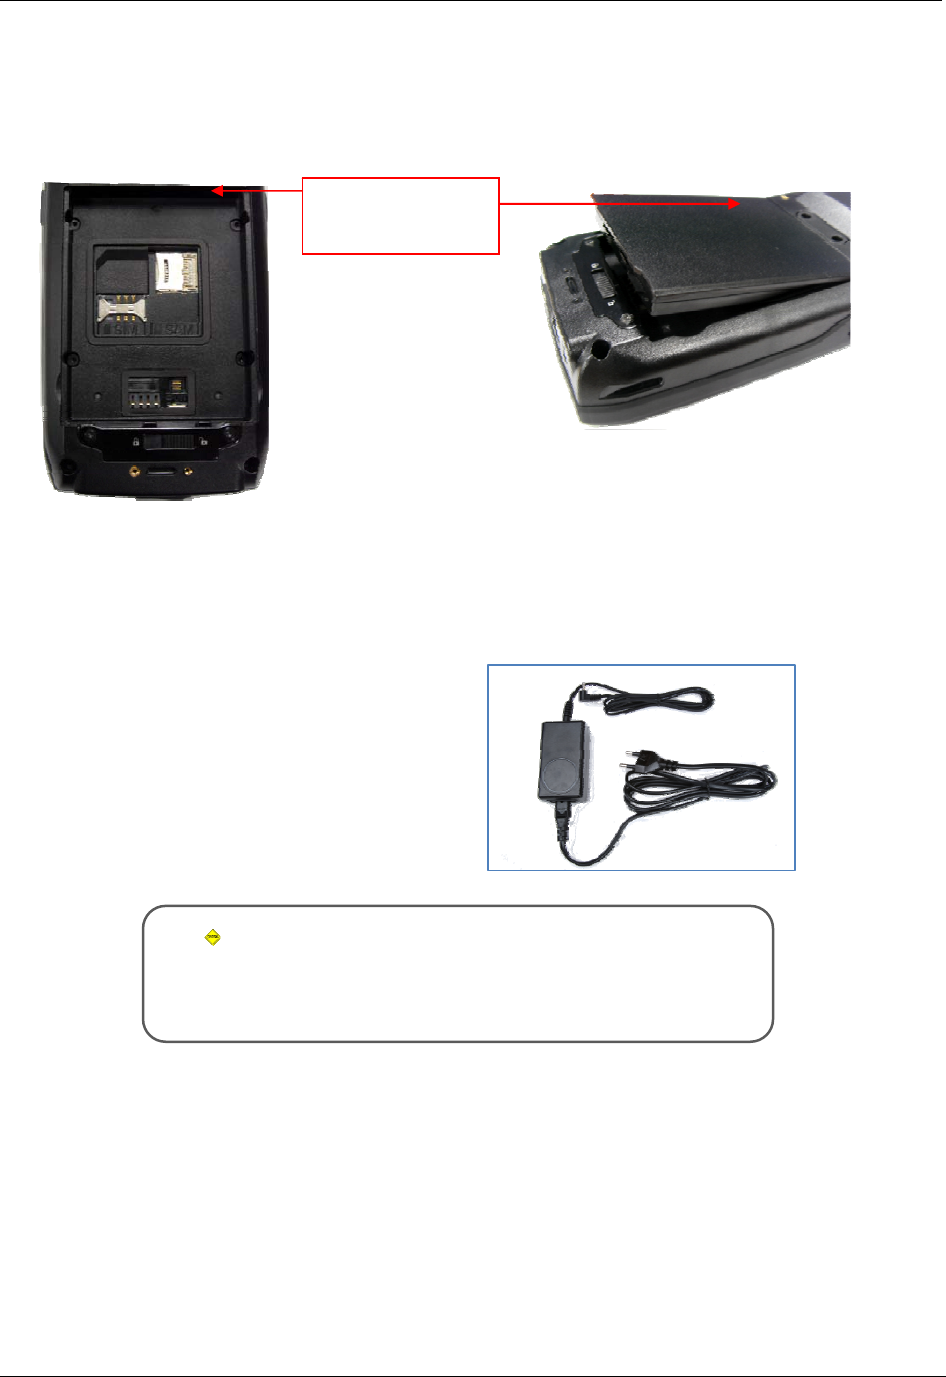
The image below shows the battery compartment, after the main battery has already been
removed. Slide the lever to the right to switch on the backup battery.
Re-attach the main battery to the back battery compartment of the PDA. Confirm that the battery
latch locked firmly (see below).
Connect the adaptor to the PDA adaptor connecting jack, and check to make sure the Power LED
is illuminated red, and then allow it to charge completely until it the Power LED turns green.
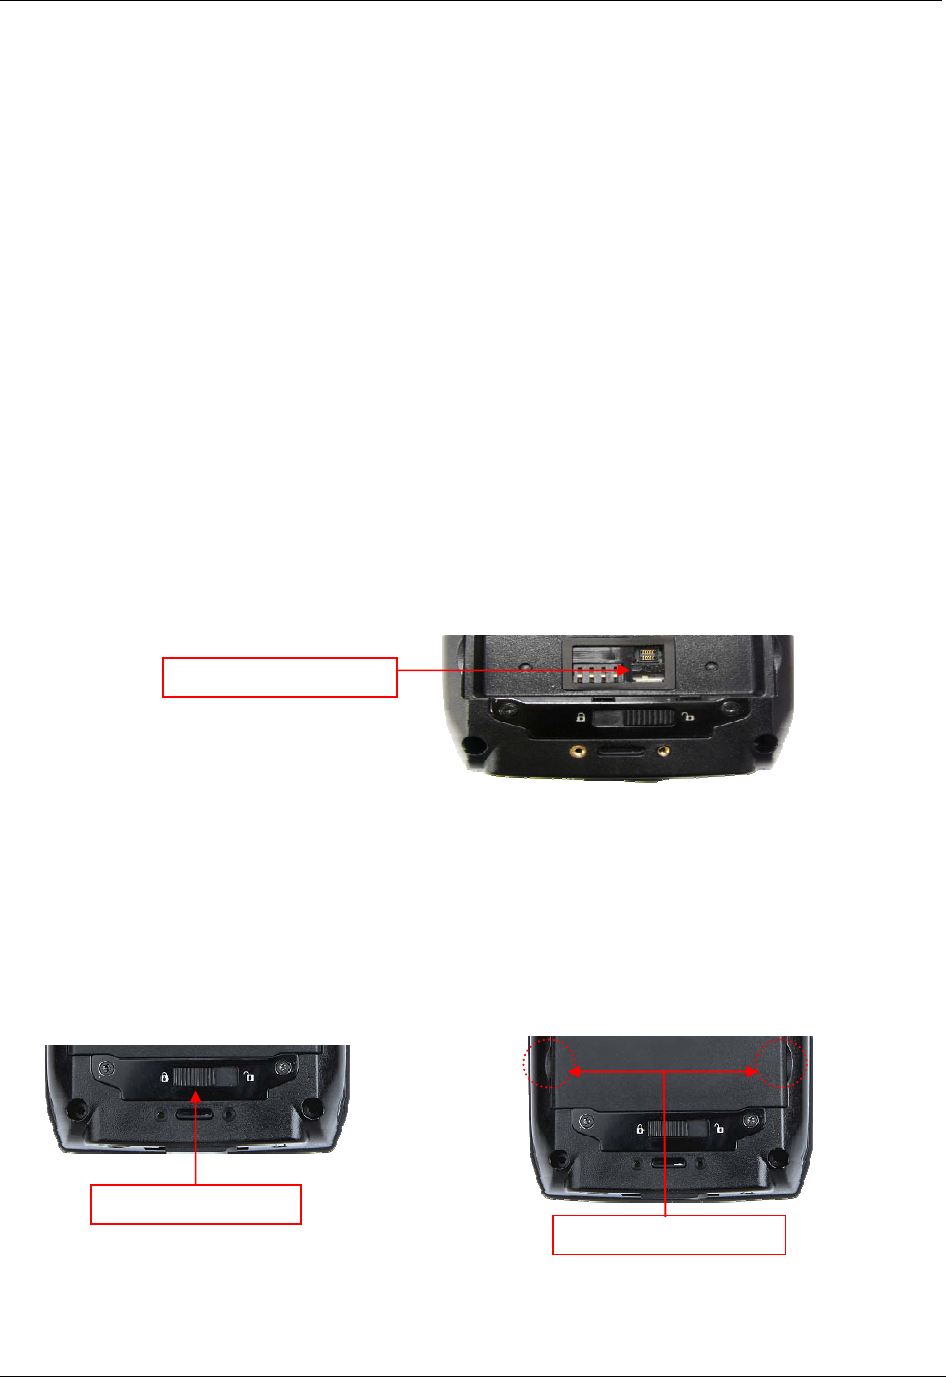
Detaching the Main Battery
The images below show the back-bottom of the handheld unit. Slide the battery latch to the right
(UNLOCK side), and then lift the main battery out of the compartment along both sides of groove.
Backup Battery Switch
Both sides of groove
Battery Latch
BASIC FUNCTIONS CHAPTER 2
ALH-900X USER’S GUIDE
DOC. CONTROL #8102114-000 REV A
6
Attaching the Main Battery
Put the top part of battery into the upward groove, and then press down on the bottom part of the
battery into the battery compartment. Slide the battery latch to the left (LOCK side) to attach the
battery firmly.
Charging
You must charge the battery only with the provided adapter or cradle. The Power LED illuminates
red while charging and green when charging is complete.
Connecting Adapter
1. Plug the adapter cable to 110V socket.
2. Connect adapter DC cable to the power
connecting jack of the main body.
3. “Power LED” is red while charging.
Caution:
You must charge the battery by using only the dedicated adapter
provided by Alien, or your device may be damaged.
R/L Battery
Attaching Groove
CHAPTER 2 BASIC FUNCTIONS
ALH-900X USER’S GUIDE
DOC. CONTROL #8102114-000 REV A 7
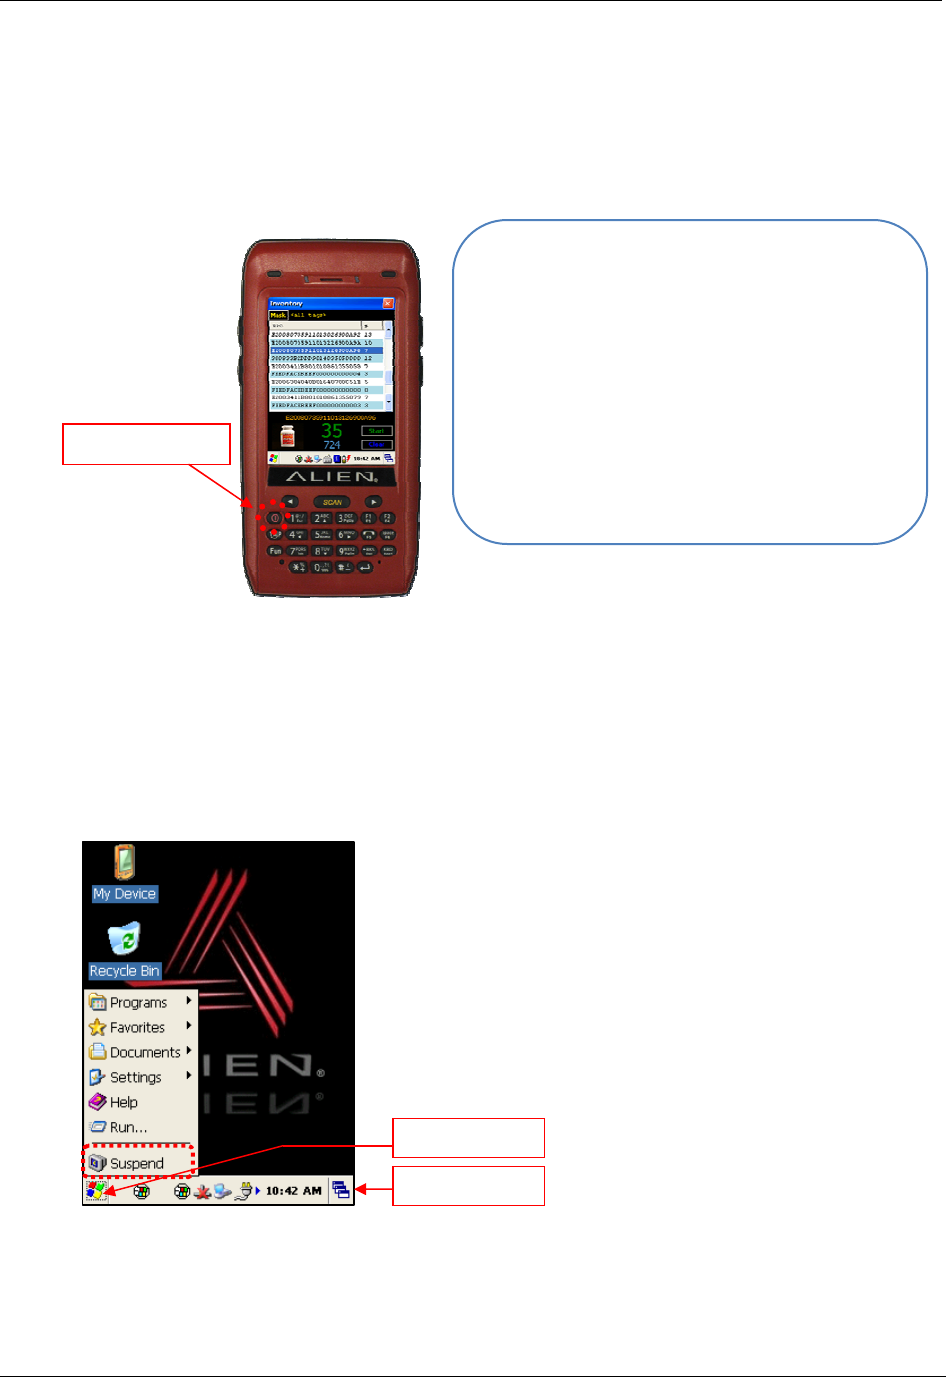
Power On and Off
Pressing the <Power> button once causes the device to enter low-power (sleep) mode. Pressing
<Power> button once again activates the system.
Power On and Off With <Power> Button
Even though the unit’s power is off, the data stored in RAM will be saved, and those programs
which have been running before the power was turned off will resume where they left off. If the
main battery and backup battery are both discharged, the RAM data will disappear and the system
will be start up as if from a cold reboot.
Power Off With <Start> Menu
You can put the handheld to sleep by pressing the Start button in the lower-left corner of the
screen and selecting “Suspend”.
Taskbar: Displays the currently running programs.
Start button: Activates the start menu to execute new programs.
Power Off:
1. When the system is on, press the <Power>
button for a couple of seconds and the
backlight will be turned off and it will enter
the low-power sleep mode.
Power On:
1. When the system is off, press the <Power>
button quickly, and the backlight will turn on
and wake up the system.
2. The power will be turned on automatically
when you connect to the ActiveSync USB
cable.
Start button
Taskbar
Power Button
BASIC FUNCTIONS CHAPTER 2
ALH-900X USER’S GUIDE
DOC. CONTROL #8102114-000 REV A
8
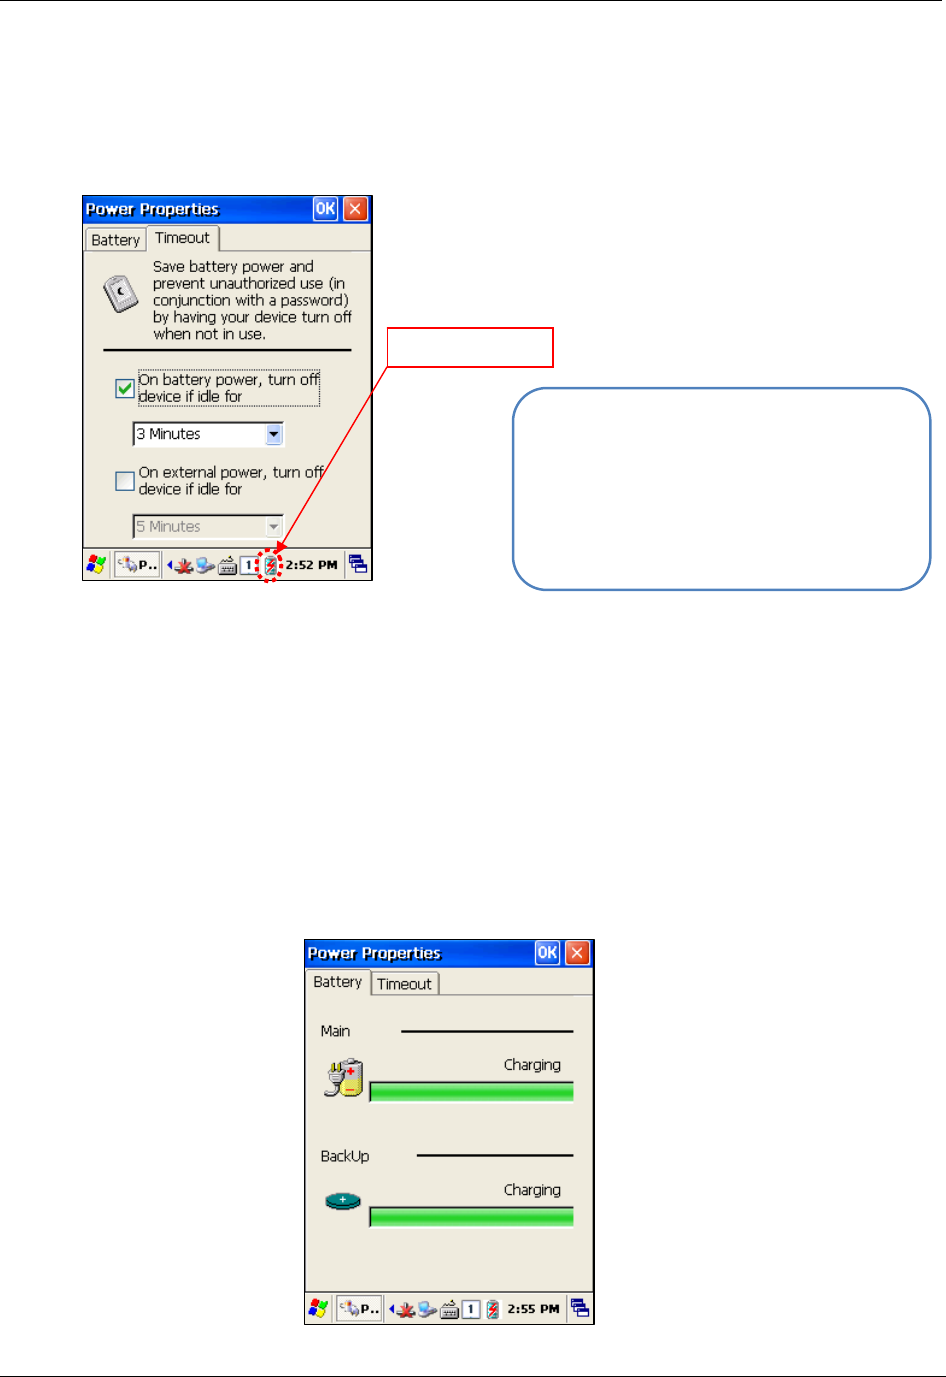
Power Off Automatically
If the device has not been used for a period of time, the system will enter low-power (sleep) mode
automatically. Carefully setting the sleep mode time in the Power Management control panel can
save power and prolong the life of the battery.
[Start] > [Settings] > [Control Panel] > [Power] > [Timeout]
Battery Discharging
If the main battery discharges completely while the system is turned on, the device will go into
low-power (sleep) mode automatically, and even pressing the <Power> button will not cause the
system to turn on. In this case, you should fully charge the main battery and then press the
<Power> button to turn on the handheld.
Checking the Battery Gauge
Battery life is largely affected by the user’s usage habits. The battery may need up to twelve hours
to charge completely.
Checking Battery Gauge
[Start] > [Settings] > [Control Panel] > [Power] > [Battery]
z You can also double click <Power> icon on
the Taskbar to enter this screen.
z To activate the device after it has gone
to sleep automatically, press the
<Power> button.
Power Icon
CHAPTER 2 BASIC FUNCTIONS
ALH-900X USER’S GUIDE
DOC. CONTROL #8102114-000 REV A 9
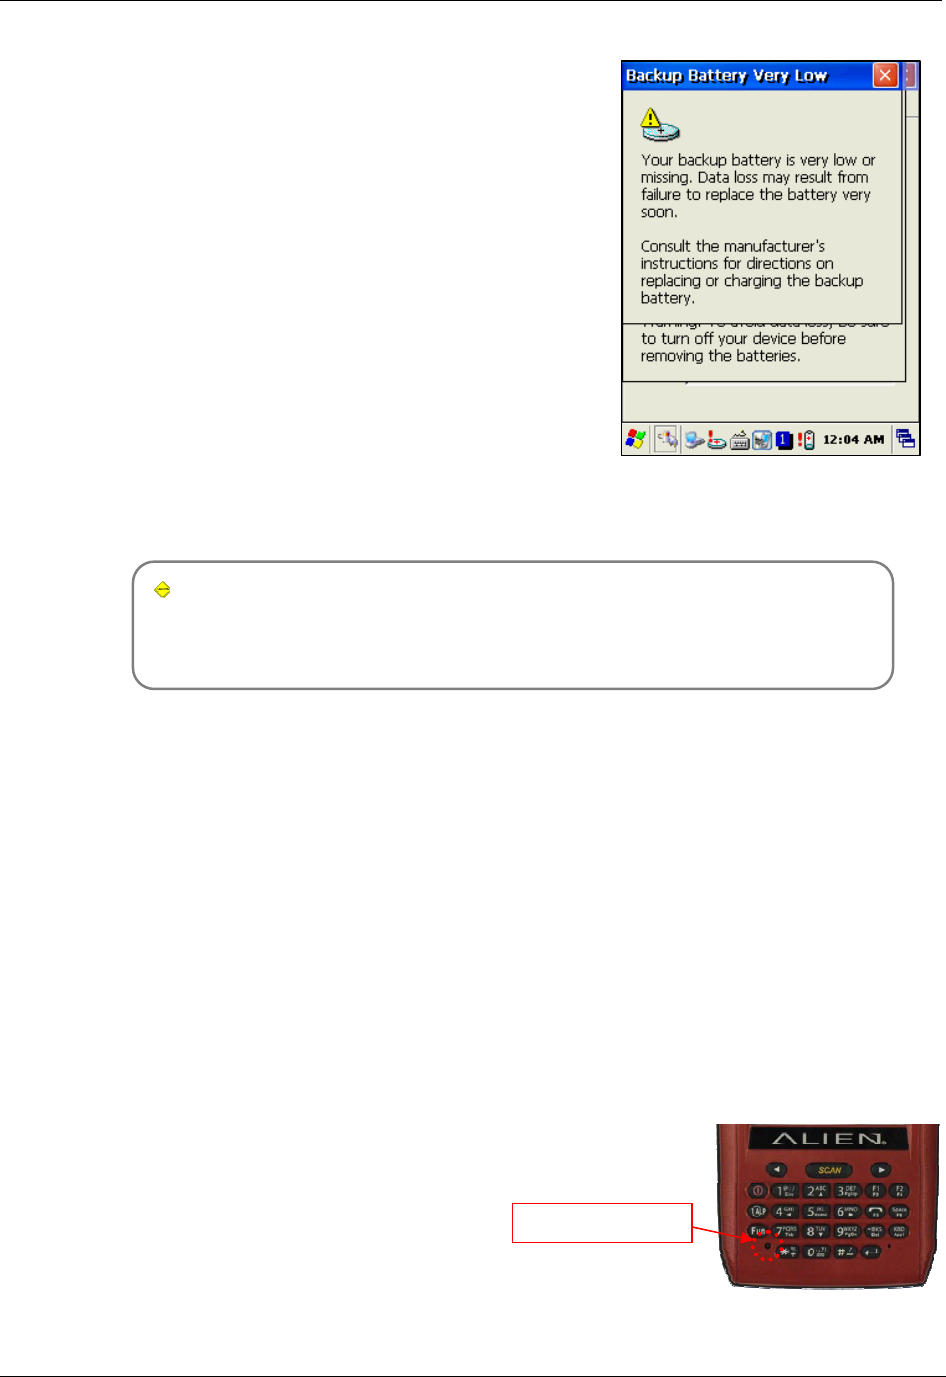
Low Power Warning
If the remaining battery charge cannot support the running
system any more, a low power warning message window
will appear on the screen. You will need to press the
<Power> button to turn off the power, and charge the
battery as soon as possible.
Backup Battery
The backup battery can safely maintain the RAM data, even when the main battery is discharged
completely.
Disposal of Battery
If the battery becomes damaged or reaches its end-of-life, you need to purchase a new one.
Please dispose the used batteries in an approved location.
System Reset
If there is no response from the handheld, or an application is locked up and stops responding,
then a reset of the handheld may be necessary. Resetting the system is also required when you
want to upgrade firmware,
Soft (Warm) Reset
If there is no response from the system, you should first perform a soft reset. A soft reset will halt
running programs and the user memory will be deleted. Installed programs and saved data are not
affected. Use the stylus pen to press <Reset> button briefly. The screen will go black momentarily
before the system reboots again.
Soft Reset
• Press Reset button.
• System will reboot.
• Desktop appears in about ten seconds.
• Your registry information, copied files,
and installed programs are all retained.
Caution:
If the main battery and the backup battery are both discharged, the RAM data will be
lost. Any unsaved data in the running programs will be lost. After charging and
rebooting, the system will not be restored to its previous state.
Reset Button
BASIC FUNCTIONS CHAPTER 2
ALH-900X USER’S GUIDE
DOC. CONTROL #8102114-000 REV A
10
Hard (Cold) Reset
A Hard Reset (which is sometimes called a Cold Reset) initializes the hardware completely. The
user’s installed programs, files, and registry values will be retained, but the real-time data and
date/time will be reset. You need to reset the time and date after performed Hard Reset. You
should only perform a Hard Reset when the Soft Reset fails to restore the system. Hold the
<Power> button while using the stylus pen to press the <Reset> button, then release both of them
simultaneously. The screen will go black momentarily before the system restarts again.
Hard Reset
• Press Power and Reset buttons together.
• System will reboot.
• Desktop reappears in about ten seconds.
• Time & date window will pop up and need
to be reconfigured.
Using a MicroSD Card
The image below is with the battery compartment off. There is one MicroSD card slot, and one
SIM card slot. Instructions for inserting and configuring a SIM card, for 3G network
communications, are given in the chapter, “Using a SIM Card”.
Installing a MicroSD Card
Carefully slide the metal cover to the
right, along the direction of the arrow,
to open it.
Lift the cover up along arrow direction.
Reset Button
Power Button
MicroSD Card Slot
SIM Card Slot
SAM Card Slot
(
unused
;
ma
y
not be
p
resent
)
CHAPTER 2 BASIC FUNCTIONS
ALH-900X USER’S GUIDE
DOC. CONTROL #8102114-000 REV A 11
You can find the MicroSD memory card icon in the file explorer, after inserting the MicroSD card.
Set the MicroSD card into the slot and
lower the cover again. Slide the cover to the left to lock it, and
reattach the main battery.
BASIC FUNCTIONS CHAPTER 2
ALH-900X USER’S GUIDE
DOC. CONTROL #8102114-000 REV A
12
System Settings
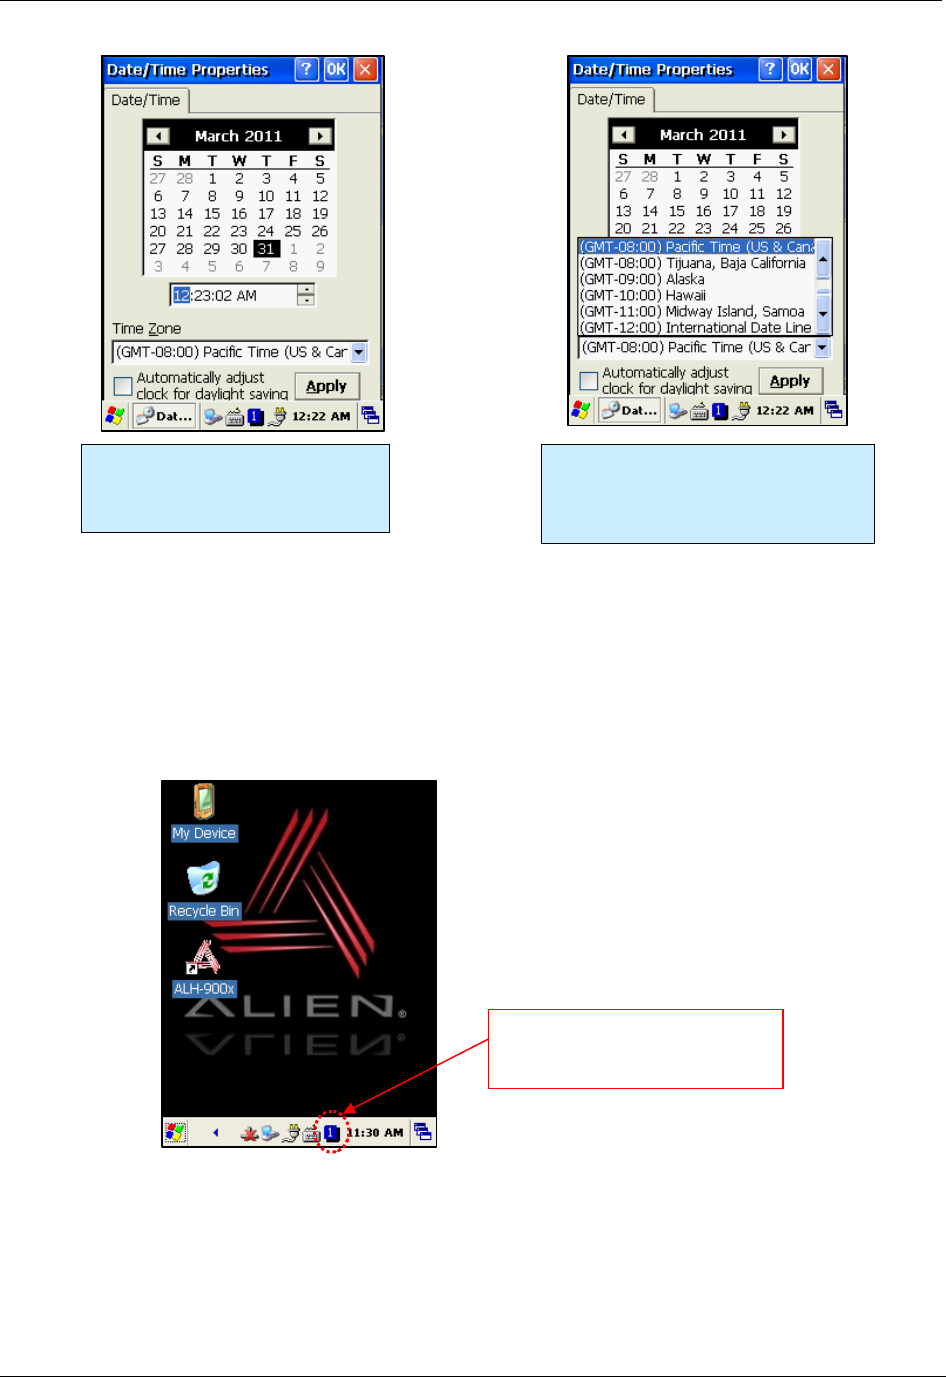
Most of the system settings can be changed through the system Control Panel, which is accessed
via the Start button, or by double-tapping on My Device on the desktop.
Setting Brightness
Brightness is set at 80% at the factory, and screen brightness is the biggest part of your power
consumption, so you might need to adjust it to suit your actual need.
[Start] > [Settings] > [Control Panel] > [Backlight]
You can adjust the brightness while on AC or battery power, the idle timeout for when the screen
should dim, and the idle timeout for when the keypad lamps should dim.
Start button
My Device
CHAPTER 2 BASIC FUNCTIONS
ALH-900X USER’S GUIDE
DOC. CONTROL #8102114-000 REV A 13
Screen Calibration
The first time the device is used, or if you haven’t used the device for a long time, you may find that
you cannot accurately select the place where you touch with the stylus. In this case, you need to
perform the screen calibration.
[Start] > [Settings] > [Control Panel] > [Stylus] > [Calibration] > [Recalibrate]
Press and hold the stylus pen briefly on the center of the cross symbol, and repeat five times as it
moves around the screen. Finish by pressing the Enter key on the keypad.
Setting Volume and Sounds
Volume is already set at 80% at the factory, and you can adjust volume as needed at the Volume
and Sounds control panel.
[Start] > [Settings] > [Control Panel] > [Volume and Sounds]
BASIC FUNCTIONS CHAPTER 2
ALH-900X USER’S GUIDE
DOC. CONTROL #8102114-000 REV A
14
Setting the Date and Time
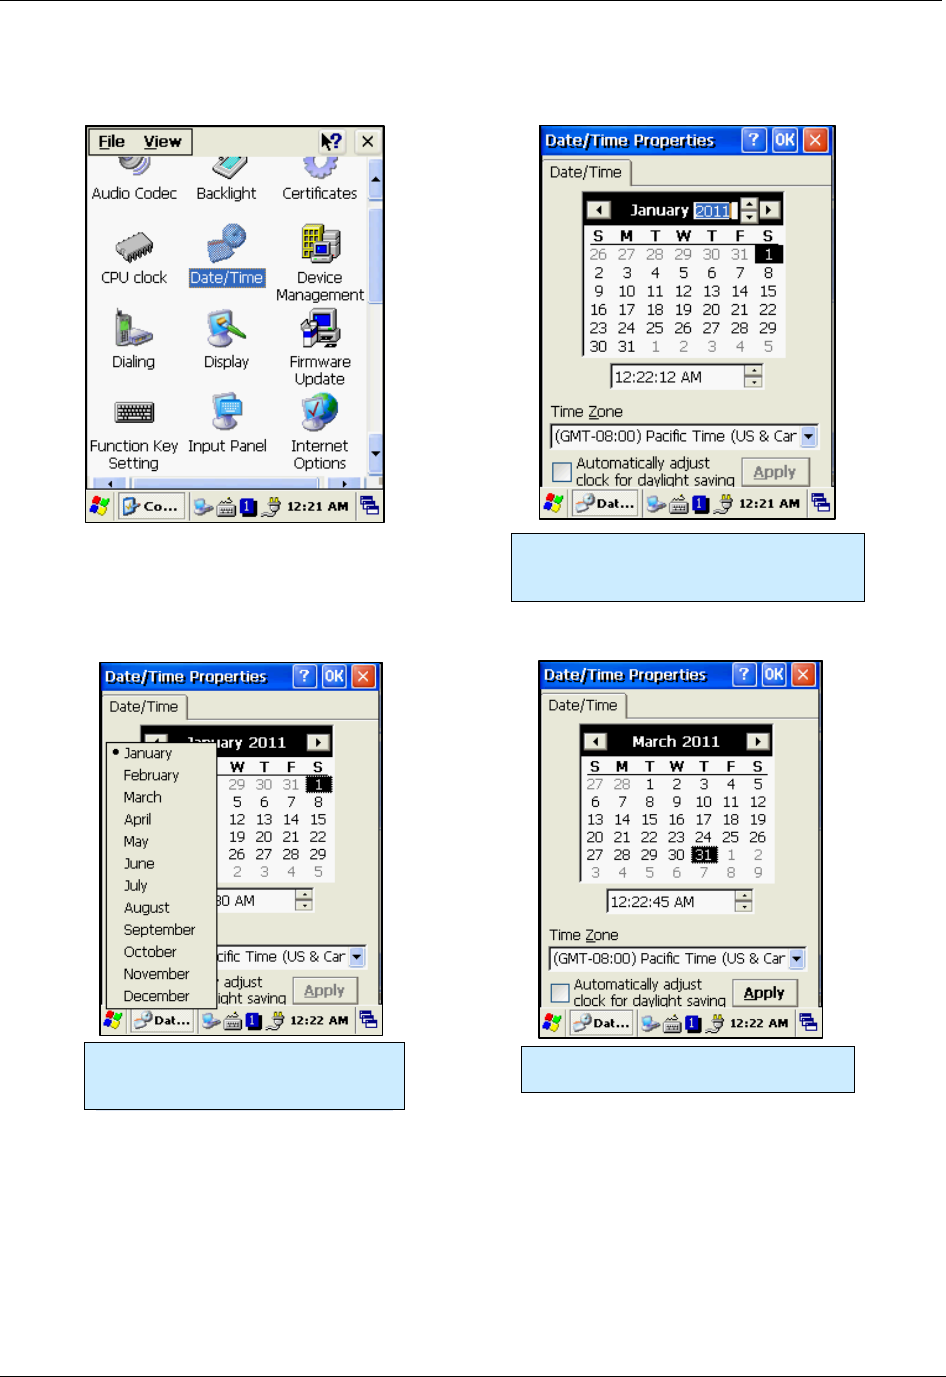
[Start] > [Settings] > [Control Panel] > [Date and Time]
Setting Year:
Double-click the year, and click the up
and down arrow button to set it.
Setting Month:
Double-click the month or click the
Left/Right arrows to set the month.
Setting Day:
Click the day directly to set the day.
CHAPTER 2 BASIC FUNCTIONS
ALH-900X USER’S GUIDE
DOC. CONTROL #8102114-000 REV A 15
Using the Keypad
The physical keypad enables you to input numbers, letters and special symbols. You can also
execute other preset functions with the <Fun> button.
If you’d like to change the current input mode, press the <1 ALP> button on the keypad as it steps
through the following sequence:
“1” (Numeric) -> “a” (lowercase letters) -> “A”(uppercase letters) -> “1”
Inputting Data
Numeric Keypad Mode, “1”: Press the <1 ALP> button or keypad icon on the taskbar to change
to the numeric mode. Pressing a keypad button will directly enter the number printed on that key.
Setting Time:
Use the up and down arrow to set
the time, and click AM/PM in the
time area directly.
Setting Time Zone:
Click the down arrow to select your
time zone, and finish by clicking the
apply button.
Clicking the input mode icon
on the taskbar also changes
the input mode.
BASIC FUNCTIONS CHAPTER 2
ALH-900X USER’S GUIDE
DOC. CONTROL #8102114-000 REV A
16
Alphabet Keypad Mode, “A,a”: Press the <1 ALP> button or keypad icon on the taskbar to
change to the lowercase (a) or uppercase (A) mode. Each keypad button has 2-4 letters or
symbols. Pressing the button once causes the first letter or symbol to be entered; quickly pressing
twice causes the second letter or symbol to be entered, and the third letter or symbol requires the
button to be pressed three times quickly.
Using the <Fun> Button
Pressing <Fun> button and other buttons simultaneously can activate various functions, as below:
Fun + Button Descriptions
<Esc> Cancels the selected command or the program’s current task.
Volume button
<Up>, <Down> Increases or decreases the sound volume.
<3>,<9> Performs page-Up or page-Down operations.
<2>,<4>,<5>,<6>,<8> Moves the cursor Left, Right, Up, Down, and Home.
<Del> Deletes a letter located to the right of the cursor.
<7> Works like a Tab key.
<*>,<0>,<#> Enables you to input +, 000, and – symbols.
<F3>,<F4> Enables you to use as two additional function buttons.
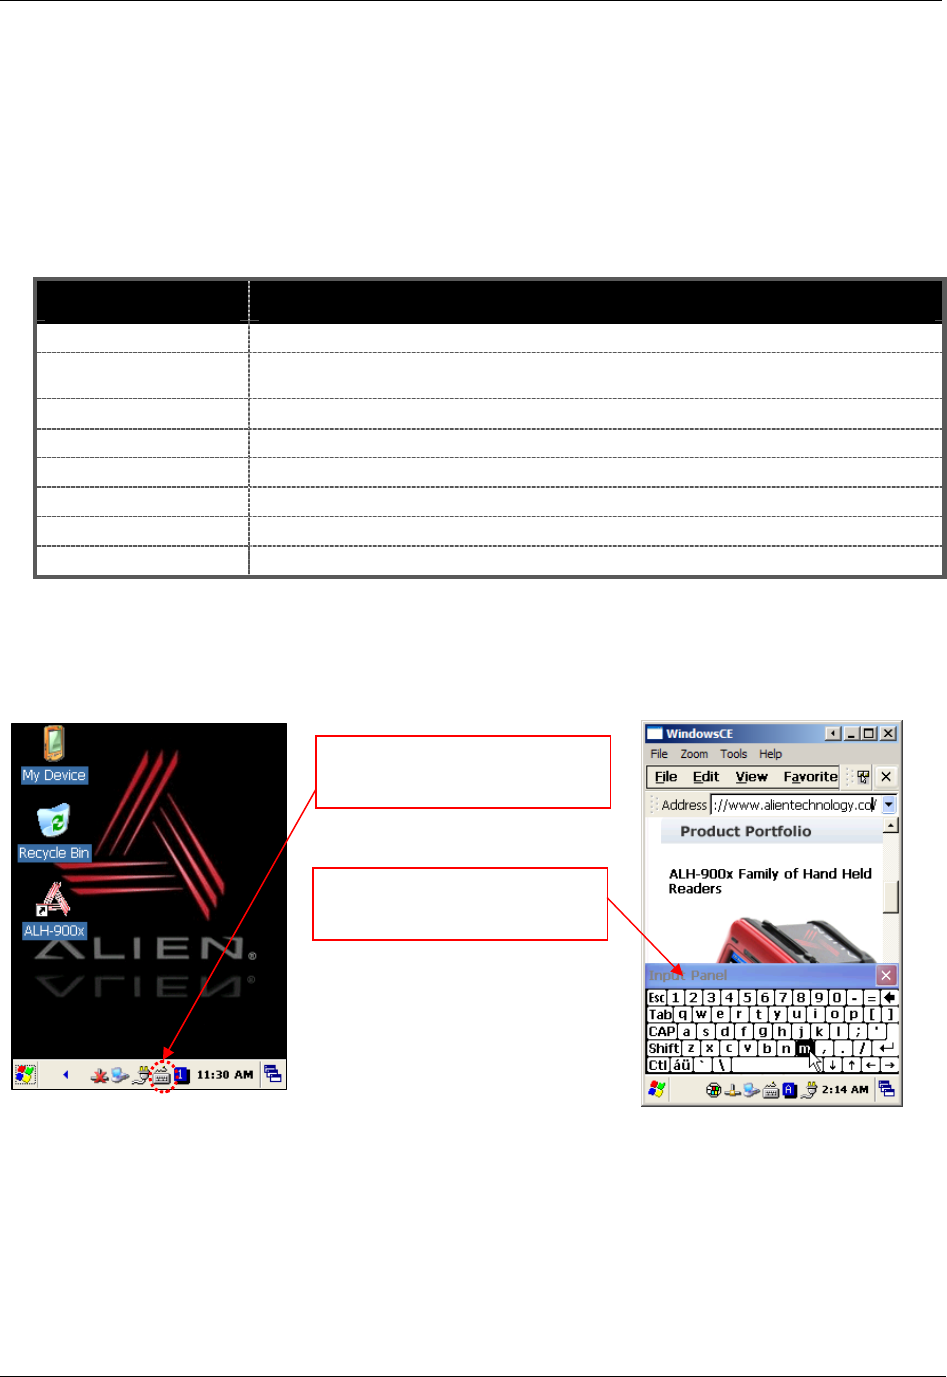
Using the Soft Input Panel
Sometimes, when entering data on-screen, it is easier to use the stylus and the soft input panel to
enter text. You can configure the layout of the soft input panel in the Input Panel control panel.
Clicking the software input panel
(keyboard) icon on the taskbar
brings up the on-screen keypad.
Tap on the on-screen keys and the
characters are entered wherever the
insertion cursor is.
CHAPTER 2 BASIC FUNCTIONS
ALH-900X USER’S GUIDE
DOC. CONTROL #8102114-000 REV A 17
Using the Stylus
You can tie the stylus to the hole in the hand strap connector, to allow you to use the stylus like a
mouse on a PC. The hand strap has a small integrated holster for storing the stylus safely.
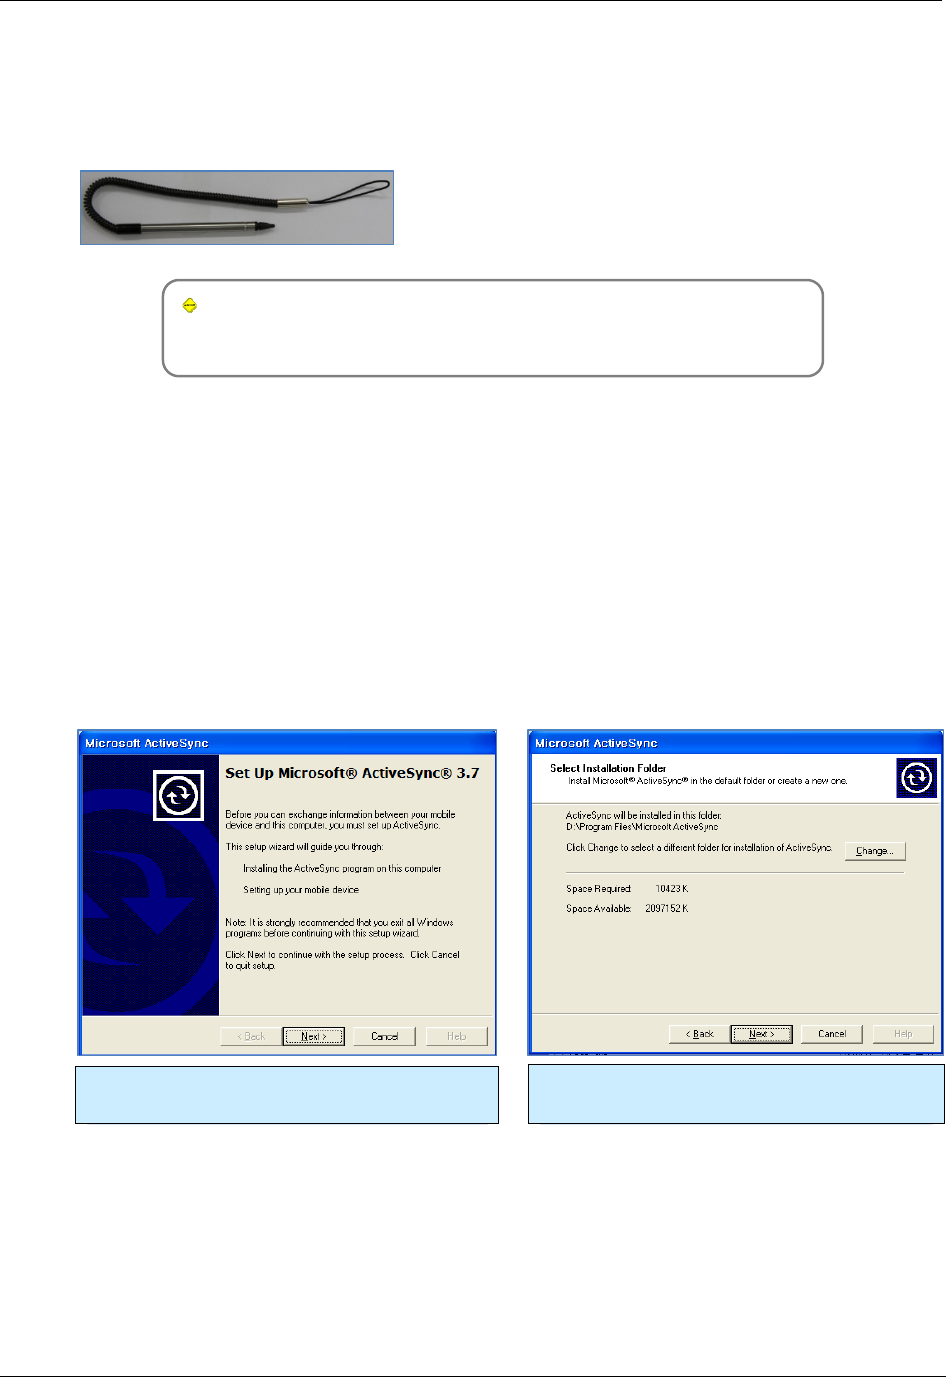
Using ActiveSync
The ActiveSync interface synchronizes data between the PC and handheld device, so that you
can install programs, copy, transition, and delete data, etc.
Installing Microsoft ActiveSync Program
Download the latest version of the ActiveSync program from the Microsoft website, and install it to
your PC. http://www.microsoft.com/downloads/
Caution:
You must use ActiveSync v3.7 version or later.
Caution:
Please do not use sharp objects on the touch screen. Use only the supplied
stylus; otherwise you could seriously damage the touch screen.
Use the stylus to:
• Select a letter on the onscreen soft keypad.
• Select a program on the desktop or taskbar.
• Select a button, tab bar, or other control in an
application window.
Click the [Next] button. Designate the installation folder, and then click
the <Next> button.

BASIC FUNCTIONS CHAPTER 2
ALH-900X USER’S GUIDE
DOC. CONTROL #8102114-000 REV A
18
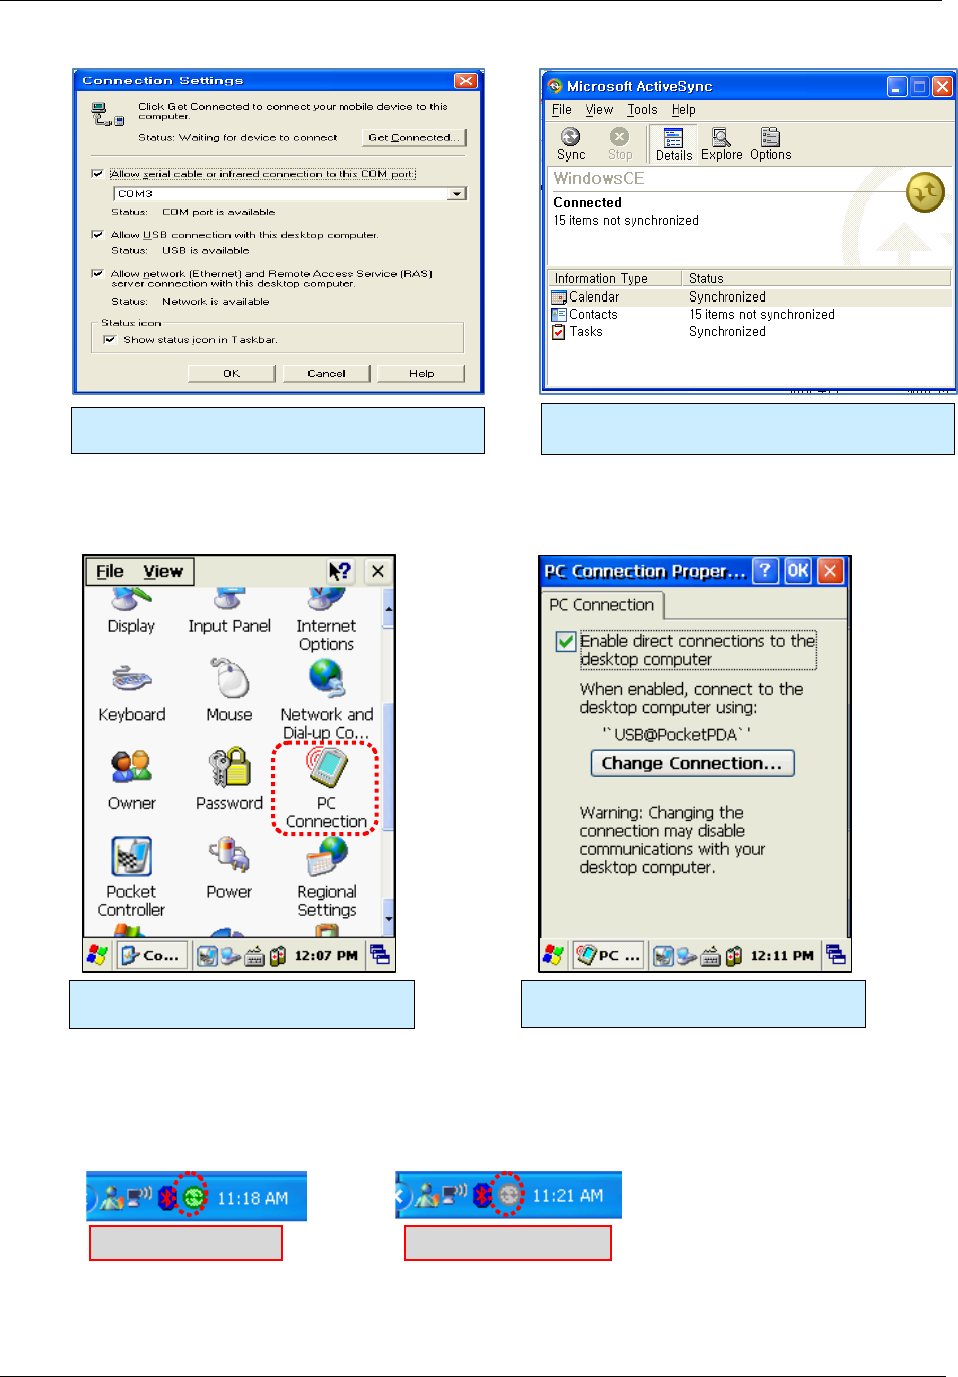
Connecting PC to PDA
On the PC:
[Start] > [Programs] > [Microsoft ActiveSync]
Windows XP Configuration
Executing Microsoft ActiveSync program. Click [File], Click [Get Connected].
The installation was finished. Now when you use
the USB cable to connect to the USB port on your
computer, ActiveSync will automatically detect the
device and make a connection.
CHAPTER 2 BASIC FUNCTIONS
ALH-900X USER’S GUIDE
DOC. CONTROL #8102114-000 REV A 19
Handheld Configuration
[Start] > [Settings] > [Control Panel] > [PC Connection]
Transmitting Data
Use the USB cable to connect the PC and the handheld device. You can check the state of the
ActiveSync connection on your PC taskbar.
Select <Allow USB connection with
this desktop computer>, press OK button.
Double click PC Connection icon To check if set to connected to USB
Sync cable
Connected state Disconnected state
ActiveSync connected to PDA.
BASIC FUNCTIONS CHAPTER 2
ALH-900X USER’S GUIDE
DOC. CONTROL #8102114-000 REV A
20
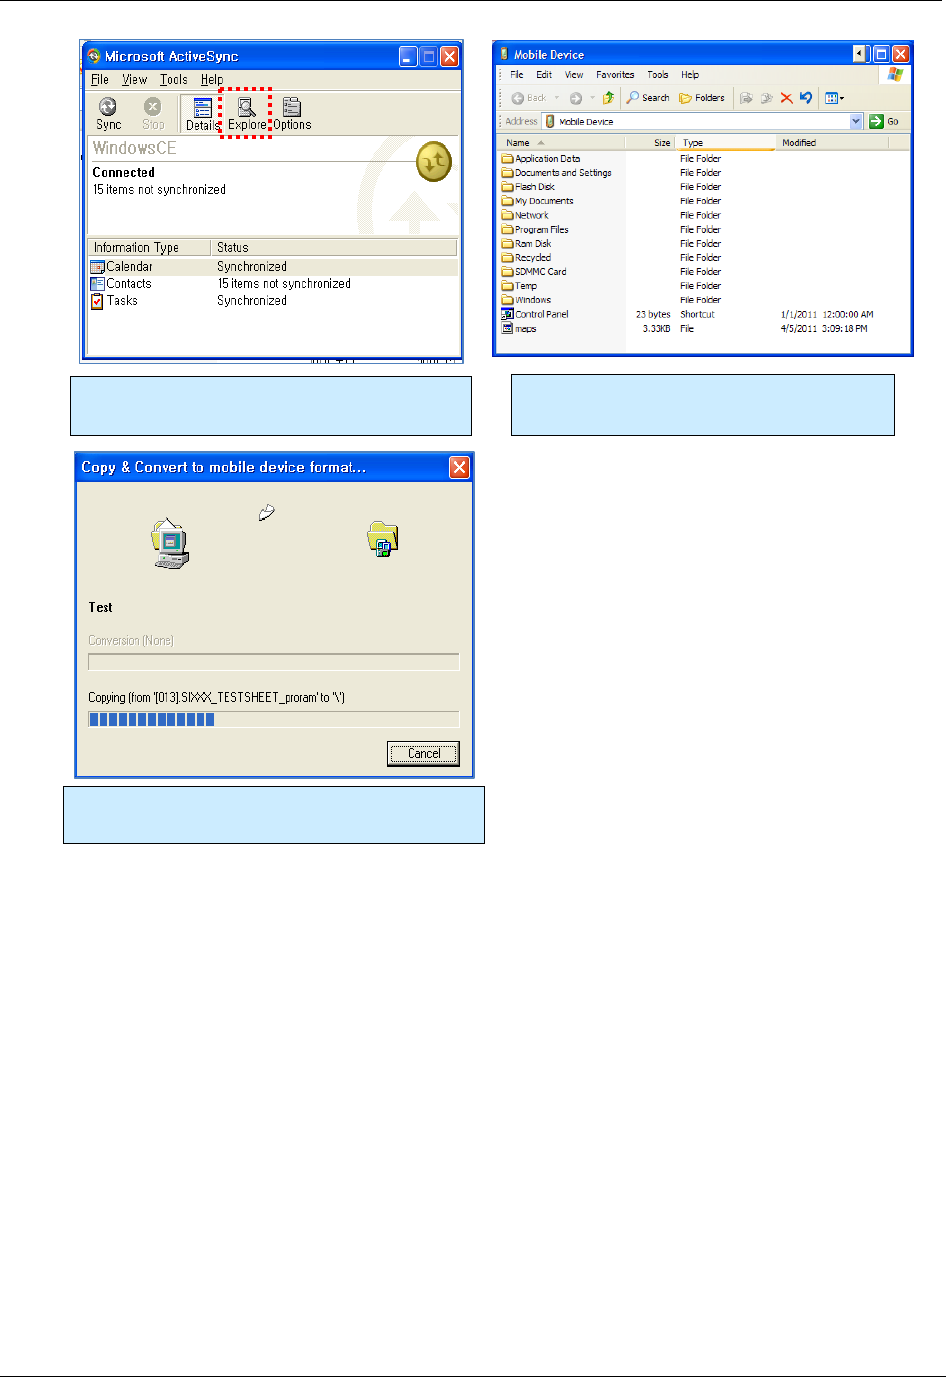
After ActiveSync is connected, click the Explore
button.
Browse to the folder on the handheld where
you would like to copy a file.
Drag and drop (from handheld to PC, or from PC
to handheld) to copy files.
CHAPTER 2 BASIC FUNCTIONS
ALH-900X USER’S GUIDE
DOC. CONTROL #8102114-000 REV A 21
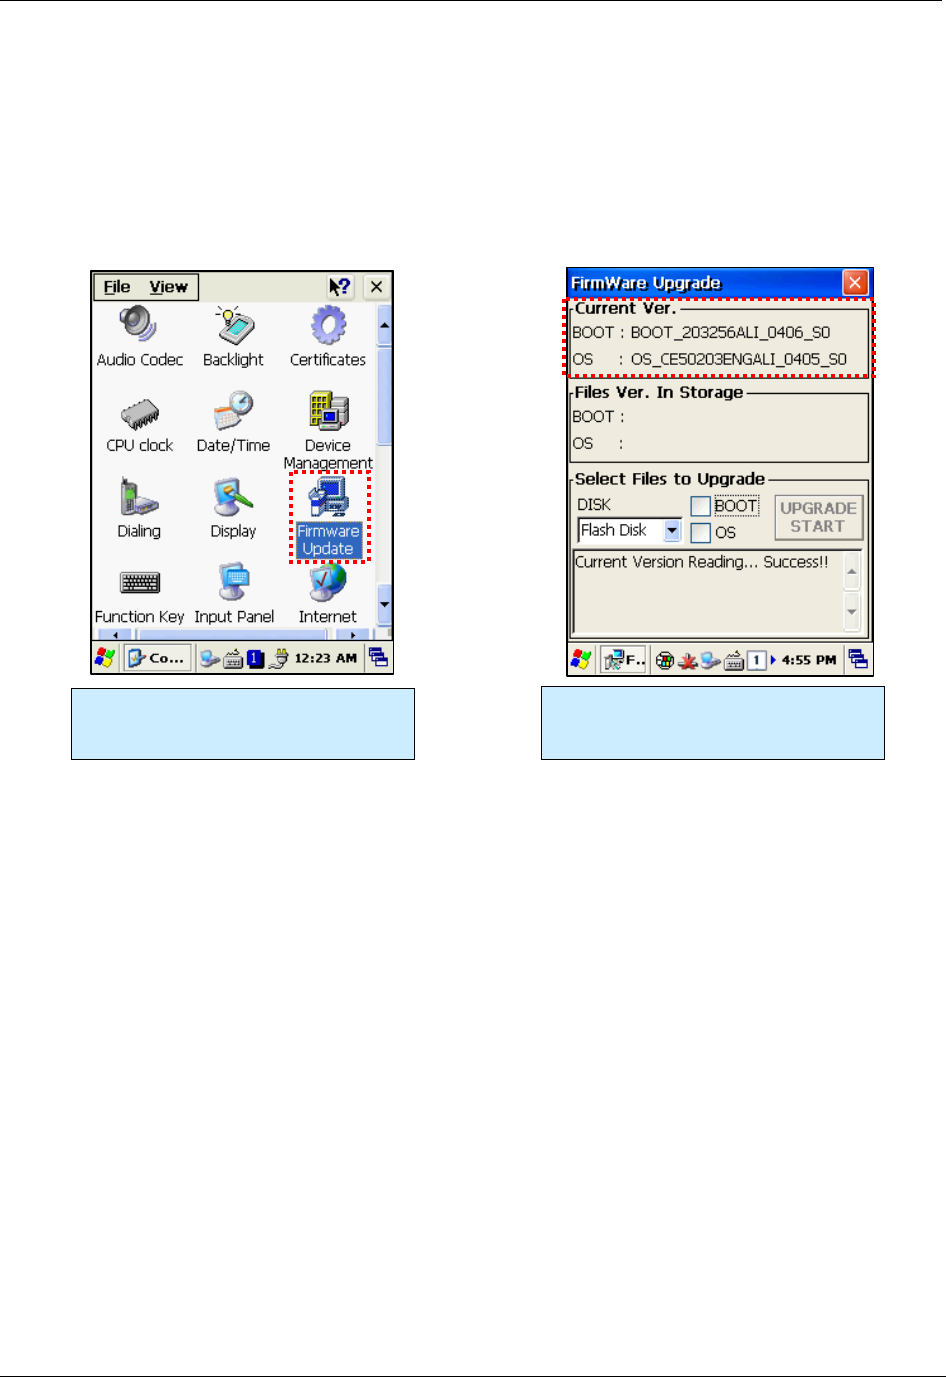
Firmware Upgrade
[Start] > [Settings] > [Control Panel] > [Firmware Update]
You can check the handheld’s firmware version in the Firmware Update control panel. It is also
possible to load a new firmware image (from either the Flash disk or a MicroSD card) using this
utility. Firmware updates require a hard reset to finish the process.
New firmware for the handheld is distributed as two separate image files – one for the bootloader,
and one for the main OS image. Upgrading the unit’s firmware will reset it to a factory-default
state. Any data or programs you may have loaded (except on the Flash Disk) will be removed and
you will have to reconfigure the unit afterwards.
You have two options for copying the new firmware files to the handheld (both methods are
explained earlier in the manual):
• Copy them to the top level of a MicroSD card and install the card into the back of the unit.
• Use ActiveSync to copy the files to the top level of the unit’s Flash Disk.
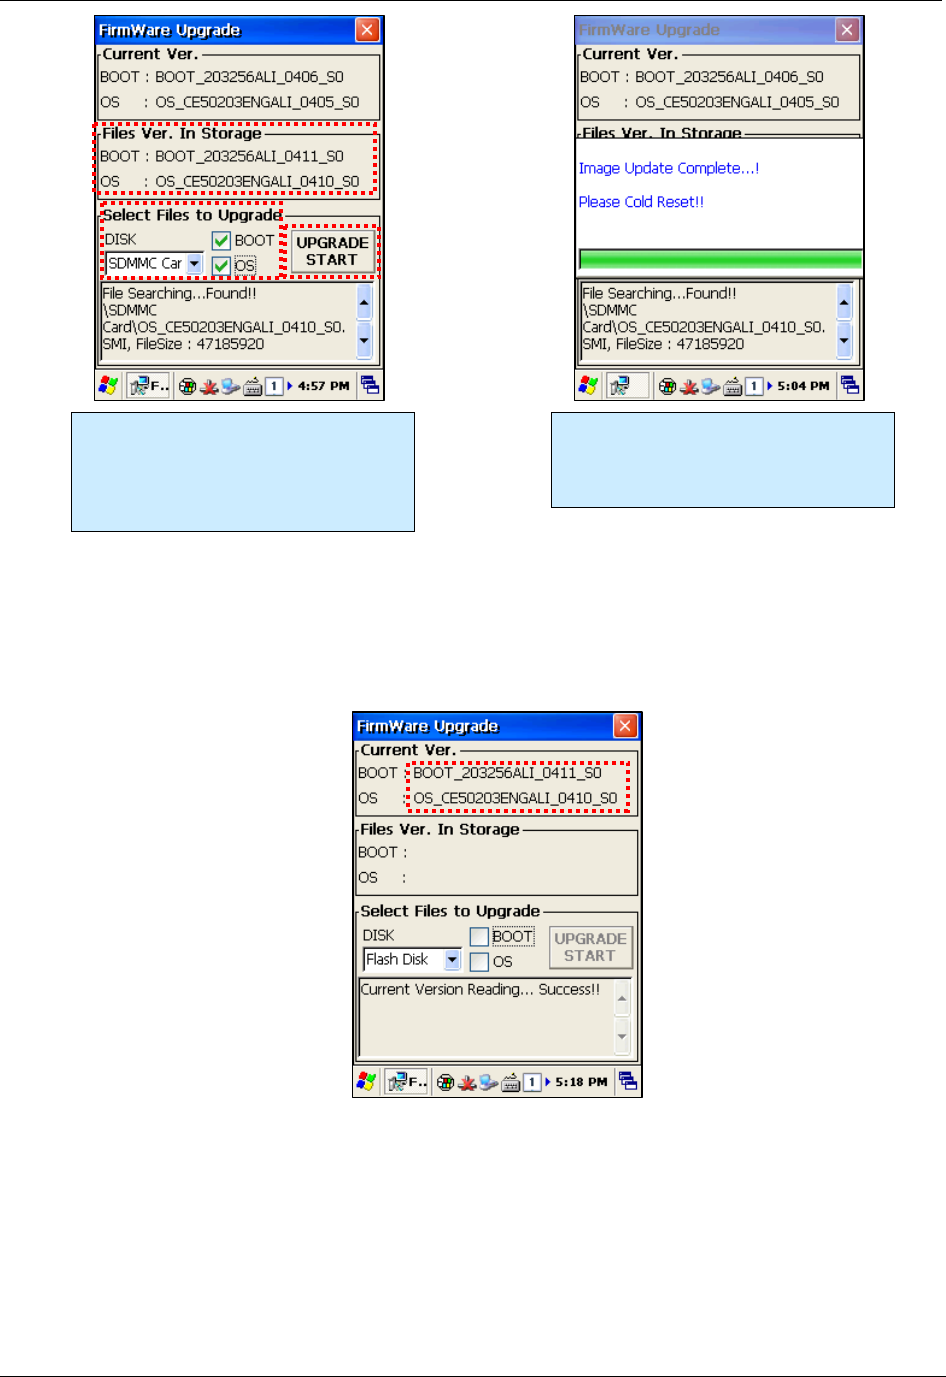
Once the two firmware files are in the handheld, use the Firmware Upgrade control panel to install
them. In the “Select Files to Upgrade” area, pick either Flash Disk or MicroSD from the DISK
pulldown, depending on where you loaded the image files. Check both the BOOT and OS
checkboxes to indicate that you want to install both, and it will verify the existence of those files
and report their version numbers in the “Files Ver. In Storage” area of the window. If everything
looks good, click the Upgrade Start button to begin the installation.
Go to the Firmware Update control
panel to examine the current firmware
version, and perform an upgrade.
The top area shows the current
firmware version (406/405 in this
example).
BASIC FUNCTIONS CHAPTER 2
ALH-900X USER’S GUIDE
DOC. CONTROL #8102114-000 REV A
22
Do not unplug the reader or attempt to turn it off while the upgrade is taking place!
After the upgrade is complete, you will be prompted to perform a Hard Reset to reboot the system
(hold both the Power & “Fun” keys while depressing the recessed reset button with the stylus).
When the reader reboots, you can verify the new firmware load through the Firmware Update
control panel.
If the reader fails to reboot, it may be because the new firmare image requires the system to be
“cleaned” first. In fact, it is a good idea to clean the system after installing new firmware on the
handheld. You can either clean the system leaving the Flash partition alone, or clean everything
including reformatting the Flash partition. Some OS updates might require this.
In order to clean the system (and recover your reader if it isn’t booting up after the upgrade), you
will need to go to the Boot Menu.
Select the location of the files, and
check both the BOOT and OS
checkboxes. The new image versions
appear in the area just above. Press
UPGRADE START to continue.
After the upgrade is complete, you must
cold-reset the unit (press Power and the
recessed Reset button at the same
time).
CHAPTER 2 BASIC FUNCTIONS
ALH-900X USER’S GUIDE
DOC. CONTROL #8102114-000 REV A 23
Boot Menu
To perform a Hard Reset and go to the Boot Menu,
hold the <Fun> button and the <Reset> button at the
same time for a few seconds. The [Boot Menu]
window will appear.
Enter the [Boot Menu] in any of the following situations:
• To upgrade the unit’s firmware.
• After an upgrade:
• to clean the Windows system
• to clean the Windows system and initialize the Flash Disk
[Boot Menu]
0. Firmware Upgrade
1. Clean (Without Flash)
2. Clean (With Flash)
3. Exit
Menu Select : Enter No.
[Boot Menu]
**** WARNING ****
Your information
will be erased !
Preview : <- BKS
Erase : Enter
[Boot Menu]
[Firmware Upgrade]
Media Source
> SD Memory
Upgraded files
> OS Image )
Complete Upgrade.
Please Cold Reset!
Preview : <- BKS
Select : Enter
The [Boot Menu] start-up screen, with
Firmware Upgrade, and two Clean
options.
Press the 0 key to do a Firmware Upgrade.
The image files must be on an installed
Micro SD memory card. The upgrade will
start automatically if a valid image file is
detected. Once it is complete, reset the
handheld to reboot it.
Press the 1 or 2 keys to clean the system
registry. The 2 option also initializes the
Flash Disk. Press Backspace to return to
the first menu, or Enter to proceed. The unit
will automatically reboot.
Fun Button
Reset Button
RFID TAG READER CHAPTER 3
ALH-900X USER’S GUIDE
DOC. CONTROL #8102114-000 REV A
24
Chapter 3
RFID Tag Reader
The ALH-900x handheld readers contains a full-featured 900 MHz UHF RFID tag reader. It is able
to inventory, selectively read from, and write to, RFID tags which support the EPC Gen2 protocol.
The Frequency range is 850MHz - 960MHz, and can be adjusted for different regions.
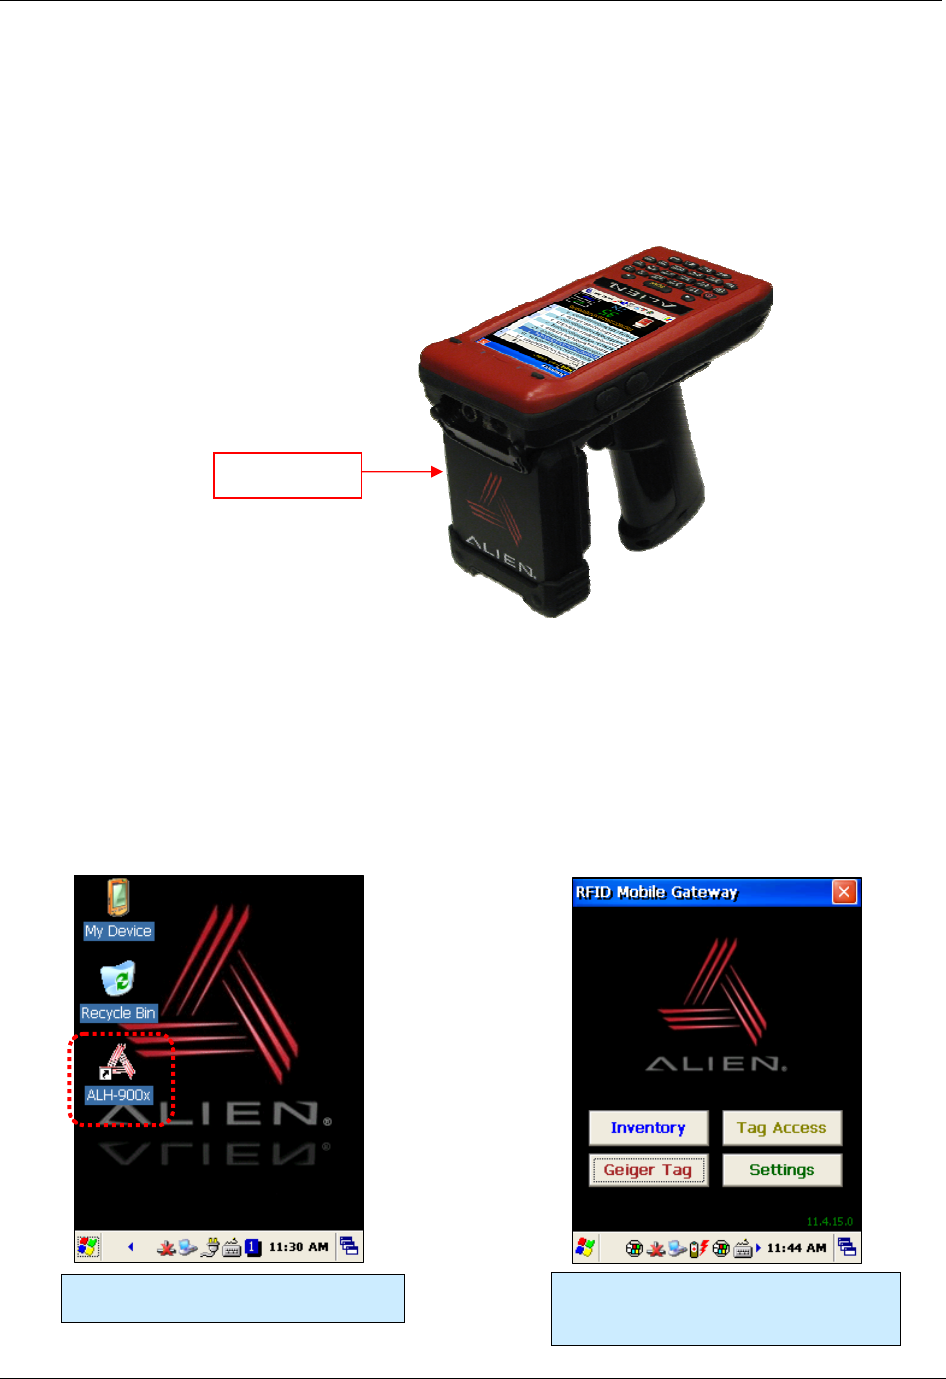
Starting the ALH-900x RFID Demo Software
The Alien RFID demo software is accessible by the RFID Demo icon on the unit’s desktop, or it
can be launched directly from the Start menu. It provides an example of what you can accomplish
with a custom application on the reader.
[Start] > [Programs] > [Alien Demos] > [RFID]
Running the RFID Mobile Gateway
demo software.
The main screen presents buttons for
each of the utilities, and one for general
reader settings.
UHF Reader
CHAPTER 3 RFID TAG READER
ALH-900X USER’S GUIDE
DOC. CONTROL #8102114-000 REV A 25
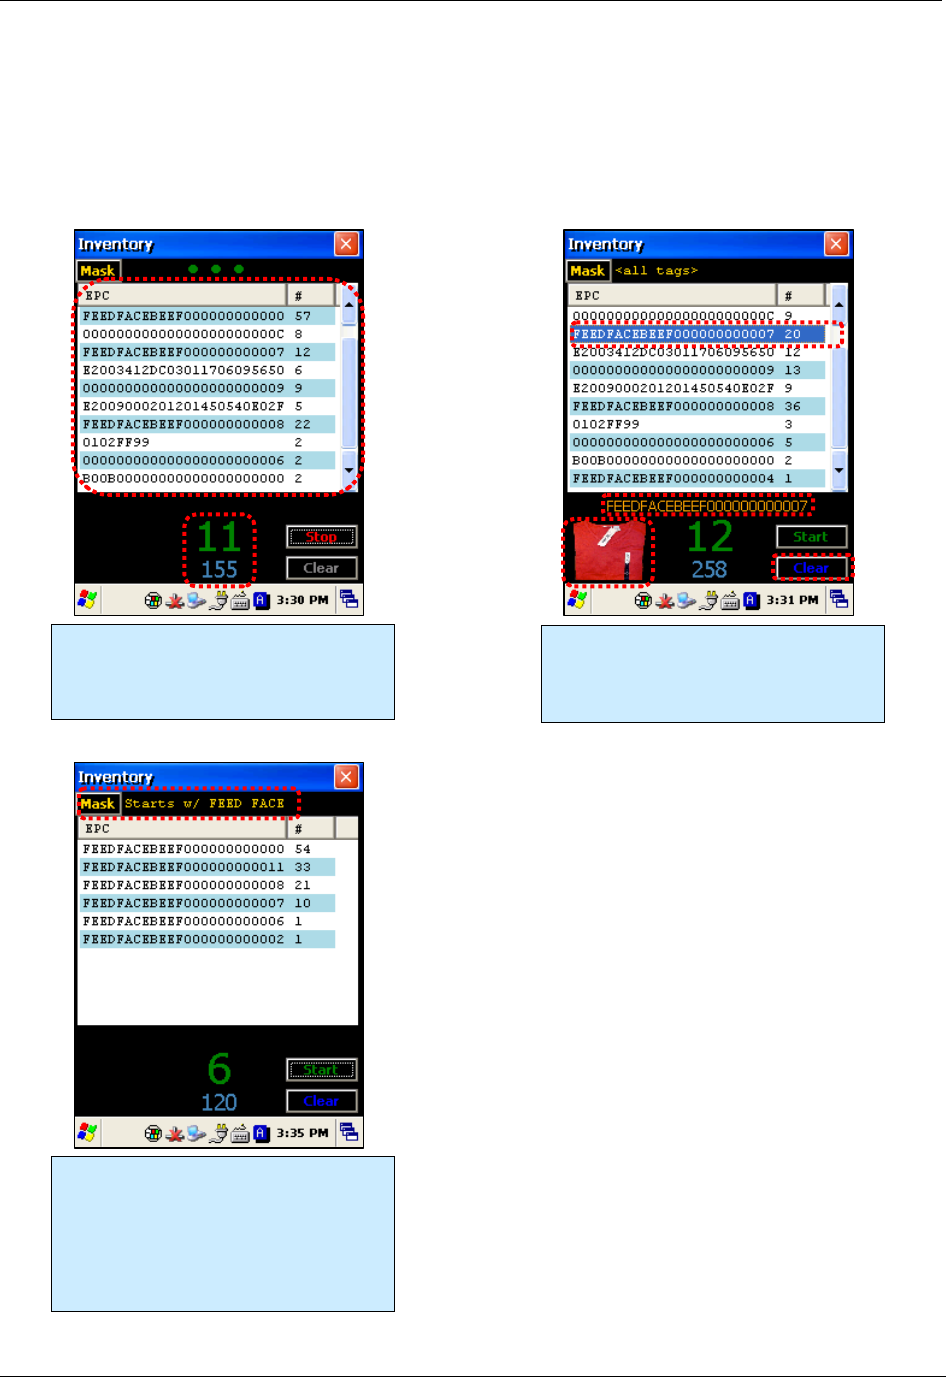
Inventory Utility
The Inventory utility allows you to scan all of the tags within range of the reader, and see each tag’s
EPC and read count in a scrollable list. You start and stop the inventory utility by either holding the
pistol-grip trigger button, or by clicking once on the green Start button. The reader continues to read
tags until you release the trigger or click the Stop button. Click the red Close box at the top-right
corner to return to the main screen.
Each tag that is read is added to the
scrolling list, along with the count for
each tag. The number of unique tags
and total number of reads is displayed.
Clicking on a tag in the list shows its full
EPC below the list, and a representative
product image is displayed. Click on the
Clear button to clear the list.
Clicking the yellow Mask button at the
top of the Inventory screen takes you to
a page where you can specify a subset
of tags to read (see the Tag Mask
section). This powerful feature causes
the reader to only read the tags you
want it to read.
RFID TAG READER CHAPTER 3
ALH-900X USER’S GUIDE
DOC. CONTROL #8102114-000 REV A
26
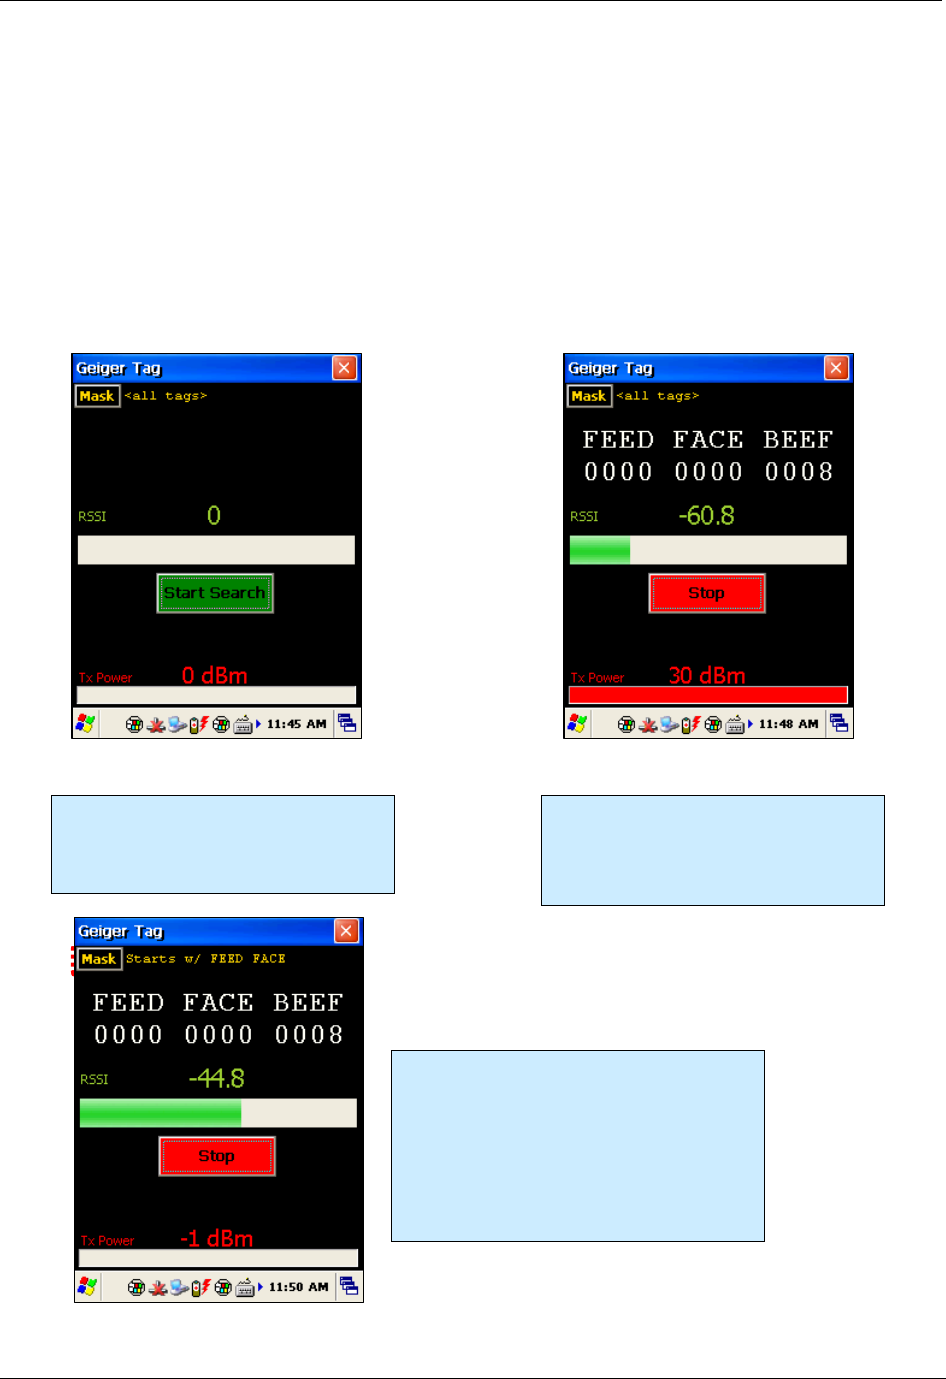
Geiger Tag Utility
The Geiger Tag utility is designed to assist you in finding the location of a particular tag, or one of a
group of tags. It does this by measuring the returning signal strength (RSSI) from the tag, and
displaying this information on the screen, along with an audible queue. As you scan the reader near
a tag, the RSSI increases, and you see and hear the change. In order to help narrow the field of
view of the reader as you zero-in on the tag, the reader’s output power is scaled down as you get
closer to the tag.
To start the Geiger Tag search, either hold the pistol-grip trigger button, or click once on the green
Start Search button. The reader continues to read tags until you release the trigger or click the Stop
button. Click the red Close box at the top-right corner to return to the main screen.
The Geiger shows the tag’s signal
strength and the reader’s current output
power. Use the Start Search button (or
pistol-grip trigger) to start the search.
When a tag is read, its EPC is displayed
on the screen, along with graphical and
numeric readouts of the tag’s return
signal strength, and the reader’s
transmitting power.
Having the Geiger react to every tag it sees
can quickly become overwhelming. Use the
yellow Mask button at the top-left corner to
indicate which tag or tags you are interested
in finding (see the Tag Mask section).
Narrowing the search down with a tag mask
can make the Geiger utility much more
effective.
CHAPTER 3 RFID TAG READER
ALH-900X USER’S GUIDE
DOC. CONTROL #8102114-000 REV A 27
Tag Access Utility
The Tag Access utility allows you to read from and write to specific portions of a tag’s memory. The
utility is divided up into two separate tabs: the Basic tab and the Advanced tab. The Basic tab gives
a quick overview of the tag’s memory layout, and gives you basic ability to write new data to the tag.
The Advanced tab gives full access (bank, start pointer, and length) over the low-level writing and
reading operations, as well as controls for locking and unlocking specific portions of tag memory.
EPC Gen2 tag memory is divided up into four distinct banks: Reserved, EPC, TID, and User. The
Reserved bank contains the tag’s Access password and Kill password (each two words long),
though all tags may not support both passwords. The EPC bank contains the tag’s “id” – its EPC
code – along with some other information related to the EPC. The TID bank is generally read-only,
and contains information about the tag’s manufacturer, model, and basic capabilities. Alien Higgs
tags contain bits in the TID bank that are guaranteed to be unique from one tag to the next. The
User bank may not be present in all tag types, and when it is supported each tag provides different
amounts of memory there.
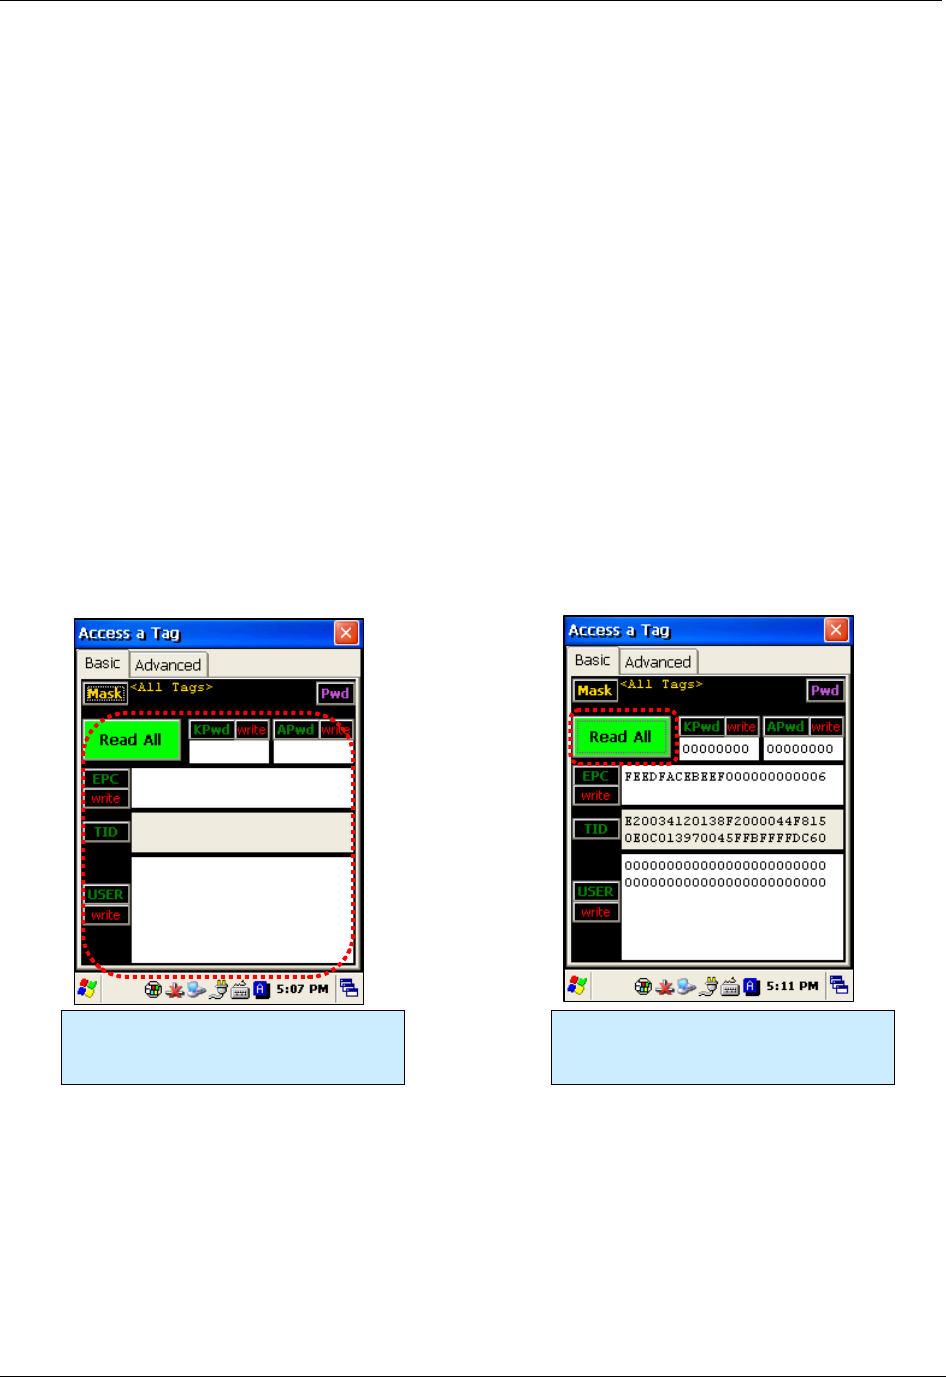
Basic Access Tab
The Basic Access tab has text fields for each of the separate fields of tag memory. Clicking the
Read All button (or pulling the pistol-grip trigger) causes the reader to try and read all of the data for
each of the fields, from whatever tag is in the field. The separate fields fill in, one-by-one, as the
data is read. Since there is no definitive way of knowing how much User memory a tag has, the
reader simply reads the User data two words (32 bits) at a time, until a failure occurs.
The Basic Access tab gives a visual
overview of all of the fields in tag
memory.
Pressing the Read All button (or pulling
the pistol-grip trigger) fills in each
memory field with data from the tag.
RFID TAG READER CHAPTER 3
ALH-900X USER’S GUIDE
DOC. CONTROL #8102114-000 REV A
28
When there are many tags in the field, the Basic Access tab can have difficulty reading all of the
data from the same tag when you click the Read All button. To make sure that you are accessing
the same tag throughout the operation, you should set a tag mask, using the yellow Mask button at
the top-left corner of the screen. Also, when the tag has some of its memory fields locked with an
access password, you must provide that same password as part of the access operation in order
for it to succeed. You use the violet Pwd button at the top-right corner to do this.
Pressing the small green buttons
labeling each memory field will cause
the reader to only read data from that
field.
Pressing the red “write” buttons cause
the reader to write the shown data to the
tag. You can edit the data in the field
before writing it to the tag. The field
turns orange while writing, and then
turns white or red, depending on the
success of the write operation.
The yellow Mask button lets you restrict
the reader to only access one tag at a
time.
The violet Pwd button opens up a dialog
window where you can enter in an
Access Password, for accessing tag
memory that may have been locked.
CHAPTER 3 RFID TAG READER
ALH-900X USER’S GUIDE
DOC. CONTROL #8102114-000 REV A 29
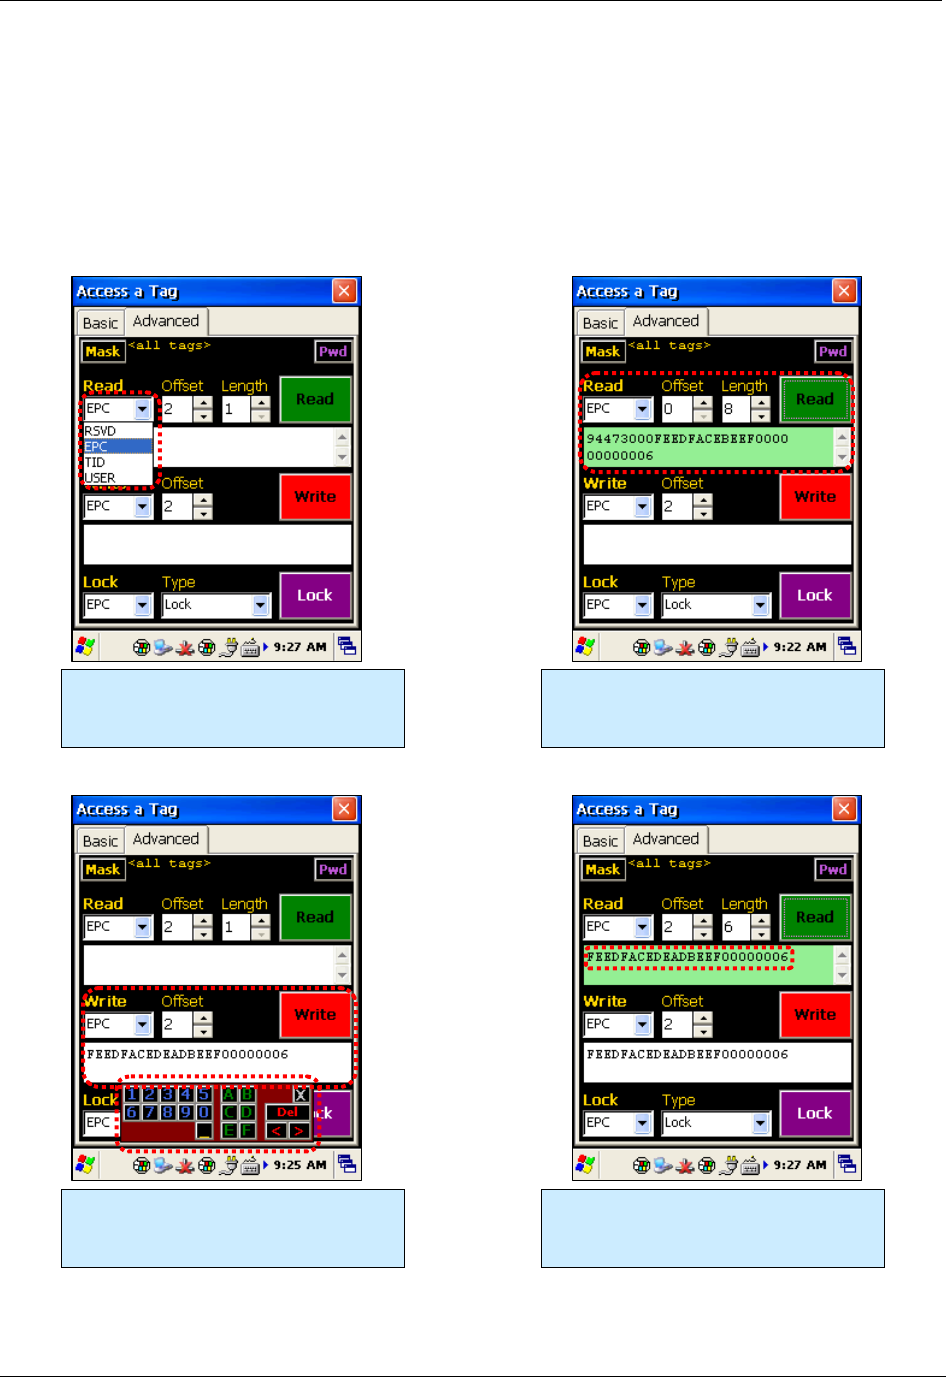
Advanced Access Tab
The Advanced Access tab has three general control areas: Read, Write, and Lock. All three
operations require you to specify the bank of tag memory to access (Reserved, EPC, TID, and
User). When reading and writing, you must specify the offset into that bank of memory where you
would like to access. The reading operation also requires you to specify the length of the data to
read. Both the offset and length parameters are measured in words (1 word = 2 bytes = 16 bits).
Three main areas in Advanced Access:
Read, Write, and Lock. Each requires
you to specify a memory bank.
Note in this read that the tag’s actual
EPC code (FEEDFACEBEEF…) is two
words offset into the EPC bank.
You must enter the hex data to write in
the field. The helpful popup keypad
makes entering hex data easy.
Verifying the success of the write, with
another read (of just the EPC code).
Now FEEDFACEDEADBEEF…

RFID TAG READER CHAPTER 3
ALH-900X USER’S GUIDE
DOC. CONTROL #8102114-000 REV A
30
When locking, you have the option of locking the Access Password and Kill Password (both in the
Reserved bank) separately, so the Lock command has a list of tag memory fields instead of banks.
The other parameter is the type of lock: Lock, Unlock, PermaLock, and PermaUnlock. All locking
operations require you to confirm by clicking OK to an alert message. The “Perma” options are,
well, permanent, so use caution.
Locking a field doesn’t immediately protect it until you also write a non-zero Access Password to
the tag (and you should probably lock that field as well!). Please refer to the EPC Gen2 Protocol
Specification for complete details on how the various locking operations affect the tag’s behavior.
You must enter the hex data to write in
the field. The helpful popup keypad
makes entering hex data easy.
Verifying the success of the write, with
another read (of just the EPC code).
Now FEEDFACEDEADBEEF…
As on the Basic Access tab, you have full access to
the tag Mask and current Access Password in this tab.
On this screen, the read operation failed for two
reasons: the mask doesn’t match the tag’s new EPC
(FEEDFACEDEADBEEF…) and we’re trying to
access it with an incorrect Access Password.

CHAPTER 3 RFID TAG READER
ALH-900X USER’S GUIDE
DOC. CONTROL #8102114-000 REV A 31
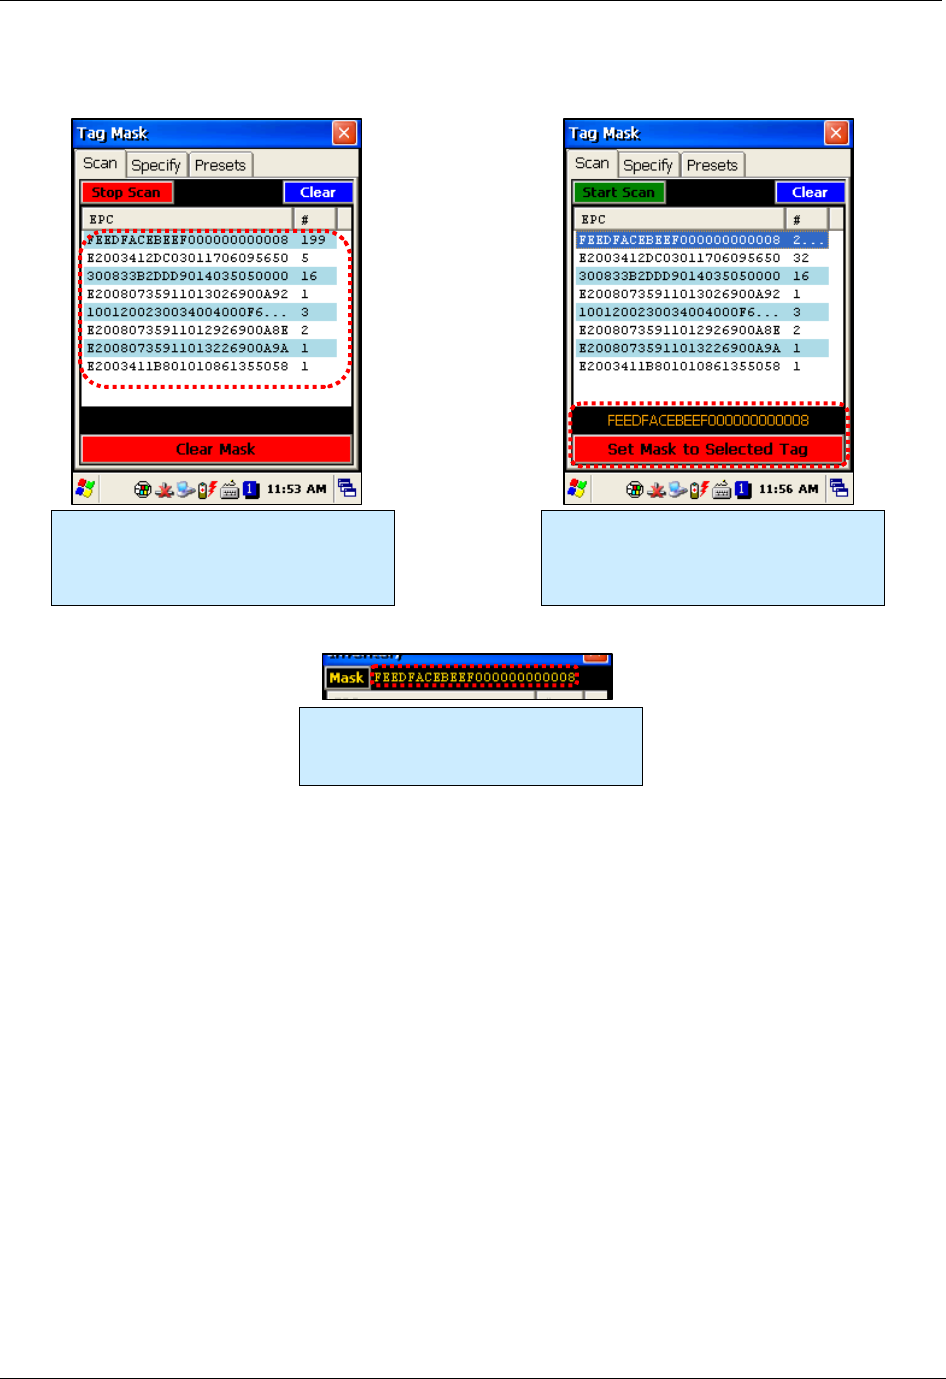
Tag Mask
When the application first launches, it is configured to look for and report every tag it sees. You
don’t always want to read every tag – perhaps you are searching for only one class of product, or
are trying to access one particular tag in order to write data to it. The Gen 2 protocol provides for
something called a select mask - a filter definition that is broadcast to all of the tags in the field
before each operation, that specifies which tags are allowed to participate in that operation.
The ALH-900x demo software allows you to specify a tag mask, which is used transparently in each
of the utility screens. The current mask is displayed at the top of each screen in yellow text,
alongside the Mask button that brings up the Tag Mask whenever it is clicked.
At its heart, a tag mask defines a piece of data that must match exactly a specific portion of the tag’s
memory. This includes the memory bank (not just the EPC bank), a pointer offset into that bank,
and the actual hex data to match against.
In reality, you don’t always want to have to think about memory banks and pointer offsets – you just
want to find that pair of jeans that is on the wrong rack, or you only care about “pallet tags”, however
that is defined for you. The Tag Mask screen therefore gives you three ways to pick a tag mask:
1. Scanning the field and picking a tag from a list.
2. Exactly defining the bank, offset, and hex data.
3. Picking a named mask from a preset list
Once you have defined and set your mask, just close the Tag Mask window and your new mask will
be displayed at the top of the screen you were originally on, and it will be used in subsequent
operations.
RFID TAG READER CHAPTER 3
ALH-900X USER’S GUIDE
DOC. CONTROL #8102114-000 REV A
32
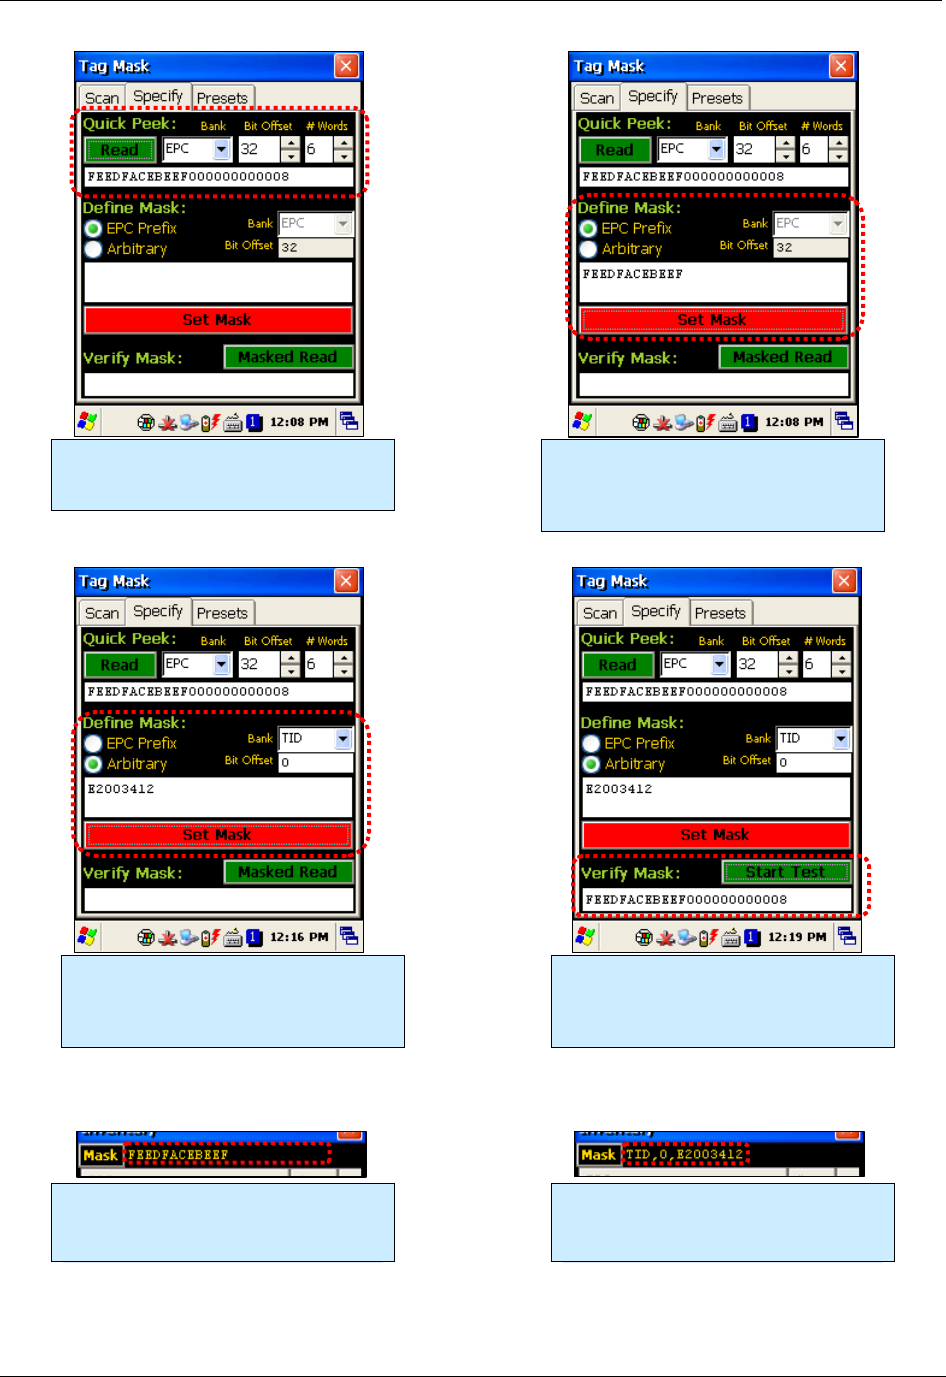
Tag Mask – Scan
Tag Mask – Specify
The Tag Mask “Specify” tab allows you to do three things: take a quick peek at tag memory (to help
you determine your mask definition), define an arbitrary or “EPC Prefix” mask, and verify your
mask.
The upper Quick Peek section lets you choose a bank, pointer offset, and number of words to read.
Clicking the green Read button will query any tag in the field (without any masking) and report the
data from that tag.
The middle section is where you actually define your mask. There are two options here: create a
mask based on an EPC prefix (i.e. “all tags starting with…”), or create an arbitrary mask. If you
select EPC Prefix, the only thing you have to provide is the hex data representing the initial part of
the EPC code for your tags (the other controls are disabled). If you select Arbitrary, you choose the
bank and pointer offset, along with the mask data. Click the red Set Mask button to define your
mask.
After you’ve defined a mask, you can do a quick verification by clicking the green Masked Read
button in the Verify Mask section at the bottom. Any responding tag’s EPC will be shown in the text
field there.
Select a tag from the list and click the
Set Mask to Selected Tag button. Click
an empty part of the list and click the
Clear Mask button to clear the mask.
The Scan tab acts just like the Inventory
screen – start/stop the reader with the
trigger or Start Scan button, and all tags
in range are displayed.
Masks defined with the Scan method
are displayed on the utility screens as
simply the full EPC of the tag.
CHAPTER 3 RFID TAG READER
ALH-900X USER’S GUIDE
DOC. CONTROL #8102114-000 REV A 33
The Quick Peek section lets you get a
glimpse of an actual tag’s memory, to
help you define your mask.
Defining a mask based on an EPC
prefix is easy – just click the radio
button, enter the EPC data and click Set
Mask.
Defining an arbitrary mask requires you
to specify the bank and offset, along
with the data. This TID mask example
selects all Alien Higgs3 tags.
Using the Verify Mask feature, you can
make sure you’ve entered the mask
correctly. Be sure to test tags that match
as well as tags that don’t match.
Masks defined with the EPC Prefix
method are displayed on the utility
screens as that initial part of the EPC.
Masks defined with the Arbitrary method
are displayed on the utility screens with
the bank, offset, and data.
RFID TAG READER CHAPTER 3
ALH-900X USER’S GUIDE
DOC. CONTROL #8102114-000 REV A
34
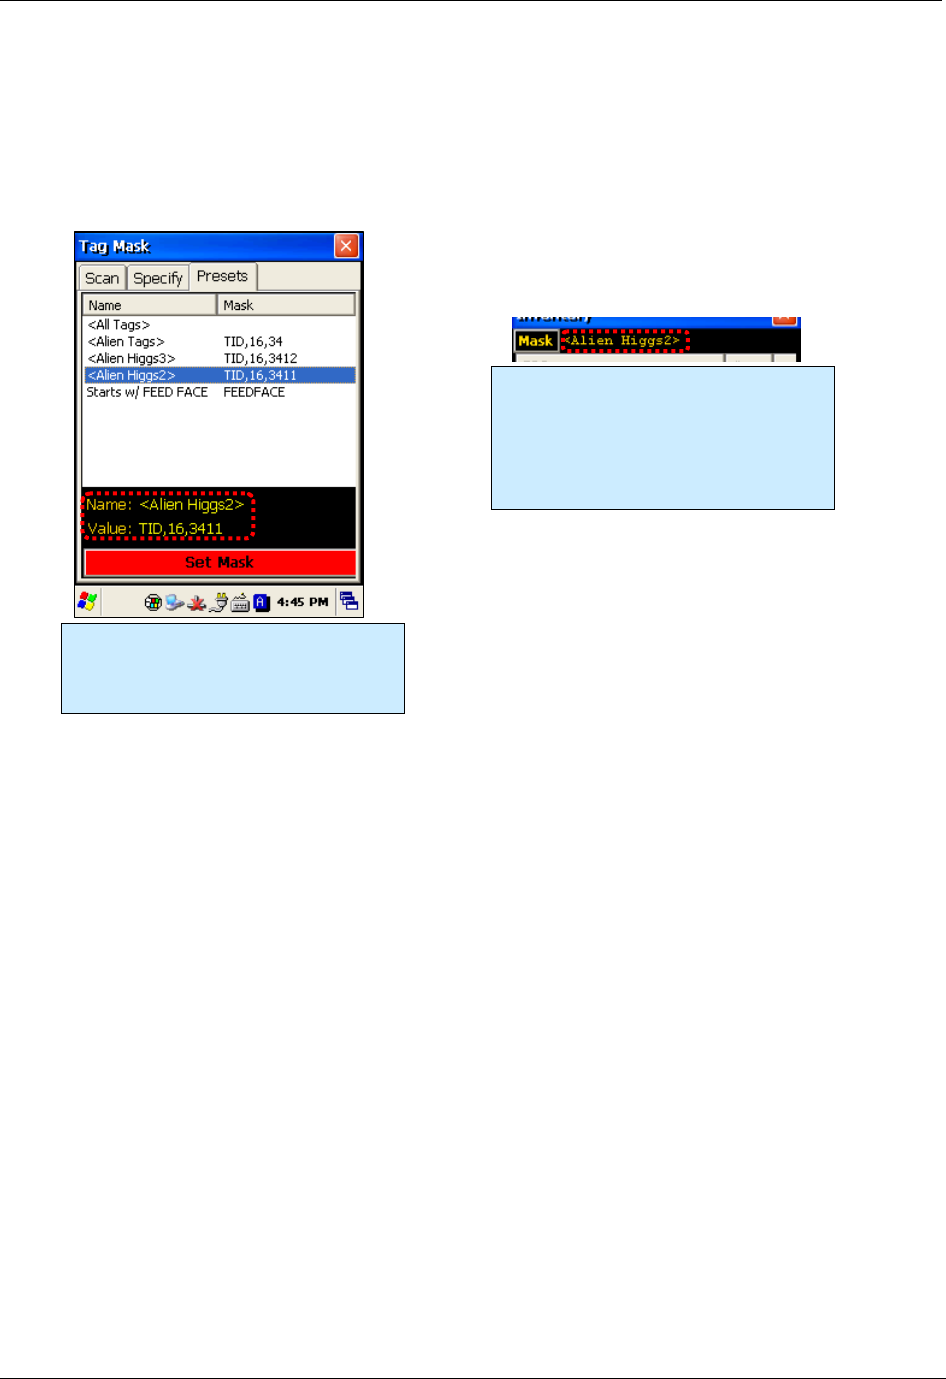
Tag Mask – Presets
The third way to set a tag mask is with the Presets tab. This screen shows a list of pre-defined tag
masks, such as “all tags”, “all Higgs3 tags”, etc. These presets are hard-coded in the application
right now, but will be user-configurable in the future.
Pick one of the selections from the
Presets list, and you can see the
displayed name and mask definition.
Click the Set Mask button to use it.
Masks chosen from the Presets tab are
shown on the utility screens with the
display name in the mask preset
definition. Your mask presets might
display “Blue Jeans” or “Pallet Tags”
instead.
CHAPTER 3 RFID TAG READER
ALH-900X USER’S GUIDE
DOC. CONTROL #8102114-000 REV A 35
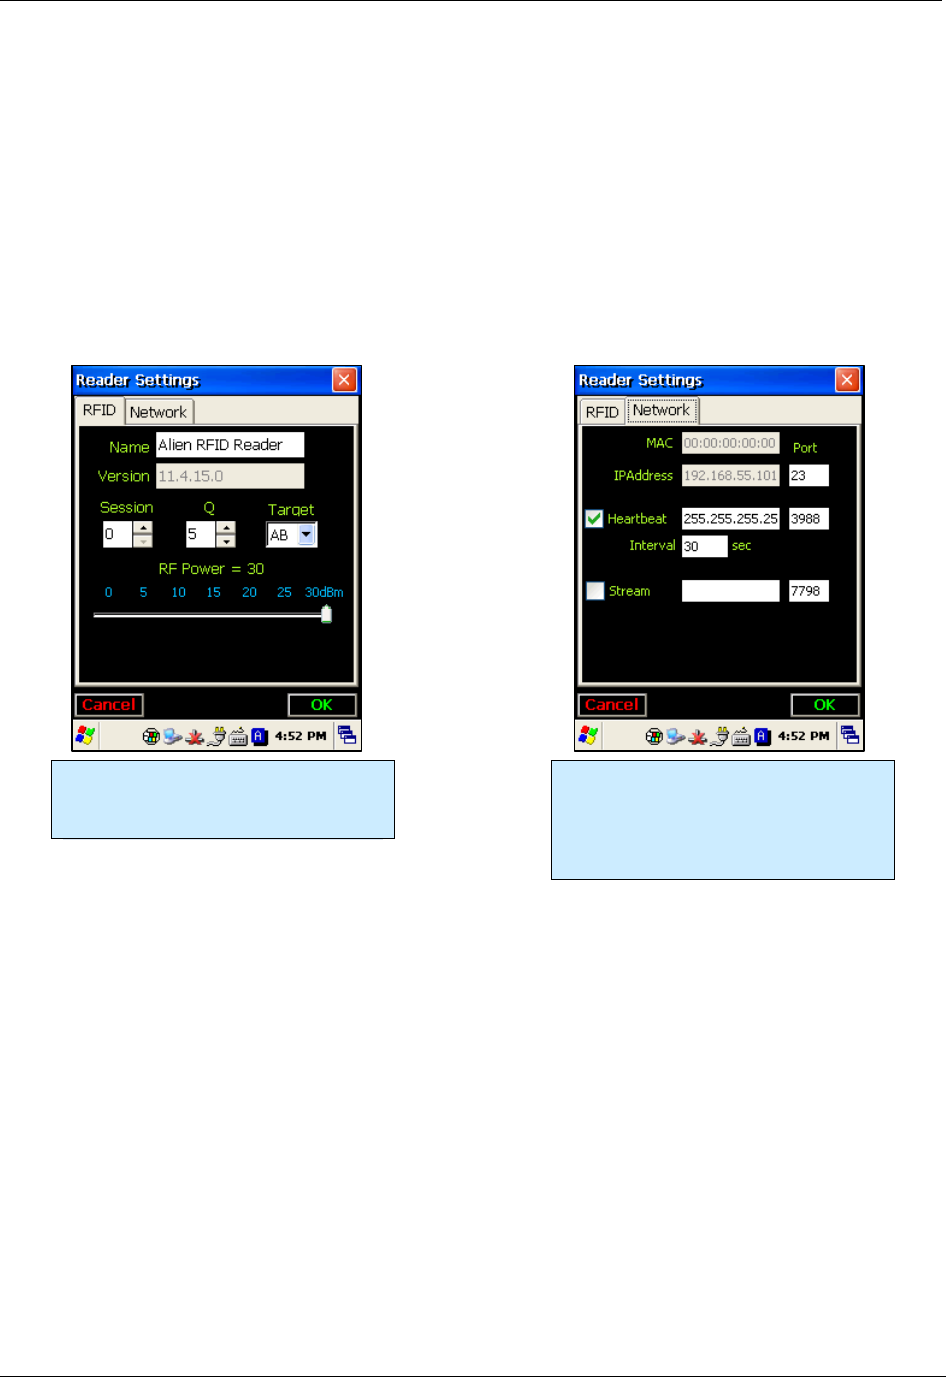
Reader Settings
The Reader Settings screen allows you to see and change certain parameters of the RFID reader,
such as transmit power, and some Gen2-specific parameters on the RFID tab. There is a second
Network tab with some additional parameters related to the reader’s network interface and some
common Alien features, such as a Heartbeat and TagStream functionality.
To commit any changes made on the Reader Settings pages, you must click the OK button at the
lower-right corner. Clicking the Cancel button or the Close (X) button in the top-right corner returns
you to the main screen without applying any of the changes that you made.
The RFID tab has controls for RF Power
and some Gen2 parameters, such as
Session, Q, and Inventory Target.
The Network tab shows the reader’s
MAC and IP addresses, as well as fields
and checkbox controls for the Heartbeat
server (for UDP-based discovery), and a
TCP-based TagStream feature.
BARCODE SCANNER CHAPTER 4
ALH-900X USER’S GUIDE
DOC. CONTROL #8102114-000 REV A
36
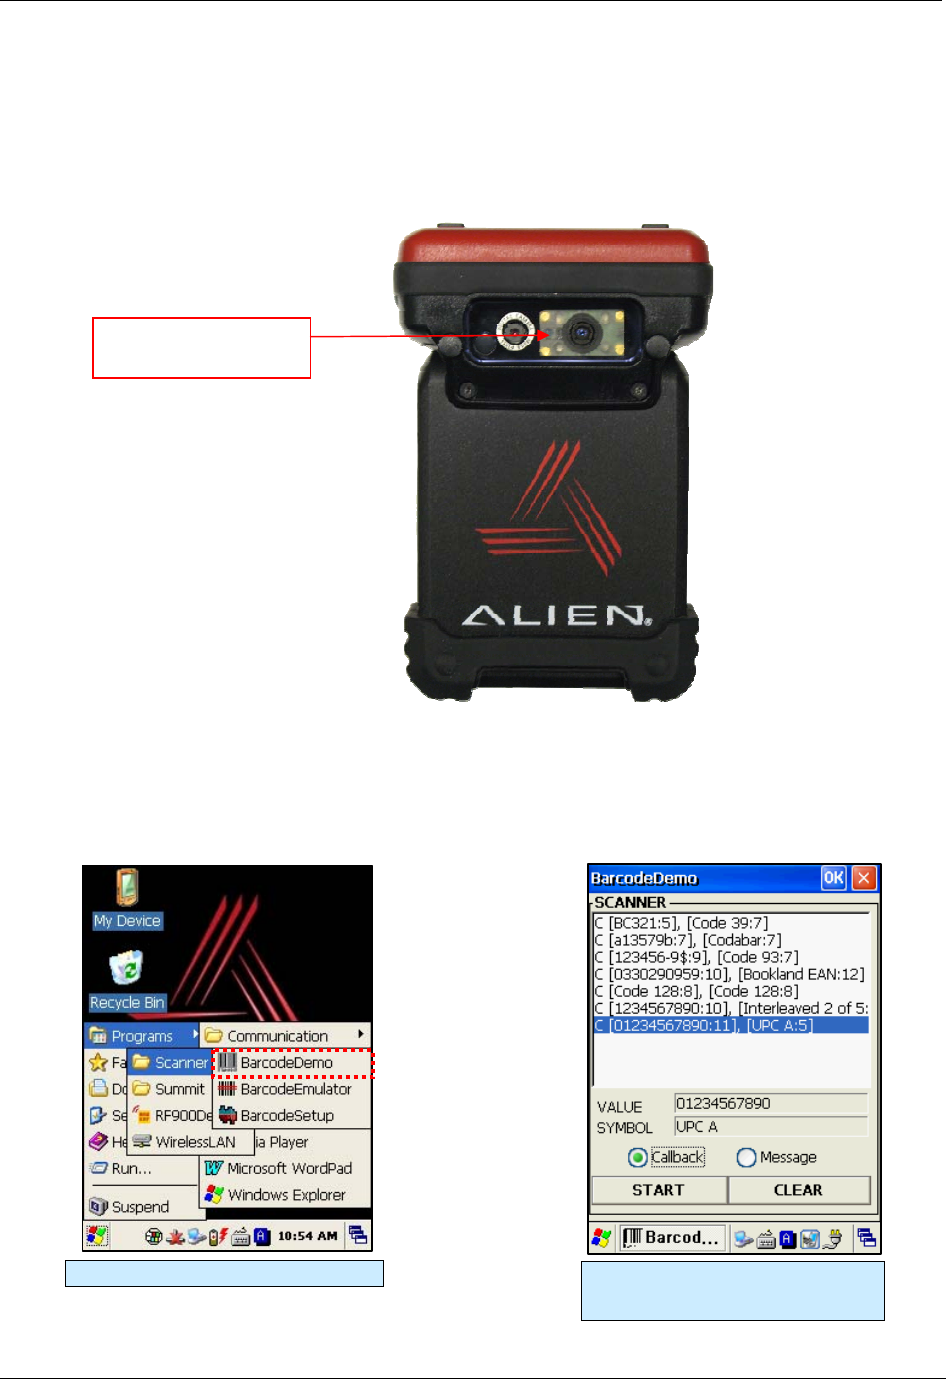
Chapter 4
Barcode Scanner (1D & 2D)
The ALH-9000 comes equipped with a 1D barcode scanner, and the ALH-9001 is equipped with a
2D barcode scanner. Both models are designed to recognize all known 1D and 2D barcodes.
BarcodeDemo
The BarcodeDemo application is accessible from the Start menu. It provides an example of what
you can accomplish with a custom application on the handheld.
[Start] > [Programs] > [Alien Demos] > [Scanner] > [BarcodeDemo]
Starting the BarcodeDemo app. Press the Start button to read a
barcode.
Barcode Scanner
(ALH-9001 shown)
CHAPTER 4 BARCODE SCANNER
ALH-900X USER’S GUIDE
DOC. CONTROL #8102114-000 REV A 37
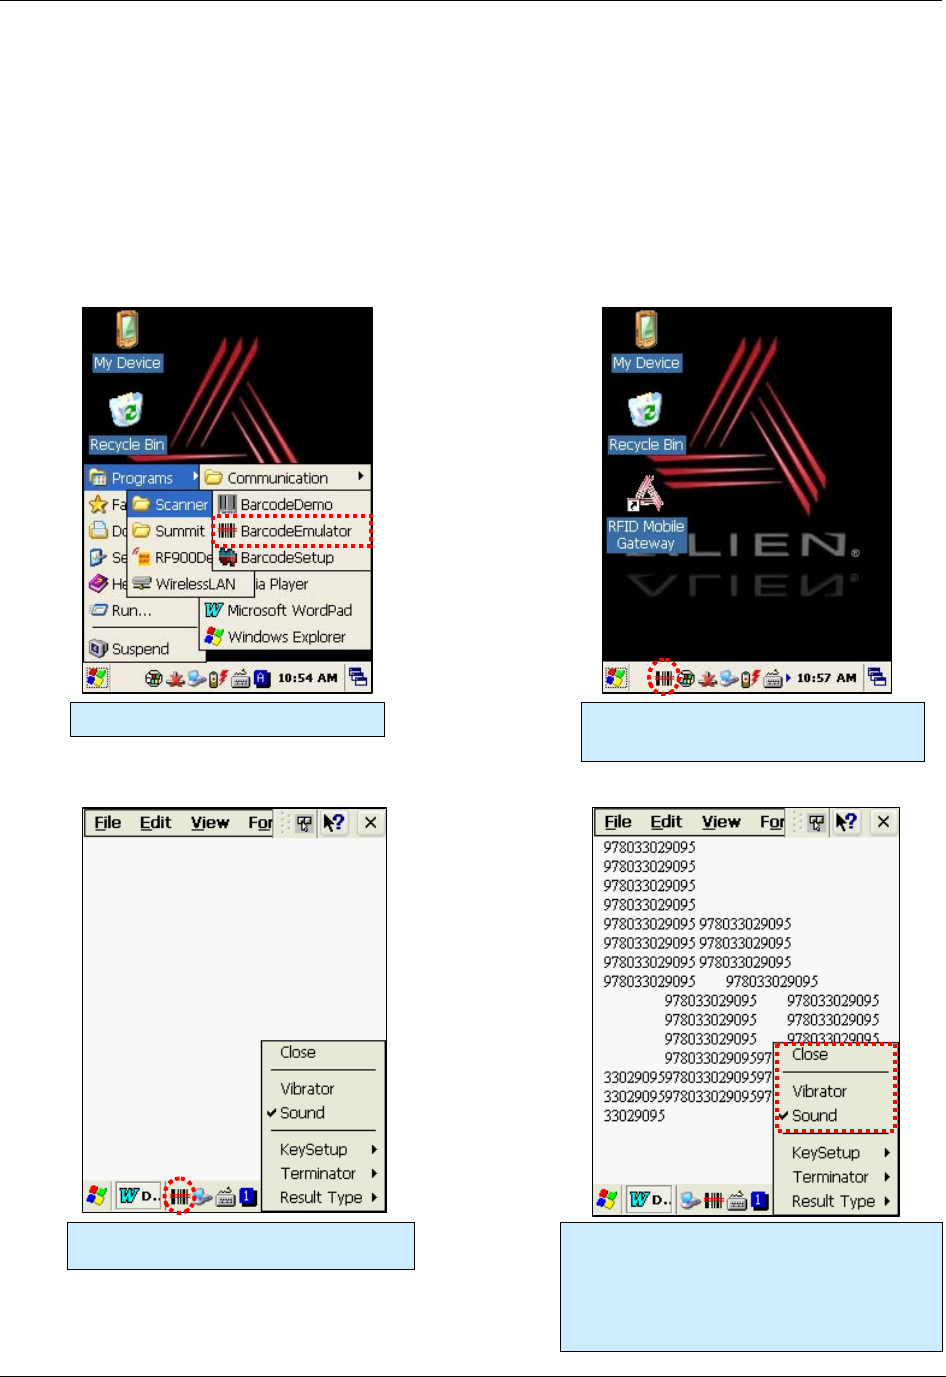
Using the BarcodeEmulator
The BarcodeEmulator program enables you to input scanned barcode data anywhere you can
manually enter text. It runs in the System Tray, and sends keyboard events directly into whatever
application is in the foreground. The icon in the System Tray lets you set the barcode value input
type, scan button, scan sound, and so on.
[Start] > [Programs] > [Scanner] > [BarcodeEmulator]
Starting the BarcodeEmulator The BarcodeEmulator icon is shown on
the taskbar.
Run WordPad Program, then click the
BarcodeEmulator Icon
Sound:
A beep sounds when a barcode is scanned.
Vibrator:
The unit vibrates when a barcode is scanned.
Close:
Exits the Emulator Program
BARCODE SCANNER CHAPTER 4
ALH-900X USER’S GUIDE
DOC. CONTROL #8102114-000 REV A
38
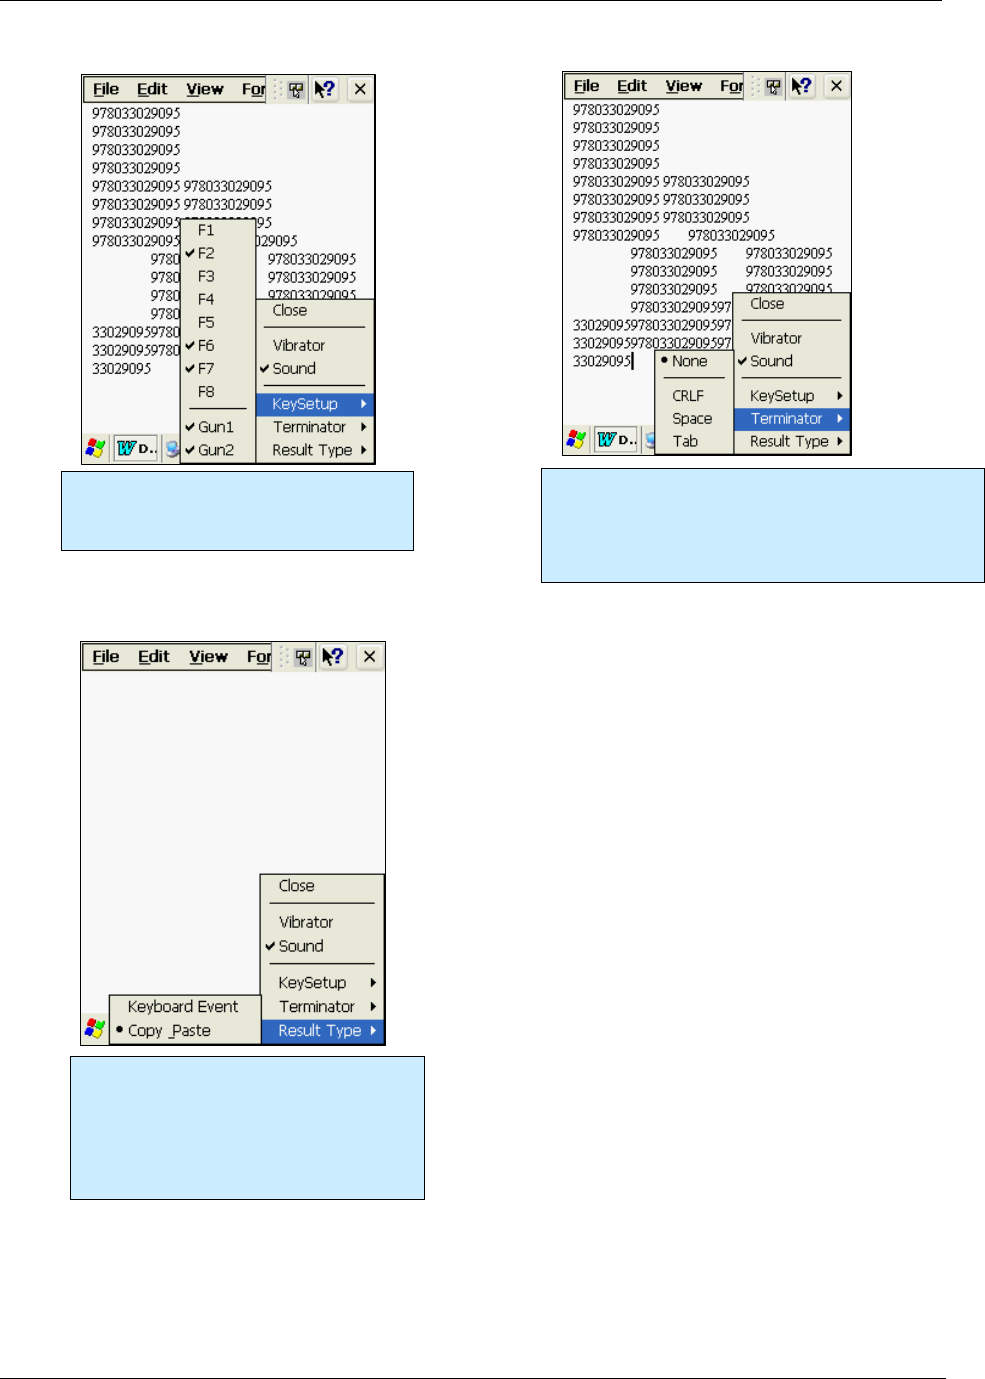
Result Type
Keyboard Event:
Barcode digits are inputted one-by-one.
Copy Paste:
Barcode data is stored on the clipboard
and can be pasted later.
Terminator
None: Do not terminate the barcode value.
CRLF: Barcode ends with a standard terminator.
Space: Barcode ends with a “Space” character.
Tab: Barcode ends with a “Tab” character.
Key Setup
F1-F8: Hardware Keypad
Gun1, Gun2: Gun Trigger
CHAPTER 4 BARCODE SCANNER
ALH-900X USER’S GUIDE
DOC. CONTROL #8102114-000 REV A 39
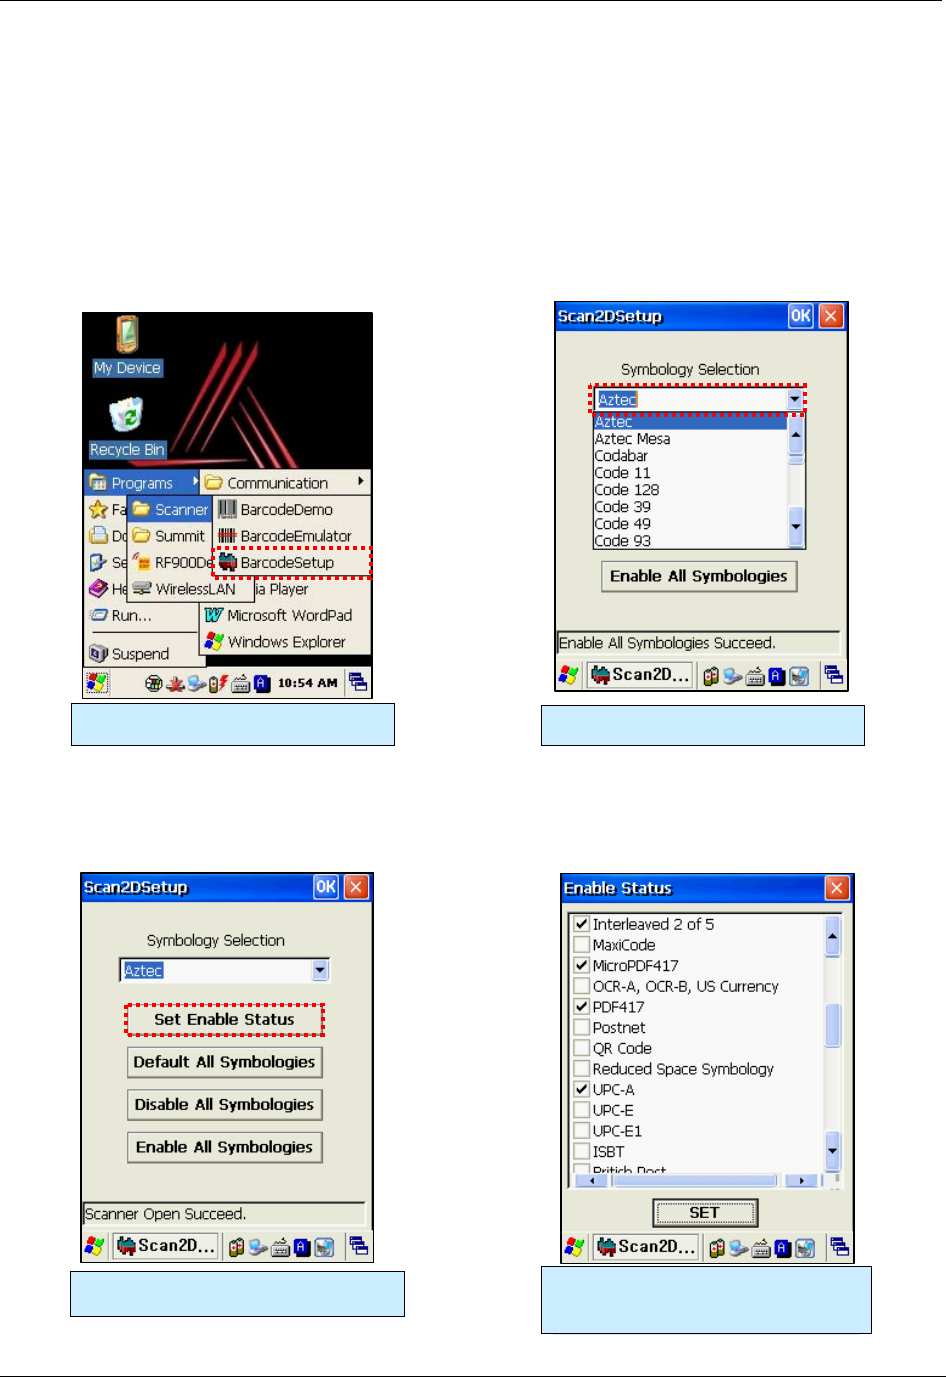
Setting Barcode Symbology
There are many different barcode encoding standards, depending on the region and industry. You
must make sure that the barcode scanner is set to decode the types of barcodes that you expect to
encounter. Selecting too many symbologies can increase the time it takes to decode a scanned
barcode once it has been scanned.
[Start] > [Programs] > [Alien Demos] > [Scanner] > [BarcodeSetup]
Click Set Enable Status button. Make a check mark on the barcode
which you want to use, and then click
the <SET> button.
Running the BarcodeSetup program. Set the Barcode type in detail.
BARCODE SCANNER CHAPTER 4
ALH-900X USER’S GUIDE
DOC. CONTROL #8102114-000 REV A
40
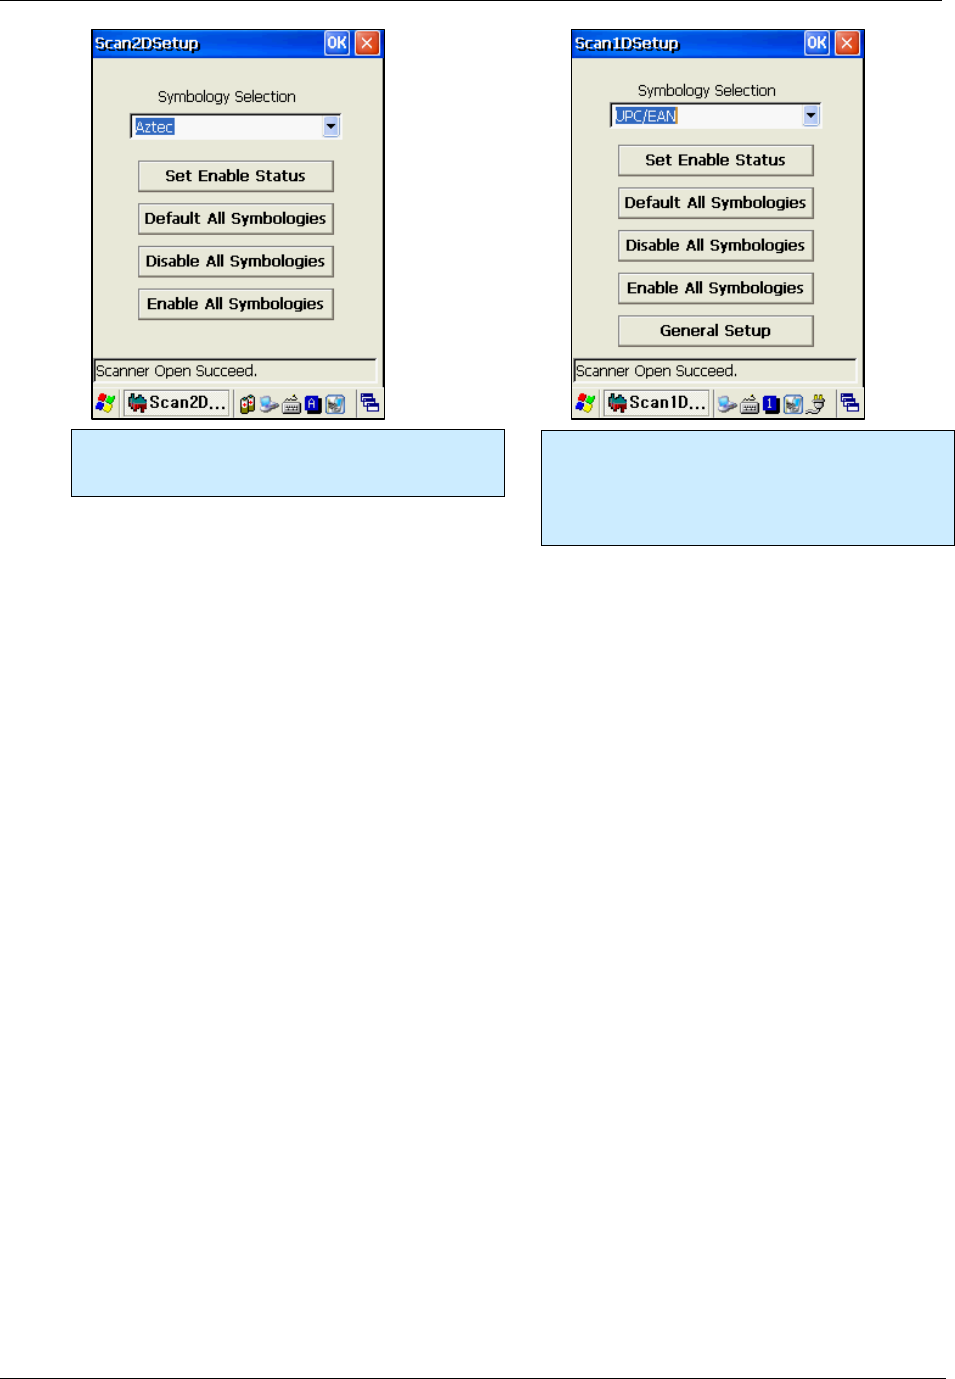
2D Symbology Selection:
Initialize all the symbologies to the factory default
values, disable or enable all of the symbologies.
1D Symbology Selection:
Initialize all the symbologies to the factory default
values, enable or disable all of the symbologies.
General Setup lets you set Linear Security levels,
and bi-directional redundancy.
CHAPTER 4 BARCODE SCANNER
ALH-900X USER’S GUIDE
DOC. CONTROL #8102114-000 REV A 41
Barcode Scanning Beam Position
1. Remove any protective film from the window of barcode scanner.
2. Launch the BarcodeDemo program.
3. Point the laser beam at the barcode.
• Adjust the distance according to the size of barcode.
• The scan will stop automatically when the barcode is read, or after ten seconds, if
no barcode is detected.
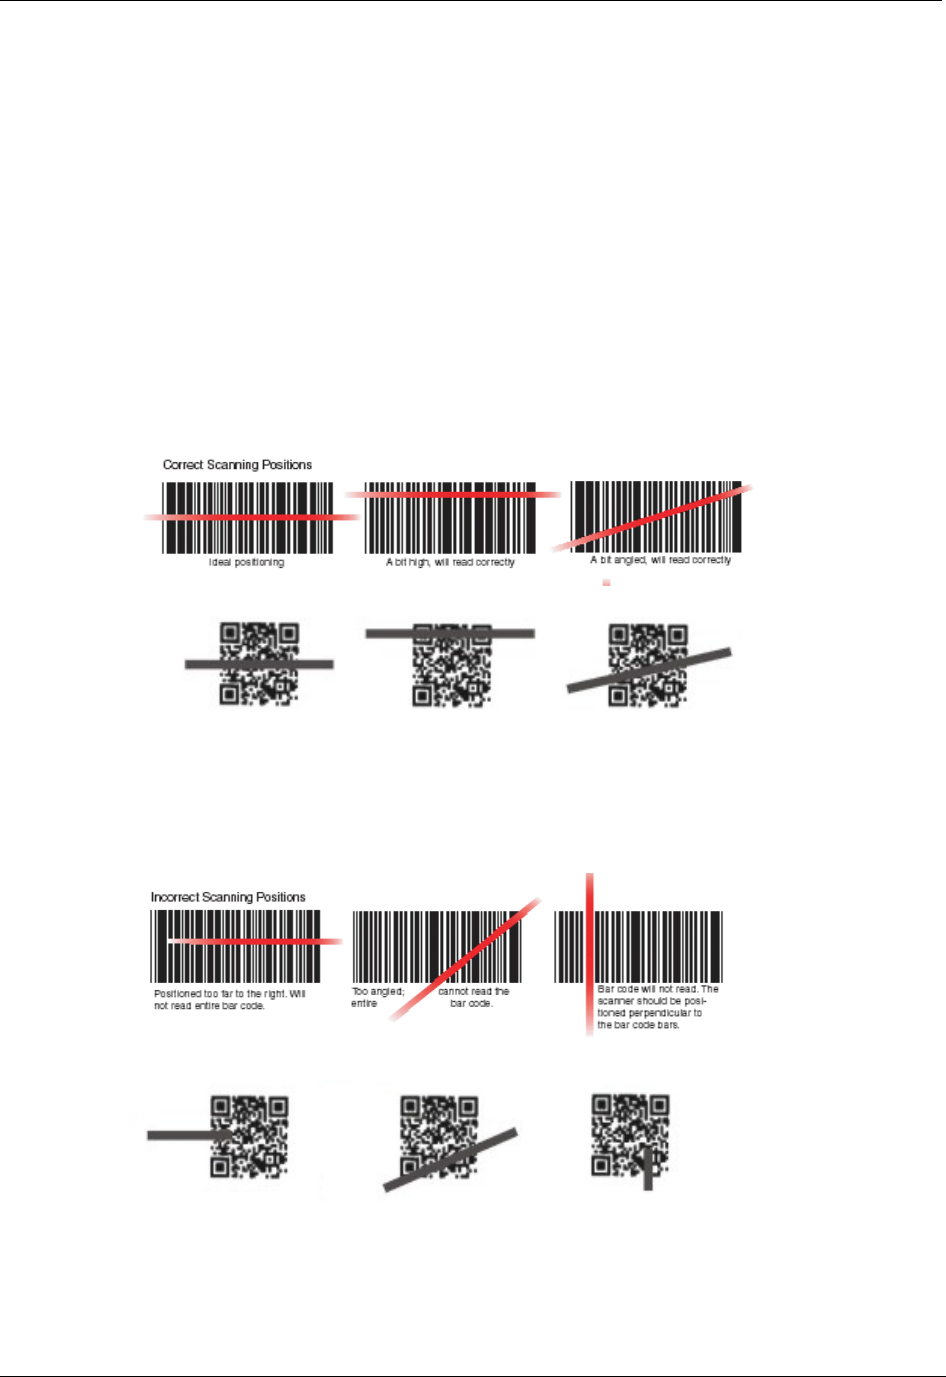
Correct Scanning Beam Position
1. The smaller the size of the barcode, the closer the handheld needs to be. The effective
scanning range is 1.5-12 inches (40-300mm). If the unit fails to scan the barcode, adjust
the scan angle and distance.
2. The laser beam is a red thick line, when scanning a barcode.
Incorrect Scanning Beam Position
1. The laser beam must pass across the entire barcode.
2. It will not scan the barcode if the laser beam crosses only part of the barcode.
1D
2D
1D
2D
WIRELESS LAN CHAPTER 5
ALH-900X USER’S GUIDE
DOC. CONTROL #8102114-000 REV A
42
Chapter 5
Wireless LAN
The ALH-900x handheld readers are equipped with an internal 802.11 radio module to transfer
data, and interface the unit with your network using wireless communication. It supports TCP/IP
network protocols, and can communicate with a host computer directly.
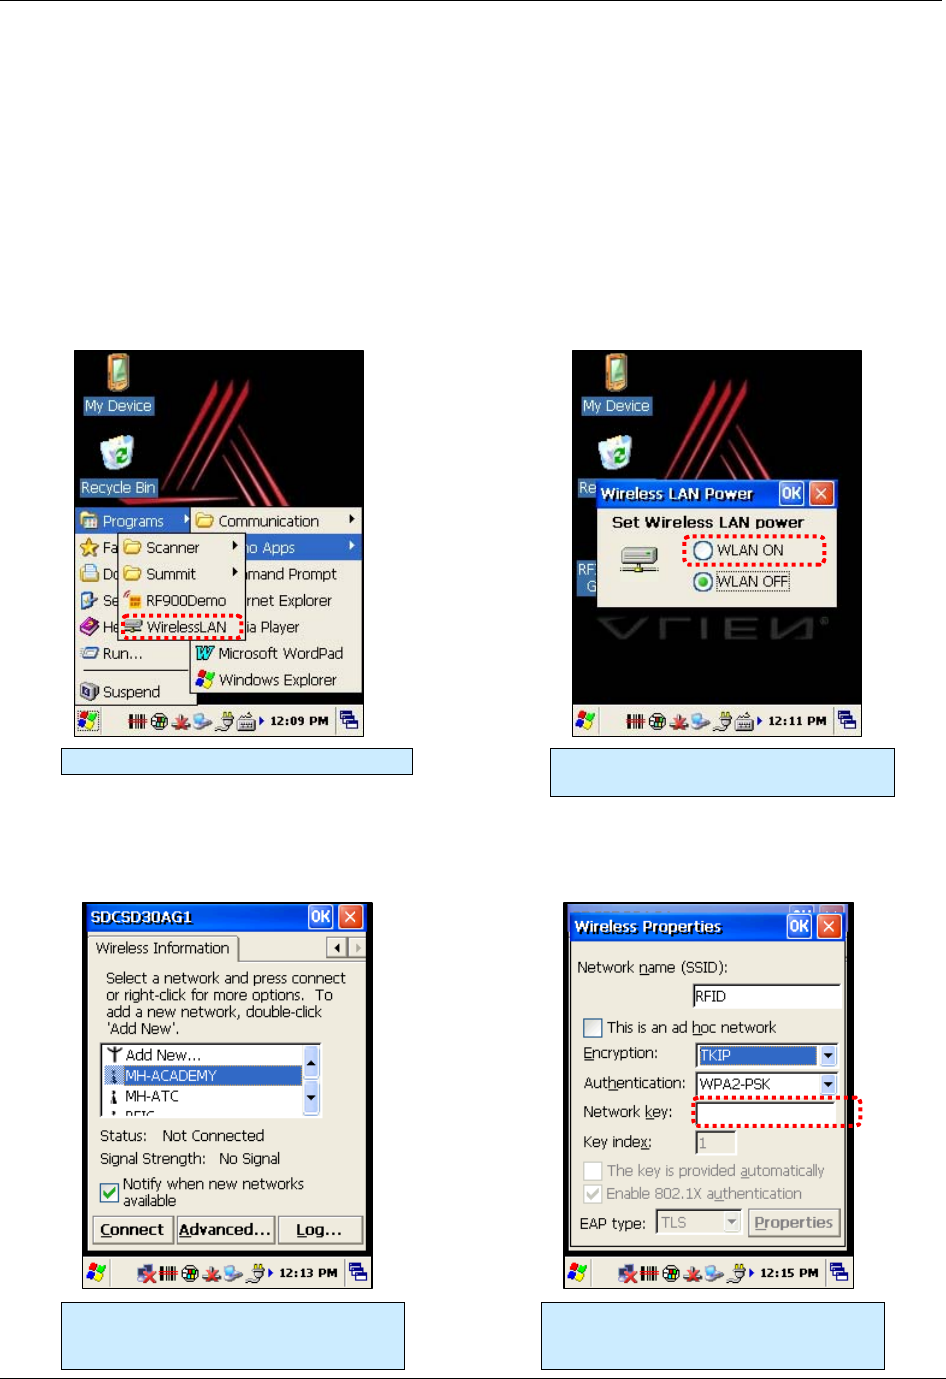
Powering Up the WLAN Radio
[Start] > [Programs] > [Alien Demos] > [WirelessLAN]
Configuring the WLAN Connection
Running the WirelessLAN program. Select <WLAN ON>, and then click the
OK button.
The network selector appears. Double
click a suitable wireless server from the
list of access points.
Input the encryption and authentication
modes, and wireless password, and
then click OK button.
CHAPTER 5 WIRELESS LAN
ALH-900X USER’S GUIDE
DOC. CONTROL #8102114-000 REV A 43
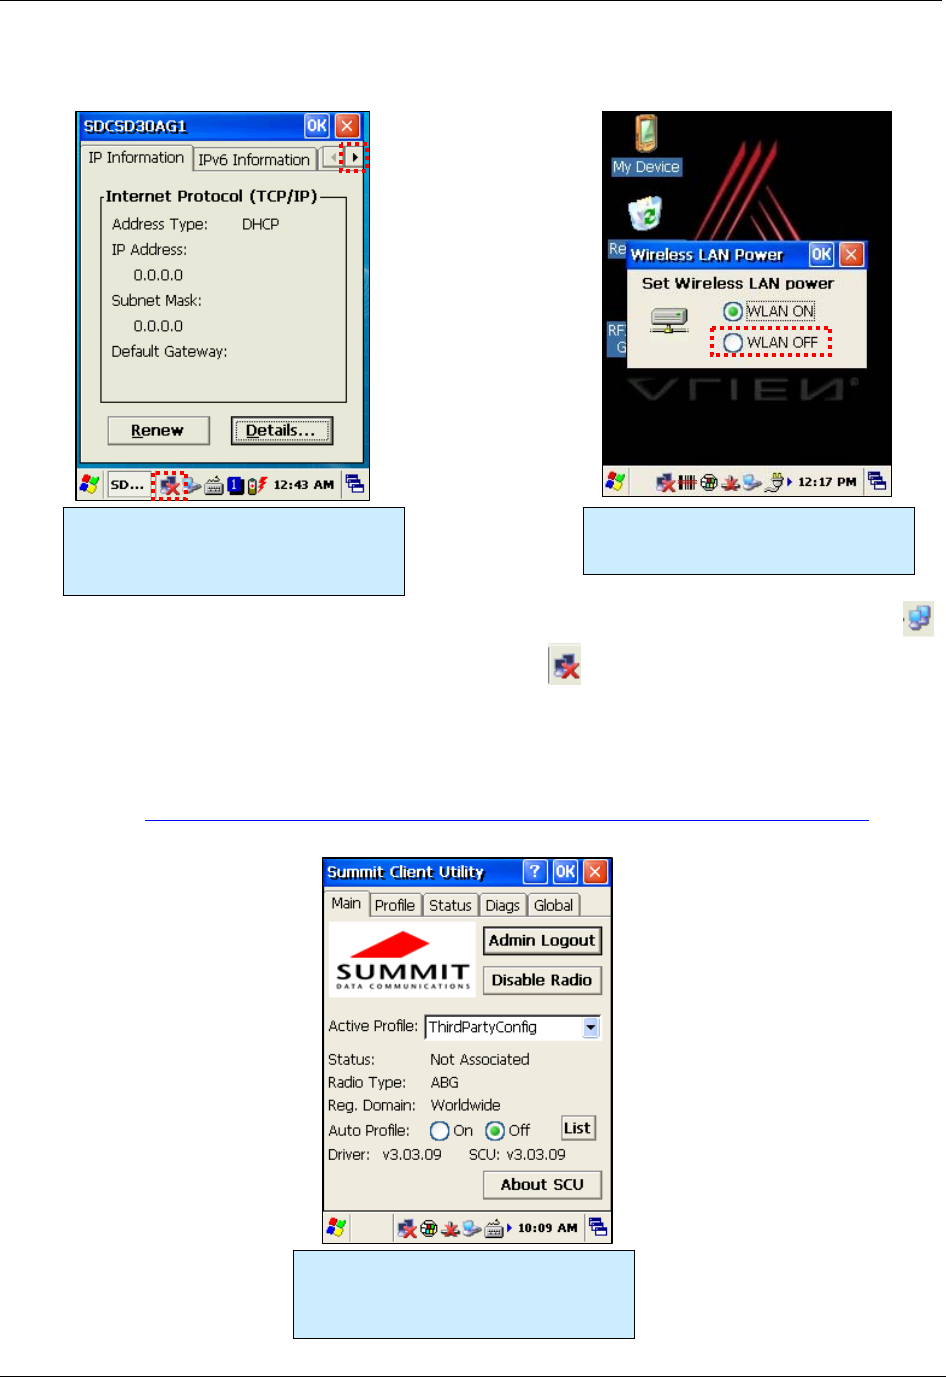
Checking WLAN Information
When connected, the WLAN LED illuminates green and the WLAN icon on the taskbar shows: .
If not connected, the WLAN LED and icon will be off:
Additional features of the WLAN module can be accessed from the Summit Client Utility:
[Start] > [Programs] > [Alien Demos] > [Summit] > [scu]
Full documentation for the Summit Client Utility can be found on their website:
http://www.summitdatacom.com/Documents/summit_users_guide_3_03.html
Double click WLAN icon on the taskbar
to check WLAN information. Use the
right-arrow button at the top to get back
to the Wireless Information tab.
Click Start > Programs > Demo Apps >
WirelessLAN, and then select <WLAN
OFF> to stop WLAN communication.
The Summit Client Utility provides five
tabs of configuration and diagnostic
information. The admin password is
“SUMMIT” (all capitals).
BLUETOOTH CHAPTER 6
ALH-900X USER’S GUIDE
DOC. CONTROL #8102114-000 REV A
44
Chapter 6
Bluetooth
The ALH-900x handheld readers feature Bluetooth technology for wireless communication with
other devices, such as wireless printers, supporting the Serial Printer Profile (SPP). By default, the
Bluetooth service is turned off.
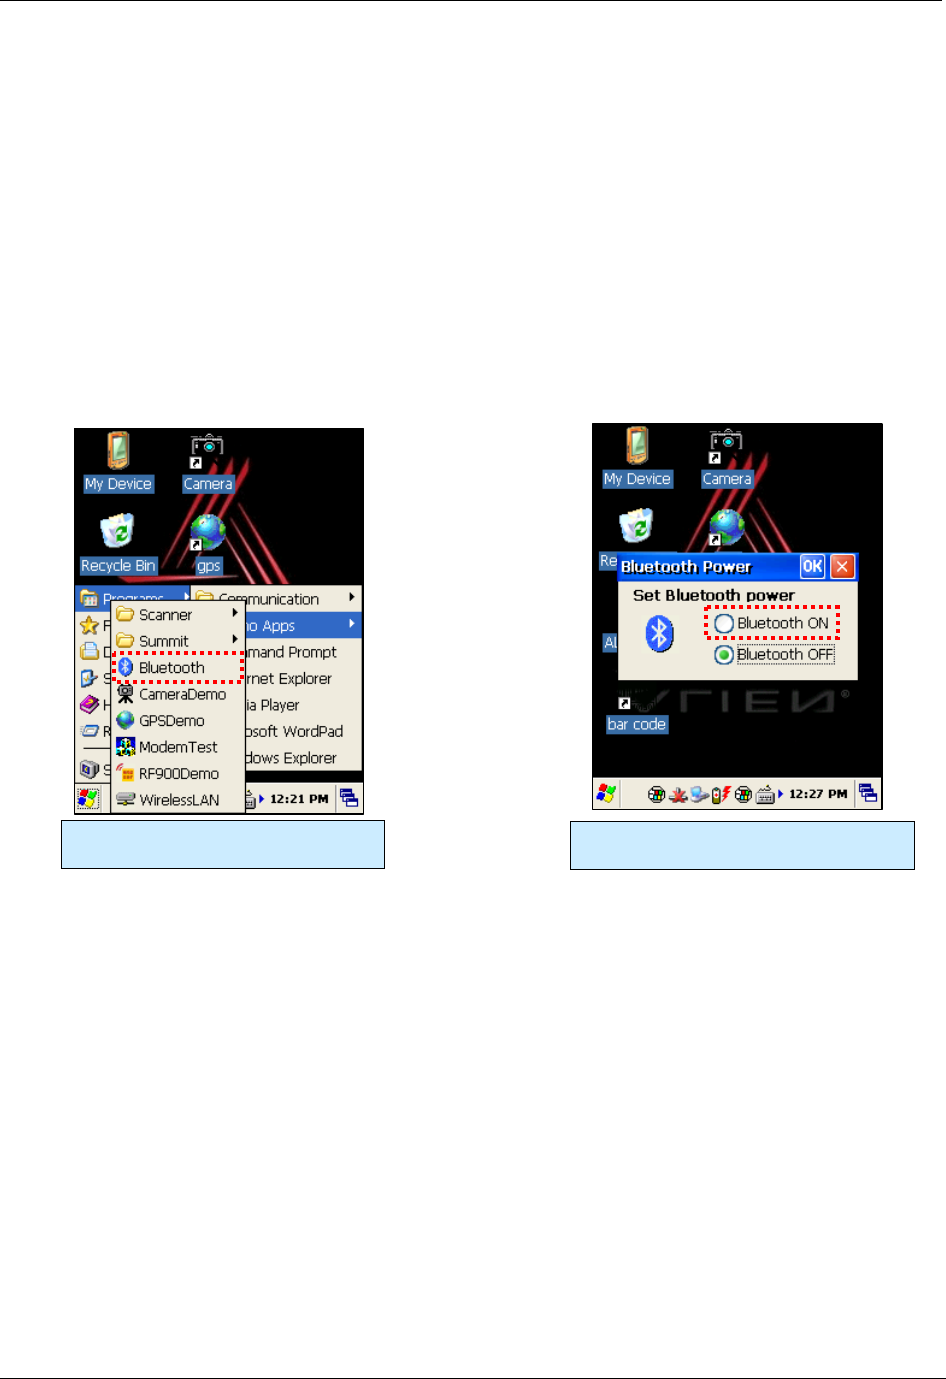
Turning on Bluetooth
The Bluetooth radio is turned off be default. To use Bluetooth, turn it on first with the Bluetooth
application.
[Start] > [Programs] > [Alien Demos] > [Bluetooth]
Connecting Bluetooth Printers (SPP)
The Bluetooth Device Properties control panel connects to a printer through a virtual serial port.
The SPP Bluetooth device will appear as a virtual Com port: generally COM3, with a baud rate of
9600 bps.
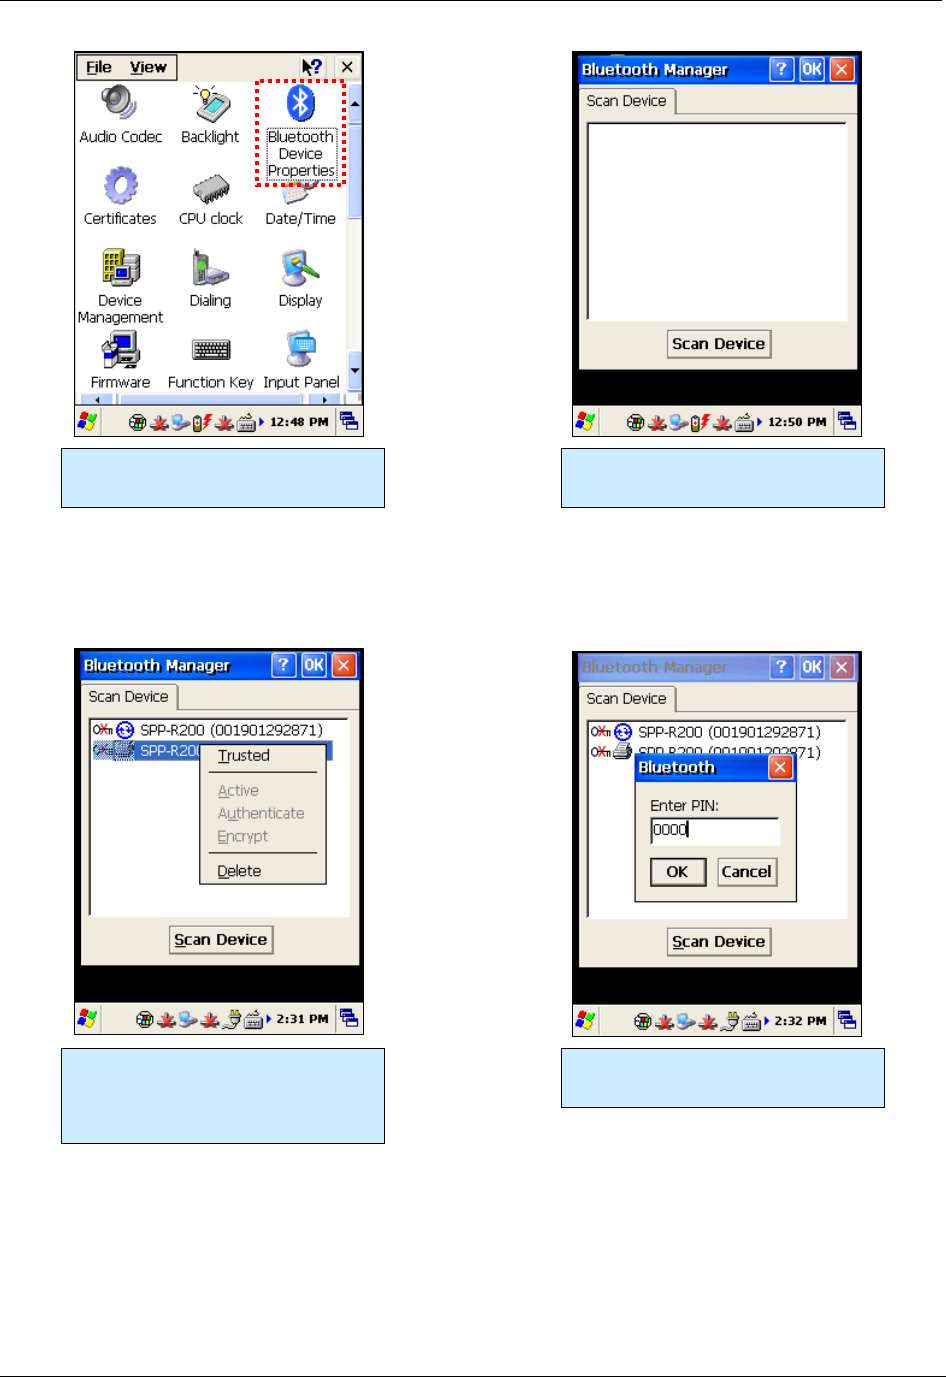
[Start] > [Settings] > [Control Panel] > [Bluetooth Device Properties]
Use the Bluetooth program to turn the
Bluetooth radio on and off. Select <Bluetooth ON>, and then click
the OK button.
CHAPTER 6 BLUETOOTH
ALH-900X USER’S GUIDE
DOC. CONTROL #8102114-000 REV A 45
You’ll find the Bluetooth Device
Properties utility in the Control Panel. Click the Scan Device button to look
for available Bluetooth devices.
Here we’ve discovered a Bixolon
SPP-R200 mobile printer. Double-tap
it and select “Trusted” to set up the
link.
Most devices require you to enter a
PIN.
BLUETOOTH CHAPTER 6
ALH-900X USER’S GUIDE
DOC. CONTROL #8102114-000 REV A
46
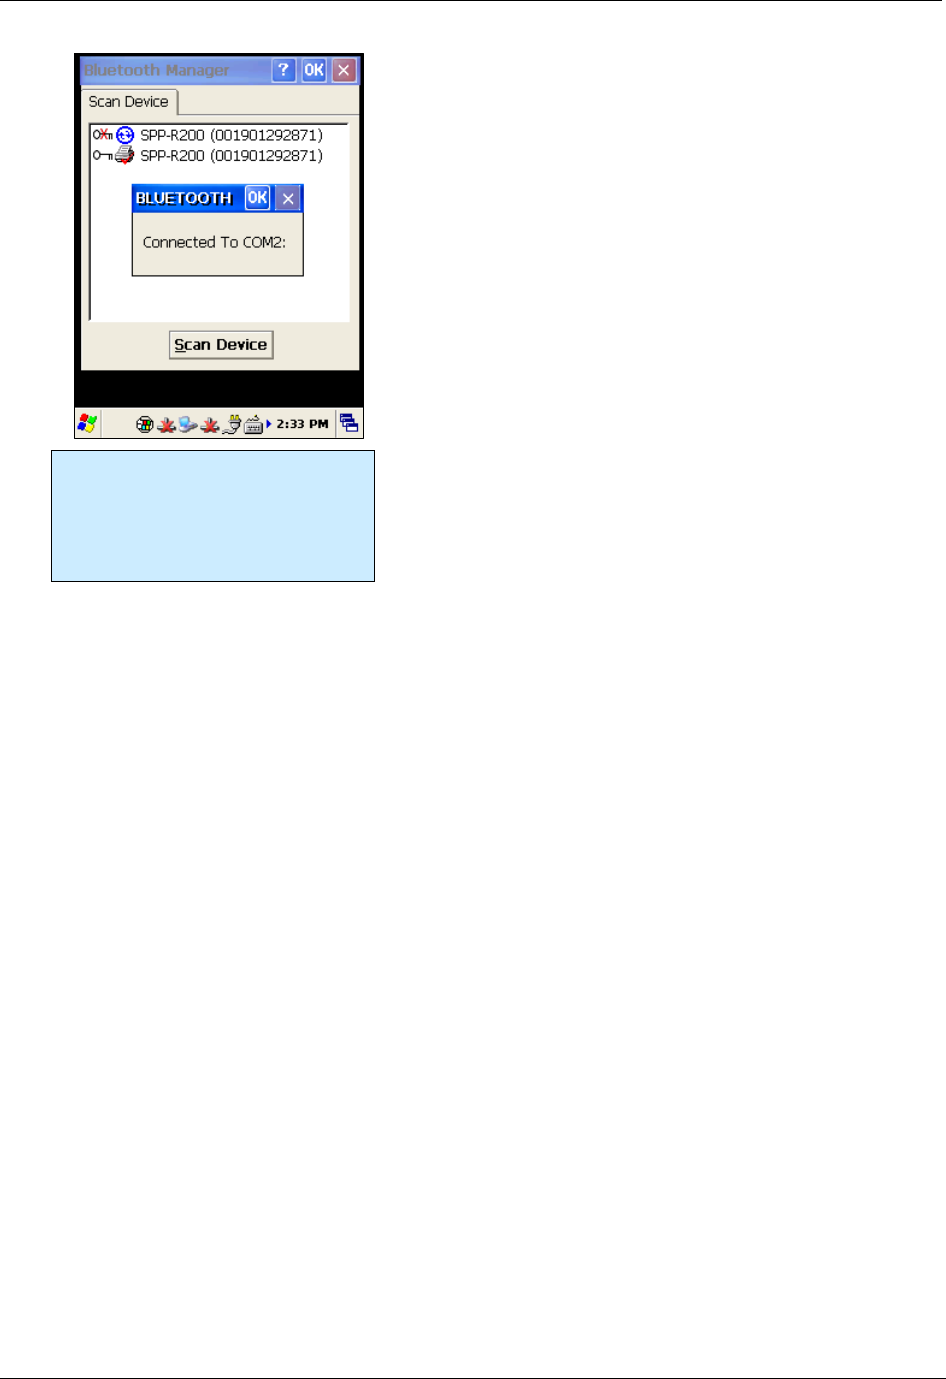
Double-tap the printer again and
select “Active”. The printer will then
be assigned a COM port. The
handheld will automatically reconnect
with the printer when needed, if it is
nearby.
CHAPTER 7 USING GPS
ALH-900X USER’S GUIDE
DOC. CONTROL #8102114-000 REV A 47
Chapter 7
Using GPS
The ALH-9001 handheld reader contains an internal GPS module for finding the geographic
location of the handheld reader. The GPS service requires line-of-sight visibility with at least four
of the constellation of orbiting GPS satellites, so the speed of the initial fix and the accuracy of all
data depend greatly on the quality of the signal from the orbiting satellites. Being inside of or in
between buildings, under tree cover, or near heavy electrical machinery can degrade the quality of
the GPS data.
The GPS receiver appears as a serial Com port, COM6, with a baud rate of 9600.
Executing GPS Demo Program
Find an open place outdoors to check your GPS signals. Depending on your actual environment,
the time to receive a fix and location data is different - about 3-10 minutes is typical. After receiving
a GPS fix the first time, it takes less time to receive GPS data on subsequent attempts.
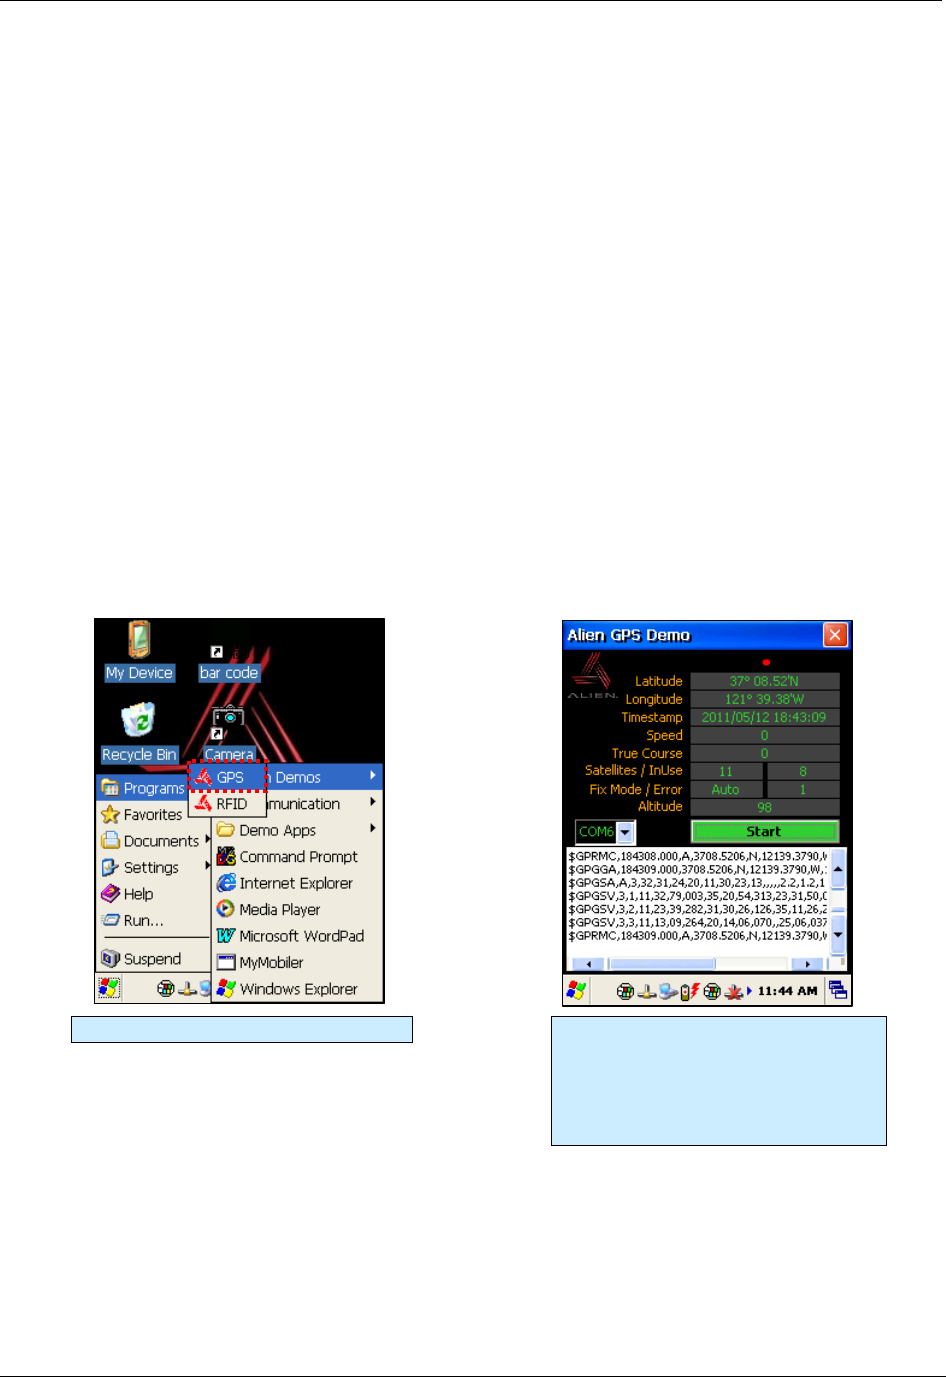
The Alien GPS demo software is accessible by the Alien GPS icon on the unit’s desktop, or it can
be launched directly from the Start menu.
[Start] > [Program] > [Alien Demos] > [GPS]
Starting the GPS demo program. Start/stop receiving GPS data with the
button. Watch raw NMEA data in the
lower window. Wait outside for a
satellite fix, and then observe decoded
data in the fields at the top of the
screen.
USING THE CAMERA CHAPTER 8
ALH-900X USER’S GUIDE
DOC. CONTROL #8102114-000 REV A
48
Chapter 8
Using the Camera
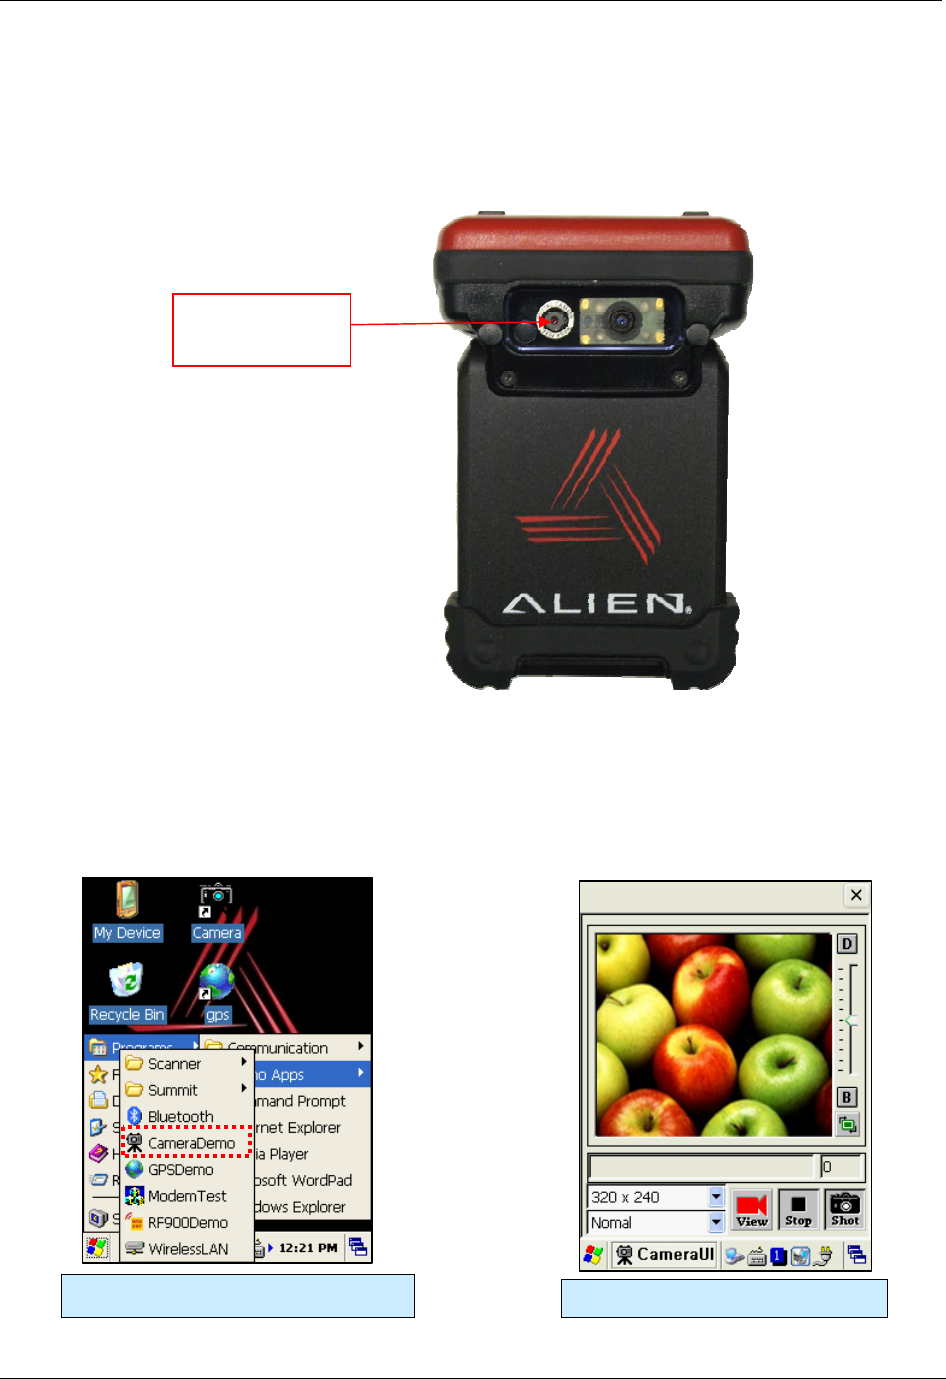
The ALH-9001 is equipped with a 3 megapixel camera which allows for adjustments of brightness,
video resolution, picture quality, etc.
Using the Camera
The CameraDemo software is accessible from the Start menu. It provides an example of what you
can accomplish with a custom application on the handheld.
[Start] > [Programs] > [Alien Demos] > [CameraDemo]
Running the CameraDemo Program CameraDemo Main Screen
Camera
(ALH-9001 only)
CHAPTER 8 USING THE CAMERA
ALH-900X USER’S GUIDE
DOC. CONTROL #8102114-000 REV A 49
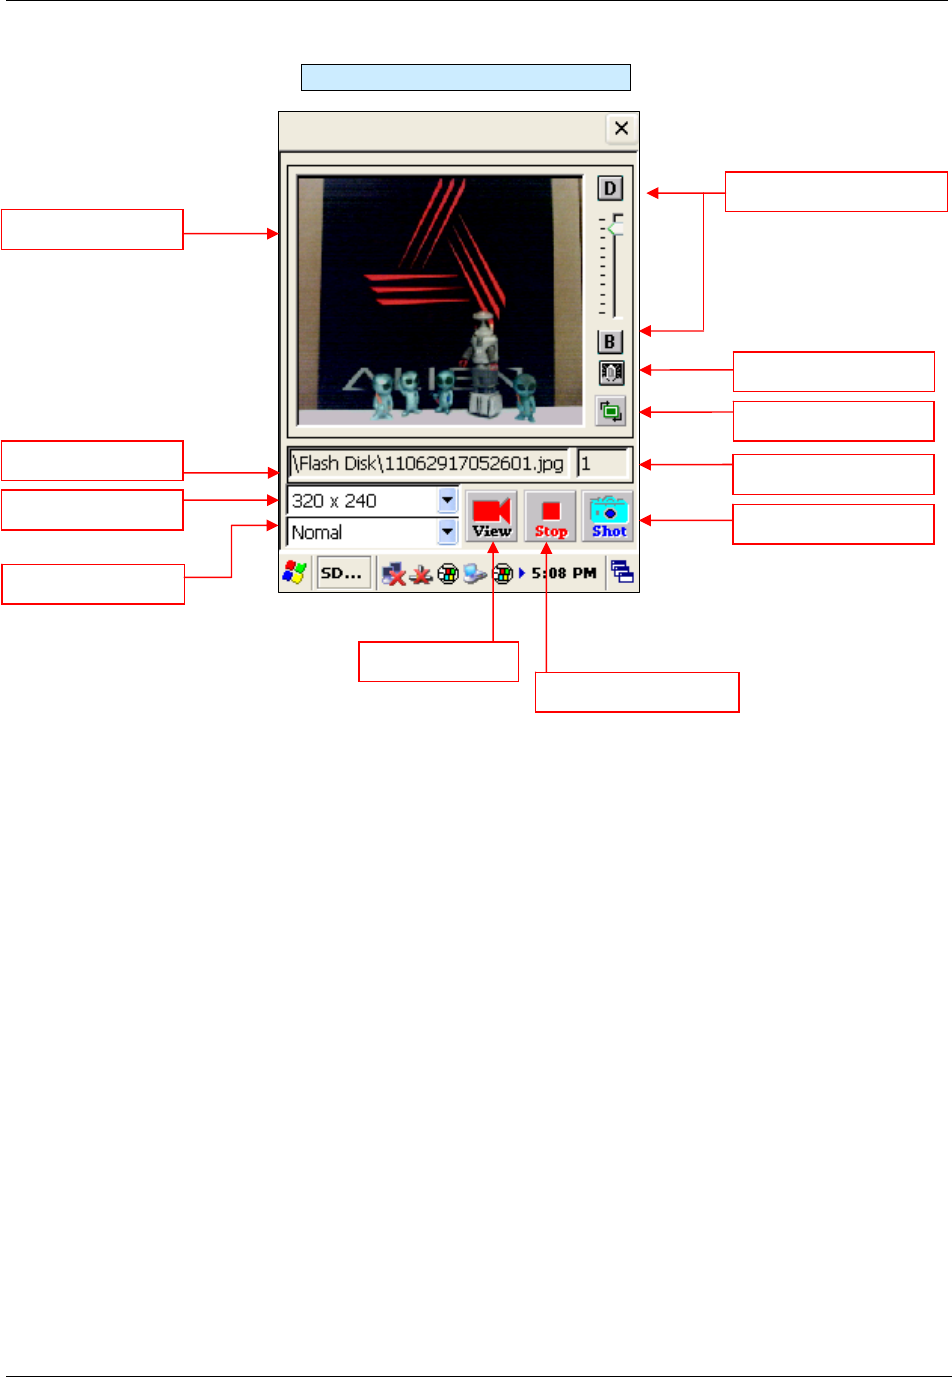
The CameraDemo Screen
Stored Images Count
Preview Window
Rotation Button
Image Files Path
Picture Resolution
Preview Button
Preview Stop Button
Capture Button
Image Effects
Brightness Bar
Flash Lamp Button
USING THE SIM CARD CHAPTER 9
ALH-900X USER’S GUIDE
DOC. CONTROL #8102114-000 REV A
50
Chapter 9
Using a SIM Card
The ALH-9001 is equipped with a SIM card slot and wireless HSDPA radio supporting enhanced
3G connectivity. After inserting the SIM card, you’ll have to do some initial configuration, depending
on the wireless carrier you choose. After that, the ALH-9001 can use the 3G network for wireless
data communications.
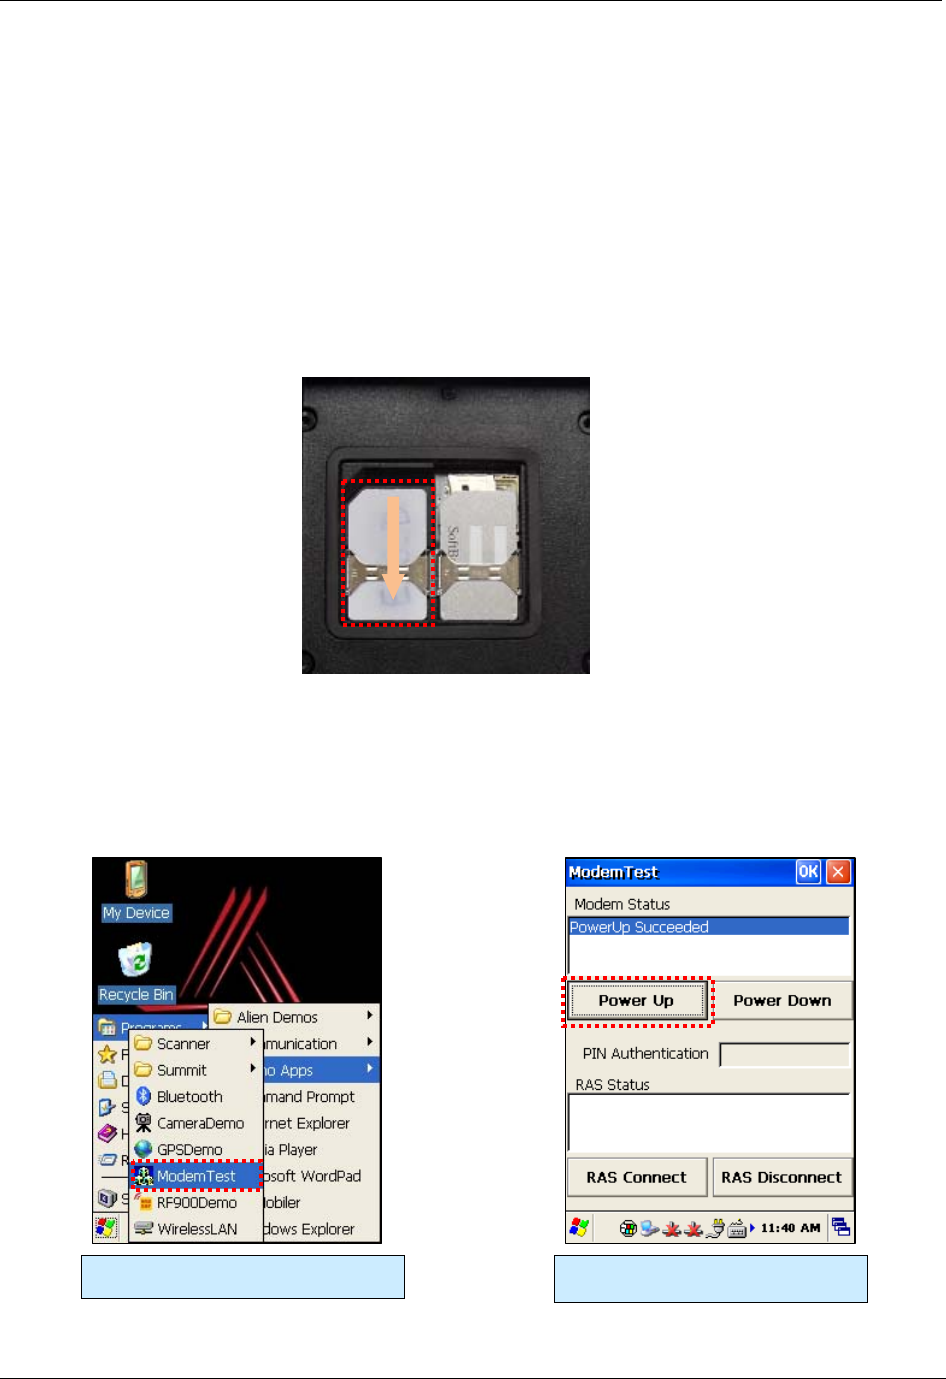
Installing SIM Card
A SIM card can be easily inserted and pulled out along the arrow direction. Note the location of the
dog-eared corner of the SIM card (top-left).
Configure the Remote Access Server (RAS)
To configure the 3G radio, you need to provide settings for your cellular provider’s Remote Access
Server (RAS) in the ModemControl utility.
[Start] > [Programs] > [Alien Demos] > [ModemControl]
Running the ModemControl Program First, click the Power Up button to
energize the HSDPA radio.
CHAPTER 9 USING THE SIM CARD
ALH-900X USER’S GUIDE
DOC. CONTROL #8102114-000 REV A 51
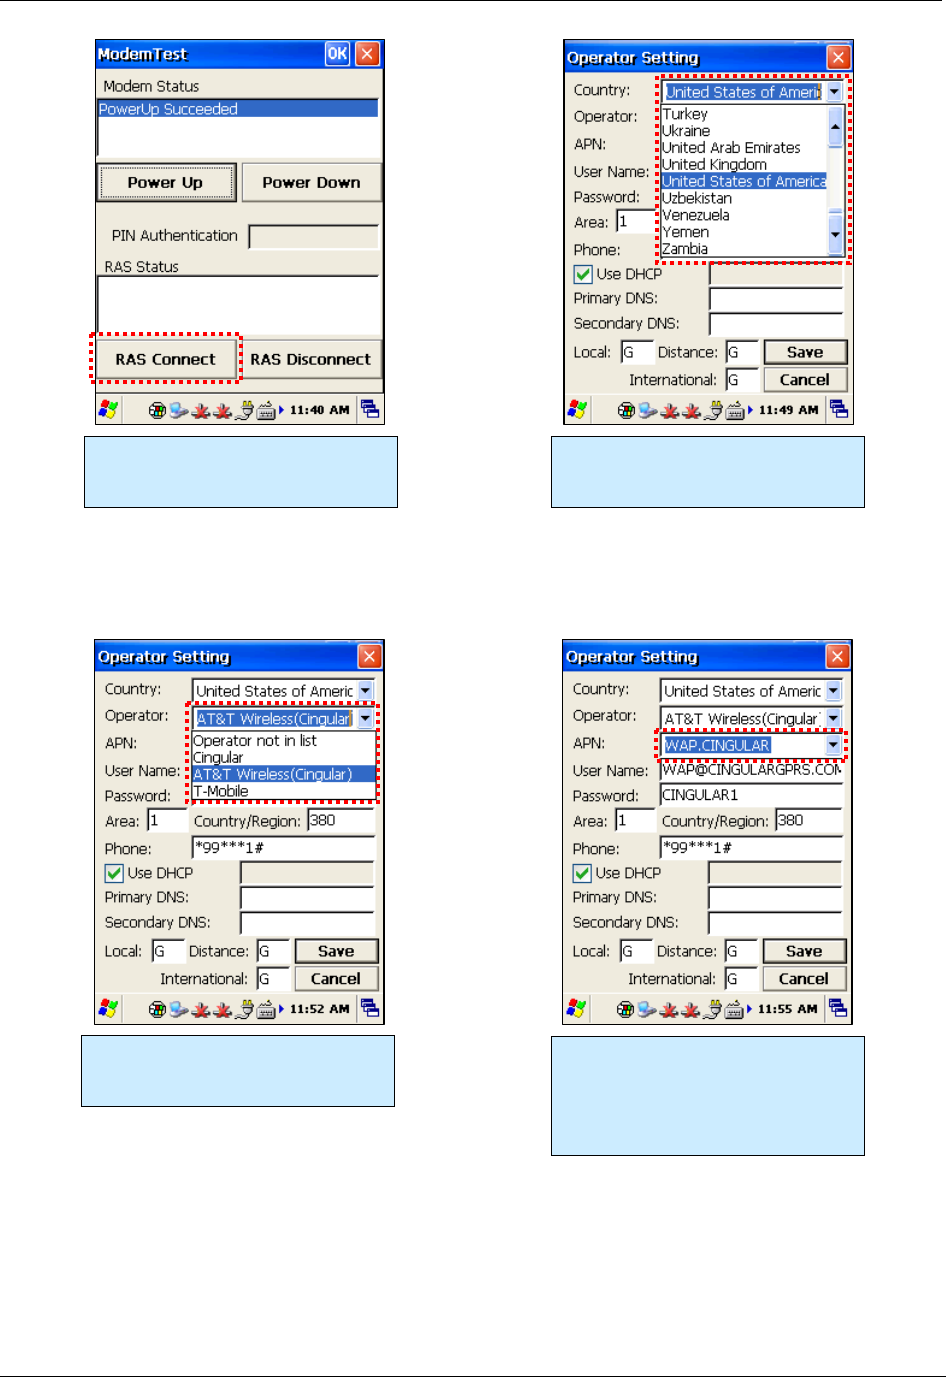
Next, click the RAS Connect button
to configure the Remote Access
Server (RAS).
In the Operator Setting screen, first
pick the country where you are
operating.
Next, select your wireless operator
from the list.
Each wireless operator may offer
more than one Access Point Name
(APN). Choose the correct one from
the list, and the rest of the form
should fill in with default values.
USING THE SIM CARD CHAPTER 9
ALH-900X USER’S GUIDE
DOC. CONTROL #8102114-000 REV A
52
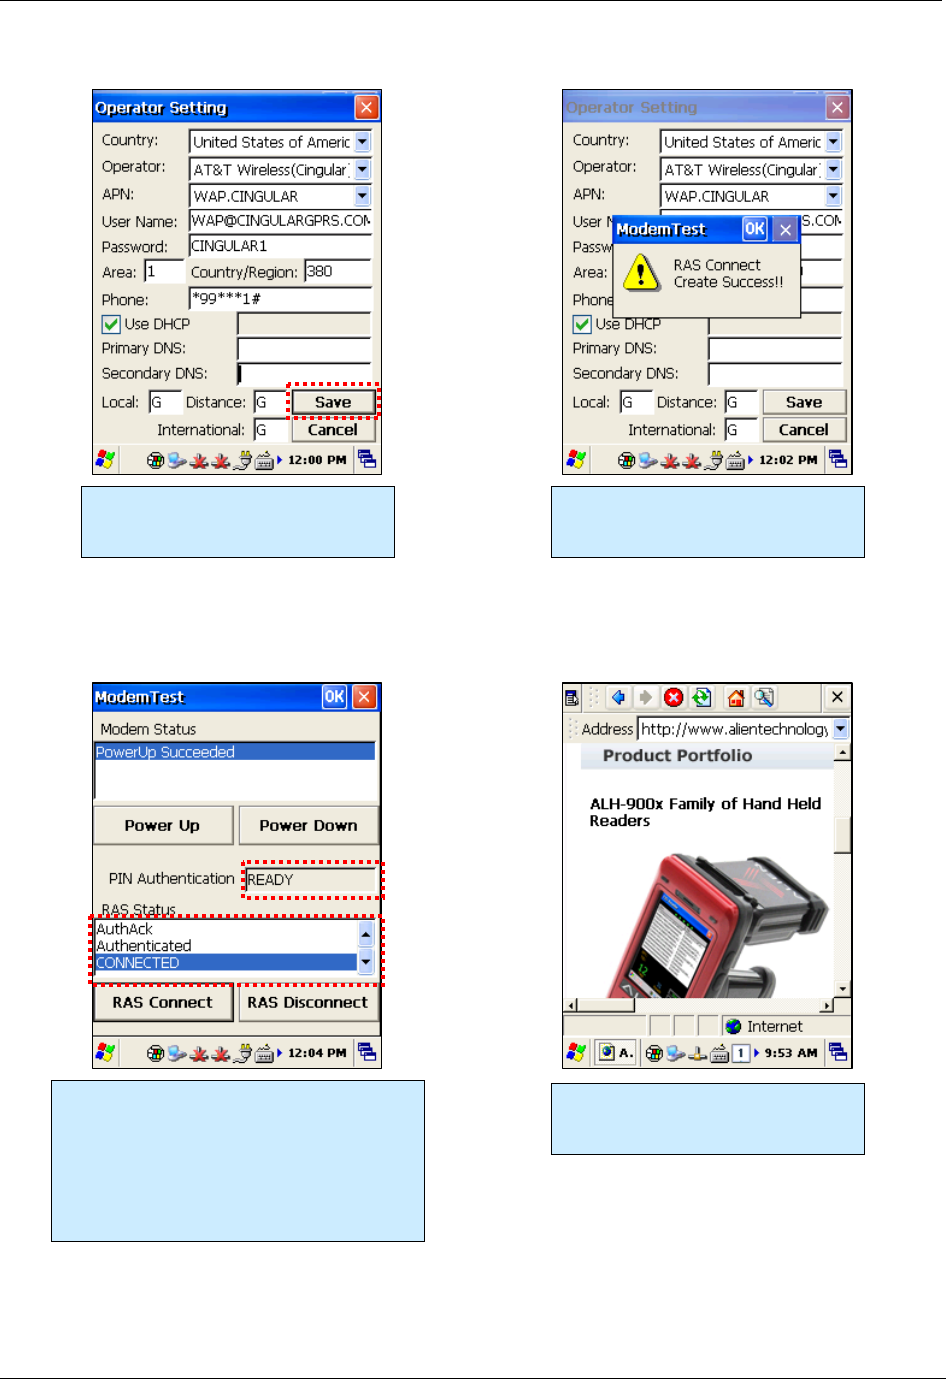
Making the 3G Network Connection
To shut down the GPRS interface, bring up the GPRS Status window and click the Close button. If
you need to reconfigure the RAS, you’ll need to remove the settings file at /Flash
Disk/Phone_UI/gprs.ini and rerun the ModemControl application.
When the settings are as you like
them, click the Save button to write
them to a configuration file.
A confirmation dialog pops up.
Dismiss it and click the close button
for the Operator Settings window.
Back at the ModemControl window, confirm
that the PIN Authentication shows READY,
and the RAS Status should list a sequence
of events, followed by Authenticated (and
possibly CONNECTED). Minimize the
ModemTest window (closing it will close the
modem connection too).
You should now have network
connectivity through the GPRS
interface.

APPENDIX CONFIGURATION
ALH-900X USER’S GUIDE
DOC. CONTROL #8102114-000 REV A 53
Appendix
Configuration
Physical and Environmental Characteristics
Dimensions 6-1/4” x 3-1/4” x 4-5/8” (5-1/8” with pistol grip)
15.8 cm x 8.0 cm x 11.5 cm (13.5 cm with pistol grip)
Weight 320g
Operation Temperature -10ºC to 50ºC
Storage Temperature -30ºC to 60ºC
Humidity Non-condensing
Drop 1.5m drop to concrete
Performance Characteristics
Processor Marvell™ PXA320 806MHz
Operating System Windows CE 5.0
Memory ROM 256MB; RAM 256MB
Display 3.5" QVGA with Backlight; TFT LCD; 240x320 Pixels; Stylus Touch-Screen Interface
Audio Phone Receiver; Earphone Jack
Communication Port RS-232 serial port; USB 1.1
Expansion Slot 1 MicroSD Slot (SDHC); 1 SIM Slot;
Keypad 29-key
Notifications Vibrator, Speaker, LEDs
Power Supply
Main Battery Lithium ion 3.7V 3,000mAh; Optional 4,400mAh in pistol grip
Backup Battery Lithium Polymer 3.7V, 100mAh
Adaptor Input 100VAC ~ 240VAC; Output 5VDC 3A
Network Characteristics
Wireless LAN WLAN (802.11 b/g)
Bluetooth Class 2, v2.0 (SPP Only)
GPS A-GPS with Internal Antenna
Antenna Internal LAN & WLAN
HSDPA Wireless HSDPA for Enhanced 3G Connectivity
Data Capture Devices
Barcode Engine 1D Laser Scanner (2D on ALH-9001)
Camera 3.0 Mega-pixels with Autofocus (ALH-9001)
UHF 900MHz RFID Reader
Frequency 850MHz - 930MHz
Reading Range 0m - 7m
Writing Range 0m - 3m
Antenna Gain 2 dBi
Speed 62.5 kbps
RF Output 1W EIRP
Protocol EPC Gen2 ISO 18000 6C
ISO 18000 6B
Multi-Reading Anti collision