Apple A1459 Tablet Device User Manual iPad User Guide
Apple Inc. Tablet Device iPad User Guide
Apple >
Contents
User Manual 3 of 8

Using AirPlay
You can stream music, photos, and video wirelessly to your HDTV or speakers using AirPlay and
Apple TV. You can also use AirPlay to stream audio to an Airport Express or AirPort Extreme base
station. Other AirPlay-enabled receivers are available from third-parties. Visit the online Apple
Store for details.
iPad and the AirPlay-enabled device must be on the same Wi-Fi network.
Stream content to an AirPlay-enabled device: Start the video, slideshow, or music, then tap and
choose the AirPlay device. Once streaming starts, you can exit the app that’s playing the content.
Get quick access to the
AirPlay controls
When the screen is on, double-click the Home button and scroll to the
left end of the multitasking bar.
Switch playback back to iPad Tap and choose iPad.
You can mirror the iPad screen (iPad 2 or later) on a TV with Apple TV. Everything on the iPad
screen appears on the TV.
Mirror the iPad screen on a TV: Tap at the left end of the multitasking bar, choose an
Apple TV, and tap the Mirroring button that appears.
A blue bar appears at the top of the iPad screen when AirPlay mirroring is turned on. You can also
mirror the iPad screen on a TV using a cable. See “Watching videos on a TV” on page 64.
Using Bluetooth devices
You can use iPad with the Apple Wireless Keyboard and other Bluetooth devices, such as
Bluetooth headphones. For supported Bluetooth proles, go to support.apple.com/kb/HT3647.
Pairing Bluetooth devices
You must rst pair a Bluetooth device (such as a keyboard or headphones) with iPad before you
can use it.
Pair a Bluetooth device with iPad:
1 Follow the instructions that came with the device to make it discoverable.
2 In Settings, choose General > Bluetooth, and turn Bluetooth on.
3 Select the device and, if prompted, enter the passkey or PIN number. See the instructions about
the passkey or PIN that came with the device.
Note: Before you pair an Apple Wireless Keyboard, press the power button to turn the keyboard
on. You can pair only one Apple Wireless Keyboard with iPad at a time. To pair a dierent
keyboard, you must rst unpair the current one.
After you pair the keyboard with iPad, the product name and a Bluetooth icon appear on
the screen.
After you pair headphones with iPad, the product name and a Bluetooth audio icon appear on
the screen along with the audio or video playback controls. Tap to switch to a dierent audio
output, such as the internal speaker.
To use the onscreen keyboard again, turn o Bluetooth in Settings > General > Bluetooth, or press
the Eject key on the Bluetooth keyboard.
37
Chapter 3 Basics
Draft
Apple Confidential

Bluetooth status
The Bluetooth icon appears in the iPad status bar at the top of the screen:
 (white): Bluetooth is on and paired with a device.
 (gray): Bluetooth is on and paired with a device, but the device is out of range or turned o.
ÂNo Bluetooth icon: Bluetooth is turned o or not paired with a device.
Unpairing a Bluetooth device from iPad
If you pair iPad with one Bluetooth device and then want to use a dierent device of the same
type instead, you must unpair the rst device.
Unpair a Bluetooth device: Go to Settings > General > Bluetooth, then turn Bluetooth on.
Choose the device, then tap “Forget this Device.”
Security features
Security features help protect the information on iPad from being accessed by others.
Passcodes and data protection
For security, you can set up a passcode that you must enter each time you turn on or wake up iPad.
Set a passcode: Go to Settings > General > Passcode Lock > Turn Passcode On. Enter a 4-digit
passcode, then enter it again to verify it. iPad will require you to enter the passcode to unlock it, or
to display the passcode lock settings.
Setting a passcode turns on data protection, which uses your passcode as the key for encrypting
mail messages and attachments stored on iPad. (Data protection may also be used by some apps
available from the App Store.) A notice at the bottom of the Passcode Lock screen in Settings
shows that data protection is enabled.
To increase security, turn o Simple Passcode (a four-digit number) and use a more robust
passcode that has a combination of numbers, letters, punctuation, and special characters. See
“Auto-Lock” on page 126.
Find My iPad
Find My iPad can help you locate a lost or misplaced iPad using an iPhone, iPod touch, or
another iPad. You can also use Find My iPad using a Mac or PC with a web browser signed in
to www.icloud.com or www.me.com. Find My iPad includes:
ÂFind on a map: View the approximate location of your iPad on a full-screen map.
ÂDisplay a Message or Play a Sound: Compose a message that appears on your iPad, or play
sound for two minutes.
ÂRemote Passcode Lock: Remotely lock your iPad and create a 4-digit passcode, if you haven’t
set one previously.
ÂRemote Wipe: Protects your privacy by erasing all the information and media on your iPad and
restoring iPad to its original factory settings.
Important: Before you can use these features, you must turn on Find My iPad either in iCloud or in
MobileMe settings on your iPad. Find My iPad can be turned on in only one account.
38 Chapter 3 Basics
Draft
Apple Confidential

Turn on Find My iPad using iCloud Go to Settings > iCloud and turn on Find My iPad.
Turn on Find My iPad using
MobileMe
Go to Settings > Mail, Contacts, Calendars, tap your MobileMe account,
then turn on Find My iPad.
Find My iPad uses Wi-Fi to locate your iPad. If Wi-Fi is turned o or if your iPad isn’t connected to a
Wi-Fi network, Find My iPad can’t nd it. See “Using iCloud” on page 19.
39
Chapter 3 Basics
Draft
Apple Confidential
Safari 4
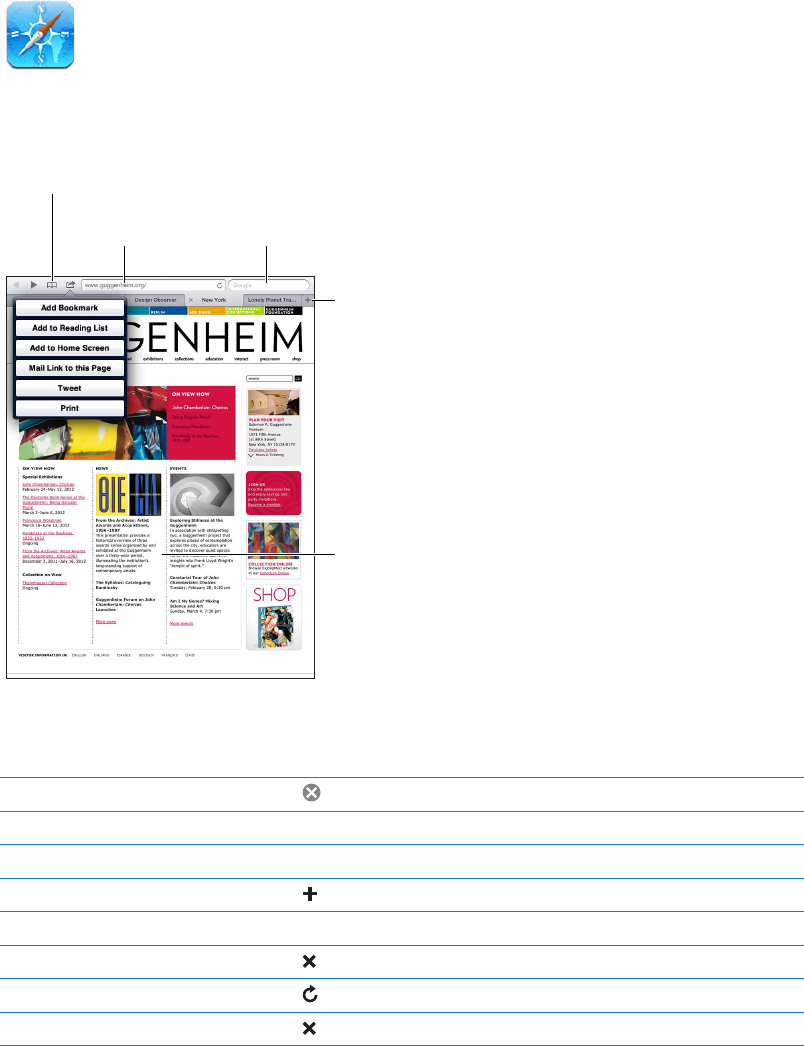
Viewing webpages
View your bookmarks
or Reading List.
View your bookmarks
or Reading List.
Open a new page.
Open a new page.
Search the web
and the current page.
Search the web
and the current page.
Enter a web
address (URL).
Enter a web
address (URL).
Double-tap
an item or pinch
to zoom in or out.
Double-tap
an item or pinch
to zoom in or out.
View a webpage: Tap the address eld (in the title bar), type the web address, then tap Go.
You can view webpages in portrait or landscape orientation.
Erase the text in the address eld Tap .
Scroll around a webpage Drag up, down, or sideways.
Scroll within a frame on a webpage Scroll with two ngers inside the frame.
Open a new page Tap . You can have up to nine pages open at a time.
Go to another page Tap a tab at the top of the page.
Stop a webpage from loading Tap in the address eld.
Reload a webpage Tap in the address eld.
Close a page Tap on the page’s tab.
40
Draft
Apple Confidential
Protect private information
and block some websites from
tracking your behavior
Go to Settings > Safari and turn on Private Browsing.
Set options for Safari Go to Settings > Safari.
Links
Follow a link on a webpage: Tap the link.
Open a link in a new tab Touch and hold the link, then tap “Open in New Tab.”
See a link’s destination address Touch and hold the link.
Detected data—such as phone numbers and email addresses—may also appear as links in
webpages. Touch and hold a link to see the available options. See “Using links and detected
data” on page 45.
Reading List
Reading List lets you collect links to webpages to read later.
Add a link to the current page to your reading list: Tap , then tap “Add to Reading List.”
Add a link to your reading list: Touch and hold the link, then choose “Add to Reading List.”
View your reading list Tap , then tap Reading List.
Use iCloud to keep your reading
list up to date on your iOS devices
and computers
Go to Settings > iCloud, then turn on Bookmarks. See “Using iCloud” on
page 19.
Reader
Reader displays web articles without ads or clutter, so you can read without distractions. On a
webpage with an article, you can use Reader to view just the article.
View an article in Reader: Tap the Reader button, if it appears in the address eld.
Adjust the font size Tap .
Bookmark, add to Reading List
or Home Screen, share, or print
the article
Tap .
Return to normal view Tap Reader.
Entering text and lling out forms
Enter text: Tap a text eld to bring up the keyboard.
Move to another text eld Tap the text eld, or tap Next or Previous.
Submit a form Tap Go or Search, or the link on the page to submit the form, if available.
To enable AutoFill to help ll out forms, go to Settings > Safari > AutoFill.
41
Chapter 4 Safari
Draft
Apple Confidential
Searching
The search eld in the upper-right corner lets you search the web, and the current page or PDF.
Search the web, and the current page or searchable PDF: Enter text in the search eld.
ÂTo search the web: Tap one of the suggestions that appear, or tap Search.
ÂTo nd the search text on the current page or PDF: Scroll to the bottom of the screen, then tap
the entry below On This Page.
The rst instance is highlighted. To nd later occurrences, tap .
Change the search engine Go to Settings > Safari > Search Engine.
Bookmarks and history
When you save a bookmark, you can edit its title. Bookmarks are normally saved at the top level of
Bookmarks. Tap Bookmarks to choose another folder.
Bookmark a webpage: Open the page, tap , then tap Add Bookmark.
View previous webpages (history): Tap , then tap History. To clear the history, tap Clear.
Open a bookmarked webpage Tap .
Display the bookmarks bar Tap the address eld. To always show the bookmarks bar, go to Settings >
Safari, under General.
Edit a bookmark or bookmark
folder
Tap , choose the folder that has the bookmark or folder you want to edit,
then tap Edit.
Use iCloud to keep bookmarks
up to date on your iOS devices
and computers
Go to Settings > iCloud, then turn on Bookmarks. See “Using iCloud” on
page 19.
Sync bookmarks with the web
browser on your computer
See “Syncing with iTunes” on page 20.
Printing webpages, PDFs, and other documents
Print a webpage, PDF, or Quick Look document: Tap , then tap Print.
For more information, see “Printing a document” on page 33.
Web clips
You can create web clips, which appear as icons on the Home screen. When you open a web clip,
Safari automatically zooms to the part of the webpage that was showing at the time you saved
the web clip.
Add a web clip: Open the webpage and tap . Then tap “Add to Home Screen.”
Unless the webpage has a custom icon, that image is also used for the web clip icon on the
Home screen.
Web clips are backed up by iCloud and by iTunes, but they aren’t synced by iTunes or MobileMe.
They also aren’t pushed to other devices by iCloud.
42 Chapter 4 Safari
Draft
Apple Confidential
Mail 5
Checking and reading email
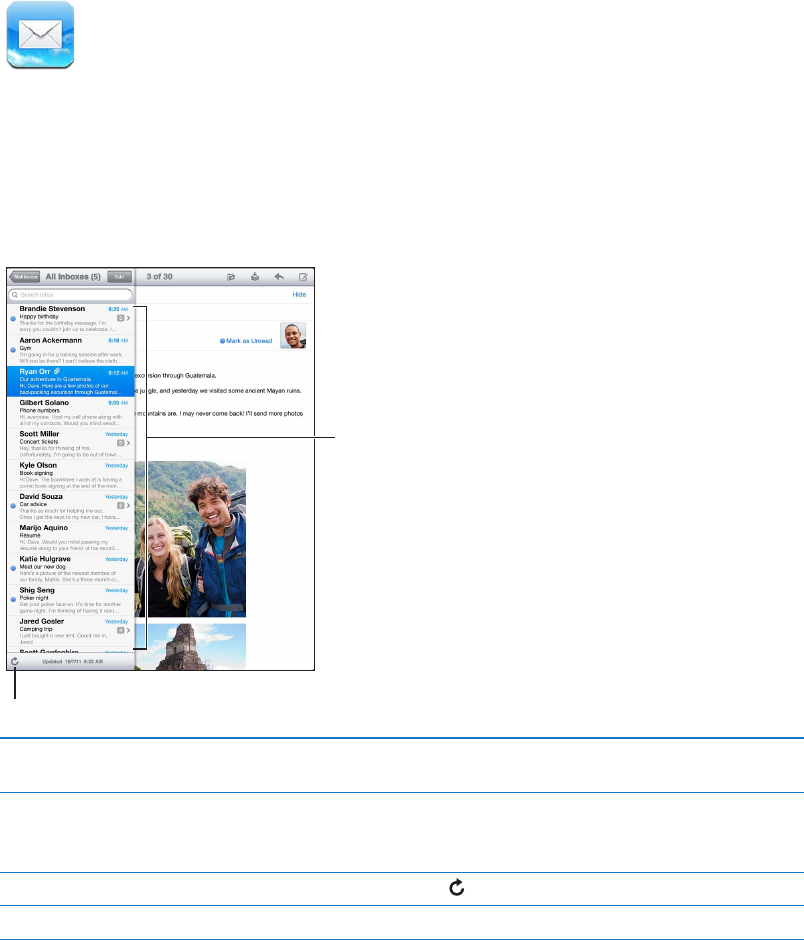
In Mail, the Mailboxes screen provides quick access to all your inboxes and other mailboxes.
When you open a mailbox, Mail retrieves and displays the most recent messages. You can set the
number of messages retrieved, in Mail settings. See “Mail accounts and settings” on page 46.
Swipe to reveal
the message list.
Swipe to reveal
the message list.
Fetch new mail.
Fetch new mail.
Reveal the message list In portrait mode, swipe from left to right to show the message list for the
current mailbox. Then tap Mailboxes to go to the mailboxes list.
Organize messages by thread Go to Settings > Mail, Contacts, Calendars.
If you organize messages by thread, related messages appear as a single
entry in the mailbox. See “Mail accounts and settings” on page 46.
Check for new messages Choose a mailbox, or tap at any time.
Load more messages Scroll to the bottom of the message list and tap Load More Messages.
43
Draft
Apple Confidential
Zoom in on part of a message Double-tap an area of the message. Double-tap again to zoom out. Or
pinch apart or together to zoom in or out.
Resize a column of text to t
the screen
Double-tap the text.
See all the recipients of a message Tap Details. Tap a name or email address to see the recipient’s contact
information. Then tap a phone number or email address to contact
the person.
Add an email recipient to your
contacts list
Tap the message and, if necessary, tap Details to see the recipients. Then
tap a name or email address and tap Create New Contact or “Add to
Existing Contact.”
Flag or mark a message
as unread
Open the message and, if necessary, tap Details. Then tap Mark.
To mark multiple messages as unread, see “Organizing mail” on page 46.
Open a meeting invitation Tap the invitation. See “Responding to invitations” on page 70.
Working with multiple accounts
If you set up more than one account, the Accounts section of the Mailboxes screen lets you access
those accounts. You can also tap All Inboxes to see all of your incoming messages in a single list.
For information about adding accounts, see “Mail accounts and settings” on page 46.
When you compose a new message, tap the From eld and select the account to send the
message from.
Sending mail
You can send an email message to anyone who has an email address.
Compose a message: Tap .
Add a recipient from Contacts Type a name or email address in the To eld, or tap .
Rearrange recipients To move a recipient from one eld to another, such as from To to Cc, drag
the recipient’s name to the new location.
Make text bold, italic, or underlined Tap the insertion point to display the selection buttons, then tap Select.
Drag the points to select the text that you want to style. Tap , then tap
B/I/U. Tap Bold, Italic, or Underline to apply the style.
Send a photo or video in an
email message
In Photos, choose a photo or video, tap , then tap Email Photo or Email
Video. You can also copy and paste photos and videos.
To send multiple photos or videos, tap while viewing thumbnails in an
album. Tap to select the photos and videos, tap Share, then tap Email.
Save a draft of a message to
nish later
Tap Cancel, then tap Save. The message is saved in the Drafts mailbox.
Touch and hold to quickly access it.
Reply to a message Tap , then tap Reply. Files or images attached to the initial message
aren’t sent back. To include the attachments, forward it instead of replying.
Quote a portion of the message
you’re replying to or forwarding
Touch and hold to select text. Drag the grab points to select the text you
want to include in your reply, then tap .
To change the indentation of quoted text, touch and hold to select text,
then tap . Tap Quote Level, then tap Increase or Decrease.
Forward a message Open a message and tap , then tap Forward.
Share contact information In Contacts, choose a contact, tap Share Contact at the bottom of the
Info screen.
44 Chapter 5 Mail
Draft
Apple Confidential
Using links and detected data
iPad detects web links, phone numbers, email addresses, dates, and other types of information
that you can use to open a webpage, create a pre-addressed email message, create or add
information to a contact, or perform some other useful action. Detected data appears as blue
underlined text.
Tap the data to use its default action, or touch and hold to see other actions. For example, for an
address, you can display the location in Maps, or add it to Contacts.
Viewing attachments
iPad displays image attachments in many commonly used formats (JPEG, GIF, and TIFF) inline with
the text in email messages. iPad can play many types of audio attachments, such as MP3, AAC, WAV,
and AIFF. You can download and view les (such as PDF, webpage, text, Pages, Keynote, Numbers,
Microsoft Word, Excel, and PowerPoint documents) that are attached to messages you receive.
View an attached le: Tap the attachment to open it in Quick Look. You may need to wait while it
downloads before viewing.
Open an attached le Touch and hold the attachment, then choose an app to open it. If none of
your apps support the le, and it isn’t one that Quick Look supports, you
can see the name of the le but you can’t open it.
Save an attached photo or video Touch and hold the photo or video, then tap Save Image or Video. The item
is saved to your Camera Roll album in the Photos app.
Quick Look supports the following document types:
.doc, .docx Microsoft Word
.htm, .html webpage
.key Keynote
.numbers Numbers
.pages Pages
.pdf Preview, Adobe Acrobat
.ppt, .pptx Microsoft PowerPoint
.rtf Rich Text Format
.txt text
.vcf contact information
.xls, .xlsx Microsoft Excel
Printing messages and attachments
You can print email messages, and attachments that can be viewed in Quick Look.
Print an email message: Tap , then tap Print.
Print an inline image Touch and hold the image, then tap Save Image. Then open Photos and
print the image from your Camera Roll album.
Print an attachment Tap the attachment to view it in Quick Look, then tap and tap Print.
For more information, see “Printing” on page 33.
45
Chapter 5 Mail
Draft
Apple Confidential
Organizing mail
You can organize messages in any mailbox, folder, or search results window. You can delete or mark
messages as read. You can also move messages from one mailbox or folder to another in the same
account or between dierent accounts. You can add, delete, or rename mailboxes and folders.
Delete a message: Open the message and tap .
You can also delete a message directly from the mailbox message list by swiping left or right over
the message title, then tapping Delete.
Some mail accounts support archiving messages instead of deleting them. When you archive
a message, it’s moved from your Inbox to All Mail. Turn archiving on or o in Settings > Mail,
Contacts, Calendars.
Recover a message Deleted messages are moved to the Trash mailbox.
To change how long a message stays in the Trash before being deleted
permanently, go to Settings > Mail, Contacts, Calendars. Then tap Advanced.
Delete or move multiple messages While viewing a list of messages, tap Edit, select the messages you want to
delete, then tap Move or Delete.
Move a message to another
mailbox or folder
While viewing a message, tap , then choose a mailbox or folder.
Add a mailbox Go to the mailboxes list, tap Edit, then tap New Mailbox.
Delete or rename a mailbox Go to the mailboxes list, tap Edit, then tap a mailbox. Enter a new name or
location for the mailbox. Tap Delete Mailbox to delete it and all its contents.
Flag and mark multiple messages
as read
While viewing a list of messages, tap Edit, select the messages you want,
then tap Mark. Choose either Flag or Mark as Read.
Searching mail
You can search the To, From, Subject and body text of email messages. Mail searches the
downloaded messages in the current mailbox. For iCloud, Exchange, and some IMAP mail
accounts, you can also search messages on the server.
Search email messages: Open a mailbox, scroll to the top, and enter text in the Search eld. Tap
From, To, Subject, or All to choose which elds you want to search. If your mail account supports it,
messages on the server are also searched.
Mail messages can also be included in searches from the Home screen. See “Searching” on page 32.
Mail accounts and settings
Accounts
For Mail and for your mail account settings, go to Settings > Mail, Contacts, Calendars.
You can set up:
iCloud Â
Microsoft Exchange Â
Gmail Â
Yahoo! Â
AOL Â
Microsoft Hotmail Â
MobileMe Â
Other POP and IMAP mail systems Â
46 Chapter 5 Mail
Draft
Apple Confidential

Some settings depend on the type of account you’re setting up. Your service provider or system
administrator can provide the information you need to enter.
Change an account’s settings: Go to Settings > Mail, Contacts, Calendars, choose an account,
then make the changes you want.
Stop using an account Go to Settings > Mail, Contacts, Calendars, choose an account, then turn o
an account service (such as Mail, Calendars, or Notes).
If an account service is o, iPad doesn’t display or sync information with
the account service until you turn it back on. This is a good way to stop
receiving work email while on vacation, for example.
Store drafts, sent messages, and
deleted messages on iPad
For IMAP accounts, you can change where these messages are stored. Go
to Settings > Mail, Contacts, Calendars, choose an IMAP account, then tap
Advanced. Choose a location for Draft Mailbox, Sent Mailbox, or Deleted
Mailbox.
Set how long before messages are
removed permanently from Mail
Go to Settings > Mail, Contacts, Calendars, choose an account, then tap
Advanced. Tap Remove, then choose a time: Never, or after one day, one
week, or one month.
Adjust email server settings Go to Settings > Mail, Contacts, Calendars, then choose an account.
Ask your network administrator or Internet service provider for the
correct settings.
Adjust SSL and password settings Go to Settings > Mail, Contacts, Calendars, choose an account, then tap
Advanced. Ask your network administrator or Internet service provider for
the correct settings.
Turn Archive Messages on or o Go to Settings > Mail, Contacts, Calendars, then choose an account. See
“Organizing mail” on page 46.
Delete an account Go to Settings > Mail, Contacts, Calendars, choose an account, then scroll
down and tap Delete Account.
All email and the contacts, calendar, and bookmark information synced
with the account are removed from iPad.
Send signed and encrypted
messages
Go to Settings > Mail, Contacts, Calendars, choose an account, then
tap Advanced. Turn on S/MIME, then select certicates for signing and
encrypting outgoing messages.
To install certicates, obtain a conguration prole from your system
administrator, download the certicates from the issuer’s website using
Safari, or receive them in Mail attachments.
Set Push settings Go to Settings > Mail, Contacts, Calendars > Fetch New Data. Push delivers
new information when iPad is connected to the Internet (some delays
may occur). You might want to turn Push o to suspend delivery of email
and other information, or to conserve battery life. When Push is o, use
the Fetch New Data setting to determine how often data is requested. For
optimal battery life, don’t fetch too often.
Mail settings
To change settings that apply to all of your accounts, go to Settings > Mail, Contacts, Calendars.
Change the tones played when mail is sent or received: Go to Settings > Sounds.
47
Chapter 5 Mail
Draft
Apple Confidential
Messages 6
Sending and receiving messages
Using the Messages app and the built-in iMessage service, you can send text messages over Wi-Fi
or cellular data connections to other iOS 5 users. Messages can include photos, videos, and other
info, let you see when the other person is typing, and let others be notied when you’ve read
their messages. Because iMessages are displayed on all of your iOS 5 devices logged in to the
same account, you can start a conversation on one of your devices, then continue it on another
device. iMessages are also encrypted.
Note: Cellular data charges or additional fees may apply.
Send a text message: Tap , then tap and choose a contact, search your contacts by entering
a name, or enter a phone number or email address manually. Enter the message, then tap Send.
Note: An alert badge appears if a message can’t be sent. If the alert appears in the address
eld, make sure you enter the name, phone number, or email address of another iOS 5 user. In a
conversation, tap the alert to try sending the message again.
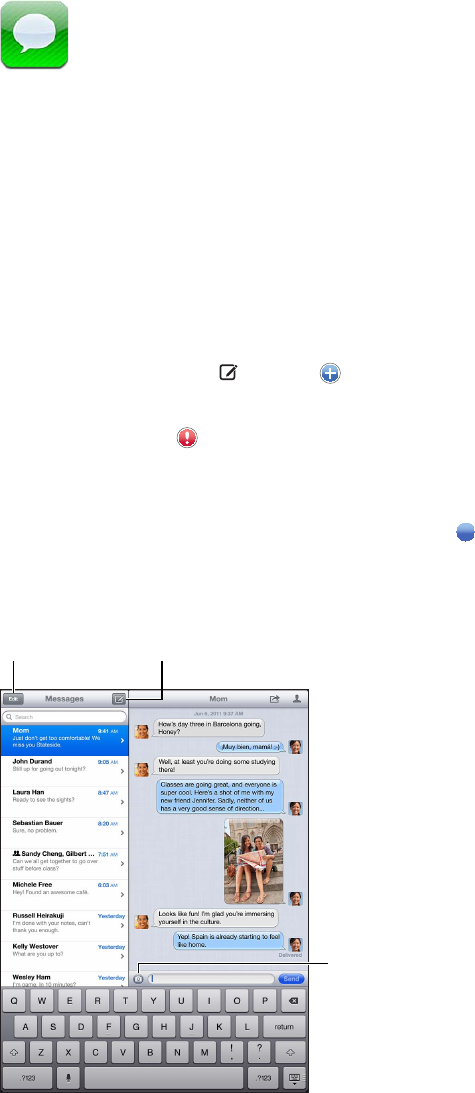
Conversations are saved in the Messages list. A blue dot indicates unread messages. Tap a
conversation to view or continue it. In an iMessage conversation, your outgoing messages are
highlighted in blue.
Tap the edit button
to edit or forward a
conversation.
Tap the edit button
to edit or forward a
conversation.
Tap the compose
button to start a
new conversation.
Tap the compose
button to start a
new conversation.
Tap the Attach
Media button to
include a photo
or video.
Tap the Attach
Media button to
include a photo
or video.
48
Draft
Apple Confidential
Use emoji characters Go to Settings > General > Keyboard > International Keyboards > Add New
Keyboard, then tap Emoji to make that keyboard available. To enter emoji
characters when typing a message, tap to bring up the Emoji keyboard.
See “Switching keyboards” on page 132.
Hide keyboard Tap in the lower-right corner.
Resume a previous conversation Tap the conversation in the Messages list, then enter a message and tap Send.
Display earlier messages in
the conversation
Tap the status bar to scroll to the top, then tap Load Earlier Messages.
Receive iMessages using another
email address
Go to Settings > Messages > Receive At > Add Another Email.
Follow a link in a message Tap the link. A link may open a webpage in Safari, or let you add a phone
number to your contacts, for example.
Forward a conversation Select a conversation, then tap . Select parts to include, then tap Forward.
Add someone to your contacts list,
or share a contact
Tap a phone number or email address in the Messages list, then tap .
Notify others when you’ve read
their messages
Go to Settings > Messages and turn on Send Read Receipts.
Set other options for Messages Go to Settings > Messages.
Manage notications for messages See “Notications” on page 121.
Set the alert sound for incoming
text messages
See “Sounds” on page 125.
Sending messages to a group
Group messaging lets you send a message to multiple recipients.
Send messages to a group: Tap , then enter multiple recipients.
Sending photos, videos, and more
You can send photos, videos, locations, contact info, and voice memos.
Send a photo or video: Tap .
The size limit of attachments is determined by your service provider. iPad may compress photo
and video attachments, if necessary.
Send a location In Maps, tap for a location, tap Share Location, then tap Message.
Send contact info In Contacts, choose a contact, tap Share Contact (below Notes), then tap
Send Message.
Save a photo or video you receive
to your Camera Roll album
Tap the photo or video, tap , then tap Save Image.
Copy a photo or video Touch and hold the attachment, then tap Copy.
Save contact info you receive Tap the contact bubble, then tap Create New Contact or “Add to
Existing Contact.”
49
Chapter 6 Messages
Draft
Apple Confidential

Editing conversations
If you want to keep just part of a conversation, you can delete the parts you don’t want. You can
also delete entire conversations from the Messages list.
Edit a conversation: Tap Edit, select the parts to delete, then tap Delete.
Clear all text and attachments,
without deleting the conversation
Tap Edit, then tap Clear All.
Delete a conversation Swipe the conversation, then tap Delete.
Searching messages
You can search the content of conversations in the Messages list.
Search a conversation: Tap the search eld, then enter the text you’re looking for.
You can also search conversations from the Home screen. See “Searching” on page 32.
50 Chapter 6 Messages
Draft
Apple Confidential

Camera 7
About Camera
If you have an iPad 2 or later, you can take both still photos and videos. There’s a camera on the
back, and a front camera for FaceTime and self-portraits.
View the photos and
videos you’ve taken.
View the photos and
videos you’ve taken.
Start and
stop video
recording.
Start and
stop video
recording.
Camera/
Video switch
Camera/
Video switch
If Location Services is turned on, photos and videos are tagged with location data that can be
used by some apps and photo-sharing websites. See “Location Services” on page 122 .
Note: If Location Services is turned o when you open Camera, you may be asked to turn it on.
You can use Camera without Location Services.
51
Draft
Apple Confidential
Taking photos and videos
Take a photo: Make sure the Camera/Video switch is set to , then aim iPad and tap . You can
also take a photo by pressing the Volume Up button.
Record a video: Slide the Camera/Video switch to , then tap to start or stop recording, or
press the Volume Up button.
When you take a photo or start a video recording, iPad makes a shutter sound. You can control the
volume with the Volume buttons or the Side Switch.
Note: In some areas, the shutter sound isn’t silenced by the Side Switch.
A rectangle briey appears where the camera is focused and setting the exposure. When you
photograph people, iPad (3rd generation) uses face detection to automatically focus on and
balance the exposure across up to 10 faces. A rectangle appears over each detected face.
Zoom in or out Pinch the screen (back camera, in camera mode only).
Turn on the grid Tap Options.
Set the exposure Tap the person or object on the screen.
Lock the exposure Touch and hold the screen until the rectangle pulses. AE Lock appears on
the screen, and the exposure remains locked until you tap the screen again.
Take a screenshot Press and release the Sleep/Wake button and the Home button at the
same time. The screenshot is added to your Camera Roll album.
Note: On an iPad without a camera, screenshots are added to the Saved
Photos album.
Viewing, sharing, and printing
The photos and videos you take with Camera are saved in your Camera Roll album.
View your Camera Roll album: Flick from left to right, or tap the thumbnail image in the
lower-left corner of the screen. You can also view your Camera Roll album in the Photos app.
To take more photos or videos, tap Done.
If you have iCloud Photo Stream turned on in Settings > iCloud, new photos also appear in your
Photo Stream album, and are streamed to your other iOS devices and computers. See “Using
iCloud” on page 19.
For more information about viewing and sharing photos and videos, see “Sharing photos and
videos” on page 61 and “Uploading photos and videos to your computer” on page 53.
Show or hide the controls
while viewing a full-screen
photo or video
Tap the screen.
Email or text a photo or video Tap .
Tweet a photo View the photo full-screen, tap , then tap Tweet. To post a Tweet, you
must be logged in to your Twitter account. Go to Settings > Twitter.
To include your location, tap Add Location.
Print a photo Tap . See “Printing a document” on page 33.
Delete a photo or video Tap .
52 Chapter 7 Camera
Draft
Apple Confidential
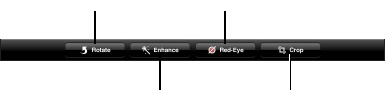
Editing photos
You can rotate, enhance, remove red-eye, and crop photos. Enhancing improves a photo’s overall
darkness or lightness, color saturation, and other qualities.
Crop
Crop
Auto enhance
Auto enhance
Rotate
Rotate
Remove red-eye
Remove red-eye
Edit a photo: While viewing a photo full-screen, tap Edit, then choose a tool.
With the red-eye tool, tap each eye to correct it. To crop, drag the corners of the grid, drag
the photo to reposition it, then tap Crop. You can also tap Constrain when cropping, to set a
specic ratio.
Trimming videos
You can trim the frames from the beginning and end of a video that you just recorded, or from
any other video in your Camera Roll album. You can replace the original video, or save the
trimmed version as a new video clip.
Trim a video: While viewing a video, tap the screen to display the controls. Drag either end of the
frame viewer at the top of the video, then tap Trim.
Important: If you choose Trim Original, the trimmed frames are permanently deleted from the
original video. If you choose “Save as New Clip,” a new trimmed video clip is saved in your Camera
Roll album, leaving the original video unaected.
Uploading photos and videos to your computer
You can upload the photos and videos you take with Camera to photo applications on your
computer, such as iPhoto on a Mac.
Upload photos and videos to your computer: Connect iPad to your computer using the
Dock Connector to USB Cable.
ÂMac: Select the photos and videos you want, then click the Import or Download button in
iPhoto or other supported photo application on your computer.
ÂPC: Follow the instructions that came with your photo application.
If you delete the photos and videos from iPad when you upload them to your computer, they’re
removed from your Camera Roll album. You can use the Photos settings pane in iTunes to sync
photos and videos to the Photos app on iPad (videos can be synced only with a Mac). See
“Syncing with iTunes” on page 20.
53
Chapter 7 Camera
Draft
Apple Confidential

Photo Stream
With Photo Stream—a feature of iCloud—photos you take on iPad are automatically uploaded to
iCloud and pushed to all your other devices that have Photo Stream enabled. Photos uploaded to
iCloud from your other devices and computers are pushed to your Photo Stream album on iPad.
See “Using iCloud” on page 19.
Turn on Photo Stream: Go to Settings > iCloud > Photo Stream.
New photos you’ve taken are uploaded to your Photo Stream when you leave the Camera app
and iPad is connected to the Internet via Wi-Fi. Any other photos added to your Camera Roll—
including photos downloaded from email and text messages, and images saved from web pages,
Photo Booth, and screenshots—are also uploaded to your Photo Stream and pushed to your
other devices. Photo Stream can share up to 1000 of your most recent photos across your iOS
devices. Your computers can keep all your Photo Stream photos permanently.
Save photos to iPad from
Photo Stream
In your Photo Stream album, tap , select the photos you want to save,
then tap Save.
Delete a photo from iCloud In your Photo Stream album, select the photo, then tap .
Delete multiple photos
from iCloud
In your Photo Stream album, tap , select the photos you want to delete,
then tap Delete.
Note: To delete photos from Photo Stream, you need iOS 5.1 or later on iPad and all of your other
iOS devices. For more information, see support.apple.com/kb/HT4486.
Although deleted photos are removed from the Photo Stream on your devices, the original
remains in the Camera Roll (or Saved Photos) album on the device the photo originated from.
54 Chapter 7 Camera
Draft
Apple Confidential
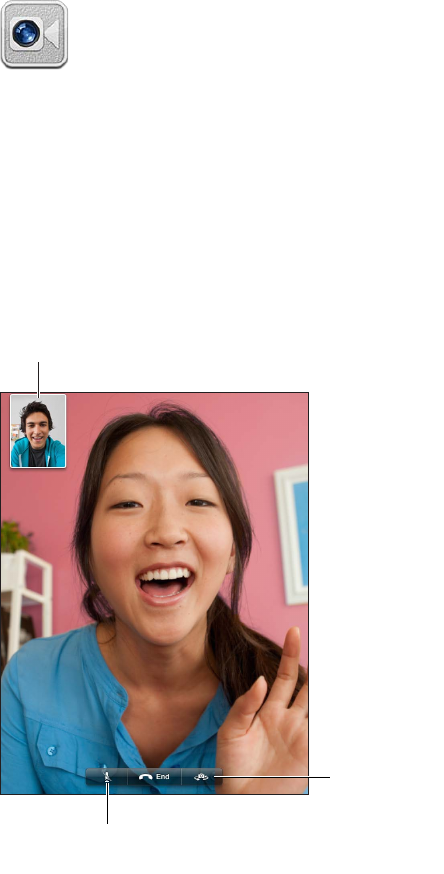
FaceTime 8
About FaceTime
FaceTime lets you make video calls over Wi-Fi. Use the front camera to talk face-to-face, or the
back camera to share what you see around you.
To use FaceTime, you need iPad 2 or later and a Wi-Fi connection to the Internet. See “Network” on
page 125. The person you call must also have an iOS device or computer that works with FaceTime.
Note: FaceTime may not be available in all areas.
Drag your image
to any corner.
Drag your image
to any corner.
Switch cameras.
Switch cameras.
Mute (you can hear
and see; the caller
can see but not hear).
Mute (you can hear
and see; the caller
can see but not hear).
55
Draft
Apple Confidential