Arista Networks SS300ATC60 SpectraGuard Access Point / Sensor User Manual 4
AirTight Networks, Inc. SpectraGuard Access Point / Sensor Users Manual 4
Contents
- 1. Users Manual
- 2. Users Manual-1
- 3. Users Manual-2
- 4. Users Manual-3
- 5. Users Manual-4
- 6. Users Manual-5
- 7. Users Manual-6
- 8. (SS-300AT-C-60) UserMan-Part1_2013.12.11 revised
- 9. (SS-300AT-C-60) UserMan-Part2
- 10. (SS-300AT-C-60) UserMan-Part3
- 11. (SS-300AT-C-60) UserMan-Part4
- 12. (SS-300AT-C-60) UserMan-Part5
- 13. (SS-300AT-C-60) UserMan-Part6
Users Manual-4
Forensics Tab
SpectraGuard® Enterprise User Guide
171
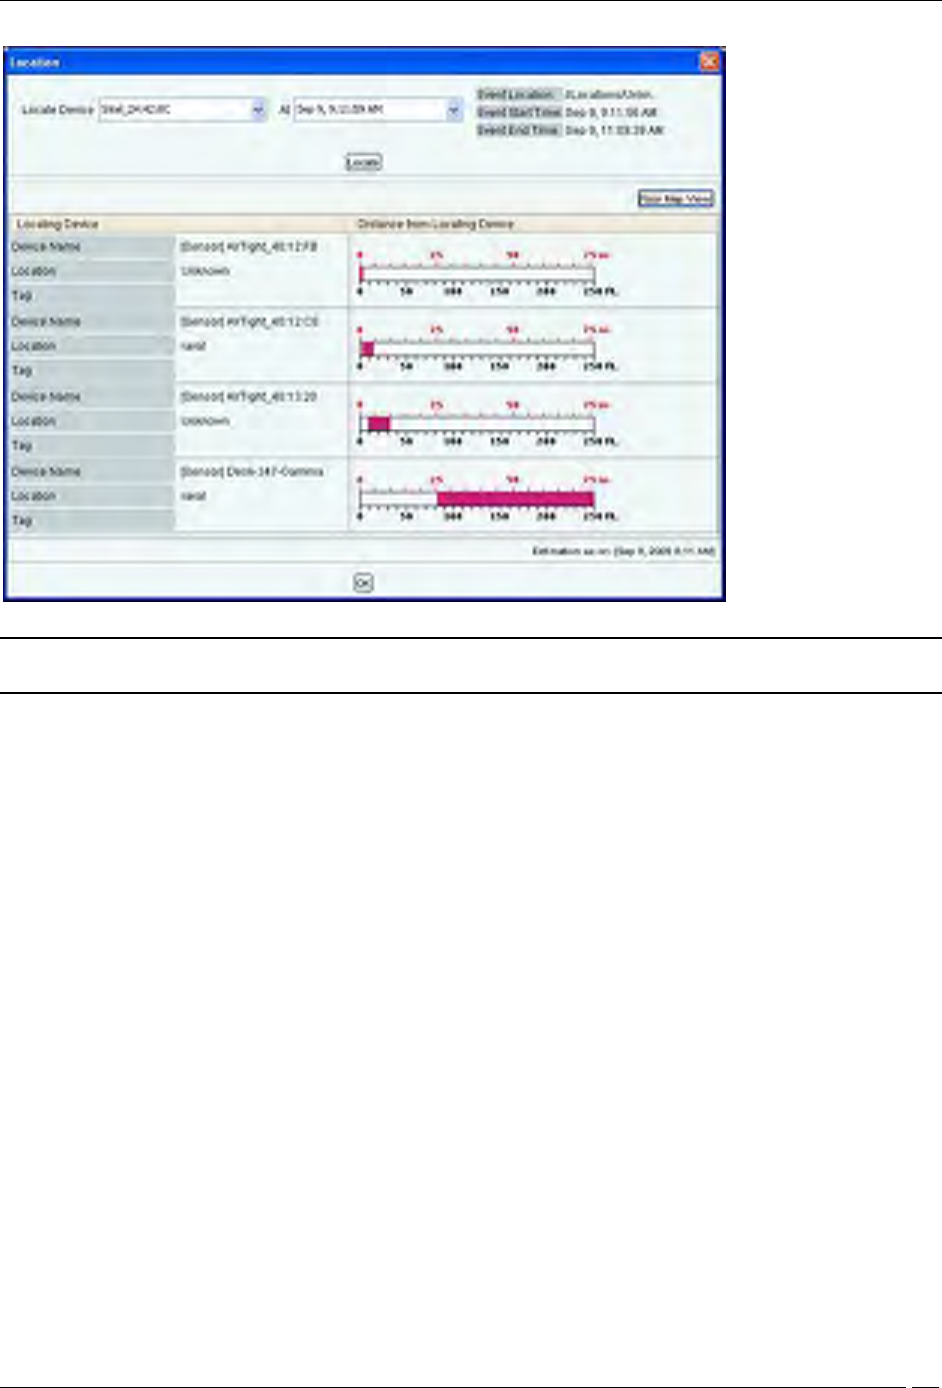
Location dialog
Note: The first row in the Client based threat displays the Event Time, while rest of the rows displays the Start/End Time of
Association. This is valid for all Client based threats, except Ad hoc.
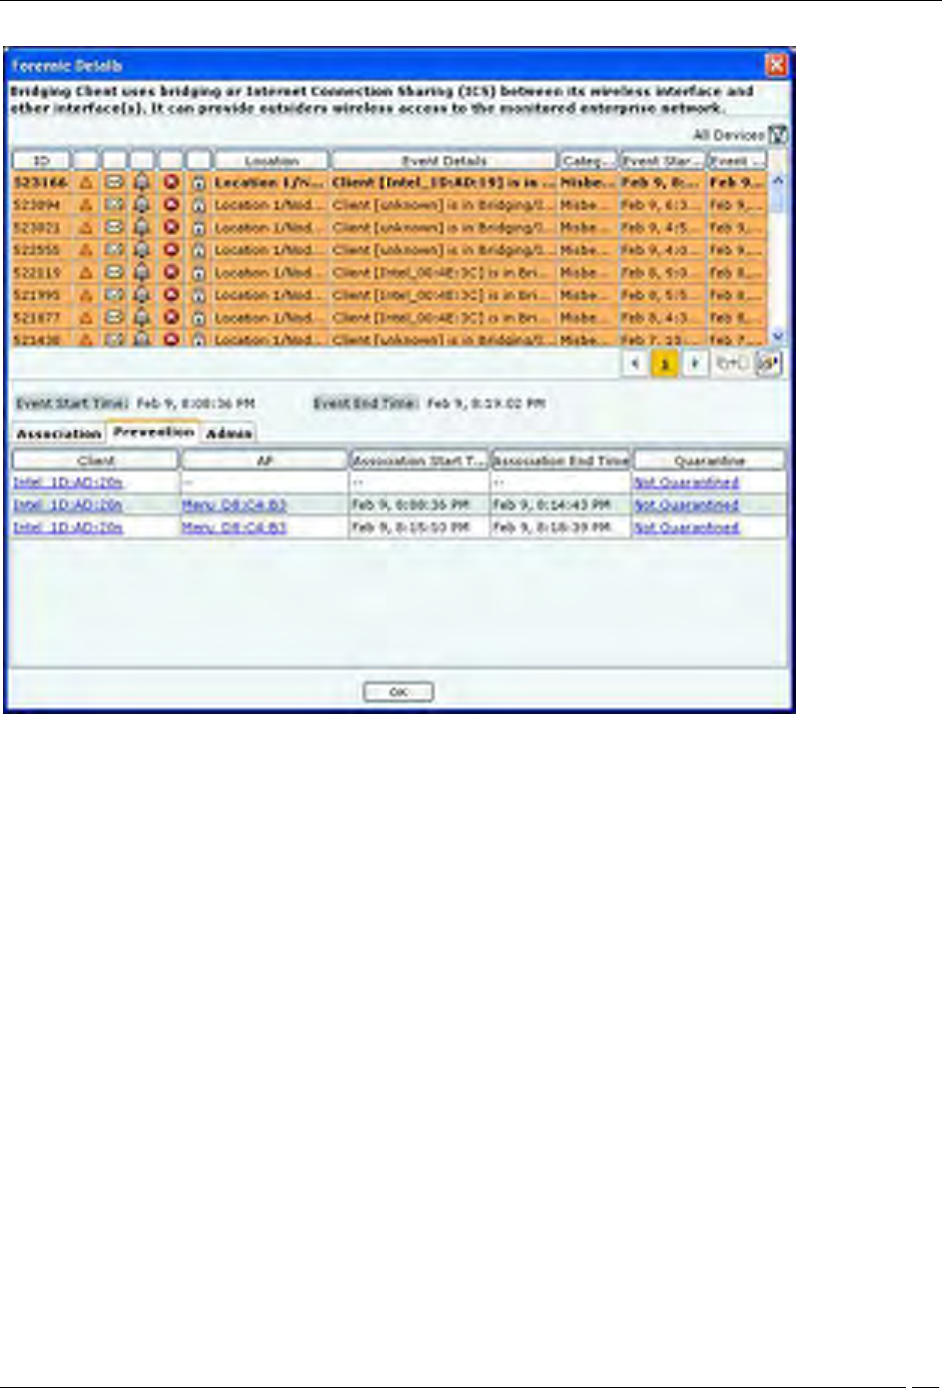
Client Based Threat – Prevention Tab
Prevention Tab shows the details of the Quarantine status of the association in the Association tab.
Forensics Tab
SpectraGuard® Enterprise User Guide
172
Client Based Threat Details – Prevention Tab
The fields in Prevention Tab are as follows:
Client
AP
Association Start Time
Association End Time
Quarantine: Specifies the action taken on both the devices in the association. Even if one of device is
quarantined, the association is Quarantined, else it is Not Quarantined. Click Quarantined, the Quarantine
Details dialog opens. Click Not Quarantined, the Not Quarantined Reason dialog opens.
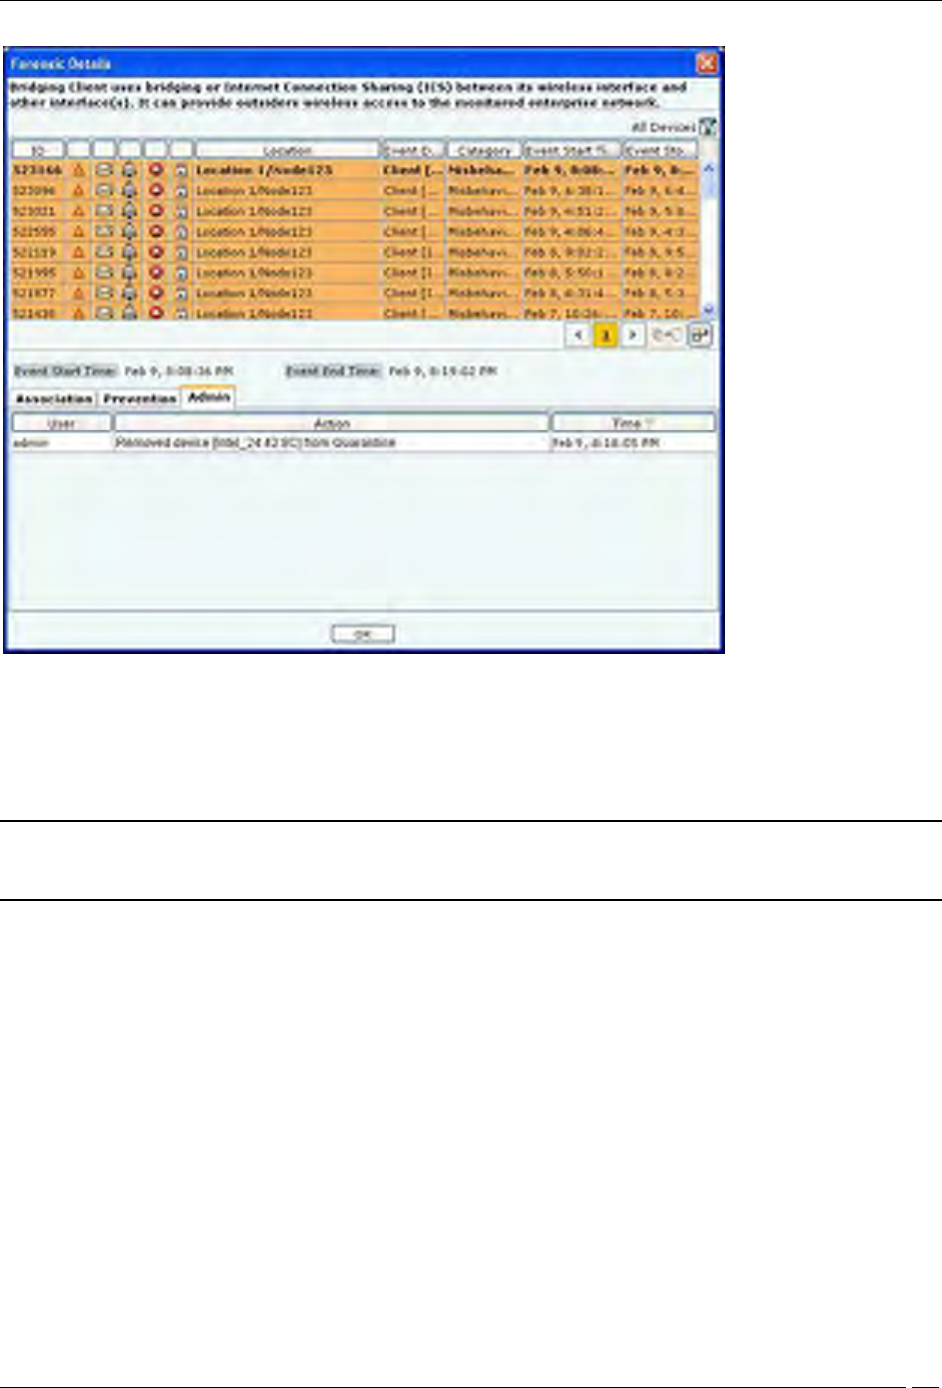
Client Based Threat – Admin Tab
Admin Tab shows all the administrator actions taken on the Client during the Event Start Time and Event End Time.
Forensics Tab
SpectraGuard® Enterprise User Guide
173
Client Based Threat Details – Admin Tab
The fields in Admin Tab are as follows:
User: Specifies the name of the user who took action on the threat.
Action: Specifies the action taken by the user for the Client based threat, such as Client added to quarantine,
Client name changed.
Time: Specifies the time when the user action was taken
Note: Client Based Threat – Misassociation, Unauthorized Association, Bridging Client, and Banned Client have the same fields
for the tabs Association, Prevention, and Admin. However Client Based Threat – Ad hoc has some different fields as discussed
in the section below.
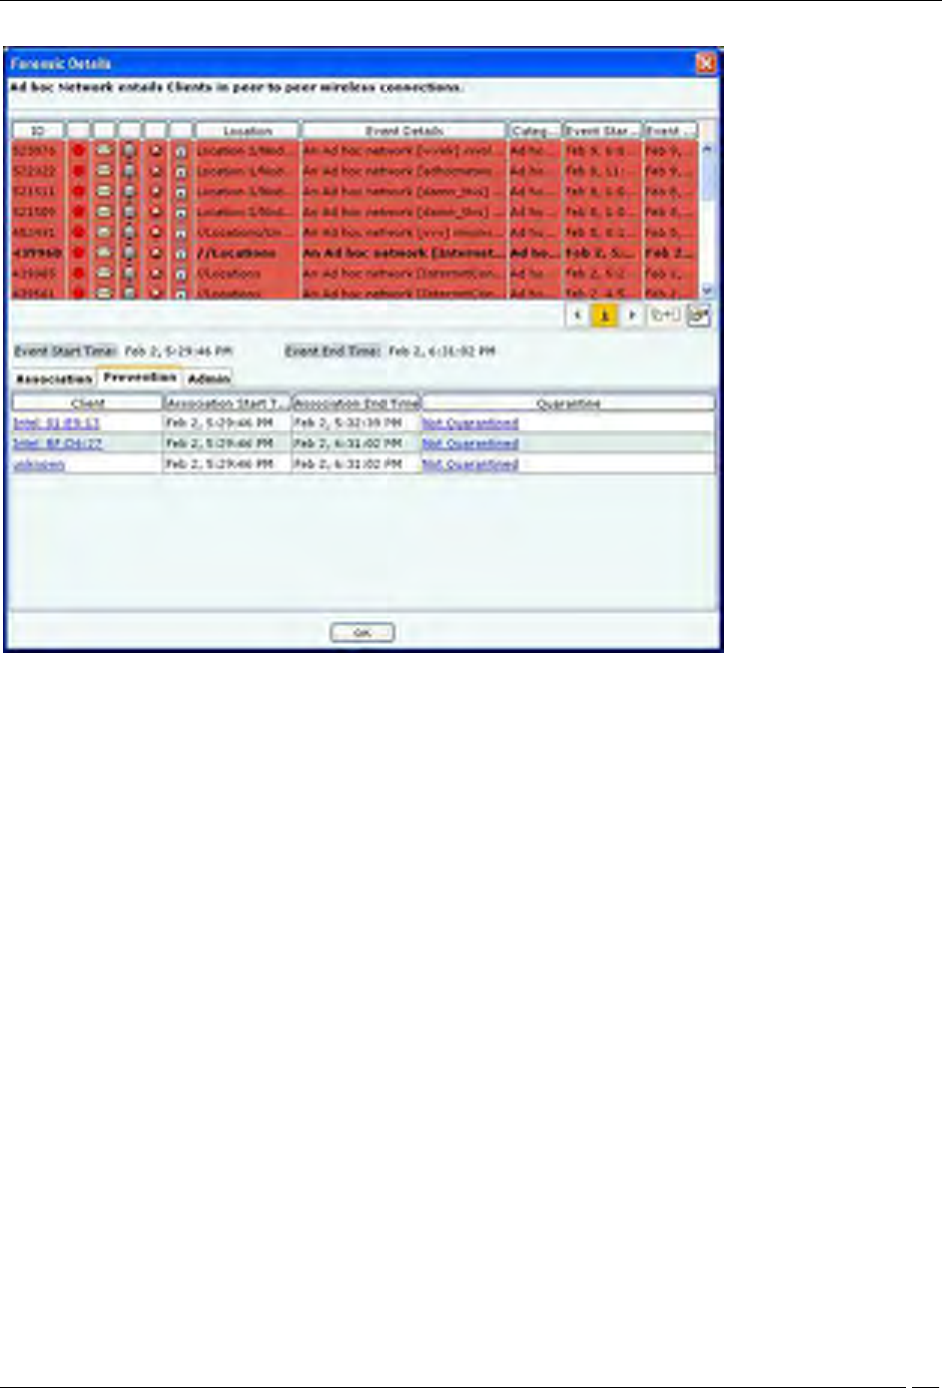
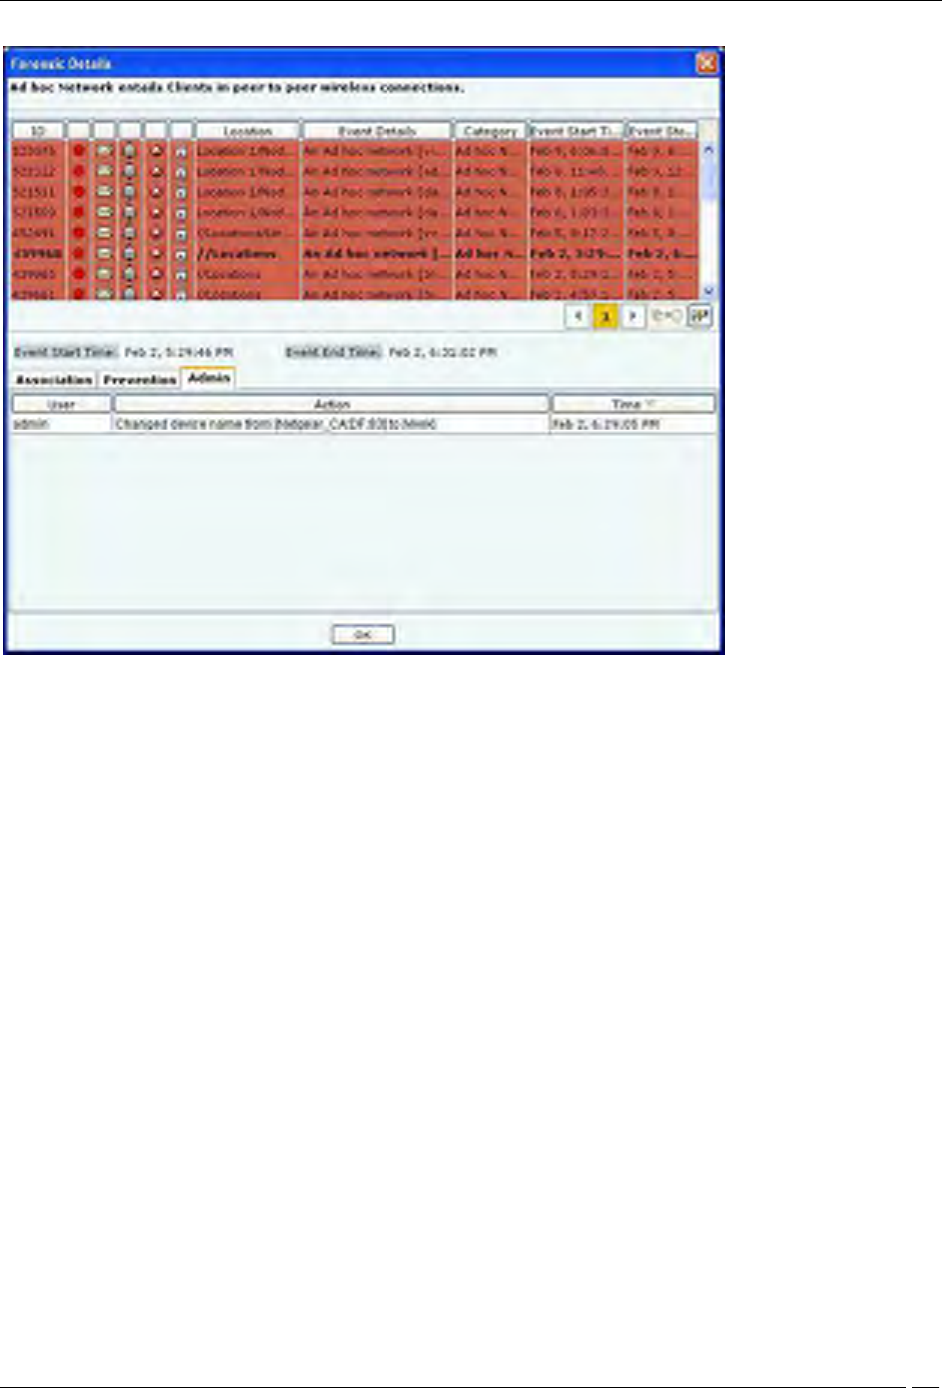
Client Based Threat – Ad hoc
Client – Ad hoc Threat displays only all the Clients participating in the Ad hoc connection.
To open the Client – Ad hoc Threat Details dialog, select the Client – Ad hoc threat row on the Forensics screen,and
click Details. The Client – Ad hoc Threat Details dialog opens.

Forensics Tab
SpectraGuard® Enterprise User Guide
174
Client – Ad hoc Threat Details dialog
Note: The Client – Ad hoc Threat Details dialog does not have All Device Filter icon
Client Ad hoc Threat – Association tab
The fields in Association Tab are as follows:
Client
Association Start Time
Association End Time
Locate: Click Locate, the Location dialog opens. In this case only the Client name appears in the Locate
Device drop down list. Select Start Time of Ad hoc Connection and End Time of Ad hoc Connection from
At drop down list. Click Locate the location of the selected device at the selected time is displayed.
Client Ad hoc Threat – Prevention tab
Click on Prevention Tab in the Client – Ad hoc Threat Details dialog.
Forensics Tab
SpectraGuard® Enterprise User Guide
175
Client – Ad hoc Threat Details – Prevention tab
The fields in Prevention tab are as follows:
Client
Association Start Time
Association End Time
Quarantine: Specifies quarantine action taken on the devices during the Ad hoc connection. Click
Quarantined, the Quarantine Details dialog opens. Click Not Quarantined, the Not Quarantined Reason
dialog opens.
Client Ad hoc Threat – Admin Tab
Click on Admin Tab in the Client – Ad hoc Threat Details dialog.
Forensics Tab
SpectraGuard® Enterprise User Guide
176
Client – Ad hoc Threat Details – Admin tab
The fields in Admin tab are as follows:
User
Action: Displays all the actions taken on all the Clients participating in the Ad hoc connection
Time
Forensics Tab – User Saved Settings
The following User choices made during browsing of Forensics Tab are saved by the system.
Time Filter
These settings are saved on log out as well as movement to other tabs on the Console.
Administration Tab
SpectraGuard® Enterprise User Guide
177
Administration Tab
Introduction
The system is highly customizable and can be configured to suit the needs of your enterprise. The Administration
screen allows you to perform various administrative activities such as event, device, and user management, configure
the system and location settings, and enable integration with SAFE and third party applications.
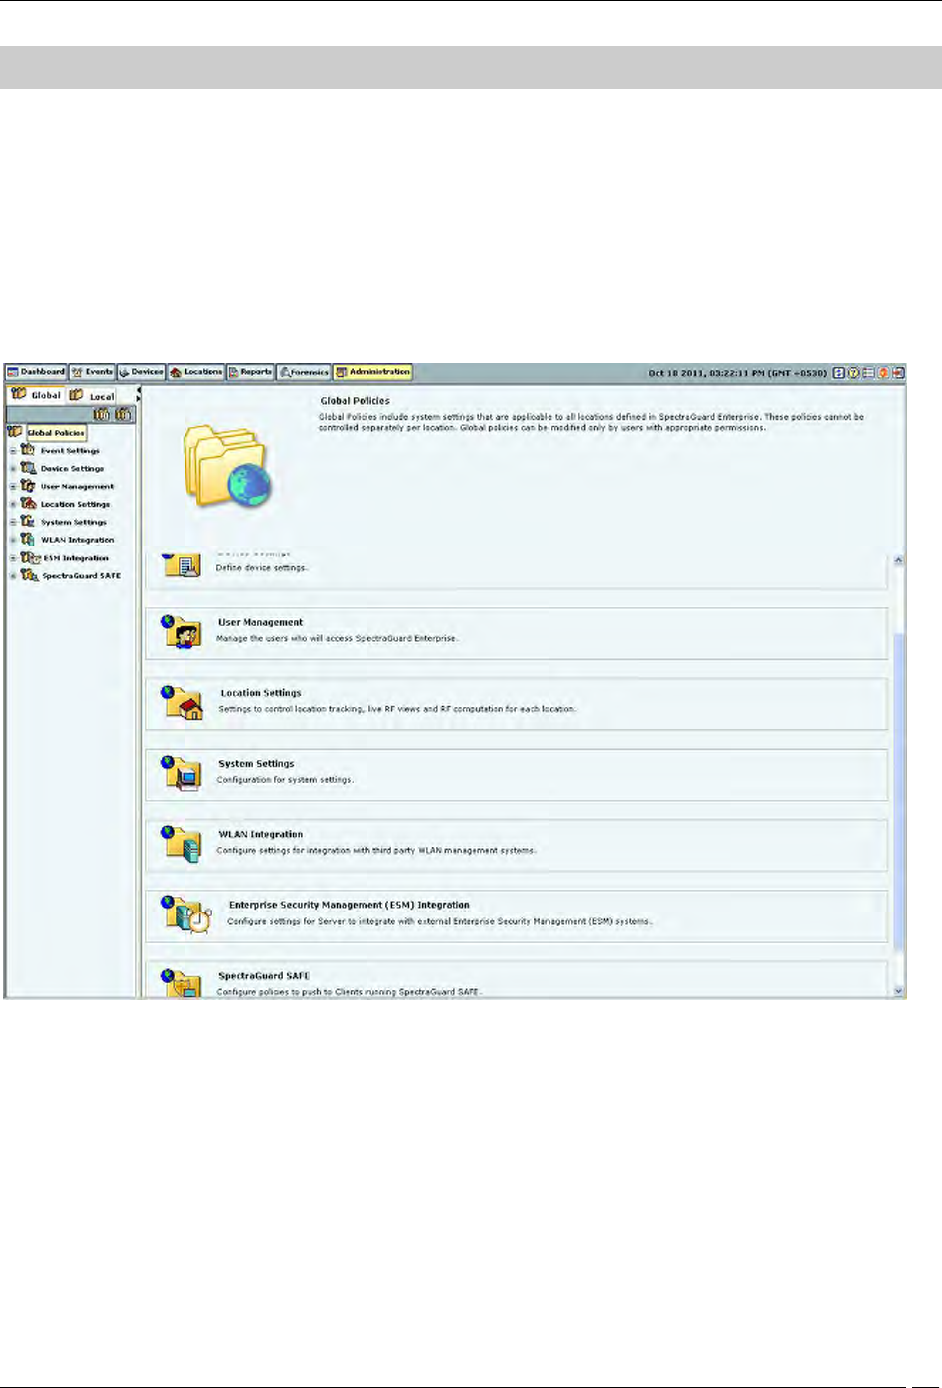
Administration Screen
The Administration screen includes two panes.
On the left, you see policy groups categorized into global policies and local policies; Global policies are grouped
under the Global tab while Local policies are grouped under the Local tab.
On the right, you see the details of the selected policy node. The following figure displays the Administration tab.
Global tab
Administration Tab
SpectraGuard® Enterprise User Guide
178
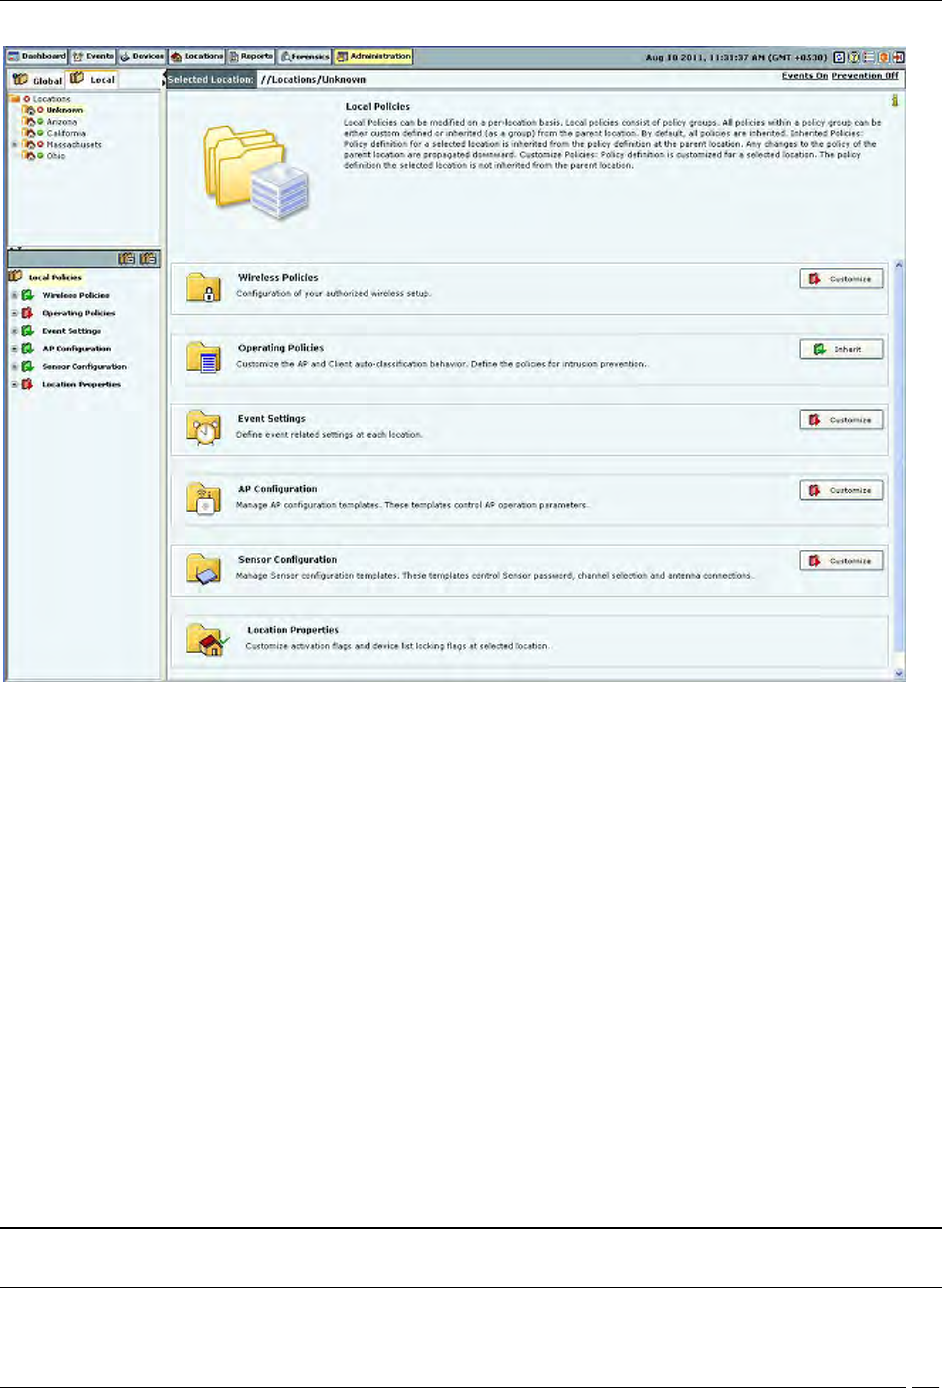
Local Tab
Global Policies
Global policies are the policies that are applicable to the entire system. A superuser or an administrator with rights to
the root location can modify the global policies.
Click the Global tab on the Administration screen to view the policies groups under this tab.
Event Settings
The Event Settings option enabled you to configure the following event settings in the system.
Hotspot SSID's
Event Regeneration
Vulnerable SSID's
Vulnerable SSID
APs have well known default SSIDs and many users may not change these SSIDs when deploying the APs. Therefore
it is highly likely that APs using default SSIDs are present in the enterprise neighborhood. If an enterprise Client
probes for a default SSID, it is at risk of connecting to the neighborhood AP without the user necessarily knowing
about it. Also if an enterprise AP uses a default SSID, such an AP may attract undesirable Clients to connect to it.
If you consider an SSID to be vulnerable to hackers, you can open the Vulnerable SSIDs screen and enter the SSID
under SSID (ASCII character string). Click Add and then Apply to place the SSID in your database. If an AP point
with a vulnerable SSID is detected, the system generates an event.
Note: Commonly known SSIDs are listed by default. To enter a blank SSID: no string, click <Add> without
entering any text. The list shows the SSID as NULL.

Administration Tab
SpectraGuard® Enterprise User Guide
179
Remove SSIDs from this list by selecting the SSIDs and clicking Delete. To remove the SSIDs from the database, click
Apply.
Vulnerable SSIDs
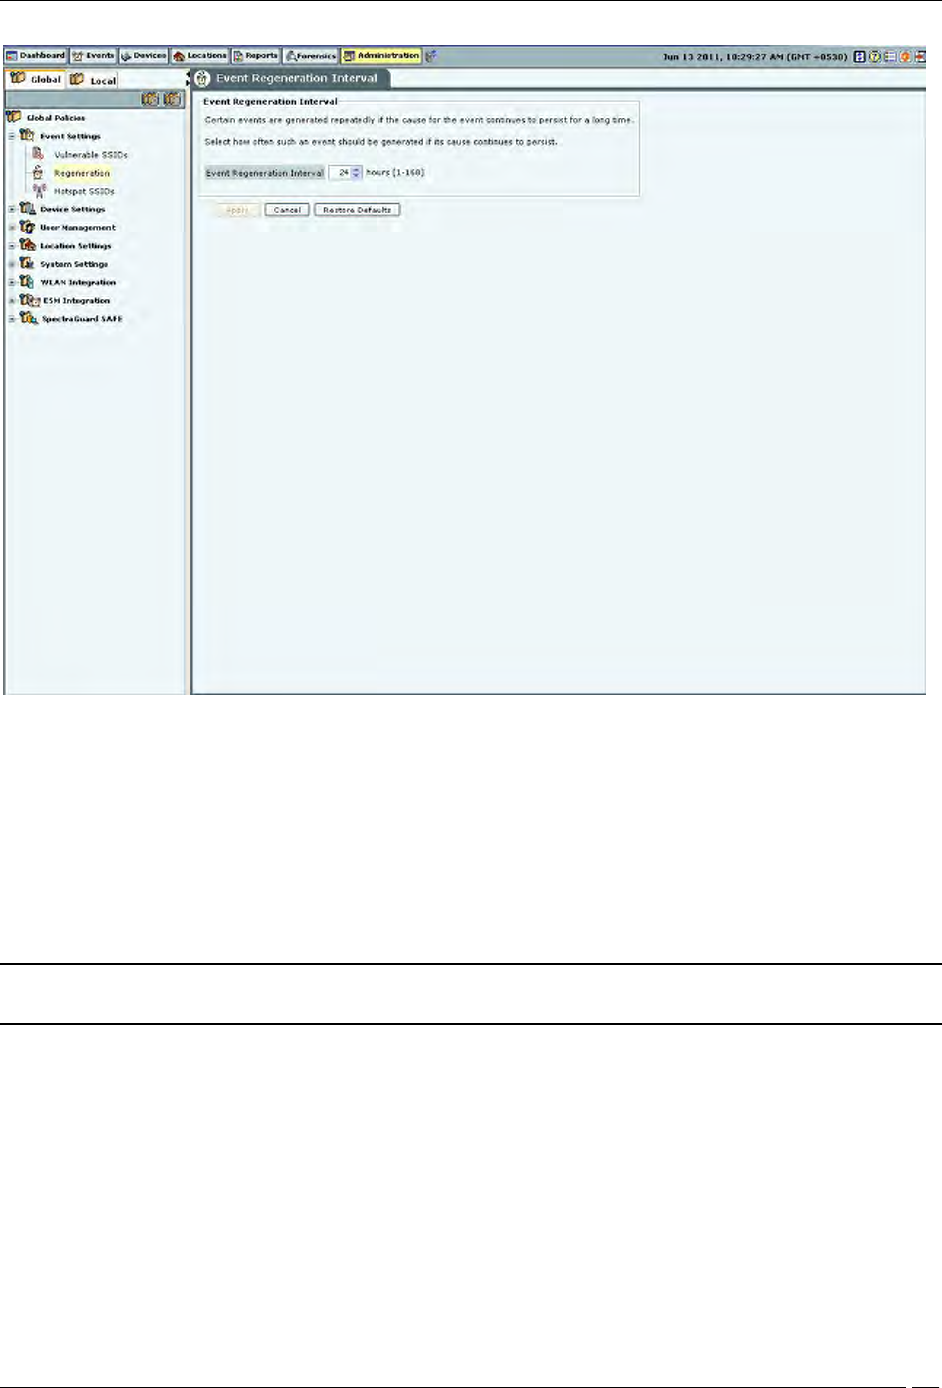
Regeneration
Some events are generated repeatedly when the cause persists; for example, Denial of Service (DoS) (Security) and
traffic events (Monitoring).
The Regeneration screen enables you to specify how often an event is repeated if the cause persists under the Event
Regeneration Interval.
(Minimum: 1 hour; Maximum: 168 hours; Default: 24 hours)
Administration Tab
SpectraGuard® Enterprise User Guide
180
Event Regeneration Interval
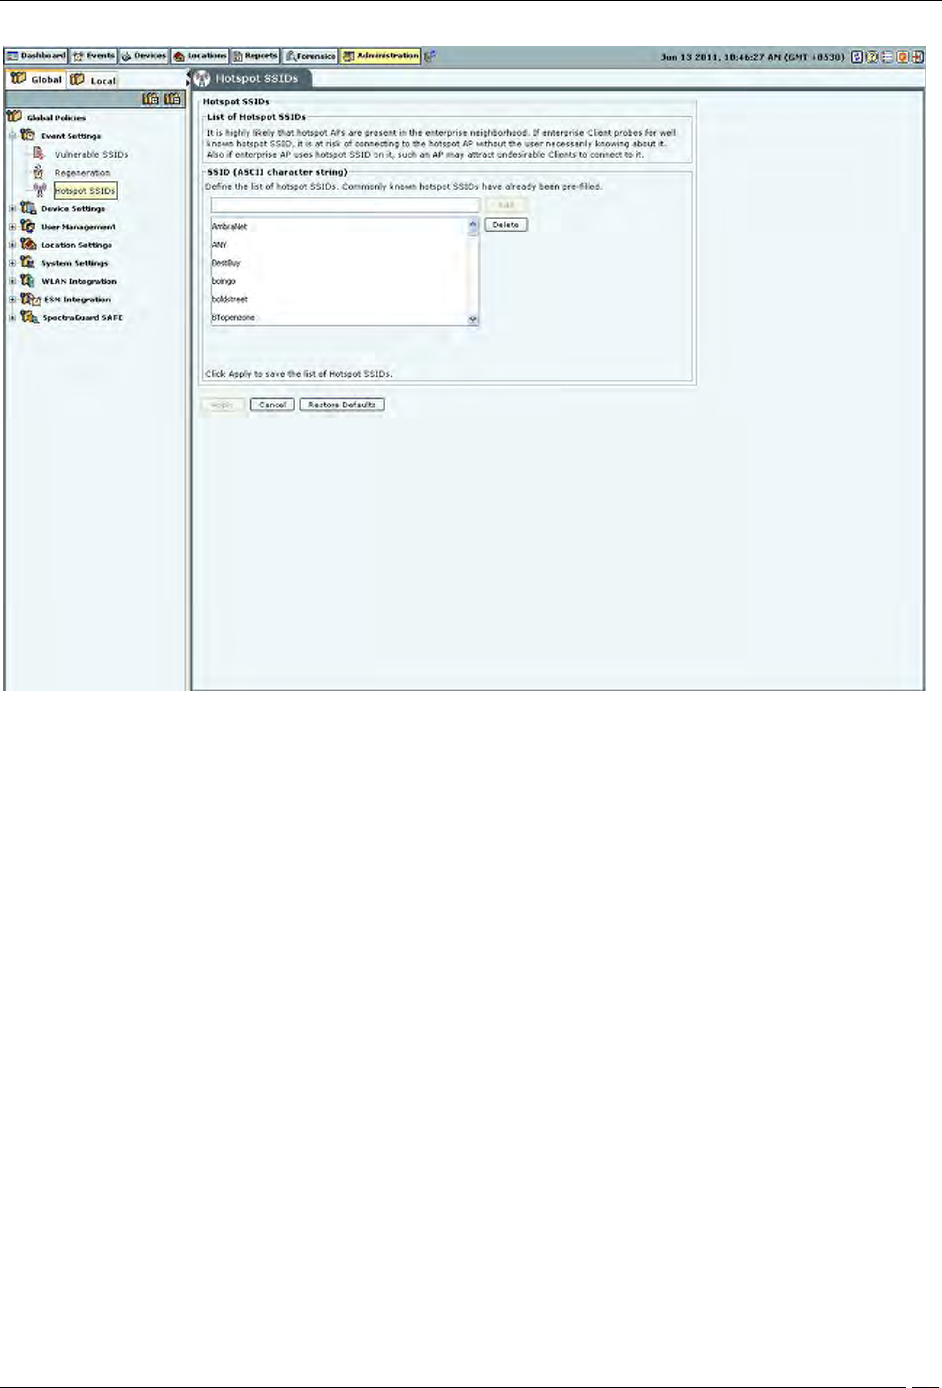
Hotspot SSIDs
It is highly likely that hotspot APs are present in the enterprise neighborhood. If enterprise Client probes for well
known hotspot SSID, it is at risk of connecting to the hotspot AP without the user necessarily knowing about it. Also
if enterprise AP uses hotspot SSID on it, such an AP may attract undesirable Clients to connect to it.
If you consider an SSID to be vulnerable to hackers, you can open the Hotspot SSIDs screen and enter the SSID
under SSID (ASCII character string). Click Add and then Apply to place the SSID in your database. If an AP with a
vulnerable SSID is detected, the system generates an event.
Note: The system lists commonly known SSIDs by default. To enter a blank SSID: that is, with no string, click
<Add> without entering any text. The list shows the SSID as NULL.
Administration Tab
SpectraGuard® Enterprise User Guide
181
Hotspot SSIDs
Remove SSIDs from this list by selecting the SSIDs and clicking Delete. To remove the SSIDs from the database, click
Apply.
Device Settings
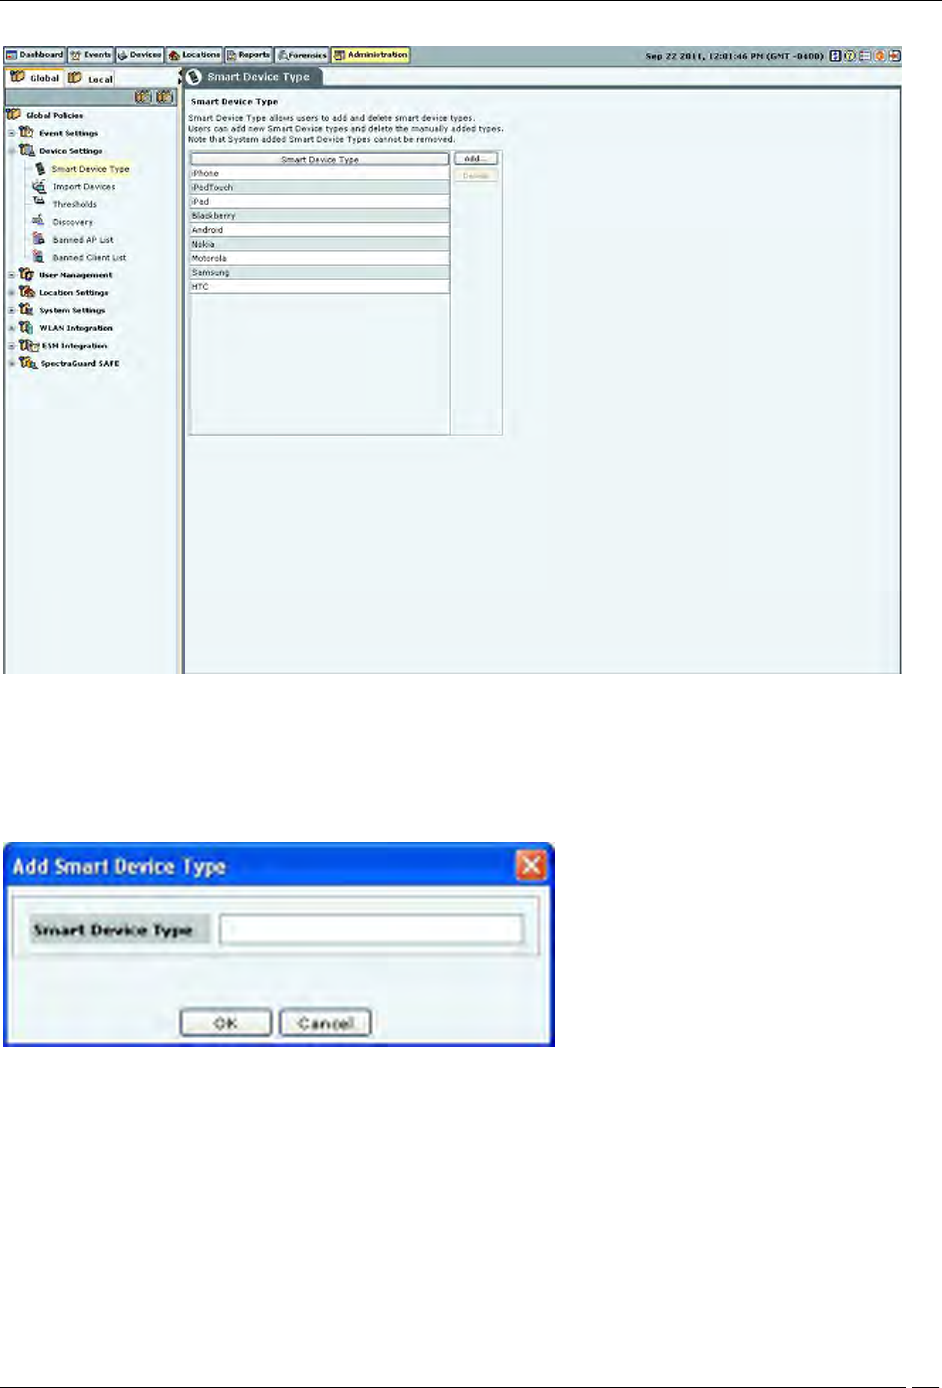
Smart Device Type
You can view, add, and delete the smart device types using the Smart Device Type dialog. Go to Administration-
>Global->Device Settings->Smart Device Type to view the Smart Device Type dialog.
The dialog shows the system-defined smart device types , and the user-defined smart device types, if any.
The following figure shows the Smart Device Type dialog.
Administration Tab
SpectraGuard® Enterprise User Guide
182
Smart Device Type
Adding a smart device type
To add a new smart device type, click Add. Enter the Smart Device Type in the Add Smart Device Type dialog
shown below, and click OK to add the smart device type to the existing list of smart device types.
Add Smart Device Type
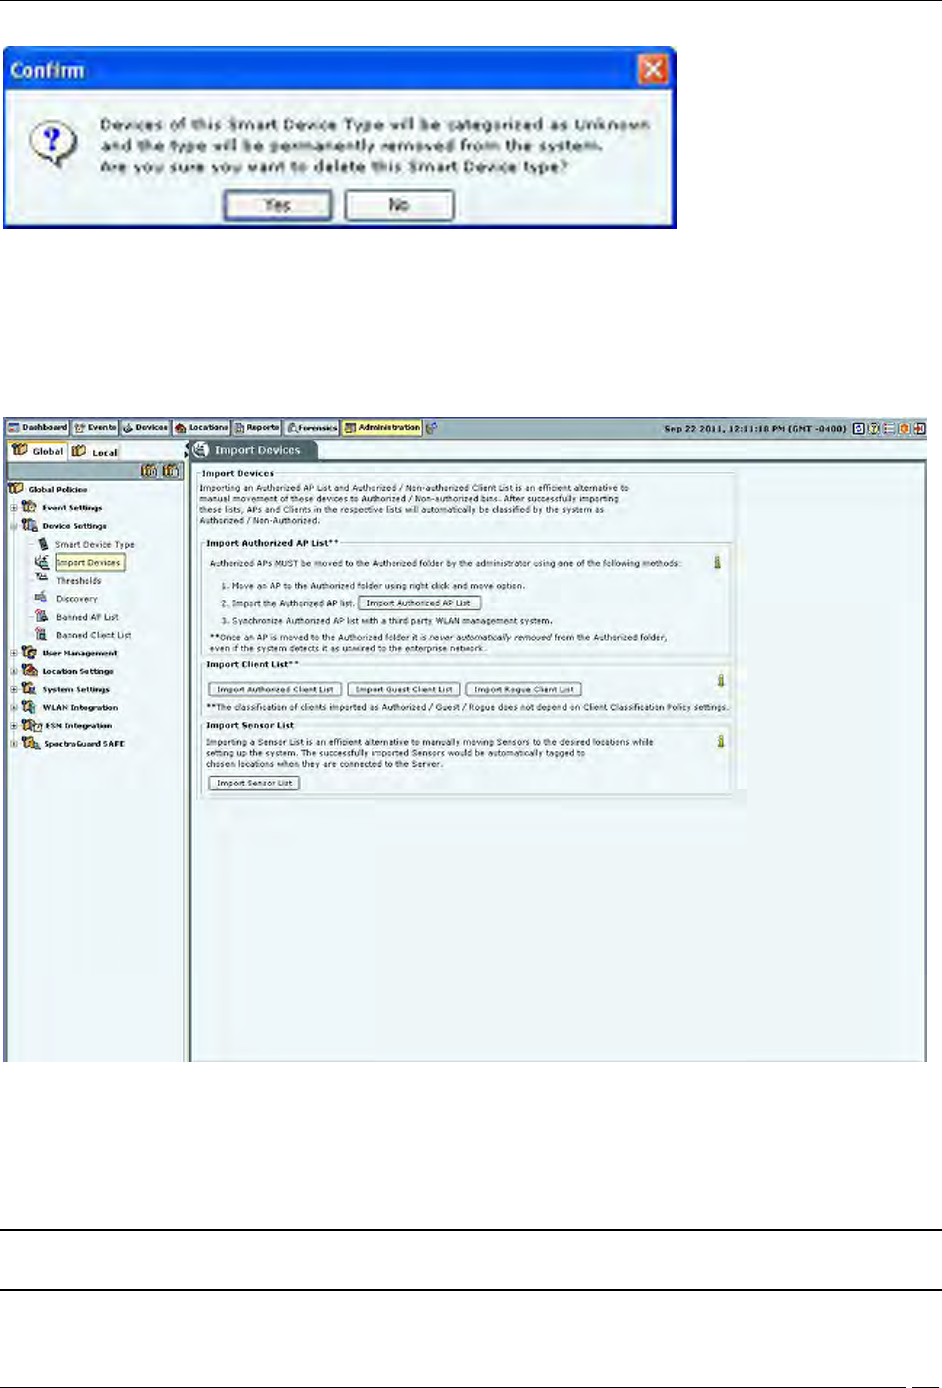
Deleting a smart device type
You can delete only the smart device types that have been manually added using Devices->Clients->Categorized->
Authorized->Smart Device->Change Device Type or through the Add Smart Device Type dialog. You cannot delete
the system-defined smart device types.
To delete a user-defined smart device type, select the smart device type and click Delete. Click Yes to confirm the
deletion.
Administration Tab
SpectraGuard® Enterprise User Guide
183
Delete Smart Device Type
Import Devices
Importing an Authorized AP List and an Authorized or Non-authorized Clients List is an efficient alternative to
manual movement of these devices into the Authorized/Non-authorized bins. After successfully importing these lists,
the system automatically classifies the APs and Clients in the respective lists as Authorized/Non-authorized.
Import Devices
You can move Authorized APs to the Authorized folder using one of the following methods:
Move an AP to the Authorized folder using right click and Move option
Import the Authorized AP list
Synchronize with an AP Management server
Note: Once you move an AP to the Authorized folder, the system never automatically removes it from the
Authorized folder, even if it later detects that the AP is unwired from the enterprise network.
Administration Tab
SpectraGuard® Enterprise User Guide
184
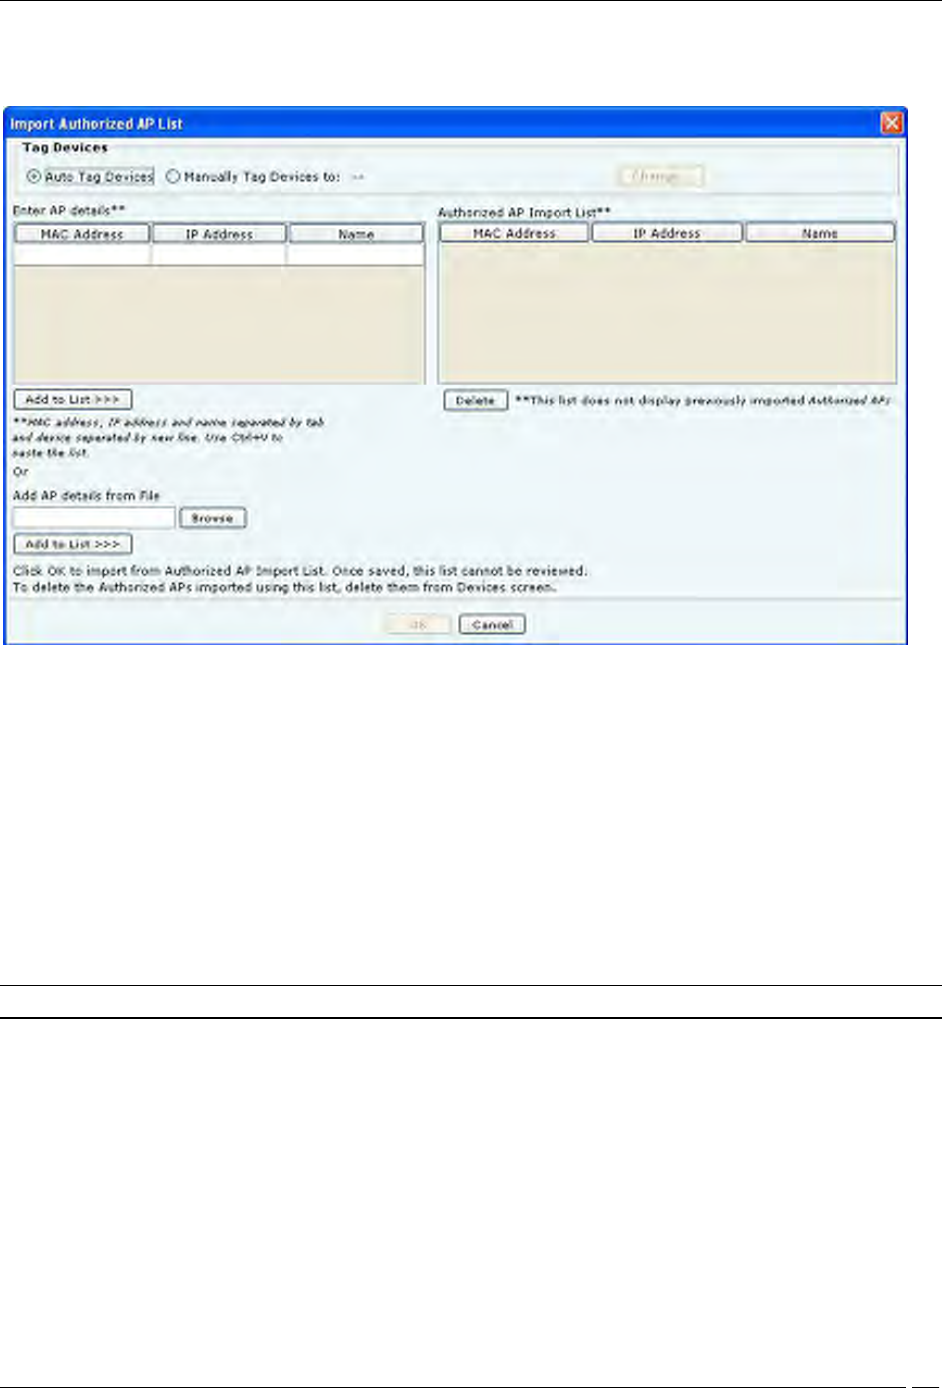
Under Import AP List, click Import Authorized AP List to open Import Authorized AP List dialog.
Import Authorized AP List
In the Import Authorized AP List dialog:
Under Tag Devices, select one of the following:
Auto Tag Devices: To automatically tag the AP to the corresponding location.
Manually Tag Devices to: Click Change to manually tag the AP to the desired location.
Under Enter AP details
To add an AP’s details, type the AP’s MAC address, IP Address, and Name and click Add to List.
To add an AP’s details from a file, click Browse. On the Select Authorized AP_Device_List_File dialog,
select the .txt file from the desired location and click Open. Then click Add to List>>>
Under Authorized AP Import List
To delete an AP’s details, select the corresponding row and click Delete.
To import Authorized APs from the Authorized AP Import List, click OK
Note: When you import APs from a list, policy settings in the Setup Wizard do not affect these APs.
In the Import Devices dialog, under Import Client List, click Import Authorized Client List to open Import
Authorized Client List dialog, click Import Guest Client List to open Import Guest Client List dialog, click Import
Rogue Client List to open Import Rogue Client List dialog.
In the Import Authorized/Guest/Rogue Client List dialog:
Under Tag Devices, select one of the following:
Auto Tag Devices: To automatically tag the Client to the corresponding location.
Manually Tag Devices to:: Click Change to manually tag the Client to the desired location.
Administration Tab
SpectraGuard® Enterprise User Guide
185
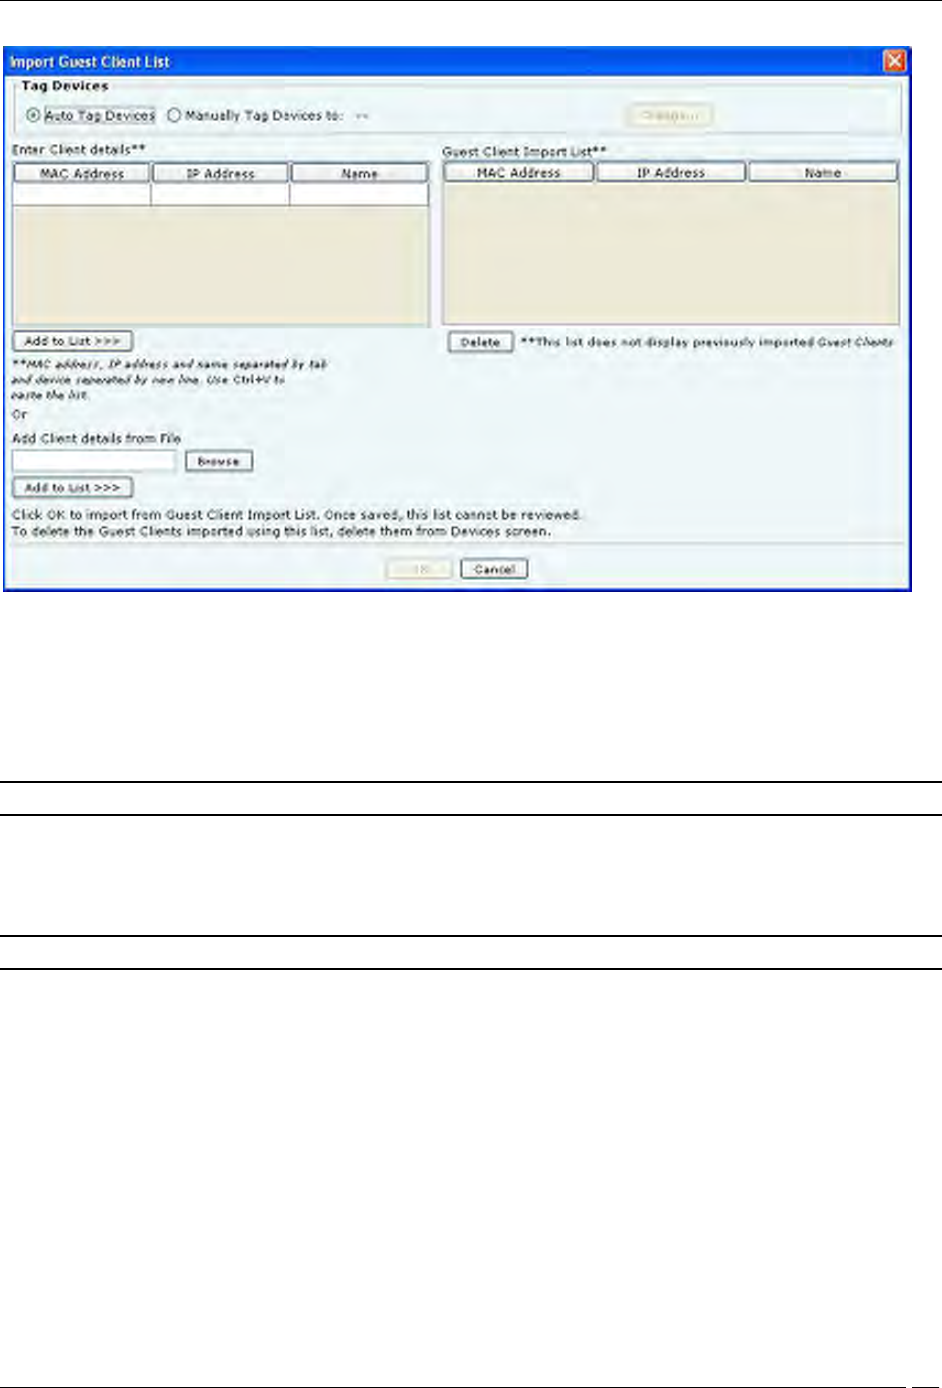
Import Guest Client List
Under Enter Client details
To add a Client’s details, type the Client’s MAC Address, IP Address, and Name and click Add to List>>>
To add a Client’s details from a file, click Browse. On the Select Authorized/Guest/Rogue
Client_Device_List_File dialog, select the .txt file from the desired location and click Open. Then click Add
to List.
Note: When you import sensors from a list, you can delete these sensors only from the Devices screen.
Under Authorized/Guest/Rogue Client Import List
To delete a Client’s details, select the corresponding row and click Delete.
To import Authorized/Guest/Rogue Clients from the Authorized/Guest/Rogue Client Import List, click OK.
Note: When you import Clients from a list, policy settings in the Setup Wizard do not affect these Clients.
In the Import Devices dialog, under Import Sensor List, click Import Sensor List to open the Import Sensor List
dialog:
In the Import Sensor List dialog:
Under Tag Devices, select one of the following:
Auto Tag Devices: To automatically tag the sensor to the corresponding location.
Manually Tag Devices to: Click Change to manually tag the sensor to the desired location.
Under Enter Sensor details
To add a sensor’s details, type the sensor’s MAC address and Name and click Add to List>>>.
To add a sensor’s details from a file, click Browse. On the Select Sensor_Device_List_File dialog, select
the .txt file from the desired location and click Open. Then click Add to List>>>.
Under Authorized Sensor Import List
To delete a sensor’s details, select the corresponding row and click Delete.
To import sensors from the Sensor Import List, click OK.
Administration Tab
SpectraGuard® Enterprise User Guide
186
Note: When you import sensors from a list, you can delete these sensors only from the Devices screen.
Thresholds
Threshold settings determine the status of devices in terms of up-down association and connectivity. The Thresholds
screen enables you to set parameters for APs, clients, and sensors.
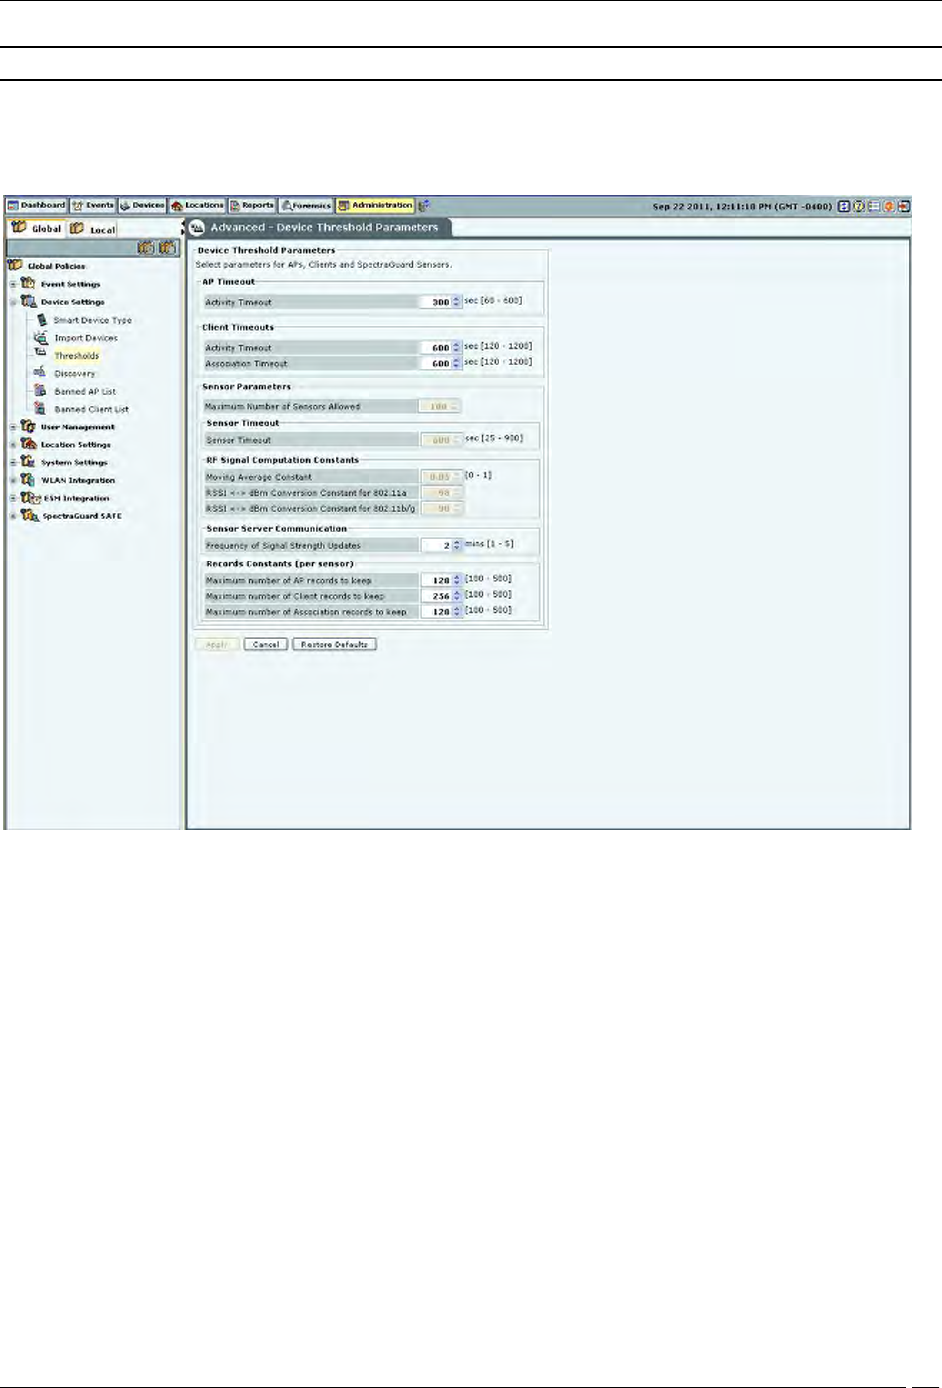
Device Thresholds
Device Threshold Parameters contains the following settings:
AP Timeout
Activity Timeout: If the system senses no activity of the AP for the period specified here, it
declares the AP inactive.
(Minimum: 60 seconds; Maximum: 600 seconds; Default: 300 seconds)
Client Timeouts
Activity Timeout: If the system senses no activity from a Client for the period specified here, it
declares the Client inactive.
(Minimum: 120 seconds; Maximum: 1200 seconds; Default: 600 seconds)
Association Timeout: If the system sees no communication between an associated AP and Client pair for
the period specified here, it declares the association as timed out.
(Minimum: 120 seconds; Maximum: 1200 seconds; Default: 600
Sensor Parameters
Maximum Number of Sensors Allowed: Maximum number of sensors allowed to connect to the
system at a given time.
(Maximum value is governed by the license applied and is a Read-Only field.)

Administration Tab
SpectraGuard® Enterprise User Guide
187
Sensor Timeout: The sensor sends keep alive information to the server at a regular time interval specified
here, to tell the server that it is alive. If the system does not receive this keep alive information for a time
span specified here, it declares the sensor inactive.
Note: Sensor timeout is not user configurable for this release and has been fixed as 600 seconds.
RF Signal Computation Constants
Moving Average Constant: A constant used to find the weighted average of signal strength as seen by a
sensor for a transmitter. Higher value gives more weight to more recently seen signal strength values.
(Minimum: 0; Maximum: 1; Default: 0.05)
sensor observes signal strengths as RSSI reported by the driver. The system converts this information to dBm values
for further use. The conversion formula for this is different for 2.4 GHz and 5 GHz frequency spectrum. The formula
is dBm = RSSI + dBm Conversion Constant.
RSSI <-> dBm Conversion Constant for 802.11a: This value used for 5 GHz band is set to -98.
RSSI <-> dBm Conversion Constant for 802.11b/g: This value used for 2.4 GHz band is set to -90.
Sensor Server Communication
Frequency of Device Updates: The system is informed immediately when device attributes change or when a
device is first detected. If no such changes take place, the system should still be informed about the device
updates. Here you can set that time after which the system is notified of the updates.
(Minimum: 1 day; Maximum: 365 days; Default: 36 days)
Frequency of Signal Strength Updates: The system should be periodically informed about the signal strength
updates. Here you can set that time after which the system is notified.
(Minimum: 1 minute; Maximum: 5 minutes; Default: 2 minutes)
Records Constants (per Sensor): A sensor maintains records for APs, Clients, and associations. The constants
below define the maximum number of APs, Clients, and associations for which to maintain records with the
sensor(s).
Maximum Number of AP records to keep: Specifies the maximum number of APs for which to maintain
records with the sensor(s).
(Minimum: 100; Maximum: 500; Default: 128)
Maximum Number of Client records to keep: Specifies the maximum number of Clients for which to
maintain records are with the sensor(s).
(Minimum: 100; Maximum: 500; Default: 256)
Maximum Number of Association records to keep: Specifies the maximum number of associations for which to
maintain records with the sensor(s).
(Minimum: 100; Maximum: 500; Default: 128)
Discovery
Sensors and NDs inject discovery (ARP) broadcast packets in bursts on the network at regular intervals. These
packets detect the presence of wireless devices connected to the network. If there are multiple sensors and NDs on a
subnet, only one injects discovery packets on the subnet.
Administration Tab
SpectraGuard® Enterprise User Guide
188
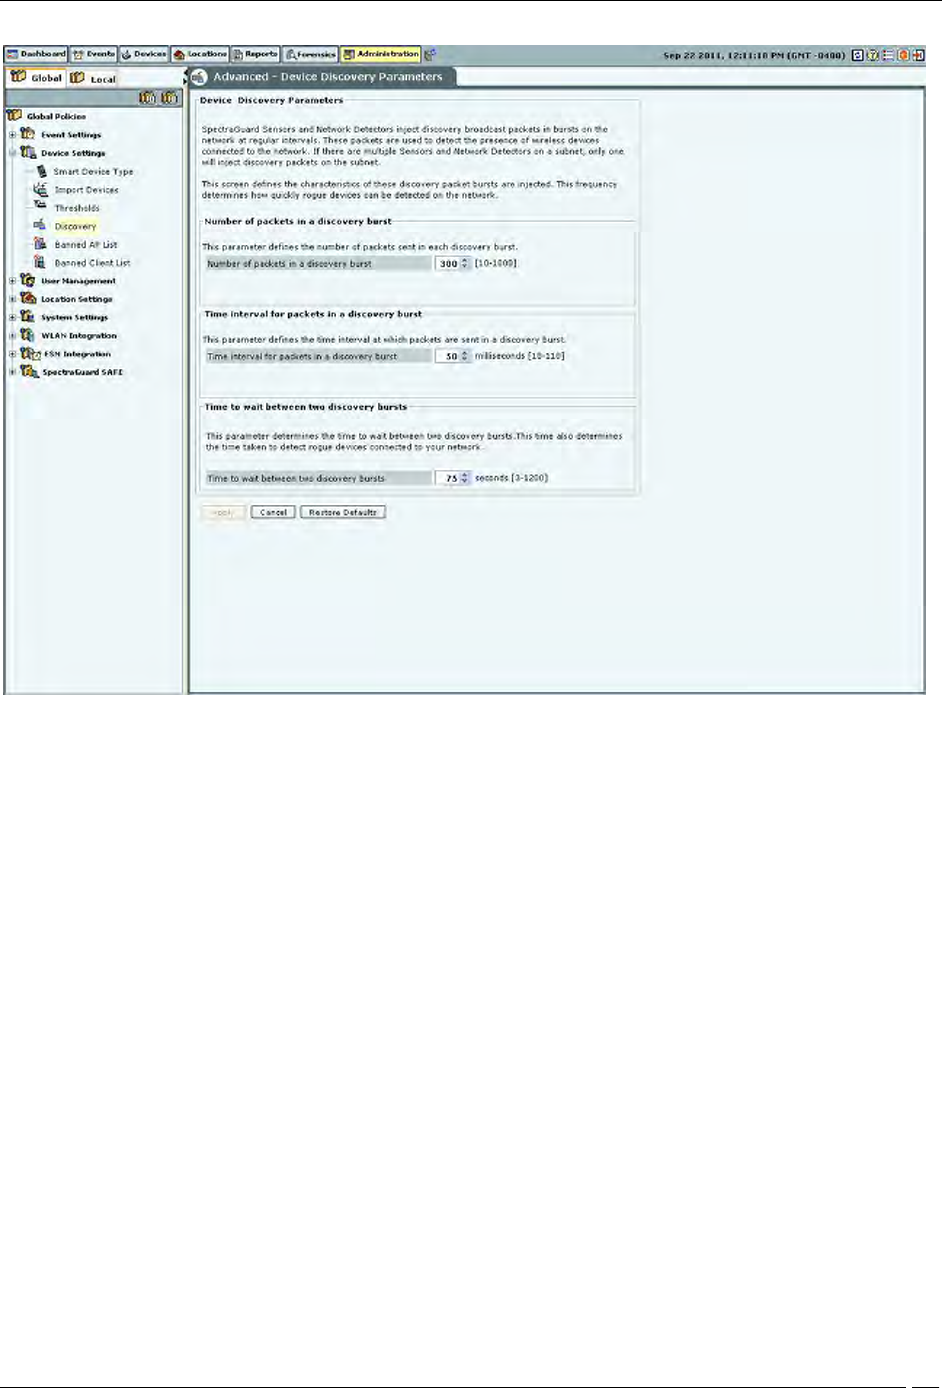
Device Discovery
The following options are available:
Number of packets in a discovery burst: Specifies the number of packets that the system sends in each
discovery burst.
(Minimum: 10; Maximum: 1000; Default: 300)
Time interval for packets in a discovery burst: Specifies the time interval between two consecutive packets
sent in a discovery burst.
(Minimum: 10 milliseconds; Maximum: 110 milliseconds; Default: 50 milliseconds)
Time to wait between two discovery bursts: Specifies the time interval between two consecutive discovery
bursts. This time also determines the time taken to detect rogue devices connected to your network. More the
time to wait between two discovery bursts means more time is required to detect the connectivity of the
wireless devices.
(Minimum: 3 seconds; Maximum: 1200 seconds; Default: 75 seconds)
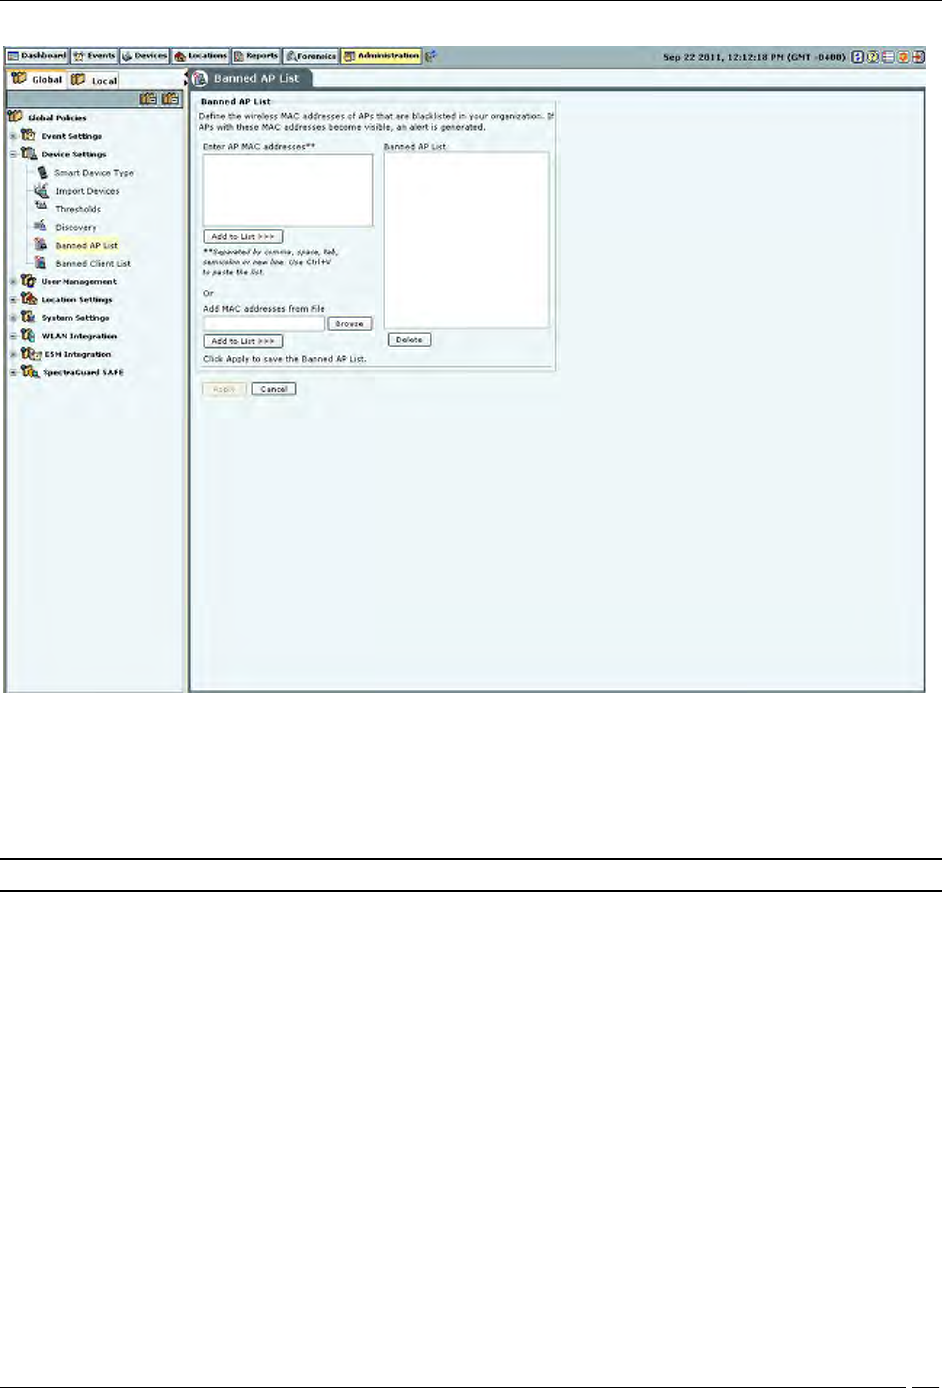
Banned AP List
The Banned AP List dialog enables you to import a list of banned APs to the database. You define the wireless MAC
addresses of APs that are blacklisted in your organization. If APs with these MAC addresses become visible, the
system generates an alert.
Administration Tab
SpectraGuard® Enterprise User Guide
189
Banned AP List
In the Banned AP List under Enter AP MAC addresses, enter the MAC address of a prohibited AP and click Add to
List>>>. The MAC address is added to the Banned AP List. You can also
Use Ctrl + V to paste a list
Add the MAC addresses from a file by clicking Browse and then selecting the file
Note: Separate MAC addresses by a comma, space, tab, semicolon, or new line.
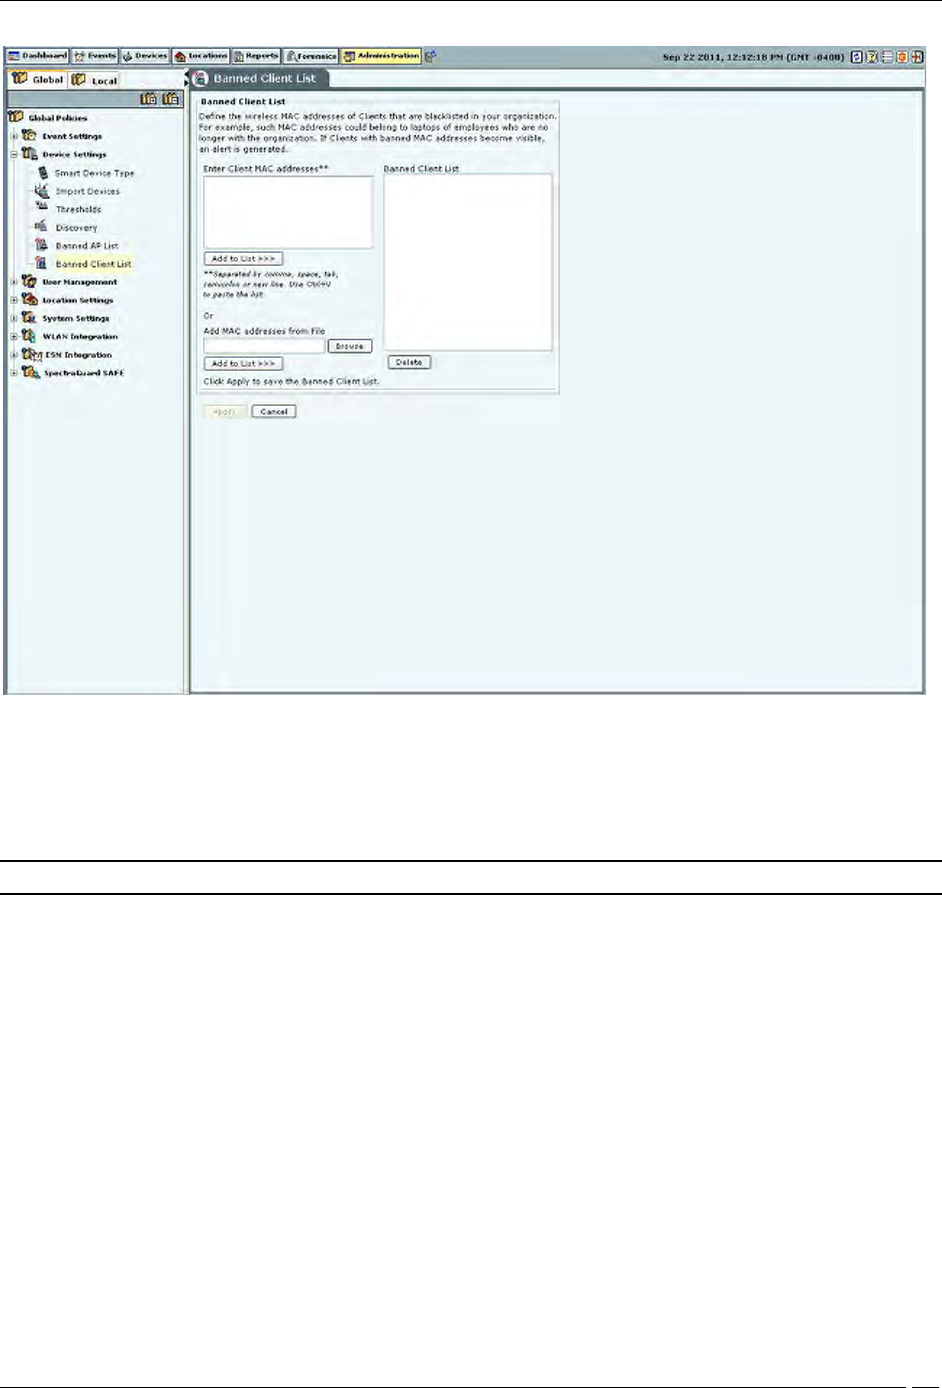
Banned Client List
The Banned Client List dialog enables you to import a list of banned Clients to the database. You define the wireless
MAC addresses of Clients that are blacklisted in your organization. For example, such MAC addresses could belong
to laptops of employees who are no longer with the organization. If Clients with these MAC addresses become
visible, the system generates an alert.
Administration Tab
SpectraGuard® Enterprise User Guide
190
Banned Client List
In the Banned Client List under Enter Client MAC addresses, enter the MAC address of a prohibited Client and click
<Add to List>>>>. The MAC address is added to the Banned Client List. You can also
Use Ctrl + V to paste a list
Add the MAC addresses from a file by clicking Browse and then selecting the file
Note: Separate MAC addresses by a comma, space, tab, semicolon, or new line.
User Management
Select the User Management option to set various user settings. You can manage different types of users, set the
password and account locking policies.
The system allows you to configure and manage local users. The system also allows you to configure users,
authenticated using LDAP and RADIUS. You can also set the user preferences for local users.
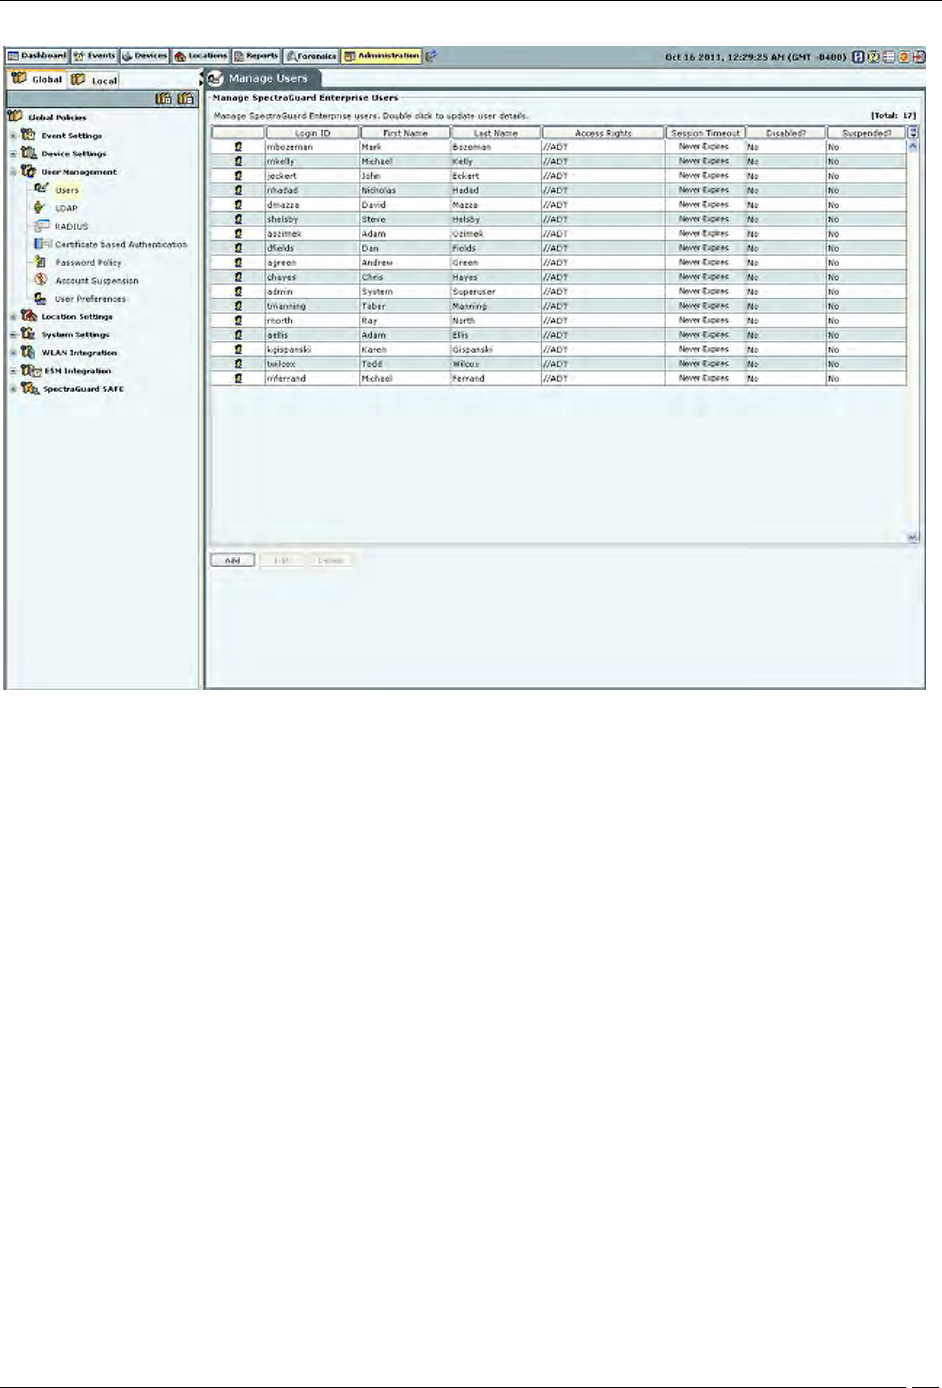
Users
The Users screen enables you to add, edit, and delete user accounts.
Administration Tab
SpectraGuard® Enterprise User Guide
191
Manage Users
Adding a User
Click Add to open the Add User Details dialog.
Administration Tab
SpectraGuard® Enterprise User Guide
192
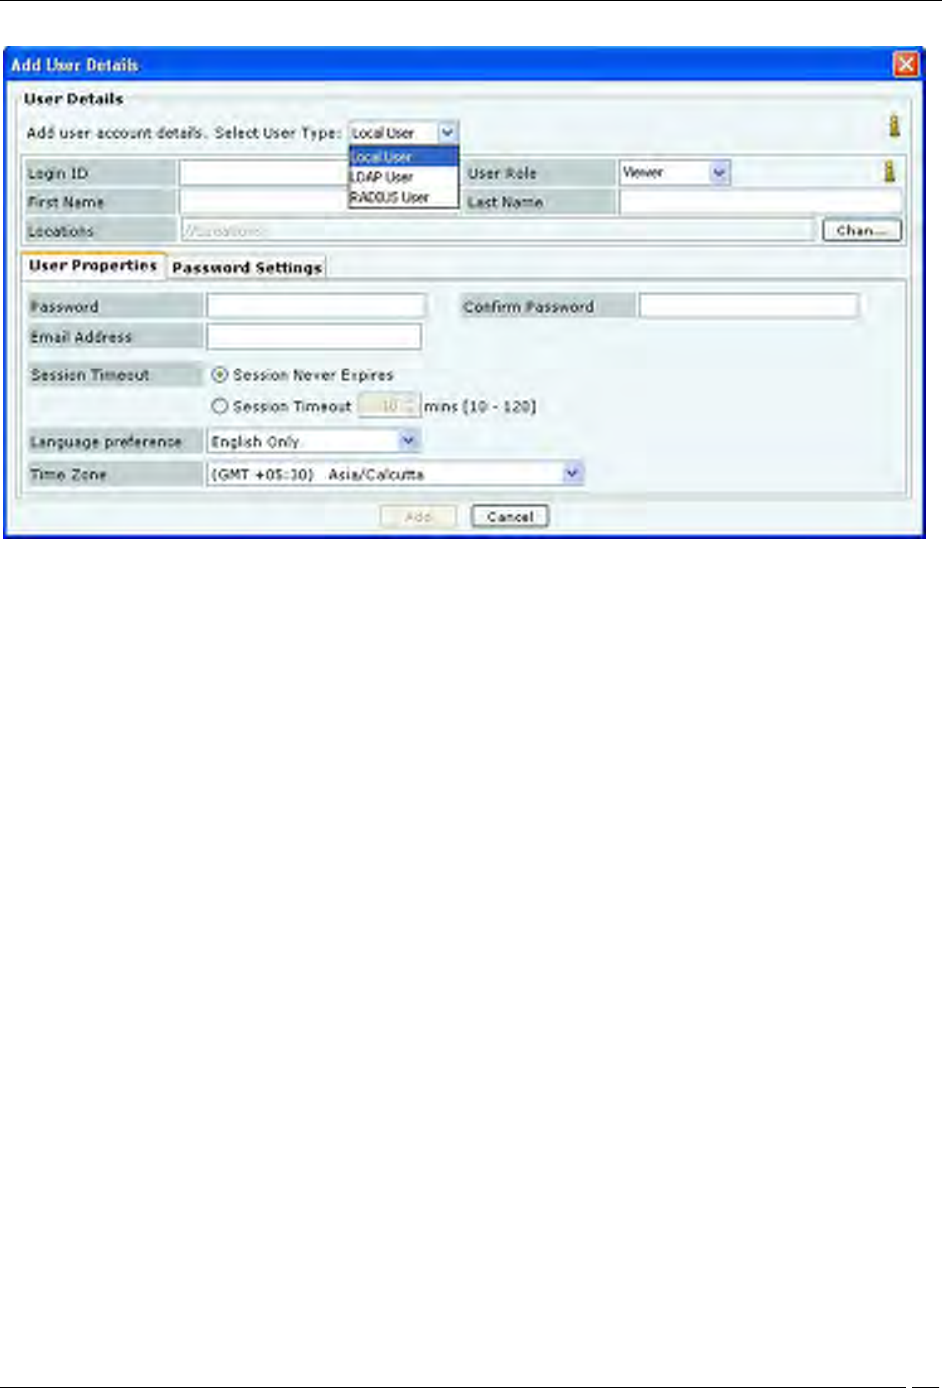
Adding User Details: User Properties Tab for Local User
Under User Details, select the user type (Local, LDAP, or Radius User). Superuser can create user accounts. For local
authentication using password, it is necessary to create the user account using this screen before the user can log in.
For a Local User, the superuser must specify the following fields:
Login ID: Login ID of the user.
User Role: This field specifies the role to be assigned to the user. The table below shows the user roles and
their respective rights.
First and Last Name: First and last name of the user.
Locations: The list of locations where the user has access privilege consistent with the role.
Password: Initial password of the user (which user can later change on his own).
Confirm Password: Reenter the password to help confirm the password before saving.
Email Address: Email address of the user.
For LDAP and RADIUS Users, creating user accounts using this screen is optional, because the user account gets
automatically created (if not already present) upon the first successful login of the user who is authenticated via
LDAP/RADIUS.
As a general rule, at the time of authenticating a user, the system always checks if the user password is locally
available in the system. If it is not locally available, the system checks if the configuration is provided to access the
LDAP authentication service. If so, the system attempts to verify the user password with the LDAP authentication
service. If the user password is not available with the LDAP service, the system checks if the configuration is
provided to access the RADIUS authentication service. If so, the system attempts to verify the user password with the
RADIUS authentication service. In case of LDAP and RADIUS authentication, the system does not maintain local
copy of the user password.
Administration Tab
SpectraGuard® Enterprise User Guide
193
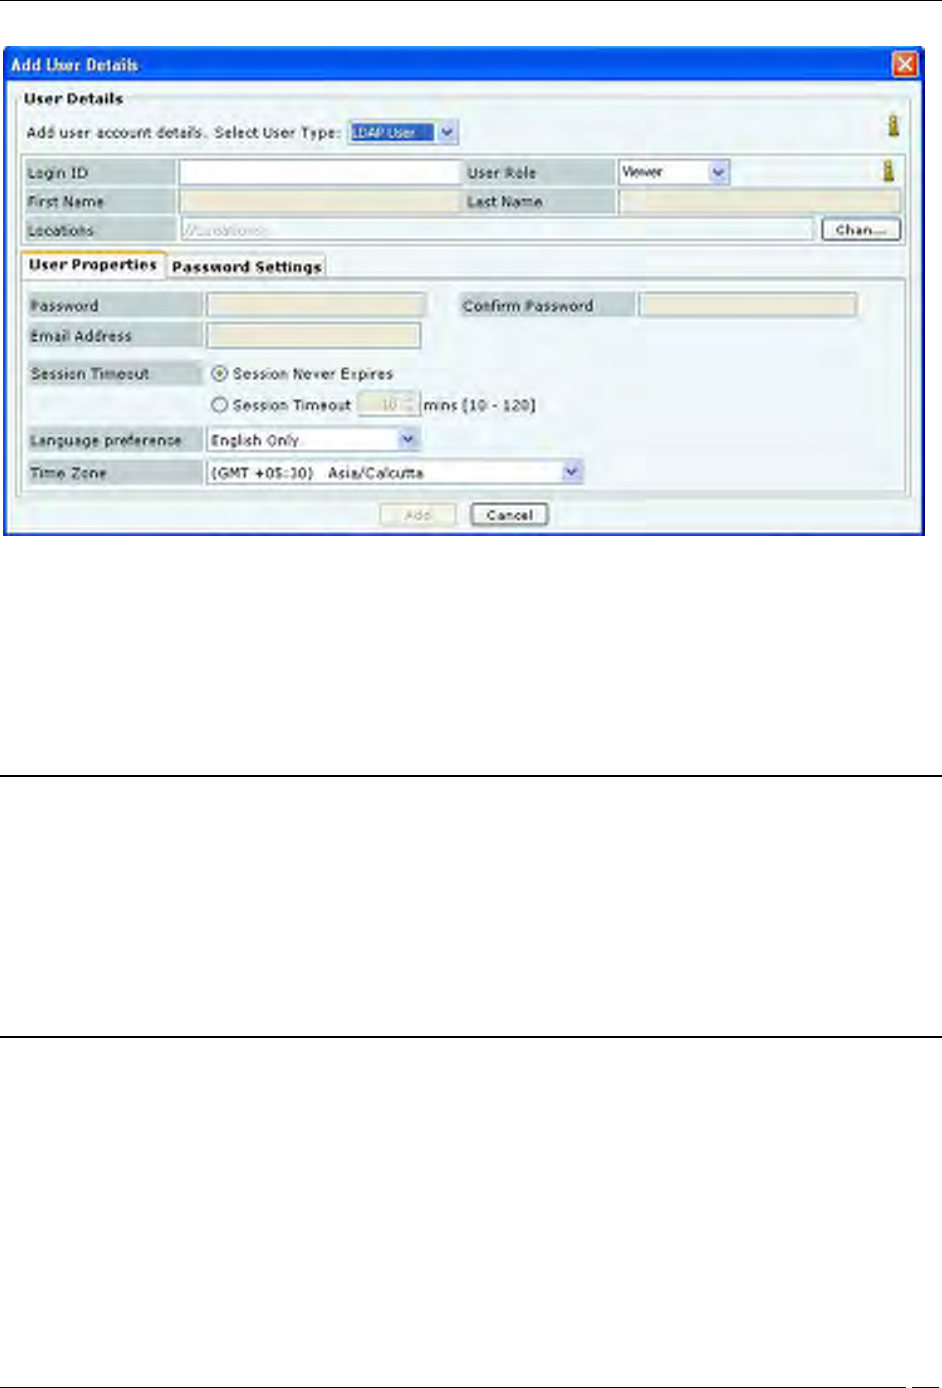
Adding User Details: User Properties Tab for LDAP User
For LDAP User, the superuser may create user accounts using this screen, prior to the first successful login of the
user. For this, the following fields can be specified:
Login ID: Login ID of the user.
User Role: This field specifies the role to be assigned to the user. The table below shows the user roles and
their respective rights.
Locations: The list of locations where the user has access privilege consistent with the role.
Notes:
1. The User Role and Locations as specified above in the User Details screen are effective only if the corresponding
attributes are not provided by the LDAP server at the time of authentication. When the LDAP server provides any
of the above attributes, the LDAP provided values override the manually specified values in this screen.
2. To enable the LDAP authentication, configuration details to access the LDAP server must be provided in the
LDAP configuration screen (described later). That screen also facilitates providing default User Role and Locations
for all LDAP authenticated users, if the LDAP server does not provide those attributes. The User Role and
Locations fields in the User Details screen facilitates providing specific default values for the corresponding
attributes for the specific users, if the LDAP server does not provide them.
Administration Tab
SpectraGuard® Enterprise User Guide
194
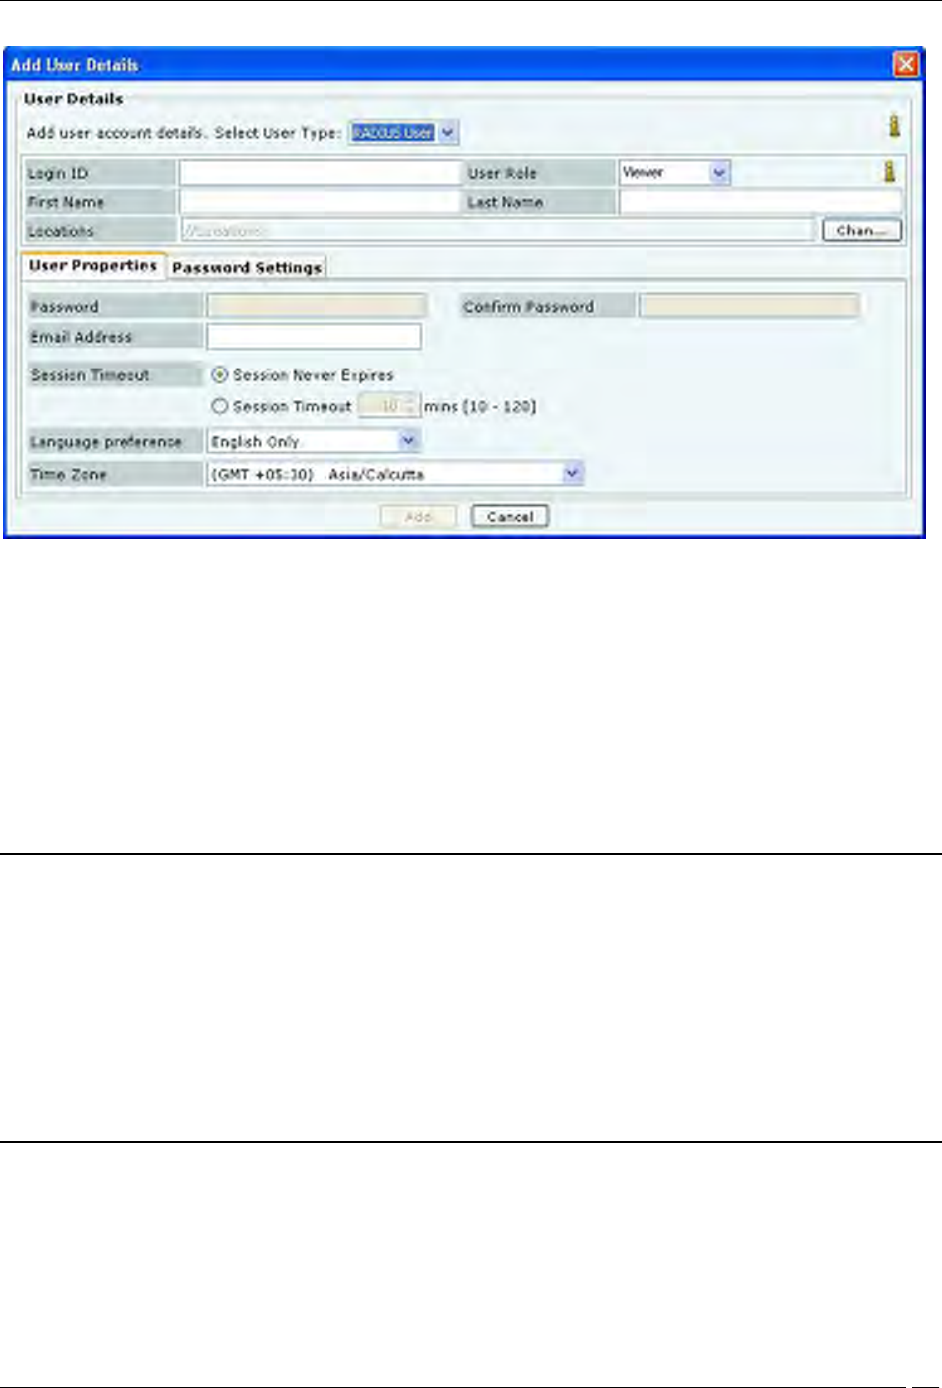
Adding User Details: User Properties Tab for RADIUS User
For a RADIUS User, the superuser may create user accounts using this screen, prior to the first successful login of the
user. For this, the following fields can be specified::
Login ID: Login ID of the user.
User Role: This field specifies the role to be assigned to the user. The table below shows the user roles and
their respective rights.
First and Last Name: First and last name of the user.
Locations: This field specifies the locations where the user has access privilege consistent with the role.
Email Address: This field specifies the email address of the user.
Notes:
1. The User Role and Locations as specified above in User Details screen are effective only if the corresponding
attributes are not provided by the RADIUS server at the time of authentication. When the RADIUS server provides
any of the above attributes, the RADIUS provided values override the manually specified values in this screen. The
RADIUS server never provides First/Last Name and Email Address attributes.
2. To enable the RADIUS authentication, configuration details to access the RADIUS server must be provided in
the RADIUS configuration screen (described later). That screen also facilitates providing default User Role and
Location values for all RADIUS authenticated users, if the RADIUS server does not provide those attributes. The
User Role and Locations fields in the User Details screen facilitates providing specific default values for the
corresponding attributes for the specific users, if the RADIUS server does not provide them.
The Session Timeout, Language and Time Zone settings are applicable to all types of users.
Session Timeout: Specify the time after which the user will be logged out automatically if the system does
not detect any activity.
Session Never Expires: Select this check box if you do not want the session to expire in response to
inactivity.
Administration Tab
SpectraGuard® Enterprise User Guide
195
Session Timeout: Specify the number of minutes after which the system automatically logs out the
currently logged in user when there is no activity on the Console for the Session Timeout period
(Minimum: 10 minutes; Maximum: 120 minutes)
Language Preference: Select English or Multilingual support from the drop-down list.
Time Zone: Select the appropriate time zone for the user
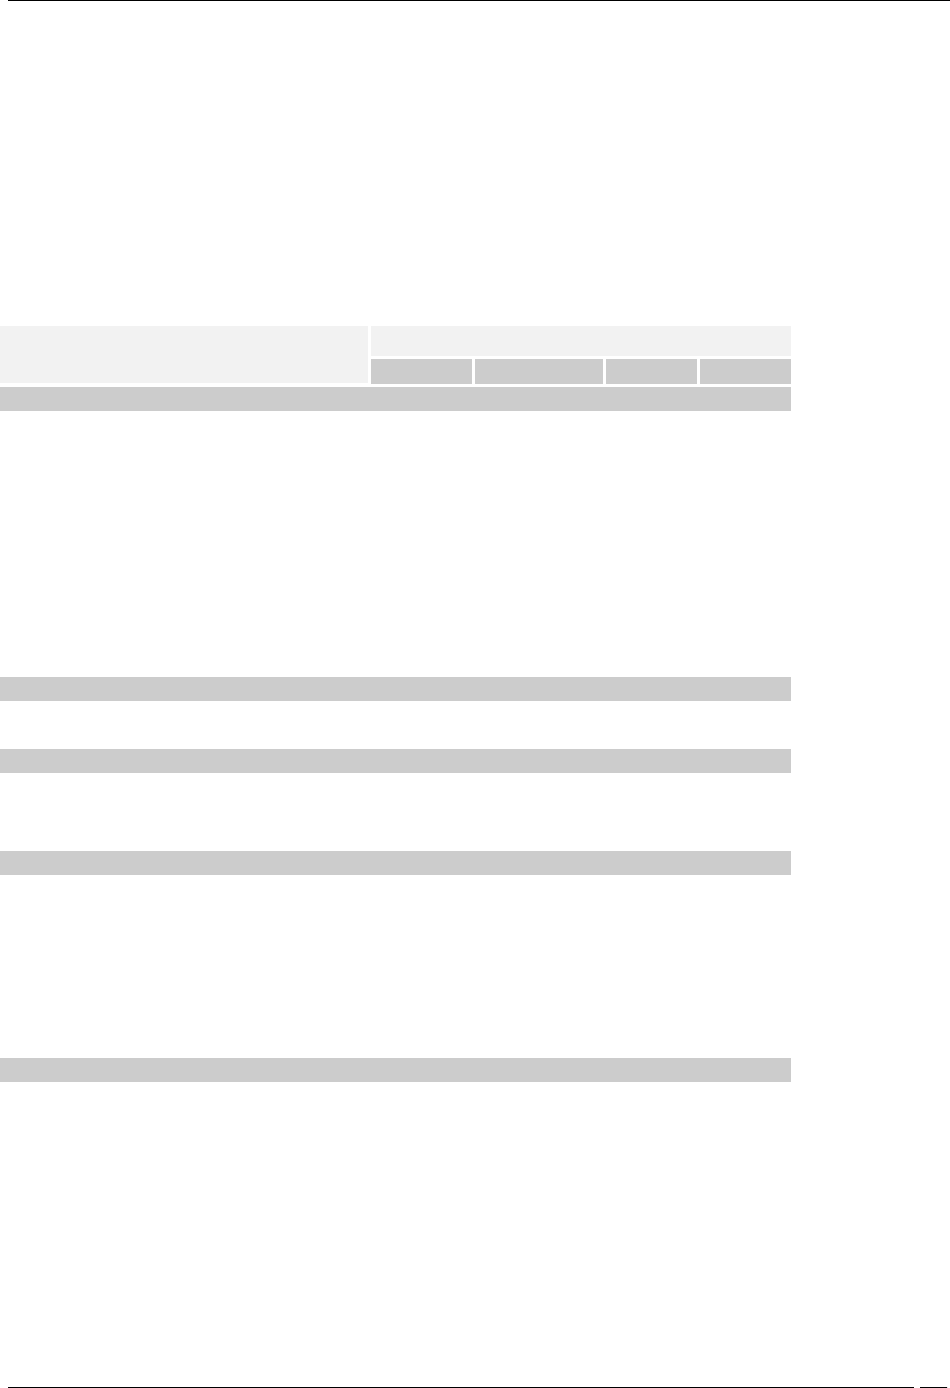
The following table summarizes the rights for various user roles.
Table 5 User Roles and User Rights
Operations
User Roles
Superuser
Administrator
Operator
Viewer
User account management
Set or modify identification and
authentication option (Password only,
Certificate only, Certificate and Password,
Certificate or Password)
Yes
No
No
No
Add and delete users
Yes
No
No
No
View and modify properties of any
user (User Management screens)
Yes
No
No
No
Define password strength, account locking
policy, maximum concurrent sessions for
all users
Yes
No
No
No
View and modify User Preferences (email,
password, session timeout)
Yes (self
only)
Yes (self
only)
Yes (self
only)
Yes (self
only)
User actions audit
Download user actions audit log
Yes
No
No
No
Modify user actions audit lifetime
Yes
No
No
No
System settings and operating policies
Modify system settings and operating
policies (all settings under Administration
tab other than User Management, Logs,
Login configuration)
Yes
Yes
No
No
Events, devices and locations
View generated events
Yes
Yes
Yes
Yes
Modify and delete generated events
Yes
Yes
Yes
No
View devices
Yes
Yes
Yes
Yes
Add, delete, and modify devices (APs,
Clients, Sensors)
Yes
Yes
Yes
No
View locations
Yes
Yes
Yes
Yes
Add, delete, and modify locations
Yes
Yes
Yes
No
Calibrate location tracking
Yes
Yes
Yes
No
Reports
Add, delete, modify Shared Report
Yes (all)
Yes (only self
created)
Yes
(only
self
created)
No
Generate Shared Report
Yes
Yes
Yes
Yes
Schedule Shared Report
Yes
Yes
Yes
No
Add, delete, modify, generate, schedule
My Report
Yes (only
self
created)
Yes (only self
created)
Yes
(only
self
created)
No
Administration Tab
SpectraGuard® Enterprise User Guide
196
Note:
1. There can be as many Superusers as required. Superuser always has rights to root of the location tree.
2. The role is unique for any user.
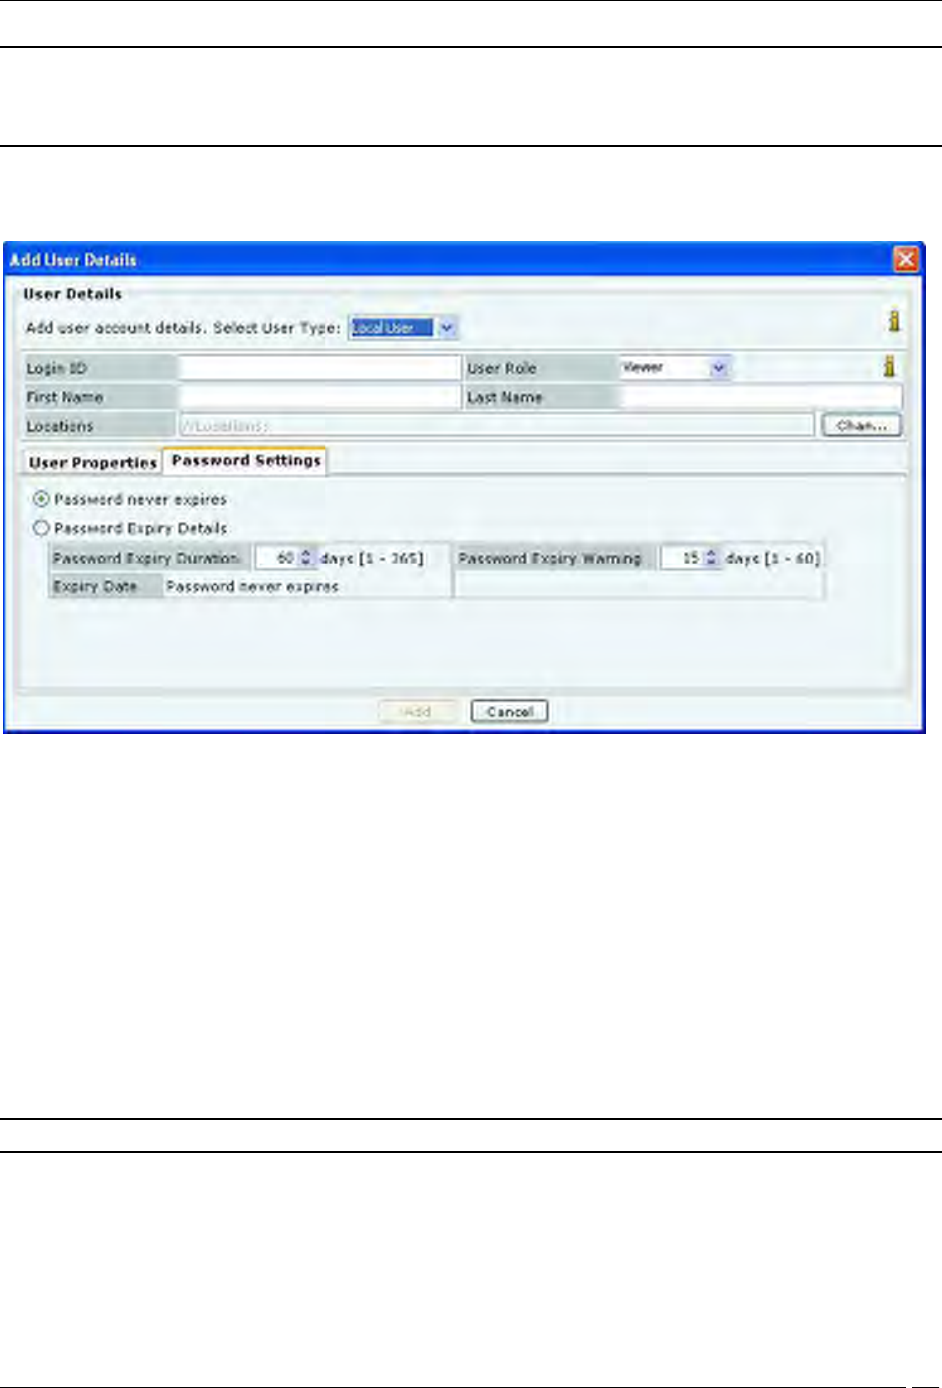
The Password Settings tab applies to only locally authenticated users. It does not apply to LDAP or RADIUS
authenticated users. The Password Settings menu has the following fields:
Adding User Details: Password Settings Tab
Password never expires: If selected, the password does not expire over time. If this option is selected, the
fields, Password Expiry Duration, Password Expiry Warning, and Expiry Date are disabled.
Password Expiry Details:If selected, specify the following parameters:
Password Expiry Duration: Enables you to specify the duration for which the specified password is valid.
If the Password Expiry Duration is less than 15 days, the system raises a Password Expiry Warning
message every time the user logs into the Console
(Minimum: 1 day; Maximum: 365 days)
Expiry Date: Shows the password expiry date and time
Password Expiry Warning: Enables you to specify the number of days before the password expiry date that
a password expiry warning should appear. The warning appears every day until you change the password.
Once you change the password, the system updates the Expiry Date depending on the value specified in the
Password Expiry Duration field
(Minimum: 1 day; Maximum: 60 days)
Note: For the LDAP and RADIUS users, the Password Settings tab is inactivated.
Click Add to add the details for a new local user.
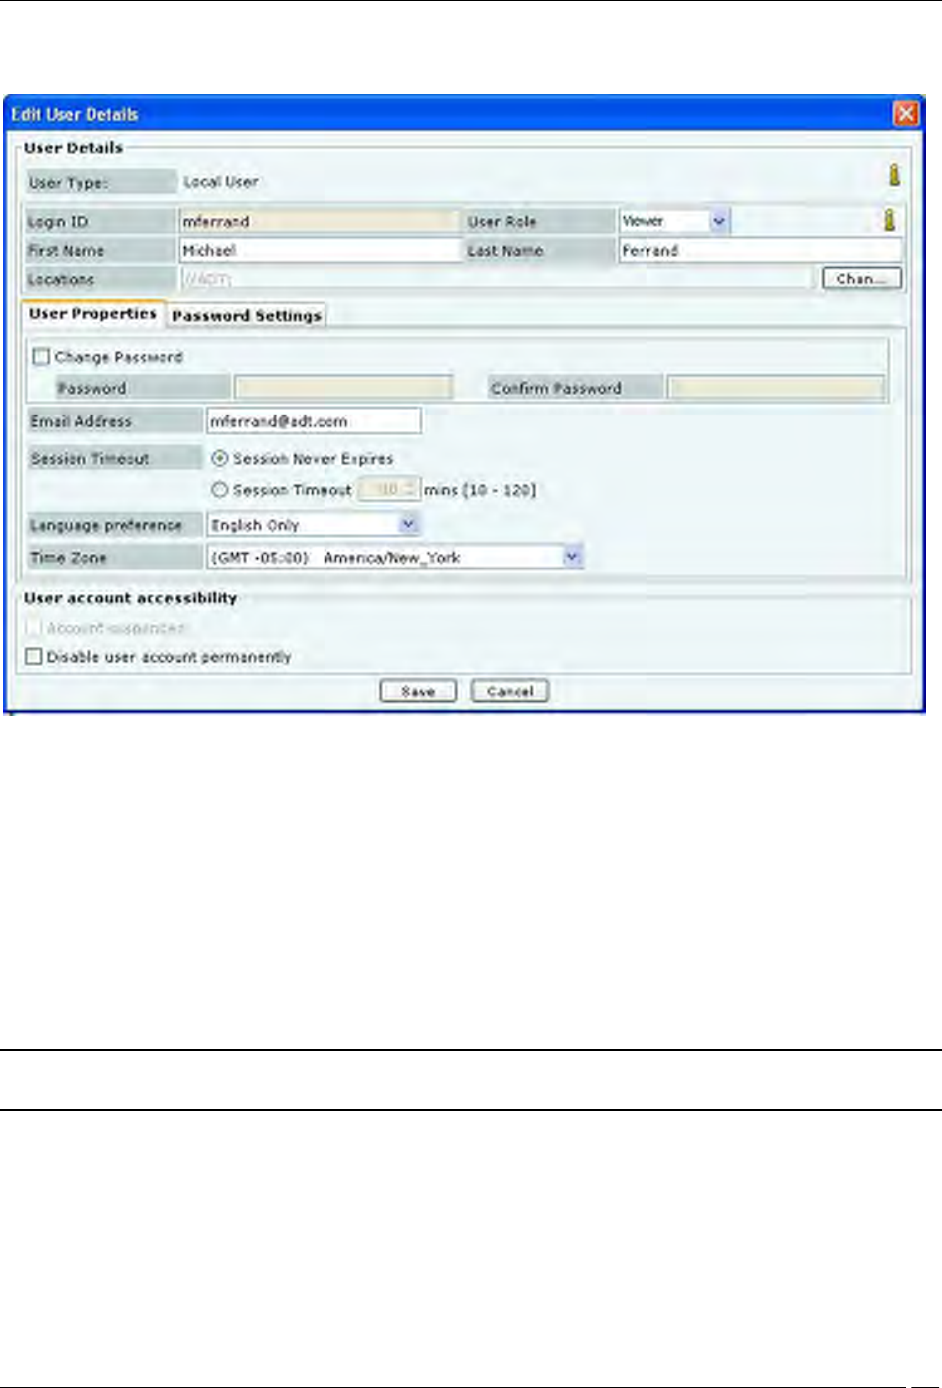
Editing a User
Administration Tab
SpectraGuard® Enterprise User Guide
197
To edit the details of an existing user, double-click a row or select a row and click Edit to open the Edit User Details
dialog.
Editing User Details
The Edit User Details dialog is similar to the Add User Details dialog.
Any field value, other than Login ID, that has been specified manually while adding user details, can be modified at
the time of editing the user details.
Under User Account Accessibility, the superuser can do the following for other users.
Account suspended: Enable a user account that has been temporarily suspended due to failed login
attempts. If the user account has been disabled due to failed login attempts then the Account suspended
check box is enabled. The administrator can enable the user account by un-checking the Account
suspended check box.
Enable/disable a user account permanently.
Click Save to save all the changes.
Note: A dark highlight for an entry in the user list indicates that the user account is disabled or suspended
permanently.
Deleting a User
Select a row and click Delete to delete specific user account from the system.
For LDAP and RADIUS authenticated users, it is necessary to delete user account from the system in addition to
deleting it from the LDAP/RADIUS server. Else, email notifications will continue to be sent to the user even after the
account is deleted from LDAP/RADIUS server.
LDAP Server Configuration
Administration Tab
SpectraGuard® Enterprise User Guide
198
The system can use an LDAP server for user authentication. The LDAP Configuration screen facilitates configuration
of the LDAP server access parameters.
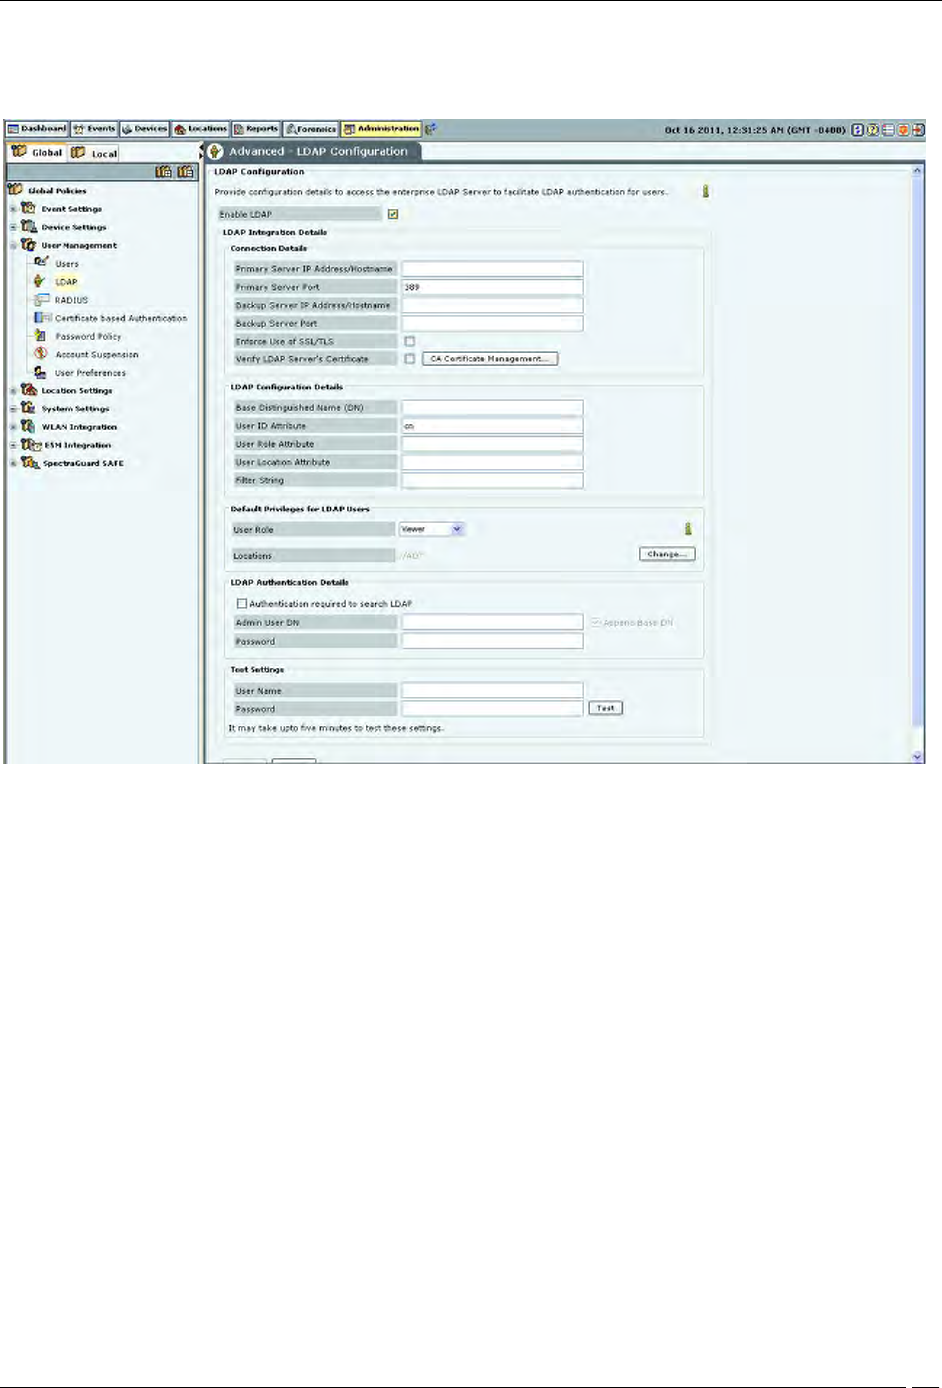
LDAP Configuration
Check Enable LDAP to enable user authentication using an LDAP compliant directory.
LDAP Integration Details: Provide configuration parameters for the system to be able to access the LDAP compliant
directory. Following details can be provided using this screen.
Connection Details: Provide details for the system to be able to establish connection with the LDAP server.
Primary Server IP Address/Hostname: Specifies the primary server IP address/Hostname of the
LDAP server.
Primary Server Port: Specifies the primary server port number of the LDAP server.(Default: 389)
Backup Server IP Address/Hostname: Specifies the backup server IP address/Hostname of the
LDAP server.
Backup Server Port: Specifies the backup server port number of the LDAP server.
Enforce Use of SSL/TLS: When this option is checked, only the SSL/TLS connection to the LDAP
server is allowed. When it is not checked, either of the Open or SSL/TLS connection to the LDAP
server is allowed.
Verify LDAP Server’s Certificate: When this option is checked, the connection to the LDAP server
is not allowed unless the certificate check passes. Click Certificate Management to add trusted root
CA Certificate(s) for the LDAP server. When this option is not checked, the connection to the LDAP
server is allowed without checking the LDAP server certificate.
LDAP Configuration Details: Provide details for the system to be able to search records in the
LDAP server.
Administration Tab
SpectraGuard® Enterprise User Guide
199
Base Distinguished Name: Specifies the base distinguished name of the directory to which you
want to connect, for example, o=democorp, c=au.
Note: Distinguished Name is a unique identifier of an entry in the Directory Information Tree (DIT). The name is
the concatenation of Relative Distinguished Names (RDNs) from the top of the DIT down to the entry in question.
User ID Attribute: Specifies the user ID attribute string that the system uses to identify the user, as
defined in your LDAP schema.
(Default: cn)
User Role Attribute: Specifies the user role attribute string that the system uses to identify the
user’s role, as defined in your LDAP schema.
User Location Attribute: Specifies the user location attribute string that the system uses to identify
the locations where the user is allowed access, as defined in your LDAP schema.
Filter String: Specifies certain attributes: existing or new: that you can use for different users, based
on which the server filters the users, for example, (IsUser=A). This feature can help restrict the use
of the system to a certain set of users.
Default Privileges for LDAP Users: This section specifies the default role and the default locations assigned
when new LDAP users log in, for the case where the role and locations attributes are not provided by the
LDAP server. Note that the default values here apply to all users authenticated via LDAP. Specific default
values can also be provided for the specific LDAP users using Edit User dialog. If the LDAP server provides
user role and locations attribute at the time of authentication, the attributes provided by the LDAP server
will override the default role and locations attributes.
User Role: Enables you to specify the default role for the new LDAP users. You can select one of
the following four options. The default user role is Viewer.
1. Superuser
2. Administrator
3. Operator
4. Viewer
Locations: Displays the list of locations to which a new LDAP user has access rights.
Click Change… to open the Assign Locations dialog. Here, you can view the complete list of
locations and select the locations to which the LDAP user can have access rights. Click OK to
assign the selected location(s) to the user.
LDAP Authentication Details: Specify user credentials required to search the LDAP compliant directory.
This is required only in case the directory does not allow anonymous search.
Select Authentication Required to search LDAP? if the LDAP server requires administrator login
to search the LDAP compliant directory. Specify the Admin User DN and Password to log in.
If you select Append Base DN, the Base Distinguished Name specified in LDAP Configuration
Details is appended to the Admin User DN.
Test Settings: Enables you to test whether the specified settings are correct. To verify the settings, enter the
User Name and Password for a specific user and click <Test>.
Note: Test is not available unless you change the settings. Apply is unavailable until you use Test.
RADIUS Server Configuration
The system can use a RADIUS server to facilitate user authentication.The RADIUS Configuration screen facilitates
configuration of the RADIUS server access parameters.
Administration Tab
SpectraGuard® Enterprise User Guide
200
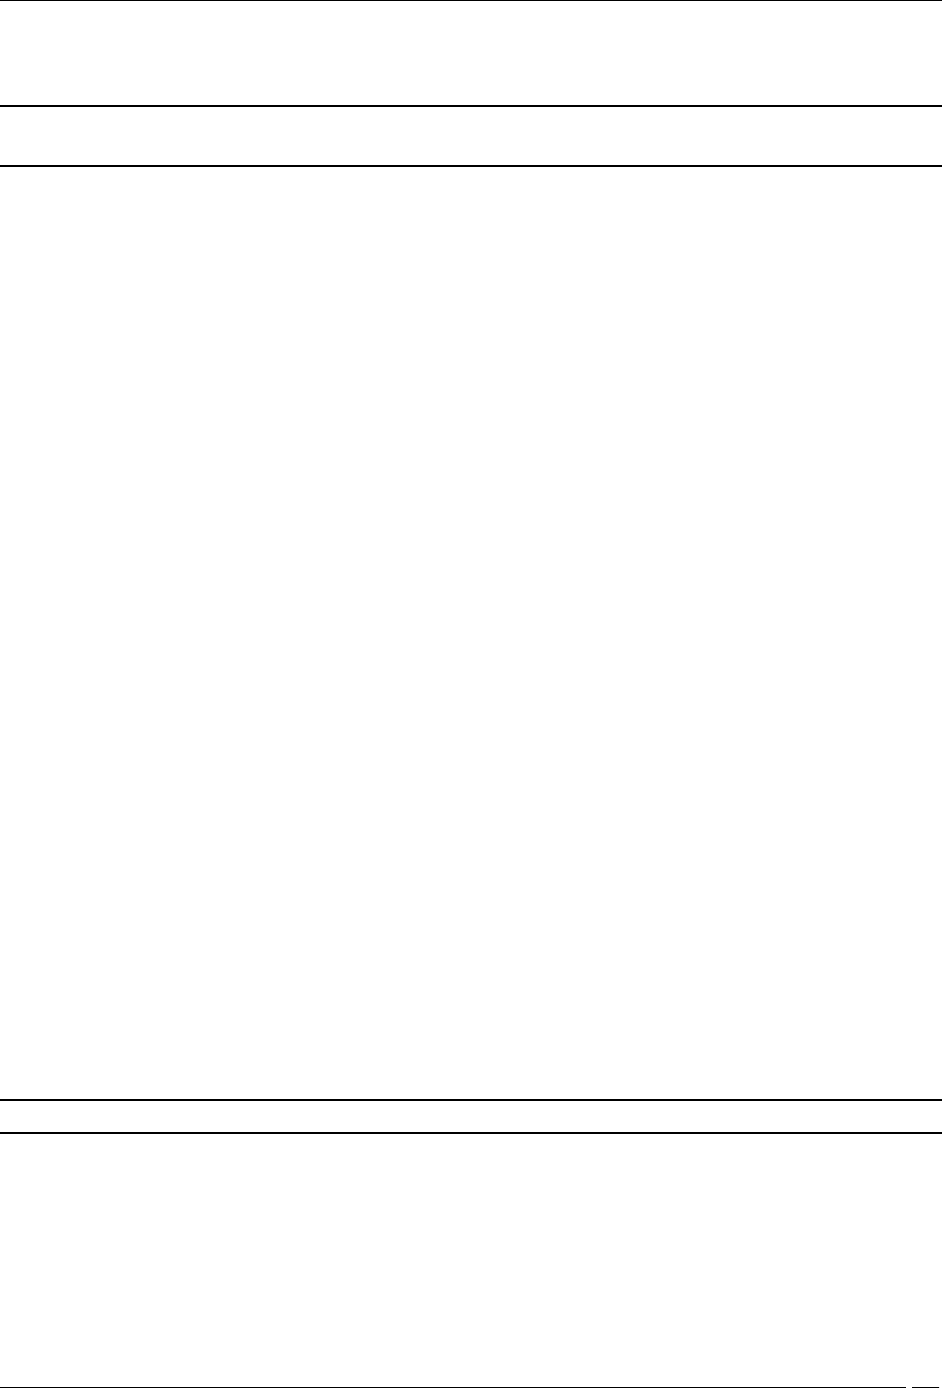
RADIUS Configuration
Check Enable RADIUS Integration for CLI login to enable CLI user authentication using RADIUS and check
Enable RADIUS Integration for GUI login to enable GUI user authentication using RADIUS.
The RADIUS Configuration screen has Authentication, Accounting, and Advanced Settings tabs.
The Authentication tab is used to specify configuration to access the RADIUS Authentication server
The Accounting tab is used to specify configuration to access the RADIUS Accounting server
The Advanced Settings tab is used to specify the realm (domain) for the CLI and the GUI users. You can also
specify in this tab how the real name is to be appended to the username (prefix notation or postfix notation).
User Authentication
The systems supports four authentication options. The superuser has to set any one authentication option, and it then
applies to all users. The four authentication options supported by the system are as follows:
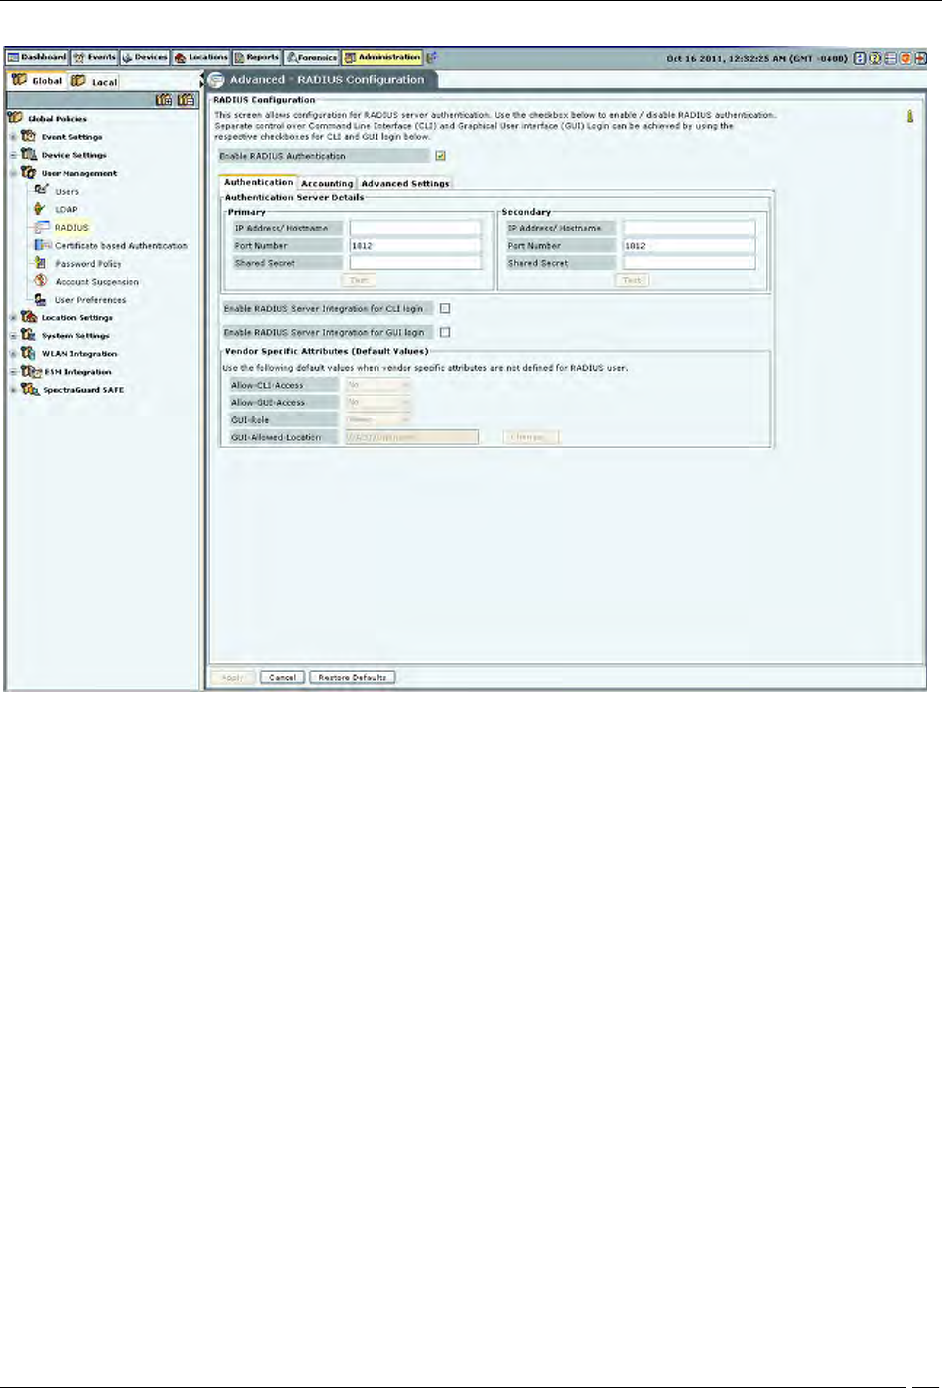
1. Password only: In this option, the user authentication is performed using the password. The user has to
enter the username and the password at the login prompt. The password may be locally verified by the
system or may be verified using the external LDAP or RADIUS authentication service, as appropriate. When
this authentication option is set, the login screen appears as follows:
Administration Tab
SpectraGuard® Enterprise User Guide
201
Login Screen – Password only authentication
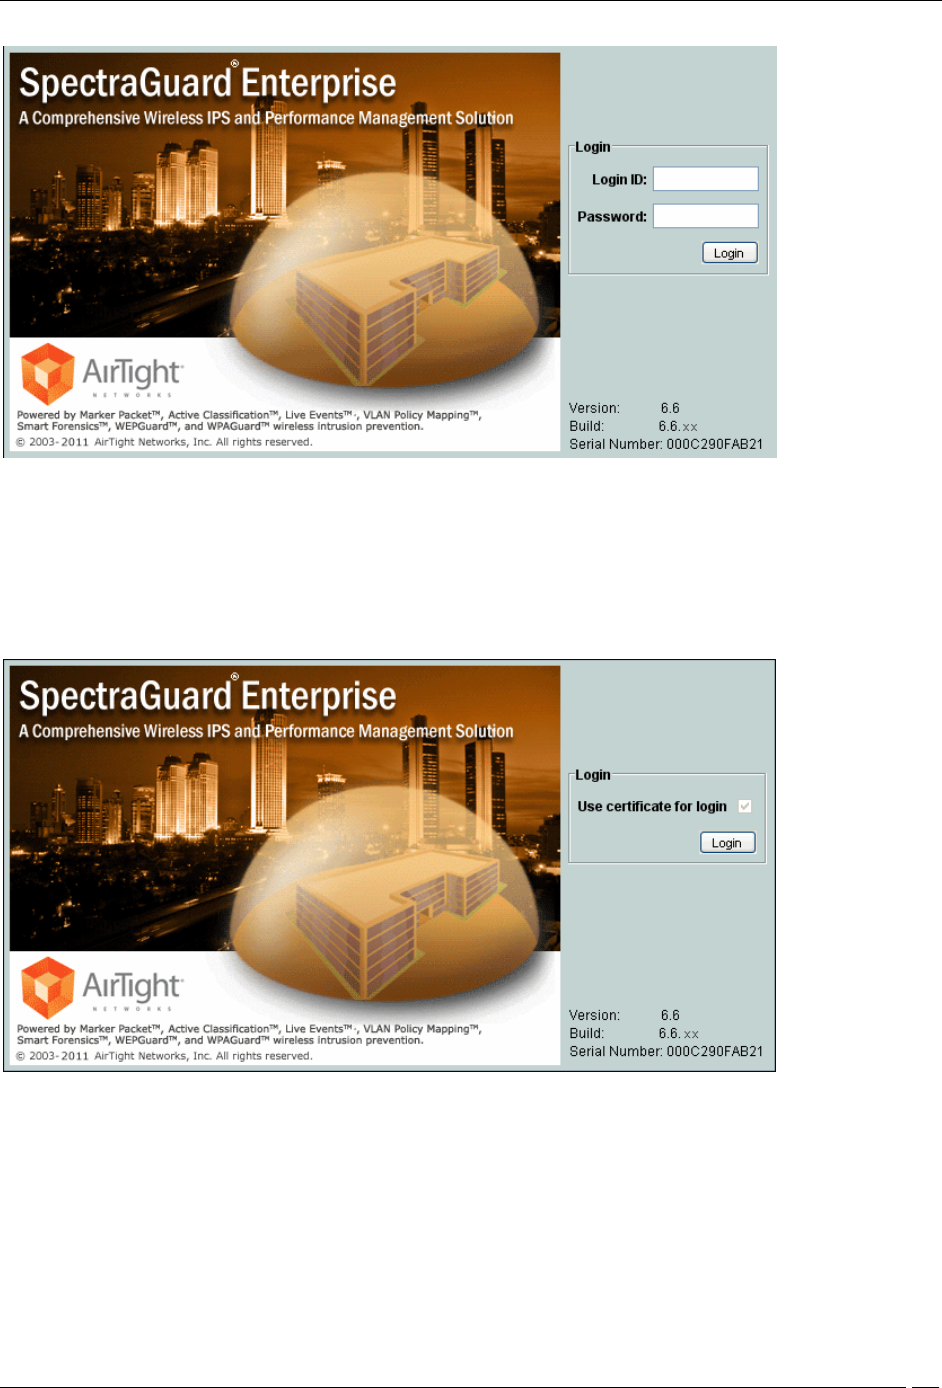
2. Certificate only: In this option, the user authentication is performed using the client certificate (such as
smart card). The user has to insert a smart card containing the client certificate in a reader attached to the
computer from where the console is accessed and then press the Login button. The system then verifies the
client certificate and obtains user identity (username) from the certificate. Other attributes for the user are
retrieved either locally or from the external authentication services such as LDAP or RADIUS, as
appropriate. When this authentication option is set, the login screen appears as follows:
Login Screen – Certificate only authentication
3. Certificate and Password: In this option, both the client certificate and the password are required for the
user authentication. The user has to insert a smart card containing the client certificate in a reader attached
to the computer from where the console is accessed, as well as enter the password at the login prompt. The
system verifies the password locally or using the external LDAP or RADIUS authentication service, as
appropriate. When this authentication option is set, the login screen appears as follows:
Administration Tab
SpectraGuard® Enterprise User Guide
202
Login Screen – Certificate and Password authentication
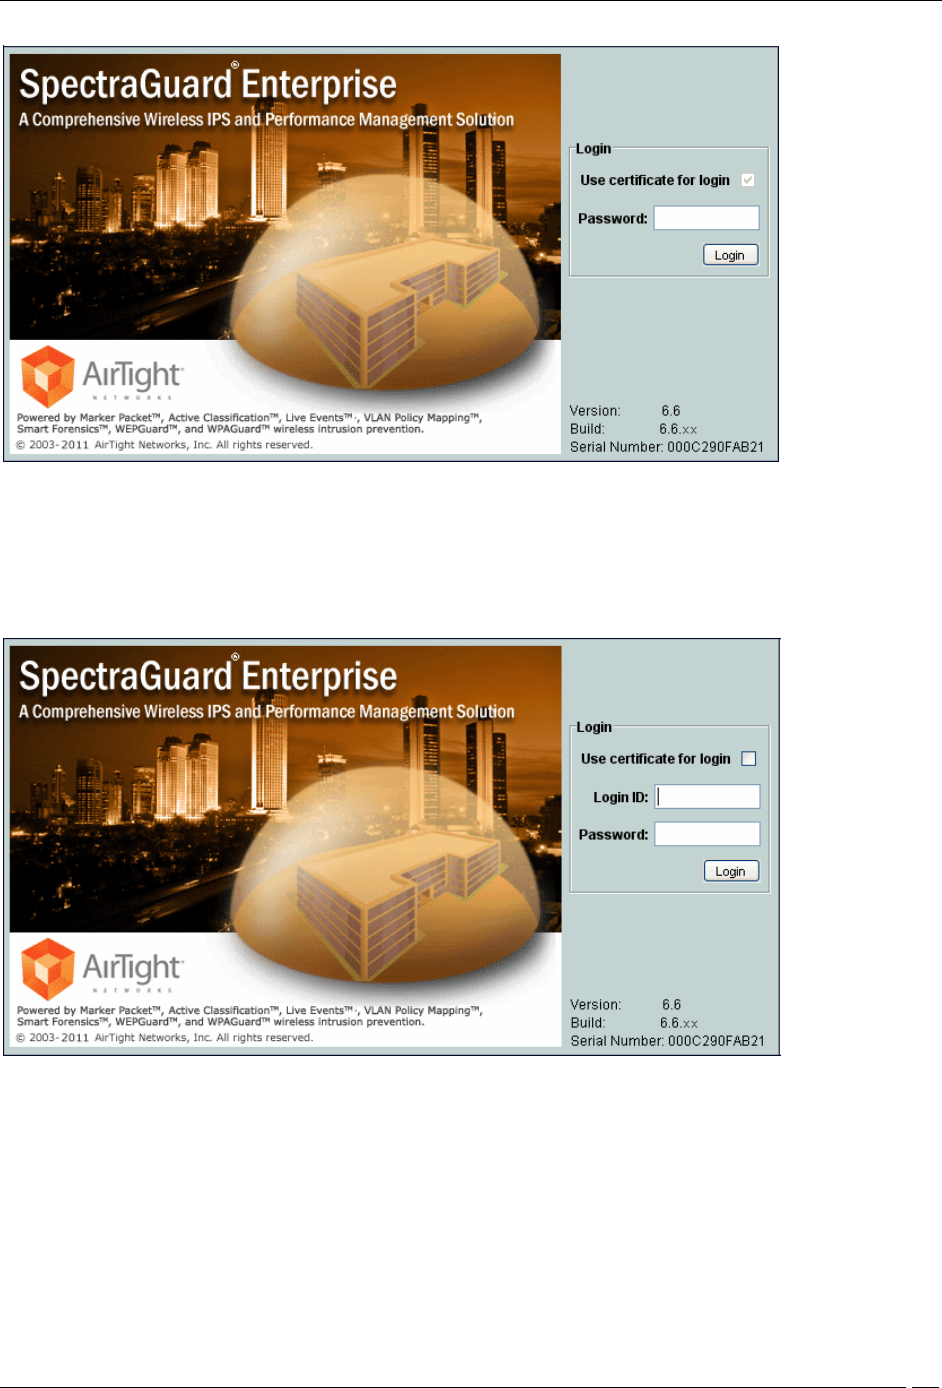
4. Certificate or Password: In this option, the user authentication is permitted either using the password or
using the client certificate. This option is appropriate for organizations which have only partially migrated
to using smart cards for authentication. At login prompt, the user can select certificate authentication by
checking the Use certificate for login box or continue with password authentication by enterping login
name and password. When this authentication option is set, the login screen appears as follows:
Login Screen – Certificate or Password authentication
The superuser can use following screen to set one of the above four authentication options namely Password only,
Certificate only, Certificate and password or Certificate or password.
Administration Tab
SpectraGuard® Enterprise User Guide
203
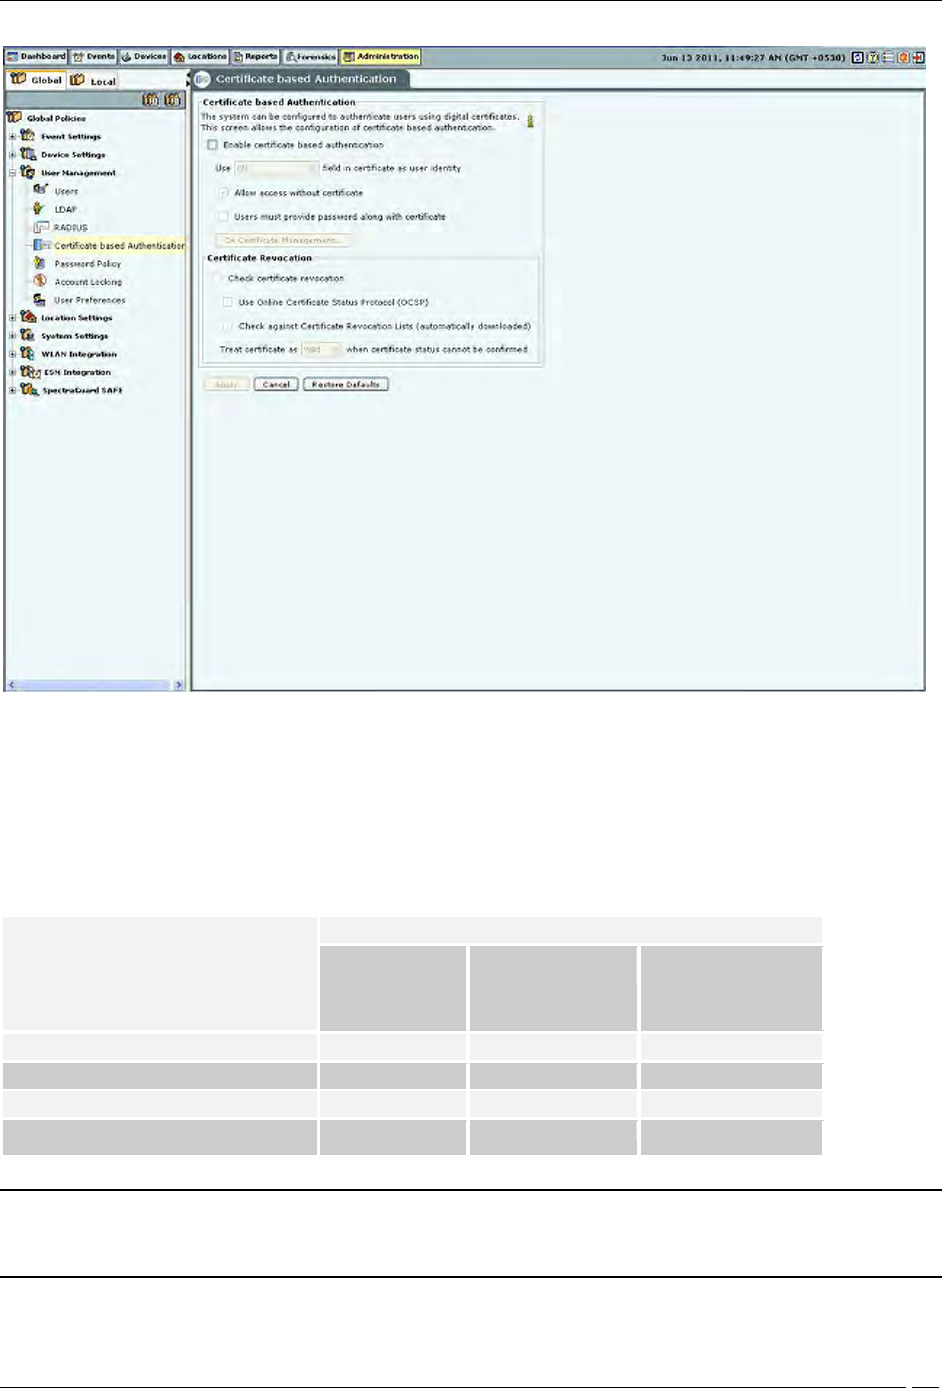
Certificate Authentication
The required authentication option can be activated based on the various combinations of the Enable certificate
based authentication box, Allow access without certificate box, and Users must provide password along with
certificate box.
The following table describes the activation of the authentication options based on the check boxes selected by the
user.
Authentication option to activate
Check box to be selected
Enable certificate
based
authentication
Allow access without
certificate
Users must provide
password along with
certificate
Password only
No
-
-
Certificate only
Yes
No
No
Certificate and password
Yes
No
Yes
Certificate or password
Yes
Yes
No
Note: In order to use certificate based authentication, it is necessary that the GUI host is able to access the server at
TCP port 4433. If there is a firewall between the GUI host and the server, port 4433 must be opened from the host to
the server, in order to be able to use certificate based authentication.
When either Certificate only, Certificate and Password, or Certificate or Password option is activated, the additional details
should be provided as follows:
Administration Tab
SpectraGuard® Enterprise User Guide
204
The field in the client certificate from which user identity can be retrieved by the system.
Root CA certificates to facilitate the verification of the client certificate.
Preferred method to check for certificate revocation.
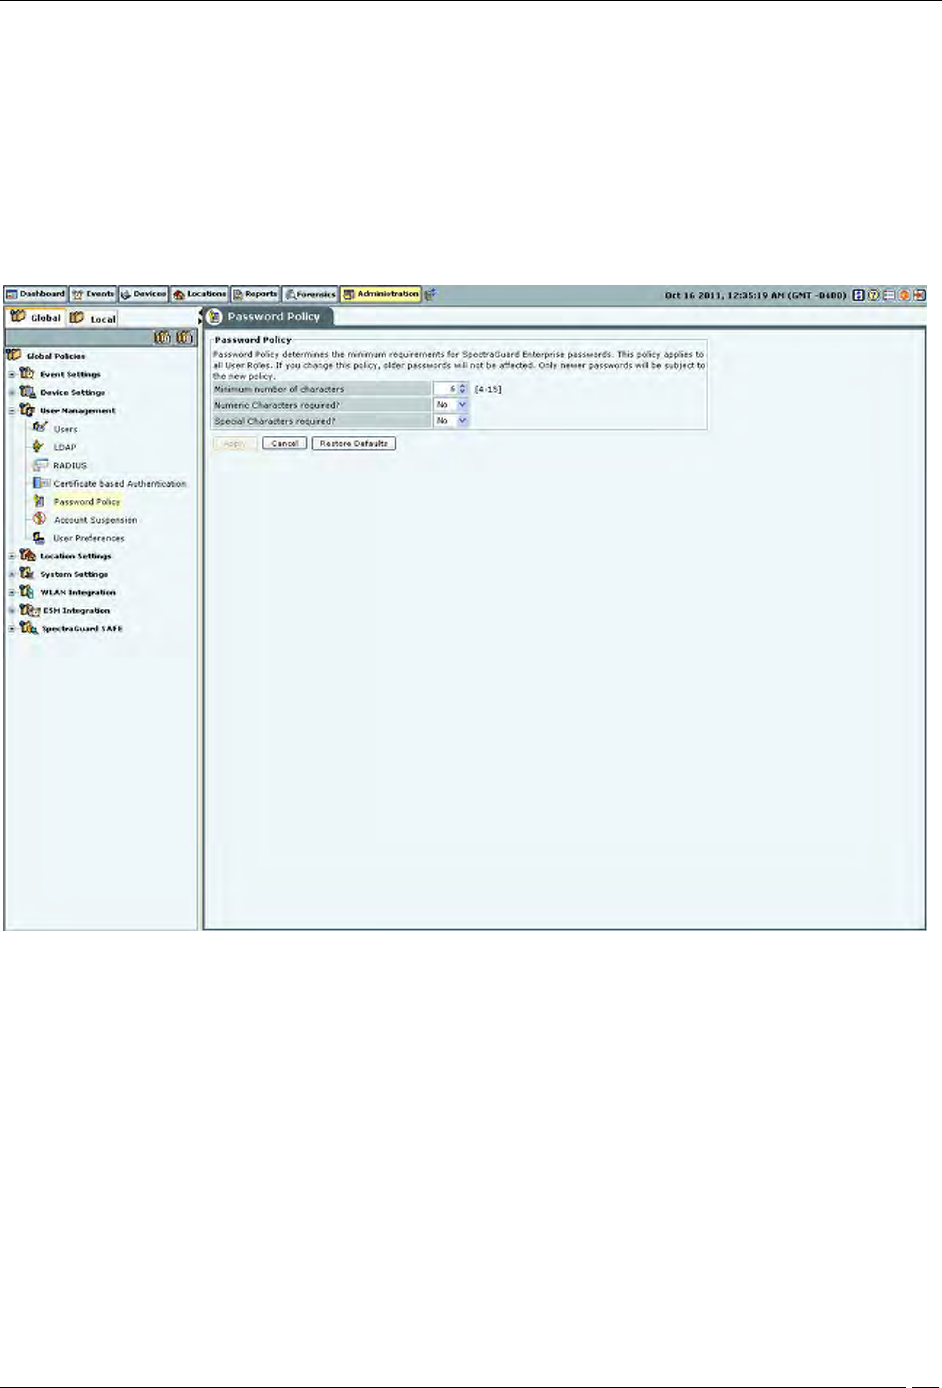
Password Policy
The Password Policy determines the minimum requirements for system passwords. This policy applies to all User
Roles: superuser,, administrator, operator, and viewer. If you change this policy, older passwords are not affected.
Only passwords created after a policy change are subject to the new policy. This setting applies only to local
authentication and does not apply to LDAP and RADIUS authentication.
Password Policy
Under Password Policy, you can specify the following:
Minimum number of characters: Enables you to specify the minimum number of characters to be used for
constructing passwords.
(Minimum: 4; Maximum: 15; Default: 6)
Numeric Characters required?: Enables you to enforce the use of numeric characters for constructing
passwords.
(Default: No)
Special Characters required?: Enables you to enforce the use of special characters for constructing
passwords.
(Default: No)
Account locking
Administration Tab
SpectraGuard® Enterprise User Guide
205
Account locking allows the superuser to specify the account locking policy for the selected user type – Superuser,
administrator, operator, or viewer. Account locking protects the system from spurious logins through dictionary
attacks. This setting applies only to those authentication options which use password as at least one of the
authentication mechanisms.
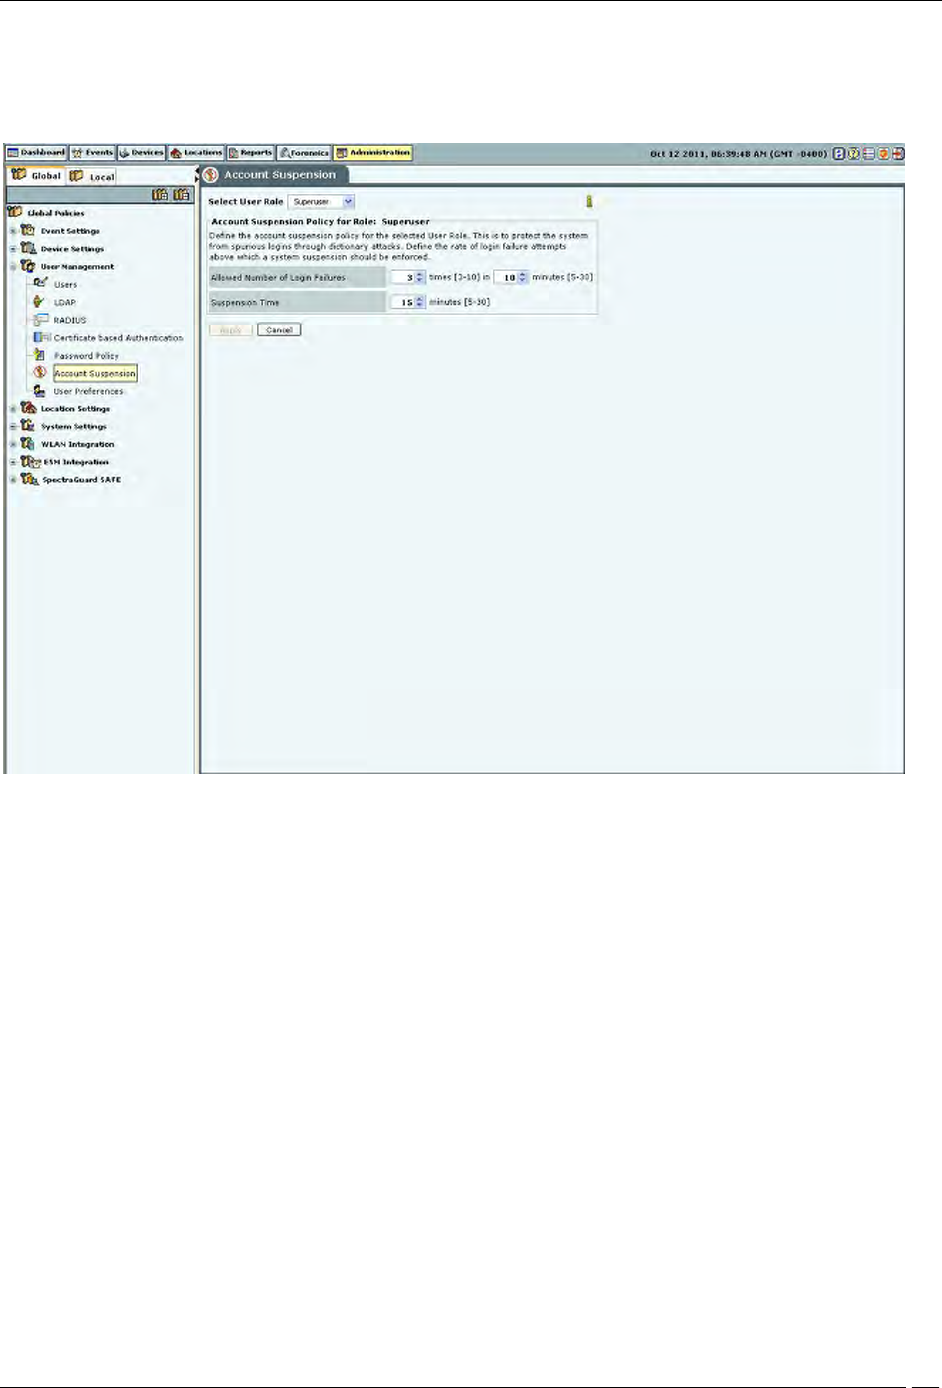
Account Suspension
Under Account Suspension, you can select the User Type and then specify the following:
Allowed Number of Login Failures: Enables the superuser to configure the number of failed login attempts
after which the account is suspended.
(Minimum: 3 times in 5 minutes; Maximum: 10 times in 30 minutes; Default: 3 times in 10 minutes)
Suspension Time: Enables the superuser to define the amount of time for which the selected user is
prevented from accessing the system.
(Minimum: 5 minutes; Maximum: 30 minutes; Default: 15 minutes)
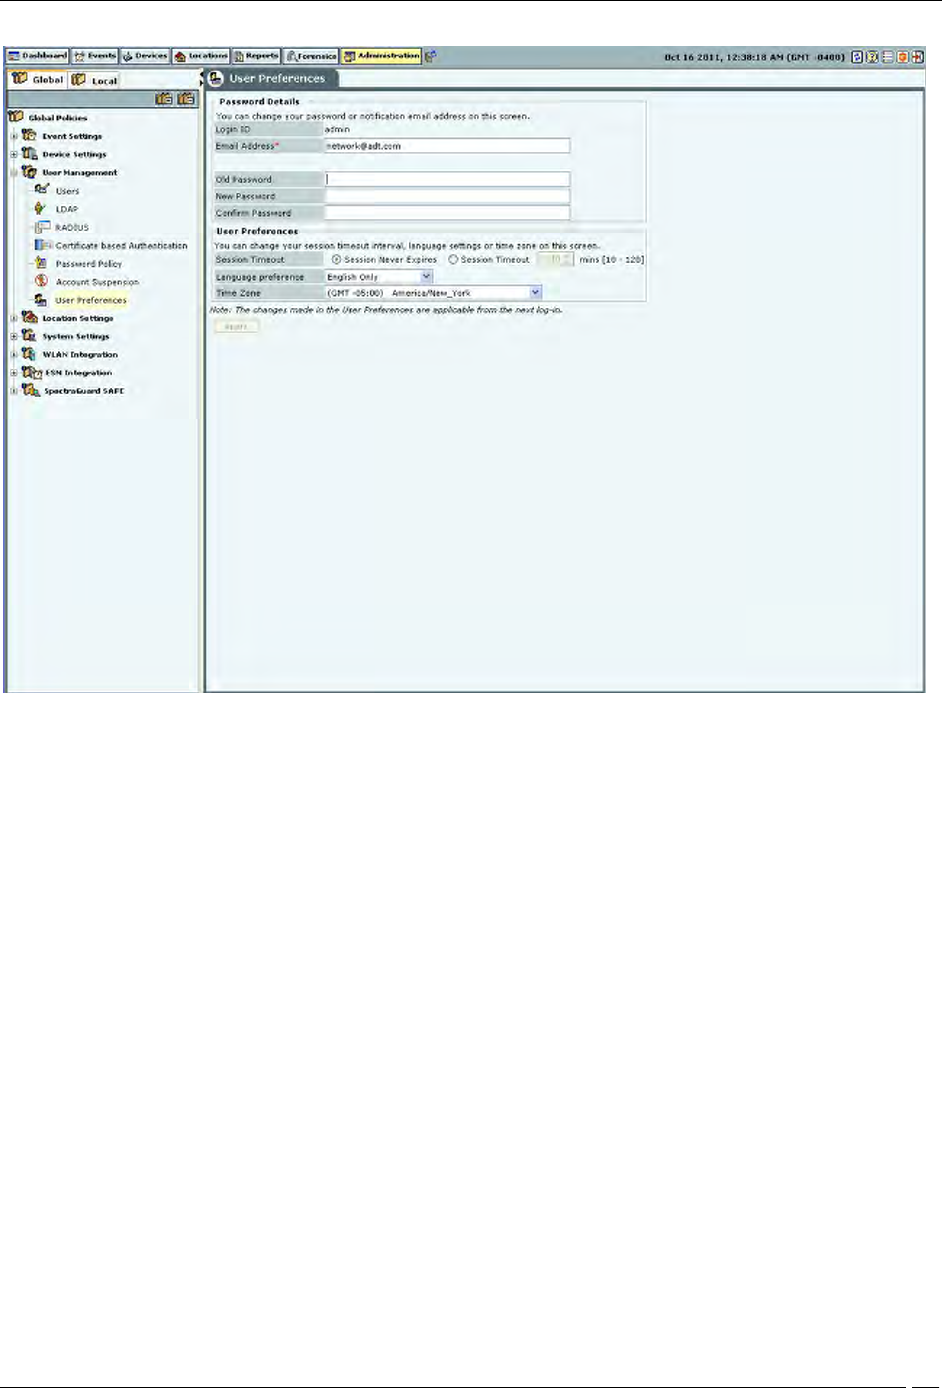
User Preferences
The User Preferences screen enables a user to change his/her own login password and other preferences.
Administration Tab
SpectraGuard® Enterprise User Guide
206
User Preferences
Under Password Details, user can specify/modify his email address and password. Password change from this
screen is not applicable for the users using LDAP/RADIUS authentication, or for users for whom password based
authentication has been disabled. Also, changing the email address from this screen is not applicable for LDAP
authenticated user.
Under User Preferences, the user can change his/her own Session Timeout, Language Preference, or Time Zone.
Click Apply to save to the new settings.
Location Settings
The Location Settings dialog sets the following location settings in the system.
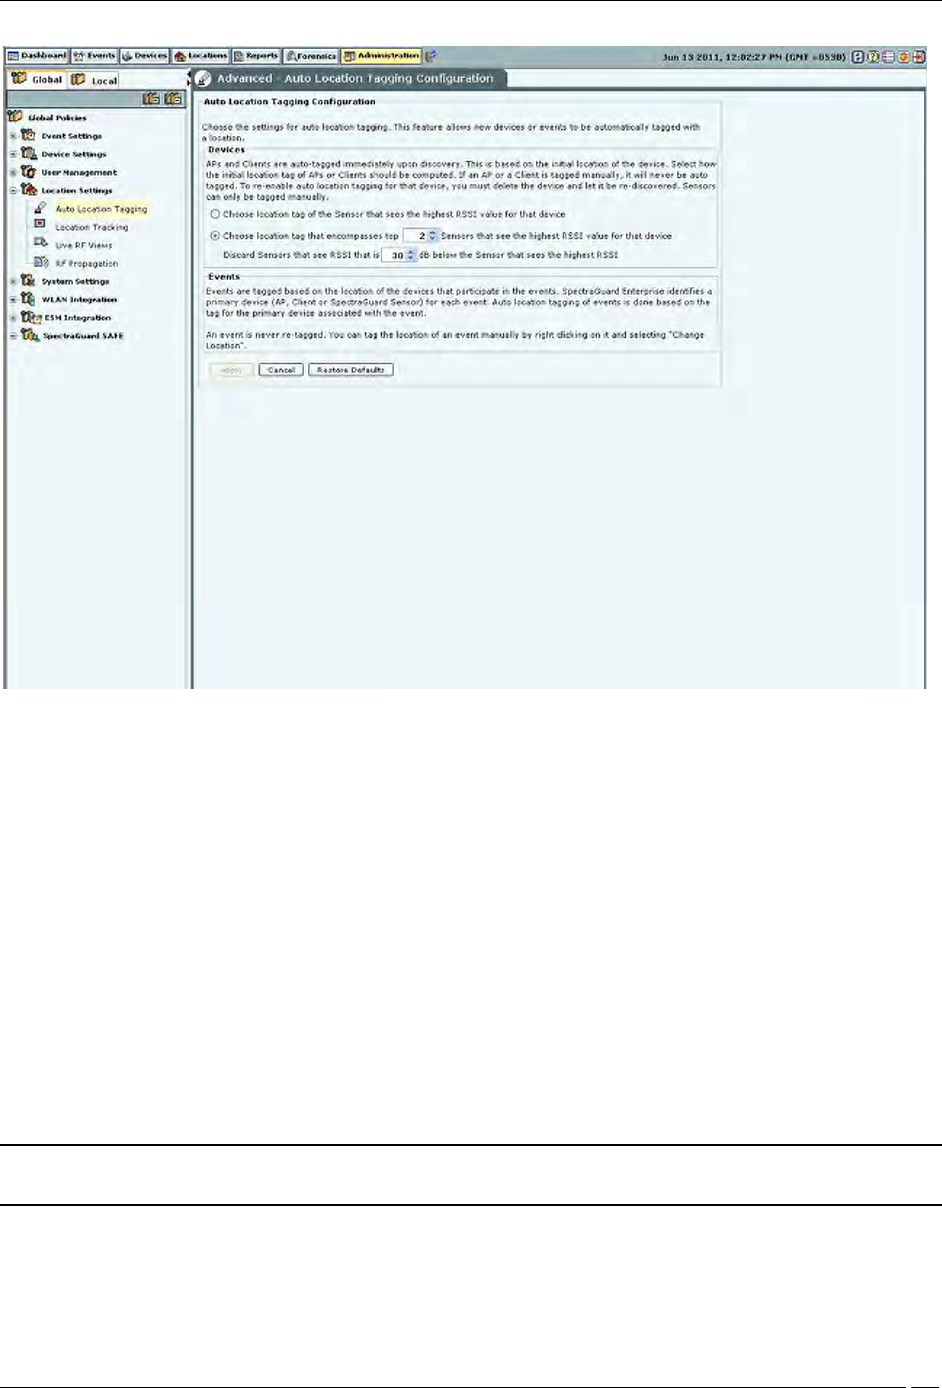
Auto Location Tagging
A location tag that is attached to a device or an event helps identify the location of that event or device. The system
has an Auto Location Tagging feature, which refers to the capability of the system to automatically ‘tag’ the devices
and events to the locations where they have been detected.
The Auto Location Tagging screen enables you to configure the settings for automatic tagging of devices discovered
by the system and events generated by the system.
Administration Tab
SpectraGuard® Enterprise User Guide
207
Auto Location Tagging
Auto Location Tagging Configuration contains the following options:
Devices: Based on the initial location of the device, the APs and Clients are auto-tagged immediately upon
discovery. You can select how the system should compute the initial location tag of the APs or Clients. The
system never auto-tags an AP or Client, if it is tagged manually. To re-enable auto location-tagging for a
device, you must delete the device and let the system re-discover it. You must manually tag sensors. You
can do one of the following:
Choose the location tag of the sensor that sees the highest RSSI value for that device.
Choose the location tag of the selected number of sensors that see the highest RSSI values for that device.
(Minimum: 2; Maximum: 10; Default: 2)
You can also discard the sensors that see a lower RSSI after comparing the value with a sensor that reports a higher
RSSI.
(Minimum: 20 dB; Maximum: 40 dB; Default: 30 dB)
Events: The system tags events based on the location of the devices that participate in the events. The system
initially identifies a primary device — AP, Client, or Sensor for each event. The system automatically tags the
location of events based on the tag for the primary device associated with the event.
Note: The system never retags an event. You can tag the location of an event manually on the Events screen by
right-clicking the event and from the resulting menu by selecting Change Location.
Location Tracking
Administration Tab
SpectraGuard® Enterprise User Guide
208
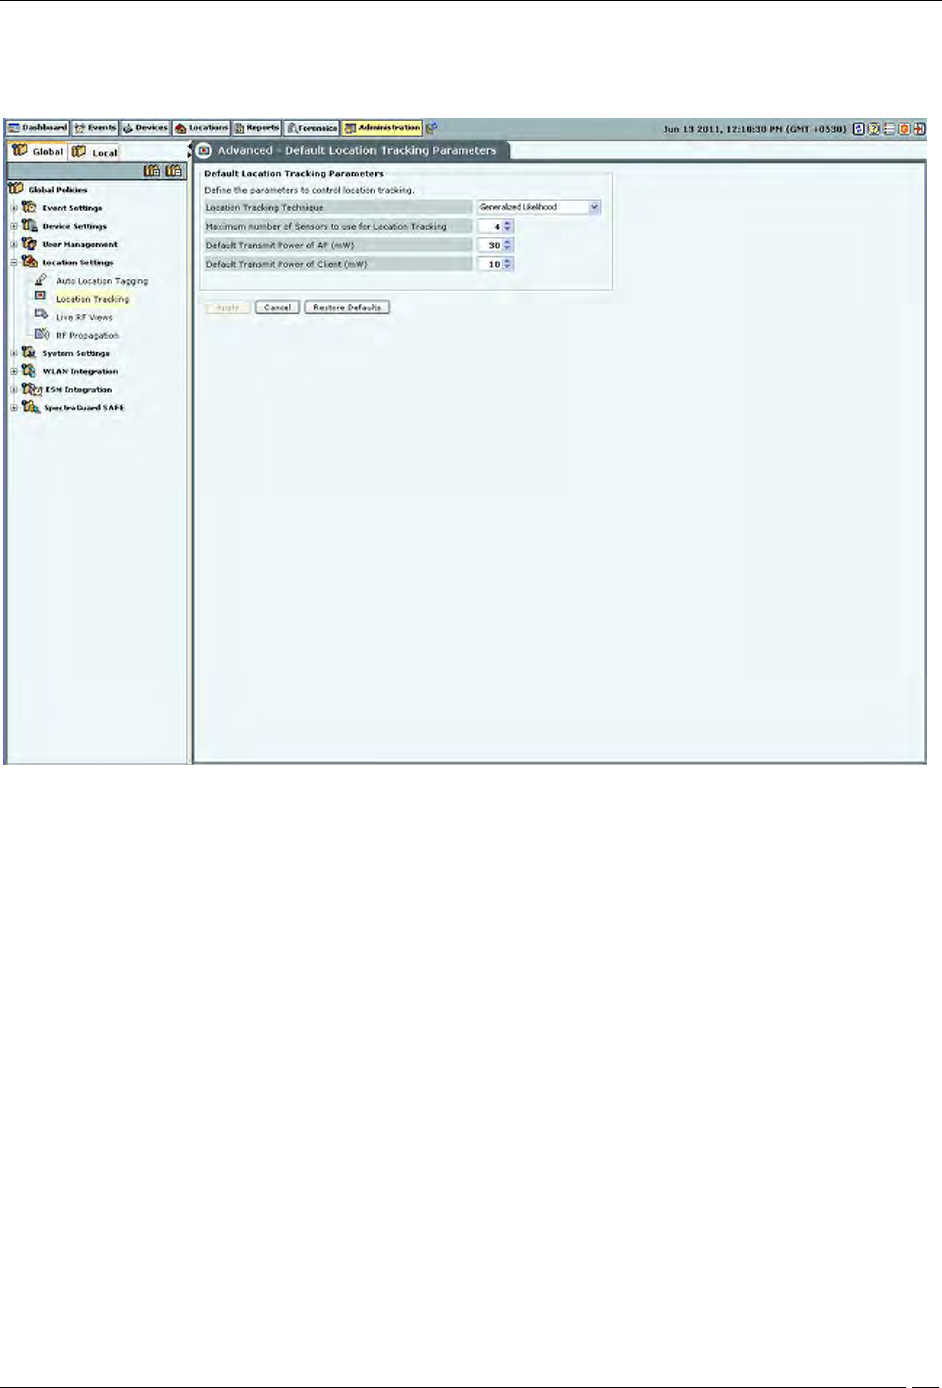
The location of a particular device can be tracked using the location tracking feature. The system needs at least three
sensors to perform location tracking. The Location Tracking screen enables you to define the parameters that control
location tracking.
Location Tracking
Default Location Tracking Parameters contains the following options:
Location Tracking Technique: Select the technique used for location tracking. The technique available is
Generalized Likelihood.
Maximum number of Sensors to use for Location Tracking: Select the maximum number of sensors used
for location tracking. Sensors track down the location of a device and the system uses sensors that see the
maximum values. A higher value is likely to give better results.
(Minimum: 3; Maximum: 10; Default: 4)
Default Transmit Power of AP (mW): Location tracking needs as input the transmit power of the AP being
located. When transmit power is unknown, the default value set here is used.
(Minimum: 1 mW/0 dBm; Maximum: 100 mW/20 dBm; Default: 30 mW/15 dBm)
Default Transmit Power of Client (mW): Location tracking needs as input the transmit power of the Client
being located. When transmit power is unknown, the default value set here is used.
(Minimum: 1 mW/0 dBm; Maximum: 100 mW/20 dBm; Default: 10 mW/ dBm)
Signal Strength Monitoring Devices: Location tracking is based on the signal strength of the monitoring
devices. This value can deviate from the actual values because of subtle variations in the RF environment.
You can specify APs only, Sensors only, and Sensors and/or APs to be used to control location tracking.
Using the system’s Application Programming Interface (API), APs can be reported as a source of signal
strength. Information from these APs can be used for location tracking.
Live RF Views
Administration Tab
SpectraGuard® Enterprise User Guide
209
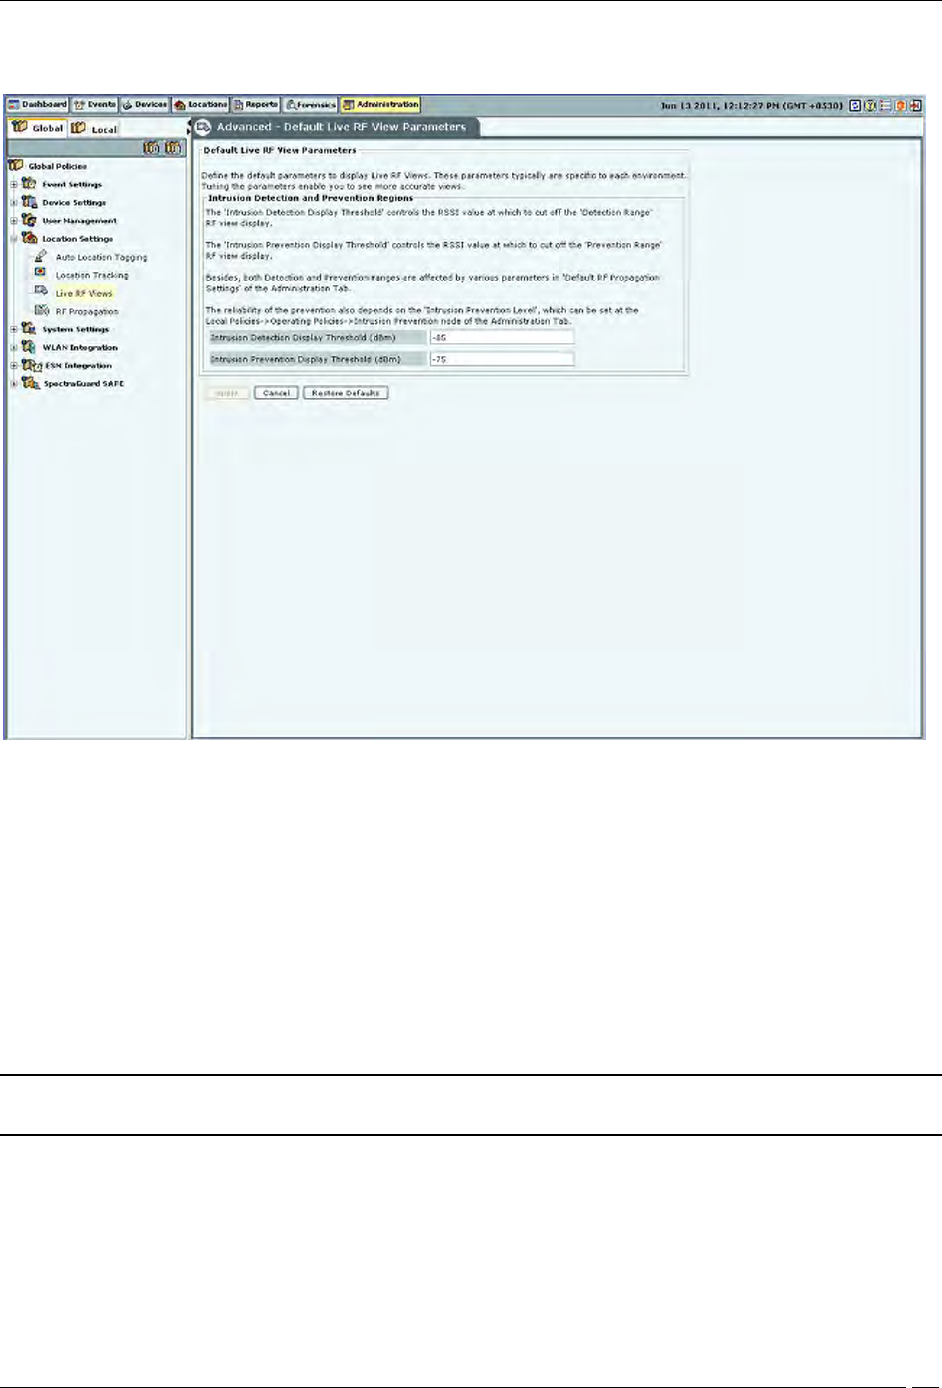
The Live RF Views screen enables you to define the parameters that are used in live RF views. These parameters are
specific to each environment. Tuning the parameters enables you to see more accurate views.
Live RF Views
Default Live RF Views Parameters contains the following options:
Intrusion Detection and Prevention Regions: Specify the dBm values for which the system shows the
intrusion detection and prevention regions in the sensor coverage views.
Intrusion Detection Display Threshold (dBm): Detection Range is the area over which sensors can reliably
detect wireless activity. Intrusion Detection Display Threshold determines the threshold for this range.
(Default: -85 dBm).
Intrusion Prevention Display Threshold (dBm): Prevention Range is the area over which sensors can
prevent unauthorized wireless activity. Intrusion Prevention Display Threshold determines the threshold
for this range. (Default: -75 dBm)
Both the Detection and Prevention ranges are affected by parameters in the RF Propagation section.
Note: The reliability of the prevention also depends on the Intrusion Prevention Level selected on
Administration
Local tab
Operating Policies
Intrusion Prevention
Intrusion Prevention Level tab.
RF Propagation
The RF Propagation screen enables you to define default AP, Client, and Sensor antenna gain values.
Administration Tab
SpectraGuard® Enterprise User Guide
210
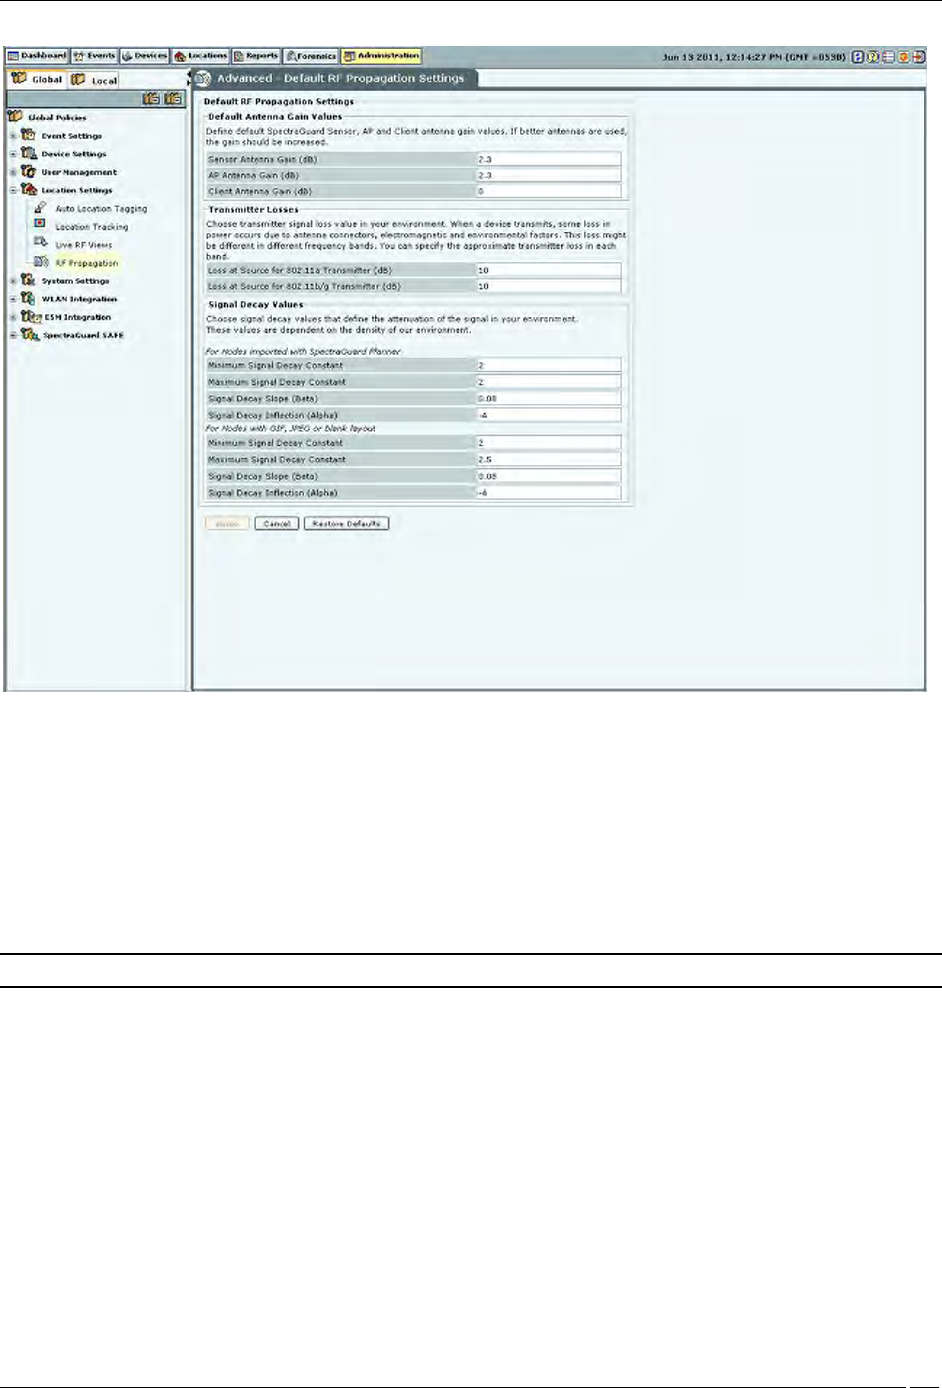
RF Propagation
Default RF Propagation Settings contains the following options:
Default Antenna Gain Values: Specify the default sensor, AP, and Client antenna gain values. Antenna gain
is a characteristic of an antenna used for transmitting or receiving signal, defined as gain in power when
signal is received (or transmitted) using the antenna.
Sensor Antenna Gain (dB): Specifies the gain of antenna attached to the sensor. (Default: 2.3 dB)
AP Antenna Gain (dB): Specifies the gain of antenna attached to the AP. (Default: 2.3 dB)
Client Antenna Gain (dB): Specifies the gain of antenna attached to the Client. (Default: 0 dBm)
Note: If better antennas are used, you should increase the gain.
Transmitter Losses: Select the transmitter signal loss value suited to your environment.
If your environment has metal or concrete walls, select a higher signal value.
If your environment has large spaces where the signal can propagate without much obstruction,
select a lower signal loss value
When a device transmits, some loss in power occurs due to antenna connectors, electromagnetic, and environmental
factors. This loss might be different in different frequency bands. You can also specify the approximate loss in each
band.
Loss at Source for 802.11a Transmitter (dB): (Default: 10 dB)
Loss at Source for 802.11b/g Transmitter (dB): (Default: 10 dB)
Signal Decay Values: Signal propagation depends heavily on environment. The obstacles present in
environment might impede signal propagation, limiting its range. It is very difficult to accurately model
signal propagation in all kinds of environment, but by fine-tuning the following four constants, you can
more or less characterize your environment for signal propagation.

Administration Tab
SpectraGuard® Enterprise User Guide
211
Note: The system uses the first set of parameters when the Planner file is imported; the second set for blank, gif, or
jpeg files.
Minimum and Maximum Signal Decay Constants specify the range for the decay exponent, that is, the exponent at
which signal decays with distance. Signal Decay Slope (Beta) and Signal Decay Inflection (Alpha) control how the
decay exponent changes from its minimum value to maximum value.
For Nodes with imported SpectraGuard Planner file:
Minimum Signal Decay Constant: (Default: 2.0 dBm)
Maximum Signal Decay Constant: (Default: 2.0 dBm)
Signal Decay Slope (Beta): (Default: 0.08 dBm)
Signal Decay Inflection (Alpha): (Default: -4 dBm)
For Nodes with GIF, JPEG or Blank layout:
Minimum Signal Decay Constant: (Default: 2.0 dBm)
Maximum Signal Decay Constant: (Default: 2.5 dBm)
Signal Decay Slope (Beta): (Default: 0.08 dBm)
Signal Decay Inflection (Alpha): (Default: -4 dBm)
Note: Planner models most significant objects; therefore Maximum Signal Decay Constant should be close to 2.0.
System Settings
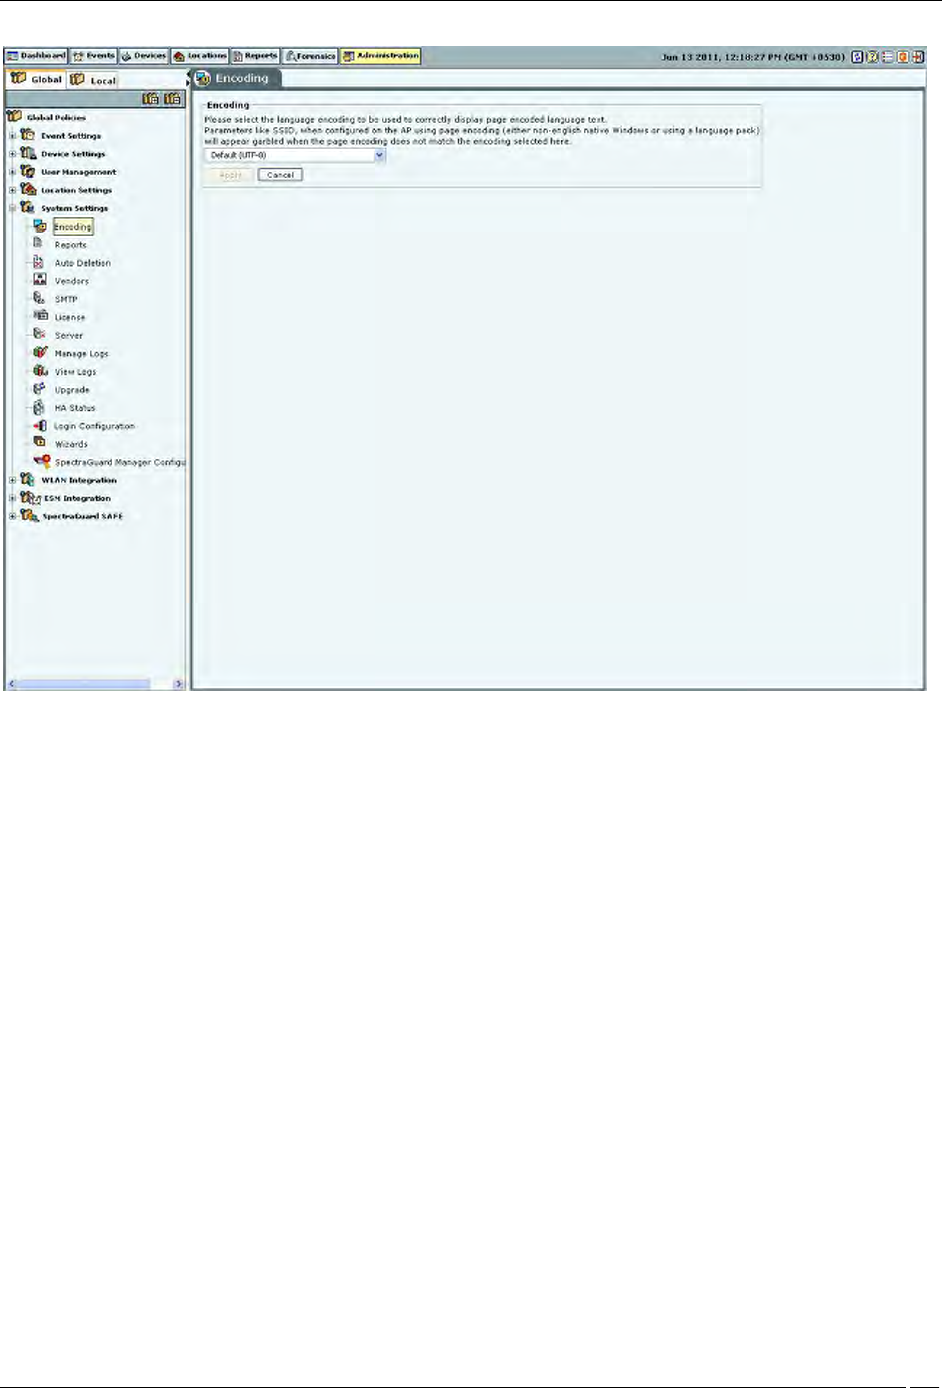
Encoding
Select the language encoding (language setting) to be used to correctly display page encoded language text from the
drop down list on the Encoding screen. Default is UTF-8. Parameters like SSID, when configured on the AP using
page encoding (either non-english native window or using a language pack) will appear garbled when the page
encoding does not match the encoding selected here.
Note: For the language encoding to be effective, it is mandatory to select Multilingual in the Language
Preference field in Administration
Global
Global Policies
User Management
User Preferences
screen along with selection of language encoding from the drop-down list on the Encoding screen.
Administration Tab
SpectraGuard® Enterprise User Guide
212
Encoding
Reports
The system can display a rich set of reports. The Reports screen enables you to modify the appearance and text in the
generated reports. Refer to 'Adding a Report' in the Reports Tab section for more details.

Administration Tab
SpectraGuard® Enterprise User Guide
213
Reports Configuration
Auto-deletion
The system is designed to store information about devices seen and older events over a period of time. The rate of
growth of this information is dependent on the volatility of the wireless environment at the deployed location. This
information also becomes obsolete after a certain time. It is necessary to delete this information periodically. Based on
the event related configuration done by you, the system also raises and stores a number of events. If the configuration
is such that there are significant number of events generated and stored, the stored event data size grows
significantly faster. This event data also requires regular cleanup.
Auto Deletion allows you to specify values of various auto deletion parameters to control the frequency of deletion
of information. The system generates an event for tracking the action of auto deletion. This event gives information
only about device deletion. There is no event separately generated that indicates event deletion. Event deletion is also
referred to as Event Purging.
Administration Tab
SpectraGuard® Enterprise User Guide
214
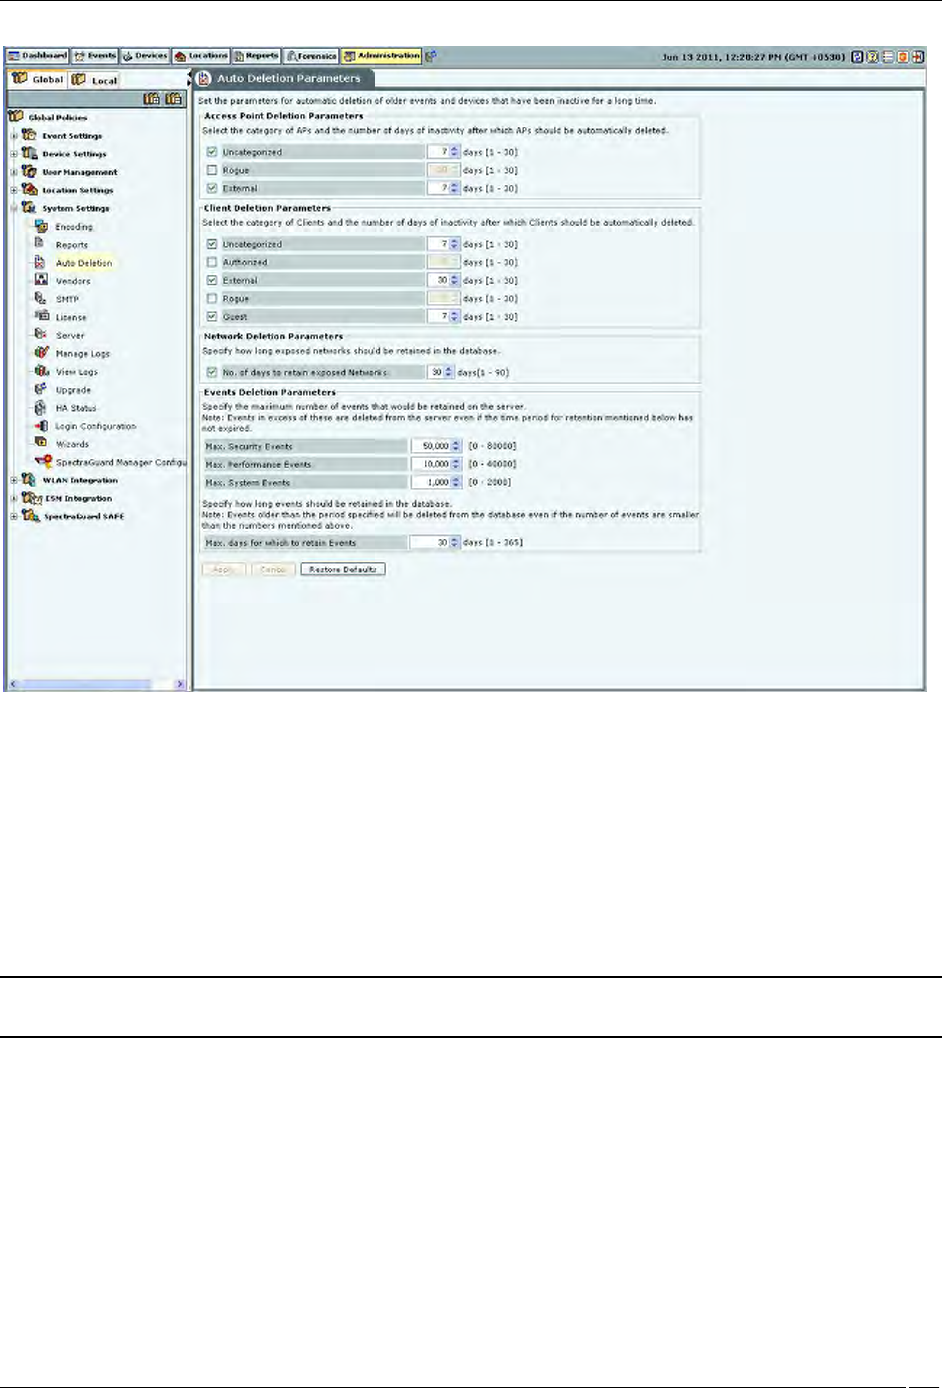
Auto Deletion
The Auto Deletion Parameters window contains the following options:
Access Point Deletion Parameters: Select the checkboxes to choose the category of APs that you would like the
system to delete automatically. Specify the number of days of inactivity after which the AP records are automatically
deleted.
(Minimum: 1 day; Maximum: 30 days)
Uncategorized
Rogue
External
Note: Authorized APs are not auto deleted from the system. If you want to delete inactive authorized Access Points,
you have to delete them manually.
Client Deletion Parameters: Select the check boxes to choose the category of wireless Client devices that you
would like the system to automatically delete. Specify the number of days of inactivity after which the wireless Client
records are deleted automatically.
(Minimum: 1 day; Maximum: 30 days)
Uncategorized
Authorized
External
Rogue
Guest
Network Deletion Parameters: Select the No. of days to retain exposed Networks check box and specify the
duration, in days, for which the exposed networks are to be retained on the server.
(Minimum: 1 day; Maximum: 90 days; Default:30 days)
Administration Tab
SpectraGuard® Enterprise User Guide
215
Events Deletion Parameters: Specify the maximum number of events that would be retained on the server.
Maximum Security Events
(Minimum: 20000; Maximum: 80000; Default: 50000)
Note: Maximum number of security events that can be retained for SA-350 appliance, is 0.7 million.
Maximum Performance Events
(Minimum: 5000; Maximum: 40000; Default: 10000)
Note: Maximum number of performance events that can be retained for SA-350 appliance, is 0.25 million.
Maximum System Events
(Minimum: 500; Maximum: 2000; Default: 1000)
Note: Maximum number of system events that can be retained for SA-350 appliance, is 0.05 million.
Specify how long events should be retained in the database.
Maximum days for which to retain Events
(Minimum: 1 day; Maximum: 365 days; Default: 30 days)
Note: Events older than the period specified will be deleted from the database even if the number of events are
smaller than the numbers mentioned above.
Auto Deletion Action
You can track auto deletion of inactive APs, Clients, and events, by monitoring the special event generated by the
system. The system generates an event containing the summary of the actions performed during the Auto Deletion
operation, if and only if any physical deletion of information actually took place.
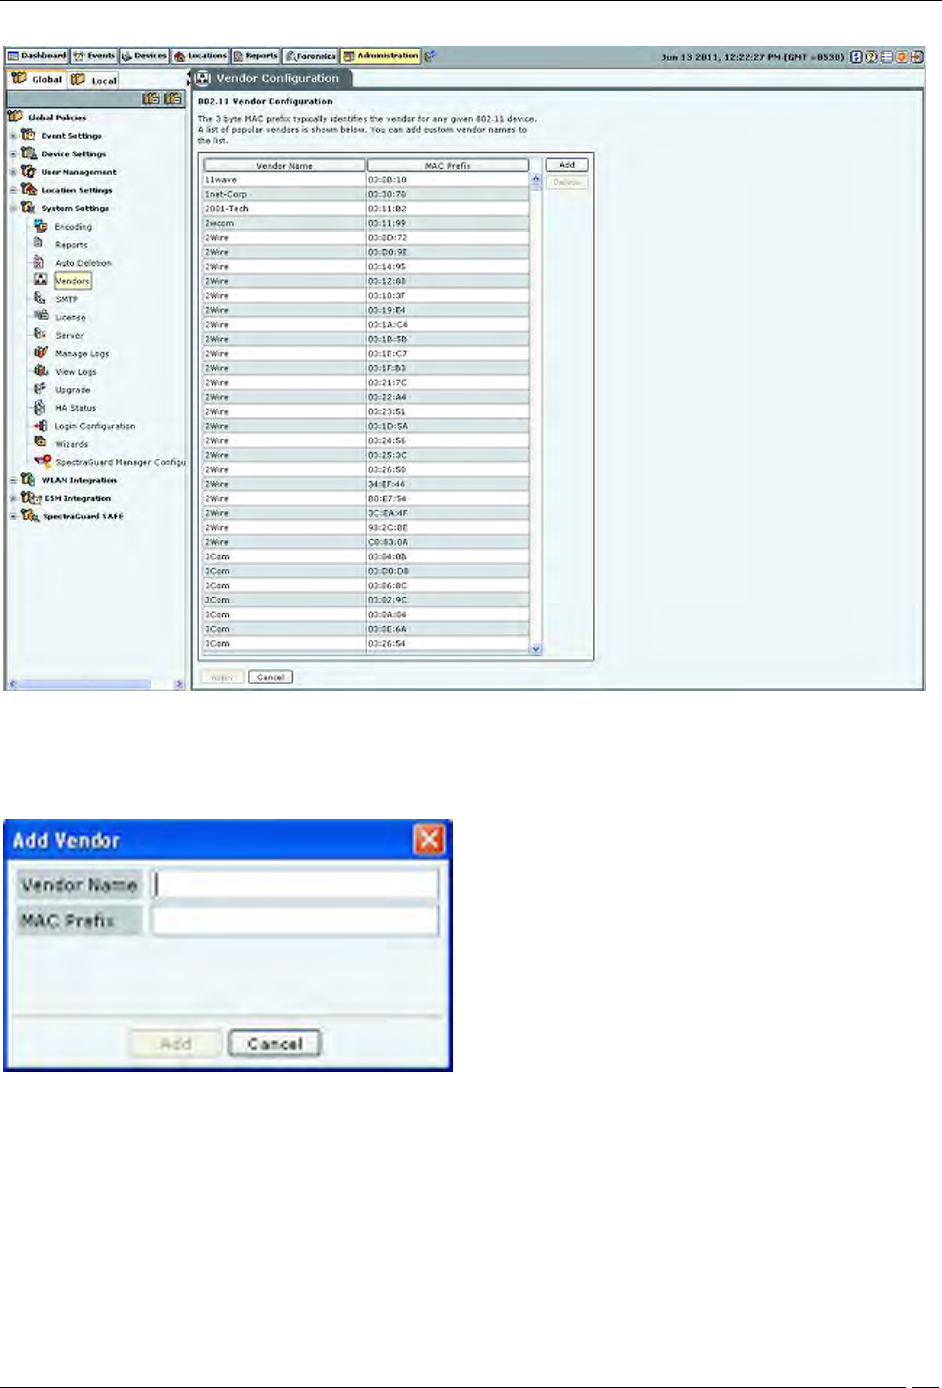
Vendors
The Vendors screen enables you to view a list of vendors with their MAC prefixes. The 3-byte MAC prefix typically
identifies the vendor for any given 802.11 device.
Administration Tab
SpectraGuard® Enterprise User Guide
216
Vendors
To add a new pair of vendor name and MAC prefix, click Add. The Add Vendor dialog opens. Specify the Vendor
Name and the MAC Prefix and click Add.
Add Vendor Dialog
To delete any pair from the existing list, select the relevant row and click Delete.
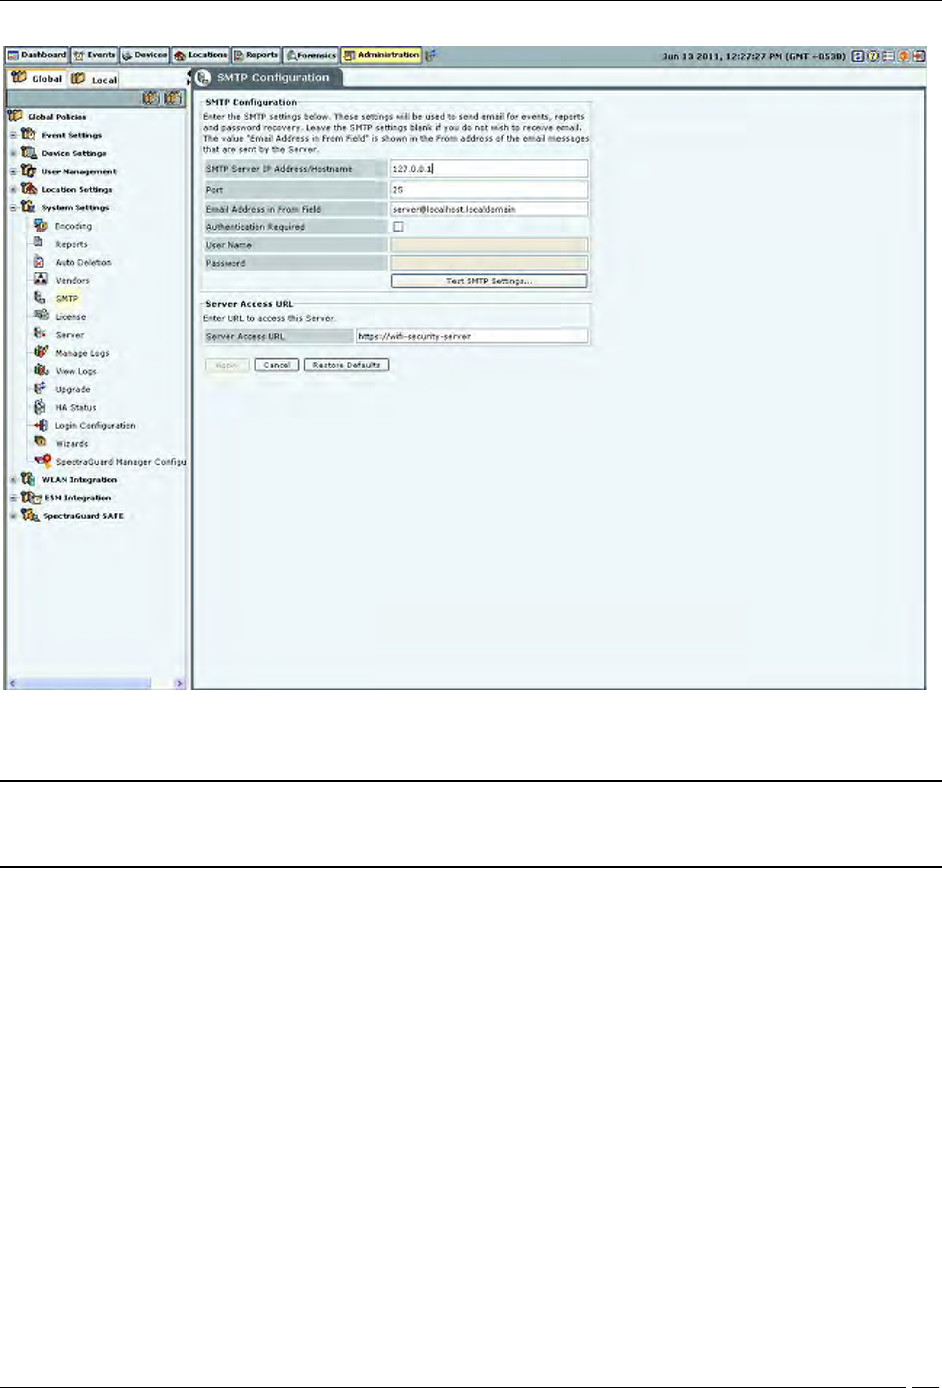
SMTP
The SMTP screen enables you to set Simple Mail Transfer Protocol (SMTP) server settings to send emails when events
occur. You must have administrator privileges to set these values.
Administration Tab
SpectraGuard® Enterprise User Guide
217
SMTP
Note: If you want the system to notify you by an events email, you need to specify SMTP server details. The system
does not email events by default. If you do not want to receive email for the events, select Restore Defaults and
Apply.
SMTP Configuration contains the following options:
SMTP Server IP Address/Hostname: Specifies the IP Address or the Hostname of the SMTP server used by the
system for sending email alerts.
(Default: 127.0.0.1:25)
The following are the authentication protocols for SMTP server:
PLAIN (For sendmail 8.10 and above)
LOGIN (For sendmail 8.10 and above)
NTLM (Windows proprietary authentication method)
Port: Specifies the Port number of the SMTP server used by the system for sending email alerts.
Email Address in From field: Specifies the source address from which email alerts are sent.
Authentication Required: If enabled, specifies whether the SMTP server requires authentication.
Username: Specifies the user name for SMTP server authentication.
Password: Specifies the password for SMTP server authentication.
To send a test e-mail, click Test SMTP Settings. The settings used for this mail are those that you have specified.
License
You can upgrade your current version to enable or disable features by a new license key.
The License Update screen enables you to change the license key.

Administration Tab
SpectraGuard® Enterprise User Guide
218
To update the license, click Browse and navigate to the location of the License Key File. To finish, click Apply.
Note: To apply the license effectively, logout and re-login to the console.
License
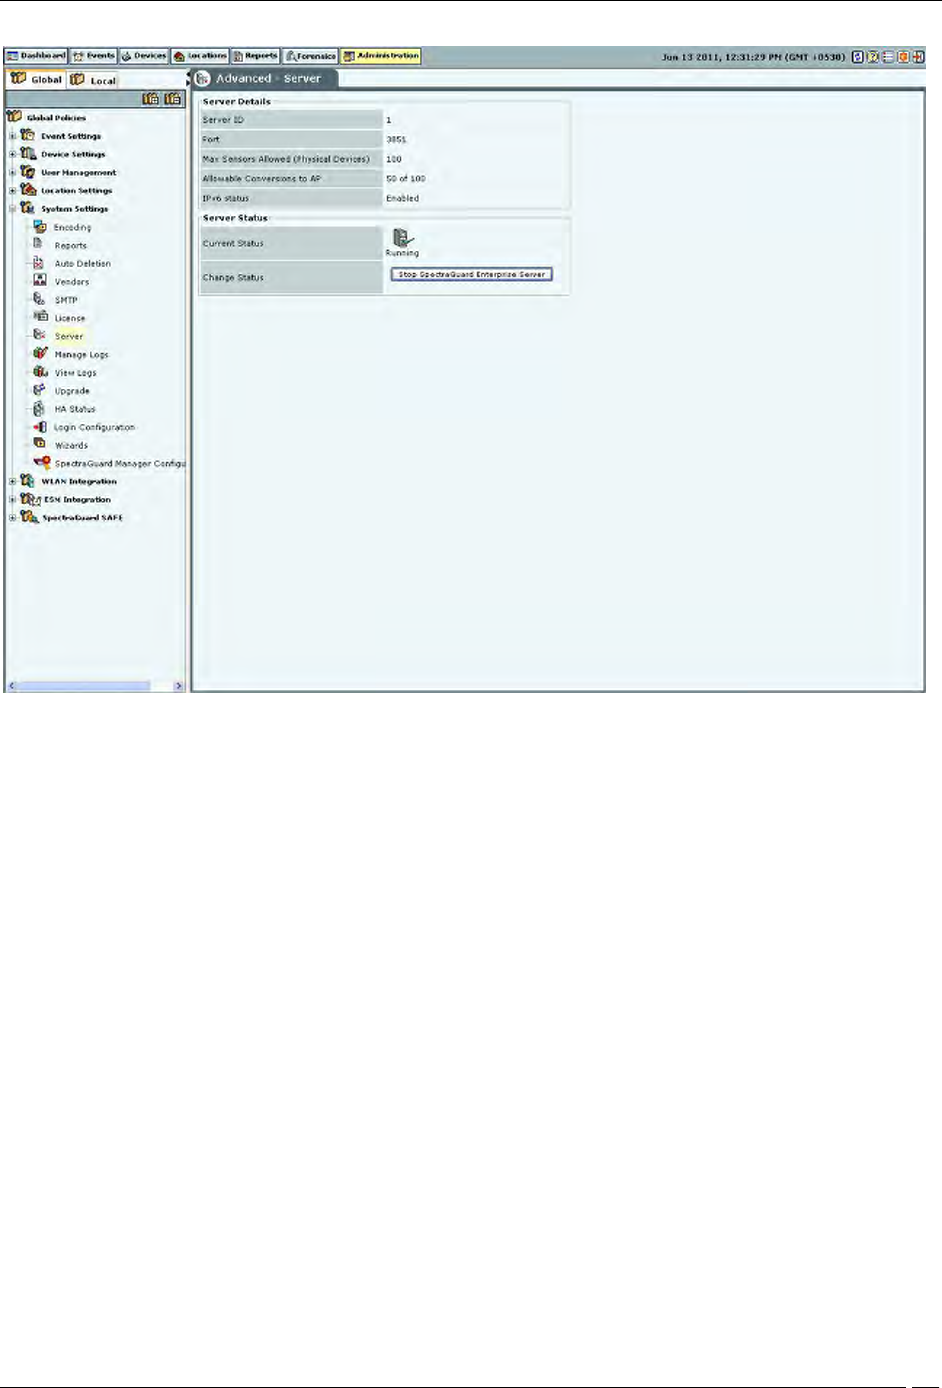
Server
The Server screen enables you to view server information.
Administration Tab
SpectraGuard® Enterprise User Guide
219
Server Details
Server Details: This is a read-only section and displays the following information:
Server ID: Unique identifier for the server appliance. If you have installed a single server appliance, then
retain the default server ID, that is, 1.
Port: The User Datagram Protocol (UDP) port number used.
Max Sensors: Maximum number of sensors that can connect to the server.
Max Sensor/AP Combos: Maximum number of sensors that can be converted to Sensor/AP Combo
devices. This is derived from the license. If you do not have a license for Sensor/AP combo device, this field
will not be seen.
IPv6 status: Indicates if IPv6 is enabled on the server.
Server Status: Enables you to view the Current Status of the server – Running or Stopped. The administrator
can Change Status, that is, start or stop the server.
RAID Status: Enables you to view the Current Status of the RAID Array – Normal, Rebuilding, Degraded, or
Failed.
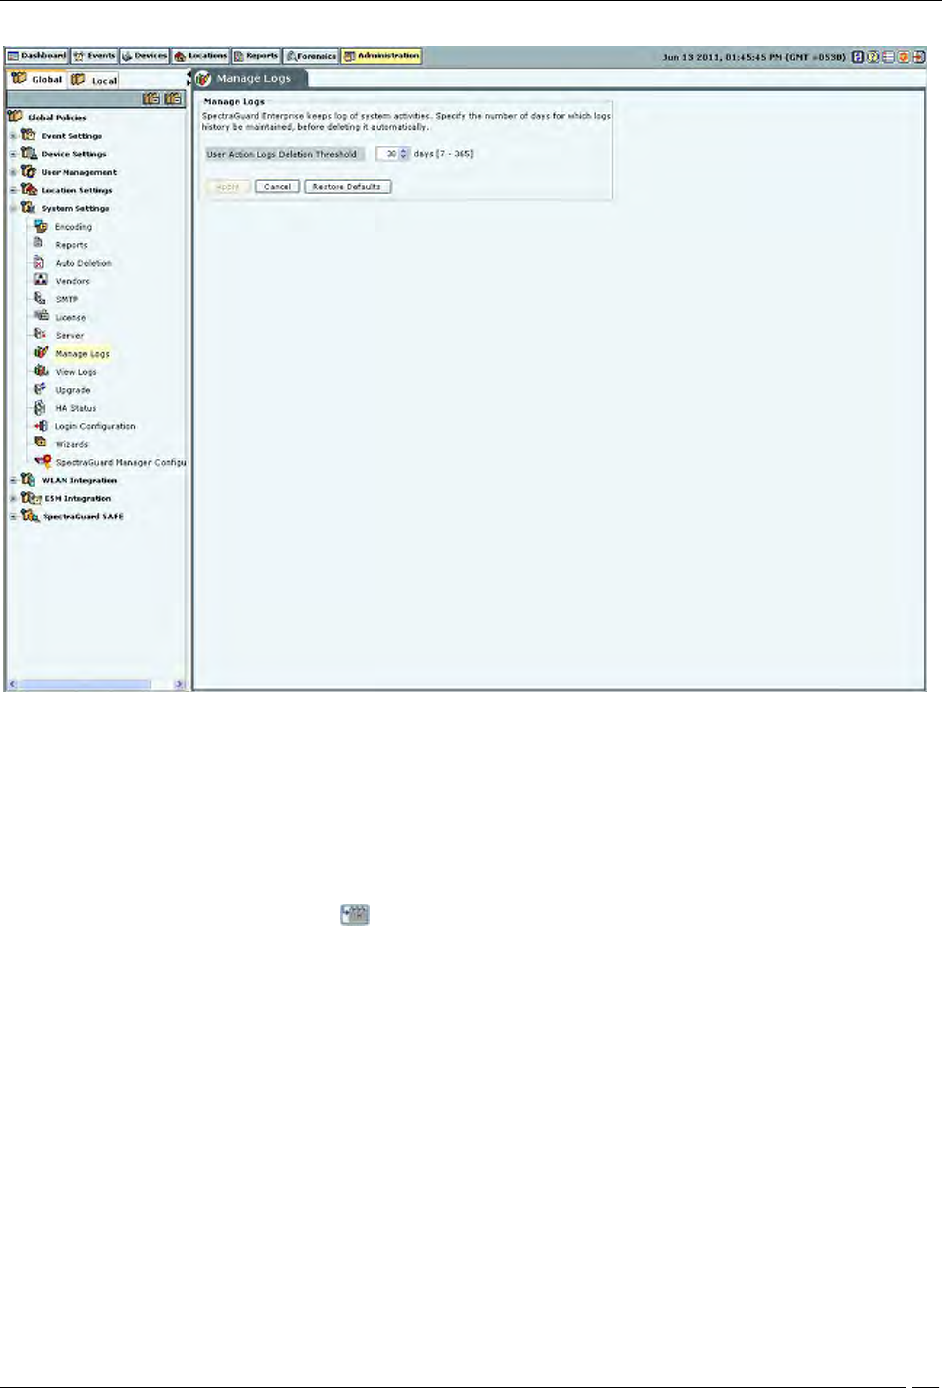
Manage Logs
The system keeps log of user activities. Under Manage Logs, you can specify in the User Action Logs Deletion
Threshold field, the number of days for which logs history is to be maintained, before deleting it automatically.
(Minimum: 7 days; Maximum: 365 days; Default: 30 days)
Administration Tab
SpectraGuard® Enterprise User Guide
220
Manage Logs
View logs
The system enables downloading the user action logs for review. Only the superuser has permission to download
logs. Logs can be downloaded as .TSV (tab separated values) or .CSV (comma separated values) format. The .TSV
format is also called Unicode format. The downloaded file can be viewed using text editors such as Excel, WordPad
etc.
Under Time Filter, click the calendar icon to specify the Time Period. Only those records in the logs which fall in
the selected time period will then be included in the downloaded log file.
Under Filter By, it is possible to select a type of log records which are to be downloaded. When such specific type is
selected, log records of only that type will be included in the downloaded log file. By default, records of all types are
included.
Under Sort By, it is possible to select a specific column on which the records in the downloaded file are to be sorted.
By default, the sorting is done on date and time.