Atoms Labs AWF53 HD Outdoor PT Network Camera User Manual JSW QSG WAPP JS V1 0
Atoms Labs LLC HD Outdoor PT Network Camera JSW QSG WAPP JS V1 0
User Manual

QUICK START GUIDE
KIT CONTENT :
Camera Antenna
x 1
x 1x 1
Quick Start Guide
Power Adapter
x 1
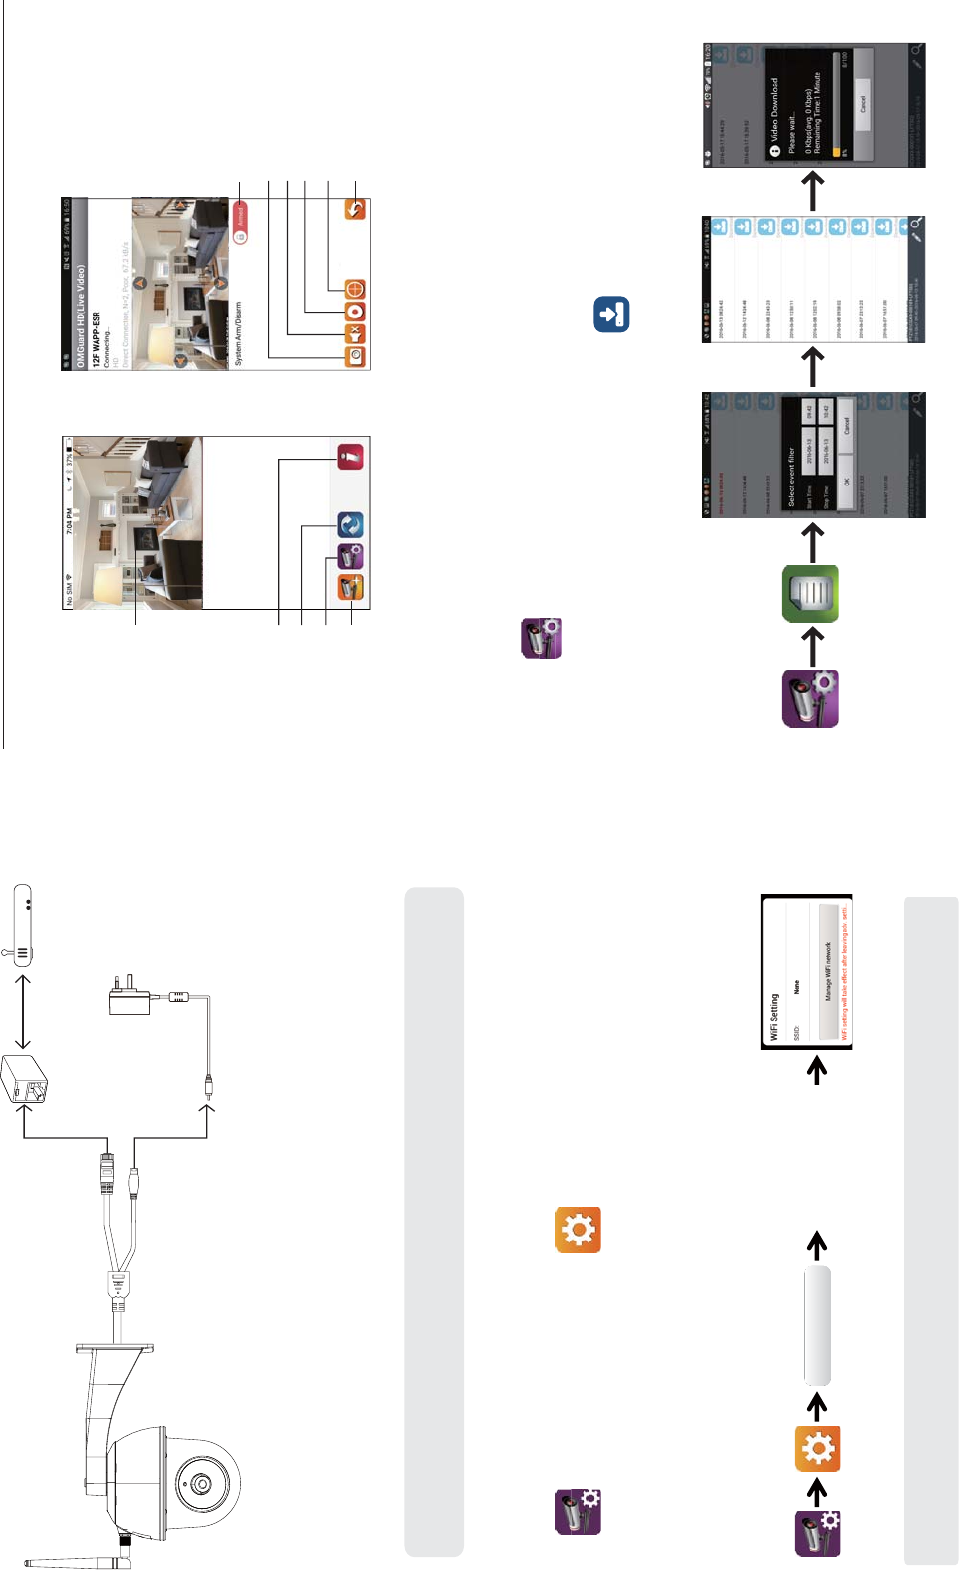
PRODUCT OVERVIEW
SETUP THE CAMERA
For iOS For Android
1. APP Download
Download and install the "OMGuard HD" APP to your device.
2. Power up The Camera
Connect the power wires to the adapter supplied, and wait until the RED LED indicator becomes
steady on. This process would be nished within 1 min and make sure the LED is ashing in RED.
3a.Wireless Connection
(1) In the Wi-Fi setting of your smart device. Choose the Wi-Fi router with prex of HD-xxxxxx
(xxxxxx=Camera ID numbers). Then enter the default password 12345678.
(2) Launch the APP, tap to add the camera.
(3) Tap (QR code icon) and scan the QR code label on the back of the camera to bring up the DID
information. Or tap "Search" to locate the camera.
(4) Enter the default password 123456.
(5) Tap “Save” when you done.
(6) Later, APP will request user to modify the default password to private password .
Note: Press and hold the “Reset” button for 5 seconds, the
system will be restored into factory default.
Pan/Tilt Wireless
Camera
x 1
Screw Pack
1
23
4
5
x 1
Rj45 Connect Jack
Micro SD Card Slot
Microphone
Antenna
Lens
Reset Button
Light Sensor
Mount Bracket.
Ethernet Cable
Power Cable
x 1
Hex Key
FRIENDLY REMINDER
- For video recording, BE SURE TO use CLASS 10 memory card or above (not included). Other kinds of
memory card may cause unexpected results and should be avoided.
- Anytime when you nd the camera pan/tile function does not perform properly, calibrate the camera
to get correct principle position (refer to step 8 of setup the camera section).
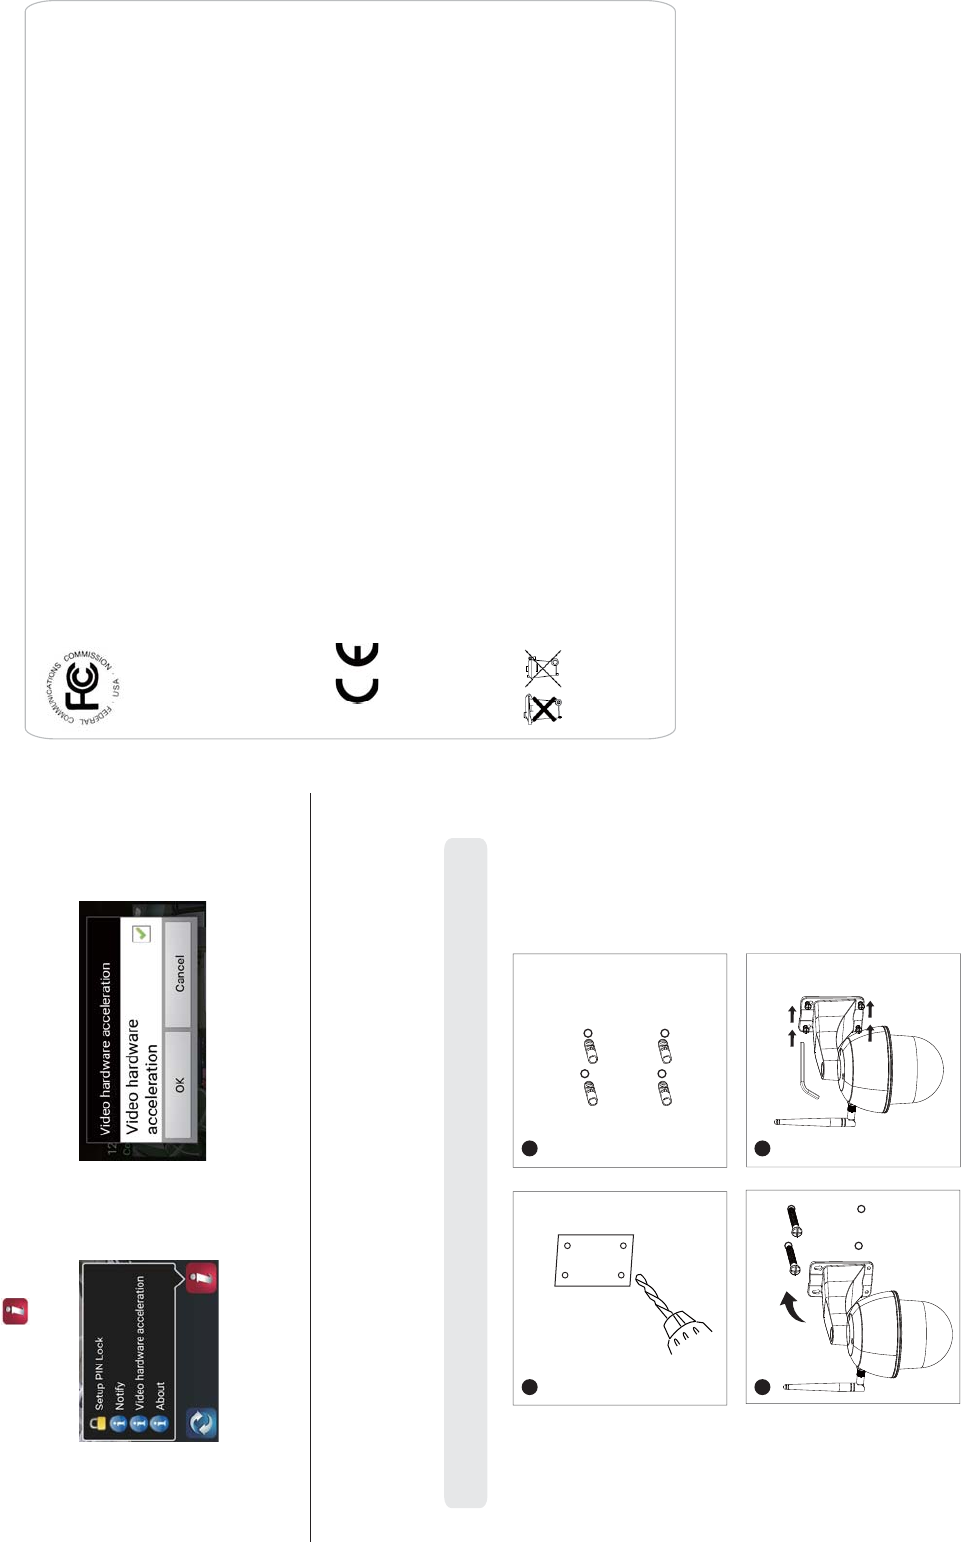
- For better performance, please enable the video hardware acceleration function. This function only for
Andriod (refer to the app introduction section).
AWF53 HD Outdoor PT Network Camera
APP INTRODUCTION
Follow the steps below for Event Playback
(1) Tap the icon to access the event list section.
(2) Select the time interval for the event list.
(3) Select the le you want to playback.
(4) If you want to store the les to the mobile device, tap to download the les (Best while under
Wi-Fi enviornment due to larger high denation data size).
(1) (1)-1
(2) (3) (4)
3b.Wired Connection
(1) Make sure your smartphone is connected your Wi-Fi router.
(2) Connect the camera’s Ethernet cable to the Rj45 connect, and power on the camera with adapter.
(3) Launch the APP, tap the “Search” to locate the camera.
(4) Enter the default password 12345678 and save the settings.
(5) Later, APP will request user to modify default password to private password .
Note: In soft AP mode, the RED LED long ashes once followed by 2 short ashes. In normal mode,
the LED is ashing in RED.
4. Wi-Fi Setting
(1) Tap then the advanced setting icon will appear on the screen.
(2) Enter the default password :12345678
(3) Select your Wi-Fi router, and enter its password.
(4) The Camera will oine for around 40 seconds to reboot for Wi connection. When camera connects
to Wi-Fi router correctly, the RED LED will stay ON.
(5) In the Wi-Fi setting on your smart device again, make sure the Wi-Fi router you are connecting
to is the same as the camera. If not, manually assign to it.
Note: If you fail to add the camera for several times, press and hold the “Reset” button for 5 seconds
to reset it.
Live-View
Camera List
Information
Refresh
Camera Setting
Add Camera
Live View
Snapshot
Video Record
Return
Mute
Setup Camera Position
Arm/Disarm
Rj45 Connect
Power Adapter
Router
Advanced Enter Admin Password
(default 123456)
Choose the appropriate Wi-Fi
router on your local network
CAMERA INSTALLATION
Enable video hardware acceleration (For Andriod)
(1) In the camera list, tap the
(2) Click the click box to enable video hardware acceleration.
(1) (2)
Note: Before mounting the camera, install the memeory card if you prefer recording to local storage.
Products with CE Marking comply with EMC Directive
(2014/30/EU); Low Voltage Directive (2014/35/EU); RED
(2014/53/EU); ROHS Directive (2011/65/EU) issued by the
Commission of the European Community. Compliance
with these directives implies conformity to the following
European Norms:
EMC: EN 301 489
LVD: EN 60950
Radio: EN 300 328
If the camera system no longer functions or can no longer be repaired, it must be disposed of according to the valid statutory regulations.
Disposal of spent batteries/accumulators:
You are required by law (Battery Ordinance) to return all spent batteries and accumulators. Disposing of spent batteries/accumulators with
common household waste is prohibited! Batteries/accumulators that contain hazardous substances are marked with the symbols on the
side. These symbols indicate that it is prohibited to dispose of these batteries/accumulators in the household waste. The abbreviations for the
respective heavy metals are: Cd=cadmium, Hg=mercury, Pb=lead. You can return spent batteries and accumulators that can no longer be
charged to the designated collection points in your community, outlets or wherever batteries or accumulators are sold. Following these
instructions will allow you to fulll the legal requirements and contribute to the protection of our environment!
(1) Drill the mounting holes by using the aligmaent paper.
(2) Insert 4 screw anchors into the wall.
(3) Insert 2 screws into the screw anchors, reserved space 8 to 10 mm. Then Hang the camera
on 2 screws.
(4) Fasten 4 screws by using hex key.
1 2
4
3
Changes or modifications not expressly approved by the party responsible for compliance could void the user's authority to
operate the equipment.
This equipment has been tested and found to comply with the limits for a Class B digital device, pursuant to Part 15 of the FCC
Rules. These limits are designed to provide reasonable protection against harmful interference in a residential installation.
This equipment generates uses and can radiate radio frequency energy and, if not installed and used in accordance with the
instructions, may cause harmful interference to radio communications. However, there is no guarantee that interference will
not occur in a particular installation. If this equipment does cause harmful interference to radio or television reception, which
can be determined by turning the equipment off and on, the user is encouraged to try to correct the interference by one or
more of the following measures:
-- Reorient or relocate the receiving antenna.
-- Increase the separation between the equipment and receiver.
-- Connect the equipment into an outlet on a circuit different from that to which the receiver is connected.
-- Consult the dealer or an experienced radio/TV technician for help
This device complies with part 15 of the FCC rules. Operation is subject to the following two conditions (1)this device may not
cause harmful interference, and (2) this device must accept any interference received, including interference that may cause
undesired operation