Avery Dennison Retail Information Services 9460IPLA3021 Wireless Printer User Manual 9460ipad
Avery Dennison Retail Information Services, LLC Wireless Printer 9460ipad
Contents
- 1. Manual
- 2. Service manual
- 3. Symbol manual
- 4. Radio confiuration
Radio confiuration

TC9460IPAD Rev. AA 7/02 2002 Paxar Corporation. All rights reserved.
MONARCH is a registered trademark of Monarch Marking Systems, Inc. Sierra Sport and 9460 are
trademarks of Monarch Marking Systems, Inc. Paxar is a trademark of Paxar Corporation.
CONFIGURING YOUR IP PRINTER
Use these instructions to configure the radio inside your MONARCH Sierra
Sport 2 IP Printer. The IP printer operates on any WiFi (Wireless Fidelity)
compatible 802.11b RF network. Make sure your access point and network
are correctly set up. Refer to your network manuals for more information.
This manual does not include information about setting up your RF network.
Refer to the printer’s Quick Reference for information about loading
supplies, etc.
Installing the Configuration Utility
Download the Configuration Utility from our Web site
(www.monarch.com/service/service_utilities.htm). This utility supports the
following platforms: Microsoft Windows 98/2000/ME and Windows NT
(SP3+). If using WinPCap version 2.3 or greater, Microsoft Windows XP and
95 are supported. Follow the instructions provided. Read readme.txt for
updates and more information.
After installing the Configuration Utility, you can set up the printer using a
serial cable or by using your network. For initial printer setup, you must use
the serial interface.
About the Configuration Utility
This utility allows you to easily configure your IP printer.
1. Start the Configuration Utility.
2. Click Features List to see a list of supported radios.
3. Click Ok when finished.
4. Click About/Disclaimer to see the version number of the Utility.
5. Click Ok when finished.
6. Click Exit to exit the Utility.
2
Selecting the Printer Using a Serial Interface
Before you can use the IP printer, you must configure it. All nodes of a
wireless network need to have the same settings in order to communicate
with each other. For initial printer setup, you must use the serial
interface.
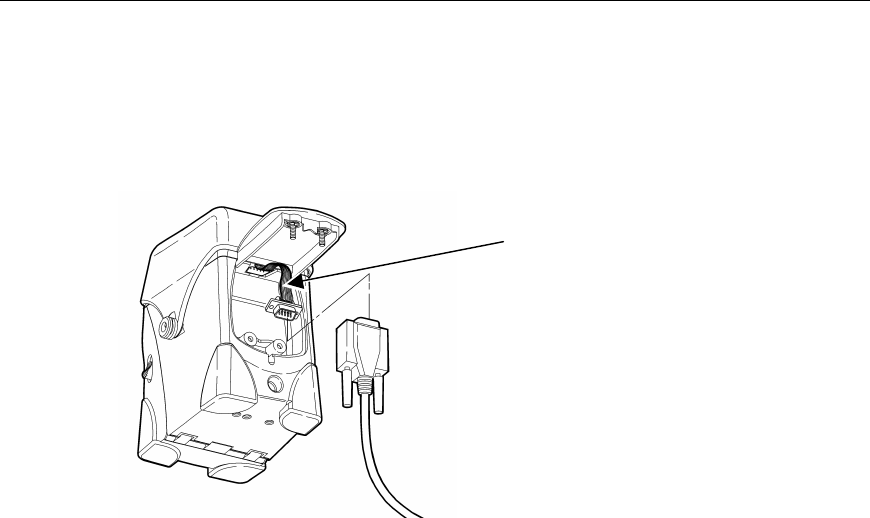
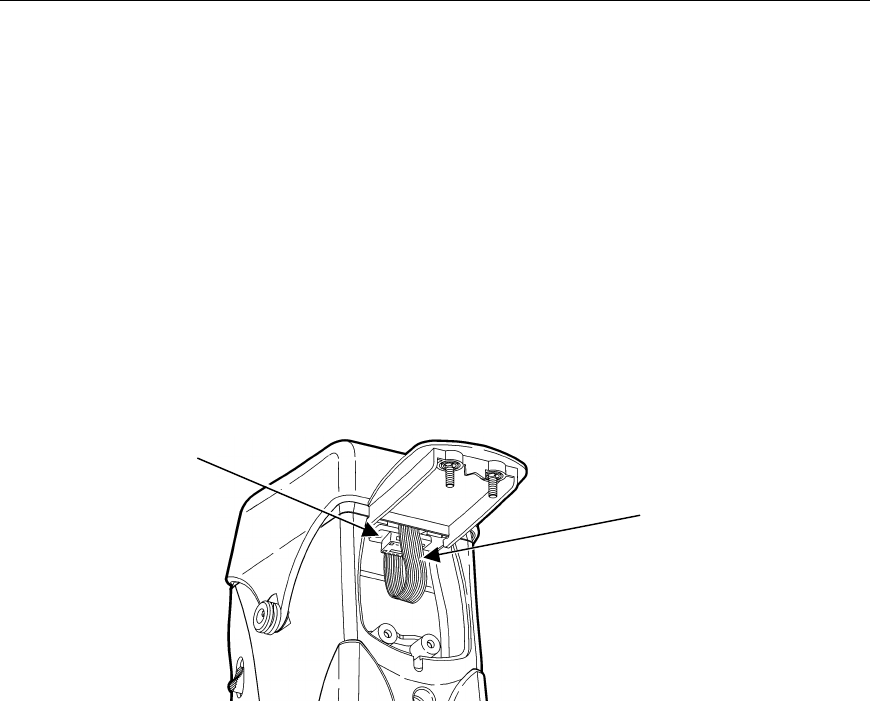
1. Connect a serial cable (DB9 female to DB9 female all lines wired straight
through) from the host or PC to the printer’s radio harness.
2. Turn on the printer.
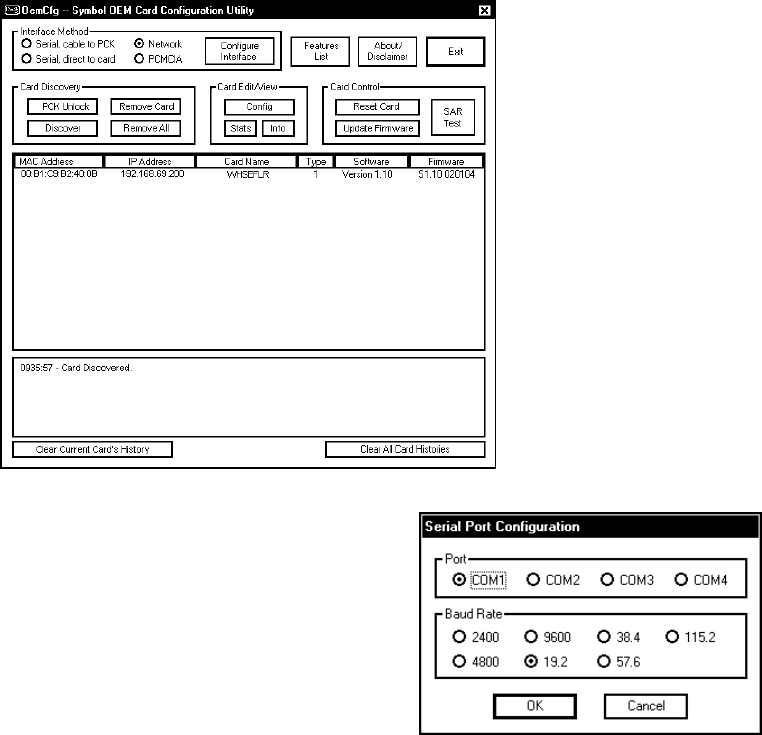
3. Start the Configuration Utility. Depending on the Configuration Utility’s
version, the screens may appear differently.
4. Select Serial, direct to card.
Radio Harness
3
5. Click Configure Interface.
6. Make sure you select the correct
communication port and 19.2 Baud
Rate (19.2 is the only supported
baud rate).
7. Click Ok.
8. Click Discover.
Since you are connected through a
serial interface, only one printer
appears.
The Card History Window appears at the bottom of the screen to give
a status of the connected printers. For example, you may see a
message “Card Discovered” when an IP printer is discovered by the
Configuration Utility. Messages also appear when printers are
turned off or disconnected from the network. You can highlight a
printer and Clear Current Card’s History or Clear All Card
Histories.
4
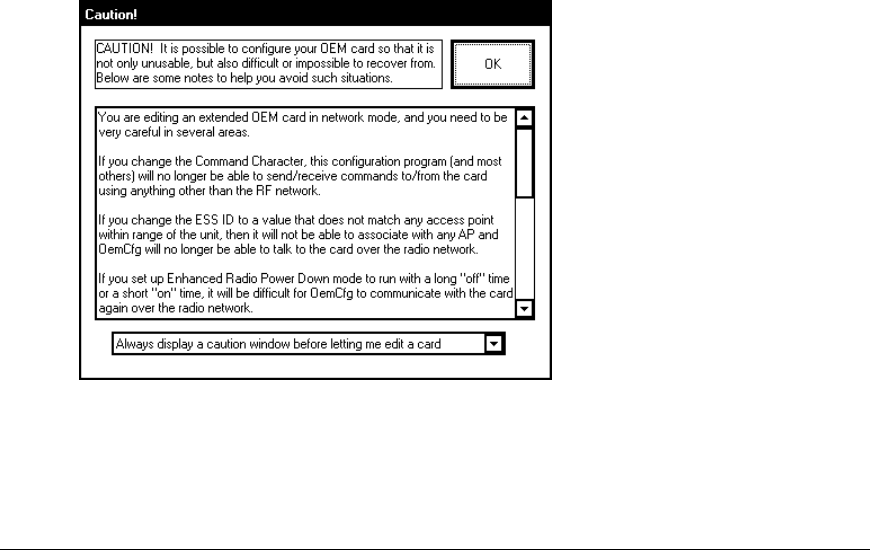
9. Highlight the printer to configure and click Config.
A CAUTION window appears. Read all the information. You can
disable the CAUTION window for this session or permanently. Click
Ok to continue.
10. Follow the steps in “Configuring the RF Interface.”
Selecting the Printer Using a Network Interface
Follow these steps to select a printer using a network interface or to verify
printers on a network.
1. Turn on the printer.
2. Start the Configuration Utility.
3. Select Network.
4. Click Discover.
Since you are connected through a network interface, multiple
printers may appear.
The Card History Window appears at the bottom of the screen to give
a status of the connected printers. For example, you may see a
message “Card Discovered” when an IP printer is discovered by the
Configuration Utility. Messages also appear when printers are
turned off or disconnected from the network. You can highlight a
printer and Clear Current Card’s History or Clear All Card
Histories.
5
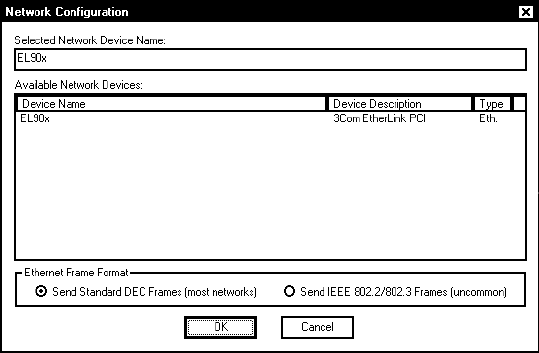
5. If necessary, click Configure Interface to check the network devices
available on the host.
6. Make any changes and click Ok when finished or click Cancel to exit
without saving any changes. You return to the Main screen.
7. Highlight the printer you want to configure and click Config. A CAUTION
window appears. Read all the information. You can disable the
CAUTION window for this session or permanently. Click Ok to continue.
8. Follow the steps in “Configuring the RF Interface.”
6
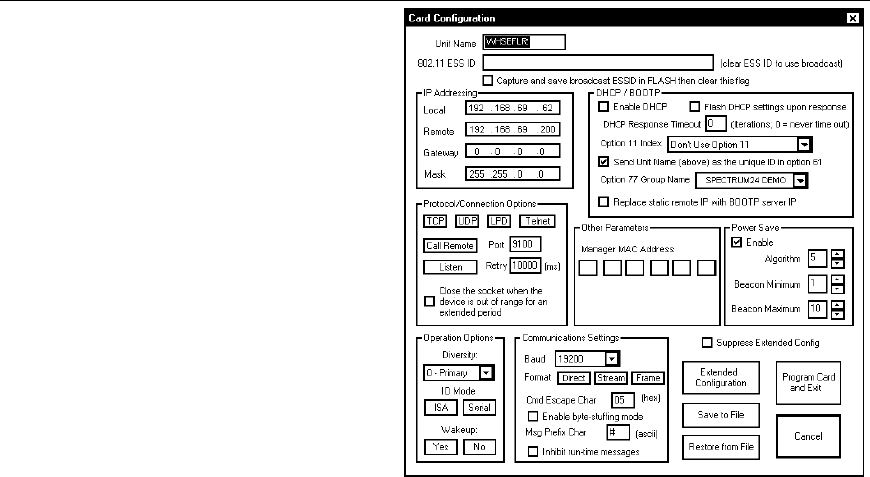
Configuring the RF Interface
Setting a Name and ESS ID
1. Enter a Unit Name. Use a
meaningful name, for
example, WHSEFLR.
2. Enter the 802.11b ESS ID.
NOTE: The ESS ID address is
case-sensitive.
3. Enter a valid address for the
Remote IP (even if you are
not using the remote IP).
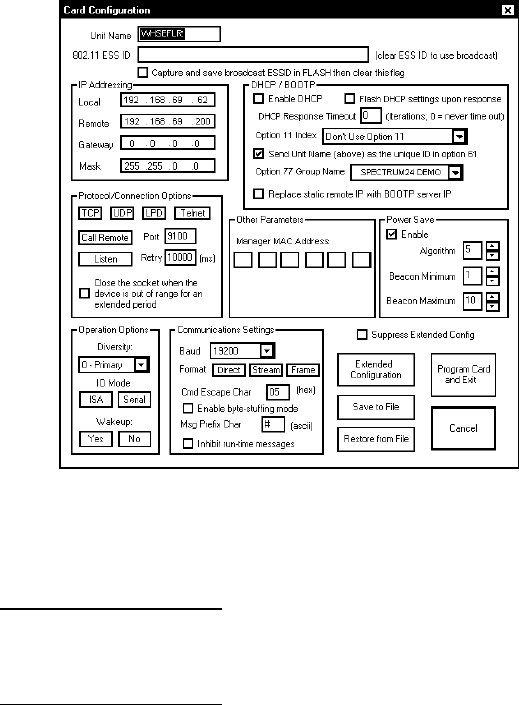
Setting the Protocol for Listen
Mode
Listen mode waits for a host to
connect to the specified port and
receives data. Listen mode can
be used with TCP (select port number) or LPD (no need to specify port)
protocols.
1. Select the Protocol as TCP or LPD. Do not use UDP.
2. Select the Connection Mode as Listen.
3. Select the Port.
Setting the Protocol for Call Remote Mode
Call remote mode initiates the data transfer. Call remote can be used for
TCP (select port number) or Telnet (no need to specify port) protocols.
1. Select the Protocol as TCP or Telnet from the Card Configuration
screen. Do not use UDP.
2. Select the Connection Mode as Call Remote.
3. Specify the Remote IP Address.
4. Select the Port.
5. Enter the amount of Retries in milliseconds after a failure before a
connection is tried again.
7
Setting the Power Save Mode
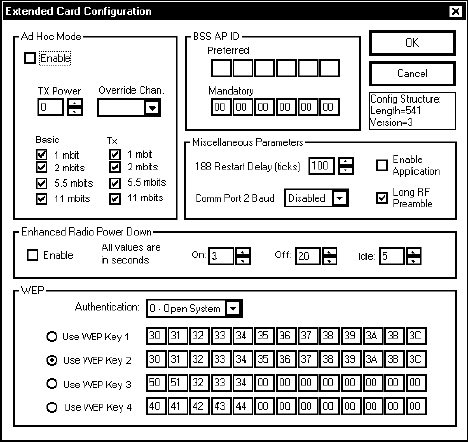
1. Select the Power Save
mode by checking the
Enable box from the Card
Configuration screen.
2. Set the Algorithm to a
value between 1 and 10.
1 is the shortest sleep time
(uses battery power
quicker, but responds
faster); 10 is the longest
sleep time (optimal battery
conservation, but responds
slower).
If the Power Save mode is
not enabled, the device
operates in CAM mode
(constantly awake). CAM
means the printer is
continuously receiving and transmitting data. This mode uses
battery power quickly.
NOTE: Do not change the Beacon Minimum and Beacon Maximum values.
The printer does not support these parameters.
Do not use the Micro AP Mode, Operation Options, or
Communication Settings. Changing any of these values
may cause the printer to stop communicating!
Do not change the Manager MAC Address from the Other Parameters
section.
8
Setting WEP Options
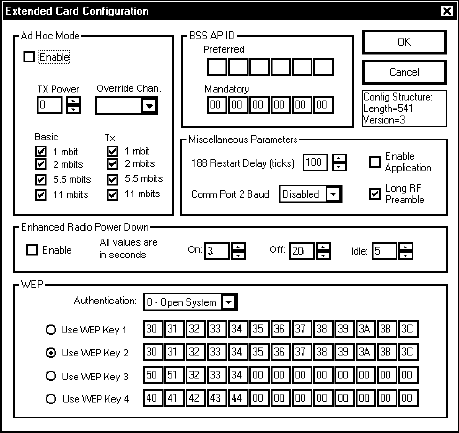
1. To set WEP options, click
Extended Configuration
from the Card
Configuration screen.
NOTE: Make sure these WEP
settings match those
for your Access Point.
2. Set the WEP
Authentication as
0 – Open System,
1 – 40-bit keys, or
2 – 128-bit keys.
3. Enter the four Key values
according to the Access
Point.
NOTE: The key values must
be entered in Hexadecimal.
4. Select the Key you want to be active.
Setting Ad Hoc Mode
1. Select the Ad Hoc Mode by checking the Enable box.
2. Select the Override Channel. All devices must be on the same channel
to communicate.
In Ad Hoc Mode, you do not need an Access Point. It operates as
peer-to-peer, so as long as the devices are in range, they will
connect and communicate with each other.
In Ad Hoc Mode, set the ESS ID address to something other than
what the Access Point is set to; otherwise, you may not be able to
communicate. For example, use the letters “AH” at the end of your
ESS ID for “Ad Hoc” Mode.
NOTE: If you do not enable Ad Hoc Mode, you are in infrastructure mode,
which requires an Access Point.
9
Setting Miscellaneous Parameters
1. Set the Basic and TX Rates
for Ad Hoc mode only. In
infrastructure mode, the
printer uses the Access
Point’s TX Rates.
2. Set the Preferred BSS AP
ID or Mandatory BSS AP
ID.
If Mandatory AP (Access
Point) is set, the printer
ONLY associates with that
Access Point. If that
particular Access Point is
not found, the printer is
unable to access the
network.
Preferred BSS AP ID is
reserved for future use. If Preferred AP is set, the printer attempts
to associate with the preferred Access Point. If that particular
Access Point is not found, the printer associates with any available
Access Point it detects.
If neither of these settings are specified, the printer associates and
roams to any Access Point it can reach.
3. Set the TX Power (transmit power) for Ad Hoc mode only. 0 is the
maximum “full power”; 4 is the minimum. In infrastructure mode, the
printer uses the Access Point’s TX Power settings.
NOTE: Do not change the 188 Restart Delay (ticks), Comm Port 2 Baud,
leave the Enable Application check box disabled (unchecked), and
do not change any of the Enhanced Power Down Mode selections.
4. Enable or disable the Long RF preamble from the Card Configuration
screen check box based on your Access Point. If your Access Point has
long RF preambles disabled, make sure they are disabled here.
5. Click Ok when finished with the extended card configuration options.

10
Selecting the IP Addressing Method
Determine which method of IP addressing your network supports: Static IP,
BOOTP, or DHCP.
Static IP Configuration
1. Enter the Local IP Address on the Card Configuration screen.
2. Enter the Subnet Mask.
3. Enter the Gateway (if necessary).
4. Enter a valid address for the Remote IP (even if you are not using the
Remote IP).
BOOTP Configuration
1. Set the IP Address (Local) to all zeros on the Card Configuration screen.
2. Make sure the check box for “Enable DHCP” is NOT checked.
3. If you enable the check box “Replace static remote IP with BOOTP
server IP,” the current remote IP address is overwritten with the IP
address of the BOOTP server.
DHCP Configuration
1. Set the IP Address (Local) to all zeros on the Card Configuration screen.
2. Select the check box for “Enable DHCP.”
3. If you enable the check box “Replace static remote IP with DHCP server
IP,” the current remote IP address is overwritten with the IP address of
the DHCP server.
4. Set the remaining options according to your network.
NOTE: Use extreme caution if you check “Flash DHCP settings upon
response.” If checked, the DHCP settings are flashed and saved.
The next time the device is turned on, it comes up as a Static IP, not
DHCP.
11
Saving the Configuration
1. Click Program Card and Exit to program the card with the current
configuration settings on the Card Configuration screen. A message
appears “Ready to update the card. Ok to proceed?” Select Ok or
Cancel to continue. OR
Click Save to File to save this configuration to a file to use for another
printer. When you use Restore from File, update the IP address, etc. if
needed.
2. Click Exit when you are finished configuring the printer using the
Configuration Utility.
3. Turn off the printer.
4. Remove the serial cable from the host to the printer’s radio harness.
5. Connect the printer’s radio harness to the printer’s serial port.
6. Turn on the printer.
The IP printer is ready to use.
NOTE: Do not change any of the communication settings on the printer
itself. Changing those values causes the printer to stop
communicating!
Radio Harness
Serial Port

12
Checking the IP Address
Turn on the printer by pressing and holding the P button until the display
turns on.
The display flashes printer version information, battery charging
status, and then you will see:
Ready
p <T>
The <T> on the display indicates the printer is connected to a
network (peer to peer or infrastructure mode). indicates the printer
is not connected to a network.
When you see “Ready,” press the Center navigational button to
display the printer’s IP address. Press any button to return to
Ready mode.
Battery and Safety Information
♦ The printer uses a 7.4V lithium-ion battery.
♦ You must charge a battery before using it. For optimal battery life, fully
charge the battery within three months of receipt.
♦ The battery should be charged immediately for either long term storage or
after the battery has been exhausted from a printing session. Frequent
charging will actually prolong battery life and has no negative effects
such as memory issues.
♦ It is normal for battery capacity to decrease up to 20% over the first 300
cycles.
WARNING
Use only Monarch chargers (Monarch 9462 Single
Station Charger or the Monarch 9464 Four Station
Charger) designed for lithium-ion batteries when
charging. The battery might explode if placed on a
different charger.
♦ Charging time is approximately 1.5 to 3 hours.
♦ Take the battery out of the printer when storing the printer for a month or
longer.

13
♦ The optimal battery storage temperature is 50°F to 73°F (10°C to 23°C)
with a maximum temperature of 104°F (40°C). The battery may
permanently lose charging capacity at temperatures less than 32°F (0°C)
or greater than 104°F (40°C). For longest life, the battery should be
stored in a cool, dry place.
♦ The recommended temperature for charging is 68°F (20°C) to 77°F
(25°C).
♦ Disposal information - Do not throw in trash. Dispose according to your
local regulations. The Rechargeable Battery Recycling Corporation
(RBRC) is a non-profit organization created to promote recycling of
rechargeable batteries. For more information about how to recycle
batteries in your area, visit www.rbrc.org. Batteries can also be
returned postage-paid to: ERC; 200 Monarch Lane Door #39;
Miamisburg, OH 45342.
CAUTION
Do not disassemble, short circuit, heat above 80°C, or
incinerate. The battery may explode.
♦ Do not let the battery get wet or come into contact with metal objects.
♦ Do not use a battery with a cracked case.
Battery Considerations
♦ The printer uses battery power even when the printer is not printing.
Remove the printer’s battery and place on a charger when the printer is
not in use.
♦ Your printer and network’s usage and configuration impacts your printer
battery life -- use the printer, access point, and wireless network power
management configuration’s to increase your printer’s battery life.
♦ Many factors affect your battery’s performance, including the quantity of
labels being printed, intervals of batches printed, percentage of black per
label, power management of the printer, power management of the radio,
connectivity and configuration of the host or node, and buffered queues.

14
Troubleshooting
Use the following table to correct some minor problems that may occur.
Problem Action
Printer does not
connect to a network
(peer to peer or
infrastructure mode) or
display <T>.
Make sure the printer’s radio harness is still
connected to the printer’s serial port. After a
drop, the cable may become disconnected.
Verify the settings for Infrastructure or
Ad Hoc mode (ESS ID, WEP, etc.).
The printer is not
configured.
Make sure the correct cable is connected. To
configure the printer’s radio, use a DB9
female to DB9 female (all lines wired straight
through) cable. After configuring the printer’s
radio, connect the printer’s radio harness to the
printer’s serial port.
To configure the printer using the serial port,
use a null modem cable (part number 12029314
or 12029315).
The printer does not
communicate with your
network.
Make sure your network settings for :
♦ ESS ID
♦ Protocol
♦ Ad Hoc or Infrastructure mode
♦ WEP options for keys and encryption
♦ Long RF preamble
♦ IP Address, Gateway, and Subnet Mask
match the printer’s radio configuration.
If your network’s protocol is set for LPR, make
sure you specify LPD protocol, not TCP.
For additional troubleshooting, disconnect the printer’s radio harness and
use the printer’s RS232 port for diagnostic purposes. Your System
Administrator can use the printer’s Diagnostics Menu. Call Technical
Support for more information.

15
Printer Specifications
Height: 6.6 inches (168 mm)
Width: 3.6 inches (91 mm)
Depth: 4.8 inches (122 mm)
Weight: 1.9 pounds (.86 kg)
Shipping
Weight:
3.5 pounds (1.6 kg)
Printing Rate: Up to 3 inches (76 mm) per second
Operating
Limits:
40° to 104° F (5° to 40° C)
Storage -40° to 140° F (4° to 60° C)
NOTE: This is also the operating range
for the battery.
Battery Type: 7.4V Lithium Ion
Inches Per
Charge:
Up to 5,000”
of 25% black printing on the supply
NOTE: Inches per charge will vary
according to your setup and usage.
Battery Cycle
Life:
Approximately 300 discharge cycles
Cycle life is approximate. Many factors
effect an individual battery’s
performance.
IEEE 802.11b Specifications
Frequency: 2.4 GHz range, direct sequence
Communication
Rate:
11 Mbps
Protocols: TCP/IP
PassThrough
BOOTP
DHCP
LPD/LPR

For supplies, service or assistance, call toll free:
1-800-543-6650 (In the U.S.A.)
1-800-263-4650 (In Canada)
www.paxar.com