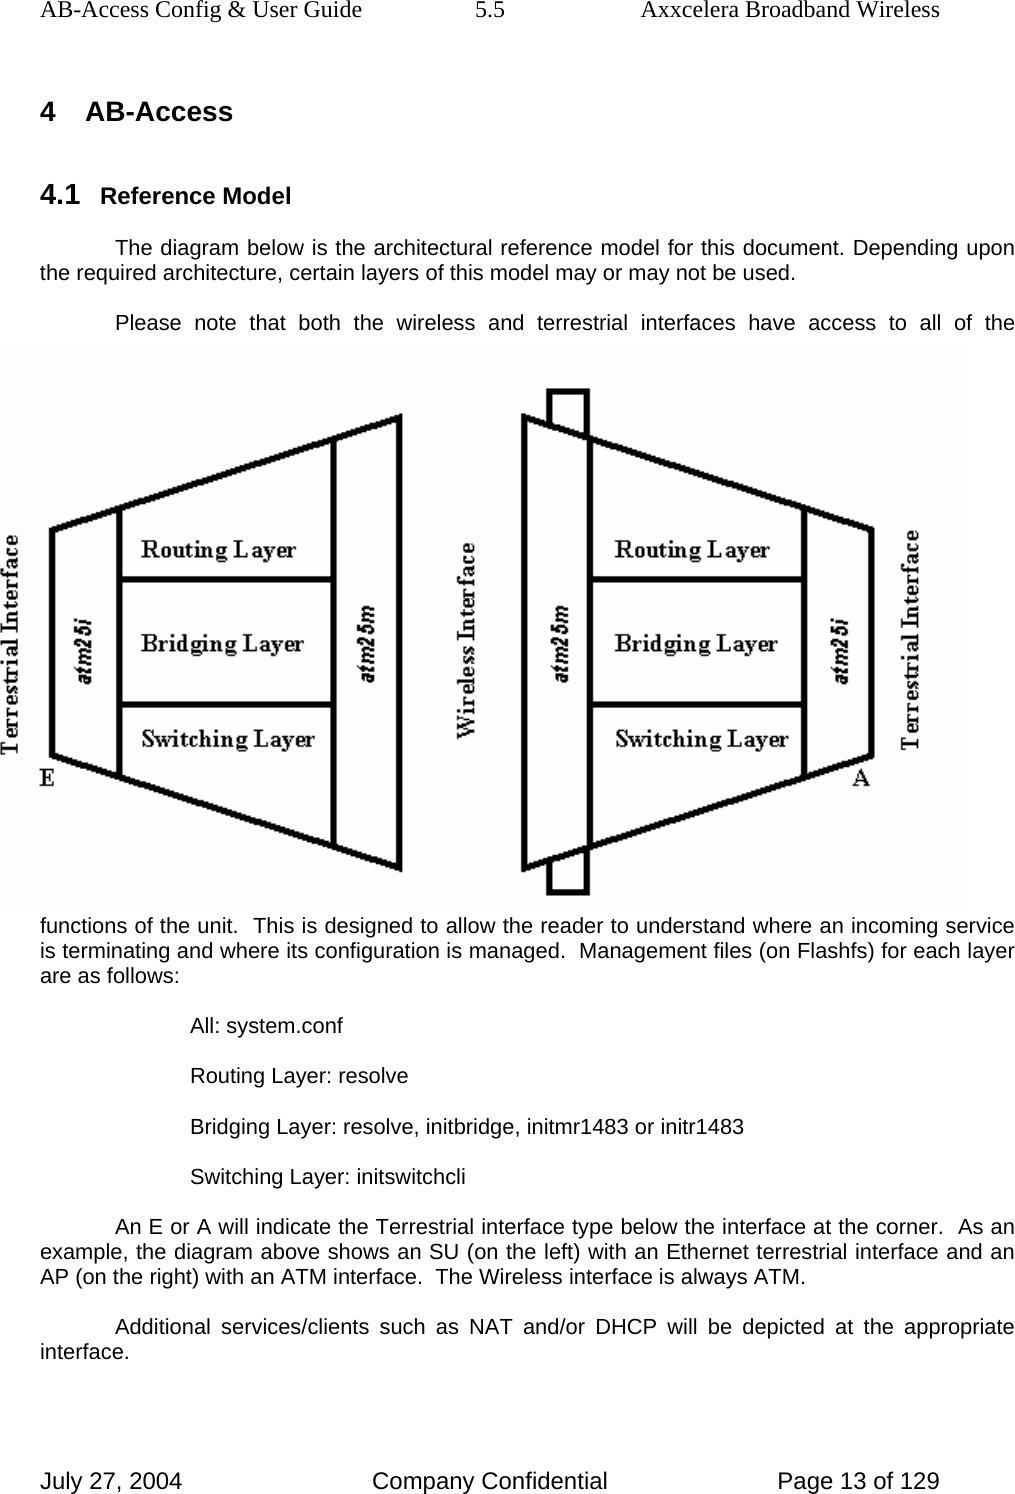
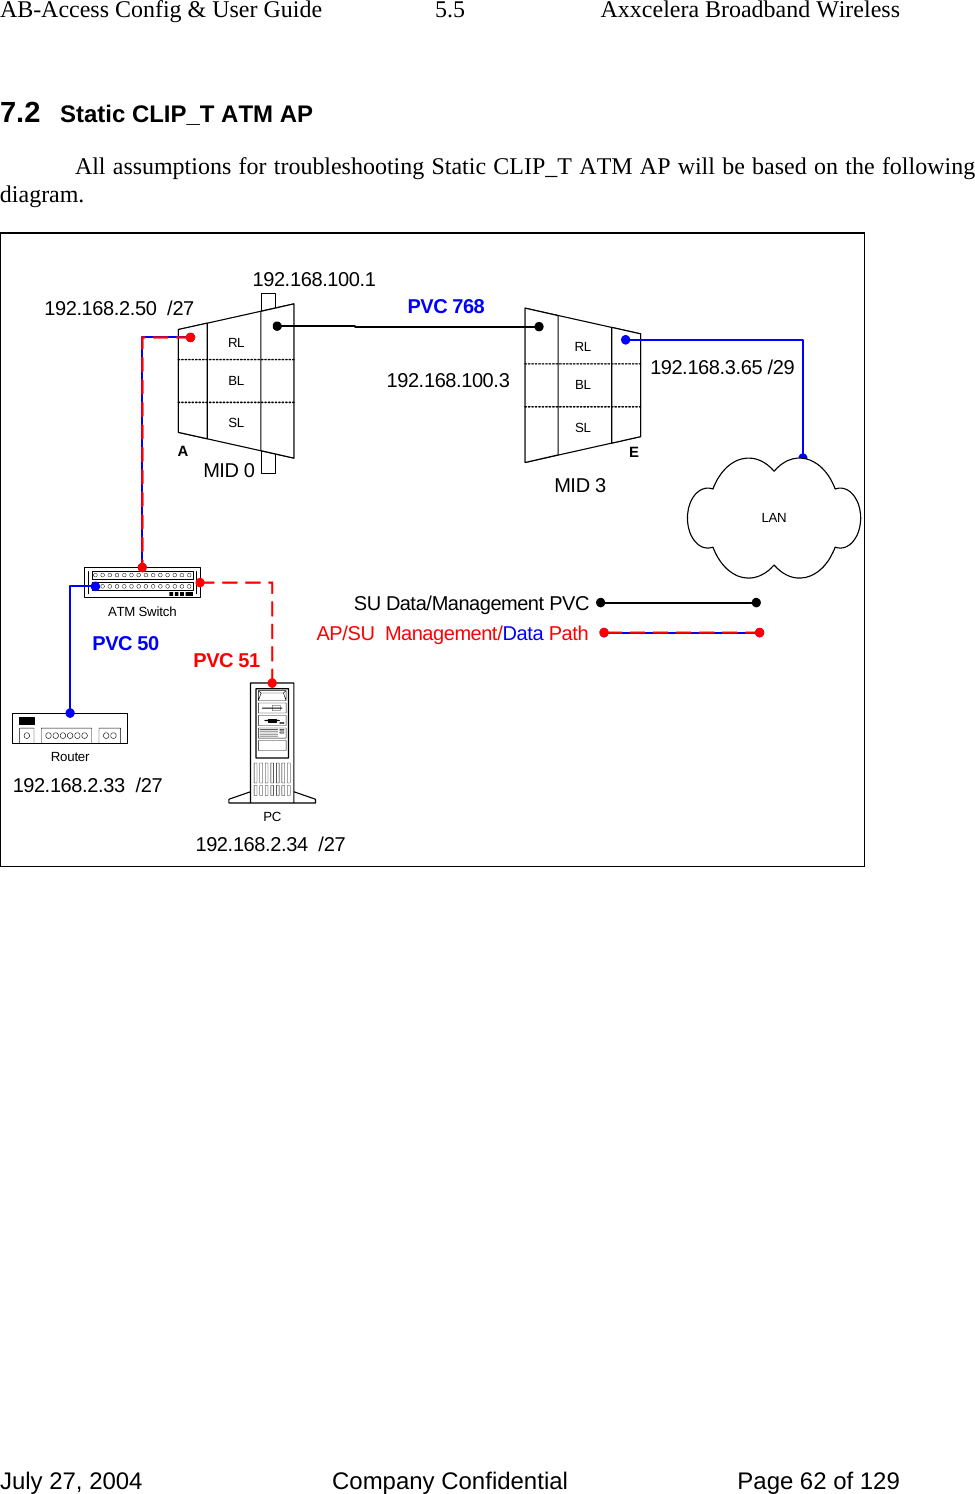
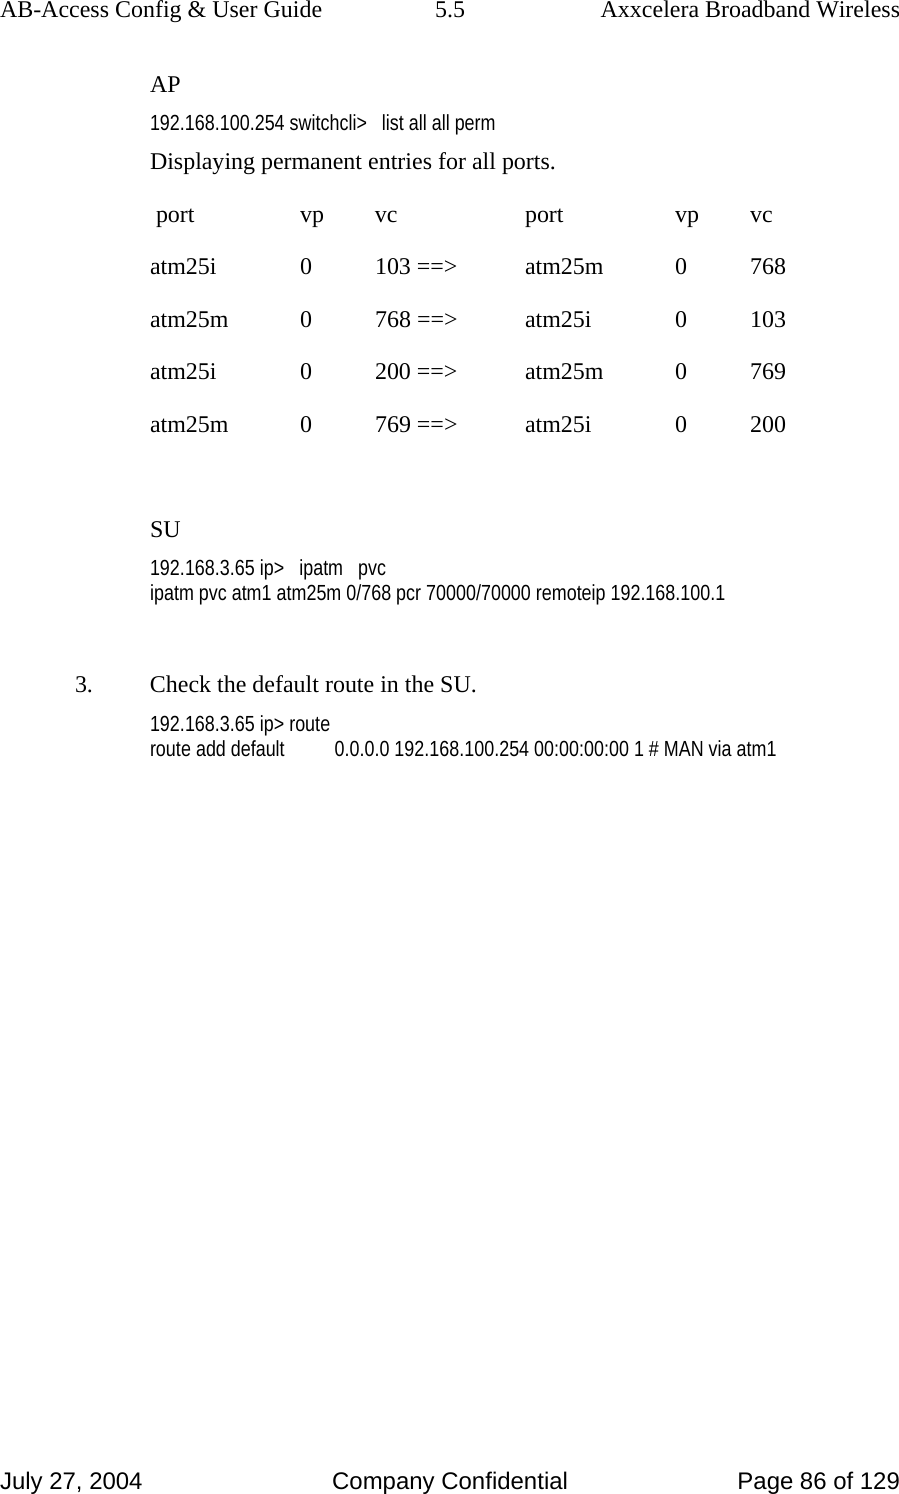
Axxcelera Broand Wireless AB-ACCESS-SU01 UNII System User Manual AB Access Quick Reference
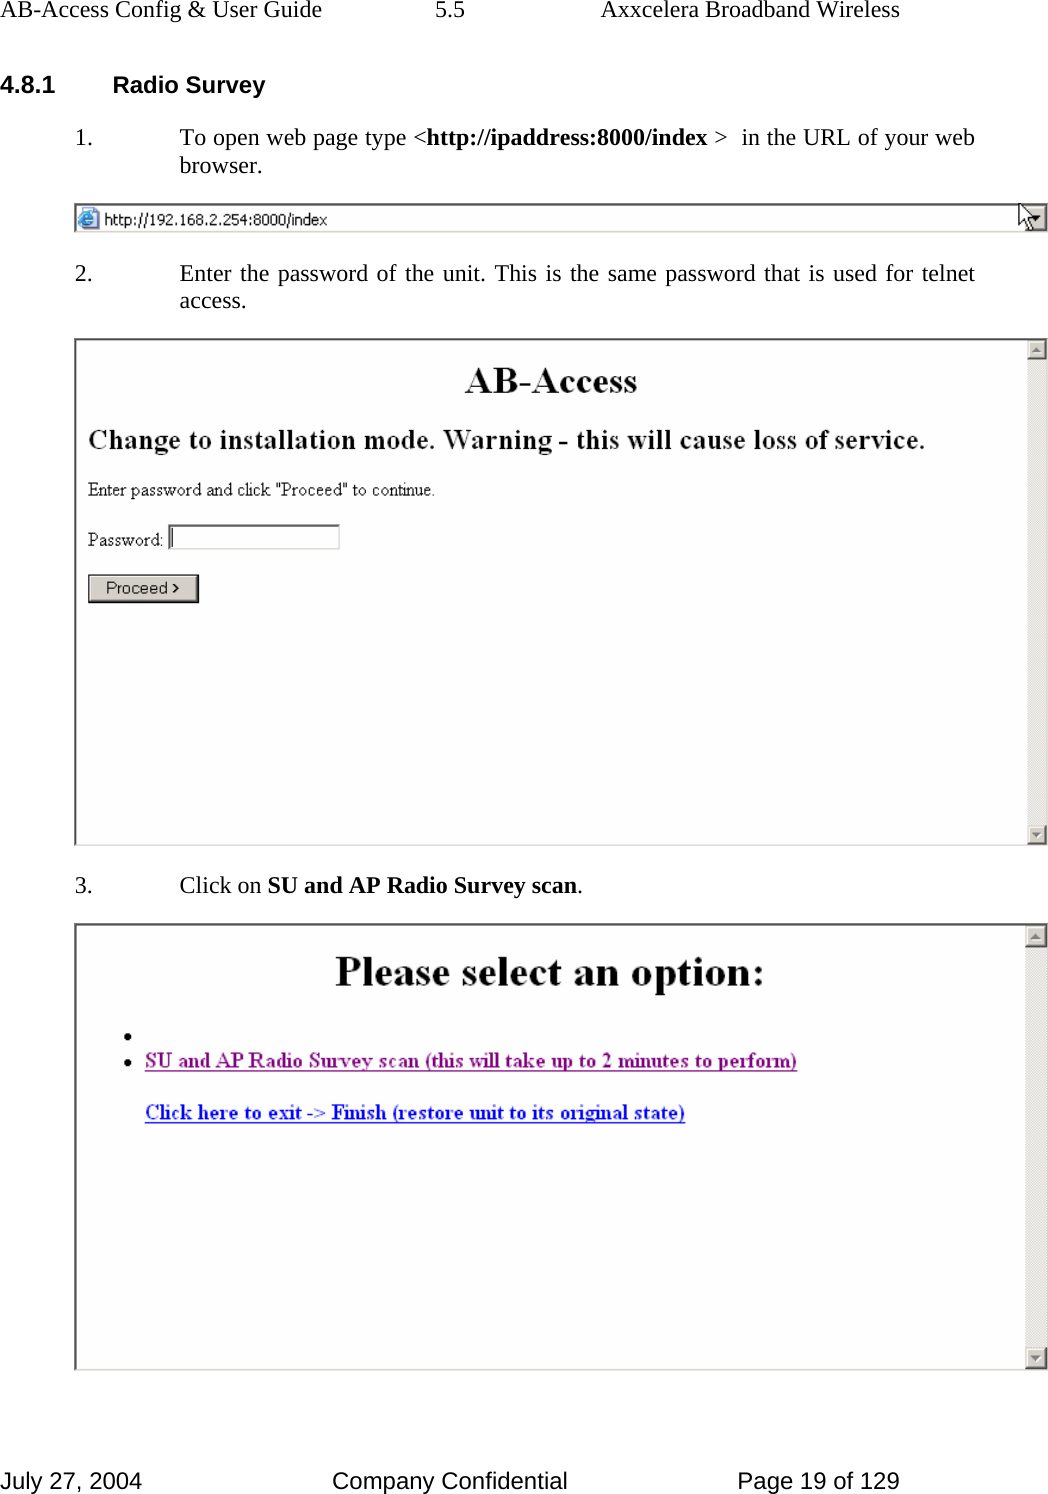
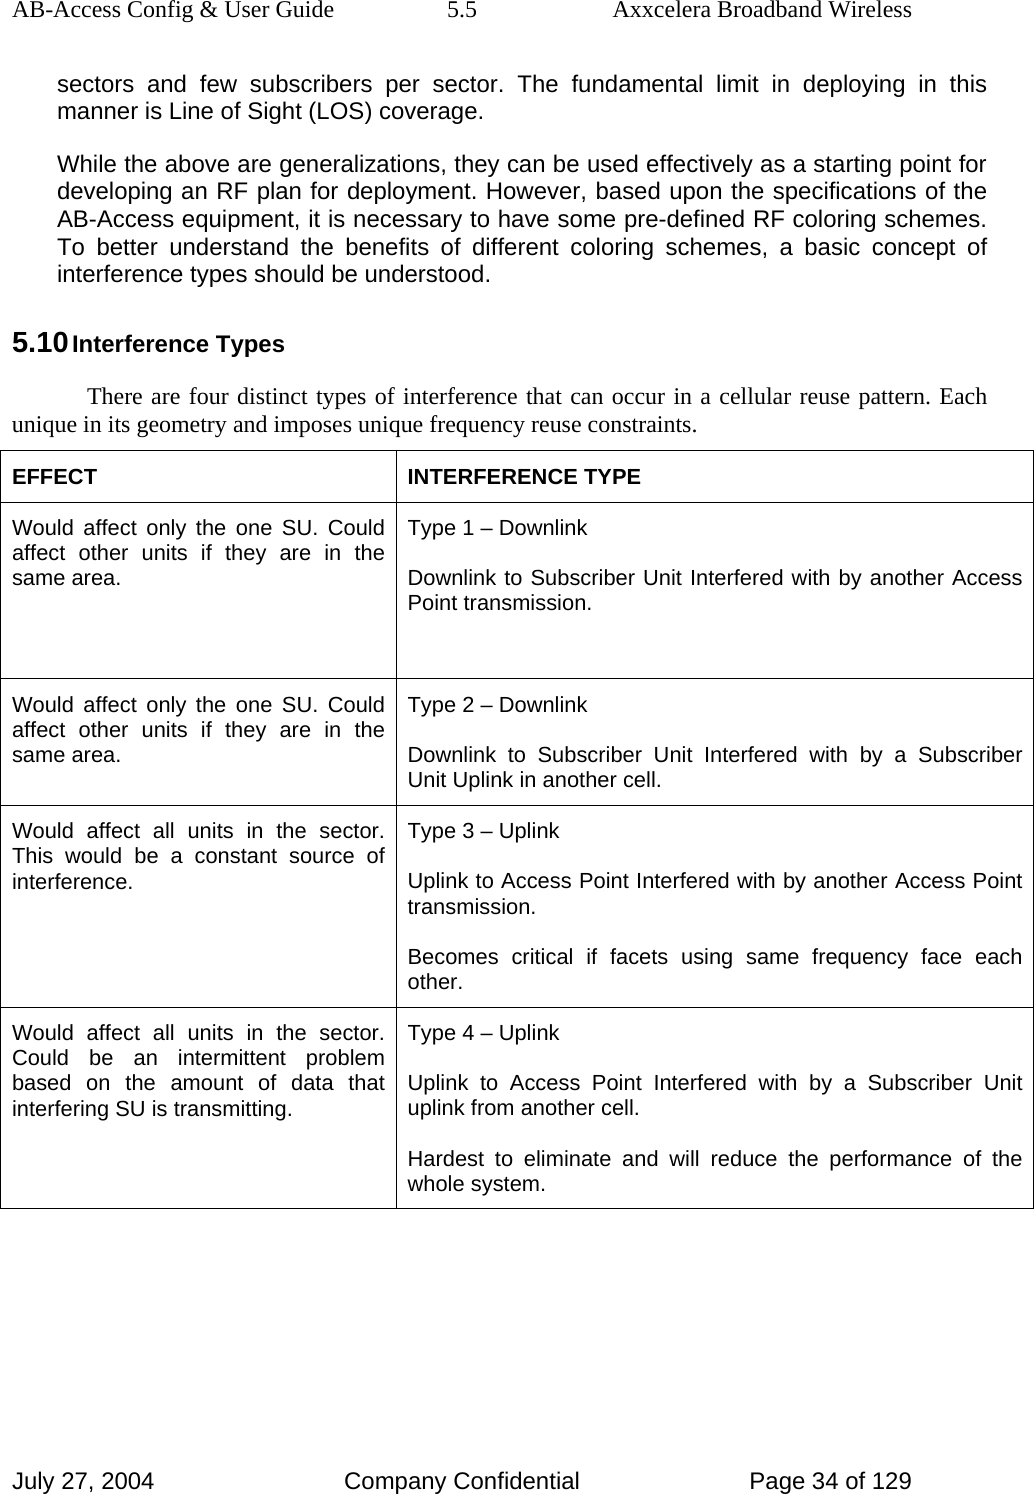
Axxcelera Broadband Wireless, Inc. UNII System AB Access Quick Reference
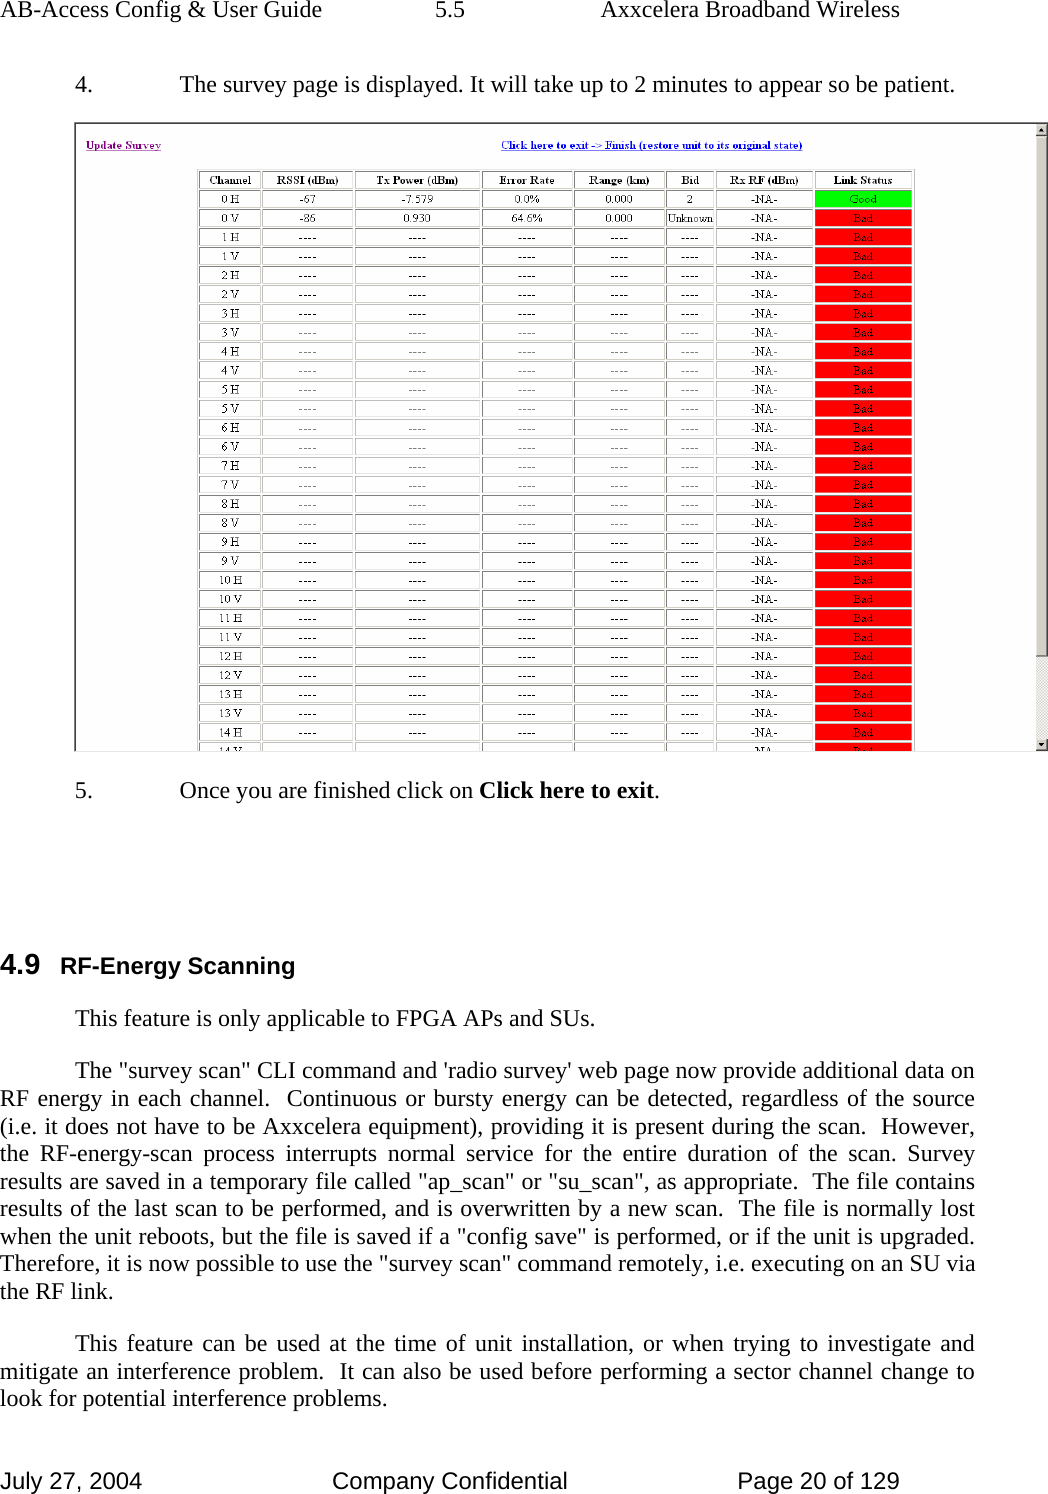
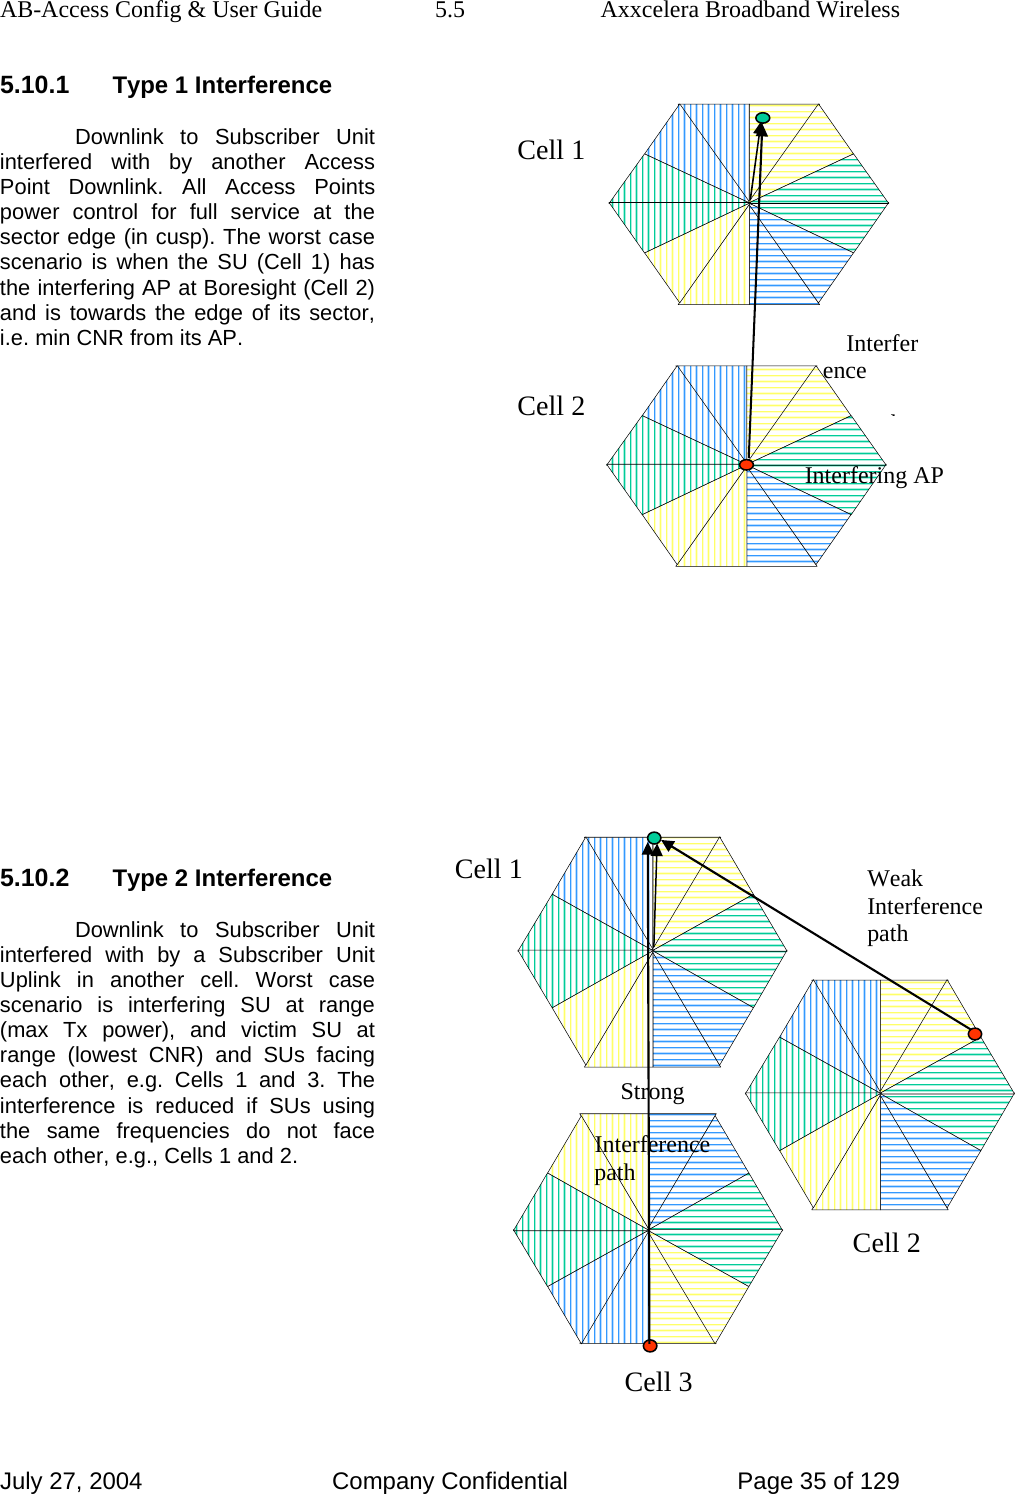
Contents
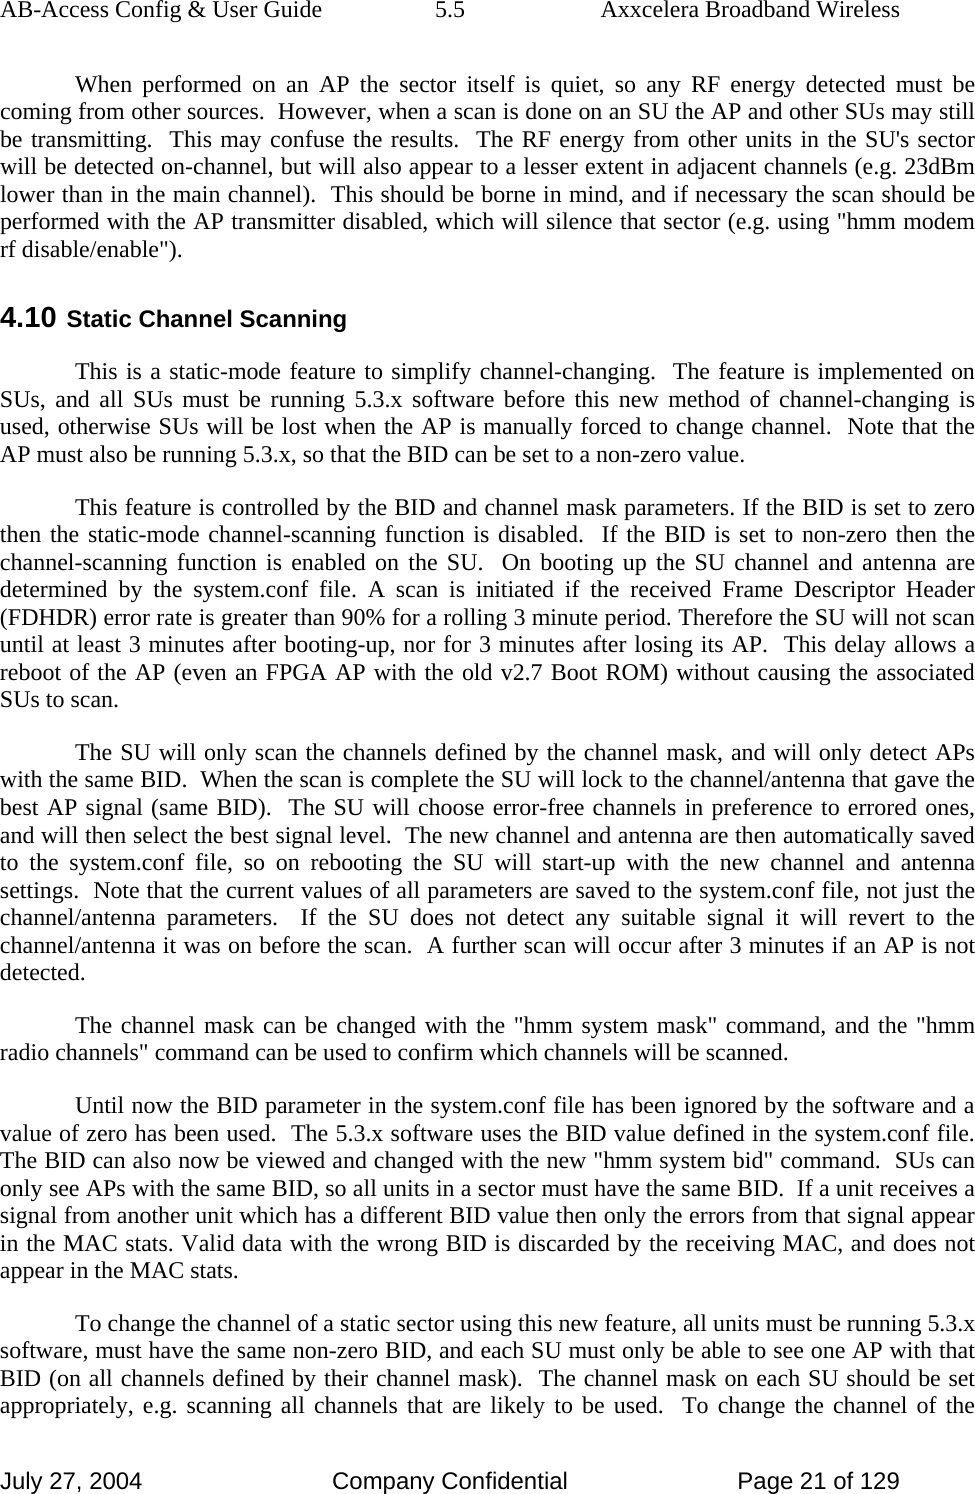
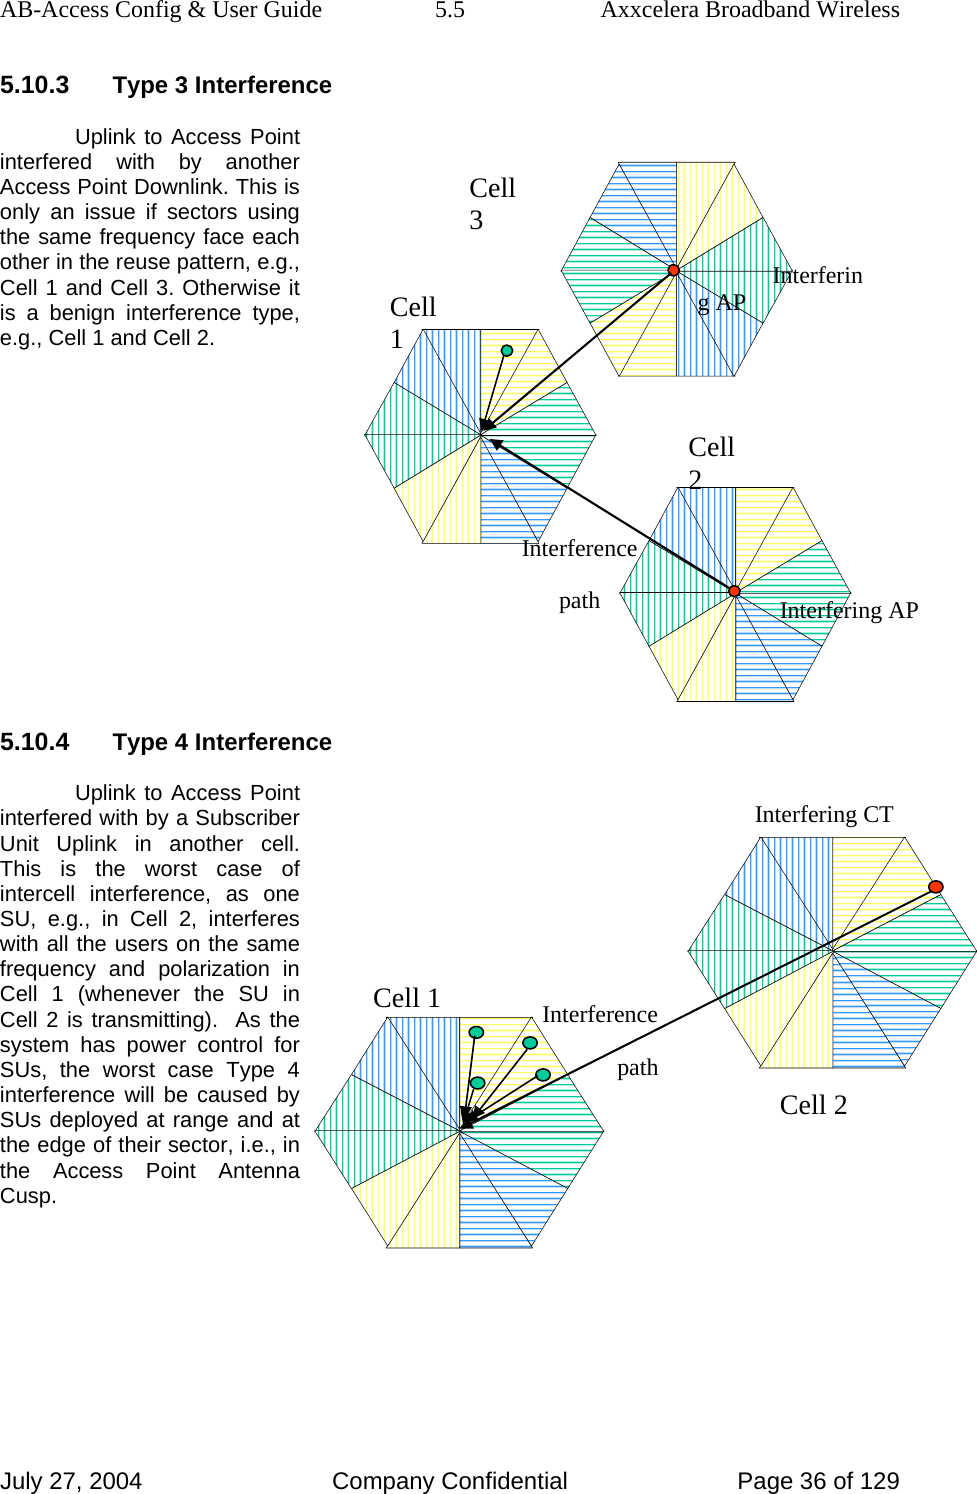
- 1. ADditional trouble shooting guide
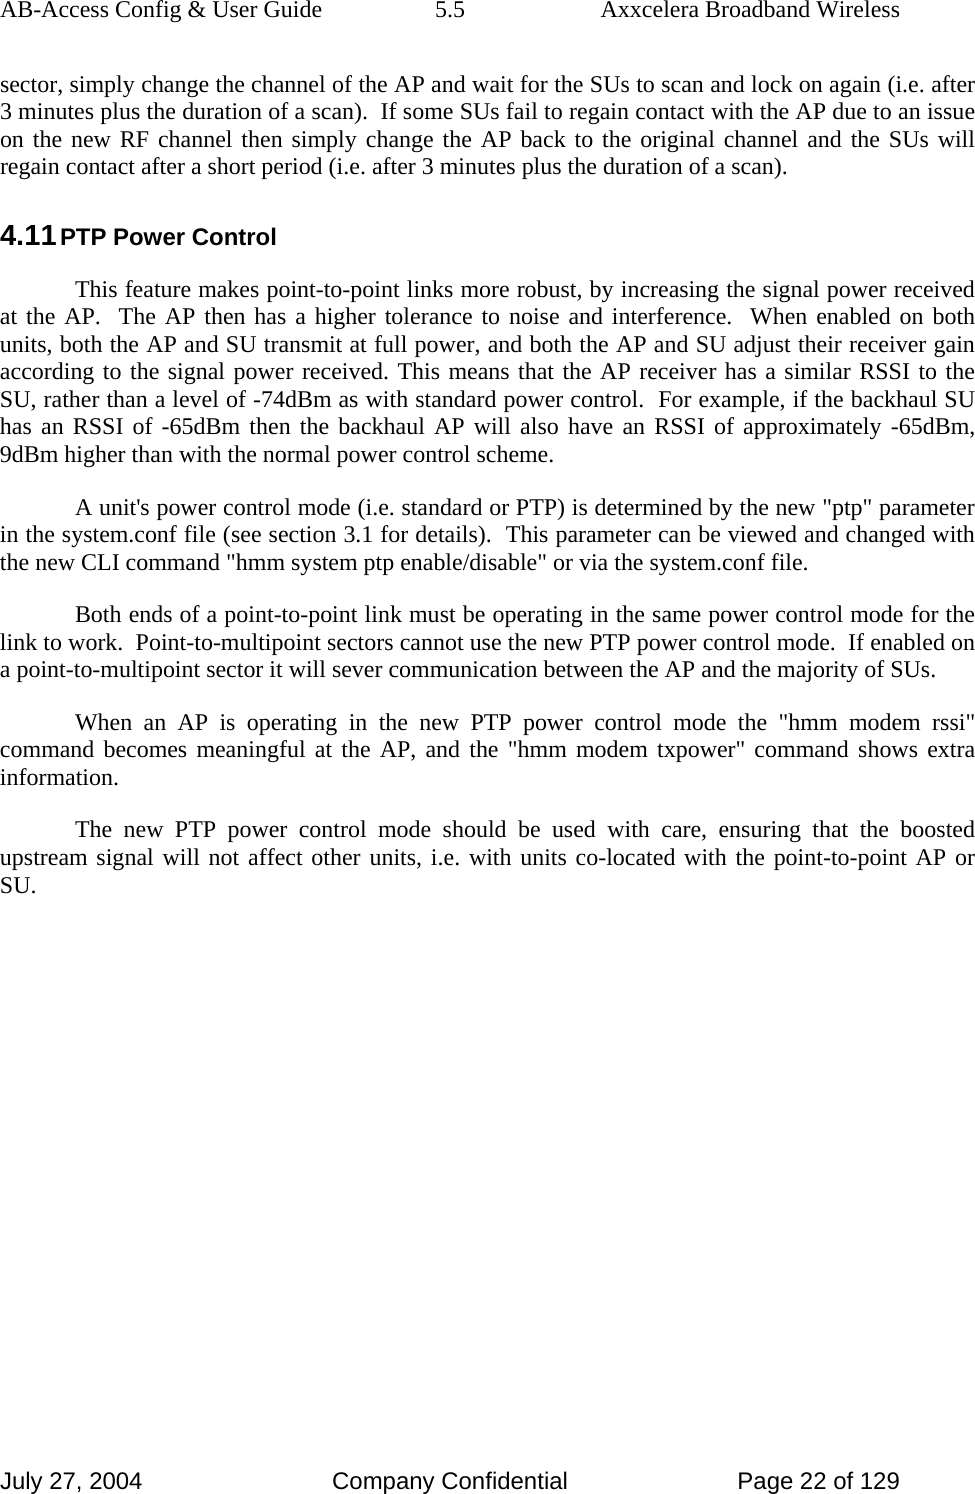
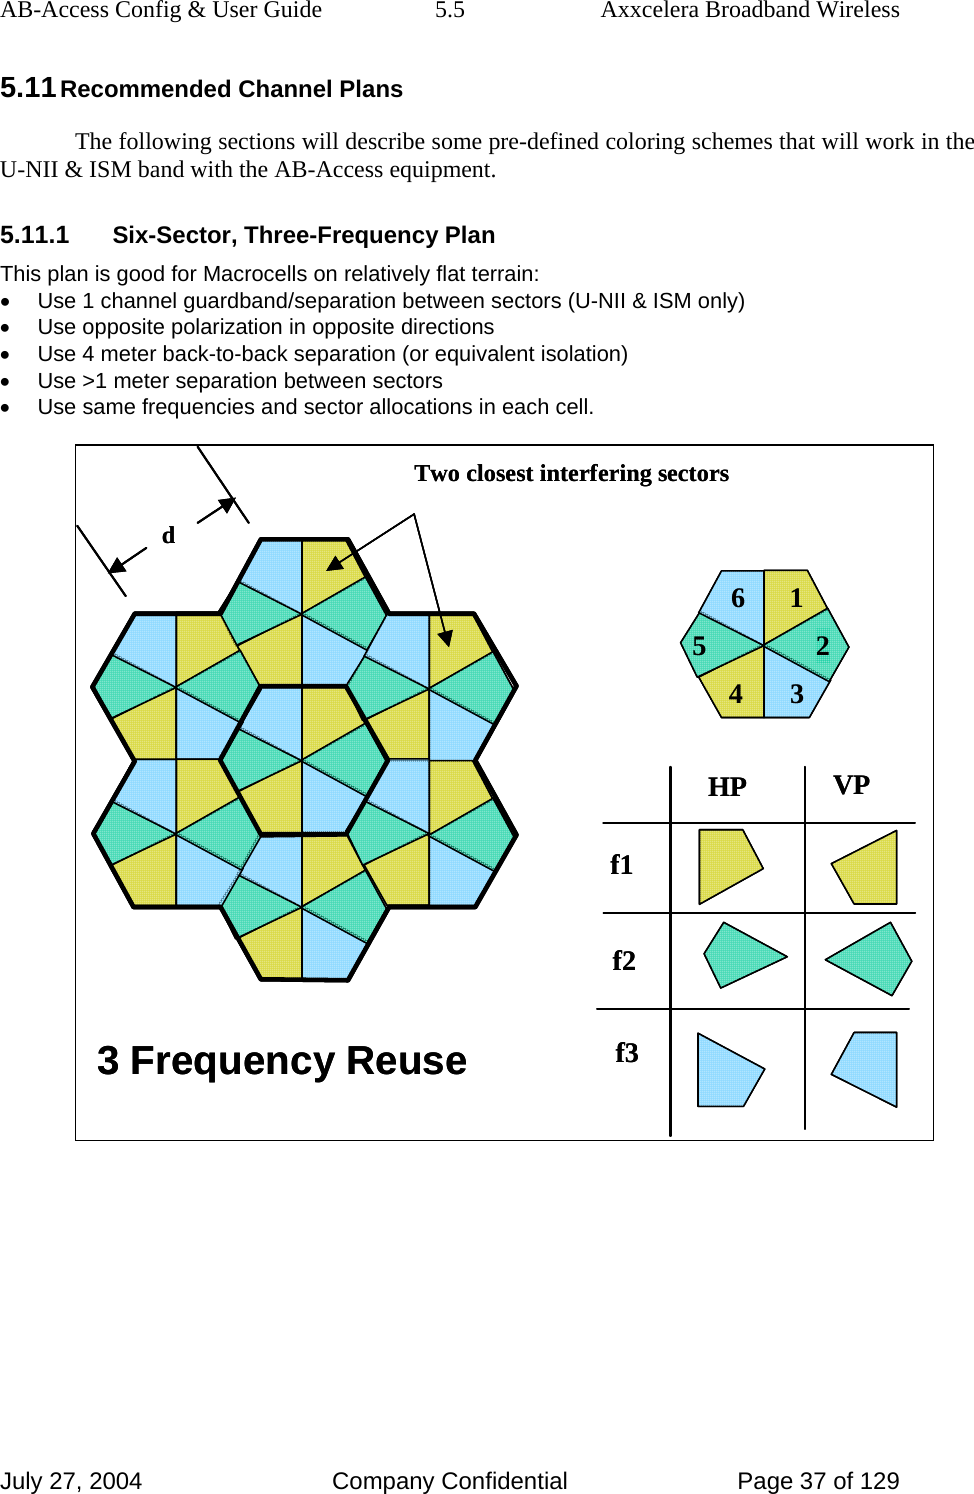
- 2. UNII configuration guide
- 3. Additional UNII Product Install Manual information
UNII configuration guide

![AB-Access Config & User Guide 5.5 Axxcelera Broadband Wireless July 27, 2004 Company Confidential Page 17 of 129 -r Reboot unit when done programming. Make sure all of your configuration files are correct if you use this option. When the unit reboots, changes are final. 4.7 RTFD (Return To Factory Default) The new Return To Factory Default (RTFD) feature allows IP connectiviey to be established with units that have unknown or invalid configurations. Using this feature, the AB-Access unit wil adopt a known IP configuration enabling Command Line Interface access via telnet through the physical Ethernet interface. Following a restart or power up, the AB-Access/AB-Extender units will listen for 1 second for a proprietary coded UDP packet on their Ethernet interface; adopting the appropriate IP configurations as indicated below. If the unit receives the UDP packet, it will retain the active configuration for 30 minutes, after which the normal start-up procedures will continue with the IP and interface configuration taken from the unit’s Flash files. If during the 30 minute period, a subsequent coded UDP packet is received, the timeout will be restarted. NOTE On Windows 2K and XP you may need to disable the auto media sense. Some NICs will be capable of disabling this feature from their configuration parameters. If this option is not available on your NIC you will have to add a registry entry. Axxcelera has created a reg edit that can be installed by simply double clicking on the media-sense.reg file. Or you can enter the following register key via regedit. [HKEY_LOCAL_MACHINE\SYSTEM\CurrentControlSet\Services\Tcpip\Parameters] "DisableDHCPMediaSense"=dword:00000001 4.7.1 RTFD IP Configurations Ethernet Interface Access: IP Address 192.168.3.254 Netmask 255.255.255.0 Default Route 192.168.3.1](https://usermanual.wiki/Axxcelera-Broand-Wireless/AB-ACCESS-SU01.UNII-configuration-guide/User-Guide-455833-Page-17.png)
![AB-Access Config & User Guide 5.5 Axxcelera Broadband Wireless July 27, 2004 Company Confidential Page 18 of 129 4.7.2 Recover To supply the coded UDP packet the “recover” utility is provided with the system software in two forms. recover-dos.exe - For use with a DOS prompt under Microsoft Windows. Recover-unix - For use with Linux installations utilizing glibc 2.1.3. 4.7.3 Procedure to restore the default configuration 1. Connect a PC (Windows or Linux) to the wallbox of the unit, ensuring that there is appropriate connectivity at the physical and IP levels. 2. Start the recovery utility. A sequence of dots will be displayed to indicate successful network transmissions. [root@temp SU_TEMPLATE]# ./recover-unix ethernet SU/AP recovery client …………………………….. 3. Restart the AB-Access unit. 4. When the recover utility terminates, the AB-Access unit has been successfully configured and can be contacted over the physical interface via a telnet session. 5. It is best to do a full system upgrade after a unit has been recovered to a state that IP connectivity is regained. This will insure the unit will function properly once redeployed. 4.7.4 Disabling the RTFD Feature RTFD can be disabled by writing a file to flash with the name “no_rtfd”. The file must be a text file; i.e. only containing ASCII characters. A suggested first line for the file is “disable RTFD” – though the actual content of the file will not be referenced: only the presence or absence of the file is significant. 4.8 Web Page The web page can be used look at channels that are available for use, and determine the quality of the current channel.](https://usermanual.wiki/Axxcelera-Broand-Wireless/AB-ACCESS-SU01.UNII-configuration-guide/User-Guide-455833-Page-18.png)


![AB-Access Config & User Guide 5.5 Axxcelera Broadband Wireless July 27, 2004 Company Confidential Page 52 of 129 sp default 256 stats N 6.3.3 add add iport ivpi ivci oport ovpi ovci tp sp type epd iport {atm25i | atm25m} In port of uni-directional PVC. atm25i = terrestrial atm25m = wireless ivpi {0-7} Currently only VPI 0 is supported on the wireless interface. The terrestrial interface can use any in the range. ivci {32-65535} In port VCI. oport {atm25i | atm25m} Out port of the uni-directional PVC. ovpi {0-7} Currently only VPI 0 is supported on the wireless interface. The terrestrial interface can use any in the range. ovci {32-65535} Out port VCI. tp {name} This is the name of the traffic parameter (previously set) that applies to this PVC mapping. sp {name} This is the name of the switch parameter (previously set) that applies to this PVC mapping. type {perm | soft | none} For all static configurations “perm” should be used. epd {epd] Early Packet Discard will discard arriving cells when buffering is below 32 cells. Example The following example shows a uni-directional PVC mapped from the terrestrial to wireless port. add atm25i 0 100 atm25m 0 256 default default perm epd 6.4 initmr1483 Use this file only on APs. The corresponding file for an SU is initr1483.](https://usermanual.wiki/Axxcelera-Broand-Wireless/AB-ACCESS-SU01.UNII-configuration-guide/User-Guide-455833-Page-52.png)
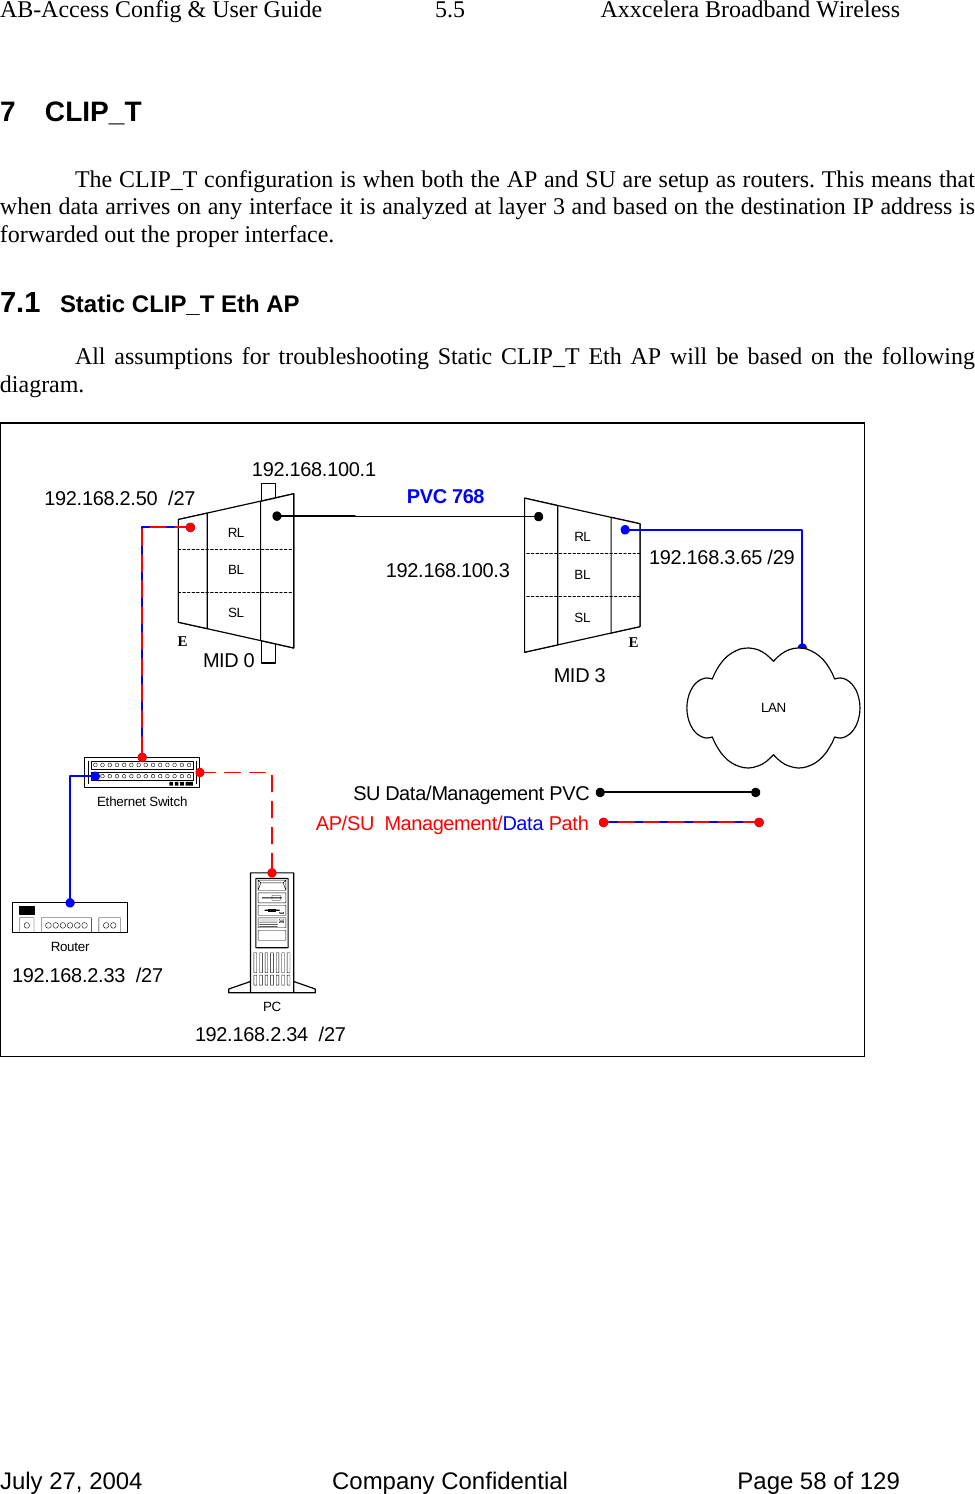
![AB-Access Config & User Guide 5.5 Axxcelera Broadband Wireless July 27, 2004 Company Confidential Page 65 of 129 1. Check all physical connections. It is a straight cable from the CS to the Switch, and a rollover twist from the wall box to the switch (1-7,2-8). 2. Check to see if your atmarp entries are in the ARP table on the CS. ( ./atmarp if you are already in the /usr/local/sbin directory) • Add an atmarp entry root@cs1 11:11:14 (4) [~] # atmarp -s 192.168.2.50 0.0.34 • View an atmarp table root@cs1 11:12:52 (5) [~] # atmarp -a ----- Itf 0 (192.168.2.1, netmask 255.255.255.0) ----- Default QOS: ubr,aal5:max_sdu=9188 IP 192.168.2.50, state VALID, addr <none>, flags 0x4<PERM> 0.0.34 ----- Unknown incoming connections ----- ----- Incoming unidirectional connections ----- ----- End of dump ----- • Delete an atmarp entry root@cs1 11:13:42 (6) [~] # atmarp -d 192.168.2.50 3. Check route on CS, by typing route at the Command line. • Add a route root@cs1 11:17:19 (8) [~] # route add -net 192.168.100.0 netmask 255.255.255.0 gw 192.168.2.50 • View the routing table root@cs1 11:18:51 (9) [~] # route Kernel IP routing table Destination Gateway Genmask Flags Metric Ref Use Iface 10.9.144.1 * 255.255.255.255 UH 0 0 0 eth0 192.168.100.0 192.168.2.50 255.255.255.0 UG 0 0 0 atm0 192.168.2.0 * 255.255.255.0 U 0 0 0 atm0 10.9.144.0 * 255.255.255.0 U 0 0 0 eth0 127.0.0.0 * 255.0.0.0 U 0 0 0 lo • Delete a route root@cs1 11:20:26 (10) [~] # route del -net 192.168.100.0 netmask 255.255.255.0 4. Check the Switch for the correct PVC’s.](https://usermanual.wiki/Axxcelera-Broand-Wireless/AB-ACCESS-SU01.UNII-configuration-guide/User-Guide-455833-Page-65.png)

![AB-Access Config & User Guide 5.5 Axxcelera Broadband Wireless July 27, 2004 Company Confidential Page 78 of 129 8.1.4 Troubleshooting 8.1.4.1 Can’t ping the radio from the terrestrial interface AP 1. Check all physical connections. It is a straight cable from the CS to the Switch, and a rollover twist from the wall box to the switch (1-7,2-8). 2. Check to see if your atmarp entries are in the ARP table on the CS. ( ./atmarp if you are already in the /usr/local/sbin directory) • Add an atmarp entry root@cs1 11:11:14 (4) [~] # atmarp -s 192.168.2.50 0.0.34 • View an atmarp table root@cs1 11:12:52 (5) [~] # atmarp -a ----- Itf 0 (192.168.2.1, netmask 255.255.255.0) ----- Default QOS: ubr,aal5:max_sdu=9188 IP 192.168.2.50, state VALID, addr <none>, flags 0x4<PERM> 0.0.34 ----- Unknown incoming connections ----- ----- Incoming unidirectional connections ----- ----- End of dump ----- • Delete an atmarp entry root@cs1 11:13:42 (6) [~] # atmarp -d 192.168.2.50 3. Check route on CS, by typing route at the Command line. • Add a route root@cs1 11:17:19 (8) [~] # route add -net 192.168.100.0 netmask 255.255.255.0 gw 192.168.2.50 • View the routing table root@cs1 11:18:51 (9) [~] # route Kernel IP routing table Destination Gateway Genmask Flags Metric Ref Use Iface 10.9.144.1 * 255.255.255.255 UH 0 0 0 eth0 192.168.100.0 192.168.2.50 255.255.255.0 UG 0 0 0 atm0 192.168.2.0 * 255.255.255.0 U 0 0 0 atm0 10.9.144.0 * 255.255.255.0 U 0 0 0 eth0 127.0.0.0 * 255.0.0.0 U 0 0 0 lo](https://usermanual.wiki/Axxcelera-Broand-Wireless/AB-ACCESS-SU01.UNII-configuration-guide/User-Guide-455833-Page-78.png)
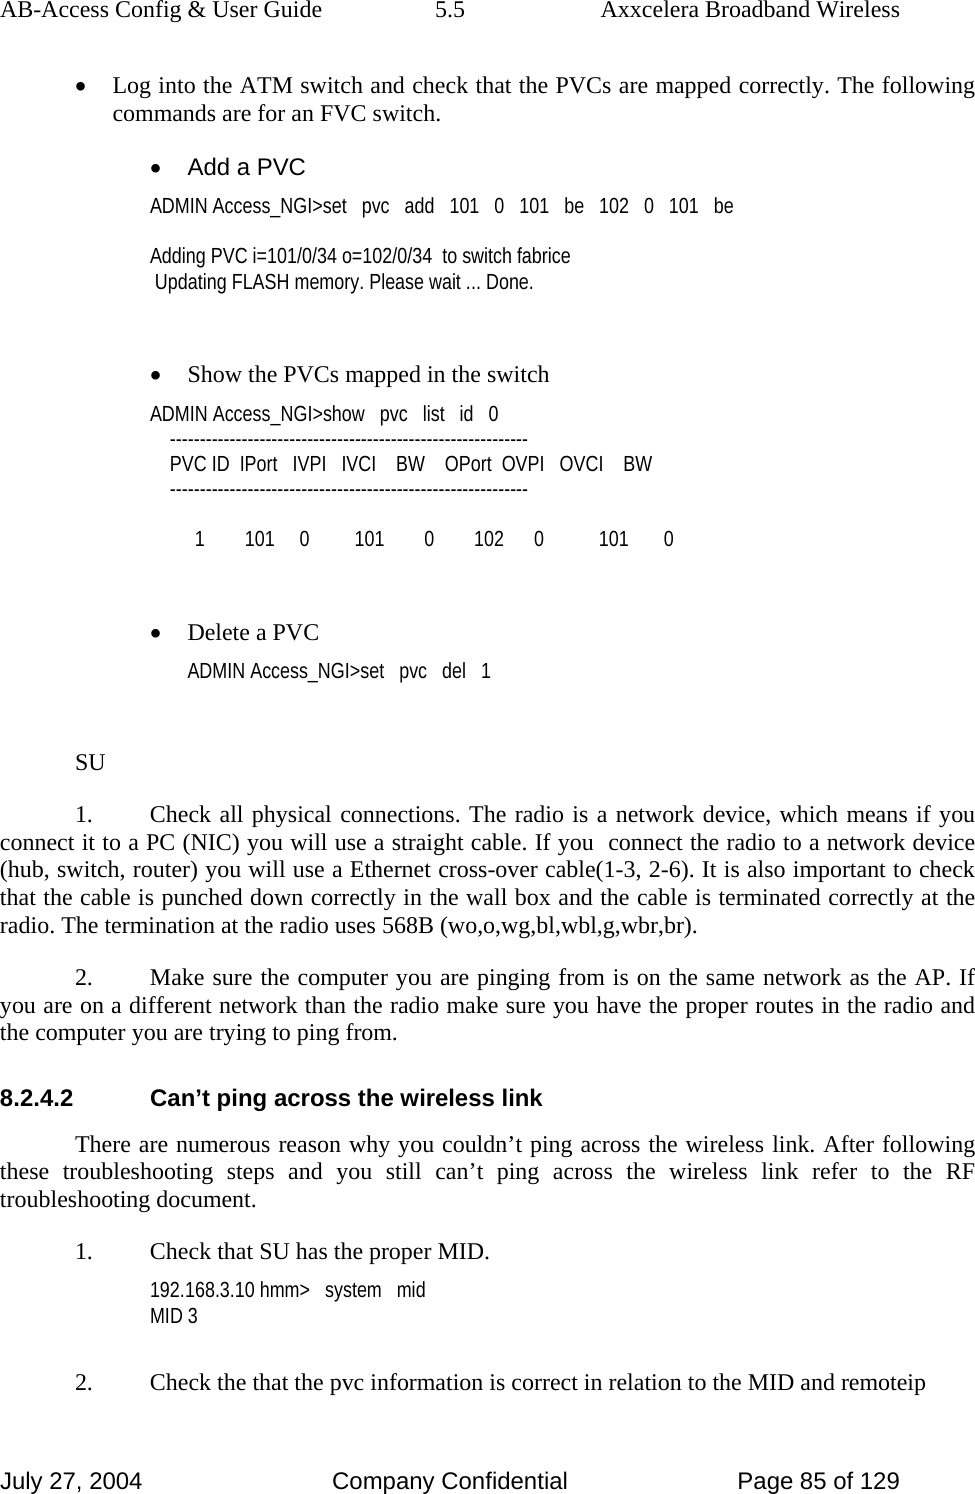
![AB-Access Config & User Guide 5.5 Axxcelera Broadband Wireless July 27, 2004 Company Confidential Page 79 of 129 • Delete a route root@cs1 11:20:26 (10) [~] # route del -net 192.168.100.0 netmask 255.255.255.0 4. Check the Switch for the correct PVC’s. • Log into the ATM switch and check that the PVCs are mapped correctly. The following commands are for an FVC switch. • Add a PVC ADMIN Access_NGI>set pvc add 101 0 34 be 102 0 34 be Adding PVC i=101/0/34 o=102/0/34 to switch fabrice Updating FLASH memory. Please wait ... Done. • Show the PVCs mapped in the switch ADMIN Access_NGI>show pvc list id 0 ------------------------------------------------------------ PVC ID IPort IVPI IVCI BW OPort OVPI OVCI BW ------------------------------------------------------------ 1 101 0 34 0 102 0 34 0 • Delete a PVC ADMIN Access_NGI>set pvc del 1 SU 1. Check all physical connections. The radio is a network device, which means if you connect it to a PC (NIC) you will use a straight cable. If you connect the radio to a network device (hub, switch, router) you will use a Ethernet cross-over cable(1-3, 2-6). It is also important to check that the cable is punched down correctly in the wall box and the cable is terminated correctly at the radio. The termination at the radio uses 568B (wo,o,wg,bl,wbl,g,wbr,br). 2. Make sure the computer you are pinging from is on the same network as the AP. If you are on a different network than the radio make sure you have the proper routes in the radio and the computer you are trying to ping from. 8.1.4.2 Can’t ping across the wireless link There are numerous reason why you couldn’t ping across the wireless link. After following these troubleshooting steps and you still can’t ping across the wireless link refer to the RF troubleshooting document.](https://usermanual.wiki/Axxcelera-Broand-Wireless/AB-ACCESS-SU01.UNII-configuration-guide/User-Guide-455833-Page-79.png)


![AB-Access Config & User Guide 5.5 Axxcelera Broadband Wireless July 27, 2004 Company Confidential Page 84 of 129 8.2.3.2 SU system.conf channel 0 antenna horizontal mode static mid 3 bid 0 interface eth0 duplex half backoff 0 provider abw key Axxcelera mask 1ffff leds active 8.2.4 Troubleshooting 8.2.4.1 Can’t ping the radio from the terrestrial interface AP 1. Check all physical connections. It is a straight cable from the CS to the Switch, and a rollover twist from the wall box to the switch (1-7,2-8). 2. Check to see if your atmarp entries are in the ARP table on the CS. ( ./atmarp if you are already in the /usr/local/sbin directory) • Add an atmarp entry root@cs1 11:11:14 (4) [~] # atmarp -s 192.168.100.1 0.0.101 • View an atmarp table root@cs1 11:12:52 (5) [~] # atmarp -a ----- Itf 0 (192.168.100.254, netmask 255.255.255.0) ----- Default QOS: ubr,aal5:max_sdu=9188 IP 192.168.100.1, state VALID, addr <none>, flags 0x4<PERM> 0.0.101 ----- Unknown incoming connections ----- ----- Incoming unidirectional connections ----- ----- End of dump ----- • Delete an atmarp entry root@cs1 11:13:42 (6) [~] # atmarp -d 192.168.100.1 3. Check the Switch for the correct PVC’s.](https://usermanual.wiki/Axxcelera-Broand-Wireless/AB-ACCESS-SU01.UNII-configuration-guide/User-Guide-455833-Page-84.png)
![AB-Access Config & User Guide 5.5 Axxcelera Broadband Wireless July 27, 2004 Company Confidential Page 93 of 129 9.1.5 Troubleshooting 9.1.5.1 Can’t ping the radio from the terrestrial interface AP 1. Check all physical connections. It is a straight cable from the CS to the Switch, and a rollover twist from the wall box to the switch (1-7,2-8). 2. Check to see if your atmarp entries are in the ARP table on the CS. ( ./atmarp if you are already in the /usr/local/sbin directory) • Add an atmarp entry root@cs1 11:11:14 (4) [~] # atmarp -s 192.168.2.50 0.0.34 • View an atmarp table root@cs1 11:12:52 (5) [~] # atmarp -a ----- Itf 0 (192.168.2.1, netmask 255.255.255.0) ----- Default QOS: ubr,aal5:max_sdu=9188 IP 192.168.2.50, state VALID, addr <none>, flags 0x4<PERM> 0.0.34 ----- Unknown incoming connections ----- ----- Incoming unidirectional connections ----- ----- End of dump ----- • Delete an atmarp entry root@cs1 11:13:42 (6) [~] # atmarp -d 192.168.2.50 3. Check route on CS, by typing route at the Command line. • Add a route root@cs1 11:17:19 (8) [~] # route add -net 192.168.100.0 netmask 255.255.255.0 gw 192.168.2.50 • View the routing table](https://usermanual.wiki/Axxcelera-Broand-Wireless/AB-ACCESS-SU01.UNII-configuration-guide/User-Guide-455833-Page-93.png)
![AB-Access Config & User Guide 5.5 Axxcelera Broadband Wireless July 27, 2004 Company Confidential Page 94 of 129 root@cs1 11:18:51 (9) [~] # route Kernel IP routing table Destination Gateway Genmask Flags Metric Ref Use Iface 10.9.144.1 * 255.255.255.255 UH 0 0 0 eth0 192.168.100.0 192.168.2.50 255.255.255.0 UG 0 0 0 atm0 192.168.2.0 * 255.255.255.0 U 0 0 0 atm0 10.9.144.0 * 255.255.255.0 U 0 0 0 eth0 127.0.0.0 * 255.0.0.0 U 0 0 0 lo • Delete a route root@cs1 11:20:26 (10) [~] # route del -net 192.168.100.0 netmask 255.255.255.0 4. Check the Switch for the correct PVC’s. • Log into the ATM switch and check that the PVCs are mapped correctly. The following commands are for an FVC switch. • Add a PVC ADMIN Access_NGI>set pvc add 101 0 34 be 102 0 34 be Adding PVC i=101/0/34 o=102/0/34 to switch fabrice Updating FLASH memory. Please wait ... Done. • Show the PVCs mapped in the switch ADMIN Access_NGI>show pvc list id 0 ------------------------------------------------------------ PVC ID IPort IVPI IVCI BW OPort OVPI OVCI BW ------------------------------------------------------------ 1 101 0 34 0 102 0 34 0 • Delete a PVC ADMIN Access_NGI>set pvc del 1 SU 1. Check all physical connections. The radio is a network device, which means if you connect it to a PC (NIC) you will use a straight cable. If you connect the radio to a network device (hub, switch, router) you will use a Ethernet cross-over cable(1-3, 2-6). It is also important to check that the cable is punched down correctly in the wall box and the cable is terminated correctly at the radio. The termination at the radio uses 568B (wo,o,wg,bl,wbl,g,wbr,br).](https://usermanual.wiki/Axxcelera-Broand-Wireless/AB-ACCESS-SU01.UNII-configuration-guide/User-Guide-455833-Page-94.png)
![AB-Access Config & User Guide 5.5 Axxcelera Broadband Wireless July 27, 2004 Company Confidential Page 103 of 129 11.1.3.3 SU system.conf channel 0 antenna horizontal mode static mid 3 bid 0 interface eth0 backoff 0 provider abw key Axxcelera mask 1ffff leds active 11.1.3.4 SU initr1483 pvc 0/769 atm25m 70000 70000 11.1.4 Troubleshooting 11.1.4.1 Can’t ping the radio from the terrestrial interface AP 1. Check all physical connections. It is a straight cable from the CS to the Switch, and a rollover twist from the wallbox to the switch (1-7,2-8). 2. Check to see if your atmarp entries are in the ARP table on the CS ( ./atmarp if you are already in the /usr/local/sbin directory). • Add an atmarp entry root@cs1 11:11:14 (4) [~] # atmarp -s 192.168.2.50 0.0.340 • View an atmarp table root@cs1 11:12:52 (5) [~] # atmarp -a ----- Itf 0 (192.168.2.1, netmask 255.255.255.0) ----- Default QOS: ubr,aal5:max_sdu=9188 IP 192.168.2.50, state VALID, addr <none>, flags 0x4<PERM> 0.0.34 ----- Unknown incoming connections ----- ----- Incoming unidirectional connections ----- ----- End of dump -----](https://usermanual.wiki/Axxcelera-Broand-Wireless/AB-ACCESS-SU01.UNII-configuration-guide/User-Guide-455833-Page-103.png)
![AB-Access Config & User Guide 5.5 Axxcelera Broadband Wireless July 27, 2004 Company Confidential Page 104 of 129 • Delete an atmarp entry root@cs1 11:13:42 (6) [~] # atmarp -d 192.168.2.50 3. Check route on CS, by typing route at the Command line. • Add a route root@cs1 11:17:19 (8) [~] # route add -net 192.168.100.0 netmask 255.255.255.0 gw 192.168.2.50 • View the routing table root@cs1 11:18:51 (9) [~] # route Kernel IP routing table Destination Gateway Genmask Flags Metric Ref Use Iface 10.9.144.1 * 255.255.255.255 UH 0 0 0 eth0 192.168.100.0 192.168.2.50 255.255.255.0 UG 0 0 0 atm0 192.168.2.0 * 255.255.255.0 U 0 0 0 atm0 10.9.144.0 * 255.255.255.0 U 0 0 0 eth0 127.0.0.0 * 255.0.0.0 U 0 0 0 lo • Delete a route root@cs1 11:20:26 (10) [~] # route del -net 192.168.100.0 netmask 255.255.255.0 4. Check the Switch for the correct PVC’s. • Log into the ATM switch and check that the PVCs are mapped correctly. The following commands are for an FVC switch. • Add a PVC ADMIN Access_NGI>set pvc add 101 0 34 be 102 0 34 be Adding PVC i=101/0/34 o=102/0/34 to switch fabrice Updating FLASH memory. Please wait ... Done. • Show the PVCs mapped in the switch ADMIN Access_NGI> show pvc list id 0 ------------------------------------------------------------ PVC ID IPort IVPI IVCI BW OPort OVPI OVCI BW ------------------------------------------------------------ 1 101 0 34 0 102 0 34 0](https://usermanual.wiki/Axxcelera-Broand-Wireless/AB-ACCESS-SU01.UNII-configuration-guide/User-Guide-455833-Page-104.png)
![AB-Access Config & User Guide 5.5 Axxcelera Broadband Wireless July 27, 2004 Company Confidential Page 109 of 129 11.2.4 Troubleshooting 11.2.4.1 Can’t ping the radio from the terrestrial interface AP 1. Check all physical connections. It is a straight cable from the CS to the Switch, and a rollover twist from the wall box to the switch (1-7,2-8). 2. Check to see if your atmarp entries are in the ARP table on the CS. ( ./atmarp if you are already in the /usr/local/sbin directory) • Add an atmarp entry root@cs1 11:11:14 (4) [~] # atmarp -s 192.168.100.1 0.0.101 • View an atmarp table root@cs1 11:12:52 (5) [~] # atmarp -a ----- Itf 0 (192.168.100.254, netmask 255.255.255.0) ----- Default QOS: ubr,aal5:max_sdu=9188 IP 192.168.100.1, state VALID, addr <none>, flags 0x4<PERM> 0.0.101 ----- Unknown incoming connections ----- ----- Incoming unidirectional connections ----- ----- End of dump ----- • Delete an atmarp entry root@cs1 11:13:42 (6) [~] # atmarp -d 192.168.100.1 3. Check the Switch for the correct PVC’s. • Log into the ATM switch and check that the PVCs are mapped correctly. The following commands are for an FVC switch. • Add a PVC ADMIN Access_NGI>set pvc add 101 0 101 be 102 0 101 be Adding PVC i=101/0/34 o=102/0/34 to switch fabrice Updating FLASH memory. Please wait ... Done. • Show the PVCs mapped in the switch](https://usermanual.wiki/Axxcelera-Broand-Wireless/AB-ACCESS-SU01.UNII-configuration-guide/User-Guide-455833-Page-109.png)
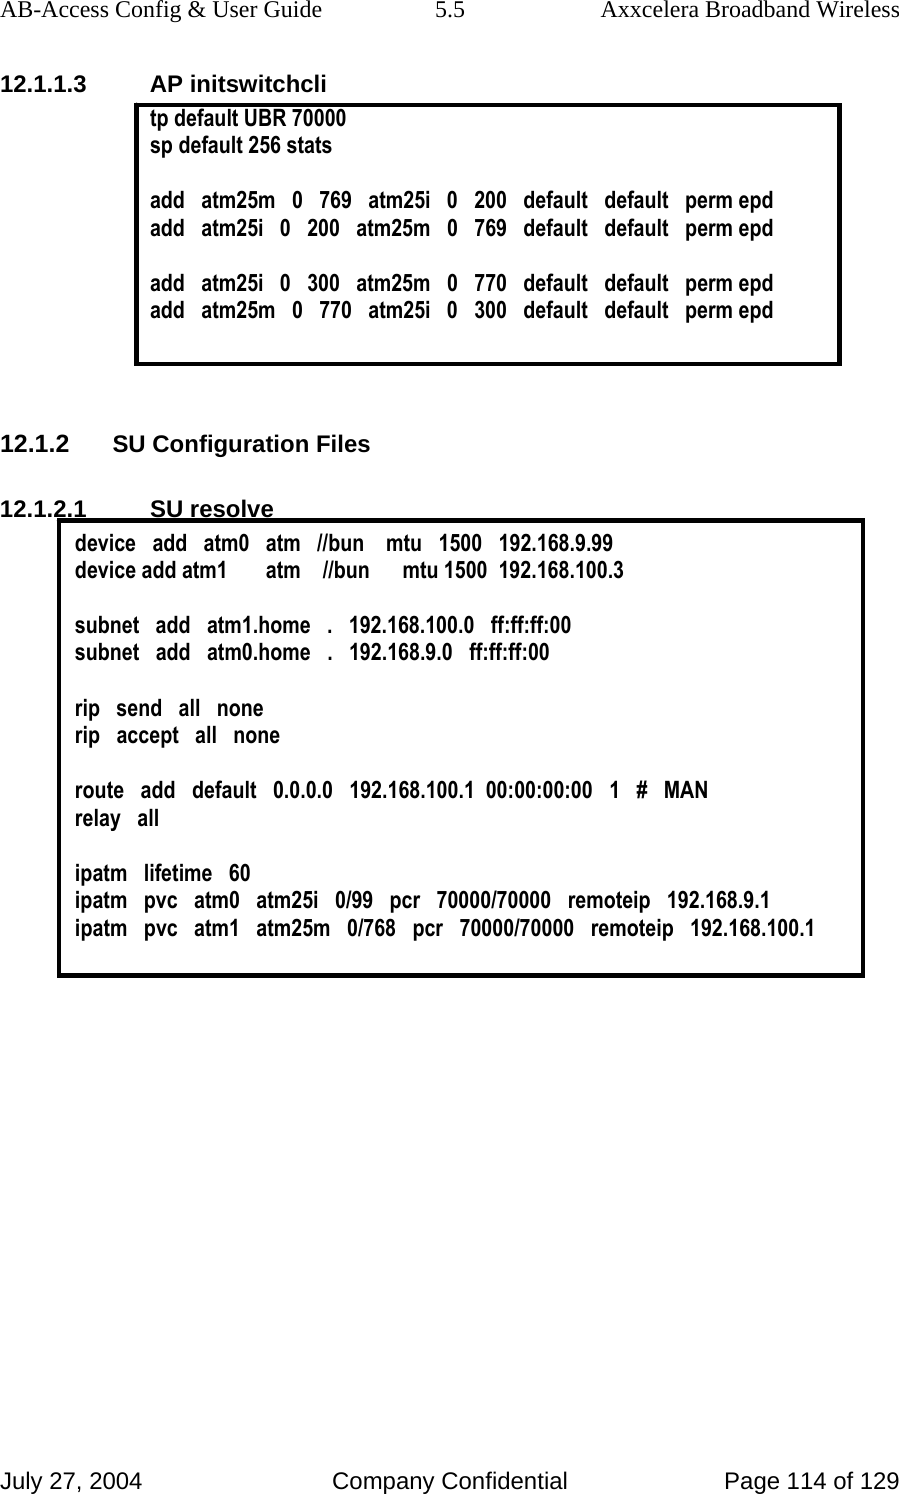
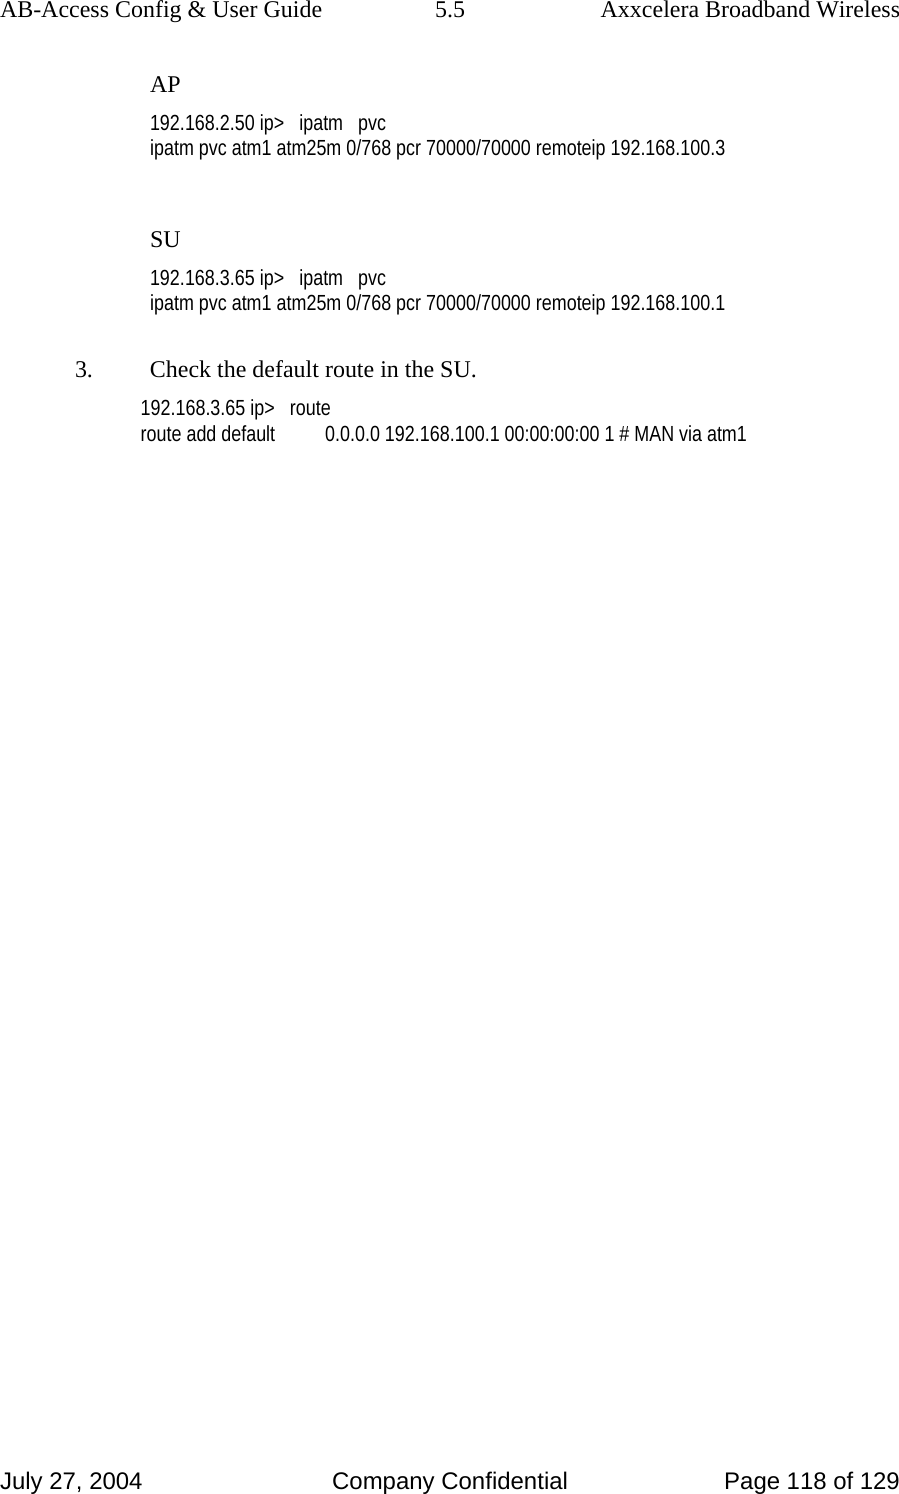
![AB-Access Config & User Guide 5.5 Axxcelera Broadband Wireless July 27, 2004 Company Confidential Page 115 of 129 12.1.2.2 SU system.conf channel 0 antenna horizontal mode static mid 3 bid 0 interface atm0 backoff 0 provider abw key Axxcelera mask 1ffff leds active 12.1.2.3 SU initswitchcli tp default UBR 70000 sp default 256 stats add atm25m 0 769 atm25i 0 200 default default perm epd add atm25i 0 200 atm25m 0 769 default default perm epd add atm25i 0 300 atm25m 0 770 default default perm epd add atm25m 0 770 atm25i 0 300 default default perm epd 12.1.3 Troubleshooting 12.1.3.1 Can’t ping the radio from the terrestrial interface AP 1. Check all physical connections. It is a straight cable from the CS to the Switch, and a rollover twist from the wallbox to the switch (1-7,2-8). 2. Check to see if your atmarp entries are in the ARP table on the CS. ( ./atmarp if you are already in the /usr/local/sbin directory) • Add an atmarp entry root@cs1 11:11:14 (4) [~] # atmarp -s 192.168.2.50 0.0.250](https://usermanual.wiki/Axxcelera-Broand-Wireless/AB-ACCESS-SU01.UNII-configuration-guide/User-Guide-455833-Page-115.png)
![AB-Access Config & User Guide 5.5 Axxcelera Broadband Wireless July 27, 2004 Company Confidential Page 116 of 129 • View an atmarp table root@cs1 11:12:52 (5) [~] # atmarp -a ----- Itf 0 (192.168.2.1, netmask 255.255.255.0) ----- Default QOS: ubr,aal5:max_sdu=9188 IP 192.168.2.50, state VALID, addr <none>, flags 0x4<PERM> 0.0.250 ----- Unknown incoming connections ----- ----- Incoming unidirectional connections ----- ----- End of dump ----- • Delete an atmarp entry root@cs1 11:13:42 (6) [~] # atmarp -d 192.168.2.50 3. Check route on CS, by typing route at the Command line. • Add a route root@cs1 11:17:19 (8) [~] # route add -net 192.168.100.0 netmask 255.255.255.0 gw 192.168.2.50 • View the routing table root@cs1 11:18:51 (9) [~] # route Kernel IP routing table Destination Gateway Genmask Flags Metric Ref Use Iface 10.9.144.1 * 255.255.255.255 UH 0 0 0 eth0 192.168.100.0 192.168.2.50 255.255.255.0 UG 0 0 0 atm0 192.168.2.0 * 255.255.255.0 U 0 0 0 atm0 192.168.2.0 * 255.255.255.0 U 0 0 0 atm0 10.9.144.0 * 255.255.255.0 U 0 0 0 eth0 127.0.0.0 * 255.0.0.0 U 0 0 0 lo • Delete a route root@cs1 11:20:26 (10) [~] # route del -net 192.168.100.0 netmask 255.255.255.0 4. Check the Switch for the correct PVC’s. • Log into the ATM switch and check that the PVCs are mapped correctly. The following commands are for an FVC switch. • Add a PVC](https://usermanual.wiki/Axxcelera-Broand-Wireless/AB-ACCESS-SU01.UNII-configuration-guide/User-Guide-455833-Page-116.png)

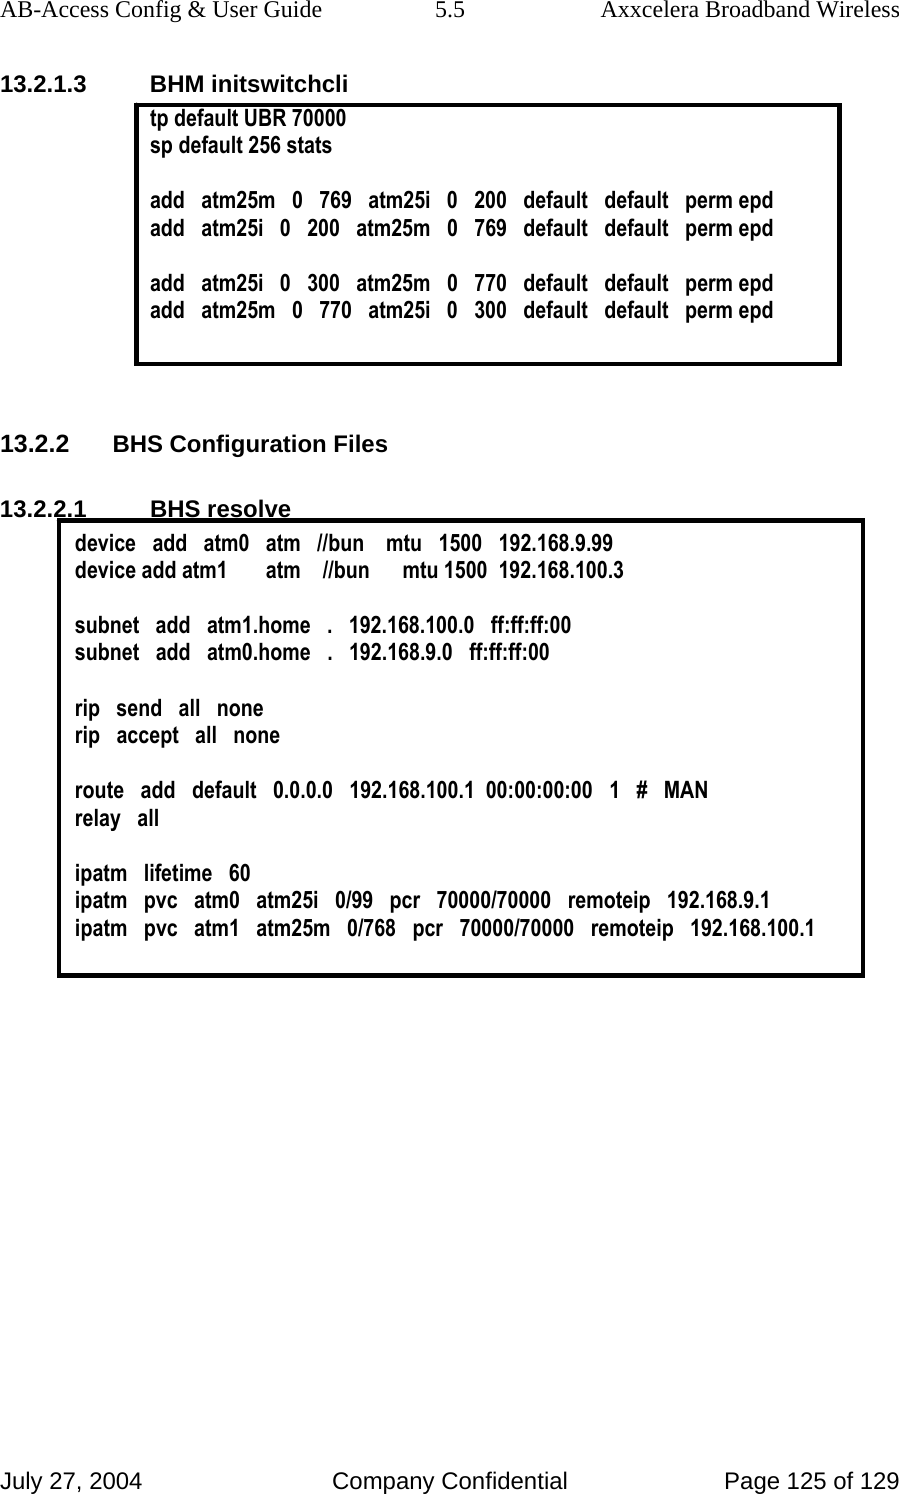
![AB-Access Config & User Guide 5.5 Axxcelera Broadband Wireless July 27, 2004 Company Confidential Page 126 of 129 13.2.2.2 BHS system.conf channel 0 antenna horizontal mode static mid 3 bid 0 interface atm0 backoff 0 provider abw key Axxcelera mask 1ffff leds debug 13.2.2.3 BHS initswitchcli tp default UBR 70000 sp default 256 stats add atm25m 0 769 atm25i 0 200 default default perm epd add atm25i 0 200 atm25m 0 769 default default perm epd add atm25i 0 300 atm25m 0 770 default default perm epd add atm25m 0 770 atm25i 0 300 default default perm epd 13.2.3 Troubleshooting 13.2.3.1 Can’t ping the radio from the terrestrial interface AP 1. Check all physical connections. It is a straight cable from the CS to the Switch, and a rollover twist from the wallbox to the switch (1-7,2-8). 2. Check to see if your atmarp entries are in the ARP table on the CS. ( ./atmarp if you are already in the /usr/local/sbin directory) • Add an atmarp entry root@cs1 11:11:14 (4) [~] # atmarp -s 192.168.2.50 0.0.250](https://usermanual.wiki/Axxcelera-Broand-Wireless/AB-ACCESS-SU01.UNII-configuration-guide/User-Guide-455833-Page-126.png)
![AB-Access Config & User Guide 5.5 Axxcelera Broadband Wireless July 27, 2004 Company Confidential Page 127 of 129 • View an atmarp table root@cs1 11:12:52 (5) [~] # atmarp -a ----- Itf 0 (192.168.2.1, netmask 255.255.255.0) ----- Default QOS: ubr,aal5:max_sdu=9188 IP 192.168.2.50, state VALID, addr <none>, flags 0x4<PERM> 0.0.250 ----- Unknown incoming connections ----- ----- Incoming unidirectional connections ----- ----- End of dump ----- • Delete an atmarp entry root@cs1 11:13:42 (6) [~] # atmarp -d 192.168.2.50 3. Check route on CS, by typing route at the Command line. • Add a route root@cs1 11:17:19 (8) [~] # route add -net 192.168.100.0 netmask 255.255.255.0 gw 192.168.2.50 • View the routing table root@cs1 11:18:51 (9) [~] # route Kernel IP routing table Destination Gateway Genmask Flags Metric Ref Use Iface 10.9.144.1 * 255.255.255.255 UH 0 0 0 eth0 192.168.100.0 192.168.2.50 255.255.255.0 UG 0 0 0 atm0 192.168.2.0 * 255.255.255.0 U 0 0 0 atm0 192.168.2.0 * 255.255.255.0 U 0 0 0 atm0 10.9.144.0 * 255.255.255.0 U 0 0 0 eth0 127.0.0.0 * 255.0.0.0 U 0 0 0 lo • Delete a route root@cs1 11:20:26 (10) [~] # route del -net 192.168.100.0 netmask 255.255.255.0 4. Check the Switch for the correct PVC’s. • Log into the ATM switch and check that the PVCs are mapped correctly. The following commands are for an FVC switch. • Add a PVC](https://usermanual.wiki/Axxcelera-Broand-Wireless/AB-ACCESS-SU01.UNII-configuration-guide/User-Guide-455833-Page-127.png)