BUFFALO 09101695-0 Wireless AC1300 / N900 Gigabit Dual Band Router User Manual WLI H4 D1300
BUFFALO INC. Wireless AC1300 / N900 Gigabit Dual Band Router WLI H4 D1300
BUFFALO >
Contents
- 1. user manual I
- 2. user manual II
- 3. User Manual I
- 4. User Manual II
User Manual I

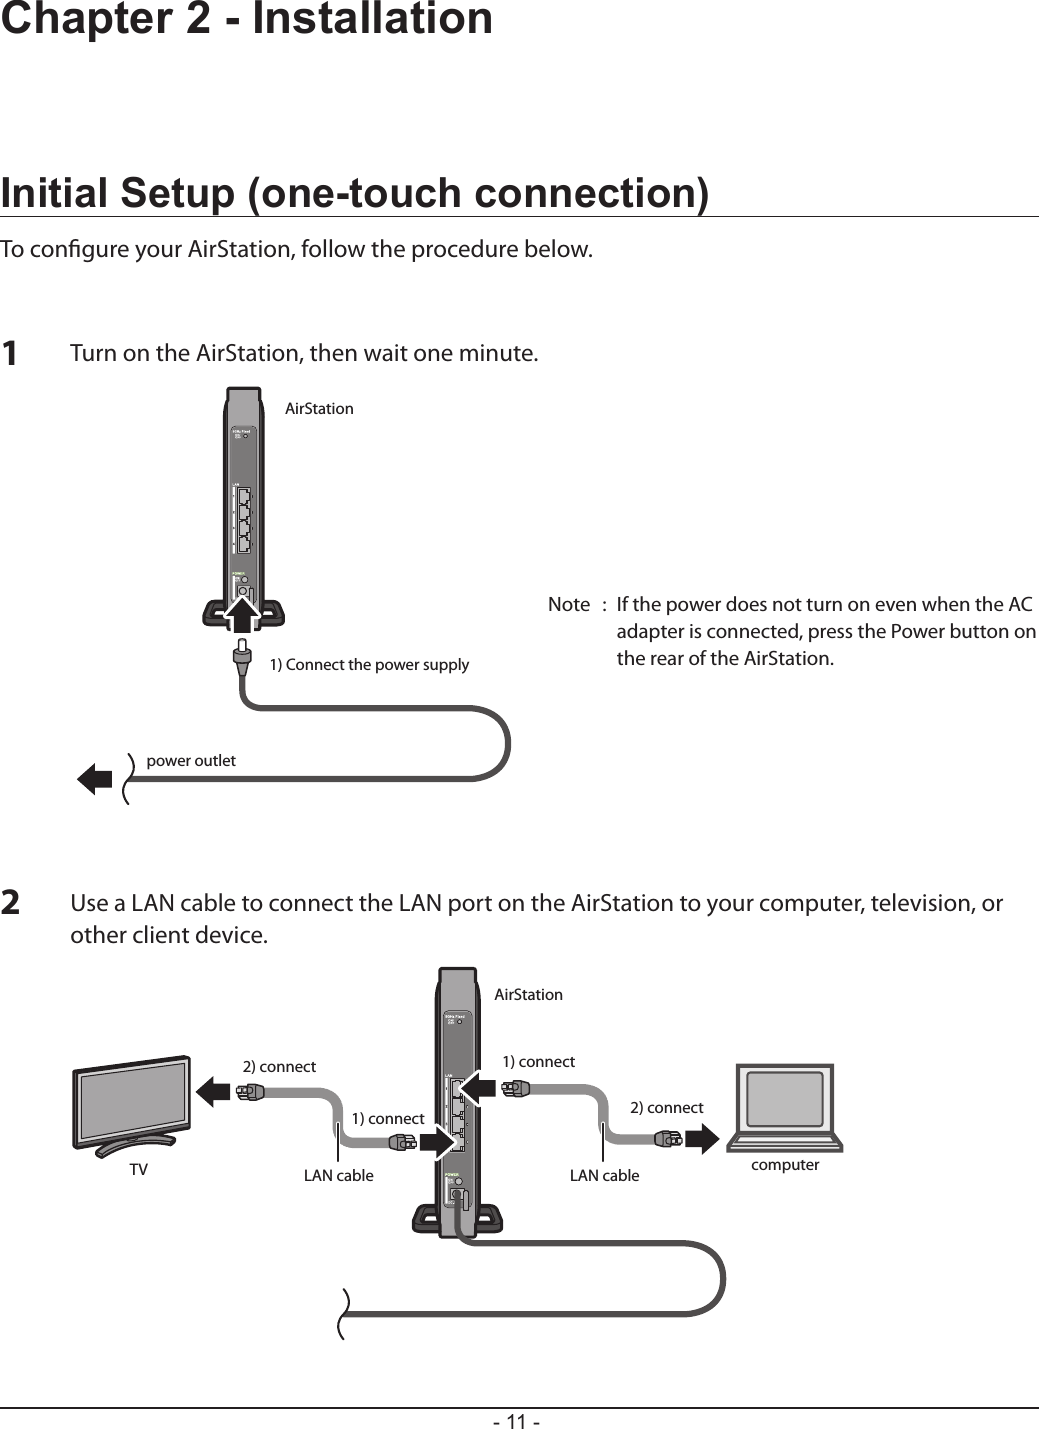
![Chapter 2 Installation- 13 -Manual Setup1Refer to Chapter 3 to open the conguration interface for the AirStation.2Click [Connect to AirStation (access point)].3Click [Search].4Choose your wireless router and click [Select].5Enter the encryption type and encryption key. Click [Setup].Note : If you cannot connect to the wireless router, double-check your encryption type and key. These settings must be the same for both the wireless router and the wireless bridge.](https://usermanual.wiki/BUFFALO/09101695-0.User-Manual-I/User-Guide-1680512-Page-14.png)
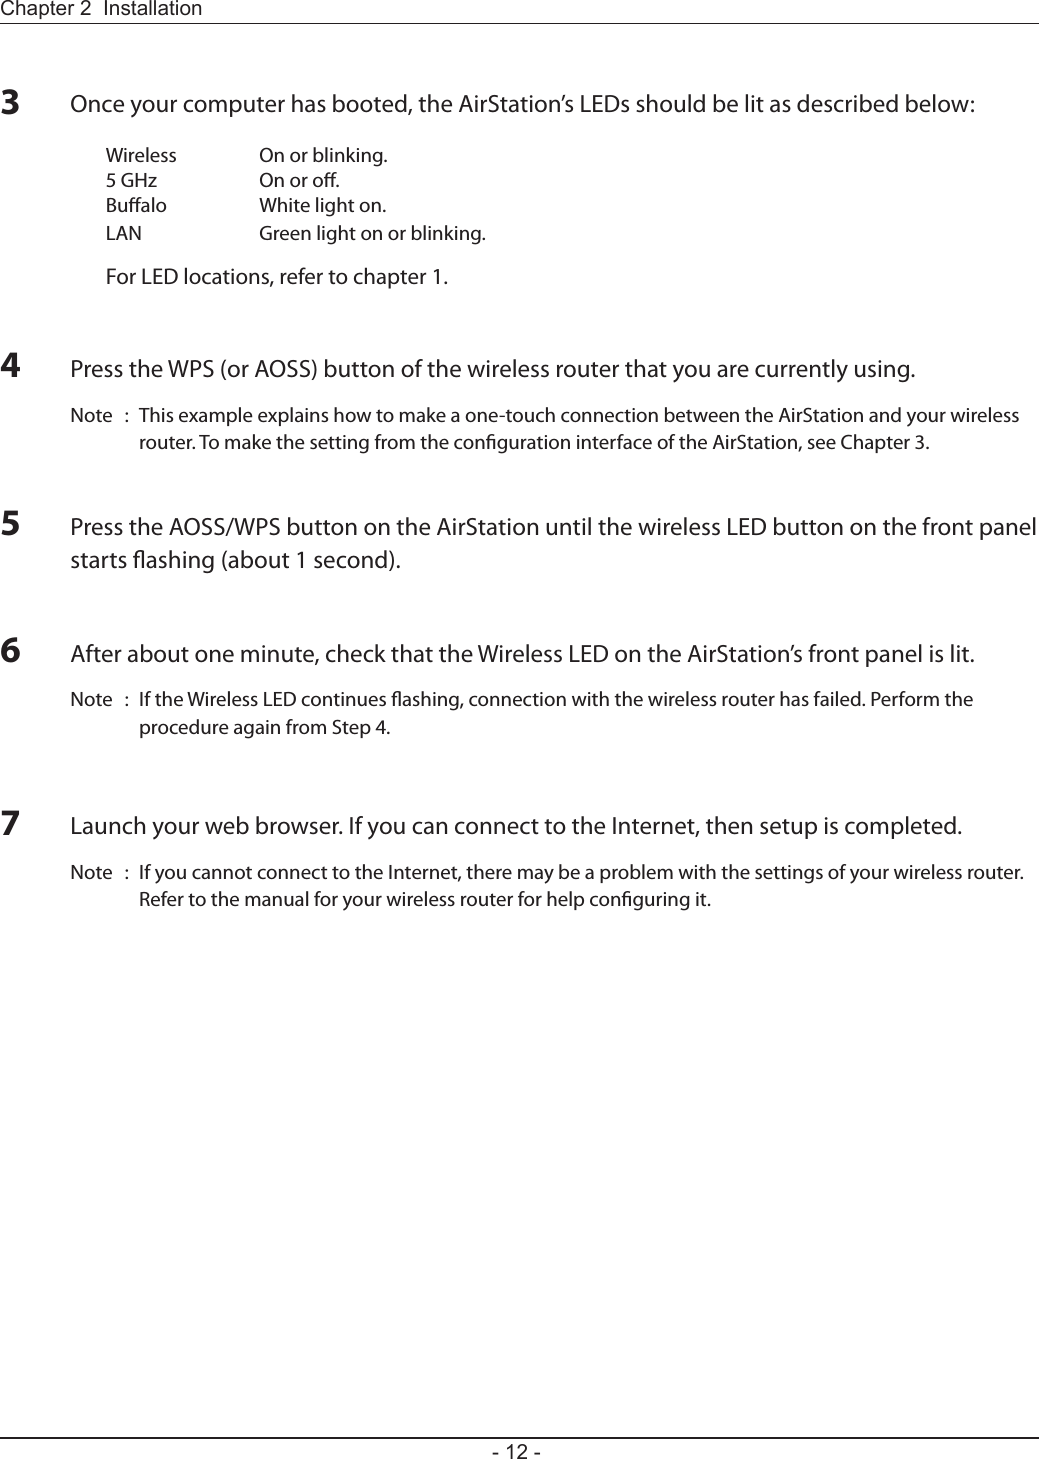
![- 14 -Chapter 3 - CongurationThe web-based conguration tool lets you change the AirStation’s settings. Don’t change these settings unless you know what you’re doing.Installing the Ethernet Converter Manager (Windows)The Ethernet Converter Manager is required to display the AirStation conguration interface for a Windows computer. Use the procedure below to perform the installation.123Load the AirNavigator CD into your computer.Step through the wizard to install the Ethernet Converter Manager software.Click [Software installation].](https://usermanual.wiki/BUFFALO/09101695-0.User-Manual-I/User-Guide-1680512-Page-15.png)
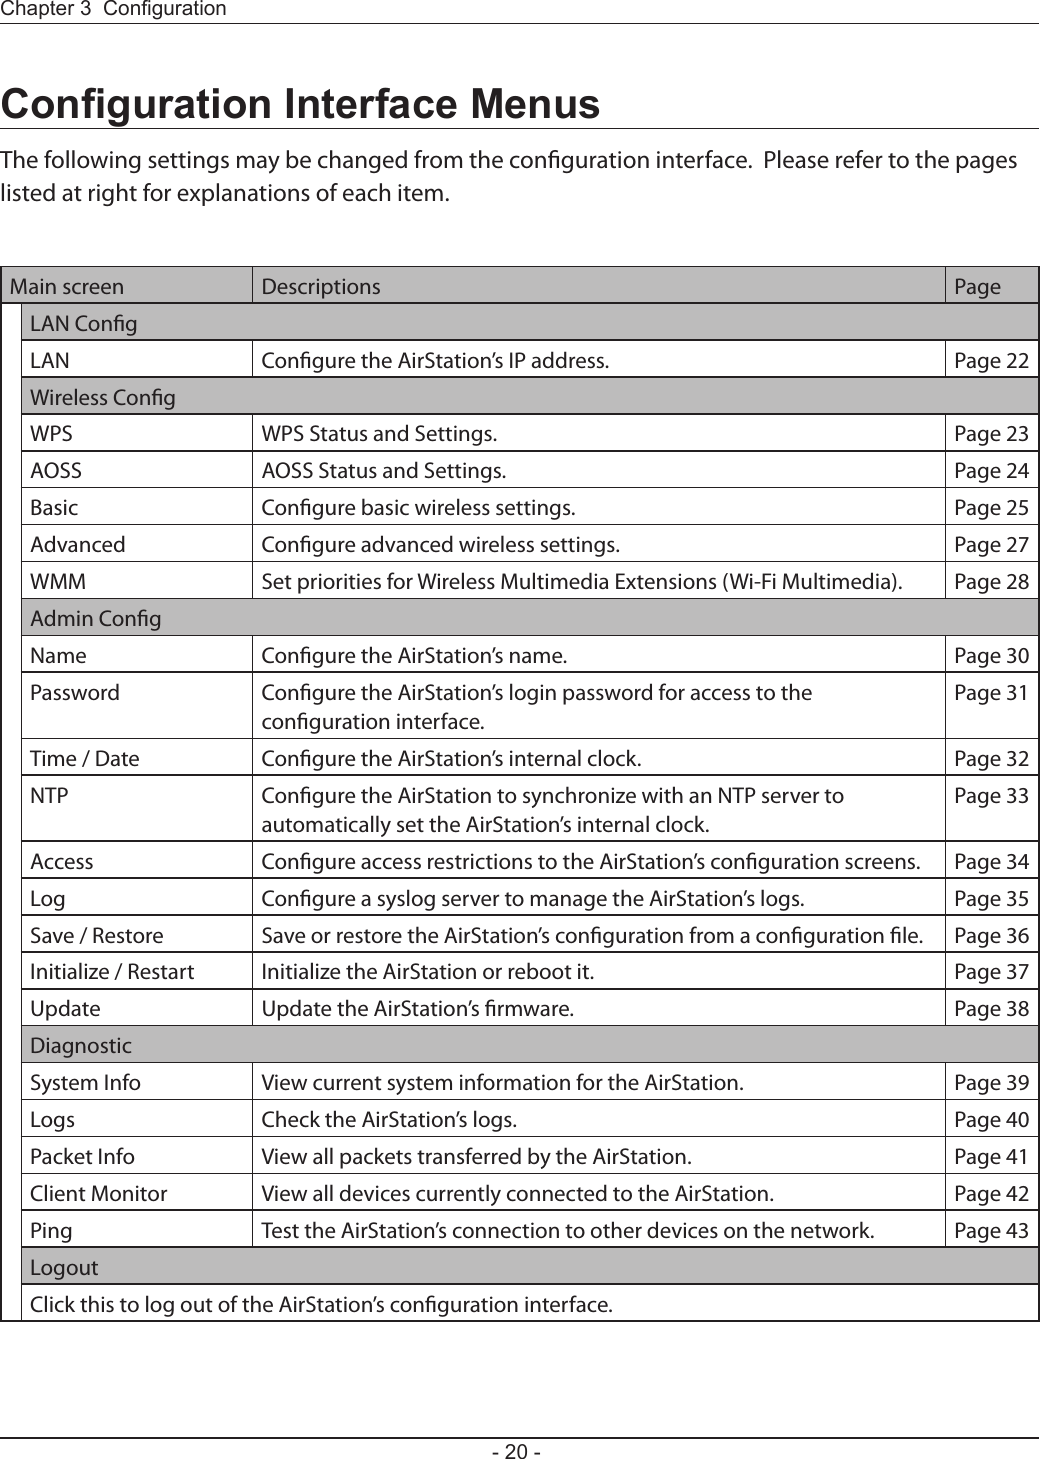
![Chapter 3 Conguration- 15 -23Click [Options] > [Modify IP Address...].When this screen appears, enter the password, then click [OK].Notes: · By default, the password is “password”. · If you forget your password, hold down the reset button (page 8) to initialize all settings. The password will then revert to “password”. Note that all other settings will also revert to their default values.Setting the AirStation IP Address (Windows)The Ethernet Converter Manager can be used to change the IP address of the AirStation. If using a Windows computer, follow the procedure below to set the AirStation’s IP address.Click [Start] > [All programs] > [BUFFALO] > [AirStation Utility] > [Ethernet Converter Manager]. 1](https://usermanual.wiki/BUFFALO/09101695-0.User-Manual-I/User-Guide-1680512-Page-16.png)
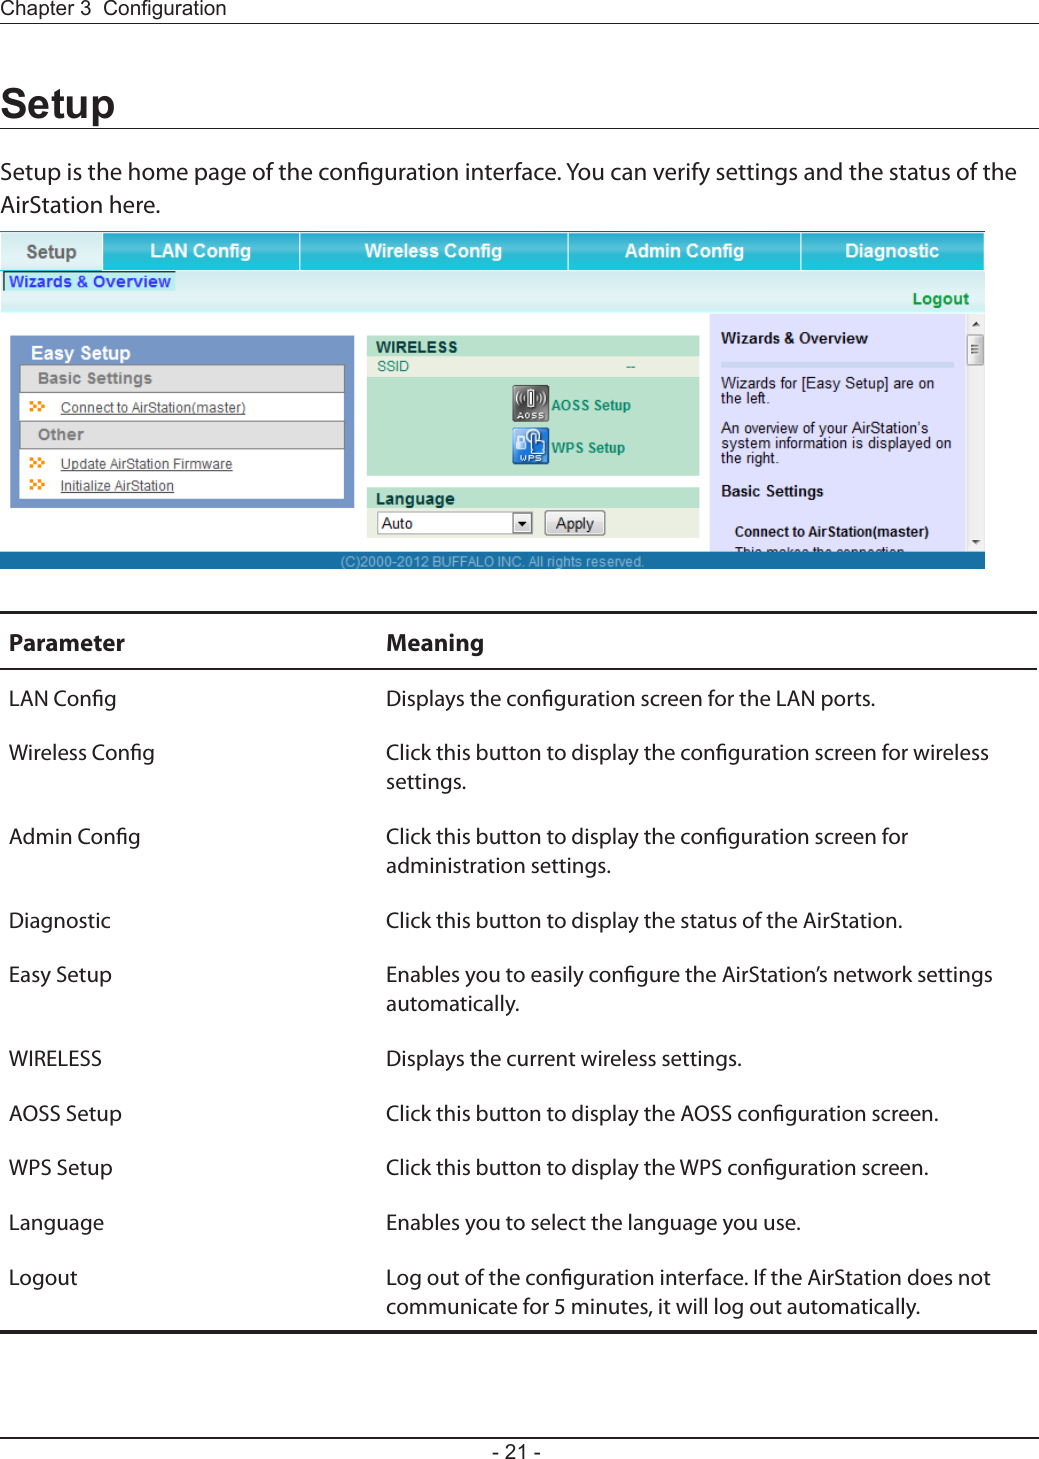
![- 16 -Chapter 3 Conguration45Select “Acquire IP Address Automatically via DHCP”, then click [OK].Click [Yes].](https://usermanual.wiki/BUFFALO/09101695-0.User-Manual-I/User-Guide-1680512-Page-17.png)
![Chapter 3 Conguration- 17 -3Click [Options] > [Launch Web Setting screen].Accessing the Web-based Conguration Interface (Windows)To manually set the AirStation advanced settings from a Windows computer, use the procedure below to log into the AirStation Conguration interface.2When this screen appears, enter the password, then click [OK].Notes: · By default, the password is “password”. · If you forget your password, hold down the reset button (page 8) to initialize all settings. The password will then revert to “password”. Note that all other settings will also revert to their default values.Click [Start] > [All programs] > [BUFFALO] > [AirStation Utility] > [Ethernet Converter Manager]. 1](https://usermanual.wiki/BUFFALO/09101695-0.User-Manual-I/User-Guide-1680512-Page-18.png)
![- 18 -Chapter 3 Conguration4Enter "admin" for the username and "password" for the password, then click [OK].Note: If the password was changed, enter the new password instead of the default.5This is the conguration interface, where most wireless media bridge settings can be congured.](https://usermanual.wiki/BUFFALO/09101695-0.User-Manual-I/User-Guide-1680512-Page-19.png)
![Chapter 3 Conguration- 19 -Accessing the Web-based Conguration Interface (Mac OS X)To access the conguration interface of the AirStation from a Mac, the IP address of the AirStation is required. If you do not know the IP address, use the procedure below to access the conguration interface.Note: If you do not know the IP address of the AirStation, reset the AirStation. All settings will be changed to their default values.12Click [Apple menu] > [System Preferences…].Click [Network].3Click [Ethernet].457Select [Manually] in the Congure IPv4 eld.Note: Make a note of the current IP address.Set the IP address of the Mac to be on the same subnet as the AirStation.The rst three numbers in the IP address should be the same and the fourth dierent. For example, if the IP address of the AirStation is 1.1.1.1, you could set the IP address of the Mac to 1.1.1.2. Click [Apply].When the settings for the AirStation are complete, return the IP address of the Mac to its original setting that was noted in step 4.6Launch your web browser, enter the IP address of the AirStation in the address eld, and press the Enter key.When a screen appears for entering the name and password, enter "admin" in the username eld and "password" in the password eld, then click [OK].](https://usermanual.wiki/BUFFALO/09101695-0.User-Manual-I/User-Guide-1680512-Page-20.png)
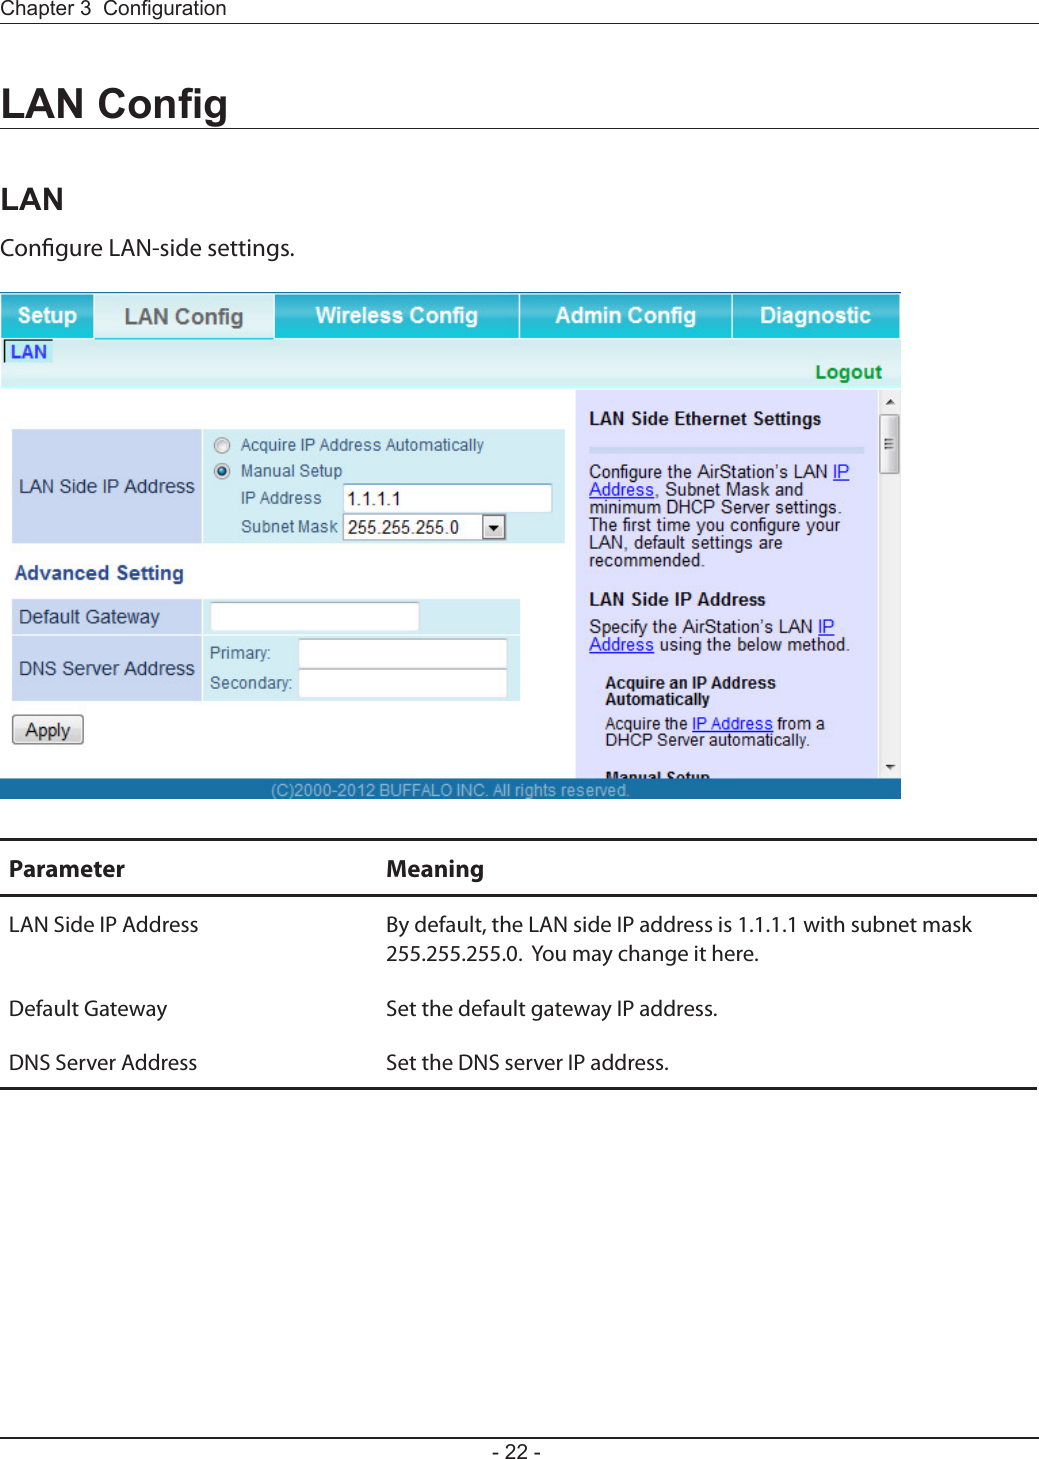
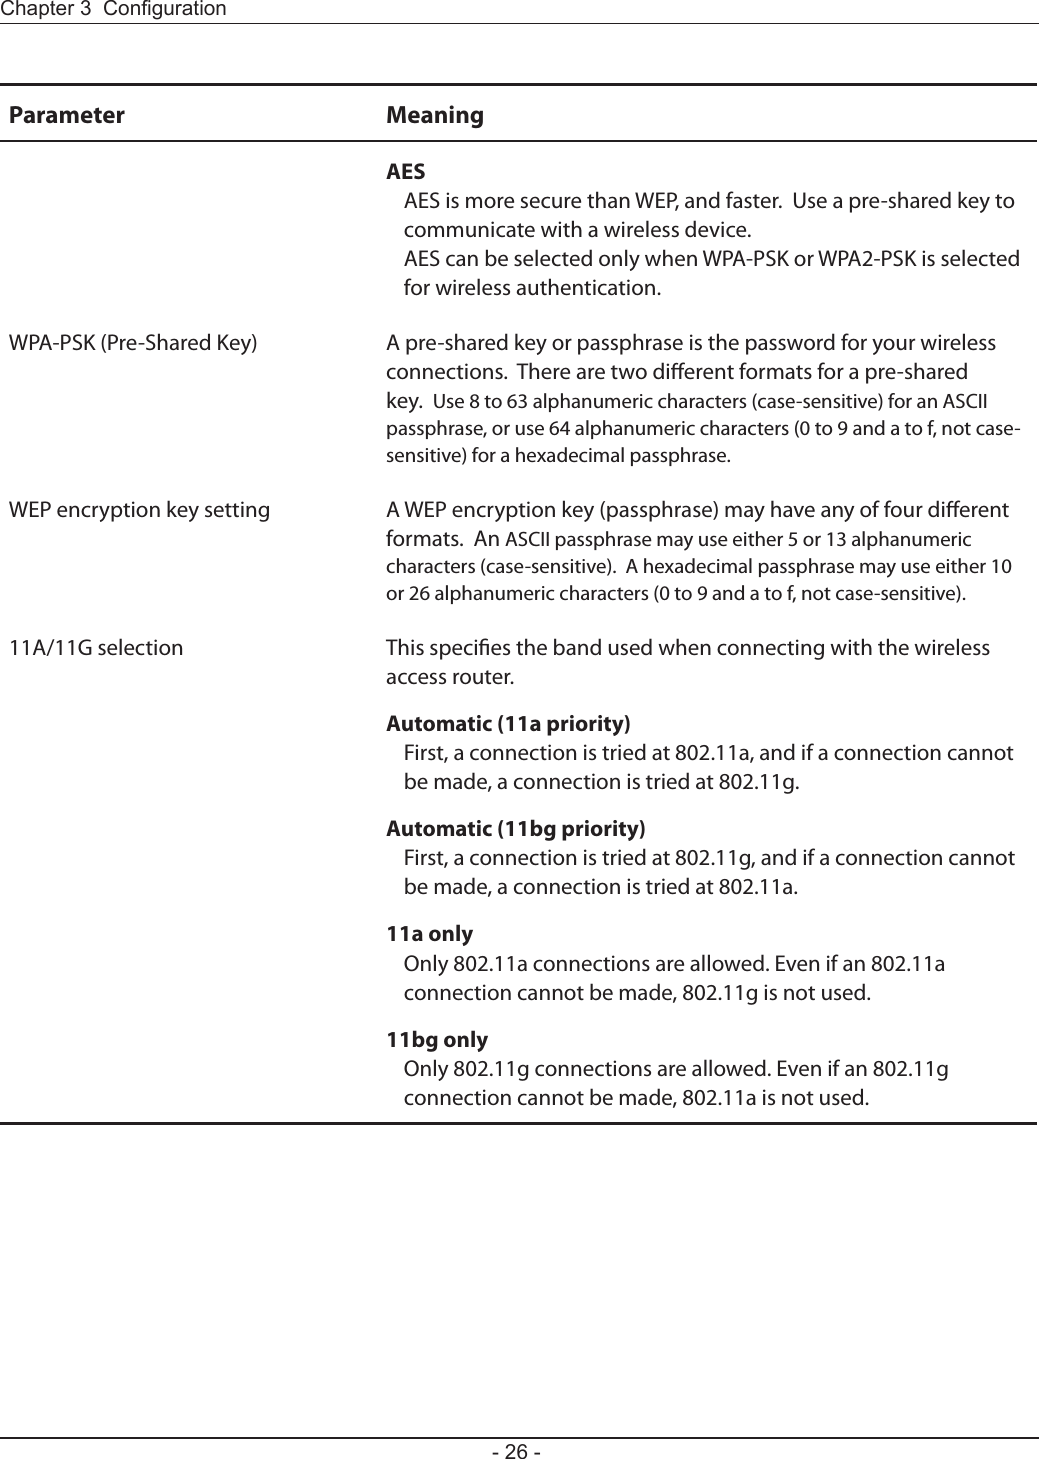
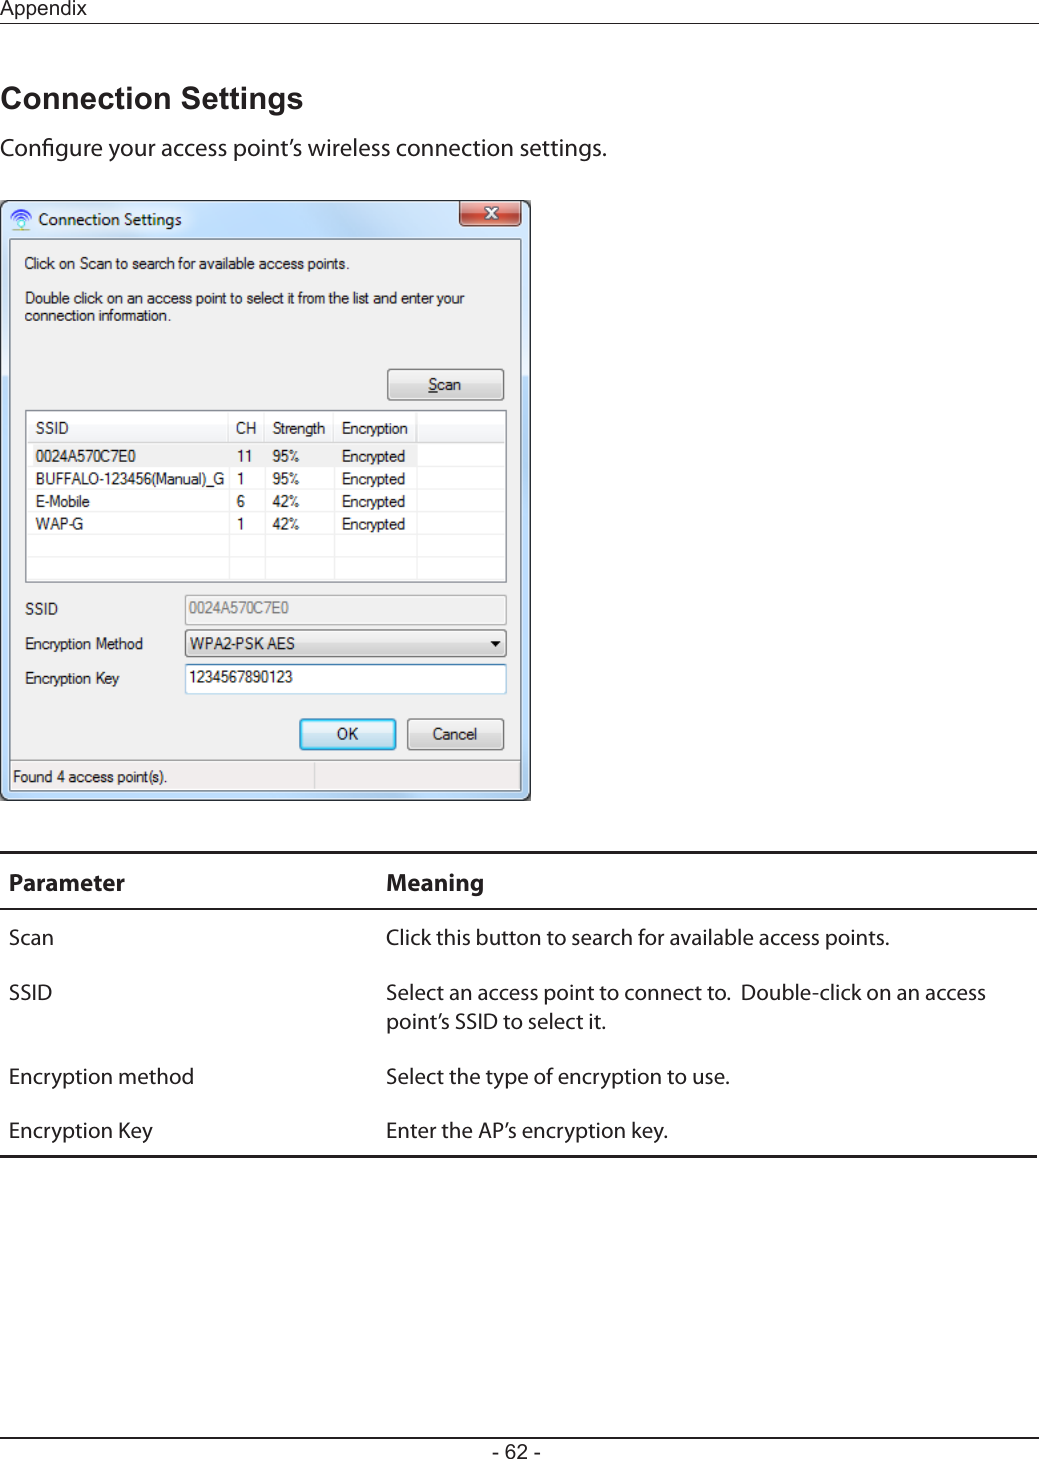
![Chapter 3 Conguration- 25 -BasicCongure basic wireless settings from here.Parameter MeaningSSID The SSID may contain 1 - 32 alphanumeric characters.Wireless authentication Species the authentication method used when connecting to a wireless router.Encryption for wireless You may use any of the following types of encryption:Not encryptedData is transmitted without encryption. With this setting, anyone within range can connect to your wireless network and might be able to access data on the network. Not recommended for anyone with private data that needs to be kept secure. [Not encrypted] can be selected only when [Do not authenticate] is selected for wireless authentication.WEPWEP is a common encryption method supported by most devices. WEP can only be selected when wireless authentication is set to [Do not authenticate]. Note that WEP’s encryption is weak, and networks protected with WEP are not much more secure than those with no encryption at all. Not recommended for anyone with private data that needs to be kept secure. TKIPTKIP is an encryption method which is more secure than WEP, but slower. Use an pre-shared key to communicate with a wireless device.TKIP can be selected only when WPA-PSK or WPA2-PSK is selected for wireless authentication.](https://usermanual.wiki/BUFFALO/09101695-0.User-Manual-I/User-Guide-1680512-Page-26.png)
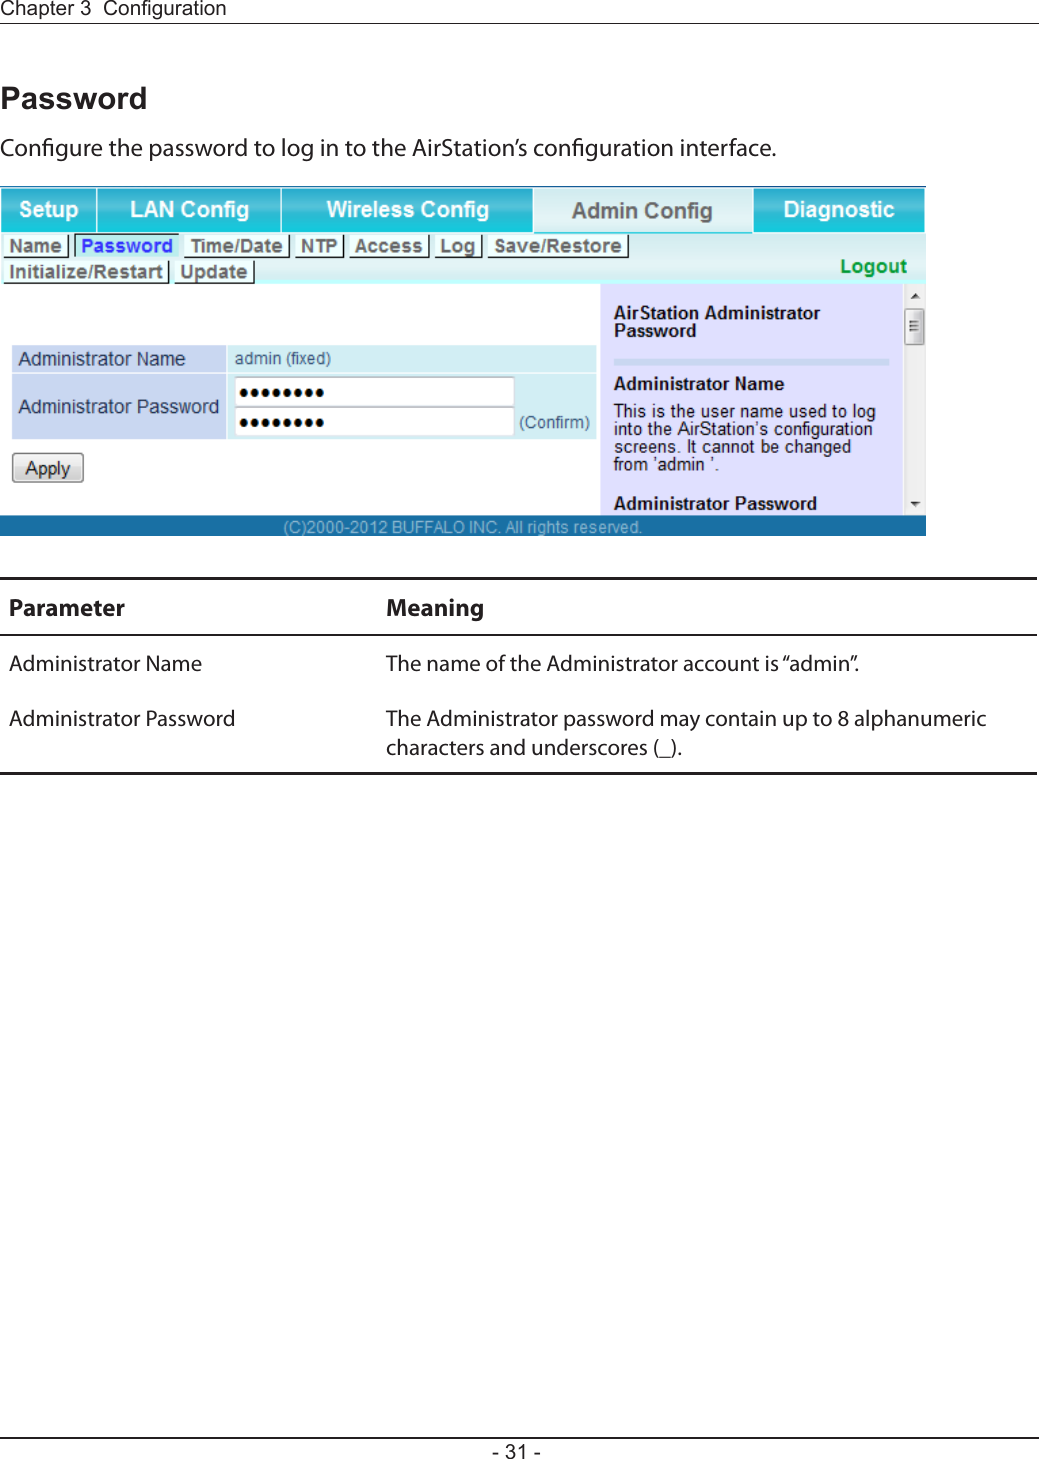
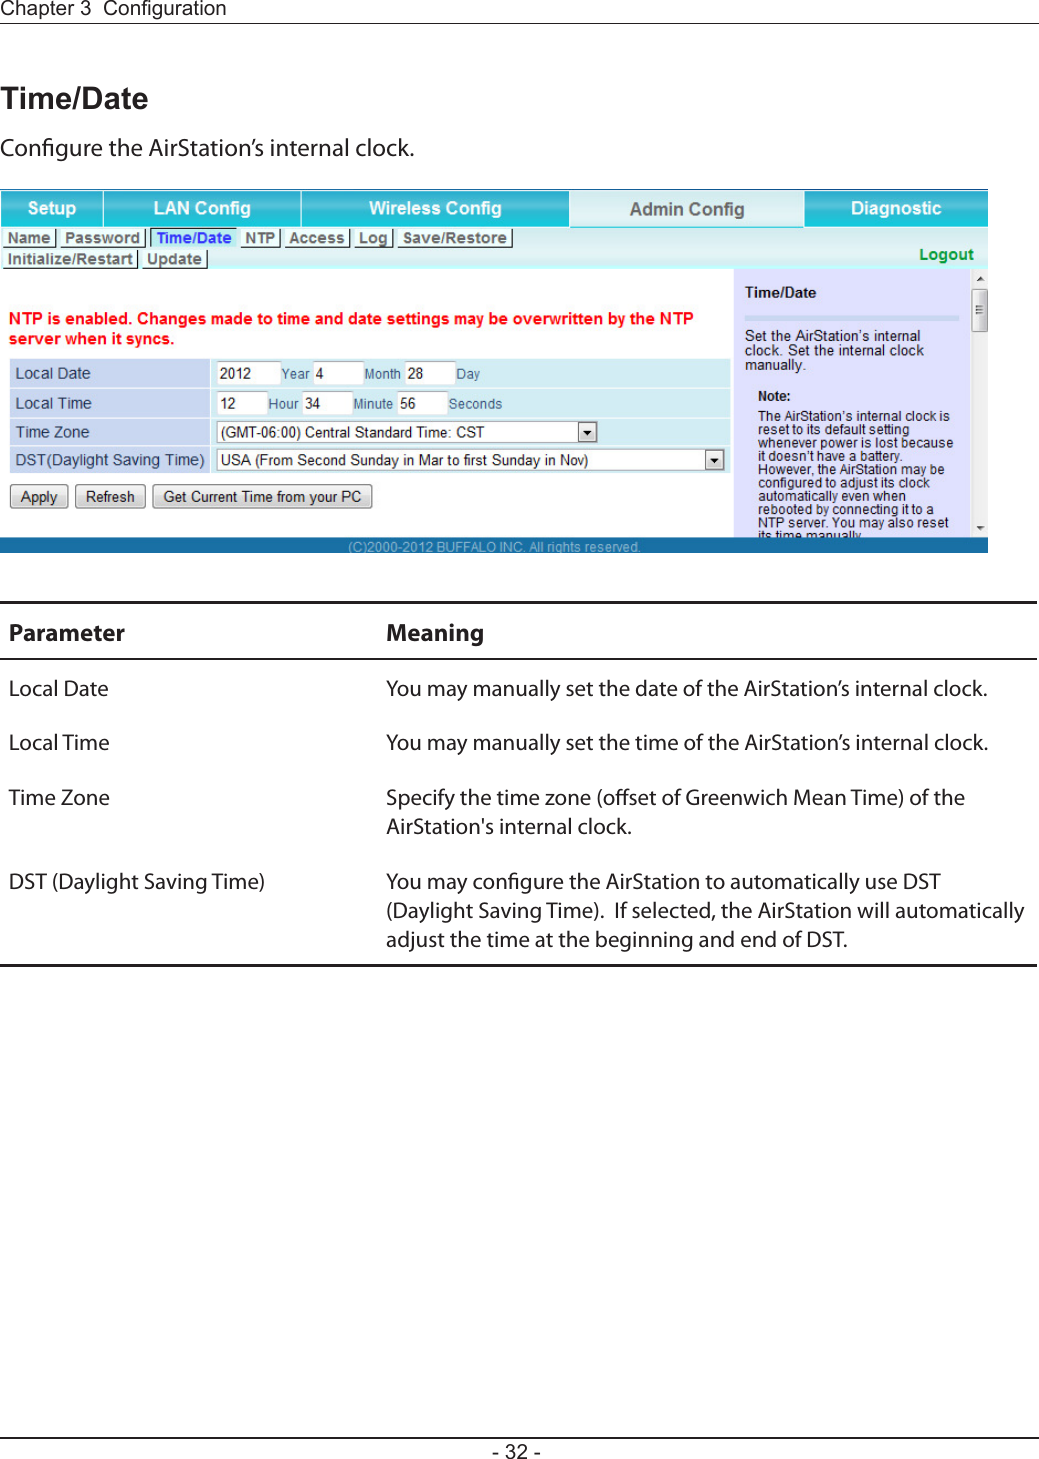
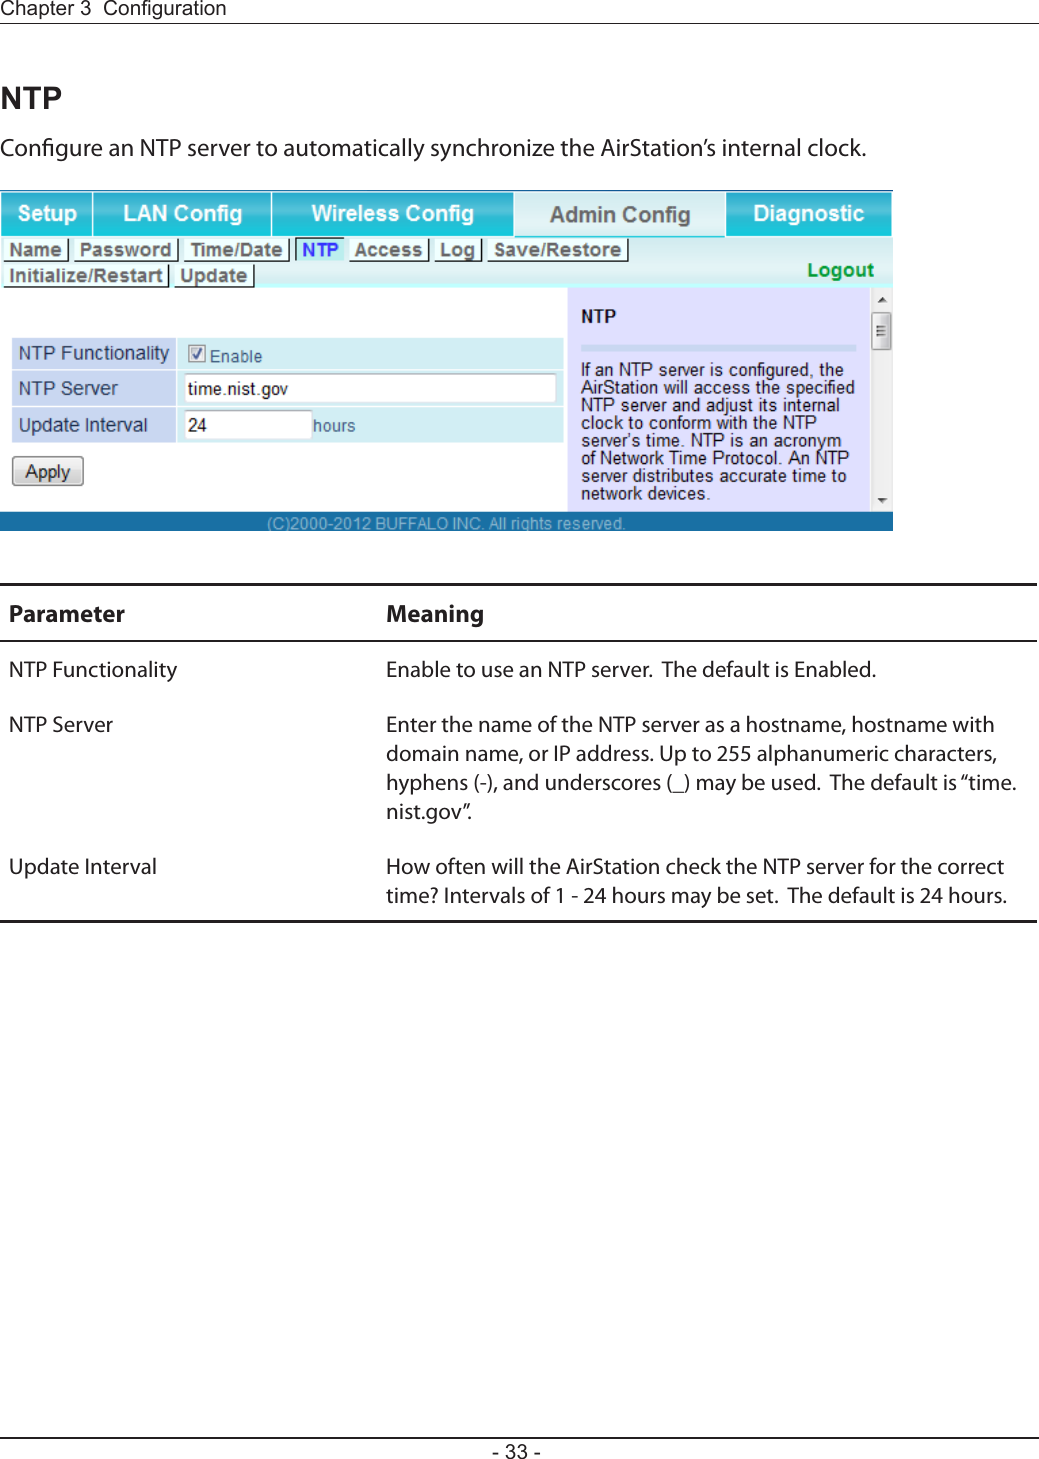
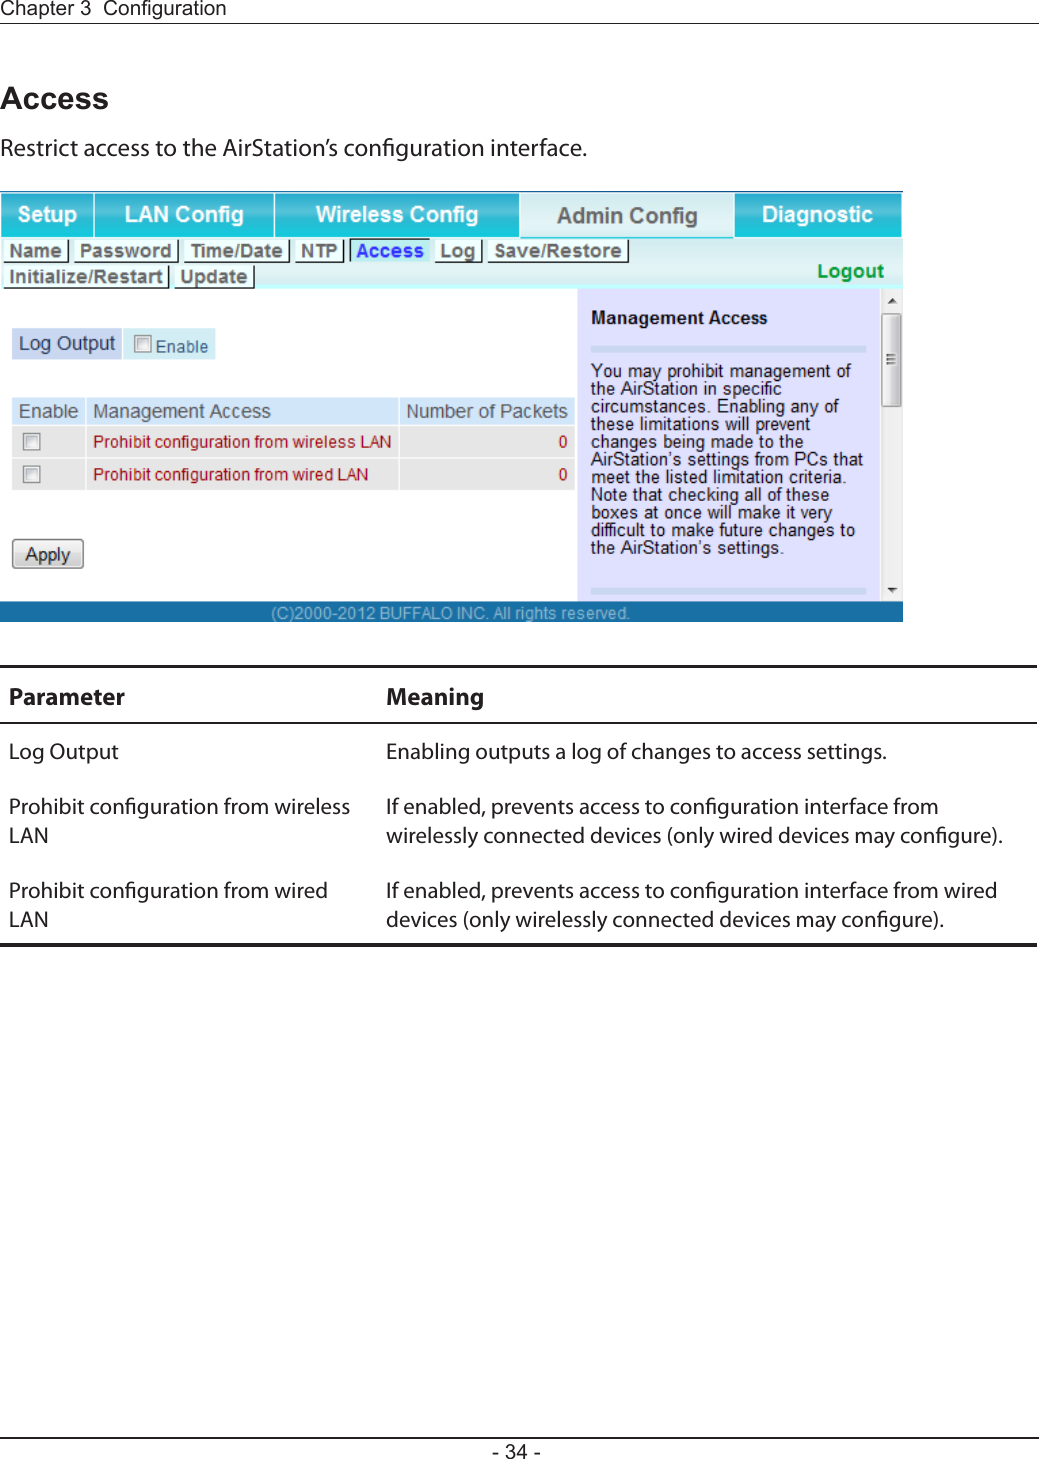
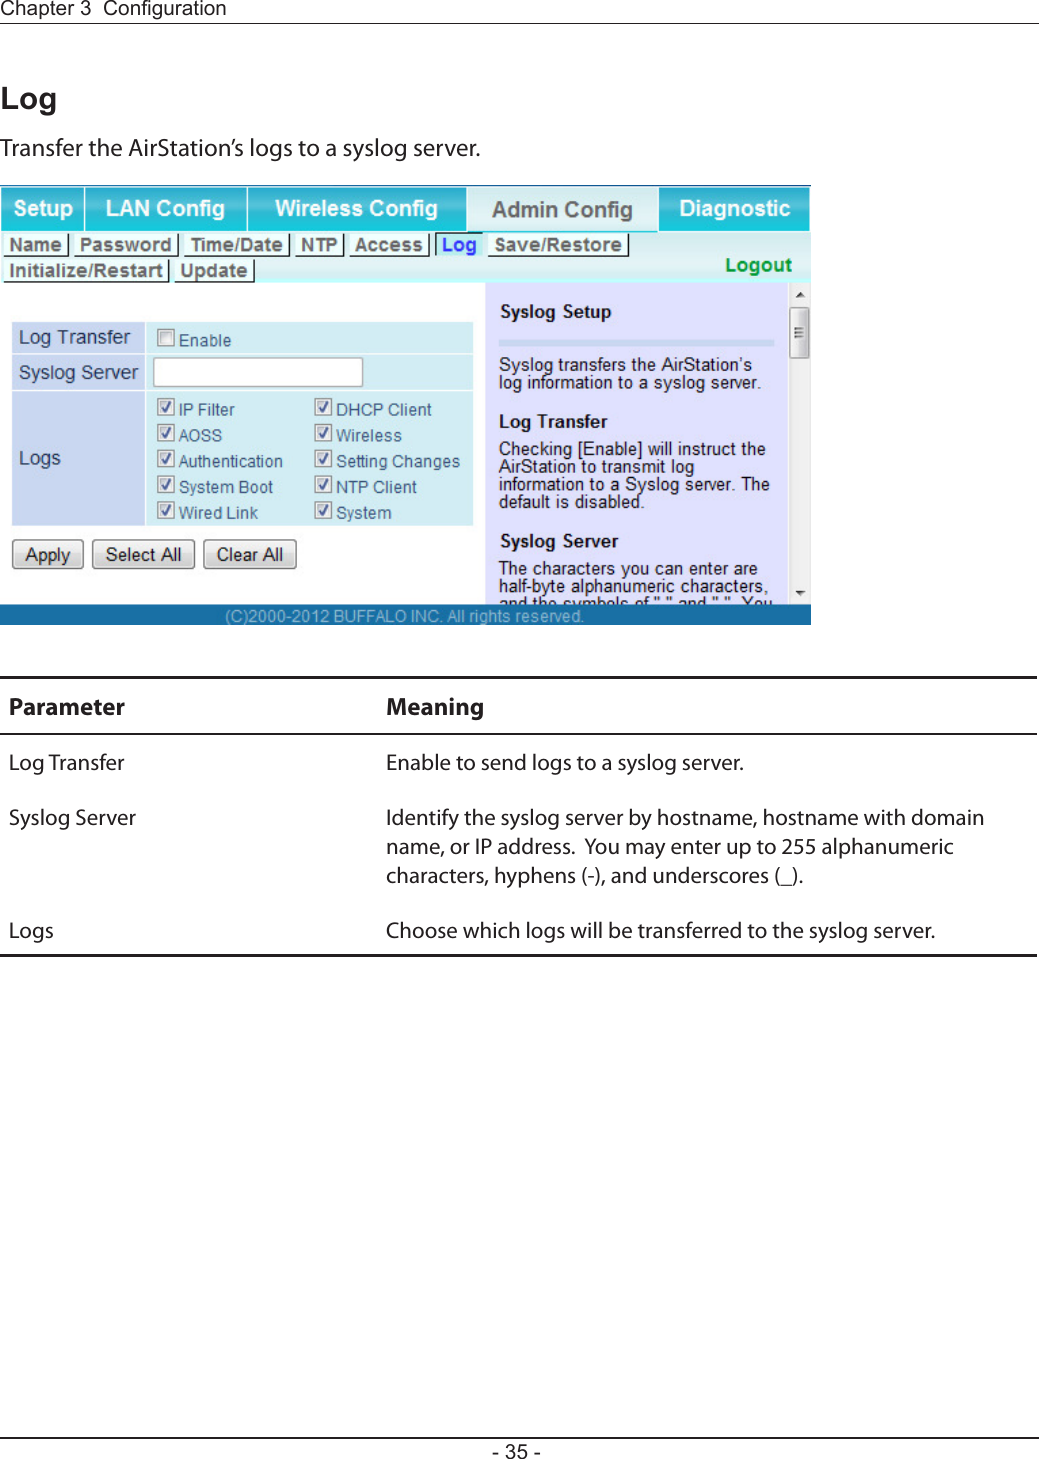
![- 36 -Chapter 3 CongurationSave/RestoreSave AirStation settings as a le and restore from them later.Parameter MeaningSave current settings Clicking [Save] will save the current conguration of the AirStation to a le. If the [Encrypt the conguration le with a password] option is checked, then the conguration le will be password protected with the current administrator password.Restore Conguration from Backup FileRestore the conguration of the AirStation from a saved conguration le by clicking the [Browse...], navigating to the conguration le, and then clicking [Restore]. If the conguration le was password protected, then put a check next to [Enter password], enter the password, and click [Open].](https://usermanual.wiki/BUFFALO/09101695-0.User-Manual-I/User-Guide-1680512-Page-37.png)
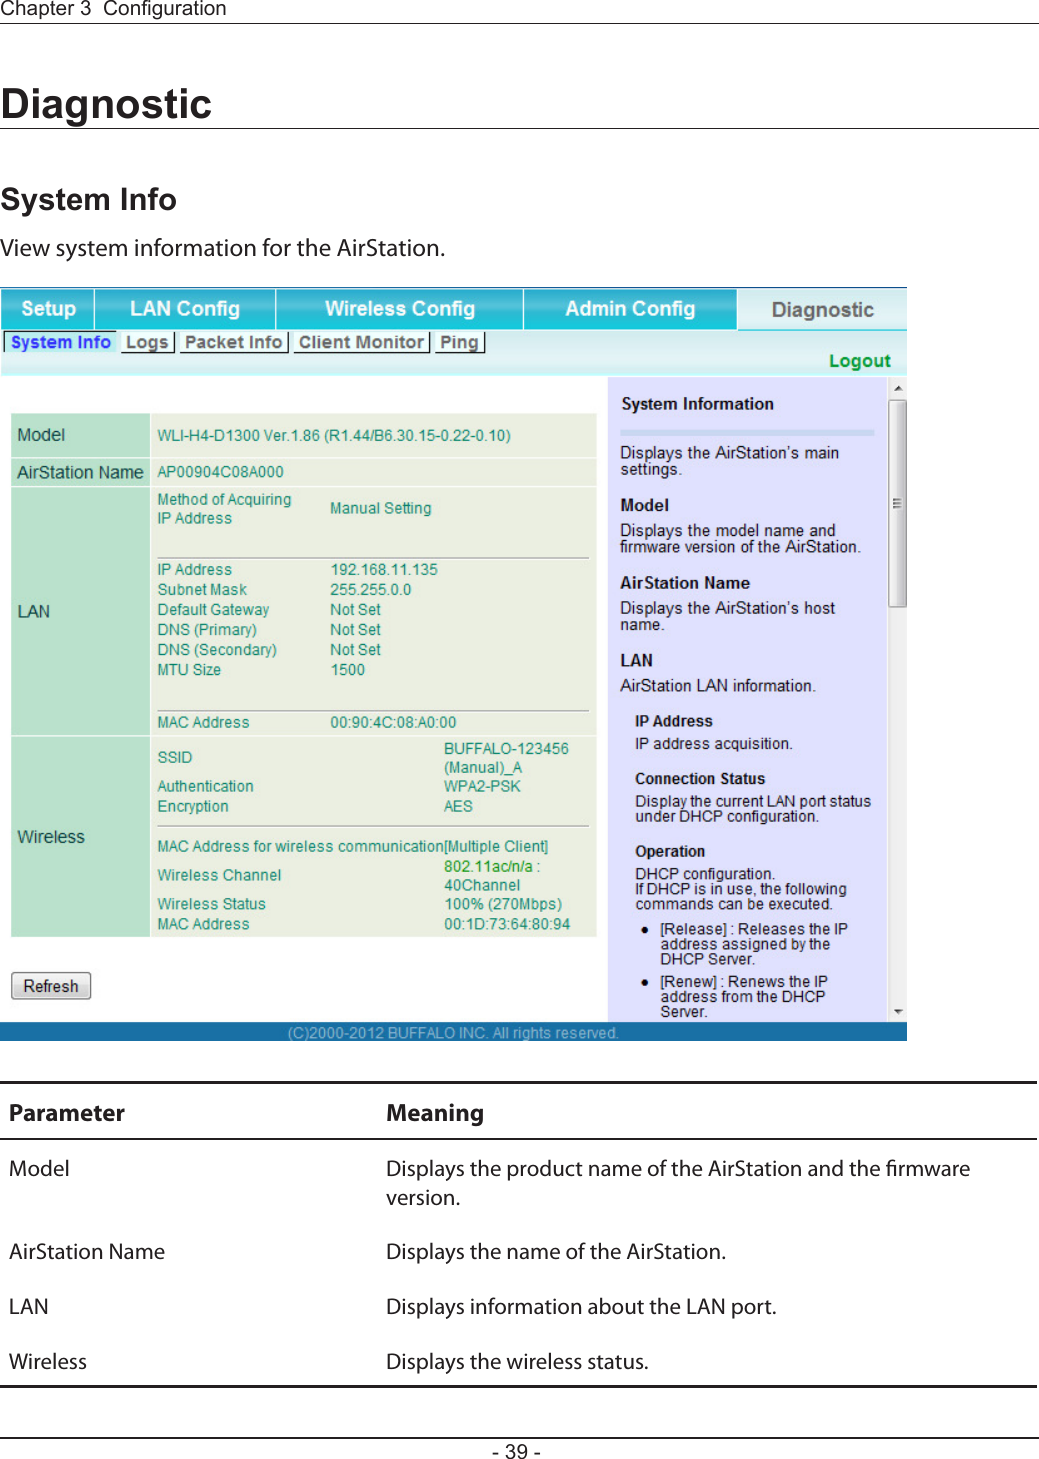
![Chapter 3 Conguration- 37 -Initialize/RestartInitialize or restart the AirStation.Parameter MeaningRestart Click [Restart Now] to restart the AirStation.Initialize Click [Initialize Now] to initialize and restart the AirStation.](https://usermanual.wiki/BUFFALO/09101695-0.User-Manual-I/User-Guide-1680512-Page-38.png)
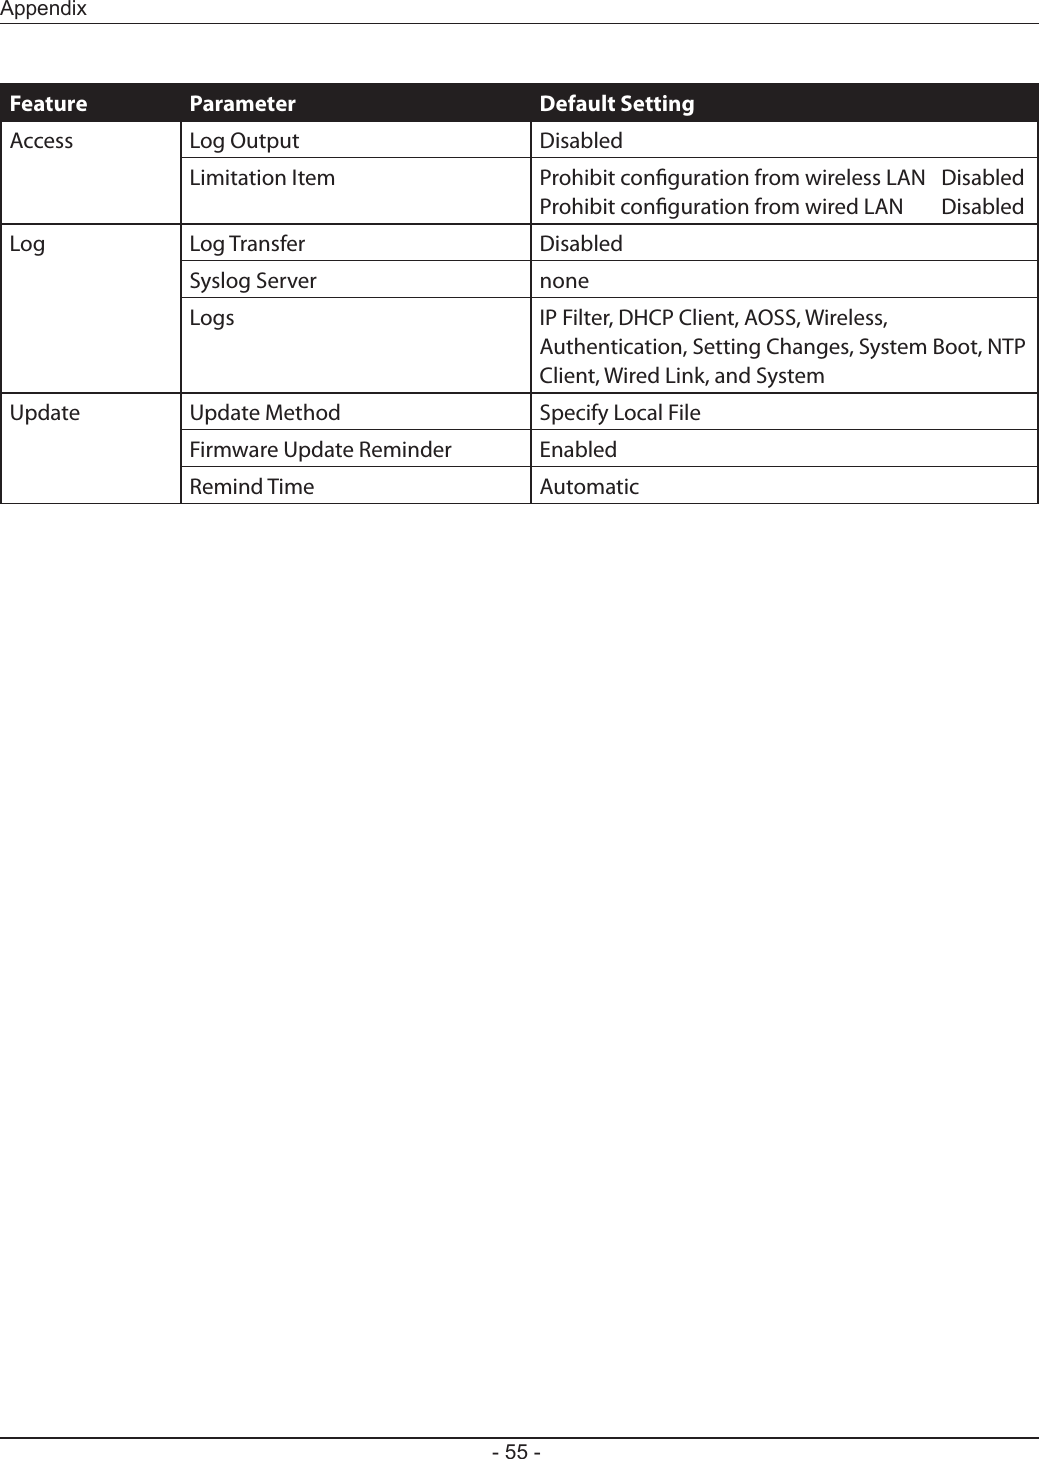
![- 38 -Chapter 3 CongurationUpdateUpdate the AirStation’s rmware.Parameter MeaningFirmware Version Displays the current rmware version of the AirStation.Update Method Specify Local FileUpdates from a rmware le stored on your computer.Automatic Update OnlineAutomatically updates to the latest rmware available.Firmware File Name Click [Browse...] to navigate to the rmware le on your computer if [Specify Local File] was selected. You don’t need to specify the rmware location if you’re using [Automatic Update]. Click [Update Firmware] to update the rmware.Firmware update Reminder Specify Enable/Disable Firmware Update Reminder.Remind Time Specify the time when the system detects new rmware.](https://usermanual.wiki/BUFFALO/09101695-0.User-Manual-I/User-Guide-1680512-Page-39.png)
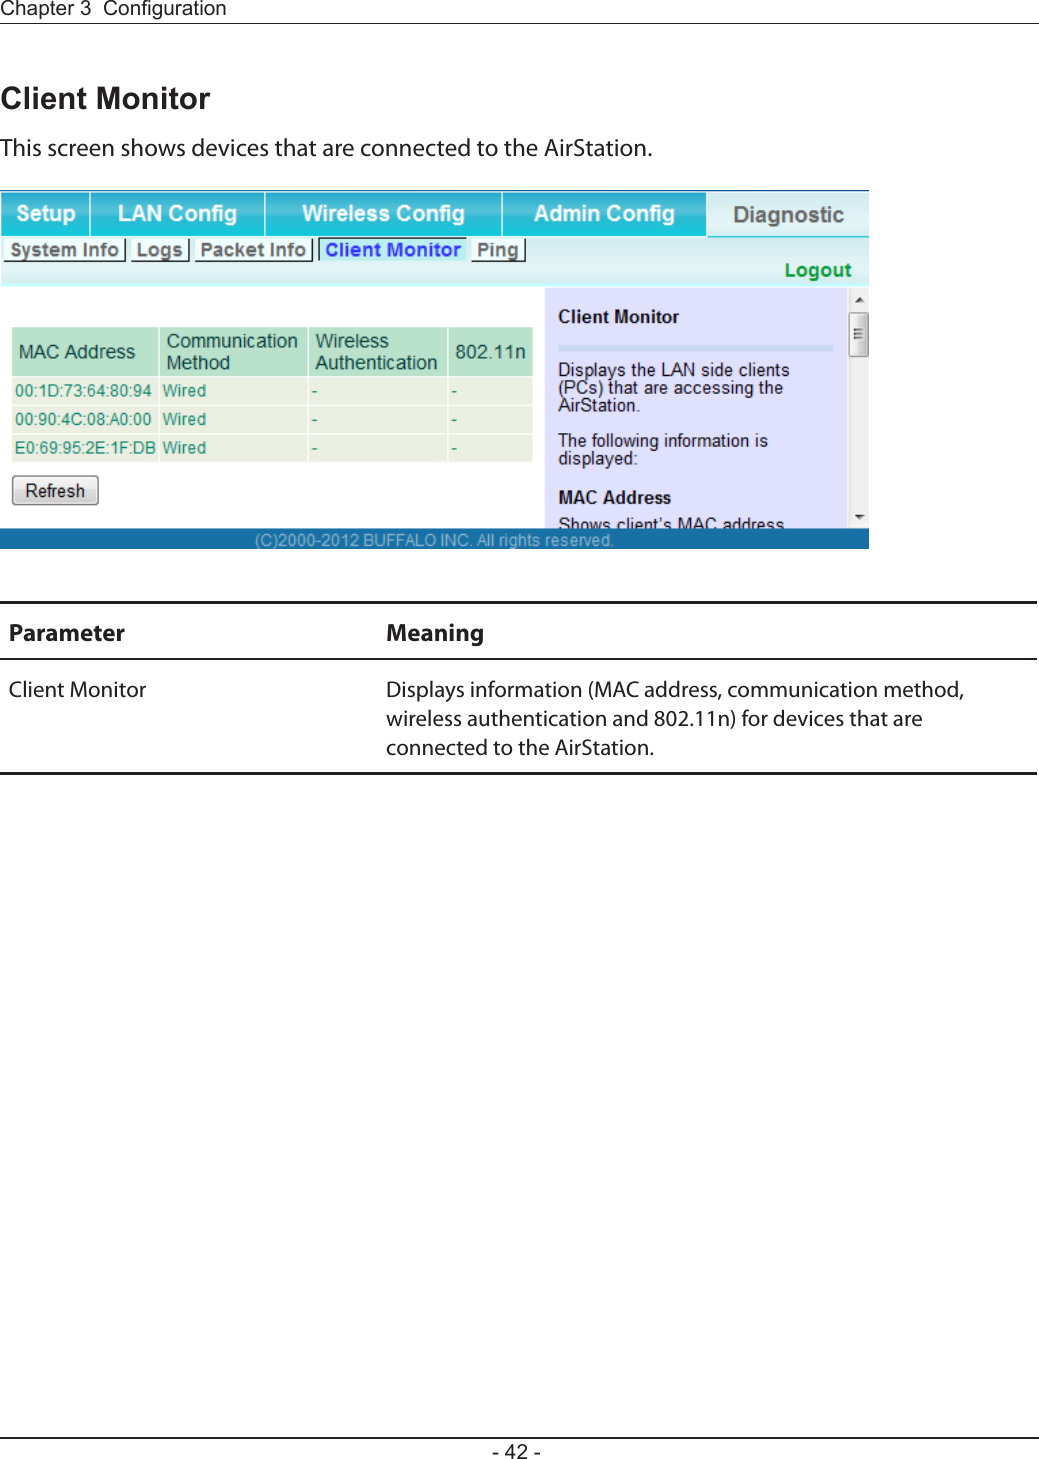
![Chapter 3 Conguration- 43 -PingA ping test checks whether the AirStation can communicate with a specic network device.Parameter MeaningDestination Address Enter the IP address or hostname of the device that you are testing communication with, then click [Execute]. The result will be displayed below.](https://usermanual.wiki/BUFFALO/09101695-0.User-Manual-I/User-Guide-1680512-Page-44.png)
![Chapter 4 TroubleShooting- 45 -TCP/IP Settings (Windows 7)To congure TCP/IP in Windows 7, follow the procedure below.1Click [Start] > [Control Panel] > [Network and Internet].2Click [Network and Sharing Center].3Click [Change Adapter Settings] on the left side menu.4Right-click on [Local Area Connection], then click [Properties].5If the User Account Control screen opens, click [Yes] or [Continue].6Select [Internet Protocol Version 4 (TCP/IPv4)] then click [Properties].7To have DHCP set your IP address settings automatically, check [Obtain an IP address automatically] and [Obtain DNS server address automatically]. To set your IP address settings manually, enter values for each setting. Examples: If your AirStation’s IP address is 1.1.1.1, IP address 1.1.1.2 Subnet mask 255.255.255.0 Default gateway blank Preferred DNS server blank Alternate DNS server blank8Click [OK].](https://usermanual.wiki/BUFFALO/09101695-0.User-Manual-I/User-Guide-1680512-Page-46.png)
![- 46 -Chapter 4 TroubleShootingTCP/IP Settings (Windows Vista)To congure TCP/IP in Windows Vista, follow the procedure below.1Click [Start] > [Settings] > [Control Panel].2Click [Network and Sharing Center].3Click [Manage network connections] on the left side menu. 4Right-click on [Local Area Connection], then click [Properties].5If the User Account Control screen opens, click [Yes] or [Continue].6Select [Internet Protocol Version 4 (TCP/IPv4)], then click [Properties].7To have DHCP set your IP address settings automatically, check [Obtain an IP address automatically] and [Obtain DNS server address automatically]. To set your IP address settings manually, enter values for each settings. Example: If your AirStation’s IP address is 1.1.1.1, IP address 1.1.1.2 Subnet mask 255.255.255.0 Default gateway blank Preferred DNS server blank Alternate DNS server blank8Click [Close].](https://usermanual.wiki/BUFFALO/09101695-0.User-Manual-I/User-Guide-1680512-Page-47.png)
![Chapter 4 TroubleShooting- 47 -TCP/IP Settings (Windows XP)To congure TCP/IP in Windows XP, follow the procedure below.1Click [Start] > [Settings] > [Control Panel].2Double-click [Network].3Right-click on [Local Area Connection], then click [Properties].4Select [Internet Protocol (TCP/IP)], then click [Properties].5To have DHCP set your IP address settings automatically, check [Obtain an IP address automatically] and [Obtain DNS server address automatically]. To set your IP address settings manually, enter values for each setting. Examples: If your AirStation’s IP address is 1.1.1.1, IP address 1.1.1.2 Subnet mask 255.255.255.0 Default gateway blank Preferred DNS server blank Alternate DNS server blank6Click [Close].](https://usermanual.wiki/BUFFALO/09101695-0.User-Manual-I/User-Guide-1680512-Page-48.png)
![- 48 -Chapter 4 TroubleShootingTCP/IP Settings (Mac OS X)To congure TCP/IP in Mac OS X, follow the procedure below.1Click [Apple menu] > [System Preferences…].2Click [Network].3Click [Ethernet].4To have DHCP set your IP address settings automatically, select [Using DHCP] in the Congure IPv4 eld. To set your IP address settings manually, select [Manually] in the Congure IPv4 eld and enter values for each setting. Examples: If your AirStation’s IP address is 1.1.1.1, IP Address 1.1.1.2 Subnet Mask 255.255.255.0 Router blank DNS Server blank Search Domains blank5Click [Apply].](https://usermanual.wiki/BUFFALO/09101695-0.User-Manual-I/User-Guide-1680512-Page-49.png)
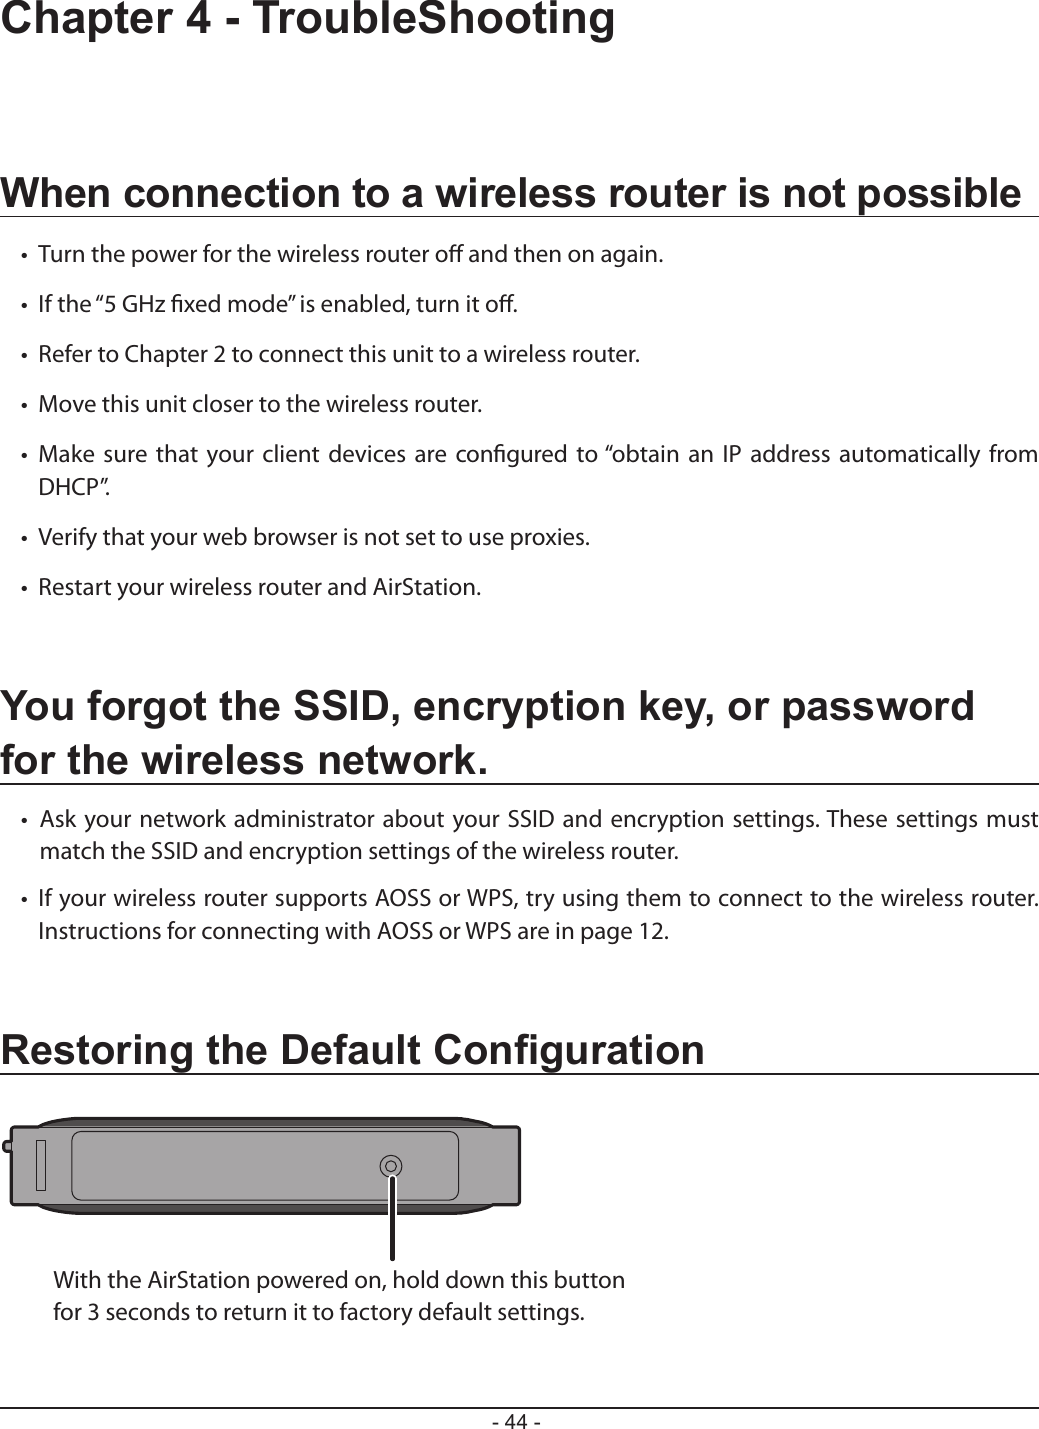
![Chapter 4 TroubleShooting- 49 -Other TipsIssue:I reset my AirStation to factory settings and forgot how to log in to the conguration interface.Answer:Open your browser, enter 1.1.1.1 as the browser address, and hit Enter. You will be prompted to log in. Enter “admin” for the username and “password” for the password. Click [OK] to log in. The option to reset your password will be available on the rst page.Issue:What can I do if my wireless connection drops randomly or seems slow?Answer:There are many environmental factors that may cause this. First, ensure the issue is not range related by moving the wireless router and the client device closer together. If the connection drops continue, then range is probably not the issue.Other 2.4 GHz devices such as microwaves, other wireless networks, and 2.4 GHz wireless phones may impact performance. Try a dierent wireless channel for your wireless router. Log in to the wireless router with your browser. Click on the Wireless Cong tab and then the Basic tab. Wireless channels from 1 - 11 may be selected. Try the Auto-Channel option if available. Otherwise, manually select an alternate channel and click [Apply].Issue:Where can I download the latest drivers, rmware, and instructions for my Bualo wireless products?Answer:The latest drivers and rmware are available online at www.bualotech.com](https://usermanual.wiki/BUFFALO/09101695-0.User-Manual-I/User-Guide-1680512-Page-50.png)
![- 56 -AppendixEthernet Converter ManagerEthernet Converter Manager OverviewEthernet Converter Manager is a tool to manage your AirStation. It lets you change the AirStation’s IP address. To install the this software, insert the Air Navigator CD into your computer. On the setup screen, click [Software installation].Opening and Closing Ethernet Converter ManagerTo start Ethernet Converter Manager, click [Start] > [All programs] > [BUFFALO] > [AirStation Utility] > [Ethernet Converter Manager]. To close the Ethernet Converter Manager, click [X] at the top right of the screen, or click [Exit].](https://usermanual.wiki/BUFFALO/09101695-0.User-Manual-I/User-Guide-1680512-Page-57.png)
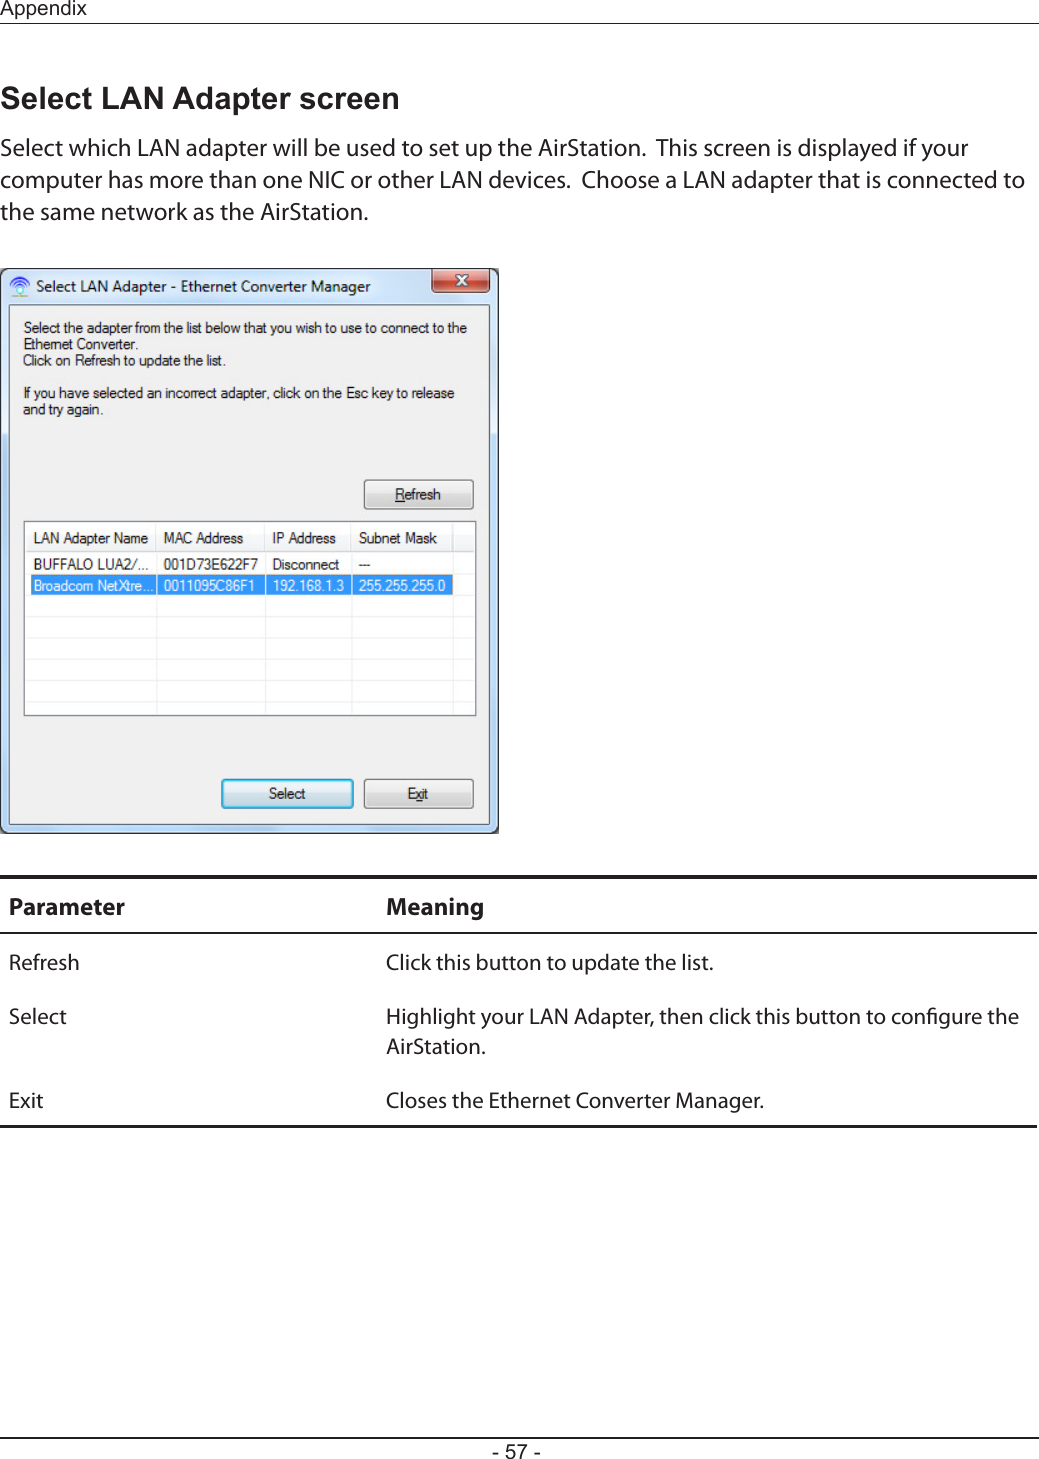
![- 58 -AppendixSelect Ethernet ConverterIf you have multiple AirStations on the network, they’ll all be displayed here. Choose your AirStation from the list and highlight it. Click [Select].Parameter MeaningRefresh Click this button to search and view the list of the AirStations that can be congured with this software.Connect automatically when only one Ethernet Converter is detectedCheck this option to skip this screen when there is only one AirStation that can be congured.Web Setting Click this button to display the AirStation’s Web conguration interface. Note: If your computer and the AirStation are on dierent network subnets, then the IP address settings page will be displayed instead.Select Highlight your AirStation, then click this button to display the main screen.Exit Closes the Ethernet Converter Manager.](https://usermanual.wiki/BUFFALO/09101695-0.User-Manual-I/User-Guide-1680512-Page-59.png)
![- 66 -AppendixČesky [Czech]Bualo Technology Inc. tímto prohlašuje, že tento AirStation WLI-H4-D1300 je ve shodě se základními požadavky a dalšími příslušnými ustanoveními směrnice 1999/5/ES.Dansk [Danish]Undertegnede Bualo Technology Inc. erklærer herved, at følgende udstyr AirStation WLI-H4-D1300 overholder de væsentlige krav og øvrige relevante krav i direktiv 1999/5/EF.Deutsch [German]Hiermit erklärt Bualo Technology Inc. dass sich das Gerät AirStation WLI-H4-D1300 in Übereinstimmung mit den grundlegenden Anforderungen und den übrigen einschlägigen Bestimmungen der Richtlinie 1999/5/EG bendet.Eesti [Estonian]Käesolevaga kinnitab Bualo Technology Inc. seadme AirStation WLI-H4-D1300 vastavust direktiivi 1999/5/EÜ põhinõuetele ja nimetatud direktiivist tulenevatele teistele asjakohastele sätetele.English Hereby, Bualo Technology Inc. declares that this AirStation WLI-H4-D1300 is in compliance with the essential requirements and other relevant provisions of Directive 1999/5/EC.Español [Spanish]Por medio de la presente Bualo Technology Inc. declara que el AirStation WLI-H4-D1300 cumple con los requisitos esenciales y cualesquiera otras disposiciones aplicables o exigibles de la Directiva 1999/5/CE.Ελληνική [Greek]ΜΕ ΤΗΝ ΠΑΡΟΥΣΑ Bualo Technology Inc. ΔΗΛΩΝΕΙ ΟΤΙ AirStation WLI-H4-D1300 ΣΥΜΜΟΡΦΩΝΕΤΑΙ ΠΡΟΣ ΤΙΣ ΟΥΣΙΩΔΕΙΣ ΑΠΑΙΤΗΣΕΙΣ ΚΑΙ ΤΙΣ ΛΟΙΠΕΣ ΣΧΕΤΙΚΕΣ ΔΙΑΤΑΞΕΙΣ ΤΗΣ ΟΔΗΓΙΑΣ 1999/5/ΕΚ.Français [French]Par la présente Bualo Technology Inc. déclare que l’appareil AirStation WLI-H4-D1300 est conforme aux exigences essentielles et aux autres dispositions pertinentes de la directive 1999/5/CE.Italiano [Italian]Con la presente Bualo Technology Inc. dichiara che questo AirStation WLI-H4-D1300 è conforme ai requisiti essenziali ed alle altre disposizioni pertinenti stabilite dalla direttiva 1999/5/CE.Latviski [Latvian]Ar šo Bualo Technology Inc. deklarē, ka AirStation WLI-H4-D1300 atbilst Direktīvas 1999/5/EK būtiskajām prasībām un citiem ar to saistītajiem noteikumiem.](https://usermanual.wiki/BUFFALO/09101695-0.User-Manual-I/User-Guide-1680512-Page-67.png)
![Appendix- 67 -Lietuvių [Lithuanian]Šiuo Bualo Technology Inc. deklaruoja, kad šis AirStation WLI-H4-D1300 atitinka esminius reikalavimus ir kitas 1999/5/EB Direktyvos nuostatas.Nederlands [Dutch]Hierbij verklaart Bualo Technology Inc. dat het toestel AirStation WLI-H4-D1300 in overeenstemming is met de essentiële eisen en de andere relevante bepalingen van richtlijn 1999/5/EG.Malti [Maltese]Hawnhekk, Bualo Technology Inc. jiddikjara li dan AirStation WLI-H4-D1300 jikkonforma mal-ħtiġijiet essenzjali u ma provvedimenti oħrajn relevanti li hemm fid-Dirrettiva 1999/5/EC.Magyar [Hungarian]Alulírott, Bualo Technology Inc. hogy a WLI-H4-D1300 megfelel a vonatkozó alapvetõ követelményeknek és az 1999/5/EC irányelv egyéb elõírásainak.Polski [Polish]Niniejszym Bualo Technology Inc. oświadcza, że WLI-H4-D1300 jest zgodny z zasadniczymi wymogami oraz pozostałymi stosownymi postanowieniami Dyrektywy 1999/5/EC.Português [Portuguese]Bualo Technology Inc. declara que este WLI-H4-D1300 está conforme com os requisitos essenciais e outras disposições da Directiva 1999/5/CE.Slovensko [Slovenian]Bualo Technology Inc. izjavlja, da je ta WLI-H4-D1300 v skladu z bistvenimi zahtevami in ostalimi relevantnimi določili direktive 1999/5/ES.Slovensky [Slovak]Bualo Technology Inc. týmto vyhlasuje, že WLI-H4-D1300 spĺňa základné požiadavky a všetky príslušné ustanovenia Smernice 1999/5/ES.Suomi [Finnish]Bualo Technology Inc. vakuuttaa täten että WLI-H4-D1300 tyyppinen laite on direktiivin 1999/5/EY oleellisten vaatimusten ja sitä koskevien direktiivin muiden ehtojen mukainen.Svenska [Swedish]Härmed intygar Bualo Technology Inc. att denna WLI-H4-D1300 står I överensstämmelse med de väsentliga egenskapskrav och övriga relevanta bestämmelser som framgår av direktiv 1999/5/EG.](https://usermanual.wiki/BUFFALO/09101695-0.User-Manual-I/User-Guide-1680512-Page-68.png)