BUFFALO 09101695-0 Wireless AC1300 / N900 Gigabit Dual Band Router User Manual WZR D1800H
BUFFALO INC. Wireless AC1300 / N900 Gigabit Dual Band Router WZR D1800H
BUFFALO >
Contents
- 1. user manual I
- 2. user manual II
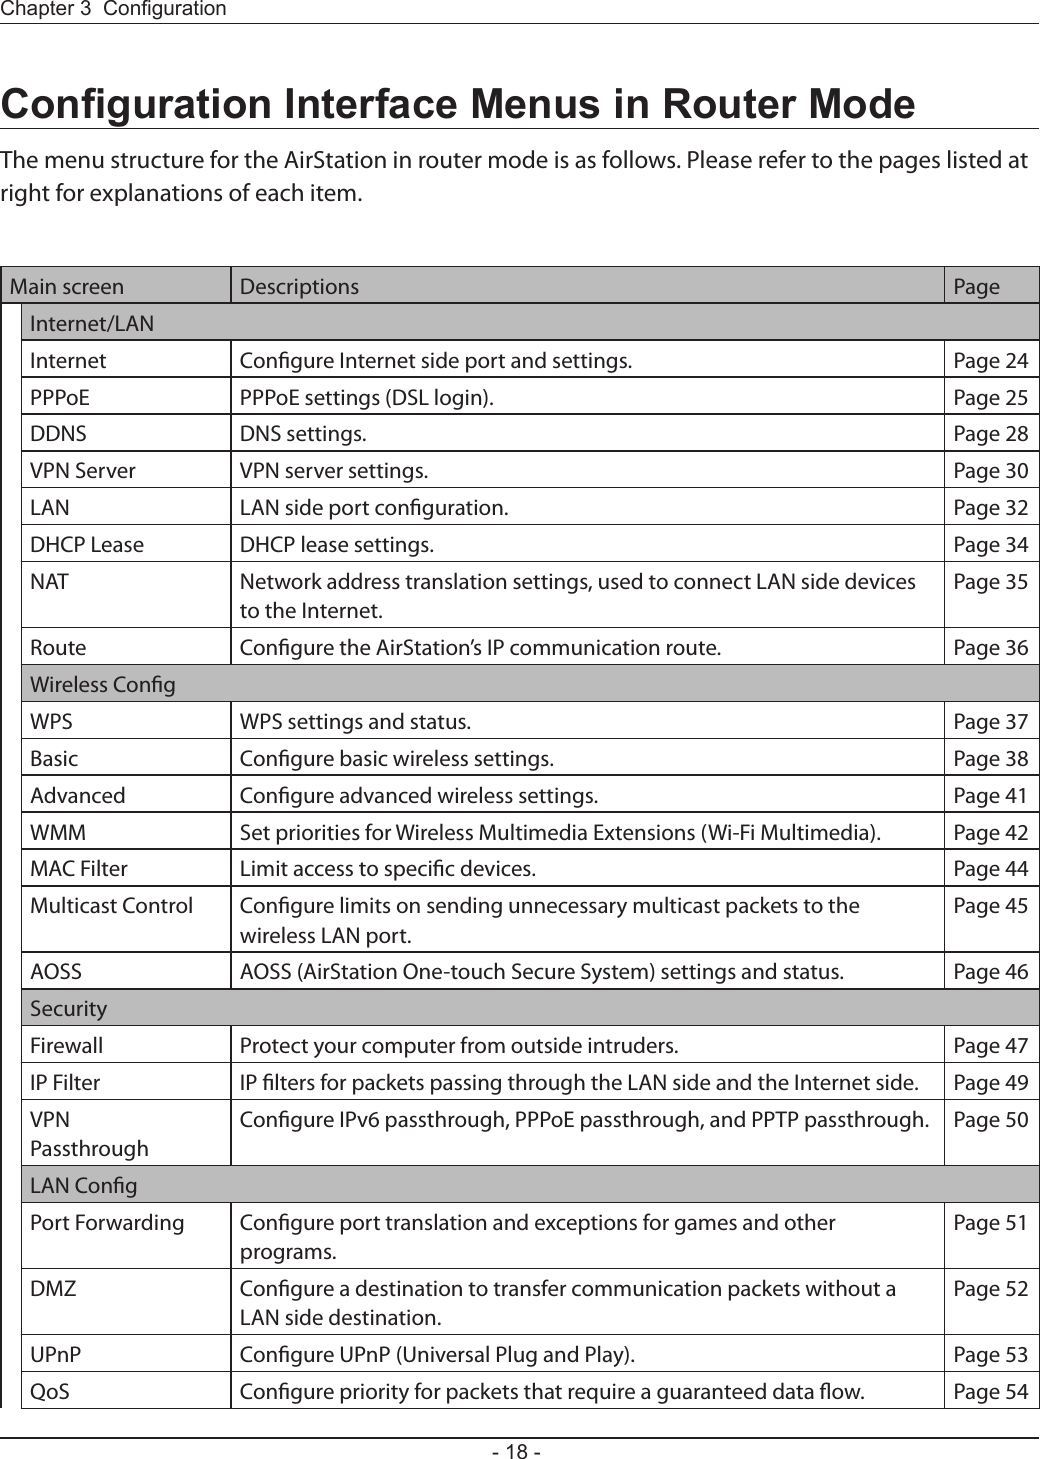
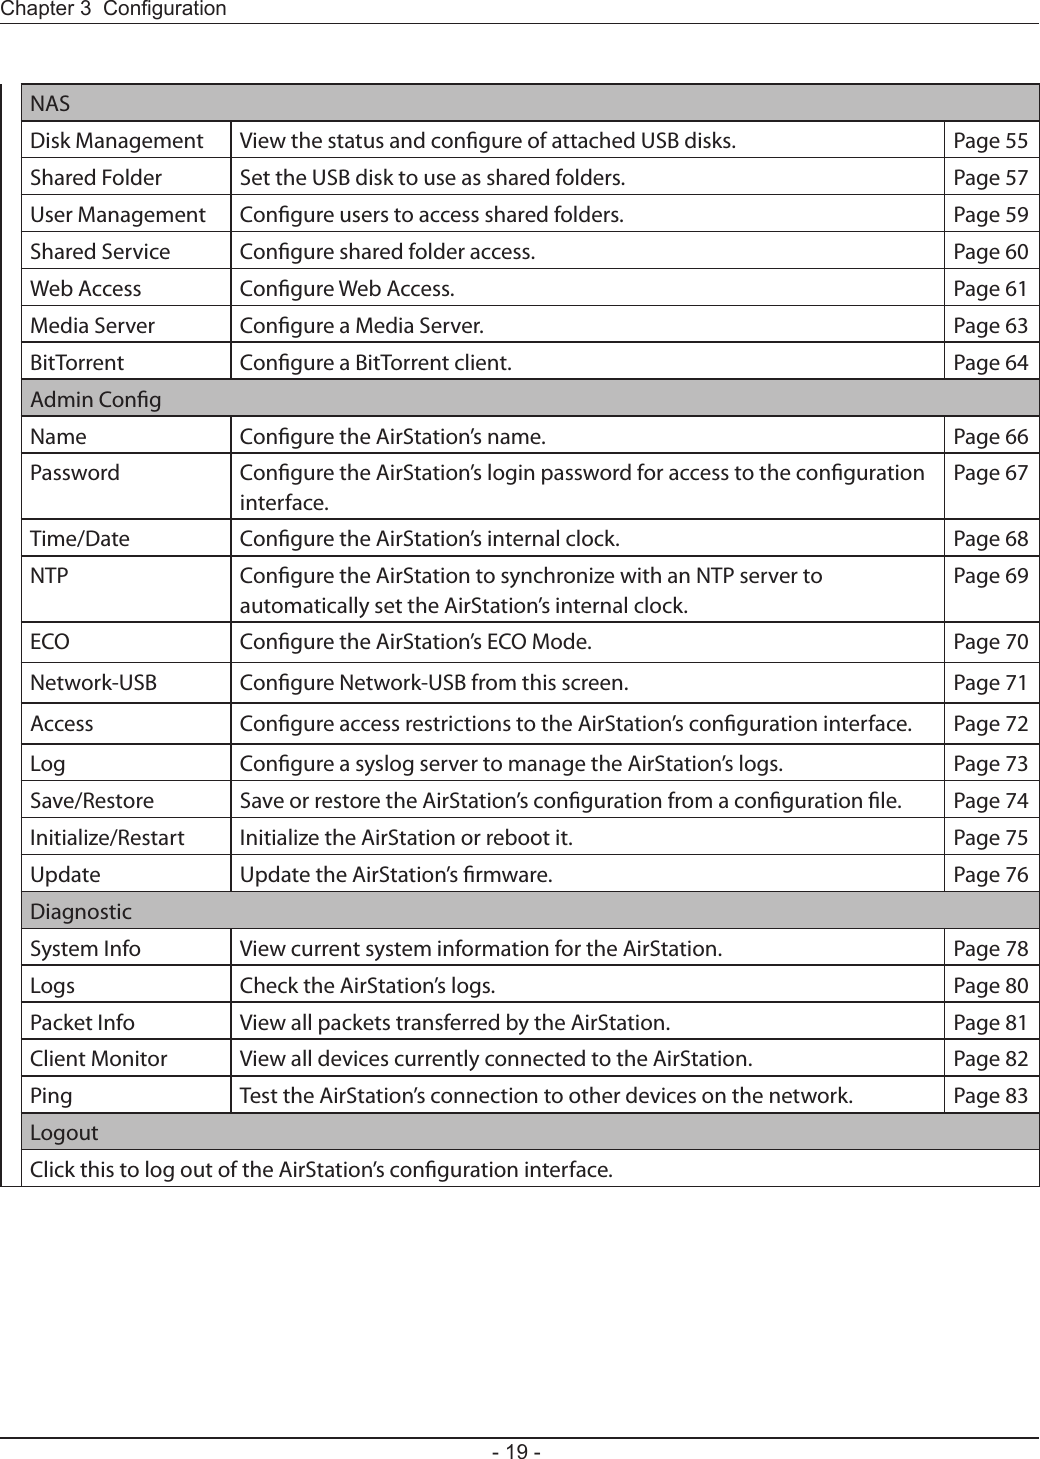
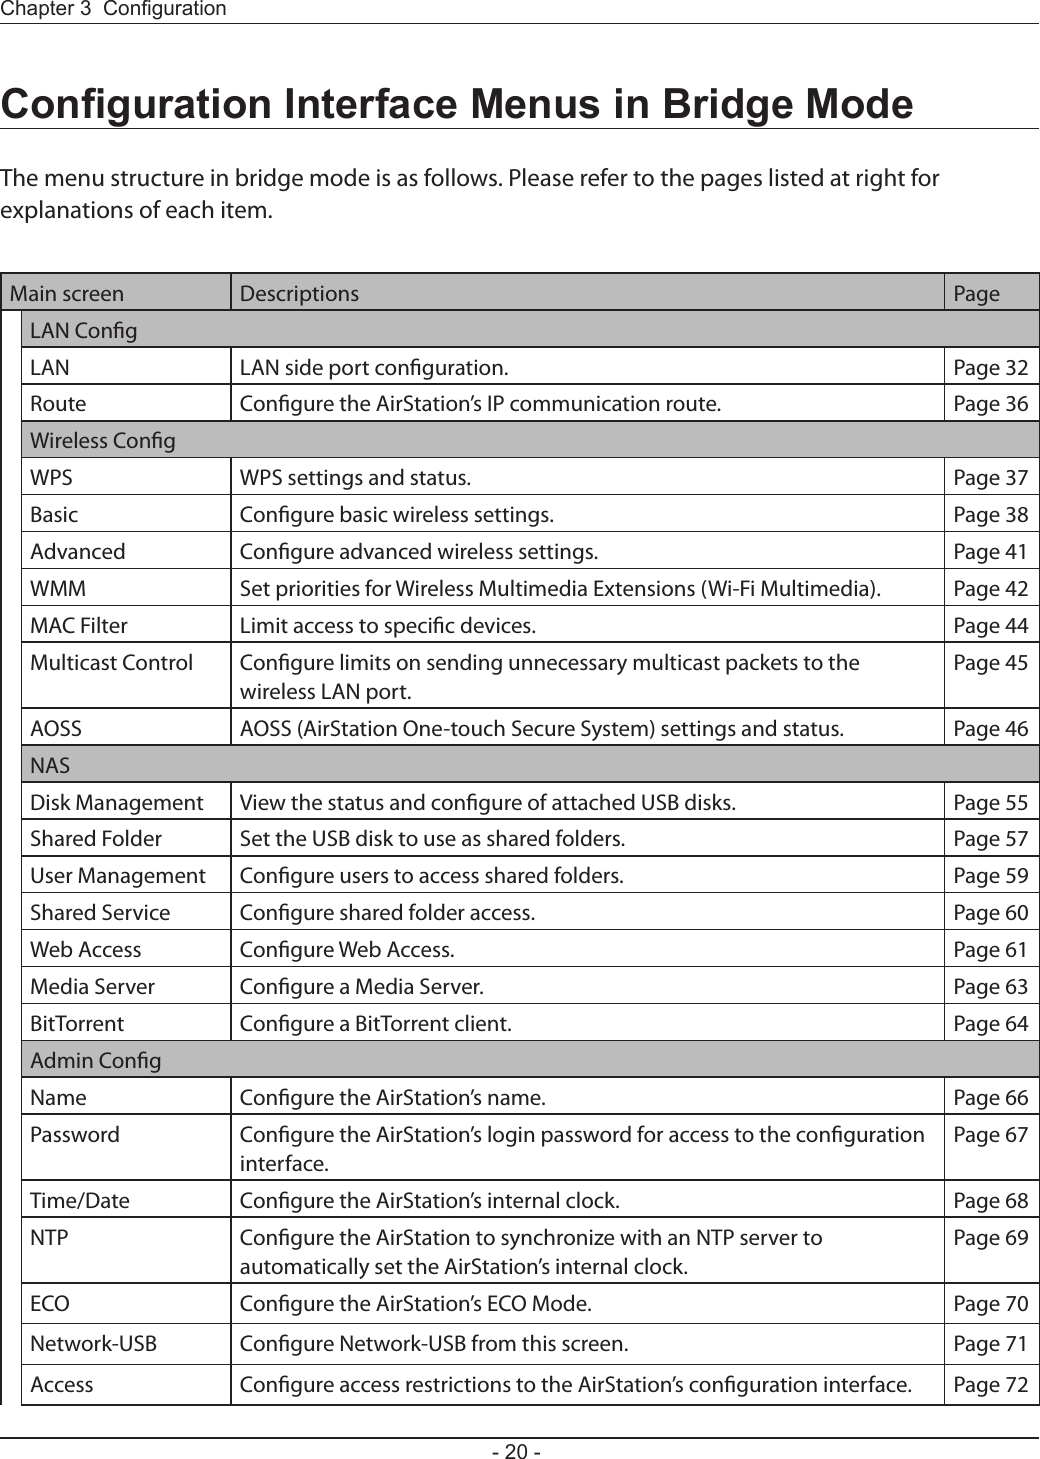
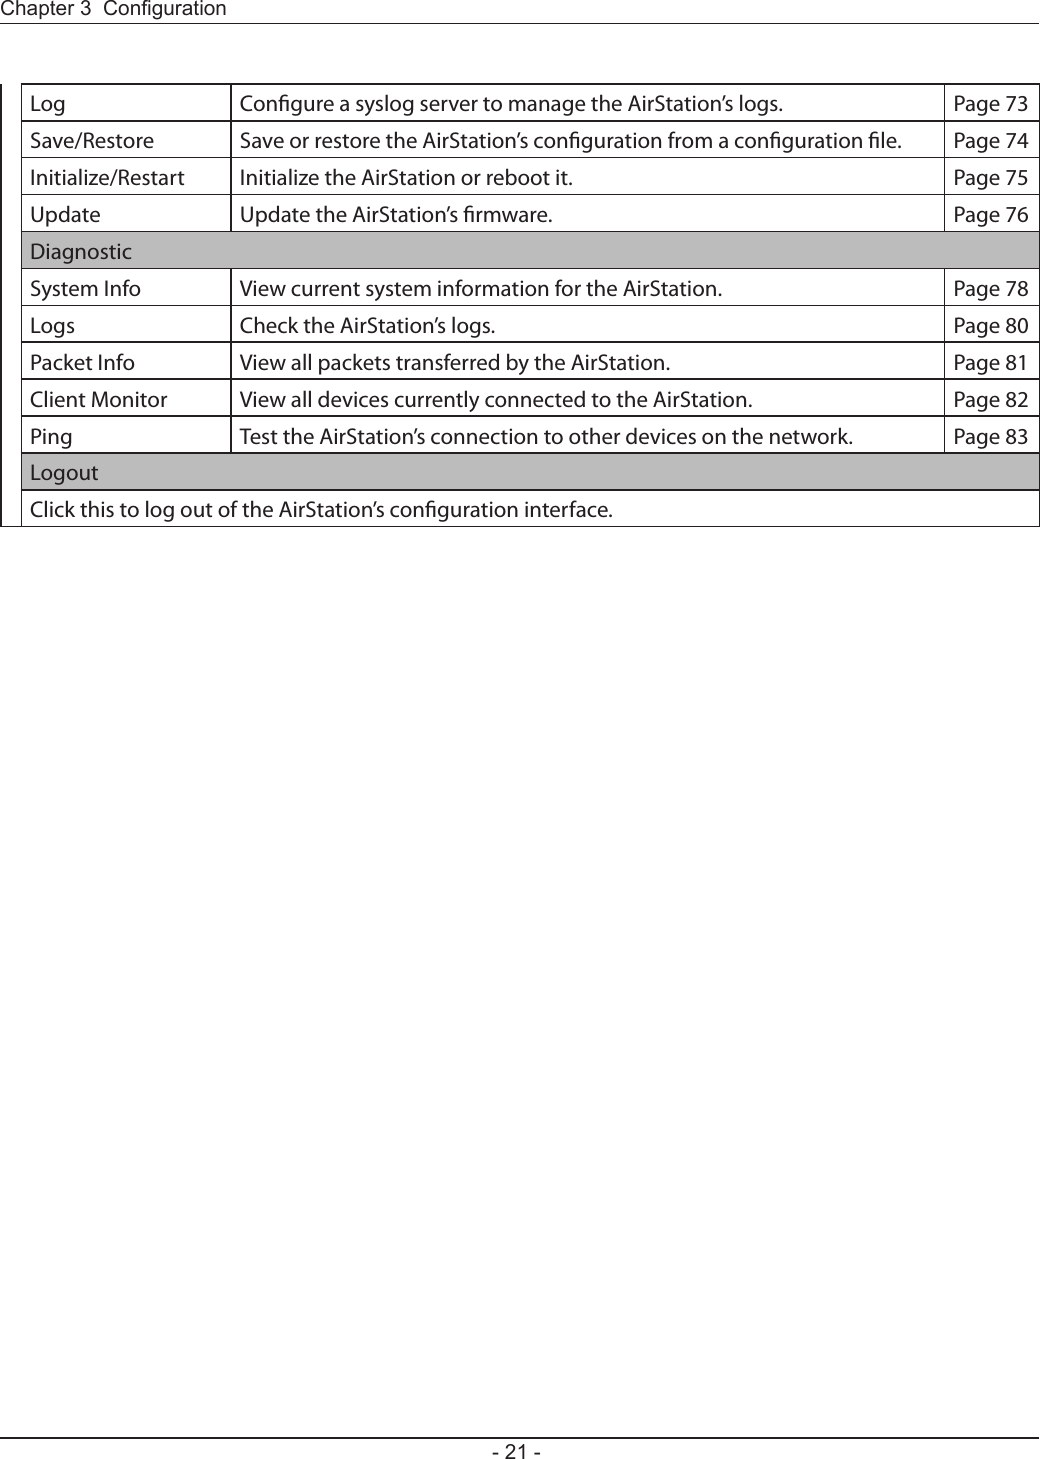
- 3. User Manual I
- 4. User Manual II
user manual II

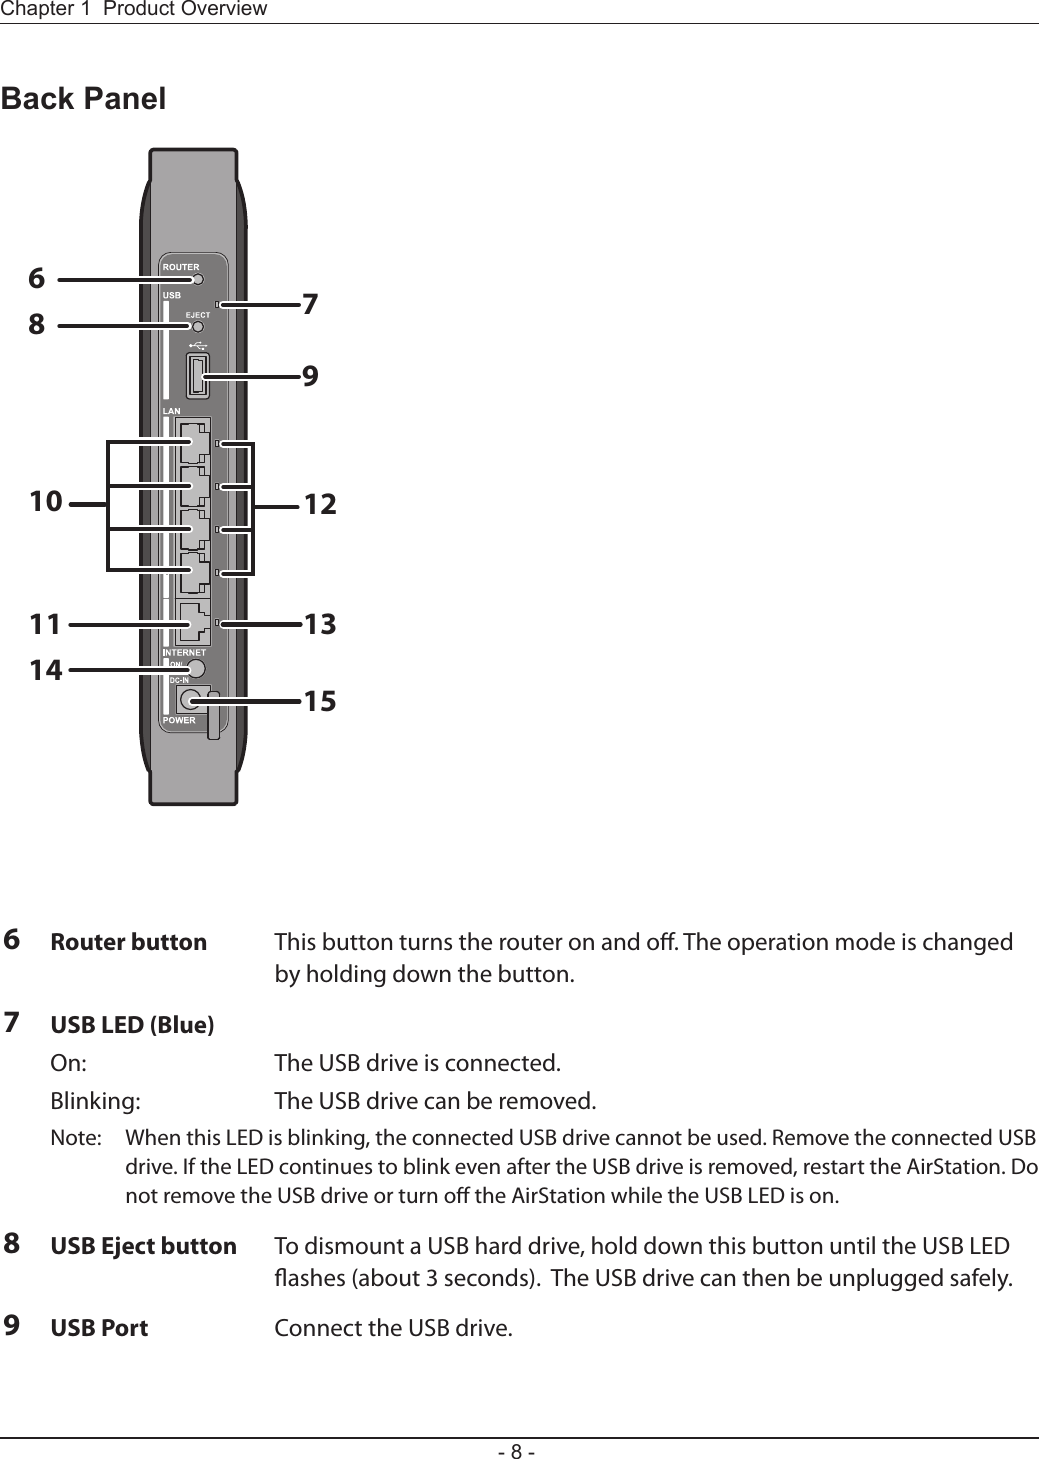
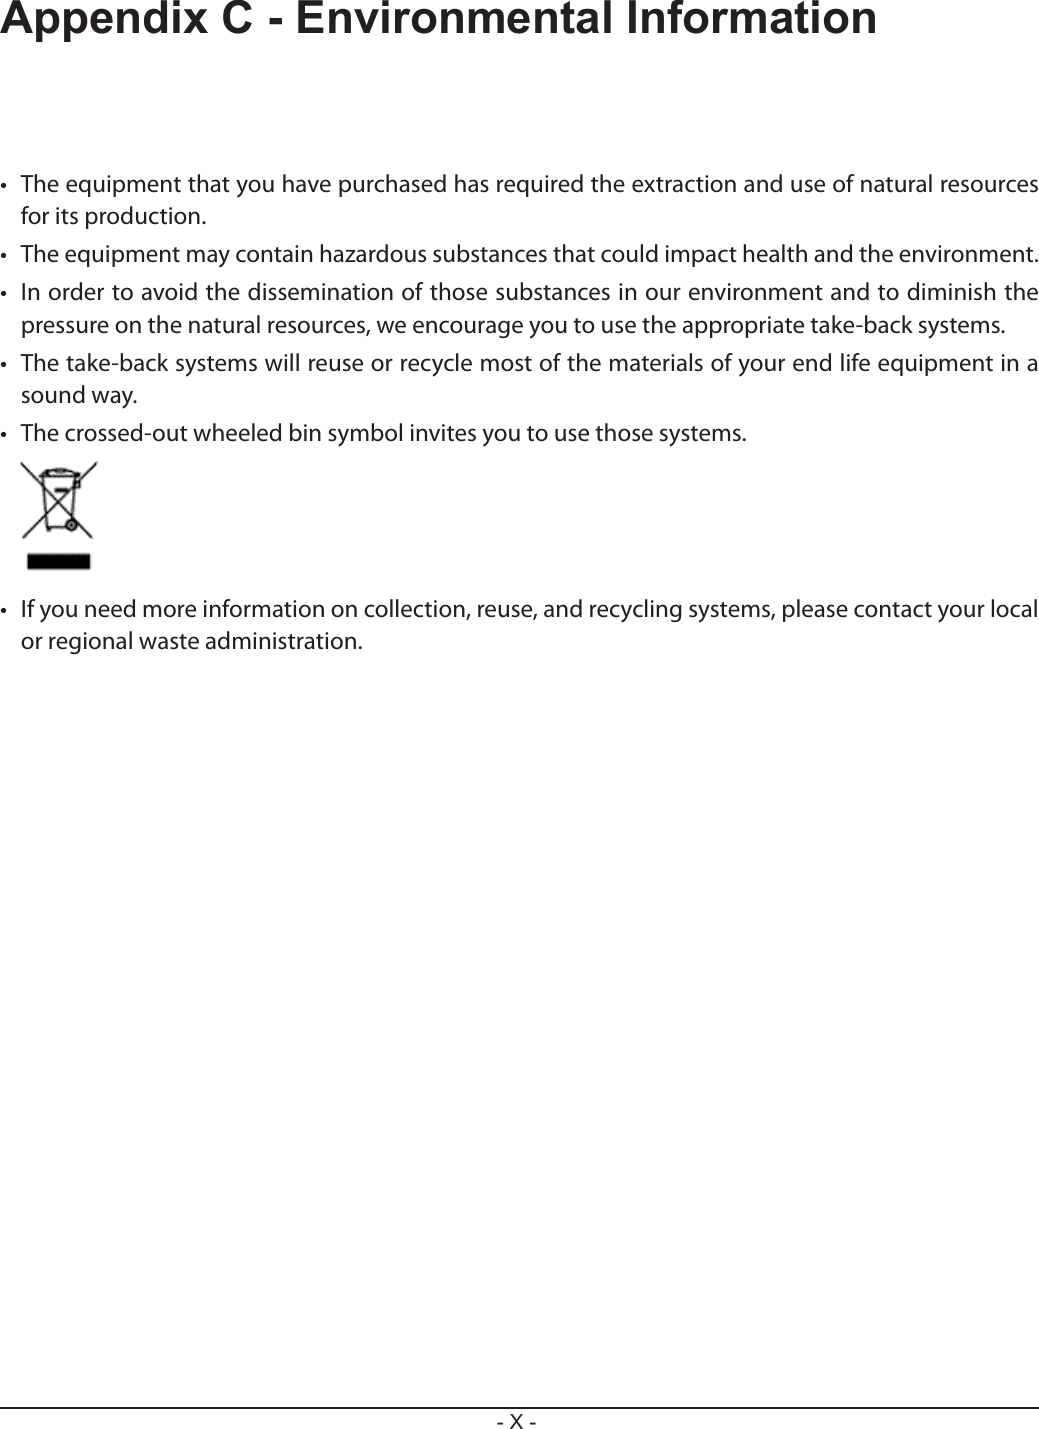
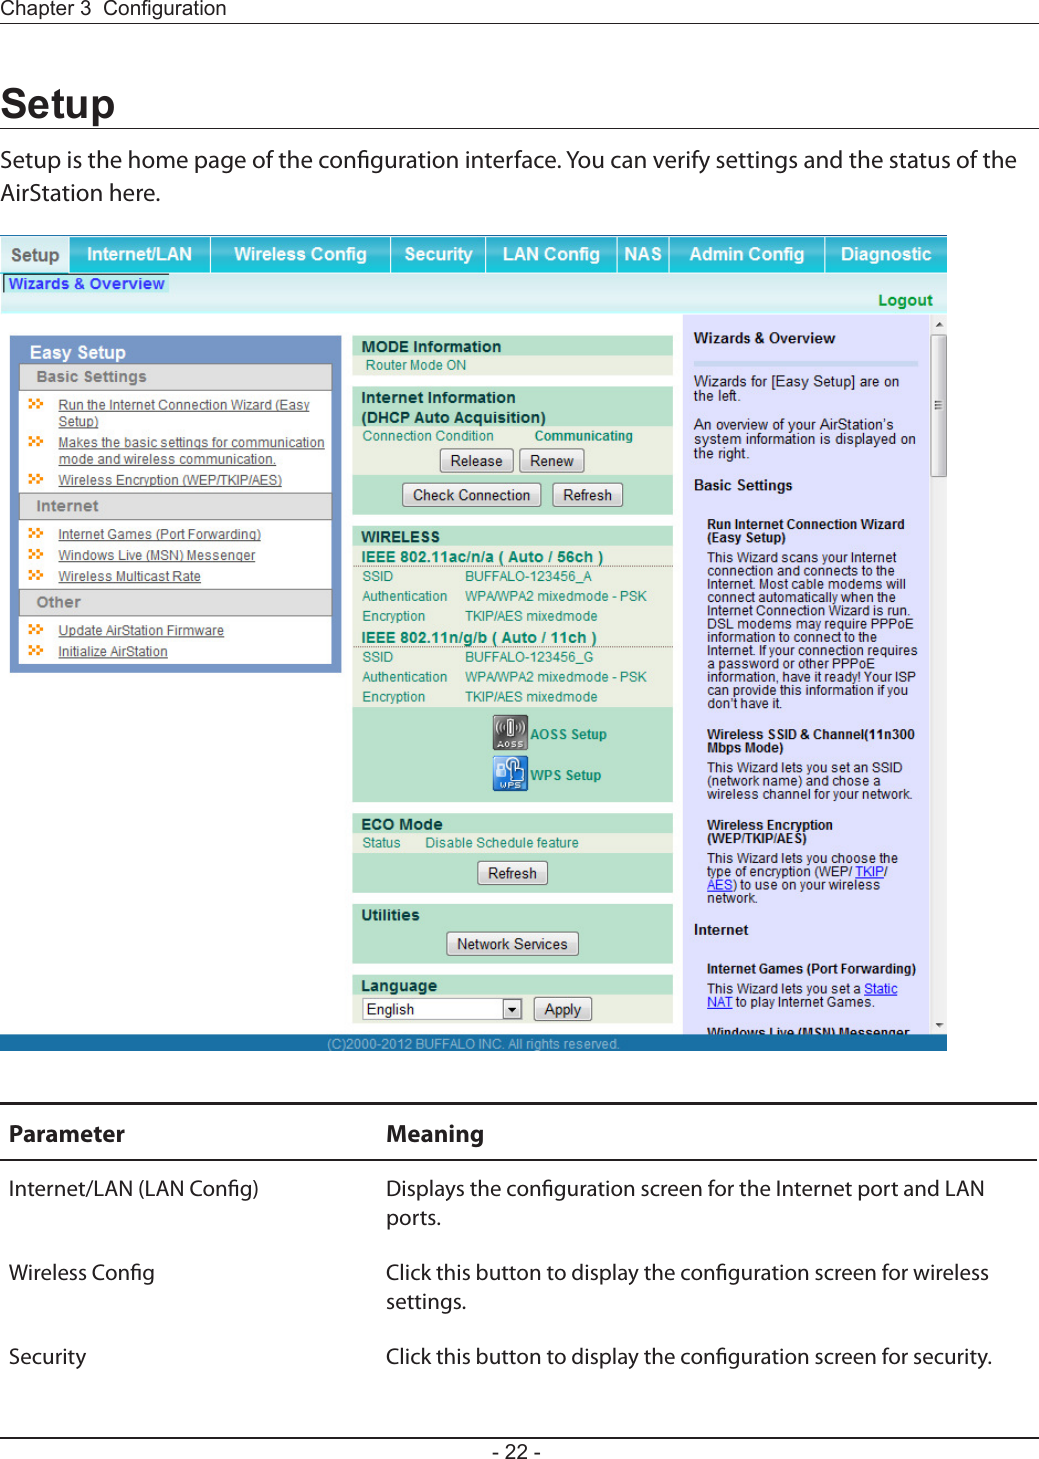
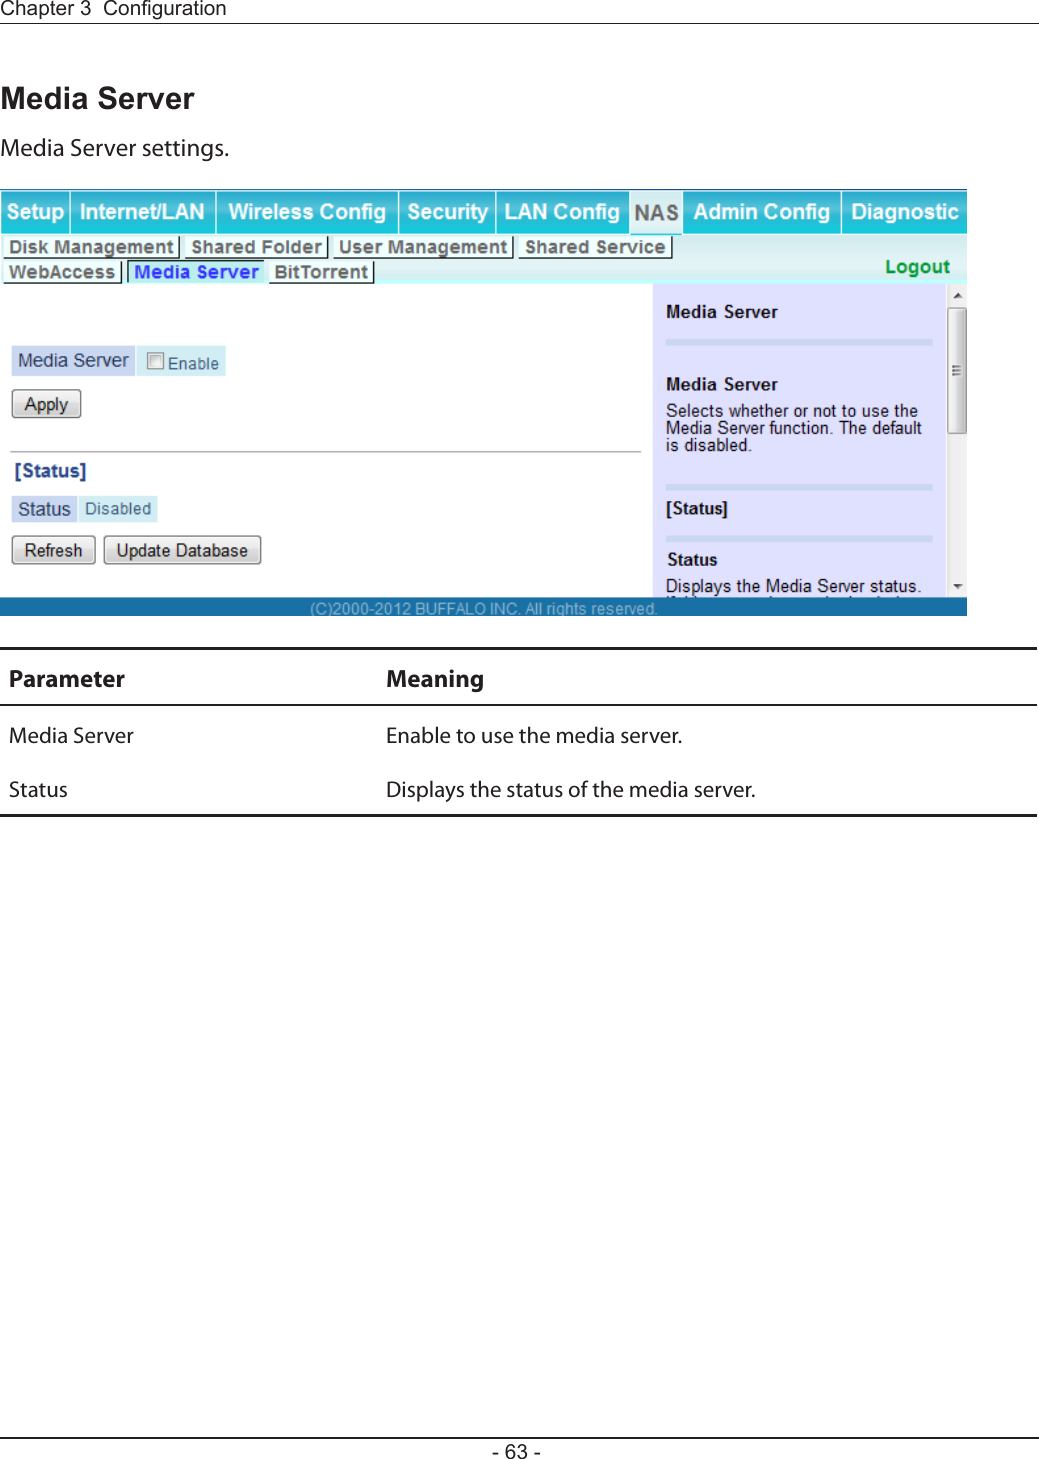
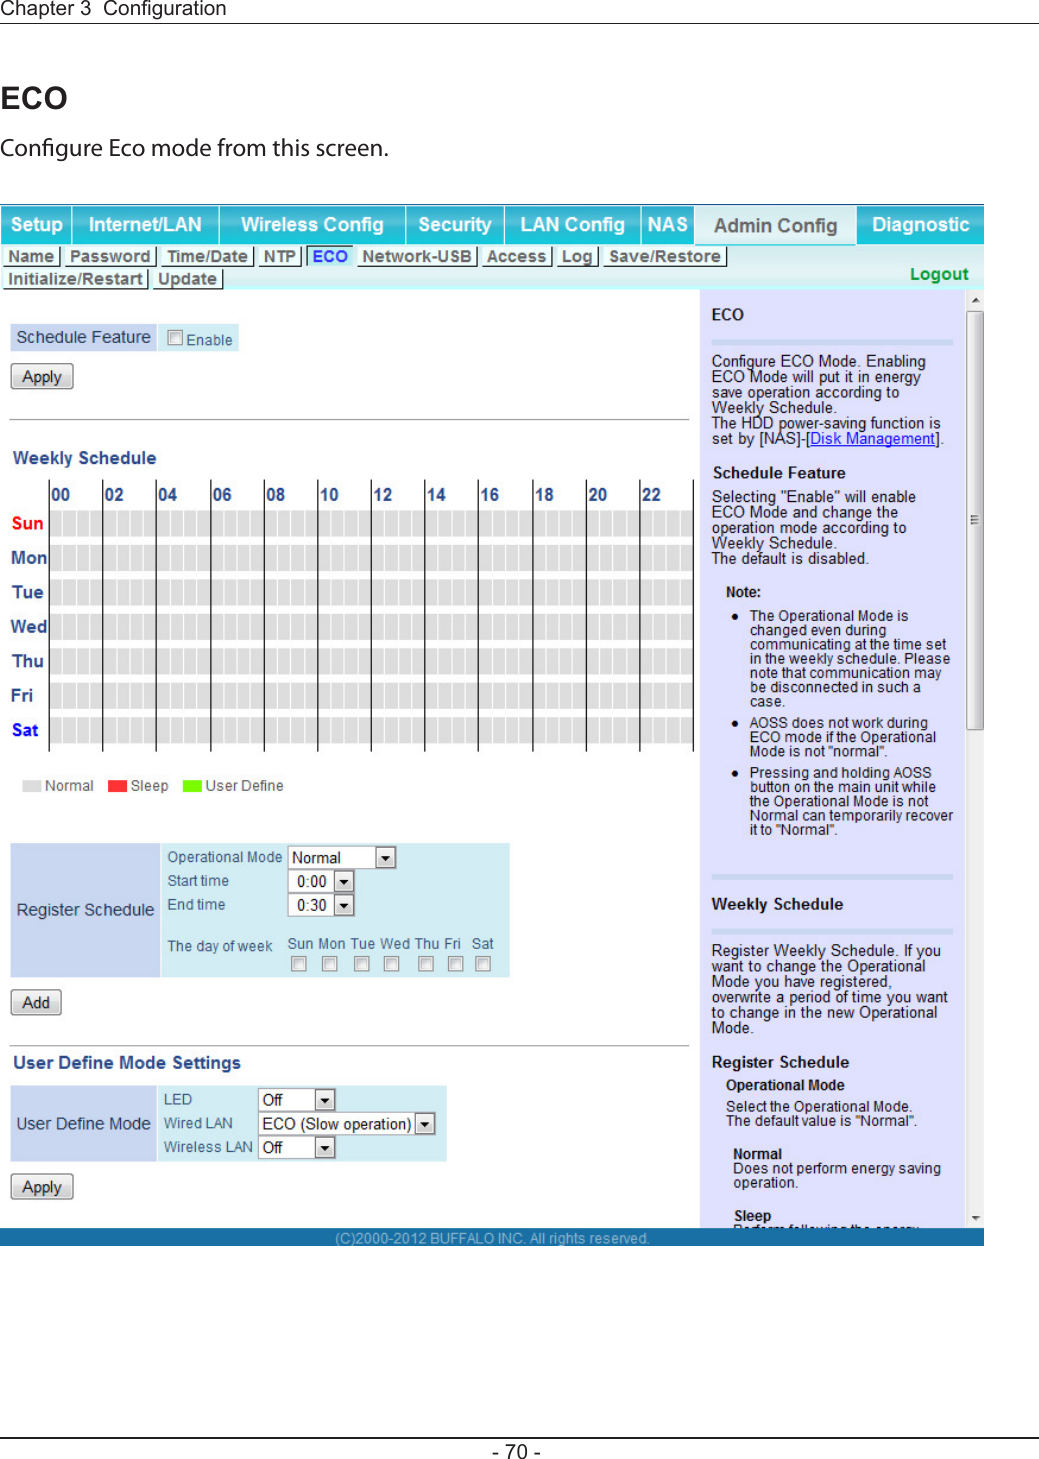
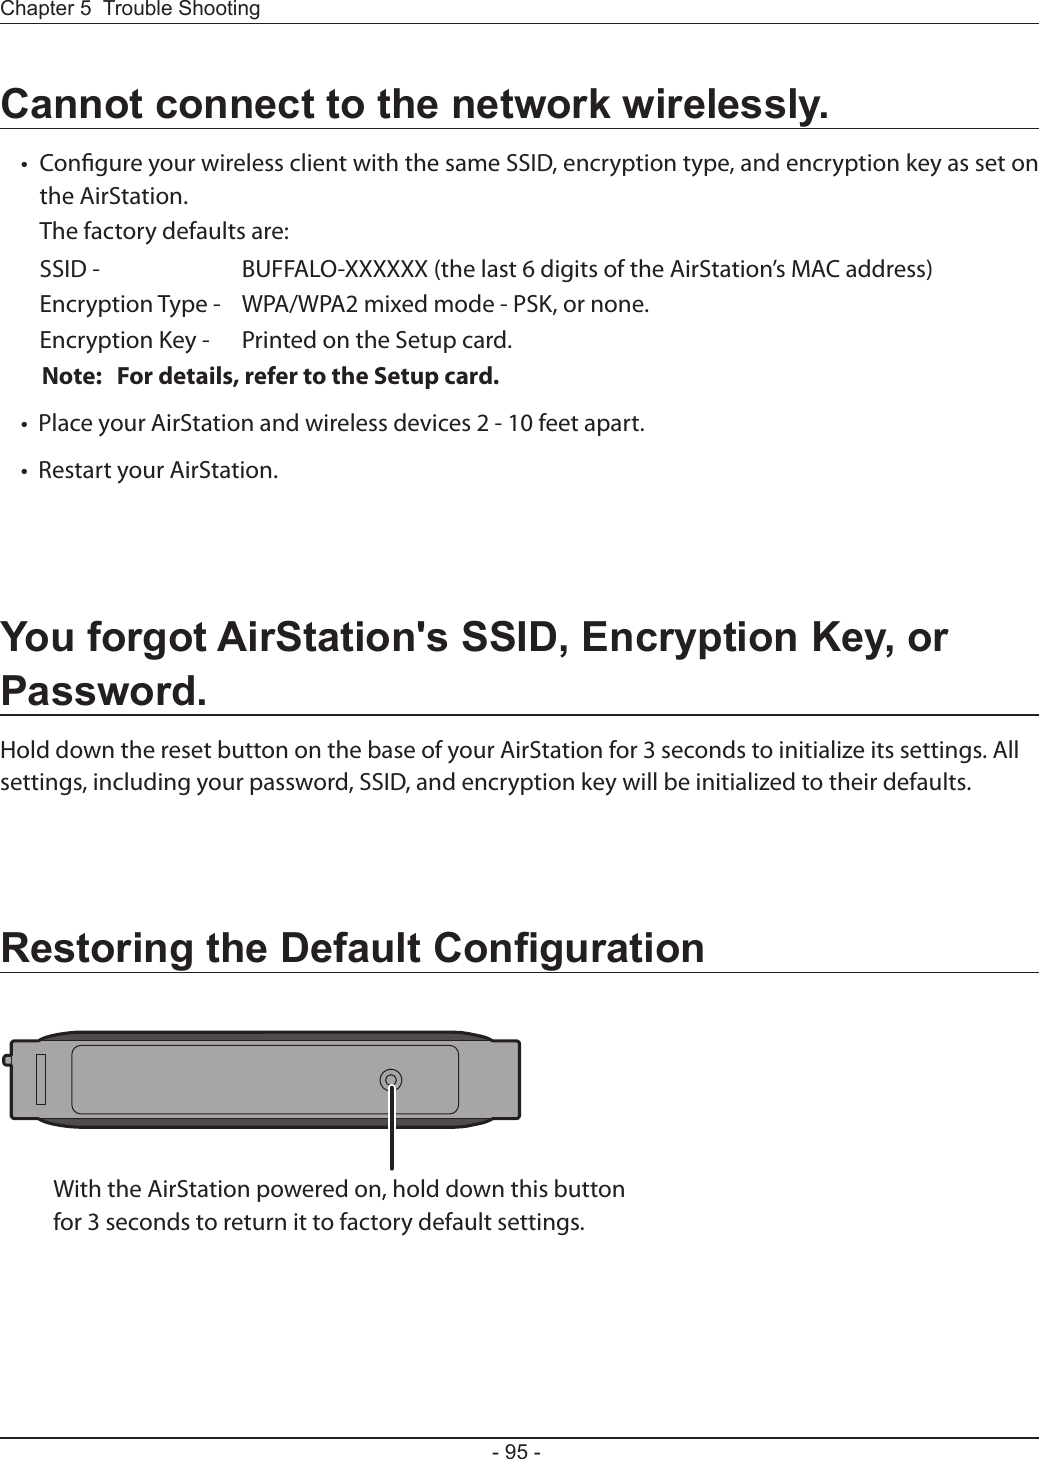
![Launch a web browser. If the home screen is displayed, setup is complete.If username and password elds are displayed, enter “admin” for the username and “password” for the password, then click [OK]. Step through the wizard to complete setup.You’ve completed the initial setup of your AirStation. Refer to Chapter 3 for advanced settings.7](https://usermanual.wiki/BUFFALO/09101695-0.user-manual-II/User-Guide-1680476-Page-16.png)
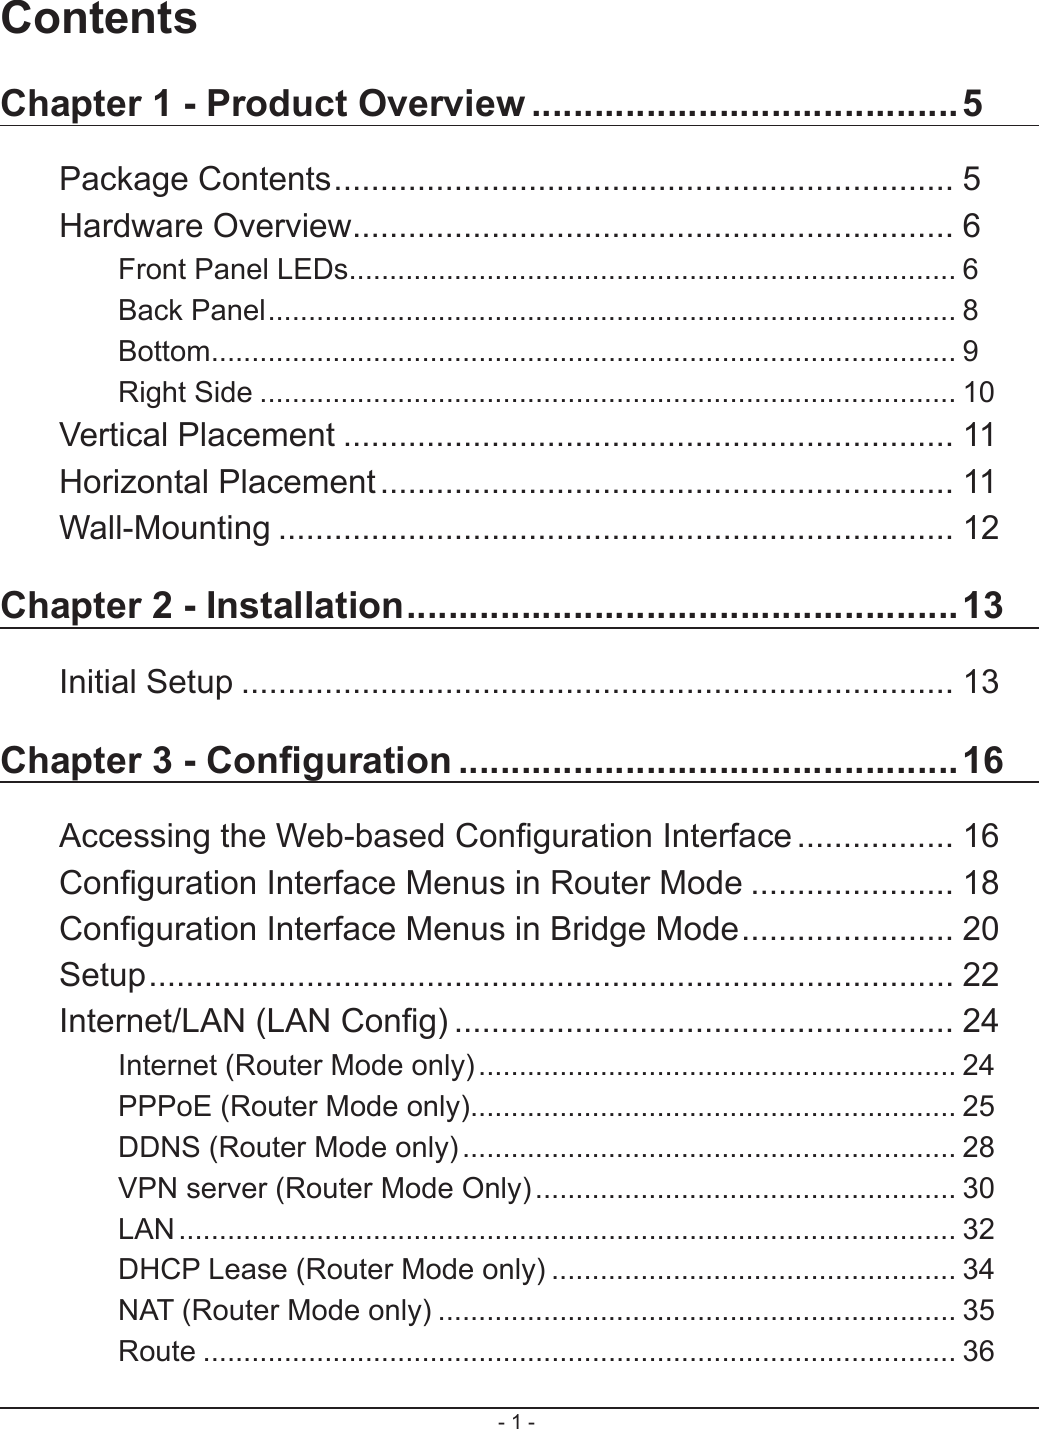
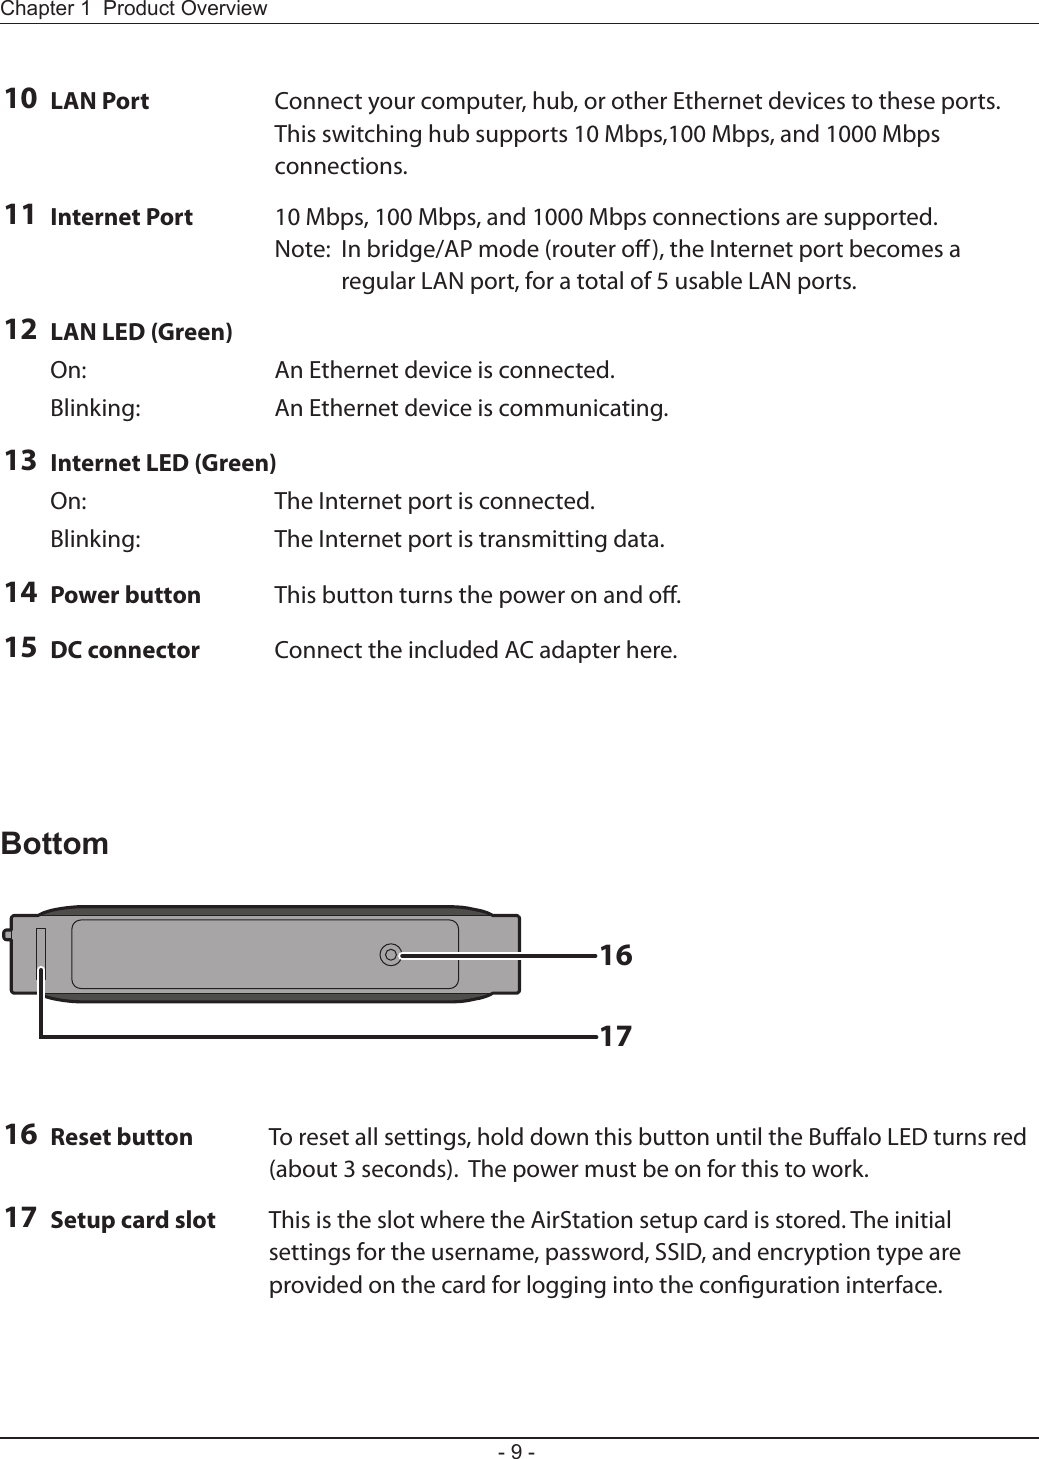
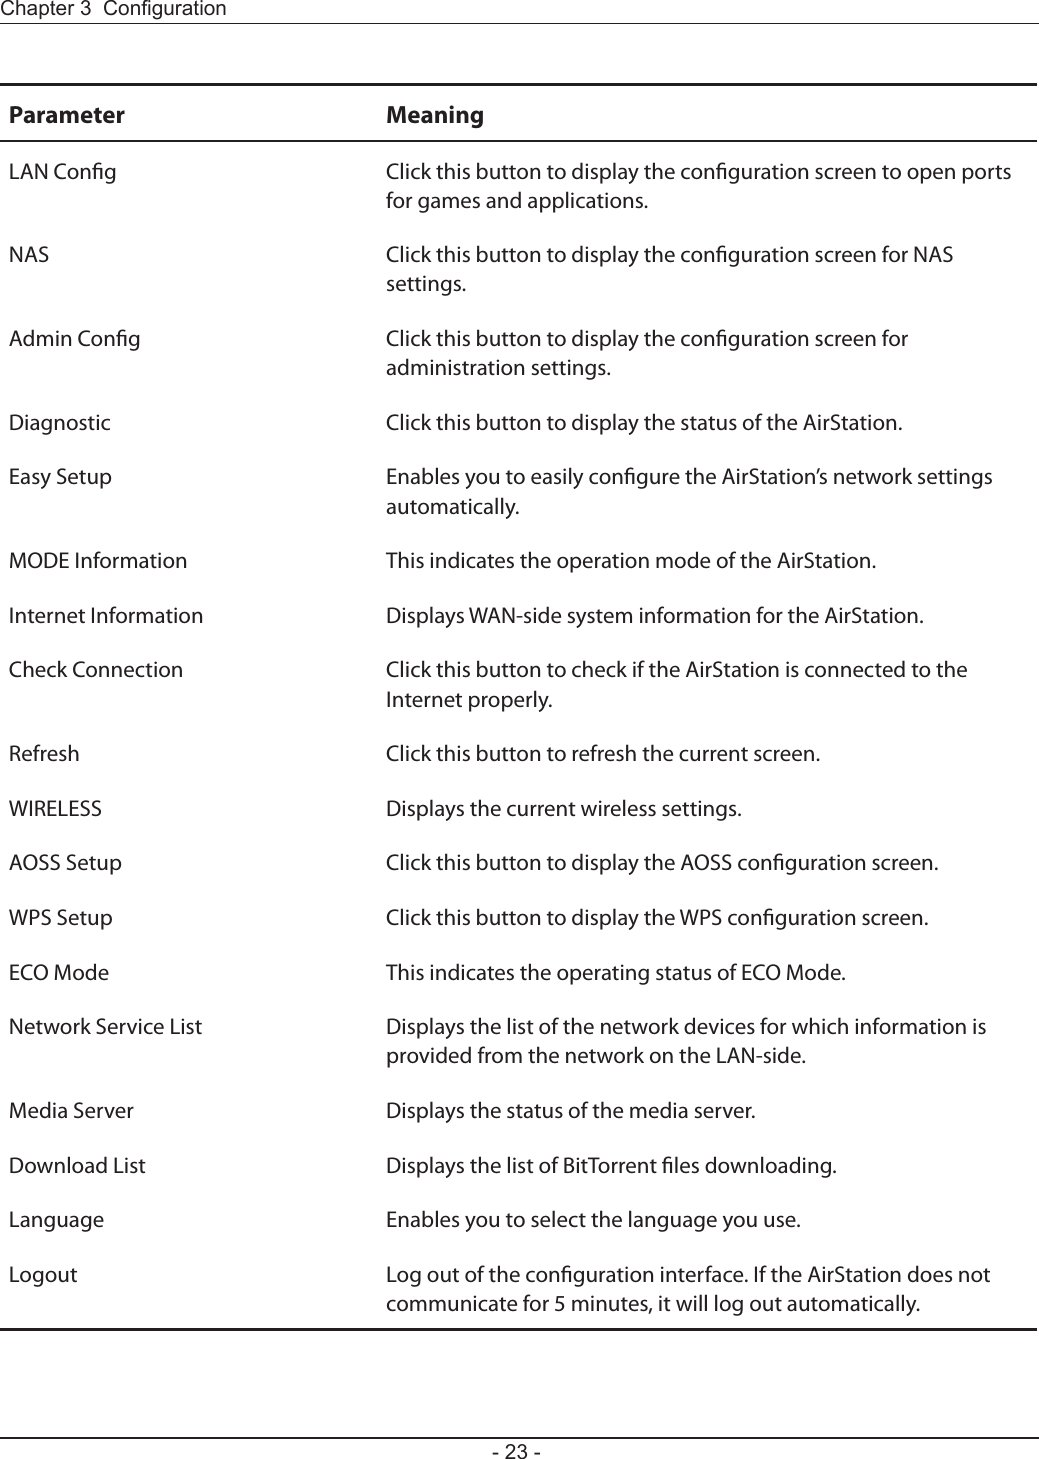
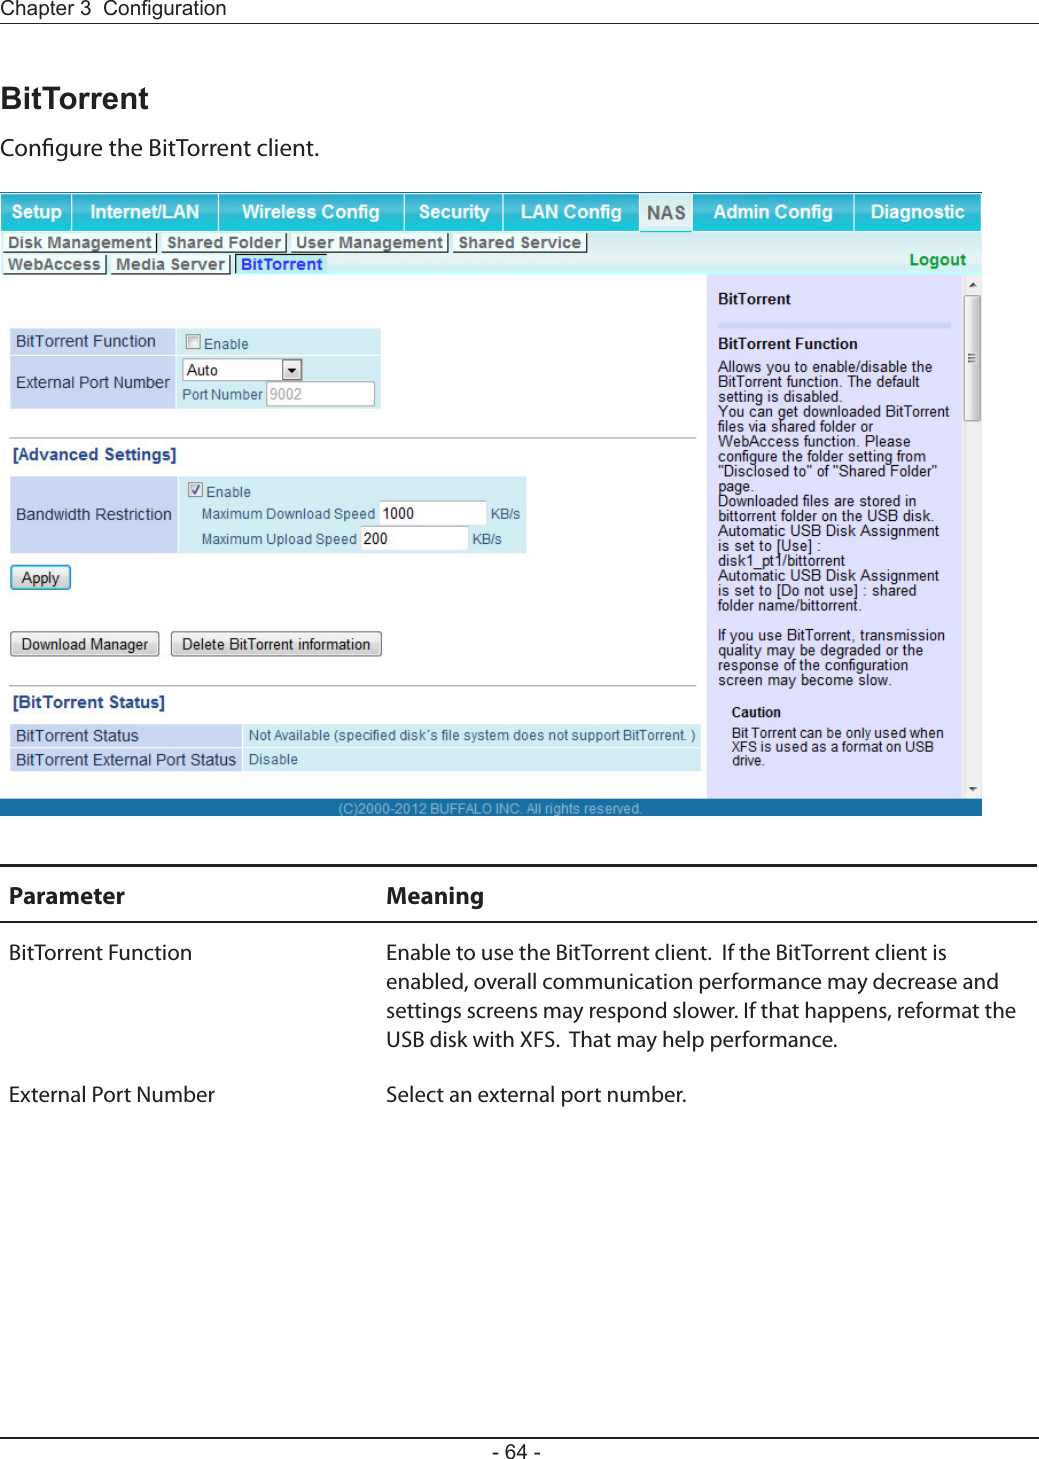
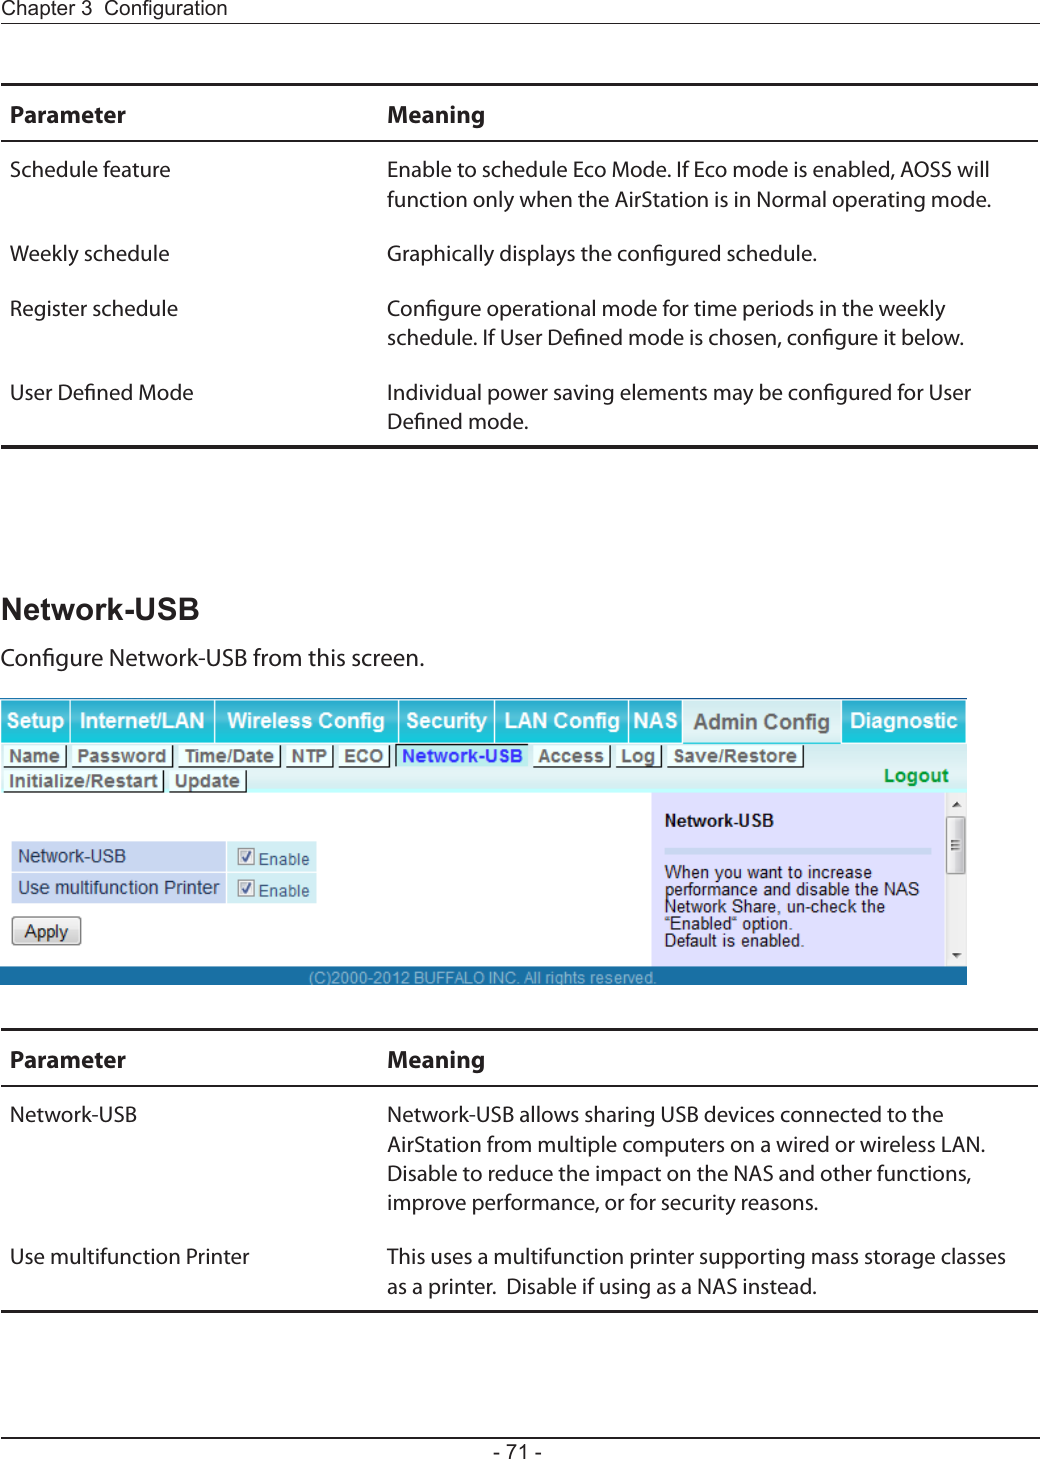
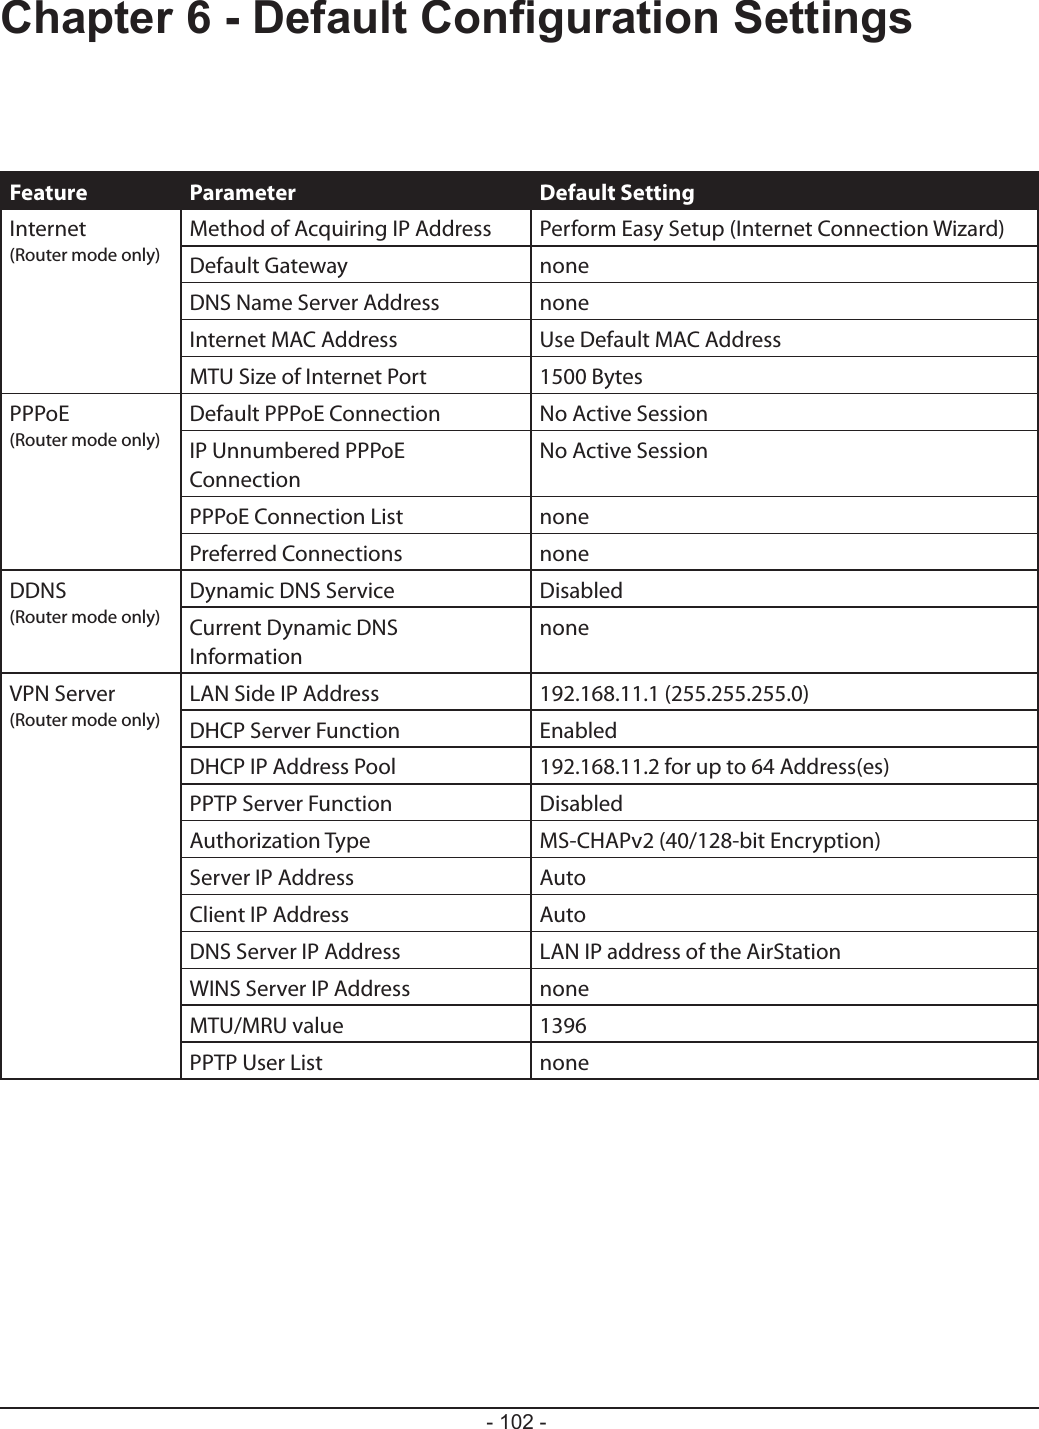
![The web-based conguration tool lets you change advanced settings for the AirStation. Don’t change these settings unless you know what you’re doing.To congure the AirStation’s advanced settings manually, log in to the web-based conguration interface as shown below.123Launch a web browser.Enter the AirStation’s LAN-side IP address in the address eld and press the Enter key.Note: The AirStation’s default LAN-side IP address depends on the mode. In router mode: 192.168.11.1 In bridge mode: 192.168.11.100 If you changed the IP address of the AirStation, then use the new IP address.Enter “admin” for the username and “password”for the password and click [OK].Note: If you forget your password, hold down the Reset button (page 9) to initialize all settings. Note that all other settings will also revert to their default values.](https://usermanual.wiki/BUFFALO/09101695-0.user-manual-II/User-Guide-1680476-Page-17.png)
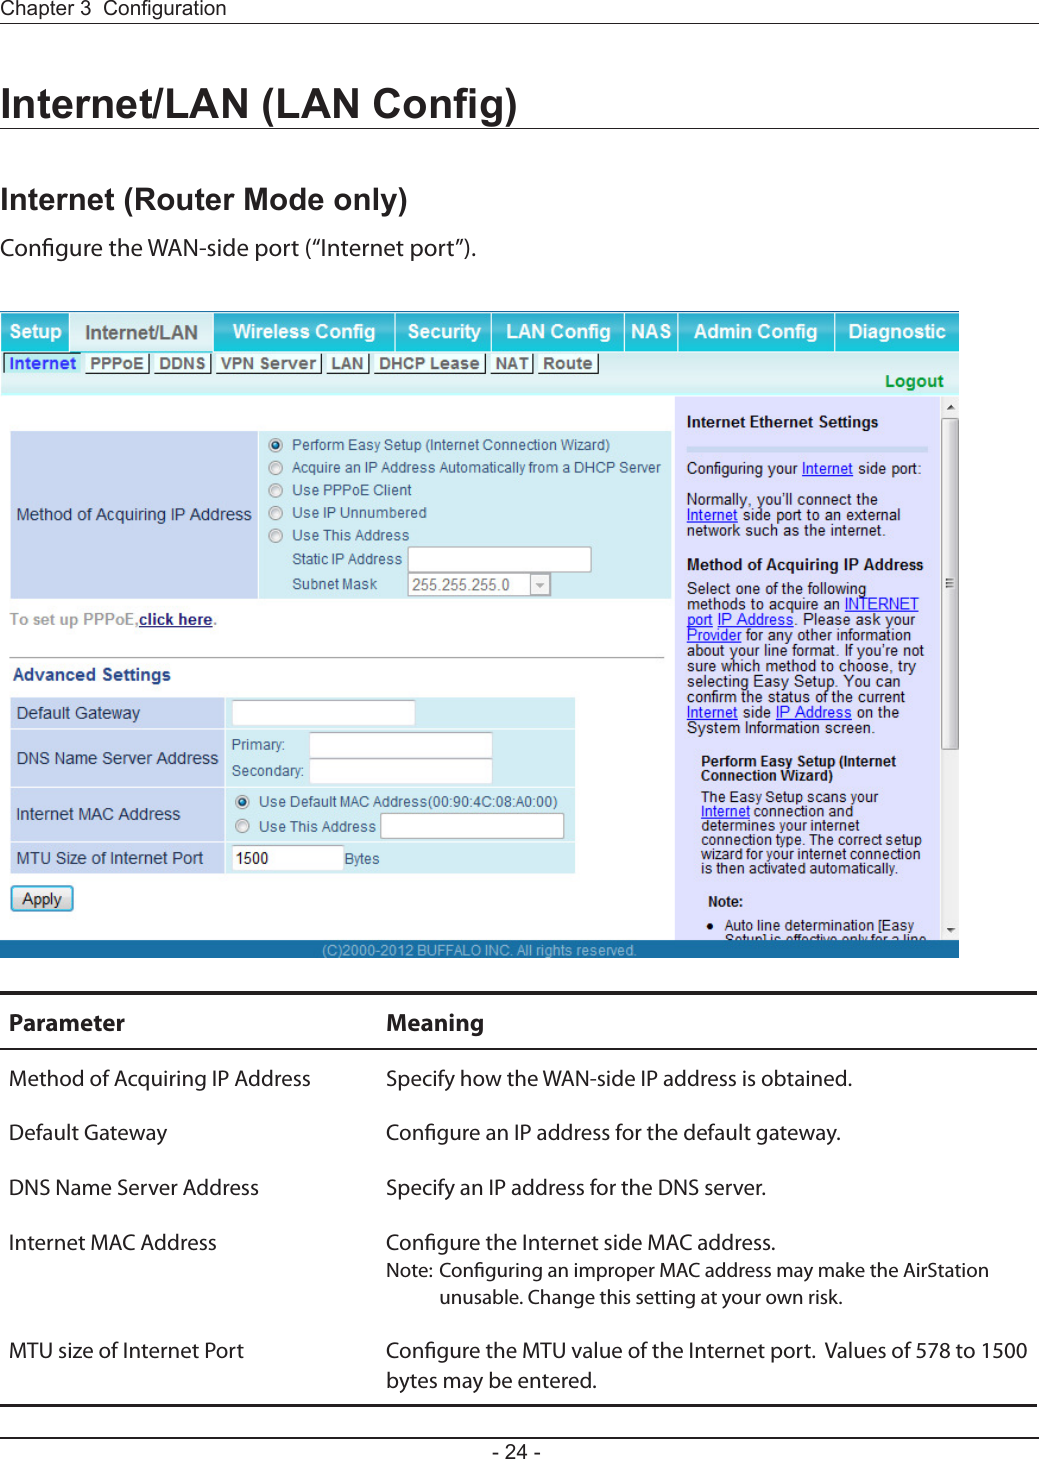
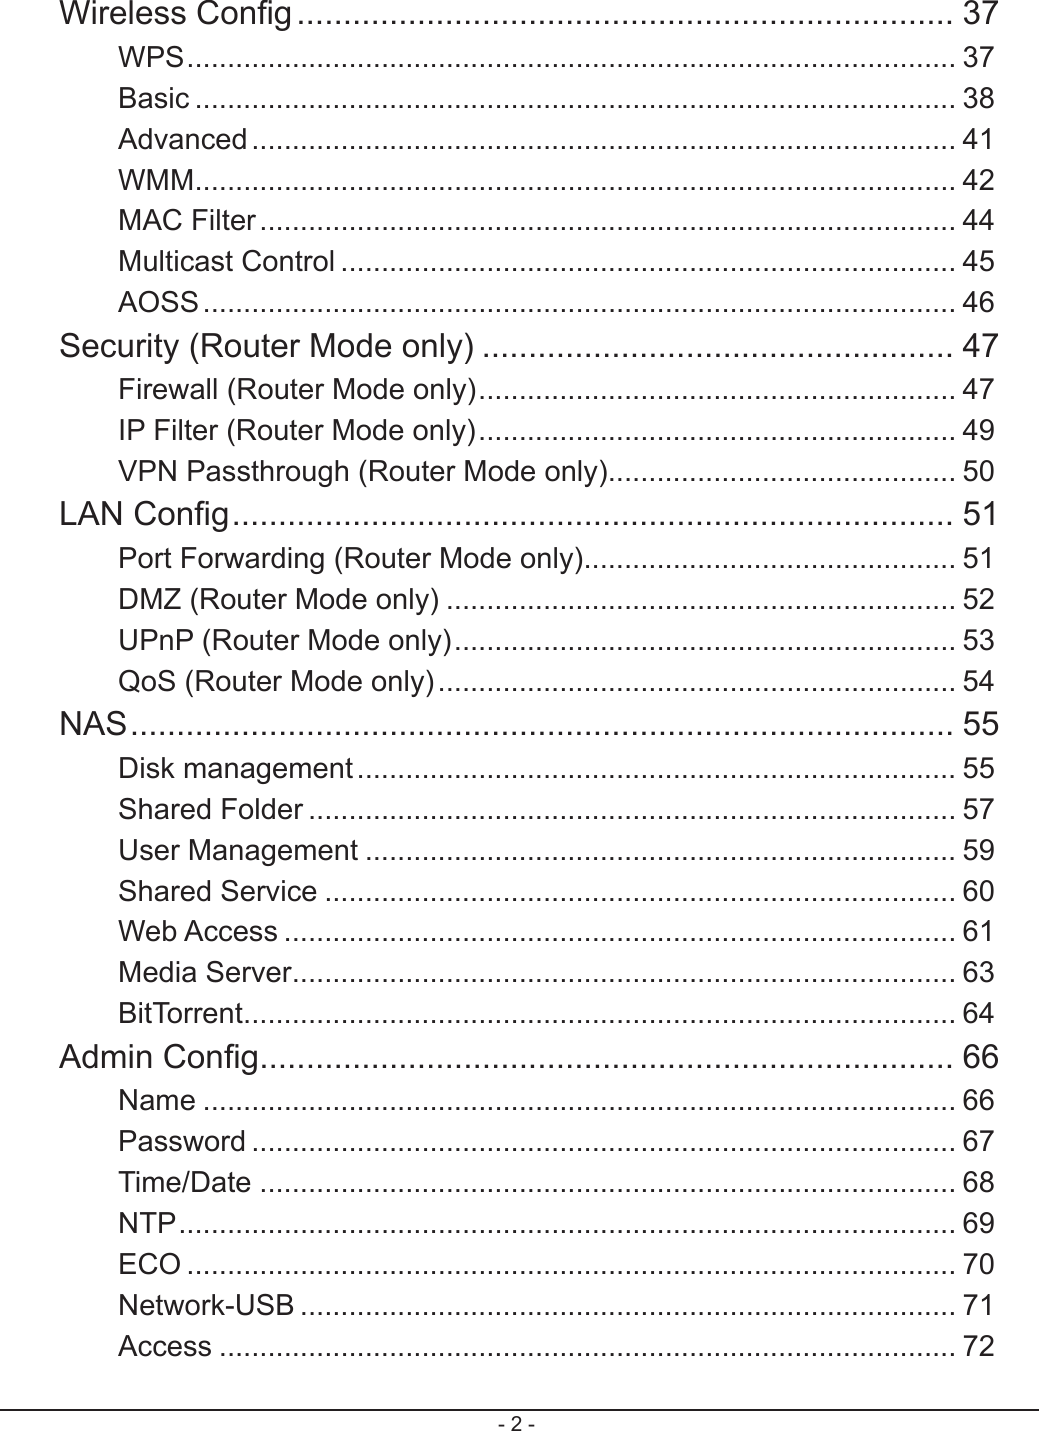
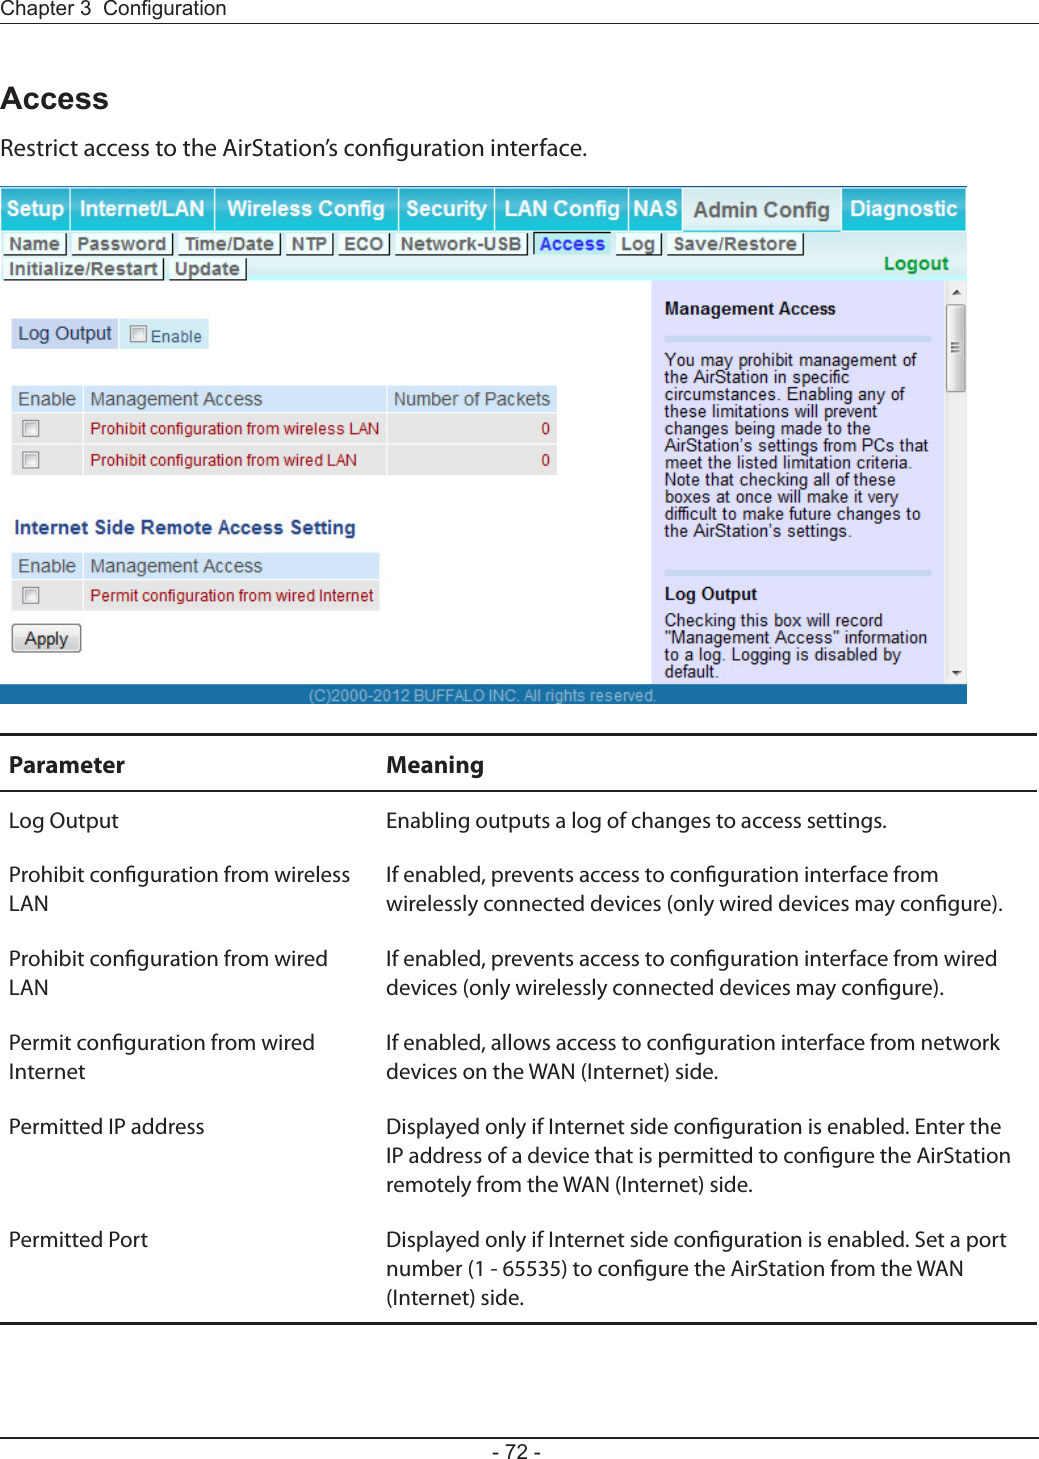
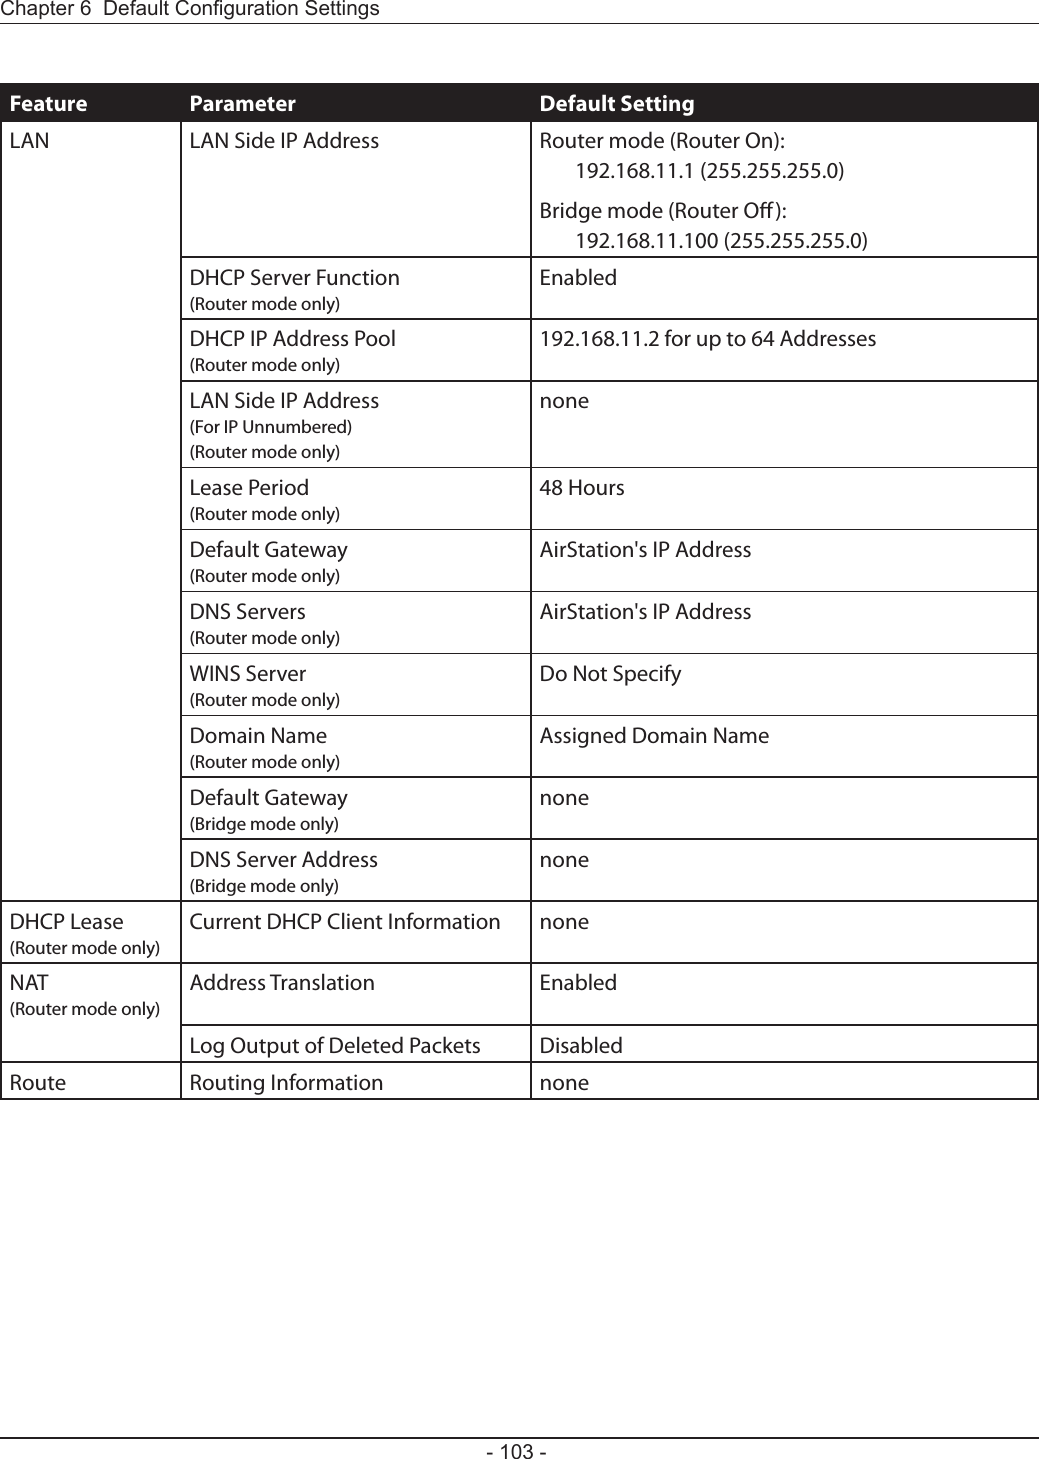
![Congure PPPoE settings.Parameter MeaningDefault PPPoE Connection If you have registered multiple connection destinations in the PPPoE Connection List, connection destinations selected here have priority. You need to congure the route to which PPPoE is connected to if you don’t use the default settings.IP Unnumbered PPPoE Connection Select the destination from the PPPoE Connection List which is used when “Use IP Unnumbered” is chosen for the Method of Acquiring IP Address (page 24).PPPoE Connection List Edit PPPoE destination. You can register up to 5 sessions.[Edit Connection List] Click this button to edit destination settings.](https://usermanual.wiki/BUFFALO/09101695-0.user-manual-II/User-Guide-1680476-Page-26.png)
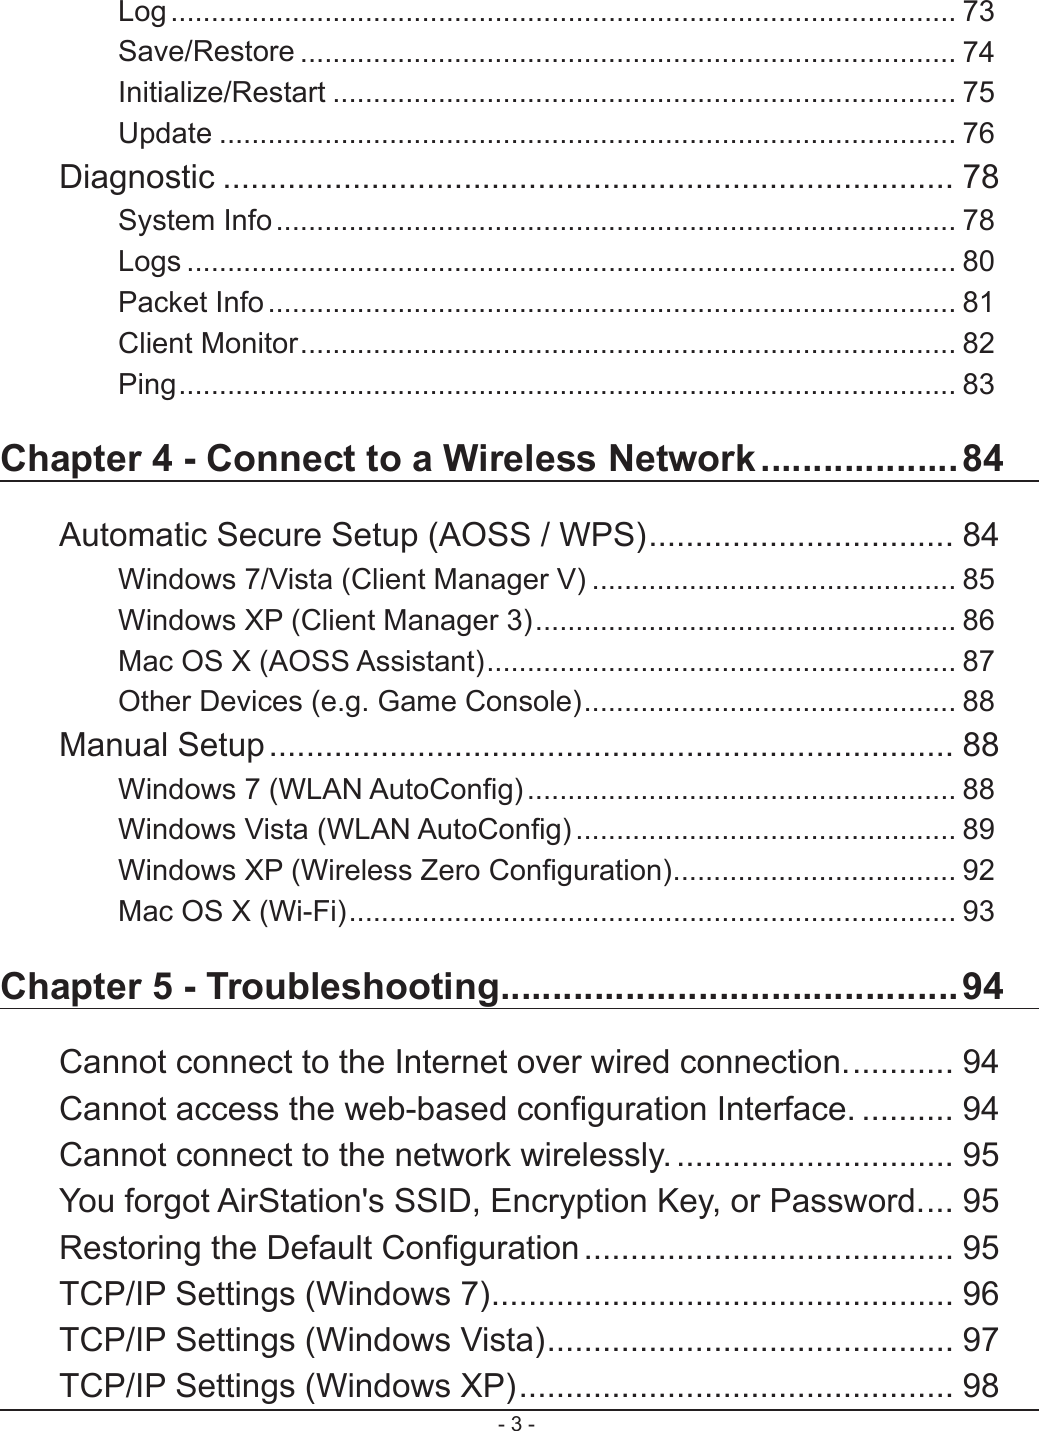
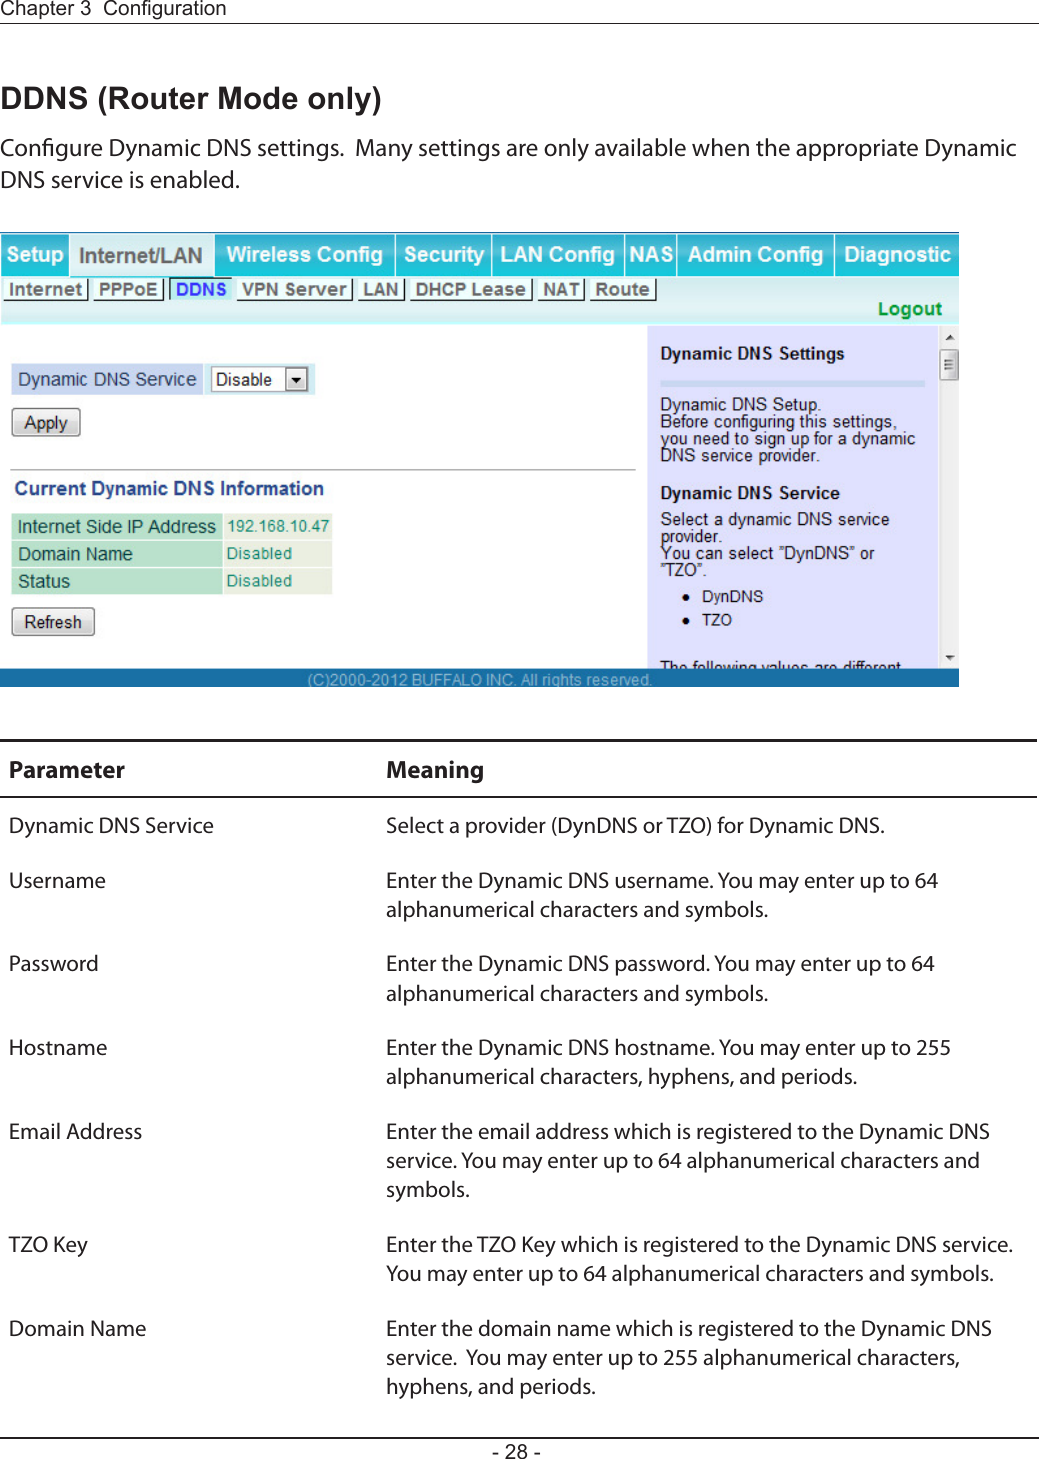
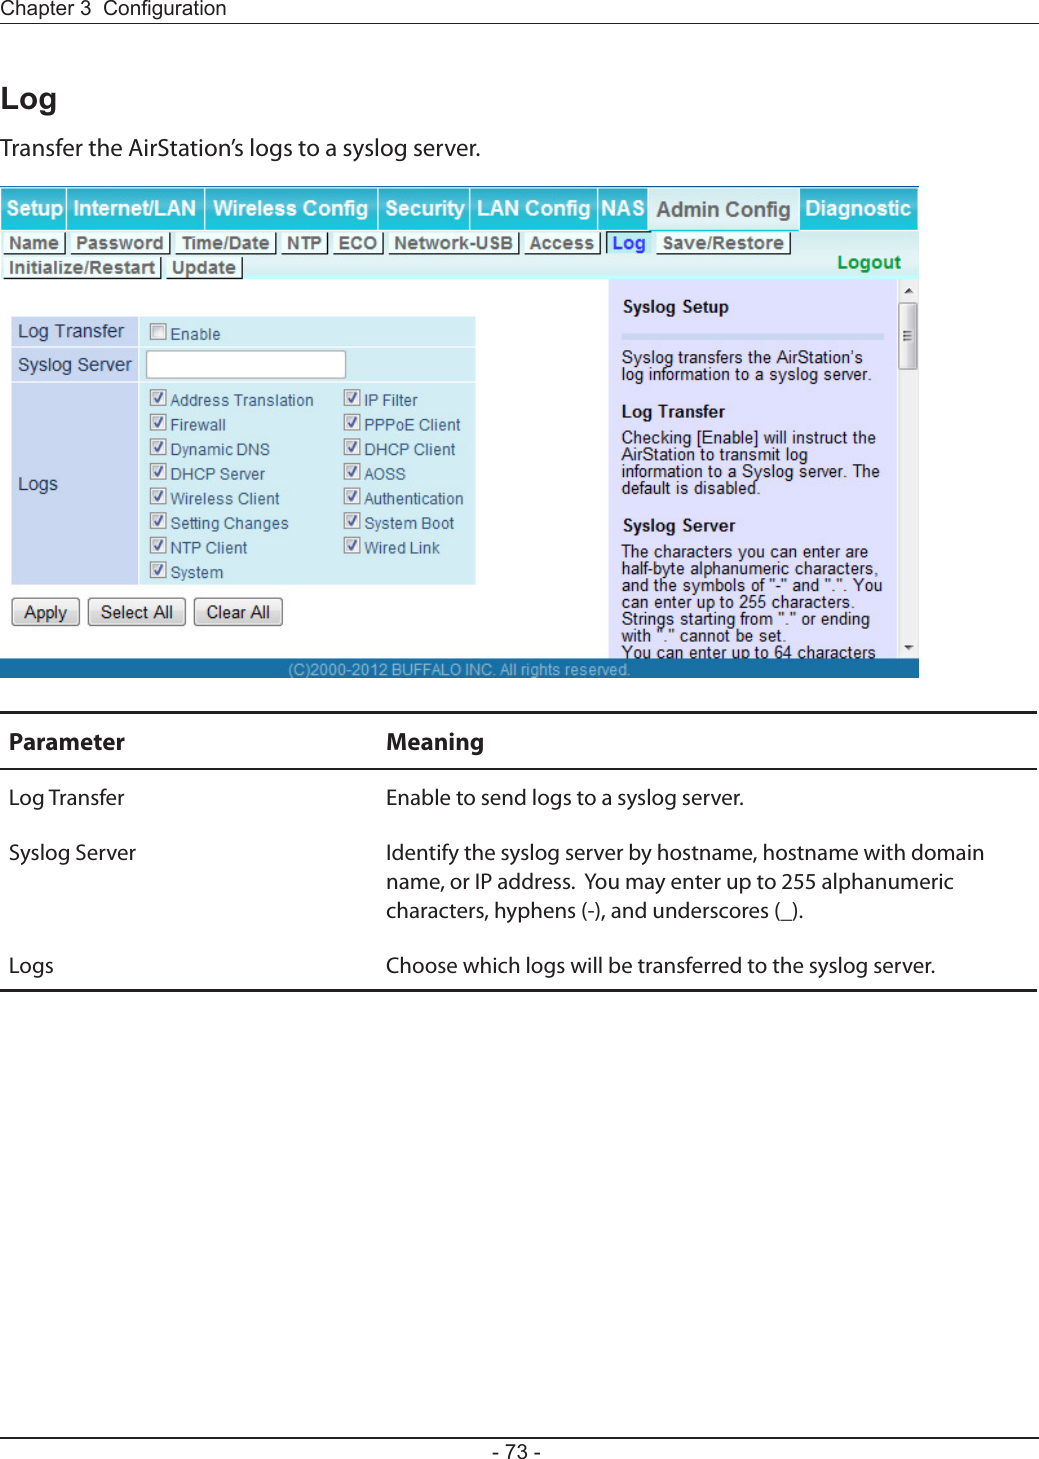
![Parameter MeaningPPPoE Connection No.*-Add This is displayed when [Edit Connection List] is clicked.Name of ConnectionEnter the name to identify the connected destination. You may enter up to 32 alphanumerical characters and symbols.UsernameEnter the username specied by your ISP for PPPoE certication. You may enter up to 32 alphanumerical characters and symbols.PasswordEnter the password specied by your ISP for PPPoE certication. You may enter up to 32 alphanumerical characters and symbols.Service NameFill in this eld only if your ISP species a Service Name. Leave blank otherwise. You may enter up to 32 alphanumerical characters and symbols.Connection TypeSpecies the timing for the AirStation to connect to your provider.Automatic disconnectionSet time to disconnect after communication is stopped when the connection method is set to [Connection on Demand] or [Manual]. You can enter up to 1440 minutes.AuthorizationCongure an authorization method with a provider.MTU SizeCongure the MTU size for PPPoE. Values of 578 to 1500 bytes may be entered.MRU SizeCongure MRU (Maximum Receive Unit) for PPPoE. Values of 578 to 1492 may be entered.](https://usermanual.wiki/BUFFALO/09101695-0.user-manual-II/User-Guide-1680476-Page-27.png)
![Parameter MeaningPPPoE Connection No. *-Add Keep AliveIf Keep Alive is enabled, then the AirStation will issue an LCP echo request once a minute in order to maintain the connection with the PPPoE. If the server does not respond for more than 6 minutes, the line is recognized as disconnected and the AirStation will terminate the connection. [Disabled] is the recommended setting.Preferred Connections Displays information you have set regarding to the connection destination route.[Edit Preferred Connections] Click to edit the connection destination route settings.Preferred PPPoE Connection -Add Click [Edit Preferred Connections] to display.NameThe destination to connect by PPPoE if [Destination address] and [Source address] match. Select the destination registered to the PPPoE Connection List.Destination addressWhen communicating to this address, the AirStation will communicate with [Name of Connection.]Source addressWhen communicating from this address, the AirStation will communicate with [Name of Connection.]](https://usermanual.wiki/BUFFALO/09101695-0.user-manual-II/User-Guide-1680476-Page-28.png)
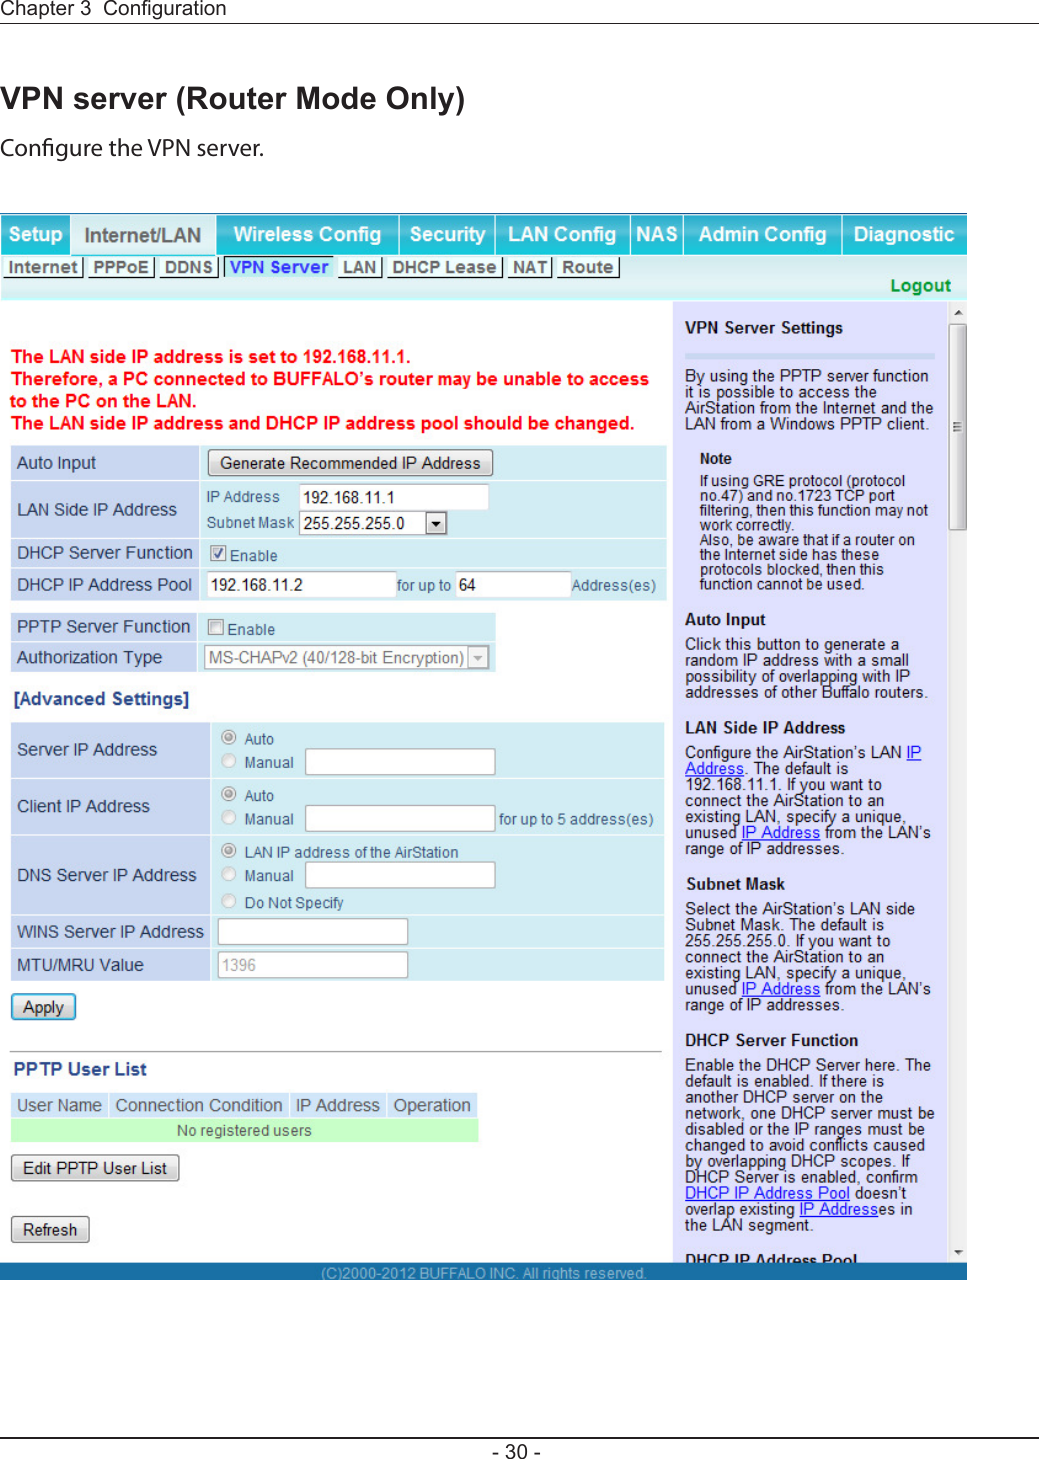
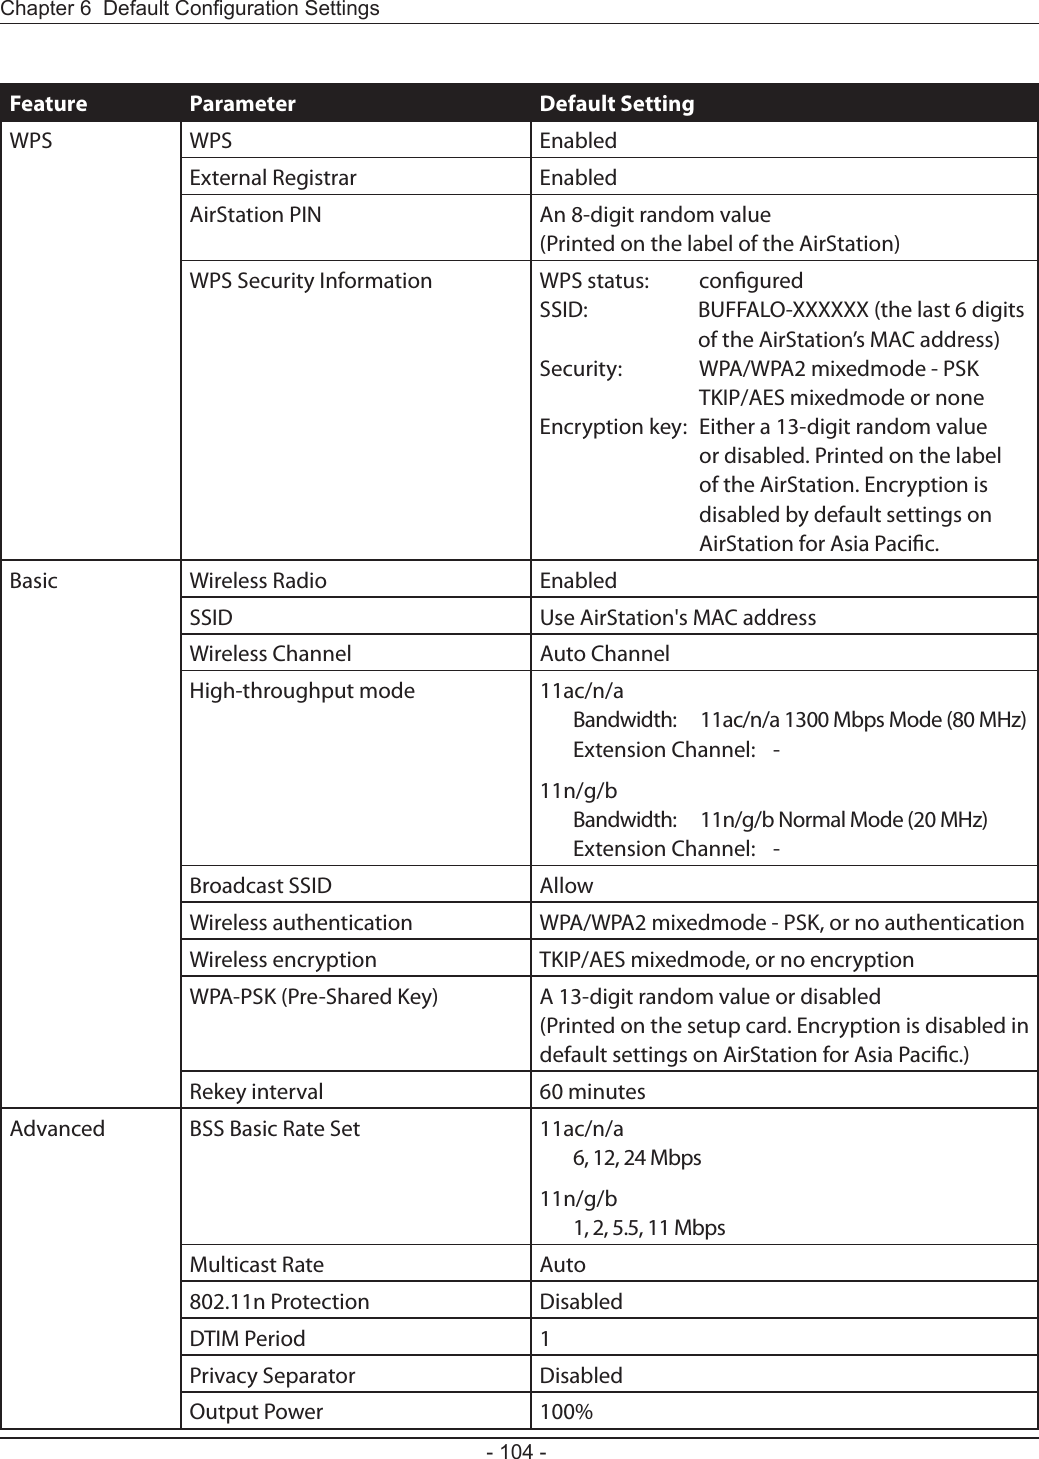
![Parameter MeaningAuto Input Click to generate a random IP address.LAN Side IP Address Set a LAN side IP address and subnet mask.DHCP Server Function Enable or disable the DHCP server, which assigns IP addresses automatically.DHCP IP Address Pool Congure the range of IP addresses to be assigned by the DHCP server and IP addresses to be excluded from that range. Values from 0-253 may be entered.PPTP Server Function Enable to use a PPTP server.Authorization Type Select the authentication method for PPTP connection.Server IP Address Select the server IP address.Client IP Address Select the IP address range.DNS Server IP Address Choose the IP address for the DHCP server.WINS Server IP Address Choose the IP address for the WINS server.[Edit PPTP User List] Click to edit user information.Username Enter the username to connect to the PPTP server. You may enter up to 16 alphanumerical characters and symbols.Password Enter the password to connect to the PPTP server. You may enter up to 16 alphanumerical characters and symbols.Method of Acquiring IP Address Select the method to be used to assign the IP address is assigned to the PPTP client.PPTP User List Displays the PPTP connection user information.](https://usermanual.wiki/BUFFALO/09101695-0.user-manual-II/User-Guide-1680476-Page-32.png)
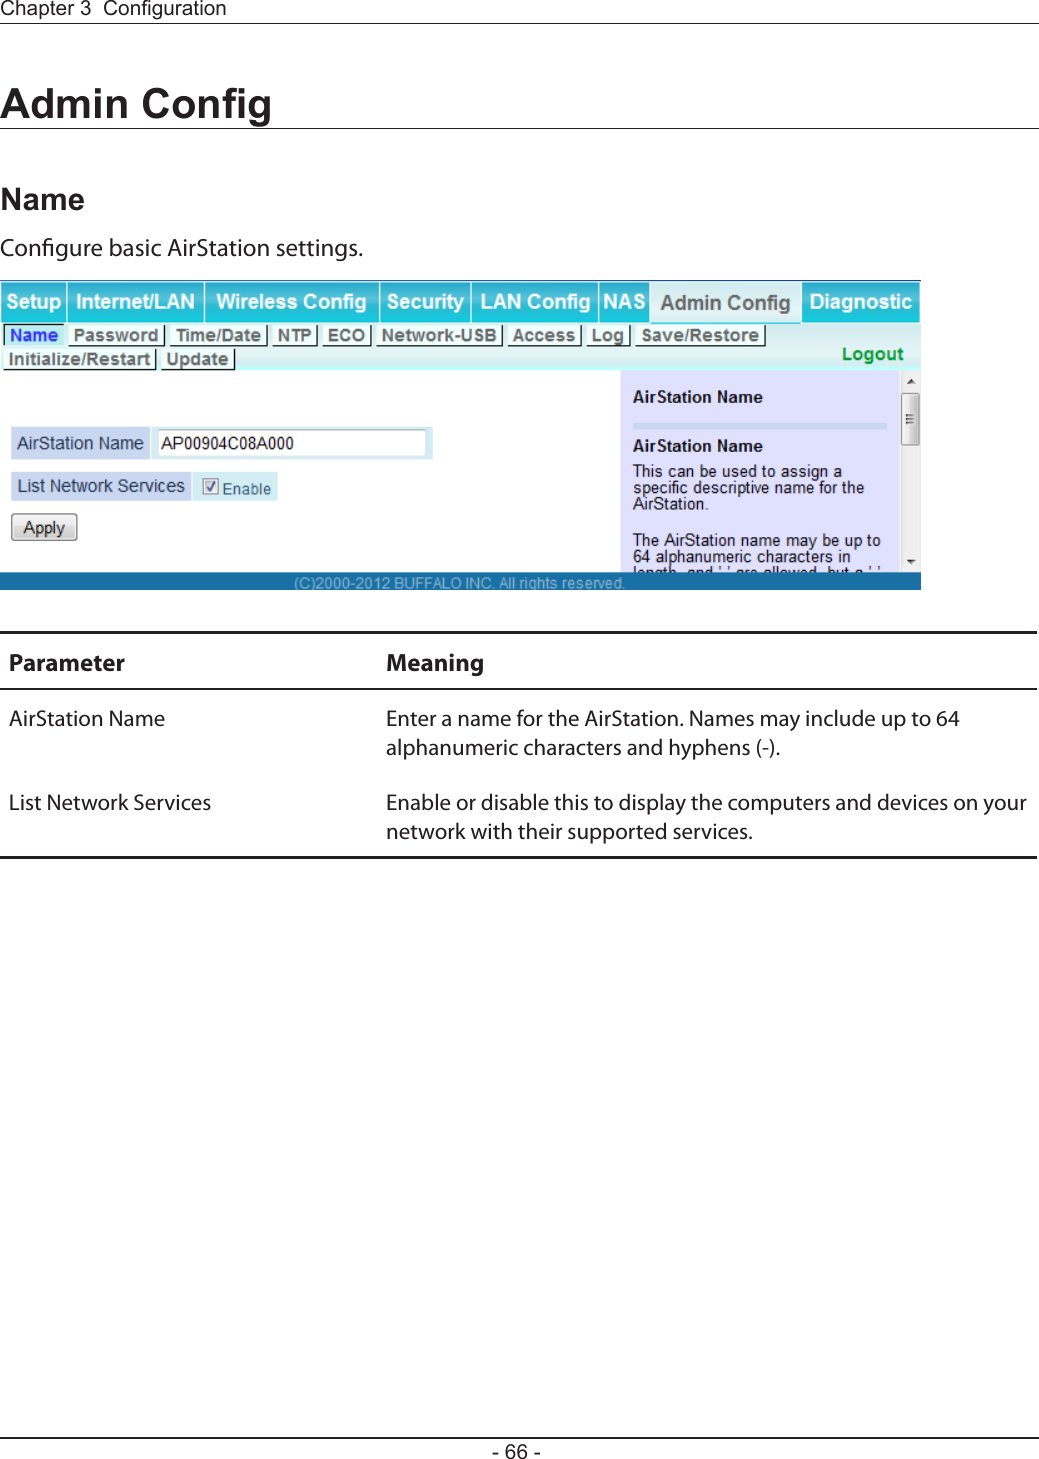
![Congure LAN-side and DHCP Server settings.Parameter MeaningLAN Side IP Address By default, the LAN side IP address is 192.168.11.1 with subnet mask 255.255.255.0. You may change it here.DHCP Server Function Enable or disable the DHCP server, which assigns LAN-side IP addresses automatically.DHCP IP Address Pool Congure the range of IP addresses to be assigned by the DHCP server and IP addresses to be excluded from that range. Values from 0-253 may be entered.LAN Side IP Address(For IP Unnumbered)Set an IP unnumbered LAN side IP address.Note: A PC with a normal LAN side IP address and a PC with an IP Unnumbered IP address cannot communicate each other.Advanced Settings Check [Display] to display DHCP server advanced settings options.Lease Period Set the eective period of an IP address assigned by the DHCP server. Up to 999 hours may be entered.Default Gateway Set the default gateway IP address for the DHCP server to issue to clients.](https://usermanual.wiki/BUFFALO/09101695-0.user-manual-II/User-Guide-1680476-Page-33.png)
![Congure DHCP Exceptions.Parameter MeaningIP Address Enter an IP address to lease manually. The IP address should be from the same subnet as the DHCP scope, but not be within the range that DHCP is assigning to other devices.MAC Address Enter the MAC address which identies the client.Current DHCP Client Information Displays information for current leases. An IP address which is leased automatically can be changed to manual leasing by clicking [Manual Assignment].](https://usermanual.wiki/BUFFALO/09101695-0.user-manual-II/User-Guide-1680476-Page-35.png)

![WPS Status and Settings.Parameter MeaningWPS Enable to use WPS automatic conguration.External Registrar Enable to accept congure requests from other WPS devices.Note: Congure requests will not be accepted if AOSS is in use.AirStation PIN Displays the PIN code of the AirStation. Clicking [Generate PIN] will generate a new PIN code. This code can be entered into other wireless devices that support WPS.Enrollee PIN Enter the PIN code for the other wireless device and click [OK].WPS status Displays “congured” if all available wireless bands are congured. Displays “uncongured” if at least one wireless band is uncongured.](https://usermanual.wiki/BUFFALO/09101695-0.user-manual-II/User-Guide-1680476-Page-38.png)
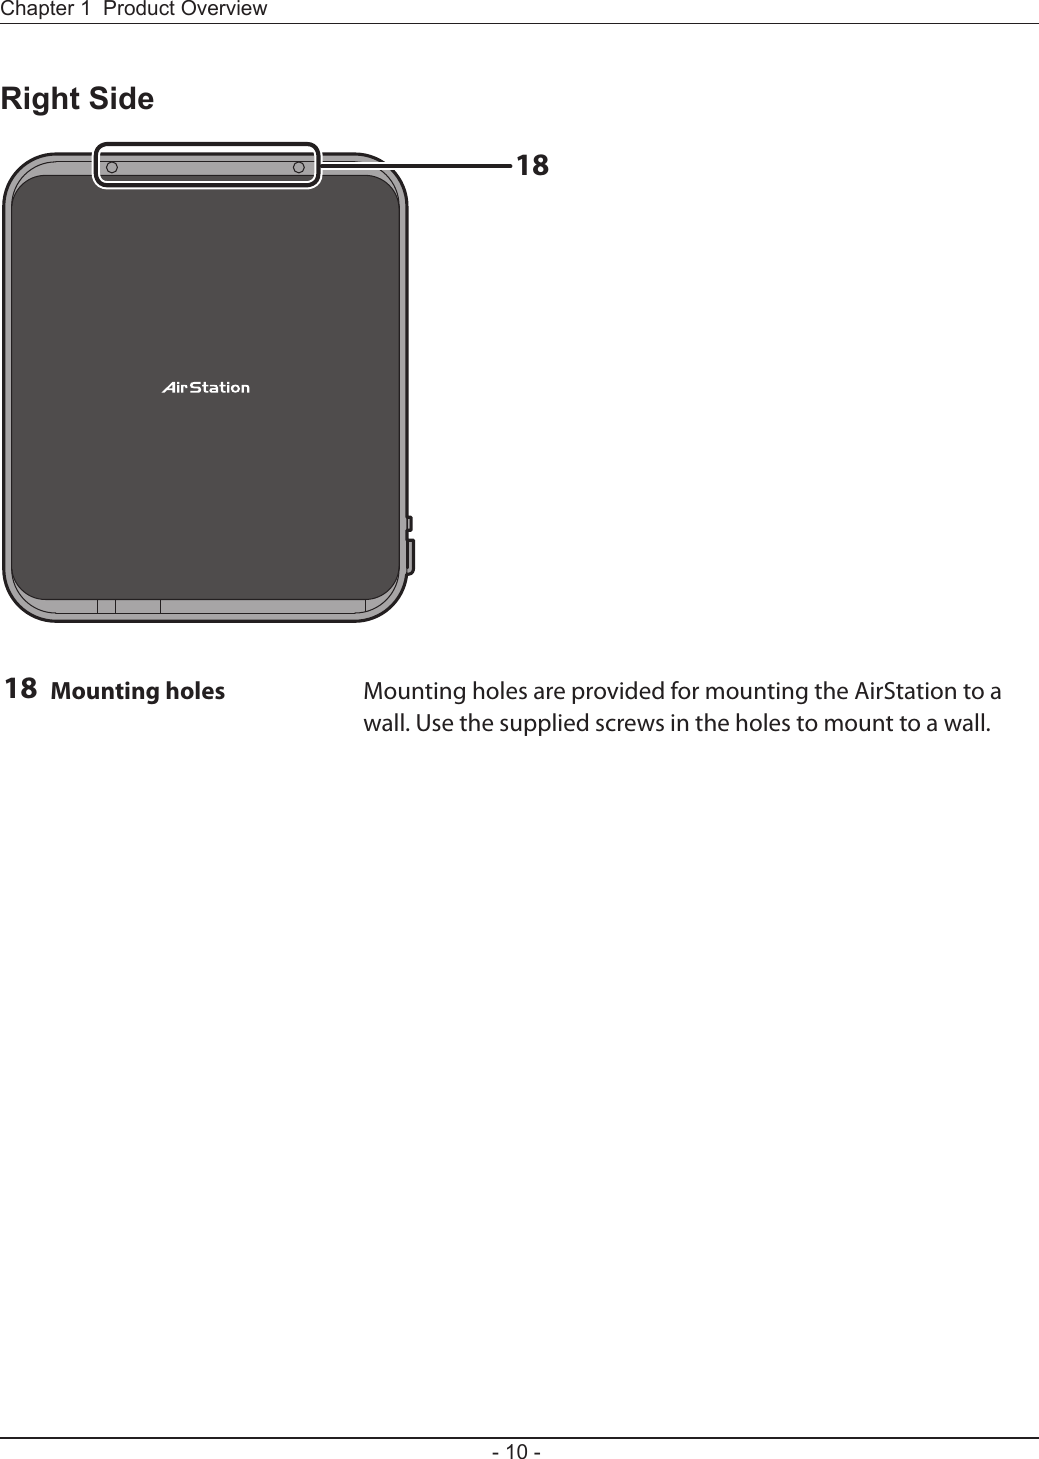
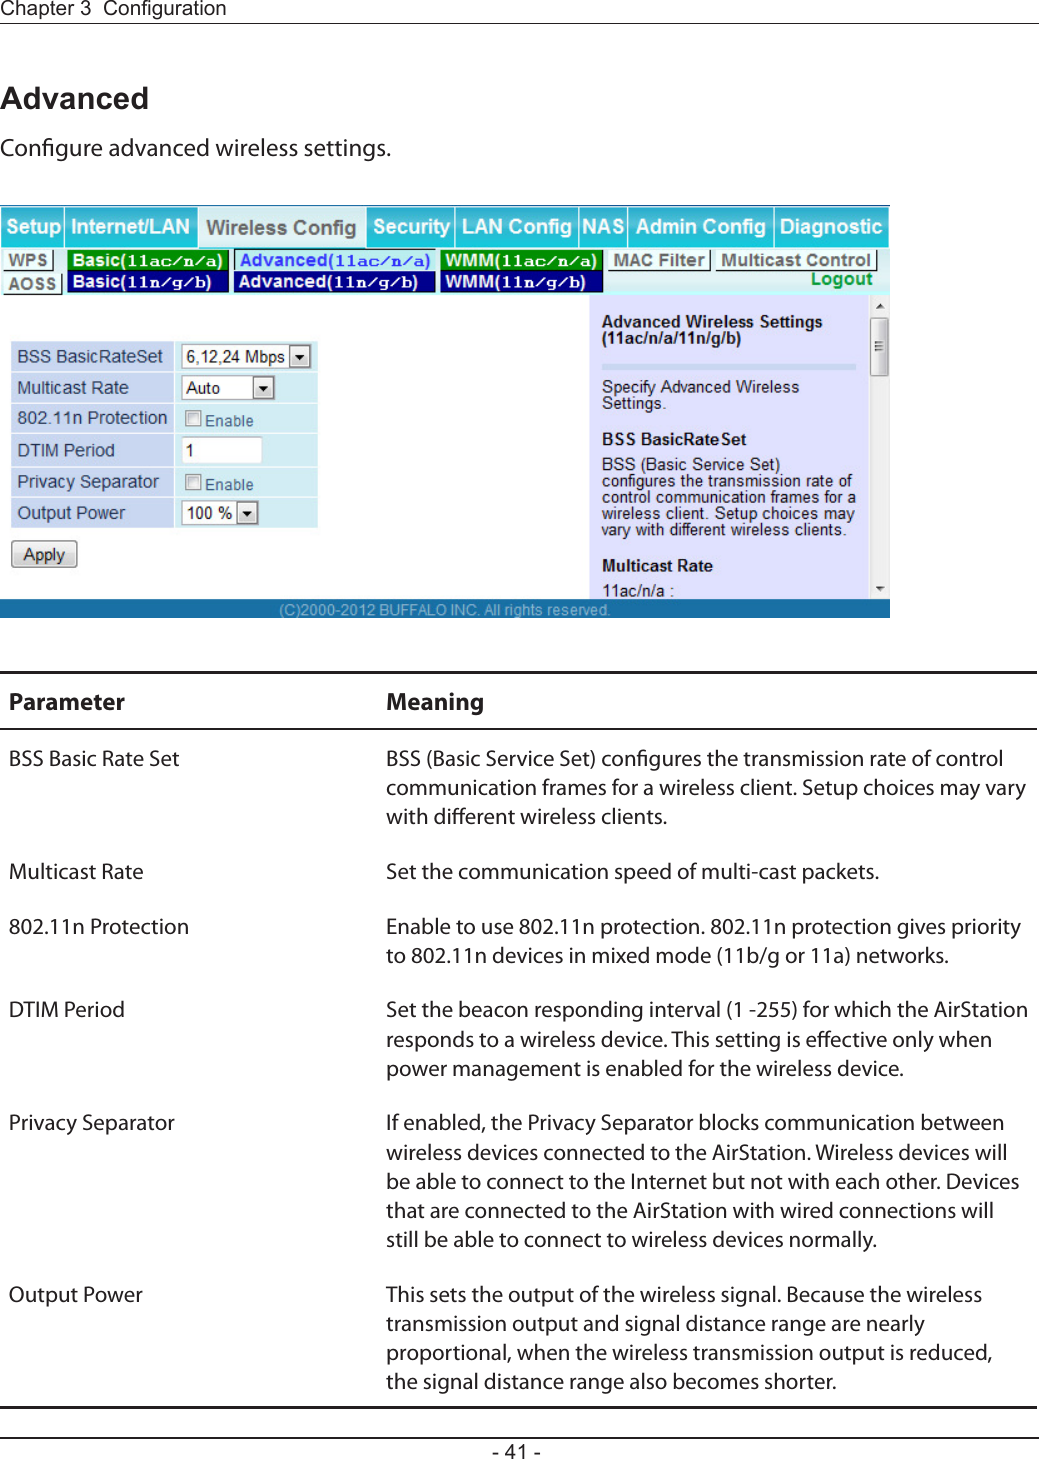
![Congure basic wireless settings from here.Parameter MeaningWireless Radio Determines whether to allow wireless communication. If this is unchecked, then no wireless connections will be allowed.SSID The SSID may contain 1 - 32 alphanumeric characters.Wireless Channel Sets a channel (a range of frequencies) for wireless connections. With Auto Channel selected, the AirStation will automatically use the best available channel.High-Throughput Mode High-throughput mode uses triple the normal frequency range, 80 MHz instead of 20 MHz. In uncongested areas this can increase performance. To use High-throughput mode, set the Bandwidth to 80 MHz and choose an Extension Channel.Note: If Auto Channel is selected, then the Extension Channel is set automatically.Broadcast SSID If [Allow] is checked, then the AirStation will respond to SSID searches from wireless devices by broadcasting its SSID. If [Allow] is unchecked, then the AirStation ignores SSID searches from wireless devices.](https://usermanual.wiki/BUFFALO/09101695-0.user-manual-II/User-Guide-1680476-Page-39.png)
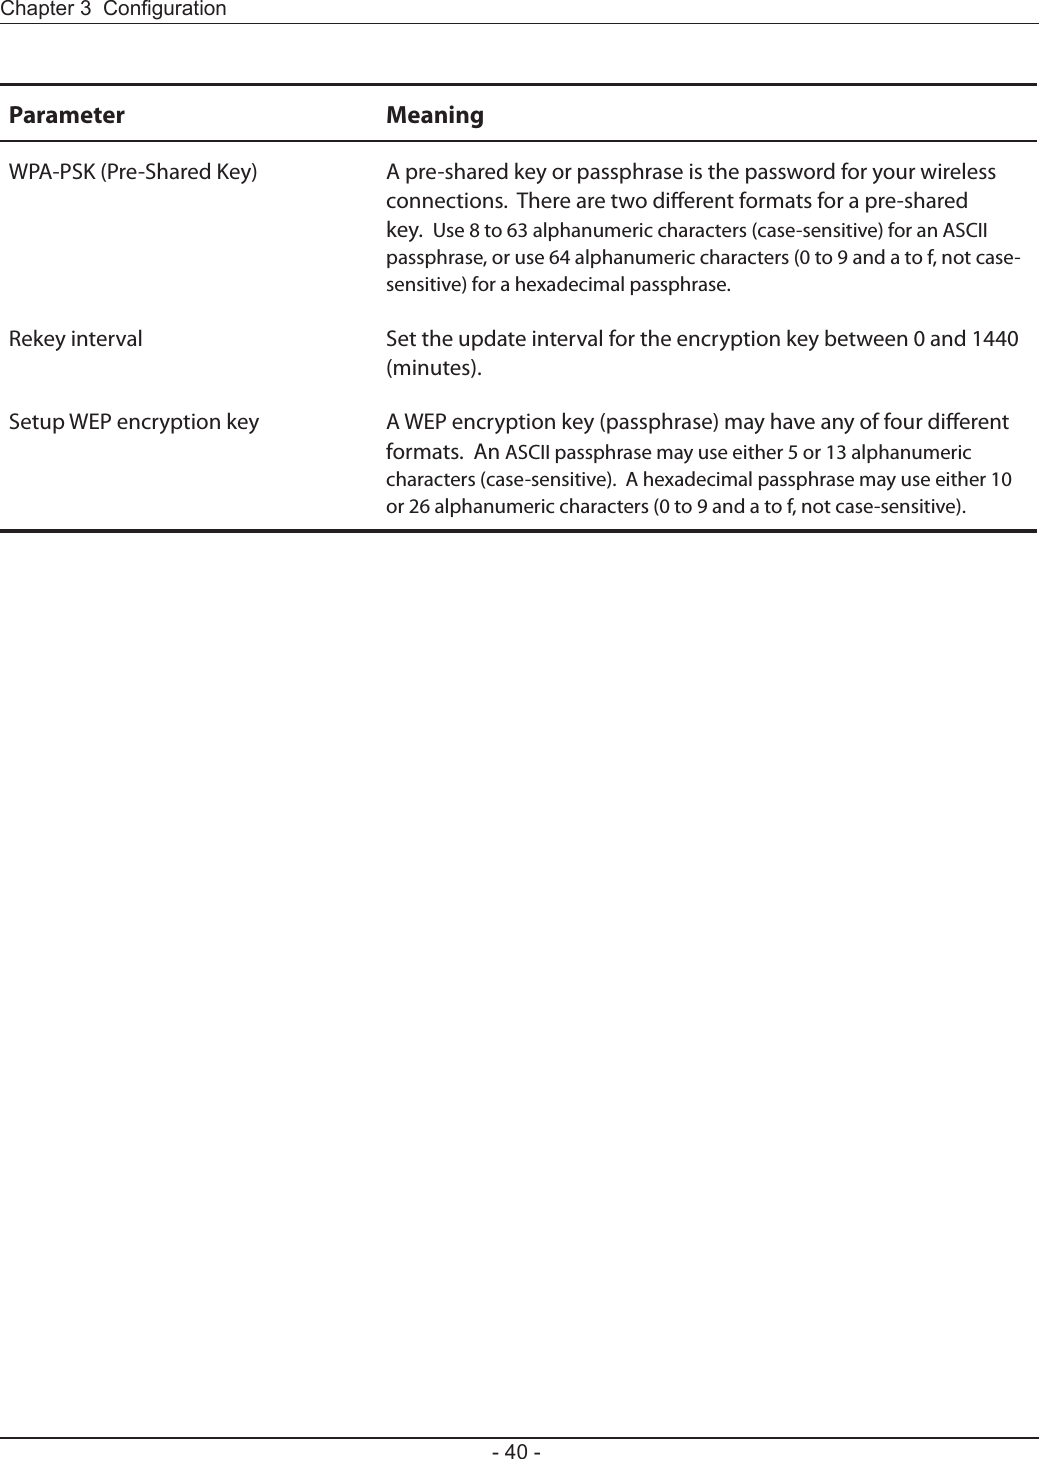
![Parameter MeaningWireless authentication Species the authentication method used when connecting to a wireless device.Wireless encryption You may use any of the following types of encryption:No encryptionData is transmitted without encryption. With this setting, anyone within range can connect to your wireless network and might be able to access data on the network. Not recommended for anyone with private data that needs to be kept secure. [No encryption] can be selected only when [No authentication] is selected for wireless authentication.WEPWEP is a common encryption method supported by most devices. WEP can only be selected when wireless authentication is set to [No authentication]. Note that WEP’s encryption is weak, and networks protected with WEP are not much more secure than those with no encryption at all. Not recommended for anyone with private data that needs to be kept secure. TKIPTKIP is an encryption method which is more secure than WEP, but slower. Use an pre-shared key to communicate with a wireless device.TKIP can be selected only when WPA-PSK or WPA2-PSK is selected for wireless authentication.AESAES is more secure than TKIP, and faster. Use a pre-shared key to communicate with a wireless device.AES can be selected only when WPA-PSK or WPA2-PSK is selected for wireless authentication.TKIP/AES mixed modeTKIP/AES mixed mode allows both TKIP and AES authentication and communication. This is no more secure than TKIP alone, but more convenient for some users. TKIP/AES mixed mode can be selected only when WPA/WPA2 mixed mode - PSK is selected for wireless authentication.](https://usermanual.wiki/BUFFALO/09101695-0.user-manual-II/User-Guide-1680476-Page-40.png)
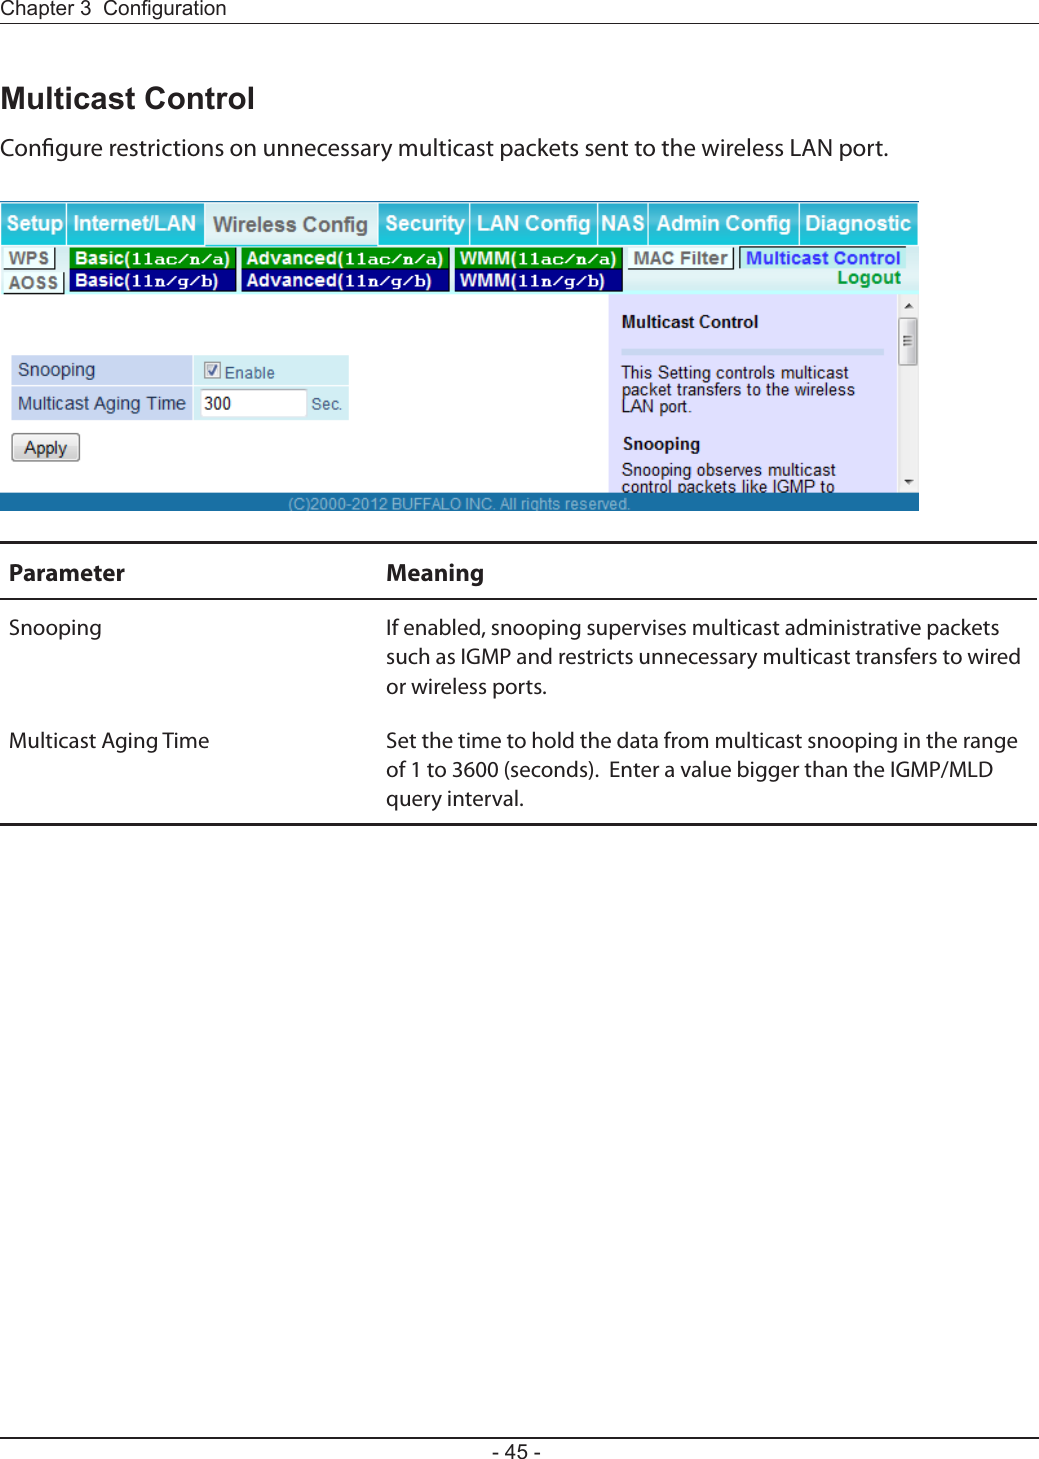
![Restrict access to specic wireless devices.Parameter MeaningEnforce MAC Filtering Enable to restrict wireless connections to devices with registered MAC addresses.Registration List Displays the MAC addresses of registered devices which are permitted to connect wirelessly.Edit Registration List Adds a wireless device to the list of permitted devices.MAC Addresses to be Registered Enter a MAC address of a wireless device to permit to connect to the AirStation. Click [Register] to add that MAC address to the list.List of all clients associated with this AirStationDisplay the list of all MAC addresses of wireless devices connected to the AirStation.](https://usermanual.wiki/BUFFALO/09101695-0.user-manual-II/User-Guide-1680476-Page-45.png)
![AOSS Status and Settings.Parameter MeaningInitiates AOSS automatic wireless conguration. Click this, then press or click the AOSS button on your AOSS-compatible wireless client. Repeat for additional AOSS clients. Click this button to disconnect AOSS connections.Note: If AOSS connections are disconnected, the SSID and encryption keys will be restored to their last settings from before AOSS was used.Encryption type Display AOSS’s Security Level status.AOSS Button on the AirStation Unit Uncheck to disable the physical AOSS button on the AirStation.Current Encryption Information(AOSS connection only)Displays the encryption type, SSID, and encryption key congured by AOSS.[Random] Click to enter random values for SSID, encryption key, and other settings. [KEY base] Click to return the SSID, encryption key, and other wireless settings to the values on the case sticker. [Reset] Click to return the SSID, encryption key, and other wireless settings to their previous values.](https://usermanual.wiki/BUFFALO/09101695-0.user-manual-II/User-Guide-1680476-Page-47.png)
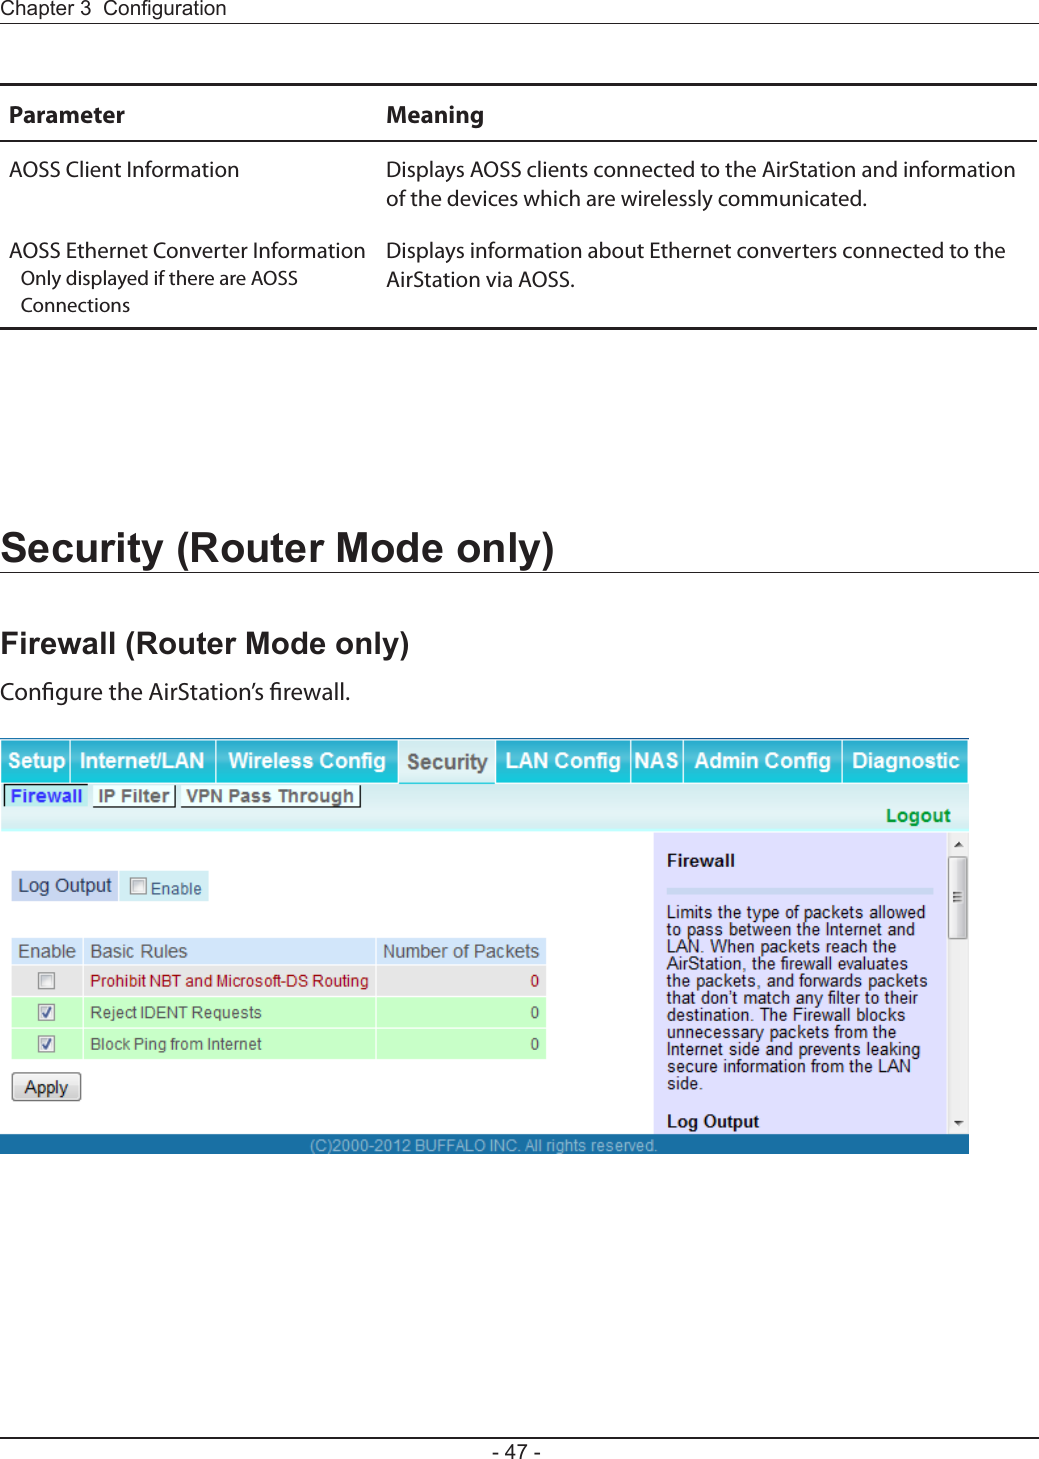
![Parameter MeaningLog Output Enable to output a log of rewall activity.Basic Rules Enable to use any of the quick lters. Precongured quick lters include:Prohibit NBT and Microsoft-DS RoutingEnabling this blocks communication using these protocols from the WAN side to the LAN side or from the LAN side to the Internet. You can congure this with PPPoE if you select [Use PPPoE Client] or [Use IP Unnumbered] in Method of Acquiring IP address (page 24), or if Easy Setup identied a PPPoE connection during setup.Reject IDENT RequestsEnabling this option will answer IDENT requests from the Internet side with corresponding rejection packets. Enable this option if you experienced slow transfer speeds for network applications such as mail, ftp or web browsing. If you have congured transfer of IDENT requests to the LAN side computer in the address translation settings (DMZ or TCP port 113), then that setting has higher priority, and overrides this setting.Block Ping from InternetIf this is enabled, the AirStation will not respond to pings from the Internet side. You can congure this with PPPoE if you select [Use PPPoE Client] or [Use IP Unnumbered] in Method of Acquiring IP address (page 24), or if Easy Setup identied a PPPoE connection during setup.](https://usermanual.wiki/BUFFALO/09101695-0.user-manual-II/User-Guide-1680476-Page-49.png)
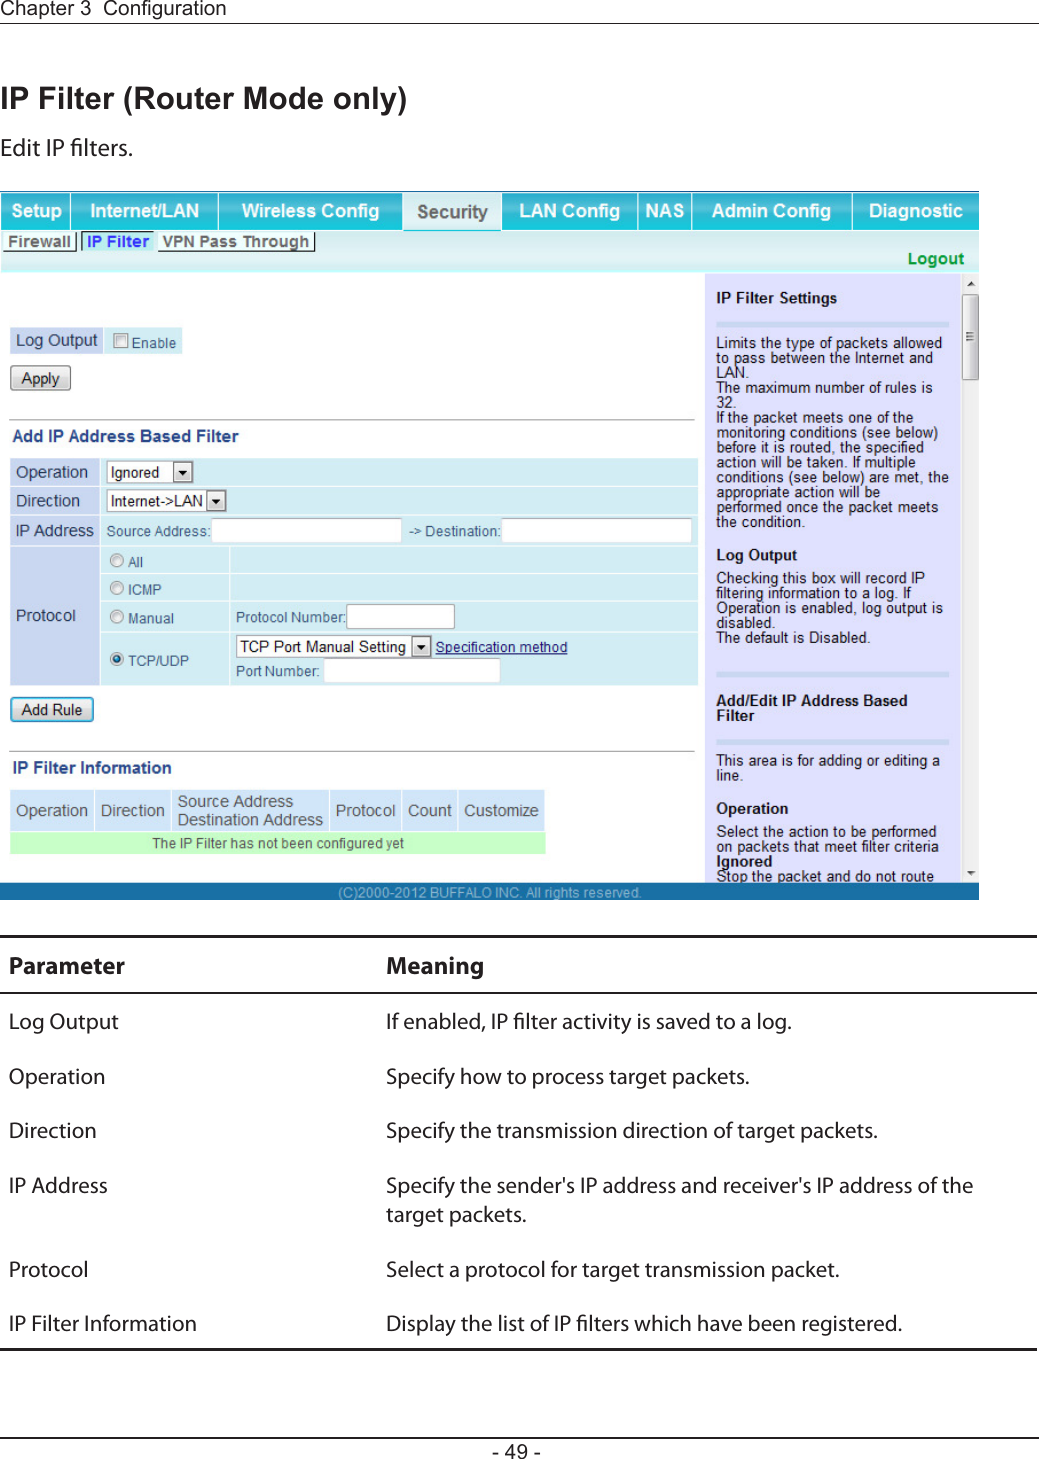
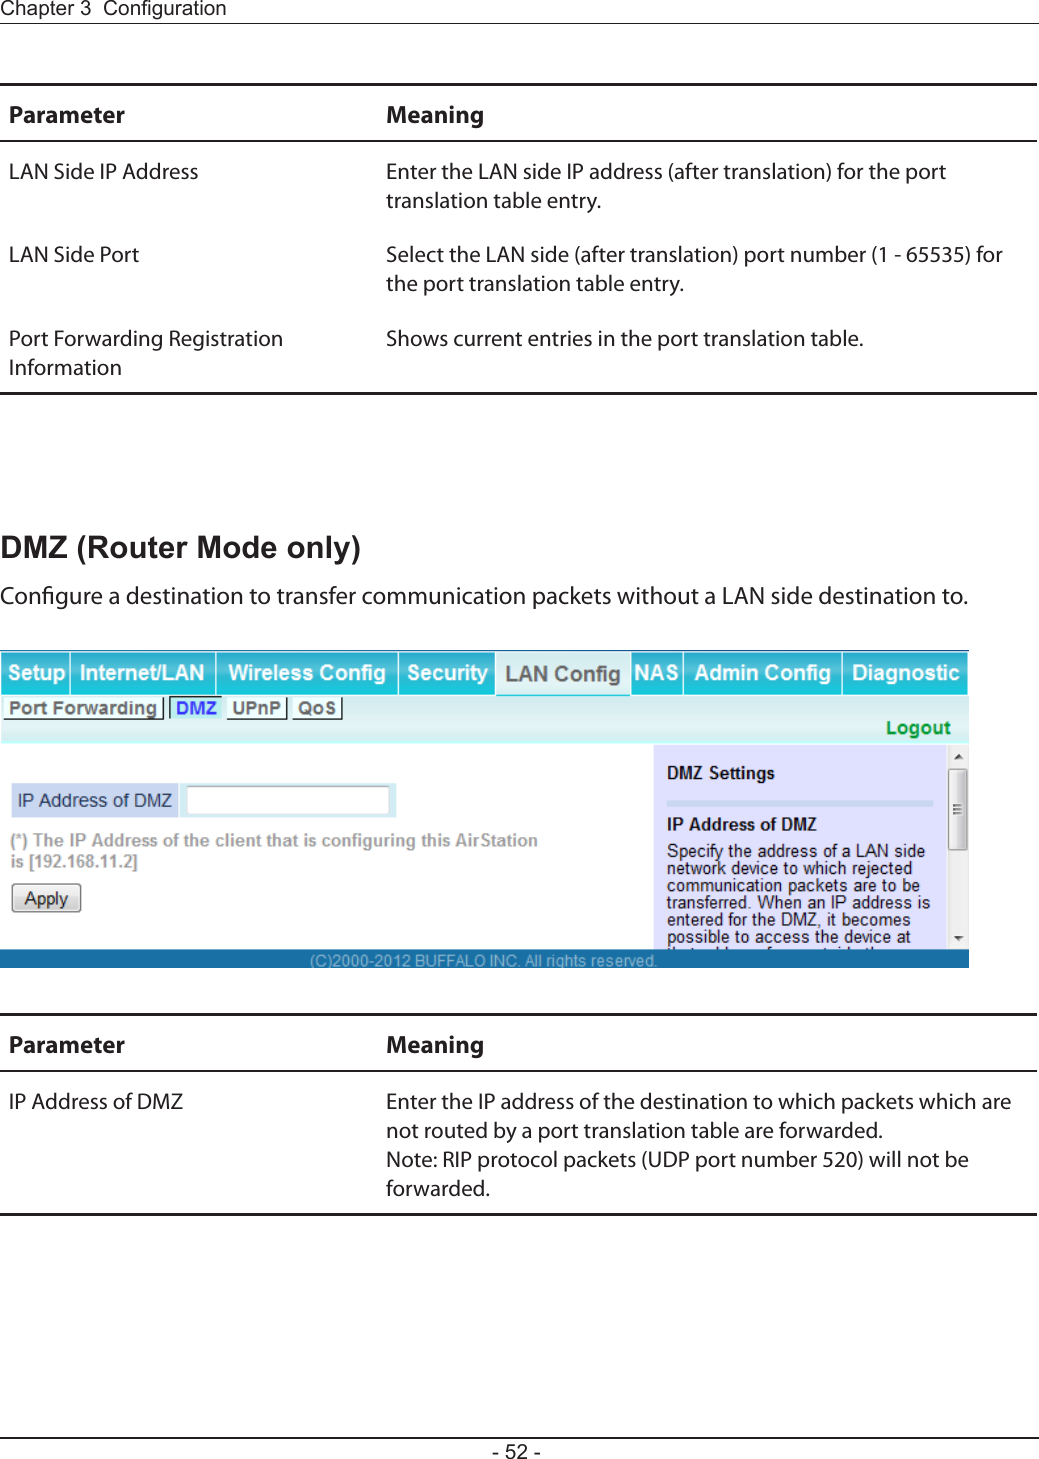
![Congure port translation.Parameter MeaningGroup Specify a group name for a new rule to belong to. Select [New Group] and enter the new group name in the Group Name eld to create a new group. A group name can include up to 16 alphanumeric characters.Internet Side IP Address Enter the Internet side IP address (before translation) for the port translation table entry.Protocol Select the Internet side protocol (before translation) for the port translation table entry.](https://usermanual.wiki/BUFFALO/09101695-0.user-manual-II/User-Guide-1680476-Page-52.png)
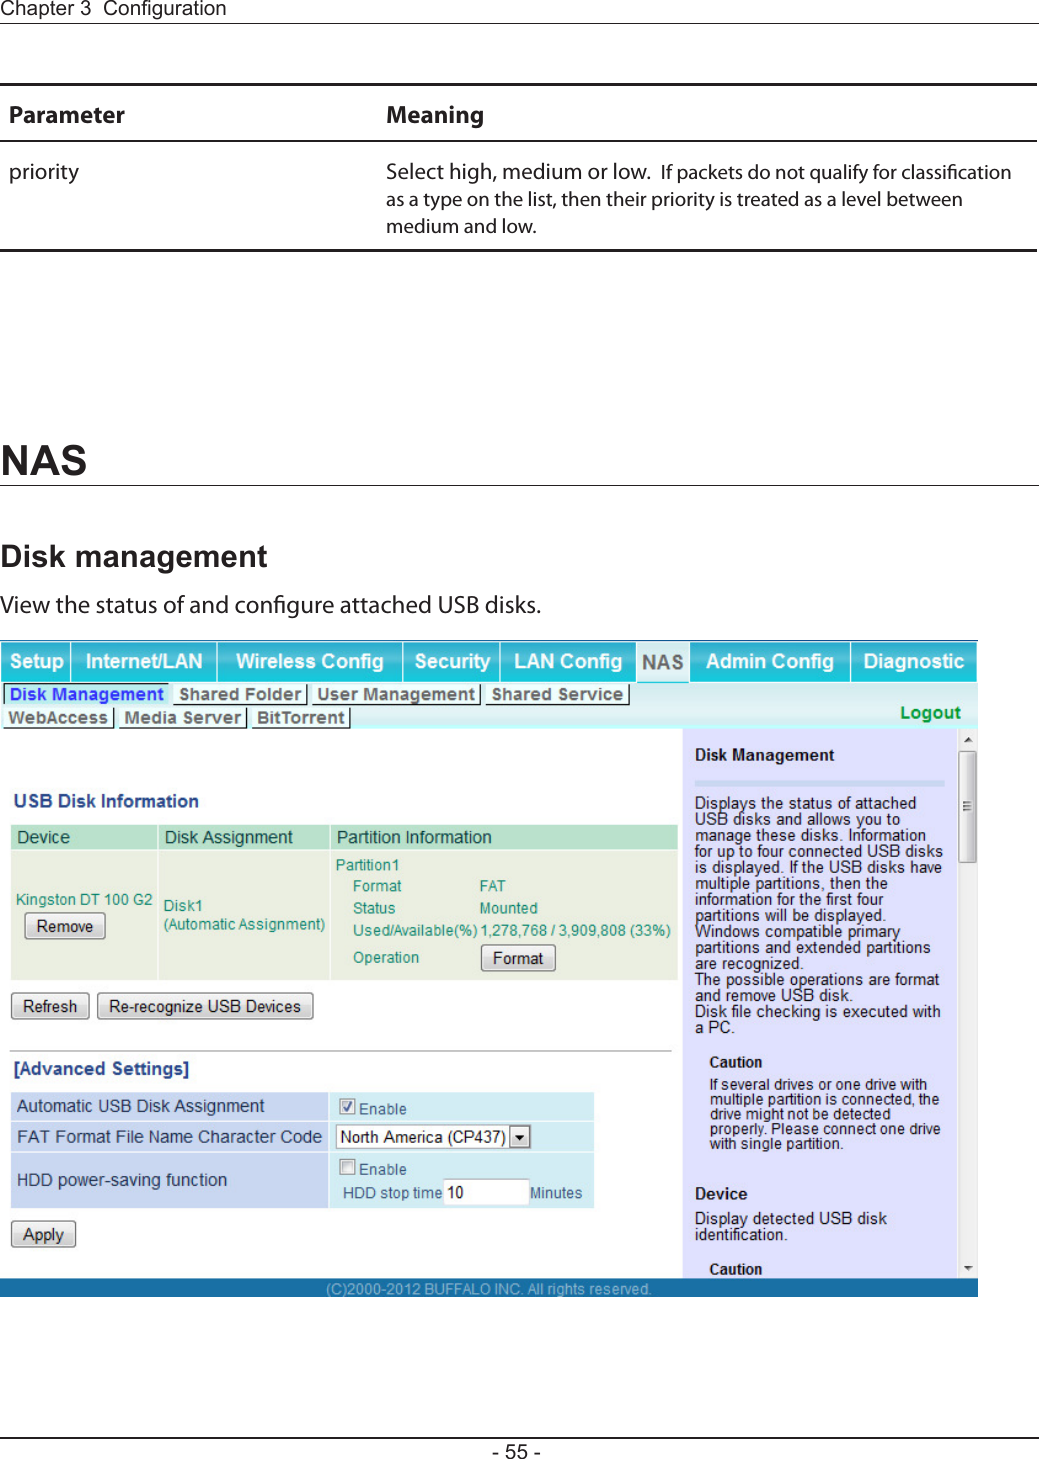
![Parameter MeaningDevice Displays information for attached USB disks. Disks are removed when [Remove] in the Device column is clicked.Disk Assignment A disk number will be automatically assigned to the disk or you can choose a number. Select a disk number, or select [Do not assign], then click [Apply].Partition Information Displays the partition information for the selected USB disk. Click [Format] to format the disk. Note: formatting a disk will erase all information on it. Re-recognize USB devices Click this to re-scan for connected USB disks. Automatic USB Disk Assignment Check [Enable] to automatically select an attached USB hard disk. The entire drive will be used as the shared folder. To congure your disk and share manually, uncheck [Enable].FAT format le name character code Select the character code for lenames in FAT formatted partitions.HDD power-saving function Click [Enable] to enable power saving mode.HDD stop time Powers down the drive after this duration of time.](https://usermanual.wiki/BUFFALO/09101695-0.user-manual-II/User-Guide-1680476-Page-57.png)
![Congure a USB disk for use with shared folders.Parameter MeaningShared Folder Name* Enter a name for the shared folder. Up to 18 alphanumeric characters, spaces, hyphens (-), and underscores (_) may be used.Shared Folder Description* Enter a description of the shared folder (optional). Up to 75 alphanumeric characters, spaces, hyphens (-), and underscores (_) may be used.Disk Partition Area* Displays the partition area, format type, and the capacity of the USB disk.Disclosed to* Check the functionality that you want to support. Win/Mac OS (Samba NAS), Web Access, Media Server, and/or BitTorrent may be checked. Only one folder may be chosen for either Media Server or BitTorrent functionality.Access Limits If access limits are enabled, use the arrows to move highlighted users between the columns for [Read/Write], [Read-only], or [No access] privileges.](https://usermanual.wiki/BUFFALO/09101695-0.user-manual-II/User-Guide-1680476-Page-58.png)
![Parameter MeaningWeb Access You may also select to enforce access limits on users accessing through Web Access by checking the Access Limits checkbox. Users will have the same access levels as assigned above. If Access Limits is not checked, then all users accessing the shared folder via Web Access will have [Read only] access..Shared Folder Registration Information*Displays information about the shared folder.* This is not displayed when Automatic USB Disk Assignment (page 56) is used:The following shared folder settings are used when Disk Management is activated:• All folders: Access limits in eect.• Shared Folder/ Web Access: All folders are shared.• Media Server/BitTorrent: The rst folder is shared.](https://usermanual.wiki/BUFFALO/09101695-0.user-manual-II/User-Guide-1680476-Page-59.png)
![The screen to congure Web Access.Parameter MeaningWeb Access Check [Enable] to use Web Access.Web Access Display Language Set the language to be used with Web Access.HTTPS/SSL Encryption Check [Enable] to use SSL encryption for protected data transfer.Web Access External Port Automatically sets the external port used for Web access. To select the port manually, select [Manual].](https://usermanual.wiki/BUFFALO/09101695-0.user-manual-II/User-Guide-1680476-Page-62.png)
![Parameter MeaningDNS Service Hostname Sets the DNS Service Hostname when the Web access function is activated. Select [Use BualoNAS.com registration function] to use the Web access function easily. You’ll have to congure a [BualoNAS.com name] and [BualoNAS.com key] to use BualoNAS.com. 3 - 0 alphanumeric characters, spaces, hyphens (-), underscores (_) and period (.), may be used in the BualoNAS.com name. 3 - 20 alphanumeric characters, spaces, hyphens (-), underscores (_) and period (.), may be used in the BualoNAS.com key. Note: The registered name is deleted from the server if the AirStation is disconnected from power, even for a moment.Web Access Displays the status of web access.External Port Status Displays the status of the external port.BualoNAS.com Displays the status of BualoNAS.com.](https://usermanual.wiki/BUFFALO/09101695-0.user-manual-II/User-Guide-1680476-Page-63.png)
![Parameter MeaningBandwidth Restriction Set a bandwidth limit for BitTorrent.[Download Manager] Displays the BitTorrent download manager screen. Add a torrent, then click [Add] to download the le(s).[Delete BitTorrent information] Deletes all les, including the torrent les and les which are currently downloading. Downloaded les are not deleted.BitTorrent Status Displays the status of the BitTorrent client.BitTorrent External Port Status Display the external port status of the BitTorrent client.You can download the latest Windows BitTorrent client from www.bittorrent.com.](https://usermanual.wiki/BUFFALO/09101695-0.user-manual-II/User-Guide-1680476-Page-66.png)
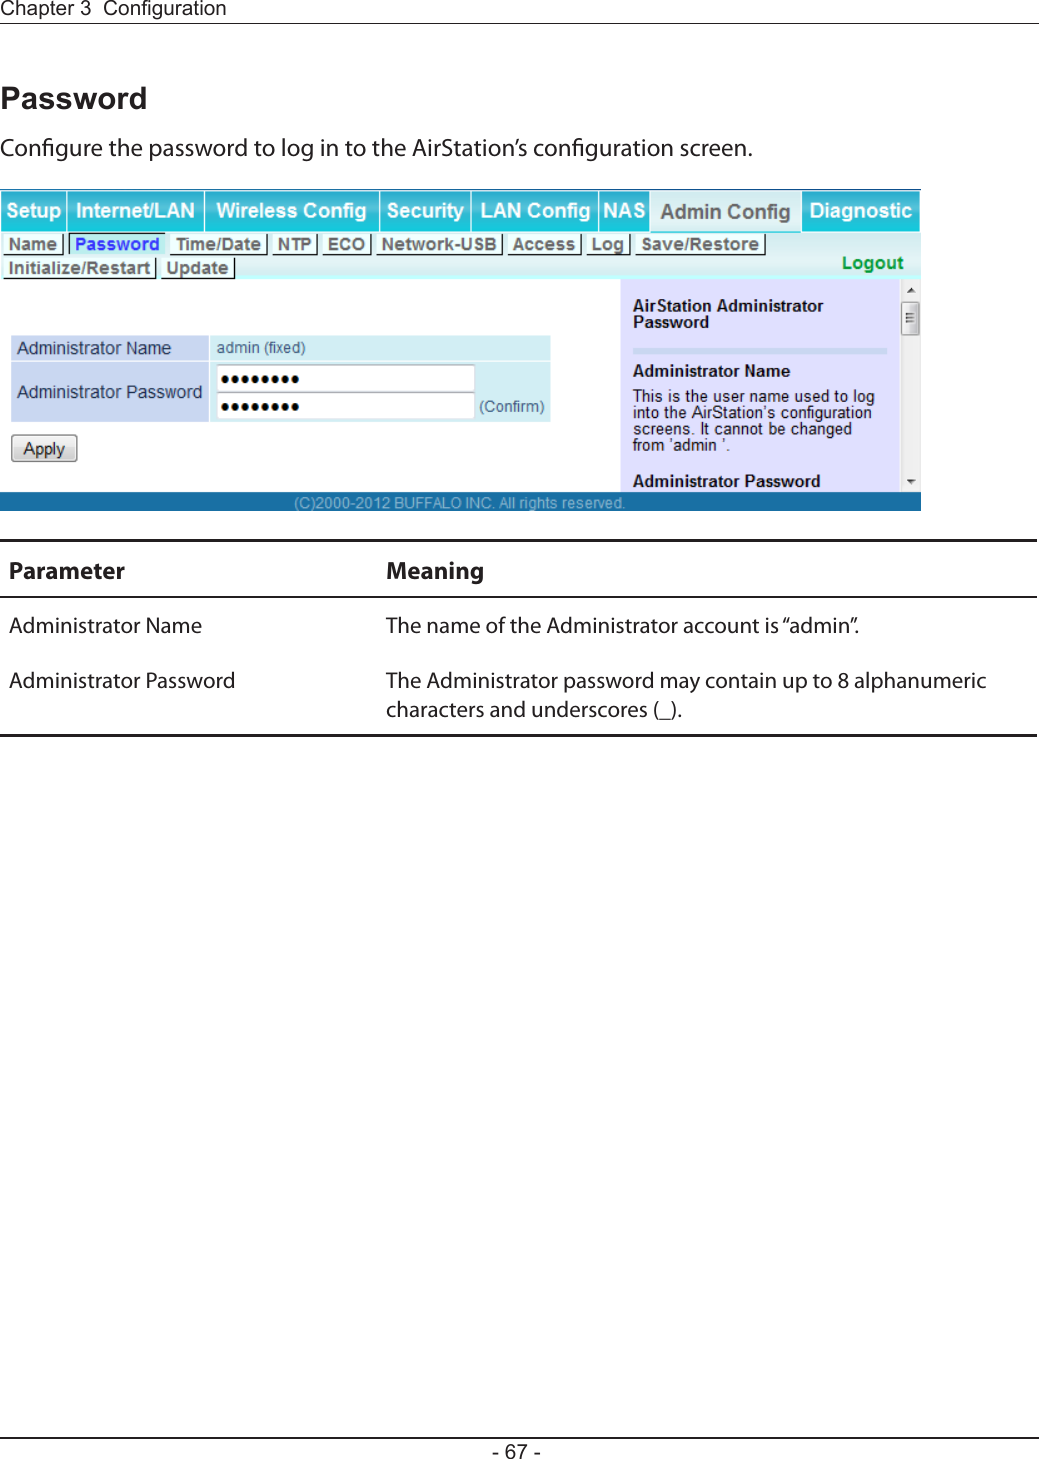
![Save AirStation settings as a le and restore from them later.Parameter MeaningSave current settings Clicking [Save] will save the current conguration of the AirStation to a le. If the [Encrypt the conguration le with a password] option is checked, then the conguration le will be password protected with the current administrator password.Restore Conguration from Backup FileRestore the conguration of the AirStation from a saved conguration le by clicking the [Browse...] button, navigating to the conguration le, and then clicking [Restore]. If the conguration le was password protected, then put a check next to [To restore from the le you need the password], enter the password, and click [Open].](https://usermanual.wiki/BUFFALO/09101695-0.user-manual-II/User-Guide-1680476-Page-75.png)
![Initialize or restart the AirStation.Parameter MeaningRestart Click [Restart Now] to restart the AirStation.Initialize Click [Initialize Now] to initialize and restart the AirStation.](https://usermanual.wiki/BUFFALO/09101695-0.user-manual-II/User-Guide-1680476-Page-76.png)
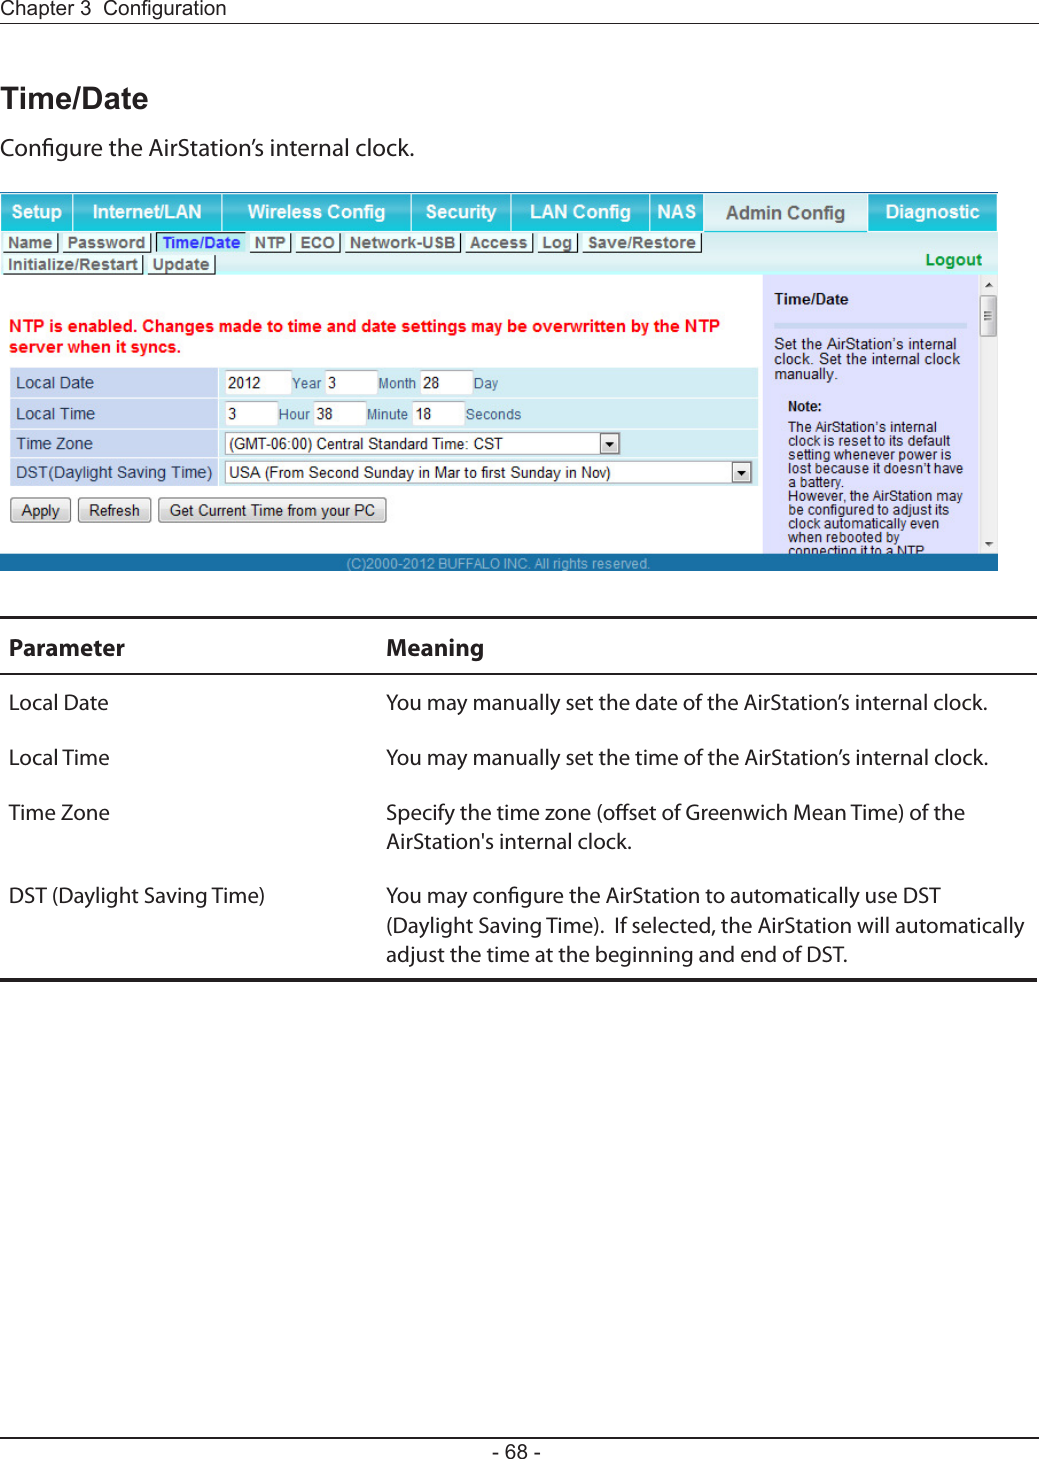
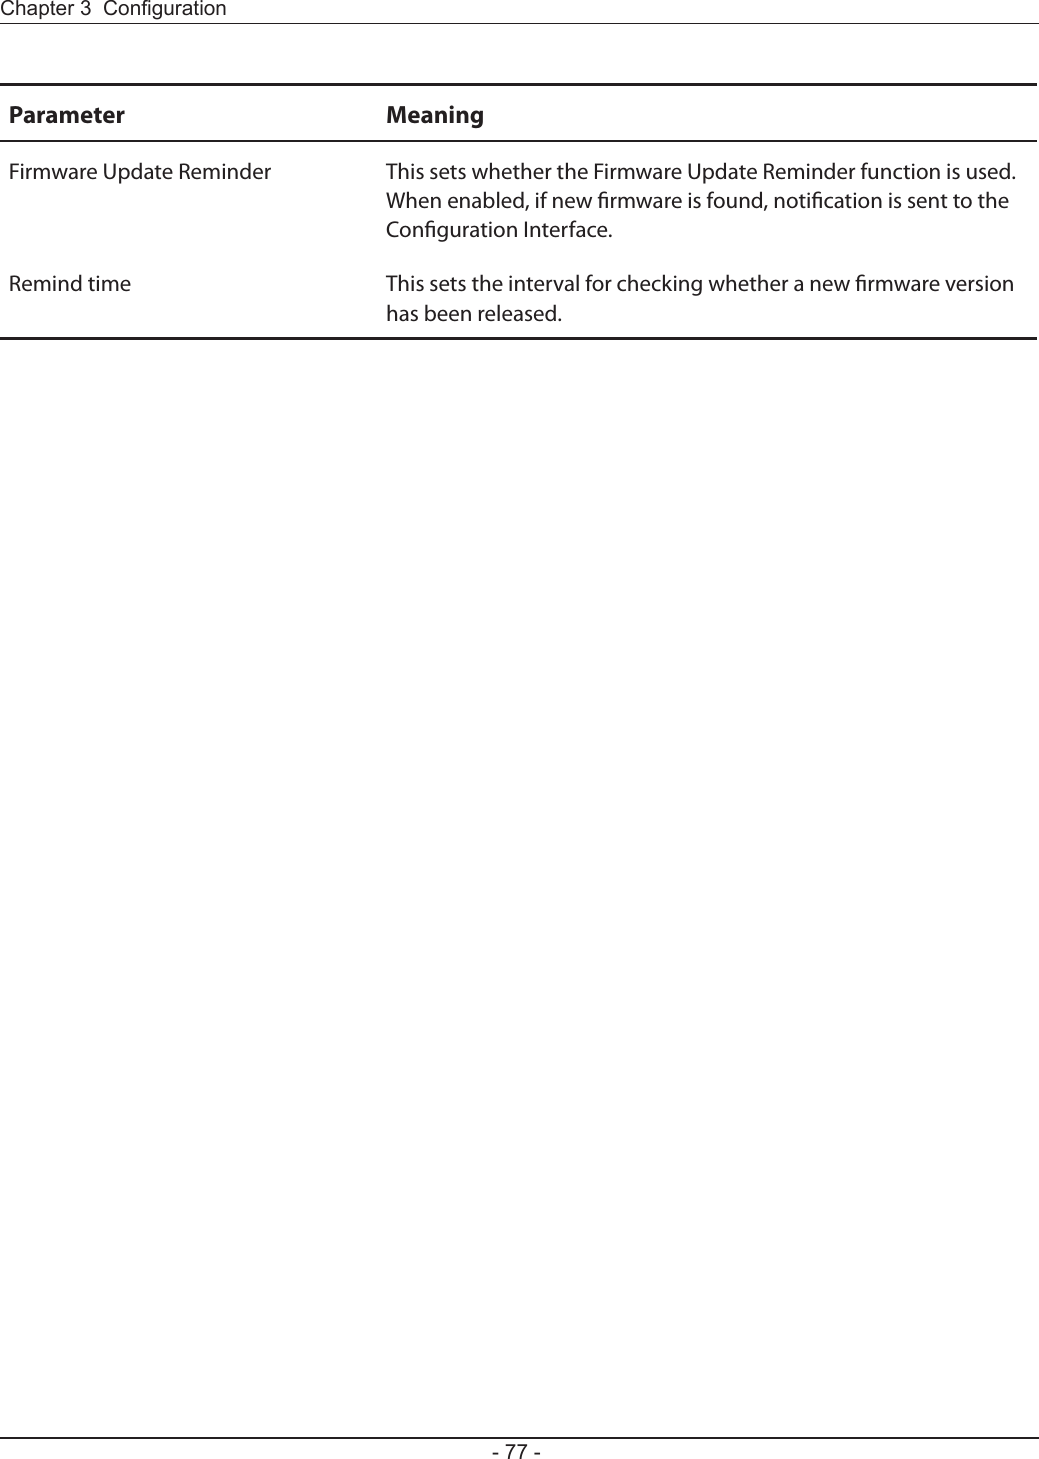
![Update the AirStation’s rmware.Parameter MeaningFirmware Version Displays the current rmware version of the AirStation.Update Method Specify Local FileUpdates from a rmware le stored on your computer.Automatic Update OnlineAutomatically updates to the latest rmware available.Firmware File Name Click [Browse...] to navigate to the rmware le on your computer if [Specify Local File] was selected. You don’t need to specify the rmware location if you’re using [Automatic Update]. Click [Update Firmware] to update the rmware.](https://usermanual.wiki/BUFFALO/09101695-0.user-manual-II/User-Guide-1680476-Page-77.png)
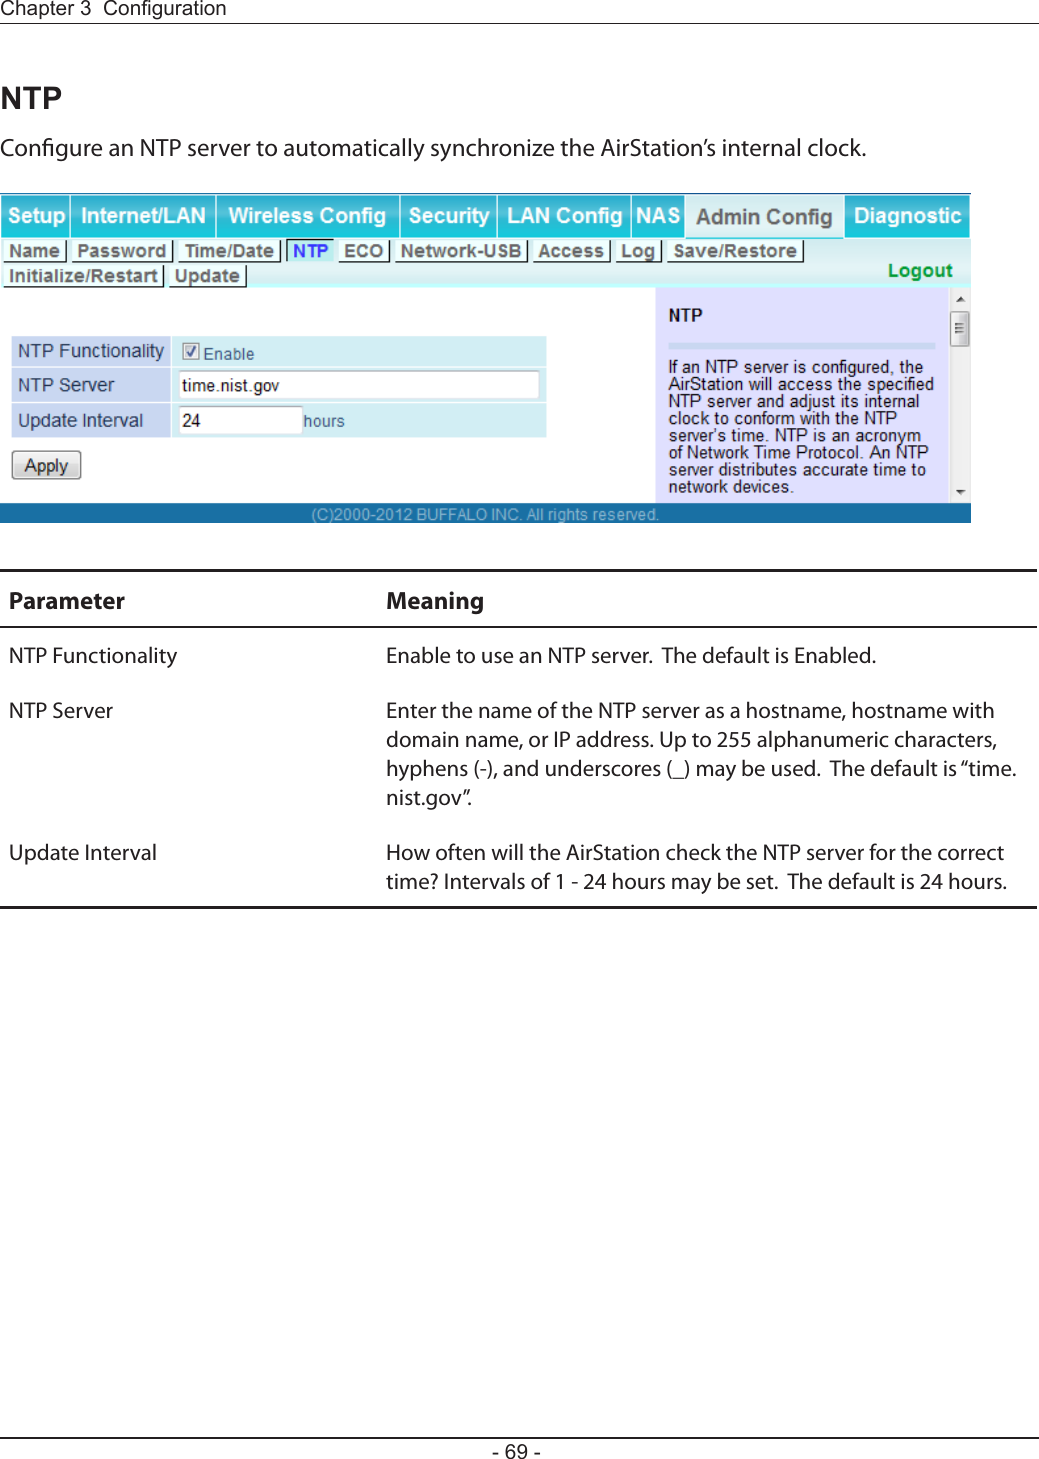
![A ping test checks whether the AirStation can communicate with a specic network device.Parameter MeaningDestination Address Enter the IP address or hostname of the device that you are testing communication with, then click [Execute]. The result will be displayed below.](https://usermanual.wiki/BUFFALO/09101695-0.user-manual-II/User-Guide-1680476-Page-84.png)
![12Click [Start] > [All Programs] > [BUFFALO] > [AirStation Utility] > [Client Manager V].If you are using Windows 7 or Vista, use the Client Manager V to connect wirelessly with AOSS or WPS.Click [Create Pro le].3If the User Account Control screen opens, click [Yes] or [Continue].4Click the [WPS AOSS ] button.Follow any instructions displayed on the screen. When the Wireless LED on the front of the AirStation stop ashing and glows steadily, the connection is complete.](https://usermanual.wiki/BUFFALO/09101695-0.user-manual-II/User-Guide-1680476-Page-86.png)
![2If you are using Windows XP, use Client Manager 3 to connect wirelessly with AOSS or WPS.1Right-click on the icon in the system tray and select [Pro le].Click the [WPS AOSS] button.It will take several seconds for your wireless connection to be con gured. When the Wireless LED on the front of the AirStation stop ashing and glows steadily, the connection is complete.](https://usermanual.wiki/BUFFALO/09101695-0.user-manual-II/User-Guide-1680476-Page-87.png)
![If you are using Mac OS X 10.7 / 10.6 / 10.5 / 10.4, use the AOSS Assistant to connect wirelessly with AOSS.1Run the AOSS Assistant program that was downloaded from the Bualo web site.234The software license screen is displayed. Click [Agree] to proceed.Click [Start AOSS ].Enter the Mac’s username and password and click [OK].It will take several seconds for your wireless connection to be congured. When the Wireless LED on the front of the AirStation stop ashing and glows steadily, the connection is complete.](https://usermanual.wiki/BUFFALO/09101695-0.user-manual-II/User-Guide-1680476-Page-88.png)
![If you are using a game machine which supports AOSS or WPS, refer to that device’s manual to initiate AOSS or WPS. When instructed, hold down the AOSS button on the AirStation for 1 second.When the Wireless LED on the front of the AirStation stop ashing and glows steadily, the connection is complete.You can also connect to the AirStation without installing Client Manager V or Client Manager 3 by using the utility built-in to operating system. The procedure varies depending on which version of operating system you are using.With Windows 7, use WLAN AutoCong to connect to the AirStation.1Click on the network icon in the system tray.2Select the target AirStation and click [Connect]. If you will be connecting to this device in the future, checking [Connect automatically] is recommended.](https://usermanual.wiki/BUFFALO/09101695-0.user-manual-II/User-Guide-1680476-Page-89.png)
![3Enter the encryption key and click [OK]. 1Right-click on the wireless network icon in the system tray.2Click [Connect to a network.When this screen is displayed, select your network and click [Connect.3With Vista, use WLAN AutoCong to connect to the AirStation.](https://usermanual.wiki/BUFFALO/09101695-0.user-manual-II/User-Guide-1680476-Page-90.png)
![If the screen below is displayed, click [I want to enter the network key or passphrase instead].Otherwise,go to step 4.](https://usermanual.wiki/BUFFALO/09101695-0.user-manual-II/User-Guide-1680476-Page-91.png)
![4Enter the encryption key and click [Connect].Step through the wizard to nish conguration. If the Set Network Location screen is displayed, select [Home], [Work], or [Public location] depending on where you’re using the AirStation.](https://usermanual.wiki/BUFFALO/09101695-0.user-manual-II/User-Guide-1680476-Page-92.png)
![Windows XP includes Wireless Zero Cong, a built-in utility to connect to your AirStation.Note: If Client Manager 3 is installed on your computer, Wireless Zero Cong is disabled. Uninstall Client Manager 3 to use Wireless Zero Cong, or just use Client Manager 3 to connect to the AirStation.1Right-click on the wireless network icon in the system tray.2Click [View Available Wireless Networks].34It will take several seconds for conguration to complete.Select the network to connect to and click [Connect].Enter the encryption key (twice) and click [Connect].](https://usermanual.wiki/BUFFALO/09101695-0.user-manual-II/User-Guide-1680476-Page-93.png)
![Use Wi-Fi on a Mac to connect to the AirStation.Note: In Mac OS X 10.6 and earlier, “Wi-Fi” appears as “AirPort”.123Refer to the setup card at the bottom of the AirStation. Make a note of the SSID and Key printed on the setup card.Click the icon in the top section of the screen and select [Turn Wi-Fi On].4It will take several seconds for conguration to complete.Find the SSID from step 1 on the list. Click it to highlight it.Enter the Key from step 1 into the Password entry box, check [Remember this network], and click [OK].](https://usermanual.wiki/BUFFALO/09101695-0.user-manual-II/User-Guide-1680476-Page-94.png)
![To congure TCP/IP in Windows 7, follow the procedure below.1Click [Start] > [Control Panel] > [Network and Internet].2Click [Network and Sharing Center].3Click [Change Adapter Settings] on the left side menu.4Right-click on [Local Area Connection], then click [Properties].5If the User Account Control screen opens, click [Yes] or [Continue].6Select [Internet Protocol Version 4 (TCP/IPv4)] then click [Properties].7To have DHCP set your IP address settings automatically, check [Obtain an IP address automatically] and [Obtain DNS server address automatically]. To set your IP address settings manually, enter values for each setting. Examples: If the router’s IP address is 192.168.11.1, IP address 192.168.11.80 Subnet mask 255.255.255.0 Default gateway 192.168.11.1 Preferred DNS server 192.168.11.1 Alternate DNS server blank8Click [OK].](https://usermanual.wiki/BUFFALO/09101695-0.user-manual-II/User-Guide-1680476-Page-97.png)
![To congure TCP/IP in Windows Vista, follow the procedure below.1Click [Start] > [Settings] > [Control Panel].2Click [Network and Sharing Center].3Click [Manage network connections] on the left side menu. 4Right-click on [Local Area Connection], then click [Properties].5If the User Account Control screen opens, click [Yes] or [Continue].6Select [Internet Protocol Version 4 (TCP/IPv4)], then click [Properties].7To have DHCP set your IP address settings automatically, check [Obtain an IP address automatically] and [Obtain DNS server address automatically]. To set your IP address settings manually, enter values for each settings. Example: If the router’s IP address is 192.168.11.1, IP address 192.168.11.80 Subnet mask 255.255.255.0 Default gateway 192.168.11.1 Preferred DNS server 192.168.11.1 Alternate DNS server blank8Click [Close].](https://usermanual.wiki/BUFFALO/09101695-0.user-manual-II/User-Guide-1680476-Page-98.png)
![To congure TCP/IP in Windows XP, follow the procedure below.1Click [Start] > [Settings] > [Control Panel].2Double-click [Network].3Right-click on [Local Area Connection], then click [Properties].4Select [Internet Protocol (TCP/IP)], then click [Properties].5To have DHCP set your IP address settings automatically, check [Obtain an IP address automatically] and [Obtain DNS server address automatically]. To set your IP address settings manually, enter values for each setting. Examples: If the router’s IP address is 192.168.11.1, IP address 192.168.11.80 Subnet mask 255.255.255.0 Default gateway 192.168.11.1 Preferred DNS server 192.168.11.1 Alternate DNS server blank6Click [Close].](https://usermanual.wiki/BUFFALO/09101695-0.user-manual-II/User-Guide-1680476-Page-99.png)
![To congure TCP/IP in Mac OS X, follow the procedure below.1Click [Apple menu] > [System Preferences…].2Click [Network].3Click [Ethernet].4To have DHCP set your IP address settings automatically, select [Using DHCP] in the Congure IPv4 eld. To set your IP address settings manually, select [Manually] in the Congure IPv4 eld and enter values for each setting. Examples: If the router’s IP address is 192.168.11.1, IP Address 192.168.11.80 Subnet Mask 255.255.255.0 Router 192.168.11.1 DNS Server 192.168.11.1 Search Domains blank5Click [Apply].](https://usermanual.wiki/BUFFALO/09101695-0.user-manual-II/User-Guide-1680476-Page-100.png)
![I reset my wireless router to factory settings and forgot how to log in to the conguration interface.Open your browser, enter 192.168.11.1 as the browser address, and hit Enter. You will be prompted to log in. Enter “admin” for the username and “password” for the password. Click [OK] to log in. The option to reset your password will be available on the rst page.How do I forward ports on my wireless router for my gaming console?Log in to the router. From the home page, go to the Internet Game/ Port Mapping section. Enter the port that needs to be forwarded and the IP address of the gaming console.How do I enable or modify security encryption settings on the wireless router?Go to the Wireless Cong tab and then select the Security tab. Bualo recommends the use of WPA/WPA2 mixed for wireless encryption. The passphrase/ key should be at least 8 characters in length.How do I change my wireless router’s broadcasted network name (SSID)?Log in to the wireless router with your browser. Navigate to Wireless Cong - Basic. Find the SSID setting. Select [Use] and enter the new name for your network. Click [Apply]. Once the wireless router has rebooted, you will need reconnect any wireless clients to the AirStation using the new network name. The encryption key will still be the same.](https://usermanual.wiki/BUFFALO/09101695-0.user-manual-II/User-Guide-1680476-Page-101.png)
![What can I do if my wireless connection drops randomly or seems slow?There are many environmental factors that may cause this. First, ensure the issue is not range related by moving the wireless router and the client device closer together. If the connection drops continue, then range is probably not the issue.Other 2.4 GHz devices such as microwaves, other wireless networks, and 2.4 GHz wireless phones may impact performance. Try a dierent wireless channel for your wireless router. Log in to the wireless router with your browser. Click on the Wireless Cong tab and then the Basic tab. Wireless channels from 1 - 11 may be selected. Try the Auto-Channel option if available. Otherwise, manually select an alternate channel and click [Apply].Though I am able to successfully make a connection with my wireless router, I am unable to access the Internet with my web browser.First, power o the cable or DSL modem, the wireless router, and your computer. Move the router's mode switch to the on position. Verify that the modem is connected to the wireless router with an Ethernet cable to the WAN port. Power on the modem and wait one minute. Power on the wireless router and wait another minute. Power on the computer. Open a browser on the computer and navigate to a familiar website to verify whether the Internet connection is functioning normally.If after these steps, an Internet connection is still unavailable, power o the cable or DSL modem and computer again and directly connect your computer to the cable or DSL modem with a cable between the computer and the port on the modem. Power on the modem and wait one minute. Power on the computer and again check for an Internet connection.If an Internet connection IS NOT available with a direct connection to the computer, please call the Internet Service Provider who installed the modem.If an Internet connection IS available with a direct connection to the computer, please call our customer support.Where can I download the latest drivers, rmware, and instructions for my Bualo wireless products?The latest drivers and rmware are available online at www.bufalotech.com](https://usermanual.wiki/BUFFALO/09101695-0.user-manual-II/User-Guide-1680476-Page-102.png)

![Network-USB Navigator is compatible only with printers and multifunction printers (all-in-one devices with a printer, scanner, and memory card reader). It cannot be used with any other type of USB devices.1Insert the AirNavigator CD into your computer.The setup menu will launch automatically. If not, open the CD and click on “Launcher.exe” in the “win” folder.2Click [Software installation].](https://usermanual.wiki/BUFFALO/09101695-0.user-manual-II/User-Guide-1680476-Page-110.png)
![4Click [Next]. 5Click [Yes]. 3Check the box for “Network-USB Navigator” and click [Install].](https://usermanual.wiki/BUFFALO/09101695-0.user-manual-II/User-Guide-1680476-Page-111.png)
![7Click [Next]. 6Click [Next]. 8Click [Start].](https://usermanual.wiki/BUFFALO/09101695-0.user-manual-II/User-Guide-1680476-Page-112.png)
![・Installation on Windows XP (SP2 or later)・Installation on Windows 7/Vista Click [Yes] when this screen is shown.Click [Install] when this screen is shown. Click [Yes] when this screen is shown.](https://usermanual.wiki/BUFFALO/09101695-0.user-manual-II/User-Guide-1680476-Page-113.png)
![910 Click [Finish] when the “Network-USB Navigator Install is Complete” screen is shown. Network-USB Navigator installation is complete. 1 You can select the behavior of this product when a USB device is detected. Select the connection behavior suited to your usage environment.2 Click [Next].](https://usermanual.wiki/BUFFALO/09101695-0.user-manual-II/User-Guide-1680476-Page-114.png)
![1Insert the Air Navigator CD. 2From the menu bar, click [Go] > [Computer].3Double-click the CD icon, and then double-click [Mac] > [DeviceServer] > [Cosetup].4Click [Continue]. 5Click [Continue].](https://usermanual.wiki/BUFFALO/09101695-0.user-manual-II/User-Guide-1680476-Page-115.png)
![6Click [Agree]. 8Click [Install]. 7Click [Continue].](https://usermanual.wiki/BUFFALO/09101695-0.user-manual-II/User-Guide-1680476-Page-116.png)
![10Click [Continue Installation]. 11Click [Restart]. 9Input your name and password. Click [OK].](https://usermanual.wiki/BUFFALO/09101695-0.user-manual-II/User-Guide-1680476-Page-117.png)
![12Network-USB Navigator installation is complete. 1 During the rst program launch only, the screen at left will appear before the main program screen is displayed. From here, you can select the behavior of this product when a USB device is detected. Select the connection behavior suited to your usage environment.2 Click [OK].1Launch Network-USB Navigator. There are two ways to launch the program.a) Click the task tray icon .b) From the Start menu, click [(All) Programs]-[BUFFALO]-[Network-USB Navigator]-[Network-USB Navigator]. Macintosh Users a) Click the Dock icon .b) Click [Macintosh HD]-[Applications]-[BUFFALO]-[Device Server]-[Network-USB Navigator].](https://usermanual.wiki/BUFFALO/09101695-0.user-manual-II/User-Guide-1680476-Page-118.png)
![To congure Network-USB, refer to the “Network-USB User Manual”.2Click , then click [Manual Page]. 3Network-USB User Manual will open.](https://usermanual.wiki/BUFFALO/09101695-0.user-manual-II/User-Guide-1680476-Page-119.png)
![For users of Windows 7, Vista, or Mac OS X (10.4 and later), software supplied with the AirStation can be used to check the quality and strength of the wireless signal.Note: If Client Manager V is not already installed, download it from the Bualo web site, and install. Client Manager V does not support Windows XP.3When the Client Manager V status screen is displayed, click .1Click [Start] > [All Programs] > [BUFFALO] > [AirStation Utility] > [Client Manager V].2Click [Advanced Setup].](https://usermanual.wiki/BUFFALO/09101695-0.user-manual-II/User-Guide-1680476-Page-120.png)
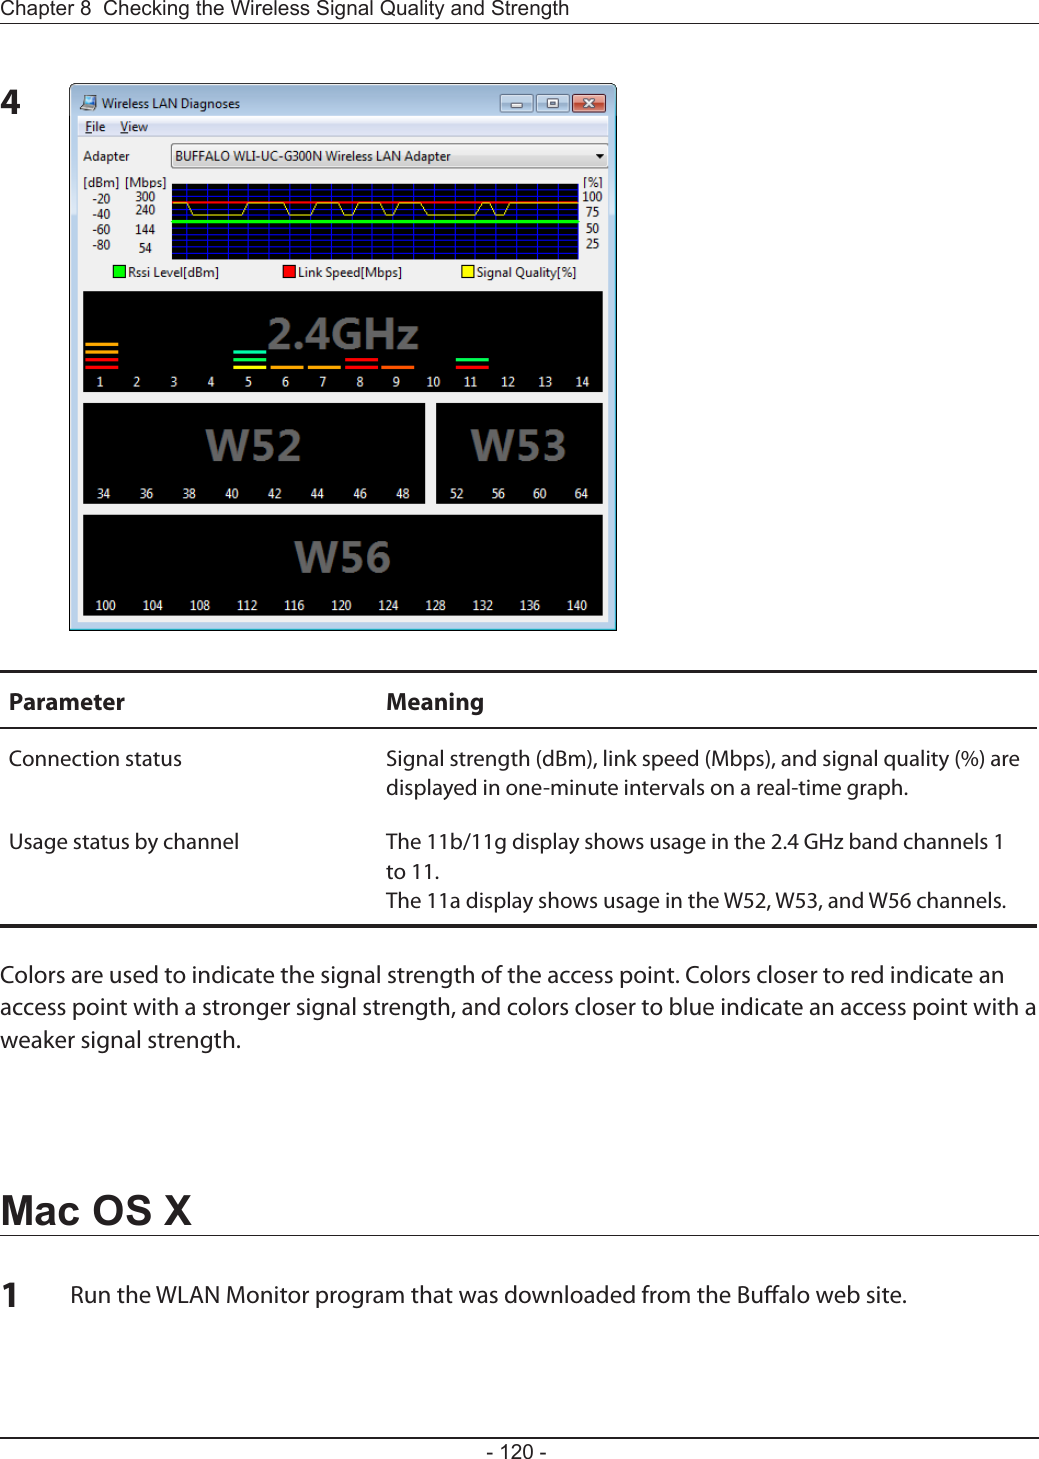
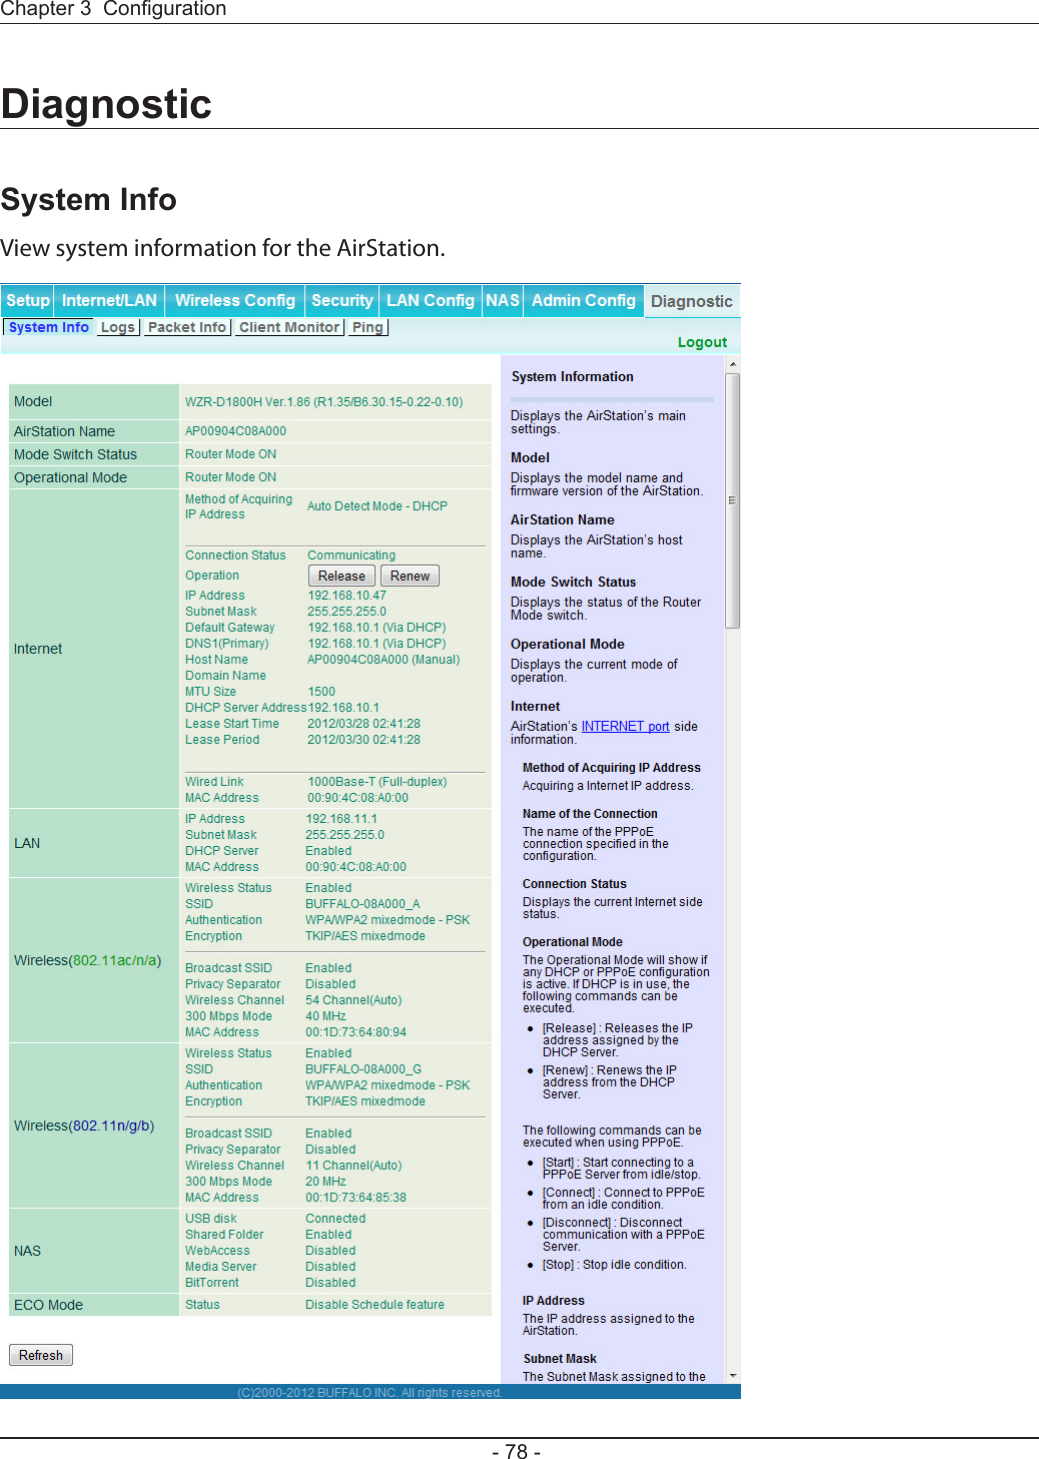
![2The software license screen is displayed when starting for the rst time only. Click [Agree] to proceed.3Parameter MeaningNetwork name (SSID) This displays the SSID of the AirStation that is currently connected.Status This indicates the current connection status.IP Address This indicates the IP address of the current wireless network port (Wi-Fi).Security This indicates the authentication method for the current connection target.Encryption This displays the encryption type for the current connection target.Band This displays the wireless band for the current connection target.Channel This displays the wireless channel for the current connection target.Link Speed (Mbps) This displays the current link speed.Quality (%) This displays the current signal quality.Signal Level (dBm) This indicates the strength of the current signal.](https://usermanual.wiki/BUFFALO/09101695-0.user-manual-II/User-Guide-1680476-Page-122.png)
![There are several restrictions on using the AirStation’s USB port:• When using two-byte characters (such as Japanese), keep folder and le names within 80 characters. You may not be able to copy a folder or a le whose name length is more than 80 characters. • You cannot set attributes (hidden or read-only) for folders or les on the AirStation. • When using access restrictions, you can register up to 16 users for the AirStation. • Please note that you are not allowed to use any of the following words as a user or group name: adm, administrator, all, bin, daemon, disk, ftp, guest, halt, hdusers, kmen, lp, mail, man, news, nobody, nogroup, none, operator, root, shadow, shutdown, sshd, sync, sys, ttyusers, utmp, uucp, www.• Please note that you are not allowed to use any of the following words as a shared folder name: global, homes, printers, bittorrent, disk1_pt1, disk1_pt2, disk1_pt3, disk1_pt4, disk2_pt1, disk2_pt2, disk2_pt3, disk2_pt4, disk3_pt1, disk3_pt2, disk3_pt3, disk3_pt4, disk4_pt1, disk4_pt2, disk4_pt3, disk4_pt4. • If shared folder names, work group names, or le names contain any of the following characters, you may not access data or manipulate les on the AirStation properly. In such a case, use a dierent character.• If a le created on a Macintosh contains any of the following characters, it will not be displayed correctly under Windows OS. Also, you cannot copy or properly display a le when connecting via SMB from Mac OS X if it contains any of these characters: ? [ ] / \ = + < > ; : ” , | * • Cancelling or aborting a le copy may leave the le incomplete, and you may no longer be able to delete the incomplete le. This can also happen during a power outage or if the LAN cable is suddenly disconnected. If it happens, restart the AirStation, delete the le, and try copying the le again. • Use the same username and password for the AirStation as the user’s Windows login. If they are dierent, the user may not be able to access shared folders with access restrictions on the AirStation. • Date and time stamps stored on the USB hard drive may be updated by the OS accessing the AirStation. File creation or access dates may not be maintained.](https://usermanual.wiki/BUFFALO/09101695-0.user-manual-II/User-Guide-1680476-Page-123.png)
![• If you view the size of a hard drives on the browser, it shows a bigger value than when you see it in Windows’ drive properties. This is because the browser shows the size of the drive in gigabytes but Windows shows it in gibibytes.• If you have logged in using a “guest” account from Windows 7, Vista, XP or 2000, access restrictions may not work properly. A (dierent) guest account already exists on the AirStation. • If you access a shared folder from a Macintosh computer, additional Mac OS X information les may be automatically generated. Do not delete these les from a Windows computer. Otherwise, you may no longer be able to access folders from a Macintosh.• Device types that can be connected to the AirStation’s USB connector are USB hard drives, USB memory sticks, or USB card readers. Card readers with 5 or more slots are not supported. USB devices such as a digital cameras, CD/DVD drives, USB hubs, mice, or keyboards are not supported. •Encrypted USB hard drives are not supported. • Only one single drive may be connected to the AirStation’s USB port at a time. Drives manufactured by other companies besides Bualo Technology are not supported.• If your hard drive has an auto power mode switch, move the switch to [manual] or [on]. Leaving the switch set to [auto] may result in unpredictable behavior. • Up to 4 partitions can be recognized on a USB hard drive.• Available le systems for USB hard drives are FAT12, FAT16, FAT32, and XFS.](https://usermanual.wiki/BUFFALO/09101695-0.user-manual-II/User-Guide-1680476-Page-124.png)

![This Class B digital apparatus complies with Canadian ICES-003.This device complies with RSS-210 of the Industry Canada Rules. Operation is subject to the following two conditions:(1) This device may not cause harmful interference, and(2) this device must accept any interference received, including interference that may cause undesired operation.Cet appareil numérique de la classe B est conforme à la norme NMB-003 du Canada.Ce dispositif est conforme à la norme CNR-210 d’Industrie Canada applicable aux appareils radio exempts de licence. Son fonctionnement est sujet aux deux conditions suivantes:(1) le dispositif ne doit pas produire de brouillage préjudiciable, et(2) ce dispositif doit accepter tout brouillage reçu, y compris un brouillage susceptible de provoquer un fonctionnement indésirable.The device for the band 5150-5250 MHz is only for indoor usage to reduce potential for harmful interference to co-channel mobile satellite systems.Le dispositif fonctionnant dans la bande 5150-5250 MHz est réservé uniquement pour une utilisation à l’intérieur an de réduire les risques de brouillage préjudiciable aux systèmes de satellites mobiles utilisant les mêmes canaux.For product available in the USA/Canada market, only channel 1~11 can be operated. Selection of other channels is not possible.This equipment complies with IC radiation exposure limits set forth for an uncontrolled environment. This equipment should be installed and operated with minimum distance 20cm between the radiator and your body.This device has been designed to operate with an antenna having a maximum gain of [4.33] dB. Antenna having a higher gain is strictly prohibited per regulations of Industry Canada. The required antenna impedance is 50 ohms.Under Industry Canada regulations, this radio transmitter may only operate using an antenna of a type and maximum (or lesser) gain approved for the transmitter by Industry Canada. To reduce potential radio interference to other users, the antenna type and its gain should be so chosen that the equivalent isotropically radiated power (e.i.r.p.) is not more than that necessary for successful communication.](https://usermanual.wiki/BUFFALO/09101695-0.user-manual-II/User-Guide-1680476-Page-129.png)
![Cet équipement est conforme aux limites d’exposition aux rayonnements IC établies pour un environnement non contrôlé. Cet équipement doit être installé et utilisé avec un minimum de 20 cm de distance entre la source de rayonnement et votre corps.Ce dispositif a été conçu pour fonctionner avec une antenne ayant un gain maximal de dB [4.33]. Une antenne à gain plus élevé est strictement interdite par les règlements d’Industrie Canada. L’impédance d’antenne requise est de 50 ohms.Conformément à la réglementation d’Industrie Canada, le présent émetteur radio peutfonctionner avec une antenne d’un type et d’un gain maximal (ou inférieur) approuvé pourl’émetteur par Industrie Canada. Dans le but de réduire les risques de brouillage radioélectriqueà l’intention des autres utilisateurs, il faut choisir le type d’antenne et son gain de sorte que lapuissance isotrope rayonnée équivalente (p.i.r.e.) ne dépasse pas l’intensité nécessaire àl’établissement d’une communication satisfaisante.This device complies with the essential requirements of the R&TTE Directive 1999/5/EC. The following test methods have been applied in order to prove presumption of conformity with the essential requirements of the R&TTE Directive 1999/5/EC:EN60950-1: 2006 +A11: 2009Safety of Information Technology EquipmentEN50385 : (2002-08)Product standard to demonstrate the compliance of radio base stations and xed terminal stations for wireless telecommunication systems with the basic restrictions or the reference levels related to human exposure to radio frequency electromagnetic elds (110MHz - 40 GHz) - General publicEN 300 328 V1.7.1: (2006-10)Electromagnetic compatibility and Radio spectrum Matters (ERM); Wideband Transmission systems; Data transmission equipment operating in the 2,4 GHz ISM band and using spread spectrum modulation techniques; Harmonized EN covering essential requirements under article 3.2 of the R&TTE DirectiveEN 301 893 V1.5.1: (2008-12)Broadband Radio Access Networks (BRAN); 5 GHz high performance RLAN; Harmonized EN covering the essential requirements of article 3.2 of the R&TTE DirectiveEN 301 489-1 V1.8.1: (2008-04)Electromagnetic compatibility and Radio Spectrum Matters (ERM); ElectroMagnetic Compatibility (EMC) standard for radio equipment and services; Part 1: Common technical requirementsEN 301 489-17 V2.1.1 (2009-05)Electromagnetic compatibility and Radio spectrum Matters (ERM); ElectroMagnetic Compatibility](https://usermanual.wiki/BUFFALO/09101695-0.user-manual-II/User-Guide-1680476-Page-130.png)
![(EMC) standard for radio equipment; Part 17: Specic conditions for Broadband Data Transmission SystemsThis device is a 2.4 GHz wideband transmission system (transceiver), intended for use in all EU member states and EFTA countries, except in France and Italy where restrictive use applies.In Italy the end-user should apply for a license at the national spectrum authorities in order to obtain authorization to use the device for setting up outdoor radio links and/or for supplying public access to telecommunications and/or network services.This device may not be used for setting up outdoor radio links in France and in some areas the RF output power may be limited to 10 mW EIRP in the frequency range of 2454 – 2483.5 MHz. For detailed information the end-user should contact the national spectrum authority in France.Česky [Czech]Bualo Technology Inc. tímto prohlašuje, že tento AirStation WZR-D1800H je ve shodě se základními požadavky a dalšími příslušnými ustanoveními směrnice 1999/5/ES.Dansk [Danish]Undertegnede Bualo Technology Inc. erklærer herved, at følgende udstyr AirStation WZR-D1800H overholder de væsentlige krav og øvrige relevante krav i direktiv 1999/5/EF.Deutsch [German]Hiermit erklärt Bualo Technology Inc. dass sich das Gerät AirStation WZR-D1800H in Übereinstimmung mit den grundlegenden Anforderungen und den übrigen einschlägigen Bestimmungen der Richtlinie 1999/5/EG bendet.Eesti [Estonian]Käesolevaga kinnitab Bualo Technology Inc. seadme AirStation WZR-D1800H vastavust direktiivi 1999/5/EÜ põhinõuetele ja nimetatud direktiivist tulenevatele teistele asjakohastele sätetele.English Hereby, Bualo Technology Inc. declares that this AirStation WZR-D1800H is in compliance with the essential requirements and other relevant provisions of Directive 1999/5/EC.Español [Spanish]Por medio de la presente Bualo Technology Inc. declara que el AirStation WZR-D1800H cumple con los requisitos esenciales y cualesquiera otras disposiciones aplicables o exigibles de la Directiva 1999/5/CE.](https://usermanual.wiki/BUFFALO/09101695-0.user-manual-II/User-Guide-1680476-Page-131.png)
![Ελληνική [Greek]ΜΕ ΤΗΝ ΠΑΡΟΥΣΑ Buffalo Technology Inc. ΗΛΝΕΙ ΟΤΙ AirStation WZR-D1800H ΣΥΜΜΟΡΦΝΕΤΑΙ ΠΡΟΣ ΤΙΣ ΟΥΣΙΕΙΣ ΑΠΑΙΤΗΣΕΙΣ ΚΑΙ ΤΙΣ ΛΟΙΠΕΣ ΣΧΕΤΙΚΕΣ ΙΑΤΑΞΕΙΣ ΤΗΣ ΟΗΓΙΑΣ 1999/5/ΕΚ.Français [French]Par la présente Buffalo Technology Inc. déclare que l’appareil AirStation WZR-D1800H est conforme aux exigences essentielles et aux autres dispositions pertinentes de la directive 1999/5/CE.Italiano [Italian]Con la presente Buffalo Technology Inc. dichiara che questo AirStation WZR-D1800H è conforme ai requisiti essenziali ed alle altre disposizioni pertinenti stabilite dalla direttiva 1999/5/CE.Latviski [Latvian]Ar šo Buffalo Technology Inc. deklarē, ka AirStation WZR-D1800H atbilst Direktīvas 1999/5/EK būtiskajām prasībām un citiem ar to saistītajiem noteikumiem.Lietuvių [Lithuanian]Šiuo Buffalo Technology Inc. deklaruoja, kad šis AirStation WZR-D1800H atitinka esminius reikalavimus ir kitas 1999/5/EB Direktyvos nuostatas.Nederlands [Dutch]Hierbij verklaart Buffalo Technology Inc. dat het toestel AirStation WZR-D1800H in overeenstemming is met de essentiële eisen en de andere relevante bepalingen van richtlijn 1999/5/EG.Malti [Maltese]Hawnhekk, Buffalo Technology Inc. , jiddikjara li dan AirStation WZR-D1800H jikkonforma mal-ħtiġijiet essenzjali u ma provvedimenti oħrajn relevanti li hemm fid-Dirrettiva 1999/5/EC.Magyar [Hungarian]Alulírott, Buffalo Technology Inc. nyilatkozom, hogy a AirStation WZR-D1800H megfelel a vonatkozó alapvetõ követelményeknek és az 1999/5/EC irányelv egyéb elõírásainak.Polski [Polish]Niniejszym Buffalo Technology Inc. oświadcza, że AirStation WZR-D1800H jest zgodny z zasadniczymi wymogami oraz pozostałymi stosownymi postanowieniami Dyrektywy 1999/5/EC.Português [Portuguese]Buffalo Technology Inc. declara que este AirStation WZR-D1800H está conforme com os requisitos essenciais e outras disposições da Directiva 1999/5/CE.Slovensko [Slovenian]Buffalo Technology Inc. izjavlja, da je ta AirStation WZR-D1800H v skladu z bistvenimi zahtevami in ostalimi relevantnimi določili direktive 1999/5/ES.](https://usermanual.wiki/BUFFALO/09101695-0.user-manual-II/User-Guide-1680476-Page-132.png)
![Slovensky [Slovak]Buffalo Technology Inc. týmto vyhlasuje, že AirStation WZR-D1800H spĺňa základné požiadavky a všetky príslušné ustanovenia Smernice 1999/5/ES.Suomi [Finnish]Buffalo Technology Inc. vakuuttaa täten että AirStation WZR-D1800H tyyppinen laite on direktiivin 1999/5/EY oleellisten vaatimusten ja sitä koskevien direktiivin muiden ehtojen mukainen.Svensk [Swedish]Härmed intygar Buffalo Technology Inc. att denna AirStation WZR-D1800H står I överensstämmelse med de väsentliga egenskapskrav och övriga relevanta bestämmelser som framgår av direktiv 1999/5/EG.SAR compliance has been established in typical laptop computer(s) with CardBus slot, and product could be used in typical laptop computer with CardBus slot. Other application like handheld PC or similar device has not been veried, may not comply with related RF exposure rules, and such use shall be prohibited.This equipment is designed with the utmost care for the safety of those who install and use it. However, special attention must be paid to the dangers of electric shock and static electricity when working with electrical equipment. All guidelines of this manual and of the computer manufacturer must therefore be allowed at all times to ensure the safe use of the equipment.根據 NCC 低功率電波輻射性電機管制辦法:第十二條:經型式認證合格之低功率射頻電機,非經許可,公司、商號或使用者均不得擅自變更頻率、加大功率或變更原設計之特性及功能。第十四條:低功率射頻電機之使用不得影響飛航安全及干擾合法通信;經發現有干擾現象時,應立即停用,並改善至無干擾時方得繼續使用。前項合法通信,指依電信法規定作業之無線電通信。低功率射頻電機須忍受合法通信或工業、科學及醫療用電波輻射性電機設備之干擾。해당 무선설비는 전파혼신 가능성이 있으므로 인명안전과 관련된 서비스는 할 수 없음기종별 사 용 자 안 내 문B 급 기기( 가정용 정보통신기기 )이 기기는 가정용 (B 급 ) 전자파적합기기로서 주로 가정에서 사용하는 것을 목적으로 하며 , 모든지역에서 사용할 수 있습니다 .](https://usermanual.wiki/BUFFALO/09101695-0.user-manual-II/User-Guide-1680476-Page-133.png)