Barrett Communication PRC2090HF HF Tactical manpack User Manual PRC 2090 Operation and installation manual ver 6
Barrett Communication Pty. Ltd. HF Tactical manpack PRC 2090 Operation and installation manual ver 6
Contents
user manual part2
201 of 285
ALE Configuration Menus
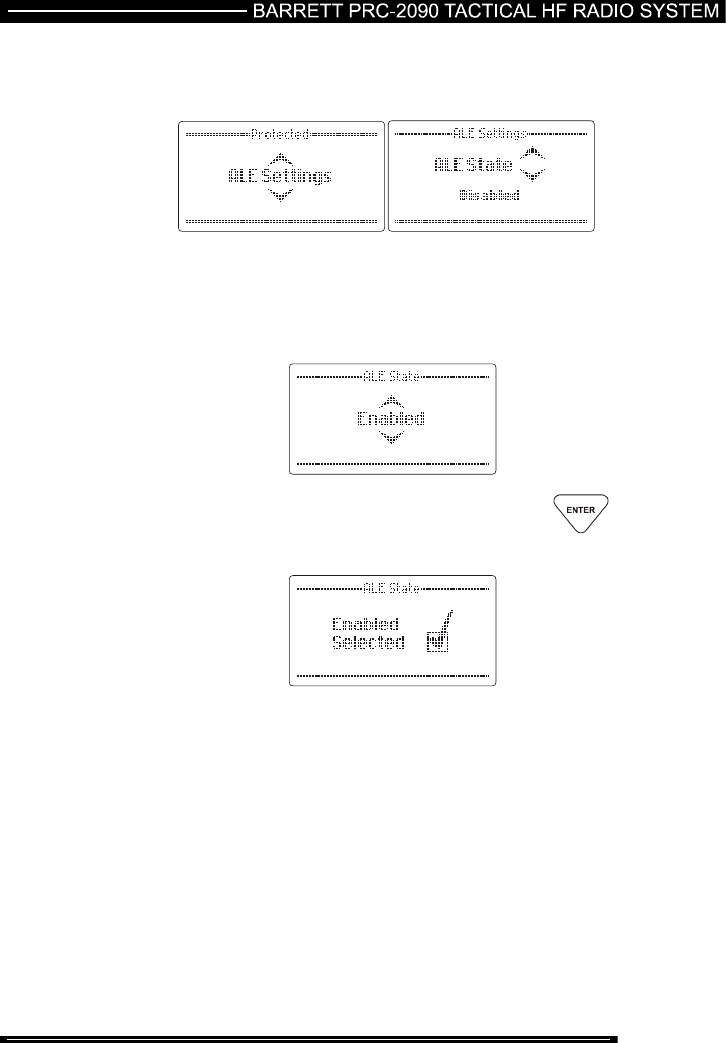
ALE State
This feature enables or disables the ALE system
Use the Scroll keys to select the setting required (example “ALE
Enabled”):-
When the setting required is selected press the key
202 of 285
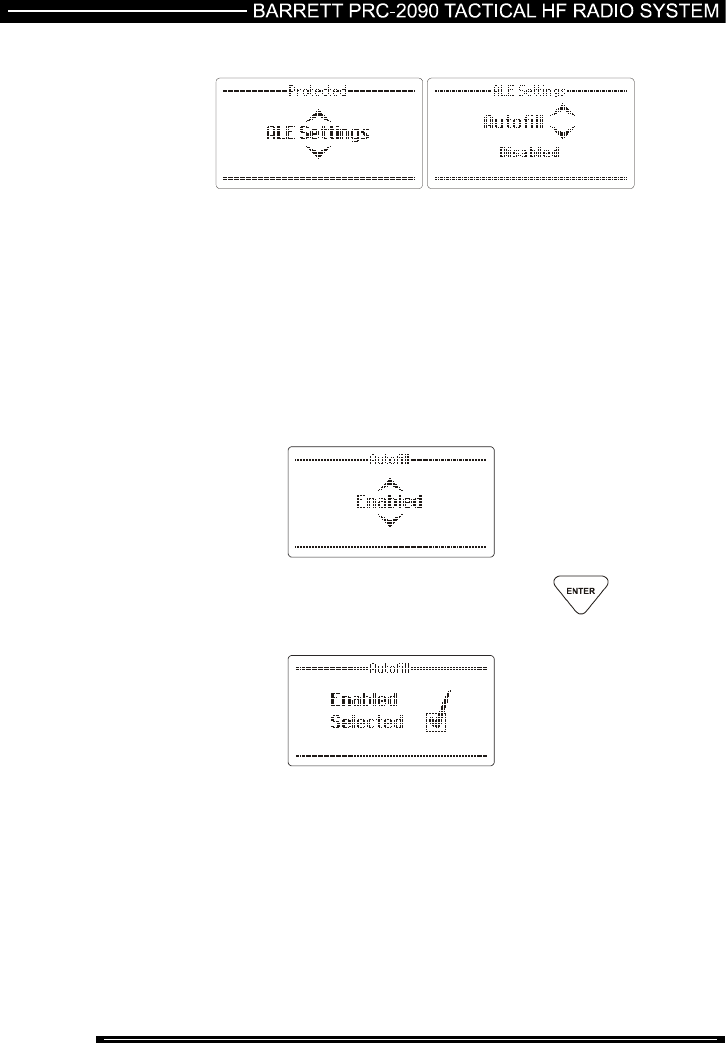
ALE Autofill
This feature enables or disables the ALE Autofill option. The Autofill option allows
the 2050 transceiver to automatically add unknown stations to the ALE network.
This means that whenever a new station is added to the network the network
administrator does not have to individually re-configure each station in the network
with the new stations ID. The Autofill queue is a first in first out queue where up to
eleven new stations can be added, after this the next received unknown station will
overwrite the first ID in the Autofill queue. To avoid this happening the operator
must reassign the Autofill station ID alias.
Use the Scroll keys to select the setting required (example
“Autofill Enabled”):-
When the setting required is selected press the key
203 of 285
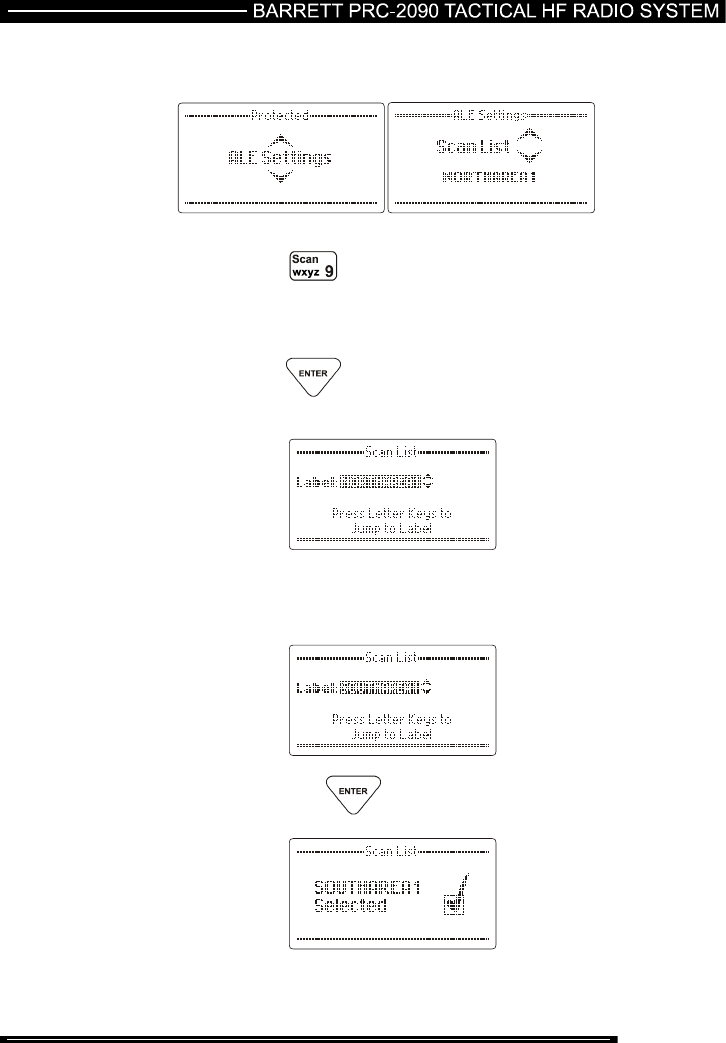
ALE Scan List
Note:- you can also enter this scan list select section by holding
down the key for more than two seconds
To select the ALE scan list required
press the key
Use the Scroll keys or press the first letter of the scan list you
want to use (example shown – “s”) to select the scan table
required:-
then press the key
204 of 285
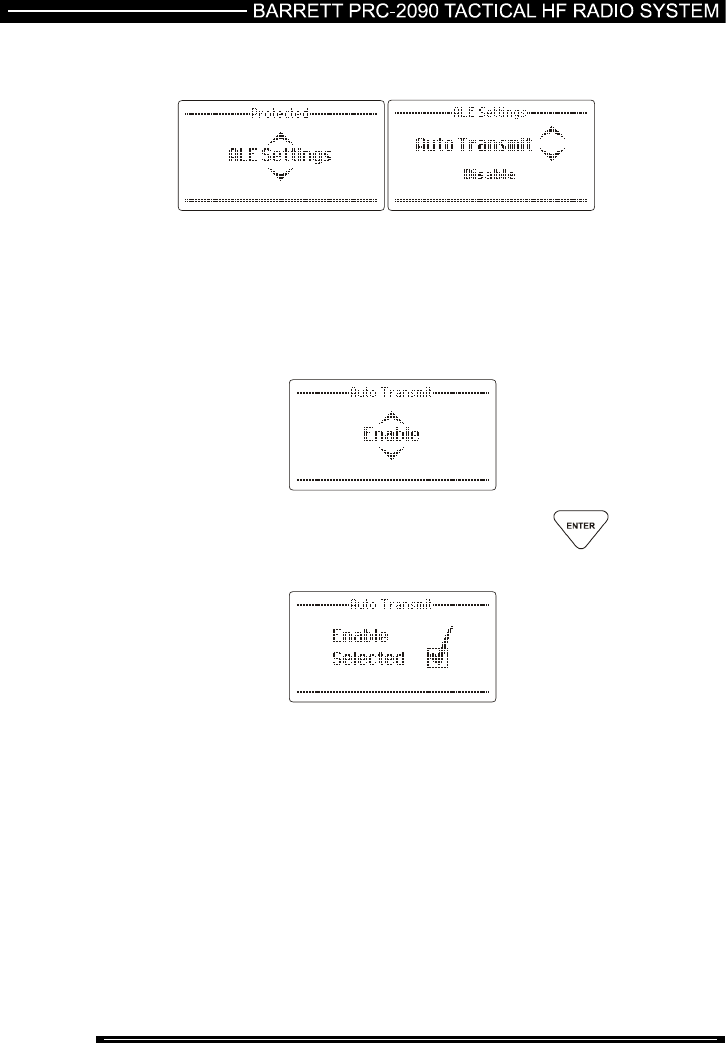
Auto Transmit
When Auto Transmit is set to “Disable” the ALE system will not respond to any calls
made to this station.
Use the Scroll keys to select the setting required (example
“Enable”):-
When the setting required is selected press the key
205 of 285
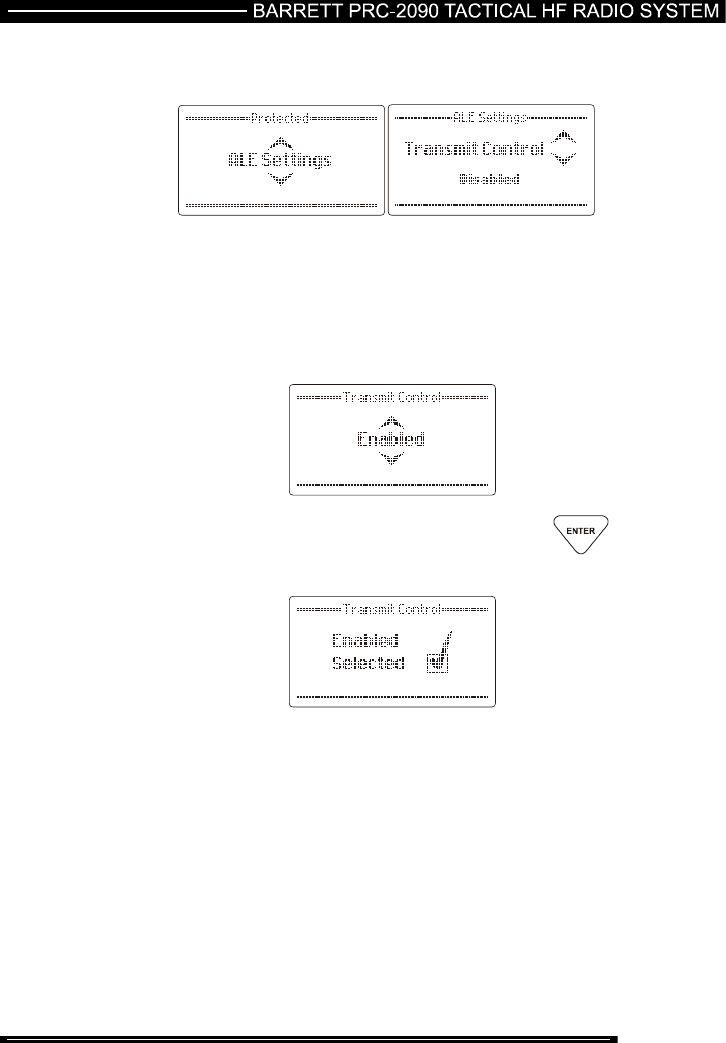
Transmit Control
When Transmit Control is set to “Disabled” the ALE system will not be able to
transmit any ALE calls, including automatic soundings and responses to incoming
ALE calls.
Use the Scroll keys to select the setting required (example
“Enabled”):-
When the setting required is selected press the key
206 of 285
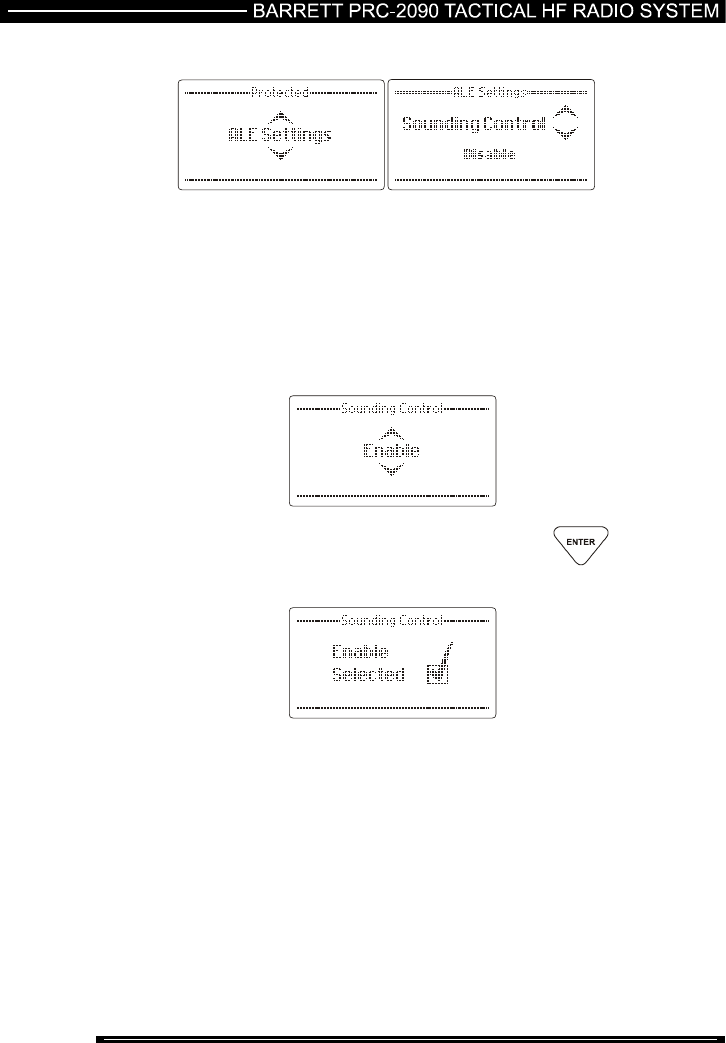
Sounding Control
ALE operates normally both transmitting and receiving sounds when Sounding
Control is set to "Enable”. In some circumstances however it is desirable not to
transmit soundings under any circumstances, in this case Sounding Control is set to
“Disable”. Sounding is limited to certain channels (pre-programmed by the ALE fill
program). The ALE system will however, continue to make and respond to calls
(depending on the Response Control settings).
Use the Scroll keys to select the setting required (example
“Enable”):-
When the setting required is selected press the key
207 of 285
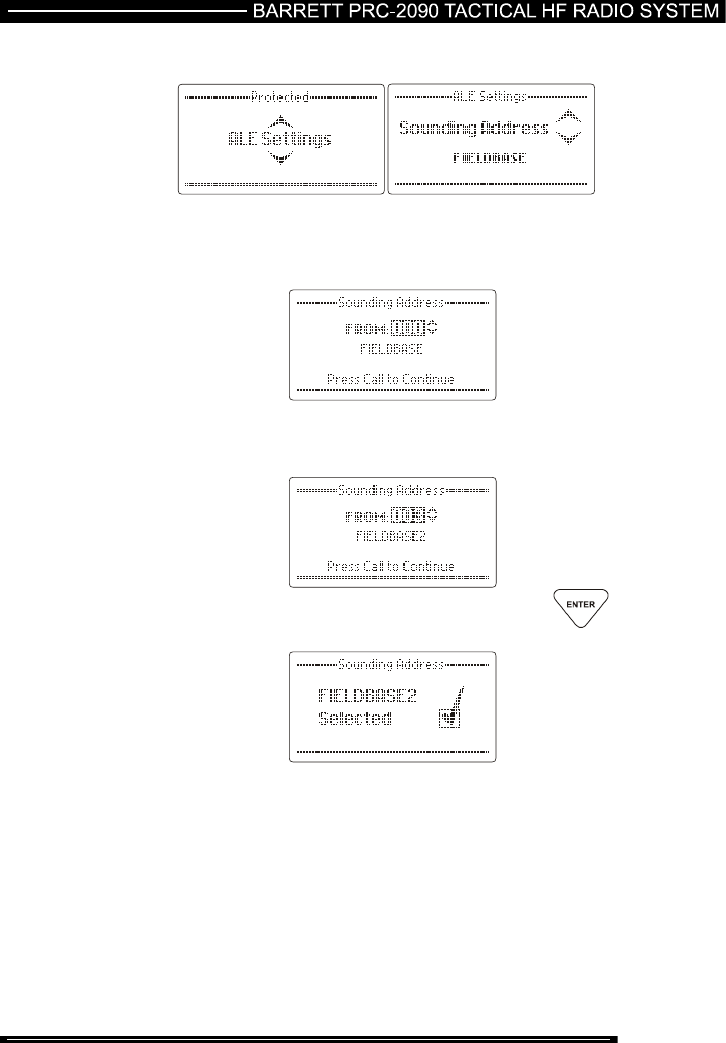
Sounding Address
Configures the self address used during an automatic sounding (Sounding Control
must be set to Global On). If sounding control = individual preset basis, the address
used is dependant on the active channel.
Use the Scroll keys to select the setting required (example
“FIELDBASE2”):-
When the setting required is selected press the key
208 of 285
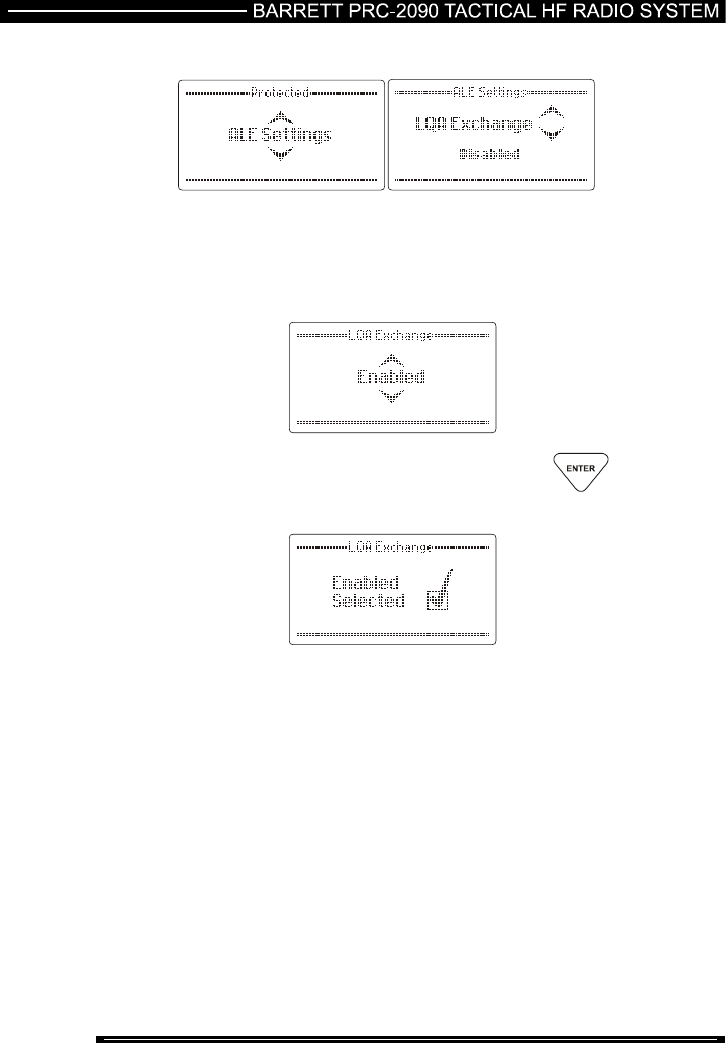
Link Quality Analysis (LQA) Exchange
This option enables or disables the exchange of LQA information with other stations
Use the Scroll keys to select the setting required (example
“Enabled”):-
When the setting required is selected press the key
209 of 285
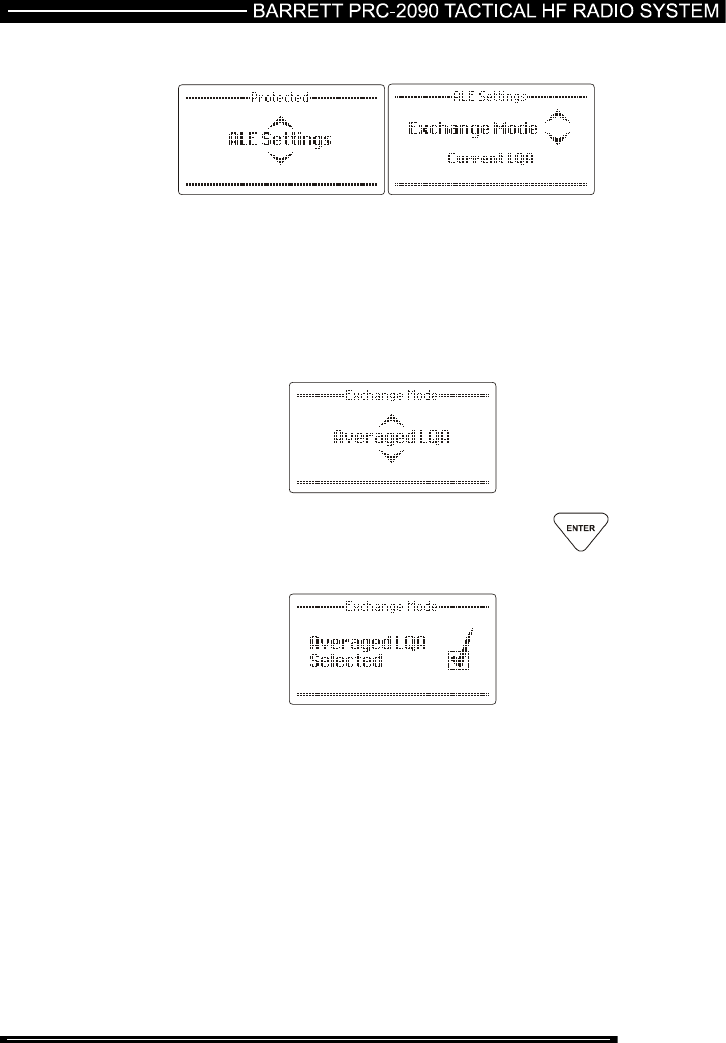
Link Quality Analysis (LQA) Exchange Mode
This option sets the source of the LQA reading sent to the other station, it can be
set to “Current LQA” which is a reading taken during the ALE burst just received or
it can be set to “Averaged LQA” which uses the long term averaged value taken
from memory.
Use the Scroll keys to select the decay time or disable (example
“Averaged LQA”):-
When the setting required is selected press the key
210 of 285
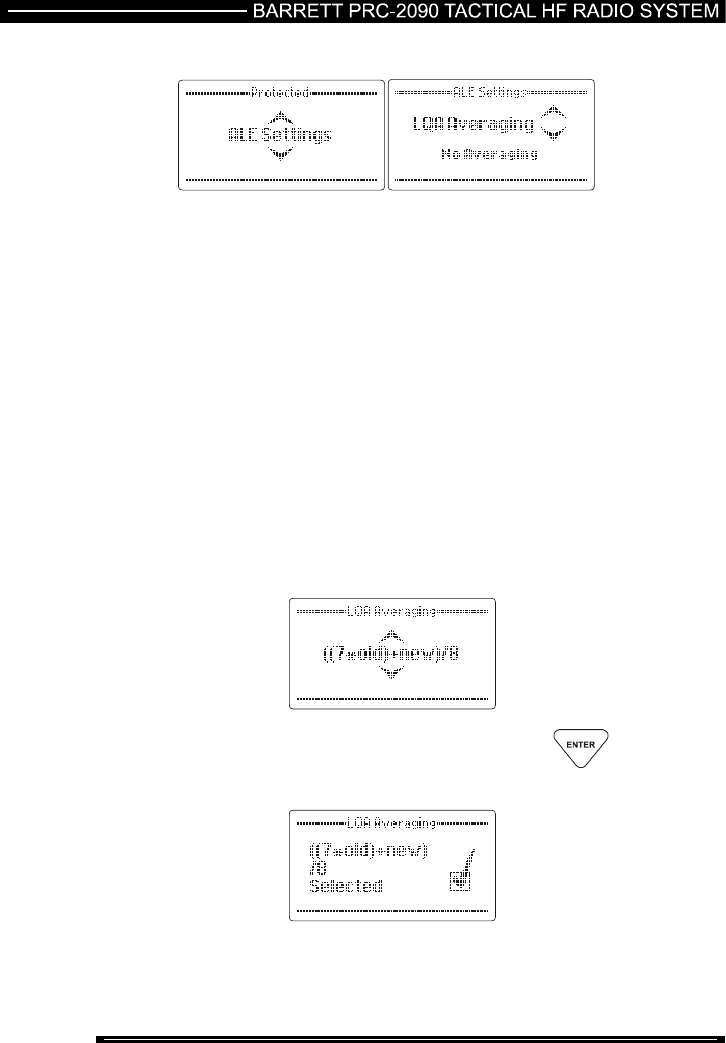
Link Quality Analysis (LQA) Averaging
This option sets the method used to update an existing link quality value stored in
ALE processor memory when the new link quality value is worse than the stored
value.
The option can be set to either replace the old values with the new values or
replace the old values with different weighted averages of the old values and new
readings.
Averaging reduces the effect that one bad reading might otherwise have on a
perfect channel. If a new reading is better than an old value, the old value is
replaced by the reading. There are 4 different averaging formulas available:-
No averaging, replace the old values with new values
(old+new)/2
((3*old)+new)/4
((7*old)+new)/8
Use the Scroll keys to select the LQA averaging value required
(example “((7*old)+new)/8”:-
When the setting required is selected press the key
211 of 285
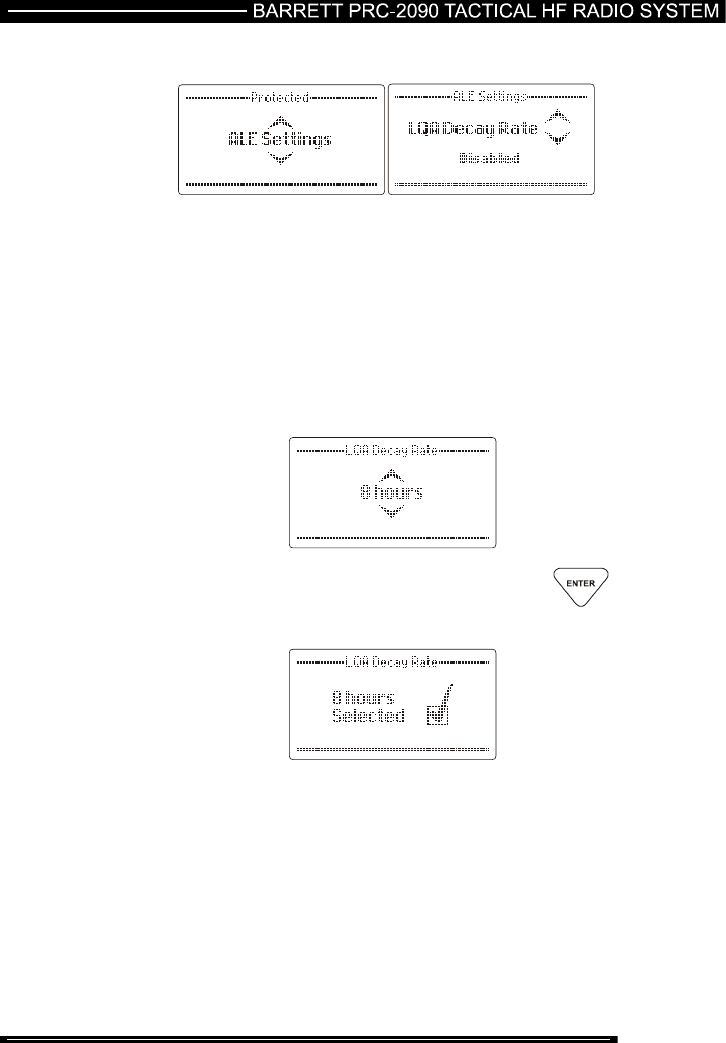
Link Quality Analysis (LQA) Decay Rate
This option sets the artificial decay rate for the link quality information that is stored
in the link quality table within the ALE processor.
Switching the sounding off and setting a decay rate of two hours would result in the
recording of a perfect channel (100% channel quality) decaying to an unusable
channel (0% channel quality) over a period of two hours.
The decay rate can be disabled, set to 1,2,4,8,24 and 48 hours.
Use the Scroll keys to select the decay time or disable (example
“8 hours”):-
When the setting required is selected press the key
212 of 285
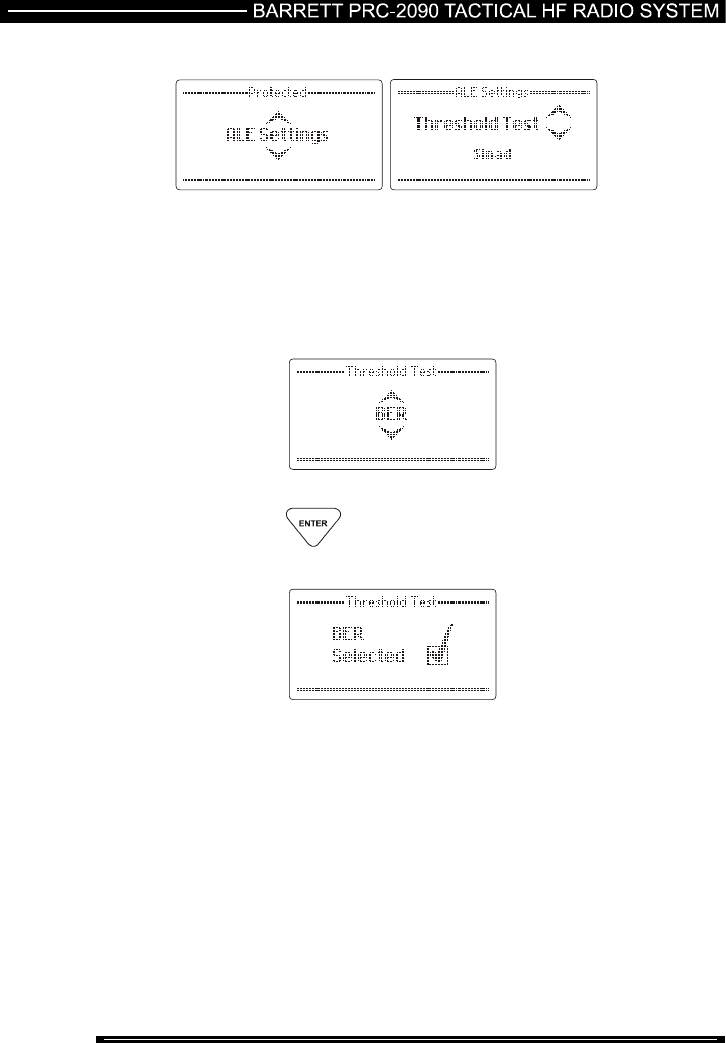
Threshold Test
Used to select which type of threshold test is used to determine what quality ALE
channel is acceptable for communication. Either “Sinad”, “BER”, “Both” or “None”
can be selected.
Use the Scroll keys to select the test required (example “BER”):-
press the key
213 of 285
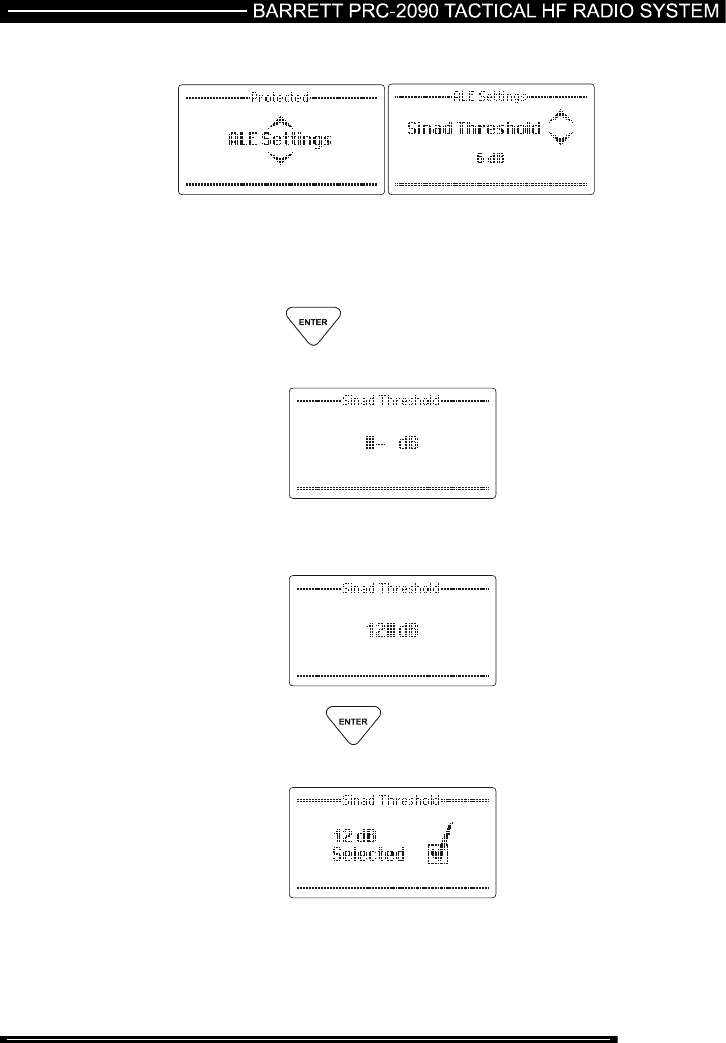
SINAD Threshold
This option sets the SINAD threshold at which an ALE channel is considered
usable.
This can be set to between 0 and 30dB.
press the key
using the numeric keys enter the SINAD threshold required
(example “12dB”):-
then press the key
214 of 285
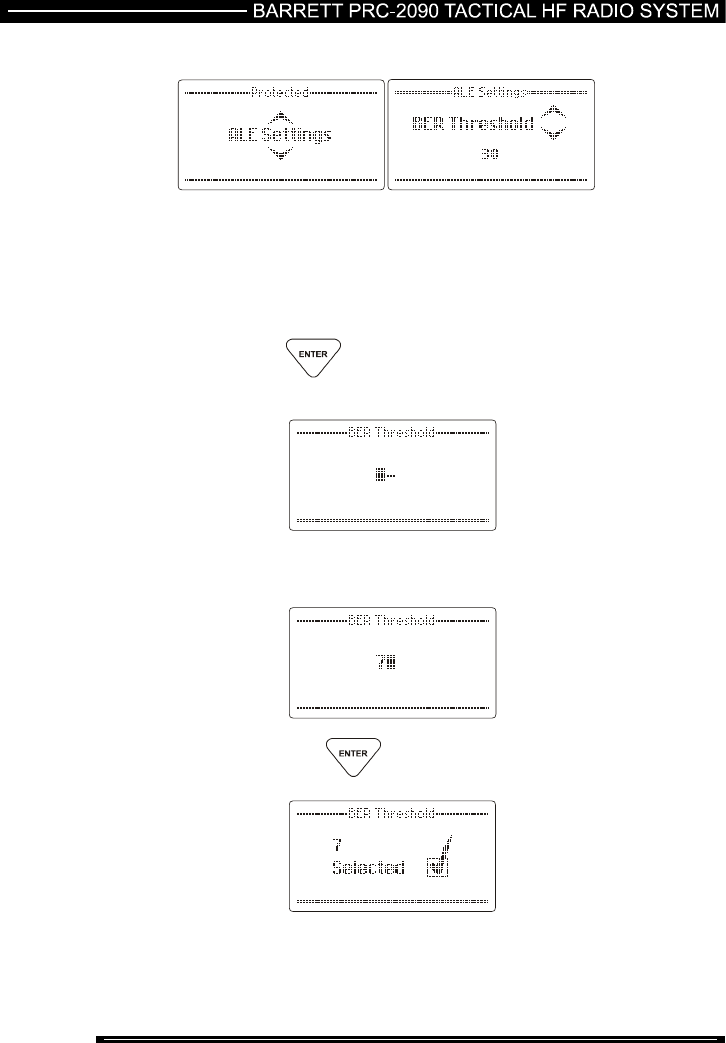
BER Threshold
This option selects the BER threshold at which an ALE channel is considered
usable. If the required BER is not reached in the reply from the remote station the
link establishment process is rejected. Depending on the retry setting the link
establishment would continue on another link.
It can be set between 0-30, selecting 30 effectively means that all links are allowed
press the key
using the numeric keys enter the BER threshold required
(example “7”):-
then press the key

215 of 285
ALE Fill Mode
The ALE is configured with its entire network data using the Barrett PC based ALE
fill program. Refer to the Barrett 2050 PC based programming software that
contains the ALE fill program for details.

216 of 285
Programming Functions
The Barrett PRC-2090 transceiver can be programmed in three ways:-
Using the software supplied with the programming kit (P/N 2090-01-30), loaded on
a PC, and transferring information to the PRC-2090 by RS-232 through the auxiliary
connector.
By direct key entry through the front panel
Note:- This facility may not be available if the network administrator has barred the
function during programming using a PC.
By cloning information from another transceiver, through the auxiliary connector
using a cloning cable Barrett P/N BCA204020.
Programming Using the Programming Software
The programming software should be loaded onto PC using the instructions
supplied with the package.
Transceiver configuration packs are uploaded and downloaded to the PRC-2090
transceiver via the auxiliary socket on the PRC-2090 transceiver
.
Programming Using the Supplied Barrett Cable
To program the transceiver using the RS-232 port of your PC or Laptop plug one
end of the programming cable supplied into the PC or laptops serial port. The other
end should be plugged into the auxiliary socket. The PC or laptop should have the
Barrett 2000 series programming software running and the PRC-2090 should be
switched on. Programming functions can now commence.
217 of 285
Programming a Channel from the Front Panel
Note:- To program a channel from the front panel it is necessary to have this
function enabled.
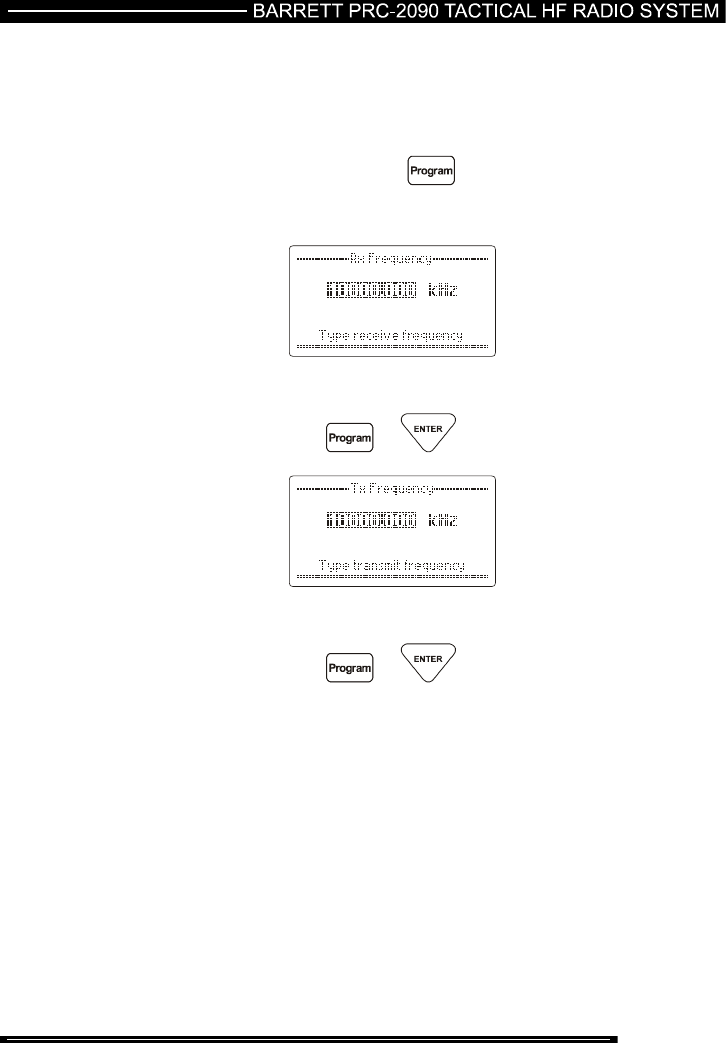
To enter the programming mode first select the channel you want
to program then press the key:-
Transmit and Receive Frequencies
Use the numeric keypad to enter the receive frequency
then press the or key
Use the numeric keypad to enter the transmit frequency
then press the or key
218 of 285
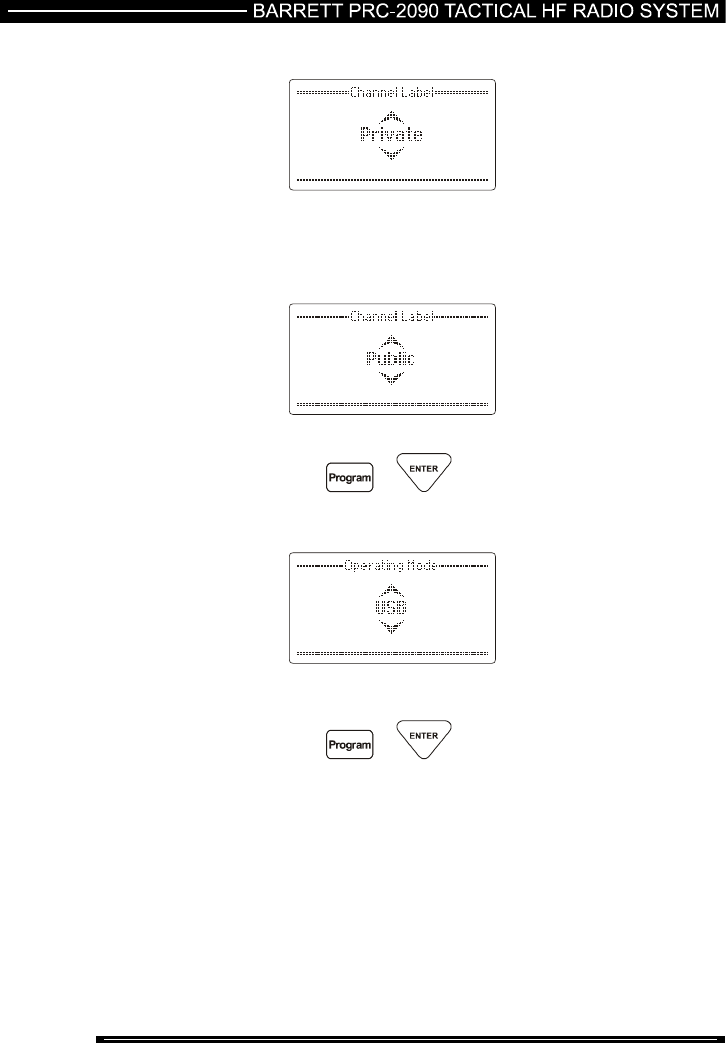
Channel Use Labels
Use the Scroll keys to select the required channel label
Note:- channel labels can be entered in the “General” section of
the protected menu.
then press the or key
Operating Mode
Use the Scroll keys to select the required operating mode, USB,
LSB, AM, CW or AFSK
then press the or key
Note:- If the 500 Hz or narrow filter hardware option is enabled
this filter is automatically selected in CW mode and AFSK mode
219 of 285
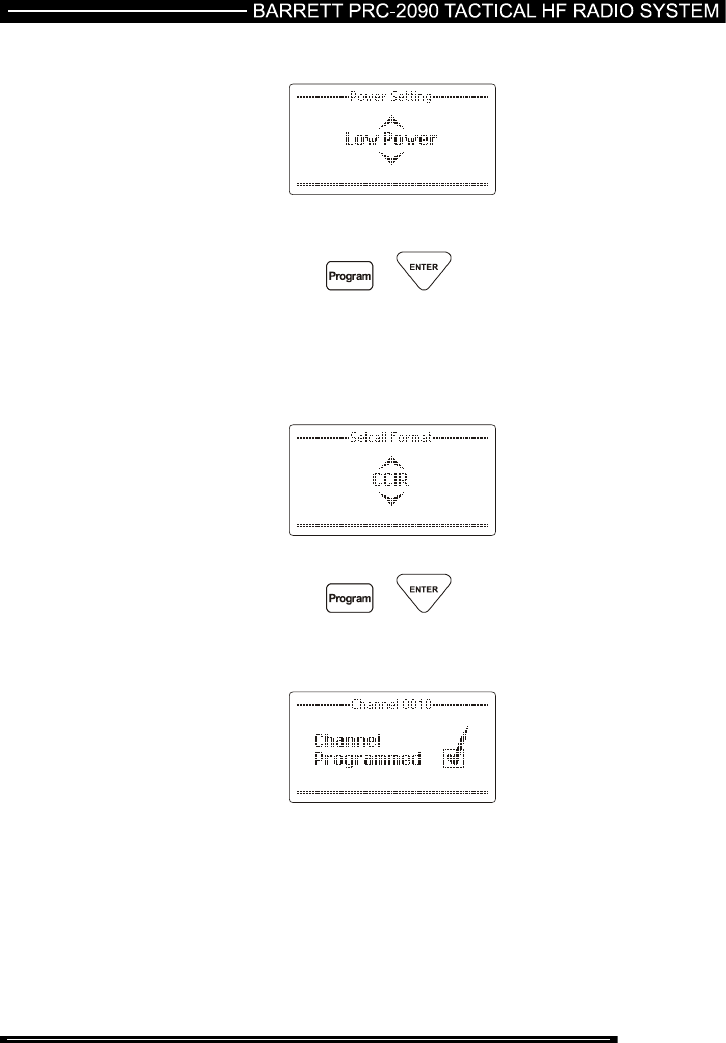
Transmitter Power Setting
Use the Scroll keys to select the required output power – high,
medium or low power.
then press the or key
Selcall Format
Each channel can be programmed for one Selcall format, for a
description of the formats available, refer to the beginning of this
manual.
Use the Scroll keys to select the required Selcall format
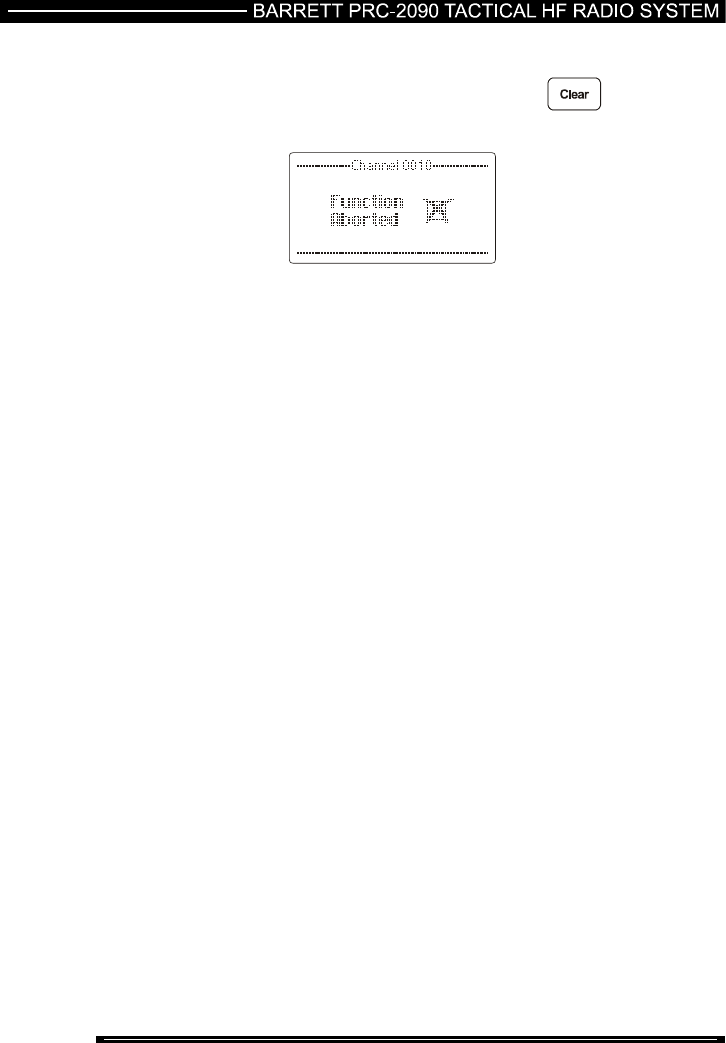
then press the or key
This last key press displays the following screen indicating the
channel programming is complete:-
220 of 285
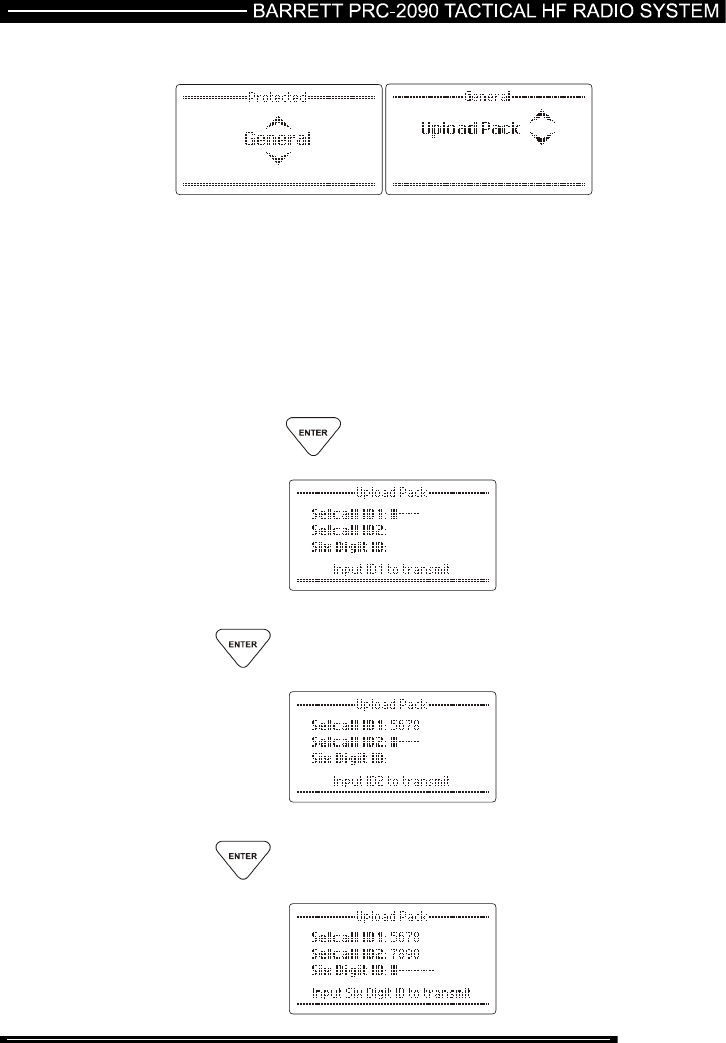
The channel program sequence can be aborted at any stage in
the programming sequence by pressing the key after
which the following is displayed:-
221 of 285
Cloning (Programming) from Another Transceiver
Note:- Use the transceiver you want to send the configuration from for the
following steps
This feature is used to send a copy of the configuration of one PRC-2090
transceiver or PRC-2090 transceiver fitted in the manpack adaptor to another using
a cable (BCA204020) connecting both transceivers together via their auxiliary
connectors using the RS-232 connection.
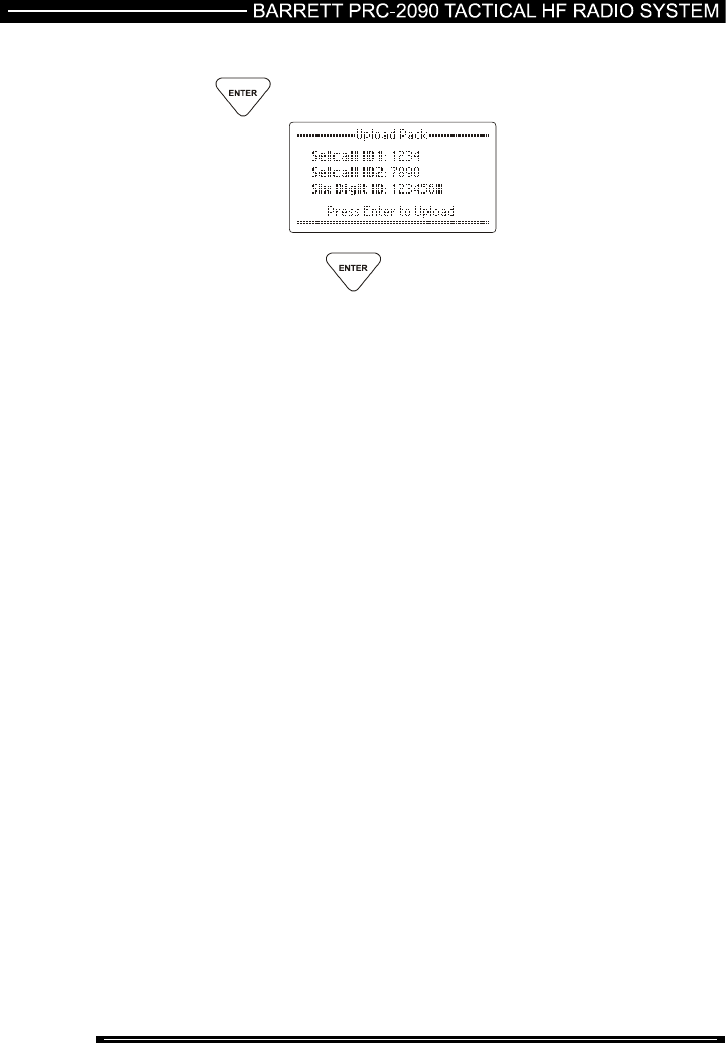
Before uploading commences it is necessary to enter the Selcall IDs of the
transceiver that will be loaded.
press the key
Using the numeric keypad enter Self ID 1 and press the
key
Using the numeric keypad enter Self ID 2 and press the
key
222 of 285
Using the numeric keypad enter Six digit ID and press the
key
then press the key
to proceed with cloning.

223 of 285
Manpack Operation
Power Systems
The Barrett PRC-2090 transceiver uses a removable 10Ah Lithium Ion battery
cartridge. This cartridge contains the battery and the battery management system.
It has a connector that is used for charging and operating the PRC-2090 when
connected to the PRC-2090 or charging the battery when not connected to the
PRC-2090.
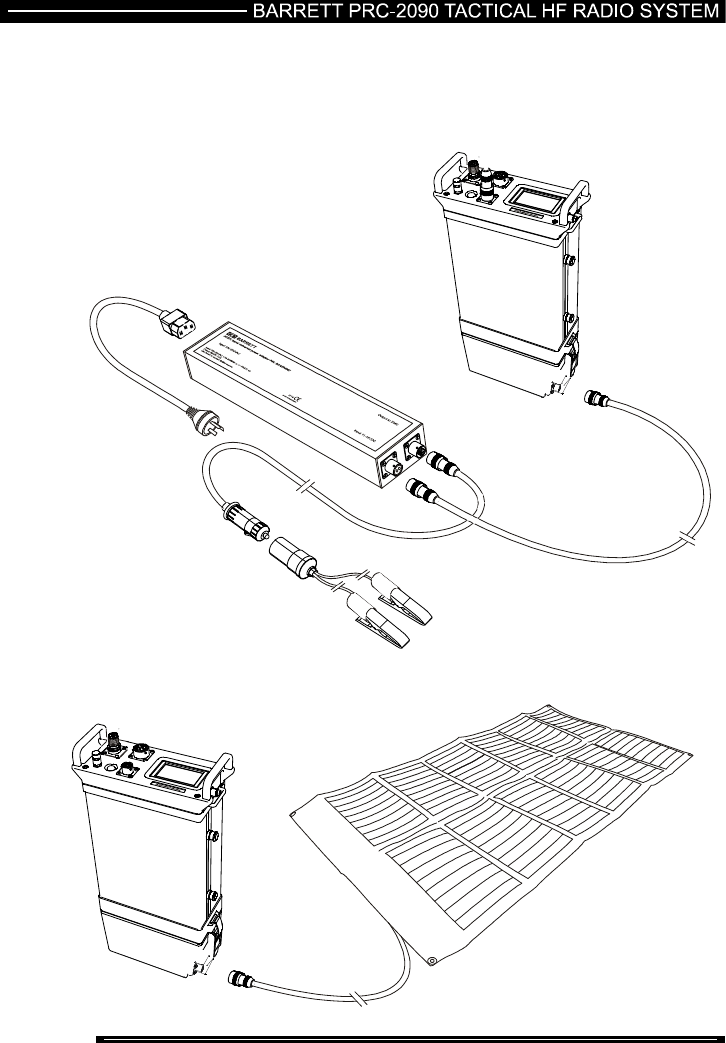
A DC input between 20VDC and 30VDC is required, allowing operation and
charging from 24V vehicle sources, 24V solar panels and 24V hand crank
generators. A separate Universal AC/DC input power adaptor is available to charge
and operate the manpack when mains voltages are available between 100-254
VAC or DC voltage between 11-18VDC are available from sources such as 12V
vehicles sources.
With the battery cartridge fitted the transceiver can be operated and the battery
cartridge charged when a DC input of between 20 VDC and 30 VDC is supplied to
the unit.
224 of 285
AC/DC input Universal Power Adaptor Unit P/N 2090-03-01
For operation from a mains voltage between 100-254VAC or from 12VDC sources
such as available in a vehicle:-
Tactical solar panel P/N 2090-03-02 or 03
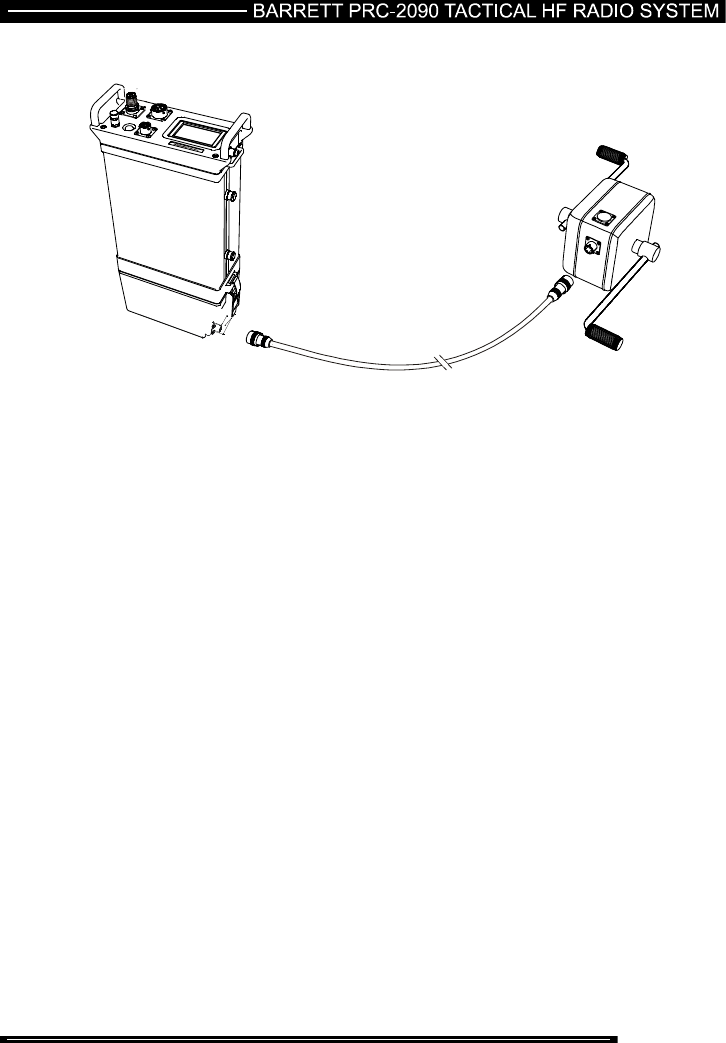
Hand Crank Generator P/N 2090-03-04
225 of 285
226 of 285
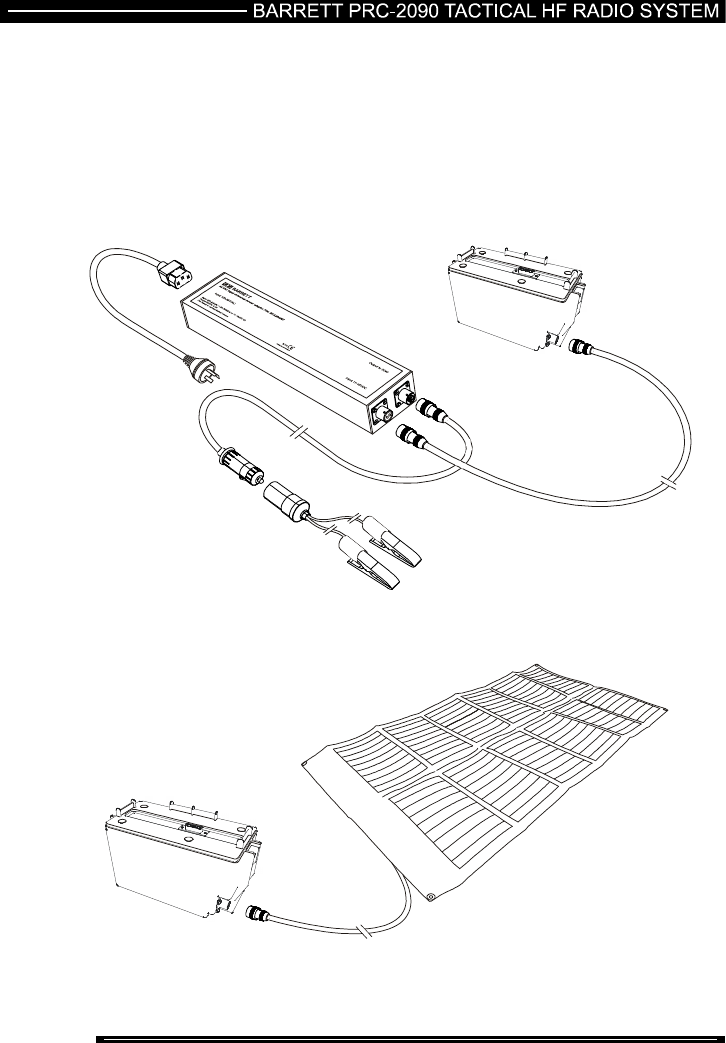
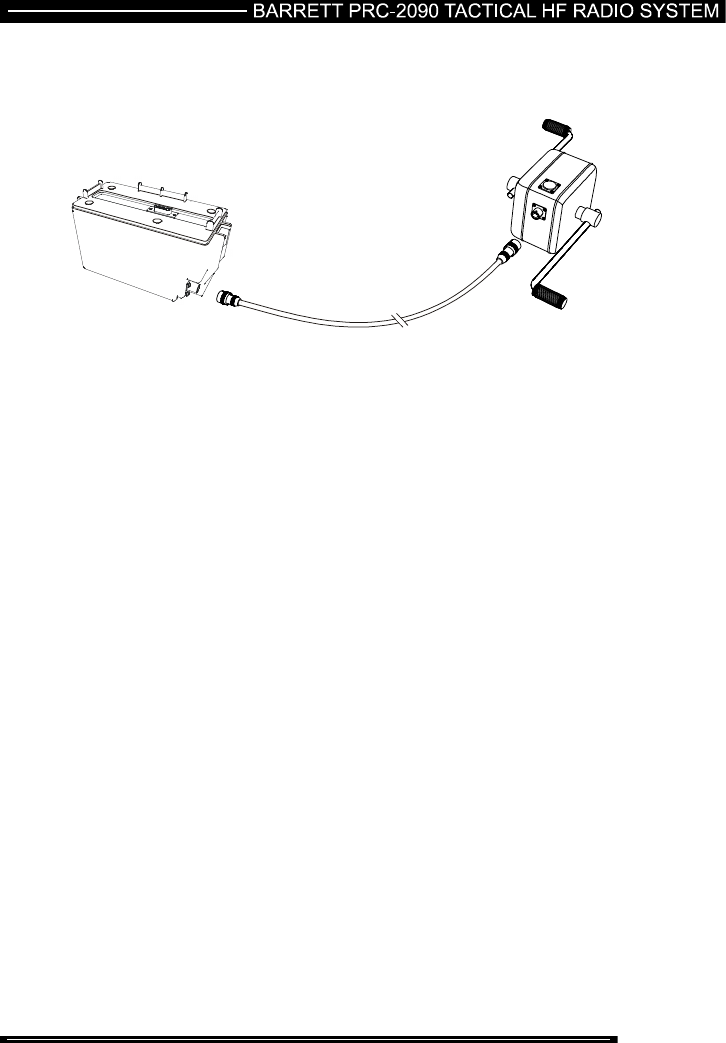
Charging a 10Ah Lithium Ion Battery Cartridge Outside the Manpack
The PRC-2090 battery cartridge can be charged outside the manpack using the
AC/DC input universal power adaptor unit or directly from a 24V tactical solar panel
or a 24V hand crank generator configured as shown in the following diagrams:-
AC/DC input universal power adaptor unit P/N 2090-03-01
For operation from a mains voltage between 100-254VAC or from 12VDC sources
such as available in a vehicle:-
Tactical Solar Panel P/N 2090-03-02 or 03
227 of 285
Hand Crank Generator P/N 2090-03-04
228 of 285
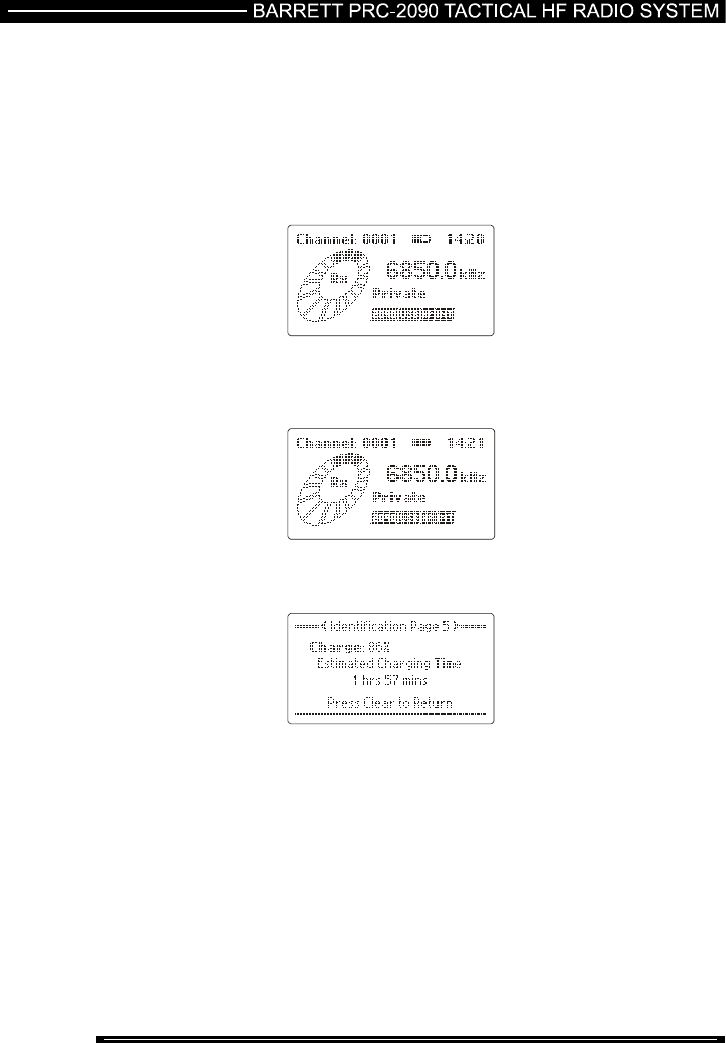
Battery Charge Indicator when Charging the 2090
When the charging source is connected to the 2090 and the transceiver is switched
on, the battery icon between the channel number and the time shows the progress
of the charge process:-
The battery icon with a moving line running from left to right
indicates that the battery is charging, once the charger is
removed the battery icon represents battery capacity available:-
The battery icon stationary and filled “black” indicates that the
battery is charged and the charger is now trickle charging:-
When the PRC-2090 is in charge mode the estimated charge time
left is displayed in the Identification menu.
229 of 285
Operation in the Manpack Configuration
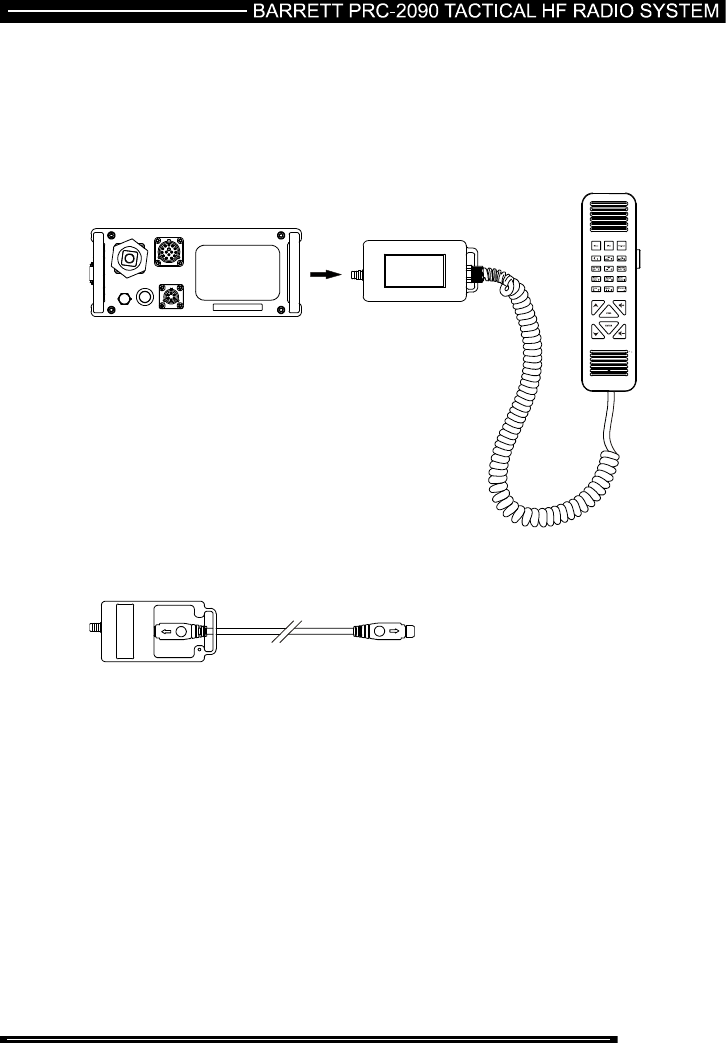
Using the LCD Unit Extension Kit (P/N 2090-01-11)
The PRC-2090 manpack LCD unit can be removed from the manpack itself and
placed into the LCD unit pouch located on the manpack bag using the extension kit
supplied. Please see below on how to use the extension kit.
Step 1: Pull out the LCD unit from the manpack.
Step 2: Get extender cable and plug one end into LCD blanking unit.
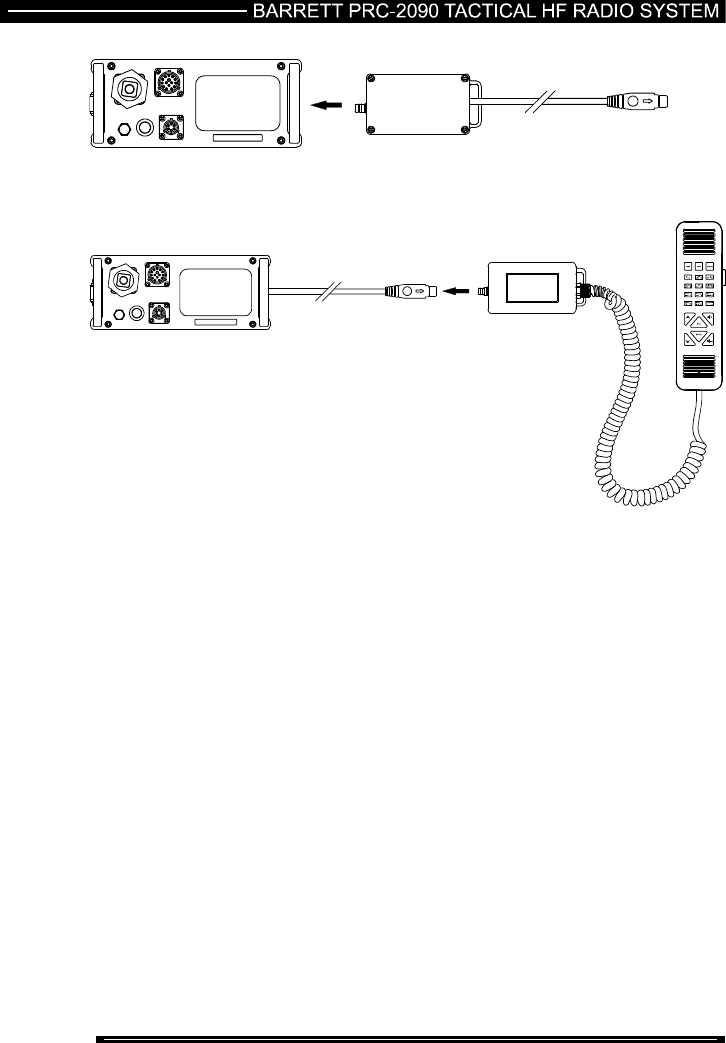
230 of 285
Step 3: Push LCD blanking (metal face side up) unit into the manpack.
Step 4: Connect LCD unit to the unconnected end of the extender cable.
231 of 285
Manpack Operation Using the Automatic Antenna Tuner
The PRC-2090 manpack can be used with the 10 metre throw over long-wire
provided or the optional 3 metre collapsible whip.
Note:- Either the whip or the long-wire can be used but not both together.
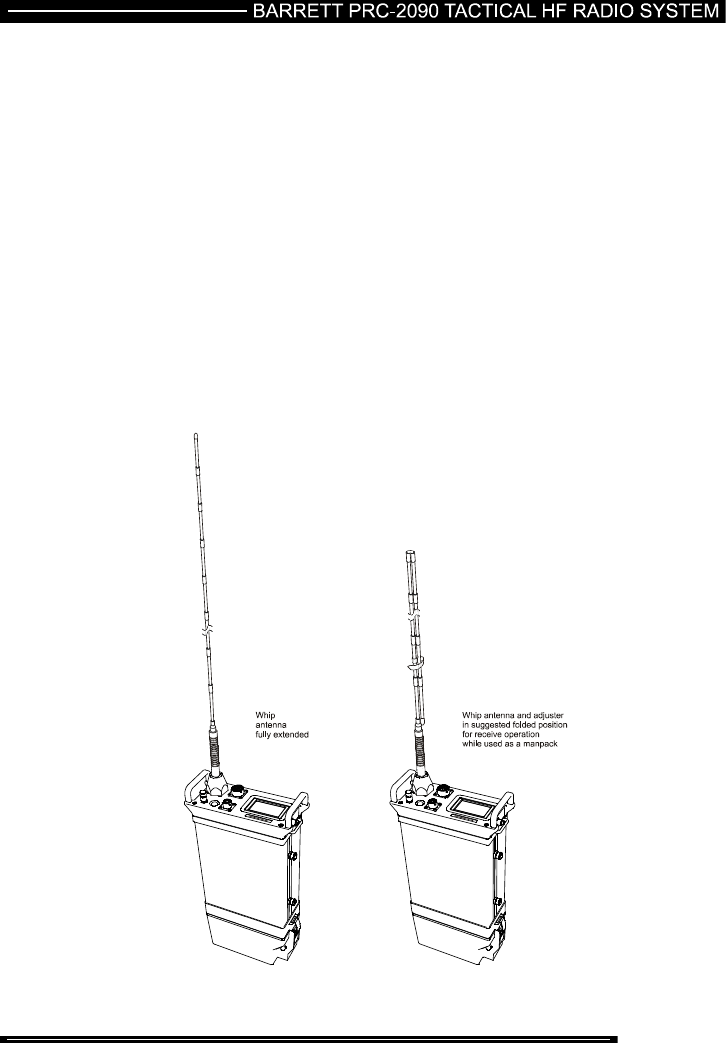
Using the Whip (P/N 2090-02-07)
The gooseneck should be fitted to the whip antenna stud and the whip unfolded to
its maximum height. If using the Barrett manpack while walking in the backpack
configuration it is suggested that while in receive standby mode the collapsible
antenna be only extended to half height and secured using the Velcro tab. When a
call is received extend the antenna to full height before transmission.
Note:- When using an un-tuned antenna such as the whip or the long-wire the
section “Antenna Select” in the standard menu should be used to enable the
automatic tuner i.e. select “Whip/Long-wire” operation. When this is selected the in-
built tuner automatically tunes the whip or long-wire whenever the unit transmits
after a channel change.
232 of 285
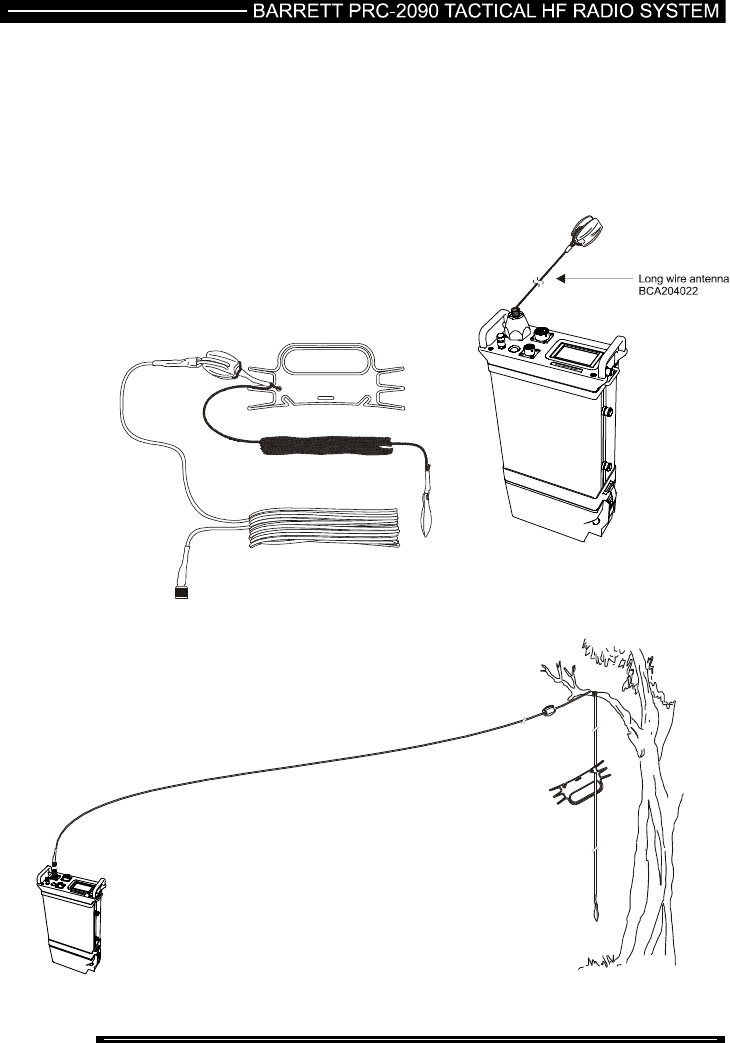
Using the Throw Over Long-wire Antenna (P/N 2090-02-06)
The long-wire antenna should be unfurled and the end away from the manpack
transceiver should be attached to any structure available and as high as possible.
Note:- When using an un-tuned antenna such as the whip or the long-wire the
section “Antenna Select” in the standard menu should be used to enable the
automatic tuner i.e. select “Whip/Long-wire” operation. When this is selected the in-
built tuner automatically tunes the
whip or long-wire whenever the unit
transmits after a channel change.
233 of 285
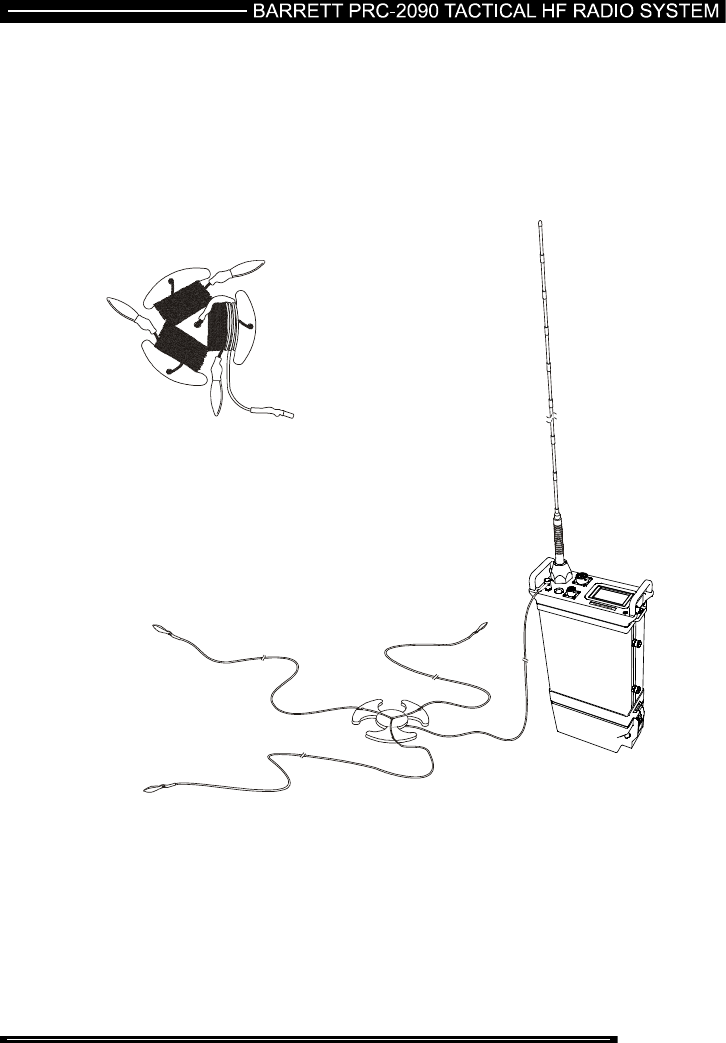
Using the Multi-wire Counterpoise (P/N 2090-02-08)
When using either a whip or the long-wire antenna efficiency can be increased by
the use of the counterpoise supplied. This is connected to the 2090 via the BNC
connector connected to the counterpoise. The three radials should be spread out
on the ground as indicated in the diagram below:-
234 of 285
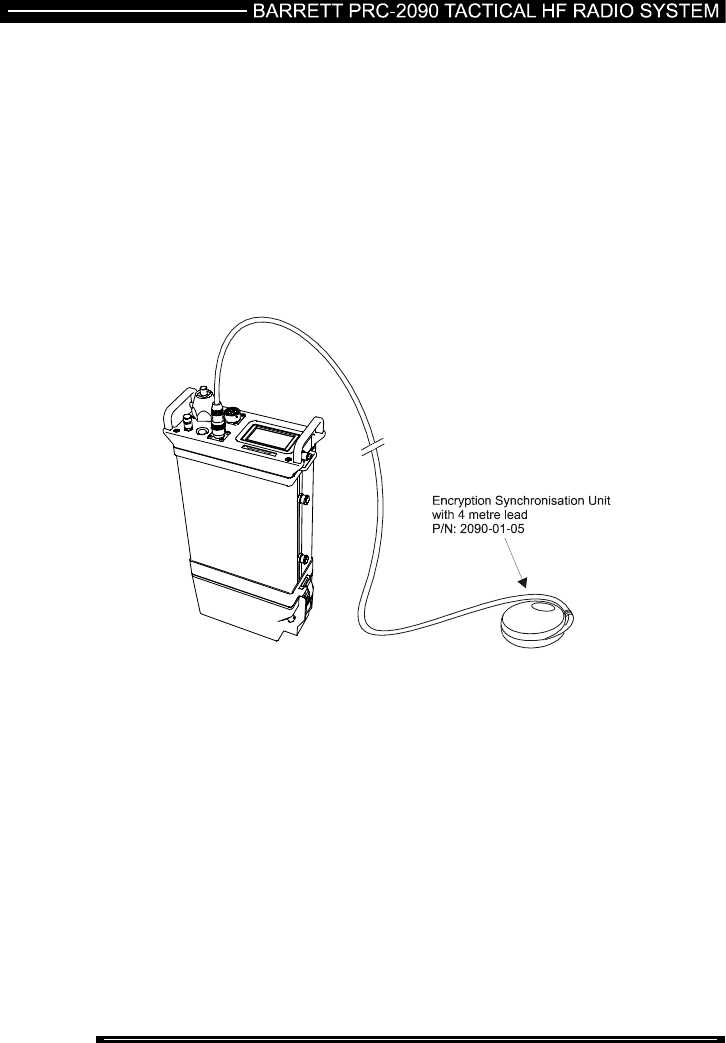
Operation of the Manpack in Frequency Hopping Mode
To operate in frequency hopping mode one of the of ESU (Encryption
Synchronisation Units) supplied with the frequency hopping option must be plugged
into the ESU socket on the top of the 2090 manpack adaptor. The ESU acquires
satellite timing information so must be in view of the sky i.e. cannot be operated
inside buildings. To help with this an optional ESU extender cable is available (P/N
2090-01-09) to enable the ESU to be positioned outside if operating within a
building.
To operate the manpack in frequency hopping mode refer to the Section
“Frequency hopping” in this manual.
235 of 285
Operation of the PRC-2090 Tactical Manpack in Temporary Base Stations
For temporary base station operation, the Barrett PRC-2090 can be operated using
either a tactical broadband antenna Barrett P/N 2090-02-03 or a tactical tunable
wire dipole, Barrett P/N 2090-02-01.
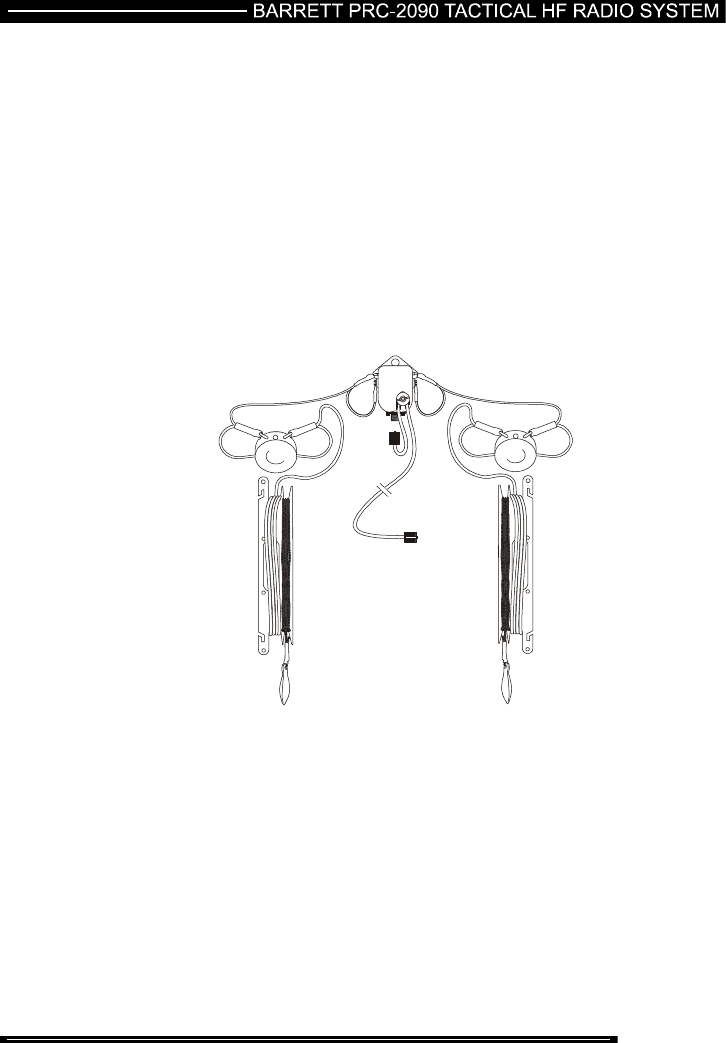
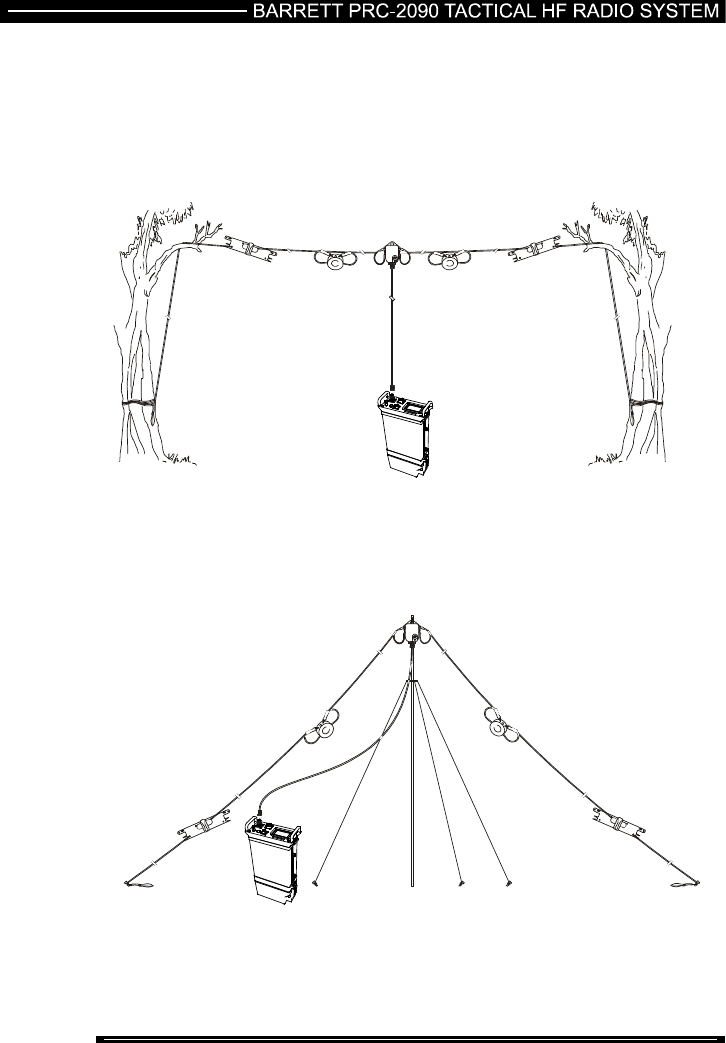
Tactical Broadband Dipole Antenna (2090-02-03)
The Tactical Broadband Dipole Antenna is a dipole antenna with loading to allow
broadband operation. For operation, each side of the antenna is unwound to its full
length. Throwing cords are provided that can be used to elevate the antenna or tie it
to ground for an inverted V configuration. The antenna will handle continuous data
and CW transmission with a Barrett 30w manpack radio. Only low duty cycle voice
operation is supported for operation with 100w transmitters. The antenna can be
used in a number of configurations, depending on structures available for elevation.
236 of 285
Tactical Broadband Dipole Antenna Configurations
Horizontal Dipole
The horizontal dipole has maximum gain on the broadsides of the antenna and
reduced gain along the axis. Height above ground affects radiation angle. Lower
heights give higher angle radiation, better for NVIS (short distance). Higher heights
give lower radiation angle, better for long distance communication.
Inverted V
The inverted-V has a more omni-directional pattern than the Horizontal Dipole, with
lower maximum gain. The ends of the antenna should be at least 0.5m above
ground. Suitable mainly for NVIS and medium distance.
237 of 285
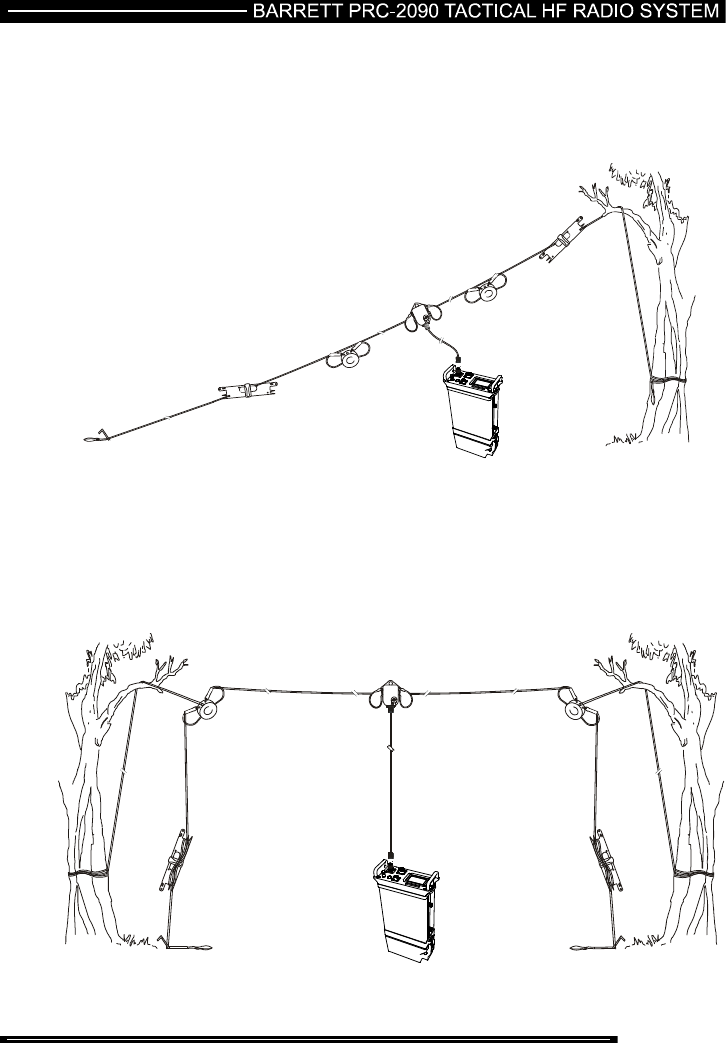
Sloping Dipole
Radiation with the Sloping Dipole becomes more directional, with increased gain in
the direction of the lower end of the antenna, and reduced gain towards the higher
end.
Inverted U
The inverted U has a radiation pattern between that of horizontal dipole and
inverted V. For optimum performance, the radiating elements should be fully
unwound, and should not touch the ground. Suitable for NVIS to medium distance.
Longer distance performance will be enhanced by erecting the antenna at a height
of 10m or more.
238 of 285
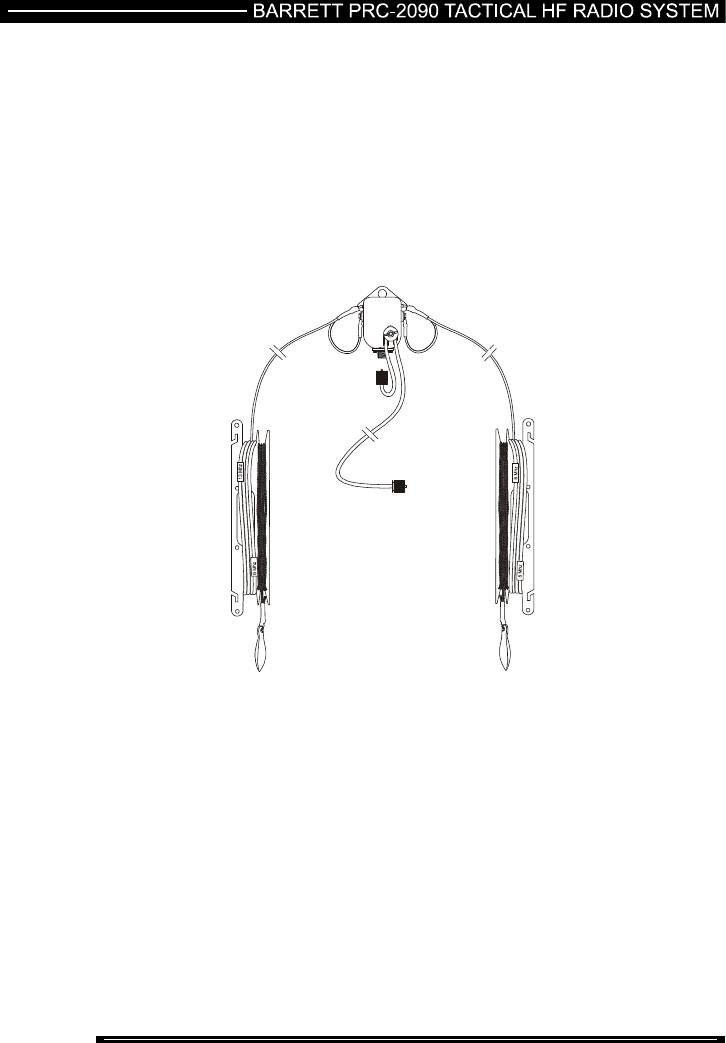
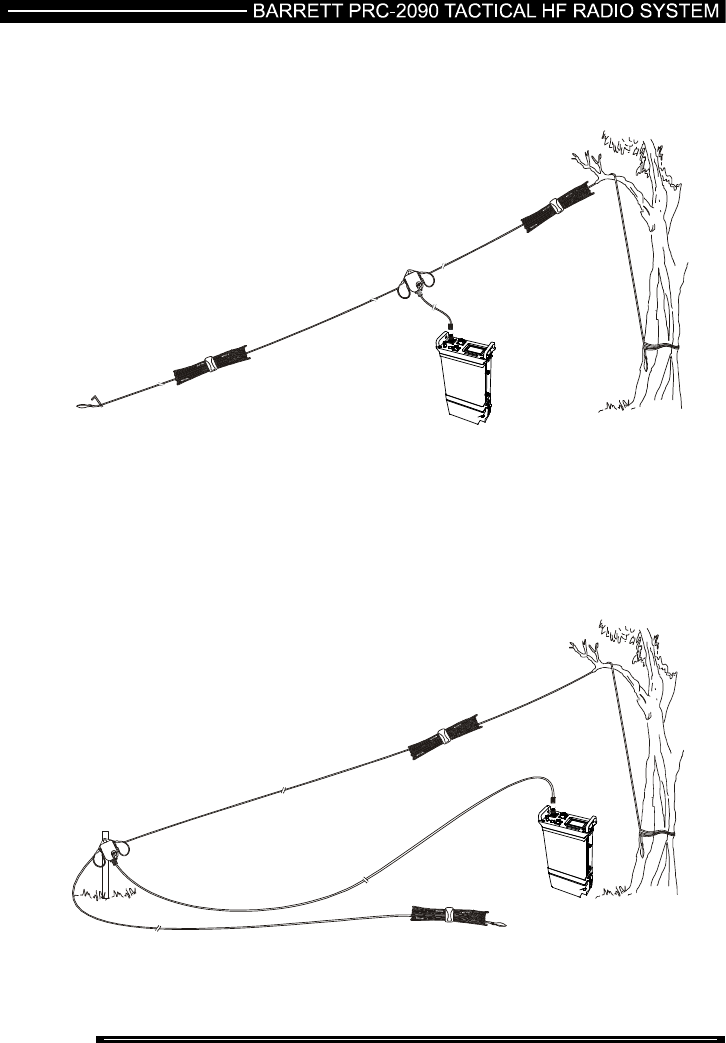
Tactical Tunable Wire Dipole Antenna (2090-02-01)
The Tactical Tuned Dipole Antenna is a tuned antenna with frequency labels to
indicate tuned lengths. For operation, each side of the antenna is unwound to the
tuned length for the frequency required. For operation at a labelled frequency, the
label should be level with the end of the winder as shown in the picture below.
Lengths for intermediate frequencies should be estimated and tied off appropriately.
The remaining wire remains on the winder. The throwing cord can then be used to
elevate the antenna. The antenna will handle 100W continuous data and CW
transmission. The antenna can be used in a number of configurations, depending
on structures available for elevation.
239 of 285
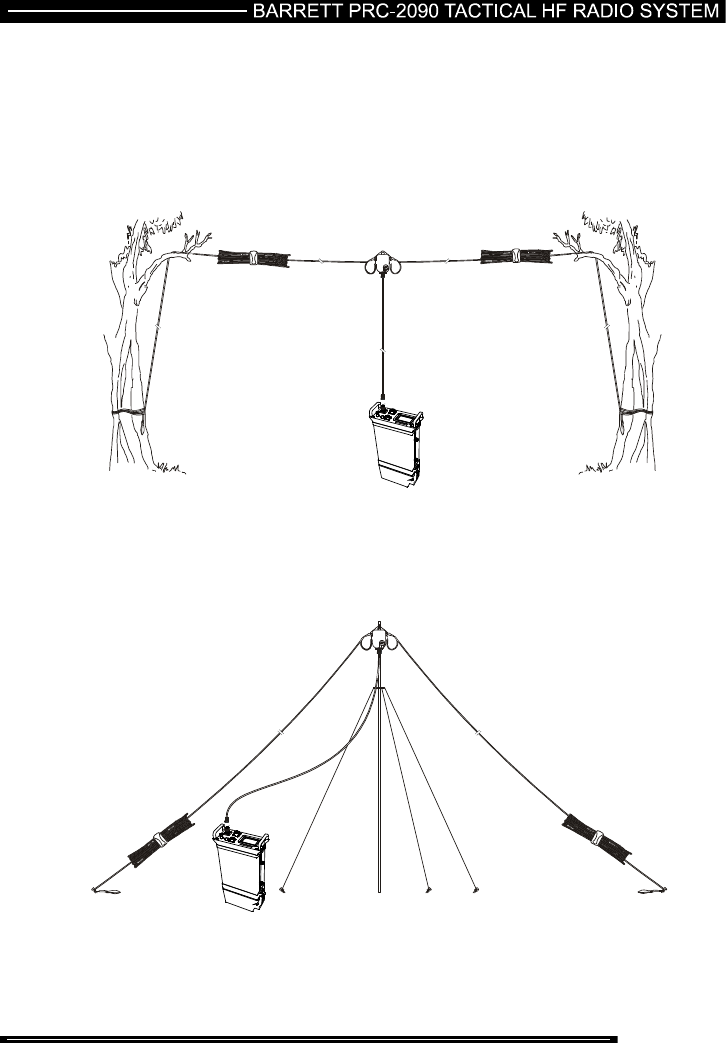
Tactical Tunable Wire Dipole Antenna Configurations
Horizontal Dipole
The horizontal dipole has maximum gain on the broadsides of the antenna, and
reduced gain along the axis. Height above ground affects radiation angle. Lower
heights give higher angle radiation, better for NVIS (short distance). Higher heights
give lower radiation angle, better for long distance communication.
Inverted V
The inverted-V has a more omni-directional pattern than the Horizontal Dipole, with
lower maximum gain. The ends of the antenna should be at least 1m
above ground. Suitable mainly for NVIS and medium distance.
240 of 285
Sloping Dipole
Radiation with the Sloping Dipole becomes somewhat asymmetrical, with increased
gain in the direction of the lower end of the antenna, and reduced gain towards the
higher end.
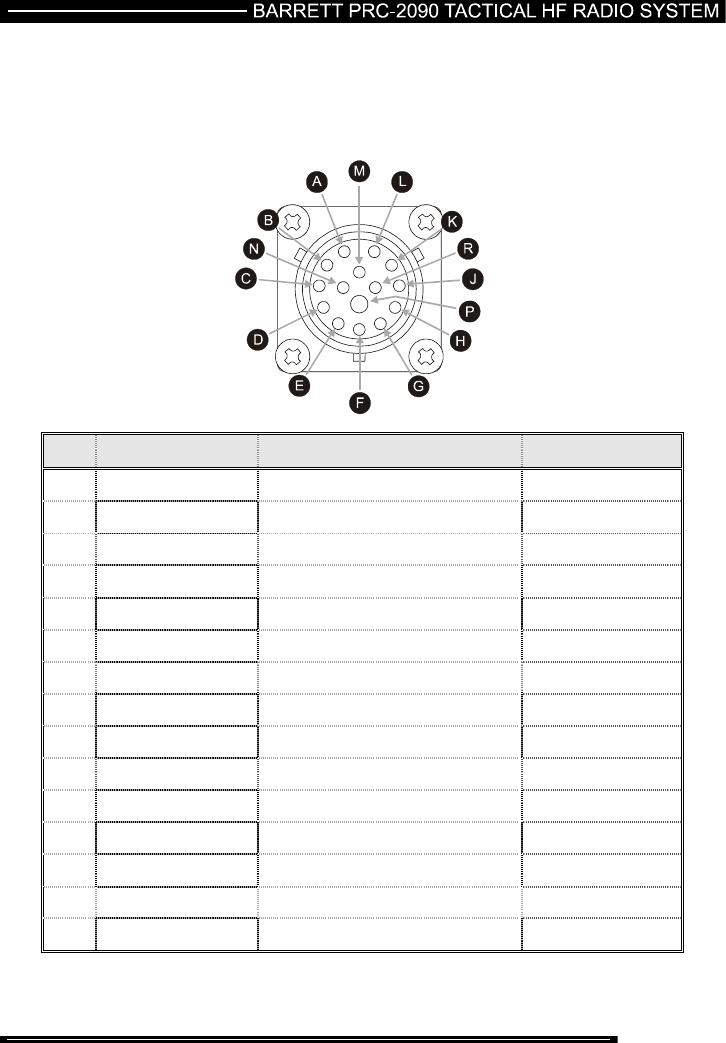
Single Ended
For rapid deployment, with reduced but still acceptable efficiency, the antenna can
be operated single ended. In this configuration, one side of the antenna (labelled
“antenna”) is unwound to the desired frequency and tied to an elevated structure.
The central balun should be located close to the ground, and the remaining side of
the antenna (“earth”) partly unwound (5 to 10m) and stretched out on the ground
below the radiating element.
241 of 285
Connectors
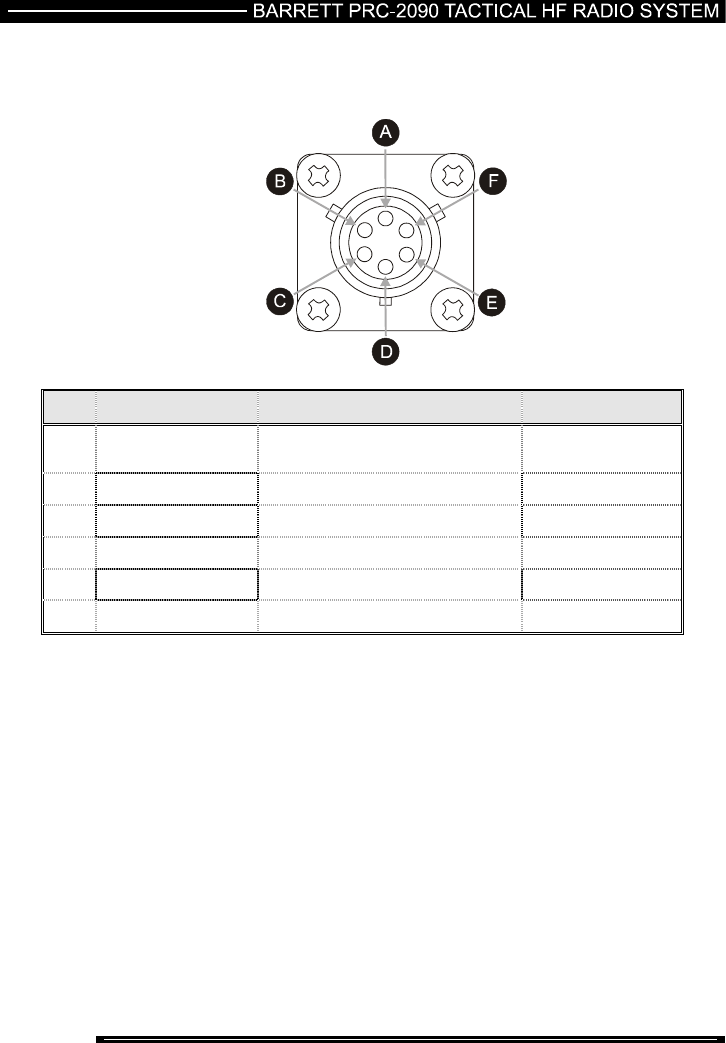
Auxiliary Socket
15 pin waterproof panel mounted socket
Pin Name Description of function Level
A +13V8 Fused Fused 13.8VDC output +13.8VDC
B Bal Audio Out 1 Balanced audio out 1 600 Ω
-6dBm to +9dBm
C Bal Audio Out 2 Balanced audio out 2 600 Ω
-6dBm to +9dBm
D Bal Audio Out 1 Balanced audio in 1 600 Ω
-24dBm to 0dBm
E Bal Audio Out 2 Balanced audio in 2 600 Ω
-24dBm to 0dBm
F Aux PTT PTT in Active low 0V
G RS-232 Tx RS-232 Tx data True RS-232 levels
H RS-232 Rx RS-232 Rx data True RS-232 levels
J Scan Stop Scan stop input Active low 0V
K PTT Out PTT output to external equipment Active low 0V
L Aux Dig Out 2 Auxiliary digital output (future use) Active low 0V
M External MICH Balanced Microphone input high
N Speaker Loudspeaker output 0-10V
P Gnd Ground Ground 0V
R External MICL Balanced Microphone input low
242 of 285
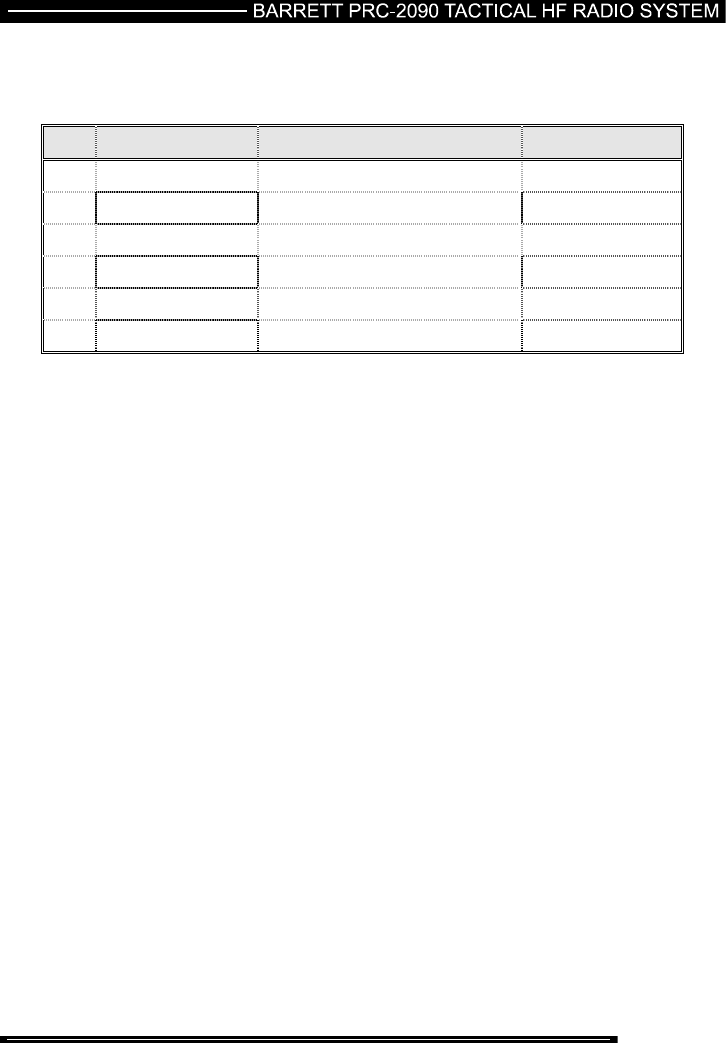
ESU/CW Socket
6 pin waterproof panel mounted socket
Pin Name Description of function Level
A 1PPS 1 PPS from External Syncronisation
Unit (ESU) TTL
B NMEA + NMEA data input +5VDC
C +5 +5V for ESU power +5VDC
D CW key CW key input Active low 0V
E Gnd Ground Ground 0V
F N/C Not connected
243 of 285
Handset Socket
6 pin waterproof panel mounted socket
Pin Name Description of function Level
A MICL Balanced Microphone input low
B MICH Balanced Microphone input high
C PTT PTT input Active low 0V
D Speaker Loudspeaker output 0-10V
E Aud UnBal Unbalanced audio in
F Gnd Ground Ground 0V
244 of 285
Power Socket (on Battery Pack)
4 pin waterproof panel mounted socket
Pin Name Description of function Level
A +VIn External supply input – positive +22 to 28 VDC
B +-VIn External supply input – positive +22 to 28 VDC
C Gnd External supply input – negative -22 to 28 VDC
D Gnd External supply input – negative -22 to 28 VDC

245 of 285
Barrett PRC-2090 Vehicle and Base Docking Stations
Vehicle Docking Station
Introduction
The Barrett PRC-2090 vehicle docking station turns the PRC-2090 tactical transceiver
into a 100W PEP capable transceiver. With this configuration the transceiver can also
interface to the full range of Barrett peripherals including the 2019 Automatic Tuning
Mobile HF Antenna and Barrett Linear Amplifiers.
Vehicle Docking Station position
The following points must be considered when mounting the 2090 vehicle docking
station.
Safety
It is essential that the transceiver be mounted in a place where it cannot cause
injury to the occupants of the vehicle in the event of a motor vehicle accident.
For this reason overhead mounting is not generally recommended and "under dash"
mounting must take into account the possibility of injuring the legs of front seat
occupants.
Convenience
The chosen position for the transceiver or control head, (if a remote controlled
model is used) should be one which allows convenient operation.
Positions which are often used are:
- on the transmission hump
- in place of the glove box
- behind the seat
- under the dash board (if safe)
Where a remote controlled transceiver is used, only the control head need be
mounted convenient to the operator. The transceiver may be mounted under a
seat, in the luggage compartment or any other out of the way place within the
vehicle (which allows for sufficient cooling).
All equipment should be positioned in such a way that convenient access for
maintenance is provided.

246 of 285
Strength
It must be assumed that the vehicle will be used on rough roads and in many cases
off road. Hence mounting of equipment must take into account the severe vibration
and shock that can be expected.
Transceivers may only be mounted to structural components of the vehicle body
and not on dress panels or plastic interior panels. In some cases, the area around
the transceiver mounting may need reinforcement.
Precautions should be taken to ensure fixing screws etc. cannot vibrate loose.
Air circulation
Most transceivers rely on air flow around cooling fins to dissipate heat generated by
the transmitter. The mounting position must allow free airflow around these fins.
Obstruction
The installation of a transceiver into a vehicle should not inhibit the normal use of
the vehicle. Before finally selecting equipment positions, check that normal
operation of steering, foot pedals, gear change, hand brake etc. are not impeded,
and that heater or air-conditioning outlets, glove box and doors are not obstructed.
Always check that the drilling of mounting screw holes will not damage electrical
wiring, heater hoses or hydraulic lines.
Power Wiring
Connect the red positive and black negative wires from the transceiver power cable
to the positive and negative terminal of the battery. Do not connect to the ignition
switch or internal fuse panels as vehicle wiring to these points is of insufficient
current capacity, causing voltage drop and possible noise interference.
- fit a suitable 25A ATC fuse and holder (Barrett P/N BCA20021), as near as
practicable to the battery connection in the positive (red) wire.
- route the power cable away from high tension ignition wiring.
- secure the power cable, either to other wiring or the vehicle body, with
suitable cable ties.
- where wiring passes through bulkheads, provide appropriate protection to
prevent insulation being damaged.

247 of 285
Antenna
In any radio system an effective antenna installation is essential. Because of the
need to reduce the size of HF antennas so that they can be fitted to a vehicle,
mobile antenna bandwidth becomes quite narrow and hence tuning is critical. In
most cases the only tuning adjustment that can be effected is adjustment to
position. Particular attention must be given to the antenna position if satisfactory
performance is to be obtained. Refer to the instructions supplied with the antenna
you have selected.
Antenna Mounting
The antenna mounting must provide a strong secure anchorage for the base of the
antenna. To obtain maximum radiation, the antenna base must be well bonded
electrically to the vehicle chassis. Paint, dirt, rust, etc. should be removed from the
respective fixing points. The mounting point must provide a low resistance
electrical path to the main vehicle metallic structure.
Antenna Feed Cables
Antenna feed cables should be run (as far as possible) away from other vehicle
wiring and especially away from ignition high tension wiring. Where passing
through body panels or internal bulkheads, grommets must be used to protect the
cables. Water-proof connectors must be used when they are outside the vehicle.
Voltage Standing Wave Ratio (VSWR)
After installation it is recommended that the VSWR of the antenna should be
measured for each channel. The instructions supplied with the antenna selected
will detail this operation.

248 of 285
Noise Suppression
Noise generated by motor or electrical accessories on the vehicle may cause
objectionable interference to the received signal. This noise enters the receiver
either by means of the battery leads or the antenna system. Providing that the
recommendations concerning battery wiring given earlier in this book are followed,
noise injected via the battery lead is unlikely to be significant. Most noise problems
result from pick-up by the antenna. Practical cures involve either preventing the
noise from being generated or minimising it from being radiated by the wiring
connected to the noise source.
Interference Suppression Kit (Barrett P/N BCA90017) is available to assist in
noise suppression and contains filters, suppressing capacitors, earth straps and
fitting instructions.
The techniques involved in noise suppression include re-routing of wiring, screening
and the use of filters. It is also necessary to maintain all electrical equipment in
good working order as worn brushes, loose connections and the like, will increase
the amount of noise generated.
Before attempting to cure a noise problem, the source (or sources) of noise must be
identified. Ideally, there should be no difference between background noise in the
receiver with motor and accessories on and that with motor and accessories off.
If a detectable difference does exist, turn off all accessories one by one until a
change in noise results. Continue, noting each contributing unit until there is no
detectable difference from the "all off" noise level. (For accessories such as
alternator, motors, instruments etc. a wire or drive belt may have to be temporarily
removed for this assessment). After identifying each noise source, they can be
worked on one at a time until an acceptable level of suppression is achieved.
Another approach to this problem is to remove or disconnect all possible sources of
noise then replace and suppress them in turn.
Some suggestions for suppressing particular noise sources follow:-

249 of 285
Ignition Systems
All high tension wiring from the ignition coil through to the spark plugs should be
kept as short as practicable, clean, and as close to the engine block as possible.
The cable should be an impregnated neoprene resistive type and the coil must be
either mounted on, or immediately adjacent to, the engine block. The low tension
wire from the coil to the distributor contact breaker points must be as short as
possible, and not included with other wires in a harness or loom. This wire must be
shielded if more than 300mm long. Twin flex or 'figure eight' cable provides a
suitable shield when connected in lieu of the original wire. This method is useful for
shielding other wires suspected of radiating noise. Do not ignore the wire to an
electric tachometer if one is fitted.
Coil to Battery Wiring
A low pass filter such as that supplied in the interference suppression kit or similar
should be fitted at the coil end of this wire. The earth connection of the filter should
be short and well-bonded to the coil body.
Battery Charging System
The charging system circuit, consisting of either generator or alternator and a
regulator may also be split into three parts:-
Alternator / Generator to Battery Wiring
A low pass filter such as that supplied in the interference suppression kit or similar
should be fitted to the main battery lead at the alternator. The filter must be rated
for the maximum current available from the charging system. The earth lug of the
filter should be attached to the alternator body or the engine block.
Alternator to Regulator Control Wire
This wire carries switching pulses that often contribute noise to the receiver.
Suppression using capacitors or filters must not be attempted since damage to the
regulator may result. Separate the wire from all other wiring, keep it as short as
possible and, if longer than about 300mm it should be shielded as described above.
Other Regulator Wires
These are normally adequately suppressed using good low-inductance bypass
capacitors. To be effective, these capacitors must connect to the wires to be
suppressed and to chassis with very short leads. For this reason, the 'pigtail' style
of suppressor capacitor often used with MF broadcast receivers is generally
ineffective at HF.
Other Noise Sources
Electric Motors (Windscreen Wipers, Fans Etc.)
Small electric motors can usually be suppressed with good low inductance bypass
capacitors.

250 of 285
Engine Instrumentation
Certain types of oil-pressure sensors and voltage regulators used in instrument
systems contain a vibrating or thermal cycling contact. These devices can only be
suppressed by isolating and screening or wiring in the same way as described for
the alternator to regulator control wire. Disc ceramic capacitors with short leads
(protected with insulating sleeving) are frequently useful but to prevent damage to
instrument contacts, where the use of bypass capacitors is attempted, values larger
than 1nF should not be used.
General Noise Suppression Tips
When searching for sources of noise, some of their characteristics can be helpful in
identification:-
Petrol engine ignition noise and contact breaker noise is a sharp staccato 'plop'
varying with engine speed. It is only with this class of noise that the impulse noise
limiter incorporated within some transceivers is effective
Noise from other sources generally has a more 'mushy' sound. That from the
alternator/generator may only be troublesome over a limited range of engine speed
and can also be influenced by the state of charge of the battery.
The noise from instrument regulators may depend on the battery voltage, the
reading of the instrument and the length of time the system has been switched on.
For this reason, the search for noise sources must be done thoroughly to prevent
noise from apparently reappearing after the installation has been completed.
Electric motors generate a 'whining' sound. Do not forget to check windscreen
wipers, electric fuel pumps, heater and air conditioning fans and other motors which
operate only on an intermittent basis.