Belkin F5D7001A Wireless PCI Adapter User Manual P74485 F5D7001 man last indd
Belkin International, Inc. Wireless PCI Adapter P74485 F5D7001 man last indd
Belkin >
Contents
- 1. Users Manual Part 1
- 2. Users Manual Part 2
- 3. Users Manual Part 3
Users Manual Part 2
11
11
section
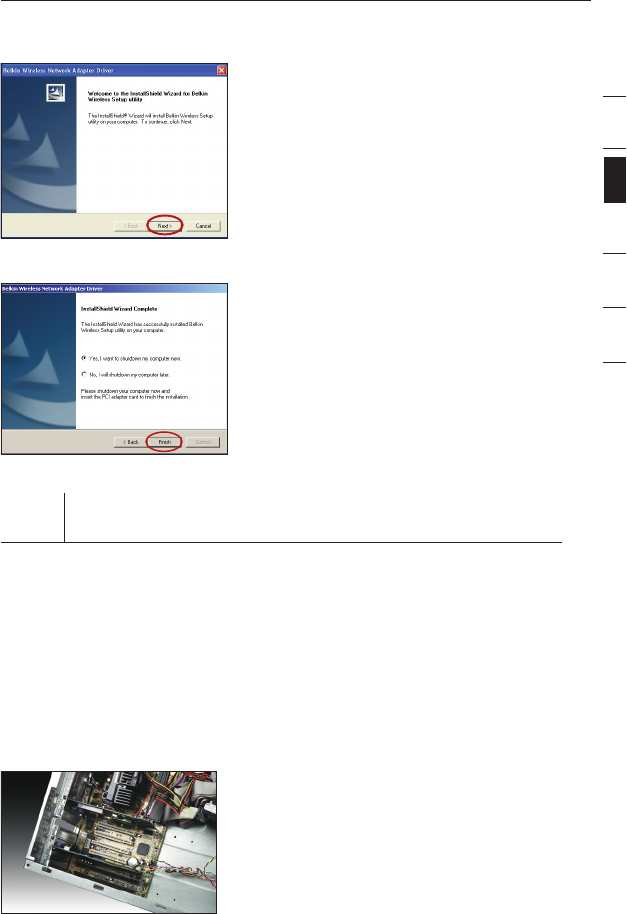
1.4 The installer will now start. Click
“Next” and follow the
on-screen instructions.
1.5 After the installation is complete,
click “Finish” to shut down
your computer.
Step 2 Insert the Card into the Computer
WARNING: Be sure to power off your computer and
disconnect your power cord before opening up your computer.
2.1 Remove the screws behind your computer case that secure the
computer cover and remove cover.
2.2 Touch any metal part of the case to discharge static
electricity, to avoid damage your product or
your computer.
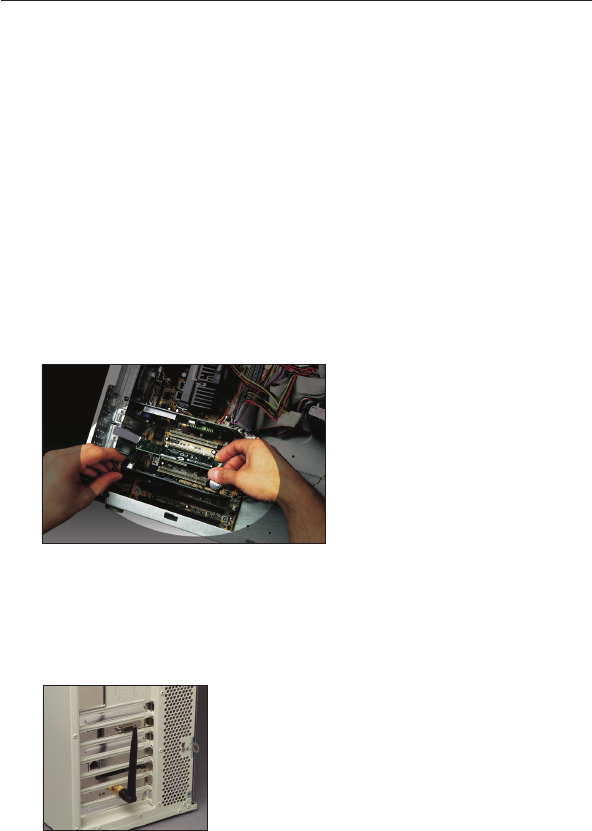
2.3 Locate an empty PCI expansion
slot. It is usually white in color.
Installing and Setting Up the Card
1
2
3
4
5
6
1312
1312
2.4 Confirm that the Card will fit into the slot you have chosen. Keep in
mind that the included antenna needs to be oriented with the top
pointing up. If there are cables and other connectors in the way, try
to pick the PCI slot that has the fewest obstructions to the correct
positioning of the antenna.
2.5 Remove the metal port cover from the back of the computer that
corresponds to the PCI slot you selected. If there is a screw, place
it in a safe place, as you will be using it to attach the Card to the
computer later.
2.6 Push the Card firmly into the PCI slot that you have chosen.
Apply pressure as needed until the connector is fully seated.
2.7 Now secure the Card with the screw that you previously
placed in a safe place.
2.8 Carefully screw the antenna onto the threaded connector on the
Card. Turn the antenna until it is vertical and pointing up.
2.9 Replace the computer’s cover. Now that the Card is installed, you
can reconnect the power cord, and turn it back on.
Installing and Setting Up the Card
13
13
section
Step 3 Let Windows Finish the Installation
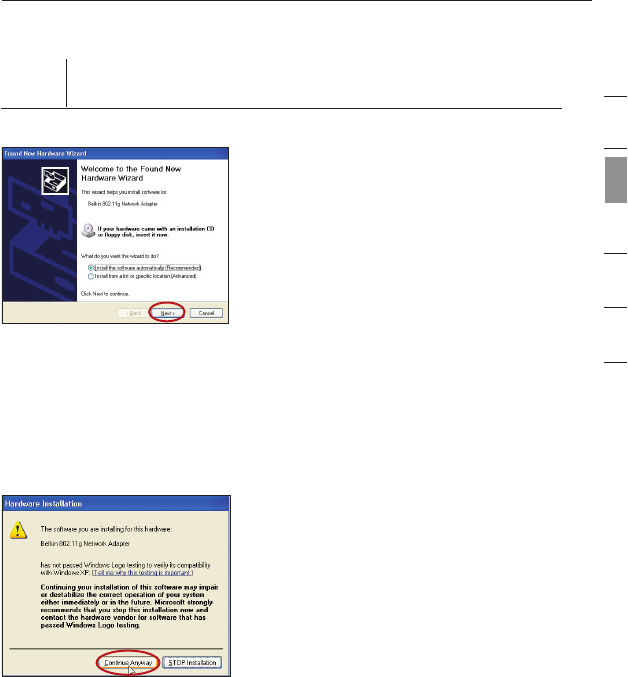
3.1 After powering on your computer,
you will see a “Found New
Hardware Wizard” screen. Select
“Install the software automatically
(Recommended)” and click “Next”.
Note: Specific screens differ
depending upon which version of
the Windows OS you are using.
3.2 Depending on the version of
Windows you are using, you might
also see a screen similar to this
one. This DOES NOT mean there is
a problem as the drivers have been
fully tested and are compatible with
this Windows operating system.
Select “Continue Anyway” and
follow the on-screen instructions.
Installing and Setting Up the Card
1
2
3
4
5
6
1514
1514
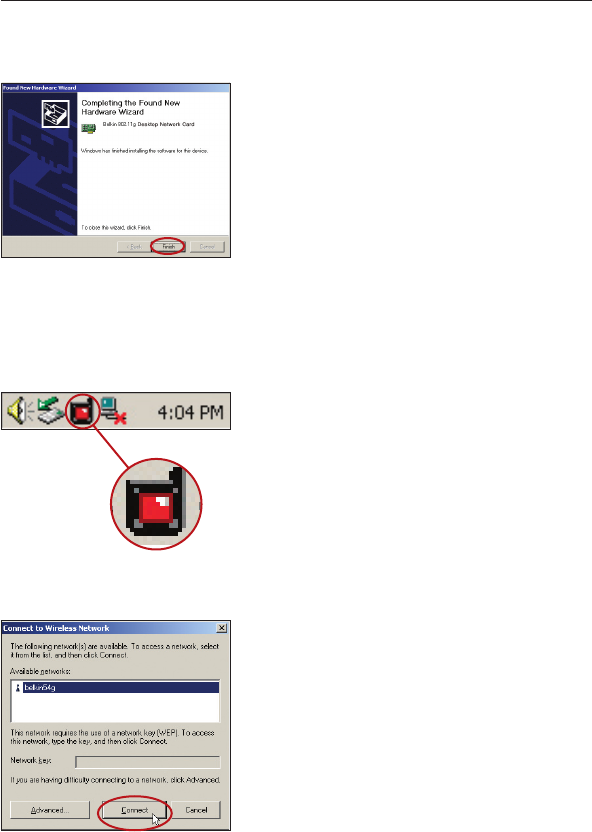
3.3 Windows will ask you where
the drivers are located. Make
no changes and click “Next”
until you see the screen that
asks you to click “Finish” to
complete the installation.
Note: Specific screens differ
depending upon which version
of the Windows OS you
are using.
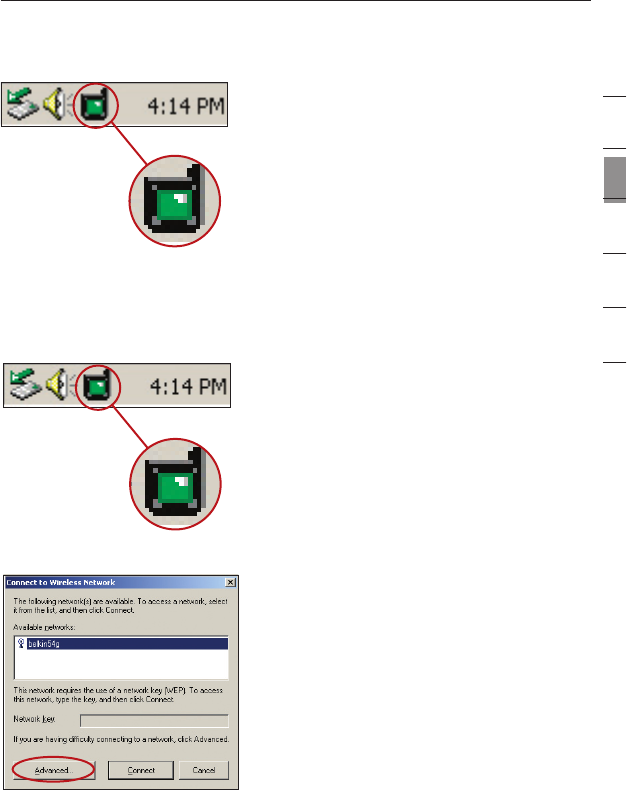
3.4 When the installation is
complete, a small Signal
Indicator icon (red) in your
system tray (bottom right
corner of most screens) will
appear. Double-click the
Signal Indicator icon to
bring up the “Wireless
Network” screen.
3.5 Select the network you want to
connect to under “Available
networks” and click “Connect”.
Installing and Setting Up the Card
15
15
section
3.6 The Signal Indicator icon in your
system tray should now turn green
(yellow if the signal is weak.)
Installation is now complete!
Double-click the Signal Indicator icon to bring up the “Wireless
Network” screen.
The following screen will appear:
Next, clicking on the “Advanced” button will allow you to view
and configure more options of your Card. The “Advanced”
button will take you to the Belkin Wireless LAN Utility.
Installing and Setting Up the Card
1
2
3
4
5
6
1716
1716
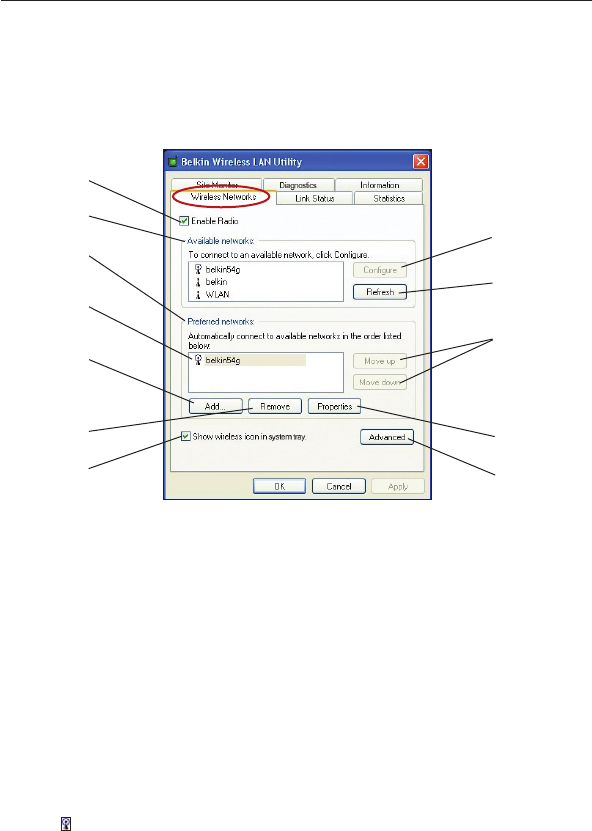
Setting Wireless Network Preferences
Click on the “Wireless Networks” tab.
(a) Enable Radio
Use this option to turn your wireless network radio ON or OFF. You
may want to turn the radio off while in airplanes or to conserve the
battery life of your mobile computer. When the radio is disabled, the
power LED on your Card will turn off and the Windows 2000 or XP
system tray wireless network icon will be depicted with an “X”.
(b) Available Networks
This displays a list of wireless networks in your area. If you don’t see
a name in the box, click on the “Refresh” (j) button to rescan for any
available networks. To connect to a network, select a network name in
the Available Networks list box and click the “Configure” (i) button.
Click “OK” (m) in the “Wireless Network Properties” box to add the
network name to the “Preferred Networks” (c) list.
Wait up to one minute for the network connection to be made. Your
computer is connected to the selected network when you see a blue
bubble (d) on top of the icon for that network.
(a)
(b)
(c)
(d)
(e)
(f)
(g)
(h)
(l)
(j)
(i)
(k)
Using the Belkin Wireless LAN Utility

17
17
section
(c) Preferred Networks
Displays a list of the networks that you have previously configured.
The one with the blue bubble (d) is the network you are currently
connected to.
You may rank the networks by selecting the network name in the
“Preferred Networks” list then clicking on the “Move Up” and “Move
Down” (k) buttons. Networks appearing higher on the list will be
preferred over networks listed lower on the list. If a preferred network
is unavailable, the Card will attempt to connect to the next available
network on the list.
(e, f) Add, Remove
You may “Add” (e) and “Remove” (f) networks from the Preferred
Networks list by using these buttons.
(g) System Tray Icon
Check this box so that the wireless icon appears on your system tray.
(h) Properties
To change the properties and WEP (security) settings of a network,
select a network from the Preferred Networks (c) then click on the
“Properties” (h) button.
(l) Advanced
Allows you to select the type of network you want to connect to. When
the “Advanced” (l) button is checked, the screen on the next page will appear.
Using the Belkin Wireless LAN Utility
1
2
3
4
5
6

1918
1918
Any Available Network (Access
Point Preferred)
When this option is selected, the Card
will attempt to connect to any available
network in the area. Wireless router or
access point networks will be preferred
networks over Ad-Hoc networks.
Access Point (Infrastructure) Networks Only
When this option is selected, the Card will attempt to connect to any
available wireless router or access point in the area. Ad-Hoc networks
(computer-to-computer) will be excluded from the list of available
networks when this option is selected.
Computer-to-Computer (Ad-Hoc) Networks Only
When this option is selected, the Card will attempt to connect to
any available computer in the area that’s also configured to be used
in Ad-Hoc mode. The wireless router or access point will be excluded
from the list of available networks when this option is selected.
Using the Belkin Wireless LAN Utility

19
19
section
Securing your Wi-Fi
®
Network
Here are a few different ways to maximize the security of your wireless
network and protect your data from unwanted intrusions. This section is
intended for the home, home office, and small office user. At the time of
publication, three encryption methods are available.
Encryption Methods:
Using the Belkin Wireless LAN Utility
1
2
3
4
5
6
Name 64-bit Wired
Equivalent Privacy
128-bit
Encryption
Wi-Fi
Protected
Access
Wi-Fi
Protected
Access
Acronym 64-bit WEP 128-bit WEP WPA-TKIP WPA-AES
Security Good Better Best Best
Features Static keys Static keys Dynamic key
encryption
and mutual
authentication
Dynamic key
encryption
and mutual
authentication
Encryption keys
based on RC4
algorithm (typically
40-bit keys)
Added security
over 64-bit
WEP using a
key length of
104 bits, plus
24 additional
bits of system-
generated data
TKIP (temporal
key integrity
protocol)
added so
that keys are
rotated and
encryption is
strengthened
AES
(Advanced
Encryption
Standard)
does not
cause any
throughput
loss.

2120
2120
WEP (Wired Equivalent Privacy)
WEP (Wired Equivalent Privacy) is a common protocol that adds
security to all Wi-Fi-compliant wireless products. WEP gives wireless
networks the equivalent level of privacy protection as a comparable
wired network.
64-Bit WEP
64-bit WEP was first introduced with 64-bit encryption, which includes
a key length of 40 bits plus 24 additional bits of system-generated
data (64 bits total). Some hardware manufacturers refer to 64-bit
as 40-bit encryption. Shortly after the technology was introduced,
researchers found that 64-bit encryption was too easy
to decode.
128-Bit WEP
As a result of 64-bit WEP’s potential security weaknesses, a more
secure method of 128-bit encryption was developed. 128-bit
encryption includes a key length of 104 bits plus 24 additional bits of
system-generated data (128 bits total). Some hardware manufacturers
refer to 128-bit as 104-bit encryption.
Most of the new wireless equipment in the market today supports
both 64-bit and 128-bit WEP encryption, but you might have older
equipment that only supports 64-bit WEP. All Belkin wireless products
will support both 64-bit and 128-bit WEP.
Encryption Keys
After selecting either the 64-bit or 128-bit WEP encryption mode, it is
critical that you generate an encryption key. If the encryption key is
not consistent throughout the entire wireless network, your wireless
networking devices will be unable to communicate with one another.
You can enter your key by typing in the hex key manually. A hex
(hexadecimal) key is a mixture of numbers and letters from A–F and
0–9. For 64-bit WEP, you need to enter 10 hex keys. For 128-bit WEP,
you need to enter 26 hex keys.
Using the Belkin Wireless LAN Utility

21
21
section
For instance:
AF0F4BC3D4 = 64-bit WEP key
C3030FAF0F4BB2C3D44BC3D4E7 = 128-bit WEP key
If you have multiple vendors’ equipment in your network, the easiest
thing to do is to write down the hex WEP key from your wireless
router or access point and enter it manually into the hex WEP key
table in your Card’s configuration screen.
WPA (Wi-Fi Protected Access)
WPA (Wi-Fi Protected Access) is a new Wi-Fi standard that
improves upon the security features of WEP. To use WPA security, the
drivers and software of your wireless equipment must be upgraded
to support it. These updates will be found on your wireless vendor’s
website. There are two types of WPA security: WPA-PSK (no server),
and WPA (with radius server).
WPA-PSK (no server) uses what is known as a pre-shared key as
the network key. A network key is a password that is between 8 and
63 characters long. It can be a combination of letters, numbers,
or characters. Each client uses the same network key to access
the network. Typically, this is the mode that will be used in a home
environment.
WPA (with radius server) is a system where a radius server
distributes the network key to the clients automatically. This is
typically found in a business environment.
For a list of Belkin wireless products that support WPA, please visit
our website at www.belkin.com/networking.
Using the Belkin Wireless LAN Utility
1
2
3
4
5
6
2322
2322
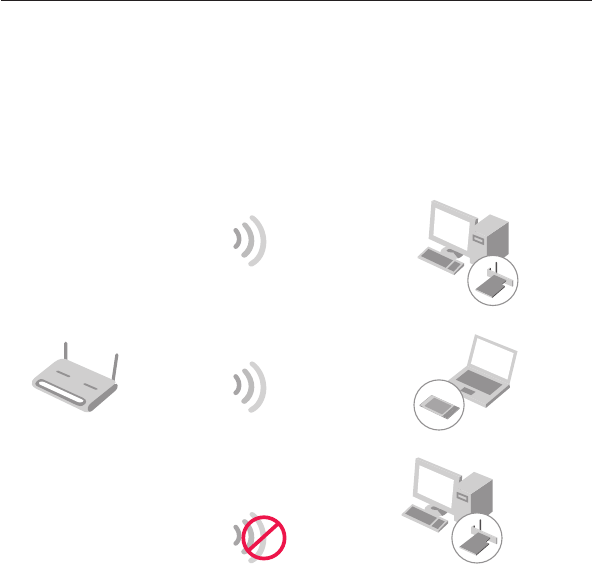
Most Wi-Fi products ship with security turned off. So once you have
your network working, you need to activate WEP or WPA and make
sure all your wireless devices are sharing the same network key.
The following diagram shows the effect of not having the correct
network key throughout your network.
The Card cannot access the network because it uses a different network key
than the one configured on the wireless router.
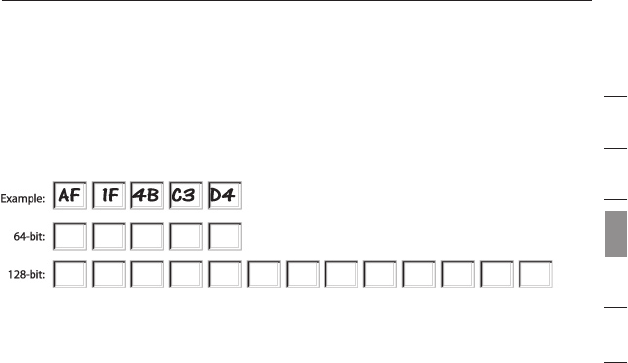
Using a Hexadecimal Key
A hexadecimal key is a mixture of numbers and letters from A–F and
0–9. 64-bit keys are five two-digit numbers. 128-bit keys are 13
two-digit numbers.
For instance:
AF 0F 4B C3 D4 = 64-bit key
C3 03 0F AF 0F 4B B2 C3 D4 4B C3 D4 E7 = 128-bit key
Wireless G Router
Wireless G Notebook
Network Card
Wireless G Desktop
Network Card
Wireless G Desktop
Network Card
Network Key=
WRONG Password
Network Key=
MyPassword
Network Key=
MyPassword
Network Key=
MyPassword
Using the Belkin Wireless LAN Utility
23
23
section
In the boxes below, make up your key by writing in two characters
between A–F and 0–9 in each box. You will use this key to program
the encryption settings on your Wirelesss Router (or Access Point)
and your wireless computers.
Setting Up your Belkin Wireless Router or Access Point
to Use Security
To start using security, you need to first enable WEP or WPA for your
wireless router or access point. For Belkin Wireless Routers or Access
Points, these security features can be configured by using the web-
based interface. (See your wireless router or access point manual for
directions on how to access the management interface.)
Changing the Wireless Security Settings
The Belkin Wireless G Router and Range Extender/Access Point are
equipped with the latest WPA security feature. They also support the
legacy WEP security standard. By default, wireless security
is disabled.
To enable security, you will need to determine which standard you
want to use (see page 19). To access the security settings, click
“Security” on the wireless section using the web-based interface. (See
your wireless router or access point manual for directions on how to
access the security settings.)
Using the Belkin Wireless LAN Utility
1
2
3
4
5
6

2524
2524
WEP Setup
64-Bit WEP Encryption
1. Select “64-bit WEP” from the drop-down menu.
2. After selecting your WEP encryption mode, you can enter your
key by typing in the hex key manually, or you can type in a
passphrase in the “Passphrase” field and click “Generate” to
create a key.
A hex (hexadecimal) key is a mixture of numbers and letters from
A–F and 0–9. For 64-bit WEP, you need to enter 10 hex keys.
For instance:
AF0F4BC3D4 = 64-bit WEP Key
3. Click “Apply Changes” to finish. Encryption in the wireless router
or access point is now set. Each of your computers on your
wireless network will now need to be configured with the same
security settings.
WARNING: If you are using a wireless client to turn on the security
settings in your Wireless Router or Access Point, you will temporarily
lose your wireless connection until you activate security on your
wireless client. Please record the key prior to applying changes in the
wireless router or access point. If you don’t remember the hex key,
your client will be locked out of the wireless router or access point.
Using the Belkin Wireless LAN Utility

25
25
1
2
3
4
5
6
section
128-Bit WEP Encryption
1. Select “128-bit WEP” from the drop-down menu.
2. After selecting your WEP encryption mode, you can enter your
key manually by typing in the hex key manually, or you can type
in a passphrase in the “Passphrase” field and click “Generate” to
create a key.
A hex (hexadecimal) key is a mixture of numbers and letters from
A–F and 0–9. For 128-bit WEP, you need to enter 26 hex keys.
For instance:
C3030FAF0F4BB2C3D44BC3D4E7 = 128-bit WEP key
3. Click “Apply Changes” to finish. Encryption in the wireless router
or access point is now set. Each of the computers on your
wireless network will now need to be configured with the same
security settings.
WARNING: If you are using a wireless client to turn on the security
settings in your Wireless Router or Access Point, you will temporarily
lose your wireless connection until you activate security on your
wireless client. Please record the key prior to applying changes in the
wireless router or access point. If you don’t remember the hex key,
your client will be locked out of the wireless router or access point.
Using the Belkin Wireless LAN Utility
2726
2726
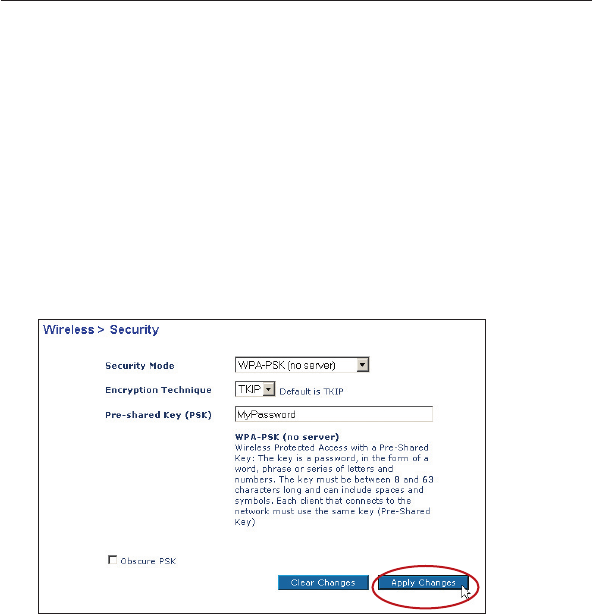
WPA-PSK (no server)
Choose this setting if your network does not use a radius server.
WPA-PSK (no server) is typically used in home and small
office networking.
1. From the Security Mode drop-down menu, select “WPA-PSK
(no server)”.
2. Enter your network key. This can be from 8 to 63 characters and
can be letters, numbers, or symbols. This same key must be used
on all of the clients (network cards) that you want to include in
your network.
3. Click “Apply Changes” to finish. You must now set all clients
(network cards) to match these settings.
Using the Belkin Wireless LAN Utility
27
27
1
2
3
4
5
6
section
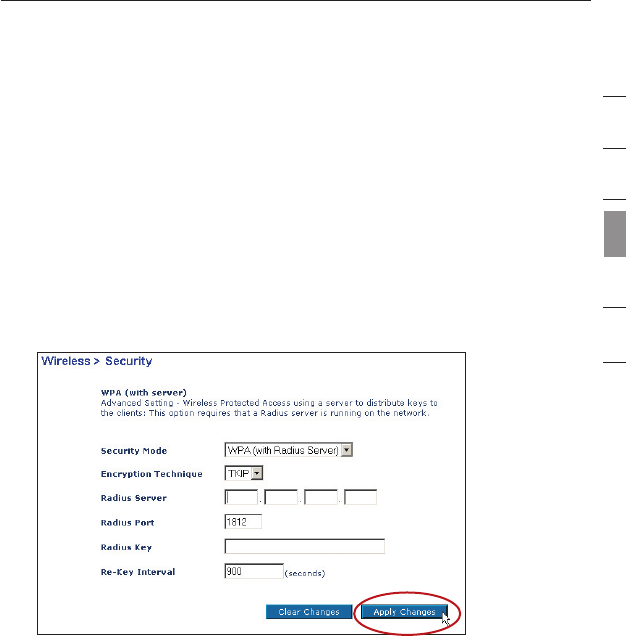
WPA (with server) Settings
Choose this setting if your network uses a radius server to distribute
keys to the clients (network cards). This is typically used for a
business network.
1. From the Security Mode drop-down menu, select “WPA (with
server)”.
2. Enter the IP address of the radius server into the “Radius
Server” fields.
3. Enter the radius key into the “Radius Key” field.
4. Enter the key interval. The key interval is how often the keys are
distributed (in packets).
5. Click “Apply Changes” to finish.
IMPORTANT: You must now set all wireless network cards/adapters
to match these settings.
Using the Belkin Wireless LAN Utility

2928
2928
Configuring your Belkin Wireless G Notebook and
Wireless G Desktop Network Cards to Use Security
At this point, you should already have your wireless router or access
point set to use WPA or WEP. In order for you to gain wireless
connection, you will need to set your Wireless G Notebook and
Wireless G Desktop Network Cards to use the same security settings.
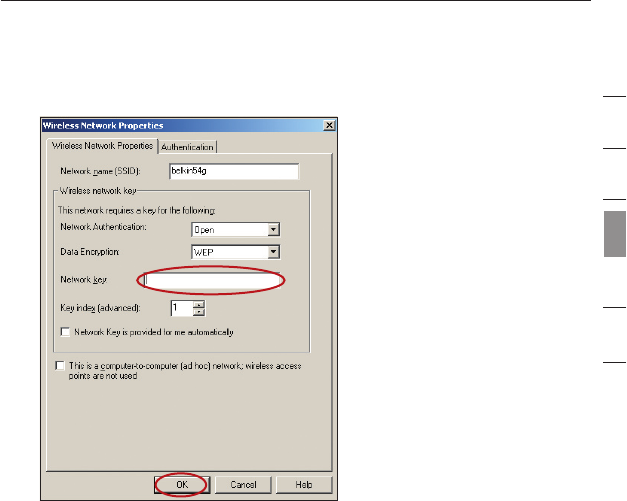
Connecting your Computer to a Wireless Router or Access Point
that Requires a 64-Bit or 128-Bit WEP Key
1. Double-click the Signal Indicator icon to bring up the
“Wireless Network” screen. The “Advanced” button will allow you
to view and configure more options of your Card.
2. Under the “Wireless Network” tab, select a network name from
the “Available networks” list and click “Configure”.
3. Under “Data Encryption” select “WEP”.
4. Ensure that the check box “Network key is provided for me
automatically” at the bottom is unchecked. If you are using this
computer to connect to a corporate network, please consult your
network administrator if this box needs to be checked.
Using the Belkin Wireless LAN Utility
29
29
1
2
3
4
5
6
section
5. Type your WEP key in the “Network key” box.
Important: A WEP key is a mixture of numbers and letters from A–F
and 0–9. For 128-bit WEP, you need to enter 26 keys. For 64-bit WEP,
you need to enter 10 keys. This network key needs to match the key
you assign to your wireless router or access point.
6. Click “OK”, to save the settings.
Using the Belkin Wireless LAN Utility
3130
3130
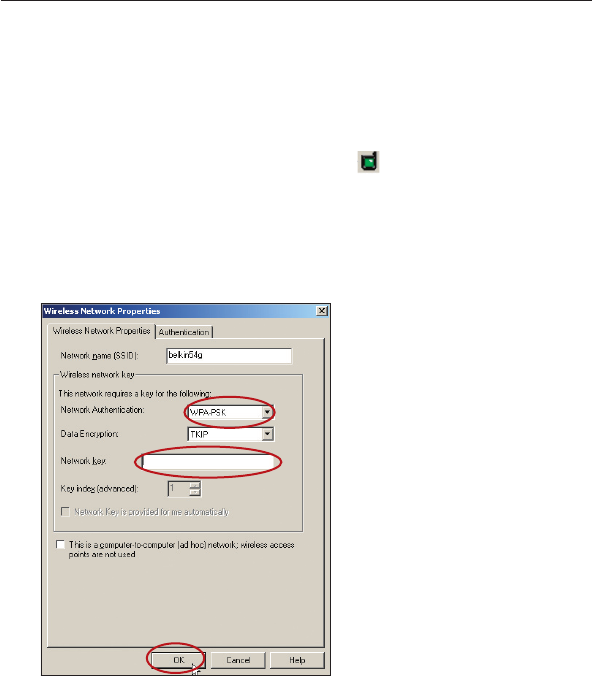
Connecting your computer to a Wireless Router or Access Point
that uses WPA-PSK (no server)
1. Double-click the “Signal Indicator” icon to bring up the
“Wireless Network Properties” screen. The “Advanced” button will
allow you to view and configure more options of your Card.
2. Under the “Wireless Networks” tab, select a network name from
the “Available networks” list and click “Configure”. The following
screen will appear.
3. Under “Network Authentication” select “WPA-PSK”.
4. Type your WPA key in the “Network key” box.
Important: WPA-PSK is a combination of numbers and letters from
A–Z and 0–9. For WPA-PSK, you can enter 8 to 63 keys. This network
key needs to match the key you assign to your wireless router or
access point.
5. Click “OK”, to save the settings.
Using the Belkin Wireless LAN Utility
31
31
1
2
3
4
5
6
section
Using the Belkin Wireless LAN Utility
Connecting your Computer to a Wireless Router or Access Point
that uses WPA (with Radius Server)
1. Double-click the “Signal Indicator” icon to bring up the
“Wireless Network Properties” screen. The “Advanced” button
will allow you to view and configure more options of your Card.
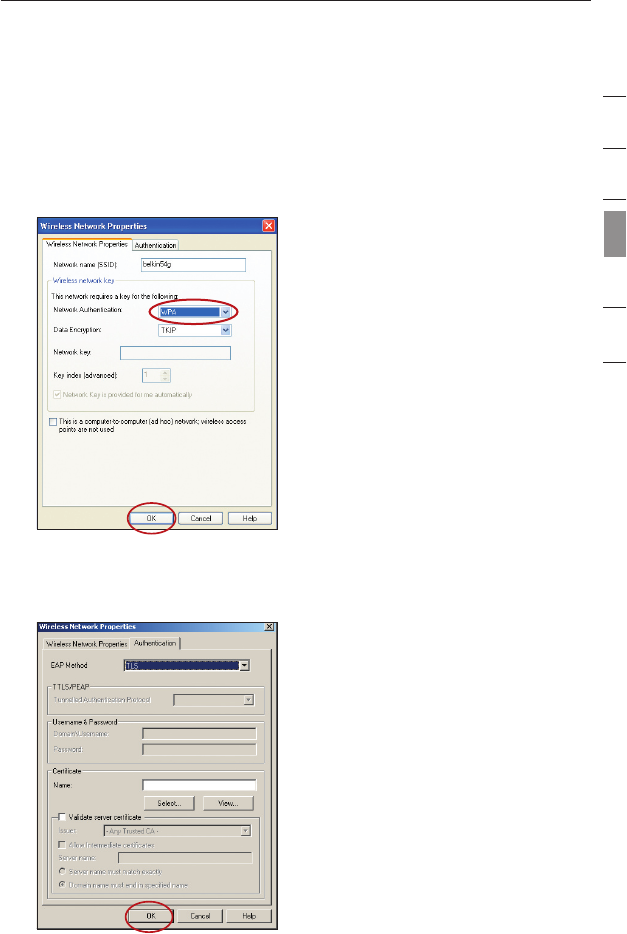
2. Under the “Wireless
Networks” tab, select a
network name from the
“Available networks” list
and click “Configure”. The
screen to the left
will appear.
3. Under “Network
Authentication”
select “WPA”.
4. Under the
“Authentication” tab,
select the settings that
are indicated by your
network administrator.
5. Click “OK”, to save
the settings.
3332
3332
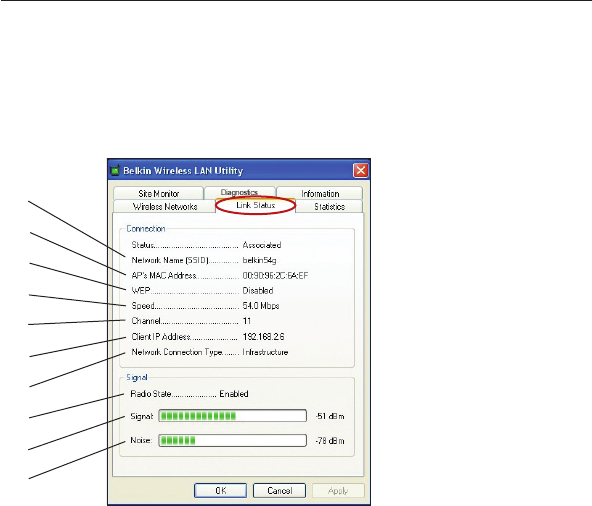
Monitoring the Status of your Network Connection
Click on the “Link Status” tab.
(a) Network Name (SSID)
The SSID is the wireless network name. This field shows the
current network name that you are connected to.
(b) AP’s MAC Address
Shows the MAC address of the wireless router or access point that
you are connected to.
(c) WEP
Shows whether the network you are associated with has WEP
encryption enabled or disabled.
(d) Speed
Displays the data rate of the current connection.
(e) Channel
Shows the current channel (1-11) you are using. When connected to a
wireless router or access point, the channel is set automatically. When
connected to another computer using Ad-Hoc mode, the channel can
be set manually. All computers using Ad-Hoc mode (computer-to-
computer) need to operate under the same channel.
Using the Belkin Wireless LAN Utility
(a)
(b)
(c)
(d)
(e)
(f)
(g)
(h)
(j)
(i)