Benq 57P31 GSM 1900 Smartphone with Bluetooth User Manual P31 E
Benq Corporation GSM 1900 Smartphone with Bluetooth P31 E
Benq >
Part 1

Welcome
P31 Smart Phone User Manual
P31 Smart Phone User ManualP31 Smart Phone User Manual
P31 Smart Phone User Manual

Copyright
Copyright 2005 by BenQ Corporation. All rights reserved. No part of
this publication may be reproduced, transmitted, transcribed, stored
in a retrieval system or translated into any language or computer lan-
guage, in any form or by any means, electronic, mechanical, mag-
netic, optical, chemical, manual or otherwise, without the prior
written permission of this company.
Disclaimer
BenQ Corporation makes no representations or warranties, either
expressed or implied, with respect to the contents hereof and specifi-
cally disclaims any warranties, merchantability or fitness for any par-
ticular purpose. Further, BenQ Corporation reserves the right to
revise this publication and to make changes from time to time in the
contents hereof without obligation of this company to notify any
person of such revision or changes.
Safety Information
For your safety, please read the guidelines below carefully before you
use your phone:
Exposure to Radio Frequency Signals
Exposure to Radio Frequency SignalsExposure to Radio Frequency Signals
Exposure to Radio Frequency Signals
Your wireless handheld portable telephone is a low power transmitter
and receiver. When it is ON, it receives and also sends out radio fre-
quency (RF) signals.
European and international agencies have set standards and recommen-
dations for the protection of public exposure to RF electromagnetic
energy.
• International Commission on Non-Ionizing Radiation Protection
(ICNIRP) 1996
• Verband Deutscher Elektringenieure (VDE) DIN- 0848
• Directives of the European Community, Directorate General V in
Matters of Radio Frequency Electromagnetic Energy
• National Radiological Protection Board of the United Kingdom, GS
11, 1988
• American National Standards Institute (ANSI) IEEE. C95.1- 1992
• National Council on Radiation Protection and Measurements
(NCRP). Report 86
• Department of Health and Welfare Canada. Safety Code 6
These standards are based on extensive scientific review. For example,
over 120 scientists, engineers and physicians from universities, govern-
ment health agencies and industry reviewed the available body of
research to develop the updated ANSI Standard.
The design of your phone complies with these standards when used nor-
mally.
Max. SAR measurement:
Max. SAR measurement: Max. SAR measurement:
Max. SAR measurement:
GSM900: 0.538 W/kg(10g) 0.762W/kg(1g)
DCS1800: 0.34 W/kg(10g) 0.576W/kg(1g)
PCS1900: 1.27 W/kg(Body) 0.455W/kg(Head)
Antenna Care
Antenna CareAntenna Care
Antenna Care
Use only the supplied or approved replacement antenna. Unauthorized
antennas, modifications or attachments may damage the phone and vio-
late FCC regulations.
Phone Operation
Phone OperationPhone Operation
Phone Operation
Normal Position: Hold the phone as you would any other telephone with
the antenna pointed up and over your shoulder. For your phone to oper-

ate most efficiently, do not touch the antenna unnecessarily when the
phone is in use. Contact with the antenna affects call quality and may
cause the phone to operate at higher power level than otherwise needed.
Batteries
BatteriesBatteries
Batteries
All batteries can cause property damage, injury or burns if a conductive
material such as jewelry, keys or beaded chains touches exposed termi-
nals. The material may complete electrical circuit and become quite hot.
To protect against such unwanted current drain, exercise care in handling
any charged battery, particularly when placing it inside your pocket,
purse or other container with metal objects. When battery is detached
from the phone, your batteries are packed with a protective battery cover;
please use this cover for storing your batteries when not in use.
Driving
DrivingDriving
Driving
Check the laws and regulations on the use of wireless telephones in the
areas where you drive. Always obey them. Also, if using your phone
while driving, please:
• Give full attention to driving--driving safety is your first responsi-
bility.
• Use hands-free operation, if available.
• Pull off the road and park before making or answering a call if driv-
ing conditions so require.
Electronic Devices
Electronic DevicesElectronic Devices
Electronic Devices
Most modern electronic equipment is shielded from RF signals. How-
ever, certain electronic equipment may not be shielded against the RF
signals from your wireless phone.
Pacemakers
PacemakersPacemakers
Pacemakers
The Health Industry Manufacturers Association recommends that a min-
imum separation of six (6") inches be maintained between a handheld
wireless phone and a pacemaker to avoid potential interference with the
pacemaker. These recommendations are consistent with the independent
research by and recommendations of Wireless Technology Research.
Persons with pacemakers:
• Should ALWAYS keep the phone more than six inches from their
pacemaker when the phone is turned ON.
• Should not carry the phone in a breast pocket.
• Should use the ear opposite the pacemaker to minimize the poten-
tial for interference.
• If you have any reason to suspect that the interference is taking
place, turn your phone OFF immediately.
Hearing Aids
Some digital wireless phones may interfere with some hearing aids. In
the event of such interference you may want to consult your hearing aid
manufacturer to discuss alternatives.
Other Medical Devices
Other Medical DevicesOther Medical Devices
Other Medical Devices
If you use any other personal medical device, consult the manufacturer
of your device to determine if they are adequately shielded from external
RF energy. Your physician may be able to assist you in obtaining this
information.
Turn your phone OFF in health care facilities when any regulations
posted in these areas instruct you to do so. Hospitals or health care facil-
ities may be using equipment that could be sensitive to external RF
energy.
Vehicles
RF signals may affect improperly installed or inadequately shielded elec-
tronic systems in motor vehicles. Check with the manufacturer or its rep-
resentative regarding your vehicle. You should also consult the
manufacturer of any equipment that has been added to your vehicle.
Posted Facilities
Posted FacilitiesPosted Facilities
Posted Facilities
Turn your phone OFF in any facility where posted notice so requires.

Aircraft
AircraftAircraft
Aircraft
FCC regulations prohibit using your phone while in the air. Switch OFF
your phone, or change to the Flight mode before boarding an aircraft.
Blasting Areas
Blasting AreasBlasting Areas
Blasting Areas
To avoid interfering with blasting operations, turn your phone OFF when
in a “blasting area” or in area posted “TURN OFF TWO-WAY RADIO.”
Obey all signs and instructions.
Potentially Explosive Atmospheres
Potentially Explosive AtmospheresPotentially Explosive Atmospheres
Potentially Explosive Atmospheres
Turn your phone OFF and do not remove the battery when in any area
with a potentially explosive atmosphere and obey all signs and instruc-
tions. Sparks, from your battery, in such areas could cause an explosion
or fire resulting in bodily injury or even death. Areas with a potentially
explosive atmosphere are often, but not always clearly marked. They
include fueling areas such as gasoline stations; below deck on boats; fuel
or chemical transfer or storage facilities; vehicles using liquefied petro-
leum gas (such as propane or butane); areas where the air contains chem-
icals or particles, such as grain, dust, or metal powders; and any other
area where you would normally be advised to turn off your vehicle
engine.
For Vehicles Equipped with an Air Bag
For Vehicles Equipped with an Air BagFor Vehicles Equipped with an Air Bag
For Vehicles Equipped with an Air Bag
An air bag inflates with great force. DO NOT place objects, including
both installed or portable wireless equipment, in the area over the air bag
or in the air bag deployment area. If in-vehicle wireless equipment is
improperly installed and the air bag inflates, serious injury could result.
FCC Information
FCC InformationFCC Information
FCC Information
This device complies with part 15 of the FCC Rule. Operation is sub-
ject to the condition that this device does not cause harmful interfer-
ence. Specific operating restrictions: no metallic component allowed
in body-worn.

Table of Contents i
Table of Contents
Introduction
IntroductionIntroduction
Introduction ...................................................
......................................................................................................
...................................................1
11
1
Getting to Know Your P31 ...........................................2
Front View ...............................................................2
Rear View.................................................................4
Left Side View ........................... 5
Right Side View .......................... 5
The Main Screen......................................................6
Status Bar Icons ................................ 7
The Stylus.................................................................8
Getting Your P31 Ready For Use
Getting Your P31 Ready For UseGetting Your P31 Ready For Use
Getting Your P31 Ready For Use...................
......................................
...................9
99
9
Installing the SIM Card.................................................9
Installing and Charging the Battery .............................10
Installing the Battery ...............................................10
Removing the Battery..............................................11
Charging the Battery ...............................................12
Initial Setup ...................................................................13
Basic Operations
Basic OperationsBasic Operations
Basic Operations.............................................
..........................................................................................
.............................................14
1414
14
Turning On/Off Your P31 ............................................14
Turning On Your P31 .............................................14
Turning Off Your P31.............................................14
Navigating the Main Screen..........................................14
Entering Text and Numbers .........................................15
Entering Text and Numbers Using the Virtual Key-
board........................................................................ 15
Entering Latin Alphabets and Numeric Characters............16
Entering Chinese Characters................................................16
Entering Text and Numbers Using the Handwriting
Recognition Method............................................... 16
Entering Latin Alphabets and Numeric Characters............17
Entering Chinese Characters................................................17
Preset Handwriting Styles ....................................................18
Using the Phone Functions
Using the Phone FunctionsUsing the Phone Functions
Using the Phone Functions ...........................
......................................................
........................... 25
2525
25
Making a Call ................................................................ 25
Making a Call Using the Phone Screen.................. 25
Making a Call from the Contact List ..................... 25
Making a Call from the Call Log............................ 25
Making a Call Using Speed Dial............................. 25
Making a Call Using Voice Control....................... 26
Answering a Call ........................................................... 26
Ending a Call................................................................. 26
Operations During a Call ............................................. 26
Adjusting Volume................................................... 26
Holding/Retrieving a Call....................................... 26
Making Another New Call During a Call .............. 26
Answering an Incoming Call.................................. 26
Switching Calls........................................................ 26
Ending All Calls....................................................... 26
Conference Call............................................................. 27

Table of Contentsii
Talking Privately to a Calling Party..................................... 27
Releasing a Calling Party During a Conference Call .......... 27
Ending a Conference Call .................................................... 27
Call Logs........................................................................ 27
Call Logs Options ................................................... 27
Viewing Total Call Information ..........................................27
Deleting All Call Logs........................................................... 27
Miscellaneous Operations ............................................ 28
Ending All Calls ...................................................... 28
Showing Cost .......................................................... 28
Calling Voice Mail-box........................................... 28
Hiding/Showing My Number ................................ 28
Transferring Sound................................................. 28
Calling Emergency Numbers ................................. 28
Adding Speed Dial .................................................. 28
Removing Speed Dial ............................................. 29
Adding number to Contacts................................... 29
Copying/Pasting Number ...................................... 29
Copying number .................................................................. 29
Pasting number .................................................................... 29
Zoom ....................................................................... 29
Adjusting Call Settings............................................ 29
Adjusting Sounds and Alerts.................................. 30
Enabling/Disabling Automatic Key Lock .............. 30
Accessing Help ........................................................ 30
Using the Application Programs
Using the Application ProgramsUsing the Application Programs
Using the Application Programs ...................
......................................
................... 31
3131
31
The Main Screen ........................................................... 31
Your P31 Application Programs.................................. 31
Agenda ............................................................33
Creating New Agenda Entries.................................33
Agenda Views ..........................................................33
Managing Agenda Entries.......................................33
Finding an Entry................................................................... 33
Editing an Entry ................................................................... 34
Deleting an Entry ................................................................. 34
Deleting Entries in a Period of Time................................... 34
Moving an Agenda to the To do Application Program ..... 34
Cutting, Copying or Pasting an Agenda Entry to the To do Ap-
plication Program................................................................. 34
Managing Agenda Folders ......................................34
Setting up Agenda Preferences ...............................34
Calculator........................................................35
Camcorder ......................................................36
Taking Still Pictures ................................................36
Capturing Video......................................................37
Camera Options When Taking Pictures and Capturing
Video........................................................................39
Image Settings..........................................................39
Video Settings..........................................................40
Contacts ..........................................................41
Creating a New Contact..........................................41
Creating a New Contact from the Phone Screen................ 41
Creating a New Contact from the Contacts Screen............ 41
Importing Contacts from a SIM Card....................41
Exporting Contacts to a SIM Card .........................41
Viewing Contacts ....................................................41

Table of Contents iii
Managing Contacts Folders ....................................42
Managing Contacts .................................................42
Finding a Contact .................................................................42
Editing a Contact ..................................................................42
Deleting a Contact ................................................................42
Copying Contacts .................................................................43
Pasting Contacts ...................................................................43
Moving Contacts to a Different Folder ...............................43
Sending Contacts ..................................................................43
Owner Card .............................................................44
Creating Your Owner Card ..................................................44
Sending Owner Card ............................................................44
Editing Owner Card..............................................................44
Contacts Preferences ...............................................44
Specifying Preferred Phone Number for Contacts .............44
Control Panel..................................................45
Device Settings.........................................................45
Certificate Manager ..............................................................45
Format Disk ..........................................................................46
Language ...............................................................................46
Master Reset ..........................................................................46
Power and Screen Saver........................................................46
Screen ....................................................................................47
Storage Manager ...................................................................47
Text Input..............................................................................47
User Profiles ..........................................................................48
Changing Themes .................................................................48
Changing Appearance ..........................................................48
WIM PIN Settings.................................................................48
Connection Settings ................................................48
Bluetooth...............................................................................48
Flight Mode...........................................................................49
GSM Networks......................................................................49
Infrared..................................................................................49
Internet Accounts .................................................................49
IP Security Manager .............................................................52
Messaging Accounts .............................................................52
USB Cable .............................................................................53
WAP Accounts......................................................................53
General Settings ...................................................... 54
Call Settings...........................................................................54
International Settings ...........................................................56
Locks......................................................................................56
Time and Date ......................................................................57
User greeting .........................................................................57
GPRS Data Log ...............................................58
Viewing GPRS Data Log......................................... 58
Resetting GPRS Data Count................................... 58
Deleting GPRS Data Log ........................................ 58
Internet............................................................59
Connecting to/Disconnecting from the Internet .. 59
Opening the Internet Browser ............................... 59
Opening Page .......................................................... 59
Working with Text.................................................. 60
Finding Text..........................................................................60
Scanning Text .......................................................................60
Key Operations When Browsing............................ 60
Scrolling Pages ......................................................................60
Link Navigation ....................................................................60
Bookmarking Pages ................................................ 60

Table of Contentsiv
Saving Pages for Off-Line Browsing ...................... 61
Going to Bookmarked Pages.................................. 61
Operations When Viewing Pages........................... 61
Pages and Bookmarks ..........................................................61
Links to Pages ....................................................................... 62
Links to Phone Numbers ..................................................... 62
Links to Email....................................................................... 62
Images ................................................................................... 62
Managing Bookmarks............................................. 62
Deleting Bookmarks............................................................. 62
Editing Bookmarks............................................................... 62
Sending Bookmarks ............................................................. 62
Managing Bookmark Folders................................. 63
Browser Preferences................................................ 63
Basic Options........................................................................ 63
Security Options ................................................................... 63
Advanced Options................................................................ 63
Jotter ............................................................... 64
Creating Notes ........................................................ 64
Managing Notes...................................................... 64
Editing Notes ........................................................................ 64
Deleting Notes ...................................................................... 64
Managing Note Folders .......................................... 64
Message........................................................... 66
Creating and Sending Messages ............................. 66
Creating and Sending an SMS (EMS) Message ..................66
Creating an MMS Message .................................................. 67
Creating an Email Message ..................................................67
Message Folders ...................................................... 68
Receiving and Viewing Messages............................68
Receiving and Viewing SMS, EMS and MMS Messages ....68
Receiving and Viewing Email .............................................. 68
Music Player ...................................................70
Playing Music ..........................................................70
Operations When Playing Music............................70
Managing Songs ......................................................71
Renaming Songs ...................................................................71
Sending Songs....................................................................... 71
Copying Songs ...................................................................... 71
Moving Songs ....................................................................... 71
Deleting Songs ...................................................................... 71
Managing Music Folders.........................................71
Online Services ...............................................73
PhotoBase .......................................................74
Viewing Images .......................................................74
Image viewing options ......................................................... 74
Organizing Images ..................................................75
Managing Image Folders...................................................... 75
Copying Images to a Different Folder................................. 75
Deleting Images .................................................................... 75
Sending Images........................................................75
Editing Images .........................................................76
Rotating Images.................................................................... 76
Flipping Images .................................................................... 76
Cropping Images ..................................................................76
Adding Special Effects to Images............................76
Adding Text to Images......................................................... 76
Adding Clipart to Images..................................................... 77

Table of Contents v
Adding Frames ......................................................................78
Using Greeting Card Templates...........................................78
Adding Warping Effects .......................................................79
Time ................................................................80
Viewing Current Time and Date ............................80
Setting Time and Date ............................................80
Specifying Your Current Location.......................................80
Setting Time and Date..........................................................80
Setting Alarms.......................................................................81
Activating/Deactivating Alarms ...........................................81
Operations When an Alarm Goes off ..................................81
To Do ..............................................................82
Creating New Tasks.................................................82
Viewing Tasks..........................................................82
Managing Tasks.......................................................82
Changing Task Status ...........................................................82
Finding a Task.......................................................................82
Editing a Task........................................................................82
Deleting a Task......................................................................82
Deleting Completed Tasks ...................................................82
Moving Tasks to the Agenda Application Program............83
Pasting Tasks from the Agenda Application Program........83
Sending Tasks........................................................................83
Managing Task Folders ...........................................83
To do Preferences....................................................83
Video Player....................................................84
Viewing Video Clips Using Video Player...............84
Managing Video Folders.........................................84
Managing Video Clips.............................................84
Deleting Video Clips.............................................................84
Renaming Video Clips..........................................................85
Sending Video Clips .............................................................85
Viewing Video Clip Information .........................................85
Voice................................................................86
Creating a New Voice Note.................................... 86
Playing Voice Notes................................................ 86
Deleting Voice Notes .............................................. 86
Sending Voice Notes............................................... 86
Expanding the Capabilities of Your P31
Expanding the Capabilities of Your P31Expanding the Capabilities of Your P31
Expanding the Capabilities of Your P31 .......
..............
....... 87
8787
87
Installing Application Programs .................................. 87
Installing Application Programs from the Internet87
Installing Application Programs from Installation Files
87
Uninstalling Application Programs ....................... 87
Installing/Removing a Memory Card.......................... 87
Installing a Standard Memory Card .......... 88
Installing a Mini SD Memory Card........... 88
Removing a Memory Card ..................................... 89
Formatting a Memory Card ................................... 89
Renaming a Memory Card..................................... 89
Managing and Personalizing Your P31
Managing and Personalizing Your P31Managing and Personalizing Your P31
Managing and Personalizing Your P31.........
..................
......... 90
9090
90
Managing Application Programs................................. 90
Grouping Application Programs ........................... 90
Setting Application Programs on the Application
Shortcut Bar ............................................................ 90

Table of Contentsvi
File Management .......................................................... 90
Personalizing Your P31 ................................................ 91
Customizing User Profiles...................................... 91
Changing Themes................................................................. 91
Changing Appearance .......................................................... 91
Selecting a User Profile........................................... 92
Getting Your P31 Connected and Synchronized
Getting Your P31 Connected and SynchronizedGetting Your P31 Connected and Synchronized
Getting Your P31 Connected and Synchronized
93
9393
93
Connecting P31 to Other Devices................................ 93
Infrared Connection ............................................... 93
USB Connection ..................................................... 93
Bluetooth Connection ............................................ 93
Establishing Bluetooth Connection..................................... 93
Breaking Bluetooth Connection.......................................... 94
Using P31 as a GPRS Modem ...................................... 94
Setting up GPRS Modem via USB Connection .... 94
Setting up GPRS Modem via Bluetooth Connection95
BenQ P31 Handset Manager........................................ 96
Installing BenQ P31 Handset Manager ........ 96
Synchronizing Data ...................................................... 98
Performing Local Synchronization Using BenQ P31
Handset Manager.................................................... 98
Performing Remote Synchronization with a Server99
Configuring Remote Synchronization Settings .................. 99
Performing Remote Synchronization ................................. 99
Backing up and Restoring Data ................................... 99
Backing up P31 Data to PC .................................... 100
Restoring P31 Data from PC ..................................100
Care and Maintenance
Care and MaintenanceCare and Maintenance
Care and Maintenance...................................
......................................................................
................................... 102
102102
102
Troubleshooting Information
Troubleshooting InformationTroubleshooting Information
Troubleshooting Information.......................
..............................................
....................... 103
103103
103
Call Related Problems...................................................103
Message Problems .........................................................103
Internet Problems .........................................................104
Application Program Problems....................................104
Connection Problems ...................................................104
System Problems ...........................................................105
Product Specifications
Product SpecificationsProduct Specifications
Product Specifications ...................................
......................................................................
................................... 106
106106
106

Introduction 1
Introduction
IntroductionIntroduction
Introduction
Thank you for purchasing BenQ P31 Smart Phone. With P31,
you will be able to get your life organized and synchronized,
whether for daily business or personal entertainment.
This User Manual will provide you with step-by-step instructions
on how to use the various functions of your P31. Please follow us
to get familiar with your P31, and keep this manual in a safe place
for future reference.

Introduction2
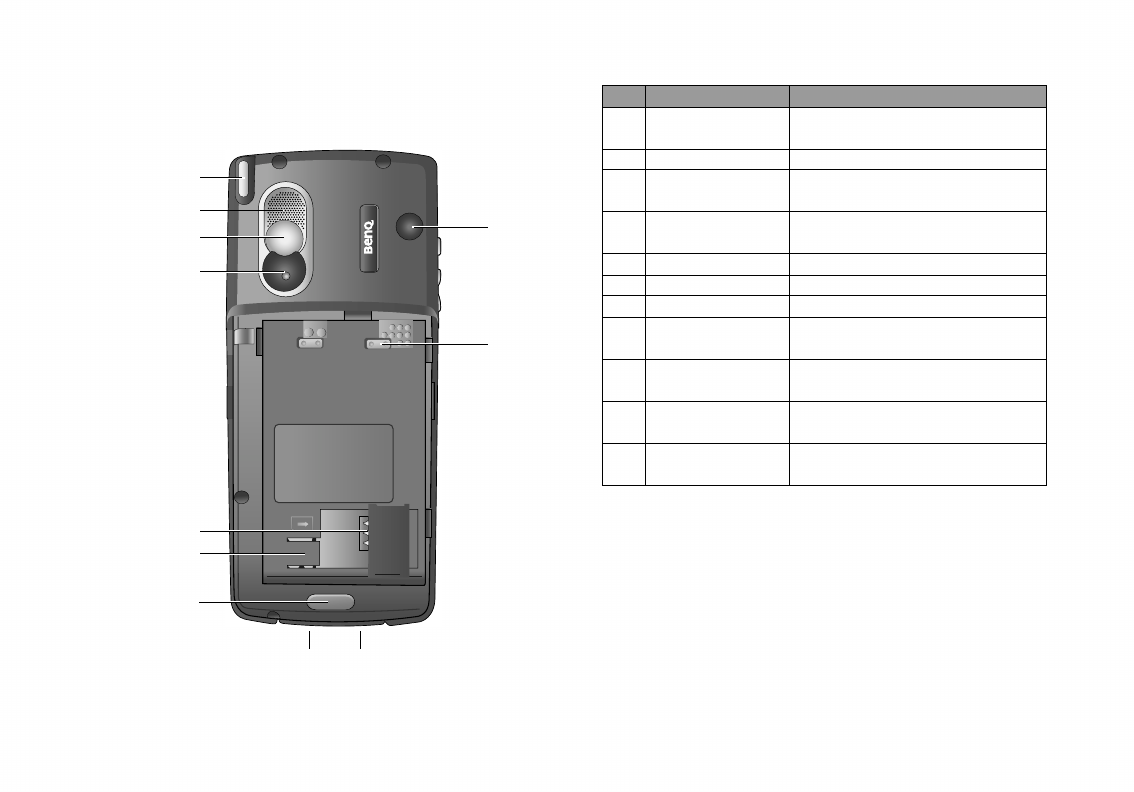
Getting to Know Your P31
Front View
Front ViewFront View
Front View
(1)
(2)
(3)
(4)
(5)
(6)
(11)
(10)
(9)
(8)
(7)
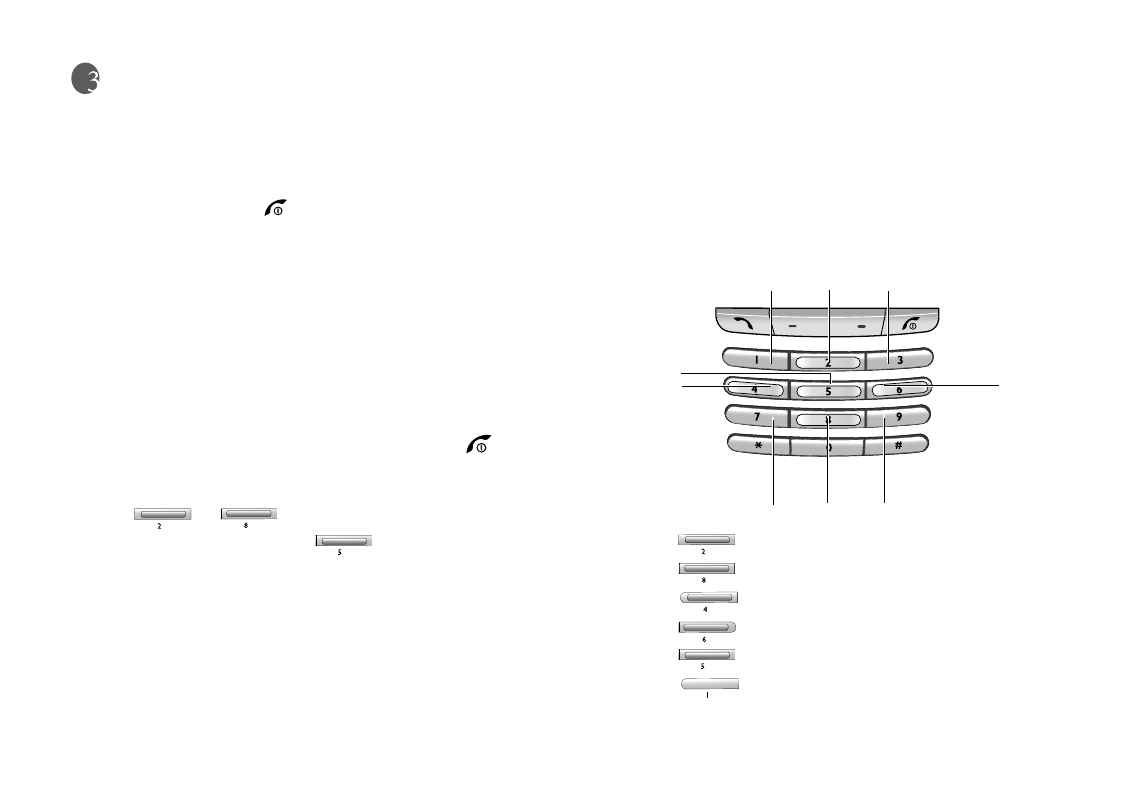
No. Name Description
(1) Internet key Press this key to launch the Internet
browser for surfing the Internet.
(2) Touch-sensi-
tive screen
The interface for displaying infor-
mation and operating functions.
(3) Call key
• In the Main screen, press this key
to go to the Phone screen.
• If there is an incoming call, press
this key to answer the call.
• In the Phone screen, press this
key to access the last dialed num-
ber.
• In the Phone screen, press and
hold this key for about 3 seconds
to activate voice dialing.
(4) Left key Press this key to go to the Contact
screen.
(5) Keypad
Allows you to enter numbers, sym-
bols and navigating in menus and
screens.
(6) Microphone Receives audio.
(7) Earpiece Generates audio.

Introduction 3
(8)
Battery/
appointment/
message indi-
cator
• Lights up in yellow: there is an
unread message or unattended
appointment.
• Lights up in red: the battery is
being charged.
• Flashes red every 3 seconds: the
battery is running low.
• Flashes yellow every second:
there is a new message or
upcoming appointment.
(9)
Network status/
incoming call
indicator
• Flashes blue every 3 seconds:
you are under your home network
or P31 is in Sleep mode.
• Flashes blue every second: you
have an incoming call or a missed
call.
(10) Power/End key
• Press and hold this key for
approximately 3 seconds to turn
power on or off.
• When there is an incoming call,
press this key to reject the call.
(11) Right Key
• Press this key to go to the Main
screen.
• Press and hold this key for
approximately 3 seconds to acti-
vate/deactivate Silent mode.
Introduction4
Rear View
Rear ViewRear View
Rear View
(1)
(2)
(8)
(9)
(5)
(6)
(7)
(10)
(11)
(3)
(4)
No. Name Description
(1) Stylus and stylus
housing Accommodates the stylus.
(2) Loudspeaker Generates audio.
(3) Self-taking mirror Used when taking your self
photo.
(4) Camcorder Built-in type camcorder set for
taking pictures and video clips.
(5) SIM card socket Allows you to install a SIM card.
(6) SIM card stay Holds the SIM card in place.
(7) Battery latch Fixes the battery in place.
(8) External antenna
connector Connects to an external antenna.
(9) Battery terminal Connects to the terminals on the
battery.
(10) Battery charger
connector Connects to the battery charger.
(11) USB connector Connects to a PC via the sup-
plied Data cable.
Introduction 5
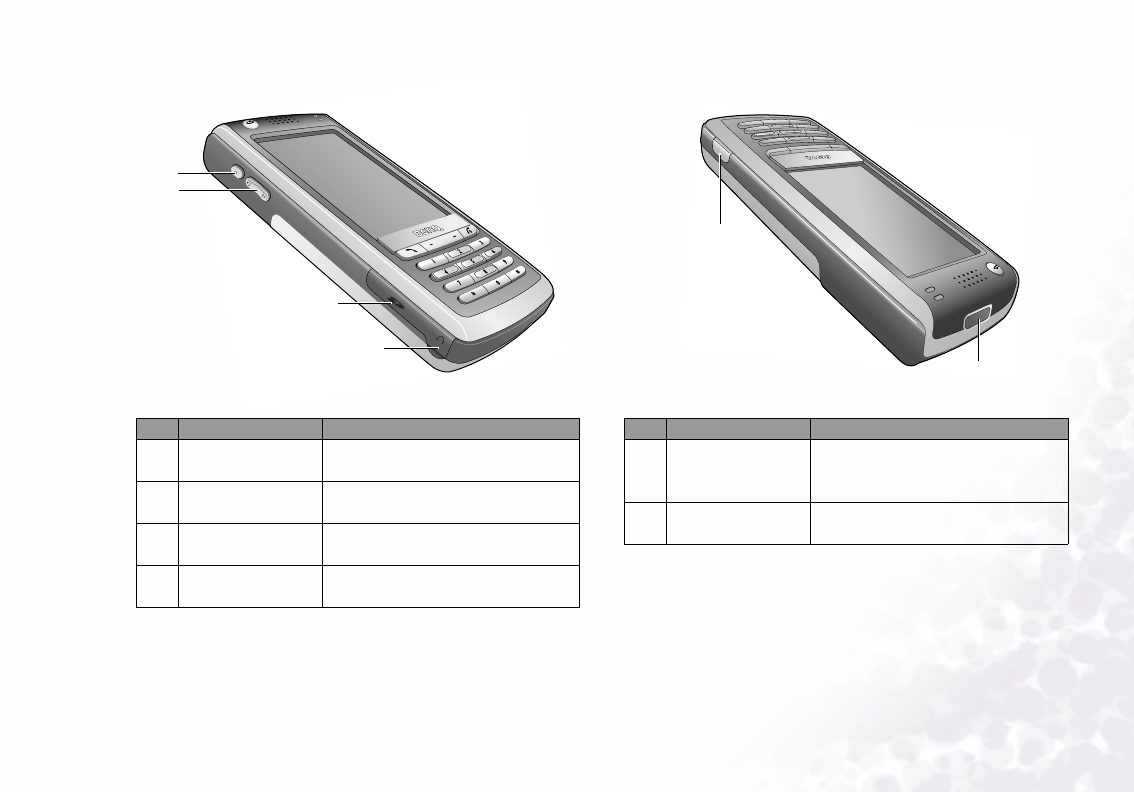
Left Side View
Left Side ViewLeft Side View
Left Side View Right Side View
Right Side ViewRight Side View
Right Side View
No. Name Description
(1) Function side key Allows you to set as a hotkey to
your desired function.
(2) Volume control
key Allows you to control volume.
(3) Memory card slot Allows you to install an SD or
MMC memory card.
(4) Headset connec-
tor Connects to the headset.
(1)
(4)
(3)
(2)
No. Name Description
(1) Camcorder key
Press this key to go to the Cam-
corder screen for taking pictures
or capturing video clips.
(2) Infrared window Connects to other devices that
support Infrared connection.
(1)
(2)
Introduction6
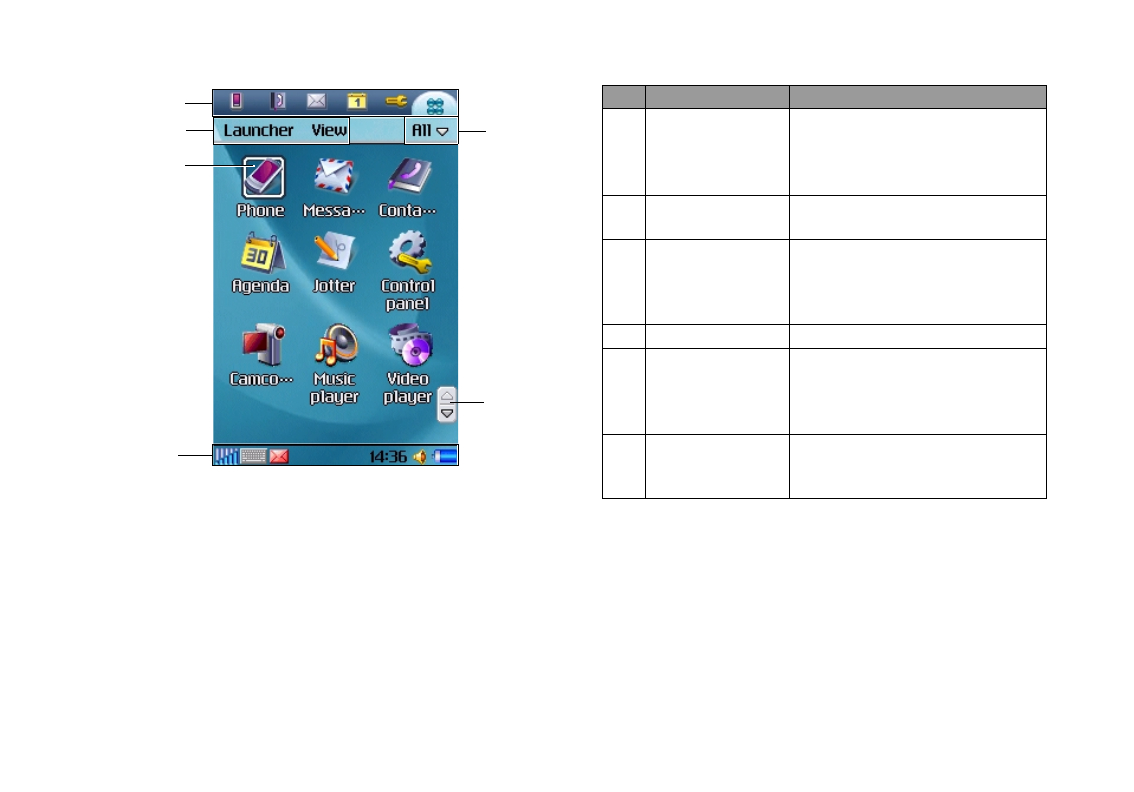
The Main Screen
The Main ScreenThe Main Screen
The Main Screen
(1)
(2)
(3)
(4)
(5)
(6)
No. Name Description
(1) Application
shortcut bar
Contains shortcut icons for
instant access to frequently used
application programs. You can
also customize this shortcut bar.
(2) Menu bar Displays menu options in each
application program screen.
(3) Application
program icons
Allows you to access application
programs in your P31. Tap an
icon to open the application pro-
gram it represents.
(4) Status bar Displays various status icons.
(5) Folder menu
Tap this item to open a menu
where you can organize your
application programs or data
using different folders.
(6) Scroll buttons
Tap the up or down arrow on tis
button to scroll pages up or down
in a screen.
Introduction 7
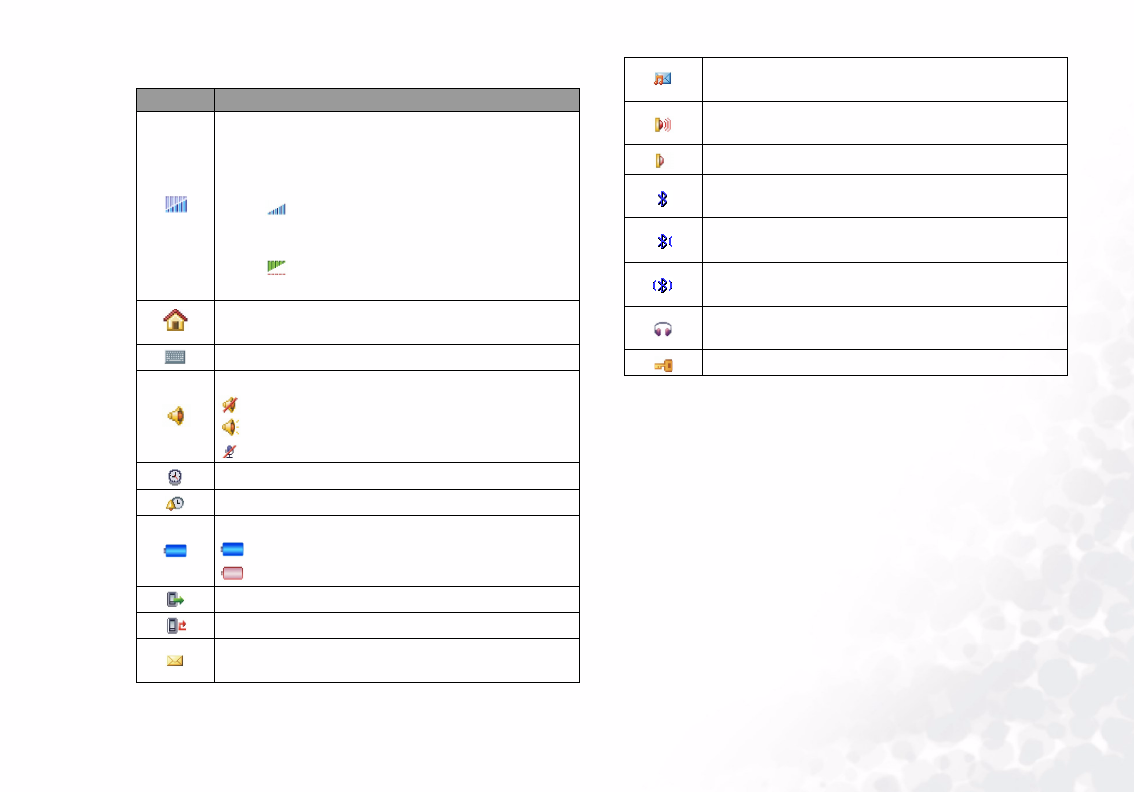
Status Bar Icons
Status Bar IconsStatus Bar Icons
Status Bar Icons
Icon Description
Indicates signal strength. The more the vertical
green bars displayed, the better the signal
reception. Appearance of the blue bars indi-
cates that the GPRS network is connected.
• The icon indicates that GSM network sig-
nal is available but no GPRS network is
attached.
• The icon indicates that GPRS network is
available but no GSM network is attached.
Appearance of this icon indicates that you are
now under your home network zone.
Tap this icon to open the virtual keyboard.
Indicates the status of audio setting.
: the phone is currently in silent mode
: the speakerphone is currently turned on
: the microphone has been muted
Tap this icon to view current time and date.
Indicates that an alarm has been set.
Indicates battery status.
: Battery full
: Battery empty
Appears when a call is in progress.
Indicates that you have missed call(s).
This icon appears when you have a new SMS/
EMS message.
This icon appears when you have a new MMS
message.
Indicates that the infrared function has been
turned on.
Indicates that infrared function is not turned on.
Indicates that the Bluetooth function has been
turned on.
Indicates that your phone is discoverable in the
Bluetooth network.
Indicates that Bluetooth transmission is in
progress.
This icon appears when a headset has been
connected to the phone.
This icon appears when the keypad is locked.

Introduction8
The Stylus
The StylusThe Stylus
The Stylus
The touch-sensitive screen and stylus design allows you to easily
and comfortably enter and browse information on your P31.
You can take out the stylus from P31 by gently pulling it from the
stylus housing as illustrated below:
The stylus can be further stretched to facilitate the convenience of
use.
When you want to put the stylus back, slowly insert it back into
the stylus housing.
You can use the pointed tip of the stylus to touch an icon on the
screen and to execute the function represented by that icon. This
is expressed as “tap” an icon hereafter in this manual. You can
also use the stylus to enter text and numbers in combination with
the handwriting input method.
The stylus is specially designed for use with your P31. Do not use
it for other purposes, or use other substitutes on your P31, as it
may damage the touch-sensitive screen.
Getting Your P31 Ready For Use 9
Getting Your P31 Ready For Use
Getting Your P31 Ready For UseGetting Your P31 Ready For Use
Getting Your P31 Ready For Use
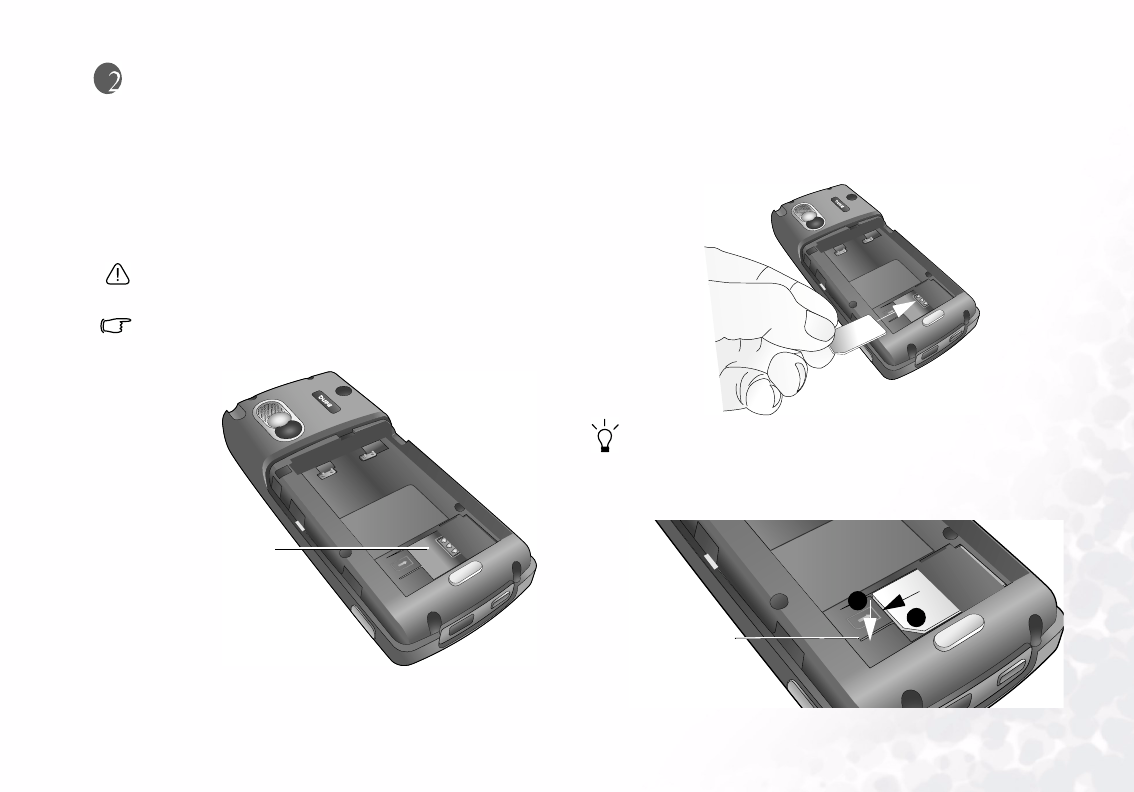
Installing the SIM Card
Upon the completion of your subscription to your network ser-
vice provider, you receive a SIM (Subscriber Identity Module)
card. This card is used to store the services you have subscribed to
your network service provider as well as your phone number and
phone book information..., etc.
A SIM card can be easily damaged if its metal contacts become
scratched. Therefore, take special care when holding or inserting
it.
You can still use P31 without a SIM card in Flight mode.
1. Turn P31 over and locate the SIM card socket.
2. Slide the SIM card in under the metal plate in the SIM card slot
with the SIM card's metal contacts facing down and the cut
corner at the bottom right.
If you want to remove the SIM card, please do the following:
1. Turn off the power of your P31.
2. Remove the battery.
3. Push the card out of the slot while pressing down the SIM card
stay.
SIM card socket
SIM card stay
1
2
Getting Your P31 Ready For Use10
A PIN (Personal Identity Number) is associated with the SIM card.
The four-digit code is supplied with the SIM card from your service
provider and may have to be entered when entering the Phone on
mode. For more information, contact your network service pro-
vider.
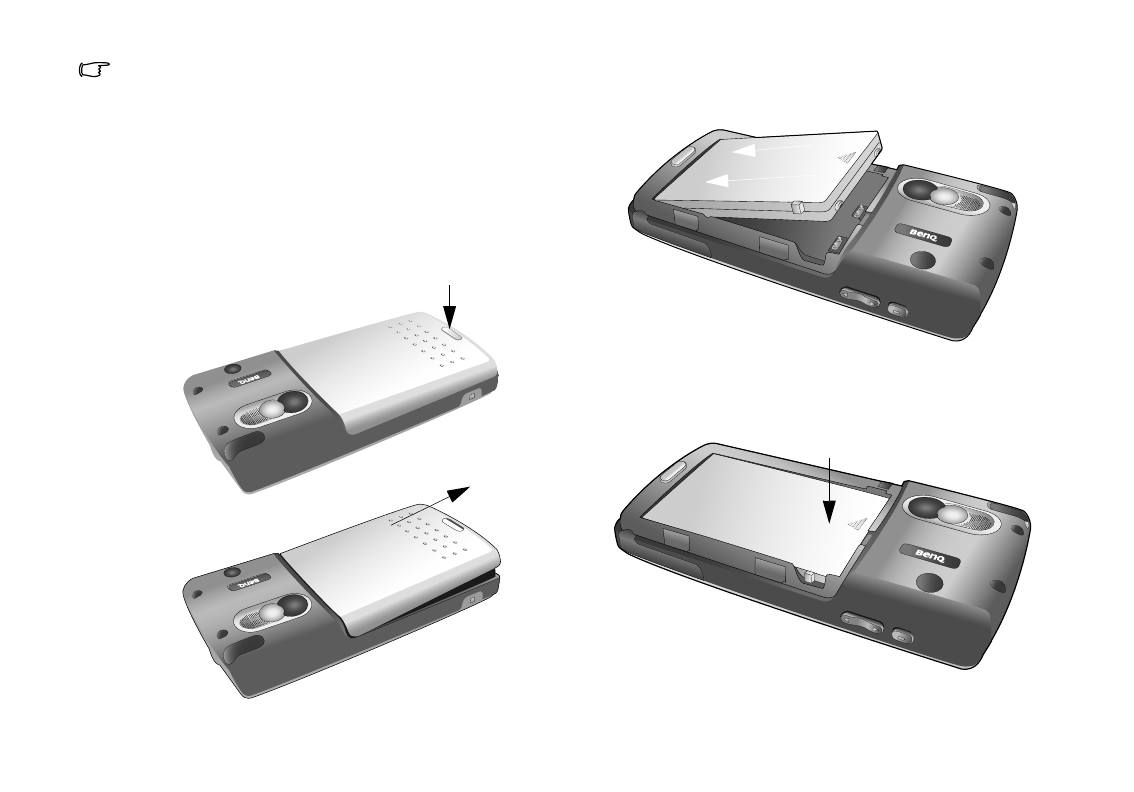
Installing and Charging the
Battery
Installing the Battery
Installing the BatteryInstalling the Battery
Installing the Battery
1. Press the button at the bottom of the battery door and slide the
door off the phone.
2. Place the battery on P31 with the battery’s contacts facing
downwards and the teeth on the top edge of the battery in
alignment with the holes on P31.
3. Push the battery against the top of P31 to insert the teeth into
the holes, then press the battery down gently to click it back
into place.
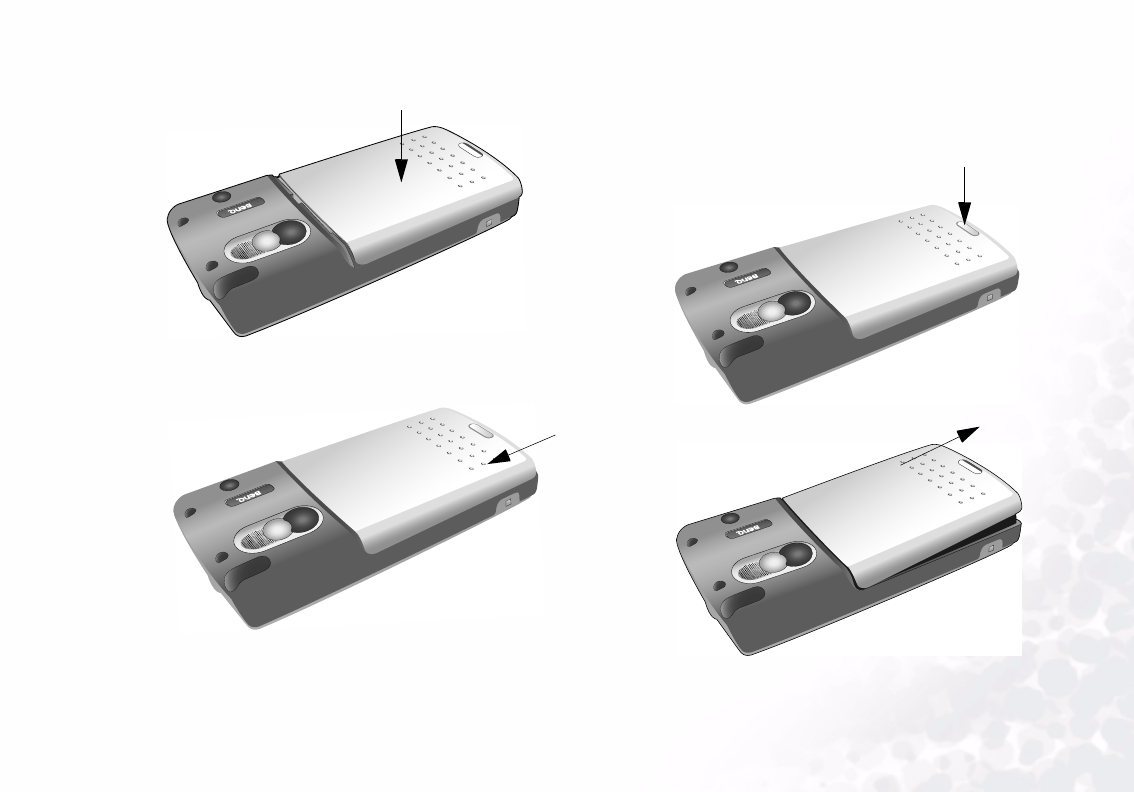
Getting Your P31 Ready For Use 11
4. Push the battery door down on the phone and slide it into
place. Removing the Battery
Removing the BatteryRemoving the Battery
Removing the Battery
1. Turn off the power of P31.
2. Press the button at the bottom of the battery door and slide the
door off the phone.
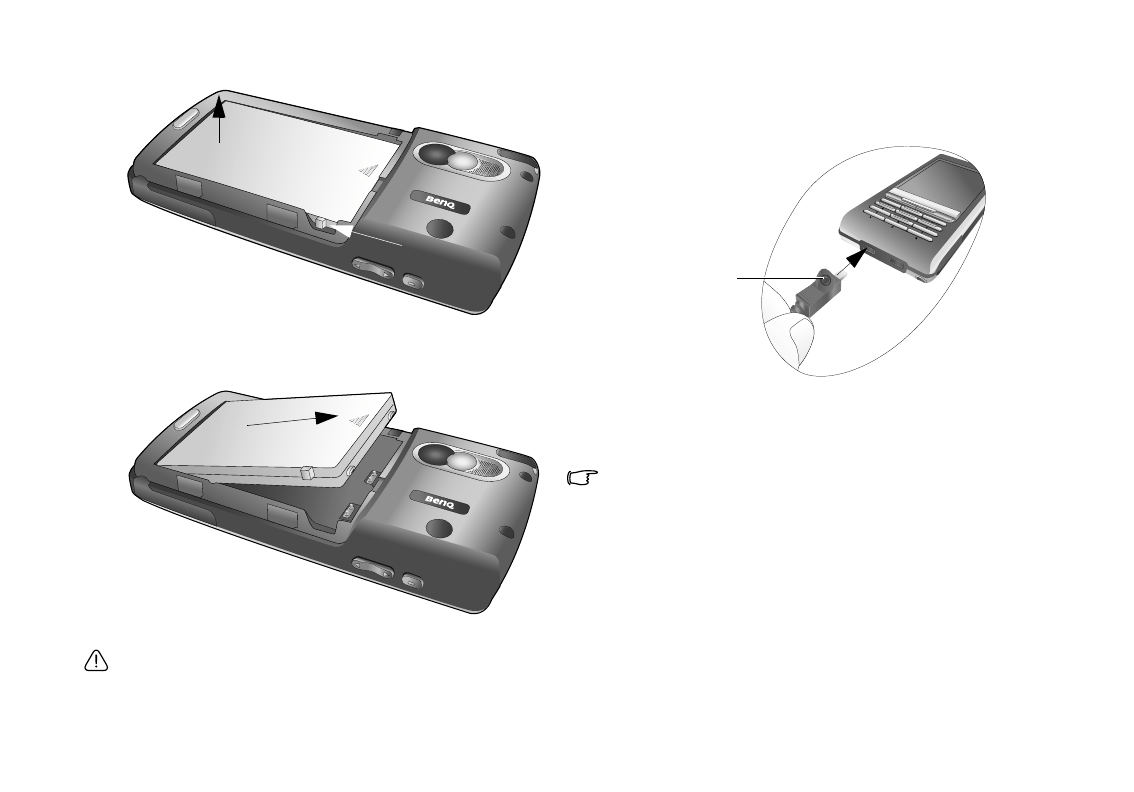
Getting Your P31 Ready For Use12
3. Slide the battery latch backward and lift the battery upward.
4. Remove the battery from P31.
Do not remove the battery when your P31 is on: you could lose all
your personal settings stored either in your SIM card or in P31
memory.
Charging the Battery
Charging the BatteryCharging the Battery
Charging the Battery
1. Insert the charger connector into the battery charger socket at
the bottom of P31. Make sure you insert the connector with
the arrow sign on the top.
2. Plug the charger into a mains outlet.
3. After your phone is fully charged, disconnect the charger from
the mains outlet and your phone.
• It takes approximately 8 hours for the travel charger to fully
charge a new battery. However, actual time needed may vary.
• It takes at least one charging-discharging cycle for the battery to
reach its peak performance.
• P31 can also obtain power supply when connected to the USB
port of a running PC via the supplied Data cable.
• During charging, the screen of P31 will indicate the status of the
battery being charged when powered off, and the Battery/
appointment/message indicator will stay red.
• When the battery is low, you will be prompted by a message on
the screen. When the battery is running out of power, another
message will appear to remind you to recharge immediately. Your
phone will then power off automatically.
Arrow sign

Getting Your P31 Ready For Use 13
Initial Setup
1. Press and hold the key for approximately 3 seconds.
2. The initial setup screen will follow within a few seconds, asking
you to select the language you want to use. Use the stylus to tap
the appropriate buttons and options, and then follow the
instructions on the screen to proceed.
3. The Power menu
Power menu Power menu
Power menu will appear within a few seconds. Use the sty-
lus to tap an appropriate option:
• Phone on
Phone onPhone on
Phone on: normal operation mode with the phone and Blue-
tooth functions enabled.
• Flight mode
Flight modeFlight mode
Flight mode: used wherever mobile phones and Bluetooth wire-
less functions are not allowed, or when there is no SIM card in
P31.
• Power off
Power offPower off
Power off: turn off P31.
Select an appropriate option using the stylus (or press the
or key) and then the tap the Done
DoneDone
Done button (or
press the key).
Refer to "Setting Time and Date" on page 80 for how to set up cur-
rent time and date.
Basic Operations14
Basic Operations
Basic OperationsBasic Operations
Basic Operations
Turning On/Off Your P31
Turning On Your P31
Turning On Your P31Turning On Your P31
Turning On Your P31
1. Press and hold the key for approximately 3 seconds. The
welcome screen will appear.
2. The Power menu
Power menu Power menu
Power menu will appear within a few seconds. Use the sty-
lus to tap an appropriate option:
• Phone on
Phone onPhone on
Phone on: normal operation mode with the phone and Blue-
tooth functions enabled.
• Flight mode
Flight modeFlight mode
Flight mode: used wherever mobile phones and Bluetooth wire-
less functions are not allowed.
Tap an appropriate option and then the Done
DoneDone
Done button.
Turning Off Your P31
Turning Off Your P31Turning Off Your P31
Turning Off Your P31
1. When the power of P31 is on, press and hold the key for
approximately 3 seconds.
2. The Power menu
Power menu Power menu
Power menu will appear. Use the stylus (or press the
or key) to select Power off
Power offPower off
Power off and then tap the
Done
DoneDone
Done button (or press the key).
Navigating the Main Screen
In the Main screen, you can:
• Use the stylus to tap the desired icons in order to open a pro-
gram or select options.
• Use the keys on the phone to perform simple selection and con-
firmation:
• Press the key to move the selection focus up.
• Press the key to move the selection focus down.
• Press the key to move the selection focus left.
• Press the key to move the selection focus right.
• Press the key to confirm selection.
• Press the key to go to the first page.
Up
Down
Left
Next page
Right
Select/
Confirm
Last page
Previous page
First page
Basic Operations 15
• Press the key to go to the last page.
• Press the key to go to the previous page.
• Press the key to go to the next page.
Entering Text and Numbers
Entering Text and Numbers Using the Virtual Key-
Entering Text and Numbers Using the Virtual Key-Entering Text and Numbers Using the Virtual Key-
Entering Text and Numbers Using the Virtual Key-
board
boardboard
board
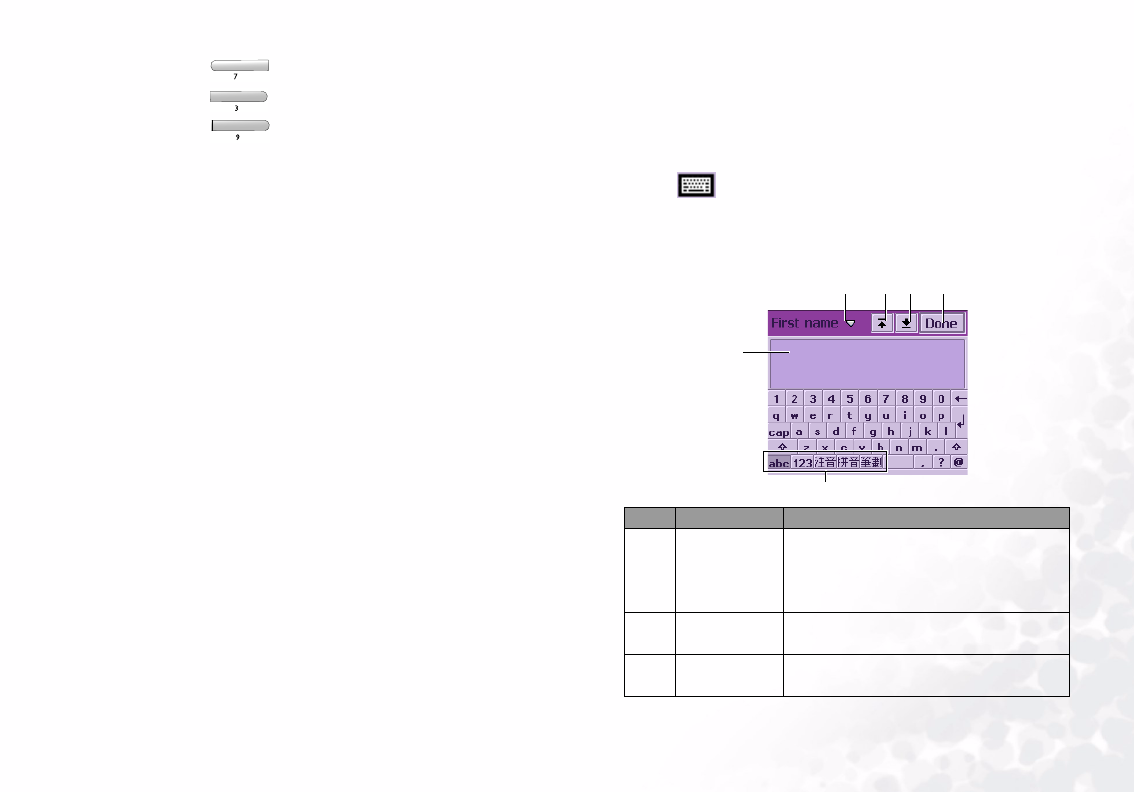
Whenever you want to enter/edit text and numbers, or when you
tap the icon, the virtual keyboard will appear on the
screen.
Please refer to the illustration below for a detailed description of
each part of the virtual keyboard and their functions.
Part Name Description
(a) Edit menu
Tap this icon to open a menu where
you can select the Copy, Cut and
Paste commands and keyboard lan-
guage.
(b) First field
button
Tap this button to go to the first text
entry field.
(c) Last field
button
Tap this button to go to the last text
entry field.
(a) (b) (c) (d)
(e)
(f)
Basic Operations16
Entering Latin Alphabets and Numeric Characters
Entering Latin Alphabets and Numeric CharactersEntering Latin Alphabets and Numeric Characters
Entering Latin Alphabets and Numeric Characters
1. Tap the icon to switch to the Latin alphabet input mode,
or the icon to switch to the numeric character input
mode.
2. Tap the desired buttons on the virtual keyboard. The text will
appear in the Text display area.
3. Tap the Done
DoneDone
Done button and the text will be placed in the text
entry field.
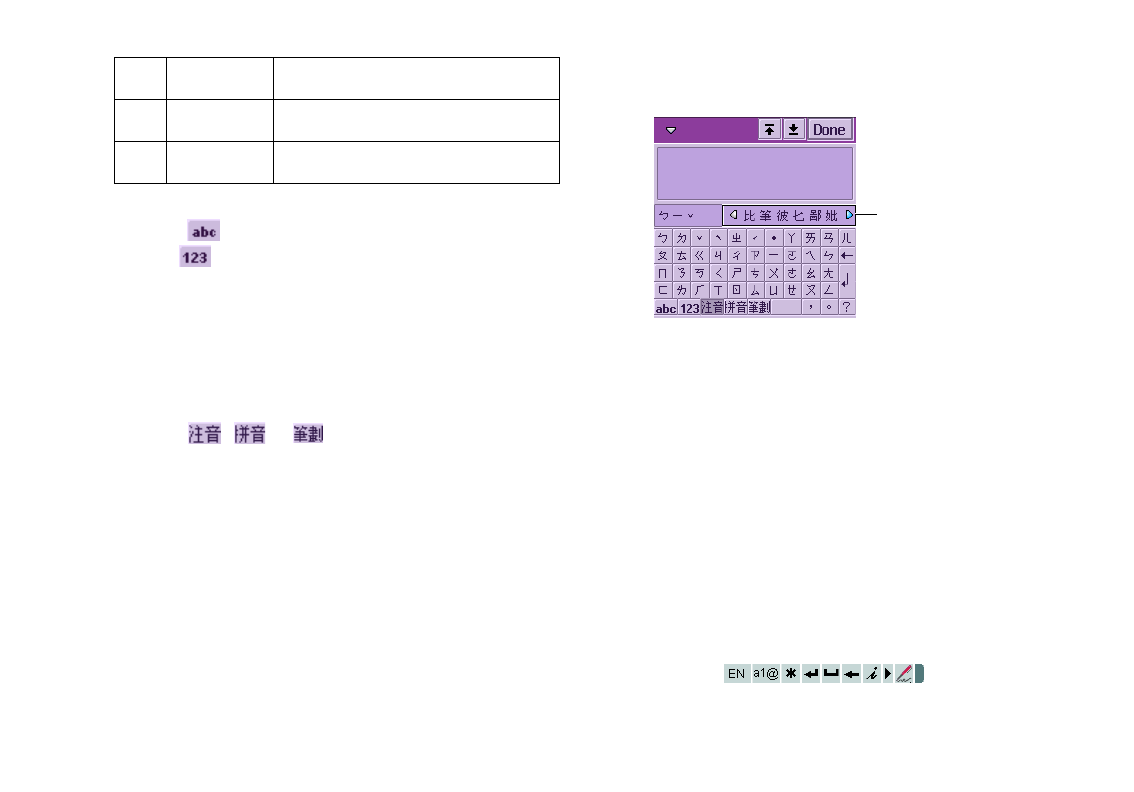
Entering Chinese Characters
Entering Chinese CharactersEntering Chinese Characters
Entering Chinese Characters
1. Tap the , or button to switch to the Phonetic,
Pinyin or Stroke input method.
2. Tap the desired buttons on the virtual keyboard.
3. The candidates that match the phonetic symbols/pinyin com-
bination or strokes you tapped will appear in the Candidate
area.
If the Chinese character you want to enter appears in the candi-
date area, tap it and it will appear in the Text display area. The
possible associated characters will then follow in the Candidate
area. You can tap to choose an associated character directly, or
continue entering another character by tapping the keys on the
keyboard.
4. Tap the Done
DoneDone
Done button and the text will be placed in the text
entry field.
Entering Text and Numbers Using the Handwrit-
Entering Text and Numbers Using the Handwrit-Entering Text and Numbers Using the Handwrit-
Entering Text and Numbers Using the Handwrit-
ing Recognition Method
ing Recognition Methoding Recognition Method
ing Recognition Method
Your P31 is equipped with a powerful handwriting recognition
system that enables you to input data more naturally and effi-
ciently.
Whenever text entry is required, the following handwriting tool
bar will appear on the screen.
(d) Done button Tap this button to hide the virtual key-
board.
(e) Text display
area
Displays the text you entered.
(f) Input mode
buttons
Tap these buttons to switch among
different input modes.
Candidate area

Basic Operations 17
Entering Latin Alphabets and Numeric Characters
Entering Latin Alphabets and Numeric CharactersEntering Latin Alphabets and Numeric Characters
Entering Latin Alphabets and Numeric Characters
1. Tap to change among Latin alphabet, numeric character
or symbol input modes. If the current field is a numeric field -
the mode is automatically switched to number.
2. Write from left to right and continuously on any part of the
screen. When you stop writing, your strokes will be recognized
and text will be placed in the input field automatically.
• Tap to open a menu that allows you to quickly enter certain
punctuation marks.
• Tap to start a new line, to add a space (or write ).
To delete a previously entered character, tap (or write
).
• Tap to open Help.
• Tap to collapse, or to extend the Handwriting tool bar.
• Tap or to switch between stylus and handwriting modes.
• Tap and drag to adjust the position of the handwriting tool-
bar on the screen.
Entering Chinese Characters
Entering Chinese CharactersEntering Chinese Characters
Entering Chinese Characters
1. Tap to switch to the Chinese input mode.
2. Tap to change among Chinese character, numeric charac-
ter or symbol input modes.
3. Write the character on the screen. When you stop writing, your
strokes will be recognized and the possible candidates will
appear in the Candidate boxes.
If the Chinese character you want to enter appears in the candi-
date boxes, tap it and it will be placed in the input field automati-
cally.
• Tap to open a menu that allows you to quickly enter certain
punctuation marks.
• Tap to start a new line, to add a space (or write ).
To delete a previously entered character, tap (or write
).
• Tap to open Help.
• Tap to collapse or extend the Handwriting tool bar. Tap
to collapse or extend the Candidate boxes.
• Tap or to switch between stylus and handwriting modes.
Tap and drag to adjust the position of the handwriting toolbar
on the screen.
To setup handwriting recognition settings to fit your personal
writing habits, please refer to "Setting up smARTwriter" on page
47.
Candidate boxes
Basic Operations18
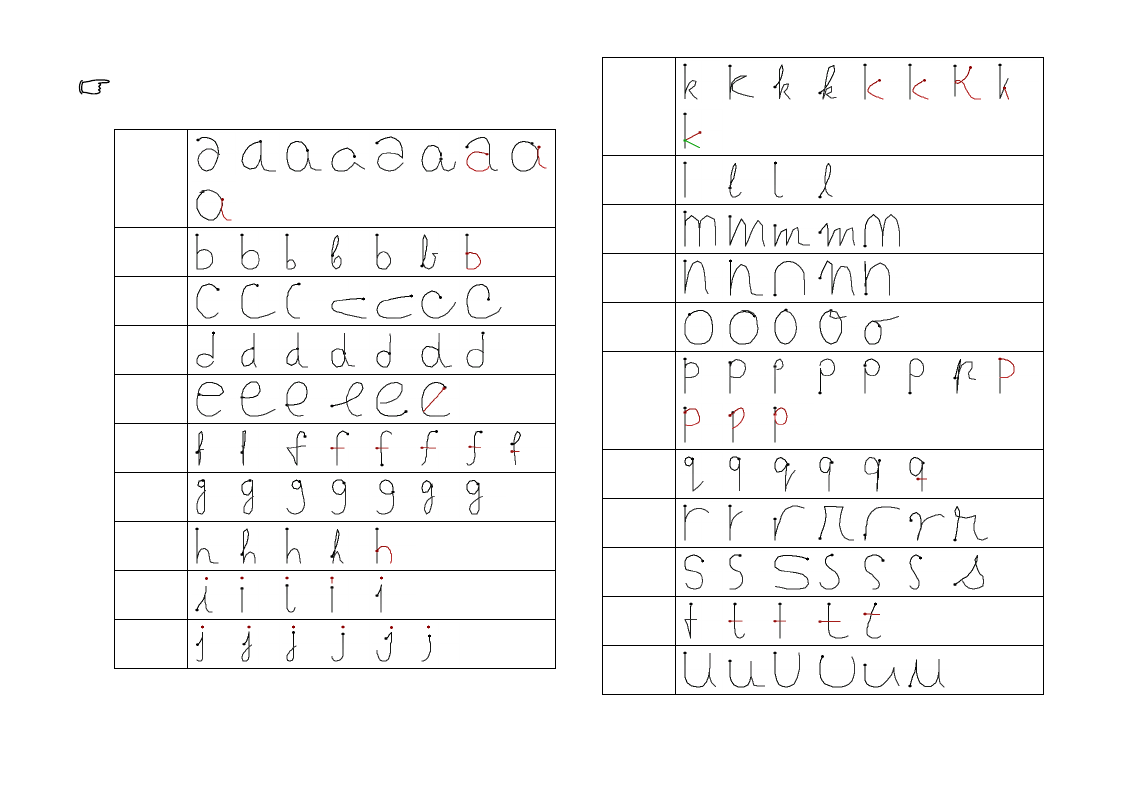
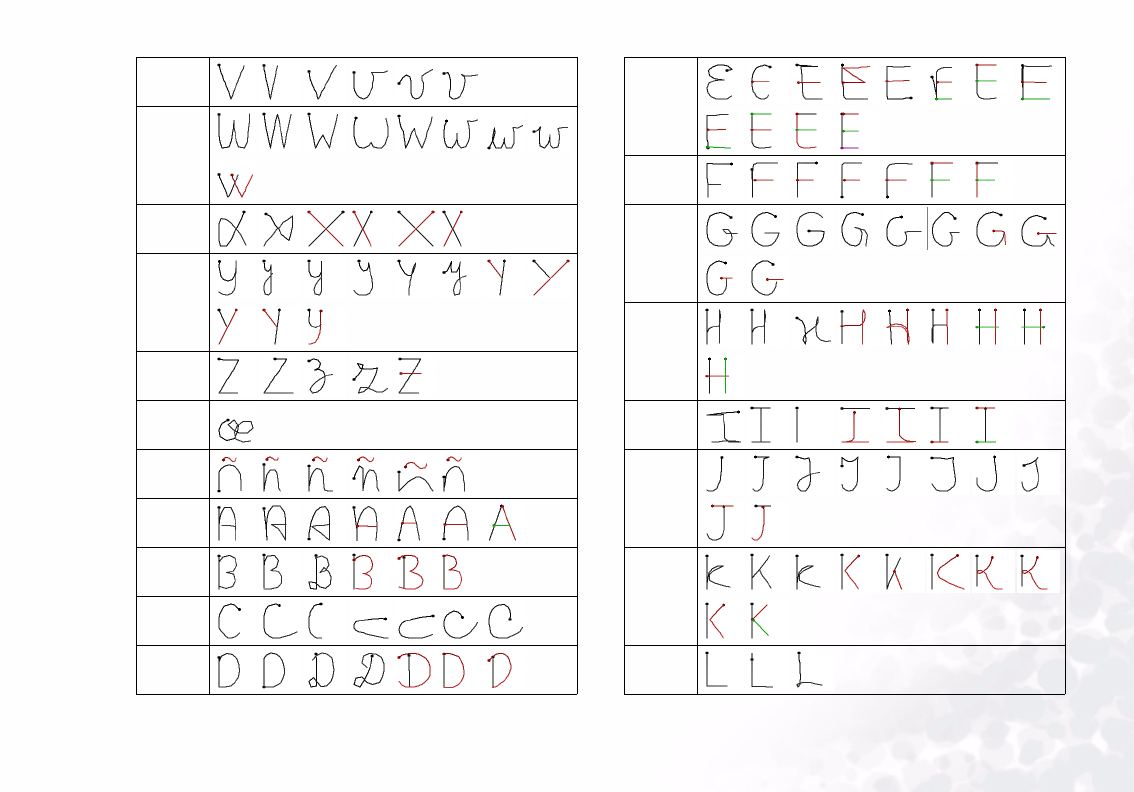
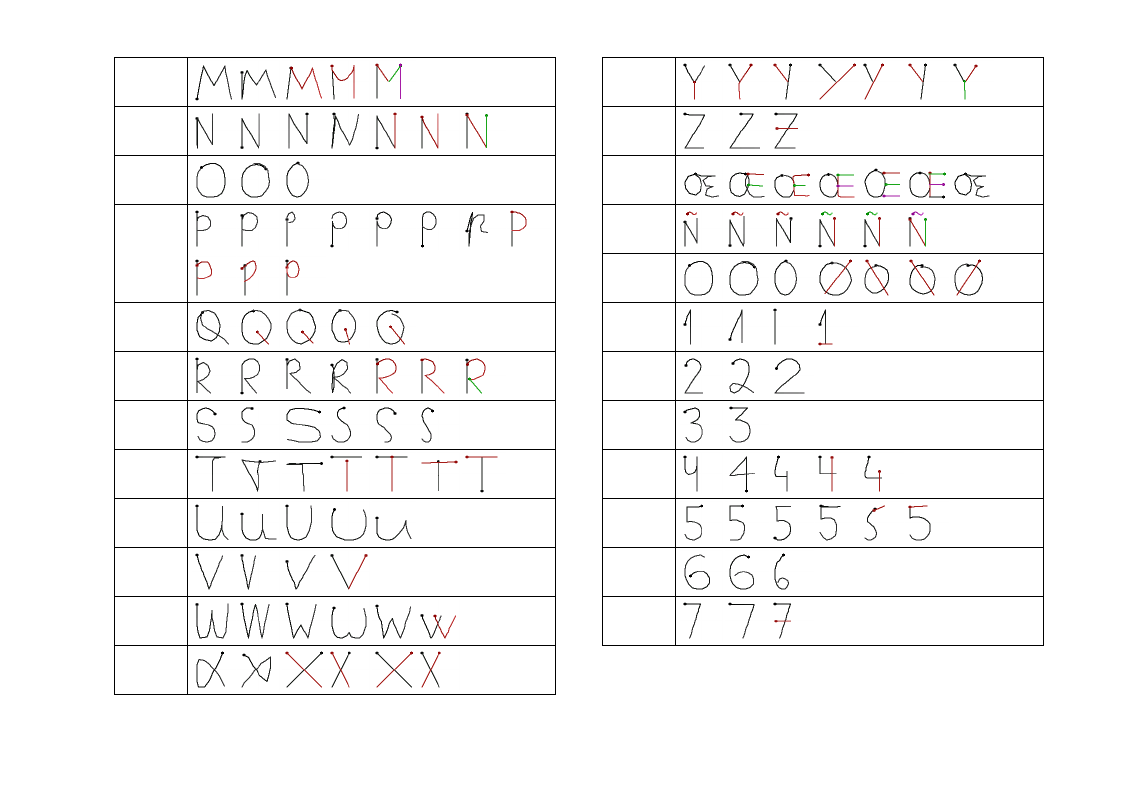
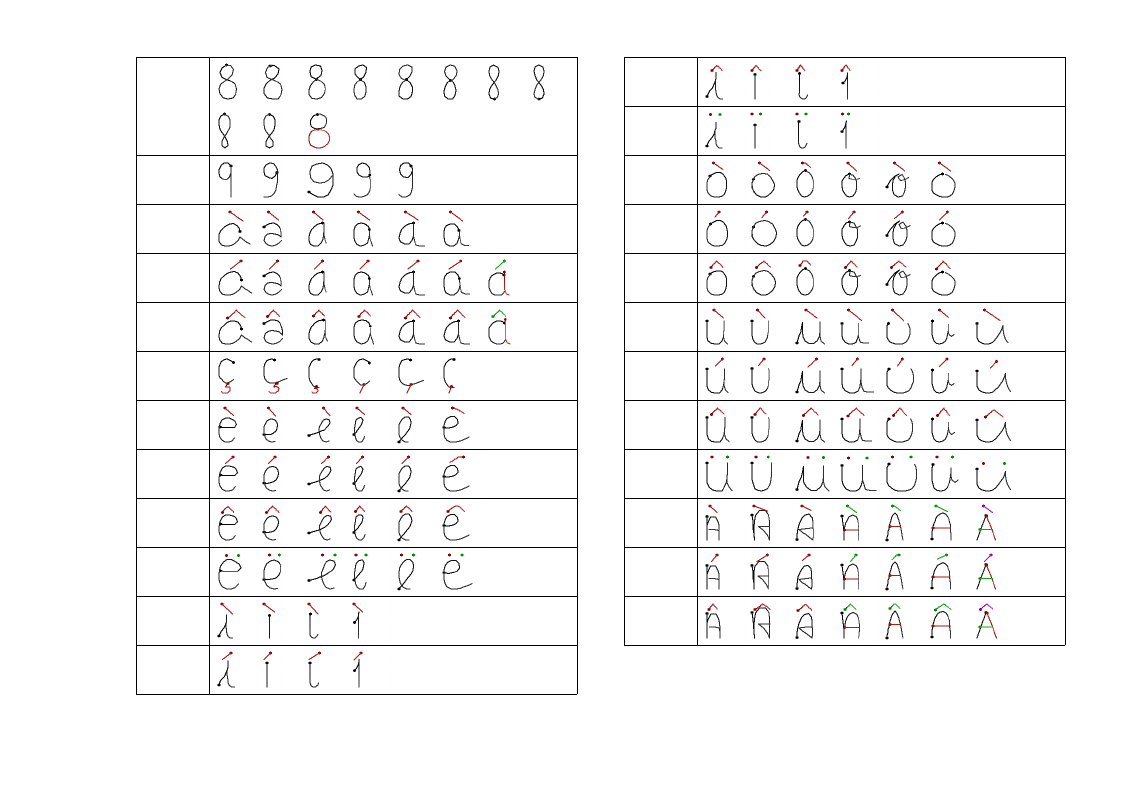
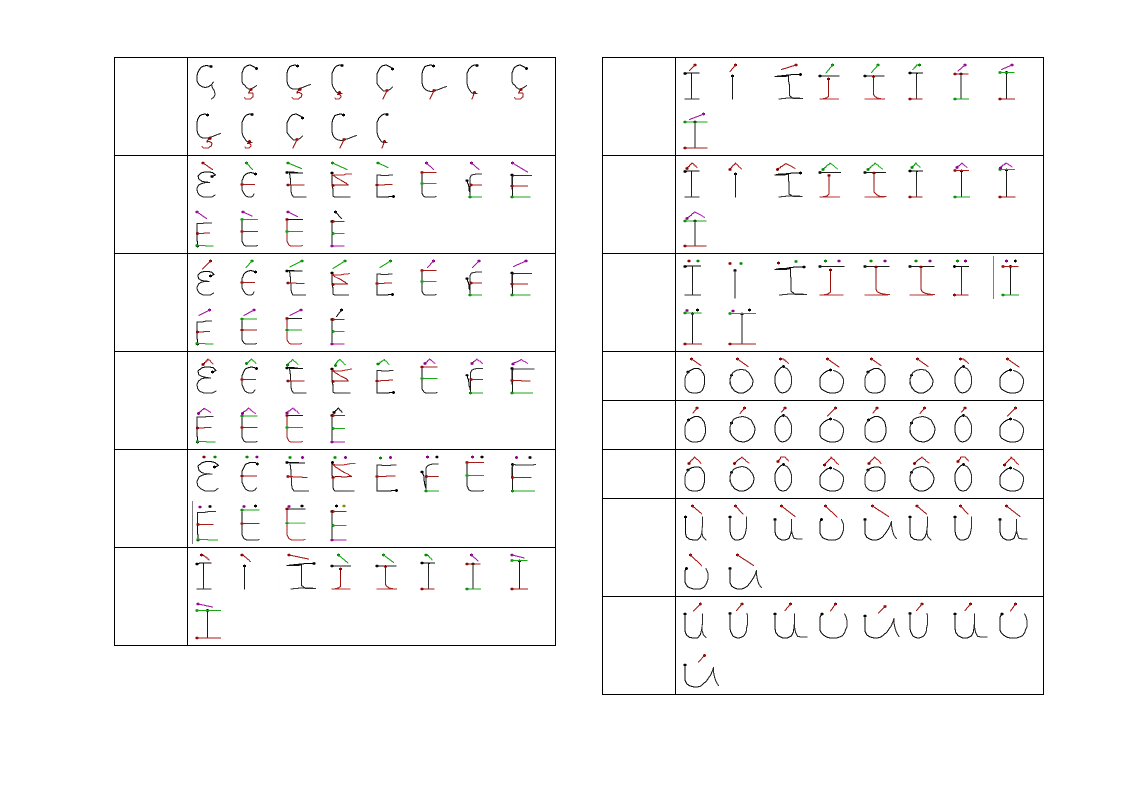
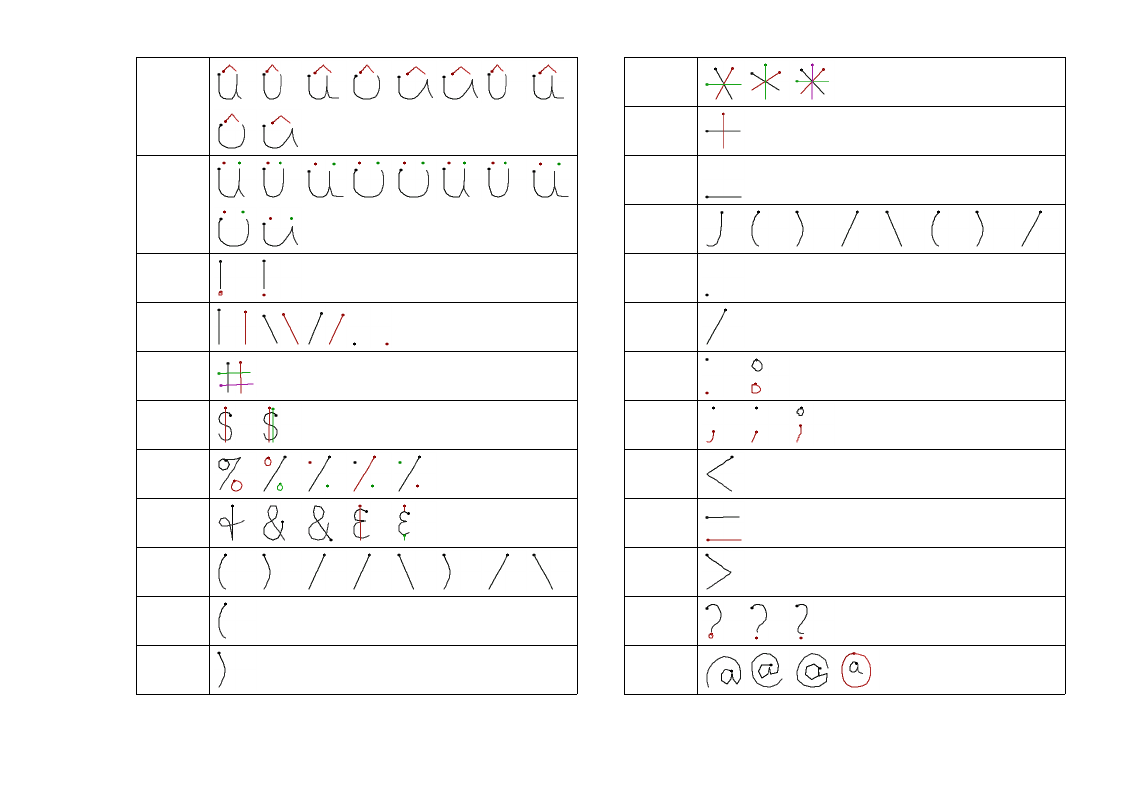
Preset Handwriting Styles
Preset Handwriting StylesPreset Handwriting Styles
Preset Handwriting Styles
In the table below, the numbers indicate stroke sequence, and the
black dots indicate the starting point of each stroke.
a
b
c
d
e
f
g
h
i
j
1
2
12
1
2
1
2
1
2
1
2
1
2
1
2
1
21
2
1
2
1
2
1
21
2
1
2
1
2
1
2
1
21
21
21
21
2
k
l
m
n
o
p
q
r
s
t
u
1
2
1
2
121
2
1
2
3
12
1
2
1
2
1
2
1
2
1
2
1
2
1
2
1
2
Basic Operations 19
v
w
x
y
z
œ
ñ
A
B
C
D
12
1
21
212 12
1
212
121212
1
2
1
2
1
2121
2
121
2
1
21
2
1
2
12
3
121
21
2
1
21
2
1
2
E
F
G
H
I
J
K
L
1
21
2
1
2
1
212
3
1
2
3
1
2
3
1
2
3
1
2
31
231
2
3
4
1
2
1
2
1
2
1
21
2
3
1
2
3
1
21
2
1
21
2
1
2
12 1
2
12
3
12
3
1
2
3
12121
2
1
2
3
1
21
2
121
2
121212
121
23
Basic Operations20
M
N
O
P
Q
R
S
T
U
V
W
X
12121234
1
2
1
2
1
23
12
121
2
12
123123123123
1
2121
2
3
121212
1
2
12
12
12 1
212 12
Y
Z
Œ
Ñ
0
1
2
3
4
5
6
7
1
2
12 1
21212 1
212
3
1
2
12
3
12
3
1
2
3
4
12
3
4
12 3
4
5
1
2
1
21
2
1
2
3
1
2
3
123
4
121
21
212
1
2
121
2
1
21
2
1
2
Basic Operations 21
8
9
à
á
â
ç
è
é
ê
ë
ì
í
1
2
1
2
1
2
1
2
1
2
1
2
1
2
1
2
1
21
2
1
2
1
2
1
2
1
23
1
2
1
21
2
1
21
21
21
2
3
1
2
1
2
1
2
1
2
1
2
1
2
1
2
1
2
1
2
1
2
1
2
1
2
1
2
1
2
1
2
1
2
1
2
1
2
1
2
1
2
1
2
1
2
1
2
1
2
1
23
1
23
1
23
1
23
1
23
1
23
1
2
1
2
1
2
1
2
1
2
1
2
1
2
1
2
î
ï
ò
ó
ô
ù
ú
û
ü
À
Á
Â
1
21
21
2
1
2
1
23
1
23 1
2
3
1
23
1
2
1
2
1
21
2
1
21
2
1
2
1
2
1
2
1
2
1
2
1
2
1
2
1
21
2
1
2
1
2
1
2
1
2
1
2
1
2
1
2
1
2
1
2
1
2
1212
1
212121212
12
1
2
1
212121212
123123
1
23 123 123123123
1
2
1
2
1
21
2
3
1
2
3
1
2
3
12
3
4
1212
1
21
2
3
1
2
3
1
2
3
12
3
4
1
2
1
2
1
21
2
3
1
2
3
1
2
312
3
Basic Operations22
Ç
È
É
Ê
Ë
Ì
1
2
1
2
1
2
1
2
1
2
1
2
1
2
1
2
1
2
1
2
1
2
1
2
1
2
1
2
3
1
2
3
1
2
3
1
2
3
1
2
3
4
12
3
4
1
2
3
4
1
2
3
41
2
3
4
1
2
3
4
12
3
4
5
1
2
1
2
3
1
2
31
2
3
1
2
3
1
2
3
4
12
3
4
1
2
3
4
1
2
1
2
1
2
1
2
1
21
2
31
2
31
2
3
1
2
31
2
3
4
12
3
41
2
3
4
1
2
4
3
1
2
4
312
4
3
12
3
4
5
1
23 1
2
34
1
2
341
2
3
4
1
2
34 12
3
4512
3
451
2
3
45
1
2
3
45
1
2
3
451
2
3
45 12
3
4
56
1
2
1
2
1
2
12
3
12
31
2
3
2
1
3
4
1
2
3
4
1
2
3
4
Í
Î
Ï
Ò
Ó
Ô
Ù
Ú
12
1
2
1
2
12
3
12
31
2
3
1
2
3
4
1
2
34
1
2
34
1
2
1
21
212
3
12
31
2
3
1
2
3
4
1
2
4
3
1
2
3
4
1
23
1
23 1
23
12
34
12
34
12
34
1
2
34
1
2
3
45
1
2
3
45
1
2
3
45
1
2
1
2
1
2
1
2
1
2
1
2
1
2
1
2
12
1
2
1
2
1
21
2
1
2
1
2
1
2
1
2
1
21
2
1
2
1
2
1
2
1
2
1
2
1
2
1
2
1
2
1
2
1
2
1
2
1
2
1
2
1
2
1
2
1212121212121212
12
Basic Operations 23
Û
Ü
!
“
#
$
%
&
‘
(
)
1212121212121212
1212
1
231
23
1
23
1
23
1
23
1
231
231
23
1
23
1
23
1
2
1
2
121212
12
12
3
4
1
2
1
23
1
2
1
2
3
1
2
3
12
3
1
3
2
1
21
2
3
*
+
-
,
.
/
:
;
<
=
>
?
@
12
3
12
312
3
4
1
2
1
2
1
2
1
2
1
2
1
2
1
2
1
2
1
2
1
2
1
2

Basic Operations24
[
\
]
^
_
{
I
}
~
¿
i
1
21
212
1
21
2

Using the Phone Functions 25
Using the Phone Functions
Using the Phone FunctionsUsing the Phone Functions
Using the Phone Functions
Your P31 provides the phone functions with which you can:
• Make and receive phone calls.
• View phone records, including incoming calls and outgoing
calls.
• Use voice dialing to initiate calls.
• Access advanced phone features, such as call barring and call
divert..., etc.
Some phone functions are subscription dependent. Please consult
your network service provider for availability of these functions.
Making a Call
To make an outgoing call, you have the following options:
Making a Call Using the Phone Screen
Making a Call Using the Phone ScreenMaking a Call Using the Phone Screen
Making a Call Using the Phone Screen
1. Press the key to bring up the Phone screen.
2. Tap the numeric buttons on the Phone screen, or press the
numeric keys on the keypad to enter the number you want to
call.
To clear a wrong number, tap the button, or press the
key.
3. Tap the button, or press the key. The call
will be initiated.
Making a Call from the Contact List
Making a Call from the Contact ListMaking a Call from the Contact List
Making a Call from the Contact List
1. Press the key to open the Contact screen.
2. Tap to select a contact record that contains the number you
want to call. The contact record will appear on the screen.
3. Tap the phone number of the record, and the call will be initi-
ated automatically.
Making a Call from the Call Log
Making a Call from the Call LogMaking a Call from the Call Log
Making a Call from the Call Log
1. Press the key to bring up the Phone screen.
2. Tap the tab to switch to the Call Log screen.
3. Tap a call log item on the Call Log screen. The content of the
selected call log item will appear.
4. Tap the button, or press the key to initiate
the call.
Making a Call Using Speed Dial
Making a Call Using Speed DialMaking a Call Using Speed Dial
Making a Call Using Speed Dial
1. Press the key to bring up the Phone screen.
2. Tap the tab to switch to the Speed Dial screen.
3. Tap a speed dial icon on the screen, or press and hold a
numeric key on the keypad representing the number (name)
you want to call. The call will be initiated automatically.
Refer to "Adding Speed Dial" on page 28 for how to set up speed
dial.
• You can repeat making the last dialed call by pressing the
key.
• You can also call the first 9 numbers in your Contacts by pressing
a numeric key followed by the and key on your

Using the Phone Functions26
P31. For example, to call contact #7, press , ,
.
Making a Call Using Voice Control
Making a Call Using Voice ControlMaking a Call Using Voice Control
Making a Call Using Voice Control
Before you can use the voice control function to make calls, you
need to create voice tags for your contacts (see "Creating a New
Contact from the Contacts Screen" on page 41) and activate the
voice dialing function (see "Voice Control" on page 56).
1. Press and hold the key for about 3 seconds. A message box
will appear on the screen prompting you to speak the name
(voice tag) after the beep.
2. Speak the name you recorded for the contact you want to call.
3. P31 will identify the name and initiate the call.
Answering a Call
When you have an incoming call, caller’s name (if available,
depending on the setting of the caller’s phone and the network),
picture (if enabled) and the following options will appear on the
screen.
Answer
AnswerAnswer
Answer: Tap this button to answer the call. You can also answer
the call by pressing the key.
Busy
BusyBusy
Busy: Tap this button to reject the call (or press the key).
Mute
MuteMute
Mute: Turn off the ring signal temporarily. you can choose to tap
the Answer
AnswerAnswer
Answer button to answer it later, or the Busy
BusyBusy
Busy button to
reject it.
Ending a Call
To end a call, tap the End
EndEnd
End button, or press the key.
Operations During a Call
Adjusting Volume
Adjusting VolumeAdjusting Volume
Adjusting Volume
1. During a call, tap the icon on the Status bar. The Sounds
SoundsSounds
Sounds
dialog will appear.
2. Tap and drag the Call volume
Call volume Call volume
Call volume slider to adjust call volume. You
can also tap the Speaker phone
Speaker phoneSpeaker phone
Speaker phone or Mute microphone
Mute microphoneMute microphone
Mute microphone checkbox
to play sound via the speaker phone or mute the microphone
during the call.
Holding/Retrieving a Call
Holding/Retrieving a CallHolding/Retrieving a Call
Holding/Retrieving a Call
During a call, tap the Hold
HoldHold
Hold button to hold current call. To retrieve
the held call, tap the Retrieve
RetrieveRetrieve
Retrieve button.
Making Another New Call During a Call
Making Another New Call During a CallMaking Another New Call During a Call
Making Another New Call During a Call
During a call, use the numeric buttons on the Phone screen, or
press the numeric keys on the keypad to make another call. The
call in progress will be held automatically.
Answering an Incoming Call
Answering an Incoming CallAnswering an Incoming Call
Answering an Incoming Call
To answer an incoming call during a call, tap the Answer button,
or press the key. The current active call will be held auto-
matically.
When the new incoming call is disconnected, the old call will be
retrieved automatically.
Switching Calls
Switching CallsSwitching Calls
Switching Calls
If you have multiple active calls in progress simultaneously, you
can tap the Switch
SwitchSwitch
Switch button to switch calls.
Ending All Calls
Ending All CallsEnding All Calls
Ending All Calls
To end all active calls, tap the End
EndEnd
End button or press the key.
Using the Phone Functions 27
Conference Call
To make a conference call:
1. During a call, make a new call to another new calling party, or
answer a new incoming call. Repeat this step if there are mul-
tiple calling parties.
2. Tap the Join calls
Join callsJoin calls
Join calls button. All active calling parties will be
joined together.
Talking Privately to a Calling Party
Talking Privately to a Calling PartyTalking Privately to a Calling Party
Talking Privately to a Calling Party
1. Tap a calling party on the screen.
2. A menu will appear. Tap Extract party
Extract partyExtract party
Extract party. The selected calling
party will become the only active one and others will be put
on hold automatically.
Releasing a Calling Party During a Conference Call
Releasing a Calling Party During a Conference CallReleasing a Calling Party During a Conference Call
Releasing a Calling Party During a Conference Call
1. Tap a calling party on the screen.
2. A menu will appear. Tap Release party
Release partyRelease party
Release party.
Ending a Conference Call
Ending a Conference CallEnding a Conference Call
Ending a Conference Call
To end a conference call, tap the End
EndEnd
End button.
Call Logs
The Call Logs function provides you with the records of the fol-
lowing call types:
• Answered calls (indicated by the icon)
• Dialed calls (indicated by the icon)
• Missed calls (indicated by the icon)
• Rejected calls (indicated by the icon)
If you have missed call(s), the Missed calls dialog will stay on the
screen letting you know about the number of calls missed. Tap
the View button to enter the Missed Call Logs screen. If Cancel is
tapped, the icon will stay on the screen and you can tap it to
open the Missed calls dialog box.
To access Call Logs:
1. Press the key to enter the Phone screen.
2. Tap the tab to open the Call Logs screen.
3. Tap All Calls
All CallsAll Calls
All Calls to open a menu for selecting the type of call logs
you want to view.
4. Tap to select a call type on the menu, and the corresponding
call logs will appear on the screen.
5. Tap a call log record and the detail information will appear on
the screen.
You can make a phone call from a call log record. Please refer to
"Making a Call from the Call Log" on page 25 for details.
Call Logs Options
Call Logs OptionsCall Logs Options
Call Logs Options
Viewing Total Call Information
Viewing Total Call InformationViewing Total Call Information
Viewing Total Call Information
1. Press the key to enter the Phone screen.
2. Tap the tab to open the Call Logs screen.
3. Tap Phone
Phone Phone
Phone and select Total call info
Total call info Total call info
Total call info.
4. The Total call info screen will appear. You can tap the Reset
ResetReset
Reset
button to reset call information, or tap the Done
DoneDone
Done button to
exit.
Deleting All Call Logs
Deleting All Call LogsDeleting All Call Logs
Deleting All Call Logs
1. Press the key to enter the Phone screen.

Using the Phone Functions28
2. Tap the tab to open the Call Logs screen.
3. Tap Phone
Phone Phone
Phone and select Delete all calls
Delete all calls Delete all calls
Delete all calls.
Miscellaneous Operations
Ending All Calls
Ending All CallsEnding All Calls
Ending All Calls
1. Return to the Phone screen.
2. Tap Phone
PhonePhone
Phone and select End all calls
End all callsEnd all calls
End all calls.
Showing Cost
Showing CostShowing Cost
Showing Cost
When enabled, upon ending an outgoing call, the cost of the call
will appear on the screen.
Calling Voice Mail-box
Calling Voice Mail-boxCalling Voice Mail-box
Calling Voice Mail-box
1. Press the key to enter the Phone screen.
2. Tap Phone
PhonePhone
Phone and select Call voice mail-box
Call voice mail-boxCall voice mail-box
Call voice mail-box.
If your voice mail-box number is not set, you will be prompted to
enter it. The voice mail-box number is available from your network
service provider.
Hiding/Showing My Number
Hiding/Showing My NumberHiding/Showing My Number
Hiding/Showing My Number
When making an outgoing call, you can choose to hide or show
your phone number to the recipient of your call.
1. Press the key to enter the Phone screen.
2. Enter the phone number you want to call.
3. Tap Phone
PhonePhone
Phone and select Hide my number
Hide my number Hide my number
Hide my number or Show my number
Show my numberShow my number
Show my number.
4. Tap the button, or press the key to initiate
the call.
Transf e r ring Sound
Transf e r ring SoundTransf e r ring Sound
Transf e r ring Sound
During a call, you can use this option to transfer the call sound
to an available Bluetooth headset.
1. Press the key to enter the Phone screen.
2. Tap Phone
PhonePhone
Phone and select Transfer sound
Transf er s ou n dTransf er s ou n d
Transf er s ou n d.
Calling Emergency Numbers
Calling Emergency NumbersCalling Emergency Numbers
Calling Emergency Numbers
This operation allows you to easily access 3 pre-stored emer-
gency numbers.
1. Press the key to enter the Phone screen.
2. Tap Phone
PhonePhone
Phone and select Emergency numbers.
Emergency numbers.Emergency numbers.
Emergency numbers.
3. Tap to choose an emergency number from the box, and then
tap the Done
DoneDone
Done button to begin dialing the selected number.
Depending on your local network service, the emergency num-
bers may be called without a SIM card as long as you are under
the GSM network coverage. Please check with your network ser-
vice provider for details.
Adding Speed Dial
Adding Speed DialAdding Speed Dial
Adding Speed Dial
Method 1
Method 1Method 1
Method 1
1. Press the key to enter the Phone screen.
2. In the Phone screen, tap the tab.
3. Tap to choose an empty speed dial icon. A Select contact
Select contact Select contact
Select contact win-
dow will appear.
4. Tap to select a contact from the window and then tap the
Done
DoneDone
Done button.
Method 2
Method 2Method 2
Method 2