Benq 57P31 GSM 1900 Smartphone with Bluetooth User Manual P31 E
Benq Corporation GSM 1900 Smartphone with Bluetooth P31 E
Benq >
Part 2

Using the Phone Functions 29
1. Press the key to enter the Phone screen.
2. In the Phone screen, tap the tab.
3. Press and hold a numeric key representing an empty speed
dial on the keypad for about 3 seconds. The figure below
shows the mapping of the keys and the speed dial.
4. A Select contact
Select contact Select contact
Select contact window will appear. Tap to select a contact
and then tap the Done
DoneDone
Done button.
Removing Speed Dial
Removing Speed DialRemoving Speed Dial
Removing Speed Dial
1. Press the key to enter the Phone screen.
2. Tap Edit
EditEdit
Edit and select Remove speed dial
Remove speed dialRemove speed dial
Remove speed dial.
3. The Remove speed dial
Remove speed dial Remove speed dial
Remove speed dial window will appear. Tap to select the
speed dial numbers you want to remove and then tap the
Done
DoneDone
Done button.
Adding number to Contacts
Adding number to ContactsAdding number to Contacts
Adding number to Contacts
1. Press the key to enter the Phone screen.
2. Enter the phone number.
3. When finished, tap Edit
EditEdit
Edit and select Add to contacts
Add to contactsAdd to contacts
Add to contacts.
Copying/Pasting Number
Copying/Pasting NumberCopying/Pasting Number
Copying/Pasting Number
With this operation, you can copy the number you entered in
the Phone screen for pasting onto other application programs,
or copy the number in other application programs onto the
Phone screen.
Copying number
Copying numberCopying number
Copying number
1. Press the key to enter the Phone screen.
2. Enter the phone number.
3. When finished, tap Edit
EditEdit
Edit and select Copy number
Copy numberCopy number
Copy number.
Pasting number
Pasting numberPasting number
Pasting number
1. Copy the phone number from other application programs.
2. Go to the Phone screen by pressing the key.
3. Tap Edit
EditEdit
Edit and select Paste number
Paste numberPaste number
Paste number.
Zoom
ZoomZoom
Zoom
This operation enlarges the user interface on the screen for easier
identification and access.
1. Press the key to enter the Phone screen.
2. Tap Edit
EditEdit
Edit and select Zoom
ZoomZoom
Zoom.
Adjusting Call Settings
Adjusting Call SettingsAdjusting Call Settings
Adjusting Call Settings
You can access Call settings following either of the methods
below:
• In the Phone screen, tap Edit
EditEdit
Edit and select Call settings
Call settingsCall settings
Call settings.
• Go to Control panel by tapping the Control panel
Control panelControl panel
Control panel application
program icon in the Main screen, and then tap Call settings
Call settingsCall settings
Call settings on
the General
GeneralGeneral
General tab.

Using the Phone Functions30
For more information about Call settings, see "Call Settings" on
page 54.
Adjusting Sounds and Alerts
Adjusting Sounds and AlertsAdjusting Sounds and Alerts
Adjusting Sounds and Alerts
This operation allows you to customize the audio settings of
your P31.
1. Press the key to enter the Phone screen.
2. Tap Edit
EditEdit
Edit and select Sounds and alerts
Sounds and alertsSounds and alerts
Sounds and alerts.
3. Tap to choose a profile from the Profiles
ProfilesProfiles
Profiles menu.
4. Adjust sound settings by selecting a sound for each setting
item (for example, ring tone, SMS sound, MMS sound..., etc.)
from the menu, or select Find sound
Find soundFind sound
Find sound to locate a sound file in
your P31.
5. Tap the Save
SaveSave
Save button to save your settings for the selected pro-
file, or the Done
DoneDone
Done button to save and apply your settings.
Enabling/Disabling Automatic Key Lock
Enabling/Disabling Automatic Key LockEnabling/Disabling Automatic Key Lock
Enabling/Disabling Automatic Key Lock
1. Press the key to enter the Phone screen.
2. Tap Edit
EditEdit
Edit and select Key lock
Key lockKey lock
Key lock.
3. A Key lock box will appear. Tap to check/uncheck the Enable
Enable Enable
Enable
automatic key lock
automatic key lockautomatic key lock
automatic key lock checkbox and then tap the Done
DoneDone
Done button to
enable/disable automatic key lock.
If automatic key lock is enabled, the keys on your P31 or buttons
on the Phone screen will be locked if there is no key or button
operation for 30 seconds.
You can also press and hold the key in the Phone
screen for about 3 seconds to enable key lock.
To disable key lock, press the key, and then the
key.
Accessing Help
Accessing HelpAccessing Help
Accessing Help
The Help system on your P31 provides you with instant infor-
mation about how to use your P31.
To access Help:
1. Press the key to enter the Phone screen.
2. Tap Edit
EditEdit
Edit and select Help
HelpHelp
Help.
Using the Application Programs 31
Using the Application Programs
Using the Application ProgramsUsing the Application Programs
Using the Application Programs
The Main Screen
The Main screen is where you can easily access the application
programs in your P31 (e.g. Agenda, Contacts, Messaging, Web...,
etc.).
• Tap the icon on the Application shortcut bar, or press the
on your P31. All application program icons on your
P31 are displayed. Tap an application program icon to open the
application program it represents.
• You can also tap one of the icons at the top of the screen. These
are shortcuts that are always visible. To customize your short-
cuts, see "Setting Application Programs on the Application
Shortcut Bar" on page 90.
If you have a lot of application programs on your P31, use folders
to organize them in the Main screen. There are pre-set folders,
such as Office (for business application programs) and Internet
(for web-based application programs). To organize your applica-
tion programs in folders, see "Grouping Application Programs"
on page 90.
Your P31 Application Programs
Your P31 comes pre-installed with the following application pro-
grams:
Agenda
AgendaAgenda
Agenda
For organizing your personal appointments and events. See
"Agenda" on page 33 for details.
Calculator
CalculatorCalculator
Calculator
Your handy calculator for making calculations. See "Calculator"
on page 35 for details.
Camcorder
CamcorderCamcorder
Camcorder
Use this application program with the built-in camera for captur-
ing still photos and video clips. See "Camcorder" on page 36 for
details.
Contacts
ContactsContacts
Contacts
For managing your contact records. Your contact database can
also be used for making phone calls or sending Emails..., etc. See
"Contacts" on page 41 for details.
Control panel
Control panelControl panel
Control panel
Allows you to setup the settings of your P31. See "Control Panel"
on page 45 for details.
GPRS data log
GPRS data logGPRS data log
GPRS data log
For tracking your GPRS connection history. See "GPRS Data
Log" on page 58 for details.
Internet
InternetInternet
Internet
Allows you to surf the Internet and access various on-line infor-
mation. See "Internet" on page 59 for details.
Jotter
JotterJotter
Jotter
A very useful program for jotting down memos. See "Jotter" on
page 64 for details.
Message
MessageMessage
Message
For creating, sending and receiving messages. See "Message" on
page 66 for details.

Using the Application Programs32
Music player
Music playerMusic player
Music player
With this application program you can listen to music transferred
from your PC or downloaded from the Internet. See "Music
Player" on page 70 for details.
Online services
Online servicesOnline services
Online services
For accessing services of your network service provider. See
"Online Services" on page 73 for details.
Phone
PhonePhone
Phone
For using the phone functions. See "Using the Phone Functions"
on page 25 for details.
PhotoBase
PhotoBasePhotoBase
PhotoBase
Allows you to view and edit images on your P31. See "PhotoBase"
on page 74 for details.
Remote sync
Remote syncRemote sync
Remote sync
For performing synchronization via remote connection. See "Per-
forming Remote Synchronization with a Server" on page 99 for
details.
Screen saver
Screen saverScreen saver
Screen saver
For displaying the screen saver of your P31.
Time
TimeTime
Time
For configuring time/date information and setting alarms. See
"Time" on page 80 for details.
To do
To doTo do
To do
For tracking your daily todo items. See "To Do" on page 82 for
details.
Video player
Video playerVideo player
Video player
For playing video clips captured by the built-in camera, trans-
ferred from your PC or downloaded from the Internet. See
"Video Player" on page 84 for details.
Voice
VoiceVoice
Voice
For recording and playing voice notes. See "Voice" on page 86 for
details.
Recon
ReconRecon
Recon
With this application program you can use your PDA phone to
remote control your home appliances such as TV, DVD player,
Air Conditioner and so on.
Voice Com mand
Voice Com mandVoice Com mand
Voice Com mand
This program allows you to control your PDA phone by voice.
You can use voice to make a phone call, look up contact person's
information or start a program.
Using the Application Programs 33
Agenda
To open the Agenda application program, tap the Agenda
AgendaAgenda
Agenda icon in
the Main screen.
Creating New Agenda Entries
Creating New Agenda EntriesCreating New Agenda Entries
Creating New Agenda Entries
To create a new Agenda entry:
1. In the Agenda screen, tap Agenda
AgendaAgenda
Agenda and select New
NewNew
New.
2. Tap Unfiled
UnfiledUnfiled
Unfiled and select a folder where you want to store the new
entry.
3. Enter the description of the entry and other necessary informa-
tion.
4. Tap to switch to the note page to write down your note for
this entry (optional).
5. Tap the button to save the entry.
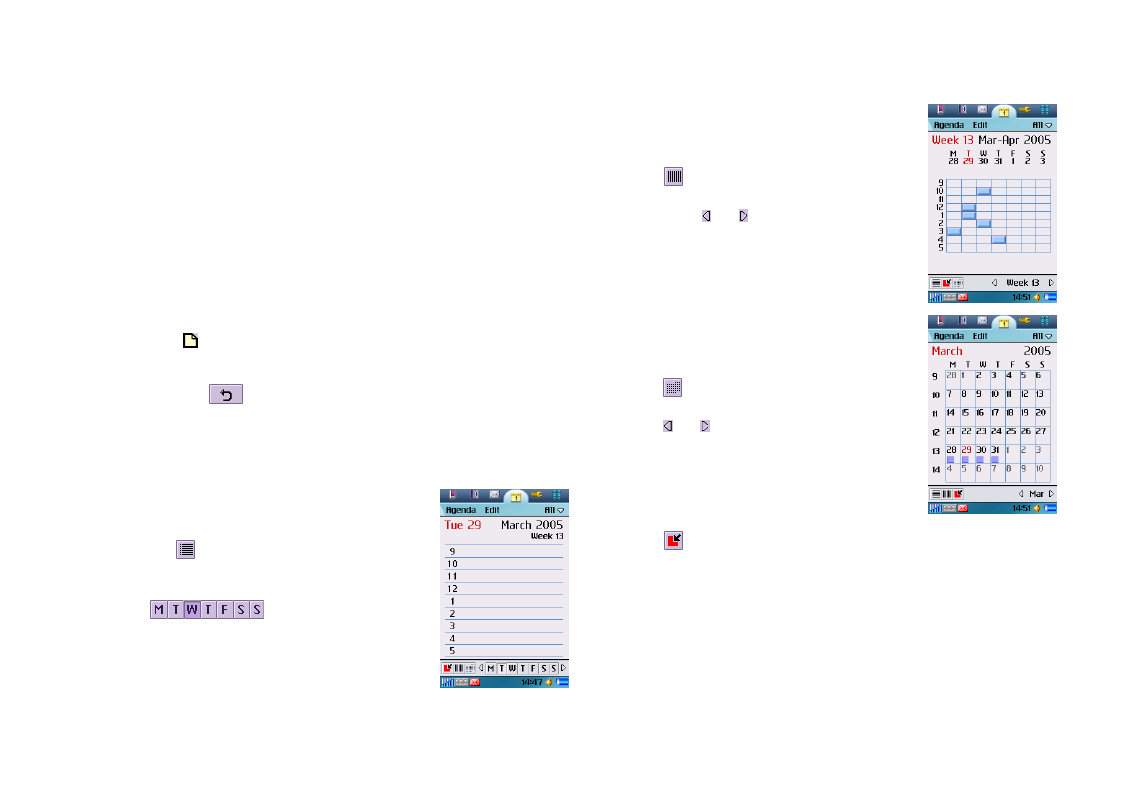
Agenda Views
Agenda ViewsAgenda Views
Agenda Views
The Agenda screen provides different views:
• Tap to go to the present day in different views.
Managing Agenda Entries
Managing Agenda EntriesManaging Agenda Entries
Managing Agenda Entries
Finding an Entry
Finding an EntryFinding an Entry
Finding an Entry
To find a specific Agenda entry:
1. In the Agenda screen, tap Agenda
AgendaAgenda
Agenda and select Find
FindFind
Find.
• Tap to change to Day view. Agenda
entries appear as vertical bars. In Day
view, tap a button on the
bar to go to a specific
day in the week.
• Tap to change to Week view. Agenda
entries appear as vertical bars. In Week
view, tap or to go to the previous or
next week.
• Tap to change to Month view. Agenda
entries appear as squares. In Month view,
tap or to go to the previous or next
month.

Using the Application Programs34
2. Enter the keyword and select Everywhere
EverywhereEverywhere
Everywhere, Future
FutureFuture
Future or Past
PastPast
Past to
select where to search.
3. Tap the Find
FindFind
Find button.
4. The entries that match your search keyword will appear on the
screen. You can tap to select and open an entry.
Editing an Entry
Editing an EntryEditing an Entry
Editing an Entry
1. Open an Agenda entry by tapping it in different views.
2. Make changes to the entry.
3. Tap the button to save your changes.
Deleting an Entry
Deleting an EntryDeleting an Entry
Deleting an Entry
1. Open an Agenda entry by tapping it in different views.
2. Tap Agenda
AgendaAgenda
Agenda and select Delete entry
Delete entryDelete entry
Delete entry.
Deleting Entries in a Period of Time
Deleting Entries in a Period of TimeDeleting Entries in a Period of Time
Deleting Entries in a Period of Time
1. Open an Agenda entry by tapping it in different views.
2. Tap Agenda
AgendaAgenda
Agenda and select Remove entries
Remove entriesRemove entries
Remove entries.
3. Tap to select a removal range and then tap the Done
DoneDone
Done button.
Moving an Agenda to the To do Application Program
Moving an Agenda to the To do Application ProgramMoving an Agenda to the To do Application Program
Moving an Agenda to the To do Application Program
1. Open an Agenda entry by tapping it in different views.
2. Tap Agenda
AgendaAgenda
Agenda and select Move to To do
Move to To doMove to To do
Move to To do.
3. Tap the Yes
YesYes
Yes button. The entry will appear in the To do applica-
tion program.
Cutting, Copying or Pasting an Agenda Entry to the To do
Cutting, Copying or Pasting an Agenda Entry to the To doCutting, Copying or Pasting an Agenda Entry to the To do
Cutting, Copying or Pasting an Agenda Entry to the To do
Application Program
Application ProgramApplication Program
Application Program
1. Open an Agenda entry by tapping it in different views.
2. Tap Edit
EditEdit
Edit and select Cut entry
Cut entryCut entry
Cut entry or Copy entry
Copy entryCopy entry
Copy entry.
3. Open the To do application program.
4. Tap Edit
EditEdit
Edit and then select Paste entry
Paste entryPaste entry
Paste entry.
Managing Agenda Folders
Managing Agenda FoldersManaging Agenda Folders
Managing Agenda Folders
1. In the Agenda screen, tap All
AllAll
All and select Edit folders
Edit foldersEdit folders
Edit folders.
2. You can:
• Tap the Add
AddAdd
Add button to create a new folder. You will then be
asked to enter a name and specify a color for the entries that
belong to the new folder. When finished, tap the Done
DoneDone
Done button.
• Tap to select a folder in the list and then tap the Delete
DeleteDelete
Delete button
to delete the selected folder.
• Tap the Edit
EditEdit
Edit button to edit selected folder. Make changes and
then tap the Done
DoneDone
Done button.
Setting up Agenda Preferences
Setting up Agenda PreferencesSetting up Agenda Preferences
Setting up Agenda Preferences
To access Agenda preferences:
1. In the Agenda screen, tap Edit
EditEdit
Edit and select Preferences
PreferencesPreferences
Preferences.
2. The Agenda preferences window will appear. Set up the
options on the General
GeneralGeneral
General and Alarm
AlarmAlarm
Alarm tabs.
3. Tap the Done
DoneDone
Done button.
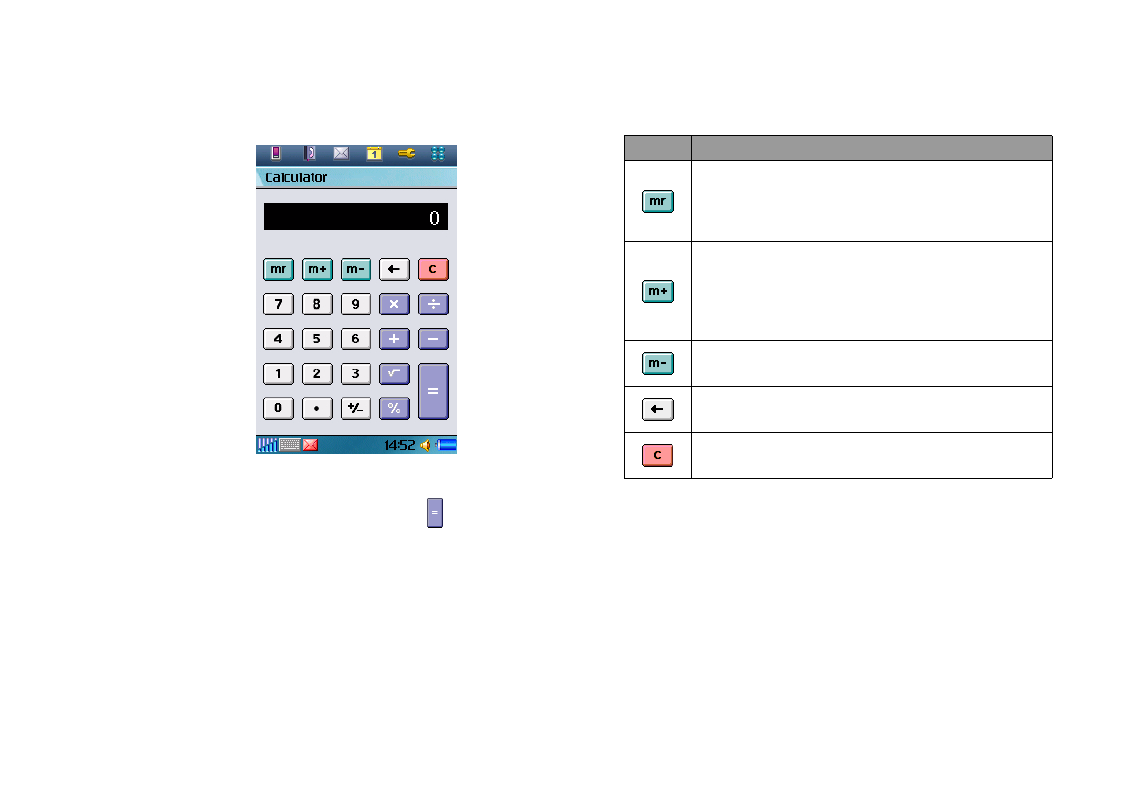
Using the Application Programs 35
Calculator
You can turn your P31 into a handy calculator with the Calcula-
tor application program.
To perform calculations, tap the numeric and operative buttons
on the Calculator screen, and then tap the button to display
calculation result.
You can tap Calculator and then select Copy
CopyCopy
Copy or Paste
PastePaste
Paste to copy a
value from or paste it to other application programs.
There are several additional buttons on the Calculator screen:
Button Description
• Tap this button for the first time to get a value
from the calculator memory.
• Tap it for a second time to clear the calculator
memory.
• Tap this button to save an entered value to
calculator memory.
• When there is already a value on the screen,
tap this button to add it to the value in the
memory.
Tap this button to remove the entered value
from that in the calculator memory.
Tap this button to delete the last digit you
entered.
Tap this button to reset the value on the screen
to 0.
Using the Application Programs36
Camcorder
With the built-in camera and the Camcorder application pro-
gram, you can take still pictures, capture video clips for viewing
on P31 or sharing them with your friends or family by sending
them via MMS messages or transferring them to PC.
Takin g Still Pic tu r es
Takin g Still Pic tu r esTakin g Still Pic tu r es
Takin g Still Pic tu r es
1. Press the Camcorder key. The Camcorder application program
will open automatically as below shows.
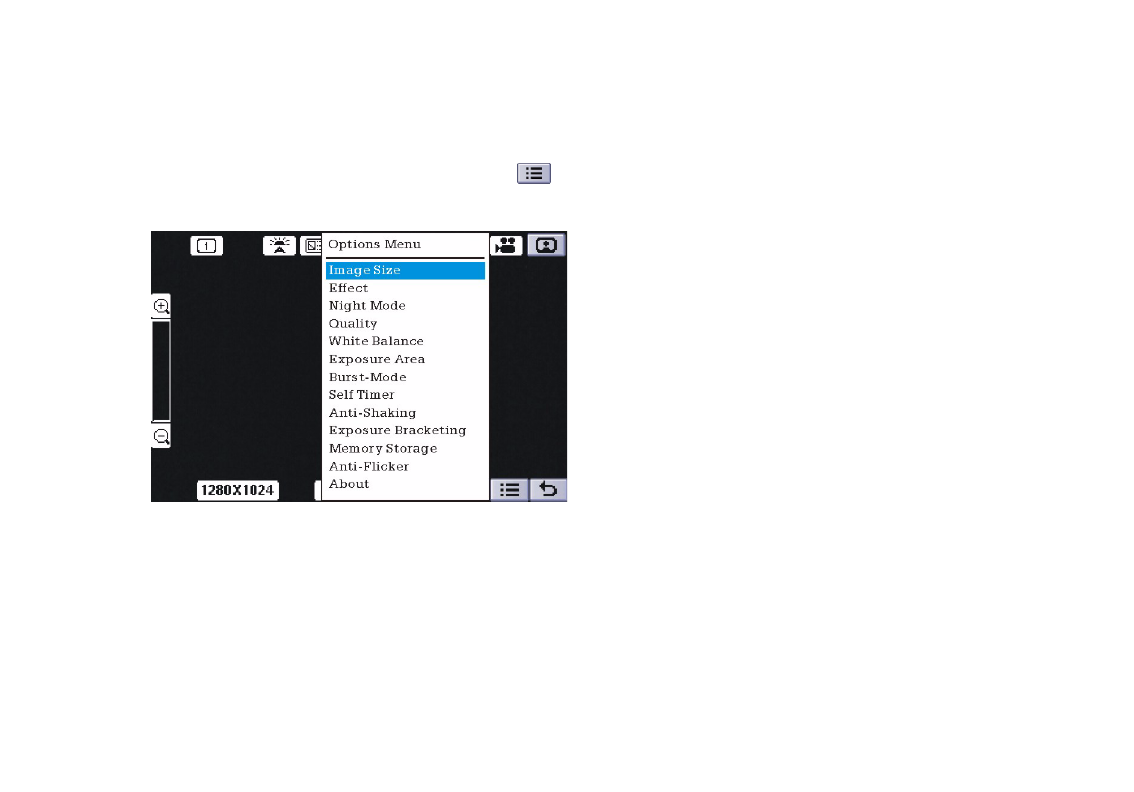
2. Preview the image using the viewfinder. You can also tap the
(or press the key) or button (or press the
key) to zoom in or out on the object.
3. Tap the “Options Menu” icon to set your desired
camcorder settings.
4. Press the Camcorder key and the still image will be captured
and saved.
You can use the 10-second self-timer by tapping Camcorder and
select Self timer.
• When the image is being saved, the buttons on the screen will
become unavailable temporarily.
• When the Camcorder key is pressed while taking a picture, a
shutter sound will be generated, even if you have put P31 in
Silent mode.
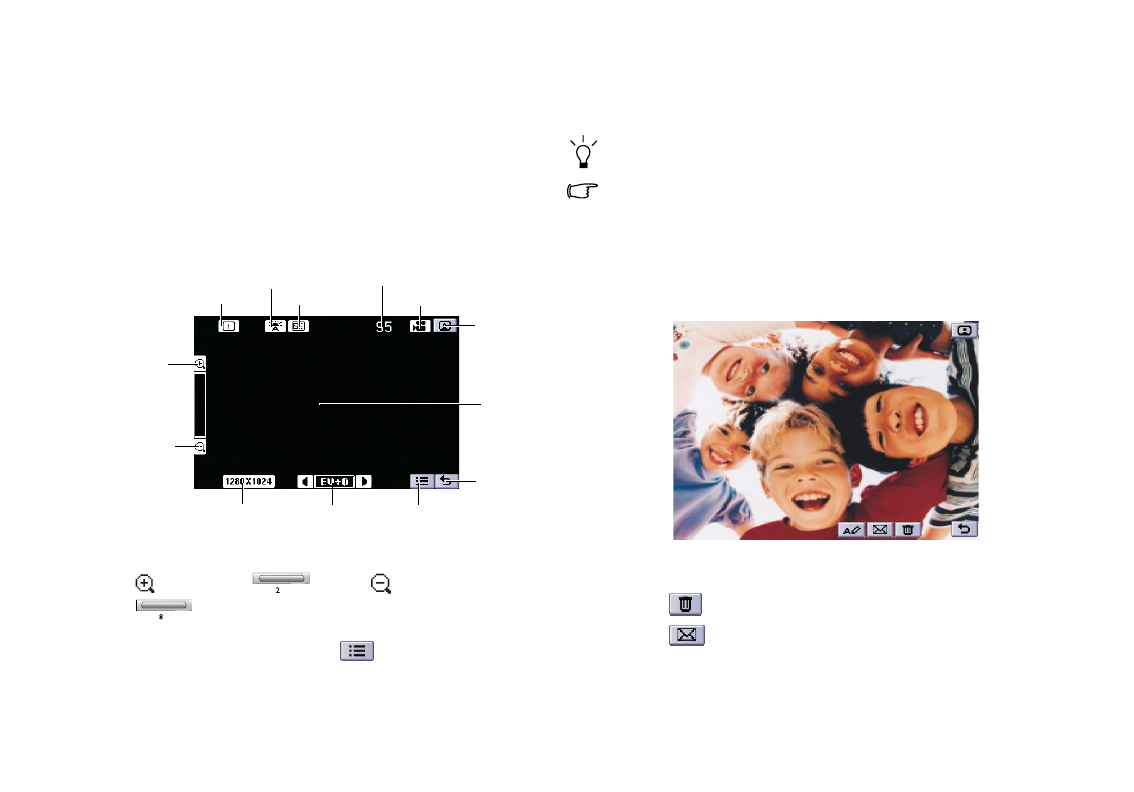
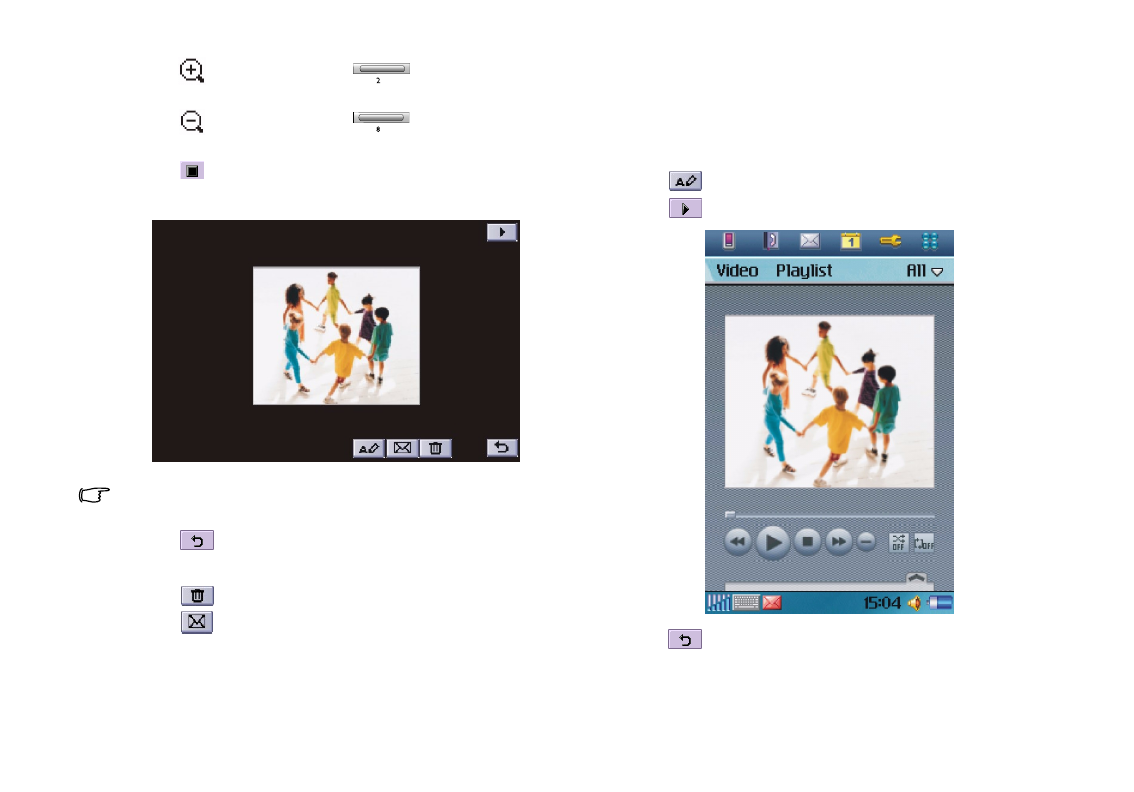
5. The picture you just took will appear in the viewfinder as
follow shows.
You can:
• Tap the button to delete the picture.
• Tap the button to send the picture. Select from the
following and then tap the Done
DoneDone
Done button:
Full Screen
Viewfinder
Remaining number of pictures
available for taking
Go to
PhotoBase
Go to Video Shooting mode
Storage Memory
White
Balance
Burst Mode
Zoon In
Zoon Out
Image size Exposure Value Options Menu
Exit

Using the Application Programs 37
• MMS
MMSMMS
MMS: send the picture to another mobile phone as an MMS
attachment. The MMS message screen will follow for you to
compose the message.
• Bluetooth
BluetoothBluetooth
Bluetooth: send the picture to other devices that support Blue-
tooth technology. A box will appear showing found paired
devices. Tap to select a device and then tap the Send
SendSend
Send button.
• IR
IRIR
IR: send the picture to other devices that support infrared con-
nection. Align the infrared port of your P31 with that of the
device and then tap the Send
SendSend
Send button.
• Tap the button to rename the picture.
• Tap the button to view the picture in the PhotoBase appli-
cation program.
• Tap the button to exit.
Capturing Video
Capturing VideoCapturing Video
Capturing Video
1. Press the Camcorder key. The Camcorder application program
will open automatically.
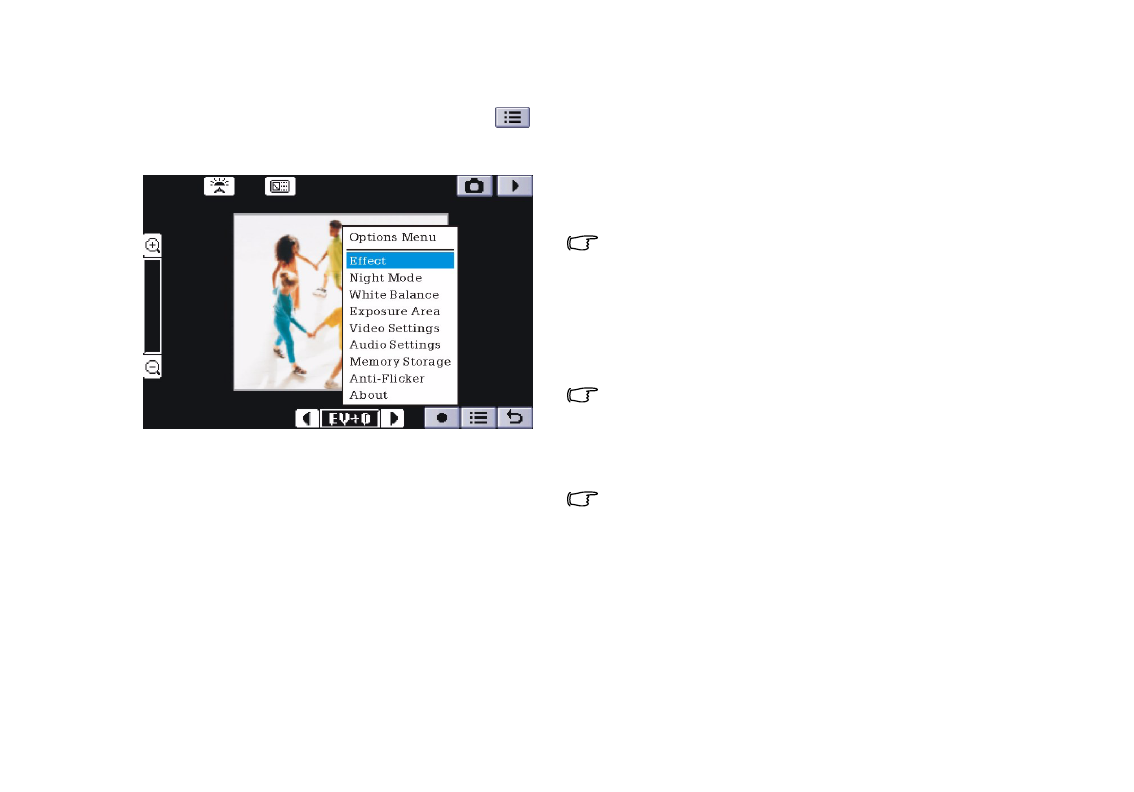
2. Preview the image using the viewfinder. You can also tap the
(or press the key) or button (or press the
key) to zoom in or out on the object.
• It is recommended that you tap the button once to zoom in
on the image one level to get better video quality.
• Try to keep the distance between the sound source and the
microphone of P31 within about 10 ~ 15 cm in order to obtain bet-
ter sound recording quality.
3. Tap the “Record” button (or press the key) to
start capturing video.
4. When capturing is in progress, you can perform the following
operations:
• Tap the button (or press the key) to pause
capturing. Tap (press) the button (key) again to resume
capturing.
Full Screen
Viewfinder
Go to
Playback
mode
Go to Camera mode Storage Memory
White
Balance
Zoon In
Zoon Out
Exposure Value Options Menu
Exit
Record
Using the Application Programs38
• Tap the button (or press the key) to zoom in on
the image.
• Tap the button (or press the key) to zoom out on
the image.
• Tap the button to stop capturing. The video clip will be
saved.
When the video clip is being saved, the buttons on the screen will
become unavailable temporarily.
• Tap the button to exit without saving.
5. Next, you can perform the following operations:
• Tap the button to delete the video clip.
• Tap the button to send the video clip. Select from the fol-
lowing and then tap the Done
DoneDone
Done button:
• MMS
MMSMMS
MMS: Send the video clip to another mobile phone as an MMS
attachment. The MMS message screen will follow for you to
compose the message.
• Bluetooth
BluetoothBluetooth
Bluetooth: Send the video clip to other devices that support
Bluetooth technology. A box will appear showing found paired
devices. Tap to select a device and then tap the Send
SendSend
Send button.
• IR
IRIR
IR: Send the video clip to other devices that support infrared
connection. Align the infrared port of your P31 with that of the
device and then tap the Send
SendSend
Send button.
• Tap the button to rename the video clip.
• Tap the button to play the video clip as below shows.
• Tap the button to exit without saving.
Using the Application Programs 39
Camera Options When Taking Pictures and
Camera Options When Taking Pictures and Camera Options When Taking Pictures and
Camera Options When Taking Pictures and
Capturing Video
Capturing VideoCapturing Video
Capturing Video
Image Settings
Image SettingsImage Settings
Image Settings
When taking pictures, you can choose to set different camera
settings for better effect. Tap the “Options Menu” icon to
set your desired camcorder settings and tap an item in the pop-
up options menu configure its corresponding settings:.
• Image size
Image sizeImage size
Image size: Tap to select a suitable image size. Larger image size
and higher image quality will result in larger picture files.
• Effect
EffectEffect
Effect: Tap to select different image effect such as normal, mono,
Sepia, Blush and Negative.
• Night Mode
Night ModeNight Mode
Night Mode: Tap to set the night mode on or off.
• Quality
QualityQuality
Quality: Tap to select a suitable image quality. Higher image
quality will result in larger picture files.
• White Balance mode
White Balance modeWhite Balance mode
White Balance mode: According to the lighting conditions, tap
to select a mode from the drop-down list.
• Exposure Area
Exposure AreaExposure Area
Exposure Area: Tap to select different exposure area. There are
four items for you to choose: Full, Center Half, Center Quarter
and Bottom Two-Thirds.
• Burst-Mode
Burst-ModeBurst-Mode
Burst-Mode: Tap to set the burst-mode on or off. If you set the
burst-mode on, there are three burst-mode for you to choose: 6
Multishot, 9 Multishot and 16 Multishot.
• Self-Timer
• Self-Timer• Self-Timer
• Self-Timer: When taking pictures, you can enable the 10-second
self-timer by setting Self timer
on.
• Anti-Shaking
• Anti-Shaking• Anti-Shaking
• Anti-Shaking: Your PDA phone supports anti-shaking function
when taking pictures. Tap this item to set this function on or
off.
• Exposure Bracketing
• Exposure Bracketing• Exposure Bracketing
• Exposure Bracketing: This item allows you to set Exposure
Bracketing function on or off. Exposure Bracketing is a
function used to take a series of images of the same scene at a
variety of different exposures.
• Memory Storage:
• Memory Storage: • Memory Storage:
• Memory Storage: Tap to select a default storage location (SD/
MMC memory or phone memory), filename and size mode for
pictures.
• Anti-Flicker:
• Anti-Flicker: • Anti-Flicker:
• Anti-Flicker: Used to eliminate the flickering effects resulting
from fluorescent lights. Tap to select a suitable frequency from
the drop-down list.
• About:
• About: • About:
• About: Tap to see more information about the camcorder.
Using the Application Programs40
Video Settings
Video SettingsVideo Settings
Video Settings
When capturing video, you can choose to set different camera
settings for better effect. Tap the “Options Menu” icon to
set your desired camcorder settings and tap an item in the pop-
up options menu configure its corresponding settings:.
• Effect
EffectEffect
Effect: Tap to select different image effect such as normal, mono,
Sepia, Blush and Negative.
• Night Mode
Night ModeNight Mode
Night Mode: Tap to set the night mode on or off.
• White Balance mode
White Balance modeWhite Balance mode
White Balance mode: According to the lighting conditions, tap
to select a mode from the drop-down list.
• Exposure Area
Exposure AreaExposure Area
Exposure Area: Tap to select different exposure area. There are
four items for you to choose: Full, Center Half, Center Quarter
and Bottom Two-Thirds.
• Video Settings
Video SettingsVideo Settings
Video Settings: Tap to select a suitable video format and quality.
The higher the video quality, the larger the size of the recorded
video clip.
• Audio Settings
Audio SettingsAudio Settings
Audio Settings: Tap to turn on/off the audio for the video clips
and select a suitable audio format and quality. The higher the
audio quality, the larger the size of the recorded video clip.
• Memory Storage:
• Memory Storage: • Memory Storage:
• Memory Storage: Tap to select a default storage location (SD/
MMC memory or phone memory), filename and size mode
(for displaying under the viewfinder when capturing video) for
video clips.
• Anti-Flicker:
• Anti-Flicker: • Anti-Flicker:
• Anti-Flicker: Used to eliminate the flickering effects resulting
from fluorescent lights. Tap to select a suitable frequency from
the drop-down list.
• About:
• About: • About:
• About: Tap to see more information about the camcorder.
• When size mode is set to "MMS", the maximum video size is
95KB.
• When size mode is set to "Maximum available memory", all free
memory space will be used for recording. (Max. 60MB)
• When size mode is set to "In seconds", the maximum length of
video can be specified. (Max. 300 seconds)
• When size mode is set to "In KB", the maximum size of video can
be specified. (Max. 1024KB)
It is recommended that you save the images/video to the memory
card to prevent phone memory from running low.
Tap D one
DoneDone
Done to confirm your settings, or Default
DefaultDefault
Default to reset all camera
settings to default values. Tap Cancel
CancelCancel
Cancel to exit the camera settings
screen.
It is recommended that when you finish using the Camcorder
application program, tap Camcorder and select Exit to close it in
order to save memory space.

Using the Application Programs 41
Contacts
With the Contact application program, you can easily manage
your contact records. In addition to just carrying and viewing
these records, you can also quickly make phone calls, send mes-
sages/Email and open web pages thanks to the integration with
other application programs.
Creating a New Contact
Creating a New ContactCreating a New Contact
Creating a New Contact
Creating a New Contact from the Phone Screen
Creating a New Contact from the Phone ScreenCreating a New Contact from the Phone Screen
Creating a New Contact from the Phone Screen
See "Adding number to Contacts" on page 29 for more informa-
tion.
Creating a New Contact from the Contacts Screen
Creating a New Contact from the Contacts ScreenCreating a New Contact from the Contacts Screen
Creating a New Contact from the Contacts Screen
1. In the Contacts screen, tap Contact
ContactContact
Contact and select New
NewNew
New.
2. Tap Unfiled
UnfiledUnfiled
Unfiled and select a folder where you want to place this
contact.
3. Enter contact information.
You can specify a ring tone for the contact by selecting a ring tone
from the Ring tone drop-down menu.
The personalized ring tone will only be played if your phone net-
work is CLI (Calling Line Identity) compatible, so the caller can be
identified. Otherwise, the default ring tone will be used, regardless
of your selection of ring tone.
4. (Optional) Tap the tab to enter your note for this contact.
5. (Optional) Tap the tab to specify a picture for this contact.
Tap the icon to open a box where you can browse and select
a picture.
6. (Optional) Tap the button to add a voice tag for this contact
for using voice dialing.
To add a voice tag, tap Record
RecordRecord
Record and speak after the beep. When
done, tap Done
DoneDone
Done. You can also tap Play
PlayPlay
Play to play the voice tag you
just recorded, or Del
DelDel
Del to delete the voice tag.
To prevent failure when recording the voice tag, it is recommended
that you do so in a quiet location.
7. Tap the button to save the contact.
Importing Contacts from a SIM Card
Importing Contacts from a SIM CardImporting Contacts from a SIM Card
Importing Contacts from a SIM Card
1. Make sure that the SIM card is installed on your P31.
2. In the Contact screen, tap All
AllAll
All and select SIM card
SIM cardSIM card
SIM card.
3. Tap Edit
EditEdit
Edit and select Copy all to contacts
Copy all to contactsCopy all to contacts
Copy all to contacts.
4. In the box that follows, tap the Yes
YesYes
Yes button.
Exporting Contacts to a SIM Card
Exporting Contacts to a SIM CardExporting Contacts to a SIM Card
Exporting Contacts to a SIM Card
1. Make sure that the SIM card is installed on your P31.
2. In the Contacts screen, tap to select a folder that contains the
contact you want to export.
3. Tap to open the contact from the list.
4. Tap Edit
EditEdit
Edit and select Copy to SIM card
Copy to SIM cardCopy to SIM card
Copy to SIM card.
Viewing Contacts
Viewing ContactsViewing Contacts
Viewing Contacts
The Contact screen displays all contacts in your P31. You can also
tap a tab below to view only the contacts that begin with the let-
ters on the tab.
Using the Application Programs42
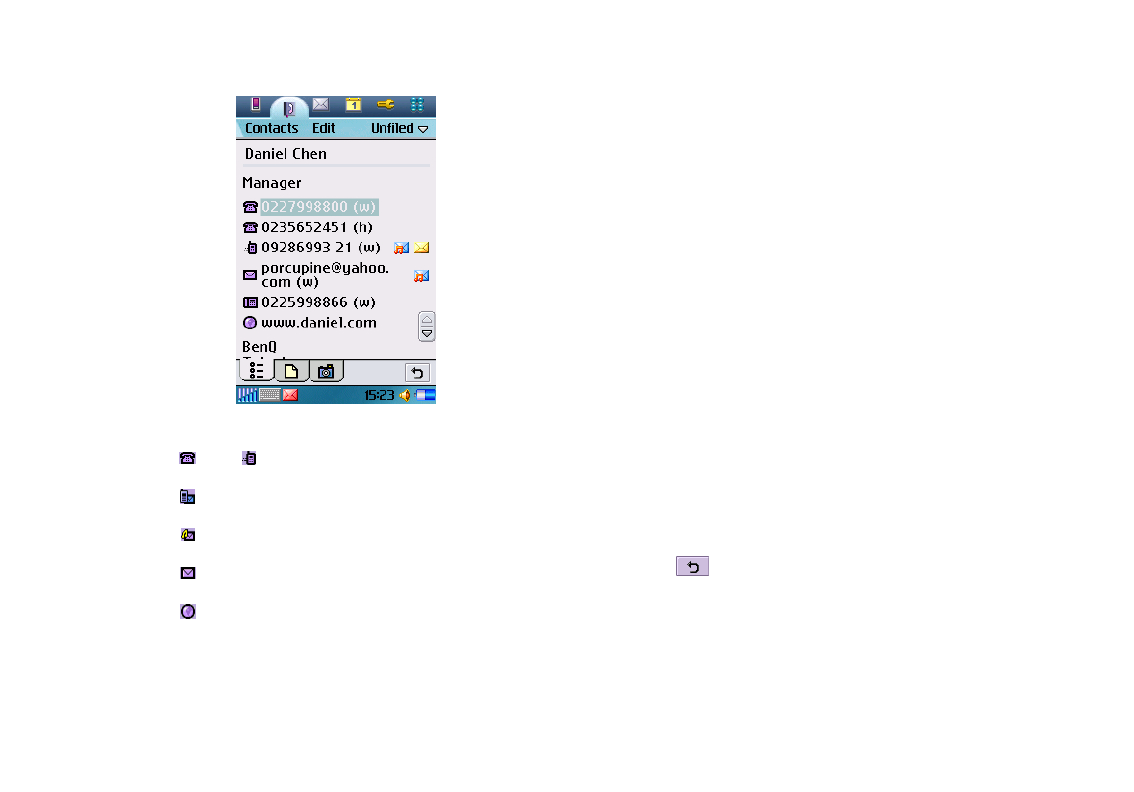
To view the detail information of a contact, tap a contact on the
screen.
You can:
• Tap the icon, icon or the phone number to make a call to
the person.
• Tap the icon or the mobile phone number to start compos-
ing a new SMS message for the person.
• Tap the icon or the mobile phone number to start compos-
ing a new MMS message for the person.
• Tap the icon or the mail address to start composing a new
Email for the person.
• Tap the icon or the web address to open the web page in the
Internet application program.
Managing Contacts Folders
Managing Contacts FoldersManaging Contacts Folders
Managing Contacts Folders
1. In the Contacts screen, tap All
AllAll
All and select Edit folders
Edit foldersEdit folders
Edit folders.
2. You can:
• Tap the Add
AddAdd
Add button to create a new folder. You will then be
asked to enter a name for the new folder. When finished, tap the
Done
DoneDone
Done button.
• Tap to select a folder on the list and then tap the Delete
DeleteDelete
Delete button
to delete the selected folder.
• Tap the Rename
RenameRename
Rename button to change the name of the selected
folder. Make changes and then tap the Done
DoneDone
Done button.
Managing Contacts
Managing ContactsManaging Contacts
Managing Contacts
Finding a Contact
Finding a ContactFinding a Contact
Finding a Contact
1. In the Contacts screen, tap Contacts
ContactsContacts
Contacts and select Find
FindFind
Find.
2. Enter the search keyword and specify where in Contacts will be
searched (in all fields
in all fieldsin all fields
in all fields or in Names and Company
in Names and Companyin Names and Company
in Names and Company).
3. Tap the Find
FindFind
Find button.
4. The contacts that match your search keyword will appear on
the screen. You can tap to select and open a contact.
Editing a Contact
Editing a ContactEditing a Contact
Editing a Contact
1. Open a contact.
2. Tap Edit
EditEdit
Edit and select Edit contact
Edit contactEdit contact
Edit contact.
3. Make changes to the contact information.
4. Tap the button.
Deleting a Contact
Deleting a ContactDeleting a Contact
Deleting a Contact
Method 1
Method 1Method 1
Method 1
1. Open a contact.
2. Tap Contacts
ContactsContacts
Contacts and select Delete contact
Delete contactDelete contact
Delete contact.

Using the Application Programs 43
Method 2
Method 2Method 2
Method 2
1. In the Contacts screen, tap Contacts
ContactsContacts
Contacts and select Contacts man-
Contacts man-Contacts man-
Contacts man-
ager
agerager
ager.
2. Tap to select a folder that contains the contact you want to edit
from the Folder
FolderFolder
Folder drop-down list.
3. In the box below, tap to check the contact(s) you want to edit.
You can also tap the Select all
Select allSelect all
Select all checkbox to select all contacts in
the selected folder.
4. Tap the Delete
DeleteDelete
Delete button, and then the Yes
YesYes
Yes button in the box that
follows.
5. Tap the Done
DoneDone
Done button.
Copying Contacts
Copying ContactsCopying Contacts
Copying Contacts
1. Open a contact.
2. Tap Edit
EditEdit
Edit and select Copy contact
Copy contactCopy contact
Copy contact.
Pasting Contacts
Pasting ContactsPasting Contacts
Pasting Contacts
In the Contacts screen, tap Edit
EditEdit
Edit and select Paste contact
Paste contactPaste contact
Paste contact.
Moving Contacts to a Different Folder
Moving Contacts to a Different FolderMoving Contacts to a Different Folder
Moving Contacts to a Different Folder
1. In the Contacts screen, tap Contacts
ContactsContacts
Contacts and select Contacts man-
Contacts man-Contacts man-
Contacts man-
ager
agerager
ager.
2. Tap to select a folder that contains the contact you want to
move from the Folder
FolderFolder
Folder drop-down list.
3. Tap to check the contact(s) you want to move. You can also tap
the Select all
Select allSelect all
Select all checkbox to select all contacts in the selected
folder.
4. Tap the Move
MoveMove
Move button, and then tap to select the folder where
the contact(s) will be moved in the Folder
FolderFolder
Folder drop-down list in
the box that follows.
5. Tap the Move
MoveMove
Move button. You can also tap the Folder
FolderFolder
Folder button to
create a new folder.
Sending Contacts
Sending ContactsSending Contacts
Sending Contacts
Sending a Contact
Sending a ContactSending a Contact
Sending a Contact
1. Open a contact.
2. Tap Contacts
ContactsContacts
Contacts and select Send as
Send asSend as
Send as.
3. Select from the following and then tap the Done
DoneDone
Done button:
• SMS
SMSSMS
SMS: Send the contact to another mobile phone via an SMS
message. Enter the number of the recipient and then tap the
Send
SendSend
Send button.
• MMS
MMSMMS
MMS: Send the contact to another mobile phone as an MMS
attachment. The MMS message screen will follow for you to
compose the message.
• Bluetooth
BluetoothBluetooth
Bluetooth: Send the contact to other devices that support Blue-
tooth technology. A box will appear showing found paired
devices. Tap to select a device and then tap the Send
SendSend
Send button.
• IR
IRIR
IR: Send the contact to other devices that support infrared con-
nection. Align the infrared port of your P31 with that of the
device and then tap the Send
SendSend
Send button.
Sending Multiple Contacts
Sending Multiple ContactsSending Multiple Contacts
Sending Multiple Contacts
1. In the Contacts screen, tap Contacts
ContactsContacts
Contacts and select Contacts man-
Contacts man-Contacts man-
Contacts man-
ager
agerager
ager.
2. Tap to select a folder that contains the contacts you want to edit
from the Folder
FolderFolder
Folder drop-down list.
3. Tap to check the contact(s) you want to send. You can also tap
the Select all
Select allSelect all
Select all checkbox to select all contacts in the selected
folder.
4. Tap the Send
SendSend
Send button.

Using the Application Programs44
5. Perform the same operation as described in step 3 in "Sending
a Contact" on page 43.
Sending All Contacts in a Folder
Sending All Contacts in a FolderSending All Contacts in a Folder
Sending All Contacts in a Folder
1. In the Contacts screen, tap All
AllAll
All and select a folder.
2. Tap Contacts
ContactsContacts
Contacts and select Send this folder
Send this folderSend this folder
Send this folder.
3. Perform the same operation as described in step 3 in "Sending
a Contact" on page 43.
Owner Card
Owner CardOwner Card
Owner Card
The owner card is your electronic name card. Once created, you
can exchange it freely with other people.
Creating Your Owner Card
Creating Your Owner CardCreating Your Owner Card
Creating Your Owner Card
Method 1
Method 1Method 1
Method 1
1. In the Contacts screen, tap Contact
ContactContact
Contact and select New
NewNew
New.
2. Enter your personal data.
3. Tap Contacts
ContactsContacts
Contacts and select Set as owner card
Set as owner cardSet as owner card
Set as owner card.
4. Tap the button.
Method 2
Method 2Method 2
Method 2
1. Open a contact.
2. Tap Contacts
ContactsContacts
Contacts and select Set as owner card
Set as owner cardSet as owner card
Set as owner card.
Sending Owner Card
Sending Owner CardSending Owner Card
Sending Owner Card
1. In the Contacts screen, tap Contact
ContactContact
Contact and select Send owner
Send owner Send owner
Send owner
card
cardcard
card.
2. Perform the same operation as described in step 3 in "Sending
a Contact" on page 43.
Editing Owner Card
Editing Owner CardEditing Owner Card
Editing Owner Card
1. In the Contacts screen, tap Contact
ContactContact
Contact and select View owner
View owner View owner
View owner
card
cardcard
card.
2. Perform the same operation as described in "Editing a Contact"
on page 42.
Contacts Preferences
Contacts PreferencesContacts Preferences
Contacts Preferences
1. In the Contacts screen, tap Edit
EditEdit
Edit and select Preferences
PreferencesPreferences
Preferences.
2. In the box that follows, tap to select a method by which the
Contacts application program sorts your contacts.
3. If you want the preferred phone number to appear next to the
contact name when viewing, tap the Show preferred phone
Show preferred phone Show preferred phone
Show preferred phone
number
numbernumber
number checkbox. If this option is selected and no preferred
number is specified, the first phone number in the contact will
be used as the preferred number.
4. Tap the Done
DoneDone
Done button.
Specifying Preferred Phone Number for Contacts
Specifying Preferred Phone Number for ContactsSpecifying Preferred Phone Number for Contacts
Specifying Preferred Phone Number for Contacts
1. Open a contact.
2. Tap Edit
EditEdit
Edit and then select Edit contact
Edit contactEdit contact
Edit contact.
3. Tap Edit
EditEdit
Edit and then select Show in list
Show in listShow in list
Show in list.
4. Tap to select a preferred number from the drop-down menu.
5. Tap the Done
DoneDone
Done button.

Using the Application Programs 45
Control Panel
The Control panel is a list of all settings sorted into groups. By
adjusting these settings, you can control the behavior of your
P31. Grouping the settings allows you to find a setting quickly if
you want to adjust it.
To change the group to which a setting is assigned:
1. Tap Control panel
Control panel Control panel
Control panel and select Set groups
Set groupsSet groups
Set groups.
2. Tap the name of the setting in the list.
3. Tap the Group
GroupGroup
Group drop-down menu in the box that appears and
select a new group.
4. Tap Done
DoneDone
Done.
Device Settings
Device SettingsDevice Settings
Device Settings
Certificate Manager
Certificate ManagerCertificate Manager
Certificate Manager
Digital certificates ensure that the web or WAP pages you visit, or
any software you install, really are created by the person you
expect.
Certificates may be present on the pages that you view or the soft-
ware that you download. Your P31 compares these certificates
with a set of certificates that's stored in Certificate manager to
ensure the authenticity of the page or software. If the certificates
don't match, your P31 informs you, and allows you to:
• Prevent the page being loaded or the software being installed, or
• Continue at your own risk
The certificates on your P31 have been created and issued by an
independent organization to ensure their authenticity.
Security Information
Security InformationSecurity Information
Security Information
Security information is displayed when Certificate manager can't
be sure of the origin of the page or software. For example, secu-
rity information will be displayed if:
• The certificate on a page has expired
• The identity of a software manufacturer can't be verified
Security information is also displayed when a certificate on your
P31:
• Has expired
• Has been revoked by the independent organization that issued it
Adding and Removing Certificates
Adding and Removing CertificatesAdding and Removing Certificates
Adding and Removing Certificates
Your P31 handles certificates automatically so, most of the time,
you can browse the Internet securely without using Certificate
manager. If you do need to add or remove a certificate, you will
usually be informed by your network operator or system admin-
istrator. You should remove a certificate from Certificate man-
ager if you are informed, or suspect, that the certificate:
• Does not belong to the person who supplied it
• Was issued incorrectly by the independent organization that
created it
Type of Certificate
Type of CertificateType of Certificate
Type of Certificate
The type can be either Certificate Authority or User.
• Certificate Authority certificates contain server details. This type
of certificate is handled by your P31 when the server only
requires server authentication. This means that your identity
remains anonymous.
• User certificate contains your identity. This type of certificate is
used when the server asks for client authentication. The client

Using the Application Programs46
application program requests you to identify yourself by choos-
ing a user certificate.
Format Disk
Format DiskFormat Disk
Format Disk
When you format a disk, you delete all the information on it,
including any application programs that you've installed.
Your P31 comes with 1 primary disk, which is displayed here. Any
memory card that you install in your P31 are also displayed.
Renaming a Disk
Renaming a DiskRenaming a Disk
Renaming a Disk
You can rename a disk to give it a more meaningful name.
1. Tap to select a disk you want to rename from the Disk
DiskDisk
Disk drop-
down menu and then tap Rename
RenameRename
Rename.
2. Enter the new name and then tap Done
DoneDone
Done.
Formatting a Disk
Formatting a DiskFormatting a Disk
Formatting a Disk
You can use this function to format a newly purchased memory
card for use with P31, or delete all data on the card at once. To
format a disk:
1. Tap to select a disk you want to format from the Disk
DiskDisk
Disk drop-
down menu and then tap Format
FormatFormat
Format.
2. Tap Yes
YesYes
Ye s .
3. The formatting progress starts. Wait until the formatting is car-
ried out completely.
When formatting a memory card, do not remove it during the pro-
cess, otherwise the card or data will be damaged.
Language
LanguageLanguage
Language
Selects the system language on your P31. To do so, tap to select a
language and then tap Done
DoneDone
Done. You need to power off P31 and then
turn it back on for the change to take effect.
Depending on the region-specific configuration, you may also
delete some user-installed languages to conserve memory space.
To do so, tap to select a language and then tap Delete
DeleteDelete
Delete.
Master Reset
Master ResetMaster Reset
Master Reset
Use Master reset to reset all the settings in your P31 to the way
they were after initial setup. If you want to keep installed applica-
tion programs, uncheck the Delete user installed applications
Delete user installed applicationsDelete user installed applications
Delete user installed applications
check box.
All user data, as well as pre-installed media files and application
program data files will be deleted and all settings will be set to the
state they were, when P31 was originally delivered.
Power and Screen Saver
Power and Screen SaverPower and Screen Saver
Power and Screen Saver
By default, your P31 will display the screensaver if there is no key
or touch screen operation for 2 minutes. 3 minutes after the
screensaver is displayed, P31 will turn off the screen and enter
power save mode automatically.
In power save mode, P31 can be waken automatically by a incom-
ing call. You can also wake P31 up by pressing the key.
Power
PowerPower
Power
• External power
External powerExternal power
External power: this is to present an external power supply to
your P31.
• Temperature
Te m p er a t u reTe m p er a t u re
Temperature: a reference value of the temperature of the bat-
tery.
• Main battery
Main batteryMain battery
Main battery: a reference percentage of the remaining power of
the battery.
• Auto power save
Auto power saveAuto power save
Auto power save: you can choose a time to manage your P31 to
auto enter power save mode after the inactive time period. This
mode is used to be more power efficient. To wake up your P31,
press the key.
When your P31 is low on battery power, a message to warn you
will pop up. You can tap Yes
YesYes
Yes to power off immediately or No
NoNo
No to
have your program or data closed gracefully. It is suggested that

Using the Application Programs 47
you plug the external power at this moment, because P31 will be
automatically powered off at further low battery level.
Screen saver
Screen saverScreen saver
Screen saver
• Screen saver
Screen saverScreen saver
Screen saver: you can use the default screen saver setting or
browse an image to enable screen saver. Choosing None
NoneNone
None will
disable screen saver.
• Activate after
Activate afterActivate after
Activate after: you can choose a time to enable your screen saver
after the time period. You can disable your screen saver by tap-
ping the screen or pressing a key on the keypad.
Screen
ScreenScreen
Screen
Occasionally you may find that you tap one object (e.g. a button
or menu option) but another is activated, or nothing happens at
all. Calibrating the screen ensures that the correct object is acti-
vated. Tap Calibrate
CalibrateCalibrate
Calibrate and follow the on-screen instructions to cal-
ibrate the screen.
To adjust screen brightness, tap and drag the Brightness
BrightnessBrightness
Brightness slider.
Storage Manager
Storage ManagerStorage Manager
Storage Manager
With Storage manager you can do the following:
Managing files
Managing filesManaging files
Managing files
1. In the Storage manager screen, tap Files
FilesFiles
Files.
2. Select from the Location
LocationLocation
Location and Type
TypeType
Type drop-down menus to locate
the files in the File
FileFile
File box below.
3. Tap the checkbox beside each file to select the file. You can
select multiple files.
4. Tap Copy
CopyCopy
Copy to copy the selected file to another location, or
Delete
DeleteDelete
Delete to delete the file from memory.
Uninstalling programs
Uninstalling programsUninstalling programs
Uninstalling programs
1. In the Storage manager screen, tap Uninstall
UninstallUninstall
Uninstall.
2. Tap to select a program you want to remove from P31 and then
tap Uninstall
UninstallUninstall
Uninstall.
Text Input
Text InputText Input
Text Input
There are two ways of entering text into your P31:
• The smARTwriter handwriting recognition system
The smARTwriter handwriting recognition systemThe smARTwriter handwriting recognition system
The smARTwriter handwriting recognition system: your pen
strokes on the screen are converted to individual letters, num-
bers, or other characters.
• The virtual keyboard
The virtual keyboardThe virtual keyboard
The virtual keyboard: you can “type” text by tapping the “keys”.
The method that you select here is enabled automatically when
you need to enter text into your P31. If you load other text input
software, select it and adjust its settings here.
Setting up smARTwriter
Setting up smARTwriterSetting up smARTwriter
Setting up smARTwriter
You can change the setting of the smARTwriter handwriting rec-
ognition system according to your writing habits. That is, you can
“train” smARTwriter to improve the accuracy of recognition.
1. In the Text input setup box, select smARTwriter
smARTwritersmARTwriter
smARTwriter from the Pri-
Pri-Pri-
Pri-
mary input method
mary input methodmary input method
mary input method drop-down menu and then tap Setup
SetupSetup
Setup.
2. Configure the following options:
• Line color
Line colorLine color
Line color: for selecting the color of pen strokes on the screen.
• Line thickness
Line thicknessLine thickness
Line thickness: for selecting the thickness of pen strokes on the
screen.
• Timeout
TimeoutTimeout
Timeout: for specifying the time between you finish writing and
smARTwriter starts recognizing.
• Add space
Add spaceAdd space
Add space: check this checkbox if you want smARTwriter to
automatically add a space after each word.
• Personalize
PersonalizePersonalize
Personalize: tap this button to open the Personalize
PersonalizePersonalize
Personalize screen that
contains two tabs: the Personalize
PersonalizePersonalize
Personalize tab and the Browse
BrowseBrowse
Browse tab.
Creating Personalized Writing Models
Creating Personalized Writing ModelsCreating Personalized Writing Models
Creating Personalized Writing Models
1. In the Personalize
PersonalizePersonalize
Personalize tab, select a character set and character from
the Set
SetSet
Set and Character
CharacterCharacter
Character drop-down menus.

Using the Application Programs48
2. Write the character in your own way in the Write a
Write a Write a
Write a box.
3. Tap Save
SaveSave
Save.
In the Browse
BrowseBrowse
Browse tab you can browse the preset handwriting models.
User Profiles
User ProfilesUser Profiles
User Profiles
You can personalize how your P31 looks and sounds by configur-
ing and applying user profiles. A user profile is a combination of
user settings, including sound settings, display theme settings and
appearance settings. You can also set up different profiles for use
in different occasions.
To customize a user profile:
1. Tap to select a profile from the Profiles
ProfilesProfiles
Profiles drop-down menu.
2. Specify the settings by selecting options in drop-down menus.
You can tap the icon to listen to the sound.
Changing Themes
Changing ThemesChanging Themes
Changing Themes
To select a display theme, tap Apply Theme
Apply Theme Apply Theme
Apply Theme and select a theme
from the dialog box that follows and then tap Select
SelectSelect
Select.
Changing Appearance
Changing AppearanceChanging Appearance
Changing Appearance
To select a different picture as the background image of the Main
screen, tap Apply Appearance
Apply AppearanceApply Appearance
Apply Appearance and then select Find image
Find image Find image
Find image in the
Background
Background Background
Background drop-down menu. A new dialog box will follow
allowing you to select an image. Tap to select a desired image and
then tap Select
SelectSelect
Select, Done
Done Done
Done.
You can also drag the slider beside the image to change its size on
the screen, or tap the Tile checkbox to tile smaller images on the
screen.
3. Tap Save
SaveSave
Save to save, or Done
DoneDone
Done to save and apply current profile set-
tings.
WIM PIN Settings
WIM PIN SettingsWIM PIN Settings
WIM PIN Settings
WIM is used for performing security functions, especially to store
and process information needed for user identification and
authentication. I.e. it's a tamper-resistant store for private keys,
certificates and other objects that may require a PIN for access or
modification.
You can select a PIN from the PIN
PINPIN
PIN choice list. The WIM objects
list changes content dynamically, displaying only the keys that are
protected by the selected PIN and also have an associated certifi-
cate. Other keys that are protected by the selected PIN but don't
have an associated certificate are not shown in the WIM object
list.
You can change status of a PIN:
• Enable PIN:
Enable PIN:Enable PIN:
Enable PIN: A PIN code that is enabled is requested for authori-
zation of an operation. To proceed with the operation you must
enter the PIN code.
• Disable PIN
Disable PINDisable PIN
Disable PIN: A PIN code that is disabled is not requested to
authoress an operation to proceed.
You can change the PIN code:
• Select the PIN you want to change and tap Change PIN
Change PINChange PIN
Change PIN.
• If a PIN code has been blocked, you must unblock it before it
can be used again. Select the PIN you want to change and tap
Change PIN
Change PINChange PIN
Change PIN.
For information on how to unblock the PIN, please consult your
network service provider.
Connection Settings
Connection SettingsConnection Settings
Connection Settings
Bluetooth
BluetoothBluetooth
Bluetooth
See "Bluetooth Connection" on page 93.

Using the Application Programs 49
Flight Mode
Flight ModeFlight Mode
Flight Mode
The Flight mode is used where mobile phones and Bluetooth
wireless functions are not allowed. To immediately activate Flight
mode, tap the Flight mode now
Flight mode now Flight mode now
Flight mode now button.
You can also check or uncheck the checkbox in the dialog to
determine if you want P31 to prompt you with the Power menu
when you press the power key.
GSM Networks
GSM NetworksGSM Networks
GSM Networks
Like any mobile phone, your P31 connects to a “network”, which
is the path that carries your phone calls, messages, web pages, and
Emails. P31 is designed to use with the GSM and GPRS networks.
When you make a phone call, your P31 uses GSM. When you
connect to the Internet, your P31 uses either GSM or GPRS
depending on the type of Internet account that you select. Dial-
up and high-speed dial-up Internet accounts connect to the GSM
network. GPRS Internet accounts connect to the GPRS network.
When you send or receive SMS messages, your P31 can use either
GPRS or GSM, and, if there is no coverage with one network, it
can automatically switch to the other.
The GSM networks setting enables you to select an appropriate
network manually if you want to change the network you are
connected to, and set up a preferred list of networks. The net-
work and band selections must be supported by your network
service provider.
Changing Network Search Mode
Changing Network Search ModeChanging Network Search Mode
Changing Network Search Mode
Tap the Search m ode
Search mode Search mode
Search mode tab and select Automatic
AutomaticAutomatic
Automatic or Manual
ManualManual
Manual. If
Manual
ManualManual
Manual is selected, P31 will list all of the networks found for you
to choose from.
Selecting Another Network
Selecting Another NetworkSelecting Another Network
Selecting Another Network
Tap th e S ea r c h mode
Search mode Search mode
Search mode tab and select Manual
ManualManual
Manual. P31 will scan all
available networks and show them in a dialog box for you to
choose from.
Not all of the networks listed may be available to you. Please refer
to your network service provider for further details.
Creating a Preferred Network List
Creating a Preferred Network ListCreating a Preferred Network List
Creating a Preferred Network List
1. Tap the Preferred list
Preferred list Preferred list
Preferred list tab and then the Add network
Add network Add network
Add network button.
2. Tap to select a network from the list.
3. Select a position (priority) of the network in the preferred net-
work list.
4. Tap Done
DoneDone
Done.
Please consult your network service provider for availability and
further details about the preferred network list function.
Infrared
InfraredInfrared
Infrared
See "Infrared Connection" on page 93.
Internet Accounts
Internet AccountsInternet Accounts
Internet Accounts
With access to the Internet you can use Email and connect to the
web. You can create 2 types of Internet accounts depending on
your ISP and the type of network you have access to:
• Dial-up account
Dial-up accountDial-up account
Dial-up account: this is indicated by the icon. With a dial-up
account, you are charged for the length of time that you're con-
nected to the Internet.
• GPRS account
GPRS accountGPRS account
GPRS account: this is indicated by the icon. With a GPRS
account, you are charged for the amount of information you
view, download, or send when you're connected to the Internet.
GPRS accounts have -GPRS appended to their name.

Using the Application Programs50
Creating New Internet Accounts
Creating New Internet AccountsCreating New Internet Accounts
Creating New Internet Accounts
You can manually set up the Internet account, or ask your service
provider to send you a message that contains the required setup
information and creates the account automatically on your P31.
To manually set up an Internet account:
1. Tap New
NewNew
New on the Accounts
AccountsAccounts
Accounts tab.
2. Enter the name of the connection in the Account name
Account nameAccount name
Account name field.
3. Select a connection type from the Connection type
Connection type Connection type
Connection type drop-down
menu.
Have the following data ready from your network service pro-
vider:
Connection
type Setting Parameter
GPRS
connection
Server
• User name and password
required:
User name: ________________
Password: _________________
APN Address:_______________
Log in
• Get IP address automatically
• Manually setup IP address:
Type: IPv4 IPv6 IPv4
compatible IPv4 mapped
IP address: ___ . ___ . ___ . ___
• Get DNS address automati-
cally
• Manually setup DNS:
Type: IPv4 IPv6 IPv4
compatible IPv4 mapped
Primary DNS address: ___ . ___ .
___ . ___
Secondary DNS address: ___ .
___ . ___ . ___
Proxy • Use proxy server
Server address: ___________
Proxy server port: __________
Proxy exceptions: __________
Using the Application Programs 51
4. Set up the settings according to the data from your network
service provider.
5. Tap Done
DoneDone
Done.
GPRS
connection
Other Enable PPP extension
Plain text authentification
QoS Header compression
Precedence Subscribed High
Normal Low
Delay Subscribed Class
1 Class 2 Class 3 Best
effort
Reliability Subscribed Class
1 Class 2 Class 3 Class
4 Class 5
Peak rate Subscribed Class
1 Class 2 Class 3 Class
4 Class 5 Class 6 Class
7 Class 8 Class 9
Peak rate Subscribed Class
1 Class 2 Class 3 Class
4 Class 5 Class 6 Class
7 Class 8 Class 9 Class
10 Class 11 Class 12 Class
13 Class 14 Class 15 Class
16 Class 17 Class 18 Best
effort
Dial-up
connection
Log in
• Get IP address automatically
• Manually setup IP address:
Type: IPv4 IPv6 IPv4
compatible IPv4 mapped
IP address: ___ . ___ . ___ . ___
• Get DNS address automati-
cally
• Manually setup DNS:
Type: IPv4 IPv6 IPv4
compatible IPv4
mapped
Primary DNS address: ___ . ___ .
___ . ___
Secondary DNS address: ___ .
___ . ___ . ___
Script
• Use log in script
• Plain text authentication
• Post connect terminal
Script: ___________________
Proxy
• Use proxy server
Server address: ___________
Proxy server port: __________
Proxy exceptions: __________
Speed • Connection type: Analogue
ISDN
Using the Application Programs52
Editing Internet Accounts
Editing Internet AccountsEditing Internet Accounts
Editing Internet Accounts
1. In the Accounts
AccountsAccounts
Accounts tab, tap to select an account.
2. Tap Edit
EditEdit
Edit.
3. Edit the settings of the selected account.
4. Tap Done
DoneDone
Done.
Deleting Internet Accounts
Deleting Internet AccountsDeleting Internet Accounts
Deleting Internet Accounts
1. In the Accounts
AccountsAccounts
Accounts tab, tap to select an account.
2. Tap Delete
DeleteDelete
Delete, Yes
YesYes
Yes.
IP Security Manager
IP Security ManagerIP Security Manager
IP Security Manager
The IP security manager displays stored policies and only one
policy can be activated at a time. There are two types of pass-
words needed:
• IP security password
IP security passwordIP security password
IP security password: is to be set when installing the very first
policy, i.e. this password is only set once, but it is possible to
change it later at any time by tapping Password button.
• Import password
Import passwordImport password
Import password: is needed when installing a policy and the
supplier of the policy gives this.
Messaging Accounts
Messaging AccountsMessaging Accounts
Messaging Accounts
Messaging accounts contain various settings for using Email,
SMS, MMS and Cell Broadcast services. These accounts must be
properly set up before the services can be used.
Cell Broadcast messages are the general messages that your net-
work service provider broadcasts to all subscribers in a particular
area. These messages are broadcast in numbered channels. For
example, channel 30 might be for local weather, 60 for traffic
reports, 80 for information of local hospitals, taxis, pharmacies,
etc.
Please contact your operator for a list of available channels and
the information they provide.
..
.
Manually Set up Messaging Accounts
Manually Set up Messaging AccountsManually Set up Messaging Accounts
Manually Set up Messaging Accounts
1. Have the account data ready from your network service pro-
vider.
2. Set up the settings on each tab according to the data.
3. Tap Done
DoneDone
Done.
Email account
Email accountEmail account
Email account data
data data
data
Tab Parameter
Basic
• Account name: ________________
• Your name: ________________
• Email address: ___________________
• Connection type: POP3 IMAP
• Internet account: (Select an Internet
account for use with Email transmission)
Inbox
• User name: ________________
• Password: ________________
• Incoming server address:
______________
• Download: Just headers Email
smaller than No restrictions (Select
whether you want to download the head-
ers only or the entire message, as well as
the limit of Email size when receiving
Email.)
• Smaller than: _____ KB (Limit of the maxi-
mum mail size. Only available when
“Email smaller than” is selected above.)
• Schedule (For setting up a schedule for
checking new Email).
Using the Application Programs 53
SMS account data
SMS account dataSMS account data
SMS account data
• SMS Service centre address: ______________________
• Character set: 7bit UCS2
• Message stored for: 1 hour 6 hours 1 day 7 days
Maximum
• Connection type: GPRS only GSM only
• Delivery report
• Use reply path
MMS account data
MMS account dataMMS account data
MMS account data
• MMS Gateway: ______________________
• Messages valid for: 1 hour 6 hours 1 day 7 days
Maximum
• Transport: WAP HTTP
• Internet account (Only available when HTTP is selected in
Transport): (Select an Internet account for use with MMS trans-
mission).
• WAP account (Only available when WAP is selected in Trans-
port): (Select a WAP account for use with MMS transmission).
Cell Broadcasting Message setting
Cell Broadcasting Message settingCell Broadcasting Message setting
Cell Broadcasting Message setting
1. Tap the Enable cell broadcast
Enable cell broadcast Enable cell broadcast
Enable cell broadcast checkbox on the CBM
CBMCBM
CBM tab to
enable the reception of Cell Broadcasting messages.
2. Tap New
NewNew
New and select a channel from the dialog box that appears,
and then tap OK
OKOK
OK.
To delete a channel, tap a channel and tap Delete
DeleteDelete
Delete, Yes
YesYes
Ye s .
USB Cable
USB CableUSB Cable
USB Cable
You can use this option to set up the cable connection mode
between P31 and PC.
• PC Connect
PC ConnectPC Connect
PC Connect: select this item before connecting P31 to your PC
and using the Handset Manager to perform synchronization
and backup/restore.
• Modem
ModemModem
Modem: select this item before connecting P31 to your PC and
use P31 as a modem.
WAP Acco unts
WAP Acco untsWAP Acco unts
WAP Acco unts
WAP account settings are essential for using Internet connections
and MMS service via a WAP gateway. You can manually set up
the WAP account, or ask your service provider to send you a mes-
sage that contains the required setup information and creates the
account automatically on your P31.
To manually set up a WAP account:
1. Tap New
NewNew
New on the Basic
BasicBasic
Basic tab.
2. Enter the name of the connection in the Account name
Account nameAccount name
Account name field.
3. Select an Internet connection from the Internet account
Internet account Internet account
Internet account drop-
down menu. Have the following data ready from your network
service provider:
Outbox
• Outgoing server address:
______________
• Use SMTP authentication
• Use Inbox login details:
User name: ______________
Password: ______________
Advanced
• Secure connection
• Outgoing mail port: ______________
• Use MME encoding
• Incoming mail port: ______________
• Secure password authentication

Using the Application Programs54
Use Proxy No Yes:
Address: ____________________
Port: _______________________
Username: __________________
Password: ___________________
4. Set up the settings according to the data from your network
service provider.
5. Tap the Preferred
PreferredPreferred
Preferred tab and tap to check the Use WAP account
Use WAP account Use WAP account
Use WAP account
checkbox.
6. Select a preferred WAP account for Internet connection and
MMS delivery from the Preferred
PreferredPreferred
Preferred drop-down menu.
7. Tap Done
DoneDone
Done.
Editing WAP Accounts
Editing WAP AccountsEditing WAP Accounts
Editing WAP Accounts
1. In the Basic
BasicBasic
Basic tab, tap to select an account.
2. Tap Edit
EditEdit
Edit.
3. Edit the settings of the selected account.
4. Tap Done
DoneDone
Done.
Deleting Internet Accounts
Deleting Internet AccountsDeleting Internet Accounts
Deleting Internet Accounts
1. In the Basic
BasicBasic
Basic tab, tap to select an account.
2. Tap Delete
DeleteDelete
Delete, Yes
YesYes
Yes.
General Settings
General SettingsGeneral Settings
General Settings
Call Settings
Call SettingsCall Settings
Call Settings
If the SIM card is not installed, certain setting items will not appear
on the screen.
Accepted Callers
Accepted CallersAccepted Callers
Accepted Callers
Accepted callers are those whose calls can reach you. Others will
be automatically rejected.
1. Select from the following options in the Accept calls from
Accept calls fromAccept calls from
Accept calls from
drop-down menu:
• All callers
All callersAll callers
All callers: Everyone can call you.
• All except listed callers
All except listed callersAll except listed callers
All except listed callers: Everyone can call you except the ones in
the rejected caller list. Tap the Add new
Add newAdd new
Add new button to add callers to
the list.
• No one
No oneNo one
No one: No one can call you.
2. Tap Done
DoneDone
Done to exit.
When the Accepted callers function is activated, the icon
will appear on the Status bar.
Add to Contacts
Add to ContactsAdd to Contacts
Add to Contacts
If this function is activated, after a call has ended, if the phone
number is not already stored in the Contacts application pro-
gram, you will be asked if you want to add it.
1. Tap the Add party to contacts
Add party to contacts Add party to contacts
Add party to contacts drop-down menu and select On
OnOn
On.
To deactivate this function, tap Off
OffOff
Off.
2. Tap Done
DoneDone
Done.
Call Meter
Call MeterCall Meter
Call Meter
The call meter function allows you to set a limit for total call
costs. If call costs exceed this limit, P31 will no longer be able to
dial pay calls.
To set up call meter:
1. Enter the price unit for calculating call cost in the Price per unit
Price per unit Price per unit
Price per unit
field. The value must be between 0.01 and 9999999.
2. Enter the 3-character name of currency in the Currency
CurrencyCurrency
Currency field.

Using the Application Programs 55
3. Select a Credit status
Credit status Credit status
Credit status: Limited
LimitedLimited
Limited or Unlimited
UnlimitedUnlimited
Unlimited.
4. Enter a credit limit in the Remaining credit
Remaining credit Remaining credit
Remaining credit field. The value
must be between 0.01 and 9999999.
5. Tap Done
DoneDone
Done.
6. Enter your PIN 2 code and then tap Done
DoneDone
Done.
• The PIN2 is the second PIN code. Its main use is in controlling
restricted services. For example, call time limits and restricted
phone numbers.
• If the PIN2 code is incorrectly entered three times consecutively,
it will be locked. To unlock it, you will need to enter the PUK2
code, which you obtain from your network operator.
If the Credit status
Credit status Credit status
Credit status is set to Limited
LimitedLimited
Limited and there is only 30 seconds
of credit left, the message "Low credit" will appear on the screen.
If “Credit expired” appears, you can not make any chargeable
calls.
For the availability and more information about the Call meter func-
tion, please consult your network service provider.
Call Waiting
Call WaitingCall Waiting
Call Waiting
If there is an incoming call when you are in the middle of another
call and the call waiting function is enabled, the screen will dis-
play the number (if available) of the incoming call and call wait-
ing message to alert you.
1. After Call waiting
Call waitingCall waiting
Call waiting is selected, P31 will inquire the status of your
call waiting setting. This will take a few seconds.
2. Select from the following options:
• On
OnOn
On: Enable call waiting.
• Off
OffOff
Off: Disable call waiting.
3. Tap Done
DoneDone
Done to exit.
Calling Cards
Calling CardsCalling Cards
Calling Cards
You can use this option to set up P31 for use with your calling
cards.
1. Tap the New
NewNew
New button to add a new calling card.
2. Enter necessary information and then tap the Done
DoneDone
Done button.
3. Tap Calling card mode
Calling card modeCalling card mode
Calling card mode to select from Off
OffOff
Off, Prompt before call
Prompt before call Prompt before call
Prompt before call
or Always use calling card
Always use calling cardAlways use calling card
Always use calling card. If you have multiple calling cards,
select one from the Calling cards
Calling cardsCalling cards
Calling cards box first.
4. Tap the Done
DoneDone
Done button.
To delete a calling card, tap to select one in the Calling cards
Calling cardsCalling cards
Calling cards box
and then tap the Delete
DeleteDelete
Delete button.
To edit a calling card, tap to select one in the Calling cards
Calling cardsCalling cards
Calling cards box
and then tap the Edit
EditEdit
Edit button.
Divert calls
Divert callsDivert calls
Divert calls
1. After Divert call
Divert callDivert call
Divert call is selected, P31 will inquire the status of your
call waiting setting. This will take a few seconds.
2. According to the call type you want to setup, tap the Voice
Voi ceVoice
Voi ce or
Data & Fax
Data & FaxData & Fax
Data & Fax tab.
3. Tap to select a divert condition (for example, When busy divert
When busy divert When busy divert
When busy divert
to:
to:to:
to:) and then select from the following options:
• Voice mail
Voice mai lVoice mai l
Voice mail: divert the call to your voice mail-box.
• Lookup in contacts
Lookup in contactsLookup in contacts
Lookup in contacts: pick a number from your contacts.
• Enter number
Enter numberEnter number
Enter number: enter the number directly.
• Off
OffOff
Off: cancel diverting calls.
4. Tap the Done
DoneDone
Done button to exit.
Handsfree
HandsfreeHandsfree
Handsfree
With this function you can setup the way your P31 works with
the handsfree kit. Tap to select an option:

Using the Application Programs56
Options for Answering Mode
Options for Answering ModeOptions for Answering Mode
Options for Answering Mode
• Normal
NormalNormal
Normal: answer the call as normal.
• After 5 seconds
After 5 secondsAfter 5 seconds
After 5 seconds: the incoming call will be answered automati-
cally after 5 seconds.
You can press and hold the button on the controller of the hands-
free to answer and end calls.
Options for Bluetooth: Preferred sound device
Options for Bluetooth: Preferred sound deviceOptions for Bluetooth: Preferred sound device
Options for Bluetooth: Preferred sound device
• Phone
PhonePhone
Phone: use the keys on P31 to manage calls.
• Headset
HeadsetHeadset
Headset: use the keys on P31 or the headset to manage calls. If a
Bluetooth headset is used, please choose Headset as the pre-
ferred device.
• Handsfree
HandsfreeHandsfree
Handsfree: use the keys on P31 or the handsfree (Bluetooth car
kit) to manage calls. If a Bluetooth car kit is used, please choose
Handsfree as the preferred device.
Incoming Call Picture
Incoming Call PictureIncoming Call Picture
Incoming Call Picture
If the incoming caller has a picture stored in the Contact applica-
tion program, the picture will appear on the screen when his/her
call is received.
Tap to check or uncheck the Show large pop-up picture for
Show large pop-up picture for Show large pop-up picture for
Show large pop-up picture for
incoming calls
incoming callsincoming calls
incoming calls checkbox. If checked, the picture will be shown.
Restrict Calls
Restrict CallsRestrict Calls
Restrict Calls
You can request your network service provider to block the dial-
ing or receiving of certain calls. The call barring services require
the support of your network. To activate or cancel any of the
options, you must enter the network password provided by the
network service provider.
1. After Restrict calls
Restrict calls Restrict calls
Restrict calls is selected, P31 will inquire the status of
your current setting. This will take a few seconds.
2. According to the call type you want to setup, tap the Voice
Vo i c eVo i c e
Vo i ce or
Data & Fax
Data & FaxData & Fax
Data & Fax tab.
3. Tap to select a divert condition (for example, When busy divert
When busy divert When busy divert
When busy divert
to:
to:to:
to:) and then select from the following options:
• On
OnOn
On: enable call restriction.
• Off
OffOff
Off: disable call restriction.
4. Tap the Done
DoneDone
Done button. You will be asked to enter the restrict
code. Enter the code and tap the Done
DoneDone
Done button.
To change the restrict code, tap the Change password
Change password Change password
Change password button.
Voice Con trol
Voice Con trolVoice Cont rol
Voice Con trol
Here you can enable or disable the voice dialing function of P31.
To enable this function, tap to check the Voice dialing
Voice dialingVoice dialing
Voice dialing checkbox.
Check the Caller name playback
Caller name playbackCaller name playback
Caller name playback checkbox if you want P31 to play
the caller name (voice tag) before dialing.
Voice Mail
Voice MailVoice Mail
Voice Mail
You must enter the voice mail-box number here before you can
access your voice mail. The voice mail-box number is available
from your network service provider.
Enter your voice mail-box number and then tap the Done
DoneDone
Done but-
ton.
International Settings
International SettingsInternational Settings
International Settings
Use these settings to set your current location as well as the cur-
rency, distance and number formats for use in other application
programs.
You can access these settings on two different tabs: Location
LocationLocation
Location and
Numbers
NumbersNumbers
Numbers. Select appropriate settings from the drop-down menus
and then tap the Done
DoneDone
Done button.
Locks
LocksLocks
Locks
Using this feature, you can prevent unauthorized persons from
using your phone to make or receive phone calls. You can enable/

Using the Application Programs 57
disable the SIM card lock function and change the SIM card PIN
with this setting option.
• To enable or disable SIM card lock, tap to select At power on
At power onAt power on
At power on or
Off
OffOff
Off. If the SIM card lock is enabled, you will be prompted to
enter the PIN before entering the Phone on
Phone onPhone on
Phone on mode of P31.
• To change SIM card PIN, tap the Change Codes
Change CodesChange Codes
Change Codes tab and then tap
the Change SIM card PIN
Change SIM card PINChange SIM card PIN
Change SIM card PIN or Change SIM card PIN2
Change SIM card PIN2Change SIM card PIN2
Change SIM card PIN2 button.
Tap Do ne
DoneDone
Done to exit.
Time and Date
Time and DateTime and Date
Time and Date
Adjusting the time and date here sets these throughout your P31.
Adjusting Time and Date
Adjusting Time and DateAdjusting Time and Date
Adjusting Time and Date
1. In the Time & Date
Time & Date Time & Date
Time & Date tab, tap the Date
DateDate
Date box. A calendar will
appear on the screen.
2. Tap to select current date from the calendar.
3. Tap the Time
TimeTime
Time box and adjust current time. Tap the upper part
of the boxes that enclose the hour and minute to increase the
numbers, or the lower part of the boxes to decrease them.
4. Tap Summertime
SummertimeSummertime
Summertime if you want to use summertime. Select the
summertime zone(s) from the dialog that appears and then tap
the Done
DoneDone
Done button.
5. Tap the Done
DoneDone
Done button.
Changing Date Format
Changing Date FormatChanging Date Format
Changing Date Format
You can customize the display of times and dates throughout
your P31 on the Format
FormatFormat
Format tab.
Specifying Workdays
Specifying WorkdaysSpecifying Workdays
Specifying Workdays
In the Workdays
WorkdaysWorkdays
Workdays tab, you can specify the days of the week that
you normally work. You can set alarms in the Time application
program that only sound on a workday. Specifying the first day of
your week customizes the display of both Week and Month views
in the Agenda application program.
User greeting
User greetingUser greeting
User greeting
You can enable the user greeting by checking the checkbox. And
you can input your customized greetings in the dialog frame and
change colors and font types (italic, underline, bold).
By enabling the user greeting; next time when you turn on your
P31, your customized user greeting will pop up.
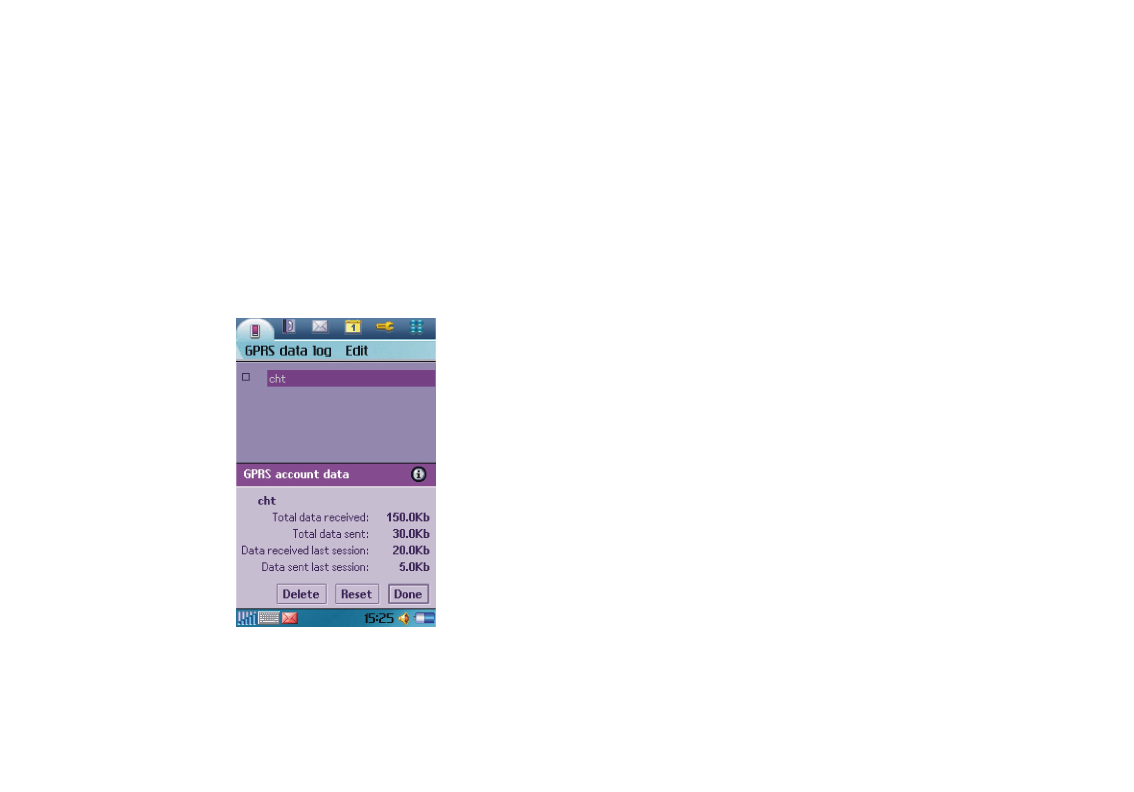
Using the Application Programs58
GPRS Data Log
You can use the GPRS data log to track the size of data sent and
received via the GPRS data connection.
Viewing GPRS Data Log
Viewing GPRS Data LogViewing GPRS Data Log
Viewing GPRS Data Log
1. Tap the GPRS data log
GPRS data logGPRS data log
GPRS data log application program icon in the Main
screen.
2. Tap to select a GPRS connection in the screen.
3. Related information, including total data sent, total data
received, data received last session and data sent last session,
will appear in a new dialog.
4. Tap Done
DoneDone
Done to close the dialog.
Resetting GPRS Data Count
Resetting GPRS Data CountResetting GPRS Data Count
Resetting GPRS Data Count
Tap Reset
ResetReset
Reset in the dialog.
Deleting GPRS Data Log
Deleting GPRS Data LogDeleting GPRS Data Log
Deleting GPRS Data Log
Tap Delete
DeleteDelete
Delete in the dialog.

Using the Application Programs 59
Internet
The Internet browser allows you to view information on the
World Wide Web or on WAP pages. You can also bookmark your
favorite pages or save them for off-line viewing.
Before you can use Internet, you need to set up an Internet
account in Control panel. If you intend to use certain WAP ser-
vices, it might also be necessary to set up a WAP account in Con-
trol panel.
Proxy settings for a WAP gateway should be set in the WAP
account. Other proxy settings should be set in the Internet
account.
Connecting to/Disconnecting from the Internet
Connecting to/Disconnecting from the InternetConnecting to/Disconnecting from the Internet
Connecting to/Disconnecting from the Internet
If your P31 is not connected to the Internet when you try to load
a Web page, it will connect automatically. It then remains con-
nected until the idle time you have specified in the Internet
accounts settings has elapsed or you disconnect manually.
To disconnect, tap on the Status bar and select Disconnect
DisconnectDisconnect
Disconnect.
Opening the Internet Browser
Opening the Internet BrowserOpening the Internet Browser
Opening the Internet Browser
Method 1
Method 1Method 1
Method 1
Press the Internet key on P31.
Method 2
Method 2Method 2
Method 2
Tap the Internet
InternetInternet
Internet application program icon in the Main screen.
Method 3
Method 3Method 3
Method 3
Tap a URL (web address) in a mail or message.
Opening Page
Opening PageOpening Page
Opening Page
1. Tap Internet
InternetInternet
Internet and select Open page
Open pageOpen page
Open page.
2. In the Location
LocationLocation
Location field, enter the web address and then tap Open
OpenOpen
Open.
If you have previously visited certain web pages, their addresses

Using the Application Programs60
will appear in the drop-down list. You can also tap to select one
from them.
To start browsing the Web, just tap any link on the page. Then
you can move around on the Web by simply tapping links. A link
can be an image or colored, underlined text. An image link is
shown with a thin, blue frame that fades away after a second.
After a page has been loaded, you can use Find
FindFind
Find and Find next
Find nextFind next
Find next in
the Internet
InternetInternet
Internet menu to search for a specific text on that page.
• Pages with frames and Java scripts may not display properly in
the browser.
• If some or all of the images on the web page can’t be displayed,
they will appear as . Try loading the data again by tapping
Internet and select Reload page or Load all images.
• To switch between full screen and normal view, tap Edit and
select Full screen, or simply press the key.
• To bring up a popup menu with useful commands, press the
key.
Working with Text
Working with TextWorking with Text
Working with Text
Finding Text
Finding TextFinding Text
Finding Text
To find certain text on a page:
1. Tap Internet
InternetInternet
Internet and select Find
FindFind
Find.
2. Enter the search keyword and specify the searching direction.
3. Tap Find
FindFind
Find. The found text will be highlighted on the page.
If necessary, tap Internet
InternetInternet
Internet and select Find next
Find next Find next
Find next to continue search-
ing.
Scanning Text
Scanning TextScanning Text
Scanning Text
Web pages will be outlined as you are used to see it on your PC.
This makes it easier for you to recognize the page and find the
way to your favorite spots. To make it even easier you can use the
Scan text function. It will visually scan for the most text frequent
part of the page. Tap Internet
InternetInternet
Internet and select Scan text
Scan textScan text
Scan text.
Key Operations When Browsing
Key Operations When BrowsingKey Operations When Browsing
Key Operations When Browsing
When browsing, you can use the following keys to conveniently
move through the web pages and links.
Scrolling Pages
Scrolling PagesScrolling Pages
Scrolling Pages
• Press the key to scroll page up.
• Press the key to scroll page down.
• Press the key to scroll page left.
• Press the key to scroll page right.
Link Navigation
Link NavigationLink Navigation
Link Navigation
• Use the keys and , or and ,
to select and navigate between links. A selected link is high-
lighted.
• Press to open a selected link.
• Press to return to the previous page.
• If a link is highlighted when you want to use the Scan text func-
tion, press any of the normal scrolling keys , ,
or .
Bookmarking Pages
Bookmarking PagesBookmarking Pages
Bookmarking Pages
1. Navigate to the page you want to bookmark.
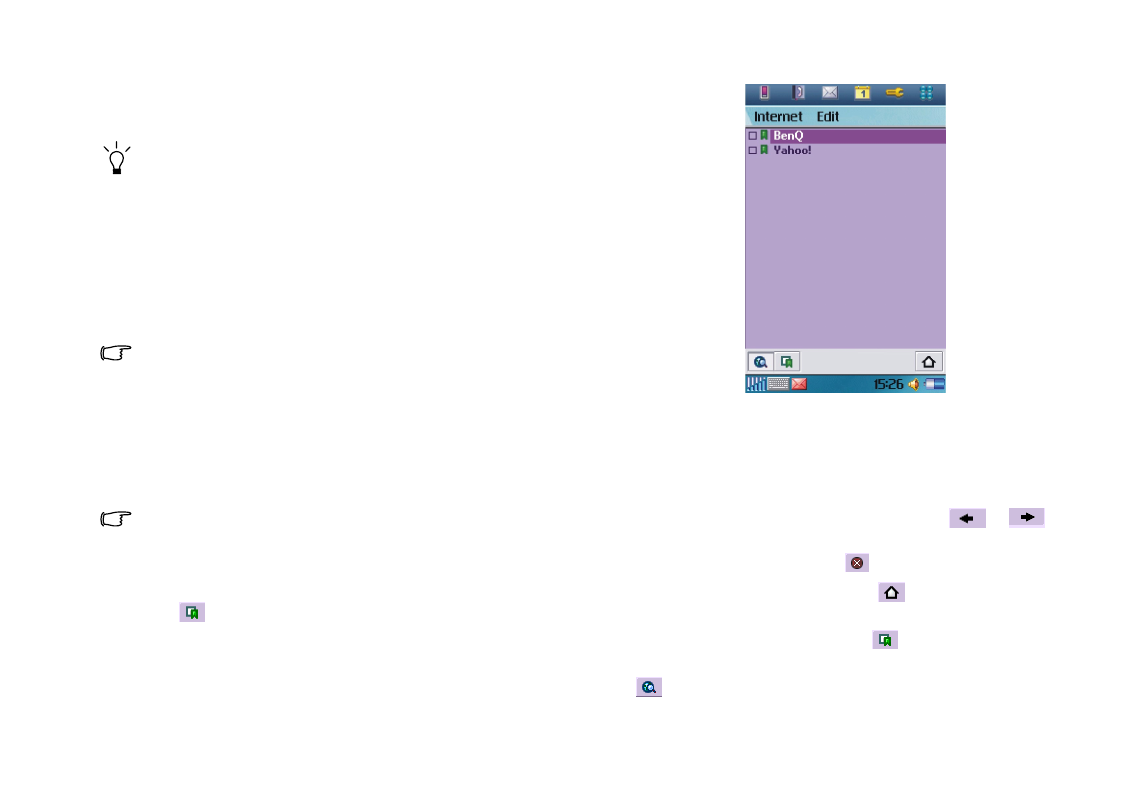
Using the Application Programs 61
2. Tap Internet
InternetInternet
Internet and select Add to bookmarks
Add to bookmarksAdd to bookmarks
Add to bookmarks.
3. Enter the bookmark name in the Name
NameName
Name field and select a loca-
tion where the bookmark will be saved in the Folder
FolderFolder
Folder drop-
down list, and then tap Done
DoneDone
Done.
Alternatively, you can bookmark a page by tapping and holding the
link to the page and select Add to bookmarks.
Saving Pages for Off-Line Browsing
Saving Pages for Off-Line BrowsingSaving Pages for Off-Line Browsing
Saving Pages for Off-Line Browsing
1. Navigate to the page you want to save.
2. Tap Internet
InternetInternet
Internet and select Save page
Save pageSave page
Save page.
3. Enter the name for the page in the Name
NameName
Name field and select a loca-
tion where the page will be saved in the Folder
FolderFolder
Folder drop-down list,
and then tap Done
DoneDone
Done.
• This saves the information on the Web page. However, images
and sounds will not be saved.
• Some Web pages are not allowed to be cached. These pages can
not be saved.
To o p e n a sav ed pa g e :
1. Go to the Bookmarks view.
2. Tap the name of the saved page that you want to open.
If you tap a link on a saved page, you will probably get an error
message because the linked page is not available offline.
Going to Bookmarked Pages
Going to Bookmarked PagesGoing to Bookmarked Pages
Going to Bookmarked Pages
1. Tap Internet
InternetInternet
Internet and select Bookmarks
BookmarksBookmarks
Bookmarks. Alternatively, you can tap
the button on the browser screen.
2. The bookmark list screen will appear.
Tap a bookmark and the bookmarked page will appear on the
browser screen.
Operations When Viewing Pages
Operations When Viewing PagesOperations When Viewing Pages
Operations When Viewing Pages
Pages and Bookmarks
Pages and BookmarksPages and Bookmarks
Pages and Bookmarks
• To move among recently visited pages, tap the or
button.
• To stop loading a page, tap the button.
• To return to the home page, tap the button. See "Basic
Options" on page 63 for how to setup your home page.
• To go to the bookmark list, tap the button.
• To return from the bookmark list to the browser screen, tap the
button.

Using the Application Programs62
Links to Pages
Links to PagesLinks to Pages
Links to Pages
• To open a link, tap the link or tapping and holding the link and
then select Open link
Open linkOpen link
Open link.
• To view link information, tap and hold the link and then select
Link information
Link informationLink information
Link information.
Links to Phone Numbers
Links to Phone NumbersLinks to Phone Numbers
Links to Phone Numbers
• To make a call to the phone number, tap and hold the link and
then select Call
CallCall
Call.
• To send an SMS to the phone number, tap and hold the link and
then select New SMS
New SMSNew SMS
New SMS.
• To send an MMS to the phone number, tap and hold the link
and then select New MMS
New MMSNew MMS
New MMS.
• To add the phone number to your contacts, tap and hold the
link and then select New contact
New contactNew contact
New contact.
Links to Email
Links to EmailLinks to Email
Links to Email
• To send an Email to the link address, tap and hold the link and
then select New Email
New EmailNew Email
New Email.
• To send an MMS to the link address, tap and hold the link and
then select New MMS
New MMSNew MMS
New MMS.
• To add the Email address to your contacts, tap and hold the link
and then select New contact
New contactNew contact
New contact.
Images
ImagesImages
Images
• To save an image on the page, tap and hold the image and select
Save image
Save imageSave image
Save image.
• To copy an image to the clipboard, tap and hold the image and
select Copy image
Copy imageCopy image
Copy image.
• To view an image in a separate image viewer, tap and hold the
image and select View image
View imageView image
View image.
• To send an image, tap and hold the image and select Send image
Send image Send image
Send image
as
asas
as.
Managing Bookmarks
Managing BookmarksManaging Bookmarks
Managing Bookmarks
Deleting Bookmarks
Deleting BookmarksDeleting Bookmarks
Deleting Bookmarks
1. Tap the button to go to the bookmark list.
2. Tap the checkbox beside each bookmark item to select it. You
can select multiple bookmarks.
3. Tap Internet
InternetInternet
Internet and select Delete
DeleteDelete
Delete.
4. Tap Yes
YesYes
Ye s .
Editing Bookmarks
Editing BookmarksEditing Bookmarks
Editing Bookmarks
1. Tap the button to go to the bookmark list.
2. Tap the checkbox beside a bookmark item to select it.
3. Tap Edit
EditEdit
Edit and select Edit
EditEdit
Edit.
4. Tap Edit
EditEdit
Edit.
5. Edit the location, name, folder of the bookmark or preferred
WAP account for connecting to this page and then tap the
Done
DoneDone
Done button.
Sending Bookmarks
Sending BookmarksSending Bookmarks
Sending Bookmarks
1. Tap the button to go to the bookmark list.
2. Tap the checkbox beside a bookmark item to select it.
3. Tap Edit
EditEdit
Edit and select Edit
EditEdit
Edit.
4. Tap Send as
Send asSend as
Send as.
5. Select a method for sending the bookmark and then tap the
Done
DoneDone
Done button.