Broadcom BRCM1002-H 802.11b WLAN Mini-PCI Module User Manual Ryan Startup and Ref Guide 3355

Broadcom Corporation 802.11b WLAN Mini-PCI Module Ryan Startup and Ref Guide 3355

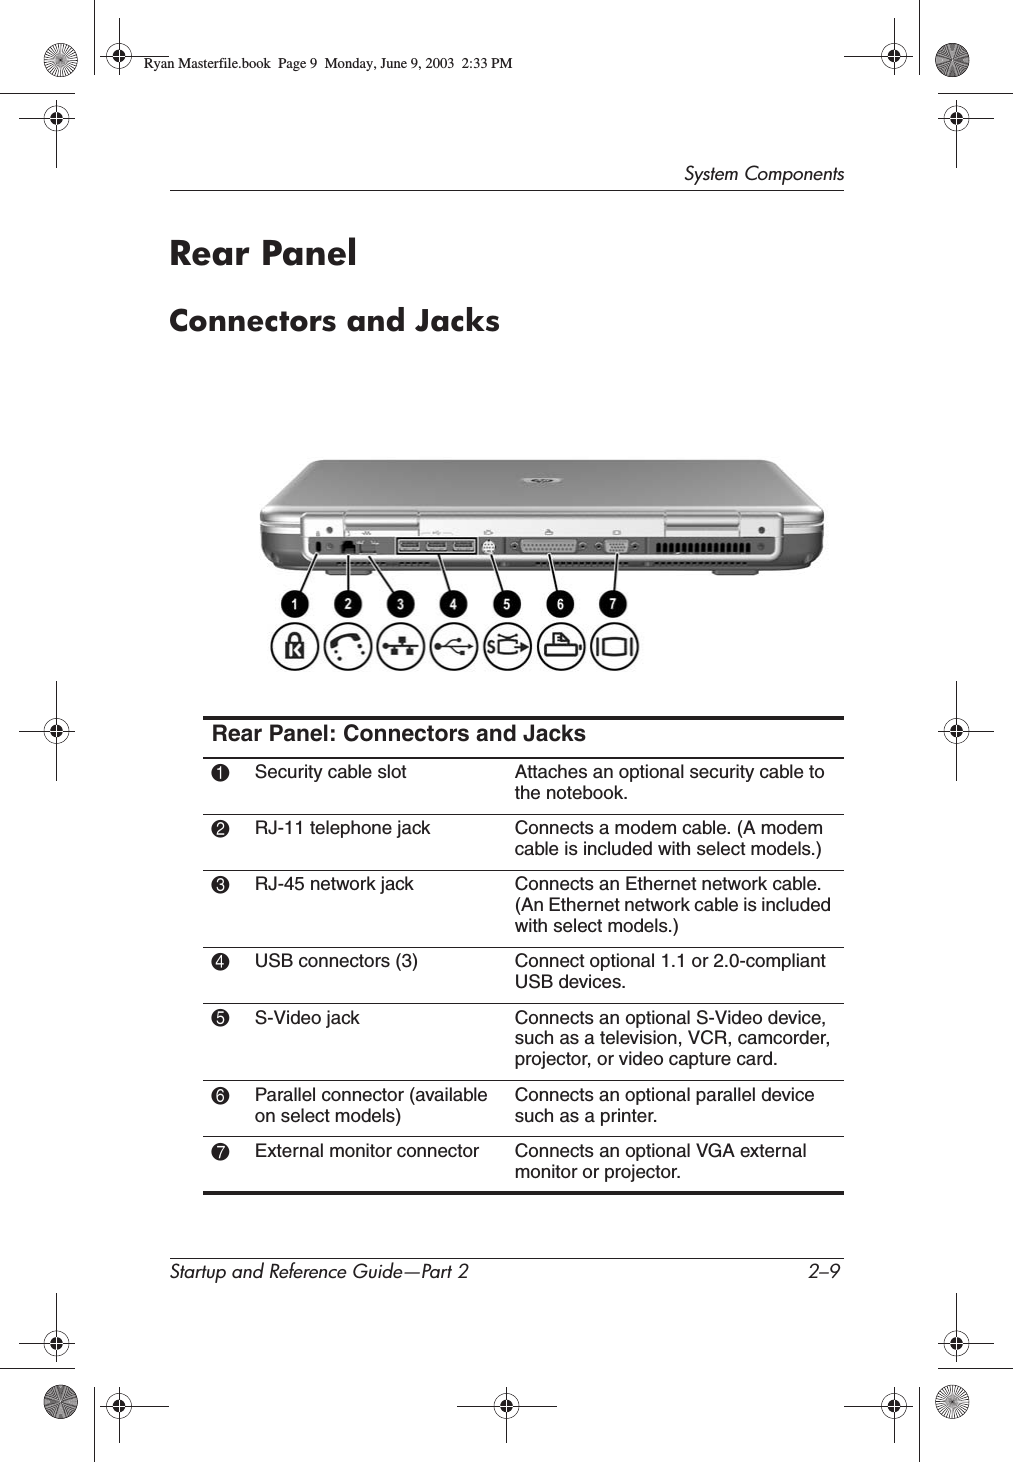
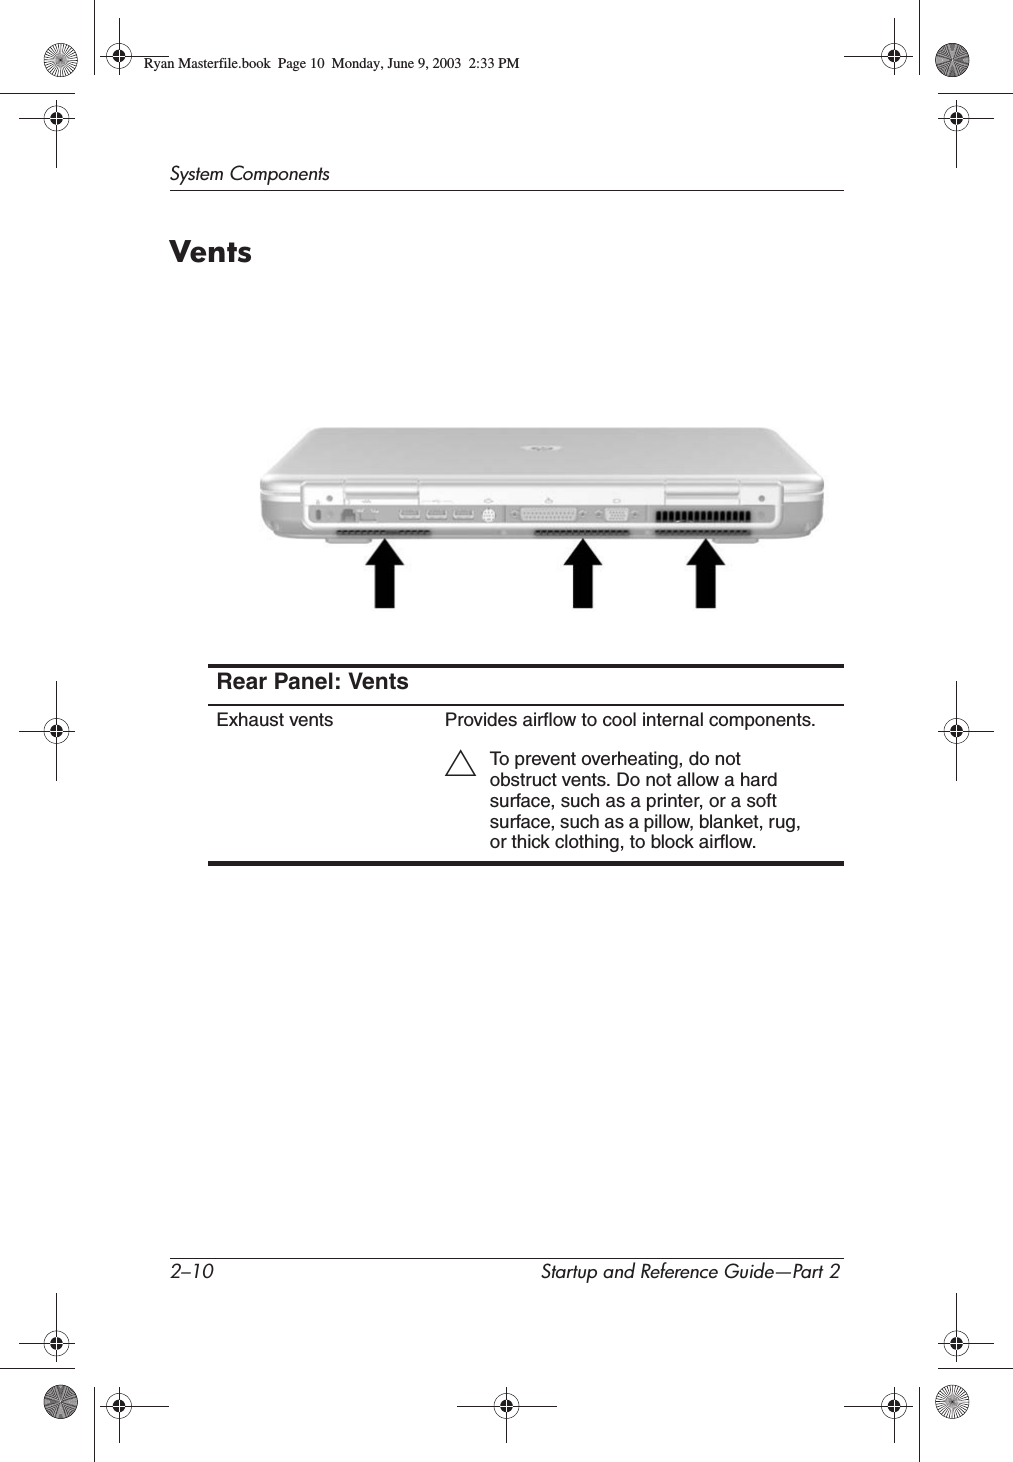
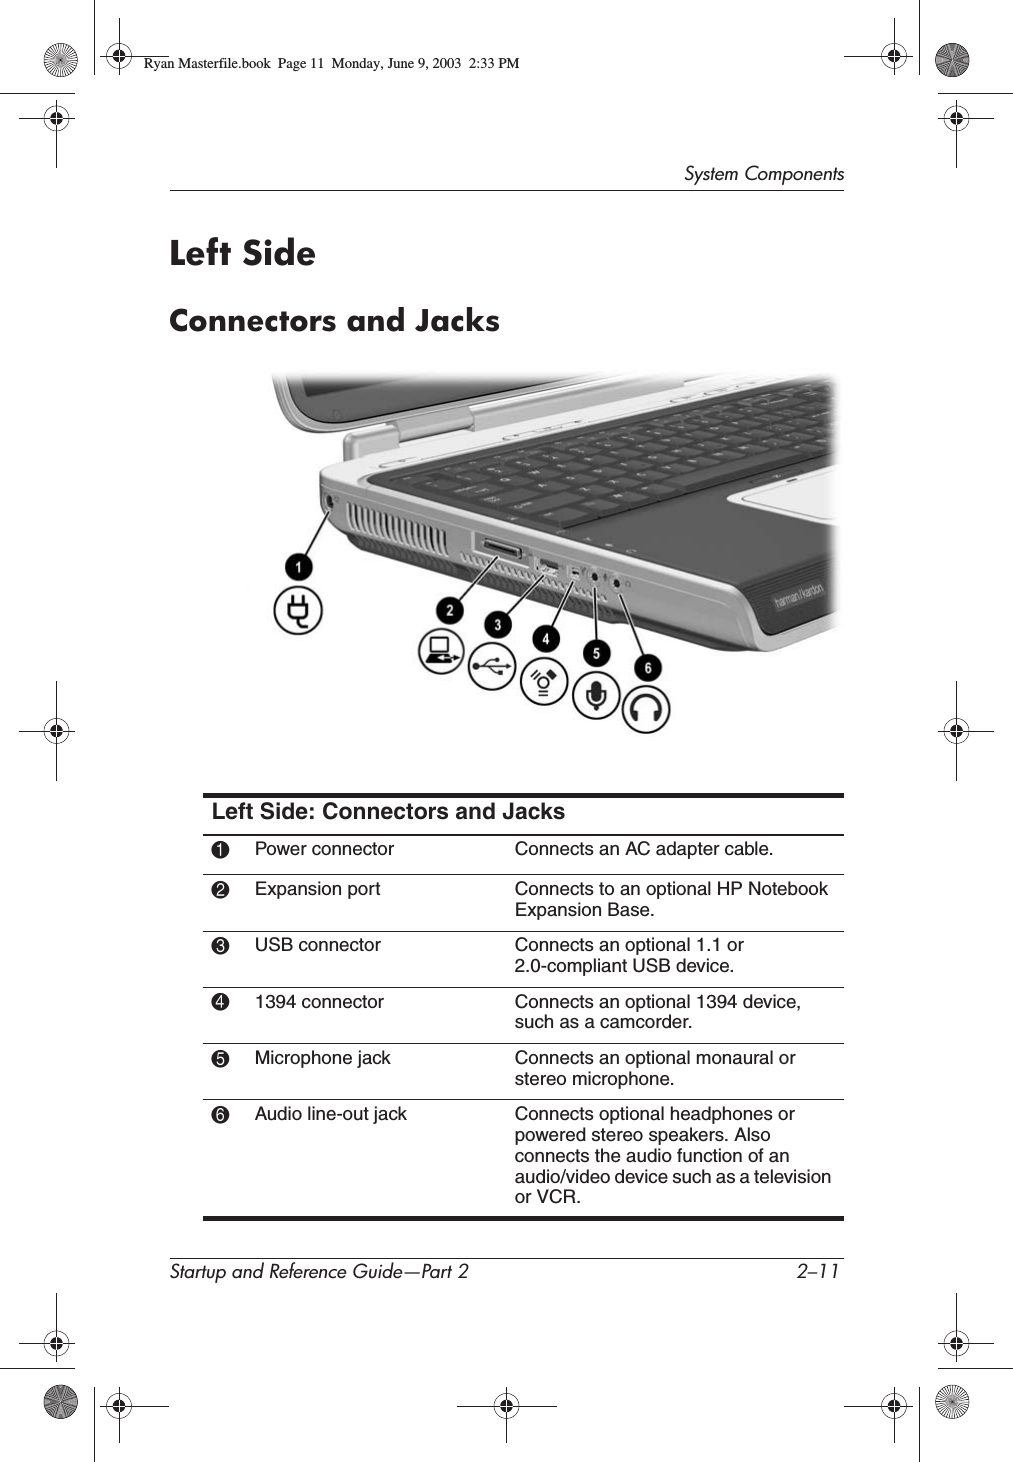
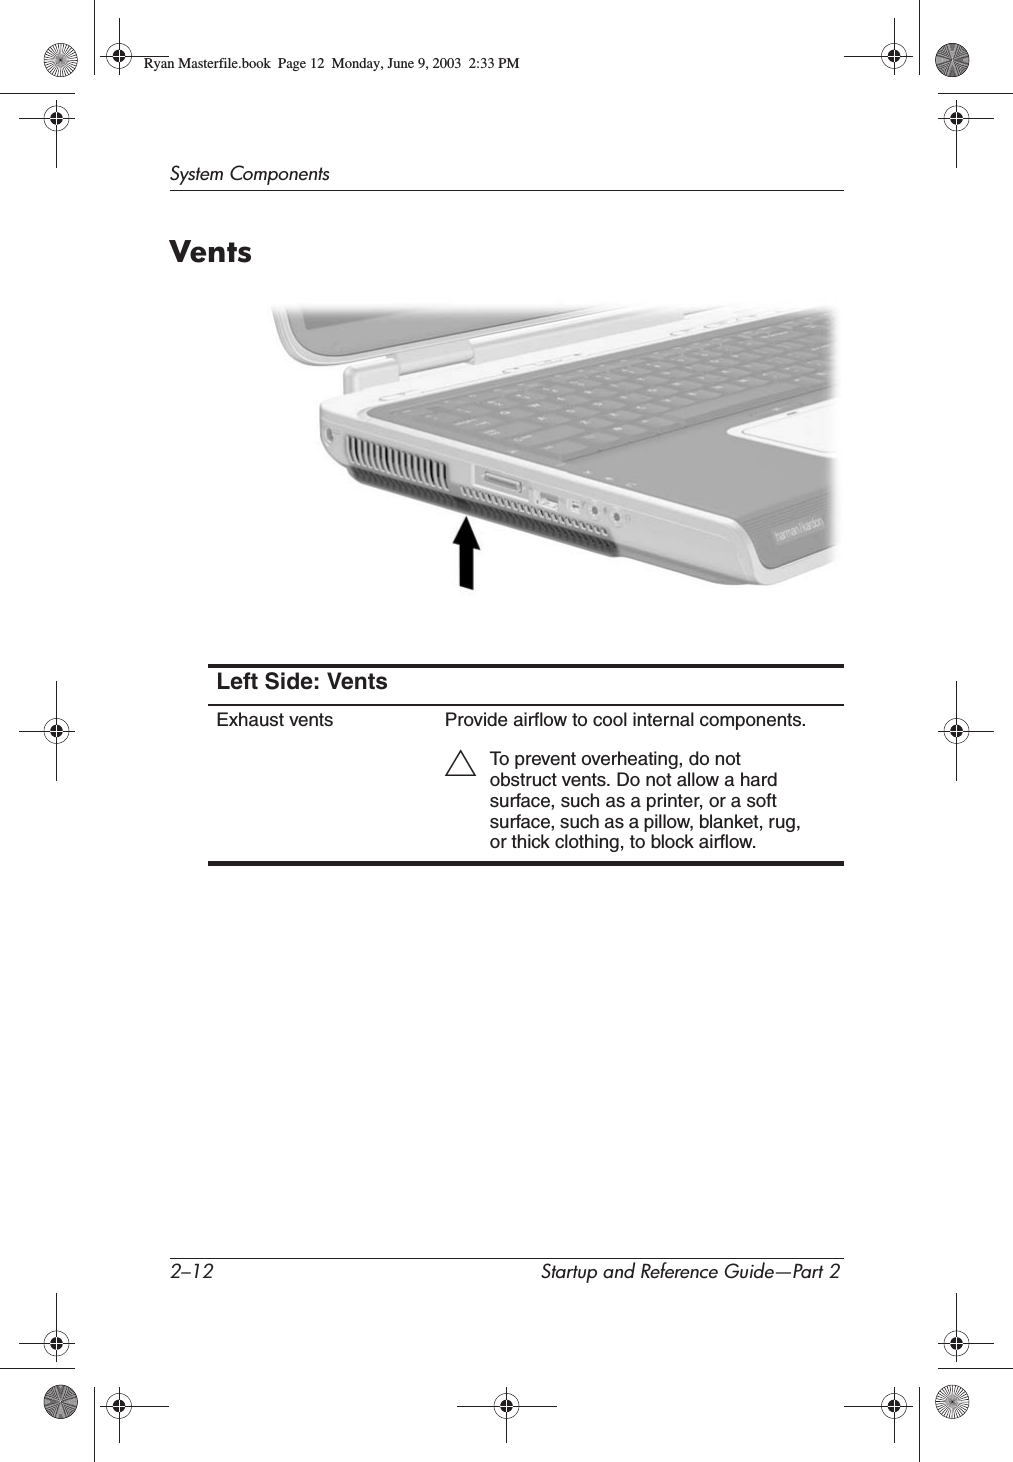
CRN 10069 Q2 HP PP2180 user manual 1 of 2

Startup and Reference GuideHP Notebook SeriesDocument Part Number: 335555-001August 2003Part 1: StartupThe Startup part of this guide explains how to set up your notebook for the first time.Part 2: ReferenceThe Reference part of this guide explains how to identify and use the hardware and software features on your notebook.Ryan Masterfile.book  Page i  Monday, June 9, 2003  2:33 PM
Contents1Startup2 System Components3 Keyboard4Power5 Drives6 Multimedia7 Communications8 Hardware Options and Upgrades9 Software Updates, Restorations and UtilitiesA SpecificationsIndexRyan Masterfile.book  Page ii  Monday, June 9, 2003  2:33 PM
Startup and Reference Guide—Part 1 1–1Part-1StartupThis Startup and Reference Guide provides information about setting up and using your notebook.■To set up your notebook hardware and software for the first time, follow the procedures in “Part 1: Startup”.■To learn more about using your notebook, refer to “Part 2: Reference.” To find information about a specific topic:❏Refer to the contents list on the first page of each chapter,or❏Refer to the Index.Ryan Masterfile.book  Page 1  Monday, June 9, 2003  2:33 PM
1–2 Startup and Reference Guide—Part 1StartupSetting Up the HardwareTo set up the notebook for the first time, you need the notebook, the power cord 1, the AC adapter 2, and the battery pack 3.Insert the battery pack into the notebook, so that the battery can begin to charge as soon as the notebook is connected to external power. (Refer to the next section for details.)Open the notebook, connect it to external power, and press the power button to turn on the notebook.Identifying the AC adapter, the power cord, and the battery pack (Power cords vary by region and country.)Ryan Masterfile.book  Page 2  Monday, June 9, 2003  2:33 PM
StartupStartup and Reference Guide—Part 1 1–3Inserting a Battery PackTo insert the battery pack into the battery bay:1. Turn the notebook upside down on a flat surface.2. Insert the alignment tab on the battery pack into the alignment slot on the notebook.3. Tilt the battery pack downward until it snaps into place.Inserting a battery packÄCAUTION: To ensure that the correct drivers load and to prevent file corruption or damage to components, do not remove the battery pack until the notebook has been connected to external power.Ryan Masterfile.book  Page 3  Monday, June 9, 2003  2:33 PM
1–4 Startup and Reference Guide—Part 1StartupOpening the NotebookTo open the notebook:1. Place the notebook display-side up on a flat surface near an electrical outlet.2. Slide the display release latch 1, then lift the display 2.Opening the notebookRyan Masterfile.book  Page 4  Monday, June 9, 2003  2:33 PM
StartupStartup and Reference Guide—Part 1 1–5Connecting the Notebook to External PowerTo connect the notebook to external power:1. Plug the AC adapter cable into the power connector 1.2. Plug the power cord into the AC adapter 2, then into an electrical outlet 3.As soon as the notebook is connected to external power, the battery light turns on, and the battery pack begins to charge.Connecting the notebook to external powerRyan Masterfile.book  Page 5  Monday, June 9, 2003  2:33 PM
1–6 Startup and Reference Guide—Part 1StartupCharging a New Battery PackThe battery pack begins to charge as soon as the notebook is connected to external power. Charge status is indicated by the battery charge light.The battery charge light is on while the battery pack is charging. HP recommends that you leave the notebook connected to external power until the battery pack is fully charged and the battery charge light turns off.A partially charged new battery pack can run the notebook, but battery charge displays will not be accurate until the new battery pack has been fully charged.Identifying the battery lightRyan Masterfile.book  Page 6  Monday, June 9, 2003  2:33 PM
StartupStartup and Reference Guide—Part 1 1–7Turning On the NotebookTo turn on the notebook, press the power button. When the notebook turns on, the power/standby button lights up, the power/standby light turns on, and you are prompted to begin software setup.Turning on the notebookIf the Notebook Does Not Turn On■Make sure that the AC adapter is securely plugged into an electrical outlet.■Make sure that the outlet is providing power. (To confirm that the outlet is providing power, plug another device into the outlet.)■If you have installed a battery pack, make sure that the battery pack is firmly seated.■Refer to the Worldwide Telephone Numbers booklet included with the notebook to contact an HP Customer Care Center.Ryan Masterfile.book  Page 7  Monday, June 9, 2003  2:33 PM
1–8 Startup and Reference Guide—Part 1StartupSetting Up the SoftwareÄCAUTION: To prevent file corruption and ensure that the correct drivers are installed, install software only when the notebook is connected to external power through the AC adapter. During the installation: ■Do not unplug the notebook from external power.■Do not shut down the notebook or initiate Standby or Hibernation.■Do not insert, remove, connect, or disconnect any device, cable, or cord.Installing Basic SoftwareWhen the notebook is connected to external power and turned on for the first time, a prompt to set up the operating system and other basic software is displayed on the screen. Before responding to the prompt and proceeding through the on-screen instructions, read the following carefully and follow the installation instructions in this chapter.■After beginning the software setup, you must complete the entire process without interruption. Setup time varies.■If you are prompted to select a language, choose carefully. On some models, the languages that you do not choose are deleted from the system and cannot be restored during the installation.■Regional settings and most other preferences can be selected or changed later, after the operating system is installed.■When you are prompted to accept the End User License Agreement, you must choose Accept to continue the software setup.✎During setup, it is normal for some notebook models to pause occasionally for up to 2 minutes and to restart several times. These pauses and restarts occur only during initial software setup. They will not occur during routine Windows startups.Ryan Masterfile.book  Page 8  Monday, June 9, 2003  2:33 PM
StartupStartup and Reference Guide—Part 1 1–9Installing Optional SoftwareInstructions for installing and using many of the applications and utilities included with the notebook are provided later in this guide. If you prefer to install optional software now, the following information may be helpful.To install an application or a utility from a CD, refer to the instructions included with the CD. If printed instructions are not included in the CD package, they may be displayed on the screen when the CD is inserted.To view or install preloaded utilities or applications, select Start > All Programs > Software Setup. Then:■To display the descriptions and space requirements of a preloaded item without installing it, select the Next button, then select an item. After viewing the information, select the Cancel button.■To install a preloaded item, select the check box for the item, select the Next button, then follow the instructions on the screen.Ryan Masterfile.book  Page 9  Monday, June 9, 2003  2:33 PM
1–10 Startup and Reference Guide—Part 1StartupSetting Regional and Display PreferencesKeyboard language and other regional preferences, such as time, date, and currency format, are set in the Regional Options window of the operating system. To access the Regional Options window, select Start > Control Panel > Date, Time, Language and Regional Options icon.Screen appearance settings are accessed from the operating system Appearance and Themes window. To access the Appearance and Themes window, select Start > Control Panel > Appearance and Themes icon. To access the settings that control the size of the items displayed on the screen, select the Change Resolution task.Turning Off the NotebookTurn off the notebook by using the Windows shutdown procedure. Select Start > Turn Off Computer > Turn Off.If the notebook does not respond, try the following emergency shutdown procedures in the order below:■Press ctrl+alt+delete, click the Shut Down button, then select Shut Down from the drop down list.■Press and hold down the power button for at least 4 seconds.■Unplug the notebook from external power and remove the battery pack. For instructions refer to “Replacing a Battery Pack” in Chapter 4.Ryan Masterfile.book  Page 10  Monday, June 9, 2003  2:33 PM
StartupStartup and Reference Guide—Part 1 1–11Using the Notebook SafetlyProtecting the Notebook Against Computer VirusesWhen you use the notebook for email, network, or Internet access, you expose the notebook to computer viruses. Computer viruses can disable the operating system, your applications, or your utilities or cause them to function abnormally.Antivirus software can detect most viruses, destroy them, and in most cases repair damage they have caused. To provide protection against newly discovered viruses, antivirus software must be updated. For antivirus instructions and more information about virus updates, refer to the Help file within the application or select Start > Help and Support.Ryan Masterfile.book  Page 11  Monday, June 9, 2003  2:33 PM
1–12 Startup and Reference Guide—Part 1StartupProtecting the Notebook from Power SurgesTo protect the notebook from the power surges that may be caused by an unreliable power supply or an electrical storm:■Plug the notebook power cord into an optional, high-quality surge protector available from most computer or electronic retailers.■Provide surge protection for the cable that connects the modem to the telephone jack.■During an electrical storm, run the notebook on battery power or shut down the notebook and disconnect the power cord.This equipment has been tested and found to comply with the limits for a Class B digital device, pursuant to part 15 of the FCC Rules. For more information, refer on the Documentation Library CD to the Regulatory and Safety Notices.ÅWARNING: To reduce the risk of electric shock or damage to your equipment:■Plug the power cord into an electrical outlet that is easily accessible at all times.■Disconnect power from the product by unplugging the power cord from the electrical outlet.■If provided with a three-pin attachment plug on your power cable, plug the cable into a grounded (earthed) three-pin outlet. Do not disable the power cord grounding pin. The grounding pin is an important safety feature.Ryan Masterfile.book  Page 12  Monday, June 9, 2003  2:33 PM
StartupStartup and Reference Guide—Part 1 1–13ÅWARNING: To reduce the risk of serious injury, read the Safety & Comfort Guide. It describes proper workstation setup, posture, and health and work habits for computer users, and provides important electrical and mechanical safety information. This guide is located on the Web at http://www.hp.com/ergo and on the hard drive or on the Documentation Library CD that is included with the product.ÅWARNING: This notebook is designed to run demanding applications at full power. As a result of increased power consumption, it is normal for the notebook to feel warm or hot when used continuously. To avoid potential discomfort or burns, do not block the air vents or use the notebook on your lap for extended periods. The notebook complies with the user-accessible surface temperature limits defined by the International Standard for Safety of Information Technology Equipment (IEC 60950).Getting HelpIf you cannot solve a notebook problem by using this guide or the supplementary information, including the Troubleshooting guide, on the Documentation Library CD, you may need to contact HP.Using the Help and Support CenterInstalled on your notebook desktop is the Help and Support Center that provides a comprehensive online resource tool that can be used for the following:■Troubleshooting assistance■Downloading the latest driver updates and product information■Learning more about using and maintaining your notebookRyan Masterfile.book  Page 13  Monday, June 9, 2003  2:33 PM
1–14 Startup and Reference Guide—Part 1StartupWith the Help and Support Center, you can get immediate assistance before contacting an HP support specialist. For example, in Help and Support, you can:■Troubleshoot and fix common notebook problems.■Learn how to use the software tools for working with your favorite music, video, games, and photos (select models).■Get basic and detailed information about Windows XP for customizing your notebook.■Set up your notebook for networking and for communicating on the Web.■Use administration tools to manage areas such as passwords, file backups, system restore, and user accounts.■Learn how to print, fax, run performance and maintenance tools, and install and configure new hardware.■Protect your notebook files by using security and privacy features such as Norton AntiVirus software.■Undo changes to your notebook with System Restore.■Improve performance of your hard drive and battery pack.■Download the latest drivers, utilities, software updates, and product documentation for your notebook.■Use Tools to view notebook information and diagnose problems.■Keep your notebook up-to-date using Windows Update.■Find compatible hardware and software.To access the online Help and Support Center:1. Press the fn+f1 hotkey or select Start > Help and Support.2. Follow the on-screen directions to select the online Help and Support Center feature that you need.Ryan Masterfile.book  Page 14  Monday, June 9, 2003  2:33 PM
StartupStartup and Reference Guide—Part 1 1–15Contacting Technical SupportIf you cannot solve a problem using the Help and Support Center installed on your notebook or the documentation provided with your notebook, you can call technical support. To obtain a list of worldwide customer support telephone numbers, use either of the following methods:■Select Start > Control Panel > Performance and Maintenance icon > System icon. Then, near the lower edge of the System Properties window, select the Support Information button.■Refer to the Worldwide Telephone Numbers booklet included with the notebook to contact an HP Customer Care Center.To provide the fastest possible resolution of your problem, have the notebook and the following information available when you call:■Notebook serial number and model description, which are provided on labels affixed to the bottom of the notebook.■Purchase date, as marked on your sales receipt/invoice.■Conditions under which the problem occurred.■Error messages that have displayed.■Manufacturer and model of any optional printer connected.■Operating system version number and registration number.To view these numbers, select Start > Control Panel > System > General tab.■Determine the version of the system ROM installed on the notebook.Ryan Masterfile.book  Page 15  Monday, June 9, 2003  2:33 PM
1–16 Startup and Reference Guide—Part 1StartupRyan Masterfile.book  Page 16  Monday, June 9, 2003  2:33 PM
Startup and Reference Guide—Part 2Part 2ReferenceRyan Masterfile.book  Page 1  Monday, June 9, 2003  2:33 PM
Ryan Masterfile.book  Page 2  Monday, June 9, 2003  2:33 PM
Startup and Reference Guide—Part 2 2–12System ComponentsContentsDisplay . . . . . . . . . . . . . . . . . . . . . . . . . . . . . . . . . . . . . . .  2–2Top . . . . . . . . . . . . . . . . . . . . . . . . . . . . . . . . . . . . . . . . . .  2–3TouchPad . . . . . . . . . . . . . . . . . . . . . . . . . . . . . . . . . .  2–3Keys . . . . . . . . . . . . . . . . . . . . . . . . . . . . . . . . . . . . . .  2–4Power Controls  . . . . . . . . . . . . . . . . . . . . . . . . . . . . .  2–5Lights . . . . . . . . . . . . . . . . . . . . . . . . . . . . . . . . . . . . .  2–6Audio Buttons . . . . . . . . . . . . . . . . . . . . . . . . . . . . . .  2–7Front Panel . . . . . . . . . . . . . . . . . . . . . . . . . . . . . . . . . . . .  2–8Rear Panel  . . . . . . . . . . . . . . . . . . . . . . . . . . . . . . . . . . . .  2–9Connectors and Jacks. . . . . . . . . . . . . . . . . . . . . . . . .  2–9Vents . . . . . . . . . . . . . . . . . . . . . . . . . . . . . . . . . . . .  2–10Left Side . . . . . . . . . . . . . . . . . . . . . . . . . . . . . . . . . . . . .  2–11Connectors and Jacks. . . . . . . . . . . . . . . . . . . . . . . .  2–11Vents  . . . . . . . . . . . . . . . . . . . . . . . . . . . . . . . . . . . . . . .  2–12Right Side. . . . . . . . . . . . . . . . . . . . . . . . . . . . . . . . . . . .  2–13Bottom . . . . . . . . . . . . . . . . . . . . . . . . . . . . . . . . . . . . . .  2–14Bays and Memory Compartment. . . . . . . . . . . . . . .  2–14Vents . . . . . . . . . . . . . . . . . . . . . . . . . . . . . . . . . . . .  2–15Labels. . . . . . . . . . . . . . . . . . . . . . . . . . . . . . . . . . . .  2–16Additional Standard Components  . . . . . . . . . . . . . . . . .  2–17Cables and Cord. . . . . . . . . . . . . . . . . . . . . . . . . . . .  2–17Adapters and Battery Pack  . . . . . . . . . . . . . . . . . . .  2–18Restoration and Documentation CDs  . . . . . . . . . . .  2–19Ryan Masterfile.book  Page 1  Monday, June 9, 2003  2:33 PM
2–2 Startup and Reference Guide—Part 2System ComponentsDisplayDisplayDisplay release latch Opens the notebook.Ryan Masterfile.book  Page 2  Monday, June 9, 2003  2:33 PM
System ComponentsStartup and Reference Guide—Part 2 2–3TopTouchPadTop: TouchPad1TouchPad on/off button Enables/disables the TouchPad.2TouchPad light On: TouchPad is enabled.3TouchPad scroll zone* Scroll up or down.4Left and right TouchPad buttons*Function like the left and right buttons on an external mouse.5TouchPad* Moves the pointer and selects or activates items on the screen.*This table describes default settings. For information about changing the functions of TouchPad features, refer to “Setting TouchPad Preferences” inchapter 3.Ryan Masterfile.book  Page 3  Monday, June 9, 2003  2:33 PM
2–4 Startup and Reference Guide—Part 2System ComponentsKeysTop: Keys1Function keys Perform system and application tasks. When combined with the fn key, the function keys f1and f3 through f12perform additional tasks as hotkeys.Refer to the “Hotkey Quick Reference” section in chapter 3 for details.2fn key Combines with other keys to perform system tasks. For example, pressing fn+f8 increases screen brightness.3Microsoft logo key Displays the Windows Start menu.4Applications key Displays a shortcut menu for items beneath the pointer.5Keypad keys (17) Standard numeric keypad.Ryan Masterfile.book  Page 4  Monday, June 9, 2003  2:33 PM
System ComponentsStartup and Reference Guide—Part 2 2–5Power ControlsTop: Power ControlsPower button* When the notebook is:■Off, press to turn on the notebook.■On, briefly press to initiate Hibernation.■In Standby, briefly press to resume from Standby.■In Hibernation, briefly press to restore from Hibernation.✎If the system has stopped responding and Windows shutdown procedures cannot be used, press and hold for at least 4 seconds to turn off the notebook.*This table describes default settings. For information about changing the function of the power button or display switch, refer to “ManagingPower Options” in chapter 4.Ryan Masterfile.book  Page 5  Monday, June 9, 2003  2:33 PM
2–6 Startup and Reference Guide—Part 2System ComponentsLightsTop: Lights1Wireless On/Off light On: An integrated wireless device has been enabled.2Caps lock light On: Caps lock is on.3Num lock light On: Num lock or the keypad is on.Ryan Masterfile.book  Page 6  Monday, June 9, 2003  2:33 PM
System ComponentsStartup and Reference Guide—Part 2 2–7Audio ButtonsTop: Audio Buttons1Decrease volume button Pressing the left side, decreases system volume.2Mute button Mutes or restores volume.3Increase volume button Pressing the right side, increases system volume.Ryan Masterfile.book  Page 7  Monday, June 9, 2003  2:33 PM
2–8 Startup and Reference Guide—Part 2System ComponentsFront PanelFront Panel1Display release latch Opens the notebook.2Stereo speakers (2) Produce stereo sound.3Hard drive activity light On: The internal hard drive is being accessed.4AC power light On: The notebook is receiving AC power. 5Battery light On: The notebook is receiving battery power.Flashing: A battery pack is malfunctioning and may need to be replaced.6Power/standby light On: Notebook is turned on.Flashing: Notebook is in Standby.Ryan Masterfile.book  Page 8  Monday, June 9, 2003  2:33 PM
System ComponentsStartup and Reference Guide—Part 2 2–9Rear PanelConnectors and JacksRear Panel: Connectors and Jacks1Security cable slot Attaches an optional security cable to the notebook.2RJ-11 telephone jack Connects a modem cable. (A modem cable is included with select models.)3RJ-45 network jack  Connects an Ethernet network cable. (An Ethernet network cable is included with select models.)4USB connectors (3) Connect optional 1.1 or 2.0-compliant USB devices.5S-Video jack Connects an optional S-Video device, such as a television, VCR, camcorder, projector, or video capture card.6Parallel connector (available on select models)Connects an optional parallel device such as a printer.7External monitor connector Connects an optional VGA external monitor or projector.Ryan Masterfile.book  Page 9  Monday, June 9, 2003  2:33 PM
2–10 Startup and Reference Guide—Part 2System ComponentsVentsRear Panel: VentsExhaust vents Provides airflow to cool internal components.ÄTo prevent overheating, do not obstruct vents. Do not allow a hard surface, such as a printer, or a soft surface, such as a pillow, blanket, rug, or thick clothing, to block airflow.Ryan Masterfile.book  Page 10  Monday, June 9, 2003  2:33 PM
System ComponentsStartup and Reference Guide—Part 2 2–11Left SideConnectors and JacksLeft Side: Connectors and Jacks1Power connector Connects an AC adapter cable.2Expansion port Connects to an optional HP Notebook Expansion Base.3USB connector Connects an optional 1.1 or 2.0-compliant USB device.41394 connector  Connects an optional 1394 device, such as a camcorder.5Microphone jack Connects an optional monaural or stereo microphone.6Audio line-out jack Connects optional headphones or powered stereo speakers. Also connects the audio function of an audio/video device such as a television or VCR.Ryan Masterfile.book  Page 11  Monday, June 9, 2003  2:33 PM
2–12 Startup and Reference Guide—Part 2System ComponentsVentsLeft Side: VentsExhaust vents Provide airflow to cool internal components.ÄTo prevent overheating, do not obstruct vents. Do not allow a hard surface, such as a printer, or a soft surface, such as a pillow, blanket, rug, or thick clothing, to block airflow.Ryan Masterfile.book  Page 12  Monday, June 9, 2003  2:33 PM
System ComponentsStartup and Reference Guide—Part 2 2–13Right SideRight Side1Infrared port  Provides wireless communication between the notebook and an optional IrDA-compliant device.2Digital Media slot Supports SD, MMC, Memory Stick, and SmartMedia.3Optical drive release button Opens the optical drive.4Optical drive* Supports an optical disc.5PC Card eject button Ejects an optional PC Card from the PC Card slot.6PC Card slot Supports an optional Type I, Type II, or Type III 32-bit (CardBus) or 16-bit PC Card.*The type of optical drive, such as a CD, DVD, or combination CD/DVD drive, varies by model.Ryan Masterfile.book  Page 13  Monday, June 9, 2003  2:33 PM
2–14 Startup and Reference Guide—Part 2System ComponentsBottomBays and Memory CompartmentBottom: Bays and Memory Compartment1Battery pack release latch Releases a battery pack from the battery bay.2Memory compartment Contains 2 memory slots. Depending on the model, when the notebook is shipped either one or both memory slots may be filled with a replaceable memory module.3Hard drive bay Holds the internal hard drive.4Battery bay Holds a battery pack.Ryan Masterfile.book  Page 14  Monday, June 9, 2003  2:33 PM
System ComponentsStartup and Reference Guide—Part 2 2–15VentsBottom: VentsIntake vents Provide airflow to cool internal components.ÄTo prevent overheating, do not obstruct vents. Do not allow a hard surface, such as a printer, or a soft surface, such as a pillow, blanket, rug, or thick clothing, to block airflow.Ryan Masterfile.book  Page 15  Monday, June 9, 2003  2:33 PM
2–16 Startup and Reference Guide—Part 2System ComponentsLabelsThe labels affixed to the notebook and some notebook components provide information you may need when troubleshooting system problems or traveling internationally with the notebook.■The Microsoft Certificate of Authenticity label contains the Product Key number. You may need this number to update or troubleshoot problems with the operating system.■The system label provides regulatory information about the notebook.■The product identification label contains the serial number of the notebook and a code describing the original configuration of the notebook. You will need the notebook serial number if you call customer support.■The modem approvals label, which is affixed to an optional internal modem, provides regulatory information.■Wireless certification labels, which are specific to various types of optional wireless devices provide regulatory information and lists the countries in which this optional wireless device has been approved for use.Ryan Masterfile.book  Page 16  Monday, June 9, 2003  2:33 PM
System ComponentsStartup and Reference Guide—Part 2 2–17Additional Standard ComponentsThe components included with the notebook vary by region, country, notebook model, and the optional hardware ordered. The following sections identify the standard external accessories and components included with most notebook models.Cables and CordAdditional Standard Components: Cables and Cord1Modem cable (included with select models)Connects a modem to an RJ-11 telephone jack or to a country-specific modem adapter.✎A modem cable has a 6-pin, RJ-11 telephone connector at each end.2Network cable(included with select models)Connects the notebook to an Ethernet network jack.✎A network cable has an 8-pin, RJ-45 network connector at each end.3Power cord* Connects an AC adapter to an AC electrical outlet.*Power cords vary in appearance by region and country.Ryan Masterfile.book  Page 17  Monday, June 9, 2003  2:33 PM
2–18 Startup and Reference Guide—Part 2System ComponentsAdapters and Battery PackAdditional Standard Components: Adapters and Battery Pack1AC adapter Converts AC power to DC power.2Country-specific modem adapter (included by region as required)Adapts the modem cable to a non-RJ-11 telephone jack.3Japan-specific outlet adapter (Japan only)Connects the AC adapter to a 2-prong electrical outlet.4Battery pack  Runs the notebook when the notebook is not connected to external power.Ryan Masterfile.book  Page 18  Monday, June 9, 2003  2:33 PM
System ComponentsStartup and Reference Guide—Part 2 2–19Restoration and Documentation CDsCDs for repairing or reinstalling software and for obtaining supplementary information about the notebook are included with the notebook. ■For information about restoring, repairing, or reinstalling software, refer to “Software Updates, Restorations and Utilities.”■For supplementary information about the notebook, refer to the Documentation Library CD. The Documentation LibraryCD provided with all models includes the following guides:❏Maintenance, Shipping and Travel Guide❏Troubleshooting Guide❏Modem and Networking Guide❏Regulatory and Safety Notices❏Safety & Comfort GuideRyan Masterfile.book  Page 19  Monday, June 9, 2003  2:33 PM
2–20 Startup and Reference Guide—Part 2System ComponentsRyan Masterfile.book  Page 20  Monday, June 9, 2003  2:33 PM
Startup and Reference Guide—Part 2 3–13KeyboardContentsTouchPad . . . . . . . . . . . . . . . . . . . . . . . . . . . . . . . . . . . . .  3–2Identifying TouchPad Components . . . . . . . . . . . . . .  3–2Using the TouchPad. . . . . . . . . . . . . . . . . . . . . . . . . .  3–3Setting TouchPad Preferences . . . . . . . . . . . . . . . . . .  3–3Using Hotkey and Shortcut Keys. . . . . . . . . . . . . . . . . . .  3–4Identifying fn and Function Keys . . . . . . . . . . . . . . .  3–4Hotkey and Shortcut Key Quick Reference  . . . . . . .  3–5Hotkey and Shortcut Key Procedures . . . . . . . . . . . .  3–6Hotkey and Shortcut Key Commands . . . . . . . . . . . .  3–6Keypad . . . . . . . . . . . . . . . . . . . . . . . . . . . . . . . . . . . . . .  3–10Quick Launch Buttons . . . . . . . . . . . . . . . . . . . . . . . . . .  3–11Using Custom Assignments and Schemes. . . . . . . .  3–12Ryan Masterfile.book  Page 1  Monday, June 9, 2003  2:33 PM
3–2 Startup and Reference Guide—Part 2KeyboardTouchPad Identifying TouchPad ComponentsThe TouchPad includes the following components:Identifying TouchPad componentsButton name Default assignment1TouchPad on/off button Enables/disables the TouchPad.2TouchPad light On: TouchPad is enabled.3TouchPad scroll zone Scroll up or down.4Left and right TouchPad buttonsFunction like the left and right buttons on an external mouse.5TouchPad Moves the pointer and selects or activates items on the screen.Ryan Masterfile.book  Page 2  Monday, June 9, 2003  2:33 PM
KeyboardStartup and Reference Guide—Part 2 3–3Using the TouchPadThe TouchPad provides the navigation, selection, and scroll functions of an optional external mouse.■To move the pointer, slide your finger across the TouchPad surface in the direction you want to move the pointer.■If the pointer continues to move after you lift your finger from the TouchPad surface, wait a few seconds and the pointer will stop moving.■To execute the click functions of the left or right button on an external mouse, press the left or right TouchPad button.■To scroll up or down, slide your finger up or down in the scroll zone.■To enable or disable the TouchPad, press the TouchPad button. When the TouchPad is enabled, the TouchPad light is on.The notebook turns on with the TouchPad enabled. Users who work with keystrokes rather than mouse actions may prefer to disable the TouchPad to prevent accidental TouchPad activity.Setting TouchPad PreferencesPointer speed and shape, click speed, mouse trails, and other pointing device preferences are set in the operating system Mouse Properties window. To access Mouse Properties, select Start > Control Panel > Printers and Other Hardware > Mouse icon.Ryan Masterfile.book  Page 3  Monday, June 9, 2003  2:33 PM
3–4 Startup and Reference Guide—Part 2KeyboardUsing Hotkey and Shortcut KeysHotkey and shortcut keys are preset combinations of the fn key with other keys on the keyboard.■A hotkey is a combination of the fn key and one of the function keys. ■A shortcut key is a combination of the fn key and a key other than a function key.Identifying fn and Function KeysThe icons on the function keys f1, and f3 through f12 represent the hotkey functions available on the notebook.Identifying hotkeysItem Component1fn key2Function keysRyan Masterfile.book  Page 4  Monday, June 9, 2003  2:33 PM
KeyboardStartup and Reference Guide—Part 2 3–5Hotkey and Shortcut Key Quick ReferenceThe following table identifies the default hotkey and shortcut key functions.✎For information about changing the function of the fn+f5 hotkey, refer to the “Managing Power Options” section in chapter 4.Default Function Key combinationDisplay System information. fn+escOpen Help and Support window. fn+f1Open Microsoft Internet Explorer. fn+f3Switch display and image. fn+f4Initiate Standby. fn+f5Initiate QuickLock. fn+f6Decrease display brightness. fn+f7Increase display brightness. fn+f8Play, pause, or resume an audio CD or DVD. fn+f9Stop an audio CD or DVD. fn+f10Play the previous track or chapter on an audio CD or DVD.fn+f11Play the next track on an audio CD or DVD. fn+f12Ryan Masterfile.book  Page 5  Monday, June 9, 2003  2:33 PM
3–6 Startup and Reference Guide—Part 2KeyboardHotkey and Shortcut Key ProceduresTo use a hotkey or shortcut key command on the notebook keyboard, use either of the following procedures:■Briefly press the fn key, then briefly press the second key of the hotkeys command.■Press and hold down the fn key, briefly press the second key of the hotkeys command, then release both keys at the same time.Hotkey and Shortcut Key CommandsDisplay System Information (fn+esc)Press fn+esc to display information about system hardware components and software version numbers. Press fn+esc a second time to remove the system information from the screen.✎When viewing system information, the system BIOS date is the version number of the system ROM. The BIOS date may display in a decimal format, such as 10/19/2002 F.07.Open Help and Support Window (fn+f1)The fn+f1 hotkey opens the Help and Support Center. From the Help and Support Center, you can access general information about your notebook, links to software updates and online technical support specialists, and other support features.For more information about the Help and Support window, refer to the “Getting Help” section in “Startup.”Open Internet Explorer (fn+f3)The fn+f3 hotkey opens Internet Explorer. After you have set up your Internet or network services and your Internet Explorer home page, you can use the fn+f3 hotkey for quick access to your home page and the Internet.Ryan Masterfile.book  Page 6  Monday, June 9, 2003  2:33 PM
KeyboardStartup and Reference Guide—Part 2 3–7Switch Display (fn+f4)The fn+f4 hotkey switches the image between display devices connected to the external monitor connector or the S-Video jack on the notebook. For example, if an external monitor is connected to the notebook, pressing the fn+f4 hotkey multiple times will toggle the image between the notebook display, the external monitor display, and a simultaneous display on both the notebook and the monitor.Most external monitors receive video information from the notebook using the external VGA video standard. The fn+f4hotkey can also toggle images between other devices receiving video information from the notebook.The following five video transmission types, with examples of devices that use them, are supported by the fn+f4 hotkey:■LCD (notebook display)■External VGA (most external monitors)■S-Video (televisions, camcorders, VCRs, and video capture boards with S-Video-in jacks)■Composite video (televisions, camcorders, VCRs, and video capture boards with composite-video-in jacks)✎Composite video devices can only be connected to the notebook when it is docked in an optional HP Notebook Expansion Base.Ryan Masterfile.book  Page 7  Monday, June 9, 2003  2:33 PM
3–8 Startup and Reference Guide—Part 2KeyboardInitiate Standby (fn+f5)The fn+f5 hotkey is set by default to initiate Standby. Standby can be initiated only while the notebook is on. If the notebook is in Hibernation, you must restore from Hibernation before you can initiate Standby. To restore from Hibernation or resume from Standby, briefly press the power button. For more information about using Standby and Hibernation, refer to “Power.”For information about changing the function of the fn+f5 hotkey, refer in chapter 4 to the “Managing Power Options” section.Initiate QuickLock (fn+f6)The fn+f6 hotkey initiates the operating system QuickLock security feature. The QuickLock feature disables the keyboard and displays the log on screen. QuickLock does not disable the TouchPad.Before you can use the QuickLock feature, you must set a Windows system password. For instructions, refer to your operating system documentation. After you have set a Windows system password:■To initiate QuickLock, press fn+f6.■To exit QuickLock, enter your Windows system password.Decrease Screen Brightness (fn+f7) The fn+f7 hotkey decreases notebook screen brightness. Hold down the hotkey to decrease the brightness level incrementally.Increase Screen Brightness (fn+f8)The fn+f8 hotkey increases notebook screen brightness. Hold down the hotkey to increase the brightness level incrementally.Ryan Masterfile.book  Page 8  Monday, June 9, 2003  2:33 PM
KeyboardStartup and Reference Guide—Part 2 3–9Play, Pause, or Resume an Audio CD or DVD (fn+f9)The fn+f9 hotkey functions only when an audio CD or DVD is inserted. If the audio CD or DVD is:■Not playing, press the fn+f9 hotkey to begin or resume the play.■Playing, press the fn+f9 hotkey to pause the play.Stop an Audio CD or DVD (fn+f10)The fn+f10 hotkey stops the play of an audio CD or DVD that is playing.Play Previous Track of an Audio CD or DVD (fn+f11)The fn+f11 hotkey plays the previously played track of an audio CD or DVD that is playing.Play Next Track of an Audio CD or DVD (fn+f12)The fn+f12 hotkey plays the next track of an audio CD or DVD that is playing.Ryan Masterfile.book  Page 9  Monday, June 9, 2003  2:33 PM
3–10 Startup and Reference Guide—Part 2KeyboardKeypadThe keypad consists of 17 keys that can be used like the keys on an external keypad.Identifying the keypad keysRyan Masterfile.book  Page 10  Monday, June 9, 2003  2:33 PM
KeyboardStartup and Reference Guide—Part 2 3–11Quick Launch ButtonsThe three Quick Launch buttons enable you to use one keystroke to access a software application or to activate a wireless network device.Identifying the Quick Launch buttons✎The settings for the Quick Launch buttons can be changed. Refer to the next section for information on reassigning these buttons to other applications.Button name Default assignment1Media button Launches multimedia application.2Picture button Launches digital imaging application.3Wireless on/off butfton Turns the wireless network device on and off.Ryan Masterfile.book  Page 11  Monday, June 9, 2003  2:33 PM
3–12 Startup and Reference Guide—Part 2KeyboardUsing Custom Assignments and SchemesA Quick Launch button can be re-assigned to an Internet or network destination or to any software application or data file. For example, an Quick Launch button can be assigned to open your Internet browser to a favorite Web page or to open an application, such as Microsoft Word, or a document, such as an Excel worksheet, on a notebook or network drive.Button assignments can be grouped into schemes. When you select a scheme, only the button assignments within that scheme are active. Button assignments and schemes are set up, changed, or deleted in the Quick Launch buttons window.To program a Quick Launch button:1. Select Start > All Programs > Utilities > Quick Launch.2. On the Quick Launch tab, select the button you want to reprogram.3. Type a label for the button, then select the application, document, folder, or Web site you want the button to open.If you want a label to appear onscreen when you press a button, select that option on the Onscreen Display tab.Ryan Masterfile.book  Page 12  Monday, June 9, 2003  2:33 PM
Startup and Reference Guide—Part 2 4–14PowerContentsSelecting a Power Source. . . . . . . . . . . . . . . . . . . . . . . . .  4–2Understanding Standby, Hibernation and Shutdown . . . .  4–3Standby  . . . . . . . . . . . . . . . . . . . . . . . . . . . . . . . . . . .  4–3Hibernation  . . . . . . . . . . . . . . . . . . . . . . . . . . . . . . . .  4–4Shutdown . . . . . . . . . . . . . . . . . . . . . . . . . . . . . . . . . .  4–5Initiating Standby, Hibernation or Shutdown  . . . . . . . . .  4–6When Leaving Your Work  . . . . . . . . . . . . . . . . . . . .  4–6When External Power Supply is Uncertain . . . . . . . .  4–6When Using Infrared or Drive Media . . . . . . . . . . . .  4–7Using Default Power Settings  . . . . . . . . . . . . . . . . . . . . .  4–8Identifying Power Controls and Indicators . . . . . . . .  4–8Turning the Notebook or Display On or Off . . . . . . .  4–9Using Emergency Shutdown Procedures  . . . . . . . .  4–10Initiating or Resuming from Standby  . . . . . . . . . . .  4–11Initiating or Resuming from Hibernation  . . . . . . . .  4–12Managing Power Options. . . . . . . . . . . . . . . . . . . . . . . .  4–13Using Battery Power  . . . . . . . . . . . . . . . . . . . . . . . . . . .  4–16Identifying the Power Lights . . . . . . . . . . . . . . . . . .  4–16Switching Between Battery and External Power. . .  4–17Charging a Battery Pack  . . . . . . . . . . . . . . . . . . . . .  4–17Monitoring the Charge in a Battery Pack  . . . . . . . .  4–18Managing Low-Battery Conditions . . . . . . . . . . . . .  4–19Resolving Low-Battery Conditions . . . . . . . . . . . . .  4–20Calibrating a Battery Pack. . . . . . . . . . . . . . . . . . . .  4–21Storing a Battery Pack . . . . . . . . . . . . . . . . . . . . . . .  4–24Battery Conservation Settings . . . . . . . . . . . . . . . . .  4–25Replacing a Battery Pack . . . . . . . . . . . . . . . . . . . . . . . .  4–26Disposing of a Used Battery Pack . . . . . . . . . . . . . . . . .  4–27Ryan Masterfile.book  Page 1  Monday, June 9, 2003  2:33 PM
4–2 Startup and Reference Guide—Part 2PowerSelecting a Power SourceThe notebook can run on internal power from a battery pack or on external power from an AC adapter and other devices. The following table describes the best power source for general tasks.ÅWARNING: This notebook is designed to run demanding applications at full power. As a result of increased power consumption, it is normal for the notebook to feel warm or hot when used continuously. To avoid potential discomfort or burns, do not block the air vents or use the notebook on your lap for extended periods. The notebook complies with the user-accessible surface temperature limits defined by the International Standard for Safety of Information Technology Equipment (IEC 60950).Task Recommended Power SourceWork in most software applications.■Charged battery pack in the notebook■External power supplied through the following devices:❐AC adapter❐Optional HP Notebook Expansion BaseCharge or calibrate a battery pack in the notebook.External power supplied through:■AC adapter■Optional HP Notebook Expansion BaseInstall or modify system software or write to a CD.External power supplied through:■AC adapter■Optional HP Notebook Expansion BaseRyan Masterfile.book  Page 2  Monday, June 9, 2003  2:33 PM
PowerStartup and Reference Guide—Part 2 4–3Understanding Standby, Hibernation and ShutdownThis section describes Standby, Hibernation, and shutdown and explains when to implement them. Standby and Hibernation are energy-saving features that can be initiated by you or by the system.StandbyStandby reduces power to system components that are not in use. When Standby is initiated, your work is saved in random access memory (RAM) and the screen is cleared.■Saving your work before initiating Standby is not usually necessary, but is a recommended precaution.■When the notebook is in Standby, the power/standby light flashes.When you resume from Standby, your work returns to the screen where you left off.ÄCAUTION: To avoid a complete battery discharge, do not leave your notebook in Standby for extended periods. Connect to an external power source if your notebook will not be used for extended periods.✎The system will not initiate from Standby through touchpad movement.Ryan Masterfile.book  Page 3  Monday, June 9, 2003  2:33 PM
4–4 Startup and Reference Guide—Part 2PowerHibernationHibernation takes a snapshot of the current system memory, saves it to the hard drive, then shuts down the notebook. When you resume from Hibernation, your work returns to the screen exactly as you left it. When possible, save your work before initiating Hibernation to prevent loss of data. Do not change the notebook configuration during Hibernation.ÄCAUTION: If the configuration of the notebook system is changed during Hibernation, it may not be possible to resume from Hibernation. When the notebook is in Hibernation:■Do not add or remove memory modules.■Do not insert or remove the hard drive.■Do not connect or disconnect external devices.■Do not insert or remove a CD or DVD.■Do not insert a PC Card, SD Card, Memory Stick, Smart Media Card, or MMC.If you cannot resume from Hibernation when power is restored to the system, you will be prompted to delete the restoration data and proceed with system boot. Unsaved data will be lost. If a power-on password has been set, the password must be entered to resume from Hibernation.Hibernation is enabled by default, but can be disabled. To reduce the risk of power loss during a low battery condition, users should disable Hibernation only during a battery pack calibration.ÄCAUTION: If Hibernation is disabled, the system does not automatically save your system memory if the notebook reaches a critical low-battery condition.Ryan Masterfile.book  Page 4  Monday, June 9, 2003  2:33 PM
PowerStartup and Reference Guide—Part 2 4–5To verify that Hibernation is enabled, select Start > Control Panel > Performance and Maintenance > Power Options > Hibernate tab. Be sure that the Enable Hibernation check box is selected.✎Hibernation will not be displayed as a power option in the Power Options window if it has been disabled.ShutdownShutdown procedures turn off the notebook. Whether to leave a battery pack in the notebook or in storage depends on how you work:■Leaving the battery pack in the notebook enables the battery pack to charge whenever the notebook is connected to external power and also protects your work during a power outage.■A battery pack in the notebook discharges more quickly, even when the notebook is turned off, than a battery pack that has been removed from the notebook and stored in a cool, dry location.Ryan Masterfile.book  Page 5  Monday, June 9, 2003  2:33 PM
4–6 Startup and Reference Guide—Part 2PowerInitiating Standby, Hibernation or ShutdownThe following sections describe when to initiate Standby or Hibernation and when to shut down your notebook.When Leaving Your WorkInitiate Standby for shorter times and Hibernation for longer times or for more power conservation.The amount of time a battery pack can support Standby or Hibernation or hold a charge varies by notebook configuration and the condition of the battery pack.■Initiating Standby clears the screen, uses less power than leaving the notebook on, and your work returns quickly to the screen when you resume from Standby. A fully charged new battery pack can typically support Standby for up to 48 hours.■Initiating Hibernation clears the screen and uses much less power than Standby. Returning to work saved in Hibernation takes longer than returning to work saved in Standby, but is faster than returning to your place manually after restarting the notebook. A fully charged new battery pack can typically support Hibernation for several weeks.To extend the life of the battery pack when the notebook will be disconnected from external power for an extended period, shut down the notebook, remove the battery pack, and store it in a cool, dry location.When External Power Supply is UncertainIf an external power supply is uncertain, for example, because of an electrical storm, save your work, then initiate Hibernation or shut down the notebook.Ryan Masterfile.book  Page 6  Monday, June 9, 2003  2:33 PM
PowerStartup and Reference Guide—Part 2 4–7When Using Infrared or Drive MediaStandby and Hibernation interfere with the use of infrared communication and drive media.■If the notebook is in Standby or Hibernation, you cannot initiate an infrared transmission.■If Standby or Hibernation is accidentally initiated while drive media (such as a diskette, disk, CD, or DVD) is in use:❏Your playback may be interrupted.❏You may see a warning message: “Putting the computer into Hibernation or Standby may stop the playback. Do you want to continue?” Select No.❏Resume from Hibernation or Standby by briefly pressing the power button.❏Audio and video may resume, or you may need to restart the media.ÄCAUTION: Do not initiate Standby or Hibernation while using drive media. Doing so may result in video and audio degradation and loss of audio and video playback functionality.Ryan Masterfile.book  Page 7  Monday, June 9, 2003  2:33 PM
4–8 Startup and Reference Guide—Part 2PowerUsing Default Power SettingsThis section explains the default Standby, Hibernation, and shutdown procedures and includes information about turning the display on or off.You can change many of these settings according to your preferences. If you want to change the default settings, refer to “Setting Power Options” later in this chapter.Identifying Power Controls and IndicatorsStandby, Hibernation, shutdown, and display procedures use the following controls and indicators:1 Power button2 Initiate Standby hotkey (fn+f5)3 Power/standby lightIdentifying Standby, Hibernation, shutdown, and display controls and indicatorsRyan Masterfile.book  Page 8  Monday, June 9, 2003  2:33 PM
PowerStartup and Reference Guide—Part 2 4–9Turning the Notebook or Display On or OffTask Procedure ResultsTurn on the notebook.Press the power button.✎Pressing the power button turns on the notebook from Standby,Hibernation, or shutdown.■The power/standby light turns on.■The operating system loads.Shut down the notebook.*Save your work and close all open applications. Then:■Press the power button and follow the onscreen instructions (if displayed) for shutting down the notebook.■Shutdown the notebook through the operating system. Select Start > Turn Off Computer > Turn Off.■The power/standby light turns off.■The operating system shuts down.■The notebook turns off.*If the system is unresponsive, and you are unable to shut down the notebook with this procedure, refer to the next section, “Using Emergency Shutdown Procedures.”Ryan Masterfile.book  Page 9  Monday, June 9, 2003  2:33 PM
4–10 Startup and Reference Guide—Part 2PowerUsing Emergency Shutdown ProceduresIf the notebook does not respond and you are unable to use normal Windows shutdown procedure, try the following emergency shutdown procedures in the sequence provided:■Press ctrl+alt+delete. Select the Shut Down button, then select Shut down from the drop-down list.■Press and hold down the power button for at least 4 seconds.■Unplug the notebook from external power and remove the battery pack. For battery pack removal instructions, refer to the “Replacing a Battery Pack” section, later in this chapter.ÄCAUTION: Emergency shutdown procedures may result in the loss of unsaved data.Ryan Masterfile.book  Page 10  Monday, June 9, 2003  2:33 PM
PowerStartup and Reference Guide—Part 2 4–11Initiating or Resuming from StandbyTask Procedure ResultInitiate Standby With the notebook on, use either of the following procedures:■Press the fn+f5 hotkey.■Select Start > Turn off Computer > Stand by.■The power/standby light flashes.■The screen clears.Allow the system to initiate standby■If the notebook is running on battery power, the system initiates standby after 10 minutes of notebook inactivity (default setting).■If the notebook is running on external power, the system does not initiate standby.■Power settings and timeouts can be changed in the Power Options window.■The power/standby light flashes.■The screen clears.Resume from user-initiated or system-initiatedStandby.■Press the power button. ■The power/standby light turns on.■Your work returns to the screen.Ryan Masterfile.book  Page 11  Monday, June 9, 2003  2:33 PM
4–12 Startup and Reference Guide—Part 2PowerInitiating or Resuming from HibernationTask Procedure ResultInitiateHibernationWith the notebook on, use either of the following procedures:■Briefly press the power button.■Select Start > Shut Down > Hibernate. (If the Hibernate option is not displayed, press and hold shift.)✎If the notebook is in Standby, you must resume from Standby before you can initiate Hibernation.■The power/standby light turns off.■The screen clears.Allow the system to initiate Hibernation (with Hibernation enabled)■If the notebook is running on battery power, the system initiates Hibernation after 30 minutes of notebook inactivity or when the battery pack reaches a critical low-battery condition.■If the notebook is running on external power, the system will not initiate Hibernation.■Power settings and timeouts can be changed in the Power Options window.■The power/standby light turns off.■The screen clears.Resume from user-initiated or system-initiatedHibernation.Press the power button.✎If the system initiated Hibernation because of a critical low-battery condition, connect external power or insert a charged battery pack before you press the power button.■The power/standby light turns on.■Your work returns to the screen.Ryan Masterfile.book  Page 12  Monday, June 9, 2003  2:33 PM
PowerStartup and Reference Guide—Part 2 4–13Managing Power OptionsMany of the default power settings, such as timeouts and alarms, can be changed in Power Options. For example, you can set an audio alert to warn you when the battery reaches a low-power condition.By default, when the notebook is on:■Briefly pressing the power button initiates Hibernation.■Pressing the fn+f5 hotkey, called the “sleep button” in the operating system, initiates Standby. ■The display switch turns off the display. The display switch is activated by closing the display. Accessing the Power Options WindowTo change the function of the power button, the fn+f5 hotkey, or the display switch:1. Select Start > Control Panel > Performance and Maintenance icon > Power Options icon > Advanced tab.❏To change the power button function, select a function from the drop-down list for When I Press The Power Button On My Computer.❏To change the function of the fn+f5 hotkey, select a function from the drop-down list for When I Press The Sleep Button On My Computer.❏To change the display switch function, select a function from the drop-down list for When I Close The Lid Of My Portable Computer.2. Select the OK button.✎The Hibernate function is available in the power button, sleep button, and display switch drop-down lists only if Hibernation is enabled.Ryan Masterfile.book  Page 13  Monday, June 9, 2003  2:33 PM
4–14 Startup and Reference Guide—Part 2PowerDisplaying the Power Meter IconThe Power Meter icon changes shape to indicate whether the notebook is running on a battery pack or external power. Double-click the icon to display the Power Options window.To hide or show the Power Meter icon on the taskbar:1. Access the Power Options window.2. Select the Advanced tab.3. Select or clear the Always show icon on the taskbar check box.4. Select the OK button.✎If you cannot see an icon you have placed on the taskbar, the icon may be hidden. Select the arrow or vertical bar on the taskbar and expand it to view icons.Setting or Changing a Power SchemeThe Power Schemes tab in the Power Options window assigns power levels to system components. You can assign different schemes depending on whether the notebook is running on a battery pack or external power.You can also set a power scheme that initiates Standby or turns off the display or hard drive after a time interval that you specify.To set a power scheme:1. Access the Power Options window > Power Schemes tab.2. Select the power scheme you wish to modify, and adjust options in the lists on the screen.3. Select Apply.Ryan Masterfile.book  Page 14  Monday, June 9, 2003  2:33 PM
PowerStartup and Reference Guide—Part 2 4–15Using a Security PasswordYou can add a security feature that prompts you for a password when the notebook turns on or resumes from Standby or Hibernation.To set a password prompt, access the Power Options window > Advanced tab. Select the check box for Prompt For Password When the Computer resumes from Standby, and select OK.Ryan Masterfile.book  Page 15  Monday, June 9, 2003  2:33 PM
4–16 Startup and Reference Guide—Part 2PowerUsing Battery PowerIdentifying the Power LightsBattery pack procedures refer to the front panel lights:Identifying the battery and power/standby lightsTop: TouchPad1Power/standby light On when the notebook has power.2Battery light ■On in the absence of AC power, when the notebook is running on battery power.■Flashing indicates that the battery pack is malfunctioning and may need to be replaced.3AC power light ■On when notebook is connected to AC power.■When AC power is available, the battery will charge.Ryan Masterfile.book  Page 16  Monday, June 9, 2003  2:33 PM
PowerStartup and Reference Guide—Part 2 4–17Switching Between Battery and External PowerThe notebook switches between AC power and battery power according to the availability of an external AC power source, always preferring AC power. If the notebook contains a charged battery pack and is running on external AC power, the notebook will switch to battery power only if the AC adapter is disconnected from the notebook.Keeping a battery pack in the notebook enables the battery pack to charge whenever the notebook is connected to external power and also protects your work in case of a power outage. On the other hand, a battery pack in the notebook slowly discharges even when the notebook is powered off. To prolong battery life, remove and store the battery pack if you will not be using the notebook for 2 weeks or more. Refer to “Storing a Battery Pack” later in this chapter for details.Charging a Battery PackThe battery pack charges whenever the notebook is connected to external power through an AC adapter.The battery pack charges whether the notebook is turned off or turned on, but charges most quickly when the notebook is turned off. When the notebook is turned on, charging times are longer and vary with system activity.Ryan Masterfile.book  Page 17  Monday, June 9, 2003  2:33 PM
4–18 Startup and Reference Guide—Part 2PowerMonitoring the Charge in a Battery PackObtaining Accurate Charge InformationTo increase the accuracy of all battery charge displays:■Allow the battery pack to fully discharge before charging it.■Charge the battery pack fully. Even a new battery pack can display charge information inaccurately if it has not been fully charged.■Fully charging and discharging the battery pack will reduce the need for battery calibration.Displaying Charge InformationTo display battery charge information on the screen, select Start > Control Panel > Performance and Maintenance icon > Power Options icon > Power Meter tab.Power Meter displays battery status in both percent and time:■The percent indicates the amount of charge remaining in the battery pack.■The time indicates the approximate running time remaining on the battery pack if the battery pack continues to provide power at the current level. For example, the time remaining will decrease if you start playing a DVD and will increase if you stop playing a DVD.Ryan Masterfile.book  Page 18  Monday, June 9, 2003  2:33 PM
PowerStartup and Reference Guide—Part 2 4–19Managing Low-Battery ConditionsSome low-battery condition alerts and system responses can be changed in the Power Options window of the operating system. The information in this section describes the alerts and system responses set at the factory. Preferences set in the Power Options window do not affect lights.Identifying Low-Battery ConditionsThis section explains how to identify low and critical battery conditions.Low-Battery ConditionWhen a battery pack that is the sole power source for the notebook reaches a low-battery condition (5 percent of a full charge), the battery light blinks.Critical Low-Battery ConditionIf a low-battery condition is not resolved, the notebook enters a critical low-battery condition (3 percent of a full charge).In a critical low-battery condition:■If Hibernation is enabled and the notebook is on or in Standby, the notebook initiates Hibernation.■If Hibernation is disabled and the notebook is on or in Standby, the notebook remains briefly in Standby, then shuts down and loses your unsaved work.To verify that Hibernation is enabled, be sure that the Enable Hibernate Support check box on the Hibernate tab is selected. To access the tab select Start > Control Panel > Performance and Maintenance > Power Options icon.Ryan Masterfile.book  Page 19  Monday, June 9, 2003  2:33 PM
4–20 Startup and Reference Guide—Part 2PowerResolving Low-Battery ConditionsÄCAUTION: If the notebook has reached a critical low-battery condition and has begun to initiate Hibernation, do not restore power until the Power/Standby light turns off.When External Power Is AvailableTo resolve a low-battery condition when external power is available, connect the AC adapter.When a Charged Battery Pack Is AvailableTo resolve a low-battery condition when a charged battery pack is available, turn off the notebook or initiate Hibernation, insert a charged battery pack, then turn on the notebook.When No Power Source Is AvailableTo resolve a low-battery condition when no power source is available, initiate Hibernation, or save your work and shut down the notebook.When the Notebook Cannot Exit HibernationTo resolve a low-battery condition when the notebook lacks the power to exit Hibernation:1. Insert a charged battery pack or connect external power.2. Exit Hibernation by briefly pressing the power button.Ryan Masterfile.book  Page 20  Monday, June 9, 2003  2:33 PM
PowerStartup and Reference Guide—Part 2 4–21Calibrating a Battery PackWhen to CalibrateEven if a battery pack is heavily used, it should not be necessary to calibrate it more than once a month. It is not necessary to calibrate a new battery pack before first use. Calibrate the battery pack under the following conditions:■When battery charge displays seem inaccurate.■When you observe a significant change in battery run time.■When the battery pack has not been used for one month or more.How to CalibrateTo calibrate a battery pack, you must fully charge, fully discharge, then fully recharge the battery pack.Charging the Battery PackCharge the battery pack while the notebook is in use. To charge the battery pack:1. Insert the battery pack into the notebook. For instructions, refer to “Replacing a Battery Pack” later in this chapter.2. Connect the notebook to external power. (The battery light is on as the battery pack charges.)3. Leave the notebook connected to external power until the battery pack is fully charged. (The battery light turns off.)Discharging the Battery PackHibernation is enabled by default, but can be disabled. Before you begin the full discharge, disable Hibernation. To disable Hibernation, select Start > Control Panel > Performance and Maintenance > Power Options > Hibernate tab. Then clear the Enable Hibernation check box.Ryan Masterfile.book  Page 21  Monday, June 9, 2003  2:33 PM
4–22 Startup and Reference Guide—Part 2PowerÄCAUTION: If you plan to leave the notebook unattended during discharge, save your work before starting the discharge procedure.To fully discharge the battery pack:1. Select the power icon on the taskbar or select Start > Control Panel > Performance and Maintenance icon > Power Options icon > Power Schemes tab.2. Record all settings in the Plugged In column and all settings in the Running On Batteries column, so you can reset them after calibration.3. Use the drop-down lists to set each item in both columns to Never.4. Select the OK button.5. Disconnect the notebook from the external power source, but do not turn off the notebook.6. Run the notebook on battery power until the battery pack is fully discharged. When the battery pack is fully discharged, the battery light turns off and the notebook shuts down.If you use the notebook occasionally during the discharge procedure and have set energy-saving timeouts, expect the following performance from your system during the discharge process:■The monitor will not turn off automatically.■Hard drive speed will not decrease automatically while the notebook is idle.■System-initiated Standby will not occur.Ryan Masterfile.book  Page 22  Monday, June 9, 2003  2:33 PM
PowerStartup and Reference Guide—Part 2 4–23Recharging the Battery Pack1. Connect the notebook to external power and keep the notebook connected until the battery pack is fully recharged and the battery light turns off. You can use the notebook while the battery pack is recharging, but the battery pack will charge faster if the notebook is turned off.2. Select the Power icon on the taskbar or select Start > Control Panel > Performance and Maintenance icon > Power Options icon > Power Schemes tab.3. Reenter the settings you recorded for the items in the Plugged In column and the Running on Batteries column.4. Select the OK button.ÄCAUTION: After calibrating the battery pack, reenable Hibernation: select Start > Control Panel > Performance and Maintenance > Power Options > Hibernate tab, then select the Enable Hibernation check box.Ryan Masterfile.book  Page 23  Monday, June 9, 2003  2:33 PM
4–24 Startup and Reference Guide—Part 2PowerStoring a Battery PackIf the notebook will be unused and unplugged for more than 2 weeks, remove and store the battery pack.ÄCAUTION: To prevent damage to a battery pack, do not expose it to high temperatures for extended periods of time.High temperatures accelerate the self-discharge rate of a stored battery pack. To prolong the charge of a stored battery pack, keep it in a cool, dry place.Use the following table to estimate how long you can safely store a battery pack. The storage times provided are based on a battery pack that contains 50 percent of a full charge. A fully charged battery pack can be safely stored longer.Temperature Range °FTemperature Range °C Safe Storage Time115°–140° 46°–60° Less than 1 month79°–113° 26°–45° No more than 3 months32°–77° 0°–25° 1 yearRyan Masterfile.book  Page 24  Monday, June 9, 2003  2:33 PM
PowerStartup and Reference Guide—Part 2 4–25Battery Conservation SettingsUsing the following battery conservation settings and procedures extends the run time of a battery pack.■Turn off wireless and local area network (LAN) connections and exit modem applications when you are not using them.■Disconnect from the notebook any external devices that use power from the notebook. Battery run time is not affected by external devices that are plugged into an external power source.■Stop or remove a PC Card you are not using. For more information, refer to the “Using a PC Card” section in Chapter 8.■Disable or remove a Digital Media card (SD, MMC, Memory Stick, or SmartMedia) you are not using.■Lower screen brightness.■Lower system volume.■Turn off a device connected to the S-Video jack.■If you leave your work, initiate Standby or Hibernation or shut down the notebook.■Select a short wait time, 5 minutes or less, for the monitor timeout. To change monitor timeout settings, select Start > Control Panel > Performance and Maintenance icon > Power Options icon > Power Meter tab. Select a short wait time from the Turn Off Monitor drop-down list, then select OK.Ryan Masterfile.book  Page 25  Monday, June 9, 2003  2:33 PM
4–26 Startup and Reference Guide—Part 2PowerReplacing a Battery PackÄCAUTION: To prevent loss of work when removing a battery pack that is the only power source, initiate Hibernation or turn off the notebook before removing the battery pack.To replace the battery pack:1. Turn the notebook upside down.❏To remove a battery pack, slide the battery release latch 1. (The battery pack tilts upward.) Then pull the battery pack out of the battery bay 2.Removing a battery packRyan Masterfile.book  Page 26  Monday, June 9, 2003  2:33 PM
PowerStartup and Reference Guide—Part 2 4–27❏To insert a battery pack, insert the alignment tab on the battery pack into the alignment slot on the notebook, then tilt the battery pack downward until it snaps into place.Inserting a battery pack2. To restore from Hibernation or to turn on the notebook, press the power button.Disposing of a Used Battery PackFor information about recycling or disposing of a used battery pack, refer on the DocumentationLibrary CD to the Regulatory and Safety Notices guide.Ryan Masterfile.book  Page 27  Monday, June 9, 2003  2:33 PM
4–28 Startup and Reference Guide—Part 2PowerRyan Masterfile.book  Page 28  Monday, June 9, 2003  2:33 PM
Startup and Reference Guide—Part 2 5–15DrivesContentsUnderstanding Drives. . . . . . . . . . . . . . . . . . . . . . . . . . . .  5–2Adding a Drive to the System . . . . . . . . . . . . . . . . . .  5–2Types of Drives . . . . . . . . . . . . . . . . . . . . . . . . . . . . .  5–2Caring for Drives . . . . . . . . . . . . . . . . . . . . . . . . . . . . . . .  5–3Hard Drive . . . . . . . . . . . . . . . . . . . . . . . . . . . . . . . . . . . .  5–4Identifying the Hard Drive Activity Light. . . . . . . . .  5–4Replacing the Internal Hard Drive. . . . . . . . . . . . . . .  5–5Optical Drive . . . . . . . . . . . . . . . . . . . . . . . . . . . . . . . . . .  5–8Inserting an Optical Disc . . . . . . . . . . . . . . . . . . . . . .  5–9Removing an Optical Disc (With Power) . . . . . . . .  5–10Removing an Optical Disc (Without Power). . . . . .  5–11Playing an Optical Disc . . . . . . . . . . . . . . . . . . . . . .  5–12Setting the Boot Order . . . . . . . . . . . . . . . . . . . . . . . . . .  5–14Ryan Masterfile.book  Page 1  Monday, June 9, 2003  2:33 PM
5–2 Startup and Reference Guide—Part 2DrivesUnderstanding DrivesThe hard drive and optical (CD/DVD) drive are standard features of the notebook, but the optical drive features vary by model. Some notebooks include a diskette drive and/or a USB Digital drive.Adding a Drive to the SystemDrives enable you to store and access data. An optional external drive can be added to the system by connecting it to one of the USB (Universal Serial Bus) or 1394 connectors on the notebook.Additional data storage can be added with Digital Media including Secure Digital Card, Multimedia Card, Smart Media, and Memory Stick.Types of DrivesHard drives are for the storage of data files and of software such as system files, applications, and drivers. A hard drive is sometimes called a hard disk drive.Optical drives include CD and DVD drives. Optical drives support DVDs and/or CDs, often called discs, which are used to store or transport data and to play music and movies. DVDs have a higher capacity than CDs. The notebook can read or write to optical drives as described in the following table.Diskette drives support diskettes, which are used to store or transport data. The notebook can read or write to any diskette. A diskette drive is sometimes called a floppy disk drive.Optical Drive Read WriteDVD-ROM drive Yes No DVD/CD-RW drive Yes YesDVD+RW Yes YesRyan Masterfile.book  Page 2  Monday, June 9, 2003  2:33 PM
DrivesStartup and Reference Guide—Part 2 5–3Caring for DrivesDrives are fragile notebook components that must be handled with care. The following cautions apply to all drives. Additional cautions are included with the procedures to which they apply.ÄCAUTION: To prevent loss or damage to the notebook or a drive:■Handle a drive carefully. Do not drop it.■When inserting a drive, use only enough pressure to seat the drive. Excessive force can damage drive connectors.■Do not spray a drive with a cleaner or other liquid or expose it to temperature extremes.■Do not remove the primary hard drive (the hard drive in the hard drive bay) except for repair or replacement.■Electrostatic discharge can damage electronic components. To prevent electrostatic damage to the notebook or a drive:❏Discharge yourself from static electricity before handling a drive by touching a grounded metal object, and❏Avoid touching the connectors on a drive. For more information about preventing electrostatic damage, refer to the Regulatory and Safety Notices on the Documentation Library CD.■Avoid exposing a hard drive or a diskette to devices with magnetic fields. Security devices with magnetic fields include airport walk-through devices and security wands. The airport security devices that check carry-on luggage, usually while it is placed on a conveyor belt, use x-rays instead of magnetism and will not damage a hard drive or a diskette.■If you mail a drive, ship it in packaging that protects it from shock, vibration, temperature, and high humidity. Label the package “FRAGILE.”ÄCAUTION: To prevent damage to drive media:■Do not open the metal shutter of a diskette or touch the disk within the diskette case.■Do not expose a diskette to a strong magnetic field, such as the security field used by a walk-through security device or a handheld security wand.■Clean a CD or DVD only with a disc cleaning kit, available from most electronics retailers.Ryan Masterfile.book  Page 3  Monday, June 9, 2003  2:33 PM
5–4 Startup and Reference Guide—Part 2DrivesHard DriveThis section discusses the primary hard drive of the notebook.Identifying the Hard Drive Activity LightThe hard drive activity light turns on when the internal hard drive is being accessed.Identifying the hard drive activity lightRyan Masterfile.book  Page 4  Monday, June 9, 2003  2:33 PM
DrivesStartup and Reference Guide—Part 2 5–5Replacing the Internal Hard DriveThe hard drive in the hard drive bay is the internal hard drive. Remove the internal hard drive only for repair or replacement.ÄCAUTION: To prevent an unresponsive system and loss of work, do not begin this procedure until you have:■Saved your work, closed all open applications, and shut down the notebook.■Disconnected the notebook from external power and removed the battery pack. 1. Save your work and close all open applications.2. Shut down the notebook and close the display.3. Disconnect the notebook from external power.4. Remove the battery pack.5. Turn the notebook upside down.6. Remove the 4 hard drive retaining screws from the hard drive bay.Removing the hard drive retaining screwsRyan Masterfile.book  Page 5  Monday, June 9, 2003  2:33 PM

Navigation menu