Broadcom BRCM1019 802.11ag Wireless LAN PCI-E Mini Card User Manual Manual Title
Broadcom Corporation 802.11ag Wireless LAN PCI-E Mini Card Manual Title
Broadcom >
Contents
Users manual part D
Hardware and Software Guide 5–1
DRAFT Revised: 8/10/04
File: Chap5.fm
PN: HP-367186-001
hp CONFIDENTIAL
August 10, 2004 12:25 pm
5
Multimedia
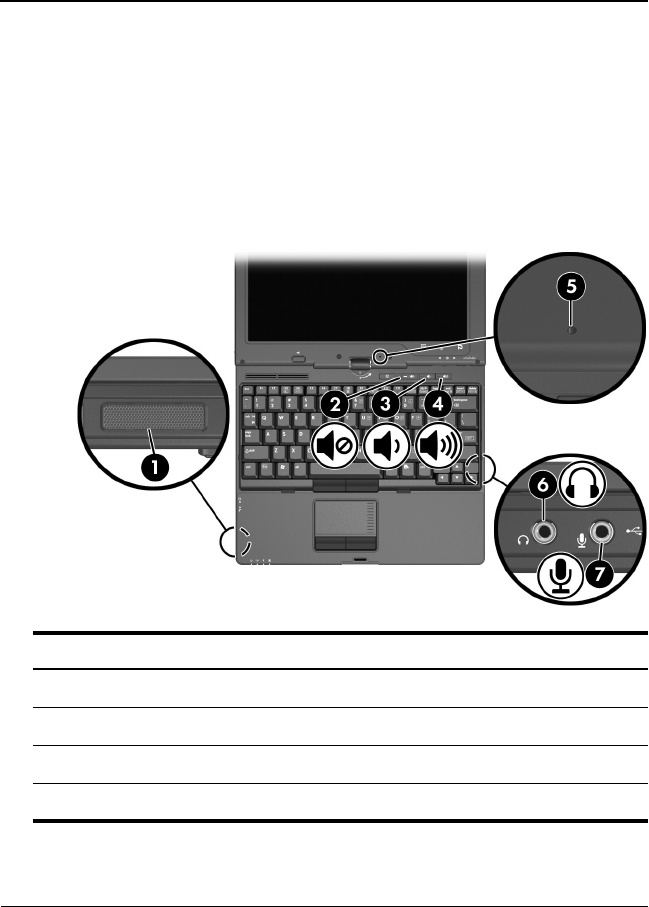
Using Audio Features
The following figure and table describe the audio features of the
tablet PC.
Component Description
1Volume mute button Turns off tablet PC sound.
2Volume down button Decreases tablet PC sound.
3Volume up button Increases tablet PC sound.
4Internal microphone Records sound.
367426-xx1.book Page 1 Tuesday, August 24, 2004 4:02 PM

5–2 Hardware and Software Guide
Multimedia
DRAFT Revised: 8/10/04
File: Chap5.fm
PN: HP-367186-001
hp CONFIDENTIAL
August 10, 2004 12:25 pm
Using the Audio-In (Microphone) Jack
The tablet PC is equipped with a stereo microphone jack. When
connecting a microphone to the microphone jack, use a
microphone with a 3.5-mm plug.
■If you connect a stereo (dual-channel) microphone, stereo
sound will be recorded.
■If you connect a monaural (single-channel) microphone,
left-channel sound will record on both channels.
■If you connect a dynamic microphone, the recommended
sensitivity may not be achieved.
✎When an external microphone is connected to the tablet PC, the
tablet PC internal microphone is disabled.
Using the Audio-Out (Headphone) Jack
ÅWARNING: To reduce the risk of personal injury, adjust the volume
before putting on headphones or a headset.
ÄCAUTION: To prevent possible damage to an external device, do not
plug a single sound channel (monaural) connector into the headphone
jack.
5Audio-out (headphone) jack Produces system sound when
connected to optional powered stereo
speakers, headphones, headset, or
television audio.
6Audio-in (microphone) jack Connects an optional monaural or
stereo microphone.
7Speaker Produces tablet PC sound.
Component Description
367426-xx1.book Page 2 Tuesday, August 24, 2004 4:02 PM

Multimedia
Hardware and Software Guide 5–3
DRAFT Revised: 8/10/04
File: Chap5.fm
PN: HP-367186-001
hp CONFIDENTIAL
August 10, 2004 12:25 pm
The stereo (dual-channel) headphone jack is used to connect
headphones, and also to connect the audio function of an
audio/video device such as a television or VCR.
When connecting a device to the headphone jack:
■Use only a 3.5-mm stereo plug.
■For best sound quality, use 24-ohm to 32-ohm headphones.
■The internal speaker is disabled.
Adjusting the Volume
To adjust the volume, use any of the following controls:
■Tablet PC volume buttons
❏To mute or restore volume, press the volume mute button.
You can also mute or restore volume by pressing the
volume down and volume up buttons simultaneously.
❏To decrease the volume, press the volume down button.
❏To increase the volume, press the volume up button.
367426-xx1.book Page 3 Tuesday, August 24, 2004 4:02 PM

5–4 Hardware and Software Guide
Multimedia
DRAFT Revised: 8/10/04
File: Chap5.fm
PN: HP-367186-001
hp CONFIDENTIAL
August 10, 2004 12:25 pm
■Windows volume control:
1. Click the Volume icon in the notification area (at the far
right of the taskbar).
2. Increase or decrease the volume by moving the slider up
or down. (You can also select the check box next to Mute
to mute the volume.)
- or -
1. Double-click the Volume icon.
2. In the Volume Control column, increase or decrease the
volume by moving the Volume slider up or down. You can
also adjust the balance or mute the volume.
✎Volume can also be adjusted within some applications.
If the Volume icon is not in the notification area, follow the
steps below to place it in the notification area.
1. Select Start > Control Panel > Sounds, Speech, and
Audio Devices > Sounds and Audio Devices.
2. Select the Volume tab.
3. Select the check box for Place volume icon in the
taskbar.
4. Select Apply.
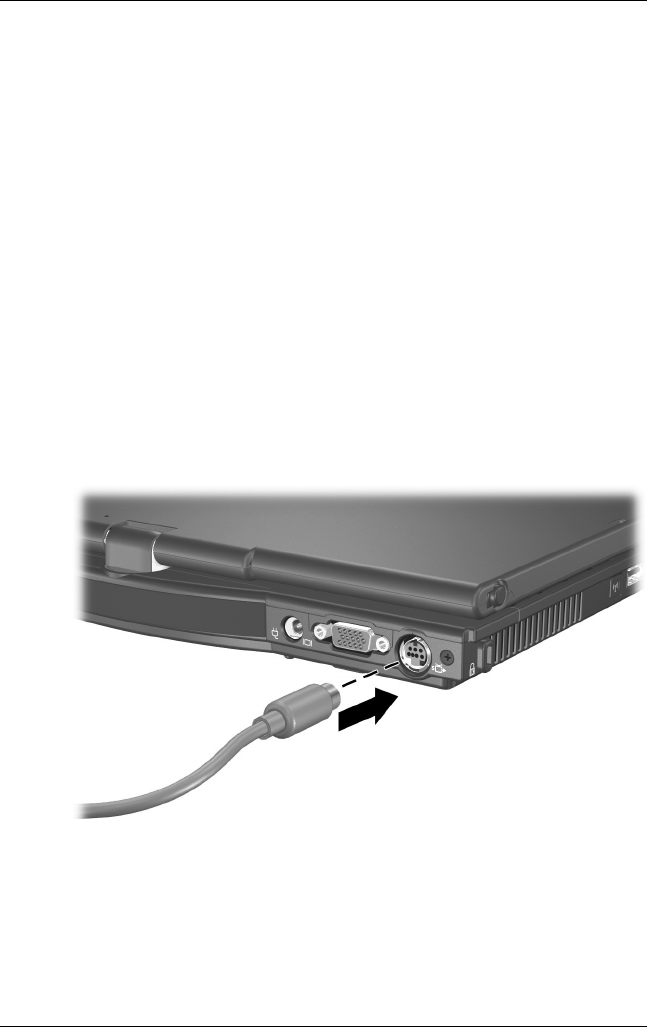
Using Video Features
The tablet PC features a 7-pin, dual-purpose S-Video out jack that
connects the tablet PC to an optional S-Video device, such as a
television, VCR, camcorder, overhead projector, or video capture
card, using an optional, standard (4-pin) S-Video cable. The
S-Video out jack features 3 extra pins that enable an optional
S-Video– to–composite adapter to be used with the tablet PC.
367426-xx1.book Page 4 Tuesday, August 24, 2004 4:02 PM
Multimedia
Hardware and Software Guide 5–5
DRAFT Revised: 8/10/04
File: Chap5.fm
PN: HP-367186-001
hp CONFIDENTIAL
August 10, 2004 12:25 pm
The tablet PC can support one S-Video device connected to the
S-Video out jack while simultaneously supporting an image on
the tablet PC display and on any other supported external display.
The S-Video connection usually provides an image of higher
quality than a composite-video connection provides.
To transmit video signals through the S-Video out jack, you need
an S-Video cable, available from most electronics retailers. If you
are combining audio and video functions, such as playing a movie
from a DVD in an optional MultiBay drive to a television, you
also need a standard audio cable, available from most electronics
retailers.
Using the S-Video Out Jack
To connect a video device to the S-Video out jack:
1. Plug either end of the S-Video cable into the S-Video out jack
on the tablet PC.
367426-xx1.book Page 5 Tuesday, August 24, 2004 4:02 PM
5–6 Hardware and Software Guide
Multimedia
DRAFT Revised: 8/10/04
File: Chap5.fm
PN: HP-367186-001
hp CONFIDENTIAL
August 10, 2004 12:25 pm
2. Connect the other end of the cable to the video device, as
instructed in the documentation included with the device.
✎If the S-Video out jack on the tablet PC is not accessible because
the tablet PC is docked into an optional docking device, you can
connect the device to the S-Video out jack on the docking device.
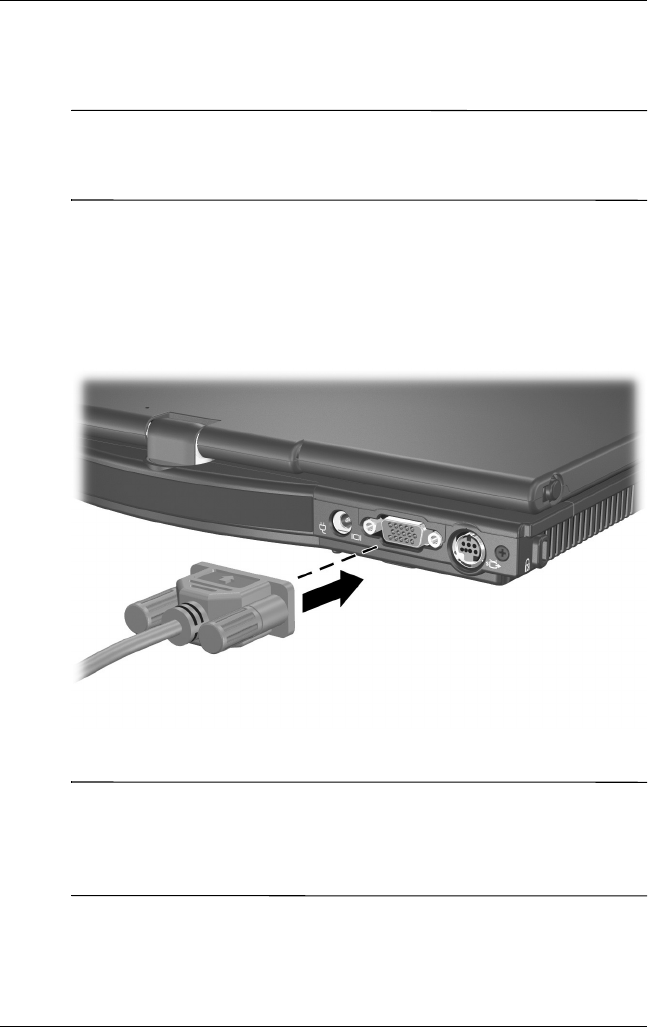
Connecting a Monitor or Projector
To connect an external monitor or projector to the tablet PC,
insert the monitor cable into the external monitor port on the back
of the tablet PC.
✎If a properly connected external monitor or projector does not
display an image, try pressing the fn+f4 hotkey to switch the
image to the monitor. You can toggle between displays by
pressing the Presentation mode button.
367426-xx1.book Page 6 Tuesday, August 24, 2004 4:02 PM

Multimedia
Hardware and Software Guide 5–7
DRAFT Revised: 8/10/04
File: Chap5.fm
PN: HP-367186-001
hp CONFIDENTIAL
August 10, 2004 12:25 pm
Using CD and DVD Software
The following software is supported for use with the tablet PC:
■Windows Media Player—Plays audio CDs and video DVDs
and copies audio and data CDs. This software is included
with the Windows operating system.
■InterVideo WinDVD—Plays video CDs and DVD movies.
This software is preinstalled on select tablet PCs. You can
also obtain this software by any of the following methods:
❏Install WinDVD from the Driver Recovery disk provided
with most HP tablet PCs.
❏If you do not have the Driver Recovery disk, refer to the
Worldwide Telephone Numbers booklet included with
your tablet PC to contact Customer Care for a copy of the
Restore solution for you tablet PC.
❏Download the software from the HP Web site:
http://www.hp.com
■InterVideo WinDVD Creator Plus—Provides the ability to
create, edit and burn movies to a DVD or video CD. This
software is located on the InterVideo WinDVD Creator CD,
included with select tablet PCs.
■Sonic RecordNow!—Enables you to create copies of data and
audio CDs and DVDs and create personalized audio CDs and
DVDs. RecordNow! is preinstalled on select tablet PCs.
Observing the Copyright Warning
It is a criminal offense, under applicable copyright laws, to make
unauthorized copies of copyright-protected material, including
computer programs, films, broadcasts, and sound recordings.
This tablet PC should not be used for such purposes.
367426-xx1.book Page 7 Tuesday, August 24, 2004 4:02 PM

5–8 Hardware and Software Guide
Multimedia
DRAFT Revised: 8/10/04
File: Chap5.fm
PN: HP-367186-001
hp CONFIDENTIAL
August 10, 2004 12:25 pm
Installing Software
To install software from a CD that is included with the tablet PC:
1. Insert an appropriate optical drive into an external MultiBay
or MultiBay II.
2. Connect the tablet PC to a reliable AC outlet.
3. Close any open applications.
4. Insert a software CD into the optical drive.
❏If Autorun is enabled, an installation wizard is displayed.
❏If Autorun is disabled, select Start > Run. Enter:
x:\setup.exe
(where x is your CD drive designation), and then select
OK.
5. When the installation wizard is displayed, follow the
installation instructions on the screen.
6. Restart the tablet PC if prompted.
✎Repeat the installation procedure for all software you want to
install.
✎WinDVD Creator has special drive requirements for proper
installation. To install WinDVD Creator, refer to the instructions
provided with the InterVideo WinDVD Creator CD.
367426-xx1.book Page 8 Tuesday, August 24, 2004 4:02 PM

Multimedia
Hardware and Software Guide 5–9
DRAFT Revised: 8/10/04
File: Chap5.fm
PN: HP-367186-001
hp CONFIDENTIAL
August 10, 2004 12:25 pm
Enabling AutoPlay
AutoPlay is an option in Windows that turns the Autorun feature
on or off. Autorun starts a program or plays a title on a disc as
soon as the disk is inserted into the drive and the drive door is
closed. By default, AutoPlay is enabled on the tablet PC.
To disable AutoPlay or to enable AutoPlay if the feature has been
turned off, refer to your operating system documentation or visit
the Microsoft Web site at: http://www.microsoft.com.
Installing the Universal Disc Format Reader
Some CDs or DVDs created with “drag-and-drop” software
might not initially run in the tablet PC you are using. The first
time you insert a CD or DVD formatted for drag-and-drop
software into the optical drive, you might be prompted to install
the Universal Disk Format (UDF) Reader. Discs formatted for
drag-and-drop software or created using drag-and-drop software
contain a copy of the UDF Reader.
To install the UDF Reader:
1. Insert the CD or DVD created with the drag-and-drop
software into the optical drive of the tablet PC.
2. Select Start > Run. Enter:
x:\udfinst.exe
(where x is the CD or DVD drive designation).
3. Select OK.
4. Follow the installation instructions on the screen.
367426-xx1.book Page 9 Tuesday, August 24, 2004 4:02 PM

5–10 Hardware and Software Guide
Multimedia
DRAFT Revised: 8/10/04
File: Chap5.fm
PN: HP-367186-001
hp CONFIDENTIAL
August 10, 2004 12:25 pm
Using Windows Media Player
Windows Media Player is included with the Windows operating
system. It can be used to play CDs and DVDs and create audio
and data CDs. To play a CD or DVD:
1. Insert the CD or DVD into the optical drive, and then close
the tray.
2. Wait several seconds, and then:
❏If AutoPlay is enabled, Windows Media Player is opened.
❏If Windows Media Player is not opened, select Start >
(All) Programs > Accessories > Entertainment >
Windows Media Player, and then select the Play button
to play the disc.
For additional instructions on using this application, select Help
on the Windows Media Player menu bar.
Using WinDVD Player
InterVideo WinDVD can be used to play video CDs and DVD
movies. To locate and install InterVideo WinDVD, refer to the
“Installing Software” section in this chapter.
To open WinDVD when AutoPlay has been disabled, select Start
> (All) Programs > InterVideo WinDVD > InterVideo
WinDVD.
For more information about using WinDVD, select Help on the
WinDVD menu bar.
Using WinDVD Creator Plus (Select Models
Only)
WinDVD Creator Plus can be used to create, edit, and burn
movies to a DVD or video CD. This software must be installed
from the InterVideo WinDVD Creator CD provided with select
tablet PCs.
367426-xx1.book Page 10 Tuesday, August 24, 2004 4:02 PM

Multimedia
Hardware and Software Guide 5–11
DRAFT Revised: 8/10/04
File: Chap5.fm
PN: HP-367186-001
hp CONFIDENTIAL
August 10, 2004 12:25 pm
WinDVD Creator Plus must be installed using a DVD/CD-RW or
DVD+RW/R and CD-RW Combo Drive only. If you do not use
one of the these drives, WinDVD Creator Plus will not be
installed.
For more information about WinDVD Creator Plus capabilities
and instructions on creating DVDs and Video CDs, refer to the
WinDVD Creator Plus online help after installing the software.
Using Sonic RecordNow!
Sonic RecordNow! can be used to create backups of data or audio
CDs or DVDs, transfer audio files from CDs to a hard drive, and
create personalized audio CDs. RecordNow! is preinstalled on
your tablet PC. For more information about RecordNow!
capabilities and for instructions on creating data and audio CDs
and DVDs, refer to the Sonic RecordNow! Tutorial and online
help.
Changing DVD Region Settings
ÄCAUTION: The region settings on your DVD drive can only be changed
5times.
■The region setting you select the fifth time becomes the permanent
region setting on the DVD drive.
■The number of allowable region changes remaining on the drive is
displayed in the Remaining Times Until Permanent field in the
WinDVD window. The number in the field includes the fifth and
permanent change.
Most DVDs that contain copyrighted files also contain region
codes. The region codes help protect copyrights internationally.
You can play a DVD containing a region code only if the region
code on the DVD matches the region setting on your DVD drive.
If the region code on a DVD does not match the region setting on
your drive, a Playback Of Content From This Region Is Not
Permitted message is displayed when you insert the DVD. To
367426-xx1.book Page 11 Tuesday, August 24, 2004 4:02 PM

5–12 Hardware and Software Guide
Multimedia
DRAFT Revised: 8/10/04
File: Chap5.fm
PN: HP-367186-001
hp CONFIDENTIAL
August 10, 2004 12:25 pm
play the DVD, you must change the region setting on your DVD
drive. DVD region settings can be changed through the operating
system or through some DVD players.
Changing Settings Using the Operating System
To change settings through the operating system:
1. Open Device Manager by selecting Start > My Computer.
Right-click in the window and select Properties > Hardware
tab > Device Manager.
2. Select DVD/CD-ROM drives, right-click the DVD drive for
which you want to change region settings, and then select
Properties.
3. Make the desired changes on the DVD Region tab.
4. Select OK.
5. For additional information, refer to the Windows operating
system Help and Support.
Changing Settings Using WinDVD
To change the region settings on a drive using WinDVD:
1. Open WinDVD through one of the following methods:
❏Select the WinDVD Player icon on the taskbar.
❏Select Start > (All) Programs > InterVideo WinDVD >
InterVideo WinDVD.
2. Right-click the WinDVD player window.
3. Select Setup.
4. Select the button for the region, and then select your region.
5. Select OK.
Changing Settings Using Other DVD Software
To change region settings on a drive using a DVD player other
then WinDVD, refer to the documentation provided with the
player.
367426-xx1.book Page 12 Tuesday, August 24, 2004 4:02 PM

Hardware and Software Guide 6–1
DRAFT Revised: 8/24/04
File: Chap6.fm
PN: HP-376186-001
hp CONFIDENTIAL
August 24, 2004 4:01 pm
6
Wireless
If your notebook is equipped with an integrated wireless device
such as 802.11 or Bluetooth wireless devices, you have a wireless
notebook.
■An 802.11 wireless notebook can connect to wireless
networks in corporate offices, your home, and public places.
Wireless networks include wireless local area networks
(WLANs) or “hotspots.” Hotspots are wireless access points
available in public places, such as airports, restaurants, coffee
shops, hotels, and universities.
■A Bluetooth wireless notebook can connect to other
Bluetooth wireless-enabled devices using a wireless personal
area network (PAN).
367426-xx1.book Page 1 Tuesday, August 24, 2004 4:02 PM

6–2 Hardware and Software Guide
Wireless
DRAFT Revised: 8/24/04
File: Chap6.fm
PN: HP-376186-001
hp CONFIDENTIAL
August 24, 2004 4:01 pm
Your notebook has a button that may be used to enable and
disable the 802.11 and Bluetooth wireless devices and an
associated light to indicate the state of the wireless devices. The
following illustration shows the wireless button 1 and light 2.
In addition to the wireless button and light, your notebook has
software controls that enable you to turn on, turn off, enable, and
disable your wireless devices. The following table explains the
software controls.
Wireless
Control Description
Wireless
Assistant
Is a software utility that enables you to turn on and
off the 802.11 and Bluetooth wireless devices
individually. For more information on using Wireless
Assistant, refer to the “Turning On, Turning Off,
Enabling and Disabling the 802.11 Wireless and
Bluetooth Devices” section in this chapter.
Computer
Setup controls
Enable and disable the 802.11 and Bluetooth
wireless devices in Computer Setup. For more
information about using Computer Setup to control
the 802.11 and Bluetooth wireless devices, refer to
Chapter 9, “Computer Setup.”
367426-xx1.book Page 2 Tuesday, August 24, 2004 4:02 PM

Wireless
Hardware and Software Guide 6–3
DRAFT Revised: 8/24/04
File: Chap6.fm
PN: HP-376186-001
hp CONFIDENTIAL
August 24, 2004 4:01 pm
Wireless Local Area Network (Select
Models Only)
With the 802.11 wireless device, you can access a wireless local
area network (WLAN), which is composed of other computers
and accessories linked by a wireless router or a wireless access
point.
■A large scale WLAN, such as a corporate WLAN or public
WLAN hotspot, typically use wireless access points, that can
handle a large number of computers and accessories and can
separate critical network functions.
■A home or small office WLAN typically uses a wireless
router, which enables several wireless and wired computers to
share an Internet connection, a printer, and files without
additional pieces of hardware or software. Wireless access
point and wireless router are often used interchangeably.
Notebooks with 802.11 WLAN devices may support one or more
of three IEEE physical layer standards:
■802.11a
■802.11b
■802.11g
There are three popular implementations of WLAN adapters:
■802.11b only
■802.11b/g
■802.11a/b/g
802.11b, the first popular WLAN standard, supports data rates of
up to 11 Mbps and operates at a frequency of 2.4 GHz. 802.11g,
which came later, also operates at 2.4 GHz but supports data rates
of up to 54 Mbps. An 802.11g WLAN device is backward
compatible with 802.11b devices, so they can operate on the same
network. 802.11a supports data rates of up to 54 Mbps but
operates at a frequency of 5 GHz. 802.11a is not compatible with
367426-xx1.book Page 3 Tuesday, August 24, 2004 4:02 PM

6–4 Hardware and Software Guide
Wireless
DRAFT Revised: 8/24/04
File: Chap6.fm
PN: HP-376186-001
hp CONFIDENTIAL
August 24, 2004 4:01 pm
802.11b and 802.11g. For information on identifying the type of
device in your notebook, refer to the “Identifying a WLAN
Device” section in this chapter.
Connecting Your Wireless Notebook to a
Corporate WLAN
Contact your network administrator or IT department for
information on connecting your notebook to your corporate
WLAN.
Connecting Your Wireless Notebook to a
Public WLAN
Contact your ISP or search the Web for a list of public WLANs
near you. Web sites that list public WLANs include Cisco
Hotspot Locator, Hotspotlist, and Geektools.
When you are within range of a public WLAN, a Wireless
Network Connection interactive message is displayed at the
bottom of the screen. Check with each public WLAN location for
cost and connection requirements.
367426-xx1.book Page 4 Tuesday, August 24, 2004 4:02 PM

Wireless
Hardware and Software Guide 6–5
DRAFT Revised: 8/24/04
File: Chap6.fm
PN: HP-376186-001
hp CONFIDENTIAL
August 24, 2004 4:01 pm
Setting Up a WLAN in Your Home
To set up a WLAN and connect to the Internet in your home, you
need the following equipment. The illustration below shows an
example of a completed wireless network installation that is
connected to the Internet. This wireless network includes
■An optional broadband modem (either DSL or cable) and
high-speed Internet service purchased from an Internet
service provider (ISP) 1.
■An optional wireless router (purchased separately) 2.
■Your wireless notebook 3.
As this network grows, additional wireless and wired computers
can be connected to the network to access the Internet.
✎If you need technical assistance to install your WLAN, contact
the router manufacturer or your ISP.
367426-xx1.book Page 5 Tuesday, August 24, 2004 4:02 PM

6–6 Hardware and Software Guide
Wireless
DRAFT Revised: 8/24/04
File: Chap6.fm
PN: HP-376186-001
hp CONFIDENTIAL
August 24, 2004 4:01 pm
Using a WLAN Connection
To use a WLAN connection:
■Verify that all drivers required by the 802.11 wireless device
are installed and that the 802.11 wireless device is correctly
configured.
✎If you are using an integrated 802.11 wireless device, all
required drivers are installed and the adapter is
preconfigured and ready for use.
■If you are using an integrated 802.11 wireless device, verify
that the 802.11 wireless device is turned on. When the 802.11
wireless device is turned on, the wireless light is turned on. If
the wireless light is off, turn on the 802.11 wireless device.
Refer to the “Turning On, Turning Off, Enabling and
Disabling the 802.11 Wireless and Bluetooth Devices”
section.
■For your home WLAN, verify that your router is correctly
configured. For instructions, refer to your router
documentation.
✎Functional range for subsequent WLAN connections vary,
depending on your notebook WLAN implementation, router
manufacturer, and interference from varying types of walls and
other electronic devices.
For more information about using a WLAN connection:
■Refer to information from your ISP and the documentation
included with your wireless router and other WLAN
equipment.
■Access the information and Web site links provided at
Start > Help and Support.
■Refer to the documentation included with your notebook. The
Troubleshooting guide on the Notebook Documentation CD
contains a section about wireless LAN device problems and
resolutions.
367426-xx1.book Page 6 Tuesday, August 24, 2004 4:02 PM

Wireless
Hardware and Software Guide 6–7
DRAFT Revised: 8/24/04
File: Chap6.fm
PN: HP-376186-001
hp CONFIDENTIAL
August 24, 2004 4:01 pm
Using Wireless Security Features
When you set up your own WLAN or access an existing WLAN,
always ensure that security features are protecting the WLAN. If
you do not enable security on your WLAN, an unauthorized
wireless user can access your notebook data and use your Internet
connection without your knowledge.
The most common security levels are Wi-Fi Protected Access
(WPA)-Personal and Wired Equivalent Privacy (WEP). In
addition to enabling WPA-Personal or WEP security encryption
on the router, you may want to use one or more of the following
security measures:
■Change the default network name (SSID) and password.
■Use a firewall.
■Set security on your Web browser.
■Enable MAC address filtering on the router.
For more information about WLAN security, refer to the HP Web
site at http://www.hp.com/go/wireless for details.
Installing Wireless Software (Optional)
Microsoft Windows XP supports WLAN configuration with the
Zero Client Configuration feature. HP provides a separate WLAN
configuration utility that must be installed if you plan to use
Cisco Compatible Extensions. Cisco Compatible Extensions
enable wireless devices to use Cicso-based WLANs.
367426-xx1.book Page 7 Tuesday, August 24, 2004 4:02 PM

6–8 Hardware and Software Guide
Wireless
DRAFT Revised: 8/24/04
File: Chap6.fm
PN: HP-376186-001
hp CONFIDENTIAL
August 24, 2004 4:01 pm
Identifying a WLAN Device
To install HP WLAN software for an integrated 802.11 wireless
device, you need to know the name of the integrated 802.11
wireless device on your notebook. To identify an integrated
802.11 wireless device:
1. Display the names of all the 802.11 wireless devices on your
notebook:
a. Select Start > My Computer.
b. Right-click in the My Computer window.
c. Select Properties > Hardware tab > Device Manager >
Network Adapters.
2. Identify the 802.11 wireless device from the list that is
displayed:
❏The listing for an 802.11 wireless device includes the term
wireless LAN, WLAN, or 802.11.
❏If no 802.11 wireless device is listed, either your notebook
does not have an integrated 802.11 wireless device, or the
driver for the 802.11 wireless device is not properly
installed.
Accessing WLAN Software and Documentation
Your WLAN software is preloaded on your notebook and is
available in the Software Setup utility.
To install the WLAN software:
»Select Start > All Programs > Software Setup, and then
follow the instructions on the screen. (When you are
prompted to select the software you want to install, select or
clear the corresponding check boxes.)
367426-xx1.book Page 8 Tuesday, August 24, 2004 4:02 PM

Wireless
Hardware and Software Guide 6–9
DRAFT Revised: 8/24/04
File: Chap6.fm
PN: HP-376186-001
hp CONFIDENTIAL
August 24, 2004 4:01 pm
The WLAN software is also available as a SoftPaq at the HP Web
site. To access, download, and install the SoftPaq, use either of
the following procedures:
■Select Start > Help and Support.
-or-
■Visit the HP Web site at http://www.hp.com/support:
a. Choose your language and region.
b. Select the Download Drivers and Software radio button
c. Enter your computer model information, and then follow
the instructions provided at the Web site.
✎WLAN software is provided in the Network category. To
access model information about your computer, refer to the
serial number label. The serial number label is on the
bottom of the notebook.
To access documentation for your WLAN software:
1. Install the WLAN software as instructed earlier in this
chapter.
2. Open the utility.
3. Select Help on the menu bar.
Troubleshooting 802.11 Wireless Devices
For more troubleshooting information, visit the HP Web site
(http://www.hp.com/go/wireless) or refer to the documentation
included with your notebook. The Troubleshooting guide on the
Notebook Documentation CD contains a section about wireless
LAN device problems and resolutions.
367426-xx1.book Page 9 Tuesday, August 24, 2004 4:02 PM

6–10 Hardware and Software Guide
Wireless
DRAFT Revised: 8/24/04
File: Chap6.fm
PN: HP-376186-001
hp CONFIDENTIAL
August 24, 2004 4:01 pm
Bluetooth (Select Models Only)
The Bluetooth device provides short-range wireless
communications that replace the physical cable connections that
traditionally link electronic devices such as
■Network access points.
■Computers (desktop, notebook, PDA).
■Phones (cellular, cordless, smart phone).
■Imaging devices (printer, camera).
■Audio devices (headset, speakers).
The devices are represented in the Bluetooth for Windows
software by graphical icons that resemble their physical features,
which makes them easily recognizable and distinguishes them
from other classes of devices.
The Bluetooth for Windows software provides the following
functions:
■Personal Information Management (PIM) item
transfer—Sends and receives information files such as
business cards, calendar items, notes, and message items to
and from another Bluetooth computer or device.
■PIM synchronization—Synchronizes PIM data between a
computer, PDA, or cell phone using Bluetooth.
■File Transfer—Sends and receives files to and from another
Bluetooth computer.
■Network access (Personal Area Networking Profile)—
Enables two or more Bluetooth devices to form an ad-hoc
(peer-to-peer) network. Provides a mechanism that enables a
Bluetooth device to access a remote network through a
network access point. The network access points can be
traditional LAN data access points or group ad-hoc networks
that represent a set of devices that are attached only to one
another.
■Dial-up networking—Connects Bluetooth devices to the
Internet.
367426-xx1.book Page 10 Tuesday, August 24, 2004 4:02 PM

Wireless
Hardware and Software Guide 6–11
DRAFT Revised: 8/24/04
File: Chap6.fm
PN: HP-376186-001
hp CONFIDENTIAL
August 24, 2004 4:01 pm
■Bluetooth serial port—Transfers data over the Bluetooth link
using a virtual COM port.
■Hands-Free—Enables a vehicle-embedded, hands-free unit or
a notebook serving as a hands-free unit to establish a wireless
connection to a cellular phone and to act as the Bluetooth
cellular phone audio input and output mechanism.
■Basic imaging—Provides a wireless connection between a
Bluetooth-enabled camera and other Bluetooth devices. The
camera can be controlled remotely by a notebook, and images
can be transferred from a camera to be stored on a computer
or to be printed.
■Human interface device—Provides a wireless connection to
other Bluetooth devices, such as keyboards, pointing devices,
gaming devices, and remote monitoring devices.
■Fax—Provides a Bluetooth connection that enables a
notebook to send or receive a fax message using a Bluetooth
cellular phone or modem.
■Headset—Provides a wireless connection between a headset
and a notebook or cellular phone. The headset acts as the
device’s audio input and output mechanism and increases
mobility.
For more information about using Bluetooth with your notebook,
refer to the Wireless Documentation CD included with your
notebook.
367426-xx1.book Page 11 Tuesday, August 24, 2004 4:02 PM

6–12 Hardware and Software Guide
Wireless
DRAFT Revised: 8/24/04
File: Chap6.fm
PN: HP-376186-001
hp CONFIDENTIAL
August 24, 2004 4:01 pm
Turning On, Turning Off, Enabling and
Disabling the 802.11 Wireless and
Bluetooth Devices
The wireless button 1 enables and disables 802.11 wireless and
Bluetooth devices in conjunction with Wireless Assistant. By
default, the 802.11 wireless and Bluetooth devices and wireless
light 2 are turned on when you turn on the notebook.
✎Turning on a wireless device does not automatically create a
WLAN or connect you to a WLAN. For information on setting up
a WLAN refer to the “Wireless Local Area Network (Select
Models Only)” section in this chapter.
The 802.11 wireless and Bluetooth devices have two power
states:
■Enabled
■Disabled
367426-xx1.book Page 12 Tuesday, August 24, 2004 4:02 PM

Wireless
Hardware and Software Guide 6–13
DRAFT Revised: 8/24/04
File: Chap6.fm
PN: HP-376186-001
hp CONFIDENTIAL
August 24, 2004 4:01 pm
You can enable and disable the wireless devices in Computer
Setup. For more information about using Computer Setup to
control the 802.11 and Bluetooth wireless devices, refer to
Chapter 9, “Computer Setup.” You can also enable and disable
the wireless devices with the wireless button.
When the wireless devices are enabled in Computer Setup and
with the wireless button, you can use Wireless Assistant to turn
on and off the devices individually.
To view the state of your wireless devices, place the cursor over
the Wireless Assistant icon in the notification area, or open
Wireless Assistant by double-clicking the icon in the notification
area. Wireless Assistant displays the status of the devices as on,
off, or disabled. Wireless Assistant also displays the status of the
devices in Computer Setup as enabled or disabled.
For more information about Wireless Assistant:
1. Open Wireless Assistant by double-clicking the icon in the
notification area.
2. Select the Help button.
✎You cannot use the wireless button or Wireless Assistant to
control the wireless devices if they are disabled in Computer
Setup.
367426-xx1.book Page 13 Tuesday, August 24, 2004 4:02 PM

6–14 Hardware and Software Guide
Wireless
DRAFT Revised: 8/24/04
File: Chap6.fm
PN: HP-376186-001
hp CONFIDENTIAL
August 24, 2004 4:01 pm
Turning On the 802.11 Wireless and
Bluetooth Devices
If And Then
■Wireless Assistant
shows that both
WLAN and
Bluetooth are off
■Wireless light is off
You want to turn on
either or both
devices
1. Right-click the Wireless
Assistant icon in the
notification area.
2. Select the device or
devices you want to turn
on.
✎If the wireless
devices are turned
off, pressing the
wireless button
disables both
devices. The button
does not turn on the
devices.
■Wireless Assistant
shows that both
WLAN and
Bluetooth are
disabled*
■Wireless light is off
You want to turn on
either or both
devices
1. Press the wireless button.
(The devices return to
their previous on or off
state.)
2. If the wireless devices are
turned off, right-click the
Wireless Assistant icon
in the notification area.
3. Select the device or
devices you want to turn
on.
■Wireless Assistant
shows that one
device is on and the
other device is off
■Wireless light is on
You want to turn on
either or both
devices
1. Right-click the Wireless
Assistant icon in the
notification area.
2. Select the device or
devices you want to turn
on.
*If the wireless devices are not both on when you disable the devices, pressing
the wireless button again returns the devices to their previous on or off state.
Pressing the button does not turn on both devices.
367426-xx1.book Page 14 Tuesday, August 24, 2004 4:02 PM

Wireless
Hardware and Software Guide 6–15
DRAFT Revised: 8/24/04
File: Chap6.fm
PN: HP-376186-001
hp CONFIDENTIAL
August 24, 2004 4:01 pm
✎If you want your wireless devices to be turned on when you turn
on your notebook, you must turn them on before you shut down
or restart.
Turning Off and Disabling the 802.11
Wireless and Bluetooth Devices
If And Then
■Wireless
Assistant
shows that
both WLAN
and Bluetooth
are on
■Wireless light
is on
You want to disable both
devices
Press the wireless button.
You want to turn off either
or both devices
1. Right-click the Wireless
Assistant icon in the
notification area.
2. Select the device or
devices you want to turn
off.
■Wireless
Assistant
shows that
both WLAN
and Bluetooth
are off
■Wireless light
is off
You want to disable both
devices
Press the wireless button.
■Wireless
Assistant
shows that one
device is on
and the other
device is off*
■Wireless light
is on
You want to disable both
devices
Press the wireless button.
You want to turn off both
devices.
1. Right-click the Wireless
Assistant icon in the
notification area.
2. Select the device or
devices you want to
turn off.
*If the wireless devices are not both on when you disable the devices, pressing
the wireless button again returns the devices to their previous on or off state.
Pressing the button does not turn on both devices.
367426-xx1.book Page 15 Tuesday, August 24, 2004 4:02 PM

6–16 Hardware and Software Guide
Wireless
DRAFT Revised: 8/24/04
File: Chap6.fm
PN: HP-376186-001
hp CONFIDENTIAL
August 24, 2004 4:01 pm
367426-xx1.book Page 16 Tuesday, August 24, 2004 4:02 PM
Hardware and Software Guide 7–1
DRAFT Revised: 8/24/04
File: Chap7.fm
PN: HP-367186-001
hp CONFIDENTIAL
August 24, 2004 4:02 pm
7
Q Menu Software
Q Menu
The Q Menu provides quick access to many of the system tasks
accessed with the buttons, keys, or hot keys found on most tablet
PCs.
You can program the Q Menu to access alternative system tasks
or to any item on a drive, a network, or the Internet.
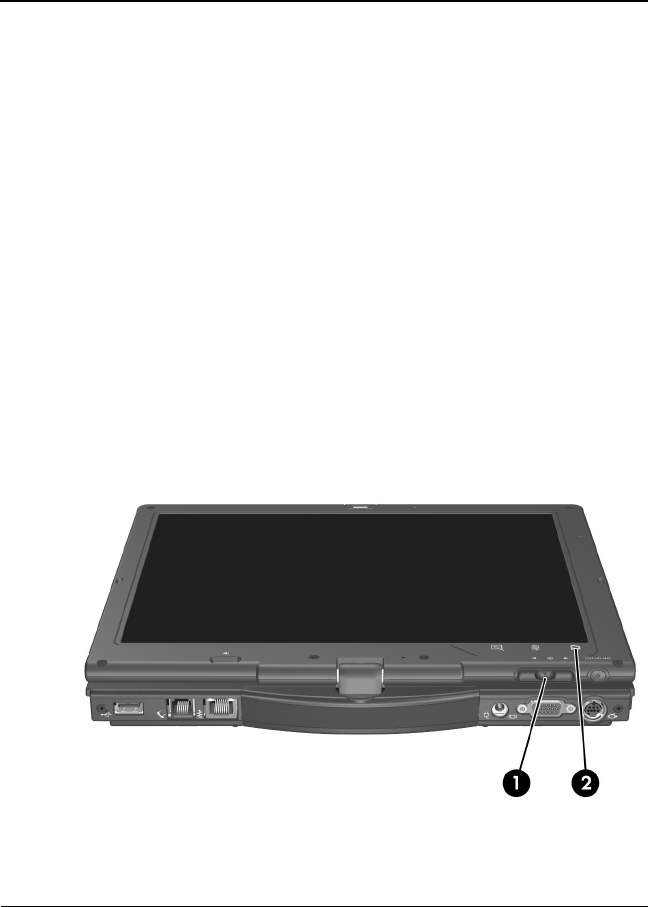
Identifying Q Menu Controls
The jog dial 1 and the Q Menu button 2 are used in Q Menu
procedures.
367426-xx1.book Page 1 Tuesday, August 24, 2004 4:02 PM

7–2 Hardware and Software Guide
Q Menu Software
DRAFT Revised: 8/24/04
File: Chap7.fm
PN: HP-367186-001
hp CONFIDENTIAL
August 24, 2004 4:02 pm
Displaying and Closing the Q Menu
The Q Menu can be displayed or closed at any time by using any
of the following procedures:
■To display the Q Menu, press the Q Menu button or select the
Q icon in the notification area (at the far right of the taskbar).
If the Q icon is not displayed in the notification area (at the
far right of the taskbar):
1. Press the Q Menu button.
2. Select Q Menu Settings.
3. Select the Display Q Menu Icon On System Tray
check box.
367426-xx1.book Page 2 Tuesday, August 24, 2004 4:02 PM

Q Menu Software
Hardware and Software Guide 7–3
DRAFT Revised: 8/24/04
File: Chap7.fm
PN: HP-367186-001
hp CONFIDENTIAL
August 24, 2004 4:02 pm
4. Select OK.
If the icon is not displayed, select Show Hidden Icons in the
notification area (at the far right of the taskbar).
■To close the Q Menu, press the Q Menu button or select
anywhere outside of the Q Menu.
For information about setting a pen-activated button to open
and close the Q Menu, refer to Chapter 4, “Pen and Command
Controls.”
Selecting an Item from the Q Menu
The items on the Q Menu can be selected with the jog dial, the
pen, an external mouse, or the pointing devices.
To select an item with the jog dial, rotate the jog dial upward or
downward to scroll vertically through the items, then press the
jog dial inward to select an item.
Obtaining Information About
System-Defined Items
To display a description of a system-defined Q Menu item or
to test any Q Menu item by executing the item command:
1. Press the Q Menu button or select the Q icon in the
notification area (at the far right of the taskbar).
2. Select Q Menu Settings.
3. On the Items to Display On Q Menu list:
❏To display a description of a system-defined item,
select the item. (A description is displayed in a panel
beneath the list.) User-defined items are not described.
❏To test any item by executing the item command,
select the item, and then select Execute.
Procedures for using all system-defined items are provided in the
“Using a System-Defined Item” section, later in this chapter.
367426-xx1.book Page 3 Tuesday, August 24, 2004 4:02 PM

7–4 Hardware and Software Guide
Q Menu Software
DRAFT Revised: 8/24/04
File: Chap7.fm
PN: HP-367186-001
hp CONFIDENTIAL
August 24, 2004 4:02 pm
Setting Q Menu Preferences
The Q Menu can display up to 40 items. Several system-defined
items are displayed by default. Additional system-defined and
user-defined items can be added. All items, including the default
items, can be removed.
The items on the Q Menu are managed from the Items to Display
On Q Menu list.
Accessing the Items to Display on Q Menu List
The Items to Display on Q Menu list can be accessed at any time
by using either of the following procedures:
■Press the Q Menu button or select the Q icon in the
notification area (at the far right of the taskbar), and then
select Q Menu Settings.
■Select Start > Control Panel > Other Control Panel
Options > Q Menu Settings.
Removing a Q Menu Item
To remove an item from the Q Menu:
1. Press the Q Menu button or select the Q icon in the
notification area (at the far right of the taskbar).
2. Select Q Menu Settings.
3. On the Items to Display On Q Menu list, clear the check box
for the item you want to remove.
4. Select Apply > OK.
367426-xx1.book Page 4 Tuesday, August 24, 2004 4:02 PM

Q Menu Software
Hardware and Software Guide 7–5
DRAFT Revised: 8/24/04
File: Chap7.fm
PN: HP-367186-001
hp CONFIDENTIAL
August 24, 2004 4:02 pm
Adding a Q Menu Item
An item must be displayed on the Items to Display On Q Menu
list before it can be added to the Q Menu.
The Q Menu and the Items to Display on Q Menu list can include
no more than 40 items. If the list currently contains 40 items, the
Add button is dimmed and unavailable. If the Add button is
unavailable, you must remove a listed item before you can add the
new item.
Adding a Listed Item to the Q Menu
To add an item from the Items to Display On Q Menu list to the
Q Menu:
1. Press the Q Menu button or select the Q icon in the
notification area (at the far right of the taskbar).
2. Select Q Menu Settings.
3. Select the check box for the item you want to add.
4. Select OK.
To display the Q Menu after adding the item, press the Q Menu
button or select the Q icon in the notification area (at the far right
of the taskbar).
Adding an Unlisted Item to the Q Menu
To add an item that is not on the Items to Display on Q Menu
list—for example, an item on a drive, network, or the
Internet—to both the Items to Display on Q Menu list and to
the Q Menu:
1. Press the Q Menu button or select the Q icon in the
notification area (at the far right of the taskbar).
2. Select Q Menu Settings.
3. Select Add.
367426-xx1.book Page 5 Tuesday, August 24, 2004 4:02 PM

7–6 Hardware and Software Guide
Q Menu Software
DRAFT Revised: 8/24/04
File: Chap7.fm
PN: HP-367186-001
hp CONFIDENTIAL
August 24, 2004 4:02 pm
4. In the Add New Menu Entry window, you can add the item
by typing or by browsing:
❏To add the item using the keyboard, type a name for the
item in the Display Name field and type the path to the
item in the File Name field. If you prefer to type the
Display Name, but browse for the File Name, leave the
File Name field blank.
❏To add an item by browsing, select the Browse button next
to the File Name field.
❏In the window, select the item. (The full name of the item
is displayed in the File Name field and, if you did not type
a name earlier in the Display Name field, a Display Name
is generated from the item name and displayed in the
Display Name field.)
5. To confirm your preference(s), select Apply > OK.
6. To close the Q Menu window, select OK.
To display the Q Menu after adding the item, press the Q Menu
button or select the Q icon in the notification area (at the far right
of the taskbar).
Changing a User-Defined Item
User-defined items can be changed, but system-defined items
cannot be changed. If you select a system-defined item on the
Items To Display on Q Menu list, the Modify button is
unavailable.
To change the Display Name and/or File Name of a
user-defined item:
1. Press the Q Menu button or select the Q icon in the
notification area (at the far right of the taskbar).
2. Select Q Menu Settings.
3. Select the item on the Items To Display On Q Menu list.
367426-xx1.book Page 6 Tuesday, August 24, 2004 4:02 PM

Q Menu Software
Hardware and Software Guide 7–7
DRAFT Revised: 8/24/04
File: Chap7.fm
PN: HP-367186-001
hp CONFIDENTIAL
August 24, 2004 4:02 pm
4. Select Modify.
❏To change the Display Name or File Name of the item
using the keyboard, type the new name for the item in the
Display Name field or type the new path to the item in the
File Name field. If you prefer to type the Display Name,
but browse for the File Name, leave the File Name field
blank.
❏To change the Display Name or File Name by browsing,
select the Browse button beside the File Name field.
❏In the window, select the item. (The full name of the item
is displayed in the File Name field and, if you did not type
a name earlier in the Display Name field, a Display Name
is generated from the item name and displayed in the
Display Name field.)
5. To confirm your preference(s), select Apply > OK.
6. To close the Q Menu window, select OK.
To display the Q Menu after changing a Display and/or File
Name, press the Q Menu button or select the Q icon in the
notification area (at the far right of the taskbar).
Repositioning a Q Menu Item
To change the location of an item on the Q Menu:
1. Press the Q Menu button or select the Q icon in the
notification area (at the far right of the taskbar).
2. Select Q Menu Settings.
3. Select the item on the Items to Display On Q Menu list, then:
❏To move the item upward, select the Move Up button.
❏To move the item downward, select the Move Down
button.
4. To confirm your preference(s) and close the Q Menu window,
select Apply > OK.
367426-xx1.book Page 7 Tuesday, August 24, 2004 4:02 PM

7–8 Hardware and Software Guide
Q Menu Software
DRAFT Revised: 8/24/04
File: Chap7.fm
PN: HP-367186-001
hp CONFIDENTIAL
August 24, 2004 4:02 pm
Removing an Item from the Items to Display on
Q Menu List
System-defined items cannot be removed from the Items to
Display on Q Menu List. To remove a user-defined item:
1. Press the Q Menu button or select the Q icon in the
notification area (at the far right of the taskbar).
2. Select Q Menu Settings.
3. Select the item you want to remove.
4. Select Remove.
5. To confirm your preference(s) and close the Q Menu window,
select Apply > OK.
Enabling Automatic Mode Change
Enabling automatic mode change allows the Q Menu software to
adjust the display orientation automatically. If you disable this
option, the orientation of the display will need to be manually
changed.
To enable automatic mode change:
1. Press the Q Menu button or select the Q icon in the
notification area (at the far right of the taskbar).
2. Select Q Menu Settings.
3. Select the Enable Automatic Mode Change check box.
Allowing All Users to Configure Q Menu
This option allows all user accounts to reconfigure Q Menu.
When selected, this change is only applied to that user.
To enable automatic mode change:
1. Press the Q Menu button or select the Q icon in the
notification area (at the far right of the taskbar).
2. Select Q Menu Settings.
3. Select the Allow All Users to Configure Q Menu check box.
367426-xx1.book Page 8 Tuesday, August 24, 2004 4:02 PM

Q Menu Software
Hardware and Software Guide 7–9
DRAFT Revised: 8/24/04
File: Chap7.fm
PN: HP-367186-001
hp CONFIDENTIAL
August 24, 2004 4:02 pm
Using a System-Defined Item
As shipped, the Q Menu displays only the items identified below
as default. All the items described below can be added or
removed from the Q Menu. For instructions, refer to “Setting Q
Menu Preferences,” earlier in this chapter.
Brightness (Default)
Select Brightness to display a pop-up window that enables you to
adjust screen brightness with the jog dial. After selecting your
preferences, select OK in the pop-up window.
Volume (Default)
Select Volume to display the operating system volume control
window.
Mute On/Off (Default)
If system volume is on, select Mute On/Off to mute system
volume. If system volume is muted, select Mute On/Off to
restore system volume.
Capture Screen
Select Capture Screen to copy the image currently displayed on
the tablet PC screen to the Windows clipboard.
To save or print the image, open an application which supports a
screen image, such as Microsoft Word or Microsoft Paint, then
paste the image.
For example, to copy the screen image into a Word document:
1. Select Capture Screen.
2. Open Word.
3. Place the pointer in the document where you want to paste
the image.
4. On the Word menu bar, select Edit > Paste.
367426-xx1.book Page 9 Tuesday, August 24, 2004 4:02 PM

7–10 Hardware and Software Guide
Q Menu Software
DRAFT Revised: 8/24/04
File: Chap7.fm
PN: HP-367186-001
hp CONFIDENTIAL
August 24, 2004 4:02 pm
Capture Window
Select Capture Window to copy the image of the currently active
window on the tablet PC screen to the Windows clipboard.
To save or print the image, open an application which supports a
screen image, such as Microsoft Word or Microsoft Paint, then
paste the image.
For example, to copy the an image of the currently active window
into a Word document:
1. Select Capture Window.
2. Open Word.
3. Place the pointer in the document where you want to paste
the image.
4. On the Word menu bar, select Edit > Paste.
Tablet Display (Default)
When an optional display device, such as an external monitor or
projector, is connected to the external monitor connector on the
tablet PC:
To display the image only on the tablet PC:
»Select Tablet Display.
✎Selecting Tablet Display turns off the Extended Desktop
option.
367426-xx1.book Page 10 Tuesday, August 24, 2004 4:02 PM

Q Menu Software
Hardware and Software Guide 7–11
DRAFT Revised: 8/24/04
File: Chap7.fm
PN: HP-367186-001
hp CONFIDENTIAL
August 24, 2004 4:02 pm
External Display
When an optional display device, such as an external monitor or
projector, is connected to the external monitor connector on the
tablet PC:
To display the image only on the display device:
»Select External Display.
✎Selecting External Display turns off the Extended Desktop
option.
Dual Display (Default)
When an optional display device, such as an external monitor
or projector, is connected to the external monitor connector on
the tablet PC:
To display the image on the tablet PC and the display device:
»Select Dual Display.
✎Selecting Dual Display turns off the Extended Desktop
option.
Extended Desktop
The Extended Desktop option extends the display from the
tablet PC screen onto the external monitor screen. For example,
you could use the Extended Desktop item to display an entire
spreadsheet. The left side columns could be displayed on the
tablet PC screen and the right side columns could be displayed
on the external monitor.
When an optional external monitor is connected to the external
monitor connector on the tablet PC:
To turn on the Extended Desktop option:
»Select Extended Desktop.
To turn off the Extended Desktop option:
1. Press the Q Menu button.
2. Select Tablet Display, External Display, or Dual Display.
367426-xx1.book Page 11 Tuesday, August 24, 2004 4:02 PM

7–12 Hardware and Software Guide
Q Menu Software
DRAFT Revised: 8/24/04
File: Chap7.fm
PN: HP-367186-001
hp CONFIDENTIAL
August 24, 2004 4:02 pm
Presentation Mode On/Off (Default)
ÄCAUTION: Presentation mode is integrated with the Q Menu software.
If the Q Menu software is uninstalled or disabled, presentation mode
will not function.
Presentation mode is a desktop profile that provides the optimal
configuration for displaying a presentation, such as a
Microsoft PowerPoint presentation, on a projector or external
monitor while displaying speaker’s notes on the tablet PC.
If you cause the system to initiate a desktop video profile while
presentation mode is applied—for example, by docking or
undocking—you must reapply presentation mode.
To apply or reapply presentation mode:
»Select Presentation Mode On.
To close presentation mode and return the system to the previous
desktop video profile:
»Select Presentation Mode Off.
Portrait-Primary (Default)
To switch the image clockwise to portrait view from
landscape view:
»Select Portrait-Primary.
Landscape-Primary (Default)
To switch the image clockwise to landscape view from
portrait view:
»Select Landscape-Primary.
367426-xx1.book Page 12 Tuesday, August 24, 2004 4:02 PM

Q Menu Software
Hardware and Software Guide 7–13
DRAFT Revised: 8/24/04
File: Chap7.fm
PN: HP-367186-001
hp CONFIDENTIAL
August 24, 2004 4:02 pm
Portrait-Secondary
To switch the image counterclockwise to portrait view from
landscape view:
»Select Portrait-Secondary.
The default Portrait-Primary item switches the image
clockwise to portrait view. Left-handed users may find the
Portrait-Secondary item, which switches the image
counterclockwise to portrait view, more convenient.
✎HP recommends that you not use the Portrait-Secondary view
while using the internal wireless. The positions commonly
occupied by the tablet PC, external devices, and the user while
the tablet PC is in the Portrait-Secondary view may obstruct the
antennas.
For exact antenna locations, refer to Chapter 1, “Tablet PC
Features.”
Landscape-Secondary
To switch the image counterclockwise to landscape view from
portrait view:
»Select Landscape-Secondary.
The default Landscape-Primary item switches the image
clockwise to landscape view. Left-handed users may prefer to
use the Landscape-Secondary item, which switches the image
counterclockwise to landscape view.
✎HP recommends that you not use the Landscape-Secondary view
while using the internal wireless. The positions commonly
occupied by the tablet PC, external devices, and the user while the
tablet PC is in the Landscape-Secondary view may obstruct
the antennas.
For exact antenna locations, refer to Chapter 1, “Tablet PC
Features.”
367426-xx1.book Page 13 Tuesday, August 24, 2004 4:02 PM

7–14 Hardware and Software Guide
Q Menu Software
DRAFT Revised: 8/24/04
File: Chap7.fm
PN: HP-367186-001
hp CONFIDENTIAL
August 24, 2004 4:02 pm
Standby
To initiate Standby:
»Select Standby.
Hibernate
To initiate Hibernation if Hibernation is enabled:
»Select Hibernate.
✎Hibernation is enabled by default. If Hibernation is not
enabled, selecting Hibernate initiates Standby.
To verify that Hibernation is enabled:
»Select Start > Control Panel > Performance and
Maintenance > Power Options > Hibernate tab.
If Hibernation is enabled, the Enable Hibernation check box is
selected.
Shut Down
To immediately close the operating system and shut down the
system:
»Select Shut Down. You are not prompted to confirm this
action.
Power Controls
To open the operating system Power Options Properties window:
»Select Power Controls.
Tablet PC Settings (Default)
To open the operating system Tablet and Pen Settings window:
»Select Tablet PC Settings.
367426-xx1.book Page 14 Tuesday, August 24, 2004 4:02 PM

Q Menu Software
Hardware and Software Guide 7–15
DRAFT Revised: 8/24/04
File: Chap7.fm
PN: HP-367186-001
hp CONFIDENTIAL
August 24, 2004 4:02 pm
Q Menu Settings (Default)
To open the Q Menu Settings window:
»Select Q Menu Settings.
Tablet PC Button Driver
The tablet PC button driver allows you to customize the
pen-activated buttons and jog dial. You can program the buttons
to perform various functions or open specific programs. Each
button can be programmed to perform a different function for
each orientation, or to perform the same function for all
orientations.
To customize a tablet PC button:
1. Select Start > Control Panel > Printers and other
Hardware > Tablet and Pen Settings.
2. Select the Tablet Buttons tab.
3. Select the orientation for which you want to program the
button.
4. Select the button you want to program in the Tablet Button
column. The button is displayed in the Button location and
Detailed view areas of the Tablet Buttons tab.
5. To change the action associated with the button, select
Change. The Change Tablet Button Actions dialog box is
displayed.
6. In the Action drop-down box, select the action that you want
the button to perform.
7. Select OK.
8. Select Apply > OK on the Tablet and Pen settings dialog
box.
ÄCAUTION: The tablet PC button driver is integrated with the Q Menu
software. If the Q Menu software is uninstalled or disabled, the button
driver will not function.
367426-xx1.book Page 15 Tuesday, August 24, 2004 4:02 PM

7–16 Hardware and Software Guide
Q Menu Software
DRAFT Revised: 8/24/04
File: Chap7.fm
PN: HP-367186-001
hp CONFIDENTIAL
August 24, 2004 4:02 pm
367426-xx1.book Page 16 Tuesday, August 24, 2004 4:02 PM