Broadcom BRCM1019 802.11ag Wireless LAN PCI-E Mini Card User Manual Manual Title
Broadcom Corporation 802.11ag Wireless LAN PCI-E Mini Card Manual Title
Broadcom >
Contents
Users manual part F

Hardware and Software Guide 8–1
DRAFT Revised: 8/24/04
File: Chap8.fm
PN: HP-376186-001
hp CONFIDENTIAL
August 24, 2004 4:02 pm
8
Wireless
If your tablet PC is equipped with an integrated wireless device
such as 802.11 or Bluetooth wireless devices, you have a wireless
tablet PC.
■An 802.11 wireless tablet PC can connect to wireless
networks in corporate offices, your home, and public places.
Wireless networks include wireless local area networks
(WLANs) or “hotspots.” Hotspots are wireless access points
available in public places, such as airports, restaurants, coffee
shops, hotels, and universities.
■A Bluetooth wireless tablet PC can connect to other
Bluetooth wireless-enabled devices using a wireless personal
area network (PAN).
367426-xx1.book Page 1 Tuesday, August 24, 2004 4:02 PM
8–2 Hardware and Software Guide
Wireless
DRAFT Revised: 8/24/04
File: Chap8.fm
PN: HP-376186-001
hp CONFIDENTIAL
August 24, 2004 4:02 pm
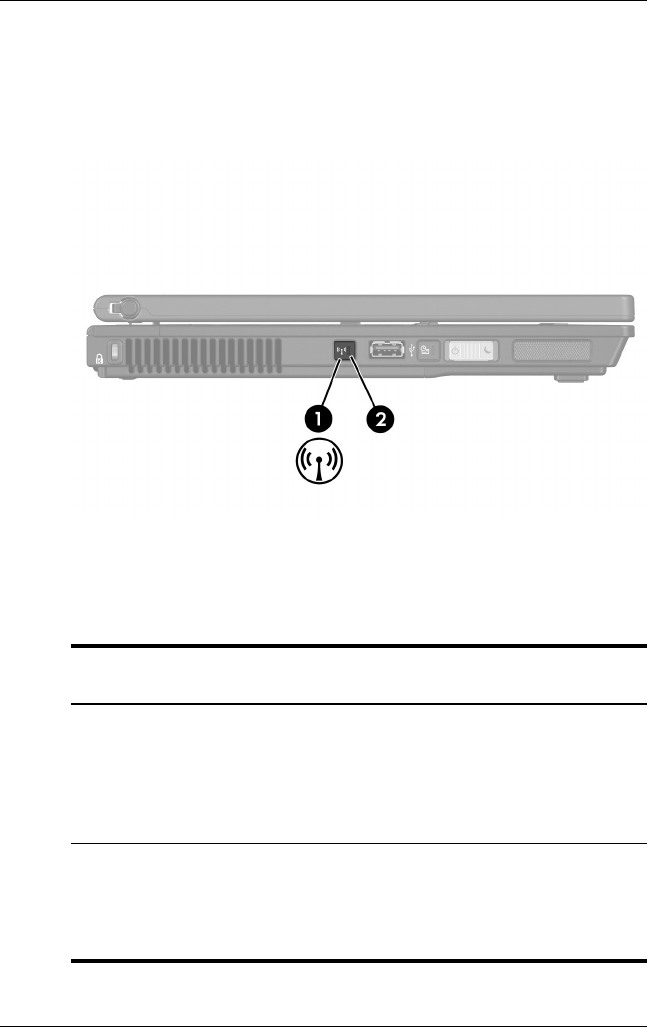
Your tablet PC has a button that may be used to enable and
disable the 802.11 and Bluetooth wireless devices and an
associated light to indicate the state of the wireless devices. The
following illustration shows the wireless button 1 and light 2.
In addition to the wireless button and light, your tablet PC has
software controls that enable you to turn on, turn off, enable, and
disable your wireless devices. The following table explains the
software controls.
Wireless
Control Description
Wireless
Assistant
Is a software utility that enables you to turn on and
off the 802.11 and Bluetooth wireless devices
individually. For more information on using Wireless
Assistant, refer to the “Turning On, Turning Off,
Enabling and Disabling the 802.11 Wireless and
Bluetooth Devices” section in this chapter.
Computer
Setup controls
Enable and disable the 802.11 and Bluetooth
wireless devices in Computer Setup. For more
information about using Computer Setup to control
the 802.11 and Bluetooth wireless devices, refer to
Chapter 11, “Computer Setup.”
367426-xx1.book Page 2 Tuesday, August 24, 2004 4:02 PM

Wireless
Hardware and Software Guide 8–3
DRAFT Revised: 8/24/04
File: Chap8.fm
PN: HP-376186-001
hp CONFIDENTIAL
August 24, 2004 4:02 pm
Wireless Local Area Network (Select
Models Only)
With the 802.11 wireless device, you can access a wireless local
area network (WLAN), which is composed of other computers
and accessories linked by a wireless router or a wireless access
point.
■A large scale WLAN, such as a corporate WLAN or public
WLAN hotspot, typically use wireless access points, that can
handle a large number of computers and accessories and can
separate critical network functions.
■A home or small office WLAN typically uses a wireless
router, which enables several wireless and wired computers to
share an Internet connection, a printer, and files without
additional pieces of hardware or software. Wireless access
point and wireless router are often used interchangeably.
Tablet PCs with 802.11 WLAN devices may support one or more
of three IEEE physical layer standards:
■802.11a
■802.11b
■802.11g
There are three popular implementations of WLAN adapters:
■802.11b only
■802.11b/g
■802.11a/b/g
802.11b, the first popular WLAN standard, supports data rates of
up to 11 Mbps and operates at a frequency of 2.4 GHz. 802.11g,
which came later, also operates at 2.4 GHz but supports data rates
of up to 54 Mbps. An 802.11g WLAN device is backward
compatible with 802.11b devices, so they can operate on the same
network. 802.11a supports data rates of up to 54 Mbps but
operates at a frequency of 5 GHz. 802.11a is not compatible with
367426-xx1.book Page 3 Tuesday, August 24, 2004 4:02 PM

8–4 Hardware and Software Guide
Wireless
DRAFT Revised: 8/24/04
File: Chap8.fm
PN: HP-376186-001
hp CONFIDENTIAL
August 24, 2004 4:02 pm
802.11b and 802.11g. For information on identifying the type of
device in your tablet PC, refer to the “Identifying a WLAN
Device” section in this chapter.
Connecting Your Wireless Tablet PC to a
Corporate WLAN
Contact your network administrator or IT department for
information on connecting your tablet PC to your corporate
WLAN.
Connecting Your Wireless Tablet PC to a
Public WLAN
Contact your ISP or search the Web for a list of public WLANs
near you. Web sites that list public WLANs include Cisco
Hotspot Locator, Hotspotlist, and Geektools.
When you are within range of a public WLAN, a Wireless
Network Connection interactive message is displayed at the
bottom of the screen. Check with each public WLAN location for
cost and connection requirements.
367426-xx1.book Page 4 Tuesday, August 24, 2004 4:02 PM

Wireless
Hardware and Software Guide 8–5
DRAFT Revised: 8/24/04
File: Chap8.fm
PN: HP-376186-001
hp CONFIDENTIAL
August 24, 2004 4:02 pm
Setting Up a WLAN in Your Home
To set up a WLAN and connect to the Internet in your home, you
need the following equipment. The illustration below shows an
example of a completed wireless network installation that is
connected to the Internet. This wireless network includes
■An optional broadband modem (either DSL or cable) and
high-speed Internet service purchased from an Internet
service provider (ISP) 1.
■An optional wireless router (purchased separately) 2.
■Your wireless tablet PC 3.
As this network grows, additional wireless and wired computers
can be connected to the network to access the Internet.
✎If you need technical assistance to install your WLAN, contact
the router manufacturer or your ISP.
367426-xx1.book Page 5 Tuesday, August 24, 2004 4:02 PM

8–6 Hardware and Software Guide
Wireless
DRAFT Revised: 8/24/04
File: Chap8.fm
PN: HP-376186-001
hp CONFIDENTIAL
August 24, 2004 4:02 pm
Using a WLAN Connection
To use a WLAN connection:
■Verify that all drivers required by the 802.11 wireless device
are installed and that the 802.11 wireless device is correctly
configured.
✎If you are using an integrated 802.11 wireless device, all
required drivers are installed and the adapter is
preconfigured and ready for use.
■If you are using an integrated 802.11 wireless device, verify
that the 802.11 wireless device is turned on. When the 802.11
wireless device is turned on, the wireless light is turned on. If
the wireless light is off, turn on the 802.11 wireless device.
Refer to the “Turning On, Turning Off, Enabling and
Disabling the 802.11 Wireless and Bluetooth Devices”
section.
■For your home WLAN, verify that your router is correctly
configured. For instructions, refer to your router
documentation.
✎Functional range for subsequent WLAN connections vary,
depending on your tablet PC WLAN implementation, router
manufacturer, and interference from varying types of walls and
other electronic devices.
For more information about using a WLAN connection:
■Refer to information from your ISP and the documentation
included with your wireless router and other WLAN
equipment.
■Access the information and Web site links provided at
Start > Help and Support.
■Refer to the documentation included with your tablet PC. The
Troubleshooting guide on the Tablet PC Documentation CD
contains a section about wireless LAN device problems and
resolutions.
367426-xx1.book Page 6 Tuesday, August 24, 2004 4:02 PM

Wireless
Hardware and Software Guide 8–7
DRAFT Revised: 8/24/04
File: Chap8.fm
PN: HP-376186-001
hp CONFIDENTIAL
August 24, 2004 4:02 pm
Using Wireless Security Features
When you set up your own WLAN or access an existing WLAN,
always ensure that security features are protecting the WLAN. If
you do not enable security on your WLAN, an unauthorized
wireless user can access your tablet PC data and use your Internet
connection without your knowledge.
The most common security levels are Wi-Fi Protected Access
(WPA)-Personal and Wired Equivalent Privacy (WEP). In
addition to enabling WPA-Personal or WEP security encryption
on the router, you may want to use one or more of the following
security measures:
■Change the default network name (SSID) and password.
■Use a firewall.
■Set security on your Web browser.
■Enable MAC address filtering on the router.
For more information about WLAN security, refer to the HP Web
site at http://www.hp.com/go/wireless for details.
Installing Wireless Software (Optional)
Microsoft Windows XP supports WLAN configuration with the
Zero Client Configuration feature. HP provides a separate WLAN
configuration utility that must be installed if you plan to use
Cisco Compatible Extensions. Cisco Compatible Extensions
enable wireless devices to use Cicso-based WLANs.
367426-xx1.book Page 7 Tuesday, August 24, 2004 4:02 PM

8–8 Hardware and Software Guide
Wireless
DRAFT Revised: 8/24/04
File: Chap8.fm
PN: HP-376186-001
hp CONFIDENTIAL
August 24, 2004 4:02 pm
Identifying a WLAN Device
To install HP WLAN software for an integrated 802.11 wireless
device, you need to know the name of the integrated 802.11
wireless device on your tablet PC. To identify an integrated
802.11 wireless device:
1. Display the names of all the 802.11 wireless devices on your
tablet PC:
a. Select Start > My Computer.
b. Right-click in the My Computer window.
c. Select Properties > Hardware tab > Device Manager >
Network Adapters.
2. Identify the 802.11 wireless device from the list that is
displayed:
❏The listing for an 802.11 wireless device includes the term
wireless LAN, WLAN, or 802.11.
❏If no 802.11 wireless device is listed, either your tablet PC
does not have an integrated 802.11 wireless device, or the
driver for the 802.11 wireless device is not properly
installed.
Accessing WLAN Software and Documentation
Your WLAN software is preloaded on your tablet PC and is
available in the Software Setup utility.
To install the WLAN software:
»Select Start > All Programs > Software Setup, and then
follow the instructions on the screen. (When you are
prompted to select the software you want to install, select or
clear the corresponding check boxes.)
367426-xx1.book Page 8 Tuesday, August 24, 2004 4:02 PM

Wireless
Hardware and Software Guide 8–9
DRAFT Revised: 8/24/04
File: Chap8.fm
PN: HP-376186-001
hp CONFIDENTIAL
August 24, 2004 4:02 pm
The WLAN software is also available as a SoftPaq at the HP Web
site. To access, download, and install the SoftPaq, use either of
the following procedures:
■Select Start > Help and Support.
-or-
■Visit the HP Web site at http://www.hp.com/support:
a. Choose your language and region.
b. Select the Download Drivers and Software radio button
c. Enter your computer model information, and then follow
the instructions provided at the Web site.
✎WLAN software is provided in the Network category. To
access model information about your computer, refer to the
serial number label. The serial number label is on the
bottom of the tablet PC.
To access documentation for your WLAN software:
1. Install the WLAN software as instructed earlier in this
chapter.
2. Open the utility.
3. Select Help on the menu bar.
Troubleshooting 802.11 Wireless Devices
For more troubleshooting information, visit the HP Web site
(http://www.hp.com/go/wireless) or refer to the documentation
included with your tablet PC. The Troubleshooting guide on the
Tablet PC Documentation CD contains a section about wireless
LAN device problems and resolutions.
367426-xx1.book Page 9 Tuesday, August 24, 2004 4:02 PM

8–10 Hardware and Software Guide
Wireless
DRAFT Revised: 8/24/04
File: Chap8.fm
PN: HP-376186-001
hp CONFIDENTIAL
August 24, 2004 4:02 pm
Bluetooth (Select Models Only)
The Bluetooth device provides short-range wireless
communications that replace the physical cable connections that
traditionally link electronic devices such as
■Network access points.
■Computers (desktop, tablet PC, PDA).
■Phones (cellular, cordless, smart phone).
■Imaging devices (printer, camera).
■Audio devices (headset, speakers).
The devices are represented in the Bluetooth for Windows
software by graphical icons that resemble their physical features,
which makes them easily recognizable and distinguishes them
from other classes of devices.
The Bluetooth for Windows software provides the following
functions:
■Personal Information Management (PIM) item
transfer—Sends and receives information files such as
business cards, calendar items, notes, and message items to
and from another Bluetooth computer or device.
■PIM synchronization—Synchronizes PIM data between a
computer, PDA, or cell phone using Bluetooth.
■File Transfer—Sends and receives files to and from another
Bluetooth computer.
■Network access (Personal Area Networking Profile)—
Enables two or more Bluetooth devices to form an ad-hoc
(peer-to-peer) network. Provides a mechanism that enables a
Bluetooth device to access a remote network through a
network access point. The network access points can be
traditional LAN data access points or group ad-hoc networks
that represent a set of devices that are attached only to one
another.
■Dial-up networking—Connects Bluetooth devices to the
Internet.
367426-xx1.book Page 10 Tuesday, August 24, 2004 4:02 PM

Wireless
Hardware and Software Guide 8–11
DRAFT Revised: 8/24/04
File: Chap8.fm
PN: HP-376186-001
hp CONFIDENTIAL
August 24, 2004 4:02 pm
■Bluetooth serial port—Transfers data over the Bluetooth link
using a virtual COM port.
■Hands-Free—Enables a vehicle-embedded, hands-free unit or
a tablet PC serving as a hands-free unit to establish a wireless
connection to a cellular phone and to act as the Bluetooth
cellular phone audio input and output mechanism.
■Basic imaging—Provides a wireless connection between a
Bluetooth-enabled camera and other Bluetooth devices. The
camera can be controlled remotely by a tablet PC, and images
can be transferred from a camera to be stored on a computer
or to be printed.
■Human interface device—Provides a wireless connection to
other Bluetooth devices, such as keyboards, pointing devices,
gaming devices, and remote monitoring devices.
■Fax—Provides a Bluetooth connection that enables a tablet
PC to send or receive a fax message using a Bluetooth
cellular phone or modem.
■Headset—Provides a wireless connection between a headset
and a tablet PC or cellular phone. The headset acts as the
device’s audio input and output mechanism and increases
mobility.
For more information about using Bluetooth with your tablet PC,
refer to the Wireless Documentation CD included with your tablet
PC.
367426-xx1.book Page 11 Tuesday, August 24, 2004 4:02 PM
8–12 Hardware and Software Guide
Wireless
DRAFT Revised: 8/24/04
File: Chap8.fm
PN: HP-376186-001
hp CONFIDENTIAL
August 24, 2004 4:02 pm
Turning On, Turning Off, Enabling and
Disabling the 802.11 Wireless and
Bluetooth Devices
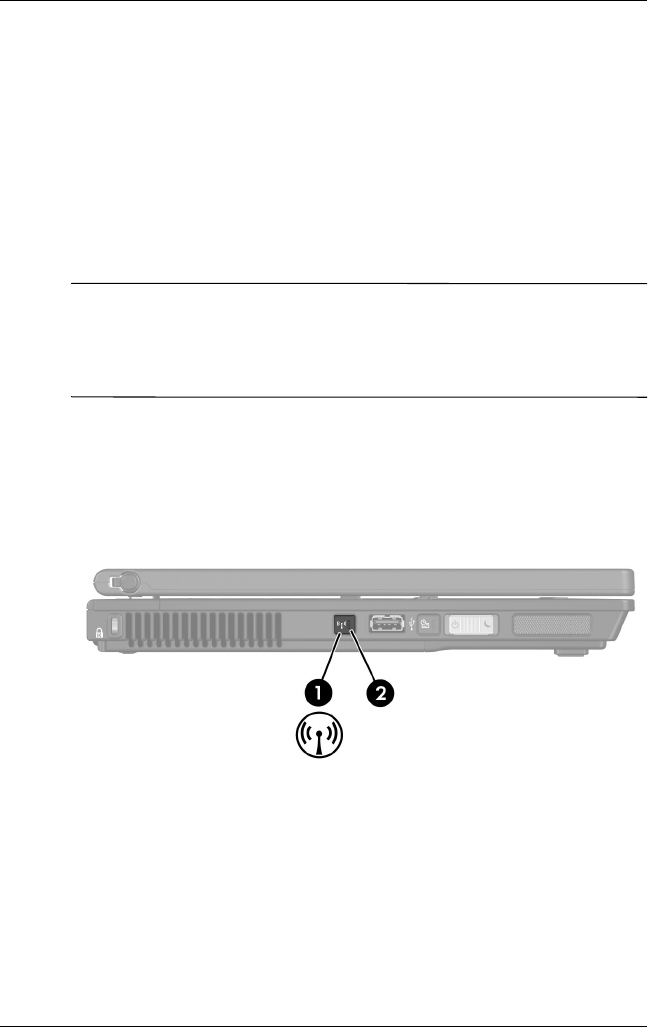
The wireless button 1 enables and disables 802.11 wireless and
Bluetooth devices in conjunction with Wireless Assistant. By
default, the 802.11 wireless and Bluetooth devices and wireless
light 2 are turned on when you turn on the tablet PC.
✎Turning on a wireless device does not automatically create a
WLAN or connect you to a WLAN. For information on setting up
a WLAN refer to the “Wireless Local Area Network (Select
Models Only)” section in this chapter.
The 802.11 wireless and Bluetooth devices have two power
states:
■Enabled
■Disabled
367426-xx1.book Page 12 Tuesday, August 24, 2004 4:02 PM

Wireless
Hardware and Software Guide 8–13
DRAFT Revised: 8/24/04
File: Chap8.fm
PN: HP-376186-001
hp CONFIDENTIAL
August 24, 2004 4:02 pm
You can enable and disable the wireless devices in Computer
Setup. For more information about using Computer Setup to
control the 802.11 and Bluetooth wireless devices, refer to
Chapter 11, “Computer Setup.” You can also enable and disable
the wireless devices with the wireless button.
When the wireless devices are enabled in Computer Setup and
with the wireless button, you can use Wireless Assistant to turn
on and off the devices individually.
To view the state of your wireless devices, place the cursor over
the Wireless Assistant icon in the notification area, or open
Wireless Assistant by double-clicking the icon in the notification
area. Wireless Assistant displays the status of the devices as on,
off, or disabled. Wireless Assistant also displays the status of the
devices in Computer Setup as enabled or disabled.
For more information about Wireless Assistant:
1. Open Wireless Assistant by double-clicking the icon in the
notification area.
2. Select the Help button.
✎You cannot use the wireless button or Wireless Assistant to
control the wireless devices if they are disabled in Computer
Setup.
367426-xx1.book Page 13 Tuesday, August 24, 2004 4:02 PM

8–14 Hardware and Software Guide
Wireless
DRAFT Revised: 8/24/04
File: Chap8.fm
PN: HP-376186-001
hp CONFIDENTIAL
August 24, 2004 4:02 pm
Turning On the 802.11 Wireless and
Bluetooth Devices
If And Then
■Wireless Assistant
shows that both
WLAN and
Bluetooth are off
■Wireless light is off
You want to turn on
either or both
devices
1. Right-click the Wireless
Assistant icon in the
notification area.
2. Select the device or
devices you want to turn
on.
✎If the wireless
devices are turned
off, pressing the
wireless button
disables both
devices. The button
does not turn on the
devices.
■Wireless Assistant
shows that both
WLAN and
Bluetooth are
disabled*
■Wireless light is off
You want to turn on
either or both
devices
1. Press the wireless button.
(The devices return to
their previous on or off
state.)
2. If the wireless devices are
turned off, right-click the
Wireless Assistant icon
in the notification area.
3. Select the device or
devices you want to turn
on.
■Wireless Assistant
shows that one
device is on and the
other device is off
■Wireless light is on
You want to turn on
either or both
devices
1. Right-click the Wireless
Assistant icon in the
notification area.
2. Select the device or
devices you want to turn
on.
*If the wireless devices are not both on when you disable the devices, pressing
the wireless button again returns the devices to their previous on or off state.
Pressing the button does not turn on both devices.
367426-xx1.book Page 14 Tuesday, August 24, 2004 4:02 PM

Wireless
Hardware and Software Guide 8–15
DRAFT Revised: 8/24/04
File: Chap8.fm
PN: HP-376186-001
hp CONFIDENTIAL
August 24, 2004 4:02 pm
✎If you want your wireless devices to be turned on when you turn
on your tablet PC, you must turn them on before you shut down
or restart.
Turning Off and Disabling the 802.11
Wireless and Bluetooth Devices
If And Then
■Wireless
Assistant
shows that
both WLAN
and Bluetooth
are on
■Wireless light
is on
You want to disable both
devices
Press the wireless button.
You want to turn off either
or both devices
1. Right-click the Wireless
Assistant icon in the
notification area.
2. Select the device or
devices you want to turn
off.
■Wireless
Assistant
shows that
both WLAN
and Bluetooth
are off
■Wireless light
is off
You want to disable both
devices
Press the wireless button.
■Wireless
Assistant
shows that one
device is on
and the other
device is off*
■Wireless light
is on
You want to disable both
devices
Press the wireless button.
You want to turn off both
devices.
1. Right-click the Wireless
Assistant icon in the
notification area.
2. Select the device or
devices you want to
turn off.
*If the wireless devices are not both on when you disable the devices, pressing
the wireless button again returns the devices to their previous on or off state.
Pressing the button does not turn on both devices.
367426-xx1.book Page 15 Tuesday, August 24, 2004 4:02 PM

8–16 Hardware and Software Guide
Wireless
DRAFT Revised: 8/24/04
File: Chap8.fm
PN: HP-376186-001
hp CONFIDENTIAL
August 24, 2004 4:02 pm
367426-xx1.book Page 16 Tuesday, August 24, 2004 4:02 PM

Hardware and Software Guide 9–1
DRAFT Revised: 8/24/04
File: Chap9.fm
PN: HP-367186-001
hp CONFIDENTIAL
August 24, 2004 4:02 pm
9
Security
Security Features Quick Reference
✎Security solutions are designed to act as deterrents. These
deterrents may not prevent a product from being mishandled or
stolen.
In addition to the Windows operating system security measures,
the tablet PC provides the following security features, most of
which can be configured in Computer Setup. For more
information, refer to Chapter 11, “Computer Setup” in this guide.
To Protect Against Use This Security Feature
Unauthorized use of the tablet PC Power-on password
Unauthorized access to the Computer
Setup utility (f10)
HP administrator password
Unauthorized access to the contents
of a hard drive
DriveLock
Unauthorized access to a Windows
user account
Optional smart cards
An enabled smart card can store the
Windows user and Windows
administrator passwords; therefore,
both the smart card and the smart
card PIN are required to access the
account.
✎This security feature is
supported by only certain
smart card readers.
367426-xx1.book Page 1 Tuesday, August 24, 2004 4:02 PM

9–2 Hardware and Software Guide
Security
DRAFT Revised: 8/24/04
File: Chap9.fm
PN: HP-367186-001
hp CONFIDENTIAL
August 24, 2004 4:02 pm
Setting Security Preferences in
Computer Setup
Most security preferences are set in Computer Setup. Because
Computer Setup is a non-Windows utility, it does not support the
pointing devices on your tablet PC. When using Computer Setup,
you must use the keys on your tablet PC to navigate and make
selections.
For more details, refer to Chapter 11, “Computer Setup.”
Unauthorized access of data Windows Firewall software
Unauthorized access to the BIOS
settings and other system
identification information
HP administrator password, which
protects the system information in
Computer Setup.
Unauthorized removal of the tablet
PC
Security cable slot (used with an
optional security cable)
For more information on the
security cable slot, refer to the
“Connecting an Optional Security
Cable” section in this chapter.
To Protect Against Use This Security Feature
367426-xx1.book Page 2 Tuesday, August 24, 2004 4:02 PM

Security
Hardware and Software Guide 9–3
DRAFT Revised: 8/24/04
File: Chap9.fm
PN: HP-367186-001
hp CONFIDENTIAL
August 24, 2004 4:02 pm
Using Passwords
ÄCAUTION: If you forget both your DriveLock user and DriveLock master
passwords, the hard drive is permanently locked and can no longer
be used.
Most security features use passwords. Whenever you set a
password, write down the password and store it in a secure
location away from the tablet PC.
■If you forget your power-on password, you cannot start up the
tablet PC or restore from Hibernation until a service partner
resets the tablet PC. To contact a service partner, refer to the
Worldwide Telephone Numbers booklet included with the
tablet PC.
■If you forget your HP administrator password, you will not be
able to access Computer Setup.
■If you forget the DriveLock user password but know
your DriveLock master password, you can remove
DriveLock protection from the drive. For instructions, refer to
the “Using DriveLock” section in this chapter.
367426-xx1.book Page 3 Tuesday, August 24, 2004 4:02 PM

9–4 Hardware and Software Guide
Security
DRAFT Revised: 8/24/04
File: Chap9.fm
PN: HP-367186-001
hp CONFIDENTIAL
August 24, 2004 4:02 pm
HP and Windows Passwords
HP security features and Windows operating system security
features work independently from one another. For example,
a device disabled in Computer Setup cannot be enabled in
Windows.
HP passwords and Windows passwords are also independent of
one another. The following table lists the different passwords
used by HP and Windows and describes their functions.
HP Passwords* Function
HP administrator password Used to access Computer Setup.
Power-on password Used to access the tablet PC during
Startup and when you restart the
tablet PC.
DriveLock user password Used by the day-to-day user to access
drives protected by DriveLock at
startup.
DriveLock master password Used by the HP administrator to
access drives protected by DriveLock
and to remove DriveLock protection
from the drive.
Smart card PIN Stores the Windows administrator and
user passwords and is used to access
Windows during startup on tablet PCs.
Power-on and HP administrator
passwords can be stored on smart
cards if an optional smart card reader
supports this functionality.
*HP passwords must be enabled in Computer Setup. For more
information, refer to Chapter 11, “Computer Setup.”
367426-xx1.book Page 4 Tuesday, August 24, 2004 4:02 PM

Security
Hardware and Software Guide 9–5
DRAFT Revised: 8/24/04
File: Chap9.fm
PN: HP-367186-001
hp CONFIDENTIAL
August 24, 2004 4:02 pm
HP and Windows Password Guidelines
HP and Windows passwords are not interchangeable. You must
use an HP password at an HP password prompt and a Windows
password at a Windows password prompt. For example:
■If a power-on password is set, the power-on password (not
a Windows password) must be entered when the tablet PC
starts up or restores from Hibernation.
■If you set Windows to prompt for a password before
resuming from Standby, a Windows password (not a
power-on password) must be entered to resume from
Standby.
The same word or series of letters or numbers used for an HP
password can be used for another HP password or for a Windows
password, with these considerations:
■HP passwords can be any combination of up to 32 letters and
numbers and are not case sensitive.
■An HP password must be set and entered with the same type
of keys. For example, an HP password set with keyboard
number keys will not be recognized if it is entered with
embedded numeric keypad number keys. For information
about the embedded numeric keypad, refer to the “Keypads”
section in Chapter 3, “Pointing Devices and Keyboard.”
Windows Passwords
Administrator password Used to log on to the tablet as the
Windows administrator after Windows
has been configured to prompt for a
password at startup.
User password Used to log on to the tablet PC as
a user after Windows has been
configured to prompt for a password
at startup.
367426-xx1.book Page 5 Tuesday, August 24, 2004 4:02 PM

9–6 Hardware and Software Guide
Security
DRAFT Revised: 8/24/04
File: Chap9.fm
PN: HP-367186-001
hp CONFIDENTIAL
August 24, 2004 4:02 pm
Using Power-On Passwords
A power-on password prevents unauthorized use of the tablet PC.
After it is set, a power-on password must be entered each time the
tablet PC is turned on or restarted. A power-on password:
■Does not display as it is set, entered, changed, or deleted.
■Must be set and entered with the same keys. For example, a
power-on password set with keyboard number keys will not
be recognized if you enter it with keypad number keys.
■Can include any combination of up to 32 letters and numbers
and is not case sensitive.
Setting Power-On Passwords
A power-on password is set, changed, or deleted in Computer
Setup. To manage the password:
1. Open Computer Setup by turning on or restarting the tablet
PC. Press f10 while the F10 = ROM Based Setup message is
displayed in the lower-left corner of the screen.
❏To change the language, press f2.
❏For navigation instructions, press f1.
2. Use the arrow keys to select Security > Power-On
password, and then press enter.
❏To set a power-on password, type the password in the
New Password and Verify New Password fields, and then
press f10.
❏To change a power-on password, type the current
password in the Old Password field, type the new
password in the New Password and Verify New Password
fields, and then press f10.
❏To delete a power-on password, type the current
password in the Old Password field, and then press f10.
367426-xx1.book Page 6 Tuesday, August 24, 2004 4:02 PM

Security
Hardware and Software Guide 9–7
DRAFT Revised: 8/24/04
File: Chap9.fm
PN: HP-367186-001
hp CONFIDENTIAL
August 24, 2004 4:02 pm
3. To save your preferences, use the arrow keys to select File >
Save Changes and Exit. Then follow the instructions on the
screen.
Your preferences are set when you exit Computer Setup and
take effect when the tablet PC restarts.
Entering Power-On Passwords
At the power-on password prompt, type your password, and then
press enter. After 3 unsuccessful attempts to enter the password,
you must restart the tablet PC and try again.
Requiring a Power-On Password at Restart
You can require that a power-on password be entered each time
the tablet PC is restarted. Enable and disable this feature in
Computer Setup.
1. Open Computer Setup by turning on or restarting the tablet
PC. Press f10 while the F10 = ROM Based Setup message is
displayed in the lower-left corner of the screen.
❏To change the language, press f2.
❏For navigation instructions, press f1.
2. Use the arrow keys to select Security > Password options >
Require password on restart.
3. Toggle the field to enable or disable, and then press enter.
4. Save your preferences by using the arrow keys to select File >
Save Changes and Exit. Then follow the instructions on the
screen.
Your preferences are set when you exit Computer Setup and
take effect when the tablet PC restarts.
367426-xx1.book Page 7 Tuesday, August 24, 2004 4:02 PM

9–8 Hardware and Software Guide
Security
DRAFT Revised: 8/24/04
File: Chap9.fm
PN: HP-367186-001
hp CONFIDENTIAL
August 24, 2004 4:02 pm
Using HP Administrator Passwords
The HP administrator password protects the configuration
settings and system identification information in Computer Setup.
After it is set, this password must be entered to access Computer
Setup. The HP administrator password
■Is not interchangeable with a Windows administrator
password, although both can use the same word or series
of letters, or numbers.
■Does not display as it is set, entered, changed, or deleted.
■Must be set and entered with the same keys. For example, an
HP administrator password set with keyboard number keys
will not be recognized if you enter it with embedded numeric
keypad number keys.
■Can include any combination of up to 32 letters and numbers
and is not case sensitive.
Setting HP Administrator Passwords
An HP administrator password is set, changed, or deleted in
Computer Setup. To manage the password:
1. Open Computer Setup by turning on or restarting the tablet
PC. Press f10 while the F10 = ROM Based Setup message is
displayed in the lower-left corner of the screen.
❏To change the language, press f2.
❏For navigation instructions, press f1.
2. Use the arrow keys to select the Security menu >
Administrator Password, and then press enter.
❏To set an HP administrator password, type your password
in the New Password and Verify New Password fields,
and then press f10.
367426-xx1.book Page 8 Tuesday, August 24, 2004 4:02 PM

Security
Hardware and Software Guide 9–9
DRAFT Revised: 8/24/04
File: Chap9.fm
PN: HP-367186-001
hp CONFIDENTIAL
August 24, 2004 4:02 pm
❏To change an HP administrator password, type your
current password in the Old Password field, type the new
password in the New Password and Verify New Password
fields, and then press f10.
❏To delete an HP administrator password, type your
current password in the Old Password field, and then
press f10.
3. To save your preferences and exit Computer Setup, use the
arrow keys to select File > Save Changes and Exit. Then
follow the instructions on the screen.
Your preferences are set when you exit Computer Setup and
take effect when the tablet PC restarts.
Entering HP Administrator Passwords
At the Computer Setup prompt, type your Administrator
Password (using the same type of keys you used to set the
password), and then press enter. After 3 unsuccessful attempts to
enter the HP administrator password, you must restart the tablet
PC and try again.
Using DriveLock
ÄCAUTION: If you forget the DriveLock user and DriveLock master
passwords, the hard drive is permanently unusable.
DriveLock prevents unauthorized access to the contents of a hard
drive. After DriveLock protection is applied to a drive, a
password must be entered to access the drive. The drive must be
inserted into the tablet PC, not an optional docking device (select
models only) or external MultiBay, in order for it to be accessed
by the DriveLock passwords.
367426-xx1.book Page 9 Tuesday, August 24, 2004 4:02 PM

9–10 Hardware and Software Guide
Security
DRAFT Revised: 8/24/04
File: Chap9.fm
PN: HP-367186-001
hp CONFIDENTIAL
August 24, 2004 4:02 pm
DriveLock involves a user password and a master password:
■A hard drive protected by DriveLock can be accessed with
either the user password or the master password.
■You can delete a user password or master password only by
removing DriveLock protection from the drive. DriveLock
protection can be removed from the drive only with the
master password.
■The owner of the user password should be the day-to-day
user of the protected hard drive. The owner of the master
password may be a system administrator or the day-to-day
user.
■A user password and a master password can be the same
word.
✎When you start the tablet PC from a hard drive protected with
DriveLock, and your power-on and DriveLock passwords are
identical, you will be prompted to enter only a power-on
password instead of both a power-on and a DriveLock password.
Setting DriveLock Passwords
ÄCAUTION: If you forget the DriveLock user and the DriveLock master
passwords, the hard drive is permanently unusable.
ÄCAUTION: To prevent system lockup and loss of information:
■Shut down the tablet PC before removing the hard drive from the
hard drive bay. Do not remove the hard drive while the tablet PC is
on, in Standby, or in Hibernation.
■If you are not sure whether the tablet PC is off or in Hibernation,
turn the tablet PC on by pressing the power/standby switch to the
left or right. Then shut down the tablet PC through the operating
system.
367426-xx1.book Page 10 Tuesday, August 24, 2004 4:02 PM

Security
Hardware and Software Guide 9–11
DRAFT Revised: 8/24/04
File: Chap9.fm
PN: HP-367186-001
hp CONFIDENTIAL
August 24, 2004 4:02 pm
To access the DriveLock settings in Computer Setup:
1. Shut down the tablet PC. If you are not sure whether the
tablet PC is off or in Hibernation, turn the tablet PC on by
pressing the power/standby switch to the left or right, and
then shut down the tablet PC through the operating system.
2. Insert the hard drive into the tablet PC (not into an optional
docking device or external MultiBay).
3. Open Computer Setup by turning on (not restarting) the tablet
PC. Press f10 while the F10 = ROM Based Setup message is
displayed in the lower-left corner of the screen.
❏To change the language, press f2.
❏For navigation instructions, press f1.
4. Use the arrow keys to select the Security menu > DriveLock
passwords. Then press enter.
5. Select the location of the hard drive, and then press f10.
6. Toggle the Protection field to Enable.
7. Read the warning. To continue, press f10.
8. Type your user password in the New Password and Verify
New Password fields, and then press f10.
9. Type your master password in the New Password and Verify
New Password fields, and then press f10.
10. To confirm DriveLock protection on the drive you have
selected, type DriveLock in the confirmation field, and then
press f10.
11. To save your DriveLock settings, select File > Save Changes
and Exit. Then follow the instructions on the screen.
Your preferences are set when you exit Computer Setup and
take effect when the tablet PC restarts.
367426-xx1.book Page 11 Tuesday, August 24, 2004 4:02 PM

9–12 Hardware and Software Guide
Security
DRAFT Revised: 8/24/04
File: Chap9.fm
PN: HP-367186-001
hp CONFIDENTIAL
August 24, 2004 4:02 pm
Entering DriveLock Passwords
1. Be sure that the drive is inserted into the tablet PC (not an
optional docking device or external MultiBay).
2. When prompted for a DriveLock password, type your user
or master password (using the same type of keys you used to
set the password), and then press enter.
3. After 2 incorrect attempts to enter the password, you must
restart the tablet PC and try again.
Requiring a Drivelock Password at Restart
You can require that a DriveLock password be entered each time
the tablet PC is restarted. Enable and disable this feature in
Computer Setup.
1. Open Computer Setup by turning on or restarting the tablet
PC. Press f10 while the F10 = ROM Based Setup message is
displayed in the lower-left corner of the screen.
❏To change the language, press f2.
❏For navigation instructions, press f1.
2. Use the arrow keys to select Security > Password options >
Require password on restart.
3. Toggle the field to enable or disable, and then press enter.
4. Save your preferences by using the arrow keys to select File >
Save Changes and Exit. Then follow the instructions on the
screen.
Your preferences are set when you exit Computer Setup and
take effect when the tablet PC restarts.
367426-xx1.book Page 12 Tuesday, August 24, 2004 4:02 PM

Security
Hardware and Software Guide 9–13
DRAFT Revised: 8/24/04
File: Chap9.fm
PN: HP-367186-001
hp CONFIDENTIAL
August 24, 2004 4:02 pm
Changing DriveLock Passwords
ÄCAUTION: To prevent loss of work and damage to the tablet PC and
the hard drive, shut down the tablet PC before inserting or removing a
hard drive. (The hard drive is any hard drive used in the hard drive bay.)
To access the DriveLock settings in Computer Setup:
1. Shut down the tablet PC. If you are not sure whether the
tablet PC is off or in Hibernation, turn the tablet PC on by
pressing the power/standby switch to the left or right, and
then shut down the tablet PC through the operating system.
2. Be sure that the hard drive is inserted into the tablet PC (not
into an optional docking device or external MultiBay).
3. Open Computer Setup by turning on (not restarting) the tablet
PC. Press f10 while the F10 = ROM Based Setup message is
displayed in the lower left of the screen.
❏To change the language, press f2.
❏For navigation instructions, press f1.
4. Use the arrow keys to select the Security menu > DriveLock
passwords, and then press enter.
5. Use the arrow keys to select the location of the hard drive,
and then press f10.
6. Use the arrow keys to select the field for the password you
want to change, type your current password in the Old
Password field, type the new password in the New Password
and in the Verify New Password fields. Then press f10.
7. To save your preferences, use arrow keys to select File >
Save Changes and Exit, and then follow the instructions on
the screen.
Your preferences are set when you exit Computer Setup and
take effect when the tablet PC restarts.
367426-xx1.book Page 13 Tuesday, August 24, 2004 4:02 PM

9–14 Hardware and Software Guide
Security
DRAFT Revised: 8/24/04
File: Chap9.fm
PN: HP-367186-001
hp CONFIDENTIAL
August 24, 2004 4:02 pm
Removing DriveLock Protection
To access the DriveLock settings in Computer Setup:
1. Shut down the tablet PC. If you are not sure whether the
tablet PC is off or in Hibernation, turn the tablet PC on by
pressing the power/standby switch to the left or right, and
then shut down the tablet PC through the operating system.
2. Be sure that the hard drive is inserted into the tablet PC (not
into an optional docking device or external MultiBay).
3. Open Computer Setup by turning on (not restarting) the tablet
PC. Press f10 while the F10 = ROM Based Setup message is
displayed in the lower-left corner of the screen.
❏To change the language, press f2.
❏For navigation instructions, press f1.
4. Use the arrow keys to select the Security menu > DriveLock
passwords, and then press enter.
5. Use the arrow keys to select the location of the hard drive,
and then press f10.
6. Toggle the Protection field to Disable, and then press f10.
7. Type your master password in the Old Password field. Then
press f10.
8. To save your preferences, use arrow keys to select File >
Save Changes and Exit. Then follow the instructions on the
screen.
Your preferences are set when you exit Computer Setup and
take effect when the tablet PC restarts.
367426-xx1.book Page 14 Tuesday, August 24, 2004 4:02 PM

Security
Hardware and Software Guide 9–15
DRAFT Revised: 8/24/04
File: Chap9.fm
PN: HP-367186-001
hp CONFIDENTIAL
August 24, 2004 4:02 pm
Disabling a Device
From the Computer Setup Device Security menu, you can
disable or partially disable most ports and drives.
1. Open Computer Setup by turning on or restarting the tablet
PC. Press f10 while the F10 = ROM Based Setup message is
displayed in the lower-left corner of the screen.
❏To change the language, press f2.
❏For navigation instructions, press f1.
2. Select the Security menu > Device Security, and then enter
your preferences.
3. To confirm your preferences, press f10.
4. To save your preferences, select File > Save Changes and
Exit. Then follow the instructions on the screen.
Your preferences are set when you exit Computer Setup and take
effect when the tablet PC restarts.
Using System Information
System information provides details about your tablet PC and
battery pack. The following sections explain how to prevent other
users from viewing system information and how to configure
system information options in Computer Setup.
System Information options allow you to
■Display or enter the tablet PC serial number, asset tag, and
ownership tag.
■Display a battery pack serial number.
✎To prevent unauthorized access to this information, you must
create an HP administrator password. For instructions, refer to the
“Setting HP Administrator Passwords,” section earlier in this
chapter.
367426-xx1.book Page 15 Tuesday, August 24, 2004 4:02 PM

9–16 Hardware and Software Guide
Security
DRAFT Revised: 8/24/04
File: Chap9.fm
PN: HP-367186-001
hp CONFIDENTIAL
August 24, 2004 4:02 pm
Setting System Information Options
1. Open Computer Setup by turning on or restarting the tablet
PC. Press f10 while the F10 = ROM Based Setup message is
displayed in the lower left of the screen.
❏To change the language, press f2.
❏For navigation instructions, press f1.
2. Access or set your preferences by following these directions:
❏To view general system information, select the File
menu > System Information.
❏To view or enter identification values for system
components, select the Security menu > System IDs.
3. To confirm the information or your preferences, press f10.
4. To save your information or preferences, use the arrow keys
to select File > Save Changes and Exit, and then follow the
instructions on the screen.
Your preferences are set when you exit Computer Setup and
take effect when the tablet PC restarts.
Firewall Software
When you use the tablet PC for e-mail, network, or Internet
access, it is possible for unauthorized persons to obtain
information about you, your tablet PC, and your data. To protect
your privacy, it is recommended that you use firewall software.
The Windows operating system firewall is available on your
tablet PC and is enabled by default. To learn more about this
firewall or to disable or reenable this firewall:
1. Select Start > Control Panel > Network and Internet
Connections > Windows Firewall.
367426-xx1.book Page 16 Tuesday, August 24, 2004 4:02 PM

Security
Hardware and Software Guide 9–17
DRAFT Revised: 8/24/04
File: Chap9.fm
PN: HP-367186-001
hp CONFIDENTIAL
August 24, 2004 4:02 pm
2. Select the General tab.
❏To learn more about Windows Firewall, select the Learn
more about Windows Firewall link.
❏To disable Windows Firewall, select Off (not
recommended).
❏To reenable Windows Firewall, select On
(recommended).
3. Select OK.
Under some circumstances a firewall can block access to Internet
games, interfere with printer or file sharing on a network, or block
authorized email attachments. If you are using Windows Firewall
and an application attempts an inbound connection to your tablet
PC for the first time, a security alert will be displayed. The
security alert allows you to configure the firewall permission for
the application.
■To allow the application to connect to your tablet PC, select
Unblock this program. The application is added to the
Exceptions list and will not be blocked by Windows Firewall.
■To permanently block the application, select Keep blocking
this program. Windows Firewall will block the application
anytime the application tries to connect.
■To temporarily block the application, select Keep blocking
this program, but ask me again later. The next time the
application attempts to connect to your tablet PC, you will
receive the security alert.
367426-xx1.book Page 17 Tuesday, August 24, 2004 4:02 PM

9–18 Hardware and Software Guide
Security
DRAFT Revised: 8/24/04
File: Chap9.fm
PN: HP-367186-001
hp CONFIDENTIAL
August 24, 2004 4:02 pm
To manually add an application to the Windows Firewall
Exceptions list so that it will not be blocked by the firewall:
1. Select Start > Control Panel > Network and Internet
Connections > Windows Firewall.
2. Select the Exceptions tab.
3. Select Add Program and enter the required information
about the application.
4. Select OK. The application is added to the Exceptions list
and will not be blocked by Windows Firewall.
If you are using an optional firewall and you want to allow a
blocked application to connect:
■Temporarily solve the problem by disabling the firewall,
performing the task, and then reenabling the firewall.
■Permanently resolve the problem by reconfiguring the
firewall. Refer to the firewall documentation or contact the
firewall manufacturer.
367426-xx1.book Page 18 Tuesday, August 24, 2004 4:02 PM

Security
Hardware and Software Guide 9–19
DRAFT Revised: 8/24/04
File: Chap9.fm
PN: HP-367186-001
hp CONFIDENTIAL
August 24, 2004 4:02 pm
Connecting an Optional Security Cable
✎Security solutions are designed to act as deterrents. These
deterrents may not prevent a product from being mishandled or
stolen.
To install a security cable:
1. Loop the security cable around a secured object.
2. Insert the key 1 into the cable lock 2.
3. Insert the cable lock into the security cable slot 3, and lock
the cable lock with the key.
367426-xx1.book Page 19 Tuesday, August 24, 2004 4:02 PM

9–20 Hardware and Software Guide
Security
DRAFT Revised: 8/24/04
File: Chap9.fm
PN: HP-367186-001
hp CONFIDENTIAL
August 24, 2004 4:02 pm
HP ProtectTools Security Manager
(Select Models Only)
Your tablet PC comes with HP ProtectTools Security Manager
preinstalled. This software is accessed through Microsoft®
Windows® Control Panel. It provides security features that are
designed to help protect against unauthorized access to the tablet
PC, networks, and critical data. Add-on modules for HP
ProtectTools Security Manager include the following:
■Embedded Security for ProtectsTools
■Credential Manager for ProtectTools
■BIOS Configuration for ProtectTools
■Smart Card Security for ProtectTools
Depending on your tablet PC model, add-on modules may be
preinstalled, preloaded, or downloaded from the HP Web site.
Visit http://www.hp.com for more information.
Embedded Security for ProtectTools
✎You must have the embedded security chip in your tablet PC in
order to use Embedded Security for ProtectTools.
Embedded Security for ProtectTools has security features that
protect against unauthorized access to user data or credentials,
which include:
■Administrative functions, such as ownership and
management of the owner pass phrase.
■User functions, such as user enrollment and management of
user pass phrases.
367426-xx1.book Page 20 Tuesday, August 24, 2004 4:02 PM

Security
Hardware and Software Guide 9–21
DRAFT Revised: 8/24/04
File: Chap9.fm
PN: HP-367186-001
hp CONFIDENTIAL
August 24, 2004 4:02 pm
■Settings configuration, including setting up enhanced
Microsoft EFS and Personal Secure Drive for protecting user
data.
■Management functions, such as backing up and restoring the
key hierarchy.
Credential Manager for ProtectTools
Credential Manager for ProtectTools has security features that
provide protection against unauthorized access to your tablet PC,
including the following:
■Alternatives to passwords when logging on to Microsoft
Windows.
■Single sign-on capability that automatically remembers
credentials for Web sites, applications, and protected network
resources.
■Support for optional security devices, such as Smart Cards
and biometric fingerprint readers.
For more information, refer to the Credential Manager for
ProtectTools online documentation.
BIOS Configuration for ProtectTools
BIOS Configuration for ProtectTools provides access to BIOS
security and configuration settings within the HP ProtectTools
Security Manager application, which gives users better access to
system security features that are managed by the system BIOS.
With BIOS Configuration for ProtectTools, you can:
■Access to power-on user and administrator password
management.
■Configure preboot authentication features, such as smart card
and power-on password.
■Enable and disable hardware features (such as the enable
CD-ROM boot).
367426-xx1.book Page 21 Tuesday, August 24, 2004 4:02 PM

9–22 Hardware and Software Guide
Security
DRAFT Revised: 8/24/04
File: Chap9.fm
PN: HP-367186-001
hp CONFIDENTIAL
August 24, 2004 4:02 pm
■Configure boot options, which includes disabling the ability
to boot to drives other than the primary hard drive.
✎Many of the features in BIOS Configuration for ProtectTools
are also available in Computer Setup. Refer to Chapter 11,
“Computer Setup” for additional information.
For more information, refer to the BIOS Configuration for
ProtectTools online documentation.
Smart Card Security for ProtectTools
With Smart Card Security for ProtectTools, you can:
■Access optional smart card security features. Security
enhancements are supported by the optional HP ProtectTools
Smart Card and an optional supported reader, such as the HP
PC Card Smart Card Reader.
■Initialize an HP ProtectTools Smart Card so that it can be
used with Credential Manager for ProtectTools.
■Work with the BIOS to enable optional smart card
authentication in a preboot environment, and to configure
separate smart cards for an administrator and a user.
■Set and change the password used to authenticate users to the
smart card.
■Backup and restore credentials stored on the smart card.
For more information, refer to the Smart Card Security for
ProtectTools online documentation.
367426-xx1.book Page 22 Tuesday, August 24, 2004 4:02 PM

Hardware and Software Guide 10–1
DRAFT Revised: 8/24/04
File: Chap10.fm
PN: HP-367186-001
hp CONFIDENTIAL
August 24, 2004 4:02 pm
10
MultiBoot
A bootable medium or network interface card (NIC) contains files
that the tablet PC needs to start and operate properly. The
MultiBoot utility, disabled by default, enables you to identify the
devices and control the sequence in which the system attempts to
boot from those devices as it starts up your tablet PC.
Bootable devices include optical drive discs, such as CDs or
DVDs, bootable diskettes, or NICs.
✎Some devices, including USB devices and NICs, must be enabled
in Computer Setup before they can be included in the boot
sequence. For more information, refer to “Enabling Bootable
Devices in Computer Setup” in this chapter.
Understanding the Default Boot
Sequence
By default, when more than one bootable device is in the system,
the tablet PC chooses the startup device by searching enabled
devices and locations in a predetermined sequence.
On every boot, the system looks for bootable drive A devices
first. If it fails to find a bootable drive A device, it searches for
bootable drive C devices. Drive A devices include optical drives
and diskette drives. Drive C devices include optical drives and
primary hard drives.
The primary hard drive can only boot as drive C. The NIC does
not have a drive letter assigned to it.
367426-xx1.book Page 1 Tuesday, August 24, 2004 4:02 PM

10–2 Hardware and Software Guide
MultiBoot
DRAFT Revised: 8/24/04
File: Chap10.fm
PN: HP-367186-001
hp CONFIDENTIAL
August 24, 2004 4:02 pm
✎An optical drive device (such as a CD-ROM drive) can boot either
as drive A or drive C, depending on the format of the CD. Most
bootable CDs boot as drive A. If you have a CD that boots as the
C drive, the system will boot the diskette drive before it boots the
CD.
By default, the tablet PC selects the startup device by searching
enabled devices and locations in a predetermined sequence.
You can change the sequence in which the tablet PC searches for
a startup device by enabling MultiBoot and entering a new startup
sequence, also called a boot order. Or, you can use MultiBoot
Express to set the tablet PC to prompt you for a startup location
each time the tablet PC is started or restarted.
The list below describes the default sequence in which drive
numbers are assigned. (The actual startup sequence varies by
configuration.)
■Default sequence for devices that boot as drive A:
a. Optical drive in an optional docking device MultiBay or in
an external MultiBay that contains a disc that boots as
drive A.
b. Diskette drive in an optional docking device or in an
external MultiBay.
■Default sequence for devices that boot as drive C:
a. An optical drive in an optional docking device MultiBay
or in an external MultiBay that contains a disc that boots
as drive C.
b. Hard drive in the tablet PC primary hard drive bay.
c. Hard drive in an optional docking device MultiBay or in
an external MultiBay.
✎Since no drive letter is associated with the NIC, changing the boot
order of a NIC does not affect drive letters of the other devices.
367426-xx1.book Page 2 Tuesday, August 24, 2004 4:02 PM

MultiBoot
Hardware and Software Guide 10–3
DRAFT Revised: 8/24/04
File: Chap10.fm
PN: HP-367186-001
hp CONFIDENTIAL
August 24, 2004 4:02 pm
Enabling Bootable Devices in
Computer Setup
The tablet PC can start up from a USB device or the NIC only if
that device has been enabled for inclusion in MultiBoot.
To enable a device or location for inclusion in MultiBoot:
1. Open Computer Setup by turning on or restarting the tablet
PC. Press f10 while the F10 = ROM Based Setup message is
displayed in the lower-left corner of the screen.
❏To change the language, press f2.
❏For navigation instructions, press f1.
2. To enable bootable media in USB drives or in drives inserted
into an optional docking device, use the arrow keys to select
Advanced > Device options. Then select Enable USB
legacy support.
-or-
To enable a NIC, select Security > Device security.
3. Save your preferences and exit Computer Setup, by using the
arrow keys to select File > Save changes and exit, and then
follow the instructions on the screen.
Your preferences are set when you exit Computer Setup and
they take effect when the tablet PC restarts.
✎To connect a NIC to a Preboot eXecution Environment (PXE) or
Remote Program Load (RPL) server during startup without using
MultiBoot, quickly press f12 when the Network Service Boot
message appears in the lower-right corner of the screen.
367426-xx1.book Page 3 Tuesday, August 24, 2004 4:02 PM

10–4 Hardware and Software Guide
MultiBoot
DRAFT Revised: 8/24/04
File: Chap10.fm
PN: HP-367186-001
hp CONFIDENTIAL
August 24, 2004 4:02 pm
Understanding MultiBoot Results
Before changing the startup sequence, consider the following:
■When the tablet PC restarts after the boot order has been
changed, it considers only the first device of each drive type
when searching for a startup device (except for optical
devices).
For example, the tablet PC is connected to an optional
docking device containing an optical drive and a diskette
drive. In the default boot sequence, the optical drive comes
before the diskette drive. If the system fails to boot to the
optical drive (either because it does not contain a disc or
because the disc is not bootable) it does not try to boot to the
diskette drive. Instead, it tries to boot to he first hard drive
device present in the system. However, if there are two
optical devices, and the first optical device does not boot, the
system tries to boot to other optical devices in the system.
■Changing the boot sequence also changes the logical drive
designations. For example, if you start up from a CD-ROM
drive with a disc that boots as drive C, that CD-ROM drive
becomes drive C and the hard drive in the hard drive bay
becomes drive D.
■Starting up from a NIC does not affect logical drive
designations because no drive letter is associated with the
NIC.
■Drives in an optional docking device are treated like external
USB devices in the boot sequence and must be enabled in
Computer Setup.
367426-xx1.book Page 4 Tuesday, August 24, 2004 4:02 PM

MultiBoot
Hardware and Software Guide 10–5
DRAFT Revised: 8/24/04
File: Chap10.fm
PN: HP-367186-001
hp CONFIDENTIAL
August 24, 2004 4:02 pm
Setting MultiBoot Preferences
There are two ways to set MultiBoot sequences:
■Set a new default boot sequence that the tablet PC uses each
time it starts up.
■Use variable boot sequences using MultiBoot Express. This
feature prompts you for a startup device each time the tablet
PC is started or restarted.
Setting a New Default Boot Sequence
To set a startup sequence that the tablet PC uses each time it is
started or restarted with Computer Setup:
1. Open Computer Setup by turning on or restarting the tablet
PC. Press f10 while the F10 = ROM Based Setup message is
displayed in the lower-left corner of the screen.
❏To change the language, press f2.
❏For navigation instructions, press f1.
2. Use the arrow keys to select Advanced > Boot options, and
then press enter.
3. Toggle the MultiBoot field to Enable.
4. Toggle the Boot Order fields to the boot sequence that you
prefer.
5. Save your preferences and exit Computer Setup by using the
arrow keys to select File > Save changes and exit, and then
follow the instructions on the screen.
Your preferences are set when you exit Computer Setup, and
they take effect when the tablet PC restarts.
367426-xx1.book Page 5 Tuesday, August 24, 2004 4:02 PM

10–6 Hardware and Software Guide
MultiBoot
DRAFT Revised: 8/24/04
File: Chap10.fm
PN: HP-367186-001
hp CONFIDENTIAL
August 24, 2004 4:02 pm
Setting a MultiBoot Express Prompt
To set the tablet PC to display the MultiBoot startup location
menu each time the tablet PC is started or restarted with
Computer Setup:
1. Open Computer Setup by turning on or restarting the tablet
PC. Press f10 while the F10 = ROM Based Setup message is
displayed in the lower-left corner of the screen.
❏To change the language, press f2.
❏For navigation instructions, press f1.
2. Use the arrow keys to select Advanced > Boot options, and
then press enter.
3. In the Express Boot Popup Delay (Sec) field, select the length
of time in seconds that you want the tablet PC to display the
startup location menu before it defaults to the current
MultiBoot setting (when 0 is selected, the Express Boot
startup location menu is not displayed.)
4. Save your preferences and exit Computer Setup by using the
arrow keys to select File > Save changes and exit, and then
follow the instructions on the screen.
Your preferences are set when you exit Computer Setup, and
they take effect when the tablet PC restarts.
367426-xx1.book Page 6 Tuesday, August 24, 2004 4:02 PM

MultiBoot
Hardware and Software Guide 10–7
DRAFT Revised: 8/24/04
File: Chap10.fm
PN: HP-367186-001
hp CONFIDENTIAL
August 24, 2004 4:02 pm
Entering MultiBoot Express Preferences
When the Express Boot menu is displayed during startup:
■To specify a startup location from the Express Boot menu,
select your preference within the allotted time, and then press
enter.
■To prevent the tablet PC from defaulting to the current
MultiBoot setting, press any key before the allotted time
expires. The tablet PC will not start up until you select a
startup location and press enter.
■To allow the tablet PC to start up according to the current
MultiBoot settings, wait for the allotted time to expire.
367426-xx1.book Page 7 Tuesday, August 24, 2004 4:02 PM

10–8 Hardware and Software Guide
MultiBoot
DRAFT Revised: 8/24/04
File: Chap10.fm
PN: HP-367186-001
hp CONFIDENTIAL
August 24, 2004 4:02 pm
367426-xx1.book Page 8 Tuesday, August 24, 2004 4:02 PM