CARLO GAVAZZI CONTROLS OPT Optical communication interface for ET and WM analyzers User Manual 8021719 8021798 OptoProg IM ML 2606218 indd
CARLO GAVAZZI CONTROLS SPA Optical communication interface for ET and WM analyzers 8021719 8021798 OptoProg IM ML 2606218 indd
Users manual
OptoProg
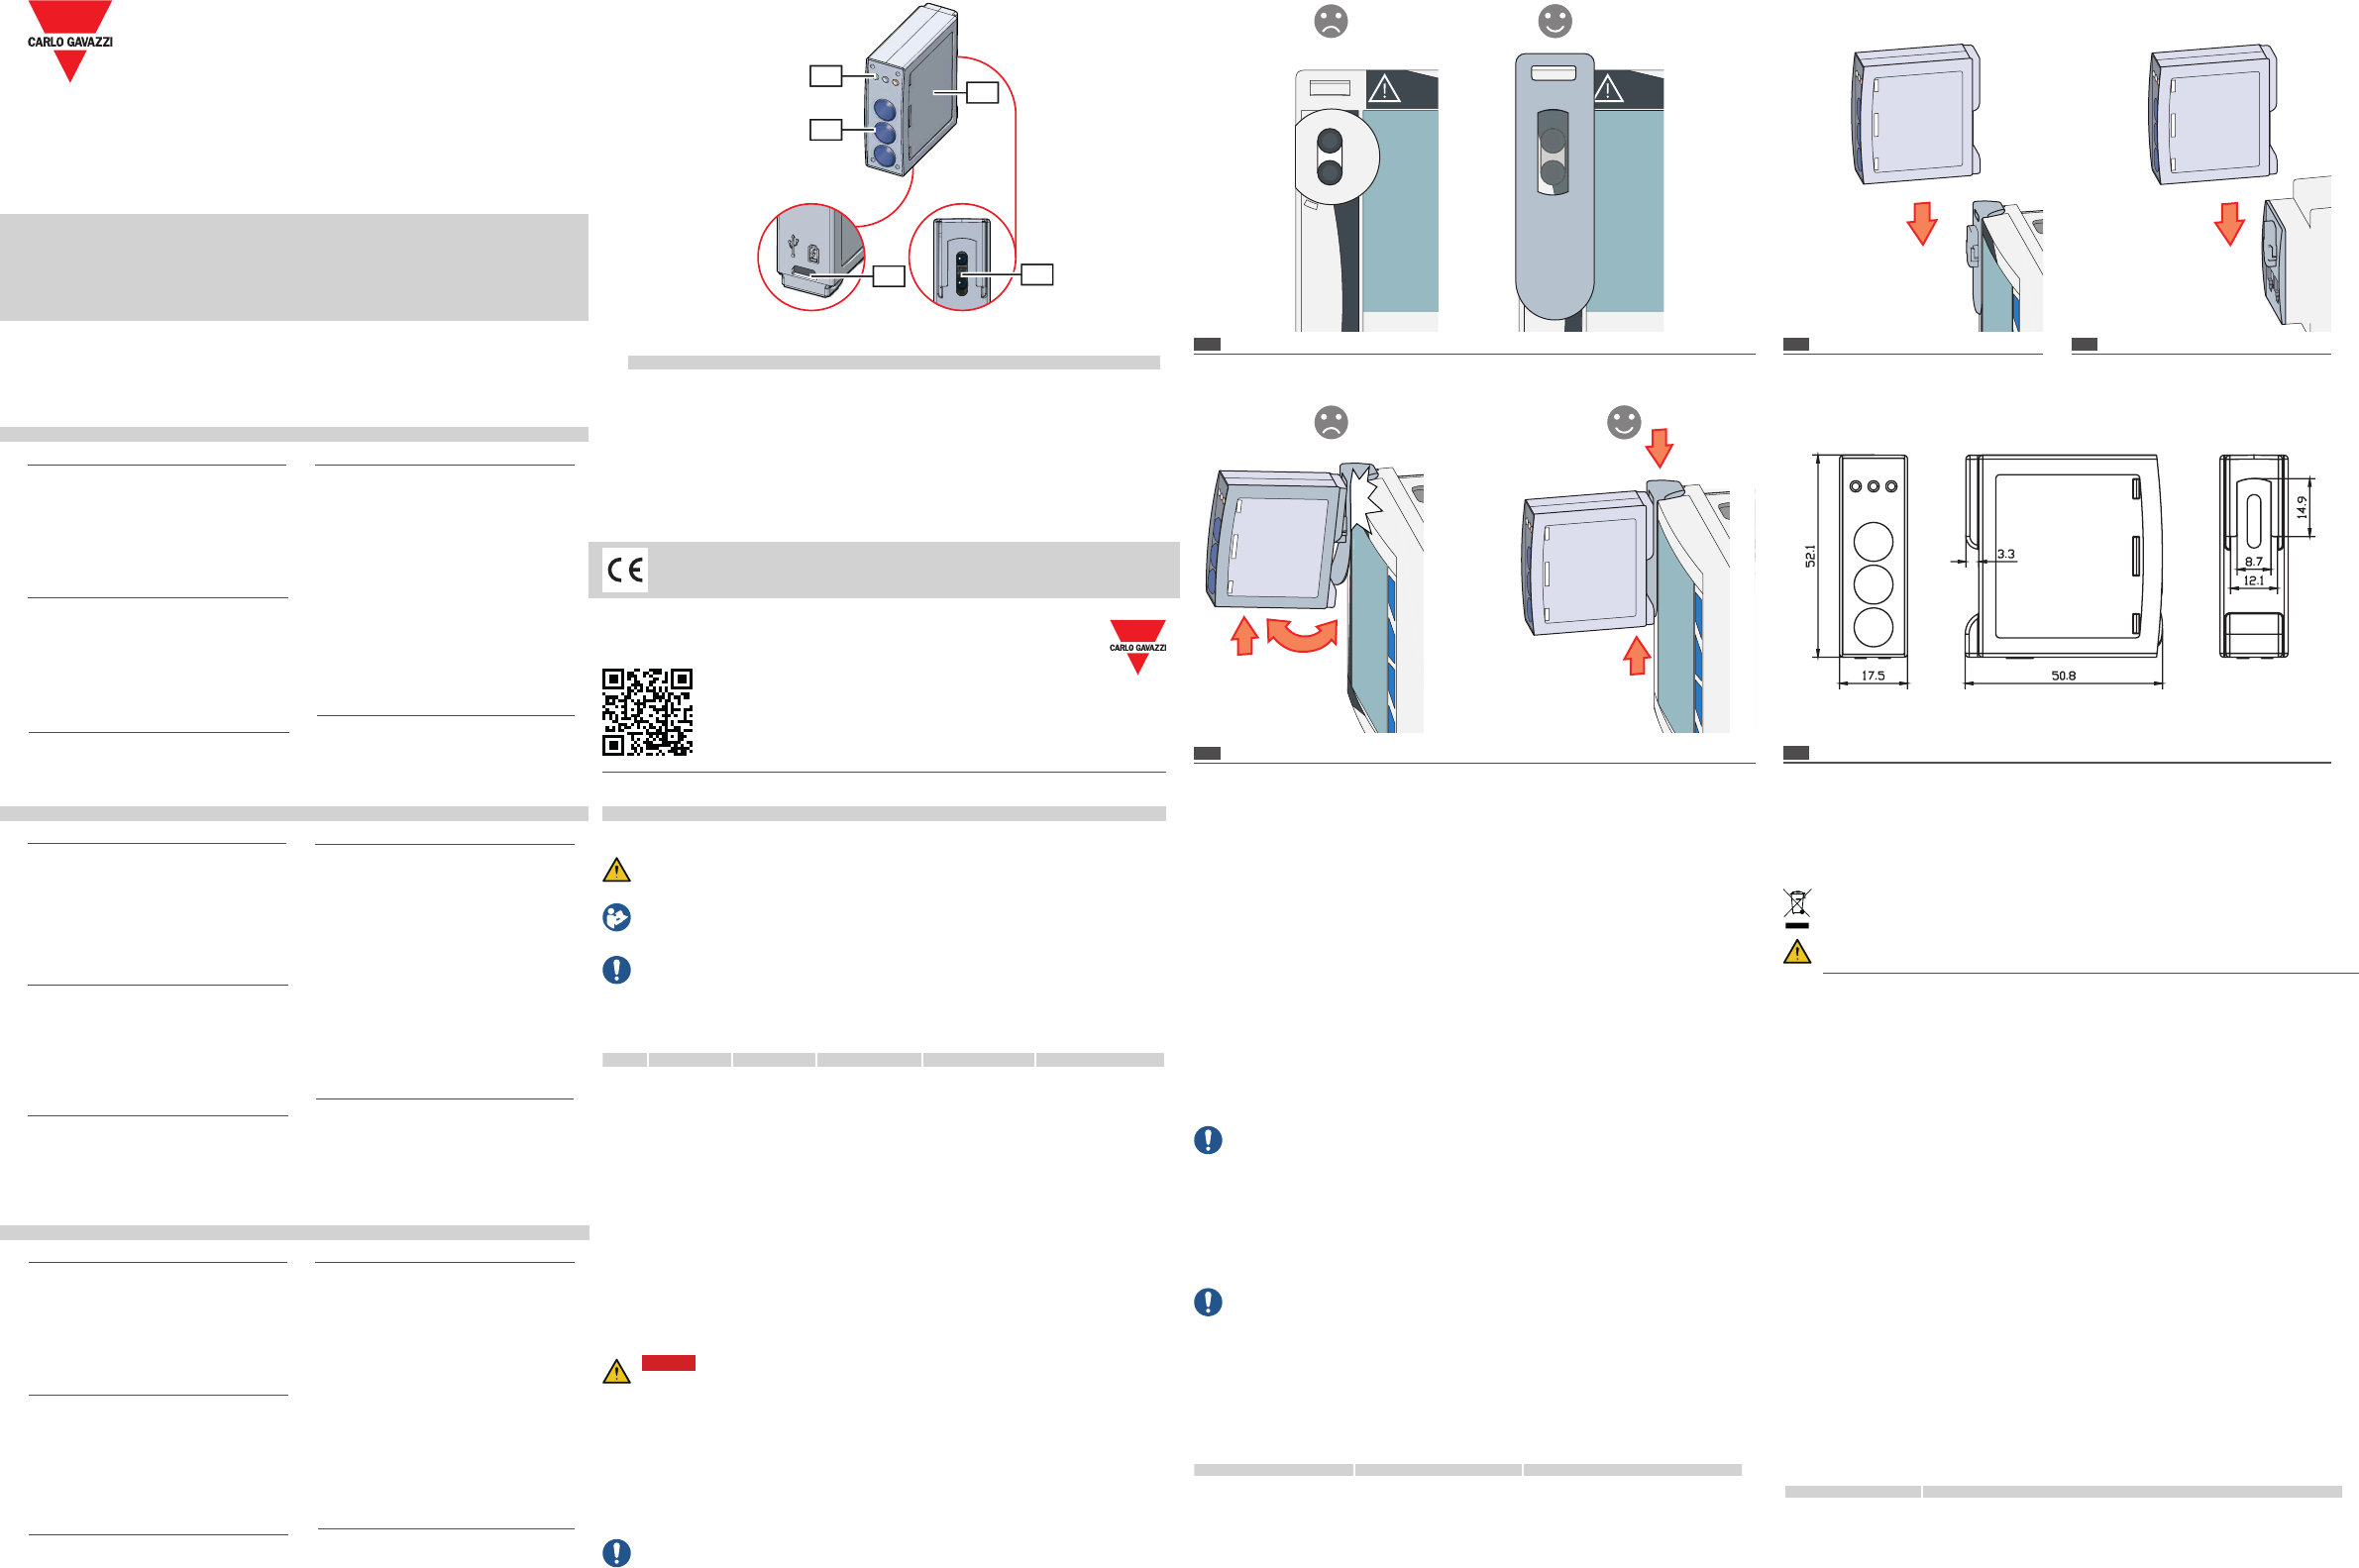
A
C
B
E
D
1
5
2
4
3
CARLO GAVAZZI Controls SpA
via Saorze, 8 - 32100 Belluno (BL) Italy
www.gavazziautomaon.com
info@gavazzi-automaon.com
info: +39 0437 355811 / fax: +39 0437 355880
2014/53/EU (RED)
2011/65/EU (RoHS)
2018-09-12 | 8021719 | COPYRIGHT ©2018
www.productselecon.net
Instrucon manual
Opcal communicaon interface for ET and WM analyzers
OptoProg is an opcal communicaon interface used to congure analyzers or to read data in real me in the eld.
Manuale d’istruzioni
Interfaccia di comunicazione oca per analizzatori ET e WM
OptoProg è una interfaccia di comunicazione oca usata per congurare gli analizzatori o leggerne i da in tempo
reale sul campo.
Bedienungsanleitung
Opsche Kommunikaonsschnistelle für ET- und WM-Analysatoren
Das OptoProg ist eine opsche Kommunikaonsschnistelle zum Kongurieren von Analysatoren oder Aufnehmen
von Daten in Echtzeit vor Ort.
Structure / Struura / Struktur
Descripon / Descrizione / Beschreibung
AStatus LED / LED di stato / Status-LED
BFunconal keys: / Pulsan funzione: / Funkonstasten:
• 3: not in use / 3: non usato / 3: keine Verwendung
• 2: Bluetooth on/o / 2: Bluetooth accensione/spegnimento / 2: Bluetooth an/aus
• 1: turns on or o OptoProg / 1: accende o spegne OptoProg / 1: schaltet das OptoProg an oder aus
CLED and key descripon label / Echea con descrizione LED e pulsan / Auleber mit LED- und
Tastenbeschreibung
DMicro-USB B port / Porta micro USB B / Mikro-USB-B Port
EOpcal port / Porta oca / Opscher Port
ENGLISH
General warnings
WARNING! Flammable material. Explosion. Do not remove the baery by force.
Not to be used for body-worn operaon
This manual is an integral part of the product. It should be consulted for all situaons ed to
installaon and use. It must be kept in good condion and in a clean locaon accessible to all
operators.
NOTICE: no one is authorized to open the device. This operaon is reserved exclusively for
CARLO GAVAZZI technical service personnel.
INTRODUCTION
LED status
Color Descripon O On Slow blink (2 s) Fast blink (0.5 s)
Green Power supply Device o or in
sleep mode Device on and
charged Device on and baery
low Device on and charging
via USB
Blue Bluetooth
communicaon Bluetooth
disabled or
device in sleep
mode
Bluetooth enabled
and connected Bluetooth enabled
but not connected Bluetooth
communicaon in
progress
Red Opcal
communicaon No error
and opcal
communicaon
deacvated
Communicaon
error on opcal
port (see
"Troubleshoong")
Searching for opcal
device in progress
(discovery mode)
Opcal communicaon in
progress
Sleep mode
In sleep mode the device is funconing and the LEDs are o to conserve power.
The device goes into sleep mode if it is inacve for a me equal to the Sleeping interval (default 1
minute). It resumes operaon in the following cases:
• briey pressing key 1
• Bluetooth communicaon in progress
• USB communicaon in progress
Assembly/disassembly of the device
DANGER! Live parts. Heart aack, burns and other injuries. Make sure that there are no
uncovered connecons on the analyzer. Use of the device is strictly reserved for persons
who know how to use it safely.
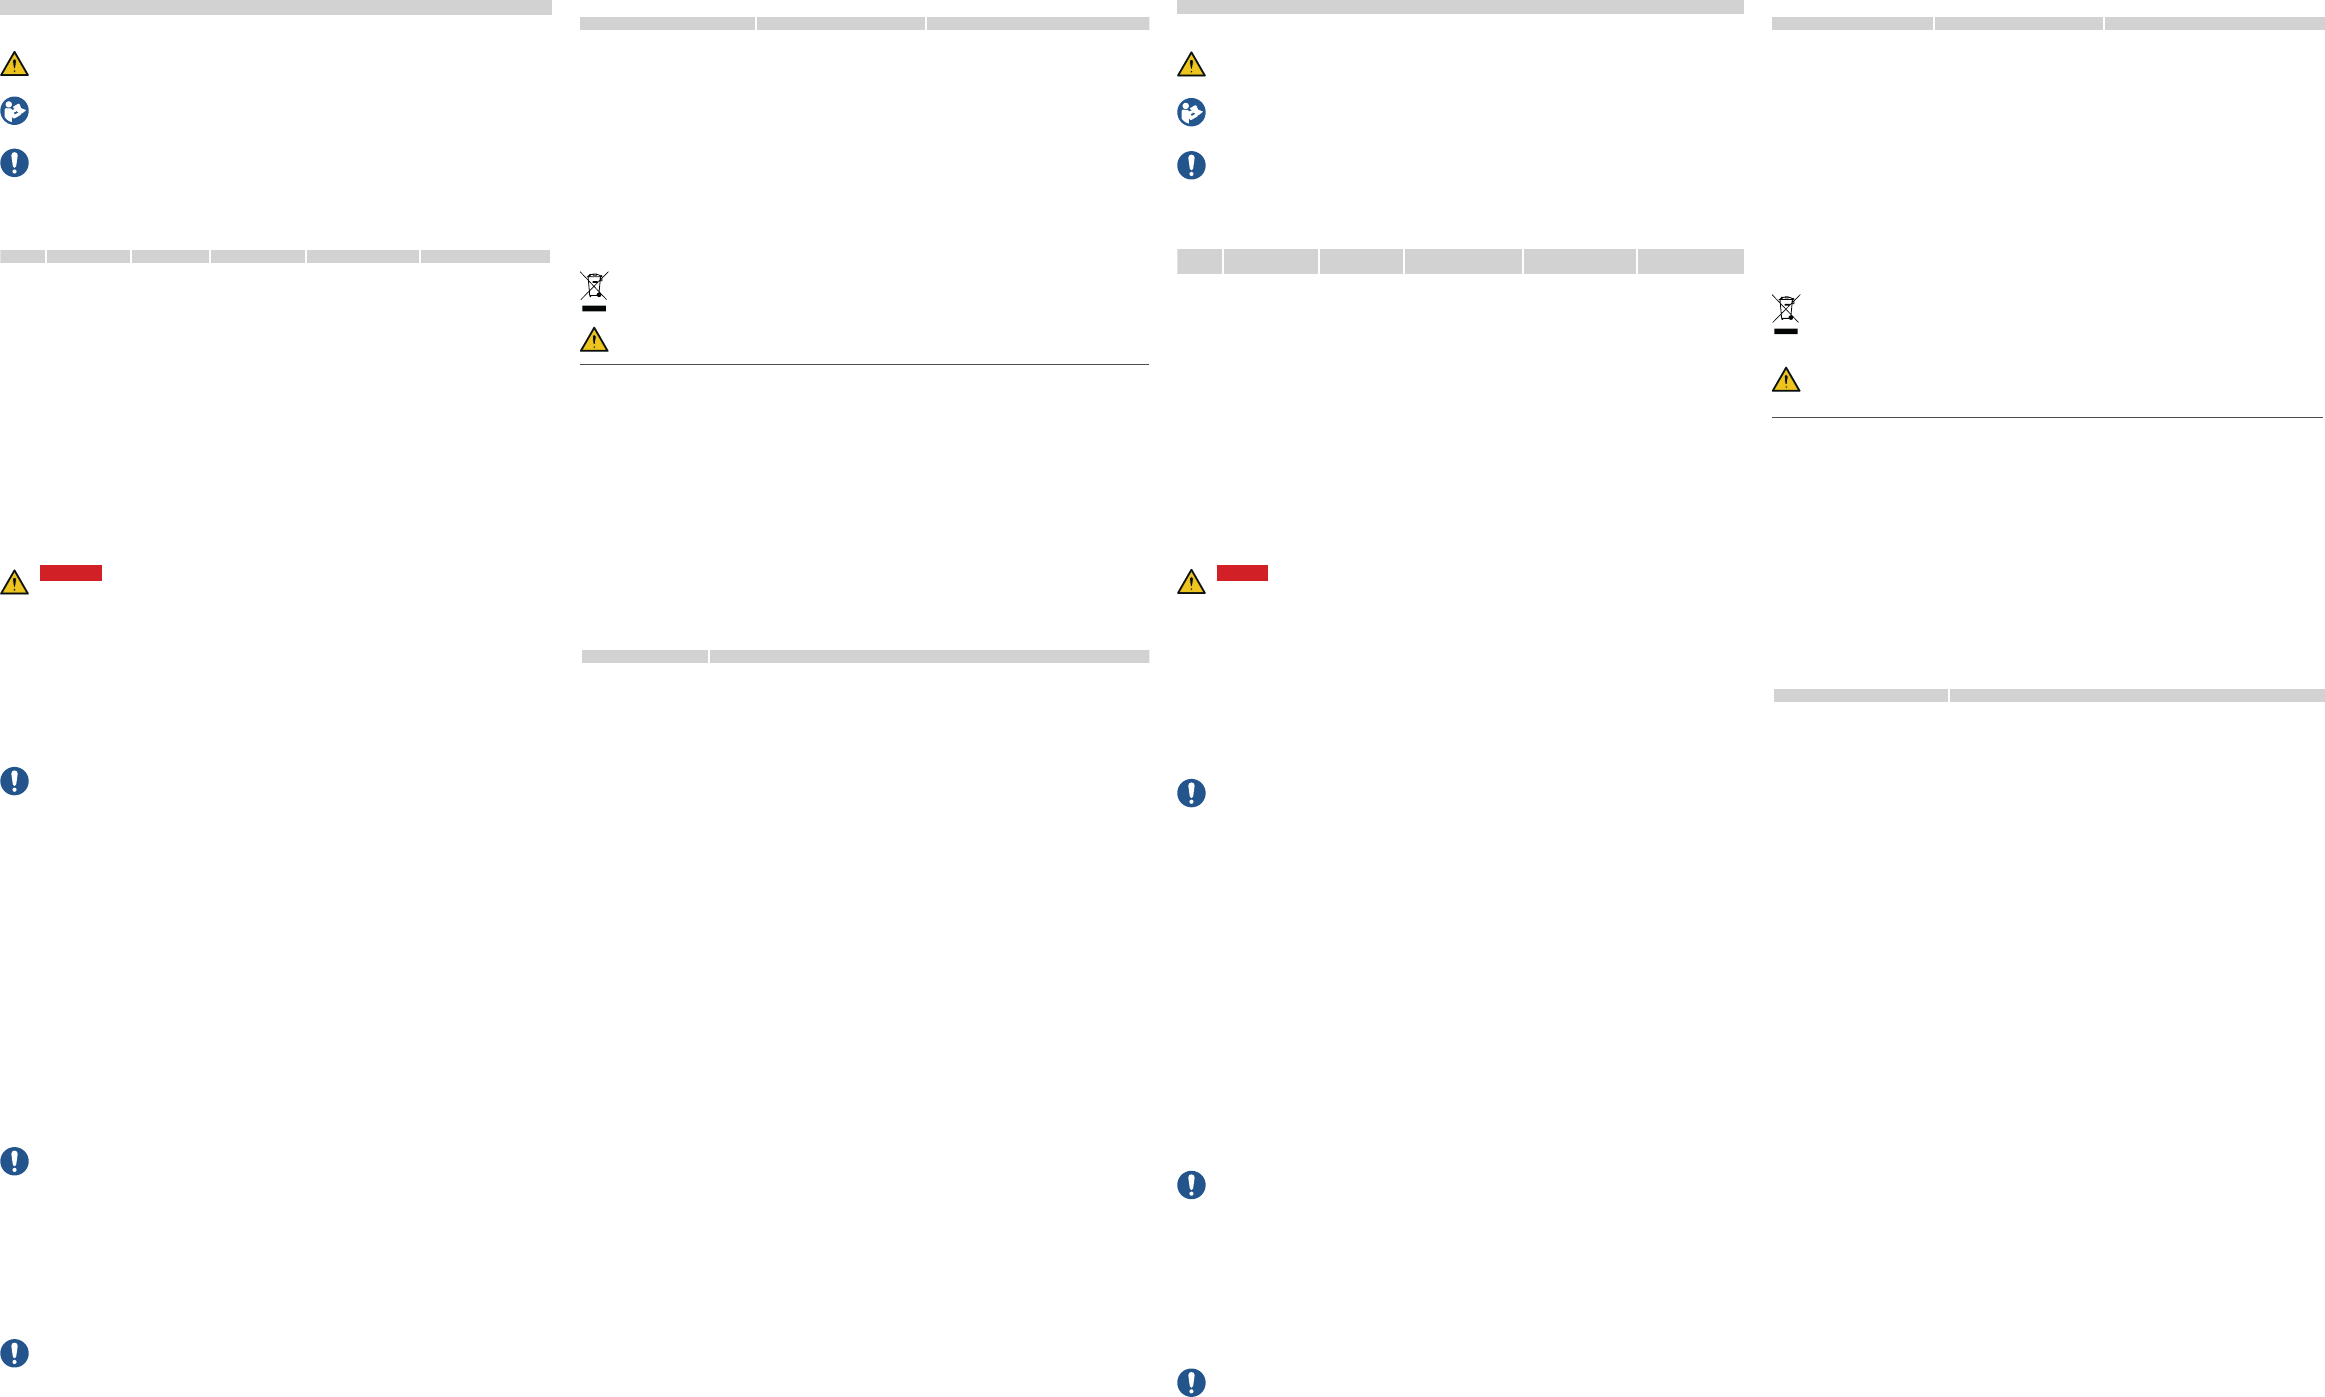
Compability
Only for WM analyzers. OptoProg is compable only with sliding fasteners (see gure 1).
Assemble the device
Slide the device along the analyzer fastener up to the end of the guide (see gure 2 for WM analyzers
and gure 3 for ET analyzers).
Disassemble the device
NOTICE: only for WM analyzers. To disassemble the device, hold the analyzer fastener rmly
and avoid exerng leverage that could cause breakage (see gure 4).
PREPARE OPTOPROG FOR USE
Turn on/o the device
To turn on the device, press key 1 for three seconds unl all the LED turn on. To turn o the device,
press key 1 for three seconds unl all the LED turn o.
Turn on/o Bluetooth
To turn on the device, press key 2 for three seconds. To turn o the device, press key 2 for three
seconds.
Charge Optoprog
Connect the USB cable and turn on the device.
Check the device status
Press and release key 1: if at least one LED turns on the device is in sleep mode; if no LED turns on
the device is o.
Prepare OptoProg for use via USB
1. Turn on the device and connect it to the PC via USB.
2. Install the USB driver (see Download).
3. In UCS desktop, select the USB port to which the device is connected.
NOTICE. Set in UCS the parameters SPEED 115200; PARITY None; STOP BIT 1.
Prepare OptoProg for use via Bluetooth
1. Turn on the device.
2. Start scan for Bluetooth devices from PC or another mobile device.
3. Only for the rst connecon. Detect the "CG_BT" device, the name of OptoProg, and connect. If
required, insert the PIN "0000": the blue LED blinks fast, then returns to slow blinking.
4. In UCS mobile, select the connecon via OptoProg.
USE
NOTICE: prior to using OptoProg in the eld, make sure that the baery is fully charged.
Use OptoProg as a Modbus bridge between UCS and the analyzer
OptoProg can be used as a Modbus bridge between the PC (or mobile device) and analyzer to
congure the laer or to read data in the eld in real me.
1. Turn on the device.
2. Fasten the device to the analyzer.
3. Connect the device to the PC via USB or Bluetooth.
4. Perform desired operaon via UCS.
Troubleshoong
Problem Cause Soluon
Error in opcal communicaon
(red LED on) Misalignment in opcal port Check that the device is properly fastened
to the analyzer.
Faulty opcal communicaon
parameters Set the opcal communicaon baud rate of
the Opto Prog (9600) on the analyzer.
The device does not charge Damaged USB cable Replace USB cable.
Error in USB communicaon USB cable disconnected Check that the USB cable is properly
inserted into the device and PC.
MAINTENANCE AND DISPOSAL
Cleaning
Clean OptoProg with a so cloth. Do not use abrasives or solvents.
Responsibility for disposal
The product must be disposed of at the relave recycling centers specied by the
government or local public authories. Correct disposal and recycling will contribute to the
prevenon of potenally harmful consequences to the environment and persons.
CAUTION! Toxic substances. Environmental polluon and hazard. Intoxicaon. Do not
remove the baery by force. Dispose of the baery together with the device.
Information property
Copyright © 2017, CARLO GAVAZZI Controls SpA
All rights reserved in all countries.
CARLO GAVAZZI Controls SpA reserves the right to apply modifications or make improvements to the relative
documentation without the obligation of advance notice.
Service and warranty
In the event of malfunction, fault or for information, contact the CARLO GAVAZZI branch or distributor in your
country.
Conformity
Hereby, CARLO GAVAZZI Controls SpA Declares that the radio equipment type Optoprog is in
compliance with Directive 2014/53/EU. The full text of the EU declaration of conformity is available at the following
internet address: www.productselection.net/MANUALS/UK/OPTOPROG_declaration.pdf
FCC/IC compliance
This device complies with the IC (Industry Canada) rules RSS-247 issue 2 (feb 2017), RSS-102 issue 5 (march
2018), RSS-GEN issue 5 (apr 2018).
IC: 7118D-OPT
This device complies with Part 15 of the FCC Rules. Operaon is subject to the following two condions:
1. this device may not cause harmful interference, and
2. this device must accept any interference received, including interference that may cause undesired
operaon.
Changes or modicaons not expressly approved by Carlo Gavazzi void the user’s authority to operate the
equipment.
This equipment has been tested and found to comply with the limits for a Class A digital device,
pursuant to Part 15 of the FCC Rules. These limits are designed to provide reasonable protecon against
harmful interference when the equipment is operated in a commercial environment. This equipment
generates, uses, and can radiate radio frequency energy and, if not installed and used in accordance
with the instrucon manual, may cause harmful interference to radio communicaons. Operaon of
this equipment in a residenal area is likely to cause harmful interference in which case the user will be
required to correct the interference at his own expense.
FCC ID: SNJOPT
The device is designed for use at least 20 cm away from the operator in normal operang condions
Download
If you want to download... Then go to...
USB Driver hp://www.productselecon.net/Download/UK/OptoProg_USBdriver.zip
UCS desktop hp://www.productselecon.net/Download/UK/ucs.zip
UCS Mobile Google Play Store
Datasheet www.productselecon.net/PDF/UK/optoprogds.pdf
Instrucon Manual www.productselecon.net/MANUALS/UK/optoprog_im.pdf
Bluetooth
Konformität Bluetooth-Version 2.0, 2.1,
3.0, 4.0
Mikro-USB Port
Typ Mikro-USB B
Maximale Last 500 mA
Umgebungsbedingungen
Betriebstemperatur Von -10 bis +55 °C/von 14 bis
+131 °F
Lagertemperatur Von -20 bis +70 °C/von -4 bis
+158 °F
Maximale Höhe
ü. M.
4000 m
Stromversorgung
Baerie Lithium, nicht austauschbar
Ladung Über Stromversorgung
oder PC
Stromversorgungs-
anschluss USB 2.0 A Buchse (vom
OptoProg zum Mobilgerät)
Verbindungskabel für
USB-Stromversorgung (5 V,
500 mA)
Selbständigkeit Bis zu 20 Tage
Stromversorgung
(nicht mitgeliefert) Ausgang: 5 V DC, ≥ 500 mA DC
DE: Technische Daten
Allgemeine Merkmale
Unterstützte
Analysatoren WM20, WM30, WM40 und
WM50
Schutzgrad Vorderseite: IP51
Mikro-USB-B Port: IP40
Abmessungen Siehe Abbildung 5
Bluetooth
Conformità Versioni Bluetooth 2.0, 2.1,
3.0, 4.0
Porta micro USB B
Tipo micro USB B
Assorbimento
massimo 500 mA
Caraerische ambientali
Temperatura di
esercizio Da -10 a +55 °C / da 14 a
+131 °F
Temperatura di
stoccaggio Da -20 a +70 °C / da -4 a
+158 °F
Altudine massima 4000 m
Alimentazione
Baeria Al lio, non sostuibile
Carica Tramite alimentatore o PC
Collegamento
alimentazione USB A 2.0 femmina (da
OptoProg a disposivo
portale)
Cavo di connessione ad
alimentatore USB (5 V, 500 mA)
Autonomia Fino a 20 giorni
Alimentatore (non
fornito) Uscita: 5 V cc, ≥ 500 mA cc
IT: Da tecnici
Caraerische generali
Analizzatori
supporta WM20, WM30, WM40 e
WM50
Grado di protezione Frontale: IP51
Porta micro USB B: IP40
Dimensioni Vedi gura 5
Micro-USB port
Type micro-USB B
Maximum
absorpon 500 mA
Environmental specicaons
Operang
temperature From -10 to +55 °C / from 14
to +131 °F
Storage
temperature From -20 to +70 °C / from -4
to +158 °F
Maximum altude 4000 m
Power supply
Baery Lithium, non-replaceable
Charge Via power supply or PC
Power supply
connecon USB A 2.0 female (from
OptoProg to mobile device)
USB power supply connecon
cable (5 V, 500 mA)
Autonomy Up to 20 days
Power supply (not
supplied) Output: 5 V dc, ≥ 500 mA dc
EN: Technical data
General features
Supported analyzers WM20, WM30, WM40 and
WM50
Protecon degree Front: IP51
Micro-USB B port: IP40
Dimensions See gure 5
Bluetooth
Conformity Bluetooth version 2.0, 2.1,
3.0, 4.0
DEUTSCH
Allgemeine Warnungen
WARNUNG! Entzündbares Material. Explosion. Baerie nicht mit Gewalt enernen.
Nicht am Körper tragen.
Diese Anleitung ist ein integraler Bestandteil des Produkts. Sie sollte in allen Situaonen
betreend Installaon und Gebrauch zu Rate gezogen werden. Sie muss in gutem Zustande
gehalten und an einem sauberen Ort auewahrt werden, der allen Benutzern zugänglich ist.
HINWEIS: Niemand ist autorisiert, das Gerät zu önen. Diese Operaon ist ausschließlich dem
technischen Kundendienstpersonal von CARLO GAVAZZI vorbehalten.
EINLEITUNG
LED-Anzeigen
Farbe Beschreibung Aus An Langsam blinkend
(2 s) Schnell blinkend
(0,5 s)
Grün Stromversorgung Gerät aus oder
im Sleep-Modus Gerät an und
aufgeladen Gerät an und Baerie
schwach Gerät an und im
Auaden über USB
Blau Bluetooth-
Kommunikaon Bluetooth
abgeschaltet
oder Gerät im
Sleep-Modus
Bluetooth angeschaltet
und verbunden Bluetooth
angeschaltet aber
nicht verbunden
Bluetooth-Kommu-
nikaon akv
Rot Opsche
Kommunikaon Kein Fehler
und opsche
Kommunikaon
abgeschaltet
Kommunikaonsfehler
am opschen
Port (siehe
„Störungssuche“)
Suche nach
opschem
Gerät im Gange
(Ermilungsmodus)
Opsche Kommuni-
kaon akv
Sleep-Modus
Im Sleep-Modus arbeitet das Gerät und die LEDs sind aus, um Energie zu sparen.
Das Gerät schaltet in den Sleep-Modus, wenn es für die Dauer des Sleeping interval (voreingestellt
auf 1 Minute) inakv ist. Es nimmt den Betrieb in den folgenden Fällen wieder auf:
• kurzes Drücken der Taste 1
• Bluetooth-Kommunikaon akv
• USB-Kommunikaon akv
Einbau/Ausbau des Geräts
GEFAHR! Stromführende Teile. Gefahr von Herzsllstand, Verbrennungen und sonsgen
Verletzungen. Stellen Sie sicher, dass keine oenliegenden Verbindungen am Analysator
vorhanden sind. Die Benutzung des Geräts ist ausschließlich Personen vorbehalten, die
damit sicher umzugehen wissen.
Kompabilität
Nur für WM-Analysatoren. Das OptoProg ist nur mit Schiebeverriegelungen kompabel (siehe
Abbildung 1).
Einbau des Geräts
Schieben Sie das Gerät entlang der Halterung am Analysator bis zum Ende der Schiene (siehe
Abbildung 2 für WM-Analysatoren und Abbildung 3 für ET-Analysatoren).
Ausbau des Geräts
HINWEIS: nur für WM-Analysatoren. Beim Ausbau des Geräts halten Sie die Halterung am
Analysator gut fest und vermeiden Sie Hebelbewegungen, die zu Brüchen führen können (siehe
Abbildung 4).
VORBEREITUNG DES OPTOPROG ZUM BETRIEB
An-/Ausschalten des Geräts
Zum Anschalten des Geräts die Taste 1 für drei Sekunden gedrückt halten, bis alle LEDs leuchten. Zum
Ausschalten des Geräts die Taste 1 für drei Sekunden gedrückt halten, bis alle LEDs verlöscht sind.
An-/Ausschalten Bluetooh
Zum Anschalten des Geräts die Taste 2 für drei Sekunden gedrückt halten. Zum Ausschalten des
Geräts die Taste 2 für drei Sekunden gedrückt halten.
Optoprog laden
Schließen Sie das USB-Kabel an und schalten Sie das Gerät ein.
Überprüfen des Geräte-Status
Taste 1 drücken und loslassen: Wenn mindestens eine LED aueuchtet, ist das Gerät im Sleep-Modus;
wenn keine LED aueuchtet, ist das Gerät aus.
Vorbereitung des OptoProg zum Betrieb über USB
1. Schalten Sie das Gerät an und verbinden es über USB mit dem PC.
2. Moneren Sie den USB-Treiber (siehe Download).
3. Wählen Sie in UCS Desktop den USB-Port, an dem das Gerät angeschlossen ist.
HINWEIS. ACHTUNG: in UCS die Parameter SPEED 115200; PARITY None; STOP BIT 1 einstellen.
Vorbereitung des OptoProg zum Betrieb über Bluetooth
1. Schalten Sie das Gerät an.
2. Starten Sie die Suche nach Bluetooth-Geräten vom PC oder einem anderen Mobilgerät aus.
3. Nur bei der ersten Verbindung. Finden Sie das Gerät „CG_BT“, der Name des OptoProg, und
verbinden. Wenn erforderlich, geben Sie den PIN „0000“ ein: die blaue LED blinkt schnell und
kehrt dann zum langsamen Blinken zurück.
4. Nur mit UCS Desktop. Wählen Sie den dem OptoProg zugewiesenen COM-Port, um das Gerät
zu benutzen.
5. Wählen Sie in UCS mobile die Verbindung über OptoProg aus.
GEBRAUCH
HINWEIS: Vor Gebrauch des OptoProg vor Ort stellen Sie sicher, dass die Baerie voll
aufgeladen ist.
Gebrauch des OptoProg als Modbus-Brücke zwischen UCS und dem Analysator.
Das OptoProg kann als eine Modbus-Brücke zwischen dem PC (oder Mobilgerät) und dem Analysator
eingesetzt werden, um den letzteren zu kongurieren oder Daten vor Ort in Echtzeit auszulesen.
1. Schalten Sie das Gerät an.
2. Befesgen Sie das Gerät am Analysator.
3. Verbinden Sie das Gerät über USB oder Bluetooth mit dem PC.
4. Führen Sie die gewünschte Operaon mit UCS aus.
Störungssuche
Problem Ursache Lösung
Fehler in der opsche
Kommunikaon (rote LED an) Fehlerhae Ausrichtung im
opschen Port Überprüfen Sie, dass das Gerät
ordnungsgemäß am Analysator befesgt ist.
Fehlerhae Parameter der
opschen Kommunikaon Stellen Sie die Baud-Rate für die
Kommunikaon von OptoProg (9600) am
Analysator ein.
Das Gerät lädt nicht auf Beschädigtes USB-Kabel Ersetzen Sie das USB-Kabel.
Fehler in der USB-
Kommunikaon USB-Kabel nicht verbunden Überprüfen Sie, dass das USB-Kabel
ordnungsgemäß am Gerät und am PC
eingesteckt ist.
INSTANDHALTUNG UND ENTSORGUNG
Reinigung
Reinigen Sie das OptoProg mit einem weichen Tuch. Benutzen Sie keine Scheuer- oder
Lösungsmiel.
Verantwortlichkeit für Entsorgung
Dieses Produkt muss bei einem geeigneten von der Regierung oder lokalen öentlichen
Autoritäten anerkannten Recyclingbetrieb entsorgt werden. Ordnungsgemäße Entsorgung
und Recycling tragen zur Vermeidung möglicher schädlicher Folgen für Umwelt und
Personen bei.
VORSICHT! Giige Substanzen. Umgebungsverschmutzung und Gefährdung.
Vergiungsgefahr. Baerie nicht mit Gewalt enernen. Baerie zusammen mit dem Gerät
entsorgen.
Informaon über Eigentumsrechte
Copyright © 2017, CARLO GAVAZZI Controls SpA
Alle Rechte vorbehalten in allen Ländern.
CARLO GAVAZZI Controls SpA behält sich vor, ohne vorherige Ankündigung Änderungen oder
Verbesserungen in der entsprechenden Dokumentaon vorzunehmen.
Kundendienst und Garane
Bei Störungen oder Fehlern bzw. wenn Sie Ausküne benögen, wenden Sie sich bie an die
Niederlassung von CARLO GAVAZZI oder den zuständigen Vertriebspartner in Ihrem Land.
Konformität
Hiermit erklärt CARLO GAVAZZI Controls SpA, dass der Funkanlagentyp OptoProg der Richtlinie
2014/53/EU entspricht. Der vollständige Text der EU-Konformitätserklärung ist unter der folgenden
Internetadresse verfügbar: www.productselecon.net/MANUALS/DE/OPTOPROG_declaraon.pdf
Download
Wenn Sie downloaden möchten... Dann gehen Sie in...
USB-Treiber hp://www.productselecon.net/Download/UK/OptoProg_USBdriver.zip
UCS Desktop hp://www.productselecon.net/Download/UK/ucs.zip
UCS Mobile Google Play Store
Datanblasheet www.productselecon.net/PDF/DE/optoprogds.pdf
Bedienungsanleitung www.productselecon.net/MANUALS/DE/optoprog_im.pdf
ITALIANO
Avvertenze generali
AVVERTIMENTO! Materiale inammabile. Esplosione. Non forzare la rimozione della
baeria. Non ulizzare a contao con il corpo.
Questo manuale è parte integrante del prodoo. Deve essere consultato per tue le
situazioni legate all’installazione e all’uso. Deve essere mantenuto in buone condizioni e
conservato in un luogo pulito e accessibile agli operatori.
AVVISO: nessuno è autorizzato ad aprire il disposivo. Solo il personale dell’assistenza
tecnica CARLO GAVAZZI può farlo.
INTRODUZIONE
Stato dei LED
Colore Descrizione Spento Acceso sso Lampeggio lento (2 s) Lampeggio veloce (0,5 s)
Verde Alimentazione Disposivo
spento o in
sleep mode
Disposivo acceso
e carico Disposivo acceso e
quasi scarico Disposivo acceso e in
carica via USB
Blu Comunicazione
Bluetooth Bluetooth
disabilitato o
disposivo in
sleep mode
Bluetooth abilitato
e connesso Bluetooth abilitato
ma non connesso Comunicazione
Bluetooth in corso
Rosso Comunicazione
oca Nessun
errore e
comunicazione
oca
disavata
Errore di
comunicazione
sulla porta oca
(vedi “Risoluzione
dei problemi”)
Ricerca disposivo
oco in corso
(discovery mode)
Comunicazione oca
in corso
Sleep mode
In sleep mode il disposivo è in funzione a LED spen per risparmiare energia.
Il disposivo entra in sleep mode se resta inavo per un periodo equivalente a Sleeping interval
(default 1 minuto). Torna operavo nei seguen casi:
• pressione breve del pulsante 1
• comunicazione Bluetooth in corso
• comunicazione USB in corso
Montare/smontare il disposivo
PERICOLO! Par soo tensione. Arresto cardiaco, bruciature e altre lesioni. Assicurarsi
che sull’analizzatore non siano presen collegamen scoper. L’uso del disposivo è
riservato a persone che sappiano operare in sicurezza.
Compabilità
Solo per analizzatori della famiglia WM. OptoProg è compabile solo con agganci a scorrimento
(vedi gura 1).
Montare il disposivo
Far scorrere il disposivo sull’aggancio dell’analizzatore no a ne corsa (vedi gura 2 per
analizzatori famiglia WM e gura 3 per analizzatori famiglia ET).
Smontare il disposivo
AVVISO: solo per analizzatori della famiglia WM. Per smontare il disposivo tenere ben
fermo l’aggancio sull’analizzatore ed evitare ee leva che potrebbero causarne la roura
(vedi gura 4).
PREPARARE OPTOPROG ALL’USO
Accendere/spegnere il disposivo
Per accendere il disposivo premere il pulsante 1 per tre secondi no all’accensione di tu i LED.
Per spegnerlo premere il pulsante 1 per tre secondi no allo spegnimento di tu i LED.
Accendere/spegnere il Bluetooth
Per accendere il disposivo premere il pulsante 2 per tre secondi. Per
spegnerlo premere il pulsante 2 per tre secondi.
Ricaricare Optoprog
Collegare il cavo USB e accendere il disposivo.
Vericare lo stato del disposivo
Premere e rilasciare il pulsante 1: se si accende almeno un LED il disposivo è in sleep mode, se
non si accende alcun LED il disposivo è spento.
Preparare OptoProg all’uso via USB
1. Accendere il disposivo e collegarlo al PC via USB.
2. Installare il driver USB (vedi Download).
3. In UCS desktop selezionare la porta USB a cui il disposivo è collegato.
AVVISO. Impostare in UCS i parametri SPEED 115200; PARITY None; STOP BIT 1.
Preparare OptoProg all’uso via Bluetooth
1. Accendere il disposivo.
2. Avviare la scansione dei disposivi Bluetooth dal PC o da altro disposivo mobile.
3. Solo per primo collegamento. Rilevare e associare il disposivo “CG_BT”, nome dell’OptoProg.
Se richiesto, inserire il PIN “0000”: il LED blu lampeggia velocemente, poi torna a lampeggiare
lentamente.
4. Solo con UCS desktop. Selezionare la porta COM relava a OptoProg per usare il disposivo.
5. In UCS mobile selezionare la connessione tramite OptoProg.
USO
AVVISO: prima di usare OptoProg sul campo assicurarsi che la baeria sia completamente
carica.
Usare OptoProg come ponte Modbus tra UCS e analizzatore
OptoProg può essere usato come ponte Modbus tra PC (o disposivo mobile) e analizzatore per
congurare quest'ulmo o leggere i da sul campo in tempo reale.
1. Accendere il disposivo.
2. Agganciare il disposivo all’analizzatore.
3. Collegare il disposivo al PC via USB o Bluetooth.
4. Tramite UCS eseguire l’operazione desiderata.
Risoluzione dei problemi
Problema Causa Soluzione
Errore nella comunicazione oca
(LED rosso sso) Disallineamento porta oca Vericare che il disposivo sia correamente
agganciato all’analizzatore.
Parametri di comunicazione
oca erra Impostare il baud rate della comunicazione
oca dell'OptoProg (9600) sull'analizzatore.
Il disposivo non si carica Cavo USB danneggiato Cambiare cavo USB.
Errore nella comunicazione
tramite USB Cavo USB non collegato Vericare che il cavo USB sia ben inserito su
disposivo e PC.
MANUTENZIONE E SMALTIMENTO
Pulizia
Pulire OptoProg con un panno morbido. Non usare abrasivi o solven.
Responsabilità di smalmento
Smalre con raccolta dierenziata tramite le struure di raccolte indicate dal governo o dagli
en pubblici locali. Il correo smalmento e il riciclaggio aiuteranno a prevenire conseguenze
potenzialmente negave per l’ambiente e per le persone.
ATTENZIONE! Sostanze tossiche. Inquinamento e danni all’ambiente. Intossicazione. Non
forzare la rimozione della baeria. Smalre la baeria unitamente al disposivo.
Proprietà delle informazioni
Copyright © 2017, CARLO GAVAZZI Controls SpA
Tu i diri riserva in tu i paesi.
CARLO GAVAZZI Controls SpA si riserva il dirio di apportare modiche o miglioramen alla relava
documentazione senza obbligo di preavviso.
Assistenza e garanzia
In caso di malfunzionamento, guasto, necessità informazioni contaare la liale CARLO GAVAZZI o il
distributore nel paese di appartenenza.
Conformità
Il fabbricante, CARLO GAVAZZI Controls SpA, dichiara che il po di apparecchiatura radio OptoProg
è conforme alla direva 2014/53/UE. Il testo completo della dichiarazione di conformità UE è
disponibile al seguente indirizzo Internet: www.productselecon.net/MANUALS/IT/OPTOPROG_
declaraon.pdf
Download
Se volete scaricare... Allora andate su...
Driver USB hp://www.productselecon.net/Download/UK/OptoProg_USBdriver.zip
UCS desktop hp://www.productselecon.net/Download/UK/ucs.zip
UCS Mobile Google Play Store
Datasheet www.productselecon.net/PDF/IT/optoprogds.pdf
Manuale d'istruzioni www.productselecon.net/MANUALS/IT/optoprog_im.pdf