Canon 161 WLAN Module User Manual A93 E
Canon Inc WLAN Module A93 E
UserManual.wiki
>
Canon
>
161 User Manual
>
Manual 2
Contents
1.
Manual 1
2.
Manual 2
3.
Manual 3
Manual 2
Navigation menu
Upload a User Manual
Namespaces
Wiki Guide
HTML
PDF
Info
Views
User Manual
Discussion / Help
Navigation
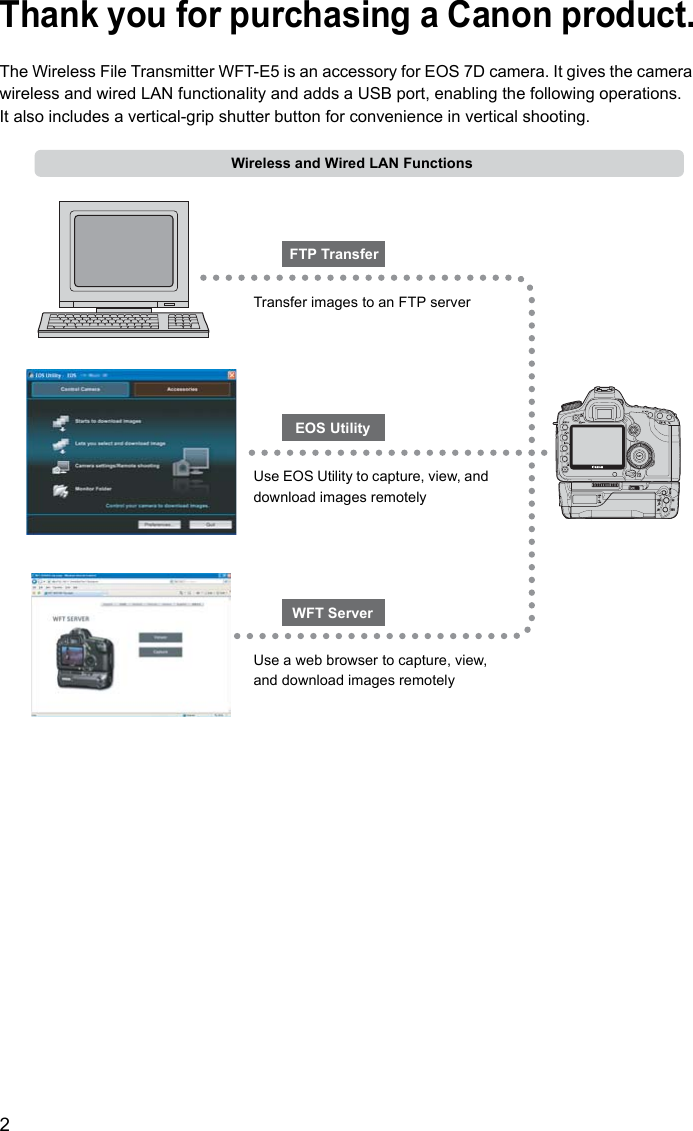
![4 These instructions should be followed only after your wireless or wired LAN and FTP server settings are complete. For details on configuring these settings, refer to the documentation provided with the respective equipment. Terms in brackets [ ] indicate button or icon names or other software elements. Brackets also denote camera menu items. Page numbers in parentheses indicate where you can find additional information. Instructions on camera operations should be followed only after you have read the Camera Instruction Manual and are familiar with operating the camera. Sections of this manual labeled with the following symbols contain information of the corresponding nature.: Warnings to avoid potential problems are labeled with a caution symbol.: Supplemental information is labeled with a note symbol.Conventions Used in this Manual Windows is a trademark or registered trademark of Microsoft Corporation in the United States and other countries. Macintosh is a registered trademark of Apple Corporation in the United States and other countries. Wi-Fi is a registered trademark of the Wi-Fi Alliance. Wi-Fi Certified, WPA, WPA2, and the Wi-Fi Certified logo are trademarks of the Wi-Fi Alliance. WPS as used on camera settings screens and in this manual signifies Wi-Fi Protected Setup. UPnP is a trademark of the UPnP Implementers Corporation. All other corporate and brand names in this manual are trademarks or registered trademarks of their respective owners.Using the transmitter for remote image transfer, capture, or viewing requires adequate knowledge ofconfiguring your wireless or wired LAN and FTP server.Canon cannot provide support for configuring wireless or wired LANs or FTP servers.Note that Canon cannot be held liable for any loss or damage to the transmitter from erroneous networkor FTP server settings. In addition, Canon cannot be held liable for any other loss or damage caused byuse of the transmitter.](https://usermanual.wiki/Canon/161.Manual-2/User-Guide-1142081-Page-4.png)
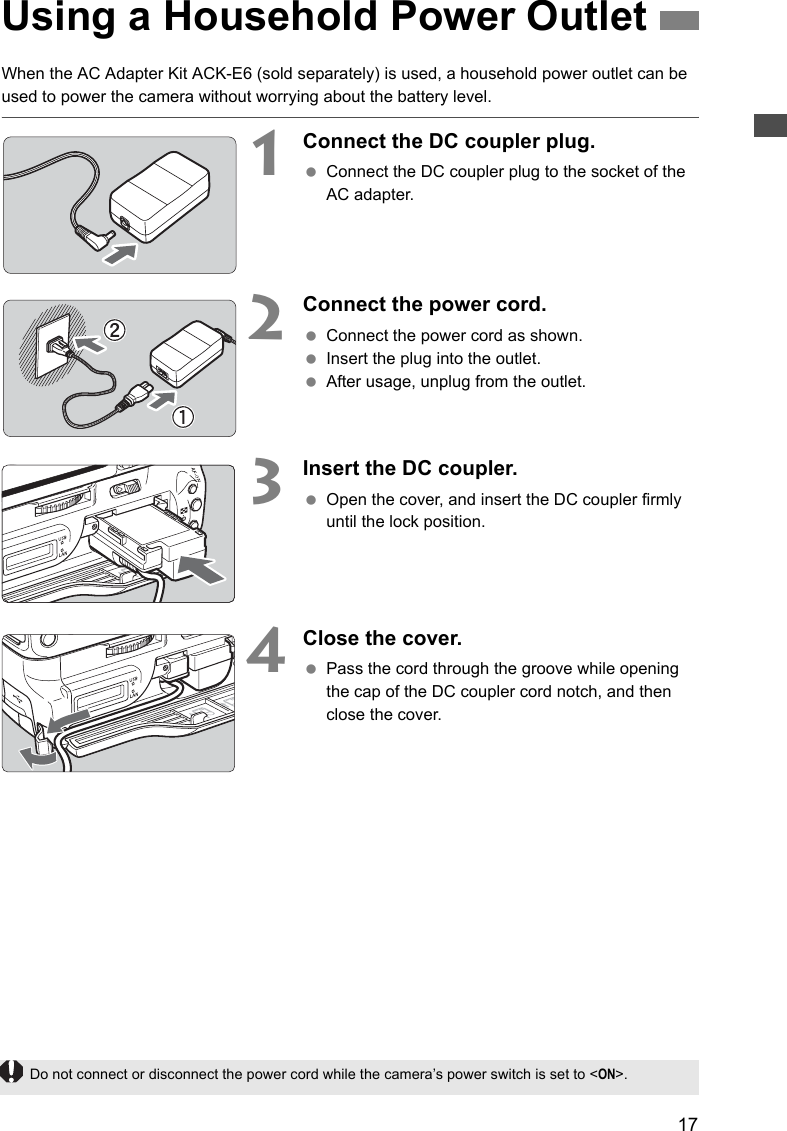
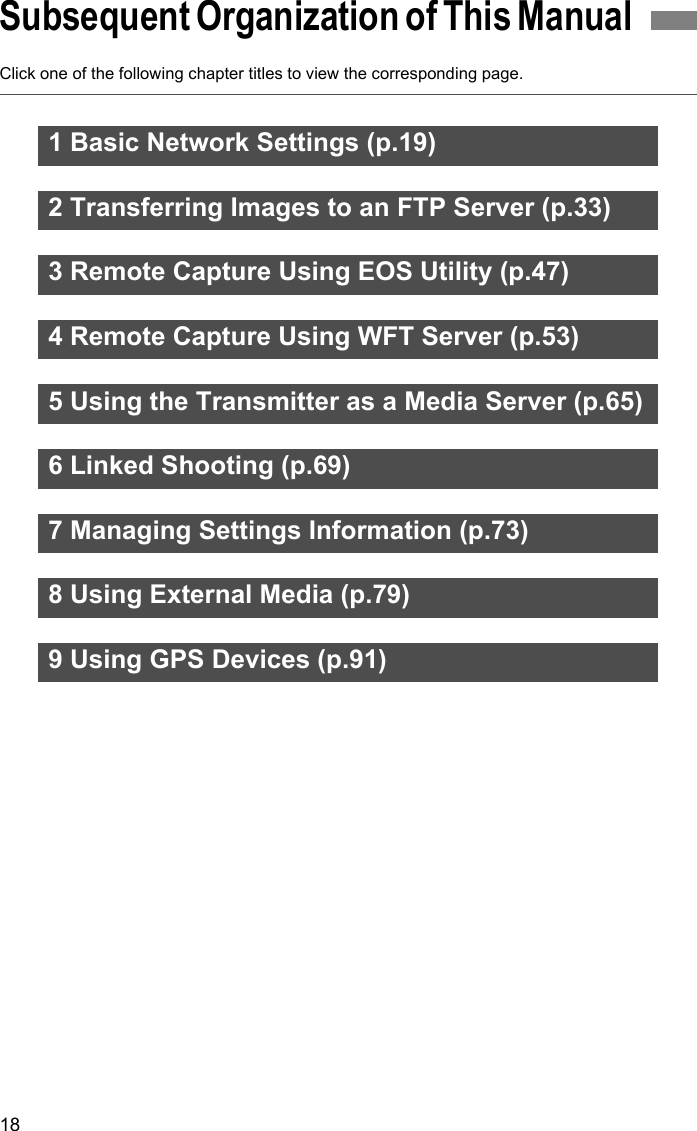
![6IntroductionConventions Used in this Manual ...................................................................................................... 4Chapter List........................................................................................................................................ 5Contents............................................................................................................................................. 6Areas of Use and Restrictions ........................................................................................................... 8Safety Warnings............................................................................................................................... 10Nomenclature................................................................................................................................... 11Attaching to the Camera .................................................................................................................. 13Vertical Shooting Controls ............................................................................................................... 14Installing and Removing the Battery ................................................................................................ 15Using a Household Power Outlet..................................................................................................... 17Subsequent Organization of This Manual........................................................................................ 181Basic Network Settings 19Getting Ready.................................................................................................................................. 20Displaying the Connection Wizard ................................................................................................... 21Selecting the Communication Method and LAN Type ..................................................................... 22Using the Wizard to Establish a Connection.................................................................................... 25WPS Connections (PBC Mode)....................................................................................................... 27WPS Connections (PIN Mode) ........................................................................................................ 28Configuring Network Settings .......................................................................................................... 292Transferring Images to an FTP Server 33Configuring FTP Communication Settings....................................................................................... 34Automatic Image Transfer After Each Shot ..................................................................................... 36Transferring Images Individually ...................................................................................................... 38Batch Transfer ................................................................................................................................. 40Checking Image Transfer History .................................................................................................... 44Viewing Transferred Images ............................................................................................................ 453Remote Capture Using EOS Utility 47Configuring EOS Utility Communication Settings ............................................................................ 48Using EOS Utility ............................................................................................................................. 514Remote Capture Using WFT Server 53Configuring WFT Server Communication Settings .......................................................................... 54Displaying WFT Server .................................................................................................................... 56Viewing Images................................................................................................................................ 57Remote Capture [Capture (Advanced)] ........................................................................................... 59Remote Capture [Capture (Basic)]................................................................................................... 62Remote Capture............................................................................................................................... 635Using the Transmitter as a Media Server 65Configuring Media Server Communication Settings ........................................................................ 66Displaying Captured Images on a Television................................................................................... 67Contents](https://usermanual.wiki/Canon/161.Manual-2/User-Guide-1142081-Page-6.png)
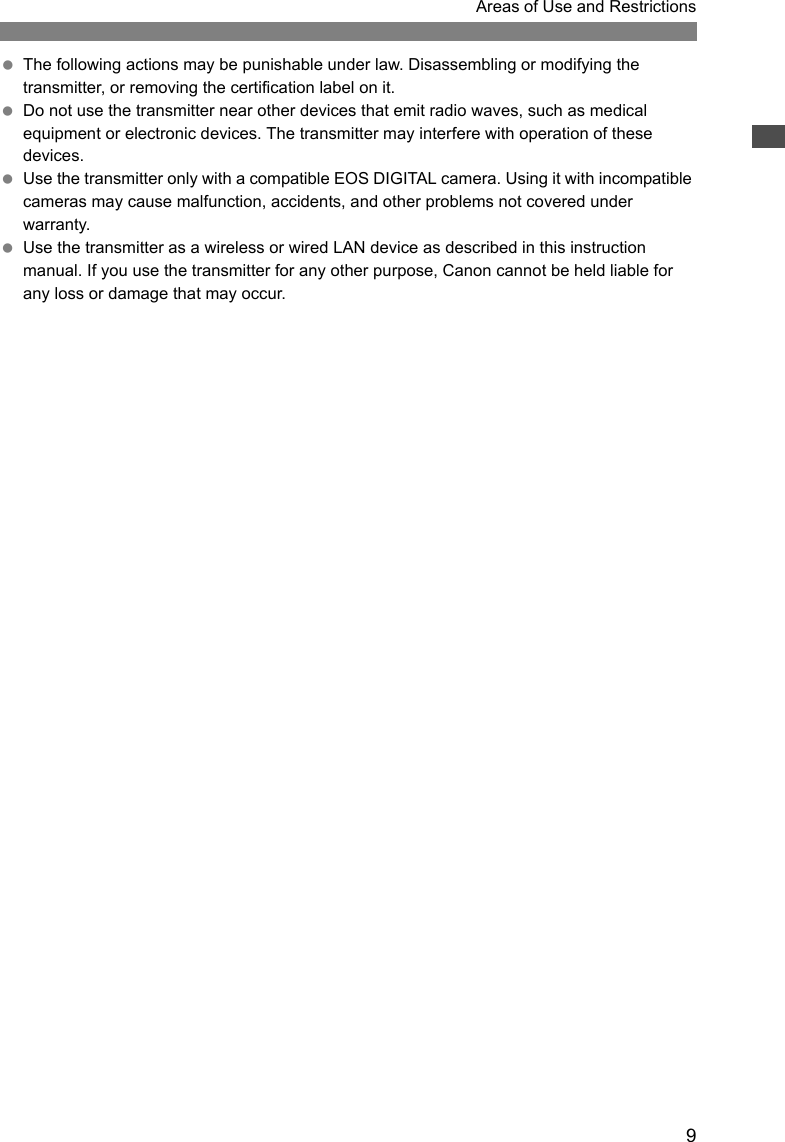
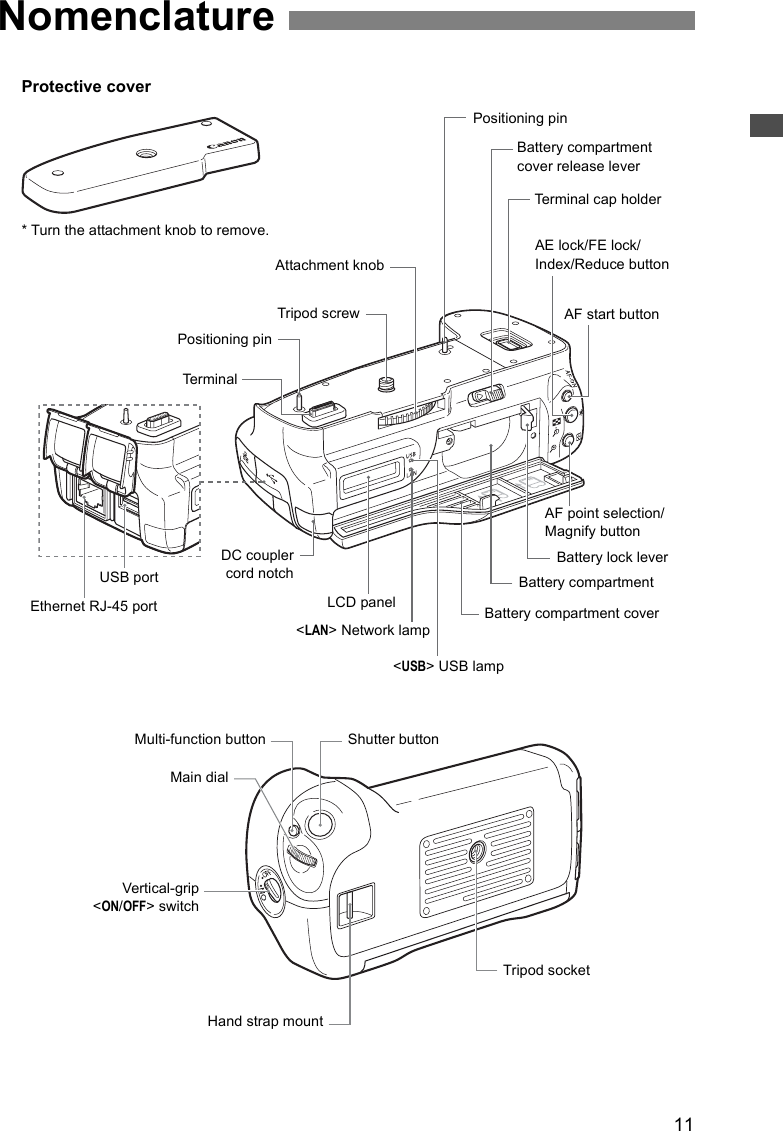
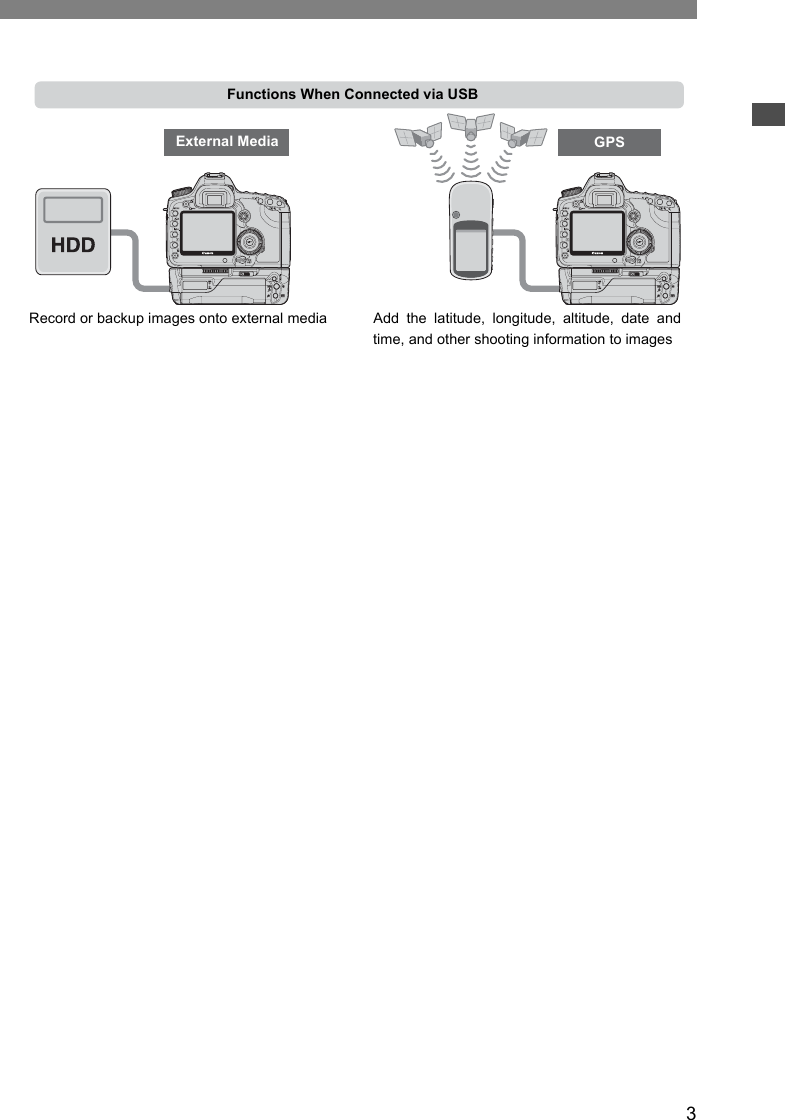
![Nomenclature12Recording quality at [Rec. separately] settingExternal media selection markExternal media connection indicatorWired LAN connectionWireless LAN connectionBattery level indicatorCF card loading indicatorCF card selection markLCD panelWaterproof/dustproof USB cap* Attach this cap before connecting the USB cable in rainy weather or under other adverse conditions.](https://usermanual.wiki/Canon/161.Manual-2/User-Guide-1142081-Page-12.png)

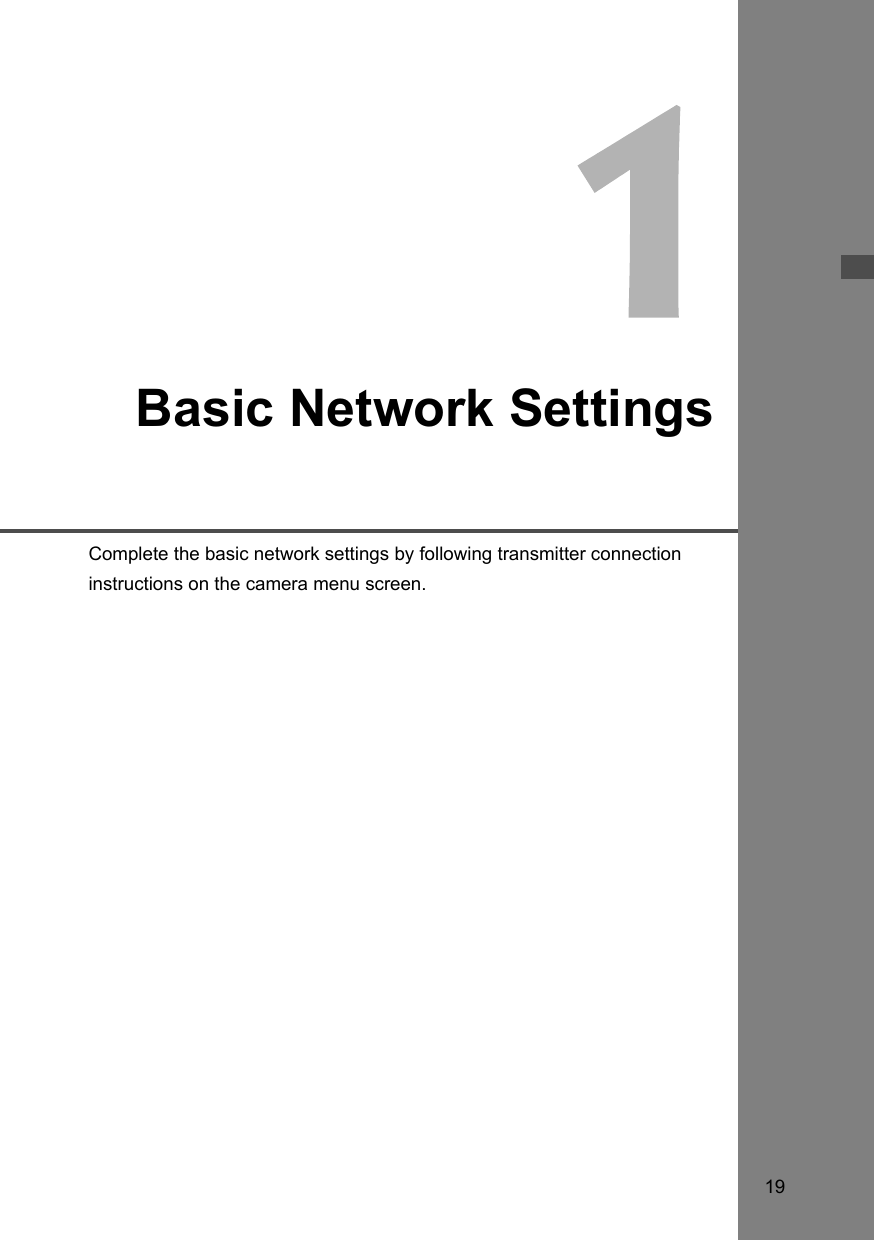
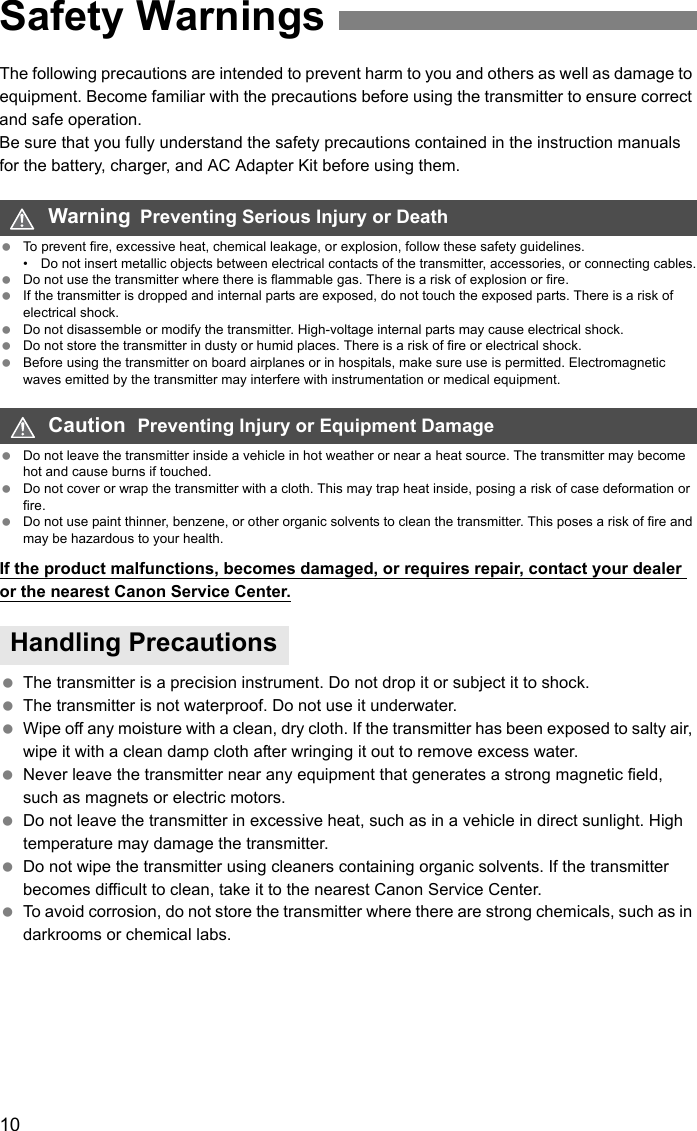
![20The connection instructions help you follow the steps to connect the transmitter to an existing wireless or wired LAN. To connect to a wireless LAN, prepare the wireless LAN terminal (wireless LAN access point or wireless LAN adapter) and computer in advance so that they are ready for you to connect the transmitter to the wireless network. When configuring the basic network settings, bring the transmitter within 3 m / 9.8 ft. of the wireless LAN terminal.To connect to a wired LAN, use a LAN cable to connect the transmitter and computer. Set the transmitter for connection to the wired network.Wireless Transmission of MovieIndividual movie files are large, and wireless file transmission takes some time. When setting up an environment for stable transmission to the wireless LAN terminal, refer to the information on page 114. Set up a DLNA*-compatible television, digital photo frame, or similar media player so that it is ready for use after the transmitter is connected to its network.* DLNA: Digital Living Network AllianceSet up two or more EOS 7D cameras with attached transmitters.Getting Ready[FTP trans.], [EOSUtility], [WFTserver][MediaServ.][LinkedShot]](https://usermanual.wiki/Canon/161.Manual-2/User-Guide-1142081-Page-20.png)
![21This section describes the process of following the connection instructions. If an error is displayed, refer to “Troubleshooting” in Chapter 10 (p.99) and check the settings. Pressing the shutter button or other camera controls during configuration by the connection instructions will close the connection instructions. Do not press the shutter button or other controls until configuration is finished. On the [5] tab, set [Auto power off] to [Off]. If auto power off is activated, the connection instructions will be closed during the configuration process.1Turn the camera on.2Display the transmitter menu. On the camera, press the <7> button. On the [5] tab, select [WFT settings] and press <0>. [WFT settings] is added to the tab after you attach the transmitter.3Select [Connection wizard].XThe [Select communication method] screen is displayed.XThe <LAN> lamp starts blinking.Displaying the Connection Wizard](https://usermanual.wiki/Canon/161.Manual-2/User-Guide-1142081-Page-21.png)
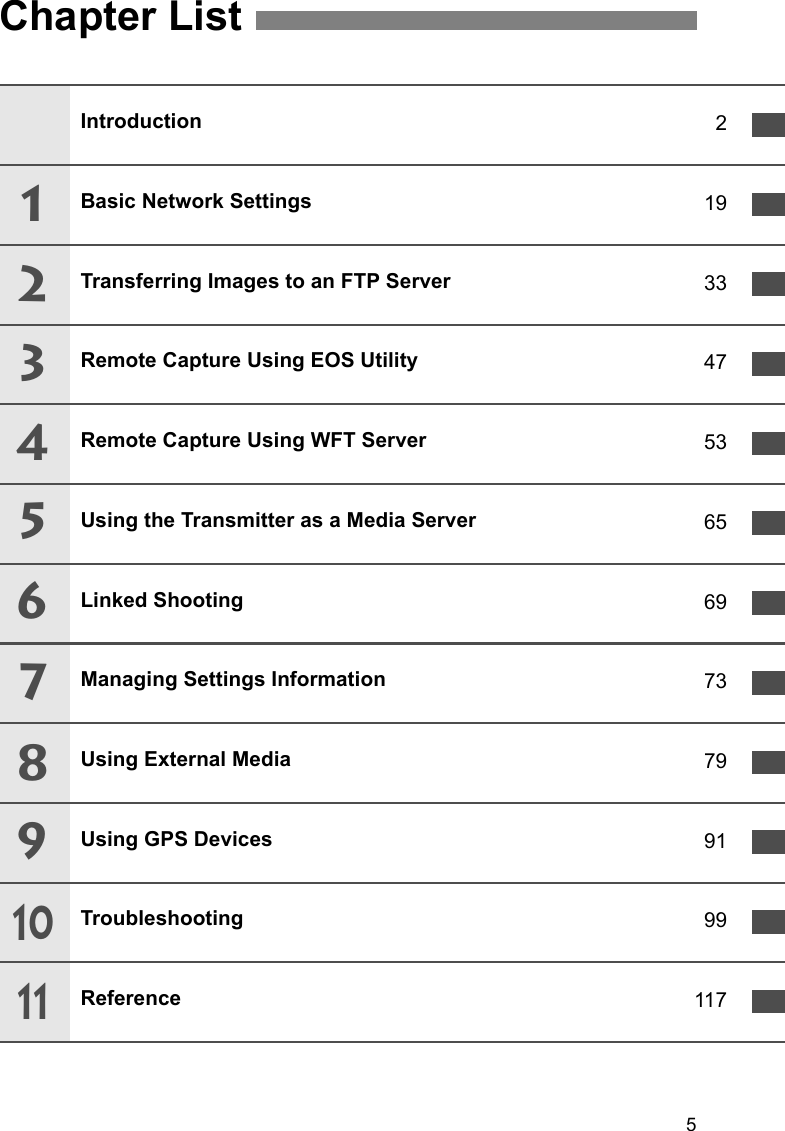
![22 Turn the <5> dial to select the communication method, and then press <0>. Select [OK] and press <0> to go to the next screen.• FTP trans.Choose this option to transfer captured images to an FTP server.Images can be automatically transferred as you shoot them, or you can select images to be transfered later.Computer Operating SystemsOperation via [FTP trans.] requires that Windows Vista (Business, Enterprise, or Ultimate Edition for 32- or 64-bit systems), Windows XP Professional, Windows 2000, or Mac OS X 10.4 or 10.5 be installed on your computer. In addition, the computer must be set up as an FTP server in advance.For instructions on setting up your computer as an FTP server, refer to the computer documentation.Windows Vista Home Premium and Home Basic Edition as well as Windows XP Home Edition cannot be used because FTP server functionality is not supported.• EOSUtilityChoose this option for remote capture over a wireless or wired LAN using the EOS Utility software included with your camera.In addition to remote capture, all camera operations in EOS Utility are supported. With this option, a wireless or wired network is used instead of the USB cable.Requires a computer with EOS Utility (included with EOS 7D cameras) installed.Selecting the Communication Method and LAN TypeSelecting the Communication Method](https://usermanual.wiki/Canon/161.Manual-2/User-Guide-1142081-Page-22.png)
![23Selecting the Communication Method and LAN Type• WFTserverChoose this option for remote capture over a wireless or wired LAN with the transmitter acting as a server.Additionally, images on a CF card in the camera can be viewed and downloaded to a computer.The camera can be accessed like browsing a webpage, by users at up to three computers.Computer Operating SystemsAny computer with a web browser can be used, regardless of the operating system.Even devices other than computers can be used, if they feature a web browser. However, if the web browser does not support JavaScript, WFT Server functions will be limited. Also note that devices with limited performance may display images more slowly, and downloading images to these devices may not be possible.• MediaServ.Choose this option to view images on a CF card in the camera over a wireless or wired LAN on a television.This function requires a DLNA-compatible television, digital photo frame, or similar media player.• LinkedShotChoose this option for linked shooting with multiple EOS 7D cameras attached with transmitters. Up to 10 slave cameras can be linked to the master camera on which you will release the shutter. Note that there will be a slight delay after you release the master camera shutter before the slave cameras shoot. Movie shooting is not supported.For further instructions on [LinkedShot], refer to page 69 of this manual.](https://usermanual.wiki/Canon/161.Manual-2/User-Guide-1142081-Page-23.png)
![24Selecting the Communication Method and LAN TypeFor [LinkedShot] instructions, refer to page 69. Note that no information about [LinkedShot] is given in this chapter. Turn the <5> dial to select the type of LAN, and then press <0>. Select [OK] and press <0> to go to the next screen.Wireless LANThe [Wireless LAN setup method] screen is displayed. [Connect with wizard]: See p.25[WPS (PBC mode)]: See p.27[WPS (PIN mode)]: See p.28Select [WPS (PBC mode)] or [WPS (PIN mode)] when using a wireless LAN terminal compatible with Wi-Fi Protected Setup (WPS). Wired LANThe [Network] settings screen is displayed. If you have selected a wired network, refer to page 29, “Configuring Network Settings.” Use a Category 5 or higher STP LAN cable. (STP: Shielded Twisted Pair)Selecting the LAN Type](https://usermanual.wiki/Canon/161.Manual-2/User-Guide-1142081-Page-24.png)
![25When you select [Connect with wizard], active wireless LAN terminals in your area are listed, accompanied by information about them. Select the SSID (or ESS-ID) of your desired wireless LAN terminal.1Select [Connect with wizard]. Turn the <5> dial to select [Connect with wizard], and then press <0>. 2Select the wireless LAN terminal. To select the wireless LAN terminal, press <0>. Turn the <5> dial to select the wireless LAN terminal, and then press <0>. Select [OK] and press <0> to go to the next screen.1Indicates whether the device is in infrastructure or ad hoc mode2An icon is displayed if the wireless LAN terminal is encrypting communication3Indicates the first 9 characters of the SSID4Indicates the channel usedEncryption by Wireless LAN TerminalsIf the wireless LAN terminal is encrypting communication, select the corresponding method in [Authentication] and [Encryption]. [Authentication]: Open system, Shared key, WPA-PSK, or WPA2-PSK [Encryption]: WEP, TKIP, or AES[Enter connection] and [Search again] To configure settings for the wireless LAN terminal manually, select [Enter connection] and press <0>. Complete the settings for the items displayed, one after another. To search for wireless LAN terminals again, select [Search again] and press <0>.Using the Wizard to Establish a ConnectionSelecting the Wireless Network123 4](https://usermanual.wiki/Canon/161.Manual-2/User-Guide-1142081-Page-25.png)
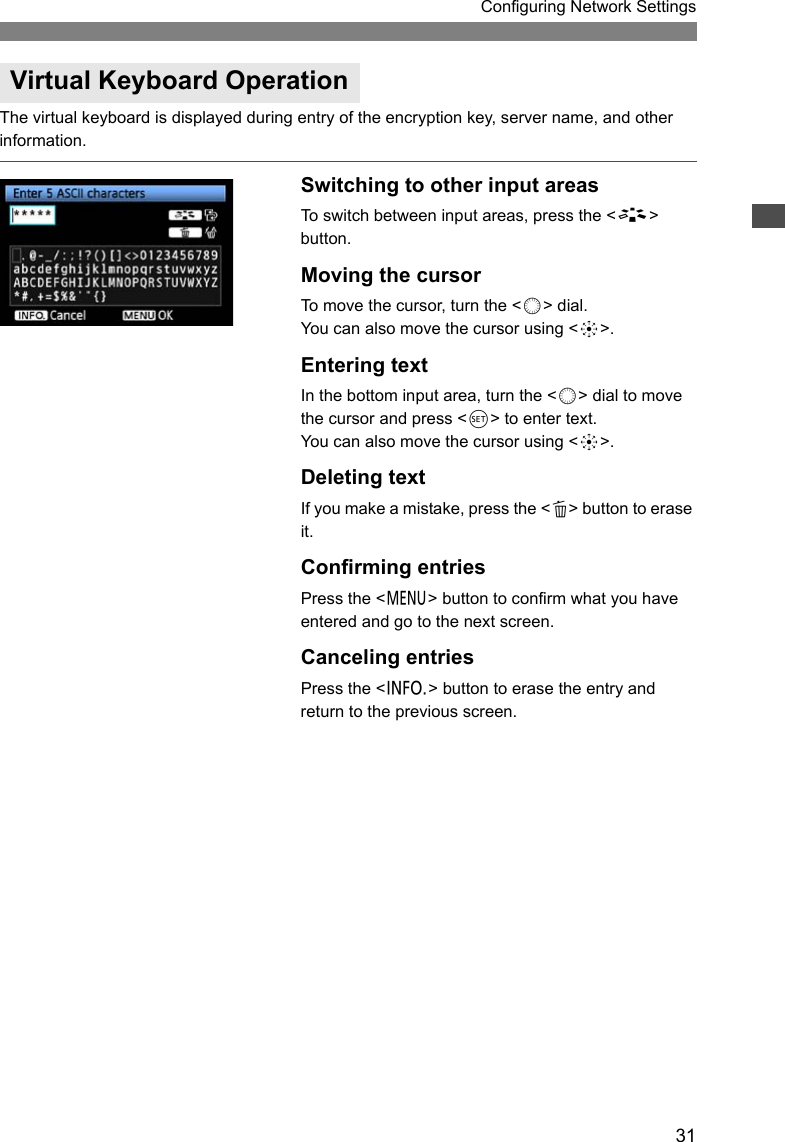
![26Using the Wizard to Establish a ConnectionNext, enter the encryption key of the wireless LAN terminal. For details on the encryption key, refer to the device’s instruction manual.Note that the screens displayed in steps 1 to 3 below vary depending on the authentication and encryption of the wireless LAN terminal.1 The [Key index] screen is displayed only if WEP encryption is used by the wireless LAN terminal. Turn the <5> dial to select the key index number specified as the access point, and then press <0>. Select [OK] and press <0> to go to the next screen.2 Turn the <5> dial to select the key format, and then press <0>. Select [OK] and press <0> to go to the next screen.3 Enter the encryption key. To switch between input areas, press the <A> button. To move the cursor, turn the <5> dial. In the bottom input area, turn the <5> dial and press <0> to enter the encryption key. If you make a mistake, press the <L> button to erase it. When you press the <7> button to complete the connection with the wireless LAN terminal, the [Network] screen (p.29) is displayed. To return to the previous screen, press the <6> button. The entry is erased.Entering the Wireless LAN Encryption Key](https://usermanual.wiki/Canon/161.Manual-2/User-Guide-1142081-Page-26.png)
![27This is a connection mode when using a wireless LAN terminal compatible with Wi-Fi Protected Setup (WPS). Pushbutton Connection mode (PBC mode) makes it easy to establish a connection between the camera and the wireless LAN terminal by pressing the WPS button on the wireless LAN terminal. Note that if multiple wireless LAN terminals are active in your area, it may be harder to establish a connection. In this case, try using [WPS (PIN mode)] to establish a connection. Confirm the position of the WPS button on the wireless LAN terminal in advance. It may take about one minute to establish connection. Connection may not be possible if stealth functions are enabled on the wireless LAN terminal. Deactivate stealth functions.1Select [WPS (PBC mode)]. Turn the <5> dial to select [WPS (PBC mode)], and then press <0>. Select [OK] and press <0> to go to the next screen. 2Establish a connection with the wireless LAN terminal. Press the WPS button on the wireless LAN terminal. For details about where the button is located and how long to press it, refer to the instruction manual of the wireless LAN terminal. Select [OK] and press <0> to establish a connection with the wireless LAN terminal. When the connection with the wireless LAN terminal is established, the [Network] screen (p.29) is displayed. WPS Connections (PBC Mode)](https://usermanual.wiki/Canon/161.Manual-2/User-Guide-1142081-Page-27.png)
![28This is a connection mode when using a wireless LAN terminal compatible with Wi-Fi Protected Setup (WPS). In PIN code connection mode (PIN mode), an 8-digit identification number specified on the camera is set on the wireless LAN terminal to establish a connection. Even if there are multiple wireless LAN terminals active in your area, this is a relatively reliable method of establishing a connection using a shared identification number. It may take about one minute to establish connection. Connection may not be possible if stealth functions are enabled on the wireless LAN terminal. Deactivate stealth functions.1Select [WPS (PIN mode)]. Turn the <5> dial to select [WPS (PIN mode)], and then press <0>. Select [OK] and press <0> to go to the next screen. 2Specify the PIN code on the wireless LAN terminal. On the wireless LAN terminal, specify the 8-digit PIN code shown on camera LCD monitor. For instructions on setting PIN codes on the wireless LAN terminal, refer to the instruction manual of the wireless LAN terminal. Select [OK] and press <0> to display the confirmation screen. 3Establish a connection with the wireless LAN terminal. Select [OK] and press <0> to establish a connection with the wireless LAN terminal. When the connection with the wireless LAN terminal is established, the [Network] screen (p.29) is displayed.WPS Connections (PIN Mode)](https://usermanual.wiki/Canon/161.Manual-2/User-Guide-1142081-Page-28.png)
![29 Turn the <5> dial to select how to configure the network settings, and then press <0>. Select [OK] and press <0> to go to the next screen.[Auto setting] Settings otherwise configured with [Manual setting] can be configured automatically. However, the IP address and similar settings must be automatically assigned and configured in environments using DHCP servers or wireless LAN terminals or routers supporting DHCP server functions.If an error is displayed, select [Manual setting] regardless of whether the IP address and similar settings are automatically assigned and configured.[Manual setting]The [IP address set.] screen is displayed after you select [Manual setting]. If [Auto setting] results in an error, enter the IP address manually. As the IP address, enter the IP address assigned to the camera.Enter the [IP address], [Subnet mask], [Gateway], and [DNS address] on each screen as they are displayed.If you are not sure what to enter, refer to page 115, “Checking Network Settings,” or ask the network administrator or another person knowledgeable about the network. When entering numbers for the IP address, subnet mask, and so on, press <0> to move the input position and turn the <5> dial to enter the number.Configuring Network Settings](https://usermanual.wiki/Canon/161.Manual-2/User-Guide-1142081-Page-29.png)
![30Configuring Network SettingsThe following instructions are for settings screens that vary depending on the communication method (FTP Transfer, EOS Utility, WFT Server, or Media Server), as shown below. Read the page that introduces the selected communication method.FTP trans.Chapter 2 (p.33)EOSUtilityChapter 3 (p.47)WFTserverChapter 4 (p.53)MediaServ.Chapter 5 (p.65)Completing Settings for the Communication MethodWindows Vista UsersBefore performing the operations from page 47, perform the operations below. If these operations arenot performed, the WFT Pairing Software described on page 48 may not start.Open the [C Drive] [Program Files] [Canon] [EOS Utility] [WFTPairing] folder (in thisorder), and then double-click the [WFT FirewallSettings] icon.After performing this operation, perform the operation on page 47.](https://usermanual.wiki/Canon/161.Manual-2/User-Guide-1142081-Page-30.png)

![34These instructions are continued from Chapter 1.1 Turn the <5> dial to select [Address setting], and then press <0>.2 If you have set the DNS server setting to [Disable], the screen at left is displayed. Press <0> to select the input position, and then turn the <5> dial to enter the IP address of the FTP server. If you have set the DNS server IP address setting to [Auto assign] or [Manual setting], the screen at left is displayed. For instructions on screen operations, refer to “Virtual Keyboard Operation” (p.31). Enter the FTP server’s server name or IP address.3 In [Port number setting], enter 00021, in most cases. Turn the <5> dial to select [OK], and then press <0> to go to the next screen.4 Complete the [Passive mode] settings. If an Error 41 (“Cannot connect to FTP server”) is displayed in step 8, setting [Passive mode] to [Enable] may resolve it.5 Complete the [Proxy server] settings. Turn the <5> dial to select [OK], and then press <0> to go to the next screen.Configuring FTP Communication Settings](https://usermanual.wiki/Canon/161.Manual-2/User-Guide-1142081-Page-34.png)
![35Configuring FTP Communication Settings6 Complete the [Login method] settings. Turn the <5> dial to select [OK], and then press <0> to go to the next screen.7 Complete the [Target folder] settings. Select [Root folder] to have images saved in the root folder as specified in FTP server settings. (p.45) Select [Select folder] to specify a subfolder in the root folder. If no folder exists, a folder will be created automatically. Turn the <5> dial to select [OK], and then press <0> to connect to the FTP server.8 On the confirmation screen displayed next, select [OK] and press <0>.XThe <LAN> lamp is lit in green.9 Press <0>. Turn the <5> dial to select the set number, and then press <0>. Turn the <5> dial to select [OK], and then press <0>. After the connection wizard is closed, the display reverts to the menu screen. Settings information is stored on the camera. It is not stored on the transmitter.The network settings for FTP transfer are now complete.](https://usermanual.wiki/Canon/161.Manual-2/User-Guide-1142081-Page-35.png)
![36An image can be automatically transferred to the FTP server immediately after shooting. You can also continue shooting even while images are being transferred.Before shooting, be sure to insert a CF card in the camera or connect external media (p.79). If you shoot without recording images, they cannot be transferred.Note that automatic transfer of movie is not supported. Transfer the movie after shooting, as described on pages 39-43. 1In [WFT settings], select [Set up].2Select [Automatic transfer]. Select [Enable].3Take the picture.XThe captured image is transferred to the FTP server. During image transfer, the <LAN> lamp blinks.Automatic Image Transfer After Each Shot During continuous shooting, images are transferred to the FTP server in the order they are captured. The captured images are also stored on the CF card. Any images for which transfer fails or is interrupted can transferred later together.](https://usermanual.wiki/Canon/161.Manual-2/User-Guide-1142081-Page-36.png)
![37Automatic Image Transfer After Each ShotIn automatic transfer during shooting, you can choose which images to transfer if different sizes of images are recorded to the CF card and external media (p.85), or during RAW+JPEG shooting.1In [WFT settings], select [Set up].2Select [Transfer type/size].3Select the size and type of images to transfer. For instance, if the camera is set up to record 73 images on a CF card and 83 images on external media and you want to transfer 83 images, set [Larger/smaller JPEG] to [Smaller JPEG]. If the camera is set up to record RAW images on a CF card and JPEGs on external media, specify which images to transfer in the [RAW+JPEG transfer] setting. Similarly, complete the same setting if RAW+JPEG images are recorded simultaneously on a single CF card.Selecting Particular Sizes or Types of Images to Transfer](https://usermanual.wiki/Canon/161.Manual-2/User-Guide-1142081-Page-37.png)
![38Simply select an image and press <0> to transfer it. You can also add a caption before transferring images. You can also continue shooting even while images are being transferred.1In [WFT settings], select [Set up].2Select [Transfer with SET]. Select [Enable].3Select the image. On the camera body, press the <x> button. Select the image to transfer, and then press <0> to transfer the image. Movie cannot be transferred this way. Selecting movie and pressing <0> will display the movie playback panel. Transferring Images IndividuallyTransferring the Current Image](https://usermanual.wiki/Canon/161.Manual-2/User-Guide-1142081-Page-38.png)
![39Transferring Images IndividuallyYou can add a registered caption to each image before transfer. This is effective if you want to inform the recipient the printing quantity, for example. The caption is also added to images stored on the camera.For instructions on creating and registering captions, refer to page 120.You can check for captions added to images by examining the Exif information, in the user comments.1Take the picture.2In [WFT settings], select [Transfer with caption].XThe last captured image is displayed. It is not possible to select other images on the [Transfer with caption] screen. To select another image for transfer with a caption, view that image before following these steps.3Select a caption. Turn the <5> dial to select the [Caption] frame, and then press <0>. Turn the <5> dial to select the content of the caption, and then press <0>.4Transfer the image. Turn the <5> dial to select [Transfer], and then press <0>.Adding a Caption Before TransferIf you add captions to images that include original decision data, these images are no longer judged tobe original images.](https://usermanual.wiki/Canon/161.Manual-2/User-Guide-1142081-Page-39.png)
![40After shooting, you can select multiple images as desired and transfer them all at once. You can also transfer unsent images or images that could not be sent previously.If both a camera CF card and external media are used at the same time, images are transferred from the source specified on the menu [5] tab, in [Recording func.+media select] [Record/play].You can also continue shooting even while images are being transferred. 1In [WFT settings], select [Image sel./transfer].2Select [Sel.Image].XAn image is displayed.3Select images to transfer. Press <0>. Turn the <5> dial to display <X> in the upper left corner of the image to transfer. Press <0> to confirm your selection.You can select up to 9,999 images. Press the <y> button to display three images per screen. Press the <u> button to display one image per screen again. After selecting images to transfer, press the <7> button.Batch Transfer Selecting Images to Transfer](https://usermanual.wiki/Canon/161.Manual-2/User-Guide-1142081-Page-40.png)
![41Batch Transfer4Transfer the images. Select [Transfer]. Select [OK] on the confirmation screen displayed next.XA transfer progress screen is displayed. During image transfer, the <LAN> lamp blinks.You can use the menu even during image transfer. However, to prevent transfer problems, some menu items are unavailable during transfer, including [WFT settings], [Protect images], [Erase images], [Format], and [Recording func.+media select].Menu Operation During Image Transfer](https://usermanual.wiki/Canon/161.Manual-2/User-Guide-1142081-Page-41.png)
![42Batch Transfer1In [WFT settings], select [Image sel./transfer].2Select [Sel.n].3Select [Folder images not transfer’d]. To transfer images that could not previously be transferred, select [Folder images failed transf.].4Select a folder.5Transfer the images. Select [Transfer]. Select [OK] on the confirmation screen displayed next.XA transfer progress screen is displayed. During image transfer, the <LAN> lamp blinks.Batch Transfer of Images in a FolderSelecting [Clear folder transf. history] will set the transfer history of images in the selected folder to “unsent.” This enables you to resend all the images in the folder later by selecting [Folder images not transfer’d].](https://usermanual.wiki/Canon/161.Manual-2/User-Guide-1142081-Page-42.png)
![43Batch Transfer1In [WFT settings], select [Image sel./transfer].2Select [All image].3Select [Card images not transferred]. To transfer images that could not previously be transferred, select [Card images failed transfer].4Transfer the images. Select [Transfer]. Select [OK] on the confirmation screen displayed next.XA transfer progress screen is displayed. During image transfer, the <LAN> lamp blinks.Batch Transfer of Images on CF CardsSelecting [Clear card’s transf. history] will set the transfer history of images on the CF card to “unsent.” This enables you to resend all the images on the card later by selecting [Card images not transferred].](https://usermanual.wiki/Canon/161.Manual-2/User-Guide-1142081-Page-43.png)
![44To check the transfer history, in [Image sel./transfer], select [Sel.Image].Image not selected for transfer (no icon)Image selected for transfer Image could not be transferredImage transferredOn the [Image sel./transfer] screen, you can check the number of images for transfer as well as the transfer history of images in the CF card. Specifically, you can check the number of images classified as [Images failed trans.] and [Images transferred].Checking Image Transfer HistoryChecking the Transfer History of Individual ImagesChecking the Transfer History of CF Cards](https://usermanual.wiki/Canon/161.Manual-2/User-Guide-1142081-Page-44.png)
![45Images transferred to the FTP server are stored in the following folder as specified in the FTP server settings. Under the default settings of the FTP server, images are stored in [C drive] [Inetpub] folder [ftproot] folder, or in a subfolder of this folder. If the root folder of the transfer destination has been changed in the FTP server settings, ask the FTP server administrator where images are transferred. Open the [Macintosh HD] [Users] folder. The folder where images are stored is located in the folder of the user currently logged on, or in a subfolder there.Under the default transmitter settings, transferred images will be stored in the root folder specified in the FTP server settings, in a folder structure such as A/DCIM/100EOS7D which is automatically created.Additionally, if you have selected a CF card as the media for recording and playback, a folder structure such as “A/DCIM/100EOS7D” is automatically created for image storage. For external media, “C/DCIM/100EOS7D” is created. (CF card images are assigned to the A folder, and external media images to the C folder.) Viewing Transferred ImagesWindowsMacintoshFolders for Image Storage](https://usermanual.wiki/Canon/161.Manual-2/User-Guide-1142081-Page-45.png)