Canon K30254 Wireless LAN Module User Manual end product users manaul 1
Canon Inc Wireless LAN Module end product users manaul 1
Canon >
Contents
- 1. end product users manaul 1
- 2. end product users manual 2
end product users manaul 1
Photo Printer
Quick Start Guide
iP5200R_QSG_US.book Page i Friday, May 20, 2005 1:58 PM

Canon PIXMA iP5200R Photo Printer Quick Start Guide.
Copyright
This manual is copyrighted by Canon U.S.A., Inc. with all rights reserved. Under the copyright laws, this manual
may not be reproduced in any form, in whole or in part, without the prior written consent of Canon U.S.A., Inc.
© 2005 Canon U.S.A., Inc.
Disclaimer
Canon U.S.A., Inc. has reviewed this manual thoroughly in order that it will be an easy-to-use
guide to your Canon PIXMA iP5200R Photo Printer. All statements, technical information and recommendations
in this manual and in any guides or related documents are believed reliable, but the accuracy and completeness
thereof are not guaranteed or warranted, and they are not intended to be, nor should they be understood to be,
representation or warranties concerning the products described.
Specifications are subject to change without notice.
As an ENERGY STAR partner, Canon U.S.A., Inc., has determined that this product meets the ENERGY
STAR guidelines for energy efficiency.
All information regarding non-Canon products was compiled from publicly available information. No
representation is made regarding the accuracy thereof.
Trademarks
z“Windows” and “Internet Explorer” are trademarks of Microsoft Corporation, registered in the United States
and other countries.
z“Macintosh” and “Mac” are trademarks of Apple Computer, Inc., registered in the U.S. and other countries.
z“Wi-Fi” is a registered trademark of the Wi-Fi Alliance. The “Wi-Fi CERTIFIED” logo is a certification mark of the
Wi-Fi Alliance.
Canon U.S.A., Inc.
One Canon Plaza
Lake Success, NY 11042
iP5200R_QSG_US.book Page ii Friday, May 20, 2005 1:58 PM

Contents
1
Contents
Basic Printing
Turning on the Printer . . . . . . . . . . . . . . . . . . . . . . . . . . . . . . . . . . . . . . . . . . . . . . . . . . . . . . . . . . . . . 2
Turning off the Printer . . . . . . . . . . . . . . . . . . . . . . . . . . . . . . . . . . . . . . . . . . . . . . . . . . . . . . . . . . . . . 3
Loading Paper . . . . . . . . . . . . . . . . . . . . . . . . . . . . . . . . . . . . . . . . . . . . . . . . . . . . . . . . . . . . . . . . . . . 4
Using Specialty Media . . . . . . . . . . . . . . . . . . . . . . . . . . . . . . . . . . . . . . . . . . . . . . . . . . . . . . . . . . . 18
Printing with Windows . . . . . . . . . . . . . . . . . . . . . . . . . . . . . . . . . . . . . . . . . . . . . . . . . . . . . . . . . . . 20
Printing with Macintosh . . . . . . . . . . . . . . . . . . . . . . . . . . . . . . . . . . . . . . . . . . . . . . . . . . . . . . . . . . 23
Canceling Printing . . . . . . . . . . . . . . . . . . . . . . . . . . . . . . . . . . . . . . . . . . . . . . . . . . . . . . . . . . . . . . . 26
Advanced Printing
Printing Photographs Directly from a PictBridge Compliant Device . . . . . . . . . . . . . . . . . . . . . . . 28
Accessing the Printer Driver (Windows) . . . . . . . . . . . . . . . . . . . . . . . . . . . . . . . . . . . . . . . . . . . . . 35
Using the Bundled Software. . . . . . . . . . . . . . . . . . . . . . . . . . . . . . . . . . . . . . . . . . . . . . . . . . . . . . . 36
Printing Maintenance
Replacing an Ink Tank . . . . . . . . . . . . . . . . . . . . . . . . . . . . . . . . . . . . . . . . . . . . . . . . . . . . . . . . . . . . 37
When Printing Becomes Faint or Colors are Incorrect . . . . . . . . . . . . . . . . . . . . . . . . . . . . . . . . . . 46
Printing the Nozzle Check Pattern . . . . . . . . . . . . . . . . . . . . . . . . . . . . . . . . . . . . . . . . . . . . . . . . . . 47
Print Head Cleaning. . . . . . . . . . . . . . . . . . . . . . . . . . . . . . . . . . . . . . . . . . . . . . . . . . . . . . . . . . . . . . 52
Print Head Deep Cleaning . . . . . . . . . . . . . . . . . . . . . . . . . . . . . . . . . . . . . . . . . . . . . . . . . . . . . . . . . 56
Aligning the Print Head . . . . . . . . . . . . . . . . . . . . . . . . . . . . . . . . . . . . . . . . . . . . . . . . . . . . . . . . . . . 60
Troubleshooting
Cannot Install the Printer Driver. . . . . . . . . . . . . . . . . . . . . . . . . . . . . . . . . . . . . . . . . . . . . . . . . . . . 65
Cannot Connect to PC Properly . . . . . . . . . . . . . . . . . . . . . . . . . . . . . . . . . . . . . . . . . . . . . . . . . . . . 66
Print Results Not Satisfactory or Contains Errors . . . . . . . . . . . . . . . . . . . . . . . . . . . . . . . . . . . . . . 67
Troubleshooting Printer Hardware. . . . . . . . . . . . . . . . . . . . . . . . . . . . . . . . . . . . . . . . . . . . . . . . . . 70
Paper Does Not Feed Properly . . . . . . . . . . . . . . . . . . . . . . . . . . . . . . . . . . . . . . . . . . . . . . . . . . . . . 72
Paper Jams . . . . . . . . . . . . . . . . . . . . . . . . . . . . . . . . . . . . . . . . . . . . . . . . . . . . . . . . . . . . . . . . . . . . . 73
Handling Error Messages . . . . . . . . . . . . . . . . . . . . . . . . . . . . . . . . . . . . . . . . . . . . . . . . . . . . . . . . . 77
An Error Message Appears on the Screen . . . . . . . . . . . . . . . . . . . . . . . . . . . . . . . . . . . . . . . . . . . . 79
Cannot Print Properly from the Digital Camera. . . . . . . . . . . . . . . . . . . . . . . . . . . . . . . . . . . . . . . . 82
Appendix
Specifications . . . . . . . . . . . . . . . . . . . . . . . . . . . . . . . . . . . . . . . . . . . . . . . . . . . . . . . . . . . . . . . . . . 87
Safety Precautions . . . . . . . . . . . . . . . . . . . . . . . . . . . . . . . . . . . . . . . . . . . . . . . . . . . . . . . . . . . . . . 92
Regulatory Information . . . . . . . . . . . . . . . . . . . . . . . . . . . . . . . . . . . . . . . . . . . . . . . . . . . . . . . . . . . 94
CANON U.S.A., INC. LIMITED WARRANTY --- (USA Only). . . . . . . . . . . . . . . . . . . . . . . . . . . . . . . . . 95
Index. . . . . . . . . . . . . . . . . . . . . . . . . . . . . . . . . . . . . . . . . . . . . . . . . . . . . . . . . . . . . . . . . . . . . . . . . . . . . . . . . . . . 97
iP5200R_QSG_US.book Page 1 Friday, May 20, 2005 1:58 PM
Basic Printing
2
Basic Printing
This
Quick Start Guide
describes some of the features of your printer and how
to use them. For more information, view the iP5200R
User’s Guide
and
Printer
Driver Guide
installed on your computer, or use the online help within your
printer driver interface:
While in the printer’s properties window, press the F1 key, or click in the
upper right corner. Then click the feature you want to know more about, or click
the Help button when displayed.
While in the Page Setup dialog box or Print dialog box, click in the lower left
corner.
Clicking provides detailed information about each setting.
When the Help window appears, select your desired topic.
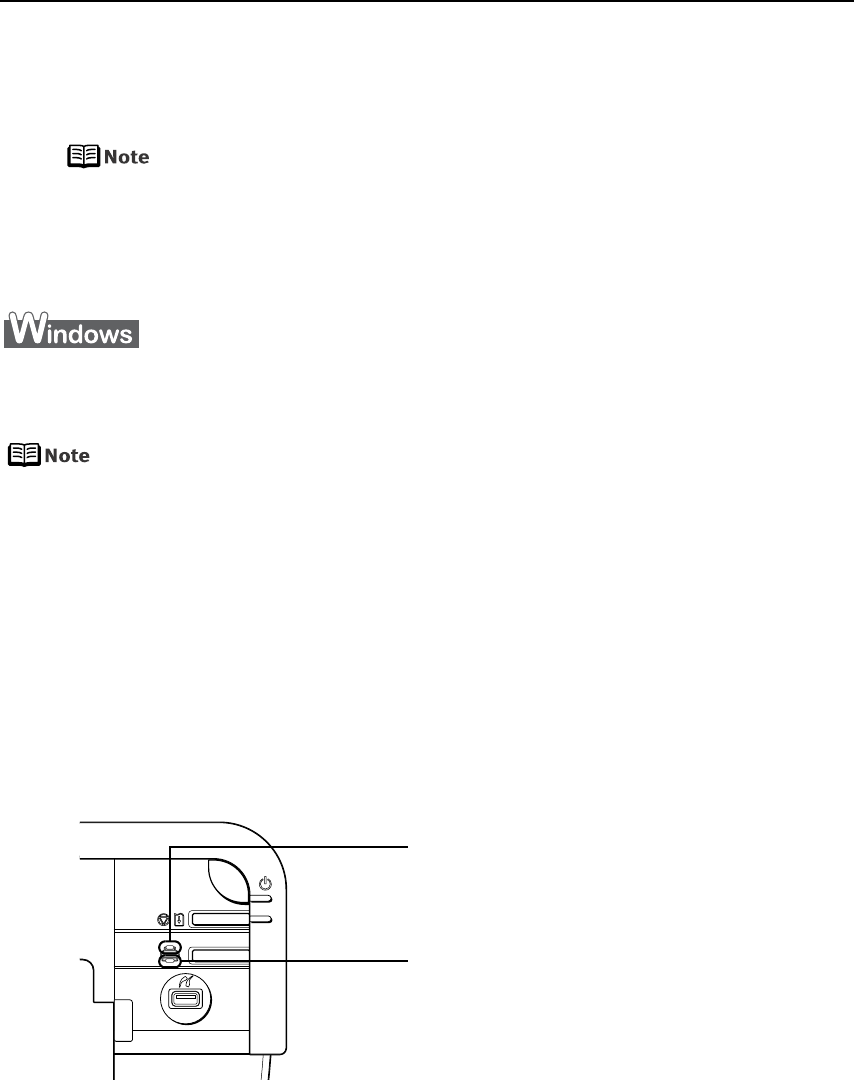
Turning on the Printer
1Press the POWER button.
The POWER lamp flashes green while the printer warms up and changes to steady
(non-flashing) when the printer is ready.
If the ALARM lamp begins flashing orange, refer to “Handling Error
Messages” on page 77.
iP5200R_QSG_US.book Page 2 Friday, May 20, 2005 1:58 PM
Basic Printing
3
Turning off the Printer
1To turn off the printer, press the POWER button.
When the POWER lamp stops blinking, the printer is turned off.
About the Power Plug
When removing the power plug after turing off the printer, be sure to
check that the POWER lamp is not lit. If the power plug is removed from
the wall outlet with the POWER lamp lit or blinking green, the printer
cannot protect its print heads and may be unable to print.
iP5200R_QSG_US.book Page 3 Friday, May 20, 2005 1:58 PM
Basic Printing
4
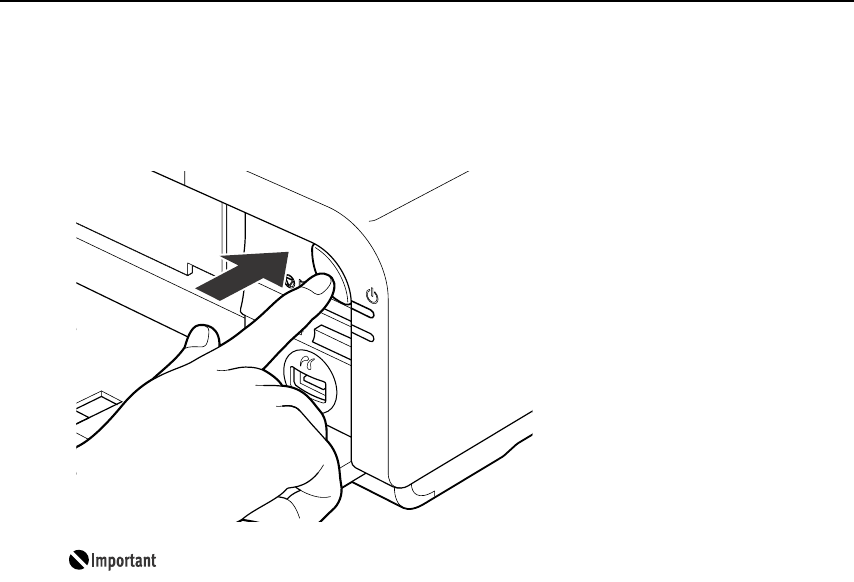
Loading Paper
This section describes how to load paper in the Auto Sheet Feeder and the Cassette.
Print Media to Avoid
Do not use the following types of paper. Using such paper will not only produce
unsatisfactory results, but can also cause the printer to jam or malfunction.
• Folded, curled or wrinkled paper
• Damp paper
• Excessively thin paper (less than 64 gsm or 17 lb)
• Excessively thick paper* (more than 105 gsm or 28 lb)
* non-Canon branded paper
•Picture postcards
• Postcards affixed with photos or stickers
• Envelopes with double flaps
• Envelopes with sticker flaps
• Envelopes with an embossed or treated surface
• Any type of paper with holes
Auto Sheet Feeder
Cassette
iP5200R_QSG_US.book Page 4 Friday, May 20, 2005 1:58 PM
Basic Printing
5
Using the Auto Sheet Feeder and the Cassette
You can load paper in both the Auto Sheet Feeder and Cassette.
Loading paper in the Auto Sheet Feeder is easy, and is convenient if you frequently
switch to and print on various sizes or types of paper.
Loading paper in the Cassette allows you to print without reloading paper for each job.
This is convenient for loading a certain type of paper, such as plain paper, you regularly
print onto.
Loading paper in both the Auto Sheet Feeder and Cassette makes the following paper
feed methods available:
* Legal-sized paper and 2.13" x 3.39"/ 54.0 x 86.0 mm size paper, and Photo Stickers are not loadable in the
Cassette.
• Changing the paper source to feed different types/sizes of paper
If you load plain paper in the Cassette and photo paper in the Auto Sheet Feeder,
changing the paper source allows you to print on both types of paper without
removing and reloading paper. To change the paper source, use the Paper Feed
Switch on the printer or printer driver.
You can also specify the type/size of paper to be fed from the Cassette for regular use
with the printer driver. For example, you can specify that Letter-sized plain paper is
always fed from the Cassette whenever you print.
For information on the printer driver settings, refer to the
Printer Driver
Guide
.
You can switch between paper
loaded in the Auto Sheet
Feeder (e.g., 4" x 6" / 101.6 x
152.4 mm) and the Cassette
(e.g., Letter-sized paper).
iP5200R_QSG_US.book Page 5 Friday, May 20, 2005 1:58 PM
Basic Printing
6
• Continuous printing on the same type/size of paper by using both the Auto Sheet
Feeder and Cassette together
If the Auto Sheet Feeder or Cassette runs out of paper, the paper source automatically
switches to the other one. This is useful for printing onto a large volume of paper. To
use this feature, you need to configure the printer driver beforehand.
For information on the printer driver settings, refer to the
Printer Driver
Guide
.
• Choosing the paper source to match the location of the printer
You can use just the Auto Sheet Feeder or Cassette according to the location of the
printer.
For example, if you intend to install the printer in a small place, such as on a shelf
with minimal space, you can use just the Cassette for printing.
Legal-sized paper and 2.13" x 3.39"/ 54.0 x 86.0 mm size paper, and
Photo Stickers are not loadable in the Cassette.
If you intend to use only the Cassette, check any usage restrictions in
advance.
If the Auto Sheet Feeder runs
out of paper, the paper source
automatically changes to the
Cassette.
iP5200R_QSG_US.book Page 6 Friday, May 20, 2005 1:58 PM
Basic Printing
7
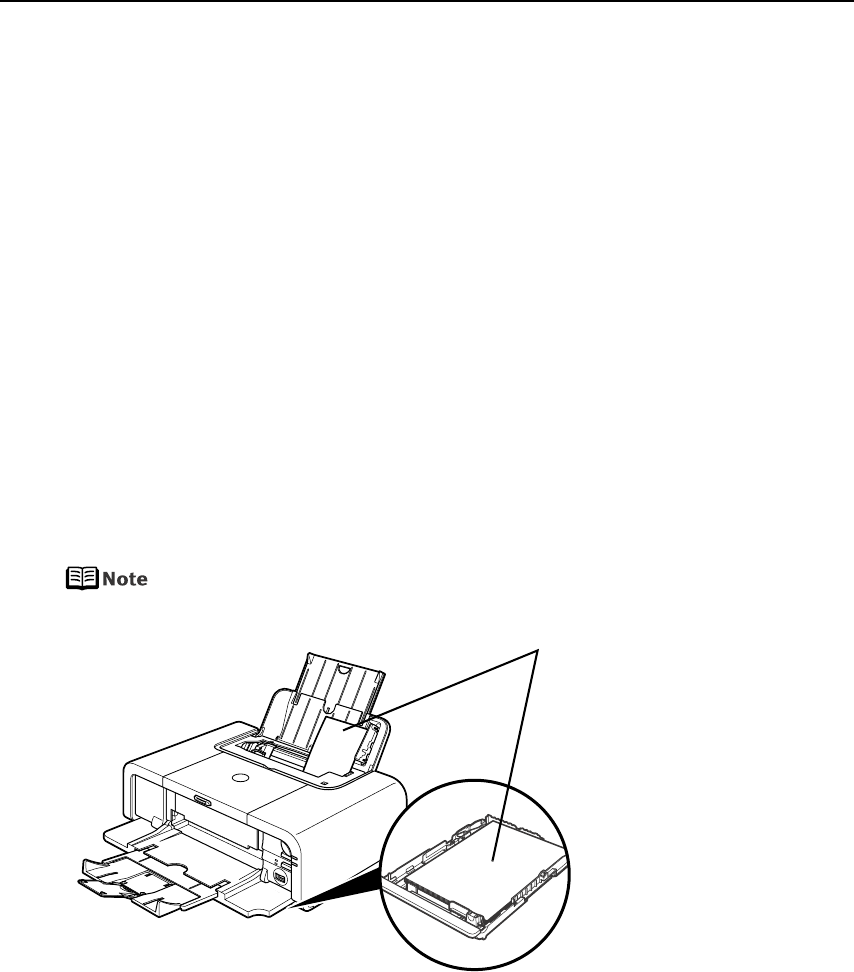
Loading Plain Paper in the Auto Sheet Feeder
zFor detailed information on the specialty media Canon provides for use
with its various printers, refer to “Using Specialty Media” on page 18.
zSee “Printing Media” in the
User’s Guide
for detailed instructions on
how to load specialty media into the printer.
1Flatten the four corners of the paper before loading it.
When paper is curled, hold the opposing curled corners and gently bend
them in the opposite direction until the paper becomes completely flat.
2Prepare to load paper.
You can also select the paper source with the printer driver. For details,
refer to the
Printer Driver Guide
.
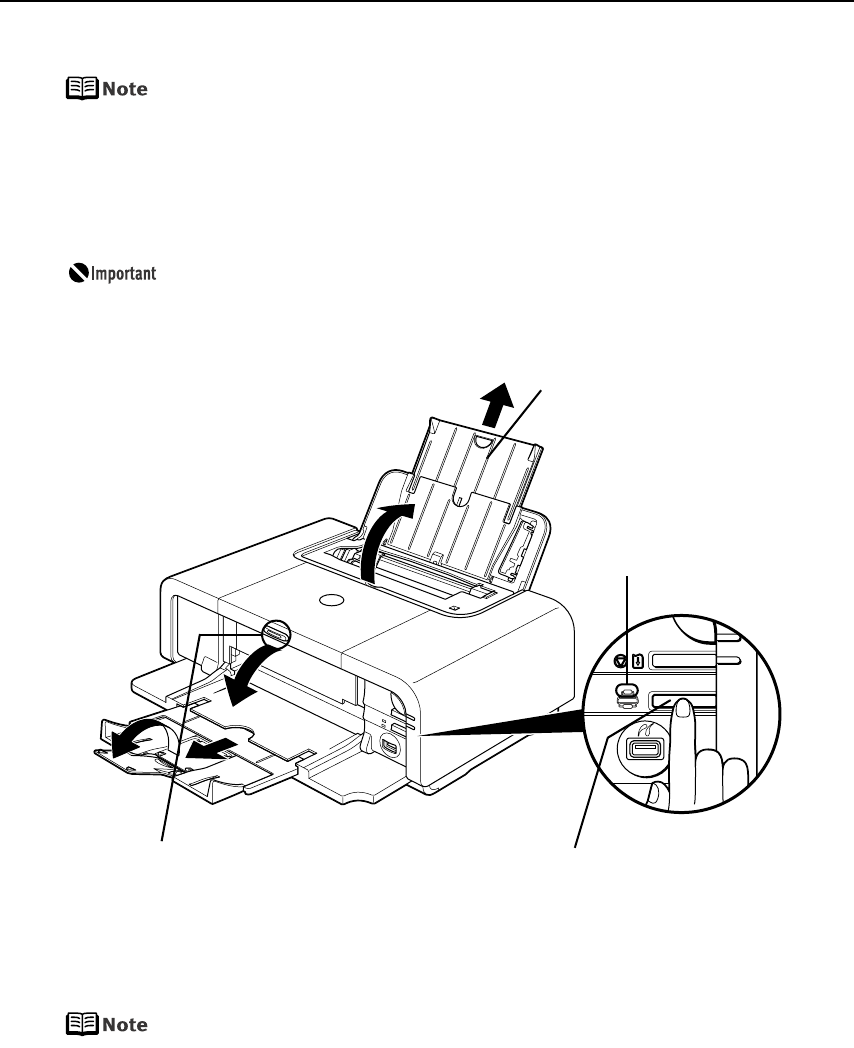
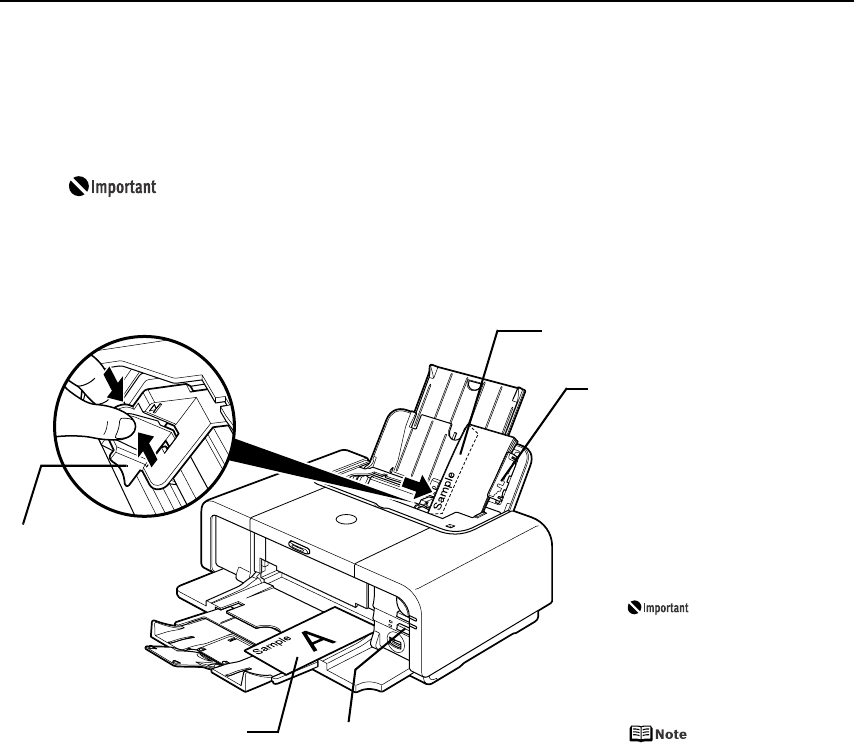
(1) 1 Open the Paper Support.
2 Pull out the Paper
Support Extension to
support the paper.
(2) 1 Push the Open Button above the
Paper Output Tray. The Paper
Output Tray automatically opens.
2 Pull out the Paper Output Tray
Extension completely.
(3) Press the Paper Feed
Switch so that the Auto
Sheet Feeder lamp lights.
Auto Sheet Feeder Lamp
1
1
2
2
iP5200R_QSG_US.book Page 7 Friday, May 20, 2005 1:58 PM
Basic Printing
8
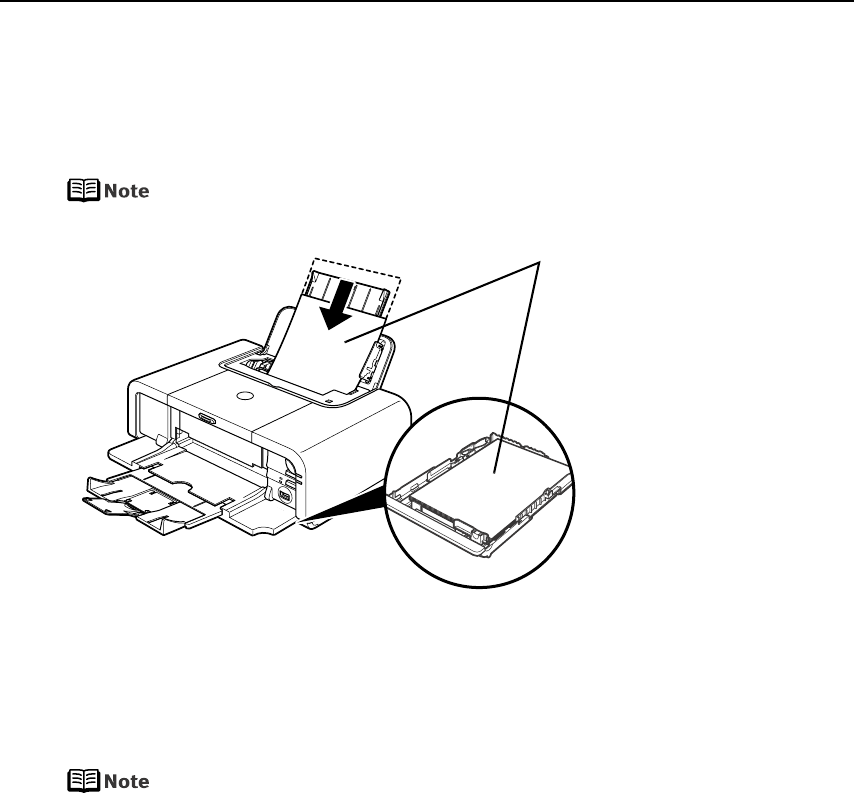
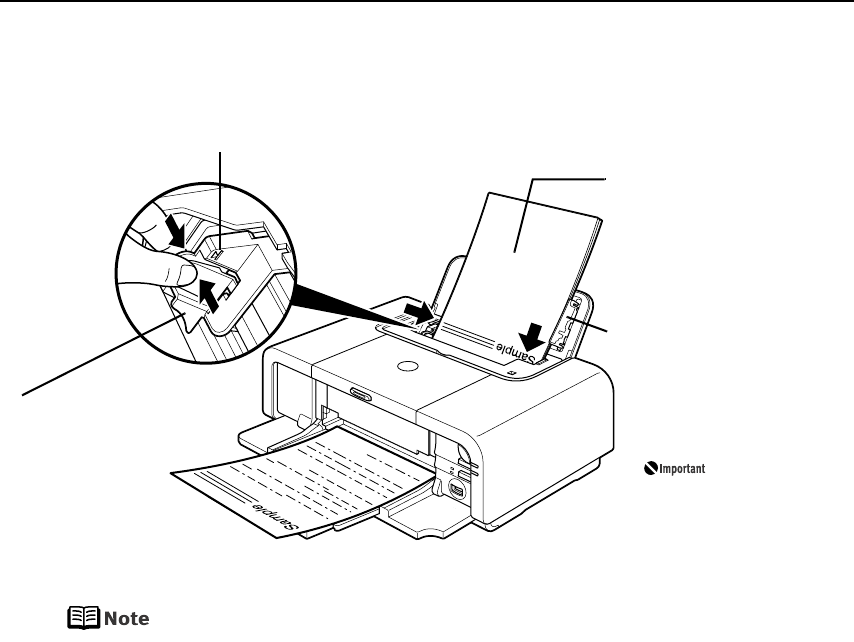
3Load the paper.
zYou can use general copy paper or Canon’s Super White Paper.
zYou can load up to 150 sheets of plain paper (64 gsm or 17 lb, 13 mm
or 0.52 inches in height) in the Auto Sheet Feeder. However, do not
stack more than 50 sheets in the Paper Output Tray.
zDo not touch the printed surfaces until the ink dries. For specific drying
times, refer to the instructions packaged with your media.
(2) Align the paper stack
against the Cover
Guide on the right
side of the Paper
Support.
Ensure that the
Cover Guide
stands when
you load paper
in the Auto
Sheet Feeder.
(3) Pinch the paper
guide and slide
it against the
left side of the
paper stack.
Load Limit Mark
Do not load beyond this Load Limit Mark.
(1) Load the paper
into the Auto
Sheet Feeder with
the print side
facing UP.
iP5200R_QSG_US.book Page 8 Friday, May 20, 2005 1:58 PM
Basic Printing
9
Loading Envelopes
Use either European DL or US Comm. Env. #10 size envelopes.
The address is rotated automatically to match the direction of the envelope when
printing.
zDo not use envelopes with embossed or treated surfaces, a double
flap, pressure seals or sticker flaps.
zSelect either European DL Env. or US Comm. Env. #10 in the printer
driver according to the envelope size you are using. If you do not, the
address will be printed in the wrong direction.
(4) Select Envelope in Media Type, and then select European DL Env. or US Comm.
Env. #10 in Page Size.
For a detailed description of the printer driver settings, refer to “Printing with
Windows” on page 20, “Printing with Macintosh” on page 23.
Fold the envelope
flap shut.
(2) Pinch the
paper guide
and slide it
against the
left side of
the envelope.
(1) Load the envelope
against the Cover
Guide on the right
side of the Paper
Support with the front
face UP, and the rear
flaps DOWN on the
left.
Ensure that the
Cover Guide
stands when
you load paper
in the Auto
Sheet Feeder.
A maximum of
10 envelopes
can be loaded at
once.
(3) Press the Paper Feed
Switch so that the Auto
Sheet Feeder lamp lights.
Printing direction
iP5200R_QSG_US.book Page 9 Friday, May 20, 2005 1:58 PM
Basic Printing
10
Loading Other Small-Sized Paper in the Auto Sheet Feeder
Cutting plain paper to 4" x 6" / 101.6 mm x 152.4 mm, 5" x 7" / 127.0 x
177.8 mm, or 2.13" x 3.39" / 54.0 x 86.0 mm (Credit Card) size for a trial
printing can cause paper jams.
(4) Select 4 x 6 in 101.6 x 152.4 mm, 5 x 7 in 127.0 x 177.8 mm, or Credit Card 2.13
x 3.39 in 54 x 86 mm from Paper Size in the printer driver.
For a detailed description of the printer driver settings, refer to “Printing with
Windows” on page 20, or “Printing with Macintosh” on page 23.
Always load paper in portrait orientation. Loading paper in
landscape orientation can cause the paper to be jammed.
We recommend using genuine Canon photo media when printing
photographs.
See “Using Specialty Media” on page 18.
(1) Load the paper into the
Auto Sheet Feeder with
the print side facing UP
and align the Cover Guide
on the right side of the
Paper Support.
Ensure that the
Cover Guide stands
when you load
paper in the Auto
Sheet Feeder.
• Load the paper lengthways
regardless of the direction of
the document.
• You can load up to 20 sheets
of 4" x 6" or 2.13" x 3.39"
(Credit Card) -sized paper;
10 sheet of 5" x 7"-sized
paper.
(2) Pinch the paper guide and
slide it against the left side of
the paper stack.
(3) Press the Paper Feed
Switch so that the Auto
Sheet Feeder lamp lights.
Portrait Landscape
iP5200R_QSG_US.book Page 10 Friday, May 20, 2005 1:58 PM
Basic Printing
11
Loading Plain Paper in the Cassette
Ensure that the paper is loadable in the Cassette. Legal-sized paper and 2.13" x 3.39" /
54.0 x 86.0 mm size paper, and Photo Stickers are not loadable in the Cassette.
zFor detailed information on the specialty media Canon provides for use
with its various printers, refer to “Using Specialty Media” on page 18.
zSee “Printing Media” in the
User’s Guide
for detailed instructions on
how to load specialty media into the printer.
1Flatten the four corners of the paper before loading it.
When paper is curled, hold the opposing curled corners and gently bend
them in the opposite direction until the paper becomes completely flat.
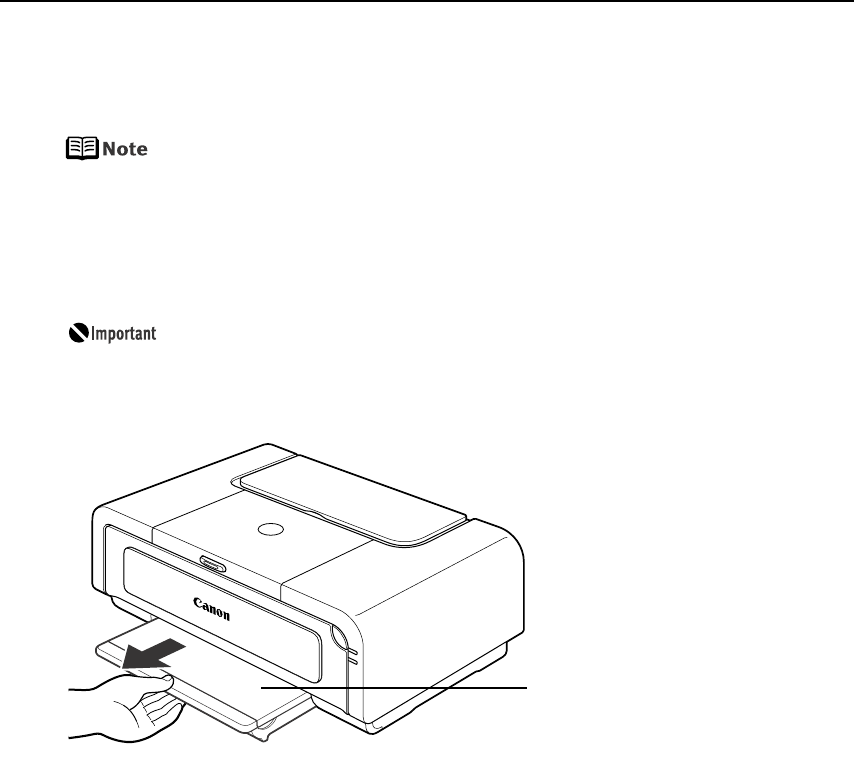
2Prepare to load paper.
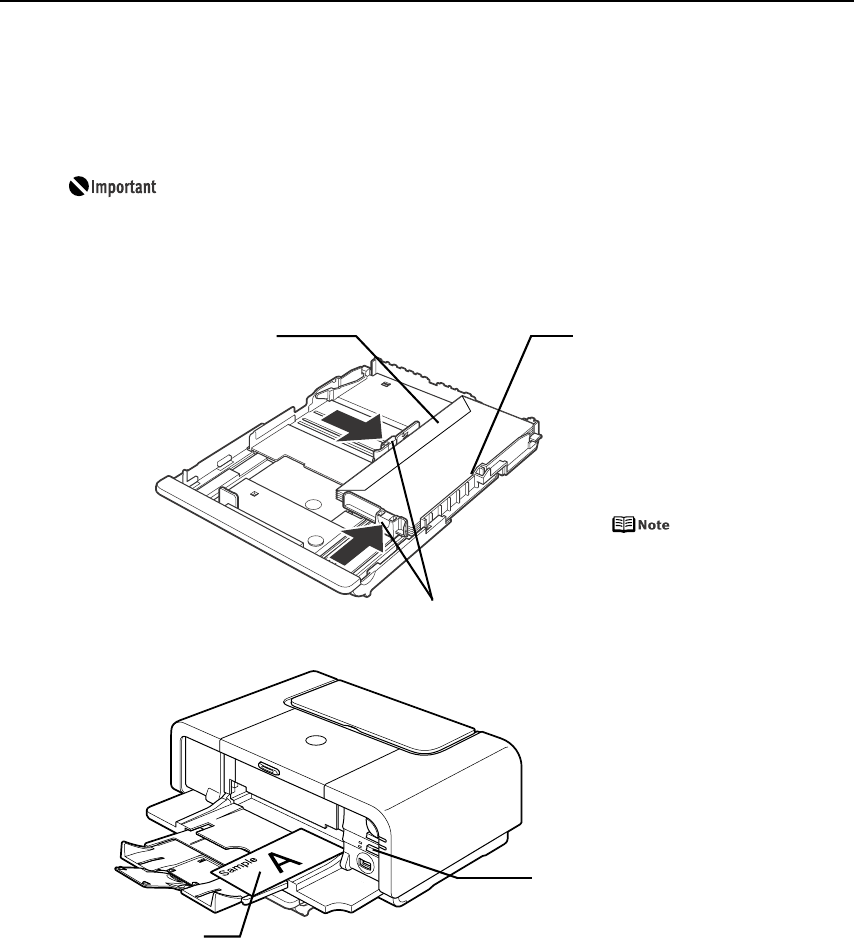
(1) Pull out the Cassette from
the printer.
(2) Remove the Cover on the
Cassette.
iP5200R_QSG_US.book Page 11 Friday, May 20, 2005 1:58 PM
Basic Printing
12
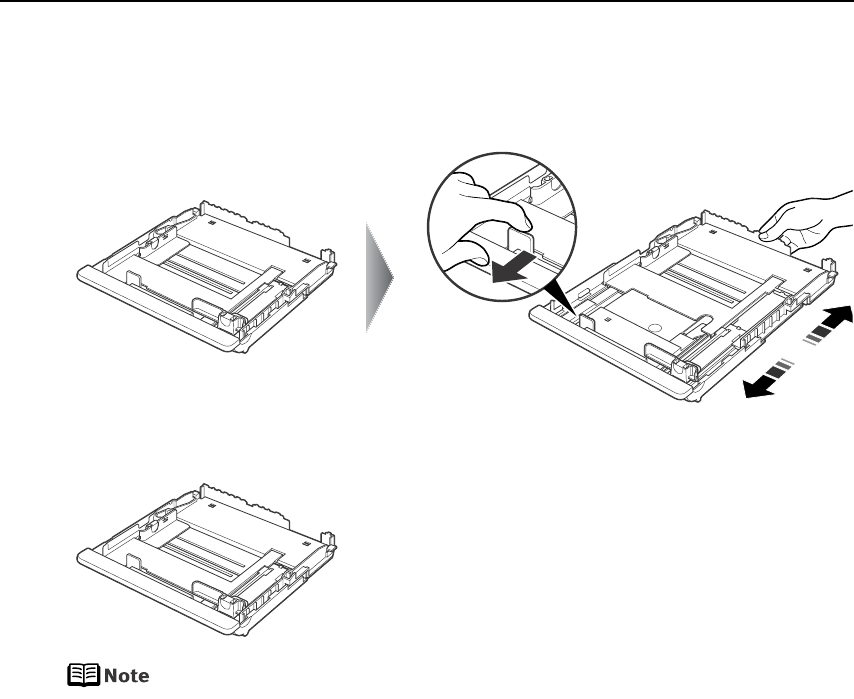
3Adjust the size of the Cassette.
When loading A5- or larger sized paper (nonstandard-size paper: 203 mm / 8 inches
or more in length), extend the Cassette.
When loading 5" x 7"- or smaller sized paper (nonstandard-size paper: less than 203
mm/ 8 inches in length), do not extend the Cassette.
Legal-sized paper and 2.13" x 3.39"/ 54.0 x 86.0 mm size paper, and
Photo Stickers are not loadable in the Cassette.
iP5200R_QSG_US.book Page 12 Friday, May 20, 2005 1:58 PM
Basic Printing
13
4Load the paper. (Print side facing DOWN)
zYou can use general copy paper or Canon’s Super White Paper.
zYou can load up to 150 sheets of plain paper (64 gsm or 17 lb, 13 mm
or 0.52 inches in height) in the Cassette. However, do not stack more
than 50 sheets in the Paper Output Tray.
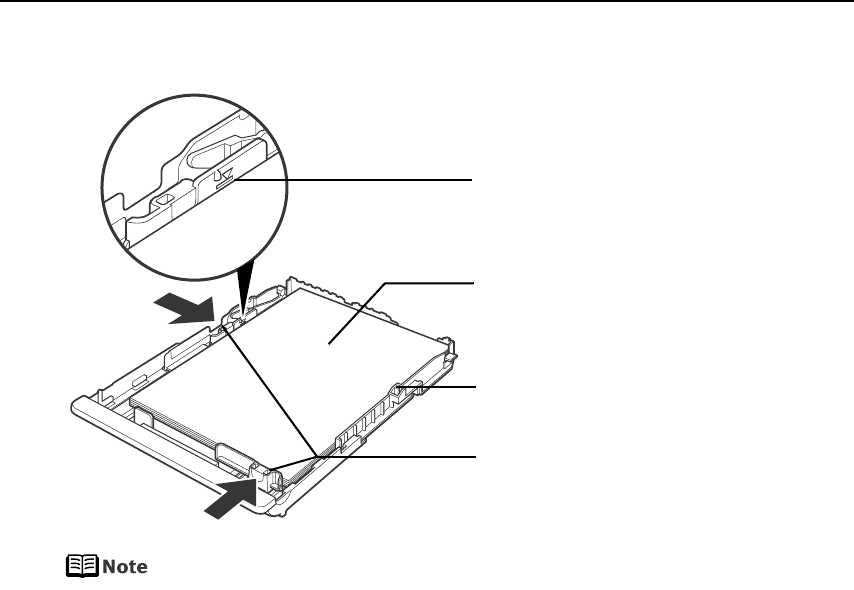
(2) Align the paper stack against the
right side of the Cassette.
(3) Slide the paper guides to fit the
loaded paper stack.
Load Limit Mark
Do not load beyond this Load Limit
Mark.
(1) Load the paper into the Cassette
with the print side facing DOWN.
iP5200R_QSG_US.book Page 13 Friday, May 20, 2005 1:58 PM
Basic Printing
14
5Insert the Cassette into the printer.
If the Cassette has been extended to accommodate paper sizes larger
than 5" x 7", the front edge of the cassette will extend beyond the front of
the printer.
6Prepare the Paper Output Tray.
zYou can also select the paper source with the printer driver. For details,
refer to the
Printer Driver Guide
.
zDo not touch the printed surfaces until the ink dries. For specific drying
times, refer to the instructions packaged with your media.
(1) Set the Cover on the
Cassette.
(2) Insert the Cassette into the
printer.
Push the Cassette all the way
into the printer.
(1) 1 Push the Open Button above the
Paper Output Tray. The Paper
Output Tray automatically
opens.
2 Pull out the Paper Output Tray
Extension completely.
Cassette
Lamp
(2) Press the Paper Feed Switch so
that the Cassette lamp lights.
1
2
iP5200R_QSG_US.book Page 14 Friday, May 20, 2005 1:58 PM
Basic Printing
15
Loading Envelopes
Use either European DL or US Comm. Env. #10 size envelopes.
The address is rotated automatically to match the direction of the envelope when
printing.
zDo not use envelopes with embossed or treated surfaces, a double
flap, pressure seals or sticker flaps.
zSelect either European DL Env. or US Comm. Env. #10 in the printer
driver according to the envelope size you are using. If you do not, the
address will be printed in the wrong direction.
(4) Select Envelope in Media Type, and then select European DL Env. or US Comm.
Env. #10 in Page Size.
For a detailed description of the printer driver settings, refer to “Printing with
Windows” on page 20, “Printing with Macintosh” on page 23.
Fold the envelope flap shut. (1) Align the envelope stack
against the right side of
the Cassette.
The flap of the envelope
will appear with its flap
facing UP on the left
side.
A maximum of 5
envelopes can be
loaded at once.
(2) Slide the Paper Guide against
the side of the envelope.
(3) Press the Paper Feed Switch
so that the Cassette lamp
lights.
Printing direction
iP5200R_QSG_US.book Page 15 Friday, May 20, 2005 1:58 PM
Basic Printing
16
Loading 4" x 6" or 5" x 7"-Sized Paper in the Cassette
zDo not leave photo paper, such as Photo Paper Pro, in the Cassette for
a long time. This may cause paper discoloration due to natural aging.
zCutting plain paper to 4" x 6" / 101.6 mm x 152.4 mm or 5" x 7" /
127.0 x 177.8 mm size for a trial printing can cause paper jams.
(1) Load the paper into the Cassette
with the print side facing DOWN.
• Do not extend the Cassette.
• Load the paper lengthways regardless of
the direction of the document.
• You can load up to 20 sheets of 4" x 6"-
sized paper or 10 sheets of 5" x 7"-sized
paper.
(3) Slide the paper guides to fit the
loaded paper stack.
(2) Align the paper stack against the
right side of the Cassette.
(4) Press the Paper Feed Switch so that
the Cassette lamp lights.
iP5200R_QSG_US.book Page 16 Friday, May 20, 2005 1:58 PM
Basic Printing
17
(5) Select 4 x 6 in 101.6 x 152.4 mm or 5 x 7 in 127.0 x 177.8 mm from Paper Size in
the printer driver.
For a detailed description of the printer driver settings, refer to “Printing with
Windows” on page 20, or “Printing with Macintosh” on page 23.
Always load paper in portrait orientation. Loading paper in
landscape orientation can cause the paper to be jammed.
We recommend using genuine Canon photo media when printing
photographs.
See “Using Specialty Media” on page 18.
Portrait Landscape
iP5200R_QSG_US.book Page 17 Friday, May 20, 2005 1:58 PM
Basic Printing
18
Using Specialty Media
Canon recommends that you use genuine Canon media to ensure optimal print quality.
Photo Quality Media
• High Resolution Paper
• Glossy Photo Paper
• Matte Photo Paper
• Photo Paper Plus Double Sided
• Photo Paper Plus Glossy
• Photo Paper Plus Semi-gloss
• Photo Paper Pro
•Photo Stickers
Media Suited for Business
Documents
•High Resolution Paper
•Transparencies
iP5200R_QSG_US.book Page 18 Friday, May 20, 2005 1:58 PM
Basic Printing
19
Canon Specialty Media
Media Type Paper Support Load Limit Printer Driver Setting
for Media Type
Auto Sheet Feeder Cassette
High Resolution
Paper
Up to 80 sheets Up to 80 sheets High Resolution
Paper
Super White Paper Up to 13 mm or
0.52 inches
Up to 13 mm or
0.52 inches
Plain Paper
Glossy Photo Paper Letter: up to 10
sheets
4" x 6": up to 20
sheets
2.13" x 3.39": up to
20 sheets
Letter: up to 10
sheets
4" x 6": up to 20
sheets
2.13" x 3.39": not
loadable*3
Glossy Photo Paper
Matte Photo Paper Letter: up to 10
sheets
4"x 6": up to 20
sheets
Letter: up to 10
sheets
4"x 6": up to 20
sheets
Matte Photo Paper
Photo Paper Plus
Double Sided*1 Letter: up to 10
sheets
5" x 7": up to 10
sheets
Letter: up to 10
sheets
5" x 7": up to 10
sheets
Photo Paper Plus
Double Sided
Photo Paper Plus
Glossy*1 Letter: up to 10
sheets
5" x 7": up to 10
sheets
4" x 6": up to 20
sheets
Letter: up to 10
sheets
5" x 7": up to 10
sheets
4" x 6": up to 20
sheets
Photo Paper Plus
Glossy
Photo Paper Plus
Semi-gloss*1 Letter: up to 10
sheets
4" x 6": up to 20
sheets
Letter: up to 10
sheets
4" x 6": up to 20
sheets
Photo Paper Plus
Glossy
Photo Paper Pro*1 Letter: up to 10
sheets
4" x 6": up to 20
sheets
Letter: up to 10
sheets
4" x 6": up to 20
sheets
Photo Paper Pro
Photo Stickers*2 1 sheet Not loadable*3 Photo Paper Plus
Glossy
Transparencies Up to 30 sheets Up to 30 sheets Transparencies
T-Shirt Transfers 1 sheet 1 sheet T-Shirt Transfers
iP5200R_QSG_US.book Page 19 Friday, May 20, 2005 1:58 PM
Basic Printing
20
*1 When loading a stack of paper, the printed side may be marked when it is fed in. If this happens, load paper one
sheet at a time.
*2 You can specify the print setting easily by using the Easy-PhotoPrint provided with the
Setup Software & User’s
Guide CD-ROM
.
*3 Feeding from the Cassette can damage the printer. Always load in the Auto Sheet Feeder.
zWhen using plain paper (64 gsm or 17 lb), up to 150 sheets (13 mm or
0.52 inches in height) can be loaded in the Auto Sheet Feeder and
Cassette respectively. Select Plain Paper from Media Type in the printer
driver.
zFor a detailed description of printing media types, refer to the
User’s
Guide.
Printing with Windows
zMenu and command names may differ between software applications, and
more steps may be required. For details, refer to the documentation for each
software application you use.
zThe steps described in this section are for printing in Windows® XP Service
Pack 2 (hereafter, called Windows XP SP2).
1Turn on the printer.
See “Turning on the Printer” on page 2.
2Load the paper in the printer.
See “Loading Paper” on page 4.
3Ensure that the proper paper source is selected.
4Create a document or open a file to print.
When the Cassette lamp is lit, paper
is fed from the Cassette.
When the Auto Sheet Feeder lamp is
lit, paper is fed from the Auto Sheet
Feeder.
iP5200R_QSG_US.book Page 20 Friday, May 20, 2005 1:58 PM
Basic Printing
21
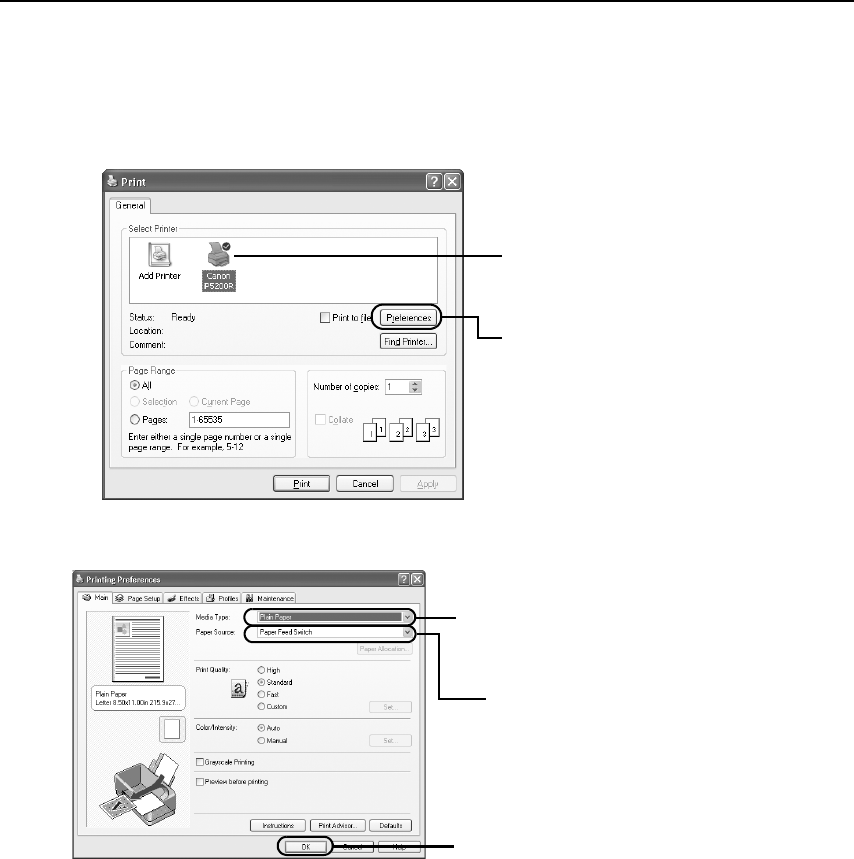
5Open the printer properties dialog box.
(1) Select Print from the application software’s File menu.
The Print dialog box opens.
6Specify the required settings.
(2) Ensure that your printer
is selected.
(3) Click Preferences or
Properties.
(1) Click Media Type to select
the type of media loaded in
the printer.
(2) Click OK.
Ensure that Paper Feed
Switch is selected from
Paper Source.
iP5200R_QSG_US.book Page 21 Friday, May 20, 2005 1:58 PM

Basic Printing
22
zFrom the Page Setup tab, select the correct document size to be
printed.
zThis section describes the procedure for selecting the paper source
with the Paper Feed Switch on the printer. For a detailed description of
the Paper Source settings, refer to the
Printer Driver Guide
.
zTo adjust the Print Quality settings, select Custom and click Set on the
Main tab. You can control the print quality in the Set Print Quality
dialog box.
zFor details about other printer driver functions, click Help or
Instructions to view the Help or
Printer Driver Guide
. Instructions is
only displayed when the On-screen Manual is installed.
zSelecting the Preview before printing check box displays a preview
screen that allows you to confirm the selected printing effects and how
your document will look when printed. Some applications do not have
a preview function.
7Print the document.
You can cancel a print job in progress by simply pressing the RESUME/
CANCEL button on the printer.
See “Canceling Printing” on page 26.
(1) Click Print or OK.
iP5200R_QSG_US.book Page 22 Friday, May 20, 2005 1:58 PM
Basic Printing
23
Printing with Macintosh
zMenu and command names may differ between software applications, and
more steps may be required. For details, refer to the documentation for each
software application you use.
zThe steps described in this section are for printing in Mac® OS X v.10.3.x
(hereafter called Macintosh®).
1Turn on the printer.
See “Turning on the Printer” on page 2.
2Load the paper on the printer.
See “Loading Paper” on page 4.
3Ensure that the proper paper source is selected.
4Create a document or open a file to print.
When the Cassette lamp is lit, paper
is fed from the Cassette.
When the Auto Sheet Feeder lamp is
lit, paper is fed from the Auto Sheet
Feeder.
iP5200R_QSG_US.book Page 23 Friday, May 20, 2005 1:58 PM

Basic Printing
24
5Select Paper Size.
(1) Select Page Setup from the application software’s File menu.
The Page Setup dialog box opens.
6Specify the required settings.
(1) Select Print from the application software’s File menu.
The Print dialog box opens.
(3) Select the desired
paper size from Paper
Size.
(4) Click OK.
(2) Confirm that iP5200R is
selected in Format for.
(2) Select Quality &
Media from the pop-
up menu.
(3) Select the desired
media type from
Media Type.
(5) Select the print mode
appropriate to your
document from Print
Mode.
(4) Ensure that Paper
Feed Switch is
selected from Paper
Source.
iP5200R_QSG_US.book Page 24 Friday, May 20, 2005 1:58 PM
Basic Printing
25
zThis section describes the procedure for selecting the paper
source with the Paper Feed Switch on the printer. For a detailed
description of the Paper Source settings, refer to the
Printer
Driver Guide
.
zWhen you select the print mode appropriate to your document
from Print Mode, the document will be printed in color and at a
print quality suited to the characteristics of the Media Type you
have selected.
-Printing a top-quality photo: Select when printing documents
consisting mainly of photographs and graphics featuring fine
color gradation.
-Printing tables and charts: Select when printing documents
consisting mainly of graphs and graphics (illustrations) with
strong color definition.
-Printing a composite document: Select when printing
documents consisting mainly of text.
-Detailed Setting: Select to fine-tune the Print Quality and
Halftoning settings.
zFor details about other printer driver functions, click to view
the
Printer Driver Guide
. If the On-screen Manual is not installed,
the
Printer Driver Guide
is not displayed even if is clicked.
zClicking the Preview button displays a preview screen that allows
you to confirm the selected printing effects and how your
document will look when printed. Some applications do not have
a preview function.
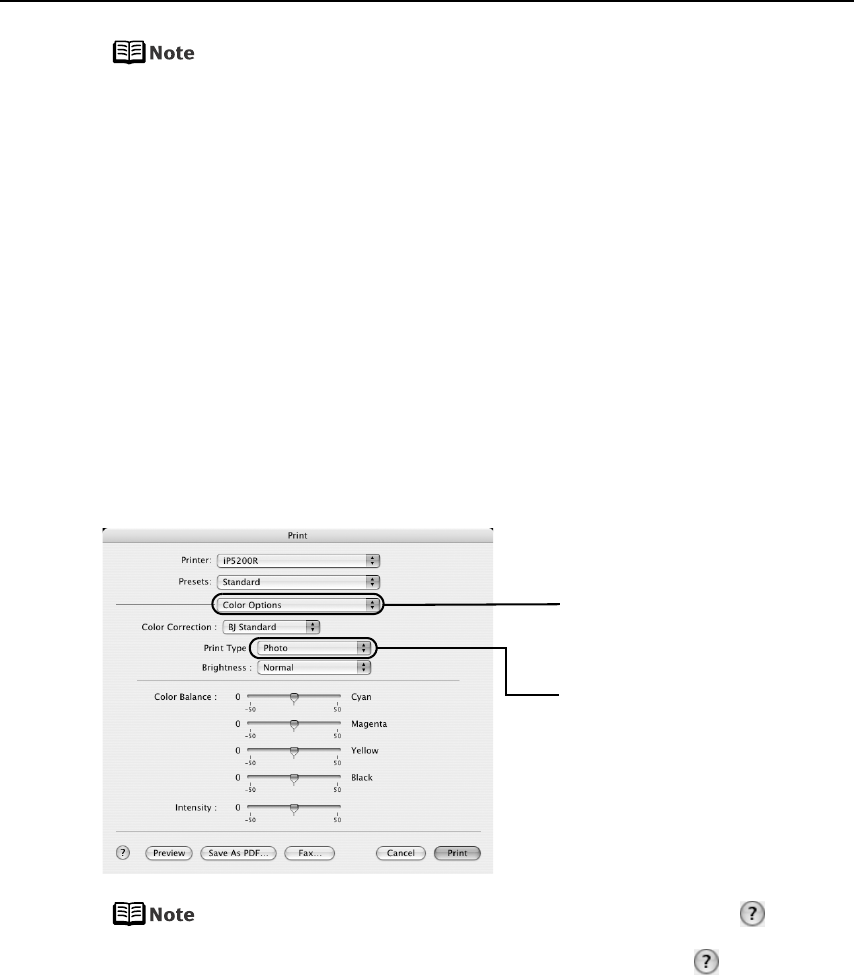
(6) Select Color Options
from the pop-up menu.
(7) Select the type of the
document from Print
Type.
iP5200R_QSG_US.book Page 25 Friday, May 20, 2005 1:58 PM
Basic Printing
26
7Print the document.
(1) Click Print.
You can cancel a print job while printing.
See “Canceling Printing” on page 26.
Canceling Printing
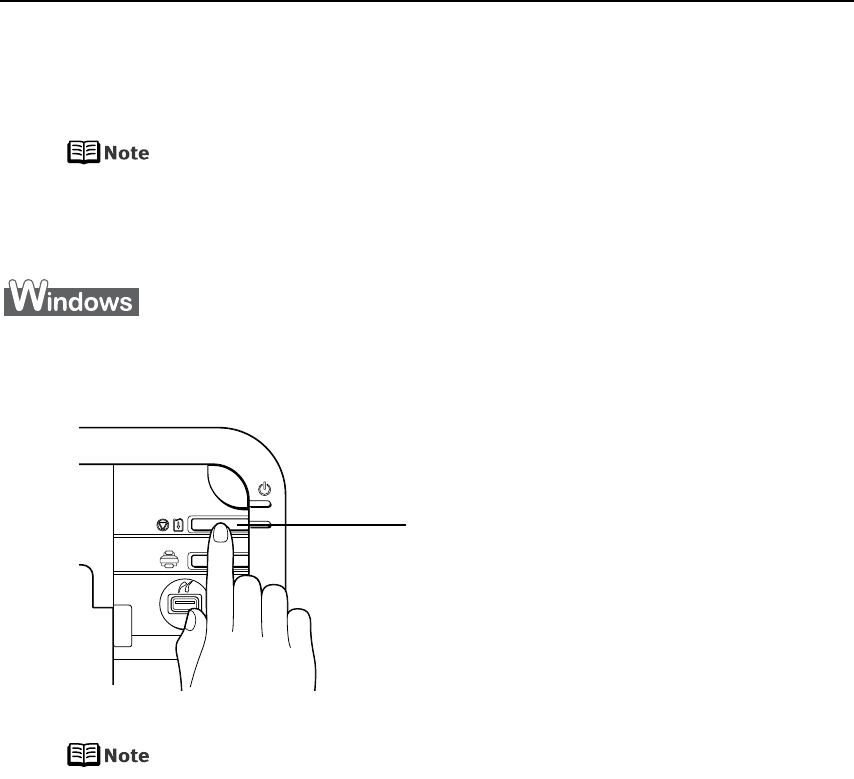
You can cancel a print job while printing, with the RESUME/CANCEL button on the printer.
1Press the RESUME/CANCEL button while printing.
Printing is canceled and paper is fed out.
You can also cancel a print job by clicking Cancel Printing on the Canon IJ
Status Monitor. To display the Canon IJ Status Monitor, click Canon
iP5200R on the taskbar.
(1) Press the RESUME/CANCEL
button.
iP5200R_QSG_US.book Page 26 Friday, May 20, 2005 1:58 PM

Basic Printing
27
1Select Print from the File menu in your application program.
The Print dialog box opens.
2Select Edit Printer List from the Printer pop-up menu.
The Printer List opens.
3Double-click the printer name displayed in the Name list.
The iP5200R dialog box opens.
4Select the desired document, then click Delete icon.
To temporality stop a job in progress, click Pause. To cancel all the jobs in
the list, click Stop Printing.
iP5200R_QSG_US.book Page 27 Friday, May 20, 2005 1:58 PM
Advanced Printing
28
Advanced Printing
Printing Photographs Directly from a PictBridge
Compliant Device
Connecting a PictBridge compliant device such as a digital camera, camcorder or mobile
phone to the printer allows you to print recorded images directly without using a computer.
zPictBridge is an industry standard enabling a range of digital photo
solutions, including the direct printing of photos from a digital camera,
camcorder or mobile phone* without the need to use a computer.
zIt is possible to specify which images to print and various print settings from
the operation panel of your camera or mobile phone.
zCanon Bubble Jet Direct allows you to print photos from a Canon Bubble Jet
Direct compatible (PictBridge incompatible) digital camera or digital video
camcorder without a computer, by simply connecting the digital camera or
digital camcorder to this printer.
For details, refer to “Printing Photographs Directly from a Canon Bubble Jet
Direct Compatible Digital Camera” on page 85.
* Hereafter, the PictBridge compliant digital camera, digital camcorder, or camera-equipped mobile
phone are collectively called a PictBridge compliant device.
See “Printing Photographs
Directly from a Canon
Bubble Jet Direct
Compatible Digital
Camera” on page 85.
See “Printing Photographs
Directly from a PictBridge
Compliant Device” on
page 31.
*This mark indicates that
the product is PictBridge-
compatible.
iP5200R_QSG_US.book Page 28 Friday, May 20, 2005 1:58 PM

Advanced Printing
29
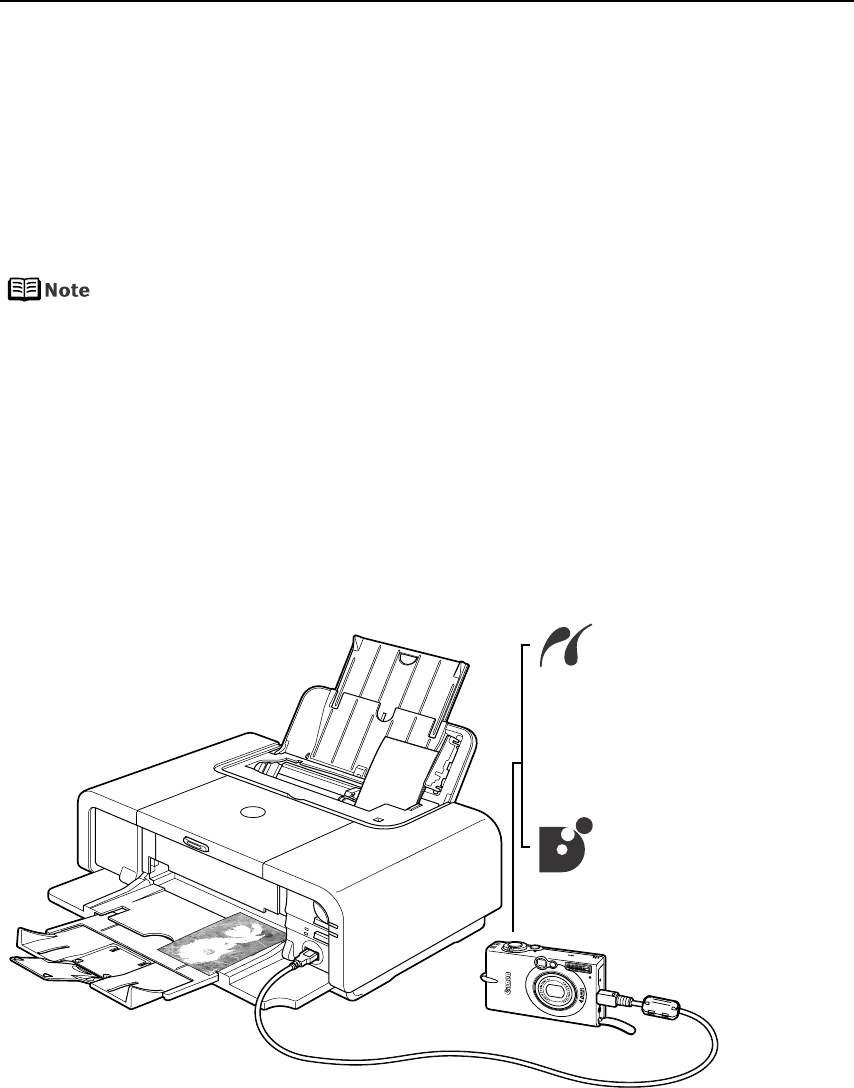
Connecting to a PictBridge Compliant Device
To connect a PictBridge compliant device to this printer, use the USB cable supplied
with the device.
Do not connect any equipment other than PictBridge compliant devices or
Canon Bubble Jet Direct compatible digital camera to the Direct Print Port
of the printer. If you do so, electric shock, fire, or damage to the device
could result.
zWhen printing photos with the digital device connected to the printer,
it is advisable to use the AC adapter supplied with the device. If you
use the device battery, be sure to charge it fully.
zThe Print Head cannot be aligned using the controls of the digital
device. The print head alignment can be performed simply by pressing
the RESUME/CANCEL button on the printer, or by connecting the
printer to the computer and then executing automatic print head
alignment. Refer to “Aligning the Print Head” on page 60.
1Set up the printer.
2Turn on the printer.
See “Turning on the Printer” on page 2.
3Load the paper in the printer.
See “Loading Paper” on page 4.
iP5200R_QSG_US.book Page 29 Friday, May 20, 2005 1:58 PM
Advanced Printing
30
4Connect the PictBridge compliant device to the printer.
Depending on the model or brand of your device, you may have to select a
print mode compliant with PictBridge before connecting the device.
You may also have to turn on the device or select Play mode manually
after connecting the device to the printer.
Perform necessary operations according to the instruction manual
supplied with your device.
(1) Make sure the device is turned off.
(2) Connect the device to the printer using the USB cable.
The device turns on automatically, when connected to the printer.
For a device not turns on automatically, turn it on manually.
iP5200R_QSG_US.book Page 30 Friday, May 20, 2005 1:58 PM

Advanced Printing
31
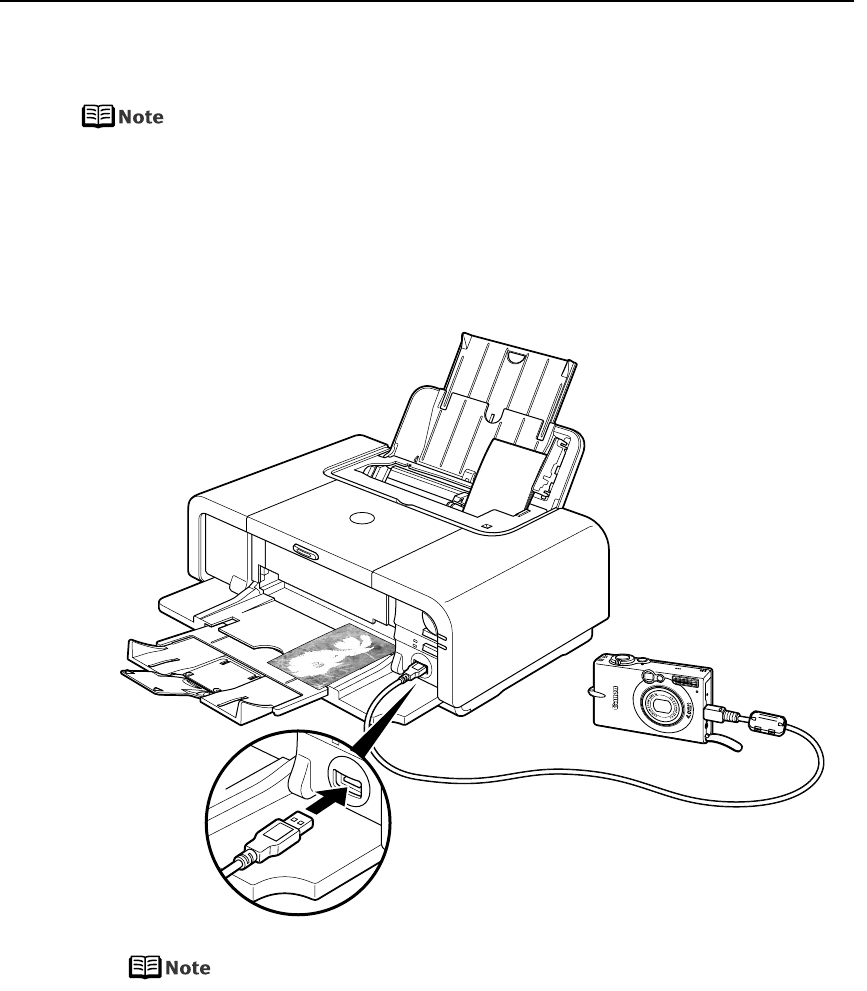
(3) Turn on and set up the device for direct printing.
When the connection between the device and printer has been established, the
POWER lamp on the printer flashes twice.
* The power-on sequence may differ depending on the model or brand of the device.
Either of the following icons will display on the LCD display of the device when
the printer is correctly connected.
A PictBridge-compliant device.
A Canon Bubble Jet Direct compatible digital camera.
Printing Photographs Directly from a PictBridge Compliant Device
When operating the device, be sure to follow the instructions given in the instruction
manual supplied with the device. Let’s take a look at the paper size, paper type, layout,
image optimization modes, and date/file number printing modes that can be set on a
PictBridge compliant device connected to the printer.
Checking or Changing PictBridge Print Settings From Your Camera
To change the PictBridge print settings, operate your device to select the PictBridge
print setup mode and confirm or change the settings.
When a PictBridge-compatible device is connected and printing is started with no
printing option selected, this printer operates based on the following default settings:
• Paper size ...............4" x 6"
• Paper type ..............Photo (Photo Paper Plus Glossy)
• Layout ....................Borderless
• Trimming ................Off (No trimming)
• Image optimize .......ExifPrint
• Date/File No. print...Off (No printing)
Additional settings
The settings explained below cannot be made depending on the brand or model of
your device. If any setting cannot be made, the default setting explained above is
used.
Names of settings that are displayed on Canon PictBridge compliant device are used
in the description given below. Different names may be displayed on your device
depending on the brand or model.
For details, refer to your device’s instruction manual.
iP5200R_QSG_US.book Page 31 Friday, May 20, 2005 1:58 PM

Advanced Printing
32
About the Image Data Format for Printing
This printer accepts images* taken with a camera compatible with the Design rule for
Camera File System and PNG files.
*Exif2.21 compliant
About “Paper size” and “Paper type”
By default, 4" x 6" is selected from Paper size and Photo (Photo Paper Plus Glossy) is
selected from Paper type for this printer. To use Photo Paper Pro, select Fast Photo from
Paper type.
The following sizes and types of paper can be loaded in the printer by selecting options
from Paper size and Paper type.
*1 This paper is exclusively used to print photo stickers. When printing on sticker paper, select 4" x 6" in Paper size.
*2 This size can be selected only for Canon PictBridge compliant devices (note that it cannot be selected for some
models).
*3 When A4 or 8.5" x 11" (Letter) is selected in Paper size, you can select Plain Paper in Paper type. When Plain Paper is
selected in Paper type, bordered printing will be performed even if you select Borderless in Layout.
*4 When A4 or 8.5" x 11" (Letter) is selected in Paper size, you can print in 4-up layout.
“Paper size” setting “Paper type” setting Paper loaded in printer
10 x 15 cm/4" x 6"
(Default)
Photo (Default) Photo Paper Plus Glossy
Photo Photo Paper Plus Semi-gloss
Photo Glossy Photo Paper
Photo Photo Stickers*1
Fast Photo Photo Paper Pro
13 x 18 cm/5" x 7"*2 Photo Photo Paper Plus Glossy
5.4 x 8.6 cm/Credit Card Photo Glossy Photo Paper
A4/8.5" x 11" (Letter)*3*4 Photo Photo Paper Plus Glossy
Photo Photo Paper Plus Semi-gloss
Photo Glossy Photo Paper
Fast Photo Photo Paper Pro
iP5200R_QSG_US.book Page 32 Friday, May 20, 2005 1:58 PM

Advanced Printing
33
About “Layout” and “Trimming”
By default, Borderless is selected for Layout and Off (No trimming) is selected for
Trimming for this printer.
When printing onto Photo Stickers (16-up), use the following settings.
1. Select the Auto Sheet Feeder as the paper source. See “Loading Plain
Paper in the Auto Sheet Feeder” on page 7.
Always load Photo Stickers in the Auto Sheet Feeder.
2. Select 10 x 15 cm / 4" x 6" for the Paper size, and Photo for the Paper
type.
3. Select N-up for Layout, then select 16.
Some PictBridge compliant devices display the Layout option; 2-up, 4-
up, 9-up, and 16-up. In this case always select 16-up.
If there are no options on the PictBridge compliant device that
correspond to 2-up, 4-up, 9-up, or 16-up, printing on stickers is not
possible.
About “Image optimize”
By default, ExifPrint is selected for this printer.
If you use a Canon PictBridge-compatible device, you can select VIVID, NR, VIVID+NR,
or Face. (Note that these options cannot be selected for some models.)
zWhen VIVID is selected, green and blue portions of photos are printed
vividly.
zWhen NR (Noise Reduction) is selected, noise in blue portions, such as
the sky, and dark portions is removed.
zWhen VIVID+NR is selected, functions of both VIVID and NR are
performed.
zWhen Face is selected, backlit images are corrected.
About “Date/File No. print”
By default, Off is selected for this printer.
If you select an image which has had the shooting date embedded in it using a camera
with the print mode, select Off for this function. If you select Date, File No., or Both, the
date and/or file number will be printed over the embedded date.
iP5200R_QSG_US.book Page 33 Friday, May 20, 2005 1:58 PM

Advanced Printing
34
Other Settings
If you use a Canon PictBridge-compliant device, you can use the following print
settings. (Note that these print settings cannot be used for some models.) For details,
refer to your device’s instruction manual.
• Shooting Info (Exif Data)
You can print shooting info (Exif data) on photos in list format, or in the margins of
specified photos.
Select Layout, then select the item displayed with the [i] icon.
• 35 mm Film Style Layout (Contact Printing Layout)
You can print selected photos or index-specified photos as 35 mm film style layout
(contact printing layout).
Select Layout then select the item displayed with the film icon.
zNever disconnect the USB cable during printing.
zWhen disconnecting the USB cable between the device and printer,
follow the instructions given in the instruction manual of the device.
zControls of the device cannot be used for the following functions:
- Print quality setting
-Printer maintenance
zFor the device operation method and troubleshooting, refer to your
device manual. For print error messages, see “Cannot Print Properly
from the Digital Camera” on page 82.
Checking or Changing PictBridge Print Settings From the Printer
You can change the printer’s default PictBridge print settings, such as paper size and
type. To do this, install the Canon Setup Utility from the included CD-ROM and connect
the printer to a computer. For details, refer to the
User’s Guide
.
iP5200R_QSG_US.book Page 34 Friday, May 20, 2005 1:58 PM

Advanced Printing
35
Accessing the Printer Driver (Windows)
The printer properties dialog box can be opened from either within an application, or
directly from the Windows Start menu.
This manual refers to Windows XP SP2 operation.
The operations may vary depending on the version of your Windows operating
system.
Opening the Printer Properties Dialog Box from Your Application
Program
Depending on your application program, the command and menu names
may differ, and there may be more steps involved in opening the printer
properties dialog box. For more details, see the user’s manual for your
application.
1In your application, select the command to print a document.
The Print dialog box can usually be opened by selecting Print from the File menu.
2Ensure that the name of your printer is selected. Then click Preferences (or
Properties).
The printer properties dialog box opens.
Opening the Printer Properties Dialog Box Directly from the Start
Menu
This method is used for printer maintenance and configuring shared print settings for
all application programs.
1Click Start and select Control Panel, Printers and Other Hardware, and then
Printers and Faxes.
For non-Windows XP, click Start, select Settings, and then Printers.
2Select the icon of your printer.
iP5200R_QSG_US.book Page 35 Friday, May 20, 2005 1:58 PM

Advanced Printing
36
3Open the File menu and select Printing Preferences (or Properties).
The printer properties dialog box opens.
When opening the printer properties dialog box from Properties, the tabs related to
the Windows function (e.g., the Ports tab, or the Details tab) are displayed. These
tabs are not displayed, when the printer properties dialog box is opened from
Printing Preferences or applications. For details about these tabs, refer to the
Windows documentation.
For details on how to set each function, refer to the Help or
Printer Driver
Guide
.
Using the Bundled Software
The
Setup Software & User’s Guide CD-ROM
includes photo applications designed to edit
the photographs taken by a digital camera and print them as photo-lab quality prints
without standard white borders. Please use the application(s) suitable for your print
purposes.
zTo install applications, refer to the
Setup Guide
.
zFor details about using the photo applications, refer to the
Photo Application
Guide
.
Easy-PhotoPrint (Windows/Macintosh)
You can make a Borderless Print easily and quickly, just by selecting a photograph
taken with a digital camera and the paper type on which to print. Also it has tools to
correct red eye caused by the camera’s flash or smooth and beautify the facial skin. It
is compatible with ExifPrint*.
PhotoRecord (Windows)
You can create fun and unique photo albums with the decorative themes such as frame,
background, and clip-art. You can also copy or move the decorated photos.
It is compatible with ExifPrint*.
Easy-WebPrint (Windows)
You can easily print out homepages displayed on Internet Explorer® in full size without
its right-hand side being cropped. This application is automatically added to the
Internet Explorer toolbar. Internet Explorer 5.5 or later must be installed.
* ExifPrint is the worldwide standard. Under ExifPrint, the digital camera can record data tags for specific camera
settings and functions such as whether the flash was on or off, if the camera was in portrait or night scene mode, etc.
Canon PIXMA Printers support ExifPrint and use a suitable photo application to read the camera data precisely,
producing optimal prints. This enables you to create prints that reproduce color more accurately.
iP5200R_QSG_US.book Page 36 Friday, May 20, 2005 1:58 PM
Printing Maintenance
37
Printing Maintenance
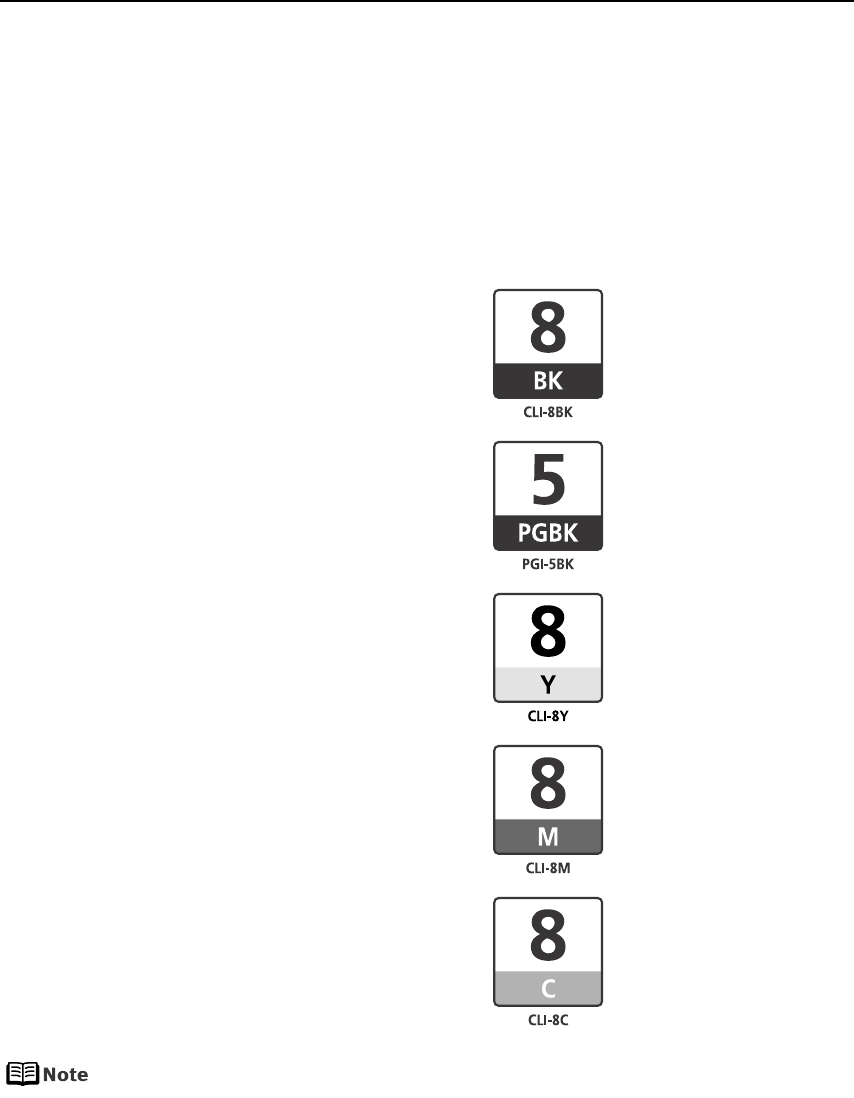
Replacing an Ink Tank
Replace ink tank(s) if they are out of ink. When replacing them, check the model numbers
and their installation positions.
With this printer, the ink tanks must be installed in the order (from left to right) indicated
below:
Should missing characters or white streaks appear despite sufficient ink levels,
refer to “When Printing Becomes Faint or Colors are Incorrect” on page 46.
zBlack: CLI-8BK
zBlack: PGI-5BK
zYellow: CLI-8Y
zMagenta: CLI-8M
zCyan: CLI-8C
iP5200R_QSG_US.book Page 37 Friday, May 20, 2005 1:58 PM
Printing Maintenance
38
Getting the Ink Level Information
Ink Level Indication on the Printer
You can confirm the ink level in each ink tank through the ink tank lamps. Open the Top
Cover of the printer to see how the ink tank lamps light or flash.
Ink is low: The ink tank lamp flashes slowly (at about three second interval). Prepare
a new ink tank.
Ink is out: The ink tank lamp flashes quickly (at about one second interval), and the
ALARM lamp on the printer flashes orange four times. Replace the ink
tank with a new one.
*When the ALARM lamp on the printer flashes orange seven or thirteen times, an error has occurred and therefore the
printer is unable to print. For details, refer to “Handling Error Messages” on page 77.
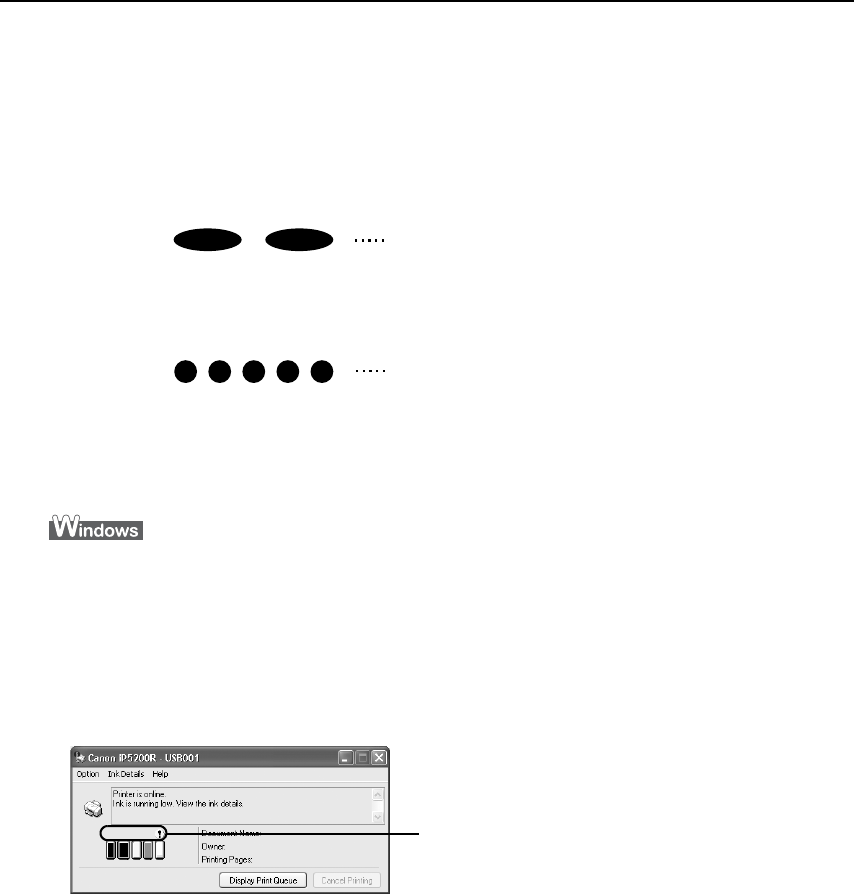
Ink Level Indication on the PC
Open the Canon IJ Status Monitor to check the ink level information.
1. Open the printer properties dialog box.
See “Accessing the Printer Driver (Windows)” on page 35.
2. Click View Printer Status on the Maintenance tab.
The following message will be displayed.
*You can also display the Canon IJ Status Monitor by clicking the Canon IJ Status Monitor button which appears on
the taskbar during printing.
Ink is low: The [!] symbol appears above an ink tank that is low.
Ink is out: The [x] symbol appears above an empty ink tank. Click Ink Details to
show the ink tank information, then replace the ink tank with a new one.
Repeats
Repeats
Confirm whether any symbols are
displayed here.
iP5200R_QSG_US.book Page 38 Friday, May 20, 2005 1:58 PM
Printing Maintenance
39
Open the Canon IJ Printer Utility to check the ink level information.
1. Select Applications from the Go menu, and then double-click the Utilities folder.
2. Double-click the Printer Setup Utility icon.
When using Mac OS X v.10.2, double-click the Print Center icon.
3. Select the name of your printer from the Name list and click Utility.
When using Mac OS X v.10.2, select the name of your printer from the Name list and
click Configure.
4. Select the name of your printer from the Product list and click Maintenance.
The Canon IJ Printer Utility launches.
5. Select Ink Level Information from the pop-up menu.
The following dialog box is displayed.
Ink is low: The [!] symbol appears above an ink tank that is low.
Ink is out: The [x] symbol appears above an empty ink tank. Click About ink to
show the ink tank information, then replace the ink tank with a new one.
Confirm whether any symbols are
displayed here.
iP5200R_QSG_US.book Page 39 Friday, May 20, 2005 1:58 PM
Printing Maintenance
40
Knowing When to Replace Ink Tanks
The ALARM lamp flashes orange four times once any one of the ink tanks is out of ink. If
ink is out during printing, a message will be displayed on your PC. Check to see which
ink tank is out of ink, and replace it with a new one. Close the Top Cover after ink tank
replacement to resume printing.
zIf printing has not finished, you can continue printing for a while by pressing the
RESUME/CANCEL button on the printer with the empty ink tank installed. However, you
will need to replace it with a new one as soon as printing finishes. If you continue
printing with an empty ink tank, it may damage the printer.
* Printing does not resume if any of the ink tanks are removed. Be sure to press the RESUME/CANCEL button with the
ink tanks installed.
* Continuing to print in the out of ink state will cause the remaining ink level to be displayed incorrectly in the Canon IJ
Status Monitor.
zClick Cancel Printing to cancel printing. Replace the ink tank with a new one.
Ink tank with no ink
iP5200R_QSG_US.book Page 40 Friday, May 20, 2005 1:58 PM

Printing Maintenance
41
zIf printing has not finished, you can continue printing for a while by pressing the
RESUME/CANCEL button on the printer with the empty ink tank installed. However, you
will need to replace it with a new one as soon as printing finishes. If you continue
printing with an empty ink tank, it may damage the printer.
* Printing does not resume if any of the ink tanks are removed. Be sure to press the RESUME/CANCEL button with the
ink tanks installed.
* Continuing to print in the out of ink state will cause the remaining ink level to be displayed incorrectly in the Canon IJ
Printer Utility.
zClick Delete Job to cancel the current printing job. Click Stop Job to stop the current
printing job. Click Stop All Jobs to stop all printing jobs. Replace the ink tank with a new
one.
iP5200R_QSG_US.book Page 41 Friday, May 20, 2005 1:58 PM
Printing Maintenance
42
Replacing Ink Tanks
When an ink tank runs out of ink, replace it using the following steps.
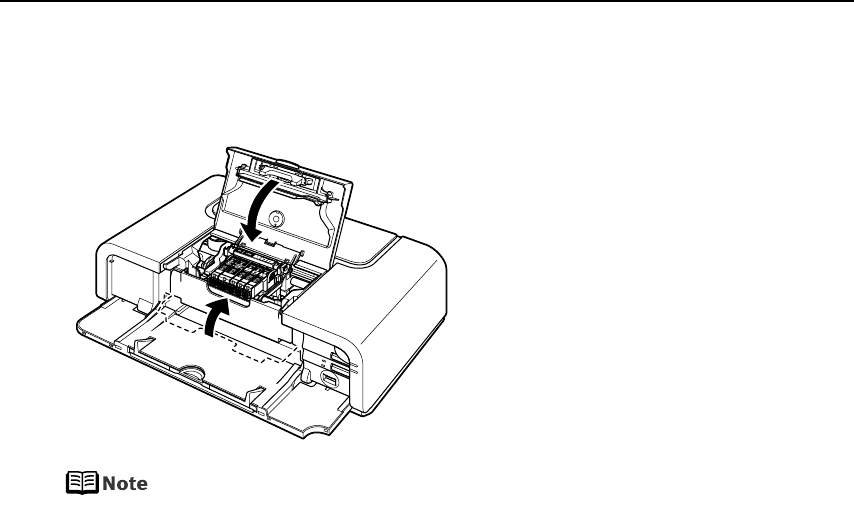
1Ensure that the printer is on, and then open the Paper Output Tray.
Push the Open Button above the Paper Output Tray. The Paper Output Tray
automatically opens.
2Open the Top Cover.
The Print Head Holder moves to the center.
If the Top Cover is left open for more than 10 minutes, the Print Head
Holder moves to the right. Close and reopen the Top Cover to return the
holder to the center.
3Remove the ink tank whose lamp is flashing fast.
zHandle ink tanks carefully to avoid staining clothing or the surrounding
area.
zDiscard empty ink tanks according to the local laws and regulations
regarding disposal of consumables.
Be sure to replace ink tanks one by one when replacing more than one ink
tank.
Do not touch the lock lever;
remove only the ink tank.
Push the tab and remove
the ink tank.
iP5200R_QSG_US.book Page 42 Friday, May 20, 2005 1:58 PM
Printing Maintenance
43
4Prepare a replacement tank.
(1) Unpack the new ink tank and completely pull off the orange tape. Then, remove
the film completely.
(2) Remove the orange protective cap from the bottom of the ink tank and discard it.
zBe sure to remove the clear film from the ink tank in the exact
order shown in step 4-(1), as failure to follow this step may cause
the ink to leak and stain your clothes and hands.
zDo not touch the electrical contacts on the ink tank. Doing so can
cause the printer to malfunction or become unable to print.
zDo not squeeze the side of ink tanks as this may cause the ink to
leak out and stain your clothes and hands.
zDo not re-attach the protective cap once you have removed it.
zDo not touch the open ink port once the protective cap is
removed, as this may prevent the ink from being ejected
properly.
zInk on the removed protective cap may stain your clothes and
hands.
zEnsure that all the orange tape has been peeled off along the
perforation. If there remains a part of the orange tape, ink may
not be ejected correctly.
Do not
touch the
electrical
contacts.
iP5200R_QSG_US.book Page 43 Friday, May 20, 2005 1:58 PM
Printing Maintenance
44
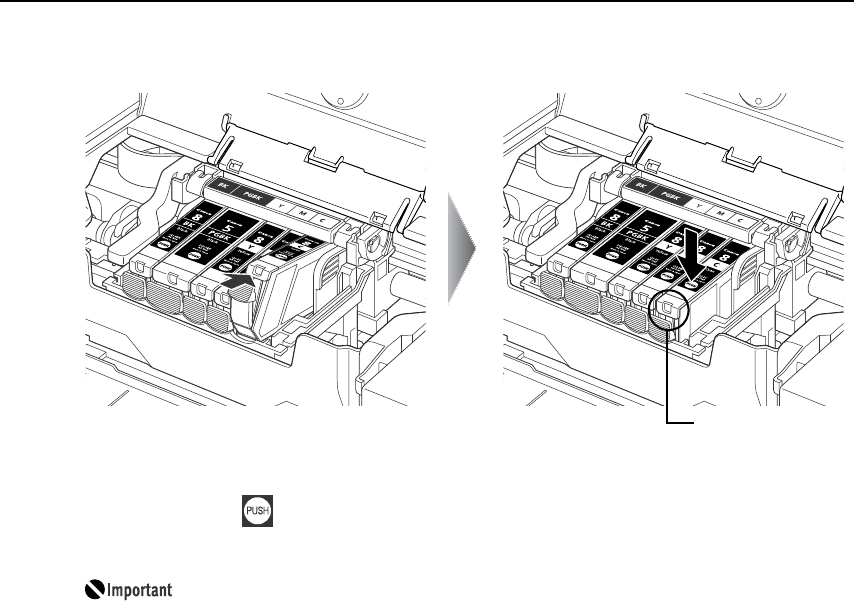
5Insert the ink tank.
(1) Insert the ink tank into the Print Head.
(2) Press on the mark on the ink tank until the ink tank snaps firmly into place.
(3) Ensure that the ink tank lamp lights red.
Ensure that all the ink tanks are installed in the order directed by the
label. The printer cannot be used unless all the ink tanks are installed.
Lamp lights red
iP5200R_QSG_US.book Page 44 Friday, May 20, 2005 1:58 PM
Printing Maintenance
45
6Close the Inner Cover and the Top Cover.
The Print Head Holder moves to the right. The ink tank installation process is now
complete.
zEnsure that the Inner Cover is closed. Printing will not occur if the Inner
Cover is open.
zThe ALARM lamp still flashes orange after the Top Cover is closed if an
ink tank is not installed properly. Open the Top Cover and make sure
that all the ink tanks are installed in the correct order directed on the
label.
zTo maintain optimal print quality, use an ink tank within six months of
its first use.
zOnce an ink tank has been used, do not remove it from the printer and
leave it out in the open. This will cause the ink tank to dry out and the
printer may not operate properly if it is reinstalled.
zColor ink consumption may occur even when black-and-white or
grayscale printing is specified.
Color ink is consumed in the head cleaning and deep cleaning, which
are necessary to maintain the printer’s capabilities.
zWhen you start printing after replacing the ink tank, the printer
executes Print Head Cleaning automatically. Do not perform any other
operations until the Print Head Cleaning finishes. The POWER lamp
flashes green during cleaning.
iP5200R_QSG_US.book Page 45 Friday, May 20, 2005 1:58 PM
Printing Maintenance
46
When Printing Becomes Faint or Colors are Incorrect
When printing becomes faint or colors are incorrect, even if ink remains in the ink tanks, the
Print Head nozzles are probably clogged. Follow the procedures below to clean the nozzles.
If the ruled lines are shifted after running the print head maintenance, align the Print Head.
Before printing the nozzle check pattern or cleaning the Print Head, check the
following;
zOpen the Top Cover and make sure that all the ink tanks click into place and
then their lamps light red.
If any one of the lamps is flashing, the associated ink tank is empty or
running low. Replace the ink tank. See “Replacing Ink Tanks” on page 42.
If an ink tank lamp is flashing even though ink remains in that ink tank, it is
inserted in the wrong position. Make sure that the correct ink tank color is
inserted in each position. See “Replacing an Ink Tank” on page 37.
If the ink tank lamp is unlit, press the mark on the ink tank to fully insert
it. Make sure that all packaging material is peeled off the ink tank. See
“Replacing Ink Tanks” on page 42.
zIncrease the Print Quality setting in the printer driver settings.
See “Print Results Not Satisfactory or Contains Errors” on page 67.
If Print Head Deep Cleaning does not resolve the problem, the Print Head may
be defective. Contact the Customer Care Center.
S
tep 1
If missing lines or white stripes appear
See “Print Head Cleaning” on page 52
Step 2
If the problem remains after performing print head cleaning twice
See “Print Head Deep Cleaning” on page 56
Step 3
After print head
cleaning, print the
nozzle check pattern.
See “Printing the Nozzle Check Pattern” on page 47
z If the ruled lines are shifted
See “Aligning the Print Head” on page 60
Step 1
iP5200R_QSG_US.book Page 46 Friday, May 20, 2005 1:58 PM

Printing Maintenance
47
Printing the Nozzle Check Pattern
Print the nozzle check pattern to determine whether the ink ejects properly from the Print
Head nozzles. Use this function when printed results are blurred or the color is incorrect.
zEnsure that the Inner Cover is closed.
Printing the Nozzle Check Pattern Without a Computer
zNozzle check pattern printing can also be executed from the printer itself.
1. With the printer on, load a sheet of Letter-sized plain paper in the Auto
Sheet Feeder or Cassette.
2. Press the Paper Feed Switch to select the paper source in which you loaded
the paper.
3. Hold down the RESUME/CANCEL button until the POWER lamp flashes
green twice, and then release it immediately.
Printing the Nozzle Check Pattern
1With the printer on, load a sheet of Letter-sized plain paper in the Auto Sheet
Feeder or Cassette.
2Press the Paper Feed Switch to select the paper source in which you loaded
the paper.
3Open the printer properties dialog box.
See “Opening the Printer Properties Dialog Box Directly from the Start Menu” on
page 35.
iP5200R_QSG_US.book Page 47 Friday, May 20, 2005 1:58 PM
Printing Maintenance
48
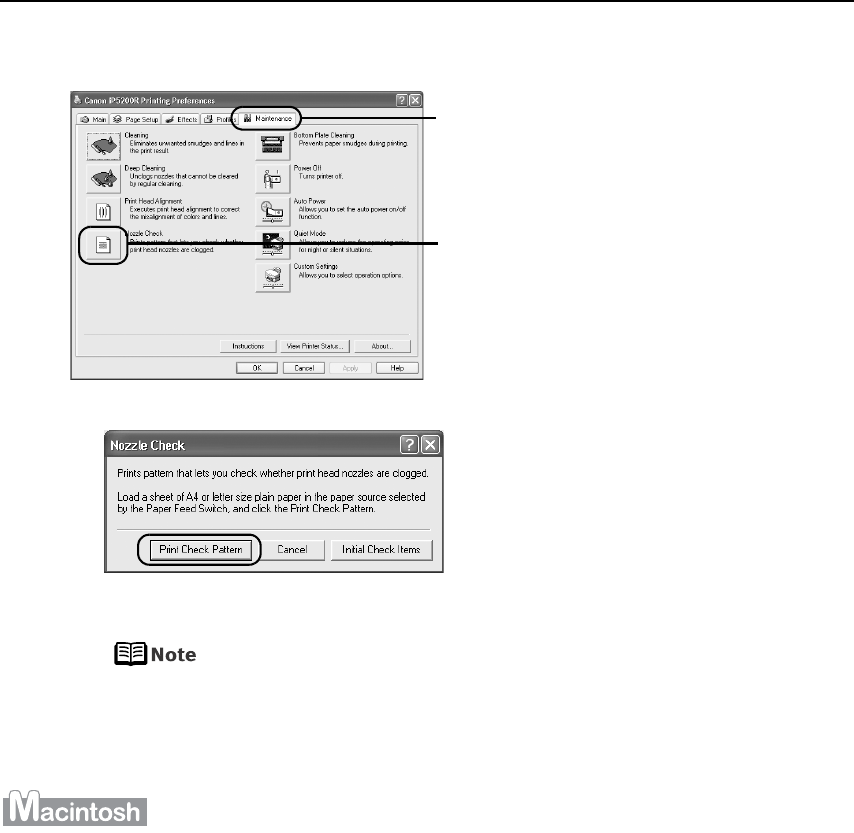
4Print the Nozzle Check Pattern.
(3) Read the message and click Print Check Pattern.
The nozzle check pattern will be printed.
Clicking Initial Check Items displays the items to be checked before
printing the pattern.
5Examine the pattern and take the appropriate action.
See “Examining the Nozzle Check Pattern” on page 50.
1With the printer on, load a sheet of Letter-sized plain paper in the Auto Sheet
Feeder or Cassette.
2Press the Paper Feed Switch to select the paper source in which you loaded
the paper.
(1) Click the Maintenance tab.
(2) Click Nozzle Check.
iP5200R_QSG_US.book Page 48 Friday, May 20, 2005 1:58 PM