Canon K30259 USB Bluetooth Transmitter User Manual 2
Canon Inc USB Bluetooth Transmitter Users Manual 2
Canon >
Contents
- 1. User manual 1 of 4
- 2. User manual 2 of 4
- 3. User manual 3 of 4
- 4. User manual 4 of 4
User manual 3 of 4

43
2
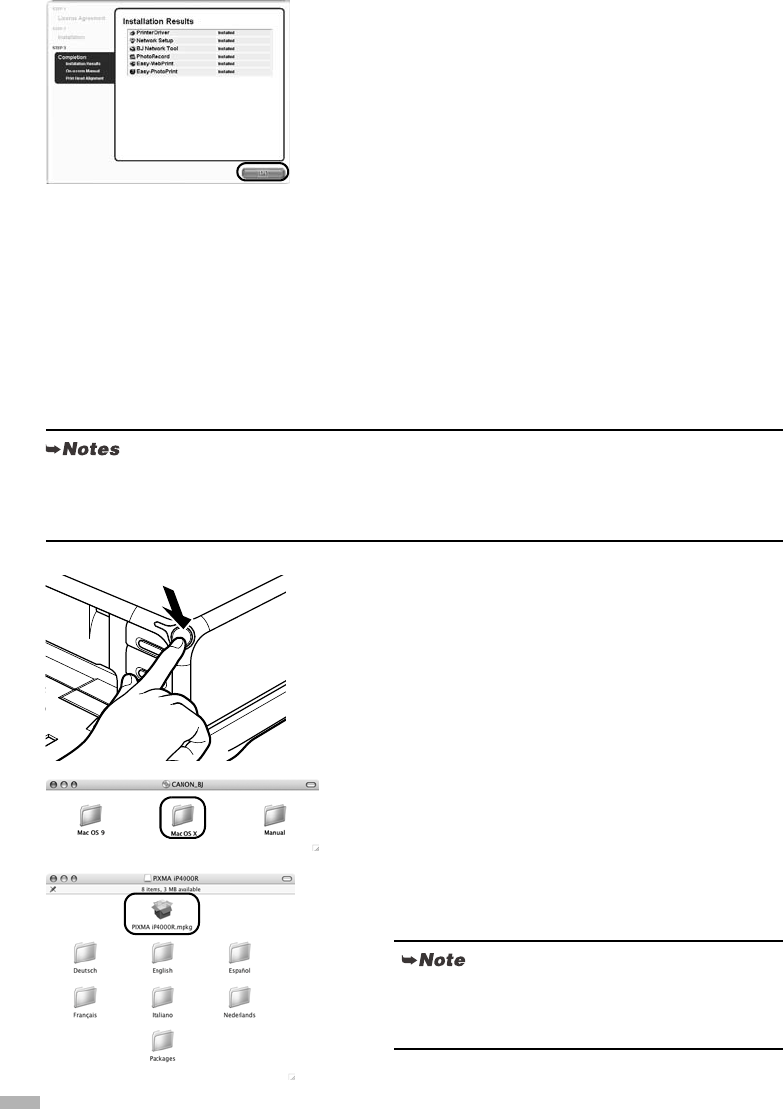
Turn on the printer.
3
Turn on the Mac.
4
Place the Setup Software & User’s
Guide CD-ROM in the CD-ROM drive.
5
Double-click the Mac OS X folder, then
double-click the Printer Driver folder.
6
Double-click PIXMA iP4000R xxx.pkg.
“x” represents a number.
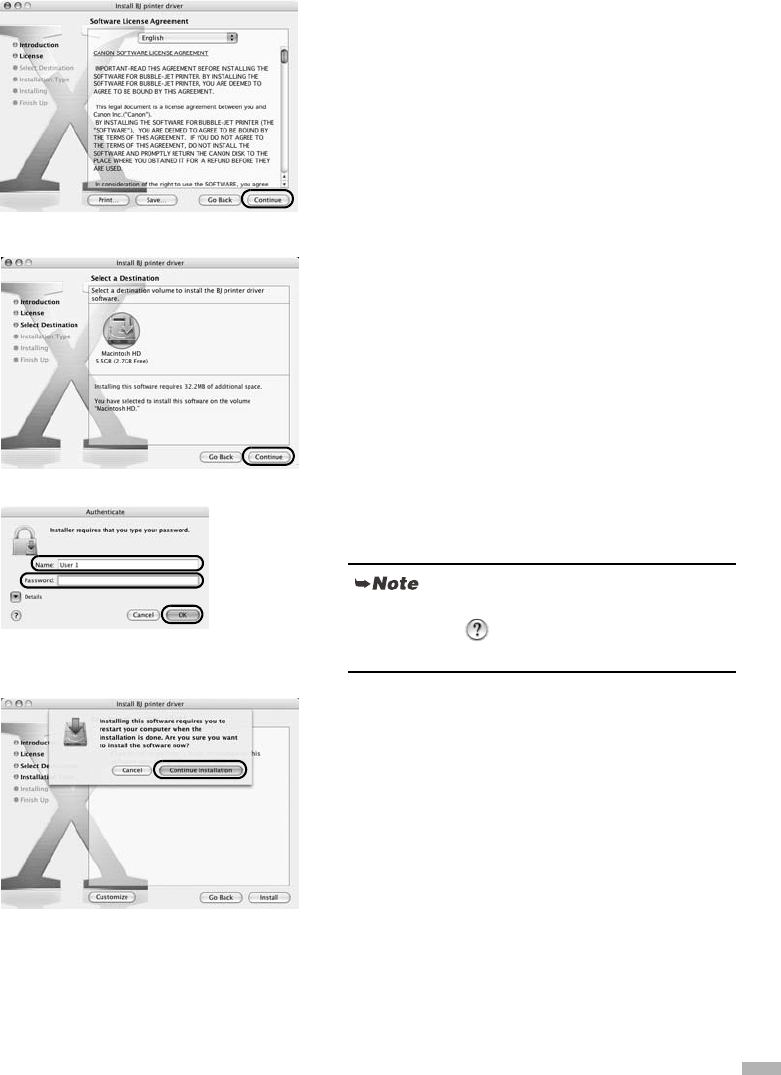
7
Click Continue.
8
Read the License Agreement carefully
and click Continue, then click Agree.
9
Select a destination to where you want
to install the printer driver, and click
Continue.
10
Click Install.
When using Mac OS X v.10.2, go to step 12.
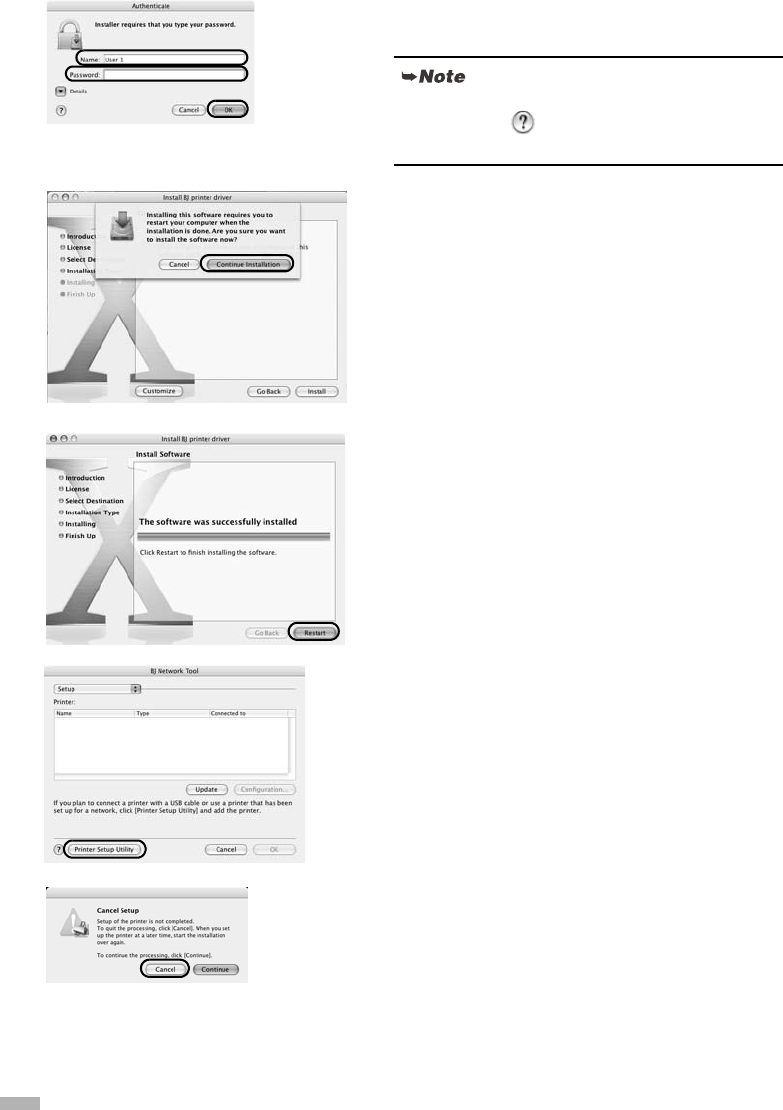
When using Mac OS X v.10.2, the
Authenticate
dialog
box appears. Enter the administrator’s name and
password, and click
OK
.
44
11
Enter the administrator’s name and
password, and click OK.
12
A message asking for your confirmation
to restart your Mac appears on the
screen. Read the message, then click
Continue Installation.
Software installation will start.
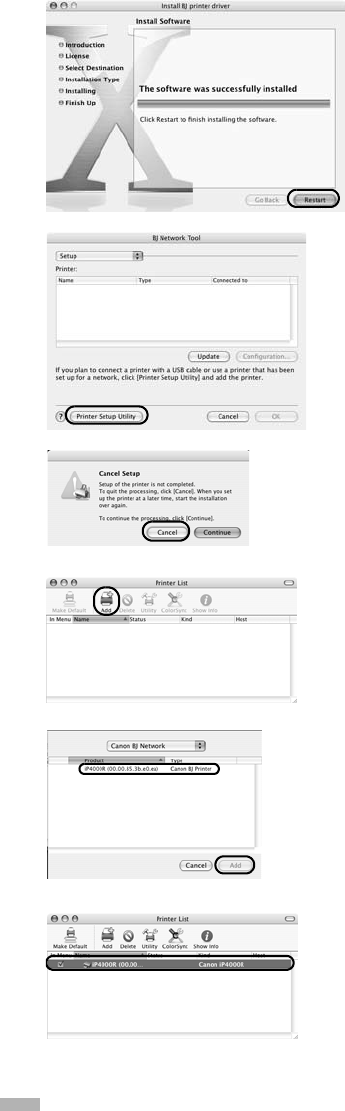
13
Click Restart.
When the computer restarts, BJ Network Tool will start
up. If it does not start automatically, select
Library
-
Printers
-
Canon - BJ Printer
-
Utilities
-
BJ Network
Tool
.
14
Select Setup from the pop-up menu.
15
Click Printer Setup Utility (Print
Center on Mac OS X v.10.2).
16
Click Cancel.
If you have forgotten the administrator name and/or
password, click and follow the instructions in
Mac
Help
.
45
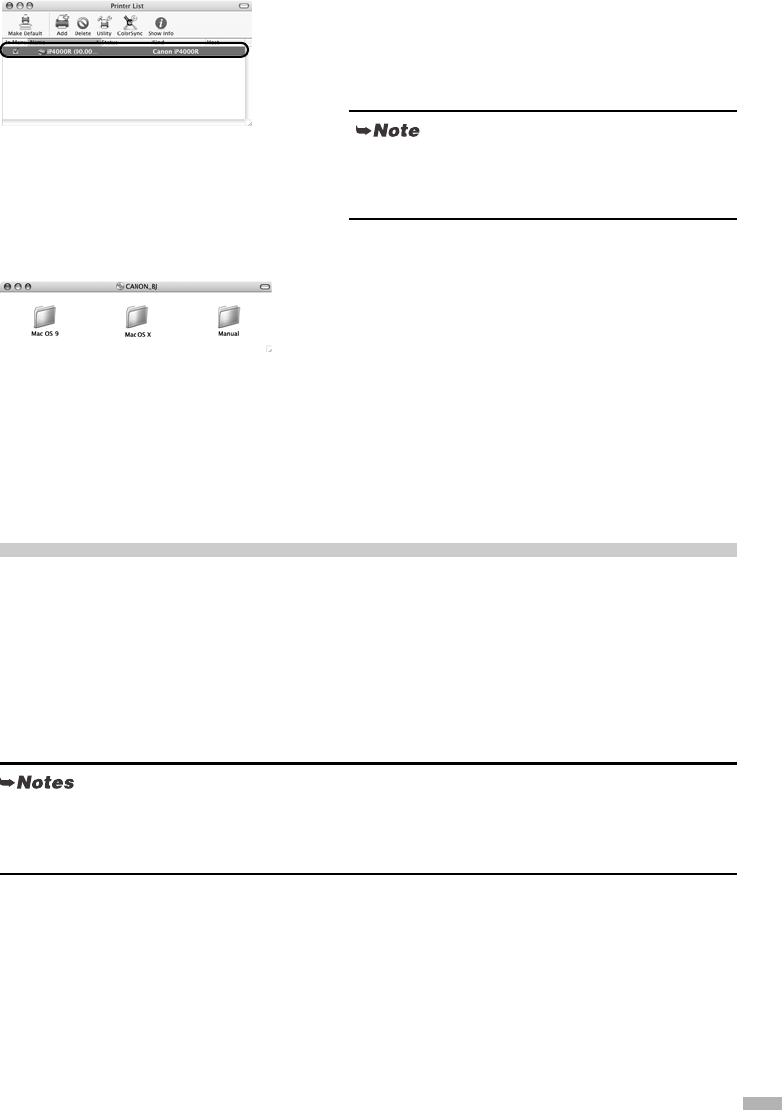
17
Confirm that your printer is added to the
list of printers.
The alphanumeric string after the printer name is its
MAC address.
Printer driver setup is now complete.
18
Install applications. In the Setup
Software & User’s Guide CD-ROM,
double-click CANON_BJ and then
double-click Application.
Double-click the installer in folder for each application
you want to install.
19
Perform print head alignment before
you start using your printer.
See “Aligning the Print Head - Macintosh” on page 53.
Setting Up an Additional Computer to Use a Printer Already
Connected to a Network
When your printer is already set up to be used over a network, and you want to set up another computer to
use the shared printer, the computer needs to be set up to use the printer, but not the printer itself. Follow
these steps.
Setting Up an Additional Computer to Use a Printer Already
Connected to a Network - Windows
If the printer does not appear on the list, click
Add
and
select
USB
from the pop-up menu. Select
iP4000R
from the list of printers and click
Add
.
• Make sure the computer you are setting up is NOT connected to the printer via a USB cable.
• Make sure the printer is properly set up and is currently available for use over the wireless or wired
network.
46
1
Turn on the printer.
2
Turn on the computer.
3
Place the Setup Software & User’s
Guide CD-ROM in the CD-ROM drive.
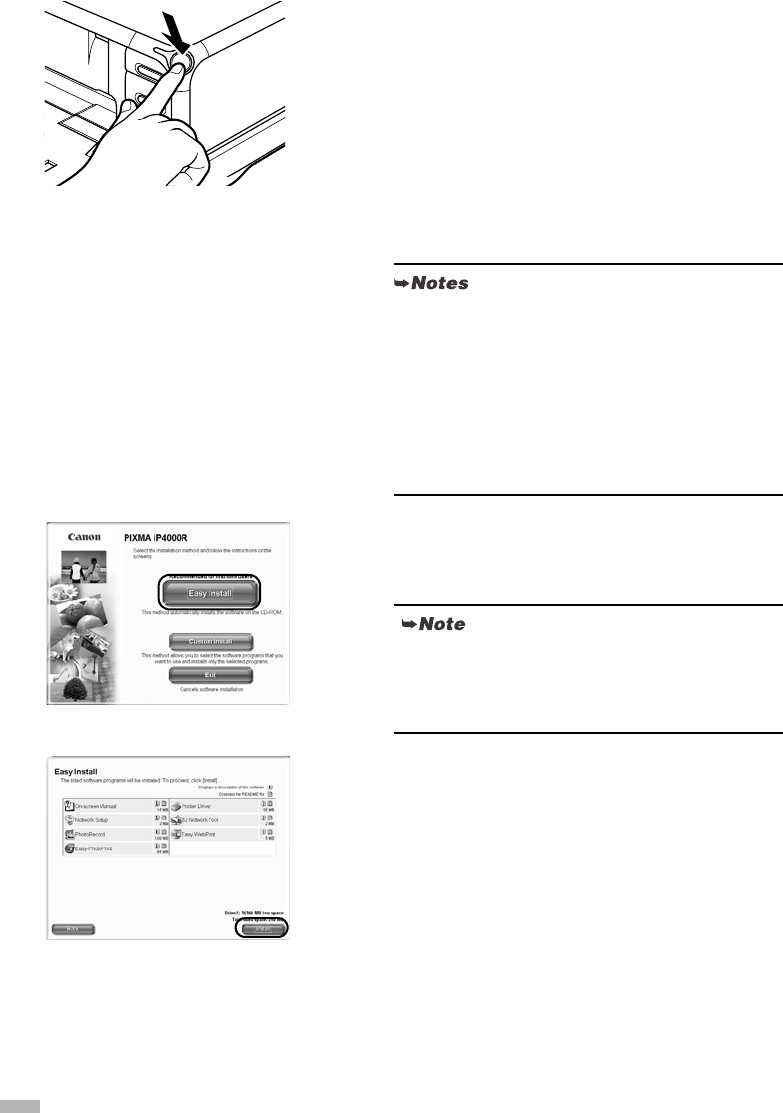
4
Follow the instructions displayed on
screen. When the screen shown on the
left is displayed, click Easy Install.
5
When the list of applications to install
appears, verify the contents, click
Install, then follow the instructions on
the screen.
• If the CD-ROM does not run automatically, click
Start and select My Computer, then double-click
the CD-ROM icon. For non-XP Windows, double-
click My Computer in the Windows screen, then
double-click the CD-ROM icon.
• If the language selection screen appears, select the
language, then click OK.
• If the location selection message appears, select
your place of residence, then click Next.
When you select
Easy Install
, the items included in the
CD-ROM are installed automatically. To select
particular items to install, click
Custom Install
and
follow the instruction on the screen.
47
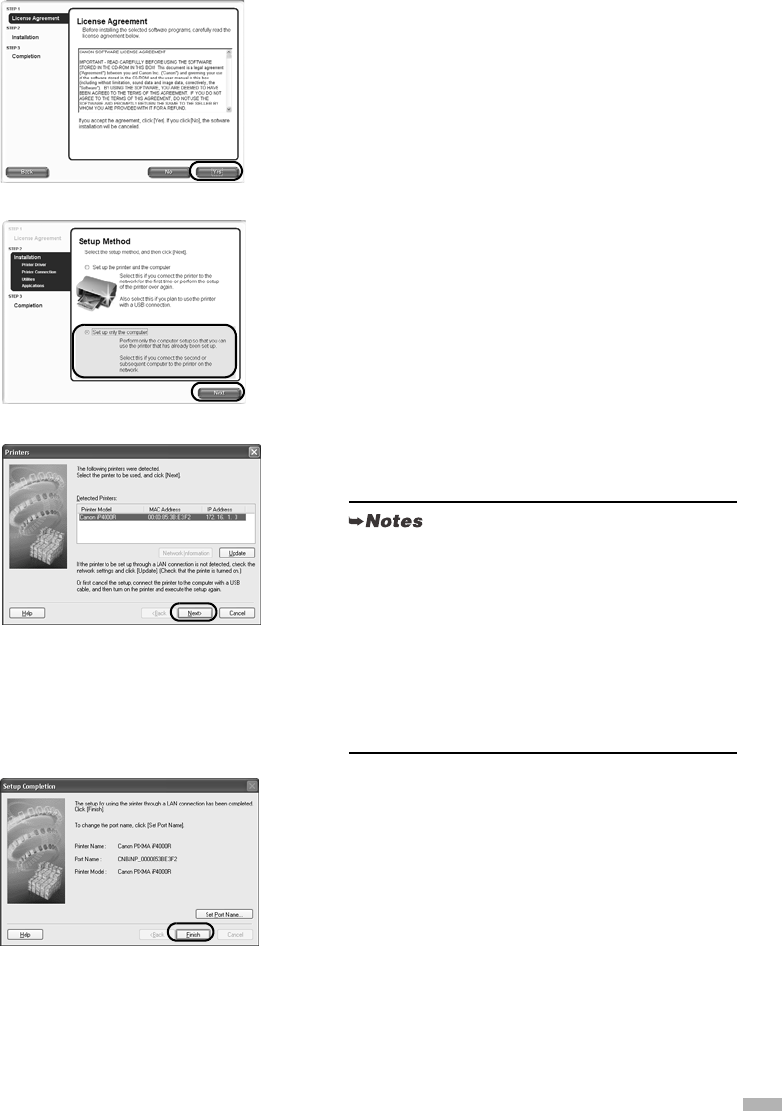
6
Read the License Agreement carefully
and click Yes.
7
Select Set up only the computer and
click Next.
8
Select the printer in the Printers dialog
box, and click Next.
9
Click Finish in the Setup Completion
dialog box.
To change the port name, click
Set Port Name
. For
details, see “Changing the port name” in
“Troubleshooting” on page 81.
Setup will next install application programs.
If the printer was not detected, confirm the following
and click
Update
.
• Ensure that the printer is on.
• Ensure that the firewall is turned off.
• When using wireless LAN, confirm that the
computer can communicate with the access point.
• When using wired LAN, confirm that the
computer is connected to the hub.
• Confirm that the printer is not set to use access
control.
48
10
When the installation results are
displayed, click OK.
If you are prompted to restart the computer, click
Yes
and restart the computer.
11
When the On-Screen Manual dialog
box appears, click Next.
Printer software installation is now complete. You can
skip print head alignment if it is already adjusted
properly.
Setting Up an Additional Computer to Use a Printer Already
Connected to a Network - Macintosh
1
Turn on the printer.
2
Turn on the Mac.
3
Place the Setup Software & User’s
Guide CD-ROM in the CD-ROM drive.
4
Double-click the Mac OS X folder, then
double-click the Printer Driver folder.
5
Double-click PIXMA iP4000R xxx.pkg.
“x” represents a number.
• Make sure the computer you are setting up is NOT connected to the printer via a USB cable.
• Make sure the printer is properly set up and is currently available for use over the wireless or wired
network.
When using Mac OS X v.10.2, the
Authenticate
dialog
box appears. Enter the administrator’s name and
password, and click
OK
.
49
6
Click Continue.
7
Read the License Agreement carefully
and click Continue, then click Agree.
8
Select a destination volume to install the
printer driver, and click Continue.
9
Click Install.
When using Mac OS X v.10.2, go to step 11.
10
Enter the administrator’s name and
password, and click OK.
11
A message asking for your confirmation
to restart your Mac appears on the
screen. Read the message, then click
Continue Installation.
Software installation will start.
If you have forgotten the administrator name and/or
password, click and follow the instructions in
Mac
Help
.
50
12
Click Restart.
When the computer restarts, BJ Network Tool will start
up. If it does not start automatically, select
Library
-
Printers
-
Canon - BJ Printer
-
Utilities
-
BJ Network
Tool
.
13
Select Setup from the pop-up menu.
14
When a message appears notifying that
no printer was detected, click OK.
15
Click Printer Setup Utility (Print
Center on Mac OS X v.10.2).
16
Click Cancel.
17
Click Add.
18
Select CANON BJ Network from the
pop-up menu, select iP4000R from the
list of printers, and click Add.
19
Confirm that your printer is added to the
list of printers.
The alphanumeric string after the printer name is its
MAC address.
Printer driver setup is now complete.
51
20
Install applications. In the Setup
Software & User’s Guide CD-ROM,
double-click CANON_BJ and then
double-click Application.
Double-click the installer in folder for each application
you want to install.
Software setup is now complete. You can skip print head
alignment if it is already adjusted properly.
Aligning the Print Head
Aligning the print head allows you to print without shifting the color registration, and is a necessary step to
print properly.
Aligning the Print Head - Windows
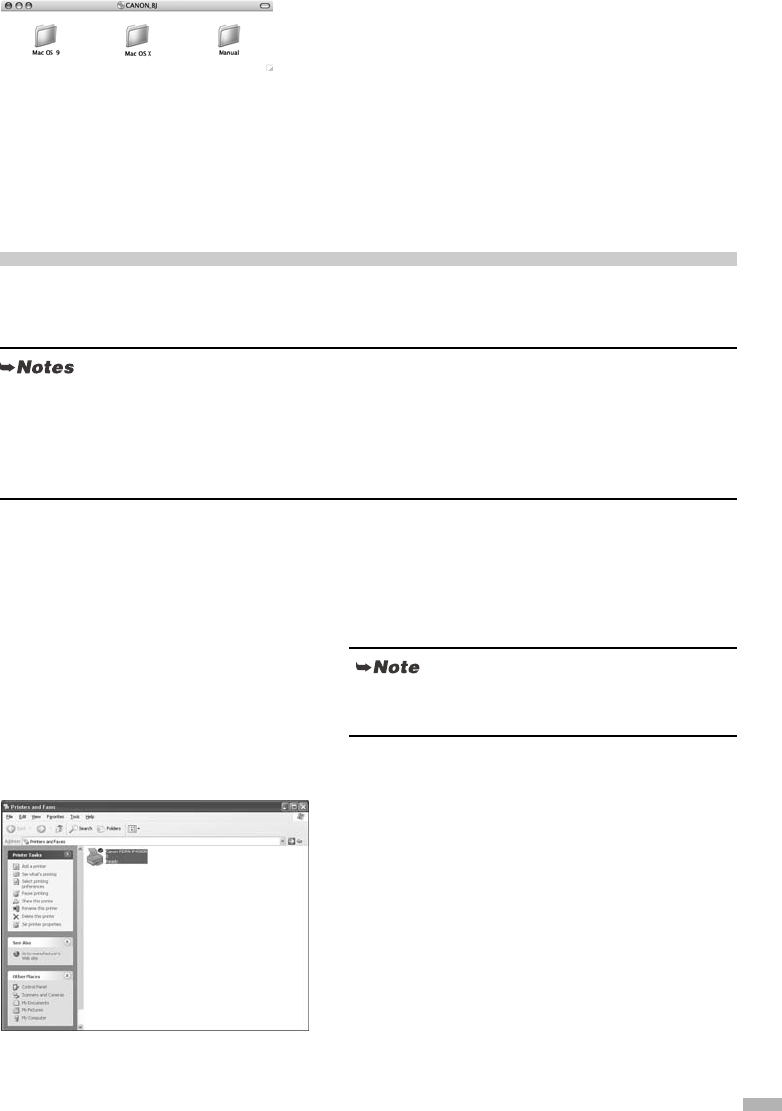
1
Click Start and select Control Panel,
Printers and Other Hardware, and
then Printers and Faxes.
2
Click the icon for your printer.
3
Open the File menu and select:
• Windows XP/Windows 2000 →
Printing Preferences
• Windows Me/Windows 98 → Properties
to open the setting screen.
• The Print Head can be aligned also from the printer itself. With the printer on, load a sheet of
Letter-sized plain paper in the Sheet Feeder. Hold the RESUME/CANCEL button until the
POWER lamp flashes four times.
• You need to load a sheet of A4 or Letter-sized plain paper in the Sheet Feeder when you carry out
the print head alignment.
For non-Windows XP users, click Start, then select
Settings,Printers.
52
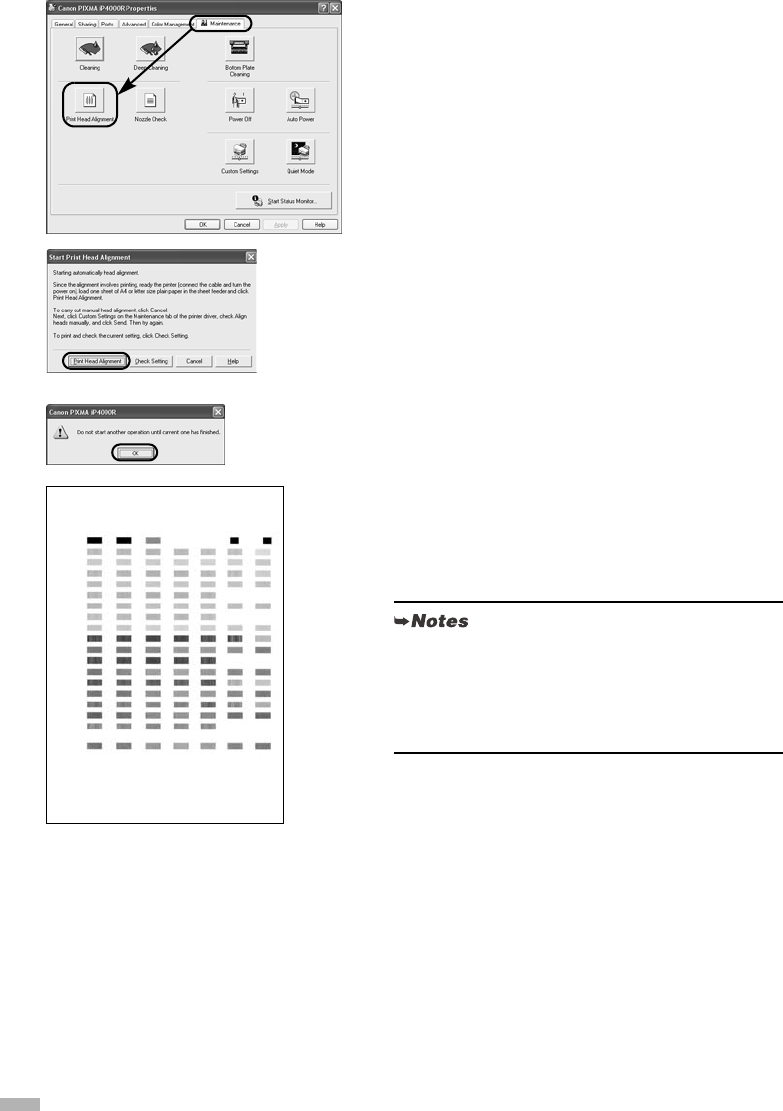
4
Click the Maintenance tab, and click
Print Head Alignment.
5
Read the message and click Print Head
Alignment.
It takes about 80 seconds to start printing. Do not open
the Top Cover while printing.
6
If a message warning you not to
perform other operations appears, click
OK.
7
Ensure the pattern shown on the left is
printed.
The Print Head is aligned automatically. The printer is
now ready to use.
• If the pattern is not printed successfully, refer to
“Eleven Flashes” in “The Power Lamp Flashes
Orange” of the User’s Guide.
• At first-time setup, if you are prompted to restart
the computer, click Ye s to restart the computer.
53
Aligning the Print Head - Macintosh
1
Double-click the hard disk icon where
the printer driver was installed, the
Applications folder, and then the
Utilities folder.
2
Double-click the Printer Setup Utility
icon.
When using Mac OS X v.10.2, double-click the
Print
Center
icon.
3
Select your printer from the Name list
and click Utility.
If the printer is not displayed in the
Printer List
, you
need to add it on the list.
For details, follow the instructions in
Mac Help
.
When using Mac OS X v.10.2, select your printer from
the
Name
list and click
Configure
.
4
Select your printer from the Product list
and click Maintenance.
BJ Printer Utility appears.
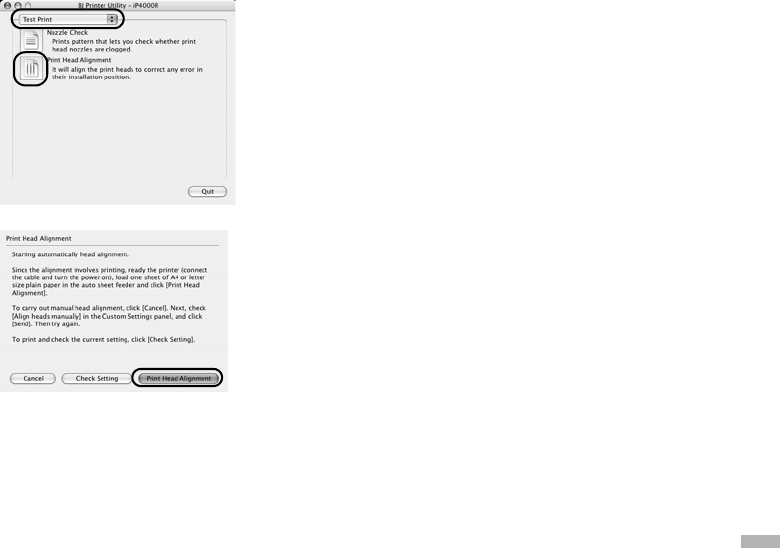
5
Select Test Print from the pop-up
menu, and click Print Head Alignment.
6
Read the message and click Print Head
Alignment.
It takes about 80 seconds to start printing. Do not open
the Top Cover while printing.
54
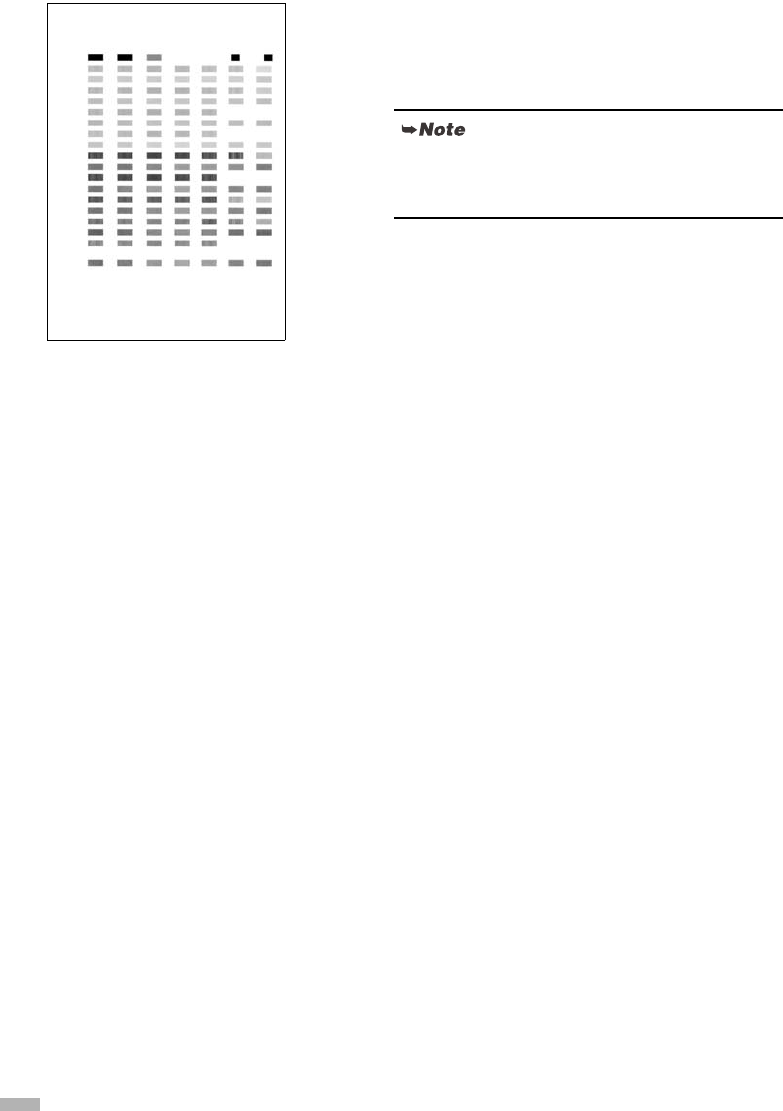
7
Ensure that the pattern on the left is
printed.
The Print Head is aligned automatically. The printer is
now ready to use.
If the pattern is not printed successfully, refer to
“Eleven Flashes” in “The Power Lamp Flashes
Orange” of the User’s Guide.
55
Basic Operations
• If you detect smoke, unusual smells or strange noises around the printer, immediately switch the
printer off and always unplug the printer. Contact your local Canon service representative.
• To avoid injury, never put your hand or fingers inside the printer while it is printing.
Printing with Windows
Adjusting the print settings according to your needs allows you to produce better quality prints.
In this section, we will use NotePad for the purpose of explanation. The procedures and the screens that
appear on your computer may differ depending on the application that you use.
Printing
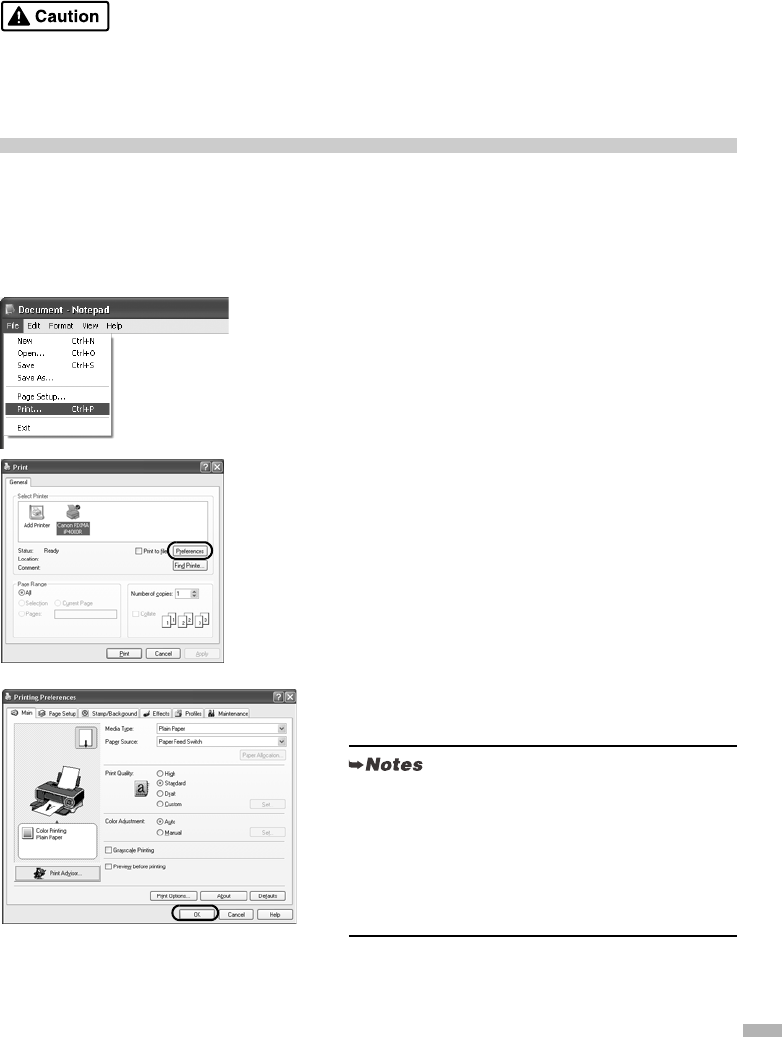
1
Print the document from the application.
From the
File
menu, click
Print
.
Refer to the application’s users manual for the actual
procedures.
2
Ensure that your printer is selected,
then click:
• Windows XP → Preferences
• Windows Me/Windows 98 →Properties
• Windows 2000 → Main tab
3
Specify the required settings and click
OK.
• If you use anything other than plain paper, see
“Basic Printing Settings” on page 57.
• This section describes the procedure for selecting
the paper source with the Paper Feed Switch on
the printer. For details about the other settings for
specifying the paper source, refer to “Changing
the Paper Source” on the User’s Guide.
56
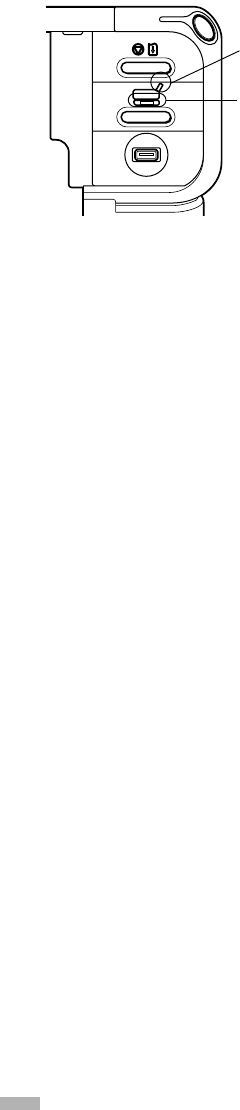
4
Ensure that the proper lamp of the
paper source is lit.
If not, press the Paper Feed Switch on the printer.
5
To start printing, click Print.
Printing will start in a few moments.
Sheet Feeder
Lamp
Cassette
Lamp
57
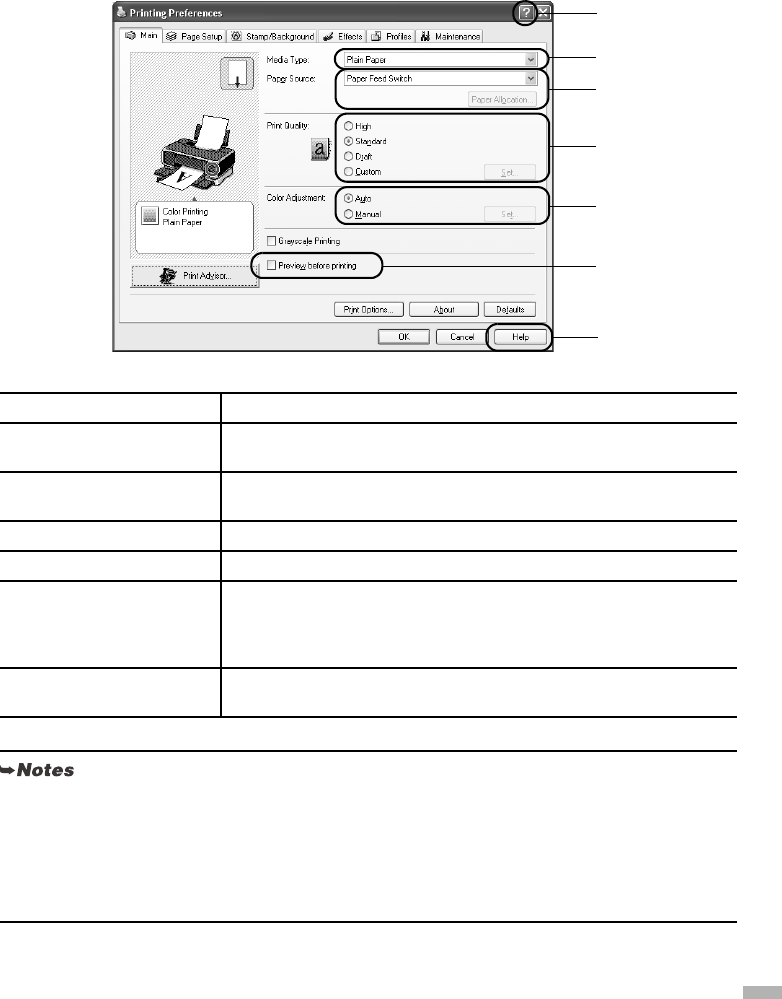
Basic Printing Settings
For the best print quality, specify the minimum requirement settings in the Main tab. To get the
best results, ensure you select the type of media loaded in the printer when printing on paper other
than plain paper.
(1) Media Type Select the type of media loaded in the printer.
(2) Paper Source Select the setting here when you do not specify the paper source with
the Paper Feed Switch on the printer.
(3) Print Quality Select one option from High,Standard, and Draft. Select Custom to
set the print quality manually.
(4) Color Adjustment To control the color adjustment settings in more detail, select Manual.
(5) Preview before printing Select this to check the layout before printing.
(6) Help Click this for a more detailed explanation of the functions in the tab.
(This may not appear when using Windows XP or Windows 2000. If
this happens, click Start then select All Programs (or Programs) -
Canon PIXMA iP4000R - Guide.)
(7) ? Click this to change the cursor shape to ?. By clicking on the item’s
name with this ? cursor, an explanation will be displayed.
• Clicking Print Advisor allows you to change to the most appropriate print settings simply by
answering questions when prompted.
• Use the application to specify the paper size and paper orientation. Before printing, open the
settings screen and check that Page Size in the Page Setup tab is the same as that specified within
application.
• Refer to the User’s Guide for more information about printer driver functionality.
(7)
(1)
(3)
(4)
(6)
(5)
(2)

58
Printing with Macintosh
Adjusting the print settings according to your needs allows you to produce better quality prints.
Printing
1
Open the Page Setup dialog box in
your application.
From the
File
menu, click
Page Setup
. Refer to the
application’s users manual for the actual procedures.
2
Specify the page setup, then click OK.
For details, see “Page Setup” on page 59.
3
Open the Print dialog box in your
application to print the document.
From the
File
menu, click
Print
. Refer to the
application’s users manual for the actual procedures.
4
Specify the printing settings according
to your requirements.
For details, see “Basic Printing Settings” on page 59.
5
Ensure that the proper lamp of the
paper source is lit.
If not, press the Paper Feed Switch on the printer.
6
Click Print.
Printing will start in a few moments.
Sheet Feeder
Lamp
Cassette
Lamp
59
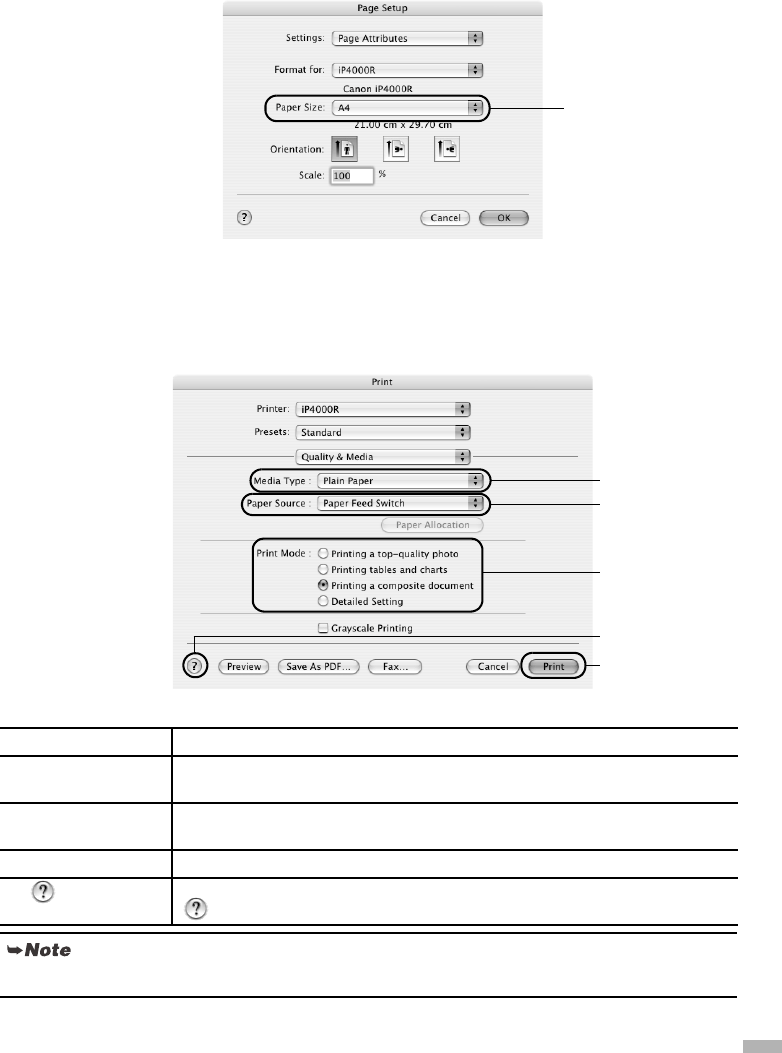
Page Setup
From the
Page Setup
dialog box, specify the
Paper Size
settings.
Basic Printing Settings
For the best print quality, specify the minimum requirement settings in the
Print
dialog box. Select
Quality & Media
from the pop-up menu to change the display of the dialog box. To get the best results,
ensure you select the type of media loaded in the printer when printing on paper other than plain paper.
(1) Media Type Select the type of media loaded in the printer.
(2) Paper Source Select the setting here when you do not specify the paper source with the
Paper Feed Switch on the printer.
(3) Print Mode Select the type of document you want to print.
To specify more detailed settings for the print quality, click Detailed Setting.
(4) Print Click this to start printing.
(5) Click this for more information about other printer driver functions.
appears also in the Page Setup dialog box.
Refer to the User’s Guide for more information about printer driver functionality.
Select the paper size
to be used.
(3)
(4)
(1)
(2)
(5)
60
Print Head Maintenance
If Blurring Occurs or If a Specific Color Does Not Print
Perform Print Head Cleaning to improve the print quality. Ensure that the printer is turned on and
follow the instructions below.
• Windows
Open the Printer Properties dialog box and click the Maintenance tab. Click Cleaning. For
details, refer to the User’s Guide.
• Macintosh
Open the BJ Printer Utility dialog box and select Cleaning from the pop-up menu. Click
Cleaning. For details, refer to the User’s Guide.
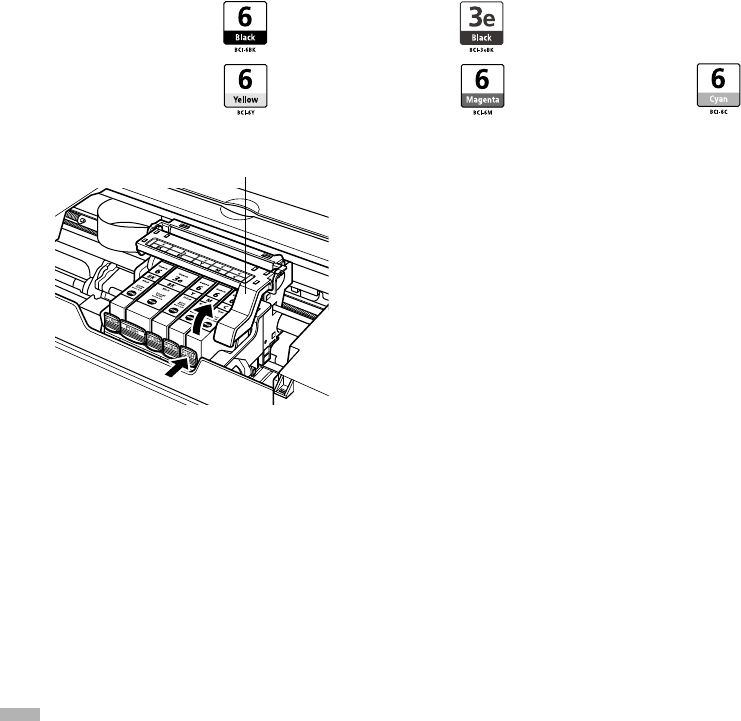
When the Printer Runs out of Ink
Replace the empty ink tank with a new one.
Specify the following ink tanks when purchasing.
1
Open the Paper Output Tray.
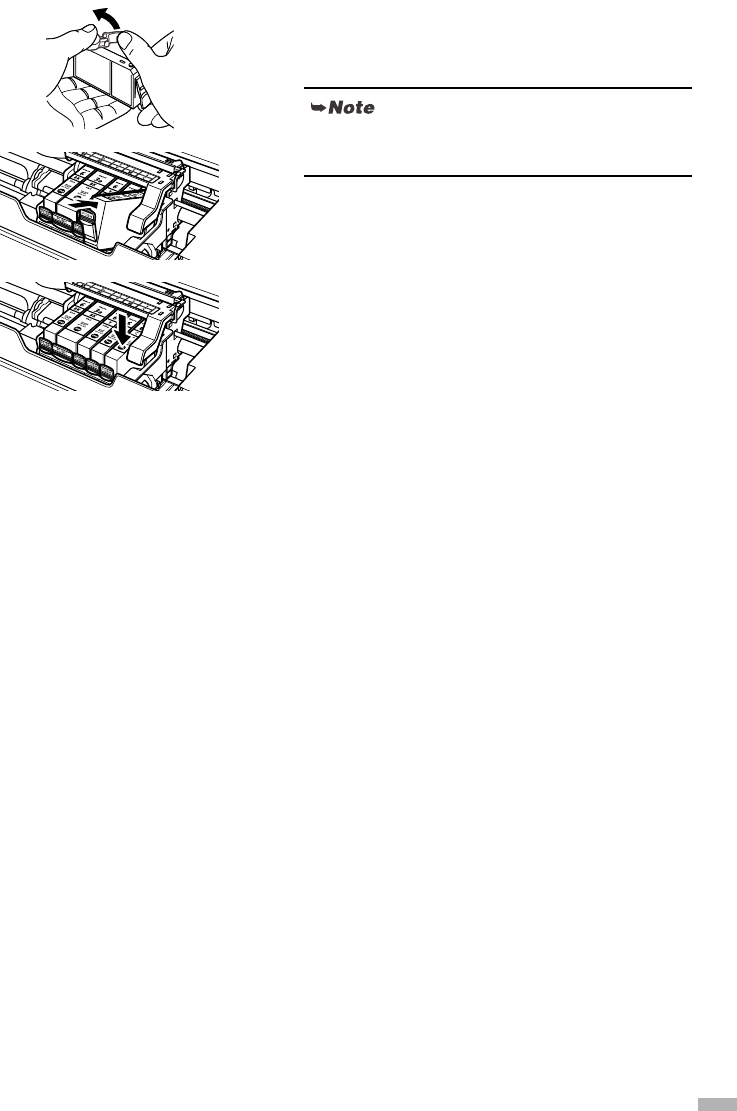
2
Open the Top Cover and pull down the
Inner Cover, then remove the empty ink
tank.
Do not touch the Print Head Lock Lever.
Black : BCI-6BK Black : BCI-3eBK
Yellow : BCI-6Y Magenta : BCI-6M Cyan : BCI-6C
Print Head Lock Lever
61
3
Install the new ink tank.
Put back the Inner Cover and close the Top Cover when
finished.
For more details about maintenance, refer to the
User’s Guide.

62
Appendix
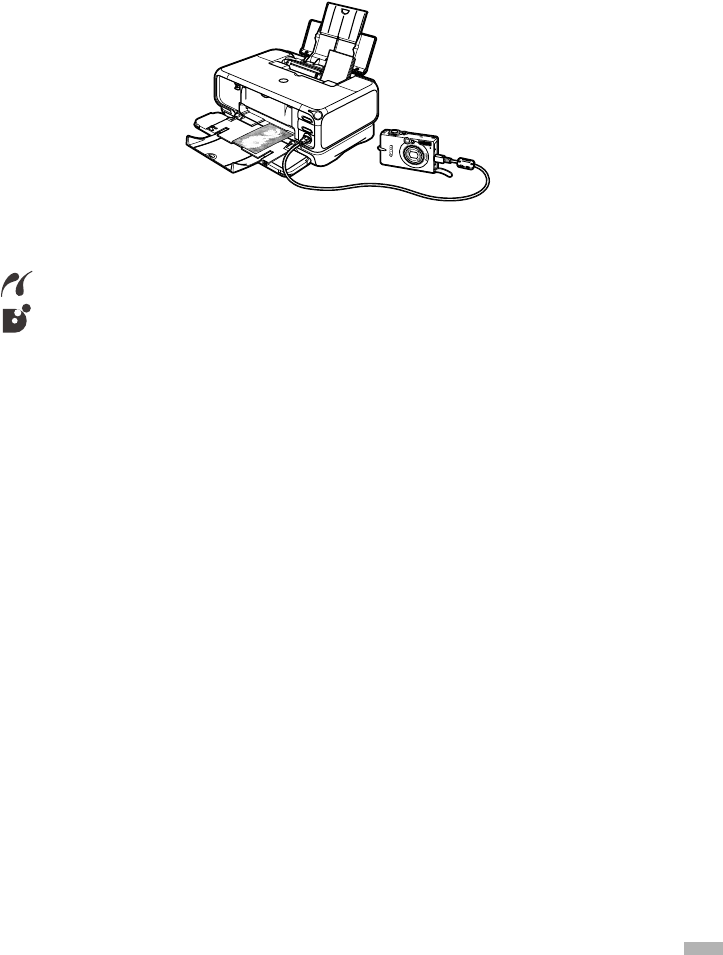
Printing Photographs Directly from a Digital Camera
Connecting a digital still camera or camcorder to the printer allows you to print recorded images directly
without using a computer. This printer supports both PictBridge and Canon Bubble Jet Direct.
Connecting to a Digital Camera
Do not connect any equipment other than the camera ready for PictBridge or Canon Bubble Jet Direct
to the Direct Print Port of the printer. If you do so, electric shock, fire, or damage to the camera could
result.
1
Turn on the printer.
Make sure the camera is turned off.
2
Load the paper in the printer.
• PictBridge is an industry standard enabling a range of digital photo solutions, including the direct
printing of photos from a digital still camera or a digital video camcorder* without the need to use
a computer.
• Canon Bubble Jet Direct allows you to print photos from a Canon Bubble Jet Direct compatible
(PictBridge incompatible) digital camera or digital video camcorder without a computer by simply
connecting the digital camera or digital video camcorder to this printer.
* Hereafter, the digital still camera and digital video camcorder are collectively called a digital
camera or camera.
• When producing photos with the digital camera connected to the printer, it is advisable to use the
AC adapter supplied with the camera. If you use the camera battery, be sure to charge it fully.
• The Print Head cannot be aligned using the controls of the digital camera. For information on how
to align the Print Head from the printer, see page 51.
• Depending on the model or brand of your camera, you may have to select a mode of producing
photos compliant with PictBridge before connecting the camera.
You may also have to turn on the camera or select Play mode manually after connecting the camera
to the printer.
Perform necessary operations according to the instruction manual supplied with your camera.
• When printing from your PC, be sure to unplug the cable connecting the digital camera.
63
3
Connect the digital camera to the printer.
(1) Connect the camera to the printer using the USB cable (for connection to a computer) supplied with
the camera.
(2) Turn on and set up the camera for direct printing.
When the connection between the camera and printer has been established, the
POWER
lamp on
the printer flashes once.
* The power-on sequence may differ depending on the model or brand of the camera.
Either of the following icons will appear on the LCD of the digital camera display when the printer
is correctly connected.
A PictBridge-compliant digital camera.
A Canon Bubble Jet Direct compatible digital camera.
Printing Photographs Directly from a PictBridge-Compliant
Digital Camera
Default Camera Settings
When a PictBridge-compliant camera is connected and printing is started with no printing option
selected, this printer operates based on the following default settings:
- Paper size ...................... 10 x 15 cm / 4" x 6"
- Paper type ..................... Photo (Photo Paper Plus Glossy)
- Layout ........................... Borderless
- Trimming ...................... Off (No trimming)
- Image optimize ............. On (ExifPrint)
- Date print ...................... Off (No printing)
About the Settings Explained Below
The settings explained on the following pages cannot be made on some cameras. If any setting cannot be
made, the default setting explained above is used.
Names of settings that are displayed on Canon PictBridge-compliant cameras are used in the description
given below.
Different names may be displayed on your camera depending on the brand or model.
For details, refer to your camera’s instruction manual.
64
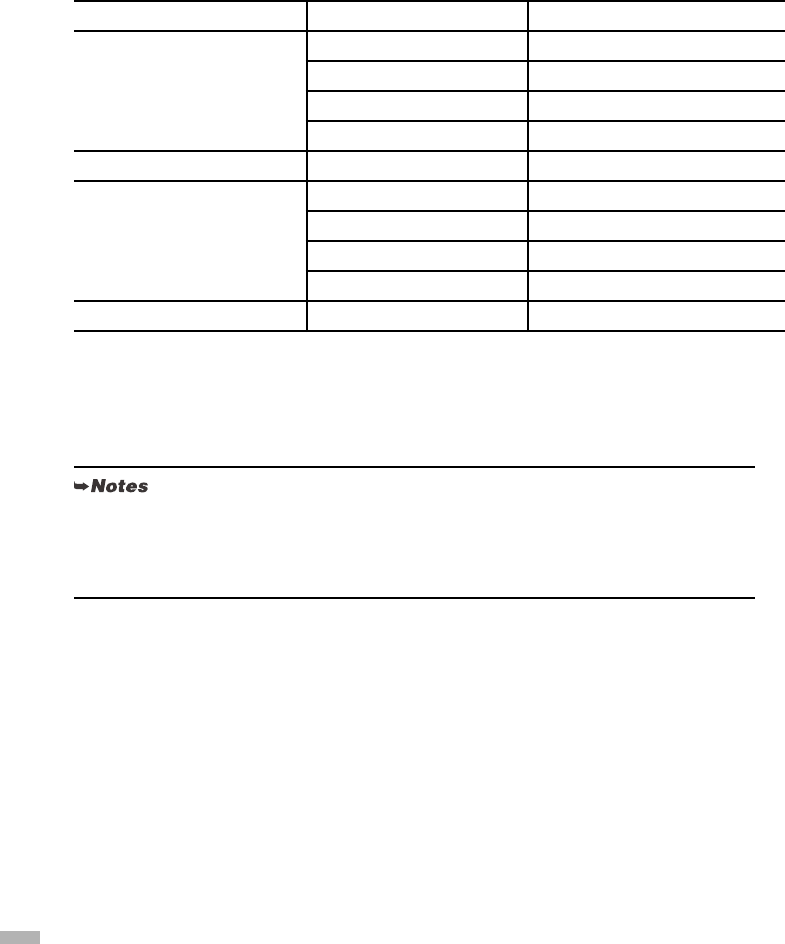
About Paper size and Paper type
To change the paper size or paper type, operate the camera to select the PictBridge print setup
mode and confirm or check the settings.
To print on Photo Paper Pro, select Fast Photo from Paper type on the display of the camera.
Select Photo for Photo Paper Plus Glossy.
If using a Canon PictBridge-compatible camera, you can select 5" x 7" from Paper size
The following sizes and types of paper can be loaded in the printer by selecting options from
Paper size and Paper type.
When 4" x 6" is selected from Paper size, “2-up”, “4-up”, “9-up”, and “16-up” options may be
available in Layout.
About Image optimize
If you use a Canon PictBridge-compliant camera, you can select VIVID,NR, or VIVID+NR.
(Note that these options cannot be selected for some models.)
Paper size setting Paper type setting Paper loaded in printer
10 x 15 cm / 4" x 6" (Default) Photo (Default) Photo Paper Plus Glossy
Fast Photo Photo Paper Pro
Photo Photo Paper Plus Semi-gloss
Photo Glossy Photo Paper
13 x 18 cm / 5" x 7" Photo Photo Paper Plus Glossy
A4 Photo Photo Paper Plus Glossy
Fast Photo Photo Paper Pro
Photo Photo Paper Plus Semi-gloss
Photo Glossy Photo Paper
5.4 x 8.6 cm / Credit Card Photo Glossy Photo Paper
• When VIVID is selected, green and blue portions of photos are printed vividly.
• When NR (Noise Reduction) is selected, noise in blue portions, such as the sky, and dark
portions is removed.
• When VIVID+NR is selected, functions of both VIVID and NR are performed.

65
About Date print
If “On” is selected, the shooting date recorded in Exif image data is printed in the lower-right
corner of each photo.
• This printer can handle only Exif/JPEG image data to produce photos using PictBridge.
• Never disconnect the USB cable during printing.
• When disconnecting the USB cable between the digital camera and printer, follow the
instructions given in the Instruction Manual of the camera.
• Controls of the digital camera cannot be used for the following:
- Print quality setting
- Printer maintenance
• For the digital camera operation method and troubleshooting, refer to your digital camera’s
manual.
• For print error messages, refer to the User’s Guide.
66
Printing Photographs Directly from a
Canon Bubble Jet Direct Compatible Digital Camera
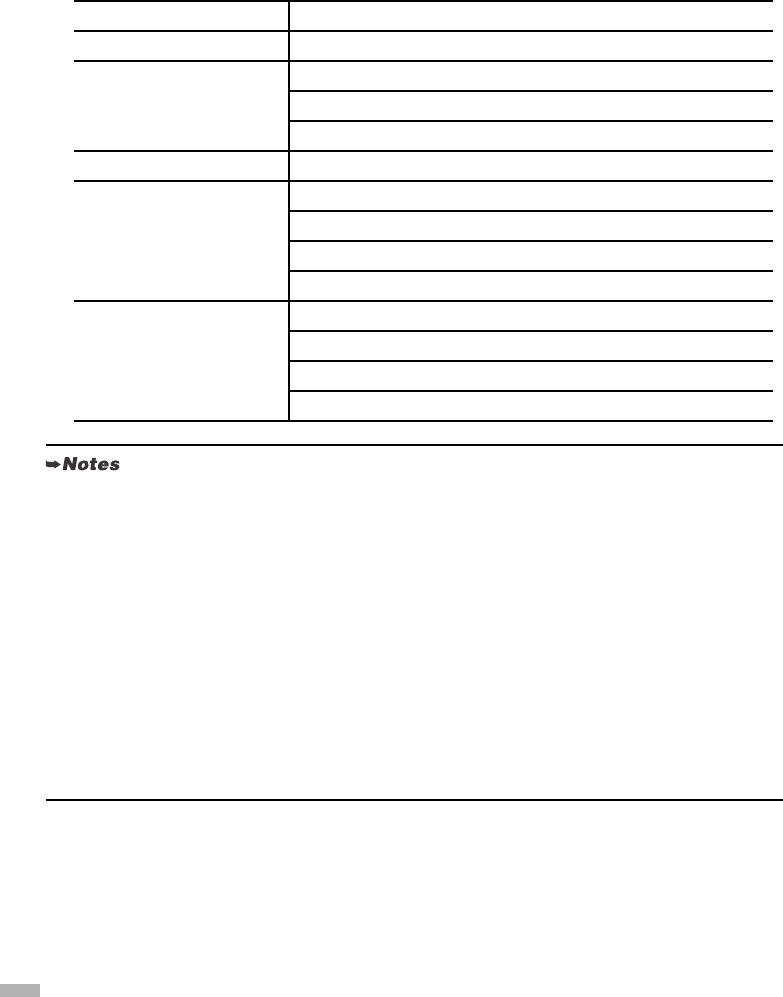
Media Types for Digital Camera
When you connect a digital camera, you can use the following media:
Digital Camera Setting Media Type
Card #1 Photo Paper Pro 4" x 6" / 101.6 x 152.4 mm
Card #2 Photo Paper Plus Glossy 4" x 6" / 101.6 x 152.4 mm
Photo Paper Plus Semi-gloss 4" x 6" / 101.6 x 152.4 mm
Glossy Photo Paper 4" x 6" / 101.6 x 152.4 mm
Card #3 Photo Paper Plus Glossy 5" x 7" / 127.0 x 177.8 mm
LTR Photo Paper Pro Letter size
Photo Paper Plus Glossy Letter size
Photo Paper Plus Semi-gloss Letter size
Glossy Photo Paper Letter size
A4 Photo Paper Pro A4 size
Photo Paper Plus Glossy A4 size
Photo Paper Plus Semi-gloss A4 size
Glossy Photo Paper A4 size
• For the digital camera operation method and troubleshooting, refer to your digital camera’s manual.
• For print error messages, refer to the User’s Guide.
• By operating the digital camera, you can make the following prints:
- You can make a standard print from the image displayed in the single display mode or in the
index display mode.
- You can print specified numbers of images, or make an index print by editing the DPOF.
- For the images taken with an ExifPrint-compatible digital camera, the Photo Optimizer PRO
function can be used.
- If date printing is set from the digital camera, the date when the photograph was taken is to be
printed (excluding the index print).
- Images will be scaled automatically according to the image size set on the digital camera and the
size of the media set on the printer.
• The digital camera does not support the following functions:
- Print quality setting
- Printer maintenance
• Images other than Exif may not be index printed.
67
Notes on Handling the USB Interface (for Windows Users)
If installation of the printer driver does not proceed as instructed in this
Setup Guide
, there may be a problem
with the USB driver installation.
Try reinstalling the printer driver.
Reinstalling
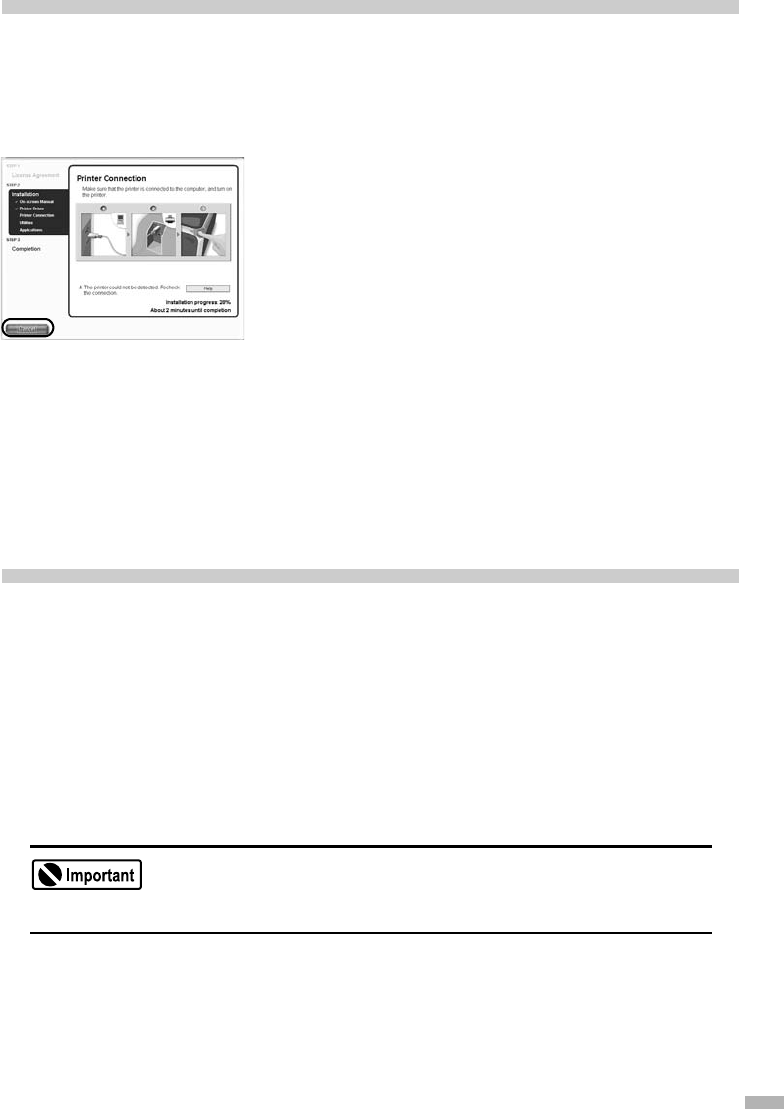
The screen shown on the left appears when the installation of
the printer driver fails.
If the reinstallation is unsuccessful;
1
Click Cancel on the Printer Connection
dialog box.
2
Click Start Over on the Installation Failure
dialog box.
3
Click Back on the screen which appears
next.
4
Click Exit on the Welcome screen, then
remove the CD-ROM.
5
Turn the printer and computer off.
6
Check the cable connection.
7
Restart the computer.
8
Reinstall the printer driver (see page 16).
Printing and Initializing Network Settings
Printing Network Setting Information
To print the current network settings of the printer, hold down the RESUME/CANCEL button
until the POWER lamp flashes 6 times, then release it.
The following information is printed.
• Printer name
• Firmware version
• Wireless LAN information
• Wired LAN information
• Printer access control
• Admin password
• Device status
This printout contains valuable information about your computer. Handle it with care.

68
Initializing Network Settings
To initialize the network settings of the printer, follow these steps.
1
Make sure that the printer is connected to your computer with a USB
cable.
2
Turn on the printer.
3
Start BJ Network Tool.
On Windows, click Start and select All programs (or Programs), BJ Network Tool and then BJ
Network Tool.
On Macintosh, select Library - Printers - Canon - BJPrinters - Utilities - BJ Network Tool.
4
Select Maintenance from the Settings menu.
5
Click Initialize under Setting Initialization in the Maintenance dialog
box.
6
Click Yes in the Initialize Settings dialog box (Windows) or OK in the
Setting Initialization dialog box (Macintosh).
For Further Details...
For further information on printing operation or about the printer in general, refer to the
User’s Guide
. For
further information on network setup, refer to the
Network Guide
. The guides are HTML manuals you can
browse through on your computer.
User’s Guide Contents
Network Guide Contents
How to View the User’s Guide/Network Guide
Note that initialization erases all connection settings with computers, disabling printing.
• Printer parts and their functions
• Using the sheet feeder and the cassette
• Printer driver functions
• Routine maintenance
• Printing media
• Troubleshooting (printing related)
• Specifications
• Overview
• On Security
• Changing and Confirming Network Settings
• Troubleshooting (network setting related)
• Appendix
•Glossary
For Windows
Double-click the
iP4000R User’s Guide
or the
iP4000R Network Guide
short-cut icon on the
desk top, or click
Start
and select
All Programs
(or
Programs
),
Canon PIXMA iP4000R
Manual
and
User’s Guide
or
Network Guide
.
For Mac OS X
(1) Load the CD-ROM in your computer, and
double-click the
OS X
folder.
(2) Double-click the
Manual
folder.
(3) Select a language folder.
(4) Double-click the
User’s Guide
or the
Network Guide
folder.
(5) Double-click the icon for the
iP4000R_UG_ENG.htm
or the
iP4000R_NWG_ENG.htm
file.

69
Applications Included in the CD-ROM Package
Easy-WebPrint (Windows)
You can easily print out homepages displayed on Internet Explorer in full size without its right-
hand side being cropped. This application is automatically added to the Internet Explorer toolbar.
Internet Explorer 5.5. or later must be installed.
Easy-PhotoPrint (Windows/Macintosh)
You can make a Borderless Print easily and quickly, just by selecting a photograph taken with a
digital camera and the paper type on which to print. Also it has tools to correct red eye caused by
the camera’s flash or smooth and beatify the facial skin. It is compatible with ExifPrint.
PhotoRecord (Windows)
You can create fun and unique photo albums with a click of your mouse. It is compatible with
ExifPrint.
For more information on the applications, refer to the Photo Application Guide.
BJ Printer Driver Systems Requirements
For Windows
• Use a computer on which Windows XP, Windows 2000, Windows Me or Windows 98 can
operate.
•USB interface
• CD-ROM drive
• Available hard-disk space for printer driver installation
Windows XP/Windows 2000: 50MB
Windows Me/Windows 98: 15MB
For Macintosh
• Use a Macintosh series computer equipped with USB interface on which Mac OS X v.10.2.1 or
later can operate.
• Available hard-disk space for printer driver installation
Mac OS X v.10.2.1 or later: 100 MB
• The following functions are not supported when using Mac OS X v.10.2.1 or later:
- Manual Duplex Printing
- Poster Printing
- Fit-to-Page Printing
- Booklet Printing
- Reverse Order Printing (supported with Mac OS X v.10.3.x)
- Photo Optimizer Pro
Additional Systems Requirements for Electronic Manuals
•Pentium
® 75 MHz equivalent or higher processor (Pentium® 133 MHz equivalent or higher
processor recommended)
• 2x or higher CD-ROM drive (4x or higher recommended)
• 15 MB of available hard-disk space (when installing the electronic manuals)
• Windows: Microsoft® Internet Explorer 5.0 or later
• Mac OS: Microsoft® Internet Explorer 5.0 or later, Safari 1.0 or later

70
Troubleshooting
Cause and measures on possible troubles in the setup procedure are explained here.
• The computer cannot communicate with the printer or an access point between rooms or floors,
page 71
• Cannot set up the printer, page 71
• When encryption (WEP or WPA) is enabled, the printer cannot be set up again, page 71
• The Access Points dialog box is displayed during setup, page 72
• The target access point is not detected, or you want to specify access point settings manually,
page 74
• Cannot connect with an access point to which a WEP key is set (You forgot the WEP key), page 75
• How to set a WEP key, page 76
• Cannot connect to the target access point, page 76
• The Set Printer IP Address / Printer IP Address Setup dialog box is displayed during setup, page 77
• Checking the IP address or the MAC address of the printer, page 78
• Checking the IP address of the computer, page 78
• The Printer Network Setup dialog box is displayed during setup, page 79
• The printer cannot communicate with the access point in a wireless LAN, page 80
• Cannot communicate with the printer after applying MAC address filtering or entering a WEP key to
the access point, page 80
• No printer is detected after the network settings are changed in Windows, page 81
• The Enter Password / Password Input dialog box is displayed during setup, page 81
• The admin password was forgotten, page 81
• Changing the port name, page 81
• Cannot print out the network setting information, page 81
• Using the printer in a multiple access point setup, page 81
• Re-setting the printer whose setup was canceled halfway, page 82
• Confirming the version of Windows XP, page 82
If you do not find a description for your trouble here, refer to “Troubleshooting” on the
User’s Guide
and
the
Network Guide
. For details on viewing the guides, see “How to View the User’s Guide/Network Guide”
on page 68.
71
Problem Possible Cause and Measures
The computer cannot
communicate with the
printer or an access
point between rooms or
floors
Although wireless communication between rooms or floors is possible, the
wireless communication quality may become poor. The wall must be made of a
material that allows radio waves to pass through. If the wall material prevents
communication, set the printer in the same room as the access point.
Cannot set up the
printer
Confirm the following:
• The USB cable is connected to the correct port.
• The printer driver is already installed.
• The printer is turned on. If it is, turn it off and then turn it on again.
• Printing via USB connection is possible.
If you cannot print through USB connection, see “Setting Up the Printer and
the Computer” on page 16 and connect the USB cable properly.
• The firewall feature of a security software may prevent proper setup or
communication over a network.
When setting up the printer for use over a network, disable the firewall of
your security software. Turn it back on when setup is complete.
If you are using Windows XP Service Pack 1 or earlier and you have Internet
Connection Firewall enabled, a dialog box asking you for confirmation to
disable the firewall will appear during setup. Click
Yes
to disable the firewall.
When setup is complete, the firewall will be re-enabled automatically.
To confirm the version of your Windows XP, see “Confirming the version of
Windows XP” on page 82.
Some network configuration programs will enable a firewall by default.
Check the settings of any such software.
• The printer, the computer, and the access point are on the same network
segment.
Do not use the printer through a router.
• The priority of the network to be used is set high. If not, select
System
Preferences
-
Network
and select
Network Port Configurations
from the
Show
pop-up menu, and modify the priority of the network.
When encryption (WEP
or WPA) is enabled, the
printer cannot be set up
again
Initialize the printer’s network settings to default (see “Initializing Network
Settings” on page 68) and perform setup again with the USB cable connected.
72
The
Access Points
dialog box is displayed
during setup
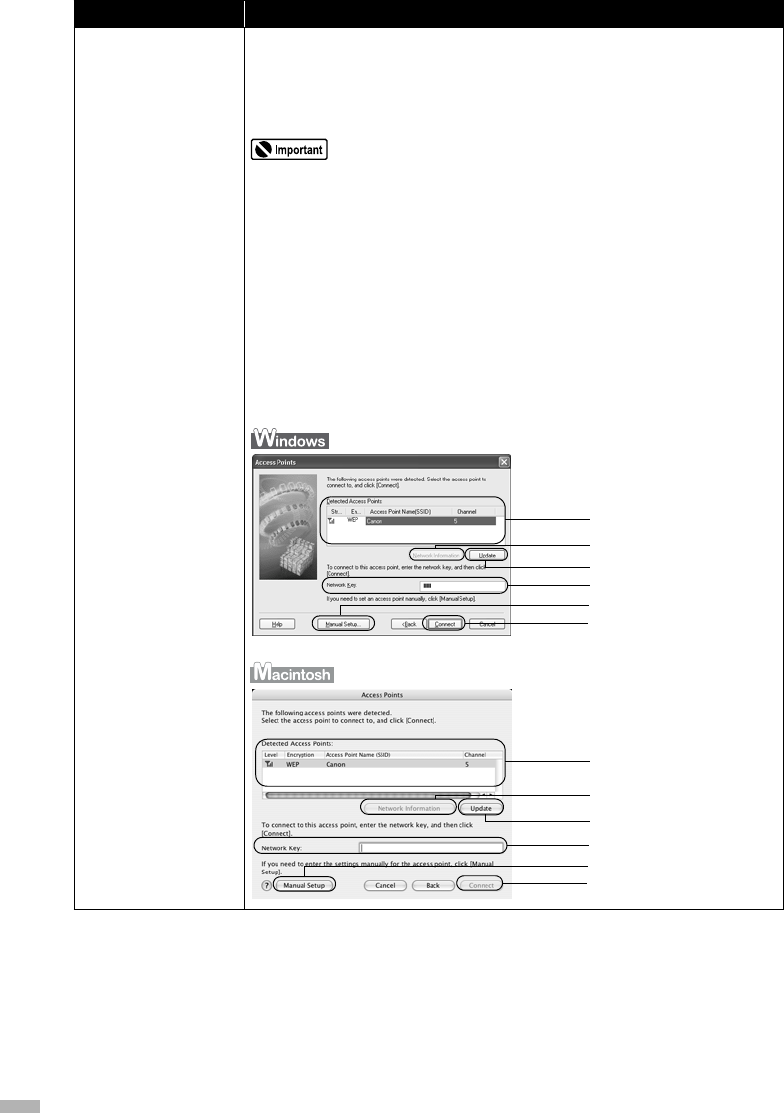
The Access Points dialog box is displayed when:
- No access point is detected.
- Multiple access points are detected.
- Entry of a network key is necessary to communicate with the target access
point.
If you connect to a network that is not protected with security measures, there is a risk of
disclosing data such as your personal information to a third party.
Follow the instructions below to detect access points.
• When no access point is detected
It may take several minutes to detect access points. For details, see “The
printer cannot communicate with the access point in a wireless LAN” on
page 80.
• When multiple access points are detected
The printer may communicate with other access points used in the vicinity.
Select the target access point, then click
Connect
.
You can also click
Manual Setup
to specify the settings of the target access
point manually on the
Manual Setup
dialog box.
Problem Possible Cause and Measures
(1)
(2)
(3)
(4)
(5)
(6)
(1)
(2)
(3)
(4)
(5)
(6)
73
The
Access Points
dialog box is displayed
during setup
(Continued)
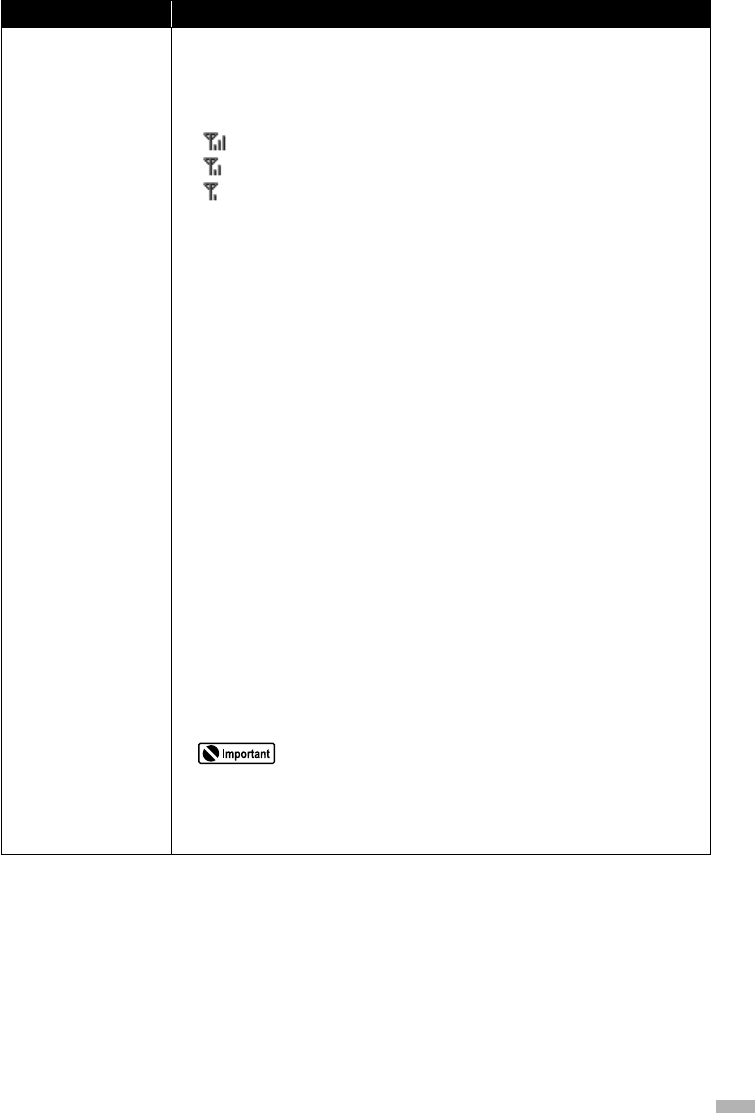
(1) Detected Access Points
The signal strength, network key (WEP or WPA) usage, network name
(SSID), and the used channel are displayed.
The signal strength is indicated by the number of bars displayed with the
antenna.
:Good
:Fair
:Poor
Whether a network key is used or not is indicated as follows.
Blank: Not used
WEP
: WEP key used
WPA
: WPA key used
(2) Network Information
The
Network Information
dialog box is displayed to confirm network
settings when your access point or your printer cannot be detected
automatically during setup for use over the network. This button is enabled
when an access point was not detected or could not be connected.
(3) Update
Click to search for access points again when the target access point is not
detected.
Make sure that the access point is powered on.
(4) Network Key
If a password (WEP key) or a WPA key is set to the target access point,
enter the pre-shared key or the passphrase in the same format and length
as the access point. The network key can be entered when an access point
using WEP or EAP/PSK is selected.
(5) Manual Setup
Click when the target access point is not detected, or to specify settings of
the access point manually. The
Manual Setup
dialog box is displayed. If
your access point is using the stealth / closed network feature, specify
settings here.
(6) Connect
Connects to the selected access point.
• When an access point using WPA-802.1x (Windows) or WPA Enterprise
(Macintosh) is selected, the
Connect
button is grayed out and cannot be clicked.
• When an access point using WPA-PSK (Windows) or WPA Personal (Macintosh)
with type of dynamic encryption set to AES is selected, the
Connect
button can be
clicked but is not operable.
Problem Possible Cause and Measures
74
The target access point
is not detected, or you
want to specify access
point settings manually
If the target access point is not detected or if you want to specify access point
settings manually, click
Manual Setup
in the
Access Points
dialog box.
If you connect to a network that is not protected with security measures, there is a risk of
disclosing data such as your personal information to a third party.
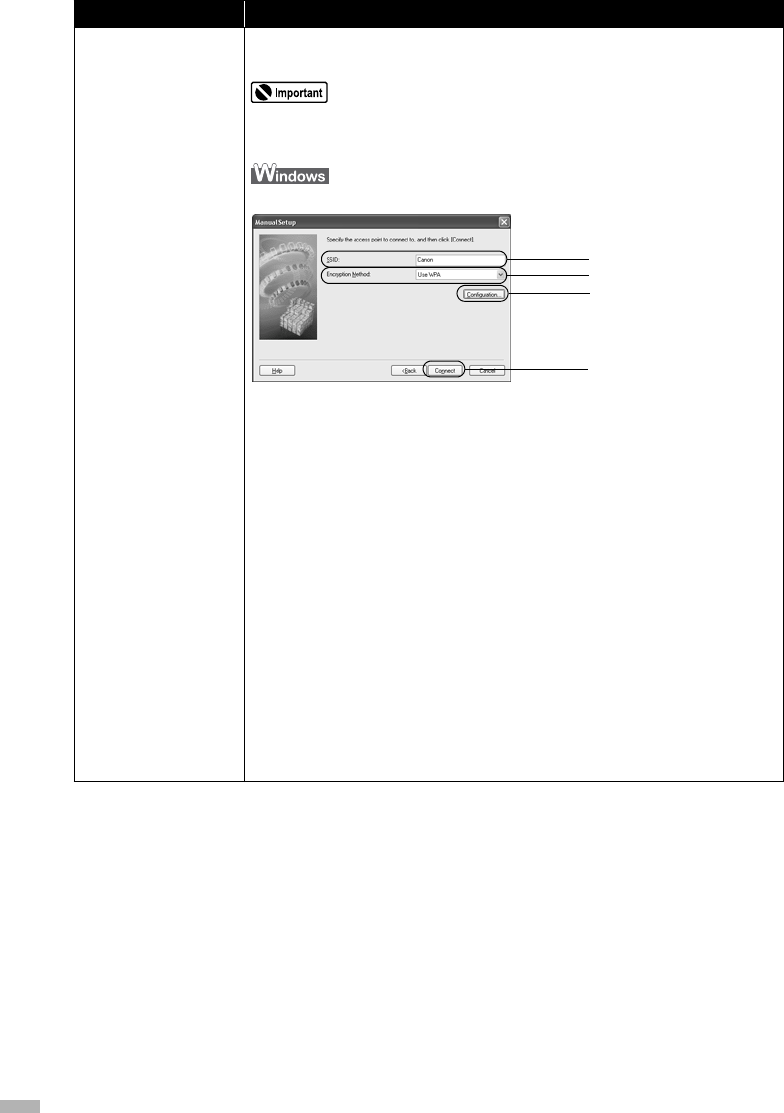
Set the target access point and click
Connect
.
Enter the settings for the target access point.
(1) SSID
Enter the SSID set to the access point.
SSID is also called ESS-ID. For details, refer to the manual of your access
point.
(2) Encryption Method
Select an encryption method from
Do Not Use
,
Use WEP
, or
Use WPA
.
When using a network key, communication is encrypted using the string you
specified. If the key has been set to the access point but not to the printer,
the setting window is displayed.
For details on WEP setting, refer to “WEP Details dialog box” on the
Network Guide
. For details on WPA setting, refer to “Changing the WPA
Detailed Settings” on the
Network Guide
.
(3) Configuration
The detailed settings dialog box is displayed. WEP or the WPA key selected
in
Encryption Method
can be confirmed and changed.
(4) Connect
Connects to the specified access point.
Problem Possible Cause and Measures
(1)
(2)
(3)
(4)

75
The target access point
is not detected, or you
want to specify access
point settings manually
(Continued)
Set the target access point and click
Connect
.
Enter the settings for the target access point.
(1) Network (SSID)
Enter the network ID (SSID) set to the access point.
SSID is also called ESS-ID. For details, refer to the manual of your access
point.
(2) Encryption Method
Select an encryption method from
Do Not Use
,
Use Password (WEP)
, or
Use WPA
. When using a network key, communication is encrypted using
the string you specified. If the key has been set to the access point but not
to the printer, the setting window is displayed.
For details on WEP setting, refer to “WEP Details dialog box” on the
Network Guide
. For details on WPA setting, refer to “Changing the WPA
Detailed Settings” on the
Network Guide
.
(3) Configuration
The detailed settings dialog box is displayed. The WEP or the WPA key
selected in
Encryption Method
can be confirmed and changed.
(4) Connect
Connects to the specified access point.
Cannot connect with an
access point to which a
WEP key is set (You
forgot the WEP key)
For information on how to set up the access point, refer to the manual provided
with the access point. Make sure that the computer and the access point can
communicate, then set up the printer to match the settings of the access point.
Problem Possible Cause and Measures
(1)
(2)
(3)
(4)
76
How to set a WEP key Refer to the manual provided with the access point and check the access point
settings.
Confirm that the computer and the access point can communicate with each
other.
Then set up the printer to match the settings of the access point.
When using WEP, the key length, key format, the key to use (out of 1 to 4), and
the authentication method must match among the access point, the printer, and
the computer.
For an access point using the WEP method such as the following, use the
hexadecimal key format for the printer.
Example:
Using 64 bit key length, when the string “canon” is entered, an access point
generates the following codes.
Key 1: C9 42 28 B3 AE
Key 2: 87 C0 FB 05 6B
Key 3: 9A 15 FB F8 F3
Key 4: 62 56 67 58 44
To communicate with such an access point, the key to use must be set to the
same key number as selected in the access point, and its code must be set to
the printer in hexadecimal format.
Normally, select
Auto
for the authentication method. If you want to specify the
method manually, select
Open System
or
Shared Key
according to the setting
of the access point.
When the AirPort Base Station is used as an access point:
• To confirm the password (WEP key), use the AirPort Admin Utility. For details, refer to
its online help.
•Select
64 bit
if
40 bit WEP
is selected for the key length in the AirPort Base Station.
Cannot connect to the
target access point
Confirm the following;
• The network name / SSID of the target access point and the printer are
identical. For information on how to set up a WEP key, see “How to set a
WEP key” on page 76.
• Infrastructure is selected as the network type.
• If a network key is set to the access point, set the printer to match it.
• If MAC address filtering is set to the access point, register the MAC address
of the printer or disable MAC address filtering.
• The wireless channel to be used may be limited depending on wireless
network devices installed in the computer. Refer to the manual provided with
your computer or your wireless network device.
• Make sure that the channel set to the access point is valid to communicate
with the computer, confirmed above. If not, change the channel set to the
access point.
• When connecting to an AirPort Base Station, use alphanumeric characters
for the name of the network (SSID).
• Make sure that there is no barrier or obstacle between the access point and
the printer.
Problem Possible Cause and Measures
77
The
Set Printer IP
Address / Printer IP
Address Setup
dialog
box is displayed during
setup
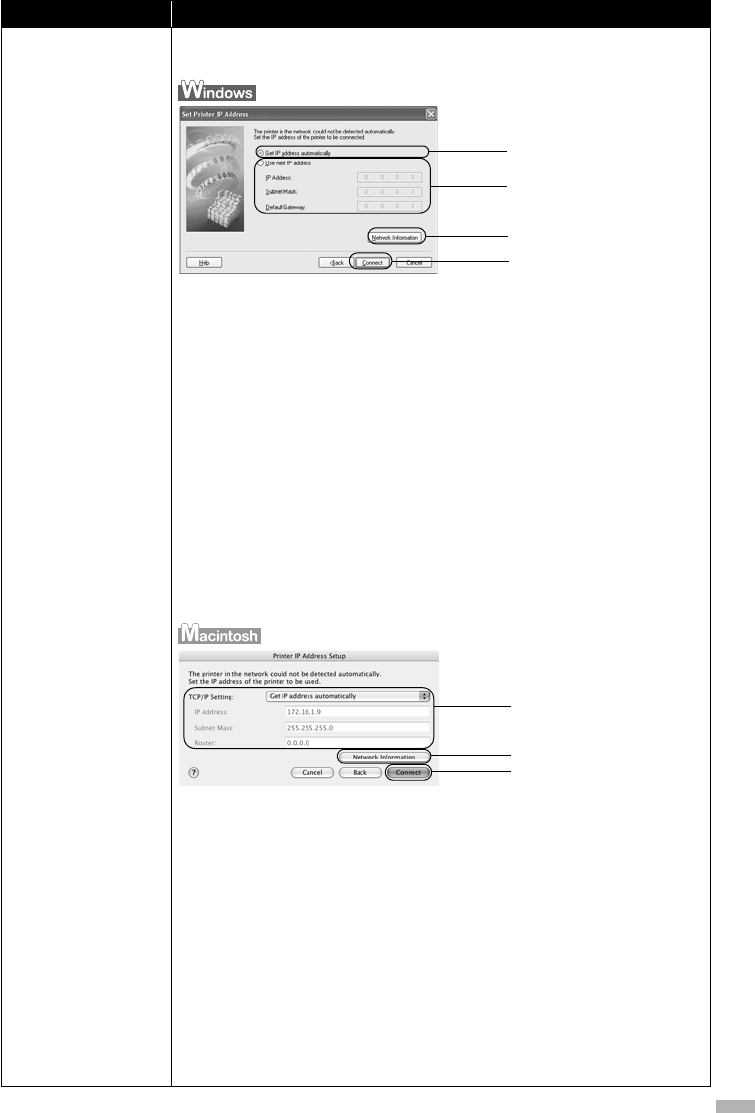
The following dialog box is displayed if no printer was detected on the network.
Specify an IP address to detect the target printer.
(1) Get IP address automatically
Detects the printer automatically. If automatic printer detection fails, check
the network settings and your network connection.
(2) Use next IP address
Select this check box to manually specify the IP address for the printer to
detect.
IP Address/Subnet Mask/Default Gateway
Enter each value to specify a fixed IP address when
Use next IP Address
is selected.
(3) Network Information
The
Network Information
dialog box is displayed to confirm network
settings when your access point or your printer cannot be detected
automatically during setup for use over the network. This button is enabled
when an access point was not detected or could not be connected.
(4) Connect
Searches for the printer with the specified settings.
(1) TCP/IP Setting
Select
Get IP address automatically
or
Use next IP address
. Select
Get
IP address automatically
to search for the target printer automatically. If it
fails, check the network settings and the network connection.
IP Address/Subnet Mask/Router
Enter each value to specify a fixed IP address when
Use next IP address
is selected.
(2) Network Information
The
Network Information
dialog box is displayed to confirm network
settings when your access point or your printer cannot be detected
automatically during setup for use over the network. This button is enabled
when an access point was not detected or could not be connected.
(3) Connect
Searches for the printer with the specified settings.
Problem Possible Cause and Measures
(1)
(2)
(3)
(4)
(1)
(2)
(3)
78
Checking the IP
address or the MAC
address of the printer
To check the IP address or the MAC address of the printer, print out the printer
setup information or use BJ Network Tool.
For information on how to print out the printer network setting information,
“Printing and Initializing Network Settings” on page 67.
To display the
Network Information
dialog box, in the BJ Network Tool, select
Network Information
from the
View
menu.
Checking the IP
address of the
computer
To check the IP address assigned to the computer, follow the procedure below.
•
When using Windows XP/Windows 2000
1
From the Start menu, select (All) Programs, Accessories, and then
Command Prompt.
2
Enter “ipconfig” and press the Enter key. The IP addresses of the
network devices installed in your computer are displayed.
•
When using Windows Me/Windows 98
1
From the Start menu, select Run.
2
Enter “winipcfg” in the Name text box and click OK.
Select the network device to display the IP address.
1
From the Apple menu, select System Preferences, and then Network.
2
From the Show pop-up menu, select the interface to use.
Select
AirPort
when using wireless LAN.
3
Select the TCP/IP tab.
The currently assigned IP address is displayed.
Problem Possible Cause and Measures
79
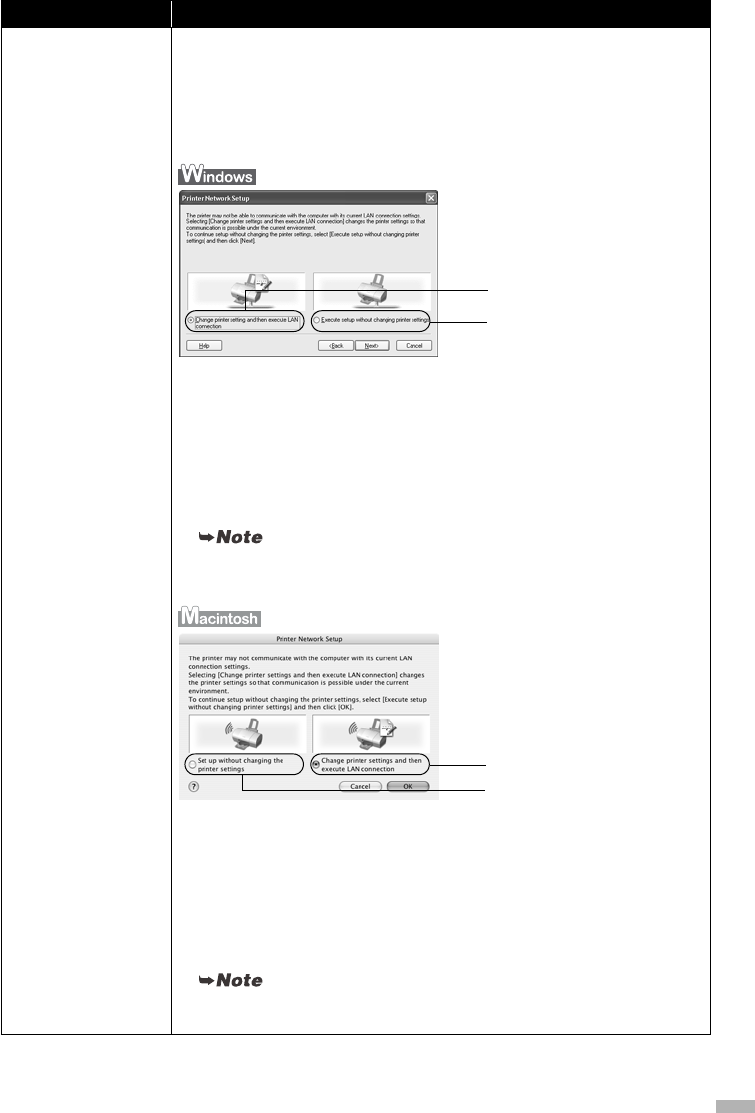
The
Printer Network
Setup
dialog box is
displayed during setup
The
Printer Network Setup
dialog box is displayed in the following cases.
- when you are re-setting a printer whose setup was canceled halfway
- when you changed the network settings
- when you are already using a printer over a wireless LAN
If you canceled setup or changed the network settings, perform network setup
again.
(1) Change printer setting and then execute LAN connection
The printer network settings will be changed to enable communication
under the current network settings.
(2) Execute setup without changing printer settings
Continues computer setup with the settings specified to the printer.
Select this when you are not currently connected to a network but want to
set up the computer with the settings specified to the printer.
After setup, confirm that the printer and the computer (or the access point, when using
wireless LAN) can communicate with each other. If not, perform network setup again.
(1) Change printer settings and then execute LAN connection
The printer network settings will be changed to enable communication
under the current network settings.
(2) Set up without changing the printer settings
Continues computer setup with the settings specified to the printer.
Select this when you are not currently connected to a wireless LAN but
want to set up the computer with the settings specified to the printer.
After setup, confirm that the printer and the computer (or the access point, when using
wireless LAN) can communicate with each other. If not, perform network setup again.
Problem Possible Cause and Measures
(1)
(2)
(1)
(2)

80
The printer cannot
communicate with the
access point in a
wireless LAN
1
Click Update to search for access points again from the Access Points
dialog box.
2
If the access point is still not detected, move the printer closer to the
access point or remove any obstacles, and then click Update.
3
If the access point is still not detected, click Manual Setup to specify
the settings of the access point in the Manual Setup dialog box, and
then click Connect.
4
Make sure that the computer and the access point can communicate
with each other. For details, see “Checking if the computer and the
printer (access point) can communicate with each other” on the
Network Guide.
5
Disconnect the power cord of the access point, plug in the cord again,
and then click Update.
• Access point settings
For information on how to modify the settings of the access point, see
the manual provided with the access point.
When MAC address filtering is set to the access point, register the
MAC address of the printer or disable MAC address filtering.
When the access point does not permit SSID broadcasting, or if the
stealth function / closed network is enabled, enter the network name
(SSID), etc, to the printer manually.
When an SSID or a network key is set to the access point, enter the
identical SSID or network key as those set to the access point. SSID
is case-sensitive.
For information on how to set WEP, see “How to set a WEP key” on
page 76.
• Wireless channels
Computers with a built-in wireless network card may restrict the
wireless channels it can use. Check the channel available to the
wireless network card. For information on how to check wireless
channel, see the manual provided with the computer or the wireless
network card.
Make sure that the wireless channel the access point is using is one
that the computer supports. If not, change the wireless channel set to
the access point to one supported by the computer.
• Location
Make sure that there is no barrier or obstacle between the access
point and the printer.
Cannot communicate
with the printer after
applying MAC address
filtering or entering a
WEP key to the access
point
- Refer to the manual provided with the access point to confirm the access
point setting. Make sure that the computer and the access point can
communicate with each other under this setting.
- If you are performing MAC address filtering at the access point, confirm that
the MAC addresses for both the computer and the printer are registered.
- If you are using a WEP key, make sure that the key for the computer and the
printer matches that set to the access point.
- Besides the WEP key itself, the key length, key format, the key ID to use, and
the authentication method must match among the printer, the access point,
and the computer.
- Normally, select
Auto
for the authentication method. If you want to specify
the method manually, select
Open System
or
Shared Key
according to the
setting of the access point.
Problem Possible Cause and Measures
81
No printer is detected
after the network
settings are changed in
Windows
Wait until the IP address is assigned to the computer. You may need to restart
your computer. When you are using Windows Me or Windows 98, you need to
restart the computer. Search for the printer again after confirming a valid IP
address is assigned to the computer.
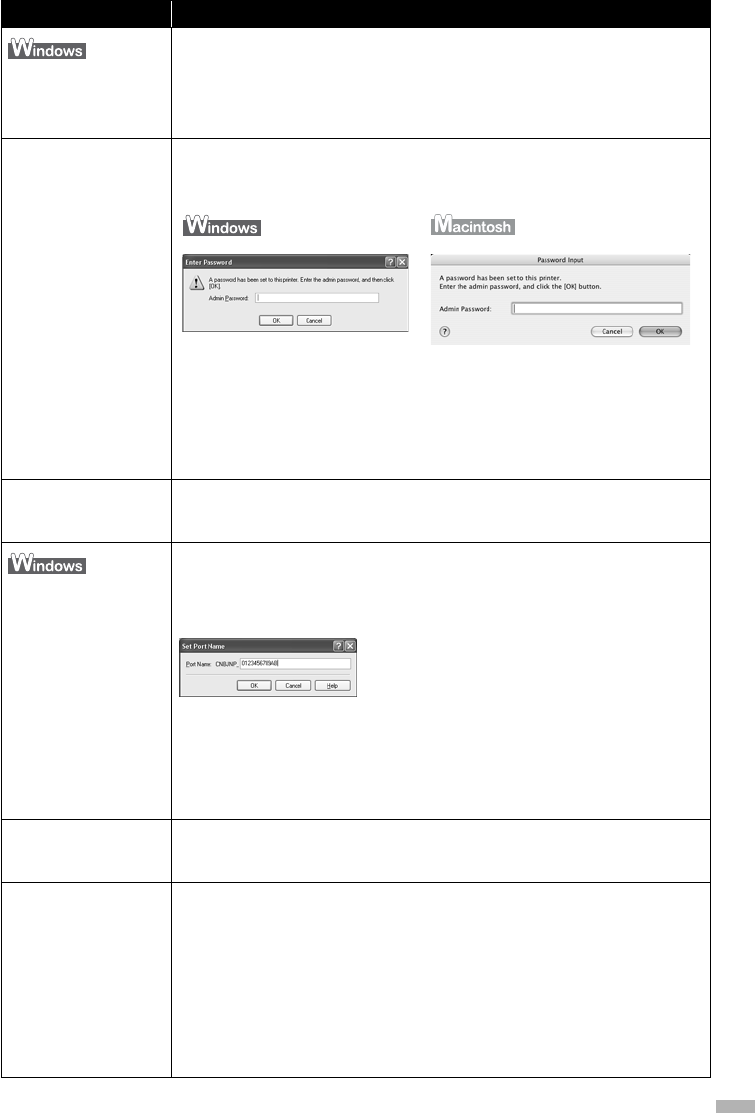
The
Enter Password /
Password Input
dialog
box is displayed during
setup
The following dialog box is displayed if an administrator password is set to the
printer which has already been set up.
Admin Password
Enter the administrator password you have set. The administrator password
consists of alphanumeric characters and is no longer than 32 characters. The
password is case-sensitive.
For security, your entry will be displayed by “*” (asterisks) for Windows and “•”
(bullets) for Macintosh.
The admin password
was forgotten
Restore the printer setting to factory default. All settings previously set will be
lost after initialization. Set up the printer again to use it. For details, see
“Printing and Initializing Network Settings” on page 67.
Changing the port
name
To change the port name, click
Set Port Name
in the
Add Port
dialog box.
The
Set Port Name
dialog box is displayed, where you specify the port name.
When you have 2 or more printers, you may want to change the port name for
identification.
Port Name
Port names should consist of alphanumeric characters and be no longer than
24 characters (12 characters under Windows Me or Windows 98), excluding
the prefix. The port name includes the fixed prefix “CNBJNP_”, which you do
not need to enter.
Cannot print out the
network setting
information
See “Printing and Initializing Network Settings” on page 67 to print out printer
setting information. If it fails, use BJ Network Tool or Network Configuration to
confirm the network settings from the computer.
Using the printer in a
multiple access point
setup
Confirm the following;
• The access point to be used can communicate with the printer and the
computer.
• Under Windows XP, the priority of the access point is set to highest in the
Preferred networks
list displayed by clicking the
Wireless Networks
tab in
the
Wireless Network Connection Properties
dialog box.
• The wireless channel of the access point is far enough away with those of
other access points.
For more information, see the manual provided with the access point.
Problem Possible Cause and Measures

82
Re-setting the printer
whose setup was
canceled halfway
Restore the printer to the factory settings and set up the printer again. For
details, see “Printing and Initializing Network Settings” on page 67. For setup
procedures, see “Setting Up the Printer and the Computer” on page 16.
Confirming the version
of Windows XP
If you are using Windows XP, you may need to confirm your system version to
configure the network setting of your computer.
To check the version of Windows XP, follow these steps.
1
Right click My Computer from the Start menu and select Properties.
System Properties
will be displayed.
2
Confirm that the General tab is displayed.
3
Confirm your Windows XP version under System.
Problem Possible Cause and Measures
83
Conformity declaration for R&TTE
English Hereby, Canon, declares that this PIXMA iP4000R is in compliance
with the essential requirements and other relevant provisions of
Directive 1999/5/EC.
Finnish Canon vakuuttaa täten että PIXMA iP4000R tyyppinen laite on
direktiivin 1999/5/EY oleellisten vaatimusten ja sitä koskevien
direktiivin muiden ehtojen mukainen.
Dutch Hierbij verklaart Canon dat het toestel PIXMA iP4000R in
overeenstemming is met de essentiële eisen en de andere relevante
bepalingen van richtlijn 1999/5/EG
Bij deze verklaart Canon dat deze PIXMA iP4000R voldoet aan de
essentiële eisen en aan de overige relevante bepalingen van
Richtlijn 1999/5/EC.
French Par la présente Canon déclare que l'appareil PIXMA iP4000R est
conforme aux exigences essentielles et aux autres dispositions
pertinentes de la directive 1999/5/CE
Par la présente, Canon déclare que ce PIXMA iP4000R est
conforme aux exigences essentielles et aux autres dispositions de la
directive 1999/5/CE qui lui sont applicables
Swedish Härmed intygar Canon att denna PIXMA iP4000R står I
överensstämmelse med de väsentliga egenskapskrav och övriga
relevanta bestämmelser som framgår av direktiv 1999/5/EG.
Danish Undertegnede Canon erklærer herved, at følgende udstyr PIXMA
iP4000R overholder de væsentlige krav og øvrige relevante krav i
direktiv 1999/5/EF
German Hiermit erklärt Canon, dass sich dieser/diese/dieses PIXMA
iP4000R in Übereinstimmung mit den grundlegenden
Anforderungen und den anderen relevanten Vorschriften der
Richtlinie 1999/5/EG befindet". (BMWi)
Hiermit erklärt Canon die Übereinstimmung des Gerätes PIXMA
iP4000R mit den grundlegenden Anforderungen und den anderen
relevanten Festlegungen der Richtlinie 1999/5/EG. (Wien)
84
Greek
ȂǼ ȉǾȃ ȆǹȇȅȊȈǹ Canon Ǿȁ ȃǼǿ ȅȉǿ PIXMA iP4000R
ȈȊȂȂȅȇĭ ȃǼȉǹǿ ȆȇȅȈ ȉǿȈ ȅȊȈǿ ǼǿȈ ǹȆǹǿȉǾȈǼǿȈ Ȁǹǿ
ȉǿȈ ȁȅǿȆǼȈ ȈȋǼȉǿȀǼȈ ǿǹȉǹȄǼǿȈ ȉǾȈ ȅ ǾīǿǹȈ 1999/5/ǼȀ
Italian Con la presente Canon dichiara che questo PIXMA iP4000R è
conforme ai requisiti essenziali ed alle altre disposizioni pertinenti
stabilite dalla direttiva 1999/5/CE.
Spanish Por medio de la presente Canon declara que el PIXMA iP4000R
cumple con los requisitos esenciales y cualesquiera otras
disposiciones aplicables o exigibles de la Directiva 1999/5/CE
Portuguese Canon declara que este PIXMA iP4000R está conforme com os
requisitos essenciais e outras disposições da Directiva 1999/5/CE.
Malti

Regulatory Information
For 110-120V, 50/60Hz model
Color Printer Model: K10245 (Contains IC 498C-K30242)
This device complies with Part 15 of the FCC Rules. Operation is subject to the following two
conditions: (1) This device may not cause harmful interference, and (2) this device must accept any
interference received, including interference that may cause undesired operation.
Note: This equipment has been tested and found to comply with the limits for a Class B digital device,
pursuant to Part 15 of the FCC Rules. These limits are designed to provide reasonable protection against
harmful interference in a residential installation. This equipment generates, uses and can radiate radio
frequency energy and, if not installed and used in accordance with the instructions, may cause harmful
interference to radio communications.
However, there is no guarantee that interference will not occur in a particular installation. If this
equipment does cause harmful interference to radio or television reception, which can be determined by
turning the equipment off and on, the user is encouraged to try to correct the interference by one or more
of the following measures:
Reorient or relocate the receiving antenna.
Increase the separation between the equipment and receiver.
Connect the equipment into an outlet on a circuit different from that to which the receiver is connected.
Consult the dealer or an experienced radio/TV technician for help.
Use of a shielded cable is required to comply with Class B limits in Subpart B of Part 15 of the FCC
Rules.
Do not make any changes or modifications to the equipment unless otherwise specified in the manual. If
such changes or modifications should be made, you could be required to stop operation of the equipment.
Canon U.S.A., Inc.
One Canon Plaza
Lake Success, NY 11042
1-516-328-5600

QA7-3430-V02 XXXXXXXX ©CANON INC.2004 PRINTED IN THAILAND
The following ink tanks are compatible with iP4000R.
For details on ink tank replacement, refer to “Print Head Maintenance” in this guide.