Cardionet 1009 C3 monitor User Manual 2
Cardionet C3 monitor 2
Contents
- 1. User Manual 1
- 2. User Manual 2
- 3. User Manual 3
- 4. User Manual 4
- 5. User Manual 5
User Manual 2
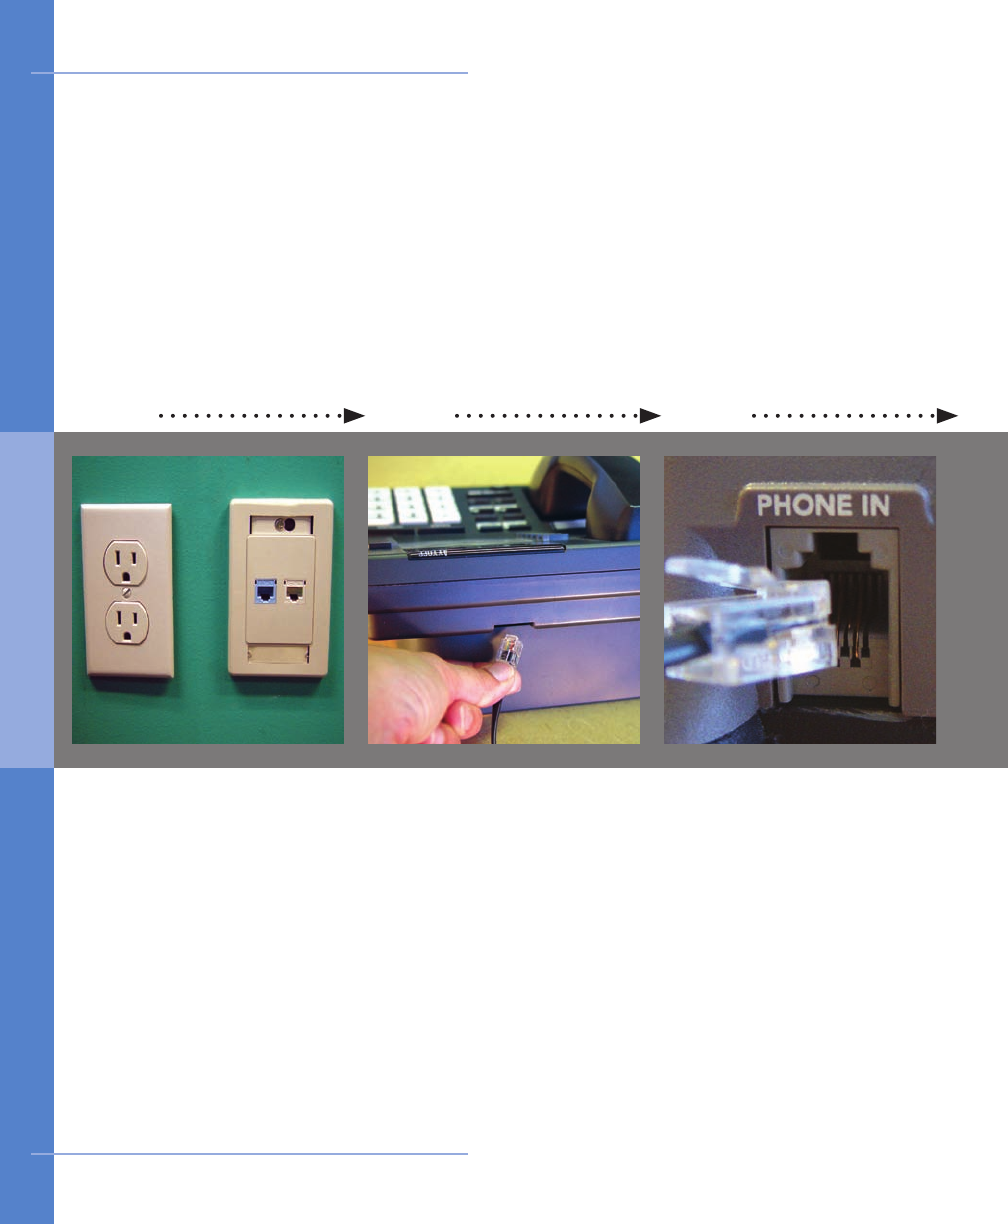
31 2
Find an electrical outlet
located close to a
telephone jack, preferably
in your bedroom.
Pick up the receiver of
your home phone and
listen to ensure there is a
dial tone.
On the CardioNet base,
locate the slot labeled
“Phone In” on the back
of the base. Take the
telephone cord you just
unplugged from the back
of your phone and plug it
into the slot on the base
labeled “Phone In”.
Locate the telephone cord
plugged into the back
of your home phone.
Unplug the telephone
cord from the back of
your telephone.
Look for outlet and jack Find your phone cord Plug phone cord into base
12 Getting Started
How to Install the CardioNet Base
2 . G ET TI NG STA R TED
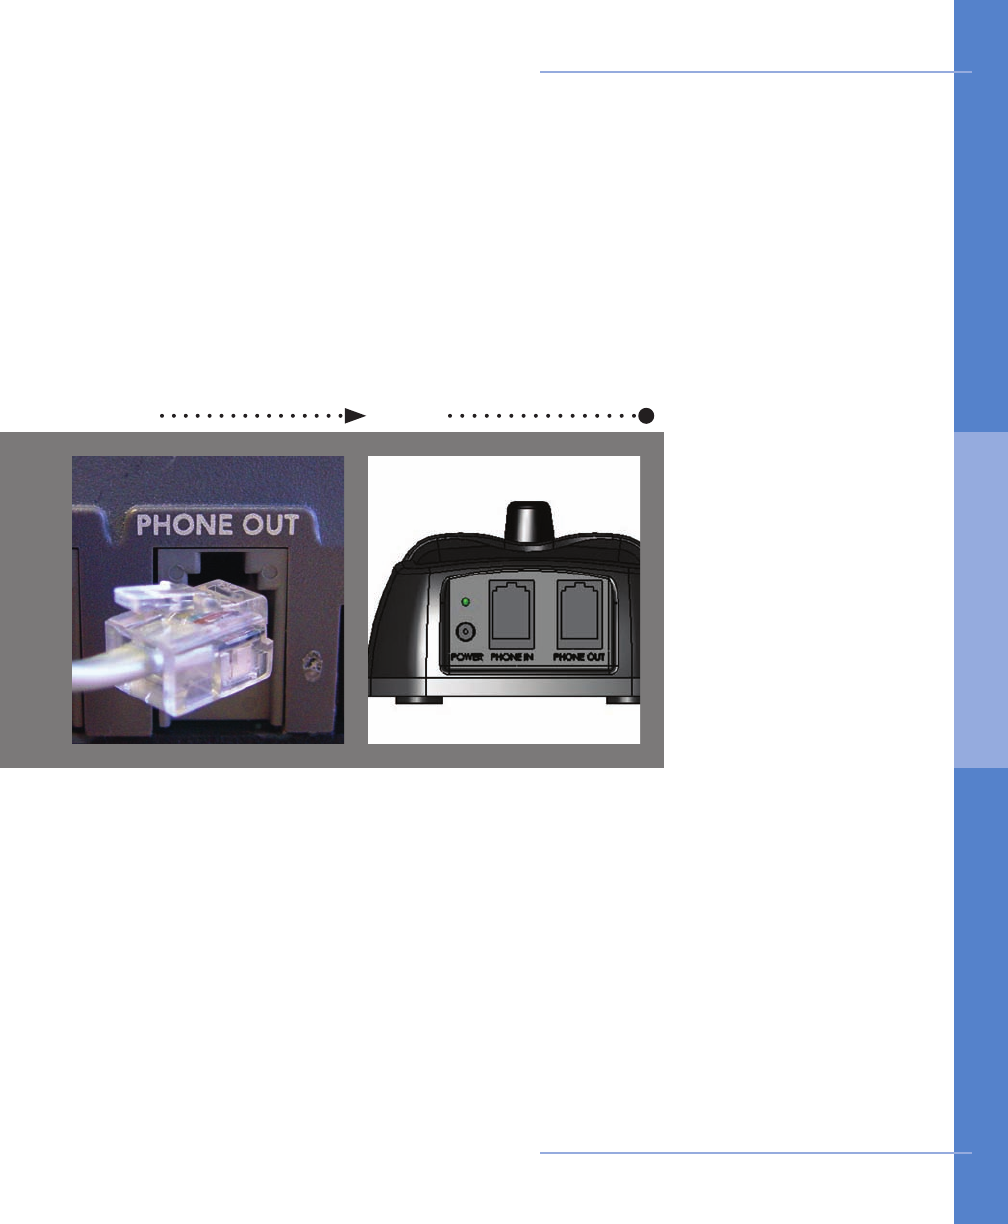
4 5
In the kit, locate the power
cord. On the back of the
base, locate the round
hole labeled “Power”. Plug
the small, round end of the
power cord into the slot on
the base labeled “Power”.
Plug the other end into
an electrical outlet.
Check your home phone
for a dial tone.
In the CardioNet kit,
nd the telephone cord.
Locate the slot labeled
“Phone Out” on the back
of the base. Plug one end
of this telephone cord
into the slot on the base
labeled “Phone Out”.
Plug the other end of this
cord into the back of your
telephone.
Plug in second phone cord Plug in power cord
Getting Started 13
How to Install the CardioNet Base
2 . G ET TI NG STA R TED

e Base Transmits Events Using your Home Telephone
When your CardioNet monitor is in the base, it uses your home telephone system
for communications with the CardioNet Monitoring Center. When you are away from
home – or whenever your CardioNet monitor is out of the base station – the monitor
uses cell phone technology to contact the CardioNet Monitoring Center and transmit
data. You do not need a cell phone. The monitor uses its own cell phone.
As with consumer cellular phones, calls can sometimes be delayed or blocked by
coverage problems, heavy trafc on cell phone networks, or physical obstructions
such as buildings or mountains.
If the CardioNet monitor has data to transmit and is unable to communicate with
the CardioNet Monitoring Center through cellular communications, the monitor will
store the data and transmit it when cell coverage becomes available or through
your home telephone system when the monitor is placed in the base.
If you pick up your telephone while the monitor is in the base and transmitting
data, you will hear static, like the sound a fax machine makes. Hang up the phone
and wait a few minutes while the data is sent and then you will get a dial tone. If
you must use your phone and the monitor is transmitting data, take the monitor
out of the base and make your call. When you are done with the call, however, you
should return your monitor to the base right away to complete the transmission.
If you are on the phone and the monitor wants to transmit data, you might hear
clicking sounds. If you are using a dial-up connection to access the Internet on the
same phone line as the base, and the monitor is in the base transmitting data, it
may disconnect you from the Internet. Hang up and the monitor will transmit the
data. When the monitor is in the base and transmitting data, your telephone line
will have a busy signal for incoming calls. You will not be charged for any calls your
monitor makes to CardioNet.
14 Getting Started
e Base Recharges your Monitor
The base functions as a recharging station for your CardioNet monitor. When you
insert the monitor into the base correctly, “Monitor is Charging” will appear on the
screen. The monitor’s rechargeable battery provides between 12 to 16 hours of use.
If you plan to be away from home for more than 12 hours, you should bring one
of the black power cords with you. At some point during the day, plug the power
cord into an electrical outlet and charge your monitor by inserting the other end of
the power cord into the hole on the side of the monitor.
About the CardioNet Base
2 . G ET TI NG STA R TED
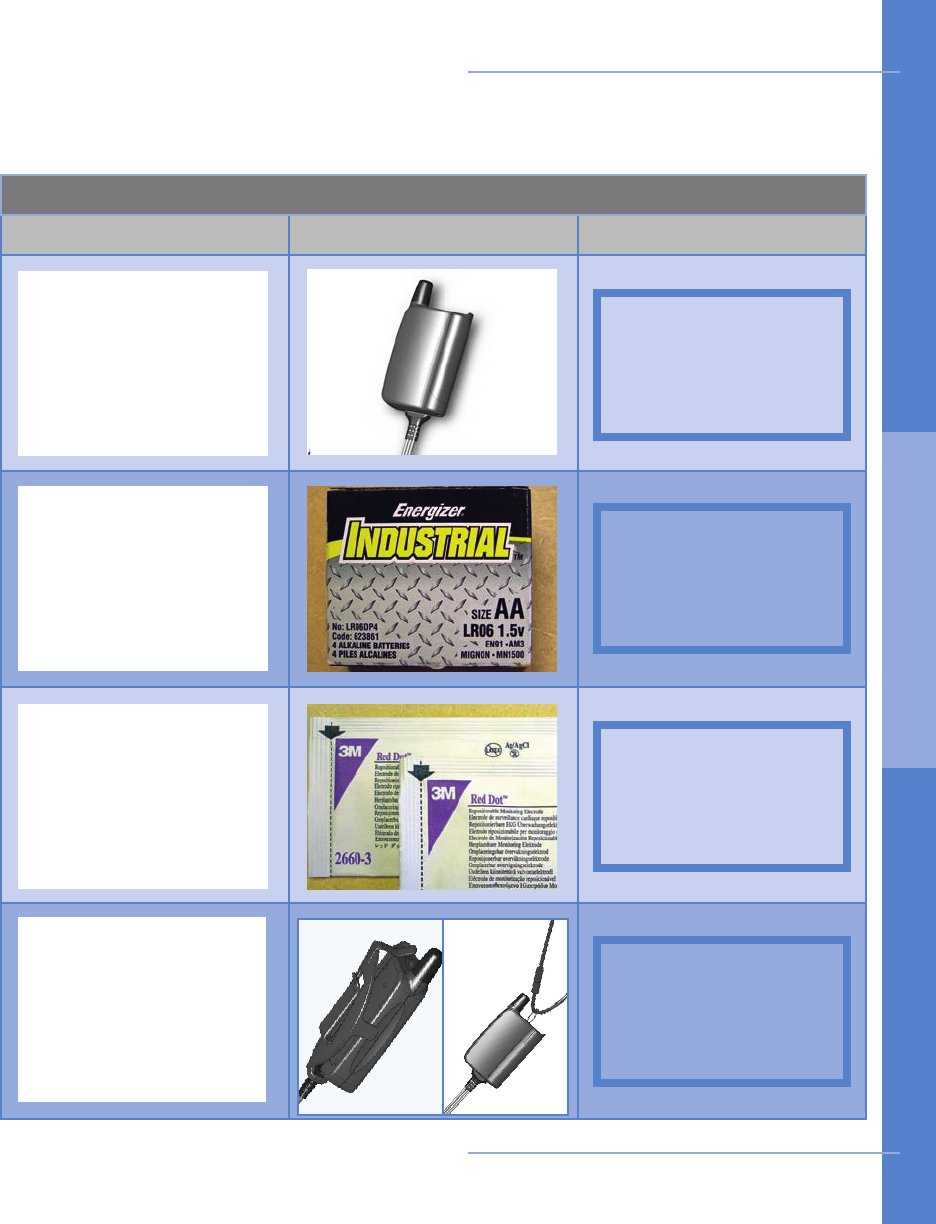
Items You’ll Need to Begin Using your CardioNet Sensor
Item and Quantity Picture of Item Kit Location
The table below will help you gather all the items you will need to begin using your
CardioNet sensor. All items are located in your CardioNet kit.
Getting Started 15
1
1
1
Pack of Electrode Pads
AA Battery
CardioNet Sensor
1
Neck Strap or Belt Clip
Place shipper kit
image here
Place shipper kit
image here
Place shipper kit
image here
Place shipper kit
image here
How to Activate the CardioNet Sensor
2 . G ET TI NG STA R TED
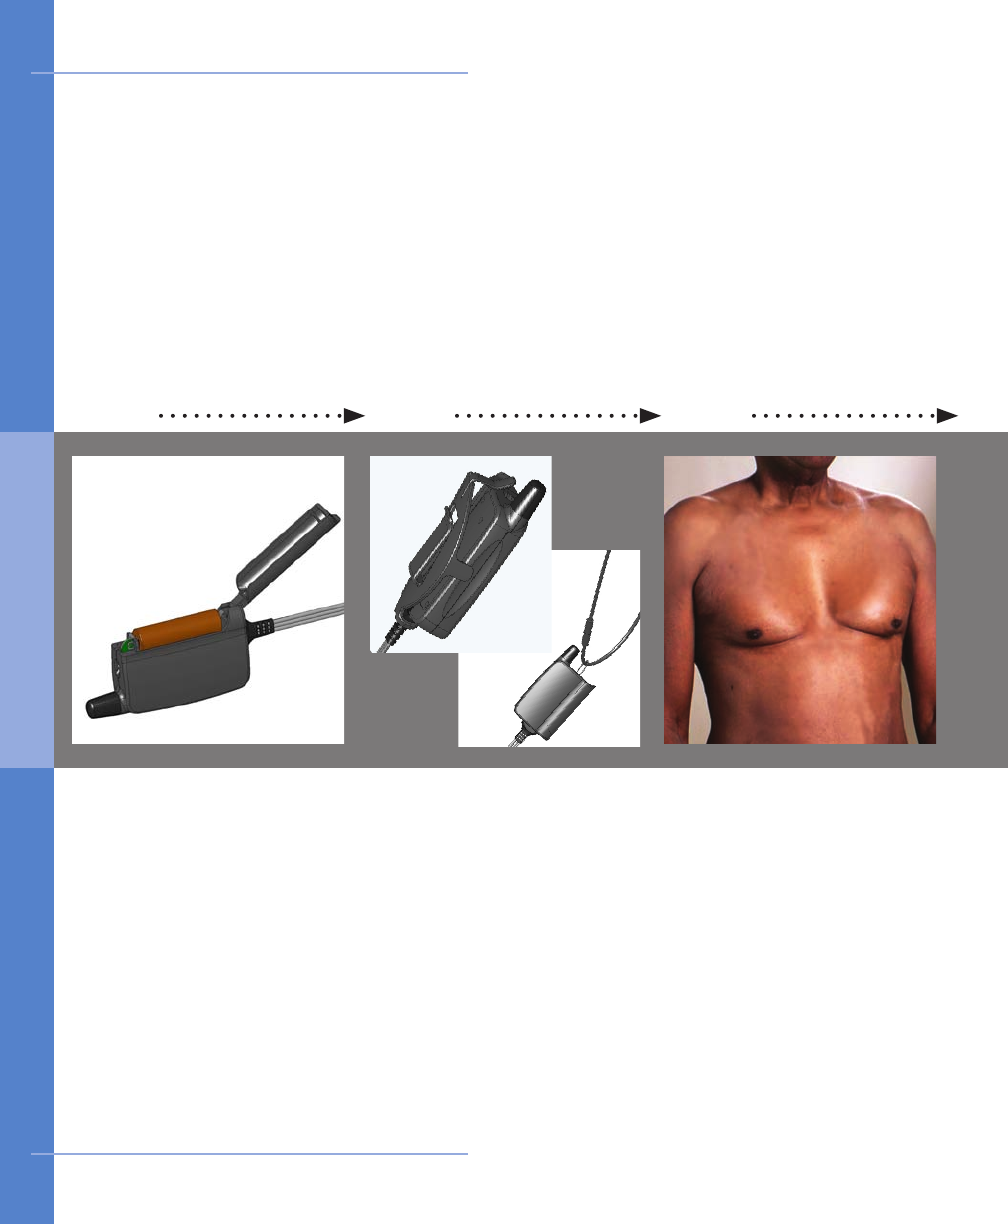
31 2
First make sure you do not
have any lotion, powder or
hair in the three locations
(steps 4-6). If you have
lotion or powder on, you
should wash off the areas
with soap and water and
dry the skin completely. If
you have any hair in these
locations, you must shave
it all off before putting the
electrodes in place.
Prepare your skin
Neck strap: unsnap the
neck strap and thread it
through the loop on the
sensor. Snap the ends
together and place it over
your head. The 2 tabs
allow you to adjust the
length of the strap.
Belt clip: attach the clip to
your pants, skirt or belt.
Snap the at side of the
sensor into the clip with
the wires pointing upward.
Belt clip or neck strap?
16 Getting Started
Insert the AA battery
Lift the lid of your sensor
and place one AA battery
inside. Use the diagram
on the inside of the
sensor to make sure you
insert the battery with
the proper positive and
negative orientation. If
you have inserted the
battery correctly, you will
hear a chime.
How to Activate the CardioNet Sensor
2 . G ET TI NG STA R TED
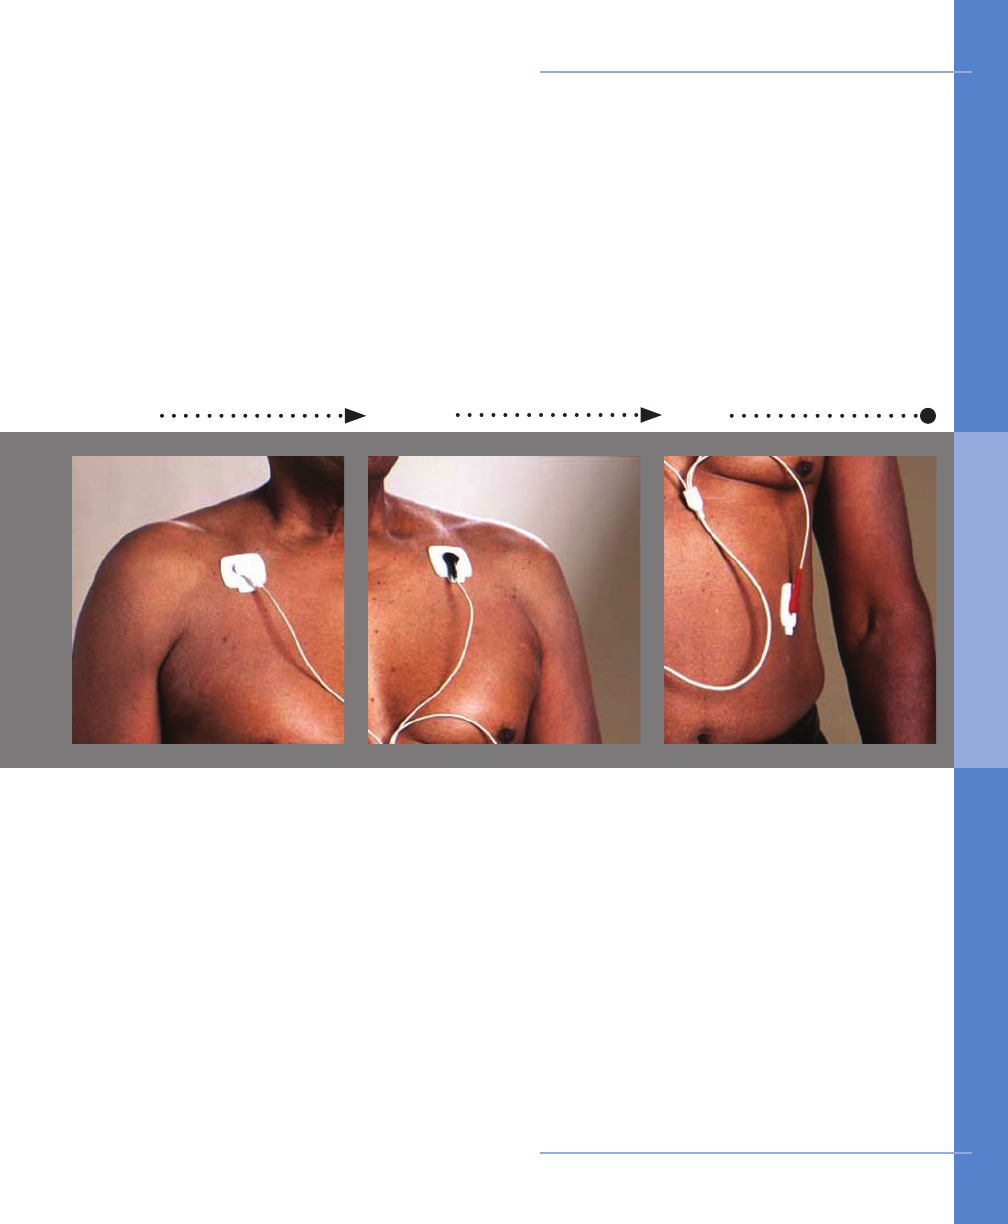
Peel off the electrode
from the backing with
the BLACK lead attached.
Place this electrode just
below the center of your
left collarbone. Press so
that the electrode is ad-
hered to your skin.
Open one pack of elec-
trodes. Snap the 3 leads
(from the end of your
sensor wires) onto the 3
electrodes. Peel off the
electrode from the back-
ing with the WHITE lead
attached. Place this elec-
trode just below the center
of your right collarbone.
Press so that the electrode
is adhered to your skin.
4 5 6
Peel off the electrode from
the backing with the RED
lead attached. Place this
electrode on your left side,
on the lower part of your
rib cage. RED on ribs.
Press so that the electrode
is adhered to your skin.
Red on ribs
Getting Started 17
White on right Black on left
How to Activate the CardioNet Sensor
2 . G ET TI NG STA R TED
18 Getting Started
How the Electrodes Work
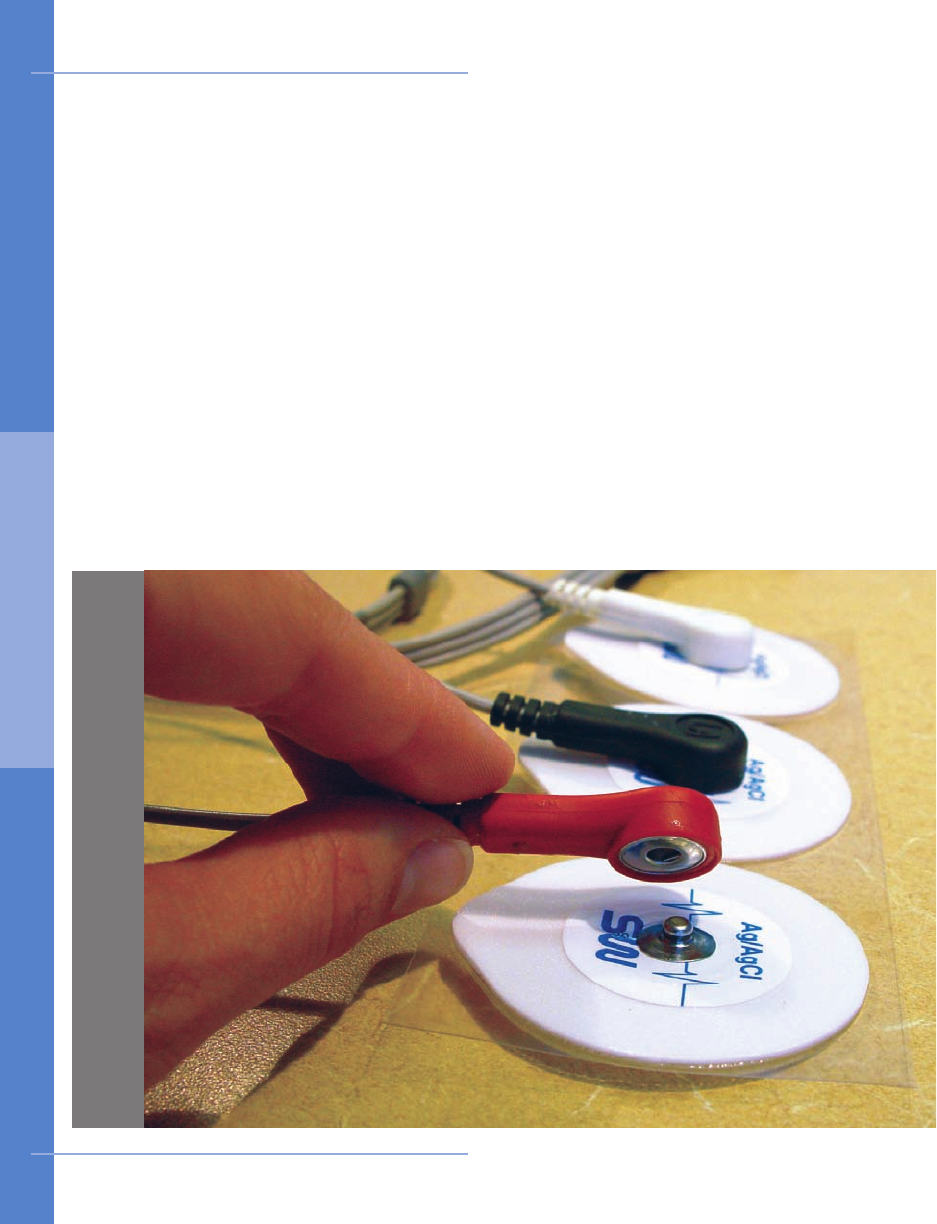
The CardioNet sensor uses three electrode pads, carefully placed on your body to
detect heartbeats by sensing electrical changes on the surface of your skin. The
electrode pads are attached to three leads - a white lead, a black lead and a red lead.
The leads can be snapped on and off the electrodes. This allows you to take off the
leads and sensor before showering – without removing the electrode pads.
It is very important that you follow the instructions in Chapter 4:
Changing Your
Electrodes
. By following these instructions carefully you are providing CardioNet
with a clear reading of your heartbeats while maintaining the health of your skin.
If You Experience Skin Irritation
If you experience skin irritation or a rash or at any time you experience discomfort
wearing the electrodes, please contact CardioNet at 1-866-426-4401.
Tips for Wearing the CardioNet Sensor
2 . G ET TI NG STA R TED
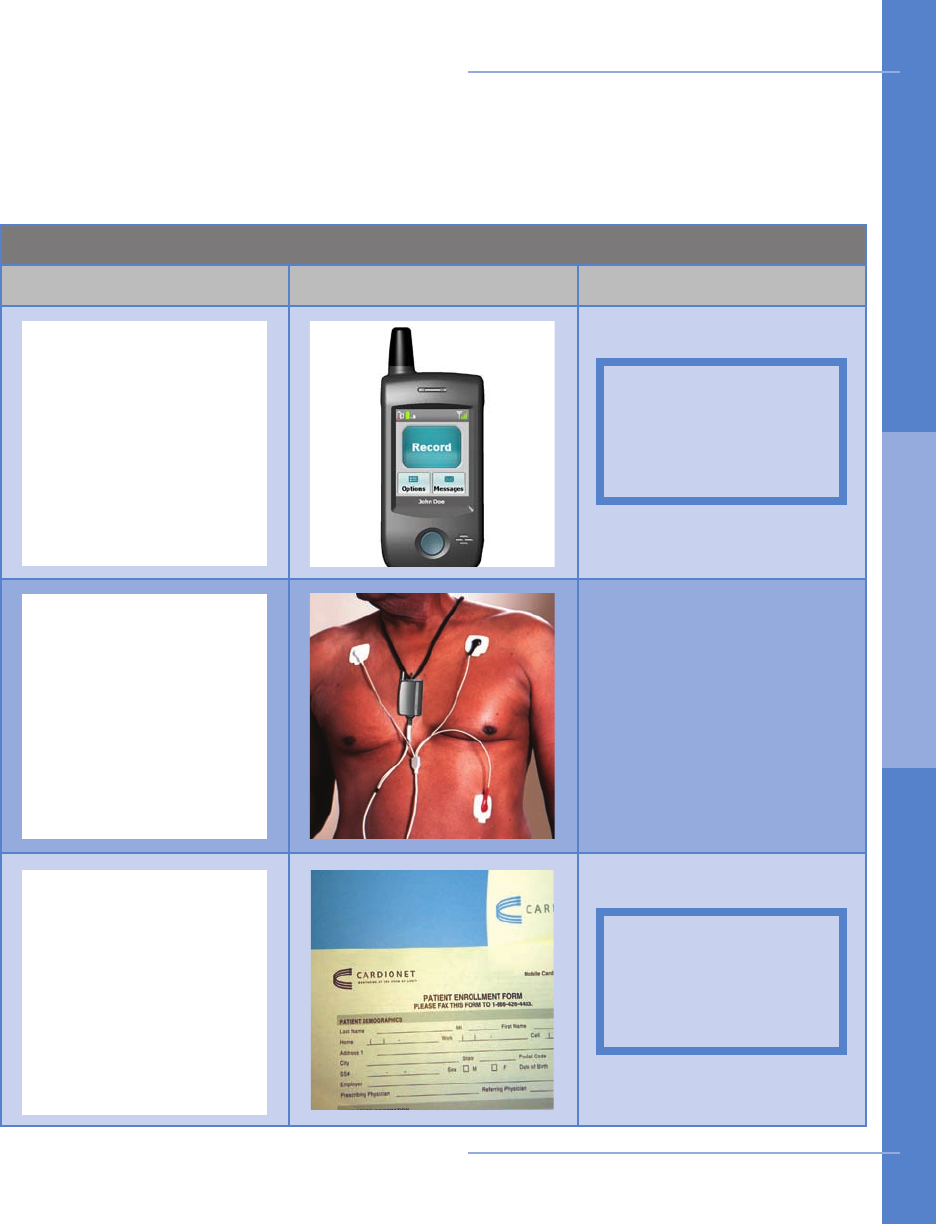
Items You’ll Need to Activate your CardioNet Monitor
Item and Quantity Picture of Item Kit Location
Before proceeding, please contact a CardioNet Customer Service Representative at
1-866-426-4401. The table below will help you gather all the items you will need to
activate your CardioNet monitor. All items are located in your CardioNet kit.
1
1
1
Patient Enrollment Form
to sign
Sensor Attached
CardioNet Monitor
Getting Started 19
The sensor should be
attached to your body.
Place shipper kit
image here
Place shipper kit
image here
How to Activate the CardioNet Monitor
2 . G ET TI NG STA R TED
31 2
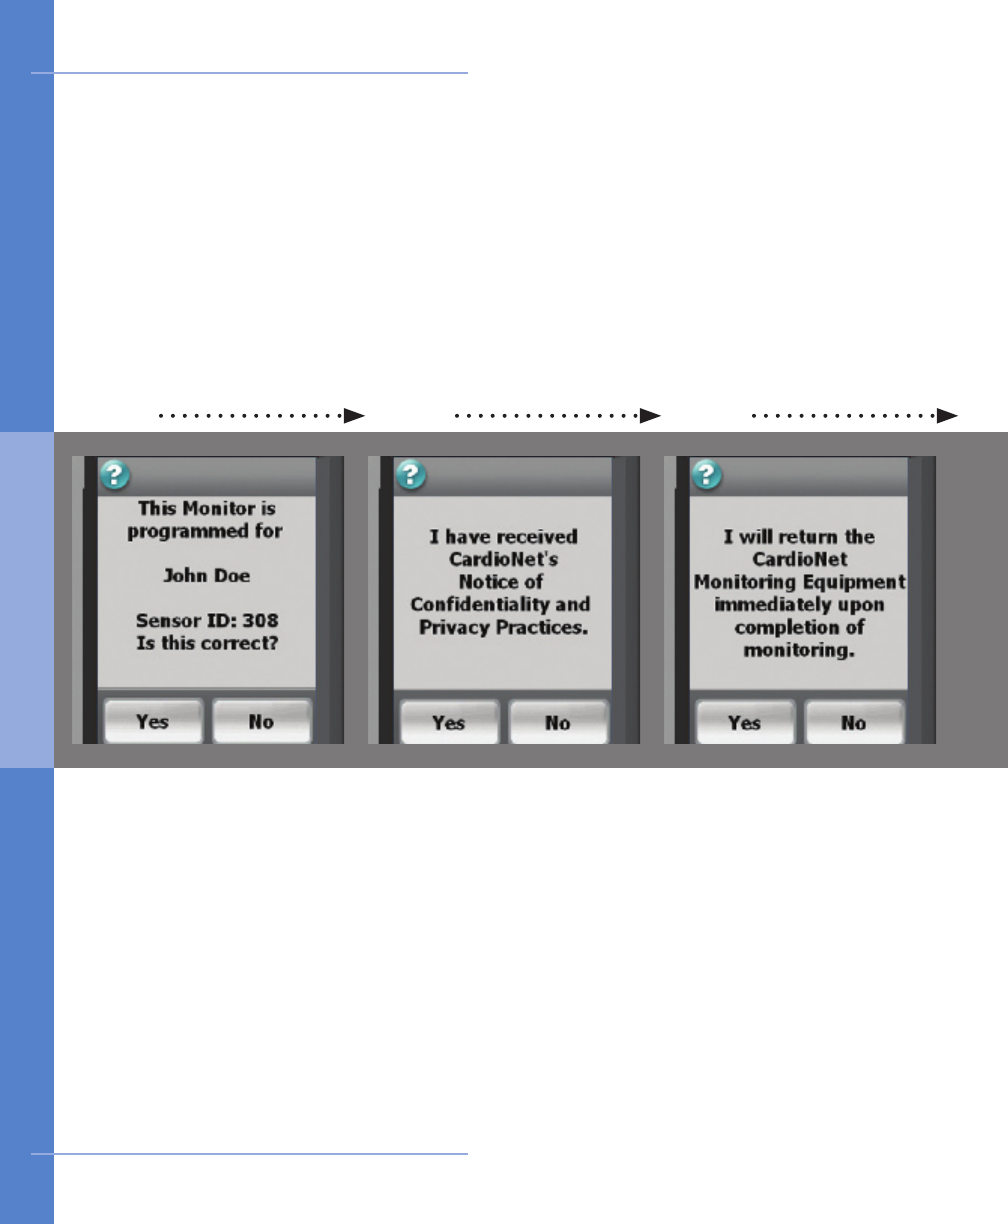
Switch the power switch
on the green/on posi-
tion. Wait for the monitor
to power up. Activation
screen 1 will appear. Your
name should appear on
the screen.
Look at the back of your
sensor. The 5 digit SNV
number should match the
number on this screen.
Touch Yes to proceed.
Conrm name and sensor
Activation screen 3 is
shown.
Touch Yes to indicate
that you agree to return
your CardioNet kit and all
its contents immediately
after your monitoring is
complete.
Activation screen 2 is
shown.
In the blue folder in your
kit, locate “CardioNet’s No-
tice of Condentiality and
Privacy Practices”.
Touch Yes to indicate that
you have received this
document.
Received Privacy Practices Agree to Return Equipment
20 Getting Started
How to Activate the CardioNet Monitor
2 . G ET TI NG STA R TED
54
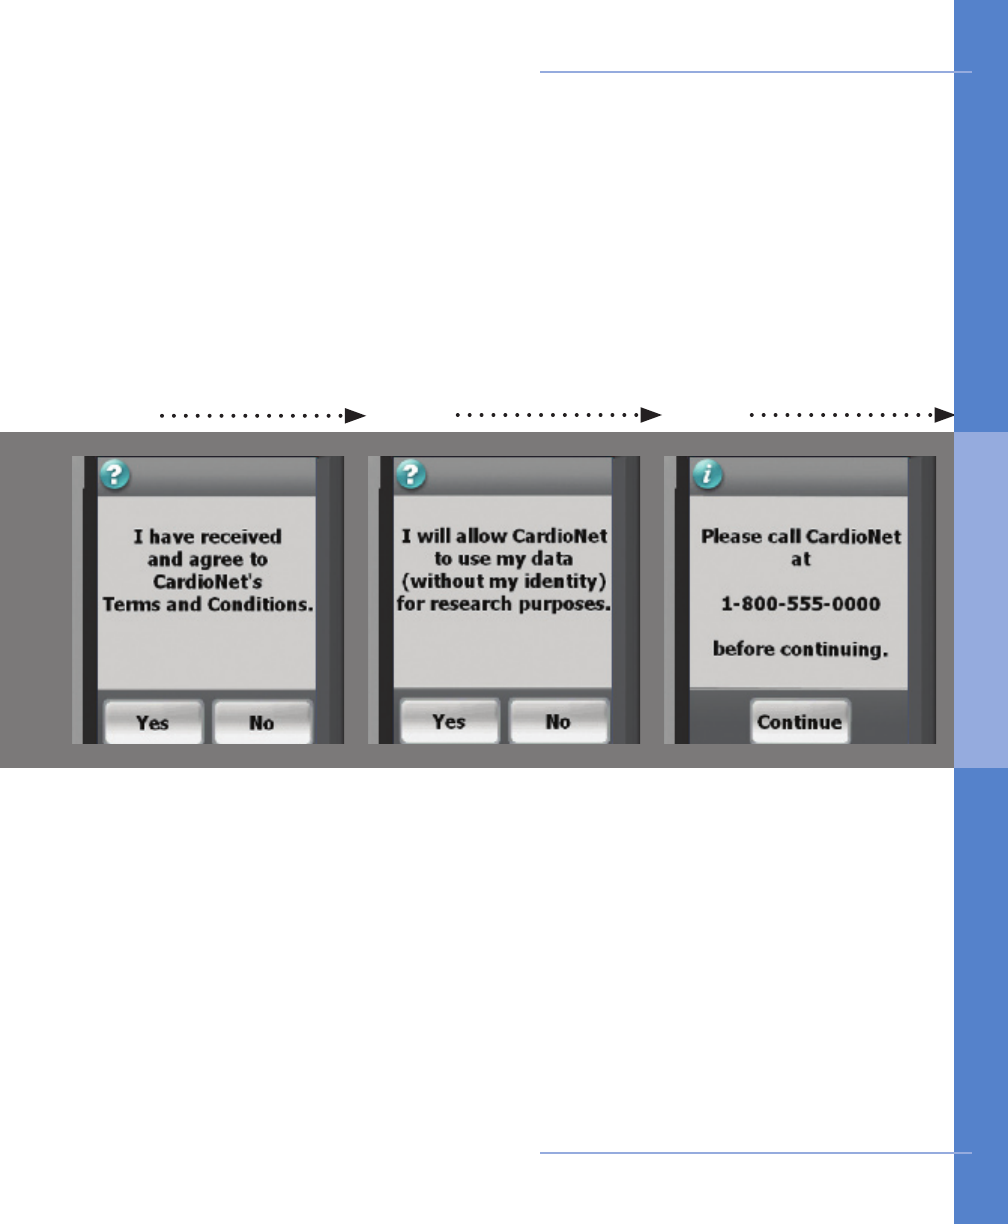
Activation screen 5 is
shown.
Touch Yes to indicate your
consent to allow CardioNet
to use your data for
research purposes. Your
identity will not be used
and will be kept private.
Activation screen 4 is
shown.
In your kit, locate the “Pa-
tient Enrollment Form.”
Touch Yes to indicate
that you agree with the
Terms and Conditions on
the form.
Agree to terms Agree to Share Data
6
Activation screen 6 is
shown.
If you are not already
speaking with a Customer
Service Representative,
please call CardioNet at
1-866-426-4401.
Touch Continue on your
screen to proceed.
Call CardioNet
Getting Started 21
How to Activate the CardioNet Monitor
2 . G ET TI NG STA R TED
97 8
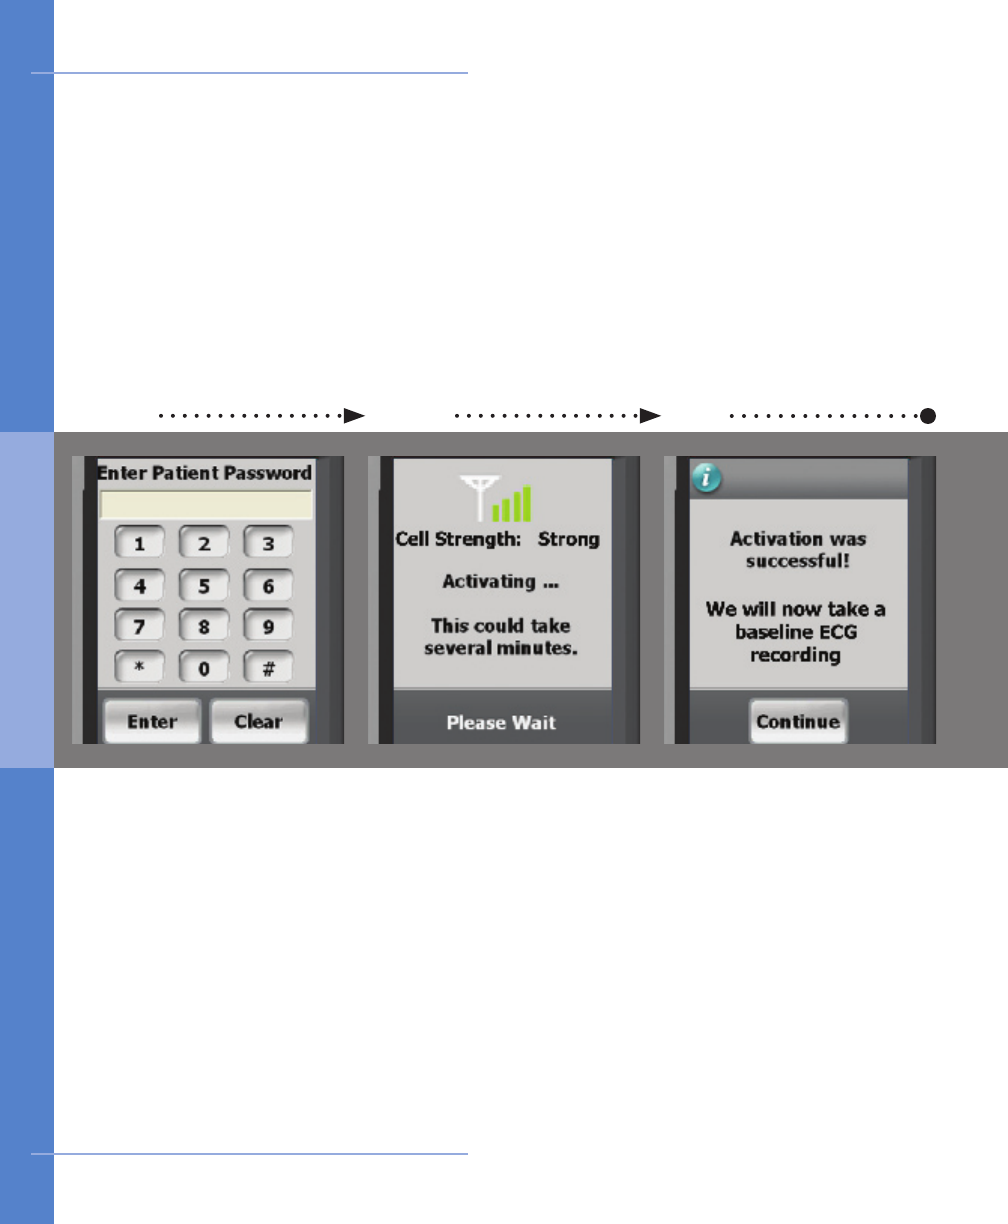
Activation screen 7 is
shown.
While you are talking with
our Customer Service Rep-
resentative, they will give
you a password to enter.
Enter the password and
touch Enter to continue.
Place the monitor in the
base. You may need to
hang up the phone now.
When the monitor has
connected and activation
is complete, the Activation
Success ful screen is
shown.
To u c h Continue t o
proceed and begin the
process of recording a
baseline ECG.
The Activating Monitor
screen appears.
During this time, your
monitor is attempting to
connect with the center and
activate your prescription.
This could take several
minutes.
If activation fails, a screen
containing instructions will
appear (see page 25).
Enter password Activating... stand by Activated.
22 Getting Started
How to Activate the CardioNet Monitor
2 . G ET TI NG STA R TED
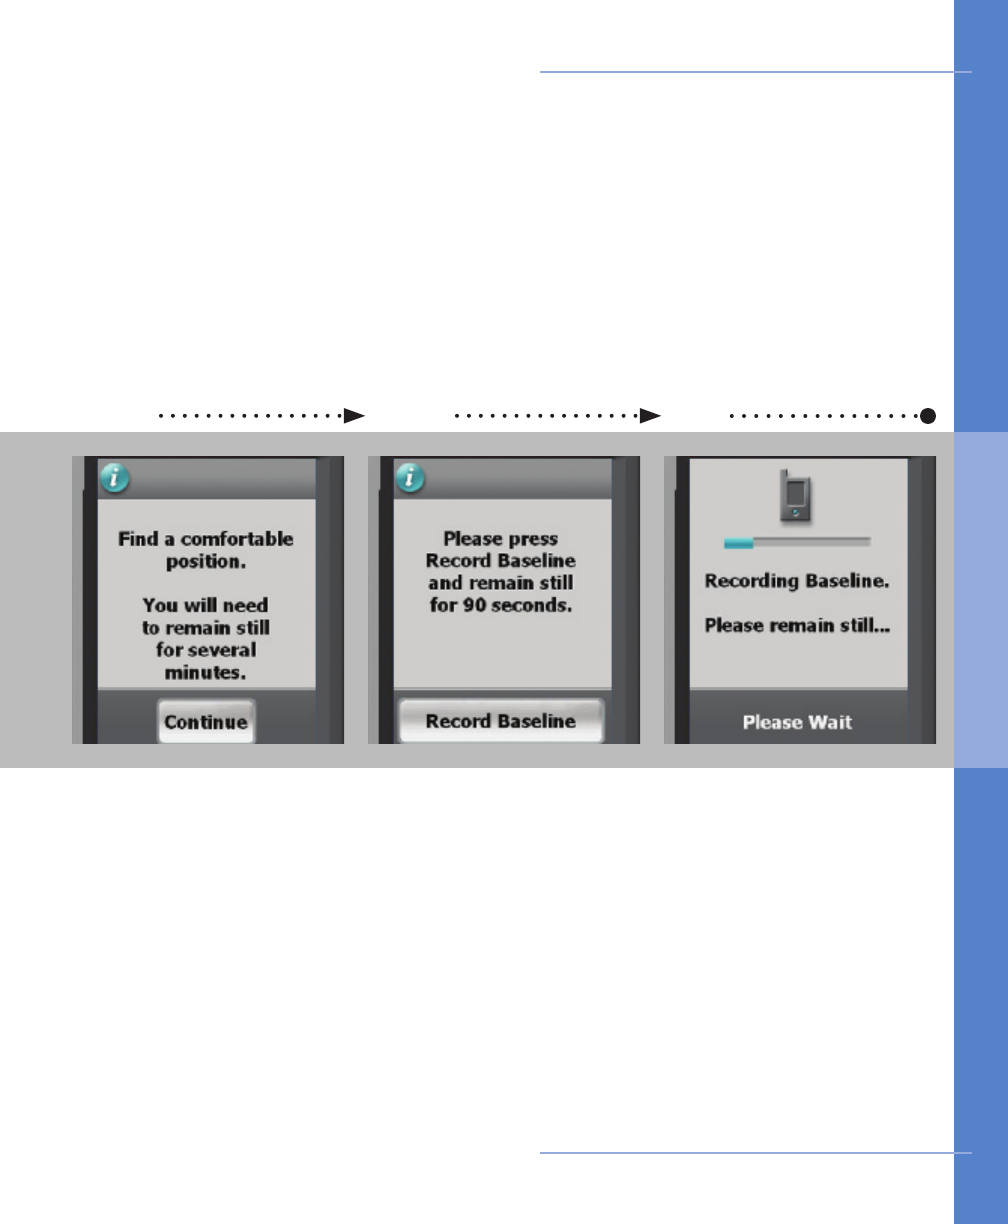
When you are comfort-
able and are certain you
can remain still for up to
2 minutes, press Record
Baseline on the screen.
While your baseline ECG
is recording the screen
will show you a blue bar
to indicate your progress.
Please wait and remain
still unitl this screen
changes.
Before you begin recording
your baseline ECG, find
a comfortable place to
sit or lay down. When
you are comfortable press
Continue on the screen.
Getting Started 23
1 2 3
How to Activate the CardioNet Monitor
Prepare to record Record baseline Recording... remain still
2 . G ET TI NG STA R TED
4 5
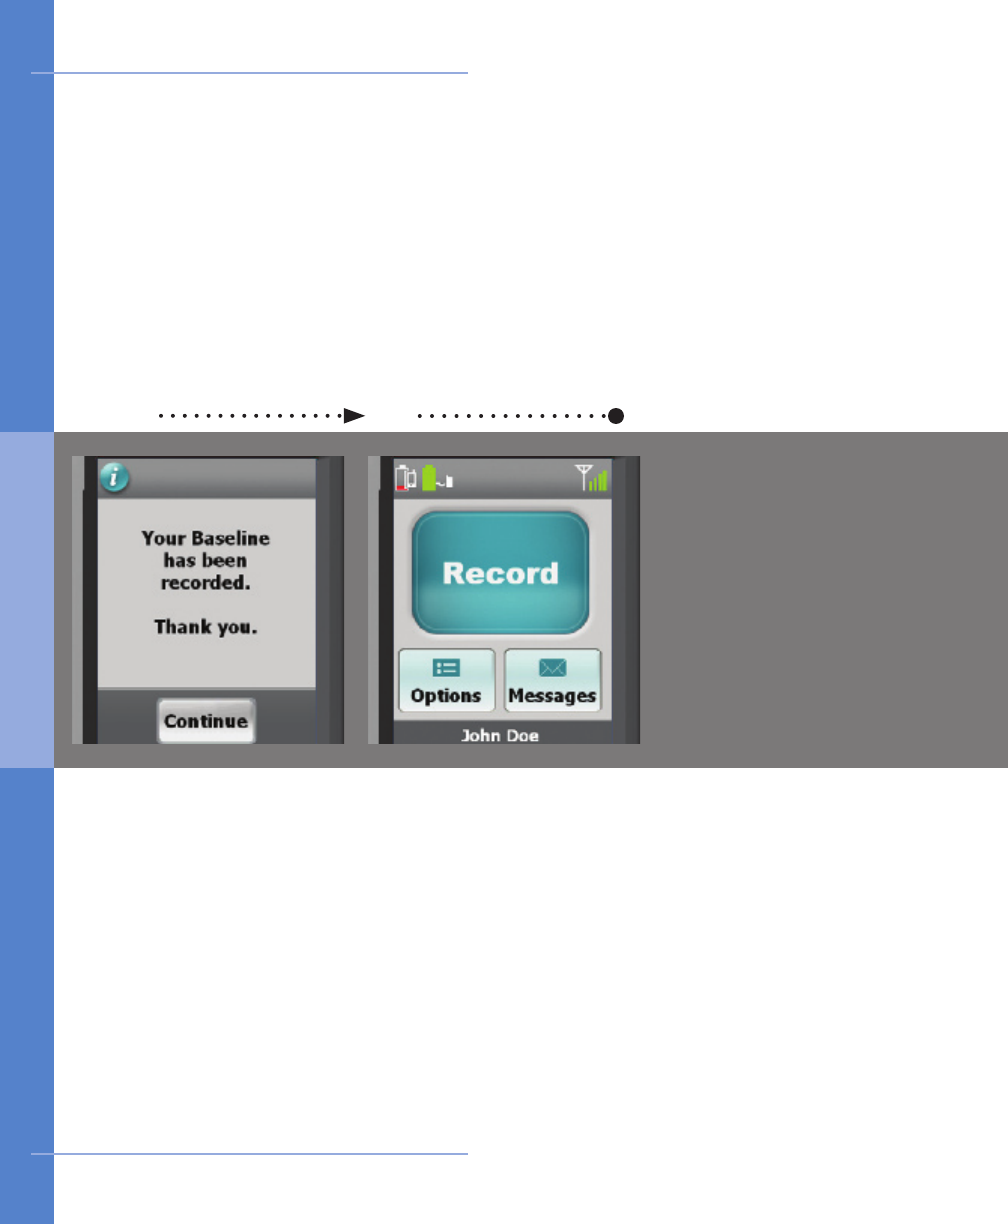
Once your baseline ECG
h a s b e e n r e co r d e d ,
the Baseline Recorded
confirmation screen wil
appear. Press Continue
to go to the Main Menu.
The Main Menu screen
is displayed. You are
now ready to begin your
monitoring session with
CardioNet.
Baseline Recorded Begin monitoring
24 Getting Started
How to Activate the CardioNet Monitor
2 . G ET TI NG STA R TED
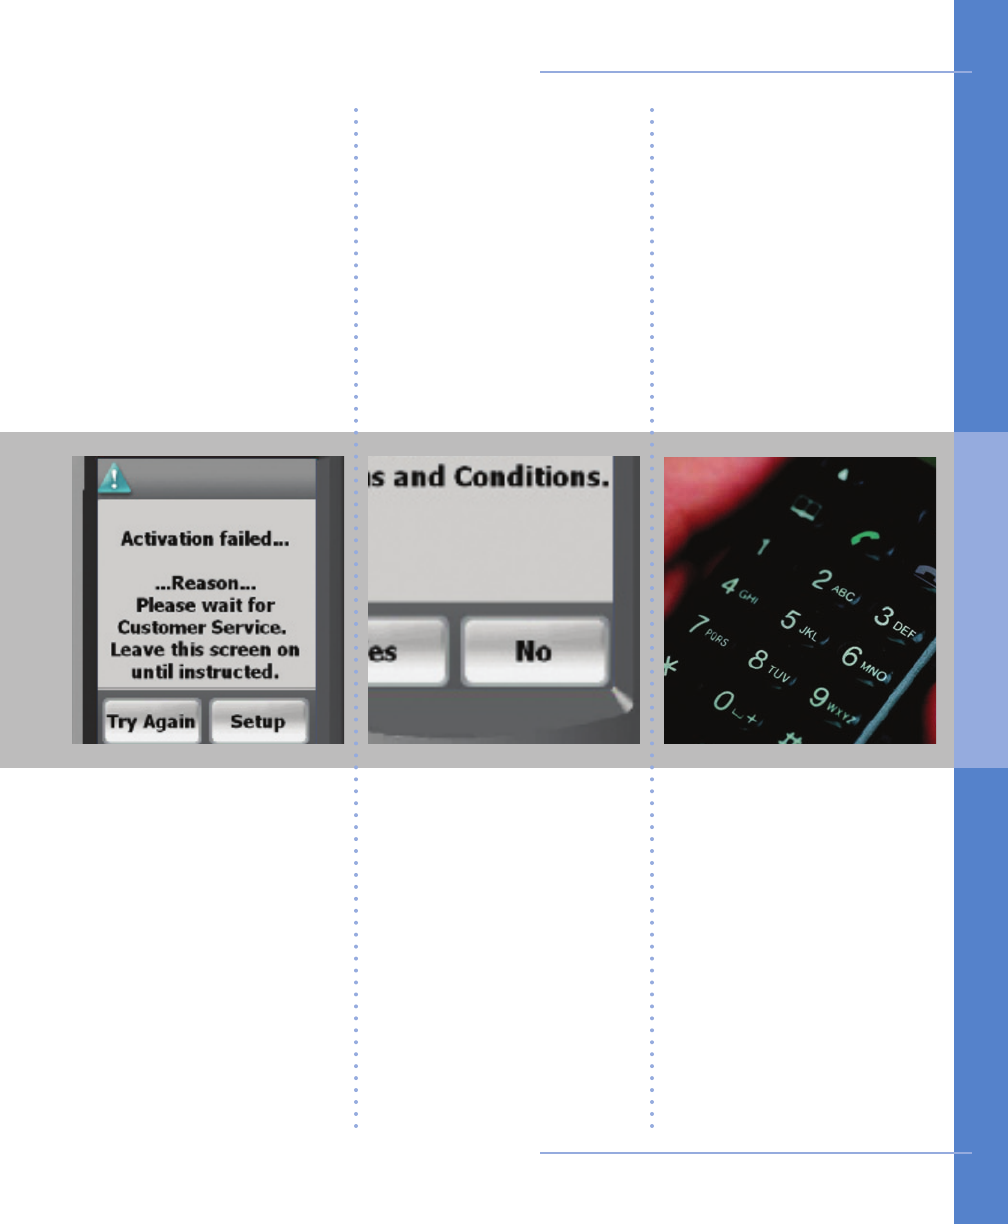
If you disagree with any of
the Activation screens you
may choose No. However,
if you do not consent
to all of the Activation
screens, CardioNet may
not be able to provide
monitoring to you. Please
call CardioNet at 1-866-
426-4401 to discuss your
options. Please do not call
your physician.
If you have questions or
need assistance at any
time, call CardioNet toll
free at 1-866-426-4401.
If the monitor is unable to
connect to the CardioNet
center, the activation will
fail.
If the “Activation failed”
s c r e e n a p p e a r s , d o
not proceed until you
have called CardioNet’s
Customer Service at 1-
866-426-4401.
Getting Started 25
If
Activation
Fails
If
You
Disagree
Need
Assistance?
How to Activate the CardioNet Monitor
2 . G ET TI NG STA R TED