Casio Communication TC-920 900 MHz Cordless Telephone User Manual tc920 p65
Casio Communication Inc. 900 MHz Cordless Telephone tc920 p65
User Manual

1
2
3
23
3
B
The answering machine is shipped with the Ring
Select Switch set to 4 rings. Set the
RING
SELECT SWITCH
(labeled RINGS) to 4, 2, or TS
(Tollsaver) to select the number of rings before
the TC-920 answers.
4 = The TC-920 will answer on the fourth ring.
2 = The TC-920 will answer on the second ring.
TS = When calling to retrieve messages from a
remote location, Tollsaver will help
eliminate toll charges by letting you know
if there are any new messages before the
TC-920 answers. When set to TS, the
TC-920 answers on:
Second ring = NEW messages
Fourth ring = NO new messages
Hang up after three rings to avoid toll
charges.
NOTE:
■After you have retrieved messages, (from a remote
location or at the machine) Tollsaver will reset to
answer on the fourth ring until a new message is
recorded.
1
1
You can record one or two customized greetings
up to 20 minutes in length. The greeting is
recorded on a digital chip.
NOTE:
■The sound level is automatically adjusted when the
greeting is played over the phone line.
3
4
BASE MESSAGE PLAYBACK
1
Press
GREETING RECORD
again after
you have finished speaking. The greeting
replays automatically and the TC-920
resets to answer phone calls with Greeting
One.
RECORD GREETING TWO
To record Greeting Two, press
GREETING SELECT
to set the TC-920
to answer with Greeting 2, then follow the
steps noted above in the section "RECORD
GREETING ONE."
You can listen to either greeting anytime when
the TC-920 is turned on.
1Press
TIME SET
(located in the cradle ).
Press
TIME SET
again after hearing
"
Sunday, 12:00 a.m.
" You will hear,
"Sunday."
Set the current time and day. The TC-920 will
stamp each message with the time and day.
Press
TIME SET
again. The TC-920 will
announce the hour.
4Press
SKIP/+
to advance or
REPEAT/-
to reverse the hour. “a.m.” and “p.m.” will
be announced for each hour.
1Press
ON/OFF
(located in the cradle ) to
turn the answering machine on and off.
The PLAY/PAUSE INDICATOR on the base
will light when the TC-920 answering
machine is on.
ON/OFF
The PLAY/PAUSE INDICATOR on the base has
four settings:
1. OFF = the answering machine is off.
2. ON = the machine is on but no messages have
been recorded.
3. Light flashes quickly = new messages have
been received and not yet played.
4. Light flashes slowly = messages have been
played and saved.
NOTE:
■Slow flashing also indicates active recording mode.
1
2
Adjust the base unit
VOLUME CONTROL
(located on the right side).
Press
NEW
on the base. The number of
new messages will be announced.
1
The PLAY/PAUSE INDICATOR on the base will
flash slowly when messages have been played
and saved.
PLAY ALL MESSAGES
Adjust the
VOLUME CONTROL
(located on the right side of the base).
2Press
ALL
(on the base) to replay all new
plus saved messages. The total number of
messages will be announced.
3
You can repeat the current message.
REPEAT MESSAGES
1
Skip backward, message by message.
SKIP BACKWARD
1During playback of messages, press
REPEAT
twice to skip backward to the
previous message. Press
REPEAT
each
time you want to skip backward through
messages.
1
NOTE:
■Messages that were individually erased during
playback will be saved.
Press
SKIP
once to skip forward to the
next message.
SKIP FORWARD
1
You can temporarily pause message playback up
to five minutes. The TC-920 will not answer calls
in the Pause Mode.
PAUSE MESSAGE PLAYBACK
Press
ALL
or
NEW
during message
playback.
REPLAY ALL MESSAGES
You can erase specific messages while saving
others.
1
E
Message File offers a convenient way to store important messages, long messages or to separate
messages for business, personal use or for other users.
The green MESSAGE FILE INDICATOR on the
base has three settings when the answering
machine is turned on:
1. OFF = No messages have been filed.
2. Quickly flashes = New messages have been
transferred and not yet played.
3. Slowly flashes = File messages were played
and saved.
You can record a memo for another household member or as a reminder for yourself up to five
minutes in length. The memo will be stamped with the time and day it was recorded.
You will hear "
Please record message.
"
Begin speaking into the Microphone
(located at the bottom right-hand corner)
about 7" from the base unit.
Press
MEMO
to end the recording.
You can play new and saved messages privately
through the handset. Make sure the handset is in
the Standby Mode and the answering machine is
on.
1Press
REMOTE/SCREEN
and then
PLAY
(
3
on the keypad). You will hear a
beep and the MESSAGES LED on the
handset will light solid.
2Return the handset to the base cradle.
1Press
ERASE
(
4
on the keypad) after
hearing “
End of messages.
”
2The specific message will be erased 7
seconds after hearing “
End of Messages
”
unless
SAVE
(
1
on the keypad) is pressed.
If you do not press
SAVE
(
1
on the keypad) or
ERASE
(
4
on the keypad) while listening to
messages or after hearing “
End of messages,
”
the TC-920 will automatically save all messages.
3
1
After listening to messages, return the
handset to the base or wait seven seconds
to exit the Playback Mode.
Press
REMOTE/SCREEN
on the
handset and then
PLAY
(
3
on the handset
keypad) to playback your messages.
2Press
MSG FILE
(
6
on the handset key-
pad) during message playback. The green
MESSAGE FILE INDICATOR on the base will
flash quickly to show that a message has
been transferred to Message File.
NOTE:
■If
SAVE
is pressed at the end of message playback,
then all messages will be saved in the main location,
and the messages that were transferred during
playback will also be saved in Message File.
1
1
H
Be sure the TALK INDICATOR on the
handset is not lit. (The handset must be in
Standby Mode.)
2Press
REMOTE/SCREEN
on the
handset.
3Press
MEMO
(
2
on the handset keypad).
4The LOW BATT/RECORD INDICATOR
above the 2 button will light solid and you
will hear
“Please record a message”
through the earpiece. The TC-920 will
begin recording.
5Press
MEMO
or
REMOTE/SCREEN
again to end the recording and return to
Standby Mode.
In the Standby Mode, the handset is inactive and
ready to receive calls. INDICATORS on the
handset will not be lit in Standby Mode.
Press
VOL +
or
VOL -
to change the
volume level of the handset during a
conversation or during message playback.
Each press of
VOL +
or
VOL -
will
increase or decrease the sound level to one
of four levels: Normal through High. When
you hang up the volume will reset to the
“Normal” setting.
1
2
3
When the handset is in the Talk Mode and
returned to the base unit, it will automatically
return to the Standby Mode and disconnect the
call. It is not necessary to press TALK on the
handset to disconnect the call.
1Pick up the handset and press
TALK
.
2Wait for dial tone and dial the phone
number. The CHARGING/LINE IN USE
INDICATOR on the base flashes slowly to
show that the handset is in use.
3To hang up, press
TALK
again or return
the handset to the base unit.
NOTE:
■When you return the handset to the base unit, you
are hanging up the phone (Standby Mode).
AUTODIAL
1
1
Press
TALK
on the handset twice (“off”
and “on”). Wait for dial tone and dial the
correct number.
1
1
Press
HOLD
. The TALK INDICATOR on
the handset flashes slowly.
Press
TALK
on the handset.
OR
1
2
3
Press
STORE
on the handset. You will
hear two beeps.
Enter one of the telephone numbers you
want to store in the AutoDial memory by
dialing it on the keypad. You will hear a
beep after entering each digit.
Press
AUTODIAL
.
It is assumed that the TC-920 is set to “PULSE”
(see "TONE/PULSE SWITCH SETTING".) If you
live in a pulse or rotary dialing area, you can use
tone to access a long distance service (i.e. Sprint
or MCI), bank by phone or any other service that
requires touchtone dialing.
Dial your telephone number and wait for
the line to connect. (You dialed your call in
Pulse Mode.)
Press
❋❋
❋❋
❋
TONE
on the handset to
temporarily change from Pulse to Tone
Mode.
Dial the tone numbers. This could be a
special service or access number.
1
1
2
5
You can use Remote Operation from most
touchtone or cellular phones to retrieve, replay,
erase and save messages.
3
4
TC-920 is shipped with the code set to 1-2-3.
To change your 3-Digit Remote Access Code:
Press
SKIP/+
or
REPEAT/-
until the first
number you select is announced.
Repeat steps 2 and 3 to set the second and
third remote code digits.
Call your answering machine from most cellular,
pay or touchtone telephones. Enter your 3-DIGIT
REMOTE ACCESS CODE immediately after the
greeting begins.
NOTE:
■If the TC-920 does not respond when you enter your
code, try again after the beep.
After entering your 3-digit remote access code,
the number of new messages will be announced.
If new messages have been received, they will
play in the order of receipt. After all new
messages have played, you will hear “
End of
messages.
” Select another option or hang up.
NOTE:
■Hang up anytime to cancel Remote Message
Playback. The TC-920 will automatically save all
messages, unless you choose to erase them.
1
SWITCH SETTINGS
The TC-920 has one switch on the side of the handset and three switches on the back of the base unit.
POWER SAVER/RINGER ON
The TC-920 is shipped with the HANDSET
RINGER SWITCH set to “PWR SAVER” (the ringer
is off). When set to PWR SAVER (power saver),
the battery power is conserved. Turn the handset
to “RINGER ON” before use.
RINGER ON - The ringer is on and the handset
will ring when an incoming call or paging
signal is received. When the handset is out of
the cradle, the rechargeable batteries will last
up to seven days in this mode (the PWR
SAVER is off).
POWER SAVER (PWR SAVER) ON - When an
incoming call or a paging signal is received the
handset will not ring, but all other handset
functions will operate. The rechargeable
batteries will last up to one month in this mode
(the ringer is off).
Set the
RINGER ON/OFF SWITCH
on the base to
control the telephone ringer. The base ringer is
preset to “RINGER ON.”
ON = Base ringer is turned on.
OFF = Base ringer is turned off, except if the
handset is charging and the handset ringer is
On. The handset will ring even if the base
ringer is set to Off.
BASE RINGER ON/OFF
RING SELECT
This switch configures the TC-920 to dial out
with either touchtone or pulse signals to match
the service supplied by your local telephone
company. The TC-920 is shipped with the TONE/
PULSE SWITCH set to “TONE.” If you have rotary
or pulse service, set this switch to “PULSE.”
PULSE = for Rotary dialing or Pulse services
TONE = for Touchtone service
TONE/PULSE
C
INITIAL SETUP
To select Greeting One or Greeting Two:
SELECT GREETINGS
Press
GREETING SELECT
(in the cradle)
You will hear “
Greeting One
” or “
Greeting
Two
” to indicate the current setting.
2Pressing
GREETING SELECT
again will
change the setting to the other Greeting.
The TC-920 will now answer all calls with
the selected greeting.
NOTES:
■If a greeting has not been recorded, all callers will
hear “
Record a message
.”
RECORD GREETING ONE
Be sure the TC-920’s indicators are lit or
flashing.
2Set the
VOLUME CONTROL
at midpoint
(located on right side of TC-920).
Press
GREETING RECORD
(located in
the cradle area). You will hear
"Please
Record Greeting One"
and a beep. Speak
loudly and clearly about 7" from the
microphone located at the lower right hand
corner of the base unit. The PLAY/PAUSE
INDICATOR on the Base unit will flash
slowly to confirm that recording is in
process.
NOTES:
■If a greeting has not been recorded, callers will hear
“
Record a message.
”
■The greeting should be recorded without any
background noise.
■The greeting should be recorded by only one person
speaking into the Microphone.
CHECK GREETING
1
2
Press
GREETING SELECT
until the
desired greeting is announced.
Press
GREETING CHECK
(located in
the cradle of TC-920.) The TC-920 will
play the greeting and reset to answer new
calls.
NOTE:
■If a greeting has not been recorded, you will hear
“
No greeting. Please record greeting
.” Callers will
hear “
Record a message.
”
SET THE TIME/DAY
2Press
SKIP/+
or
REPEAT/-
(on the
base) until the correct day is announced.
5Press
TIME SET
again. The TC-920 will
announce the minutes.
6Press
SKIP/+
to advance or
REPEAT/-
to reverse the minutes.
7Press
TIME SET
again to end. The day
and time will be announced.
NOTE:
■If the time and day have not been set, all messages
will be stamped with “
Sunday 12:00 a.m.
”
2The ringer will operate with the unit off,
but no messages will be recorded.
1Press
TIME SET/CHECK
(in the cradle)
once. The day and time will be announced.
TALKING CLOCK
The TC-920 also functions as a clock.
D
PLAY/PAUSE INDICATOR
When messages have been received and not
played yet, the PLAY/PAUSE INDICATOR on the
base will flash quickly. To listen to new messages
only:
PLAY NEW MESSAGES
3All new messages are played in the order
received. The message number, time and
day will be announced before each
message. After the last message is played,
you will hear, “
End of messages.
”
All messages are played in the order
received. The message number, time and
day will be announced before each message.
After the end of the last message you will
hear “
End of messages.
”
During playback of messages, press
REPEAT
(on the base) once to repeat the
current message.
You can skip forward through messages.
You have three options during pause:
2
2
2
Press
ALL
or
NEW
again to resume
listening to messages.
OR Leave the TC-920 in Pause Mode. It will
automatically reset to answer calls after
five minutes. All messages will be saved.
OR Press
ON/OFF
(in the cradle ) twice to
end pause. All messages will be saved.
To replay all messages,
1Press
ALL
on the base after hearing, “
End
of messages.
”
If you do not press ERASE while listening to
messages or after playing them, the TC-920 will
automatically save all the messages.
AUTOMATIC SAVE
ERASE INDIVIDUAL MESSAGES
1Press
ERASE
while listening to a specific
message.
2If you change your mind and decide to
save the message, press
SAVE
at end of
message playback.
1Press
ERASE
within seven seconds after
hearing “
End of messages
” to erase all
messages. You will hear “
Erase Messages
”.
ERASE ALL MESSAGES
NOTE:
■Messages that were individually saved during
playback will be erased.
1If you wish to save all messages, press
SAVE
within seven seconds after hearing
“End of messages”
or after pressing
ERASE
.
SAVE ALL MESSAGES
1Press
TALK
on the handset or pick up any
extension phone to speak with the caller.
All messages will be automatically saved.
ANSWERING A CALL
DURING PLAYBACK
If you receive an incoming call during message
playback:
MESSAGE FILE
MESSAGE FILE INDICATOR
1Press
ALL
or
NEW
on the base to
playback your messages.
TRANSFER MESSAGES TO
MESSAGE FILE
To store messages into Message File:
2Press
MESSAGE FILE
during message
playback. You will hear
“Message Two
Transferred”
to indicate that a newly
transferred message has been saved in
Message File.
NOTE:
■If
SAVE
is pressed at the end of message playback,
then all messages will be saved in the main location,
and the messages that were transferred during
playback will also be saved in Message File.
1Press
MESSAGE FILE
. The number of
messages in Message File will be
announced. Messages stored in this
location will be played.
PLAY ALL MESSAGES IN
MESSAGE FILE
When playing messages in Message File, you can
utilize the convenient playback features such as:
Pause, Skip/Repeat and Selective Save/Erase.
NOTES:
■If there are no messages in Message File, you will
hear “
No file messages.
”
■After the last message is played you will hear “
End of
messages.
”
RECORD A MEMO AT BASE
Press
MEMO
on the base unit.
F
Recorded memos are played along with the
incoming messages in the order in which they
were recorded.
G
HANDSET MESSAGE PLAYBACK
HANDSET MESSAGE
INDICATOR
In the Standby Mode, if you have messages, the
MESSAGES INDICATOR on the handset flashes
for 10 seconds after the handset is used. (In the
Standby Mode the TALK INDICATOR on the
handset is not lit.)
NOTE:
■The MESSAGES INDICATOR on the handset does not
flash for messages stored in Message File.
MESSAGE PLAYBACK FROM
THE HANDSET
After listening to messages, to exit the Handset
Playback Mode:
2
OR
Press
REMOTE/SCREEN
again.
NOTE:
■If you hang up during handset message retrieval, all
messages will be saved.
1Press
REPEAT
(
❋❋
❋❋
❋
TONE
key) once to
repeat the current message.
REPEAT MESSAGES
You can repeat the current message.
1Press
REPEAT
(
❋❋
❋❋
❋
TONE
key) twice to
skip backward to the previous message.
Press
REPEAT
each time you want to skip
backward through messages.
SKIP BACKWARD
Skip backward message by message.
1Press
SKIP
(
#
key) once to skip forward
to the next message.
SKIP FORWARD
You can skip forward through messages.
1
SAVE ALL MESSAGES
Messages will be saved within seven seconds
after you hear the last message. To manually save
all messages,
Press
SAVE
(
1
on the handset keypad)
after hearing, "
End of messages
. "
ERASE ALL MESSAGES
All messages may be erased within seven
seconds after hearing the last message.
1Press
ERASE
(
4
on the keypad) during
playback of a specific message.
ERASE INDIVIDUAL MESSAGES
Erase specific messages during Handset
message playback.
AUTOMATIC SAVE
2
1Press
TALK
on the handset to answer the
incoming call. All messages will be saved.
ANSWER A CALL DURING
PLAYBACK
If a call comes in while you are playing your
messages through the handset, the answering
machine will not answer the call. Your phone will
ring if the HANDSET RINGER SWITCH is set to
“RINGER ON.”
To hang up and continue listening to your
messages, press
TALK, REMOTE/
SCREEN
and then
PLAY
(
3
on the
keypad).
TRANSFER MESSAGES TO
MESSAGE FILE
To store messages into Message File while
playing back messages through the handset:
PLAY ALL MESSAGES IN
MESSAGE FILE
When playing messages in Message File, you can
utilize the convenient playback features such as:
Skip/Repeat, and Selective Save/Erase.
1Press
REMOTE/SCREEN
on the
handset and then
MSG FILE
(
6
on the
handset keypad). Messages stored in this
location will be played. After the last
message is played you will hear
“End of file
messages”
.
You can record a memo using the handset.
RECORD A MEMO The TC-920 allows you to record important
telephone conversations.
CONVERSATION RECORD
Press
REMOTE/SCREEN
on the
handset during your phone conversation.
MEMO & CONVERSATION RECORD
Press
CONV
(
5
on the handset keypad).
The LOW BATT/RECORD INDICATOR
above the 2 button will light solid and the
TC-920 will begin recording.
Press
CONV
or
REMOTE/SCREEN
again to end the recording and return to
Standby Mode.
NOTE:
■In certain states, it is unlawful and may lead to
criminal penalties to record any telephone
conversation without prior consent of all parties.
HANDSET TELEPHONE OPERATION
When the battery pack needs recharging, the
LOW BATT/RECORD Indicator on the handset will
flash. You may also notice a reduction in the
quality of your cordless handset communica-
tions. Return the cordless handset to the base
unit when the LOW BATT/RECORD INDICATOR is
flashing.
NOTE:
■The batteries can be recharged many times, but if
you get a low battery indication even after 12-15
hours of charging, you should replace the battery
pack.
BATTERIES - If it becomes necessary to remove
or replace the batteries see "HANDSET NI-CAD
BATTERY INSTALLATION."
HANDSET LOW BATTERY
INDICATOR
STANDBY MODE
HANDSET VOLUME CONTROL
1.If you move out of the base unit’s operating
range, you will hear a warning tone. Move
closer to the base unit to deactivate the alarm.
If you remain out of range for too long, the
TC-920 will disconnect from the line.
2.If the handset loses its security code you will
also hear an alarm tone. To reset this security
code place the handset in the base unit for a
few seconds. Pick up the handset and try your
call again.
3.Interference from other appliances may also
cause the alarm to sound. To prevent
interference, move the base unit to another
location and vertically position the base unit
antenna.
ALARM
AUTO HANG UP
PLACING A CALL
MISDIALING A NUMBER
RECEIVING A CALL
When the phone rings, pick up the cordless
handset and press
TALK
. Speak to the
caller. To hang up, press
TALK
on the
handset or return the handset to the base
unit.
PLACING A CALL ON HOLD
NOTE:
■If a call has been on hold for five minutes, the
TC-920 will automatically disconnect the call.
1
TAKING A CALL OFF HOLD
There are three ways to take a call off HOLD.
Press
HOLD
again on the handset.
1
OR Pick up any extension phone that is
connected to the same line.
1Pick up the handset, press
TALK
and then
REDIAL/PAUSE
. The TC-920 will
automatically redial the number.
LAST NUMBER REDIAL
The TC-920 remembers the last number you
dialed.
If you subscribe to a call waiting service and you
receive another call while using the phone, press
FLASH
(on the handset) to answer the second
call. Press
FLASH
again to return to the first
call. Flash may also be used on a business phone
system (CENTREX, PBX) for transferring calls.
FLASH/CALL WAITING
J
You may store up to 10 of your most frequently
dialed numbers in AutoDial memory. Autodial
numbers can be up to 24 digits in the Tone Mode
and the Pulse Mode.
STORING AUTODIAL
NUMBERS
4
5
Enter a one-digit keypad number (0-9) as
the AutoDial location for that number. You
will hear two beeps
.
Repeat steps 1-4 to store up to 10
AutoDial numbers.
6Write the names and telephone numbers
of the people whose numbers you have
stored on the TC-920’s AutoDial index card
(located under the base unit).
NOTES:
■To erase AutoDial numbers, store a new number in
the AutoDial location you wish to erase. For example,
you may store a one digit number to erase an old
phone number.
■Autodial numbers are stored in the handset
permanently until they are changed. Autodial
numbers will not be lost when installing a new
handset battery.
■You can store important emergency numbers in
AutoDial memory (police, fire, medical or 911 for
example) but Casio PhoneMate assumes no
responsibility for this feature.
Press
TALK
on the handset and wait for
the dial tone.
USING AUTODIAL
2Press
AUTODIAL
.
3Press the one-digit AutoDial location
number you wish to dial (0-9 on the
keypad). The TC-920 will dial your number
automatically. You will hear a series of
beeps during dialing.
TONE/PULSE MIXED DIALING
4Hang up and the TC-920 automatically
returns to the Pulse Mode.
Pause is convenient for use on a business
telephone system (i.e.; PBX) when an 8 or 9 must
be dialed to reach an outside phone line. This
feature can also be used for a long distance
service (i.e.; MCI) where you have to wait for a
second dial tone before you continue dialing.
Follow instructions for "STORING AUTODIAL
NUMBERS."
PROGRAMMABLE PAUSE
Press
REDIAL/PAUSE
on the handset
when a pause is required. Each pause is
two seconds in length and counts as one
digit in the AutoDial memory.
REMOTE OPERATION K
PROGRAM
REMOTE ACCESS CODE
Press
CODE SET/CHECK
(located in
the cradle ). You will hear the current
setting.
Press
CODE SET/CHECK
again within
five seconds after the audio speech. You
will hear, "
Enter remote code one.
" The
first remote code digit is announced.
Press
CODE SET/CHECK
again to end.
You will hear the newly programmed
3-digit access code announced.
REPEAT MESSAGES - Press
❋❋
❋❋
❋
once.
SKIP BACKWARD - Press
❋❋
❋❋
❋
twice.
SKIP FORWARD - Press
#
once.
REPLAY ALL MESSAGES - Press
1
.
SAVE ALL MESSAGES - Press
2
.
ERASE INDIVIDUAL MESSAGES - Press
3
as a
message plays back, you will hear, “
Erase
message
” and then the next message will play.
ERASE ALL MESSAGES - Press
3
after hearing,
“
End of messages
.”
AUTO SAVE - If you do not press SAVE or ERASE,
the TC-920 will automatically save all messages.
RECORD MEMO - Press
4
.
RECORD GREETING - Press
5
.
CHANGE GREETINGS - Press
6
.
PLAY MESSAGES IN MESSAGE FILE - Press
7
.
REMOTE MESSAGE RETRIEVAL
Frequent callers can skip your greeting when
they call to leave a message. Instruct them to
press
#
on their touchtone keypad any time after
the TC-920 answers their call.
GREETING BYPASS
REMOTE VOICE MENU
Enter
1
to play messages.
Enter
2
to save messages.
Enter
3
to erase messages.
Enter
4
to record message.
Enter
5
to record greeting.
Enter
6
for Greeting One (or Two)
Enter
7
to play file messages.
NOTE:
■Remote menu items 1, 2 and 3 will not be announced
if no messages are received and stored. Remote
menu item 7 will not be announced if no messages
are stored in Message File.
REMOTE OPERATION OPTIONS
I
REMOTE TURN-ON
Call and let your phone ring 10 times or more.
The TC-920 will turn on and you will hear "Please
enter remote code."
1
When the phone rings, the TC-920 will answer
the call. You may use the handset to screen your
phone calls.
2Press
REMOTE/SCREEN
to listen to
incoming calls from the cordless handset.
You will hear the TC-920 play your greeting
and your caller leave a message.
NOTE:
■DO NOT press
ON/OFF
on the base unit as you may
disconnect your caller.
CALL SCREENING
Be sure the PLAY/PAUSE INDICATOR on
the base unit is on.
3
4
Press
REMOTE/SCREEN
again to exit
Call Screening.
To speak to the caller, press
TALK
on the
handset. The unit will stop recording.
5To hang up, press
TALK
or return the
handset to the base unit. The unit will
automatically reset to answer new calls.
You will hear “
Memory is Full
” after your greeting
is played. Enter your 3-DIGIT REMOTE ACCESS
CODE. After listening to messages, press
3
on
the keypad to erase them. If you have erased
messages, the TC-920 can now answer calls and
record new messages.
MEMORY FULL MESSAGE
RETRIEVAL
1
2
3
4
5
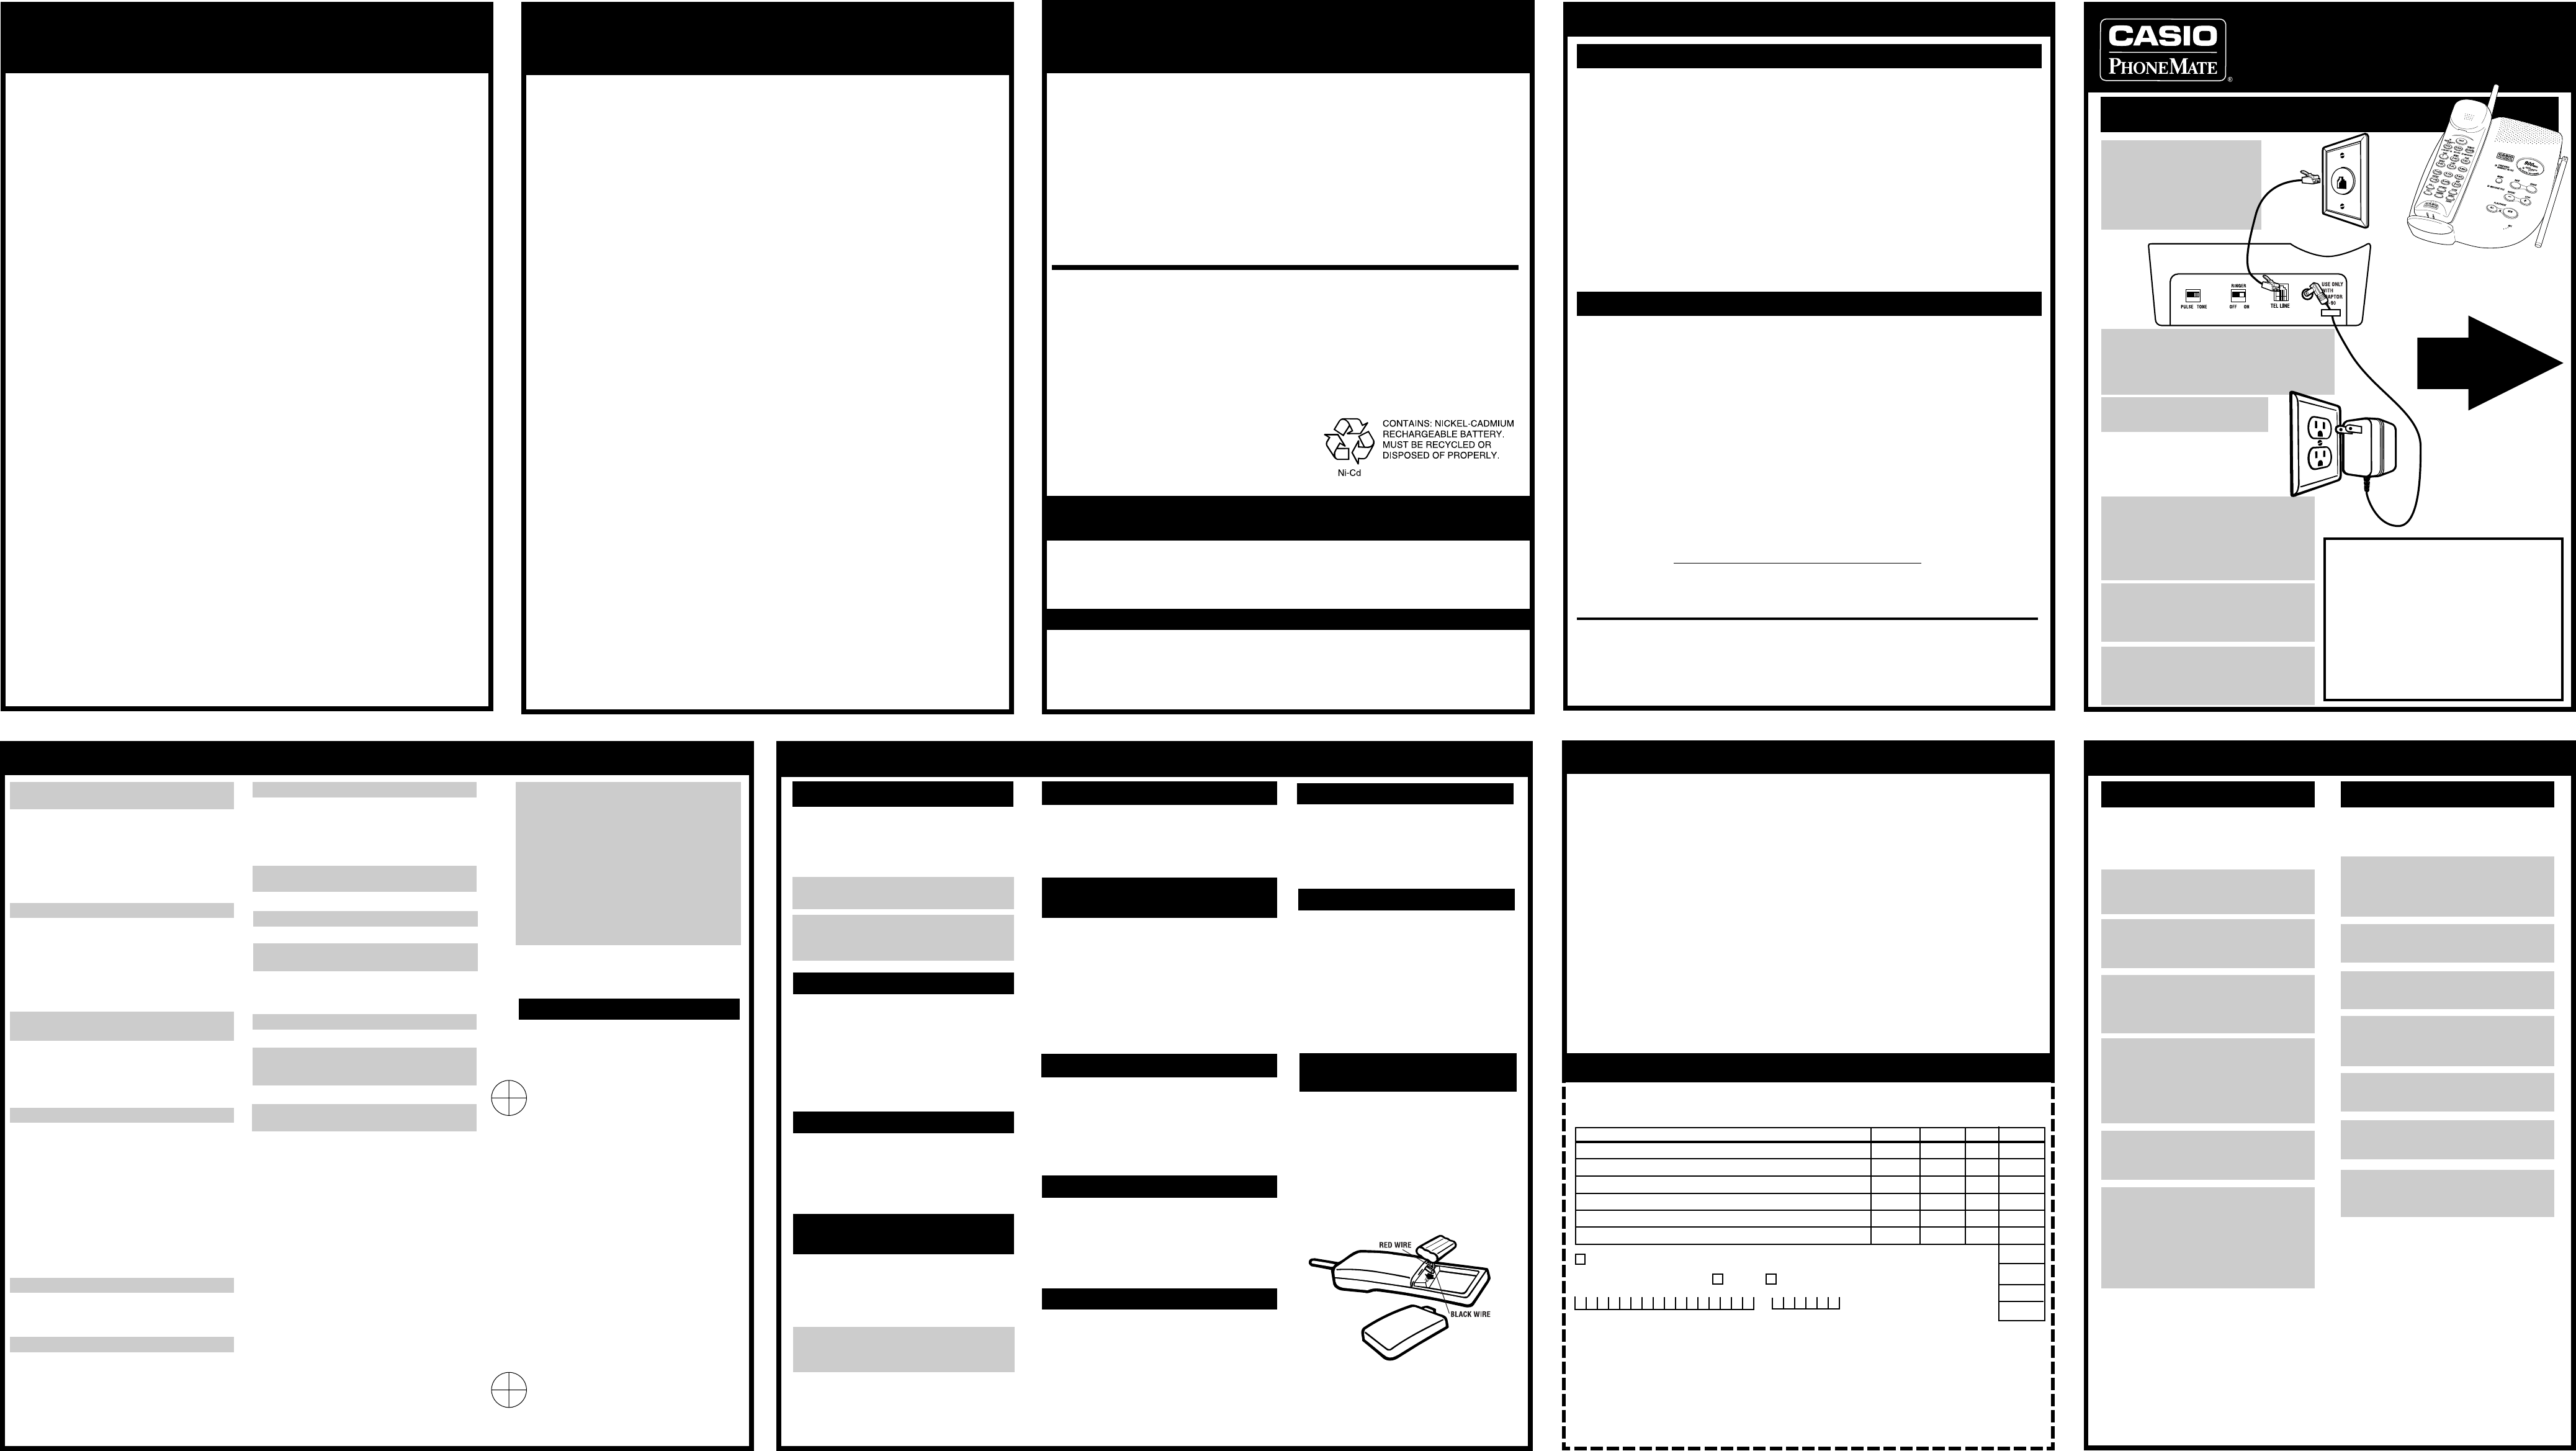
1
PLUG
the separate
Telephone Cord included in
the package into the rear of
the unit.
PLUG
the TC-920’s
Telephone Cord into a
Telephone Wall Jack.
ADDITIONAL INFO
TROUBLESHOOTING REFERENCIA RÀPIDA
FCC REQUIREMENTS
USER INSTRUCTIONS
1. This equipment complies with Part 68 of the FCC rules. On the bottom of this equipment is a label
that contains, among other information, the FCC registration number and Ringer Equivalence
Number (REN) for this equipment. If requested, provide this information to your telephone
company.
2. The REN is useful to determine the quantity of devices you may connect to your telephone line and
still have all of those devices ring when your number is called. In most, but not all areas, the sum of
the RENs of all devices should not exceed five (5.0). To be certain of the number of devices you
may connect to your line, as determined by the REN, you should call your local telephone company
to determine the maximum REN for your calling area.
3. If your answering machine causes harm to the telephone network, the telephone company may
discontinue your service temporarily. If possible, they will notify you in advance. But if advance
notice is not practical, you will be notified as soon as possible. You will be advised of your right to
file a complaint with the FCC.
4. Your telephone company may make changes in its facilities, equipment, operations, or procedures
that could affect the proper operation of your equipment. If they do, you will be given advance
notice so as to give you an opportunity to maintain uninterrupted service.
5. If there is a problem with this unit, the telephone company may ask you to disconnect this
equipment from the network until the problem has been corrected or you are sure that the
equipment is not malfunctioning.
6. Repairs can only be made by the manufacturer or an authorized service agency. Unauthorized
repairs void registration and warranty. Contact seller or manufacturer for details of permissible
user-performed routine repairs, and where and how to have other than routine repairs made.
7. This equipment may not be used on coin service provided by the telephone company. Connection to
party lines is subject to state tariffs. (Contact your state public utility commission or corporation
commission for information.)
Jack: RJ11 Ringer Equivalence: See bottom/underside of the TC-920 base unit.
CASIO PHONEMATE, Inc. 20665 Manhattan Place, Torrance, CA 90501
NOTE: This equipment has been tested and found to comply with the limits for a Class B digital device,
pursuant to Part 15 of the FCC Rules. These limits are designed to provide reasonable protection
against harmful interference in a residential installation. This equipment generates, uses, and can
radiate radio frequency energy and, if not installed and used in accordance with the instructions, may
cause harmful interference to radio communications. However, there is no guarantee that interference
will not occur in a particular installation. If this equipment does cause harmful interference to radio or
television reception, which can be determined by turning the equipment off and on, the user is
encouraged to try to correct the interference by one or more of the following measures:
●Reorient or relocate the receiving antenna.
●Increase the separation between the equipment and receiver.
●Connect the equipment into an outlet on a circuit different from that to which the receiver is
connected.
●Consult the dealer or an experienced radio/TV technician for help.
Any changes made by the user not approved by CASIO PHONEMATE can void the user’s authority to
operate the equipment. This product is hearing aid compatible.
L
IMPORTANT CORDLESS
TELEPHONE INFORMATION
INTERFERENCE INFORMATION
Notice: This cordless telephone uses radio communications between the handset and the base unit,
and may not ensure privacy of communication. Other devices including other cordless telephones
may interfere with the operation of this cordless telephone or cause noise during operation. Cordless
telephone equipment generates and receives radio waves and, if not installed and used properly, may pick
up interference.
To prevent interference:
Avoid locations such as heating appliances, electrical equipment (e.g., fluorescent lamp, TV, radio,
refrigerator, computer), places subject to direct sunlight, excessive dust, moisture, vibration, etc.
Locate the base unit in a high place in the house (such as the second floor) in order to receive the
most effective communication range. Fully extend the base unit antenna. Telephones must not cause
interference to any licensed radio service.
WARNING
To prevent fire or shock hazard, do not expose the set to rain or moisture.
To avoid electrical shock, do not open the cabinet. Refer servicing to qualified personnel only.
CAUTION
1. Use batteries only intended for recharging. Use only the following battery pack:
Nickel-Cadmium Rechargeable, 3.6 volts, 600 mAh.
2. Do not dispose of the battery in a fire. The cell may explode. Check with local codes for special
disposal instructions.
3. Do not open or mutilate the battery Released electrolyte is corrosive and may cause damage to the
eyes or skin. It may be toxic if swallowed.
4. Exercise care when handling the battery in order not to
short the battery with conducting materials such as
rings, bracelets, and keys. The battery or conductor
may overheat and cause burns.
IMPORTANT
SAFETY INSTRUCTIONS
INSTALLATION INSTRUCTIONS
1. Never install telephone wiring during a lightning storm.
2. Never install telephone jacks in wet locations unless the jack is specifically designed for wet locations.
3. Never touch uninsulated telephone wires or terminals unless the telephone line has been disconnected at
the network interface.
4. Use caution when installing or modifying telephone lines.
SAFETY PRECAUTIONS
When using your telephone equipment, basic safety precautions should always be followed to reduce the risk of
fire, electric shock and injury to persons, including the following:
1. Read and understand all instructions.
2. Follow all warnings and instructions marked on the product.
3. Unplug this product from the wall outlet before cleaning. Do not use liquid cleaners or aerosol cleaners. Use
a damp cloth for cleaning.
4. Do not use this product near water; for example, near a bath tub, wash bowl, kitchen sink, or laundry tub, in
a wet basement, or near a swimming pool.
5. Do not place this product on an unstable cart, stand, or table. The product may fall, causing serious damage
to the product.
6. Slots and openings in the cabinet and the back or bottom are provided for ventilation, to protect it from
overheating, these openings must not be blocked or covered. The openings should never be blocked by
placing the product on the bed, sofa, rug, or other similar surface. This product should never be placed near
or over a radiator or heat register. This product should not be placed in an enclosed environment unless
proper ventilation is provided.
7. Do not allow anything to rest on the power cord. Do not locate this product where the cord will be abused
by animals or persons walking on it.
8. Do not overload wall outlets and extension cords as this can result in the risk of fire or electric shock.
9. Never push objects of any kind into this product through cabinet slots as they may touch dangerous voltage
points or short out parts that could result in a risk of fire or electric shock. Never spill liquid of any kind on
the product.
10.To reduce the risk of electric shock, do not disassemble this product, but take it to a qualified serviceperson
when service or repair work is required. Opening or removing covers may expose you to dangerous
voltages or other risks. Incorrect re-assembly can cause electric shock when the appliance is subsequently
used.
11.Unplug this product from the wall outlet and refer servicing to qualified service personnel under the
following conditions:
A. When the power supply cord or plug is damaged or frayed.
B. If liquid has been spilled into the product.
C. If the product has been exposed to rain or water.
D. If the product does not operate normally by following the operating instructions. Adjust only those
controls, that are covered by the operating instructions because improper adjustment of other controls
may result in damage and will often require extensive work by a qualified technician to restore the
product to normal operation.
E. If the product has been dropped or the cabinet has been damaged.
F. If the product exhibits a distinct change in performance.
12.Avoid using a telephone (other than a cordless type) during an electrical storm. There may be a remote risk
of electric shock from lightning.
13.Do not use the telephone to report a gas leak while near the leak.
SAVE THESE INSTRUCTIONS
M
Two-line installations may require a two-line
T-Adapter for your machine to operate correctly.
The T-Adapter allows you to connect your machine
to Line 1 or Line 2. The TC-920 will only answer one
line.
N
R
O
Install one 9 volt (9V) battery in the base to
protect your outgoing and incoming messages
and any programmed information (i.e.; time/day
stamp, remote access code) during a power
failure. Otherwise, your greeting, incoming
messages, the time/day and the handset
security code will be lost, even during a short
power failure. (The 9V battery is not included.)
BATTERY BACKUP
INSTALLING A 9V BATTERY
1. Turn the TC-920 over and remove the battery
cover while unit power is on.
2. Install a fresh 9V alkaline battery. Make sure
the battery is connected correctly. Replace the
cover.
POWER FAILURE
Installations with more than two lines, such as a
business phone system, may require a separate
RJ11 jack for answering machines. Please contact
your telephone equipment provider for additional
information. You can use the TC-920 as an extension
phone on a business phone system, but some
systems will require that you install an A+A1 Adapter
to light the in-use indicator on the receptionist’s
console.
MULTI-LINE INSTALLATION
Unplug the AC Adapter from the wall outlet. DO
NOT unplug the AC Adapter from the back of the
unit or your greeting, incoming messages,
remote access code and the time and day may
be erased.
MOVING THE TC-920
CAUTION
: Disconnect the TC-920 from the AC
power outlet before cleaning. Make sure you
have a 9 volt battery installed in the base unit.
Clean the battery charging contacts on the base
unit and the handset with a soft cloth once a
month. Clean the antenna, and the plastic
cabinet of the base unit and the handset, with a
soft cloth only. Do not use excess water or
cleaning liquid of any kind.
WARNING: Use only NiCd Rechargeable
Battery Pack (3.6 volts 600 mAh.)
Recorded greeting sounds garbled or difficult to
hear.
Strictly follow the guidelines for recording your
greetings to ensure the best possible quality:
1. Speak loudly and clearly about 7" from the
Microphone.
2. Avoid any background noise.
3. Greeting should be recorded using the voice of
one person.
No dial tone is heard when calling out.
1. Place the handset in the charging cradle for about
3 seconds to reset the security code.
2. Make sure the handset battery pack was charged
for at least 12-15 hours.
3. Is the handset LOW BATT/RECORD INDICATOR
on?
4. Check the telephone cord connection.
Your incoming messages, greetings and machine
settings were erased.
Disconnection of the AC Adapter from the back of the
unit will cause the TC-920 to lose all recorded
messages, greetings and other settings. Make sure
that you have looped the power cord through the AC
Adapter Cord Holder on the back of the unit.
The unit does not record incoming messages.
1. Memory may be full. Erase messages to allow new
messages to be recorded.
2. The VOLUME SWITCH may be set too low and
recorded messages cannot be heard.
3. The machine may have been accidentally turned
off.
4. The caller may have hung up within four seconds
of the machine answering the call. The TC-920 will
not record a message by design.
5. Your local telephone company may transmit
signals that are recorded by your machine.
6. No calls were actually received.
Calls on hold are disconnected.
1. The call placed on hold may have exceeded the
five minute holding limit.
2. Review the hold section.
The handset does not ring.
1. Place the handset in the charging cradle for about
3 seconds to reset the handset security code.
2. Make sure the HANDSET RINGER SWITCH is on.
3. Check the AC Adapter and the telephone cord
connections.
Recorded messages are cut off.
The TC-920 is designed to disconnect from the line
after a caller stops talking. Calls may be cut off if a
four second pause is detected, if the caller does not
speak loud enough, or if the message is less than
four seconds in length.
You have more than one telephone number and
are experiencing difficulty.
See MULTI-LINE INSTALLATION.
There is no sound during playback.
Check and adjust the base volume control.
Between messages there is an operator recording
or a beep and dial tone.
The caller has hung up without leaving a message. A
shorter greeting will reduce the frequency of these
recordings.
LO BATT INDICATOR on the handset lights.
The handset needs to be charged.
The unit does not automatically stop playing the
greeting or recording a message when an
extension phone is picked up.
Hang up briefly and answer the call again.
After several attempts the TC-920 will not operate
properly.
Reset the TC-920 by unplugging the AC ADAPTER
PLUG from the back of the unit for 10 seconds and
remove the battery (if one is installed). The greetings,
incoming messages and time/day stamp will be lost.
Re-record the greeting and set the time and day.
If this action does not fix the problem, call the CASIO
PHONEMATE Helpline. CASIO PHONEMATE’s Helpline
staff can often resolve problems or recommend
repair service when needed.
Unless you live close to a CASIO PHONEMATE
Service Center, you may be required to mail a
product to CASIO PHONEMATE for repair. To mail
the product to the service center you should:
1. Package the unit in its original box or a
comparable package.
2. Include a clear and specific explanation of the
problem.
3. Include your name, address, and phone number.
4. Provide a legible photocopy of the dated store
receipt for warranty purposes.
PU
2
3
CONNECT
the AC Adapter Plug into the AC
Adapter Outlet on the back of the TC-920.
LOOP
the cord through the AC Adapter Cord
Holder to prevent accidental disconnection.
PLUG
the AC Adapter into an
Electrical Wall Outlet.
NOTE:
■Disconnection of the AC Adapter from the
back of the unit will cause the TC-920 to
erase all recorded messages, greetings
and the time and day.
INSTALLATION
TC-920 EASY TO USE OWNER'S GUIDE
900 MHz CORDLESS PHONE WITH
ALL DIGITAL ANSWERING MACHINE
A
Open for easy
operating guide!
IMPORTANT FEATURES
CHARGE THE HANDSET BATTERIES BEFORE USING
THE CORDLESS TELEPHONE
The batteries lose their charge during shipping and storage. Be sure to charge the batteries before you use
the TC-920 cordless telephone. Place the handset in the base unit. The CHARGING/LINE IN USE
INDICATOR on the base will light. Leave the handset in the base unit for 12-15 hours.
The Digital Security Coding System automatically resets a new personal security code to one of over
64,000 combinations every time you return the TC-920 handset to the base unit. (Whenever the handset
is returned to the base unit you will hear a beep.) The security code prevents unauthorized use of your
telephone line, false rings and false dialing.
DIGITAL SECURITY CODE
GREATER RECEPTION RANGE
Shorter, more powerful signals are able to travel farther and penetrate thick concrete walls, enabling
users a wider area of reception, free of interference caused by obstructions.
ULTRA CLEAR NOISE REDUCTION CIRCUIT
The TC-920 is equipped with Ultra Clear Noise Reduction Circuitry (Compander Circuit). It reduces
background noise-reception is superior to conventional cordless telephones.
40 CHANNELS WITH CLEAR CHANNEL SELECTION
The TC-920 has 40 channels with Clear Channel Selection. Clear Channel Selection checks and secures
a clear channel with every call. When you press
TALK
to call out or receive a call, the unit automatically
finds a clear channel. Press
CHANNEL
if you wish to change channels manually.
HEADSET JACK
As a convenience, the TC-920 cordless phone can be operated hands-free using a wired headset and the
belt clip provided with the unit. An industry standard 2.5mm headset jack is built into the handset for
attachment to a headset. The belt clip can be used in conjunction with the headset. It snaps easily and
securely into the back of the handset. Note: headset not provided.
AUTO EXTENSION DISCONNECT
You can answer a call from any extension phone connected to the same line as the TC-920. Pick up any
extension phone after the TC-920 has answered a call. The unit will automatically stop playing your
greeting or recording a message. If it does not stop, hang up briefly and answer the call again.
MODEM MONITORTM CONNECTION PROTECTION
Modem MonitorTM constantly scans the telephone line and protects the modem and fax connections
when a call attempt is made from the TC-920 or any phone that includes the Modem MonitorTM feature.
It distinguishes between data and standard voice communication and allows for normal telephone
operation. Modem MonitorTM prevents the telephone from interrupting an online session and safeguards
data during file transfer.
When the TC-920 detects a modem in use on the line to which it is connected, the Modem MonitorTM
feature prevents the TC-920 from going off-hook. When you attempt to make a call on the TC-920 and a
modem is connected, The TALK LED will flash to indicate active data transmission and you will hear the
modem data sounded through the handset earpiece. The data you hear is protected from interruptions.
The MODEM MONITORTM INDICATOR on the base unit will light red.
NOTE:
■If you wish to disable Modem Monitor after pressing
TALK
, you can do so by pressing
9
. To insure that you can
place outbound calls, you must still manually or electronically disconnect the modem.
CHARGING/LINE IN USE INDICATOR
Flashes red = someone is using an extension phone or the cordless handset.
Lights solid red = the handset is charging .
BENEFITS OF 900 MHZ CORDLESS TECHNOLOGY
OTHER FEATURES
When power is restored after a power failure, all
Base INDICATOR’s will flash to indicate that the
installed battery was depleted during the power
failure. After you install a new 9 volt battery, reset
the time/day stamp, record a new greeting and
reprogram other settings.
TWO-LINE INSTALLATION
CLEANING THE TC-920
If it becomes necessary to replace the battery
pack:
1.Press down on the battery compartment cover
and slide it toward the bottom of the handset.
2.Install the new battery pack with the red wire
on the right side of the black wire.
3.Replace the battery cover by sliding it up from
the bottom.
4.Place the handset in the base unit and charge
the battery pack for 12-15 hours.
HANDSET NI-CAD BATTERY
INSTALLATION
The TC-920 can easily be wall mounted by
following these instructions. If you have a
standard telephone wall mounting bracket, begin
with step 2.
FACTORY SERVICE CENTERS
CASIO PHONEMATE, INC.
Attn: Customer Service
20665 Manhattan Place
Torrance, CA 90501
(310) 328-6453
CASIO PHONEMATE, INC.
Attn: Customer Service
8805 Kelso Drive
Baltimore, MD 21221
(410) 391-0974
Should you have additional questions, please call the
CASIO PHONEMATE Helpline at (310) 320-9810 for
assistance.
WALL MOUNTING Q
T
E
M
P
L
A
T
E
1.Purchase and mount wood screws, round
head, brass, size #10, 1/14 inches in
length into wall. Use the template (left) to
space screws correctly.
2.Guide the telephone cord through the right
cord holder on the unit’s bottom. Tightly
coil the telephone cord around the four
guides on the inside of the wall mounting
bracket. Pull the telephone cord through
the center opening on the wall mounting
bracket.
3.Guide the AC Adapter through the left cord
holder on the bottom of the unit. Tightly
coil the AC Adapter cord around the four
guides on the inside of the wall mounting
bracket. Direct the AC Adapter cord
through the opening in the side of the wall
mounting bracket.
4.Snap the wall mounting bracket into the
back of the TC-920.
5.Plug the AC Adapter into a wall outlet and
the telephone cord into a wall jack. Hang
the Handset on the fixed Handset hook
and insure that the CHARGING LED on the
base is lit solid. Vertically position the
base antenna to ensure the best reception.
XXXX
1
Fije la hora y el día correctos. Su TC-920
asignara a cada mensaje la hora y el día en que
fueron recibidos.
GRABANDO EL SALUDO UNO
Usted puede grabar uno o dos saludos
personales con duración hasta de 20 minutos.
El saludo es grabado en un circuito integrado
digital.
Asegúrese de que las luces indicadoras
de su TC-920 estén encendidas o
centellando.
2
3
Ajuste el control de volumen a su punto
medio (control localizado en el lado
derecho de su TC-920).
Oprima
GREETING RECORD
(grabación del saludo) (localizado en el
área donde se coloca el auricular en la
base).
4Usted escuchará un bip seguido por la
siguiente grabación “
Please Record
Greeting One”
y luego otro bip. Hable
claramente y con voz fuerte a unos 18 cm
del micrófono localizado en la esquina
derecha de la unidad base.
5La luz indicadora junto a PLAY/PAUSE
en la unidad base centellará lentamente
para indicarle que está grabando.
6Oprima
GREETING RECORD
de
nuevo después de que usted a terminado
de decir su mensaje. El mensaje se
reproduce automáticamente una vez,
luego su TC-920 se re-posiciona para
contestar llamadas telefónicas usando el
Saludo Uno.
NOTA:
■Para grabar el Saludo Dos, oprima
GREETING
SELECT
(selección de saludo) para indicarle a su
TC-920 que conteste utilizando el Saludo Dos,
luego siga los pasos indicados anteriormente en la
sección GRABANDO EL SALUDO UNO.
FIJANDO LA HORA Y EL DÍA
Oprima
TIME SET
(fijación de la hora)
(localizado en el área donde se coloca el
auricular en la base) dos veces
rápidamente. Usted escuchará, "
Sunday."
Oprima
SKIP
o
REPEAT
(en la base)
hasta que el día correcto sea anunciado.
Oprima
TIME SET
. Su TC-920
anunciará la hora.
Oprima
SKIP
para avanzar o
REPEAT
para retroceder la hora. «a.m.» y
«p.m.» será anunciado para cada hora.
Oprima
TIME SET
. Su TC-920
anunciará los minutos.
6Oprima
SKIP
para avanzar o
REPEAT
para retroceder los minutos.
7Oprima
TIME SET
de nuevo para
terminar. El día y la hora serán
anunciados.
1
2
Charge the cordless handset batteries for 12-15
hours before using the handset for the first time
or after installing a new battery pack. The
handset is always charging while it is in the base
unit and cannot be overcharged.
CHARGING THE BATTERIES
Check the AC Adapter to see that it is
connected correctly.
Place the handset in the base unit. The
CHARGING INDICATOR on the base unit
lights to indicate the TC-920 is charging.
CHARGE THE HANDSET BATTERIES
BEFORE USING THE CORDLESS
TELEPHONE
The batteries lose their charge during shipping
and storage. Be sure to charge the batteries
before you use the TC-920 cordless telephone.
Place the handset in the base unit. The
CHARGING/LINE IN USE INDICATOR on the base
will light. Leave the handset in the base unit for
12-15 hours.
4The TC-920 will broadcast a beep in
about 20 seconds indicating that the
unit is fully initialized and ready to
operate. On the base, all indicators will
flash. The TC-920 is ready to record
your personalized greeting.
5You must install a fresh 9 volt battery in
the base unit to prevent loss of the
greetings and messages if power is
interrupted. See "Installing a 9V battery".
6Position the base antenna vertically for
clear reception. Before use, place the
handset in the base unit for 12-15 hours
to charge the cordless handset batteries.
1Press
PAGE
on the base unit. You will hear
the handset ring, if the HANDSET RINGER
SWITCH is set to “RINGER ON.”
PAGING THE HANDSET FROM
THE BASE UNIT
To page the handset user or to locate the handset
from the base unit, the handset must be in the
Standby Mode (the TALK INDICATOR on the
handset is not lit) and the Handset Ringer must
be ON.
CHANGING CHANNELS
After TALK is pressed, the TC-920 selects a clear
channel using Clear Channel Selection
.
If you hear
noise or interference while using the TC-920, press
CHANNEL
on the handset to manually change
channels.
CASIO PHONEMATE, INC.
20665 Manhattan Place
Torrance, CA 90501-1827
Internet Web Site:
http://www.casiophonemate.com
Design and specifications are subject
to change without notice.
M1S1 3/99
Printed in China
US Patents 5,400,393 & 5,289,529; Other Patents Pending.
DISTINCTIVE RING GREETING
MODE
If you subscribe to a distinctive ring service from
your local telephone company, you can set the
TC-920 to play a different greeting for normal ring
calls and distinctive ring calls. To set the TC-920 to
Distinctive Ring Greeting Mode, select Greeting Two
by pressing
GREETING SELECT
. The TC-920 will
answer normal ring calls with Greeting Two and will
answer special (distinctive) ring pattern calls with
Greeting One.
LIMITED WARRANTY
To order accessories, simply cut out this order form, fill in the appropriate information and send it with
payment (check, money order or credit card information) to: CASIO PHONEMATE Parts Department,
8805 Kelso Drive, Baltimore, MD 21221 or Call: 1-800-322-9995 for credit card orders.
Description Part No. Price Qty. Total
Lightning Arrestor - Recommended for areas prone to electrical storms. 2700140 $19.95
AC Adapter - For Model TC-920. 1601073 $13.50
Belt Clip (White) 2401734 $4.95
Belt Clip (Black) 2401735 $4.95
Headset (over ear) 8000688 $19.95
Headset (over head) 8000689 $19.95
Please charge my credit card.
Card No. Expiration Date
Name ______________________________________________________________________________
Street Address_______________________________________________________________________
City _________________________________________ State __________ Zip Code _______________
Signature ___________________________________________ Telephone_______________________
We do not accept C.O.D. orders. Allow 15 working days for delivery. Prices subject to change without notice. Returns
subject to 20% restocking charge upon approval.
IMPORTANT! SALES SLIP OR EVIDENCE OF PURCHASE DATE REQUIRED
This limited warranty gives you specific legal rights; you may also have other rights which vary from state to state.
The limited warranty is extended only to the original consumer of a CASIO PHONEMATE product and is valid only with
respect to consumers within the United States of America and Canada. Should this product prove defective by reason
of improper workmanship or material during the period of one (1) year from the date of original purchase, CASIO
PHONEMATE will repair or, at its option, replace the product without charge for parts or labor. If CASIO PHONEMATE
elects to replace the product, such replacement may be accomplished with a factory-reconditioned unit.
This limited warranty does not apply: (a) to any product damaged by accident, misuse, improper line voltage, lightning,
fire, water, or other acts of nature, (b) if the product is altered or repaired by anyone other than CASIO PHONEMATE,
INC. or one of its authorized warranty stations or (c) if the FCC-approved connector plugs are removed. This limited
warranty does not cover broken or marred cabinets.
Except to the extent prohibited by applicable law, all implied warranties made by CASIO PHONEMATE in connection
with this product are limited in duration to a period of one (1) year from the date of original purchase, and no
warranties, whether expressed or implied, shall apply to this product after said period.
Should this product prove defective in workmanship or material, the consumer’s sole remedies shall be such repair or
replacement as is herein-above provided. Under no circumstances shall CASIO PHONEMATE be liable for any loss or
damage, direct, consequential, or incidental arising out of the use of or inability to use this product.
Some states do not allow limitations on how long an implied warranty lasts or the exclusion or limitation of incidental
or consequential damages, so the above limitations or exclusion may not apply to you.
In order to obtain warranty service, you must provide evidence of purchase date. For your convenience, keep the
dealer’s dated bill of sale or delivery ticket as evidence of the purchase date.
Before returning or exchanging your product, call CASIO PHONEMATE ’s Helpline at (310) 320-9810.
S
ACCESSORIES T
VISA MasterCard
Subtotal
CA & MD residents
add applicable sales tax
All orders add shipping & handling $3.50
Total
Enclosed is my check/money order for the total amount.