CeoTronics CTMUPTTBT CT-Multi-PTT User Manual Handmikrofon SM 3 mit integriertem Lautsprecher
CeoTronics AG CT-Multi-PTT Handmikrofon SM 3 mit integriertem Lautsprecher
user manual
Revision: 02/1015 DOK 1643-us
CT-Multi-PTT Bluetooth
Operation Instructions
English- USA - Canada

Revision: 02/1015 DOK 1643-us 2 of 28
Contents
1 Warning - and Safety instructions ................................................................... 3
1.1 General safety instructions ....................................................................................................... 3
2 Abbreviations and Terms................................................................................ 5
3 Scope of delivery ............................................................................................ 5
4 Labeling of the product ................................................................................... 5
5 Product description ......................................................................................... 6
5.1 Description ............................................................................................................................... 6
5.2 Fixation clamp .......................................................................................................................... 9
5.3 CT-Multi-PTT Bluetooth with CT-ClipCom Digital ................................................................... 10
5.3.1 EarMike .......................................................................................................................... 10
5.3.2 Earphone with BoomMike ............................................................................................... 11
5.3.3 Use with standard ear plug ............................................................................................. 12
6 Preparing the Product for Use ...................................................................... 12
6.1 Receipt of Goods ................................................................................................................... 12
7 Operating Instruction .................................................................................... 13
7.1 Change of the battery ............................................................................................................ 13
7.1.1 Change of the battery – CT-Multi PTT Bluetooth ............................................................. 13
7.1.2 Change of the battery in the CT-Wireless-PTT ................................................................ 14
7.2 Connect the CT-MultiPTT Bluetooth to the radio .................................................................... 15
7.2.1 12-pin connector ............................................................................................................. 15
7.3 Switch-on ............................................................................................................................... 16
7.4 Switch-off ............................................................................................................................... 16
7.5 Pairing ................................................................................................................................... 16
7.6 Change operating modes ....................................................................................................... 17
7.7 Telephone mode (mode 1) ..................................................................................................... 17
7.7.1 Accept the call ................................................................................................................ 17
7.7.2 End the call ..................................................................................................................... 17
7.7.3 Reject the call ................................................................................................................. 17
7.7.4 Redial ............................................................................................................................. 17
7.7.5 Abort redialing ................................................................................................................. 17
7.8 Telephone mode with MIC switch (mode 2) ........................................................................... 17
7.8.1 Accept the call ................................................................................................................ 18
7.8.2 End the call ..................................................................................................................... 18
7.8.3 Reject the call ................................................................................................................. 18
7.8.4 Redial ............................................................................................................................. 18
7.8.5 Abort redialing ................................................................................................................. 18
7.9 Limited telephone mode with MIC switch (mode 3) ................................................................ 18
7.10 Increase the volume ............................................................................................................... 18
7.11 Lower the volume .................................................................................................................. 18
7.12 Battery status ......................................................................................................................... 18
7.13 Change the PIN for CT-Multi PTT Bluetooth .......................................................................... 19
7.14 CT-Wireless-PTT (optional) ................................................................................................... 20
7.15 Subscribe the CT-Wireless-PTT to the CT-Multi PTT Bluetooth ............................................. 21
7.16 Delete one CT-Wireless-PTT from the memory of the CT-Bluetooth Adapter......................... 22
7.17 Delete all CT-Wireless-PTT from the memory of the CT-Bluetooth Adapter ........................... 23

Revision: 02/1015 DOK 1643-us 3 of 28
7.18 Switch-on and operation ........................................................................................................ 24
7.18.1 Communication via radio ................................................................................................. 24
7.18.2 Communication via cellular phone .................................................................................. 24
7.19 End of operation..................................................................................................................... 25
8 Safekeeping – storage .................................................................................. 25
8.1 Cleaning ................................................................................................................................ 26
9 Disposal ........................................................................................................ 26
10 Technical data .............................................................................................. 26
11 Brief instruction ............................................................................................. 27
1 Warning - and Safety instructions
Notice for the use of the device for prevention of personal injury or property damage the national safety
and accident prevention regulations and the following warning and safety instructions in this instruction
manual.
The following information-, warning- and safety symbols can be used:
This symbol indicates important information.
This symbol indicates a possibly dangerous situation. Non-observance of the safety
instruction could cause damage to property.
This symbol indicates a possibly dangerous situation. Non-observance of the safety
instruction could cause minor or moderate injuries.
This symbol indicates a possibly dangerous situation through electric current. Non-
observance of the safety instruction could cause minor or moderate injuries.
This symbol indicates a potential situation of danger. Non-observance of the safety
instruction could cause death or extremely severe injuries.
This symbol indicates a potential situation of danger through electric current. Non-
observance of the safety instruction could cause death or extremely severe injuries.
This symbol indicates imminent danger. Non-observance of the safety instruction
could cause death or extremely severe injuries.
This symbol indicates imminent danger through electric current. Non-observance of
the safety instruction could cause death or extremely severe injuries.
All warning and safety symbols may include pictograms, calling the attention clearly to the
danger involved.
1.1 General safety instructions
Before using CeoTronics products read completely the appropriate operating
instructions. If in doubt, ask our technical staff.
Keep these operating instructions for later use.
If repair work of any kind needs to be done to CeoTronics products, arrange for it to
be performed only by the company CeoTronics or by a specialized workshop that is

Revision: 02/1015 DOK 1643-us 4 of 28
authorized by CeoTronics. In all other cases, our warranty and liability for the
product shall lapse.
Keep CeoTronics products out of the reach of children and any other persons who
are not familiar with the handling and operation thereof.
CeoTronics products may only be used for the specific application envisaged.
Product damage!
Do not immerse a CeoTronics product into water, if it is not expressly specified for
this purpose.
Risk of injury!
When using CeoTronics products that are equipped with connection leads ensure
that the latter do not get caught up in operational machinery or wheels!
Road traffic hazard!
Do not leave CeoTronics products lying around loose in cars, e.g. on the parcel
shelf. Stow these products in a suitable, safe place in the car so that they do not
present a danger to you or to other occupants of the car, if emergency braking is
effected.
When driving a car, do not use the radio because it may distract you from the other
traffic. Never use a CeoTronics product (communication set, insert earphone,
inductive receiver etc.) that will impair your hearing.
Risk of explosion!
CeoTronics products that are not intrinsically safe (explosion-proof) and therefore
have no special explosion-proof designation must never be operated in potentially
explosive environments (e.g. when refuelling cars, aircraft etc.). Devices that are not
explosion-proof can unintentionally trigger off explosions in such areas!

Revision: 02/1015 DOK 1643-us 5 of 28
Legal note for operation in the USA
The receiver of the CT-Multi- PTT should be used in the USA only when it is marked as following:
916,5 MHz
Important Notes for operation of the Transmitter in the USA
Changes or modifications not expressly approved by the party responsible for compliance could void
the user's authority to operate the equipment
This device complies with Part 15 of the FCC Rules.
Operation is subject to the following two conditions:
(1) this device may not cause harmful interference, and
(2) this device must accept any interference received, including interference that may cause undesired
operation.
2 Abbreviations and Terms
PTT Push to Talk – Press and hold the button so long as you want to speak.
Switch between receiving and transmitting
3 Scope of delivery
1 x CT-MultiPTT Bluetooth
1 x CT-Wireless PTT (Option)
1 x Operating instructions Dok1643
4 Labeling of the product
Name of the product
CT-MultiPTT Bluetooth
Manufacturer
CeoTronics AG
Adam-Opel-Str. 6
63322 Rödermark
Revision: 02/1015 DOK 1643-us 6 of 28
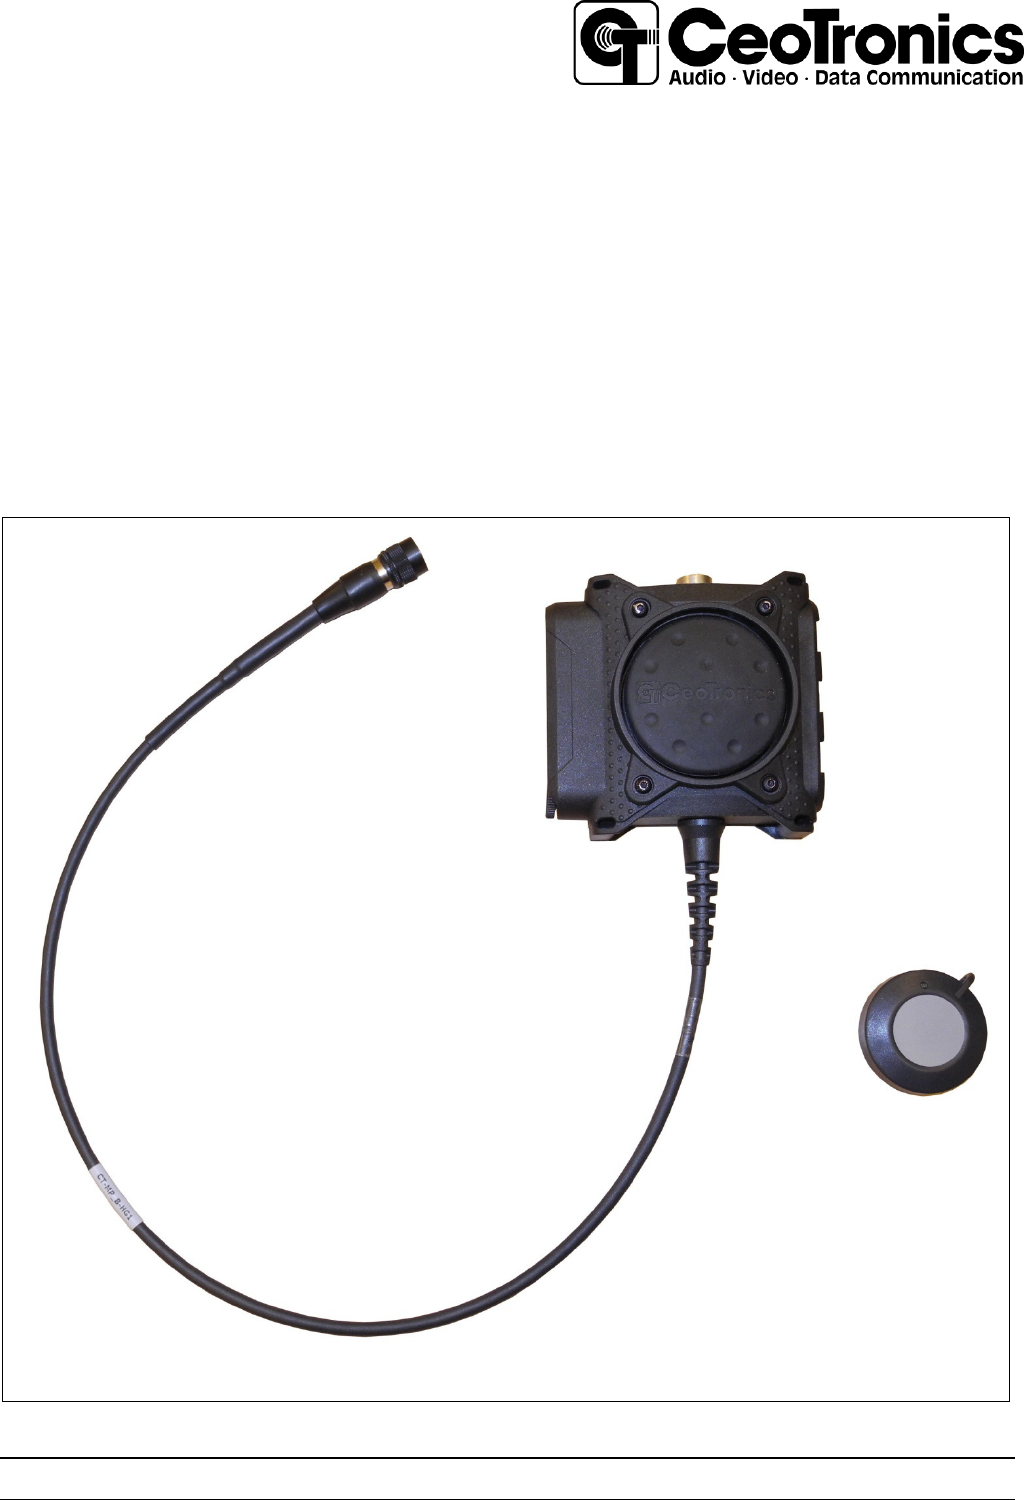
Figure 1 – Example metal clip
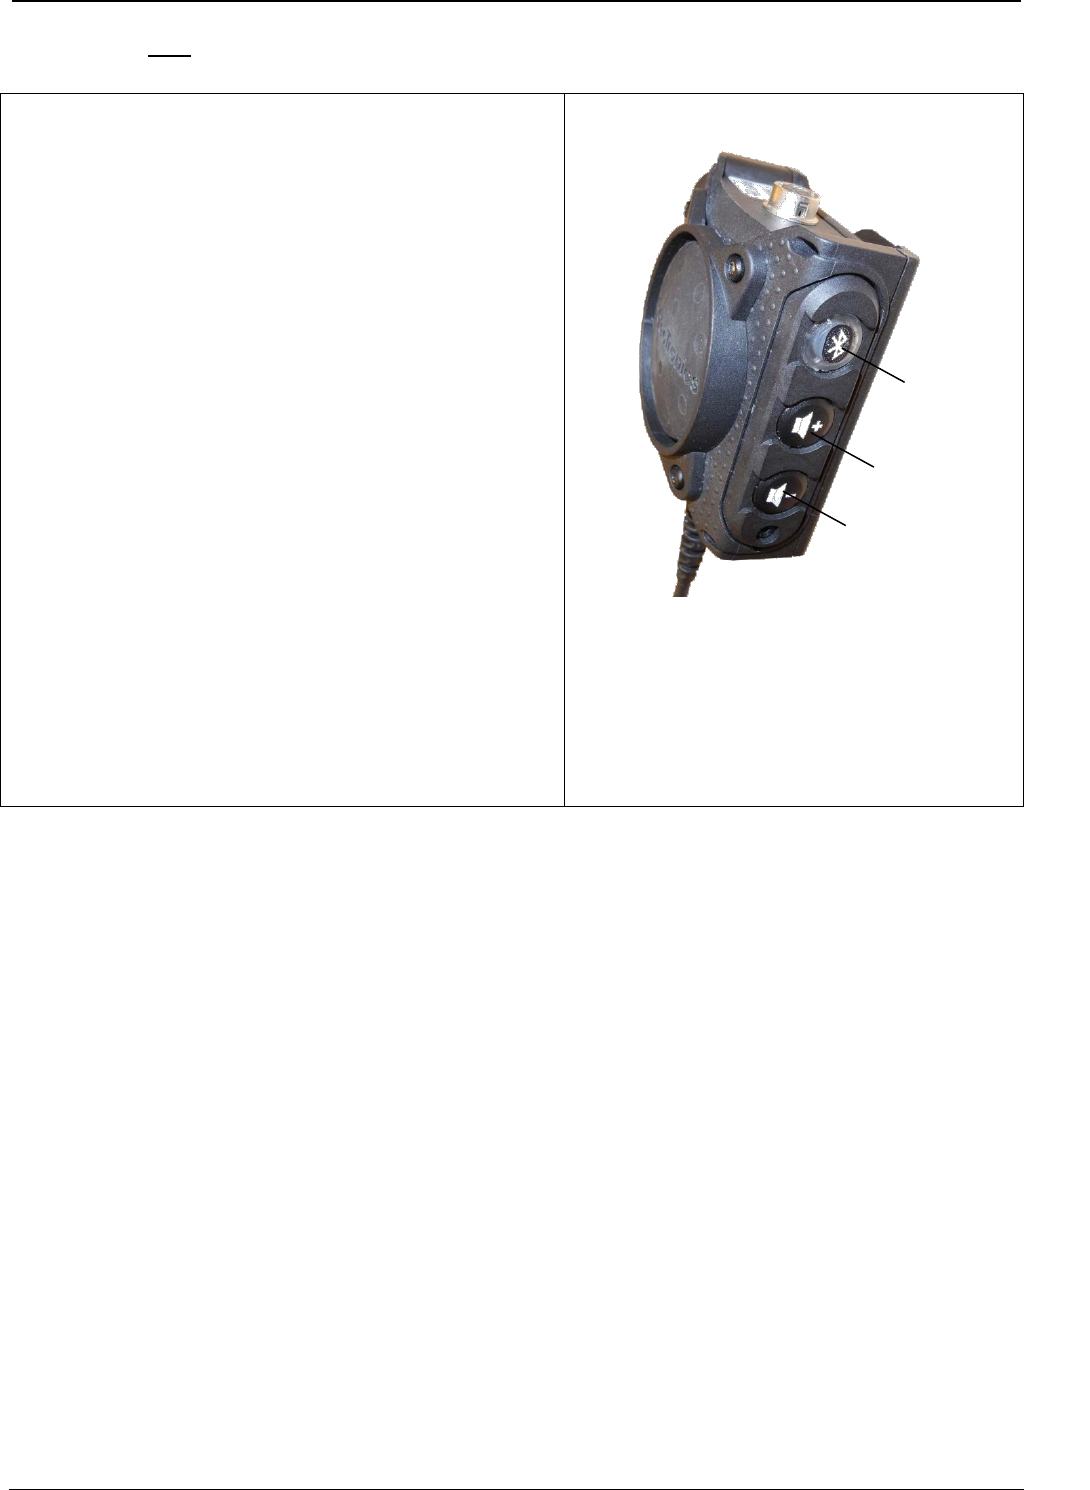
5 Product description
5.1 Description
The CT-Multi PTT Bluetooth (PTT-Push to talk) provides the possibility of cable connection to a radio
and to a cellular phone via the integrated Bluetooth interface. The necessary CT communication set
(not part of the scope of supply) is plugged into the corresponding socket.
With the CT-Multi PTT Bluetooth, most of CeoTronics communication systems with 12-pin connector
can be used on all cellular phones, supporting the Bluetooth Standard.
The CT-Multi PTT Bluetooth can be equipped with a CT-Wireless-PTT.
The CT-Multi PTT Bluetooth provides 128 bit coding.
Bluetooth devices should have a distance of maximum 40 cm from each other (could be more,
depending on the particular cell phone) and “visual contact” to ensure a secure Bluetooth connection.
Serial number
FCC labeling
Revision: 02/1015 DOK 1643-us 7 of 28
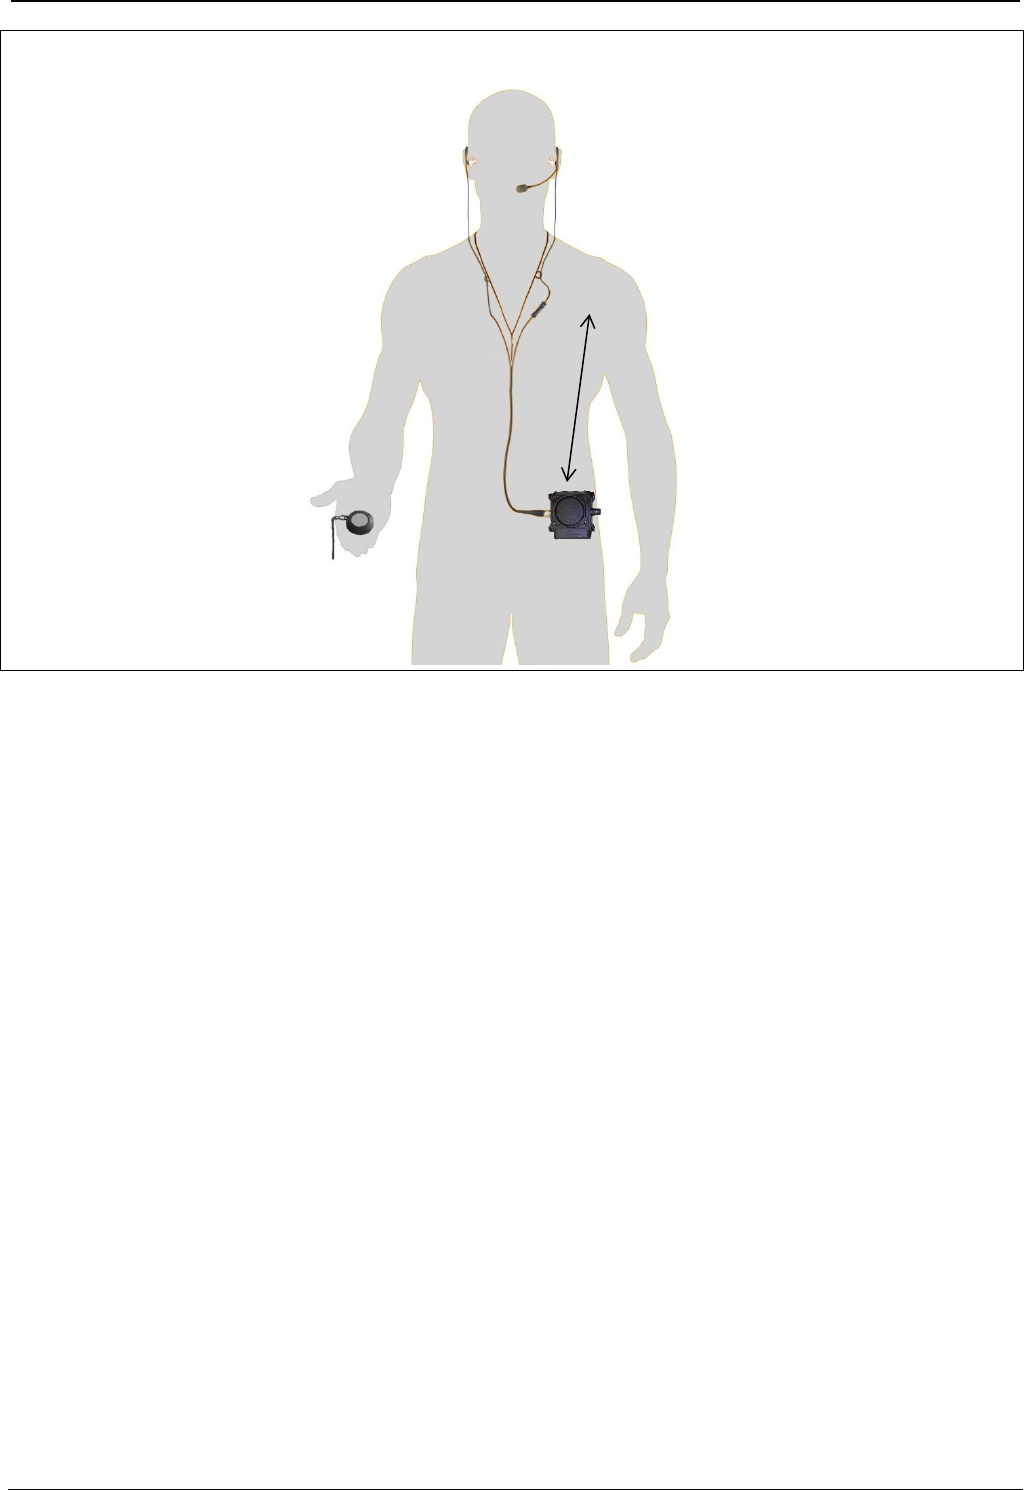
Figure 2 Example Wearing method
The CT-Multi PTT Bluetooth complies with the Bluetooth specification 2.1. At some places, there exist
restrictions regarding the use of Bluetooth devices. Ask your service provider or the competent
authorities.
An AA battery or AA storage battery provides the electrical power. For radio operation, the Bluetooth
module must be in switched-on state, even if no cellular phone is used. Normally, switch-on is
controlled via radio or by keystroke.
max. 40 cm

Revision: 02/1015 DOK 1643-us 8 of 28
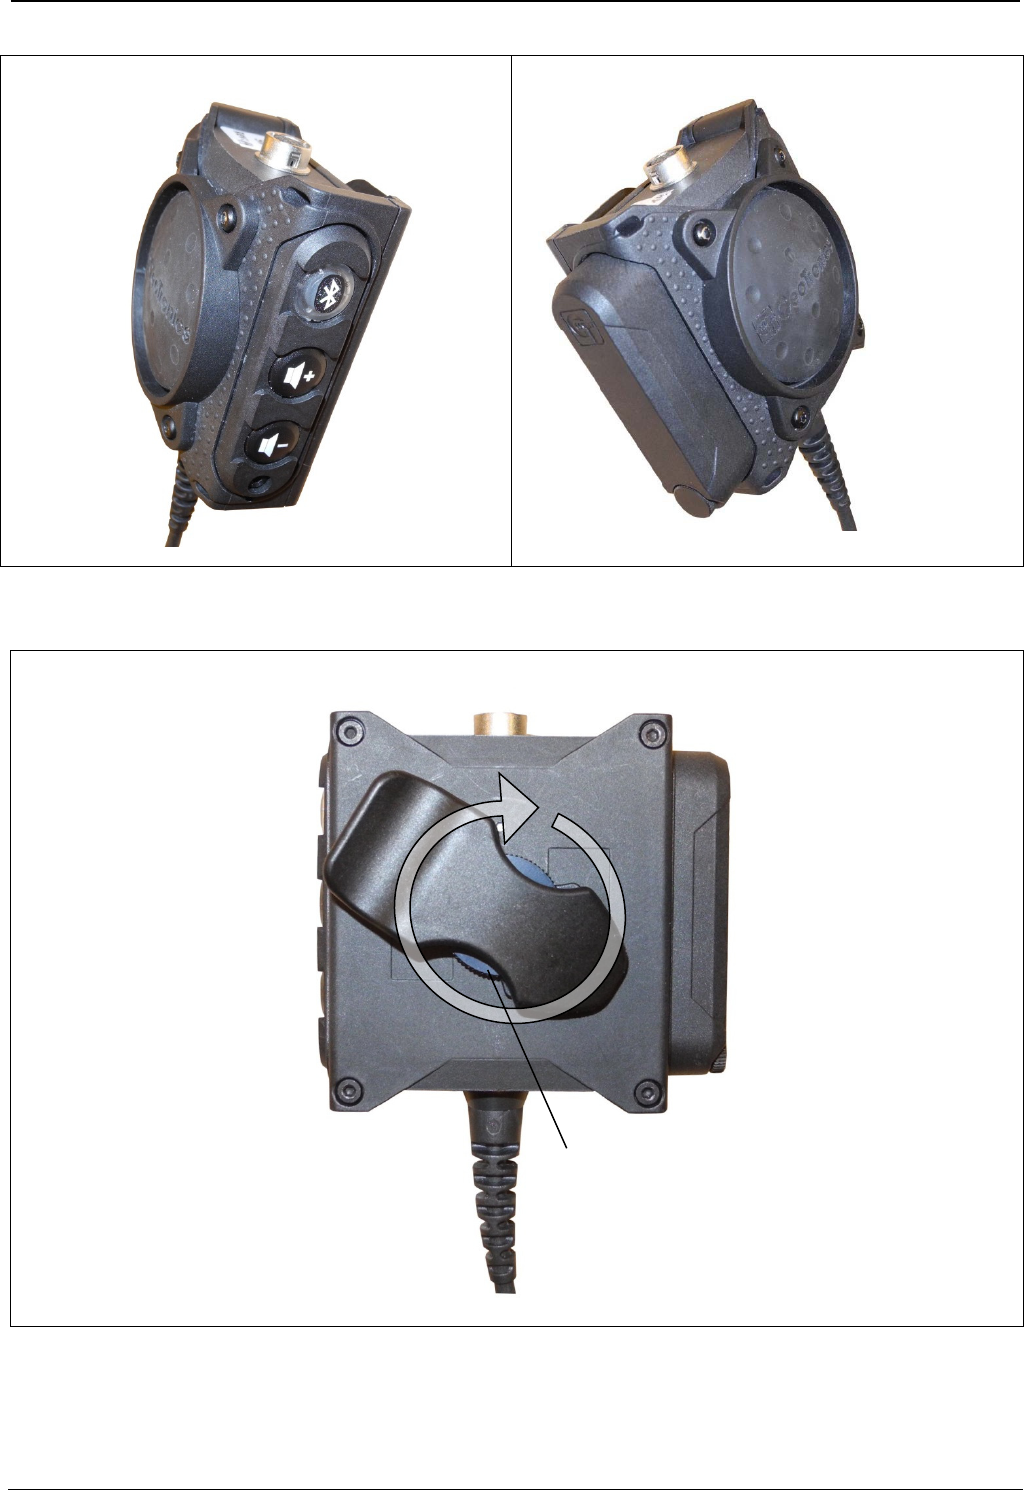
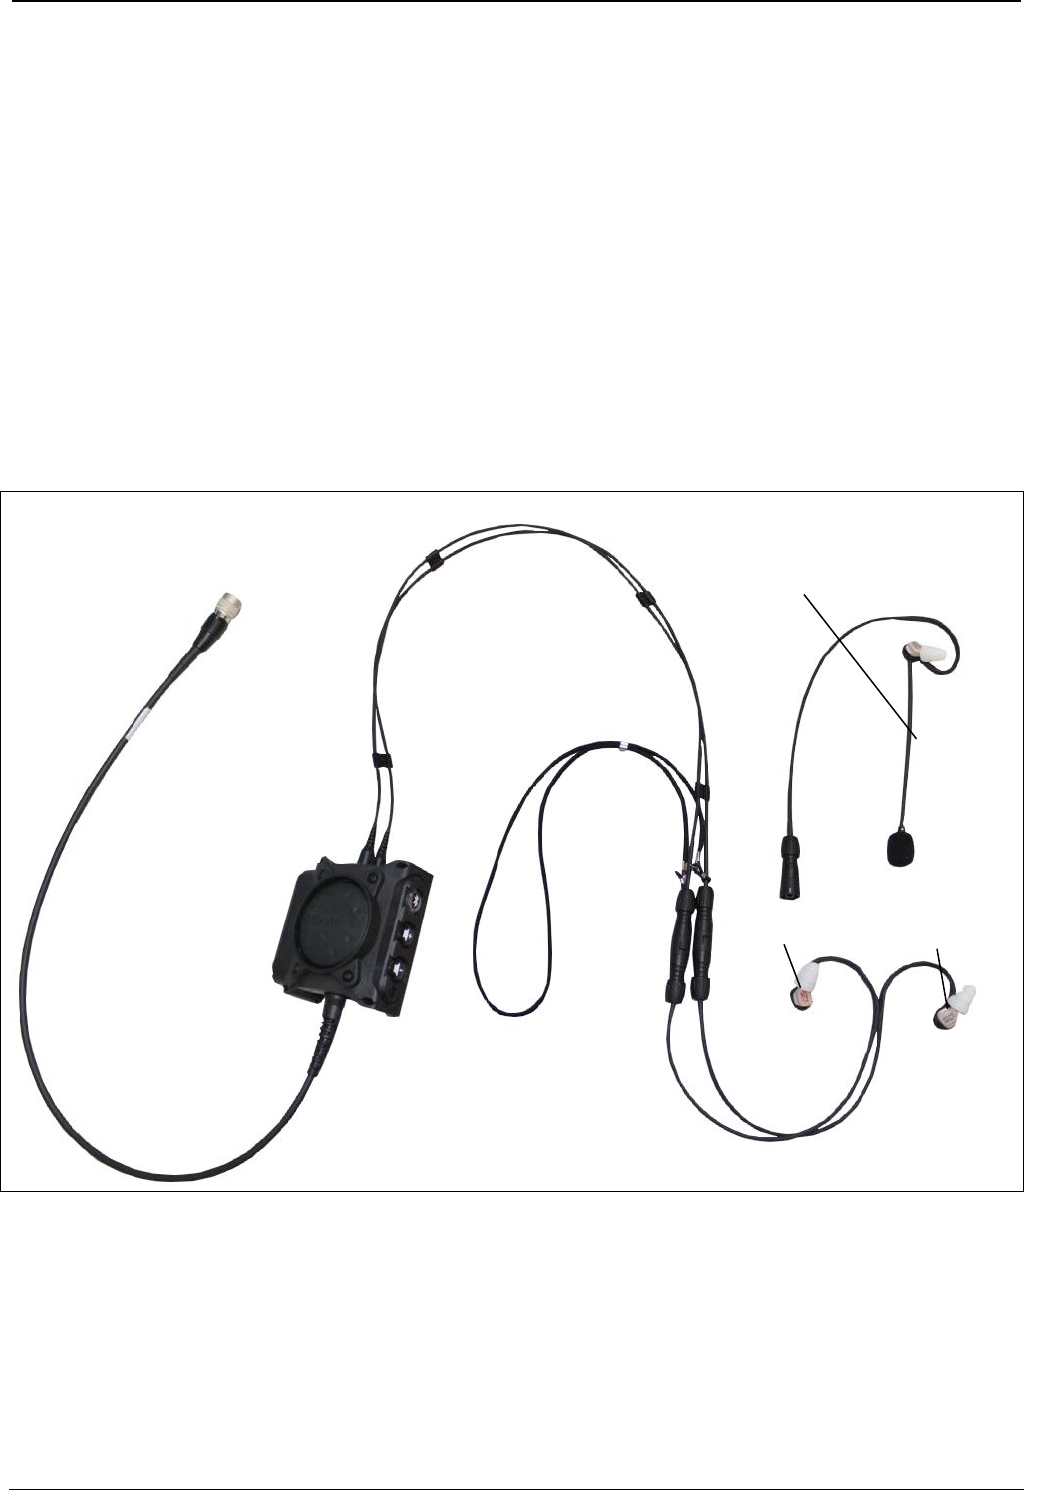
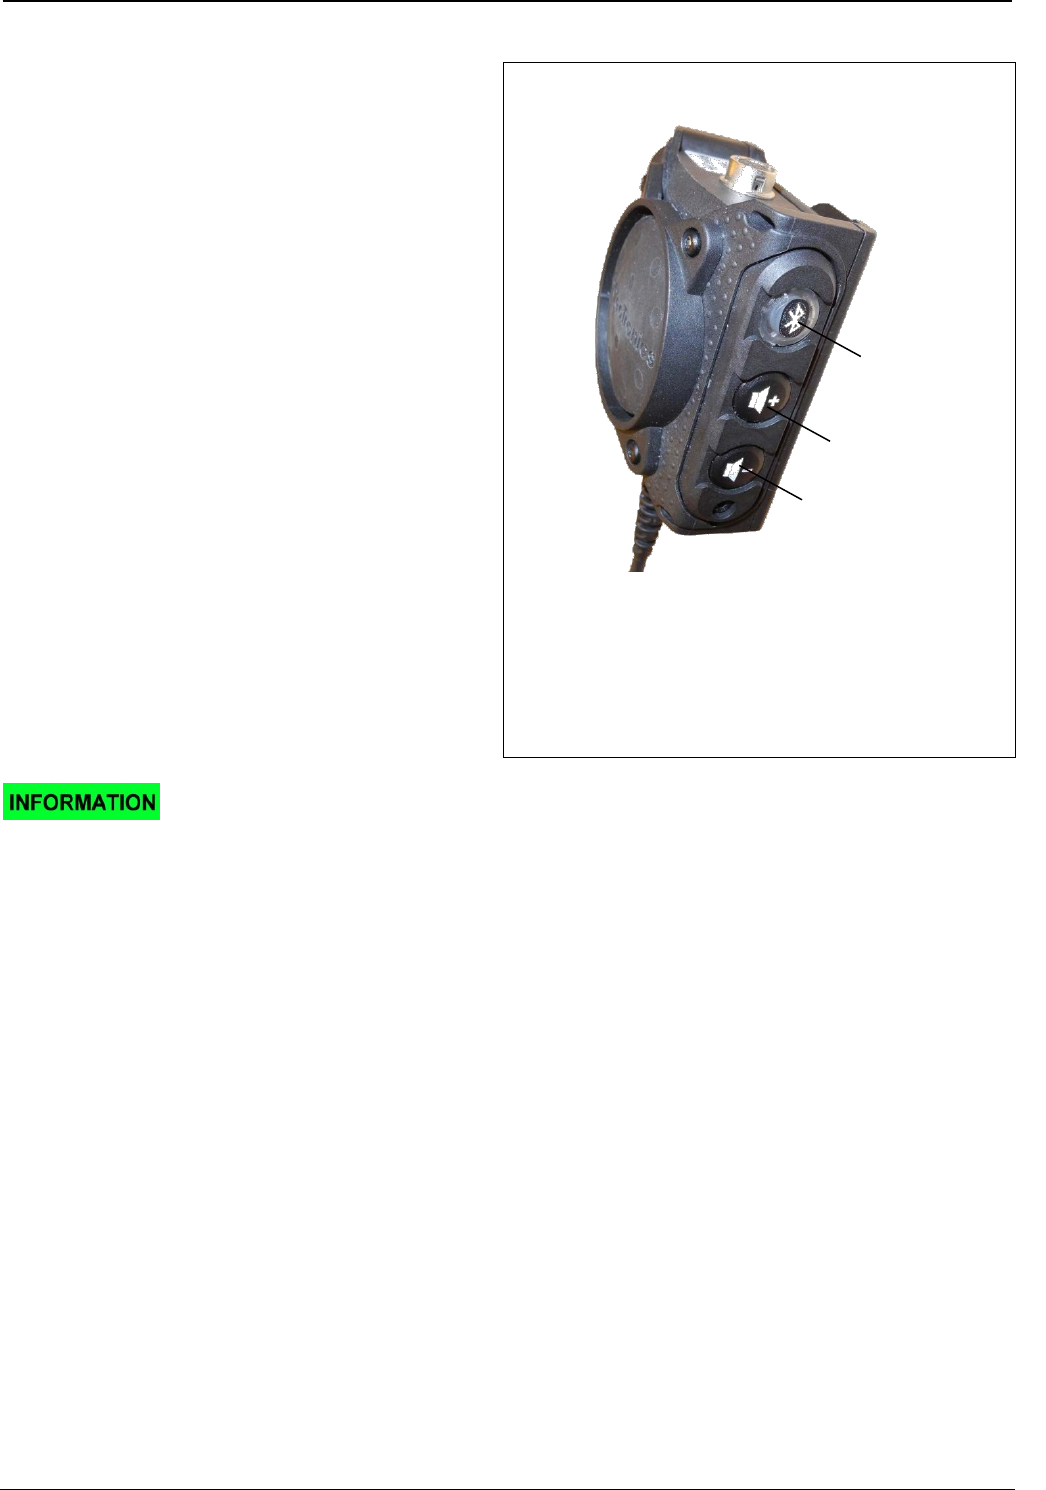
Figure 3
a Plug for connection to a radio
b Pasted label with name of device
c Socket for communication set
d Battery compartment
e PTT button
f Bluetooth control button + storage battery / battery pilot lamp
Green, continuous - battery fully charged
Green, flashing - battery at half charge
Red, flashing - battery almost flat, approx. 30 minutes remaining
LED off - device does not switch on, battery/storage battery is flat
g Volume-up key (in active call – telephone louder)
h Volume-down key (in active call – telephone softer)
I CT-Wireless PTT
a
b
d
e
f
g
h
i
c
Revision: 02/1015 DOK 1643-us 9 of 28
Figure 4
Figure 5
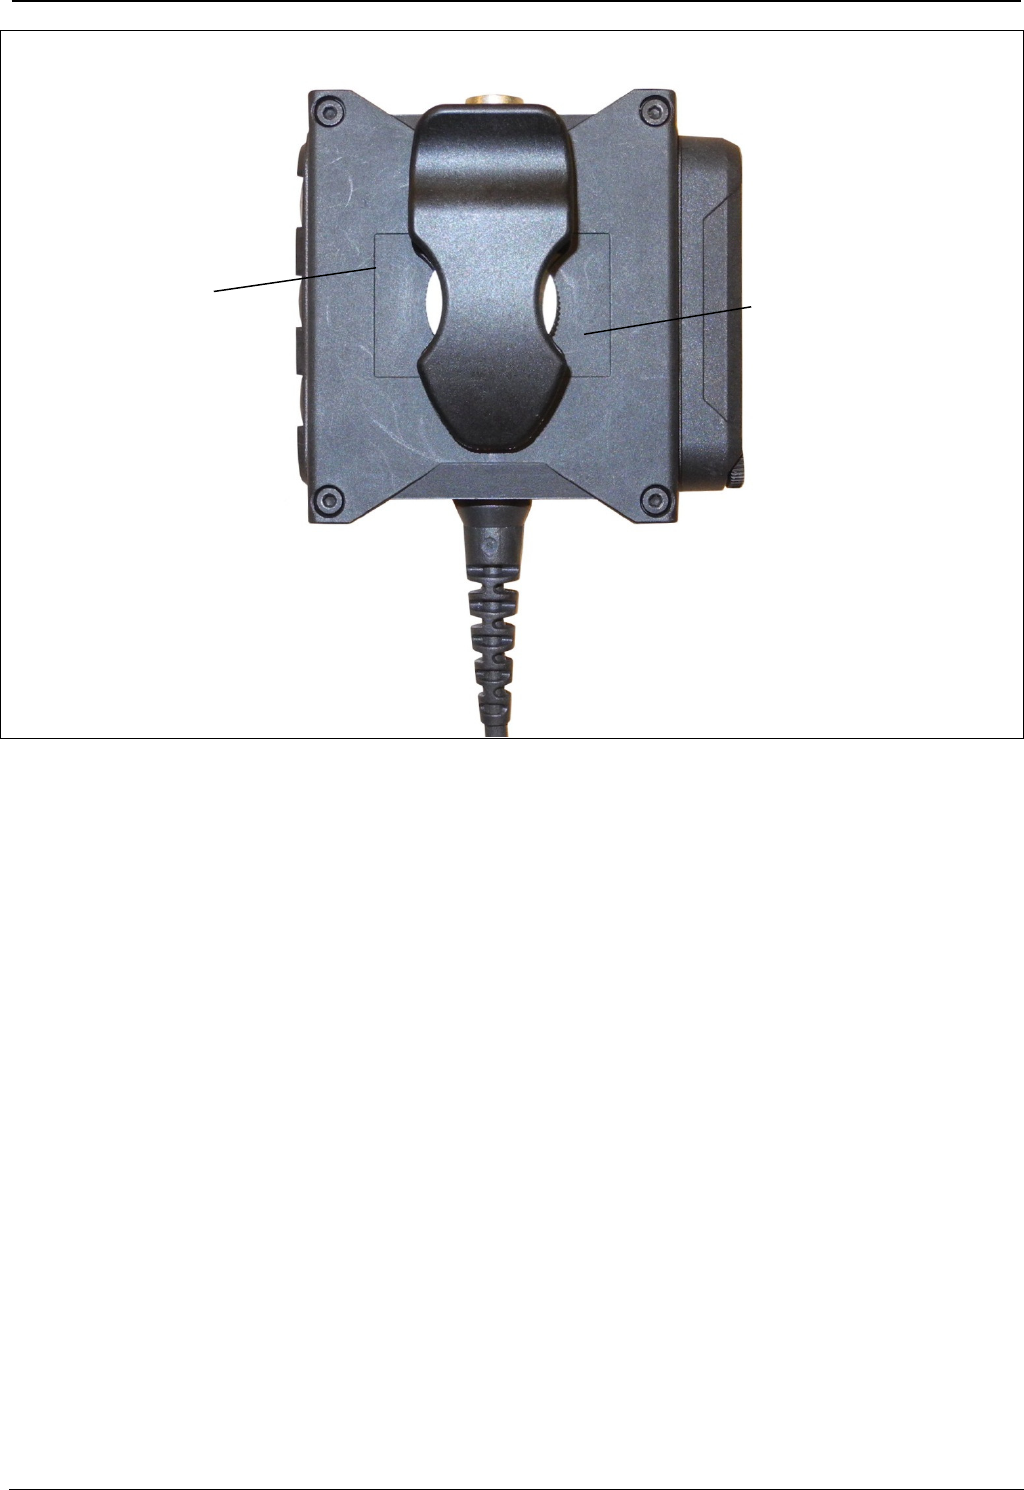
5.2 Fixation clamp
The clamp can be rotated 360 °, infinitely variable.
Figure 6
For rotating, loosen the knurled screw
Revision: 02/1015 DOK 1643-us 10 of 28
5.3 CT-Multi-PTT Bluetooth with CT-ClipCom Digital
The CT-Multi-PTT Bluetooth is also available with integrated CT-ClipCom Digital technology and firmly
attached communication set.
The following two (2) system configurations are available:
CT-ClipCom Digital EarMike consisting of an ear microphone and an additional speaker
You hear radio messages and the ringing tone of the cellular phone on both sides. If a PTT transmit
button is activated or a conversation takes place via cellular phone, the RH ear microphone is switched
over from speaker to microphone operation. This deactivates the reception of exterior noise on that ear
microphone.
CT-ClipCom Digital BoomMike consisting of one earphone with boom microphone and an additional
speaker.
While activating a transmit button, the reception of exterior noise continues being active on both sides.
The earmike is an electroacoustic transducer working as both, microphone (transmitting) and earphone
(receiving), and is worn inside the ear with earplugs or personalized ear molds. Regarding personalized
ear molds, follow the instruction manual Dok1463.
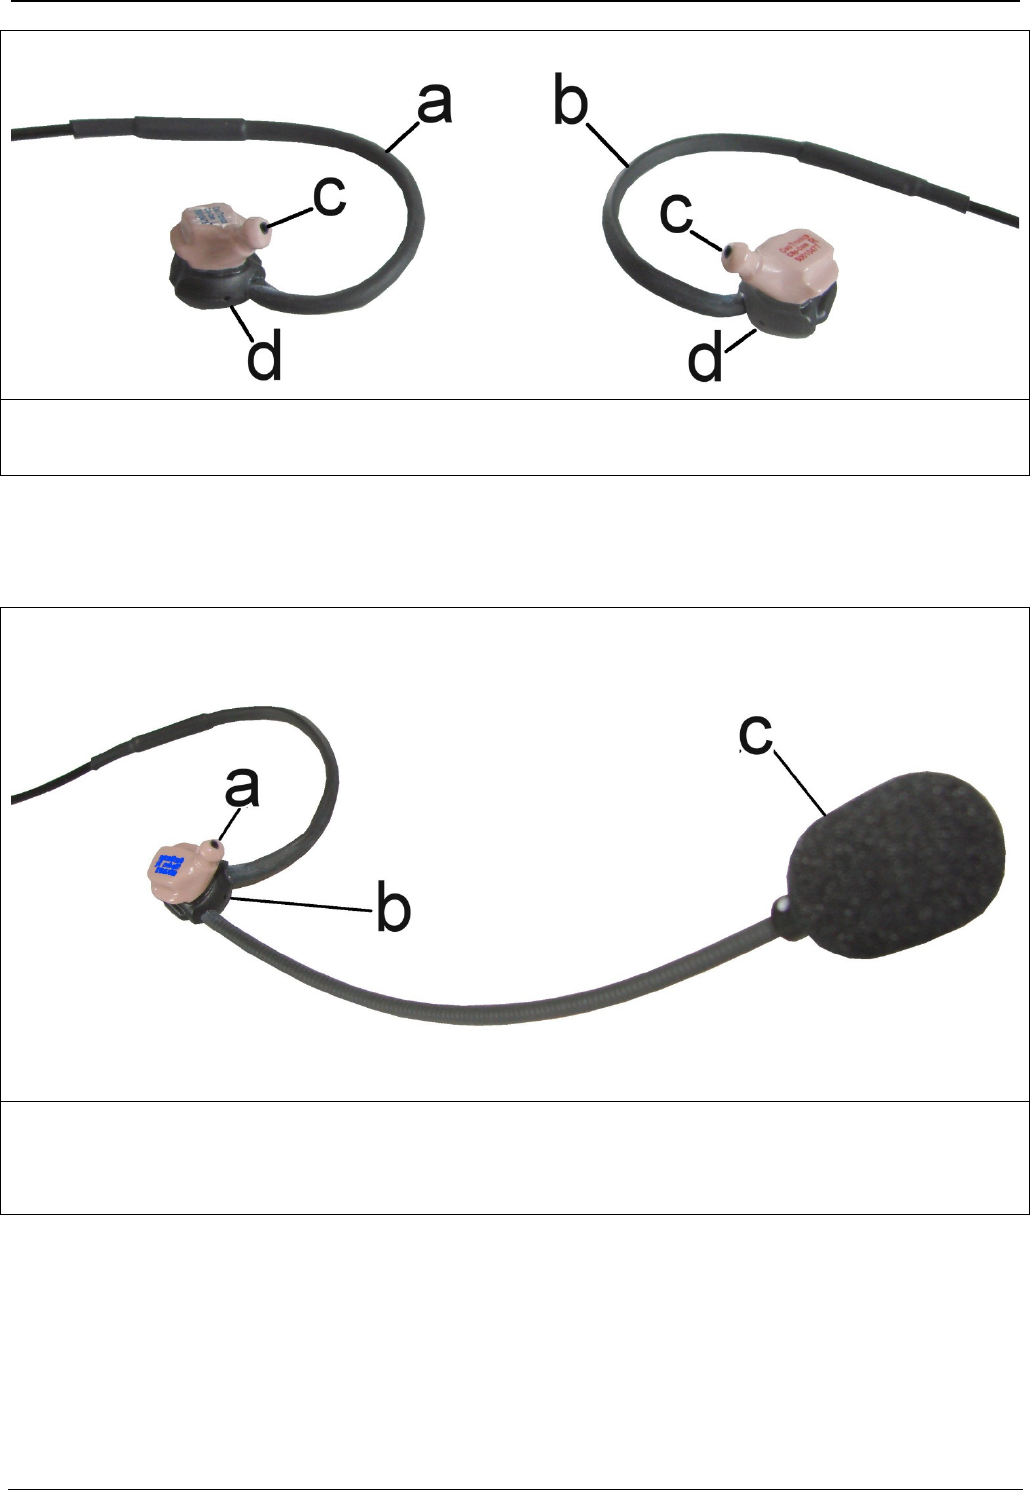
Figure 7
5.3.1 EarMike
The ear microphone is on the right side, marked in red ink. The earphone is on the left side, marked in
blue ink. The ear microphone housing contains, in addition to the ear microphone (Figure 8/c) itself,
also the ASR microphone (Figure 8/d)
CT-ClipCom Digital
BoomMike
Earmike
Earphone
Revision: 02/1015 DOK 1643-us 11 of 28
Figure 8
a Earphone on the left side b Ear microphone on the right side
c Ear microphone with earphone d ASR microphone
5.3.2 Earphone with BoomMike
The earphone with boom microphone is available only for the left ear. Attached to the earphone is the
boom microphone with protective cover (Figure 9/c) and the ASR microphone (Figure 9/b).
Figure 9
a Earphone
b ASR microphone
c BoomMike with protective cover
Revision: 02/1015 DOK 1643-us 12 of 28
5.3.3 Use with standard ear plug
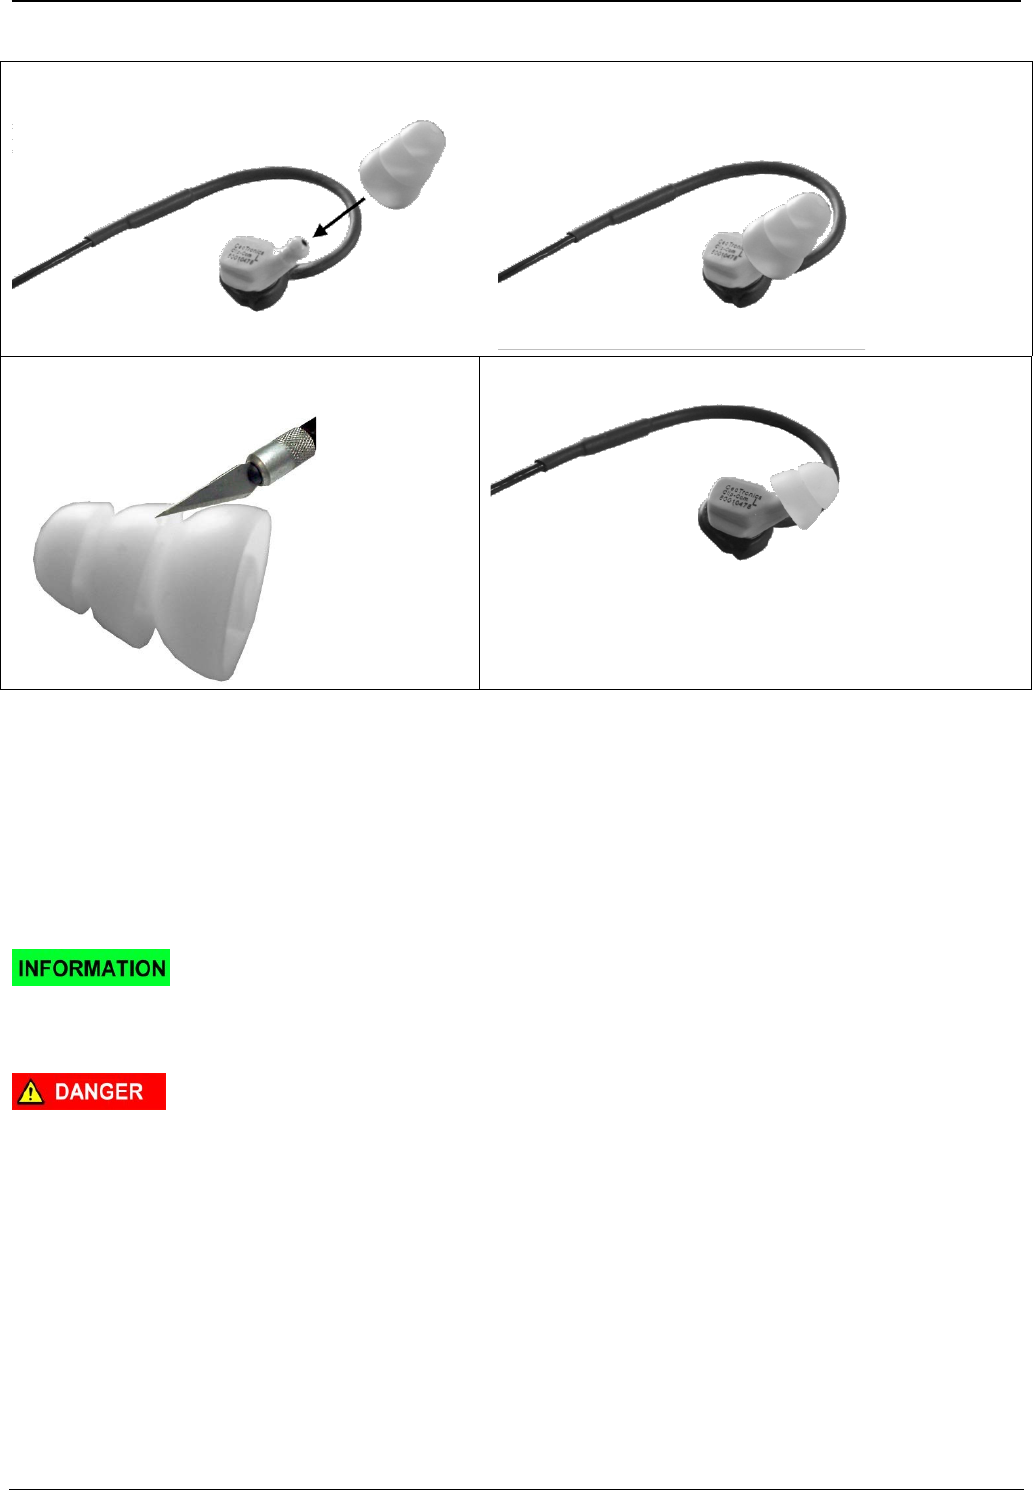
Figure 10
Figure 11
Figure 12
The standard earplug is used for adaptation of the ear microphone / earphone to the auditory canal. It is
»pushed« with a rotating motion onto the ear microphone / earphone (Fig.10). If no perfect seat inside
the ear is achievable, because the standard earplug is too large, the largest lamella ring can be cut off
with a sharp knife (figure 10-12).
6 Preparing the Product for Use
6.1 Receipt of Goods
Check incoming goods immediately upon receipt for completeness and/or
transport damage!
Inform the transport company and CeoTronics AG immediately of any transport
damages!
Risk of swallowing and choking!
Keep packing material, e.g. filler materials und plastic bags,
out of the reach of children; they are no toys!
Dispose of packing materials environmentally responsible!
Revision: 02/1015 DOK 1643-us 13 of 28
7 Operating Instruction
7.1 Change of the battery
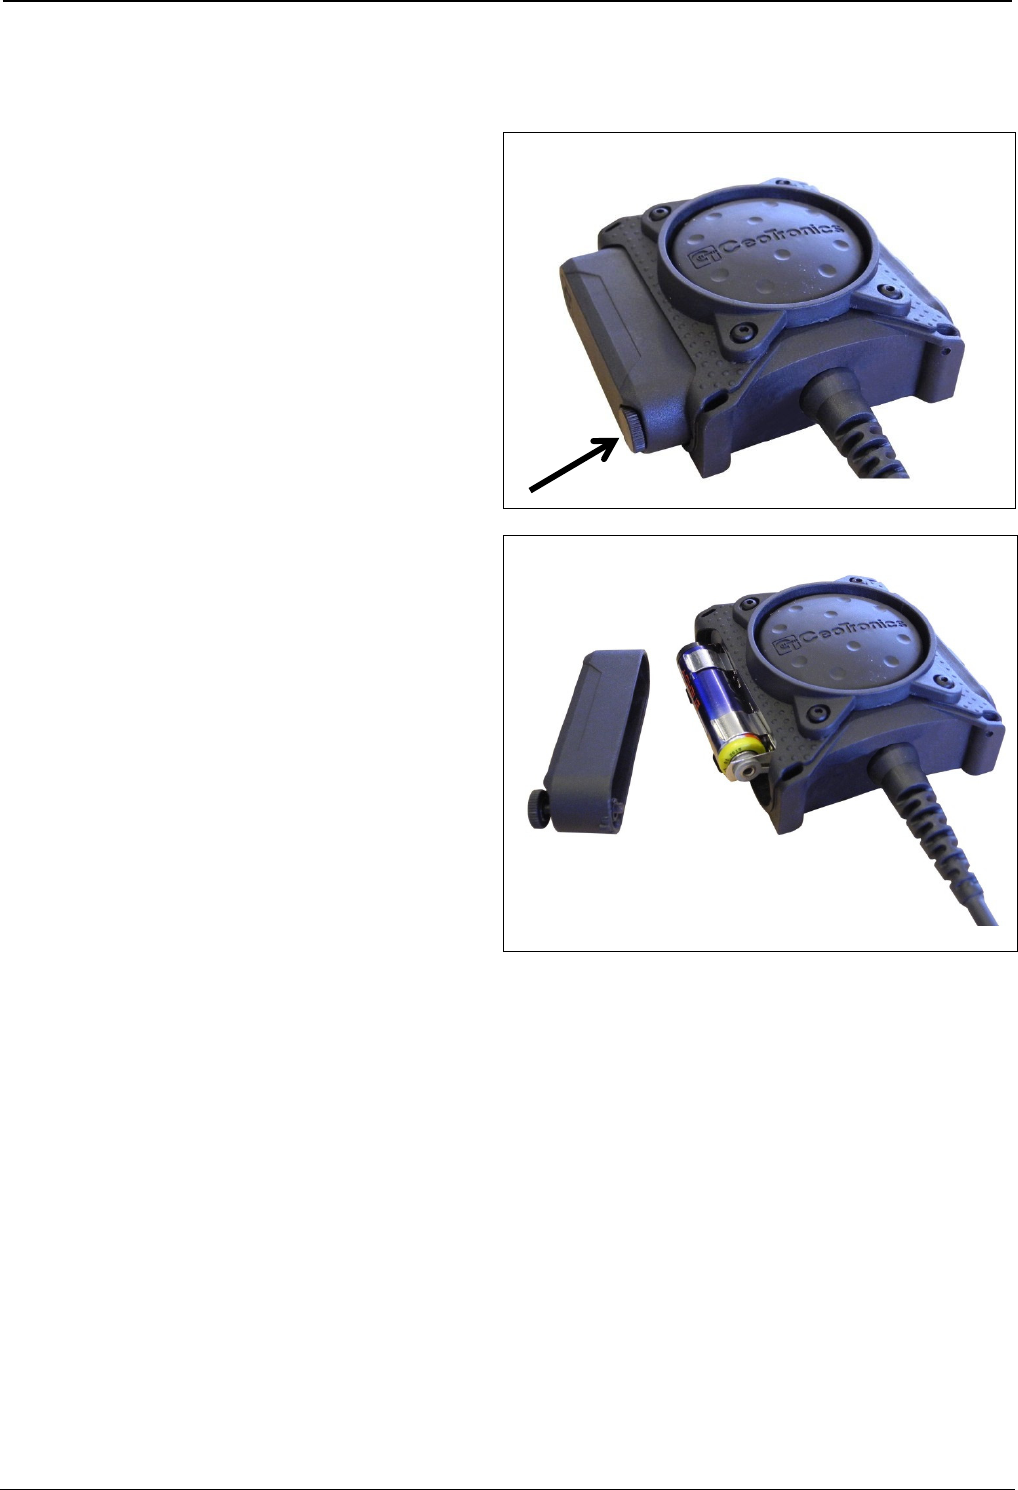
7.1.1 Change of the battery – CT-Multi PTT Bluetooth
1. Open the battery compartment by loosening
the knurled screw.
Figure 13
2. Remove and replace the rechargeable
battery / battery from the battery
compartment.
When inserting observe polarity.
3. Fix the cover of battery compartment again at
the PTT-button.
Figure 14
Revision: 02/1015 DOK 1643-us 14 of 28
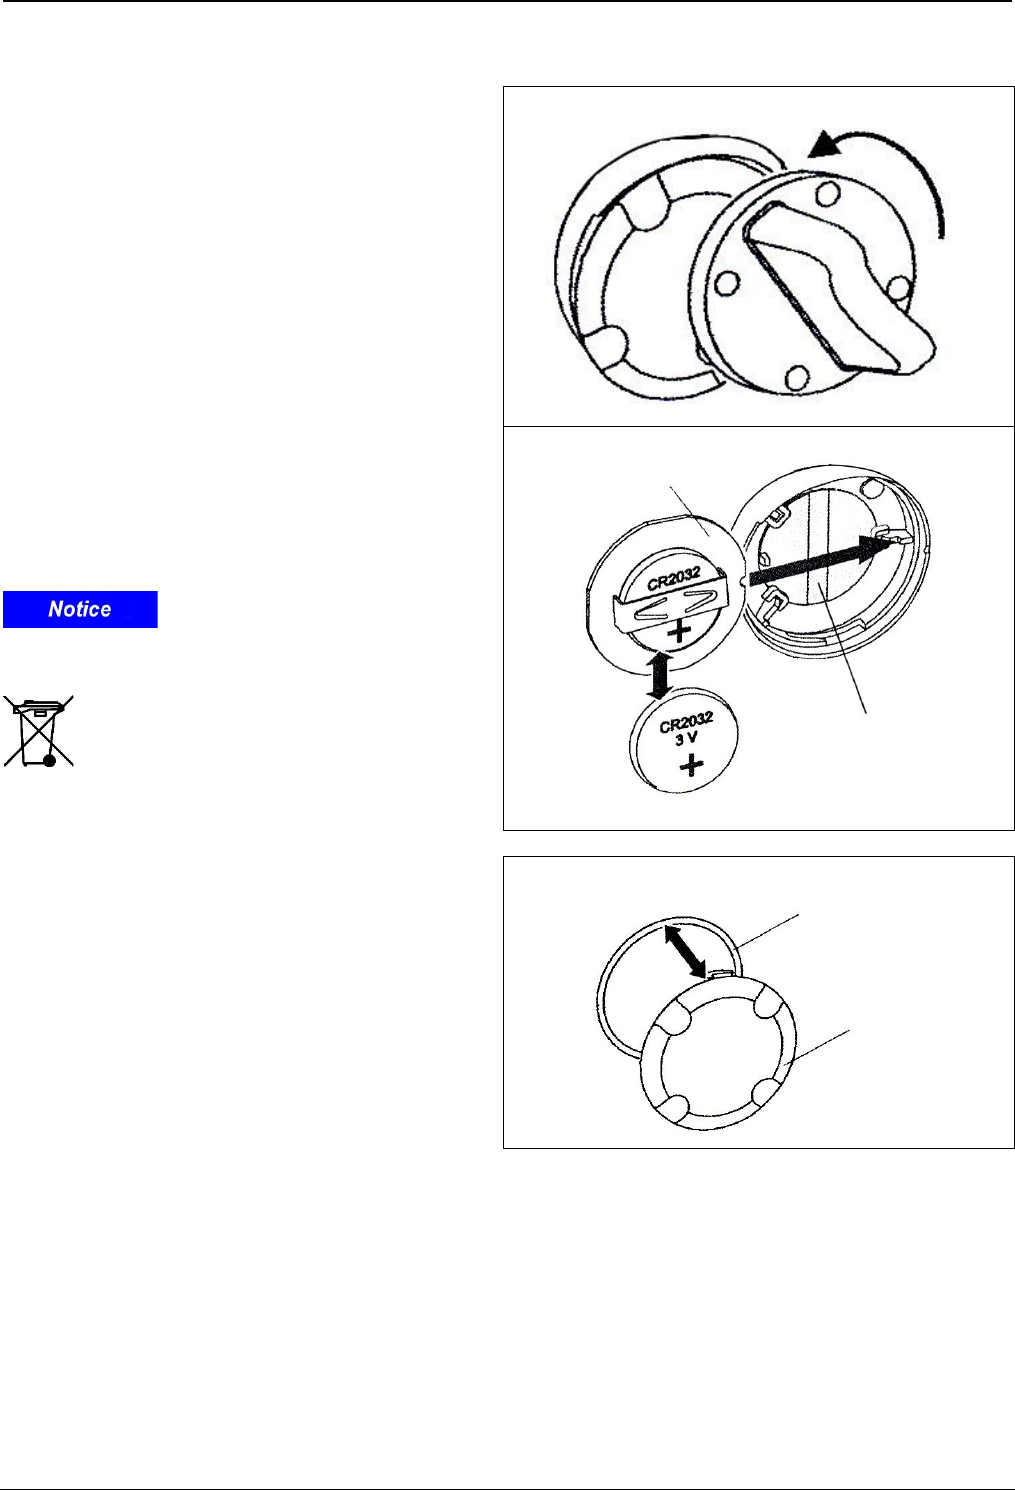
7.1.2 Change of the battery in the CT-Wireless-PTT
1. Open the battery compartment at the back of
the CT-Wireless-PTT with help of the special
tool by short turn to left.
Figure 15
2. Remove the circuit board careful from the
housing. Change the battery and pay
attention to the correct position; the lettering
must be visible.
Use only the 3 V batteries type CR2032.
Pay attention to the correct polarity.
Do not throw used (defective) storage batteries
into the domestic refuse.
Figure 16
3. When closing the CT-Wireless-PTT insert, if
needed, a new gasket under the cover edge.
Put the hooks of the cover in the rail of the
housing and close the cover with a twist to
the right. Pay attention that the cover fits tight
with the housing.
Figure 17
Touch-lamina
Circuit board
Sealing ring
Lid
Revision: 02/1015 DOK 1643-us 15 of 28
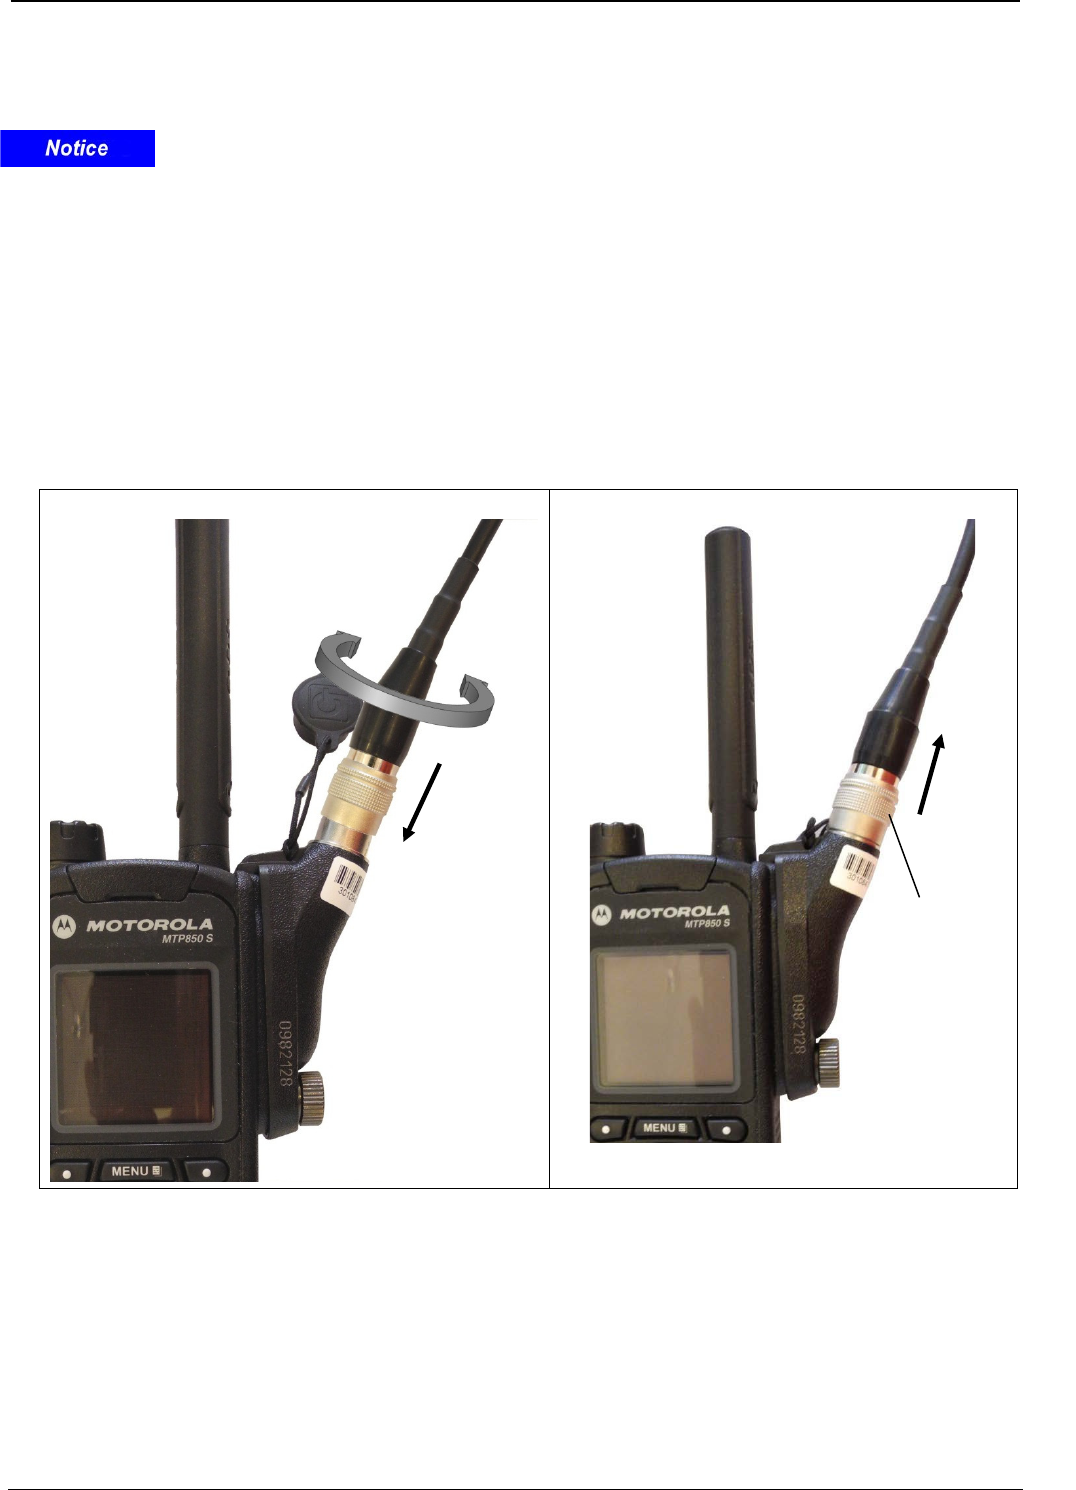
7.2 Connect the CT-MultiPTT Bluetooth to the radio
7.2.1 12-pin connector
Damage to connectors, sockets and/or cables
Observe the following instructions when handling plug-in connections.
Normally, the 12-pin connector is used in combination with radio adapters. For it, the adapter is
attached to the radio and the 12-pin connector itself plugged into the radio adapter.
Turn the radio off, if it is turned-on. Plug the 12-pin connector into the radio adapter.
To do so, grab the connector behind the grooved sliding collar and put it on the socket.
Rotate the connector cautiously on the socket until it starts sliding into it (Figure 18).
Now, push the connector into the socket until the sliding collar snaps into place in direction of the arrow,
locking the connector.
To unlock the plug-in connection, grab the connector at the grooved sliding collar only and pull the
connector cautiously out of the socket (Figure 19).
Figure 18 - Locking
Figure 19 - Unlocking
Sliding collar
Revision: 02/1015 DOK 1643-us 16 of 28
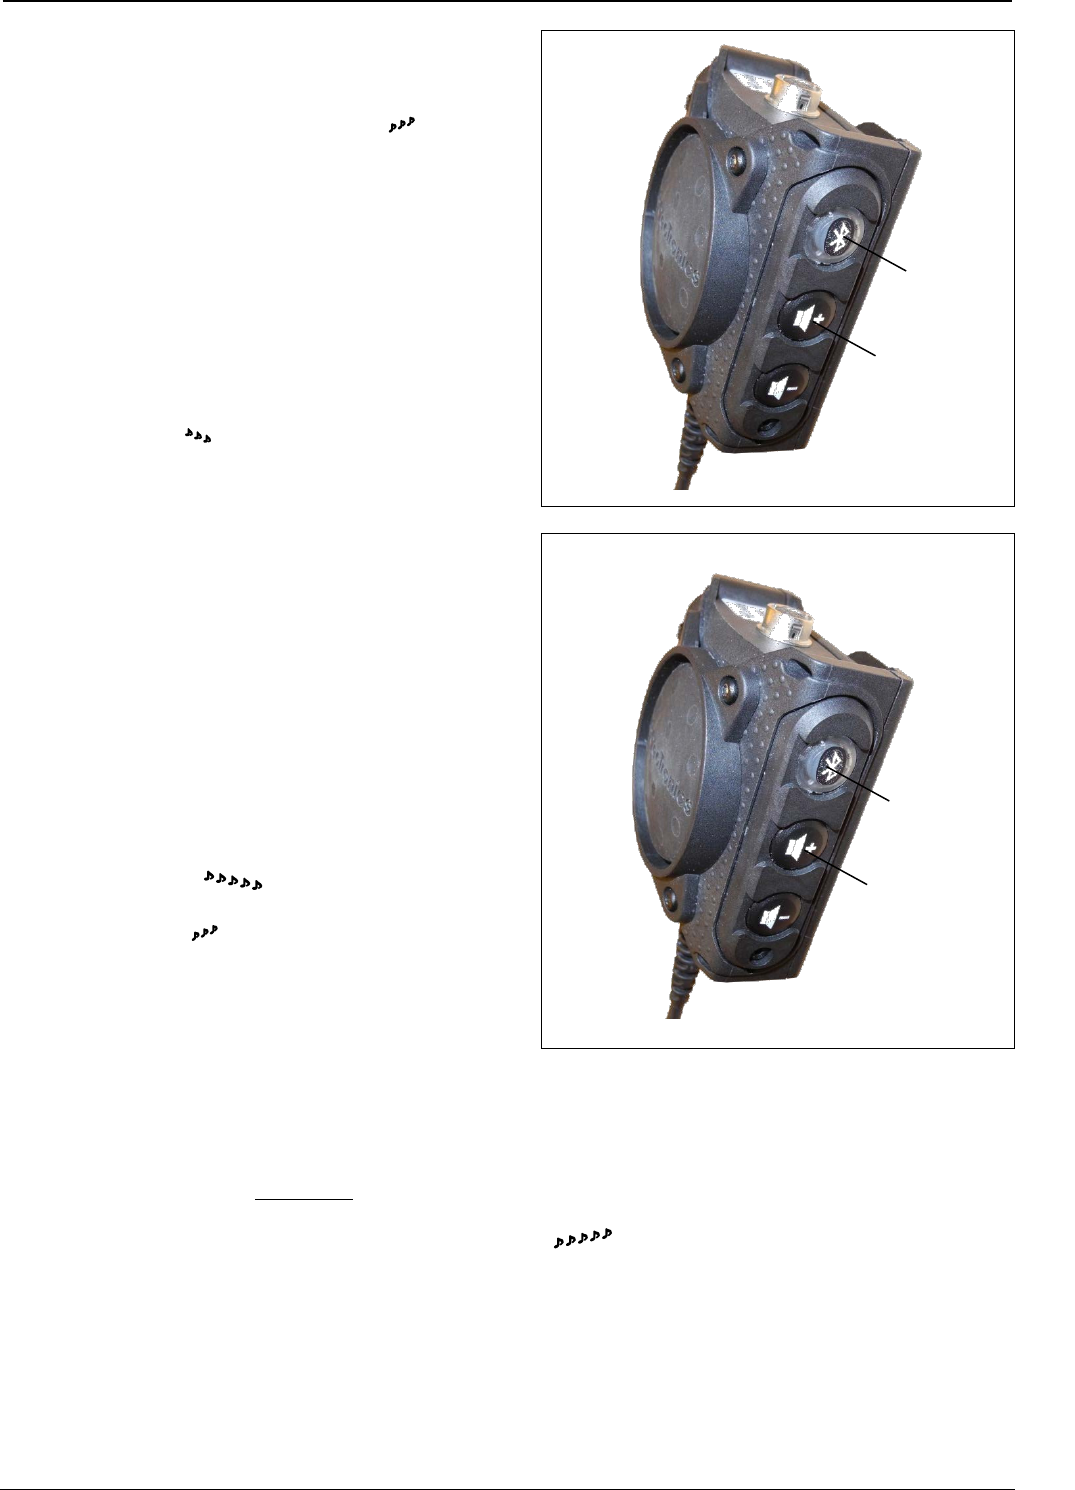
7.3 Switch-on
Press simultaneously Bluetooth key and volume-
up key until you hear an ascending three-tone
sequence in the CT communication set. Then let
the buttons go. The LED in the Bluetooth key
indicates the condition of the battery/storage
battery. Should the LED not illuminate continuous
green since the first second of switch-on, then the
battery or storage battery is flat, and has to be
replaced. Operation is not possible.
7.4 Switch-off
Press simultaneously Bluetooth key and volume-
up key for about three (3) seconds until you hear
a descending three-tone sequence. The LED
in the Bluetooth key goes out. Let the buttons go.
Figure 20
7.5 Pairing
Pairing of only one Bluetooth device at a time is
possible with a CT-Multi PTT Bluetooth. When
repeating the pairing, the existing connection is
lost.
1. Switch the CT-Multi PTT Bluetooth off.
2. Activate the Bluetooth function of your
Bluetooth device (cellular phone or digital
radio).
3. Press simultaneously for about 8 seconds the
Bluetooth and volume-up keys on the CT-
Multi PTT Bluetooth until you hear a
descending five-tone sequence
(approx. 8 seconds). In between, you hear an
ascending three-tone sequence,
confirming the switch-on process.
4. Let the keys go. You hear a beep in 2-second
intervals. The CT-Multi PTT Bluetooth is in
search mode.
Figure 21
5. Put the other Bluetooth device (cellular phone or digital radio) into Bluetooth search mode. For
it, follow the operating instruction of the device manufacturer.
6. When the Bluetooth device to be paired announces a search result with the name of the
CT-Multi PTT Bluetooth, confirm the pairing by entering the following PIN number in the
device: 83787432
You find the name of the CT-Multi PTT Bluetooth on the label pasted on the cable (Figure 3).
7. After successful pairing, you hear an ascending five-tone sequence in the CT
communication set.
Once paired, both devices re-establish the Bluetooth connection, even after interruptions, within
the possible Bluetooth range.
Bluetooth
key
Volume-up
key
Volume-up
key
Bluetooth-
key

Revision: 02/1015 DOK 1643-us 17 of 28
7.6 Change operating modes
You may switch between telephone mode (mode
1), telephone mode with MIC-switch (mode 2),
and limited telephone mode with MIC-switch
(mode 3). For it, proceed as follows The modes
are signalized by the following beeps:
Mode 1- 1 beep cellular phone mode
Mode 2- 2 beeps cellular phone mode
with MIC-switch
Mode 3- 3 beeps limited cellular phone
mode with MIC-switch
1. Press on the CT-Multi PTT Bluetooth
simultaneously, for at least 2 seconds, the
volume-down and volume-up keys until you
hear the actual audio signal.
2. Then, quickly press both keys briefly once
again for changing the mode.
The change itself is acknowledged by the
audio signals indicated above.
Figure 22
7.7 Telephone mode (mode 1)
The telephone mode provides the traditional telephone functionality. Simultaneous hearing and
speaking is possible without pressing an extra button. In telephone mode, the Bluetooth key serves for
the functions: Accept the call
End the call
Reject the call
Redial
Abort redialing.
The CT-Wireless-PTT can be used in lieu of the Bluetooth key; it has equal function.
7.7.1 Accept the call
You hear the ringing tone of incoming calls in the CT communication set.
To accept the call, press briefly the Bluetooth key.
7.7.2 End the call
To end a communication, press briefly the Bluetooth key.
7.7.3 Reject the call
You hear the ringing tone of incoming calls in the CT communication set.
To reject the call, press the Bluetooth key until you hear a double beep (approx. 2 seconds). The call
is rejected.
7.7.4 Redial
Press the Bluetooth key briefly two (2) times in order to redial the phone number dialed last from your
cellular phone.
7.7.5 Abort redialing
When you hear the ringing tone in the CT communication set, press the Bluetooth key to abort
redialing.
7.8 Telephone mode with MIC switch (mode 2)
The telephone mode with MIC switch provides limited telephone functionality. You can hear without
pressing an extra button. For speaking, you must press the Bluetooth key in order to switch on the
Volume-up
key
Volume -down
key

Revision: 02/1015 DOK 1643-us 18 of 28
microphone. The microphone remains switched-on as long as the key is pressed. In the event the
existing phone call has been interrupted intentionally or unintentionally, you hear in the CT
communication set two times a descending sequence of tones. In the telephone mode with
MIC switch, the Bluetooth key serves the following functions:
Accept the call
End the call
Reject the call
Redial
Abort redialing
You can use the CT-Wireless-PTT in lieu of the Bluetooth key; it has equal function.
7.8.1 Accept the call
You hear the ringing tone of incoming calls in the CT communication set.
To accept the call, press briefly the Bluetooth key
.
7.8.2 End the call
In an existing telephone conversation, press briefly the Bluetooth key immediately and consecutively 4
times to end the conversation. You will hear two (2) times a descending sequence of
tones.
7.8.3 Reject the call
You hear the ringing tone of incoming calls in the CT communication set.
To reject the call, press the Bluetooth key until you hear a double beep (approx. 2 seconds). The call
is rejected.
7.8.4 Redial
Press the Bluetooth key briefly two (2) times in order to redial the phone number, dialed last from your
cellular phone.
7.8.5 Abort redialing
When you hear the ringing tone in the CT communication set, press the Bluetooth key to abort
redialing.
7.9 Limited telephone mode with MIC switch (mode 3)
The limited telephone mode with MIC switch provides limited telephone functionality. You can hear
without the need of pressing an extra button. For speaking, you must press the Bluetooth key in order
to switch the microphone on. The microphone remains switched on as long as the key is held down. All
other functions, available in mode 2, have to be performed on the cellular phone or you must switch to
another telephone mode.
7.10 Increase the volume
Press briefly the volume-up key to increase gradually the volume in the CT communication set. One
high beep acknowledges each step up. When reaching maximum volume, you hear a double beep.
7.11 Lower the volume
Press briefly the volume-down key to reduce gradually the volume in the CT communication set. One
low beep acknowledges each step down. When reaching minimum volume, you hear a double beep.
7.12 Battery status
The LED in the Bluetooth key indicates the status of the battery. The display lights up only for the first
15 seconds after switching the CT-Multi PTT Bluetooth on. Afterwards, you can display the battery
status for 15 seconds by briefly pressing the volume-up or volume-down keys.
LED glows green: fully charged

Revision: 02/1015 DOK 1643-us 19 of 28
LED flashes green: at half charge
LED flashes red: very low – replace
You hear in the CT communication set three (3) low beeps in 30-second
intervals
Undser heavy load and high volume and depending on the battery/storage battery
status the communication may result in a distortion-like audio impression. This is
normal and prevents system crashes / malfunctions if a battery / storage battery
does not provide enough power anymore. An acoustic warning signal advises if
the battery / storage battery is almost flat.
Remedy:
Reduce slightly the volume or change the battery / storage battery.
The button does not disconnect if the battery/storage battery is dead, in order to
enable the user to communicate even in critical situations where a battery change
is not possible.
7.13 Change the PIN for CT-Multi PTT Bluetooth
Store the newly set PIN in a safe place. In case the new PIN is lost,
reprogramming is possible by CeoTronics, only.
The PIN of the CT-Multi PTT Bluetooth is 83787432 in
the state as delivered from factory. To change the PIN
start the program “CT-BluetoothUtillity” on your
personal computer. Follow the instruction manual
Dok1345 “CT-BluetoothUtillity”.
Put the CT-Multi PTT Bluetooth in programming mode.
For it, press simultaneously the Bluetooth and volume-
down keys and keep both pressed for at least 8
seconds, until you hear a four (4) tone sequence in
your CT communication set, and the LED in the
Bluetooth key glows red. After a few seconds your can
hear a readiness beep – now you can establish a
connection to the personal computer. Follow the
instructions of the PC program. To abort programming
on the CT-Multi PTT Bluetooth or to end the process
after successful change, press briefly the volume-up
key. The LED in the Bluetooth key goes out and you
hear a descending three-tone sequence.
Figure 23
Bluetooth-
key
Volume-down
key
Revision: 02/1015 DOK 1643-us 20 of 28
7.14 CT-Wireless-PTT (optional)
For interference-free operation of the CT-Wireless-PTT receiver in the CT-Multi
PTT Bluetooth, take care that the CT-Multi PTT Bluetooth is not located in close
proximity to the transmitting antenna of a radio or cellular phone. Heterodyning the
CT-Wireless-PTT radio signal by the comparatively strong transmit signal of a
radio or cellular phone can compromise the sensitivity of the CT-Wireless-PTT
receiver in the near field of the transmit antenna. This could interrupt the radio
transmission from the sending to the receiving PTT.
The CT-Wireless-PTT and the Bluetooth key of the CT-Multi PTT Bluetooth have equal function. The
CT-Wireless-PTT necessarily requires subscription to the CT-Multi PTT Bluetooth. A battery supplies
electric power to the CT-Wireless-PTT. For safety reasons, continuous keying of the CT-Wireless-PTT
is limited to 30 seconds.
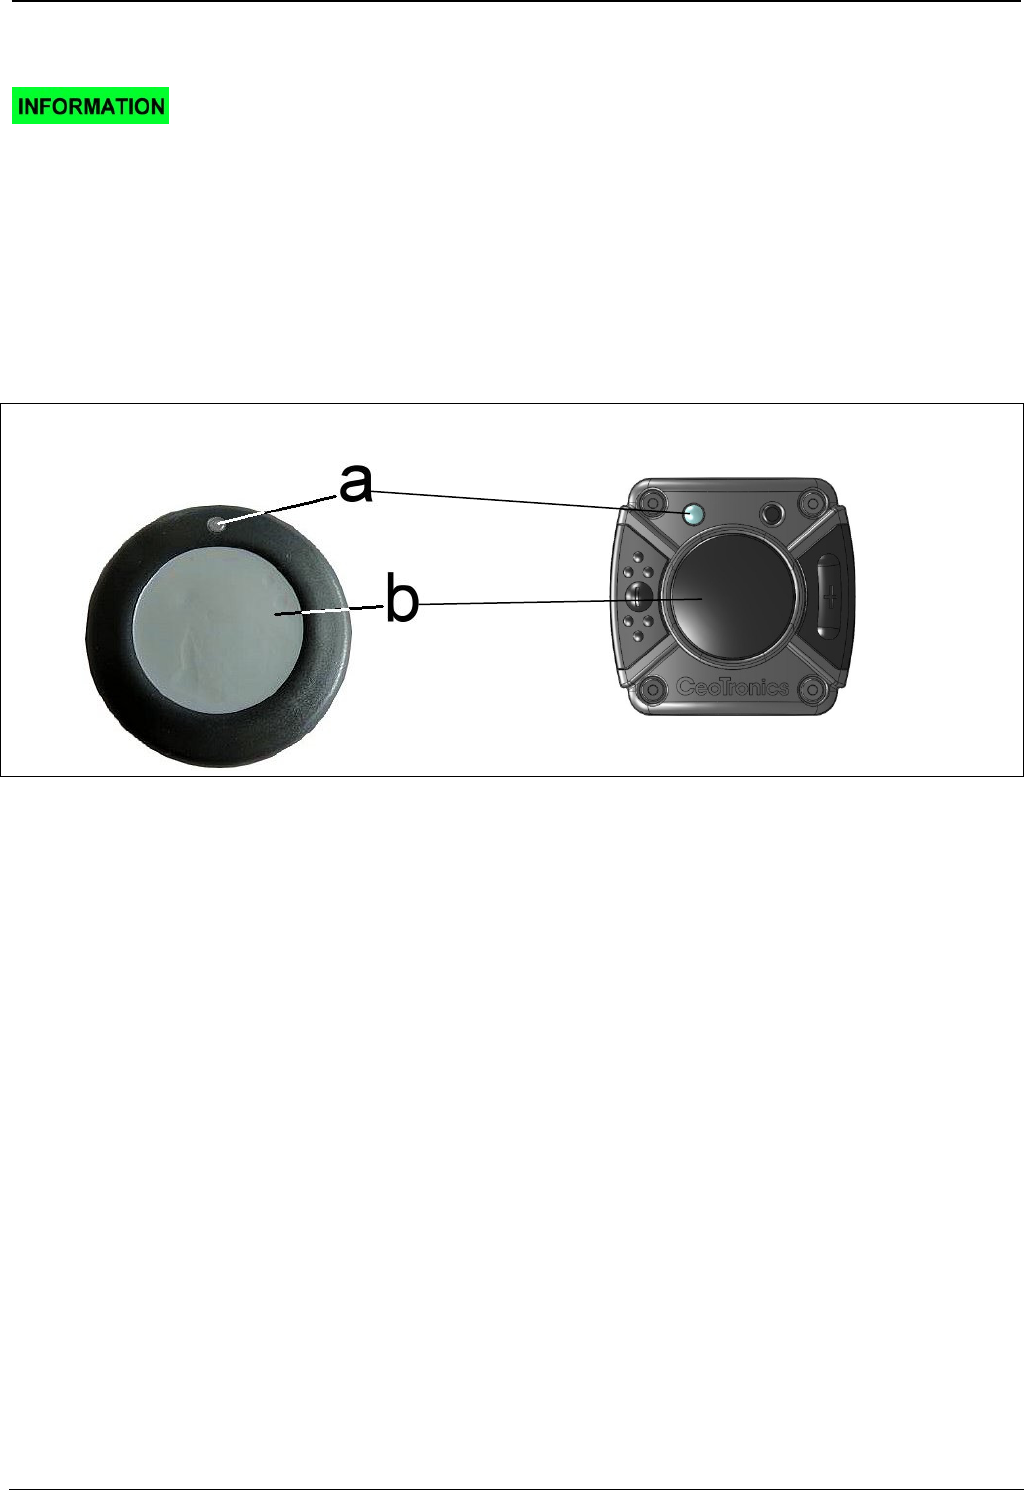
Figure 24
a LED glows when PTT button is pressed
b PTT button (of CT-Wireless-PTT MIL - C1 Bluetooth
- C2 PTT radio
Observe the instruction manual Dok1652)
Revision: 02/1015 DOK 1643-us 21 of 28
7.15 Subscribe the CT-Wireless-PTT to the CT-Multi PTT Bluetooth
1. Switch the CT-Multi PTT Bluetooth off, if it is
on.
2. Press all three (3) lateral keys of the CT-Multi
PTT Bluetooth simultaneously until the LED of
the Bluetooth button starts flashing three (3)
times red-green. The LED keeps flashing red-
green until you let the keys go, however
minimum three times.
3. Press the Bluetooth key three (3) times until
the LED flashes as follows:
….red-red-red…..red-red-red….red-red-red….
4. Press briefly the CT-Wireless-PTT (the red
LED glows); simultaneously and as
confirmation the LED in the Bluetooth key
lights up red for about four seconds; now, the
CT Wireless-PTT is subscribed.
5. Press now one time the Bluetooth key of the
CT-Multi PTT Bluetooth. The LED does not
glow anymore. Now you can change to
operating mode (6.) or apply (3. and ff.) of 7.15
/ 7.16 / 7.17.
6. Change to the operating mode of the CT-Multi
PTT Bluetooth by pressing for at least one (1)
second both, the Volume-up” and “Volume-
down” keys – like changing operating modes.
Figure 25
In case the CT-Multi PTT Bluetooth is in programming mode, all other functions
are disconnected. In order to exit programming mode and enter operating mode,
press for at least one (1) second both keys, “Volume-up” and “Volume-down”.
We recommend, after the loss of a CT-Wireless-PTT, to delete it from the receiver.
For it, it is necessary to delete all CT-Wireless-PTT from the CT-Multi PTT
Bluetooth (see 7.17), and to re-subscribe the existing ones.
The CT-Multi PTT Bluetooth accepts the subscription of maximum 32 CT-
Wireless-PTT devices.
Bluetooth-
key
Volume-up
key
Volume-down
key
Revision: 02/1015 DOK 1643-us 22 of 28
7.16 Delete one CT-Wireless-PTT from the memory of the CT-Bluetooth Adapter
1. Switch the CT-Multi PTT Bluetooth off, if it is on.
2. Press all three (3) lateral buttons of the CT-Multi
PTT Bluetooth simultaneously until the LED in the
Bluetooth button starts flashing three (3) times red-
green. The LED keeps flashing red-green until you
let the buttons go, however minimum three times.
3. Press the Bluetooth key of the CT-Multi PTT
Bluetooth and hold it down for at least two (2)
seconds. Now the deletion mode is active.
- in deletion mode the LED flashes very quickly
To abort deletion mode, press the Bluetooth key
briefly once again.
4. Now, press the PTT button of the CT-Wireless-PTT
you want to delete and hold it down until the LED
starts glowing for four (4) seconds. This deletes the
transmitter code.
5. Then, press the Bluetooth key of the CT-Multi PTT
Bluetooth one time. The LED is not glowing
anymore. Now you can change to operating mode
(6.) or apply (3. and ff.) of 7.15 / 7.16 / 7.17.
6. Change to operating mode of the CT-Multi PTT
Bluetooth by pressing for at least one (1) second
both, the Volume-up” and “Volume-down” keys - like
changing operating modes.
Figure 26
Bluetooth-
key
Volume-up
key
Volume-down
key

Revision: 02/1015 DOK 1643-us 23 of 28
7.17 Delete all CT-Wireless-PTT from the memory of the CT-Bluetooth Adapter
1. Switch the CT-Multi PTT Bluetooth off, if it is on.
2. Press all three (3) lateral keys of the CT-Multi PTT
Bluetooth simultaneously until the LED in the
Bluetooth button starts flashing three (3) times red-
green. The LED keeps flashing red-green until you
let the buttons go, however minimum three times.
3. Press the Bluetooth key of the CT-Multi PTT
Bluetooth and hold it down for at least two (2)
seconds. Now the deletion mode is active.
- in deletion mode the LED flashes very quickly
To abort the deletion mode, press the Bluetooth key
briefly once again.
4. Now, press the Bluetooth key again for more than
two (2) seconds. If the LED glows four (4) seconds,
all transmitter codes are deleted.
5. Then, press the Bluetooth key of the CT-Multi PTT
Bluetooth one time. The LED is not glowing
anymore. Now you can change to operating mode
(6.) or apply (3. and ff.) of 7.15 / 7.16 / 7.17.
6. Change to operating mode of the CT-Multi PTT
Bluetooth by pressing for at least one (1) second
both, the Volume-up” and “Volume-down” keys – like
changing operating modes.
Figure 27
Bluetooth
key
Volume-up
key
Volume-down
key

Revision: 02/1015 DOK 1643-us 24 of 28
7.18 Switch-on and operation
Risk of hearing impairment
For safety reasons reception volumes in excess of 85 dB(A) are possible with
a whole series of CeoTronics products. However, the user can regulate the
volumes. After switching on the communication system, set the reception
volume to approx. 1/2 the available loudness volume and then test the audible
volume, e.g. by opening the squelch on the radio set.
Do not set the volume any higher than is necessary. A very high volume
setting can lead to damaged hearing, particularly if it is continuous. For higher
volumes or noise levels wear additional earplugs. If in doubt, ask your safety
officer or company doctor.
Turn the radio on, observing the manufacturer’s instruction manual. When turning the CT-MultiPTT
Bluetooth on, the LED in the Bluetooth button lights up green for about four (4) seconds (battery test).
After that, the battery / storage battery status is displayed. Should the LED not glow continuous green
during the first seconds, then the battery or storage battery is flat and requires replacement. Operation
is not possible.
At turn-on, the volume of the CT-MultiPTT is always set to medium. Now you can hear the incoming
radio messages in your communication set.
7.18.1 Communication via radio
The PTT serves the purpose of switching the radio between transmitting and receiving. For transmitting,
you must press the PTT button while speaking. If the communication set is equipped with a PTT button,
then this one and the PTT of the CT-MultiPTT Bluetooth have equal function.
If there exists an active telephone communication, voice to telephone is deactivated while transmitting.
Hearing the telephone is possible. When you let the button go, you return to standby/receiving mode.
Adjust the volume
Adjust the desired reception volume using the “Volume-up” and Volume-down” keys. It is not possible,
to completely down-regulate the volume. A minimum level persists. In a telephone conversation via
Bluetooth (cellular phone), adjustment of the reception volume takes effect on the Bluetooth connection.
7.18.2 Communication via cellular phone
Switch on the cellular phone and set it to mute. (Observe the instruction manual of your cellular phone)
Now, you are ready for communication via radio or cellular phone.
Switch on the Bluetooth module
You are able to communicate via cellular phone, even if on the CT-Multi PTT Bluetooth the radio is
neither active nor connected. Press simultaneously both, the Bluetooth and “Volume-up” keys, until you
hear an ascending three-tone sequence in the CT communication set. When switching on the CT-
MultiPTT Bluetooth the LED in the Bluetooth button lights up green for about four (4) seconds (battery
test). Should the LED not glow continuous green during the first seconds, then the battery or storage
battery is flat and needs replacement. Operation is not possible.
Afterwards, the LED indicates the battery / storage battery status for the first 15 seconds.
Green, continuous - battery fully charged
Green, flashing - battery at half charge
Red, flashing - battery almost flat, approx. 30 minutes remaining
LED off - device does not switch on; battery/storage battery is flat.
After 15 seconds, the LED goes out.

Revision: 02/1015 DOK 1643-us 25 of 28
Should the radio be turned off (battery change) while the Bluetooth module is on,
you hear in the communication set for 30 seconds an acoustic warning signal in
two (2) second intervals. During these 30 seconds press a key or turn the radio on,
to ensure the Bluetooth module continues in switched-on condition. This way it is
possible to keep up telephone standby.
Switch off the Bluetooth module
Turning the radio off, switches the Bluetooth module off as well, with a delay of 30 seconds. However,
you are also able to disconnect the entire system, independently from the radio.
Press simultaneously both, the Bluetooth and Volume-up keys, for about 3 seconds until you hear a
descending three-tone sequence in the communication set which confirms the switch-off. The LED
in the Bluetooth key does not glow anymore. Let the keys go.
7.19 End of operation
To end the operation, turn the radio off.
In some radios, the accessory interface continues energized, even after turning the
radio off. In such a case switch the key off manually, or disconnect the CTMultiPTT
Bluetooth plug from the radio adapter. Otherwise, it is possible that the CT-
MultiPTT Bluetooth storage battery is discharging.
8 Safekeeping – storage
Store the cleaned devices in a clean, dry place at normal room temperature and in normal relative air
humidity.
Product damage!
Do not store CeoTronics products outside or in damp ambient conditions. At all
times keep them clean, dry and at normal air humidity. CeoTronics products must
not be stored in areas with a temperature of over +80° C (+176° F), e.g. in the
summertime on the parcel shelf of a car. If not stated otherwise, the following
temperature ranges are admissible for CeoTronics products: -10 to +55°C for
operation, storage -40 to +80°C.
Revision: 02/1015 DOK 1643-us 26 of 28
8.1 Cleaning
Product damage!
Pay attention that no humidity could penetrate into the device during cleaning.
Do not use solvents (e.g. benzene, alcohol, etc.) for cleaning!
Safe operation requires clean devices. Ensure that the devices (microphones,
connectors etc.) are clean and in good condition at all times.
Remove loose dust with a soft brush. Clean the outside of components, if necessary, with an
appropriate clean cloth, only lightly moistened with clear water, and then rub it down thoroughly. If
heavily soiled, a few drops of rinsing agent may be added. Clean the connector pins with a commercial
cleaning agent.
9 Disposal
Should equipment, supplied by CeoTronics, be definitely put out of service you
may return it to CeoTronics. We ensure recycling and/or disposal of outdated
equipment in compliance with the applicable environment protection law.
10 Technical data
Electrical values
min
typical
max
unit
Supply voltage
1.1
1.25
1.6
V
Accessory speaker
16
-
-
Ohm
Induction coil
Type „B“
Mechanical values
Specifications without plugs and cable sleeves
LxWxH [mm]
Weight [g]
Housing
54 x 88 x 84
Housing with cable
54 x 88 x 700
270g
Revision: 02/1015 DOK 1643-us 27 of 28
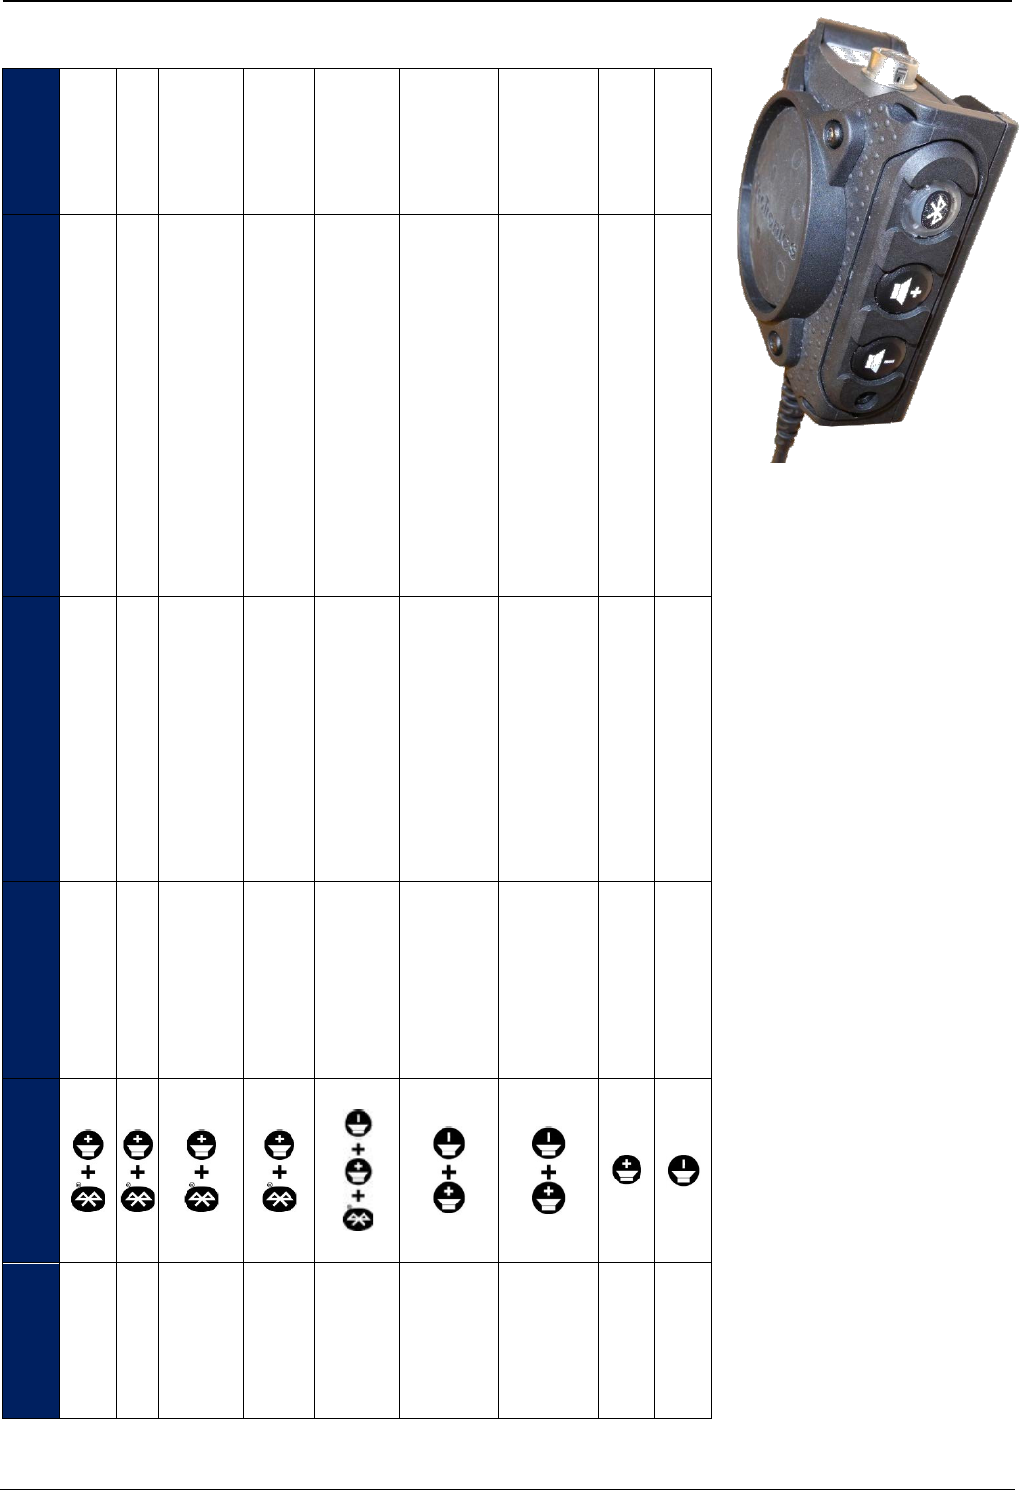
11 Brief instruction
Executable in
condition
Off
On
Off
Pairing mode
Off
On
Operating mode
display
On
On
Sound
signal
Ascending 3-tone sequence
Descending 3-tone sequence
Ascending 3-tone sequence after 3 sec.,
descending 5
-tone sequence after 8 sec.,
brief
search beep every 2 seconds
Descending 3-tone sequence
None
1 beep = Cellular phone
2
beeps = Cellular phone with MIC switch
3
beeps = limited mode cellular phone with
MIC
switch
1 beep = Cellular phone
2
beeps = Cellular phone with MIC switch
3
beeps =
limited mode cellular phone with
MIC switch
High beep
Double tone at maximum volume
Low beep
Double
beep at minimum volume
Visual
signaling
LED displays the battery status
for
15 seconds
None
LED displays the battery status
for 15 seconds
LED poes out
LED glows red / green
None
None
LED active,
Color acc.
to battery status
LED active,
Color acc. to battery status
Keying
duration
Hold 3 seconds
Hold 3 seconds
Hold 8 seconds
Hold 3 seconds
Hold 2 seconds
Hold 2 seconds
Hold 2 seconds,
brief keying
Brief keying
Brief keying
Key
combination
Function
Switch on
Switch off
Activate pairing
mode
Abort pairing
mode
Activate wireless
configuration
Display operating
mode
Change
operating mode
Lautstärke
erhöhen
Lautstärke
verringern
Deutschland und
Internationaler Vertrieb
CeoTronics AG
Adam-Opel-Str. 6
63322 Rödermark
Tel. +49 6074 8751-0
Fax +49 6074 8751-676
E-Mail verkauf@ceotronics.com
Spanien
CeoTronics S.L.
C/Ciudad de Frias 7 y 9
Nave 19
28021 Madrid
Tel. +34 91 4608250 51
Fax +34 91 4603193
E-Mail ventas@ceotronics.es
USA/Kanada/Mexico
CeoTronics, Inc.
512 South Lynnhaven Road, Suite 104
Virginia Beach, Virginia 23452
Tel. +1 757 549-6220
Fax +1 757 549-6240
E-Mail sales@ceotronicsusa.com
Deutschland und
Internationaler Vertrieb
CT-Video GmbH
Gewerbegebiet Rothenschirmbach 9
06295 Lutherstadt Eisleben
Tel. +49 34776 6149-0
Fax +49 34776 6149-11
E-Mail ctv.info@ceotronics.com
Revision: 02/1015 DOK 1643-us Subject to change
Copyright © 01/2014 CeoTronics AG, 63322 Rödermark, Germany, Internet www.ceotronics.com