Chengdu Vantron Technology TAB185-SKLU Embedded Computer User Manual 1025
Chengdu Vantron Technology, Ltd. Embedded Computer User Manual 1025
User Manual
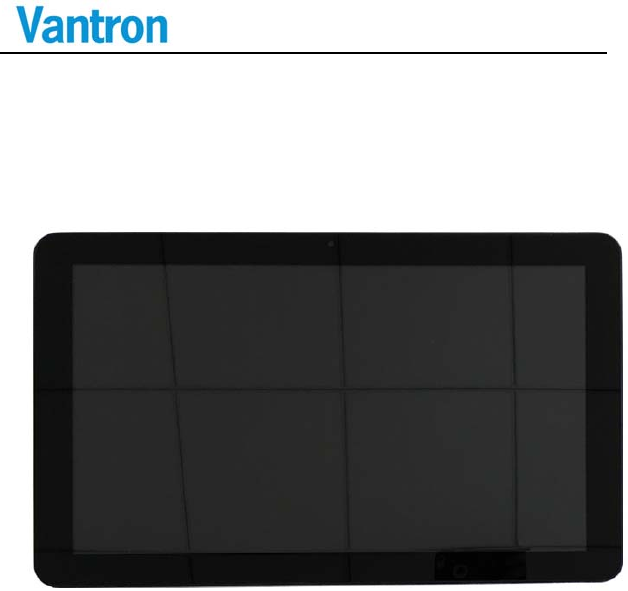
VT‐TAB185‐SKLU
AllRightsReserved
VT‐TAB185‐SKLU
User’sManual
ChengduVantronTechnology,Ltd.
www.vantrontech.com

VT‐TAB185‐SKLU
RevisionHistory:
No.VersionDescription Date
1V1.0Firstrelease Sep,23,2017
2V1.1ModifydescriptionofWLAN Oct,18,2017
3V1.2Modifypicture Nov,15,2017
4V1.3ModifydescriptionofbatteryLED Dec,7,2017
5V1.4UpdateLTEModuledescription Feb,5,2018
6V1.5Addlightsensor,SIMCard,SDCard
descriptionMay,8,2018
7V1.6AddspeakerandMICdescription May,25,2018
8V1.7ModifyApprovalsJun,12,2018

VT‐TAB185‐SKLU
3/52
TableofContents
1Foreword.....................................................................................5
1.1CopyrightNotice......................................................................5
1.2Notes............................................................................6
1.3Statement............................................................................6
1.4Disclaimer............................................................................6
1.5LimitationofLiability/Non‐warranty.......................................6
1.6SafetyInstructions...................................................................7
1.7Precautions............................................................................7
1.8SafetyInstructionsforPowerCablesandAccessories.............8
2VT‐TAB185‐SKLUHardwareInstructions......................................10
2.1ProductAppearance..............................................................10
2.2ProductUsageEnvironment..................................................12
2.3Productinstallationmethod..................................................14
2.4Specifications.........................................................................16
2.5InterfaceInstructions.............................................................17
2.6InterfaceInstructions.............................................................19
2.7InterfaceDescription.............................................................20
2.7.1USBHostConnector................................................20
3SoftwareIntroduction................................................................22
3.1AboutThisManual.................................................................22
3.2WindowsOSSupport.............................................................22
3.3VT‐TAB185‐SKLUFeatures......................................................23
4DriverInstallation.......................................................................24
4.1GraphicCardDriver................................................................25

VT‐TAB185‐SKLU
4/52
4.2AudioCardDriver...................................................................27
4.3ChipsetDriver........................................................................29
4.4TXE..........................................................................33
5FirmwareUpdate.......................................................................34
5.1BIOSFirmware.......................................................................34
5.2ECFirmware..........................................................................34
6Modulefunction........................................................................35
6.14GModule..........................................................................35
6.1.1DriverInstall............................................................37
6.1.2Dial‐Up.....................................................................37
6.2WIFIModule..........................................................................41
6.3SensorTool..........................................................................43
6.4FanControl..........................................................................45
6.5Bluetooth..........................................................................46
7Tips............................................................................................47
VT‐TAB185‐SKLU
5/52
1 Foreword
1.1 CopyrightNotice
Whileallinformationcontainedhereinhavebeencarefullychecked
toassureitsaccuracyintechnicaldetailsandprinting,Vantronassumes
noresponsibilityresultingfromanyerrororfeaturesofthismanual,or
fromimproperusesofthismanualorthesoftware.Pleasecontactour
technicaldepartmentforrelevantoperationsolutionsifthereisany
problemthatcannotbesolvedaccordingtothismanual.
Vantronreservesallrightsofthismanual,includingtherightto
changethecontent,form,productfeatures,andspecifications
containedhereinatanytimewithoutpriornotice.Thelatestversionof
thismanualisatwww.vantrontech.com.cn.PleasecontactVantronfor
furtherinformation:
VantronTechnology(Vantron)
E‐mail:sales@vantrontech.com
The trademarks and registered trademarks in this manual are properties
of their respective owners. No part of this manual may be copied,
reproduced, translated or sold. No changes or other purposes are
permitted without the prior written consent of Vantron.
Vantronreservestherightofallpublicly‐releasedcopiesofthis
manual.
VT‐TAB185‐SKLU
6/52
1.2 Notes
Applicablenotesarelistedinthefollowingtable:
SignNoticeTypeDescription
NoticeImportantinformationandregulations
CautionCautionforlatentdamagetosystemorharm
topersonnel
1.3 Statement
Itisrecommendedtoreadandcomplywiththismanualbefore
operatingVT‐TAB185‐SKLUwhichprovidesimportantguidanceand
helpsdecreasingthedangerofinjury,electricshock,fire,oranydamage
tothedevice.
1.4 Disclaimer
Vantronassumesnolegalliabilityofaccidentsresultingfromfailureof
conformingtothesafetyinstructions.
1.5 LimitationofLiability/Non‐warranty
Fordirectorindirectdamagetothisdeviceorotherdevicesof
Vantroncausedbyfailureofconformingtothismanualorthesafety
instructionsondevicelabel,Vantronassumesneitherwarrantynorlegal
liabilityevenifthedeviceisstillunderwarranty.
TheVT‐TAB185‐SKLUshouldbeinstalled,debuggedandmaintained
byprofessionalpeople.
Theunauthorizedantennasarenotpermittedtobeinstalledortobe
changedbynon‐professionalpeople.Torunthedevicenormally,only

VT‐TAB185‐SKLU
7/52
specificantennasareapprovedtobeassembledtogetherby
professionalpeople.
1.6 SafetyInstructions
Keepandcomplywithalloperationinstructions,warnings,and
information.
Payattentiontowarningsonthisdevice.
Readthefollowingprecautionssoastodecreasethedangerof
injury,electricshock,fire,oranydamagetothedevice.
OperationsandServiceinstructionsareprovidedwiththe
equipment.
Themaximumoperationtemperatureis45°C.
1.7 Precautions
Payattentiontotheproductlabels/safetyinstructionsprintedon
silkscreens.
Donottryrepairingthisproductunlessdeclaredinthismanual.
Keepawayfromheatsource,suchasheater,heatdissipater,or
enginecasing.
Donotinsertotheritemsintotheslot(ifany)ofthisdevice.
•Keeptheventilationslotventilatedforcooling.
•Systemfaultmayariseifotheritemsareinsertedintothisdevice.
Installation:ensurecorrectinstallationaccordingtoinstructions
fromthemanufacturerwithrecommendedinstallationtools.
Ensureventilationandsmoothnessaccordingtorelevantventilation
standard.

VT‐TAB185‐SKLU
8/52
1.8 SafetyInstructionsforPowerCablesandAccessories
Properpowersourceonly:Startonlywithpowersourcethat
satisfiesvoltagelabelandthevoltagenecessaryaccordingtothis
manual.PleasecontacttechnicalsupportpersonnelofVantronforany
uncertaintyabouttherequirementsofnecessarypowersource.
Usetestedpowersource.Thisproductstillcontainsabutton
lithiumbatteryasareal‐timeclockafteritsexternalpowersourceis
removedandthereforeshouldnotbeshort‐circuitedduring
transportationorplacedunderhightemperature.
Placecablesproperly:Donotplacecablesatanyplacewith
extrusiondanger.

VT‐TAB185‐SKLU
9/52
Cleaning Instructions
Pleasepoweroffbeforecleaningthedevice.
Donotusespraydetergent.
Cleanwithadampcloth.
Donottrycleaningexposedelectroniccomponentsunlesswitha
dustcollector.
Supportforspecialfault:Poweroffandcontacttechnicalsupport
personnelofVantronincaseofthefollowingfaults:
Thedeviceisdamaged.
Thetemperatureisexcessivelyhigh.
Faultisstillnotsolvedaftertheoperationaccordingtothe
manual.
2
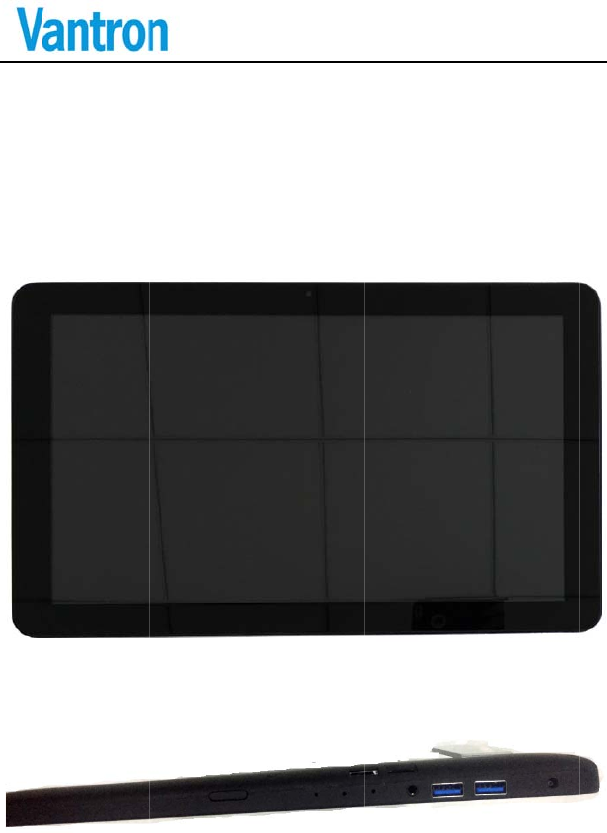
2.1
VT‐TAB185
‐
ProductApp
‐
SKLUHard
w
earance
10/52
w
areInstruc
t
FrontView
V
t
ions
V
T‐TAB185‐SK
L
L
U
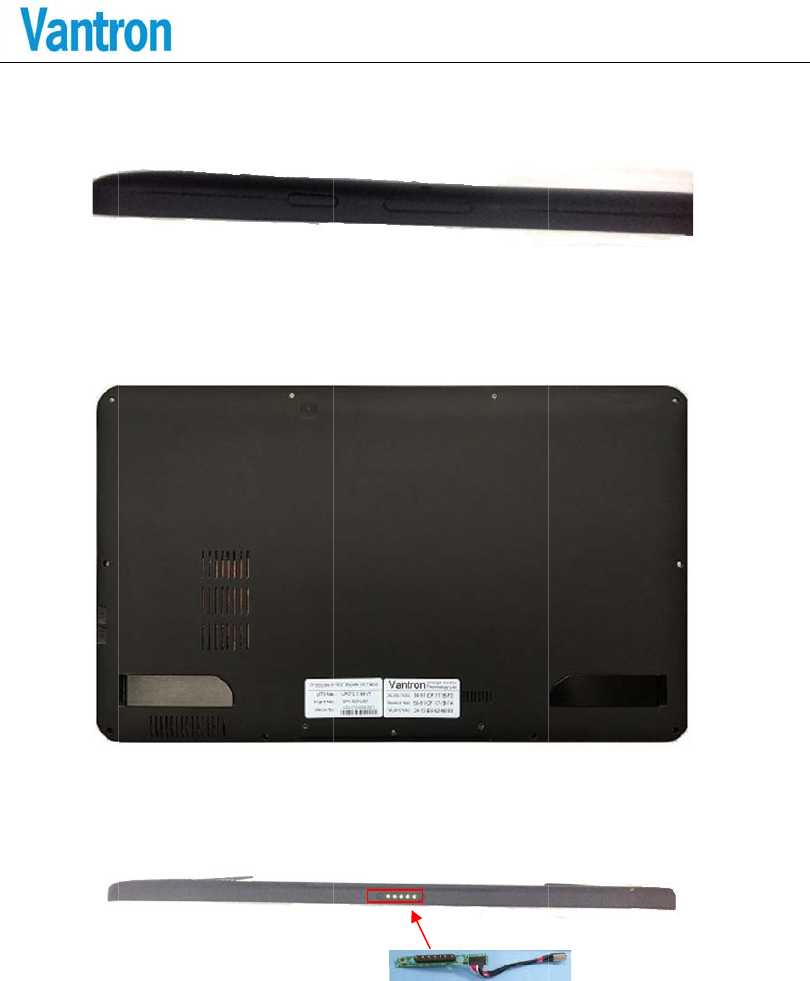
Sideview
BackView
Bottomview
11/52
V
V
T‐TAB185‐SKL
U
VT‐TAB185‐SKLU
12/52
2.2 ProductUsageEnvironment
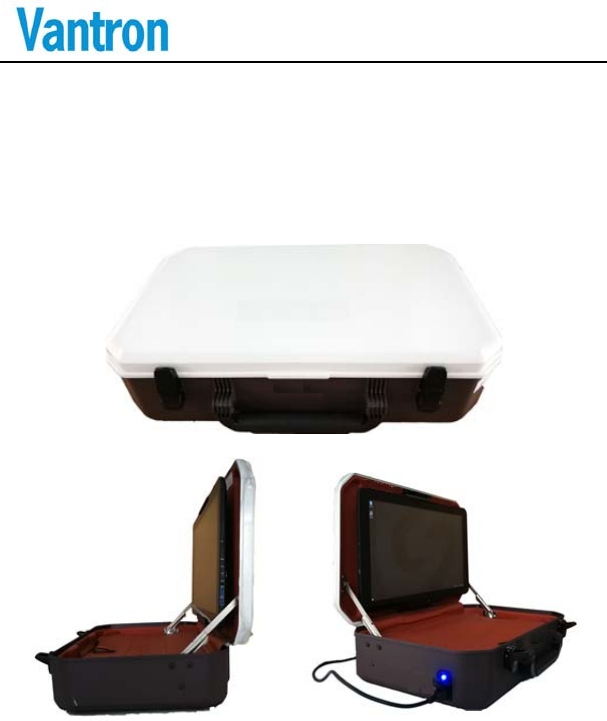
Theembeddedcomputercanbeusedinmanyoccasionswithmounting
brackets,suchasaboxwithmountingbracketsinternal,orfixeddirectly
onthewallwithmountingbrackets,andsoon.
Packinginaboxcanbeeasytocarryandusedindifferentoccasions.
Warning:whenusingthecomputerinaboxsuchasaboxshownasthe
abovephotos,peopleshouldkeepitsbodyatleast20centimeterfar
awayfromthecomputer.
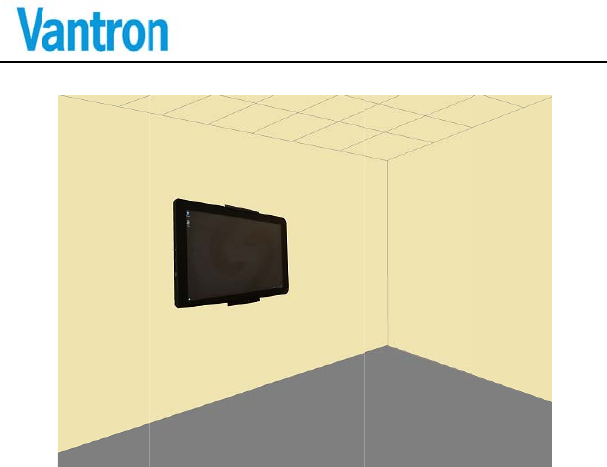
Fixe
d
d
onthewall
f
f
orindooren
v
13/52
v
ironment
V
V
T‐TAB185‐SK
L
L
U
VT‐TAB185‐SKLU
14/52
2.3 Productinstallationmethod
Withitsmountingbracket,theembeddedcomputeronlycanbeusedin
thetwoenvironmentsspecifiedbythemanufacturer,andoneoftheways
wedescribeistoinstallitinabox,theotheristobeinstalledonthewall.
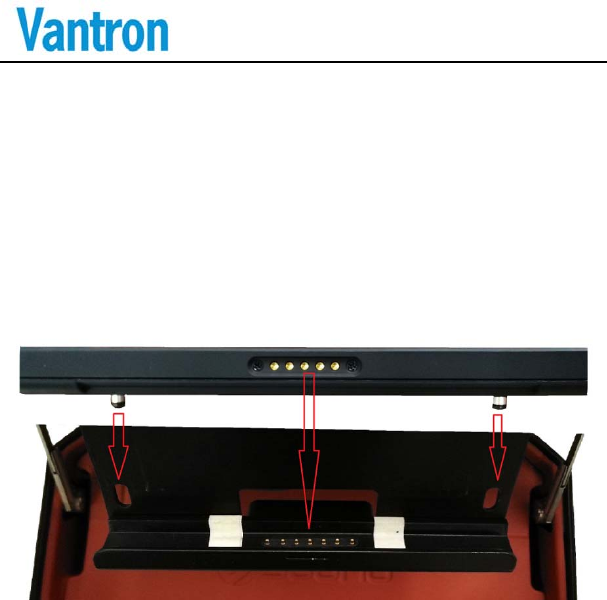
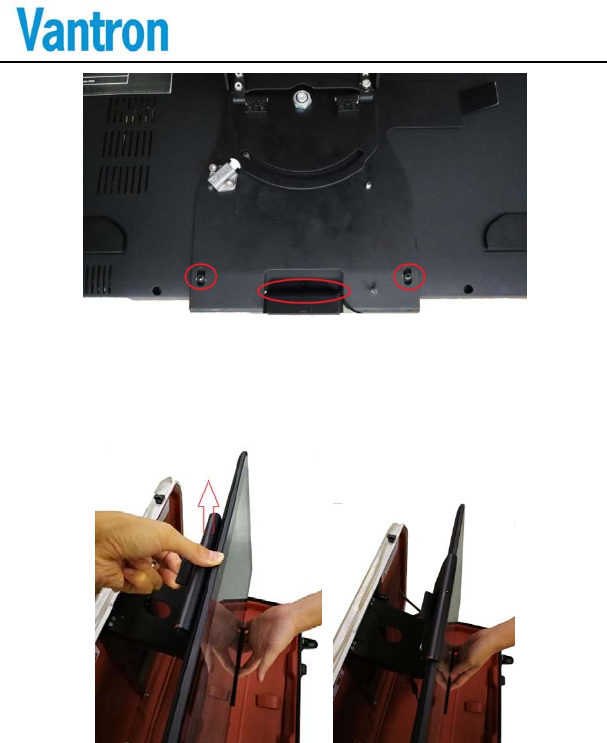
Howtoinstallinaspecificbox:
Step1:weneedtoinstallthebottomwithitschargingsocketandtwo
positioningscrewsofthecomputer.
VT‐TAB185‐SKLU
15/52
Step2:weneedtouseonehandtopullthebottomofthecomputerand
theotherhandtoliftthetopofthemountingbracketupwardsothatit
cangripthetopofthecomputer.
Warning:theinstallationshouldbedoneasabove‐mentioned,andthe
installationshouldbedonelightlyandwithoutdamagingtheequipment.

VT‐TAB185‐SKLU
16/52
2.4 Specifications
Specifications
CPU Processor Intel®CoreTM i5-6300U Base 2.4GHz Turbo 3.0GHz
Processor( DUAL CORE)
Memory On Board RAM On Board DDR4 1333Mhz up to 8GB
ROM Internal M.2 2280 SSD, 1TB
Display
Display 18.5" 16:9, 2 Channel LVDS LCD, 1920x1080@60Hz
LED Back Light, 350cd/ m2
Touch Screen Capacitive Touch Screen, 10 points
Camera Front 5M pixel
Interfaces
Sensor Ambient light sensor, Accelerometer, magnetometer,
gyroscope
Memory
CardReader MicroSD / micro-SDHC / micro-SDXC(SDXC 3.01)
USB 2xUSB3.0 Host (Type A)
Wireless/Bluet
ooth
802.11 a/b/g/n/ac, 2X M.2 CONN for supporting two WLAN
module (PCIE x2 +USB2.0 x2), with 2xMain antenna, and
2xAux Antenna
1x Bluetooth4.2 on 7265 module 1x Bluetooth4.2 on 8265
module(can not work together)
LTE module LTE(Band:2/4/5/7/12/13/17/25/26/30/38/41/66)
WCDMA/3G(Band:2/4/5)
RTC Supported
Audio 1xline Out 3.5mm(with MIC),1xSpeaker(right channel)
LED indicators Power; Charging
Security TPM module
Software OS Windows or Linux
VT‐TAB185‐SKLU
17/52
2.5 InterfaceInstructions
Applications SDK Available
Power
Battery Lithium Ion Battery,4S2P, 15.2V, 3800mAh
Pogo Pin DC19V Supply60W(MAX)
DC Input DC19V Supply 60W(MAX)
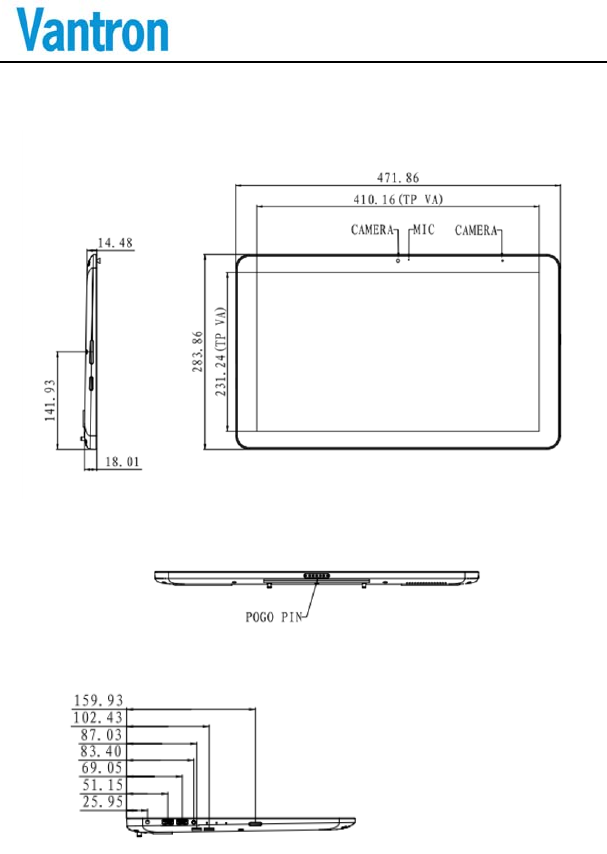
Mechanical Dimensions 283.86x471.86x18.01mm
Weight 3.19KG
Environment
Condition
Temperature Operating: 0°C ~ +45°C, Storage: -10~+55°C.
Humidity Working 20%~80%, storage 10%~90%
Approvals FCC,ISED,CE and UL
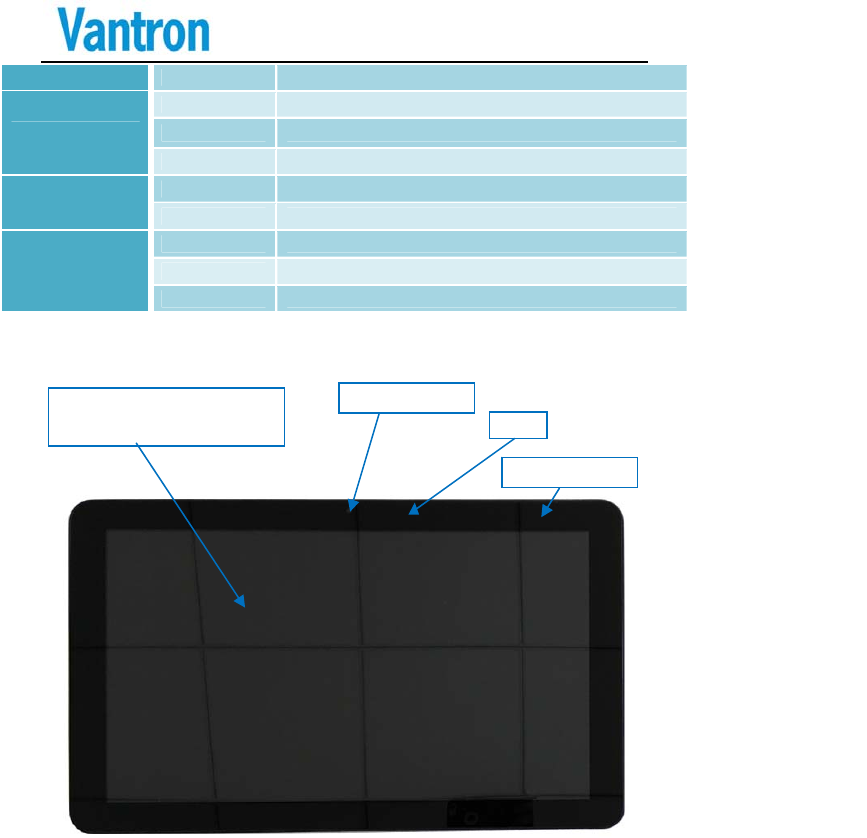
18.5” LCD, 1920x1080
With Capacitive TP
5M Camera
MIC
Light sensor
Hom
e
PWR
B
Reset BT
N
e
BTN
B
TN
R
e
B
l
Batter
y
R
Tur
n
N
Pogo Pin
CONN
18/52
Volume+
BTN
Power led
e
d: power of
f
l
ue: power o
n
y
LED indic
a
R
ed: Chargin
g
n
off: full cha
r
SD
V
Audio
Volu
m
BT
N
f
n
a
to
r
g
r
ged
Card
S
V
T‐TAB185‐SK
L
m
e-
N
USB3.
0
D
S
IM Card
L
U
0
C IN
VT‐TAB185‐SKLU
19/52
2.6 InterfaceInstructions
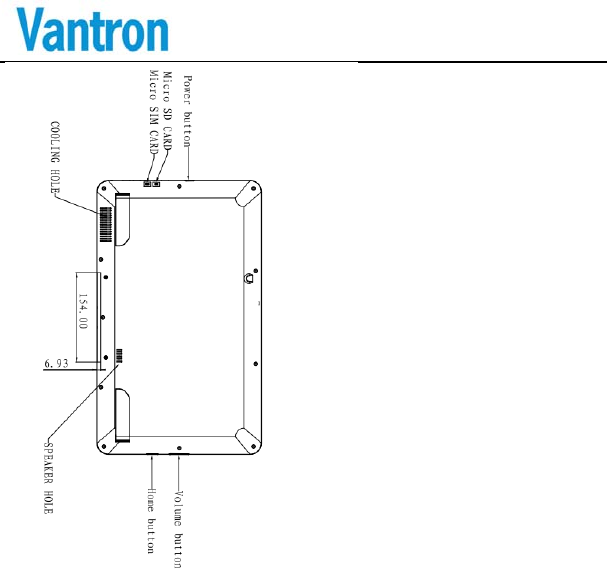
VT‐TAB185‐SKLU
20/52
2.7 InterfaceDescription
2.7.1 USBHostConnector
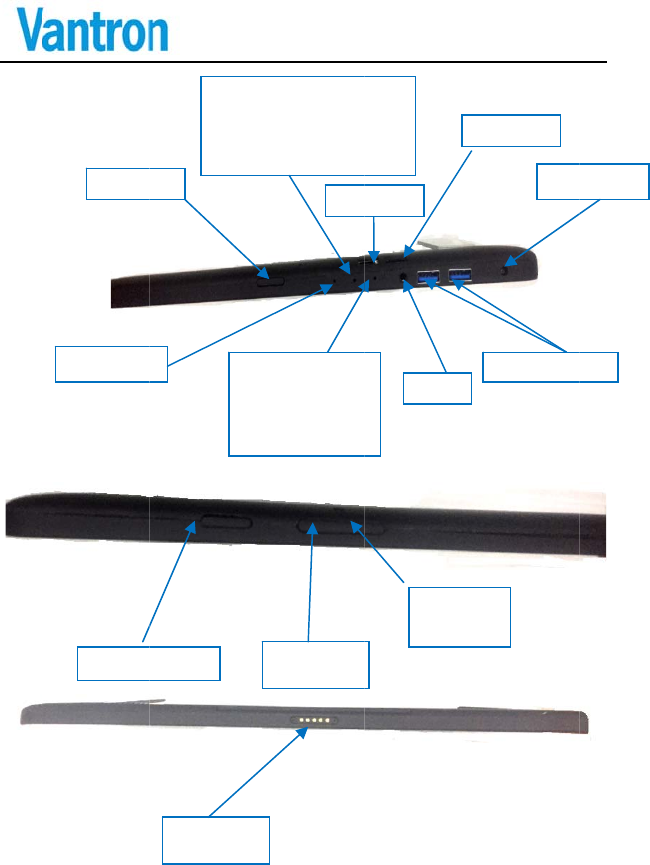
DualverticalUSBAtypeinterface,supporting2xUSB3.0
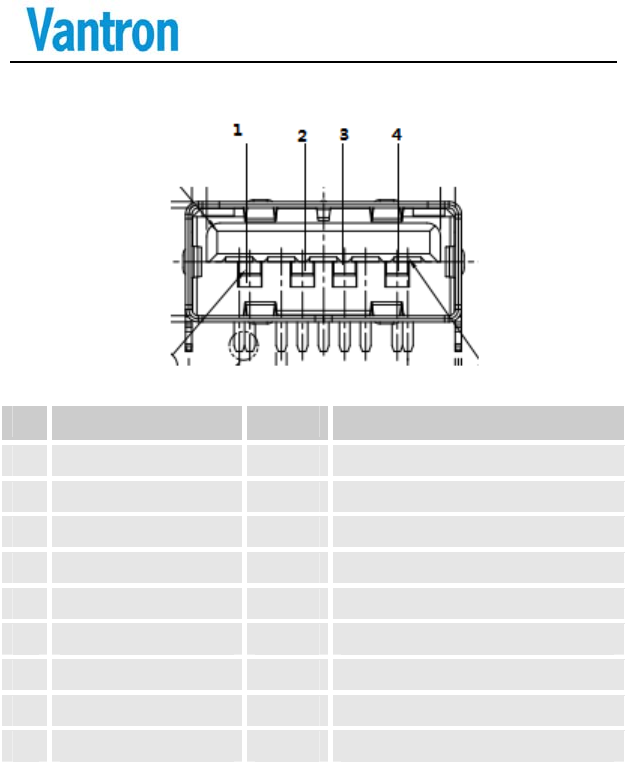
VT‐TAB185‐SKLU
21/52
Pin Name Type Description
1 AUSB_VCC P +5VDC
2 AUSB_DN IO USB Data1- Signal
3 AUSB_DP IO USB Data1+ Signal
4 AUSB_GND P Ground
5 AUSB3.0_RXN IO USB3.0 RECEIVE DATA -Signal
6 AUSB3.0_RXP IO USB3.0 RECEIVE DATA +Signal
7 AUSB3.0_GND P Ground
8 AUSB3.0_TXN IO USB3.0 TRANSFER DATA -Signal
9 AUSB3.0_TXP IO USB3.0 TRANSFER DATA +Signal

VT‐TAB185‐SKLU
22/52
3 SoftwareIntroduction
ThankyouforchoosingVantron.Itisourcommitmentto
provide our valued customers with the embedded devices
equippedwiththestateofthearttechnologyandthebestproduct
services.
Vantron’sproductsarebasedontheIntelAtomprocessors
andhavelowpowerconsumptionandhighintegration.The
products are designed for applications of BT35 in industrials,
medicals,financial,retail,vehicle,andtransportationsetc.
3.1 AboutThisManual
Thismanualisforuserhowtoconfigureandusedevicesin
WindowsWin10system.
3.2 WindowsOSSupport
The VT‐TAB185‐SKLU supports the following Windows operating
systems,andwejustintroduceWin10systeminthisdocument.
Windows*832bit/64bit
Windows*EmbeddedStandard864bit(WES8)
Windows10Desktop/Windows10IoTCore

VT‐TAB185‐SKLU
23/52
3.3 VT‐TAB185‐SKLUFeatures
The below table lists VT-TAB185-SKLU features.
Device Name Description
LVDS
Resolution
18.5",2 Channel LVDS TFT, 16:9,
1920x1080,24bit
Contrast 1000:1
Brightness 350 cd/ m2
View
Angle 89U/89D,89L/89R
Touch
Screen Cap Touch Screen
Wireless
Communication 2 x 802.11 ac/a/b/g/n Wireless Module with
Bluetooth4.0, internal antenna
Note: The frequency bands from 5150MHz to
5250MHz for the 2 WLAN modules are designed
only for indoor operating.
USB 2xUSB3.0 Host
Audio 1xInternal 2W Speaker,1x 3.5mm Combo Jack
Micro-SD Support Micro-SD / Micro-SDHC / Micro-SDXC
Camera Front 5M
Sensor Ambient light sensor, Accelerometer,
magnetometer, gyroscope
LTE module LN940A9, M.2 CONN

VT‐TAB185‐SKLU
24/52
4 DriverInstallation
The driver list of WIN10 64bit on VT-TAB185-SKLU as below:
Driver
Category
Description/Version Driver Path
TXE 11.0.6.1194 \Win10 Driver
\TXE\ME_Corporate_11.0.6.1194.zip
Chipset 10.1.1.14 \Win10 Driver
\Chipset\Chipset_10.1.1.14_Public.zip
Graphic 154028.4501 \WIin10 Driver\Graphic
\ Graphics_win64_154028.4501.zip
Audio R279 \Win10 Driver\Audio
\ 0006-Win7_Win8_Win81_Win10_R279.zip
BT 20.10.0 \Win10Driver\BT\BT_20.60.0_64_Win10.exe
Wireless 20.10.2 \Win10Driver\
Wireless\WiFi_20.60.0_PROSet64_Win10.exe
SIO
Serial
163303 \Win10Driver\ SIO
Serial\intel_sio_163303_64_1020n.exe
Sensor
Hub
3.1.0.3429 \Win10
Driver\Sensor\intel_iss_3.1.0.3429_w1064.zip
4G 1.0.1.9 \Win10 Driver\4G\Telit Installer_v1.0.1.9.zip
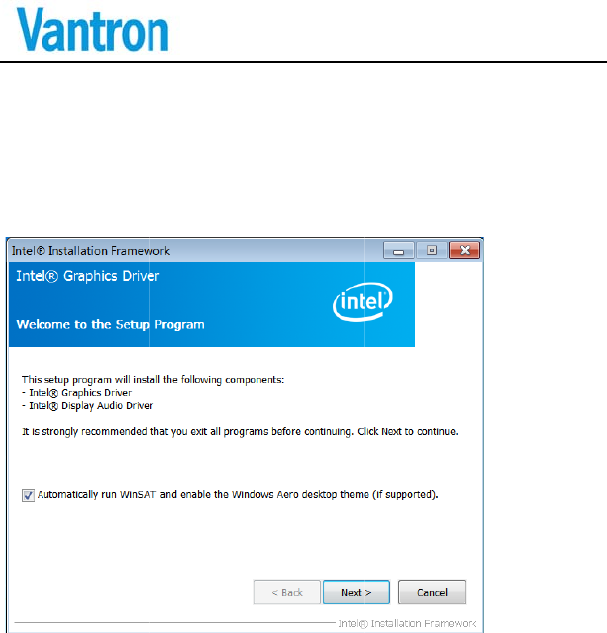
4.
1
D
1
2
1
Grap
h
D
river Instal
l
1
. Unzip *.
z
2
. Show co
n
h
icCard
l
ation:
z
ip, Double
c
n
tent of driv
e
25/52
Driver
c
lick setup.e
x
e
r installatio
n
V
x
e
n
, Then click
“
V
T‐TAB185‐SK
L
“
Next >”.
L
U
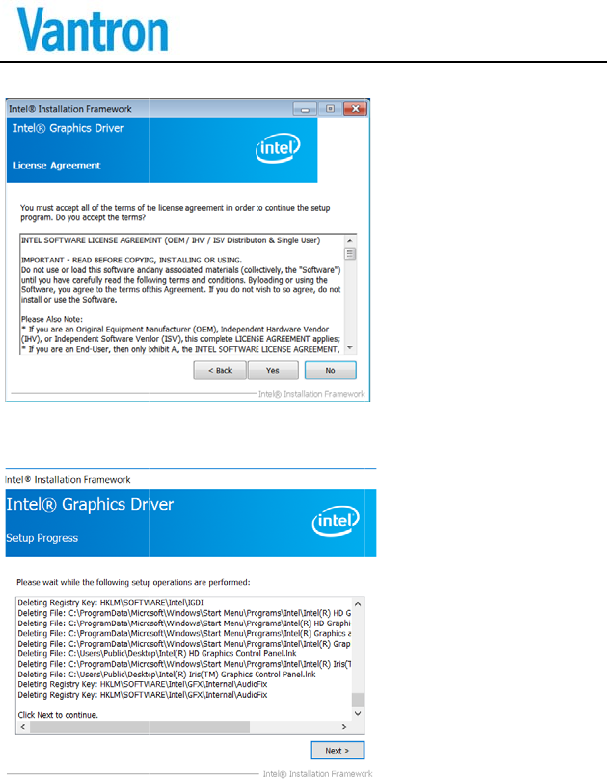
3
4
3
. Read Li
c
4
. Read sy
s
click “N
e
5. Reset sys
t
c
ense Agree
m
s
tem require
m
e
xt >”.
t
em.
26/52
m
ent carefull
y
m
ents and in
V
y
, Click “Yes
”
stallation in
f
V
T‐TAB185‐SK
L
”
.
f
ormation. T
h
L
U
h
en
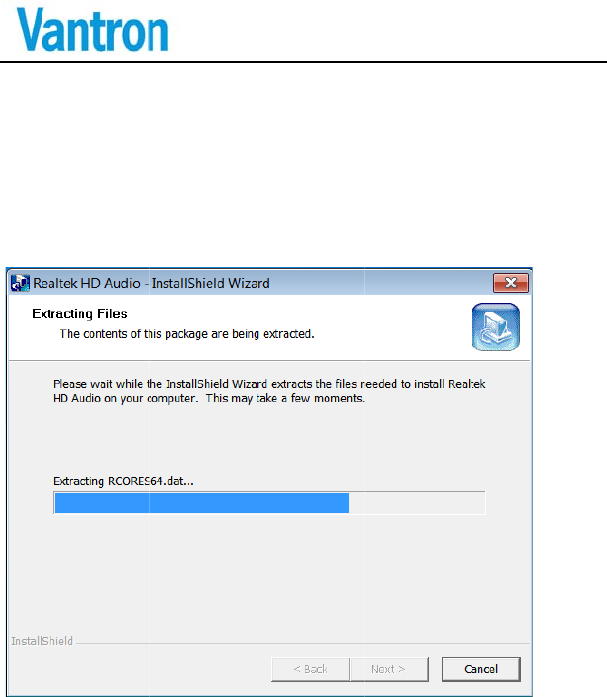
4.
2
2
Audio
Driver Insta
l
1. Unzip 0
0
2. Double
c
3. Extract
i
CardD
l
lation:
0
06-Win7_
W
c
lick setup.e
x
i
nstallation f
i
27/52
river
W
in8_Win81
_
x
e.
i
les.
V
_
Win10_R27
9
V
T‐TAB185‐SK
L
9
.zip
L
U
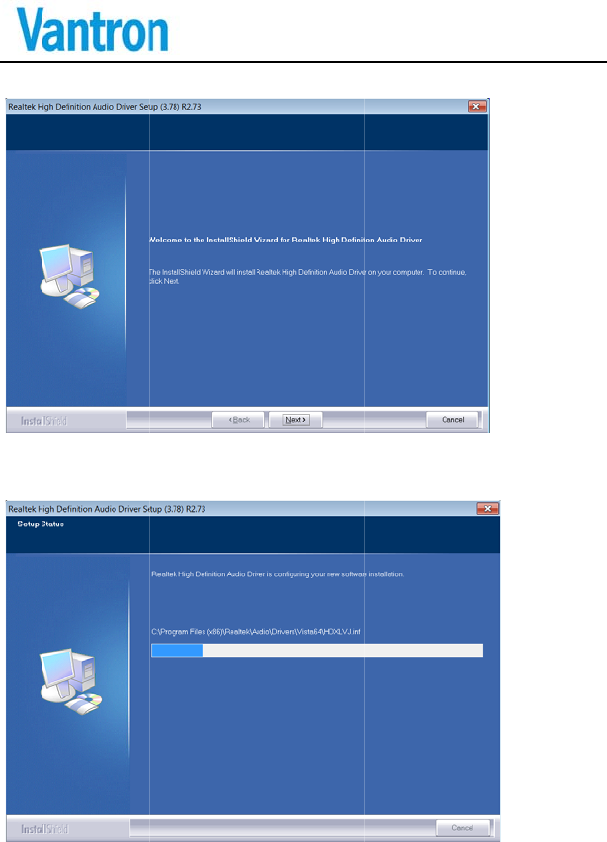
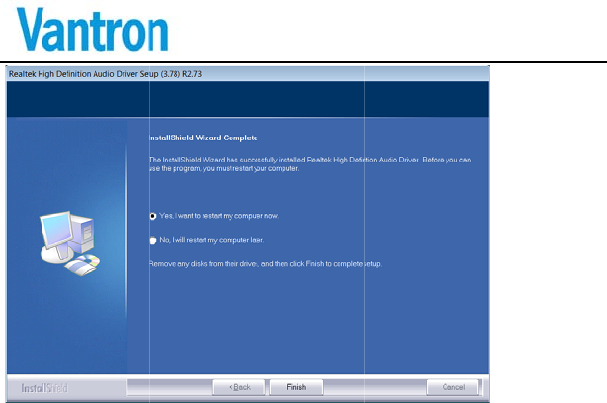
4. Click “
N
5. Wait fo
r
N
ext>”
r
some while,
t
28/52
t
hen finish i
n
V
n
stallation.
V
T‐TAB185‐SK
L
L
U
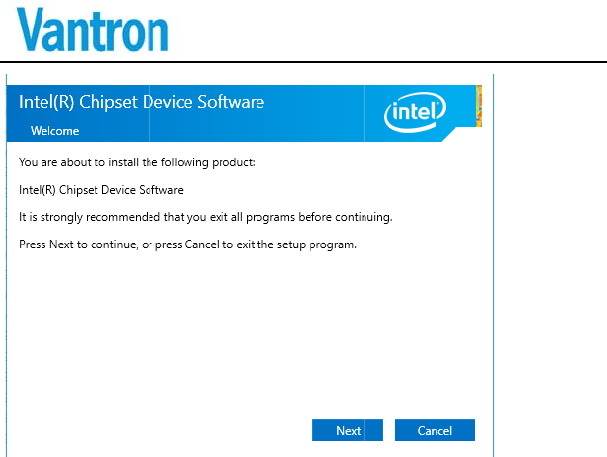
4.
3
Driv
e
1.
“Set
u
3
Chips
e
e
r location: \
W
Unzip
u
pChipset.ex
e
tDriv
e
W
in10 Drive
r
chipset_10.
e”. Then clic
k
29/52
e
r
r
\Chipset\ ch
1.1.14
_
publi
c
k
“Next>”
V
ipset_10.1.1.
c
.zip, D
o
V
T‐TAB185‐SK
L
14
_
public.zi
p
o
uble cl
i
L
U
p
i
ck
2. R
e
e
ad License
a
a
greement, cl
i
30/52
i
ck “Accept”
V
.
V
T‐TAB185‐SK
L
L
U
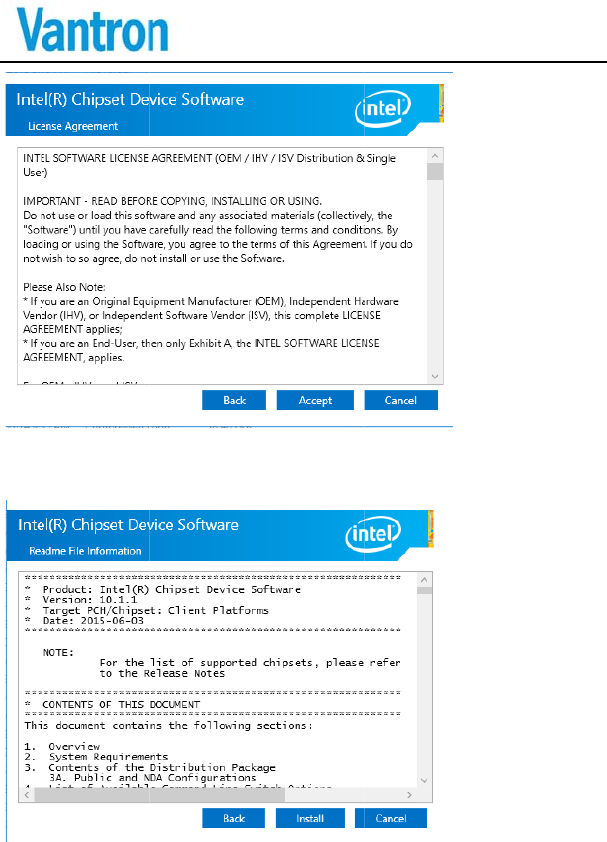
2.
S
S
how syste
m
m
requirement
31/52
and Click “I
V
nstall”.
V
T‐TAB185‐SK
L
L
U
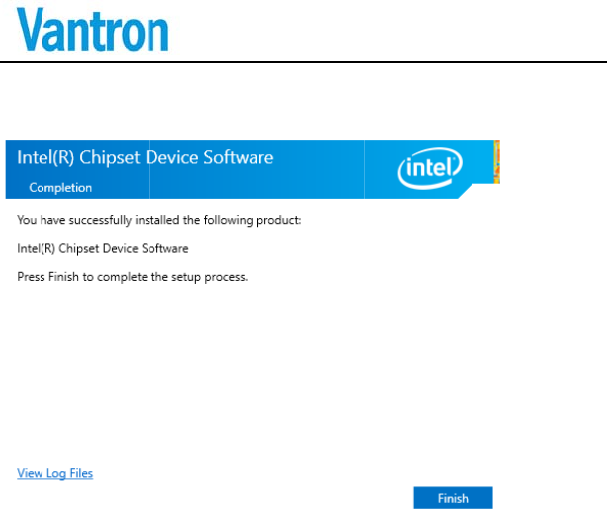
4.
W
W
ait for some
m
m
inutes, dri
v
32/52
v
er is OK.
V
V
T‐TAB185‐SK
L
L
U
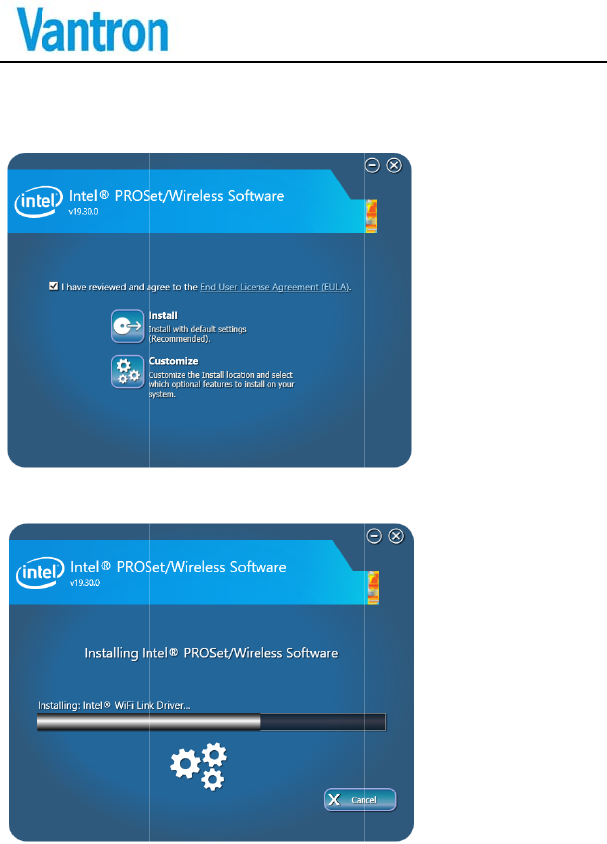
4.4
1. R
e
TXE
e
ad License
a
2. Reset sys
t
a
greement, cl
i
t
em.
33/52
i
ck “Install”.
V
V
T‐TAB185‐SK
L
L
U

VT‐TAB185‐SKLU
34/52
5 FirmwareUpdate
Warning: If Vantron needs to update EC and/or BIOS,
please follow the following steps:
1. Upgrade BIOS firmware first
2. Press power button to turn off the machine
3. Press power button to turn on the machine
4. Then upgrade EC firmware
5. Press power button to turn off the machine
6. Press power button to turn on the machine
Otherwise, it may lead to can’t boot problem (low
probability event).
5.1 BIOSFirmware
For flash details, see \Firmware\BIOS\*
5.2 ECFirmware
For flash details, see \Firmware\EC\*
VT‐TAB185‐SKLU
35/52
6 Modulefunction
This section describes the use of some modules, such as 4G module
and Rotate Screen.
6.1 4GModule
We use LN940A9 module for 4G networking.
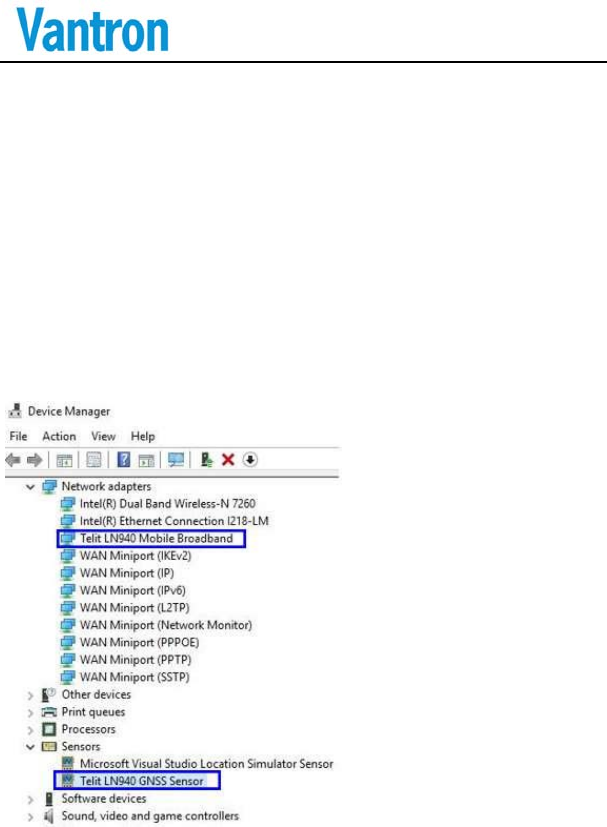
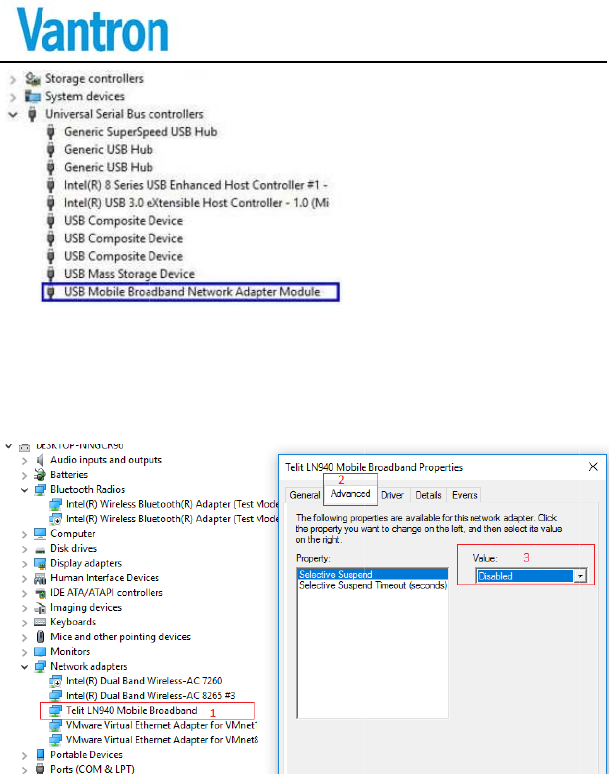
How to detect the existence of modules? If we see the following device,
the module is installed.
War
n
cons
i
con
fi
n
ing: Pleas
e
i
stent. If no
fi
guration is
o
e
check w
h
t, May cau
s
o
nly used for
L
36/52
h
ether the
f
s
e automatic
L
N940A9)
V
f
ollowing c
o
wake up a
f
V
T‐TAB185‐SK
L
o
nfiguration
f
ter sleep.(T
h
L
U
is
h
is
VT‐TAB185‐SKLU
37/52
6.1.1 DriverInstall
Please refer to \Win10 Driver\4G\LN940Telit
Installer_v1.0.1.9.zip=>LN940 Installer User Guide(Win10).pdf
6.1.2 Dial‐Up
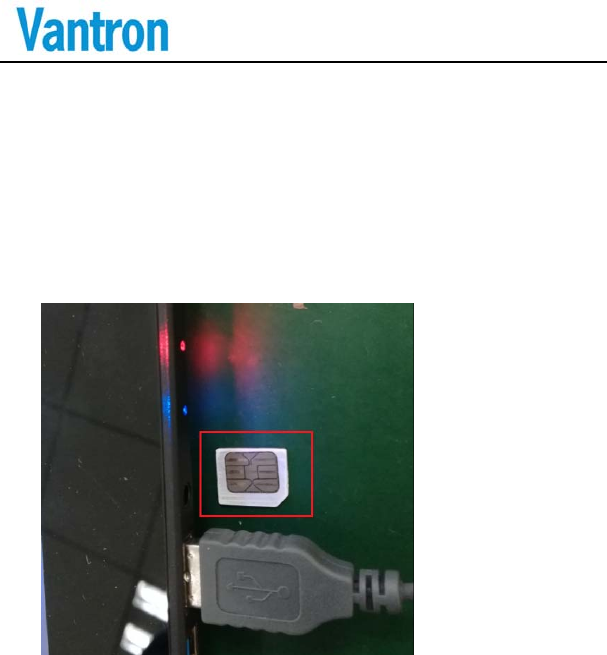
Insert the SIM card according to the picture below, Pay
attention to the direction of the missing angle of SIM card.
VT‐TAB185‐SKLU
38/52
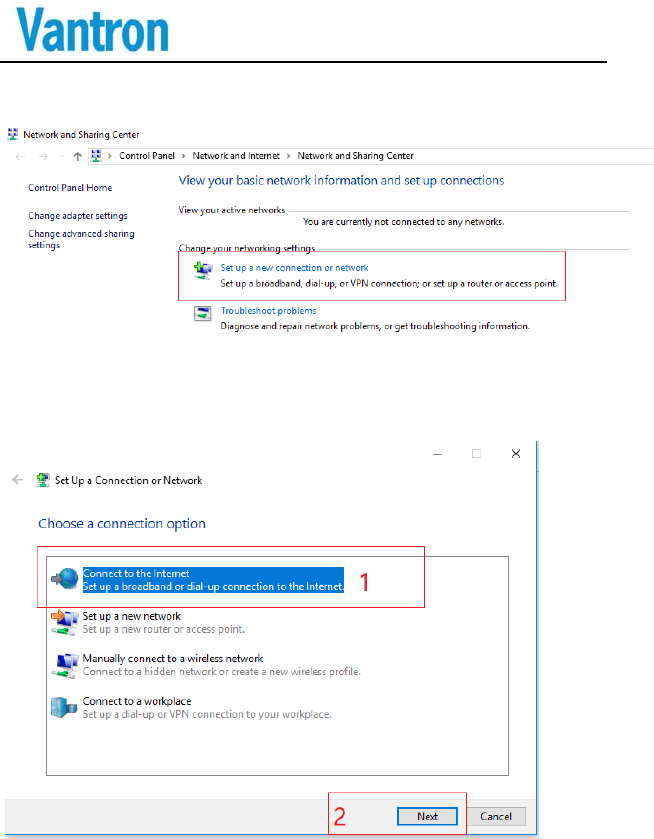
Open “Network and Sharing Center”, Click “Set up a new
connection or network”
Select “Connect to the Internet”, then click “Next”
VT‐TAB185‐SKLU
39/52
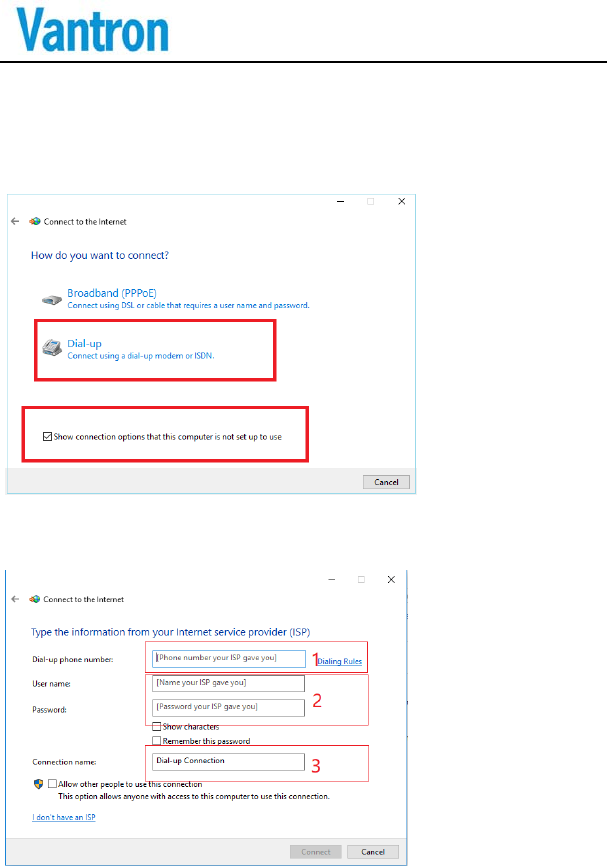
Click Dial-up to create a dial-up connection, if the option
“Dial-up”does not appear, please enable option “Show connection
options that this computer is not set up to use”
Input right phone number, User name and Password
according to different telecom operators.

VT‐TAB185‐SKLU
40/52
After completion of the above Settings, Click “Connect”.
If nothing else, the dial-up connection was successfully created,
now, we can surf the Internet.
If dial-up fail, we can check module information by AT command
1. Check module model
AT+G MM
2. Check firmware version
AT+C GM R
3. Check SIM Card if exist
AT+C PI N?
If “+CPIN:READY” is received, SIM card has been inserted into
the device.
4. Check signal strength
AT+C SQ
5. Get Serial Number
AT+G SN
VT‐TAB185‐SKLU
41/52
6.2 WIFIModule
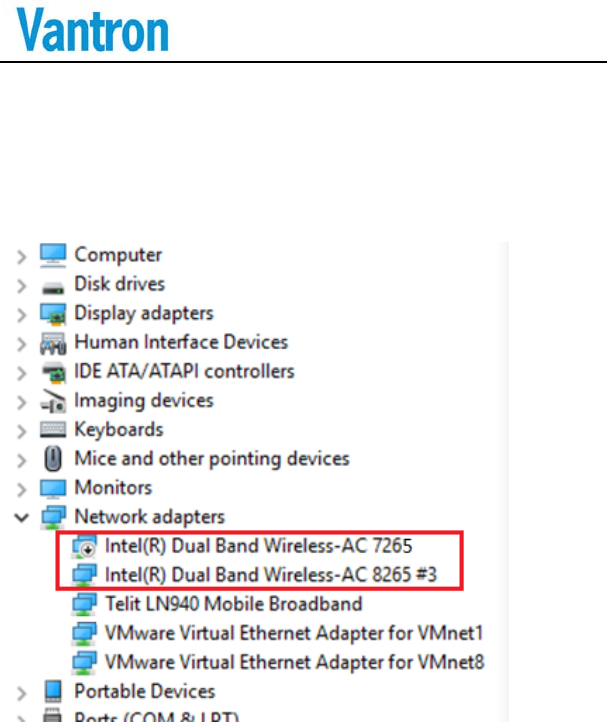
We use Intel 7265 and 8265 for WLAN connecting.
How to detect the existence of modules? If we see the following device,
the module is present.
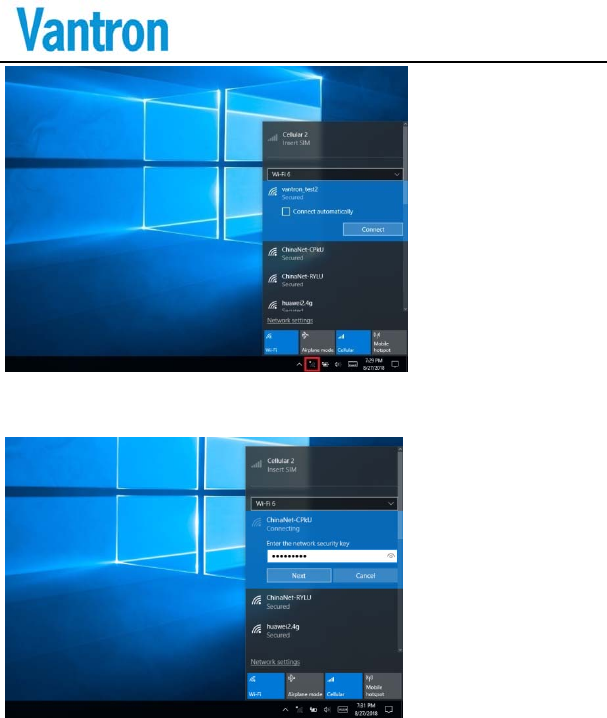
How to connect the network?
Press WIFI button to open available network, then press the network
name you want to connect.
VT‐TAB185‐SKLU
42/52
Press the Connect button and input the network password, then press
the Next button to connect the network.
Warning: The device for operation in the band 5150–5250 MHz is only
for indoor use to reduce the potential for harmful interference to
co-channel mobile satellite systems.
VT‐TAB185‐SKLU
43/52
6.3 SensorTool
Here we will introduce screen rotation and light sensation.
We use LIS3DE as acceleration chip to complete the function of screen
rotation and APDS9922 as light sensation chip. They are integrated
into sensor tools.
The following is the use of software:
Tool location: \SW Guide\Sensors\*
To run this software, install the runtime library “Microsoft Visual C++
2015 Redistributable Package.exe”first, it is in the directory“\SW
Guide”. If we have installed this library, ignore this step.
Copy SensorsWinio_v[xx].exe and Winio64.sys to
“C:\RotateScreen”. If we were the first to enter the system, we need to
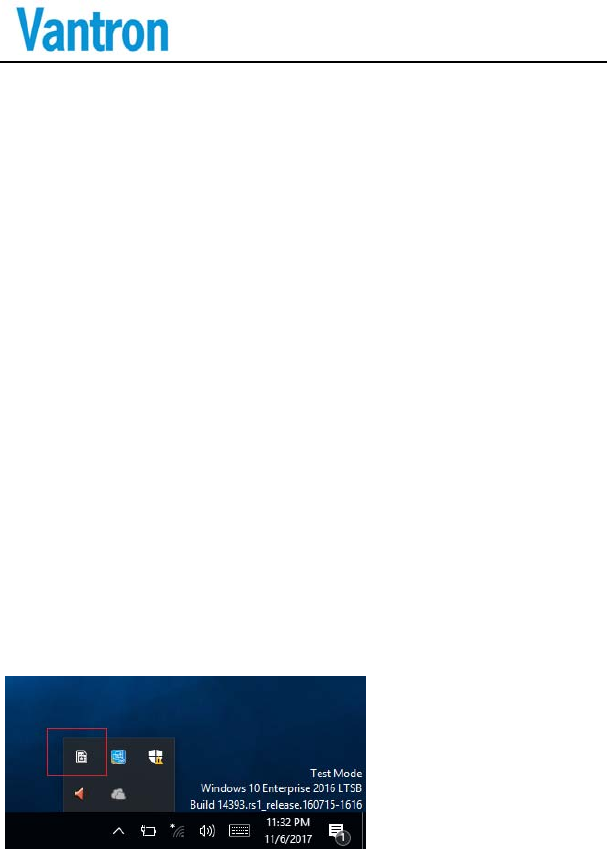
run “SensorsWinio_v[xx].exe” once with administrator privileges. If
the program runs normally, there is a tray icon in the lower right corner
of the desktop as below:
VT‐TAB185‐SKLU
44/52
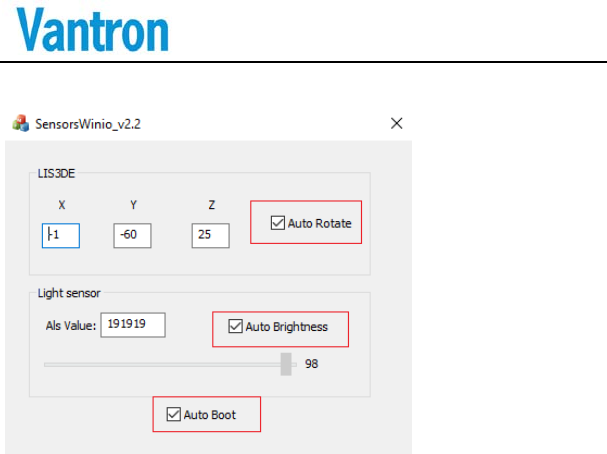
Double click tray icon to open main window as below:
Setting the default value for the startup configurationaccording to
the red box configuration above.
“Auto Rotate”: If checked, screen rotation according to x, y, z axis
data.
“Auto Brightness”: If checked, adjust screen brightness according to
data of light sensor. If unchecked, we can manually adjust the screen
brightness by dragging scrollbar.
“Auto Boot”: If checked, driver will be installed automatically and the
program will run automatically.
Finally, reboot PC. The next time we enter the system, Rotate
Screen and Light sensor will work properly.
VT‐TAB185‐SKLU
45/52
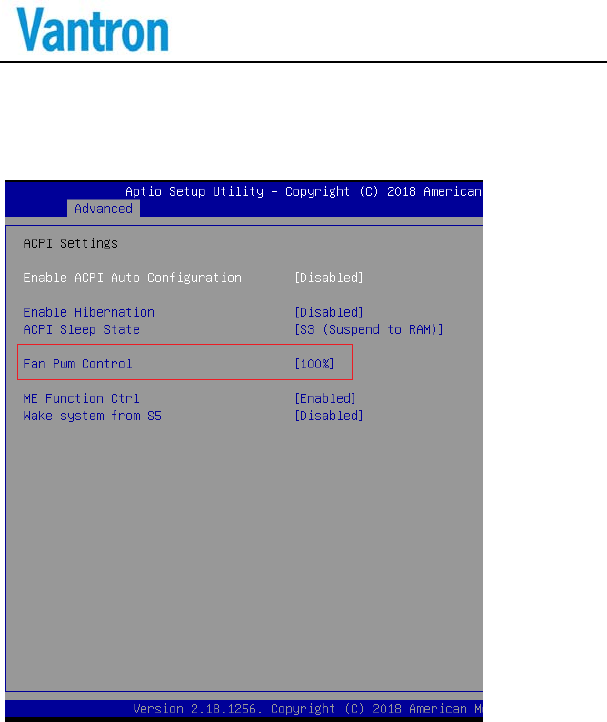
6.4 FanControl
We can adjust fan speed under the BIOS menu.

VT‐TAB185‐SKLU
46/52
6.5 Bluetooth
There are 2 Bluetooth modules from Intel 8265 and Intel 7265, but
only one module can work to support Bluetooth at one time, so
please disable onemodule’s Bluetooth in the device manager after
installing new OS.
VT‐TAB185‐SKLU
47/52
7 Tips
WasteDisposal
Itisrecommendedtodisassemblethedevicebeforeabandoningitin
conformitywithlocalregulations.Pleaseensurethattheabandoned
batteriesaredisposedaccordingtolocalregulationsonwastedisposal.
Donotthrowbatteriesintofire(explosive)orputincommonwaste
canister.Productsorproductpackageswiththesignof“explosive”
shouldnotbedisposedlikehouseholdwastebutdeliveredto
specializedelectrical &electronicwasterecycling/disposalcenter.
Properdisposalofthissortofwastehelpsavoidingharmandadverse
effectuponsurroundingsandpeople’shealth.Pleasecontactlocal
organizationsorrecycling/disposalcenterformorerecycling/disposal
methodsofrelatedproducts.
Complywiththefollowingsafetytips:
Donotuseincombustibleandexplosiveenvironment
Keepawayfromcombustibleandexplosiveenvironmentforfearof
danger.
Keepawayfromallenergizedcircuits.
Operatorsshouldnotremoveenclosurefromthedevice.Onlythe
grouporpersonwithfactorycertificationispermittedtoopenthe
enclosuretoadjustandreplacethestructureandcomponentsofthe

VT‐TAB185‐SKLU
48/52
device.Donotchangecomponentsunlessthepowercordisremoved.
Insomecases,thedevicemaystillhaveresidualvoltageevenifthe
powercordisremoved.Therefore,itisamusttoremoveandfully
dischargethedevicebeforecontactsoastoavoidinjury.
Unauthorizedchangestothisproductoritscomponentsare
prohibited.
Intheaimofavoidingaccidentsasfaraspossible,itisnotallowedto
replacethesystemorchangecomponentsunlesswithpermissionand
certification.PleasecontactthetechnicaldepartmentofVantronor
localbranchesforhelp.
Payattentiontocautionsigns.
Cautionsignsinthismanualremindofpossibledanger.Pleasecomply
withrelevantsafetytipsbeloweachsign.Meanwhile,youshouldstrictly
conformtoallsafetytipsforoperationenvironment.
VT‐TAB185‐SKLU
49/52
Notice
Consideringthatreasonableeffortshavebeenmadetoassure
accuracyofthismanual,Vantronassumesnoresponsibilityofpossible
missingcontentsandinformation,errorsincontents,citations,
examples,andsourceprograms.
Vantronreservestherighttomakenecessarychangestothismanual
withoutpriornotice.Nopartofthismanualmaybereprintedorpublicly
releasedinformsofphotocopy,tape,broadcast,e‐document,etc.
Thisdeviceisnotusedasaportabledeviceanditisintendedtouse
asmobileorfixedequipment.
FCCWarning
Note:Thisequipmenthasbeentestedandfoundtocomplywiththe
limitsforaClassBdigitaldevice,pursuanttopart15oftheFCCRules.
Theselimitsaredesignedtoprovidereasonableprotectionagainst
harmfulinterferenceinaresidentialinstallation.Thisequipment
generates,usesandcanradiateradiofrequencyenergyand,ifnot
installedandusedinaccordancewiththeinstructions,maycause
harmfulinterferencetoradiocommunications.However,thereisno
guaranteethatinterferencewillnotoccurinaparticularinstallation.If
thisequipmentdoescauseharmfulinterferencetoradioortelevision
reception,whichcanbedeterminedbyturningtheequipmentoffand

VT‐TAB185‐SKLU
50/52
on,theuserisencouragedtotrytocorrecttheinterferencebyoneor
moreofthefollowingmeasures:
—Reorientorrelocatethereceivingantenna.
—Connecttheequipmentintoanoutletonacircuitdifferentfrom
thattowhichthereceiverisconnected.
—Consultthedealeroranexperiencedradio/TVtechnicianforhelp.
FCCCaution
ThisdevicecomplieswithFCCclassBRules.Operationissubjecttothe
Followingconditions.
Thisdevicemaynotcauseharmfulinterference.
Thisdevicemustacceptanyinterferencereceived,including
interferencethatmaycauseundesiredoperation.
Anymodificationtotheproductisnotpermittedunlessauthorizedby
Vantron.It’snotallowedtodisassembletheproduct,itisnotallowed
toreplacethesystemorchangecomponentsunlesswithpermission
andcertification.Pleasecontactthetechnicalsupportdepartmentof
Vantronorlocalbranchesforhelp.
RFExposureStatement
Thisequipmentmustbeinstalledandoperatedinaccordancewith
provideinstructionsandtheantennausedforthistransmittermustbe
installedtoprovideaseparationdistanceofatleast20cmfromall
personsandmustnotbeco‐locatedoroperationinconjunctionwith
anyotherantennaortransmitter.End‐usersandinstallersmustbe
providewithantennainstallationinstructionsandtransmitteroperating
conditionsforsatisfyingRFexposurecompliance.
VT‐TAB185‐SKLU
51/52
ISEDstatement
This device complies with Industry Canada license-exempt RSS standard(s).
Operation is subject to the following two
conditions:
(1) This device may not cause interference, and
(2) This device must accept any interference, including interference that may cause
undesired operation of the device.
LeprésentappareilestconformeauxCNRd'IndustrieCanadaapplicablesauxappareilsradio
exemptsdelicence.
L'exploitationestautoriséeauxdeuxconditionssuivantes:
(1)l'appareilnedoitpasproduiredebrouillage,et
(2)l'utilisateurdel'appareildoitacceptertoutbrouillageradioélectriquesubi,mêmesile
brouillageestsusceptibled'en
compromettrelefonctionnement.
RFExposureStatement
Thisequipmentmustbeinstalledandoperatedinaccordancewithprovideinstructions
andtheantennausedforthistransmittermustbeinstalledtoprovideaseparation
distanceofatleast20cmfromallpersonsandmustnotbeco‐locatedoroperationin
conjunctionwithanyotherantennaortransmitter.End‐usersandinstallersmustbe
providewithantennainstallationinstructionsandtransmitteroperatingconditionsfor
satisfyingRFexposurecompliance.
cematérieldoitêtreinstalléetexploitéconformémentàdesinstructionsetl'antenne
utiliséepourcetémetteurdoitêtreinstallépourfournirunedistanced'aumoins20cmde
touteslespersonnesetnedoitpasêtreinstalléouopérationconjointementavectoute
autreantenneoutransmitter.lesutilisateursfinalsetlesinstallateursdoiventfournirdes
instructionsd'installationetd'antennes‐conditionsrelativesàl'expositionauxchampsrf
deconformité.

VT‐TAB185‐SKLU
52/52
ChinaOffice:ChengduVantronTechnology,Ltd.
Address:No.5GaopengRoad,Hi‐TechZone,Chengdu,Sichuan,P.R.China610045
Tel:86‐28‐8512‐3930/3931,8515‐7572/6320
Email:sales@vantrontech.com.cn
USOffice:VantronTechnology,Inc.
Address:440BoulderCourt,Suite300,
Pleasanton,CA94566
Tel:+1916‐202‐7042
Email:sales@vantrontech.com