Chi Mei Communication Systems 0307KON01 900/1800/1900 TRIBANDS PHONE WITH GPRS10 AND BLUET User Manual Amadeus
Chi Mei Communication Systems, Inc. 900/1800/1900 TRIBANDS PHONE WITH GPRS10 AND BLUET Amadeus
Contents
- 1. Users manual 1
- 2. Users manual 2
Users manual 2

The Main Menu
Message
50
• Delete page: Delete current page.
• Go to...: Move to one of the pages you are writing.
• Preview: Preview the message you are writing. All inserted objects(includ-
ing picture, animation, sound...etc.) will be displayed.
• Remove object: Remove the inserted multimedia objects of the message.
• View object: View all inserted multimedia objects of the message.
• Set title: Set a title for the multimedia message. The title will appear when
the message is received by recipient.
• Detail info.: View the title, recipients, memory of the message.
Viewing unsent multimedia messages
The drafts of multimedia messages are automatically stored in the Outbox. To
open the Outbox and check these messages:
1. In standby mode, press the left soft key, Select.
2. Scroll to Multimedia msgs. and press Select.
3. Scroll to Outbox and press Select. A list of multimedia message drafts with
the icon in front of them will appear on the screen.
4. Scroll to a message and press Select. The message will be opened.
5. Press Options and you can also choose to perform the following operations
to selected message.
• Send: Send the message immediately. You will be prompted to enter the
number of the recipients. You can also press Options, scroll to Add recipient
and press Select. Scroll to Number and press Select to pick up one recipient
from your Phone Book by pressing Names. Scroll to e-mail address and
press Select to enter the recipient’s e-mail address.
Scroll to Sending options and press Select to access the options below:
Status report: Turn on/off a message delivery status report.
• Each multimedia message size can not be over 30KB.
• Each page of the multimedia message allows a maximum of 1,000 Latin characters or Chi-
nese characters(including space and symbols).
• You can add up to 5 pages into a multimedia message.
• Your phone support the following multimedia objects formats:
Picture: JPEG, GIF87,GIF89, BMP, WBMP, PNG.
Sound: iMelody, MIDI, SP-MIDI, AMR.
• Each page can only be inserted one picture and one sound if the memory is available.
• The number of recipients of each message can be up to 10 persons.
Note

The Main Menu
Message
51
Validity period: The valid period determines the duration of time the mes-
sage is stored in the Outbox.
• Erase: Erase current message.
• Edit: Edit current message.
• Objects: All inserted multimedia objects of the message will be listed here.
Press Select, scroll to a desired object and press Select, you can view the
object, save the object to the multimedia center or view the detail info. of
the object.
• Use address: Capture the address(numbers) in the message. The address
(numbers) captured will appear on the screen. Scroll to an address (number)
and press Select. You can call the number directly or save it in Phone Book.
• Detail info.: View the detail info. of the message.
Viewing received multimedia messages
The messages you received are stored in the Inbox.
To open Inbox and view received messages:
1. In standby mode, press the left soft key, Select.
2. Scroll to Multimedia msgs. and press Select.
3. Scroll to Inbox and press Select.
4. Scroll to a message you want to read and press Select. The contents of the
message will be opened to the screen.
5. You can press Options to perform the following operations:
• Reply: Reply to current message. Press Select to choose to reply to the
sender of the message or to other recipients.
• Forward: Send this message to other recipients.
• Erase: Erase current message.
• Edit: Edit current message.
• Objects: All inserted multimedia objects of the message will be listed here.
Press Select, scroll to a desired object and press Select, you can view the
object, save the object to the multimedia center or view the detail info. of
the object.
• Use address: Capture the address(number) of the message. The address
(number) captured will appear on the screen. Scroll to the address(number)
and press Select. You can call the number directly or save it in Phone Book.

The Main Menu
Message
52
• Detail info.: View the detail info. of the message.
Erasing all multimedia messages
This function allows you to erase all messages in Inbox and Outbox.
1. In standby mode, press the left soft key, Select.
2. Scroll to Multimedia msgs. and press Select.
3. Scroll to Erase all and press Select.
4. Scroll to All inbox msgs. to erase all messages in Inbox. Scroll to All outbox
msgs. to erase all messages in Onbox. Scroll to All msgs. to erase all mes-
sages in Inbox and Outbox.
Chatroom The Chatroom function allows you to chat on-line with multiple members via
text messages. In a chat session, you can invite up to 4 members to your chat-
room and talk to each other simultaneously.
If someone else invites you to join his/her chatroom, you will be notified by a
chat message. Press OK to join the chat.
Accepting an invitation to join a chatroom
If someone else invites you to join his/her chatroom, you will be notified by a
chat message.
1. Press Detail, Select to enter the chatroom.
2. Press Options, scroll to Open chatroom, press Select, press OK.
3. Enter your nickname and press OK.
4. Enter your message and press Options, Select. On the screen, your chat
messages follows the ">" symbol and your nickname, and the chat mes-
sages from other chat members follow the "<" symbol and their nicknames.
Opening a new chat session
Multimedia messages, Voice recorder and Multimedia center share memory of total 504KB. It
will be allocated automatically by your phone. Therefore, the number of the multimedia mes-
sages that can be stored in Inbox and Outbox will depend on the memory size of the multime-
dia messages you received(sent) and the remaining space of the Inbox/Outbox. When the
memory is full, the icon will appear on the screen to remind you to delete some multime-
Note

The Main Menu
Message
53
1. In standby mode, press the left soft key, Select.
2. Scroll to Chatroom and press Select.
3. Enter the number of chat member, or pick a member from your Phone
Book by pressing Names. Repeat this step if you want to invite multiple
members to your chatroom.
4. Press OK.
5. Enter your nickname and press OK.
6. Enter your message and press Options, Select.
The chat members you invited will receive a message from you. If they accept
your invitation, their nicknames will appear on your screen.
In a chat session, the chat members’ message will appear on the screen follow-
ing their nicknames. You can enter your message and send it by pressing
Options, Select. Your message will appear on the screen following the symbol
">" and your nickname.
Options during a chat session
Press Options during a chat session. Scroll to an option and press Select to
select it.
• Send: Send the message you entered.
• Insert template: Insert message templates into your chat message. You can
also customize your own message templates. See "Customizing message
template"on page 48 for details.
• Insert smiley: Insert smiley symbols into your chat message.
• Nickname: change your nickname during a chat session. Enter your new
nickname and press OK.
• Chat numbers: Invite new members to your chatroom. Enter the number of
chat member, or pick a member from your Phone Book by pressing Names.
• View history: View the history of current chat session.
Message settings
Configuring text message setting profiles
The message settings can be configured in different profiles. Usually the pro-
files are provided by your operator and have been programmed on the SIM
card. If your SIM card does not contain such profile, you need to set up a pro-
file in your phone. Please consult your operator for details.

The Main Menu
Message
54
Using the profile on your SIM card
1. In standby mode, press the left soft key, Select.
2. Scroll to Settings and press Select.
3. Press Select three times.
Configuring a new profile
1. In standby mode, press the left soft key, Select.
2. Scroll to Settings and press Select.
3. Press Select.
4. Scroll to an empty profile and press Select.
5. Scroll to Customize and press Select.
6. Complete following settings:
• Name: Enter a name for this profile.
• Center number: Enter the message center number. This number is supplied
by your operator.
• Send as: Defines the type of message. Your system operator may be able to
convert your message to the type you select here. Press Left or Right to
select a type.
• Valid period: The valid period determines the duration of time the message
is stored in the message center if it can not be successfully received by the
recipient. Press Left or Right to select a duration.
6. Press Save.
Using a self-configured profile
1. In standby mode, press the left soft key, Select.
2. Scroll to Settings and press Select.
3. Press Select.
4. Scroll to the profile you configured and press Select.
5. Press Select.
Multimedia message settings
You can configure the following multimedia message services.
Retrieving messages automatically
If other people send you a multimedia message, you will receive a notice first
and the message will be stored in your operator’s server temporarily. With this
function, you can decide to retrieve the multimedia message automatically or
not while receiving the new multimedia message notice.

The Main Menu
Message
55
1. In standby mode, press the left soft key, Select.
2. Scroll to Settings and press Select.
3. Scroll to Multimedia msgs. and press Select.
4. Press Select to access the following functions and then press OK.
• On: Retrieve the multimedia messages automatically from the server.
• Off: Retrieve the multimedia messages manually from the Inbox.
• Ask me: You will be prompted if retrieve the messages immediately or not.
Retrieving messages while roaming
With this function, you can decide to retrieve the multimedia messages imme-
diately or not while you are roaming.
1. In standby mode, press the left soft key, Select.
2. Scroll to Settings and press Select.
3. Scroll to Multimedia msgs. and press Select.
4. Scroll to While roaming and press Select, you can select the following func-
tions by pressing OK.
• Immediate retrieval: Retrieve the multimedia messages immediately from
the server.
• Delayed retrieval: Retrieve the multimedia messages by yourself from the
Inbox.
• Ask me: You will be prompted if retrieve the messages immediately or not.
Connection settings
The connection settings must be configured before you can use the multime-
dia message services. The profiles will be provided after you subscribe the
multimedia message services to your operator, or may have been programmed
on your phone and you can use them right away.
Using the profiles on your phone
1. In standby mode, press the left soft key, Select.
2. Scroll to Settings and press Select.
3. Scroll to Multimedia msgs. and press Select.
4. Scroll to Connection settings and press Select.
5. Scroll to a desired profile and press Select.
Configuring a new connection profile manually
The Main Menu
Message
56
You can configure up to 5 sets of connection profiles. Please consult your
operator for related information.
1. In standby mode, press the left soft key, Select.
2. Scroll to Settings and press Select.
3. Scroll to Multimedia msgs. and press Select.
4. Scroll to Connection settings and press Select.
5. Scroll to an empty profile and press Select.
6. Scroll to Edit and press Select.
7. According to the parameters supplied by your operator, configure the fol-
lowing:
• Homepage: Enter the address of the homepage.
• Session mode: Temporary or Permanent.
• Connection Security: On or Off.
• Data bearer: GSM Data or GPRS. If GSM Data is selected, you need to
setup Dial-up number, Data call type and Data call speed. If GPRS is
selected, you need to setup GPRS access point.
• IP address: Enter the IP address.
• Authentication type: Normal or Secure.
• Username: Enter the username.
• Password: Enter the password.
Editing profiles
Before setting up a connection profile, please be sure to obtain the following parameters from
your operator:
Homepage:
Session mode: Temporary Permanent
Connection security: On Off
Data bearer: GSM Data (Dial-up number , Data call type Analogue ISDN,
Data call speed Automatic 9600 14400)
GPRS (GPRS access point )
IP address: . . .
Authentication type: Normal Secure
Username:
Password:
Information you need in case you have to set up a connection profile manually

The Main Menu
Message
57
1. In standby mode, press the left soft key, Select.
2. Scroll to Settings and press Select.
3. Scroll to Multimedia msgs. and press Select.
4. Scroll to Connection settings and press Select.
5. Scroll to a desired profile and press Select.
6. Scroll to Edit and press Select.
7. Edit the contents of the profile and press Back.
Renaming profiles
1. In standby mode, press the left soft key, Select.
2. Scroll to Settings and press Select.
3. Scroll to Multimedia msgs. and press Select.
4. Scroll to Connection settings and press Select.
5. Scroll to a desired profile and press Select.
6. Scroll to Rename and press Select.
7. Enter the new profile name and press OK.
Allow adverts.
You can select to receive or reject adverts. with this function.
1. In standby mode, press the left soft key, Select.
2. Scroll to Settings and press Select.
3. Scroll to Multimedia msgs. and press Select.
4. Scroll to Allow adverts. and press On/Off.
Sending options
Status report
If this function is activated, your operator will send you a message delivery
report, letting you know if your multimedia message is sent successfully.
1. In standby mode, press the left soft key, Select.
2. Scroll to Settings and press Select.
3. Scroll to Multimedia msgs. and press Select.
4. Scroll to Sending options and press Select.
5. Press On or Off.
Validity period
With this function, you can set the duration of time for which the received
multimedia messages are stored in your operator’s server. The messages will

The Main Menu
Message
58
be deleted by the server automatically if you don’t fetch them in a valid time.
1. In standby mode, press the left soft key, Select.
2. Scroll to Settings and press Select.
3. Scroll to Multimedia msgs. and press Select.
4. Scroll to Sending options and press Select.
5. Scroll to Validity period and press Select.
6. Scroll to a desired period and press OK.
Message options
Message status report
If this function is turned on, your operator will send you a message delivery
report, letting you know if your message is sent successfully.
To turn on/off the message status report:
1. In standby mode, press the left soft key, Select.
2. Scroll to Settings and press Select.
3. Scroll to Misc. setting and press Select.
4. Press On (or Off).
Reply pathThe Reply Path function allows the recipient of your message to send you a
reply message via your message center.
To turn on/off the reply path:
1. In standby mode, press the left soft key, Select.
2. Scroll to Settings and press Select.
3. Scroll to Misc. setting and press Select.
4. Scroll to Reply Path and press On (or Off).
Send by GSM or GPRS
Depending on your selection here, your message can be sent either by GSM or
by GPRS.
1. In standby mode, press the left soft key, Select.
2. Scroll to Settings and press Select.
3. Scroll to Misc. setting and press Select.
4. Scroll to Send by and press Select.
5. Scroll one of the following items and press OK.
• GSM first: Send messages via GSM network first. If GSM network is not
available, send messages via GPRS.

The Main Menu
Message
59
• GPRS first: Send messages via GPRS first. If GSM network is not available,
send messages via GSM network.
• GSM only: Send messages via GSM network only.
• GPRS only: Send messages via GPRS only.
Checking message memory status
The messages you received and the copy of your sent messages are stored in
the memory in your phone and on the SIM card. You can check the status of
the memory here.
1. In standby mode, press the left soft key, Select.
2. Scroll to Settings and press Select.
3. Scroll to Misc. setting and press Select.
4. Scroll to Memory status and press Select.
Configuring voice mailbox number
Depending on your operator, the voice mailbox number may have already
been programmed on the SIM card and your phone can detect it automati-
cally. Otherwise, you have to enter it following the steps below:
1. In standby mode, press the left soft key, Select.
2. Scroll to Voice mail and press Select.
3. Enter the voice mailbox number and press Save.
Sending history
After you send a message, the related data will be registered to the sending his-
tory for you to check later.
1. In standby mode, press the left soft key, Select.
2. Scroll to Sending history and press Select.
3. The list of history records will appear on the screen. Scroll to a record and
press Select to view its details.
Cell broadcast options
Cell broadcast refers to the text messages that your operator sends to all sub-
scribers. For example, on-line traffic report or notification from the system
operator. For details about cell broadcast services and contents, please contact
your operator.
Turning on or off cell broadcast

The Main Menu
Message
60
You can choose to turn on or off the cell broadcast.
1. In standby mode, press the left soft key, Select.
2. Scroll to Cell broadcast and press Select.
3. Press On (or Off).
Setting up cell broadcast topics
You can edit cell broadcast topics in the topics list.
1. In standby mode, press the left soft key, Select.
2. Scroll to Cell broadcast and press Select.
3. Scroll to Topic and press Select.
4. Scroll to the topic you want to edit.
5. Edit the topic. When done, press Save.
Sending message service commands
With this function you can edit and send certain service commands to your
operator to perform certain operations.
For details on service commands and how to use them, please consult your
operator.
1. In standby mode, press the left soft key, Select.
2. Scroll to Service command and press Select.
3. Enter the command and press Send.

The Main Menu
Call Meter
61
Call Meter
The options in the Call Meter menu allow you to easily manage your phone
call records.
Viewing missed call records
1. In standby mode, press the left soft key.
2. Scroll to Call meter and press Select.
3. Press Select. The list of missed calls will appear on the screen. Each call
record is represented by the name of the caller. If the caller can not be
found in your Phone Book, or the number is unknown, No number will
appear.
4. You can press Options to access the following options:
• View: View date and time record of the missed call.
• Erase: Erase this call record. Press OK to erase it.
Viewing received call records
1. In standby mode, press the left soft key.
2. Scroll to Call meter and press Select.
3. Scroll to Received calls and press Select. The list of received calls will appear
on the screen. Each call record is represented by the name of the caller. If
the caller can not be found in your Phone Book, or the number is
unknown, No number will appear.
4. You can press Options to access the following options:
• View: View date and time record of the missed call.
• Erase: Erase this call record. Press OK to erase it.
• Call: Make a call to the caller immediately.
• Save: Save this record to Phone Book.
Viewing dialed call records
1. In standby mode, press the left soft key.
2. Scroll to Call meter and press Select.
3. Scroll to Dialed calls and press Select. The list of dialed calls will appear on
the screen. Each call record is represented by the name of the recipient. If
the recipient can not be found in your Phone Book, only the number you
dialed will appear.
4. You can press Options to access the following options:
• View: View date and time record of the missed call.

The Main Menu
Call Meter
62
• Erase: Erase this call record. Press Select to erase it.
• Call: Make a call to the recipient immediately.
• Save: Save this record to Phone Book.
Erasing all call records
1. In standby mode, press the left soft key.
2. Scroll to Call meter and press Select.
3. Scroll to Erase all and press Select.
4. Press OK.
Viewing call time information
You can check the duration of your phone calls with this function. The infor-
mation includes the duration of the last call, all calls, received calls and dialed
calls.
To view call time information:
1. In standby mode, press the left soft key.
2. Scroll to Call meter and press Select.
3. Scroll to Call time and press Select.
4. Scroll to the type of information you want to view and press Select.
Clearing call timer
The call time can be cleared by resetting the call timer.
1. In standby mode, press the left soft key.
2. Scroll to Call meter and press Select.
3. Scroll to Call time and press Select.
4. Scroll Clear timer and press Select.
Viewing call cost information
If your operator supports, you can check the cost of your last call and all calls
with this function. Note that the call cost shown here may not exactly reflect
the amount of your phone bill, since there may be different discount rates
offered by your system operator in different time periods.
You need PIN2 code to access certain call cost functions.
Note

The Main Menu
Call Meter
63
Viewing call cost
1. In standby mode, press the left soft key.
2. Scroll to Call meter and press Select.
3. Scroll to Call cost and press Select.
4. Scroll to Last call or All calls and press Select.
Clearing call cost
1. In standby mode, press the left soft key.
2. Scroll to Call meter and press Select.
3. Scroll to Call cost and press Select.
4. Scroll to Clear cost and press Select.
5. Enter your PIN2 code and press OK.
Viewing remaining call cost credit
Call cost credit is used to limit the cost of your call. If your call cost exceeds
such credit, you will not be able to make phone calls. However, you can still
make emergency calls.
1. In standby mode, press the left soft key.
2. Scroll to Call meter and press Select.
3. Scroll to Call cost and press Select.
4. Scroll to Credit remaining and press Select.
Configuring call cost settings
Before you can obtain call cost information, you need to configure call cost
settings following the steps below:
1. In standby mode, press the left soft key.
2. Scroll to Call meter and press Select.
3. Scroll to Call cost and press Select.
4. Scroll to Setting and press Select.
5. Enter your PIN2 code and press OK.
6. Scroll to an item and press Select to configure.
• Cost limit: Enter a cost limit. This limit is also your call cost credit.
• Currency: Enter the currency that will be used to calculate your call cost.
• Price unit: Enter the unit of price that will be used to calculate your call cost.
You will be prompted to enter your PIN2 code when modifying call cost settings.
Note

The Main Menu
Call Meter
64
7. When done, press OK.
Viewing GPRS related information
GPRS data
GPRS data counter
The GPRS data counter provides information about the size of data you sent/
received via GPRS.
1. In standby mode, press the left soft key.
2. Scroll to Call meter and press Select.
3. Scroll to GPRS data counter and press Select.
4. Scroll to an item below and press Select to view corresponding informa-
tion:
Last sent: Display the total size of data you last sent.
Last received: Display the total size of data you last received.
Total sent: Display the total size of data you sent.
Total received: Display the total size of data you received.
Clearing GPRS data counter
1. In standby mode, press the left soft key.
2. Scroll to Call meter and press Select.
3. Scroll to GPRS data counter and press Select.
4. Scroll to Clear counter and press Select.
GPRS connection time
GPRS timer
The GPRS time counter provides information about the duration you spent
on GPRS connection.
1. In standby mode, press the left soft key.
2. Scroll to Call meter and press Select.
3. Scroll to GPRS connection time and press Select.
4. Scroll to an item below and press Select to view corresponding informa-
tion:
• Last connection: Display the duration of your last GPRS connection.
• Total connection: Display accumulated duration of all GPRS connection.

The Main Menu
Call Meter
65
Clearing GPRS timer
1. In standby mode, press the left soft key.
2. Scroll to Call meter and press Select.
3. Scroll to GPRS connection time and press Select.
4. Scroll to Clear timer and press Select.
In-call count
The In-call count function automatically counts the time or cost and displays
such information on the screen when you are on a call.
1. In standby mode, press the left soft key.
2. Scroll to Call meter and press Select.
3. Scroll to In-call count and press Select.
4. Scroll to Call time (display call time during a call) or Call cost (display call
time during a call) and press OK.
Session information
If this function is activated, the time and cost information of the phone call
will appear on the screen after you end a call.
1. In standby mode, press the left soft key.
2. Scroll to Call meter and press Select.
3. Scroll to Session information and press On (to activate it) or Off (to deacti-
vate it).

The Main Menu
Call Feature
66
Call FeatureThe options in the Call Feature menu allows you to access advanced call fea-
tures.
Call divert If for any reason you can not answer a call, you can activate the call divert
function to direct incoming calls to a specific phone number. If Call divert
function is activated, the icon will appear on the screen.
Diverting voice calls
To activate call divert function for voice calls:
1. In standby mode, press the left soft key.
2. Scroll to Call feature and press Select.
3. Press Select.
4. Press Select.
5. Scroll to a desired condition and press Select:
• When busy: divert all voice calls when you are on a call.
• No reply: divert all voice calls when they are not answered.
• Not reachable: divert all voice calls when you are outside your operator’s
network service area.
• Not available: divert all voice calls whenever you are not available for
answering a call.
• All calls: divert all incoming voice calls.
6. Press Select.
7. Enter the number you want to diver to or press Names to pick up the num-
ber from your Phone Book.
8. Press OK.
Deactivating voice call divert function
To cancel specific call divert function, scroll to Off and press Select in step 6
above.
Some of the call features described in this section are operator dependent. Please consult your
operator for availability.
Note

The Main Menu
Call Feature
67
Inquiring status
To inquire the service status of specific call divert function, scroll to Status and
press Select in step 6 above.
Diverting data or fax calls
To activate call divert function for voice calls:
1. In standby mode, press the left soft key.
2. Scroll to Call feature and press Select.
3. Press Select.
4. Scroll to Fax calls (to divert Fax calls) or Data calls (to divert data calls) and
press Select.
5. Press Select.
6. Enter the number you want to diver to or press Names to pick up the num-
ber from your Phone Book.
7. Press OK.
Deactivating data or fax call divert function
Scroll to Off and press Select in step 5 above.
Inquiring status
Scroll to Status and press Select in step 5 above.
Deactivating all call divert functions
You can deactivate all call divert functions (including voice, Fax and data calls)
at once.
1. In standby mode, press the left soft key.
2. Scroll to Call feature and press Select.
3. Press Select.
4. Scroll to Cancel all and press Select.
Call waiting If activated, the Call waiting function allows you to answer the second incom-
ing call when you are on a call. See "Answering a new incoming call"on page
21 for details.
1. In standby mode, press the left soft key.
2. Scroll to Call feature and press Select.

The Main Menu
Call Feature
68
3. Scroll to Call waiting and press Select.
4. Scroll to On and press Select.
Deactivating call waiting
To cancel call waiting, scroll to Off and press Select in step 4 above.
Inquiring status
To inquire the service status of call waiting function, scroll to Status and press
Select in step 4 above.
Call barring With Call barring function, you can bar (restrict) incoming and outgoing calls
under certain conditions.
Barring outgoing calls
To bar outgoing calls:
1. In standby mode, press the left soft key.
2. Scroll to Call feature and press Select.
3. Scroll to Call barring and press Select.
4. Press Select.
5. Scroll to a desired barring condition and press Select:
• Int’l calls: bar all outgoing international calls.
• Int’l calls except home: bar all outgoing international calls except the calls
made to your home country.
• All calls: bar all outgoing calls.
6. Press Select.
7. Enter your network code and press OK. The phone will contact the system
and activate selected call barring function.
Cancel barring of outgoing calls
To deactivate barring of outgoing calls, scroll to Off and press Select in step 6
above.
You need network code to activate/deactivate call barring function. Such code is available from
your operator.
Note

The Main Menu
Call Feature
69
Inquiring status
To inquire the service status of call barring function, scroll to Status and press
Select in step 6 above.
Barring incoming calls
To bar incoming calls:
1. In standby mode, press the left soft key.
2. Scroll to Call feature and press Select.
3. Scroll to Call barring and press Select.
4. Scroll to Incoming calls and press Select.
5. Scroll to a desired barring condition and press Select:
• When roaming: bar all incoming calls when roaming.
• All calls: bar all incoming calls.
6. Press Select.
7. Enter your network code and press OK. The phone will contact the system
and activate selected call barring function.
Cancel barring of incoming calls
To deactivate barring of outgoing calls, scroll to Off and press Select in step 6
above.
Inquiring status
To inquire the service status of call barring function, scroll to Status and press
Select in step 6 above.
Cancel all call barring functions
You can deactivate all call barring functions (including barring of incoming
and outgoing calls) here.
1. In standby mode, press the left soft key.
2. Scroll to Call feature and press Select.
3. Scroll to Call barring and press Select.
4. Scroll to Cancel all and press Select.
5. Enter your network code and press OK.
Changing network code
You can change the network code with this function.

The Main Menu
Call Feature
70
1. In standby mode, press the left soft key.
2. Scroll to Call feature and press Select.
3. Scroll to Call barring and press Select.
4. Scroll to Change password and press Select.
5. Enter your network code and press OK.
6. Enter new network code and press OK.
7. Enter new network code again to confirm. Press OK.
Showing/hiding your number
Depending on the your operator, you may choose to show or hide your num-
ber when making a call. If your number is hidden, it will not be shown to the
person who receives your call.
To show/hide your number:
1. In standby mode, press the left soft key.
2. Scroll to Call feature and press Select.
3. Scroll to Show number and press Select.
4. Scroll to one of the following:
• Preset: use your operator setting. Your operator decides whether to show
your number or not.
• On: show your number.
• Off: hide your number.
5. Press OK.
Selecting a phone line to use
Depending on your subscription to the operator, you may use two different
phone lines (numbers) to receive and make voice calls. You can select a phone
line to use here.
To select a phone line:
1. In standby mode, press the left soft key.
2. Scroll to Call feature and press Select.
3. Scroll to Phone lines and press Select.
4. Scroll to Line 1 (to use phone line 1) or Line 2 (to use phone line 2).
5. Press OK.
If phone line 2 is selected, the icon will appear on the screen.

The Main Menu
Call Feature
71
Anykey answer
The anykey answer function allows you to answer a call by pressing any key
(except End and key). You can activate/deactivate such function here.
1. In standby mode, press the left soft key.
2. Scroll to Call feature and press Select.
3. Scroll to Anykey answer and press On (to activate it) or Off (to deactivate
it).
Auto redial If this function is activated, your phone redials the number automatically
when your attempt to make a call fails.
1. In standby mode, press the left soft key.
2. Scroll to Call feature and press Select.
3. Scroll to Auto redial and press On (to activate it) or Off (to deactivate it).
Speed dialing
You can activate/deactivate speed dialing function here. You must activate
speed dialing before you setup speed dialing numbers.
1. In standby mode, press the left soft key.
2. Scroll to Call feature and press Select.
3. Scroll to Speed dialing and press On (to activate it) or Off (to deactivate
it).
Receiving a fax or data call
Depending on your subscription to the operator, your may be able to receive
fax and data calls. However, if you do not have separate data and voice lines,
you need to setup the type of phone call to answer.
To receive a fax or data call:
1. Before receiving the call, connect the phone to a computer using one of the
methods below:
• Place the phone near the computer and align the infrared port of the phone
to the one on the computer.
• Connect the phone to the computer using the data cable (available sepa-
rately).
2. In standby mode, press the left soft key.
3. Scroll to Call feature and press Select.

The Main Menu
Call Feature
72
4. Scroll to Next call and press Select.
5. Depending on the type of call to receive, scroll to Fax or Data and press
OK.
6. Open the software program on the computer and answer the call.
The icon (the next call is set as Fax call) or (the next call is set as data
call) will appear on the screen.
To receive voice calls after the data or fax call:
1. In standby mode, press the left soft key.
2. Scroll to Call feature and press Select.
3. Scroll to Next call and press Select.
4. Scroll to Voice and press OK.
Talk and Fax
If you have subscribed the fax service to your operator and you have activated
this function, you can send or receive fax after making a voice call.
To activate/deactivate the talk and fax function:
1. In standby mode, press the left soft key.
2. Scroll to Call feature and press Select.
3. Scroll to Talk and fax and press On (to activate it) or Off (to deactivate it).
Minute reminder
If this function is activated, your phone will beep every 50 seconds when you
are on a call to remind you of the call time.
To activate/deactivate the minute reminder function:
1. In standby mode, press the left soft key.
2. Scroll to Call feature and press Select.
3. Scroll to Minute reminder and press On (to activate it) or Off (to deactivate
it).
Connection indication
If this function is activated, you can be notified by the screen prompt of the
phone when your outgoing call is connected.
To activate/deactivate connection indicator:
1. In standby mode, press the left soft key.
2. Scroll to Call feature and press Select.
3. Scroll to Connection indication and press Select.

The Main Menu
Call Feature
73
4. Scroll to one of the following:
• Off
• Vibrating alert
• Tone
5. Press On (to activate it) or Off (to deactivate it).

The Main Menu
Sound
74
Sound The options in the Sound menu allows you to setup the sound settings of your
phone.
Sound profiles
A sound profile is a combination of sound settings. Your phone provides 6
pre-configured sound profiles and you can select one that fits your circum-
stances to use. For example, in a meeting, you can select to use the Meeting
profile. You can also configure these profiles according to your preferences.
Selecting a sound profile
To select a sound profile to use:
1. In standby mode, press the left soft key.
2. Scroll to Sound and press Select.
3. Press Select.
Default profile settings
Ringing
volume Ringing
tone Incoming
call alert Vibrating Message
alert tone
Key
tone
volume
Key
tone
type
Warning
tones Startup
music
General Volume
5Tone 1 Continue
ringing On Tone 1 Level 3 Key
tone 1 On On
Meeting Volume
1Tone 1 Ring once Off Tone 1 Level 1 Off Off Off
Outdoor Volume
5Tone 1 Continue
ringing On Tone 1 Level 4 Key
tone 1 On On
Pager Volume
5Tone 1 Continue
ringing On Tone 1 Level 4 Key
tone 1 On On
Headset Volume
4Tone 1 Continue
ringing Off Tone 1 Level 2 Key
tone 1 On On
The Headset profiles won’t work unless a handsfree kit or headset in plugged into your phone.
Note about sound profiles

The Main Menu
Sound
75
4. Scroll to desired sound profile and press Select.
5. Press Select.
Or:
1. Press the power key in standby mode. The sound profiles will appear on the
screen.
2. Scroll to desired profile and press OK.
The name of selected sound profile will appear on the screen in standby mode.
Customizing a sound profile
To customize a sound profile:
1. In standby mode, press the left soft key.
2. Scroll to Sound and press Select.
3. Press Select.
4. Scroll to the sound profile you want to customize and press Select.
5. Scroll to Customize and press Select.
6. Use the following options to customize settings. Scroll to each option and
press Select to customize.
• Ringing volume: Scroll to a desired ringing volume and press OK. 5 volume
levels are available.
• Ringing tone: Scroll to a desired ringing tone and press OK. There are 40
built-in ringing tomes and 5 ringing tones you can compose by yourself (see
"Composing your ringing tones"on page 76 for how to compose a ringing
tone).
• Incoming call alert: Here you can select the ringing mode of incoming calls.
Available modes are: Off (no ringing tone), Continue ringing, Ring once,
Ascending, Group (the phone rings only when calls from selected caller
groups are received). If Group is selected, you will be prompted to select a
caller group.
• Vibrating: Press On to activate vibration, or Off to deactivate it.
• Message alert tone: Select the sound that is played upon receiving a mes-
sage. There are 4 tones available for selection. If Off is selected, the message
alert tone will be turned off.
• Key tone volume: Scroll to a desired keypad tone level and press OK. 4 vol-
ume levels are available.
• Key tone type: Scroll to select a desired keypad tone type and press OK, 4
key tones are available. Press Off to deactivate it.
• Warning tones: Warning tone is played when phone battery is low, or there
is an error in operation. Press On to activate warning tone, or Off to deacti-
vate it.
The Main Menu
Sound
76
• Startup music: Press On, your phone will play music when the phone power
is turned on/off. Press Off to deactivate it.
Renaming a sound profile
1. In standby mode, press the left soft key.
2. Scroll to Sound and press Select.
3. Press Select.
4. Scroll to the sound profile you want to rename and press Select.
5. Scroll to Rename and press Select.
6. Enter the new name and press OK.
Composing your ringing tones
With the Tone editor function, you can create your unique ringing tone or
compose a ringing tone according to your favorite songs. You can create up to
5 ringing tones.
1. In standby mode, press the left soft key.
2. Scroll to Sound and press Select.
3. Scroll to Tone editor and press Select.
4. The ringing tone editor screen appears. Press an appropriate key to insert
symbols. Please see the table below for the mapping of keys and symbols.
The Headset profiles can’t be renamed.
Note
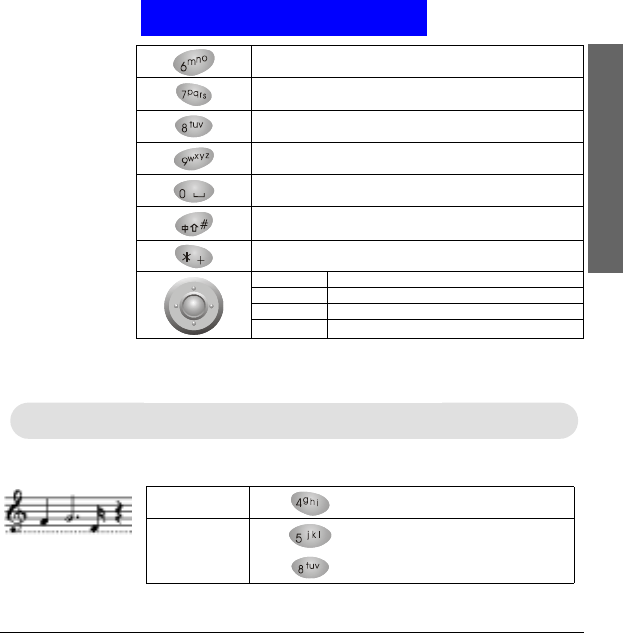
Press this key... To...
Insert a C sharp note.
Insert a D sharp note.
Insert an E sharp note.
Insert an F sharp note.
Insert a G sharp note.
The Main Menu
Sound
77
When selecting a note, inserting a note, moving selected note up/down or
changing the length of the note, corresponding tone is played.
For example, to get the melody on the left:
Insert an A sharp note.
Insert a B sharp note.
Increase the length of selected note/rest.
Move the note one octave up.
Decrease the length of selected note/rest.
Move the note one octave down.
Insert a rest.
Up Move selected symbol up on the staff.
Down Move selected symbol down on the staff.
Left Select previous symbol.
Right Select next symbol.
You can insert up to 126 symbols in one ringing tone.
Note
1st symbol Press to get an F sharp note.
2nd symbol Press to get a G sharp note.
Press three times to increase length.
The Main Menu
Sound
78
5. Press Options to select from the following:
Open: Press Select to view exist ringing tones.
Play: Press Select to play the ringing tone you just created.
Save: Press Select to save the ringing tone you just created.
Instruments: Press Select to choose an instrument that is used to play the
ring tone.
Tempo: Press Select to change the speed of tempo. Scroll to a tempo and
press OK. The larger the number, the slower the tempo.
Clear screen: Press Select to delete all symbols.
Erase: Press Select to erase this ring tone.
Quick silence
If you want your phone not to emit any sound under all circumstances, you
can activate the quick silence function. The phone will not issue any sound no
matter what sound profile is used.
1. In standby mode, press the left soft key.
2. Scroll to Sound and press Select.
3. Scroll to Silence and press On (to activate it) or Off (to deactivate it).
3rd symbol Press to get a D sharp note.
Press four times to decrease length.
4th symbol Press to insert a rest.

The Main Menu
Phone setup
79
Phone setup
The options in the Phone Setup menu allows you to setup the phone accord-
ing to your preferences.
Changing menu language
1. In standby mode, press the left soft key.
2. Scroll to Phone setup and press Select.
3. Press Select.
4. Scroll to preferred language and press OK.
Adjusting backlight duration
This option allows you to change the duration of backlight in standby mode.
Note that longer backlight consumes more battery power. You can also
choose to turn it off.
1. In standby mode, press the left soft key.
2. Scroll to Phone setup and press Select.
3. Scroll to Backlight and press Select.
4. Scroll to desired duration and press OK. If Off is selected, the backlight will
be turned off.
Adjusting screen contrast
1. In standby mode, press the left soft key.
2. Scroll to Phone setup and press Select.
3. Scroll to Adjust contrast and press Select.
4. Press Left or Right to select an appropriate contrast level and press OK.
Clock
Showing/hiding clock on the screen
1. In standby mode, press the left soft key.
2. Scroll to Phone setup and press Select.
3. Scroll to Clock and press Select.
4. Press On (to show clock) or Off (to hide clock).
Setting up current time and date

The Main Menu
Phone setup
80
Before you can use the clock of your phone, you need to setup current time
and date first.
Selecting time zone
1. In standby mode, press the left soft key.
2. Scroll to Phone setup and press Select.
3. Scroll to Clock and press Select.
4. Scroll to Local time zone and press Select.
5. Press Left or Right to scroll to the time zone where you are located and
press Save.
Setting up current date
1. In standby mode, press the left soft key.
2. Scroll to Phone setup and press Select.
3. Scroll to Clock and press Select.
4. Scroll to Set the date and press Select.
5. Enter current date using alphanumeric keys and press Save.
Setting up current time
1. In standby mode, press the left soft key.
2. Scroll to Phone setup and press Select.
3. Scroll to Clock and press Select.
4. Scroll to Set the time and press Select.
5. Enter current time using the alphanumeric keys and press Save.
Setting up date format
Here you can select a preferred date format.
1. In standby mode, press the left soft key.
2. Scroll to Phone setup and press Select.
3. Scroll to Clock and press Select.
4. Scroll to Date format and press Select.
5. Scroll to desired format and press OK.
World clock The world clock function allows you to view current time of major cities in the
world.
1. In standby mode, press the left soft key.

The Main Menu
Phone setup
81
2. Scroll to Phone setup and press Select.
3. Scroll to Clock and press Select.
4. Scroll to World clock and press Select.
5. Press Left or Right to scroll to a desired city, and the current time will
appear on the screen. You can also press Detail to view detailed time infor-
mation of selected city.
Auto power off
If this function is activated, your phone can be switched off automatically at
the specified time.
Activating Auto power off
1. In standby mode, press the left soft key.
2. Scroll to Phone setup and press Select.
3. Scroll to Auto power off and press Select.
4. Scroll to On and press OK.
5. Enter the power off time using alphanumeric keys. When done, press
Down.
6. Press Left or Right to select desired repeat type.
7. Press Save.
Deactivating Auto power off
To deactivate Auto power off function, scroll to Off and press OK in step 4
above.
Display settings
Changing color scheme
Your phone provides several color schemes and you can change it whenever
you like.
1. In standby mode, press the left soft key.
2. Scroll to Phone setup and press Select.
3. Scroll to Display and press Select.
4. Press Select.
5. Scroll to a desired color scheme and press OK.

The Main Menu
Phone setup
82
Changing wallpaper
Wallpaper is the background image that is displayed under standby mode.
You can change it whenever you like.
1. In standby mode, press the left soft key.
2. Scroll to Phone setup and press Select.
3. Scroll to Display and press Select.
4. Scroll to Wall paper and press Select.
5. Scroll to a desired wallpaper and press OK. If Off is selected, the wallpaper
image will not be displayed.
Activating screen saver
If the function is activated, screen saver will appear on phone screen when
there is no user operation for a period of time in standby mode. If you press
any key or there is an incoming call, the screen display will go back to the nor-
mal status.
1. In standby mode, press the left soft key.
2. Scroll to Phone setup and press Select.
3. Scroll to Display and press Select.
4. Scroll to Screen saver and press Select.
5. Scroll to one of the followings and press OK to activate it:
• Digital clock: A digital clock will appear on the screen when the phone is
idle for a period of time in standby mode.
• Power saving: No picture will appear on the screen when the phone is idle
for a period of time in standby mode.
6. Scroll to Off and press OK to deactivate screen saver.
Showing/hiding standby information
With this function, you can decide the name of your operator and the current
sound profile is displayed on the screen or not in standby mode.
1. In standby mode, press the left soft key.
2. Scroll to Phone setup and press Select.
3. Scroll to Display and press Select.
4. Scroll to Standby info and press On (to show operator’s name and sound
profile) or Off (to hide operator’s name and sound profile).
Showing/hiding standby logo

The Main Menu
Phone setup
83
With this function, the name of your operator on the screen will be replaced
by the standby logo. To show the standby logo, the standby info. should be
activated first.
1. In standby mode, press Menu.
2. Scroll to Phone setup and press Select.
3. Scroll to Display and press Select.
4. Scroll to Standby logo and press Select.
5. Press On (to show logo) or Off (to hide logo).
Key lock
Activating Key lock
1. In standby mode, press the left soft key.
2. Scroll to Phone setup and press Select.
3. Scroll to Key lock and press Select.
4. Scroll to Auto (the phone activates key lock automatically if there is no key
operation in 20 seconds) or Lock now (activate Key lock immediately) and
press Select.
In standby mode, you can activate key lock by pressing the left soft key and
then key. To temporarily unlock, press Unlock, key.
Deactivating Key lock
To deactivate Key lock function, scroll to Off and press OK in step 4 above.
Selecting default input mode
Here you can select a default input mode to use.
1. In standby mode, press the left soft key.
2. Scroll to Phone setup and press Select.
3. Scroll to Input mode and press Select.
4. Scroll to the input mode you want to set as default, and press OK.
You can still make emergency calls when keypad is locked.
Note

The Main Menu
Phone setup
84
Changing right softkey function
With this option, you can change the function of the right soft key as a short-
cut to a desired feature under standby mode.
1. In standby mode, press the left soft key.
2. Scroll to Phone setup and press Select.
3. Scroll to Right key and press Select.
4. Scroll to a function item and press OK.
Restoring factory settings
With this function, you can reset most of the menu settings to their original
factory values at once.
1. In standby mode, press the left soft key.
2. Scroll to Phone setup and press Select.
3. Scroll to Restore factory settings and press Select.
4. Enter your phone code and press OK.
Phone security settings
The security settings deal with security codes of your phone. With these codes,
you can protect your phone from being accidentally used by another person.

The Main Menu
Phone setup
85
Activating/deactivating security codes
Activating/deactivating PIN code
1. In standby mode, press the left soft key.
2. Scroll to Phone setup and press Select.
3. Scroll to Security and press Select.
4. Press Select.
5. Press On (to activate it) or Off (to deactivate it).
6. Enter your PIN code and press OK.
Activating/deactivating phone code
1. In standby mode, press the left soft key.
2. Scroll to Phone setup and press Select.
3. Scroll to Security and press Select.
4. Press Select.
5. Scroll to Phone code and press On (to activate it) or Off (to deactivate it).
Network Code: The code for accessing your operator's network. You can get such code from
your operator.
Phone code: The code for preventing unauthorized use of your phone. If Phone code is
enabled, you have to enter it each time you turn on your phone. The default Phone
code of your phone is 12345678.
SIM lock code: The SIM lock function prevents your phone from being used with unknown
SIM cards and vise versa. If the SIM lock is activated, unknown SIM cards can
not be used with your phone. The default SIM lock code of your phone is
12345678.
PIN code: A 4~8 digit code that is supplied by your operator upon subscription.
PIN2 code: The second set of PIN code that is supplied by your operator to control over cer-
tain services (such as call cost calculation). This code is supplied by your operator.
PUK code: The code for unblocking your SIM card. You can get such code from your opera-
tor.
PUK 2 code: The code for unblocking your PIN2 code. You can get such code from your oper-
ator.
About security codes

The Main Menu
Phone setup
86
6. Enter your phone code (the default phone code is 12345678) and press
OK.
Activating/deactivating SIM lock
1. In standby mode, press the left soft key.
2. Scroll to Phone setup and press Select.
3. Scroll to Security and press Select.
4. Press Select.
5. Scroll to SIM lock and press On (to activate it) or Off (to deactivate it).
6. Enter your SIM lock code (the default SIM lock code is 12345678) and
press OK.
Changing security codes
Changing PIN code
1. In standby mode, press the left soft key.
2. Scroll to Phone setup and press Select.
3. Scroll to Security and press Select.
4. Scroll to Change code and press Select.
5. Press Select.
6. Enter the old PIN code and press OK.
7. Enter the new PIN code and press OK.
8. Enter the new PIN code again and press OK.
Changing PIN2 code
1. In standby mode, press the left soft key.
2. Scroll to Phone setup and press Select.
3. Scroll to Security and press Select.
4. Scroll to Change code and press Select.
5. Scroll to PIN2 and press Select.
6. Enter the old PIN2 code and press OK.
7. Enter the new PIN2 code and press OK.
8. Enter the new PIN2 code again and press OK.
Changing phone code
Before changing these codes, you must activate them first.
Note

The Main Menu
Phone setup
87
1. In standby mode, press the left soft key.
2. Scroll to Phone setup and press Select.
3. Scroll to Security and press Select.
4. Scroll to Change code and press Select.
5. Scroll to Phone code and press Select.
6. Enter the old Phone code and press OK.
7. Enter the new Phone code and press OK.
8. Enter the new Phone code again and press OK.
Changing SIM lock code
1. In standby mode, press the left soft key.
2. Scroll to Phone setup and press Select.
3. Scroll to Security and press Select.
4. Scroll to Change code and press Select.
5. Scroll to SIM lock and press Select.
6. Enter the old SIM lock code and press OK.
7. Enter the new SIM lock code and press OK.
8. Enter the new SIM lock code again and press OK.
Closed user group
Closed user group is an operator dependent function. If you have subscribed
this feature, you can specify the group of people who can call you and receive
your call.
To activate closed user group:
1. In standby mode, press the left soft key.
2. Scroll to Phone setup and press Select.
3. Scroll to Security and press Select.
4. Scroll to Closed user group and press Select.
5. Scroll to one of the following and press OK.
• Preset: Activate the closed user group function and use preset closed user
group.
• On: Activate the closed user group function and specify a closed user group.
You will be prompted to enter the number of the closed user group. The
number is available from your system operator.
• Off: Deactivate the closed user group function.

The Main Menu
Phone setup
88
Network settings
Network selection
Your phone provides 2 network selection modes: Automatic and Manual.
Your phone automatically selects the network of your operator in Automatic
mode. In Manual mode, your phone scans the networks available and allows
you to select a network to use. For example, if you are roaming under other
networks, you can manually select the network that has roaming agreement
with your home network.
1. In standby mode, press the left soft key.
2. Scroll to Phone setup and press Select.
3. Scroll to Network and press Select.
4. Scroll to Automatic or Manual and press Select. If Manual is selected, the
phone scans the network and a network operator list appears. Scroll to
desired operator and press Select.
Band selection
Normally, your phone selects an appropriate band of the network automati-
cally. However, you can also select it manually when you are using your phone
in different countries.
1. In standby mode, press the left soft key.
2. Scroll to Phone setup and press Select.
3. Scroll to Network and press Select.
4. Scroll to Band and press Select.
5. Scroll to Auto, 900/1800 MHz or 1900MHz and press OK.
GPRS attach You can set up your phone to register to a GPRS network automatically when
the power is turned on or to be activated only when an application using
GPRS needs it and closed when you end the application.
1. In standby mode, press the left soft key.
2. Scroll to Phone setup and press Select.
3. Scroll to Network and press Select.
4. Scroll to GPRS attach and press Select.
5. Scroll to Power on(Your phone will register to a GPRS network automati-
cally when the power is turned on) or Application(GPRS connection is
activated when an application using GPRS needs it and closed when you
end the application) and press OK.

The Main Menu
Phone setup
89
Service lightYou can change the color of service light with this function.
1. In standby mode, press the left soft key.
2. Scroll to Phone setup and press Select.
3. Scroll to Service light and press Select.
4. Scroll to a favorite color and press OK.

The Main Menu
Extras
90
Extras
My Picture My Picture allows you to draw your own pictures. The pictures can be stored
in the multimedia center and be inserted into your messages.
Creating My Picture
1. In standby mode, press the left soft key.
2. Scroll to Extras and press Select.
3. Press Select.
4. Press Options.
5. Scroll to Picture size and press Select.
6. Press Left or Right to determine the width of the picture (in pixels), and
press Down.
7. Press Left or Right to determine the height of the picture. Press Save.
8. Now you can start drawing your picture:
• Press key to switch among line mode (to draw lines), dot mode (to
make dots) or eraser mode (to erase lines and dots).
• Press key to change the thickness of line (when drawing lines) or size
of dot (when making dots).
• Press key to change the color of pen.
• You can also change the above drawing modes by pressing Options, scroll-
ing to Pen mode, Pen color, Pen size and Pen step and pressing OK.
• Press Options, scroll to Zoom in (or Zoom out) to zoom in (or out) on the
picture.
• Press Options, scroll to Clear screen to clear the screen.
• Press the arrows on the navigation key to draw a line in desired direction (in
line mode), or move the cursor to desired position (in dot mode) and press
key. You can also use the keys on the keypad to control the direction.
The Main Menu
Extras
91
9. Press Options, scroll to Save and press Select to save the picture.
Editing My Picture
1. In standby mode, press the left soft key.
2. Scroll to Extras and press Select.
3. Press Select.
4. Scroll to the picture you want to edit and press Select.
5. Press Select.
6. Now you can start editing the picture.
Erasing My Picture
1. In standby mode, press the left soft key.
2. Scroll to Extras and press Select.
3. Press Select.
4. Scroll to the picture you want to erase and press Select.
5. Scroll to Erase and press Select.
Sending My Picture
With this function, you can send My Picture via message.
1. In standby mode, press the left soft key.
Make a dot in dot mode

The Main Menu
Extras
92
2. Scroll to Extras and press Select.
3. Press Select.
4. Press Options, Select, scroll to the picture you want to send and press
Select.
5. Press Options, Select, Options, scroll to Send and press Select.
6. Enter recipient’s number, or press Names to pick up a recipient from your
Phone Book.
7. Press Send.
Alarm clock
Activating alarm clock
1. In standby mode, press the left soft key.
2. Scroll to Extras and press Select.
3. Scroll to Alarm clock and press Select.
4. Scroll to On and press OK.
5. Enter alarm time using alphanumeric keys. Press Down.
6. Press Left or Right to select a repeat type. Press Down.
7. Press Mark or Unmark to turn on/off vibration. Press Down.
8. Press Left or Right to select an alarm tone.
9. Press Save.
When alarm is activated, the icon will appear on the screen.
When alarm rings, long press volume adjustment key or press Stop to stop the
alarm. Press volume adjustment key or Snooze to activate the Snooze func-
tion. If the Snooze function is activated, The alarm will ring again in 5 min-
utes. Press Stop to deactivate the Snooze function. Your phone will activate
the Snooze function automatically after the alarm rings for one minute, and
the alarm will ring again in 5 minutes.
The alarm still rings when the alarm time is reached even if your phone is
turned off. You will be prompted to turn on the phone right away. Press Yes
or No to power on/off your phone.
Deactivating alarm clock
Scroll to Off and press OK in step 4 above.

The Main Menu
Extras
93
Calendar With the Calendar function, you can easily write down notes and check
appointments on each date to keep you organized.
Writing note1. In standby mode, press the left soft key.
2. Scroll to Extras and press Select.
3. Scroll to Calendar and press Select.
• To write a note for today, press Select two times.
• To write a note for a specific date, scroll to Go to date and press Select.
Enter the date using alphanumeric keys and press OK.
Press Select two times.
4. Specify the following:
• Time: enter the time of the event using alphanumeric keys. Press Down.
• Note type: Press Left or Right to select a type for this note. Press Down.
• Content: Enter the description of the event. Press Down.
• Name: If you want to make a call to someone, enter a name here, or press
Options and select From phone book to pick up a name from Phone Book.
• Phone number: Same as above. You can enter a phone number here or pick
up a phone number in Phone Book by pressing Options and select From
Phone Book.
• Circulation type: Press Left or Right to select the repeat type of this event.
If this event occurs only once, select None.
• Alarm: Press Left or Right to select the time of the alarm to be activated
before the event. If Off is selected, the alarm will be deactivated.
• Vibrator: Press Mark or Unmark to turn on/off the vibration when alarm is
activated.
• Alarm tone: Press Left or Right to select an alarm tone.
5. Press Save.
Viewing note
Viewing today’s note
1. In standby mode, press the left soft key.
2. Scroll to Extras and press Select.
3. Scroll to Calendar and press Select.
4. Press Select.
5. Scroll to a note and press Select.

The Main Menu
Extras
94
Viewing notes on a specific date
1. In standby mode, press the left soft key.
2. Scroll to Extras and press Select.
3. Scroll to Calendar and press Select.
4. Scroll to Go to date and press Select.
5. Enter the date using alphanumeric keys and press OK.
6. Press Select.
7. Scroll to a note and press Select to view the details of selected note.
View all notes
1. In standby mode, press the left soft key.
2. Scroll to Extras and press Select.
3. Scroll to Calendar and press Select.
4. Scroll to View all notes and press Select.
5. Press Up or Down to scroll to a note and press Select to view the details of
selected note.
Viewing calendar in month mode
1. In standby mode, press the left soft key.
2. Scroll to Extras and press Select.
3. Scroll to Calendar and press Select.
4. Scroll to Month mode and press Select.
5. Use the navigation key to go to desired day.
The days that have notes are bold. You can highlight them and press Select to
view notes.
Jumping to a specific day
1. In standby mode, press the left soft key.
2. Scroll to Extras and press Select.
3. Scroll to Calendar and press Select.
4. Scroll to Go to date and press Select.
5. Enter the date using alphanumeric keys and press OK.
Editing note1. Scroll to the note you want to edit and press Select.
2.Press Options.
3. Scroll to Edit and press Select.

The Main Menu
Extras
95
4. Edit the note. When done, press Save.
Erasing note
Method 1 1. In standby mode, press the left soft key.
2. Scroll to Extras and press Select.
3. Scroll to Calendar and press Select.
4. Scroll to Erase notes and press Select.
• To erase notes one by one, press Select.
Scroll to the note you want to erase and press Erase.
• To erase notes on a specific date, scroll to Of chosen day and press Select.
Enter the date using alphanumeric keys and press OK.
Press Erase.
• To erase all notes at once, scroll to All at once and press Select.
Press Yes.
• To let the phone erase notes automatically, scroll to Auto erase and press
Select.
Scroll to a desired time period and press OK.
Method 2 1. Scroll to the note you want to erase and press Select.
2.Press Options.
3. Scroll to Erase and press Select.
4. Press Yes.
Moving a note to another date
1. Scroll to the note you want to move and press Select.
2.Press Options.
3. Scroll to Move and press Select.
4. Enter the date using alphanumeric keys.
5. Press OK.
Copying a note to another date
1. Scroll to the note you want to move and press Select.
2.Press Options.
3. Scroll to Copy and press Select.
4. Enter the date using alphanumeric keys.

The Main Menu
Extras
96
5. Press OK.
Sending a note
You can send your calendar note to other person as a message.
1. Scroll to the note you want to send and press Select.
2. Press Options.
3. Scroll to Send note and press Select.
4. You can send the note in two types:
• Scroll to Send as SMS to send the note as a short message. The recipient
who uses compatible phone will receive the message as a calendar note.
Press Select.
Enter the recipient’s number, or pick up a recipient from your Phone Book
by pressing Names.
Press Send.
• Scroll to Send as text to send the note as text. You can edit the contents
before sending.
Press Options, Select.
Enter the recipient’s number, or pick up a recipient from your Phone Book
by pressing Names.
Press Send.
Sending a message
If the calendar note contains a name in your Phone Book, you can use this
function to send a message to that name directly.
1. Scroll to the note you want to send and press Select.
2. Press Options.
3. Scroll to Send message and press Select.
Account book
The Account book of your phone helps you to track your income and
expenses records easily. You can also get a balance result of all your accounting
records or records in a specific month.
Creating an accounting record
1. In standby mode, press the left soft key.
2. Scroll to Extras and press Select.
3. Scroll to Calendar and press Select.

The Main Menu
Extras
97
4. Scroll to Account book and press Select.
5. Press Select.
6. Complete the following:
• Date: Enter the date of the accounting record using alphanumeric keys.
When done, press Down.
• Amount: Enter the amount of the accounting record using alphanumeric
keys. When done, press Down.
• Item: Enter the description of the accounting record. When done, press
Down.
• In/Out: Press Left or Right to select the type of the accounting record.
7. Press Save.
Viewing accounting records
1. In standby mode, press the left soft key.
2. Scroll to Extras and press Select.
3. Scroll to Calendar and press Select.
4. Scroll to Account book and press Select.
5. Scroll to Accounts list and press Select.
6. You can choose to view accounting records of a specific month or view all
records.
• To view accounting records of a specific month, press Select.
Enter the year and month using alphanumeric keys and press OK.
Scroll to a record and press Select.
• To view all accounting records, scroll to All accounts and press Select.
All accounting records will appear on the screen. Scroll to a record and press
Select.
Viewing results of accounting records
1. In standby mode, press the left soft key.
2. Scroll to Extras and press Select.
3. Scroll to Calendar and press Select.
4. Scroll to Account book and press Select.
5. Scroll to Total count and press Select.
6. You can choose to view result of accounting records of a specific month or
view result of all records.
• To view result of accounting records of a specific month, press Select.
Enter the year and month using alphanumeric keys and press OK.
Scroll to In (sum of all income amount), Out (sum of all expense amount)
or Balance (balance of income and expense) and press Select.

The Main Menu
Extras
98
Corresponding information will appear on the screen.
• To view result of all accounting records, scroll to All accounts and press
Select.
Scroll to In (sum of all income amount), Out (sum of all expense amount)
or Balance (balance of income and expense) and press Select.
Corresponding information will appear on the screen.
Editing accounting record
1. Scroll to the accounting record you want to edit and press Select.
2. Press Options, scroll to Edit and press Select.
3. Edit the accounting record. When done, press Save.
Erasing accounting record
Method 1 1. In standby mode, press the left soft key.
2. Scroll to Extras and press Select.
3. Scroll to Calendar and press Select.
4. Scroll to Account book and press Select.
5. Scroll to Erase accounts and press Select.
• To erase accounting records one by one, press Select.
Scroll to the record you want to erase and press Erase.
• To erase records of a specific month, scroll to Of chosen month and press
Select.
Enter the year and month using alphanumeric keys and press OK.
• To erase all records at once, scroll to All at once and press Select.
Press Yes.
• To let the phone erase accounting records automatically, scroll to Auto erase
and press Select.
Scroll to a desired time period and press OK.
Method 2 1. Scroll to the note you want to erase and press Select.
2. Press Options, scroll to Erase and press Select.
Playing Games
Your phone provides 5 interesting games.
The Main Menu
Extras
99
To play a game:
1. In standby mode, press the left soft key.
2. Scroll to Extras and press Select.
3. Scroll to Game and press Select.
3. Scroll to a game you want to play and press Select.
4. Scroll to one of the following:
• New game: Start a new game.
• Level: Press Up or Down to select the level of the game and press OK.
• Top score: View top score.
• Instruction: View instructions of the game.
During a game, you can press key to pause and access the options above.
Five ball A board with 9x9 squares and several balls in different colors will appear on
the screen. The objective of this game is to put 5 or more than 5 balls with the
same color in adjacent straight vertical, diagonal or horizontal lines. Once
done, the balls will disappear and you will get 2 points for each ball.If you
move a ball without being able to make other balls disappear, 3 more new
balls will appear on the pad.
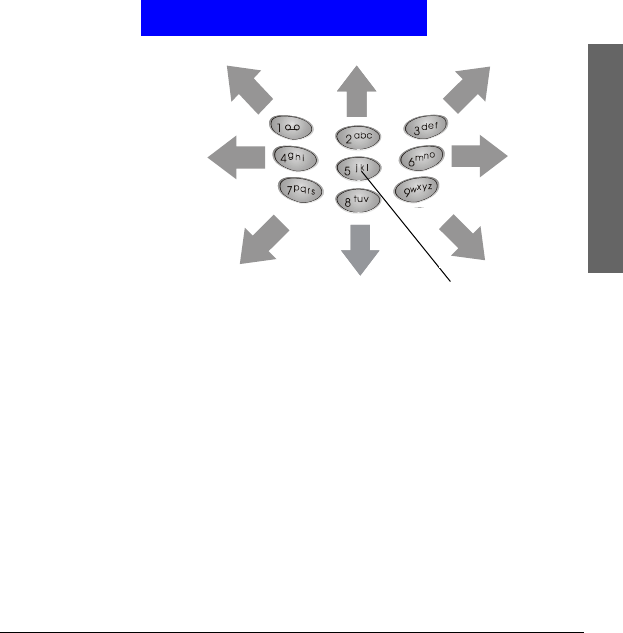
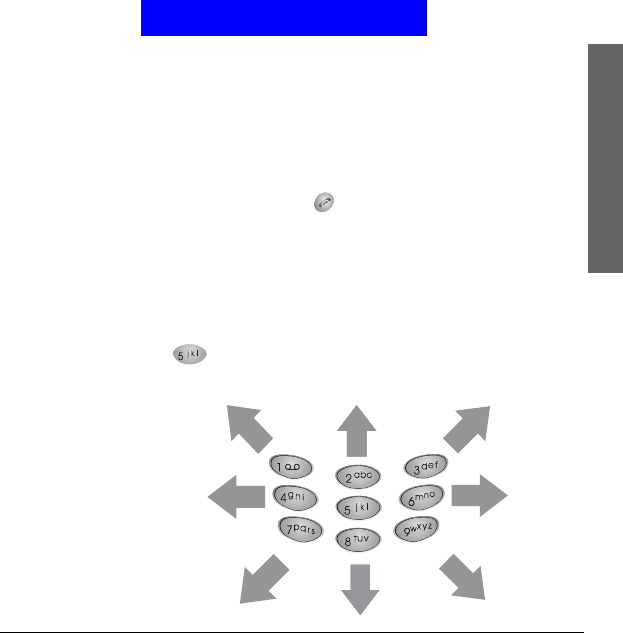
Press key to select a ball and then the navigation key or alphanumeric
keys to moved the cursor on the pad.
Please see the illustration below for the mapping of key and direction.

The Main Menu
Extras
100
Press key again to put the ball on a selected square. If there is no more
place for the new generated balls, the game is over.
Flying Move the aircraft away from the attack of enemy fire (the yellow moving
dots). The longer you survive, the higher your score. The game is over when
you get hit by enemy fire.
Press key to start the game. Press the navigation key or the alphanu-
meric keys to move the cursor on the pad.
Popo car Drive your car and get as more flags as you can. While you are driving, you
will be chased by enemy cars. Try to get away from them. When necessary,
you can emit a popo to confuse them temporarily. The yellow bar on the right
of the screen indicates your fuel level. If the fuel is low, you need to get a fuel-
box to refuel. The game is over when you run out of your fuel or when the
enemy car gets you.
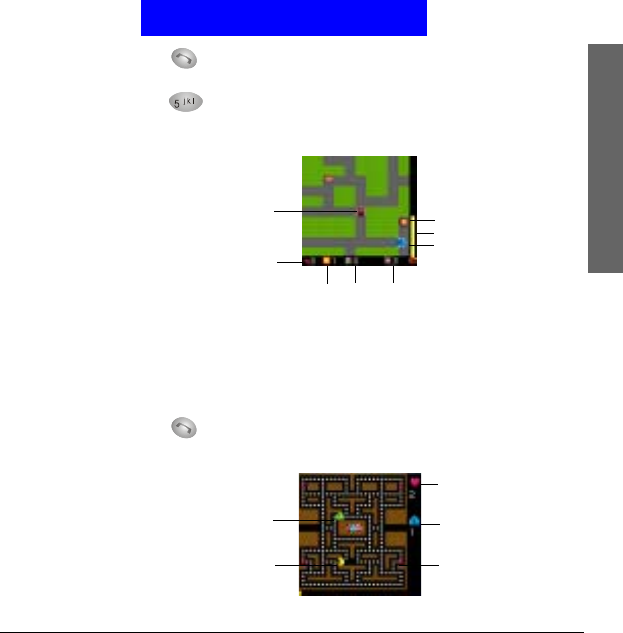
The Main Menu
Extras
101
Press key to start the game. Drive your car using the navigation key or
the alphanumeric keys.
Press key to emit a popo to confuse enemy cars. The more flags you get,
the higher your score.
Genie Guide the genie to eat the white dots on the path and keep it away from the
enemies. If the genie eats the pink dots located at the corners, the enemies will
become weak temporarily and you can guide the genie to eat them. The more
dots and enemies the genie eats, the higher your score.
Press key to start the game. Guide the genie using the navigation key or
the alphanumeric keys. The game is over once the enemy gets the genie.
Remain fuel
Your car Flag
Enemy car
Remain games
Score Remain flags
Fuel
Flag
Remain game
Level
Genie
Enemy
Pink dots

The Main Menu
Extras
102
Calculator You can use this function to perform simple calculations and covert curren-
cies.
Using calculator
1. In standby mode, press the left soft key.
2. Scroll to Extras and press Select.
3. Scroll to Calculator and press Select.
4. Enter numbers using alphanumeric keys.
5. Press the navigation key to perform operations.
Press key to get the result of calculation.
Converting currencies
Setting up exchange rate
Exchange rate must be setup before using the currency exchange function.
1. In standby mode, press the left soft key.
2. Scroll to Extras and press Select.
3. Scroll to Calculator and press Select.
4. Press Options.
5. Scroll to Exchange rate and press Select.
6. Press Select.
6. Enter the exchange rate of foreign unit expressed in domestic unit using
alphanumeric keys and press OK.
7. Scroll to Domestic unit expressed in foreign unit and press Select.
8. Enter the exchange rate of domestic unit expressed in foreign unit using
alphanumeric keys and press OK.
Navigation key Operation
Up +
Down -
Left *
Right /

The Main Menu
Extras
103
Performing currency exchange
1. In standby mode, press the left soft key.
2. Scroll to Extras and press Select.
3. Scroll to Calculator and press Select.
4. Enter the amount of currency and press Options.
4. Scroll to In foreign or In domestic and press Select.
Stopwatch
Split timing 1. In standby mode, press the left soft key.
2. Scroll to Extras and press Select.
3. Scroll to Stopwatch and press Select.
4. Press Select.
5. Press Start to start timing.
6. Press Split to get a split timing. You can get up to 10 split timings.
7. Press Stop to stop timing.
8. Press Options and you can do the following:
• Press Select to start the timer again.
• Scroll to Save and press Select to save the timing record. Enter the name of
the record and press OK.
• Scroll to Reset and press Select to reset timer.
Lap timing 1. In standby mode, press the left soft key.
2. Scroll to Extras and press Select.
3. Scroll to Stopwatch and press Select.
4. Scroll to Lap timing and press Select.
5. Press Start to start timing.
6. Press Lap to get a lap timing. You can get up to 10 lap timings.
7. Press Stop to stop timing.
8. Press Options and you can do the following:
• Press Select to start the timer again.
• Scroll to Save and press Select to save the timing record. Enter the name of
the record and press OK.
• Scroll to Reset and press Select to reset timer.
Viewing timing records

The Main Menu
Extras
104
1. In standby mode, press the left soft key.
2. Scroll to Extras and press Select.
3. Scroll to Stopwatch and press Select.
4. Scroll to View times and press Select.
5. Scroll to the timing record you want to view and press Select.
Erasing timing records
1. In standby mode, press the left soft key.
2. Scroll to Extras and press Select.
3. Scroll to Stopwatch and press Select.
4. Scroll to Erase times and press Select.
5. You can erase timing records one by one or all at once:
• To erase timing records one by one, press Select.
Scroll to the timing record to erase and press Select.
Press Yes.
• To erase all timing records at once, scroll to All at once and press Select.
Press Yes.
Voice recorder
You can make a voice recording with this function. The limitation for each
recording is 30 seconds.
Recording voice
1. In standby mode, press the left soft key.
2. Scroll to Extras and press Select.
3. Scroll to Voice recorder and press Select.
4. Press Select to start to record your voice.
5. End the recording by pressing Stop. Enter the name and press OK to save
the record.
Playing recordings
1. In standby mode, press the left soft key.
2. Scroll to Extras and press Select.
3. Scroll to Voice recorder and press Select.
4. Scroll to Recordings list and press Select.
5. Scroll to a desired recording and press Select.
6. Press Select to play the recording.

The Main Menu
Extras
105
Renaming recordings
1. In standby mode, press the left soft key.
2. Scroll to Extras and press Select.
3. Scroll to Voice recorder and press Select.
4. Scroll to Recordings list and press Select.
5. Scroll to a desired recording and press Select.
6. Scroll to Edit title and press Select.
7. Enter the name and press OK.
Erasing recordings
1. In standby mode, press the left soft key.
2. Scroll to Extras and press Select.
3. Scroll to Voice recorder and press Select.
4. Scroll to Recordings list and press Select.
5. Scroll to a desired recording and press Select.
6. Scroll to Erase and press Select.
7. Press OK to delete the recording.
Activating speaker
With this function, you can select to have the recording to be played from the
receiver or the speaker.
1. In standby mode, press the left soft key.
2. Scroll to Extras and press Select.
3. Scroll to Voice recorder and press Select.
4. Scroll to Speaker settings, press On(Off) to activate(disactivate) the speaker
function.

The Main Menu
WAP Service
106
WAP ServiceThe WAP Service allows you to access mobile Internet information via your
operator using the WAP (Wireless Application Protocol) technology. For
example, you can browse weather reports, parking information and on-line
banking services.
If you are using the GPRS network to access WAP services, the icon will
appear on the screen.
The WAP settings must be configured before you can use the WAP service.
See "Configuring WAP profiles"on page 108 for details.
Browsing the Internet
Going to your homepage
1. In standby mode, press the left soft key.
2. Scroll to WAP service and press Select.
3. Press Select.
4. Your phone will start connecting to the mobile Internet. If connection is
successful, the homepage will appear on the screen.
Going to your bookmarked pages
1. In standby mode, press the left soft key.
2. Scroll to WAP service and press Select.
3. Scroll to Bookmark and press Select.
4. Scroll to a desired bookmark and press Select.
5. Press Select.
6. Your phone will start connecting to the mobile Internet. If connection is
successful, the page will appear on the screen.
Navigating the Internet using the options menu
When browsing the mobile Internet, you can press Options to access the fol-
lowing options:
• Home: Scroll to this option and press Select to return to the homepage.
• Bookmark: Scroll to this option and press Select to open the bookmark list.
To go to bookmarked pages, scroll to a bookmark and press Select two
times.

The Main Menu
WAP Service
107
To edit a bookmark, scroll to a bookmark and press Select, then scroll to
Edit and press Select. Enter the name and address of the book mark and
then press OK.
To erase a bookmark, scroll to a bookmark and press Select, then scroll to
Erase and press Select two times.
• Relevant operation: Here apperas different options which depand on the
element you select in the WAP page. Press Select to activate the selected
function. You can activate a selected function directly in the WAP page by
pressing key.
• Add bookmark: Scroll to this option and press Select to bookmark current
page.
• Go to address: Go to another page by entering the address. Scroll to this
option and press Select. Enter the address and press OK.
• Appearance settings: This option allows you to configure the appearance of
information when browsing the mobile Internet. Scroll to this option and
press Select. You will be presented with the following sub-options:
Text wrapping: Scroll to this sub-option and press On (or Off) to turn on or
off the text wrapping function.
Show image: Scroll to this sub-option and press On (or Off) to show or not
to show the image.
Show title: Scroll to this sub-option and press On (or Off) to show or not to
show the title of page.
• Download settings: You can decide whether to accept the cookies or not
when browsing. Scroll to this option and press Select two times. Scroll to
Allow (to accept cookies) or Reject (to reject all cookies) and press OK.
• Reload: Scroll to this option and press Select to reload current page.
• Clear the cache: Scroll to this option and press Select to delete all cache files
in phone memory.
• Service inbox: Your operator may send you some service messages that con-
tains WAP links and other information. If such message is received by your
phone under standby mode, you can open and read it immediately. Other-
wise it will be store in the service inbox. Here you can check the service mes-
sages.
• Exit: Scroll to this option and press Select to disconnect from the Internet
and exit browser.

The Main Menu
WAP Service
108
Configuring WAP profiles
You can configure up to 5 sets of WAP settings. Each set of WAP settings is
called a WAP profile. The WAP profile may have already been programmed
on your SIM card after you subscribe the WAP service to your system so you
can access mobile Internet immediately. Otherwise, you need to configure the
settings manually. Please contact your system operator for details.
Setting up a WAP profile
1. In standby mode, press the left soft key.
2. Scroll to WAP service and press Select.
3. Scroll to Profiles and press Select.
4. Scroll to an empty profile and press Select.
5. Scroll to Edit and press Select.
6. According to the parameters supplied by your operator, configure the fol-
lowing:
Homepage: Enter the address of the homepage.
Session mode: Temporary or Permanent.
Connection security: On or Off.
Data bearer: GSM data or GPRS. If GSM is selected, you need to setup
the Dial-up number, Data call type and Data call speed. If
Before setting up a WAP profile, please be sure to obtain the following parameters from your
operator:
Homepage:
Session mode: Temporary Permanent
Connection security: On Off
Data bearer: GSM Data (Dial-up number, Data call type, Data call speed)
GPRS (GPRS access point )
IP address: . . .
Authentication type: Normal Secure
Username:
Password:
Information you need in case you have to set up a WAP profile manually

The Main Menu
WAP Service
109
GPRS is selected, you need to setup GPRS connection type
and access point.
IP address: Enter the IP address.
Authentication type: Normal or Secure.
Username: Enter the username.
Password: Enter the password.
The setup is complete. Now you are ready to access the mobile Internet.
Selecting and activating a WAP profile
If you have multiple WAP profiles for different operators, you can use this
function to select one to use.
1. In standby mode, press the left soft key.
2. Scroll to WAP service and press Select.
3. Scroll to Profiles and press Select.
4. Scroll to a desired profile and press Select.
Editing a WAP profile
1. In standby mode, press the left soft key.
2. Scroll to WAP service and press Select.
3. Scroll to Profiles and press Select.
4. Scroll to the profile you want to edit and press Select.
5. Scroll to Edit and press Select.
6. Edit the contents of the profile.
Renaming a WAP profile
1. In standby mode, press the left soft key.
2. Scroll to WAP service and press Select.
3. Scroll to Profiles and press Select.
4. Scroll to the profile you want to rename and press Select.
5. Scroll to Rename and press Select.
6. Enter the new profile name and press OK.

The Main Menu
Media center
110
Media center
You can sort out and save the received multimedia objects in the Media center.
You can also select desired multimedia objects from the Media center and
insert them into the multimedia message that you are writing or editing.
Viewing the contents of the Media center
1. In standby mode, press the left soft key.
2. Scroll to Media center and press Select.
3. Scroll to a multimedia folder you want to open and press Select.
4. Scroll to a multimedia object you want to view and press Select.
5. If you select an image, it will appear on the screen. If you select a melody or
voice, it will be displayed by your phone.
6. Press Options to access the following:
• Detail: View detail information of the file.
• Rename: Change the file name.
• Delete: Delete the file.
• Memory info: Display the memory status of the Media center.
Inserting multimedia objects in multimedia msgs.
1. In standby mode, press the left soft key.
2. Press Select.
3. Scroll to Multimedia msgs. and press Select.
4. Press Select and start to write/edit messages.
5. Press Options, scroll to Insert object and press Select two times.
6. Scroll to a desired multimedia folder and press Select.
7. Scroll to a desired multimedia object and press Select.
8. Press Options, Select.
Multimedia messages, Voice recorder and Multimedia center share memory of total 504KB. It
will be allocated automatically by your phone. Therefore, the number of the multimedia objects
that can be stored in the multimedia center will depend on the memory size of the objects and
the remaining space of the multimedia center.
Note

The Main Menu
My shortcut
111
My shortcutYou can put 9 most frequently used functions in My Shortcut so you can
access them quickly and easily.
Using My shortcut
9 frequently used functions are already pre-programmed in My shortcut and
you can use them directly.
To use My shortcut:
1. Long press key under standby mode and the shortcut menu will
appear.
2. Scroll to an item and press Select.
Customizing My shortcut
To customize My Shortcut:
1. In standby mode, press the left soft key.
2. Scroll to My shortcut and press Select.
3. Scroll to Edit and press Select.
4. Scroll to a desired item and press Select.
5. Specify the position of the item in My shortcut and press Save.

The Main Menu
Operator services
112
Operator services
If you have subscribed STK (SIM Tool Kit) or other operator services to your
operator, there will be an additional item here. The contents of service and
how to use them depends on your subscription. Please consult your operator
for details.

The Main Menu
PMG
113
PMG You can connect a variety of devices which are designed for PMG as well as
Bluetooth devices to your PMG phone and creat your own Personal Area Net-
work(PAN). You can add up to 20 devices to your PAN.
Adding new devices
When the first time you connect Bluetooth devices or designed for PMG
devices to your PMG phone, you have to pair them with your phone in
advance. Pairing will creat a wireless link between two Bluetooth devices and
add devices to your PAN.
1. In standby mode, press the left soft key.
2. Scroll to PMG and press Select.
3. Press Select. A list of all Bluetooth and designed for PMG devices will be
shown on the screen
4. Scroll to a desired device and press Select.
5. Enter the PIN code and press OK.
Changing name
With this function, you can change the name of your PMG phone which is
shown on the other Bluetooth devices.
1. In standby mode, press the left soft key.
2. Scroll to PMG and press Select.
3. Scroll to Change name and Press Select.
4. Enter a name and press OK.
Switching between Handset and Headset
With this function, you can switch between your Handset and Headset during
a phone call.
1. Press Option when during a call.
• Pairing has to be proceeded only on the first time you add Bluetooth or designed for PMG
devices to your PMG phone.
• Please refer to the user’s guide of the devices that you are adding for pairing for more infor-
mation.
Note

The Main Menu
PMG
114
• To switch to Handset:
Scroll to Audio to Handset and press Select.
• To switch to Headset:
Scroll to Audio to Headset and press Select.

115
Troubleshooting & FAQ
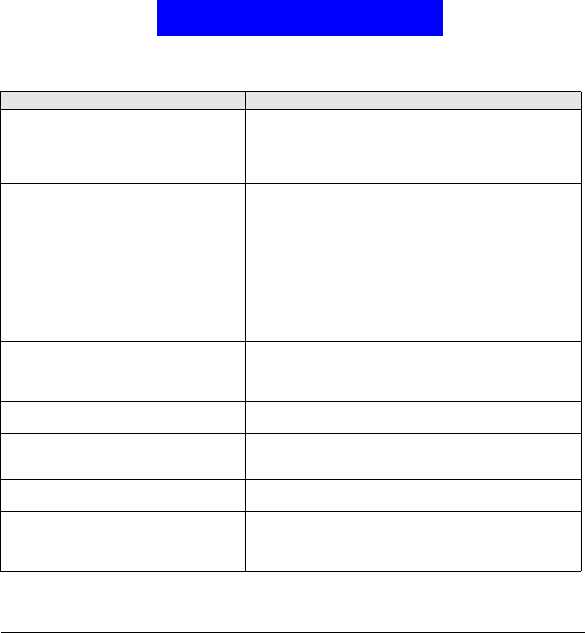
Troubleshooting & FAQ
116
If problems occur when you use your phone, please refer to the table below to find out possible solu-
tions. If your problem is not in the table, or the problem still persists after you try these solutions,
please seek your original dealer for help.
When you encounter these problems... Please check...
Can not turn on the phone
• Is the battery empty?
• Is the battery properly installed?
• Are the contacts on battery and phone clean? If the con-
tacts appear to be soiled, contact your dealer to clean
them.
Unable to make calls.
• Is the reception of network signal in good condition?
Move to an open space, or a place closer to window.
• Is network selection setting setup properly? If necessary,
try to select your network manually.
• Have you already activated the fixed dialing and call
barring functions? If yes, deactivate them temporarily.
• Has the call cost exceeded your cost credit? Check your
remaining cost credit and reset the call cost if necessary.
• Are you using your phone with other SIM cards when
SIM lock protection function has been activated? Deac-
tivate the function if necessary.
Unable to receive calls. • Is the reception of network signal in good condition?
Move to an open space, or a place closer to window.
• Have you already activated call divert or call barring
functions? Deactivate them if necessary.
Your voice can not be heard. Have you already turned on the in-call mute function?
Turn it off if necessary.
Can not use certain call functions. To use certain advanced call functions (such as call divert
and call barring), you may need to subscribe these services
to your operator first.
There are noises during a phone call. Avoid using the phone near a microwave oven, speaker or
TV. Their interference has adverse effect to call quality.
Can not connect to the Internet • Have you subscribed the Internet (WAP) service to
your operator?
• Did you enter correct setting parameters (such as APN
and IP addresses) in WAP profile setup?

117
Troubleshooting & FAQ
The screen shows "Insert SIM". • Is your SIM card correctly inserted into the phone?
• Are the metal contacts on SIM card clean? If they
appear to be soiled, please contact your dealer to clean
them.
The battery can not be charged.
• Is the battery charger correctly plugged into the battery
charger socket on the phone?
• Is the power cord of the charger damaged?
• Is the battery very old? Replace with a new battery and
try again.
The standby and talk time is apparently
shorter than ever.
• Your phone consumes more power when signal recep-
tion is poor. Try to move to a better location when you
use the phone.
• Are you using a new battery? It takes several charge dis-
charge cycles for the battery to reach its original capac-
ity.
• Is the battery very old? Replace it with a new one.
• Are you using the phone in very high or low tempera-
ture environment? The efficiency of a battery can be
effected by ambient temperature.
Can not deactivate call barring or call
divert functions. Is the reception of network signal in good condition?
Move to an open space, or a place closer to window.

118
Care and Maintenance

119
Care and Maintenance
It is recommended that you observe the cautions below to prevent possible damage to your phone and
to keep your phone in good condition.
When using your phone
• Avoid using your phone in dusty, extremely high or low temperature envi-
ronments.
• Your phone does not provide water-proof capability. Do not spill water
onto the phone or use it in the water or rain.
• Avoid removing the battery without turning off the phone in advance. If
you want to remove the battery, turn phone power off first.
• Do not apply strong force or shock to the phone.
• Keep the phone and its accessories away from small children.
• Do not insert metal objects into the battery charger socket of the phone.
This can short-circuit the battery and result in danger.
• Back up your Phone Book data regularly onto the SIM card.
When cleaning your phone
• Use soft, clean and slightly moistened cloth to clean your phone. Do not let
water come into any openings (such as earpiece and microphone) or remain
on metal surface (such as the metal contacts).
• Do not wipe your phone with any corrosive liquid or coarse objects. This
can damage the outer case of your phone.
When carrying/storing your phone
• Do not leave your phone in hot enclosed places (such as in a car under direct
sunlight).
• Avoid pressing and shaking the phone when you carry it.
• Remove the battery from phone if it is not going to be used for a long
period of time. Keep the phone and battery in a cool and dry place.
When using the accessories
• Use only approved batteries and accessories. Use of non-approved accesso-
ries can cause damage to your phone or yourself.
• Do not use the battery and charger for other purposes.
When using your phone in public areas
Use the phone with manner. Turn it off or make it silent when you are asked
to.
When the phone appears to be broken

Care and Maintenance
120
Do not attempt to disassemble/fix the phone by yourself. Seek your original
dealer for help.

121
Appendix

Appendix
122
Left soft key
Appendix
123
Quick Reference
Left soft key To go to this item Press these keys
Message
Text messages Left soft key Select Select
Multimedia messages Left soft key Select Select
Chatroom Left soft key Select Select
Settings Left soft key Select Select
Voice mail Left soft key Select Select
Cell broadcast Left soft key Select Select
Sending history Left soft key Select Select
Service command Left soft key Select Select
Call meter
Missed calls Left soft key Select Select
Received calls Left soft key Select Select
Dialed calls Left soft key Select Select
Erase all Left soft key Select Select
Call time Left soft key Select Select
Call cost Left soft key Select Select
GPRS data counter Left soft key Select Select
GPRS connection time Left soft key Select Select
In-call count Left soft key Select Select
Appendix
124
Call feature
Call divert Left soft key Select Select
Call waiting Left soft key Select Select
Call barring Left soft key Select Select
Show number Left soft key Select Select
Phone lines Left soft key Select Select
Anykey answer Left soft key Select Select
Auto redial Left soft key Select Select
Speed dialing Left soft key Select Select
Next call Left soft key Select Select
Sound Profiles Left soft key Select Select
Tone editor Left soft key Select Select
Silence Left soft key Select Select
Phone settup
Language Left soft key Select Select
Backlight Left soft key Select Select
Adjust contrast Left soft key Select Select
Clock Left soft key Select Select
Auto power off Left soft key Select Select
Display Left soft key Select Select
Key lock Left soft key Select Select
Input mode Left soft key Select Select
Right key Left soft key Select Select
Appendix
125
Extras
My picture Left soft key Select Select
Alarm clock Left soft key Select Select
Calendar Left soft key Select Select
Game Left soft key Select Select
Calculator Left soft key Select Select
Stopwatch Left soft key Select Select
Voice recorder Left soft key Select Select
WAP Service
Home Left soft key Select Select
Bookmark Left soft key Select Select
Profiles Left soft key Select Select
Appearance settings Left soft key Select Select
Download settings Left soft key Select Select
Authority certificates Left soft key Select Select
Go to address Left soft key Select Select
Clear the cache Left soft key Select Select
Service inbox Left soft key Select Select
Appendix
126
My shortcut
Inbox Left soft key Select Select
Write message Left soft key Select Select
Last call time Left soft key Select Select
Tone editor Left soft key Select Select
Calendar Left soft key Select Select
Calculator Left soft key Select Select
Display Left soft key Select Select
Access Internet Left soft key Select Select
Game Left soft key Select Select