Chuango Security Technology MD9100 Pet-Immune PIR Motion Detector User Manual MD9100 UM EN V1 1
Chuango Security Technology Corporation Pet-Immune PIR Motion Detector MD9100 UM EN V1 1
User Manual
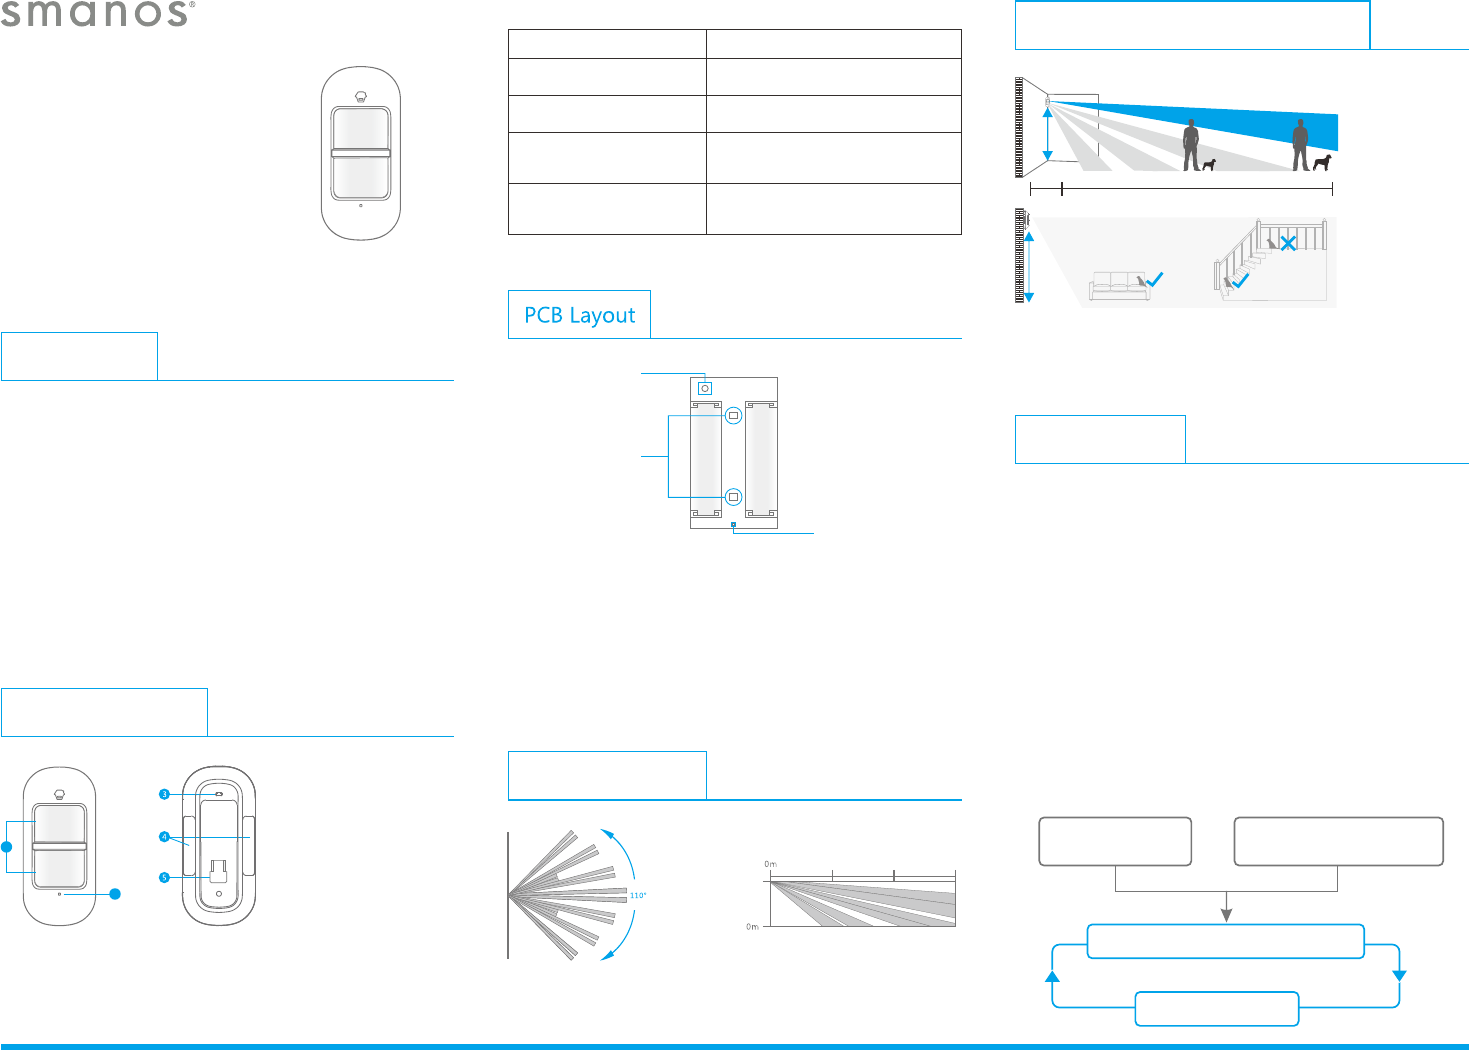
Pet-Immune Function Illustration
MD9100
User Manual
Introduction
MD9100 motion detector adopts unique design with dual
infrared sensors and intelligent analysis algorithm which
effectively identify interference signal from body movement
signals. It can reduce false alarm rate caused by pets under
20kgs or other interfering objects. The detector is suitable for
lobby, hallway detection with a detective range of 0-9 m at front.
With low power feedback function, the users will get SMS alert
or push message for low battery if the detector has been
connected to a GSM or Wi-Fi alarm system.
Product Overview
1. Detection window
2. Status indicator
3. Test button
4. Double-sided tape
stick place
5. Bracket slot
Detection Range
1
2
Infrared sensor: It detects the infrared rays released by human
body motion, please don’t touch the surface and always keep it
clean.
Tamper switch: Once the case is opened in working mode, the
tamper switch is triggered and then generates an alarm signal.
Infrared sensor
AA 1 . 5V LR6
AA 1 . 5V LR6
Status indicator
Pet-Immune PIR
Motion Detector
Tamper switch
Blinks twice
Blinks once every 3 seconds
Testing mode is finished, the
detector enters power-saving mode
Low battery, please replace the
battery as soon as possible
Status Indication
Display Meaning
Blinks continuously
Blinks once
Self testing
Intrusion detected
Working Mode
Testing Mode
Press the test button, the detector enters testing mode and detects
once every 10 seconds. After 3 minutes, the status indicator blinks
twice, and the detector switches to power saving mode.
2m
1m 9 m
Side view
IMPORTANT: If you keep a pet at home, make sure the detector is installed
at the upright position to achieve pet-immune function.
2m
2m
3m 6 m 9 m
Top view
Power Saving Mode
If the PIR motion detector detects movements twice in 3 minutes, it
automatically goes into a sleep state. If there is no movement
detected in next 3 minutes, it will switch from sleep state to arm.
During the 3 minutes, the detector won’t be active and send any
signals to the control panel. As long as there is a movement
detected within 3 minutes, the duration of power saving mode will
be extended.
Sleep after detecting human movement twice.
Case 2:
Press the test button and then arm.
3 minutes later
No human movement within 3 minutes
Switch from sleep to arm.
Case 1:
Initial start and then arm.
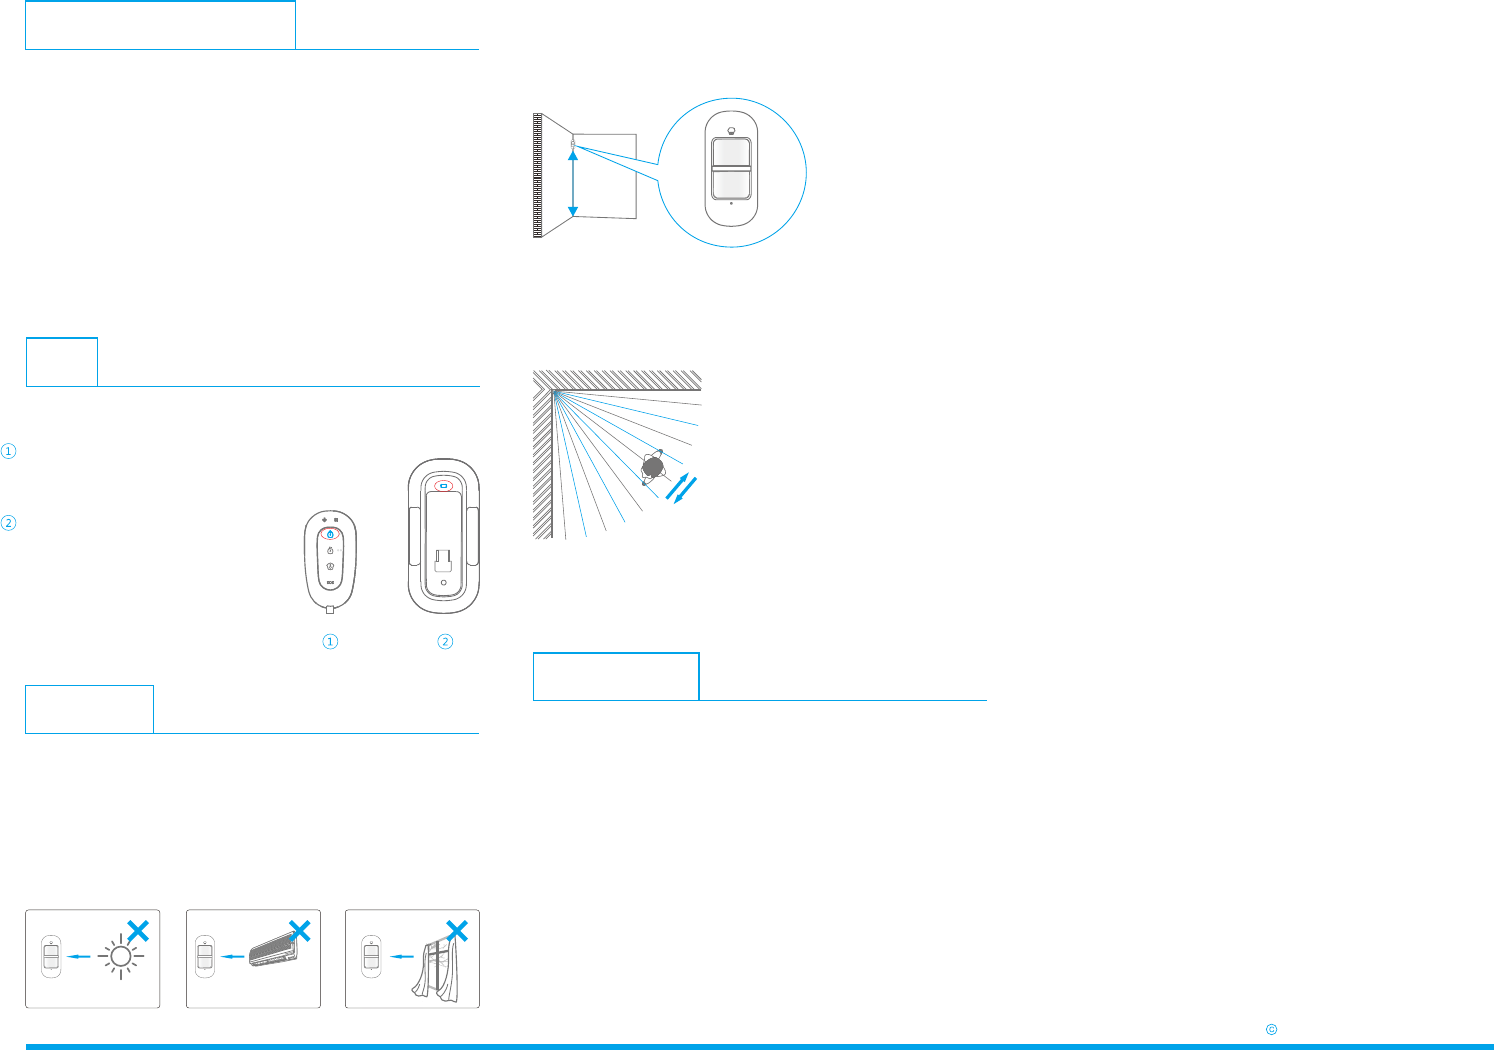
Installation
Important: Avoid installing the motion detector directly toward
windows or near heat sources, such as heat extraction units, air-
condition, micro-wave oven, refrigerator etc. Also try to avoid
placing two motion detectors in the opposite of each other and
don’t place them in each other’s detection range.
Specifications
Power Supply DC 3V (AA 1.5V LR6 battery x 2 pcs)
Static Current <50 uA
Alarm Current <9.5 mA
Detection Scope 9m/110°
Pet Immunity <20kgs
Transmitting Distance <80 m (open area/ no interference)
Radio Frequency 868 MHz or 915 MHZ (±75KHz)
Housing Material ABS plastic
Operating Condition Temperature: -10°C ~+ 55°C
Relative Humidity: <80% (non-condensing)
Detector Dimensions (L x W x H) 108 x 52 x 36.8 mm
Bracket Dimensions (L x W x H) 52 x 30 x 26.5 mm
Arm the system
Make sure the alarm system is in armed state.
Trigger an alarm
Press the test button until an alarm
is triggered. The detector is proved
to be connected successfully and
ready for installation.
Test
It is to check whether the PIR motion detector can work properly or not.
Pairing to Control Panel
Control panel enters pairing state
Make the control panel in pairing state.
Press the test button
Press the test button on the back of the detector twice, the
control panel beeps once to indicate a successful pairing.
Note: If the control panel beeps twice when the above operation is done,
it means the detector has been paired already.
Step 1: The ideal mounting height of the motion detector is 2
meters from the floor. It is suggested to mount it at the corner of
the wall or just stick it to the wall by using the supplied 3M sticker.
2 m
ON
Ground
Note: This PIR motion detector can also be mounted at special location by
using the supplied bracket and screw kits.
Step 2: After mounting the detector, please walk from left to right
in the room for a test; The status indicator will blink once when
motion is detected.
Ver: MD9100-UM-EN-V1.0
2015 SMANOS HOLDING LTD. All Rights Reserved.
FCC STATEMENT
1.This device complies with Part 15 of the FCC Rules. Operation is
subject to the following two conditions:
(1)This device may not cause harmful interference.
(2)This device must accept any interference received, including
interference that may cause undesired operation.
2. Changes or modifications not expressly approved by the party
responsible for compliance could void the user's authority to
operate the equipment.
NOTE: This equipment has been tested and found to comply with
the limits for a Class B digital device, pursuant to Part 15 of the FCC
Rules. These limits are designed to provide reasonable protection
against harmful interference in a residential installation.
This equipment generates uses and can radiate radio frequency
energy and, if not installed and used in accordance with the
instructions, may cause harmful interference to radio
communications. However, there is no guarantee that interference
will not occur in a particular installation. If this equipment does
cause harmful interference to radio or television reception, which
can be determined by turning the equipment off and on, the user is
encouraged to try to correct the interference by one or more of the
following measures:
Reorient or relocate the receiving antenna.
Increase the separation between the equipment and receiver.
Connect the equipment into an outlet on a circuit different from
that to which the receiver is connected.
Consult the dealer or an experienced radio/TV technician for help.